9 CREATING RESOURCES
9 创建资源
In this section, we are going to show you how to use the POST HTTP method to create resources in the database.
在本节中,我们将向您展示如何使用 POST HTTP 方法在数据库中创建资源。
So, let’s start.
那么,让我们开始吧。
9.1 Handling POST Requests
9.1 处理 POST 请求
Firstly, let’s modify the decoration attribute for the GetCompany action in the Companies controller:
首先,让我们在 Companies 控制器中修改 GetCompany作的 decoration 属性:
[HttpGet("{id:guid}", Name = "CompanyById")]With this modification, we are setting the name for the action. This name will come in handy in the action method for creating a new company.
通过此修改,我们将设置作的名称。这个名字在创建新公司的作方法中会派上用场。
We have a DTO class for the output (the GET methods), but right now we need the one for the input as well. So, let’s create a new record in the Shared/DataTransferObjects folder:
我们有一个用于输出的 DTO 类(GET 方法),但现在我们也需要一个用于输入的 DTO 类。因此,让我们在 Shared/DataTransferObjects 文件夹中创建一个新记录:
public record CompanyForCreationDto(string Name, string Address, string Country);We can see that this DTO record is almost the same as the Company record but without the Id property. We don’t need that property when we create an entity.
我们可以看到,此 DTO 记录与 Company 记录几乎相同,但没有 Id 属性。在创建实体时,我们不需要该属性。
We should pay attention to one more thing. In some projects, the input and output DTO classes are the same, but we still recommend separating them for easier maintenance and refactoring of our code. Furthermore, when we start talking about validation, we don’t want to validate the output objects — but we definitely want to validate the input ones.
我们还应该注意一件事。在某些项目中,输入和输出 DTO 类是相同的,但我们仍然建议将它们分开,以便于维护和重构代码。此外,当我们开始讨论验证时,我们不想验证输出对象 — 但我们肯定想要验证输入对象。
With all of that said and done, let’s continue by modifying the ICompanyRepository interface:
完成所有这些作后,让我们继续修改 ICompanyRepository 接口:
using Entities.Models;

namespace Contracts
{
    public interface ICompanyRepository
    {
        IEnumerable<Company> GetAllCompanies(bool trackChanges);
        Company GetCompany(Guid companyId, bool trackChanges);
        void CreateCompany(Company company);
    }
}
After the interface modification, we are going to implement that interface:
修改接口后,我们将实现该接口:
public void CreateCompany(Company company) => Create(company);We don’t explicitly generate a new Id for our company; this would be done by EF Core. All we do is to set the state of the company to Added.
我们不会为公司显式生成新 ID;这将由 EF Core 完成。我们所做的只是将公司的状态设置为 Added。
Next, we want to modify the ICompanyService interface:
接下来,我们要修改 ICompanyService 接口:
using Shared.DataTransferObjects;

namespace Service.Contracts
{
    public interface ICompanyService
    {
        IEnumerable<CompanyDto> GetAllCompanies(bool trackChanges);
        CompanyDto GetCompany(Guid companyId, bool trackChanges);
        CompanyDto CreateCompany(CompanyForCreationDto company);
    }
}
And of course, we have to implement this method in the CompanyService class:
当然,我们必须在 CompanyService 类中实现此方法:
public CompanyDto CreateCompany(CompanyForCreationDto company)
{
    var companyEntity = _mapper.Map<Company>(company);
    _repository.Company.CreateCompany(companyEntity);
    _repository.Save();
    var companyToReturn = _mapper.Map<CompanyDto>(companyEntity);
    return companyToReturn;
}
Here, we map the company for creation to the company entity, call the repository method for creation, and call the Save() method to save the entity to the database. After that, we map the company entity to the company DTO object to return it to the controller.
在这里,我们将要创建的公司映射到公司实体,调用用于创建的存储库方法,并调用 Save() 方法将实体保存到数据库。之后,我们将公司实体映射到公司 DTO 对象,以将其返回给控制器。
But we don’t have the mapping rule for this so we have to create another mapping rule for the Company and CompanyForCreationDto objects.Let’s do this in the MappingProfile class:
但是我们没有用于此目的的映射规则,因此我们必须为 Company 和 CompanyForCreationDto 对象创建另一个映射规则。让我们在 MappingProfile 类中执行此作:
using AutoMapper;
using Entities.Models;
using Shared.DataTransferObjects;

namespace CompanyEmployees
{
    public class MappingProfile : Profile
    {
        public MappingProfile()
        {
            CreateMap<Company, CompanyDto>().ForMember(c => c.FullAddress, opt => opt.MapFrom(x => string.Join(' ', x.Address, x.Country)));

            CreateMap<Employee, EmployeeDto>();

            CreateMap<CompanyForCreationDto, Company>();
        }
    }
}
Our POST action will accept a parameter of the type CompanyForCreationDto, and as you can see our service method accepts the parameter of the same type as well, but we need the Company object to send it to the repository layer for creation. Therefore, we have to create this mapping rule.
我们的 POST作将接受 CompanyForCreationDto 类型的参数,如您所见,我们的服务方法也接受相同类型的参数,但我们需要 Company 对象将其发送到存储库层进行创建。因此,我们必须创建此映射规则。
Last, let’s modify the controller:
最后,我们修改控制器:
[HttpPost]
public IActionResult CreateCompany([FromBody] CompanyForCreationDto company)
{
if (company is null)
return BadRequest("CompanyForCreationDto object is null");
var createdCompany = _service.CompanyService.CreateCompany(company);
return CreatedAtRoute("CompanyById", new { id = createdCompany.Id }, createdCompany);
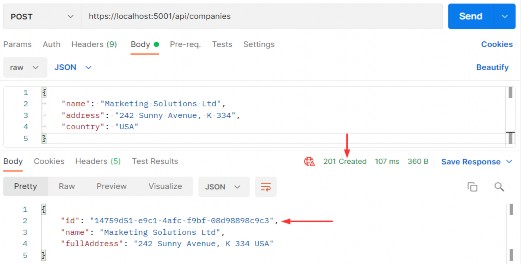
}Let’s use Postman to send the request and examine the result:
让我们使用 Postman 发送请求并检查结果:
https://localhost:5001/api/companies
9.2 Code Explanation
9.2 代码说明
Let’s talk a little bit about this code. The interface and the repository parts are pretty clear, so we won’t talk about that. We have already explained the code in the service method. But the code in the controller contains several things worth mentioning.
我们来谈谈这段代码。界面和存储库部分非常清晰,因此我们不会讨论这些。我们已经在 service 方法中解释了代码。但是控制器中的代码包含几个值得一提的内容。
If you take a look at the request URI, you’ll see that we use the same one as for the GetCompanies action: api/companies — but this time we are using the POST request.
如果您查看请求 URI,您会发现我们使用与 GetCompanies作相同的 URI:api/companies,但这次我们使用的是 POST 请求。
The CreateCompany method has its own [HttpPost] decoration attribute, which restricts it to POST requests. Furthermore, notice the company parameter which comes from the client. We are not collecting it from the URI but the request body. Thus the usage of the [FromBody] attribute. Also, the company object is a complex type; therefore, we have to use [FromBody].
CreateCompany 方法具有自己的 [HttpPost] 修饰属性,该属性将其限制为 POST 请求。此外,请注意来自客户端的 company 参数。我们不是从 URI 中收集数据,而是从请求正文中收集数据。因此,使用[FromBody] 属性。此外,company 对象是一个复杂类型;因此,我们必须使用 [FromBody]。
If we wanted to, we could explicitly mark the action to take this parameter from the URI by decorating it with the [FromUri] attribute, though we wouldn’t recommend that at all because of security reasons and the complexity of the request.
如果需要,我们可以通过使用 [FromUri] 属性修饰作来显式标记从 URI 中获取此参数的作,尽管出于安全原因和请求的复杂性,我们根本不建议这样做。
Because the company parameter comes from the client, it could happen that it can’t be deserialized. As a result, we have to validate it against the reference type’s default value, which is null.
由于 company 参数来自客户端,因此可能无法对其进行反序列化。因此,我们必须根据引用类型的默认值 (null) 对其进行验证。
The last thing to mention is this part of the code:
最后要提到的是这部分代码:
CreatedAtRoute("CompanyById", new { id = companyToReturn.Id }, companyToReturn);CreatedAtRoute will return a status code 201, which stands for Created. Also, it will populate the body of the response with the new company object as well as the Location attribute within the response header with the address to retrieve that company. We need to provide the name of the action, where we can retrieve the created entity.
CreatedAtRoute 将返回状态代码 201,代表 Created。此外,它还将使用新的 company 对象以及响应标头中的 Location 属性填充响应正文,其中包含用于检索该公司的地址。我们需要提供作的名称,以便我们可以在其中检索创建的实体。
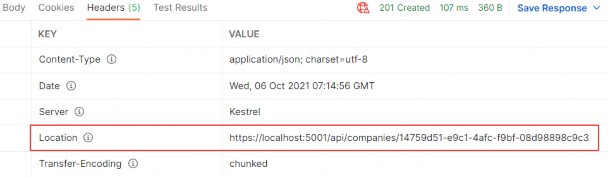
If we take a look at the headers part of our response, we are going to see a link to retrieve the created company:
如果我们查看响应的 headers 部分,我们将看到一个链接来检索创建的公司:
Finally, from the previous example, we can confirm that the POST method is neither safe nor idempotent. We saw that when we send the POST request, it is going to create a new resource in the database — thus changing the resource representation. Furthermore, if we try to send this request a couple of times, we will get a new object for every request (it will have a different Id for sure).
最后,从前面的示例中,我们可以确认 POST 方法既不安全也不幂等。我们看到,当我们发送 POST 请求时,它将在数据库中创建一个新资源——从而改变资源表示形式。此外,如果我们尝试多次发送此请求,我们将为每个请求获取一个新对象(它肯定会具有不同的 Id)。
Excellent.
非常好。
There is still one more thing we need to explain.
还有一件事我们需要解释。
9.2.1 Validation from the ApiController Attribute
9.2.1 从 ApiController 属性进行验证
In this section, we are going to talk about the [ApiController] attribute that we can find right below the [Route] attribute in our controller:
在本节中,我们将讨论 [ApiController] 属性,我们可以在控制器中的 [Route] 属性正下方找到该属性:
[Route("api/companies")] [ApiController] public class CompaniesController : ControllerBase {But, before we start with the explanation, let’s place a breakpoint in the CreateCompany action, right on the if (company is null) check.Then, let’s use Postman to send an invalid POST request:
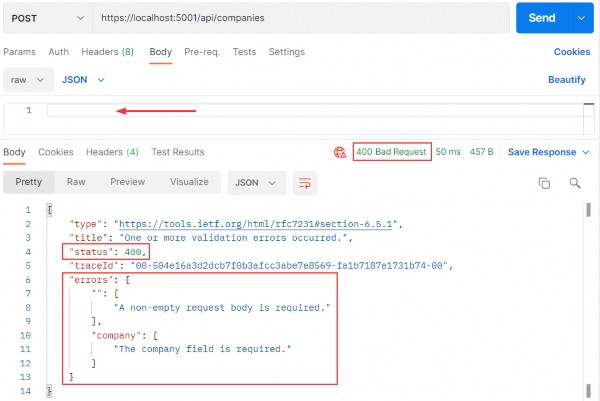
但是,在开始解释之前,让我们在 CreateCompany作中放置一个断点,就在 if (company is null) 检查上。然后,让我们使用 Postman 发送一个无效的 POST 请求:
https://localhost:5001/api/companies
We are going to talk about Validation in chapter 13, but for now, we have to explain a couple of things.
我们将在第 13 章讨论验证,但现在,我们必须解释几件事。
First of all, we have our response - a Bad Request in Postman, and we have error messages that state what’s wrong with our request. But, we never hit that breakpoint that we’ve placed inside the CreateCompany action.
首先,我们有我们的响应 - Postman 中的 Bad Request,并且我们有错误消息说明我们的请求出了什么问题。但是,我们从未遇到放置在 CreateCompany作中的断点。
Why is that?
为什么?
Well, the [ApiController] attribute is applied to a controller class to enable the following opinionated, API-specific behaviors:
嗯,[ApiController] 属性应用于控制器类,以启用以下特定于 API 的固执己见的行为:
• Attribute routing requirement
属性路由要求
• Automatic HTTP 400 responses
自动 HTTP 400 响应
• Binding source parameter inference
绑定源参数推理
• Multipart/form-data request inference
部分/表单数据请求推理
• Problem details for error status codes
错误状态代码的问题详细信息
As you can see, it handles the HTTP 400 responses, and in our case, since the request’s body is null, the [ApiController] attribute handles that and returns the 400 (BadReqeust) response before the request even hits the CreateCompany action.
如您所见,它处理 HTTP 400 响应,在我们的示例中,由于请求正文为 null,因此 [ApiController] 属性会处理该响应,并在请求到达 CreateCompany作之前返回 400 (BadReqeust) 响应。
This is useful behavior, but it prevents us from sending our custom responses with different messages and status codes to the client. This will be very important once we get to the Validation.
这是有用的行为,但它会阻止我们将具有不同消息和状态代码的自定义响应发送到客户端。一旦我们进入验证,这将非常重要。
So to enable our custom responses from the actions, we are going to add this code into the Program class right above the AddControllers method:
因此,为了启用来自作的自定义响应,我们将以下代码添加到 AddControllers 方法正上方的 Program 类中:
builder.Services.Configure<ApiBehaviorOptions>(options => { options.SuppressModelStateInvalidFilter = true; });With this, we are suppressing a default model state validation that is implemented due to the existence of the [ApiController] attribute in all API controllers. So this means that we can solve the same problem differently, by commenting out or removing the [ApiController] attribute only, without additional code for suppressing validation. It's all up to you. But we like keeping it in our controllers because, as you could’ve seen, it provides additional functionalities other than just 400 – Bad Request responses.
这样,我们将禁止默认模型状态验证,该验证是由于所有 API 控制器中存在 [ApiController] 属性而实现的。因此,这意味着我们可以以不同的方式解决相同的问题,只需注释掉或删除 [ApiController] 属性,而无需额外的代码来抑制验证。这一切都取决于您。但是我们喜欢将它保存在我们的控制器中,因为正如你所看到的,它提供了额外的功能,而不仅仅是 400 – Bad Request 响应。
Now, once we start the app and send the same request, we will hit that breakpoint and see our response in Postman.
现在,一旦我们启动应用程序并发送相同的请求,我们将命中该断点并在 Postman 中看到我们的响应。
Nicely done.
干得漂亮。
Now, we can remove that breakpoint and continue with learning about the creation of child resources.
现在,我们可以删除该断点并继续了解子资源的创建。
9.3 Creating a Child Resource
9.3 创建子资源
While creating our company, we created the DTO object required for the CreateCompany action. So, for employee creation, we are going to do the same thing:
在创建公司时,我们创建了 CreateCompany作所需的 DTO 对象。所以,对于员工创建,我们将做同样的事情:
public record EmployeeForCreationDto(string Name, int Age, string Position);We don’t have the Id property because we are going to create that Id on the server-side. But additionally, we don’t have the CompanyId because we accept that parameter through the route:[Route("api/companies/{companyId}/employees")]
我们没有 Id 属性,因为我们要在服务器端创建该 Id。但此外,我们没有 CompanyId,因为我们通过路由接受该参数:[Route(“api/companies/{companyId}/employees”)]
The next step is to modify the IEmployeeRepository interface:
下一步是修改 IEmployeeRepository 接口:
using Entities.Models;

namespace Contracts
{
    public interface IEmployeeRepository
    {
        IEnumerable<Employee> GetEmployees(Guid companyId, bool trackChanges);
        Employee GetEmployee(Guid companyId, Guid id, bool trackChanges);
        void CreateEmployeeForCompany(Guid companyId, Employee employee);
    }
}
Of course, we have to implement this interface:
当然,我们必须实现这个接口:
using Contracts;
using Entities.Models;

namespace Repository
{
    public class EmployeeRepository : RepositoryBase<Employee>, IEmployeeRepository
    {
        public EmployeeRepository(RepositoryContext repositoryContext) : base(repositoryContext) { }
        public IEnumerable<Employee> GetEmployees(Guid companyId, bool trackChanges) => FindByCondition(e => e.CompanyId.Equals(companyId), trackChanges).OrderBy(e => e.Name).ToList();
        public Employee GetEmployee(Guid companyId, Guid id, bool trackChanges) => FindByCondition(e => e.CompanyId.Equals(companyId) && e.Id.Equals(id), trackChanges).SingleOrDefault();
        public void CreateEmployeeForCompany(Guid companyId, Employee employee) { employee.CompanyId = companyId; Create(employee); }

    }
}
Because we are going to accept the employee DTO object in our action and send it to a service method, but we also have to send an employee object to this repository method, we have to create an additional mapping rule in the MappingProfile class:
因为我们要在作中接受 employee DTO 对象并将其发送到 service 方法,但我们还必须将 employee 对象发送到此存储库方法,因此我们必须在 MappingProfile 类中创建额外的映射规则:
CreateMap<EmployeeForCreationDto, Employee>();The next thing we have to do is IEmployeeService modification:
接下来我们要做的是修改 IEmployeeService:
using Shared.DataTransferObjects;

namespace Service.Contracts
{
    public interface IEmployeeService
    {
        IEnumerable<EmployeeDto> GetEmployees(Guid companyId, bool trackChanges);
        EmployeeDto GetEmployee(Guid companyId, Guid id, bool trackChanges);
        EmployeeDto CreateEmployeeForCompany(Guid companyId, EmployeeForCreationDto employeeForCreation, bool trackChanges);
    }
}
And implement this new method in EmployeeService:
并在 EmployeeService 中实现这个新方法:
public EmployeeDto CreateEmployeeForCompany(Guid companyId, EmployeeForCreationDto employeeForCreation, bool trackChanges)
{
    var company = _repository.Company.GetCompany(companyId, trackChanges);
    if (company is null) throw new CompanyNotFoundException(companyId);
    var employeeEntity = _mapper.Map<Employee>(employeeForCreation);
    _repository.Employee.CreateEmployeeForCompany(companyId, employeeEntity);
    _repository.Save();
    var employeeToReturn = _mapper.Map<EmployeeDto>(employeeEntity);
    return employeeToReturn;
}
We have to check whether that company exists in the database because there is no point in creating an employee for a company that does not exist. After that, we map the DTO to an entity, call the repository methods to create a new employee, map back the entity to the DTO, and return it to the caller.
我们必须检查数据库中是否存在该公司,因为为不存在的公司创建员工是没有意义的。之后,我们将 DTO 映射到实体,调用存储库方法以创建新员工,将实体映射回 DTO,并将其返回给调用方。
Now, we can add a new action in the EmployeesController:
现在,我们可以在 EmployeesController 中添加一个新动作:
[HttpPost]
public IActionResult CreateEmployeeForCompany(Guid companyId, [FromBody] EmployeeForCreationDto employee)
{
    if (employee is null)
        return BadRequest("EmployeeForCreationDto object is null");
    var employeeToReturn = _service.EmployeeService.CreateEmployeeForCompany(companyId, employee, trackChanges: false);
    return CreatedAtRoute("GetEmployeeForCompany", new { companyId, id = employeeToReturn.Id }, employeeToReturn);
}
As we can see, the main difference between this action and the CreateCompany action (if we exclude the fact that we are working with different DTOs) is the return statement, which now has two parameters for the anonymous object.
正如我们所看到的,此作与 CreateCompany作(如果排除我们使用的是不同 DTO 的事实)之间的主要区别在于 return 语句,该语句现在有两个用于匿名对象的参数。
For this to work, we have to modify the HTTP attribute above the GetEmployeeForCompany action:
为此,我们必须修改 GetEmployeeForCompany作上方的 HTTP 属性:
[HttpGet("{id:guid}", Name = "GetEmployeeForCompany")]
public IActionResult GetEmployeeForCompany(Guid companyId, Guid id)
{
    var employee = _service.EmployeeService.GetEmployee(companyId, id, trackChanges: false);
    return Ok(employee);
}
Let’s give this a try:
让我们试一试:
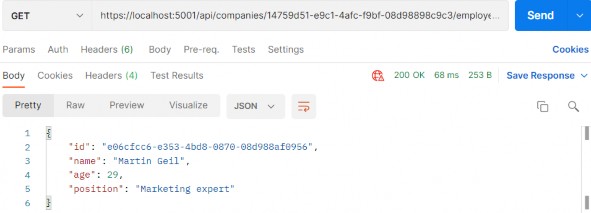
https://localhost:5001/api/companies/14759d51-e9c1-4afc-f9bf-08d98898c9c3/employees
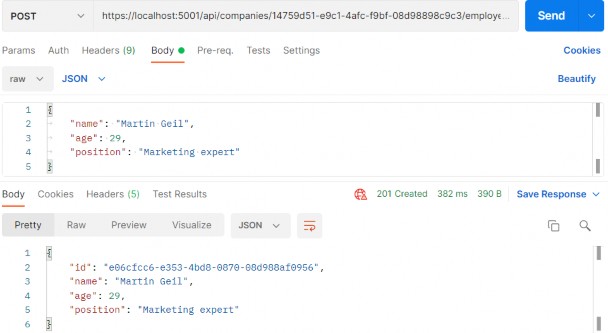
Excellent. A new employee was created.
非常好。创建了一个新员工。
If we take a look at the Headers tab, we'll see a link to fetch our newly created employee. If you copy that link and send another request with it, you will get this employee for sure:
如果我们查看 Headers 选项卡,我们将看到一个链接,用于获取我们新创建的员工。如果您复制该链接并发送另一个请求,您肯定会得到这个员工:
9.4 Creating Children Resources Together with a Parent
9.4 与父资源一起创建子资源
There are situations where we want to create a parent resource with its children. Rather than using multiple requests for every single child, we want to do this in the same request with the parent resource.
在某些情况下,我们希望创建一个包含其子资源的父资源。我们希望在具有父资源的同一请求中执行此作,而不是对每个子项使用多个请求。
We are going to show you how to do this.
我们将向您展示如何执行此作。
The first thing we are going to do is extend the CompanyForCreationDto class:
我们要做的第一件事是扩展 CompanyForCreationDto 类:
public record CompanyForCreationDto(string Name, string Address, string Country, IEnumerable<EmployeeForCreationDto> Employees);We are not going to change the action logic inside the controller nor the repository/service logic; everything is great there. That’s all. Let’s test it:
我们不会更改控制器内部的动作逻辑,也不会更改存储库/服务逻辑;那里的一切都很棒。就这样。让我们测试一下:
https://localhost:5001/api/companies
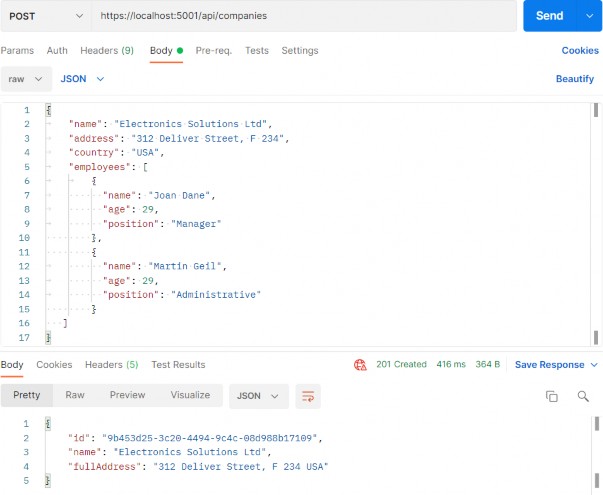
You can see that this company was created successfully.
您可以看到此公司已成功创建。
Now we can copy the location link from the Headers tab, paste it in another Postman tab, and just add the /employees part:
现在我们可以从 Headers 选项卡复制位置链接,将其粘贴到另一个 Postman 选项卡中,然后添加 /employees 部分:
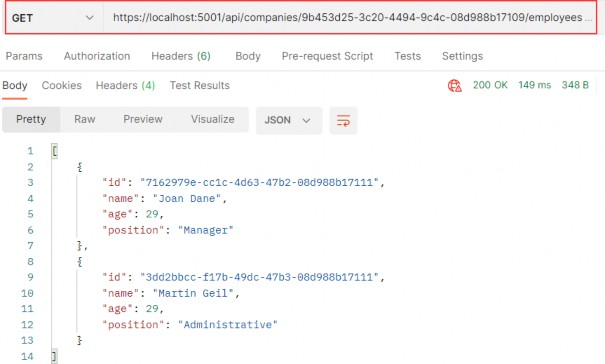
We have confirmed that the employees were created as well.
我们已经确认员工也被创建出来了。
9.5 Creating a Collection of Resources
9.5 创建资源集合
Until now, we have been creating a single resource whether it was Company or Employee. But it is quite normal to create a collection of resources, and in this section that is something we are going to work with.
到目前为止,我们一直在创建单个资源,无论是 Company 还是 Employee。但是创建资源集合是很正常的,在本节中,我们将要处理这一点。
If we take a look at the CreateCompany action, for example, we can see that the return part points to the CompanyById route (the GetCompany action). That said, we don’t have the GET action for the collection creating action to point to. So, before we start with the POST collection action, we are going to create the GetCompanyCollection action in the Companies controller.
例如,如果我们看一下 CreateCompany作,我们可以看到返回部分指向 CompanyById 路由(GetCompany作)。也就是说,我们没有要指向的集合创建作的 GET作。因此,在开始执行 POST 集合作之前,我们将在 Companies 控制器中创建 GetCompanyCollection作。
But first, let's modify the ICompanyRepository interface:
但首先,让我们修改 ICompanyRepository 接口:
IEnumerable<Company> GetByIds(IEnumerable<Guid> ids, bool trackChanges);Then we have to change the CompanyRepository class:
然后我们必须更改 CompanyRepository 类:
public IEnumerable<Company> GetByIds(IEnumerable<Guid> ids, bool trackChanges) => FindByCondition(x => ids.Contains(x.Id), trackChanges) .ToList();After that, we are going to modify ICompanyService:
之后,我们将修改 ICompanyService:
using Shared.DataTransferObjects;

namespace Service.Contracts
{
    public interface ICompanyService
    {
        IEnumerable<CompanyDto> GetAllCompanies(bool trackChanges);
        CompanyDto GetCompany(Guid companyId, bool trackChanges);
        CompanyDto CreateCompany(CompanyForCreationDto company);
        IEnumerable<CompanyDto> GetByIds(IEnumerable<Guid> ids, bool trackChanges);
    }
}
And implement this in CompanyService:
并在 CompanyService 中实现这一点:
public IEnumerable<CompanyDto> GetByIds(IEnumerable<Guid> ids, bool trackChanges)
{
    if (ids is null)
        throw new IdParametersBadRequestException();
    var companyEntities = _repository.Company.GetByIds(ids, trackChanges);
    if (ids.Count() != companyEntities.Count())
        throw new CollectionByIdsBadRequestException();
    var companiesToReturn = _mapper.Map<IEnumerable<CompanyDto>>(companyEntities);
    return companiesToReturn;
}
Here, we check if ids parameter is null and if it is we stop the execution flow and return a bad request response to the client. If it’s not null, we fetch all the companies for each id in the ids collection. If the count of ids and companies mismatch, we return another bad request response to the client. Finally, we are executing the mapping action and returning the result to the caller.
在这里,我们检查 ids 参数是否为 null,如果为 null,则停止执行流并向客户端返回错误的请求响应。如果它不为 null,我们将获取 ids 集合中每个 id 的所有公司。如果 ids 和 companies 的计数不匹配,我们将向客户端返回另一个错误的请求响应。最后,我们执行 mapping作并将结果返回给调用者。
Of course, we don’t have these two exception classes yet, so let’s create them.
当然,我们还没有这两个异常类,所以让我们创建它们。
Since we are returning a bad request result, we are going to create a new abstract class in the Entities/Exceptions folder:
由于我们返回了一个错误的请求结果,因此我们将在 Entities/Exceptions 文件夹中创建一个新的抽象类:
namespace Entities.Exceptions
{
    public abstract class BadRequestException : Exception
    {
        protected BadRequestException(string message) : base(message) { }
    }
}
Then, in the same folder, let’s create two new specific exception classes:
然后,在同一个文件夹中,让我们创建两个新的特定异常类:
namespace Entities.Exceptions
{
    public sealed class IdParametersBadRequestException : BadRequestException
    {
        public IdParametersBadRequestException() : base("Parameter ids is null") { }
    }

}
namespace Entities.Exceptions
{
public sealed class CollectionByIdsBadRequestException : BadRequestException
{
public CollectionByIdsBadRequestException() : base("Collection count mismatch comparing to ids.") { }
}
}At this point, we’ve removed two errors from the GetByIds method. But, to show the correct response to the client, we have to modify the ConfigureExceptionHandler class – the part where we populate the StatusCode property:
此时,我们已经从 GetByIds 方法中删除了两个错误。但是,为了向客户端显示正确的响应,我们必须修改 ConfigureExceptionHandler 类 – 我们填充 StatusCode 属性的部分:
using Contracts;
using Entities.ErrorModel;
using Entities.Exceptions;
using Microsoft.AspNetCore.Diagnostics;

namespace CompanyEmployees.Extensions
{
    public static class ExceptionMiddlewareExtensions
    {
        public static void ConfigureExceptionHandler(this WebApplication app, ILoggerManager logger)
        {
            app.UseExceptionHandler(appError =>
            {
                appError.Run(async context =>
                {
                    context.Response.ContentType = "application/json";
                    var contextFeature = context.Features.Get<IExceptionHandlerFeature>();
                    if (contextFeature != null)
                    {
                        //context.Response.StatusCode = contextFeature.Error
                        //switch
                        //{
                        //    NotFoundException => StatusCodes.Status404NotFound,
                        //    _ => StatusCodes.Status500InternalServerError
                        //};

                        context.Response.StatusCode = contextFeature.Error switch
                        {
                            NotFoundException => StatusCodes.Status404NotFound,
                            BadRequestException => StatusCodes.Status400BadRequest,
                            _ => StatusCodes.Status500InternalServerError
                        };

                        logger.LogError($"Something went wrong: {contextFeature.Error}");
                        await context.Response.WriteAsync(new ErrorDetails()
                        {
                            StatusCode = context.Response.StatusCode,
                            Message = contextFeature.Error.Message,
                        }.ToString());
                    }
                });
            });
        }
    }
}
After that, we can add a new action in the controller:
之后,我们可以在控制器中添加一个新的动作:
[HttpGet("collection/({ids})", Name = "CompanyCollection")]
public IActionResult GetCompanyCollection(IEnumerable<Guid> ids)
{
    var companies = _service.CompanyService.GetByIds(ids, trackChanges: false);
    return Ok(companies);
}
And that's it. This action is pretty straightforward, so let's continue towards POST implementation.
就是这样。此作非常简单,因此让我们继续进行 POST 实现。
Let’s modify the ICompanyService interface first:
让我们先修改 ICompanyService 接口:
using Shared.DataTransferObjects;

namespace Service.Contracts
{
    public interface ICompanyService
    {
        IEnumerable<CompanyDto> GetAllCompanies(bool trackChanges);
        CompanyDto GetCompany(Guid companyId, bool trackChanges);
        CompanyDto CreateCompany(CompanyForCreationDto company);
        IEnumerable<CompanyDto> GetByIds(IEnumerable<Guid> ids, bool trackChanges);
        (IEnumerable<CompanyDto> companies, string ids) CreateCompanyCollection(IEnumerable<CompanyForCreationDto> companyCollection);
    }
}
So, this new method will accept a collection of the CompanyForCreationDto type as a parameter, and return a Tuple with two fields (companies and ids) as a result.
因此,这个新方法将接受 CompanyForCreationDto 类型的集合作为参数,并返回一个包含两个字段(companies 和 ids)的 Tuples。
That said, let’s implement it in the CompanyService class:
也就是说,让我们在 CompanyService 类中实现它:
public (IEnumerable<CompanyDto> companies, string ids) CreateCompanyCollection(IEnumerable<CompanyForCreationDto> companyCollection)
{
    if (companyCollection is null)
        throw new CompanyCollectionBadRequest();
    var companyEntities = _mapper.Map<IEnumerable<Company>>(companyCollection);
    foreach (var company in companyEntities)
    {
        _repository.Company.CreateCompany(company);
    }
    _repository.Save();
    var companyCollectionToReturn = _mapper.Map<IEnumerable<CompanyDto>>(companyEntities);
    var ids = string.Join(",", companyCollectionToReturn.Select(c => c.Id));
    return (companies: companyCollectionToReturn, ids: ids);
}
So, we check if our collection is null and if it is, we return a bad request. If it isn’t, then we map that collection and save all the collection elements to the database. Finally, we map the company collection back, take all the ids as a comma-separated string, and return the Tuple with these two fields as a result to the caller.
因此,我们检查我们的集合是否为 null,如果为 null,则返回一个错误的请求。如果不是,那么我们映射该集合并将所有集合元素保存到数据库中。最后,我们将 company 集合映射回来,将所有 id 作为逗号分隔的字符串,并将包含这两个字段的 Tuple 作为结果返回给调用者。
Again, we can see that we don’t have the exception class, so let’s just create it:
同样,我们可以看到我们没有 exception 类,所以让我们创建它:
namespace Entities.Exceptions
{
    public sealed class CompanyCollectionBadRequest : BadRequestException
    {
        public CompanyCollectionBadRequest() : base("Company collection sent from a client is null.")
        { }
    }
}
Finally, we can add a new action in the CompaniesController:
最后,我们可以在 CompaniesController 中添加一个新作:
[HttpPost("collection")]
public IActionResult CreateCompanyCollection([FromBody] IEnumerable<CompanyForCreationDto> companyCollection)
{
    var result = _service.CompanyService.CreateCompanyCollection(companyCollection);
    return CreatedAtRoute("CompanyCollection", new { result.ids }, result.companies);
}
We receive the companyCollection parameter from the client, send it to the service method, and return a result with a comma-separated string and our newly created companies.
我们从客户端接收 companyCollection 参数,将其发送到 service 方法,并返回一个带有逗号分隔字符串的结果和我们新创建的公司。
Now you may ask, why are we sending a comma-separated string when we expect a collection of ids in the GetCompanyCollection action?
现在您可能会问,当我们期望在 GetCompanyCollection作中有一个 id 集合时,为什么还要发送一个逗号分隔的字符串?
Well, we can’t just pass a list of ids in the CreatedAtRoute method because there is no support for the Header Location creation with the list. You may try it, but we're pretty sure you would get the location like this:
我们不能只在 CreatedAtRoute 方法中传递 id 列表,因为不支持使用该列表创建 Header Location。您可以尝试一下,但我们非常确定您会得到这样的位置:

We can test our create action now with a bad request:
我们现在可以使用错误的请求来测试我们的 create操作:
https://localhost:5001/api/companies/collection
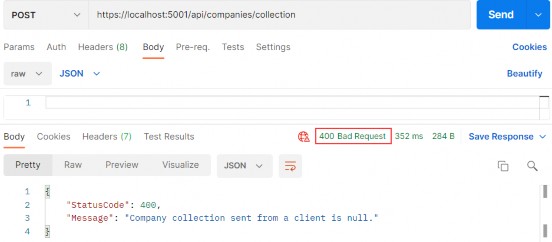
We can see that the request is handled properly and we have a correct response.
我们可以看到请求得到了正确的处理,并且我们得到了正确的响应。
Now, let’s send a valid request:
现在,让我们发送一个有效的请求:
https://localhost:5001/api/companies/collection

Excellent. Let’s check the header tab:
非常好。让我们检查一下 header 选项卡:
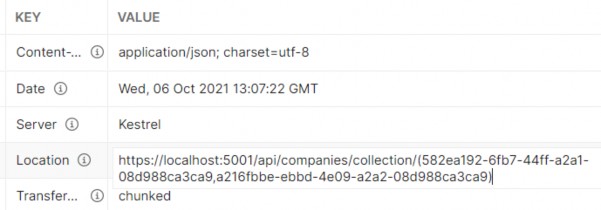
We can see a valid location link. So, we can copy it and try to fetch our newly created companies:
我们可以看到有效的位置链接。因此,我们可以复制它并尝试获取我们新创建的公司:
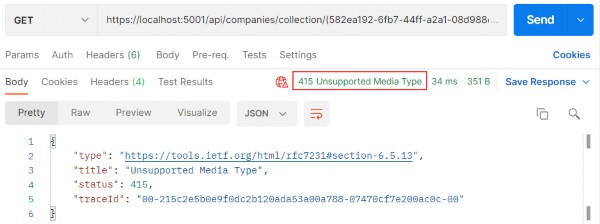
But we are getting the 415 Unsupported Media Type message. This is because our API can’t bind the string type parameter to the IEnumerable
但是我们收到了 415 Unsupported Media Type 消息。这是因为我们的 API 无法将字符串类型参数绑定到 GetCompanyCollection作中的 IEnumerable 参数。
Well, we can solve this with a custom model binding.
好吧,我们可以通过自定义模型绑定来解决这个问题。
9.6 Model Binding in API
9.6 API 中的模型绑定
Let’s create the new folder ModelBinders in the Presentation project and inside the new class ArrayModelBinder:
让我们在 Presentation 项目和新类 ArrayModelBinder 中创建新文件夹 ModelBinders:
using Microsoft.AspNetCore.Mvc.ModelBinding;
using System.ComponentModel;
using System.Reflection;

namespace CompanyEmployees.Presentation.ModelBinders
{
    public class ArrayModelBinder : IModelBinder
    {
        public Task BindModelAsync(ModelBindingContext bindingContext)
        {
            if (!bindingContext.ModelMetadata.IsEnumerableType)
            {
                bindingContext.Result = ModelBindingResult.Failed();
                return Task.CompletedTask;
            }
            var providedValue = bindingContext.ValueProvider.GetValue(bindingContext.ModelName).ToString();
            if (string.IsNullOrEmpty(providedValue))
            {
                bindingContext.Result = ModelBindingResult.Success(null);
                return Task.CompletedTask;
            }
            var genericType = bindingContext.ModelType.GetTypeInfo().GenericTypeArguments[0];
            var converter = TypeDescriptor.GetConverter(genericType);
            var objectArray = providedValue.Split(new[] { "," }, StringSplitOptions.RemoveEmptyEntries).Select(x => converter.ConvertFromString(x.Trim())).ToArray();
            var guidArray = Array.CreateInstance(genericType, objectArray.Length);
            objectArray.CopyTo(guidArray, 0);
            bindingContext.Model = guidArray;
            bindingContext.Result = ModelBindingResult.Success(bindingContext.Model);
            return Task.CompletedTask;
        }
    }
}
At first glance, this code might be hard to comprehend, but once we explain it, it will be easier to understand.
乍一看,这段代码可能很难理解,但是一旦我们解释了它,就会更容易理解。
We are creating a model binder for the IEnumerable type. Therefore, we have to check if our parameter is the same type.
我们正在为 IEnumerable 类型创建模型绑定器。因此,我们必须检查我们的参数是否为相同类型。
Next, we extract the value (a comma-separated string of GUIDs) with the ValueProvider.GetValue() expression. Because it is a type string, we just check whether it is null or empty. If it is, we return null as a result because we have a null check in our action in the controller. If it is not, we move on.
接下来,我们使用 ValueProvider.GetValue() 表达式提取值(以逗号分隔的 GUID 字符串)。因为它是一个类型字符串,所以我们只检查它是 null 还是空。如果是,我们将返回 null,因为我们在控制器中的作中有 null 检查。如果不是,我们继续前进。
In the genericType variable, with the reflection help, we store the type the IEnumerable consists of. In our case, it is GUID. With the converter variable, we create a converter to a GUID type. As you can see, we didn’t just force the GUID type in this model binder; instead, we inspected what is the nested type of the IEnumerable parameter and then created a converter for that exact type, thus making this binder generic.
在 genericType 变量中,在反射帮助下,我们存储 IEnumerable 包含的类型。在我们的例子中,它是 GUID。使用 converter 变量,我们创建到 GUID 类型的转换器。如你所见,我们不仅在此模型绑定器中强制使用 GUID 类型;相反,我们检查了 IEnumerable 参数的嵌套类型是什么,然后为该确切类型创建了一个转换器,从而使此 Binder 成为通用的。
After that, we create an array of type object (objectArray) that consist of all the GUID values we sent to the API and then create an array of GUID types (guidArray), copy all the values from the objectArray to the guidArray, and assign it to the bindingContext.
之后,我们创建一个对象类型的数组 (objectArray),其中包含我们发送到 API 的所有 GUID 值,然后创建一个 GUID 类型数组 (guidArray),将所有值从 objectArray 复制到 guidArray,并将其分配给 bindingContext。
These are the required using directives:
这些是必需的 using 指令:
using Microsoft.AspNetCore.Mvc.ModelBinding;
using System.ComponentModel;
using System.Reflection;
And that is it. Now, we have just to make a slight modification in the GetCompanyCollection action:
就是这样。现在,我们只需要在 GetCompanyCollection作中进行轻微修改:
[HttpGet("collection/({ids})", Name = "CompanyCollection")]
// public IActionResult GetCompanyCollection(IEnumerable<Guid> ids)
public IActionResult GetCompanyCollection([ModelBinder(BinderType = typeof(ArrayModelBinder))] IEnumerable<Guid> ids)
{
    var companies = _service.CompanyService.GetByIds(ids, trackChanges: false);
    return Ok(companies);
}
This is the required namespace:
这是必需的命名空间:
using CompanyEmployees.Presentation.ModelBinders;Visual Studio will provide two different namespaces to resolve the error, so be sure to pick the right one.
Visual Studio 将提供两个不同的命名空间来解决错误,因此请务必选择正确的命名空间。
Excellent.
非常好。
Our ArrayModelBinder will be triggered before an action executes. It will convert the sent string parameter to the IEnumerable
我们的 ArrayModelBinder 将在 action 执行之前触发。它会将发送的字符串参数转换为 IEnumerable 类型,然后执行作:
Well done.
干的好。
We are ready to continue towards DELETE actions.
我们已准备好继续执行 DELETE作。