33 BONUS 2 - INTRODUCTION TO CQRS AND MEDIATR WITH ASP.NET CORE WEB API
33 奖励 2 - 使用 ASP.NET 核心 WEB API 的 CQRS 和 MEDIATR 简介
In this chapter, we will provide an introduction to the CQRS pattern and how the .NET library MediatR helps us build software with this architecture.
在本章中,我们将介绍 CQRS 模式以及 .NET 库 MediatR 如何帮助我们构建具有此体系结构的软件。
In the Source Code folder, you will find the folder for this chapter with two folders inside – start and end. In the start folder, you will find a prepared project for this section. We are going to use it to explain the implementation of CQRS and MediatR. We have used the existing project from one of the previous chapters and removed the things we don’t need or want to replace - like the service layer.
在 Source Code 文件夹中,您将找到本章的文件夹,其中包含两个文件夹 – start 和 end。在 start 文件夹中,您将找到此部分的准备工程。我们将使用它来解释 CQRS 和 MediatR 的实现。我们使用了前几章中的现有项目,并删除了我们不需要或不想替换的东西 - 比如服务层。
In the end folder, you will find a finished project for this chapter.
在 end 文件夹中,您将找到本章的已完成项目。
33.1 About CQRS and Mediator Pattern
33.1 关于 CQRS 和中介模式
The MediatR library was built to facilitate two primary software architecture patterns: CQRS and the Mediator pattern. Whilst similar, let’s spend a moment understanding the principles behind each pattern.
MediatR 库的构建是为了促进两种主要的软件架构模式:CQRS 和 Mediaator 模式。虽然相似,但让我们花点时间了解每种模式背后的原则。
33.1.1 CQRS
CQRS stands for “Command Query Responsibility Segregation”. As the acronym suggests, it’s all about splitting the responsibility of commands (saves) and queries (reads) into different models.
CQRS 代表 “Command Query Responsibility Segregation”。正如首字母缩略词所暗示的那样,这一切都是为了将命令 (saves) 和查询 (reads) 的责任拆分到不同的模型中。
If we think about the commonly used CRUD pattern (Create-Read- Update-Delete), we usually have the user interface interacting with a datastore responsible for all four operations. CQRS would instead have us split these operations into two models, one for the queries (aka “R”), and another for the commands (aka “CUD”).
如果我们考虑常用的 CRUD 模式(创建-读取-更新-删除),我们通常会让用户界面与负责所有四个作的数据存储进行交互。相反,CQRS 会让我们将这些作拆分为两个模型,一个用于查询(又名“R”),另一个用于命令(又名“CUD”)。
The following image illustrates how this works:
下图说明了其工作原理:
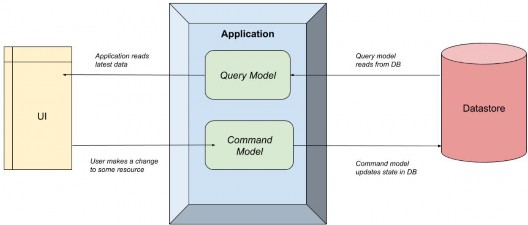
The Application simply separates the query and command models.
Application 只是将 query 和 command 模型分开。
The CQRS pattern makes no formal requirements of how this separation occurs. It could be as simple as a separate class in the same application (as we’ll see shortly with MediatR), all the way up to separate physical applications on different servers. That decision would be based on factors such as scaling requirements and infrastructure, so we won’t go into that decision path here.
CQRS 模式对这种分离的发生方式没有正式要求。它可以像同一应用程序中的单独类一样简单(我们稍后将在 MediatR 中看到),一直到不同服务器上的单独物理应用程序。该决策将基于扩展需求和基础设施等因素,因此我们不会在这里讨论该决策路径。
The key point being is that to create a CQRS system, we just need to split the reads from the writes.
关键是,要创建 CQRS 系统,我们只需要将读取与写入分开。
What problem is this trying to solve?
这试图解决什么问题?
Well, a common reason is when we design a system, we start with data storage. We perform database normalization, add primary and foreign keys to enforce referential integrity, add indexes, and generally ensure the “write system” is optimized. This is a common setup for a relational database such as SQL Server or MySQL. Other times, we think about the read use cases first, then try and add that into a database, worrying less about duplication or other relational DB concerns (often “document databases” are used for these patterns).
嗯,一个常见的原因是,当我们设计一个系统时,我们从数据存储开始。我们执行数据库规范化,添加主键和外键以强制引用完整性,添加索引,并且通常确保“写入系统”得到优化。这是关系数据库(如 SQL Server 或 MySQL)的常见设置。其他时候,我们首先考虑读取用例,然后尝试将其添加到数据库中,而不必担心重复或其他关系数据库问题(通常“文档数据库”用于这些模式)。
Neither approach is wrong. But the issue is that it’s a constant balancing act between reads and writes, and eventually one side will “win out”. All further development means both sides need to be analyzed, and often one is compromised.
这两种方法都没有错。但问题是,这是读取和写入之间的持续平衡行为,最终一方将 “胜出”。所有进一步的发展都意味着双方都需要分析,而且往往有一个会受到损害。
CQRS allows us to “break free” from these considerations and give each system the equal design and consideration it deserves without worrying about the impact of the other system. This has tremendous benefits on both performance and agility, especially if separate teams are working on these systems.
CQRS 使我们能够“摆脱”这些考虑,并为每个系统提供应有的平等设计和考虑,而无需担心其他系统的影响。这对性能和敏捷性都有巨大的好处,尤其是在不同的团队在这些系统上工作时。
33.1.2 Advantages and Disadvantages of CQRS
33.1.2 CQRS 的优点和缺点
The benefits of CQRS are:
CQRS 的优点是:
• Single Responsibility – Commands and Queries have only one job. It is either to change the state of the application or retrieve it. Therefore, they are very easy to reason about and understand.
单一职责 – 命令和查询只有一个作业。要么更改应用程序的状态,要么检索它。因此,它们很容易推理和理解。
• Decoupling – The Command or Query is completely decoupled from its handler, giving you a lot of flexibility on the handler side to implement it the best way you see fit.
Decoupling – Command 或 Query 与其处理程序完全解耦,在处理程序端为您提供了很大的灵活性,以便以您认为合适的最佳方式实施它。
• Scalability – The CQRS pattern is very flexible in terms of how you can organize your data storage, giving you options for great scalability. You can use one database for both Commands and Queries. You can use separate Read/Write databases, for improved performance, with messaging or replication between the databases for synchronization.
可伸缩性 – CQRS 模式在组织数据存储的方式方面非常灵活,为您提供了出色的可伸缩性选项。您可以对 Commands 和 Queries 使用一个数据库。您可以使用单独的读/写数据库来提高性能,并在数据库之间进行消息传递或复制以进行同步。
• Testability – It is very easy to test Command or Query handlers since they will be very simple by design, and perform only a single job.
可测试性 – 测试 Command 或 Query 处理程序非常容易,因为它们的设计非常简单,并且只执行一项工作。
Of course, it can’t all be good. Here are some of the disadvantages of CQRS:
当然,不可能都是好的。以下是 CQRS 的一些缺点:
• Complexity – CQRS is an advanced design pattern, and it will take you time to fully understand it. It introduces a lot of complexity that will create friction and potential problems in your project. Be sure to consider everything, before deciding to use it in your project.
复杂性 – CQRS 是一种高级设计模式,您需要花时间才能完全理解它。它引入了许多复杂性,这将在您的项目中产生摩擦和潜在问题。在决定在您的项目中使用它之前,请务必考虑所有因素。
• Learning Curve – Although it seems like a straightforward design pattern, there is still a learning curve with CQRS. Most developers are used to the procedural (imperative) style of writing code, and CQRS is a big shift away from that.
学习曲线 – 尽管它看起来是一个简单的设计模式,但 CQRS 仍然存在学习曲线。大多数开发人员都习惯了编写代码的过程(命令式)风格,而 CQRS 与此截然不同。
• Hard to Debug – Since Commands and Queries are decoupled from their handler, there isn’t a natural imperative flow of the application. This makes it harder to debug than traditional applications.
难以调试 – 由于命令和查询与其处理程序分离,因此应用程序没有自然的命令式流程。这使得它比传统应用程序更难调试。
33.1.3 Mediator Pattern
33.1.3 调解器模式
The Mediator pattern is simply defining an object that encapsulates how objects interact with each other. Instead of having two or more objects take a direct dependency on each other, they instead interact with a “mediator”, who is in charge of sending those interactions to the other party:
中介器模式只是定义一个对象,该对象封装了对象之间的交互方式。它们不是让两个或多个对象彼此直接依赖,而是与 “中介” 交互,该 “中介” 负责将这些交互发送给另一方:
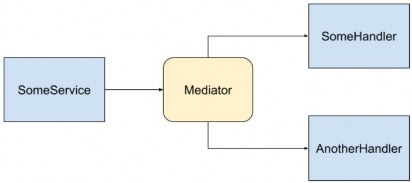
In this image, SomeService sends a message to the Mediator, and the Mediator then invokes multiple services to handle the message. There is no direct dependency between any of the blue components.
在此图中,SomeService 向 Mediator 发送一条消息,然后 Mediator 调用多个服务来处理该消息。任何蓝色组件之间都没有直接依赖关系。
The reason the Mediator pattern is useful is the same reason patterns like Inversion of Control are useful. It enables “loose coupling”, as the dependency graph is minimized and therefore code is simpler and easier to test. In other words, the fewer considerations a component has, the easier it is to develop and evolve.
中介者模式有用的原因与像 Inversion of Control 这样的模式有用的原因相同。它支持“松散耦合”,因为依赖关系图被最小化,因此代码更简单,更容易测试。换句话说,组件的考虑因素越少,它就越容易开发和发展。
We saw in the previous image how the services have no direct dependency, and the producer of the messages doesn’t know who or how many things are going to handle it. This is very similar to how a message broker works in the “publish/subscribe” pattern. If we wanted to add another handler we could, and the producer wouldn’t have to be modified.
在上图中,我们看到服务没有直接依赖关系,消息的生成者不知道谁或多少事情将处理它。这与消息代理在 “publish/subscribe” 模式中的工作方式非常相似。如果我们想添加另一个处理程序,我们可以这样做,并且不必修改 producer。
Now that we’ve been over some theory, let’s talk about how MediatR makes all these things possible.
现在我们已经了解了一些理论,让我们谈谈 MediatR 如何使所有这些事情成为可能。
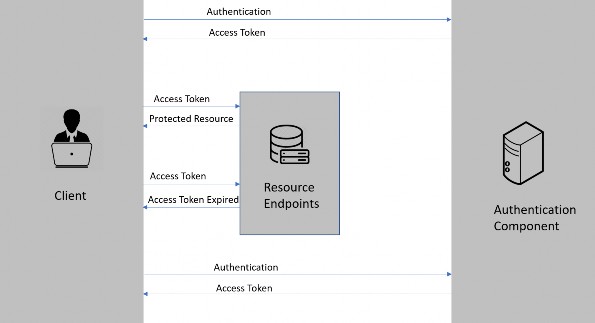
33.2 How MediatR facilitates CQRS and Mediator Patterns
33.2 MediatR 如何促进 CQRS 和中介模式
You can think of MediatR as an “in-process” Mediator implementation, that helps us build CQRS systems. All communication between the user interface and the data store happens via MediatR.
您可以将 MediatR 视为“进程内”中介器实现,它帮助我们构建 CQRS 系统。用户界面和数据存储之间的所有通信都通过 MediatR 进行。
The term “in process” is an important limitation here. Since it’s a .NET library that manages interactions within classes on the same process, it’s not an appropriate library to use if we want to separate the commands and queries across two systems. A better approach would be to use a message broker such as Kafka or Azure Service Bus.
术语 “in process” 在这里是一个重要的限制。由于它是一个 .NET 库,用于管理同一进程上类内的交互,因此如果我们想跨两个系统分离命令和查询,则它不是一个合适的库。更好的方法是使用消息代理,例如 Kafka 或 Azure 服务总线。
However, for this chapter, we are going to stick with a simple single- process CQRS system, so MediatR fits the bill perfectly.
但是,在本章中,我们将坚持使用一个简单的单进程 CQRS 系统,因此 MediatR 完全符合要求。
33.3 Adding Application Project and Initial Configuration
33.3 添加应用程序项目和初始配置
Let’s start by opening the starter project from the start folder. You will see that we don’t have the Service nor the Service.Contracts projects. Well, we don’t need them. We are going to use CQRS with MediatR to replace that part of our solution.
让我们从 start 文件夹打开 starter 项目。您将看到我们没有 Service 和 Service.Contracts 项目。好吧,我们不需要它们。我们将使用 CQRS 和 MediatR 来替换我们解决方案的该部分。
But, we do need an additional project for our business logic so, let’s create a new class library (.NET Core) and name it Application.
但是,我们确实需要一个额外的项目来运行我们的业务逻辑,因此,让我们创建一个新的类库 (.NET Core) 并将其命名为 Application。
Additionally, we are going to add a new class named AssemblyReference. We will use it for the same purpose as we used the class with the same name in the Presentation project:
此外,我们将添加一个名为 AssemblyReference 的新类。我们将将其用于与 Presentation 项目中使用同名类相同的目的:
public static class AssemblyReference { }
Now let’s install a couple of packages.
现在让我们安装几个包。
The first package we are going to install is the MediatR in the Application project:
我们要安装的第一个包是 Application 项目中的 MediatR:
PM> install-package MediatR
Then in the main project, we are going to install another package that wires up MediatR with the ASP.NET dependency injection container:
然后在主项目中,我们将安装另一个包,该包将 MediatR 与 ASP.NET 依赖项注入容器连接起来:
PM> install-package MediatR.Extensions.Microsoft.DependencyInjection
After the installations, we are going to configure MediatR in the Program class:
安装完成后,我们将在 Program 类中配置 MediatR:
builder.Services.AddMediatR(typeof(Application.AssemblyReference).Assembly);
For this, we have to reference the Application project, and add a using directive:
为此,我们必须引用 Application 项目,并添加一个 using 指令:
using MediatR;
The AddMediatR method will scan the project assembly that contains the handlers that we are going to use to handle our business logic. Since we are going to place those handlers in the Application project, we are using the Application’s assembly as a parameter.
AddMediatR 方法将扫描包含我们将用于处理业务逻辑的处理程序的项目程序集。由于我们将这些处理程序放在 Application 项目中,因此我们将 Application 的程序集用作参数。
Before we continue, we have to reference the Application project from the Presentation project.
在继续之前,我们必须从 Presentation 项目中引用 Application 项目。
Now MediatR is configured, and we can use it inside our controller.
现在 MediatR 已经配置好了,我们可以在控制器中使用它。
In the Controllers folder of the Presentation project, we are going to find a single controller class. It contains only a base code, and we are going to modify it by adding a sender through the constructor injection:
在 Presentation 项目的 Controllers 文件夹中,我们将找到一个控制器类。它只包含一个基本代码,我们将通过构造函数注入添加一个 sender 来修改它:
[Route("api/companies")] [ApiController] public class CompaniesController : ControllerBase { private readonly ISender _sender; public CompaniesController(ISender sender) => _sender = sender; }
Here we inject the ISender interface from the MediatR namespace. We are going to use this interface to send requests to our handlers.
在这里,我们从 MediatR 命名空间注入 ISender 接口。我们将使用此接口将请求发送到我们的处理程序。
We have to mention one thing about using ISender and not the IMediator interface. From the MediatR version 9.0, the IMediator interface is split into two interfaces:
我们必须提到关于使用 ISender 而不是 IMediator 接口的一件事。从 MediatR 版本 9.0 开始,IMediator 接口分为两个接口:
public interface ISender { Task<TResponse> Send<TResponse>(IRequest<TResponse> request, CancellationToken cancellationToken = default); Task<object?> Send(object request, CancellationToken cancellationToken = default); } public interface IPublisher { Task Publish(object notification, CancellationToken cancellationToken = default); Task Publish<TNotification>(TNotification notification, CancellationToken cancellationToken = default) where TNotification : INotification; } public interface IMediator : ISender, IPublisher { }
So, by looking at the code, it is clear that you can continue using the IMediator interface to send requests and publish notifications. But it is recommended to split that by using ISender and IPublisher interfaces.
因此,通过查看代码,很明显您可以继续使用 IMediator 接口来发送请求和发布通知。但建议使用 ISender 和 IPublisher 接口来拆分该接口。
With that said, we can continue with the Application’s logic implementation.
话虽如此,我们可以继续 Application 的 logic implementation。
33.4 Requests with MediatR
33.4 使用 MediatR 的请求
MediatR Requests are simple request-response style messages where a single request is synchronously handled by a single handler (synchronous from the request point of view, not C# internal async/await). Good use cases here would be returning something from a database or updating a database.
MediatR 请求是简单的请求-响应样式的消息,其中单个请求由单个处理程序同步处理(从请求的角度来看是同步的,而不是 C# 内部的 async/await)。这里的好用例是从数据库返回一些东西或更新数据库。
There are two types of requests in MediatR. One that returns a value, and one that doesn’t. Often this corresponds to reads/queries (returning a value) and writes/commands (usually doesn’t return a value).
MediatR 中有两种类型的请求。一个返回值,另一个不返回值。这通常对应于 reads/queries(返回一个值)和 writes/commands(通常不返回一个值)。
So, before we start sending requests, we are going to create several folders in the Application project to separate queries, commands, and handlers:
因此,在开始发送请求之前,我们将在 Application 项目中创建多个文件夹,以分隔查询、命令和处理程序:
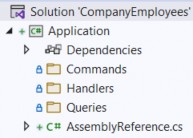
Since we are going to work only with the company entity, we are going to place our queries, commands, and handlers directly into these folders.
由于我们只要使用 company 实体,因此我们将查询、命令和处理程序直接放入这些文件夹中。
But in larger projects with multiple entities, we can create additional folders for each entity inside each of these folders for better organization.
但在具有多个实体的大型项目中,我们可以为每个文件夹中的每个实体创建额外的文件夹,以便更好地组织。
Also, as we already know, we are not going to send our entities as a result to the client but DTOs, so we have to reference the Shared project.
此外,正如我们已经知道的,我们不会将实体作为结果发送给客户端,而是发送给 DTO,因此我们必须引用 Shared 项目。
That said, let’s start with our first query. Let’s create it in the Queries folder:
也就是说,让我们从第一个查询开始。让我们在 Queries 文件夹中创建它:
public sealed record GetCompaniesQuery(bool TrackChanges) : IRequest<IEnumerable<CompanyDto>>;
Here, we create the GetCompaniesQuery record, which implements IRequest<IEnumerable<CompanyDto>>. This simply means our request will return a list of companies.
在这里,我们创建 GetCompaniesQuery 记录,该记录实现 IRequest<IEnumerable<CompanyDto>>。这只是意味着我们的请求将返回公司列表。
Here we need two additional namespaces:
这里我们需要两个额外的命名空间:
using MediatR;
using Shared.DataTransferObjects;
Once we send the request from our controller’s action, we are going to see the usage of this query.
一旦我们从控制器的 action 发送请求,我们将看到这个查询的用法。
After the query, we need a handler. This handler in simple words will be our replacement for the service layer method that we had in our project. In our previous project, all the service classes were using the repository to access the database – we will make no difference here. For that, we have to reference the Contracts project so we can access the IRepositoryManager interface.
查询之后,我们需要一个处理程序。简单来说,这个处理程序将成为我们项目中服务层方法的替代品。在我们之前的项目中,所有服务类都使用存储库来访问数据库 – 我们在这里不会有什么区别。为此,我们必须引用 Contracts 项目,以便我们可以访问 IRepositoryManager 接口。
After adding the reference, we can create a new GetCompaniesHandler class in the Handlers folder:
添加引用后,我们可以在 Handlers 文件夹中创建一个新的 GetCompaniesHandler 类:
internal sealed class GetCompaniesHandler : IRequestHandler<GetCompaniesQuery, IEnumerable<CompanyDto>> { private readonly IRepositoryManager _repository; public GetCompaniesHandler(IRepositoryManager repository) => _repository = repository; public Task<IEnumerable<CompanyDto>> Handle(GetCompaniesQuery request, CancellationToken cancellationToken) { throw new NotImplementedException(); } }
Our handler inherits from IRequestHandler<GetCompaniesQuery,IEnumerable<Product>>. This means this class will handle GetCompaniesQuery, in this case, returning the list of companies.
我们的处理程序继承自 IRequestHandler<GetCompaniesQuery,IEnumerable<Product>>。这意味着此类将处理 GetCompaniesQuery,在本例中,返回公司列表。
We also inject the repository through the constructor and add a default implementation of the Handle method, required by the IRequestHandler interface.
我们还通过构造函数注入存储库,并添加 IRequestHandler 接口所需的 Handle 方法的默认实现。
These are the required namespaces:
这些是必需的命名空间:
using Application.Queries;
using Contracts;
using MediatR;
using Shared.DataTransferObjects;
Of course, we are not going to leave this method to throw an exception. But before we add business logic, we have to install AutoMapper in the Application project:
当然,我们不会让此方法抛出异常。但在添加业务逻辑之前,我们必须在 Application 项目中安装 AutoMapper:
PM> Install-Package AutoMapper.Extensions.Microsoft.DependencyInjection
Register the package in the Program class:
在 Program 类中注册包:
builder.Services.AddAutoMapper(typeof(Program));
builder.Services.AddMediatR(typeof(Application.AssemblyReference).Assembly);
And create the MappingProfile class, also in the main project, with a single mapping rule:
并在主项目中使用 single mapping rule 创建 MappingProfile 类:
public class MappingProfile : Profile { public MappingProfile() { CreateMap<Company, CompanyDto>() .ForMember(c => c.FullAddress, opt => opt.MapFrom(x => string.Join(' ', x.Address, x.Country))); } }
Everything with these actions is familiar since we’ve already used AutoMapper in our project.
这些作的所有内容都是熟悉的,因为我们已经在项目中使用了 AutoMapper。
Now, we can modify the handler class:
现在,我们可以修改 handler 类:
internal sealed class GetCompaniesHandler : IRequestHandler<GetCompaniesQuery, IEnumerable<CompanyDto>> { private readonly IRepositoryManager _repository; private readonly IMapper _mapper; public GetCompaniesHandler(IRepositoryManager repository, IMapper mapper) {_repository = repository; _mapper = mapper; } public async Task<IEnumerable<CompanyDto>> Handle(GetCompaniesQuery request, CancellationToken cancellationToken) { var companies = await _repository.Company.GetAllCompaniesAsync(request.TrackChanges); var companiesDto = _mapper.Map<IEnumerable<CompanyDto>>(companies); return companiesDto; } }
This logic is also familiar since we had almost the same one in our GetAllCompaniesAsync service method. One difference is that we are passing the track changes parameter through the request object.
此逻辑也很熟悉,因为我们在 GetAllCompaniesAsync 服务方法中具有几乎相同的逻辑。一个区别是,我们通过 request 对象传递 track changes 参数。
Now, we can modify CompaniesController:
现在,我们可以修改 CompaniesController:
[HttpGet] public async Task<IActionResult> GetCompanies() { var companies = await _sender.Send(new GetCompaniesQuery(TrackChanges: false)); return Ok(companies); }
We use the Send method to send a request to our handler and pass the GetCompaniesQuery as a parameter. Nothing more than that. We also need an additional namespace:
我们使用 Send 方法向处理程序发送请求,并将 GetCompaniesQuery 作为参数传递。仅此而已。我们还需要一个额外的命名空间:
using Application.Queries;
Our controller is clean as it was with the service layer implemented. But this time, we don’t have a single service class to handle all the methods but a single handler to take care of only one thing.
我们的控制器与实施服务层时一样干净。但是这一次,我们没有一个服务类来处理所有方法,而只有一个处理程序来处理一件事。
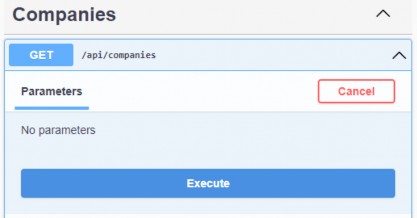
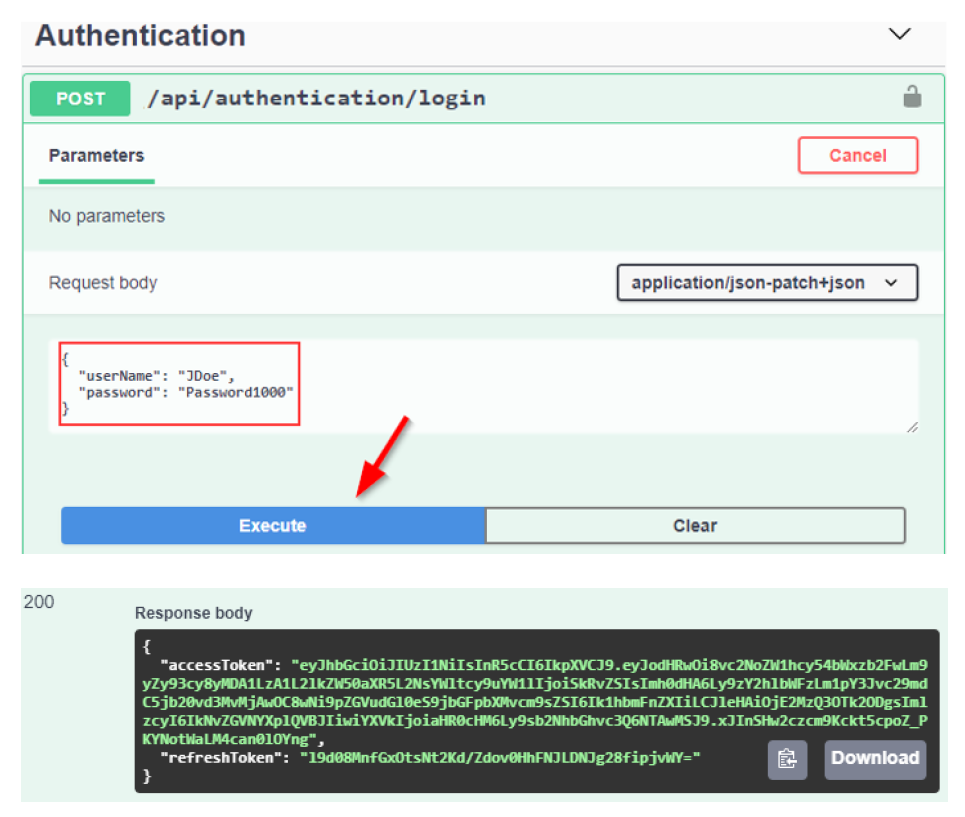
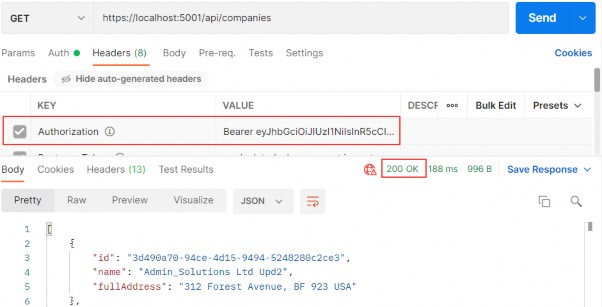
Now, we can test this:
现在,我们可以测试一下:
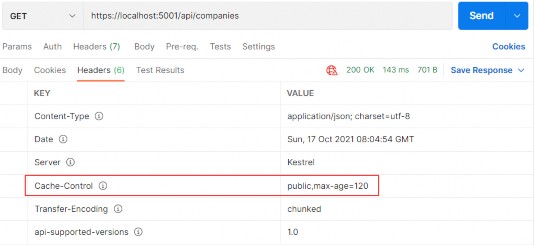
https://localhost:5001/api/companies
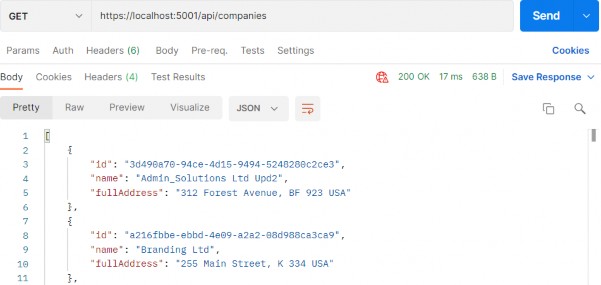
Everything works great. With this in mind, we can continue and implement the logic for fetching a single company.
一切都很好。考虑到这一点,我们可以继续并实现获取单个公司的逻辑。
So, let’s start with the query in the Queries folder:
因此,让我们从 Queries 文件夹中的查询开始:
public sealed record GetCompanyQuery(Guid Id, bool TrackChanges) : IRequest<CompanyDto>;
Then, let’s implement a new handler:
然后,让我们实现一个新的处理程序:
internal sealed class GetCompanyHandler : IRequestHandler<GetCompanyQuery, CompanyDto> { private readonly IRepositoryManager _repository; private readonly IMapper _mapper; public GetCompanyHandler(IRepositoryManager repository, IMapper mapper) { _repository = repository; _mapper = mapper; } public async Task<CompanyDto> Handle(GetCompanyQuery request, CancellationToken cancellationToken) { var company = await _repository.Company.GetCompanyAsync(request.Id, request.TrackChanges); if (company is null) throw new CompanyNotFoundException(request.Id); var companyDto = _mapper.Map<CompanyDto>(company); return companyDto;} }
So again, our handler inherits from the IRequestHandler interface accepting the query as the first parameter and the result as the second. Then, we inject the required services and familiarly implement the Handle method.
因此,我们的处理程序再次继承自 IRequestHandler 接口,接受查询作为第一个参数,将结果作为第二个参数。然后,我们注入所需的服务并熟悉地实现 Handle 方法。
We need these namespaces here:
我们在此处需要这些命名空间:
using Application.Queries;
using AutoMapper;
using Contracts;
using Entities.Exceptions;
using MediatR;
using Shared.DataTransferObjects;
Lastly, we have to add another action in CompaniesController:
最后,我们必须在 CompaniesController 中添加另一个作:
[HttpGet("{id:guid}", Name = "CompanyById")] public async Task<IActionResult> GetCompany(Guid id) { var company = await _sender.Send(new GetCompanyQuery(id, TrackChanges: false)); return Ok(company); }
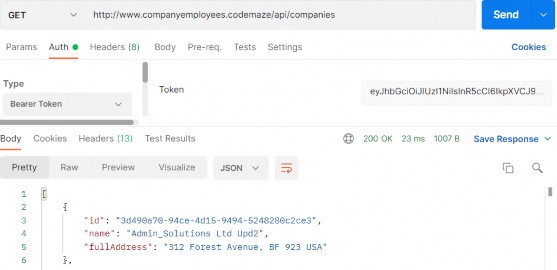
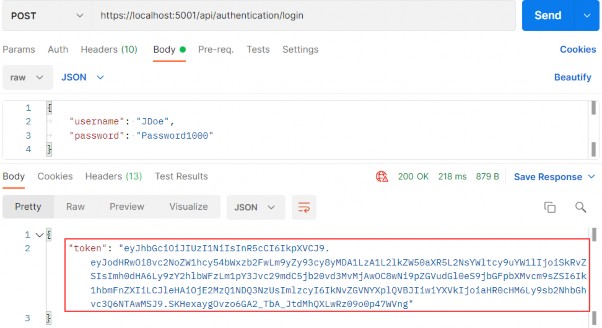
Awesome, let’s test it:
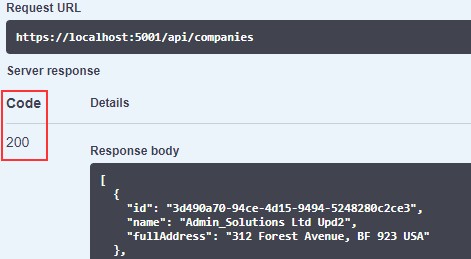
太棒了,让我们测试一下:
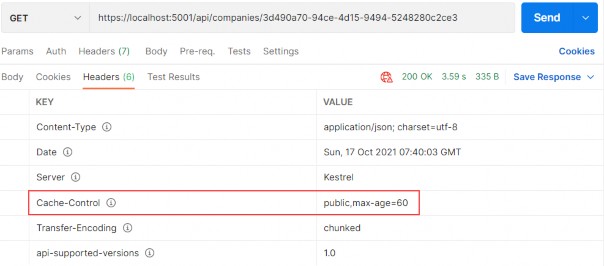
https://localhost:5001/api/companies/3d490a70-94ce-4d15-9494-5248280c2ce3
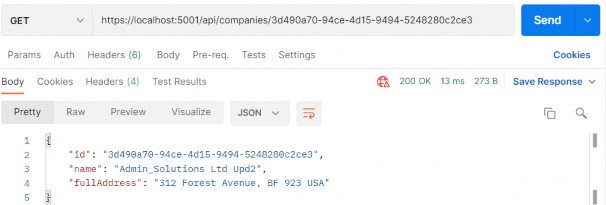
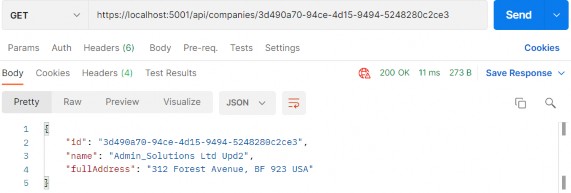
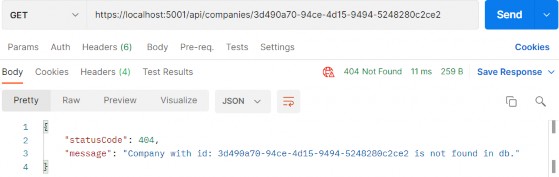
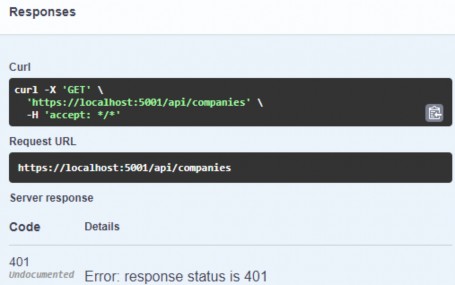
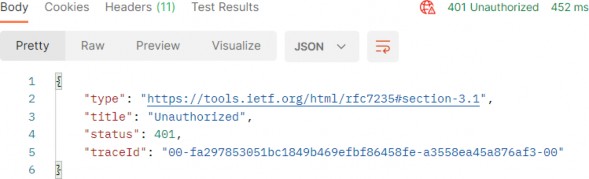
Excellent, we can see the company DTO in the response body. Additionally, we can try an invalid request:
太好了,我们可以在响应正文中看到公司 DTO。此外,我们可以尝试无效的请求:
https://localhost:5001/api/companies/3d490a70-94ce-4d15-9494-5248280c2ce2
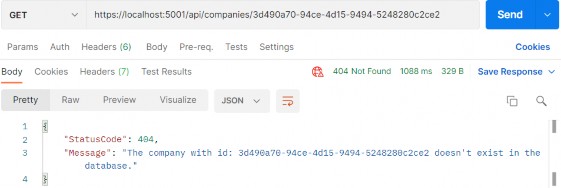
And, we can see this works as well.
而且,我们可以看到这也有效。
33.5 Commands with MediatR
33.5 使用 MediatR 的命令
As with both queries, we are going to start with a command record creation inside the Commands folder:
与这两个查询一样,我们将从 Commands 文件夹中的命令记录创建开始:
public sealed record CreateCompanyCommand(CompanyForCreationDto Company) : IRequest<CompanyDto>;
Our command has a single parameter sent from the client, and it inherits from IRequest. Our request has to return CompanyDto because we will need it, in our action, to create a valid route in the return statement.
我们的命令有一个从客户端发送的参数,它继承自 IRequest。我们的请求必须返回 CompanyDto,因为我们在作中需要它来在 return 语句中创建有效的路由。
After the query, we are going to create another handler:
查询之后,我们将创建另一个处理程序:
internal sealed class CreateCompanyHandler : IRequestHandler<CreateCompanyCommand, CompanyDto> { private readonly IRepositoryManager _repository; private readonly IMapper _mapper; public CreateCompanyHandler(IRepositoryManager repository, IMapper mapper) { _repository = repository; _mapper = mapper; } public async Task<CompanyDto> Handle(CreateCompanyCommand request, CancellationToken cancellationToken) { var companyEntity = _mapper.Map<Company>(request.Company); _repository.Company.CreateCompany(companyEntity); await _repository.SaveAsync();var companyToReturn = _mapper.Map<CompanyDto>(companyEntity); return companyToReturn; } }
So, we inject our services and implement the Handle method as we did with the service method. We map from the creation DTO to the entity, save it to the database, and map it to the company DTO object.
因此,我们注入我们的服务并实现 Handle 方法,就像我们对 service 方法所做的那样。我们从创建 DTO 映射到实体,将其保存到数据库,并将其映射到公司 DTO 对象。
Then, before we add a new mapping rule in the MappingProfile class:
然后,在我们在 MappingProfile 类中添加新的映射规则之前:
CreateMap<CompanyForCreationDto, Company>();
Now, we can add a new action in a controller:
现在,我们可以在控制器中添加一个新的动作:
[HttpPost] public async Task<IActionResult> CreateCompany([FromBody] CompanyForCreationDto companyForCreationDto) { if (companyForCreationDto is null) return BadRequest("CompanyForCreationDto object is null"); var company = await _sender.Send(new CreateCompanyCommand(companyForCreationDto)); return CreatedAtRoute("CompanyById", new { id = company.Id }, company); }
That’s all it takes. Now we can test this:
就这样。现在我们可以测试一下:
https://localhost:5001/api/companies

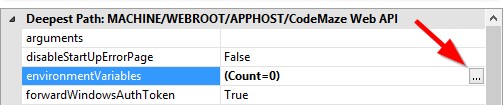
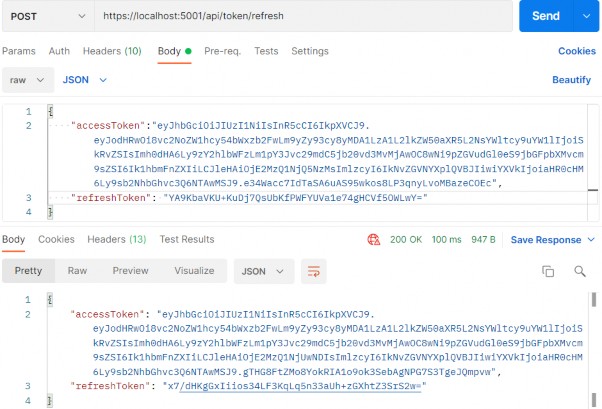
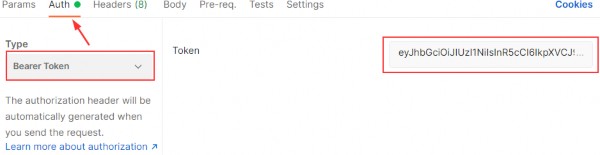
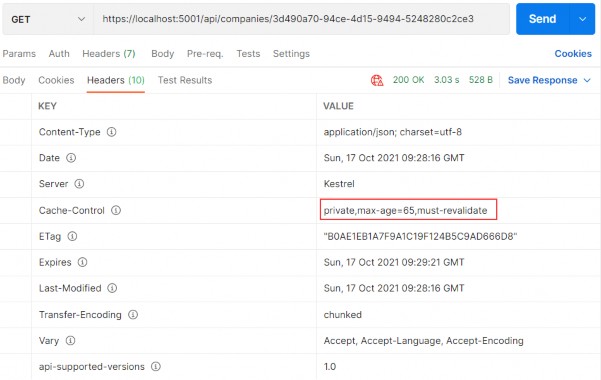
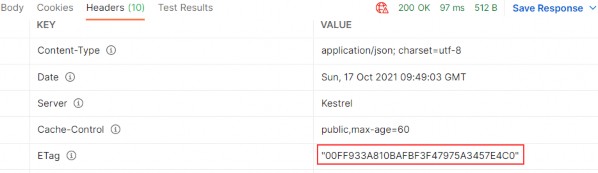
A new company is created, and if we inspect the Headers tab, we are going to find the link to fetch this new company:
创建了一个新公司,如果我们检查 Headers 选项卡,我们将找到获取这家新公司的链接:
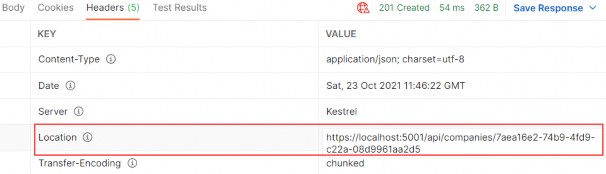
There is one important thing we have to understand here. We are communicating to a datastore via simple message constructs without having any idea on how it’s being implemented. The commands and queries could be pointing to different data stores. They don’t know how their request will be handled, and they don’t care.
在这里,我们必须了解一件重要的事情。我们通过简单的消息构造与 datastore 通信,但不知道它是如何实现的。命令和查询可能指向不同的数据存储。他们不知道他们的请求将如何处理,他们也不在乎。
33.5.1 Update Command
33.5.1 update 命令
Following the same principle from the previous example, we can implement the update request.
按照前面示例中的相同原则,我们可以实现 update 请求。
Let’s start with the command:
让我们从命令开始:
public sealed record UpdateCompanyCommand
(Guid Id, CompanyForUpdateDto Company, bool TrackChanges) : IRequest;
This time our command inherits from IRequest without any generic parameter. That’s because we are not going to return any value with this request.
这次我们的命令继承自 IRequest,没有任何泛型参数。那是因为我们不会在这个请求中返回任何值。
Let’s continue with the handler implementation:
让我们继续处理程序实现:
internal sealed class UpdateCompanyHandler : IRequestHandler<UpdateCompanyCommand, Unit> { private readonly IRepositoryManager _repository; private readonly IMapper _mapper; public UpdateCompanyHandler(IRepositoryManager repository, IMapper mapper) { _repository = repository; _mapper = mapper; } public async Task<Unit> Handle(UpdateCompanyCommand request, CancellationToken cancellationToken) {var companyEntity = await _repository.Company.GetCompanyAsync(request.Id, request.TrackChanges); if (companyEntity is null) throw new CompanyNotFoundException(request.Id); _mapper.Map(request.Company, companyEntity); await _repository.SaveAsync(); return Unit.Value; } }
This handler inherits from IRequestHandler<UpdateCompanyCommand, Unit>. This is new for us because the first time our command is not returning any value. But IRequestHandler always accepts two parameters (TRequest and TResponse). So, we provide the Unit structure for the TResponse parameter since it represents the void type.
此处理程序继承自 IRequestHandler<UpdateCompanyCommand, Unit> .这对我们来说是新的,因为第一次我们的命令没有返回任何值。但 IRequestHandler 始终接受两个参数(TRequest 和 TResponse)。因此,我们为 TResponse 参数提供了 Unit 结构,因为它表示 void 类型。
Then the Handle implementation is familiar to us except for the return part. We have to return something from the Handle method and we use Unit.Value.
然后,除了 return 部分之外,我们熟悉 Handle 实现。我们必须从 Handle 方法返回一些内容,并使用 Unit.Value。
Before we modify the controller, we have to add another mapping rule:
在我们修改控制器之前,我们必须添加另一个映射规则:
CreateMap<CompanyForUpdateDto, Company>();
Lastly, let’s add a new action in the controller:
最后,让我们在控制器中添加一个新作:
[HttpPut("{id:guid}")] public async Task<IActionResult> UpdateCompany(Guid id, CompanyForUpdateDto companyForUpdateDto) { if (companyForUpdateDto is null) return BadRequest("CompanyForUpdateDto object is null"); await _sender.Send(new UpdateCompanyCommand(id, companyForUpdateDto, TrackChanges: true)); return NoContent(); }
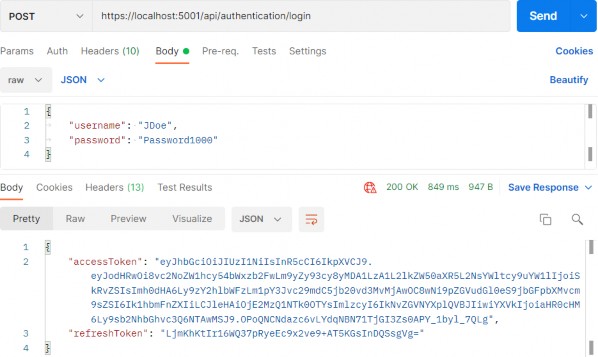
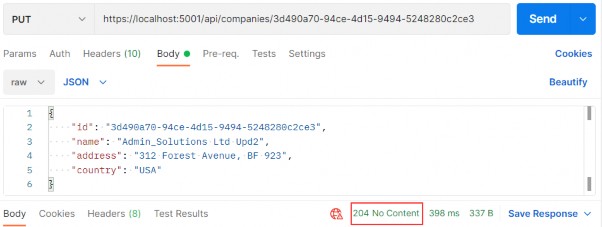
At this point, we can send a PUT request from Postman:
此时,我们可以从 Postman 发送一个 PUT 请求:
https://localhost:5001/api/companies/7aea16e2-74b9-4fd9-c22a-08d9961aa2d5
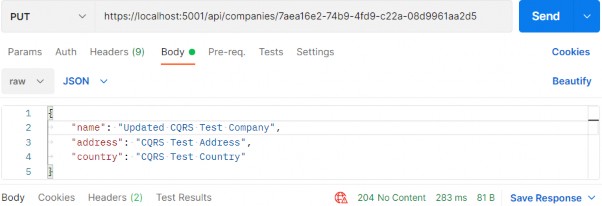
There is the 204 status code.
有 204 状态代码。
If you fetch this company, you will find the name updated for sure.
如果你找到这家公司,你肯定会发现名称更新了。
33.5.2 Delete Command
33.5.2 Delete 命令
After all of this implementation, this one should be pretty straightforward.
在所有这些实现之后,这个应该非常简单。
Let’s start with the command:
让我们从命令开始:
public record DeleteCompanyCommand(Guid Id, bool TrackChanges) : IRequest;
Then, let’s continue with a handler:
然后,让我们继续使用处理程序:
internal sealed class DeleteCompanyHandler : IRequestHandler<DeleteCompanyCommand, Unit> { private readonly IRepositoryManager _repository; public DeleteCompanyHandler(IRepositoryManager repository) => _repository = repository; public async Task<Unit> Handle(DeleteCompanyCommand request, CancellationToken cancellationToken) { var company = await _repository.Company.GetCompanyAsync(request.Id, request.TrackChanges); if (company is null) throw new CompanyNotFoundException(request.Id); _repository.Company.DeleteCompany(company); await _repository.SaveAsync(); return Unit.Value; } }
Finally, let’s add one more action inside the controller:
最后,让我们在控制器中再添加一个操作:
[HttpDelete("{id:guid}")]
public async Task<IActionResult> DeleteCompany(Guid id) { await _sender.Send(new DeleteCompanyCommand(id, TrackChanges: false)); return NoContent(); }
That’s it. Pretty easy.We can test this now:
就是这样。很简单。我们现在可以测试一下:
https://localhost:5001/api/companies/7aea16e2-74b9-4fd9-c22a-08d9961aa2d5
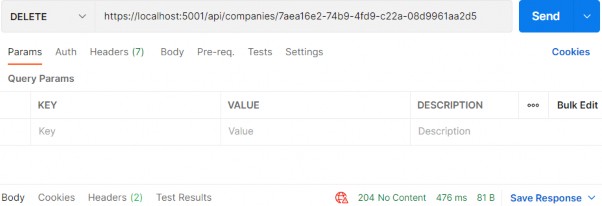
It works great.
它效果很好。
Now that we know how to work with requests using MediatR, let’s see how to use notifications.
现在,我们已经知道如何使用 MediatR 处理请求,让我们看看如何使用通知。
33.6 MediatR Notifications
So for we’ve only seen a single request being handled by a single handler. However, what if we want to handle a single request by multiple handlers?
因此,我们只看到单个请求由单个处理程序处理。但是,如果我们想处理多个处理程序的单个请求怎么办?
That’s where notifications come in. In these situations, we usually have multiple independent operations that need to occur after some event. Examples might be:
这就是通知的用武之地。在这些情况下,我们通常会有多个独立的作需要在某些事件之后发生。示例可能是:
• Sending an email
• Invalidating a cache
• ...
To demonstrate this, we will update the delete company flow we created previously to publish a notification and have it handled by two handlers.
为了演示这一点,我们将更新之前创建的删除公司流程,以发布通知并让两个处理程序处理该通知。
Sending an email is out of the scope of this book (you can learn more about that in our Bonus 6 Security book). But to demonstrate the behavior of notifications, we will use our logger service and log a message as if the email was sent.
发送电子邮件不在本书的讨论范围之内(您可以在我们的 Bonus 6 Security 书籍中了解更多信息)。但为了演示通知的行为,我们将使用我们的 logger 服务并记录一条消息,就像电子邮件已发送一样。
So, the flow will be - once we delete the Company, we want to inform our administrators with an email message that the delete has action occurred.
因此,流程将是 - 删除公司后,我们希望通过电子邮件通知管理员发生了删除作。
That said, let’s start by creating a new Notifications folder inside the Application project and add a new notification in that folder:
也就是说,让我们首先在 Application 项目中创建一个新的 Notifications 文件夹,然后在该文件夹中添加新的通知:
public sealed record CompanyDeletedNotification(Guid Id, bool TrackChanges) : INotification;
The notification has to inherit from the INotification interface. This is the equivalent of the IRequest we saw earlier, but for Notifications.
通知必须继承自 INotification 接口。这相当于我们之前看到的 IRequest,但用于 Notifications。
As we can conclude, notifications don’t return a value. They work on the fire and forget principle, like publishers.
我们可以得出结论,通知不返回值。他们像出版商一样,按照 Fire and Forget 的原则工作。
Next, we are going to create a new Emailhandler class:
接下来,我们将创建一个新的 Emailhandler 类:
internal sealed class EmailHandler : INotificationHandler<CompanyDeletedNotification> { private readonly ILoggerManager _logger; public EmailHandler(ILoggerManager logger) => _logger = logger; public async Task Handle(CompanyDeletedNotification notification, CancellationToken cancellationToken) { _logger.LogWarn($"Delete action for the company with id: {notification.Id} has occurred."); await Task.CompletedTask; } }
Here, we just simulate sending our email message in an async manner. Without too many complications, we use our logger service to process the message.
在这里,我们只是模拟以异步方式发送电子邮件。没有太多的复杂性,我们使用 logger 服务来处理消息。
Let’s continue by modifying the DeleteCompanyHandler class:
我们继续修改 DeleteCompanyHandler 类:
internal sealed class DeleteCompanyHandler : INotificationHandler<CompanyDeletedNotification> { private readonly IRepositoryManager _repository; public DeleteCompanyHandler(IRepositoryManager repository) => _repository = repository; public async Task Handle(CompanyDeletedNotification notification, CancellationToken cancellationToken) { var company = await _repository.Company.GetCompanyAsync(notification.Id, notification.TrackChanges); if (company is null) throw new CompanyNotFoundException(notification.Id); _repository.Company.DeleteCompany(company); await _repository.SaveAsync(); } }
This time, our handler inherits from the INotificationHandler interface, and it doesn’t return any value – we’ve modified the method signature and removed the return statement.
这一次,我们的处理程序继承自 INotificationHandler 接口,它不返回任何值 – 我们修改了方法签名并删除了 return 语句。
Finally, we have to modify the controller’s constructor:
最后,我们必须修改控制器的构造函数:
private readonly ISender _sender; private readonly IPublisher _publisher; public CompaniesController(ISender sender, IPublisher publisher) { _sender = sender; _publisher = publisher; }
We inject another interface, which we are going to use to publish notifications.
我们注入另一个接口,我们将使用它来发布通知。
And, we have to modify the DeleteCompany action:
而且,我们必须修改 DeleteCompany作:
[HttpDelete("{id:guid}")] public async Task<IActionResult> DeleteCompany(Guid id) { await _publisher.Publish(new CompanyDeletedNotification(id, TrackChanges: false)); return NoContent(); }
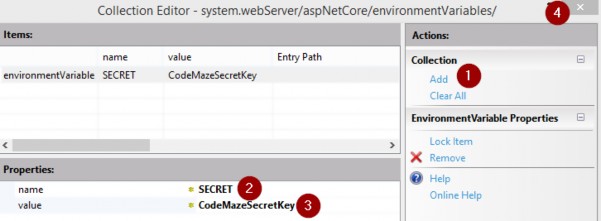
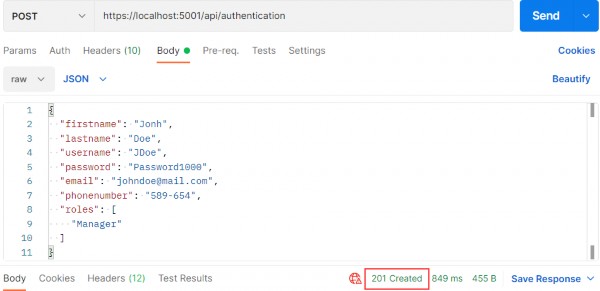
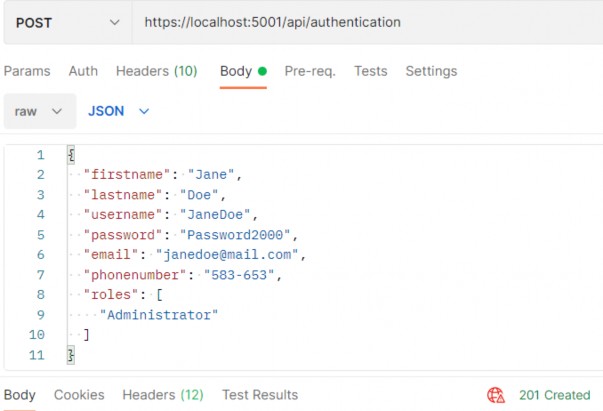
To test this, let’s create a new company first:
为了测试这一点,让我们先创建一个新公司:
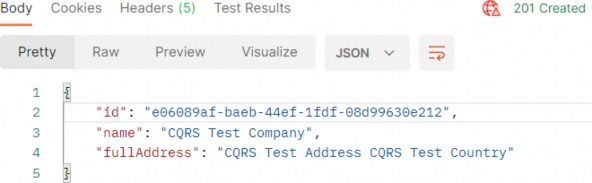
Now, if we send the Delete request, we are going to receive the 204 NoContent response:
现在,如果我们发送 Delete 请求,我们将收到 204 NoContent 响应:
https://localhost:5001/api/companies/e06089af-baeb-44ef-1fdf-08d99630e212

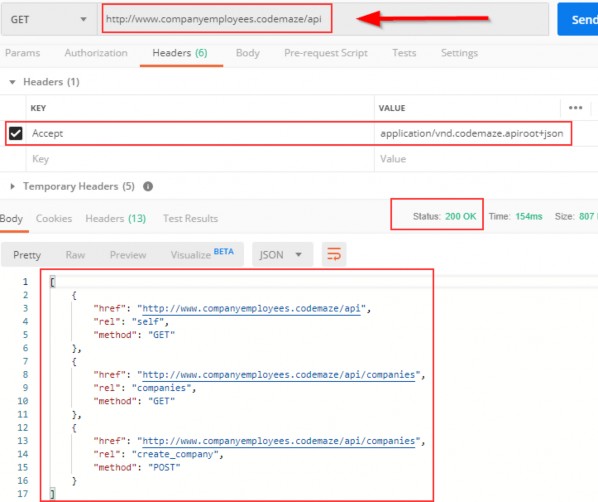
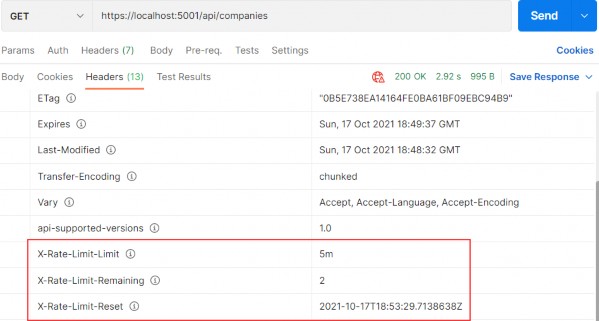
And also, if we inspect the logs, we will find a new logged message stating that the delete action has occurred:
此外,如果我们检查日志,我们将找到一条新的日志记录消息,指出已发生删除操作:

33.7 MediatR Behaviors
33.7 MediatR 行为
Often when we build applications, we have many cross-cutting concerns. These include authorization, validating, and logging.
通常,当我们构建应用程序时,我们有许多横切关注点。这些作包括 authorization、validation 和 logging。
Instead of repeating this logic throughout our handlers, we can make use of Behaviors. Behaviors are very similar to ASP.NET Core middleware in that they accept a request, perform some action, then (optionally) pass along the request.
我们可以使用 Behaviors,而不是在整个处理程序中重复这个逻辑。行为与 ASP.NET Core 中间件非常相似,因为它们接受请求,执行一些作,然后(可选地)传递请求。
In this section, we are going to use behaviors to perform validation on the DTOs that come from the client.
在本节中,我们将使用行为对来自客户端的 DTO 执行验证。
As we have already learned in chapter 13, we can perform the validation by using data annotations attributes and the ModelState dictionary. Then we can extract the validation logic into action filters to clear our actions. Well, we can apply all of that to our current solution as well.
正如我们在第 13 章中学到的那样,我们可以使用数据注释属性和 ModelState 字典来执行验证。然后,我们可以将验证逻辑提取到作筛选器中以清除我们的作。好吧,我们也可以将所有这些应用到我们当前的解决方案中。
But, some developers have a preference for using fluent validation over data annotation attributes. In that case, behaviors are the perfect place to execute that validation logic.
但是,一些开发人员更喜欢使用 Fluent 验证而不是数据注释属性。在这种情况下,行为是执行该验证逻辑的完美位置。
So, let’s go step by step and add the fluent validation in our project first and then use behavior to extract validation errors if any, and return them to the client.
因此,让我们一步一步地开始,首先在我们的项目中添加 Fluent 验证,然后使用 behavior 提取验证错误(如果有),并将它们返回给客户端。
33.7.1 Adding Fluent Validation
33.7.1 添加 Fluent 验证
The FluentValidation library allows us to easily define very rich custom validation for our classes. Since we are implementing CQRS, it makes the most sense to define validation for our Commands. We should not bother ourselves with defining validators for Queries, since they don’t contain any behavior. We use Queries only for fetching data from the application.
FluentValidation 库允许我们轻松地为类定义非常丰富的自定义验证。由于我们正在实现 CQRS,因此为命令定义验证是最有意义的。我们不应该费心为 Queries 定义验证器,因为它们不包含任何行为。我们仅使用 Queries 从应用程序获取数据。
So, let’s start by installing the FluentValidation package in the Application project:
因此,让我们首先在 Application 项目中安装 FluentValidation 包:
PM> install-package FluentValidation.AspNetCore
The FluentValidation.AspNetCore package installs both FluentValidation and FluentValidation.DependencyInjectionExtensions packages.
FluentValidation.AspNetCore 包同时安装 FluentValidation 和 FluentValidation.DependencyInjectionExtensions 包。
After the installation, we are going to register all the validators inside the service collection by modifying the Program class:
安装完成后,我们将通过修改 Program 类来注册服务集合中的所有验证器:
builder.Services.AddValidatorsFromAssembly(typeof(Application.AssemblyReference).Assem bly);
builder.Services.AddMediatR(typeof(Application.AssemblyReference).Assembly); builder.Services.AddAutoMapper(typeof(Program));
Then, let’s create a new Validators folder inside the Application project and add a new class inside:
然后,让我们在 Application 项目中创建一个新的 Validators 文件夹,并在其中添加一个新类:
public sealed class CreateCompanyCommandValidator : AbstractValidator<CreateCompanyCommand> {public CreateCompanyCommandValidator() { RuleFor(c => c.Company.Name).NotEmpty().MaximumLength(60); RuleFor(c => c.Company.Address).NotEmpty().MaximumLength(60); } }
The following using directives are necessary for this class:
此类需要以下 using 指令:
using Application.Commands;
using FluentValidation;
We create the CreateCompanyCommandValidator class that inherits from the AbstractValidator<T> class, specifying the type CreateCompanyCommand. This lets FluentValidation know that this validation is for the CreateCompanyCommand record. Since this record contains a parameter of type CompanyForCreationDto, which is the object that we have to validate since it comes from the client, we specify the rules for properties from that DTO.
我们创建从 AbstractValidator<T> 类继承的 CreateCompanyCommandValidator 类,并指定类型 CreateCompanyCommand。这让 FluentValidation 知道此验证是针对 CreateCompanyCommand 记录的。由于此记录包含一个 CompanyForCreationDto 类型的参数,该参数是我们必须验证的对象,因为它来自客户端,因此我们为该 DTO 中的属性指定规则。
The NotEmpty method specifies that the property can’t be null or empty, and the MaximumLength method specifies the maximum string length of the property.
NotEmpty 方法指定属性不能为 null 或为空,MaximumLength 方法指定属性的最大字符串长度。
33.7.2 Creating Decorators with MediatR PipelineBehavior
33.7.2 使用 MediatR PipelineBehavior 创建装饰器
The CQRS pattern uses Commands and Queries to convey information, and receive a response. In essence, it represents a request-response pipeline. This gives us the ability to easily introduce additional behavior around each request that is going through the pipeline, without actually modifying the original request.
CQRS 模式使用命令和查询来传达信息并接收响应。从本质上讲,它表示一个请求-响应管道。这使我们能够轻松地围绕通过管道的每个请求引入其他行为,而无需实际修改原始请求。
You may be familiar with this technique under the name Decorator pattern. Another example of using the Decorator pattern is the ASP.NET Core Middleware concept, which we talked about in section 1.8.
您可能熟悉这种名为 Decorator 模式的技术。使用 Decorator 模式的另一个例子是 ASP.NET Core Middleware 概念,我们在 1.8 节中讨论过。
MediatR has a similar concept to middleware, and it is called IPipelineBehavior:
MediatR 与中间件的概念类似,称为 IPipelineBehavior:
public interface IPipelineBehavior<in TRequest, TResponse> where TRequest : notnull { Task<TResponse> Handle(TRequest request, CancellationToken cancellationToken, RequestHandlerDelegate<TResponse> next); }
The pipeline behavior is a wrapper around a request instance and gives us a lot of flexibility with the implementation. Pipeline behaviors are a good fit for cross-cutting concerns in your application. Good examples of cross- cutting concerns are logging, caching, and of course, validation!
管道行为是请求实例的包装器,为我们的实现提供了很大的灵活性。管道行为非常适合应用程序中的横切关注点。横切关注点的好例子是日志记录、缓存,当然还有验证!
Before we use this interface, let’s create a new exception class in the Entities/Exceptions folder:
在使用此接口之前,让我们在 Entities/Exceptions 文件夹中创建一个新的异常类:
public sealed class ValidationAppException : Exception { public IReadOnlyDictionary<string, string[]> Errors { get; } public ValidationAppException(IReadOnlyDictionary<string, string[]> errors) :base("One or more validation errors occurred") => Errors = errors; }
Next, to implement the IPipelineBehavior interface, we are going to create another folder named Behaviors in the Application project, and add a single class inside it:
接下来,为了实现 IPipelineBehavior 接口,我们将在 Application 项目中创建另一个名为 Behaviors 的文件夹,并在其中添加一个类:
public sealed class ValidationBehavior<TRequest, TResponse> : IPipelineBehavior<TRequest, TResponse> where TRequest : IRequest<TResponse> { private readonly IEnumerable<IValidator<TRequest>> _validators; public ValidationBehavior(IEnumerable<IValidator<TRequest>> validators) => _validators = validators; public async Task<TResponse> Handle(TRequest request, CancellationToken cancellationToken, RequestHandlerDelegate<TResponse> next) { if (!_validators.Any()) return await next(); var context = new ValidationContext<TRequest>(request); var errorsDictionary = _validators .Select(x => x.Validate(context)) .SelectMany(x => x.Errors) .Where(x => x != null) .GroupBy( x => x.PropertyName.Substring(x.PropertyName.IndexOf('.') + 1), x => x.ErrorMessage,(propertyName, errorMessages) => new { Key = propertyName, Values = errorMessages.Distinct().ToArray() }) .ToDictionary(x => x.Key, x => x.Values); if (errorsDictionary.Any()) throw new ValidationAppException(errorsDictionary); return await next(); } }
This class has to inherit from the IPipelineBehavior interface and implement the Handler method. We also inject a collection of IValidator implementations in the constructor. The FluentValidation library will scan our project for all AbstractValidator implementations for a given type and then provide us with the instance at runtime. It is how we can apply the actual validators that we implemented in our project.
此类必须继承自 IPipelineBehavior 接口并实现 Handler 方法。我们还在构造函数中注入了一组 IValidator 实现。FluentValidation 库将扫描我们的项目以查找给定类型的所有 AbstractValidator 实现,然后在运行时为我们提供实例。这就是我们如何应用我们在项目中实现的实际验证器。
Then, if there are no validation errors, we just call the next delegate to allow the execution of the next component in the middleware.
然后,如果没有验证错误,我们只调用 next 委托,以允许在中间件中执行 next 组件。
But if there are any errors, we extract them from the _validators collection and group them inside the dictionary. If there are entries in our dictionary, we throw the ValidationAppException and pass the dictionary with errors. This exception will be caught inside our global error handler, which we will modify in a minute.
但是如果有任何错误,我们会从 _validators 集合中提取它们,并在字典中对它们进行分组。如果字典中有条目,则抛出 ValidationAppException 并传递带有错误的字典。这个异常将在我们的全局错误处理程序中捕获,我们将在一分钟内对其进行修改。
But before we do that, we have to register this behavior in the Program class:
但在此之前,我们必须在 Program 类中注册此行为:
builder.Services.AddMediatR(typeof(Application.AssemblyReference).Assembly); builder.Services.AddAutoMapper(typeof(Program)); builder.Services.AddTransient(typeof(IPipelineBehavior<,>), typeof(ValidationBehavior<,>)); builder.Services.AddValidatorsFromAssembly(typeof(Application.AssemblyReference).Assembly);
After that, we can modify the ExceptionMiddlewareExtensions class:
之后,我们可以修改 ExceptionMiddlewareExtensions 类:
public static class ExceptionMiddlewareExtensions
{ public static void ConfigureExceptionHandler(this WebApplication app, ILoggerManager logger) { app.UseExceptionHandler(appError => { appError.Run(async context => { context.Response.ContentType = "application/json"; var contextFeature = context.Features.Get<IExceptionHandlerFeature>(); if (contextFeature != null) { context.Response.StatusCode = contextFeature.Error switch { NotFoundException => StatusCodes.Status404NotFound, BadRequestException => StatusCodes.Status400BadRequest, ValidationAppException => StatusCodes.Status422UnprocessableEntity, _ => StatusCodes.Status500InternalServerError }; logger.LogError($"Something went wrong: {contextFeature.Error}"); if (contextFeature.Error is ValidationAppException exception) { await context.Response .WriteAsync(JsonSerializer.Serialize(new { exception.Errors })); } else { await context.Response.WriteAsync(new ErrorDetails() { StatusCode = context.Response.StatusCode, Message = contextFeature.Error.Message, }.ToString()); } } }); }); } }
So we modify the switch statement to check for the ValidationAppException type and to assign a proper status code 422.
因此,我们修改 switch 语句以检查 ValidationAppException 类型并分配正确的状态代码 422。
Then, we use the declaration pattern to test the type of the variable and assign it to a new variable named exception. If the type is ValidationAppException we just write our response to the client providing our errors dictionary as a parameter. Otherwise, we do the same thing we did up until now.
然后,我们使用声明模式来测试变量的类型,并将其分配给名为 exception 的新变量。如果类型是 ValidationAppException,我们只将响应写入客户端,提供我们的 errors 字典作为参数。否则,我们将做与现在相同的事情。
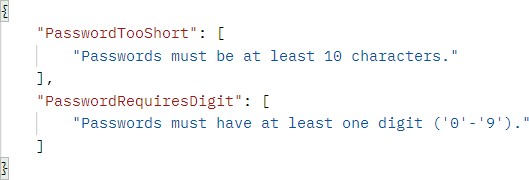
Now, we can test this by sending an invalid request:
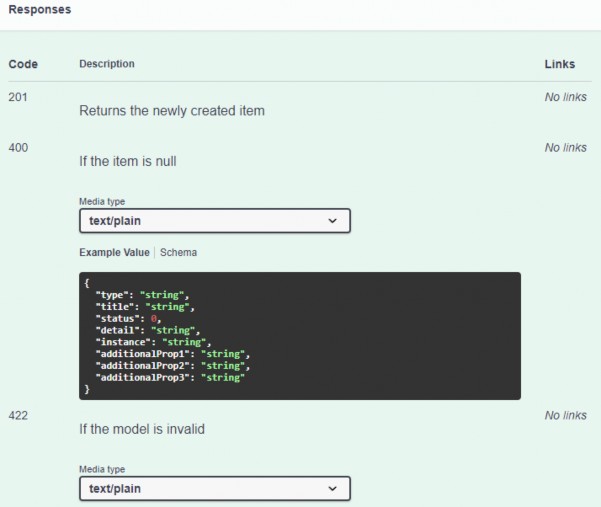
现在,我们可以通过发送无效请求来测试这一点:
https://localhost:5001/api/companies
Excellent, this works great.
太好了,这效果很好。
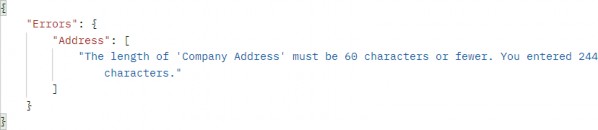
Additionally, if the Address property has too many characters, we will see a different message:
此外,如果 Address 属性的字符太多,我们将看到一条不同的消息:
Great.
伟大。
33.7.3 Validating null Object
33.7.3 验证 null 对象
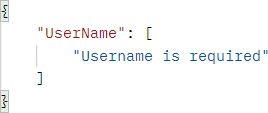
Now, if we send a request with an empty request body, we are going to get the result produced from our action:
现在,如果我们发送一个请求正文为空的请求,我们将得到我们的作生成的结果:
https://localhost:5001/api/companies
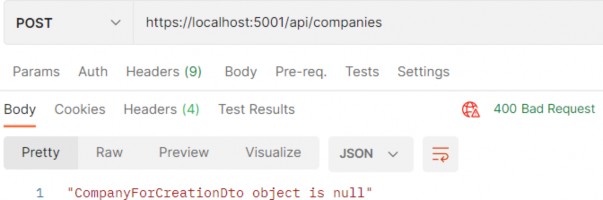
We can see the 400 status code and the error message. It is perfectly fine since we want to have a Bad Request response if the object sent from the client is null. But if for any reason you want to remove that validation from the action, and handle it with fluent validation rules, you can do that by modifying the CreateCompanyCommandValidator class and overriding the Validate method:
我们可以看到 400 状态代码和错误消息。这完全没问题,因为如果从客户端发送的对象为 null,我们希望得到 Bad Request 响应。但是,如果出于任何原因,您希望从作中删除该验证,并使用 Fluent 验证规则处理它,则可以通过修改 CreateCompanyCommandValidator 类并重写 Validate 方法来执行此作:
public sealed class CreateCompanyCommandValidator : AbstractValidator<CreateCompanyCommand> { public CreateCompanyCommandValidator() { RuleFor(c => c.Company.Name).NotEmpty().MaximumLength(60); RuleFor(c => c.Company.Address).NotEmpty().MaximumLength(60); } public override ValidationResult Validate(ValidationContext<CreateCompanyCommand> context) { return context.InstanceToValidate.Company is null ? new ValidationResult(new[] { new ValidationFailure("CompanyForCreationDto", "CompanyForCreationDto object is null") }) : base.Validate(context); } }
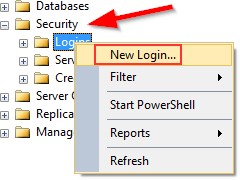
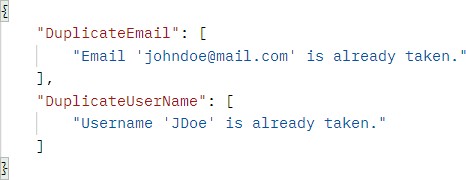
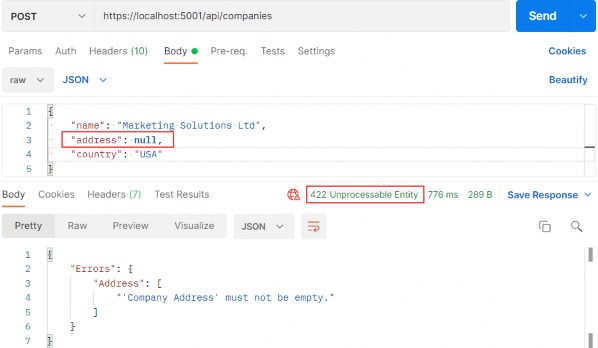
Now, you can remove the validation check inside the action and send a null body request:
现在,您可以删除作中的验证检查并发送 null 正文请求:
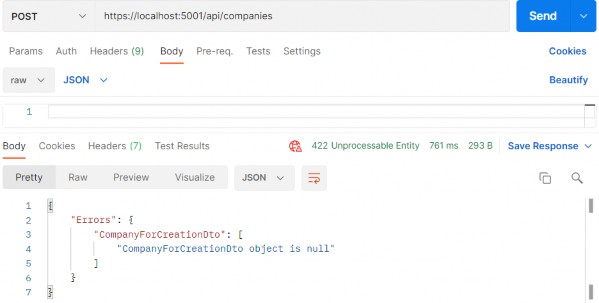
Pay attention that now the status code is 422 and not 400. But this validation is now part of the fluent validation.
请注意,现在状态代码是 422 而不是 400。但此验证现在是 Fluent 验证的一部分。
If this solution fits your project, feel free to use it. Our recommendation is to use 422 only for the validation errors, and 400 if the request body is null.
如果此解决方案适合您的项目,请随意使用。我们建议仅对验证错误使用 422,如果请求正文为 null,则使用 400。