27 JWT, IDENTITY, AND REFRESH TOKEN
27 JWT、身份认证和刷新令牌
User authentication is an important part of any application. It refers to the process of confirming the identity of an application’s users. Implementing it properly could be a hard job if you are not familiar with the process.
用户身份验证是任何应用程序的重要组成部分。它是指确认应用程序用户身份的过程。如果您不熟悉该过程,正确实施它可能是一项艰巨的工作。
Also, it could take a lot of time that could be spent on different features of an application.
此外,可能需要花费大量时间,这些时间可能会花在应用程序的不同功能上。
So, in this section, we are going to learn about authentication and authorization in ASP.NET Core by using Identity and JWT (Json Web Token). We are going to explain step by step how to integrate Identity in the existing project and then how to implement JWT for the authentication and authorization actions.
因此,在本节中,我们将使用身份和 JWT(Json Web 令牌)了解 ASP.NET Core 中的身份验证和授权。我们将逐步解释如何在现有项目中集成 Identity,然后如何为身份验证和授权作实施 JWT。
ASP.NET Core provides us with both functionalities, making implementation even easier.
ASP.NET Core 为我们提供了这两种功能,使实施变得更加容易。
Finally, we are going to learn more about the refresh token flow and implement it in our Web API project.
最后,我们将了解有关刷新令牌流的更多信息,并在我们的 Web API 项目中实现它。
So, let’s start with Identity integration.
那么,让我们从 Identity integration 开始。
27.1 Implementing Identity in ASP.NET Core Project
27.1 在 ASP.NET Core Project 中实现身份认真
Asp.NET Core Identity is the membership system for web applications that includes membership, login, and user data. It provides a rich set of services that help us with creating users, hashing their passwords, creating a database model, and the authentication overall.That said, let’s start with the integration process.
Asp.NET Core Identity 是 Web 应用程序的成员资格系统,包括成员资格、登录名和用户数据。它提供了一组丰富的服务,可帮助我们创建用户、对他们的密码进行哈希处理、创建数据库模型以及整体身份验证。也就是说,让我们从集成过程开始。
The first thing we have to do is to install the Microsoft.AspNetCore.Identity.EntityFrameworkCore library in the Entities project:
我们要做的第一件事是在 Entities 项目中安装 Microsoft.AspNetCore.Identity.EntityFrameworkCore 库:

After the installation, we are going to create a new User class in the Entities/Models folder:
安装后,我们将在 Entities/Models 文件夹中创建一个新的 User 类:
public class User : IdentityUser { public string FirstName { get; set; } public string LastName { get; set; } }Our class inherits from the IdentityUser class that has been provided by the ASP.NET Core Identity. It contains different properties and we can extend it with our own as well.
我们的类继承自 ASP.NET Core Identity 提供的 IdentityUser 类。它包含不同的属性,我们也可以使用自己的属性来扩展它。
After that, we have to modify the RepositoryContext class:
之后,我们必须修改 RepositoryContext 类:
public class RepositoryContext : IdentityDbContext<User> { public RepositoryContext(DbContextOptions options) : base(options) { } protected override void OnModelCreating(ModelBuilder modelBuilder) { base.OnModelCreating(modelBuilder); modelBuilder.ApplyConfiguration(new CompanyConfiguration()); modelBuilder.ApplyConfiguration(new EmployeeConfiguration()); } public DbSet<Company> Companies { get; set; } public DbSet<Employee> Employees { get; set; } }So, our class now inherits from the IdentityDbContext class and not DbContext because we want to integrate our context with Identity. For this, we have to include the Identity.EntityFrameworkCore namespace:
因此,我们的类现在继承自 IdentityDbContext 类,而不是 DbContext,因为我们希望将上下文与 Identity 集成。为此,我们必须包含 Identity.EntityFrameworkCore 命名空间:
using Microsoft.AspNetCore.Identity.EntityFrameworkCore;We don’t have to install the library in the Repository project since we already did that in the Entities project, and Repository has the reference to Entities.
我们不必在 Repository 项目中安装库,因为我们已经在 Entities 项目中安装了该库,并且 Repository 具有对 Entities 的引用。
Additionally, we call the OnModelCreating method from the base class. This is required for migration to work properly.
此外,我们还从基类调用 OnModelCreating 方法。这是迁移正常工作所必需的。
Now, we have to move on to the configuration part.
现在,我们必须进入配置部分。
To do that, let’s create a new extension method in the ServiceExtensions class:
为此,让我们在 ServiceExtensions 类中创建一个新的扩展方法:
public static void ConfigureIdentity(this IServiceCollection services) { var builder = services.AddIdentity<User, IdentityRole>(o => { o.Password.RequireDigit = true; o.Password.RequireLowercase = false; o.Password.RequireUppercase = false; o.Password.RequireNonAlphanumeric = false; o.Password.RequiredLength = 10; o.User.RequireUniqueEmail = true; }) .AddEntityFrameworkStores<RepositoryContext>() .AddDefaultTokenProviders(); }With the AddIdentity method, we are adding and configuring Identity for the specific type; in this case, the User and the IdentityRole type. We use different configuration parameters that are pretty self-explanatory on their own. Identity provides us with even more features to configure, but these are sufficient for our example.
使用 AddIdentity 方法,我们将为特定类型添加和配置 Identity;在本例中为 User 和 IdentityRole 类型。我们使用不同的配置参数,这些参数本身就很容易理解。Identity 为我们提供了更多需要配置的功能,但这些功能对于我们的示例来说已经足够了。
Then, we add EntityFrameworkStores implementation with the default token providers.
然后,我们添加具有默认令牌提供程序的 EntityFrameworkStores 实现。
Now, let’s modify the Program class:
现在,让我们修改 Program 类:
builder.Services.AddAuthentication();
builder.Services.ConfigureIdentity();
And, let’s add the authentication middleware to the application’s request pipeline:
然后,让我们将身份验证中间件添加到应用程序的请求管道中:
app.UseAuthorization();
app.UseAuthentication();
That’s it. We have prepared everything we need.
就是这样。我们已经准备好了我们需要的一切。
27.2 Creating Tables and Inserting Roles
27.2 创建 table 和插入角色
Creating tables is quite an easy process. All we have to do is to create and apply migration. So, let’s create a migration:
创建表格是一个非常简单的过程。我们所要做的就是创建并应用迁移。那么,让我们创建一个迁移:
PM> Add-Migration CreatingIdentityTablesAnd then apply it:
然后应用它:
PM> Update-DatabaseIf we check our database now, we are going to see additional tables:
如果我们现在检查我们的数据库,我们将看到额外的表:
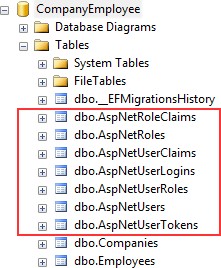
For our project, the AspNetRoles, AspNetUserRoles, and AspNetUsers tables will be quite enough. If you open the AspNetUsers table, you will see additional FirstName and LastName columns.
对于我们的项目,AspNetRoles、AspNetUserRoles 和 AspNetUsers 表就足够了。如果打开 AspNetUsers 表,将看到其他 FirstName 和 LastName 列。
Now, let’s insert several roles in the AspNetRoles table, again by using migrations. The first thing we are going to do is to create the RoleConfiguration class in the Repository/Configuration folder:
现在,让我们再次使用迁移在 AspNetRoles 表中插入多个角色。我们要做的第一件事是在 Repository/Configuration 文件夹中创建 RoleConfiguration 类:
public class RoleConfiguration : IEntityTypeConfiguration<IdentityRole> { public void Configure(EntityTypeBuilder<IdentityRole> builder) {builder.HasData( new IdentityRole { Name = "Manager", NormalizedName = "MANAGER" }, new IdentityRole { Name = "Administrator", NormalizedName = "ADMINISTRATOR" } ); }For this to work, we need the following namespaces included:
为此,我们需要包含以下命名空间:
using Microsoft.AspNetCore.Identity;
using Microsoft.EntityFrameworkCore;
using Microsoft.EntityFrameworkCore.Metadata.Builders;
And let’s modify the OnModelCreating method in the RepositoryContext class:
让我们修改 RepositoryContext 类中的 OnModelCreating 方法:
protected override void OnModelCreating(ModelBuilder modelBuilder) { base.OnModelCreating(modelBuilder); modelBuilder.ApplyConfiguration(new CompanyConfiguration()); modelBuilder.ApplyConfiguration(new EmployeeConfiguration()); modelBuilder.ApplyConfiguration(new RoleConfiguration()); }Finally, let’s create and apply migration:
最后,让我们创建并应用迁移:
PM> Add-Migration AddedRolesToDb
PM> Update-Database
If you check the AspNetRoles table, you will find two new roles created.
如果检查 AspNetRoles 表,您将发现创建了两个新角色。
27.3 User Creation
27.3 用户创建
To create/register a new user, we have to create a new controller:
要创建/注册新用户,我们必须创建一个新的控制器:
[Route("api/authentication")] [ApiController] public class AuthenticationController : ControllerBase { private readonly IServiceManager _service; public AuthenticationController(IServiceManager service) => _service = service; }So, nothing new here. We have the basic setup for our controller with IServiceManager injected.
所以,这里没什么新鲜事。我们有了注入了 IServiceManager 的控制器的基本设置。
The next thing we have to do is to create a UserForRegistrationDto record in the Shared/DataTransferObjects folder:
接下来我们要做的是在 Shared/DataTransferObjects 文件夹中创建一个 UserForRegistrationDto 记录:
public record UserForRegistrationDto { public string? FirstName { get; init; } public string? LastName { get; init; } [Required(ErrorMessage = "Username is required")] public string? UserName { get; init; } [Required(ErrorMessage = "Password is required")] public string? Password { get; init; } public string? Email { get; init; } public string? PhoneNumber { get; init; } public ICollection<string>? Roles { get; init; } }Then, let’s create a mapping rule in the MappingProfile class:
然后,让我们在 MappingProfile 类中创建一个映射规则:
CreateMap<UserForRegistrationDto, User>();Since we want to extract all the registration/authentication logic to the service layer, we are going to create a new IAuthenticationService interface inside the Service.Contracts project:
由于我们希望将所有注册/身份验证逻辑提取到服务层,因此我们将在 Service.Contracts 项目中创建一个新的 IAuthenticationService 接口:
public interface IAuthenticationService { Task<IdentityResult> RegisterUser(UserForRegistrationDto userForRegistration); }This method will execute the registration logic and return the identity result to the caller.
该方法将执行注册逻辑,并将身份结果返回给调用方。
Now that we have the interface, we need to create an implementation service class inside the Service project:
现在我们有了接口,我们需要在 Service 项目中创建一个实现服务类:
internal sealed class AuthenticationService : IAuthenticationService { private readonly ILoggerManager _logger; private readonly IMapper _mapper; private readonly UserManager<User> _userManager; private readonly IConfiguration _configuration; public AuthenticationService(ILoggerManager logger, IMapper mapper, UserManager<User> userManager, IConfiguration configuration) { _logger = logger;_mapper = mapper; _userManager = userManager; _configuration = configuration; } }This code is pretty familiar from the previous service classes except for the UserManager class. This class is used to provide the APIs for managing users in a persistence store. It is not concerned with how user information is stored. For this, it relies on a UserStore (which in our case uses Entity Framework Core).
此代码与前面的服务类非常相似,但 UserManager 类除外。此类用于提供用于管理持久性存储中的用户的 API。它不关心用户信息的存储方式。为此,它依赖于 UserStore(在我们的例子中使用 Entity Framework Core)。
Of course, we have to add some additional namespaces:
当然,我们必须添加一些额外的命名空间:
using AutoMapper; using Contracts; using Entities.Models; using Microsoft.AspNetCore.Identity; using Microsoft.Extensions.Configuration; using Service.Contracts;Great. Now, we can implement the RegisterUser method:
现在,我们可以实现 RegisterUser 方法:
public async Task<IdentityResult> RegisterUser(UserForRegistrationDto userForRegistration) { var user = _mapper.Map<User>(userForRegistration); var result = await _userManager.CreateAsync(user, userForRegistration.Password); if (result.Succeeded) await _userManager.AddToRolesAsync(user, userForRegistration.Roles); return result; }So we map the DTO object to the User object and call the CreateAsync method to create that specific user in the database. The CreateAsync method will save the user to the database if the action succeeds or it will return error messages as a result.
因此,我们将 DTO 对象映射到 User 对象,并调用 CreateAsync 方法在数据库中创建该特定用户。如果作成功,CreateAsync 方法会将用户保存到数据库,否则它将返回错误消息。
After that, if a user is created, we add that user to the named roles — the ones sent from the client side — and return the result.
之后,如果创建了一个用户,我们将该用户添加到命名角色(从客户端发送的角色)并返回结果。
If you want, before calling AddToRoleAsync or AddToRolesAsync, you can check if roles exist in the database. But for that, you have to inject RoleManager
如果需要,在调用 AddToRoleAsync 或 AddToRolesAsync 之前,可以检查数据库中是否存在角色。但为此,您必须注入 RoleManager 并使用 RoleExistsAsync 方法。
We want to provide this service to the caller through ServiceManager and for that, we have to modify the IServiceManager interface first:
我们希望通过 ServiceManager 向调用方提供此服务,为此,我们必须先修改 IServiceManager 接口:
public interface IServiceManager { ICompanyService CompanyService { get; } IEmployeeService EmployeeService { get; } IAuthenticationService AuthenticationService { get; } }And then the ServiceManager class:
然后是 ServiceManager 类:
public sealed class ServiceManager : IServiceManager { private readonly Lazy<ICompanyService> _companyService; private readonly Lazy<IEmployeeService> _employeeService; private readonly Lazy<IAuthenticationService> _authenticationService; public ServiceManager(IRepositoryManager repositoryManager, ILoggerManager logger, IMapper mapper, IEmployeeLinks employeeLinks, UserManager<User> userManager, IConfiguration configuration) { _companyService = new Lazy<ICompanyService>(() => new CompanyService(repositoryManager, logger, mapper)); _employeeService = new Lazy<IEmployeeService>(() => new EmployeeService(repositoryManager, logger, mapper, employeeLinks)); _authenticationService = new Lazy<IAuthenticationService>(() => new AuthenticationService(logger, mapper, userManager, configuration)); } public ICompanyService CompanyService => _companyService.Value; public IEmployeeService EmployeeService => _employeeService.Value; public IAuthenticationService AuthenticationService => _authenticationService.Value; }Finally, it is time to create the RegisterUser action:
最后,是时候创建 RegisterUser作了:
[HttpPost] [ServiceFilter(typeof(ValidationFilterAttribute))] public async Task<IActionResult> RegisterUser([FromBody] UserForRegistrationDto userForRegistration) { var result = await _service.AuthenticationService.RegisterUser(userForRegistration); if (!result.Succeeded){ foreach (var error in result.Errors) { ModelState.TryAddModelError(error.Code, error.Description); } return BadRequest(ModelState); } return StatusCode(201); }We are implementing our existing action filter for the entity and model validation on top of our action. Then, we call the RegisterUser method and accept the result. If the registration fails, we iterate through each error add it to the ModelState and return the BadRequest response. Otherwise, we return the 201 created status code.
我们正在为作之上的实体和模型验证实现现有的作筛选器。然后,我们调用 RegisterUser 方法并接受结果。如果注册失败,我们将遍历每个错误,将其添加到 ModelState 并返回 BadRequest 响应。否则,我们将返回 201 created 状态代码。
Before we continue with testing, we should increase a rate limit from 3 to 30 (ServiceExtensions class, ConfigureRateLimitingOptions method) just to not stand in our way while we’re testing the different features of our application.
在继续测试之前,我们应该将速率限制从 3 增加到 30(ServiceExtensions 类,ConfigureRateLimitingOptions 方法),以免在测试应用程序的不同功能时成为我们的障碍。
Now we can start with testing.Let’s send a valid request first:
现在我们可以从测试开始。让我们先发送一个有效的请求:
https://localhost:5001/api/authentication
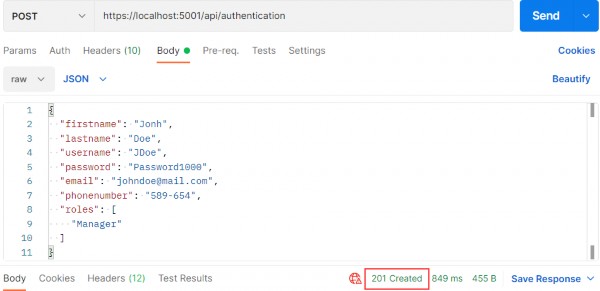
And we get 201, which means that the user has been created and added to the role. We can send additional invalid requests to test our Action and Identity features.
我们得到 201,这意味着用户已被创建并添加到角色中。我们可以发送其他无效请求来测试我们的 Action 和 Identity 功能。
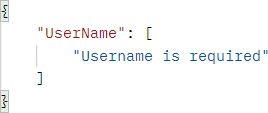
If the model is invalid:
如果模型无效:
https://localhost:5001/api/authentication
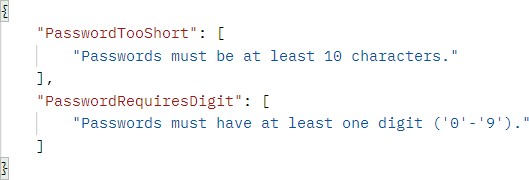
If the password is invalid:
如果密码无效:
https://localhost:5001/api/authentication
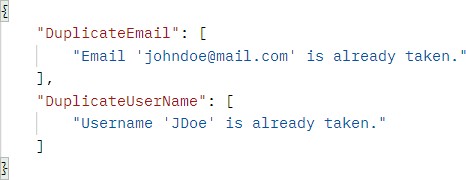
Finally, if we want to create a user with the same user name and email:
最后,如果我们想创建一个具有相同用户名和电子邮件的用户:
https://localhost:5001/api/authentication
Excellent. Everything is working as planned. We can move on to the JWT implementation.
非常好。一切都在按计划进行。我们可以继续进行 JWT 实现。
27.4 Big Picture
27.4 大局
Before we get into the implementation of authentication and authorization, let’s have a quick look at the big picture. There is an application that has a login form. A user enters their username and password and presses the login button. After pressing the login button, a client (e.g., web browser) sends the user’s data to the server’s API endpoint:
在我们开始实现身份验证和授权之前,让我们快速了解一下大局。有一个应用程序具有登录表单。用户输入其用户名和密码,然后按登录按钮。按下登录按钮后,客户端(例如 Web 浏览器)将用户的数据发送到服务器的 API 端点:
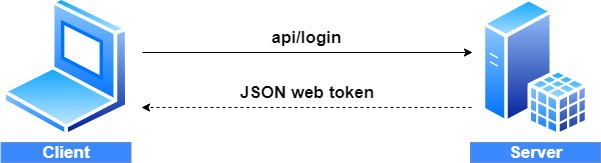
When the server validates the user’s credentials and confirms that the user is valid, it’s going to send an encoded JWT to the client. A JSON web token is a JavaScript object that can contain some attributes of the logged-in user. It can contain a username, user subject, user roles, or some other useful information.
当服务器验证用户的凭证并确认用户有效时,它将向客户端发送编码的 JWT。JSON Web 令牌是一个 JavaScript 对象,可以包含已登录用户的某些属性。它可以包含用户名、用户主题、用户角色或其他一些有用的信息。
27.5 About JWT
27.5 关于 JWT
JSON web tokens enable a secure way to transmit data between two parties in the form of a JSON object. It’s an open standard and it’s a popular mechanism for web authentication. In our case, we are going to use JSON web tokens to securely transfer a user’s data between the client and the server.
JSON Web 令牌支持以 JSON 对象的形式在两方之间传输数据的安全方式。它是一个开放标准,也是一种流行的 Web 身份验证机制。在我们的例子中,我们将使用 JSON Web 令牌在客户端和服务器之间安全地传输用户的数据。
JSON web tokens consist of three basic parts: the header, the payload, and the signature.
JSON Web 令牌由三个基本部分组成:标头、有效负载和签名。
One real example of a JSON web token:
JSON Web 令牌的一个真实示例:
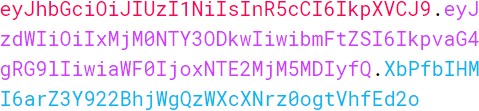
Every part of all three parts is shown in a different color. The first part of JWT is the header, which is a JSON object encoded in the base64 format. The header is a standard part of JWT and we don’t have to worry about it. It contains information like the type of token and the name of the algorithm:
所有三个部分的每个部分都以不同的颜色显示。JWT 的第一部分是标头,它是以 base64 格式编码的 JSON 对象。标头是 JWT 的标准部分,我们不必担心它。它包含令牌类型和算法名称等信息:
{ "alg": "HS256", "typ": "JWT" }After the header, we have a payload which is also a JavaScript object encoded in the base64 format. The payload contains some attributes about the logged-in user. For example, it can contain the user id, the user subject, and information about whether a user is an admin user or not.
在标头之后,我们有一个有效负载,它也是一个以 base64 格式编码的 JavaScript 对象。有效负载包含有关已登录用户的一些属性。例如,它可以包含用户 ID、用户主题以及有关用户是否为管理员用户的信息。
JSON web tokens are not encrypted and can be decoded with any base64 decoder, so please never include sensitive information in the Payload:
JSON Web 令牌未加密,可以使用任何 base64 解码器进行解码,因此请不要在有效负载中包含敏感信息:
{ "sub": "1234567890", "name": "John Doe", "iat": 1516239022 }Finally, we have the signature part. Usually, the server uses the signature part to verify whether the token contains valid information, the information which the server is issuing. It is a digital signature that gets generated by combining the header and the payload. Moreover, it’s based on a secret key that only the server knows:
最后,我们有签名部分。通常,服务器使用签名部分来验证令牌是否包含有效信息,即服务器颁发的信息。它是通过组合标头和有效负载生成的数字签名。此外,它基于只有服务器知道的密钥:
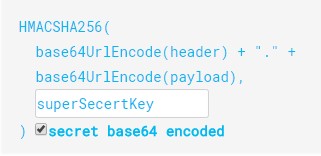
So, if malicious users try to modify the values in the payload, they have to recreate the signature; for that purpose, they need the secret key only known to the server. On the server side, we can easily verify if the values are original or not by comparing the original signature with a new signature computed from the values coming from the client.
因此,如果恶意用户尝试修改有效负载中的值,则必须重新创建签名;为此,他们需要只有服务器知道的密钥。在服务器端,我们可以通过将原始签名与根据来自客户端的值计算的新签名进行比较,轻松验证值是否为原始值。
So, we can easily verify the integrity of our data just by comparing the digital signatures. This is the reason why we use JWT.
因此,我们只需比较数字签名即可轻松验证数据的完整性。这就是我们使用 JWT 的原因。
27.6 JWT Configuration
27.6 JWT 配置
Let’s start by modifying the appsettings.json file:
让我们从修改 appsettings.json 文件开始:
{ "Logging": { "LogLevel": { "Default": "Information", "Microsoft.AspNetCore": "Warning", } }, "ConnectionStrings": { "sqlConnection": "server=.; database=CompanyEmployee; Integrated Security=true" }, "JwtSettings": { "validIssuer": "CodeMazeAPI", "validAudience": "https://localhost:5001" }, "AllowedHosts": "*" }We just store the issuer and audience information in the appsettings.json file. We are going to talk more about that in a minute. As you probably remember, we require a secret key on the server-side. So, we are going to create one and store it in the environment variable because this is much safer than storing it inside the project.
我们只将发行者和受众信息存储在 appsettings.json 文件中。我们稍后将详细讨论这个问题。您可能还记得,我们需要服务器端的密钥。因此,我们将创建一个并将其存储在环境变量中,因为这比将其存储在项目中要安全得多。
To create an environment variable, we have to open the cmd window as an administrator and type the following command:
要创建环境变量,我们必须以管理员身份打开 cmd 窗口并键入以下命令:
setx SECRET "CodeMazeSecretKey" /MThis is going to create a system environment variable with the name SECRET and the value CodeMazeSecretKey. By using /M we specify that we want a system variable and not local.
这将创建一个名称为 SECRET 且值为 CodeMazeSecretKey 的系统环境变量。通过使用 /M,我们指定我们想要一个系统变量,而不是局部变量。
Great. We can now modify the ServiceExtensions class:
我们现在可以修改 ServiceExtensions 类:
public static void ConfigureJWT(this IServiceCollection services, IConfiguration configuration) { var jwtSettings = configuration.GetSection("JwtSettings"); var secretKey = Environment.GetEnvironmentVariable("SECRET"); services.AddAuthentication(opt => { opt.DefaultAuthenticateScheme = JwtBearerDefaults.AuthenticationScheme; opt.DefaultChallengeScheme = JwtBearerDefaults.AuthenticationScheme; }) .AddJwtBearer(options => { options.TokenValidationParameters = new TokenValidationParameters { ValidateIssuer = true, ValidateAudience = true, ValidateLifetime = true, ValidateIssuerSigningKey = true, ValidIssuer = jwtSettings["validIssuer"], ValidAudience = jwtSettings["validAudience"], IssuerSigningKey = new SymmetricSecurityKey(Encoding.UTF8.GetBytes(secretKey)) }; }); }First, we extract the JwtSettings from the appsettings.json file and extract our environment variable (If you keep getting null for the secret key, try restarting the Visual Studio or even your computer).
首先,我们从 appsettings.json 文件中提取 JwtSettings 并提取环境变量(如果密钥一直为 null,请尝试重新启动 Visual Studio 甚至计算机)。
Then, we register the JWT authentication middleware by calling the method AddAuthentication on the IServiceCollection interface. Next, we specify the authentication scheme JwtBearerDefaults.AuthenticationScheme as well as ChallengeScheme. We also provide some parameters that will be used while validating JWT. For this to work, we have to install the Microsoft.AspNetCore.Authentication.JwtBearer library.
然后,我们通过在 IServiceCollection 接口上调用 AddAuthentication 方法来注册 JWT 身份验证中间件。接下来,我们指定身份验证方案 JwtBearerDefaults.AuthenticationScheme 以及 ChallengeScheme。我们还提供了一些参数,这些参数将在验证 JWT 时使用。为此,我们必须安装 Microsoft.AspNetCore.Authentication.JwtBearer 库。
For this to work, we require the following namespaces:
为此,我们需要以下命名空间:
using Microsoft.AspNetCore.Authentication.JwtBearer;
using Microsoft.AspNetCore.Identity;
using Microsoft.IdentityModel.Tokens;
using System.Text;
Excellent. We’ve successfully configured the JWT authentication.
非常好。我们已成功配置 JWT 身份验证。
According to the configuration, the token is going to be valid if:
根据配置,如果满足以下条件,则令牌将有效:
• The issuer is the actual server that created the token (ValidateIssuer=true)
颁发者是创建令牌的实际服务器 (ValidateIssuer=true)
• The receiver of the token is a valid recipient (ValidateAudience=true)
令牌的接收者是有效的接收者 (ValidateAudience=true)
• The token has not expired (ValidateLifetime=true)
令牌尚未过期 (ValidateLifetime=true)
• The signing key is valid and is trusted by the server (ValidateIssuerSigningKey=true)
签名密钥有效且受服务器信任 (ValidateIssuerSigningKey=true)
Additionally, we are providing values for the issuer, the audience, and the secret key that the server uses to generate the signature for JWT.
此外,我们还为颁发者、受众和服务器用于生成 JWT 签名的密钥提供值。
All we have to do is to call this method in the Program class:
我们所要做的就是在 Program 类中调用此方法:
builder.Services.ConfigureJWT(builder.Configuration);
builder.Services.AddAuthentication();
builder.Services.ConfigureIdentity();
And that is it. We can now protect our endpoints.
就是这样。我们现在可以保护我们的端点。
27.7 Protecting Endpoints
27.7 保护端点
Let’s open the CompaniesController and add an additional attribute above the GetCompanies action:
让我们打开 CompaniesController 并在 GetCompanies作上方添加一个附加属性:
[HttpGet(Name = "GetCompanies")]
[Authorize]
public async Task<IActionResult> GetCompanies()
The [Authorize] attribute specifies that the action or controller that it is applied to requires authorization. For it to be available we need an additional namespace:
[Authorize] 属性指定应用该属性的作或控制器需要授权。为了使其可用,我们需要一个额外的命名空间:
using Microsoft.AspNetCore.Authorization;Now to test this, let’s send a request to get all companies:
现在为了测试这一点,让我们发送一个请求以获取 all companies:
https://localhost:5001/api/companies

We see the protection works. We get a 401 Unauthorized response, which is expected because an unauthorized user tried to access the protected endpoint. So, what we need is for our users to be authenticated and to have a valid token.
我们看到保护工作正常。我们收到 401 Unauthorized 响应,这是意料之中的,因为未经授权的用户试图访问受保护的终端节点。因此,我们需要的是让我们的用户经过身份验证并拥有有效的令牌。
27.8 Implementing Authentication
27.8 实现身份验证
Let’s begin with the UserForAuthenticationDto record:
让我们从 UserForAuthenticationDto 记录开始:
public record UserForAuthenticationDto { [Required(ErrorMessage = "User name is required")] public string? UserName { get; init; } [Required(ErrorMessage = "Password name is required")] public string? Password { get; init; } }To continue, let’s modify the IAuthenticationService interface:
要继续,让我们修改 IAuthenticationService 接口:
public interface IAuthenticationService { Task<IdentityResult> RegisterUser(UserForRegistrationDto userForRegistration); Task<bool> ValidateUser(UserForAuthenticationDto userForAuth); Task<string> CreateToken(); }Next, let’s add a private variable in the AuthenticationService class:
接下来,让我们在 AuthenticationService 类中添加一个私有变量:
private readonly UserManager<User> _userManager; private readonly IConfiguration _configuration; private User? _user;Before we continue to the interface implementation, we have to install System.IdentityModel.Tokens.Jwt library in the Service project. Then, we can implement the required methods:
在继续接口实现之前,我们必须在 Service 项目中安装 System.IdentityModel.Tokens.Jwt 库。然后,我们可以实现所需的方法:
public async Task<bool> ValidateUser(UserForAuthenticationDto userForAuth) { _user = await _userManager.FindByNameAsync(userForAuth.UserName); var result = (_user != null && await _userManager.CheckPasswordAsync(_user, userForAuth.Password)); if (!result) _logger.LogWarn($"{nameof(ValidateUser)}: Authentication failed. Wrong user name or password."); return result; } public async Task<string> CreateToken() { var signingCredentials = GetSigningCredentials(); var claims = await GetClaims(); var tokenOptions = GenerateTokenOptions(signingCredentials, claims); return new JwtSecurityTokenHandler().WriteToken(tokenOptions); } private SigningCredentials GetSigningCredentials() { var key = Encoding.UTF8.GetBytes(Environment.GetEnvironmentVariable("SECRET")); var secret = new SymmetricSecurityKey(key); return new SigningCredentials(secret, SecurityAlgorithms.HmacSha256); } private async Task<List<Claim>> GetClaims() { var claims = new List<Claim> { new Claim(ClaimTypes.Name, _user.UserName) }; var roles = await _userManager.GetRolesAsync(_user); foreach (var role in roles) { claims.Add(new Claim(ClaimTypes.Role, role)); } return claims; }private JwtSecurityToken GenerateTokenOptions(SigningCredentials signingCredentials, List<Claim> claims) { var jwtSettings = _configuration.GetSection("JwtSettings"); var tokenOptions = new JwtSecurityToken ( issuer: jwtSettings["validIssuer"], audience: jwtSettings["validAudience"], claims: claims, expires: DateTime.Now.AddMinutes(Convert.ToDouble(jwtSettings["expires"])), signingCredentials: signingCredentials ); return tokenOptions; }For this to work, we require a few more namespaces:
为此,我们需要更多的命名空间:
using System.IdentityModel.Tokens.Jwt;
using Microsoft.IdentityModel.Tokens;
using System.Text;
using System.Security.Claims;
Now we can explain the code.
现在我们可以解释代码。
In the ValidateUser method, we fetch the user from the database and check whether they exist and if the password matches. The UserManager<TUser> class provides the FindByNameAsync method to find the user by user name and the CheckPasswordAsync to verify the user’s password against the hashed password from the database. If the check result is false, we log a message about failed authentication. Lastly, we return the result.
在 ValidateUser 方法中,我们从数据库中获取用户,并检查他们是否存在以及密码是否匹配。UserManager<TUser> 类提供 FindByNameAsync 方法,用于按用户名查找用户,并提供 CheckPasswordAsync 方法,用于根据数据库中的哈希密码验证用户的密码。如果检查结果为 false,我们将记录有关身份验证失败的消息。最后,我们返回结果。
The CreateToken method does exactly that — it creates a token. It does that by collecting information from the private methods and serializing token options with the WriteToken method.
CreateToken 方法正是这样做的 — 它创建一个令牌。它通过从私有方法收集信息并使用 WriteToken 方法序列化令牌选项来实现此目的。
We have three private methods as well. The GetSignInCredentials method returns our secret key as a byte array with the security algorithm. The GetClaims method creates a list of claims with the user name inside and all the roles the user belongs to. The last method, GenerateTokenOptions, creates an object of the JwtSecurityToken type with all of the required options. We can see the expires parameter as one of the token options. We would extract it from the appsettings.json file as well, but we don’t have it there. So, we have to add it:
我们还有三个私有方法。GetSignInCredentials 方法将密钥作为包含安全算法的字节数组返回。GetClaims 方法创建一个声明列表,其中包含用户名以及用户所属的所有角色。最后一个方法 GenerateTokenOptions 创建一个 JwtSecurityToken 类型的对象,其中包含所有必需的选项。我们可以将 expires 参数视为 token 选项之一。我们也会从 appsettings.json 文件中提取它,但我们没有它。所以,我们必须添加它:
"JwtSettings": { "validIssuer": "CodeMazeAPI", "validAudience": "https://localhost:5001", "expires": 5 }Finally, we have to add a new action in the AuthenticationController:
最后,我们必须在 AuthenticationController 中添加一个新作:
[HttpPost("login")] [ServiceFilter(typeof(ValidationFilterAttribute))] public async Task<IActionResult> Authenticate([FromBody] UserForAuthenticationDto user) { if (!await _service.AuthenticationService.ValidateUser(user)) return Unauthorized(); return Ok(new { Token = await _service .AuthenticationService.CreateToken() }); }There is nothing special in this controller. If validation fails, we return the 401 Unauthorized response; otherwise, we return our created token:
这个控制器没有什么特别之处。如果验证失败,我们将返回 401 Unauthorized 响应;否则,我们将返回创建的 token:
https://localhost:5001/api/authentication/login
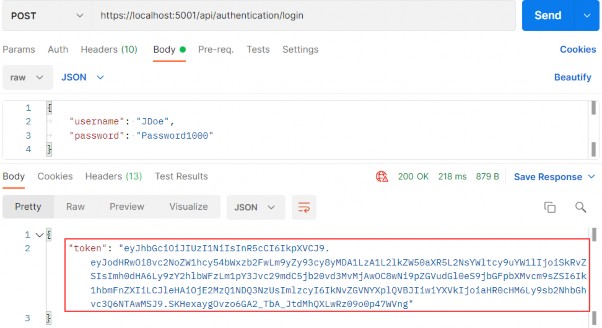
Excellent. We can see our token generated. Now, let’s send invalid credentials:
非常好。我们可以看到我们的 Token 已生成。现在,让我们发送无效的凭据:
https://localhost:5001/api/authentication/login
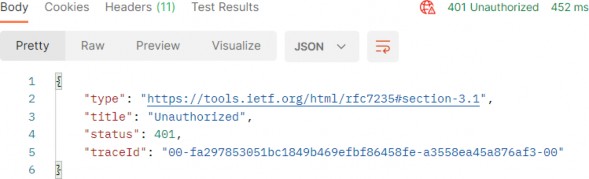
And we get a 401 Unauthorized response.
我们收到了 401 Unauthorized 响应。
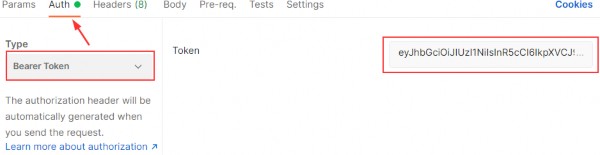
Right now if we send a request to the GetCompanies action, we are still going to get the 401 Unauthorized response even though we have successful authentication. That’s because we didn’t provide our token in a request header and our API has nothing to authorize against. To solve that, we are going to create another GET request, and in the Authorization header choose the header type and paste the token from the previous request:
现在,如果我们向 GetCompanies作发送请求,即使我们已成功进行身份验证,我们仍会收到 401 Unauthorized 响应。那是因为我们没有在请求标头中提供令牌,并且我们的 API 没有什么可以授权的。为了解决这个问题,我们将创建另一个 GET 请求,并在 Authorization 标头中选择标头类型并粘贴上一个请求的令牌:
https://localhost:5001/api/companies
Now, we can send the request again:
现在,我们可以再次发送请求:
https://localhost:5001/api/companies
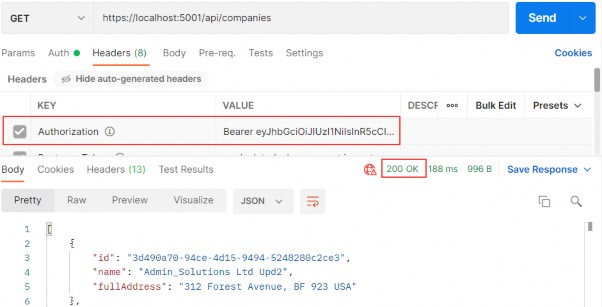
Excellent. It works like a charm.
非常好。它就像一个吉祥小饰物。
27.9 Role-Based Authorization
27.9 基于角色的授权
Right now, even though authentication and authorization are working as expected, every single authenticated user can access the GetCompanies action. What if we don’t want that type of behavior? For example, we want to allow only managers to access it. To do that, we have to make one simple change:
现在,即使身份验证和授权按预期工作,每个经过身份验证的用户都可以访问 GetCompanies作。如果我们不希望出现这种行为怎么办?例如,我们希望仅允许管理者访问它。为此,我们必须进行一个简单的更改:
[HttpGet(Name = "GetCompanies")]
[Authorize(Roles = "Manager")]
public async Task<IActionResult> GetCompanies()
And that is it. To test this, let’s create another user with the Administrator role (the second role from the database):
就是这样。为了测试这一点,让我们创建另一个具有 Administrator 角色的用户(数据库中的第二个角色):
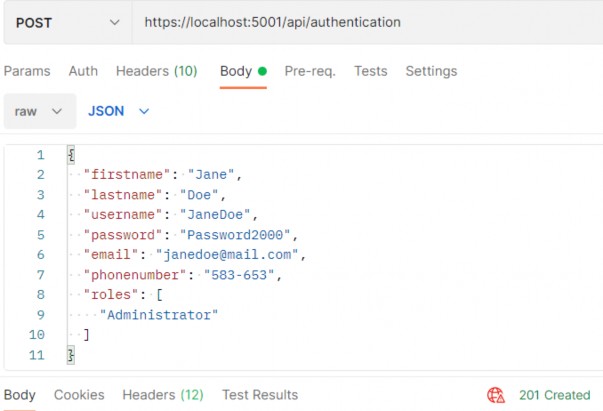
We get 201. After we send an authentication request for Jane Doe, we are going to get a new token. Let’s use that token to send the request towards the GetCompanies action:
我们得到 201。在我们发送 Jane Doe 的身份验证请求后,我们将获取新令牌。让我们使用该令牌将请求发送到 GetCompanies作:
https://localhost:5001/api/companies

We get a 403 Forbidden response because this user is not allowed to access the required endpoint. If we log in with John Doe and use his token, we are going to get a successful response for sure. Of course, we don’t have to place an Authorize attribute only on top of the action; we can place it on the controller level as well. For example, we can place just [Authorize] on the controller level to allow only authorized users to access all the actions in that controller; also, we can place the [Authorize (Role=…)] on top of any action in that controller to state that only a user with that specific role has access to that action.
我们收到 403 Forbidden 响应,因为不允许此用户访问所需的终端节点。如果我们使用 John Doe 登录并使用他的令牌,我们肯定会得到成功的响应。当然,我们不必仅在作顶部放置 Authorize 属性;我们也可以将其放在控制器级别。例如,我们可以只将 [Authorize] 放在控制器级别,以仅允许授权用户访问该控制器中的所有作;此外,我们可以将 [Authorize (Role=...)] 放在该控制器中任何作的顶部,以声明只有具有该特定角色的用户才能访问该作。
One more thing. Our token expires after five minutes after the creation point. So, if we try to send another request after that period (we probably have to wait 5 more minutes due to the time difference between servers, which is embedded inside the token – this can be overridden with the ClockSkew property in the TokenValidationParameters object ), we are going to get the 401 Unauthorized status for sure. Feel free to try.
还有一件事。我们的令牌在创建点后 5 分钟后过期。因此,如果我们尝试在该时间段之后发送另一个请求(由于服务器之间的时差,我们可能不得不再等待 5 分钟,这嵌入在令牌中 - 这可以用 TokenValidationParameters 对象中的 ClockSkew 属性覆盖),我们肯定会得到 401 Unauthorized 状态。请随意尝试。