31 DEPLOYMENT TO IIS
30 部署到 IIS
Before we start the deployment process, we would like to point out one important thing. We should always try to deploy an application on at least a local machine to somehow simulate the production environment as soon as we start with development. That way, we can observe how the application behaves in a production environment from the beginning of the development process.
在开始部署过程之前,我们想指出一件重要的事情。一旦开始开发,我们应该始终尝试至少在本地计算机上部署应用程序,以某种方式模拟生产环境。这样,我们可以从开发过程的一开始就观察应用程序在生产环境中的行为。
That leads us to the conclusion that the deployment process should not be the last step of the application’s lifecycle. We should deploy our application to the staging environment as soon as we start building it.
这使我们得出结论,部署过程不应该是应用程序生命周期的最后一步。我们应该在开始构建应用程序后立即将其部署到暂存环境。
That said, let’s start with the deployment process.
也就是说,让我们从部署过程开始。
31.1 Creating Publish Files
31.1 创建 Publish 文件
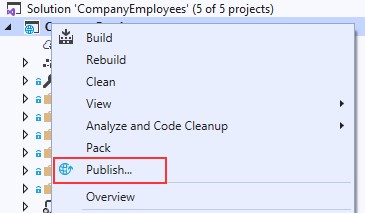
Let’s create a folder on the local machine with the name Publish. Inside that folder, we want to place all of our files for deployment. After the folder creation, let’s right-click on the main project in the Solution Explorer window and click publish option:
让我们在本地计算机上创建一个名为 Publish 的文件夹。在该文件夹中,我们希望放置所有用于部署的文件。创建文件夹后,让我们右键单击 Solution Explorer 窗口中的主项目,然后单击 publish 选项:
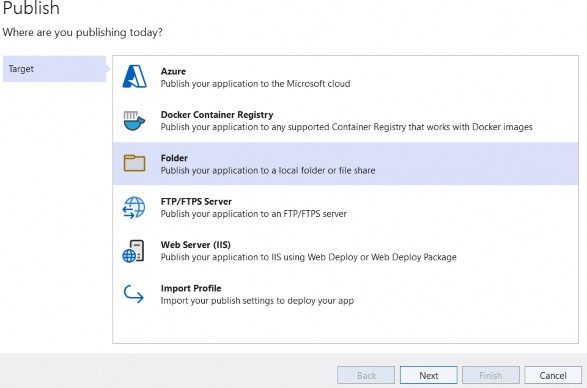
In the “Pick a publish target” window, we are going to choose the Folder option and click Next:
在“Pick a publish target”窗口中,我们将选择 Folder 选项,然后单击 Next:
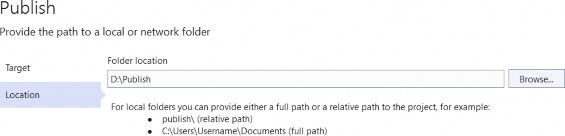
And point to the location of the Publish folder we just created and click Finish:
并指向我们刚刚创建的 Publish 文件夹的位置,然后单击 Finish:
Publish windows can be different depending on the Visual Studio version.
发布窗口可能因 Visual Studio 版本而异。
After that, we have to click the Publish button:
之后,我们必须单击 Publish 按钮:
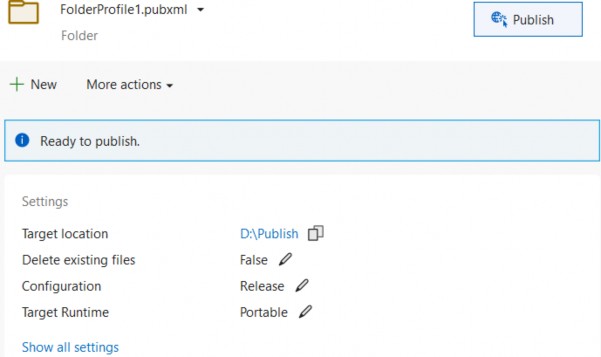
Visual Studio is going to do its job and publish the required files in the specified folder.
Visual Studio 将执行其工作并在指定文件夹中发布所需的文件。
31.2 Windows Server Hosting Bundle
31.2 Windows Server 托管捆绑包
Before any further action, let’s install the .NET Core Windows Server Hosting bundle on our system to install .NET Core Runtime. Furthermore, with this bundle, we are installing the .NET Core Library and the ASP.NET Core Module. This installation will create a reverse proxy between IIS and the Kestrel server, which is crucial for the deployment process.
在执行任何进一步作之前,让我们在系统上安装 .NET Core Windows Server 托管捆绑包以安装 .NET Core 运行时。此外,通过此捆绑包,我们将安装 .NET Core 库和 ASP.NET Core Module。此安装将在 IIS 和 Kestrel 服务器之间创建反向代理,这对于部署过程至关重要。
If you have a problem with missing SDK after installing the Hosting Bundle, follow this solution suggested by Microsoft:
如果您在安装 Hosting Bundle 后遇到缺少 SDK 的问题,请遵循 Microsoft 建议的以下解决方案:
Installing the .NET Core Hosting Bundle modifies the PATH when it installs the .NET Core runtime to point to the 32-bit (x86) version of .NET Core (C:\Program Files (x86)\dotnet). This can result in missing SDKs when the 32-bit (x86) .NET Core dotnet command is used (No .NET Core SDKs were detected). To resolve this problem, move C:\Program Files\dotnet\to a position before C:\Program Files (x86)\dotnet\ on the PATH environment variable.
安装 .NET Core 托管捆绑包会在安装 .NET Core 运行时时修改 PATH,使其指向 .NET Core 的 32 位 (x86) 版本 (C:\Program Files (x86)\dotnet)。这可能会导致在使用 32 位 (x86) .NET Core dotnet 命令时缺少 SDK(未检测到 .NET Core SDK)。若要解决此问题,请将 C:\Program Files\dotnet\ 移动到 PATH 环境变量上 C:\Program Files (x86)\dotnet\ 之前的位置。
After the installation, we are going to locate the Windows hosts file on C:\Windows\System32\drivers\etc and add the following record at the end of the file:
安装完成后,我们将在 C:\Windows\System32\drivers\etc 上找到 Windows 主机文件,并在文件末尾添加以下记录:
127.0.0.1 www.companyemployees.codemazeAfter that, we are going to save the file.
之后,我们将保存文件。
31.3 Installing IIS
31.3 安装 IIS
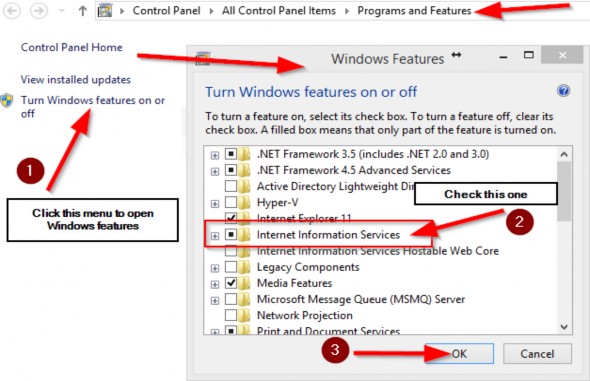
If you don’t have IIS installed on your machine, you need to install it by opening ControlPanel and then Programs and Features:
如果您的计算机上没有安装 IIS,则需要通过打开 ControlPanel,然后打开“程序和功能”来安装它:
After the IIS installation finishes, let’s open the Run window (windows key + R) and type: inetmgr to open the IIS manager:
IIS 安装完成后,让我们打开 Run 窗口(Windows 键 + R)并键入:inetmgr 以打开 IIS 管理器:

Now, we can create a new website:
现在,我们可以创建一个新网站:

In the next window, we need to add a name to our site and a path to the published files:
在下一个窗口中,我们需要为我们的网站添加一个名称和一个已发布文件的路径:
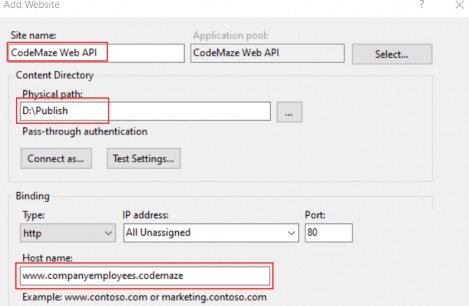
And click the OK button.
然后点击 OK 按钮。
After this step, we are going to have our site inside the “sites” folder in the IIS Manager. Additionally, we need to set up some basic settings for our application pool:
完成此步骤后,我们将站点置于 IIS Manager 的 “sites” 文件夹中。此外,我们需要为应用程序池设置一些基本设置:
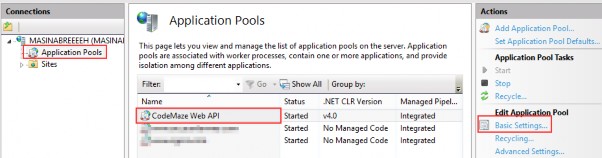
After we click on the Basic Settings link, let’s configure our application pool:
单击 Basic Settings 链接后,让我们配置应用程序池:
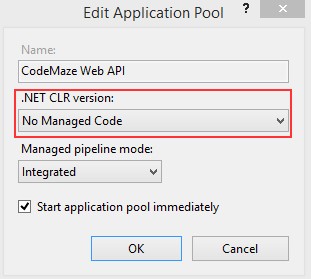
ASP.NET Core runs in a separate process and manages the runtime. It doesn't rely on loading the desktop CLR (.NET CLR). The Core Common Language Runtime for .NET Core is booted to host the app in the worker process. Setting the .NET CLR version to No Managed Code is optional but recommended.
ASP.NET Core 在单独的进程中运行并管理运行时。它不依赖于加载桌面 CLR (.NET CLR)。.NET Core 的核心公共语言运行时启动,以在工作进程中托管应用。将 .NET CLR 版本设置为“无托管代码”是可选的,但建议使用。
Our website and the application pool should be started automatically.
我们的网站和应用程序池应该会自动启动。
31.4 Configuring Environment File
31.4 配置环境文件
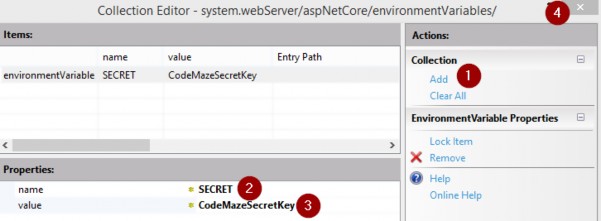
In the section where we configured JWT, we had to use a secret key that we placed in the environment file. Now, we have to provide to IIS the name of that key and the value as well.
在配置 JWT 的部分中,我们必须使用放置在环境文件中的密钥。现在,我们必须向 IIS 提供该键的名称和值。
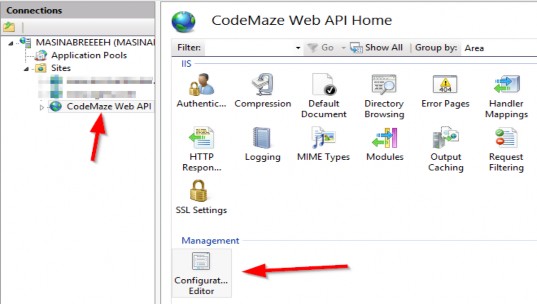
The first step is to click on our site in IIS and open Configuration Editor:
第一步是在 IIS 中单击我们的站点并打开配置编辑器:
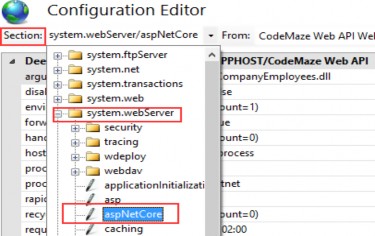
Then, in the section box, we are going to choose system.webServer/aspNetcore:
然后,在部分框中,我们将选择 system.webServer/aspNetcore:
From the “From” combo box, we are going to choose ApplicationHost.config:
从 “From” 组合框中,我们将选择 ApplicationHost.config:

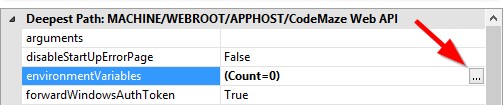
After that, we are going to select environment variables:
之后,我们将选择环境变量:
Click Add and type the name and the value of our variable:
单击 Add 并键入变量的名称和值:
As soon as we click the close button, we should click apply in the next window, restart our application in IIS, and we are good to go.
单击关闭按钮后,我们应该在下一个窗口中单击应用,在 IIS 中重新启动我们的应用程序,然后就可以开始了。
31.5 Testing Deployed Application
31.5 测试已部署的应用程序
Let’s open Postman and send a request for the Root document:
让我们打开 Postman 并发送根文档的请求:
http://www.companyemployees.codemaze/api
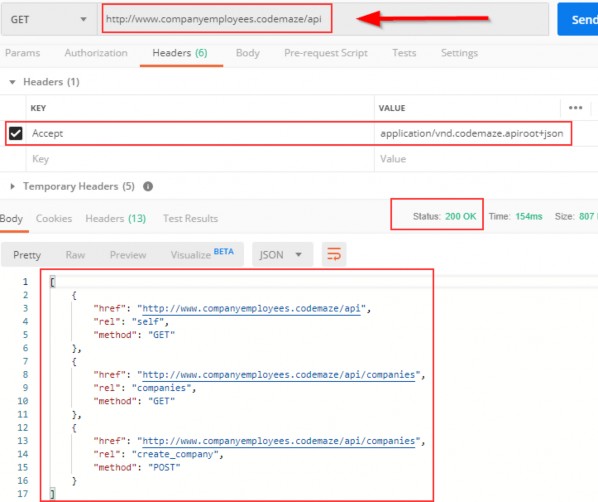
We can see that our API is working as expected. If it’s not, and you have a problem related to web.config in IIS, try reinstalling the Server Hosting Bundle package.
我们可以看到我们的 API 正在按预期工作。如果不是,并且您在 IIS 中存在与 web.config 相关的问题,请尝试重新安装 Server Hosting Bundle 包。
If you get an error message that the Presentation.xml file is missing, you can copy it from the project and paste it into the Publish folder. Also, in the Properties window for that file, you can set it to always copy during the publish.
如果收到一条错误消息,指出 Presentation.xml 文件缺失,则可以从项目中复制该文件并将其粘贴到 Publish 文件夹中。此外,在该文件的 Properties (属性) 窗口中,您可以将其设置为在发布期间始终复制。
Now, let’s continue.
现在,让我们继续。
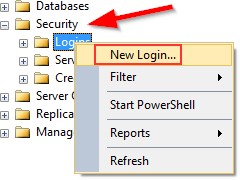
We still have one more thing to do. We have to add a login to the SQL Server for IIS APPPOOL\CodeMaze Web Api and grant permissions to the database. So, let’s open the SQL Server Management Studio and add a new login:
我们还有一件事要做。我们必须向 SQL Server for IIS APPPOOL\CodeMaze Web Api 添加登录名,并授予对数据库的权限。因此,让我们打开 SQL Server Management Studio 并添加新的登录名:
In the next window, we are going to add our user:
在下一个窗口中,我们将添加我们的用户:
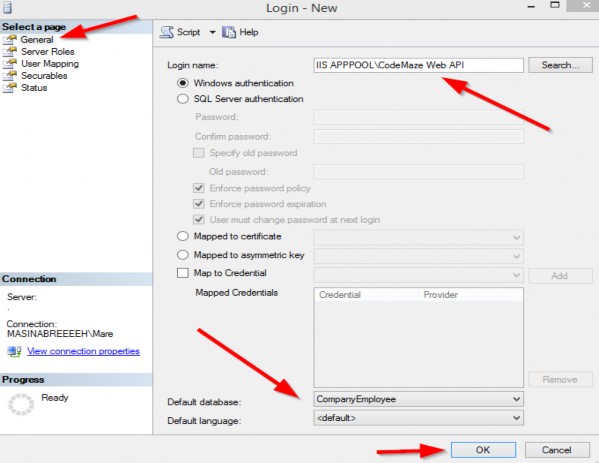
After that, we are going to expand the Logins folder, right-click on our user, and choose Properties. There, under UserMappings, we have to select the CompanyEmployee database and grant the dbwriter and dbreader roles.
之后,我们将展开 Logins 文件夹,右键单击我们的用户,然后选择 Properties。在那里,在 UserMappings 下,我们必须选择 CompanyEmployee 数据库并授予 dbwriter 和 dbreader 角色。
Now, we can try to send the Authentication request:
现在,我们可以尝试发送 Authentication 请求:
http://www.companyemployees.codemaze/api/authentication/login
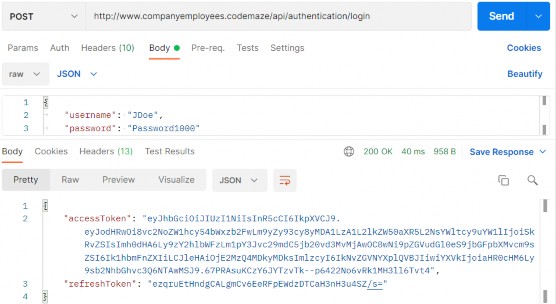
Excellent; we have our token. Now, we can send the request to the GetCompanies action with the generated token:
非常好;我们有我们的token。现在,我们可以使用生成的令牌将请求发送到 GetCompanies作:
http://www.companyemployees.codemaze/api/companies
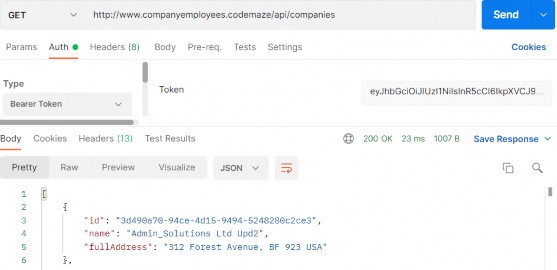
And there we go. Our API is published and working as expected.
好了。我们的 API 已发布并按预期工作。