30 DOCUMENTING API WITH SWAGGER
30 使用 SWAGGER 编写 API 文档
Developers who consume our API might be trying to solve important business problems with it. Hence, it is very important for them to understand how to use our API effectively. This is where API documentation comes into the picture.
使用我们的 API 的开发人员可能正在尝试使用它来解决重要的业务问题。因此,他们了解如何有效地使用我们的 API 非常重要。这就是 API 文档的用武之地。
API documentation is the process of giving instructions on how to effectively use and integrate an API. Hence, it can be thought of as a concise reference manual containing all the information required to work with the API, with details about functions, classes, return types, arguments, and more, supported by tutorials and examples.
API 文档是提供有关如何有效使用和集成 API 的说明的过程。因此,它可以被认为是一本简明的参考手册,其中包含使用 API 所需的所有信息,以及有关函数、类、返回类型、参数等的详细信息,并附有教程和示例。
So, having the proper documentation for our API enables consumers to integrate our APIs as quickly as possible and move forward with their development. Furthermore, this also helps them understand the value and usage of our API, improves the chances for our API’s adoption, and makes our APIs easier to maintain and support.
因此,为我们的 API 提供适当的文档使消费者能够尽快集成我们的 API 并继续进行开发。此外,这还可以帮助他们了解我们 API 的价值和用法,提高我们 API 被采用的机会,并使我们的 API 更易于维护和支持。
30.1 About Swagger
30.1 关于 Swagger
Swagger is a language-agnostic specification for describing REST APIs. Swagger is also referred to as OpenAPI. It allows us to understand the capabilities of a service without looking at the actual implementation code.
Swagger 是用于描述 REST API 的与语言无关的规范。Swagger 也称为 OpenAPI。它允许我们了解服务的功能,而无需查看实际的实现代码。
Swagger minimizes the amount of work needed while integrating an API. Similarly, it also helps API developers document their APIs quickly and accurately.
Swagger 最大限度地减少了集成 API 时所需的工作量。同样,它还可以帮助 API 开发人员快速准确地记录他们的 API。
Swagger Specification is an important part of the Swagger flow. By default, a document named swagger.json is generated by the Swagger tool which is based on our API. It describes the capabilities of our API and how to access it via HTTP.
Swagger 规范是 Swagger 流程的重要组成部分。默认情况下,名为 swagger.json 的文档由基于我们的 API 的 Swagger 工具生成。它描述了我们的 API 的功能以及如何通过 HTTP 访问它。
30.2 Swagger Integration Into Our Project
30.2 Swagger 集成到我们的项目中
We can use the Swashbuckle package to easily integrate Swagger into our .NET Core Web API project. It will generate the Swagger specification for the project as well. Additionally, the Swagger UI is also contained within Swashbuckle.
我们可以使用 Swashbuckle 包轻松地将 Swagger 集成到我们的 .NET Core Web API 项目中。它还将为项目生成 Swagger 规范。此外,Swagger UI 也包含在 Swashbuckle 中。
There are three main components in the Swashbuckle package:
Swashbuckle 包中有三个主要组件:
• Swashbuckle.AspNetCore.Swagger: This contains the Swagger object model and the middleware to expose SwaggerDocument objects as JSON.
Swashbuckle.AspNetCore.Swagger:这包含 Swagger 对象模型和用于将 SwaggerDocument 对象公开为 JSON 的中间件。
• Swashbuckle.AspNetCore.SwaggerGen: A Swagger generator that builds SwaggerDocument objects directly from our routes, controllers, and models.
Swashbuckle.AspNetCore.SwaggerGen:一个 Swagger 生成器,可直接从我们的路由、控制器和模型构建 SwaggerDocument 对象。
• Swashbuckle.AspNetCore.SwaggerUI: An embedded version of the Swagger UI tool. It interprets Swagger JSON to build a rich, customizable experience for describing web API functionality.
Swashbuckle.AspNetCore.SwaggerUI:Swagger UI 工具的嵌入式版本。它解释 Swagger JSON 以构建丰富的可自定义体验,用于描述 Web API 功能。
So, the first thing we are going to do is to install the required library in the main project. Let’s open the Package Manager Console window and type the following command:
所以,我们要做的第一件事是在主项目中安装所需的库。让我们打开 Package Manager Console 窗口并键入以下命令:
PM> Install-Package Swashbuckle.AspNetCoreAfter a couple of seconds, the package will be installed. Now, we have to configure the Swagger Middleware. To do that, we are going to add a new method in the ServiceExtensions class:
几秒钟后,将安装该软件包。现在,我们必须配置 Swagger 中间件。为此,我们将在 ServiceExtensions 类中添加一个新方法:
public static void ConfigureSwagger(this IServiceCollection services) { services.AddSwaggerGen(s => { s.SwaggerDoc("v1", new OpenApiInfo { Title = "Code Maze API", Version = "v1" }); s.SwaggerDoc("v2", new OpenApiInfo { Title = "Code Maze API", Version = "v2" }); }); }We are creating two versions of SwaggerDoc because if you remember, we have two versions for the Companies controller and we want to separate them in our documentation.
我们正在创建两个版本的 SwaggerDoc,因为如果您还记得,我们有两个版本用于 Companies 控制器,我们希望在我们的文档中将它们分开。
Also, we need an additional namespace:
此外,我们还需要一个额外的命名空间:
using Microsoft.OpenApi.Models;The next step is to call this method in the Program class:
下一步是在 Program 类中调用此方法:
builder.Services.ConfigureSwagger();And in the middleware part of the class, we are going to add it to the application’s execution pipeline together with the UI feature:
在类的中间件部分,我们将它与 UI 功能一起添加到应用程序的执行管道中:
app.UseSwagger(); app.UseSwaggerUI(s => { s.SwaggerEndpoint("/swagger/v1/swagger.json", "Code Maze API v1"); s.SwaggerEndpoint("/swagger/v2/swagger.json", "Code Maze API v2"); });Finally, let’s slightly modify the Companies and CompaniesV2 controllers:
最后,让我们稍微修改一下 Companies 和 CompaniesV2 控制器:
[Route("api/companies")] [ApiController] [ApiExplorerSettings(GroupName = "v1")] public class CompaniesController : ControllerBase [Route("api/companies")] [ApiController] [ApiExplorerSettings(GroupName = "v2")] public class CompaniesV2Controller : ControllerBaseWith this change, we state that the CompaniesController belongs to group v1 and the CompaniesV2Controller belongs to group v2. All the other controllers will be included in both groups because they are not versioned. Which is what we want.
通过此更改,我们声明 CompaniesController 属于组 v1,而 CompaniesV2Controller 属于组 v2。所有其他控制器都将包含在这两个组中,因为它们未进行版本控制。这就是我们想要的。
And that is all. We have prepared the basic configuration.
就这样。我们已经准备好了基本配置。
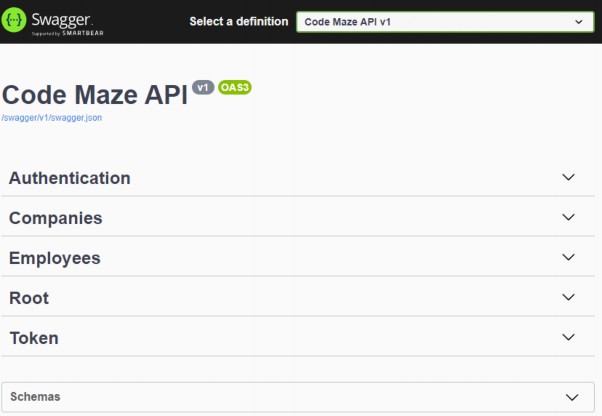
Now, we can start our app, open the browser, and navigate to https://localhost:5001/swagger/v1/swagger.json. Once the page is up, you are going to see a json document containing all the controllers and actions without the v2 companies controller. Of course, if you change v1 to v2 in the URL, you are going to see all the controllers — including v2 companies, but without v1 companies.
现在,我们可以启动我们的应用程序,打开浏览器,然后导航到 https://localhost:5001/swagger/v1/swagger.json。页面打开后,您将看到一个 json 文档,其中包含所有控制器和作,但没有 v2 companies 控制器。当然,如果您在 URL 中将 v1 更改为 v2,您将看到所有控制器 — 包括 v2 公司,但没有 v1 公司。
Additionally, let’s navigate to
此外,让我们导航到
https://localhost:5001/swagger/index.html:
Also if we expand the Schemas part, we are going to find the DTOs that we used in our project.
此外,如果我们扩展 Schemas 部分,我们将找到我们在项目中使用的 DTO。
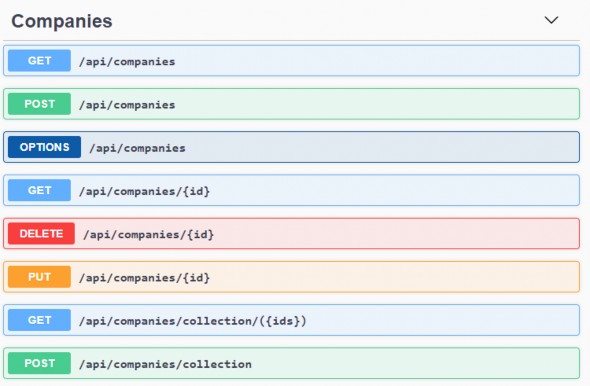
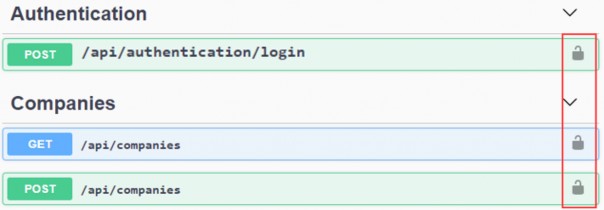
If we click on a specific controller to expand its details, we are going to see all the actions inside:
如果我们单击特定控制器以展开其详细信息,我们将看到其中的所有作:
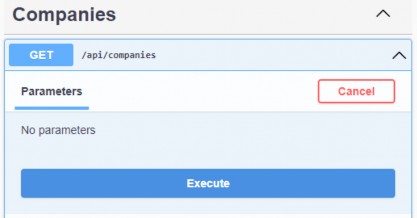
Once we click on an action method, we can see detailed information like parameters, response, and example values. There is also an option to try out each of those action methods by clicking the Try it out button.
单击作方法后,我们可以看到参数、响应和示例值等详细信息。还有一个选项,可以通过单击 Try it out (试用) 按钮来尝试这些作方法中的每一种。
So, let’s try it with the /api/companies action:
那么,让我们用 /api/companies作来试试:
Once we click the Execute button, we are going to see that we get our response:
单击 Execute 按钮后,我们将看到我们收到了响应:
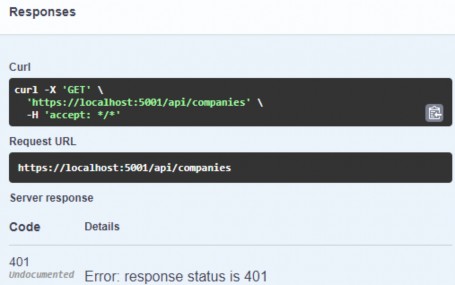
And this is an expected response. We are not authorized. To enable authorization, we have to add some modifications.
这是意料之中的回应。我们没有获得授权。要启用授权,我们必须添加一些修改。
30.3 Adding Authorization Support
30.3 添加授权支持
To add authorization support, we need to modify the ConfigureSwagger method:
要添加授权支持,我们需要修改 ConfigureSwagger 方法:
public static void ConfigureSwagger(this IServiceCollection services) { services.AddSwaggerGen(s => { s.SwaggerDoc("v1", new OpenApiInfo { Title = "Code Maze API", Version = "v1" }); s.SwaggerDoc("v2", new OpenApiInfo { Title = "Code Maze API", Version = "v2" }); s.AddSecurityDefinition("Bearer", new OpenApiSecurityScheme { In = ParameterLocation.Header, Description = "Place to add JWT with Bearer", Name = "Authorization", Type = SecuritySchemeType.ApiKey, Scheme = "Bearer" }); s.AddSecurityRequirement(new OpenApiSecurityRequirement() { { new OpenApiSecurityScheme { Reference = new OpenApiReference { Type = ReferenceType.SecurityScheme, Id = "Bearer"}, Name = "Bearer", }, new List<string>() } }); }); }
With this modification, we are adding the security definition in our swagger configuration. Now, we can start our app again and navigate to the index.html page.
通过此修改,我们将在 swagger 配置中添加安全定义。现在,我们可以再次启动我们的应用程序并导航到 index.html 页面。
The first thing we are going to notice is the Authorize options for requests:
我们首先要注意的是请求的 Authorize 选项:
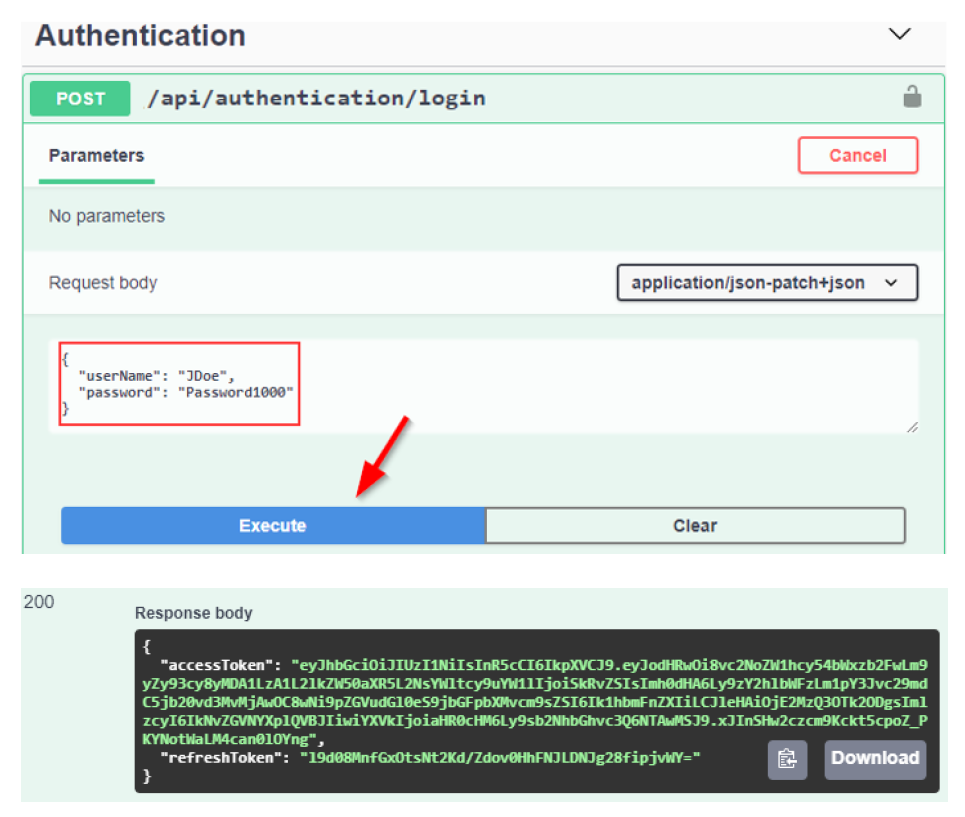
We are going to use that in a moment. But let’s get our token first. For that, let’s open the api/authentication/login action, click try it out, add credentials, and copy the received token:
我们稍后会用到它。但是,让我们先获取我们的令牌。为此,让我们打开 api/authentication/login作,单击 try it out,添加凭据,然后复制收到的令牌:
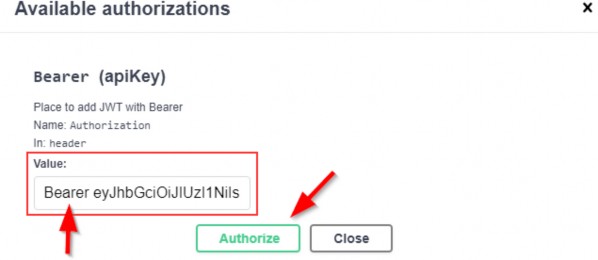
Once we have copied the token, we are going to click on the authorization button for the /api/companies request, paste it with the Bearer in front of it, and click Authorize:
复制令牌后,我们将单击 /api/companies 请求的授权按钮,将其粘贴到其前面并带有 Bearer,然后单击 Authorize:
After authorization, we are going to click on the Close button and try our request:
授权后,我们将单击 Close 按钮并尝试我们的请求:
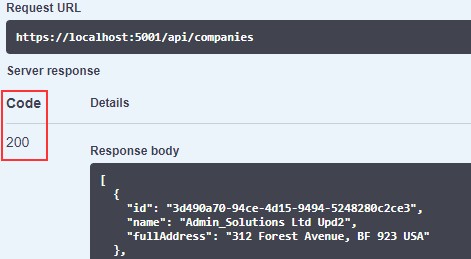
And we get our response. Excellent job.
我们得到了我们的回应。干得好。
30.4 Extending Swagger Configuration
30.4 扩展 Swagger 配置
Swagger provides options for extending the documentation and customizing the UI. Let’s explore some of those.
Swagger 提供了用于扩展文档和自定义 UI 的选项。让我们来探讨其中的一些。
First, let’s see how we can specify the API info and description. The configuration action passed to the AddSwaggerGen() method adds information such as Contact, License, and Description. Let’s provide some values for those:
首先,让我们看看如何指定 API 信息和描述。传递给 AddSwaggerGen() 方法的配置作将添加 Contact、License 和 Description 等信息。让我们为这些值提供一些值:
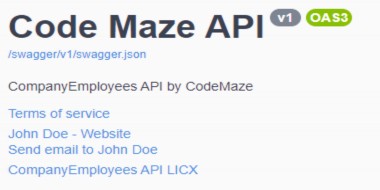
s.SwaggerDoc("v1", new OpenApiInfo { Title = "Code Maze API", Version = "v1", Description = "CompanyEmployees API by CodeMaze", TermsOfService = new Uri("https://example.com/terms"), Contact = new OpenApiContact { Name = "John Doe", Email = "John.Doe@gmail.com", Url = new Uri("https://twitter.com/johndoe"), }, License = new OpenApiLicense { Name = "CompanyEmployees API LICX", Url = new Uri("https://example.com/license"), } });
......
We have implemented this just for the first version, but you get the point. Now, let’s run the application once again and explore the Swagger UI:
我们只为第一个版本实现了这一点,但您明白了。现在,让我们再次运行应用程序并探索 Swagger UI:
For enabling XML comments, we need to suppress warning 1591, which will now give warnings about any method, class, or field that doesn’t have triple-slash comments. We need to do this in the Presentation project.
要启用 XML 注释,我们需要禁止显示警告 1591,它现在将针对任何没有三斜杠注释的方法、类或字段发出警告。我们需要在 Presentation 项目中执行此作。
Additionally, we have to add the documentation path for the same project, since our controllers are in the Presentation project:
此外,我们必须为同一项目添加文档路径,因为我们的控制器位于 Presentation 项目中:
<Project Sdk="Microsoft.NET.Sdk"> <PropertyGroup> <TargetFramework>net6.0</TargetFramework> <ImplicitUsings>enable</ImplicitUsings> <Nullable>enable</Nullable> </PropertyGroup> <PropertyGroup Condition="'$(Configuration)|$(Platform)'=='Debug|AnyCPU'"> <DocumentationFile>CompanyEmployees.Presentation.xml</DocumentationFile> <OutputPath></OutputPath> <NoWarn>1701;1702;1591</NoWarn> </PropertyGroup> <PropertyGroup Condition="'$(Configuration)|$(Platform)'=='Release|AnyCPU'"> <NoWarn>1701;1702;1591</NoWarn> </PropertyGroup>Now, let’s modify our configuration:
现在,让我们修改我们的配置:
s.SwaggerDoc("v2", new OpenApiInfo { Title = "Code Maze API", Version = "v2" }); var xmlFile = $"{typeof(Presentation.AssemblyReference).Assembly.GetName().Name}.xml"; var xmlPath = Path.Combine(AppContext.BaseDirectory, xmlFile); s.IncludeXmlComments(xmlPath);Next, adding triple-slash comments to the action method enhances the Swagger UI by adding a description to the section header:
接下来,通过向部分标题添加说明,向作方法添加三斜杠注释可增强 Swagger UI:
/// <summary> /// Gets the list of all companies /// </summary> /// <returns>The companies list</returns> [HttpGet(Name = "GetCompanies")] [Authorize(Roles = "Manager")] public async Task<IActionResult> GetCompanies()And this is the result:
结果如下:

The developers who consume our APIs are usually more interested in what it returns — specifically the response types and error codes. Hence, it is very important to describe our response types. These are denoted using XML comments and data annotations.
使用我们的 API 的开发人员通常对它返回的内容更感兴趣 — 特别是响应类型和错误代码。因此,描述我们的响应类型非常重要。这些使用 XML 注释和数据注释表示。
Let’s enhance the response types a little bit:
让我们稍微增强一下响应类型:
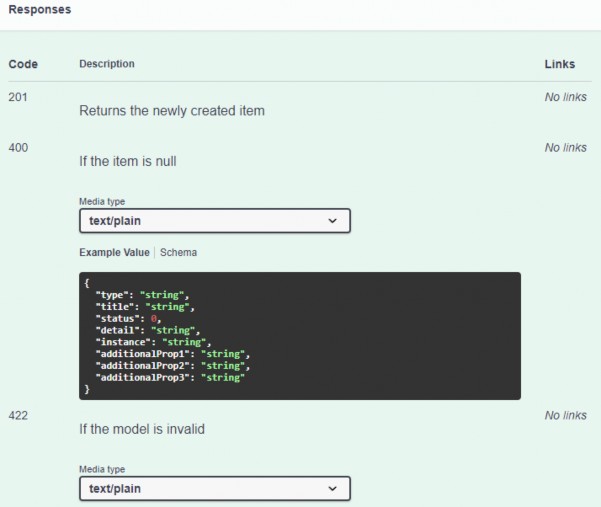
/// <summary> /// Creates a newly created company /// </summary> /// <param name="company"></param> /// <returns>A newly created company</returns> /// <response code="201">Returns the newly created item</response> /// <response code="400">If the item is null</response> /// <response code="422">If the model is invalid</response> [HttpPost(Name = "CreateCompany")] [ProducesResponseType(201)] [ProducesResponseType(400)] [ProducesResponseType(422)]Here, we are using both XML comments and data annotation attributes. Now, we can see the result:
在这里,我们同时使用了 XML 注释和数据注释属性。现在,我们可以看到结果:

And, if we inspect the response part, we will find our mentioned responses:
而且,如果我们检查响应部分,我们会找到我们提到的响应:
Excellent.We can continue to the deployment part.
非常好。我们可以继续进行部署部分。