13 VALIDATION
13 验证
While writing API actions, we have a set of rules that we need to check. If we take a look at the Company class, we can see different data annotation attributes above our properties:
在编写 API动作时,我们有一组规则需要检查。如果我们看一下 Company 类,我们可以在属性上方看到不同的数据注释属性:
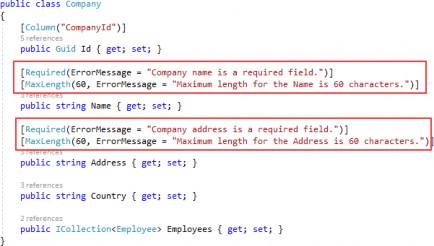
Those attributes serve the purpose to validate our model object while creating or updating resources in the database. But we are not making use of them yet.
这些属性用于在数据库中创建或更新资源时验证我们的模型对象。但我们还没有利用它们。
In this chapter, we are going to show you how to validate our model objects and how to return an appropriate response to the client if the model is not valid. So, we need to validate the input and not the output of our controller actions. This means that we are going to apply this validation to the POST, PUT, and PATCH requests, but not for the GET request.
在本章中,我们将向您展示如何验证我们的模型对象,以及如何在模型无效时向客户端返回适当的响应。因此,我们需要验证控制器作的输入,而不是输出。这意味着我们将将此验证应用于 POST、PUT 和 PATCH 请求,但不应用于 GET 请求。
13.1 ModelState, Rerun Validation, and Built-in Attributes
13.1 ModelState、rerun 验证和内置属性
To validate against validation rules applied by Data Annotation attributes, we are going to use the concept of ModelState. It is a dictionary containing the state of the model and model binding validation.
为了根据 Data Annotation 属性应用的验证规则进行验证,我们将使用 ModelState 的概念。它是一个包含模型状态和模型绑定验证的字典。
It is important to know that model validation occurs after model binding and reports errors where the data, sent from the client, doesn’t meet our validation criteria. Both model validation and data binding occur before our request reaches an action inside a controller. We are going to use the ModelState.IsValid expression to check for those validation rules.
请务必了解,模型验证发生在模型绑定之后,并报告从客户端发送的数据不符合验证条件的错误。模型验证和数据绑定都发生在我们的请求到达控制器内的 action 之前。我们将使用 ModelState.IsValid 表达式来检查这些验证规则。
By default, we don’t have to use the ModelState.IsValid expression in Web API projects since, as we explained in section 9.2.1, controllers are decorated with the [ApiController] attribute. But, as we could’ve seen, it defaults all the model state errors to 400 – BadRequest and doesn’t allow us to return our custom error messages with a different status code. So, we suppressed it in the Program class.
默认情况下,我们不必在 Web API 项目中使用 ModelState.IsValid 表达式,因为正如我们在第 9.2.1 节中所解释的那样,控制器是使用 [ApiController] 属性修饰的。但是,正如我们所看到的,它默认所有模型状态错误为 400 – BadRequest,并且不允许我们返回具有不同状态代码的自定义错误消息。因此,我们在 Program 类中抑制了它。
The response status code, when validation fails, should be 422 Unprocessable Entity. That means that the server understood the content type of the request and the syntax of the request entity is correct, but it was unable to process validation rules applied on the entity inside the request body. If we didn’t suppress the model validation from the [ApiController] attribute, we wouldn’t be able to return this status code (422) since, as we said, it would default to 400.
验证失败时,响应状态代码应为 422 Unprocessable Entity。这意味着服务器理解请求的内容类型,并且请求实体的语法是正确的,但它无法处理应用于请求正文内的实体的验证规则。如果我们没有从 [ApiController] 属性中禁止显示模型验证,我们将无法返回此状态代码 (422),因为正如我们所说,它将默认为 400。
13.1.1 Rerun Validation
13.1.1 重新运行验证
In some cases, we want to repeat our validation. This can happen if, after the initial validation, we compute a value in our code, and assign it to the property of an already validated object.
在某些情况下,我们希望重复验证。如果在初始验证之后,我们在代码中计算一个值,并将其分配给已验证对象的属性,则可能会发生这种情况。
If this is the case, and we want to run the validation again, we can use the ModelStateDictionary.ClearValidationState method to clear the validation specific to the model that we’ve already validated, and then use the TryValidateModel method:
如果是这种情况,并且我们想要再次运行验证,我们可以使用 ModelStateDictionary.ClearValidationState 方法来清除特定于我们已经验证的模型的验证,然后使用 TryValidateModel 方法:
[HttpPost]
public IActionResult POST([FromBody] Book book)
{
    if (!ModelState.IsValid)
        return UnprocessableEntity(ModelState);
    var newPrice = book.Price - 10;
    book.Price = newPrice;
    ModelState.ClearValidationState(nameof(Book));
    if (!TryValidateModel(book, nameof(Book)))
        return UnprocessableEntity(ModelState);
    _service.CreateBook(book);
    return CreatedAtRoute("BookById", new { id = book.Id }, book);
}
This is just a simple example but it explains how we can revalidate our model object.
这只是一个简单的示例,但它解释了我们如何重新验证我们的模型对象。
13.1.2 Built-in Attributes
13.1.2 内置属性
Validation attributes let us specify validation rules for model properties. At the beginning of this chapter, we have marked some validation attributes. Those attributes (Required and MaxLength) are part of built-in attributes. And of course, there are more than two built-in attributes. These are the most used ones:
验证属性允许我们为模型属性指定验证规则。在本章的开头,我们标记了一些验证属性。这些属性 (Required 和 MaxLength) 是内置属性的一部分。当然,还有不止两个内置属性。这些是最常用的:
| ATTRIBUTE | USAGE |
|---|---|
| [ValidateNever] | Indicates that property or parameter should be excluded from validation. |
| [Compare] | We use it for the properties comparison. |
| [EmailAddress] | Validates the email format of the property. |
| [Phone] | Validates the phone format of the property. |
| [Range] | Validates that the property falls within a specified range. |
| [RegularExpression] | Validates that the property value matches a specified regular expression. |
| [Required] | We use it to prevent a null value for the property. |
| [StringLength] | Validates that a string property value doesn't exceed a specified length limit. |
If you want to see a complete list of built-in attributes, you can visit this page. https://learn.microsoft.com/en-us/dotnet/api/system.componentmodel.dataannotations?view=net-6.0
如果您想查看内置属性的完整列表,可以访问此页面。https://learn.microsoft.com/en-us/dotnet/api/system.componentmodel.dataannotations?view=net-6.0
13.2 Custom Attributes and IValidatableObject
13.2 自定义属性和 IValidatableObject
There are scenarios where built-in attributes are not enough and we have to provide some custom logic. For that, we can create a custom attribute by using the ValidationAttribute class, or we can use the IValidatableObject interface.
在某些情况下,内置属性是不够的,我们必须提供一些自定义逻辑。为此,我们可以使用 ValidationAttribute 类创建自定义属性,也可以使用 IValidatableObject 接口。
So, let’s see an example of how we can create a custom attribute:
那么,让我们看看如何创建自定义属性的示例:
public class ScienceBookAttribute : ValidationAttribute
{
    public BookGenre Genre { get; set; }
    public string Error => $"The genre of the book must be {BookGenre.Science}";
    public ScienceBookAttribute(BookGenre genre) { Genre = genre; }
    protected override ValidationResult? IsValid(object? value, ValidationContext validationContext)
    {
        var book = (Book)validationContext.ObjectInstance;
        if (!book.Genre.Equals(Genre.ToString()))
            return new ValidationResult(Error);
        return ValidationResult.Success;
    }
}
Once this attribute is called, we are going to pass the genre parameter inside the constructor. Then, we have to override the IsValid method. There we extract the object we want to validate and inspect if the Genre property matches our value sent through the constructor. If it’s not we return the Error property as a validation result. Otherwise, we return success.
调用此属性后,我们将在构造函数中传递 genre 参数。然后,我们必须重写 IsValid 方法。在那里,我们提取要验证的对象,并检查 Genre 属性是否与通过构造函数发送的值匹配。如果不是,我们将返回 Error 属性作为验证结果。否则,我们将返回 success。
To call this custom attribute, we can do something like this:
要调用这个 custom attribute,我们可以做这样的事情:
public class Book
{
    public int Id { get; set; }
    [Required] public string? Name { get; set; }
    [Range(10, int.MaxValue)] public int Price { get; set; }
    [ScienceBook(BookGenre.Science)] public string? Genre { get; set; }
}
Now we can use the IValidatableObject interface:
现在我们可以使用 IValidatableObject 接口:
public class Book : IValidatableObject
{
    public int Id { get; set; }
    [Required] public string? Name { get; set; }
    [Range(10, int.MaxValue)] public int Price { get; set; }
    public string? Genre { get; set; }
    public IEnumerable<ValidationResult> Validate(ValidationContext validationContext)
    {
        var errorMessage = $"The genre of the book must be {BookGenre.Science}";
        if (!Genre.Equals(BookGenre.Science.ToString()))
            yield return new ValidationResult(errorMessage, new[] { nameof(Genre) });
    }
}
This validation happens in the model class, where we have to implement the Validate method. The code inside that method is pretty straightforward. Also, pay attention that we don’t have to apply any validation attribute on top of the Genre property.
此验证发生在 model 类中,我们必须在其中实现 Validate 方法。该方法中的代码非常简单。此外,请注意,我们不必在 Genre 属性之上应用任何 validation 属性。
As we’ve seen from the previous examples, we can create a custom attribute in a separate class and even make it generic so it could be reused for other model objects. This is not the case with the IValidatableObject interface. It is used inside the model class and of course, the validation logic can’t be reused.
正如我们从前面的示例中看到的,我们可以在单独的类中创建自定义属性,甚至可以将其设置为泛型,以便它可以被其他模型对象重用。IValidatableObject 接口并非如此。它在 model 类中使用,当然,验证逻辑不能重用。
So, this could be something you can think about when deciding which one to use.
因此,这可能是您在决定使用哪一个时可以考虑的事情。
After all of this theory and code samples, we are ready to implement model validation in our code.
在所有这些理论和代码示例之后,我们准备好在代码中实现模型验证。
13.3 Validation while Creating Resource
13.3 创建资源时进行验证
Let’s send another request for the CreateEmployee action, but this time with the invalid request body:
让我们为 CreateEmployee作发送另一个请求,但这次的请求正文无效:
https://localhost:5001/api/companies/582ea192-6fb7-44ff-a2a1-08d988ca3ca9/employees
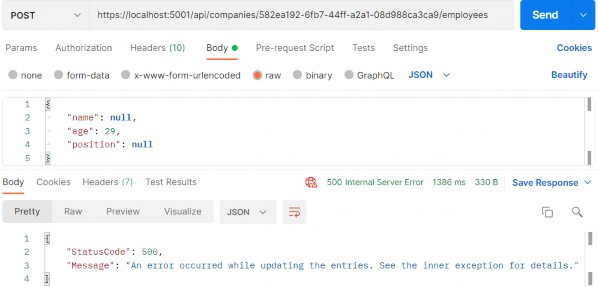
And we get the 500 Internal Server Error, which is a generic message when something unhandled happens in our code. But this is not good. This means that the server made an error, which is not the case. In this case, we, as a consumer, sent the wrong model to the API — thus the error message should be different.
我们得到 500 Internal Server Error,这是我们的代码中发生未处理的事情时的一般消息。但这并不好。这意味着服务器出错,但事实并非如此。在这种情况下,我们作为消费者向 API 发送了错误的模型——因此错误消息应该不同。
To fix this, let’s modify our EmployeeForCreationDto record because that’s what we deserialize the request body to:
为了解决这个问题,让我们修改我们的 EmployeeForCreationDto 记录,因为这是我们将请求正文反序列化为:
using System.ComponentModel.DataAnnotations;

namespace Shared.DataTransferObjects
{
    public record EmployeeForCreationDto(
        [Required(ErrorMessage = "Employee name is a required field.")]
        [MaxLength(30, ErrorMessage = "Maximum length for the Name is 30 characters.")]
        string Name,

        [Required(ErrorMessage = "Age is a required field.")]
        int Age,

        [Required(ErrorMessage = "Position is a required field.")]
        [MaxLength(20, ErrorMessage = "Maximum length for the Position is 20 characters.")]

        string Position
        );
}
This is how we can apply validation attributes in our positional records. But, in our opinion, positional records start losing readability once the attributes are applied, and for that reason, we like using init setters if we have to apply validation attributes. So, we are going to do exactly that and modify this position record:
这就是我们在位置记录中应用验证属性的方法。但是,在我们看来,一旦应用了属性,位置记录就会开始失去可读性,因此,如果必须应用验证属性,我们喜欢使用 init setter。所以,我们将这样做并修改这个位置记录:
using System.ComponentModel.DataAnnotations;

namespace Shared.DataTransferObjects
{
    public record EmployeeForCreationDto
    {
        [Required(ErrorMessage = "Employee name is a required field.")]
        [MaxLength(30, ErrorMessage = "Maximum length for the Name is 30 characters.")]
        public string? Name { get; init; }

        [Required(ErrorMessage = "Age is a required field.")]
        public int Age { get; init; }

        [Required(ErrorMessage = "Position is a required field.")]
        [MaxLength(20, ErrorMessage = "Maximum length for the Position is 20 characters.")]
        public string? Position { get; init; }
    }
}
Now, we have to modify our action:
现在,我们必须修改我们的作:
//[HttpPost]
//public IActionResult CreateEmployeeForCompany(Guid companyId, [FromBody] EmployeeForCreationDto employee)
//{
//    if (employee is null)
//        return BadRequest("EmployeeForCreationDto object is null");
//    var employeeToReturn = _service.EmployeeService.CreateEmployeeForCompany(companyId, employee, trackChanges: false);
//    return CreatedAtRoute("GetEmployeeForCompany", new { companyId, id = employeeToReturn.Id }, employeeToReturn);
//}

[HttpPost]
public IActionResult CreateEmployeeForCompany(Guid companyId, [FromBody] EmployeeForCreationDto employee)
{
    if (employee is null) return BadRequest("EmployeeForCreationDto object is null");
    if (!ModelState.IsValid) return UnprocessableEntity(ModelState);
    var employeeToReturn = _service.EmployeeService.CreateEmployeeForCompany(companyId, employee, trackChanges: false);
    return CreatedAtRoute("GetEmployeeForCompany", new { companyId, id = employeeToReturn.Id }, employeeToReturn);
}
As mentioned before in the part about the ModelState dictionary, all we have to do is to call the IsValid method and return the UnprocessableEntity response by providing our ModelState.
如前所述,在前面关于 ModelState 字典的部分,我们所要做的就是调用 IsValid 方法,并通过提供 ModelState 返回 UnprocessableEntity 响应。
And that is all.
就这样。
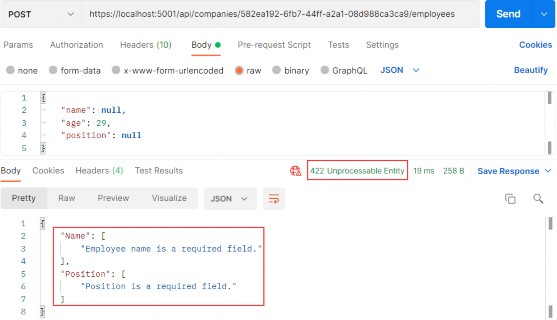
Let’s send our request one more time:
让我们再发送一次我们的请求:
https://localhost:5001/api/companies/582ea192-6fb7-44ff-a2a1-08d988ca3ca9/employees
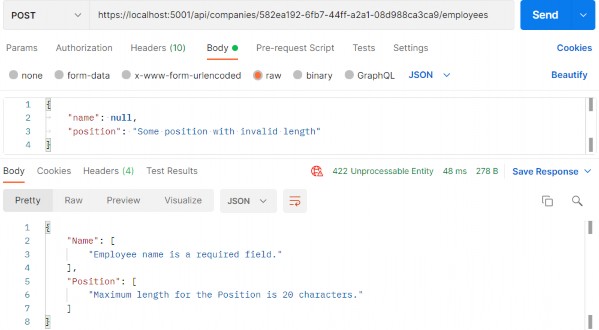
Let’s send an additional request to test the max length rule:
让我们发送一个额外的请求来测试 max length 规则:
https://localhost:5001/api/companies/582ea192-6fb7-44ff-a2a1-08d988ca3ca9/employees
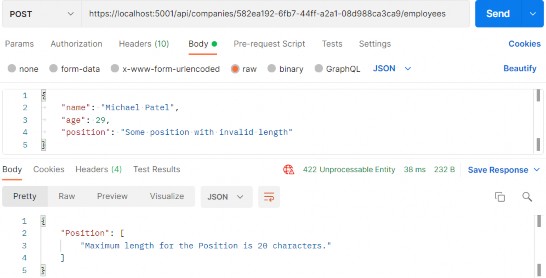
Excellent. It works as expected.
非常好。它按预期工作。
The same actions can be applied for the CreateCompany action and CompanyForCreationDto class — and if you check the source code for this chapter, you will find it implemented.
相同的作可以应用于 CreateCompany作和 CompanyForCreationDto 类 — 如果您查看本章的源代码,您会发现它已实现。
13.3.1 Validating Int Type
13.3.1 验证 int 类型
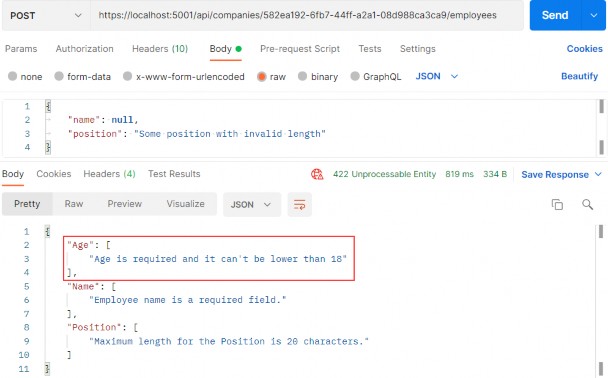
Let’s create one more request with the request body without the age property:
让我们再创建一个请求,请求正文不带 age 属性:
https://localhost:5001/api/companies/582ea192-6fb7-44ff-a2a1-08d988ca3ca9/employees
We can see that the age property hasn’t been sent, but in the response body, we don’t see the error message for the age property next to other error messages. That is because the age is of type int and if we don’t send that property, it would be set to a default value, which is 0.
我们可以看到 age 属性尚未发送,但在响应正文中,我们没有在其他错误消息旁边看到 age 属性的错误消息。这是因为 age 是 int 类型,如果我们不发送该属性,它将被设置为默认值,即 0。
So, on the server-side, validation for the Age property will pass, because it is not null.
因此,在服务器端,对 Age 属性的验证将通过,因为它不是 null。
To prevent this type of behavior, we have to modify the data annotation attribute on top of the Age property in the EmployeeForCreationDto class:
为了防止此类行为,我们必须修改 EmployeeForCreationDto 类中 Age 属性顶部的数据注释属性:
[Range(18, int.MaxValue, ErrorMessage = "Age is required and it can't be lower than 18")]
public int Age { get; init; }
Now, let’s try to send the same request one more time:
现在,让我们尝试再次发送相同的请求:
https://localhost:5001/api/companies/582ea192-6fb7-44ff-a2a1-08d988ca3ca9/employees
Now, we have the Age error message in our response.
现在,我们的响应中有 Age 错误消息。
If we want, we can add the custom error messages in our action: ModelState.AddModelError(string key, string errorMessage)
如果需要,我们可以在作中添加自定义错误消息:ModelState.AddModelError(string key, string errorMessage)
With this expression, the additional error message will be included with all the other messages.
使用此表达式,其他错误消息将包含在所有其他消息中。
13.4 Validation for PUT Requests
13.4 PUT 请求的验证
The validation for PUT requests shouldn’t be different from POST requests (except in some cases), but there are still things we have to do to at least optimize our code.
PUT 请求的验证不应与 POST 请求不同(在某些情况下除外),但我们仍然需要做一些事情来至少优化我们的代码。
But let’s go step by step.
但是,让我们一步一步来。
First, let’s add Data Annotation Attributes to the EmployeeForUpdateDto record:
首先,让我们将 Data Annotation Attributes 添加到 EmployeeForUpdateDto 记录中:
using System.ComponentModel.DataAnnotations;

namespace Shared.DataTransferObjects
{
    public record EmployeeForUpdateDto
    {
        [Required(ErrorMessage = "Employee name is a required field.")]
        [MaxLength(30, ErrorMessage = "Maximum length for the Name is 30 characters.")]

        public string? Name { get; init; }

        [Range(18, int.MaxValue, ErrorMessage = "Age is required and it can't be lower than 18")]
        public int Age { get; init; }

        [Required(ErrorMessage = "Position is a required field.")]
        [MaxLength(20, ErrorMessage = "Maximum length for the Position is 20 characters.")]
        public string? Position { get; init; }
    }
}
Once we have done this, we realize we have a small problem. If we compare this class with the DTO class for creation, we are going to see that they are the same. Of course, we don’t want to repeat ourselves, thus we are going to add some modifications.
一旦我们完成了这些,我们就会意识到我们有一个小问题。如果我们将这个类与用于创建的 DTO 类进行比较,我们将发现它们是相同的。当然,我们不想重复自己,因此我们将添加一些修改。
Let’s create a new record in the DataTransferObjects folder:
让我们在 DataTransferObjects 文件夹中创建一个新记录:
using System.ComponentModel.DataAnnotations;

namespace Shared.DataTransferObjects
{
    public abstract record EmployeeForManipulationDto
    {
        [Required(ErrorMessage = "Employee name is a required field.")]
        [MaxLength(30, ErrorMessage = "Maximum length for the Name is 30 characters.")]
        public string? Name { get; init; }

        [Range(18, int.MaxValue, ErrorMessage = "Age is required and it can't be lower than 18")]
        public int Age { get; init; }

        [Required(ErrorMessage = "Position is a required field.")]
        [MaxLength(20, ErrorMessage = "Maximum length for the Position is 20 characters.")]
        public string? Position { get; init; }
    }
}
We create this record as an abstract record because we want our creation and update DTO records to inherit from it:
我们将此记录创建为抽象记录,因为我们希望创建和更新 DTO 记录继承自它:
public record EmployeeForCreationDto : EmployeeForManipulationDto;
public record EmployeeForUpdateDto : EmployeeForManipulationDto;
Now, we can modify the UpdateEmployeeForCompany action by adding the model validation right after the null check:
现在,我们可以通过在 null 检查后立即添加模型验证来修改 UpdateEmployeeForCompany作:
if (employee is null) return BadRequest("EmployeeForUpdateDto object is null");
if (!ModelState.IsValid) return UnprocessableEntity(ModelState);
The same process can be applied to the Company DTO records and actions. You can find it implemented in the source code for this chapter.
相同的过程可以应用于公司 DTO 记录和作。您可以在本章的源代码中找到它实现的。
Let’s test this:
让我们测试一下:

Great.Everything works well.
一切都很顺利。
13.5 Validation for PATCH Requests
13.5 PATCH 请求的验证
The validation for PATCH requests is a bit different from the previous ones. We are using the ModelState concept again, but this time we have to place it in the ApplyTo method first:
PATCH 请求的验证与前面的验证略有不同。我们再次使用 ModelState 概念,但这次我们必须首先将其放在 ApplyTo 方法中:
patchDoc.ApplyTo(employeeToPatch, ModelState);But once we do this, we are going to get an error. That’s because the current ApplyTo method comes from the JsonPatch namespace, and we need the method with the same name but from the NewtonsoftJson namespace.
但是一旦我们这样做了,就会得到一个错误。这是因为当前的 ApplyTo 方法来自 JsonPatch 命名空间,我们需要具有相同名称但来自 NewtonsoftJson 命名空间的方法。
Since we have the Microsoft.AspNetCore.Mvc.NewtonsoftJson package installed in the main project, we are going to remove it from there and install it in the Presentation project.
由于我们在主项目中安装了 Microsoft.AspNetCore.Mvc.NewtonsoftJson 包,因此我们将从主项目中删除它并将其安装在 Presentation 项目中。
If we navigate to the ApplyTo method declaration we can find two extension methods:
如果我们导航到 ApplyTo 方法声明,我们可以找到两个扩展方法:
public static class JsonPatchExtensions
{
    public static void ApplyTo<T>(this JsonPatchDocument<T> patchDoc, T objectToApplyTo, ModelStateDictionary modelState) where T : class...
    public static void ApplyTo<T>(this JsonPatchDocument<T> patchDoc, T objectToApplyTo, ModelStateDictionary modelState, string prefix) where T : class...
}
We are using the first one.
我们正在使用第一个。
After the package installation, the error in the action will disappear.
安装包后,作中的错误将消失。
Now, right below thee ApplyTo method, we can add our familiar validation logic:
现在,在 ApplyTo 方法的正下方,我们可以添加熟悉的验证逻辑:
patchDoc.ApplyTo(result.employeeToPatch, ModelState);
if (!ModelState.IsValid) return UnprocessableEntity(ModelState);
_service.EmployeeService.SaveChangesForPatch(...);
Let’s test this now:
现在让我们测试一下:
You can see that it works as it is supposed to.
您可以看到它按预期工作。
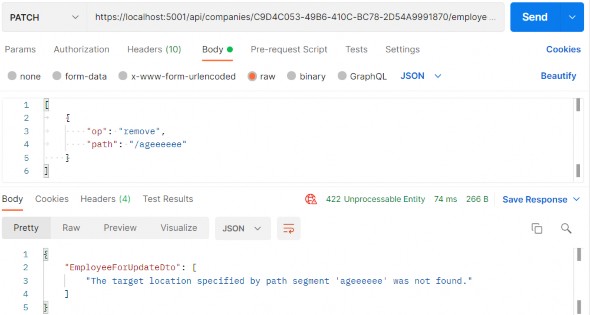
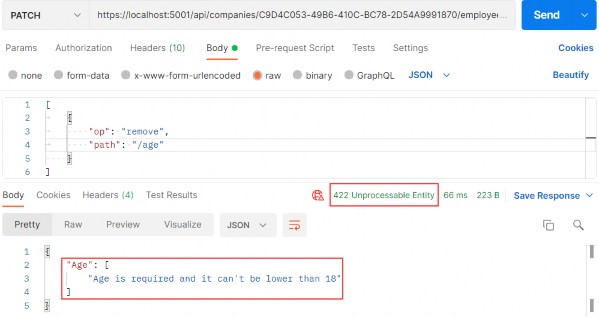
But, we have a small problem now. What if we try to send a remove operation, but for the valid path:
但是,我们现在有一个小问题。如果我们尝试发送一个 remove作,但对于有效路径,该怎么办:
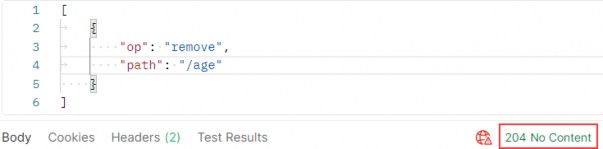
We can see it passes, but this is not good. If you can remember, we said that the remove operation will set the value for the included property to its default value, which is 0. But in the EmployeeForUpdateDto class, we have a Range attribute that doesn’t allow that value to be below 18. So, where is the problem?
我们可以看到它通过,但这并不好。如果您还记得,我们说过 remove作会将 included 属性的值设置为其默认值,即 0。但在 EmployeeForUpdateDto 类中,我们有一个 Range 属性,它不允许该值低于 18。那么,问题出在哪里呢?
Let’s illustrate this for you:
让我们为您说明一下:
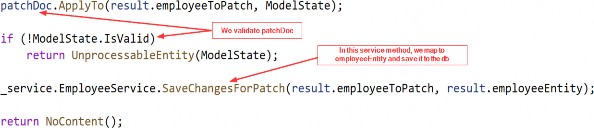
As you can see, we are validating patchDoc which is completely valid at this moment, but we save employeeEntity to the database. So, we need some additional validation to prevent an invalid employeeEntity from being saved to the database:
如你所见,我们正在验证 patchDoc,它目前是完全有效的,但我们把 employeeEntity 保存到数据库中。因此,我们需要一些额外的验证来防止将无效的 employeeEntity 保存到数据库中:
patchDoc.ApplyTo(result.employeeToPatch, ModelState);
TryValidateModel(result.employeeToPatch);
if (!ModelState.IsValid) return UnprocessableEntity(ModelState);
We can use the TryValidateModel method to validate the already patched employeeToPatch instance. This will trigger validation and every error will make ModelState invalid. After that, we execute a familiar validation check.
我们可以使用 TryValidateModel 方法来验证已修补的 employeeToPatch 实例。这将触发验证,并且每个错误都会使 ModelState 无效。之后,我们执行熟悉的验证检查。
Now, we can test this again:
现在,我们可以再次测试一下:
https://localhost:5001/api/companies/C9D4C053-49B6-410C-BC78-2D54A9991870/employees/80ABBCA8-664D- 4B20-B5DE-024705497D4A
And we get 422, which is the expected status code.
我们得到 422,这是预期的状态代码。