21 SUPPORTING HATEOAS
21 支持 HATEOAS
In this section, we are going to talk about one of the most important concepts in building RESTful APIs — HATEOAS and learn how to implement HATEOAS in ASP.NET Core Web API. This part relies heavily on the concepts we've implemented so far in paging, filtering, searching, sorting, and especially data shaping and builds upon the foundations we've put down in these parts.
在本节中,我们将讨论构建 RESTful API 中最重要的概念之一 — HATEOAS,并学习如何在 ASP.NET Core Web API 中实现 HATEOAS。这部分在很大程度上依赖于我们到目前为止在分页、过滤、搜索、排序,尤其是数据调整方面实现的概念,并建立在我们在这些部分中奠定的基础之上。
21.1 What is HATEOAS and Why is it so Important?
21.1 什么是 HATEOAS,为什么它如此重要?
HATEOAS (Hypermedia as the Engine of Application State) is a very important REST constraint. Without it, a REST API cannot be considered RESTful and many of the benefits we get by implementing a REST architecture are unavailable.
HATEOAS(超媒体作为应用程序状态的引擎)是一个非常重要的 REST 约束。没有它,REST API 就不能被视为 RESTful,并且我们无法通过实施 REST 架构获得许多好处。
Hypermedia refers to any kind of content that contains links to media types such as documents, images, videos, etc.
超媒体是指包含指向媒体类型(如文档、图像、视频等)的链接的任何类型的内容。
REST architecture allows us to generate hypermedia links in our responses dynamically and thus make navigation much easier. To put this into perspective, think about a website that uses hyperlinks to help you navigate to different parts of it. You can achieve the same effect with HATEOAS in your REST API.
REST 架构允许我们在响应中动态生成超媒体链接,从而使导航变得更加容易。为了正确看待这一点,请考虑一个使用超链接来帮助您导航到其不同部分的网站。您可以在 REST API 中使用 HATEOAS 实现相同的效果。
Imagine a website that has a home page and you land on it, but there are no links anywhere. You need to scrape the website or find some other way to navigate it to get to the content you want. We're not saying that the website is the same as a REST API, but you get the point.
想象一下,一个网站有一个主页,你登陆它,但任何地方都没有链接。您需要抓取网站或找到其他方法来导航它以访问您想要的内容。我们并不是说该网站与 REST API 相同,但您明白了。
The power of being able to explore an API on your own can be very useful.
能够自行探索 API 的功能可能非常有用。
Let's see how that works.
让我们看看它是如何工作的。
21.1.1 Typical Response with HATEOAS Implemented
21.1.1 实施HATEOAS 的典型响应
Once we implement HATEOAS in our API, we are going to have this type of response:
在 API 中实施 HATEOAS 后,我们将得到这种类型的响应:
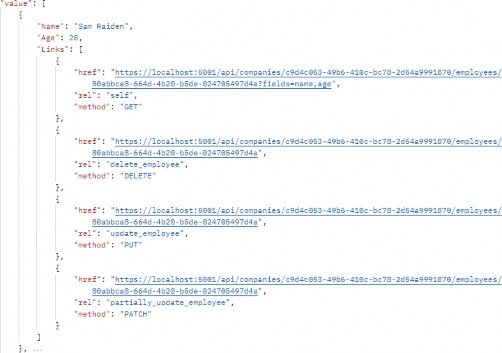
As you can see, we got the list of our employees and for each employee all the actions we can perform on them. And so on...
如您所见,我们得到了我们的员工名单以及我们可以对每位员工执行的所有作。等等......
So, it's a nice way to make an API self-discoverable and evolvable.
因此,这是使 API 可自我发现和可演化的好方法。
21.1.2 What is a Link?
21.1.2 什么是链接?
According to RFC5988, a link is "a typed connection between two resources that are identified by Internationalised Resource Identifiers (IRIs)". Simply put, we use links to traverse the internet or rather the resources on the internet.
根据 RFC5988 的说法,链接是“由国际化资源标识符 (IRI) 标识的两个资源之间的类型化连接”。简而言之,我们使用链接来遍历 Internet,或者更确切地说是 Internet 上的资源。
Our responses contain an array of links, which consist of a few properties according to the RFC:
我们的响应包含一系列链接,根据 RFC,这些链接由一些属性组成:
• href - represents a target URI.
href - 表示目标 URI。
• rel - represents a link relation type, which means it describes how the current context is related to the target resource.
rel -表示链接关系类型,这意味着它描述当前上下文与目标资源的关系。
• method - we need an HTTP method to know how to distinguish the same target URIs.
method - 我们需要一个 HTTP 方法来了解如何区分相同的目标 URI。
21.1.3 Pros/Cons of Implementing HATEOAS
21.1.3 实施 HATEOAS 的利弊
So, what are all the benefits we can expect when implementing HATEOAS?
那么,实施 HATEOAS 时我们可以期待的所有好处是什么?
HATEOAS is not trivial to implement, but the rewards we reap are worth it. Here are the things we can expect to get when we implement HATEOAS:
HATEOAS 的实施并非易事,但我们获得的回报是值得的。以下是我们在实施 HATEOAS 时可以预期获得的东西:
• API becomes self-discoverable and explorable.
API 变得可自我发现和可探索。
• A client can use the links to implement its logic, it becomes much easier, and any changes that happen in the API structure are directly reflected onto the client.
客户端可以使用链接来实现其逻辑,这变得更加容易,并且 API 结构中发生的任何更改都会直接反映到客户端上。
• The server drives the application state and URL structure and not vice versa.
服务器驱动应用程序状态和 URL 结构,反之则不然。
• The link relations can be used to point to the developer’s documentation.
链接关系可用于指向开发人员的文档。
• Versioning through hyperlinks becomes easier.
通过超链接进行版本控制变得更加容易。
• Reduced invalid state transaction calls.
减少了无效状态事务调用。
• API is evolvable without breaking all the clients.
API 是可演化的,而不会破坏所有客户端。
We can do so much with HATEOAS. But since it's not easy to implement all these features, we should keep in mind the scope of our API and if we need all this. There is a great difference between a high-volume public API and some internal API that is needed to communicate between parts of the same system.
我们可以用 HATEOAS 做很多事情。但是由于实现所有这些功能并不容易,我们应该记住 API 的范围以及我们是否需要所有这些。大容量公共 API 与在同一系统的各个部分之间进行通信所需的一些内部 API 之间存在很大差异。
That is more than enough theory for now. Let's get to work and see what the concrete implementation of HATEOAS looks like.
目前,这已经足够了。让我们开始工作,看看 HATEOAS 的具体实现是什么样子。
21.2 Adding Links in the Project
21.2 在项目中添加链接
Let’s begin with the concept we know so far, and that’s the link. In the Entities project, we are going to create the LinkModels folder and inside a new Link class:
让我们从我们目前知道的概念开始,这就是链接。在 Entities 项目中,我们将创建 LinkModels 文件夹,并在新的 Link 类中:
public class Link { public string? Href { get; set; } public string? Rel { get; set; } public string? Method { get; set; } public Link() { } public Link(string href, string rel, string method) { Href = href; Rel = rel; Method = method; } }Note that we have an empty constructor, too. We'll need that for XML serialization purposes, so keep it that way.
请注意,我们还有一个空的构造函数。我们将需要它来进行 XML 序列化,因此请保持这种方式。
Next, we need to create a class that will contain all of our links — LinkResourceBase:
接下来,我们需要创建一个包含所有链接的类 — LinkResourceBase:
public class LinkResourceBase { public LinkResourceBase() {} public List<Link> Links { get; set; } = new List<Link>(); }And finally, since our response needs to describe the root of the controller, we need a wrapper for our links:
最后,由于我们的响应需要描述控制器的根,因此我们需要一个链接的包装器:
public class LinkCollectionWrapper<T> : LinkResourceBase { public List<T> Value { get; set; } = new List<T>(); public LinkCollectionWrapper() { } public LinkCollectionWrapper(List<T> value) => Value = value; }This class might not make too much sense right now, but stay with us and it will become clear later down the road. For now, let's just assume we wrapped our links in another class for response representation purposes.
这门课现在可能没有太大意义,但请留在我们身边,稍后会变得清晰。现在,我们只假设我们将链接包装在另一个类中以用于响应表示目的。
Since our response will contain links too, we need to extend the XML serialization rules so that our XML response returns the properly formatted links. Without this, we would get something like:
由于我们的响应也将包含链接,因此我们需要扩展 XML 序列化规则,以便我们的 XML 响应返回格式正确的链接。如果没有这个,我们会得到这样的结果:
<Links>System.Collections.Generic.List1[Entites.Models.Link]. So, in the Entities/Models/Entity class, we need to extend the WriteLinksToXml method to support links: .因此,在 Entities/Models/Entity 类中,我们需要扩展 WriteLinksToXml 方法以支持链接:<Links>System.Collections.Generic.List1[Entites.Models.Link]
private void WriteLinksToXml(string key, object value, XmlWriter writer) { writer.WriteStartElement(key); if (value.GetType() == typeof(List<Link>)) { foreach (var val in value as List<Link>) { writer.WriteStartElement(nameof(Link)); WriteLinksToXml(nameof(val.Href), val.Href, writer); WriteLinksToXml(nameof(val.Method), val.Method, writer); WriteLinksToXml(nameof(val.Rel), val.Rel, writer); writer.WriteEndElement(); } } else { writer.WriteString(value.ToString()); } writer.WriteEndElement(); }So, we check if the type is List<Link>. If it is, we iterate through all the links and call the method recursively for each of the properties: href, method, and rel.
因此,我们检查类型是否为List<Link>。如果是,我们遍历所有链接,并为每个属性递归调用该方法:href、method 和 rel。
That's all we need for now. We have a solid foundation to implement HATEOAS in our project.
这就是我们现在需要的。我们有坚实的基础来在我们的项目中实施 HATEOAS。
21.3 Additional Project Changes
21.3 其他 Project 更改
When we generate links, HATEOAS strongly relies on having the ids available to construct the links for the response. Data shaping, on the other hand, enables us to return only the fields we want. So, if we want only the name and age fields, the id field won’t be added. To solve that, we have to apply some changes.
当我们生成链接时,HATEOAS 强烈依赖于可用的 id 来构建响应的链接。另一方面,数据整形使我们能够仅返回我们想要的字段。因此,如果我们只需要 name 和 age 字段,则不会添加 id 字段。为了解决这个问题,我们必须应用一些更改。
The first thing we are going to do is to add a ShapedEntity class in the Entities/Models folder:
我们要做的第一件事是在 Entities/Models 文件夹中添加一个 ShapedEntity 类:
public class ShapedEntity { public ShapedEntity() { Entity = new Entity(); } public Guid Id { get; set; } public Entity Entity { get; set; } }With this class, we expose the Entity and the Id property as well.
使用此类,我们还公开了 Entity 和 Id 属性。
Now, we have to modify the IDataShaper interface and the DataShaper class by replacing all Entity usage with ShapedEntity.
现在,我们必须修改 IDataShaper 接口和 DataShaper 类,将所有 Entity 用法替换为 ShapedEntity。
In addition to that, we need to extend the FetchDataForEntity method in the DataShaper class to get the id separately:
除此之外,我们还需要在 DataShaper 类中扩展 FetchDataForEntity 方法,以单独获取 id:
private ShapedEntity FetchDataForEntity(T entity, IEnumerable<PropertyInfo> requiredProperties) { var shapedObject = new ShapedEntity(); foreach (var property in requiredProperties) { var objectPropertyValue = property.GetValue(entity); shapedObject.Entity.TryAdd(property.Name, objectPropertyValue); } var objectProperty = entity.GetType().GetProperty("Id"); shapedObject.Id = (Guid)objectProperty.GetValue(entity); return shapedObject; }Finally, let’s add the LinkResponse class in the LinkModels folder; that will help us with the response once we start with the HATEOAS implementation:
最后,让我们在 LinkModels 文件夹中添加 LinkResponse 类;这将有助于我们在开始 HATEOAS 实现后做出响应:
public class LinkResponse
{ public bool HasLinks { get; set; } public List<Entity> ShapedEntities { get; set; } public LinkCollectionWrapper<Entity> LinkedEntities { get; set; } public LinkResponse() { LinkedEntities = new LinkCollectionWrapper<Entity>(); ShapedEntities = new List<Entity>(); } }
With this class, we are going to know whether our response has links. If it does, we are going to use the LinkedEntities property. Otherwise, we are going to use the ShapedEntities property.
通过这个类,我们将知道我们的响应是否有链接。如果是这样,我们将使用 LinkedEntities 属性。否则,我们将使用 ShapedEntities 属性。
21.4 Adding Custom Media Types
21.4 添加自定义媒体类型
What we want to do is to enable links in our response only if it is explicitly asked for. To do that, we are going to introduce custom media types.
我们想要做的是,只有在明确要求的情况下,才在我们的响应中启用链接。为此,我们将引入自定义媒体类型。
Before we start, let’s see how we can create a custom media type. A custom media type should look something like this: application/vnd.codemaze.hateoas+json. To compare it to the typical json media type which we use by default: application/json.
在开始之前,让我们看看如何创建自定义媒体类型。自定义媒体类型应如下所示:application/vnd.codemaze.hateoas+json。将其与我们默认使用的典型 json 媒体类型进行比较:application/json。
So let’s break down the different parts of a custom media type:
因此,让我们分解自定义媒体类型的不同部分:
• vnd – vendor prefix; it’s always there.
• codemaze – vendor identifier; we’ve chosen codemaze, because why not?
• hateoas – media type name.
• json – suffix; we can use it to describe if we want json or an XML response, for example.
Now, let’s implement that in our application.
现在,让我们在应用程序中实现它。
21.4.1 Registering Custom Media Types
21.4.1 注册自定义媒体类型
First, we want to register our new custom media types in the middleware. Otherwise, we’ll just get a 406 Not Acceptable message.
首先,我们想在中间件中注册新的自定义媒体类型。否则,我们只会收到 406 Not Acceptable 消息。
Let’s add a new extension method to our ServiceExtensions:
让我们向 ServiceExtensions 添加新的扩展方法:
public static void AddCustomMediaTypes(this IServiceCollection services) { services.Configure<MvcOptions>(config => { var systemTextJsonOutputFormatter = config.OutputFormatters .OfType<SystemTextJsonOutputFormatter>()?.FirstOrDefault(); if (systemTextJsonOutputFormatter != null) { systemTextJsonOutputFormatter.SupportedMediaTypes .Add("application/vnd.codemaze.hateoas+json"); } var xmlOutputFormatter = config.OutputFormatters .OfType<XmlDataContractSerializerOutputFormatter>()? .FirstOrDefault(); if (xmlOutputFormatter != null) { xmlOutputFormatter.SupportedMediaTypes .Add("application/vnd.codemaze.hateoas+xml"); } }); }We are registering two new custom media types for the JSON and XML output formatters. This ensures we don’t get a 406 Not Acceptable response.
我们正在为 JSON 和 XML 输出格式化程序注册两种新的自定义媒体类型。这可确保我们不会收到 406 Not Acceptable 响应。
Now, we have to add that to the Program class, just after the AddControllers method:
现在,我们必须将其添加到 Program 类中,就在 AddControllers 方法之后:
builder.Services.AddCustomMediaTypes();Excellent. The registration process is done.
非常好。注册过程已完成。
21.4.2 Implementing a Media Type Validation Filter
21.4.2 实现媒体类型验证过滤器
Now, since we’ve implemented custom media types, we want our Accept header to be present in our requests so we can detect when the user requested the HATEOAS-enriched response.
现在,由于我们已经实现了自定义媒体类型,因此我们希望 Accept 标头出现在我们的请求中,以便我们可以检测用户何时请求了 HATEOAS 扩充的响应。
To do that, we’ll implement an ActionFilter in the Presentation project inside the ActionFilters folder, which will validate our Accept header and media types:
为此,我们将在 ActionFilters 文件夹内的 Presentation 项目中实现一个 ActionFilter,它将验证我们的 Accept 标头和媒体类型:
public class ValidateMediaTypeAttribute : IActionFilter { public void OnActionExecuting(ActionExecutingContext context) { var acceptHeaderPresent = context.HttpContext .Request.Headers.ContainsKey("Accept"); if (!acceptHeaderPresent) { context.Result = new BadRequestObjectResult($"Accept header is missing."); return; } var mediaType = context.HttpContext .Request.Headers["Accept"].FirstOrDefault(); if (!MediaTypeHeaderValue.TryParse(mediaType, out MediaTypeHeaderValue? outMediaType)) { context.Result = new BadRequestObjectResult($"Media type not present. Please add Accept header with the required media type."); return; } context.HttpContext.Items.Add("AcceptHeaderMediaType", outMediaType); } public void OnActionExecuted(ActionExecutedContext context){} }We check for the existence of the Accept header first. If it’s not present, we return BadRequest. If it is, we parse the media type — and if there is no valid media type present, we return BadRequest.
我们首先检查 Accept 标头是否存在。如果不存在,则返回 BadRequest。如果是,我们解析媒体类型——如果不存在有效的媒体类型,我们返回 BadRequest。
Once we’ve passed the validation checks, we pass the parsed media type to the HttpContext of the controller.
通过验证检查后,我们将解析的媒体类型传递给控制器的 HttpContext。
Now, we have to register the filter in the Program class:
现在,我们必须在 Program 类中注册过滤器:
builder.Services.AddScoped<ValidateMediaTypeAttribute>();And to decorate the GetEmployeesForCompany action:
要修饰 GetEmployeesForCompany作,请执行以下作:
[HttpGet] [ServiceFilter(typeof(ValidateMediaTypeAttribute))] public async Task<IActionResult> GetEmployeesForCompany(Guid companyId, [FromQuery] EmployeeParameters employeeParameters)Great job.
干得好。
Finally, we can work on the HATEOAS implementation.
最后,我们可以进行 HATEOAS 实现。
21.5 Implementing HATEOAS
21.5 实施 HATEOAS
We are going to start by creating a new interface in the Contracts project:
首先,在 Contracts 项目中创建一个新接口:
public interface IEmployeeLinks { LinkResponse TryGenerateLinks(IEnumerable<EmployeeDto> employeesDto, string fields, Guid companyId, HttpContext httpContext); }Currently, you will get the error about HttpContext, but we will solve that a bit later.
目前,您将收到有关 HttpContext 的错误,但我们稍后会解决这个问题。
Let’s continue by creating a new Utility folder in the main project and the EmployeeLinks class in it. Let’s start by adding the required dependencies inside the class:
让我们继续在主项目中创建一个新的 Utility 文件夹,并在其中创建一个 EmployeeLinks 类。让我们从在类中添加所需的依赖项开始:
public class EmployeeLinks : IEmployeeLinks { private readonly LinkGenerator _linkGenerator; private readonly IDataShaper<EmployeeDto> _dataShaper; public EmployeeLinks(LinkGenerator linkGenerator, IDataShaper<EmployeeDto> dataShaper) { _linkGenerator = linkGenerator; _dataShaper = dataShaper; } }We are going to use LinkGenerator to generate links for our responses and IDataShaper to shape our data. As you can see, the shaping logic is now extracted from the EmployeeService class, which we will modify a bit later.
我们将使用 LinkGenerator 为我们的响应生成链接,并使用 IDataShaper 来塑造我们的数据。如您所见,调整逻辑现在是从 EmployeeService 类中提取的,我们稍后将对其进行修改。
After dependencies, we are going to add the first method:
在依赖项之后,我们将添加第一个方法:
public LinkResponse TryGenerateLinks(IEnumerable<EmployeeDto> employeesDto, string fields, Guid companyId, HttpContext httpContext) { var shapedEmployees = ShapeData(employeesDto, fields); if (ShouldGenerateLinks(httpContext)) return ReturnLinkdedEmployees(employeesDto, fields, companyId, httpContext, shapedEmployees); return ReturnShapedEmployees(shapedEmployees);}So, our method accepts four parameters. The employeeDto collection, the fields that are going to be used to shape the previous collection, companyId because routes to the employee resources contain the Id from the company, and httpContext which holds information about media types.
因此,我们的方法接受四个参数。employeeDto 集合、将用于塑造前一个集合的字段、companyId(因为到员工资源的路由包含来自公司的 Id)和 httpContext(保存有关媒体类型的信息)。
The first thing we do is shape our collection. Then if the httpContext contains the required media type, we add links to the response. On the other hand, we just return our shaped data.
我们做的第一件事是塑造我们的收藏。然后,如果 httpContext 包含所需的媒体类型,我们将添加指向响应的链接。另一方面,我们只返回我们的 shaped 数据。
Of course, we have to add those not implemented methods:
当然,我们必须添加那些未实现的方法:
private List<Entity> ShapeData(IEnumerable<EmployeeDto> employeesDto, string fields) => _dataShaper.ShapeData(employeesDto, fields) .Select(e => e.Entity) .ToList();The ShapeData method executes data shaping and extracts only the entity part without the Id property.
ShapeData 方法执行数据调整,并仅提取不带 Id 属性的实体部分。
Let’s add two additional methods:
让我们添加两个额外的方法:
private bool ShouldGenerateLinks(HttpContext httpContext) { var mediaType = (MediaTypeHeaderValue)httpContext.Items["AcceptHeaderMediaType"]; return mediaType.SubTypeWithoutSuffix.EndsWith("hateoas", StringComparison.InvariantCultureIgnoreCase); } private LinkResponse ReturnShapedEmployees(List<Entity> shapedEmployees) => new LinkResponse { ShapedEntities = shapedEmployees };In the ShouldGenerateLinks method, we extract the media type from the httpContext. If that media type ends with hateoas, the method returns true; otherwise, it returns false. The ReturnShapedEmployees method just returns a new LinkResponse with the ShapedEntities property populated. By default, the HasLinks property is false.
在 ShouldGenerateLinks 方法中,我们从 httpContext 中提取媒体类型。如果该媒体类型以 hateoas 结尾,则该方法返回 true;否则,它将返回 false。ReturnShapedEmployees 方法只返回一个填充了 ShapedEntities 属性的新 LinkResponse。默认情况下,HasLinks 属性为 false。
After these methods, we have to add the ReturnLinkedEmployees method as well:
在这些方法之后,我们还必须添加 ReturnLinkedEmployees 方法:
private LinkResponse ReturnLinkdedEmployees(IEnumerable<EmployeeDto> employeesDto, string fields, Guid companyId, HttpContext httpContext, List<Entity> shapedEmployees) { var employeeDtoList = employeesDto.ToList(); for (var index = 0; index < employeeDtoList.Count(); index++) { var employeeLinks = CreateLinksForEmployee(httpContext, companyId, employeeDtoList[index].Id, fields); shapedEmployees[index].Add("Links", employeeLinks); } var employeeCollection = new LinkCollectionWrapper<Entity>(shapedEmployees); var linkedEmployees = CreateLinksForEmployees(httpContext, employeeCollection); return new LinkResponse { HasLinks = true, LinkedEntities = linkedEmployees }; }In this method, we iterate through each employee and create links for it by calling the CreateLinksForEmployee method. Then, we just add it to the shapedEmployees collection. After that, we wrap the collection and create links that are important for the entire collection by calling the CreateLinksForEmployees method.
在此方法中,我们循环访问每个员工,并通过调用 CreateLinksForEmployee 方法为其创建链接。然后,我们只需将其添加到 shapedEmployees 集合中。之后,我们通过调用 CreateLinksForEmployees 方法包装集合并创建对整个集合很重要的链接。
Finally, we have to add those two new methods that create links:
最后,我们必须添加这两个创建链接的新方法:
private List<Link> CreateLinksForEmployee(HttpContext httpContext, Guid companyId, Guid id, string fields = "") { var links = new List<Link> { new Link(_linkGenerator.GetUriByAction(httpContext, "GetEmployeeForCompany", values: new { companyId, id, fields }), "self", "GET"), new Link(_linkGenerator.GetUriByAction(httpContext, "DeleteEmployeeForCompany", values: new { companyId, id }), "delete_employee", "DELETE"), new Link(_linkGenerator.GetUriByAction(httpContext, "UpdateEmployeeForCompany", values: new { companyId, id }), "update_employee", "PUT"), new Link(_linkGenerator.GetUriByAction(httpContext, "PartiallyUpdateEmployeeForCompany", values: new { companyId, id }), "partially_update_employee", "PATCH") }; return links;
} private LinkCollectionWrapper<Entity> CreateLinksForEmployees(HttpContext httpContext, LinkCollectionWrapper<Entity> employeesWrapper) { employeesWrapper.Links.Add(new Link(_linkGenerator.GetUriByAction(httpContext, "GetEmployeesForCompany", values: new { }), "self", "GET")); return employeesWrapper; }
There are a few things to note here.
这里有几点需要注意。
We need to consider the fields while creating the links since we might be using them in our requests. We are creating the links by using the LinkGenerator‘s GetUriByAction method — which accepts HttpContext, the name of the action, and the values that need to be used to make the URL valid. In the case of the EmployeesController, we send the company id, employee id, and fields.
我们在创建链接时需要考虑这些字段,因为我们可能会在请求中使用它们。我们使用 LinkGenerator 的 GetUriByAction 方法创建链接,该方法接受 HttpContext、作的名称以及需要用于使 URL 有效的值。对于 EmployeesController,我们发送公司 ID、员工 ID 和字段。
And that is it regarding this class.
这就是关于这个类的内容。
Now, we have to register this class in the Program class:
现在,我们必须在 Program 类中注册这个类:
builder.Services.AddScoped<IEmployeeLinks, EmployeeLinks>();After the service registration, we are going to create a new record inside the Entities/LinkModels folder:
服务注册后,我们将在 Entities/LinkModels 文件夹中创建一个新记录:
public record LinkParameters(EmployeeParameters EmployeeParameters, HttpContext Context);We are going to use this record to transfer required parameters from our controller to the service layer and avoid the installation of an additional NuGet package inside the Service and Service.Contracts projects.
我们将使用此记录将所需参数从控制器传输到服务层,并避免在 Service 和 Service.Contracts 项目中安装额外的 NuGet 包。
Also for this to work, we have to add the reference to the Shared project, install the Microsoft.AspNetCore.Mvc.Abstractions package needed for HttpContext, and add required using directives:
此外,要使其正常工作,我们必须添加对 Shared 项目的引用,安装 HttpContext 所需的 Microsoft.AspNetCore.Mvc.Abstractions 包,并添加所需的 using 指令:
using Microsoft.AspNetCore.Http;
using Shared.RequestFeatures;
Now, we can return to the IEmployeeLinks interface and fix that error by importing the required namespace. As you can see, we didn’t have to install the Abstractions NuGet package since Contracts references Entities. If Visual Studio keeps asking for the package installation, just remove the Entities reference from the Contracts project and add it again.
现在,我们可以返回到 IEmployeeLinks 接口,并通过导入所需的命名空间来修复该错误。如你所见,我们不必安装抽象 NuGet 包,因为 Contracts 引用实体。如果 Visual Studio 不断要求安装包,只需从 Contracts 项目中删除 Entities 引用,然后再次添加它。
Once that is done, we can modify the EmployeesController:
完成后,我们可以修改 EmployeesController:
[HttpGet] [ServiceFilter(typeof(ValidateMediaTypeAttribute))] public async Task<IActionResult> GetEmployeesForCompany(Guid companyId, [FromQuery] EmployeeParameters employeeParameters) { var linkParams = new LinkParameters(employeeParameters, HttpContext); var pagedResult = await _service.EmployeeService.GetEmployeesAsync(companyId, linkParams, trackChanges: false); Response.Headers.Add("X-Pagination", JsonSerializer.Serialize(pagedResult.metaData)); return Ok(pagedResult.employees); }So, we create the linkParams variable and send it instead of employeeParameters to the service method.
因此,我们创建 linkParams 变量并将其(而不是 employeeParameters)发送到 service 方法。
Of course, this means we have to modify the IEmployeeService interface:
当然,这意味着我们必须修改 IEmployeeService 接口:
Task<(LinkResponse linkResponse, MetaData metaData)> GetEmployeesAsync(Guid companyId, LinkParameters linkParameters, bool trackChanges);Now the Tuple return type has the LinkResponse as the first field and also we have LinkParameters as the second parameter.
现在,Tuple 返回类型将 LinkResponse 作为第一个字段,并将 LinkParameters 作为第二个参数。
After we modified our interface, let’s modify the EmployeeService class:
修改接口后,让我们修改 EmployeeService 类:
private readonly IRepositoryManager _repository; private readonly ILoggerManager _logger; private readonly IMapper _mapper; private readonly IEmployeeLinks _employeeLinks; public EmployeeService(IRepositoryManager repository, ILoggerManager logger, IMapper mapper, IEmployeeLinks employeeLinks) {_repository = repository; _logger = logger; _mapper = mapper; _employeeLinks = employeeLinks; } public async Task<(LinkResponse linkResponse, MetaData metaData)> GetEmployeesAsync (Guid companyId, LinkParameters linkParameters, bool trackChanges) { if (!linkParameters.EmployeeParameters.ValidAgeRange) throw new MaxAgeRangeBadRequestException(); await CheckIfCompanyExists(companyId, trackChanges); var employeesWithMetaData = await _repository.Employee .GetEmployeesAsync(companyId, linkParameters.EmployeeParameters, trackChanges); var employeesDto = _mapper.Map<IEnumerable<EmployeeDto>>(employeesWithMetaData); var links = _employeeLinks.TryGenerateLinks(employeesDto, linkParameters.EmployeeParameters.Fields, companyId, linkParameters.Context); return (linkResponse: links, metaData: employeesWithMetaData.MetaData); }First, we don’t have the DataShaper injected anymore since this logic is now inside the EmployeeLinks class. Then, we change the method signature, fix a couple of errors since now we have linkParameters and not employeeParameters as a parameter, and we call the TryGenerateLinks method, which will return LinkResponse as a result.
首先,我们不再注入 DataShaper,因为此逻辑现在位于 EmployeeLinks 类中。然后,我们更改方法签名,修复几个错误,因为现在我们有 linkParameters 而不是 employeeParameters 作为参数,并且我们调用 TryGenerateLinks 方法,该方法将返回 LinkResponse 作为结果。
Finally, we construct our Tuple and return it to the caller.
最后,我们构造 Tuple 并将其返回给调用者。
Now we can return to our controller and modify the GetEmployeesForCompany action:
现在我们可以返回到控制器并修改 GetEmployeesForCompany作:
[HttpGet] [ServiceFilter(typeof(ValidateMediaTypeAttribute))] public async Task<IActionResult> GetEmployeesForCompany(Guid companyId, [FromQuery] EmployeeParameters employeeParameters) { var linkParams = new LinkParameters(employeeParameters, HttpContext); var result = await _service.EmployeeService.GetEmployeesAsync(companyId, linkParams, trackChanges: false); Response.Headers.Add("X-Pagination", JsonSerializer.Serialize(result.metaData));return result.linkResponse.HasLinks ? Ok(result.linkResponse.LinkedEntities) : Ok(result.linkResponse.ShapedEntities); }We change the pageResult variable name to result and use it to return the proper response to the client. If our result has links, we return linked entities, otherwise, we return shaped ones.
我们将 pageResult 变量名称更改为 result,并使用它向客户端返回正确的响应。如果我们的结果有链接,我们返回链接的实体,否则,我们返回有形状的实体。
Before we test this, we shouldn’t forget to modify the ServiceManager’s constructor:
在我们测试之前,我们不应该忘记修改 ServiceManager 的构造函数:
public ServiceManager(IRepositoryManager repositoryManager, ILoggerManager logger, IMapper mapper, IEmployeeLinks employeeLinks) { _companyService = new Lazy<ICompanyService>(() => new CompanyService(repositoryManager, logger, mapper)); _employeeService = new Lazy<IEmployeeService>(() => new EmployeeService(repositoryManager, logger, mapper, employeeLinks)); }Excellent. We can test this now:
非常好。我们现在可以测试一下:
https://localhost:5001/api/companies/C9D4C053-49B6-410C-BC78-2D54A9991870/employees?pageNumber=1&pageSize=4&minAge=26&maxAge=32&searchTerm=A&orderBy=namedesc&fields=name,age
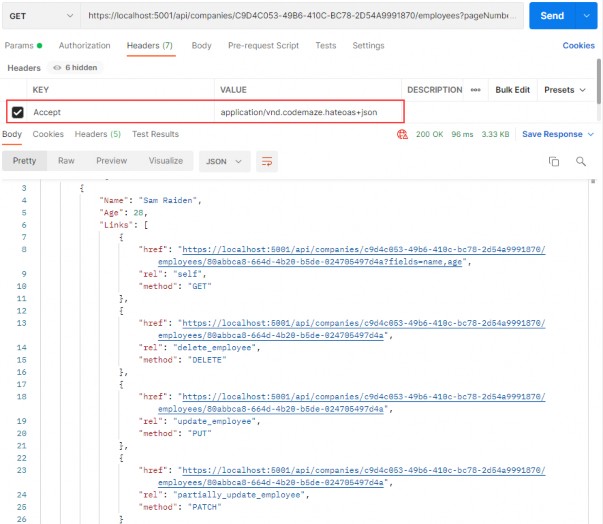
You can test this with the xml media type as well (we have prepared the request in Postman for you).
您也可以使用 xml 媒体类型对此进行测试(我们已经在 Postman 中为您准备了请求)。