5 Essential C# features
This chapter covers
• Using C# language features for ASP.NET Core development
• Dealing with null values and the null state analysis feature
• Creating objects concisely
• Adding features to classes without directly modifying them
• Expressing functions concisely
• Modifying interfaces without breaking implementation classes
• Defining asynchronous methods
In this chapter, I describe C# features used in web application development that are not widely understood or that often cause confusion. This is not a book about C#, however, so I provide only a brief example for each feature so that you can follow the examples in the rest of the book and take advantage of these features in your projects. Table 5.1 provides a guide to this chapter.
Table 5.1 Chapter guide
| Problem | Solution | Listing |
|---|---|---|
Reducing duplication in using statements
|
Use global or implicit using statements.
|
8–10 |
| Managing null values | Use nullable and non-nullable types, which are managed with the null management operators. | 11–20 |
| Mixing static and dynamic values in strings | Use string interpolation. | 21 |
| Initializing and populate objects |
Use the object and collection initializers and target-typed new expressions.
|
22–26 |
| Assigning a value for specific types | Use pattern matching. | 27, 28 |
| Extending the functionality of a class without modifying it | Define an extension method. | 29–36 |
| Expressing functions and methods concisely | Use lambda expressions. | 37–44 |
| Defining a variable without explicitly declaring its type |
Use the var keyword.
|
45–47 |
| Modifying an interface without requiring changes in its implementation classes | Define a default implementation. | 48–52 |
| Performing work asynchronously |
Use tasks or the async/await keywords.
|
53–55 |
| Producing a sequence of values over time | Use an asynchronous enumerable. | 56–59 |
| Getting the name of a class or member |
Use a nameof expression.
|
60, 61 |
5.1 Preparing for this chapter
To create the example project for this chapter, open a new PowerShell command prompt and run the commands shown in listing 5.1. If you are using Visual Studio and prefer not to use the command line, you can create the project using the process described in chapter 4.
TIP You can download the example project for this chapter—and for all the other chapters in this book—from https://github.com/manningbooks/pro-asp.net-core-7. See chapter 1 for how to get help if you have problems running the examples.
Listing 5.1 Creating the example project
dotnet new globaljson --sdk-version 7.0.100 --output LanguageFeatures
dotnet new web --no-https --output LanguageFeatures --framework net7.0
dotnet new sln -o LanguageFeatures
dotnet sln LanguageFeatures add LanguageFeatures
5.1.1 Opening the project
If you are using Visual Studio, select File > Open > Project/Solution, select the LanguageFeatures.sln file in the LanguageFeatures folder, and click the Open button to open the solution file and the project it references. If you are using Visual Studio Code, select File > Open Folder, navigate to the LanguageFeatures folder, and click the Select Folder button.
5.1.2 Enabling the MVC Framework
The web project template creates a project that contains a minimal ASP.NET Core configuration. This means the placeholder content that is added by the mvc template used in chapter 3 is not available and that extra steps are required to reach the point where the application can produce useful output. In this section, I make the changes required to set up the MVC Framework, which is one of the application frameworks supported by ASP.NET Core, as I explained in chapter 1. First, to enable the MVC framework, make the changes shown in listing 5.2 to the Program.cs file.
Listing 5.2 Enabling MVC in the Program.cs file in the LanguageFeatures folder
var builder = WebApplication.CreateBuilder(args);

builder.Services.AddControllersWithViews();

var app = builder.Build();

//app.MapGet("/", () => "Hello World!");
app.MapDefaultControllerRoute();

app.Run();
I explain how to configure ASP.NET Core applications in part 2, but the two statements added in listing 5.2 provide a basic MVC framework setup using a default configuration.
5.1.3 Creating the application components
Now that the MVC framework is set up, I can add the application components that I will use to demonstrate important C# language features. As you create these components, you will see that the code editor underlines some expressions to warn you of potential problems. These are safe to ignore until the “Understanding Null State Analysis” section, where I explain their significance.
Creating the data model
I started by creating a simple model class so that I can have some data to work with. I added a folder called Models and created a class file called Product.cs within it, which I used to define the class shown in listing 5.3.
Listing 5.3 The contents of the Product.cs file in the Models folder
namespace LanguageFeatures.Models {
    public class Product {

        public string Name { get; set; }
        public decimal? Price { get; set; }

        public static Product[] GetProducts() {

            Product kayak = new Product {
                Name = "Kayak", Price = 275M
            };

            Product lifejacket = new Product {
                Name = "Lifejacket", Price = 48.95M
            };

            return new Product[] { kayak, lifejacket, null };
        }
    }
}
The Product class defines Name and Price properties, and there is a static method called GetProducts that returns a Product array. One of the elements contained in the array returned by the GetProducts method is set to null, which I will use to demonstrate some useful language features later in the chapter.
The Visual Studio and Visual Studio Code editors will highlight a problem with the Name property. This is a deliberate error that I explain later in the chapter and which should be ignored for now.
Creating the controller and view
For the examples in this chapter, I use a simple controller class to demonstrate different language features. I created a Controllers folder and added to it a class file called HomeController.cs, the contents of which are shown in listing 5.4.
Listing 5.4 The contents of the HomeController.cs file in the Controllers folder
using Microsoft.AspNetCore.Mvc;

namespace LanguageFeatures.Controllers {
    public class HomeController : Controller {

        public ViewResult Index() {
            return View(new string[] { "C#", "Language", "Features" });
        }
    }
}
The Index action method tells ASP.NET Core to render the default view and provides it with an array of strings as its view model, which will be included in the HTML sent to the client. To create the view, I added a Views/Home folder (by creating a Views folder and then adding a Home folder within it) and added a Razor View called Index.cshtml, the contents of which are shown in listing 5.5.
Listing 5.5 The contents of the Index.cshtml file in the Views/Home folder
@model IEnumerable<string>
@{ Layout = null; }

<!DOCTYPE html>
<html>
<head>
    <meta name="viewport" content="width=device-width" />
    <title>Language Features</title>
</head>
<body>
    <ul>
        @foreach (string s in Model) {
            <li>@s</li>
        }
    </ul>
</body>
</html>
The code editor will highlight part of this file to denote a warning, which I explain shortly.
5.1.4 Selecting the HTTP port
Change the HTTP port that ASP.NET Core uses to receive requests, as shown in listing 5.6.
Listing 5.6 Setting the HTTP port in the launchSettings.json file in the Properties folder
{
  "iisSettings": {
    "windowsAuthentication": false,
    "anonymousAuthentication": true,
    "iisExpress": {
      "applicationUrl": "http://localhost:5000",
      "sslPort": 0
    }
  },
  "profiles": {
    "LanguageFeatures": {
      "commandName": "Project",
      "dotnetRunMessages": true,
      "launchBrowser": true,
      "applicationUrl": "http://localhost:5000",
      "environmentVariables": {
        "ASPNETCORE_ENVIRONMENT": "Development"
      }
    },
    "IIS Express": {
      "commandName": "IISExpress",
      "launchBrowser": true,
      "environmentVariables": {
        "ASPNETCORE_ENVIRONMENT": "Development"
      }
    }
  }
}
5.1.5 Running the example application
Start ASP.NET Core by running the command shown in listing 5.7 in the LanguageFeatures folder.
Listing 5.7 Running the example application
dotnet run
The output from the dotnet run command will include two build warnings, which I explain in the “Understanding Null State Analysis” section. Once ASP.NET Core has started, use a web browser to request http://localhost:5000, and you will see the output shown in figure 5.1.
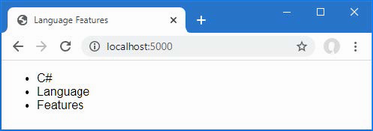
Figure 5.1 Running the example application
Since the output from all the examples in this chapter is text, I will show the messages displayed by the browser like this:
• C#
• Language
• Features
5.2 Understanding top-level statements
Top-level statements are intended to remove unnecessary code structure from class files. A project can contain one file that defines code statements outside of a namespace or a file. For ASP.NET Core applications, this feature is used to configure the application in the Program.cs file. Here is the content of the Program.cs file in the example application for this chapter:
var builder = WebApplication.CreateBuilder(args);

builder.Services.AddControllersWithViews();

var app = builder.Build();

//app.MapGet("/", () => "Hello World!");

app.MapDefaultControllerRoute();

app.Run();
If you have used earlier versions of ASP.NET Core, you will be familiar with the Startup class, which was used to configure the application. Top-level statements have allowed this process to be simplified, and all of the configuration statements are now defined in the Program.cs file.
The compiler will report an error if there is more than one file in a project with top-level statements, so the Program.cs file is the only place you will find them in an ASP.NET Core project.
5.3 Understanding global using statements
C# supports global using statements, which allow a using statement to be defined once but take effect throughout a project. Traditionally, each code file contains a series of using statements that declare dependencies on the namespaces that it requires. Listing 5.8 adds a using statement that provides access to the types defined in the Models namespace. (The code editor will highlight part of this code listing, which I explain in the “Understanding Null State Analysis” section.)
Listing 5.8 Adding a statement in the HomeController.cs file in the Controllers folder
using Microsoft.AspNetCore.Mvc;
using LanguageFeatures.Models;

namespace LanguageFeatures.Controllers {
    public class HomeController : Controller {

        public ViewResult Index() {
            Product[] products = Product.GetProducts();
            return View(new string[] { products[0].Name });
        }
    }
}
To access the Product class, I added a using statement for the namespace that contains it, which is LanguageFeatures.Models. The code file already contains a using statement for the Microsoft.AspNetCore.Mvc namespace, which provides access to the Controller class, from which the HomeController class is derived.
In most projects, some namespaces are required throughout the application, such as those containing data model classes. This can result in a long list of using statements, duplicated in every code file. Global using statements address this problem by allowing using statements for commonly required namespaces to be defined in a single location. Add a code file named GlobalUsings.cs to the LanguageFeatures project with the content shown in listing 5.9.
Listing 5.9 The contents of the GlobalUsings.cs file in the LanguageFeatures folder
global using LanguageFeatures.Models;
global using Microsoft.AspNetCore.Mvc;
The global keyword is used to denote a global using. The statements in listing 5.9 make the LanguageFeatures.Models and Microsoft.AspNetCore.Mvc namespaces available throughout the application, which means they can be removed from the HomeController.cs file, as shown in listing 5.10.
Listing 5.10 Removing statements in the HomeController.cs file in the Controllers folder
//using Microsoft.AspNetCore.Mvc;
//using LanguageFeatures.Models;

namespace LanguageFeatures.Controllers {
    public class HomeController : Controller {

        public ViewResult Index() {
            Product[] products = Product.GetProducts();
            return View(new string[] { products[0].Name });
        }
    }
}
If you run the example, you will see the following results displayed in the browser window:
Kayak
You will receive warnings when compiling the project, which I explain in the “Understanding Null State Analysis” section.
NOTE Global using statements are a good idea, but I have not used them in this book because I want to make it obvious when I add a dependency to a new namespace.
5.3.1 Understanding implicit using statements
The ASP.NET Core project templates enable a feature named implicit usings, which define global using statements for these commonly required namespaces:
• System
• System.Collections.Generic
• System.IO
• System.Linq
• System.Net.Http
• System.Net.Http.Json
• System.Threading
• System.Threading.Tasks
• Microsoft.AspNetCore.Builder
• Microsoft.AspNetCore.Hosting
• Microsoft.AspNetCore.Http
• Microsoft.AspNetCore.Routing
• Microsoft.Extensions.Configuration
• Microsoft.Extensions.DependencyInjection
• Microsoft.Extensions.Hosting
• Microsoft.Extensions.Logging
using statements are not required for these namespaces, which are available throughout the application. These namespaces don’t cover all of the ASP.NET Core features, but they do cover the basics, which is why no explicit using statements are required in the Program.cs file.
5.4 Understanding null state analysis
The editor and compiler warnings shown in earlier sections are produced because ASP.NET Core project templates enable null state analysis, in which the compiler identifies attempts to access references that may be unintentionally null, preventing null reference exceptions at runtime.
Open the Product.cs file, and the editor will display two warnings, as shown in figure 5.2. The figure shows how Visual Studio displays a warning, but Visual Studio Code is similar.

Figure 5.2 A null state analysis warning
When null state analysis is enabled, C# variables are divided into two groups: nullable and non-nullable. As their name suggests, nullable variables can be assigned the special value null. This is the behavior that most programmers are familiar with, and it is entirely up to the developer to guard against trying to use null references, which will trigger a NullReferenceException.
By contrast, non-nullable variables can never be null. When you receive a non-nullable variable, you don’t have to guard against a null value because that is not a value that can ever be assigned.
A question mark (the ? character) is appended to a type to denote a nullable type. So, if a variable’s type is string?, for example, then it can be assigned any value string value or null. When attempting to access this variable, you should check to ensure that it isn’t null before attempting to access any of the fields, properties, or methods defined by the string type.
If a variable’s type is string, then it cannot be assigned null values, which means you can confidently access the features it provides without needing to guard against null references.
The compiler examines the code in the project and warns you when it finds statements that might break these rules. The most common issues are attempting to assign null to non-nullable variables and attempting to access members defined by nullable variables without checking to see if they are null. In the sections that follow, I explain the different ways that the warnings raised by the compiler in the example application can be addressed.
NOTE Getting to grips with nullable and non-nullable types can be frustrating. A change in one code file can simply move a warning to another part of the application, and it can feel like you are chasing problems through a project. But it is worth sticking with null state analysis because null reference exceptions are the most common runtime error, and few programmers are disciplined enough to guard against null values without the compiler analysis feature.
5.4.1 Ensuring fields and properties are assigned values
The first warning in the Product.cs file is for the Name field, whose type is string, which is a non-nullable type (because it hasn’t been annotated with a question mark).
...
public string Name { get; set; }
...
One consequence of using non-nullable types is that properties like Name must be assigned a value when a new instance of the enclosing class is created. If this were not the case, then the Name property would not be initialized and would be null. And this is a problem because we can’t assign null to a non-nullable property, even indirectly.
The required keyword can be used to indicate that a value is required for a non-nullable type, as shown in listing 5.11.
Listing 5.11 Using the required keyword in the Product.cs file in the Models folder
namespace LanguageFeatures.Models {
    public class Product {

        public required string Name { get; set; }
        public decimal? Price { get; set; }

        public static Product[] GetProducts() {

            Product kayak = new Product {
                Name = "Kayak", Price = 275M
            };

            Product lifejacket = new Product {
                Name = "Lifejacket", Price = 48.95M
            };

            return new Product[] { kayak, lifejacket, null };
        }
    }
}
The compiler will check to make sure that a value is assigned to the property when a new instance of the containing type is created. The two Product objects used in the listing are created with a value for the Name field, which satisfies the demands of the required keyword. Listing 5.12 omits the Name value from one of Product objects.
Listing 5.12 Omitting a value in the Product.cs file in the Models folder
namespace LanguageFeatures.Models {
    public class Product {

        public required string Name { get; set; }
        public decimal? Price { get; set; }

        public static Product[] GetProducts() {

            Product kayak = new Product {
                Name = "Kayak", Price = 275M
            };

            Product lifejacket = new Product {
                //Name = "Lifejacket",
                Price = 48.95M
            };

            return new Product[] { kayak, lifejacket, null };
        }
    }
}
If you run the example, the build process will fail with this error:
Required member 'Product.Name' must be set in the object initializer or attribute constructor.
This error—and the corresponding red line in the code editor—tell you that a value for the Name property is required but has not been provided.
5.4.2 Providing a default value for non-nullable types
The required keyword is a good way to denote a property that cannot be null, and which requires a value when an object is created. This approach can become cumbersome in situations where there may not always be a suitable data value available, because it requires the code wants to create the object to provide a fallback value and there is no good way to enforce consistency.
For these situations a default value can be used instead of the required keyword, as shown in listing 5.13.
Listing 5.13 Providing a default value in the Product.cs file in the Models folder
namespace LanguageFeatures.Models {
    public class Product {

        public string Name { get; set; } = string.Empty;
        public decimal? Price { get; set; }

        public static Product[] GetProducts() {

            Product kayak = new Product {
                Name = "Kayak", Price = 275M
            };

            Product lifejacket = new Product {
                //Name = "Lifejacket",
                Price = 48.95M
            };

            return new Product[] { kayak, lifejacket, null };
        }
    }
}
The default value in this example is the empty string. This value will be replaced for Product objects that are created with a Name value and ensures consistency for objects that are created without one.
5.4.3 Using nullable types
The remaining warning in the Product.cs file occurs because there is a mismatch between the type used for the result of the GetProducts method and the values that are used to initialize it:
...
return new Product[] { kayak, lifejacket, null };
...
The type of the array that is created is Product[], which contains non-nullable Product references. But one of the values used to populate the array is null, which isn’t allowed. Listing 5.14 changes the array type so that nullable values are allowed.
Listing 5.14 Using a nullable type in the Product.cs file in the Models folder
namespace LanguageFeatures.Models {
    public class Product {

        public string Name { get; set; } = string.Empty;
        public decimal? Price { get; set; }

        public static Product?[] GetProducts() {

            Product kayak = new Product {
                Name = "Kayak", Price = 275M
            };

            Product lifejacket = new Product {
                //Name = "Lifejacket",
                Price = 48.95M
            };

            return new Product?[] { kayak, lifejacket, null };
        }
    }
}
/
The type Product?[] denotes an array of Product? references, which means the result can include null. Notice that I had to make the same change to the result type declared by the GetProducts method because a Product?[] array cannot be used where a Product[] is expected.
Selecting the right nullable type
Care must be taken to apply the question mark correctly, especially when dealing with arrays and collections. A variable of type Product?[] denotes an array that can contain Product or null values but that won’t be null itself:
...
Product?[] arr1 = new Product?[] { kayak, lifejacket, null };  // OK
Product?[] arr2 = null;                                        // Not OK
...
A variable of type Product[]? is an array that can hold only Product values and not null values, but the array itself may be null:
...
Product[]? arr1 = new Product?[] { kayak, lifejacket, null }; // Not OK
Product[]? arr2 = null;                                       // OK
...
A variable of type Product?[]? is an array that can contain Product or null values and that can itself be null:
...
Product?[]? arr1 = new Product?[] { kayak, lifejacket, null }; // OK
Product?[]? arr2 = null;                                          // Also OK
...
Null state analysis is a useful feature, but that doesn’t mean it is always easy to understand.
5.4.4 Checking for null values
I explained that dealing with null state analysis warnings can feel like chasing a problem through code, and you can see a simple example of this in the HomeController.cs file in the Controllers folder. In listing 5.14, I changed the type returned by the GetProducts method to allow null values, but that has created a mismatch in the HomeController class, which invokes that method and assigns the result to an array of non-nullable Product values:
...
Product[] products = Product.GetProducts();
...
This is easily resolved by changing the type of the products variable to match the type returned by the GetProducts method, as shown in listing 5.15.
Listing 5.15 Changing Type in the HomeController.cs File in the Controllers Folder
namespace LanguageFeatures.Controllers {
    public class HomeController : Controller {

        public ViewResult Index() {
            Product?[] products = Product.GetProducts();
            return View(new string[] { products[0].Name });
        }
    }
}
This resolves one warning and introduces another, as shown in figure 5.3.
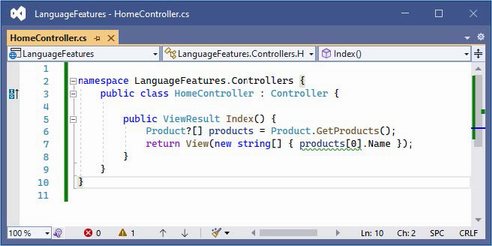
Figure 5.3 An additional null state analysis warning
The statement flagged by the compiler attempts to access the Name field of the element at index zero in the array, which might be null since the array type is Product?[]. Addressing this issue requires a check for null values, as shown in listing 5.16.
Listing 5.16 Guarding against null in the HomeController.cs file in the Controllers folder
namespace LanguageFeatures.Controllers {
    public class HomeController : Controller {

        public ViewResult Index() {
            Product?[] products = Product.GetProducts();
            Product? p = products[0];
            string val;
            if (p != null) {
                val = p.Name;
            } else {
                val = "No value";
            }
            return View(new string[] { val });
        }
    }
}
This is an especially verbose way of avoiding a null, which I will refine shortly. But it demonstrates an important point, which is that the compiler can understand the effect of C# expressions when checking for a null reference. In listing 5.16, I use an if statement to see if a Product? variable is not null, and the compiler understands that the variable cannot be null within the scope of the if clause and doesn’t generate a warning when I read the name field:
...
if (p != null) {
    val = p.Name;
} else {
    val = "No value";
}
...
The compiler has a sophisticated understanding of C# but doesn’t always get it right, and I explain what to do when the compiler isn’t able to accurately determine whether a variable is null in the “Overriding Null State Analysis” section.
Using the null conditional operator
The null conditional operator is a more concise way of avoiding member access for null values, as shown in listing 5.17.
Listing 5.17 Null conditional operator in the HomeController.cs file in the Controllers folder
namespace LanguageFeatures.Controllers {
    public class HomeController : Controller {

        public ViewResult Index() {

            Product?[] products = Product.GetProducts();

            string? val = products[0]?.Name;
            if (val != null) {
                return View(new string[] { val });
            }
            return View(new string[] { "No Value" });
        }
    }
}
The null conditional operator is a question mark applied before a member is accessed, like this:
...
string? val = products[0]?.Name;
...
The operator returns null if it is applied to a variable that is null. In this case, if the element at index zero of the products array is null, then the operator will return null and prevent an attempt to access the Name property, which would cause an exception. If products[0] isn’t null, then the operator does nothing, and the expression returns the value assigned to the Name property. Applying the null conditional operator can return null, and its result must always be assigned to a nullable variable, such as the string? used in this example.
Using the null-coalescing operator
The null-coalescing operator is two question mark characters (??) and is used to provide a fallback value, often used in conjunction with the null conditional operator, as shown in listing 5.18.
Listing 5.18 Using the null-coalescing operator in the HomeController.cs file in the Controllers folder
namespace LanguageFeatures.Controllers {
    public class HomeController : Controller {

        public ViewResult Index() {
            Product?[] products = Product.GetProducts();
            return View(new string[] { products[0]?.Name ??"No Value" });
        }
    }
}
The ?? operator returns the value of its left-hand operand if it isn’t null. If the left-hand operand is null, then the ?? operator returns the value of its right-hand operand. This behavior works well with the null conditional operator. If products[0] is null, then the ? operator will return null, and the ?? operator will return "No Value". If products[0] isn’t null, then the result will be the value of its Name property. This is a more concise way of performing the same null checks shown in earlier examples.
NOTE The ? and ?? operators cannot always be used, and you will see examples in later chapters where I use an if statement to check for null values. One common example is when using the await/async keywords, which are described later in this chapter, and which do not integrate well with the null conditional operator.
5.4.5 Overriding null state analysis
The C# compiler has a sophisticated understanding of when a variable can be null, but it doesn’t always get it right, and there are times when you have a better understanding of whether a null value can arise than the compiler. In these situations, the null-forgiving operator can be used to tell the compiler that a variable isn’t null, regardless of what the null state analysis suggests, as shown in listing 5.19.
Listing 5.19 Using the null-forgiving operator in the HomeController.cs file in the Controllers folder
namespace LanguageFeatures.Controllers {
    public class HomeController : Controller {

        public ViewResult Index() {
            Product?[] products = Product.GetProducts();
            return View(new string[] { products[0]!.Name });
        }
    }
}
The null-forgiving operator is an exclamation mark and is used in this example to tell the compiler that products[0] isn’t null, even though null state analysis has identified that it might be.
When using the ! operator, you are telling the compiler that you have better insight into whether a variable can be null, and, naturally, this should be done only when you are entirely confident that you are right.
5.4.6 Disabling null state analysis warnings
An alternative to the null-forgiving operator is to disable null state analysis warnings for a particular section of code or a complete code file, as shown in listing 5.20.
Listing 5.20 Disabling warnings in the HomeController.cs file in the Controllers folder
namespace LanguageFeatures.Controllers {
    public class HomeController : Controller {

        public ViewResult Index() {
            Product?[] products = Product.GetProducts();
            #pragma warning disable CS8602
            return View(new string[] { products[0].Name });
        }
    }
}
This listing uses a #pragma directive to suppress warning CS8602 (you can identify warnings in the output from the build process).
NOTE .NET includes a set of advanced attributes that can be used to provide the compiler with guidance for null state analysis. These are not widely used and are encountered only in chapter 36 of this book because they are used by one part of the ASP.NET Core API. See https://docs.microsoft.com/en-us/dotnet/csharp/language-reference/attributes/nullable-analysis for details.
5.5 Using string interpolation
C# supports string interpolation to create formatted strings, which uses templates with variable names that are resolved and inserted into the output, as shown in listing 5.21.
Listing 5.21 Using string interpolation in the HomeController.cs file in the Controllers folder
namespace LanguageFeatures.Controllers {
    public class HomeController : Controller {

        public ViewResult Index() {
            Product?[] products = Product.GetProducts();

            return View(new string[] {
                $"Name: {products[0]?.Name}, Price: { products[0]?.Price }"
            });
        }
    }
}
Interpolated strings are prefixed with the $ character and contain holes, which are references to values contained within the { and } characters. When the string is evaluated, the holes are filled in with the current values of the variables or constants that are specified.
TIP String interpolation supports the string format specifiers, which can be applied within holes, so $"Price: {price:C2}" would format the price value as a currency value with two decimal digits, for example.
Start ASP.NET Core and request http://localhost:5000, and you will see a formatted string:
Name: Kayak, Price: 275
5.6 Using object and collection initializers
When I create an object in the static GetProducts method of the Product class, I use an object initializer, which allows me to create an object and specify its property values in a single step, like this:
...
Product kayak = new Product {
    Name = "Kayak", Price = 275M
};
...
This is another syntactic sugar feature that makes C# easier to use. Without this feature, I would have to call the Product constructor and then use the newly created object to set each of the properties, like this:
...
Product kayak = new Product();
kayak.Name = "Kayak";
kayak.Price = 275M;
...
A related feature is the collection initializer, which allows the creation of a collection and its contents to be specified in a single step. Without an initializer, creating a string array, for example, requires the size of the array and the array elements to be specified separately, as shown in listing 5.22.
Listing 5.22 Initializing an object in the HomeController.cs file in the Controllers folder
namespace LanguageFeatures.Controllers {

    public class HomeController : Controller {

        public ViewResult Index() {
            string[] names = new string[3];
            names[0] = "Bob";
            names[1] = "Joe";
            names[2] = "Alice";
            return View("Index", names);
        }
    }
}
Using a collection initializer allows the contents of the array to be specified as part of the construction, which implicitly provides the compiler with the size of the array, as shown in listing 5.23.
Listing 5.23 A collection initializer in the HomeController.cs file in the Controllers folder
namespace LanguageFeatures.Controllers {

    public class HomeController : Controller {

        public ViewResult Index() {
            return View("Index", new string[] { "Bob", "Joe", "Alice" });
        }
    }
}
The array elements are specified between the { and } characters, which allows for a more concise definition of the collection and makes it possible to define a collection inline within a method call. The code in listing 5.23 has the same effect as the code in listing 5.22. Restart ASP.NET Core and request http://localhost:5000, and you will see the following output in the browser window:
Bob
Joe
Alice
5.6.1 Using an index initializer
Recent versions of C# tidy up the way collections that use indexes, such as dictionaries, are initialized. Listing 5.24 shows the Index action rewritten to define a collection using the traditional C# approach to initializing a dictionary.
Listing 5.24 Initializing a dictionary in the HomeController.cs file in the Controllers folder
namespace LanguageFeatures.Controllers {

    public class HomeController : Controller {

        public ViewResult Index() {
            Dictionary<string, Product> products
                    = new Dictionary<string, Product> {
                {
                    "Kayak",
                    new Product { Name = "Kayak", Price = 275M }
                },
                {
                    "Lifejacket",
                    new Product{ Name = "Lifejacket", Price = 48.95M }
                }
            };
            return View("Index", products.Keys);
        }
    }
}
The syntax for initializing this type of collection relies too much on the { and } characters, especially when the collection values are created using object initializers. The latest versions of C# support a more natural approach to initializing indexed collections that is consistent with the way that values are retrieved or modified once the collection has been initialized, as shown in listing 5.25.
Listing 5.25 Using collection initializer syntax in the HomeController.cs file in the Controllers folder
namespace LanguageFeatures.Controllers {

    public class HomeController : Controller {

        public ViewResult Index() {
            Dictionary<string, Product> products
                    = new Dictionary<string, Product> {
                ["Kayak"] = new Product { Name = "Kayak", Price = 275M },
                ["Lifejacket"] = new Product { Name = "Lifejacket",
                    Price = 48.95M }
            };
            return View("Index", products.Keys);
        }
    }
}
The effect is the same—to create a dictionary whose keys are Kayak and Lifejacket and whose values are Product objects—but the elements are created using the index notation that is used for other collection operations. Restart ASP.NET Core and request http://localhost:5000, and you will see the following results in the browser:
Kayak
Lifejacket
5.7 Using target-typed new expressions
The example in listing 5.25 is still verbose and declares the collection type when defining the variable and creating an instance with the new keyword:
...
Dictionary<string, Product> products = new Dictionary<string, Product> {
    ["Kayak"] = new Product { Name = "Kayak", Price = 275M },
    ["Lifejacket"] = new Product { Name = "Lifejacket", Price = 48.95M }
};
...
This can be simplified using a target-typed new expression, as shown in listing 5.26.
Listing 5.26 Using a target-typed new expression in the HomeController.cs file in the Controllers folder
namespace LanguageFeatures.Controllers {

    public class HomeController : Controller {

        public ViewResult Index() {
            Dictionary<string, Product> products = new () {
                ["Kayak"] = new Product { Name = "Kayak", Price = 275M },
                ["Lifejacket"] = new Product { Name = "Lifejacket",
                    Price = 48.95M }
            };
            return View("Index", products.Keys);
        }
    }
}
The type can be replaced with new() when the compiler can determine which type is required and constructor arguments are provided as arguments to the new method. Creating instances with the new() expression works only when the compiler can determine which type is required. Restart ASP.NET Core and request http://localhost:5000, and you will see the following results in the browser:
Kayak
Lifejacket
5.8 Pattern Matching
One of the most useful recent additions to C# is support for pattern matching, which can be used to test that an object is of a specific type or has specific characteristics. This is another form of syntactic sugar, and it can dramatically simplify complex blocks of conditional statements. The is keyword is used to perform a type test, as demonstrated in listing 5.27.
Listing 5.27 Testing a type in the HomeController.cs file in the Controllers folder
namespace LanguageFeatures.Controllers {

    public class HomeController : Controller {

        public ViewResult Index() {

            object[] data = new object[] { 275M, 29.95M,
                "apple", "orange", 100, 10 };
            decimal total = 0;
            for (int i = 0; i < data.Length; i++) {
                if (data[i] is decimal d) {
                    total += d;
                }
            }

            return View("Index", new string[] { $"Total: {total:C2}" });
        }
    }
}
The is keyword performs a type check and, if a value is of the specified type, will assign the value to a new variable, like this:
...
if (data[i] is decimal d) {
...
This expression evaluates as true if the value stored in data[i] is a decimal. The value of data[i] will be assigned to the variable d, which allows it to be used in subsequent statements without needing to perform any type conversions. The is keyword will match only the specified type, which means that only two of the values in the data array will be processed (the other items in the array are string and int values). If you run the application, you will see the following output in the browser window:
Total: $304.955.8.1 Pattern matching in switch statements
Pattern matching can also be used in switch statements, which support the when keyword for restricting when a value is matched by a case statement, as shown in listing 5.28.
Listing 5.28 Pattern matching in the HomeController.cs file in the Controllers folder
namespace LanguageFeatures.Controllers {

    public class HomeController : Controller {

        public ViewResult Index() {

            object[] data = new object[] { 275M, 29.95M,
                "apple", "orange", 100, 10 };
            decimal total = 0;
            for (int i = 0; i < data.Length; i++) {
                switch (data[i]) {
                    case decimal decimalValue:
                        total += decimalValue;
                        break;
                    case int intValue when intValue > 50:
                        total += intValue;
                        break;
                }
            }

            return View("Index", new string[] { $"Total: {total:C2}" });
        }
    }
}
To match any value of a specific type, use the type and variable name in the case statement, like this:
...
case decimal decimalValue:
...
This case statement matches any decimal value and assigns it to a new variable called decimalValue. To be more selective, the when keyword can be included, like this:
...
case int intValue when intValue > 50:
...
This case statement matches int values and assigns them to a variable called intValue, but only when the value is greater than 50. Restart ASP.NET Core and request http://localhost:5000, and you will see the following output in the browser window:
Total: $404.95
5.9 Using extension methods
Extension methods are a convenient way of adding methods to classes that you cannot modify directly, typically because they are provided by Microsoft or a third-party package. Listing 5.29 shows the definition of the ShoppingCart class, which I added to the Models folder in a class file called ShoppingCart.cs and which represents a collection of Product objects.
Listing 5.29 The contents of the ShoppingCart.cs file in the Models folder
namespace LanguageFeatures.Models {

    public class ShoppingCart {
        public IEnumerable<Product?>? Products { get; set; }
    }
}
This is a simple class that acts as a wrapper around a sequence of Product objects (I only need a basic class for this example). Note the type of the Products property, which denotes a nullable enumerable of nullable Products, meaning that the Products property may be null and that any sequence of elements assigned to the property may contain null values.
Suppose I need to be able to determine the total value of the Product objects in the ShoppingCart class, but I cannot modify the class because it comes from a third party, and I do not have the source code. I can use an extension method to add the functionality I need.
Add a class file named MyExtensionMethods.cs in the Models folder and use it to define the class shown in listing 5.30.
Listing 5.30 The contents of the MyExtensionMethods.cs file in the Models folder
namespace LanguageFeatures.Models {

    public static class MyExtensionMethods {

        public static decimal TotalPrices(this ShoppingCart cartParam) {
            decimal total = 0;
            if (cartParam.Products != null) {
                foreach (Product? prod in cartParam.Products) {
                    total += prod?.Price ?? 0;
                }
            }
            return total;
        }
    }
}
Extension methods are static and are defined in static classes. Listing 5.30 defines a single extension method named TotalPrices. The this keyword in front of the first parameter marks TotalPrices as an extension method. The first parameter tells .NET which class the extension method can be applied to—ShoppingCart in this case. I can refer to the instance of the ShoppingCart that the extension method has been applied to by using the cartParam parameter. This extension method enumerates the Product objects in the ShoppingCart and returns the sum of the Product.Price property values. Listing 5.31 shows how I apply the extension method in the Home controller’s action method.
Note Extension methods do not let you break through the access rules that classes define for methods, fields, and properties. You can extend the functionality of a class by using an extension method but only using the class members that you had access to anyway.
Listing 5.31 Applying an extension method in the HomeController.cs file in the Controllers folder
namespace LanguageFeatures.Controllers {
    public class HomeController : Controller {

        public ViewResult Index() {
            ShoppingCart cart
                = new ShoppingCart { Products = Product.GetProducts()};
            decimal cartTotal = cart.TotalPrices();
            return View("Index",
                new string[] { $"Total: {cartTotal:C2}" });
        }
    }
}
The key statement is this one:
...
decimal cartTotal = cart.TotalPrices();
...
I call the TotalPrices method on a ShoppingCart object as though it were part of the ShoppingCart class, even though it is an extension method defined by a different class altogether. .NET will find extension classes if they are in the scope of the current class, meaning that they are part of the same namespace or in a namespace that is the subject of a using statement. Restart ASP.NET Core and request http://localhost:5000, which will produce the following output in the browser window:
Total: $323.955.9.1 Applying extension methods to an interface
Extension methods can also be applied to an interface, which allows me to call the extension method on all the classes that implement the interface. Listing 5.32 shows the ShoppingCart class updated to implement the IEnumerable<Product> interface.
Listing 5.32 Implementing an interface in the ShoppingCart.cs file in the Models folder
using System.Collections;

namespace LanguageFeatures.Models {

    public class ShoppingCart : IEnumerable<Product?> {
        public IEnumerable<Product?>? Products { get; set; }

        public IEnumerator<Product?> GetEnumerator() =>
                Products?.GetEnumerator()
                    ?? Enumerable.Empty<Product?>().GetEnumerator();
        IEnumerator IEnumerable.GetEnumerator() => GetEnumerator();
    }
}
I can now update the extension method so that it deals with IEnumerable<Product?>, as shown in listing 5.33.
Listing 5.33 Updating an extension method in the MyExtensionMethods.cs file in the Models folder
namespace LanguageFeatures.Models {

    public static class MyExtensionMethods {

        public static decimal TotalPrices(
                this IEnumerable<Product?> products) {
            decimal total = 0;
            foreach (Product? prod in products) {
                total += prod?.Price ?? 0;
            }
            return total;
        }
    }
}
The first parameter type has changed to IEnumerable<Product?>, which means the foreach loop in the method body works directly on Product? objects. The change to using the interface means that I can calculate the total value of the Product objects enumerated by any IEnumerable<Product?>, which includes instances of ShoppingCart but also arrays of Product objects, as shown in listing 5.34.
Listing 5.34 Applying an extension method in the HomeController.cs file in the Controllers folder
namespace LanguageFeatures.Controllers {
    public class HomeController : Controller {

        public ViewResult Index() {
            ShoppingCart cart
                = new ShoppingCart { Products = Product.GetProducts()};

            Product[] productArray = {
                new Product {Name = "Kayak", Price = 275M},
                new Product {Name = "Lifejacket", Price = 48.95M}
            };

            decimal cartTotal = cart.TotalPrices();
            decimal arrayTotal = productArray.TotalPrices();

            return View("Index", new string[] {
                $"Cart Total: {cartTotal:C2}",
                $"Array Total: {arrayTotal:C2}" });
        }
    }
}
Restart ASP.NET Core and request http://localhost:5000, which will produce the following output in the browser, demonstrating that I get the same result from the extension method, irrespective of how the Product objects are collected:
Cart Total: $323.95
Array Total: $323.95
5.9.2 Creating filtering extension methods
The last thing I want to show you about extension methods is that they can be used to filter collections of objects. An extension method that operates on an IEnumerable<T> and that also returns an IEnumerable<T> can use the yield keyword to apply selection criteria to items in the source data to produce a reduced set of results. Listing 5.35 demonstrates such a method, which I have added to the MyExtensionMethods class.
Listing 5.35 A filtering extension method in the MyExtensionMethods.cs file in the Models folder
namespace LanguageFeatures.Models {

    public static class MyExtensionMethods {

        public static decimal TotalPrices(
                this IEnumerable<Product?> products) {
            decimal total = 0;
            foreach (Product? prod in products) {
                total += prod?.Price ?? 0;
            }
            return total;
        }

        public static IEnumerable<Product?> FilterByPrice(
                this IEnumerable<Product?> productEnum,
                decimal minimumPrice) {
            foreach (Product? prod in productEnum) {
                if ((prod?.Price ?? 0) >= minimumPrice) {
                    yield return prod;
                }
            }
        }
    }
}
This extension method, called FilterByPrice, takes an additional parameter that allows me to filter products so that Product objects whose Price property matches or exceeds the parameter are returned in the result. Listing 5.36 shows this method being used.
Listing 5.36 Using the filtering extension method in the HomeController.cs file in the Controllers folder
namespace LanguageFeatures.Controllers {
    public class HomeController : Controller {

        public ViewResult Index() {
            ShoppingCart cart
                = new ShoppingCart { Products = Product.GetProducts()};

            Product[] productArray = {
                new Product {Name = "Kayak", Price = 275M},
                new Product {Name = "Lifejacket", Price = 48.95M},
                new Product {Name = "Soccer ball", Price = 19.50M},
                new Product {Name = "Corner flag", Price = 34.95M}
            };

            decimal arrayTotal =
                productArray.FilterByPrice(20).TotalPrices();

            return View("Index",
                new string[] { $"Array Total: {arrayTotal:C2}" });
        }
    }
}
When I call the FilterByPrice method on the array of Product objects, only those that cost more than $20 are received by the TotalPrices method and used to calculate the total. If you run the application, you will see the following output in the browser window:
Total: $358.905.10 Using lambda expressions
Lambda expressions are a feature that causes a lot of confusion, not least because the feature they simplify is also confusing. To understand the problem that is being solved, consider the FilterByPrice extension method that I defined in the previous section. This method is written so that it can filter Product objects by price, which means I must create a second method if I want to filter by name, as shown in listing 5.37.
Listing 5.37 Adding a filter method in the MyExtensionMethods.cs file in the Models folder
namespace LanguageFeatures.Models {

    public static class MyExtensionMethods {

        public static decimal TotalPrices(
                this IEnumerable<Product?> products) {
            decimal total = 0;
            foreach (Product? prod in products) {
                total += prod?.Price ?? 0;
            }
            return total;
        }

        public static IEnumerable<Product?> FilterByPrice(
                this IEnumerable<Product?> productEnum,
                decimal minimumPrice) {
            foreach (Product? prod in productEnum) {
                if ((prod?.Price ?? 0) >= minimumPrice) {
                    yield return prod;
                }
            }
        }

        public static IEnumerable<Product?> FilterByName(
                this IEnumerable<Product?> productEnum,
                char firstLetter) {

            foreach (Product? prod in productEnum) {
                if (prod?.Name?[0] == firstLetter) {
                    yield return prod;
                }
            }
        }
    }
}
Listing 5.38 shows the use of both filter methods applied in the controller to create two different totals.
Listing 5.38 Using two filter methods in the HomeController.cs file in the Controllers folder
namespace LanguageFeatures.Controllers {
    public class HomeController : Controller {

        public ViewResult Index() {
            ShoppingCart cart
                = new ShoppingCart { Products = Product.GetProducts()};

            Product[] productArray = {
                new Product {Name = "Kayak", Price = 275M},
                new Product {Name = "Lifejacket", Price = 48.95M},
                new Product {Name = "Soccer ball", Price = 19.50M},
                new Product {Name = "Corner flag", Price = 34.95M}
            };

            decimal priceFilterTotal =
                productArray.FilterByPrice(20).TotalPrices();
            decimal nameFilterTotal =
                productArray.FilterByName('S').TotalPrices();

            return View("Index", new string[] {
                $"Price Total: {priceFilterTotal:C2}",
                $"Name Total: {nameFilterTotal:C2}" });
        }
    }
}
The first filter selects all the products with a price of $20 or more, and the second filter selects products whose name starts with the letter S. You will see the following output in the browser window if you run the example application:
Price Total: $358.90
Name Total: $19.50
5.10.1 Defining functions
I can repeat this process indefinitely to create filter methods for every property and every combination of properties that I am interested in. A more elegant approach is to separate the code that processes the enumeration from the selection criteria. C# makes this easy by allowing functions to be passed around as objects. Listing 5.39 shows a single extension method that filters an enumeration of Product objects but that delegates the decision about which ones are included in the results to a separate function.
Listing 5.39 Creating a general filter method in the MyExtensionMethods.cs file in the Models folder
namespace LanguageFeatures.Models {

    public static class MyExtensionMethods {

        public static decimal TotalPrices(
                this IEnumerable<Product?> products) {
            decimal total = 0;
            foreach (Product? prod in products) {
                total += prod?.Price ?? 0;
            }
            return total;
        }

        public static IEnumerable<Product?> FilterByPrice(
                this IEnumerable<Product?> productEnum,
                decimal minimumPrice) {
            foreach (Product? prod in productEnum) {
                if ((prod?.Price ?? 0) >= minimumPrice) {
                    yield return prod;
                }
            }
        }

        public static IEnumerable<Product?> Filter(
                this IEnumerable<Product?> productEnum,
                Func<Product?, bool> selector) {

            foreach (Product? prod in productEnum) {
                if (selector(prod)) {
                    yield return prod;
                }
            }
        }
    }
}
The second argument to the Filter method is a function that accepts a Product? object and that returns a bool value. The Filter method calls the function for each Product? object and includes it in the result if the function returns true. To use the Filter method, I can specify a method or create a stand-alone function, as shown in listing 5.40.
Listing 5.40 Using a function to filter objects in the HomeController.cs file in the Controllers folder
namespace LanguageFeatures.Controllers {
    public class HomeController : Controller {

        bool FilterByPrice(Product? p) {
            return (p?.Price ?? 0) >= 20;
        }

        public ViewResult Index() {
            ShoppingCart cart
                = new ShoppingCart { Products = Product.GetProducts()};

            Product[] productArray = {
                new Product {Name = "Kayak", Price = 275M},
                new Product {Name = "Lifejacket", Price = 48.95M},
                new Product {Name = "Soccer ball", Price = 19.50M},
                new Product {Name = "Corner flag", Price = 34.95M}
            };

            Func<Product?, bool> nameFilter = delegate (Product? prod) {
                return prod?.Name?[0] == 'S';
            };

            decimal priceFilterTotal = productArray
                .Filter(FilterByPrice)
                .TotalPrices();
            decimal nameFilterTotal = productArray
                .Filter(nameFilter)
                .TotalPrices();

            return View("Index", new string[] {
                $"Price Total: {priceFilterTotal:C2}",
                $"Name Total: {nameFilterTotal:C2}" });
        }
    }
}
Neither approach is ideal. Defining methods like FilterByPrice clutters up a class definition. Creating a Func<Product?, bool> object avoids this problem but uses an awkward syntax that is hard to read and hard to maintain. It is this issue that lambda expressions address by allowing functions to be defined in a more elegant and expressive way, as shown in listing 5.41.
Listing 5.41 Using a lambda expression in the HomeController.cs file in the Controllers folder
namespace LanguageFeatures.Controllers {
    public class HomeController : Controller {

        //bool FilterByPrice(Product? p) {
        //    return (p?.Price ?? 0) >= 20;
        //}

        public ViewResult Index() {
            ShoppingCart cart
                = new ShoppingCart { Products = Product.GetProducts()};

            Product[] productArray = {
                new Product {Name = "Kayak", Price = 275M},
                new Product {Name = "Lifejacket", Price = 48.95M},
                new Product {Name = "Soccer ball", Price = 19.50M},
                new Product {Name = "Corner flag", Price = 34.95M}
            };

            //Func<Product?, bool> nameFilter = delegate (Product? prod) {
            //    return prod?.Name?[0] == 'S';
            //};

            decimal priceFilterTotal = productArray
                .Filter(p => (p?.Price ?? 0) >= 20)
                .TotalPrices();

            decimal nameFilterTotal = productArray
                .Filter(p => p?.Name?[0] == 'S')
                .TotalPrices();

            return View("Index", new string[] {
                $"Price Total: {priceFilterTotal:C2}",
                $"Name Total: {nameFilterTotal:C2}" });
        }
    }
}
The lambda expressions are shown in bold. The parameters are expressed without specifying a type, which will be inferred automatically. The => characters are read aloud as “goes to” and link the parameter to the result of the lambda expression. In my examples, a Product? parameter called p goes to a bool result, which will be true if the Price property is equal or greater than 20 in the first expression or if the Name property starts with S in the second expression. This code works in the same way as the separate method and the function delegate but is more concise and is—for most people—easier to read.
Other Forms for Lambda Expressions
I don’t need to express the logic of my delegate in the lambda expression. I can as easily call a method, like this:
...
prod => EvaluateProduct(prod)
...
If I need a lambda expression for a delegate that has multiple parameters, I must wrap the parameters in parentheses, like this:
...
(prod, count) => prod.Price > 20 && count > 0
...
Finally, if I need logic in the lambda expression that requires more than one statement, I can do so by using braces ({}) and finishing with a return statement, like this:
...
(prod, count) => {
    // ...multiple code statements...
    return result;
}
...
You do not need to use lambda expressions in your code, but they are a neat way of expressing complex functions simply and in a manner that is readable and clear. I like them a lot, and you will see them used throughout this book.
5.10.2 Using lambda expression methods and properties
Lambda expressions can be used to implement constructors, methods, and properties. In ASP.NET Core development, you will often end up with methods that contain a single statement that selects the data to display and the view to render. In listing 5.42, I have rewritten the Index action method so that it follows this common pattern.
Listing 5.42 Creating a common action pattern in the HomeController.cs file in the Controllers folder
namespace LanguageFeatures.Controllers {
    public class HomeController : Controller {

        public ViewResult Index() {
            return View(Product.GetProducts().Select(p => p?.Name));
        }
    }
}
The action method gets a collection of Product objects from the static Product.GetProducts method and uses LINQ to project the values of the Name properties, which are then used as the view model for the default view. If you run the application, you will see the following output displayed in the browser window:
KayakThere will be empty list items in the browser window as well because the GetProducts method includes a null reference in its results and one of the Product objects is created without a Name value, but that doesn’t matter for this section of the chapter.
When a constructor or method body consists of a single statement, it can be rewritten as a lambda expression, as shown in listing 5.43.
Listing 5.43 A lambda action method in the HomeController.cs file in the Controllers folder
namespace LanguageFeatures.Controllers {
    public class HomeController : Controller {

        public ViewResult Index() =>
            View(Product.GetProducts().Select(p => p?.Name));
    }
}
Lambda expressions for methods omit the return keyword and use => (goes to) to associate the method signature (including its arguments) with its implementation. The Index method shown in listing 5.43 works in the same way as the one shown in listing 5.42 but is expressed more concisely. The same basic approach can also be used to define properties. Listing 5.44 shows the addition of a property that uses a lambda expression to the Product class.
Listing 5.44 A lambda property in the Product.cs file in the Models folder
namespace LanguageFeatures.Models {
    public class Product {

        public string Name { get; set; } = string.Empty;
        public decimal? Price { get; set; }

        public bool NameBeginsWithS =>  Name.Length > 0 && Name[0] == 'S';

        public static Product?[] GetProducts() {
            Product kayak = new Product {
                Name = "Kayak", Price = 275M
            };

            Product lifejacket = new Product {
                //Name = "Lifejacket",
                Price = 48.95M
            };

            return new Product?[] { kayak, lifejacket, null };
        }
    }
}
5.11 Using type inference and anonymous types
The var keyword allows you to define a local variable without explicitly specifying the variable type, as demonstrated by listing 5.45. This is called type inference, or implicit typing.
Listing 5.45 Using type inference in the HomeController.cs file in the Controllers folder
namespace LanguageFeatures.Controllers {
    public class HomeController : Controller {

        public ViewResult Index() {
            var names = new[] { "Kayak", "Lifejacket", "Soccer ball" };
            return View(names);
        }
    }
}
It is not that the names variable does not have a type; instead, I am asking the compiler to infer the type from the code. The compiler examines the array declaration and works out that it is a string array. Running the example produces the following output:
Kayak
Lifejacket
Soccer ball
5.11.1 Using anonymous types
By combining object initializers and type inference, I can create simple view model objects that are useful for transferring data between a controller and a view without having to define a class or struct, as shown in listing 5.46.
Listing 5.46 An anonymous type in the HomeController.cs file in the Controllers folder
namespace LanguageFeatures.Controllers {
    public class HomeController : Controller {
        public ViewResult Index() {

            var products = new[] {
                new { Name = "Kayak", Price = 275M },
                new { Name = "Lifejacket", Price = 48.95M },
                new { Name = "Soccer ball", Price = 19.50M },
                new { Name = "Corner flag", Price = 34.95M }
            };

            return View(products.Select(p => p.Name));
        }
    }
}
Each of the objects in the products array is an anonymously typed object. This does not mean that it is dynamic in the sense that JavaScript variables are dynamic. It just means that the type definition will be created automatically by the compiler. Strong typing is still enforced. You can get and set only the properties that have been defined in the initializer, for example. Restart ASP.NET Core and request http://localhost:5000, and you will see the following output in the browser window:
Kayak
Lifejacket
Soccer ball
Corner flag
The C# compiler generates the class based on the name and type of the parameters in the initializer. Two anonymously typed objects that have the same property names and types defined in the same order will be assigned to the same automatically generated class. This means that all the objects in the products array will have the same type because they define the same properties.
TIP I have to use the var keyword to define the array of anonymously typed objects because the type isn’t created until the code is compiled, so I don’t know the name of the type to use. The elements in an array of anonymously typed objects must all define the same properties; otherwise, the compiler can’t work out what the array type should be.
To demonstrate this, I have changed the output from the example in listing 5.47 so that it shows the type name rather than the value of the Name property.
Listing 5.47 Displaying the type name in the HomeController.cs file in the Controllers folder
namespace LanguageFeatures.Controllers {
    public class HomeController : Controller {

        public ViewResult Index() {
            var products = new[] {
                new { Name = "Kayak", Price = 275M },
                new { Name = "Lifejacket", Price = 48.95M },
                new { Name = "Soccer ball", Price = 19.50M },
                new { Name = "Corner flag", Price = 34.95M }
            };

            return View(products.Select(p => p.GetType().Name));
        }
    }
}
All the objects in the array have been assigned the same type, which you can see if you run the example. The type name isn’t user-friendly but isn’t intended to be used directly, and you may see a different name than the one shown in the following output:
<>f__AnonymousType0`2
<>f__AnonymousType0`2
<>f__AnonymousType0`2
<>f__AnonymousType0`2
5.12 Using default implementations in interfaces
C# provides the ability to define default implementations for properties and methods defined by interfaces. This may seem like an odd feature because an interface is intended to be a description of features without specifying an implementation, but this addition to C# makes it possible to update interfaces without breaking the existing implementations of them.
Add a class file named IProductSelection.cs to the Models folder and use it to define the interface shown in listing 5.48.
Listing 5.48 The contents of the IProductSelection.cs file in the Models folder
namespace LanguageFeatures.Models {

    public interface IProductSelection {

        IEnumerable<Product>? Products { get; }
    }
}
Update the ShoppingCart class to implement the new interface, as shown in listing 5.49.
Listing 5.49 Implementing an interface in the ShoppingCart.cs file in the Models folder
namespace LanguageFeatures.Models {

    public class ShoppingCart : IProductSelection {
        private List<Product> products = new();

        public ShoppingCart(params Product[] prods) {
            products.AddRange(prods);
        }

        public IEnumerable<Product>? Products { get => products; }
    }
}
Listing 5.50 updates the Home controller so that it uses the ShoppingCart class.
Listing 5.50 Using an interface in the HomeController.cs file in the Controllers folder
namespace LanguageFeatures.Controllers {
    public class HomeController : Controller {

        public ViewResult Index() {
            IProductSelection cart = new ShoppingCart(
                new Product { Name = "Kayak", Price = 275M },
                new Product { Name = "Lifejacket", Price = 48.95M },
                new Product { Name = "Soccer ball", Price = 19.50M },
                new Product { Name = "Corner flag", Price = 34.95M }
            );
            return View(cart.Products?.Select(p => p.Name));
        }
    }
}
This is the familiar use of an interface, and if you restart ASP.NET Core and request http://localhost:5000, you will see the following output in the browser:
Kayak
Lifejacket
Soccer ball
Corner flag
If I want to add a new feature to the interface, I must locate and update all the classes that implement it, which can be difficult, especially if an interface is used by other development teams in their projects. This is where the default implementation feature can be used, allowing new features to be added to an interface, as shown in listing 5.51.
Listing 5.51 Adding a feature in the IProductSelection.cs file in the Models folder
namespace LanguageFeatures.Models {

    public interface IProductSelection {

        IEnumerable<Product>? Products { get; }

        IEnumerable<string>? Names => Products?.Select(p => p.Name);
    }
}
The listing defines a Names property and provides a default implementation, which means that consumers of the IProductSelection interface can use the Names property even if it isn’t defined by implementation classes, as shown in listing 5.52.
Listing 5.52 Using a default implementation in the HomeController.cs file in the Controllers folder
namespace LanguageFeatures.Controllers {
    public class HomeController : Controller {

        public ViewResult Index() {
            IProductSelection cart = new ShoppingCart(
                new Product { Name = "Kayak", Price = 275M },
                new Product { Name = "Lifejacket", Price = 48.95M },
                new Product { Name = "Soccer ball", Price = 19.50M },
                new Product { Name = "Corner flag", Price = 34.95M }
            );
            return View(cart.Names);
        }
    }
}
The ShoppingCart class has not been modified, but the Index method can use the default implementation of the Names property. Restart ASP.NET Core and request http://localhost:5000, and you will see the following output in the browser:
Kayak
Lifejacket
Soccer ball
Corner flag
5.13 Using asynchronous methods
Asynchronous methods perform work in the background and notify you when they are complete, allowing your code to take care of other business while the background work is performed. Asynchronous methods are an important tool in removing bottlenecks from code and allow applications to take advantage of multiple processors and processor cores to perform work in parallel.
In ASP.NET Core, asynchronous methods can be used to improve the overall performance of an application by allowing the server more flexibility in the way that requests are scheduled and executed. Two C# keywords—async and await—are used to perform work asynchronously.
5.13.1 Working with tasks directly
C# and .NET have excellent support for asynchronous methods, but the code has tended to be verbose, and developers who are not used to parallel programming often get bogged down by the unusual syntax. To create an example, add a class file called MyAsyncMethods.cs to the Models folder and add the code shown in listing 5.53.
Listing 5.53 The contents of the MyAsyncMethods.cs file in the Models folder
namespace LanguageFeatures.Models {

    public class MyAsyncMethods {

        public static Task<long?> GetPageLength() {
            HttpClient client = new HttpClient();
            var httpTask = client.GetAsync("http://manning.com");
            return httpTask.ContinueWith((Task<HttpResponseMessage>
                    antecedent) => {
                return antecedent.Result.Content.Headers.ContentLength;
            });
        }
    }
}
This method uses a System.Net.Http.HttpClient object to request the contents of the Manning home page and returns its length. .NET represents work that will be done asynchronously as a Task. Task objects are strongly typed based on the result that the background work produces. So, when I call the HttpClient.GetAsync method, what I get back is a Task<HttpResponseMessage>. This tells me that the request will be performed in the background and that the result of the request will be an HttpResponseMessage object.
TIP When I use words like background, I am skipping over a lot of detail to make just the key points that are important to the world of ASP.NET Core. The .NET support for asynchronous methods and parallel programming is excellent, and I encourage you to learn more about it if you want to create truly high-performing applications that can take advantage of multicore and multiprocessor hardware. You will see how ASP.NET Core makes it easy to create asynchronous web applications throughout this book as I introduce different features.
The part that most programmers get bogged down with is the continuation, which is the mechanism by which you specify what you want to happen when the task is complete. In the example, I have used the ContinueWith method to process the HttpResponseMessage object I get from the HttpClient.GetAsync method, which I do with a lambda expression that returns the value of a property that contains the length of the content I get from the Manning web server. Here is the continuation code:
...
return httpTask.ContinueWith((Task<HttpResponseMessage> antecedent) => {
    return antecedent.Result.Content.Headers.ContentLength;
});
...
Notice that I use the return keyword twice. This is the part that causes confusion. The first use of the return keyword specifies that I am returning a Task<HttpResponseMessage> object, which, when the task is complete, will return the length of the ContentLength header. The ContentLength header returns a long? result (a nullable long value), and this means the result of my GetPageLength method is Task<long?>, like this:
...
public static Task<long?> GetPageLength() {
...
Do not worry if this does not make sense—you are not alone in your confusion. It is for this reason that Microsoft added keywords to C# to simplify asynchronous methods.
5.13.2 Applying the async and await keywords
Microsoft introduced two keywords to C# that simplify using asynchronous methods like HttpClient.GetAsync. The keywords are async and await, and you can see how I have used them to simplify my example method in listing 5.54.
Listing 5.54 Using the async and await keywords in the MyAsyncMethods.cs file in the Models folder
namespace LanguageFeatures.Models {

    public class MyAsyncMethods {

        public async static Task<long?> GetPageLength() {
            HttpClient client = new HttpClient();
            var httpMessage = await client.GetAsync("http://manning.com");
            return httpMessage.Content.Headers.ContentLength;
        }
    }
}
I used the await keyword when calling the asynchronous method. This tells the C# compiler that I want to wait for the result of the Task that the GetAsync method returns and then carry on executing other statements in the same method.
Applying the await keyword means I can treat the result from the GetAsync method as though it were a regular method and just assign the HttpResponseMessage object that it returns to a variable. Even better, I can then use the return keyword in the normal way to produce a result from another method—in this case, the value of the ContentLength property. This is a much more natural technique, and it means I do not have to worry about the ContinueWith method and multiple uses of the return keyword.
When you use the await keyword, you must also add the async keyword to the method signature, as I have done in the example. The method result type does not change—my example GetPageLength method still returns a Task<long?>. This is because await and async are implemented using some clever compiler tricks, meaning that they allow a more natural syntax, but they do not change what is happening in the methods to which they are applied. Someone who is calling my GetPageLength method still has to deal with a Task<long?> result because there is still a background operation that produces a nullable long—although, of course, that programmer can also choose to use the await and async keywords.
This pattern follows through into the controller, which makes it easy to write asynchronous action methods, as shown in listing 5.55.
Note You can also use the async and await keywords in lambda expressions, which I demonstrate in later chapters.
Listing 5.55 An asynchronous action method in the HomeController.cs file in the Controllers folder
namespace LanguageFeatures.Controllers {
    public class HomeController : Controller {

        public async Task<ViewResult> Index() {
            long? length = await MyAsyncMethods.GetPageLength();
            return View(new string[] { $"Length: {length}" });
        }
    }
}
I have changed the result of the Index action method to Task<ViewResult>, which declares that the action method will return a Task that will produce a ViewResult object when it completes, which will provide details of the view that should be rendered and the data that it requires. I have added the async keyword to the method’s definition, which allows me to use the await keyword when calling the MyAsyncMethods.GetPathLength method. .NET takes care of dealing with the continuations, and the result is asynchronous code that is easy to write, easy to read, and easy to maintain. Restart ASP.NET Core and request http://localhost:5000, and you will see output similar to the following (although with a different length since the content of the Manning website changes often):
Length: 4729225.13.3 Using an asynchronous enumerable
An asynchronous enumerable describes a sequence of values that will be generated over time. To demonstrate the issue that this feature addresses, listing 5.56 adds a method to the MyAsyncMethods class.
Listing 5.56 Adding a method in the MyAsyncMethods.cs file in the Models folder
namespace LanguageFeatures.Models {

    public class MyAsyncMethods {

        public async static Task<long?> GetPageLength() {
            HttpClient client = new HttpClient();
            var httpMessage = await client.GetAsync("http://manning.com");
            return httpMessage.Content.Headers.ContentLength;
        }

        public static async Task<IEnumerable<long?>>
                GetPageLengths(List<string> output,
                    params string[] urls) {
            List<long?> results = new List<long?>();
            HttpClient client = new HttpClient();
            foreach (string url in urls) {
                output.Add($"Started request for {url}");
                var httpMessage = await client.GetAsync($"http://{url}");
                results.Add(httpMessage.Content.Headers.ContentLength);
                output.Add($"Completed request for {url}");
            }
            return results;
        }
    }
}
The GetPageLengths method makes HTTP requests to a series of websites and gets their length. The requests are performed asynchronously, but there is no way to feed the results back to the method’s caller as they arrive. Instead, the method waits until all the requests are complete and then returns all the results in one go. In addition to the URLs that will be requested, this method accepts a List<string> to which I add messages in order to highlight how the code works. Listing 5.57 updates the Index action method of the Home controller to use the new method.
Listing 5.57 Using the new method in the HomeController.cs file in the Controllers folder
namespace LanguageFeatures.Controllers {
    public class HomeController : Controller {

        public async Task<ViewResult> Index() {
            List<string> output = new List<string>();
            foreach (long? len in await MyAsyncMethods.GetPageLengths(
                    output,
                    "manning.com", "microsoft.com", "amazon.com")) {
                output.Add($"Page length: { len}");
            }
            return View(output);
        }
    }
}
The action method enumerates the sequence produced by the GetPageLengths method and adds each result to the List<string> object, which produces an ordered sequence of messages showing the interaction between the foreach loop in the Index method that processes the results and the foreach loop in the GetPageLengths method that generates them. Restart ASP.NET Core and request http://localhost:5000, and you will see the following output in the browser (which may take several seconds to appear and may have different page lengths):
Started request for manning.com
Completed request for manning.com
Started request for microsoft.com
Completed request for microsoft.com
Started request for amazon.com
Completed request for amazon.com
Page length: 26973
Page length: 199526
Page length: 357777
You can see that the Index action method doesn’t receive the results until all the HTTP requests have been completed. This is the problem that the asynchronous enumerable feature solves, as shown in listing 5.58.
Listing 5.58 Using an asynchronous enumerable in the MyAsyncMethods.cs file in the Models folder
namespace LanguageFeatures.Models {

    public class MyAsyncMethods {

        public async static Task<long?> GetPageLength() {
            HttpClient client = new HttpClient();
            var httpMessage = await client.GetAsync("http://manning.com");
            return httpMessage.Content.Headers.ContentLength;
        }

        public static async IAsyncEnumerable<long?>
                GetPageLengths(List<string> output,
                    params string[] urls) {
            HttpClient client = new HttpClient();
            foreach (string url in urls) {
                output.Add($"Started request for {url}");
                var httpMessage = await client.GetAsync($"http://{url}");
                output.Add($"Completed request for {url}");
                yield return httpMessage.Content.Headers.ContentLength;
            }
        }
    }
}
The methods result is IAsyncEnumerable<long?>, which denotes an asynchronous sequence of nullable long values. This result type has special support in .NET Core and works with standard yield return statements, which isn’t otherwise possible because the result constraints for asynchronous methods conflict with the yield keyword. Listing 5.59 updates the controller to use the revised method.
Listing 5.59 Using an asynchronous enumerable in the HomeController.cs file in the Controllers folder
namespace LanguageFeatures.Controllers {
    public class HomeController : Controller {

        public async Task<ViewResult> Index() {
            List<string> output = new List<string>();
            await foreach (long? len in MyAsyncMethods.GetPageLengths(
                    output,
                    "manning.com", "microsoft.com", "amazon.com")) {
                output.Add($"Page length: { len}");
            }
            return View(output);
        }
    }
}
The difference is that the await keyword is applied before the foreach keyword and not before the call to the async method. Restart ASP.NET Core and request http://localhost:5000; once the HTTP requests are complete, you will see that the order of the response messages has changed, like this:
Started request for manning.com
Completed request for manning.com
Page length: 26973
Started request for microsoft.com
Completed request for microsoft.com
Page length: 199528
Started request for amazon.com
Completed request for amazon.com
Page length: 441398
The controller receives the next result in the sequence as it is produced. As I explain in chapter 19, ASP.NET Core has special support for using IAsyncEnumerable<T> results in web services, allowing data values to be serialized as the values in the sequence are generated.
5.14 Getting names
There are many tasks in web application development in which you need to refer to the name of an argument, variable, method, or class. Common examples include when you throw an exception or create a validation error when processing input from the user. The traditional approach has been to use a string value hard-coded with the name, as shown in listing 5.60.
Listing 5.60 Hard-coding a name in the HomeController.cs file in the Controllers folder
namespace LanguageFeatures.Controllers {
    public class HomeController : Controller {

        public ViewResult Index() {
            var products = new[] {
                new { Name = "Kayak", Price = 275M },
                new { Name = "Lifejacket", Price = 48.95M },
                new { Name = "Soccer ball", Price = 19.50M },
                new { Name = "Corner flag", Price = 34.95M }
            };
            return View(products.Select(p =>
                $"Name: {p.Name}, Price: {p.Price}"));
        }
    }
}
The call to the LINQ Select method generates a sequence of strings, each of which contains a hard-coded reference to the Name and Price properties. Restart ASP.NET Core and request http://localhost:5000, and you will see the following output in the browser window:
Name: Kayak, Price: 275
Name: Lifejacket, Price: 48.95
Name: Soccer ball, Price: 19.50
Name: Corner flag, Price: 34.95
This approach is prone to errors, either because the name was mistyped or because the code was refactored and the name in the string isn’t correctly updated. C# supports the nameof expression, in which the compiler takes responsibility for producing a name string, as shown in listing 5.61.
Listing 5.61 Using nameof expressions in the HomeController.cs file in the Controllers folder
namespace LanguageFeatures.Controllers {
    public class HomeController : Controller {

        public ViewResult Index() {
            var products = new[] {
                new { Name = "Kayak", Price = 275M },
                new { Name = "Lifejacket", Price = 48.95M },
                new { Name = "Soccer ball", Price = 19.50M },
                new { Name = "Corner flag", Price = 34.95M }
            };
            return View(products.Select(p =>
            $"{nameof(p.Name)}: {p.Name}, {nameof(p.Price)}: {p.Price}"));
        }
    }
}
The compiler processes a reference such as p.Name so that only the last part is included in the string, producing the same output as in previous examples. There is IntelliSense support for nameof expressions, so you will be prompted to select references, and expressions will be correctly updated when you refactor code. Since the compiler is responsible for dealing with nameof, using an invalid reference causes a compiler error, which prevents incorrect or outdated references from escaping notice.
Summary
• Top-level statements allow code to be defined outside of a class, which can make ASP.NET Core configuration more concise.
• Global using statements take effect throughout a project so that namespaces don’t have to be imported in individual C# files.
• Null state analysis ensures that null values are only assigned to nullable types and that values are read safely.
• String interpolation allows data values to be composed into strings.
• Object initialization patterns simplify the code required to create objects.
• Target-typed expressions omit the type name from the new statement.
• Pattern matching is used to execute code when a value has specific characteristics.
• Extension methods allow new functionality to be added to a type without needing to modify the class file.
• Lambda expressions are a concise way to express functions.
• Interfaces can be defined with default implementations, which means it is possible to modify the interface without breaking implementation classes.
• The async and await keywords are used to create asynchronous methods without needing to work directly with tasks and continuations.