Tag Archives: Pro-csharp10-with-net6

Pro C#10 CHAPTER 2 Building C# Applications

CHAPTER 2 Building C# Applications

构建 C# 应用程序

Building C# Applications

构建 C# 应用程序

As a C# programmer, you can choose from among numerous tools to build .NET Core applications. The tool (or tools) you select will be based primarily on three factors: any associated costs, the OS you are using to develop the software, and the computing platforms you are targeting. The point of this chapter is to provide the information you need to install the .NET 6 SDK and runtime and to present a first look at Microsoft’s flagship IDEs, Visual Studio Code and Visual Studio.
作为 C# 程序员,您可以从众多工具中进行选择来构建 .NET Core 应用程序。您选择的工具将主要基于三个因素:任何相关成本、用于开发软件的操作系统以及目标计算平台。本章的重点是提供安装 .NET 6 SDK 和运行时所需的信息,并介绍Microsoft旗舰 IDE、Visual Studio Code 和 Visual Studio。

The first part of this chapter will cover setting up your computer with the .NET 6 SDK and runtime.The next section will examine building your first C# application with Visual Studio Code and Visual Studio Community Edition.
本章的第一部分将介绍如何使用 .NET 6 SDK 和运行时设置计算机。下一节将介绍如何使用 Visual Studio Code 和 Visual Studio Community Edition 构建您的第一个 C# 应用程序。

■ Note The screenshots in this and subsequent chapters are from Visual Studio Code v 1.61.2 or Visual Studio 2022 Community Edition v17.0.0 on Windows. If you want to build your applications on a different OS or IDE, this chapter will guide you in the right direction; however, the look and feel of your IDE might differ from the various screenshots in this text.
注意 本章和后续章节中的屏幕截图来自 Windows 上的 Visual Studio Code v 1.61.2 或 Visual Studio 2022 Community Edition v17.0.0。如果您想在不同的操作系统或 IDE 上构建应用程序,本章将指导您朝着正确的方向前进;但是,IDE 的外观可能与本文中的各种屏幕截图不同。

Installing .NET 6

安装 .NET 6

To get started developing applications with C# 10 and .NET 6 (on Windows, macOS, or Linux), the .NET 6 SDK needs to be installed (which also installs the .NET 6 runtime). All of the installs for .NET and .NET Core are located at the convenient www.dot.net. On the home page, click Download and then click “All .NET downloads” under .NET. After clicking “All .NET downloads,” you will see the LTS versions of .NET (6.0) and a link for .NET 6.0. Click “.NET 6.0 (recommended).” Once on that page, select the correct .NET 6 SDK for your operating system. For this book, you will need to install the SDK for .NET Core version 6.0.100 or higher, which also installs the .NET and ASP.NET Core runtimes. If you are using a Windows machine, it will also install the .NET Desktop runtime.
若要开始使用 C# 10 和 .NET 6(在 Windows、macOS 或 Linux 上)开发应用程序,需要安装 .NET 6 SDK(同时安装 .NET 6 运行时)。所有 .NET 和 .NET Core 的安装都位于方便的 www.dot.net。在主页上,单击“下载”,然后单击“.NET”下的“所有 .NET 下载”。单击“所有 .NET 下载”后,您将看到 .NET 的 LTS 版本 (6.0) 和 .NET 6.0 的链接。单击“.NET 6.0(推荐)”。进入该页面后,为操作系统选择正确的 .NET 6 SDK。对于本书,你将需要安装适用于 .NET Core 的 SDK 版本 6.0.100 或更高版本,该版本还会安装 .NET 和 ASP.NET Core 运行时。如果您使用的是 Windows 计算机,它还将安装 .NET Desktop 运行时。

Understanding the .NET Version Numbering Scheme

了解 .NET 版本编号方案

At the time of this writing, the .NET 6 SDK is at version 6.0.100. The first two numbers (6.0) indicate the highest version of the runtime you can target. In this case, that’s 6.0. This means the SDK also supports developing for a lower version of the runtime, such as .NET 5 or .NET Core 3.1. The next number (1) is the quarterly feature band. Since we are currently in the first quarter of the year since the release, it is a 1. The final two numbers (00) indicate the patch version. This is a little bit clearer if you add a separator into the version in your mind and think of the current version as 6.0.1.00.
在撰写本文时,.NET 6 SDK 的版本为 6.0.100。前两个数字 (6.0) 表示可以面向的最高运行时版本。在本例中,这是 6.0。这意味着 SDK 还支持针对较低版本的运行时进行开发,例如 .NET 5 或 .NET Core 3.1。下一个数字 (1) 是季度特征带。由于我们目前处于发布以来的第一季度,因此它是 1。最后两个数字 (00) 表示修补程序版本。如果您在脑海中的版本中添加分隔符并将当前版本视为 6.0.1.00,这一点会更清楚一些。

Confirming the .NET 6 Install确认 .NET 6 安装
To confirm the installation of the SDK and the runtimes, open a command window and use the .NET command-line interface (CLI), dotnet.exe. The CLI has SDK options and commands available. The commands include creating, building, running, and publishing projects and solutions, and you will see examples of those commands later in this text. In this section, we will examine the SDK options, of which there are four, as shown in Table 2-1.
若要确认 SDK 的安装和运行时,请打开命令窗口并使用 .NET 命令行界面 (CLI) dotnet.exe。CLI 具有可用的开发工具包选项和命令。这些命令包括创建、生成、运行和发布项目和解决方案,本文后面将看到这些命令的示例。在本节中,我们将检查 SDK 选项,其中有四个选项,如表 2-1 所示。

Table 2-1. .NET 5 CLI SDK Options
表 2-1. .NET 5 命令行界面开发工具包选项

Option Meaning in Life
--version Display the .NET SDK version in use
显示正在使用的
NET SDK 版本
--info Display .NET information
显示 .NET 信息
--list-runtimes Display the installed runtimes
显示已安装的运行时
--list-sdks Display the installed SDKs
显示已安装的软件开发工具包

The --version option displays the highest version of the SDK installed on your machine, or the version specified in a global.json located at or above your current directory. Check the current version of the .NET SDK installed on your machine, enter the following:
-version 选项显示计算机上安装的 SDK 的最高版本,或在当前目录或上方的 global.json 中指定的版本。检查计算机上安装的 .NET SDK 的当前版本,输入以下内容:

dotnet --version

For this book, the result needs to be 6.0.100 (or higher).
对于本书,结果需要为 6.0.100(或更高)。

To show all of the .NET Core Runtimes installed on your machine, enter the following:
若要显示计算机上安装的所有 .NET Core 运行时,请输入以下内容:

dotnet --list-runtimes

There are three different runtimes:
有三种不同的运行时:

  • Microsoft.AspNetCore.App (for building ASP.NET Core applications)
    Microsoft.AspNetCore.App(用于构建 ASP.NET 核心应用程序)
  • Microsoft.NETCore.App (the foundational runtime for .NET)
    Microsoft.NETCore.App(.NET 的基础运行时)
  • Microsoft.WindowsDesktop.App (for building WinForms and WPF applications) Microsoft.WindowsDesktop.App
    (用于构建 WinForms 和 WPF 应用程序)

If you are running a Windows OS, each of these must be version 6.0.0 (or higher). If you are not on Windows, you will just need the first two, Microsoft.NETCore.App and Microsoft.AspNetCore.App, and also be showing version 6.0.0 (or higher).
如果您运行的是 Windows 操作系统,则其中每个都必须是版本 6.0.0(或更高版本)。如果您不在Windows上,则只需要前两个,Microsoft.NETCore.App 和 Microsoft.AspNetCore.App,并且还显示版本6.0.0(或更高版本)。

Finally, to show all of the SDKs installed, enter the following:
最后,要显示已安装的所有 SDK,请输入以下内容:

dotnet --list-sdks

Again, the version must be 6.0.100 (or higher).
同样,版本必须为 6.0.100(或更高版本)。

Checking For Updates

检查更新

New with .NET 6, the CLI has a new command that checks your installed versions of the .NET/.NET Core SDKs and runtimes for updates. This command is backwards compatible, so it also checks for updates for .NET Core 3.1. It will also inform you if any of the installed SDK or runtimes are out of support (like the 2.x versions). To check the versions, enter the following command:
作为 .NET 6 的新增功能,CLI 有一个新命令,用于检查已安装的 .NET/.NET Core SDK 版本和运行时是否有更新。此命令向后兼容,因此它还会检查.NET Core 3.1.如果任何已安装的 SDK 或运行时不受支持(如 2.x 版本),它还会通知您。要检查版本,请输入以下命令:

dotnet sdk check

The command will not update any of the versions for you, it just reports the status. To update, follow the same procedure outlined above to download and install the new version(s).
该命令不会为您更新任何版本,它只会报告状态。要进行更新,请按照上述相同过程下载并安装新版本。

Use an Earlier Version of the .NET (Core) SDK

使用早期版本的 .NET(核心)SDK

Sometimes you might want to ensure you are using an older version of the .NET SDK. As an example, you are building your production applications using .NET 6. An early release candidate for .NET 7 is available, and you want to start experimenting with it while not putting your production work at risk. While Microsoft states that you can build previous versions of .NET applications with a later SDK, many developers and organizations aren’t comfortable with release candidates, much less early beta/preview releases.
有时,你可能希望确保使用的是旧版本的 .NET SDK。例如,您正在使用 .NET 6 生成生产应用程序。.NET 7 的早期候选版本可用,并且你希望开始试验它,同时又不使生产工作面临风险。虽然Microsoft声明可以使用更高版本的 SDK 生成以前版本的 .NET 应用程序,但许多开发人员和组织对候选版本感到不舒服,更不用说早期测试版/预览版了。

If you need to pin your project to an earlier version of the .NET SDK, you can do that with a global. json file. To create this file, you can use this command, which pins the current folder and all subfolders to SDK version 5.0.400:
如果需要将项目固定到早期版本的 .NET SDK,可以使用全局 JSON 文件执行此操作。若要创建此文件,可以使用以下命令,该命令将当前文件夹和所有子文件夹固定到 SDK 版本 5.0.400:

dotnet new globaljson –sdk-version 5.0.400

This creates a global.json file that looks like this:
这将创建一个如下所示的 global.json 文件:

{
    "sdk": {
        "version": "5.0.400"
    }
}

Running dotnet.exe --version in this directory (or any subdirectory) will return 5.0.400.
在此目录(或任何子目录)中运行 dotnet.exe --version 将返回 5.0.400。

Building .NET Core Applications with Visual Studio

使用 Visual Studio 构建 .NET Core 应用程序

If you have experience building applications using prior versions of Microsoft technologies, you are probably familiar with Visual Studio. The edition names and features sets have changed throughout the life of the product but have settled down since the release of .NET Core. Visual Studio is available in the following editions (for both Window and Mac):
如果您具有使用以前版本的Microsoft技术构建应用程序的经验,则可能熟悉 Visual Studio。版本名称和功能集在产品的整个生命周期中发生了变化,但自 .NET Core 发布以来已稳定下来。Visual Studio 在以下版本中可用(适用于 Window 和 Mac):

  • Visual Studio 2022 Community (free)
    Visual Studio 2022 社区(免费)
  • Visual Studio 2022 Professional (paid)
    视觉工作室 2022 专业版(付费)
  • Visual Studio 2022 Enterprise (paid)
    Visual Studio 2022 企业版(付费)

The Community and Professional editions are essentially the same. The most significant difference is in the licensing model. Community is licensed for open source, academic, and small-business uses. Professional and Enterprise are commercial products that are licensed for any development, including enterprise development. As one would expect, the Enterprise edition has many additional features compared to the Professional edition.
社区版和专业版基本相同。最显着的区别在于许可模式。社区被许可用于开源、学术和小型企业用途。专业版和企业版是获得任何开发许可的商业产品,包括企业开发。正如人们所期望的那样,与专业版相比,企业版具有许多附加功能。

■ Note For specific licensing details, please go to www.visualstudio.com. licensing Microsoft products can be complex, and this book does not cover the details. For the purposes of writing (and following along with) this book, Community is legal to use.
有关具体的许可详情,请转到 www.visualstudio.com。 许可Microsoft产品可能很复杂,本书不涉及详细信息。出于撰写(并遵循)本书的目的,社区是合法使用的。

All Visual Studio editions ship with sophisticated code editors, integrated debuggers, GUI designers for desktop applications, and much more. Since they all share a common core set of features, the good news is that it is easy to move between them and feel quite comfortable with their basic operation.
所有Visual Studio版本都附带复杂的代码编辑器,集成调试器,用于桌面应用程序的GUI设计器等等。由于它们都具有一组共同的核心功能,因此好消息是很容易在它们之间移动并且对它们的基本操作感到非常舒服。

Installing Visual Studio 2022 (Windows)

安装 Visual Studio 2022 (Windows)

Before using Visual Studio 2022 to develop, execute, and debug C# applications, you need to get it installed. The installation experience changed dramatically with the 2017 version and is worth discussing in more detail. If you have been using 2019, you will find the experience very similar.

在使用 Visual Studio 2022 开发、执行和调试 C# 应用程序之前,需要安装它。2017 版本的安装体验发生了巨大变化,值得更详细地讨论。如果您一直在使用2019,您会发现体验非常相似。

■ Note You can download Visual Studio 2022 Community from www.visualstudio.com/downloads.
您可以从 www.visualstudio.com/downloads 下载 Visual Studio 2022 社区。

The Visual Studio 2022 installation process is now broken down into application-type workloads. This allows you to install just the components you need for the type of applications you plan on building. For example, if you are going to build web applications, you would install the “ASP.NET and web development” workload.
Visual Studio 2022 安装过程现在分解为应用程序类型的工作负载。这允许您仅安装计划构建的应用程序类型所需的组件。例如,如果要构建 Web 应用程序,则需要安装“ASP.NET 和 Web 开发”工作负载。

Another (extremely) significant change is that Visual Studio 2022 supports true side-by-side installation.Note that I am not referring to just previous versions of Visual Studio but to Visual Studio 2022 itself! For example, on my main work computer, I have Visual Studio 2022 Enterprise installed for my professional work and Visual Studio 2022 Community for use in my books, courses, and conference lectures. If you have Professional or Enterprise supplied by your employer, you can still install the Community edition to work on open source projects (or the code in this book).
另一个(非常)重大的变化是 Visual Studio 2022 支持真正的并行安装。请注意,我指的不仅仅是以前版本的 Visual Studio ,而是 Visual Studio 2022 本身!例如,在我的主工作计算机上,我为我的专业工作安装了 Visual Studio 2022 企业版,并为我的书籍、课程和会议讲座安装了 Visual Studio 2022 社区。如果你的雇主提供了专业版或企业版,你仍然可以安装社区版来处理开源项目(或本书中的代码)。

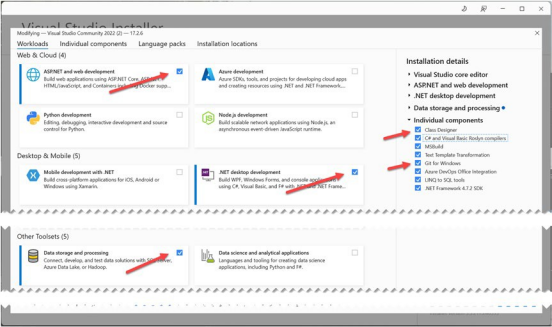
When you launch the installer for Visual Studio 2022 Community, you are presented with the screen shown in Figure 2-1. This screen has all of the workloads available, the option to select individual components, and a summary on the right side showing what has been selected.
启动 Visual Studio 2022 社区的安装程序时,将显示如图 2-1 所示的屏幕。此屏幕包含所有可用的工作负载、选择单个组件的选项,以及右侧显示已选择内容的摘要。
Alt text

Figure 2-1. The new Visual Studio installer
图 2-1。 新的 Visual Studio 安装程序

For this book, you will want to install the following workloads:
对于本书,您需要安装以下工作负载:

  • .NET desktop development.NET
    桌面开发
  • ASP.NET and web development
    ASP.NET 和网络开发
  • Data storage and processing
    数据存储和处理

On the “Individual components” tab, also select Class Designer and Git for Windows (all under “Code tools”). Once you have all of them selected, click Install. This will provide you with everything you need to work through the examples in this book.
在“单个组件”选项卡上,还选择“类设计器”和“适用于 Windows的 Git”(全部在“代码工具”下)。选择所有这些选项后,单击“安装”。这将为您提供完成本书中示例所需的一切。

Taking Visual Studio 2022 for a Test-Drive

将 Visual Studio 2022 作为试驾

Visual Studio 2022 is a complete IDE for software development using .NET and C#. Let’s take a quick look at Visual Studio by building a simple .NET 6 Console application.
Visual Studio 2022 是一个完整的 IDE,用于使用 .NET 和 C# 进行软件开发。让我们通过构建一个简单的 .NET 6 控制台应用程序来快速了解 Visual Studio。

Using the New Project Dialog and C# Code Editor

使用“新建项目”对话框和 C# 代码编辑器

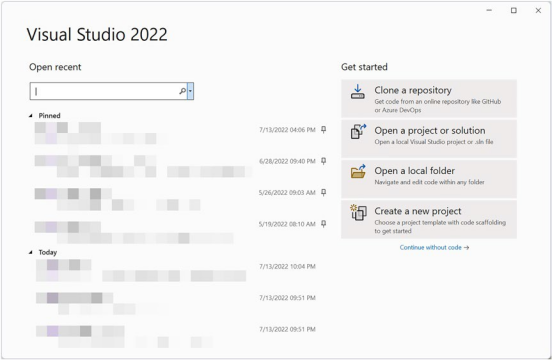
When you start Visual Studio, you will see the updated Launch dialog, as shown in Figure 2-2. The left side of the dialog has the most recently used solutions, and the right side has options for launching VisualStudio by launching code from a repository, opening an existing project/solution, opening a local folder, or creating a new project. There is also an option to continue without any code, which just launches the Visual Studio IDE.
启动 Visual Studio 时,您将看到更新的“启动”对话框,如图 2-2 所示。对话框的左侧包含最近使用的解决方案,右侧包含用于启动 Visual 的选项通过从存储库启动代码、打开现有项目/解决方案、打开本地文件夹或创建新项目来进行工作室。还有一个选项可以在没有任何代码的情况下继续,它只会启动Visual Studio IDE。
Alt text

Figure 2-2. The new Visual Studio launch dialog
图 2-2。 新的 Visual Studio 启动对话框

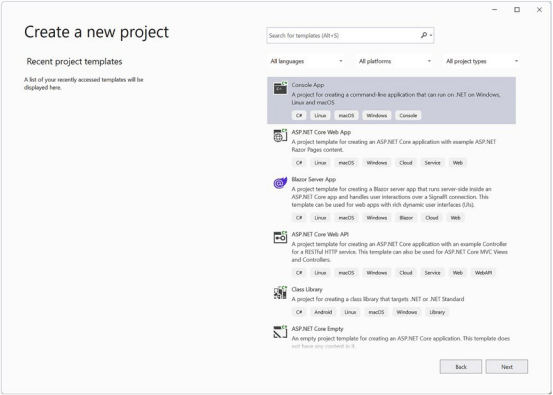
Select the “Create a new project” option, and you will be prompted with the “Create a new project” dialog. As shown in Figure 2-3, recently used templates (if any) are on the left, and all available templates are on the right, including a set of filters and a search box.
选择“创建新项目”选项,系统将提示您“创建新项目”对话框。如图 2-3 所示,最近使用的模板(如果有)位于左侧,所有可用模板位于右侧,包括一组筛选器和一个搜索框。
Alt text

Figure 2-3. The “Create a new project” dialog
图 2-3。 “创建新项目”对话框

To start, create a new Console App, making sure to select the C# version and not the Visual Basic version.
首先,创建一个新的控制台应用,确保选择 C# 版本而不是 Visual Basic 版本。

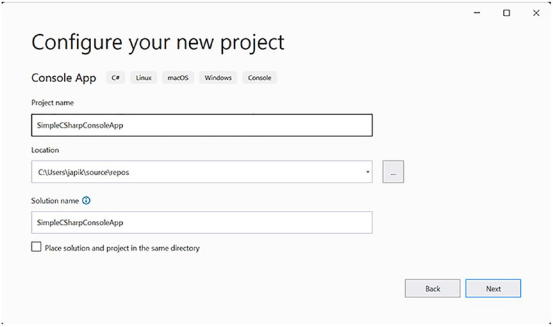
The next screen is the “Configure your new project” dialog, as shown in Figure 2-4. Enter SimpleCSharpConsoleApp for the project name and select a location for the project. The wizard will also create a Visual Studio solution, by default named after the project name.
下一个屏幕是“配置新项目”对话框,如图 2-4 所示。输入 SimpleCSharpConsoleApp 作为项目名称,并选择项目的位置。该向导还将创建一个 Visual Studio 解决方案,默认情况下以项目名称命名。
Alt text

Figure 2-4. The “Configure your new project” dialog
图 2-4。 “配置新项目”对话框

Note Creating solutions and projects can also be accomplished using the .nET Core Command line Interface (ClI). This will be covered with Visual Studio Code.
注意 还可以使用 .nET Core 命令行界面 (ClI) 创建解决方案和项目。这将在Visual Studio Code中介绍。

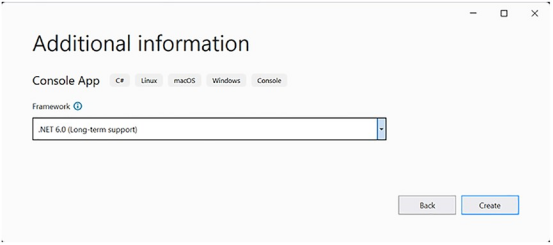
The next screen prompts for the version of .NET to use. Make sure “.NET 6.0 (Long-term support)” is selected, as shown in Figure 2-5.
下一个屏幕提示要使用的 .NET 版本。确保选中“.NET 6.0(长期支持)”,如图 2-5 所示。
Alt text

Figure 2-5. Chosing the .NET Version
图 2-5。 选择 .NET 版本

Once the project has been created, you will see that the initial C# code file (named Program.cs) has been opened in the code editor. The initial template just has a comment (the line starting with //) and a single line of code that writes “Hello, World!” to the console:

创建项目后,您将看到初始 C# 代码文件(名为 Program.cs)已在代码编辑器中打开。初始模板只有一个注释(以 // 开头的行)和一行代码,将“Hello, World!”写入控制台。

// See https://aka.ms/new-console-template for more information 
//有关更多信息,请参阅 https://aka.ms/new-console-template

Console.WriteLine("Hello, World!");

Those two lines of code are referred to as top level statements and serve as the entry point into the application. The next chapter covers top level statements and application entry points in detail. For now, realize that this is where the execution starts for your app, and ends when all of the lines have executed.
这两行代码称为顶级语句,用作应用程序的入口点。下一章将详细介绍顶级语句和应用程序入口点。现在,请注意,这是应用的执行开始位置,并在所有行都执行完毕后结束。

Replace the comment and the single line of code with the following:
将注释和单行代码替换为以下内容:

 
// Set up Console UI (CUI)
// 设置 Console UI (CUI)

Console.Title = "My Rocking App";
Console.ForegroundColor = ConsoleColor.Yellow;
Console.BackgroundColor = ConsoleColor.Blue;
Console.WriteLine("*************************************");
Console.WriteLine("***** Welcome to My Rocking App *****");
Console.WriteLine("*************************************");
Console.BackgroundColor = ConsoleColor.Black;

// Wait for Enter key to be pressed.
// 等待按回车键。
Console.ReadLine();

Note You will notice as you type, Visual Studio attempts to complete the words for you. This is called IntelliSense (code completion help) and is integrated into Visual Studio and Visual Studio Code.
您会注意到,当您键入时,Visual Studio 会尝试为您完成单词。这称为IntelliSense(代码完成帮助),并集成到Visual Studio和Visual Studio Code中。

Here, you are using the Console class defined in the System namespace. The System namespace is included as part of the global implicit using statements, so it isn’t explicitly needed. This program does not do anything too interesting; however, note the final call to Console.ReadLine(). This is in place simply to ensure the user must press a key to terminate the application. With Visual Studio 2022, this is unnecessary as the VS debugger will pause the program and prevent it from exiting. If you were to navigate to the compiled version and run it, the program would disappear almost instantly when debugging the program!
在这里,您将使用在系统命名空间中定义的控制台类。System 命名空间作为全局隐式 using 语句的一部分包含在内,因此不需要它。该程序不会做任何太有趣的事情;但是,请注意对 Console.ReadLine() 的最后一次调用。这样做只是为了确保用户必须按某个键才能终止应用程序。在 Visual Studio 2022 中,这是不必要的,因为 VS 调试器将暂停程序并阻止其退出。如果要导航到编译版本并运行它,则在调试程序时,程序几乎会立即消失!

■ Note If you want to change the VS debugging experience to automatically end the program, select Tools ➤Options ➤ Debugging ➤ automatically close the console when debugging stops.
如果要更改 VS 调试体验以自动结束程序,请选择“工具”➤选项 ➤ 调试 ➤ 调试停止时自动关闭控制台。

Changing the Target .NET Core Framework

更改目标 .NET Core 框架

When creating this project, you selected the version of .NET that you wanted to use. If you chose the wrong one (or want to change it for some other reason), double-click the project name in Solution Explorer. This opens the project file in the editor (this feature was introduced with Visual Studio 2019 and .NET Core).You can also edit the project file by right-clicking the project name in Solution Explorer and selecting “Edit Project file.” You will see the following:
创建此项目时,选择了要使用的 .NET 版本。如果选择了错误的项目名称(或出于其他原因想要更改它),请在“解决方案资源管理器”中双击项目名称。这将在编辑器中打开项目文件(此功能随 Visual Studio 2019 和 .NET Core 一起引入)。还可以通过在“解决方案资源管理器”中右键单击项目名称并选择“编辑项目文件”来编辑项目文件。您将看到以下内容:

<Project Sdk="Microsoft.NET.Sdk">
    <PropertyGroup>
        <OutputType>Exe</OutputType>
        <TargetFramework>net6.0</TargetFramework>
        <ImplicitUsings>enable</ImplicitUsings>
        <Nullable>enable</Nullable>
    </PropertyGroup>
</Project>

To change the .NET version to version 5, for example, simply change the TargetFramework value to net5.0, as shown here:
例如,若要将 .NET 版本更改为版本 5,只需将 TargetFramework 值更改为 net5.0,如下所示:

<Project Sdk="Microsoft.NET.Sdk">
    <PropertyGroup>
        <OutputType>Exe</OutputType>
        <TargetFramework>net5.0</TargetFramework>
        <ImplicitUsings>enable</ImplicitUsings>
        <Nullable>enable</Nullable>
        </PropertyGroup>
    </Project>

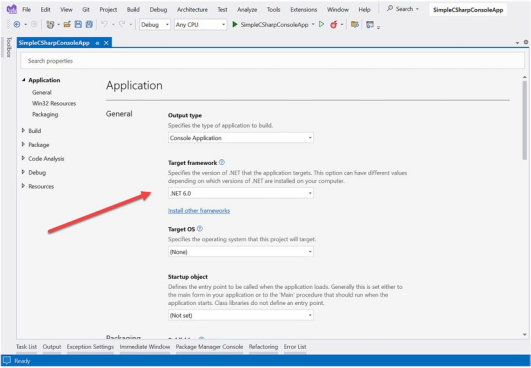
You can also change the target framework by right-clicking the project name in Solution Explorer and selecting Properties, opening the Application tab, and updating the Target Framework value, as shown in Figure 2-6.
还可以通过在“解决方案资源管理器”中右键单击项目名称并选择“属性”,打开“应用程序”选项卡并更新“目标框架”值来更改目标框架,如图 2-6 所示。
Alt text

Figure 2-6. Changing the target framework for your application
图 2-6。 更改应用程序的目标框架

Using C# 10 Features

使用 C# 10 功能

In versions of .NET and the .NET Framework, the version of C# supported by a project could be changed. Since the release of .NET Core 3.0 (and each subsequent.NET version), the version of C# used is tied into the .NET Core/.NET version. For .NET 6.0 projects, the language version is locked into C# 10. Table 2-2 lists the target frameworks (.NET, .NET Core, .NET Standard, and .NET Framework) and the default C# version utilized.
在 .NET 和 .NET Framework 版本中,可以更改项目支持的 C# 版本。自 .NET Core 3.0(以及每个 subsequent.NET 版本)发布以来,使用的 C# 版本与 .NET Core/.NET 版本相关联。对于 .NET 6.0 项目,语言版本锁定在 C# 10 中。表 2-2 列出了目标框架(.NET、.NET Core、.NET Standard 和 .NET Framework)和所使用的默认 C# 版本。

Table 2-2. C# 8 Version and Target Framework 表 2-2. C# 8 版本和目标框架

Target Framework 目标框架 Version 版本 C# Language Version Default C#语言版本
.NET 6.x C# 10.0
.NET 5.x C# 9.0
.NET Core 3.x C# 8.0
.NET Core 2.x C# 7.3
.NET Standard 2.1 C# 8.0
.NET Standard 2.0 C# 7.3
.NET Standard 1.x C# 7.3
.NET Framework all C# 7.3

Running and Debugging Your Project

运行和调试项目

To run your program and see the output, press the Ctrl+F5 keyboard command (which is also accessed from the Debug ➤ Start Without Debugging menu option). Once you do, you will see a Windows console window pop on the screen with your custom (and colorful) message. Be aware that when you “run” your program with Ctrl+F5, you bypass the integrated debugger.
若要运行程序并查看输出,请按 Ctrl+F5 键盘命令(也可从“调试”➤“启动(不调试)菜单选项访问该命令)。完成后,您将看到屏幕上弹出一个Windows控制台窗口,其中包含自定义(和彩色)消息。请注意,使用 Ctrl+F5 “运行”程序时,会绕过集成调试器。

■ Note .NET applications can also be compiled and executed using the ClI. To run your project, enter dotnet run in the same directory as the project file (SimpleCSharpApp.csproj in this example). The dotnet run command also automatically builds the project.
.NET 应用程序也可以使用 ClI 编译和执行。若要运行项目,请在与项目文件相同的目录中输入 dotnet run(在此示例中为 SimpleCSharpApp.csproj)。dotnet run 命令也会自动生成项目。

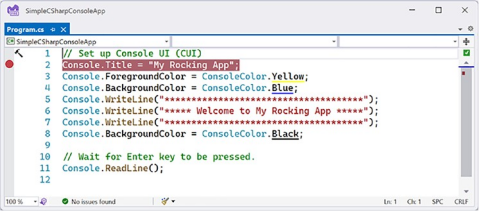
If you need to debug your code (which will certainly be important when building larger programs), your first step is to set breakpoints at the code statement you want to examine. Although there is not much code in this example, set a breakpoint by clicking the leftmost gray bar of the code editor (note that breakpoints are marked with a red dot icon; see Figure 2-7).
如果需要调试代码(这在构建大型程序时肯定很重要),第一步是在要检查的代码语句处设置断点。尽管此示例中的代码不多,但请通过单击代码编辑器最左侧的灰色条来设置断点(请注意,断点用红点图标标记;请参阅图 2-7)。
Alt text

Figure 2-7. Setting breakpoints
图 2-7。 设置断点

If you now press the F5 key (or use the Debug ➤ Start Debugging menu option or click the green arrow with Start next to it in the toolbar), your program will halt at each breakpoint. As you would expect, you can interact with the debugger using the various toolbar buttons and menu options of the IDE. Once you have evaluated all breakpoints, the application will eventually terminate once the statements have completed.
如果现在按 F5 键(或使用“调试”➤“启动调试”菜单选项,或单击工具栏中旁边带有“开始”的绿色箭头),则程序将在每个断点处停止。如您所料,您可以使用 IDE 的各种工具栏按钮和菜单选项与调试器进行交互。评估所有断点后,应用程序最终将在语句完成后终止。

■ Note Microsoft IDEs have sophisticated debuggers, and you will learn about various techniques over the chapters to come. For now, be aware that when you are in a debugging session, a large number of useful options will appear under the Debug menu. Take a moment to verify this for yourself.
请注意Microsoft IDE 具有复杂的调试器,您将在后面的章节中了解各种技术。现在,请注意,当您处于调试会话中时,“调试”菜单下将出现大量有用的选项。花点时间自己验证一下。

Using Solution Explorer

使用解决方案资源管理器

If you look to the right of the text editor, you will see the Solution Explorer window, which shows you a few important things. First, notice that the new project wizard has created a solution along with the single project. This can be confusing at first, as they both have been given the same name
(SimpleCSharpConsoleApp). The idea here is that a “solution” can contain multiple projects that all work together. For example, your solution might include three class libraries, one WPF application, and one ASP. NET Core web service. The earlier chapters of this book will almost always have a single for the example code; however, when you build some more complex examples, you will see how to add new projects to your initial solution.
如果查看文本编辑器的右侧,将看到“解决方案资源管理器”窗口,其中显示了一些重要内容。首先,请注意,新建项目向导已与单个项目一起创建了一个解决方案。起初这可能会令人困惑,因为它们都被赋予了相同的名称(SimpleCSharpConsoleApp)。这里的想法是,一个“解决方案”可以包含多个协同工作的项目。例如,您的解决方案可能包括三个类库、一个 WPF 应用程序和一个 ASP. NET Core Web 服务。本书前面的章节几乎总是有一个示例代码;但是,当您生成一些更复杂的示例时,您将看到如何将新项目添加到初始解决方案中。

■ Note Be aware that when you select the solution in the Solution Explorer window, the IDE’s menu system will show you a different set of choices than when you select a project. If you ever find yourself wondering where a certain menu item has disappeared to, double-check you did not accidentally select the wrong node.
请注意,在“解决方案资源管理器”窗口中选择解决方案时,IDE 的菜单系统将显示一组与选择项目时不同的选项集。如果您发现自己想知道某个菜单项消失到哪里,请仔细检查您是否意外选择了错误的节点。

Using the Visual Class Diagram Tool

使用可视类图工具

Visual Studio also gives you the ability to design classes and other types (such as interfaces or delegates) in a visual manner. The Class Diagram provides tools that allow you to create, view, and modify the objects in your project and their relationships with other objects. Using this tool, you are able to visually add (or remove) members to (or from) a type and have your modifications reflected in the corresponding C# file. Also, as you modify a given C# file, changes are reflected in the class diagram.
Visual Studio 还使您能够以可视方式设计类和其他类型(如接口或委托)。类图提供了一些工具,可用于创建、查看和修改项目中的对象及其与其他对象的关系。使用此工具,可以直观地向类型添加(或删除)成员,并将修改反映在相应的 C# 文件中。此外,修改给定的 C# 文件时,更改将反映在类图中。

■ Note This book only uses the Class Diagram tool occasionally to accentuate certain concepts. It is shown here for completeness, and the choice to use it or the text editor is entirely up to you. The overwhelming majority of the examples use the text editor of Visual Studio/Visual Studio Code.
本书只是偶尔使用类图工具来强调某些概念。此处显示它是为了完整性,使用它还是文本编辑器完全取决于您。绝大多数示例使用Visual Studio/Visual Studio Code的文本编辑器。

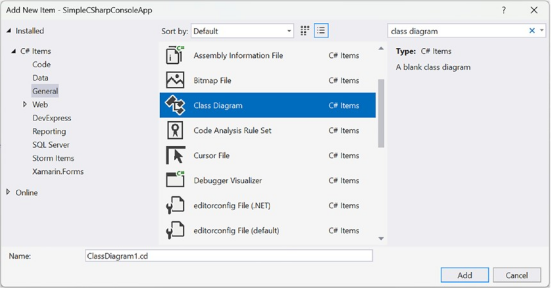
To access the visual class designer tools, the first step is to insert a new class diagram file. To do so, select project in the Solution Explorer, then activate the Project ➤ Add New Item menu option and locate the Class Diagram type (Figure 2-8). 若要访问可视化类设计器工具,第一步是插入新的类图文件。为此,请在“解决方案资源管理器”中选择“项目”,然后激活“项目”➤“添加新项”菜单选项并找到“类图”类型(图 2-8)。
Alt text

Figure 2-8. Inserting a class diagram file into the current project
图 2-8。 将类关系图文件插入到当前项目中

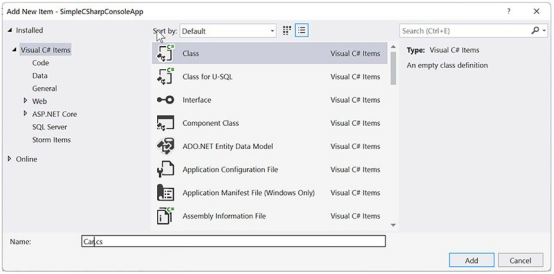
Initially, the designer will be empty; however, you can drag and drop files from your Solution Explorer window on the surface or right click on the design surface to create new classes. To get started, create a new class in your project by right clicking on the project and selecting Add ➤ Class. In the Add New Item – SimpleCSharpConsoleApp dialog, select Class, and name it Car.cs, as shown in Figure 2-9.
最初,设计器将是空的;但是,可以将文件从“解决方案资源管理器”窗口拖放到图面上,或右键单击设计图面以创建新类。要开始使用,请在项目中创建一个新类,方法是右键单击该项目并选择添加 ➤ 类。在“添加新项 – SimpleCSharpConsoleApp”对话框中,选择“类”,并将其命名为 Car.cs,如图 2-9 所示。
Alt text

Figure 2-9. The Add New Item Dialog
图 2-9。 “添加新项”对话框

Update the code to the following to create a Car class (you will learn all about classes over the next few chapters):
将代码更新为以下内容以创建 Car 类(您将在接下来的几章中了解有关类的所有信息):

namespace SimpleCSharpConsoleApp;
public class Car
{
    public string PetName { get; set; }
    public string Make { get; set; }
}

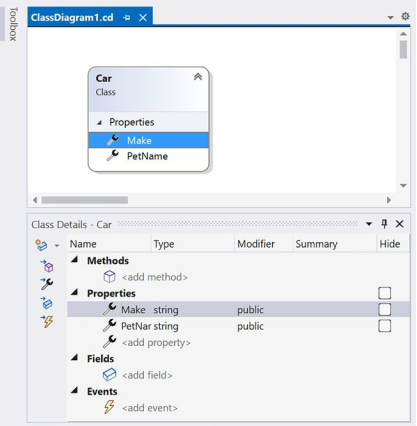
After saving the file, drag the Car.cs file from the Solution Explorer onto the Class Diagram. Once you do this, you will find a visual representation of the class. If you click the arrow icon for a given type, you can show or hide the type’s members. Underneath the Class Diagram is the Class Details window, which shows the specifics of the selected class diagram (see Figure 2-10).
保存文件后,将 Car.cs 文件从解决方案资源管理器拖到类图上。完成此操作后,您将找到类的可视化表示形式。如果单击给定类型的箭头图标,则可以显示或隐藏该类型的成员。“类图”下方是“类详细信息”窗口,其中显示了所选类图的细节(请参阅图 2-10)。
Alt text

Figure 2-10. The Class Diagram viewer
图 2-10。 类图查看器

■ Note using the Class Designer toolbar, you can fine-tune the display options of the designer surface.
使用类设计器工具栏,可以微调设计器图面的显示选项。

The Class Details window not only shows you the details of the currently selected item in the diagram but also allows you to modify existing members and insert new members on the fly.
“类详细信息”窗口不仅显示关系图中当前选定项的详细信息,还允许您修改现有成员并动态插入新成员。

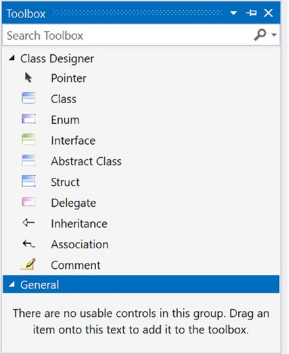
The Class Designer Toolbox allows you to insert new types (and create relationships between these types) into your project visually (see Figure 2-11). (Be aware you must have a class diagram as the active window to view this toolbox.) As you do so, the IDE automatically creates new C# type definitions in the background.
使用类设计器工具箱,可以直观地将新类型(并在这些类型之间创建关系)插入到项目中(请参见图 2-11)。(请注意,必须将类图作为活动窗口才能查看此工具箱。执行此操作时,IDE 会在后台自动创建新的 C# 类型定义。
Alt text

Figure 2-11. The Class Designer Toolbox
图 2-11。 类设计器工具箱

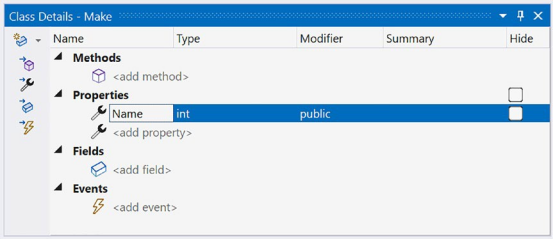
By way of example, drag a new class from the Class Designer Toolbox onto your Class Designer. Name this class Make with public access and select Create new file. This will result in the creation of a new C# file named Make.cs that is automatically added to your project. Now, using the Class Details window, add a public string property named Name (see Figure 2-12).
例如,将一个新类从“类设计器工具箱”拖到“类设计器”上。将此类命名为“具有公共访问权限的 Make”,然后选择“创建新文件”。这将导致创建一个名为 Make.cs 的新 C# 文件,该文件会自动添加到项目中。现在,使用“类详细信息”窗口,添加一个名为 Name 的公共字符串属性(请参见图 2-12)。
Alt text

Figure 2-12. Adding a property with the Class Details window
图 2-12。 使用“类详细信息”窗口添加属性

If you now look at the C# definition of the Make class, you will see it has been updated accordingly:
如果现在查看 Make 类的 C# 定义,将看到它已相应地更新:

using System;
using System.Collections.Generic;
using System.Linq;
using System.Text;
namespace SimpleCSharpConsoleApp
{
    public class Make
    {
        public int Name
        {
            get => default;
            set { }
        }
    }
}

■ Note Don’t worry about the extra using statements or the syntax of property. This will all be covered in subsequent chapters.
不要担心额外的 using 语句或属性语法。这些都将在后续章节中介绍。

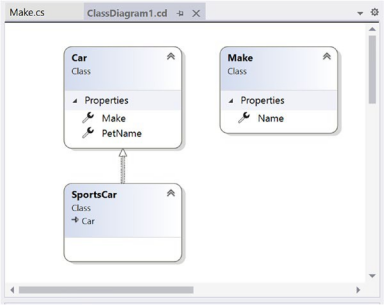
Now, activate the designer file once again and drag another new class onto the designer and name it SportsCar. Click the Inheritance icon in the Class Designer Toolbox and click the top of the SportsCar icon. Next, click the mouse on top of the Car class icon. If you performed these steps correctly, you have just derived the SportsCar class from Car (see Figure 2-13).
现在,再次激活设计器文件,并将另一个新类拖到设计器上并将其命名为 SportsCar。单击“类设计器工具箱”中的“继承”图标,然后单击跑车的顶部图标。接下来,单击汽车类图标顶部的鼠标。如果正确执行了这些步骤,则刚刚从 Car 派生了 SportsCar 类(请参阅图 2-13)。
Alt text

Figure 2-13. Visually deriving from an existing class
图 2-13。 从现有类直观派生

■ Note The concept of inheritance will be fully examined in Chapter 6.
注意继承的概念将在第6章中全面讨论。

To complete this example, update the generated SportsCar class with a public method namedGetPetName(), authored as follows:
若要完成此示例,请使用名为GetPetName(),编写如下:

public class SportsCar : Car
{
    public string GetPetName()
    {
        PetNam" = ""red";
        return PetName;
    }
}

As you would expect, the designer shows the added method to the SportsCar class.
如您所料,设计器显示了添加到 SportsCar 类的方法。

This concludes your first look at Visual Studio. Now let’s look at the most recent addition to the Visual Studio family, Visual Studio Code.
你对Visual Studio的第一次了解到此结束。现在让我们看看Visual Studio系列的最新成员Visual Studio Code。

Building .NET Core Applications with Visual Studio Code

使用 Visual Studio Code 构建 .NET Core 应用程序

Another popular IDE from Microsoft is Visual Studio Code (VS Code). Visual Studio Code is a relatively new edition to the Microsoft family; is free, open source, and cross-platform; and has gained significant adoption among developers in and out of the .NET ecosystem. The focus of Visual Studio Code is (as the name suggests) the code of your application. While it does not have many of the built-in features that are included in Visual Studio, it is extremely fast, and additional functionality (like different language support) can be added through extensions. This allows you to have a fast IDE customized for your workflow. Many samples in this book are built and tested with Visual Studio Code. You can download it here:
Microsoft另一个流行的IDE是Visual Studio Code(VS Code)。Visual Studio Code是Microsoft系列中相对较新的版本;免费、开源和跨平台;并在 .NET 生态系统内外的开发人员中获得了广泛的采用。Visual Studio Code 的重点是(顾名思义)应用程序的代码。虽然它没有Visual Studio中包含的许多内置功能,但它非常快,并且可以通过扩展添加其他功能(如不同的语言支持)。这允许您为工作流自定义快速 IDE。本书中的许多示例都是使用 Visual Studio Code 构建和测试的。您可以在此处下载:https://code.visualstudio.com/download

After installing VS Code, you will want to add the C# extension found here:
安装 VS Code 后,需要添加在此处找到的 C# 扩展:
https://marketplace.visualstudio.com/items?itemName=ms-dotnettools.csharp

■ Note Visual Studio Code is used to develop many different types of applications based on a multitude of languages. There are extensions for angular, View, php, Java, and many, many, more.
注意 Visual Studio Code 用于开发基于多种语言的许多不同类型的应用程序。有angular,View,php,Java等扩展。

Taking Visual Studio Code for a Test-Drive

使用 Visual Studio 写代码

Let’s take a quick look at Visual Studio Code by building the same .NET 6 Console application from the Visual Studio example.
让我们通过从Visual Studio示例构建相同的.NET 6 Console应用程序来快速浏览Visual Studio Code。

Creating Solutions and Projects

创建解决方案和项目

When you start Visual Studio Code, you are presented with a blank slate. Creating solutions and projects must be done through the .NET 6 command-line interface, also known as the CLI. To start, open a folder with Visual Studio Code by selecting File ➤ Open Folder, and navigate through the explorer window to where you want your solution and project to live. Next, open a terminal window by selecting Terminal ➤ New Terminal or by pressing Ctl+. 当你启动Visual Studio Code时,你会看到一个空白的石板。必须通过 .NET 6 命令行界面(也称为 CLI)创建解决方案和项目。首先,通过选择“文件”➤“打开文件夹”,使用 Visual Studio Code 打开文件夹,然后在资源管理器窗口中导航到希望解决方案和项目所在的位置。接下来,通过选择终端 ➤ 新建终端或按 Ctl+ 打开终端窗口。(键盘上数字1左边的键)

In the terminal window, enter the following command to create an empty .NET 5 solution file:
在终端窗口中,输入以下命令以创建空的 .NET 5 解决方案文件:

dotnet new sln -n SimpleCSharpConsoleApp -o .\VisualStudioCode

This creates a new solution file with the name (-n) SimpleCSharpConsoleApp in a subdirectory (of the current directory) named VisualStudioCode. When using Visual Studio Code with a single project app, there is no need to create a solution file. Visual Studio is solution centric; Visual Studio Code is code centric. We created a solution file here to duplicate the process in the Visual Studio example.
这将在名为 VisualStudioCode 的子目录(当前目录)中创建一个名为 (-n) SimpleCSharpConsoleApp 的新解决方案文件。将 Visual Studio Code 与单个项目应用程序一起使用时,无需创建解决方案文件。Visual Studio以解决方案为中心;Visual Studio Code以代码为中心。我们在此处创建了一个解决方案文件,用于复制 Visual Studio 示例中的过程。

■ Note These examples use the Windows directory separators. adjust the separators based on your operating system.
这些示例使用 Windows 目录分隔符。 根据您的操作系统调整分隔符。

Next, create a new C# 9/.NET 5 (-f net6.0) console application named (-n) SimpleCSharpConsoleApp in a subdirectory (-o) of the same name (note that this command must be all on one line):
接下来,在同名的子目录 (-o) 中创建一个名为 (-n) 的 SimpleCSharpConsoleApp 的新 C# 9/.NET 5 (-f net6.0) 控制台应用程序(请注意,此命令必须全部在一行上):

dotnet new console -lang c# -n SimpleCSharpConsoleApp -o .\VisualStudioCode\ SimpleCSharpConsoleApp -f net6.0

Finally, add the newly created project to the solution with the following command:
最后,使用以下命令将新创建的项目添加到解决方案中:

dotnet sln .\VisualStudioCode\SimpleCSharpConsoleApp.sln add .\VisualStudioCode\ SimpleCSharpConsoleApp

■ Note This is just a small sample of what the ClI is capable of. To discover everything the ClI can do, enter dotnet -h.
这只是 ClI 功能的一小部分示例。要了解 ClI 可以执行的所有操作,请输入dotnet -h.

Exploring the Visual Studio Code Workspace

探索 Visual Studio Code Workspace

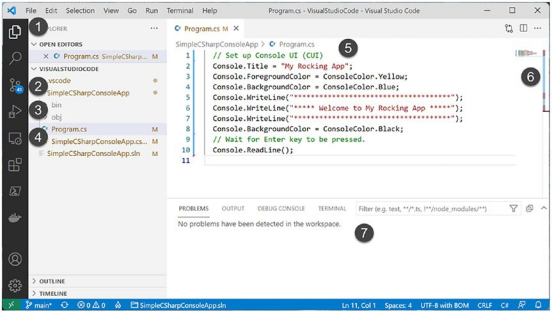
As you can see in Figure 2-14, the Visual Studio Code workspace is focused on the code, but also provides a lot of additional features to aid your productivity. The explorer (1) is an integrated file explorer andis selected in the figure. The Source Control (2) integrates with Git. The Debug icon (3) launches the appropriate debugger (once the correct extension is installed). The next one down is the extension manager (4). The extension manager is context sensitive and will make recommendations based on the type of code in the open directory and subdirectories.
如图 2-14 所示,Visual Studio Code 工作区侧重于代码,但也提供了许多附加功能来帮助提高工作效率。资源管理器 (1) 是一个集成的文件浏览器和在图中被选中。源代码管理 (2) 与 Git 集成。调试图标 (3) 启动相应的调试器(安装正确的扩展后)。下一个是扩展管理器 (4)。扩展管理器与上下文相关,将根据打开目录和子目录中的代码类型提出建议。
Alt text

Figure 2-14. The Visual Studio Code workspace
图 2-14。 Visual Studio Code 工作区

The code editor (5) is complete with color coding and IntelliSense support. The code map (6) shows the map of your entire code file, and the Problems/Output/Debug Console/Terminal window (7) receives the output from debug sessions and accepts input from the user.
代码编辑器 (5) 具有颜色编码和智能感知支持。代码图 (6) 显示整个代码文件的映射,问题/输出/调试控制台/终端窗口 (7) 接收来自调试会话的输出并接受来自用户的输入。

Restoring Packages, Building and Running Programs

恢复包,构建和运行程序

The .NET 6 CLI has all of the power needed to create and build solutions and projects, add and restore NuGet packages, and run applications. To restore all of the NuGet packages required for your solution and project, enter the following command in the terminal window (or a command window outside of VS Code), making sure to run the command from the same directory as the solution file:
.NET 6 CLI 具有创建和生成解决方案和项目、添加和还原 NuGet 包以及运行应用程序所需的所有功能。若要还原解决方案和项目所需的所有 NuGet 包,请在终端窗口(或 VS Code 外部的命令窗口)中输入以下命令,确保从与解决方案文件相同的目录运行命令:

dotnet restore

■ Note using dotnet build also restores all of the nuget packages.
使用 dotnet 生成还会还原所有 nuget 包。

To restore and build all of the projects in your solution, execute the following in the terminal/command window (again, making sure the command is executed in the same directory as the solution file):
若要还原和生成解决方案中的所有项目,请在终端/命令窗口中执行以下命令(再次确保命令在与解决方案文件相同的目录中执行):

dotnet build

■ Note When dotnet restore and dotnet build are executed in a directory that contains a solution file, all of the projects in the solution are acted on. The commands can also be run on a single project by running the command in the directory of the C# project file (.csproj).
在包含解决方案文件的目录中执行 dotnet 还原和 dotnet 生成时,将执行解决方案中的所有项目。还可以通过在 C# 项目文件 (
.csproj) 的目录中运行命令来在单个项目上运行这些命令。

To run your project without debugging, execute the following .NET CLI command in the same directory as the project file (SimpleCSharpConsoleApp.csproj):
若要在不调试的情况下运行项目,请在与项目文件 (SimpleCSharpConsoleApp.csproj) 相同的目录中执行以下 .NET CLI 命令:

dotnet run

Debugging Your Project

调试项目

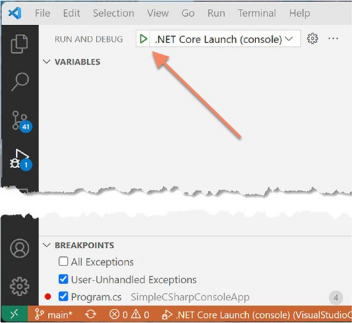
To debug your program after setting a break point, click the Debug icon (2 in Figure 2-14), then click Run and Debug (Figure 2-15).
若要在设置断点后调试程序,请单击“调试”图标(图 2-2 中的 14),然后单击“运行和调试”(图 2-15)。
Alt text

Figure 2-15. Run and Debug in Visual Studio Code
图 2-15。 在 Visual Studio Code 中运行和调试

Finding the .NET Core and C# Documentation

查找 .NET Core 和 C# 文档

The C# and .NET Core documentation are both extremely good, very readable, and full of useful information. Given the huge number of predefined .NET types (which number well into the thousands), you must be willing to roll up your sleeves and dig into the provided documentation. You can view all of the Microsoft documentation here:
C# 和 .NET Core 文档都非常好,非常易读,并且充满了有用的信息。鉴于预定义的 .NET 类型数量庞大(数量达到数千种),您必须愿意卷起袖子并深入研究提供的文档。您可以在此处查看所有Microsoft文档:
https://docs.microsoft.com/en-us/dotnet/csharp/

The areas that you will use the most in the first half of this book are the C# documentation and the .NET Core documentation, found at the following locations:
在本书的前半部分,您将使用最多的区域是 C# 文档和 .NET Core 文档,它们位于以下位置:https://docs.microsoft.com/en-us/dotnet/csharp/ https://docs.microsoft.com/en-us/dotnet/core/

Summary

总结

The point of this chapter was to provide you the information to set up your development environment with the .NET 6 SDK and runtimes as well as provide a tour of Visual Studio 2022 Community Edition and Visual Studio Code. If you are interested in building cross-platform .NET Core applications, you have a host of choices. Visual Studio (Windows only), Visual Studio for the Mac (Mac only), and Visual Studio Code (cross platform) are all supplied by Microsoft. Building WPF or WinForms applications still requires Visual Studio on a Windows machine.
本章的要点是为您提供使用 .NET 6 SDK 和运行时设置开发环境的信息,并提供 Visual Studio 2022 社区版和 Visual Studio 代码的教程。如果您对构建跨平台的 .NET Core 应用程序感兴趣,则有很多选择。Visual Studio(仅限Windows),Visual Studio for the Mac(仅限Mac)和Visual Studio Code(跨平台)均由Microsoft提供。构建WPF或WinForms应用程序仍然需要在Windows机器上构建Visual Studio。

Pro C#10 CHAPTER 1 Introducing C# and .NET 6

Pro C# 10 with .NET 6

PART I

Introducing C# and .NET 6
介绍 C# 和 .NET 6

CHAPTER 1

第一章

Introducing C# and .NET 6
介绍 C# 和 .NET 6

Microsoft’s .NET platform and the C# programming language were formally introduced circa 2002 and have quickly become a mainstay of modern-day software development. The .NET platform enables a large number of programming languages (including C#, VB.NET, and F#) to interact with each other. A program written in C# can be referenced by another program written in VB.NET. More on this interoperability later in this chapter.
Microsoft的.NET平台和C#编程语言大约在2002年正式推出,并迅速成为现代软件开发的支柱。.NET 平台使大量编程语言(包括 C#、VB.NET 和 F#)能够相互交互。一个程序用 C# 编写的程序可以被另一个用 VB.NET 编写的程序引用。本章后面将详细介绍此互操作性。

In 2016, Microsoft officially launched .NET Core. Like .NET, .NET Core allows languages to interop with each other (although a limited number of languages are supported). More importantly, this new framework is no longer limited to running on the Windows operating system but can also run on iOS, and Linux and be developed on MacOS and Linux. This platform independence opened up .NET and C# to a much larger pool of developers. While cross-platform use of C# was supported prior to .NET Core, that was through various other frameworks such as the Mono project.
2016年,Microsoft正式推出.NET Core。与 .NET 一样,.NET Core 允许语言相互互操作(尽管支持的语言数量有限)。更重要的是,这个新框架不再局限于在Windows操作系统上运行,还可以在iOS和Linux上运行,并在MacOS和Linux上开发。这种平台独立性向更多的开发人员开放了 .NET 和 C#。虽然在.NET Core之前支持跨平台使用C#,但这是通过各种其他框架(如Mono项目)支持的。

■ Note
With the release of .NET 5, the “Core” part of the name was dropped. Throughout this book, the term .NET refers to .NET Core (up to 3.1) and .NET 5/6
注意 随着 .NET 5 的发布,名称的“核心”部分被删除。在整本书中,术语.NET 是指 .NET Core(最高 3.1)和 .NET 5/6。

Microsoft launched C# 10 and .NET 6 on November 8, 2021. C# 10 is tied to a specific version of the framework and will run only on .NET 6 and above. This relationship between language and .NET versions gives the C# team the freedom to introduce features into C# that couldn’t otherwise be added into the language due to framework limitations.
Microsoft于 10 年 6 月 8 日推出了 C# 10 和 .NET6。C# 10 绑定到特定版本的框架,并且只能在 .NET6及更高版本上运行。语言和 .NET 版本之间的这种关系使 C# 团队可以自由地将由于框架限制而无法添加到语言中的功能引入 C#。

As mentioned in the book’s introduction, the goal of this text is twofold. The first order of business is to provide you with a deep and detailed examination of the syntax and semantics of C#. The second (equally important) order of business is to illustrate the use of numerous .NET development frameworks. These include database access with ADO.NET and Entity Framework (EF) Core, user interfaces with Windows Presentation Foundation (WPF), and finally RESTful services and web applications with ASP.NET Core. As it is said, the journey of a thousand miles begins with a single step; and with this, I welcome you to Chapter 1.
正如本书的引言中提到的,本文的目标是双重的。首要任务是为您提供对 C# 语法和语义的深入而详细的检查。第二个(同样重要)的业务顺序是说明许多 .NET 开发框架的使用。其中包括使用 ADO.NET 和实体框架 (EF) 核心访问数据库、使用 Windows Presentation Foundation (WPF) 的用户界面,以及最后使用 ASP.NET Core 的 RESTful 服务和 Web 应用程序。俗话说,千里之行,始于足下;有了这个,我欢迎你来到第一章。

This first chapter lays the conceptual groundwork for the remainder of the book. Here, you will find a high-level discussion of a number of .NET-related topics such as assemblies, the Common Intermediate Language (CIL), and just-in-time (JIT) compilation. In addition to previewing some keywords of the C# programming language, you will also come to understand the relationship between the .NET Runtime, the Common Type System (CTS) and the Common Language Specification (CLS).
第一章为本书的其余部分奠定了概念基础。在这里,您将找到一些 .与 NET 相关的主题,例如程序集、公共中间语言 (CIL) 和实时 (JIT) 编译。除了预览 C# 编程语言的一些关键字外,您还将了解 .NET 运行时、通用类型系统 (CTS) 和公共语言规范 (CLS) 之间的关系。

This chapter also provides you with a survey of the functionality supplied by the .NET base class libraries, sometimes abbreviated as BCLs. Here, you will get an overview of the language-agnostic and platform-independent nature of the .NET platform. As you would expect, these topics are explored in further detail throughout the remainder of this text.
本章还概述了 .NET 基类库(有时缩写为 BCL)提供的功能。在这里,你将大致了解 .NET 平台与语言无关且独立于平台的性质。如您所料,本文的其余部分将更详细地探讨这些主题。

■ Note
Many of the features highlighted in this chapter (and throughout the book) also apply to the original.NET Framework.
注意 本章(以及整本书)中强调的许多功能也适用于原文.NET Framework.

Exploring Some Key Benefits of the .NET Platform

探索 .NET 平台的一些主要优势

The .NET framework is a software platform for building web applications and services for the Windows, iOS, and Linux operating systems, as well as WinForms and WPF applications on Windows operating systems. To set the stage, here is a quick rundown of some core features provided, courtesy of .NET:
NET 框架是一个软件平台,用于为 Windows、iOS 和 Linux 操作系统以及 Windows 操作系统上的 WinForms 和 WPF 应用程序构建 Web 应用程序和服务。为了奠定基础,下面是由 .NET 提供的一些核心功能的快速概述:

  • Support for numerous programming languages: .NET applications can be created using C#, F#, and VB.NET programming languages (with C# and F# being the primary languages for ASP.NET Core).
    支持多种编程语言:可以使用 C#、F# 和 VB.NET 编程语言(C# 和 F# 是 ASP.NET Core 的主要语言)创建 .NET 应用程序。
  • A common runtime engine shared by all .NET languages: One aspect of this engine is a well-defined set of types that each .NET language understands.
    所有 .NET 语言共享的通用运行时引擎:此引擎的一个方面是一组定义良好的类型,每种 .NET 语言都能理解这些类型。
  • Language integration: .NET supports cross-language inheritance, cross-language exception handling, and cross-language debugging of code. For example, you can define a base class in C# and extend this type in Visual Basic.
    语言集成:.NET 支持跨语言继承、跨语言异常处理和跨语言代码调试。例如,可以在 C# 中定义基类,并在 Visual Basic 中扩展此类型。
  • A comprehensive base class library: This library provides thousands of predefined types that allow you to build code libraries, simple terminal applications, graphical desktop applications, and enterprise-level websites.
    全面的基类库:此库提供数千种预定义类型,允许您构建代码库、简单终端应用程序、图形桌面应用程序和企业级网站。
  • A simplified deployment model: .NET libraries are not registered into the system registry. Furthermore, the .NET platform allows multiple versions of the framework as well as applications to exist in harmony on a single machine.
    简化的部署模型:.NET 库未注册到系统注册表中。此外,.NET 平台允许框架的多个版本以及应用程序在一台机器上和谐存在。
  • Extensive command-line support: The .NET command-line interface (CLI) is a cross- platform tool chain for developing and packaging .NET applications. Additional tools can be installed (globally or locally) beyond the standard tools that ship with the .NET SDK.
    广泛的命令行支持:.NET 命令行界面 (CLI) 是用于开发和打包 .NET 应用程序的跨平台工具链。除了 .NET SDK 附带的标准工具之外,还可以安装其他工具(全局或本地)。

You will see each of these topics (and many more) examined in the chapters to come. But first, I need to explain the new support lifecycle for .NET.
您将在接下来的章节中看到这些主题中的每一个(以及更多)。但首先,我需要解释 .NET 的新支持生命周期。

Understanding the .NET Support Lifecycle

了解.NET 支持生命周期

.NET versions are released much more frequently than prior .NET Framework. With all of these releases available, it can be difficult to keep up, especially in an enterprise development environment. To better define the support lifecycle for the releases, Microsoft has adopted a variation of the Long-Term Support Model,1 commonly used by modern open source frameworks.
.NET 版本的发布频率比以前的 .NET Framework 高得多。由于所有这些版本都可用,因此可能很难跟上,尤其是在企业开发环境中。为了更好地定义版本的支持生命周期,Microsoft采用了现代开源框架常用的长期支持模型1的变体。

Long-Term Support (LTS) releases are major releases that will be supported for an extended period of time. They will only receive critical and/or nonbreaking fixes throughout their life span. Prior to end-of-life, LTS versions will be changed to the designation of maintenance. LTS releases with .NET will be supported for the following time frames, whichever is longer:
长期支持 (LTS) 版本是将长期支持的主要版本。他们只会在其整个生命周期内收到关键和/或不间断的修复。在使用寿命结束之前,LTS 版本将更改为维护指定。在以下时间范围内,将支持带有 .NET 的 LTS 版本,以较长者为准:

  • Three years after initial release
    首次发布三年后
  • One year of maintenance support after subsequent LTS release
    后续 LTS 发布后一年的维护支持

Microsoft has decided to name Short-Term Support releases as Current, which are interval releases between the major LTS releases. They are supported for six months after a subsequent Current or LTS release.
Microsoft已决定将短期支持版本命名为当前版本,这是主要 LTS 版本之间的间隔版本。它们在后续当前或 LTS 版本发布后的六个月内受支持。

As mentioned earlier, .NET 6 was released in November 2021. It was released as a Long Term Support version and will be supported at least until November 2024. .NET 5 will go out of support on May 8, 2022, six months after the .NET 6 release. The only other supported version at the time of this writing is .NET Core 3.1 which is supported until December 3, 2022.
如前所述,.NET 6于2021年11月发布。它作为长期支持版本发布,至少在2024年11月之前将受支持。.NET 5将于2022年5月停止支持,即.NET 6发布3个月后。在撰写本文时,唯一受支持的其他版本是 .NET Core 3.1,该版本在2022年12月3日之前受支持。

It’s important to check the support policy for each new version of .NET that is released. Just having a higher number doesn’t necessarily mean it’s going to be supported long term. The full policy is located here:
请务必检查发布的每个新版本 .NET 的支持策略。仅仅拥有更高的数字并不一定意味着它将得到长期支持。完整政策位于此处:
https://dotnet.microsoft.com/platform/support-policy/dotnet-core

Previewing the Building Blocks of the .NET Platform

预览 .NET 平台的构建基块

Now that you know some of the major benefits provided by .NET, let’s preview key (and interrelated) topics that make it all possible: the .NET Runtime, CTS, and the CLS. From a programmer’s point of view, .NET can be understood as a runtime environment and a comprehensive base class library. The runtime layer contains the set of minimal implementations that are tied specifically to a platform (Windows, iOS, Linux) and architecture (x86, x64, ARM), as well as all of the base types for .NET.
现在,您已经了解了 .NET 提供的一些主要优势,让我们预览一下使这一切成为可能的关键(和相互关联)主题:.NET 运行时、CTS 和 CLS。从程序员的角度来看,.NET 可以理解为运行时环境和全面的基类库。运行时层包含一组专门绑定到平台(Windows、iOS、Linux)和体系结构(x86、x64、ARM)的最小实现,以及 .NET 的所有基本类型。

Another building block of the .NET platform is the Common Type System, or CTS. The CTS specification fully describes all possible data types and all programming constructs supported by the runtime, specifies how these entities can interact with each other, and details how they are represented in the .NET metadata format (more information on metadata later in this chapter; see Chapter 17 for complete details).
.NET 平台的另一个构建基块是通用类型系统或 CTS。CTS 规范完整描述了运行时支持的所有可能的数据类型和所有编程构造,指定了这些实体如何相互交互,并详细说明了它们如何以 .NET 元数据格式表示(有关本章后面的元数据的详细信息;有关完整详细信息,请参阅第 17 章)。

Understand that a given .NET language might not support every feature defined by the CTS. The Common Language Specification, or CLS, is a related specification that defines a subset of common types and programming constructs that all .NET programming languages can agree on. Thus, if you build .NET types that expose only CLS-compliant features, you can rest assured that all .NET languages can consume them. Conversely, if you make use of a data type or programming construct that is outside of the bounds of the CLS, you cannot guarantee that every .NET programming language can interact with your .NET code library. Thankfully, as you will see later in this chapter, it is simple to tell your C# compiler to check all of your code for CLS compliance.
了解给定的 .NET 语言可能不支持 CTS 定义的所有功能。公共语言规范 (CLS) 是一个相关规范,它定义所有 .NET 编程语言都可以同意的常见类型和编程构造的子集。因此,如果生成仅公开符合 CLS 的功能的 .NET 类型,则可以放心,所有 .NET 语言都可以使用它们。相反,如果使用 CLS 边界之外的数据类型或编程构造,则无法保证每种 .NET 编程语言都可以与 .NET 代码库交互。值得庆幸的是,正如您将在本章后面看到的那样,告诉 C# 编译器检查所有代码是否符合 CLS 非常简单。

The Role of the Base Class Libraries

基类库的作用

The .NET platform also provides a set of base class libraries (BCLs) that are available to all .NET programming languages. Not only does this base class library encapsulate various primitives such as threads, file input/output (I/O), graphical rendering systems, and interaction with various external hardware devices, but it also provides support for a number of services required by most real-world applications.
.NET 平台还提供了一组可用于所有 .NET 编程语言的基类库 (BCL)。此基类库不仅封装了各种基元,例如线程、文件输入/输出 (I/O)、图形呈现系统以及与各种外部硬件设备的交互,而且还为大多数实际应用程序所需的许多服务提供支持。

The base class libraries define types that can be used to build any type of software application and for components of the application to interact with each other.
基类库定义可用于生成任何类型的软件应用程序以及应用程序组件相互交互的类型。

The Role of .NET Standard

.NET 标准的角色

The number of base class libraries in the .NET Framework far exceeds those in .NET. This is understandable, as the .NET Framework had a 14-year head start on .NET. This disparity created issues when attempting to use .NET Framework code with .NET code. The solution (and requirement) for .NET Framework/.NET Core3.1 interop is .NET Standard.
.NET Framework 中的基类库数量远远超过 .NET 中的基类库。这是可以理解的,因为.NET Framework在.NET上已经领先了14年。这种差异在尝试将.NET Framework代码与.NET代码一起使用时会产生问题。.NET Framework/.NET Core 的解决方案(和要求)互操作是 .NET Standard。

.NET Standard is a specification that defines the availability of .NET APIs and base class libraries that must be available in each implementation. The standard enables the following scenarios:
.NET 标准是一个规范,用于定义每个实现中必须可用的.NET API 和基类库的可用性。该标准支持以下方案:

  • Defines a uniform set of BCL APIs for all .NET implementations to implement, independent of workload
    为所有要实现的 .NET 实现定义一组统一的 BCL API,与工作负载无关
  • Enables developers to produce portable libraries that are usable across .NET implementations, using this same set of APIs
    使开发人员能够使用同一组 API 生成可跨 .NET 实现使用的可移植库
  • Reduces or even eliminates conditional compilation of shared source due to .NET APIs, only for OS APIs
    减少甚至消除由于 .NET API 而对共享源代码的条件编译,仅适用于操作系统 API

The chart located in the Microsoft documentation (https://docs.microsoft.com/en-us/dotnet/standard/net-standard) shows the various compatibility between .NET Framework and .NET. This is useful for prior versions of C#. However, C# 9+ will only run on .NET 5+ or .NET Standard 2.1, and .NET Standard 2.1 is not available to the .NET Framework.
位于Microsoft文档(https://docs.microsoft.com/en-us/dotnet/standard/net-standard )中的图表显示了.NET Framework和.NET之间的各种兼容性。这对于以前版本的 C# 很有用。但是,C# 9+ 只能在 .NET 5+ 或 .NET Standard 2.1。.NET Standard 对 .NET Framework 不可用。

What C# Brings to the Table

C# 带来了什么

C# is a programming language whose core syntax looks very similar to the syntax of Java. However, calling C# a Java clone is inaccurate. In reality, both C# and Java are members of the C family of programming languages (e.g., C, Objective-C, C++) and, therefore, share a similar syntax.
C#是一种编程语言,其核心语法看起来与Java的语法非常相似。但是,将 C# 称为 Java 克隆是不准确的。实际上,C#和Java都是C系列编程语言(例如C,Objective-C,C++)的成员,因此共享相似的语法。

The truth of the matter is that many of C#’s syntactic constructs are modeled after various aspects of Visual Basic (VB) and C++. For example, like VB, C# supports the notion of class properties (as opposed to traditional getter and setter methods) and optional parameters. Like C++, C# allows you to overload operators, as well as create structures, enumerations, and callback functions (via delegates).
事情的真相是,C#的许多语法结构都是根据Visual Basic(VB)和C++的各个方面建模的。例如,与 VB 一样,C# 支持类属性(与传统的 getter 和 setter 方法相反)和可选参数的概念。与C++一样,C# 允许您重载运算符,以及创建结构、枚举和回调函数(通过委托)。

Moreover, as you work through this text, you will quickly see that C# supports a number of features, such as lambda expressions and anonymous types, traditionally found in various functional languages (e.g., LISP or Haskell). Furthermore, with the advent of Language Integrated Query (LINQ), C# supports a number of constructs that make it quite unique in the programming landscape. Nevertheless, the bulk of C# is indeed influenced by C-based languages.
此外,当您阅读本文时,您将很快看到 C# 支持许多功能,例如 lambda 表达式和匿名类型,这些功能传统上存在于各种函数式语言(例如 LISP 或 Haskell)中。此外,随着语言集成查询 (LINQ) 的出现,C# 支持使其在编程环境中非常独特的构造数量。尽管如此,大部分 C# 确实受到基于 C 的语言的影响。

Because C# is a hybrid of numerous languages, the result is a product that is as syntactically clean as (if not cleaner than) Java provides just about as much power and flexibility as C++. Here is a partial list of core C# features that are found in all versions of the language:
由于 C# 是多种语言的混合体,因此其结果是产品在语法上与 Java 一样干净(如果不是比 Java 更干净的话),它提供的功能和灵活性与 C++ 一样多。下面是该语言的所有版本中的核心 C# 功能的部分列表:

  • No pointers required! C# programs typically have no need for direct pointer manipulation (although you are free to drop down to that level if absolutely necessary, as shown in Chapter 11).
    无需指针!C# 程序通常不需要直接指针操作(尽管如果绝对必要,您可以自由下降到该级别,如第 11 章所示)。
  • Automatic memory management through garbage collection. Given this, C# does not support a delete keyword.
    通过垃圾回收进行自动内存管理。鉴于此,C# 不支持 delete 关键字。
  • Formal syntactic constructs for classes, interfaces, structures, enumerations, and delegates.
    类、接口、结构、枚举和委托的正式语法构造。
  • The C++-like ability to overload operators for a custom type, without the complexity.
    类似C++的功能,可重载自定义类型的运算符,而没有复杂性。
  • Support for attribute-based programming. This brand of development allows you to annotate types and their members to further qualify their behavior. For example, if you mark a method with the [Obsolete] attribute, programmers will see your custom warning message print out if they attempt to make use of the decorated member.
    支持基于属性的编程。此开发品牌允许您批注类型及其成员,以进一步限定其行为。例如,如果使用 [Obsolete] 属性标记方法,则程序员在尝试使用修饰成员时将看到打印出的自定义警告消息。

C# 10 is an already powerful language and, combined with .NET, enables building a wide range of application types.
C# 10 是一种已经很强大的语言,与 .NET 结合使用,可以生成各种应用程序类型。

Major Features in Prior Releases

先前版本中的主要功能

Starting with C# 7, I started adding into the section headers the version when features were added (e.g. “(New 7.x)”) or updated (e.g. “(Updated 7.x)”).
从 C# 7 开始,我开始在节标题中添加添加功能(例如“(新 7.x)”)或更新功能(例如“(更新的 7.x)”)时的版本。

New Features in C# 10

C# 10 中的新功能

C# 10, released on November 8, 2021, with .NET 6, adds the following features:
2021年11月8日发布的 C# 6 与 .NET6一起发布,添加了以下功能:

  • Record structs
    记录结构
  • Improvements to structure types
    对结构类型的改进
  • Global using directives and global implicit using directives
    全局 using 指令和全局隐式 using 指令
  • File scoped namespaces
    文件范围的命名空间
  • Property pattern matching enhancements
    属性模式匹配增强功能
  • Constant Interpolated strings
    常量内插字符串
  • Improvements to lambda expressions
    对lambda表达式的改进
  • Record type enhancements
    记录类型增强功能
  • Assignment and declaration in deconstruction
    解构中的转让和声明
  • Removal of false warnings on definite assignment
    消除明确分配的错误警告

In addition to this, there are also updates to the .NET framework that impact development. I have updated the section headers that are new (or updated) in C#10 /NET 6 with “(New 10)” or “(Updated 10”).
除此之外,还有影响开发的 .NET 框架更新。我已经将 C#10 /NET 6 中新增(或更新)的部分标题更新为“(新 10)”或“(更新 10”)。

Managed vs. Unmanaged Code

托管代码与非托管代码

It is important to note that the C# language can be used only to build software that is hosted under the .NET runtime (you could never use C# to build a native COM server or an unmanaged C/C++-style application). Officially speaking, the term used to describe the code targeting the .NET runtime is managed code. The binary unit that contains the managed code is termed an assembly (more details on assemblies in just a bit). Conversely, code that cannot be directly hosted by the .NET runtime is termed unmanaged code.
请务必注意,C# 语言只能用于生成在 .NET 运行时下承载的软件(永远不能使用 C# 生成本机 COM 服务器或非托管 C/C++ 样式的应用程序)。正式地说,用于描述面向 .NET 运行时的代码的术语是托管代码。包含托管代码的二进制单元称为程序集(稍后将详细介绍程序集)。相反,不能由 .NET 运行时直接承载的代码称为非托管代码。

As mentioned previously, the .NET platform can run on a variety of operating systems. Thus, it is quite possible to build a C# application on a Windows machine and run the program on an iOS machine using the .NET runtime. As well, you can build a C# application on Linux using Visual Studio Code and run the program on Windows. With Visual Studio for Mac, you can also build .NET applications on a Mac to be run on Windows, macOS, or Linux.
如前所述,.NET 平台可以在各种操作系统上运行。因此,很有可能在 Windows 计算机上生成 C# 应用程序并使用 .NET 运行时在 iOS 计算机上运行该程序。同样,您可以使用Visual Studio Code在Linux上构建C#应用程序,并在Windows上运行该程序。使用 Visual Studio for Mac,您还可以在 Mac 上构建 .NET 应用程序,以便在 Windows、macOS 或 Linux 上运行。

Unmanaged code can still be accessed from a C# program, but it then locks you into a specific development and deployment target.
仍然可以从 C# 程序访问非托管代码,但随后它会将您锁定到特定的开发和部署目标。

Using Additional .NET–Aware Programming Languages

使用其他 .NET 感知编程语言

Understand that C# is not the only language that can be used to build .NET applications. .NET applications can generally be built with C#, Visual Basic, and F#, which are the three languages supported directly by Microsoft.
了解 C# 并不是可用于生成 .NET 应用程序的唯一语言。.NET 应用程序通常可以使用 C#、Visual Basic 和 F# 构建,这是 Microsoft直接支持的三种语言。

Getting an Overview of .NET Assemblies

获取 .NET 程序集的概述

Regardless of which .NET language you choose to program with, understand that despite .NET binaries taking the same file extension as unmanaged Windows binaries (.dll), they have absolutely no internal similarities. Specifically, .NET binaries do not contain platform-specific instructions but rather platform- agnostic Intermediate Language (IL) and type metadata.
无论选择使用哪种 .NET 语言进行编程,请了解,尽管 .NET 二进制文件采用与非托管 Windows 二进制文件相同的文件扩展名 (
.dll),但它们绝对没有内部相似之处。具体而言,.NET 二进制文件不包含特定于平台的指令,而是包含与平台无关的中间语言 (IL) 和类型元数据。

■ Note
IL is also known as Microsoft Intermediate Language (MSIL) or alternatively as the Common Intermediate Language (CIL). Thus, as you read the .NET literature, understand that IL, MSIL, and CIL are all describing essentially the same concept. In this book, I will use the abbreviation CIL to refer to this low-level instruction set.
注意 IL 也称为Microsoft中间语言 (MSIL) 或公共中间语言 (CIL)。因此,在阅读 .NET 文献时,请了解 IL、MSIL 和 CIL 本质上都描述了相同的概念。在本书中,我将使用缩写CIL来指代这个低级指令集。

When a .dll has been created using a .NET compiler, the binary blob is termed an assembly. You will examine numerous details of .NET assemblies in Chapter 16. However, to facilitate the current discussion, you do need to understand four basic properties of this new file format.
使用 .NET 编译器创建
.dll 时,二进制 blob 称为程序集。您将在第 16 章中研究 .NET 程序集的大量细节。但是,为了便于当前的讨论,您确实需要了解这种新文件格式的四个基本属性。

First, unlike .NET Framework assemblies that can be either a .dll or .exe, .NET projects are always compiled to a file with a .dll extension, even if the project is an executable. Executable .NET assemblies are executed with the command dotnet .dll. New in .NET Core 3.0 (and later), the dotnet.exe command is copied to the build directory and renamed to .exe. Running this command automatically calls the dotnet .dll file, executing the equivalent of dotnet .dll. The .exe with your project name isn’t actually your project’s code; it is a convenient shortcut to running your application.
首先,与可以是
.dll 或 .exe 的 .NET Framework 程序集不同,.NET 项目始终编译为扩展名为 .dll 的文件,即使该项目是可执行文件也是如此。可执行的 .NET 程序集使用命令 dotnet<程序集名称>.dll执行。dotnet.exe 命令是 .NET Core 3.0(及更高版本)中的新增功能,它被复制到生成目录并重命名为 <程序集名称>.exe。运行此命令会自动调用 dotnet<程序集名称>.dll文件,执行等效的 dotnet<程序集名称>.dll。带有项目名称的 .exe 实际上并不是项目代码;它是运行应用程序的便捷快捷方式。

Updated in .NET 6, your application can be reduced to a single file that is executed directly. Even though this single file looks and acts like a C++-style native executable, the single file is a packaging convenience. It contains all the files needed to run your application, potentially even the .NET runtime itself! But know that your code is still running in a managed container just as if it were published as multiple files.
在 .NET 6 中更新,可以将应用程序缩减为直接执行的单个文件。尽管此单个文件的外观和行为类似于 C++ 样式的本机可执行文件,但单个文件是一种打包便利。它包含运行应用程序所需的所有文件,甚至可能包含 .NET 运行时本身!但要知道,您的代码仍在托管容器中运行,就像它作为多个文件发布一样。

Second, an assembly contains CIL code, which is conceptually similar to Java bytecode, in that it is not compiled to platform-specific instructions until absolutely necessary. Typically, “absolutely necessary” is the point at which a block of CIL instructions (such as a method implementation) is referenced for use by the.NET runtime.
其次,程序集包含 CIL 代码,这在概念上类似于 Java 字节码,因为它不会编译为特定于平台的指令,除非绝对必要。通常,“绝对必要”是引用 CIL 指令块(例如方法实现)以供.NET 运行时。

Third, assemblies also contain metadata that describes in vivid detail the characteristics of every “type” within the binary. For example, if you have a class named SportsCar, the type metadata describes details such as SportsCar’s base class, specifies which interfaces are implemented by SportsCar (if any), and gives full descriptions of each member supported by the SportsCar type. .NET metadata is always present within an assembly and is automatically generated by the language compiler.
第三,程序集还包含元数据,这些元数据生动详细地描述了二进制文件中每个“类型”的特征。例如,如果您有一个名为 SportsCar 的类,则类型元数据描述 SportsCar 基类等详细信息,指定 SportsCar 实现的接口(如果有),并提供 SportsCar 类型支持的每个成员的完整说明。 .NET 元数据始终存在于程序集中,并由语言编译器自动生成。

Finally, in addition to CIL and type metadata, assemblies themselves are also described using metadata, which is officially termed a manifest. The manifest contains information about the current version of the assembly, culture information (used for localizing string and image resources), and a list of all externally referenced assemblies that are required for proper execution. You’ll examine various tools that can be used to examine an assembly’s types, metadata, and manifest information over the course of the next few chapters.
最后,除了 CIL 和类型元数据之外,程序集本身也使用元数据进行描述,正式称为清单。清单包含有关程序集当前版本的信息、区域性信息(用于本地化字符串和图像资源)以及正确执行所需的所有外部引用程序集的列表。您将检查各种工具用于在接下来的几章中检查程序集的类型、元数据和清单信息。

The Role of the Common Intermediate Language

公共中间语言的作用

Let’s examine CIL code, type metadata, and the assembly manifest in a bit more detail. CIL is a language that sits above any particular platform-specific instruction set. For example, the following C# code models a trivial calculator. Don’t concern yourself with the exact syntax for now, but do notice the format of the Add() method in the Calc class.
让我们更详细地检查 CIL 代码、类型元数据和程序集清单。CIL 是一种位于任何特定平台特定指令集之上的语言。例如,以下 C# 代码对一个简单的计算器进行了建模。现在不要关心确切的语法,但请注意 Calc 类中 Add() 方法的格式。

```
//Clac.cs or Program.cs
//在Program.cs文件中编写代码或者单独编写Clac.cs文件

Calc c = new Calc();
int ans = c.Add(10, 84);
Console.WriteLine("10+84 is {0} .",ans);

// Wait for user to press the Enter key
// 等待用户按下Enter键
Console.ReadLine();

// The C# Calculator .
// C# 代码计算器
class Calc
{
    public int Add(int addend1, int addend2)
    {
        return addend1 + addend2;
    }
}
```

Compiling this code produces a file .dll assembly that contains a manifest, CIL instructions, and metadata describing each aspect of the Calc and Program classes.
编译此代码会生成一个文件
.dll 程序集,其中包含清单、CIL 指令和描述 Calc 和 Program 类各个方面的元数据。

■ Note
Chapter 2 examines how to use graphical integrated development environments (IdEs), such as Visual Studio Community, to compile your code files.
注意 第 2 章探讨如何使用图形集成开发环境 (IdE)(如 Visual Studio Community)来编译代码文件。

For example, if you were to output the IL from this assembly using ildasm.exe (examined later in this chapter), you would find that the Add() method is represented using CIL such as the following:
例如,如果要使用 ildasm.exe(在本章后面进行检查)从此程序集输出 IL,您会发现 Add() 方法是使用 CIL 表示的,如下所示:

.method public hidebysig instance int32 Add(int32 addend1,
              int32 addend2) cil managed
{
// Method begins at RVA 0x2090
// Code size        9 (0x9)
.maxstack 2
.locals /*11000002*/ init (int32 V_0)
IL_0000: /* 00 |        */ nop
IL_0001: /* 03 |        */ ldarg.1
IL_0002: /* 04 |        */ ldarg.2
IL_0003: /* 58 |        */ add
IL_0004: /* 0A |        */ stloc.0
IL_0005: /* 2B | 00     */ br.s IL_0007
IL_0007: /* 06 |        */ ldloc.0
IL_0008: /* 2A |        */ ret
} // end of method Calc::Add

Don’t worry if you are unable to make heads or tails of the resulting CIL for this method because Chapter 18 will describe the basics of the CIL programming language. The point to concentrate on is that the C# compiler emits CIL, not platform-specific instructions.
如果您无法为此方法生成 CIL 的正面或反面,请不要担心,因为第 18 章将描述 CIL 编程语言的基础知识。需要关注的一点是 C# 编译器发出 CIL,而不是特定于平台的指令。

Now, recall that this is true of all .NET compilers. To illustrate, assume you created this same application using Visual Basic, rather than C#.
现在,回想一下,所有 .NET 编译器都是如此。为了说明这一点,假设您使用 Visual Basic 而不是 C# 创建了相同的应用程序。

```
REM: Calc.vb
Module Program
    REM: This class contains the app&#039;s entry point.
    Sub Main(args As String())
        Dim c As New Calc
        Dim ans As Integer = c.Add(10, 84)
        Console.WriteLine("10 + 84 is {0}", ans)
        REM: Wait for user to press the Enter key before shutting down
        Console.ReadLine()
    End Sub
End Module
REM: The VB.NET calculator.
Class Calc
    Public Function Add(ByVal addend1 As Integer, ByVal addend2 As Integer) As Integer
        Return addend1 + addend2
    End Function
End Class
```

If you examine the CIL for the Add() method, you find similar instructions (slightly tweaked by the Visual Basic compiler).
如果您检查 Add()方法的 CIL,您会发现类似的指令(Visual Basic 编译器略有调整)。

.method public instance int32 Add(int32 addend1,
                    int32 addend2) cil managed
{
// Code size     9 (0x9)
.maxstack 2
.locals init (int32 V_0)
IL_0000: nop
IL_0001: ldarg.1
IL_0002: ldarg.2
IL_0003: add.ovf
IL_0004: stloc.0
IL_0005: br.s    IL_0007
IL_0007: ldloc.0
IL_0008: ret
} // end of method Calc::Add

As a final example, the same simple Calc program developed in F# (another .NET language) is shown here:
作为最后一个示例,下面显示了用 F#(另一种 .NET 语言)开发的相同简单 Calc 程序:

// Learn more about F# at http://fsharp.org
// Calc.fs
open System

module Calc =
    let add addend1 addend2 =
        addend1 + addend2

[<EntryPoint>]
let main argv =
    let ans = Calc.add 10 84
    printfn "10 + 84 is %d" ans
    Console.ReadLine()
    0

If you examine the CIL for the Add() method, once again you find similar instructions (slightly tweaked by the F# compiler).
如果检查 Add()方法的 CIL,则会再次发现类似的指令(F# 编译器略有调整)。

.method public instance int32 Add(int32 addend1,
                    int32 addend2) cil managed
{
// Code size 9 (0x9)
.maxstack 2
.locals init (int32 V_0)
IL_0000: nop
IL_0001: ldarg.1
IL_0002: ldarg.2
IL_0003: add.ovf
IL_0004: stloc.0
IL_0005: br.s        IL_0007

IL_0007: ldloc.0
IL_0008: ret
} // end of method Calc::Add

Benefits of CIL

CIL的好处

At this point, you might be wondering exactly what is gained by compiling source code into CIL rather than directly to a specific instruction set. One benefit is language integration. As you have already seen, each .NET compiler produces nearly identical CIL instructions. Therefore, all languages are able to interact within a well-defined binary arena.
在这一点上,您可能想知道通过将源代码编译到 CIL 而不是直接编译到特定指令集会得到什么。一个好处是语言集成。如您所见,每个 .NET 编译器都会生成几乎相同的 CIL 指令。因此,所有语言都能够在明确定义的二进制领域内进行交互。

Furthermore, given that CIL is platform-agnostic, the .NET Framework itself is platform-agnostic, providing the same benefits Java developers have grown accustomed to (e.g., a single code base running on numerous operating systems). In fact, there is an international standard for the C# language. Prior to .NET Core, there were numerous implementations of the .NET framework for non-Windows platforms, such as Mono. These still exist, although the release of .NET 6 greatly reduced the need for those other platforms.
此外,鉴于CIL与平台无关,.NET Framework本身与平台无关,提供了Java开发人员已经习惯的相同好处(例如,在众多操作系统上运行的单个代码库)。事实上,C# 语言有一个国际标准。在.NET Core之前,有许多用于非Windows平台(如Mono)的.NET框架实现。这些仍然存在,尽管 .NET 6 的发布大大减少了对这些其他平台的需求。

Compiling CIL to Platform-Specific Instructions

将 CIL 编译为特定于平台的指令

Because assemblies contain CIL instructions rather than platform-specific instructions, CIL code must be compiled on the fly before use. The entity that compiles CIL code into meaningful CPU instructions is a JIT compiler, which sometimes goes by the friendly name of jitter. The .NET runtime environment leverages a JIT compiler for each CPU targeting the runtime, each optimized for the underlying platform.
由于程序集包含 CIL 指令而不是特定于平台的指令,因此必须在使用前动态编译 CIL 代码。将 CIL 代码编译为有意义的 CPU 指令的实体是 JIT 编译器,它有时使用友好名称 jitter。.NET 运行时环境为面向运行时的每个 CPU 利用一个 JIT 编译器,每个 CPU 都针对基础平台进行了优化。

For example, if you are building a .NET application to be deployed to a handheld device (such as an iOS or Android phone), the corresponding jitter is well equipped to run within a low-memory environment. On the other hand, if you are deploying your assembly to a back-end company server (where memory is seldom an issue), the jitter will be optimized to function in a high-memory environment. In this way, developers can write a single body of code that can be efficiently JIT compiled and executed on machines with different architectures.
例如,如果您正在构建要部署到手持设备(如 iOS 或 Android 手机)的 .NET 应用程序,则相应的抖动非常适合在低内存环境中运行。另一方面,如果要将程序集部署到后端公司服务器(内存很少出现问题),则抖动将经过优化,以便在高内存环境中运行。通过这种方式,开发人员可以编写单个代码体,这些代码可以在具有不同体系结构的计算机上有效地进行 JIT 编译和执行。
Furthermore, as a given jitter compiles CIL instructions into corresponding machine code, it will cache the results in memory in a manner suited to the target operating system. In this way, if a call is made to a method named PrintDocument(), the CIL instructions are compiled into platform-specific instructions on the first invocation and retained in memory for later use. Therefore, the next time PrintDocument() is called, there is no need to recompile the CIL.
此外,当给定的抖动将CIL指令编译成相应的机器代码时,它将以适合目标操作系统的方式将结果缓存在内存中。这样,如果调用名为 PrintDocument() 的方法,CIL 指令将在第一次调用时编译为特定于平台的指令,并保留在内存中供以后使用。因此,下次调用 PrintDocument() 时,无需重新编译 CIL。

Precompiling CIL to Platform-Specific Instructions

将 CIL 预编译为特定于平台的指令

There is a utility in .NET called crossgen.exe, which can be used to pre-JIT your code. Fortunately, in .NET Core 6, the ability to produce “ready-to-run” assemblies is built into the framework. More on this later in this book.
.NET 中有一个名为 crossgen.exe 的实用程序,可用于预 JIT 代码。幸运的是,在 .NET Core 6 中,生成“即用型”程序集的功能内置于框架中。本书后面会详细介绍这一点。

The Role of .NET Type Metadata.NET

类型元数据的作用

In addition to CIL instructions, a .NET assembly contains full, complete, and accurate metadata, which describes every type (e.g., class, structure, enumeration) defined in the binary, as well as the members of each type (e.g., properties, methods, events). Thankfully, it is always the job of the compiler (not the programmer) to emit the latest and greatest type metadata. Because .NET metadata is so wickedly meticulous, assemblies are completely self-describing entities.
除了 CIL 指令之外,.NET 程序集还包含完整、完整且准确的元数据,这些元数据描述二进制文件中定义的每种类型(例如,类、结构、枚举)以及每种类型的成员(例如,属性、方法、事件)。值得庆幸的是,这始终是编译器的工作(不是程序员)发出最新和最好的类型元数据。由于 .NET 元数据非常细致,因此程序集是完全自描述的实体。

To illustrate the format of .NET type metadata, let’s take a look at the metadata that has been generated for the Add() method of the C# Calc class you examined previously (the metadata generated for the Visual Basic version of the Add() method is similar, so we will examine the C# version only).
为了说明 .NET 类型元数据的格式,让我们看一下为前面检查的 C# Calc 类的 Add() 方法生成的元数据(为 Add() 方法的 Visual Basic 版本生成的元数据类似,因此我们将仅检查 C# 版本)。

// TypeDef #2 (02000003)
// -------------------------------------------------------
// TypDefName: Calc (02000003)
// Flags : [NotPublic] [AutoLayout] [Class] [AnsiClass] [BeforeFieldInit] (00100000)
// Extends : 0100000D [TypeRef] System.Object
// Method #1 (06000003)
// -------------------------------------------------------
// MethodName: Add (06000003)
// Flags : [Public] [HideBySig] [ReuseSlot] (00000086)
// RVA : 0x00002090
// ImplFlags : [IL] [Managed] (00000000)
// CallCnvntn: [DEFAULT]
// hasThis
// ReturnType: I4
// 2 Arguments
// Argument #1: I4
// Argument #2: I4
// 2 Parameters
// (1) ParamToken : (08000002) Name : addend1 flags: [none] (00000000)
// (2) ParamToken : (08000003) Name : addend2 flags: [none] (00000000)

Metadata is used by numerous aspects of the .NET runtime environment, as well as by various development tools. For example, the IntelliSense feature provided by tools such as Visual Studio is made possible by reading an assembly’s metadata at design time. Metadata is also used by various object-browsing utilities, debugging tools, and the C# compiler itself. To be sure, metadata is the backbone of numerous .NET technologies including reflection, late binding, and object serialization. Chapter 17 will formalize the role of .NET metadata.
元数据由 .NET 运行时环境的许多方面以及各种开发工具使用。例如,Visual Studio 等工具提供的智能感知功能是通过在设计时读取程序集的元数据来实现的。元数据还由各种对象浏览实用程序、调试工具和 C# 编译器本身使用。可以肯定的是,元数据是许多 .NET 技术的支柱,包括反射、后期绑定和对象序列化。第17章将正式确定.NET 元数据。

The Role of the Assembly Manifest

程序集清单的作用

Last but not least, remember that a .NET assembly also contains metadata that describes the assembly itself (technically termed a manifest). Among other details, the manifest documents all external assemblies required by the current assembly to function correctly, the assembly’s version number, copyright information, and so forth. Like type metadata, it is always the job of the compiler to generate the assembly’s manifest. Here are some relevant details of the manifest generated when compiling the Calc.cs code file shown earlier in this chapter (some lines omitted for brevity):
最后但并非最不重要的一点是,请记住,.NET 程序集还包含描述程序集本身的元数据(技术上称为清单)。除其他详细信息外,清单还记录了当前程序集正常运行所需的所有外部程序集、程序集的版本号、版权信息等。与类型元数据一样,编译器的工作始终是生成程序集的清单。以下是编译本章前面所示的 Calc.cs 代码文件时生成的清单的一些相关详细信息(为简洁起见,省略了一些行):

.assembly extern /*23000001*/ System.Runtime
{
.publickeytoken = (B0 3F 5F 7F 11 D5 0A 3A ) // .?_....:
.ver 6:0:0:0
}
.assembly extern /*23000002*/ System.Console
{
.publickeytoken = (B0 3F 5F 7F 11 D5 0A 3A ) // .?_....:
.ver 6:0:0:0
}
.assembly /*20000001*/ Calc.Cs
{
.hash algorithm 0x00008004
.ver 1:0:0:0
}
.module Calc.Cs.dll
.imagebase 0x00400000
.file alignment 0x00000200
.stackreserve 0x00100000
.subsystem 0x0003 // WINDOWS_CUI
.corflags 0x00000001 // ILONLY

In a nutshell, the manifest documents the set of external assemblies required by Calc.dll (via the .assembly extern directive) as well as various characteristics of the assembly itself (e.g., version number, module name). Chapter 16 will examine the usefulness of manifest data in much more detail.
简而言之,清单记录了 Calc 所需的外部程序集集.dll(通过.assembly extern指令)以及程序集本身的各种特征(例如,版本号,模块名称)。第16章将更详细地研究清单数据的有用性。

Understanding the Common Type System

了解通用类型系统

A given assembly may contain any number of distinct types. In the world of .NET, type is simply a general term used to refer to a member from the set {class, interface, structure, enumeration, delegate}. When you build solutions using a .NET language, you will most likely interact with many of these types. For example, your assembly might define a single class that implements some number of interfaces. Perhaps one of the interface methods takes an enumeration type as an input parameter and returns a structure to the caller.
给定程序集可能包含任意数量的不同类型。在 .NET 世界中,类型只是一个通用术语,用于引用集合 {类、接口、结构、枚举、委托} 中的成员。使用 .NET 语言生成解决方案时,很可能会与其中许多类型进行交互。例如,程序集可能定义实现一定数量接口的单个类。也许其中一个接口方法将枚举类型作为输入参数,并将结构返回给调用方。

Recall that the CTS is a formal specification that documents how types must be defined in order to be hosted by the .NET Runtime. Typically, the only individuals who are deeply concerned with the inner workings of the CTS are those building tools and/or compilers that target the .NET platform. It is important, however, for all .NET programmers to learn about how to work with the five types defined by the CTS in their language of choice. The following is a brief overview.
回想一下,CTS 是一个正式规范,它记录了必须如何定义类型才能由 .NET 运行时托管。通常,唯一深切关注内在的人CTS 的工作原理是那些面向 .NET 平台的构建工具和/或编译器。但是,对于所有 .NET 程序员来说,了解如何使用他们选择的语言中 CTS 定义的五种类型非常重要。以下是简要概述。

CTS Class TypesCTS

类类型
Every .NET language supports, at the least, the notion of a class type, which is the cornerstone of object- oriented programming (OOP). A class may be composed of any number of members (such as constructors, properties, methods, and events) and data points (fields). In C#, classes are declared using the class keyword, like so:
每种 .NET 语言至少都支持类类型的概念,这是面向对象编程 (OOP) 的基石。类可以由任意数量的成员(如构造函数、属性、方法和事件)和数据点(字段)组成。在 C# 中,类是使用 class 关键字声明的,如下所示:

```
// A C# class type with 1 method. 
// 具有 1 个方法的 C# 类类型。
class Calc
{
    public int Add(int addend1, int addend2)
    {
        return addend1 + addend2;
    }
}
```

Chapter 5 will begin your formal examination of building class types with C#; however, Table 1-1 documents a number of characteristics pertaining to class types.
第 5 章将开始对使用 C# 构建类类型进行正式检查;但是,表 1-1 记录了许多与类类型相关的特征。

Table 1-1. CTS Class Characteristics
表 1-1. CTS 类特征

Class Characteristic
类特征
Meaning in Life
意义
Is the class sealed?
类是密封的吗?
Sealed classes cannot function as a base class to other classes.
密封类不能充当其他类的基类。
Does the class implement any interfaces?
该类是否实现任何接口?
An interface is a collection of abstract members that provides a contract between the object and object user. The CTS allows a class to implement any number of interfaces.
接口是抽象成员的集合,它提供对象和对象用户之间的协定。CTS 允许一个类实现任意数量的接口。
Is the class abstract or concrete?
类是抽象的还是具体的?
Abstract classes cannot be directly instantiated but are intended to define common behaviors for derived types. Concrete classes can be instantiated directly.
抽象类不能直接实例化,但旨在定义派生类型的常见行为。具体类可以直接实例化。
What is the visibility of this class?
这个类的可见性是多少?
Each class must be configured with a visibility keyword such as public or internal. Basically, this controls whether the class may be used by external assemblies or only from within the defining assembly.
每个类都必须配置一个可见性关键字,例如公共或内部。基本上,这控制类是可以由外部程序集使用还是只能从定义程序集内部使用。

CTS Interface Types

CTS 接口类型

Interfaces are nothing more than a named collection of abstract member definitions and/or (introduced in C# 8) default implementations, which are implemented (optionally in the case of default implementations) by a given class or structure. In C#, interface types are defined using the interface keyword. By convention, all .NET interfaces begin with a capital letter I, as in the following example:
接口只不过是抽象成员定义和/或(在 C# 8 中引入)默认实现的命名集合,这些实现由给定的类或结构实现(在默认实现的情况下是可选的)。在 C# 中,接口类型是使用接口关键字定义的。按照约定,所有 .NET 接口都以大写字母 I 开头,如以下示例所示:

```
// A C# interface type is usually
// declared as public, to allow types in other
// assemblies to implement their behavior.
// C# 接口类型通常是
// 声明为公共,以允许其他类型
// 用于实现其行为的程序集。
public interface IDraw
{
    void Draw();
}
```

On their own, interfaces are of little use. However, when a class or structure implements a given interface in its unique way, you are able to request access to the supplied functionality using an interface reference in a polymorphic manner. Interface-based programming will be fully explored in Chapter 8.
就其本身而言,接口几乎没有用处。但是,当类或结构以其唯一方式实现给定接口时,您可以使用接口引用以多态方式请求访问所提供的功能。第8章将全面探讨基于接口的编程。

CTS Structure Types

CTS 结构类型

The concept of a structure is also formalized under the CTS. If you have a C background, you should be pleased to know that these user-defined types (UDTs) have survived in the world of .NET (although they behave a bit differently under the hood). Simply put, a structure can be thought of as a lightweight class type having value-based semantics. For more details on the subtleties of structures, see Chapter 4. Typically, structures are best suited for modeling geometric and mathematical data and are created in C# using the struct keyword, as follows:
结构的概念也在CTS下正式确定。如果你有 C 背景,你应该很高兴知道这些用户定义类型 (UDT) 在 .NET 世界中幸存下来(尽管它们在后台的行为略有不同)。简单地说,可以将结构视为具有基于值的语义的轻量级类类型。有关结构微妙之处的更多详细信息,请参阅第4章。通常,结构最适合对几何和数学数据进行建模,并使用 struct 关键字在 C# 中创建,如下所示:

```
// A C# structure type.
// C# 结构类型。
struct Point
{
    // Structures can contain fields.
    // 结构可以包含字段。
    public int xPos, yPos;

    // Structures can contain parameterized constructors.
    // 结构可以包含参数化构造函数。
    public Point(int x, int y)
    { xPos = x; yPos = y; }

    // Structures may define methods.
    // 结构可以定义方法。
    public void PrintPosition()
    {
        Console.WriteLine("({0}, {1})", xPos, yPos);
    }
}
```

CTS Enumeration Types

CTS枚举类型

Enumerations are a handy programming construct that allow you to group name-value pairs. For example, assume you are creating a video game application that allows the player to select from three character categories (Wizard, Fighter, or Thief). Rather than keeping track of simple numerical values to represent each possibility, you could build a strongly typed enumeration using the enum keyword.
枚举是一种方便的编程构造,可用于对名称-值对进行分组。例如,假设您正在创建一个视频游戏应用程序,该应用程序允许玩家从三个角色类别(巫师、战士或小偷)中进行选择。与其跟踪简单的数值来表示每种可能性,不如使用 enum 关键字生成强类型枚举。

```
// A C# enumeration type.
// C# 枚举类型。
enum CharacterTypeEnum
{
    Wizard = 100,
    Fighter = 200,
    Thief = 300
}
```

By default, the storage used to hold each item is a 32-bit integer; however, it is possible to alter this storage slot if need be (e.g., when programming for a low-memory device such as a mobile device). Also, the CTS demands that enumerated types derive from a common base class, System.Enum. As you will see in Chapter 4, this base class defines a number of interesting members that allow you to extract, manipulate, and transform the underlying name-value pairs programmatically.
默认情况下,用于保存每个项目的存储为 32 位整数;但是,如果需要,可以更改此存储插槽(例如,在为诸如移动设备的低内存设备编程时)。此外,CTS 要求枚举类型派生自公共基类 System.Enum。正如您将在第 4 章中看到的,此基类定义了许多有趣的成员,这些成员允许您以编程方式提取、操作和转换基础名称-值对。

CTS Delegate Types

CTS 委托类型

Delegates are the .NET equivalent of a type-safe, C-style function pointer. The key difference is that a .NET delegate is a class that derives from System.MulticastDelegate, rather than a simple pointer to a raw memory address. In C#, delegates are declared using the delegate keyword. 委托等效于类型安全的 C 样式函数指针。主要区别在于,.NET 委托是派生自 System.MulticastDelegate 的类,而不是指向原始内存地址的简单指针。在 C# 中,委托是使用 delegate 关键字声明的。

// This C# delegate type can "point to" any method
// 此 C# 委托类型可以“指向”任何方法
// returning an int and taking two ints as input.
// 返回一个 int 并将两个整数作为输入。
delegate int BinaryOp(int x, int y);

Delegates are critical when you want to provide a way for one object to forward a call to another object and provide the foundation for the .NET event architecture. As you will see in Chapters 12 and 14, delegates have intrinsic support for multicasting (i.e., forwarding a request to multiple recipients) and asynchronous method invocations (i.e., invoking the method on a secondary thread).
如果要为一个对象提供将调用转发到另一个对象并为 .NET 事件体系结构提供基础的方法,则委托至关重要。正如您将在第 12 章和第 14 章中看到的,委托对多播(即将请求转发给多个接收者)和异步方法调用(即在辅助线程上调用该方法)具有内在支持。

CTS Type Members

CTS 类型成员

Now that you have previewed each of the types formalized by the CTS, realize that most types take any number of members. Formally speaking, a type member is constrained by the set {constructor, finalizer, static constructor, nested type, operator, method, property, indexer, field, read-only field, constant, event}.
现在,您已经预览了 CTS 形式化的每个类型,请注意大多数类型采用任意数量的成员。从形式上讲,类型成员受集合 {构造函数、终结器、静态构造函数、嵌套类型、运算符、方法、属性、索引器、字段、只读字段、常量、事件} 的约束。

The CTS defines various adornments that may be associated with a given member. For example, each member has a given visibility trait (e.g., public, private, protected). Some members may be declared as abstract (to enforce a polymorphic behavior on derived types) as well as virtual (to define a canned, but overridable, implementation). Also, most members may be configured as static (bound at the class level) or instance (bound at the object level). The creation of type members is examined over the course of the next several chapters.
CTS 定义了可能与给定成员关联的各种装饰。例如,每个成员都有一个给定的可见性特征(例如,公共、私有、受保护)。某些成员可能被声明为抽象(以对派生类型强制实施多态行为)以及虚拟(以定义固定但可重写的实现)。此外,大多数成员可以配置为静态(在类级别绑定)或实例(在对象级别绑定)。类型成员的创建将在接下来的几章中进行检查。

■ Note
as described in Chapter 10, the C# language also supports the creation of generic types and generic members.
注意 如第 10 章中所述,C# 语言还支持创建泛型类型和泛型成员。

Intrinsic CTS Data Types

固有 CTS 数据类型

The final aspect of the CTS to be aware of for the time being is that it establishes a well-defined set of fundamental data types. Although a given language typically has a unique keyword used to declare a fundamental data type, all .NET language keywords ultimately resolve to the same CTS type defined in an assembly named mscorlib.dll. Consider Table 1-2, which documents how key CTS data types are expressed in VB.NET and C#.
CTS 目前需要注意的最后一个方面是它建立了一组定义明确的基本数据类型。尽管给定语言通常具有用于声明基本数据类型的唯一关键字,但所有 .NET 语言关键字最终解析为在名为 mscorlib.dll 的程序集中定义的相同 CTS 类型。请考虑表 1-2,其中记录了关键 CTS 数据类型如何在 VB.NET 和 C# 中表示。

Table 1-2. The Intrinsic CTS Data Types
表 1-2. 固有 CTS 数据类型

CTS Data Type VB Keyword C# Keyword
System.Byte Byte byte
System.SByte SByte sbyte
System.Int16 Short short
System.Int32 Integer int
System.Int64 Long long
System.UInt16 UShort ushort
System.UInt32 UInteger uint
System.UInt64 ULong ulong
System.Single Single float
System.Double Double double
System.Object Object object
System.Char Char char
System.String String string
System.Decimal Decimal decimal
System.Boolean Boolean bool

Given that the unique keywords of a managed language are simply shorthand notations for a real type in the System namespace, you no longer have to worry about overflow/underflow conditions for numerical data or how strings and Booleans are internally represented across different languages. Consider the following code snippets, which define 32-bit numerical variables in C# and Visual Basic, using language keywords as well as the formal CTS data type:
鉴于托管语言的唯一关键字只是 System 命名空间中实际类型的简写表示法,您不再需要担心数值数据的溢出/下溢情况,也不必担心字符串和布尔值在不同语言中的内部表示方式。请考虑以下代码片段,这些代码片段使用语言关键字和正式的 CTS 数据类型在 C# 和 Visual Basic 中定义 32 位数值变量:

```
// Define some "ints" in C#.
// 在 C# 中定义一些“整数”。
int i = 0; 
System.Int32 j = 0;

REM: Define some "ints" in VB.
REM: 在 VB 中定义一些“整数”。
Dim i As Integer = 0
Dim j As System.Int32 = 0
```

Understanding the Common Language Specification

了解公共语言规范

As you are aware, different languages express the same programming constructs in unique, language- specific terms. For example, in C# you denote string concatenation using the plus operator (+), while in VB you typically make use of the ampersand (&). Even when two distinct languages express the same programmatic idiom (e.g., a function with no return value), the chances are good that the syntax will appear quite different on the surface.
如您所知,不同的语言以独特的、特定于语言的术语表达相同的编程结构。例如,在 C# 中,使用加号运算符 (+) 表示字符串连接,而在 VB 中,通常使用与号 (&)。即使两种不同的语言表达相同编程习语(例如,没有返回值的函数),语法很有可能在表面上看起来完全不同。

```
// C# method returning nothing.
// 方法不返回任何内容。
public void MyMethod()
{
    // Some interesting code...
    // 一些有趣的代码...
}
```

```
REM: VB method returning nothing.
REM: VB 方法不返回任何内容。
Public Sub MyMethod()
    REM: Some interesting code...
    REM: 一些有趣的代码...
End Sub
```

As you have already seen, these minor syntactic variations are inconsequential in the eyes of the .NET runtime, given that the respective compilers (csc.exe or vbc.exe, in this case) emit a similar set of CIL instructions. However, languages can also differ with regard to their overall level of functionality. For
example, a .NET language might or might not have a keyword to represent unsigned data and might or might not support pointer types. Given these possible variations, it would be ideal to have a baseline to which all.NET languages are expected to conform.
正如你已经看到的,这些微小的句法变化在.NET 运行时,假设相应的编译器(在本例中为 csc.exe 或 vbc.exe)发出一组类似的 CIL 指令。但是,语言在整体功能级别方面也可能有所不同。例如,.NET 语言可能有也可能没有用于表示无符号数据的关键字,并且可能支持也可能不支持指针类型。鉴于这些可能的变化,理想的做法是有一个基线,所有.NET 语言应符合要求。

The CLS is a set of rules that describe in vivid detail the minimal and complete set of features a given.NET compiler must support to produce code that can be hosted by the .NET Runtime, while at the same time be accessed in a uniform manner by all languages that target the .NET platform. In many ways, the CLS can be viewed as a subset of the full functionality defined by the CTS.
CLS 是一组规则,用于生动详细地描述给定的最小和完整功能集.NET 编译器必须支持生成可由 .NET 运行时承载的代码,同时由面向 .NET 平台的所有语言以统一方式访问。在许多方面,CLS 可以被视为 CTS 定义的完整功能的子集。

The CLS is ultimately a set of rules that compiler builders must conform to if they intend their products to function seamlessly within the .NET universe. Each rule is assigned a simple name (e.g., CLS Rule 6) and describes how this rule affects those who build the compilers as well as those who (in some way) interact with them. The crème de la crème of the CLS is Rule 1. CLS
最终是一组规则,如果编译器构建者希望其产品在 .NET 世界中无缝运行,则必须遵守这些规则。每个规则都被分配了一个简单的名称(例如,CLS 规则 6),并描述了该规则如何影响构建编译器的人以及(以某种方式)与他们交互的人。CLS的精华是规则1。

Rule 1: CLS rules apply only to those parts of a type that are exposed outside the defining assembly.
规则 1:CLS 规则仅适用于在定义程序集外部公开的类型零件。

Given this rule, you can (correctly) infer that the remaining rules of the CLS do not apply to the logic used to build the inner workings of a .NET type. The only aspects of a type that must conform to the CLS are the member definitions themselves (i.e., naming conventions, parameters, and return types). The

implementation logic for a member may use any number of non-CLS techniques, as the outside world won’t know the difference.
给定此规则,您可以(正确)推断 CLS 的其余规则不适用于用于生成 .NET 类型内部工作的逻辑。类型中唯一必须符合 CLS 的方面是成员定义本身(即命名约定、参数和返回类型)。这成员的实现逻辑可以使用任意数量的非 CLS 技术,因为外界不会知道其中的区别。

To illustrate, the following C# Add() method is not CLS compliant, as the parameters and return values make use of unsigned data (which is not a requirement of the CLS):
为了说明这一点,以下 C# Add() 方法不符合 CLS,因为参数和返回值使用未签名的数据(这不是 CLS 的要求):

class Calc
{
    // Exposed unsigned data is not CLS compliant!
    // 暴露的未签名数据不符合 CLS 标准!
    public ulong Add(ulong addend1, ulong addend2)
    {
        return addend1 + addend2;
    }
}

However, consider the following code that makes use of unsigned data internally in a method:
但是,请考虑以下代码,该代码在方法内部使用未签名的数据:

class Calc
{
    public int Add(int addend1, int addend2)
    {
        // As this ulong variable is only used internally,
        // 由于此 ulong 变量仅在内部使用,
        // we are still CLS compliant.
        // 我们仍然符合CLS标准。
        ulong temp = 0;
        ......
        return addend1 + addend2;
    }
}

The class still conforms to the rules of the CLS and can rest assured that all .NET languages are able to invoke the Add() method.
该类仍然符合 CLS 的规则,并且可以放心,所有 .NET 语言都能够调用 Add() 方法。

Of course, in addition to Rule 1, the CLS defines numerous other rules. For example, the CLS describes how a given language must represent text strings, how enumerations should be represented internally (the base type used for storage), how to define static members, and so forth. Luckily, you don’t have to commit these rules to memory to be a proficient .NET developer. Again, by and large, an intimate understanding of the CTS and CLS specifications is typically of interest only to tool/compiler builders.
当然,除了规则 1 之外,CLS 还定义了许多其他规则。例如,CLS 描述给定语言必须如何表示文本字符串、枚举应在内部表示(用于存储的基类型)、如何定义静态成员等。幸运的是,您不必将这些规则提交到内存中即可成为熟练的 .NET 开发人员。同样,总的来说,对 CTS 和 CLS 规范的深入了解通常只有工具/编译器构建者感兴趣。

Ensuring CLS Compliance

确保 CLS 合规性

As you will see over the course of this book, C# does define a number of programming constructs that are not CLS compliant. The good news, however, is that you can instruct the C# compiler to check your code for CLS compliance using a single .NET attribute.
正如您将在本书中看到的那样,C# 确实定义了许多不符合 CLS 的编程结构。不过,好消息是,您可以指示 C# 编译器使用单个 .NET 属性检查代码是否符合 CLS。

// Tell the C# compiler to check for CLS compliance. 
// 告诉 C# 编译器检查 CLS 合规性。
[assembly: CLSCompliant(true)]

Chapter 17 dives into the details of attribute-based programming. Until then, simply understand that the [CLSCompliant] attribute will instruct the C# compiler to check every line of code against the rulesof the CLS. If any CLS violations are discovered, you receive a compiler warning and a description of the offending code.
第17章深入探讨了基于属性的编程的细节。在此之前,只需了解[CLSCompliant] 属性将指示 C# 编译器根据规则检查每一行代码的 CLS。如果发现任何 CLS 冲突,您将收到编译器警告和违规代码的说明。

Understanding the .NET Runtime

了解 .NET 运行时

In addition to the CTS and CLS specifications, the final piece of the puzzle to contend with is the .NET Runtime. Programmatically speaking, the term runtime can be understood as a collection of services that are required to execute a given compiled unit of code. For example, when Java developers deploy software to a new computer, they need to ensure the Java virtual machine (JVM) has been installed on the machine in order to run their software.
除了 CTS 和 CLS 规范之外,要解决的最后一块难题是 .NET 运行时。从编程方式讲,术语运行时可以理解为执行给定的已编译代码单元所需的服务集合。例如,当 Java 开发人员将软件部署到新计算机时,他们需要确保已在计算机上安装 Java 虚拟机 (JVM) 才能运行其软件。

The .NET platform offers yet another runtime system. The key difference between the .NET runtime and the various other runtimes I just mentioned is that the .NET runtime provides a single, well-defined runtime layer that is shared by all languages and platforms that are .NET.
.NET 平台提供了另一个运行时系统。.NET 运行时与我刚才提到的各种其他运行时之间的主要区别在于,.NET 运行时提供了一个由 .NET 的所有语言和平台共享的单个定义明确的运行时层。

Distinguishing Between Assembly, Namespace, and Type

区分程序集、命名空间和类型

Each of us understands the importance of code libraries. The point of framework libraries is to give developers a well-defined set of existing code to leverage in their applications. However, the C# language does not come with a language-specific code library. Rather, C# developers leverage the language-neutral.NET libraries. To keep all the types within the base class libraries well organized, the .NET platform makes extensive use of the namespace concept.
我们每个人都明白代码库的重要性。框架库的要点是为开发人员提供一组定义良好的现有代码,以便在其应用程序中利用。但是,C# 语言不附带特定于语言的代码库。相反,C# 开发人员利用与语言无关.NET 库。为了使基类库中的所有类型井井有条,.NET 平台广泛使用命名空间概念。

A namespace is a grouping of semantically related types contained in an assembly or possibly spread across multiple related assemblies. For example, the System.IO namespace contains file I/O-related types, the System.Data namespace defines basic database types, and so on. It is important to point out that a single assembly can contain any number of namespaces, each of which can contain any number of types.
命名空间是程序集中包含的语义相关类型的分组,或者可能分布在多个相关程序集中。例如,System.IO 命名空间包含与文件 I/O 相关的类型,System.Data 命名空间定义基本数据库类型,等等。必须指出的是,单个程序集可以包含任意数量的命名空间,每个命名空间可以包含任意数量的类型。

The key difference between this approach and a language-specific library is that any language targeting the .NET runtime uses the same namespaces and same types. For example, the following two programs all illustrate the ubiquitous Hello World application, written in C# and VB:
此方法与特定于语言的库之间的主要区别在于,面向 .NET 运行时的任何语言都使用相同的命名空间和相同类型。例如,以下两个程序都说明了用 C# 和 VB 编写的无处不在的 Hello World 应用程序:

■ Note
The following code uses the C# 9 version of the Program class with a void Main() method to help illustrate the example. The new templates in C# 10 use top level statements (covered in Chapter 3) and global implicit using statements (covered later in this chapter).
下面的代码使用带有 void Main() 方法的 C# 9 版本的 Program 类来帮助说明该示例。C# 10 中的新模板使用顶级语句(在第 3 章中介绍)和全局隐式 using 语句(在本章后面介绍)。

```
// Hello World in C#.
using System;
public class MyApp
{
    static void Main()
    {
        Console.WriteLine("Hi from C#");
    }
}
```

```
REM: Hello World in VB.
Imports System
Public Module MyApp
    Sub Main()
        Console.WriteLine("Hi from VB")
    End Sub
End Module
```

Notice that each language is using the Console class defined in the System namespace. Beyond some obvious syntactic variations, these applications look and feel very much alike, both physically and logically.
请注意,每种语言都使用 System 命名空间中定义的 Console 类。除了一些明显的语法变化之外,这些应用程序在物理和逻辑上的外观和感觉都非常相似。

Clearly, once you are comfortable with your .NET programming language of choice, your next goal as a .NET developer is to get to know the wealth of types defined in the (numerous) .NET namespaces. The most fundamental namespace to get your head around initially is named System. This namespace provides a core body of types that you will need to leverage time and again as a .NET developer. In fact, you cannot build any sort of functional C# application without at least making a reference to the System namespace, as the core data types (e.g., System.Int32, System.String) are defined here. Table 1-3 offers a rundown of some (but certainly not all) of the .NET namespaces grouped by related functionality.
显然,一旦你对你选择的.NET编程语言感到满意,你的下一个目标就是.NET 开发人员将了解(大量).NET 命名空间中定义的大量类型。最初要了解的最基本的命名空间名为 System。此命名空间提供了作为 .NET 开发人员需要一次又一次利用的核心类型主体。事实上,如果不至少引用 System 命名空间,就无法生成任何类型的功能性 C# 应用程序,因为此处定义了核心数据类型(例如,System.Int32、System.String)。表 1-3 提供了按相关功能分组的一些(但肯定不是全部).NET 命名空间的概要。

Table 1-3. A Sampling of .NET Namespaces
表 1-3. .NET 命名空间的示例

.NET Namespace
.NET 命名空间
Meaning in Life
意义
System Within System, you find numerous useful types dealing with intrinsic data, mathematical computations, random number generation, environment variables, and garbage collection, as well as a number of commonly used exceptions and attributes.
在 System 中,您会发现许多有用的类型,这些类型处理内部数据、数学计算、随机数生成、环境变量和垃圾回收,以及许多常用的异常和属性。
System.Collections
System.Collections.Generic
These namespaces define a number of stock container types, as well as base types and interfaces that allow you to build customized collections.
这些命名空间定义了许多常用容器类型,以及允许您生成自定义集合的基类型和接口。
System.Data System.Data.Common
System.Data.SqlClient
These namespaces are used for interacting with relational databases using ADO.NET.
这些命名空间用于使用 ADO.NET 与关系数据库进行交互。

System.IO System.IO.Compression
System.IO.Ports
These namespaces define numerous types used to work with file I/O, compression of data, and port manipulation.
这些命名空间定义了用于处理文件 I/O、数据压缩和端口操作的多种类型。
System.Runtime.InteropServices This namespace provides facilities to allow .NET types to interact with unmanaged code (e.g., C-based DLLs and COM servers) and vice versa.
此命名空间提供的工具允许 .NET 类型与非托管代码(例如,基于 C 的 DLL 和 COM 服务器)交互,反之亦然。
System.Drawing System.Windows.Forms These namespaces define types used to build desktop applications using .NET’s original UI toolkit (Windows Forms).
这些命名空间定义用于使用 构建桌面应用程序的类型。NET的原始UI工具包(Windows Forms)。
System.Windows System.Windows.Controls
System.Windows.Shapes
The System.Windows namespace is the root for several namespaces that are used in Windows Presentation Foundation applications.
System.Windows 命名空间是 Windows Presentation Foundation 应用程序中使用的多个命名空间的根。
System.Windows.Forms
System.Drawing
The System.Windows.Forms namespace is the root for several namespaces used in Windows Forms applications.
命名空间是 Windows 窗体应用程序中使用的多个命名空间的根。
System.Linq System.Linq.Expressions These namespaces define types used when programming against the LINQ API.
这些命名空间定义针对 LINQ API 进行编程时使用的类型。
System.AspNetCore This is one of many namespaces that allows you to build ASP.NET Core web applications and RESTful services.
这是允许您构建 ASP.NET 核心 Web 应用程序和 RESTful 服务的众多命名空间之一。
System.Threading
System.Threading.Tasks
These namespaces define numerous types to build multithreaded applications that can distribute workloads across multiple CPUs.
这些命名空间定义了多种类型来构建可在多个 CPU 之间分配工作负载的多线程应用程序。
System.Security Security is an integrated aspect of the .NET universe. In the security-centric namespaces, you find numerous types dealing with permissions, cryptography, etc.
安全性是 .NET 领域的一个集成方面。在以安全为中心的命名空间,您会发现许多处理权限、加密等的类型。
System.Xml The XML-centric namespaces contain numerous types used to interact with XML data.
以 XML 为中心的命名空间包含许多用于与 XML 数据交互的类型。

Accessing a Namespace Programmatically

以编程方式访问命名空间

It is worth reiterating that a namespace is nothing more than a convenient way for us mere humans to logically understand and organize related types. Consider again the System namespace. From your perspective, you can assume that System.Console represents a class named Console that is contained within a namespace called System. However, in the eyes of the .NET runtime, this is not so. The runtime engine sees only a single class named System.Console.
值得重申的是,命名空间只不过是我们人类在逻辑上理解和组织相关类型的一种便捷方式。再次考虑系统命名空间。从您的透视,您可以假设 System.Console 表示一个名为 Console 的类,该类包含在名为 System 的命名空间中。但是,在 .NET 运行时看来,事实并非如此。运行时引擎只看到一个名为 System.Console 的类。

In C#, the using keyword simplifies the process of referencing types defined in a particular namespace. Here is how it works. Returning to the Calc example program earlier in this chapter, there is a single using statement at the top of the file.
在 C# 中,using 关键字简化了引用特定命名空间中定义的类型的过程。这是它的工作原理。回到本章前面的 Calc 示例程序,文件顶部有一个 using 语句。

using System;

That statement is a shortcut to enable this line of code:
该语句是启用此代码行的快捷方式:

Console.WriteLine("10 + 84 is {0}.", ans);

Without the using statement, the code would need to be written like this:
如果没有 using 语句,代码需要像这样编写:

System.Console.WriteLine("10 + 84 is {0}.", ans);

While defining a type using the fully qualified name provides greater readability, I think you’d agree that the C# using keyword reduces keystrokes. In this text, we will avoid the use of fully qualified names (unless there is a definite ambiguity to be resolved) and opt for the simplified approach of the C# using keyword.
虽然使用完全限定名称定义类型提供了更高的可读性,但我认为您会同意 C# using 关键字可以减少击键。在本文中,我们将避免使用完全限定的名称(除非有明确的歧义需要解决),并选择 C# using 关键字的简化方法。

However, always remember that the using keyword is simply a shorthand notation for specifying a type’s fully qualified name, and either approach results in the same underlying CIL (given that CIL code always uses fully qualified names) and has no effect on performance or the size of the assembly.
但是,请始终记住,using 关键字只是用于指定类型的完全限定名称的简写表示法,并且这两种方法都会导致相同的基础 CIL(假设 CIL 代码始终使用完全限定名称),并且对性能或程序集的大小没有影响。

Global Using Statements (New 10.0)

全局Using语句(新 10.0)

As you build more complex C# applications, you will most likely have namespaces repeated in multiple files. Introduced in C# 10, namespaces can be referenced globally, and then be available in every file in the project automatically. Simply add the global keyword in front of your using statements, like this:
在生成更复杂的 C# 应用程序时,很可能会在多个文件中重复命名空间。在 C# 10 中引入,命名空间可以全局引用,然后自动在项目中的每个文件中可用。只需在 using 语句前面添加 global 关键字,如下所示:

global using System;

■ Note
all global using statements must come before any non-global using statements.
所有全局 using 语句都必须位于任何非全局 using 语句之前。

A recommendation is that you place the global using statements along with your top level statements (covered in Chapter 3) or a completely separate file (such as GlobalUsings.cs) for better visibility. You will see many examples of this throughout this text.
建议将全局 using 语句与顶级语句(在第 3 章中介绍)或完全独立的文件(如 GlobalUsings.cs)一起放置,以提高可见性。在本文中,您将看到许多示例。

In addition to placing the global using statements in Program.cs (or a separate file), they can be placed in the project file for the application using the following format:
除了将全局 using 语句放在 Program.cs(或单独的文件)中之外,还可以使用以下格式将它们放置在应用程序的项目文件中:

<ItemGroup>
    <Using Include=”System.Text” />
    <Using Include=”System.Text.Encodings.Web” />
    <Using Include=”System.Text.Json” />
    <Using Include=”System.Text.Json.Serialization” />
</ItemGroup>

Implicit Global Using Statements (New 10.0)

隐式全局Using语句(新 10.0)

Another new feature included with .NET 6/C# 10 are implicit global using statements. The implicit global using statements supplied by .NET 6 varies based on the type of application you are building. Table 1-4 lists the types of applications and the included namespaces.
.NET 6/C# 10 中包含的另一个新功能是隐式全局 using 语句。.NET 6 提供的隐式全局 using 语句因要生成的应用程序类型而异。表 1-4 列出了应用程序的类型和包含的命名空间。

Table 1-4. A Sampling of .NET Namespaces
表 1-4. .NET 命名空间的示例

.NET Application Type
.NET 应用程序类型
Namespaces covered by implicit global using statements
隐式全局 using 语句涵盖的命名空间
Client (Microsoft.NET.Sdk) System
System.Collections.Generic
System.IO
System.Linq
System.Net.Http
System.Threading
System.Threading.Tasks
Web (Microsoft.NET.Sdk.Web) All from Microsoft.NET.Sdk plus:
System.Net.Http.Json
Microsoft.AspNetCore.Builder
Microsoft.AspNetCore.Hosting
Microsoft.AspNetCore.Http
Microsoft.AspNetCore.Routing
Microsoft.Extensions.Configuration
Microsoft.Extensions.DependencyInjection
Microsoft.Extensions.Hosting
Microsoft.Extensions.Logging
Worker Service (Microsoft.NET.Sdk.Worker) All from Microsoft.NET.Sdk plus:
Microsoft.Extensions.Configuration
Microsoft.Extensions.DependencyInjection
Microsoft.Extensions.Hosting
Microsoft.Extensions.Logging

The vast majority of the C# 10 project templates enable global implicit using statements by default with the ImplicitUsings element in the project’s main Property group. To disable the setting, update the project file to the following:
默认情况下,绝大多数 C# 10 项目模板使用项目主属性组中的 ImplicitUsings 元素启用全局隐式 using 语句。若要禁用该设置,请将项目文件更新为以下内容:

<PropertyGroup>
    <TargetFramework>net6.0</TargetFramework>
    <Nullable>enable</Nullable>
    <ImplicitUsings>disable</ImplicitUsings>
</PropertyGroup>

To see the global using statements in your project, look for the .GlobalUsings.g.cs file in the \obj\Debug\net6.0 folder. For the Calc.cs project, the following is the generated code:
若要查看项目中的全局 using 语句,请查找 。GlobalUsings.g.cs 文件在 \obj\Debug\net6.0 文件夹中。对于 Calc.cs 项目,以下是生成的代码:

// <auto-generated/>
global using global::System;
global using global::System.Collections.Generic;
global using global::System.IO;
global using global::System.Linq;
global using global::System.Net.Http;
global using global::System.Threading;
global using global::System.Threading.Tasks;

File Scoped Namespaces (New 10.0)

文件范围的命名空间(新版 10.0)

Also new in C# 10, file-scoped namespaces remove the need to wrap your code in braces when placing it in a custom namespace. Take the following example of the Calculator class, contained in the CalculatorExamples namespace. Prior to C# 10, to place a class in a namespace required the namespace declaration, an opening curly brace, the code (Calculator), and then a closing curly brace. In the example, the extra code is in bold:
文件范围的命名空间也是 C# 10 中的新增功能,在将代码放入自定义命名空间时,无需将代码包装在大括号中。以以下计算器类为例,该类包含在计算器示例命名空间。在 C# 10 之前,若要将类放在命名空间中,需要命名空间声明、左大括号、代码(计算器),然后是右大括号。在示例中,额外代码以粗体显示:

namespace CalculatorExamples
{
    class Calculator()
    {

    }
}

As your code becomes more complex, this can add a lot of extra code and indentation. With file scoped namespaces, the following code achieves the same effect:
随着代码变得更加复杂,这可能会添加大量额外的代码和缩进。对于文件范围的命名空间,以下代码可实现相同的效果:

namespace CalculatorExamples
class Calculator()
{
...
}

■ Note
Custom namespaces are covered in depth in Chapter 16
自定义命名空间在第 16 章中有深入介绍

Referencing External Assemblies

引用外部程序集

Prior versions of the .NET Framework used a common installation location for framework libraries known as the Global Assembly Cache (GAC). Instead of having a single installation location, .NET does not use the GAC. Instead, each version (including minor releases) is installed in its own location (by version) on the computer. When using Windows, each version of the runtime and SDK gets installed into c:\Program Files\dotnet.
早期版本的 .NET Framework 使用框架库的通用安装位置,称为全局程序集缓存 (GAC)。.NET 不使用 GAC,而不是只有一个安装位置。相反,每个版本(包括次要版本)都安装在计算机上自己的位置(按版本)。使用 Windows 时,每个版本的运行时和 SDK 都会安装到 c:\Program Files\dotnet 中。

Adding assemblies into most .NET projects is done by adding NuGet packages (covered later in this text). However, .NET applications targeting (and being developed on) Windows still have access to COM libraries.
将程序集添加到大多数 .NET 项目中是通过添加 NuGet 包来完成的(本文稍后将介绍)。但是,面向 Windows(并在 Windows 上开发)的 .NET 应用程序仍然可以访问 COM 库。

For an assembly to have access to another assembly that you are building (or someone built for you), you need to add a reference from your assembly to the other assembly and have physical access to the other assembly. Depending on the development tool you are using to build your .NET applications, you will have various ways to inform the compiler which assemblies you want to include during the compilation cycle.
要使程序集能够访问您正在生成的另一个程序集(或为您构建的人),您需要将程序集中的引用添加到另一个程序集,并具有对其他程序集的物理访问权限。根据用于生成 .NET 应用程序的开发工具,您将有多种方法通知编译器要在编译周期中包含哪些程序集。

Exploring an Assembly Using ildasm.exe

使用 ildasm 探索程序集.exe

If you are beginning to feel a tad overwhelmed at the thought of gaining mastery over every namespace in the .NET platform, just remember that what makes a namespace unique is that it contains types that are somehow semantically related. Therefore, if you have no need for a user interface beyond a simple console application, you can forget all about the desktop and web namespaces (among others). If you are building a painting application, the database namespaces are most likely of little concern. You will learn over time the namespaces that are most relevant to your programming needs.
如果你开始对掌握 .NET 平台中的每个命名空间的想法感到有点不知所措,请记住,命名空间的独特之处在于它包含某种语义相关的类型。因此,如果您不需要简单的控制台应用程序之外的用户界面,则可以忘记有关桌面和Web命名空间(以及其他)的所有内容。如果您正在构建绘画应用程序,则数据库命名空间很可能无关紧要。随着时间的推移,您将了解与您的编程需求最相关的命名空间。

The Intermediate Language Disassembler utility (ildasm.exe) allows you to create a text document representing a .NET assembly and investigate its contents, including the associated manifest, CIL code, and type metadata. This tool allows you to dive deeply into how the C# code maps to CIL and ultimately helps you understand the inner workings of the .NET platform. While you never need to use ildasm.exe to become a proficient .NET programmer, I highly recommend you fire up this tool from time to time to better understand how your C# code maps to runtime concepts.
中间语言反汇编程序实用工具 (ildasm.exe) 允许您创建表示 .NET 程序集的文本文档并调查其内容,包括关联的清单、CIL 代码和类型元数据。此工具允许您深入了解 C# 代码如何映射到 CIL,并最终帮助您了解 .NET 平台的内部工作原理。虽然你永远不需要使用 ildasm.exe 成为一名熟练的 .NET 程序员,但我强烈建议你不时启动此工具,以更好地了解 C# 代码如何映射到运行时概念。

■ Note
The ildasm.exe program no longer ships with the .NET 6 runtime. There are two options for getting this tool into your workspace. The first is to compile from the .NET 6 runtime source located at https:// github.com/dotnet/runtime. The second, and easier method, is to pull down the desired version from www.nuget.org. ILdasm on Nuget is at https://www.nuget.org/packages/Microsoft.NETCore. ILDAsm/. Make sure to select the correct version (for this book you will want version 6.0.0 or higher). add the ILdasm Nuget package to your project with the following command: dotnet add package Microsoft. NETCore.ILDAsm --version 6.0.0.
ildasm.exe 程序不再附带 .NET 6 运行时。有两个选项可用于将此工具放入工作区。第一种是从位于 github.com/dotnet/runtime 的 .NET 6 运行时源编译 https://。第二种也是更简单的方法是从 www.nuget.org 下拉所需的版本。Nuget上的ILdasm正在 https://www.nuget.org/packages/Microsoft.NETCore。 伊尔达/.确保选择正确的版本(对于本书,您需要6.0.0或更高版本)。使用以下命令将 ILdasm Nuget 包添加到项目中:dotnet 添加包Microsoft。NETCore.ILDAsm --version 6.0.0.
This doesn’t actually load ILDasm.exe into your project but places it in your package folder (on Windows):%userprofile%.nuget\packages\microsoft.netcore.ildasm\6.0.0\runtimes\native.
这实际上不会将 ILDasm.exe 加载到您的项目中,而是将其放在您的包文件夹中(在 Windows 上):%userprofile%.nuget\packages\microsoft.netcore.ildasm\6.0.0\runtimes\native.
I have also included the 6.0.0 version of ILDasm.exe in this book’s github repo in the root folder for the code samples.
我还在本书的 github 存储库中包含了 ILDasm 的 6.0.0 版本.exe在代码示例的根文件夹中。

After you get ildasm.exe loaded onto your machine, you can run the program from the command line without any arguments to see the help comments. At a minimum, you have to specify the assembly to extract the CIL.
将 ildasm.exe 加载到计算机上后,可以从命令行运行程序,而无需任何参数来查看帮助注释。至少必须指定程序集以提取 CIL。

An example command line is as follows:
命令行示例如下:

ildasm /all /METADATA /out=csharp.il calc.cs.dll

This will create a file named csharp.il exporting all available data into the file. This is the file where the previous IL examples came from.
这将创建一个名为 csharp.il 的文件,将所有可用数据导出到文件中。这是前面的 IL 示例的来源文件。

Summary

总结

The point of this chapter was to lay out the conceptual framework necessary for the remainder of this book. I began by examining a number of limitations and complexities found within the technologies prior to .NET and followed up with an overview of how .NET and C# attempt to simplify the current state of affairs.
本章的要点是阐述本书其余部分所需的概念框架。我首先检查了 .NET 之前的技术中的一些限制和复杂性,然后概述了 .NET 和 C# 如何尝试简化当前事务状态。

.NET basically boils down to a runtime execution engine (the .NET Runtime) and base class libraries.The runtime is able to host any .NET binary (aka assembly) that abides by the rules of managed code. As you saw, assemblies contain CIL instructions (in addition to type metadata and the assembly manifest) that are compiled to platform-specific instructions using a just-in-time compiler. In addition, you explored the role of the Common Language Specification and Common Type System.
.NET 基本上归结为运行时执行引擎(.NET 运行时)和基类库。运行时能够承载遵守托管代码规则的任何 .NET 二进制文件(也称为程序集)。如您所见,程序集包含 CIL 指令(除了类型元数据和程序集清单之外),这些指令使用实时编译器编译为特定于平台的指令。此外,您还探讨了公共语言规范和公共类型系统的作用。

In the next chapter, you will take a tour of the common integrated development environments you can use when you build your C# programming projects. You will be happy to know that in this book you will use completely free (and feature-rich) IDEs, so you can start exploring the .NET universe with no money down.
在下一章中,您将浏览在生成 C# 编程项目时可以使用的常见集成开发环境。你会很高兴地知道,在本书中,你将使用完全免费(且功能丰富)的IDE,这样你就可以开始探索.NET世界了,不用花钱。

Pro C#10 Introduction

Pro C# 10 with .NET 6

Introduction

Choose Your Own Adventures

选择你自己的冒险

From the very first editions that Andrew wrote, and the ensuing editions since I have taken over the book, the goal has been (and always will be) to help you be productive and informed software engineers. This book, like C# and the .NET platform, continues to grow with every release. This provides an opportunity for you, the reader, to choose your own adventures. Whether you are new to software development or a seasoned veteran, this book has content to take you to the next level.
从Andrew写的第一版,到我接手这本书以来的后续版本,我们的目标一直是(并且永远是)帮助你成为高效和知情的软件工程师。本书与 C# 和 .NET 平台一样,随着每个版本的发布而不断增长。这为你(读者)提供了一个选择自己的冒险的机会。无论你是软件开发新手还是经验丰富的老手,本书都有内容将带你更上一层楼。

For the veteran C# developer, this book keeps you up to date with the latest that C# and .NET has to offer. Starting with C# 7, the section headers indicate when a feature was introduced or updated. Quickly scanning the table of contents highlights the new features so you can quickly read up on them and take them for a spin. This book can also serve as a reference manual, with code samples ready to help you complete that task that isn’t quite muscle memory.
对于资深的 C# 开发人员,本书让您了解 C# 和 .NET 提供的最新信息。从 C# 7 开始,节标题指示何时引入或更新功能。快速扫描目录会突出显示新功能,以便您可以快速阅读它们并试一试。本书还可以作为参考手册,其中包含代码示例,可帮助您完成不完全是肌肉记忆的任务。

For the beginner, this book uses an organized approach to teaching C# and object oriented programming. Once you are comfortable with those topics, you can exercise them by skipping ahead and building application ASP.NET Core or Windows Presentation Foundation. Not ready to dive into data access? All of the code for each chapter is provide in the GitHub repo, so you can skip ahead in the book and use the provided code samples to explore in the order you choose.
对于初学者,本书使用有组织的方法来教授C#和面向对象编程。熟悉这些主题后,可以通过跳过并 ASP.NET Core 或 Windows Presentation Foundation 构建应用程序来练习它们。还没准备好深入了解数据访问?每章的所有代码都在 GitHub 存储库中提供,因此您可以跳过本书并使用提供的代码示例按您选择的顺序进行探索。

As an author, I don’t know what your individual needs are at any single point in time. As a CTO and Chief Architect, I know what our organization and software engineers need for the long haul. Not only for the software they build, but for their careers as the move towards tech lead and architect positions. My goal is to provide you with the same information that I provide my team and my organization. Chances are you don’t need everything in this book – right now. Chances are also good that you will at some point in your development cycles. So, choose your own adventure, grab what you need to finish your task at hand, and know that we’ll be ready for you when you come back to tackle another section.
作为一名作者,我不知道你的个人在任何单一时间点的需求是什么。作为首席技术官和首席架构师,我知道我们的组织和软件工程师需要什么。不仅是为了他们构建的软件,也是为了他们的职业生涯,因为向技术主管和架构师职位迈进。我的目标是为您提供与我提供给我的团队和组织相同的信息。很可能你不需要这本书中的所有内容——现在。在开发周期的某个时刻,您也很有可能会这样做。因此,选择您自己的冒险,抓住完成手头任务所需的东西,并知道当您回来处理另一个部分时,我们会为您做好准备。

The Source Code

源代码

The source code for this book is hosted on GitHub in the https://github.com/apress/pro-c-sharp-10 repository.
本书的源代码托管在 GitHub 的存储库中。
https://www.Github.com/apress/pro-c- sharp-10 repository

An Overview of This Book

本书概述

Pro C# 10 with .NET 6 is logically divided into nine distinct parts, each of which contains a number of related chapters. Here is a part-by-part and chapter-by-chapter breakdown of the text.
带有 .NET 10 的 Pro C# 6 在逻辑上分为九个不同的部分,每个部分都包含许多相关章节。以下是文本的逐部分和逐章分解。

Part I: Introducing C# and .NET 6

第 I 部分:介绍 C# 和 .NET 6

The purpose of Part I is to acclimate you to the nature of the .NET platform and various development tools used during the construction of .NET applications.
第一部分的目的是让您适应 .NET 平台的性质以及在构建 .NET 应用程序期间使用的各种开发工具。

Chapter 1: Introducing C# and .NET 6

第 1 章:介绍 C# 和 .NET 6

This first chapter functions as the backbone for the remainder of the text. The primary goal of this chapter is to acquaint you with a number of .NET–centric building blocks, such as the Common Language Runtime (CLR), Common Type System (CTS), Common Language Specification (CLS), and Base Class Libraries (BCL). Here, you will take an initial look at the C# programming language, namespaces, and the .NET assembly format.
第一章是文本其余部分的主干。本章的主要目标是让您熟悉许多以 .NET 为中心的构建基块,例如公共语言运行时 (CLR)、通用类型系统 (CTS)、公共语言规范 (CLS) 和基类库 (BCL)。在这里,您将初步了解 C# 编程语言、命名空间和 .NET 程序集格式。

Chapter 2: Building C# Applications

第 2 章:构建 C# 应用程序

The goal of this chapter is to introduce you to the process of compiling C# source code files. After installing the .NET SDK and runtimes, you will learn about the completely free (and fully functional) Visual Studio Community edition as well as the extremely popular (and also free) Visual Studio Code. You learn how to create, run, and debug .NET C# applications using both Visual Studio and Visual Studio Code.
本章的目标是向您介绍编译 C# 源代码文件的过程。安装 .NET SDK 和运行时后,您将了解完全免费(且功能齐全)的 Visual Studio 社区版以及非常流行(也是免费的)Visual Studio Code。您将学习如何使用 Visual Studio 和 Visual Studio Code 创建、运行和调试 .NET C# 应用程序。

Part II: Core C# Programming

第二部分:核心 C# 编程

The topics presented in this part of the book are quite important because you will use them regardless of which type of .NET software you intend to develop (e.g., web applications, desktop GUI applications, code libraries, services, etc.). Here, you will learn about the fundamental data types of .NET, work with text manipulation, and learn the role of various C# parameter modifiers (including optional and named arguments).
本书这一部分中介绍的主题非常重要,因为无论您打算开发哪种类型的 .NET 软件(例如,Web 应用程序、桌面 GUI 应用程序、代码库、服务等),您都将使用它们。在这里,你将了解 .NET 的基本数据类型,使用文本操作,并了解各种 C# 参数修饰符(包括可选参数和命名参数)的作用。

Chapter 3: Core C# Programming Constructs, Part 1

第 3 章:核心 C# 编程构造,第 1 部分

This chapter begins your formal investigation of the C# programming language. Here, you will learn about the role of the Main() method, top-level statements, and numerous details regarding the intrinsic data types of the .NET platform and variable declaration. You will work with and manipulate textual data using System. String and System.Text.StringBuilder. You will also examine iteration and decision constructs, pattern matching, narrowing and widening operations, and the unchecked keyword.
本章开始对 C# 编程语言进行正式研究。在这里,您将了解 Main() 方法的作用、顶级语句以及有关 .NET 平台和变量声明的内部数据类型的大量详细信息。您将使用系统处理和操作文本数据。String and System.Text.StringBuilder.您还将检查迭代和决策构造、模式匹配、缩小和加宽操作以及未选中的关键字。

Chapter 4: Core C# Programming Constructs, Part 2

第 4 章:核心 C# 编程构造,第 2 部分

This chapter completes your examination of the core aspects of C#, beginning with creating and manipulating arrays of data. Next, you examine how to construct overloaded type methods and define parameters using the out, ref, and params keywords. You will also learn about the enum type, structures, and nullable data types, and you will understand the distinction between value types and reference types. Finally, you will learn about tuples.
本章完成了对 C# 核心方面的检查,从创建和操作数据数组开始。接下来,您将研究如何使用 out、ref 和 params 关键字构造重载类型方法和定义参数。您还将了解枚举类型、结构和可为 null 的数据类型,并了解值类型和引用类型之间的区别。最后,您将了解元组。

Part III: Object-Oriented Programming with C

第三部分:用C#语言进行面向对象编程

In this part, you will come to understand the core constructs of the C# language, including the details of object-oriented programming. This part will also examine how to process runtime exceptions and will dive into the details of working with strongly typed interfaces. Finally, you will learn about object lifetime and garbage collection.
在这一部分中,您将了解 C# 语言的核心结构,包括面向对象编程的细节。本部分还将研究如何处理运行时异常,并将深入探讨使用强类型接口的详细信息。最后,您将了解对象生存期和垃圾回收。

Chapter 5: Understanding Encapsulation

第 5 章:了解封装

This chapter begins your examination of object-oriented programming (OOP) using the C# programming language. After you are introduced to the pillars of OOP (encapsulation, inheritance, and polymorphism), the remainder of this chapter will show you how to build robust class types using constructors, properties, static members, constants, and read-only fields. You will also learn about partial type definitions, object initialization syntax, and automatic properties, and the chapter will wrap up with an examination of record types and record structs.
本章开始使用 C# 编程语言检查面向对象编程 (OOP)。在介绍了 OOP 的支柱(封装、继承和多态性)之后,本章的其余部分将向您展示如何使用构造函数、属性、静态成员、常量和只读字段构建健壮的类类型。您还将了解分部类型定义、对象初始化语法和自动属性,本章将最后检查记录类型和记录结构。

Chapter 6: Understanding Inheritance and Polymorphism

第6章 理解继承和多态性

Here, you will examine the remaining pillars of OOP (inheritance and polymorphism), which allow you to build families of related class types. As you do this, you will examine the role of virtual methods, abstract methods (and abstract base classes), and the nature of the polymorphic interface. Then you will explore pattern matching with the is keyword, and finally, this chapter will explain the role of the ultimate base class of the .NET platform, System.Object.
在这里,您将检查 OOP(继承和多态性)的其余支柱,它们允许您构建相关类类型的族。执行此操作时,您将检查虚拟方法、抽象方法(和抽象基类)的作用以及多态接口的性质。然后,您将探索使用 is 关键字的模式匹配,最后,本章将解释 .NET 平台的最终基类 System.Object 的作用。

Chapter 7: Understanding Structured Exception Handling

第 7 章:了解结构化异常处理

The point of this chapter is to discuss how to handle runtime anomalies in your code base through the use of structured exception handling. Not only will you learn about the C# keywords that allow you to handle such problems (try, catch, throw, when, and finally), but you will also come to understand the distinction between application-level and system-level exceptions. In addition, this chapter will show you how to set Visual Studio on break on all exceptions to debug the exceptions that escape your notice.
本章的重点是讨论如何使用结构化异常处理来处理代码库中的运行时异常。您不仅将了解允许您处理此类问题的 C# 关键字(尝试、捕获、抛出、何时和最后),而且还将了解应用程序级和系统级异常之间的区别。此外,本章将介绍如何在所有异常上设置 Visual Studio 中断,以调试逃脱您注意的异常。

Chapter 8: Working with Interfaces

第 8 章:使用接口

The material in this chapter builds upon your understanding of object-based development by covering the topic of interface-based programming. Here, you will learn how to define classes and structures that support multiple behaviors, how to discover these behaviors at runtime, and how to selectively hide particular behaviors using explicit interface implementation. In addition to creating a number of custom interfaces, you will also learn how to implement standard interfaces found within the .NET platform. You will use these to build objects that can be sorted, copied, enumerated, and compared.
本章中的材料基于您对基于对象的开发的理解,涵盖了基于接口的编程主题。在这里,您将学习如何定义支持多种行为的类和结构,如何在运行时发现这些行为,以及如何使用显式接口实现有选择地隐藏特定行为。除了创建许多自定义接口外,您还将学习如何实现 .NET 平台中的标准接口。您将使用这些来构建可以排序、复制、枚举和比较的对象。

Chapter 9: Understanding Object Lifetime

第 9 章:了解对象生存期

The final chapter of this part examines how the CLR manages memory using the .NET garbage collector. Here, you will come to understand the role of application roots, object generations, and the System.GC type. Once you understand the basics, you will examine the topics of disposable objects (using the IDisposable interface) and the finalization process (using the System.Object.Finalize() method). This chapter will also investigate the Lazy class, which allows you to define data that will not be allocated until requested by a caller. As you will see, this feature can be helpful when you want to ensure you do not clutter the heap with objects that are not actually required by your programs.
本部分的最后一章介绍 CLR 如何使用 .NET 垃圾回收器管理内存。在这里,您将了解应用程序根、对象生成和 System.GC 类型的作用。了解基础知识后,您将检查一次性对象(使用 IDisposable 接口)和定稿过程(使用 System.Object.Finalize() 方法)的主题。本章将还要调查 Lazy 类,该类允许您定义在调用方请求之前不会分配的数据。如您所见,当您想要确保不会用程序实际上不需要的对象弄乱堆时,此功能会很有帮助。

Part IV: Advanced C# Programming

第四部分:高级 C# 编程

This part of the book will deepen your understanding of the C# language by walking you through a number of more advanced (but important) concepts. Here, you will complete your examination of the .NET type system by investigating collections and generics. You will also examine a number of more advanced features of C# (e.g., extension methods, operator overloading, anonymous types, and pointer manipulation). You will then examine delegates and lambda expressions, take a first look at Language Integrated Query, and finish the section with two chapters that focus on processes and multithreaded/async programming.
本书的这一部分将通过引导您了解一些更高级(但重要)的概念来加深您对 C# 语言的理解。在这里,您将通过调查集合和泛型来完成对 .NET 类型系统的检查。您还将检查 C# 的许多更高级的功能(例如,扩展方法、运算符重载、匿名类型和指针操作)。然后,您将检查委托和 lambda 表达式,首先了解语言集成查询,并以两章结束本节,重点介绍进程和多线程/异步编程。

Chapter 10: Collections and Generics

第10章 集合和泛型

This chapter explores the topic of generics. As you will see, generic programming gives you a way to create types and type members, which contain various placeholders that can be specified by the caller. In a nutshell, generics greatly enhance application performance and type safety. Not only will you explore various generic types within the System.Collections.Generic namespace, but you will also learn how to build your own generic methods and types (with and without constraints).
本章探讨泛型的主题。如您所见,泛型编程为您提供了一种创建类型和类型成员的方法,其中包含可由调用方指定的各种占位符。简而言之,泛型极大地增强了应用程序性能和类型安全性。您不仅将探索 System.Collections.Generic 命名空间中的各种泛型类型,还将学习如何构建自己的泛型方法和类型(有和没有约束)。

Chapter 11: Advanced C# Language Features

第 11 章:高级 C# 语言功能

This chapter deepens your understanding of the C# programming language by introducing you to a number of advanced programming techniques. Here, you will learn how to overload operators and create custom conversion routines (both implicit and explicit) for your types. You will also learn how to build and interact with type indexers, as well as work with extension methods, anonymous types, partial methods, and C# pointers using an unsafe code context.
本章通过向您介绍许多高级编程技术,加深您对 C# 编程语言的理解。在这里,您将学习如何重载运算符并为类型创建自定义转换例程(隐式和显式)。您还将学习如何生成类型索引器并与之交互,以及如何使用不安全的代码上下文使用扩展方法、匿名类型、分部方法和 C# 指针。

Chapter 12: Delegates, Events, and Lambda Expressions

第 12 章:委托、事件和 Lambda 表达式

The purpose of this chapter is to demystify the delegate type. Simply put, a .NET delegate is an object that points to other methods in your application. Using this type, you can build systems that allow multiple objects to engage in a two-way conversation. After you have examined the use of .NET delegates, you will then be introduced to the C# event keyword, which you can use to simplify the manipulation of raw delegate programming. You will wrap up this chapter by investigating the role of the C# lambda operator (=>) and exploring the connection between delegates, anonymous methods, and lambda expressions.
本章的目的是揭开委托类型的神秘面纱。简而言之,.NET 委托是指向应用程序中其他方法的对象。使用此类型,您可以构建允许多个对象进行双向对话的系统。检查 .NET 委托的用法后,将向您介绍 C# 事件关键字,该关键字可用于简化原始委托编程的操作。您将通过研究 C# lambda 运算符 (=>) 的角色并探索委托、匿名方法和 lambda 表达式之间的联系来结束本章。

Chapter 13: LINQ to Objects

第 13 章:LINQ to 对象

This chapter begins your examination of Language Integrated Query (LINQ). LINQ allows you to build strongly typed query expressions that can be applied to a number of LINQ targets to manipulate data in the broadest sense of the word. Here, you will learn about LINQ to Objects, which allows you to apply LINQ expressions to containers of data (e.g., arrays, collections, and custom types). This information will serve you well as you encounter a number of additional LINQ APIs throughout the remainder of this book.
本章开始研究语言集成查询 (LINQ)。LINQ 允许您生成强类型查询表达式,这些表达式可应用于多个 LINQ 目标,以最广泛的意义上操作数据。在这里,您将了解 LINQ to Objects,它允许您将 LINQ 表达式应用于数据容器(例如,数组、集合和自定义类型)。此信息将很好地帮助您在本书的其余部分中遇到许多其他 LINQ API。

Chapter 14: Processes, AppDomains, and Load Contexts

第 14 章:进程、应用程序域和加载上下文

Now that you have a solid understanding of assemblies, this chapter dives deeper into the composition of a loaded .NET Core executable. The goal of this chapter is to illustrate the relationship between processes,application domains, and contextual boundaries. These topics provide the proper foundation for Chapter 15, where you will examine the construction of multithreaded applications.
现在,你已对程序集有了深入的了解,本章将更深入地介绍加载的 .NET Core 可执行文件的组合。本章的目标是说明过程之间的关系,应用程序域和上下文边界。这些主题为第 15 章提供了适当的基础,您将在其中研究多线程应用程序的构造。

Chapter 15: Multithreaded, Parallel, and Async Programming

第15章 多线程、并行和异步编程

This chapter examines how to build multithreaded applications and illustrates a number of techniques you can use to author thread-safe code. The chapter opens by revisiting the .NET delegate type to ensure explaining a delegate’s intrinsic support for asynchronous method invocations. Next, you will investigate the types within the System.Threading namespace. The next section covers the Task Parallel Library (TPL). Using the TPL, .NET developers can build applications that distribute their workload across all available CPUs in a wickedly simple manner. At this point, you will also learn about the role of Parallel LINQ, which provides a way to create LINQ queries that scale across multiple machine cores. The remainder of the chapter covers creating nonblocking calls using the async/await keywords, local functions and generalized async return types, and asynchronous streams, and the ForEachAsync() method.
本章介绍如何构建多线程应用程序,并说明了可用于编写线程安全代码的许多技术。本章首先重新访问 .NET 委托类型,以确保解释委托对异步方法调用的固有支持。接下来,您将调查
命名空间中的类型。下一节将介绍任务并行库 (TPL)。使用 TPL,.NET 开发人员可以构建应用程序,以非常简单的方式在所有可用的 CPU 之间分配其工作负载。此时,您还将了解并行 LINQ 的作用,它提供了一种创建跨多个计算机核心缩放的 LINQ 查询的方法。本章的其余部分介绍如何使用 async/await 关键字、本地函数和通用异步返回类型、异步流以及 ForEachAsync() 方法创建非阻塞调用。

Part V: Programming with .NET Core Assemblies

第 V 部分:使用 .NET Core 程序集进行编程
Part V dives into the details of the .NET assembly format. Not only will you learn how to deploy and configure .NET code libraries, but you will also come to understand the internal composition of a .NET binary image. This section explains the role of .NET attributes and the role of resolving type information at runtime and the role of the Dynamic Language Runtime (DLR) and the C# dynamic keyword. The final chapter covers the syntax of Common Intermediate Language (CIL) and the role of dynamic assemblies.
第 V 部分深入介绍了 .NET 程序集格式的详细信息。您不仅将学习如何部署和配置 .NET 代码库,而且还将了解 .NET 二进制映像的内部组合。本节介绍 .NET 属性的作用和在运行时解析类型信息的角色,以及动态语言运行时 (DLR) 和 C# 动态关键字的角色。最后一章介绍公共中间语言 (CIL) 的语法和动态程序集的作用。

Chapter 16: Building and Configuring Class Libraries

第 16 章:构建和配置类库

At a high level, assembly is the term used to describe a binary file created with a .NET compiler. However, the true story of .NET assemblies is far richer than that. Here, you will learn how to build and deploy assemblies and learn the difference between class libraries and console applications. The final section covers the new options available in .NET, such as single file executables and ready-to-run publishing.
在高级别上,程序集是用于描述使用 .NET 编译器创建的二进制文件的术语。但是,.NET 程序集的真实故事远不止于此。在这里,您将学习如何生成和部署程序集,并了解类库和控制台应用程序之间的区别。最后一部分介绍 .NET 中可用的新选项,例如单个文件可执行文件和随时可以运行的发布。

Chapter 17: Type Reflection, Late Binding, Attribute, and Dynamic Types

第 17 章:类型反射、后期绑定、属性和动态类型

This chapter continues your examination of .NET assemblies by checking out the process of runtime type discovery using the System.Reflection namespace. Using the types of this namespace, you can build applications that can read an assembly’s metadata on the fly. You will also learn how to load and create types at runtime dynamically using late binding. The next topic of this chapter will explore the role of .NET attributes (both standard and custom). To illustrate the usefulness of each of these topics, the chapter shows you how to construct an extendable application complete with snap-ins. .NET 4.0 introduced a new aspect of the .NET runtime environment called the Dynamic Language Runtime. Using the DLR and the C# dynamic keyword, you can define data that is not truly resolved until runtime. Using these features simplifies some complex .NET programming tasks dramatically. In this final topic of the chapter, you will learn some practical uses of dynamic data, including how to leverage the .NET reflection APIs in a streamlined manner.
本章通过检查使用 System.Reflection 命名空间的运行时类型发现过程来继续检查 .NET 程序集。使用此命名空间的类型,可以生成可以动态读取程序集元数据的应用程序。您还将学习如何使用后期绑定在运行时动态加载和创建类型。本章的下一主题将探讨 .NET 属性(标准属性和自定义属性)的作用。为了说明其中每个主题的有用性,本章介绍如何构造一个带有管理单元的可扩展应用程序。.NET 4.0 引入了 .NET 运行时环境的新方面,称为动态语言运行时。使用 DLR 和 C#
动态关键字,您可以定义直到运行时才真正解析的数据。使用这些功能可以大大简化一些复杂的 .NET 编程任务。在本章的最后一个主题中,您将学习动态数据的一些实际用法,包括如何以简化的方式利用 .NET 反射 API。

Chapter 18: Understanding CIL and the Role of Dynamic Assemblies

第18章 了解CIL和动态装配体的作用
The goal of the final chapter in this section is twofold. The first part examines the syntax and semantics of CIL in much greater detail than in previous chapters. The remainder of this chapter will cover the role of the System.Reflection.Emit namespace. You can use these types to build software that can generate .NET Core assemblies in memory at runtime. Formally speaking, assemblies defined and executed in memory are termed dynamic assemblies.
本节最后一章的目标是双重的。第一部分比前几章更详细地检查了 CIL 的语法和语义。本章的其余部分将介绍 System.Reflection.Emit 命名空间的角色。可以使用这些类型来生成可生成 .NET 的软件运行时内存中的核心程序集。从形式上讲,在内存中定义和执行的程序集称为动态程序集。

Part VI: File Handling, Object Serialization, and Data Access

第 VI 部分:文件处理、对象序列化和数据访问

By this point in the text, you have a solid handle on the C# language and the details of the .NET assembly format. Part VI leverages your newfound knowledge by exploring a number of commonly used services found within the base class libraries, including file I/O, object serialization, and database access using ADO.NET.
到文本中的这一点,你已经掌握了 C# 语言和 .NET 程序集格式的详细信息。第 VI 部分通过探索基类库中的许多常用服务(包括文件 I/O、对象序列化和使用 ADO.NET 访问数据库)来利用您新发现的知识。

Chapter 19: File I/O and Object Serialization

第 19 章:文件 I/O 和对象序列化

The System.IO namespace allows you to interact with a machine’s file and directory structure. Over the course of this chapter, you will learn how to create (and destroy) a directory system programmatically. You will also learn how to move data into and out of various streams (e.g., file based, string based, and memory based). The latter part of this chapter will examine the XML and JSON object serialization services of the .NET platform. Simply put, serialization allows you to persist the public state of an object (or a set of related objects) into a stream for later use. Deserialization (as you might expect) is the process of plucking an object from the stream into memory for consumption by your application.
System.IO 命名空间允许您与计算机的文件和目录结构进行交互。在本章中,您将学习如何以编程方式创建(和销毁)目录系统。您还将学习如何将数据移入和移出各种流(例如,基于文件、基于字符串和基于内存)。本章的后半部分将研究.NET 平台。简而言之,序列化允许您将一个对象(或一组相关对象)的公共状态保存到流中以供以后使用。反序列化(如您所料)是将对象从流中提取到内存以供应用程序使用的过程。

Chapter 20: Data Access with ADO.NET

第 20 章:ADO.NET 数据访问

This chapter covers database access using ADO.NET, the database API for .NET applications. Specifically, this chapter will introduce you to the role of .NET data providers and how to communicate with a relational database using ADO.NET, which is represented by connection objects, command objects, transaction objects, and data reader objects. This chapter also begins the creation of the AutoLot database, which will be enhanced in Part VII.
本章介绍如何使用 ADO.NET(适用于 .NET 应用程序的数据库 API)进行数据库访问。具体而言,本章将介绍 .NET 数据提供程序的角色以及如何使用 ADO.NET(由连接对象、命令对象、事务对象和数据读取器对象表示)与关系数据库进行通信。本章还开始创建 AutoLot 数据库,该数据库将在第七部分中得到增强。

Part VII: Entity Framework Core

第七部分:实体框架核心

By this point in the text, you have a solid handle on the C# language and the details of the .NET assembly format. Part VI leverages your newfound knowledge by exploring a number of commonly used services found within the base class libraries, including file I/O, database access using ADO.NET, and database access using Entity Framework Core.
到文本中的这一点,你已经掌握了 C# 语言和 .NET 程序集格式的详细信息。第 VI 部分通过探索基类库中找到的许多常用服务(包括文件 I/O、使用 ADO.NET 的数据库访问和使用实体框架核心的数据库访问)来利用您新发现的知识。

Chapter 21: Introducing Entity Framework Core

第 21 章:实体框架核心简介

This chapter introduces Entity Framework (EF) Core. EF Core is an object-relational mapping (ORM) framework built on top of ADO.NET. EF Core provides a way to author data access code using strongly typed classes that directly map to your business model. Here, you will come to understand the building blocks of EF Core, including DbContext, entities, the specialized collection class DbSet, and the DbChangeTracker. Next, you will learn about building your data model understanding EF Core conventions, data annotations, and the Fluent API. The next sections cover query execution and tracking versus non-tracking queries. The final piece of this chapter is the EF Core global tool for the .NET Core command-line interface (CLI).
本章介绍实体框架 (EF) 核心。EF Core 是一个基于 ADO.NET 构建的对象关系映射 (ORM) 框架。EF Core 提供了一种使用直接映射到业务模型的强类型类创作数据访问代码的方法。在这里,您将了解 EF Core 的构建基块,包括 DbContext、实体、专用集合类 DbSet 和 DbChangeTracker。接下来,你将了解如何构建数据模型,了解 EF Core 约定、数据批注和 Fluent API。接下来的部分介绍查询执行和跟踪与非跟踪查询。本章的最后一部分是用于 .NET Core 命令行界面 (CLI) 的 EF Core 全局工具。

Chapter 22: Exploring Entity Framework Core

第 22 章:探索实体框架核心

This chapter continues exploring EF Core. The chapter begins by diving deep into create, read, update, and delete (CRUD) operations. The rest of the chapter covers some of the more notable features of EF Core, including global query filters, raw SQL queries with LINQ, projections, database generated values, concurrency checking, connection resiliency, database function mapping, batching of statements, value converters, and shadow properties. The final section covers SQL Server temporal table support, the newest feature in EF Core 6.
本章继续探讨 EF Core。本章首先深入探讨创建、读取、更新和删除 (CRUD) 操作。本章的其余部分介绍 EF Core 的一些更值得注意的功能,包括全局查询筛选器、使用 LINQ 的原始 SQL 查询、投影、数据库生成的值、并发检查、连接复原、数据库函数映射、语句批处理、值转换器和影子属性。最后一部分介绍 SQL Server 临时表支持,这是 EF Core 6 中的最新功能。

Chapter 23: Build a Data Access Layer with Entity Framework Core

第 23 章:使用实体框架核心构建数据访问层

This chapter builds the AutoLot data access layer. It begins with scaffolding the AutoLot database from Chapter 20 into a derived DbContext and entity classes. Then the project and database are updated to change to a code first approach. The entities are updated to their final version, and migration are used to update the database tables and add SQL Server objects. The final database change is to create a migration for the stored procedure from Chapter 21 and a new database view. The next section builds a rich set of repositories for code encapsulation, and the final update is to add data initialization code.
本章构建 AutoLot 数据访问层。它首先将第 20 章中的 AutoLot 数据库基架构建 为派生的 DbContext 和实体类。然后更新项目和数据库以更改为代码优先方法。实体将更新到其最终版本,迁移用于更新数据库表和添加 SQL Server 对象。最后一个数据库更改是从第 21 章为存储过程创建一个迁移 和一个新的数据库视图。下一节为代码封装构建一组丰富的存储库,最终更新是添加数据初始化代码。

Chapter 24: Test Driving the AutoLot

第24章 Test Driving the AutoLot

Chapter 24 uses the xUnit testing framework to build automated integration tests for the AutoLot data access layer. In this chapter over 60 tests are used to explore querying, creating, updating, and deleting records.
第24章使用xUnit测试框架为AutoLot数据访问层构建自动化集成测试。在本章中,使用了 60 多个测试来探索查询、创建、更新和删除记录。

Part VIII: Windows Presentation Foundation

第八部分:WPF基础

The initial desktop GUI API supported by the .NET platform was termed Windows Forms. While this API is still fully supported, .NET 3.0 introduced programmers to an API called Windows Presentation Foundation (WPF). Unlike Windows Forms, this framework integrates a number of key services, including data binding, 2D and 3D graphics, animations, and rich documents, into a single, unified object model. This is all accomplished using a declarative markup grammar called Extensible Application Markup Language (XAML). Furthermore,the WPF control architecture provides a trivial way to restyle the look and feel of a typical control radically using little more than some well-formed XAML.
.NET 平台支持的初始桌面 GUI API 称为 Windows Forms。虽然此 API 仍完全受支持,但 .NET 3.0 向程序员介绍了一个名为 Windows Presentation Foundation (WPF) 的 API。与 Windows 窗体不同,此框架将许多关键服务(包括数据绑定、二维和三维图形、动画和丰富文档)集成到单个统一的对象模型中。这一切都是使用称为可扩展应用程序标记语言 (XAML) 的声明性标记语法完成的。此外WPF 控件体系结构提供了一种简单的方法来重新设计典型控件的外观,从根本上只使用一些格式良好的 XAML。

Chapter 25: Introducing Windows Presentation Foundation and XAML

第 25 章:介绍 Windows Presentation Foundation 和 XAML

In this chapter, you will begin by examining the motivation behind the creation of WPF (when there was already a desktop development framework in .NET). Then, you will learn about the syntax of XAML and, finally, take a look at the Visual Studio support for building WPF applications.
在本章中,您将首先检查创建 WPF 背后的动机(当时 .NET 中已经有一个桌面开发框架)。然后,您将了解 XAML 的语法,最后,了解 Visual Studio 对生成 WPF 应用程序的支持。

Chapter 26: WPF Controls, Layouts, Events, and Data Binding

第 26 章:WPF 控件、布局、事件和数据绑定
This chapter will expose you to the process of using intrinsic WPF controls and layout managers. For example, you will learn to build menu systems, splitter windows, toolbars, and status bars. This chapter will also introduce you to a number of WPF APIs (and their related controls), including the Ink API, commands, routed events, the data-binding model, and dependency properties.
本章将向您介绍使用内部 WPF 控件和布局管理器的过程。例如,您将学习构建菜单系统、拆分器窗口、工具栏和状态栏。本章还将介绍许多 WPF API(及其相关控件),包括 Ink API、命令、路由事件、数据绑定模型和依赖项属性。

Chapter 27: WPF Graphics Rendering Services

第 27 章:WPF 图形呈现服务

WPF is a graphically intensive API; given this fact, WPF provides three ways to render graphics: shapes, drawings and geometrics, and visuals. In this chapter, you will evaluate each option and learn about a number of important graphics primitives (e.g., brushes, pens, and transformations) along the way. This chapter will also examine ways to incorporate vector images into your WPF graphics, as well as how to perform hit-testing operations against graphical data.
WPF 是一个图形密集型 API;鉴于这一事实,WPF 提供了三种呈现图形的方法:形状、绘图和几何以及视觉对象。在本章中,您将评估每个选项,并在此过程中了解许多重要的图形基元(例如,画笔、笔和变换)。本章还将研究将矢量图像合并到 WPF 图形中的方法,以及如何对图形数据执行命中测试操作。

Chapter 28: WPF Resources, Animations, Styles, and Templates

第 28 章:WPF 资源、动画、样式和模板

This chapter will introduce you to three important (and interrelated) topics that will deepen your understanding of the Windows Presentation Foundation API. The first order of business is to learn the role of logical resources. As you will see, the logical resource (also termed an object resource) system provides a way for you to name and refer to commonly used objects within a WPF application. Next, you will learn how to define, execute, and control an animation sequence. Despite what you might be thinking, however, WPF animations are not limited to the confines of video games or multimedia applications. You will wrap up the chapter by learning about the role of WPF styles. Similar to a web page that uses CSS or the ASP.NET theme engine, a WPF application can define a common look and feel for a set of controls.
本章将向您介绍三个重要(且相互关联)的主题,这些主题将加深您对 Windows Presentation Foundation API 的理解。业务的首要任务是学习逻辑资源的作用。如您所见,逻辑资源(也称为对象资源)系统提供了一种命名和引用 WPF 应用程序中常用对象的方法。接下来,您将学习如何定义、执行和控制动画序列。但是,不管您可能在想什么,WPF 动画并不局限于视频游戏或多媒体应用程序。您将通过了解 WPF 样式的作用来结束本章。与使用 CSS 或 ASP.NET 主题引擎的网页类似,WPF 应用程序可以为一组控件定义通用外观。

Chapter 29: WPF Notifications, Validations, Commands, and MVVM

第 29 章:WPF 通知、验证、命令和 MVVM

This chapter begins by examining three core WPF framework capabilities: notifications, validations, and commands. In the notifications section, you will learn about observable models and collections and how they keep your application data and UI in sync. Next, you will dig deeper into commands, building custom commands to encapsulate your code. In the validations section, you will learn how to use the several validation mechanisms available in WPF applications. The chapter closes with an examination of the Model- View-ViewModel (MVVM) pattern and ends by creating an application that demonstrates the MVVM pattern in action.
本章首先介绍三个核心 WPF 框架功能:通知、验证和命令。在通知部分中,你将了解可观察的模型和集合,以及它们如何使应用程序数据和 UI 保持同步。接下来,您将深入挖掘命令,构建自定义命令来封装代码。在验证部分中,您将学习如何使用 WPF 应用程序中提供的几种验证机制。本章以对模型-视图-视图模型 (MVVM) 模式的检查结束,最后创建一个演示 MVVM 模式运行的应用程序。

Part IX: ASP.NET Core

第九部分: ASP.NET Core

Part VIII is devoted to an examination of constructing web applications using ASP.NET Core. The chapters in this section cover ASP.NET Core fundamentals as well as build a RESTful service, a web application using the MVC pattern, and a Razor page based web application.
第八部分专门研究使用 ASP.NET 核心构建Web应用程序。本节中的章节涵盖 ASP.NET 核心基础知识,以及构建 RESTful 服务、使用 MVC 模式的 Web 应用程序和基于 Razor 页面的 Web 应用程序。

Chapter 30: Introducing ASP.NET Core

第 30 章:ASP.NET Core 简介

This chapter introduces ASP.NET Core. After describing the Model-View-Controller (MVC) pattern, the solution and the three ASP.NET Core projects are created and the multiple ways to run and debug application is explored. Next, the chapter covers many of the features from ASP.NET MVC/ASP.NET WebAPI that were brought forward into ASP.NET Core. These include convention over configuration, controllers and actions, routing, model binding and validation, and filters.
本章介绍 ASP.NET Core。在描述模型-视图-控制器 (MVC) 模式之后,将创建解决方案和三个 ASP.NET 核心项目,以及运行和调试的多种方式探索应用。接下来,本章将介绍 MVC/ASP.NET WebAPI 中的许多功能 ASP.NET 这些功能被引入 ASP.NET Core。其中包括配置约定、控制器和操作、路由、模型绑定和验证以及筛选器。

Chapter 31: Diving into ASP.NET Core

第31章 潜入ASP.NET Core

The chapter covers the many new features introduced in ASP.NET Core, including Razor pages, the environmentally aware configuration system, built-in dependency injection and the options pattern, the HTTP client factory, deployment patterns, the HTTP request pipeline, and logging.
本章介绍了 ASP.NET Core 中引入的许多新功能,包括 Razor 页面、环境感知配置系统、内置依赖项注入和选项模式、HTTP 客户端工厂、部署模式、HTTP 请求管道和日志记录。

Chapter 32: RESTful Services with ASP.NET Core

第 32 章: ASP.NET Core REST 服务

This chapter finishes the ASP.NET Core RESTful service application. The chapter begins with a look at returning JSON from action methods and JSON configuration options. The functionality for API controllers that the ApiAttribute adds is explored. API Versioning is covered next, and the Swagger/OpenAPI configuration is updated to support versioned APIs. A base controller to provide standard CRUD operations is created and the entity specific controllers are added. An exception filter is added and basic authentication is added to the service.
本章完成了 ASP.NET Core RESTful 服务应用程序。本章首先介绍如何从操作方法和 JSON 配置选项返回 JSON。本文探讨了 ApiAttribute 添加的 API 控制器的功能。接下来将介绍 API 版本控制,并更新 Swagger/OpenAPI 配置以支持版本控制的 API。将创建用于提供标准 CRUD 操作的基本控制器,并添加特定于实体的控制器。将添加异常筛选器,并将基本身份验证添加到服务中。

Chapter 33: Web Applications with MVC

第 33 章:使用 MVC 的 Web 应用程序

This chapter finishes the MVC-based web application. The chapter starts with a deep look into views and the Razor View Engine, including layouts and partials. Next, managing client-side libraries and the bundling/ minification of those libraries is covered. The base controller is built along with the derived entity specific controller. An Area is added to the application for managing Make records. Next tag helpers (another new feature in ASP.NET Core) are explored, followed by creating custom tag helpers. The application’s view component is added for the dynamic menu. Two custom validation attributes and their related server and client-side code are used to provide validation to a view model. The final section covers the General Data Protection Regulation (GDPR) support in ASP.NET Core.
本章将完成基于 MVC 的 Web 应用程序。本章首先深入探讨视图和 Razor 视图引擎,包括布局和部分。接下来,介绍管理客户端库以及这些库的捆绑/缩小。基本控制器与派生的实体特定控制器一起构建。区域将添加到用于管理创建记录的应用程序中。接下来将探索标记帮助程序(ASP.NET Core 中的另一个新功能),然后创建自定义标记帮助程序。为动态菜单添加了应用程序的视图组件。两个自定义验证属性及其相关的服务器和客户端代码用于为视图模型提供验证。最后一部分介绍了 ASP.NET Core 中的通用数据保护条例 (GDPR) 支持。

Chapter 34: Web Applications Using Razor Pages

第 34 章:使用 Razor 页面的 Web 应用程序

The chapter starts with a deep look into Razor pages and Razor page views and then completes the AutoLot. Web application. Many of the MVC application capabilities, like layouts, partial views, tag helpers, view components, GDPR support, and areas are supported in Razor page applications. All of the features of the AutoLot.Mvc application is replicated in the AutoLot.Web application, leveraging the similarities and highlighting the differences between MVC and Razor pages.
本章首先深入了解 Razor 页面和 Razor 页面视图,然后完成 AutoLot。网络应用程序。Razor 页面应用程序支持许多 MVC 应用程序功能,如布局、分部视图、标记帮助程序、视图组件、GDPR 支持和区域。的所有功能AutoLot.Mvc 应用程序在 AutoLot.Web 应用程序中复制,利用 MVC 和 Razor 页面之间的相似之处并突出显示差异。

Pro C#10 About Authors & Technical Reviewers And Acknowledgments

Pro C# 10 with .NET 6

About the Authors

关于作者

Andrew Troelsen has more than 20 years of experience in the software industry. Over this time, he has worked as a developer, educator, author, public speaker, and now team lead and lead engineer atThomson Reuters. He is the author of numerous books in the Microsoft universe covering C++-based COM development with ATL, COM, and .NET interoperability; Visual Basic; and the award-winning C# and the.NET platform. He has a master of science degree in software engineering (MSSE) from the University of St. Thomas and is working on a second master of science degree in computational linguistics (CLMS) from the University of Washington.
Andrew Troelsen 在软件行业拥有 20 多年的经验。在这段时间里,他曾担任开发人员、教育家、作家、公众演说家,现在是汤森路透团队负责人和首席工程师。他是Microsoft领域的许多书籍的作者,这些书籍涵盖了具有ATL,COM和.NET互操作性的基于C++的COM开发;视觉基础;以及屡获殊荣的 C# 和.NET 平台。他拥有圣托马斯大学软件工程理学硕士学位(MSSE),并正在华盛顿大学攻读计算语言学(CLMS)的第二个理学硕士学位。

Phil Japikse is an international speaker, Microsoft MVP, ASPInsider, Professional Scrum Trainer, and passionate member of the developer community. Phil has been working with .NET since the first betas, developing software for more than 35 years, and heavily involved in the agile community since 2005. He is the lead director of the Cincinnati .NET User Group and the Cincinnati Software Architect Roundtable, founded the CincyDeliver (cincydeliver.org) conference, and volunteers for the National Ski Patrol. During the day, Phil works as the CTO/Chief Architect for Pintas & Mullins. He enjoys learning new tech and is always striving to improve his craft. You can follow Phil on his blog (skimedic.com) or on Twitter (@skimedic).
Phil Japikse 是一位国际演说家、Microsoft MVP、ASPInsider、专业 Scrum 培训师,也是开发人员社区的热情成员。Phil 从第一个测试版开始就一直使用 .NET,开发软件超过 35 年,自 2005 年以来一直积极参与敏捷社区。他是辛辛那提 .NET 用户组和辛辛那提软件架构师圆桌会议的首席主任,创立了 CincyDeliver(cincydeliver.org)会议,并成为国家滑雪巡逻队的志愿者。白天,Phil担任Pintas & Mullins的首席技术官/首席架构师。他喜欢学习新技术,并且一直在努力以提高他的手艺。你可以在他的博客(skimedic.com)或Twitter(@skimedic)上关注菲尔。

About the Technical Reviewers

关于技术评审员

Eric Smith is a consultant with Strategic Data Systems in Sharonville, Ohio, working on the .NET project team. He is a 2017 graduate of MAX Technical Training’s .NET Bootcamp and previously received a master’s degree in German Studies from the University of Cincinnati in 2014. He has been tinkering with writing software since the mid-1990s and still enjoys writing directly against hardware whenever the opportunity arises. Outside of computing, he spends most of his time reading, working in his machine shop, and endurance cycling.
Eric Smith 是俄亥俄州沙伦维尔战略数据系统的顾问,在 .NET 项目团队工作。他是 MAX Technical Training 的 .NET 训练营 2017 届毕业生,此前于 2014 年获得辛辛那提大学德国研究硕士学位。自 1990 年代中期以来,他一直在修补编写软件,并且仍然喜欢在有机会时直接针对硬件编写。在计算机之外,他大部分时间都花在阅读、在机械车间工作和耐力自行车上。

William Pintas is a professional software engineer and project manager at Pintas & Mullins Law Firm. He graduated from New York University in 2018 with a degree in Computer Science. He has spent the past few years diving deep into the Microsoft tech stack. Currently, William is developing a business-to-business API platform using ASP.NET Core, C#, and Azure to seamlessly share legal information between law firms. In his free time, William loves kite boarding and composing classical piano music.
William Pintas是Pintas & Mullins Law Firm的专业软件工程师和项目经理。他于2018年毕业于纽约大学,获得计算机科学学位。在过去的几年里,他一直在深入研究Microsoft技术堆栈。目前,William正在使用 ASP.NET Core,C#和Azure开发企业对企业的API平台,以便在律师事务所之间无缝共享法律信息。在空闲时间,威廉喜欢风筝冲浪和创作古典钢琴音乐。

Acknowledgments

致谢

I want to thank Apress and the entire team involved in writing this book. As I’ve come to expect with all of my books for Apress, I am very impressed with the dedication and level of support we received during the writing process. I want to thank you, the reader, for reading this book and hope that you will find it as helpful in your career as it has been in mine. Lastly, I couldn’t have done this without my family and the support I’ve had from them. Between reading my work and proofing it and your understanding of the time involved, I couldn’t have done it without you! Love you all!
————Phil Japikse

我要感谢Apress和参与编写本书的整个团队。正如我对Apress的所有书籍所期望的那样,我对我们在写作过程中获得的奉献精神和支持程度印象深刻。我要感謝你,讀者,閱讀這本書,希望你會發現它對你的職業生涯和我的職業生涯一樣有用。最后,如果没有我的家人和他们的支持,我不可能做到这一点。在阅读我的作品和校对它以及您对所涉及的时间的理解之间,没有你,我不可能做到这一点!爱你们!
————菲尔·贾皮克塞