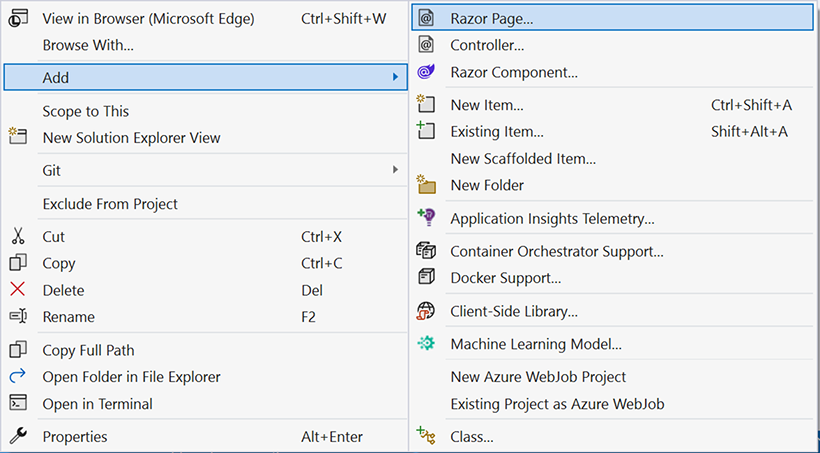
如第 1 章所述,Visual Studio 是在 Windows 上工作的 .NET 开发人员的主要 IDE。它包括用于执行最常见任务的简单菜单驱动工作流。Razor Pages 应用程序是在 Visual Studio 中创建为项目,因此打开 Visual Studio 后,您的起点是创建新项目。您可以通过单击启动启动画面上的 Create a New Project 按钮或转到 File > New Project...在主菜单栏中。
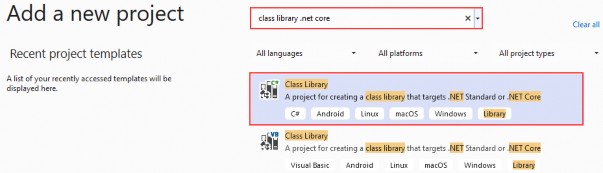
在下一个屏幕上,您可以从模板列表中选择要创建的项目类型。在此之前,我建议从右侧窗格顶部的语言选择器中选择 C# 以过滤掉一些干扰。选择 ASP.NET Core Web App 模板 — 名称中没有 (Model-View-Controller) 的模板,还要注意避免选择名称非常相似的 ASP.NET Core Web API 模板。正确的模板带有以下说明:“用于创建 ASP.NET Core 应用程序的项目模板,其中包含 ASP.NET Razor Pages 内容。
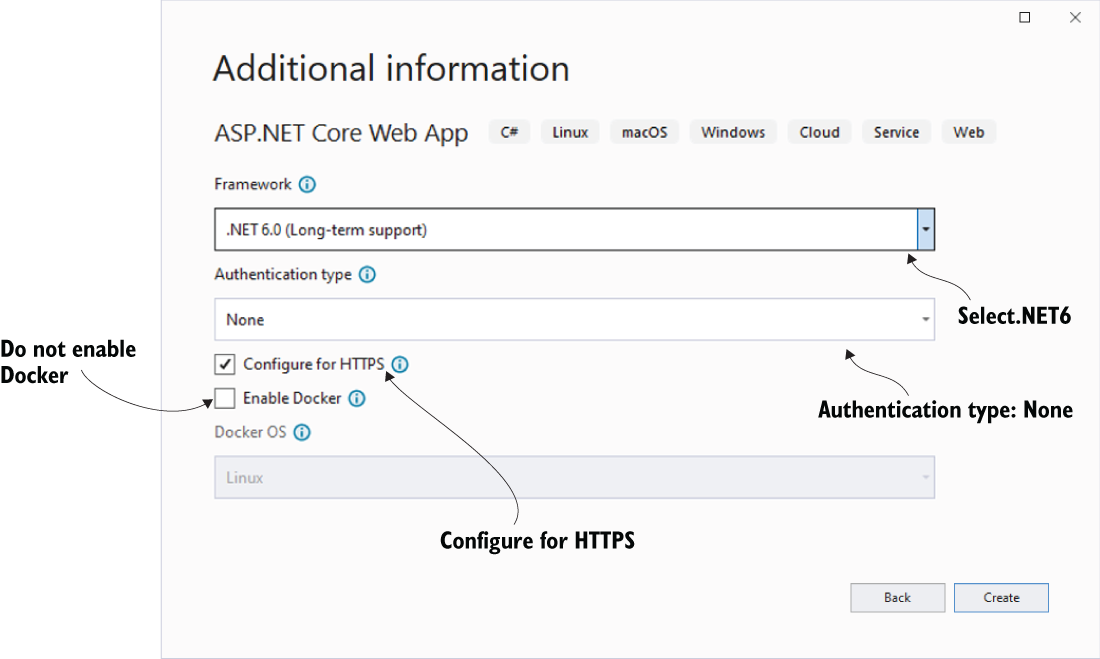
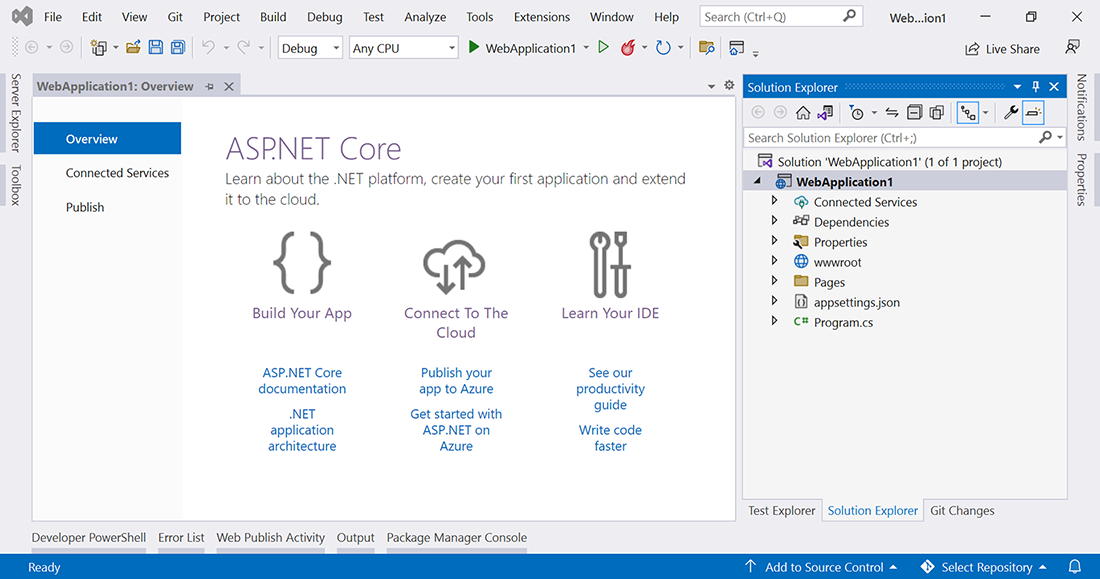
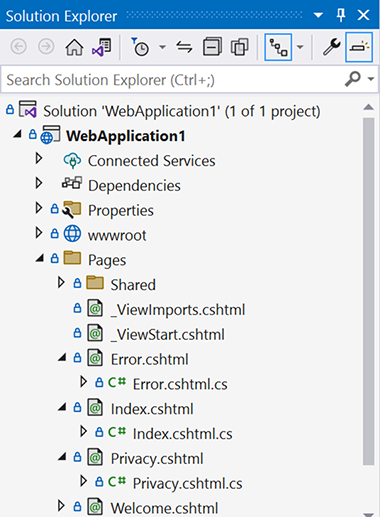
为应用程序文件选择合适的位置并移动到下一个屏幕后,请确保您的 Target Framework 选择是 .NET 6,将所有其他选项保留为默认值。Authentication Type 应该设置为 None,应该选中 Configure for HTTPS,并且你应该取消选中 Enable Docker 选项(图 2.1)。对选择感到满意后,单击 Create 按钮。此时,Visual Studio 应该会打开,并在 Solution Explorer 中显示您的新应用程序(图 2.2)。
图 2.1 在点击 Create 按钮之前检查您是否已应用这些设置。
图 2.2 新应用程序将在 Visual Studio 中打开,其中有一个概述页,右侧打开“解决方案资源管理器”窗口,其中显示了 WebApplication1 解决方案及其单个项目(也称为 WebApplication1)的结构和内容。
尽管 Solution Explorer 的内容看起来像文件结构,但并非您看到的所有项实际上都是文件。我们将在本章后面仔细研究这些项目。
2.1.2 使用命令行界面创建网站
如果您已经使用 Visual Studio 构建了应用程序,则可能需要跳过此步骤。但是,我建议您也尝试这种方法来创建应用程序,因为该过程会揭示 Visual Studio 中的新项目创建向导隐藏的一两个令人兴奋的事情。
可以使用您喜欢的任何命令 shell 调用 CLI 工具,包括 Windows 命令提示符、Bash、终端或 PowerShell(有跨平台版本)。从现在开始,我将 shell 称为终端,主要是因为它在 VS Code 中命名。以下步骤并不假定您使用 VS Code 执行命令,但您可以使用 VS Code 提供的集成终端来执行命令。
首先,在系统上的适当位置创建一个名为 WebApplication1 的文件夹,然后使用终端导航到该文件夹,或在 VS Code 中打开该文件夹。如果您选择使用 VS Code,则可以通过按 Ctrl-' 访问终端。在命令提示符下,键入以下命令,并在每个命令后按 Enter 键。
列表 2.1 使用 CLI 创建 Razor Pages 应用程序
dotnet new sln                                           ❶
dotnet new webapp -o WebApplication1                     ❷
dotnet sln add WebApplication1\WebApplication1.csproj    ❸
info: Microsoft.Hosting.Lifetime[0]
      Now listening on: https://localhost:7235
info: Microsoft.Hosting.Lifetime[0]
      Now listening on: http://localhost:5235
您可能想知道为什么您添加到布局页面以创建链接的锚元素上没有 href 属性。此元素称为锚点标记帮助程序。标记帮助程序是针对常规 HTML 元素的组件,它使服务器端代码能够通过通常以 asp- 开头的特殊属性来影响它们呈现到浏览器的方式。例如,asp-page 属性采用一个值,该值表示要生成链接的页面的名称。标签帮助程序将在下一章中更详细地介绍。
因此,您已经了解了 C# 和 HTML 在 Razor 页面中协同工作以生成 HTML 的一些方法。通常,最好的建议是将 Razor 页面中包含的 C# 代码量限制为仅影响演示文稿所需的代码量。应用程序逻辑(包括确定时间的算法)应保留在 Razor 页面文件中。Razor 页面文件和应用程序逻辑之间的第一级分离是 PageModel 类,该类构成了下一章的重点,以及我已经介绍的其他与视图相关的技术,包括布局、部件和标记帮助程序。
2.2 浏览工程文件
现在,您已经创建了第一个 Razor Pages 应用程序并尝试了一些 Razor 语法,现在是时候更详细地探索构成您刚刚创建的 Web 应用程序的每个文件夹和文件的内容,以了解每个文件夹和文件在应用程序中所扮演的角色。在此过程中,您将更清楚地了解 ASP.NET Core 应用程序的工作原理。您还将了解磁盘上的物理文件与您在 Visual Studio 的“解决方案资源管理器”窗口中看到的内容之间的区别。
2.2.1 WebApplication1.sln 文件
SLN 文件称为解决方案文件。在 Visual Studio 中,解决方案充当管理相关项目的容器,解决方案文件包含每个项目的详细信息,包括项目文件的路径。Visual Studio 在打开解决方案时使用此信息加载所有相关项目。
较大的 Web 应用程序通常由多个项目组成:一个负责 UI 的 Web 应用程序项目和多个类库项目,每个项目负责应用程序中的一个逻辑层,例如数据访问层或业务逻辑层。也可能有一些单元测试项目。然后,您可能会看到其他项目添加了表示其用途的后缀:WebApplication1.Tests、WebApplication1.Data 等。
此应用程序由单个项目组成。因此,它实际上根本不需要放在解决方案中,但 Visual Studio 仍然会创建解决方案文件。如果使用 CLI 创建应用程序,则通过 dotnet new sln 命令创建了解决方案文件。然后,通过 dotnet sln add 命令将 WebApplication1 项目显式添加到解决方案中。您可以跳过这些步骤,仅在需要向应用程序添加其他项目时才创建解决方案文件。
项目文件在 Visual Studio 中的“解决方案资源管理器”中不可见。您可以通过右键单击 Solution Explorer 中的项目并选择 Edit Project File(编辑项目文件)来访问它。如果您使用的是 VS Code,则该文件在文件资源管理器中可见,您可以像访问任何其他文件一样访问和编辑它。
第二个配置文件使用项目名称来标识自身。如果选择此配置文件来启动应用程序,它将完全在其内部或进程内 Web 服务器上运行。默认服务器实现称为 Kestrel。您将在本章后面了解更多信息。最终配置文件 (WSL 2) 与在适用于 Linux 的 Windows 子系统中运行应用程序有关。本书不涉及 WSL,但如果您想了解更多信息,Microsoft 文档提供了一个很好的起点:https://docs.microsoft.com/en-us/windows/wsl/。
2.2.5 wwwroot 文件夹
wwwroot 文件夹是 Web 应用程序中的一个特殊文件夹。它在 Solution Explorer 中有一个地球图标。它是 Web 根目录,包含静态文件。由于是 Web 根目录,wwwroot 被配置为允许直接浏览其内容。它是样式表、JavaScript 文件、图像和其他内容的正确位置,这些内容在下载到浏览器之前不需要任何处理。因此,您不应将任何不希望用户能够访问的文件放在 wwwroot 文件夹中。可以将备用位置配置为 Web 根目录,但新位置不会在“解决方案资源管理器”中获得特殊图标。
熟悉 C# 编程的读者都知道,Program.cs 提供了控制台应用程序的入口点。按照约定,它包含一个静态 Main 方法,其中包含用于执行应用程序的逻辑。此文件没有什么不同,只是没有可见的 Main 方法。项目模板利用了一些较新的 C# 语言功能,这些功能在 C# 10 中引入,其中之一是顶级语句。此功能允许您省略 Program.cs 中的类声明和 Main 方法,并开始编写可执行代码。编译器将生成 class 和 Main 方法,并在该方法中调用您的可执行代码。
所有 .NET 应用程序都以这种方式进行配置,无论它们是 Web 应用程序、服务还是控制台应用程序。最重要的是,为 Web 应用程序配置了 Web 服务器。Web 服务器通过 WebHost 属性进行配置,该属性表示 IWebHostBuilder 类型的实现。默认 Web 服务器是名为 Kestrel 的轻量级且速度极快的 Web 服务器。Kestrel 服务器已合并到您的应用程序中。IWebHostBuilder 还配置主机筛选以及与 Internet Information Services (IIS)(即 Windows Web 服务器)的集成。
IWebHostBuilder 对象公开了多个扩展方法,这些方法支持进一步配置应用程序。例如,前面我讨论了将 wwwroot 文件夹的替代路径配置为 Web 根路径。WebHost 属性使您能够在有充分理由的情况下执行此作。在下面的清单中,Content 文件夹被配置为 wwwroot 的替代品。
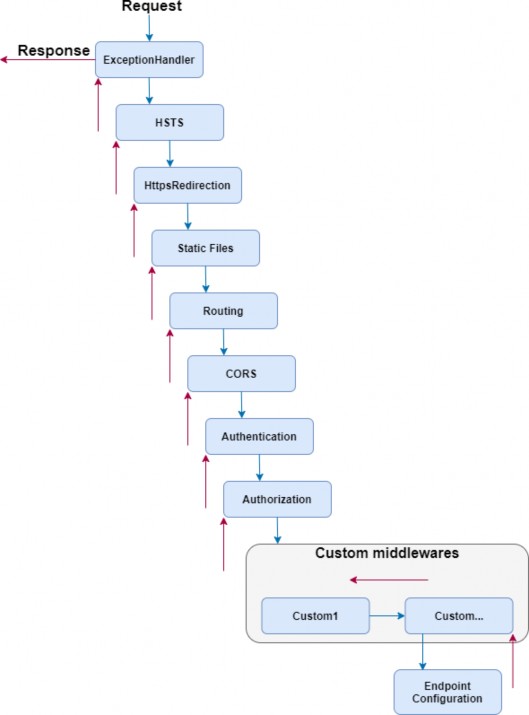
注意 ASP.NET Core 中间件是一个相当大的话题。我将只介绍可能在大多数 Razor Pages 应用程序中使用的区域。如果您想探索更高级的中间件概念,例如分支管道,我推荐 Andrew Lock 的 ASP.NET Core in Action, Second Edition(Manning,2021 年)。
该方法由动词(例如 GET、POST、PUT、DELETE、TRACE 或 CONNECT)或名词(例如 HEAD 或 OPTIONS)表示。向网站请求最常用的方法是 GET 和 POST,其中 GET 主要用于从服务器请求数据,POST 主要用于将数据传输到服务器,尽管 POST 方法也可能导致数据被发送回客户端。这是本书中将介绍的仅有的两种方法。
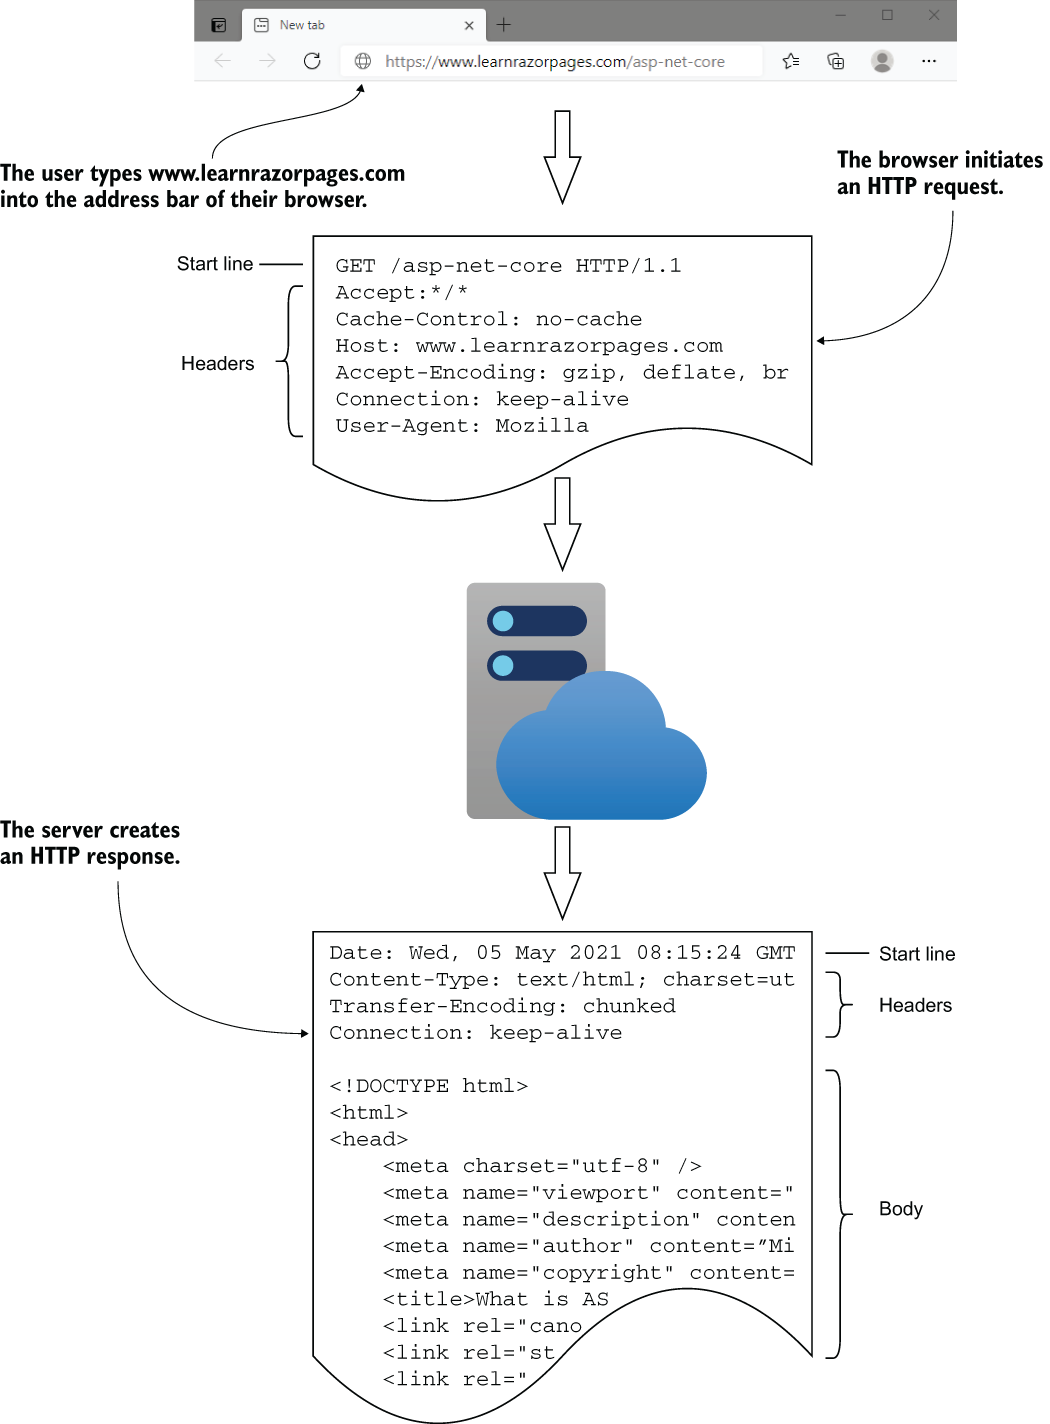
该标识符由统一资源标识符 (URI) 表示。此特定数据通常也称为统一资源定位符 (URL),就好像它们表示同一事物一样。从技术上讲,它们有所不同。就本书而言,知道所有 URL 都是 URI,但并非所有 URI 都是 URL 就足够了。RFC3986 的 1.1.3 节详细解释了差异: https://www.ietf.org/rfc/rfc3986.txt.在示例中,我将使用的 URI 类型在所有情况下都是 URL。
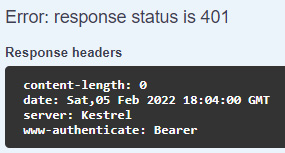
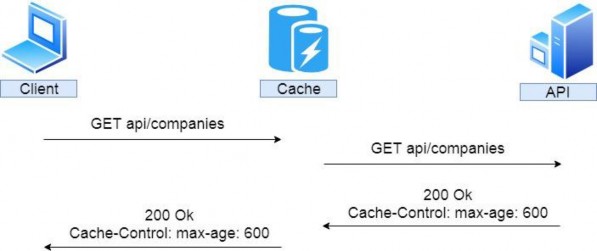
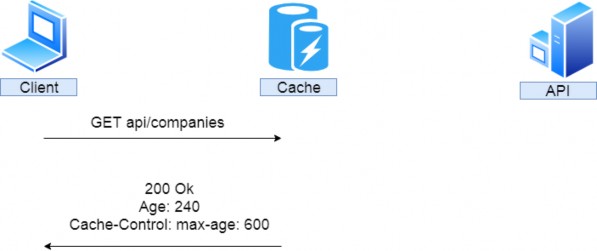
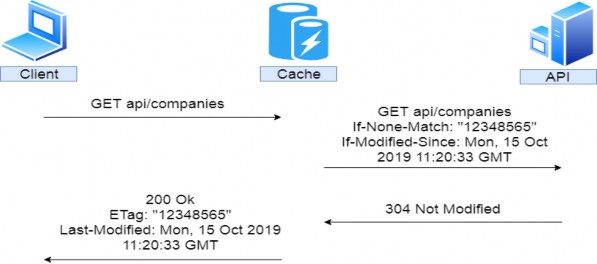
该请求还包括一组标头 — 名称-值对,可用于向服务器提供可能影响其响应的其他信息。例如,If-Modified-Since 标头指定日期时间值。如果请求的资源在指定时间后未被修改,则服务器应返回 304 Not Modified 状态码;否则,它应该发送修改后的资源。其他标头可能会通知服务器响应的首选语言或请求者可以处理的内容类型。
The value of the content-length header detailing the size of the request, measured in bytes.
ContentType
The value of the content-type header detailing the media type of the request.
Cookies
Provides access to the cookies collection.
Form
Represents submitted form data. You won’t work with this directly. You are more likely to use model binding to access this data (see chapter 5).
Headers
Provides access to all request headers.
IsHttps
Indicates whether the current request was made over HTTPS.
Method
The HTTP verb used to make the request
Path
The part of the URL after the domain and port
Query
Provides access to query string values as key-value pairs
The Response property is represented by the HttpResponse class. Table 2.3 details the main members of this class and their purpose.
Table 2.3 Primary HttpResponse members
Property
Description
ContentLength
The size of the response in bytes, which is assigned to the content-length header.
ContentType
The media type of the response, which is assigned to the content-type header.
Cookies
The cookie collection of the outgoing response.
HasStarted
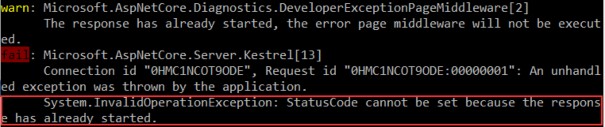
Indicates whether the response headers have been sent to the client. If they have, you should not attempt to alter the response. If you do, the values provided in the content-length and content-type headers may no longer be valid, leading to unpredictable results at the client.
Headers
Provides access to the response headers.
StatusCode
The HTTP status code for the response (e.g., 200, 302, 404, etc.).
WriteAsync
An extension method that writes text to the response body, using UTF-8 encoding.
Redirect
Returns a temporary (302) or permanent (301) redirect response to the client, together with the location to redirect to.
The size of the response in bytes, which is assigned to the content-length header.
ContentType
The media type of the response, which is assigned to the content-type header.
Cookies
The cookie collection of the outgoing response.
HasStarted
Indicates whether the response headers have been sent to the client. If they have, you should not attempt to alter the response. If you do, the values provided in the content-length and content-type headers may no longer be valid, leading to unpredictable results at the client.
Headers
Provides access to the response headers.
StatusCode
The HTTP status code for the response (e.g., 200, 302, 404, etc.).
WriteAsync
An extension method that writes text to the response body, using UTF-8 encoding.
Redirect
Returns a temporary (302) or permanent (301) redirect response to the client, together with the location to redirect to.
上表中详述的方法和属性在直接处理请求和响应时非常有用,例如,在创建自己的中间件时将执行此作。
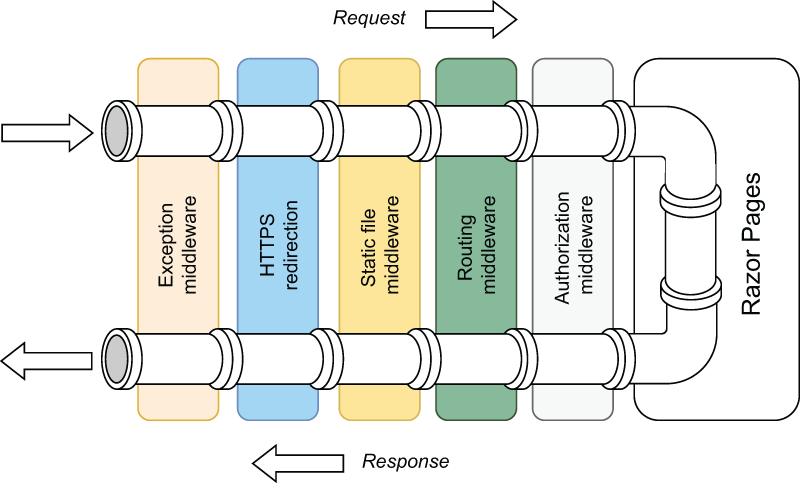
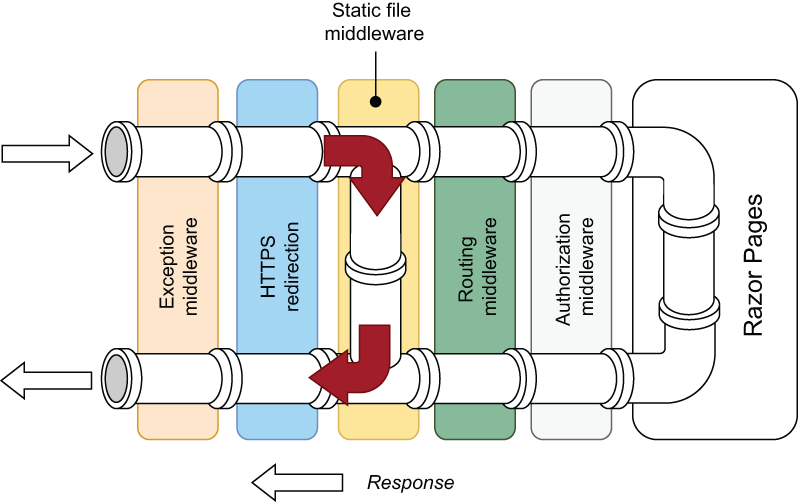
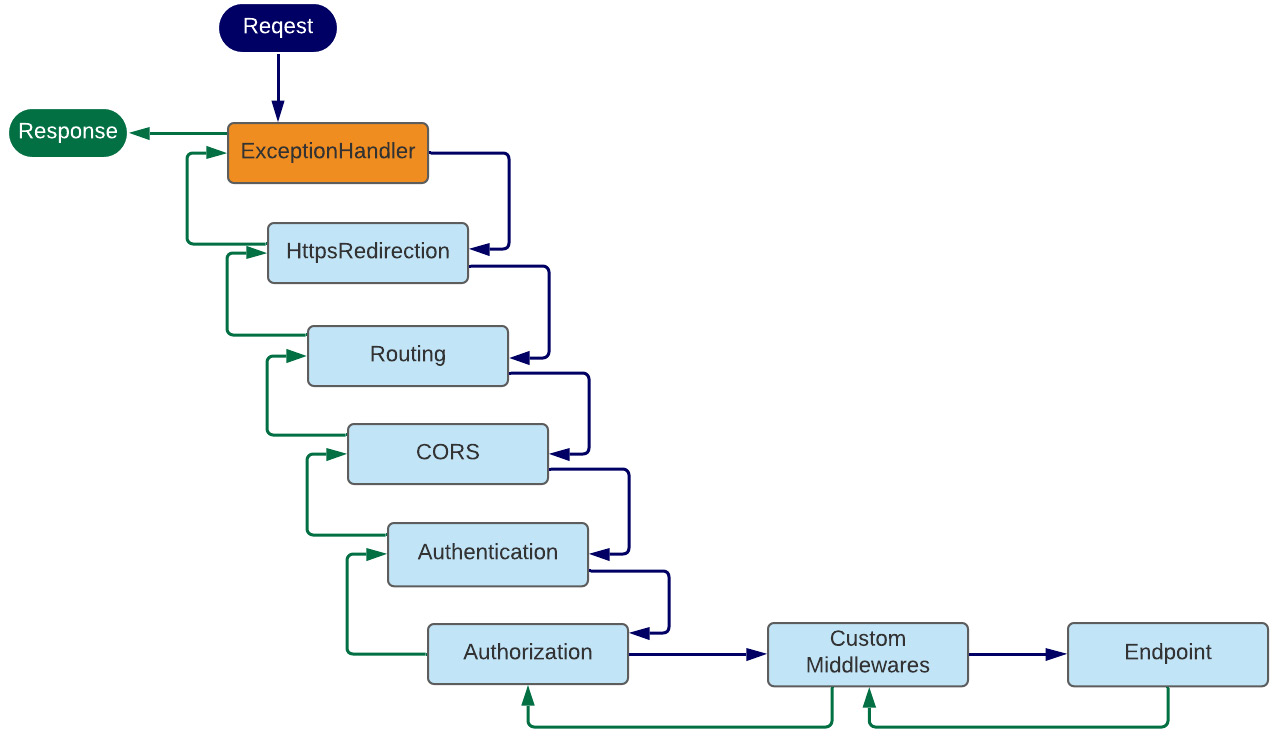
2.3.3 应用程序请求管道
当 Web 服务器将请求路由到您的应用程序时,应用程序必须决定如何处理它。需要考虑许多因素。请求应定向或路由到何处?是否应记录请求的详细信息?应用程序是否应该只返回文件的内容?它应该压缩响应吗?如果在处理请求时遇到异常,会发生什么情况?发出请求的人是否真的被允许访问他们请求的资源?应如何处理 Cookie 或其他与请求相关的数据?
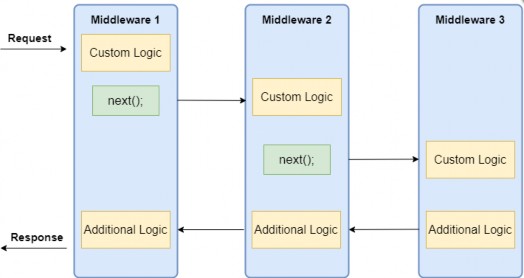
此决策过程称为请求管道。在 ASP.NET Core 应用程序中,请求管道由一系列软件组件组成,每个组件都有自己的单独责任。其中一些组件在请求进入应用程序的途中作用于请求,而其他组件则对应用程序返回的响应进行作。有些人可能会两者兼而有之。执行这些功能的各个组件称为中间件。
图 2.12 说明了这个概念,显示了一个来自 Web 服务器的请求,然后通过多个中间件组件的管道传递,然后到达标记为 Razor Pages 的实际应用程序本身。
此中间件的注册方式与基于约定的示例完全相同:通过 UseMiddleware 方法或扩展方法。但是,基于 IMiddle ware 的组件还需要执行一个额外的步骤:它们还必须注册到应用程序的服务容器中。在第 7 章中,您将了解有关服务和依赖关系注入的更多信息,但目前,只需知道您需要将下一个清单中的粗体代码行添加到 Program 类就足够了。
Web 开发框架通过为常见任务提供预构建的解决方案来减轻这些复杂性,因此您可以继续构建应用程序。以显示所有这些书籍的详细信息的任务为例。不必为每本书创建一个页面,框架(如 Razor Pages)将为您提供创建模板以显示任何书籍的功能。它还包括占位符,因此可以从中央存储(例如数据库)获取特定书籍的详细信息,例如其标题、作者、ISBN 和页数(很像邮件合并文档的工作方式)。现在,您只需管理所有书籍的一页,而不是每本书一页。
这些示例涉及 Web 开发框架提供的几个功能。(图 1.2)。但名单并不止于此。想想开发 Web 应用程序可能需要您执行的任何常见重复性任务:处理传入的数据请求、映射不包含文件扩展名的 URL、与数据库通信、处理和验证表单提交、处理文件、发送电子邮件。使用包含这些功能的框架时,所有这些任务都会变得更加容易。当您完成本书时,您将能够使用 Razor Pages 轻松完成所有这些任务。
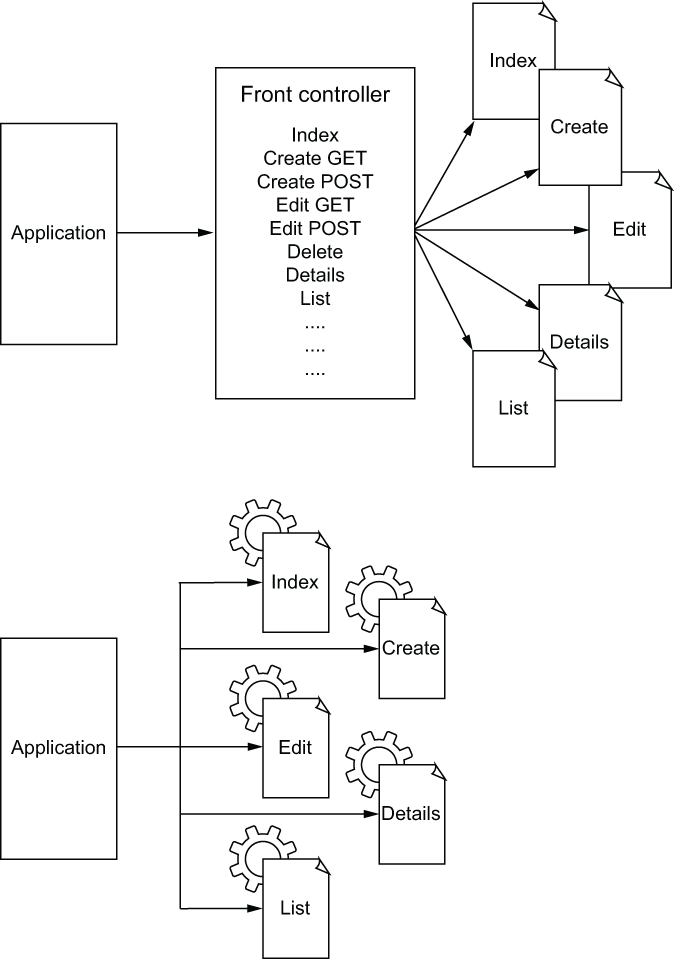
图 1.2 工作流图显示了涉及使用模板的过程在 Razor Pages 中的工作原理。此工作流从左下角开始,客户端请求 /book/razor-pages-in-action 或类似内容。白色箭头显示通过 Internet 到 Web 服务器的行进方向,该服务器找到正确的应用程序,然后将处理传递给 Razor 页面(其中包含 func())。然后,控制权将传递给应用程序服务层,该层负责从数据库中检索详细信息。数据将发送到服务层(请参阅灰色箭头),然后发送到 Razor 页面,在那里它与视图模板(带有 @ 符号的模板)合并以创建 HTML。生成的 HTML 通过应用程序传递到 Web 服务器,然后返回给客户端。
从本质上讲,Web 开发框架可以通过为常见的重复性任务提供预构建和测试的解决方案来加快开发 Web 应用程序的过程。他们可以通过鼓励您按照一组标准工作来帮助您产生一致的结果。
1.1.2 服务器端框架
接下来,我们将了解一下 Razor Pages 是服务器端框架的含义。在开发动态 Web 应用程序时,您必须确定 HTML 的生成位置。您可以选择在用户的设备(客户端)或 Web 服务器上生成 HTML。
在客户端上生成 HTML 的应用程序或单页应用程序 (SPA) 在可以使用的技术方面受到限制。直到最近,你还只能真正使用 JavaScript 来创建这类应用程序。自从 Blazor 推出以来,这种情况发生了变化,它使你能够使用 C# 作为应用程序编程语言。若要详细了解此内容,请参阅 Chris Sainty 的 Blazor in Action(Manning,2021 年)。由于大多数应用程序处理都在用户的设备上进行,因此您必须注意其资源,您无法控制这些资源。在编写代码时,您还必须考虑浏览器功能之间的差异。另一方面,客户端应用程序可以带来丰富的用户体验,甚至可以与桌面应用程序非常相似。主要在客户端上呈现的应用程序的优秀示例包括 Facebook 和 Google Docs。
在服务器上呈现 HTML 的应用程序可以利用服务器支持的任何框架或语言,并拥有服务器可以提供的尽可能多的处理能力。这意味着 HTML 生成是可控且可预测的。此外,所有应用程序逻辑都部署到服务器本身,这意味着它与服务器一样安全。由于处理的输出应该是符合标准的 HTML,因此您不需要太担心浏览器的怪癖。
1.1.3 跨平台功能
可以在各种平台上创建和部署 Razor Pages 应用程序。Windows、Linux、macOS 和 Docker 均受支持。如果您想在超薄且昂贵的 MacBook Air 或 Surface Pro 上创建应用程序,您可以。或者,如果您更喜欢使用运行 Debian 或 Ubuntu 的翻新 ThinkPad,没问题。您仍然可以与使用不同平台的同事共享您的源代码。您的部署选项同样不受限制,这意味着您可以利用您的网络托管公司提供的最优惠价格。
1.1.4 开源
过去,当我第一次被授予 Microsoft 最有价值专业人士(MVP,Microsoft 评判为通过分享技术专业知识为社区做出重大贡献的人的年度奖项)时,该奖项的好处之一是可以直接访问负责 MVP 专业领域的 Microsoft 产品组。就我而言(我确信这是错误的身份之一),专业领域是 ASP.NET,Microsoft 的 Web 开发框架。
能够访问 ASP.NET 产品组是一个特权地位。请记住,在那个年代,Microsoft 在很大程度上是一家闭源公司。Microsoft MVP 比社区其他成员更早地了解了 Microsoft 在其领域的一些新产品计划。他们甚至可能会被邀请对他们的新产品进行一些 beta 测试或提供改进建议,尽管所有主要设计决策通常是在您获得访问权限时做出的。
几年后,Microsoft 已经转变为一家开源公司。他们开发平台的源代码在 GitHub 上供所有人查看。不仅如此,我们鼓励每个人通过提交可能的错误并提供改进、新功能、错误修复或更好的文档来为源代码做出贡献。与其被告知 Microsoft 将在遥远的将来发布什么,不如参与关于框架应该采取的方向的对话。任何人都可以在 GitHub 上询问有关框架的问题,通常可以从 Microsoft 开发人员那里获得答案。
Microsoft 在这种方法上取胜,因为他们受益于公司外部的专家,增加了他们的技术专长,甚至增加了时间,而框架的用户则受益,因为他们获得了其他真实用户影响的更好的产品。在撰写本文时,Razor Pages 所属的 ASP.NET 的当前版本 ASP.NET Core 拥有超过 1,000 个活跃的贡献者。
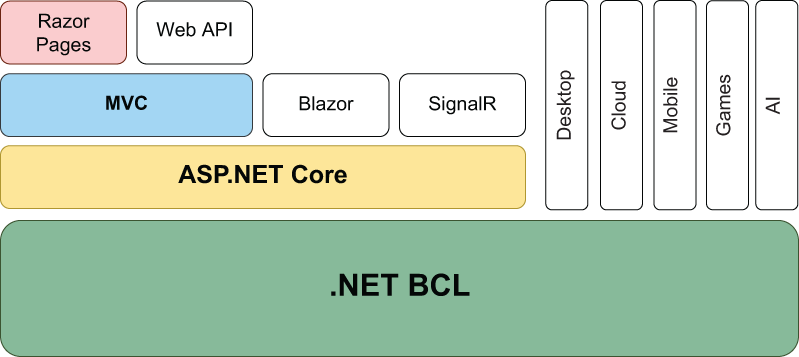
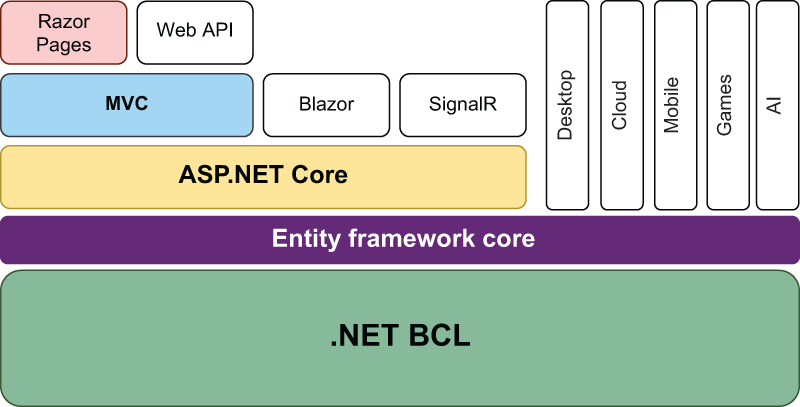
图 1.3 .NET 堆栈。Razor Pages 是 MVC 框架的一项功能,而 MVC 框架又是 ASP.NET Core 框架的一部分,该框架代表 Web 开发层。
堆栈的 Web 层称为 ASP.NET Core。它包括用于处理 HTTP、路由、身份验证的库,以及用于支持 Razor 语法和 HTML 生成的类。除了我之前提到的 Blazor 之外,ASP.NET Core 还包括 SignalR,这是一个用于将数据从服务器推送到连接的客户端的框架。SignalR 用例的最简单示例是聊天应用程序。
除了 SignalR 和 Blazor 之外,还有 ASP.NET Core 模型-视图-控制器 (MVC) 框架,顶部是 Razor Pages。Razor Pages 是 MVC 框架的一项功能,它支持开发遵循 MVC 设计模式的 Web 应用程序。要理解这意味着什么,有必要了解 ASP.NET Core MVC 框架的性质。
1.3.1 ASP.NET Core MVC 框架
ASP.NET Core MVC 是 Microsoft 的原始跨平台 Web 应用程序框架。这就是所谓的固执己见的框架。框架设计者对框架的用户应该应用的架构决策、约定和最佳实践有意见,以产生最高质量的结果。然后,框架设计人员生成一个框架,引导用户采用这些架构决策、约定和最佳实践。整个 Microsoft 的开发人员将此过程描述为帮助客户陷入“成功的深渊”。
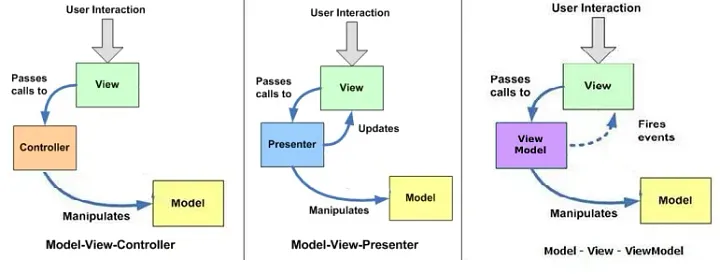
1.3.2 模型-视图-控制器
MVC 框架背后的开发人员的主要架构决策是支持实现 MVC 模式的 Web 应用程序的开发,因此,框架的名称也应运而生。之所以做出这一决定,是因为 MVC 是 Web 开发中一种众所周知的表示设计模式,其目的是强制分离关注点 — 具体而言,应用程序模型及其表示的关注点。
MVC 中的 V 是视图或页面。M 是应用程序模型,它是一个模糊的术语,表示应用程序中不是视图或控制器的所有内容。该模型包括数据访问代码、业务或域对象(在曼宁的情况下,您的应用程序的全部内容(书籍、作者和客户))以及旨在管理它们的编程逻辑(即业务逻辑)。然后,根据其他良好的软件设计实践,应用程序模型需要进一步分离,但这不是 MVC 的业务,它纯粹是一种表示设计模式。在 UI 和模型的其余部分之间强制分离的主要原因是提高维护和可测试性。如果应用程序逻辑与 HTML 混合在一起,则很难测试应用程序逻辑。
• 单页应用程序 - 作为服务器端开发框架,Razor Pages 不是构建单页应用程序的合适工具,在单页应用程序中,应用程序通常用 JavaScript 编写并在浏览器中执行,除非需要服务器呈现 (http://mng.bz/YGWB)。
• 静态内容站点 – 如果站点仅由静态内容组成,则启动 Razor Pages 项目不会有任何好处。您只是不需要一个主要目的是在服务器上动态生成 HTML 的框架。
• Web API - Razor Pages 主要是一个 UI 生成框架。但是,Razor 页面处理程序可以返回任何类型的内容,包括 JSON。不过,如果您的应用程序主要是基于 Web 的服务,则 Razor Pages 不是正确的工具。您应该考虑改用 MVC API 控制器。应该指出的是,如果您的要求是生成 HTML 以及通过 HTTP 提供服务,那么在同一个项目中混合使用 Razor 页面和 API 控制器是完全可能的(并且很容易的)。
• 从旧版本的 MVC 迁移 – 如果您希望将现有 MVC 应用程序从早期版本的 .NET Framework 迁移到 ASP.NET Core,则移植到 ASP.NET Core MVC 可能更有意义,因为您的许多现有代码无需修改即可重复使用。迁移后,您可以将 Razor Pages 用于迁移的应用程序中的所有以页面为中心的新功能,因为 MVC 控制器和 Razor Pages 可以愉快地位于同一应用程序中。
Razor Pages 是在 Visual Studio 中构建基于页面的 Web 应用程序的默认项目类型,因此,在除上述例外情况之外的所有情况下,都应将 Razor Pages 用于以页面为中心的应用程序,无论其复杂程度如何。
ASP.NET Core 的设计将性能作为一流的功能。该框架经常在备受推崇的 TechEmpower Web 框架性能评级 (https://www.techempower.com/benchmarks) 中名列前茅。因此,如果您需要一个提供 HTML 的高性能应用程序,Razor Pages 有一个很好的基础。
ASP.NET Core 应用程序设计为模块化。也就是说,您只包含应用程序所需的功能。如果您不需要某个功能,则不包括在内。这样做的好处是使已发布的应用程序的占用空间尽可能小。如果限制已部署应用程序的整体大小对您很重要,Razor Pages 也可以勾选该框。
当您使用 EF Core 等 ORM 时,数据库系统之间的差异或多或少完全隐藏在应用程序本身之外。您为一个数据库系统的数据存储和检索编写的 C# 代码在另一个系统上的工作方式完全相同。一个系统与另一个系统之间唯一真正的区别是初始配置。在本书中,我选择了两个数据库系统:一个 SQL Server 版本,适用于仅限 Windows 的开发人员,以及 SQLite,适用于希望了解其他作系统的读者。我将强调它们之间出现的罕见差异。
在 Microsoft 世界中工作,您比其他任何选择都更有可能遇到他们的旗舰关系数据库系统 SQL Server。安装 Visual Studio 时,可以很容易地安装 SQL Server 的一个版本 LocalDB。它不是为生产用途而设计的,并且仅包含运行 SQL Server 数据库所需的最小文件集。因此,我选择了 LocalDB 作为想要使用 Windows 的读者使用的版本。
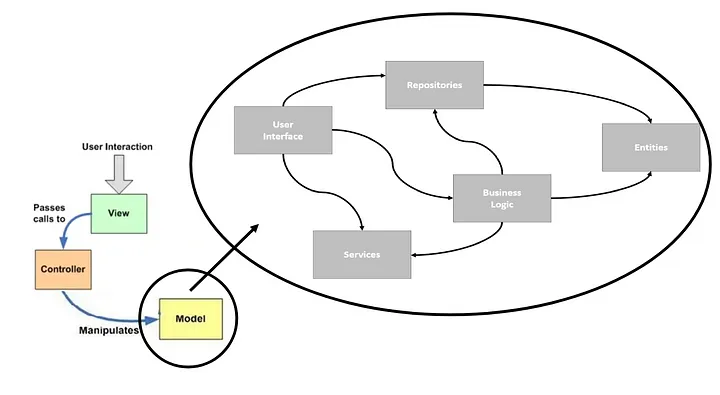
通常在 ASP 中我们没有单独的 Presenter 组件。这也是由控制器完成的。因此整个图可以用如下代码表示:
class OrderController : ControllerBase、IInputPort、IOutputPort
{
[ HttpGet ]
public IActionResult Get ( int id )

{
_getOrderUserCase.Execute(id); }
return DisplayOutputPortResult();
}
}
In memory of my mother and father, Giovanna and Francesco, for their sacrifices and for supporting me in studying and facing new challenges every day.
为了纪念我的父母 Giovanna 和 Francesco,感谢他们的牺牲,以及支持我学习和每天面对新的挑战。
– 安德里亚·土里
– Andrea Tosato
To my family, friends, and colleagues, who have always believed in me during this journey.
– Marco Minerva
感谢我的家人、朋友和同事,他们在这段旅程中一直相信我。
– 马可·密涅瓦
In memory of my beloved mom, and to my wife, Francesca, for her sacrifices and understanding.
Last but not least, to my son, Leonardo. The greatest success in my life.
– Emanuele Bartolesi
为了纪念我敬爱的妈妈,以及我的妻子弗朗西斯卡,感谢她的牺牲和理解。
最后但并非最不重要的一点是,感谢我的儿子莱昂纳多。我一生中最大的成功。
– 埃马努埃莱·巴托莱西
Contributors
贡献
About the authors
作者简介
Andrea Tosato is a full stack software engineer and architect of .NET applications. Andrea has successfully developed .NET applications in various industries, sometimes facing complex technological challenges. He deals with desktop, web, and mobile development but with the arrival of the cloud, Azure has become his passion. In 2017, he co-founded Cloudgen Verona (a .NET community based in Verona, Italy) with his friend, Marco Zamana. In 2019, he was named Microsoft MVP for the first time in the Azure category. Andrea graduated from the University of Pavia with a degree in computer engineering in 2008 and successfully completed his master’s degree, also in computer engineering, in Modena in 2011. Andrea was born in 1986 in Verona, Italy, where he currently works as a remote worker. You can find Andrea on Twitter.
Andrea Tosato 是一名全栈软件工程师和 .NET 应用程序架构师。Andrea 在各个行业成功开发了 .NET 应用程序,有时面临复杂的技术挑战。他处理桌面、Web 和移动开发,但随着云的到来,Azure 已成为他的热情所在。2017 年,他与朋友 Marco Zamana 共同创立了 Cloudgen Verona(一个位于意大利维罗纳的 .NET 社区)。2019 年,他首次被评为 Azure 类别的 Microsoft MVP。Andrea 于 2008 年毕业于帕维亚大学,获得计算机工程学位,并于 2011 年在摩德纳成功完成了计算机工程硕士学位。Andrea 于 1986 年出生于意大利维罗纳,目前在那里担任远程工作者。你可以在 Twitter 上找到 Andrea。
Marco Minerva has been a computer enthusiast since elementary school when he received an old Commodore VIC-20 as a gift. He began developing with GW-BASIC. After some experience with Visual Basic, he has been using .NET since its first introduction. He got his master’s degree in information technology in 2006. Today, he lives in Taggia, Italy, where he works as a freelance consultant and is involved in designing and developing solutions for the Microsoft ecosystem, building applications for desktop, mobile, and web. His expertise is in backend development as a software architect. He runs training courses, is a speaker at technical events, writes articles for magazines, and regularly makes live streams about coding on Twitch. He has been a Microsoft MVP since 2013. You can find Marco on Twitter.
Marco Minerva 从小学开始就是一个计算机爱好者,当时他收到了一台旧的 Commodore VIC-20 作为礼物。他开始使用 GW-BASIC 进行开发。在具备一些 Visual Basic 经验后,他自首次引入 .NET 以来就一直在使用 .NET。他于 2006 年获得信息技术硕士学位。如今,他住在意大利塔吉亚,在那里他是一名自由顾问,参与为 Microsoft 生态系统设计和开发解决方案,构建桌面、移动和 Web 应用程序。他的专长是作为软件架构师进行后端开发。他举办培训课程,在技术活动中发表演讲,为杂志撰写文章,并定期在 Twitch 上制作有关编码的直播。自 2013 年以来,他一直是 Microsoft MVP。您可以在 Twitter 上找到 Marco。
Emanuele Bartolesi is a Microsoft 365 architect who is passionate about frontend technologies and everything related to the cloud, especially Microsoft Azure. He currently lives in Zurich and actively participates in local and international community activities and events. Emanuele shares his love of technology through his blog. He has also become a Twitch affiliate as a live coder, and you can find him as kasuken on Twitch to write some code with him. Emanuele has been a Microsoft MVP in the developer technologies category since 2014, and a GitHub Star since 2022. You can find Emanuele on Twitter.
Emanuele Bartolesi 是一名 Microsoft 365 架构师,他对前端技术以及与云相关的一切(尤其是 Microsoft Azure)充满热情。他目前居住在苏黎世,积极参与当地和国际社区活动。Emanuele 通过他的博客分享了他对技术的热爱。他还作为实时编码员成为 Twitch 的附属机构,您可以在 Twitch 上找到他作为 kasuken 与他一起编写一些代码。Emanuele 自 2014 年以来一直是开发人员技术类别的 Microsoft MVP,自 2022 年以来一直是 GitHub Star。您可以在 Twitter 上找到 Emanuele。
About the reviewers
关于审稿人
Marco Parenzan is a senior solution architect for Smart Factory, IoT, and Azure-based solutions at beanTech, a tech company in Italy. He has been a Microsoft Azure MVP since 2014 and has been playing with the cloud since 2010. He speaks about Azure and .NET development at major community events in Italy. He is a community lead for 1nn0va, a recognized Microsoft-oriented community in Pordenone, Italy, where he organizes local community events. He wrote a book on Azure for Packt Publishing in 2016. He loves playing with his Commodore 64 and trying to write small retro games in .NET or JavaScript.
Marco Parenzan 是意大利科技公司 beanTech 的智能工厂、IoT 和基于 Azure 的解决方案的高级解决方案架构师。自 2014 年以来,他一直是 Microsoft Azure MVP,自 2010 年以来一直在玩云。他在意大利的主要社区活动中谈论 Azure 和 .NET 开发。他是 1nn0va 的社区负责人,这是意大利波代诺内一个公认的面向 Microsoft 的社区,他在那里组织当地社区活动。他在 2016 年为 Packt Publishing 撰写了一本关于 Azure 的书。他喜欢玩他的 Commodore 64,并尝试用 .NET 或 JavaScript 编写小型复古游戏。
Marco Zamana lives in Verona in the magnificent hills of Valpolicella. He has a background as a software developer and architect. He was Microsoft’s Most Valuable Professional for 3 years in the artificial intelligence category. He currently works as a cloud solution architect in engineering at Microsoft. He is the co-founder of Cloudgen Verona, a Veronese association that discusses topics related to the cloud and, above all, Azure.
Marco Zamana 住在维罗纳 Valpolicella 壮丽的山丘上。他拥有软件开发人员和架构师的背景。他在人工智能类别中连续 3 年被评为 Microsoft 最有价值专家。他目前在 Microsoft 担任工程部门的云解决方案架构师。他是 Cloudgen Verona 的联合创始人,这是一个 Veronese 协会,讨论与云相关的主题,尤其是 Azure。
Ashirwad Satapathi works as an associate consultant at Microsoft and has expertise in building scalable applications with ASP.NET Core and Microsoft Azure. He is a published author and an active blogger in the C# Corner developer community. He was awarded the title of C# Corner Most Valuable Professional (MVP) in September 2020 and September 2021 for his contributions to the developer community. He is also a member of the Outreach Committee of the .NET Foundation.
Ashirwad Satapathi 是 Microsoft 的助理顾问,拥有使用 ASP.NET Core 和 Microsoft Azure 构建可缩放应用程序的专业知识。他是 C# Corner 开发人员社区的出版作者和活跃的博客作者。他于 2020 年 9 月和 2021 年 9 月被授予 C# Corner 最有价值专家 (MVP) 称号,以表彰他对开发者社区的贡献。他还是 .NET Foundation 外展委员会的成员。
Table of Contents
目录
Preface
前言
Part 1: Introduction
第 1 部分:简介
1 Introduction to Minimal APIs
最小 API 简介
2 Exploring Minimal APIs and Their Advantages
探索最小 API 及其优势
3 Working with Minimal APIs
使用最少的 API
Part 2: What’s New in .NET 6?
第 2 部分:.NET 6 中的新增功能
4 Dependency Injection in a Minimal API Project
最小 API 项目中的依赖关系注入
5 Using Logging to Identify Errors
使用日志记录识别错误
6 Exploring Validation and Mapping
探索验证和映射
7 Integration with the Data Access Layer
与 Data Access Layer 集成
Part 3: Advanced Development and Microservices Concepts
第 3 部分:高级开发和微服务概念
8 Adding Authentication and Authorization
添加身份验证和授权
9 Leveraging Globalization and Localization
利用全球化和本地化
10 Evaluating and Benchmarking the Performance of Minimal APIs
评估最小 API 的性能并对其进行基准测试
Index
索引
Other Books You May Enjoy
您可能喜欢的其他书籍
Preface
前言
The simplification of code is every developer’s dream. Minimal APIs are a new feature in .NET 6 that aims to simplify code. They are used for building APIs with minimal dependencies in ASP.NET Core. Minimal APIs simplify API development through the use of more compact code syntax.
简化代码是每个开发人员的梦想。最小 API 是 .NET 6 中的一项新功能,旨在简化代码。它们用于在 ASP.NET Core 中构建具有最小依赖项的 API。最少的 API 通过使用更紧凑的代码语法简化了 API 开发。
Developers using minimal APIs will be able to take advantage of this syntax on some occasions to work more quickly with less code and fewer files to maintain. Here, you will be introduced to the main new features of .NET 6 and understand the basic themes of minimal APIs, which weren’t available in .NET 5 and previous versions. You’ll see how to enable Swagger for API documentation, along with CORS, and how to handle application errors. You will learn to structure your code better with Microsoft’s new .NET framework called Dependency Injection. Finally, you will see the performance and benchmarking improvements in .NET 6 that are introduced with minimal APIs.
使用最少 API 的开发人员将能够在某些情况下利用此语法,以更少的代码和更少的文件更快地工作。在这里,将向您介绍 .NET 6 的主要新功能,并了解最小 API 的基本主题,这些主题在 .NET 5 和以前的版本中不可用。您将了解如何为 API 文档以及 CORS 启用 Swagger,以及如何处理应用程序错误。您将学习如何使用 Microsoft 的新 .NET 框架(称为 Dependency Injection)更好地构建代码。最后,您将看到 .NET 6 中的性能和基准测试改进,这些改进是通过最少的 API 引入的。
By the end of this book, you will be able to leverage minimal APIs and understand in what way they are related to the classic development of web APIs.
在本书结束时,您将能够利用最少的 API,并了解它们与 Web API 的经典开发有何关系。
Who this book is for
这本书是给谁的
This book is for .NET developers who want to build .NET and .NET Core APIs and want to study the new features of .NET 6. Basic knowledge of C#, .NET, Visual Studio, and REST APIs is assumed.
本书适用于想要构建 .NET 和 .NET Core API 并希望学习 .NET 6 新功能的 .NET 开发人员。假定您具备 C#、.NET、Visual Studio 和 REST API 的基本知识。
What this book covers
本书涵盖的内容
Chapter 1, Introduction to Minimal APIs, introduces you to the motivations behind introducing minimal APIs within .NET 6. We will explain the main new features of .NET 6 and the work that the .NET team is doing with this latest version. You will come to understand the reasons why we decided to write the book.
第 1 章 最小 API 简介,介绍了在 .NET 6 中引入最小 API 的动机。我们将解释 .NET 6 的主要新功能以及 .NET 团队正在使用此最新版本所做的工作。您将了解我们决定写这本书的原因。
Chapter 2, Exploring Minimal APIs and Their Advantages, introduces you to the basic ways in which minimal APIs differ from .NET 5 and all previous versions. We will explore in detail routing and serialization with System.Text.JSON. Finally, we will end with some concepts related to writing our first REST API.
第 2 章“探索最小 API 及其优势”介绍了最小 API 与 .NET 5 和所有以前版本的基本区别。我们将详细探讨 System.Text.JSON 的路由和序列化。最后,我们将介绍与编写第一个 REST API 相关的一些概念。
Chapter 3, Working with Minimal APIs, introduces you to the advanced ways in which minimal APIs differ from .NET 5 and all previous versions. We will explore in detail how to enable Swagger for API documentation. We will see how to enable CORS and how to handle application errors.
第 3 章 使用最小 API 介绍了最小 API 与 .NET 5 和所有以前版本的不同之处。我们将详细探讨如何为 API 文档启用 Swagger。我们将了解如何启用 CORS 以及如何处理应用程序错误。
Chapter 4, Dependency Injection in a Minimal API Project, introduces you to Dependency Injection and goes over how to use it with a minimal API.
第 4 章 最小 API 项目中的依赖注入 介绍了依赖注入,并介绍了如何将其与最小 API 一起使用。
Chapter 5, Using Logging to Identify Errors, teaches you about the logging tools that .NET provides. A logger is one of the tools that developers have to use to debug an application or understand its failure in production. The logging library has been built into ASP.NET with several features enabled by design.
第 5 章 使用日志记录识别错误,介绍 .NET 提供的日志记录工具。记录器是开发人员用来调试应用程序或了解其在生产中的故障的工具之一。日志记录库已内置于 ASP.NET 中,并通过设计启用了多项功能。
Chapter 6, Exploring Validation and Mapping, will teach you how to validate incoming data to an API and how to return any errors or messages. Once the data is validated, it can be mapped to a model that will then be used to process the request.
第 6 章 探索验证和映射 将教您如何验证 API 的传入数据以及如何返回任何错误或消息。验证数据后,可以将其映射到模型,然后该模型将用于处理请求。
Chapter 7, Integration with the Data Access Layer, helps you understand the best practices for accessing and using data in minimal APIs.
第 7 章 与数据访问层集成 可帮助您了解在最小 API 中访问和使用数据的最佳实践。
Chapter 8, Adding Authentication and Authorization, looks at how to write an authentication and authorization system by leveraging our own database or a cloud service such as Azure Active Directory.
第 8 章 添加身份验证和授权,介绍如何利用我们自己的数据库或云服务(如 Azure Active Directory)编写身份验证和授权系统。
Chapter 9, Leveraging Globalization and Localization, shows you how to leverage the translation system in a minimal API project and provide errors in the same language of the client.
第 9 章 利用全球化和本地化 向您展示如何在最小的 API 项目中利用翻译系统,并以客户端的相同语言提供错误。
Chapter 10, Evaluating and Benchmarking the Performance of Minimal APIs, shows the improvements in .NET 6 and those that will be introduced with the minimal APIs.
第 10 章 评估最小 API 的性能并对其进行基准测试,介绍了 .NET 6 中的改进以及最小 API 将引入的改进。
To get the most out of this book
充分利用本书
You will need Visual Studio 2022 with ASP.NET and a web development workload or Visual Studio Code and K6 installed on your computer.
您的计算机上需要带有 ASP.NET 和 Web 开发工作负载的 Visual Studio 2022 或 Visual Studio Code 和 K6。
All code examples have been tested using Visual Studio 2022 and Visual Studio Code on the Windows OS.
所有代码示例均已在 Windows作系统上使用 Visual Studio 2022 和 Visual Studio Code 进行了测试。
If you are using the digital version of this book, we advise you to type the code yourself or access the code from the book’s GitHub repository (a link is available in the next section). Doing so will help you avoid any potential errors related to the copying and pasting of code.
如果您使用的是本书的数字版本,我们建议您自己输入代码或从本书的 GitHub 存储库访问代码(下一节中提供了链接)。这样做将帮助您避免与复制和粘贴代码相关的任何潜在错误。
Basic development skills for Microsoft web technology are required to fully understand this book.
要完全理解本书,需要具备 Microsoft Web 技术的基本开发技能。
We also provide a PDF file that has color images of the screenshots and diagrams used in this book.You can download it here: https://packt.link/GmUNL
我们还提供了一个 PDF 文件,其中包含本书中使用的屏幕截图和图表的彩色图像。您可以在此处下载:https://packt.link/GmUNL
Conventions used
使用的约定
There are a number of text conventions used throughout this book.
本书中使用了许多文本约定。
Code in text: Indicates code words in text, database table names, folder names, filenames, file extensions, pathnames, dummy URLs, user input, and Twitter handles. Here is an example: “In minimal APIs, we define the route patterns using the Map methods of the WebApplication object.”
文本中的代码:指示文本中的代码词、数据库表名称、文件夹名称、文件名、文件扩展名、路径名、虚拟 URL、用户输入和 Twitter 句柄。下面是一个示例:“在最小的 API 中,我们使用 WebApplication 对象的 Map 方法定义路由模式。
When we wish to draw your attention to a particular part of a code block, the relevant lines or items are set in bold:
当我们希望您注意到代码块的特定部分时,相关行或项目以粗体设置:
if (app.Environment.IsDevelopment())
{
    app.UseSwagger();
    app.UseSwaggerUI();
}
Any command-line input or output is written as follows:
任何命令行输入或输出的编写方式如下:
dotnet new webapi -minimal -o Chapter01
Bold: Indicates a new term, an important word, or words that you see onscreen. For instance, words in menus or dialog boxes appear in bold. Here is an example: “Open Visual Studio 2022 and from the main screen, click on Create a new project.”
粗体:表示新词、重要字词或您在屏幕上看到的字词。例如,菜单或对话框中的单词以粗体显示。这是一个例子:“打开 Visual Studio 2022,然后在主屏幕上单击创建新项目。
Tips or important notes
提示或重要说明
Appear like this.
如下所示。
Get in touch
联系我们
Feedback from our readers is always welcome.
我们始终欢迎读者的反馈。
General feedback: If you have questions about any aspect of this book, email us at customercare@packtpub.com and mention the book title in the subject of your message.
一般反馈:如果您对本书的任何方面有任何疑问,请发送电子邮件至 customercare@packtpub.com 并在邮件主题中提及书名。
Errata: Although we have taken every care to ensure the accuracy of our content, mistakes do happen. If you have found a mistake in this book, we would be grateful if you would report this to us. Please visit www.packtpub.com/support/errata and fill in the form.
勘误表: 尽管我们已尽一切努力确保内容的准确性,但错误还是会发生。如果您发现本书中有错误,如果您能向我们报告,我们将不胜感激。请访问 www.packtpub.com/support/errata 并填写表格。
Piracy: If you come across any illegal copies of our works in any form on the internet, we would be grateful if you would provide us with the location address or website name. Please contact us at copyright@packt.com with a link to the material.
盗版:如果您在互联网上发现任何形式的非法复制我们的作品,如果您能向我们提供位置地址或网站名称,我们将不胜感激。请通过 copyright@packt.com 与我们联系,并提供材料链接。
If you are interested in becoming an author: If there is a topic that you have expertise in and you are interested in either writing or contributing to a book, please visit authors.packtpub.com.
如果您有兴趣成为作者:如果您擅长某个主题,并且您对写作或为一本书做出贡献感兴趣,请访问 authors.packtpub.com。
Share Your Thoughts
分享您的想法
Once you’ve read Mastering Minimal APIs in ASP.NET Core, we’d love to hear your thoughts! Please click here to go straight to the Amazon review page for this book and share your feedback.
阅读了掌握 ASP.NET Core 中的最小 API 后,我们很想听听你的想法!请单击此处直接进入本书的亚马逊评论页面并分享您的反馈。
Your review is important to us and the tech community and will help us make sure we’re delivering excellent quality content.
您的评论对我们和技术社区都很重要,这将有助于我们确保我们提供卓越的内容质量。
Part 1: Introduction
第 1 部分:简介
In the first part of the book, we want to introduce you to the context of the book. We will explain the basics of minimal APIs and how they work. We want to add, brick by brick, the knowledge needed to take advantage of all the power that minimal APIs can grant us.
在本书的第一部分,我们想向您介绍这本书的背景。我们将解释最小 API 的基础知识及其工作原理。我们希望一砖一瓦地添加所需的知识,以利用最小 API 可以赋予我们的所有功能。
We will cover the following chapters in this part:
我们将在这部分介绍以下章节:
Chapter 1, Introduction to Minimal APIs
第 1 章 最小 API 简介
Chapter 2, Exploring Minimal APIs and Their Advantages
第 2 章 探索最小 API 及其优点
Chapter 3, Working with Minimal APIs
第 3 章 使用最少的 API
1 Introduction to Minimal APIs
1 最小 API 简介
In this chapter of the book, we will introduce some basic themes related to minimal APIs in .NET 6.0, showing how to set up a development environment for .NET 6 and more specifically for developing minimal APIs with ASP.NET Core.
在本书的这一章中,我们将介绍一些与 .NET 6.0 中的最小 API 相关的基本主题,展示如何为 .NET 6 设置开发环境,更具体地说,如何为 ASP.NET Core 开发最小 API。
We will first begin with a brief history of minimal APIs. Then, we will create a new minimal API project with Visual Studio 2022 and Visual Code Studio. At the end, we will take a look at the structure of our project.
首先,我们将从最小 API 的简要历史开始。然后,我们将使用 Visual Studio 2022 和 Visual Code Studio 创建一个新的最小 API 项目。最后,我们将看看我们项目的结构。
By the end of this chapter, you will be able to create a new minimal API project and start to work with this new template for a REST API.
在本章结束时,您将能够创建一个新的最小 API 项目,并开始为 REST API 使用这个新模板。
In this chapter, we will be covering the following topics:
在本章中,我们将介绍以下主题:
• A brief history of the Microsoft Web API
• Creating a new minimal API project
• Looking at the structure of the project
Technical requirements
技术要求
To work with the ASP.NET Core 6 minimal APIs you need to install, first of all, .NET 6 on your development environment.
要使用 ASP.NET Core 6 最小 API,您需要首先在开发环境中安装 .NET 6。
If you have not already installed it, let’s do that now:
如果您还没有安装它,我们现在就安装它:
By default, the browser chooses the right operating system for you, but if not, select your operating system at the top of the page.
默认情况下,浏览器会为您选择合适的作系统,如果没有,请在页面顶部选择您的作系统。
Download the LTS version of the .NET 6.0 SDK.
下载 .NET 6.0 SDK 的 LTS 版本。
Start the installer.
启动安装程序。
Reboot the machine (this is not mandatory).
重新启动计算机(这不是强制性的)。
You can see which SDKs are installed on your development machine using the following command in a terminal:
您可以在终端中使用以下命令查看开发计算机上安装了哪些 SDK:
dotnet –list-sdks
Before you start coding, you will need a code editor or an Integrated Development Environment (IDE). You can choose your favorite from the following list:
在开始编码之前,您需要一个代码编辑器或集成开发环境 (IDE)。您可以从以下列表中选择您最喜欢的:
• Visual Studio Code for Windows, Mac, or Linux
• Visual Studio 2022
• Visual Studio 2022 for Mac
In the last few years, Visual Studio Code has become very popular not only in the developer community but also in the Microsoft community. Even if you use Visual Studio 2022 for your day-to-day work, we recommend downloading and installing Visual Studio Code and giving it a try.
在过去的几年里,Visual Studio Code 不仅在开发人员社区中非常流行,而且在 Microsoft 社区中也非常流行。即使您将 Visual Studio 2022 用于日常工作,我们也建议您下载并安装 Visual Studio Code 并试一试。
Let’s download and install Visual Studio Code and some extensions:
让我们下载并安装 Visual Studio Code 和一些扩展:
Download the Stable or the Insiders edition.
下载 Stable 或 Insiders 版本。
Start the installer.
启动安装程序。
Launch Visual Studio Code.
启动 Visual Studio Code。
Click on the Extensions icon.
单击 Extensions 图标。
You will see the C# extension at the top of the list.
您将在列表顶部看到 C# 扩展。
Click on the Install button and wait.
点击 Install 安装 按钮并等待。
You can install other recommended extensions for developing with C# and ASP.NET Core. If you want to install them, you see our recommendations in the following table:
您可以安装其他推荐的扩展,以便使用 C# 和 ASP.NET Core 进行开发。如果您想安装它们,您可以在下表中看到我们的建议:
Additionally, if you want to proceed with the IDE that’s most widely used by .NET developers, you can download and install Visual Studio 2022.
此外,如果您想继续使用 .NET 开发人员使用最广泛的 IDE,您可以下载并安装 Visual Studio 2022。
If you don’t have a license, check if you can use the Community Edition. There are a few restrictions on getting a license, but you can use it if you are a student, have open source projects, or want to use it as an individual. Here’s how to download and install Visual Studio 2022:
如果您没有许可证,请检查是否可以使用 Community Edition。获得许可证有一些限制,但如果您是学生、拥有开源项目或想以个人身份使用它,则可以使用它。以下是下载和安装 Visual Studio 2022 的方法:
Now, you have an environment in which you can follow and try the code used in this book.
现在,您有一个环境,可以在其中遵循和尝试本书中使用的代码。
A brief history of the Microsoft Web API
Microsoft Web API 简史
A few years ago in 2007, .NET web applications went through an evolution with the introduction of ASP.NET MVC. Since then, .NET has provided native support for the Model-View-Controller pattern that was common in other languages.
几年前的 2007 年,随着 ASP.NET MVC 的推出,.NET Web 应用程序经历了一场演变。从那时起,.NET 就为其他语言中常见的 Model-View-Controller 模式提供了本机支持。
Five years later, in 2012, RESTful APIs were the new trend on the internet and .NET responded to this with a new approach for developing APIs, called ASP.NET Web API. It was a significant improvement over Windows Communication Foundation (WCF) because it was easier to develop services for the web. Later, in ASP.NET Core these frameworks were unified under the name ASP.NET Core MVC: one single framework with which to develop web applications and APIs.
五年后,即 2012 年,RESTful API 成为 Internet 上的新趋势,.NET 以一种称为 ASP.NET Web API 的 API 开发新方法对此做出了回应。与 Windows Communication Foundation (WCF) 相比,这是一个重大改进,因为它更容易开发 Web 服务。后来,在 ASP.NET Core 中,这些框架统一为 ASP.NET Core MVC:一个用于开发 Web 应用程序和 API 的单一框架。
In ASP.NET Core MVC applications, the controller is responsible for accepting inputs, orchestrating operations, and at the end, returning a response. A developer can extend the entire pipeline with filters, binding, validation, and much more. It’s a fully featured framework for building modern web applications.
在 ASP.NET Core MVC 应用程序中,控制器负责接受输入、编排作,并在最后返回响应。开发人员可以使用过滤器、绑定、验证等来扩展整个管道。它是一个功能齐全的框架,用于构建现代 Web 应用程序。
But in the real world, there are also scenarios and use cases where you don’t need all the features of the MVC framework or you have to factor in a constraint on performance. ASP.NET Core implements a lot of middleware that you can remove from or add to your applications at will, but there are a lot of common features that you would need to implement by yourself in this scenario.
但在现实世界中,也有一些场景和用例不需要 MVC 框架的所有功能,或者必须考虑性能约束。ASP.NET Core 实现了许多中间件,你可以随意从应用程序中删除或添加到应用程序中,但在这种情况下,有许多常见功能需要你自己实现。
At last, ASP.NET Core 6.0 has filled these gaps with minimal APIs.
最后,ASP.NET Core 6.0 用最少的 API 填补了这些空白。
Now that we have covered a brief history of minimal APIs, we will start creating a new minimal API project in the next section.
现在我们已经简要介绍了最小 API 的历史,我们将在下一节中开始创建一个新的最小 API 项目。
Creating a new minimal API project
创建新的最小 API 项目
Let’s start with our first project and try to analyze the new template for the minimal API approach when writing a RESTful API.
让我们从第一个项目开始,尝试在编写 RESTful API 时分析最小 API 方法的新模板。
In this section, we will create our first minimal API project. We will start by using Visual Studio 2022 and then we will show how you can also create the project with Visual Studio Code and the .NET CLI.
在本节中,我们将创建我们的第一个最小 API 项目。我们将从使用 Visual Studio 2022 开始,然后我们将展示如何使用 Visual Studio Code 和 .NET CLI 创建项目。
Creating the project with Visual Studio 2022
使用 Visual Studio 2022 创建项目
Follow these steps to create a new project in Visual Studio 2022:
按照以下步骤在 Visual Studio 2022 中创建新项目:
Open Visual Studio 2022 and on the main screen, click on Create a new project:
打开 Visual Studio 2022 并在主屏幕上单击 Create a new project:
Figure 1.1 – Visual Studio 2022 splash screen
图 1.1 – Visual Studio 2022 初始屏幕
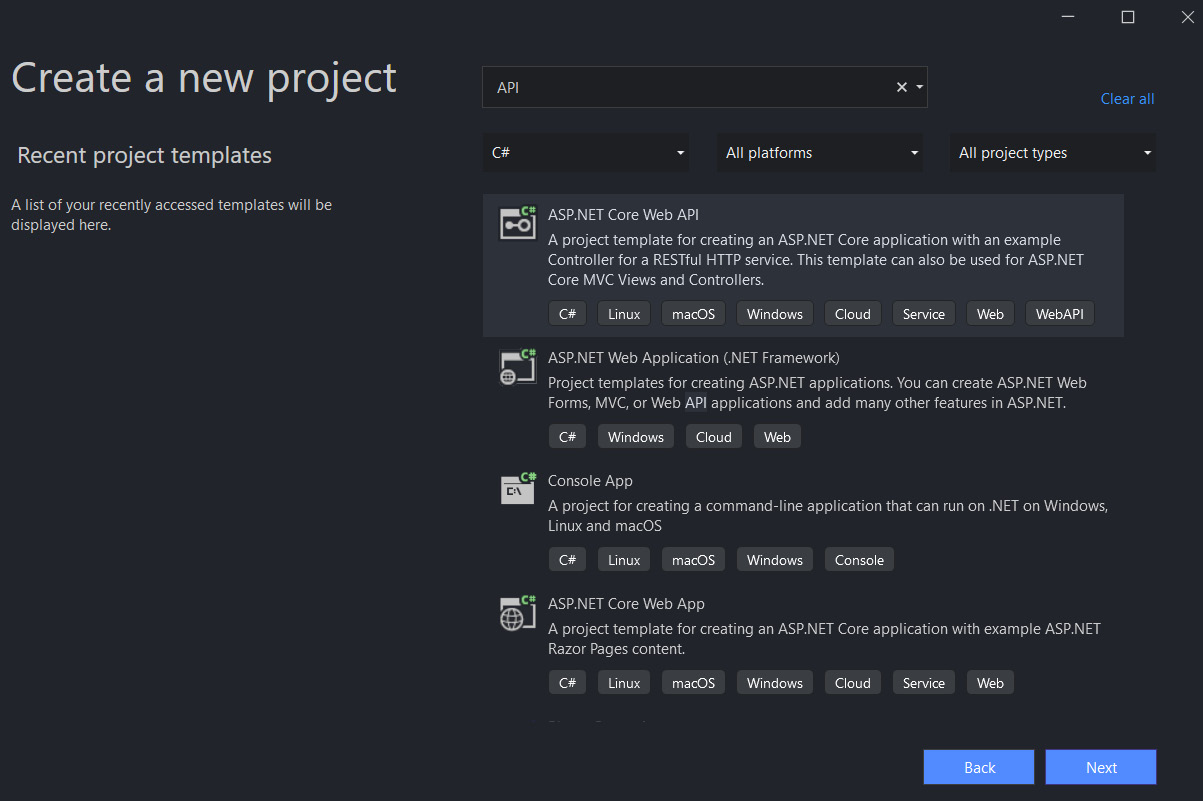
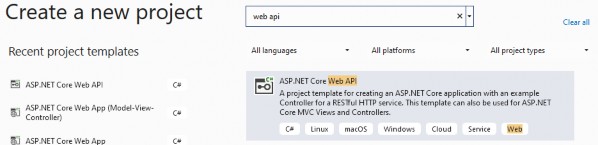
On the next screen, write API in the textbox at the top of the window and select the template called ASP.NET Core Web API:
在下一个屏幕上,在窗口顶部的文本框中编写 API,然后选择名为 ASP.NET Core Web API 的模板:
Figure 1.2 – Create a new project screen
图 1.2 – Create a new project 屏幕
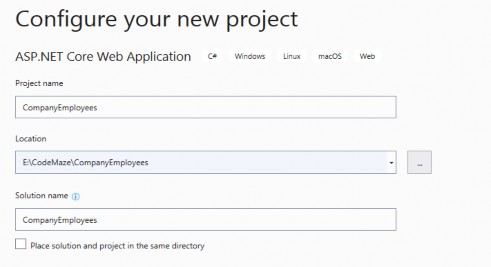
Next, on the Configure your new project screen, insert a name for the new project and select the root folder for your new solution:
接下来,在 Configure your new project 屏幕上,插入新项目的名称,然后选择新解决方案的根文件夹:
Figure 1.3 – Configure your new project screen
图 1.3 – 配置您的新项目屏幕
For this example we will use the name Chapter01, but you can choose any name that appeals to you.
在此示例中,我们将使用名称 Chapter01,但您可以选择任何吸引您的名称。
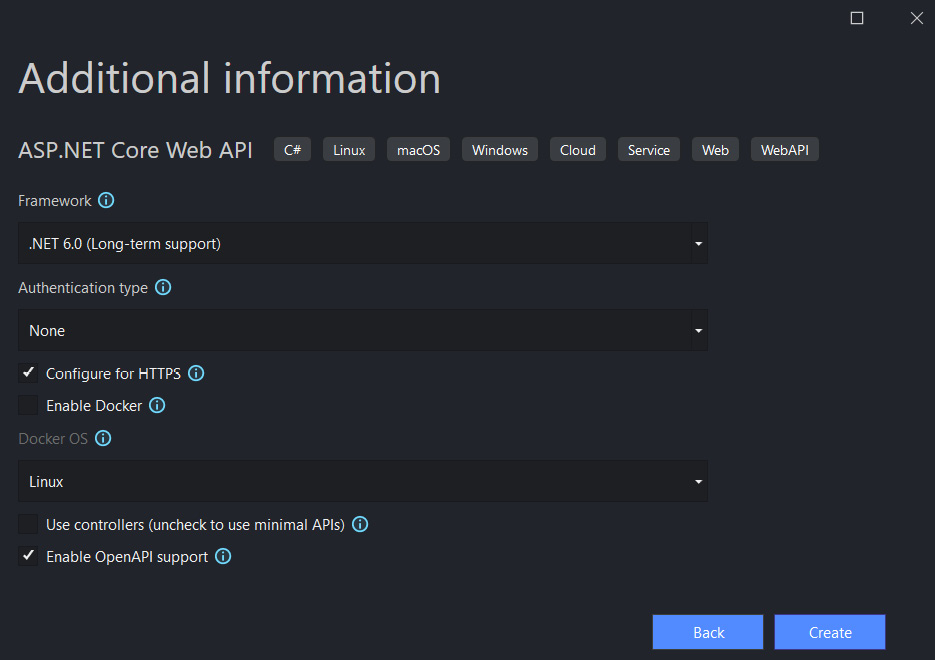
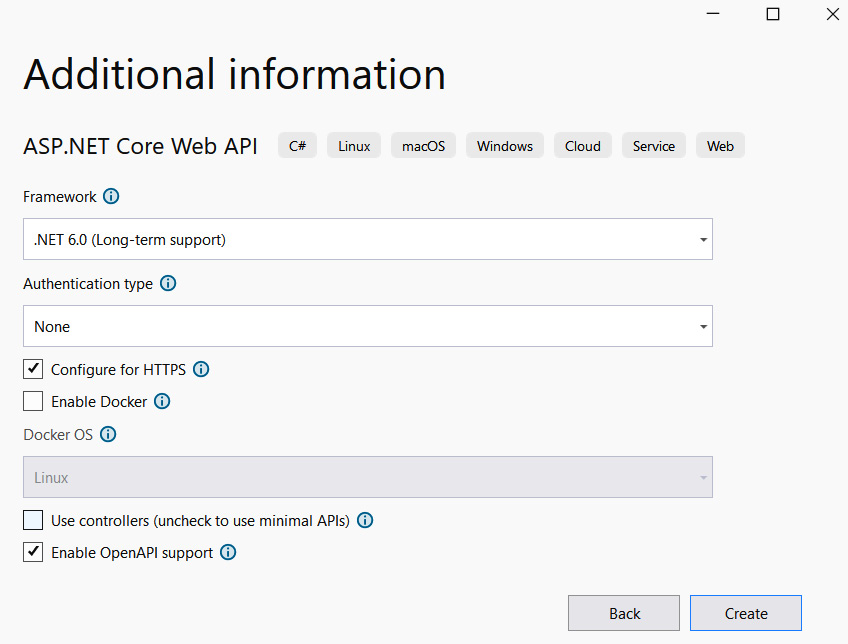
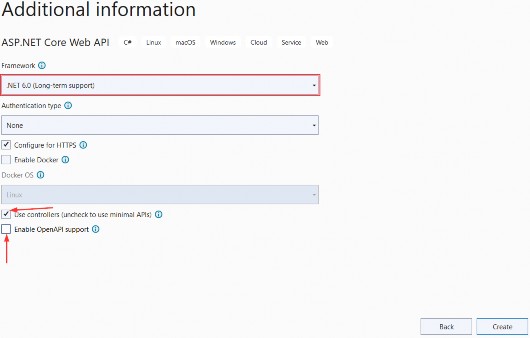
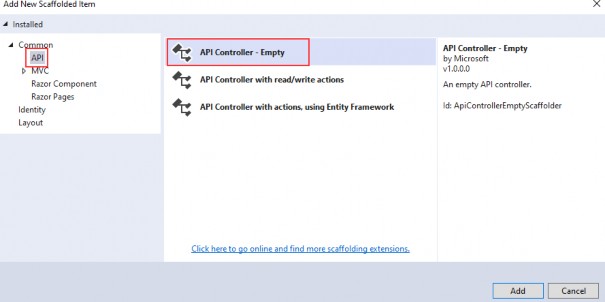
On the following Additional information screen, make sure to select .NET 6.0 (Long-term-support) from the Framework dropdown. And most important of all, uncheck the Use controllers (uncheck to use minimal APIs) option.
在下面的 Additional information 屏幕上,确保从 Framework 下拉列表中选择 .NET 6.0 (Long-term-support)。最重要的是,取消选中 Use controllers (取消选中以使用最少的 API) 选项。
Figure 1.4 – Additional information screen
Click Create and, after a few seconds, you will see the code of your new minimal API project.
单击 Create(创建),几秒钟后,您将看到新的最小 API 项目的代码。
Now we are going to show how to create the same project using Visual Studio Code and the .NET CLI.
现在,我们将展示如何使用 Visual Studio Code 和 .NET CLI 创建相同的项目。
Creating the project with Visual Studio Code
使用 Visual Studio Code 创建项目
Creating a project with Visual Studio Code is easier and faster than with Visual Studio 2022 because you don’t have to use a UI or wizard, rather just a terminal and the .NET CLI.
使用 Visual Studio Code 创建项目比使用 Visual Studio 2022 更容易、更快捷,因为您不必使用 UI 或向导,而只需使用终端和 .NET CLI。
You don’t need to install anything new for this because the .NET CLI is included with the .NET 6 installation (as in the previous versions of the .NET SDKs). Follow these steps to create a project using Visual Studio Code:
您无需为此安装任何新内容,因为 .NET CLI 包含在 .NET 6 安装中(与以前版本的 .NET SDK 一样)。按照以下步骤使用 Visual Studio Code 创建项目:
Open your console, shell, or Bash terminal, and switch to your working directory.
打开您的控制台、shell 或 Bash 终端,然后切换到您的工作目录。
Use the following command to create a new Web API application:
使用以下命令创建新的 Web API 应用程序:
dotnet new webapi -minimal -o Chapter01
As you can see, we have inserted the -minimal parameter in the preceding command to use the minimal API project template instead of the ASP.NET Core template with the controllers.
如您所见,我们在前面的命令中插入了 -minimal 参数,以使用最小 API 项目模板,而不是控制器的 ASP.NET Core 模板。
Now open the new project with Visual Studio Code using the following commands:
现在使用以下命令使用 Visual Studio Code 打开新项目:
cd Chapter01
code.
Now that we know how to create a new minimal API project, we are going to have a quick look at the structure of this new template.
现在我们知道如何创建一个新的最小 API 项目,我们将快速了解一下这个新模板的结构。
Looking at the structure of the project
查看项目结构
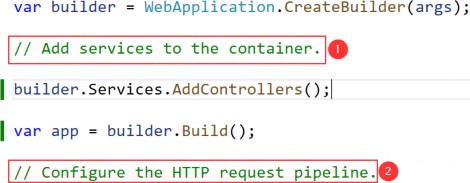
Whether you are using Visual Studio or Visual Studio Code, you should see the following code in the Program.cs file:
无论您使用的是 Visual Studio 还是 Visual Studio Code,您都应该在 Program.cs 文件中看到以下代码:
var builder = WebApplication.CreateBuilder(args);
// Add services to the container.
// Learn more about configuring Swagger/OpenAPI at https://aka.
ms/aspnetcore/swashbuckle
builder.Services.AddEndpointsApiExplorer();
builder.Services.AddSwaggerGen();
var app = builder.Build();
// Configure the HTTP request pipeline.
if (app.Environment.IsDevelopment())
{
app.UseSwagger();
app.UseSwaggerUI();
}
app.UseHttpsRedirection();
var summaries = new[]
{
"Freezing", "Bracing", "Chilly", "Cool", "Mild", "Warm",
"Balmy", "Hot", "Sweltering", "Scorching"
};
app.MapGet("/weatherforecast", () =>
{
var forecast = Enumerable.Range(1, 5).Select(index =>
new WeatherForecast
(
DateTime.Now.AddDays(index),
Random.Shared.Next(-20, 55),
summaries[Random.Shared.Next(summaries.Length)]
))
.ToArray();
return forecast;
})
.WithName("GetWeatherForecast");
app.Run();
internal record WeatherForecast(DateTime Date, int
TemperatureC, string? Summary)
{
public int TemperatureF => 32 + (int)(TemperatureC /
0.5556);
}
First of all, with the minimal API approach, all of your code will be inside the Program.cs file. If you are a seasoned .NET developer, it’s easy to understand the preceding code, and you’ll find it similar to some of the things you’ve always used with the controller approach.
首先,使用最小 API 方法,您的所有代码都将位于 Program.cs 文件中。如果您是一位经验丰富的 .NET 开发人员,则很容易理解前面的代码,并且您会发现它类似于您一直使用控制器方法的一些内容。
At the end of the day, it’s another way to write an API, but it’s based on ASP.NET Core.
归根结底,这是编写 API 的另一种方式,但它基于 ASP.NET Core。
However, if you are new to ASP.NET, this single file approach is easy to understand. It’s easy to understand how to extend the code in the template and add more features to this API.
但是,如果您不熟悉 ASP.NET,这种单文件方法很容易理解。很容易理解如何扩展模板中的代码并向此 API 添加更多功能。
Don’t forget that minimal means that it contains the minimum set of components needed to build an HTTP API but it doesn’t mean that the application you are going to build will be simple. It will require a good design like any other .NET application.
不要忘记,minimal 意味着它包含构建 HTTP API 所需的最少组件集,但这并不意味着您要构建的应用程序会很简单。与任何其他 .NET 应用程序一样,它需要良好的设计。
As a final point, the minimal API approach is not a replacement for the MVC approach. It’s just another way to write the same thing.
最后一点,最小 API 方法不能替代 MVC 方法。这只是另一种写同样东西的方法。
Let’s go back to the code.
让我们回到代码。
Even the template of the minimal API uses the new approach of .NET 6 web applications: a top-level statement.
即使是最小 API 的模板也使用 .NET 6 Web 应用程序的新方法:顶级语句。
It means that the project has a Program.cs file only instead of using two files to configure an application.
这意味着项目只有一个 Program.cs 文件,而不是使用两个文件来配置应用程序。
If you don’t like this style of coding, you can convert your application to the old template for ASP.NET Core 3.x/5. This approach still continues to work in .NET as well.
如果您不喜欢这种编码样式,可以将应用程序转换为 ASP.NET Core 3.x/5 的旧模板。此方法在 .NET 中也将继续有效。
By default, the new template includes support for the OpenAPI Specification and more specifically, Swagger.
默认情况下,新模板包括对 OpenAPI 规范的支持,更具体地说,包括对 Swagger 的支持。
Let’s say that we have our documentation and playground for the endpoints working out of the box without any additional configuration needed.
假设我们有现成的端点文档和 Playground,无需任何额外的配置。
You can see the default configuration for Swagger in the following two lines of codes:
您可以在以下两行代码中看到 Swagger 的默认配置:
Very often, you don’t want to expose Swagger and all the endpoints to the production or staging environments. The default template enables Swagger out of the box only in the development environment with the following lines of code:
通常,您不希望将 Swagger 和所有终端节点公开给生产或暂存环境。默认模板仅在开发环境中启用开箱即用的 Swagger,代码行如下:
if (app.Environment.IsDevelopment())
{
app.UseSwagger();
app.UseSwaggerUI();
}
If the application is running on the dev elopment environment, you must also include the Swagger documentation, but otherwise not.
如果应用程序在 dev elopment 环境中运行,则还必须包含 Swagger 文档,否则不得包含。
Note : We’ll talk in detail about Swagger in Chapter 3, Working with Minimal APIs.
注意:我们将在第 3 章 使用最小 API 中详细讨论 Swagger。
In these last few lines of code in the template, we are introducing another generic concept for .NET 6 web applications: environments.
在模板的最后几行代码中,我们引入了 .NET 6 Web 应用程序的另一个通用概念:环境。
Typically, when we develop a professional application, there are a lot of phases through which an application is developed, tested, and finally published to the end users.
通常,当我们开发专业应用程序时,应用程序会经历许多开发、测试并最终发布给最终用户的阶段。
By convention, these phases are regulated and called development, staging, and production. As developers, we might like to change the behavior of the application based on the current environment.
按照惯例,这些阶段受到监管,称为开发、暂存和生产。作为开发人员,我们可能希望根据当前环境更改应用程序的行为。
There are several ways to access this information but the typical way to retrieve the actual environment in modern .NET 6 applications is to use environment variables. You can access the environment variables directly from the app variable in the Program.cs file.
有多种方法可以访问此信息,但在现代 .NET 6 应用程序中检索实际环境的典型方法是使用环境变量。您可以直接从 Program.cs 文件中的 app 变量访问环境变量。
The following code block shows how to retrieve all the information about the environments directly from the startup point of the application:
以下代码块演示如何直接从应用程序的启动点检索有关环境的所有信息:
if (app.Environment.IsDevelopment())
{
// your code here
}
if (app.Environment.IsStaging())
{
// your code here
}
if (app.Environment.IsProduction())
{
// your code here
}
In many cases, you can define additional environments, and you can check your custom environment with the following code:
在许多情况下,您可以定义其他环境,并且可以使用以下代码检查您的自定义环境:
if (app.Environment.IsEnvironment("TestEnvironment"))
{
// your code here
}
To define routes and handlers in minimal APIs, we use the MapGet, MapPost, MapPut, and MapDelete methods. If you are used to using HTTP verbs, you will have noticed that the verb Patch is not present, but you can define any set of verbs using MapMethods.
要在最小的 API 中定义路由和处理程序,我们使用 MapGet、MapPost、MapPut 和 MapDelete 方法。如果您习惯使用 HTTP 动词,您会注意到动词 Patch 不存在,但您可以使用 MapMethods 定义任何动词集。
For instance, if you want to create a new endpoint to post some data to the API, you can write the following code:
As you can see in the short preceding code, it’s very easy to add a new endpoint with the new minimal API template.
正如您在前面的简短代码中所看到的,使用新的最小 API 模板添加新终端节点非常容易。
It was more difficult previously, especially for a new developer, to code a new endpoint with binding parameters and use dependency injection.
以前,使用绑定参数编写新终端节点并使用依赖项注入更加困难,尤其是对于新开发人员而言。
Important note : We’ll talk in detail about routing in Chapter 2, Exploring Minimal APIs and Their Advantages, and about dependency injection in Chapter 4, Dependency Injection in a Minimal API Project.
重要提示 : 我们将在第 2 章 探索最小 API 及其优势中详细讨论路由,并在第 4 章 最小 API 项目中的依赖注入。
Summary
总结
In this chapter, we first started with a brief history of minimal APIs. Next, we saw how to create a project with Visual Studio 2022 as well as Visual Studio Code and the .NET CLI. After that, we examined the structure of the new template, how to access different environments, and how to start interacting with REST endpoints.
在本章中,我们首先从最小 API 的简要历史开始。接下来,我们了解了如何使用 Visual Studio 2022 以及 Visual Studio Code 和 .NET CLI 创建项目。之后,我们检查了新模板的结构、如何访问不同的环境以及如何开始与 REST 端点交互。
In the next chapter, we will see how to bind parameters, the new routing configuration, and how to customize a response.
在下一章中,我们将了解如何绑定参数、新的路由配置以及如何自定义响应。
2 Exploring Minimal APIs and Their Advantages
探索最小 API 及其优势
In this chapter of the book, we will introduce some of the basic themes related to minimal APIs in .NET 6.0, showing how they differ from the controller-based web APIs that we have written in the previous version of .NET. We will also try to underline both the pros and the cons of this new approach of writing APIs.
在本书的这一章中,我们将介绍与 .NET 6.0 中的最小 API 相关的一些基本主题,展示它们与我们在早期版本的 .NET 中编写的基于控制器的 Web API 有何不同。我们还将尝试强调这种编写 API 的新方法的优缺点。
In this chapter, we will be covering the following topics:
在本章中,我们将介绍以下主题:
• Routing
• Parameter binding
• Exploring responses
• Controlling serialization
• Architecting a minimal API project
Technical requirements
技术要求
To follow the descriptions in this chapter, you will need to create an ASP.NET Core 6.0 Web API application. You can either use one of the following options:
要按照本章中的描述进行作,您需要创建一个 ASP.NET Core 6.0 Web API 应用程序。您可以使用以下选项之一:
• Option 1: Click on the New | Project command in the File menu of Visual Studio 2022 – then, choose the ASP.NET Core Web API template. Select a name and the working directory in the wizard and be sure to uncheck the Use controllers (uncheck to use minimal APIs) option in the next step.
选项 1:点击新建 |Visual Studio 2022 的 File (文件) 菜单中的 Project (项目) 命令,然后选择 ASP.NET Core Web API 模板。在向导中选择一个名称和工作目录,并确保在下一步中取消选中 Use controllers (不选中使用最少的 API) 选项。
• Option 2: Open your console, shell, or Bash terminal, and change to your working directory. Use the following command to create a new Web API application:
选项 2:打开您的控制台、shell 或 Bash 终端,然后切换到您的工作目录。使用以下命令创建新的 Web API 应用程序:
dotnet new webapi -minimal -o Chapter02
Now, open the project in Visual Studio by double-clicking the project file, or in Visual Studio Code, by typing the following command in the already open console:
现在,通过在 Visual Studio 中双击项目文件或在 Visual Studio Code 中通过在已打开的控制台中键入以下命令来打开项目:
cd Chapter02
code.
Finally, you can safely remove all the code related to the WeatherForecast sample, as we don’t need it for this chapter.
最后,您可以安全地删除与 WeatherForecast 示例相关的所有代码,因为本章不需要它。
Routing is responsible for matching incoming HTTP requests and dispatching those requests to the app’s executable endpoints. Endpoints are the app’s units of executable request-handling code. Endpoints are defined in the app and configured when the app starts. The endpoint matching process can extract values from the request’s URL and provide those values for request processing. Using endpoint information from the app, routing is also able to generate URLs that map to endpoints.
路由负责匹配传入的 HTTP 请求并将这些请求分派到应用程序的可执行端点。端点是应用程序的可执行请求处理代码单元。终端节点在应用程序中定义,并在应用程序启动时进行配置。终端节点匹配过程可以从请求的 URL 中提取值,并提供这些值以供请求处理。使用应用程序中的终端节点信息,路由还能够生成映射到终端节点的 URL。
In controller-based web APIs, routing is defined via the UseEndpoints() method in Startup.cs or using data annotations such as Route, HttpGet, HttpPost, HttpPut, HttpPatch, and HttpDelete right over the action methods.
在基于控制器的 Web API 中,路由是通过 Startup.cs 中的 UseEndpoints() 方法定义的,或者使用作方法上的数据注释(如 Route、HttpGet、HttpPost、HttpPut、HttpPatch 和 HttpDelete)来定义。
As mentioned in Chapter 1, Introduction to Minimal APIs in minimal APIs, we define the route patterns using the Map methods of the WebApplication object. Here’s an example:
如第 1 章 最小 API 简介中所述,在最小 API 中,我们使用 WebApplication 对象的 Map 方法定义路由模式。下面是一个示例:
In this code, we have defined four endpoints, each with a different routing and method. Of course, we can use the same route pattern with different HTTP verbs.
在此代码中,我们定义了四个终端节点,每个终端节点都有不同的路由和方法。当然,我们可以对不同的 HTTP 动词使用相同的路由模式。
Note : As soon as we add an endpoint to our application (for example, using MapGet()), UseRouting() is automatically added at the start of the middleware pipeline and UseEndpoints() at the end of the pipeline.
注意 : 一旦我们将端点添加到应用程序(例如,使用 MapGet()),UseRouting() 就会自动添加到中间件管道的开头,UseEndpoints() 会自动添加到管道的末尾。
As shown here, ASP.NET Core 6.0 provides Map methods for the most common HTTP verbs. If we need to use other verbs, we can use the generic MapMethods:
如此处所示,ASP.NET Core 6.0 为最常见的 HTTP 动词提供了 Map 方法。如果我们需要使用其他动词,我们可以使用通用的 MapMethods:
In the following sections, we will show in detail how routing works effectively and how we can control its behavior.
在以下部分中,我们将详细展示路由如何有效工作以及如何控制其行为。
Route handlers
路由处理程序
Methods that execute when a route URL matches (according to parameters and constraints, as described in the following sections) are called route handlers. Route handlers can be a lambda expression, a local function, an instance method, or a static method, whether synchronous or asynchronous:
当路由 URL 匹配时执行的方法(根据参数和约束,如以下部分所述)称为路由处理程序。路由处理程序可以是 lambda 表达式、本地函数、实例方法或静态方法,无论是同步方法还是异步方法:
• Here’s an example of a lambda expression (inline or using a variable):
以下是 lambda 表达式的示例(内联或使用变量):
• The following is an example of an instance method:
以下是实例方法的示例:
var handler = new HelloHandler();
app.MapGet("/hello", handler.Hello);
class HelloHandler
{
public string Hello()
=> "[INSTANCE METHOD] Hello
World!";
}
• Here, we can see an example of a static method:
在这里,我们可以看到一个静态方法的示例:
app.MapGet("/hello", HelloHandler.Hello);
class HelloHandler
{
public static string Hello()
=> "[STATIC METHOD] Hello World!";
}
Route parameters
路由参数
As with the previous versions of .NET, we can create route patterns with parameters that will be automatically captured by the handler:
与以前版本的 .NET 一样,我们可以创建路由模式,其中包含处理程序将自动捕获的参数:
app.MapGet("/users/{username}/products/{productId}",
(string username, int productId)
=> $"The Username is {username} and the product Id
is {productId}");
A route can contain an arbitrary number of parameters. When a request is made to this route, the parameters will be captured, parsed, and passed as arguments to the corresponding handler. In this way, the handler will always receive typed arguments (in the preceding sample, we are sure that the username is string and the product ID is int).
路由可以包含任意数量的参数。当向此路由发出请求时,参数将被捕获、解析并作为参数传递给相应的处理程序。这样,处理程序将始终接收类型化参数(在前面的示例中,我们确保 username 是 string,产品 ID 是 int)。
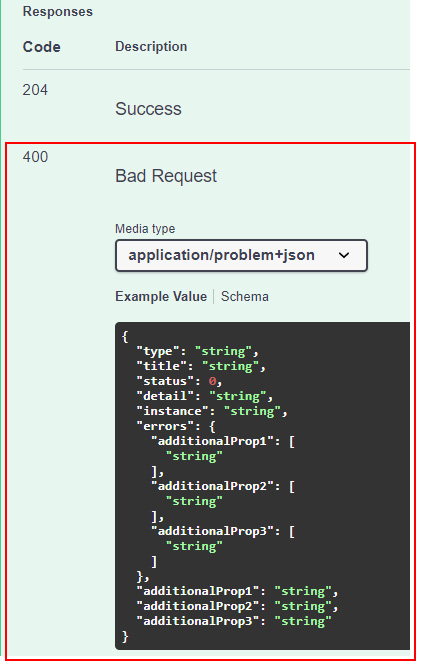
If the route values cannot be casted to the specified types, then an exception of the BadHttpRequestException type will be thrown, and the API will respond with a 400 Bad Request message.
如果无法将路由值强制转换为指定类型,则将引发 BadHttpRequestException 类型的异常,并且 API 将以 400 Bad Request 消息进行响应。
Route constraints
路由约束
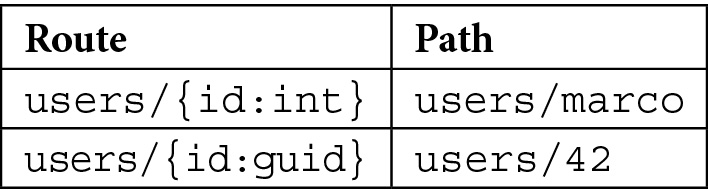
Route constraints are used to restrict valid types for route parameters. Typical constraints allow us to specify that a parameter must be a number, a string, or a GUID. To specify a route constraint, we simply need to add a colon after the parameter name, then specify the constraint name:
路由约束用于限制路由参数的有效类型。典型约束允许我们指定参数必须是数字、字符串或 GUID。要指定路由约束,我们只需要在参数名称后添加一个冒号,然后指定约束名称:
app.MapGet("/users/{id:int}", (int id) => $"The user Id is
{id}");
app.MapGet("/users/{id:guid}", (Guid id) => $"The user Guid
is {id}");
If, according to the constraints, no route matches the specified path, we don’t get an exception. Instead we obtain a 404 Not Found message, because, in fact, if the constraints do not fit, the route itself isn’t reachable. So, for example, in the following cases we get 404 responses:
如果根据约束,没有路由与指定的路径匹配,则不会收到异常。相反,我们会收到 404 Not Found 消息,因为事实上,如果约束不合适,则路由本身无法访问。因此,例如,在以下情况下,我们会收到 404 个响应:
Table 2.1 – Examples of an invalid path according to the route constraints
表 2.1 – 根据路由约束的无效路径示例
Every other argument in the handler that is not declared as a route constraint is expected, by default, in the query string. For example, see the following:
默认情况下,处理程序中未声明为路由约束的所有其他参数都应在查询字符串中。例如,请参阅以下内容:
In the next section, Parameter binding, we’ll go deeper into how to use binding to further customize routing by specifying, for example, where to search for routing arguments, how to change their names, and how to have optional route parameters.
在下一节 参数绑定 中,我们将更深入地介绍如何使用 binding 进一步自定义路由,例如,指定在何处搜索路由参数、如何更改其名称以及如何拥有可选的路由参数。
Parameter binding
参数绑定
Parameter binding is the process that converts request data (i.e., URL paths, query strings, or the body) into strongly typed parameters that can be consumed by route handlers. ASP.NET Core minimal APIs support the following binding sources:
参数绑定是将请求数据(即 URL 路径、查询字符串或正文)转换为路由处理程序可以使用的强类型参数的过程。ASP.NET Core 最小 API 支持以下绑定源:
• Route values
• Query strings
• Headers
• The body (as JSON, the only format supported by default)
• A service provider (dependency injection)
We’ll talk in detail about dependency injection in Chapter 4, Implementing Dependency Injection.
我们将在 第 4 章 实现依赖注入 中详细讨论依赖注入。
As we’ll see later in this chapter, if necessary, we can customize the way in which binding is performed for a particular input. Unfortunately, in the current version, binding from Form is not natively supported in minimal APIs. This means that, for example, IFormFile is not supported either.
正如我们在本章后面看到的那样,如有必要,我们可以自定义对特定 input 执行绑定的方式。遗憾的是,在当前版本中,最小的 API 本身并不支持从 Form 进行绑定。这意味着,例如,IFormFile 也不受支持。
To better understand how parameter binding works, let’s take a look at the following API:
为了更好地理解参数绑定的工作原理,我们来看一下以下 API:
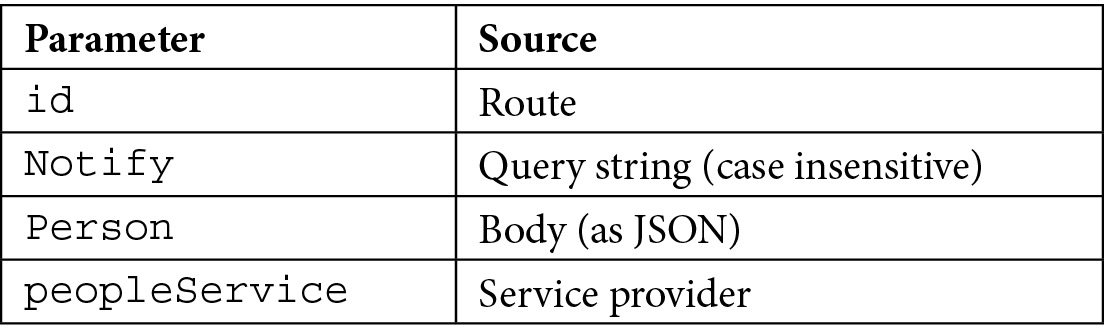
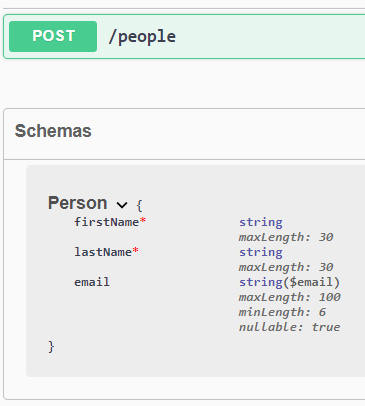
var builder = WebApplication.CreateBuilder(args);
builder.Services.AddScoped<PeopleService>();
var app = builder.Build();
app.MapPut("/people/{id:int}", (int id, bool notify, Person
person, PeopleService peopleService) => { });
app.Run();
public class PeopleService { }
public record class Person(string FirstName, string
LastName);
Parameters that are passed to the handler are resolved in the following ways:
传递给处理程序的参数通过以下方式解析:
As we can see, ASP.NET Core is able to automatically understand where to search for parameters for binding, based on the route pattern and the types of the parameters themselves. For example, a complex type such as the Person class is expected in the request body.
正如我们所看到的,ASP.NET Core 能够根据路由模式和参数本身的类型,自动理解在何处搜索要绑定的参数。例如,请求正文中应包含复杂类型(如 Person 类)。
If needed, as in the previous versions of ASP.NET Core, we can use attributes to explicitly specify where parameters are bound from and, optionally, use different names for them. See the following endpoint:
如果需要,就像在早期版本的 ASP.NET Core 中一样,我们可以使用属性来显式指定参数的绑定位置,并可选择为它们使用不同的名称。请参阅以下终端节点:
app.MapGet("/search", string q) => { });
The API can be invoked with /search?q=text. However, using q as the name of the argument isn’t a good idea, because its meaning is not self-explanatory. So, we can modify the handler using FromQueryAttribute:
可以使用 /search?q=text 调用 API。但是,使用 q 作为参数的名称并不是一个好主意,因为它的含义不言自明。因此,我们可以使用 FromQueryAttribute 修改处理程序:
In this way, the API still expects a query string parameter named q, but in the handler its value is now bound to the searchText argument.
这样,API 仍然需要名为 q 的查询字符串参数,但在处理程序中,其值现在绑定到 searchText 参数。
Note : According to the standard, the GET, DELETE, HEAD, and OPTIONS HTTP options should never have a body. If, nevertheless, you want to use it, you need to explicitly add the [FromBody] attribute to the handler argument; otherwise, you’ll get an InvalidOperationException error. However, keep in mind that this is a bad practice.
注意 : 根据该标准,GET、DELETE、HEAD 和 OPTIONS HTTP 选项不应有正文。但是,如果要使用它,则需要将 [FromBody] 属性显式添加到 handler 参数;否则,您将收到 InvalidOperationException 错误。但是,请记住,这是一种不好的做法。
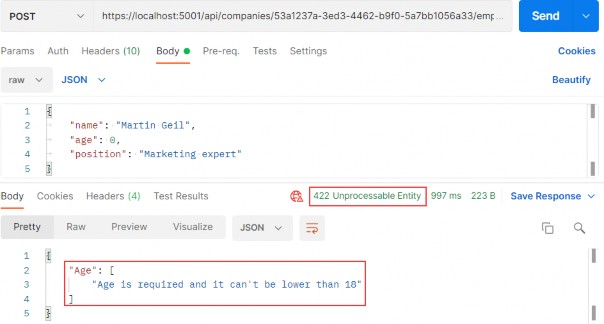
By default, all the parameters in route handlers are required. So, if, according to routing, ASP.NET Core finds a valid route, but not all the required parameters are provided, we will get an error. For example, let’s look at the following method:
默认情况下,路由处理程序中的所有参数都是必需的。因此,如果根据路由,ASP.NET Core 找到了一个有效的路由,但未提供所有必需的参数,我们将收到错误。例如,让我们看看下面的方法:
app.MapGet("/people", (int pageIndex, int itemsPerPage) => { });
If we call the endpoint without the pageIndex or itemsPerPage query string values, we will obtain a BadHttpRequestException error, and the response will be 400 Bad Request.
如果我们在没有 pageIndex 或 itemsPerPage 查询字符串值的情况下调用终端节点,我们将获得 BadHttpRequestException 错误,并且响应将为 400 Bad Request。
To make the parameters optional, we just need to declare them as nullable or provide a default value. The latter case is the most common. However, if we adopt this solution, we cannot use a lambda expression for the handler. We need another approach, for example, a local function:
要使参数成为可选的,我们只需要将它们声明为 nullable 或提供默认值。后一种情况是最常见的。但是,如果我们采用此解决方案,则不能对处理程序使用 lambda 表达式。我们需要另一种方法,例如本地函数:
// This won't compile
//app.MapGet("/people", (int pageIndex = 0, int
itemsPerPage = 50) => { });
string SearchMethod(int pageIndex = 0,
int itemsPerPage = 50) => $"Sample
result for page {pageIndex} getting
{itemsPerPage} elements";
app.MapGet("/people", SearchMethod);
In this case, we are dealing with a query string, but the same rules apply to all the binding sources.
在本例中,我们正在处理查询字符串,但相同的规则适用于所有绑定源。
Keep in mind that if we use nullable reference types (which are enabled by default in .NET 6.0 projects) and we have, for example, a string parameter that could be null, we need to declare it as nullable – otherwise, we’ll get a BadHttpRequestException error again. The following example correctly defines the orderBy query string parameter as optional:
请记住,如果我们使用可为 null 的引用类型(在 .NET 6.0 项目中默认启用),并且我们有一个可能为 null 的字符串参数,则需要将其声明为可为 null,否则,我们将再次收到 BadHttpRequestException 错误。以下示例正确地将 orderBy 查询字符串参数定义为可选:
app.MapGet("/people", (string? orderBy) => $"Results ordered by {orderBy}");
Special bindings
特殊绑定
In controller-based web APIs, a controller that inherits from Microsoft.AspNetCore.Mvc.ControllerBase has access to some properties that allows it to get the context of the request and response: HttpContext, Request, Response, and User. In minimal APIs, we don’t have a base class, but we can still access this information because it is treated as a special binding that is always available to any handler:
在基于控制器的 Web API 中,从 Microsoft.AspNetCore.Mvc.ControllerBase 继承的控制器有权访问一些属性,这些属性允许它获取请求和响应的上下文:HttpContext、Request、Response 和 User。在最小的 API 中,我们没有基类,但我们仍然可以访问此信息,因为它被视为任何处理程序始终可用的特殊绑定:
Tip : We can also access all these objects using the IHttpContextAccessor interface, as we did in the previous ASP.NET Core versions.
提示 : 我们还可以使用 IHttpContextAccessor 接口访问所有这些对象,就像我们在以前的 ASP.NET Core 版本中所做的那样。
Custom binding
自定义绑定
In some cases, the default way in which parameter binding works isn’t enough for our purpose. In minimal APIs, we don’t have support for the IModelBinderProvider and IModelBinder interfaces, but we have two alternatives to implement custom model binding.
在某些情况下,参数绑定的默认工作方式不足以满足我们的目的。在最小的 API 中,我们不支持 IModelBinderProvider 和 IModelBinder 接口,但我们有两种实现自定义模型绑定的方法。
Important note : The IModelBinderProvider and IModelBinder interfaces in controller-based projects allow us to define the mapping between the request data and the application model. The default model binder provided by ASP.NET Core supports most of the common data types, but, if necessary, we can extend the system by creating our own providers. We can find more information at the following link: https://docs.microsoft.com/aspnet/core/mvc/advanced/custom-model-binding.
重要提示 : 基于控制器的项目中的 IModelBinderProvider 和 IModelBinder 接口允许我们定义请求数据和应用程序模型之间的映射。ASP.NET Core 提供的默认模型 Binder 支持大多数常见数据类型,但如有必要,我们可以通过创建自己的提供程序来扩展系统。我们可以在以下链接中找到更多信息:https://docs.microsoft.com/aspnet/core/mvc/advanced/custom-model-binding。
If we want to bind a parameter that comes from a route, query string, or header to a custom type, we can add a static TryParse method to the type:
如果我们想将来自路由、查询字符串或标头的参数绑定到自定义类型,我们可以向该类型添加静态 TryParse 方法:
// GET /navigate?location=43.8427,7.8527
app.MapGet("/navigate", (Location location) => $"Location:
{location.Latitude}, {location.Longitude}");
public class Location
{
public double Latitude { get; set; }
public double Longitude { get; set; }
public static bool TryParse(string? value,
IFormatProvider? provider, out Location? location)
{
if (!string.IsNullOrWhiteSpace(value))
{
var values = value.Split(',',
StringSplitOptions.RemoveEmptyEntries);
if (values.Length == 2 && double.
TryParse(values[0],
NumberStyles.AllowDecimalPoint,
CultureInfo.InvariantCulture,
out var latitude) && double.
TryParse(values[1], NumberStyles.
AllowDecimalPoint, CultureInfo.
InvariantCulture, out var longitude))
{
location = new Location
{ Latitude = latitude,
Longitude = longitude };
return true;
}
}
location = null;
return false;
}
}
In the TryParse method, we can try to split the input parameter and check whether it contains two decimal values: in this case, we parse the numbers to build the Location object and we return true. Otherwise, we return false because the Location object cannot be initialized.
在 TryParse 方法中,我们可以尝试拆分输入参数并检查它是否包含两个十进制值:在本例中,我们解析数字以构建 Location 对象并返回 true。否则,我们将返回 false,因为无法初始化 Location 对象。
Important note : When the minimal API finds that a type contains a static TryParse method, even if it is a complex type, it assumes that it is passed in the route or the query string, based on the routing template. We can use the [FromHeader] attributes to change the binding source. In any case, TryParse will never be invoked for the body of the request.
重要提示 : 当最小 API 发现某个类型包含静态 TryParse 方法时,即使它是一个复杂类型,它也会根据路由模板假定它是在路由或查询字符串中传递的。我们可以使用 [FromHeader] 属性来更改绑定源。在任何情况下,都不会为请求正文调用 TryParse。
If we need to completely control how binding is performed, we can implement a static BindAsync method on the type. This isn’t a very common solution, but in some cases, it can be useful:
如果我们需要完全控制绑定的执行方式,我们可以在类型上实现静态 BindAsync 方法。这不是一个非常常见的解决方案,但在某些情况下,它可能很有用:
// POST /navigate?lat=43.8427&lon=7.8527
app.MapPost("/navigate", (Location location) =>
$"Location: {location.Latitude}, {location.Longitude}");
public class Location
{
// ...
public static ValueTask<Location?> BindAsync(HttpContext
context, ParameterInfo parameter)
{
if (double.TryParse(context.Request.Query["lat"],
NumberStyles.AllowDecimalPoint, CultureInfo.
InvariantCulture, out var latitude)&& double.
TryParse(context.Request.Query["lon"],
NumberStyles.AllowDecimalPoint, CultureInfo.
InvariantCulture, out var longitude))
{
var location = new Location
{ Latitude = latitude, Longitude = longitude };
return ValueTask.
FromResult<Location?>(location);
}
return ValueTask.FromResult<Location?>(null);
}
}
As we can see, the BindAsync method takes the whole HttpContext as an argument, so we can read all the information we need to create the actual Location object that is passed to the route handler. In this example, we read two query string parameters (lat and lon), but (in the case of POST, PUT, or PATCH methods) we can also read the entire body of the request and manually parse its content. This can be useful, for instance, if we need to handle requests that have a format other than JSON (which, as said before, is the only one supported by default).
正如我们所看到的,BindAsync 方法将整个 HttpContext 作为参数,因此我们可以读取创建传递给路由处理程序的实际 Location 对象所需的所有信息。在此示例中,我们读取两个查询字符串参数(lat 和 lon),但(在 POST、PUT 或 PATCH 方法的情况下)我们还可以读取请求的整个正文并手动解析其内容。例如,如果我们需要处理格式不是 JSON 的请求(如前所述,JSON 是默认支持的唯一格式),这可能很有用。
If the BindAsync method returns null, while the corresponding route handler parameter cannot assume this value (as in the previous example), we will get an HttpBadRequestException error, which. as usual, will be wrapped in a 400 Bad Request response.
如果 BindAsync 方法返回 null,而相应的路由处理程序参数不能采用此值(如前面的示例所示),我们将收到 HttpBadRequestException 错误。像往常一样,将包装在 400 Bad Request 响应中。
Important note : We shouldn’t define both the TryParse and BindAsync methods using a type; if both are present, BindAsync always has precedence (that is, TryParse will never be invoked).
重要提示 : 我们不应该使用类型同时定义 TryParse 和 BindAsync 方法;如果两者都存在,则 BindAsync 始终具有优先权(即,永远不会调用 TryParse)。
Now that we have looked at parameter binding and understood how to use it and customize its behavior, let’s see how to work with responses in minimal APIs.
现在我们已经了解了参数绑定并了解了如何使用它并自定义其行为,让我们看看如何在最小的 API 中使用响应。
Exploring responses
探索响应
As with controller-based projects, with route handlers of minimal APIs as well, we can directly return a string or a class (either synchronously or asynchronously):
与基于控制器的项目一样,使用最小 API 的路由处理程序,我们可以直接返回字符串或类(同步或异步):
• If we return a string (as in the examples of the previous section), the framework writes the string directly to the response, setting its content type to text/plain and the status code to 200 OK
如果我们返回一个字符串(如上一节的示例所示),框架会将该字符串直接写入响应,将其内容类型设置为 text/plain,并将状态代码设置为 200 OK
• If we use a class, the object is serialized into the JSON format and sent to the response with the application/json content type and a 200 OK status code
如果我们使用类,则对象将序列化为 JSON 格式,并使用 application/json 内容类型和 200 OK 状态代码发送到响应
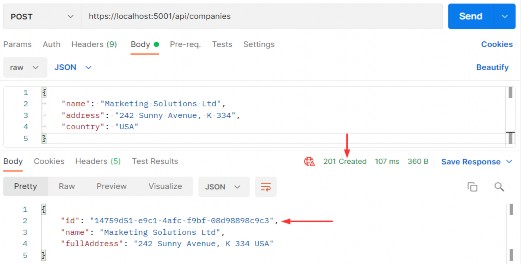
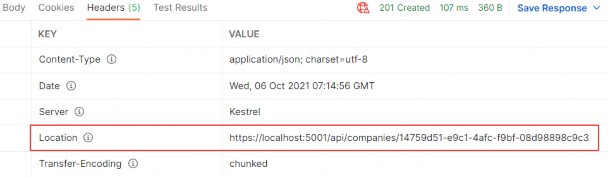
However, in a real application, we typically need to control the response type and the status code. In this case, we can use the static Results class, which allows us to return an instance of the IResult interface, which in minimal APIs acts how IActionResult does for controllers. For instance, we can use it to return a 201 Created response rather than a 400 Bad Request or a 404 Not Found message. L et’s look at some examples:
但是,在实际应用程序中,我们通常需要控制响应类型和状态代码。在这种情况下,我们可以使用静态 Results 类,该类允许我们返回 IResult 接口的实例,该实例在最小的 API 中的作用类似于 IActionResult 对控制器的作用。例如,我们可以使用它来返回 201 Created 响应,而不是 400 Bad Request 或 404 Not Found 消息。我们来看看一些例子:
app.MapGet("/ok", () => Results.Ok(new Person("Donald",
"Duck")));
app.MapGet("/notfound", () => Results.NotFound());
app.MapPost("/badrequest", () =>
{
// Creates a 400 response with a JSON body.
return Results.BadRequest(new { ErrorMessage = "Unable to
complete the request" });
});
app.MapGet("/download", (string fileName) =>
Results.File(fileName));
record class Person(string FirstName, string LastName);
Each method of the Results class is responsible for setting the response type and status code that correspond to the meaning of the method itself (e.g., the Results.NotFound() method returns a 404 Not Found response). Note that even if we typically need to return an object in the case of a 200 OK response (with Results.Ok()), it isn’t the only method that allows this. Many other methods allow us to include a custom response; in all these cases, the response type will be set to application/json and the object will automatically be JSON-serialized.
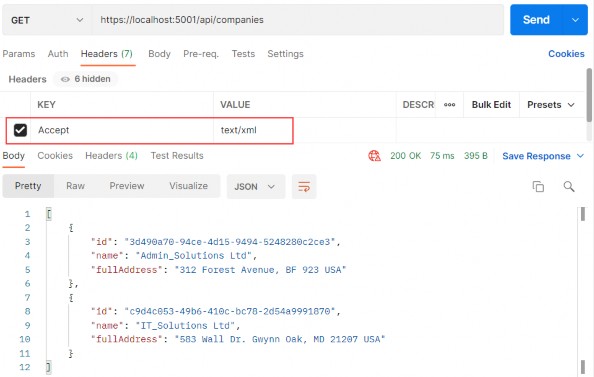
Results 类的每个方法都负责设置与方法本身的含义相对应的响应类型和状态代码(例如,Results.NotFound() 方法返回 404 Not Found 响应)。请注意,即使我们通常需要在 200 OK 响应的情况下返回一个对象(使用 Results.Ok()),它也不是唯一允许这样做的方法。许多其他方法允许我们包含自定义响应;在所有这些情况下,响应类型都将设置为 application/json,并且对象将自动进行 JSON 序列化。
The current version of minimal APIs does not support content negotiation. We only have a few methods that allow us to explicitly set the content type, when getting a file with Results.Bytes(), Results.Stream(), and Results.File(), or when using Results.Text() and Results.Content(). In all other cases, when we’re dealing with complex objects, the response will be in JSON format. This is a precise design choice since most developers rarely need to support other media types. By supporting only JSON without performing content negotiation, minimal APIs can be very efficient.
当前版本的 minimal API 不支持内容协商。只有少数方法允许我们显式设置内容类型,当使用 Results.Bytes()、Results.Stream() 和 Results.File() 获取文件时,或者使用 Results.Text() 和 Results.Content() 时。在所有其他情况下,当我们处理复杂对象时,响应将采用 JSON 格式。这是一个精确的设计选择,因为大多数开发人员很少需要支持其他媒体类型。通过仅支持 JSON 而不执行内容协商,最少的 API 可以非常高效。
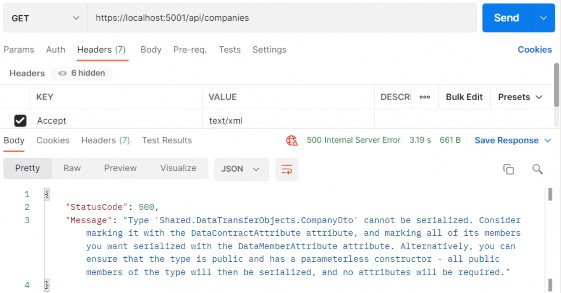
However, this approach isn’t enough in all scenarios. In some cases, we may need to create a custom response type, for example, if we want to return an HTML or XML response instead of the standard JSON. We can manually use the Results.Content() method (which allows us to specify the content as a simple string with a particular content type), but, if we have this requirement, it is better to implement a custom IResult type, so that the solution can be reused.
但是,这种方法并非在所有情况下都足够。在某些情况下,我们可能需要创建自定义响应类型,例如,如果我们要返回 HTML 或 XML 响应而不是标准 JSON。我们可以手动使用 Results.Content() 方法(它允许我们将内容指定为具有特定内容类型的简单字符串),但是,如果我们有此要求,最好实现自定义 IResult 类型,以便可以重用解决方案。
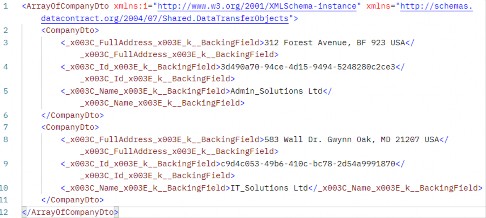
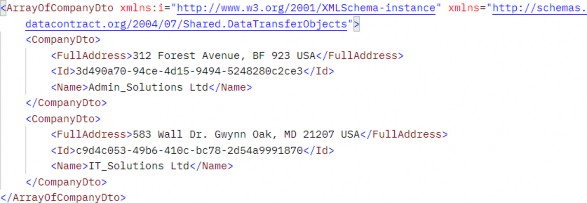
For example, let’s suppose that we want to serialize objects in XML instead of JSON. We can then define an XmlResult class that implements the IResult interface:
例如,假设我们想用 XML 而不是 JSON 来序列化对象。然后,我们可以定义一个实现 IResult 接口的 XmlResult 类:
public class XmlResult : IResult
{
private readonly object value;
public XmlResult(object value)
{
this.value = value;
}
public Task ExecuteAsync(HttpContext httpContext)
{
using var writer = new StringWriter();
var serializer = new XmlSerializer(value.GetType());
serializer.Serialize(writer, value);
var xml = writer.ToString();
httpContext.Response.ContentType = MediaTypeNames.
Application.Xml;
httpContext.Response.ContentLength = Encoding.UTF8
.GetByteCount(xml);
return httpContext.Response.WriteAsync(xml);
}
}
The IResult interface requires us to implement the ExecuteAsync method, which receives the current HttpContext as an argument. We serialize the value using the XmlSerializer class and then write it to the response, specifying the correct response type.
IResult 接口要求我们实现 ExecuteAsync 方法,该方法接收当前 HttpContext 作为参数。我们使用 XmlSerializer 类序列化该值,然后将其写入响应,并指定正确的响应类型。
Now, we can directly use the new XmlResult type in our route handlers. However, best practices suggest that we create an extension method for the IResultExtensions interface, as with the following one:
现在,我们可以直接在路由处理程序中使用新的 XmlResult 类型。但是,最佳实践建议我们为 IResultExtensions 接口创建一个扩展方法,如下所示:
public static class ResultExtensions
{
public static IResult Xml(this IResultExtensions
resultExtensions, object value) => new XmlResult(value);
}
In this way, we have a new Xml method available on the Results.Extensions property:
这样,我们在 Results.Extensions 属性上就有了一个新的 Xml 方法:
app.MapGet("/xml", () => Results.Extensions.Xml(new City { Name = "Taggia" }));
public record class City
{
public string? Name { get; init; }
}
The benefit of this approach is that we can reuse it everywhere we need to deal with XML without having to manually handle the serialization and the response type (as we should have done using the Result.Content() method instead).
这种方法的好处是,我们可以在需要处理 XML 的任何地方重用它,而不必手动处理序列化和响应类型(就像我们应该使用 Result.Content() 方法所做的那样)。
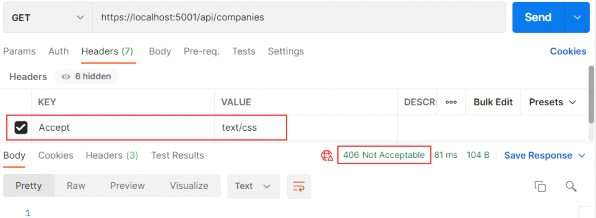
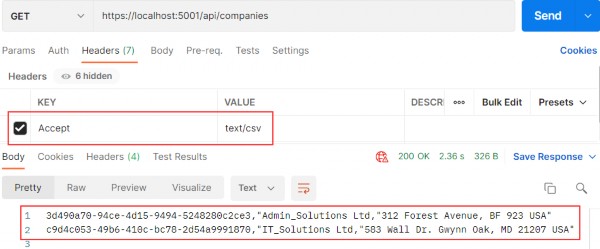
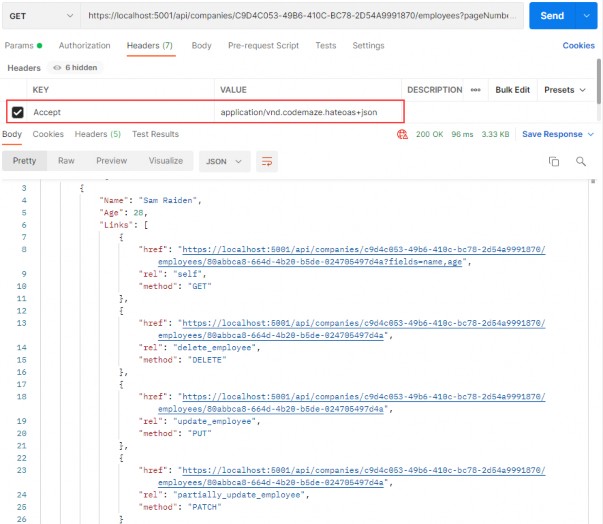
Tip : If we want to perform content validation, we need to manually check the Accept header of the HttpRequest object, which we can pass to our handlers, and then create the correct response accordingly.
提示 : 如果我们想执行内容验证,我们需要手动检查 HttpRequest 对象的 Accept 标头,我们可以将其传递给我们的处理程序,然后相应地创建正确的响应。
After analyzing how to properly handle responses in minimal APIs, we’ll see how to control the way our data is serialized and deserialized in the next section.
在分析了如何在最小 API 中正确处理响应之后,我们将在下一节中了解如何控制数据的序列化和反序列化方式。
Controlling serialization
控制序列化
As described in the previous sections, minimal APIs only provide built-in support for the JSON format. In particular, the framework uses System.Text.Json for serialization and deserialization. In controller-based APIs, we can change this default and use JSON.NET instead. This is not possible when working with minimal APIs: we can’t replace the serializer at all.
如前几节所述,最小 API 仅提供对 JSON 格式的内置支持。具体而言,框架使用 System.Text.Json 进行序列化和反序列化。在基于控制器的 API 中,我们可以更改此默认值并改用 JSON.NET。当使用最少的 API 时,这是不可能的:我们根本无法替换序列化器。
The built-in serializer uses the following options:
内置序列化程序使用以下选项:
• Case-insensitive property names during serialization
序列化期间不区分大小写的属性名称
• Camel case property naming policy
驼峰式大小写属性命名策略
• Support for quoted numbers (JSON strings for number properties)
支持带引号的数字(数字属性的 JSON 字符串)
In controller-based APIs, we can customize these settings by calling AddJsonOptions() fluently after AddControllers(). In minimal APIs, we can’t use this approach since we don’t have controllers at all, so we need to explicitly call the Configure method for JsonOptions. So, let’s consider this handler:
在基于控制器的 API 中,我们可以通过在 AddControllers() 之后流畅地调用 AddJsonOptions() 来自定义这些设置。在最小的 API 中,我们不能使用这种方法,因为我们根本没有控制器,因此我们需要显式调用 JsonOptions 的 Configure 方法。那么,让我们考虑一下这个处理程序:
app.MapGet("/product", () =>
{
var product = new Product("Apple", null, 0.42, 6);
return Results.Ok(product);
});
public record class Product(string Name, string? Description, double UnitPrice, int Quantity)
{
public double TotalPrice => UnitPrice * Quantity;
}
Using the default JSON options, we get this result:
使用默认的 JSON 选项,我们得到以下结果:
As expected, the Description property hasn’t been serialized because it is null, as well as TotalPrice, which isn’t included in the response because it is read-only.
正如预期的那样,Description 属性尚未序列化,因为它为 null,以及 TotalPrice,由于它是只读的,因此未包含在响应中。
Another typical use case for JsonOptions is when we want to add converters that will be automatically applied for each serialization or deserialization, for example, JsonStrinEnumConverter to convert enumeration values into or from strings.
JsonOptions 的另一个典型用例是当我们想要添加将自动应用于每个序列化或反序列化的转换器时,例如,JsonStrinEnumConverter 用于将枚举值转换为字符串或从字符串转换。
Important note : Be aware that the JsonOptions class used by minimal APIs is the one available in the Microsoft.AspNetCore.Http.Json namespace. Do not confuse it with the one that is defined in the Microsoft.AspNetCore.Mvc namespace; the name of the object is the same, but the latter is valid only for controllers, so it has no effect if set in a minimal API project.
重要提示 : 请注意,最小 API 使用的 JsonOptions 类是 Microsoft.AspNetCore.Http.Json 命名空间中可用的类。不要将其与 Microsoft.AspNetCore.Mvc 命名空间中定义的名称混淆;对象的名称相同,但后者仅对控制器有效,因此如果在最小 API 项目中设置,则无效。
Because of the JSON-only support, if we do not explicitly add support for other formats, as described in the previous sections (using, for example, the BindAsync method on a custom type), minimal APIs will automatically perform some validations on the body binding source and handle the following scenarios:
由于仅支持 JSON,如果我们没有显式添加对其他格式的支持,如前面部分所述(例如,在自定义类型上使用 BindAsync 方法),则最小 API 将在正文绑定源上自动执行一些验证并处理以下情况:
Table 2.3 – The response status codes for body binding problems
表 2.3 – 正文绑定问题的响应状态代码
In these cases, because body validation fails, our route handlers will never be invoked, and we will get the response status codes shown in the preceding table directly.
在这些情况下,由于主体验证失败,我们的路由处理程序将永远不会被调用,我们将直接获取上表中显示的响应状态代码。
Now, we have covered all the pillars that we need to start developing minimal APIs. However, there is another important thing to talk about: the correct way to design a real project to avoid common mistakes within the architecture.
现在,我们已经涵盖了开始开发最小 API 所需的所有支柱。但是,还有一件重要的事情要谈:设计真实项目的正确方法,以避免架构中的常见错误。
Architecting a minimal API project
构建一个最小的 API 项目
Up to now, we have written route handlers directly in the Program.cs file. This is a perfectly supported scenario: with minimal APIs, we can write all our code inside this single file. In fact, almost all the samples show this solution. However, while this is allowed, we can easily imagine how this approach can lead to unstructured and therefore unmaintainable projects. If we have fewer endpoints, it is fine – otherwise, it is better to organize our handlers in separate files.
到目前为止,我们已经直接在 Program.cs 文件中编写了路由处理程序。这是一个完全支持的场景:使用最少的 API,我们可以在这个文件中编写所有代码。事实上,几乎所有样本都显示了这种解决方案。然而,虽然这是允许的,但我们可以很容易地想象这种方法如何导致非结构化的、因此无法维护的项目。如果端点较少,那很好 —— 否则,最好将我们的处理程序组织在单独的文件中。
Let’s suppose that we have the following code right in the Program.cs file because we have to handle CRUD operations:
假设 Program.cs 文件中有以下代码,因为我们必须处理 CRUD作:
It’s easy to imagine that, if we have all the implementation here (even if we’re using PeopleService to extract the business logic), this file can easily explode. So, in real scenarios, the inline lambda approach isn’t the best practice. We should use the other methods that we have covered in the Routing section to define the handlers instead. So, it is a good idea to create an external class to hold all the route handlers:
很容易想象,如果我们在这里拥有所有实现(即使我们使用 PeopleService 来提取业务逻辑),此文件很容易爆炸。因此,在实际场景中,内联 lambda 方法并不是最佳实践。我们应该使用 路由 部分介绍的其他方法来定义处理程序。因此,创建一个外部类来保存所有路由处理程序是一个好主意:
We have grouped all the endpoint definitions inside the PeopleHandler.MapEndpoints static method, which takes the IEndpointRouteBuilder interface as an argument, which in turn is implemented by the WebApplication class. Then, instead of using lambda expressions, we have created separate methods for each handler, so that the code is much cleaner. In this way, to register all these handlers in our minimal API, we just need the following code in Program.cs:
我们已将所有端点定义分组到 PeopleHandler.MapEndpoints 静态方法中,该方法将 IEndpointRouteBuilder 接口作为参数,而该接口又由 WebApplication 类实现。然后,我们没有使用 lambda 表达式,而是为每个处理程序创建了单独的方法,以便代码更加简洁。这样,要在我们的最小 API 中注册所有这些处理程序,我们只需要在 Program.cs 中编写以下代码:
var builder = WebApplication.CreateBuilder(args);
// ..
var app = builder.Build();
// ..
PeopleHandler.MapEndpoints(app);
app.Run();
Going forward
展望未来
The approach just shown allows us to better organize a minimal API project, but still requires that we explicitly add a line to Program.cs for every handler we want to define. Using an interface and a bit of reflection, we can create a straightforward and reusable solution to simplify our work with minimal APIs.
刚才展示的方法使我们能够更好地组织一个最小的 API 项目,但仍然需要我们为要定义的每个处理程序显式添加一行 to Program.cs。使用接口和一些反射,我们可以创建一个简单且可重用的解决方案,以最少的 API 简化我们的工作。
So, let’s start by defining the following interface:
因此,让我们从定义以下接口开始:
public interface IEndpointRouteHandler
{
public void MapEndpoints(IEndpointRouteBuilder app);
}
As the name implies, we need to make all our handlers (as with PeopleHandler previously) implement it:
顾名思义,我们需要让所有的处理程序(就像之前的 PeopleHandler 一样)实现它:
public class PeopleHandler : IEndpointRouteHandler
{
public void MapEndpoints(IEndpointRouteBuilder app)
{
// ...
}
// ...
}
Note : The MapEndpoints method isn’t static anymore, because now it is the implementation of the IEndpointRouteHandler interface.
注意 : MapEndpoints 方法不再是静态的,因为它现在是 IEndpointRouteHandler 接口的实现。
Now we need a new extension method that, using reflection, scans an assembly for all the classes that implement this interface and automatically calls their MapEndpoints methods:
现在,我们需要一个新的扩展方法,该方法使用反射扫描程序集中实现此接口的所有类,并自动调用其 MapEndpoints 方法:
public static class IEndpointRouteBuilderExtensions
{
public static void MapEndpoints(this
IEndpointRouteBuilder app, Assembly assembly)
{
var endpointRouteHandlerInterfaceType =
typeof(IEndpointRouteHandler);
var endpointRouteHandlerTypes =
assembly.GetTypes().Where(t =>
t.IsClass && !t.IsAbstract && !t.IsGenericType
&& t.GetConstructor(Type.EmptyTypes) != null
&& endpointRouteHandlerInterfaceType
.IsAssignableFrom(t));
foreach (var endpointRouteHandlerType in
endpointRouteHandlerTypes)
{
var instantiatedType = (IEndpointRouteHandler)
Activator.CreateInstance
(endpointRouteHandlerType)!;
instantiatedType.MapEndpoints(app);
}
}
}
With all these pieces in place, the last thing to do is to call the extension method in the Program.cs file, before the Run() method:
完成所有这些部分后,最后要做的是在 Run() 方法之前调用 Program.cs 文件中的扩展方法:
In this way, when we add new handlers, we should only need to create a new class that implements the IEndpointRouteHandler interface. No other changes will be required in Program.cs to add the new endpoints to the routing engine.
这样,当我们添加新的处理程序时,我们应该只需要创建一个实现 IEndpointRouteHandler 接口的新类。Program.cs 中无需进行其他更改即可将新终端节点添加到路由引擎。
Writing route handlers in external files and thinking about a way to automate endpoint registrations so that Program.cs won’t grow for each feature addition is the right way to architect a minimal API project.
在外部文件中编写路由处理程序并考虑一种自动化终端节点注册的方法,以便Program.cs不会因每个功能添加而增长,这是构建最小 API 项目的正确方法。
Summary
总结
ASP.NET Core minimal APIs represent a new way of writing HTTP APIs in the .NET world. In this chapter, we covered all the pillars that we need to start developing minimal APIs, how to effectively approach them, and the best practices to take into consideration when deciding to follow this architecture.
ASP.NET Core 最小 API 代表了在 .NET 环境中编写 HTTP API 的一种新方法。在本章中,我们介绍了开始开发最小 API 所需的所有支柱、如何有效地处理它们,以及在决定遵循此架构时要考虑的最佳实践。
In the next chapter, we’ll focus on some advanced concepts such as documenting APIs with Swagger, defining a correct error handling system, and integrating a minimal API with a single-page application.
在下一章中,我们将重点介绍一些高级概念,例如使用 Swagger 记录 API、定义正确的错误处理系统以及将最小 API 与单页应用程序集成。
3 Working with Minimal APIs
使用最少的 API
In this chapter, we will try to apply some advanced development techniques available in earlier versions of .NET. We will touch on four common topics that are disjointed from each other.
在本章中,我们将尝试应用早期版本的 .NET 中提供的一些高级开发技术。我们将讨论四个彼此脱节的常见主题。
We’ll cover productivity topics and best practices for frontend interfacing and configuration management.
我们将介绍前端接口和配置管理的生产力主题和最佳实践。
Every developer, sooner or later, will encounter the issues that we describe in this chapter. A programmer will have to write documentation for APIs, will have to make the API talk to a JavaScript frontend, will have to handle errors and try to fix them, and will have to configure the application according to parameters.
每个开发人员迟早都会遇到我们在本章中描述的问题。程序员必须为 API 编写文档,必须使 API 与 JavaScript 前端通信,必须处理错误并尝试修复它们,并且必须根据参数配置应用程序。
The themes we will touch on in this chapter are as follows:
我们将在本章中讨论的主题如下:
• Exploring Swagger
• Supporting CORS
• Working with global API settings
• Error handling
Technical requirements
技术要求
As reported in the previous chapters, it will be necessary to have the .NET 6 development framework available; you will also need to use .NET tools to run an in-memory web server.
如前几章所述,有必要提供 .NET 6 开发框架;您还需要使用 .NET 工具来运行内存中的 Web 服务器。
To validate the functionality of cross-origin resource sharing (CORS), we should exploit a frontend application residing on a different HTTP address from the one where we will host the API.
为了验证跨域资源共享 (CORS) 的功能,我们应该利用驻留在与我们将托管 API 的 HTTP 地址不同的 HTTP 地址上的前端应用程序。
To test the CORS example that we will propose within the chapter, we will take advantage of a web server in memory, which will allow us to host a simple static HTML page.
为了测试我们将在本章中提出的 CORS 示例,我们将利用内存中的 Web 服务器,这将允许我们托管一个简单的静态 HTML 页面。
To host the web page (HTML and JavaScript), we will therefore use LiveReloadServer, which you can install as a .NET tool with the following command:
因此,为了托管网页(HTML 和 JavaScript),我们将使用 LiveReloadServer,您可以使用以下命令将其作为 .NET 工具安装:
Swagger has entered the life of .NET developers in a big way; it’s been present on the project shelves for several versions of Visual Studio.
Swagger 已经在很大程度上进入了 .NET 开发人员的生活;它已出现在多个版本的 Visual Studio 的项目架上。
“The OpenAPI Specification allows the description of a remote API accessible through HTTP or HTTP-like protocols.
An API defines the allowed interactions between two pieces of software, just like a user interface defines the ways in which a user can interact with a program.
“OpenAPI 规范允许描述可通过 HTTP 或类似 HTTP 的协议访问的远程 API。API 定义两个软件之间允许的交互,就像用户界面定义用户与程序交互的方式一样。
An API is composed of the list of possible methods to call (requests to make), their parameters, return values and any data format they require (among other things). This is equivalent to how a user’s interactions with a mobile phone app are limited to the buttons, sliders and text boxes in the app’s user interface.”
API 由可能调用的方法列表 (发出的请求) 、它们的参数、返回值和它们需要的任何数据格式 (以及其他内容) 组成。这相当于用户与手机应用程序的交互仅限于应用程序用户界面中的按钮、滑块和文本框。
Swagger in the Visual Studio scaffold
Visual Studio 基架中的 Swagger
We understand then that Swagger, as we know it in the .NET world, is nothing but a set of specifications defined for all applications that expose web-based APIs:
然后我们明白,正如我们在 .NET 世界中所知道的那样,Swagger 只不过是为公开基于 Web 的 API 的所有应用程序定义的一组规范:
Figure 3.1 – Visual Studio scaffold
By selecting Enable OpenAPI support, Visual Studio goes to add a NuGet package called Swashbuckle.AspNetCore and automatically configures it in the Program.cs file.
通过选择“启用 OpenAPI 支持”,Visual Studio 将添加一个名为 Swashbuckle.AspNetCore 的 NuGet 包,并自动在 Program.cs 文件中对其进行配置。
We show the few lines that are added with a new project. With these few pieces of information, a web application is enabled only for the development environment, which allows the developer to test the API without generating a client or using tools external to the application:
我们显示了随新项目添加的几行。有了这几条信息,Web 应用程序仅针对开发环境启用,这允许开发人员在不生成客户端或使用应用程序外部工具的情况下测试 API:
var builder = WebApplication.CreateBuilder(args);
builder.Services.AddEndpointsApiExplorer();
builder.Services.AddSwaggerGen();
var app = builder.Build();
if (app.Environment.IsDevelopment())
{
         app.UseSwagger();
         app.UseSwaggerUI();
}
The graphical part generated by Swagger greatly increases productivity and allows the developer to share information with those who will interface with the application, be it a frontend application or a machine application.
Swagger 生成的图形部分大大提高了生产力,并允许开发人员与将与应用程序交互的人员共享信息,无论是前端应用程序还是机器应用程序。
Note : We remind you that enabling Swagger in a production environment is strongly discouraged because sensitive information could be publicly exposed on the web or on the network where the application resides.
注意 : 我们提醒您,强烈建议不要在生产环境中启用 Swagger,因为敏感信息可能会在 Web 或应用程序所在的网络上公开暴露。
We have seen how to introduce Swagger into our API applications; this functionality allows us to document our API, as well as allow users to generate a client to call our application. Let’s see the options we have to quickly interface an application with APIs described with OpenAPI.
我们已经了解了如何将 Swagger 引入我们的 API 应用程序;此功能允许我们记录我们的 API,并允许用户生成客户端来调用我们的应用程序。让我们看看我们必须选择哪些选项来快速将应用程序与 OpenAPI 中描述的 API 连接起来。
OpenAPI Generator
OpenAPI 生成器
With Swagger, and especially with the OpenAPI standard, you can automatically generate clients to connect to the web application. Clients can be generated for many languages but also for development tools. We know how tedious and repetitive it is to write clients to access the Web API. Open API Generator helps us automate code generation, inspect the API documentation made by Swagger and OpenAPI, and automatically generate code to interface with the API. Simple, easy, and above all, fast.
使用 Swagger,尤其是 OpenAPI 标准,您可以自动生成客户端以连接到 Web 应用程序。可以为多种语言生成客户端,也可以为开发工具生成客户端。我们知道编写客户端来访问 Web API 是多么乏味和重复。Open API Generator 帮助我们自动生成代码,检查 Swagger 和 OpenAPI 制作的 API 文档,并自动生成代码以与 API 交互。简单、轻松,最重要的是,快速。
The @openapitools/openapi-generator-cli npm package is a very well-known package wrapper for OpenAPI Generator, which you can find at https://openapi-generator.tech/.
@openapitools/openapi-generator-cli npm 包是 OpenAPI 生成器的一个非常知名的包包装器,您可以在 https://openapi-generator.tech/ 中找到它。
With this tool, you can generate clients for programming languages as well as load testing tools such as JMeter and K6.
使用此工具,您可以为编程语言生成客户端以及 JMeter 和 K6 等负载测试工具。
It is not necessary to install the tool on your machine, but if the URL of the application is accessible from the machine, you can use a Docker image, as described by the following command:
无需在计算机上安装该工具,但如果可以从计算机访问应用程序的 URL,则可以使用 Docker 映像,如以下命令所述:
docker run --rm \

    -v ${PWD}:/local openapitools/openapi-generator-cli generate \

    -i /local/petstore.yaml \

    -g go \

    -o /local/out/go
The command allows you to generate a Go client using the OpenAPI definition found in the petstore.yaml file that is mounted on the Docker volume.
该命令允许您使用挂载在 Docker 卷上的 petstore.yaml 文件中找到的 OpenAPI 定义生成 Go 客户端。
Now, let’s go into detail to understand how you can leverage Swagger in .NET 6 projects and with minimal APIs.
现在,让我们详细介绍如何在 .NET 6 项目中利用 Swagger 并使用最少的 API。
Swagger in minimal APIs
在最少的 API 中使用Swagger
In ASP.NET Web API, as in the following code excerpt, we see a method documented with C# language annotations with the triple slash (///).
在 Web API ASP.NET,如以下代码摘录所示,我们看到一个使用带有三斜杠 () 的 C# 语言注释记录的方法。
The documentation section is leveraged to add more information to the API description. In addition, the ProducesResponseType annotations help Swagger identify the possible codes that the client must handle as a result of the method call:
利用 documentation 部分向 API 描述添加更多信息。此外,ProducesResponseType 注释可帮助 Swagger 识别客户端在方法调用后必须处理的可能代码:
/// <summary>
/// Creates a Contact.
/// </summary>
/// <param name="contact"></param>
/// <returns>A newly created Contact</returns>
/// <response code="201">Returns the newly created contact</response>
/// <response code="400">If the contact is null</response>
[HttpPost]
[ProducesResponseType(StatusCodes.Status201Created)]
[ProducesResponseType(StatusCodes.Status400BadRequest)]
public async Task<IActionResult> Create(Contact contactItem)
{
     _context.Contacts.Add(contactItem);
     await _context.SaveChangesAsync();
     return CreatedAtAction(nameof(Get), new { id =
     contactItem.Id }, contactItem);
}
Swagger, in addition to the annotations on single methods, is also instructed by the documentation of the language to give further information to those who will then have to use the API application. A description of the methods of the parameters is always welcome by those who will have to interface; unfortunately, it is not possible to exploit this functionality in the minimal API.
除了单个方法的注释外,该语言的文档还指示 Swagger 为那些随后必须使用 API 应用程序的人提供更多信息。对参数方法的描述总是受到那些必须进行接口的人的欢迎;遗憾的是,无法在最小 API 中利用此功能。
Let’s go in order and see how to start using Swagger on a single method:
让我们按顺序来看看如何在单个方法上开始使用 Swagger:
var builder = WebApplication.CreateBuilder(args);
builder.Services.AddEndpointsApiExplorer();
builder.Services.AddSwaggerGen(c =>
{
    c.SwaggerDoc("v1", new()
    {
        Title = builder.Environment.ApplicationName,
        Version = "v1", Contact = new()
        { Name = "PacktAuthor", Email = "authors@packtpub.com",
          Url = new Uri("https://www.packtpub.com/") },
          Description = "PacktPub Minimal API - Swagger",
          License = new Microsoft.OpenApi.Models.
            OpenApiLicense(),
          TermsOfService = new("https://www.packtpub.com/")
});
});
var app = builder.Build();
if (app.Environment.IsDevelopment())
{
    app.UseSwagger();
    app.UseSwaggerUI();
}
With this first example, we have configured Swagger and general Swagger information. We have included additional information that enriches Swagger’s UI. The only mandatory information is the title, while the version, contact, description, license, and terms of service are optional.
在第一个示例中,我们配置了 Swagger 和常规 Swagger 信息。我们添加了丰富 Swagger UI 的其他信息。唯一的必填信息是标题,而版本、联系人、描述、许可证和服务条款是可选的。
The UseSwaggerUI() method automatically configures where to put the UI and the JSON file describing the API with the OpenAPI format.
UseSwaggerUI() 方法自动配置放置 UI 和描述 OpenAPI 格式 API 的 JSON 文件的位置。
Here is the result at the graphical level:
这是图形级别的结果:
Figure 3.2 – The Swagger UI
We can immediately see that the OpenAPI contract information has been placed in the /swagger/v1/swagger.json path.
我们可以立即看到 OpenAPI 合约信息已经放在 /swagger/v1/swagger.json 路径下。
The contact information is populated, but no operations are reported as we haven’t entered any yet. Should the API have versioning? In the top-right section, we can select the available operations for each version.
联系信息已填充,但未报告任何作,因为我们尚未输入任何作。API 应该有版本控制吗?在右上角,我们可以为每个版本选择可用的作。
We can customize the Swagger URL and insert the documentation on a new path; the important thing is to redefine SwaggerEndpoint, as follows:
我们可以自定义 Swagger URL 并将文档插入到新路径上;重要的是重新定义 SwaggerEndpoint,如下所示:
Let’s now go on to add the endpoints that describe the business logic.
现在,我们继续添加描述业务逻辑的终端节点。
It is very important to define RouteHandlerBuilder because it allows us to describe all the properties of the endpoint that we have written in code.
定义 RouteHandlerBuilder 非常重要,因为它允许我们描述我们在代码中编写的端点的所有属性。
The UI of Swagger must be enriched as much as possible; we must describe at best what the minimal APIs allow us to specify. Unfortunately, not all the functionalities are available, as in ASP.NET Web API.
必须尽可能丰富 Swagger 的 UI;我们最多只能描述最小 API 允许我们指定的内容。遗憾的是,并非所有功能都可用,就像 ASP.NET Web API 一样。
Versioning in minimal APIs
在最少的 API 中进行版本控制
Versioning in minimal APIs is not handled in the framework functionality; as a result, even Swagger cannot handle UI-side API versioning. So, we observe that when we go to the Select a definition section shown in Figure 3.2, only one entry for the current version of the API is visible.
最小 API 中的版本控制不在框架功能中处理;因此,即使是 Swagger 也无法处理 UI 端 API 版本控制。因此,我们观察到,当我们转到图 3.2 所示的 Select a definition 部分时,只有当前版本 API 的一个条目可见。
Swagger features
Swagger 功能
We just realized that not all features are available in Swagger; let’s now explore what is available instead. To describe the possible output values of an endpoint, we can call functions that can be called after the handler, such as the Produces or WithTags functions, which we are now going to explore.
我们刚刚意识到并非所有功能在 Swagger 中都可用;现在让我们来探索一下可用的内容。为了描述终端节点的可能输出值,我们可以调用可以在处理程序之后调用的函数,例如 Produces 或 WithTags 函数,我们现在将探讨这些函数。
The Produces function decorates the endpoint with all the possible responses that the client should be able to manage. We can add the name of the operation ID; this information will not appear in the Swagger screen, but it will be the name with which the client will create the method to call the endpoint. OperationId is the unique name of the operation made available by the handler.
Produces 函数使用客户端应该能够管理的所有可能的响应来装饰终端节点。我们可以添加作 ID 的名称;此信息不会显示在 Swagger 屏幕中,但它将是客户端创建调用终结点的方法时使用的名称。OperationId 是处理程序可用的作的唯一名称。
To exclude an endpoint from the API description, you need to call ExcludeFromDescription(). This function is rarely used, but it is very useful in cases where you don’t want to expose endpoints to programmers who are developing the frontend because that particular endpoint is used by a machine application.
要从 API 描述中排除终端节点,您需要调用 ExcludeFromDescription()。此函数很少使用,但在您不想将端点公开给正在开发前端的程序员的情况下,它非常有用,因为该特定端点由机器应用程序使用。
Finally, we can add and tag the various endpoints and segment them for better client management:
最后,我们可以添加和标记各种终端节点,并对其进行细分以更好地管理客户端:
This is the graphical result of Swagger; as I anticipated earlier, the tags and operation IDs are not shown by the web client:
这是 Swagger 的图形结果;正如我之前所预料的那样,Web 客户端不会显示标签和作 ID:
The endpoint description, on the other hand, is very useful to include. It’s very easy to implement: just insert C# comments in the method (just insert three slashes, ///, in the method). Minimal APIs don’t have methods like we are used to in web-based controllers, so they are not natively supported.
另一方面,终端节点描述非常有用。这很容易实现:只需在方法中插入 C# 注释(只需在方法中插入三个斜杠 , 即可)。Minimal API 没有我们在基于 Web 的控制器中习惯的方法,因此它们本身不受支持。
Swagger isn’t just the GUI we’re used to seeing. Above all, Swagger is the JSON file that supports the OpenAPI specification, of which the latest version is 3.1.0.
Swagger 不仅仅是我们习惯看到的 GUI。首先,Swagger 是支持 OpenAPI 规范的 JSON 文件,最新版本为 3.1.0。
In the following snippet, we show the section containing the description of the first endpoint that we inserted in the API. We can infer both the tag and the operation ID; this information will be used by those who will interface with the API:
在以下代码段中,我们显示了包含我们在 API 中插入的第一个终端节点的描述的部分。我们可以推断 tag 和作 ID;此信息将由将与 API 交互的人员使用:
In this section, we have seen how to configure Swagger and what is currently not yet supported.
在本节中,我们了解了如何配置 Swagger 以及当前尚不支持的内容。
In the following chapters, we will also see how to configure OpenAPI, both for the OpenID Connect standard and authentication via the API key.
在接下来的章节中,我们还将了解如何配置 OpenAPI,包括 OpenID Connect 标准和通过 API 密钥进行身份验证。
In the preceding code snippet of the Swagger UI, Swagger makes the schematics of the objects involved available, both inbound to the various endpoints and outbound from them.
在 Swagger UI 的前面的代码片段中,Swagger 使所涉及对象的示意图可用,包括入站到各个端点和从它们出站的示意图。
Figure 3.4 – Input and output data schema
图 3.4 – 输入和输出数据架构
We will learn how to deal with these objects and how to validate and define them in Chapter 6, Exploring Validation and Mapping.
我们将在第 6 章 探索验证和映射 中学习如何处理这些对象以及如何验证和定义它们。
Swagger OperationFilter
Swagger OperationFilter
The operation filter allows you to add behavior to all operations shown by Swagger. In the following example, we’ll show you how to add an HTTP header to a particular call, filtering it by OperationId.
作筛选器允许您向 Swagger 显示的所有作添加行为。在以下示例中,我们将向您展示如何向特定调用添加 HTTP 标头,并按 OperationId 对其进行筛选。
When you go to define an operation filter, you can also set filters based on routes, tags, and operation IDs:
在定义作筛选条件时,您还可以根据路由、标签和作 ID 设置筛选条件:
public class CorrelationIdOperationFilter : IOperationFilter
{
    private readonly IWebHostEnvironment environment;
    public CorrelationIdOperationFilter(IWebHostEnvironment
    environment)
    {
        this.environment = environment;
    }
    /// <summary>
    /// Apply header in parameter Swagger.
    /// We add default value in parameter for developer
        environment
    /// </summary>
    /// <param name="operation"></param>
    /// <param name="context"></param>
    public void Apply(OpenApiOperation operation,
    OperationFilterContext context)
    {
        if (operation.Parameters == null)
        {
            operation.Parameters = new
            List<OpenApiParameter>();
        }
        if (operation.OperationId ==
            "SampleResponseOperation")
        {
             operation.Parameters.Add(new OpenApiParameter
             {
                 Name = "x-correlation-id",
                 In = ParameterLocation.Header,
                 Required = false,
                 Schema = new OpenApiSchema { Type =
                 "String", Default = new OpenApiString("42") }
             });
        }
         }
}
To define an operation filter, the IOperationFilter interface must be implemented.
要定义作过滤器,必须实现 IOperationFilter 接口。
In the constructor, you can define all interfaces or objects that have been previously registered in the dependency inject engine.
在构造函数中,您可以定义之前在 dependency inject 引擎中注册的所有接口或对象。
The filter then consists of a single method, called Apply, which provides two objects:
然后,筛选器由一个名为 Apply 的方法组成,该方法提供两个对象:
• OpenApiOperation: An operation where we can add parameters or check the operation ID of the current call
• OperationFilterContext: The filter context that allows you to read ApiDescription, where you can find the URL of the current endpoint
Finally, to enable the operation filter in Swagger, we will need to register it inside the SwaggerGen method.
最后,要在 Swagger 中启用作筛选器,我们需要在 SwaggerGen 方法中注册它。
In this method, we should then add the filter, as follows:
在此方法中,我们应该添加过滤器,如下所示:
builder.Services.AddSwaggerGen(c =>
{
         … removed for brevity
         c.OperationFilter<CorrelationIdOperationFilter>();
});
Here is the result at the UI level; in the endpoint and only for a particular operation ID, we would have a new mandatory header with a default parameter that, in development, will not have to be inserted:
下面是 UI 级别的结果;在终端节点中,并且仅针对特定的作 ID,我们将有一个带有 default 参数的新 mandatory 标头,在开发中,不必插入该参数:
Figure 3.5 – API key section
图 3.5 – API 密钥部分
This case study helps us a lot when we have an API key that we need to set up and we don’t want to insert it on every single call.
当我们有一个需要设置的 API 密钥并且我们不想在每次调用时都插入它时,这个案例研究对我们有很大帮助。
Operation filter in production
生产中的作过滤器
Since Swagger should not be enabled in the production environment, the filter and its default value will not create application security problems.
由于不应在生产环境中启用 Swagger,因此过滤器及其默认值不会造成应用程序安全问题。
We recommend that you disable Swagger in the production environment.
建议您在生产环境中关闭 Swagger。
In this section, we figured out how to enable a UI tool that describes the API and allows us to test it. In the next section, we will see how to enable the call between single-page applications (SPAs) and the backend via CORS.
在本节中,我们弄清楚了如何启用描述 API 并允许我们测试它的 UI 工具。在下一节中,我们将了解如何通过 CORS 启用单页应用程序 (SPA) 与后端之间的调用。
Enabling CORS
启用 CORS
CORS is a security mechanism whereby an HTTP/S request is blocked if it arrives from a different domain than the one where the application is hosted. More information can be found in the Microsoft documentation or on the Mozilla site for developers.
CORS 是一种安全机制,如果 HTTP/S 请求来自与托管应用程序的域不同的域,则 HTTP/S 请求将被阻止。有关详细信息,请参阅 Microsoft 文档或 Mozilla 开发人员网站。
A browser prevents a web page from making requests to a domain other than the domain that serves that web page. A web page, SPA, or server-side web page can make HTTP requests to several backend APIs that are hosted in different origins.
浏览器会阻止网页向提供该网页的域以外的域发出请求。网页、SPA 或服务器端网页可以向托管在不同源中的多个后端 API 发出 HTTP 请求。
This restriction is called the same-origin policy. The same-origin policy prevents a malicious site from reading data from another site. Browsers don’t block HTTP requests but do block response data.
此限制称为同源策略。同源策略可防止恶意站点从其他站点读取数据。浏览器不会阻止 HTTP 请求,但会阻止响应数据。
We, therefore, understand that the CORS qualification, as it relates to safety, must be evaluated with caution.
因此,我们理解必须谨慎评估与安全相关的 CORS 资格。
The most common scenario is that of SPAs that are released on web servers with different web addresses than the web server hosting the minimal API:
最常见的情况是在 Web 服务器上发布的 SPA,这些 SPA 的 Web 地址与托管最小 API 的 Web 服务器不同:
Figure 3.6 – SPA and minimal API
图 3.6 – SPA 和最小 API
A similar scenario is that of microservices, which need to talk to each other. Each microservice will reside at a particular web address that will be different from the others.
类似的场景是微服务,它们需要相互通信。每个微服务将驻留在一个与其他微服务不同的特定 Web 地址上。
Figure 3.7 – Microservices and minimal APIs
图 3.7 – 微服务和最少的 API
In all these cases, therefore, a CORS problem is encountered.
因此,在所有这些情况下,都会遇到 CORS 问题。
We now understand the cases in which a CORS request can occur. Now let’s see what the correct HTTP request flow is and how the browser handles the request.
现在,我们了解了可能发生 CORS 请求的情况。现在让我们看看正确的 HTTP 请求流是什么,以及浏览器如何处理请求。
CORS flow from an HTTP request
来自 HTTP 请求的 CORS 流
What happens when a call leaves the browser for a different address other than the one where the frontend is hosted?
当调用离开浏览器前往托管前端的地址以外的其他地址时,会发生什么情况?
The HTTP call is executed and it goes all the way to the backend code, which executes correctly.
HTTP 调用被执行,并一直进入后端代码,后端代码正确执行。
The response, with the correct data inside, is blocked by the browser. That’s why when we execute a call with Postman, Fiddler, or any HTTP client, the response reaches us correctly.
包含正确数据的响应被浏览器阻止。这就是为什么当我们使用 Postman、Fiddler 或任何 HTTP 客户端执行调用时,响应会正确到达我们。
Figure 3.8 – CORS flow
图 3.8 – CORS 流程
In the following figure, we can see that the browser makes the first call with the OPTIONS method, to which the backend responds correctly with a 204 status code:
在下图中,我们可以看到浏览器使用 OPTIONS 方法进行了第一次调用,后端以 204 状态码正确响应:
Figure 3.9 – First request for the CORS call (204 No Content result)
图 3.9 – CORS 调用的第一个请求(204 No Content 结果)
In the second call that the browser makes, an error occurs; the strict-origin-when-cross-origin value is shown in Referrer Policy, which indicates the refusal by the browser to accept data from the backend:
在浏览器进行的第二次调用中,会发生错误;strict-origin-when-cross-origin 值显示在 Referrer Policy 中,该值表示浏览器拒绝接受来自后端的数据:
Figure 3.10 – Second request for the CORS call (blocked by the browser)
图 3.10 – CORS 调用的第二个请求(被浏览器阻止)
When CORS is enabled, in the response to the OPTIONS method call, three headers are inserted with the characteristics that the backend is willing to respect:
启用 CORS 后,在对 OPTIONS 方法调用的响应中,将插入三个标头,这些标头具有后端愿意遵循的特征:
Figure 3.11 – Request for CORS call (with CORS enabled)
图 3.11 – 请求 CORS 调用(启用 CORS)
In this case, we can see that three headers are added that define Access-Control-Allow-Headers, Access-Control-Allow-Methods, and Access-Control-Allow-Origin.
在本例中,我们可以看到添加了三个标头,分别定义 Access-Control-Allow-Headers、Access-Control-Allow-Methods 和 Access-Control-Allow-Origin。
The browser with this information can accept or block the response to this API.
具有此信息的浏览器可以接受或阻止对此 API 的响应。
Setting CORS with a policy
使用策略设置 CORS
Many configurations are possible within a .NET 6 application for activating CORS. We can define authorization policies in which the four available settings can be configured. CORS can also be activated by adding extension methods or annotations.
在 .NET 6 应用程序中可以使用许多配置来激活 CORS。我们可以定义授权策略,在其中可以配置四个可用设置。还可以通过添加扩展方法或注释来激活 CORS。
But let us proceed in order.
但是,让我们按顺序进行吧。
The CorsPolicyBuilder class allows us to define what is allowed or not allowed within the CORS acceptance policy.
orsPolicyBuilder 类允许我们定义 CORS 接受策略中允许或不允许的内容。
We have, therefore, the possibility to set different methods, for example:
因此,我们可以设置不同的方法,例如:
While the first three methods are descriptive and allow us to enable any settings relating to the header, method, and origin of the HTTP call, respectively, AllowCredentials allows us to include the cookie with the authentication credentials.
虽然前三种方法是描述性的,并允许我们分别启用与 HTTP 调用的标头、方法和来源相关的任何设置,但 AllowCredentials 允许我们将 Cookie 与身份验证凭据一起包含。
CORS policy recommendations
CORS 策略建议
We recommend that you don’t use the AllowAny methods but instead filter out the necessary information to allow for greater security. As a best practice, when enabling CORS, we recommend the use of these methods:
我们建议您不要使用 AllowAny 方法,而是筛选掉必要的信息以提高安全性。作为最佳实践,在启用 CORS 时,我们建议使用以下方法:
• WithExposedHeaders
• WithHeaders
• WithOrigins
To simulate a scenario for CORS, we created a simple frontend application with three different buttons. Each button allows you to test one of the possible configurations of CORS within the minimal API. We will explain these configurations in a few lines.
为了模拟 CORS 的场景,我们创建了一个具有三个不同按钮的简单前端应用程序。每个按钮都允许您在最小 API 中测试 CORS 的一种可能配置。我们将用几行来解释这些配置。
To enable the CORS scenario, we have created a single-page application that can be launched on a web server in memory. We have used LiveReloadServer, a tool that can be installed with the .NET CLI. We talked about it at the start of the chapter and now it’s time to use it.
为了启用 CORS 方案,我们创建了一个单页应用程序,该应用程序可以在内存中的 Web 服务器上启动。我们使用了 LiveReloadServer,这是一个可以使用 .NET CLI 安装的工具。我们在本章的开头讨论过它,现在是时候使用它了。
After installing it, you need to launch the SPA with the following command:
安装后,您需要使用以下命令启动 SPA:
Here, BasePath is the folder where you are going to download the examples available on GitHub.
此处,BasePath 是您要下载 GitHub 上可用示例的文件夹。
Then you must start the application backend, either through Visual Studio or Visual Studio Code or through the .NET CLI with the following command:
然后,您必须使用以下命令通过 Visual Studio 或 Visual Studio Code 或通过 .NET CLI 启动应用程序后端:
dotnet run .\Backend\CorsSample.csproj
We’ve figured out how to start an example that highlights the CORS problem; now we need to configure the server to accept the request and inform the browser that it is aware that the request is coming from a different source.
我们已经想出了如何开始一个突出 CORS 问题的示例;现在我们需要配置服务器以接受请求并通知浏览器它知道请求来自不同的来源。
Next, we will talk about policy configuration. We will understand the characteristics of the default policy as well as how to create a custom one.
接下来,我们将讨论策略配置。我们将了解默认策略的特征以及如何创建自定义策略。
Configuring a default policy
配置默认策略
To configure a single CORS enabling policy, you need to define the behavior in the Program.cs file and add the desired configurations. Let’s implement a policy and define it as Default.
要配置单个 CORS 启用策略,您需要在 Program.cs 文件中定义行为并添加所需的配置。让我们实现一个策略并将其定义为 Default。
Then, to enable the policy for the whole application, simply add app.UseCors(); before defining the handlers:
然后,要为整个应用程序启用策略,只需添加 app.UseCors();在定义处理程序之前:
var builder = WebApplication.CreateBuilder(args);
var corsPolicy = new CorsPolicyBuilder("http://localhost:5200")
    .AllowAnyHeader()
    .AllowAnyMethod()
    .Build();
builder.Services.AddCors(c => c.AddDefaultPolicy(corsPolicy));
var app = builder.Build();
app.UseCors();
app.MapGet("/api/cors", () =>
{
         return Results.Ok(new { CorsResultJson = true });
});
app.Run();
Configuring custom policies
配置自定义策略
We can create several policies within an application; each policy may have its own configuration and each policy may be associated with one or more endpoints.
我们可以在一个应用程序中创建多个策略;每个策略可能有自己的配置,并且每个策略可能与一个或多个终端节点关联。
In the case of microservices, having several policies helps to precisely segment access from a different source.
对于微服务,拥有多个策略有助于精确分段来自不同来源的访问。
In order to configure a new policy, it is necessary to add it and give it a name; this name will give access to the policy and allow it to be associated with the endpoint.
要配置新策略,必须添加该策略并为其命名;此名称将授予对策略的访问权限,并允许它与终端节点关联。
The customized policy, as in the previous example, is assigned to the entire application:
如前面的示例所示,自定义策略被分配给整个应用程序:
var builder = WebApplication.CreateBuilder(args);
var corsPolicy = new CorsPolicyBuilder("http://localhost:5200")
    .AllowAnyHeader()
    .AllowAnyMethod()
    .Build();
builder.Services.AddCors(options => options.AddPolicy("MyCustomPolicy", corsPolicy));
var app = builder.Build();
app.UseCors("MyCustomPolicy");
app.MapGet("/api/cors", () =>
{
    return Results.Ok(new { CorsResultJson = true });
});
app.Run();
We next look at how to apply a single policy to a specific endpoint; to this end, two methods are available. The first is via an extension method to the IEndpointConventionBuilder interface. The second method is to add the EnableCors annotation followed by the name of the policy to be enabled for that method.
接下来,我们将了解如何将单个策略应用于特定终端节点;为此,有两种方法可供选择。第一种是通过 IEndpointConventionBuilder 接口的扩展方法。第二种方法是添加 EnableCors 注释,后跟要为该方法启用的策略的名称。
Setting CORS with extensions
使用扩展设置 CORS
It is necessary to use the RequireCors method followed by the name of the policy.
必须使用 RequireCors 方法,后跟策略的名称。
With this method, it is then possible to enable one or more policies for an endpoint:
使用此方法,可以为终端节点启用一个或多个策略:
The second method is to add the EnableCors annotation followed by the name of the policy to be enabled for that method:
第二种方法是添加 EnableCors 注释,后跟要为该方法启用的策略的名称:
Regarding controller programming, it soon becomes apparent that it is not possible to apply a policy to all methods of a particular controller. It is also not possible to group controllers and enable the policy. It is therefore necessary to apply the individual policy to the method or the entire application.
关于控制器编程,很快就会发现不可能将策略应用于特定控制器的所有方法。也无法对控制器进行分组并启用策略。因此,有必要将单个策略应用于方法或整个应用程序。
In this section, we found out how to configure browser protection for applications hosted on different domains.
在本节中,我们了解了如何为托管在不同域上的应用程序配置浏览器保护。
In the next section, we will start configuring our applications.
在下一节中,我们将开始配置我们的应用程序。
Working with global API settings
使用全局 API 设置
We have just defined how you can load data with the options pattern within an ASP.NET application. In this section, we want to describe how you can configure an application and take advantage of everything we saw in the previous section.
我们刚刚定义了如何在 ASP.NET 应用程序中使用 options 模式加载数据。在本节中,我们想描述如何配置应用程序并利用我们在上一节中看到的所有内容。
With the birth of .NET Core, the standard has moved from the Web.config file to the appsettings.json file. The configurations can also be read from other sources, such as other file formats like the old .ini file or a positional file.
随着 .NET Core 的诞生,该标准已从 Web.config 文件移至 appsettings.json 文件。还可以从其他来源读取配置,例如其他文件格式,如旧.ini文件或位置文件。
In minimal APIs, the options pattern feature remains unchanged, but in the next few paragraphs, we will see how to reuse the interfaces or the appsettings.json file structure.
在最小 API 中,选项模式功能保持不变,但在接下来的几段中,我们将看到如何重用接口或 appsettings.json 文件结构。
Configuration in .NET 6
.NET 6 中的配置
The object provided from .NET is IConfiguration, which allows us to read some specific configurations inside the appsettings file.
从 .NET 提供的对象是 IConfiguration,它允许我们读取 appsettings 文件中的一些特定配置。
But, as described earlier, this interface does much more than just access a file for reading.
但是,如前所述,此接口的作用不仅仅是访问文件进行读取。
The following extract from the official documentation helps us understand how the interface is the generic access point that allows us to access the data inserted in various services:
以下摘录自官方文档有助于我们了解接口如何成为允许我们访问插入各种服务中的数据的通用接入点:
Configuration in ASP.NET Core is performed using one or more configuration providers. Configuration providers read configuration data from key-value pairs using a variety of configuration sources.
ASP.NET Core 中的配置是使用一个或多个配置提供程序执行的。配置提供程序使用各种配置源从键值对中读取配置数据。
The following is a list of configuration sources:
以下是配置源的列表:
• Settings files, such as appsettings.json
• Environment variables
• Azure Key Vault
• Azure App Configuration
• Command-line arguments
• Custom providers, installed or created
• Directory files
• In-memory .NET objects
The IConfiguration and IOptions interfaces, which we will see in the next chapter, are designed to read data from the various providers. These interfaces are not suitable for reading and editing the configuration file while the program is running.
我们将在下一章中看到的 IConfiguration 和 IOptions 接口旨在从各种提供程序读取数据。这些接口不适合在程序运行时读取和编辑配置文件。
The IConfiguration interface is available through the builder object, builder.Configuration, which provides all the methods needed to read a value, an object, or a connection string.
IConfiguration 接口可通过 builder 对象 builder 获得。Configuration,它提供读取值、对象或连接字符串所需的所有方法。
After looking at one of the most important interfaces that we will use to configure the application, we want to define good development practices and use a fundamental building block for any developer: namely, classes. Copying the configuration into a class will allow us to better enjoy the content anywhere in the code.
在查看了我们将用于配置应用程序的最重要的接口之一之后,我们想要定义良好的开发实践并为任何开发人员使用一个基本构建块:即类。将配置复制到类中将使我们能够更好地享受代码中任何位置的内容。
We define classes containing a property and classes corresponding appsettings file:
我们定义包含属性的类和对应的 appsettings 文件的类:
Configuration classes
public class MyCustomObject
{
    public string? CustomProperty { get; init; }
}
public class MyCustomStartupObject
{
    public string? CustomProperty { get; init; }
}
And here, we bring back the corresponding JSON of the C# class that we just saw:
在这里,我们返回我们刚刚看到的 C# 类的相应 JSON:
Next, we will be performing several operations.
接下来,我们将执行几项作。
The first operation we perform creates an instance of the startupConfig object that will be of the MyCustomStartupObject type. To populate the instance of this object, through IConfiguration, we are going to read the data from the section called MyCustomStartupObject:
我们执行的第一个作将创建一个 startupConfig 对象的实例,该实例将为 MyCustomStartupObject 类型。为了填充此对象的实例,通过 IConfiguration,我们将从名为 MyCustomStartupObject 的部分读取数据:
var startupConfig = builder.Configuration.GetSection(nameof(MyCustomStartupObject)).Get<MyCustomStartupObject>();
The newly created object can then be used in the various handlers of the minimal APIs.
然后,新创建的对象可以在最小 API 的各种处理程序中使用。
Instead, in this second operation, we use the dependency injection engine to request the instance of the IConfiguration object:
相反,在第二个作中,我们使用依赖项注入引擎来请求 IConfiguration 对象的实例:
app.MapGet("/read/configurations", (IConfiguration configuration) =>
{
    var customObject = configuration.
    GetSection(nameof(MyCustomObject)).Get<MyCustomObject>();
With the IConfiguration object, we will retrieve the data similarly to the operation just described. We select the GetSection(nameof(MyCustomObject)) section and type the object with the Get<T>() method.
使用 IConfiguration 对象,我们将检索数据,类似于刚才描述的作。我们选择 GetSection(nameof(MyCustomObject)) 部分,并使用Get<T>()方法键入对象。
Finally, in these last two examples, we read a single key, present at the root level of the appsettings file:
最后,在最后两个示例中,我们读取了一个键,该键位于 appsettings 文件的根级别:
The configuration.GetValue<T>(“JsonRootKey”) method extracts the value of a key and converts it into an object; this method is used to read strings or numbers from a root-level property. configuration.GetValue<T>(“JsonRootKey”) 方法提取键的值并将其转换为对象;此方法用于从根级别属性中读取字符串或数字。
In the next line, we can see how you can leverage an IConfiguration method to read ConnectionString.
在下一行中,我们可以看到如何利用 IConfiguration 方法来读取 ConnectionString。
In the appsettings file, connection strings are placed in a specific section, ConnectionStrings, that allows you to name the string and read it. Multiple connection strings can be placed in this section to exploit it in different objects.
在 appsettings 文件中,连接字符串放置在特定部分 ConnectionStrings 中,该部分允许你命名和读取字符串。可以在此部分中放置多个连接字符串,以便在不同的对象中利用它。
For completeness, we will bring back the entire code just described in order to have a better general picture of how to exploit the IConfiguration object inside the code:
为了完整起见,我们将返回刚才描述的整个代码,以便更好地了解如何在代码中利用 IConfiguration 对象:
We’ve seen how to take advantage of the appsettings file with connection strings, but very often, we have many different files for each environment. Let’s see how to take advantage of one file for each environment.
我们已经了解了如何利用带有连接字符串的 appsettings 文件,但通常,每个环境都有许多不同的文件。让我们看看如何为每个环境利用一个文件。
Priority in appsettings files
appsettings 文件中的优先级
The appsettings file can be managed according to the environments in which the application is located. In this case, the practice is to place key information for that environment in the appsettings.{ENVIRONMENT}.json file.
可以根据应用程序所在的环境来管理 appsettings 文件。在这种情况下,做法是将该环境的关键信息放在 appsettings.{ENVIRONMENT}.json文件。
The root file (that is, appsettings.json) should be used for the production environment only.
根文件(即 appsettings.json)应仅用于生产环境。
For example, if we created these examples in the two files for the “Priority” key, what would we get?
例如,如果我们在两个文件中为 “Priority” 键创建这些示例,我们会得到什么?
appsettings.json
"Priority": "Root"
appsettings.Development.json
"Priority": "Dev"
If it is a Development environment, the value of the key would result in Dev, while in a Production environment, the value would result in Root.
如果是 Development 环境,则 key 的值将导致 Dev,而在 Production 环境中,该值将导致 Root。
What would happen if the environment was anything other than Production or Development? For example, if it were called Stage? In this case, having not specified any appsettings.Stage.json file, the read value would be that of one of the appsettings.json files and therefore, Root.
如果环境不是生产或开发,会发生什么情况?例如,如果它被称为 Stage?在本例中,未指定任何 appsettings.Stage.json文件中,读取值将是其中一个appsettings.json文件的值,因此是 Root。
However, if we specified the appsettings.Stage.json file, the value would be read from the that file.
但是,如果我们指定 appsettings.Stage.json文件中,将从该文件中读取该值。
Next, let’s visit the Options pattern. There are objects that the framework provides to load configuration information upon startup or when changes are made by the systems department. Let’s go over how.
接下来,让我们访问 Options 模式。框架提供了一些对象,用于在启动时或系统部门进行更改时加载配置信息。让我们来看看如何作。
Options pattern
选项模式
The options pattern uses classes to provide strongly typed access to groups of related settings, that is, when configuration settings are isolated by scenario into separate classes.
选项模式使用类提供对相关设置组的强类型访问,即,当配置设置按方案隔离到单独的类中时。
The options pattern will be implemented with different interfaces and different functionalities. Each interface (see the following subsection) has its own features that help us achieve certain goals.
选项模式将使用不同的接口和不同的功能实现。每个界面(请参阅以下小节)都有自己的功能,可以帮助我们实现某些目标。
But let’s start in order. We define an object for each type of interface (we will do it to better represent the examples), but the same class can be used to register more options inside the configuration file. It is important to keep the structure of the file identical:
但让我们按顺序开始。我们为每种类型的接口定义一个对象(我们将这样做以更好地表示示例),但同一个类可用于在配置文件中注册更多选项。保持文件的结构相同非常重要:
public class OptionBasic
{
    public string? Value { get; init; }
}
    public class OptionSnapshot
    {
        public string? Value { get; init; }
    }
    public class OptionMonitor
    {
        public string? Value { get; init; }
    }
    public class OptionCustomName
    {
        public string? Value { get; init; }
    }
Each option is registered in the dependency injection engine via the Configure method, which also requires the registration of the T type present in the method signature. As you can see, in the registration phase, we declared the types and the section of the file where to retrieve the information, and nothing more:
每个选项都通过 Configure 方法在依赖项注入引擎中注册,该方法还需要注册方法签名中存在的 T 类型。如你所见,在注册阶段,我们声明了类型和文件部分,用于检索信息,仅此而已:
We have not yet defined how the object should be read, how often, and with what type of interface.
我们尚未定义应该如何读取对象、读取频率以及使用什么类型的接口。
The only thing that changes is the parameter, as seen in the last two examples of the preceding code snippet. This parameter allows you to add a name to the option type. The name is required to match the type used in the method signature. This feature is called named options.
唯一更改的是参数,如前面代码段的最后两个示例所示。此参数允许您向选项类型添加名称。该名称必须与方法签名中使用的类型匹配。此功能称为 named options。
Different option interfaces
不同的选项接口
Different interfaces can take advantage of the recordings you just defined. Some support named options and some do not:
不同的界面可以利用您刚刚定义的记录。有些支持命名选项,有些则不支持:
• IOptions<TOptions>:
Is registered as a singleton and can be injected into any service lifetime
注册为单一实例,可以注入到任何服务生命周期中
Does not support the following:
不支持以下内容:
Reading of configuration data after the app has started
在应用程序启动后读取配置数据
Named options
命名选项
• IOptionsSnapshot<TOptions>:
Is useful in scenarios where options should be recomputed on every request
在应在每个请求上重新计算选项的情况下非常有用
Is registered as scoped and therefore cannot be injected into a singleton service
注册为 scoped,因此不能注入到单一实例服务
Supports named options
支持命名选项
IOptionsMonitor<TOptions>:
Is used to retrieve options and manage options notifications for TOptions instances
用于检索选项和管理 TOptions 实例的选项通知
Is registered as a singleton and can be injected into any service lifetime
注册为单一实例,可以注入到任何服务生命周期中
Supports the following:
支持以下功能:
Change notifications
更改通知
Named options
命名选项
Reloadable configuration
可重新加载配置
Selective options invalidation (IOptionsMonitorCache<TOptions>)
选择性选项失效 (IOptionsMonitorCache<TOptions>)
The Configure method can also be followed by another method in the configuration pipeline. This method is called PostConfigure and is intended to modify the configuration each time it is configured or reread. Here is an example of how to record this behavior:
Configure 方法也可以后跟配置管道中的另一个方法。此方法称为 PostConfigure,旨在在每次配置或重新读取配置时修改配置。以下是如何记录此行为的示例:
Having defined the theory of these numerous interfaces, it remains for us to see IOptions at work with a concrete example.
在定义了这些众多接口的理论之后,我们仍然需要通过一个具体的例子来了解 IOptions 的工作原理。
Let’s see the use of the three interfaces just described and the use of IOptionsFactory, which, along with the Create method and with the named options function, retrieves the correct instance of the object:
让我们看看刚才描述的三个接口的用法以及 IOptionsFactory 的用法,它与 Create 方法和命名选项函数一起检索对象的正确实例:
In the previous code snippet, we want to bring attention to the use of the different interfaces available.
在前面的代码片段中,我们希望提请注意可用不同接口的使用。
Each individual interface used in the previous snippet has a particular life cycle that characterizes its behavior. Finally, each interface has slight differences in the methods, as we have already described in the previous paragraphs.
上一个代码段中使用的每个接口都有一个特定的生命周期,用于描述其行为。最后,正如我们在前面的段落中已经描述的那样,每个接口在方法上略有不同。
IOptions and validation
操作和验证
Last but not least is the validation functionality of the data present in the configuration. This is very useful when the team that has to release the application still performs manual or delicate operations that need to be at least verified by the code.
最后但并非最不重要的一点是配置中存在的数据的验证功能。当必须发布应用程序的团队仍然执行至少需要由代码验证的手动或精细作时,这非常有用。
Before the advent of .NET Core, very often, the application would not start because of an incorrect configuration. Now, with this feature, we can validate the data in the configuration and throw errors.
在 .NET Core 出现之前,应用程序经常由于配置不正确而无法启动。现在,借助此功能,我们可以验证配置中的数据并引发错误。
And here is the class containing the validation logic:
下面是包含验证逻辑的类:
public class ConfigWithValidation
{
    [RegularExpression(@"^([\w\.\-]+)@([\w\-]+)((\.(\w)
                      {2,})+)$")]
    public string? Email { get; set; }
    [Range(0, 1000, ErrorMessage = "Value for {0} must be
                                    between {1} and {2}.")]
    public int NumericRange { get; set; }
}
The application then encounters errors while using the particular configuration and not at startup. This is also because, as we have seen before, IOptions could reload information following a change in appsettings:
然后,应用程序在使用特定配置时遇到错误,而不是在启动时遇到错误。这也是因为,正如我们之前看到的,IOptions 可以在 appsettings 更改后重新加载信息:
Error validate option
错误验证选项
Microsoft.Extensions.Options.OptionsValidationException: DataAnnotation validation failed for 'ConfigWithValidation' members: 'NumericRange' with the error: 'Value for NumericRange must be between 0 and 1000.'.
Best practice for using validation in IOptions
在 IOptions 中使用验证的最佳实践
This setting is not suitable for all application scenarios. Only some options can have formal validations; if we think of a connection string, it is not necessarily formally incorrect, but the connection may not be working.
此设置并不适合所有应用程序方案。只有某些选项可以进行正式验证;如果我们考虑一个连接字符串,它不一定在形式上是错误的,但连接可能无法正常工作。
Be cautious about applying this feature, especially since it reports errors at runtime and not during startup and gives an Internal Server Error, which is not a best practice in scenarios that should be handled.
在应用此功能时请谨慎,尤其是因为它在运行时而不是在启动期间报告错误,并给出内部服务器错误,这在应该处理的场景中不是最佳实践。
Everything we’ve seen up to this point is about configuring the appsettings.json file, but what if we wanted to use other sources for configuration management? We’ll look at that in the next section.
到目前为止,我们所看到的所有内容都是关于配置 appsettings.json 文件的,但是如果我们想使用其他源进行配置管理呢?我们将在下一节中介绍这一点。
Configuration sources
配置源
As we mentioned at the beginning of the section, the IConfiguration interface and all variants of IOptions work not only with the appsettings file but also on different sources.
正如我们在本节开头提到的,IConfiguration 接口和 IOptions 的所有变体不仅适用于 appsettings 文件,也适用于不同的源。
Each source has its own characteristics, and the syntax for accessing objects is very similar between providers. The main problem is when we must define a complex object or an array of objects; in this case, we will see how to behave and be able to replicate the dynamic structure of a JSON file.
每个源都有其自己的特征,并且访问对象的语法在提供程序之间非常相似。主要问题是当我们必须定义一个复杂对象或一个对象数组时;在这种情况下,我们将了解如何作并能够复制 JSON 文件的动态结构。
Let’s look at two very common use cases.
让我们看两个非常常见的用例。
Configuring an application in Azure App Service
在 Azure 应用服务中配置应用程序
Let’s start with Azure, and in particular, the Azure Web Apps service.
让我们从 Azure 开始,特别是 Azure Web 应用服务。
On the Configuration page, there are two sections: Application settings and Connection strings.
在 Configuration (配置) 页面上,有两个部分: Application settings (应用程序设置) 和 Connection strings (连接字符串)。
In the first section, we need to insert the keys and values or JSON objects that we saw in the previous examples.
在第一部分中,我们需要插入我们在前面的示例中看到的键和值或 JSON 对象。
In the Connection strings section, you can insert the connection strings that are usually inserted in the appsettings.json file. In this section, in addition to the textual string, it is necessary to set the connection type, as we saw in the Configuration in .NET 6 section.
在 Connection strings (连接字符串) 部分中,您可以插入通常插入 appsettings.json 文件中的连接字符串。在本节中,除了文本字符串之外,还需要设置连接类型,正如我们在 .NET 6 中的配置部分中看到的那样。
So, we should write MyCustomObjectCustomProperty.
所以,我们应该写MyCustomObjectCustomProperty。
Inserting an array
插入数组
Inserting an array is much more verbose.
插入数组要详细得多。
The format is as follows:
格式如下:
parent__child__ArrayIndexNumber_key
The array in the JSON file would be defined as follows:
JSON 文件中的数组定义如下:
{
"MyCustomArray": {
"CustomPropertyArray": [
{ "CustomKey": "ValueOne" },
{ "CustomKey ": "ValueTwo" }
]
}
}
So, to access the ValueOne value, we should write the following: MyCustomArrayCustomPropertyArray0CustomKey.
因此,要访问 ValueOne 值,我们应该编写以下内容:MyCustomArrayCustomPropertyArray0CustomKey。
Configuring an application in Docker
在 Docker 中配置应用程序
If we are developing for containers and therefore for Docker, appsettings files are usually replaced in the docker-compose file, and very often in the override file, because it behaves analogously to the settings files divided by the environment.
如果我们针对容器和 Docker 进行开发,则 appsettings 文件通常会在 docker-compose 文件中被替换,并且经常在 override 文件中被替换,因为它的行为类似于按环境划分的设置文件。
We want to provide a brief overview of the features that are usually leveraged to configure an application hosted in Docker. Let’s see in detail how to define root keys and objects, and how to set the connection string. Here is an example:
我们想简要概述通常用于配置 Docker 中托管的应用程序的功能。让我们详细看看如何定义根键和对象,以及如何设置连接字符串。下面是一个示例:
There is only one application container for this example, and the service that instantiates it is called dockerenvironment.
此示例只有一个应用程序容器,实例化它的服务称为 dockerenvironment。
In the configuration section, we can see three particularities that we are going to analyze line by line.
在配置部分,我们可以看到我们将逐行分析的三个特性。
The snippet we want to show you has several very interesting components: a property in the configuration root, an object composed of a single property, and a connection string to a database.
我们要向您展示的代码段有几个非常有趣的组件:配置根中的属性、由单个属性组成的对象以及数据库的连接字符串。
In this first configuration, you are going to set a property that is the root of the configurations. In this case, it is a simple string:
在第一个配置中,您将设置一个属性,该属性是配置的根。在本例中,它是一个简单的字符串:
# First configuration
- RootProperty=minimalapi-root-value
In this second configuration, we are going to set up an object:
在第二个配置中,我们将设置一个对象:
# Second configuration
- RootSettings__SampleVariable=minimalapi-variable-value
The object is called RootSettings, while the only property it contains is called SampleVariable. This object can be read in different ways. We recommend using the Ioptions object that we have seen extensively before. In the preceding example, we show how to access a single property present in an object via code.
该对象称为 RootSettings,而它包含的唯一属性称为 SampleVariable。可以通过不同的方式读取此对象。我们建议使用我们之前广泛看到的 Ioptions 对象。在前面的示例中,我们展示了如何通过代码访问对象中存在的单个属性。
In this case, via code, you need to use the following notation to access the value: RootSettings:SampleVariable. This approach is useful if you need to read a single property, but we recommend using the Ioptions interfaces to access the object.
在这种情况下,您需要通过代码使用以下表示法来访问该值:RootSettings:SampleVariable。如果需要读取单个属性,此方法非常有用,但我们建议使用 Ioptions 接口来访问对象。
In this last example, we show you how to set the connection string called SqlConnection. This way, it will be easy to retrieve the information from the base methods available on Iconfiguration:
在最后一个示例中,我们将向您展示如何设置名为 SqlConnection 的连接字符串。这样,就很容易从 Iconfiguration 上可用的 base 方法中检索信息:
# Third configuration
- ConnectionStrings__SqlConnection=Server=minimal.db;Database=minimal_db;User Id=sa;Password=Taggia42!
To read the information, it is necessary to exploit this method: GetConnectionString(“SqlConnection”).
要读取信息,必须利用此方法: GetConnectionString(“SqlConnection”)。
There are a lot of scenarios for configuring our applications; in the next section, we will also see how to handle errors.
配置我们的应用程序有很多场景;在下一节中,我们还将了解如何处理错误。
Error handling
错误处理
Error handling is one of the features that every application must provide. The representation of an error allows the client to understand the error and possibly handle the request accordingly. Very often, we have our own customized methods of handling errors.
错误处理是每个应用程序都必须提供的功能之一。错误的表示允许客户端理解错误并可能相应地处理请求。很多时候,我们有自己的自定义错误处理方法。
Since what we’re describing is a key functionality of the application, we think it’s fair to see what the framework provides and what is more correct to use.
由于我们所描述的是应用程序的关键功能,因此我们认为查看框架提供的内容以及使用起来更正确的内容是公平的。
Traditional approach
传统方法
.NET provides the same tool for minimal APIs that we can implement in traditional development: a Developer Exception Page. This is nothing but middleware that reports the error in plain text format. This middleware can’t be removed from the ASP.NET pipeline and works exclusively in the development environment (https://docs.microsoft.com/aspnet/core/fundamentals/error-handling).
.NET 为最小 API 提供了我们可以在传统开发中实现的相同工具:开发人员异常页。这只不过是以纯文本格式报告错误的中间件。此中间件无法从 ASP.NET 管道中删除,并且只能在开发环境 (https://docs.microsoft.com/aspnet/core/fundamentals/error-handling) 中运行。
If exceptions are raised within our code, the only way to catch them in the application layer is through middleware that is activated before sending the response to the client.
如果在我们的代码中引发了异常,那么在应用程序层捕获它们的唯一方法是通过在将响应发送到客户端之前激活的中间件。
Error handling middleware is standard and can be implemented as follows:
错误处理中间件是标准的,可以按如下方式实现:
app.UseExceptionHandler(exceptionHandlerApp =>
{
    exceptionHandlerApp.Run(async context =>
    {
        context.Response.StatusCode = StatusCodes.
        Status500InternalServerError;
        context.Response.ContentType = Application.Json;
        var exceptionHandlerPathFeature = context.Features.
          Get<IExceptionHandlerPathFeature>()!;
        var errorMessage = new
        {
            Message = exceptionHandlerPathFeature.Error.Message
        };
        await context.Response.WriteAsync
        (JsonSerializer.Serialize(errorMessage));
         if (exceptionHandlerPathFeature?.
             Error is FileNotFoundException)
         {
             await context.Response.
             WriteAsync(" The file was not found.");
         }
         if (exceptionHandlerPathFeature?.Path == "/")
         {
             await context.Response.WriteAsync("Page: Home.");
         }
    });
});
We have shown here a possible implementation of the middleware. In order to be implemented, the UseExceptionHandler method must be exploited, allowing the writing of management code for the whole application.
我们在这里展示了中间件的可能实现。为了实现,必须利用 UseExceptionHandler 方法,允许为整个应用程序编写管理代码。
Through the var functionality called exceptionHandlerPathFeature = context.Features.Get<IExceptionHandlerPathFeature>()!;, we can access the error stack and return the information of interest for the caller in the output:
通过名为 exceptionHandlerPathFeature = context.Features.Get<IExceptionHandlerPathFeature>()!;,我们可以访问错误堆栈并在输出中返回调用方感兴趣的信息:
app.MapGet("/ok-result", () =>
{
         throw new ArgumentNullException("taggia-parameter",
         "Taggia has an error");
})
.WithName("OkResult");
When an exception occurs in the code, as in the preceding example, the middleware steps in and handles the return message to the client.
当代码中发生异常时,如前面的示例所示,中间件会介入并处理发送给客户端的返回消息。
If the exception were to occur in internal application stacks, the middleware would still intervene to provide the client with the correct error and appropriate indication.
如果内部应用程序堆栈中发生异常,中间件仍会进行干预,为客户端提供正确的错误和适当的指示。
Problem Details and the IETF standard
问题详细信息和 IETF 标准
Problem Details for HTTP APIs is an IETF standard that was approved in 2016. This standard allows a set of information to be returned to the caller with standard fields and JSON notations that help identify the error.
HTTP API 的问题详细信息是 2016 年批准的 IETF 标准。此标准允许使用标准字段和 JSON 表示法将一组信息返回给调用方,以帮助识别错误。
HTTP status codes are sometimes not enough to convey enough information about an error to be useful. While the humans behind web browsers can be informed about the nature of the problem with an HTML response body, non-human consumers, such as machine, PC, and server, of so-called HTTP APIs usually cannot.
HTTP 状态代码有时不足以传达有关错误的足够信息,因此没有用。虽然 Web 浏览器背后的人类可以通过 HTML 响应正文了解问题的性质,但所谓的 HTTP API 的非人类使用者(如机器、PC 和服务器)通常不能。
This specification defines simple JSON and XML document formats to suit this purpose. They are designed to be reused by HTTP APIs, which can identify distinct problem types specific to their needs.
此规范定义了简单的 JSON 和 XML 文档格式以适应此目的。它们旨在供 HTTP API 重用,HTTP API 可以识别特定于其需求的不同问题类型。
Since, in the minimal APIs, the IActionResultExecutor interface is not present in the ASP.NET pipeline, it is necessary to add a custom class to handle the response in case of an error.
由于在最小 API 中,ASP.NET 管道中不存在 IActionResultExecutor 接口,因此有必要添加自定义类以在出现错误时处理响应。
To do this, you need to add a class (the following) and register it in the dependency injection engine: builder.Services.TryAddSingleton<IActionResultExecutor<ObjectResult>, ProblemDetailsResultExecutor>(); .
为此,您需要添加一个类(如下)并在依赖项注入引擎 builder 中注册它。 builder.Services.TryAddSingleton<IActionResultExecutor<ObjectResult>, ProblemDetailsResultExecutor>();。
Here is the class to support the package, also under minimal APIs:
以下是支持该包的类,也在最小 API 下:
public class ProblemDetailsResultExecutor : IActionResultExecutor<ObjectResult>
{
    public virtual Task ExecuteAsync(ActionContext context,
    ObjectResult result)
{
        ArgumentNullException.ThrowIfNull(context);
        ArgumentNullException.ThrowIfNull(result);
        var executor = Results.Json(result.Value, null,
        "application/problem+json", result.StatusCode);
        return executor.ExecuteAsync(context.HttpContext);
    }
}
As mentioned earlier, the standard for handling error messages has been present in the IETF standard for several years, but for the C# language, it is necessary to add the package just mentioned.
如前所述,处理错误消息的标准在 IETF 标准中已经存在了几年,但对于 C# 语言,有必要添加刚才提到的包。
Now, let’s see how this package goes about handling errors on some endpoints that we report here:
现在,让我们看看这个软件包如何处理我们在此处报告的某些端点上的错误:
app.MapGet("/internal-server-error", () =>
{
    throw new ArgumentNullException("taggia-parameter",
    "Taggia has an error");
})
    .Produces<ProblemDetails>(StatusCodes.
     Status500InternalServerError)
         .WithName("internal-server-error");
We throw an application-level exception with this endpoint. In this case, the ProblemDetails middleware goes and returns a JSON error consistent with the error. We then have the handling of an unhandled exception for free:
我们使用此终端节点引发应用程序级异常。在这种情况下,ProblemDetails 中间件会返回与错误一致的 JSON 错误。然后,我们可以免费处理未处理的异常:
{
    "type": "https://httpstatuses.com/500",
    "title": "Internal Server Error",
    "status": 500,
    "detail": "Taggia has an error (Parameter 'taggia-
     parameter')",
    "exceptionDetails": [
         {
 ------- for brevity
         }
    ],
    "traceId": "00-f6ff69d6f7ba6d2692d87687d5be75c5-
     e734f5f081d7a02a-00"
}
By inserting additional configurations in the Program file, you can map some specific exceptions to HTTP errors. Here is an example:
通过在 Program 文件中插入其他配置,您可以将某些特定异常映射到 HTTP 错误。下面是一个示例:
The code with the NotImplementedException exception is mapped to HTTP error code 501:
具有 NotImplementedException 异常的代码映射到 HTTP 错误代码 501:
app.MapGet("/not-implemented-exception", () =>
{
    throw new NotImplementedException
      ("This is an exception thrown from a Minimal API.");
})
    .Produces<ProblemDetails>(StatusCodes.
     Status501NotImplemented)
         .WithName("NotImplementedExceptions");
Finally, it is possible to create extensions to the ProblemDetails class of the framework with additional fields or to call the base method by adding custom text.
最后,可以使用其他字段创建框架的 ProblemDetails 类的扩展,或者通过添加自定义文本来调用基方法。
Here are the last two examples of MapGet endpoint handlers:
以下是 MapGet 端点处理程序的最后两个示例:
app.MapGet("/problems", () =>
{
    return Results.Problem(detail: "This will end up in
                                    the 'detail' field.");
})
    .Produces<ProblemDetails>(StatusCodes.Status400BadRequest)
    .WithName("Problems");
app.MapGet("/custom-error", () =>
{
    var problem = new OutOfCreditProblemDetails
    {
        Type = "https://example.com/probs/out-of-credit",
        Title = "You do not have enough credit.",
        Detail = "Your current balance is 30,
        but that costs 50.",
        Instance = "/account/12345/msgs/abc",
        Balance = 30.0m, Accounts =
        { "/account/12345", "/account/67890" }
    };
    return Results.Problem(problem);
})
    .Produces<OutOfCreditProblemDetails>(StatusCodes.
     Status400BadRequest)
     .WithName("CreditProblems");
app.Run();
public class OutOfCreditProblemDetails : ProblemDetails
{
    public OutOfCreditProblemDetails()
    {
        Accounts = new List<string>();
    }
    public decimal Balance { get; set; }
    public ICollection<string> Accounts { get; }
}
Summary
总结
In this chapter, we have seen several advanced aspects regarding the implementation of minimal APIs. We explored Swagger, which is used to document APIs and provide the developer with a convenient, working debugging environment. We saw how CORS handles the issue of applications hosted on different addresses other than the current API. Finally, we saw how to load configuration information and handle unexpected errors in the application.
在本章中,我们了解了有关实现最小 API 的几个高级方面。我们探索了 Swagger,它用于记录 API,并为开发人员提供方便、有效的调试环境。我们了解了 CORS 如何处理托管在当前 API 以外的不同地址上的应用程序问题。最后,我们了解了如何加载配置信息和处理应用程序中的意外错误。
We explored the nuts and bolts that will allow us to be productive in a short amount of time.
我们探索了使我们能够在短时间内提高工作效率的具体细节。
In the next chapter, we will add a fundamental building block for SOLID pattern-oriented programming, namely the dependency injection engine, which will help us to better manage the application code scattered in the various layers.
在下一章中,我们将为 SOLID 面向模式的编程添加一个基本构建块,即依赖注入引擎,这将帮助我们更好地管理分散在各个层中的应用程序代码。
Part 2: What’s New in .NET 6?
第 2 部分:.NET 6 中的新增功能
In the second part of the book, we want to show you the features of the .NET 6 framework and how they can also be used in minimal APIs.
在本书的第二部分,我们想向你展示 .NET 6 框架的功能,以及如何在最小的 API 中使用它们。
We will cover the following chapters in this section:
在本节中,我们将介绍以下章节:
Chapter 4, Dependency Injection in a Minimal API Project
第 4 章 最小 API 项目中的依赖关系注入
Chapter 5, Using Logging to Identify Errors
第 5 章 使用日志记录识别错误
Chapter 6, Exploring Validation and Mapping
第 6 章 探索验证和映射
Chapter 7, Integration with the Data Access Layer
第 7 章 与数据访问层集成
4 Dependency Injection in a Minimal API Project
最小 API 项目中的依赖关系注入
In this chapter of the book, we will discuss some basic topics of minimal APIs in .NET 6.0. We will learn how they differ from the controller-based Web APIs that we were used to using in the previous version of .NET. We will also try to underline the pros and the cons of this new approach of writing APIs.
在本书的这一章中,我们将讨论 .NET 6.0 中最小 API 的一些基本主题。我们将了解它们与我们以前在 .NET 版本中习惯使用的基于控制器的 Web API 有何不同。我们还将尝试强调这种编写 API 的新方法的优缺点。
In this chapter, we will be covering the following topics:
在本章中,我们将介绍以下主题:
• What is dependency injection?
什么是依赖项注入?
• Implementing dependency injection in a minimal API project
在最小 API 项目中实现依赖关系注入
Technical requirements
技术要求
To follow the explanations in this chapter, you will need to create an ASP.NET Core 6.0 Web API application. You can refer the Technical requirements section of Chapter 2, Exploring Minimal APIs and Their Advantages to know how to do it.
要按照本章中的说明进行作,您需要创建一个 ASP.NET Core 6.0 Web API 应用程序。您可以参考 第 2 章 探索最小 API 及其优势 的技术要求 部分来了解如何作。
For a while, .NET has natively supported the dependency injection (often referred to as DI) software design pattern.
一段时间以来,.NET 本身就支持依赖关系注入(通常称为 DI)软件设计模式。
Dependency injection is a way to implement in .NET the Inversion of Control (IoC) pattern between service classes and their dependencies. By the way, in .NET, many fundamental services are built with dependency injection, such as logging, configuration, and other services.
依赖项注入是在 .NET 中实现服务类及其依赖项之间的控制反转 (IoC) 模式的一种方式。顺便说一句,在 .NET 中,许多基本服务都是通过依赖项注入构建的,例如日志记录、配置和其他服务。
Let’s look at a practical example to get a good understanding of how it works.
让我们看一个实际示例,以更好地理解它是如何工作的。
Generally speaking, a dependency is an object that depends on another object. In the following example, we have a LogWriter class with only one method inside, called Log:
一般来说,依赖项是依赖于另一个对象的对象。在下面的示例中,我们有一个 LogWriter 类,其中只有一个方法,称为 Log:
public class LogWriter
{
    public void Log(string message)
    {
        Console.WriteLine($"LogWriter.Write
          (message: \"{message}\")");
    }
}
Other classes in the project, or in another project, can create an instance of the LogWriter class and use the Log method.
项目或其他项目中的其他类可以创建 LogWriter 类的实例并使用 Log 方法。
Take a look at the following example:
请看以下示例:
public class Worker
{
    private readonly LogWriter _logWriter = new LogWriter();
    protected async Task ExecuteAsync(CancellationToken
                                      stoppingToken)
    {
        while (!stoppingToken.IsCancellationRequested)
        {
            _logWriter.Log($"Worker running at:
             {DateTimeOffset.Now}");
             await Task.Delay(1000, stoppingToken);
        }
    }
}
This class depends directly on the LogWriter class, and it’s hardcoded in each class of your projects.
此类直接依赖于 LogWriter 类,并且在项目的每个类中都是硬编码的。
This means that you will have some issues if you want to change the Log method; for instance, you will have to replace the implementation in each class of your solution.
这意味着,如果要更改 Log 方法,您将遇到一些问题;例如,您必须替换解决方案的每个类中的 implementation。
The preceding implementation has some issues if you want to implement unit tests in your solution. It’s not easy to create a mock of the LogWriter class.
如果要在解决方案中实现单元测试,前面的实现存在一些问题。创建 LogWriter 类的 mock 并不容易。
Dependency injection can solve these problems with some changes in our code:
依赖项注入可以通过对代码进行一些更改来解决这些问题:
Use an interface to abstract the dependency.
使用接口抽象依赖项。
Register the dependency injection in the built-in service connecte to .NET.
在内置服务 connecte to .NET 中注册依赖项注入。
Inject the service into the constructor of the class.
将服务注入到类的构造函数中。
The preceding things might seem like they require big change in your code, but they are very easy to implement.
上述内容似乎需要对代码进行大量更改,但它们很容易实现。
Let’s see how we can achieve this goal with our previous example:
让我们看看如何通过前面的示例来实现这个目标:
First, we will create an ILogWriter interface with the abstraction of our logger:
public interface ILogWriter
首先,我们将使用记录器的抽象创建一个 ILogWriter 接口:
{
    void Log(string message);
}
Next, implement this ILogWriter interface in a real class called ConsoleLogWriter:
public class ConsoleLogWriter : ILogWriter
接下来,在名为 ConsoleLogWriter 的实际类中实现此 ILogWriter 接口:
public class Worker
{
    private readonly ILogWriter _logWriter;
    public Worker(ILogWriter logWriter)
    {
        _logWriter = logWriter;
    }

    protected async Task ExecuteAsync
      (CancellationToken stoppingToken)
    {
        while (!stoppingToken.IsCancellationRequested)
        {
            _logWriter.Log($"Worker running at:
                             {DateTimeOffset.Now}");
             await Task.Delay(1000, stoppingToken);
        }
    }
}
As you can see, it’s very easy to work in this new way, and the advantages are substantial. Here are a few advantages of dependency injection:
如您所见,以这种新方式工作非常容易,而且优势非常大。以下是依赖项注入的一些优点:
In the next section, we will discuss the difference between dependency injection lifetimes, another concept that you need to understand before using dependency injection in your minimal API project.
在下一节中,我们将讨论依赖注入生命周期之间的区别,这是在最小 API 项目中使用依赖注入之前需要了解的另一个概念。
In the previous section, we learned the benefits of using dependency injection in our project and how to transform our code to use it.
在上一节中,我们了解了在项目中使用依赖项注入的好处,以及如何转换代码以使用它。
In one of the last paragraphs, we added our class as a service to ServiceCollection of .NET.
在最后一段中,我们将类作为服务添加到 .NET 的 ServiceCollection 中。
In this section, we will try to understand the difference between each dependency injection’s lifetime.
在本节中,我们将尝试了解每个依赖注入的生命周期之间的差异。
The service lifetime defines how long an object will be alive after it has been created by the container.
服务生存期定义对象在容器创建后将处于活动状态的时间。
When they are registered, dependencies require a lifetime definition. This defines the conditions when a new service instance is created.
注册依赖项时,它们需要生命周期定义。这定义了创建新服务实例时的条件。
In the following list, you can find the lifetimes defined in .NET:
在以下列表中,您可以找到 .NET 中定义的生存期:
• Transient: A new instance of the class is created every time it is requested.
Transient:每次请求时都会创建类的新实例。
• Scoped: A new instance of the class is created once per scope, for instance, for the same HTTP request.
范围:每个范围创建一次类的新实例,例如,针对同一 HTTP 请求。
• Singleton: A new instance of the class is created only on the first request. The next request will use the same instance of the same class.
Singleton:仅在第一个请求时创建类的新实例。下一个请求将使用同一类的相同实例。
Very often, in web applications, you only find the first two lifetimes, that is, transient and scoped.
很多时候,在 Web 应用程序中,你只能找到前两个生命周期,即 transient 和 scoped。
If you have a particular use case that requires a singleton, it’s not prohibited, but for best practice, it is recommended to avoid them in web applications.
如果您有需要单例的特定用例,则不禁止这样做,但为了最佳实践,建议在 Web 应用程序中避免使用它们。
In the first two cases, transient and scoped, the services are disposed of at the end of the request.
在前两种情况中,transient 和 scoped,服务将在请求结束时被释放。
In the next section, we will see how to implement all the concepts that we have mentioned in the last two sections (the definition of dependency injection and its lifetime) in a short demo that you can use as a starting point for your next project.
在下一节中,我们将通过一个简短的演示来了解如何实现我们在最后两节中提到的所有概念(依赖注入的定义及其生命周期),您可以将其用作下一个项目的起点。
Implementing dependency injection in a minimal API project
在最小 API 项目中实现依赖关系注入
After understanding how to use dependency injection in an ASP.NET Core project, let’s try to understand how to use dependency injection in our minimal API project, starting with the default project using the WeatherForecast endpoint.
在了解了如何在 ASP.NET Core 项目中使用依赖项注入之后,让我们尝试了解如何在最小 API 项目中使用依赖项注入,从使用 WeatherForecast 端点的默认项目开始。
This is the actual code of the WeatherForecast GET endpoint:
这是 WeatherForecast GET 端点的实际代码:
As we mentioned before, this code works but it’s not easy to test it, especially the creation of the new values of the weather.
正如我们之前提到的,这段代码可以工作,但并不容易测试它,尤其是创建 weather 的新值。
The best choice is to use a service to create fake values and use it with dependency injection.
最好的选择是使用服务创建假值并将其与依赖项注入一起使用。
Let’s see how we can better implement our code:
让我们看看如何更好地实现我们的代码:
First of all, in the Program.cs file, add a new interface called IWeatherForecastService and define a method that returns an array of the WeatherForecast entity:
首先,在 Program.cs 文件中,添加一个名为 IWeatherForecastService 的新接口,并定义一个返回 WeatherForecast 实体数组的方法:
public interface IWeatherForecastService
{
           WeatherForecast[] GetForecast();
}
The next step is to create the real implementation of the class inherited from the interface.
下一步是创建从接口继承的类的真正实现。
The code should look like this:
代码应如下所示:
public class WeatherForecastService : IWeatherForecastService
{
}
Now cut and paste the code from the project template inside our new implementation of the service. The final code looks like this:
现在,将项目模板中的代码剪切并粘贴到我们新的服务实现中。最终代码如下所示:
public class WeatherForecastService : IWeatherForecastService
{
public WeatherForecast[] GetForecast()
{
    var summaries = new[]
    {
        "Freezing", "Bracing", "Chilly", "Cool",
        "Mild", "Warm", "Balmy", "Hot", "Sweltering",
        "Scorching"
    };
    var forecast = Enumerable.Range(1, 5).
    Select(index =>
    new WeatherForecast
    (
        DateTime.Now.AddDays(index),
        Random.Shared.Next(-20, 55),
        summaries[Random.Shared.Next
        (summaries.Length)]
    ))
    .ToArray();
    return forecast;
}
}
We are now ready to add our implementation of WeatherForecastService as a dependency injection in our project. To do that, insert the following line below the first line of code in the Program.cs file:
现在,我们已准备好将 WeatherForecastService 的实现作为依赖项注入添加到我们的项目中。为此,请在 Program.cs 文件中的第一行代码下方插入以下行:
When the application starts, insert our service into the services collection. Our work is not finished yet.
当应用程序启动时,将我们的服务插入到服务集合中。我们的工作还没有完成。
We need to use our service in the default MapGet implementation of the WeatherForecast endpoint.
我们需要在 WeatherForecast 端点的默认 MapGet 实现中使用我们的服务。
The minimal API has his own parameter binding implementation and it’s very easy to use.
最小的 API 有自己的参数绑定实现,非常易于使用。
First of all, to implement our service with dependency injection, we need to remove all the old code from the endpoint.
首先,要使用依赖项注入实现我们的服务,我们需要从端点中删除所有旧代码。
The code of the endpoint, after removing the code, looks like this:
删除代码后,端点的代码如下所示:
app.MapGet("/weatherforecast", () =>
{
});
We can improve our code and use the dependency injection very easily by simply replacing the old code with the new code:
我们可以通过简单地将旧代码替换为新代码来非常轻松地改进我们的代码并使用依赖注入:
In the minimal API project, the real implementations of the services in the service collection are passed as parameters to the functions and you can use them directly.
在最小 API 项目中,服务集合中服务的真实实现作为参数传递给函数,您可以直接使用它们。
From time to time, you may have to use a service from the dependency injection directly in the main function during the startup phase. In this case, you must retrieve the instance of the implementation directly from the services collection, as shown in the following code snippet:
有时,您可能必须在启动阶段直接在 main 函数中使用依赖项注入中的服务。在这种情况下,您必须直接从 services 集合中检索实现的实例,如以下代码片段所示:
using (var scope = app.Services.CreateScope())
{
    var service = scope.ServiceProvider.GetRequiredService
                  <IWeatherForecastService>();
    service.GetForecast();
}
In this section, we have implemented dependency injection in a minimal API project, starting from the default template.
在本节中,我们从默认模板开始,在最小 API 项目中实现了依赖注入。
We reused the existing code but implemented it with logic that’s more geared toward an architecture that’s better suited to being maintained and tested in the future.
我们重用了现有代码,但使用更适合将来维护和测试的架构的逻辑来实现它。
Summary
总结
Dependency injection is a very important approach to implement in modern applications. In this chapter, we learned what dependency injection is and discussed its fundamentals. Then, we saw how to use dependency injection in a minimal API project.
依赖项注入是在现代应用程序中实现的一种非常重要的方法。在本章中,我们了解了什么是依赖注入并讨论了它的基础知识。然后,我们了解了如何在最小 API 项目中使用依赖注入。
In the next chapter, we will focus on another important layer of modern applications and discuss how to implement a logging strategy in a minimal API project.
在下一章中,我们将重点介绍现代应用程序的另一个重要层,并讨论如何在最小的 API 项目中实现日志记录策略。
5 Using Logging to Identify Errors
5 使用日志记录识别错误
In this chapter, we will begin to learn about the logging tools that .NET provides us with. A logger is one of the tools that developers must use to debug an application or understand its failure in production. The log library has been built into ASP.NET with several features enabled by design. The purpose of this chapter is to delve into the things we take for granted and add more information as we go.
在本章中,我们将开始了解 .NET 为我们提供的日志记录工具。记录器是开发人员用来调试应用程序或了解其在生产中的故障时必须使用的工具之一。日志库已内置于 ASP.NET 中,通过设计启用了多项功能。本章的目的是深入研究我们认为理所当然的事情,并在此过程中添加更多信息。
The themes we will touch on in this chapter are as follows:
我们将在本章中讨论的主题如下:
• Exploring logging in .NET
探索 .NET 中的日志记录
• Leveraging the logging framework
利用日志记录框架
• Storing a structured log with Serilog
使用 Serilog 存储结构化日志
Technical requirements
技术要求
As reported in the previous chapters, it will be necessary to have the .NET 6 development framework.
如前几章所述,有必要具有 .NET 6 开发框架。
There are no special requirements in this chapter for beginning to test the examples described.
本章中没有对开始测试所描述的示例的特殊要求。
ASP.NET Core templates create a WebApplicationBuilder and a WebApplication, which provide a simplified way to configure and run web applications without a startup class.
ASP.NET Core 模板创建 WebApplicationBuilder 和 WebApplication,它们提供了一种无需启动类即可配置和运行 Web 应用程序的简化方法。
As mentioned previously, with .NET 6, the Startup.cs file is eliminated in favor of the existing Program.cs file. All startup configurations are placed in this file, and in the case of minimal APIs, endpoint implementations are also placed.
如前所述,在 .NET 6 中,Startup.cs 文件被消除,取而代之的是现有的 Program.cs 文件。所有启动配置都放置在此文件中,对于最小的 API,还会放置端点实现。
What we have just described is the starting point of every .NET application and its various configurations.
我们刚才描述的是每个 .NET 应用程序及其各种配置的起点。
Logging into an application means tracking the evidence in different points of the code to check whether it is running as expected. The purpose of logging is to track over time all the conditions that led to an unexpected result or event in the application. Logging in an application can be useful both during development and while the application is in production.
登录到应用程序意味着跟踪代码不同点的证据,以检查它是否按预期运行。日志记录的目的是随着时间的推移跟踪导致应用程序中出现意外结果或事件的所有条件。在开发期间和应用程序处于生产状态时,登录应用程序都非常有用。
However, for logging, as many as four providers are added for tracking application information:
但是,对于日志记录,将添加多达四个提供程序来跟踪应用程序信息:
• Console: The Console provider logs output to the console. This log is unusable in production because the console of a web application is usually not visible. This kind of log is useful during development to make logging fast when you are running your app under Kestrel on your desktop machine in the app console window.
控制台:控制台提供程序将输出记录到控制台。此日志在生产中不可用,因为 Web 应用程序的控制台通常不可见。在开发过程中,这种日志非常有用,当您在应用程序控制台窗口中的桌面计算机上的 Kestrel 下运行应用程序时,可以快速进行日志记录。
• Debug: The Debug provider writes log output by using the System.Diagnostics.Debug class. When we develop, we are used to seeing this section in the Visual Studio output window.
调试:调试提供程序使用 System.Diagnostics.Debug 类写入日志输出。在开发时,我们习惯于 Visual Studio 输出窗口中看到此部分。
Under the Linux operating system, information is tracked depending on the distribution in the following locations: /var/log/message and /var/log/syslog.
在 Linux作系统下,根据以下位置的分发情况跟踪信息:/var/log/message 和 /var/log/syslog。
• EventSource: On Windows, this information can be viewed in the EventTracing window.
EventSource:在 Windows 上,可以在 EventTracing 窗口中查看此信息。
• EventLog (only when running on Windows): This information is displayed in the native Windows window, so you can only see it if you run the application on the Windows operating system.
EventLog (仅在 Windows 上运行时):此信息显示在本机 Windows 窗口中,因此只有在 Windows作系统上运行应用程序时才能看到它。
A new feature in the latest .NET release
最新 .NET 版本中的新功能
New logging providers have been added in the latest versions of .NET. However, these providers are not enabled within the framework.
最新版本的 .NET 中添加了新的日志记录提供程序。但是,这些提供程序未在框架内启用。
Use these extensions to enable new logging scenarios: AddSystemdConsole, AddJsonConsole, and AddSimpleConsole.
使用以下扩展启用新的日志记录方案:AddSystemdConsole、AddJsonConsole 和 AddSimpleConsole。
We’ve started to see what the framework gives us; now we need to understand how to leverage it within our applications. Before proceeding, we need to understand what a logging layer is. It is a fundamental concept that will help us break down information into different layers and enable them as needed:
我们已经开始看到框架给我们带来了什么;现在我们需要了解如何在我们的应用程序中利用它。在继续之前,我们需要了解什么是日志层。这是一个基本概念,可帮助我们将信息分解为不同的层并根据需要启用它们:
Table 5.1 – Log levels
表 5.1 – 日志级别
Table 5.1 shows the most verbose levels down to the least verbose level.
表 5.1 显示了最详细的级别到最不详细的级别。
If we select our log level as Information, everything at this level will be tracked down to the Critical level, skipping Debug and Trace.
如果我们将日志级别选为 Information,则此级别的所有内容都将被跟踪到 Critical 级别,跳过 Debug 和 Trace。
We’ve seen how to take advantage of the log layers; now, let’s move on to writing a single statement that will log information and can allow us to insert valuable content into the tracking system.
我们已经看到了如何利用日志层;现在,让我们继续编写一个语句,该语句将记录信息,并允许我们将有价值的内容插入到跟踪系统中。
Configuring logging
配置日志记录
To start using the logging component, you need to know a couple of pieces of information to start tracking data. Each logger object (ILogger<T>) must have an associated category. The log category allows you to segment the tracking layer with a high definition. For example, if we want to track everything that happens in a certain class or in an ASP.NET controller, without having to rewrite all our code, we need to enable the category or categories of our interest.
要开始使用 logging 组件,您需要了解一些信息才能开始跟踪数据。每个记录器对象 (ILogger<T>) 必须具有关联的类别。日志类别允许您对高清晰度的跟踪层进行分段。例如,如果我们想跟踪某个类或 ASP.NET 控制器中发生的所有事情,而不必重写所有代码,我们需要启用我们感兴趣的一个或多个类别。
A category is a T class. Nothing could be simpler. You can reuse typed objects of the class where the log method is injected. For example, if we’re implementing MyService, and we want to track everything that happens in the service with the same category, we just need to request an ILogger<MyService> object instance from the dependency injection engine.
类别是 T 类。没有比这更简单的了。您可以重用注入 log 方法的类的类型化对象。例如,如果我们正在实现 MyService,并且想要跟踪具有相同类别的服务中发生的所有事情,则只需从依赖项注入引擎请求 ILogger<MyService> 对象实例。
Once the log categories are defined, we need to call the ILogger<T> object and take advantage of the object’s public methods. In the previous section, we looked at the log layers. Each log layer has its own method for tracking information. For example, LogDebug is the method specified to track information with a Debug layer.
定义日志类别后,我们需要调用 ILogger<T> 对象并利用该对象的公共方法。在上一节中,我们了解了日志层。每个日志层都有自己的跟踪信息方法。例如,LogDebug 是指定用于使用 Debug 层跟踪信息的方法。
Let’s now look at an example. I created a record in the Program.cs file:
现在让我们看一个示例。我在 Program.cs 文件中创建了一条记录:
internal record CategoryFiltered();
This record is used to define a particular category of logs that I want to track only when necessary. To do this, it is advisable to define a class or a record as an end in itself and enable the necessary trace level.
此记录用于定义我只想在必要时跟踪的特定日志类别。为此,建议将类或记录定义为其本身的 end,并启用必要的跟踪级别。
A record that is defined in the Program.cs file has no namespace; we must remember this when we define the appsettings file with all the necessary information.
在 Program.cs 文件中定义的记录没有命名空间;当我们使用所有必要的信息定义 AppSettings 文件时,我们必须记住这一点。
If the log category is within a namespace, we must consider the full name of the class. In this case, it is LoggingSamples.Categories.MyCategoryAlert:
如果日志类别位于命名空间内,则必须考虑类的全名。在本例中,它是 LoggingSamples.Categories.MyCategoryAlert:
namespace LoggingSamples.Categories
{
    public class MyCategoryAlert
    {
    }
}
If we do not specify the category, as in the following example, the selected log level is the default:
如果我们不指定类别,如以下示例所示,则所选日志级别为默认日志级别:
Anything that comprises infrastructure logs, such as Microsoft logs, stays in special categories such as Microsoft.AspNetCore or Microsoft.EntityFrameworkCore.
构成基础结构日志的任何内容(如 Microsoft 日志)都属于特殊类别,如 Microsoft.AspNetCore 或 Microsoft.EntityFrameworkCore。
Sometimes, we need to define certain log levels depending on the tracking provider. For example, during development, we want to see all the information in the log console, but we only want to see errors in the log file.
有时,我们需要根据跟踪提供商定义某些日志级别。例如,在开发过程中,我们希望在日志控制台中看到所有信息,但我们只想在日志文件中看到错误。
To do this, we don’t need to change the configuration code but just define its level for each provider. The following is an example that shows how everything that is tracked in the Microsoft categories is shown from the Information layer to the ones below it:
为此,我们不需要更改配置代码,只需为每个提供程序定义其级别。以下示例显示了如何从信息层向其下方的 Microsoft 类别中跟踪的所有内容显示:
Now that we’ve figured out how to enable logging and how to filter the various categories, all that’s left is to apply this information to a minimal API.
现在我们已经弄清楚了如何启用日志记录以及如何筛选各种类别,剩下的工作就是将此信息应用于最小的 API。
In the following code, we inject two ILogger instances with different categories. This is not a common practice, but we did it to make the example more concrete and show how the logger works:
在下面的代码中,我们注入了两个不同类别的 ILogger 实例。这不是一种常见的做法,但我们这样做是为了使示例更加具体并展示 Logger 的工作原理:
app.MapGet("/first-log", (ILogger<CategoryFiltered> loggerCategory, ILogger<MyCategoryAlert> loggerAlertCategory) =>
{
    loggerCategory.LogInformation("I'm information
      {MyName}", "My Name Information");
    loggerAlertCategory.LogInformation("I'm information
      {MyName}", "Alert Information");
    return Results.Ok();
})
.WithName("GetFirstLog");
In the preceding snippet, we inject two instances of the logger with different categories; each category tracks a single piece of information. The information is written according to a template that we will describe shortly. The effect of this example is that based on the level, we can show or disable the information displayed for a single category, without changing the code.
在前面的代码段中,我们注入了两个不同类别的 Logger 实例;每个类别跟踪一条信息。该信息是根据我们稍后将介绍的模板编写的。此示例的效果是,根据级别,我们可以显示或禁用为单个类别显示的信息,而无需更改代码。
We started filtering the logo by levels and categories. Now, we want to show you how to define a template that will allow us to define a message and make it dynamic in some of its parts.
我们开始按级别和类别过滤徽标。现在,我们想向您展示如何定义一个模板,该模板将允许我们定义消息并使其在某些部分中是动态的。
Customizing log message
自定义日志消息
The message field that is asked by the log methods is a simple string object that we can enrich and serialize through the logging frameworks in proper structures. The message is therefore essential to identify malfunctions and errors, and inserting objects in it can significantly help us to identify the problem:
log 方法询问的 message 字段是一个简单的字符串对象,我们可以通过日志记录框架以适当的结构对其进行扩充和序列化。因此,该消息对于识别故障和错误至关重要,在其中插入对象可以显着帮助我们识别问题:
The message template contains placeholders that interpolate content into the textual message.
消息模板包含将内容插入到文本消息中的占位符。
In addition to the text, it is necessary to pass the arguments to replace the placeholders. Therefore, the order of the parameters is valid but not the name of the placeholders for the substitution.
除了文本之外,还需要传递参数来替换占位符。因此,参数的顺序有效,但替换的占位符名称无效。
The result then considers the positional parameters and not the placeholder names:
然后,结果会考虑位置参数,而不是占位符名称:
My fruit box has: apples, pears, bananas
Now you know how to customize log messages. Next, let us learn about infrastructure logging, which is essential while working in more complex scenarios.
现在您知道如何自定义日志消息了。接下来,让我们了解一下基础设施日志记录,这在更复杂的场景中工作时是必不可少的。
Infrastructure logging
基础设施日志记录
In this section, we want to tell you about a little-known and little-used theme within ASP.NET applications: the W3C log.
在本节中,我们想向您介绍 ASP.NET 应用程序中一个鲜为人知且很少使用的主题:W3C 日志。
This log is a standard that is used by all web servers, not only Internet Information Services (IIS). It also works on NGINX and many other web servers and can be used on Linux, too. It is also used to trace various requests. However, the log cannot understand what happened inside the call.
此日志是所有 Web 服务器都使用的标准,而不仅仅是 Internet Information Services (IIS)。它也适用于 NGINX 和许多其他 Web 服务器,也可以在 Linux 上使用。它还用于跟踪各种请求。但是,日志无法理解调用中发生的情况。
Thus, this feature focuses on the infrastructure, that is, how many calls are made and to which endpoint.
因此,此功能侧重于基础设施,即进行多少次调用以及调用到哪个终端节点。
In this section, we will see how to enable tracking, which, by default, is stored on a file. The functionality takes a little time to find but enables more complex scenarios that must be managed with appropriate practices and tools, such as OpenTelemetry.
在本节中,我们将了解如何启用跟踪,默认情况下,跟踪存储在文件中。该功能需要一点时间才能找到,但支持更复杂的场景,这些场景必须使用适当的实践和工具(如 OpenTelemetry)进行管理。
OpenTelemetry
开放遥测
OpenTelemetry is a collection of tools, APIs, and SDKs. We use it to instrument, generate, collect, and export telemetry data (metrics, logs, and traces) to help analyze software performance and behavior. You can learn more at the OpenTelemetry official website: https://opentelemetry.io/.
OpenTelemetry 是工具、API 和 SDK 的集合。我们使用它来检测、生成、收集和导出遥测数据(指标、日志和跟踪),以帮助分析软件性能和行为。您可以在 OpenTelemetry 官方网站上了解更多信息: https://opentelemetry.io/.
To configure W3C logging, you need to register the AddW3CLogging method and configure all available options.
要配置 W3C 日志记录,您需要注册 AddW3CLogging 方法并配置所有可用选项。
To enable logging, you only need to add UseW3CLogging.
要启用日志记录,您只需添加 UseW3CLogging。
The writing of the log does not change; the two methods enable the scenario just described and start writing data to the W3C log standard:
日志的写入不会改变;这两种方法启用刚才描述的方案并开始将数据写入 W3C 日志标准:
We’ve seen how to track information about the infrastructure hosting our application; now, we want to increase log performance with new features in .NET 6 that help us set up standard log messages and avoid errors.
我们已经了解了如何跟踪有关托管应用程序的基础设施的信息;现在,我们希望通过 .NET 6 中的新功能来提高日志性能,这些功能可以帮助我们设置标准日志消息并避免错误。
Source generators
源生成器
One of the novelties of .NET 6 is the source generators; they are performance optimization tools that generate executable code at compile time. The creation of executable code at compile time, therefore, generates an increase in performance. During the execution phase of the program, all structures are comparable to code written by the programmer before compilation.
.NET 6 的新颖之处之一是源生成器;它们是在编译时生成可执行代码的性能优化工具。因此,在编译时创建可执行代码会提高性能。在程序的执行阶段,所有结构都与程序员在编译前编写的代码相当。
String interpolation using $”” is generally great, and it makes for much more readable code than string.Format(), but you should almost never use it when writing log messages:
使用 $“” 的字符串插值通常很棒,并且它使代码比 string 更具可读性。Format(),但在编写日志消息时几乎不应该使用它:
The output of this method to the Console will be the same when using string interpolation or structural logging, but there are several problems:
使用字符串插值或结构日志记录时,此方法对 Console 的输出将相同,但存在几个问题:
• You lose the structured logs and you won’t be able to filter by the format values or archive the log message in the custom field of NoSQL products.
您将丢失结构化日志,并且无法按格式值进行筛选,也无法在 NoSQL 产品的自定义字段中存档日志消息。
• Similarly, you no longer have a constant message template to find all identical logs.
同样,您不再有固定的消息模板来查找所有相同的日志。
• The serialization of the person is done ahead of time before the string is passed into LogInformation.
将字符串传递到 LogInformation 之前,会提前完成人员的序列化。
• The serialization is done even though the log filter is not enabled. To avoid processing the log, it is necessary to check whether the layer is active, which would make the code much less readable.
即使未启用日志过滤器,也会完成序列化。为避免处理日志,有必要检查该层是否处于活动状态,这将使代码的可读性大大降低。
Let us say you decide to update the log message to include Age to clarify why the log is being written:
假设您决定更新日志消息以包含 Age 以阐明写入日志的原因:
logger.LogInformation("I'm {Name}-{Surname} with {Age}", person.Name, person.Surname);
In the previous code snippet, I added Age in the message template but not in the method signature. At compile time, there is no compile-time error, but when this line is executed, an exception is thrown due to the lack of a third parameter.
在前面的代码段中,我在消息模板中添加了 Age,但没有在方法签名中添加。在编译时,没有编译时错误,但是当执行此行时,由于缺少第三个参数,会引发异常。
LoggerMessage in .NET 6 comes to our rescue, automatically generating the code to log the necessary data. The methods will require the correct number of parameters and the text will be formatted in a standard way.
.NET 6 中的 LoggerMessage 可以帮我们忙,自动生成代码来记录必要的数据。这些方法将需要正确数量的参数,并且文本将以标准方式格式化。
To use the LoggerMessage syntax, you can take advantage of a partial class or a static class. Inside the class, it will be possible to define the method or methods with all the various log cases:
要使用 LoggerMessage 语法,您可以利用分部类或静态类。在类中,可以使用所有不同的日志情况定义一个或多个方法:
public partial class LogGenerator
    {
        private readonly ILogger<LogGeneratorCategory>
          _logger;
        public LogGenerator(ILogger<LogGeneratorCategory>
          logger)
        {
            _logger = logger;
        }
        [LoggerMessage(
            EventId = 100,
            EventName = "Start",
            Level = LogLevel.Debug,
            Message = "Start Endpoint: {endpointName} with
              data {dataIn}")]
        public partial void StartEndpointSignal(string
          endpointName, object dataIn);
        [LoggerMessage(
           EventId = 101,
           EventName = "StartFiltered",
           Message = "Log level filtered: {endpointName}
             with data {dataIn}")]
        public partial void LogLevelFilteredAtRuntime(
          LogLevel, string endpointName, object dataIn);
    }
    public class LogGeneratorCategory { }
In the previous example, we created a partial class, injected the logger and its category, and implemented two methods. The methods are used in the following code:
在前面的示例中,我们创建了一个分部类,注入了 Logger 及其类别,并实现了两个方法。这些方法在以下代码中使用:
Notice how in the second method, we also have the possibility to define the log level at runtime.
请注意,在第二种方法中,我们还可以在运行时定义日志级别。
Behind the scenes, the [LoggerMessage] source generator generates the LoggerMessage.Define() code to optimize your method call. The following output shows the generated code:
在后台,[LoggerMessage] 源生成器会生成 LoggerMessage.Define() 代码来优化方法调用。以下输出显示了生成的代码:
[global::System.CodeDom.Compiler.GeneratedCodeAttribute("Microsoft.Extensions.Logging.Generators", "6.0.5.2210")]
        public partial void LogLevelFilteredAtRuntime(
          global::Microsoft.Extensions.Logging.LogLevel
          logLevel, global::System.String endpointName,
          global::System.Object dataIn)
        {
            if (_logger.IsEnabled(logLevel))
            {
                _logger.Log(
                    logLevel,
                    new global::Microsoft.Extensions.
                     Logging.EventId(101, "StartFiltered"),
                    new __LogLevelFilteredAtRuntimeStruct(
                      endpointName, dataIn),
                    null,
                      __LogLevelFilteredAtRuntimeStruct.
                          Format);
            }
        }
In this section, you have learned about some logging providers, different log levels, how to configure them, what parts of the message template to modify, enabling logging, and the benefits of source generators. In the next section, we will focus more on logging providers.
在本节中,您了解了一些日志记录提供程序、不同的日志级别、如何配置它们、要修改消息模板的哪些部分、启用日志记录以及源生成器的好处。在下一节中,我们将更多地关注日志提供程序。
Leveraging the logging framework
利用日志记录框架
The logging framework, as mentioned at the beginning of the chapter, already has by design a series of providers that do not require adding any additional packages. Now, let us explore how to work with these providers and how to build custom ones. We will analyze only the Console log provider because it has all the sufficient elements to replicate the same reasoning on other log providers.
如本章开头所述,日志框架在设计上已经有一系列不需要添加任何其他包的提供程序。现在,让我们探索如何与这些提供商合作以及如何构建自定义提供商。我们将仅分析 Console 日志提供程序,因为它具有在其他日志提供程序上复制相同推理的所有足够元素。
Console log
控制台日志
The Console log provider is the most used one because, during the development, it gives us a lot of information and collects all the application errors.
Console 日志提供程序是最常用的一种,因为在开发过程中,它为我们提供了大量信息并收集了所有应用程序错误。
Since .NET 6, this provider has been joined by the AddJsonConsole provider, which, besides tracing the errors like the console, serializes them in a JSON object readable by the human eye.
从 .NET 6 开始,此提供程序已由 AddJsonConsole 提供程序加入,该提供程序除了像控制台一样跟踪错误外,还会将它们序列化为人眼可读的 JSON 对象。
In the following example, we show how to configure the JsonConsole provider and also add indentation when writing the JSON payload:
在以下示例中,我们将展示如何配置 JsonConsole 提供程序,并在写入 JSON 有效负载时添加缩进:
As we’ve seen in the previous examples, we’re going to track the information with the message template:
正如我们在前面的示例中所看到的,我们将使用 message 模板跟踪信息:
app.MapGet("/first-log", (ILogger<CategoryFiltered> loggerCategory, ILogger<MyCategoryAlert> loggerAlertCategory) =>
{
    loggerCategory.LogInformation("I'm information
      {MyName}", "My Name Information");
    loggerCategory.LogDebug("I'm debug {MyName}",
      "My Name Debug");
    loggerCategory.LogInformation("I'm debug {Data}",
      new PayloadData("CategoryRoot", "Debug"));
    loggerAlertCategory.LogInformation("I'm information
      {MyName}", "Alert Information");
    loggerAlertCategory.LogDebug("I'm debug {MyName}",
      "Alert Debug");
    var p = new PayloadData("AlertCategory", "Debug");
    loggerAlertCategory.LogDebug("I'm debug {Data}", p);
    return Results.Ok();
})
.WithName("GetFirstLog");
Finally, an important note: the Console and JsonConsole providers do not serialize objects passed via the message template but only write the class name.
最后,需要注意的是:Console 和 JsonConsole 提供程序不会序列化通过消息模板传递的对象,而只写入类名。
var p = new PayloadData("AlertCategory", "Debug");
loggerAlertCategory.LogDebug("I'm debug {Data}", p);
This is definitely a limitation of providers. Thus, we suggest using structured logging tools such as NLog, log4net, and Serilog, which we will talk about shortly.
这绝对是提供商的限制。因此,我们建议使用结构化日志记录工具,例如 NLog、log4net 和 Serilog,我们稍后会讨论这些工具。
We present the outputs of the previous lines with the two providers just described:
我们将前面几行的输出与刚才描述的两个提供商一起呈现:
Figure 5.1 shows the log formatted as JSON, with several additional details compared to the traditional console log.
图 5.1 显示了格式为 JSON 的日志,与传统控制台日志相比,还有一些额外的细节。
Given the default providers, we want to show you how you can create a custom one that fits the needs of your application.
给定默认提供程序,我们想向您展示如何创建适合您应用程序需求的自定义提供程序。
Creating a custom provider
创建自定义提供程序
The logging framework designed by Microsoft can be customized with little effort. Thus, let us learn how to create a custom provider.
Microsoft 设计的日志记录框架可以毫不费力地进行自定义。因此,让我们学习如何创建自定义提供商(provider)。
Why create a custom provider? Well, put simply, to not have dependencies with logging libraries and to better manage the performance of the application. Finally, it also encapsulates some custom logic of your specific scenario and makes your code more manageable and readable.
为什么要创建自定义提供商?嗯,简单地说,不要依赖日志库,并更好地管理应用程序的性能。最后,它还封装了特定方案的一些自定义逻辑,并使代码更易于管理和可读。
In the following example, we have simplified the usage scenario to show you the minimum components needed to create a working logging provider for profit.
在以下示例中,我们简化了使用场景,向您展示了创建有效的日志记录提供商以获取利润所需的最少组件。
One of the fundamental parts of a provider is the ability to configure its behavior. Let us create a class that can be customized at application startup or retrieve information from appsettings.
提供程序的基本部分之一是配置其行为的能力。让我们创建一个类,该类可以在应用程序启动时自定义或从 appsettings 中检索信息。
In our example, we define a fixed EventId to verify a daily rolling file logic and a path of where to write the file:
在我们的示例中,我们定义了一个固定的 EventId 来验证每日滚动文件逻辑和写入文件的路径:
public class FileLoggerConfiguration
{
        public int EventId { get; set; }
        public string PathFolderName { get; set; } =
          "logs";
        public bool IsRollingFile { get; set; }
}
The custom provider we are writing will be responsible for writing the log information to a text file. We achieve this by implementing the log class, which we call FileLogger, which implements the ILogger interface.
我们正在编写的自定义提供程序将负责将日志信息写入文本文件。我们通过实现 log 类来实现这一点,我们称之为 FileLogger,它实现 ILogger 接口。
In the class logic, all we do is implement the log method and check which file to put the information in.
在 class logic中,我们所做的只是实现 log 方法并检查将信息放入哪个文件。
We put the directory verification in the next file, but it’s more correct to put all the control logic in this method. We also need to make sure that the log method does not throw exceptions at the application level. The logger should never affect the stability of the application:
我们将目录验证放在下一个文件中,但将所有 control logic 都放在此方法中更为正确。我们还需要确保 log 方法不会在应用程序级别引发异常。记录器不应影响应用程序的稳定性:
Now, we need to implement the ILoggerProvider interface, which is intended to create one or more instances of the logger class just discussed.
现在,我们需要实现 ILoggerProvider 接口,该接口旨在创建刚才讨论的 Logger 类的一个或多个实例。
In this class, we check the directory we mentioned in the previous paragraph, but we also check whether the settings in the appsettings file change, via IOptionsMonitor<T>:
在这个类中,我们检查了我们在上一段中提到的目录,但我们也会通过 IOptionsMonitor<T>检查 appsettings 文件中的设置是否发生了变化:
public class FileLoggerProvider : ILoggerProvider
{
    private readonly IDisposable onChangeToken;
    private FileLoggerConfiguration currentConfig;
    private readonly ConcurrentDictionary<string,
      FileLogger> _loggers = new();
    public FileLoggerProvider(
      IOptionsMonitor<FileLoggerConfiguration> config)
    {
        currentConfig = config.CurrentValue;
        CheckDirectory();
        onChangeToken = config.OnChange(updateConfig =>
        {
            currentConfig = updateConfig;
            CheckDirectory();
        });
    }
    public ILogger CreateLogger(string categoryName)
    {
        return _loggers.GetOrAdd(categoryName, name => new
          FileLogger(name, () => currentConfig));
    }
    public void Dispose()
    {
        _loggers.Clear();
        onChangeToken.Dispose();
    }
    private void CheckDirectory()
    {
        if (!Directory.Exists(currentConfig.PathFolderName))
            Directory.CreateDirectory(currentConfig.
            PathFolderName);
    }
}
Finally, to simplify its use and configuration during the application startup phase, we also define an extension method for registering the various classes just mentioned.
最后,为了简化它在应用程序启动阶段的使用和配置,我们还定义了一个扩展方法,用于注册刚才提到的各种类。
The AddFile method will register ILoggerProvider and couple it to its configuration (very simple as an example, but it encapsulates several aspects of configuring and using a custom provider):
AddFile 方法将注册 ILoggerProvider 并将其耦合到其配置(示例非常简单,但它封装了配置和使用自定义提供程序的几个方面):
public static class FileLoggerExtensions
    {
        public static ILoggingBuilder AddFile(
        this ILoggingBuilder builder)
        {
            builder.AddConfiguration();
           builder.Services.TryAddEnumerable(
             ServiceDescriptor.Singleton<ILoggerProvider,
             FileLoggerProvider>());
            LoggerProviderOptions.RegisterProviderOptions<
              FileLoggerConfiguration, FileLoggerProvider>
              (builder.Services);
            return builder;
        }
        public static ILoggingBuilder AddFile(
            this ILoggingBuilder builder,
            Action<FileLoggerConfiguration> configure)
        {
            builder.AddFile();
            builder.Services.Configure(configure);
            return builder;
        }
    }
We record everything seen in the Program.cs file with the AddFile extension as shown:
我们使用 AddFile 扩展名记录 Program.cs 文件中看到的所有内容,如下所示:
The output is shown in Figure 5.3, where we can see both Microsoft log categories in the first five lines (this is the classic application startup information):
输出如图 5.3 所示,我们可以在前五行中看到两个 Microsoft 日志类别(这是经典应用程序启动信息):
Then, the handler of the minimal APIs that we reported in the previous sections is called. As you can see, no exception data or data passed to the logger is serialized.
然后,调用我们在前面几节中报告的最小 API 的处理程序。如您所见,不会序列化任何异常数据或传递给 logger 的数据。
To add this functionality as well, it is necessary to rewrite ILogger formatter and support serialization of the object. This will give you everything you need to have in a useful logging framework for production scenarios.
若要同时添加此功能,必须重写 ILogger 格式化程序并支持对象的序列化。这将为您提供用于生产场景的有用日志记录框架所需的一切。
We’ve seen how to configure the log and how to customize the provider object to create a structured log to send to a service or storage.
我们已经了解了如何配置日志以及如何自定义 provider 对象以创建要发送到服务或存储的结构化日志。
In the next section, we want to describe the Azure Application Insights service, which is very useful for both logging and application monitoring.
在下一部分中,我们将介绍 Azure Application Insights 服务,该服务对于日志记录和应用程序监视都非常有用。
Application Insights
应用程序洞察
In addition to the already seen providers, one of the most used ones is Azure Application Insights. This provider allows you to send every single log event in the Azure service. In order to insert the provider into our project, all we would have to do is install the following NuGet package:
除了已经看到的提供程序之外,最常用的提供程序之一是 Azure Application Insights。此提供程序允许您发送 Azure 服务中的每个日志事件。为了将提供程序插入到我们的项目中,我们只需安装以下 NuGet 包:
We first register the Application Insights framework, AddApplicationInsightsTelemetry, and then register its extension on the AddApplicationInsights logging framework.
我们首先注册 Application Insights 框架 AddApplicationInsightsTelemetry,然后在 AddApplicationInsights 日志记录框架上注册其扩展。
In the NuGet package previously described, the one for logging the component to the logging framework is also present as a reference:
在前面描述的 NuGet 包中,用于将组件记录到日志记录框架的包也作为参考存在:
var builder = WebApplication.CreateBuilder(args);
builder.Services.AddApplicationInsightsTelemetry();
builder.Logging.AddApplicationInsights();
To register the instrumentation key, which is the key that is issued after registering the service on Azure, you will need to pass this information to the registration method. We can avoid hardcoding this information by placing it in the appsettings.json file using the following format:
若要注册检测密钥(在 Azure 上注册服务后颁发的密钥),您需要将此信息传递给注册方法。我们可以使用以下格式将此信息放在 appsettings.json 文件中,从而避免对此信息进行硬编码:
By launching the method already discussed in the previous sections, we have all the information hooked into Application Insights.
通过启动前面部分中已讨论的方法,我们将所有信息挂接到 Application Insights 中。
Application Insights groups the logs under a particular trace. A trace is a call to an API, so everything that happens in that call is logically grouped together. This feature takes advantage of the WebServer information and, in particular, TraceParentId issued by the W3C standard for each call.
Application Insights 将日志分组到特定跟踪下。跟踪是对 API 的调用,因此该调用中发生的所有事情都在逻辑上分组在一起。此功能利用 WebServer 信息,特别是 W3C 标准为每个调用颁发的 TraceParentId。
In this way, Application Insights can bind calls between various minimal APIs, should we be in a microservice application or with multiple services collaborating with each other.
通过这种方式,Application Insights 可以在各种最小 API 之间绑定调用,前提是我们位于微服务应用程序中或多个服务相互协作。
Figure 5.4 – Application Insights with a standard log provider
图 5.4 – 具有标准日志提供程序的 Application Insights
We notice how the default formatter of the logging framework does not serialize the PayloadData object but only writes the text of the object.
我们注意到日志记录框架的默认格式化程序不会序列化 PayloadData 对象,而只写入对象的文本。
In the applications that we will bring into production, it will be necessary to also trace the serialization of the objects. Understanding the state of the object on time is fundamental to analyzing the errors that occurred during a particular call while running queries in the database or reading the data read from the same.
在我们即将投入生产的应用程序中,还需要跟踪对象的序列化。了解对象的按时状态对于在数据库中运行查询或读取从数据库中读取的数据时分析特定调用期间发生的错误至关重要。
Storing a structured log with Serilog
使用 Serilog 存储结构化日志
As we just discussed, tracking structured objects in the log helps us tremendously in understanding errors.
正如我们刚才讨论的,跟踪日志中的结构化对象对我们理解错误有很大帮助。
We, therefore, suggest one of the many logging frameworks: Serilog.
因此,我们建议使用众多日志框架之一:Serilog。
Serilog is a comprehensive library that has many sinks already written that allow you to store log data and search it later.
Serilog 是一个综合库,它已经编写了许多接收器,允许您存储日志数据并在以后进行搜索。
Serilog is a logging library that allows you to track information on multiple data sources. In Serilog, these sources are called sinks, and they allow you to write structured data inside the log applying a serialization of the data passed to the logging system.
Serilog 是一个日志记录库,允许您跟踪有关多个数据源的信息。在 Serilog 中,这些源称为 sink,它们允许您在日志中写入结构化数据,应用传递给日志记录系统的数据的序列化。
Let’s see how to get started using Serilog for a minimal API application. Let’s install these NuGet packages. Our goal will be to track the same information we’ve been using so far, specifically Console and ApplicationInsights:
让我们看看如何开始将 Serilog 用于最小的 API 应用程序。让我们安装这些 NuGet 包。我们的目标是跟踪我们目前一直在使用的相同信息,特别是控制台和 ApplicationInsights:
The first package is the one needed for the ApplicationInsights SDK in the application. The second package allows us to register Serilog in the ASP.NET pipeline and to be able to exploit Serilog. The third package allows us to configure the framework in the appsettings file and not have to rewrite the application to change a parameter or code. Finally, we have the package to add the ApplicationInsights sink.
第一个包是应用程序中 ApplicationInsights SDK 所需的包。第二个包允许我们在 ASP.NET 管道中注册 Serilog,并能够利用 Serilog。第三个包允许我们在 appsettings 文件中配置框架,而不必重写应用程序来更改参数或代码。最后,我们有了用于添加 ApplicationInsights 接收器的包。
In the appsettings file, we create a new Serilog section, in which we should register the various sinks in the Using section. We register the log level, the sinks, the enrichers that enrich the information for each event, and the properties, such as the application name:
在 appsettings 文件中,我们创建一个新的 Serilog 部分,我们应该在其中注册 Using 部分的各种接收器。我们注册日志级别、接收器、扩充每个事件信息的 enricher 以及属性,例如应用程序名称:
Now, we just have to register Serilog in the ASP.NET pipeline:
现在,我们只需要在 ASP.NET 管道中注册 Serilog:
using Microsoft.ApplicationInsights.Extensibility;
using Serilog;
var builder = WebApplication.CreateBuilder(args);
builder.Logging.AddSerilog();
builder.Services.AddApplicationInsightsTelemetry();
var app = builder.Build();
Log.Logger = new LoggerConfiguration()
.WriteTo.ApplicationInsights(app.Services.GetRequiredService<TelemetryConfiguration>(), TelemetryConverter.Traces)
.CreateLogger();
With the builder.Logging.AddSerilog() statement, we register Serilog with the logging framework to which all logged events will be passed with the usual ILogger interface. Since the framework needs to register the TelemetryConfiguration class to register ApplicationInsights, we are forced to hook the configuration to the static Logger object of Serilog. This is all because Serilog will turn the information from the Microsoft logging framework over to the Serilog framework and add all the necessary information.
builder.Logging.AddSerilog()语句中,我们将 Serilog 注册到日志记录框架,所有记录的事件都将使用通常的 ILogger 接口传递到该框架。由于框架需要注册 TelemetryConfiguration 类来注册 ApplicationInsights,因此我们被迫将配置挂接到 Serilog 的静态 Logger 对象。这都是因为 Serilog 会将信息从 Microsoft 日志记录框架转移到 Serilog 框架并添加所有必要的信息。
The usage is very similar to the previous one, but this time, we add an @ (at) to the message template that will tell Serilog to serialize the sent object.
用法与前一个非常相似,但这次,我们在消息模板中添加一个 @ (at),它将告诉 Serilog 序列化发送的对象。
With this very simple {@Person} wording, we will be able to achieve the goal of serializing the object and sending it to the ApplicationInsights service:
使用这个非常简单的 {@Person} 措辞,我们将能够实现序列化对象并将其发送到 ApplicationInsights 服务的目标:
app.MapGet("/serilog", (ILogger<CategoryFiltered> loggerCategory) =>
{
    loggerCategory.LogInformation("I'm {@Person}", new
      Person("Andrea", "Tosato", new DateTime(1986, 11,
      9)));
    return Results.Ok();
})
.WithName("GetFirstLog");
internal record Person(string Name, string Surname, DateTime Birthdate);
Finally, we have to find the complete data, serialized with the JSON format, in the Application Insights service.
最后,我们必须在 Application Insights 服务中找到使用 JSON 格式序列化的完整数据。
Figure 5.5 – Application Insights with structured data
图 5.5 – 包含结构化数据的 Application Insights
Summary
总结
In this chapter, we have seen several logging aspects of the implementation of minimal APIs.
在本章中,我们了解了最小 API 实现的几个日志记录方面。
We started to appreciate the ASP.NET churned logging framework, and we understood how to configure and customize it. We focused on how to define a message template and how to avoid errors with the source generator.
我们开始欣赏 ASP.NET 的 churned 日志记录框架,并且我们了解如何配置和自定义它。我们重点介绍了如何定义消息模板以及如何避免源生成器出错。
We saw how to use the new provider to serialize logs with the JSON format and create a custom provider. These elements turned out to be very important for mastering the logging tool and customizing it to your liking.
我们了解了如何使用新的提供程序以 JSON 格式序列化日志并创建自定义提供程序。事实证明,这些元素对于掌握日志记录工具并根据您的喜好对其进行自定义非常重要。
Not only was the application log mentioned but also the infrastructure log, which together with Application Insights becomes a key element to monitoring your application. Finally, we understood that there are ready-made tools, such as Serilog, that help us to have ready-to-use functionalities with a few steps thanks to some packages installed by NuGet.
不仅提到了应用程序日志,还提到了基础结构日志,它与 Application Insights 一起成为监视应用程序的关键元素。最后,我们了解到有一些现成的工具,例如 Serilog,由于 NuGet 安装的一些软件包,它们可以帮助我们通过几个步骤获得即用型功能。
In the next chapter, we will present the mechanisms for validating an input object to the API. This is a fundamental feature to return a correct error to the calls and discard inaccurate requests or those promoted by illicit activities such as spam and attacks, aimed at generating load on our servers.
在下一章中,我们将介绍验证 API 的输入对象的机制。这是一项基本功能,可向调用返回正确的错误并丢弃不准确的请求或由非法活动(如垃圾邮件和攻击)推动的请求,旨在在我们的服务器上产生负载。
6 Exploring Validation and Mapping
6 探索验证和映射
In this chapter of the book, we will discuss how to perform data validation and mapping with minimal APIs, showing what features we currently have, what is missing, and what the most interesting alternatives are. Learning about these concepts will help us to develop more robust and maintainable applications.
在本书的这一章中,我们将讨论如何使用最少的 API 执行数据验证和映射,展示我们目前拥有的功能、缺少的功能以及最有趣的替代方案。了解这些概念将有助于我们开发更健壮且可维护的应用程序。
In this chapter, we will be covering the following topics:
在本章中,我们将介绍以下主题:
• Handling validation
处理验证
• Mapping data to and from APIs
将数据映射到 API 或从 API 映射数据
Technical requirements
技术要求
To follow the descriptions in this chapter, you will need to create an ASP.NET Core 6.0 Web API application. Refer to the Technical requirements section in Chapter 2, Exploring Minimal APIs and Their Advantages, for instructions on how to do so.
要按照本章中的描述进行作,您需要创建一个 ASP.NET Core 6.0 Web API 应用程序。有关如何执行此作的说明,请参阅第 2 章 “探索最小 API 及其优势”中的“技术要求”部分。
If you’re using your console, shell, or bash terminal to create the API, remember to change your working directory to the current chapter number (Chapter06).
如果您使用控制台、shell 或 bash 终端创建 API,请记住将工作目录更改为当前章节编号 (Chapter06)。
Data validation is one of the most important processes in any working software. In the context of a Web API, we perform the validation process to ensure that the information passed to our endpoints respects certain rules – for example, that a Person object has both the FirstName and LastName properties defined, an email address is valid, or an appointment date isn’t in the past.
数据验证是任何工作软件中最重要的过程之一。在 Web API 的上下文中,我们执行验证过程以确保传递给终端节点的信息符合某些规则,例如,Person 对象同时定义了 FirstName 和 LastName 属性、电子邮件地址有效或约会日期不是过去的日期。
In controller-based projects, we can perform these checks, also termed model validation, directly on the model, using data annotations. In fact, the ApiController attribute that is placed on a controller makes model validation errors automatically trigger a 400 Bad Request response if one or more validation rules fail. Therefore, in controller-based projects, we typically don’t need to perform explicit model validation at all: if the validation fails, our endpoint will never be invoked.
在基于控制器的项目中,我们可以使用数据注释直接在模型上执行这些检查,也称为模型验证。事实上,放置在控制器上的 ApiController 属性会使模型验证错误在一个或多个验证规则失败时自动触发 400 Bad Request 响应。因此,在基于控制器的项目中,我们通常根本不需要执行显式模型验证:如果验证失败,我们的端点将永远不会被调用。
Note : The ApiController attribute enables the automatic model validation behavior using the ModelStateInvalidFilter action filter.
注意 : ApiController 属性使用 ModelStateInvalidFilter作筛选器启用自动模型验证行为。
Unfortunately, minimal APIs do not provide built-in support for validation. The IModelValidator interface and all related objects cannot be used. Thus, we don’t have a ModelState; we can’t prevent the execution of our endpoint if there is a validation error and must explicitly return a 400 Bad Request response.
遗憾的是,最小 API 不提供对验证的内置支持。不能使用 IModelValidator 接口和所有相关对象。因此,我们没有 ModelState;如果存在验证错误,我们无法阻止终端节点的执行,并且必须显式返回 400 Bad Request 响应。
So, for example, let’s see the following code:
因此,例如,让我们看看以下代码:
app.MapPost("/people", (Person person) =>
{
    return Results.NoContent();
});
public class Person
{
    [Required]
    [MaxLength(30)]
    public string FirstName { get; set; }
    [Required]
    [MaxLength(30)]
    public string LastName { get; set; }
    [EmailAddress]
    [StringLength(100, MinimumLength = 6)]
    public string Email { get; set; }
}
As we can see, the endpoint will be invoked even if the Person argument does not respect the validation rules. There is only one exception: if we use nullable reference types and we don’t pass a body in the request, we effectively get a 400 Bad Request response. As mentioned in Chapter 2, Exploring Minimal APIs and Their Advantages, nullable reference types are enabled by default in .NET 6.0 projects.
正如我们所看到的,即使 Person 参数不遵守验证规则,也会调用端点。只有一个例外:如果我们使用可为 null 的引用类型,并且我们没有在请求中传递正文,我们实际上会得到 400 Bad Request 响应。如第 2 章 探索最小 API 及其优点中所述,在 .NET 6.0 项目中默认启用可为 null 的引用类型。
If we want to accept a null body (if ever there was a need), we need to declare the parameter as Person?. But, as long as there is a body, the endpoint will always be invoked.
如果我们想接受一个 null body(如果有需要),我们需要将参数声明为 Person?。但是,只要有 body,端点就会始终被调用。
So, with minimal APIs, it is necessary to perform validation inside each route handler and return the appropriate response if some rules fail. We can either implement a validation library compatible with the existing attributes so that we can perform validation using the classic data annotations approach, as described in the next section, or use a third-party solution such as FluentValidation, as we will see in the Integrating FluentValidation section.
因此,使用最少的 API,有必要在每个路由处理程序中执行验证,并在某些规则失败时返回相应的响应。我们可以实现与现有属性兼容的验证库,以便我们可以使用经典数据注释方法执行验证,如下一节所述,也可以使用第三方解决方案,例如 FluentValidation,正如我们将在集成 FluentValidation 部分中看到的那样。
Performing validation with data annotations
使用数据注释执行验证
If we want to use the common validation pattern based on data annotations, we need to rely on reflection to retrieve all the validation attributes in a model and invoke their IsValid methods, which are provided by the ValidationAttribute base class.
如果我们想使用基于数据注释的通用验证模式,则需要依靠反射来检索模型中的所有验证属性,并调用它们的 IsValid 方法,这些方法由 ValidationAttribute 基类提供。
This behavior is a simplification of what ASP.NET Core actually does to handle validations. However, this is the way validation in controller-based projects works.
此行为简化了 ASP.NET Core 实际处理验证的作。但是,这就是基于 controller 的 projects 中 validation 的工作方式。
Important note : At the time of writing, MiniValidation is available on NuGet as a prerelease.
重要提示 : 在撰写本文时,MiniValidation 在 NuGet 上作为预发行版提供。
We can add this library to our project in one of the following ways:
我们可以通过以下方式之一将此库添加到我们的项目中:
• Option 1: If you’re using Visual Studio 2022, right-click on the project and choose the Manage NuGet Packages command to open the Package Manager GUI; then, search for MiniValidation. Be sure to check the Include prerelease option and click Install.
选项 1:如果您使用的是 Visual Studio 2022,请右键单击项目并选择“管理 NuGet 包”命令以打开包管理器 GUI;然后,搜索 MiniValidation。请务必选中 Include prerelease 选项,然后单击 Install。
• Option 2: Open the Package Manager Console if you’re inside Visual Studio 2022, or open your console, shell, or bash terminal, go to your project directory, and execute the following command: dotnet add package MiniValidation --prerelease
选项 2:如果您在 Visual Studio 2022 中,请打开包管理器控制台,或者打开控制台、shell 或 bash 终端,转到您的项目目录,然后执行以下命令:dotnet add package MiniValidation --prerelease
Now, we can validate a Person object using the following code:
现在,我们可以使用以下代码验证 Person 对象:
app.MapPost("/people", (Person person) =>
{
    var isValid = MiniValidator.TryValidate(person,
      out var errors);
    if (!isValid)
    {
        return Results.ValidationProblem(errors);
    }
    return Results.NoContent();
});
As we can see, the MiniValidator.TryValidate static method provided by MiniValidation takes an object as input and automatically verifies all the validation rules that are defined on its properties. If the validation fails, it returns false and populates the out parameter with all the validation errors that have occurred. In this case, because it is our responsibility to return the appropriate response code, we use Results.ValidationProblem, which produces a 400 Bad Request response with a ProblemDetails object (as described in Chapter 3, Working with Minimal APIs) and also contains the validation issues.
正如我们所看到的,MiniValidation 提供的 MiniValidator.TryValidate 静态方法将对象作为输入,并自动验证在其属性上定义的所有验证规则。如果验证失败,它将返回 false 并使用已发生的所有验证错误填充 out 参数。在这种情况下,由于我们有责任返回适当的响应代码,因此我们使用 Results.ValidationProblem,它生成带有 ProblemDetails 对象的 400 Bad Request 响应(如第 3 章 使用最小 API 中所述),并且还包含验证问题。
Now, as an example, we can invoke the endpoint using the following invalid input:
现在,例如,我们可以使用以下无效输入调用终端节点:
{
  "lastName": "MyLastName",
  "email": "email"
}
This is the response we will obtain:
这是我们将获得的响应:
{
  "type":
    "https://tools.ietf.org/html/rfc7231#section-6.5.1",
  "title": "One or more validation errors occurred.",
  "status": 400,
  "errors": {
    "FirstName": [
      "The FirstName field is required."
    ],
    "Email": [
      "The Email field is not a valid e-mail address.",
      "The field Email must be a string with a minimum
       length of 6 and a maximum length of 100."
    ]
  }
}
In this way, besides the fact that we need to execute validation manually, we can implement the approach of using data annotations on our models in the same way we were accustomed to in previous versions of ASP.NET Core. We can also customize error messages and define custom rules by creating classes that inherit from ValidationAttribute.
这样,除了需要手动执行验证之外,我们还可以像以前版本的 ASP.NET Core 一样,在模型上实现使用数据注释的方法。我们还可以通过创建继承自 ValidationAttribute 的类来自定义错误消息和定义自定义规则。
Although data annotations are the most used solution, we can also handle validations using a so-called fluent approach, which has the benefit of completely decoupling validation rules from the model, as we’ll see in the next section.
尽管数据注释是最常用的解决方案,但我们也可以使用所谓的 Fluent 方法处理验证,其优点是将验证规则与模型完全解耦,我们将在下一节中看到。
Note : .NET Foundation is an independent organization that aims to support open source software development and collaboration around the .NET platform. You can learn more at https://dotnetfoundation.org.
注意 : .NET Foundation 是一个独立的组织,旨在支持围绕 .NET 平台的开源软件开发和协作。您可以在 https://dotnetfoundation.org 中了解更多信息。
As stated before, with this library, we can decouple validation rules from the model to create a more structured application. Moreover, FluentValidation allows us to define even more complex rules with a fluent syntax without the need to create custom classes based on ValidationAttribute. The library also natively supports the localization of standard error messages.
如前所述,借助此库,我们可以将验证规则与模型解耦,以创建更加结构化的应用程序。此外,FluentValidation 允许我们使用 Fluent 语法定义更复杂的规则,而无需基于 ValidationAttribute 创建自定义类。该库还原生支持标准错误消息的本地化。
So, let’s see how we can integrate FluentValidation into a minimal API project. First, we need to add this library to our project in one of the following ways:
那么,让我们看看如何将 FluentValidation 集成到一个最小的 API 项目中。首先,我们需要通过以下方式之一将此库添加到我们的项目中:
• Option 1: If you’re using Visual Studio 2022, right-click on the project and choose the Manage NuGet Packages command to open Package Manager GUI. Then, search for FluentValidation.DependencyInjectionExtensions and click Install.
选项 1:如果您使用的是 Visual Studio 2022,请右键单击项目并选择“管理 NuGet 包”命令以打开包管理器 GUI。然后,搜索 FluentValidation.DependencyInjectionExtensions 并单击 Install。
• Option 2: Open Package Manager Console if you’re inside Visual Studio 2022, or open your console, shell, or bash terminal, go to your project directory, and execute the following command: dotnet add package FluentValidation.DependencyInjectionExtensions
选项 2:如果您在 Visual Studio 2022 中,请打开包管理器控制台,或者打开控制台、shell 或 bash 终端,转到您的项目目录,然后执行以下命令:
dotnet add 包 FluentValidation.DependencyInjectionExtensions
Now, we can rewrite the validation rules for the Person object and put them in a PersonValidator class:
现在,我们可以重写 Person 对象的验证规则,并将它们放入 PersonValidator 类中:
public class PersonValidator : AbstractValidator<Person>
{
    public PersonValidator()
    {
        RuleFor(p =>
          p.FirstName).NotEmpty().MaximumLength(30);
        RuleFor(p =>
          p.LastName).NotEmpty().MaximumLength(30);
        RuleFor(p => p.Email).EmailAddress().Length(6,
          100);
    }
}
PersonValidator inherits from AbstractValidator<T>, a base class provided by FluentValidation that contains all the methods we need to define the validation rules. For example, we fluently say that we have a rule for the FirstName property, which is that it must not be empty and it can have a maximum length of 30 characters.
PersonValidator 继承自 AbstractValidator<T>,后者是 FluentValidation 提供的基类,包含定义验证规则所需的所有方法。例如,我们流畅地说我们有一条 FirstName 属性的规则,即它不能为空,并且最大长度为 30 个字符。
The next step is to register the validator in the service provider so that we can use it in our route handlers. We can perform this task with a simple instruction:
下一步是在 service provider 中注册 validator,以便我们可以在 route handlers 中使用它。我们可以通过一个简单的指令来执行这项任务:
var builder = WebApplication.CreateBuilder(args);
//...
builder.Services.AddValidatorsFromAssemblyContaining<Program>();
The AddValidatorsFromAssemblyContaining method automatically registers all the validators derived from AbstractValidator within the assembly containing the specified type. In particular, this method registers the validators and makes them accessible through dependency injection via the IValidator<T> interface, which in turn, is implemented by the AbstractValidator<T> class. If we have multiple validators, we can register them all with this single instruction. We can also easily put our validators in external assemblies.
AddValidatorsFromAssemblyContaining 方法会自动在包含指定类型的程序集中注册从 AbstractValidator 派生的所有验证程序。特别是,此方法注册验证器,并通过 IValidator<T> 接口通过依赖项注入使它们可访问,而 IValidator<T> 接口又由 AbstractValidatorT 类实现。如果我们有多个验证者,我们可以使用这个指令将它们全部注册。我们还可以轻松地将验证器放在外部程序集中。
Now that everything is in place, remembering that with minimal APIs we don’t have automatic model validation, we must update our route handler in this way:
现在一切都已准备就绪,请记住,使用最少的 API 时,我们没有自动模型验证,我们必须以这种方式更新我们的路由处理程序:
app.MapPost("/people", async (Person person, IValidator<Person> validator) =>
{
    var validationResult =
      await validator.ValidateAsync(person);
    if (!validationResult.IsValid)
    {
        var errors = validationResult.ToDictionary();
        return Results.ValidationProblem(errors);
    }
    return Results.NoContent();
});
We have added an IValidator argument in the route handler parameter list, so now we can invoke its ValidateAsync method to apply the validation rules against the input Person object. If the validation fails, we extract all the error messages and return them to the client with the usual Results.ValidationProblem method, as described in the previous section.
我们在路由处理程序参数列表中添加了 IValidator 参数,因此现在我们可以调用其 ValidateAsync 方法,以对输入 Person 对象应用验证规则。如果验证失败,我们将提取所有错误消息,并使用通常的 Results.ValidationProblem 方法将它们返回给客户端,如上一节所述。
In conclusion, let’s see what happens if we try to invoke the endpoint using the following input as before:
总之,让我们看看如果我们像以前一样尝试使用以下输入调用终端节点会发生什么情况:
{
  "lastName": "MyLastName",
  "email": "email"
}
We’ll get the following response:
我们将收到以下响应:
{
  "type":
    "https://tools.ietf.org/html/rfc7231#section-6.5.1",
  "title": "One or more validation errors occurred.",
  "status": 400,
  "errors": {
    "FirstName": [
      "'First Name' non può essere vuoto."
    ],
    "Email": [
      "'Email' non è un indirizzo email valido.",
      "'Email' deve essere lungo tra i 6 e 100 caratteri.
        Hai inserito 5 caratteri."
    ]
  }
}
As mentioned earlier, FluentValidation provides translations for standard error messages, so this is the response you get when running on an Italian system. Of course, we can completely customize the messages with the typical fluent approach, using the WithMessage method chained to the validation methods defined in the validator. For example, see the following:
如前所述,FluentValidation 为标准错误消息提供翻译,因此这是您在意大利语系统上运行时得到的响应。当然,我们可以使用典型的 Fluent 方法完全自定义消息,使用链接到验证器中定义的验证方法的 WithMessage 方法。例如,请参阅以下内容:
RuleFor(p => p.FirstName).NotEmpty().WithMessage("You must provide the first name");
We’ll talk about localization in further detail in Chapter 9, Leveraging Globalization and Localization.
我们将在第 9 章 利用全球化和本地化 中更详细地讨论本地化。
This is just a quick example of how to define validation rules with FluentValidation and use them with minimal APIs. This library allows many more complex scenarios that are comprehensively described in the official documentation available at https://fluentvalidation.net.
这只是一个快速示例,说明如何使用 FluentValidation 定义验证规则并将其与最少的 API 一起使用。此库允许许多更复杂的场景,这些场景在 https://fluentvalidation.net 上提供的官方文档中进行了全面描述。
Now that we have seen how to add validation to our route handlers, it is important to understand how we can update the documentation created by Swagger with this information.
现在我们已经了解了如何将验证添加到路由处理程序中,了解如何使用此信息更新 Swagger 创建的文档非常重要。
Adding validation information to Swagger
向 Swagger 添加验证信息
Regardless of the solution that has been chosen to handle validation, it is important to update the OpenAPI definition with the indication that a handler can produce a validation problem response, calling the ProducesValidationProblem method after the endpoint declaration:
无论选择哪种解决方案来处理验证,都必须更新 OpenAPI 定义,并指示处理程序可以生成验证问题响应,并在端点声明后调用 ProducesValidationProblem 方法:
In this way, a new response type for the 400 Bad Request status code will be added to Swagger, as we can see in Figure 6.1:
这样,400 Bad Request 状态码的新响应类型就会被添加到 Swagger 中,如图 6.1 所示:
Figure 6.1 – The validation problem response added to Swagger
图 6.1 – 添加到 Swagger 的验证问题响应
Moreover, the JSON schemas that are shown at the bottom of the Swagger UI can show the rules of the corresponding models. One of the benefits of defining validation rules using data annotations is that they are automatically reflected in these schemas:
此外,Swagger UI 底部显示的 JSON 架构可以显示相应模型的规则。使用数据注释定义验证规则的好处之一是,它们会自动反映在这些架构中:
Figure 6.2 – The validation rules for the Person object in Swagger
图 6.2 – Swagger 中 Person 对象的验证规则
var builder = WebApplication.CreateBuilder(args);
//...
builder.Services.AddFluentValidationRulesToSwagger();
In this way, the JSON schema shown in Swagger will reflect the validation rules, as with the data annotations. However, it’s worth remembering that, at the time of writing, this library does not support all the validators available in FluentValidation. For more information, we can refer to the GitHub page of the library.
这样,Swagger 中显示的 JSON 架构将反映验证规则,就像数据注释一样。但是,值得记住的是,在撰写本文时,此库并不支持 FluentValidation 中可用的所有验证器。有关更多信息,我们可以参考该库的 GitHub 页面。
This ends our overview of validation in minimal APIs. In the next section, we’ll analyze another important theme of every API: how to correctly handle the mapping of data to and from our services.
我们对最小 API 中的验证的概述到此结束。在下一节中,我们将分析每个 API 的另一个重要主题:如何正确处理进出我们服务的数据。
Mapping data to and from APIs
将数据映射到 API 或从 API 映射数据
When dealing with APIs that can be called by any system, there is one golden rule: we should never expose our internal objects to the callers. If we don’t follow this decoupling idea and, for some reason, need to change our internal data structures, we could end up breaking all the clients that interact with us. Both the internal data structures and the objects that are used to dialog with the clients must be able to evolve independently from one another.
在处理任何系统都可以调用的 API 时,有一条黄金法则:我们永远不应该将我们的内部对象暴露给调用者。如果我们不遵循这种解耦的想法,并且出于某种原因需要改变我们的内部数据结构,我们最终可能会破坏所有与我们交互的客户端。内部数据结构和用于与 Client 端对话的对象都必须能够彼此独立地发展。
This requirement for dialog is the reason why mapping is so important. We need to transform input objects of one type into output objects of a different type and vice versa. In this way, we can achieve two objectives:
这种对对话的要求是映射如此重要的原因。我们需要将一种类型的输入对象转换为不同类型的输出对象,反之亦然。通过这种方式,我们可以实现两个目标:
• Evolve our internal data structures without introducing breaking changes with the contracts that are exposed to the callers
改进我们的内部数据结构,而不会对暴露给调用方的合约引入中断性变更
• Modify the format of the objects used to communicate with the clients without the need to change the way these objects are handled internally
修改用于与 Client 端通信的对象的格式,而无需更改内部处理这些对象的方式
In other words, mapping means transforming one object into another, literally, by copying and converting an object’s properties from a source to a destination. However, mapping code is boring, and testing mapping code is even more boring. Nevertheless, we need to fully understand that the process is crucial and strive to adopt it in all scenarios.
换句话说,映射意味着通过将对象的属性从源复制并转换为目标,将一个对象转换为另一个对象。但是,映射代码很无聊,测试映射代码更无聊。尽管如此,我们需要充分理解这个过程是至关重要的,并努力在所有情况下采用它。
So, let’s consider the following object, which could represent a person saved in a database using Entity Framework Core:
因此,让我们考虑以下对象,它可以表示使用 Entity Framework Core 保存在数据库中的人员:
public class PersonEntity
{
    public int Id { get; set; }
    public string FirstName { get; set; }
    public string LastName { get; set; }
    public DateTime BirthDate { get; set; }
    public string City { get; set; }
}
We have set endpoints for getting a list of people or retrieving a specific person.
我们设置了用于获取人员列表或检索特定人员的端点。
The first thought could be to directly return PersonEntity to the caller. The following code is highly simplified, enough for us to understand the scenario:
第一个想法可能是直接将 PersonEntity 返回给调用方。以下代码经过高度简化,足以让我们理解该场景:
app.MapGet("/people/{id:int}", (int id) =>
{
    // In a real application, this entity could be
    // retrieved from a database, checking if the person
    // with the given ID exists.
    var person = new PersonEntity();
    return Results.Ok(person);
})
.Produces(StatusCodes.Status200OK, typeof(PersonEntity));
What happens if we need to modify the schema of the database, adding, for example, the creation date of the entity? In this case, we need to change PersonEntity with a new property that maps the relevant date. However, the callers also get this information now, which we probably don’t want to be exposed. Instead, if we use a so-called data transformation object (DTO) to expose the person, this problem will be redundant:
如果我们需要修改数据库的架构,例如添加实体的创建日期,会发生什么情况?在这种情况下,我们需要使用映射相关日期的新属性更改 PersonEntity。但是,调用方现在也会获得此信息,我们可能不希望这些信息被公开。相反,如果我们使用所谓的数据转换对象 (DTO) 来公开人员,则此问题将是多余的:
public class PersonDto
{
    public int Id { get; set; }
    public string FirstName { get; set; }
    public string LastName { get; set; }
    public DateTime BirthDate { get; set; }
    public string City { get; set; }
}
This means that our API should return an object of the PersonDto type instead of PersonEntity, performing a conversion between the two objects. At first sight, the exercise appears to be a useless duplication of code, as the two classes contain the same properties. However, if we consider the fact that PersonEntity could evolve with new properties that are necessary for the database, or change structure with a new semantic that the caller shouldn’t know, the importance of mapping becomes clear. An example is storing the city in a separate table and exposing it through an Address property. Or suppose that, for security reasons, we don’t want to expose the exact birth date anymore, only the age of the person. Using an ad-hoc DTO, we can easily change the schema and update the mapping without touching our entity, having a better separation of concerns.
这意味着我们的 API 应返回 PersonDto 类型的对象,而不是 PersonEntity,从而在两个对象之间执行转换。乍一看,该练习似乎是无用的代码重复,因为这两个类包含相同的属性。但是,如果我们考虑到 PersonEntity 可能会使用数据库所需的新属性进行演变,或者使用调用方不应知道的新语义更改结构,则映射的重要性就会变得显而易见。例如,将城市存储在单独的表中,并通过 Address 属性公开它。或者假设,出于安全原因,我们不想再公开确切的出生日期,而只想公开人的年龄。使用临时 DTO,我们可以轻松更改架构并更新映射,而无需接触我们的实体,从而更好地分离关注点。
Of course, mapping can be bidirectional. In our example, we need to convert PersonEntity to PersonDto before returning it to the client. However, we could also do the opposite – that is, convert the PersonDto type that comes from a client into PersonEntity to save it to a database. All the solutions we’re talking about are valid for both scenarios.
当然,映射可以是双向的。在我们的示例中,我们需要先将 PersonEntity 转换为 PersonDto,然后再将其返回给客户端。但是,我们也可以执行相反的作,即,将来自客户端的 PersonDto 类型转换为 PersonEntity 以将其保存到数据库。我们讨论的所有解决方案都适用于这两种情况。
We can either perform mapping manually or adopt a third-party library that provides us with this feature. In the following sections, we’ll analyze both approaches, understanding the pros and cons of the available solutions.
我们可以手动执行映射,也可以采用为我们提供此功能的第三方库。在以下部分中,我们将分析这两种方法,了解可用解决方案的优缺点。
Performing manual mapping
执行手动映射
In the previous section, we said that mapping essentially means copying the properties of a source object into the properties of a destination and applying some sort of conversion. The easiest and most effective way to perform this task is to do it manually.
在上一节中,我们说过映射实质上意味着将源对象的属性复制到目标的属性中,并应用某种转换。执行此任务的最简单、最有效的方法是手动执行。
With this approach, we need to take care of all the mapping code by ourselves. From this point of view, there is nothing much more to say; we need a method that takes an object as input and transforms it into another as output, remembering to apply mapping recursively if a class contains a complex property that must be mapped in turn. The only suggestion is to use an extension method so that we can easily call it everywhere we need.
使用这种方法,我们需要自己处理所有的 map 代码。从这个角度来看,没有什么可说的了;我们需要一个方法,将一个对象作为输入并将其转换为另一个作为输出,如果一个类包含必须依次映射的复杂属性,请记住递归地应用映射。唯一的建议是使用扩展方法,这样我们就可以轻松地在需要的任何地方调用它。
This solution guarantees the best performance because we explicitly write all mapping instructions without relying on an automatic system (such as reflection). However, the manual method has a drawback: every time we add a property in the entity that must be mapped to a DTO, we need to change the mapping code. On the other hand, some approaches can simplify mapping, but at the cost of performance overhead. In the next section, we look at one such approach using AutoMapper.
此解决方案保证了最佳性能,因为我们显式编写了所有映射指令,而无需依赖自动系统(例如反射)。但是,手动方法有一个缺点:每次我们在实体中添加必须映射到 DTO 的属性时,都需要更改映射代码。另一方面,某些方法可以简化映射,但会以性能开销为代价。在下一节中,我们将介绍一种使用 AutoMapper 的此类方法。
Let’s take a quick look at how to integrate AutoMapper in a minimal API project, showing its main features. The full documentation of the library is available at https://docs.automapper.org.
让我们快速看一下如何将 AutoMapper 集成到一个最小的 API 项目中,展示它的主要功能。该库的完整文档可在 https://docs.automapper.org 上获得。
As usual, the first thing to do is to add the library to our project, following the same instructions we used in the previous sections. Then, we need to configure AutoMapper, telling it how to perform mapping. There are several ways to perform this task, but the recommended approach is to create classes that are inherited from the Profile base class provided by the library and put the configuration into the constructor:
像往常一样,首先要做的是按照我们在前面部分中使用的相同说明将库添加到我们的项目中。然后,我们需要配置 AutoMapper,告诉它如何执行映射。有多种方法可以执行此任务,但推荐的方法是创建从库提供的 Profile 基类继承的类,并将配置放入构造函数中:
public class PersonProfile : Profile
{
    public PersonProfile()
    {
        CreateMap<PersonEntity, PersonDto>();
    }
}
That’s all we need to start: a single instruction to indicate that we want to map PersonEntity to PersonDto, without any other details. We have said that AutoMapper is convention-based. This means that, by default, it maps properties with the same name from the source to the destination, while also performing automatic conversions into compatible types, if necessary. For example, an int property on the source can be automatically mapped to a double property with the same name on the destination. In other words, if source and destination objects have the same property, there is no need for any explicit mapping instruction. However, in our case, we need to perform some transformations, so we can add them fluently after CreateMap:
这就是我们需要开始的全部内容:一条指令,指示我们想要将 PersonEntity 映射到 PersonDto,没有任何其他细节。我们已经说过 AutoMapper 是基于约定的。这意味着,默认情况下,它将具有相同名称的属性从源映射到目标,同时还会根据需要执行自动转换为兼容类型。例如,源上的 int 属性可以自动映射到目标上具有相同名称的 double 属性。换句话说,如果源对象和目标对象具有相同的属性,则不需要任何显式映射指令。但是,在我们的示例中,我们需要执行一些转换,以便我们可以在 CreateMap 之后流畅地添加它们:
public class PersonProfile : Profile
{
    public PersonProfile()
    {
        CreateMap<PersonEntity, PersonDto>()
            .ForMember(dst => dst.Age, opt =>
           opt.MapFrom(src => CalculateAge(src.BirthDate)))
            .ForMember(dst => dst.City, opt =>
              opt.MapFrom(src => src.Address.City));
    }
    private static int CalculateAge(DateTime dateOfBirth)
    {
        var today = DateTime.Today;
        var age = today.Year - dateOfBirth.Year;
        if (today.DayOfYear < dateOfBirth.DayOfYear)
        {
            age--;
        }
        return age;
    }
}
With the ForMember method, we can specify how to map destination properties, dst.Age and dst.City, using conversion expressions. We still don’t need to explicitly map the Id, FirstName, or LastName properties because they exist with these names at both the source and destination.
使用 ForMember 方法,我们可以指定如何映射目标属性 dst。年龄和 dst。City,使用转换表达式。我们仍然不需要显式映射 Id、FirstName 或 LastName 属性,因为它们与这些名称一起存在于源和目标中。
Now that we have defined the mapping profile, we need to register it at startup so that ASP.NET Core can use it. As with FluentValidation, we can invoke an extension method on IServiceCollection:
现在我们已经定义了映射配置文件,我们需要在启动时注册它,以便 ASP.NET Core 可以使用它。与 FluentValidation 一样,我们可以在 IServiceCollection 上调用扩展方法:
With this line of code, we automatically register all the profiles that are contained in the specified assembly. If we add more profiles to our project, such as a separate Profile class for every entity to map, we don’t need to change the registration instructions.
使用这行代码,我们会自动注册指定程序集中包含的所有配置文件。如果我们向项目添加更多配置文件,例如要映射的每个实体的单独 Profile 类,则无需更改注册说明。
In this way, we can now use the IMapper interface through dependency injection:
这样,我们现在可以通过依赖注入来使用 IMapper 接口:
app.MapGet("/people/{id:int}", (int id, IMapper mapper) =>
{
    var personEntity = new PersonEntity();
    //...
    var personDto = mapper.Map<PersonDto>(personEntity);
    return Results.Ok(personDto);
})
.Produces(StatusCodes.Status200OK, typeof(PersonDto));
After retrieving PersonEntity, for example, from a database using Entity Framework Core, we call the Map method on the IMapper interface, specifying the type of the resulting object and the input class. With this line of code, AutoMapper will use the corresponding profile to convert PersonEntity into a PersonDto instance.
例如,在使用 Entity Framework Core 从数据库中检索 PersonEntity 后,我们在 IMapper 接口上调用 Map 方法,并指定结果对象的类型和输入类。通过这行代码,AutoMapper 将使用相应的配置文件将 PersonEntity 转换为 PersonDto 实例。
With this solution in place, mapping is now much easier to maintain because, as long as we add properties with the same name on the source and destination, we don’t need to change the profile at all. Moreover, AutoMapper supports list mapping and recursive mapping too. So, if we have an entity that must be mapped, such as a property of the AddressEntity type on the PersonEntity class, and the corresponding profile is available, the conversion is again performed automatically.
有了这个解决方案,映射现在更容易维护,因为只要我们在源和目标上添加具有相同名称的属性,我们就根本不需要更改配置文件。此外,AutoMapper 还支持列表映射和递归映射。因此,如果我们有一个必须映射的实体,例如 PersonEntity 类上 AddressEntity 类型的属性,并且相应的配置文件可用,则转换将再次自动执行。
The drawback of this approach is a performance overhead. AutoMapper works by dynamically executing mapping code at runtime, so it uses reflection under the hood. Profiles are created the first time they are used and then they are cached to speed up subsequent mappings. However, profiles are always applied dynamically, so there is a cost for the operation that is dependent on the complexity of the mapping code itself. We have only seen a basic example of AutoMapper. The library is very powerful and can manage quite complex mappings. However, we need to be careful not to abuse it – otherwise, we can negatively impact the performance of our application.
这种方法的缺点是性能开销。AutoMapper 的工作原理是在运行时动态执行映射代码,因此它在后台使用反射。配置文件在首次使用时创建,然后缓存以加快后续映射的速度。但是,配置文件始终是动态应用的,因此作的成本取决于映射代码本身的复杂性。我们只看到了 AutoMapper 的一个基本示例。该库非常强大,可以管理相当复杂的映射。但是,我们需要小心不要滥用它 - 否则,我们可能会对应用程序的性能产生负面影响。
Summary
总结
Validation and mapping are two important features that we need to take into account when developing APIs to build more robust and maintainable applications. Minimal APIs do not provide any built-in way to perform these tasks, so it is important to know how we can add support for this kind of feature. We have seen that we can perform validations with data annotations or using FluentValidation and how to add validation information to Swagger. We have also talked about the significance of data mapping and shown how to either leverage manual mapping or the AutoMapper library, describing the pros and cons of each approach.
验证和映射是我们在开发 API 以构建更健壮且可维护的应用程序时需要考虑的两个重要功能。Minimal API 不提供任何内置方法来执行这些任务,因此了解如何添加对此类功能的支持非常重要。我们已经看到,我们可以使用数据注释或使用 FluentValidation 执行验证,以及如何向 Swagger 添加验证信息。我们还讨论了数据映射的重要性,并展示了如何利用手动映射或 AutoMapper 库,描述了每种方法的优缺点。
In the next chapter, we will talk about how to integrate minimal APIs with a data access layer, showing, for example, how to access a database using Entity Framework Core.
在下一章中,我们将讨论如何将最小 API 与数据访问层集成,例如,展示如何使用 Entity Framework Core 访问数据库。
7 Integration with the Data Access Layer
与 Data Access Layer 集成
In this chapter, we will learn about some basic ways to add a data access layer to the minimal APIs in .NET 6.0. We will see how we can use some topics covered previously in the book to access data with Entity Framework (EF) and then with Dapper. These are two ways to access a database.
在本章中,我们将了解向 .NET 6.0 中的最小 API 添加数据访问层的一些基本方法。我们将了解如何使用本书前面介绍的一些主题,通过 Entity Framework (EF) 和 Dapper 访问数据。这是访问数据库的两种方法。
In this chapter, we will be covering the following topics:
在本章中,我们将介绍以下主题:
• Using Entity Framework
• Using Dapper
By the end of this chapter, you will be able to use EF from scratch in a minimal API project, and use Dapper for the same goal. You will also be able to tell when one approach is better than the other in a project.
在本章结束时,您将能够在最小的 API 项目中从头开始使用 EF,并将 Dapper 用于相同的目标。您还可以判断在项目中何时一种方法优于另一种方法。
Technical requirements
技术要求
To follow along with this chapter, you will need to create an ASP.NET Core 6.0 Web API application. You can use either of the following options:
要按照本章的学习,您需要创建一个 ASP.NET Core 6.0 Web API 应用程序。您可以使用以下任一选项:
• Click on the New Project option in the File menu of Visual Studio 2022, then choose the ASP.NET Core Web API template, select a name and the working directory in the wizard, and be sure to uncheck the Use controllers option in the next step.
单击 Visual Studio 2022 的“文件”菜单中的“新建项目”选项,然后选择 ASP.NET Core Web API 模板,在向导中选择名称和工作目录,并确保在下一步中取消选中“使用控制器”选项。
• Open your console, shell, or Bash terminal, and change to your working directory. Use the following command to create a new Web API application: dotnet new webapi -minimal -o Chapter07
打开您的控制台、shell 或 Bash 终端,然后切换到您的工作目录。使用以下命令创建新的 Web API 应用程序:dotnet new webapi -minimal -o Chapter07
Now, open the project in Visual Studio by double-clicking on the project file or, in Visual Studio Code, type the following command in the already open console:
现在,通过双击项目文件在 Visual Studio 中打开项目,或者在 Visual Studio Code 中,在已打开的控制台中键入以下命令:
cd Chapter07
code.
Finally, you can safely remove all the code related to the WeatherForecast sample, as we don’t need it for this chapter.
最后,您可以安全地删除与 WeatherForecast 示例相关的所有代码,因为本章不需要它。
We can absolutely say that if we are building an API, it is very likely that we will interact with data.
我们可以肯定地说,如果我们正在构建一个 API,我们很可能会与数据交互。
In addition, this data most probably needs to be persisted after the application restarts or after other events, such as a new deployment of the application. There are many options for persisting data in .NET applications, but EF is the most user-friendly and common solution for a lot of scenarios.
此外,这些数据很可能需要在应用程序重启后或其他事件(例如应用程序的新部署)之后保留。在 .NET 应用程序中保存数据的选项有很多,但 EF 是适用于许多方案的最用户友好和最常见的解决方案。
Entity Framework Core (EF Core) is an extensible, open source, and cross-platform data access library for .NET applications. It enables developers to work with the database by using .NET objects directly and removes, in most cases, the need to know how to write the data access code directly in the database.
Entity Framework Core (EF Core) 是一个适用于 .NET 应用程序的可扩展、开源和跨平台数据访问库。它使开发人员能够直接使用 .NET 对象来处理数据库,并且在大多数情况下,无需知道如何直接在数据库中编写数据访问代码。
On top of this, EF Core supports a lot of databases, including SQLite, MySQL, Oracle, Microsoft SQL Server, and PostgreSQL.
最重要的是,EF Core 支持许多数据库,包括 SQLite、MySQL、Oracle、Microsoft SQL Server 和 PostgreSQL。
In addition, it supports an in-memory database that helps to write tests for our applications or to make the development cycle easier because you don’t need a real database up and running.
此外,它还支持内存数据库,有助于为我们的应用程序编写测试或简化开发周期,因为您不需要启动和运行真正的数据库。
In the next section, we will see how to set up a project for using EF and its main features.
在下一节中,我们将了解如何设置使用 EF 的项目及其主要功能。
Setting up the project
设置项目
From the project root, create an Icecream.cs class and give it the following content:
从项目根目录中,创建一个 Icecream.cs 类并为其提供以下内容:
namespace Chapter07.Models;
public class Icecream
{
    public int Id { get; set; }
    public string? Name { get; set; }
    public string? Description { get; set; }
}
The Icecream class is an object that represents an ice cream in our project. This class should be called a data model, and we will use this object in the next sections of this chapter to map it to a database table.
Icecream 类是表示我们项目中的Icecream的对象。这个类应该被称为 data model,我们将在本章的后面部分使用这个对象来 Map 它到一个数据库表。
Now it’s time to add the EF Core NuGet reference to the project.
现在,可以将 EF Core NuGet 引用添加到项目。
In order to do that, you can use one of the following methods:
为此,您可以使用以下方法之一:
• In a new terminal window, enter the following code to add the EF Core InMemory package:
在新的终端窗口中,输入以下代码以添加 EF Core InMemory 包:
dotnet add package Microsoft.EntityFrameworkCore.InMemory
• If you would like to use Visual Studio 2022 to add the reference, right-click on Dependencies and then select Manage NuGet Packages. Search for Microsoft.EntityFrameworkCore.InMemory and install the package.
如果要使用 Visual Studio 2022 添加引用,请右键单击 “依赖项”,然后选择 “管理 NuGet 包”。搜索 Microsoft.EntityFrameworkCore.InMemory 并安装该包。
In the next section, we will be adding EF Core to our project.
在下一部分中,我们将 EF Core 添加到我们的项目中。
Adding EF Core to the project
将 EF Core 添加到项目
In order to store the ice cream objects in the database, we need to set up EF Core in our project.
为了将冰淇淋对象存储在数据库中,我们需要在项目中设置 EF Core。
To set up an in-memory database, add the following code to the bottom of the Program.cs file:
要设置内存中数据库,请将以下代码添加到 Program.cs 文件的底部:
class IcecreamDb : DbContext
{
    public IcecreamDb(DbContextOptions options) :
      base(options) { }
    public DbSet<Icecream> Icecreams { get; set; } = null!;
}
DbContext object represents a connection to the database, and it’s used to save and query instances of entities in the database.
DbContext 对象表示与数据库的连接,用于保存和查询数据库中的实体实例。
The DbSet represents the instances of the entities, and they will be converted into a real table in the database.
DbSet 表示实体的实例,它们将转换为数据库中的实际表。
In this case, we will have just one table in the database, called Icecreams.
在本例中,数据库中只有一个名为 Icecreams 的表。
In Program.cs, after the builder initialization, add the following code:
在 Program.cs 中,在生成器初始化后,添加以下代码:
Now we are ready to add some API endpoints to start interacting with the database.
现在我们准备添加一些 API 端点以开始与数据库交互。
Adding endpoints to the project
向项目添加端点
Let’s add the code to create a new item in the icecreams list. In Program.cs, add the following code before the app.Run() line of code:
让我们添加代码以在 icecreams 列表中创建一个新项目。在 Program.cs 中,在app.Run() 之前添加以下代码:
The first parameter of the MapPost function is the DbContext. By default, the minimal API architecture uses dependency injection to share the instances of the DbContext.
MapPost 函数的第一个参数是 DbContext。默认情况下,最小 API 体系结构使用依赖项注入来共享 DbContext 的实例。
Dependency injection
依赖关系注入
If you want to know more about dependency injection, go to Chapter 4, Dependency Injection in a Minimal API Project.
如果您想了解有关依赖注入的更多信息,请转到第 4 章 最小 API 项目中的依赖注入。
In order to save an item into the database, we use the AddSync method directly from the entity that represents the object.
为了将项保存到数据库中,我们直接从表示对象的实体中使用 AddSync 方法。
To persist the new item in the database, we need to call the SaveChangesAsync() method, which is responsible for saving all the changes that happen to the database before the last call to SaveChangesAsync().
要在数据库中保留新项,我们需要调用 SaveChangesAsync() 方法,该方法负责保存上次调用 SaveChangesAsync() 之前对数据库发生的所有更改。
In a very similar way, we can add the endpoint to retrieve all the items in the icecreams database.
以非常相似的方式,我们可以添加终端节点来检索 icecreams 数据库中的所有项目。
After the code to add an ice cream, we can add the following code:
在添加冰淇淋的代码之后,我们可以添加以下代码:
Also, in this case, the DbContext is available as a parameter and we can retrieve all the items in the database directly from the entities in the DbContext.
此外,在这种情况下,DbContext 可用作参数,我们可以直接从 DbContext 中的实体检索数据库中的所有项。
With the ToListAsync() method, the application loads all the entities in the database and sends them back as the endpoint result.
使用 ToListAsync() 方法,应用程序加载数据库中的所有实体,并将它们作为终端节点结果发送回去。
Make sure you have saved all your changes in the project and run the app.
确保您已保存项目中的所有更改并运行应用程序。
A new browser window will open, and you can navigate to the /swagger URL:
将打开一个新的浏览器窗口,您可以导航到 /swagger URL:
Now we have at least one item in the database, and we can try the other endpoint to retrieve all the items in the database.
现在,数据库中至少有一个项目,我们可以尝试使用另一个端点来检索数据库中的所有项目。
Scroll down the page a little bit and select GET/icecreams, followed by Try it out and then Execute.
向下滚动页面并选择 GET/icecreams,然后选择 Try it out,然后选择 Execute。
You will see the list with one item under Response Body.
您将在 Response Body (响应正文) 下看到带有一个项目的列表。
Let’s see how to finalize this first demo by adding the other CRUD operations to our endpoints:
让我们看看如何通过将其他 CRUD作添加到我们的端点来完成第一个演示:
To get an item by ID, add the following code under the app.MapGet route you created earlier:
要按 ID 获取项目,请在应用程序下添加app.MapGet路由代码:
app.MapGet("/icecreams/{id}", async (IcecreamDb db, int id) => await db.Icecreams.FindAsync(id));
To check this out, you can launch the application again and use the Swagger UI as before.
要检查这一点,您可以再次启动应用程序并像以前一样使用 Swagger UI。
Next, add an item in the database by performing a post call (as in the previous section).
接下来,通过执行 post 调用在数据库中添加一个项目(如上一节所示)。
Click GET/icecreams/{id) followed by Try it out.
单击 GET/icecreams/{id) 后跟 Try it out。
Insert the value 1 in the id parameter field and then click on Execute.
在 id 参数字段中插入值 1,然后单击 Execute。
You will see the item in the Response Body section.
您将在 Response Body (响应正文) 部分看到该项目。
The following is an example of a response from the API:
以下是来自 API 的响应示例:
To update an item by ID, we can create a new MapPut endpoint with two parameters: the item with the entity values and the ID of the old entity in the database that we want to update.
要按 ID 更新项目,我们可以创建一个具有两个参数的新 MapPut 终端节点:具有实体值的项目和数据库中要更新的旧实体的 ID。
The code should be like the following snippet:
代码应类似于以下代码段:
app.MapPut("/icecreams/{id}", async (IcecreamDb db, Icecream updateicecream, int id) =>
{
    var icecream = await db.Icecreams.FindAsync(id);
    if (icecream is null) return Results.NotFound();
    icecream.Name = updateicecream.Name;
    icecream.Description = updateicecream.Description;
    await db.SaveChangesAsync();
    return Results.NoContent();
});
Just to be clear, first of all, we need to find the item in the database with the ID from the parameters. If we don’t find an item in the database, it’s a good practice to return a Not Found HTTP status to the caller.
需要明确的是,首先,我们需要在数据库中找到具有参数中 ID 的项目。如果我们在数据库中找不到项目,最好将 Not Found HTTP 状态返回给调用者。
If we find the entity in the database, we update the entity with the new values and we save all the changes in the database before sending back the HTTP status No Content.
如果我们在数据库中找到实体,我们将使用新值更新实体,并在发回 HTTP 状态 No Content 之前保存数据库中的所有更改。
The last CRUD operation we need to perform is to delete an item from the database.
我们需要执行的最后一个 CRUD作是从数据库中删除一个项目。
This operation is very similar to the update operation because, first of all, we need to find the item in the database and then we can try to perform the delete operation.
此操作与更新作非常相似,因为首先,我们需要在数据库中找到该项目,然后我们可以尝试执行删除作。
The following code snippet shows how to implement a delete operation with the right HTTP verb of the minimal API:
以下代码片段显示了如何使用最小 API 的正确 HTTP 动词实施删除作:
app.MapDelete("/icecreams/{id}", async (IcecreamDb db, int id) =>
{
    var icecream = await db.Icecreams.FindAsync(id);
    if (icecream is null)
    {
        return Results.NotFound();
    }
    db.Icecreams.Remove(icecream);
    await db.SaveChangesAsync();
    return Results.Ok();
});
In this section, we have learned how to use EF in a minimal API project.
在本节中,我们学习了如何在最小 API 项目中使用 EF。
We saw how to add the NuGet packages to start working with EF, and how to implement the entire set of CRUD operations in a minimal API .NET 6 project.
我们了解了如何添加 NuGet 包以开始使用 EF,以及如何在最小的 API .NET 6 项目中实现整套 CRUD作。
In the next section, we will see how to implement the same project with the same logic but using Dapper as the primary library to access data.
在下一节中,我们将了解如何使用相同的逻辑实现相同的项目,但使用 Dapper 作为主库来访问数据。
Using Dapper
使用 Dapper
Dapper is an Object-Relational Mapper (ORM) or, to be more precise, a micro ORM. With Dapper, we can write SQL statements directly in .NET projects like we can do in SQL Server (or another database). One of the best advantages of using Dapper in a project is the performance, because it doesn’t translate queries from .NET objects and doesn’t add any layers between the application and the library to access the database. It extends the IDbConnection object and provides a lot of methods to query the database. This means we have to write queries that are compatible with the database provider.
Dapper 是一个对象关系映射器 (ORM),或者更准确地说,是一个微型 ORM。使用 Dapper,我们可以直接在 .NET 项目中编写 SQL 语句,就像在 SQL Server(或其他数据库)中一样。在项目中使用 Dapper 的最大优势之一是性能,因为它不会转换来自 .NET 对象的查询,也不会在应用程序和库之间添加任何层来访问数据库。它扩展了 IDbConnection 对象,并提供了许多查询数据库的方法。这意味着我们必须编写与数据库提供程序兼容的查询。
It supports synchronous and asynchronous method executions. This is a list of the methods that Dapper adds to the IDbConnection interface:
它支持同步和异步方法执行。以下是 Dapper 添加到 IDbConnection 接口的方法列表:
As we mentioned, it provides an async version for all these methods. You can find the right methods by adding the Async keyword at the end of the method name.
正如我们所提到的,它为所有这些方法提供了一个异步版本。您可以通过在方法名称的末尾添加 Async 关键字来查找正确的方法。
In the next section, we will see how to set up a project for using Dapper with a SQL Server LocalDB.
在下一节中,我们将了解如何设置一个项目,以便将 Dapper 与 SQL Server LocalDB 结合使用。
Setting up the project
设置项目
The first thing we are going to do is to create a new database. You can use your SQL Server LocalDB instance installed with Visual Studio by default or another SQL Server instance in your environment.
我们要做的第一件事是创建一个新数据库。您可以使用默认随 Visual Studio 一起安装的 SQL Server LocalDB 实例,也可以使用环境中的其他 SQL Server 实例。
You can execute the following script in your database to create one table and populate it with data:
您可以在数据库中执行以下脚本来创建一个表并使用数据填充它:
Once we have the database, we can install these NuGet packages with the following command in the Visual Studio terminal:
拥有数据库后,我们可以在 Visual Studio 终端中使用以下命令安装这些 NuGet 包:
Now we can continue to add the code to interact with the database. In this example, we are going to use a repository pattern.
现在我们可以继续添加代码以与数据库交互。在此示例中,我们将使用存储库模式。
Creating a repository pattern
创建存储库模式
In this section, we are going to create a simple repository pattern, but we will try to make it as simple as possible so we can understand the main features of Dapper:
在本节中,我们将创建一个简单的存储库模式,但我们将尝试使其尽可能简单,以便我们了解 Dapper 的主要功能:
In the Program.cs file, add a simple class that represents our entity in the database:
public class Icecream
在 Program.cs 文件中,添加一个表示数据库中实体的简单类:
{
public int Id { get; set; }
public string? Name { get; set; }
public string? Description { get; set; }
}
After this, modify the appsettings.json file by adding the connection string at the end of the file:
在此之后,通过在文件末尾添加连接字符串来修改 appsettings.json 文件:
If you are using LocalDB, the connection string should be the right one for your environment as well.
如果您使用的是 LocalDB,则连接字符串也应适合您的环境。
Create a new class in the root of the project called DapperContext and give it the following code:
在项目的根目录中创建一个名为 DapperContext 的新类,并为其提供以下代码:
public class DapperContext
{
private readonly IConfiguration _configuration;
private readonly string _connectionString;
public DapperContext(IConfiguration configuration)
{
    _configuration = configuration;
    _connectionString = _configuration
      .GetConnectionString("SqlConnection");
}

public IDbConnection CreateConnection()
    => new SqlConnection(_connectionString);
}
We injected with dependency injection the IConfiguration interface to retrieve the connection string from the settings file.
我们通过依赖项注入注入 IConfiguration 接口从设置文件中检索连接字符串。
Now we are going to create the interface and the implementation of our repository. In order to do that, add the following code to the Program.cs file.
现在,我们将创建接口和存储库的实现。为此,请将以下代码添加到 Program.cs 文件中。
public interface IIcecreamsRepository
{
}
public class IcecreamsRepository : IIcecreamsRepository
{
    private readonly DapperContext _context;
    public IcecreamsRepository(DapperContext context)
    {
        _context = context;
    }
}
In the next sections, we will be adding some code to the interface and to the implementation of the repository.
在接下来的部分中,我们将向接口和存储库的实现添加一些代码。
Finally, we can register the context, the interface, and its implementation as a service.
在接下来的部分中,我们将向接口和存储库的实现添加一些代码。
Let’s put the following code after the builder initialization in the Program.cs file:
让我们在 builder 初始化后将以下代码放入 Program.cs 文件中:
Now we are ready to implement the first query.
现在我们已准备好实现第一个查询。
Using Dapper to query the database
使用 Dapper 查询数据库
First of all, let’s modify the IIcecreamsRepository interface by adding a new method:
首先,我们通过添加新方法来修改 IIcecreamsRepository 接口:
public Task<IEnumerable<Icecream>> GetIcecreams();
Then, let’s implement this method in the IcecreamsRepository class:
然后,让我们在 IcecreamsRepository 类中实现此方法:
public async Task<IEnumerable<Icecream>> GetIcecreams()
{
    var query = "SELECT * FROM Icecreams";
    using (var connection = _context.CreateConnection())
    {
        var result =
          await connection.QueryAsync<Icecream>(query);
        return result.ToList();
    }
}
Let’s try to understand all the steps in this method. We created a string called query, where we store the SQL query to fetch all the entities from the database.
让我们尝试了解此方法中的所有步骤。我们创建了一个名为 query 的字符串,我们在其中存储 SQL 查询以从数据库中获取所有实体。
Then, inside the using statement, we used DapperContext to create the connection.
然后,在 using 语句中,我们使用 DapperContext 创建连接。
Once the connection was created, we used it to call the QueryAsync method and passed the query as an argument.
创建连接后,我们使用它来调用 QueryAsync 方法并将查询作为参数传递。
Dapper, when the results return from the database, converted them into IEnumerable<T> automatically.
当结果从数据库返回时,Dapper 会自动将它们转换为 IEnumerable<T>。
The following is the final code of the interface and our first implementation:
以下是接口的最终代码和我们的第一个实现:
public interface IIcecreamsRepository
{
    public Task<IEnumerable<Icecream>> GetIcecreams();
}
public class IcecreamsRepository : IIcecreamsRepository
{
    private readonly DapperContext _context;
    public IcecreamsRepository(DapperContext context)
    {
        _context = context;
    }
    public async Task<IEnumerable<Icecream>> GetIcecreams()
    {
        var query = "SELECT * FROM Icecreams";
        using (var connection =
              _context.CreateConnection())
        {
            var result =
              await connection.QueryAsync<Icecream>(query);
            return result.ToList();
        }
    }
}
In the next section, we will see how to add a new entity to the database and how to use the ExecuteAsync method to run a query.
在下一节中,我们将了解如何向数据库添加新实体,以及如何使用 ExecuteAsync 方法运行查询。
Adding a new entity in the database with Dapper
使用 Dapper 在数据库中添加新实体
Now we are going to manage adding a new entity to the database for future implementations of the API post request.
现在,我们将管理向数据库添加新实体,以便将来实现 API post 请求。
Let’s modify the interface by adding a new method called CreateIcecream with an input parameter of the Icecream type:
让我们通过添加一个名为 CreateIcecream 的新方法来修改接口,该方法的输入参数为 Icecream 类型:
public Task CreateIcecream(Icecream icecream);
Now we must implement this method in the repository class:
现在我们必须在 repository 类中实现此方法:
public async Task CreateIcecream(Icecream icecream)
{
    var query = "INSERT INTO Icecreams (Name, Description)
      VALUES (@Name, @Description)";
    var parameters = new DynamicParameters();
    parameters.Add("Name", icecream.Name, DbType.String);
    parameters.Add("Description", icecream.Description,
                    DbType.String);
    using (var connection = _context.CreateConnection())
    {
        await connection.ExecuteAsync(query, parameters);
    }
}
Here, we create the query and a dynamic parameters object to pass all the values to the database.
在这里,我们创建查询和动态参数对象,以将所有值传递给数据库。
We populate the parameters with the values from the Icecream object in the method parameter.
我们在 method 参数中使用 Icecream 对象的值填充参数。
We create the connection with the Dapper context and then we use the ExecuteAsync method to execute the INSERT statement.
我们使用 Dapper 上下文创建连接,然后使用 ExecuteAsync 方法执行 INSERT 语句。
This method returns an integer value as a result, representing the number of affected rows in the database. In this case, we don’t use this information, but you can return this value as the result of the method if you need it.
此方法返回一个整数值作为结果,该值表示数据库中受影响的行数。在这种情况下,我们不会使用此信息,但如果需要,可以将此值作为方法的结果返回。
Implementing the repository in the endpoints
在端点中实施存储库
To add the final touch to our minimal API, we need to implement the two endpoints to manage all the methods in our repository pattern:
为了对我们的最小 API 进行最后的润色,我们需要实现两个端点来管理存储库模式中的所有方法:
In both map methods, we pass the repository as a parameter because, as usual in the minimal API, the services are passed as parameters in the map methods.
在这两种 map 方法中,我们都将存储库作为参数传递,因为与最小 API 一样,服务在 map 方法中作为参数传递。
This means that the repository is always available in all parts of the code.
这意味着存储库在代码的所有部分中始终可用。
In the MapGet endpoint, we use the repository to load all the entities from the implementation of the repository and we use the result as the result of the endpoint.
在 MapGet 端点中,我们使用存储库加载存储库实现中的所有实体,并将结果用作端点的结果。
In the MapPost endpoint, in addition to the repository parameter, we accept also the Icecream entity from the body of the request and we use the same entity as a parameter to the CreateIcecream method of the repository.
在 MapPost 终端节点中,除了存储库参数之外,我们还接受请求正文中的 Icecream 实体,并将同一实体用作存储库的 CreateIcecream 方法的参数。
Summary
总结
In this chapter, we learned how to interact with a data access layer in a minimal API project with the two most common tools in a real-world scenario: EF and Dapper.
在本章中,我们学习了如何使用实际场景中最常用的两种工具(EF 和 Dapper)与最小 API 项目中的数据访问层进行交互。
For EF, we covered some basic features, such as setting up a project to use this ORM and how to perform some basic operations to implement a full CRUD API endpoint.
对于 EF,我们介绍了一些基本功能,例如设置项目以使用此 ORM,以及如何执行一些基本作来实现完整的 CRUD API 终端节点。
We did basically the same thing with Dapper as well, starting from an empty project, adding Dapper, setting up the project for working with a SQL Server LocalDB, and implementing some basic interactions with the entities of the database.
我们对 Dapper 也做了基本相同的作,从一个空项目开始,添加 Dapper,设置项目以使用 SQL Server LocalDB,并实现与数据库实体的一些基本交互。
In the next chapter, we’ll focus on authentication and authorization in a minimal API project. It’s important, first of all, to protect your data in the database.
在下一章中,我们将重点介绍最小 API 项目中的身份验证和授权。首先,保护数据库中的数据很重要。
Part 3: Advanced Development and Microservices Concepts
第 3 部分:高级开发和微服务概念
In this advanced section of the book, we want to show more scenarios that are typical in backend development. We will also go over the performance of this new framework and understand the scenarios in which it is really useful.
在本书的这个高级部分,我们想展示更多后端开发中的典型场景。我们还将介绍这个新框架的性能,并了解它真正有用的场景。
We will cover the following chapters in this section:
在本节中,我们将介绍以下章节:
Chapter 8, Adding Authentication and Authorization
第 8 章 添加验证和授权
Chapter 9, Leveraging Globalization and Localization
第 9 章 利用全球化和本地化
Chapter 10, Evaluating and Benchmarking the Performance of Minimal APIs
第 10 章 评估最小 API 的性能并对其进行基准测试
8 Adding Authentication and Authorization
8 添加身份验证和授权
Any kind of application must deal with authentication and authorization. Often, these terms are used interchangeably, but they actually refer to different scenarios. In this chapter of the book, we will explain the difference between authentication and authorization and show how to add these features to a minimal API project.
任何类型的应用程序都必须处理身份验证和授权。通常,这些术语可以互换使用,但它们实际上指的是不同的场景。在本书的这一章中,我们将解释身份验证和授权之间的区别,并展示如何将这些功能添加到最小的 API 项目中。
Authentication can be performed in many different ways: using local accounts with external login providers, such as Microsoft, Google, Facebook, and Twitter; using Azure Active Directory and Azure B2C; and using authentication servers such as Identity Server and Okta. Moreover, we may have to deal with requirements such as two-factor authentication and refresh tokens. In this chapter, however, we will focus on the general aspects of authentication and authorization and see how to implement them in a minimal API project, in order to provide a general understanding of the topic. The information and samples that will be provided will show how to effectively work with authentication and authorization and how to customize their behaviors according to our requirements.
可以通过多种不同的方式执行身份验证:使用外部登录提供程序(如 Microsoft、Google、Facebook 和 Twitter)的本地帐户;使用 Azure Active Directory 和 Azure B2C;以及使用 Identity Server 和 Okta 等身份验证服务器。此外,我们可能必须处理双重身份验证和刷新令牌等要求。但是,在本章中,我们将重点介绍身份验证和授权的一般方面,并了解如何在最小的 API 项目中实现它们,以便对该主题有一个大致的理解。将提供的信息和示例将展示如何有效地使用身份验证和授权,以及如何根据我们的要求自定义它们的行为。
In this chapter, we will be covering the following topics:
在本章中,我们将介绍以下主题:
• Introducing authentication and authorization
身份验证和授权简介
• Protecting a minimal API
保护最小 API
• Handling authorization – roles and policies
处理授权 – 角色和策略
Technical requirements
技术要求
To follow the examples in this chapter, you will need to create an ASP.NET Core 6.0 Web API application. Refer to the Technical requirements section in Chapter 2, Exploring Minimal APIs and Their Advantages, for instructions on how to do so.
要遵循本章中的示例,您需要创建一个 ASP.NET Core 6.0 Web API 应用程序。有关如何执行此作的说明,请参阅第 2 章 “探索最小 API 及其优势”中的“技术要求”部分。
If you’re using your console, shell, or Bash terminal to create the API, remember to change your working directory to the current chapter number: Chapter08.
如果您使用控制台、shell 或 Bash 终端创建 API,请记住将工作目录更改为当前章节编号:Chapter08。
Introducing authentication and authorization
身份验证和授权简介
As said at the beginning, the terms authentication and authorization are often used interchangeably, but they represent different security functions. Authentication is the process of verifying that users are who they say they are, while authorization is the task of granting an authenticated user permission to do something. So, authorization must always follow authentication.
如开头所述,术语 authentication 和 authorization 经常互换使用,但它们代表不同的安全功能。身份验证是验证用户是否是他们所声称的身份的过程,而授权是授予经过身份验证的用户执行某项作的权限的任务。因此,授权必须始终遵循身份验证。
Let’s think about the security in an airport: first, you show your ID to authenticate your identity; then, at the gate, you present the boarding pass to be authorized to board the flight and get access to the plane.
让我们考虑一下机场的安检:首先,您出示您的身份证以验证您的身份;然后,在登机口,您出示登机牌以获得登机和登机权。
Authentication and authorization in ASP.NET Core are handled by corresponding middleware and work in the same way in minimal APIs and controller-based projects. They allow the restriction of access to endpoints depending on user identity, roles, policies, and so on, as we’ll see in detail in the following sections.
ASP.NET Core 中的身份验证和授权由相应的中间件处理,并且在最小 API 和基于控制器的项目中以相同的方式工作。它们允许根据用户身份、角色、策略等限制对终端节点的访问,我们将在以下部分中详细介绍。
Protecting a minimal API means correctly setting up authentication and authorization. There are many types of authentication solutions that are adopted in modern applications. In web applications, we typically use cookies, while when dealing with web APIs, we use methods such as an API key, basic authentication, and JSON Web Token (JWT). JWTs are the most commonly used, and in the rest of the chapter, we’ll focus on this solution.
保护最小 API 意味着正确设置身份验证和授权。现代应用程序中采用的身份验证解决方案有多种类型。在 Web 应用程序中,我们通常使用 cookie,而在处理 Web API 时,我们使用 API 密钥、基本身份验证和 JSON Web 令牌 (JWT) 等方法。JWT 是最常用的,在本章的其余部分,我们将重点介绍此解决方案。
To enable authentication and authorization based on JWT, the first thing to do is to add the Microsoft.AspNetCore.Authentication.JwtBearer NuGet package to our project, using one of the following ways:
要启用基于 JWT 的身份验证和授权,首先要做的是使用以下方法之一将 Microsoft.AspNetCore.Authentication.JwtBearer NuGet 包添加到我们的项目中:
• Option 1: If you’re using Visual Studio 2022, right-click on the project and choose the Manage NuGet Packages command to open Package Manager GUI, then search for Microsoft.AspNetCore.Authentication.JwtBearer and click on Install.
选项 1:如果您使用的是 Visual Studio 2022,请右键单击项目并选择“管理 NuGet 包”命令以打开包管理器 GUI,然后搜索 Microsoft.AspNetCore.Authentication.JwtBearer 并单击“安装”。
• Option 2: Open Package Manager Console if you’re inside Visual Studio 2022, or open your console, shell, or Bash terminal, go to your project directory, and execute the following command:
选项 2:如果您在 Visual Studio 2022 中,请打开包管理器控制台,或者打开控制台、shell 或 Bash 终端,转到您的项目目录,然后执行以下命令:
dotnet add package Microsoft.AspNetCore.Authentication.JwtBearer
Now, we need to add authentication and authorization services to the service provider, so that they are available through dependency injection:
现在,我们需要向服务提供商添加身份验证和授权服务,以便它们可以通过依赖项注入使用:
var builder = WebApplication.CreateBuilder(args);
//...
builder.Services.AddAuthentication(JwtBearerDefaults.AuthenticationScheme).AddJwtBearer();
builder.Services.AddAuthorization();
This is the minimum code that is necessary to add JWT authentication and authorization support to an ASP.NET Core project. It isn’t a real working solution yet, because it is missing the actual configuration, but it is enough to verify how endpoint protection works.
这是向 ASP.NET Core 项目添加 JWT 身份验证和授权支持所需的最少代码。它还不是一个真正的有效解决方案,因为它缺少实际配置,但足以验证 Endpoint Protection 的工作原理。
In the AddAuthentication() method, we specify that we want to use the bearer authentication scheme. This is an HTTP authentication scheme that involves security tokens that are in fact called bearer tokens. These tokens must be sent in the Authorization HTTP header with the format Authorization: Bearer <token>. Then, we call AddJwtBearer() to tell ASP.NET Core that it must expect a bearer token in the JWT format. As we’ll see later, the bearer token is an encoded string generated by the server in response to a login request. After that, we use AddAuthorization() to also add authorization services.
在 AddAuthentication() 方法中,我们指定要使用不记名身份验证方案。这是一种 HTTP 身份验证方案,它涉及实际上称为持有者令牌的安全令牌。这些令牌必须在 Authorization HTTP 标头中以 Authorization: Bearer <token>格式发送。然后,我们调用 AddJwtBearer() 来告诉 ASP.NET Core 它必须需要 JWT 格式的不记名令牌。正如我们稍后将看到的,持有者令牌是服务器为响应登录请求而生成的编码字符串。之后,我们使用 AddAuthorization() 也添加授权服务。
Now, we need to insert authentication and authorization middleware in the pipeline so that ASP.NET Core will be instructed to check the token and apply all the authorization rules:
现在,我们需要在管道中插入身份验证和授权中间件,以便指示 ASP.NET Core 检查令牌并应用所有授权规则:
var app = builder.Build();
//..
app.UseAuthentication();
app.UseAuthorization();
//...
app.Run();
Important Note : We have said that authorization must follow authentication. This means that the authentication middleware must come first; otherwise, the security will not work as expected.
重要提示 : 我们已经说过,授权必须在身份验证之后进行。这意味着身份验证中间件必须放在第一位;否则,安全性将无法按预期工作。
Finally, we can protect our endpoints using the Authorize attribute or the RequireAuthorization() method:
最后,我们可以使用 Authorize 属性或 RequireAuthorization() 方法保护我们的端点:
app.MapGet("/api/attribute-protected", [Authorize] () => "This endpoint is protected using the Authorize attribute");
app.MapGet("/api/method-protected", () => "This endpoint is protected using the RequireAuthorization method")
.RequireAuthorization();
Note : The ability to specify an attribute directly on a lambda expression (as in the first endpoint of the previous example) is a new feature of C# 10.
注意 : 直接在 lambda 表达式上指定属性的功能(如上一个示例的第一个终结点所示)是 C# 10 的一项新功能。
If we now try to call each of these methods using Swagger, we’ll get a 401 unauthorized response, which should look as follows:
如果我们现在尝试使用 Swagger 调用这些方法中的每一个,我们将得到一个 401 未授权的响应,它应该如下所示:
Note that the message contains a header indicating that the expected authentication scheme is Bearer, as we have declared in the code.
请注意,该消息包含一个标头,指示预期的身份验证方案是 Bearer,正如我们在代码中声明的那样。
So, now we know how to restrict access to our endpoints to authenticated users. But our work isn’t finished: we need to generate a JWT bearer, validate it, and find a way to pass such a token to Swagger so that we can test our protected endpoints.
因此,现在我们知道如何将对终端节点的访问限制为经过身份验证的用户。但我们的工作还没有完成:我们需要生成一个 JWT bearer,验证它,并找到一种方法将这样的令牌传递给 Swagger,以便我们可以测试受保护的端点。
Generating a JWT bearer
生成 JWT 持有者
We have said that a JWT bearer is generated by the server as a response to a login request. ASP.NET Core provides all the APIs we need to create it, so let’s see how to perform this task.
我们已经说过,JWT bearer 是由服务器生成的,作为对登录请求的响应。ASP.NET Core 提供了创建它所需的所有 API,让我们看看如何执行此任务。
The first thing to do is to define the login request endpoint to authenticate the user with their username and password:
首先要做的是定义登录请求端点,以使用用户的用户名和密码对用户进行身份验证:
In a typical login workflow, if the credentials are invalid, we return a 400 Bad Request response to the client. If, instead, the username and password are correct, we can effectively generate a JWT bearer, using the classes available in ASP.NET Core:
在典型的登录工作流程中,如果凭证无效,我们会向客户端返回 400 Bad Request 响应。相反,如果用户名和密码正确,我们可以使用 ASP.NET Core 中可用的类有效地生成 JWT bearer:
var claims = new List<Claim>()
{
    new(ClaimTypes.Name, request.Username)
};
var securityKey = new SymmetricSecurityKey(Encoding.UTF8.GetBytes("mysecuritystring"));
var credentials = new SigningCredentials(securityKey, SecurityAlgorithms.HmacSha256);
var jwtSecurityToken = new JwtSecurityToken(
    issuer: "https://www.packtpub.com",
    audience: "Minimal APIs Client",
    claims: claims, expires: DateTime.UtcNow.AddHours(1),
      signingCredentials: credentials);
var accessToken = new JwtSecurityTokenHandler()
  .WriteToken(jwtSecurityToken);
return Results.Ok(new { AccessToken = accessToken });
JWT bearer creation involves many different concepts, but through the preceding code example, we’ll focus on the basic ones. This kind of bearer contains information that allows verifying the user identity, along with other declarations that describe the properties of the user. These properties are called claims and are expressed as string key-value pairs. In the preceding code, we created a list with a single claim that contains the username. We can add as many claims as we need, and we can also have claims with the same name. In the next sections, we’ll see how to use claims, for example, to enforce authorization.
JWT bearer 创建涉及许多不同的概念,但通过前面的代码示例,我们将重点介绍基本概念。这种类型的 bearer 包含允许验证用户身份的信息,以及描述用户属性的其他声明。这些属性称为声明,表示为字符串键值对。在前面的代码中,我们创建了一个列表,其中包含一个包含用户名的声明。我们可以根据需要添加任意数量的声明,也可以拥有具有相同名称的声明。在接下来的部分中,我们将了解如何使用声明,例如,强制实施授权。
Next in the preceding code, we defined the credentials (SigningCredentials) to sign the JWT bearer. The signature depends on the actual token content and is used to check that the token hasn’t been tampered with. In fact, if we change anything in the token, such as a claim value, the signature will consequentially change. As the key to sign the bearer is known only by the server, it is impossible for a third party to modify the token and sustain its validity. In the preceding code, we used SymmetricSecurityKey, which is never shared with clients.
接下来,在前面的代码中,我们定义了凭证 (SigningCredentials) 来对 JWT 持有者进行签名。签名取决于实际的 Token 内容,用于检查 Token 是否未被篡改。事实上,如果我们更改 Token 中的任何内容,例如声明值,签名也会随之更改。由于对 bearer 进行签名的密钥只有服务器知道,因此第三方无法修改 Token 并维持其有效性。在上面的代码中,我们使用了 SymmetricSecurityKey,它永远不会与客户端共享。
We used a short string to create the credentials, but the only requirement is that the key should be at least 32 bytes or 16 characters long. In .NET, strings are Unicode and therefore, each character takes 2 bytes. We also needed to set the algorithm that the credentials will use to sign the token. To this end, we have specified the Hash-Based Message Authentication Code (HMAC) and the hash function, SHA256, specifying the SecurityAlgorithms.HmacSha256 value. This algorithm is quite a common choice in these kinds of scenarios.
我们使用了一个短字符串来创建凭证,但唯一的要求是密钥应至少为 32 字节或 16 个字符长。在 .NET 中,字符串是 Unicode,因此每个字符占用 2 个字节。我们还需要设置凭证将用于对令牌进行签名的算法。为此,我们指定了基于哈希的消息身份验证代码 (HMAC) 和哈希函数 SHA256,并指定了 SecurityAlgorithms.HmacSha256 值。在这类场景中,这种算法是一个非常常见的选择。
By this point in the preceding code, we finally have all the information to create the token, so we can instantiate a JwtSecurityToken object. This class can use many parameters to build the token, but for the sake of simplicity, we have specified only the minimum set for a working example:
在前面的代码中,到这一点时,我们终于拥有了创建令牌的所有信息,因此我们可以实例化 JwtSecurityToken 对象。这个类可以使用许多参数来构建令牌,但为了简单起见,我们只为工作示例指定了最小集:
Issuer: A string (typically a URI) that identifies the name of the entity that is creating the token
颁发者:一个字符串(通常是 URI),用于标识创建令牌的实体的名称
Audience: The recipient that the JWT is intended for, that is, who can consume the token
受众:JWT 的目标接收者,即可以使用令牌的用户
The list of claims
索赔列表
The expiration time of the token (in UTC)
Token 的过期时间(UTC 单位)
The signing credentials
签名凭证
Tip In the preceding code example, values used to build the token are hardcoded, but in a real-life application, we should place them in an external source, for example, in the appsettings.json configuration file.
提示 : 在前面的代码示例中,用于构建令牌的值是硬编码的,但在实际应用程序中,我们应该将它们放在外部源中,例如,在 appsettings.json 配置文件中。
After all the preceding steps, we could create JwtSecurityTokenHandler, which is responsible for actually generating the bearer token and returning it to the caller with a 200 OK response.
完成上述所有步骤后,我们可以创建 JwtSecurityTokenHandler,它负责实际生成不记名令牌并将其返回给调用方,并给出 200 OK 响应。
So, now we can try the login endpoint in Swagger. After inserting the correct username and password and clicking the Execute button, we will get the following response:
所以,现在我们可以尝试 Swagger 中的登录端点。在插入正确的用户名和密码并单击 Execute 按钮后,我们将得到以下响应:
Figure 8.2 – The JWT bearer as a result of the login request in Swagger
图 8.2 – Swagger 中登录请求的结果 JWT 持有者
We can copy the token value and insert it in the URL of the site https://jwt.ms to see what it contains. We’ll get something like this:
我们可以复制 token 值并将其插入到站点的 URL 中 https://jwt.ms 以查看它包含的内容。我们将得到如下结果:
In particular, we see the claims that have been configured:
具体而言,我们会看到已配置的声明:
• name: The name of the logged user
name:已登录用户的名称
• exp: The token expiration time, expressed in Unix epoch
exp:Token 过期时间,以 Unix 纪元表示
• iss: The issuer of the token
iss:令牌的发行者
• aud: The audience (receiver) of the token
aud:令牌的受众(接收者)
This is the raw view, but we can switch to the Claims tab to see the decoded list of all the claims, with a description of their meaning, where available.
这是原始视图,但我们可以切换到 Claims 选项卡,查看所有声明的解码列表,以及其含义的描述(如果可用)。
There is one important point that requires attention: by default, the JWT bearer isn’t encrypted (it’s just a Base64-encoded string), so everyone can read its content. Token security does not depend on the inability to be decoded, but on the fact that it is signed. Even if the token’s content is clear, it is impossible to modify it because in this case, the signature (which uses a key that is known only by the server) will become invalid.
有一点需要注意:默认情况下,JWT bearer 未加密(它只是一个 Base64 编码的字符串),因此每个人都可以读取其内容。令牌安全性不取决于无法解码,而是取决于它是否已签名。即使 Token 的内容很清楚,也无法修改它,因为在这种情况下,签名(使用只有服务器知道的密钥)将失效。
So, it’s important not to insert sensitive data in the token; claims such as usernames, user IDs, and roles are usually fine, but, for example, we should not insert information related to privacy. To give a deliberately exaggerated example, we mustn’t insert a credit card number in the token! In any case, keep in mind that even Microsoft for Azure Active Directory uses JWT, with no encryption, so we can trust this security system.
因此,不要在令牌中插入敏感数据非常重要;用户名、用户 ID 和角色等声明通常没问题,但例如,我们不应插入与隐私相关的信息。举一个故意夸大的例子,我们不能在令牌中插入信用卡号!无论如何,请记住,即使是 Microsoft for Azure Active Directory 也使用 JWT,没有加密,因此我们可以信任这个安全系统。
In conclusion, we have described how to obtain a valid JWT. The next steps are to pass the token to our protected endpoints and instruct our minimal API on how to validate it.
总之,我们已经描述了如何获取有效的 JWT。接下来的步骤是将令牌传递给我们受保护的终端节点,并指示我们的最小 API 如何验证它。
Validating a JWT bearer
验证 JWT 持有者
After creating the JWT bearer, we need to pass it in every HTTP request, inside the Authorization HTTP header, so that ASP.NET Core can verify its validity and allow us to invoke the protected endpoints. So, we have to complete the AddJwtBearer() method invocation that we showed earlier with the description of the rules to validate the bearer:
创建 JWT 不记名后,我们需要在 Authorization HTTP 标头内的每个 HTTP 请求中传递它,以便 ASP.NET Core 可以验证其有效性并允许我们调用受保护的端点。因此,我们必须完成之前展示的 AddJwtBearer() 方法调用,其中包含验证 bearer 的规则说明:
In the preceding code, we added a lambda expression with which we defined the TokenValidationParameter object that contains the token validation rules. First of all, we checked the issuer signing key, that is, the signature of the token, as shown in the Generating a JWT bearer section, to verify that the JWT has not been tampered with. The security string that has been used to sign the token is required to perform this check, so we specify the same value (mysecuritystring) that we inserted during the login request.
在前面的代码中,我们添加了一个 lambda 表达式,我们用该表达式定义了包含令牌验证规则的 TokenValidationParameter 对象。首先,我们检查了颁发者的签名密钥,即 Token 的签名,如 生成 JWT bearer 部分所示,以验证 JWT 是否未被篡改。执行此检查需要用于对令牌进行签名的安全字符串,因此我们指定了在登录请求期间插入的相同值 (mysecuritystring)。
Then, we specify what valid values for the issuer and the audience of the token are. If the token has been emitted from a different issuer, or was intended for another audience, the validation fails. This is an important security check; we should be sure that the bearer has been issued by someone we expected to issue it and for the audience we want.
然后,我们指定令牌的颁发者和受众的有效值。如果令牌是从其他颁发者发出的,或者是针对其他受众的,则验证将失败。这是一项重要的安全检查;我们应该确保 Bearer 是由我们预期会颁发它的人签发的,并且是针对我们想要的受众。
Tip : As already pointed out, we should place the information used to work with the token in an external source, so that we can reference the correct values during token generation and validation, avoiding hardcoding them or writing their values twice.
提示 : 如前所述,我们应该将用于处理令牌的信息放在外部源中,以便我们可以在令牌生成和验证期间引用正确的值,避免对它们进行硬编码或重复写入它们的值。
We don’t need to specify that we also want to validate the token expiration because this check is automatically enabled. A clock skew is applied when validating the time to compensate for slight differences in clock time or to handle delays between the client request and the instant at which it is processed by the server. The default value is 5 minutes, which means that an expired token is considered valid for a 5-minute timeframe after its actual expiration. We can reduce the clock skew, or disable it, using the ClockSkew property of the TokenValidationParameter class.
我们不需要指定我们还要验证令牌过期,因为此检查是自动启用的。在验证时间时应用 clock skew 以补偿 clock time 的微小差异或处理 Client 端请求与服务器处理请求的时刻之间的延迟。默认值为 5 分钟,这意味着过期的令牌在实际过期后的 5 分钟内被视为有效。我们可以使用 TokenValidationParameter 类的 ClockSkew 属性来减少或禁用时钟偏差。
Now, the minimal API has all the information to check the bearer token validity. In order to test whether everything works as expected, we need a way to tell Swagger how to send the token within a request, as we’ll see in the next section.
现在,最小 API 拥有检查持有者令牌有效性的所有信息。为了测试一切是否按预期工作,我们需要一种方法来告诉 Swagger 如何在请求中发送令牌,我们将在下一节中看到。
Adding JWT support to Swagger
向 Swagger 添加 JWT 支持
We have said that the bearer token is sent in the Authorization HTTP header of a request. If we want to use Swagger to verify the authentication system and test our protected endpoints, we need to update the configuration so that it will be able to include this header in the requests.
我们已经说过,持有者令牌是在请求的 Authorization HTTP 标头中发送的。如果我们想使用 Swagger 来验证身份验证系统并测试受保护的端点,我们需要更新配置,以便它能够在请求中包含此标头。
To perform this task, it is necessary to add a bit of code to the AddSwaggerGen() method:
要执行此任务,必须向 AddSwaggerGen() 方法添加一些代码:
var builder = WebApplication.CreateBuilder(args);
//...
builder.Services.AddSwaggerGen(options =>
{
    options.AddSecurityDefinition(JwtBearerDefaults.AuthenticationScheme, new OpenApiSecurityScheme
    {
        Type = SecuritySchemeType.ApiKey,
        In = ParameterLocation.Header,
        Name = HeaderNames.Authorization,
        Description = "Insert the token with the 'Bearer '
                       prefix"
    });
    options.AddSecurityRequirement(new
      OpenApiSecurityRequirement
    {
        {
            new OpenApiSecurityScheme
            {
                Reference = new OpenApiReference
                {
                    Type = ReferenceType.SecurityScheme,
                    Id =
                     JwtBearerDefaults.AuthenticationScheme
                }
            },
            Array.Empty<string>()
        }
    });
});
In the preceding code, we defined how Swagger handles authentication. Using the AddSecurityDefinition() method, we described how our API is protected; we used an API key, which is the bearer token, in the header with the name Authorization. Then, with AddSecurityRequirement(), we specified that we have a security requirement for our endpoints, which means that the security information must be sent for every request.
在上面的代码中,我们定义了 Swagger 如何处理身份验证。使用 AddSecurityDefinition() 方法,我们描述了如何保护我们的 API;我们在标头中使用了名为 Authorization 的 API 密钥,即不记名令牌。然后,使用 AddSecurityRequirement(),我们指定了端点的安全要求,这意味着必须为每个请求发送安全信息。
After adding the preceding code, if we now run our application, the Swagger UI will contain something new.
添加上述代码后,如果我们现在运行应用程序,Swagger UI 将包含一些新内容。
Figure 8.3 – Swagger showing the authentication features
图 8.3 – Swagger 显示身份验证功能
Upon clicking the Authorize button or any of the padlock icons at the right of the endpoints, the following window will show up, allowing us to insert the bearer token:
单击 Authorize 按钮或端点右侧的任何挂锁图标后,将显示以下窗口,允许我们插入不记名令牌:
Figure 8.4 – The window that allows setting the bearer token
图 8.4 – 允许设置 bearer token 的窗口
The last thing to do is to insert the token in the Value textbox and confirm by clicking on Authorize. From now on, the specified bearer will be sent along with every request made with Swagger.
最后要做的是将令牌插入 Value 文本框中,然后单击 Authorize 进行确认。从现在开始,指定的 bearer 将与使用 Swagger 发出的每个请求一起发送。
We have finally completed all the required steps to add authentication support to minimal APIs. Now, it’s time to verify that everything works as expected. In the next section, we’ll perform some tests.
我们终于完成了向最小 API 添加身份验证支持所需的所有步骤。现在,是时候验证一切是否按预期工作了。在下一节中,我们将执行一些测试。
Testing authentication
测试身份验证
As described in the previous sections, if we call one of the protected endpoints, we get a 401 Unauthorized response. To verify that token authentication works, let’s call the login endpoint to get a token. After that, click on the Authorize button in Swagger and insert the obtained token, remembering the Bearer prefix. Now, we’ll get a 200 OK response, meaning that we are able to correctly invoke the endpoints that require authentication. We can also try changing a single character in the token to again get the 401 Unauthorized response, because in this case, the signature will not be the expected one, as described before. In the same way, if the token is formally valid but has expired, we will obtain a 401 response.
如前面部分所述,如果我们调用其中一个受保护的终端节点,则会收到 401 Unauthorized 响应。要验证令牌身份验证是否有效,让我们调用登录终端节点以获取令牌。之后,点击 Swagger 中的 Authorize 按钮并插入获取的令牌,记住 Bearer 前缀。现在,我们将收到 200 OK 响应,这意味着我们能够正确调用需要身份验证的终端节点。我们还可以尝试更改令牌中的单个字符以再次获得 401 Unauthorized 响应,因为在这种情况下,签名将不是预期的签名,如前所述。同理,如果 Token 正式有效但已过期,我们将获得 401 响应。
As we have defined endpoints that can be reached only by authenticated users, a common requirement is to access user information within the corresponding route handlers. In Chapter 2, Exploring Minimal APIs and Their Advantages, we showed that minimal APIs provide a special binding that directly provides a ClaimsPrincipal object representing the logged user:
由于我们已经定义了只有经过身份验证的用户才能访问的端点,因此一个常见的要求是访问相应路由处理程序中的用户信息。在第 2 章 探索最小 API 及其优势中,我们展示了最小 API 提供了一个特殊的绑定,该绑定直接提供表示已记录用户的 ClaimsPrincipal 对象:
This ends our overview of authentication. In the next section, we’ll see how to handle authorization.
我们对身份验证的概述到此结束。在下一节中,我们将了解如何处理授权。
Handling authorization – roles and policies
处理授权 – 角色和策略
Right after the authentication, there is the authorization step, which grants an authenticated user permission to do something. Minimal APIs provide the same authorization features as controller-based projects, based on the concepts of roles and policies.
在身份验证之后,立即执行授权步骤,该步骤授予经过身份验证的用户执行某些作的权限。Minimal API 基于角色和策略的概念,提供与基于控制器的项目相同的授权功能。
When an identity is created, it may belong to one or more roles. For example, a user can belong to the Administrator role, while another can be part of two roles: User and Stakeholder. Typically, each user can perform only the operations that are allowed by their roles. Roles are just claims that are inserted in the JWT bearer upon authentication. As we’ll see in a moment, ASP.NET Core provides built-in support to verify whether a user belongs to a role.
创建身份时,它可能属于一个或多个角色。例如,一个用户可以属于 Administrator 角色,而另一个用户可以属于两个角色:User 和 Slikeholder。通常,每个用户只能执行其角色允许的作。角色只是在身份验证时插入到 JWT 持有者中的声明。正如我们稍后将看到的,ASP.NET Core 提供了内置支持来验证用户是否属于某个角色。
While role-based authorization covers many scenarios, there are cases in which this kind of security isn’t enough because we need to apply more specific rules to check whether the user has the right to perform some activities. In such a situation, we can create custom policies that allow us to specify more detailed authorization requirements and even completely define the authorization logic based on our algorithms.
虽然基于角色的授权涵盖了许多场景,但在某些情况下,这种安全性是不够的,因为我们需要应用更具体的规则来检查用户是否有权执行某些活动。在这种情况下,我们可以创建自定义策略,允许我们指定更详细的授权要求,甚至根据我们的算法完全定义授权逻辑。
In the next sections, we’ll see how to manage both role-based and policy-based authorization in our APIs, so that we can cover all our requirements, that is, allowing access to certain endpoints only to users with specific roles or claims, or based on our custom logic.
在接下来的部分中,我们将了解如何在 API 中管理基于角色和基于策略的授权,以便我们可以满足所有要求,即仅允许具有特定角色或声明的用户访问某些终端节点,或者允许基于我们的自定义逻辑访问某些终端节点。
Handling role-based authorization
处理基于角色的授权
As already introduced, roles are claims. This means that they must be inserted in the JWT bearer token upon authentication, just like any other claims:
如前所述,角色是声明。这意味着,在身份验证时,必须将它们插入到 JWT 不记名令牌中,就像任何其他声明一样:
app.MapPost("/api/auth/login", (LoginRequest request) =>
{
    if (request.Username == "marco" && request.Password ==
        "P@$$w0rd")
    {
        var claims = new List<Claim>()
        {
            new(ClaimTypes.Name, request.Username),
            new(ClaimTypes.Role, "Administrator"),
            new(ClaimTypes.Role, "User")
        };

    //...
}
In this example, we statically add two claims with name ClaimTypes.Role: Administrator and User. As said in the previous sections, in a real-world application, these values typically come from a complete user management system built, for example, with ASP.NET Core Identity.
在此示例中,我们静态添加两个名称为 ClaimTypes.Role 的声明:Administrator 和 User。如前几节所述,在实际应用程序中,这些值通常来自一个完整的用户管理系统,例如,使用 ASP.NET Core Identity 构建。
As in all the other claims, roles are inserted in the JWT bearer. If now we try to invoke the login endpoint, we’ll notice that the token is longer because it contains a lot of information, which we can verify using the https://jwt.ms site again, as follows:
与所有其他声明一样,角色也插入到 JWT 持有者中。如果现在我们尝试调用登录端点,我们会注意到令牌更长,因为它包含大量信息,我们可以再次使用 https://jwt.ms 站点验证这些信息,如下所示:
In order to restrict access to a particular endpoint only for users that belong to a given role, we need to specify this role as an argument in the Authorize attribute or the RequireAuthorization() method:
为了限制仅属于给定角色的用户访问特定端点,我们需要将此角色指定为 Authorize 属性或 RequireAuthorization() 方法中的参数:
In this way, only users who are assigned the Administrator role can access the endpoints. We can also specify more roles, separating them with a comma: the user will be authorized if they have at least one of the specified roles.
这样,只有分配了 Administrator 角色的用户才能访问终端节点。我们还可以指定更多角色,用逗号分隔:如果用户至少拥有一个指定的角色,则用户将被授权。
Important Note : Role names are case sensitive.
重要提示 : 角色名称区分大小写。
Now suppose we have the following endpoint:
现在假设我们有以下端点:
This method can only be consumed by a user who is assigned the Stakeholder role. However, in our example, this role isn’t assigned. So, if we use the previous bearer token and try to invoke this endpoint, of course, we’ll get an error. But in this case, it won’t be 401 Unauthorized, but rather 403 Forbidden. We see this behavior because the user is actually authenticated (meaning the token is valid, so no 401 error), but they don’t have the authorization to execute the method, so access is forbidden. In other words, authentication errors and authorization errors lead to different HTTP status codes.
此方法只能由分配了 Stakeholder 角色的用户使用。但是,在我们的示例中,未分配此角色。因此,如果我们使用以前的 bearer token 并尝试调用此 endpoint,我们当然会收到错误。但在这种情况下,它不会是 401 Unauthorized,而是 403 Forbidden。我们看到这种行为是因为用户实际上已经过身份验证(意味着令牌有效,因此没有 401 错误),但他们没有执行该方法的授权,因此禁止访问。换句话说,身份验证错误和授权错误会导致不同的 HTTP 状态代码。
There is another important scenario that involves roles. Sometimes, we don’t need to restrict endpoint access at all but need to adapt the behavior of the handler according to the specific user role, such as when retrieving only a certain type of information. In this case, we can use the IsInRole() method, which is available on the ClaimsPrincipal object:
还有另一个涉及角色的重要方案。有时,我们根本不需要限制端点访问,但需要根据特定的用户角色来调整处理程序的行为,例如当只检索某种类型的信息时。在这种情况下,我们可以使用 IsInRole() 方法,该方法在 ClaimsPrincipal 对象上可用:
app.MapGet("/api/role-check", [Authorize] (ClaimsPrincipal user) =>
{
    if (user.IsInRole("Administrator"))
    {
        return "User is an Administrator";
    }
    return "This is a normal user";
});
In this endpoint, we only use the Authorize attribute to check whether the user is authenticated or not. Then, in the route handler, we check whether the user has the Administrator role. If yes, we just return a message, but we can imagine that administrators can retrieve all the available information, while normal users get only a subset, based on the values of the information itself.
在此终端节点中,我们只使用 Authorize 属性来检查用户是否经过身份验证。然后,在路由处理程序中,我们检查用户是否具有 Administrator 角色。如果是,我们只返回一条消息,但我们可以想象管理员可以检索所有可用信息,而普通用户只能根据信息本身的值获得一个子集。
As we have seen, with role-based authorization, we can perform different types of authorization checks in our endpoints, to cover many scenarios. However, this approach cannot handle all situations. If roles aren’t enough, we need to use authorization based on policies, which we will discuss in the next section.
正如我们所看到的,通过基于角色的授权,我们可以在端点中执行不同类型的授权检查,以涵盖许多场景。但是,此方法无法处理所有情况。如果角色还不够,我们需要使用基于策略的授权,我们将在下一节中讨论。
Applying policy-based authorization
应用基于策略的授权
Policies are a more general way to define authorization rules. Role-based authorization can be considered a specific policy authorization that involves a roles check. We typically use policies when we need to handle more complex scenarios.
策略是定义授权规则的更通用方法。基于角色的授权可被视为涉及角色检查的特定策略授权。当我们需要处理更复杂的场景时,我们通常会使用策略。
This kind of authorization requires two steps:
这种授权需要两个步骤:
Defining a policy with a rule set
使用规则集定义策略
Applying a certain policy on the endpoints
在端点上应用特定策略
Policies are added in the context of the AddAuthorization() method, which we saw in the previous section, Protecting a minimal API. Each policy has a unique name, which is used to later reference it, and a set of rules, which are typically described in a fluent manner.
策略是在 AddAuthorization() 方法的上下文中添加的,我们在上一节 保护最小 API 中看到了。每个策略都有一个唯一的名称(用于以后引用它)和一组规则,这些规则通常以流畅的方式进行描述。
We can use policies when role authorization is not enough. Suppose that the bearer token also contains the ID of the tenant to which the user belongs:
当角色授权不足时,我们可以使用策略。假设 bearer token 还包含用户所属租户的 ID:
var claims = new List<Claim>()
{
    // ...
    new("tenant-id", "42")
};
Again, in a real-world scenario, this value could come from a database that stores the properties of the user. Suppose that we want to only allow users who belong to a particular tenant to reach an endpoint. As tenant-id is a custom claim, ASP.NET Core doesn’t know how to use it to enforce authorization. So, we can’t use the solutions shown earlier. We need to define a custom policy with the corresponding rule:
同样,在实际方案中,此值可能来自存储用户属性的数据库。假设我们只想允许属于特定租户的用户访问终端节点。由于 tenant-id 是一个自定义声明,因此 ASP.NET Core 不知道如何使用它来强制实施授权。因此,我们不能使用前面显示的解决方案。我们需要定义一个带有相应规则的自定义策略:
In the preceding code, we created a policy named Tenant42, which requires that the token contains the tenant-id claim with the value 42. The policy variable is an instance of AuthorizationPolicyBuilder and exposes methods that allow us to fluently specify the authorization rules; we can specify that a policy requires certain users, roles, and claims to be satisfied. We can also chain multiple requirements in the same policy, writing, for example, something such as policy.RequireRole(“Administrator”).RequireClaim(“tenant-id”). The full list of methods is available on the documentation page at https://docs.microsoft.com/dotnet/api/microsoft.aspnetcore.authorization.authorizationpolicybuilder.
在上面的代码中,我们创建了一个名为 Tenant42 的策略,该策略要求令牌包含值为 42 的 tenant-id 声明。policy 变量是 AuthorizationPolicyBuilder 的一个实例,它公开了允许我们流畅地指定授权规则的方法;我们可以指定策略要求满足某些用户、角色和声明。我们还可以将多个需求链接在同一个策略中,例如,编写诸如 policy 之类的内容。RequireRole(“管理员”)。RequireClaim(“tenant-id”)的完整的方法列表可在 https://docs.microsoft.com/dotnet/api/microsoft.aspnetcore.authorization.authorizationpolicybuilder 的文档页面上找到。
Then, in the method we want to protect, we have to specify the policy name, as usual with the Authorize attribute or the RequireAuthorization() method:
然后,在我们想要保护的方法中,我们必须指定策略名称,就像通常使用 Authorize 属性或 RequireAuthorization() 方法一样:
If we try to execute these preceding endpoints with a token that doesn’t have the tenant-id claim, or its value isn’t 42, we get a 403 Forbidden result, as happened with the role check.
如果我们尝试使用没有 tenant-id 声明或其值不是 42 的令牌执行这些前面的终结点,则会收到 403 Forbidden 结果,就像角色检查一样。
There are scenarios in which declaring a list of allowed roles and claims isn’t enough: for example, we would need to perform more complex checks or verify authorization based on dynamic parameters. In these cases, we can use the so-called policy requirements, which comprise a collection of authorization rules for which we can provide custom verification logic.
在某些情况下,声明允许的角色和声明列表是不够的:例如,我们需要执行更复杂的检查或根据动态参数验证授权。在这些情况下,我们可以使用所谓的策略要求,它包含一组授权规则,我们可以为其提供自定义验证逻辑。
To adopt this solution, we need two objects:
要采用此解决方案,我们需要两个对象:
• A requirement class that implements the IAuthorizationRequirement interface and defines the requirement we want to manage
实现 IAuthorizationRequirement 接口并定义我们要管理的要求的要求类
• A handler class that inherits from AuthorizationHandler and contains the logic to verify the requirement
一个从 AuthorizationHandler 继承并包含验证要求的逻辑的处理程序类
Let’s suppose we don’t want users who don’t belong to the Administrator role to access certain endpoints during a maintenance time window. This is a perfectly valid authorization rule, but we cannot afford it using the solutions we have seen up to now. The rule involves a condition that considers the current time, so the policy cannot be statically defined.
假设我们不希望不属于 Administrator 角色的用户在维护时段内访问某些终端节点。这是一个完全有效的授权规则,但使用我们目前看到的解决方案,我们无法承受它。该规则涉及考虑当前时间的条件,因此不能静态定义策略。
So, we start by creating a custom requirement:
因此,我们首先创建自定义需求:
public class MaintenanceTimeRequirement : IAuthorizationRequirement
{
    public TimeOnly StartTime { get; init; }
    public TimeOnly EndTime { get; init; }
}
The requirement contains the start and end times of the maintenance window. During this interval, we only want administrators to be able to operate.
该要求包含维护时段的开始和结束时间。在此间隔期间,我们只希望管理员能够进行作。
Note that the IAuthorizationRequirement interface is just a placeholder. It doesn’t contain any method or property to be implemented; it serves only to identify that the class is a requirement. In other words, if we don’t need any additional information for the requirement, we can create a class that implements IAuthorizationRequirement but actually has no content at all.
请注意,IAuthorizationRequirement 接口只是一个占位符。它不包含任何要实现的方法或属性;它仅用于标识该类是必需的。换句话说,如果我们不需要要求的任何其他信息,我们可以创建一个实现 IAuthorizationRequirement 但实际上根本没有内容的类。
This requirement must be enforced, so it is necessary to create the corresponding handler:
必须强制执行此要求,因此必须创建相应的处理程序:
public class MaintenanceTimeAuthorizationHandler
    : AuthorizationHandler<MaintenanceTimeRequirement>
{
    protected override Task HandleRequirementAsync(
        AuthorizationHandlerContext context,
        MaintenanceTimeRequirement requirement)
    {
        var isAuthorized = true;
        if (!context.User.IsInRole("Administrator"))
        {
            var time = TimeOnly.FromDateTime(DateTime.Now);
            if (time >= requirement.StartTime && time <
                requirement.EndTime)
            {
                isAuthorized = false;
            }
        }
        if (isAuthorized)
        {
            context.Succeed(requirement);
        }
        return Task.CompletedTask;
    }
}
Our handler inherits from AuthorizationHandler<MaintenanceTimeRequirement>, so we need to override the HandleRequirementAsync() method to verify the requirement, using the AuthorizationHandlerContext parameter, which contains a reference to the current user. As said at the beginning, if the user is not assigned the Administrator role, we check whether the current time falls in the maintenance window. If so, the user doesn’t have the right to access.
我们的处理程序继承自 AuthorizationHandler<MaintenanceTimeRequirement>,因此我们需要使用 AuthorizationHandlerContext 参数(包含对当前用户的引用)重写 HandleRequirementAsync() 方法来验证需求。如开头所述,如果未为用户分配 Administrator 角色,我们将检查当前时间是否在维护时段内。如果是这样,则用户无权访问。
At the end, if the isAuthorized variable is true, it means that the authorization can be granted, so we call the Succeed() method on the context object, passing the requirement that we want to validate. Otherwise, we don’t invoke any method on the context, meaning that the requirement hasn’t been verified.
最后,如果 isAuthorized 变量为 true,则表示可以授予授权,因此我们在上下文对象上调用 Succeed() 方法,传递我们要验证的要求。否则,我们不会在上下文中调用任何方法,这意味着需求尚未经过验证。
We haven’t yet finished implementing the custom policy. We still have to define the policy and register the handler in the service provider:
我们尚未完成自定义策略的实施。我们仍然需要定义策略并在服务提供者中注册处理程序:
In the preceding code, we defined a maintenance time window from midnight till 4:00 in the morning. Then, we registered the handler as an implementation of the IAuthorizationHandler interface, which in turn is implemented by the AuthorizationHandler class.
在上面的代码中,我们定义了从午夜到凌晨 4:00 的维护时间窗口。然后,我们将处理程序注册为 IAuthorizationHandler 接口的实现,而该接口又由 AuthorizationHandler 类实现。
Now that we have everything in place, we can apply the policy to our endpoints:
现在我们已经准备好了一切,我们可以将策略应用于我们的端点:
When we try to reach this endpoint, ASP.NET Core will check the corresponding policy, find that it contains a requirement, and scan all the registrations of the IAuhorizationHandler interface to see whether there is one that is able to handle the requirement. Then, the handler will be invoked, and the result will be used to determine whether the user has the right to access the route. If the policy isn’t verified, we’ll get a 403 Forbidden response.
当我们尝试访问此终端节点时,ASP.NET Core 将检查相应的策略,发现它包含需求,并扫描 IAuhorizationHandler 接口的所有注册,以查看是否有能够处理该要求的接口。然后,将调用处理程序,结果将用于确定用户是否有权访问路由。如果策略未经过验证,我们将收到 403 Forbidden 响应。
We have shown how powerful policies are, but there is more. We can also use them to define global rules that are automatically applied to all endpoints, using the concepts of default and fallback policies, as we’ll see in the next section.
我们已经展示了政策的强大之处,但还有更多。我们还可以使用 default 和 fallback 策略的概念,使用它们来定义自动应用于所有端点的全局规则,我们将在下一节中看到。
Using default and fallback policies
使用 default 和 fallback 策略
Default and fallback policies are useful when we want to define global rules that must be automatically applied. In fact, when we use the Authorize attribute or the RequireAuthorization() method, without any other parameter, we implicitly refer to the default policy defined by ASP.NET Core, which is set to require an authenticated user.
当我们想要定义必须自动应用的全局规则时,Default 和 fallback 策略非常有用。事实上,当我们使用 Authorize 属性或 RequireAuthorization() 方法时,如果没有任何其他参数,我们隐式引用了 ASP.NET Core 定义的默认策略,该策略设置为需要经过身份验证的用户。
If we want to use different conditions by default, we just need to redefine the DefaultPolicy property, which is available in the context of the AddAuthorization() method:
如果我们想默认使用不同的条件,我们只需要重新定义 DefaultPolicy 属性,该属性在 AddAuthorization() 方法的上下文中可用:
builder.Services.AddAuthorization(options =>
{
    var policy = new AuthorizationPolicyBuilder()
      .RequireAuthenticatedUser()
        .RequireClaim("tenant-id").Build();
    options.DefaultPolicy = policy;
});
We use AuthorizationPolicyBuilder to define all the security requirements, then we set it as a default policy. In this way, even if we don’t specify a custom policy in the Authorize attribute or the RequireAuthorization() method, the system will always verify whether the user is authenticated, and the bearer contains the tenant-id claim. Of course, we can override this default behavior by just specifying roles or policy names in the authorization attribute or method.
我们使用 AuthorizationPolicyBuilder 定义所有安全要求,然后将其设置为默认策略。这样,即使我们没有在 Authorize 属性或 RequireAuthorization() 方法中指定自定义策略,系统也将始终验证用户是否经过身份验证,并且持有者包含 tenant-id 声明。当然,我们可以通过在 authorization 属性或方法中指定角色或策略名称来覆盖此默认行为。
A fallback policy, on the other hand, is the policy that is applied when there is no authorization information on the endpoints. It is useful, for example, when we want all our endpoints to be automatically protected, even if we forget to specify the Authorize attribute or just don’t want to repeat the attribute for each handler. Let us try and understand this using the following code:
另一方面,回退策略是在终端节点上没有授权信息时应用的策略。例如,当我们希望自动保护所有端点时,即使我们忘记指定 Authorize 属性或只是不想为每个处理程序重复该属性,它也很有用。让我们尝试使用以下代码来理解这一点:
In the preceding code, FallbackPolicy becomes equal to DefaultPolicy. We have said that the default policy requires that the user be authenticated, so the result of this code is that now, all the endpoints automatically need authentication, even if we don’t explicitly protect them.
在上面的代码中,FallbackPolicy 等于 DefaultPolicy。我们已经说过,默认策略要求对用户进行身份验证,因此此代码的结果是,现在,所有端点都自动需要身份验证,即使我们没有明确保护它们。
This is a typical solution to adopt when most of our endpoints have restricted access. We don’t need to specify the Authorize attribute or use the RequireAuthorization() method anymore. In other words, now all our endpoints are protected by default.
当我们的大多数端点都限制访问时,这是一种典型的解决方案。我们不再需要指定 Authorize 属性或使用 RequireAuthorization() 方法。换句话说,现在我们所有的端点都默认受到保护。
If we decide to use this approach, but a bunch of endpoints need public access, such as the login endpoint, which everyone should be able to invoke, we can use the AllowAnonymous attribute or the AllowAnonymous() method:
如果我们决定使用这种方法,但有大量端点需要公共访问,例如每个人都应该能够调用的登录端点,我们可以使用 AllowAnonymous 属性或 AllowAnonymous() 方法:
As the name implies, the preceding code will bypass all authorization checks for the endpoint, including the default and fallback authorization policies.
顾名思义,前面的代码将绕过终端节点的所有授权检查,包括默认和回退授权策略。
Knowing how authentication and authorization work in minimal APIs is fundamental to developing secure applications. Using JWT bearer authentication roles and policies, we can even define complex authorization scenarios, with the ability to use both standard and custom rules.
了解身份验证和授权在最小 API 中的工作原理是开发安全应用程序的基础。使用 JWT 不记名身份验证角色和策略,我们甚至可以定义复杂的授权场景,并能够使用标准和自定义规则。
In this chapter, we have introduced basic concepts to make a service secure, but there is much more to talk about, especially regarding ASP.NET Core Identity: an API that supports login functionality and allows managing users, passwords, profile data, roles, claims, and more. We can look further into this topic by checking out the official documentation, which is available at https://docs.microsoft.com/aspnet/core/security/authentication/identity.
在本章中,我们介绍了确保服务安全的基本概念,但还有更多内容要讨论,尤其是关于 ASP.NET 核心身份:一个支持登录功能并允许管理用户、密码、配置文件数据、角色、声明等的 API。我们可以通过查看官方文档来进一步了解这个主题,该文档可在 https://docs.microsoft.com/aspnet/core/security/authentication/identity 上获得。
In the next chapter, we will see how to add multilanguage support to our minimal APIs and how to correctly handle applications that work with different date formats, time zones, and so on.
在下一章中,我们将了解如何为我们的最小 API 添加多语言支持,以及如何正确处理使用不同日期格式、时区等的应用程序。
9 Leveraging Globalization and Localization
9 利用全球化和本地化
When developing an application, it is important to think about multi-language support; a multilingual application allows for a wider audience reach. This is also true for web APIs: messages returned by endpoints (for example, validation errors) should be localized, and the service should be able to handle different cultures and deal with time zones. In this chapter of the book, we will talk about globalization and localization, and we will explain what features are available in minimal APIs to work with these concepts. The information and samples that will be provided will guide us when adding multi-language support to our services and correctly handling all the related behaviors so that we will be able to develop global applications.
在开发应用程序时,考虑多语言支持非常重要;多语言应用程序允许更广泛的受众范围。Web API 也是如此:端点返回的消息(例如,验证错误)应该本地化,并且服务应该能够处理不同的区域性并处理时区。在本书的这一章中,我们将讨论全球化和本地化,并将解释最小 API 中有哪些功能可用于处理这些概念。将提供的信息和示例将指导我们向我们的服务添加多语言支持并正确处理所有相关行为,以便我们能够开发全球应用程序。
In this chapter, we will be covering the following topics:
在本章中,我们将介绍以下主题:
• Introducing globalization and localization
全球化和本地化简介
• Localizing a minimal API application
本地化最小 API 应用程序
• Using resource files
使用资源文件
• Integrating localization in validation frameworks
将本地化集成到验证框架中
• Adding UTC support to a globalized minimal API
向全球化的最小 API 添加 UTC 支持
Technical requirements
技术要求
To follow the descriptions in this chapter, you will need to create an ASP.NET Core 6.0 Web API application. Refer to the Technical requirements section in Chapter 1, Introduction to Minimal APIs, for instructions on how to do so.
要按照本章中的描述进行作,您需要创建一个 ASP.NET Core 6.0 Web API 应用程序。有关如何执行此作的说明,请参阅第 1 章 最小 API 简介中的技术要求部分。
If you’re using your console, shell, or Bash terminal to create the API, remember to change your working directory to the current chapter number (Chapter09).
如果您使用控制台、shell 或 Bash 终端创建 API,请记住将工作目录更改为当前章节编号 (Chapter09)。
Introducing globalization and localization
全球化和本地化简介
When thinking about internationalization, we must deal with globalization and localization, two terms that seem to refer to the same concepts but actually involve different areas. Globalization is the task of designing applications that can manage and support different cultures. Localization is the process of adapting an application to a particular culture, for example, by providing translated resources for each culture that will be supported.
在考虑国际化时,我们必须处理全球化和本地化,这两个术语似乎指的是相同的概念,但实际上涉及不同的领域。全球化的任务是设计能够管理和支持不同区域性的应用程序。本地化是使应用程序适应特定区域性的过程,例如,为将要支持的每种区域性提供翻译资源。
Note : The terms internationalization, globalization, and localization are often abbreviated to I18N, G11N, and L10N, respectively.
注意 : 术语国际化、全球化和本地化通常分别缩写为 I18N、G11N 和 L10N。
As with all the other features that we have already introduced in the previous chapters, globalization and localization can be handled by the corresponding middleware and services that ASP.NET Core provides and work in the same way in minimal APIs and controller-based projects.
与我们在前几章中介绍的所有其他功能一样,全球化和本地化可以由 ASP.NET Core 提供的相应中间件和服务处理,并且在最小的 API 和基于控制器的项目中以相同的方式工作。
Localizing a minimal API application
本地化最小 API 应用程序
To enable localization within a minimal API application, let us go through the following steps:
要在最小 API 应用程序中启用本地化,让我们执行以下步骤:
The first step to making an application localizable is to specify the supported cultures by setting the corresponding options, as follows:
使应用程序可本地化的第一步是通过设置相应的选项来指定受支持的区域性,如下所示:
var builder = WebApplication.CreateBuilder(args);
//...
var supportedCultures = new CultureInfo[] { new("en"), new("it"), new("fr") };
builder.Services.Configure<RequestLocalizationOptions>(options =>
{
options.SupportedCultures = supportedCultures;
options.SupportedUICultures = supportedCultures;
options.DefaultRequestCulture = new
RequestCulture(supportedCultures.First());
});
In our example, we want to support three cultures – English, Italian, and French – so, we create an array of CultureInfo objects.
在我们的示例中,我们希望支持三种区域性 – 英语、意大利语和法语 – 因此,我们创建了一个 CultureInfo 对象数组。
We’re defining neutral cultures, that is, cultures that have a language but are not associated with a country or region. We could also use specific cultures, such as en-US or en-GB, to represent the cultures of a particular region: for example, en-US would refer to the English culture prevalent in the United States, while en-GB would refer to the English culture prevalent in the United Kingdom. This difference is important because, depending on the scenario, we may need to use country-specific information to correctly implement localization. For example, if we want to show a date, we have to know that the date format in the United States is M/d/yyyy, while in the United Kingdom, it is dd/MM/yyyy. So, in this case, it becomes fundamental to work with specific cultures. We also use specific cultures if we need to support language differences across cultures. For example, a particular word may have different spellings depending on the country (e.g., color in the US versus colour in the UK). That said, for our scenario of minimal APIs, working with neutral cultures is just fine.
我们定义的非特定区域性,即具有某种语言但与国家或地区无关的区域性。我们还可以使用特定区域性(如 en-US 或 en-GB)来表示特定区域的区域性:例如,en-US 表示美国流行的英语区域性,而 en-GB 表示英国流行的英语区域性。这种差异很重要,因为根据具体情况,我们可能需要使用特定于国家/地区的信息来正确实施本地化。例如,如果我们想显示一个日期,我们必须知道美国的日期格式是 M/d/yyyy,而在英国是 dd/MM/yyyy。因此,在这种情况下,与特定文化合作变得至关重要。如果我们需要支持跨文化的语言差异,我们也会使用特定区域性。例如,根据国家/地区,特定单词可能具有不同的拼写(例如,美国的 color 与英国的 colour)。也就是说,对于我们的最小 API 方案,使用非特定区域性就很好了。
Next, we configure RequestLocalizationOptions, setting the cultures and specifying the default one to use if no information about the culture is provided. We specify both the supported cultures and the supported UI cultures:
接下来,我们配置 RequestLocalizationOptions,设置区域性并指定在未提供有关区域性的信息时要使用的默认区域性。我们指定了受支持的区域性和受支持的 UI 区域性:
• The supported cultures control the output of culture-dependent functions, such as date, time, and number format.
支持的区域性控制依赖于区域性的函数(如日期、时间和数字格式)的输出。
• The supported UI cultures are used to choose which translated strings (from .resx files) are searched for. We will talk about .resx files later in this chapter.
支持的 UI 区域性用于选择要搜索的已翻译字符串(从 .resx 文件)。我们将在本章后面讨论 .resx 文件。
In a typical application, cultures and UI cultures are set to the same values, but of course, we can use different options if needed.
在典型的应用程序中,区域性和 UI 区域性设置为相同的值,但当然,如果需要,我们可以使用不同的选项。
Now that we have configured our service to support globalization, we need to add the localization middleware to the ASP.NET Core pipeline so it will be able to automatically set the culture of the request. Let us do so using the following code:
现在我们已经将服务配置为支持全球化,我们需要将本地化中间件添加到 ASP.NET Core 管道中,以便它能够自动设置请求的区域性。让我们使用以下代码来做到这一点:
var app = builder.Build();
//...
app.UseRequestLocalization();
//...
app.Run();
In the preceding code, with UseRequestLocalization(), we’re adding RequestLocalizationMiddleware to the ASP.NET Core pipeline to set the current culture of each request. This task is performed using a list of RequestCultureProvider that can read information about the culture from various sources. Default providers comprise the following:
在前面的代码中,我们使用 UseRequestLocalization() 将 RequestLocalizationMiddleware 添加到 ASP.NET Core 管道,以设置每个请求的当前区域性。此任务是使用 RequestCultureProvider 列表执行的,该列表可以从各种源读取有关区域性的信息。默认提供程序包括以下内容:
• QueryStringRequestCultureProvider: Searches for the culture and ui-culture query string parameters
• QueryStringRequestCultureProvider:搜索 culture 和 ui-culture 查询字符串参数
• CookieRequestCultureProvider: Uses the ASP.NET Core cookie
CookieRequestCultureProvider:使用 ASP.NET Core Cookie
AcceptLanguageHeaderRequestProvider: Reads the requested culture from the Accept-Language HTTP header
AcceptLanguageHeaderRequestProvider:从 Accept-Language HTTP 标头中读取请求的区域性
For each request, the system will try to use these providers in this exact order, until it finds the first one that can determine the culture. If the culture cannot be set, the one specified in the DefaultRequestCulture property of RequestLocalizationOptions will be used.
对于每个请求,系统将尝试按此确切顺序使用这些提供程序,直到找到可以确定区域性的第一个提供程序。如果无法设置区域性,则将使用 RequestLocalizationOptions 的 DefaultRequestCulture 属性中指定的区域性。
If necessary, it is also possible to change the order of the request culture providers or even define a custom provider to implement our own logic to determine the culture. More information on this topic is available at :
如有必要,还可以更改请求文化提供者的顺序,甚至定义自定义提供者来实现我们自己的逻辑来确定文化。有关此主题的更多信息,请访问: https://docs.microsoft.com/aspnet/core/fundamentals/localization#use-a-custom-provider.
Important note : The localization middleware must be inserted before any other middleware that might use the request culture.
重要提示 : 本地化中间件必须插入到可能使用请求区域性的任何其他中间件之前。
In the case of web APIs, whether using controller-based or minimal APIs, we usually set the request culture through the Accept-Language HTTP header. In the following section, we will see how to extend Swagger with the ability to add this header when trying to invoke methods.
对于 Web API,无论是使用基于控制器的 API 还是最小的 API,我们通常通过 Accept-Language HTTP 标头来设置请求文化。在下一节中,我们将看到如何扩展 Swagger,使其能够在尝试调用方法时添加此标头。
Adding globalization support to Swagger
向 Swagger 添加全球化支持
We want Swagger to provide us with a way to specify the Accept-Language HTTP header for each request so that we can test our globalized endpoints. Technically speaking, this means adding an operation filter to Swagger that will be able to automatically insert the language header, using the following code:
我们希望 Swagger 为我们提供一种方法来为每个请求指定 Accept-Language HTTP 标头,以便我们可以测试我们的全球化端点。从技术上讲,这意味着向 Swagger 添加一个作过滤器,该过滤器将能够使用以下代码自动插入语言标头:
public class AcceptLanguageHeaderOperationFilter : IOperationFilter
{
     private readonly List<IOpenApiAny>?
     supportedLanguages;
     public AcceptLanguageHeaderOperationFilter
     (IOptions<RequestLocalizationOptions>
     requestLocalizationOptions)
     {
           supportedLanguages =
           requestLocalizationOptions.Value.
           SupportedCultures?.Select(c =>
           newOpenApiString(c.TwoLetterISOLanguageName)).
           Cast<IOpenApiAny>().           ToList();
     }
     public void Apply(OpenApiOperation operation,
     OperationFilterContext context)
     {
           if (supportedLanguages?.Any() ?? false)
           {
                 operation.Parameters ??= new
                 List<OpenApiParameter>();
                 operation.Parameters.Add(new
                 OpenApiParameter
                 {
                       Name = HeaderNames.AcceptLanguage,
                       In = ParameterLocation.Header,
                       Required = false,
                       Schema = new OpenApiSchema
                       {
                             Type = "string",
                             Enum = supportedLanguages,
                             Default = supportedLanguages.
                             First()
                       }
                 });
           }
     }
}
In the preceding code, AcceptLanguageHeaderOperationFilter takes the RequestLocalizationOptions object via dependency injection that we have defined at startup and extracts the supported languages in the format that Swagger expects from it. Then, in the Apply() method, we add a new OpenApiParameter that corresponds to the Accept-Language header. In particular, with the Schema.Enum property, we provide the list of supported languages using the values we have extracted in the constructor. This method is invoked for every operation (that is, every endpoint), meaning that the parameter will be automatically added to each of them.
在前面的代码中,AcceptLanguageHeaderOperationFilter 通过我们在启动时定义的依赖项注入获取 RequestLocalizationOptions 对象,并以 Swagger 期望的格式提取支持的语言。然后,在 Apply() 方法中,我们添加一个对应于 Accept-Language 标头的新 OpenApiParameter。具体而言,对于 Schema.Enum 属性,我们使用在构造函数中提取的值提供支持的语言列表。每个作(即每个端点)都会调用此方法,这意味着参数将自动添加到每个作中。
Now, we need to add the new filter to Swagger:
现在,我们需要将新过滤器添加到 Swagger:
As we did with the preceding code, for every operation, Swagger will execute the filter, which in turn will add a parameter to specify the language of the request.
正如我们对前面的代码所做的那样,对于每个作,Swagger 将执行过滤器,而过滤器又会添加一个参数来指定请求的语言。
So, let’s suppose we have the following endpoint:
因此,假设我们有以下端点:
In the preceding handler, we just return the culture of the thread. This method takes no parameter; however, after adding the preceding filter, the Swagger UI will show the following:
在前面的处理程序中,我们只返回线程的区域性。此方法不带参数;但是,在添加上述筛选器后,Swagger UI 将显示以下内容:
Figure 9.1 – The Accept-Language header added to Swagger
图 9.1 – 添加到 Swagger 的 Accept-Language 标头
The operation filter has added a new parameter to the endpoint, allowing us to select the language from a dropdown. We can click the Try it out button to choose a value from the list and then click Execute to invoke the endpoint:
作筛选器已向终端节点添加了一个新参数,允许我们从下拉列表中选择语言。我们可以单击 Try it out 按钮从列表中选择一个值,然后单击 Execute 以调用终端节点:
Figure 9.2 – The result of the execution with the Accept-Language HTTP header
图 9.2 – 使用 Accept-Language HTTP 标头执行的结果
This is the result of selecting it as a language request: Swagger has added the Accept-Language HTTP header, which, in turn, has been used by ASP.NET Core to set the current culture. Then, in the end, we get and return the culture display name in the route handler.
这是选择它作为语言请求的结果:Swagger 添加了 Accept-Language HTTP 标头,而 ASP.NET Core 又使用该标头来设置当前区域性。然后,最后,我们在路由处理程序中获取并返回区域性显示名称。
This example shows us that we have correctly added globalization support to our minimal API. In the next section, we’ll go further and work with localization, starting by providing translated resources to callers based on the corresponding languages.
此示例向我们展示了我们已正确地将全球化支持添加到我们的最小 API 中。在下一节中,我们将进一步讨论本地化,首先根据相应的语言向调用者提供翻译后的资源。
Using resource files
使用资源文件
Our minimal API now supports globalization, so it can switch cultures based on the request. This means that we can provide localized messages to callers, for example, when communicating validation errors. This feature is based on the so-called resource files (.resx), a particular kind of XML file that contains key-value string pairs representing messages that must be localized.
我们的最小 API 现在支持全球化,因此它可以根据请求切换区域性。这意味着我们可以向调用者提供本地化消息,例如,在传达验证错误时。此功能基于所谓的资源文件 (.resx),这是一种特殊类型的 XML 文件,其中包含表示必须本地化的消息的键值字符串对。
Note : These resource files are exactly the same as they have been since the early versions of .NET.
注意 : 这些资源文件与自 .NET 早期版本以来完全相同。
Creating and working with resource files
创建和使用资源文件
With resource files, we can easily separate strings from code and group them by culture. Typically, resource files are put in a folder called Resources. To create a file of this kind using Visual Studio, let us go through the following steps:
使用资源文件,我们可以轻松地将字符串与代码分离,并按区域性对它们进行分组。通常,资源文件放在名为 Resources 的文件夹中。要使用 Visual Studio 创建此类文件,让我们执行以下步骤:
Right-click on the folder in Solution Explorer and then choose Add | New Item.
右键单击“解决方案资源管理器”中的文件夹,然后选择“添加”|”新建项目。
In the Add New Item dialog window, search for Resources, select the corresponding template, and name the file, for example, Messages.resx:
在 Add New Item 对话框窗口中,搜索 Resources,选择相应的模板,然后将文件命名为 Messages.resx:
Figure 9.3 – Adding a resource file to the project
图 9.3 – 将资源文件添加到项目中
The new file will immediately open in the Visual Studio editor.
新文件将立即在 Visual Studio 编辑器中打开。
The first thing to do in the new file is to select Internal or Public (based on the code visibility we want to achieve) from the Access Modifier option so that Visual Studio will create a C# file that exposes the properties to access the resources:
在新文件中要做的第一件事是从 Access Modifier 选项中选择 Internal 或 Public (基于我们想要实现的代码可见性),以便 Visual Studio 创建一个 C# 文件,该文件公开属性以访问资源:
Figure 9.4 – Changing the Access Modifier of the resource file
图 9.4 – 更改资源文件的访问修饰符
As soon as we change this value, Visual Studio will add a Messages.Designer.cs file to the project and automatically create properties that correspond to the strings we insert in the resource file.
一旦我们更改了此值,Visual Studio 就会将 Messages.Designer.cs 文件添加到项目中,并自动创建与我们插入到资源文件中的字符串相对应的属性。
Resource files must follow a precise naming convention. The file that contains default culture messages can have any name (such as Messages.resx, as in our example), but the other .resx files that provide the corresponding translations must have the same name, with the specification of the culture (neutral or specific) to which they refer. So, we have Messages.resx, which will store default (English) messages.
资源文件必须遵循精确的命名约定。包含默认区域性消息的文件可以具有任何名称(如 Messages.resx,如本例中所示),但提供相应翻译的其他 .resx 文件必须具有相同的名称,并具有它们所引用的区域性(非特定或特定)的规范。因此,我们有 Messages.resx,它将存储默认(英文)消息。
Since we also want to localize our messages in Italian, we need to create another file with the name Messages.it.resx.
由于我们还希望将消息本地化为 Italian,因此需要创建另一个名为 Messages.it.resx 的文件。
Note : We don’t create a resource file for French culture on purpose because this way, we’ll see how APS.NET Core looks up the localized messages in practice.
注意 : 我们不会故意为法国文化创建资源文件,因为这样,我们将看到 APS.NET Core 在实践中如何查找本地化的消息。
Now, we can start experimenting with resource files. Let’s open the Messages.resx file and set Name to HelloWorld and Value to Hello World!.
现在,我们可以开始试验资源文件。让我们打开 Messages.resx 文件,并将 Name 设置为 HelloWorld,将 Value 设置为 Hello World!。
In this way, Visual Studio will add a static HelloWorld property in the Messages autogenerated class that allows us to access values based on the current culture.
通过这种方式,Visual Studio 将在 Messages 自动生成的类中添加一个静态 HelloWorld 属性,该属性允许我们访问基于当前区域性的值。
To demonstrate this behavior, also open the Messages.it.resx file and add an item with the same Name, HelloWorld, but now set Value to the translation Ciao mondo!.
为了演示此行为,还请打开 Messages.it.resx 文件并添加具有相同名称的项 HelloWorld,但现在将 Value 设置为翻译 Ciao mondo!。
Finally, we can add a new endpoint to showcase the usage of the resource files:
最后,我们可以添加新的端点来展示资源文件的使用情况:
// using Chapter09.Resources;
app.MapGet("/helloworld", () => Messages.HelloWorld);
In the preceding route handler, we simply access the static Mesasges.HelloWorld property that, as discussed before, has been automatically created while editing the Messages.resx file.
在前面的路由处理程序中,我们只需访问静态 Mesasges.HelloWorld 属性,如前所述,该属性是在编辑 Messages.resx 文件时自动创建的。
If we now run the minimal API and try to execute this endpoint, we’ll get the following responses based on the request language that we select in Swagger:
如果我们现在运行最小 API 并尝试执行此终端节点,我们将根据我们在 Swagger 中选择的请求语言获得以下响应:
Table 9.1 – Responses based on the request language
表 9.1 – 基于请求语言的响应
When accessing a property such as HelloWorld, the autogenerated Messages class internally uses ResourceManager to look up the corresponding localized string. First of all, it looks for a resource file whose name contains the requested culture. If it is not found, it reverts to the parent culture of that culture. This means that, if the requested culture is specific, ResourceManager searches for the neutral culture. If no resource file is still found, then the default one is used.
当访问诸如 HelloWorld 之类的属性时,自动生成的 Messages 类在内部使用 ResourceManager 来查找相应的本地化字符串。首先,它查找其名称包含所请求区域性的资源文件。如果未找到,它将还原为该区域性的父区域性。这意味着,如果请求的区域性是特定的,则 ResourceManager 会搜索非特定区域性。如果仍未找到资源文件,则使用默认资源文件。
In our case, using Swagger, we can select only English, Italian, or French as a neutral culture. But what happens if a client sends other values? We can have situations such as the following:
在我们的示例中,使用 Swagger,我们只能选择英语、意大利语或法语作为非特定区域性。但是,如果客户端发送其他值,会发生什么情况呢?我们可能会遇到以下情况:
• The request culture is it-IT: the system searches for Messages.it-IT.resx and then finds and uses Messages.it.resx.
请求区域性是 it-IT:系统搜索 Messages.it-IT.resx,然后查找并使用 Messages.it.resx。
• The request culture is fr-FR: the system searches for Messages.fr-FR.resx, then Messages.fr.resx, and (because neither are available) finally uses the default, Messages.resx.
请求区域性是 fr-FR:系统搜索 Messages.fr-FR.resx,然后搜索 Messages.fr.resx,最后(因为两者都不可用)使用默认的 Messages.resx。
• The request culture is de (German): because this isn’t a supported culture at all, the default request culture will be automatically selected, so strings will be searched for in the Messages.resx file.
请求区域性为 de (德语) :由于这根本不是受支持的区域性,因此将自动选择默认请求区域性,因此将在 Messages.resx 文件中搜索字符串。
Note : If a localized resource file exists, but it doesn’t contain the specified key, then the value of the default file will be used.
注意 : 如果本地化资源文件存在,但不包含指定的键,则将使用默认文件的值。
Formatting localized messages using resource files
使用资源文件设置本地化消息的格式
We can also use resource files to format localized messages. For example, we can add the following strings to the resource files of the project:
我们还可以使用 resource 文件来格式化本地化的消息。例如,我们可以将以下字符串添加到项目的资源文件中:
// using Chapter09.Resources;
app.MapGet("/hello", (string name) =>
{
var message = string.Format(Messages.GreetingMessage,
name);
return message;
});
As in the preceding code example, we get a string from a resource file according to the culture of the request. But, in this case, the message contains a placeholder, so we can use it to create a custom localized message using the name that is passed to the route handler. If we try to execute the endpoint, we will get results such as these:
与前面的代码示例一样,我们根据请求的区域性从资源文件中获取字符串。但是,在这种情况下,消息包含一个占位符,因此我们可以使用它来使用传递给路由处理程序的名称创建自定义本地化消息。如果我们尝试执行端点,我们将得到如下结果:
Table 9.3 – Responses with custom localized messages based on the request language
表 9.3 – 使用基于请求语言的自定义本地化消息的响应
The possibility to create localized messages with placeholders that are replaced at runtime using different values is a key point for creating truly localizable services.
创建带有占位符的本地化消息的可能性,这些占位符在运行时使用不同的值替换,这是创建真正可本地化服务的关键点。
In the beginning, we said that a typical use case of localization in web APIs is when we need to provide localized error messages upon validation. In the next section, we’ll see how to add this feature to our minimal API.
一开始,我们说过 Web API 中本地化的一个典型用例是我们需要在验证时提供本地化的错误消息。在下一节中,我们将了解如何将此功能添加到我们的最小 API 中。
Integrating localization in validation frameworks
将本地化集成到验证框架中
In Chapter 6, Exploring Validation and Mapping, we talked about how to integrate validation into a minimal API project. We learned how to use the MiniValidation library, rather than FluentValidation, to validate our models and provide validation messages to the callers. We also said that FluentValidation already provides translations for standard error messages.
在 第 6 章 探索验证和映射 中,我们讨论了如何将验证集成到一个最小的 API 项目中。我们学习了如何使用 MiniValidation 库(而不是 FluentValidation)来验证我们的模型并向调用者提供验证消息。我们还说过,FluentValidation 已经为标准错误消息提供了翻译。
However, with both libraries, we can leverage the localization support we have just added to our project to support localized and custom validation messages.
但是,对于这两个库,我们可以利用刚刚添加到项目中的本地化支持来支持本地化和自定义验证消息。
Localizing validation messages with MiniValidation
使用 MiniValidation 本地化验证消息
Using the MiniValidation library, we can use validation based on Data Annotations with minimal APIs. Refer to Chapter 6, Exploring Validation and Mapping, for instructions on how to add this library to the project.
使用 MiniValidation 库,我们可以使用基于数据注释的验证和最少的 API。有关如何将此库添加到项目中的说明,请参阅第 6 章 探索验证和映射。
Then, recreate the same Person class:
然后,重新创建相同的 Person 类:
public class Person
{
[Required]
[MaxLength(30)]
public string FirstName { get; set; }
[Required]
[MaxLength(30)]
public string LastName { get; set; }
[EmailAddress]
[StringLength(100, MinimumLength = 6)]
public string Email { get; set; }
}
Every validation attribute allows us to specify an error message, which can be a static string or a reference to a resource file. Let’s see how to correctly handle the localization for the Required attribute. Add the following values in resource files:
每个 validation 属性都允许我们指定一条错误消息,它可以是静态字符串或对资源文件的引用。让我们看看如何正确处理 Required 属性的本地化。在资源文件中添加以下值:
Table 9.4 – Localized validation error messages used by Data Annotations
表 9.4 – 数据注释使用的本地化验证错误消息
We want it so that when a required validation rule fails, the localized message that corresponds to FieldRequiredAnnotation is returned. Moreover, this message contains a placeholder, because we want to use it for every required field, so we also need the translation of property names.
我们希望,当必需的验证规则失败时,将返回与 FieldRequiredAnnotation 对应的本地化消息。此外,此消息包含一个占位符,因为我们希望将其用于每个必填字段,因此我们还需要属性名称的翻译。
With these resources, we can update the Person class with the following declarations:
有了这些资源,我们可以使用以下声明更新 Person 类:
public class Person
{
[Display(Name = "FirstName", ResourceType =
typeof(Messages))]
[Required(ErrorMessageResourceName =
"FieldRequiredAnnotation",
ErrorMessageResourceType = typeof(Messages))]
public string FirstName { get; set; }
//...
}
Each validation attribute, such as Required (as used in this example), exposes properties that allow us to specify the name of the resource to use and the type of class that contains the corresponding definition. Keep in mind that the name is a simple string, with no check at compile time, so if we write an incorrect value, we’ll only get an error at runtime.
每个验证属性(如 Required(如本例中所示))都公开了允许我们指定要使用的资源的名称以及包含相应定义的类类型的属性。请记住,名称是一个简单的字符串,在编译时没有检查,因此如果我们写入了不正确的值,我们只会在运行时收到错误。
Next, we can use the Display attribute to also specify the name of the field that must be inserted in the validation message.
接下来,我们还可以使用 Display 属性来指定必须插入到验证消息中的字段的名称。
Now we can re-add the validation code shown in Chapter 6, Exploring Validation and Mapping. The difference is that now the validation messages will be localized:
现在我们可以重新添加第 6 章 探索验证和映射 中所示的验证代码。不同之处在于,现在验证消息将被本地化:
app.MapPost("/people", (Person person) =>
{
var isValid = MiniValidator.TryValidate(person, out
var errors);
if (!isValid)
{
return Results.ValidationProblem(errors, title:
Messages.ValidationErrors);
}
return Results.NoContent();
});
In the preceding code, the messages contained in the errors dictionary that is returned by the MiniValidator.TryValidate() method will be localized according to the request culture, as described in the previous sections. We also specify the title parameter in the Results.ValidationProblem() invocation because we want to localize this value too (otherwise, it will always be the default One or more validation errors occurred).
在上面的代码中,MiniValidator.TryValidate() 方法返回的 errors 字典中包含的消息将根据请求区域性进行本地化,如前面的部分所述。我们还在 Results.ValidationProblem() 调用中指定了 title 参数,因为我们也希望本地化此值(否则,它将始终为默认的 One or more validation errors occurred)。
If instead of data annotations, we prefer using FluentValidation, we know that it supports localization of standard error messages by default from Chapter 6, Exploring Validation and Mapping. However, with this library, we can also provide our translations. In the next section, we’ll talk about implementing this solution.
如果我们更喜欢使用 FluentValidation 而不是数据注释,那么我们知道它默认支持第 6 章 探索验证和映射 中的标准错误消息的本地化。但是,有了这个库,我们也可以提供我们的翻译。在下一节中,我们将讨论如何实现此解决方案。
Localizing validation messages with FluentValidation
使用 FluentValidation 本地化验证消息
With FluentValidation, we can totally decouple the validation rules from our models. As said before, refer to Chapter 6, Exploring Validation and Mapping, for instructions on how to add this library to the project and how to configure it.
使用 FluentValidation,我们可以将验证规则与我们的模型完全解耦。如前所述,请参阅 第 6 章 探索验证和映射 ,以获取有关如何将此库添加到项目以及如何配置它的说明。
Next, let us recreate the PersonValidator class:
接下来,让我们重新创建 PersonValidator 类:
public class PersonValidator : AbstractValidator<Person>
{
public PersonValidator()
{
RuleFor(p => p.FirstName).NotEmpty().
MaximumLength(30);
RuleFor(p => p.LastName).NotEmpty().
MaximumLength(30);
RuleFor(p => p.Email).EmailAddress().Length(6,
100);
}
}
In the case that we haven’t specified any messages, the default ones will be used. Let’s add the following resource to customize the NotEmpty validation rule:
如果我们没有指定任何消息,则将使用默认消息。让我们添加以下资源来自定义 NotEmpty 验证规则:
Table 9.5 – The localized validation error messages used by FluentValidation
表 9.5 – FluentValidation 使用的本地化验证错误消息
Note that, in this case, we also have a placeholder that will be replaced by the property name. However, different from data annotations, FluentValidation uses a placeholder with a name to better identify its meaning.
请注意,在本例中,我们还有一个占位符,该占位符将替换为属性名称。但是,与数据注释不同,FluentValidation 使用带有名称的占位符来更好地识别其含义。
Now, we can add this message in the validator, for example, for the FirstName property:
现在,我们可以在验证器中添加以下消息,例如,对于 FirstName 属性:
We use WithMessage() to specify the message that must be used when the preceding rule fails, following which we add the WithName() invocation to overwrite the default property name used for the {PropertyName} placeholder of the message.
我们使用 WithMessage() 指定在前面的规则失败时必须使用的消息,然后我们添加 WithName() 调用以覆盖用于消息的 {PropertyName} 占位符的默认属性名称。
Finally, we can leverage the localized validator in our endpoint, as we did in Chapter 6, Exploring Validation and Mapping:
最后,我们可以在端点中利用本地化的验证器,就像我们在第 6 章 探索验证和映射中所做的那样:
app.MapPost("/people", async (Person person, IValidator<Person> validator) =>
{
var validationResult = await validator.
ValidateAsync(person);
if (!validationResult.IsValid)
{
var errors = validationResult.ToDictionary();
return Results.ValidationProblem(errors, title:
Messages.ValidationErrors);
}
return Results.NoContent();
});
As in the case of data annotations, the validationResult variable will contain localized error messages that we return to the caller using the Results.ValidationProblem() method (again, with the definition of the title property).
与数据注释一样,validationResult 变量将包含本地化的错误消息,我们使用 Results.ValidationProblem() 方法(同样,使用 title 属性的定义)将这些错误消息返回给调用者。
This ends our overview of localization using resource files. Next, we’ll talk about an important topic when dealing with services that are meant to be used worldwide: the correct handling of different time zones.
我们对使用资源文件的本地化的概述到此结束。接下来,我们将讨论在处理旨在在全球范围内使用的服务时的一个重要话题:正确处理不同的时区。
Adding UTC support to a globalized minimal API
向全球化的最小 API 添加 UTC 支持
So far, we have added globalization and localization support to our minimal API because we want it to be used by the widest audience possible, irrespective of culture. But, if we think about being accessible to a worldwide audience, we should consider several aspects related to globalization. Globalization does not only pertain to language support; there are important factors we need to consider, for example, geographic locations, as well as time zones.
到目前为止,我们已经在我们的最小 API 中添加了全球化和本地化支持,因为我们希望它被尽可能广泛的受众使用,而不受文化影响。但是,如果我们考虑让全世界的受众都能接触到,我们应该考虑与全球化相关的几个方面。全球化不仅与语言支持有关;我们需要考虑一些重要因素,例如地理位置和时区。
So, for example, we can have our minimal API running in Italy, which follows Central European Time (CET) (GMT+1), while our clients can use browsers that execute a single-page application, rather than mobile apps, all over the world. We could also have a database server that contains our data, and this could be in another time zone. Moreover, at a certain point, it may be necessary to provide better support for worldwide users, so we’ll have to move our service to another location, which could have a new time zone. In conclusion, our system could deal with data in different time zones, and, potentially, the same services could switch time zones during their lives.
因此,例如,我们可以在意大利运行我们的最小 API,它遵循中欧时间 (CET) (GMT+1),而我们的客户可以使用执行单页应用程序的浏览器,而不是世界各地的移动应用程序。我们还可以有一个包含我们数据的数据库服务器,它可以在另一个时区。此外,在某个时候,可能需要为全球用户提供更好的支持,因此我们将不得不将我们的服务转移到另一个位置,该位置可能具有新的时区。总之,我们的系统可以处理不同时区的数据,并且相同的服务在其生命周期中可能会切换时区。
In these situations, the ideal solution is working with DateTimeOffset, a data type that includes time zones and that JsonSerializer fully supports, preserving time zone information during serialization and deserialization. If we could always use it, we’d automatically solve any problem related to globalization, because converting a DateTimeOffset value to a different time zone is straightforward. However, there are cases in which we can’t handle the DateTimeOffset type, for example:
在这些情况下,理想的解决方案是使用 DateTimeOffset,这是一种包含时区的数据类型,并且 JsonSerializer 完全支持,在序列化和反序列化期间保留时区信息。如果我们始终可以使用它,我们就会自动解决与全球化相关的任何问题,因为将 DateTimeOffset 值转换为不同的时区非常简单。但是,在某些情况下,我们无法处理 DateTimeOffset 类型,例如:
• When we’re working on a legacy system that relies on DateTime everywhere, updating the code to use DateTimeOffset isn’t an option because it requires too many changes and breaks the compatibility with the old data.
当我们在无处不在都依赖 DateTime 的旧系统上工作时,更新代码以使用 DateTimeOffset 不是一个选项,因为它需要太多更改并破坏与旧数据的兼容性。
• We have a database server such as MySQL that doesn’t have a column type for storing DateTimeOffset directly, so handling it requires extra effort, for example, using two separate columns, increasing the complexity of the domain.
我们有一个数据库服务器,例如 MySQL,它没有用于直接存储 DateTimeOffset 的列类型,因此处理它需要额外的工作,例如,使用两个单独的列,这增加了域的复杂性。
• In some cases, we simply aren’t interested in sending, receiving, and saving time zones – we just want to handle time in a “universal” way.
在某些情况下,我们只是对发送、接收和保存时区不感兴趣——我们只想以 “通用” 的方式处理时间。
So, in all the scenarios where we can’t or don’t want to use the DateTimeOffset data type, one of the best and simplest ways to deal with different time zones is to handle all dates using Coordinated Universal Time (UTC): the service must assume that the dates it receives are in the UTC format and, on the other hand, all the dates returned by the API must be in UTC.
因此,在我们不能或不想使用 DateTimeOffset 数据类型的所有情况下,处理不同时区的最佳和最简单的方法之一是使用协调世界时 (UTC) 处理所有日期:服务必须假定它收到的日期是 UTC 格式,另一方面, API 返回的所有日期都必须采用 UTC 格式。
Of course, we must handle this behavior in a centralized way; we don’t want to have to remember to apply the conversion to and from the UTC format every time we receive or send a date. The well-known JSON.NET library provides an option to specify how to treat the time value when working with a DateTime property, allowing it to automatically handle all dates as UTC and convert them to that format if they represent a local time. However, the current version of Microsoft JsonSerializer used in minimal APIs doesn’t include such a feature. From Chapter 2, Exploring Minimal APIs and Their Advantages, we know that we cannot change the default JSON serializer in minimal APIs, but we can overcome this lack of UTC support by creating a simple JsonConverter:
当然,我们必须以集中的方式处理这种行为;我们不想记住在每次接收或发送日期时都要应用与 UTC 格式之间的转换。众所周知的 JSON.NET 库提供了一个选项,用于指定在使用 DateTime 属性时如何处理时间值,从而允许它自动将所有日期作为 UTC 处理,并在它们表示本地时间时将其转换为该格式。但是,最小 API 中使用的 Microsoft JsonSerializer 的当前版本不包含此类功能。从第 2 章 探索最小 API 及其优势中,我们知道我们无法在最小 API 中更改默认的 JSON 序列化器,但是我们可以通过创建一个简单的 JsonConverter 来克服缺乏 UTC 支持的问题:
public class UtcDateTimeConverter : JsonConverter<DateTime>
{
public override DateTime Read(ref Utf8JsonReader
reader, Type typeToConvert, JsonSerializerOptions
options)
=> reader.GetDateTime().ToUniversalTime();
public override void Write(Utf8JsonWriter writer,
DateTime value, JsonSerializerOptions options)
=> writer.WriteStringValue((value.Kind ==
DateTimeKind.Local ? value.ToUniversalTime() : value)
.ToString("yyyy'-'MM'-'dd'T'HH':'mm':'ss'.'
fffffff'Z'"));
}
With this converter, we tell JsonSerializer how to treat DateTime properties:
通过这个转换器,我们告诉 JsonSerializer 如何处理 DateTime 属性:
• When DateTime is read from JSON, the value is converted to UTC using the ToUniversalTime() method.
从 JSON 中读取 DateTime 时,将使用 ToUniversalTime() 方法将该值转换为 UTC。
• When DateTime must be written to JSON, if it represents a local time (DateTimeKind.Local), it is converted to UTC before serialization – then, it is serialized using the Z suffix, which indicates that the time is UTC.
当必须将 DateTime 写入 JSON 时,如果它表示本地时间 (DateTimeKind.Local),则会在序列化之前将其转换为 UTC – 然后,它将使用 Z 后缀进行序列化,这表示时间为 UTC。
Now, before using this converter, let’s add the following endpoint definition:
现在,在使用此转换器之前,让我们添加以下端点定义:
Let’s try to call it, for example, with a date formatted as 2022-03-06T16:42:37-05:00. We’ll obtain something similar to the following:
例如,让我们尝试使用格式为 2022-03-06T16:42:37-05:00 的日期来调用它。我们将获得类似于以下内容的内容:
The input date, containing a time zone, has automatically been converted to the local time of the server (in this case, the server is running in Italy, as stated at the beginning), as also demonstrated by the dateKind field. Moreover, serverDate contains a date that is relative to the server time zone.
包含时区的输入日期已自动转换为服务器的本地时间(在本例中,服务器在意大利运行,如开头所述),dateKind 字段也演示了该日期。此外, serverDate 包含相对于服务器时区的日期。
With this configuration, every DateTime property will be processed using our custom converters. Now, execute the endpoint again, using the same input as before. This time, the result will be as follows:
使用此配置,每个 DateTime 属性都将使用我们的自定义转换器进行处理。现在,使用与之前相同的输入再次执行终端节点。这一次,结果将如下所示:
The input is the same, but our UtcDateTimeConverter has now converted the date to UTC and, on the other hand, has serialized the server date as UTC; now, our API, in a centralized way, can automatically handle all dates as UTC, no matter its time zone or the time zones of the callers.
输入是相同的,但是我们的 UtcDateTimeConverter 现在已经将日期转换为 UTC,另一方面,已将服务器日期序列化为 UTC;现在,我们的 API 以集中的方式自动将所有日期处理为 UTC,无论其时区或调用者的时区如何。
Finally, there are two other points to make all the systems correctly work with UTC:
最后,还有另外两点可以使所有系统正确地使用 UTC:
• When we need to retrieve the current date in the code, we always have to use DateTime.UtcNow instead of DateTime.Now
当我们需要在代码中检索当前日期时,我们始终必须使用 DateTime.UtcNow 而不是 DateTime.Now
• Client applications must know that they will receive the date in UTC format and act accordingly, for example, invoking the ToLocalTime() method
客户端应用程序必须知道它们将收到 UTC 格式的日期并采取相应的措施,例如,调用 ToLocalTime() 方法
In this way, the minimal API is truly globalized and can work with any time zone; without having to worry about explicit conversion, all times input or output will be always in UTC, so it will be much easier to handle them.
通过这种方式,最小的 API 是真正全球化的,并且可以在任何时区工作;无需担心显式转换,所有时间 input 或 output 都将始终为 UTC,因此处理它们会容易得多。
Summary
总结
Developing minimal APIs with globalization and localization support in mind is fundamental in an interconnected world. ASP.NET Core includes all the features needed to create services that can react to the culture of the user and provide translations based on the request language: the usage of localization middleware, resource files, and custom validation messages allows the creation of services that can support virtually every culture. We have also talked about the globalization-related problems that could arise when working with different time zones and shown how to solve it using the centralized UTC date time format so that our APIs can seamlessly work irrespective of the geographic location and time zone of clients.
在考虑全球化和本地化支持的情况下开发最少的 API 是互联世界的基础。ASP.NET Core 包括创建服务所需的所有功能,这些服务可以响应用户文化并根据请求语言提供翻译:使用本地化中间件、资源文件和自定义验证消息,可以创建几乎可以支持所有文化的服务。我们还讨论了使用不同时区时可能出现的全球化相关问题,并展示了如何使用集中式 UTC 日期时间格式来解决这个问题,以便我们的 API 可以无缝工作,而不受客户的地理位置和时区的影响。
In Chapter 10, Evaluating and Benchmarking the Performance of Minimal APIs, we will talk about why minimal APIs were created and analyze the performance benefits of using minimal APIs over the classic controller-based approach.
在第 10 章 评估最小 API 的性能并对其进行基准测试中,我们将讨论创建最小 API 的原因,并分析使用最小 API 相对于基于控制器的经典方法的性能优势。
10 Evaluating and Benchmarking the Performance of Minimal APIs
评估最小 API 的性能并对其进行基准测试
The purpose of this chapter is to understand one of the motivations for which the minimal APIs framework was created.
本章的目的是了解创建最小 API 框架的动机之一。
This chapter will provide some obvious data and examples of how you can measure the performance of an ASP.NET 6 application using the traditional approach as well as how you can measure the performance of an ASP.NET application using the minimal API approach.
本章将提供一些明显的数据和示例,说明如何使用传统方法测量 ASP.NET 6 应用程序的性能,以及如何使用最小 API 方法测量 ASP.NET 应用程序的性能。
Performance is key to any functioning application; however, very often it takes a back seat.
性能是任何正常运行的应用程序的关键;然而,它经常退居二线。
A performant and scalable application depends not only on our code but also on the development stack. Today, we have moved on from the .NET full framework and .NET Core to .NET and can start to appreciate the performance that the new .NET has achieved, version after version – not only with the introduction of new features and the clarity of the framework but also primarily because the framework has been completely rewritten and improved with many features that have made it fast and very competitive compared to other languages.
高性能和可扩展的应用程序不仅取决于我们的代码,还取决于开发堆栈。今天,我们已经从 .NET 完整框架和 .NET Core 转向 .NET,并且可以开始欣赏新 .NET 所实现的性能,一个版本又一个版本 - 不仅引入了新功能和框架的清晰度,而且主要是因为该框架已被完全重写和改进,具有许多功能,与其他语言相比,这些功能使其速度更快且非常有竞争力。
In this chapter, we will evaluate the performance of the minimal API by comparing its code with identical code that has been developed traditionally. We’ll understand how to evaluate the performance of a web application, taking advantage of the BenchmarkDotNet framework, which can be useful in other application scenarios.
在本章中,我们将通过将最小 API 的代码与传统开发的相同代码进行比较来评估最小 API 的性能。我们将了解如何利用 BenchmarkDotNet 框架评估 Web 应用程序的性能,该框架在其他应用程序场景中可能很有用。
With minimal APIs, we have a new simplified framework that helps improve performance by leaving out some components that we take for granted with ASP.NET.
通过最少的 API,我们有一个新的简化框架,它通过省略一些我们认为理所当然的组件来帮助提高性能 ASP.NET。
The themes we will touch on in this chapter are as follows:
我们将在本章中讨论的主题如下:
• Improvements with minimal APIs
使用最少的 API 进行改进
• Exploring performance with load tests
通过负载测试探索性能
• Benchmarking minimal APIs with BenchmarkDotNet
使用 BenchmarkDotNet 对最小 API 进行基准测试
Technical requirements
技术要求
Many systems can help us test the performance of a framework.
许多系统可以帮助我们测试框架的性能。
We can measure how many requests per second one application can handle compared to another, assuming equal application load. In this case, we are talking about load testing.
我们可以测量一个应用程序每秒可以处理多少个请求,假设应用程序负载相同。在本例中,我们谈论的是负载测试。
To put the minimal APIs on the test bench, we need to install k6, the framework we will use for conducting our tests.
要将最小的 API 放在测试台上,我们需要安装 k6,我们将用于执行测试的框架。
We will launch load testing on a Windows machine with only .NET applications running.
我们将在仅运行 .NET 应用程序的 Windows 计算机上启动负载测试。
To install k6, you can do either one of the following:
要安装 k6,您可以执行以下任一操作:
In the final part of the chapter, we’ll measure the duration of the HTTP method for making calls to the API.
在本章的最后一部分,我们将测量 HTTP 方法调用 API 的持续时间。
We’ll stand at the end of the system as if the API were a black box and measure the reaction time. BenchmarkDotNet is the tool we’ll be using – to include it in our project, we need to reference its NuGet package:
我们将站在系统的末端,就好像 API 是一个黑匣子一样,并测量反应时间。BenchmarkDotNet 是我们将要使用的工具 - 要将其包含在我们的项目中,我们需要引用其 NuGet 包:
Minimal APIs were designed not only to improve the performance of APIs but also for better code convenience and similarity to other languages to bring developers from other platforms closer. Performance has increased both from the point of view of the .NET framework, as each version has incredible improvements, as well as from the point of view of the simplification of the application pipeline. Let’s see in detail what has not been ported and what improves the performance of this framework.
Minimal API 的设计不仅是为了提高 API 的性能,也是为了更好的代码便利性和与其他语言的相似性,从而拉近来自其他平台的开发人员的距离。从 .NET Framework 的角度来看,性能都有所提高,因为每个版本都有令人难以置信的改进,而且从应用程序管道的简化的角度来看也是如此。让我们详细看看哪些内容尚未移植,哪些内容提高了此框架的性能。
The minimal APIs execution pipeline omits the following features, which makes the framework lighter:
最小 API 执行管道省略了以下功能,这使得框架更轻量级:
• Filters, such as IAsyncAuthorizationFilter, IAsyncActionFilter, IAsyncExceptionFilter, IAsyncResultFilter, and IasyncResourceFilter
• Model binding
• Binding for forms, such as IFormFile
• Built-in validation
• Formatters
• Content negotiations
• Some middleware
• View rendering
• JsonPatch
• OData
• API versioning
Performance Improvements in .NET 6
.NET 6 中的性能改进
Version after version, .NET improves its performance. In the latest version of the framework, improvements made over previous versions have been reported. Here’s where you can find a complete summary of what’s new in .NET 6:
一个又一个版本,.NET 提高了其性能。在最新版本的框架中,报告了对以前版本所做的改进。您可以在此处找到 .NET 6 中新增功能的完整摘要: https://devblogs.microsoft.com/dotnet/performance-improvements-in-net-6/
Exploring performance with load tests
通过负载测试探索性能
How to estimate the performance of minimal APIs? There are many points of view to consider and in this chapter, we will try to address them from the point of view of the load they can support. We decided to adopt a tool – k6 – that performs load tests on a web application and tells us how many requests per second can a minimal API handle.
如何估算最小 API 的性能?有许多观点需要考虑,在本章中,我们将尝试从它们可以支持的负载的角度来解决这些问题。我们决定采用一种工具 k6,它在 Web 应用程序上执行负载测试,并告诉我们最小 API 每秒可以处理多少个请求。
As described by its creators, k6 is an open source load testing tool that makes performance testing easy and productive for engineering teams. The tool is free, developer-centric, and extensible. Using k6, you can test the reliability and performance of your systems and catch performance regressions and problems earlier. This tool will help you to build resilient and performant applications that scale.
正如其创建者所描述的那样,k6 是一种开源负载测试工具,它使工程团队的性能测试变得简单而高效。该工具是免费的、以开发人员为中心且可扩展的。使用 k6,您可以测试系统的可靠性和性能,并更早地捕获性能回归和问题。此工具将帮助您构建可扩展的弹性和高性能应用程序。
In our case, we would like to use the tool for performance evaluation and not for load testing. Many parameters should be considered during load testing, but we will only focus on the http_reqs index, which indicates how many requests have been handled correctly by the system.
在我们的例子中,我们希望使用该工具进行性能评估,而不是进行负载测试。在负载测试期间应考虑许多参数,但我们只关注 http_reqs 指数,它表示系统正确处理了多少个请求。
We agree with the creators of k6 about the purpose of our test, namely performance and synthetic monitoring.
我们同意 k6 的创建者关于我们测试的目的,即性能和综合监控。
Use cases
使用案例
k6 users are typically developers, QA engineers, SDETs, and SREs. They use k6 for testing the performance and reliability of APIs, microservices, and websites. Common k6 use cases include the following:
k6 用户通常是开发人员、QA 工程师、SDET 和 SRE。他们使用 k6 来测试 API、微服务和网站的性能和可靠性。常见的 k6 使用案例包括:
• Load testing: k6 is optimized for minimal resource consumption and designed for running high load tests (spike, stress, and soak tests).
负载测试:k6 针对最小资源消耗进行了优化,专为运行高负载测试(峰值、压力和浸泡测试)而设计。
• Performance and synthetic monitoring: With k6, you can run tests with a small load to continuously validate the performance and availability of your production environment.
性能和综合监控:使用 k6,您可以运行小负载测试,以持续验证生产环境的性能和可用性。
• Chaos and reliability testing: k6 provides an extensible architecture. You can use k6 to simulate traffic as part of your chaos experiments or trigger them from your k6 tests.
混沌和可靠性测试:k6 提供可扩展的架构。您可以使用 k6 在混沌实验中模拟流量,也可以从 k6 测试中触发流量。
However, we have to make several assumptions if we want to evaluate the application from the point of view just described. When a load test is performed, it is usually much more complex than the ones we will perform in this section. When an application is bombarded with requests, not all of them will be successful. We can say that the test passed successfully if a very small percentage of the responses failed. In particular, we usually consider 95 or 98 percentiles of outcomes as the statistic on which to derive the test numbers.
但是,如果我们想从刚才描述的角度评估应用程序,我们必须做出几个假设。执行负载测试时,它通常比我们将在本节中执行的要复杂得多。当应用程序被请求轰炸时,并非所有请求都会成功。如果极小比例的响应失败,我们可以说测试成功通过。特别是,我们通常将 95 或 98 个百分位数的结果视为得出测试数字的统计数据。
With this background, we can perform stepwise load testing as follows: in ramp up, the system will be concerned with running the virtual user (VU) load from 0 to 50 for about 15 seconds. Then, we will keep the number of users stable for 60 seconds, and finally, ramp down the load to zero virtual users for another 15 seconds.
在此背景下,我们可以按如下方式执行逐步负载测试:在加速过程中,系统将关注从 0 到 50 的虚拟用户 (VU) 负载运行约 15 秒。然后,我们将保持用户数量稳定 60 秒,最后,将负载降低到零虚拟用户,再持续 15 秒。
Each newly written stage of the test is expressed in the JavaScript file in the stages section. Testing is therefore conducted under a simple empirical evaluation.
测试的每个新编写阶段都表示在 JavaScript 文件的 stages 部分中。因此,测试是在简单的实证评估下进行的。
First, we create three types of responses, both for the ASP.NET Web API and minimal API:
首先,我们为 ASP.NET Web API 和最小 API 创建三种类型的响应:
• Plain-text.
• Very small JSON data against a call – the data is static and always the same.
针对调用的非常小的 JSON 数据 – 数据是静态的,并且始终相同。
• In the third response, we send JSON data with an HTTP POST method to the API. For the Web API, we check the validation of the object, and for the minimal API, since there is no validation, we return the object as received.
在第三个响应中,我们使用 HTTP POST 方法将 JSON 数据发送到 API。对于 Web API,我们检查对象的验证,对于最小的 API,由于没有验证,我们返回接收的对象。
The following code will be used to compare the performance between the minimal API and the traditional approach:
以下代码将用于比较最小 API 和传统方法之间的性能:
Minimal API
最小 API
app.MapGet("text-plain",() => Results.Content("response"))
.WithName("GetTextPlain");
app.MapPost("validations",(ValidationData validation) => Results.Ok(validation)).WithName("PostValidationData");
app.MapGet("jsons", () =>
{
var response = new[]
{
new PersonData { Name = "Andrea", Surname =
"Tosato", BirthDate = new DateTime
(2022, 01, 01) },
new PersonData { Name = "Emanuele",
Surname = "Bartolesi", BirthDate = new
DateTime(2022, 01, 01) },
new PersonData { Name = "Marco", Surname =
"Minerva", BirthDate = new DateTime
(2022, 01, 01) }
};
return Results.Ok(response);
})
.WithName("GetJsonData");
Traditional Approach
传统方法
For the traditional approach, three distinct controllers have been designed as shown here:
对于传统方法,设计了三个不同的控制器,如下所示:
[Route("text-plain")]
[ApiController]
public class TextPlainController : ControllerBase
{
[HttpGet]
public IActionResult Get()
{
return Content("response");
}
}
[Route("validations")]
[ApiController]
public class ValidationsController : ControllerBase
{
[HttpPost]
public IActionResult Post(ValidationData data)
{
return Ok(data);
}
}
public class ValidationData
{
[Required]
public int Id { get; set; }
[Required]
[StringLength(100)]
public string Description { get; set; }
}
[Route("jsons")]
[ApiController]
public class JsonsController : ControllerBase
{
[HttpGet]
public IActionResult Get()
{
var response = new[]
{
new PersonData { Name = "Andrea", Surname =
"Tosato", BirthDate = new
DateTime(2022, 01, 01) },
new PersonData { Name = "Emanuele", Surname =
"Bartolesi", BirthDate = new
DateTime(2022, 01, 01) },
new PersonData { Name = "Marco", Surname =
"Minerva", BirthDate = new
DateTime(2022, 01, 01) }
};
return Ok(response);
}
}
public class PersonData
{
public string Name { get; set; }
public string Surname { get; set; }
public DateTime BirthDate { get; set; }
}
In the next section, we will define an options object, where we are going to define the execution ramp described here. We define all clauses to consider the test satisfied. As the last step, we write the real test, which does nothing but call the HTTP endpoint using GET or POST, depending on the test.
在下一节中,我们将定义一个 options 对象,我们将在其中定义此处描述的执行斜坡。我们定义所有子句以认为满足测试。作为最后一步,我们编写真正的测试,它只使用 GET 或 POST 调用 HTTP 终端节点,具体取决于测试。
Writing k6 tests
编写 k6 测试
Let’s create a test for each case scenario that we described in the previous section:
让我们为上一节中描述的每个 case 场景创建一个测试:
import http from "k6/http";
import { check } from "k6";
export let options = {
summaryTrendStats: ["avg", "p(95)"],
stages: [
// Linearly ramp up from 1 to 50 VUs during 10
seconds
{ target: 50, duration: "10s" },
// Hold at 50 VUs for the next 1 minute
{ target: 50, duration: "1m" },
// Linearly ramp down from 50 to 0 VUs over the
last 15 seconds
{ target: 0, duration: "15s" }
],
thresholds: {
// We want the 95th percentile of all HTTP
request durations to be less than 500ms
"http_req_duration": ["p(95)<500"],
// Thresholds based on the custom metric we
defined and use to track application failures
"check_failure_rate": [
// Global failure rate should be less than 1%
"rate<0.01",
// Abort the test early if it climbs over 5%
{ threshold: "rate<=0.05", abortOnFail: true },
],
},
};
export default function () {
// execute http get call
let response = http.get("http://localhost:7060/jsons");
// check() returns false if any of the specified
conditions fail
check(response, {
"status is 200": (r) => r.status === 200,
});
}
In the preceding JavaScript file, we wrote the test using k6 syntax. We have defined the options, such as the evaluation threshold of the test, the parameters to be measured, and the stages that the test should simulate. Once we have defined the options of the test, we just have to write the code to call the APIs that interest us – in our case, we have defined three tests to call the three endpoints that we want to evaluate.
在上面的 JavaScript 文件中,我们使用 k6 语法编写了测试。我们已经定义了选项,例如测试的评估阈值、要测量的参数以及测试应模拟的阶段。定义测试选项后,我们只需编写代码来调用我们感兴趣的 API – 在我们的例子中,我们已经定义了三个测试来调用我们想要评估的三个端点。
Running a k6 performance test
运行 k6 性能测试
Now that we have written the code to test the performance, let’s run the test and generate the statistics of the tests.
现在我们已经编写了代码来测试性能,让我们运行测试并生成测试的统计信息。
We will report all the general statistics of the collected tests:
我们将报告所收集测试的所有一般统计数据:
First, we need to start the web applications to run the load test. Let’s start with both the ASP.NET Web API application and the minimal API application. We expose the URLs, both the HTTPS and HTTP protocols.
首先,我们需要启动 Web 应用程序以运行负载测试。让我们从 ASP.NET Web API 应用程序和最小 API 应用程序开始。我们公开 URL,包括 HTTPS 和 HTTP 协议。
Move the shell to the root folder and run the following two commands in two different shells:
将 shell 移动到根文件夹,并在两个不同的 shell 中运行以下两个命令:
Now, we just have to run the three test files for each project.
现在,我们只需要为每个项目运行三个测试文件。
• This one is for the controller-based Web API:
此 API 适用于基于控制器的 Web API:
k6 run .\K6\Controllers\json.js --summary-export=.\K6\results\controller-json.json
• This one is for the minimal API:
此 API 适用于最小 API:
k6 run .\K6\Minimal\json.js --summary-export=.\K6\results\minimal-json.json
Here are the results.
以下是结果。
For the test in traditional development mode with a plain-text content type, the number of requests served per second is 1,547:
对于纯文本内容类型的传统开发模式下的测试,每秒提供的请求数为 1547:
Figure 10.1 – The load test for a controller-based API and plain text
图 10.1 – 基于控制器的 API 和纯文本的负载测试
For the test in traditional development mode with a json content type, the number of requests served per second is 1,614:
对于传统开发模式下的 json 内容类型的测试,每秒提供的请求数为 1614:
Figure 10.2 – The load test for a controller-based API and JSON result
图 10.2 – 基于控制器的 API 和 JSON 结果的负载测试
For the test in traditional development mode with a json content type and model validation, the number of requests served per second is 1,602:
对于传统开发模式下的 json 内容类型和模型验证的测试,每秒提供的请求数为 1602:
Figure 10.3 – The load test for a controller-based API and validation payload
图 10.3 – 基于控制器的 API 和验证有效负载的负载测试
For the test in minimal API development mode with a plain-text content type, the number of requests served per second is 2,285:
对于在纯文本内容类型的最小 API 开发模式下的测试,每秒提供的请求数为 2285:
Figure 10.4 – The load test for a minimal API and plain text
图 10.4 – 最小 API 和纯文本的负载测试
For the test in minimal API development mode with a json content type, the number of requests served per second is 2,030:
对于在 json 内容类型的最小 API 开发模式下的测试,每秒提供的请求数为 2030:
Figure 10.5 – The load test for a minimal API and JSON result
图 10.5 – 最小 API 和 JSON 结果的负载测试
For the test in minimal API development mode with a json content type with model validation, the number of requests served per second is 2,070:
对于在最小 API 开发模式下使用具有模型验证的 json 内容类型的测试,每秒提供的请求数为 2070:
Figure 10.6 – The load test for a minimal API and no validation payload
图 10.6 – 最小 API 且无验证有效负载的负载测试
In the following image, we show a comparison of the three tested functionalities, reporting the number of requests served with the same functionality:
在下图中,我们显示了三个测试功能的比较,报告了使用相同功能提供的请求数:
Figure 10.7 – The performance results
As we might have expected, minimal APIs are much faster than controller-based web APIs.
正如我们所料,最小的 API 比基于控制器的 Web API 快得多。
The difference is approximately 30%, and that’s no small feat.
差异约为 30%,这可不是一件小事。
Obviously, as previously mentioned, minimal APIs have features missing in order to optimize performance, the most striking being data validation.
显然,如前所述,为了优化性能,最小的 API 缺少一些功能,最引人注目的是数据验证。
In the example, the payload is very small, and the differences are not very noticeable.
在此示例中,有效负载非常小,差异不是很明显。
As the payload and validation rules grow, the difference in speed between the two frameworks will only increase.
随着有效负载和验证规则的增长,两个框架之间的速度差异只会增加。
We have seen how to measure performance with a load testing tool and then evaluate how many requests it can serve per second with the same number of machines and users connected.
我们已经了解了如何使用负载测试工具测量性能,然后评估在连接相同数量的机器和用户的情况下,它每秒可以处理多少个请求。
We can also use other tools to understand how minimal APIs have had a strong positive impact on performance.
我们还可以使用其他工具来了解最少的 API 如何对性能产生强大的积极影响。
Benchmarking minimal APIs with BenchmarkDotNet
使用 BenchmarkDotNet 对最小 API 进行基准测试
BenchmarkDotNet is a framework that allows you to measure written code and compare performance between libraries written in different versions or compiled with different .NET frameworks.
BenchmarkDotNet 是一个框架,可用于测量编写的代码,并比较以不同版本编写或使用不同 .NET 框架编译的库之间的性能。
This tool is used for calculating the time taken for the execution of a task, the memory used, and many other parameters.
此工具用于计算执行任务所花费的时间、使用的内存和许多其他参数。
Our case is a very simple scenario. We want to compare the response times of two applications written to the same version of the .NET Framework.
我们的情况非常简单。我们想要比较写入同一版本的 .NET Framework 的两个应用程序的响应时间。
How do we perform this comparison? We take an HttpClient object and start calling the methods that we have also defined for the load testing case.
我们如何进行这种比较?我们获取一个 HttpClient 对象,并开始调用我们也为负载测试案例定义的方法。
We will therefore obtain a comparison between two methods that exploit the same HttpClient object and recall methods with the same functionality, but one is written with the ASP.NET Web API and the traditional controllers, while the other is written using minimal APIs.
因此,我们将比较两种利用相同 HttpClient 对象和调用具有相同功能的方法,但一种是使用 ASP.NET Web API 和传统控制器编写的,而另一种是使用最少的 API 编写的。
BenchmarkDotNet helps you to transform methods into benchmarks, track their performance, and share reproducible measurement experiments.
BenchmarkDotNet 可帮助您将方法转换为基准测试,跟踪其性能,并共享可重现的测量实验。
Under the hood, it performs a lot of magic that guarantees reliable and precise results thanks to the perfolizer statistical engine. BenchmarkDotNet protects you from popular benchmarking mistakes and warns you if something is wrong with your benchmark design or obtained measurements. The library has been adopted by over 6,800 projects, including .NET Runtime, and is supported by the .NET Foundation (https://benchmarkdotnet.org/).
在引擎盖下,它执行了很多魔力,由于 perfolizer 统计引擎,保证了可靠和精确的结果。BenchmarkDotNet 可保护您免受常见的基准测试错误的影响,并在基准测试设计或获得的测量值出现问题时向您发出警告。该库已被 6,800 多个项目采用,包括 .NET Runtime,并得到 .NET Foundation (https://benchmarkdotnet.org/) 的支持。
Running BenchmarkDotNet
运行 BenchmarkDotNet
We will write a class that represents all the methods for calling the APIs of the two web applications. Let’s make the most of the startup feature and prepare the objects we will send via POST. The function marked as [GlobalSetup] is not computed during runtime, and this helps us calculate exactly how long it takes between the call and the response from the web application:
我们将编写一个类,该类表示用于调用两个 Web 应用程序的 API 的所有方法。让我们充分利用启动功能并准备将通过 POST 发送的对象。标记为 [GlobalSetup] 的函数在运行时不会计算,这有助于我们准确计算调用和 Web 应用程序的响应之间需要多长时间:
Register all the classes in Program.cs that implement BenchmarkDotNet:
在 Program.cs 中注册所有实现 BenchmarkDotNet 的类:
In the preceding snippet, we have registered the current assembly that implements all the functions that will be needed to be evaluated in the performance calculation. The methods marked with [Benchmark] will be executed over and over again to establish the average execution time.
在前面的代码段中,我们注册了当前程序集,该程序集实现了在性能计算中需要评估的所有函数。标有 [Benchmark] 的方法将一遍又一遍地执行,以确定平均执行时间。
The application must be compiled on release and possibly within the production environment:
应用程序必须在发布时编译,并且可能在生产环境中编译:
namespace DotNetBenchmarkRunners
{
[SimpleJob(RuntimeMoniker.Net60, baseline: true)]
[JsonExporter]
public class Performances
{
private readonly HttpClient clientMinimal =
new HttpClient();
private readonly HttpClient
clientControllers = new HttpClient();
private readonly ValidationData data = new
ValidationData()
{
Id = 1,
Description = "Performance"
};
[GlobalSetup]
public void Setup()
{
clientMinimal.BaseAddress = new
Uri("https://localhost:7059");
clientControllers.BaseAddress = new
Uri("https://localhost:7149");
}
[Benchmark]
public async Task Minimal_Json_Get() =>
await clientMinimal.GetAsync("/jsons");
[Benchmark]
public async Task Controller_Json_Get() =>
await clientControllers.GetAsync("/jsons");
[Benchmark]
public async Task Minimal_TextPlain_Get()
=> await clientMinimal.
GetAsync("/text-plain");
[Benchmark]
public async Task
Controller_TextPlain_Get() => await
clientControllers.GetAsync("/text-plain");
[Benchmark]
public async Task Minimal_Validation_Post()
=> await clientMinimal.
PostAsJsonAsync("/validations", data);
[Benchmark]
public async Task
Controller_Validation_Post() => await
clientControllers.
PostAsJsonAsync("/validations", data);
}
public class ValidationData
{
public int Id { get; set; }
public string Description { get; set; }
}
}
Before launching the benchmark application, launch the web applications:
在启动基准测试应用程序之前,请启动 Web 应用程序:
By launching these applications, various steps will be performed and a summary report will be extracted with the timelines that we report here:
通过启动这些应用程序,将执行各种步骤,并提取一份摘要报告,其中包含我们在此处报告的时间表:
For each method performed, the average value or the average execution time is reported.
对于执行的每种方法,都会报告平均值或平均执行时间。
Table 10.1 – Benchmark HTTP requests for minimal APIs and controllers
表 10.1 – 针对最小 API 和控制器的 HTTP 请求进行基准测试
In the following table, Error denotes how much the average value may vary due to a measurement error. Finally, the standard deviation (StdDev) indicates the deviation from the mean value. The times are given in μs and are therefore very small to measure empirically if not with instruments with that just exposed.
在下表中,Error 表示平均值可能因测量误差而变化的程度。最后,标准差 (StdDev) 表示与平均值的偏差。时间以 μs 为单位,因此如果不是用刚刚曝光的仪器,实证测量的时间非常小。
Summary
总结
In the chapter, we compared the performance of minimal APIs with that of the traditional approach by using two very different methods.
在本章中,我们使用两种截然不同的方法比较了最小 API 的性能与传统方法的性能。
Minimal APIs were not designed for performance alone and evaluating them solely on that basis is a poor starting point.
最小的 API 不仅仅是为了性能而设计的,仅根据该基础评估它们是一个糟糕的起点。
Table 10.1 indicates that there are a lot of differences between the responses of minimal APIs and that of traditional ASP.NET Web API applications.
表 10.1 表明,最小 API 的响应与传统的 ASP.NET Web API 应用程序的响应之间存在很多差异。
The tests were conducted on the same machine with the same resources. We found that minimal APIs performed about 30% better than the traditional framework.
测试是在同一台机器上以相同的资源进行的。我们发现,minimal API 的性能比传统框架高出约 30%。
We have learned about how to measure the speed of our applications – this can be useful for understanding whether the application will hold the load and what response time it can offer. We can also leverage this on small portions of critical code.
我们已经了解了如何测量应用程序的速度 – 这对于了解应用程序是否能够承受负载以及它可以提供多少响应时间非常有用。我们还可以将它用于关键代码的一小部分。
As a final note, the applications tested were practically bare bones. The validation part that should be evaluated in the ASP.NET Web API application is almost irrelevant since there are only two fields to consider. The gap between the two frameworks increases as the number of components that have been eliminated in the minimal APIs that we have already described increases.
最后要注意的是,测试的应用程序几乎是裸露的。应在 ASP.NET Web API 应用程序中评估的验证部分几乎无关紧要,因为只有两个字段需要考虑。随着我们已经描述的最小 API 中已删除的组件数量的增加,这两个框架之间的差距也会增加。
Other Books You May Enjoy
您可能喜欢的其他书籍
If you enjoyed this book, you may be interested in these other books by Packt:
如果您喜欢这本书,您可能会对 Packt 的这些其他书籍感兴趣:
Customizing ASP.NET Core 6.0 - Second Edition
定制 ASP.NET Core 6.0 - 第二版
Jürgen Gutsch
ISBN: 978-1-80323-360-4
Explore various application configurations and providers in ASP.NET Core 6
Enable and work with caches to improve the performance of your application
Understand dependency injection in .NET and learn how to add third-party DI containers
Discover the concept of middleware and write your middleware for ASP.NET Core apps
Create various API output formats in your API-driven projects
Get familiar with different hosting models for your ASP.NET Core app
ASP.NET Core 6 and Angular - Fifth Edition
ASP.NET Core 6 和 Angular - 第五版
Valerio De Sanctis
ISBN: 978-1-80323-970-5
Use the new Visual Studio Standalone TypeScript Angular template
Implement and consume a Web API interface with ASP.NET Core
Set up an SQL database server using a local instance or a cloud datastore
Perform C# and TypeScript debugging using Visual Studio 2022
Create TDD and BDD unit tests using xUnit, Jasmine, and Karma
Perform DBMS structured logging using providers such as SeriLog
Deploy web apps to Azure App Service using IIS, Kestrel, and NGINX
Learn to develop fast and flexible Web APIs using GraphQL
Add real-time capabilities to Angular apps with ASP.NET Core SignalR
Packt is searching for authors like you
If you’re interested in becoming an author for Packt, please visit authors.packtpub.com and apply today. We have worked with thousands of developers and tech professionals, just like you, to help them share their insight with the global tech community. You can make a general application, apply for a specific hot topic that we are recruiting an author for, or submit your own idea.
// 定义一个与数据库表对应的C#类
public class Product
{
public int Id { get; set; }
public string Name { get; set; }
public decimal Price { get; set; }
}
// 使用Entity Framework上下文类来管理数据库操作
public class MyDbContext : DbContext
{
public DbSet<Product> Products { get; set; }
protected override void OnConfiguring(DbContextOptionsBuilder optionsBuilder)
{
optionsBuilder.UseSqlServer("YourConnectionStringHere");
}
}
public class ClassA
{
private readonly ClassB _classB;
public ClassA()
{
_classB = new ClassB(); //主动创建对象B
}
public void Process()
{
_classB.DoSomething();
/// ...
}
}
public class ClassB
{
public void DoSomething()
{
/// ...
}
}
使用依赖注入(以C#为例)
public class ClassA
{
private readonly ClassB _classB;
public ClassA(ClassB classB) // 声明构造器里需要对象B引用,依赖注入框架就会自动注入对象B
{
_classB = classB;
}
public void Process()
{
_classB.DoSomething();
// ...
}
}
public class ClassB
{
public void DoSomething()
{
// ...
}
}
// 伪代码: 向依赖注入系统中注册 ClassA 和 ClassB
DependencyInjectionSystem.AddType(ClassA);
DependencyInjectionSystem.AddType(ClassB);</code></pre>
namespace ConsoleDIApp.demo
{
public class ClassA
{
private readonly IInterfaceB _b;
public ClassA(IInterfaceB b)
{
_b = b;
}
public void Process()
{
Console.WriteLine("Class A start process");
_b.DoSomething();
Console.WriteLine("Class A finish process");
}
}
}
ClassB.cs
namespace ConsoleDIApp.demo
{
public class ClassB : IInterfaceB
{
public void DoSomething()
{
Console.WriteLine("class B is doing something ...");
}
}
}
namespace ConsoleDIApp.demo
{
public class ClassA
{
private readonly IInterfaceB _b;
private readonly long _id;
public ClassA(IInterfaceB b)
{
_b = b;
_id = DateTime.UtcNow.Ticks; // 利用 id 来区分是否是同一个实例
}
public void Process()
{
Console.WriteLine($"[{_id}]: Class A start process");
_b.DoSomething();
Console.WriteLine("Class A finish process");
}
}
}
ClassB.cs
namespace ConsoleDIApp.demo
{
public class ClassB : IInterfaceB
{
private readonly long _id;
public ClassB()
{
_id = DateTime.UtcNow.Ticks; // 利用 id 来区分是否是同一个实例
}
public void DoSomething()
{
Console.WriteLine($"[{_id}]: class B is doing something ...");
}
}
}
Input User Name:
tom
[638831071897299805]: Class A start process
[638831071897292850]: class B is doing something ...
Class A finish process
Input User Name:
jerry
[638831071933082335]: Class A start process
[638831071933082295]: class B is doing something ...
Class A finish process
Input User Name:
观察点:
• 每次 ClassA 的 id 都不同 (因为 AddTransient )
• tom 的 ClassB 的 id 都一样 ,jerry 的 ClassB 的 id 都一样, 说明 AddScoped 如预期一样表现
后面的全部代码
using ConsoleDIApp;
using ConsoleDIApp.demo;
using Microsoft.Extensions.DependencyInjection;
using Microsoft.Extensions.Hosting;
namespace ConsoleDIApp.demo
{
internal class Program
{
public static async Task Main(string[] args)
{
IHost host = Host.CreateDefaultBuilder(args)
.ConfigureServices((context, services) =>
{
// 每此实例一个新的ClassA
services.AddTransient<ClassA>();
// 相同scope共享同一个ClassB实例
services.AddScoped<IInterfaceB, ClassB>();
services.AddHostedService<HostedService>();
})
.Build();
await host.RunAsync();
}
}
}
namespace ConsoleDIApp.demo
{
public class ClassA
{
private readonly IInterfaceB _b;
private readonly long _id;
public ClassA(IInterfaceB b)
{
_b = b;
_id = DateTime.UtcNow.Ticks; // 利用 id 来区分是否是同一个实例
}
public void Process()
{
Console.WriteLine($"[{_id}]: Class A start process");
_b.DoSomething();
Console.WriteLine("Class A finish process");
}
}
}
namespace ConsoleDIApp.demo
{
public class ClassB : IInterfaceB
{
private readonly long _id;
public ClassB()
{
_id = DateTime.UtcNow.Ticks; // 利用 id 来区分是否是同一个实例
}
public void DoSomething()
{
Console.WriteLine($"[{_id}]: class B is doing something ...");
}
}
}
namespace ConsoleDIApp.demo
{
public interface IInterfaceB
{
void DoSomething();
}
}
namespace ConsoleDIApp
{
public class HostedService : IHostedService
{
private readonly IServiceProvider _services;
// 关联用户名和IServiceScope实例的集合
private Dictionary<string, IServiceScope> _scopes = new();
public HostedService(IServiceProvider a)
{
_services = a;
}
public Task StartAsync(CancellationToken cancellationToken)
{
while (true)
{
Console.WriteLine("Input User Name: ");
var user = Console.ReadLine();
if (user == null || user == "q")
{
break; // 退出循环
}
if (!_scopes.ContainsKey(user))
{
// 对新用户,创建一个新的 IServiceScope 实例
IServiceScope newServiceScope = _services.CreateScope();
_scopes.Add(user, newServiceScope);
}
IServiceScope serviceScope = _scopes[user];
IServiceProvider serviceProvider = serviceScope.ServiceProvider;
ClassA a = serviceProvider.GetRequiredService<ClassA>();
a.Process();
}
return Task.CompletedTask;
}
public Task StopAsync(CancellationToken cancellationToken)
{
return Task.CompletedTask;
}
}
}
I’ve been a software developer for over 30 years now and have been developing high-performance servers using multithreading and asynchronous programming since the late 1990s. I’ve been using C# since 2003. For the last decade and a bit, I’ve worked as a consultant, coming into a project for a short period of time and helping solve a specific problem. Over that decade, I’ve had the privilege of visiting many companies, and I’ve gotten to see and help with a lot of projects.
While every project is obviously completely different, with each company inventing its own innovative, disruptive, and one-of-a-kind technology, after you encounter enough projects, you start to see some similarities. And one thing I’ve seen time and time again are problems arising from incorrect usage of multithreading and asynchronous programming.
Multithreading is a straightforward concept: it involves running multiple tasks simultaneously. It is notoriously difficult to get it right, but despite this difficulty, it has been widely used for a long time. Developers like you, who take the time to study multithreading through books, are able to use it effectively.
Asynchronous programming has existed since the invention of the microprocessor and has long been used in high-performance servers. However, it gained wider popularity among average developers when the async/await feature was introduced in C# in 2012. (It was introduced in JavaScript earlier, but in a limited way.) Based on my observations of various projects and my experience conducting job interviews, I’ve found that very few people understand how async/await works.
The problems arising from a lack of knowledge in multithreading and asynchronous programming are quite apparent. In just the month or so that I discussed publishing this book with Manning, I taught multithreading and async/await at three different companies.
And this is how this book was born. What followed was a little more than two years of very deep diving into multithreading and asynchronous programming in C#. During this time, I’ve learned a lot. There is truly no better way to learn something than teaching it, and I hope this book will be at least as beneficial to you as writing it was to me.
acknowledgments
I truly believe this is a very good book, but I didn’t write it alone. Writing a book is a team effort, and it takes an enormous amount of work by many people. Without all those people, this book wouldn’t be as good and, most likely, it wouldn’t exist at all.
First, I want to thank my development editor at Manning, Doug Rudder, who had the patience to teach this first-time author how to write a technical book. Associate publisher Mike Stephens, who agreed to publish my idea of a book, helped with support and feedback. Using a food analogy in the first chapter was his idea. And technical editor Paul Grebenc was the first line of defense against technical mistakes. Paul is a Principal Software Developer at OpenText. He has over 25 years of professional experience in software development, working primarily with C# and Java. His primary interests are systems involving multithreading, asynchronous programming, and networking.
Next, I also want to thank all the reviewers who reviewed drafts of this book and everyone who commented while the book was in MEAP: your comments have been invaluable to improving the book. To all the reviewers—Aldo Biondo, Alexandre Santos Costa, Allan Tabilog, Amrah Umudlu, Andriy Stosyk, Barry Wallis, Chriss Barnard, David Paccoud, Dustin Metzgar, Geert Van Laethem, Jason Down, Jason Hales, Jean-Paul Malherbe, Jeff Shergalis, Jeremy Caney, Jim Welch, Jiří Činčura, Joe Cuevas, Jonathan Blair, Jort Rodenburg, Jose Antonio Martinez, Julien Pohie, Krishna Chaitanya Anipindi, Marek Petak, Mark Elston, Markus Wolff, Mikkel Arentoft, Milorad Imbra, Oliver Korten, Onofrei George, Sachin Handiekar, Simon Seyag, Stefan Turalski, Sumit Singh, and Vincent Delcoigne—your suggestions helped make this book better.
I also want to give my personal thanks to everyone who bought the book while in early access. Seeing that people are interested enough to spend their hard-earned money on a book I wrote is a wonderful feeling, and it was an important part of the motivation to complete the book.
And last, but most important, I want to thank my family, and especially my wife, who put up with all my nonsense in general and, in particular, with me spending a lot of our free time in my office writing.
about this book
This book is designed to help C# developers write safe and efficient multithreaded and asynchronous application code. It focuses on practical techniques and features you are likely to encounter in normal day-to-day software development.
It delves into all the details you need to know to write and debug multithreaded and asynchronous code. It leaves out the exotic, fun techniques that are only applicable if you need to build something like your own database server, but that are too complicated for normal application code and will probably get you into trouble if you try to use them in normal code, because normal multithreading is difficult enough as it is.
Who should read this book
This book is for any C# developer who wants to improve their knowledge of multithreading and asynchronous programming. The information in this book is applicable to any version of .NET, .NET Core, and .NET Framework released since 2012 and to both Windows and Linux (obviously only for .NET Core and .NET 5 and later, since earlier versions do not support Linux).
The book focuses more on backend development but also covers what you need to know to write UI applications.
How this book is organized: A road map
This book has two parts that include 14 chapters.
Part 1 covers the basics of multithreading and async/await in C#:
Chapter 1 introduces the concepts and terminology of multithreading and asynchronous programming.
Chapter 2 covers the techniques that the .NET compiler uses to implement advanced functionality.
Chapter 3 is a deep dive into how async/await works.
Chapter 4 explains multithreading.
Chapter 5 ties chapters 3 and 4 together and shows how async/await interacts with multithreading.
Chapter 6 talks about when you should use async/await—just because you can use it doesn’t mean you should use it everywhere.
Chapter 7 closes the first part with information about the common multithreading pitfalls, and more importantly, what you have to do to avoid them.
Part 2 is about how to use the information you learned about in part 1:
Chapter 8 is about processing data in the background.
Chapter 9 is about stopping background processing.
Chapter 10 teaches how to build advanced asynchronous components that do more than just combine built-in asynchronous operations.
Chapter 11 discusses advanced use cases of async/await and threading.
Chapter 12 helps you debug a problem with exceptions in asynchronous code.
Chapter 13 goes over thread-safe collections.
Chapter 14 shows how you can build things that work like asynchronous collections yourself.
About the code
This book contains many examples of source code both in numbered listings and in line with normal text. In both cases, source code is formatted in a fixed-widthfont likethis to separate it from ordinary text. Sometimes code is also inbold to highlight code that has changed from previous steps in the chapter, such as when a new feature adds to an existing line of code.
In many cases, the original source code has been reformatted; we’ve added line breaks and reworked indentation to accommodate the available page space in the book. In rare cases, even this was not enough, and listings include line-continuation markers (➥). Additionally, comments in the source code have often been removed from the listings when the code is described in the text. Code annotations accompany many of the listings, highlighting important concepts.
Purchase of C# Concurrency includes free access to liveBook, Manning’s online reading platform. Using liveBook’s exclusive discussion features, you can attach comments to the book globally or to specific sections or paragraphs. It’s a snap to make notes for yourself, ask and answer technical questions, and receive help from the author and other users. To access the forum, go to https://livebook.manning.com/book/csharp-concurrency/discussion. You can also learn more about Manning’s forums and the rules of conduct at https://livebook.manning.com/discussion.
Manning’s commitment to our readers is to provide a venue where a meaningful dialogue between individual readers and between readers and the author can take place. It is not a commitment to any specific amount of participation on the part of the author, whose contribution to the forum remains voluntary (and unpaid). We suggest you try asking the author some challenging questions lest his interest stray! The forum and the archives of previous discussions will be accessible from the publisher’s website as long as the book is in print.
about the author
Nir Dobovizki is a software architect and a senior consultant. He’s worked on concurrent and asynchronous systems, mostly high-performance servers, since the late 1990s. He’s used both in native code and, since the introduction of .NET 1.1 in 2003, .NET and C#. He has worked with multiple companies in the medical, defense, and manufacturing industries to solve problems arising from incorrect usage of multithreading and asynchronous programming.
about the cover illustration
The figure on the cover of C# Concurrency is “Homme Tatar de Tobolsk” or “Tatar man from Tobolsk,” taken from a collection by Jacques Grasset de Saint-Sauveur, published in 1788. Each illustration is finely drawn and colored by hand.
In those days, it was easy to identify where people lived and what their trade or station in life was just by their dress. Manning celebrates the inventiveness and initiative of the computer business with book covers based on the rich diversity of regional culture centuries ago, brought back to life by pictures from collections such as this one.
Part 1. Asynchronous programming and multithreading basics
The first part of this book covers asynchronous programming and multi-threading in C#, explaining what they are and how to implement them. This part highlights common pitfalls and provides guidance on how to avoid them.
We start with the concepts and terminology of multithreading and asynchronous programming, as used in computer science generally and in C# specifically (chapter 1). Next, we’ll dive right into how asynchronous programming with async/await works in C# (chapters 2 and 3). Then, we’ll discuss multithreading in C# (chapter 4) and how multithreading and asynchronous programming work together (chapter 5). Finally, we’ll talk about when to use async/await (chapter 6) and how to use multithreading properly (chapter 7).
By the end of part 1, you will learn how to write correct multithread code and use async/await properly.
1 Asynchronous programming and multithreading
This chapter covers
Introduction to multithreading
Introduction to asynchronous programming
Asynchronous programming and multithreading used together
As software developers, we often strive to make our applications faster, more responsive, and more efficient. One way to achieve this is by enabling the computer to perform multiple tasks simultaneously, maximizing the use of existing CPU cores. Multithreading and asynchronous programming are two techniques commonly used for this task.
Multithreading allows a computer to appear as if it is executing several tasks at once, even when the number of tasks exceeds the number of CPU cores. In contrast, asynchronous programming focuses on optimizing CPU usage during operations that would typically make it wait, which ensures the CPU remains active and productive.
Enabling a computer to perform multiple tasks simultaneously is extremely useful. It helps keep native applications responsive while they work and is essential for building high-performance servers that can interact with many clients at the same time.
Both techniques can be employed to create responsive client applications or servers that handle a few clients. But when combined, they can greatly boost performance, allowing servers to handle thousands of clients at once.
This chapter will introduce you to multithreading and asynchronous programming and illustrate why they are important. In the rest of the book, we’ll talk about how to use them correctly in .NET and C#, especially focusing on the C# async/await feature. You will learn how these technologies work, go over the common pitfalls, and see how to use them correctly.
1.1 What is multithreading?
Before we begin talking about async/await, we need to understand what multithreading and asynchronous programming are. To do so, we are going to talk a bit about web servers and pizza making. We’ll start with the pizza (because it’s tastier than a web server).
The high-level process of pizza making in a takeout place is typically as follows:
The cook receives an order.
The cook does stuff—takes preprepared dough, shapes it, and adds sauce, cheese, and toppings.
The cook places the pizza in the oven and waits for it to bake (this is the longest bit).
The cook then does more stuff—takes the pizza out of the oven, cuts it, and places it in a box.
The cook hands the pizza to the delivery person.
This is not a cookbook, so obviously, our pizza baking is a metaphor for one of the simplest server scenarios out there—a web server serving static files. The high-level process for a simple web server is as follows:
The server receives a web request.
The server performs some processing to figure out what needs to be done.
The server reads a file (this is the longest bit).
The server does some more processing (such as packaging the file content).
The server sends the file content back to the browser.
For most of the chapter, we are going to ignore the first and last steps because, in most backend web frameworks (including ASP.NET and ASP.NET Core), they are handled by the framework and not by our code. We will talk about them briefly near the end of this chapter. Figure 1.1 illustrates the web request process.
Figure 1.1 Single-threaded, single-request flow
Now back to the pizza. In the simplest case, the cook will follow the steps in order, completely finishing one pizza before starting the next one. While the pizza is baking, the cook will just stand there staring at the oven and do nothing (this is a fully synchronous single-threaded version of the process).
In the world of web servers, the cook is the CPU. In this single-threaded web server, we have straightforward code that performs the operations required to complete the web request, and while the file is read from disk, the CPU is frozen doing nothing (in practice, the operating system will suspend our thread while this happens and hand over the CPU to another program, but from our program point of view, it looks like the CPU is frozen).
This version of the process has some advantages—it is simple and easy to understand. You can look at the current step and know exactly where we are in the process. As two things are never taking place at the same time, different jobs can’t interfere with each other. Finally, this version requires the least amount of space and uses fewer resources at any one time because we only handle one web request (or pizza) at a time.
This single-threaded synchronous version of the process is apparently wasteful because the cook/CPU spends most of their time doing nothing while the pizza is baking in the oven (or the file is retrieved from disk), and if our pizzeria isn’t going out of business, we are going to receive new orders faster than we can fulfill them.
For this reason, we want the cook to make more than one pizza at the same time. One approach might be to use a timer and have it beep every few seconds. Every time the timer beeps, the cook will stop whatever they are doing and make a note of what they did when they stopped. The cook will then start a new pizza or continue making the previous one (ignoring the unready pizzas in the oven) until the timer beeps again.
In this version, the cook is attempting to do multiple things at the same time, and each of those things is called a thread. Each thread represents a sequence of operations that can happen in parallel with other similar or different sequences.
This example may seem silly, as it is obviously inefficient, and our cook will spend too much time putting things away and picking up stuff. Yet this is exactly how multithreading works. Inside the CPU, there’s a timer that signals when the CPU should switch to the next thread, and with every switch, the CPU needs to store whatever it was doing and load the other thread’s status (this is called a context switch).
For example, when your code reads a file, the thread can’t do anything until the file’s data is retrieved from disk. During this time, we say the thread is blocked. Having the system allocate CPU time to a blocked thread would obviously be wasteful, so when a thread begins reading a file, it is switched to a blocked state by the operating system. When entering this state, the thread will immediately release the CPU to the next waiting thread (possibly from another program), and the operating system will not assign any CPU time to the thread while in this state. When the system finishes reading the file, the thread exits the blocked state and is again eligible for CPU time.
The operations that can cause the thread to become blocked are called blocking operations. All file and network access operations are blocking, as is anything else that communicates with anything outside the CPU and memory; moreover, all operations that wait for another thread can block.
Back in the pizzeria, in addition to the time we spend switching between pizzas, there’s also all the information the cook needs to get back to exactly the same place they were before switching tasks. In our software, every thread, even if not running, consumes some memory, so while it’s possible to create a large number of threads, each of them executing a blocking operation (so they are blocked most of the time and not consuming CPU time), this is wasteful of memory. It will slow the program down as we increase the number of threads because we must manage all the threads. At some point, we will either spend so much time managing threads that no useful work will get done or we will just run out of memory and crash.
Even with all this inefficiency, the multithreading cook, who jumps from one pizza to another like a crazy person, will make more pizzas in the same amount of time, unless they can’t make progress or crash (I know, a cook can’t crash; no metaphor is perfect). This mostly happens because the single-threaded cooks from before spent most of their time waiting while the pizza was in the oven.
As illustrated in figure 1.2, because we only have one CPU core (I know, everyone has multicore CPUs nowadays; we’ll talk about them soon), we can’t really do two things simultaneously. All the processing parts happen one after the other and are not truly in parallel; however, the CPU can wait as many times as you like in parallel. And that’s why our multithread version managed to process three requests in significantly less time than it took the single-threaded version to process two.
Figure 1.2 Single-threaded versus multithread with multiple requests
If you look closely at figure 1.2, you can see that while the single-threaded version handled the first request faster, the multithreaded version completed all three before the single-threaded version managed to complete the second request. This shows us the big advantage of multithreading, which is a much better utilization of the CPU in scenarios that involve waiting. It also shows the price we pay—just a little bit of extra overhead every step of the way.
Until now, we’ve talked about single-core CPUs, but all modern CPUs are multicore. How does that change things?
1.2 Introducing multicore CPUs
Multicore CPUs are conceptually simple. They are just multiple single-core CPUs packed into the same physical chip.
In our pizzeria, having an eight-core CPU is equivalent to having eight cooks carrying out the pizza-making tasks. In the previous example, we had one cook who could only do one thing at a time but pretended to do multiple things by switching between them quickly. Now we have eight cooks, each able to do one task at the same time (for a total of eight tasks at once), and each pretending to do multiple things by switching between tasks quickly.
In software terms, with multicore CPUs, you can really have multiple threads running simultaneously. When we had a single-core CPU, we sliced the work into tiny parts and interleaved them to make it seem like they were running at the same time (while, in fact, only one thing could run). Now, with our example eight-core CPU, we still slice the work into tiny parts and interleave them, but we can run eight of those parts at the same time.
Theoretically, eight cooks can make more pizzas than only one; however, multiple cooks may unintentionally interfere with each other’s work. For example, they might bump into each other, try to put a pizza in the oven at the same time, or need to use the same pizza cutter—the more cooks we have, the greater the chance of this happening.
Figure 1.3 takes the same multithreaded work we had in figure 1.2 and shows how it would run on a dual-core CPU (just two cores because a diagram with enough work for an eight-core CPU would be too big to illustrate here).
Figure 1.3 Three requests on a dual-core CPU
Note that by default, there is no persistent relation between threads and cores. A thread can jump between cores at any time (you can set threads to run on specific cores, which is called “thread affinity,” and except in really special circumstances, something you shouldn’t do).
The dual-core CPU cut the time we spent processing by half compared to the single-core version but didn’t affect the time we spent waiting. So while we did get a significant speedup, it did not cut the total time in half. Until now, we’ve gotten most of the performance improvement from doing other stuff while waiting for the hard drive to read the file, but we’ve paid for it with all the overhead and complexity of multithreading. Maybe we can reduce this overhead.
1.3 Asynchronous programming
Back in the pizzeria, there’s a rational solution we ignored. The cook should make a single pizza without stopping and switching to other pizzas, but when the pizza is in the oven, they can start the next pizza instead of just sitting there. Later, whenever the cook finishes something, they can check whether the pizza in the oven is ready, and if it is, they can take it out, cut it, put it in a box, and hand it over to the delivery person.
This is an example of asynchronous programming. Whenever the CPU needs to do something that happens outside the CPU itself (for example, reading a file), it sends the job to the component that handles it (the disk controller) and asks this component to notify the CPU when it’s done.
The asynchronous (also called nonblocking) version of the file function just queues the operation with the operating system (that will then queue it with the disk controller) and returns immediately, letting the same thread do other stuff instead of waiting (figure 1.4). Later, we can check whether the operation has been completed and access the resulting data.
If you compare all the diagrams in this chapter, you will see that this single-threaded asynchronous version is the fastest of all the options. It completes the first request almost as fast as the first single-threaded version while also completing the last request almost as fast as the dual-core multithreaded version (without even using a second core), which makes it the most performant version so far.
Figure 1.4 Single-threaded asynchronous web server with three web requests
You can also clearly see that figure 1.4 is kind of a mess and is more difficult to read than the previous diagrams, and that is even without indicating in the diagram that the “second processing” steps depend on completing the read operations. The thing that makes the diagram more difficult to understand is that you can no longer see the entire process; the work done for every request is broken up into parts, and unlike the threading example, those parts are not connected to each other.
This is the reason that while multithreading is widely used, until the introduction of async/await, asynchronous programming has only been used by people building high-performance servers (or using environments where you have no other choice; for example, JavaScript). Like in figure 1.4, the code must be broken into parts that are written separately, which made the code difficult to write and even more difficult to understand—until C# introduced the async/await feature that lets one write asynchronous code as if it were normal synchronous code.
Also, in figure 1.4, I indicated that I use the same asynchronous techniques as for reading the file when sending the response back to the browser. That’s because the first and last steps in our web request sequence, “get web request” and “send response to browser,” are both performed mostly by the network card and not the CPU, just like reading the file is done by the hard drive, so the two can be performed asynchronously without making the CPU wait.
Even with multithreading only, without asynchronous programming, it’s completely possible to write servers that can handle low and medium loads by opening a thread for every connection. However, if you need to build a server that can serve thousands of connections at the same time, the overhead of so many threads will slow the server down to the point of not being able to handle the load or will crash the server outright.
We talked about asynchronous programming as a way to avoid multithreading, but we can’t take advantage of the power of multicore CPUs without multithreading. Let’s see whether we can use multithreading and asynchronous programming jointly to get even more performance.
1.4 Using multithreading and asynchronous programming together
Let’s jump back to the pizzeria one last time. We can improve our pizza making even more: instead of having the cook actively check the oven, just make the oven beep when the pizza is ready, and when the oven beeps, the cook can stop what they are doing, take the pizza out, put it in a box, hand it over to the delivery person, and then get back to what they were doing.
The software equivalent is, when starting the asynchronous operation, to ask the operating system to notify our program by calling a callback function we registered when starting the asynchronous operation. That callback function will need to run on a new thread (actually, a thread pool thread; we will talk about the thread pool later in the book) because the original calling thread is not waiting and is currently doing something else. That’s why asynchronous programming and multithreading work well together.
1.5 Software efficiency and cloud computing
Today, we can just use our favorite cloud provider’s “serverless” option and run 10,000 copies of our single-threaded code at the same time. So do we need to bother with all this multithreaded and asynchronous code?
Well, theoretically, we can just throw a lot of processing power at the problem. With the modern cloud offerings, you can basically get infinite compute power whenever you want, but you do have to pay for it. Because you pay exactly for what you use, every bit of efficiency you get saves you money.
Before cloud computing, you would buy a server, and as long as you didn’t max out the server you bought, the efficiency of your code didn’t really matter. Today, shaving off a part of a second of every request in a high-load site can save a significant amount of money.
In the past, CPUs got faster all the time. The rule of thumb was that CPU speed doubled every two years, which meant that you could fix slow software by waiting a bit and buying a new computer. Unfortunately, this is no longer the case because the modern CPU got so close to the maximum number of transistors that can be put in a specific area that it is basically not possible to make a single core much faster. Consequently, the single-thread performance of CPUs now rises rather slowly, and our only choice to improve performance is to use more CPU cores (there’s a very influential paper called “The Free Lunch Is Over” by Herb Sutter covering this topic; see www.gotw.ca/publications/concurrency-ddj.htm).
Nonetheless, the modern CPU is still extremely fast, faster than other computer components, and obviously, much faster than any human. Therefore, a typical CPU spends most of its time waiting. Sometimes it’s waiting for user input, and other times, it’s waiting for the hard drive, but it’s still waiting. Multithreading and asynchronous programming enable employing this waiting time to do useful work.
Summary
Multithreading is switching between several things on the same CPU fast enough to make it feel like they are all running simultaneously.
A thread is one of those things running simultaneously.
A thread has significant overhead.
Switching between threads is called context switching, and it also has overhead.
When doing stuff that happens outside the CPU, such as reading a file or using a network, the thread must wait until the operation is complete to get the result and continue to operate on it, which is called a blocking operation.
Asynchronous programming frees up the thread while operations are taking place by asking the system to send a notification when the operation ends instead of waiting, which is called a nonblocking operation. The program then needs to pick up processing later when the data is available, usually on a different thread.
We need asynchronous and multithreading techniques because the complexity of our software grows faster than the single-thread performance of our CPUs.
Because in cloud computing we pay for the exact resources we use, asynchronous and multithreading techniques that increase efficiency can save us some money.
2 The compiler rewrites your code
This chapter covers
How the C# compiler supports features that do not exist in the .NET runtime
The implementation of lambda functions by the compiler
The implementation of yield return by the compiler
The compiler modifies your code, which means that the output is not a direct representation of the source code. This is done for two main reasons: to reduce the amount of typing required by boilerplate code generation and to add features not supported by the underlying platform. One such feature is async/await, which is primarily implemented by the C# compiler rather than the .NET runtime. To write correct asynchronous code, avoid the potential pitfalls, and especially to debug code, it’s important to understand how the compiler transforms your code, that is, what happens when your code runs.
This chapter discusses how the C# compiler rewrites your code during compilation. However, because async/await is probably the most complicated code transformation in the current version of C#, we’re going to start with lambda functions and yield return, which are implemented using the same techniques as async/await. By starting with simpler compiler features, we can learn the concepts behind async/await without having to deal with the complexities of asynchronous programming and multithreading. The next chapter will show how everything translates directly to async/await.
Now let’s see how the C# compiler adds advanced features not supported by the underlying .NET runtime, starting with lambda functions (note that the C# lambda functions have nothing to do with the Amazon AWS Lambda service).
2.1 Lambda functions
Let’s start with one of the simpler C# features implemented by the compiler—lambda functions. These functions are code blocks you can write inline, inside a larger method that can be used just like a standalone method. Lambda functions allow us to take code that, for technical reasons, needs to be a different method and write it in-line where it is used, making the code easier to read and understand. Lambda functions can also use local variables from the method that defined them.
However, the .NET runtime does not have in-line functions—all code in .NET must be in the form of methods that are part of classes. So how do lambda functions work? Let’s take a very simple example: we will create a timer, set it to call us in 1 second, and then write the string "Elapsed" to the console.
Listing 2.1 Using lambda functions
public class LambdaDemo1
{
private System.Timers.Timer? _timer;
public void InitTimer()
{
_timer = new System.Timers.Timer(1000);
_timer.Elapsed += (sender,args) => Console.WriteLine("Elapsed");
_timer.Enabled = true;
}
}
If we run this example, unsurprisingly, the program will print "Elapsed" after 1 second. The line I want you to focus on is the one that sets the _timer.Elapsed property. This line defines a lambda function and passes it the Elapsed property.
But I said that in .NET, all code must be in methods defined in classes, so how is this done? The answer is that the C# compiler rewrites your lambda function as a normal method. If you look at the compile output, it would be similar to
public class LambdaDemo2
{
private System.Timers.Timer? _timer;
private void HiddenMethodForLambda( ❶
object? sender, System.Timers.ElapsedEventArgs args)
{
Console.WriteLine("Elapsed");
}
public void InitTimer()
{
_timer = new System.Timers.Timer(1000);
_timer.Elapsed += HiddenMethodForLambda;
_timer.Enabled = true;
}
}
❶ The lambda function becomes a regular method.
The compiler rearranged our code and moved the body of the lambda function into a new method. That way, we can write the code inline, and the runtime can treat it as a normal method.
But the lambda function can also use local variables from the method that defined them. Let’s add a variable defined in the InitTimer method and used inside the lambda function.
Listing 2.2 Lambda function that uses local variables
public class LambdaDemo3
{
private System.Timers.Timer? _timer;
public void InitTimer()
{
int aVariable = 5; ❶
_timer = new System.Timers.Timer(1000);
_timer.Elapsed += (sender,args) => Console.WriteLine(aVariable);
_timer.Enabled = true;
}
}
❶ The new variable
If we try to apply the same transformation on this code like in the previous example, we will get two methods that share a local variable. This is obviously not supported and doesn’t even make sense. How can the compiler handle that? Well, it needs something that can hold data that can be accessed from two places, and we have such a thing in .NET: classes. So the compiler creates a class to hold our “local” variable:
public class LambdaDemo4
{
private System.Timers.Timer? _timer;
private class HiddenClassForLambda ❶
{
public int aVariable; ❷
public void HiddenMethodForLambda( ❸
object? sender, ❸
System.Timers.ElapsedEventArgs args) ❸
{ ❸
Console.WriteLine(aVariable); ❸
} ❸
}
public void InitTimer()
{
var hiddenObject = new HiddenClassForLambda();
hiddenObject.aVariable = 5;
_timer = new System.Timers.Timer(1000);
_timer.Elapsed += hiddenObject.HiddenMethodForLambda;
_timer.Enabled = true;
}
}
❶ The compiler creates a class for our lambda function.
❷ The local variable becomes a field of the class.
❸ The lambda function becomes a method inside that class.
Here, the compiler created a new method and an entirely new class. The local variable was moved to be a member of this class, and both the InitTimer method and the lambda function reference this new class member. This changes the way the local variable is accessed outside the lambda function—some operation that only used local variables can turn into access to class member fields when you introduce a lambda. If there are multiple lambda functions defined in the same method, they are placed in the same class so they can share local variables. The important point is that there is no magic here—everything the compiler adds to the .NET runtime is done by just writing code that we can write ourselves because we have basically the same access to the runtime’s functionality as the compiler.
Now that we’ve seen the lambda function transformation, let’s take a look at something a bit more complicated.
2.2 Yield return
The yield return feature uses the same tricks we’ve seen in the lambda function example to do even more advanced stuff. It’s also somewhat similar to async/await, but without the complexities of multithreading and asynchronous code, so it’s a good way to learn the fundamentals of async/await.
What is yield return? It basically lets you write functions that generate a sequence of values you can use in foreach loops directly without using a collection such as a list or an array. Each value can be used without waiting for the entire sequence to be generated. Let’s write something extremely simple—a method that returns a collection with two items, the numbers 1 and 2. The following listing shows what it looks like without yield return.
Listing 2.3 Using a list
private IEnumerable<int> NoYieldDemo()
{
var result = new List<int>();
result.Add(1);
result.Add(2);
return result;
}
public void UseNoYieldDemo()
{
foreach(var current in NoYieldDemo())
{
Console.WriteLine($"Got {current}");
}
}
Unsurprisingly, this code will output two lines, Got 1 and Got 2. The following listing shows the same functionality with yield return.
Listing 2.4 Using yield return
private IEnumerable<int> YieldDemo()
{
yield return 1;
yield return 2;
}
public void UseYieldDemo()
{
foreach(var current in YieldDemo())
{
Console.WriteLine($"Got {current}");
}
}
The code looks very similar, and the results are the same. So what is the big difference? In the first example, all the values were generated first and then used, while in the second example, each value was generated just when it was needed, as illustrated in figure 2.1.
Figure 2.1 Using a collection versus using yield return
In the non-yield return version, the code ran normally. The NoYieldDemo method started, did some stuff, and then returned. However, the YieldDemo method behaved differently—it suspended at startup, and then, every time a value was needed, it resumed, ran the minimal amount of code to provide the next value (until the next yield return), and suspended itself again. But .NET doesn’t have a way to suspend and resume code. What kind of sorcery is that?
Obviously, there is no sorcery, as magic does not exist in computer science. Just like in the case of the lambda function examples we’ve seen before, the compiler just rewrote our code.
In computer science, code that can be suspended, resumed, and potentially return multiple values is called a coroutine. In C#, it is called iterator methods in relation to yield return and async methods in relation to async/await. This book uses the C# terminology.
The IEnumerable<T> interface that I used as the return type for the YieldDemo method is the most basic interface for anything that can be treated as collections or sequences of items (including everything you can use foreach to iterate over). Every generic collection in .NET implements this interface (older collections classes, from before generics were introduced in .NET 2.0, use the nongeneric IEnumerable interface instead). This interface has just one method that returns an IEnumerator<T>, and this enumerator does all the work. An enumerator can do two things: return the current value and move to the next one.
The IEnumerator<T> interface is important because it lets us (and the compiler) write code that handles a sequence of items without knowing anything about that sequence. Every collection in .NET implements IEnumerable<T>, so constructs that deal with sequences (like the foreach loop) don’t need to know how to work with every type of collection—they just need to know how to work with IEnumerable<T>. The inverse is also true—everything that implements IEnumerable<T> is automatically a sequence of items that can be used with foreach loops and all the other relevant parts of .NET and C#.
Just like in the lambda example, the compiler rewrote the YieldDemo method into a class, but this time, a class that implements IEnumerator<int>, so the foreach loop knows what to do with it. Let’s rewrite the code ourselves to get the same result.
To begin, YieldDemo returned an IEnumerable<int>, so obviously, we have a class that implements this interface, so it can be returned from YieldDemo. Like I said before, the only thing the IEnumerable<int> does is provide an IEnumerator<int> (for historical reasons, to be compatible with code written before .NET 2.0, in addition to IEnumerator<int>, we also need to provide a nongeneric IEnumerator, and we will use the same class for both):
public class YieldDemo_Enumerable : IEnumerable<int> ❶
{
public IEnumerator<int> GetEnumerator()
{
return new YieldDemo_Enumerator(); ❷
}
IEnumerator IEnumerable.GetEnumerator()
{
return new YieldDemo_Enumerator(); ❷
}
}
❶ Our IEnumerable<int>
❷ Returns an IEnumerator<int>
Now we need to write our IEnumerator<int> that will do all the work:
public class YieldDemo_Enumerator : IEnumerator<int>
{
We need a Current property to hold the current value:
public int Current { get; private set; }
Now comes the important part. Here, we divide our original code into chunks, breaking it just after each yield return, and replace the yield return with Current =:
private void Step0()
{
Current = 1;
}
private void Step1()
{
Current = 2;
}
The next part is the MoveNext method. This method runs the correct chunk from the previous paragraph to update the Current property. It uses the _step field to remember which step to run, and when we run out of steps, it returns false to indicate we are done (if you have a computer science background, you may recognize this as a simple implementation of a finite state machine):
private int _step = 0; ❶
public bool MoveNext()
{
switch(_step)
{
case 0:
Step0();
++_step;
break;
case 1:
Step1();
++_step;
break;
case 2:
return false; ❷
}
return true;
}
❶ A variable to keep track of where we are
❷ We’re done; return false.
Now there’s some necessary technical stuff not relevant to this example:
object IEnumerator.Current => Current;
public void Dispose() { }
public void Reset() { }
}
And finally, wrap the classes we generated in a method so we can call it:
public IEnumerable<int> YieldDemo()
{
return new YieldDemo_Enumerable();
}
The actual compiler-generated code is longer and more complicated, mostly because I completely ignored all the possible error conditions. However, conceptually, this is what the compiler does. The compiler rewrote our code into chunks and called each chunk in turn when needed, giving us an illusion of code that suspends and resumes.
For the yield return feature to work, we need
The code transformation that divided our code into chunks and simulated a single method that can be suspended and resumed
A standard representation for anything collection-like (IEnumerable<T>) so that everyone can use the results of this transformation
That brings us directly to async/await and the Task class in the next chapter.
Summary
The C# compiler will rearrange and rewrite your code to add features that do not exist in .NET.
For lambda functions, the compiler moves code into a new method and shared data into a new class.
For yield return, the compiler also divides your code into chunks and wraps them in a class that runs the correct chunk at the correct time to simulate a function that can be suspended and resumed.
3 The async and await keywords
This chapter covers
Using Task and Task<T> to check whether an operation has completed
Using Task and Task<T> to notify your code when the operation has completed
Using Task and Task<T> in synchronous code
How async/await works
In the previous chapter, we saw how the compiler can transform our code to add language features. In this chapter, we’ll learn how it applies to async/await.
async/await is a feature that lets us write asynchronous code as if it were normal synchronous code. With asynchronous programming, when we perform an operation that would normally make the CPU wait (usually for data to arrive from some device—for example, reading a file), instead of waiting, we just do something else. Making asynchronous code look like normal code is kind of a big deal because traditionally, you had to divide each sequence of operations into small parts (breaking at each asynchronous operation) and call the right part at the right time. Unsurprisingly, this makes the code confusing to write.
3.1 Asynchronous code complexity
To demonstrate this, I placed figures 1.1 and 1.4 side by side (figure 3.1).
Figure 3.1 Logical flow versus code running asynchronously
Clearly, the left side describing the logical flow is simple, linear, and easy to understand, while the right side that describes how the asynchronous version is running is none of those things (it’s also very difficult to debug).
Traditionally, asynchronous programming requires us to design and write our code for the right diagram, as well as divide our code into chunks that do not represent the logical flow of the code. Also, we need code to manage the whole mess and decide what to run when.
The async/await feature lets us write code that describes the logical flow, and the compiler will transform it to something that can run asynchronously automatically—it lets us write our code as shown on the left side of the diagram and have it run like the right side.
Let’s illustrate this through a simple example—a method that reads the image width (in pixels) of a BMP image file. I’ve chosen BMP because unlike more modern image file formats, all the data in the BMP file is at a fixed location, which makes it easy to extract. We’ll read the image width in two steps:
First, we check whether the file is a BMP image file at all. We do that by looking at the beginning of the file: BMP image files start with “BM.”
We will then jump to the eighteenth byte in the file where the width is stored as a 32-bit (4 bytes) integer.
Our method will return the image width in pixels or throw an exception if the file is not a BMP image and if there are other errors. Because we haven’t talked about how to write asynchronous code yet, the first version of this example will be simple, old-style, synchronous code.
Listing 3.1 Reading BMP width, non-asynchronous version
int GetBitmapWidth(string path)
{
using (var file = new FileStream(path, FileMode.Open, FileAccess.Read))
{
var fileId = new byte[2]; ❶
var read = file.Read(fileId, 0, 2); ❶
if (read != 2 || fileId[0] != 'B' || fileId[1] != 'M') ❶
throw new Exception("Not a BMP file"); ❶
file.Seek(18, SeekOrigin.Begin); ❷
var widthBuffer = new byte[4]; ❷
read = file.Read(widthBuffer, 0, 4); ❷
if(read != 4) throw new Exception("Not a BMP file"); ❷
return BitConverter.ToInt32(widthBuffer, 0); ❷
}
}
❶ The file should start with “BM.”
❷ Reads the width from byte 18
As you can see, the code is straightforward. We read the first two bytes and check whether their value is “BM.” Next, we skip to the eighteenth byte and read the image width.
3.2 Introducing Task and Task<T>
Now let’s make this code asynchronous. We have two excellent reasons for doing so:
The first and most important reason is that this is a book about asynchronous programming.
The second reason is that the main thing our code does is read a file, and reading a file is a blocking operation that will make our thread wait for data to arrive from the hard disk. That means we can improve efficiency by using our thread to do other stuff while waiting instead of making the operating system switch to another thread (or another process entirely).
The main thing our method does is read a file using the Stream.Read method, and luckily, there’s an asynchronous version of the Stream.Read method called Stream.ReadAsync. Let’s take a look at the difference in the method signature between those two methods:
public int Read(byte[] buffer, int offset, int count);
public Task<int> ReadAsync(byte[] buffer, int offset, int count,
CancellationToken cancellationToken);
We can see the following two differences in the method signature:
While Read returns an int, ReadAsync returns Task<int>. The Task and Task<T> classes are an important part of modern asynchronous programming in C#, and we will explore their usage here.
ReadAsync also accepts a CancellationToken, but we’re going to ignore it for now because there’s an entire chapter about it later in this book.
Earlier in this chapter, I wrote that for asynchronous code, we need to divide our code into parts, and we also need a system to manage the execution of those parts. Task is the class that we use to interact with that system. A Task does multiple things: it represents an ongoing asynchronous operation, lets us schedule code to run when an asynchronous operation ends (we’ll talk about these two in this chapter), and lets us create and compose asynchronous operations (we’ll talk about those later in this book).
Chapter 2 introduced us to IEnumerable<T> and how it enables yield return. The Task and Task<T> classes are the IEnumerable<T> of async programming. They are a standard way to represent the async stuff, so everyone knows how to work with it.
The name of the Task class is confusing; the word “task” implies there’s an operation, something that runs, but this is not the only meaning of Task. A Task represents an event that may happen in the future, while Task<T> represents a value that may be available in the future. Those events and values may or may not be the results of something we will describe using the English word task. In computer science, those concepts are often called future, promise, or deferred value, but in this book, we’ll refer to them using the .NET/C# term Task.
It’s important to note that while it is common to create a Task or a Task<T> for code we run in the background (as we’ll see in the next chapter), some classes and methods in .NET use the word task to refer to this code or to manage context information related to it. The Task or Task<T> objects themselves do not let you manage the background operation and do not carry context related to it. A Task just lets you know when that background operation finishes running (the Task object represents the event of the background operation ending), and Task<T> adds the ability to get the result of the background operation (Task<T> represents the value produced by the background operation). A Task is not a thread or a background operation, but it is sometimes used to convey the results of a background operation.
In .NET/C# terminology, we say that the task is completed when the event represented by a Task happens or the value represented by a Task<T> is available. The Task is also considered completed if it is marked as canceled or faulted.
For example, when we call Task.Delay(1000), we get an object that represents an event that will happen in 1 second but has no corresponding thread or activity. In the same way, if we call File.ReadAllBytesAsync, and, for example, there is no thread reading in the background, the system asks the disk controller (a different hardware device than the CPU) to load data and calls us when it’s done, so we get back a Task<byte[]> object that represents the data that will be received from the disk in the future.
The Read method we used in our example fills the buffer we gave it and returns the number of bytes that were successfully read. For compatibility and performance reasons, the ReadAsync method works in the same way, except it returns a Task<int> instead of an int. The returned Task<int> represents the number of bytes successfully read that will be available after the operation completes. Note that we should not touch the buffer we passed ReadAsync until the operation is complete.
So a Task or Task<T> object represents an event or a value that may be available in the future. When we want to know whether this event happened or the value is available yet, there are two asynchronous approaches supported by Task and Task<T>—to use a travel metaphor, there are the “Are we there yet” model and the “Wake me up when we arrive” model. Furthermore, there is also the synchronous approach if you can’t or don’t want to use asynchronous programming.
3.2.1 Are we there yet?
In the “Are we there yet” model, you are responsible for asking the Task whether it has completed yet, usually in a loop that does other things between those checks (this is called polling), which is done by reading the IsCompleted property. Note that IsCompleted is true even if the task has errored out or was canceled.
Task also has a Status property we can use. The task has completed if Status is RanToCompletion, Canceled, or Faulted. Using the IsCompleted property is better than using the Status property because checking one condition as opposed to three is more concise and less error-prone (we will talk about canceled and faulted tasks later in this book).
You should not check IsCompleted or Status in a loop unless you are doing other work between the checks. If most of what you do is just waiting for the task to complete, you are not only using up a thread for waiting, completely negating the advantages of asynchronous techniques, but you are also wasting CPU cycles, thus wasting resources that other code on the computer (including the work you are waiting for) could utilize for useful stuff.
This is just like asking “Are we there yet?” in a car. If you do it too often, you are interfering with what everyone else in the car is doing and might even arrive later if you annoy the driver.
Here’s an example of using IsCompleted in a loop to check whether the task has completed:
var readCompleted = File.ReadAllBytesAsync("example.bin");
while(!readCompleted.IsCompleted)
{
UpdateCounter();
}
var bytes = readCompleted.Result;
// do something with bytes
In this example, the program needs to continuously update a counter while waiting for the data to arrive from the disk. So it updates the counter and checks whether the read has completed in a loop. When the data is available, it exits the loop to process the data it just received.
Most of the time, we don’t have anything useful to do while waiting for IsCompleted to become true, so this model is rarely used. In most cases (and most of this book), we will let the .NET runtime schedule and run our tasks and will not use the “Are we there yet” model. This is only beneficial when we have something to do while waiting and don’t want to return and release the thread for some reason (we will see an example with UI threads later in this book).
3.2.2 Wake me up when we get there
In the “Wake me up when we get there” model, you pass a callback method to the task, and it will call you when it’s complete (or errored out or canceled). This is done by passing the callback to the ContinueWith method.
The task is passed as a parameter to the callback, so you can use it to check whether the operation completed successfully and, in the case of Task<T>, read the result value:
var readCompleted = File.ReadAllBytesAsync("example.bin");
readCompleted.ContinueWith( t =>
{
if(t.IsCompletedSuccessfully)
{
byte[] bytes = t.Result;
// do something with bytes
}
});
Unlike the previous model, this fits the needs of our example code very well. If we take a look at just the code immediately around the first Read call, it changes from
var fileId = new byte[2];
var read = file.Read(fileId, 0, 2);
if (read != 2 || fileId[0] != 'B' || fileId[1] != 'M')
…
to
var fileId = new byte[2];
var read = file.ReadAsync(fileId, 0, 2, CancellationToken.None).
ContinueWith(t=>
{
if (t.Result != 2 || fileId[0] != 'B' || fileId[1] != 'M')
…
In this case, we only replaced Read with ReadAsync and passed all the code that was after the Read call into ContinueWith as a lambda function (doing some more required changes if we use using or throw, but fortunately, it doesn’t affect the three lines of code in this snippet—we’ll talk about it later in this chapter).
Technically speaking, you can make multiple asynchronous calls by chaining ContinueWith calls with lambdas, as shown in the example, although this tends to be unreadable and creates extremely long lines of code. For example, reading 3 bytes from a file 1 byte at a time will look like this:
The code isn’t very readable, and each ContinueWith pushes our code farther to the right. If I wanted to change this example to read 4 or more bytes in the same way, it wouldn’t fit within the width of the book’s page. (Spoiler: Later in this chapter, we’ll see how async/await solves this problem.)
3.2.3 The synchronous option
There is also the possibility that you will want to wait for a task in a non-asynchronous way. For example, if you write old fashion synchronous code that uses an API that only has a Task-based asynchronous method, the best way is to call the Task.Wait method or read the Task<T>.Result property. The Wait method and Result property will block the current thread until the task is complete and will throw an exception if the task is canceled or errored out, making it behave like synchronous code. Note that using the Wait method or the Result property to wait for a task to complete is inefficient and negates the advantages of using asynchronous programming in the first place. It also might cause deadlocks in some scenarios (deadlocks make your program become stuck, and we will talk about them extensively later in the book):
var readCompleted = File.ReadAllBytesAsync("example.bin");
var bytes = readCompleted.Result; ❶
// do something with bytes
❶ This will wait until the read has completed.
Generally, you would only use this approach when you had no other choice (mostly when integrating asynchronous and non-asynchronous code).
3.2.4 After the task has completed
After the task is completed, you need to check whether it completed successfully or not; both Task and Task<T> have the IsFaulted, IsCanceled, and IsCompletedSuccessfully properties that do exactly what their name suggests. They can be used after the task is complete to check the status of the task. (It’s okay to call them before the task completes; in that case, they just return false.) If IsFaulted is true, you can read the Exception property to see what went wrong.
In case the task is faulted, the easiest way to throw the error stored in a task so you can handle it with a normal try-catch block is to call Wait. Calling Wait after the task has completed is safe and will not block the thread (because the event it is waiting for has already happened). It will just return immediately if the task completed successfully or throw an exception if the task was canceled or has errored out. Because of this behavior, you don’t even have to check that the task is in a faulted or canceled state (it will throw an exception if the task was completed unsuccessfully).
So if you want to check whether the task has errored out and check the exception object without throwing, you would use
if(task.IsFaulted)
HandleError(task.Exception);
However, if you want to check whether the task has errored out and throw the exception only after the task has completed, you could just use
task.Wait();
This works because, like we said, calling Task.Wait when the task has already completed will either do nothing and return immediately or throw an exception. Note that the last two code snippets behave differently if the task was canceled (there is an entire chapter about cancellation later in the book).
The exception in the Task.Exception property (or the exception thrown by the Wait method or Result property if the task is in a faulted state) will be an AggregateException. The AggregateException will contain the original exception in its InnerExceptions (plural) property, which should not be confused with the InnerException (singular) property that is inherited from Exception and is not used in this case. AggregateException is used here to support situations where the task represents the combination of several operations.
If you know there is just one exception, and you want to access it and not the AggregateException, you use something like
Task<T> (but not Task) also has a Result property that is used to get the value stored in the task. Typically, we will only read the Result property after the task has completed (IsCompleted is true or ContinueWith is called). If we try to read the Result property before the task is completed, the Result property will block and wait until the task is completed. This is equivalent to calling Wait and has all the same inefficiencies and dangers we talked about. If the task is in an error or canceled state, then reading Result will throw an exception.
To summarize, when using tasks without async/await, you can use the IsCompleted or Status properties to ask “Are we there yet?” And just like in a car, you don’t want to ask too often. You can use ContinueWith to make the task call you when it completes (“Wake me up when we arrive”). Finally, you can call Wait or Result to make the task synchronous, but that’s inefficient and dangerous because it will block the thread until the task is complete (calling Wait or Result after the task has completed is perfectly efficient and safe because the result is already available, and there’s no need for blocking).
Now that we understand how Task and Task<T> work, let’s see how async/await makes it easier to use.
3.3 How does async/await work?
We’ve already seen that Task and Task<T> are all we need to write asynchronous code, but writing any nontrivial code using ContinueWith and lambdas (like in the “Wake me up when we get there” example) gets tedious and unreadable pretty quickly. Let’s copy just the part that reads the file from our “get BMP width” example and convert it to use ReadAsync and ContinueWith.
We will do the simplest mechanical conversion possible. Every time there is a call to Read, we will replace it with a call to ReadAsync and just pass the rest of the code as a lambda function to ContinueWith:
file.ReadAsync(fileId, 0, 2,CancellationToken.None).
ContinueWith(firstReadTask =>
{
int read = firstReadTask.Result;
if (read != 2 || fileId[0] != 'B' || fileId[1] != 'M')
{
// get error to caller somehow
}
file.Seek(18, SeekOrigin.Begin);
var widthBuffer = new byte[4];
file.ReadAsync(widthBuffer, 0, 4, CancellationToken.None).
ContinueWith(secondReadTask =>
{
read = secondReadTask.Result;
if(read != 4) throw new Exception("Not a BMP file");
var result = BitConverter.ToInt32(widthBuffer, 0);
// get result back to our caller somehow
});
});
What a mess! What was a simple and readable method looks awful now. It is less readable because the code is divided by the async calls and no longer follows the logic of our algorithm. And worst of all, our conversion isn’t even correct! The original code had a using statement that disposed of the file on completion and on exception, so to get the same behavior, we have to wrap everything in try-catch blocks and do it ourselves (I didn’t add those to the code because it’s difficult to read even without it). We also need to get the exception and results to the caller, and because the lambdas are running asynchronously, we can no longer use return and throw to communicate with the caller of the method. Fortunately, we have async/await that takes care of this for us.
To rewrite our example with async/await and ReadAsync, we need to make the following changes:
First, we start by marking our method with the async keyword, and as we’ll see a bit later, this by itself does nothing.
We can no longer return an int because as an asynchronous method, our method will return immediately and complete its work later. It’s not possible to return an int because we don’t know the correct value at the time the method returns! Fortunately, we do have a way to return “an int that will be available in the future”—Task<int>.
And finally, insert the await keyword before every ReadAsync call. The await keyword tells the compiler that the code needs to be suspended at this point and resumed when whatever async operation you are waiting for completes.
The following listing shows our method with async/await. Changes from the original non-async version are in bold.
Listing 3.2 Reading the BMP width (async version)
public async Task<int> GetBitmapWidth(string path)
{
using (var file = new FileStream(path, FileMode.Open, FileAccess.Read))
{
var fileId = new byte[2];
var read = await file.ReadAsync(fileId, 0, 2);
if (read != 2 || fileId[0] != 'B' || fileId[1] != 'M')
throw new Exception("Not a BMP file");
file.Seek(18, SeekOrigin.Begin);
var widthBuffer = new byte[4];
read = await file.ReadAsync(widthBuffer, 0, 4);
if(read != 4) throw new Exception("Not a BMP file");
return BitConverter.ToInt32(widthBuffer, 0);
}
}
It looks basically the same as the original non-async version, only with the async and await keywords added, but it’s actually very different. Let’s see what the code really does.
Note that the code in listing 3.3 describes what the compiler does conceptually. The actual code generated by the compiler is very different and much more complex. I’m using this simplified version because it is easier to understand while giving a good mental model of what the compiler does. At the end of this section, I’ll talk about the major differences between my version and the actual compiler code.
asynch/await uses the “Wake me up when we arrive” model. It breaks the code into chunks (like the yieldreturn feature from the previous chapter) and uses the task’s ContinueWith method to run the chunks at the correct time.
Let’s see how the compiler rewrites our code. But before exploring what the compiler does, we’ll make just one tiny change: in the async/await example, we returned Task<int>, but we didn’t talk about how you can create a Task yet (don’t worry, there is a whole chapter about it later). Instead, we’re going to pass two callbacks to our method: setResult, which will be called when our code completes successfully, and setException, which will be called in case we get an exception.
What the compiler does is separate the code after an await into a different method (like we did with yieldreturn in the previous chapter) and pass it to the Task’s ContinueWith method. To be able to share variables between the methods, we will move the local variables into a class like we did with lambda functions.
Listing 3.3 Reading the BMP width (async with ContinueWith only)
public void GetBitmapWidth(string path,
Action<int> setResult, Action<Exception> setException)
{
var data = new ClassForGetBitmapWidth();
data.setResult = setResult;
data.setException = setException;
data.file = new FileStream(path, FileMode.Open, FileAccess.Read); ❶
try
{
data.fileId = new byte[2]; ❶
var read = data.file.ReadAsync(data.fileId, 0, 2). ❶
ContinueWith(data.GetBitmapWidthStep2); ❶
}
catch(Exception ex) ❷
{ ❷
data.file.Dispose(); ❷
setException(ex); ❷
} ❷
}
❶ Code from listing 3.2
❷ Code added to simulate the using statement
This took care of the code before the first await. Note that our changes didn’t make this part run asynchronously at all. Everything before the first await runs like normal non-async code. And if you have a method marked with the async keyword without an await, then the entire method will run as if it weren’t an async method (except that the return value will be wrapped in a Task).
We had to replace the using statement with try-catch to make sure the file is disposed properly on exception (not try-finally because, if this part of the code succeeds, we need to keep the file open until the next part finishes).
Now for the class that we need to store the “local” variables, we use
private class ClassForGetBitmapWidth
{
public Stream file;
public byte[] fileId;
public byte[] widthBuffer;
public Action<int> setResult;
public Action<Exception> setException;
In this class, the code between the first and second await is
public void GetBitmapWidthStep2(Task<int> task)
{
try
{
var read = task.Result; ❶
if (read != 2 || fileId[0] != 'B' || fileId[1] != 'M') ❶
throw new Exception("Not a BMP file"); ❶
file.Seek(18, SeekOrigin.Begin); ❶
widthBuffer = new byte[4]; ❶
file.ReadAsync(widthBuffer, 0, 4). ❶
ContinueWith(GetBitmapWidthStep3);
}
catch(Exception ex) ❷
{ ❷
file.Dispose(); ❷
setException(ex); ❷
} ❷
}
❶ Code from listing 3.2
❷ Code added to simulate the using statement
It looks like we didn’t check the result of the previous operation. We didn’t read the TaskIsCompletedSuccessfully property or the Task.Status property. Thus, we don’t know if there was an error. However, reading Task.Result will throw an exception if the task was completed unsuccessfully, so writing code to explicitly check for errors is not required. Also note that because this was called from ContinueWith, we know the task has already completed, and we are guaranteed the task is completed and reading Result is a nice, safe, and fast nonblocking operation.
Now for the part after the last await, we have
public void GetBitmapWidthStep3(Task<int> task)
{
try
{
var read = task.Result; ❶
if(read != 4) throw new Exception("Not a BMP file"); ❶
file.Dispose(); ❶
var result = BitConverter.ToInt32(widthBuffer, 0); ❶
setResult(result); ❷
}
catch(Exception ex) ❸
{ ❸
file.Dispose(); ❸
setException(ex); ❸
} ❸
}
}
❶ Code from listing 3.2
❷ Instead of a return statement
❸ Code added to simulate the using statement
Just like we’ve seen with yield return in chapter 2, the compiler divided our function into chunks and added code to call them at the correct time. We’ve also seen that the correct time for the first chunk, before the first await, is when the method was called. Marking the method as async does not make it asynchronous. It’s just a compiler flag to tell the compiler to look for await keywords and divide the method into chunks. In the same way, await does not wait—it actually ends the current chunk and returns control to the caller.
As promised, here are the major differences between the code we just talked about and the code the compiler really generates:
The compiler does not divide your code into different methods. It builds a single state machine method that keeps track of the current position using a variable and uses a big switch statement to run the correct piece of code.
The compiler does not use ContinueWith; instead, it uses an internal object called an awaiter. I’ve chosen to use ContinueWith because it’s conceptually similar, and unless you are writing a compiler or a replacement of the .NET asynchronous framework, you don’t need to know about it.
await actually does much more than ContinueWith. ContinueWith just makes the callback run when the Task is complete, while the former has other useful features that we will talk about later in this book.
3.4 async void methods
Let’s say we are writing a WinForms app, and we want to add a feature that copies all the text from one file into another file when the user clicks a button. Let’s also say we know those are small files, so we can just load the entire contents into memory. The code for that feature will look something like the one in the following listing.
Listing 3.4 async event handler
private async void Button1_Click(object sender, EventArgs ea)
{
var text = await File.ReadAllTextAsync("source.txt");
await File.WriteAllTextAsync("dest.txt", text);
}
This code just asynchronously loads all the content of a file into a variable and then asynchronously writes the contents of the variable into another file. Now let’s use what we’ve learned in this chapter and transform it like we transformed the GetBitmapWidth method in listing 3.3, except that this time, we must keep the event handler signature. We can’t add the setResult and setException parameters (this is analogous to how in the async version we had to return void and couldn’t return Task).
Listing 3.5 Compiler transformation for async event handler
private void Button1_Click(object sender, EventArgs ea)
{
var data = new ClassForButton1_Click();
File.ReadAllTextAsync("source.txt").
ContinueWith(data.Button1_ClickStep2);
}
private class ClassForButton1_Click
{
public void Button1_ClickStep2(Task<string> task)
{
try
{
var text = task.Result;
File.WriteAllTextAsync("dest.txt", text).
ContinueWith(Button1_ClickStep3);
}
catch
{
// ? ❶
}
}
public void Button1_ClickStep3(Task task)
{
if(task.IsFaulted)
{
// ? ❷
}
else
{
// ? ❸
}
}
}
❶ We have no way to notify that we had an exception
❷ We have no way to notify that we had an exception (again).
❸ We have no way to notify that we are done.
Because this method is simple, the transformation was also simple (but maybe just a bit tedious). We didn’t even have to move any local variables into the class. However, we do have a problem: after we finish copying the data, we don’t have any way to notify the rest of the program that we are done. Even worse, if there is any error, we also have no way to notify anyone. We have the three question mark comments in the code, and we don’t know what to write there.
This is exactly what happens with async methods with a void return type. Because there is no Task, the caller of the method has no way of knowing when the method finished running (all the ways we talked about—await, Wait, IsCompleted, and even ContinueWith—require a Task object). This is not a problem in this case because event handlers are usually “fire-and-forget” operations where the caller doesn’t care what the handler does or when it finishes (as long as it returns control to the caller quickly, which our code does).
There is also no way to report the exception to the caller (like in the success case, there’s no access to the Task.Exception property or any other way to get to the exception because there is no Task), but unlike the success case, this is a real problem. Some code is going to get an exception it didn’t expect and most likely crash. We’ll talk about all the details in the chapter about exceptions, but the solution is just to not let async void methods throw exceptions—if you write an async void method, you need to catch all exceptions and handle them yourself.
So if this feature is so problematic, why do we have asyncvoid methods to begin with? The reason for async void is event handlers. By convention, just like in our example, event handlers always have a void return type, so if async methods didn’t support void, we couldn’t use async/await in event handlers.
This brings us to the official guidance about asyncvoid methods: you should only use asyncvoid for event handlers and avoid throwing exceptions from asyncvoid methods. So the correct way to write the event handler from listing 3.4 is as follows.
Listing 3.6 async event handler with error handling
private async void Button1_Click(object sender, EventArgs ea)
{
try
{
var text = await File.ReadAllTextAsync("source.txt");
await File.WriteAllTextAsync("dest.txt", text);
}
catch(Exception ex)
{
// Do something with the exception
}
}
3.5 ValueTask and ValueTask<T>
Certain methods are sometimes (but not always) asynchronous. For example, let’s say we have a method that performs an asynchronous operation but only if it can’t satisfy the request from a cache:
public async Task<int> GetValue(string request)
{
if(_cache.TryGetValue(request, out var fromCache))
{
return fromCache; ❶
}
int newValue = await GetValueFromServer(request); ❷
return newValue;
}
❶ Returns value from cache if possible
❷ Otherwise performs async operation
Note that _cache is not a Dictionary. Dictionary is not thread safe and is unsuitable to be used with async methods. We’ll talk about thread-safe data structures that can be used to build a thread-safe cache in chapter 13.
The GetValue method first checks whether the requested value is in the cache. If so, it will return the value before the first time it uses await. As we’ve seen in this chapter, the code before the first await runs non-asynchronously, so if the value is in the cache, it will be returned immediately, making the Task<int> returned by the method just a very complicated wrapper for an int.
Allocating the entire Task<int> object when it’s not required is obviously wasteful, and it would have been better if we could return an int if the value could be returned immediately and only return the full Task when we need to perform an asynchronous operation. This is what ValueTask<T> is. ValueTask<T> is a struct that contains the value directly if the value is available immediately and a reference to a Task<T> otherwise. The nongeneric ValueTask is the same, except it only contains a flag saying the operation has completed and not the value.
You can await a ValueTask or a ValueTask<T>, just like Task and Task<T>. They also have most of the properties of Task and Task<T>. If you want to use a feature of Task that is not available in ValueTask (for example, Wait), you can use the ValueTask.AsTask() method to get the Task stored inside a ValueTask.
ValueTask and ValueTask<T> are slightly less efficient than Task and Task<T> if there is an asynchronous operation, but much more efficient if the result was available immediately. It is recommended to return a ValueTask in methods that usually return a value without performing an asynchronous operation, especially if those methods are called often.
3.6 What about multithreading?
In chapter 1, I said that asynchronous programming and multithreading work very well together. Yet in this entire chapter, we didn’t talk about multithreading at all. Also, I said the callback you pass to ContinueWith will run later, but we completely ignored how and where the callback will run. This leads us to the next chapter, which covers multithreading.
Summary
Task represents an event that may happen in the future.
Task<T> represents a value that may be available in the future.
When the event happens or the value is available, we say that the Task or Task<T> has completed.
The IsCompleted or Status properties can be used to test whether the task has completed.
Use ContinueWith to make the task call you when it completes.
You can call Wait or Result to make the task synchronous, but that’s inefficient and dangerous.
Calling Wait or Result after the task has completed is perfectly efficient and safe.
async is just a compiler flag. It tells the compiler that the method needs to be broken into chunks whenever there’s an await keyword.
The async keyword does not make the code run in the background. Without await, it does nothing (except make the compiler generate an awful lot of boilerplate code).
The compiler breaks the method after each await and passes the next chunk to ContinueWith (conceptually).
await does not wait but ends the current chunk and returns to the caller.
async methods can be void, but then there’s no way to know when the method has finished, and you should catch and handle all exceptions inside the method.
If an async method often returns a result immediately without doing anything asynchronous, you can improve the efficiency by returning ValueTask or ValueTask<T> instead of Task or Task<T>.
4 Multithreading basics
This chapter covers
The basics of threads
Starting threads
Waiting for threads
Accessing shared data and using locks
The basics of deadlocks
Chapter 1 discussed how a system can run multiple pieces of code simultaneously—much more than the number of CPU cores—by quickly switching between them. This functionality is made possible by a hardware timer inside the CPU. Each time the timer ticks, the operating system can pause the currently running code and switch to another piece of code. If the switching is fast enough, it creates the illusion that all threads are running simultaneously.
This chapter explores how to use threads for parallel execution and discusses key aspects of concurrent programming. In the next chapter, we will connect these topics to the async/await feature.
When a process starts, it begins with one thread that runs the Main method (along with a few other system-controlled threads, which we will set aside for now). This initial thread is referred to as the main thread. We will now look at how to utilize additional threads to allow multiple pieces of code to run simultaneously.
4.1 Different ways to run in another thread
Now that we’ve decided we want to run code in parallel, we need to talk about how to do it. This section covers the three most common ways to run code in another thread in C#. We will start with the oldest and most flexible option—creating your own thread.
4.1.1 Thread.Start
In .NET, a thread is represented by the appropriately named System.Threading.Thread class. This class lets you inspect and control existing threads, as well as create new ones.
To create a new thread, you first create a new Thread object, passing a callback with the code you want to run in the new thread to the constructor. After that, you have a chance to configure the thread before it starts running. Finally, you call Thread.Start to start the thread. In the following listing, we are going to create and configure a thread.
Listing 4.1 Creating a thread
public void RunInBackground()
{
var newThread = new Thread(CodeToRunInBackgroundThread); ❶
newThread.IsBackground = true; ❷
newThread.Start(); ❸
}
private void CodeToRunInBackgroundThread() ❹
{
Console.WriteLine("Do stuff");
}
❶ Creates thread object
❷ Configures thread
❸ Starts running
❹ Code to run in new thread
As you can see, this code example follows exactly the described steps:
We created a thread, passing the method we want to run in that thread to the constructor.
We configured the thread, in this case by making it a background thread (we’ll talk about background threads later in the book). This step is optional.
We started the thread by calling Thread.Start.
The Thread class constructor has two versions that each accept a different delegate. There’s the simple version we used in this example that accepts a void method with no parameters, and there is also a parameterized version that accepts a void method that takes one parameter of type object.
The Thread.Start method also has two corresponding versions: one that has no parameters and one that accepts a parameter of type object. If you use the second version of both, you can pass whatever object you want to your thread code by passing it to Thread.Start.
This option lets you write a single method for threads doing slightly different things and pass a different parameter value to each thread to differentiate between them. For example, let’s create 100 threads and pass a different number to each.
Listing 4.2 Creating a thread with a parameter
public void RunLotsOfThreads()
{
var threads = new Thread[100];
for(int i=0;i<100;++i)
{
threads[i] = new Thread(MyThread);
threads[i].Start(i); ❶
}
}
private void MyThread(object? parameter)
{
Console.WriteLine($"Hello from thread {parameter}"); ❷
}
❶ Passes a value per thread
❷ Uses that value
In this listing, we just passed our loop index to Thread.Start, and it was conveniently provided to our MyThread method when it started running in the new thread.
Mixing it up by passing a non-parameterized method to the Thread constructor and then using the parameterized version of Thread.Start, or vice versa, doesn’t make much sense but is fully supported. If you use the parameterized delegate and the non-parametrized Thread.Start, your method parameter value will be null. If you use the non-parametrized delegate and the parameterized Thread.Start, the value will be ignored.
The Thread class also contains a method that will wait until the thread completes its work, called Join. Join is the standard computer science term for waiting for a thread. I’ve found conflicting stories about the origin of this term, all of them using metaphors that I don’t want to repeat here because they don’t work that well. We’ll just have to accept that in this context, join means wait.
The Join method is very useful when we want to run several threads in parallel and then, after they all finish, do something like combining the results from multiple threads. Thread.Join will return immediately if the thread has already finished. In the following listing, we run three threads and wait for them all to finish before notifying the user we are done.
Listing 4.3 Waiting for threads to finish
public void RunAndWait()
{
var threads = new Thread[3];
for(int i=0;i<3;++i) ❶
{
threads[i] = new Thread(DoWork);
threads[i].Start();
}
foreach(var current in threads) ❷
{
current.Join();
}
Console.WriteLine("Finished");
}
private void DoWork()
{
Console.WriteLine("Doing work");
}
❶ Runs all threads
❷ Waits for threads to finish
Here we start three threads in one loop and then wait for them in a second loop. It’s important that those are two separate loops because we want to start all threads and only then wait for all of them. We don’t want to start and wait repeatedly, as that would cause sequential execution, just with threading overhead (this problem is called synchronization, and we will discuss it in chapter 7).
The second loop looks like it depends on the order of the threads in the list, but it doesn’t. It doesn’t matter in what order we wait for the threads. If the longest-running thread is the first, we will wait for it to complete, and then the Join calls for the other already finished threads will return immediately. If the longest-running thread is the last, the loop will wait for the first thread, and when it finishes, it will wait for the next one until it gets to the last one. In both cases, the loop will wait until the longest running of the threads finishes.
The Thread class also has other methods that let us control threads: Suspend, Resume, and Abort. Those may seem handy at first, but they are in fact extremely dangerous, and you should never use them. You will discover why later in the chapter.
Using the Thread class and Thread.Start is the only way to get a thread that is completely under your control, and you can do whatever you want with it without interfering with other code running in your app.
Creating and destroying threads is relatively resource intensive, and if you create a lot of threads where each thread does just a little bit of work, your app might spend more time managing threads than doing actual useful work.
This affects asynchronous code because even if it takes a long time to complete, it is usually composed of many short parts. For example, the following method performs two asynchronous operations:
When this method starts, it will get to the DoFirstPart call and then return control to its caller as soon as DoFirstPart does something asynchronous (and the caller is likely to be using await and do the same until there are no more callers and the thread is released). When the asynchronous operation is complete, the method will resume, requiring a thread run for just long enough to get to the DoSecondPart call and release the thread again. Later, when DoSecondPart completes, the method will resume, requiring a thread again. If this involved creating and destroying threads, there would have been two thread destructions and two thread creations involved.
Short tasks have the same problem. If we spin up a thread to run just a quick, tiny calculation, we can easily find ourselves wasting a significant amount of time creating and destroying the thread relative to actually doing useful work. And that brings us to our next topic—the thread pool.
When to use Thread.Start
Use Thread.Start for
Long-running code.
If you need to change the thread properties such as language and locale information, background status, COM apartment, etc. (We’ll talk about all the thread settings near the end of this chapter.)
Do not use Thread.Start for
Asynchronous code
Short tasks
4.1.2 The thread pool
The thread pool is the solution for the thread creation and destruction overhead we talked about. With the thread pool, the system keeps a small number of threads waiting in the background, and whenever you have something to run, you can use one of those pre-existing threads to run it. The system automatically manages those threads and creates new ones when needed (between a minimum and maximum number of threads you control).
The thread pool is optimized for short-running tasks where the same thread can pick up multiple tasks one after the other. If you use the thread pool for a long-running task, you are taking a thread out of rotation for a long time, and when all the threads in the pool are busy, new work must wait until one of the threads frees up.
Also, because you are “borrowing” a thread, you should not change any of its properties, since any change will affect future code that runs in that same thread (just like you wouldn’t rearrange someone’s furniture if you’re just visiting). If you need to change the thread properties, you must create the thread with the Thread class.
The thread pool is controlled by the appropriately named System.Threading.ThreadPool class. To run something on the thread pool, you will use the less-appropriately named QueueUserWorkItem method.
The code is similar to that in listing 4.1, but we can’t change the thread configuration (because we are borrowing an existing thread) and don’t have to manually start the thread (because the thread is already running).
Like Thread.Start, QueueUserWorkItem also has a parametrized and a non-parametrized version. But unlike the Thread class, the method that runs on the thread pool always accepts an object parameter; if you use the non-parameterized QueueUserWorkItem, the parameter will be null. Let’s rewrite the code from listing 4.2 to use the thread pool.
Listing 4.5 Running in the thread pool with a parameter
The code in this example is unsurprising—it’s exactly like code from listing 4.2, except we don’t have to start the thread manually.
Unlike the Thread class with its Join method, the thread pool does not give us a built-in way to wait until the code we run on it ends. We will see later in this chapter how we can build our own way to wait until the background code completes.
This chapter talks about the thread pool. There is one thread pool created for you by the framework, and all the examples here use it. However, you can easily create your own thread pools, but you probably shouldn’t.
The thread pool interface is old and clunky (for example, you use a method named QueueUserWorkItem) and doesn’t work well with Tasks and async-await (because it predates them by a decade), which is why we have Task.Run.
When to use ThreadPool.QueueUesrWorkItem
Use ThreadPool.QueueUesrWorkItem for
Short-running tasks
Do not use ThreadPool.QueueUesrWorkItem
For long-running tasks
When you need to change the thread properties
With Task-based asynchronous operations
With async/await
4.1.3 Task.Run
We’ve seen that the thread pool is optimized to run many short-running tasks, and we know that asynchronous tasks are actually a sequence of short tasks, so the thread pool is ideal for running asynchronous code, except that the QueueUserWorkItem method doesn’t use the Task class (because it predates async/await and Task by about a decade). This is why we have Task.Run.
The Task.Run method runs code on the thread pool, just like ThreadPool.QueueUserWorkItem, but it has a nicer interface that works well with async/await. For the simple scenario, it works basically the same as in the previous example.
Listing 4.6 Running in the thread pool with Task.Run
The code is the same as the thread pool example in listing 4.4, except ThreadPool.QueueUserWorkItem was replaced with Task.Run. But unlike with the ThreadPool class, Task.Run works very well with async/await (and other methods that return a Task).
As you can see from the code, it just works. We didn’t have to do anything special to run an async method with Task.Run.
Also, Task.Run returns a Task itself, and we can use it to know when the code we run on the thread pool is finished—a feature the ThreadPool class does not have. Here’s an adaptation of the example from listing 4.3 that creates multiple threads with the Thread class and waits for all of them to finish.
Listing 4.8 Waiting for tasks to finish with Task.Run
Here we can wait with the Task.WhenAll method that is much more elegant than the Thread.Join loop. Not only does it not require a loop, but it also waits asynchronously.
Note that when you use Task.Run without waiting for it, the compiler will generate a warning, but adding an await is almost never the right thing to do. If you awaitTask.Run, you are telling your compiler to wait for the task to complete before moving to the next line of code, essentially making it run sequentially, which defeats the purpose of using Task.Run. If you await Task.Run, you’re taking on the overhead of managing different tasks without getting any benefits; it’s more efficient to just run the code without Task.Run. The exception to this rule is the UI thread, and we will talk about it near the end of this chapter.
To get rid of the warning, you can assign the Task returned by Task.Run to a discard variable:
Task.Run doesn’t have a parameterized version like Thread.Start and ThreadPool.QueueUserWorkItem, but we can easily use lambdas to simulate it and pass data to the code we run.
Listing 4.9 Using lambdas to create a parametrized Task.Run
public void RunInBackground()
{
for(int i=0;i<10;++i)
{
var icopy = i;
Task.Run(()=>
{
Console.WriteLine($"Hello from thread {icopy}");
});
}
}
Here we used the lambda’s feature of capturing local variables to pass a unique value to each task. Note that we had to use the icopy variable that is scoped inside the loop because otherwise, all threads would have shared the same i variable as the for loop, and because it takes time for the task to start, by the time tasks run, the loop will have finished, so all tasks will have only the final value of i (10 in this case).
When to use Task.Run
Use Task.Run for
Code that uses async-await
Short running tasks
Do not use Task.Run for
Non-asynchronous long running tasks
In this case, we could create a different copy of i for each thread, but in many cases, we have shared data that multiple threads need to access, and that brings us to accessing the same variables from multiple threads.
4.2 Accessing the same variables from multiple threads
Now that we know how to run code in parallel, we must deal with the consequences. Most programs manipulate data in memory, and the problem with manipulating data in a multithreaded program is that data access is often not a single uninterruptable operation, even when it’s just one line of code or even one operator.
Let’s take the simplest data manipulation operation I can think of—incrementing an integer:
int n=0;
++n;
The ++n line sure looks like it does a single thing. It’s just one variable and one operator, and it’s just three characters long. How many distinct operations can we do in just three characters? Well, it’s actually three distinct operations:
Read the value from the memory location allocated for the n variable into the CPU.
Increment the value inside the CPU.
Save the new value from the CPU back into the memory location allocated for the n variable.
In a single-threaded program, this looks like a single operation because I can never accidentally break this sequence or sneak some code that runs in the middle of the sequence; however, in a multithreaded program, I can.
Operations that can’t be interrupted in a multithreaded application, usually because they are a single operation at the hardware level, are called atomic operations. Figure 4.1 compares incrementing a variable twice in a single-threaded application, where everything is sane and works as expected; in a multithreaded application on a single-core CPU, where the way the system simulates multithreading can and will suspend threads at the wrong time; and finally, multithreaded on multicore CPUs, where things really happen in parallel.
Figure 4.1 Operations can be interrupted at the wrong time and produce wrong results.
As figure 4.1 illustrates, only in single-threaded applications, or applications that don’t share data between threads, does our simple operation act like an operation that can’t be interrupted. In all other configurations, anything can happen.
Let’s write code that demonstrates that point. In this example, we will create two threads and increment the same variable from both. We will increment the variable five million times in each thread.
Listing 4.10 Incorrect value when accessing shared data without locking
public void GetIncorrectValue()
{
int theValue = 0;
var threads = new Thread[2];
for(int i=0;i<2;++i)
{
threads[i] = new Thread(()=>
{
for(int j=0;j<5000000;++j)
++theValue;
});
threads[i].Start();
}
foreach(var current in threads)
{
current.Join();
}
Console.WriteLine(theValue);
}
If we run this code, we may expect it to print 10000000, but after reading what I wrote before the code sample, you already know that won’t be the case. In fact, the result will change every time we run code, but it but will be around 6000000 most of the time.
So how do we solve this problem?
4.2.1 No shared data
The simplest solution is to never share any data between threads. If each thread has its own set of variables that can only be accessed by that thread, we never get a chance to read or write the variable from another thread, and we are safe.
This is possible some of the time. For example, if we are writing a server that accepts data from the client, calculates something based solely on that data, and then returns results, each thread can operate without ever touching any value accessible to other threads. However, this isn’t possible most of the time because our app is usually all about manipulating shared data.
But what if we bypass the problem another way, for example, by not modifying the shared data?
4.2.2 Immutable shared data
If our problem is that it is not safe for one thread to access data while another is modifying it, we can eliminate the problem completely if we just never modify any shared data. A common example is a web server serving static files; because those files never change, you can read them as many times as you like in parallel without causing any problems.
For most applications, it isn’t as easy as that, but this is the standard solution in functional languages and can be done in C#. However, this is not how we usually write C#.
Making all the shared data immutable, which might seem impractical to developers who aren’t used to functional programming, is actually not only possible but technically an extremely good solution. The only problem is that it requires us to write our code completely differently than we usually do in C#. I’m going to ignore it here because I could fill an entire book on the subject (and Manning has actually published a book on this topic; see Concurrency in .NET by Riccardo Terrell), and you would still not use this approach because it would feel alien to the way we usually write C#. However, .NET does have some built-in immutable data structures, which we’ll discuss in chapter 13.
And that brings us to the standard solution—locks and mutexes.
4.2.3 Locks and mutexes
What we are left with is synchronizing access to the shared state—whenever a thread needs to access the shared state, it “locks” it, and when it is finished with the data, it “releases” the lock. If another thread tries to lock the data while it is already locked, it must wait until the data is released by the current user.
In computer science, this is called a mutex (short for mutual exclusion). In C#, we have the Mutex class that represents the operating system’s mutex implementation and the lock statement that uses an internal .NET implementation. The lock statement is easier to use and faster (because it doesn’t require a system call), so we will prefer to use it. Let’s rewrite our program from before using a lock.
Listing 4.11 Adding locks to avoid simultaneous access problems
public void GetCorrectValue()
{
int theValue = 0;
object theLock = new Object();
var threads = new Thread[2];
for(int i=0;i<2;++i)
{
threads[i] = new Thread(()=>
{
for(int j=0;j<5000000;++j)
{
lock(theLock) ❶
{ ❶
++theValue; ❶
} ❶
}
});
threads[i].Start();
}
foreach(var current in threads)
{
current.Join();
}
Console.WriteLine(theValue);
}
❶ Locks for the duration of the modification
We can see that the lock statement is followed by a code block, and the lock is released when we exit the block, so we can’t accidentally forget to release the lock. (The lock will also be released if we exit the code block because of an exception, which is nice.)
We can also see that the lock statement accepts an object. We can use any .NET object; however, the best practice is to utilize an internal object that is used just for the lock and is accessible only to the code that needs it. Usually, it will be a private class member of your code.
Why use lock with an object
In .NET 8 and earlier, the best practice is to use an object of type Object (that can also be used with the keyword object) because we’re not going to use this object for anything else, and an object of type Object has the lowest overhead of all reference type objects.
In .NET 9 and later, it’s better to use an object of type System.Threading.Lock. Using a lock statement with the new Lock class is clearer (because it’s obviously a lock) and may be faster in newer versions.
Using the lock statement with an Object is still supported, safe, and correct in .NET 9 and later. In this book, all the examples will use an Object and not a Lock for backward compatibility.
Using lock in this example was required to make our program produce the correct result, and synchronization objects such as lock and Mutex are needed for multithreaded programming. Those same objects also introduce a number of new failure modes, the biggest of them being the deadlock.
4.2.4 Deadlocks
A deadlock is the situation where a thread or multiple threads are stuck waiting for something that will never happen. The simplest example is where one thread locked mutex A and is waiting for mutex B, while a second thread locked mutex B and is waiting for mutex A. Thus, thread A is waiting for thread B to complete, which is waiting for thread A to complete, that we already established is waiting for thread B, which we said is waiting for thread A, and so on—forever(figure 4.2).
Figure 4.2 Deadlock that occurs when one thread has locked mutex A and is waiting for mutex B, while another thread has locked mutex B and is waiting for mutex A. This creates a situation where thread A is dependent on thread B to finish, but thread B is also dependent on thread A, which leads to an endless cycle of waiting.
Now you can see why the best practice for the lock statement is to use a private object that is only accessible by the code that needs it. It’s because external code could, otherwise, accidentally or intentionally lock the same object we’ve locked at a time we don’t expect and cause a deadlock. If we use a private object, we can still cause a deadlock, but with both sides under our control, there are techniques we can use to prevent deadlocks. There is an entire chapter on deadlocks and other typical multithreading problems in this book, including on how to prevent them.
This is also why I said earlier that Thread.Suspend, Thread.Resume, and Thread.Abort are so dangerous. Let’s say you wrote a very clever system to manage your program’s work that uses Suspend and Resume to control threads. From the thread’s point of view, your calls to Suspend can happen at any time (for example, when the thread is in the middle of allocating memory and is holding a lock inside the memory manager). Normally this lock would be completely safe because it is released quickly, and the code never waits for anything while holding the lock, but now you’ve made the memory manager’s code wait until you call Resume. In the meantime, no one can allocate memory, including the thread that is supposed to call Resume. If this thread tries to allocate memory (a very common operation), you’ve just created a deadlock.
A deadlock can even happen without using locks or mutexes when two threads share other resources; in some cases, this resource might even be the thread itself. This is especially common with special-purpose threads, and the most common special-purpose thread is the UI thread in native applications.
4.3 Special considerations for native UI apps
In all Windows desktop application technologies (WinForms, WPF, UWP, and WinAPI), UI windows and controls can only be accessed from the thread that created them. Trying to access the UI elements from a different thread might produce potentially incorrect results, error codes, or exceptions, depending on the UI technology you are using.
When the program starts, you set up the main window and then call Dispatcher.Run or Application.Run (depending on UI technology). This is typically done in boilerplate code generated by Visual Studio. When you call Run, the thread enters a loop that waits for UI events and, if needed, calls your code to handle them. If you block the thread or perform any long activity in your UI event handlers, you are preventing the thread from handling the UI events, and the program’s UI will freeze until your event handler is complete.
You can take advantage of the fact that the UI thread is waiting and handing events and inject your own events. This lets other threads ask for code to run on the UI thread, which is useful because otherwise, it would have been difficult to update the UI due to activity done in background threads (since the only thread that can access the UI directly is the UI thread). You can do this by using the Control.BeginInvoke or Control.Invoke method in WinForms and Dispatcher.BeginInvoke or Dispatcher.Invoke methods in WPF or the generic SynchronizationContext interface.
In a typical workflow, in an event handler you write that is called in response to a UI event such as a button click, the event handler uses the Thread class or the thread pool to run code in the background, and when it finishes doing its work, this background code calls BeginInvoke to make the UI thread update the UI with the results.
You must be extra careful with code that is running on the UI thread because you can get into a situation where code is blocked or busy waiting for something that happens in response to an Invoke/BeginInvoke call (or in some cases, and as we will see in the next chapter, await). But because the thread is blocked or busy, the code passed to Invoke/BeginInvoke never runs, which creates a deadlock situation and a frozen UI.
4.4 Waiting for another thread
Sometimes, one thread must wait for another thread to do something. If we are waiting for a thread we created to complete its work and terminate, we can use Thread.Join (as discussed earlier in this chapter). But if the thread we are waiting for needs to continue running after notifying us, we can’t use Thread.Join, and we need some mechanism for one thread to send a signal to another thread and for that other thread to wait until such a signal arrives. This mechanism is called ManualResetEventSlim and is a newer, faster, and simpler implementation of ManualResetEvent. Like all the classes that end with Slim, it forgoes some functionality, mostly cross-process capabilities and compatibility with native code, in exchange for better performance.
ManualResetEventSlim works like a gate. When the event is in the unset state, the gate is closed, and any thread calling its Wait method will wait. When the event is in the set stage, the gate is open, and the Wait method will return immediately for any thread currently waiting and for all future calls (until the event is reset to the unset state).
The ManualResetEventSlim constructor has a single parameter that can be false to create the event in the unset state (gate closed) or true to create the event in the set state (gate open). The Set method switches to the set state and opens the gate, while the Reset method switches to the unset state and closes the gate. Let’s write code with one thread waiting for another using ManualResetEventSlim.
Listing 4.12 Waiting for another thread
var myEvent = new ManualResetEventSlim(false); ❶
var threadWeWaitFor = new Thread(()=>
{
Console.WriteLine("Doing something");
Thread.Sleep(5000);
Console.WriteLine("Finished");
myEvent.Set(); ❷
});
var waitingThread = new Thread(()=>
{
Console.WriteLine("Waiting for other thread to do something");
myEvent.Wait(); ❸
Console.WriteLine("Other thread finished, we can continue");
});
threadWeWaitFor.Start();
waitingThread.Start();
❶ Creates a “gate closed” event
❷ Opens gate
❸ Waits for gate to open
In this example, we create two threads. The first simulates running a long operation by waiting, and after completing the operation, it sets an event. The second thread uses the event to wait for the first thread to complete.
4.5 Other synchronization methods
In addition to the two multithreading synchronization methods discussed in this chapter—the lock statement and ManualRestEventSlim—.NET contains a vast collection of other multithreading primitives. Each of those was written for a reason and is extremely useful in some circumstances. All of them have something in common: in most cases, you should avoid using them.
The lock statement is the simplest and safest thread synchronization construct in .NET, and even it may have the deadlock problem we talked about earlier and a whole lot of other pitfalls we’ll examine in chapter 7. For this reason, I recommend staying with the lock statement and using the more advanced, and more dangerous, mechanisms only if you have to—that is, only after you’ve profiled the code and discovered that there is a real bottleneck in your code that can be solved by switching to another thread synchronization technique.
For example, let’s take everyone’s favorite thread synchronization tool—the Interlocked class—which provides operations that are both thread safe and do not require locking. Seemingly, this is a magical class that solves all our problems; however, it, too, has its pitfalls, the most common being
It supports only a limited set of operations, namely Increment, Decrement, and Add, as well as bitwise And and Or for some integer types (int, uint, long, and ulong).
All other operations can be implemented by the Exchange and CompareExchange methods, and these methods must be used in a very specific way (you’ll see some examples in chapter 13).
It protects the operation, not the variable. If anyone accesses the variable “protected” by an interlocked operation by anything other than members of the Interlocked class, all bets are off, and your code is no longer thread safe, even the parts of the code that do use the Interlocked class. If you just want to read the variable without modifying it, you must use Interlocked.Read and not use the variable directly.
While the value you get from the interlocked methods is guaranteed to be correct when the interlocked method runs, by the time you use it, even if it’s in the same line of code, it might already be outdated.
Only a single interlocked method call is thread safe. If you call Interlocked.Increment twice for two variables, for example, it is possible for another thread (even one also using the Interlocked class) to read or modify any of the variables between those two operations. This is a special case of the “composing thread-safe operations rarely results in a thread-safe operation” problem we’ll discuss in chapter 7.
While the Interlocked class members are faster than using a lock, they might be significantly slower than using the normal operations (using the +=, ++, --, &, and | operators).
With all those pitfalls (and more), it’s easier and safer to use the lock statement and only use the Interlocked class (carefully) in code that is very performance sensitive. The same goes for all the other multithreading primitives we didn’t discuss—avoid using them unless you absolutely have to because they are complicated and not as safe and easy to use as the lock statement.
4.6 Thread settings
When talking about the Thread class, I said that you should only change the settings of threads you create yourself using the Thread class (or the main thread if you are writing the application and not a library) and never change the settings of a thread pool or a thread created by another component. The reason is that the component that created the thread probably relies on the thread settings, and changing them would interfere with the operation of the component.
Note that none of those settings works well with asynchronous code because any time you use await (or ContinueWith), execution can continue on another thread that has different settings. Here are the settings you can change using the Thread class in the order of usefulness.
4.6.1 Thread background status
This is the most commonly used of all the thread settings. It is set by using the Thread.IsBackground property, and it controls when your application exits. An application exits when all the non-background threads exit. That means that if you start a thread using the Thread class (and don’t set its IsBackground property), and your Main method ends, the application will keep running until the thread exits. If you don’t want the thread you created to keep the application running, you can just set the IsBackgroud property to true.
This property must be set before calling Thread.Start. It has no effect when the application is deliberately terminated (for example, by using Environment.Exit or Environment.FailFast) or if the application exits due to an unhandled exception.
4.6.2 Language and locale
You can change the thread language and locale using the Thread.CurrentCulture property, which affects how values, mostly numbers and dates, are formatted (if you don’t pass a CultureInfo object to the specific formatting method). It also affects the selection of UI resources in GUI applications. The default is the language and formatting used on the user’s computer.
You should only use this property if your application has a way for the user to change the language. Otherwise, you should respect the user’s computer settings.
4.6.3 COM Apartment
You can use the Thread.SetApartmentState and Thread.TrySetApartmentState methods to control the thread’s COM apartment type. This is only relevant to applications utilizing COM components in threads you create using the Thread class (for the main thread, you should probably use the STAThread or MTAThread attributes on your Main method).
COM is a huge topic and outside the scope of this book. The short explanation for readers who are lucky and don’t use COM is that COM has a concept of apartment type, and most COM objects can only run as a specific apartment type. Reading or setting the COM apartment is only supported on Windows because other operating systems don’t use COM.
4.6.4 Current user
This property is mostly (but not officially) obsolete. You can use the static Thread.CurrentPrincipal property to attach identity and permissions to the thread, which does not change the thread’s permissions at the operating system level. It’s just a place for you (or a library you are using) to store user information for your own permission system.
In ASP.NET classic (.NET Framework 4.x and earlier), if you used the built-in authentication system, the current web user information was stored in the CurrentPrincipal property. This is no longer the case in ASP.NET Core (.NET Core and .NET 5 and later); in the newer version, the current user is in HttpContext.User only.
4.6.5 Thread priority
Setting the thread priority is dangerous, and you shouldn’t do it. Unless you are extremely careful, setting the thread priority is likely to cause performance degradation and/or deadlocks.
The problem is that it’s too easy to get into some variation of a high-priority thread that is waiting for a resource held by a lower-priority thread, but that lower-priority thread can’t release the resource because the higher-priority thread is taking all the CPU time.
Controlling the thread’s priority is required for some kinds of system programming, but you should never set thread priorities in normal applications. The priority is controlled by the Thread.Priority property. The system is allowed to ignore the priority you set.
Summary
You can run multiple things in parallel. Each one of these things is called a thread.
The program starts with one thread running the Main method. This thread is called the main thread.
You can create dedicated threads that are completely under your control with the Thread class by creating a Thread object, optionally reconfiguring it, and calling the Thread.Start method to start running it.
The thread pool is a collection of threads managed by the system and is available for use when you have code to run. It is optimized for short-running tasks and can create new threads as needed.
Traditionally, you run code in the thread pool by using the ThreadPool.QueueUserWorkItem method.
A simpler and more async/await friendly way to run code in the thread pool is using Task.Run.
The main thread and threads you create with the Thread class are the only threads that are completely under your control and that you can reconfigure any way you want. However, you should never reconfigure threads created by other components, especially threads managed by the thread pool.
When you access data shared by more than one thread, you have to use a lock; otherwise, different threads may overwrite data written by other threads, leading to incorrect results.
The same also applies to reading shared data. If you don’t use locks to synchronize reads as well as writes, you may get stale data and even the results of incomplete writes.
In native UI applications, the thread running the UI is called the UI thread. It is typically the main thread, but it can be a different thread if needed. The UI thread is the only thread that may access windows and other UI controls.
You should avoid blocking the UI thread because this makes the UI freeze.
5 async/await and multithreading
This chapter covers
Using async/await and multithreading together
Running code after await
Using locks with async/await
Asynchronous programming is about doing stuff (such as reading a file or waiting for data to arrive over the network) that doesn’t require the CPU in the background while using the CPU to do something else. Multithreading is about doing stuff that may or may not require the CPU in the background while using the CPU to do something else. Those two things are obviously similar, and we use the same tools to interact with them.
In chapter 3, we talked about async/await but didn’t mention threads; we especially ignored where the callback passed to ContinueWith runs. In chapter 4, we talked about multithreading and almost didn’t mention async/await at all. In this chapter, we’ll connect these two together.
5.1 Asynchronous programming and multithreading
To demonstrate the interaction between asynchronous programming and multithreading, we’ll start with a method that reads 10 files in parallel using asynchronous operations and then waits for all the read operations to complete. And just for the fun of it, we won’t make the method itself async but just use asynchronous operations.
Listing 5.1 Reading 10 files
public void Read10Files()
{
var tasks = new Task[10];
for(int i=0;i<10;++i)
{
tasks[i] = File.ReadAllBytesAsync($"{i}.txt");
}
Task.WaitAll(tasks);
}
This is obviously asynchronous programming. Reading a file is a textbook example of work done mostly outside the CPU (and yes, I completely ignored the data we loaded from the file—this is just a demonstration of the mechanics of Task and asynchronous operations). But what would it look like if instead we wrote code to compute 10 values (or, for simplicity’s sake, let’s print text claiming we are calculating) in parallel and wait for the results? We’ll use Task.Run, which runs our code in a thread pool thread (see chapter 4).
Listing 5.2 Calculating 10 values
public void Compute10Values()
{
var tasks = new Task[10];
for(int i=0;i<10;++i)
{
tasks[i] = Task.Run(()=>Console.WriteLine("Calculating"));
}
Task.WaitAll(tasks);
}
I literally changed just one line and didn’t even change the entire text of the line. This demonstrates that the same tools used for asynchronous operations work in the exact same way for multithreading. Let’s take it one step further and use multithreading to read the files in parallel.
Listing 5.3 Reading 10 files using multithreading
public void Read10Files()
{
var tasks = new Task[10];
for(int i=0;i<10;++i)
{
var icopy = i;
tasks[i] = Task.Run(()=>File.ReadAllBytes($"{icopy}.txt"));
}
Task.WaitAll(tasks);
}
We needed to create a local variable inside the loop. Otherwise, all the threads would have shared the same i variable, and by the time the threads ran, the loop would have finished already, so i would have its final value of 10. That would have made all the threads try to read 10.txt and fail because our files are 0.txt–9.txt.
Other than that, the code looks almost the same as the one in listing 5.1, and it does exactly the same thing. However, it does it in a much more wasteful way because this example uses up to 10 separate threads (depending on how quickly the system can read the files). Furthermore, each and every one of them is stuck waiting for the file to arrive from the hard drive, while listing 5.1 uses just one thread waiting for all the files.
But a real program wouldn’t read files and ignore the data. A real program would read the file and then do something with the file’s content. Let’s fix the latest example to also do something (or just write to the console that we are doing something).
Listing 5.4 Reading 10 files and doing something with the data
public void Process10Files()
{
var tasks = new Task[10];
for(int i=0;i<10;++i)
{
var icopy = i;
tasks[i] = Task.Run(()=>
{
File.ReadAllBytes($"{icopy}.txt");
Console.WriteLine("Doing something with the file's content");
);
}
Task.WaitAll(tasks);
}
This will use up to 10 threads from the thread pool (because remember, Task.Run uses the thread pool), possibly creating new threads if there weren’t enough threads already in the thread pool and then immediately putting all those threads in a blocked state where they would be doing nothing except waiting for the hard drive. Let’s see what would happen if we wrote the exact same thing using asynchronous operations only.
Listing 5.5 Reading 10 files asynchronously and processing the data
public void Process10Files()
{
var tasks = new Task[10];
for(int i=0;i<10;++i)
{
var icopy = i;
tasks[i] = Task.Run(async ()=>
{
await File.ReadAllBytesAsync($"{icopy}.txt");
Console.WriteLine("Doing something with the file's content");
});
}
Task.WaitAll(tasks);
}
The code looks exactly the same, except we switched from File.ReadAllBytes to File.ReadAllBytesAsync and added the async and await keywords; however, what happens at runtime is very different. Instead of using 10 threads for the whole time, this will pick up a thread from the thread pool, use it to start the read operation, and then free the thread and use the callback mechanism we talked about in chapter 3. That means the program will use a small number of threads to start the read operations (maybe even one; it depends on the current load on the computer and the state of the thread pool), and then use no threads at all while waiting. Only after the data arrives will it start using 10 threads (that is, only when there is work for them to do).
In fact, this is even better because as we are reading all the files from the same hard drive, we are likely to get the files’ contents one after the other and not all at once (because there’s just one hard drive with one data connection to the motherboard), and each task will only pick up a thread after its data is available. That means it’s likely we’ll never actually use 10 threads simultaneously (but we can’t tell in advance because multithreaded programming is inherently unpredictable).
There was one small lie two paragraphs ago: I said we don’t use any threads while waiting for the files, but we are actually using one thread—the thread that called Process10Files and is waiting for all the processing to complete. We can fix this; if we just make Process10Files itself async, we will get the following.
Listing 5.6 Making the caller async too
public async Task Process10Files() ❶
{
var tasks = new Task[10];
for(int i=0;i<10;++i)
{
var icopy = i;
tasks[i] = Task.Run(async ()=>
{
await File.ReadAllBytesAsync($"{icopy}.txt");
Console.WriteLine("Doing something with the file's content");
});
}
await Task.WhenAll(tasks); ❷
}
❶ Makes the metho
❷ Changes WaitAll to WhenAll
This will free the thread that called Process10Files itself and will truly use no threads at all until we finish reading some files.
If we free up all the threads while waiting for the data to arrive, when the data finally arrives, we need to continue running, but we can’t because we freed up the thread. So where does our code run after the await call?
5.2 Where does code run after await?
If you remember from chapter 2, I said that using the await keyword is equivalent to calling Task.ContinueWith, so the code
var buffer = await File.ReadAllBytesAsync("somefile.bin");
Console.WriteLine(buffer[0]);
is translated by the compiler to
File.ReadAllBytesAsync("somefile.bin").ContinueWith(task=>
{
var buffer = task.Result;
Console.WriteLine(buffer[0]);
});
I also mentioned that this is a simplification and that await is a bit more complicated. Now it’s time to see exactly what await does differently.
ContinueWith runs the callback in the thread pool, just like Task.Run. Technically, ContinueWith has a version that accepts parameters specifying how to run the callback passed to it, but I won’t go into that because await takes care of it for us, and ContinueWith is very rarely used directly in application code.
await tries to run the code after it in a thread of the same type, so in most cases, you don’t have to think about the possibility of a thread change. If await can’t use a thread of the same type, it will use the thread pool instead. The specific rules are
If you are using await on the UI thread of a WinForms, WPF, or UWP app, the code after the await will run on the same thread.
If you are using await while processing a request in an ASP.NET Classic application (.NET framework 4.8 and earlier), the code after the await will run on the same thread.
If your code or a framework you are using changes the current thread’s SynchronizationContext or TaskFactory (we’ll talk about them later in the book), then await will use those. This is how the frameworks in the previous bullet points control the behavior of await; except for UI frameworks, this is extremely rare.
In all other cases, the code after await will run on the thread pool. Here are some common examples:
If the code calling await is running in the thread pool, the code after the await will also run in the thread pool. However, it might run on a different thread.
This also applies to code processing a request in an ASP.NET Core application (.NET Core or .NET 5.0 and later) because ASP.NET Core uses the thread pool for all processing.
If you use await in the main thread of a non-UI app, the code after the await will also run in the thread pool and not in the main thread. The system will keep the main thread (and the entire application) alive until the Task you are awaiting completes.
If you use await in a thread you created with the Thread class, inside the method you passed to the Thread constructor, the thread will terminate, and the code after the await will run on the thread pool.
Those rules only apply if await has to actually wait. If the operation you are awaiting has already completed by the time await runs, in almost all cases, the code will just continue normally without switching threads. The most common situation in which this happens is if you are awaiting a method that doesn’t do anything asynchronous. For example, the following method calls a remote server to retrieve a result, and it uses a very simple cache to avoid repeating those costly network calls if it already got the result.
Listing 5.7 Getting a value from a server with caching; not thread safe
// This method is not thread safe, keep reading for the correct version
private Dictionary<string,string> _cache = new();
public async Task<string> GetResult(string query)
{
if(_cache.TryGetValue(query, out var cacheResult)
return cacheResult; ❶
var http = new HttpClient();
var result = await http.GetStringAsync( ❷
"https://example.com?"+query); ❷
_cache[query] = result; ❸
return result;
}
❶ If the result is in the cache, return it.
❷ Calls server to get the result
❸ Saves the result in the cache
This method first checks whether the query string is in the cache; if the value is already there, it returns it without doing asynchronous work. If not, the code performs an asynchronous HTTP call to get the result from the server. After the code gets the result from the server, it stores it in the cache.
The first time you call this method for a given query, it will return a Task that needs awaiting, but on subsequent calls for the same query, it will return a Task that has already completed because no asynchronous operation has happened. To demonstrate this, let’s write some code that calls this method from a thread created using the Thread class.
Listing 5.8 Calling GetResult from a thread created by the Thread class
var thread = new Thread(()=>
{
var result = await GetResult("my query");
DoSomething(result); ❶
});
thread.Name = "Query thread";
thread.Start();
❶ On which thread will this run?
We create a thread that calls the GetResult method from listing 5.7 and then does something with the result. One of the reasons for using the Thread class is the ability to change the thread properties. In this case, I changed the thread name. The thread name is just a string attached to the thread. We can view it in the threads window in Visual Studio to quickly identify the thread and understand its purpose. It has no effect on how the thread runs.
If this code happens to be the first time, we call GetResult("my query"). The thread will terminate because, if you remember from chapter 3, await registers code to run later and then returns control to the caller like a return statement, and later, when DoSomething runs, it will run on the thread pool and not in our named thread. In contrast, if the result for “my query” is already in the cache, the code will continue in our named thread as if the await wasn’t there.
Now let’s see how to make the GetResult method from listing 5.7 thread safe.
5.3 Locks and async/await
The problem with the GetResult from listing 5.7 is that it will most likely run in a multithread environment (by virtue of having an await statement), but it is not thread safe. It is not safe to access a Dictionary<TKey,TValue> (either to modify it or to read from it) while it is being modified by another thread. The code in listing 5.7 modifies the dictionary without protecting it from concurrent access. Fortunately, we learned about the lock statement in the previous chapter. Unfortunately, if we just add a lock around the entire method body, it won’t compile.
Listing 5.9 Getting a value from a server with caching protected by a lock
private Dictionary<string,string> _cache = new();
private object _cacheLock = new();
public async Task<string> GetResult(string query)
{
lock(_cacheLock)
{
if(_cache.TryGetValue(query, out var cacheResult)
return cacheResult;
var http = new HttpClient();
var result =
await http.GetStringAsync( ❶
"https://example.com?"+query); ❶
_cache[query] = result;
}
return result;
}
❶ Compiler error
This doesn’t compile because we are not allowed to use await inside the code block of the lock statement. There are two reasons for this—one conceptual and one practical:
The conceptual problem is that calling await frees up the thread and potentially runs other code, so we don’t even know what code will run. This is a problem because, as we talked about in the previous chapter, running code you don’t control while holding a lock can cause deadlocks.
The practical problem is that the code after the await can run on a different thread, and the system used internally by the lock statement only works if you release the lock from the same thread that locked it.
How can we solve the problem? It’s easy. Rearrange the code so that the await is outside the lock. We don’t need to hold the lock while doing the HTTP call. We just need to protect the cache access before and after the call.
Listing 5.10 Releasing the lock while awaiting
private Dictionary<string,string> _cache = new();
private object _cacheLock = new();
public async Task<string> GetResult(string query)
{
lock(_cacheLock) ❶
{
if(_cache.TryGetValue(query, out var cacheResult)
return cacheResult;
}
var http = new HttpClient();
var result = await http.GetStringAsync( ❷
"https://example.com?"+query); ❷
lock(_cacheLock) ❸
{
_cache[query] = result;
}
return result;
}
❶ Lock while checking the cache
❷ The async HTTP call
❸ Lock while updating the cache
In this code, we solved our compilation problem by moving the lock to protect only the cache access and not the whole method, but at the cost of releasing the lock in the middle of the method. In the hypothetical method that was completely protected by a lock, trying to run the method twice simultaneously would result in the sequence shown in figure 5.1.
Figure 5.1 Sequence when locking the entire body of the method
One of the concurrent calls gets to run first. It tests the cache, does not find a cached result, makes the HTTP call, and updates the cache, all while inside the lock block. The other call will run second after the cache is updated and will return the cached value. But in the version of the method that actually compiles, we get the sequence as shown in figure 5.2.
Figure 5.2 Sequences when locking only the parts that touch the dictionary
One of the concurrent calls gets to run first, tests the cache, and does not find a cached result inside the first lock block. It will then release the lock. At this point, the other call will get to run and also test the cache, also not finding a cached result because the first HTTP call hasn’t finished yet. At some point, the first HTTP call will complete, and the first thread will update the cache. A bit later, the second HTTP call will complete, and the second thread will overwrite the value in the cache (that is why we use the operator [] and not Add to update the cache—Add would have thrown an exception).
This is a simple form of caching that works very well for any long process (both asynchronous and non-asynchronous) if that process always returns the same value for the same inputs, we are willing to accept the potential performance hit of running the long process multiple times before the first run completes, and the cache is populated. If we are not willing to run the long process multiple times, this way of writing the cache won’t work.
5.4 UI threads
The rules for which thread runs the code after the await have a special case for the UI thread of native apps. Let’s see why. To demonstrate the problem this solves, let’s write an event handler for a WinForms button click that does some long calculation and updates the UI with the result (don’t worry, you don’t need to know WinForms to understand the code).
Listing 5.11 Long calculation that freezes the UI
private void MyButtonClick(object sender, EventArgs ea)
{
int result = 0;
result = LongCalculation(); ❶
MyLabel.Text = result.ToString();
}
❶ Freezes the UI
In response to a button click, this code calls LongCalculation and then displays its result in a label control. However, we have a problem: the thread will be busy while running LongCalculation, so the application’s UI will be frozen until the calculation is done. But we can fix it with multithreading.
Listing 5.12 Calculation that doesn’t freeze the UI but throws an exception
private void MyButtonClick(object sender, EventArgs ea)
{
Task.Run(()=>
{
int result = 0;
result = LongCalculation();
MyLabel.Text = result.ToString(); ❶
}
}
❶ Exception
We just used Task.Run to move all the calculations to a background thread so the UI thread will be free to handle UI events, and the UI will not freeze. We solved the previous problem, but we created another one. Now when we try to display the result, we are doing it from the wrong thread, and this will throw an exception and crash the program instead of showing the result. We need a way to return to the UI thread after the background process completes. Luckily, Task.Run returns a Task we can use. Specifically, we can use it to know when the result is ready.
Listing 5.13 Running in the background from the UI code correctly
private async void MyButtonClick(object sender, EventArgs ea)
{
int result = 0;
await Task.Run(()=>
{
result = LongCalculation(); ❶
});
MyLabel.Text = result.ToString(); ❷
}
❶ Runs in background; UI not frozen
❷ Back in the UI thread
Here we used Task.Run to run the long calculation in the background and await to free up the UI thread until the calculation is complete. Because we called await in the UI thread, when the calculation is complete, our code runs in the UI thread again and so can safely set the text of the label.
Now you can see why await Task.Run is valuable when used to run a background process from the UI thread, unlike almost every other case where it is just wasteful (see the previous chapter).
Summary
The tools for using asynchronous operations are also good for using multithreaded operations.
The high-performance code that benefits from multithreading is also likely to benefit from using asynchronous operations.
In UI apps, when using await in the UI thread, the code after the await will also run in the UI thread.
In all other cases, the code after await will run in the thread pool (except if someone used SynchronizationContext or TaskFactory to override this behavior).
If the code calling await is running in the thread pool, the code after the await might run in a different thread in the thread pool.
You can’t use await inside the code block of a lock statement. The best solution is to rearrange your code and move the await outside of the lock block.
6 When to use async/await
This chapter covers
The importance of async/await
The disadvantages of async/await
Deciding when to use async/await and when to avoid it
You probably won’t find it surprising that I, the author of a book about multithreading and asynchronous programming, think that they are important, useful, and something that every software developer should know. However, it’s important to acknowledge that they are not suitable for every situation, and if used inappropriately, they will make your software more complicated and create some bugs that are really difficult to find.
This chapter talks about the performance gains of multithreading and asynchronous programming, as well as how asynchronous programming can backfire sometimes and make our life miserable. For the rest of this chapter, I’m going to talk about the concept of asynchronous programming and the C# feature of async/await as if they were interchangeable—while they are different, async/await is by far the easiest way to do asynchronous programming in C#. If you want to use asynchronous programming in C#, you should use async/await, and conversely, if you don’t use asynchronous programming, you will find async/await mostly useless.
First, let’s quickly go over the scenarios where async/await truly shines.
6.1 Asynchronous benefits on servers
No one builds non-asynchronous single-threaded servers. Such a server would only be able to handle one client at a time, and the maximum load would be one, or maybe the number of connections we configure this server to have in a pending state before our software starts handling them, depending on how you measure load.
Single-threaded asynchronous servers are quite common, but almost exclusively in languages that don’t support multithreading, such as node.js and Python. Well-written asynchronous servers can be quite efficient, especially if they are mostly IO bound and do very little processing (for example, serving static files or making database queries). But if you have to do any nontrivial processing, it is advantageous to be able to use that expensive multicore CPU inside the server.
To demonstrate the performance advantage of adding asynchronous techniques to a multithreaded server, we will build two nearly identical servers, a classic one-thread-per-request server you will find in network programming tutorials and an asynchronous server. Those will be simple servers serving a static file. They will wait for a network connection, and when a client connects, they will read a file from disk and send it to the client.
But before we can test our servers, we need a load-testing client. We’ll make our client asynchronous too because it’s more efficient (as we’ll see from running the tests later in this chapter), and we want to minimize the effect of the client on performance so we can better measure the performance of the servers. Also, the client is a nice example of an asynchronous program.
In this program, we start by getting the number of connections from the command line, as this will let us easily run tests with different loads. We will then call RunTest, which actually connects to the server. We will measure how long it takes until all instances of RunTest complete using the System.Diagnostics.Stopwatch class. We will also count the number of times we failed to connect because that will give us a clue about the maximum number of connections the server can handle.
Listing 6.1 Asynchronous load-testing client
using System.Diagnostics;
using System.Net;
using System.Net.Sockets;
int count = int.Parse(args[0]);
Console.WriteLine($"Running with {count} connections");
var tasks = new Task[count];
int failCount = 0;
var faileCountLock = new object();
Stopwatch sw = Stopwatch.StartNew(); ❶
for (int i = 0; i < count; ++i)
{
tasks[i] = RunTest(i); ❷
}
Task.WaitAll(tasks); ❸
sw.Stop(); ❹
lock(faileCountLock)
if (failCount > 0) Console.WriteLine($"{failCount} failures");
Console.WriteLine($"time: {sw.ElapsedMilliseconds}ms");
Task RunTest(int currentTask)
{
return Task.Run(()=> ❺
{
var rng = new Random(currentTask);
await Task.Delay(rng.Next(2*count));
using var clientSocket =
new Socket(SocketType.Stream, ProtocolType.Tcp);
try
{
await clientSocket.ConnectAsync( ❻
new IPEndPoint(IPAddress.Loopback, 7777));
var buffer = new byte[1024 * 1024];
while (clientSocket.Connected)
{
int read = await clientSocket.ReceiveAsync(
buffer, SocketFlags.None); ❼
if (read == 0) break;
}
}
catch
{
lock (faileCountLock)
++failCount; ❽
}
});
}
❶ Starts stopwatch
❷ Runs individual test
❸ Waits for all tests to complete
❹ Stops stopwatch
❺ Runs tests in parallel
❻ Connects to server
❼ Reads data
❽ Counts failures
Note that in the loop, when we called the RunTest method that actually connects to the server, we did not await it because we want all instances to run in parallel. If you remember from chapter 3, calling an async method does not run it in the background—the method runs normally until the first await.
Inside the RunTest method, we made sure everything ran in the background using Task.Run. Because RunTest only called Task.Run, we can just return the Task we got from Task.Run instead of making RunTestasync and using await. This improves efficiency because the compiler doesn’t have to do the async transformation and doesn’t have to create and manage a Task for RunTest that would only mirror the Task returned from Task.Run.
Inside the test code, we add a small random delay before connecting, because in real-world scenarios, we don’t have all clients trying to connect at exactly the same time, and then we connect to the server and read all the information the server sends. We use sockets because this is the lowest overhead network access technology we have access to.
Socket communication
We used socket communication in the load testing client and server. Because this isn’t a book about networking, I won’t go into details, but here’s a very short explanation of the networking calls we used.
On the server, we first must use Bind to take control of a network port, and then we call Listen to signal we are waiting for connections from clients. Accept will actually wait for the next connection. When a client connects to the server, Accept will return a new socket representing the new connection. AcceptAsync is the asynchronous version of Accept that, instead of waiting, returns a Task<Socket> that will complete when a client connects.
On the client, we then call ConnectAsync to connect to the server. We use IPAddress.Loopback as the server address, that is, a special address that always contacts the current computer. It is better known as localhost in most networking tools.
Send sends data, and it returns after the data is handed over to the network stack inside the sending computer (not after the data is sent and not after the data is received by the other side; you can’t know when those happen). Send returns the number of bytes that were actually accepted by the network stack on a modern computer, which will almost always be the entire buffer you are trying to send. SendAsync is the asynchronous version. It returns immediately and returns a Task<int> that will complete when Send would have returned.
ReceiveAsync reads data into an array we give it and returns a Task<int> with the number of bytes received. If that Task’s result is 0, it means no more data is available, and we assume the server closed the connection.
And finally, Shutdown shuts down the connection gracefully, including sending a message to the other side notifying it that the connection is now closed. It also clears all the resources held by the connection.
That was all the code for the test client. Now we need a server. Our first server will be the classic textbook one-thread-per-request server.
Listing 6.2 One-thread-per-request server
using System.Net;
using System.Net.Sockets;
var listenSocket = new Socket(SocketType.Stream, ProtocolType.Tcp);
listenSocket.Bind(new IPEndPoint(IPAddress.Any, 7777));
listenSocket.Listen(50);
while (true)
{
var connection = listenSocket.Accept();
var thread = new Thread(() => ❶
{
using var file = new FileStream(@"somefile.bin",
FileMode.Open, FileAccess.Read);
var buffer = new byte[1024 * 1024];
while (true)
{
int read = file.Read(buffer, 0, buffer.Length);
if ((read) != 0)
{
connection.Send( ❷
new ArraySegment<byte>(buffer, 0, read),
SocketFlags.None);
}
else
{
connection.Shutdown(SocketShutdown.Both);
connection.Dispose();
return;
}
}
});
thread.Start(); ❸
}
❶ Handles connection in a new thread
❷ Sends file content to client
❸ Don’t forget to start the thread.
That is our classic multithreaded non-asynchronous server. Now it’s time to test it.
I’ve run the server and then the client with 50 connections. The test completed successfully in just under 8 seconds. I looked at the number of threads that the server spun up, and the server used 56 threads. Of those, 50 threads are the threads we created to handle the requests. Apart from this, there’s also the main thread and five more background threads created by the .NET runtime.
I repeated the test with 100 connections. The test also completed successfully, this time in about 16 seconds. Looking at the threads of the server process, I’ve seen 106 threads: 100 worker threads instead of the 50 in the previous test, and the same number of overhead threads.
After that success, I doubled the number of connections to 200. This time, the test failed with 61 of the connections not being able to complete receiving the file (the time the test took to complete is irrelevant because it didn’t do all the work). The failure is caused by the program being too slow to get to new connections because it is too busy handling the earlier connections. This will overwhelm the pending connection queue and make the network stack refuse to accept any more connections.
Now that we’ve seen the limits of the first server, let’s write an asynchronous one. To keep everything as fair as possible, we will only change all the blocking and thread-management calls to their asynchronous version.
Listing 6.3 Asynchronous server
using System.Net;
using System.Net.Sockets;
var listenSocket = new Socket(SocketType.Stream, ProtocolType.Tcp);
listenSocket.Bind(new IPEndPoint(IPAddress.Any, 7777));
listenSocket.Listen(100);
while(true)
{
var connection = await listenSocket.AcceptAsync(); ❶
Task.Run(async () => ❷
{
using var file = new FileStream("somefile.bin",
FileMode.Open, FileAccess.Read);
var buffer = new byte[1024*1024];
while (true)
{
int read = await file.ReadAsync(buffer,
0, buffer.Length)); ❸
if (read != 0)
{
await connection.SendAsync(
new ArraySegment<byte>(buffer, 0, read),
SocketFlags.None); ❹
}
else
{
connection.Shutdown(SocketShutdown.Both);
connection.Dispose();
return;
}
}
});
}
❶ AcceptAsync instead of Accept
❷ Task.Run instead of new Thread
❸ File.ReadAsync instead of Read
❹ SendAsync instead of Send
This code is identical to that in listing 6.2, except we changed Accept to AcceptAsync, Send to SendAsync, new Thread to Task.Run, and of course, we’ve added the async and await keywords where needed.
The difference between servers in run time is that AcceptAsync, SendAsync, and ReadAsync will all release the thread instead of blocking it. This means we need just a small number of threads to handle the same number of connections in parallel. Instead of creating a new thread for each connection, we can use the thread pool (that we use with Task.Run).
Now we can finally compare the performance of the asynchronous and non-asynchronous versions (see table 6.1). Like with the first server, I’ve first run the test with 50 connections. The test completed successfully in just under 8 seconds—the same as the non-asynchronous version. However, when looking at the number of threads, this version used only 27 threads instead of the 56 used by the non-asynchronous version (those are 20 thread pool threads doing all the work, the main thread, and six threads created by the framework or operating system—one more overhead thread compared to the non-asynchronous version).
After the first successful test, I doubled the number of connections to 100, and the test completed successfully in about 16 seconds—again the same as the non-asynchronous version. Looking at the threads, we see only 27 threads—the same number of threads as in the 50-connection run (compared to 106 for the non-asynchronous version).
I doubled the number of connections again to 200 (if you remember, at this point, the non-asynchronous version started failing), but the asynchronous version completed successfully again. Looking at the threads, we can again see only 27 threads.
I’ll spare you all the boring details of the rest of the tests. On the poor laptop I’m writing this on, the non-asynchronous version managed to handle around 130 connections, while the asynchronous version got to just above 300.
Table 6.1 Differences between non-asynchronous and asynchronous connection handling
Number of connections
Non-asynchronous
Asynchronous
Failures
Time
No. of threads
Failures
Time
No. of threads
50
0
8389 ms
56
0
8534 ms
27
100
0
16538 ms
106
0
16310 ms
27
200
61
N/R
N/R
0
32132 ms
27
300
168
N/R
N/R
0
48229 ms
27
400
265
N/R
N/R
72
N/R
N/R
Those numbers might not look impressive, but it’s unlikely that a real-world server will have to handle this number of connections in such a short time (an average of a connection every 2 ms) while also running Word and Visual Studio. In addition, it’s important to note those numbers are very “noisy”; the exact number of connections will vary depending on your hardware, details of your application, what is running at the time, usage patterns, .NET version, operating system version, and more. But you should see that the asynchronous version consistently uses fewer resources and can handle greater loads. Basically, what we see here is that the asynchronous server could easily handle a double load of the non-asynchronous version while using a fraction of the resources.
These days, I expect most C# development to be done on the server, but there are also native and desktop applications.
6.2 Asynchronous benefits on native client applications
Asynchronous programming is also very useful in desktop applications. While desktop applications typically don’t do tens of thousands of things simultaneously (due to the hardware limits of the person in front of the computer), they do need to keep the thread managing the UI available at all times so the UI does not become frozen.
For example, if we have a long calculation that is making our UI nonresponsive, the code making the UI nonresponsive is likely to look like this:
public void button1_Click(object sender, EventArgs args)
{
LongCalculation();
UpdateUIWithCalculationResults();
}
We need to move LongCalculation to a background thread, but we must keep UpdateUiWithCalculationResults in the UI thread. Thus, we need to do something like
We used Task.Run to run code on a background thread and then BeginInvoke to run code back on the UI thread. With async/await, we can rely on await to get us back to the correct thread, and then we only need to write
Those three advantages of async/wait (that asynchronous code can handle higher loads, that it uses less resources even at lower loads, and that it makes it easy to use multithreading in conjunction with code that has to run on a specific thread) are pretty significant and can easily outweigh all the downsides. But the downsides are there, and you should learn about them.
6.3 The downside of async/await
Up until now, we talked extensively about the benefits of asynchronous programming and why async/await makes it easy. But, like just about everything, asynchronous programming also has some significant downsides.
6.3.1 Asynchronous programming is contagious
Any code that calls asynchronous code must be asynchronous itself. If you are calling asynchronous code, you must use await or callbacks to get the results. This is often referred to as “asynchronous all the way down.”
To illustrate this, we’ll start with a program that takes a picture using the camera attached to the computer. The following code snippet is representative of what you need to do to use a camera using Windows’ UWP API. To simplify the example, I removed all the parameters and the code that searches for a camera, but the structure of the code is correct:
public void TakeSinglePicture()
{
cameraApi.AquireCamera();
cameraApi.TakePicture();
cameraApi.ReleaseCamera();
}
The code first acquires the camera, then uses it to take a picture, and finally frees the camera and any associated resources. Now let’s say that in the newest version of our imaginary camera, API made the TakePicture method asynchronous. If we just switch to the new asynchronous version, we get
public void TakeSinglePicture()
{
cameraApi.AquireCamera();
cameraApi.TakePictureAsync();
cameraApi.ReleaseCamera(); ❶
}
❶ Error: Releases camera before TakePictureAsync is complete
However, this is a logic error: taking the picture is asynchronous, so it will complete in the background, but in this example, we don’t wait for it to complete, so we release the camera while it’s still taking the picture. What we need to do is to somehow wait for the TakePictureAsync to complete before continuing. Luckily for us, async/await makes it easy, but it does require changing the TakeSinglePicture method to be async too:
It looks like it was an easy fix, but now we need to do the same to the code that calls TakeSinglePicture, and the code that calls that, and the code that calls that, all the way back to the entry point of our code.
You may think that we can use Task.Wait() and Task.Result to bypass the problem by turning the asynchronous code into blocking code, but unless the asynchronous code was specifically designed to support this use case, this might cause weird bugs and deadlocks. Some APIs (like the UWP camera API this example is inspired by) will outright fail and throw an exception. And even if it does work, by turning the asynchronous call into a blocking call, we are eliminating any benefits of having an asynchronous method to begin with.
6.3.2 Asynchronous programming has more edge cases
Another problem is that by making your code asynchronous, you add new edge cases and failure modes that just don’t exist in nonasynchronous single-threaded code. Let’s take some straightforward WinForms code. We have a program that manages sources that provide values, and this specific code chooses a random source and displays the source name and the provided value (for extra realism, this code also uses the WinForms editor’s autogenerated names):
This code is pretty straightforward, and except for failures in the source itself, there’s basically nothing that can go wrong. But if GetValue takes a long time to run, it will make the UI unresponsive. We can solve this problem by making GetValue and this method async. The changes to this method are minimal, and our UI will no longer become unresponsive:
This may look like an easy fix, but we introduced a bug. Now that the UI is not frozen while GetValue is running, the user can click the button again, and if we are unlucky with timing, it’s easy to encounter a situation where the code displays that the source value is from the first click, while the source name is from the second, showing the user incorrect information. To fix the problem, we need to at least disable the specific button while the code is running:
Sometimes we might even have to disable all the UI controls in the application, depending on the details of the app and the dependencies between different UI elements.
6.3.3 Multithreading has even more edge cases
The reason that the previous demo is using WinForms is that WinForms makes it easy to write code that is asynchronous and not multithreaded. But nowadays, we mostly don’t write desktop applications, and that innocent-looking await you added to the code might have made your code multithreaded without even knowing it.
Multithreading has many pitfalls, so many that there’s an entire chapter about it later in the book.
6.3.4 async/await is expensive
async/await is expensive compared to single-threaded code. It adds a lot of compiler-generated code and mechanisms required to make the code asynchronous. It’s important to remember that this is compared to single-threaded code, and in most cases, asynchronous code is more efficient than non-asynchronous multithreading, even with all the overhead.
For example, let’s take this complete but useless C# program:
Thread.Sleep(1000);
What is the actual code that was generated for this program? To answer this question, we’ll use IlSpy—a free program that can take a .NET-compiled program and reverse-engineer it back to source code form. Because IlSpy looks at the compiled code, it sees all the generated code we talked about in the previous chapters.
When we decompile our program, we get eight lines of code. One line is our original line of code, and seven lines wrap our code in a Main method and a class (because while the C# compiler lets you just write code, the runtime only supports code inside classes and methods), and that’s it. If we take the equivalent asynchronous program
await Task.Delay(1000);
we get a whopping 63 lines of code. The compiler did what we talked about in chapter 3: it turned this line into a class implementing a state machine with two states (before and after the await) with all the associated code to manage it.
So after discussing all those advantages and drawbacks, when should we use async/await, and when should we avoid it?
6.4 When to use async/await
Here are some simple guidelines that can help you decide when to use async/await and when to opt for non-asynchronous blocking operations:
If your code needs to manage a large number of connections simultaneously, use async/await whenever you can.
If you are using an async-only API, use async/await whenever you use that API.
If you are writing a native UI application, and you have a problem with the UI freezing, use async/await in the specific long-running code that makes the UI freeze.
If your code creates a thread per request/item, and a significant part of the run time is I/O (for example, network or file access), consider using async/await.
If you add code to a codebase that already uses async/await extensively, use async/await where it makes sense to you.
If you add code to a codebase that does not use async/await, avoid async/await in the code as much as possible. If you decide to use async/await in the new code, consider refactoring at least the code that calls the new code to also use async/await.
If you write code that only does one thing simultaneously, don’t use async/await.
And in all other cases, absolutely and without a doubt, consider the trade-offs and make your own judgement.
The list is sorted by importance, from the most important consideration to the least important one. If your project fits the conditions of more than one of the listed guidelines, give more weight to the earlier entry in the list. But in any such case, or if the best fit is that annoying last bullet, you really do need to weigh the trade-offs and decide for yourself. I wish I could give you straightforward rules that cover every possibility, but the truth is that software design is complicated, and there is no alternative to making difficult choices based on the specific details of your specific project—after all, if software development was that easy, you wouldn’t have to read books about it.
Summary
Asynchronous code can handle a much higher load than non-asynchronous code, while using significantly fewer resources.
In cases where it’s important to run code on a specific thread (like in native UI applications), async/await makes it easy to use multithreading and asynchronous calls.
However, asynchronous code also has some disadvantages:
Code that calls asynchronous methods must be made asynchronous itself.
Asynchronous code has more failure modes than non-asynchronous single threaded code.
Multithreaded code has more failure modes than single-threaded code.
Asynchronous techniques require more code than non-asynchronous code (but it’s still faster and more efficient than non-asynchronous multithreaded code).
You should consider the trade-offs when you choose whether to use async/await.
7 Classic multithreading pitfalls and how to avoid them
Following simple rules to avoid the classic multithreading pitfalls
When transitioning from single-thread to multithreaded programming, it’s important to recognize that multithreading introduces certain types of bugs that don’t occur in single-threaded applications. Fortunately, by understanding these common bug categories, we can avoid them. This chapter contains straightforward guidelines you can follow to significantly reduce the likelihood of encountering such problems.
We’ll start by examining the most fundamental multithreading side effect. In a single-threaded environment, each piece of code must complete its task before the next one can begin. However, when two pieces of code run simultaneously, one can access the data the other is still processing, leading to potential problems with incomplete work.
7.1 Partial updates
Partial updates happen when one thread updates some data, and then, in the middle of that update, another thread reads the data and sees a mix of the old and new values.
Sometimes, this problem is obvious, such as in
x = 5;
y = 7;
The first line sets x, and the second line sets y. There is a short time between those lines when x has already been set to 5, but y is still not 7. However, often, the problem is not so obvious. For example, the following method has only one assignment and still has a potential partial updates problem:
void SetGuid(Guid src)
{
_myGuid = src;
}
In this case, Guid is a struct, and while C# lets us copy a struct with a single assignment operator, internally, the compiler will generate code to copy the members of the struct one by one, thereby making this equivalent to the first code snippet.
But things can get worse. In the following code, we assign a decimal variable. decimal is a basic type in .NET and not a struct. So how can this go wrong?
The problem here is that decimal is 128 bits long, and in 64-bit CPUs, memory access is done in 64-bit–long blocks. So assigning a decimal variable is split into two distinct memory operations, basically making it exactly as problematic as the other two examples.
However, decimal is kind of a weird basic type. It is a basic type in .NET, but it is not natively supported in any CPU architecture I know of, so let’s talk about a basic type: long. The long type is a 64-bit integer and is the most natively supported type in 64-bit CPUs. We even said that memory access is done in 64-bit blocks, so assigning a single long value should be safe, right?
This assignment will most likely be atomic in 64-bit systems, but .NET still supports 32 bits, and if your code runs on a 32-bit computer (or a 32-bit operating system on a 64-bit CPU, or a 32-bit process running in a 64-bit OS—you get the point), then memory access is done in 32-bit blocks, and we’re facing the exact same problem.
The solution to all those problems is using a locking mechanism of some sort, and the easiest locking mechanism in C# is the lock statement. For example, in the following listing, we use lock statements in every access to a member variable (both reads and writes), so we are completely safe from partial updates.
Listing 7.1 Using the lock statement
private int _x;
private int _y;
private object _lock = new object();
public void SetXY(int newX, int newY)
{
lock(_lock) ❶
{
_x = newX;
_y = newY;
}
}
public (int x, int y) GetXY()
{
lock(_lock) ❷
{
return (_x,_y);
}
}
❶ lock statement around writes
❷ Another lock statement around reads
lock statements prevent more than one thread from running code that is inside the lock’s code block simultaneously. If a thread reaches the lock statement, and another thread is already running code in the code block of a lock statement, the first thread will stop and wait until the other thread exits the block.
The lock statement accepts a parameter that lets us have different locks for different variables. When reaching the lock statement, a thread will only wait if there is another thread inside a lock statement with the same parameter. In the following listing, we have two values named A and B. If you call both GetA and GetB at the same time from different threads, one of them will run immediately, and the other will wait until the first one exits the lock code block.
Listing 7.2 Single lock for two variables
private object _lock = new object();
private int _a;
private int _b;
public int GetA()
{
lock(_lock)
{
return _a;
}
}
public int GetB()
{
lock(_lock)
{
return _b;
}
}
However, in the following example, because GetA uses _lockA and GetB uses _lockB, they can run simultaneously and will only wait if called at the same time as another piece of code that uses the lock statement with _lockA or _lockB, respectively.
Listing 7.3 Two locks for two variables
private object _lockA = new object();
private object _lockB = new object();
private int _a;
private int _b;
public int GetA()
{
lock(_lockA)
{
return _a;
}
}
public int GetB()
{
lock(_lockB)
{
return _b;
}
}
It is best practice to use a private member of type object (in .NET 9 and later, you can also use an object of type Lock) that is only used for the lock statement and not exposed anywhere outside your class. The reason for not exposing it outside your class is that you don’t want to risk external code using the lock statement with the same object because it can mess up your locking strategy and cause deadlocks (as we will see later in this chapter). The reason for using an object of type object is that any other class that actually does something might use lock(this) (this is common in older code from before using a private object became a best practice), thereby messing with your locking strategy and causing a deadlock.
You may think that you can prevent partial updates by being careful about the order of assignments, but this doesn’t work due to memory access reordering.
7.2 Memory access reordering
In modern hardware architectures, accessing memory is painstakingly slow relative to processing data inside the CPU, and different memory access patterns can have a significant effect on performance. To help with better utilization of the hardware, the compiler will change the order of operations in your code to reduce the number of memory access operations and make memory access faster.
The computer I’m using right now for writing this book has 2.666Mhz DDR4 memory. This type of memory has a latency of about 14.5 nanoseconds (that is, 0.0000000145 seconds), but the computer has 12 virtual cores running at 2.66Ghz, which means each clock cycle takes just 0.37 nanoseconds (to put this in perspective, by the time light travels from the screen to your eye, each CPU core has already finished around seven operations). A simple division tells us that each CPU core can perform roughly 40 operations in the time it takes to retrieve one value from memory, or considering the number of cores, the CPU can do up to 480 operations in the time it takes to get just one value from memory (the real world is, of course, more complicated, and the amount of work the CPU can do in a clock cycle can vary based on what exactly your code does; this is the maximum value). To put this in human terms, if the CPU could do one operation per second, then loading a single value from memory would take 8 minutes.
Let’s see a simple example of how the compiler can improve performance by moving and eliminating memory access. Let’s take a simple loop that increments a variable 100 times:
int counter=0;
for(int i;i<100;++i)
{
++counter;
}
Now let’s translate this C# code into pseudo-machine code. In machine code, each statement or expression is divided into instructions. Instructions that do calculations can work only on internal variables inside the CPU itself. Those variables are called registers, and there are a limited number of them. Loading a value from memory into a register or storing the value of a register in memory are separate instructions. To keep the results short and readable, we’re not going to translate the loop itself:
Set register to 0 (fast)
Store register to memory location "counter"(slow)
for(int i;i<100;++i)
{
Load from memory location "counter" into register (slow)
Increment value of register (fast)
Store register to memory location "counter"(slow)
}
When this pseudo-code runs, it will execute 101 fast and 201 slow operations (ignoring the overhead of the for loop itself). Now let’s move the memory access outside the loop:
Set register to 0 (fast)
Store register to memory location "counter" (slow)
Load from memory location "counter" into register (slow)
for(int i;i<100;++i)
{
Increment value of register (fast)
}
Store register to memory location "counter" (slow)
This new pseudo-code will generate the exact same result but with only 4 slow operations compared to 201 in the direct translation. But we can do even better. At the beginning, we are storing a variable and then immediately loading it. We can skip those two operations and get
Set register to 0 (fast)
for(int i;i<100;++i)
{
Increment value of register (fast)
}
Store register to memory location "counter" (slow)
And we’re at 101 fast operations and only 1 slow operation, down from 101 fast and 201 slow operations in the direct translation. If we say that each fast operation takes 1 time unit and each slow operation takes 10 units, the direct translation would run in 2,111 time units, and the optimized version would only need 121 time units to do the same work, which is a 20-fold improvement!
The general rule is that the compiler is allowed to make any changes that do not alter the observed results of the code in a single-threaded environment; in our example, the only result is the value of the counter variable at the end of the loop. In a single-threaded environment, all our transformations did not change any observable results because there is no other thread that can observe the value of counter in the middle of our code. In a multithreading environment, the situation is different. In the original code, another thread could have seen counter gradually increasing, while in the optimized version, counter jumps directly to the final value.
Now let’s take the same logic and apply it to another piece of code. We will try to prevent two threads from running the same block of code by using a flag that we set before starting and resetting after we finish. Before entering the code, we will check the value of this flag and stop if the flag is set:
But when we exit this code, the _doingSomething flag will always be false, which means that in a single-threaded environment, no one can ever observe the flag as true, so this code is equivalent to
if(_doingSomething) return;
// do something
_doingSomething = false;
The compiler is free to move or remove the code that sets the flag, thereby completely eliminating our homemade thread synchronization. And we can see that optimizing the code by making alterations that don’t change the results of the code in a single-threaded environment might lead to results that are obviously nonsensical in a multithreaded environment.
Things are even worse than that because access to the computer’s memory is so slow. CPUs have smaller and faster (but still slower than the CPU’s processing) blocks of memory built into the CPU. This is called cache memory. The CPU tries to load data from the main memory into the cache before it is needed (in the background, while doing other things), so when the instruction to load a value from memory is executed, the value is already in the cache. Different cores may have their own cache memories.
does not guarantee that if _initialized is true, _value is set. The compiler is allowed to swap the order of those assignments, and even if it doesn’t, your code might see an outdated uninitialized version of _value simply because it was already in the cache.
If you read just the first paragraph of the C# volatile keyword, you may get the (wrong) impression that it can solve this problem. However, the C# volatile semantics are so complicated that it doesn’t guarantee access to the latest value and might cause even more problems. Basically, don’t use volatile—it doesn’t do what you think it does.
Obviously, it’s impossible to write correct multithreaded code when any memory access can be moved or eliminated. That’s why we have tools to limit the way the system moves memory access. There are operations that tell the system, “Don’t move reads earlier than this.” This is called acquire semantics, and all the operations that acquire a lock have this property. There are operations that tell the system “Don’t move writes later than this point.” This is called release semantics, and all the operations that release a lock have this property. Figure 7.1 shows how acquire and release semantics affect the system’s ability to move memory operations.
Figure 7.1 Acquire and release semantics
There are also operations that prevent the compiler from moving both reads and writes across them in any direction. Those are called memory barriers. The set of rules of exactly how the compiler and CPU are allowed to move memory access, in addition to what operations have to acquire or release, or memory barrier semantics, is called the memory model.
The important fact about memory reordering and the C# memory model is that if you always use locks when accessing any data that is shared between threads, everything just works. Acquiring a lock has acquire semantics and will give you the most up-to-date values from memory. Releasing a lock has release semantics that will write all changes back to memory, so they are available for the next thread that enters the lock. This also brings us to the first rule for simple multithreading: always use a lock when accessing shared data.
And now that we know we absolutely must use locks, we can talk about the most common problem with locks—deadlocks.
7.3 Deadlocks
A deadlock, as we mentioned back in chapter 4, is a situation where a thread is stuck waiting for a resource that will never become available because of something that the same thread did. In the classic deadlock, one thread is holding resource A while waiting for resource B at the same time that another thread is holding resource B while waiting for resource A. At this point, both threads are stuck, each waiting for the other one to complete. And that will never happen because the other one is also stuck, as illustrated in figure 7.2.
Figure 7.2 Simple deadlock between two threads
While this is the classic and most common deadlock, deadlocks can be and often are more complicated. There can be any number of threads in a ring (thread 1 holding A waiting for B, thread 2 holding B waiting for C, and thread 3 holding C waiting for A) or even a single thread waiting for itself, which can happen when a thread is holding a resource while trying to acquire that same resource again.
Some types of resources, like the lock statement or the Mutex class, will let the same thread acquire them more than once (and you must release them the same number of times as you acquired them). Those are called recursive locks. Other resources, like the Semaphore class or files in exclusive access mode, will consider each attempt to acquire them—even by the same thread—as a separate attempt and will block (causing a deadlock) or fail, depending on the actual resource.
Sometimes you can see the problem by just reading the code. For example, in the following code, there are two methods, and one acquires locks in the reverse order of the other one.
Listing 7.4 Code with a simple deadlock bug
public int Multiply()
{
lock(_leftOperandLock) ❶
{
lock(_rightOperandLock)
{
return _leftOperand * _rightOperand;
}
}
}
public int Add()
{
lock(_rightOperandLock) ❷
{
lock(_leftOperandLock)
{
return _leftOperand * _rightOperand;
}
}
}
❶ lock left then right
❷ lock right then left
In this example, the person who wrote the Multiply method locked the left operand first because you read math from left to right, and the person who wrote the Add method locked the right operand first because they are right-handed. In each of the methods, the order does not matter, but if you run the two methods simultaneously and get unlucky with your timing, you get a deadlock.
This brings us to the second rule for easy multithreading: always acquire the locks in the same order. The order itself doesn’t matter. You can painstakingly analyze the code to deduce the optimal order, or you can always lock in alphabetical order—it doesn’t matter. The point is to always lock in the same order. This is called lock hierarchy.
The following listing fixes the bug in the previous listing by defining a lock hierarchy—locks are acquired in math-reading order, so _leftOperandLock is always acquired before _rightOperandLock.
Listing 7.5 Solving the deadlock with lock hierarchy
public int Multiply()
{
lock(_leftOperandLock) ❶
{
lock(_rightOperandLock)
{
return _leftOperand * _rightOperand;
}
}
}
public int Add()
{
lock(_leftOperandLock) ❷
{
lock(_leftOperandLock)
{
return _leftOperand * _rightOperand;
}
}
}
❶ lock left and then right
❷ Also lock left and then right
It’s important to always keep the same lock order, even if we think we have a good reason to change it. For example, let’s add a Divide method, and because division by zero is not allowed in math, this method will check that the right operand is not zero before dividing the numbers (if the second number is zero, it will invoke the DivideByZero event). We might be tempted to lock and check the right operand before locking the left operand because if the right operand is zero, we don’t need to access the left operand at all.
Listing 7.6 Causing a deadlock by trying to avoid unnecessary locking
In this code, while trying to avoid unnecessary locking, we broke the lock order by locking the right operand before the left operand, thereby introducing a potential deadlock. We must always keep the lock ordering, as in the following listing.
Listing 7.7 Correct lock order but with unnecessary locking
public int Divide()
{
lock(_leftOperandLock) ❶
{
lock(_rightOperandLock)
{
if(_rightOperand==0)
{
DivideByZeroEvent?.Invoke(this,EventArgs.Empty);
return 0
}
return _leftOperand/_rightOperand;
}
}
}
❶ Locks left operand first, even if we don’t need it
In this listing, we kept the lock ordering, but if the right operand is zero, we acquire the left operand lock without using it. This is bad because we could delay another operation that needs the left operand. If we do not want to hold a lock we don’t need (like in listing 7.7) and also do not want to risk getting into a deadlock (listing 7.6), then whenever we need to acquire a lock out of order, we have to release and reacquire locks as needed to keep the order intact—and deal with the possibility that things have changed because we released the lock. The correct way to write the previous listing while avoiding unnecessary locking is as follows.
Listing 7.8 Correct lock order without unnecessary locking
❷ If the right operand is zero, the method ends here.
❸ Releases lock and reacquires in the correct order
❹ Rechecks condition because it could have changed while the lock was released
In this code, we acquired the right operand lock and handled the case where the right operand is zero. We then released the lock to acquire both locks in the correct order. Next, we had to handle the case where the right operand is zero again because it could have changed in that tiny period between when we released the right operand lock and when we acquired it again. And only then could we finally do the calculation and return the result.
But those were the easy cases. Sometimes, the deadlock is more difficult to find. The previous two listings, the ones with the correct locking order, still have a potential deadlock bug. Let’s take a look at this code again (we’ll use the shorter and simpler code from listing 7.7).
Listing 7.9 Correct lock ordering but still a potential deadlock
public int Divide()
{
lock(_leftOperandLock)
{
lock(_rightOperandLock)
{
if(_rightOperand==0)
{
DivideByZero?.Invoke(this,EventArgs.Empty);
return 0
}
return _leftOperand/_rightOperand;
}
}
}
This code acquires both locks in the correct order, and then, if the second operand is zero, it invokes the DivideByZero event; otherwise, it divides the first operand by the second and returns the result. The problem is in the call to the DivideByZero event handler. The code in that event is outside our control. It could be written by someone from a different organization and could do different things in different applications. This code could, for example, have locks of its own.
Listing 7.10 Code that triggers the deadlock bug in listing 7.9
This code acquires a lock to call the Add method from listing 7.5 and acquires the same lock if it is called by the Divide method from listing 7.9. By itself, this code looks correct, just like our Divide method that also by itself looks correct.
But if one thread calls SomeMethod while another thread tries to use Divide to divide by zero, we might get a deadlock. The first thread acquires a lock on _outputLock (in SomeMethod) first and then tries to acquire _leftOperandLock and _rightOperandLock (inside Add), while the second thread acquires _leftOperandLock and _rightOperandLock (inside Divide) and then tries to acquire _outputLock (in Numbers_DivideByZeroEvent).
The first thread is holding _outputLock while waiting for _leftOperandLock and _rightOperandLock, while the second thread is holding _leftOperandLock and _rightOperandLock while waiting for _outputLock. This is the exact same problem we’ve seen before, only now it’s spread out over multiple files and is more difficult to debug.
This brings us to the third rule: never call code that is not under your control while holding a lock. When you need to call any code that is not under your control, you must call it after releasing the locks. For example, the current way to write the code from listing 7.9 is as follows.
❷ If the right operand is not zero, the method ends here.
❸ Calls the event outside the lock
With this version, instead of checking whether the right operand is zero and invoking the event, we check whether the right operand is not zero and perform the calculation. This means that if we get to the code at the end of the method, after we release all the locks, the operand is zero, and at this point, it’s safe to invoke events.
You might think we can solve the problem by never holding more than one lock at the same time, but that can lead to race conditions.
7.4 Race conditions
A race condition is a situation where the result of the code is dependent on uncontrollable timing events. For example, let’s say someone “fixed” the Add method from earlier to only hold one lock at a time, and that same developer also added a SetOperands method to set the two operands using the same locking strategy.
Listing 7.12 Holding just one lock at a time
public int Add()
{
int leftCopy,rightCopy;
lock(_leftOperandLock)
{
leftCopy = _leftOperand;
}
lock(_rightOperandLock)
{
rightCopy = _rightOperand;
}
return rightCopy + leftCopy;
}
public int SetOperands(int left, int right)
{
lock(_leftOperandLock)
{
_leftOperand = left;
}
lock(_rightOperandLock)
{
_rightOperand = right;
}
}
In the Add method, this code acquires a lock for both operands one at a time, copies the value to a local variable, and then immediately releases the lock. Likewise, in the SetOperands method, the code acquires one lock, sets the values, and then releases the lock before repeating this for the second operand. Because the code never tries to acquire a lock while holding another, it is completely deadlock proof. However, together, those two methods present a new problem. If those two methods are called at exactly the same time, we can’t be sure in what order the four lock statements will execute. If we are lucky, the two blocks from the same thread will execute together—let’s call those situations the “good options” (figure 7.3).
Figure 7.3 Locking operations ordering with correct results
In option 1, we get the correct result; we set the new values and then immediately use them. In option 2, we get an outdated result, but it’s only outdated by less than a millisecond, so I’m going to call this a correct result too. Usually, it is okay to produce a result that is just a little bit outdated (the acceptable value of “a little bit” varies greatly between projects), and it’s exceptionally difficult to guarantee that the results are never outdated because of physics. If you look out the window and see that there is light outside, it only tells you that the sun existed 8 minutes ago (it takes the light from the sun about 8 minutes to get to the earth). It’s possible (but, very fortunately for us, extremely unlikely) that during the last 8 minutes, the sun exploded, and we just don’t know it yet.
Because we can get different results based on tiny thread scheduling differences, this is already a race condition. But it gets worse because the operation from the two threads can interleave in any way. It’s also possible the two operations from one thread will run between the operations from the other thread. Then we get the situation shown in figure 7.4.
Figure 7.4 Locking operations ordering with incorrect results
In those two options, we clearly get incorrect results. What happened is that because we used separate short locks, we managed to get the results of a partial update despite using locks. This is due to the unfortunate fact that composing several thread-safe operations together does not necessarily result in a thread-safe operation—each of the two locks is individually thread safe, but two locks in succession are likely to introduce race conditions.
And this brings us to the fourth rule: you must hold locks for the entire operation. In case you are now screaming, “No, you must hold locks only for the absolute minimal duration!” you are right and should keep reading because holding a lock for too long is likely to cause synchronization.
7.5 Synchronization
Synchronization is the situation when operations happen sequentially and not in parallel. To demonstrate, let’s revisit listing 4.11 for a quick recap of our adventure in chapter 4. We wrote a program that counts from 0 to 10 million. To count faster, we created two threads, each counting to five million. But then we didn’t get the correct result because of the partial update problem that we talked about in chapter 4 and in more detail at the beginning of this chapter. After we fixed the problem by adding locks, we got the following.
Listing 7. 13 Multithreaded counting to 10 million
public void GetCorrectValue()
{
int theValue = 0;
object theLock = new Object();
var threads = new Thread[2];
for(int i=0;i<2;++i)
{
threads[i] = new Thread(()=>
{
for(int j=0;j<5000000;++j)
{
lock(theLock)
{
++theValue;
}
}
});
threads[i].Start();
}
foreach(var current in threads)
{
current.Join();
}
Console.WriteLine(theValue);
}
This code creates two threads, and each increments a value five million times. To avoid the partial updates problem we talked about at the beginning of this chapter, the code uses a lock while incrementing the value. But there is still a problem with this code. We use two threads so we can increase performance, but because of the locks around the actual incrementing operations, the incrementing itself happens sequentially and not in parallel. Figure 7.5 is a diagram showing how the code runs.
Figure 7.5 Not getting performance gains from multithreading due to synchronization
The first bar shows what would happen if we just built this code as a single-threaded program: we would have a single thread that starts, counts to 10 million, and then exits. The second two bars look like what we wanted to happen: two threads each doing half the work—finishing the same work in about half the time. The last two columns are what actually happened: we did divide the work between two threads, but whenever one of the threads is doing useful work, the other has to wait, resulting in no real parallelism and slower speed than the single-threaded case (because of thread synchronization overhead).
This brings us to the fifth rule for easy multithreading: to avoid synchronization, we need to hold locks for the shortest time possible, preferably just for the time it takes to access the shared resource, and not for the duration of the entire operation. You may think that this rule conflicts with the previous one, that “hold locks for the minimum duration, and not for an entire operation” somehow contradicts “hold locks for the entire operation.” And if that is what you think, you are absolutely right. If our locks are too short, we risk race conditions, and if our locks are too long, we get synchronization.
We should try to aim for the happy middle ground where the locks are long enough to prevent race conditions but short enough to avoid synchronization. But this happy middle ground doesn’t always exist. There are situations where reducing the lock’s duration to anything that doesn’t cause synchronization will cause race conditions. In those cases, you should remember that synchronization may hurt performance, but race conditions will produce incorrect and unexpected results. So prefer synchronization to race conditions.
Synchronization is bad if we intend to do things in parallel and synchronize them unintentionally, but it is actually desirable in some other cases. For example, in banking, it’s generally frowned upon if money is transferred twice just because two wire transfer instructions arrived simultaneously. To avoid this situation, the international banking system (which is a highly decentralized digital distributed system run by thousands of different independent organizations around the world) synchronizes access to your bank account. Whenever you look at your bank account or credit card transaction history, you will see a sequence of transactions where each transaction ends before the next one begins.
Even if two credit card transactions started at the exact same time at two shops in different countries, and each shop used a different payment processor and a different bank (much more parallel than different threads in the same computer can ever be), the system will still synchronize them into an ordered sequence and act like one of them started after the other completed.
When you want to synchronize operations, you can use locks like in the counting example we’ve just seen, or you can use one of the other more advanced strategies we will discuss in the next chapter. In cases when synchronization is not desired, when parallel operations become sequential unintentionally and reduce the performance of the system, two or more threads need exclusive access to the same shared resource (usually a lock) to do their work, so the threads alternate between themselves. Each thread acquires the resource, does a little bit of work, and releases it. However, sometimes the one thread might hold that resource for a very long time, preventing another thread from working at all. This is called starvation.
7.6 Starvation
Starvation is the situation when one thread or a group of threads monopolizes access to some resource, never letting another thread or group of threads do any work. For example, the following program will create two threads, with each thread acquiring a lock and writing a character in the console (the first thread is a minus sign and the second thread is an x) in an infinite loop.
Listing 7.14 Starvation due to locking
using System.Diagnostics;
var theLock = new object();
var thread1 = new Thread(() =>
{
lock(theLock)
{
while (true)
{
Console.Write("-");
}
}
});
thread1.Start();
var thread2 = new Thread(() =>
{
while (true)
{
lock (theLock)
{
Console.Write("x");
}
}
});
thread2.Start();
The first thread acquires the lock before entering the loop and releases it after the loop (because it’s an infinite loop, that means never), while the second thread acquires and releases the lock for each character written to the console. If we run this program, we will see it writes only minus signs because the first thread holds the lock for the duration of the program, and the second thread never gets a chance to acquire the lock.
This brings us back to the fifth rule: hold locks for the shortest duration possible. When we talked about this rule before, we said that holding a lock for too long can lead to synchronization. Now we see that in extreme cases, we get starvation when we hold a lock for way too long.
Starvation is also often caused by some threads monopolizing other resources—often the CPU. If you have high-priority threads that do not block, they might prevent lower-priority threads from running. For example, this program creates two threads: the first thread writes minus signs to the console in an infinite loop, and the second write x characters. I’ve bumped the second thread’s priority to AboveNormal and made the whole program use just the first CPU core (because otherwise, we’d have to create enough threads to saturate all cores and risk making your computer unresponsive when you run this program). This is called processor affinity.
Listing 7.15 Starvation due to thread priority
using System.Diagnostics;
Process.GetCurrentProcess().ProcessorAffinity = new IntPtr(1); ❶
var thread1 = new Thread(() =>
{
while (true)
{
Console.Write("-");
}
});
thread1.Start();
var thread2 = new Thread(() =>
{
while (true)
{
Console.Write("x");
}
});
thread2.Priority = ThreadPriority.AboveNormal; ❷
thread2.Start();
❶ Runs only on the first CPU core
❷ Increases thread priority
If we run this program on Windows, we will get a screen full of x characters with a single minus thrown in every once in a while. This happens because of an anti-starvation mechanism Microsoft added to the Windows thread scheduler. On Linux, we will see roughly the same number of x characters and minuses because by default, Linux does not allow changing the thread priority.
Running this program on those two operating systems shows the two sides of the problem with changing the threads’ or processes’ priority and affinity:
The Windows example showed us that even a tiny bump in a single thread’s priority can significantly limit the processing power that other threads can use.
The Linux example showed us that priority and affinity sometimes don’t work like we expect them to.
And this gives us the final rule for easy multithreading: don’t change priority or processor affinity.
Now that we have covered the most common multithreading mistakes and know how to avoid them, it’s time to talk about different strategies for writing multithreaded code.
Summary
The compiler and CPU may reorder or even eliminate memory access operation (as long as the result of your code doesn’t change in a single-threaded environment). You can’t count on other threads seeing the state that is consistent with the code you wrote unless you use locks. So always use a lock when accessing shared data.
Always acquire the locks in the same order; that is called lock hierarchy.
Never call code that is not under your control while holding a lock.
Composing several thread-safe operations together rarely results in a thread-safe operation.
Hold locks for entire operations.
Hold locks for the shortest possible duration.
The last two bullet points contradict each other. If you hold locks for too long, you might get synchronization. If your locks are not long enough, you get race conditions. Try to find something in the middle. If you can’t do it, opt for longer locks because race conditions are typically worse than synchronization.
Synchronization is sometimes desirable. There are operations you want to perform sequentially, even when most of the system can work in parallel.
Don’t change the thread’s and processes’ priority or processor affinity.
Part 2. Advanced uses of async/await and multithreading
Now that you know all about async/await and multithreading, it’s time to dive deeper and understand that there’s much more to multithreading and asynchronous programming than the await keyword and Task.Run.
Part 2 discusses different ways to process data in the background (chapter 8) and then explains how to cancel background processing (chapter 9). Next, you will learn how to build complex asynchronous components (chapter 10) and how to customize async/await’s threading behavior (chapter 11). We’ll have a short discussion about the complexity of exceptions in asynchronous programming (chapter 12) and talk about thread-safe collections (chapter 13). In the final chapter, we’ll talk about how to write our own asynchronous collection-like components (chapter 14).
By the end of part 2 (and the book), you should have everything you need to understand and develop multithreaded applications. You will know how all the parts work and how to combine them.
8 Processing a sequence of items in the background
This chapter covers
Processing items in parallel
Performance characteristics of different ways to run code in parallel
Processing items sequentially in the background
Background processing of important jobs
There are three primary reasons for using multithreading in everyday applications. The first, and the most common, is when an application server needs to manage requests from multiple clients simultaneously. Typically, this is handled by the framework we use, such as ASP.NET, and it is beyond our control. The other two reasons for using multithreading are to finish processing sooner by performing parts of the processing in parallel and to push some tasks to be run later in the background. Both of these can significantly improve your program performance (or, at least, responsiveness and perceived performance). Let’s begin by discussing the first reason: completing our processing faster.
8.1 Processing items in parallel
To demonstrate parallel processing, we will write the world’s simplest mail merge software. Mail merge is a process that takes a mail template and creates an individual customized message for each recipient by replacing tokens in the template with information about the recipient.
Listing 8.1 World’s simplest mail merge
void MailMerge(
string from,
string subject,
string text,
(string email,string name)[] recipients)
{
var sender = new SmtpClient("smtp.example.com");
foreach(var current in recipients) ❶
{
try
{
var message = new MailMessage();
message.From = new MailAddress(from);
message.Subject = subject;
message.To.Add(new MailAddress(current.email));
message.Body = text.Replace("{name}", current.name); ❷
sender.Send(message); ❸
}
catch
{
LogFailure(current.email);
}
}
}
❶ Loops over all recipients
❷ Replaces token with value
❸ Sends message
This method accepts the sender’s e-mail address, the mail subject line, the e-mail template text, and a list of recipients’ names and addresses. It then replaces the token {name} for each recipient with the recipient’s name and sends the message. If there’s an error, we just log it and continue (in real code, sending an e-mail can fail for many reasons, many of them being transient, so we’ll usually have some retry logic).
Note that, due to constant abuse by spammers, e-mail service providers are very strict about enforcing their terms of use. If you need to send e-mail from your program, make sure you comply with your provider’s terms and consider using a transactional e-mail–sending service instead of your regular e-mail service provider. I highly recommend you never write code that sends e-mail in a loop unless you’ve cleared it with your e-mail service provider.
If we use this method in a web application, we will quickly run into an issue: sending an e-mail is slow and can take up to several seconds per message. The typical timeout for a web request is 30 seconds. That means we will start timing out and not returning the results to the user at somewhere between 10 and 40 messages, and this is a really small number of messages for anything that requires automated mail merge.
8.1.1 Processing items in parallel with the Thread class
We don’t have time to wait for all the messages to be sent sequentially, so the obvious solution is to just send all the messages in parallel. That way, we only have to wait for as long as it takes to send the longest message. To parallelize this, we can use any of the options we talked about in chapter 4, for example, the Thread class.
Listing 8.2 Mail merge with a thread per message
void MailMerge(
string from,
string subject,
string text,
(string email,string name)[] recipients)
{
var processingThreads = new Thread[recipients.Length];
for(int i=0;i< recipients.Length;++i)
{
processingThreads[i] = new Thread(()=> ❶
{
try
{
var sender = new SmtpClient("smtp.example.com");
var message = new MailMessage();
message.From = new MailAddress(from);
message.Subject = subject;
message.To.Add(new MailAddress(recipients[i].email));
message.Body = text.Replace("{name}", recipients[i].name);
sender.Send(message);
}
catch
{
LogFailure(current.email);
}
});
processingThreads[i].Start();
}
foreach(var current in processingThreads) ❷
{
current.Join();
}
}
❶ Sends each message in its own thread
❷ Waits for all threads to complete
In this code, we create a thread for every message we want to send, run all those threads in parallel, and then wait for all those threads to finish.
This can work just fine, but it does have a few weaknesses—most obviously, there is no limit to the number of threads this code can create. For example, if we have 10 simultaneous users, and each sends 100 messages (and those are not big numbers), this code is going to create 1,000 threads, and we don’t know how that will affect our program’s performance. But we can write a small program to estimate that effect.
for (int j = 0; j < 5; ++j)
{
var sw = Stopwatch.StartNew();
var threads = new Thread[1000];
for (int i = 0; i < 1000; i++)
{
threads[i] = new Thread(() => Thread.Sleep(1000));
threads[i].Start();
}
foreach (var current in threads)
current.Join();
sw.Stop();
Console.WriteLine(sw.ElapsedMilliseconds);
}
This program creates 1,000 threads, where each thread just sleeps for 1 second. We repeat this five times just to make sure we didn’t get an incorrect number because of something that isn’t related to our code running simultaneously.
When running in release configuration and without a debugger, my laptop outputs between 1.1 and 1.2 seconds for each iteration. This shows us that with a modern computer, the overhead of 1,000 threads is acceptable for our program.
If we increase the number of threads to 10,000, the output will be just over 2 seconds, and if we go to 100,000 threads, it will be between 15 and 20 seconds, and that is in a program that does nothing. In a real server, things are likely to be worse because the server needs to actually do useful work and not just play around with threads, so please don’t create a huge number of threads and assume the overhead will be negligible.
Note that if you run the program under a debugger, you will get significantly worst results because the debugger monitors thread creation and destruction. When I ran the program under a debugger, it took 14 seconds instead of just 1.2—be careful with your performance tests!
8.1.2 Processing items in parallel with the thread pool
Creating an arbitrarily large number of threads inside our server process seems bad. Fortunately for us, the thread pool was designed exactly for this situation. Let’s move our message processing to the thread pool. We could use ThreadPool.QueueUserWorkItem to run our code in the thread pool, but then we will have to write our own mechanism for detecting when all the threads finish sending the message. Writing this code isn’t that difficult, but it’s even easier to not write it, and Microsoft has been nice enough to include this feature in Task.Run.
Listing 8.4 Mail merge with each message processed in the thread pool
void MailMerge(
string from,
string subject,
string text,
(string email,string name)[] recipients)
{
var processingTasks = new Task[recipients.Length];
for(int i=0;i< recipients.Length;++i)
{
processingTasks[i] = Task.Run(()=> ❶
{
try
{
var sender = new SmtpClient("smtp.example.com");
var message = new MailMessage();
message.From = new MailAddress(from);
message.Subject = subject;
message.To.Add(new MailAddress(recipients[i].email));
message.Body = text.Replace("{name}", recipients[i].name);
sender.Send(message);
}
catch
{
LogFailure(current.email);
}
});
}
Task.WaitAll(processingTasks); ❷
}
❶ Uses Task.Run to run in the thread pool
❷ Waits for all threads to finish
This is almost the same code as that in listing 8.2. We just replaced newThread with Task.Run, removed the call to Thread.Start, and changed the Join loop at the end to a single call to Task.WaitAll.
This will solve the problem of potentially creating a huge number of threads. The thread pool will limit the number of threads to a sane number the system can handle, and there’s no longer any thread creation and destruction overhead. However, we do introduce the possibility of oversaturating the thread pool. If we try to send the same 1,000 messages from the previous example, we will tie up the thread pool until all those messages are sent, and in the meantime, anything else that uses the thread pool (like ASP.NET, for example) will have to wait. That means our server might stop processing web requests if we try to send too many messages.
Let’s modify our performance test program and see how switching to the thread pool improves our performance.
Listing 8.5 Thread pool performance benchmark
for (int j = 0; j < 5; ++j)
{
var sw = Stopwatch.StartNew();
var tasks = new Task[1000];
for (int i = 0; i < 1000; i++)
{
tasks[i] = Task.Run(() => Thread.Sleep(1000));
}
Task.WaitAll(tasks);
sw.Stop();
Console.WriteLine(sw.ElapsedMilliseconds);
}
Here we just took our code from listing 8.3 and made the same changes to switch from dedicated threads to the thread pool.
When I ran this performance test, I got 69 seconds for the first iteration, 37 for the second, 27 for the third, 23 for the fourth, and 20 seconds for the fifth and final iteration. What does this tell us? First, obviously, we completely overwhelmed the thread pool, and this version took 60 times longer to run compared to the previous one. But there’s something weird in the results: each iteration is faster than the previous one. The reason for this is that the thread pool is always automatically optimizing the number of threads, and it will continue to become faster with every iteration. This means that while this is unacceptably slow for a program that does something that rarely requires a lot of threads, in a system that continuously uses a large number of threads, this will run very well.
If we are writing a program that we know will require a large number of thread pool threads, we can just tell the system about it and not wait for the automatic optimizations. If we tell the thread pool, we will require 1,000 worker threads by using the following two lines of code:
ThreadPool.GetMinThreads(out _, out var completionPortThreads);
ThreadPool.SetMinThreads(1000, completionPortThreads);
The first iteration will be just as fast as using the Thread class, and subsequent iterations will be faster, averaging 1,025 milliseconds on my computer.
8.1.3 Asynchronously processing items in parallel
In the previous example, we overwhelmed the thread pool because we added too many long-running work items, and there were not enough available threads to process them. In our case, the threads are long running because we used blocking operations. If those work items were doing calculations, the thread pool wouldn’t have been slower than any other options because we would have been limited by the number of CPU cores. But our program is spending most of its time just waiting for the server and doing nothing. All those thread pool threads are just blocked and doing nothing. We already said that this is the exact situation where asynchronous techniques shine, so let’s make our mail merge asynchronous.
Listing 8.6 Asynchronous mail merge using Task.Run
void MailMerge(
string from,
string subject,
string text,
(string email,string name)[] recipients)
{
var processingTasks = new Task[recipients.Length];
for(int i=0;i< recipients.Length;++i)
{
processingTasks[i] = Task.Run(async ()=> ❶
{
try
{
var sender = new SmtpClient("smtp.example.com");
var message = new MailMessage();
message.From = new MailAddress(from);
message.Subject = subject;
message.To.Add(new MailAddress(recipients[i].email));
message.Body = text.Replace("{name}", recipients[i].name);
await sender.SendMailAsync(message); ❷
}
catch
{
LogFailure(current.email);
}
});
}
Task.WaitAll(processingTasks);
}
❶ Added async
❷ Added await
We only had to make two tiny changes to the code from listing 6.4. We added the async keyword and switched from using Send to SendMailAsync awaiting the result (the async version of Send is called SendMailAsync and not SendAsync because that name was already taken by an older method that predates async/await).
And, of course, we are also going to update our performance test to be asynchronous. This only requires changing ()=>Thread.Sleep(1000) to async()=>awaitTask.Delay(1000).
Listing 8.7 Asynchronous performance benchmark
for (int j = 0; j < 5; ++j)
{
var sw = Stopwatch.StartNew();
var tasks = new Task[1000];
for (int i = 0; i < 1000; i++)
{
tasks[i] = Task.Run(async () => await Task.Delay(1000));
}
Task.WaitAll(tasks);
sw.Stop();
Console.WriteLine(sw.ElapsedMilliseconds);
}
How is this going to affect performance? Running this code, I got results between 1,001 and 1,017 milliseconds, which means that here, the thread pool has virtually no overhead. It’s important to remember that in the mail merge program, the code will spend most of its time waiting, but in our performance test, it spends all of its time waiting, so those results do not perfectly translate to the real program (I already said you need to be careful with your performance tests).
8.1.4 The Parallel class
In all the samples so far, we wrote a loop that created threads or added items to the thread pool. We then collected the Thread or Task objects so we could wait until they were all completed. This is tedious and exactly the kind of boilerplate code we don’t like to write. Luckily, the .NET library has the Parallel class that can do all of this for us.
The Parallel class has four static methods:
Invoke—Takes an array of delegates and executes all of them, potentially in parallel. This method returns after all the delegates finish running.
For—Acts like a for loop, but iterations happen in parallel. It will return after all the iterations finish running.
ForEach—Acts like a foreach loop, but iterations happen in parallel. It will return after all the iterations finish running.
ForEachAsync—Similar to ForEach, but the loop body is an async method. It will return immediately and return a Task that will complete when all the iterations finish running.
In this chapter, we talk about Parallel.ForEach and Parallel.ForEachAsync because they are useful for our mail merge example. Internally, Invoke and For use the same code as ForEach. Here is what that code will look like if we use the Parallel class.
Listing 8.8 Mail merge with the Parallel class
void MailMerge(
string from,
string subject,
string text,
(string email,string name)[] recipients)
{
var processingTasks = new Task[recipients.Length];
Parallel.ForEach(recipients,
(current,_) =>
{
try
{
var sender = new SmtpClient("smtp.example.com");
var message = new MailMessage();
message.From = new MailAddress(from);
message.Subject = subject;
message.To.Add(new MailAddress(current.email));
message.Body = text.Replace("{name}", current.name);
sender.Send(message);
}
catch
{
LogFailure(current.email);
}
}).Wait();
}
We can see that this code looks closer to the original nonmultithreaded code from listing 8.1. Basically, we swapped foreach for Parallel.ForEach, which made our code run in parallel. The ignored parameter is a cancellation token. We will talk about those in the next chapter.
The Parallel class also supports cancellation, setting a scheduler, and controlling the maximum number of items we process simultaneously. Cancellation is easy to implement ourselves, and we will talk about it in the next chapter. Using schedulers is also widely supported, and we will talk about it in chapter 11. Controlling the maximum number of items processed in parallel is not easily available elsewhere and is, surprisingly, the biggest pitfall of using the Parallel class. If we migrate our performance test to use Parallel.ForEach, we get the following.
for (int j = 0; j < 5; ++j)
{
var items = Enumerable.Range(0, 1000).ToArray();
var sw = Stopwatch.StartNew();
Parallel.ForEach(items,
(item)=>Thread.Sleep(1000));
sw.Stop();
Console.WriteLine(sw.ElapsedMilliseconds);
}
In this version of the performance test, we create an array of numbers from 0 to 999 and use Parallel.ForEach to iterate over them, waiting 1 second for each item. I fully expected this code to have exactly the same performance characteristics as when using Task.Run in listing 8.5 because it’s a different syntax for doing exactly the same thing. But when I ran it, I was surprised. The first iteration took 48 seconds—faster than the almost 70 seconds we got using Task.Run. However, all subsequent iterations took 31 seconds, which was faster than the first two iterations with Task.Run but slower than the third iteration and later.
What happened here is that contrary to what is explicitly written in the documentation, Parallel.ForEach by default limits the number of items processed in parallel, so it didn’t quite overwhelm the thread pool as much as our Task.Run code did. However, because of that, the thread pool self-optimization didn’t create so many threads in response to our unreasonable load, and that is why later iterations are slower with Parallel.ForEach.
We can test this theory by setting the max number of items to be processed in parallel to a high number, by replacing the Parallel.ForEach line with
Parallel.ForEach(items,
new ParallelOptions { MaxDegreeOfParallelism = 1000 },
(item)=>Thread.Sleep(1000));
If we do that and set MaxDegreeOfParallelism to the length of the list (thereby telling it to process everything simultaneously), we do get the exact same performance characteristics we got with Task.Run in listing 8.5. This is in contradiction to the official documentation that clearly states that the default behavior is to use all threads and that setting MaxDegreeOfParallelism can only reduce but never increase the number of threads used. This means Parallel.ForEach works very well for shorter collections and when the thread pool didn’t have a chance to create a lot of threads already.
Note that whenever we find that the observed behavior contradicts the documented behavior, we have a problem. Obviously, we can’t rely on the documented behavior because that’s not how the system actually works. But it’s also risky to rely on the observed behavior because any update can fix the bug and make the system work as documented. We need to either write code that works well with both the documented behavior and the observed behavior or take the risk that we will need to issue as emergency update if this ever gets fixed in the future.
In the previous examples that used Task.Run, we got an enormous speed boost when we switched from blocking operations (listings 8.4 and 8.5) to asynchronous operations (listings 8.6 and 8.7). Unfortunately, this doesn’t happen when switching from Parallel.ForEach to its async/await compatible counterpart Parallel.ForEachAsync. Unlike Parallel.ForEach, the default MaxDegreeOfParallelism is, according to the documentation, the number of cores, and this is logically and theoretically the most efficient number of threads for asynchronous code. However, here is the problem: Parallel.ForEachAsync uses this as the number of items that are processed at the same time and not the number of threads.
For example, our code waits asynchronously for 1 second 1,000 times, and my laptop has 12 cores, so Parallel.ForEachAsync will start working on the first 12 items. They will all take exactly 1 second to complete, and it will then start working on the next 12, for a total run time of 84 seconds (because 1,000 divided by 12 rounded up is 84).
This behavior is problematic, and unless it’s changed in a future version of .NET, I would recommend avoiding Parallel.ForEachAsync or, if you have to use it, choosing a good value for MaxDegreeOfParallelism.
For completeness, here is a version of the code with Parallel.ForEachAsync.
Listing 8.10 Asyncronous mail merge with the Parallel class
void MailMerge(
string from,
string subject,
string text,
(string email,string name)[] recipients)
{
var processingTasks = new Task[recipients.Length];
Parallel.ForEachAsync(recipients, ❶
new ParallelOptions {
MaxDegreeOfParallelism= recipients.Length ❷
},
async (current,_) => ❸
{
try
{
var sender = new SmtpClient("smtp.example.com");
var message = new MailMessage();
message.From = new MailAddress(from);
message.Subject = subject;
message.To.Add(new MailAddress(current.email));
message.Body = text.Replace("{name}", current.name);
await sender.SendMailAsync(message); ❹
}
catch
{
LogFailure(current.email);
}
}).Wait(); ❺
}
❶ Uses Parallel.ForEach
❷ Don’t forget MaxDegreeOfParallelism.
❸ Makes the loop body lambda async
❹ Awaits the async version of Send
❺ At the end, waits until all threads complete
In this code, we made the following changes:
We made the loop body lambda async, switched from Send to SendMailAsync, and awaited it (like the changes we made when we converted the Task.Run example to async in listing 8.6).
We used Task.Wait() on the task returned from Parallel.ForEachAsync to wait until all the processing completes (in listing 8.6, we used Task.WaitAll for the same purpose).
And finally, we set MaxDegreeOfParallelism to the length of the list. This is probably not the optimal value, but it’s much better than the default.
8.2 Processing items sequentially in the background
In all the preceding examples, we always waited until all the messages were sent, but we didn’t do anything with the result of the sending operation. We could have just moved the sending operation to a background thread and returned a reply to the user immediately without waiting for the result. Basically, if we don’t wait for all the messages to be sent, we don’t care how long it takes to send them.
If we just move the entire e-mail sending loop to a background thread, we solve all our performance problems. And, as a bonus, we are also nicer to our e-mail service provider because we don’t try to send an unreasonable number of messages simultaneously.
8.2.1 Processing items sequentially in the background with the Thread class
Way back at the beginning of the chapter, when we started running things in parallel in listing 8.2, the first thing we used was the Thread class, so it only seems fitting that the first thing we use here is also the Thread class.
Listing 8.11 Moving the entire loop to a background thread
void MailMerge(
string from,
string subject,
string text,
(string email,string name)[] recipients)
{
var processingThread = new Thread(()=> ❶
{
var sender = new SmtpClient("smtp.example.com");
foreach(var current in recipients)
{
Try ❷
{
var message = new MailMessage();
message.From = new MailAddress(from);
message.Subject = subject;
message.To.Add(new MailAddress(current.email));
message.Body = text.Replace("{name}", current.name);
sender.Send(message);
}
catch
{
LogFailure(current.email);
}
});
processingThread.Start();
}
}
❶ Creates thread here
❷ Instead of here
This code is very similar to listing 8.2. Basically, the only difference is that we create our thread outside the loop instead of inside. We still don’t have a limit on the number of threads this code can create, but it’s now one per request and not one per message, so the performance implications should really be negligible.
It’s important to note that if we try to exit our program normally (which never happens in ASP.NET applications but does happen in the command line and native UI apps), the program will not exit until the thread finishes sending all the messages. This can be an advantage or a disadvantage, depending on the situation. If we want the program to exit without waiting for the thread, we can set the thread’s IsBackground property to true.
Spinning up a new thread to run some process in the background is useful in single-user applications, such as native UI apps, because we only need to run work in the background occasionally, and if the app does produce too many threads and overwhelms the CPU, the only person that suffers from the degraded performance is the user who made the app do it. This is not true for servers. In servers (and other multiuser scenarios), we tend to have to manage sustained load and prevent any single user from overwhelming the system. That is why in servers we need to better control the number of threads, and for this, we will usually use the work queue pattern.
8.2.2 The work queue pattern and BlockingCollection
If we no longer care about the time it takes to send the messages, it’s better to just use one thread, or a small, fixed number of threads, that will send everything. This is called the work queue pattern and is implemented by creating a queue where every thread can add items to the queue, and there is a dedicated set of threads that processes all the items. Those threads just have a loop that reads the next item from the queue and handles it. To keep the code simple, we’ll have just one processing thread in our example.
There are a surprisingly large number of tiny details you must get right when building this queue, but Microsoft has been nice enough to do most of the work for us with the BlockingCollection<T> class.
BlockingCollection<T> can be used in multiple ways. For example, it can be used as a thread-safe List<T>. But the interesting scenario is when we use BlockingCollection<T> as a work queue. In this case, there are only three methods we care about:
Add—Unsurprisingly, adds a new item to the end of the queue.
CompleteAdding—Indicates that we will not add any more items, and the thread that is processing the items can exit after it finishes with items already in the queue.
GetConsumingEnumerable—Returns an object that can be used with a foreach loop to iterate over all the items in the queue. If the queue is empty, foreach will block until another item is added to the queue or CompleteAdding is called. When CompleteAdding is called, the enumerable will indicate that there are no more items, and the foreach loop will exit.
Because this is a bit longer than the previous examples, I’ve written it as a class and not as a method. We’ll start with the class definition, a record to store all the information we need to store in the queue and the BlockingCollection queue itself.
Listing 8.12 Work queue with BlockingCollection
public class MailMerger
{
private record MailInfo(
string from,
string subject,
string text,
string email);
BlockingCollection<MailInfo> _queue = new();
Now we need to create a thread to process the queue (the code to run in that thread is in the BackgroundThread):
public void Start()
{
var thread = new Thread(BackgroundProc);
thread.Start();
}
We will also add a way to close the background thread, so we should add a method that calls CompleteAdding; that will cause the background thread to exit once everything in the queue is already handled:
public void Stop()
{
_queue.CompleteAdding();
}
Now we add a method that acts like the MailMerge from the previous code listings. In this example, this method only adds to the queue and doesn’t actually send the mail. We run the mail merge loop here and add the individually prepared messages to the queue. Preparing the messages before inserting them into or after reading them from the queue doesn’t make any difference here, but it is important for persistent queues (we will talk about that in just a few paragraphs):
public void MailMerge(
string from,
string subject,
string text,
(string email, string name)[] recipients)
{
foreach(var current in recipients)
{
_queue.Add(new MailInfo(
from,
subject,
text.Replace("{name}", current.name),
current.email));
}
}
And finally, the part you’ve all been waiting for—the code that runs in the background thread and sends this message. This method is somewhat anticlimactic. It just uses foreach on the return value of the BlockingCollections.GetConsumingEnumerable and sends the message:
private void BackgroundProc()
{
var sender = new SmtpClient("smtp.example.com");
foreach (var current in _queue.GetConsumingEnumerable())
{
try
{
var message = new MailMessage();
message.From = new MailAddress(current.from);
message.Subject = current.subject;
message.To.Add(new MailAddress(current.email));
message.Body = current.text.Replace("{name}", current.name);
sender.Send(message);
}
catch
{
LogFailure(current.email);
}
}
}
}
This is a complete work queue implementation of our mail merge feature. We used the Thread class because this is a very long-running thread—probably it will run for the entire run time of the program—and using the thread pool will just use up one of the thread pool threads without giving us the benefit of being able to reuse that thread for something else after we finish with it (because we will never finish with it). We saw back in chapter 5 that the Thread class doesn’t work well with asynchronous code, but BlockingCollection is not asynchronous and does not have an asynchronous version that does not block. You will see how we can build one in chapter 10.
BlockingCollection is stored only in memory, meaning that if the process crashes or exists in any other way (including if the computer is rebooted or someone pulls the power cord), all unprocessed items that are still in the queue will be lost. This makes it suitable only for “best effort” work (the system will try to do the work, but it can fail unexpectedly for any reason). If you need a more reliable work queue implementation, you need to use persistent queues.
8.2.3 Processing important items with persistent queues
In all the previous samples, if the process crashes (and in some of them, even if the process exists normally), all the messages that are still pending would be lost. In many cases, this is unacceptable. For those situations, we will use persistent queues (also called durable queues).
Persistent queues are simply queues stored on disk and not in memory, so they are not lost if the program crashes. You can write your own queue by just storing the items in a database table, or you can use a separate queues server. If you are running in a cloud environment, your cloud provider probably has a cheap and easy-to-use queueing service you can use (AWS has SQS, and Azure has storage queues). Another common option is the free RabbitMQ server. However, how exactly to use Azure, AWS, or RabbitMQ is outside the scope of this book.
When you use a persistent queue, reading the next item from the queue and removing it can be separate operations. This is important because it lets us select what happens when there’s a failure.
The first option is to remove the item from the queue after we finish processing it. In this case, if a stray cat pulls the power cord out of the wall right after we finish processing but before we remove the item, then after the computer restarts, we won’t know that we already processed this item, and we will process it again. This is called “at-least-once delivery.”
The second option is to remove the item from the queue before we process it. In this case, if a good dog wags his tail because he is happy to see us and hits the power switch after we remove the item from the queue but before we process it, then after the computer restarts, the item will not be in the queue and will never be processed. This is called “at-most-once delivery.”
What we really want is to guarantee each item will be processed once and only once. This is called “exactly once delivery” and, unfortunately, is usually impossible. For example, in our mail merge program, even if our queue supports exactly one delivery, if we lose connection to the mail server after we finished sending the message but before we got the confirmation from the server, we have no way of knowing whether the message was sent. And that brings us back to the same situation where we must either risk sending the message twice or risk not sending it at all.
In almost all cases, losing data is worse than processing it twice, and we will opt for at least one delivery. But if we opt for at least one delivery, and there is a message in the queue that causes our program to crash, we will be stuck in an infinite loop where the program starts, reads the first item from the queue, crashes while trying to process it, restarts, and repeats the whole process. That is why it’s important to have something that monitors the processing code for failure (this can be as simple as a try-catch block around the processing code), and if processing fails repeatedly for the same message, removes this message from the queue.
Messages that always cause code to crash are called poison messages, and the best practice is to save them somewhere (often in another persistent queue) so we can inspect the message and find the bug that caused the crash. Queues that store those messages, as well as messages that weren’t processed for other reasons, are often referred to as dead letter queues.
It’s also important to think about failures when we design the items that we store in the queue. This is why the last example in listing 8.12 prepared the messages before adding them to the queue. That way, a failure to process an item will only affect one message and not all the messages in our mail merge operation.
Summary
If you have work items that are processed individually, you can make the processing finish faster by processing the items in parallel.
You can use the Thread class for parallel processing. This works well but can be resource intensive.
You can use the thread pool using ThreadPool.QueueUserWorkItem or Task.Run. The thread pool is efficient and self-tuning. But it can take a while to get to peak performance if you throw a lot of work at it all at once. This can be mitigated by changing the thread pool settings if you know in advance the number of threads you will need.
The thread pool is especially efficient with asynchronous code.
The Parallel class is a simpler syntax to use the thread pool, but if you use it on a large collection, you should use a performance test to get a good value for MaxDegreeOfParallelism.
If you don’t care how much time it takes to finish the operation but just want to free the current thread, you can process work items sequentially in the background.
You can use the Thread class or the thread pool. Both options will work.
However, a better option is to use the work queue pattern, probably with the BlockingCollection class.
If you don’t want to lose data when the program crashes, you should use a persistent queue. You can implement one yourself using a database or use a dedicated queue solution such as RabbitMQ, AWS SQS, or Azure Storage Queues.
With persistent queues, you should consider whether you want an “at-least-once delivery” or an “at-most-once delivery” system. You should also handle poison messages.
9 Canceling background tasks
This chapter covers
Canceling operations
The CancellationToken and Cancellation-TokenSource classes
Implementing timeouts
Combining cancellation sources
In the previous chapter, we talked about how to run stuff in the background. In this chapter, we are going to talk about how to make it stop. The .NET library provides a standard mechanism for signaling that a background operation should end, which is called CancellationToken. The CancellationToken class is used consistently for (almost) all cancelable operations in the .NET library itself and in most third-party libraries.
9.1 Introducing CancellationToken
For this chapter, we need an example of a long-running operation we can cancel. So let’s write a short program that will count for the longest time possible—forever.
Listing 9.1 Running a background thread forever
var thread = new Thread(BackgroundProc);
thread.Start();
Console.ReadKey();
void BackgroundProc()
{
int i=0;
while(true)
{
Console.WriteLine(i++);
}
}
This program starts a thread that counts forever. It then waits for the user to press any key, and when the user finally does so, nothing happens. The program won’t end until the second thread stops, and because we didn’t write any mechanism that will make it stop, this program will continue forever, or more correctly, until you use some external means to terminate the entire process (you can use Task Manager, the taskkill command, debugger, hitting Ctrl-C, rebooting the entire machine, etc.)
The easiest way to make the program terminate is to mark the thread as a background thread. A process terminates when the last thread that is not marked as a background thread terminates, so we can make the program exit when the user hits a key by simply adding this line before the call to Thread.Start:
thread.IsBackground = true;
While this can solve the problem in some cases, it has two major drawbacks:
You can only use this technique to cancel an operation when you completely exit your program.
This will stop the background thread in the middle of whatever it was doing without giving it a chance to complete an operation or save its state (however, it will not leave your program in an unstable state because the program is no longer running).
The first problem alone already makes this unsuitable for most scenarios. When we look for a way to stop a thread without closing the entire program, we can see that the Thread class has a method named Abort that seems promising. However, that method still suffers from the second problem. It’s actually worse than the previous example because terminating a thread in the middle of whatever it was doing can leave the entire program in an inconsistent state if that process, for instance, was allocating memory and updating the memory manager internal data structures.
This makes Abort too dangerous to use, so dangerous that Microsoft made it not work anymore in .NET Core and .NET 5 and later (it now just throws a PlatformNotSupportedException on all platforms).
So with no built-in way to stop a thread, we have no choice but to code something ourselves. Let’s start with the simplest possible option, just a flag that tells us when to stop the thread.
Listing 9.2 Using a flag to cancel a background thread
var thread = new Thread(BackgroundProc);
bool isCancellationRequested = false; ❶
thread.Start();
Console.ReadKey();
isCancellationRequested = true; ❷
void BackgroundProc()
{
int i=0;
while(true)
{
if(isCancellationRequested) return; ❸
Console.WriteLine(i++);
}
}
❶ Flags variable
❷ Sets flag to exit
❸ If a flag is set, exit.
This option works in the current version of .NET and on current hardware, but it isn’t guaranteed to work. As we talked about in chapter 7, high-end CPUs can have per-core cache, and when the main thread sets the flag, it actually updates its own core’s cached version. Likewise, when the background thread checks the flag, it might be reading from a different core’s cached version. On your development machine, you’ll typically have a smaller number of cores and a lot of programs running (such as your development environment and a web browser), so the CPU cores need to switch threads and processes often, and this problem will never surface. But if you then run your software on a high-end server with many CPU cores and a smaller number of processes, the cancellation might be delayed because setting the flag won’t propagate to the background thread until both cores flush their cache.
In addition, as also discussed chapter 7, the compiler is allowed to rewrite your code to make it run faster as long as it does not change the result of the code in a single-threaded environment. And in a single-threaded environment, the flag can’t change during the loop, so it’s safe to remove the check. This problem is especially difficult to debug because it tends to happen only in release builds (debug builds are usually not optimized) and can appear only in some environments; thus, the code can run perfectly fine on your development machine and fail on the production server. It can even run on the server today but start failing when something on the server is upgraded in the future.
The solution, as we’ve also seen in chapter 7, is to use locks when accessing the flag. There are better and faster ways to protect access to a single bool variable, but I’m going to use the lock statement for simplicity. Don’t worry. We will change it to something better in the next code listing.
Listing 9.3 Using locks to protect the cancellation flag
var thread = new Thread(BackgroundProc);
var cancelLock = new object();
bool isCancellationRequested = false;
thread.Start();
Console.ReadKey();
lock(cancelLock) ❶
{
isCancellationRequested = true;
}
void BackgroundProc()
{
int i=0;
while(true)
{
lock(cancelLock) ❷
{
if(isCancellationRequested) return;
}
Console.WriteLine(i++);
}
}
❶ Locks when setting the flag
❷ Locks when checking the flag
We just took the previous example and wrapped all access to the flag with lock statements. Now we have a thread-safe, future-proof way to cancel the background thread. But we created a maintainability problem. It’s just a matter of time until some future team member forgets to add a lock and introduces a bug that only happens in production under load. This is bad, but fortunately for us, object-oriented programming already solved this problem more than 50 years ago (object-oriented programming was first formalized in 1967): just write a class that encapsulates the flag and controls all access to it.
Listing 9.4 Wrapping the cancel flag in a class
public class CancelFlag
{
private bool _isCancellationRequested;
private object _lock = new();
public void Cancel()
{
lock(_lock)
{
_isCancellationRequested = true;
}
}
public bool IsCancellationRequested
{
get
{
lock(_lock)
{
return _isCancellationRequested;
}
}
}
}
This class is about as simple as it can get: there’s a Cancel method that lets you set the cancel flag and an IsCancellationRequested property that lets you check the value of the cancel flag. Inside each of those, access to the flag is protected by locks.
Now we just need to change our program to use the CancelFlag class:
var thread = new Thread(BackgroundProc);
var shouldCancel = new CancelFlag(); ❶
thread.Start();
Console.ReadKey();
shouldCancel.Cancel(); ❷
void BackgroundProc()
{
int i=0;
while(true)
{
if(shouldCancel. IsCancellationRequested) return; ❸
Console.WriteLine(i++);
}
}
❶ Creates cancel flag
❷ Sets cancel flag
❸ Checks cancel flag
We have now created a thread-safe, future-proof, and maintainable way to cancel the background thread. But—and you know there has to be a but because we’re not even close to the end of the chapter—the CancelFlag API has a weak point. It’s easy to abuse the CancelFlag and use it in a way that will have unexpected effects on other parts of the program. For example, if we add another background thread that sometimes needs to cancel itself, it might look something like this:
This is a method similar to BackgroundProc from the previous example that has an additional exit condition, and the developer noticed there is already a way to stop the thread (our cancel flag), so they used it. This works for this method, but it also has the side effect of canceling the other background thread simply because both threads are using the same flag, which is probably not what we want. We can fix this shortcoming by splitting our CancelFlag into two classes: one lets us set the cancel flag, while the other can only check it. We then get an API that looks like
class CancelFlag
{
public bool IsCancellationRequested {get;}
}
class CancelFlagSource
{
public void Cancel();
public CancelFlag Flag {get;}
}
We separated the interface into two classes: the CancelFlagSource creates and controls the CancelFlag, and the CancelFlag is only used for checking if cancellation was requested. Code that may cancel the operation uses CancelFlagSource, while code that can be canceled only gets the CancelFlag. If we change the program to use our new cancel flag interface, we get the following.
Listing 9.5 Using CancelFlag and CancelFlagSource
var thread = new Thread(BackgroundProc);
var cancelFlagSource = new CancellationFlagSource(); ❶
var shouldCancel = cancelFlagSource.Flag; ❷
thread.Start();
Console.ReadKey();
cancelFlagSource.Cancel(); ❸
void BackgroundProc()
{
int i=0;
while(true)
{
if(shouldCancel. IsCancellationRequested) return; ❹
Console.WriteLine(i++);
}
}
❶ Creates flag source
❷ Gets flag for background thread
❸ Sets flag
❹ Checks whether flag was set
There is one important thing missing in this example: we didn’t implement the CancelFlagSource and CancelFlag classes. But that’s okay because Microsoft has done all the work and implemented the CancellationToken and CancellationTokenSource classes that do everything we talked about and more. Here’s how our program looks when we use CancellationToken.
Listing 9.6 Using CancellationToken
var thread = new Thread(BackgroundProc);
var cancelTokenSource = new CancellationTokenSource(); ❶
var shouldCancel = cancelTokenSource.Token; ❷
thread.Start();
Console.ReadKey();
cancelTokenSource.Cancel(); ❸
void BackgroundProc()
{
int i=0;
while(true)
{
if(shouldCancel. IsCancellationRequested) return; ❹
Console.WriteLine(i++);
}
}
❶ Creates CancellationTokenSource
❷ Gets token for background thread
❸ Cancels token
❹ Checks whether token was canceled
This is exactly the same code as in listing 9.5. I just replaced CancelFlag with CancellationToken.
It’s important to remember that at its core, CancellationToken is just a bool variable (wrapped in a thread-safe, future-proof, abuse-resistant class); there’s nothing magic about it, and it doesn’t know by itself how to cancel anything. If our previous program did something time consuming in the loop instead of Console.WriteLine (for example, a calculation that takes 1 full minute), the thread cancellation will be delayed until that long calculation completes.
Listing 9.7 Delayed cancellation with a long operation
var thread = new Thread(BackgroundProc);
var cancelTokenSource = new CancellationTokenSource();
var shouldCancel = cancelTokenSource.Token;
thread.Start();
Console.ReadKey();
cancelTokenSource.Cancel();
void BackgroundProc()
{
int i=0;
while(true)
{
if(shouldCancel.IsCancellationRequested) return;
ACalculationThatTakesOneMinute();
Console.WriteLine(i++);
}
}
void ACalculationThatTakesOneMinute()
{
var result = 0;
var start = DateTime.UtcNow;
while((DateTime.UtcNow - start).TotalMinutes < 1) ❶
{
result++; ❷
}
}
❶ For 1 full minute
❷ Calculates stuff
In this code, the background thread main loop, which does the cancellation checking, calls another long-running method. That means that we wait until this method returns before the next cancellation check, and because the time between cancellation checks is 1 minute in this example, it would take between 0 and 1 minute (or 30 seconds on average) from the time we cancel the background thread until it finally terminates.
If you do anything time-consuming inside the loop, you either have to accept that canceling may take a while or change the long-running code to check the CancellationToken periodically. For example, we can modify our previous example to check for cancellation inside ACalculationThatTakesOneMinute.
Listing 9.8 Using CancellationToken with a long operation
var thread = new Thread(BackgroundProc);
var cancelTokenSource = new CancellationTokenSource();
var shouldCancel = cancelTokenSource.Token;
thread.Start();
Console.ReadKey();
cancelTokenSource.Cancel();
void BackgroundProc()
{
int i=0;
while(true)
{
if(!ACalculationThatTakesOneMinute(cancelTokenSource.Token))
return;
Console.WriteLine(i++);
}
}
bool ACalculationThatTakesOneMinute(CancellationToken shouldCancel)
{
var start = DateTime.UtcNow;
var result = 0;
while((DateTime.UtcNow - start).TotalMinutes < 1)
{
if(shouldCancel.IsCancellationRequested) ❶
return false;
result++;
}
return true;
}
❶ Inner cancellation check
In this code, we moved the cancellation check into the ACalculationThatTakesOneMinute method and changed it to return bool where true means the method has completed successfully, and false means it has been canceled. This is required because most of the time in a real program, it’s useful to know whether the calculation has completed, and we can use the result or not.
9.2 Canceling using an exception
In our previous examples, we moved the cancellation check into the ACalculationThatTakesOneMinute method. This means calling the method changed from the nice and straightforward
ACalculationThatTakesOneMinute();
to the more convoluted
if(!ACalculationThatTakesOneMinute()) return;
This doesn’t only clutter our code with ifs, but it also creates a maintenance risk because someone in the future might change the code and forget to add the if. It also uses up the method return value, so if our method needs to return a value, we must use tuples or out parameters.
We can solve all those problems by using an exception. We can solve those problems if we replace our cancellation check that returns false on cancellation from
if(shouldCancel.IsCancellationRequested)
throw new OperationCanceledException();
This is so common that Microsoft has provided a method that does just that, and the cancellation check becomes just
shouldCancel.ThrowIfCancellationRequested();
In all the examples so far, the background operations we wanted to cancel were some kind of calculations, a piece of code that is doing some work, and we can embed the cancellation check inside that work. But what if we want to cancel an operation that we can’t insert cancellation checks into?
9.3 Getting a callback when the caller cancels our operation
Let’s say we have a library that has its own cancellation system not based on CancellationToken. For example, it can have an interface that looks like
With this interface, in normal operation, we call Start and wait for the Complete event. If we want to cancel an ongoing operation, we call the Cancel method. We sometimes find interfaces like those in code that calls remote servers, code that uses some non-.NET libraries, or more rarely, in third-party libraries written by someone who just for whatever reason doesn’t like CancellationToken.
We can add another background thread that just repeatedly checks the status of CancellationToken and calls MyCalculation.Cancel when IsCancellationRequested becomes true, but this is obviously wasteful. That is why CancellationToken can call a callback when it is canceled. That way, using the example MyCalculation class is easy:
void RunMyCalculation(CancellationToken cancel)
{
var calc = new MyCaclulation();
cancel.Register(()=>calc.Cancel()); ❶
calc.Complete += CalcComplete();
calc.Start();
}
❶ Registers a callback
The CancellationToken.Register method is used to register the callback we want the CancellationToken to call when it is canceled. Calling Register multiple times will cause all callbacks to run when the CancellationToken is canceled. Calling Register when the CancellationToken is already canceled will run the callback immediately. Register returns an object that can be used to unregister the callback.
Note that the callback you pass to Register will run in the thread calling Cancel and not in the background thread you are trying to cancel. Make sure everything you do in the callback is thread safe and avoid doing things that can interfere with the calling thread.
9.4 Implementing timeouts
A very common scenario for cancellation is the timeout, where we want to cancel an operation if it hasn’t completed in a certain time. For example, if we tried to open a network connection, and we didn’t get a reply, we can’t tell if we didn’t get an answer because the network packet hasn’t reached us yet or because the computer we are trying to connect to doesn’t exist. So we wait for a certain time, and if we don’t get a reply by then, we assume that the reply will never arrive and cancel the operation.
It would have been easy to write code that starts a timer and calls the CancellationTokenSource.Cancel when the timer elapses, but because this is such a common scenario, CancellationTokenSource already has this feature built in with the CancelAfter method. The CancelAfter method has two overrides, one that accepts the number of milliseconds to wait
var cancelSource = new CancellationTokenSource();
cancelSource.CancelAfter(30000);
and the nicer, more modern override that accepts a TimeSpan:
var cancelSource = new CancellationTokenSource();
cancelSource.CancelAfter(TimeSpan.FromSeconds(30));
Both of those code snippets create a CancellationToken (accessible as cancelSource .Token) that will cancel automatically after 30 seconds.
Calling CancelAfter when the CancellationToken is already canceled does nothing. Calling CancelAfter a second time, before the CancellationToken is canceled, will reset the timer. Calling CancelAfter(-1) before the CancellationToken is canceled will cancel the timeout.
9.5 Combining cancellation methods
Sometimes you want to be able to cancel an operation for two completely different reasons. For example, let’s say you have code that can be canceled by the user, and you want to add a timeout. For this example, we’ll write code that performs an HTTP GET request to a server and returns the result as a string.
Listing 9.9 HTTP call that can be canceled by the user
public async Task<string>
GetTextFromServer(CancellationToken canceledByUser)
{
using(var http = new HttpClient())
{
return await http.GetStringAsync("http://example.com",
canceledByUser);
}
}
This method accepts a CancellationToken called canceledByUser, unsurprisingly indicating that the operation was canceled by the user. We now want to add a timeout, but we can’t because we need a CancellationTokenSource, and we only have a CancellationToken.
The CancellationTokenSource.CreateLinkedTokenSource static method can create a CancellationTokenSource from one or more CancellationToken objects. We can then use the new CancellationTokenSource to create a CancellationToken we control and add the timeout to it.
Listing 9.10 HTTP call that can be canceled by the user or a timeout
public async Task<string>
GetTextFromServer(CancellationToken canceledByUser)
{
var combined = CancellationTokenSource.CreateLinkedTokenSource( ❶
canceledByUser);
combined.CancelAfter(TimeSpan.FromSeconds(10)); ❷
using(var http = new HttpClient())
{
return await http.GetStringAsync("http://example.com",
combined.Token); ❸
}
}
❶ Creates a CancellationTokenSource we control
❷ Adds timeout
❸ Uses new token
You can pass any number of CancellationToken objects to CreateLinkedTokenSource; the token controlled by the new CancellationTokenSource will be canceled automatically if any of them are canceled. You can then use the new CancellationTokenSource to add a timeout or manually cancel its token. Anything you do with the new CancellationTokenSource will not affect the tokens used to create it.
9.6 Special cancellation tokens
We spent this entire chapter talking about how to use a CancellationToken to cancel an operation; however, sometimes, while you don’t need to be able to cancel an operation, the API you are using still requires a CancellationToken. In those cases, you can just pass CancellationToken.None. This will give you a CancellationToken that can never be canceled. Creating a CancellationToken with new CancellationToken(false) will give you the same results but is less readable.
In contrast, new CancellationToken(true) will create a CancellationToken that is already canceled. This doesn’t make much sense in normal code but can be useful in unit tests.
Summary
CancellationToken is the standard way to cancel operations in .NET.
The CancellationTokenSource class is used to create and control CancellationToken objects.
CancellationTokenSource.Cancel is used to cancel an operation, and CancellationToken.IsCancellationRequired is used to check whether it has been canceled.
CancellationToken is just a flag. It doesn’t know how to cancel anything by itself.
You can use CancellationToken.Register to run a callback when it canceled.
You can use CancellationTokenSource.CancelAfter to implement timeouts.
CancellationTokenSource.CreateLinkedTokenSource lets you create a CancellationTokenSource you control from one or more existing CancellationToken objects.
When you need to pass a CancellationToken that you never want to cancel, you can use CancellationToken.None.
10 Await your own events
This chapter covers
Creating Task objects that you can control
TaskCompletionSource and TaskCompletionSource<T>
Completing a Task successfully and with an error, and canceling a Task
Adapting old and nonstandard asynchronous APIs to use tasks
Using TaskCompletionSource to implement asynchronous initialization
Using TaskCompletionSource to implement asynchronous data structures
Until now, we’ve talked about using async/await to consume asynchronous APIs. In this chapter, we’ll talk about writing your own asynchronous APIs. Common reasons for doing so include adapting a non-Task–based asynchronous API so that it can be used with await, using await to asynchronously wait for events that happen in your application, or creating an async/await-compatible thread-safe data structure, just to give a few examples. (Spoiler: We will write code for those examples later in this chapter.)
Way back in chapter 3, to understand how the async and await keywords work, we took a method that used async/await and transformed it into an equivalent method that produces exactly the same asynchronous operation but doesn’t use async and await. Back then, we didn’t know how to create Task objects, but we did know that await can be implemented by a callback (specifically, Task.ContinueWith). So instead of a Task, we used callbacks to report the operation results. To make this change, we modified the method signature from
ContinueWith, the .NET built in callback mechanism, uses a single callback that must check the Task for information regarding the success and failure of the asynchronous operation. However, we choose to use separate setResult and setException callbacks for the success and failure cases because it’s simpler. As a byproduct, by successfully simulating a Task with those two calls, we showed that those setResult and setException calls are (if we have a way to connect them to a Task) sufficient to control it.
Surprise! The .NET library has a class named TaskCompletionSource<T>. It can create Task<T> objects and has methods named SetResult and SetException. Let’s see how you can use it.
10.1 Introducing TaskCompletionSource
The .NET library has the TaskCompletionSource class to create and control Task objects and the TaskCompletionSource<T> class to create and control Task<T> objects. TaskCompletionSource and TaskCompletionSource<T> are exactly the same, except that for TaskCompletionSource (without the <T>), the SetResult and TrySetResult methods do not accept any parameter and just complete the Task without setting a result (because unlike Task<T>, Task does not have a Result property). For the rest of this chapter, I’m going to write TaskCompletionSource instead of TaskCompletionSource or TaskCompletionSource<T>, but everything I write applies to both.
TaskCompletionSource has a property named Task that lets us get the Task created by it. Each TaskCompletionSource controls one Task, and reading the Task property multiple times will return the same Task object.
Initially, the Task status is WaitingForActivation, and the Task’s IsCompleted, IsCompletedSuccessfully, IsCanceled, and IsFaulted properties are all false. Using await on the new Task will asynchronously wait, and calling Wait or reading the Result property will block until you use the TaskCompletionSource to complete the Task.
To demonstrate the various ways we can complete the Task, we’ll use the following example code.
Listing 10.1 A template for TaskCompletionSource demo
public class TaskCompletionSourceDemo
{
private Task<int> BackgroundWork() ❶
{
var tcs = new TaskCompletionSource<int>();
Task.Run(()=> ❷
{
❸
});
return tcs.Task; ❹
}
public async Task RunDemo()
{
var result = await BackgroundWork(); ❺
Console.WriteLine(result);
}
}
❶ No async keyword
❷ Runs in another thread
❸ Task completion should happen here.
❹ Returns Task<int>, not int
❺ Waits for Task to complet
Note that the BackgroundWork method is not marked as async. Because of this, the compiler doesn’t transform it, we can’t use await inside of it, and the compiler doesn’t wrap the result in a Task, which means we are responsible for creating and returning the Task<int> ourselves. The RunDemo method (that is marked as async) just uses await to get the result produced by the BackgroundWork method.
TaskCompletionSource has three sets of methods we can use to complete the Task:
1. SetResult and TrySetResult will complete the Task, change its state to RanToCompletion, and in case of a Task<T>, store the result value in the Task<T> object (accessible with Task.Result or await). After calling SetResult or TrySetResult, both IsCompleted and IsCompletedSuccessfully will be true.
public class TaskCompletionSourceDemo
{
private Task<int> BackgroundWork()
{
var tcs = new TaskCompletionSource<int>();
Task.Run(()=>
{
tcs.TrySetResult(7) ❶
});
return tcs.Task;
}
public async Task RunDemo()
{
var result = await BackgroundWork(); ❷
Console.WriteLine(result); ❸
}
}
❶ Completes Task successfully
❷ Continues running
❸ Prints 7
This example shows how to complete a Task successfully. Calling TrySetResult (or SetResult) causes the await to continue running.
2. SetException and TrySetException will complete the Task, change its state to Faulted, and store the exception or list of exceptions in the Task. The exception or list of exceptions will be wrapped in an AggregateException object and stored in the Task.Exception property. Using await on the task, reading the Result property, or calling Wait() will cause the AggregateException to be thrown. After calling SetException or TrySetException, IsCompleted and IsFaulted will be true.
public class TaskCompletionSourceDemo
{
private Task<int> BackgroundWork()
{
var tcs = new TaskCompletionSource<int>();
Task.Run(()=>
{
tcs.TrySetException(new Exception("oops")) ❶
});
return tcs.Task;
}
public async Task RunDemo()
{
var result = await BackgroundWork(); ❷
Console.WriteLine(result);
}
}
❶ Completes Task with error
❷ Throws AggregateException
In this example, we used TrySetException to complete the Task and change it to a faulted state. The await operator will throw the exception.
3. SetCanceled and TrySetCanceled will complete the Task, change its state to Canceled, and optionally, store a cancellation token in the Task. Using await on the task, reading the Result property, or calling Wait()will throw a TaskCanceledException. If you pass a cancellation token to TrySetCanceled, it will be available in the TaskCanceledException.CancellationToken property. After calling SetCanceled or TrySetCanceled, the IsCompleted and IsCanceled properties will be true. Note that although await will throw an exception, the Task’s IsFaulted property will be false, and the Exception property will be null.
public class TaskCompletionSourceDemo
{
private Task<int> BackgroundWork()
{
var tcs = new TaskCompletionSource<int>();
Task.Run(()=>
{
tcs.TrySetCanceled() ❶
});
return tcs.Task;
}
public async Task RunDemo()
{
var result = await BackgroundWork(); ❷
Console.WriteLine(result);
}
}
❶ Completes Task by canceling it
❷ Throws TaskCanceledException
In this example, we used TrySetCanceled to cancel the Task, and await will throw a TaskCanceledException exception. There is no way to use TaskCompletionSource to set the Task’s status to any of the other options (WaitingToRun, Running, or WaitingForChildrenToComplete).
The difference between the two variations of each method is that the older SetXXX will throw an exception if the Task is already complete, while the newer TrySetXXX will not (if the Task is already complete, the Task will not change, and any parameters passed to the method will be ignored). The TrySetXXX variation was added because the older methods can create a race condition in any situation where you might try to complete a task from two different threads (for example, one thread doing the work and another handling cancellation). It is best practice to use the newer Try versions of all the methods unless you specifically rely on them to throw an exception if the Task is already complete. The Try variant will return true if it completes the Task or false if the Task was already completed.
For example, in the following code snippet, simulating a situation when a different thread cancels the Task right before a calculation is complete, the call to SetResult will throw an exception:
var tcs = new TaskCompletionSource<int>();
tcs.SetCanceled(); ❶
tcs.SetResult(7); ❷
❶ Cancels the task
❷ Throws an exception
While in this code snippet, the call to TrySetResult will be ignored without an exception (you can still know TrySetResult failed because it will return false):
var tcs = new TaskCompletionSource<int>();
tcs.TrySetCanceled(); ❶
tcs.TrySetResult(7); ❷
❶ Cancels the task
❷ Ignored, returns false
10.2 Choosing where continuations run
The code that runs after the asynchronous operation (the code after the await or the callback passed to ContinueWith) is called a continuation. Calling any of the TaskCompletionSource’s methods that complete the Task will cause the continuation to run (obviously, that’s the whole point), and TaskCompletionSource lets us decide whether the continuation can run immediately in the thread that called the TaskCompletionSource method.
If we allow the continuation to run immediately, it can run before TrySetResult (or any of the other methods) return. This means that TrySetResult can take an arbitrarily long time to run and that our code is in a state that can run arbitrary code that isn’t under our control safely. For example, the following code has a potential deadlock bug:
In this code, we want to use a value protected by a lock as the result of a task, so we acquire the lock and call TrySetResult with the value. This might cause code that is not under our control (the Task continuation) to run while we are holding the lock, and if this code waits for something else that needs the same lock in another thread, we will have a deadlock.
One solution to this problem is to move the TrySetResult call outside of the lock block:
int copyOfValue;
lock(_valueLock)
{
copyOfValue = _value;
}
_taskSource.TrySetResult(copyOfValue);
We can’t use the _value variables outside of the lock block, but we can copy it to a local variable and pass the copy to TrySetResult outside the lock. This might still run code outside our control before TrySetResult returns, so we can’t know how much time TrySetResult will take, but there is no longer a risk of a deadlock.
Another option is to make TaskCompletionSource run the code in another thread. We do this by using the TaskCompletionSource constructor that accepts a TaskCreationOptions parameter and passes the TaskCreationOptions. RunContinuationsAsynchronously value:
_taskSource = new TaskCompletionSource<int>(
TaskCreationOptions. RunContinuationsAsynchronously);
We need to decide whether we want TaskCompletionSource to run the continuation code in another thread at the TaskCompletionSource construction time. We can’t choose some TrySetResult to run the continuation in a background thread while others don’t. For example, we can’t make TaskCompletionSource use another thread only when we are holding a lock.
I used TrySetResult in this example, but everything here also applies to all the other methods that complete the Task (SetResult, SetException, TrySetExcetion, SetCanceled, and TrySetCanceld).
10.3 Example: Waiting for initialization
Let’s start with a simple example: we’ll write a class that requires a lengthy initialization process and performs this initialization in the background. Whenever you call a method of this class, if the initialization hasn’t completed yet, that method will await until the initialization is complete.
Listing 10.5 Class with background initialization
public class RequiresInit
{
private Task<int> _value;
public RequiresInit ()
{
var tcs = new TaskCompletionSource<int>();
_value = tcs.Task; ❶
Task.Run(()=>
{
try
{
Thread.Sleep(1000); ❷
tcs.TrySetResult(7); ❸
}
catch(Exception ex)
{
tcs.TrySetException(ex);
}
});
}
public async Task<int> Add1()
{
var actualValue = await _value; ❹
return actualValue+1;
}
}
❶ Assigns the Task before leaving constructor
❷ Simulates long calculation
❸ Sets the Task’s result
❹ Waits for result if needed
In this example, we wrote the RequiresInit class. This class has a lengthy initialization process and doesn’t want to (or maybe can’t) let the entire initialization process run in the constructor. So inside the constructor, we just kick off that initialization process in a background thread using Task.Run and return immediately. To access the result of the initialization process, we create a Task<int> using TaskCompletionSource<int> and assign it to the value field.
Obviously, the result of this lengthy initialization is probably a complex object, but for the sake of simplicity, it’s an int in this example. Also, the initialization is just a call to Thread.Sleep, and the result of the initialization is always the number 7.
In the background thread, after calculating the result, we use TrySetResult to complete the task and assign the calculation result to it. In case of an exception during the calculation, we use TrySetException to propagate the exception into the task.
Later, when we want to use the initialization result, we read it using await_value, and if the calculation has already completed, this will return the value immediately. If the calculation hasn’t completed yet, this will asynchronously wait until the result becomes available. Finally, if the calculation has failed, this will throw an exception telling us why.
Using a task like this combines getting the result, handling the signal that the result is available, and reporting initialization errors (if any) into a single operation. This not only saves us from typing but also makes the code more maintainable because future developers can’t forget to wait for the value to become available or forget to check for errors.
10.4 Example: Adapting old APIs
Probably the most straightforward use of TaskCompletionSource is adapting asynchronous APIs that are incompatible with await. Fortunately, this is becoming quite rare because almost all the asynchronous operations in the .NET library and common third-party components have been adapted to use Task objects and are already compatible with await. Today, libraries that don’t support async/await are mostly either wrappers for non-.NET code or written by authors who really hate async/await.
To demonstrate this, we’ll use a pattern that was pretty common before async/await, an interface that lets you start an operation and get notified when it completes:
public interface IAsyncOperation
{
void StartCalculation();
event Action<int> CalculationComplete;
}
Adapting this using TaskCompletionSource is rather simple, as shown in the following listing.
public Task<int> CallAsyncOperation()
{
var tcs = new TaskCompletionSource<int>();
_asyncOperation.CalculationComplete +=
result => tcs.TrySetResult(result);
_asyncOperation.StartCalculation();
return tcs.Task;
}
We just created a TaskCompletionSource, subscribed to the asynchronous operation’s nonstandard completion notification, and called TrySetResult when the asynchronous operation is completed.
The standard pattern for asynchronous operations in .NET before tasks and async/await was a pair of methods, one with the Begin prefix that returns an IAsyncResult object and one with the End prefix. All those methods in the .NET library and most third-party libraries already have a task-based alternative, so it’s quite rare to have to deal with those. I’m only talking about this so you’ll know what all of those BeginXXX and EndXXX methods are and what to do if you find yourself using an old library that wasn’t adapted to using the Task class.
Before async/await, writing asynchronous code was difficult. The asynchronous methods were a rarely used option for only those who really needed them, so the asynchronous version was based on the non-asynchronous API version. The asynchronous version was always composed of two methods:
The method with the Begin prefix accepts all the parameters of the non-async version and two additional parameters (called callback and state). This method starts the asynchronous operation. The IAsyncResult object returned by the Begin method represents the asynchronous operation and, like Task in the newer APIs, can be used to detect when the operation completes.
The method with the End prefix takes the IAsyncResult object, cleans up any resources used by the asynchronous operation, and returns the result of the operation.
To demonstrate adapting this, we’ll take an old-style asynchronous operation and adapt it to the new Task-based style. For this example, we will use the Stream.Read method:
int Read (byte[] buffer, int offset, int count);
And the old-style async version is composed of two methods—Stream.BeginRead and Stream.EndRead:
IAsyncResult BeginRead(
byte[] buffer, int offset, int count,
AsyncCallback? callback, object? state);
int EndRead (IAsyncResult asyncResult);
As you can guess, we can use the callback parameter and TaskCompletionSource just like we used in the previous example, but there’s an easier way. The .NET library contains the Task.Factory.FromAsync method that creates a Task from this method pair. Here is how it is used:
public Task<int> MyReadAsync(
Stream stream, byte[] buffer, int offset, int length)
{
return Task.Factory.FromAsync(
(callback,state)=>stream.BeginRead(
buffer,0,buffer.Length,callback,state), stream.EndRead, null);
}
The Task.Factory.FromAsync method takes three parameters:
A lambda that calls theBeginXXXmethod—If the BeginXXX method doesn’t need any parameters other than callback and state, you can pass it without wrapping it in a lambda.
TheEndXXXmethod—If this method has out parameters, you need to wrap it in a lambda and extract the values of those parameters.
Thestateparameter—It isn’t required if you are using lambda, and it can always be null.
Because most APIs (including Stream.Read) already have a Task-based version, and newer APIs only have Task-based asynchronous versions without the BeginXXX and EndXXX methods, having to use this is quite rare. So we will not go into any more detail about it.
10.6 Example: Asynchronous data structures
In this example, we’ll write an asynchronous queue. Our asynchronous queue, just like a normal queue, is a FIFO (first-in, first-out) collection with two operations: enqueue and dequeue. The enqueue operation adds an item to the queue, and the dequeue operation returns the first item in the queue if the queue isn’t empty. What makes our AsyncQueue special is that if there are no items in the queue, the dequeue operation will return a Task that will complete when a new item is later added to the queue. That way, await asyncQueue.Dequeue() will return immediately with the next value if it’s already in the queue or, if the queue is empty, asynchronously wait until the next value becomes available.
Our queue class is mostly two queues, one of data waiting to be processed and one of processors waiting for data. At least one of those queues must be empty at all times, because otherwise, we have missed an opportunity to match a data item with a processor.
Listing 10.7 AsyncQueue
public class AsyncQueue<T>
{
private Queue<TaskCompletionSource<T>>
_processorsWaitingForData = new();
private Queue<T> _dataWaitingForProcessors = new();
private object _lock = new object();
When a processor becomes available, it calls Dequeue. If a data item is waiting, we deliver it to the processor immediately via a completed Task created with Task.FromResult. If no data is available, we create a new TaskCompletionSource and return its Task, and we enqueue this TaskCompletionSource in the processorsWaitingForData queue:
public Task<T> Dequeue(CancellationToken cancellationToken)
{
lock (_lock)
{
if (_dataWaitingForProcessors.Count > 0)
{
return Task.FromResult(_dataWaitingForProcessors.Dequeue());
}
var tcs = new TaskCompletionSource<T>(
TaskCreationOptions.RunContinuationsAsynchronously);
_processorsWaitingForData.Enqueue(tcs);
Because whoever uses our class is likely to expect Enqueue and Dequque operations to be fast, we create the TaskCompletionSource objects with the TaskCreationOptions.RunContinuationsAsynchronously flag. This means the code that processes the data will run in another thread and not inside our Enqueue and Dequeue methods. It also allows us to call TrySetResult and TryCancel while holding a lock.
We also let the processor pass a CancellationToken because we need a way for a processor to indicate it is no longer available. If this cancellation token becomes canceled, we cancel the processor’s Task but leave the TaskCompletionSource in the queue because it’s simpler that way.
As an optimization, we only register if the CancellationToken can be canceled. An example of a CancellationToken that can’t be canceled is the dummy token returned by the CancellationToken.None property:
When data is added to the queue by calling Enqueue, we try to deliver it to the first available processor, dequeue the first TaskCompletionSource from _processorsWaitingForData queue, and call TrySetResult. If TrySetResult returns true, we successfully completed the Task and sent the data item to the processor, so we can return.
If TrySetResult returns false, it means the Task has already completed, that is, it was canceled because the TaskCompletionSource is fully under our control, and the cancellation code is the only code we wrote that completes a task without first removing its TaskCompletionSource from the queue. In this case, we just move to the next processor.
As an optimization, we only handle the cancellation case if the CancellationToken can be canceled (for example, the CancellationToken.None property returns a dummy token that is never canceled):
public void Enqueue(T value)
{
lock (_lock)
{
while (_processorsWaitingForData.Count > 0)
{
var nextDequqer = _processorsWaitingForData.Dequeue();
if(nextDequqer.TrySetResult(value))
{
return;
}
}
If the processor queue was empty or all the entries in the queue were canceled, we enqueue the data in the _dataWaitingForProcessors queue, where it will wait until someone calls Dequeue:
_dataWaitingForProcessors .Enqueue(value);
}
}
}
Summary
You can use TaskCompletionSource to create Task objects and TaskCompletionSource<T> to create Task<T> objects.
TaskCompletionSource<T>.TrySetResult is used to complete a Task<T> successfully and set the Task’s Result property.
TaskCompletionSource.TrySetResult is used to complete a Task successfully. It doesn’t set the result because unlike Task<T>, Task doesn’t have a result.
TaskCompletionSource<T>.TrySetException and TaskCompletionSource.TrySetException are used to complete the Task, change its status to faulted, and store one or more exceptions in the Task<T> or Task.
TaskCompletionSource<T>.TrySetCanceled and TaskCompletionSource.TrySetCanceled are used to complete the Task and change its state to Canceled.
While using await, calling Wait or reading the Result property of a canceled Task will throw a TaskCanceledException. The Task’s Exception property will be null. You can use the Task’s Status or IsCanceled properties to check whether a Task is canceled.
All the TrySetXXX methods mentioned previously will return true if they completed the Task or false if the Task is already completed.
There’s also a SetXXX variant that throws an exception if the Task is already completed. It’s best practice to use the TrySetXXX variant because the older SetXXX might cause a race condition in some multithreading scenarios.
By default, continuations (code after the await or in ContinueWith callbacks) can run immediately inside the TrySetXXX or SetXXX call, which makes it unsafe to call them while holding a lock. To make it run in another thread (and so make it safe to call them while holding a lock), pass the TaskCreationOptions.RunContinuationsAsynchronously flag to the TaskCompletionSource constructor.
If you need to use an old-style asynchronous operation (BeginXXX, EndXXX) with tasks, use the Task.Factory.FromAsync method.
11 Controlling on which thread your asynchronous code runs
This chapter covers
The await threading behavior
Understanding SynchronizationContext
When to use ConfigureAwait
Using Task.Yield
The basics of TaskScheduler
Most of the time, you don’t care on which thread your code runs. If you calculate something, your calculation will produce the exact same result regardless of the thread or CPU core it runs on. But some operations do work differently, depending on the thread that runs them, the most common being
GUI—In WinForms and in WPF, all UI elements can only be accessed by the same thread that created them. Typically, all UI elements are created and accessed by just one thread (called the UI thread), and it is usually the process’ main thread.
ASP.NET classic—In ASP.NET classic, which is an older version used in .NET Framework 4.8 and earlier, the HttpContext.Current property will only return the correct value if called from the right thread. (For anyone who doesn’t have experience with ASP.NET classic, access to HttpContext.Current is required in many common scenarios.)
COM—The rules about threads and COM components are complex, and we won’t cover them in this book. But accessing a COM component from the wrong thread might fail or incur a significant performance penalty, depending on the circumstances.
Blocking operations—Blocking operations can lock up the thread for a potentially long time. Blocking different threads can have different effects on the system; for example, blocking the UI thread will cause the UI to freeze, blocking a lot of thread pool threads can prevent the servers from accepting connections and continuing asynchronous operations, and so forth.
Potentially any other piece of third-party code—Any code you use can have restrictions regarding its use. Newer .NET code tends to be compatible with async/await and agnostic about which thread runs it. But older code and native code can have stricter rules about threads.
In previous chapters, we talked about code after an await and the callbacks passed to ContinueWith as interchangeable. However, everything in this chapter applies only to await. Back in chapter 3, we implemented await using ContinueWith, and I said the code generated by the compiler is more complicated. This is what I meant: all the complexity in this chapter is implemented by code generated by the compiler for the await operator.
11.1 await-threading behavior
Basically, the rules for where the code after await runs are
In UI apps (WinForms and WPF), if you are using await in a UI thread and don’t use ConfigureAwait (we will talk about it later in this chapter), the code after the await will run in the same thread.
In ASP.NET classic (not ASP.NET Core), if you are using await in a thread that is processing a web request, and you don’t use ConfigureAwait, the code after the await will run in the same thread.
In all other cases, the code after the await will run in the thread pool.
This list is short, simple, and easy to remember, and it reveals the motivation behind this feature—supporting UI apps and the older ASP.NET. While this is the default behavior for everything included out of the box in .NET (at least up to version 9), this behavior can be modified. Later in this chapter, we will see how this is implemented and how you (and third-party code) can change this behavior.
11.1.1 await in UI threads
It’s common in UI apps to read values from the user, do something with them, and display the result. For example, the following methods, which are called when the user clicks a button, read the text the user has entered into a text box, pass it to the async DoSomething method, and display the result on screen in a label.
This method will be called by the UI framework on the thread that created the button. In almost all cases, this will be the thread that created all the UI (and so it will be the only thread that can access the UI). Reading textBox1.Text is done before the await, and it runs on the UI thread. Writing label1.Text comes after the await, and it will fail if not run on the UI thread.
If the code running after the await did not run on the UI thread, this would break one of the most useful properties of await—that asynchronous code using await is written just like non-asynchronous code. If we use what we learned in chapter 3 about converting this method from an async method that uses await to a non-async method that uses ContinueWith, we will get the following listing.
Listing 11.2 UI access failure with ContinueWith
private void button1_Click(object sender, EventArgs ea)
{
var result = DoSomething(textBox1.Text).ContinueWith(t=> ❶
{
label1.Text = t.Result; ❷
}
}
❶ Changes await to ContinueWith
❷ Exception
We just took the part after the await and moved it into a lambda that we passed to ContinueWith, but this doesn’t work. If you run it, you will get an exception because ContinueWith always runs the callback on the thread pool (and not the UI thread). So we need to make the part that sets the label text run in the UI thread explicitly. Both WinForms and WPF provide this feature. In WinForms, this is done with Control.BeginInvoke, and in WPF, with Dispatcher.BeginInvoke.
In this listing, we used ContinueWith, like in listing 11.2, but this time, we also used Control.BeginInvoke to ask WinForms to run the code that writes to label1.Text in the UI thread. Now the UI is only accessed from the UI thread, and everything works.
Listings 11.1 and 11.3 do exactly the same thing, and you can see from the difference between them that the threading behavior of await saves us quite a bit of complexity and messing with threads.
11.1.2 await in non-UI threads
Now that we have covered the UI case and we’ve seen why returning to the same thread after an await is so important in UI threads, let’s see why await doesn’t return to the same thread when it is used in non-UI threads. To demonstrate this, we’ll write a program that creates a thread and does something asynchronous in that thread.
Listing 11.4 async operation is a thread created by the Thread class
var thread = new Thread(async ()=>
{
Console.WriteLine($"Thread {Thread.CurrentThread.ManagedThreadId}");
await Task.Delay(500);
Console.WriteLine($"Thread {Thread. CurrentThread.ManagedThreadId}");
});
thread.Start();
Thread.Sleep(1000);
This program creates a thread that asynchronously waits for half a second. It also writes the thread ID to the console both before and after waiting. The main thread starts the thread we created and then waits for a second because the program will terminate when the code in the main thread ends, and we want to keep the program alive until the second thread does its thing.
If we run this code, we’ll see that the thread ID before and after the await is different. But why didn’t await get us back to the original thread like with UI threads?
If you remember from chapter 3, await sets up the asynchronous operation and then returns, in this case, from the main method of the thread (the method we passed to the Thread constructor). This will make the thread terminate (successfully; for all it knows, the code we ran in the thread finished doing whatever we needed it to do). After waiting for half a second, when it’s time to run the code after the await, the original thread that called await no longer exists.
But what happens if we manage to call await in a way that doesn’t terminate the thread?
Listing 11.5 async operation without terminating the thread
var thread = new Thread(()=>
{
DoSomethingAsync();
int i=0;
while(true) Console.Write(++i);
});
thread.IsBackground = true;
thread.Start();
Thread.Sleep(1000);
async Task DoSomethingAsync()
{
Console.WriteLine($"Thread {Thread.CurrentThread.ManagedThreadId}");
await Task.Delay(500);
Console.WriteLine($"Thread {Thread. CurrentThread.ManagedThreadId}");
}
In this listing, we changed the code so the await happens in a method that is called from the thread’s main code. In the thread’s main method, we ignore the Task returned by this method and do not await it. Because we don’t use await, the compiler await support does not kick in, and it does not introduce a return. That way, the thread’s main method doesn’t return, and the thread does not terminate. After calling the async method, the thread starts counting forever just so it has something to do, and we can see it’s working. We also marked this thread as a background thread, so the app will exit after the main thread exits (after one second) and will not keep running forever.
If we run this code, we will see that the code before and after the await ran on different threads (as expected). We can also see that the thread we created is busy counting. Even if the system wanted to run the code after the await in the same thread, it has no way of doing so. The thread is running our code, and we didn’t implement any way for the system to ask us to run the code after the await (like WinForms’s Control.BeginInvoke that we used in listing 11.3).
11.2 Synchronization contexts
The UI thread behavior isn’t magic or some special case in the compiler available just for UI frameworks written by Microsoft. This behavior is implemented using a .NET feature called SynchronizationContext.
A SynchronizationContext is a generic way of running code in another thread. Let’s say that you are writing code that spins up a background thread to calculate something and then uses a callback to report the result back to its caller. By default, the callback will run in the background thread you created, which is inconvenient if used in a native UI app because trying to access the UI from that thread will cause an exception.
If you know this code will always be used in, for example, a WinForms app, you could use the Control.BeginInvoke method like we did in listing 11.3. However, this has the obvious limitation that it only works in WinForms. For WPF, you’ll need to use Dispatcher, and other frameworks will have other mechanisms.
If you want your code to work in any situation, you can’t use Control.BeginInvoke directly. You could create an abstract class that represents running stuff in another thread and require whoever uses your code to implement it. The class may look like this:
public abstract class RunInOtherThread
{
public abstract void Run(Action codeToRun);
}
Anyone writing a WPF app will implement the Run method using Dispatcher.BeginInvoke, anyone writing a WinForms app will implement it using Control.BeginInvoke, and so on for any framework that has threading limitations. That way, you can both run your callbacks in the most convenient thread for your user and not take a dependency on any UI framework. As a bonus, this will also work with future frameworks you don’t even know about.
SynchronizationContext is the .NET built-in implementation of our RunInOtherThread class. It has two ways of running code in the target thread: Send, which will wait until the other threads finish running our code, and Post which doesn’t wait. await only uses Post.
But we never passed a SynchronizationContext to await, so how does it know how to use the correct one? For this, a SynchronizationContext can be associated with a thread by calling SynchronizationContext.SetSynchronizationContext. After that call, any code running in this thread can read SynchronizationContext.Current to retrieve it. WinForms, WPF, and ASP.NET classic all implement a class derived from SynchronizationContext and associate it with the UI or request handling threads so that any generic code that needs to return to the correct thread (such as await) can use it.
Let’s write a SynchronizationContext-derived class that runs the code after the await in the same thread. We’ll use BlockingCollection and the work queue pattern we talked about back in chapter 8.
Listing 11.6 Custom SynchronizationContext for async/await
using System.Collections.Concurrent;
public class SingleThreadSyncContext : SynchronizationContext
{
We begin with a Run method that will start our work queue. Because we want to run everything in the current thread, the Run method will not return until we are finished. The Run method will accept as a parameter a method to run because without it, no one will be able to use our SynchronizationContext (only code that we run after the SetSynchronizationContext call will have access to the SynchronizationContext, so if we need to run code, that will kick off the operation there):
public static void Run(Func<Task> startup)
{
var prev = SynchronizationContext.Current;
try
{
var ctxt = new SingleThreadSyncContext();
SynchronizationContext.SetSynchronizationContext(ctxt); ❶
ctxt.Loop(startup); ❷
}
finally
{
SynchronizationContext.SetSynchronizationContext(prev); ❸
}
}
❶ Associates SynchronizationContext with thread
❷ Runs work queue
❸ Restores original SynchronizationContext
Now we’ll implement the work queue part. Just like we did in chapter 8, we create a queue of delegates representing the work to be done. Using foreach with GetConsumingEnumerable, we get the next item in the queue or wait if the item isn’t available yet, and then we invoke the delegate we get from the queue:
The last part is the Post method that will add work to the queue. When an asynchronous operation ends, await will call it to run the code after the await (via a TaskScheduler; we’ll talk about those later in this chapter):
What’s left are all the parts of SynchronizationContext that are not used by await. We will just throw NotImplementedException exceptions for all of those:
public override void Send(SendOrPostCallback d, object? state)
{
// not needed for async/await
throw new NotImplementedException();
}
public override SynchronizationContext CreateCopy()
{
// not needed for async/await
throw new NotImplementedException();
}
public override int Wait(IntPtr[] waitHandles,
bool waitAll, int millisecondsTimeout)
{
// not needed for async/await
throw new NotImplementedException();
}
}
Now we just need to test our custom SynchronizationContext. First, we’ll run a simple async operation without it.
Listing 11.7 Simple async operation without SingleThreadSyncContext
This code just prints the current thread ID, uses await, and then prints the current thread ID again. If we run this, we’ll see that the code after the await runs in a different thread than the code before the await, just like we expected.
And now let’s run the same code with our SingleThreadSyncContext.
Listing 11.8 Simple async operation with SingleThreadSyncContext
We took the exact code from listing 11.7 and put it into a lambda passed to SingleThreadSyncContext.Run. When we run this code, we’ll see that the thread ID doesn’t change, and the code before and after the await runs in the same thread (specifically, the thread that called SingleThreadSyncContext.Run).
WinForms and WPF both install their own SynchronizationContext in the UI thread, and as we’ve seen in our example, any third-party code can also use its own SynchronizationContext by calling SetSynchronizationContext. But if no one called SetSynchronizationContext in the current thread—which is almost always the case in non-UI apps (such as console apps and ASP.NET Core apps), as well as in non-UI threads in UI apps—then SynchronizationContext.Current will be null, and like we’ve seen in listing 11.7, the code after an await will run in the thread pool.
11.3 Breaking away—ConfigureAwait(false)
We’ve talked about why and how await returns to the same thread in UI apps. Now it’s time to talk about how and why to block this behavior.
The ConfigureAwait(false) method allows us to prevent await from using the current SynchronizationContext, as well as the current TaskScheduler (that we’ll discuss later in this chapter). First, I want to debunk the common but wrong explanation of ConfigureAwait(false) that “without ConfigureAwait(false), you continue on the same thread, and with ConfigureAwait(false), you continue on another thread.” First, let’s debunk the first half of this explanation.
Listing 11.9 Console app without ConfigureAwait(false)
If you run this program as a console application, you will see that we used await without ConfigureAwait(false) and switched threads. The reason is that while await tries to stay in the same SynchronizationContext (not thread), we do not have one set, and so await continues on the thread pool.
Now for the second part: Will ConfigureAwait(false) always switch to a different thread?
Listing 11.10 ConfigureAwait(false) and completed tasks
If you run this code, you will see that ConfigureAwait(false) didn’t make us switch threads. The reason for this is that DoSomething always returns a completed task, and using await on a completed task always just continues running on the same thread.
Why does DoSomething return a completed task? Like we said in chapter 3, a simplified but mostly correct model (except for synchronization contexts) of how the compiler deals with async methods is that each await is replaced with a call to Task.ContinueWith. Because DoSomething does not use await, the compiler has nothing to replace. The method remains exactly the same as it would if it weren’t async, except that it needs to return a Task, so it translates roughly into
Remember, marking a method as async does not make it run in the background—it only turns on the compiler’s support for await.
You might think our DoSomething method is a rare edge case or even a bug, but methods that always return an already completed Task are not uncommon. Many libraries have non-asynchronous methods that return a Task, mostly because the author wants to be able to support asynchronous operations in the future without changing the API or because the operation was asynchronous in a previous version.
Now let’s see what ConfigureAwait(false) really does. We’ll start with this WinForms code.
Listing 11.11 WinForms event handler with ConfigureAwait
This code uses await with ConfgureAwait(false) to wait for half a second and prints the thread ID both before and after the await. We know that without ConfigureAwait(false), both should print the same thread ID, but if we run this code, we’ll see two different thread IDs, exactly like we’ve seen in listing 11.9. The difference between listings 11.9 and 11.11 is that listing 11.9 is a console app, and as such, it doesn’t have a SynchronizationContext, while listing 11.11 is a WinForms app, and so it has a SynchronizationContext. So what ConfigureAwait(false) does is simply ignore any SynchronizationContext associated with the current thread.
If we summarize everything we’ve talked about so far, the rules for where the code after an await runs are the following:
If the task has already completed, the code continues to run in the same thread. ConfigureAwait(false) has no effect in this case.
If there is a SynchronizationContext set for the current thread, and ConfigureAwait(false) is not used, the code after the await will use the SynchronizationContext to run.
In all other cases, the code will run using the thread pool.
And now I’m going to write something that might seem controversial to readers who have seen async/await best practices’ lists (but really isn’t): don’t use ConfigureAwait(false) every time you use await.
A lot of best practice lists state you should use ConfigureAwait(false) whenever you use await. They say that because misusing async/await in UI apps and ASP.NET classic apps (not ASP.NET core) can cause deadlocks, and ConfigureAwait(false) will prevent them. However, this is throwing out the baby with the bathwater. The official guidance from Microsoft agrees with me and says you should always use ConfigureAwait(false) in library code and not application code.
Quite a few best practice lists adopted the use “always use ConfigureAwait(false)” part but leave out the “in library code” part because it seems like just putting ConfigureAwait(false)everywhere will prevent deadlocks without making the developer think about it or debug their code, which sounds nice but doesn’t work so well. I will show the problem with this approach and other solutions for this deadlock. But first, let’s see the problem.
This code combines asynchronous calls with blocking calls. The first method, button1_Click, calls DoSomething without using await, and then it reads the Task.Result property—that makes the thread block because DoSomething hasn’t completed yet. Meanwhile, inside DoSomething, Task.Delay completes, and the next line (return "done") is ready to run. As we’ve seen in this chapter, the code after the await will run on the UI thread, but the UI thread is busy waiting in Task.Result.
So what we have here is that the UI thread is busy waiting for DoSomething to complete, but DoSomething can’t complete until the UI thread frees up—a classic deadlock. If we just add ConfigureAwait(false) to the await, we get the following.
Listing 11.13 Deadlock prevented by using ConfigureAwait(false)
Now, in button1_Click, the UI thread blocks waiting for DoSomething to complete just like in listing 11.12. But this time, after Task.Delay completes, DoSomething continues to run on the thread pool and not the UI thread. This means DoSomething will complete in the background, Task.Result will stop blocking and return the result, and everything will just work.
So if just dropping ConfigureAwait(false) mechanically everywhere prevents deadlocks, why am I so against it? First, in this case, there’s an easier fix: if we don’t mix asynchronous and blocking operations and just stick to using await, we don’t have that problem.
We solved this problem by using await instead of reading Task.Result. Now button1_Click does not block the thread until DoSomething completes, and we have no deadlock. Note that using await isn’t always possible, and we did change the way the program operates in case there’s an exception in DoSomething. We’ll cover those problems in a bit, but first, let’s see what happens if we introduce ConfigureAwait to this version of the code.
Listing 11.15 WinForms code with ConfigureAwait(false) everywhere
In this listing, we added ConfigureAwait(false) to the first await. This means the code after the await will run in the thread pool instead of taking up the UI thread, but this code modifies the UI (now from the wrong thread), and we get an InvalidOperationException exception.
To make this code work with ConfigureAwait(false), we need to use Control.BeginInvoke, like we did in listing 11.3 where we didn’t use await at all.
Listing 11.16 WinForms code that works with ConfigureAwait(false) everywhere
In this listing, because the code after the await no longer runs in the UI thread (due to our usage of ConfigureAwait(false)), we had to use other means to run the code that updates the UI on the UI thread, and this looks very much like code that doesn’t use await at all, which shows us that ConfigureAwait(false) outright negates the benefits of await.
But ConfigureAwait isn’t totally evil. If we only use ConfigureAwait(false) on the await inside DoSomething, everything still works.
Listing 11.17 WinForms code with ConfigureAwait(false) only in non-UI methods
Here, inside DoSomething, we break out of the UI context, and the return line will run on the thread pool. But the await in button1_Click (that does not use ConfigureAwait(false)) will return us to the UI thread, and the line that modifies the label will work.
Also note that the DoSomething method in this listing is exactly the same as the one in listing 11.12, so ConfigureAwait(false) can be beneficial if you don’t know if your caller is asynchronous, like in listing 11.16, or blocking, like in listing 11.13, as would commonly happen if you were writing a library. Note that ConfigureAwait(false) works here because DoSomething doesn’t access the UI itself and thus doesn’t care in what context the code after the await runs.
Remember that even in libraries, you often do care about the context (and thread) in which your code runs. An obvious example is a library designed to be used specifically in a UI application. A less obvious example is a library that uses callbacks to call the application that uses it. Even if the library doesn’t care in which thread it runs, the code inside the application’s callback might.
Before we wrap up our discussion of ConfigureAwait(false), I’ll mention how we can solve our deadlock without using ConfigureAwait. This deadlock, in its general form—UI waiting for something that is waiting for UI—has existed ever since we started making UI applications; it predates async/await, it predates .NET and C#, it even predates asynchronous IO in the Windows operating system. And so, unsurprisingly, there is a standard solution for this problem already built into WinForms (and WPF and all other UI frameworks I know about). This solution is to let the UI handle events (or pump messages, in Windows API terminology) while we are waiting for the background task to complete. In WinForms, we do this by calling the Application.DoEvents method.
This works exactly like we expected our original code in listing 11.11 would work. It doesn’t deadlock, the button1_Click method isn’t asynchronous, and as an added benefit, the UI doesn’t freeze until DoSomething completes.
A note about DoEvents
Note that the DoEvents loop will take 100% CPU (of one core) while waiting. It does not affect your app (specifically your app’s UI thread) because this loop will run any UI events as soon as possible, but it does take resources that could be used by another app and prevent the CPU core from switching to idle power saving mode. As such, it is not recommended to use DoEvents; yet, it is better than having a deadlock. It’s mostly okay to use a DoEvents here because we know we are only waiting for half a second, and the effect on the system will be minimal, but we need to consider this every time we write DoEvents loops.
To summarize, my suggested rules for using ConfigureAwait(false) are
If you are writing application code, avoid using ConfigureAwait(false); the default behavior is there for a reason.
If your code is only designed to run in environments that don’t use SynchronizationContext (for example, Console apps and ASP.NET core), don’t use ConfigureAwait(false).
If you are writing library code, and you don’t care in which context your code runs, use ConfigureAwait(false) on every await.
If you want to leave the current context, use Task.Run and not ConfigureAwait(false), because ConfigureAwait(false) does nothing if the Task is already completed.
There are some unit-testing frameworks that will not work unless you always use ConfigureAwait(false). I personally think this is a bug in the unit-testing framework, and I will let you decide if it’s better to change the threading behavior of the app to compensate for a technical bug in your unit-test framework or to use a different unit–test framework.
After all this talk about ConfigureAwait(false), you may be curious about ConfigureAwait(true). ConfigureAwait(true) is the default behavior and has no effect on your code whatsoever (except for silencing static code analyzers that complain about not using ConfigureAwait(false)).
11.4 More ConfigureAwait options
.NET 8 added a new version of ConfigureAwait with new and exciting options that further complicate things. Those options are implemented as an overload of ConfigureAwait that accepts a ConfigureAwaitOptions parameter. Unfortunately, while useful in specialized cases, all those options have hidden complexities, and I recommend not using them in normal application code.
Just in case you encounter them in code you have to debug, these are the options, each with its biggest pitfall identified:
None—Calling ConfigureAwait(ConfigureAwaitOptions.None) is equivalent to ConfigureAwait(false), that is, it changes the behavior of await and makes it run continuations on the thread pool. I recommend using the old ConfigureAwait(false) and not the new ConfigureAwait(ConfigureAwaitOptions.None). The new version is somehow even worse at actually saying what it does (considering the meaning of “none” in the English language, I would expect None to do nothing, but it changes the behavior), and the old one is at least more concise.
ContinueOnCapturedContext—This value keeps the default await behavior; using it by itself does nothing. It is required because the ConfigureAwaitOptions options are flags, which means this can be combined together, and with None being the default. All the other options also include the ConfigureAwait(false) behavior unless you combine them with the ContinueOnCapturedContext option.
ForceYielding—This option makes await always return and schedule the continuation to run later, even if it doesn’t have to because the Task has already completed. This does not make the code you are calling run in the background—it just switches to the thread pool after the await. Using this option is equivalent to writing await Task.Yield().ConfigureAwait(false); in the next line.
SuppressThrowing—This option makes await ignore some errors. It is meant for situations where you don’t care if the operation you run succeeds or fails. However, it will only ignore errors that occur after the first await inside the method you are calling, so it doesn’t guarantee that no exception will be thrown. Also, it will throw an exception at run time if you try to use it with a Task<T>.
In conclusion, out of the four new options, None and ContinueOnCapturedContext are already more concisely supported with the old ConfigureAwait. ForceYielding is not very useful, and SuppressThrowing doesn’t do what its name implies. Also, just to add another pitfall, the new ConfigureAwait is not supported on ValueTask and ValueTask<T>, so I recommend sticking with the older ConfigureAwait(bool).
11.5 Letting other code run: Task.Yield
Internally, both events generated by Windows (mouse moves, keyboard clicks, and so forth) and work queued by Control.BeginInvoke and the SynchronizationContext are stored in a queue called the input queue (because its primary function is to deliver input from the UI to the app).
We’ve seen in listing 11.18 that in WinForms, we can use Application.DoEvents to let the framework handle events and remain responsive. DoEvents simply reads all pending entries in the input queue, returning only when all the events are handled.
The generic async/await compatible version of DoEvents is Task.Yield. When you await Task.Yield() in a UI thread, the code after the await is added to the end of the input queue and runs after all the other events that are already pending. The following listing shows what happens if we build a WinForms app that counts forever.
Listing 11.19 Trying to count forever and freezing the app
With this method, when the user clicks a button, the program will loop forever, counting and setting the number into a label’s Text property. If you run this code, the program will just freeze. The UI thread will be busy counting and will not handle input queue events such as mouse clicks. Also, you will not see the content of the label change because the UI thread will not handle requests to redraw the label. We can use the same strategy that worked so well in listing 11.18 and fix this with DoEvents.
Listing 11.20 Counting forever without freezing the app
Now at every iteration, the method calls DoEvents. This will handle all the pending events (including the label’s redraw events). The app will remain responsive, and the label with show the changing number. Note that our code will use 100% of a CPU core doing the counting, so unlike listing 11.18, it is not negatively affecting the system by calling DoEvents. We could also go the async/await route and do this with Task.Yield.
Listing 11.21 Counting forever without freezing the app using await
In this version, at the end of every iteration, the method will queue itself at the end of the input queue and return. It is a very different technique than DoEvents, but with exactly the same results.
When deciding where to run the code after it, awaitTask.Yield() follows the same rules listed in this chapter, so you can use them to figure out in which thread the code will run in your specific situation.
11.6 Task schedulers
In this chapter, I repeatedly wrote that await uses SynchronizationContext. Well, I left something out: async/await has its own infrastructure for deciding on which thread to run code. This infrastructure is based on the TaskScheduler class. Classes derived from TaskScheduler, like classes derived from SyncronizationContext, know how to take a task created by await and schedule it to run on some thread sometime in the future.
The default task scheduler (accessible via the TaskScheduler.Default static property) always queues your code to run on the thread pool. If you call await in a thread with a SynchronizationContext, the compiler will create a scheduler that will use its Post method to schedule the code (the TaskScheduler.FromCurrentSynchronizationContext does this). You can get the current scheduler by reading TaskScheduler.Current.
Unlike SynchronizationContext, you can’t set the current TaskSchuduler, but you can set the task scheduler when you call Task.Run, ContinueWith, or any of the other async/await compatible ways to run code. For example, this code will run a lambda half a second later on the thread pool:
This code uses ContinueWith to run after the timeout is passed to Task.Delay. Because we didn’t pass the optional TaskScheduler parameter, this will use the default scheduler that will run the code on the thread pool. However, if we are running in a thread with SynchronizationContext, we can create a task scheduler that uses it:
Here we passed the optional TaskScheduler parameter. Specifically, we passed a scheduler created from the current SynchronizationContext, so the lambda will run on this thread. If there’s no current SynchronizationContext, or the SynchronizationContext can’t be wrapped in a TaskScheduler, FromCurrentSynchronizationContext will throw an exception. In the current version of .NET at the time of this writing (version 8), this only happens if there is no current SynchronizationContext (that is, SynchronizationContext.Current is null).
Just like with SyncronizationContext, ConfigureAwait(false) will make await ignore the current TaskScheduler and use the default scheduler instead.
This completes the rules for which thread runs the code after an await, in this order:
If the task is already complete, the code continues to run immediately in the same thread. ConfigureAwait(false) has no effect in this case.
If the current thread has a SynchronizationContext set, and ConfigureAwait(false) is not used, the SynchronizationContext will be used.
If the current task has a TaskScheduler associated with it, and ConfigureAwait(false) is not used, the TaskScheduler will be used.
If ConfigureAwait(false) was called, or if the thread has no SynchronizationContext and no TaskScheduler, the default task scheduler will be used, and the code will run in the thread pool.
Summary
The simplified rules regarding which thread runs the code after an await are as follows:
In UI apps (WinForms and WPF), if you are using await in a UI thread, and you don’t use ConfigureAwait(false), the code after the await will run in the same thread.
In ASP.NET classic (not ASP.NET Core), if you are using await in a thread that is processing a web request, and you don’t use ConfigureAwait(false), the code after the await will run in the same thread.
In all other cases, the code after the await will run in the thread pool.
However, the real rules are
If the task is already complete, and ConfigureAwait(ConfigureAwaitOptions.ForceYielding) was not used, the code continues to run immediately in the same thread, ConfigureAwait(false) has no effect in this case.
If the current thread has a SynchronizationContext set, and ConfigureAwait(false) is not used, the SynchronizationContext will be used.
If the current task has a TaskScheduler associated with it, and ConfigureAwait(false) is not used, the TaskScheduler will be used.
If ConfigureAwait(false) was called, or the thread has no SynchronizationContext and no TaskScheduler, the default task scheduler will be used, and the code will run in the thread pool.
If you are not using third-party frameworks or writing your own SynchronizationContext or TaskScheduler, those two sets of rules produce the same results.
ConfigureAwait(false) makes await ignore the current SynchronizationContext or TaskScheduler. This may prevent deadlocks but can make usingawait much less convenient.
The rules for using ConfigureAwait(false) are as follows:
If you are writing application code, avoid using ConfigureAwait(false). The default behavior is there for a reason.
If your code needs to continue running on the same thread, for example, if you change the thread’s settings or you use thread local storage, don’t use ConfigureAwait(false).
If your code is only designed to run in environments that don’t use SynchronizationContext (for example, Console apps and ASP.NET core), don’t use ConfigureAwait(false).
If you are writing library code, and you don’t care in which context your code runs, use ConfigureAwait(false) on every await.
If you want to leave the current context, use Task.Run and not ConfigureAwait(false) because ConfigureAwait(false) does nothing if the Task is already completed.
12 Exceptions and async/await
This chapter covers
How exceptions work with asynchronous code
How to fix lost exceptions
Handling exceptions in async void methods
In this chapter, we are going to talk about exceptions. We’ll discuss how they work in asynchronous code and the differences in how they work in non-asynchronous code. In transitional code, exceptions bubble up the call stack. As we’ve seen in chapters 3, 5, and 11, in asynchronous code, callbacks are constantly registered to be called later, often from other threads; thus, the call stack no longer describes the flow of your code. This knowledge and the knowledge about what async/await does to mitigate this are important when debugging problems related to exceptions in asynchronous code, that is, when debugging any situation where the asynchronous code fails in a non-straightforward way. We’ll also cover some pitfalls you should be aware of regarding exceptions.
12.1 Exceptions and asynchronous code
Exceptions use the call stack. The call stack is a data structure (specifically a stack) used by the system to implement the concept of methods (or functions or procedures, depending on your programming language). When you call a method, the system pushes the memory address of the next instruction into the call stack, and when you execute a return statement, the system jumps to the address at the top of the stack (this explanation is a gross oversimplification because this book is not about processor architecture).
When an exception is thrown, if it’s inside a try block with an appropriate catch clause, control passes to that catch clause. If the exception is thrown outside of a try block, or that try block has no appropriate catch clause, the exception bubbles up the call stack until it finds an appropriate catch clause. If it gets to the beginning of the call stack without finding a catch clause, the program crashes.
This exception bubbling happens in run time and uses the program’s call stack, not the structure of the source code. For example, let’s take a look at some code where the structure of the code doesn’t match the runtime behavior:
In this code, while the throw statement is located inside the try block from a textual perspective, it doesn’t run as part of this method. The lambda added to the Click event is separated by the compiler into a different method (like we’ve seen in chapter 2). It doesn’t run inside our try block. The only thing that runs inside the try is attaching the Click event. When and if the code in the lambda runs, it will be called by the code that triggers the Click event, and the exception will bubble up into that code and not into our code.
async methods have the same problem because, as we’ve seen in chapter 3, await is equivalent to calling ContinueWith. So if we take a simple async method that throws an exception, we get
And this code has the same problem as the event handler example. The throw line is in the lambda (that is passed to ContinueWith), so it’s not inside the try block. For this reason, the compiler will also duplicate the try-catch to make it look like await works seamlessly with try-catch blocks:
Here the compiler knows where the catch clause is, so it can do all those transformations to make try-catch work. But what if the try statement is not in our methods but in code that calls us? In this case, you can’t know at compile time which catch clause to use, and the compiler can’t just copy it into the continuation code. Let’s see what happens with a simple async method that can throw an exception:
public async Task<int> MyMethod()
{
throw new NotImplementedException();
}
This is an async method that just throws an exception, and it translates to
public Task MyMethod()
{
throw new NotImplementedException();
}
The compiler didn’t do anything! Remember, marking a method as async does not make it asynchronous; it’s just a flag for the compiler to enable all the processing required for supporting await. If you don’t use await, the only thing the compiler does is wrap the return value in a Task object. Note that the compiler didn’t need to change the code to make exceptions behave like in a non-async method; calling this method will throw the exception just like a non-async method, which is what we wanted.
Now let’s take a look at a method that uses await:
public async Task<int> MyMethod()
{
await File.ReadAllBytesAsync("file.bin");
throw new NotImplementedException();
}
This is a method that awaits ReadAllBytesAsync and then throws an exception. In this case, to support reporting the error to the calling code, the compiler will add a try-catch that will catch the exception and stash it in the returned task:
public async Task<int> MyMethod()
{
var result = new TaskCompletionSource<int>();
File.ReadAllBytesAsync("file.bin").ContinueWith(t=>
{
try
{
throw new NotImplementedException();
}
catch(Exception ex)
{
result.TrySetException(new AggregateException(ex));
}
});
}
Here, the compiler added a try block inside the continuation (the code that it passed to ContinueWith). Note that, like in our previous example, the compiler did not add a try block to the part before the first await and the call to ReadAllBytesAsync itself. If an error occurs before the first await, the method will throw a regular exception. Only if the error occurs after the first await will the exception be caught by compiler generated code and stored in the returned Task. This is how most asynchronous code works; an asynchronous method can both throw a regular exception and report an error using the Task object (by setting the Task’s Status property to Faulted and storing the exception in the Task.Exception property).
If you use await when you call the method, both situations look the same. But if you are not using await (for example, if you are collecting multiple tasks and using Task.WhenAny or Task.WhenAll), you need to handle both exceptions thrown by the asynchronous methods and exceptions stored in the returned Task. Also, remember that the continuation usually runs after the method returns, so in case of an error, the Task returned by the asynchronous method will be in the Created, WaitingForActivation, or Running state when it’s returned, and it will only change to the Faulted state later.
There’s just one difference between using await to rethrow the exception or using the Task.Exception property, and that is how they use the AggregateException.
12.2 await and AggregateException
The Task.Exception property always stores an AggregateException. The AggregateException class, as the name suggests, is an exception class that stores multiple other exceptions inside it.
Task uses AggreggateException because a Task can represent the result of multiple operations running in parallel (for example, multiple asynchronous operations passed to Task.WhenAll). Because more than one of those background operations can fail, we need a way to store multiple exceptions.
In practice, this feature is almost never used. In fact, this feature is so rarely used that if you use await, and the Task you are awaiting fails, the await operator will always throw the first exception inside the AggregateException and not the AggregateException itself. If there is more than one exception inside, the AggregateExceptionawait will still throw just the first one and ignore the rest. All exceptions except for the first one, along with any information stored inside them, will be lost. Here is code showing how await throws the stored exception:
This program stores a NotSupportedException in a Task using TaskCompletionSource (we talked about creating your own tasks with TaskCompletionSource back in chapter 10). Then we check to see what exception is stored inside the Task and get an AggregateException wrapping our exception. However, we then use await because the Task in the Failed state await will throw an exception, but it will throw the inner NotSupportedException and not the AggregateException.
12.3 The case of the lost exception
We’ve seen that the compiler will generate code to catch exceptions and stash them inside the Task. And await will rethrow that exception. But what happens if, for some reason, we don’t use await?
The answer is nothing. The compiler-generated code will catch the exception and store it in the Task. And that’s it. If no one reads the exception from the Task (either by using await or by reading the Task’s Exception property), the exception will be ignored.
Let’s take a look at another piece of code:
Public async Task MethodThatThrowsException()
{
await Task.Delay(100);
throw new NotImplementedException();
}
Public async Task MethodThatCallsOtherMethod()
{
MethodThatTHrowsException();
}
Here we have two methods. The first method, MethodThatThrowsException, throws an exception after an await, so the compiler will catch the exception and stash it in the returned Task. The second method calls the first, but when I wrote it, I forgot the await, so no one is looking at the retuned Task. The exception was caught in the first method by the compiler-generated code but ignored by the second method because I didn’t use await. And so the runtime thinks we handled the exception (because the compiler generated code caught it), and the code continues to run while ignoring the error.
If the method that throws the exception is in a library, and you have the “just my code” feature of the debugger enabled, you won’t even see the exception in the debugger. So if some code in your program seems to stop running with no indication of why, there’s a good chance someone forgot an await somewhere.
12.4 Exceptions and async void methods
In async void methods, the method does not return a Task (obviously). Because there is no Task to stash the exception in, the compiler doesn’t know what to do with the exception thrown inside the method, so it will not generate the try-catch block we’ve seen in the previous example. As a result, any exception thrown in the code will bubble up the call stack into the SynchronizationContext that runs the code (we talked about how SynchronizationContext works in chapter 11). This will most likely crash your program. Because of that, it is best practice to handle all exceptions in async void methods yourself and never let an exception bubble out of it.
Summary
Exceptions use the call stack to find the correct code to run in case of error, which is a problem for asynchronous code because continuations don’t run in the same call stack as the code that calls the asynchronous method.
If you use async/await, the compiler will generate code to make it look like non-async code. It does this by catching exceptions inside async methods and stashing them in the returned Task. await then throws the exception inside the continuation, making it look like it was thrown by the await.
Every asynchronous method can throw a normal exception or signal a failure using the returned Task. await makes both of those failure modes look the same. If you don’t use await, you need to handle both yourself.
The exception stored inside the Task is an AggregateException, just in case the Task represents multiple operations. await ignores all but the first exception inside that AggregateException. If you don’t use await, you need to deal with this yourself. In rare cases, the Task does represent multiple operations, and if you care about multiple failures, you can’t use await and need to read the Task.Exception property yourself.
If you ignore the Task returned by an asynchronous method (by forgetting to use await, for example), and that method throws an exception, the exception will be lost.
As a corollary, if code fails in a way that should have been an exception, but you can’t see that exception, there’s a good chance you forgot an await somewhere.
All the exception support provided by async/await is dependent on the returned Task. async void methods don’t return a Task and so don’t have this support. Never throw an exception from or let an exception bubble out of an async void method.
13 Thread-safe collections
This chapter covers
The problems encountered when using regular collections in a multithreaded program
Concurrent collections
The BlockingCollection class
Asynchronous alternatives to Blocking-Collection
Immutable collections and special considerations when using them
Frozen collections
The System.Collections.Generic namespace contains many useful collections; however, we can’t just use them in a multithreaded application because all those collections are not thread safe. In this chapter, we’ll look at the problems with the simplest way of making collections thread safe—just putting a lock around any access to the collection. We’ll also talk about the thread-safe alternatives provided by the .NET library.
Specifically, we’ll examine the concurrent collections added in .NET framework 4, discuss the immutable collections added in .NET Core (which is the basis for .NET 5 and later), and talk about the frozen collections added in .NET 8. You will also learn how to use each type of collection and when it’s appropriate to do so. But first, let’s talk about why you can’t just use the regular collections.
13.1 The problems with using regular collections
The .NET library provides many useful collection classes in the System.Collections.Generic namespace. Those collections support multiple concurrent reads, but they can be corrupted and produce unexpected results if there are multiple concurrent writers or if different threads try to read and write simultaneously.
Also, according to the official documentation, iterating over the collection is intrinsically not thread safe, which means that if you iterate over the collection, either with a loop such as foreach or a Linq expression, you must prevent any writes by other threads to the collection for the entire duration of the loop. To use those collections in a multithreaded program, you must take care of synchronization yourself, typically by using locks, and doing so correctly when using collections is often nontrivial.
For example, let’s consider a very common use case. We want to use a Dictionary<TKey,TValue> as a cache. When we need some data item, we first check whether it’s in the cache, and if not, we create and initialize the item, probably by retrieving it from an external service or by precalculating some stuff (the reason we use a cache to begin with is that initializing the item takes a long time). We’ll start with the single threaded code first and add locking later.
Listing 13.1 Simple, non–thread-safe cache
if(!dictionary.TryGetValue(itemId, out var item))
{
item = CreateAndInitializeItem(itemId);
dictionary.Add(itemId,item);
}
This code tries to retrieve an item from the dictionary, and if the item isn’t already there, it calls CreateAndInitializeItem to create and initialize the item. After creating an item, the code calls Add to add the item to the dictionary so it’s available the next time we need it.
This is a perfectly good way to implement a simple in-process cache for single-threaded applications, but this code is very much not thread safe. Calling TryGetValue from multiple threads simultaneously is explicitly allowed, but calling Add concurrently or calling Add and TryGetValue at the same time can produce unexpected results and even corrupt the dictionary.
Let’s make this thread safe. We’ll start with the simplest option—placing a lock around the entire block.
This code is the same as listing 13.1, except it uses a lock to prevent multiple threads from running it simultaneously. This does make our code thread safe, but at the cost of locking the entire cache every time we run it. If the item is already in the dictionary, the lock will be short, and everything will be fine. However, if we need to create a new item, the entire cache will remain locked for the entire duration of the initialization, meaning that other threads that are working on completely different items will have to wait every time a new item has to be initialized. To solve this problem, we must release the lock while initializing the item.
Listing 13.3 Non–thread-safe cache with lock released during initialization
This code has two lock blocks, one protecting the TryGetValue call and the other protecting the Add call. Those locks ensure that Dictionary<T> is never called from multiple threads at the same time, which means we will not corrupt the dictionary. Unfortunately, this does not make our code thread safe. This code is actually almost guaranteed to fail if multiple threads need to use the same item that is not already in the cache.
This a common problem, where composing two (or more) thread-safe operations often does not result in thread-safe code. The call to TryGetValue is now thread safe because it is protected by the lock, and the call to Add is thread safe for the same reason. But because we don’t hold a lock for the entire runtime of the code, other threads can change the dictionary between TryGetValue and Add.
If two threads run this code simultaneously for the same item, the first thread will execute the TryGetValue and discover that the item isn’t in the dictionary, so it will go on to create and initialize the item. The second thread will then also call TryGetValue (before the initialization is complete, because the reason we use a cache is that the initialization takes a long time). In addition, because the first thread didn’t add the item yet, it will also see that the item is not in the cache and go on to create and initialize another copy of the item.
Now we have two different threads busy initializing two different copies of the Item object for the same logical item. One of those threads will finish first and add the item to the cache by calling Add. The other thread will also finish initializing its copy at some point and attempt to add it to the cache by calling Add; however, because the first thread has already added the item, Add will now throw an ArgumentException. Figure 13.1 illustrates the flow of those two threads.
Figure 13.1 Concurrent initialization of the same item with two threads. The second thread fails because the first thread already added the item.
To make this code thread safe, we must avoid calling Add if another thread has already added the item while we were busy initializing it. The easiest option is to replace the call to Add with the [] operator (technically, it’s the Item[] property, but I’m going to call it an operator and not a property because it’s used as an operator). The [] operator adds a new item if the key does not exist and overrides the existing item if it does. This solves our exception problem but also introduces a new subtle bug.
❹ Overrides changes if already added by another thread
This code just replaces dictionary.Add(itemId,item) with dictionary[itemId]=item, which solves our immediate problem because operator [] will just override the previous value if it exists; however, this might introduce a bug. Now the first thread uses its own copy of the Item object, while the second and subsequent threads use the copy created by the second thread. If the Item object is immutable, and the initialization always returns an equivalent object for the same key, this can be fine; however, if the Item object is modified by the first thread, those changes will be lost.
To make sure all the threads use the same Item object, we have no choice but to recheck the dictionary after initialization and, if another thread has updated the dictionary first, use the value from the first thread.
Listing 13.5 Thread-safe cache with lock released during initialization
Here, we check the dictionary again instead of blindly calling Add or operator [] after the initialization. If we find the item is now in the dictionary, we drop the copy we initialized and use the one from the dictionary (because we want all threads to use the same object). We add the item only if it is still not in the dictionary.
As you can see, this code is quite complicated and difficult to follow compared to the single-threaded version in listing 13.1. Luckily, we don’t have to write it because we have the concurrent collections.
13.2 The concurrent collections
The collections in the System.Collections.Concurrent are thread-safe versions of the most popular collections. The concurrent collections employ clever fine-grained locking strategies and lockless techniques to stay thread safe even when the collection is accessed by many threads simultaneously. This means all the methods and properties of the concurrent collection can be used concurrently from different threads without causing corruptions or unexpected behavior.
The concurrent collections have a different interface than the collections we all know and love from the System.Collections.Generic namespace because, as we’ve seen earlier in this chapter, just making all the normal collection’s methods callable from multiple threads would not, by itself, result in thread-safe code.
This section covers the commonly used concurrent collections, starting with ConcurrentDictionary<TKey,TValue>, that will elegantly solve the problems we’ve talked about in this chapter so far.
13.2.1 ConcurrentDictionary<TKey,TValue>
Unsurprisingly, ConcurrentDictionary<TKey,TValue> is a thread-safe alternative for Dictionary<TKey,TValue>, but because of the problems we’ve seen when trying to use locks with Dictionary<TKey,TValue>, it has a slightly different interface geared toward solving multithreaded problems. Let’s go back to the original single-threaded code of our Dictionary<TKey,TValue>-based cache.
Listing 13.6 Non–thread-safe cache again
if(!dictionary.TryGetValue(itemId, out var item))
{
item = CreateAndInitializeItem(itemId);
dictionary.Add(itemId,item);
}
This is the same code from listing 13.1. It tests whether an item is in the dictionary-based cache, and if not, it creates and initializes a new item object and adds it to the cache.
Now let’s do the minimal amount of work to replace Dictionary<TKey,TValue> with ConcurrentDictionary<TKey,TValue>. The ConcurrentDictionary<TKey,TValue> class has a TryGetValue method that works the same as Dictionary<TKey,TValue>’s TryGetValue. If a value with the provided key exists in the dictionary, it returns true and puts the value in an out parameter. If a value with the key does not exist in the dictionary, it returns false.
But ConcurrentDictionary<TKey,TValue> doesn’t have an Add method because, as we saw in listing 13.3, in multithreaded code, there’s aways a chance another thread will add an item right before we call Add and cause it to fail with an exception. For this reason, ConcurrentDictionary<TKey,TValue> doesn’t have an Add method—it is replaced with TryAdd.
As we’ve seen, no matter how small the time window between TryGetValue and Add is, there is always a chance that another thread will manage to add the item in that timeframe. To address this problem, we must treat the case where a key is already present in the dictionary, not as an exceptional error condition, but as a normal occurrence. This is what TryAdd does.
This difference between Add and TryAdd manifests itself in a tiny change in the method interface. While Add will throw an exception if the key is already in the dictionary, TryAdd will only return false.
Just replacing Add with TryAdd in the code from listing 13.6 gives this simple code that is thread safe but has a small problem. (Hint: It’s the same problem from listing 13.4.)
Listing 13.7 Thread-safe cache with ConcurrentDictionary.TryAdd
if(!dictionary.TryGetValue(itemId, out var item))
{
item = CreateAndInitializeItem(itemId);
dictionary.TryAdd(itemId,item);
}
This listing replaces Add with TryAdd. And because TryAdd doesn’t throw an exception if the key is already in the dictionary, this code works and is thread safe. It just has a variation of the problem we had in listing 13.4. If multiple threads initialize the same item at the same time, each will have its own copy of the Item object. If the Item object isn’t immutable, or all those copies are not identical, this can cause a real problem.
What we really want is to combine TryGetValue and TryAdd into a single atomic operation in a way that eliminates this problem. ConcurrentDictionary<TKey,TValue> does this with the GetOrAdd method.
Listing 13.8 Thread-safe cache with ConcurrentDictionary.GetOrAdd
var item = dictionary.GetOrAdd(itemId,CreateAndInitializeItem);
This single line calling to GetOrAdd is equivalent to the 21 lines in listing 13.5. If the item is already in the dictionary, it will return the item. If not, it will call CreateAndInitialize to create the item. If multiple threads call GetOrAdd before the item completed initialization and was added to the dictionary, all of them will run CreateAndInitialize, but GetOrAdd will return the same object in all threads.
GetOrAdd has a version that accepts the value to add to the dictionary as the second parameter, as well as the version we used that accepts a delegate to call to initialize the value. ConcurrentDictionary<TKey,TValue> uses fine-grained locking so that GetOrAdd calls for different keys can run concurrently.
Note that if you use the version of the method that accepts a delegate, and you call GetOrAdd from multiple threads simultaneously, the initialization code can run more than once. The first thread to finish will get to add the value to the dictionary, and the result of the initialization code from other threads will be ignored. You should be aware whether your item requires cleanup or if you can’t run the initialization code multiple times.
ConcurrentDictionary<TKey,TVale> also has a TryRemove method that will remove the value and return true if the value existed and was removed. However, it will return false if the value doesn’t exist in the dictionary. Having a TryRemove instead of a Remove method solves the same kind of race condition we’ve seen when we’ve talked about Add and TryAdd.
And finally, ConcurrentDictionary<TKey,TVale> also has a TryUpdate method. This method solves a problem where one thread might overwrite data written by another thread. As an example of this problem, let’s write a method that increments a value in the dictionary.
Listing 13.9 Non–thread-safe increment
private ConcurrentDictionary<string, int> _dictionary = new();
public void Increment(string key)
{
int prevValue = _dictionary[key];
_dictionary[key] = prevValue+1;
}
This method reads the value associated with a key, adds one to the value, and writes the new value into the dictionary.
This code also has a race condition bug. Let’s say the current value for a given key is 1, and we call Increment simultaneously from two different threads. The expected result is that the value will be 3 (we started with 1 and incremented it twice), but if we’re unlucky with our timing, we might get the following sequence:
Thread 1 reads the value and gets 1.
Thread 2 reads the value. Because the first thread hasn’t written the new value yet, it also gets 1.
Thread 1 increments and saves the value; the value in the dictionary is now 2.
Thread 2 increments and saves the value; the value in the dictionary is still 2.
To solve this problem, we must either add a lock around the entire operation or at least have a way to detect this problem so we can correct it. This is what TryUpdate does.
Listing 13.10 Thread-safe increment with ConcurrentDictionary.TryUpdate
Now the method enters a loop, and it reads the current value into the prevValue variable. It then calls TryUpdate with both the new value (prevValue+1) and the old value (prevValue). If the current value in the dictionary is still prevValue, TryUpdate will update the value and return true. This will make our code break out of the loop. But if someone else changed the value in the dictionary, TryUpdate will leave the dictionary unchanged and will return false, which will make our code repeat the loop and retry incrementing the value until it succeeds.
ConcurrentDictionary<TKey,TValue> doesn’t have asynchronous interfaces, but it only blocks for a very short time, and it works very well with asynchronous code.
13.2.2 BlockingCollection<T>
BlockingCollection<T> adds blocking producer–consumer operations on top of another collection. Basically, it adds the ability to wait until an item becomes available. The options for the collection backing a BlockingCollection<T> are ConcurrentQueue<T>, ConcurrentStack<T>, and ConcurrentBag<T>. (We’ll talk about them more in the next section.)
The default option, and most used by an enormous margin, is ConcurrentQueue<T>. A BlockingCollection<T> backed by a ConcurrentQueue<T> keeps the item order—like in a queue, the first item in is the first item out. We’ve already seen back in chapter 8 how it can be used as the basis for a very simple and effective work queue.
The second used option is ConcurrentStack<T>. A BlockingCollection<T> backed by a ConcurrentStack<T> acts like a stack—the last item to be added is the first item out. This is useful if you have a multithreaded algorithm that requires a thread-safe stack, which makes the consumer wait until another thread adds items to the stack if the stack is empty.
The last option, ConcurrentBag<T>, is rarely used. ConcurrentBag<T> is a specialized collection that is optimized for the case where the same thread both reads and writes from/to the collection (more about this later in this chapter).
Apart from adding the ability to wait until an item is available, BlockingCollection<T> also lets you specify the maximum size of the collection; this is useful in preventing the producer from getting too far ahead of the consumer. This feature is called bounded capacity.
The most common usage for BlockingCollection<T> is as a work queue (like our work queue example in chapter 8, where we wrote a work queue implementation with a single background thread). Let’s extend the code from chapter 8 and write a BlockingCollection<T>-based queue with multiple consumer threads.
Listing 13.11 BlockingCollection with 10 processing threads
BlockingCollection<int> blockingCollection = new BlockingCollection<int>();
Thread[] workers = new Thread[10];
for(int i=0; i<workers.Length; i++) ❶
{
workers[i] = new Thread(threadNumber =>
{
var rng = new Random((int)threadNumber);
int count = 0;
foreach (var currentValue in
blockingCollection.GetConsumingEnumerable())
{
Console.WriteLine($"thread {threadNumber} value {currentValue}");
Thread.Sleep(rng.Next(500));
count++;
}
Console.WriteLine($"thread {threadNumber}, total {count} items");
});
workers[i].Start(i);
}
for(int i=0;i<100;i++) ❷
{
blockingCollection.Add(i);
}
blockingCollection.CompleteAdding(); ❸
foreach (var curentThread in workers) ❹
curentThread.Join();
❶ Creates 10 worker threads
❷ Adds 100 items to process
❸ Signals no more items
❹ Waits for all threads to finish
This code creates a BlockingCollection<int> to hold the data we need to process in the background. It then starts 10 background threads to do this processing, and each thread uses foreach and GetConsumingEnumerable to get the items to process. To simulate the processing, we just wait a small random amount of time and print the number. We insert the numbers 0 to 99 into the queue as a stand-in for the data we want to process.
When we run this code, we see that it works—all the data is processed, each data item is processed exactly once, and data items are mostly processed in order. The items are processed mostly in order because while the BlockingCollection<T> provides the items in order, timing problems will sometimes cause one thread to overtake a previous thread, making it look like the two items swapped position.
The bounded capacity feature mentioned earlier is mainly implemented by the Add method. The Add method adds an item to the collection. If the collection is at maximum capacity, it will block until some other thread removes an item. The TryAdd method is similar but adds a timeout (that can be zero). If the collection is at maximum capacity, it will block until another thread removes an item or until the timeout elapses. If the timeout elapses, TryAdd will fail and return false. If the timeout is zero, TryAdd will always return immediately.
The Take method returns the next item in the collection and removes it in a single thread-safe operation. The next item will be the oldest item in the collection if it’s backed by a ConcurrentQueue<T>, the newest if it’s backed by a ConcurrentStack<T>, or any of the items if the backing collection is a ConcurrentBag<T>. If the collection is empty, Take will block until another thread adds an item using Add or TryAdd. TryTake (like TryAdd) is the same as Take with an added timeout. If the collection is empty, and the timeout elapses before an item becomes available, TryTake will fail and return false. If you pass zero as the timeout, TryTake will always return immediately.
The most common way to read data from a BlockingCollection<T> is to use foreach with GetConsumingEnumerable, like we did in chapter 8, instead of calling Take or TryTake directly. GetConsumingEnumerable returns an IEnumerable<T> that, when used with foreach, removes the current item at every iteration of the loop and, if the collection is empty, blocks until another thread adds an item to the collection. It is basically equivalent to calling Take at the beginning of every loop iteration.
If we use GetConsumingEnumerable and foreach, we need a way to signal that there are no new items and we can exit the loop. This is done with CompleteAdding. After calling CompleteAdding, the foreach loop will continue to process all remaining items in the collection and then exit. Calling Add or TryAdd after CompleteAdding will throw an InvalidOperationException.
BlockingCollection<T> also has the static AddToAny, TryAddToAny, TakeFromAny, and TryTakeFromAny methods. They work like their non-static counterparts except that they accept an array of BlockingCollection<T> objects and use one of them based on the number of items in each collection. They look like a good way to build a system with multiple consumer threads where every thread has its own BlockingCollection<T>, but they’re not.
AddToAny and TryAddToAny do not provide any load balancing. They’re optimized to complete the AddToAny operation as quickly as possible, so they will always look for the fastest option to add to a collection. In most cases, they will just add the item to the first collection that is not at maximum capacity. So AddToAny and TryAddToAny will tend to add items to the same BlockingCollection<T>. If you use them to build a multiple processing threads system, then one thread will receive most of the work, and the rest of the threads will be idle most of the time.
BlockingCollection<T> is very useful if you manage your own threads, but as its name implies, it uses blocking operations and thus doesn’t fit the asynchronous programming model.
13.2.3 Async alternatives for BlockingCollection
As of .NET version 8, the .NET standard library does not have asynchronous collections in general and does not have an asynchronous version of BlockingCollection<T>. However, it does have several other classes that can be repurposed as an asynchronous queue. One of those is Channel<T>, a thread-safe multiple-producers multiple-consumers queue, designed for communication between software components.
The Channel<T> class represents a communication channel; each channel has a writer that can add messages to the channel and a reader that can take messages from the channel. The channel keeps the message ordering, which makes it equivalent to a queue. Both the reader and the writer explicitly support concurrent access.
We can translate listing 13.11 to use Channel<T> instead of BlockingCollection<T> and get the following.
Listing 13.12 Async background processing with Channel<T>
var ch = Channel.CreateUnbounded<int>();
Task[] tasks = new Task[10];
for(int i=0; i<10;++i) ❶
{
var threadNumber = i;
tasks[i] = Task.Run(async () =>
{
var rng = new Random((int)threadNumber);
int count = 0;
while (true)
{
try
{
var currentValue = await ch.Reader.ReadAsync(); ❷
Console.WriteLine($"task {threadNumber} value {currentValue}");
Thread.Sleep(rng.Next(500));
count++;
}
catch(ChannelClosedException) ❸
{
break;
}
}
Console.WriteLine($"task {threadNumber}, total {count} items");
});
}
for (int i = 0; i < 100; i++) ❹
{
await ch.Writer.WriteAsync(i);
}
ch.Writer.Complete(); ❺
Task.WaitAll(tasks); ❻
❶ Starts 10 async tasks
❷ Awaits next data item
❸ This exception means no more data.
❹ Adds 100 items to process
❺ Signals no more data
❻ Waits for all tasks to complete
Here we create a Channel<T> instead of a BlockingCollection<T>, and instead of creating a thread, we use Task.Run. The code we pass to Task.Run will start running on a thread pool thread and then immediately use await to release the thread. We could skip this step with some clever use of ContinueWith, but it would make the code more complicated.
The biggest change from listing 13.11 is that instead of using foreach, we need to use while(true), and we need to use an exception to detect when we should exit. We will see what we can do about this in the next chapter.
13.2.4 ConcurrentQueue<T> and ConcurrentStack<T>
ConcurrentQueue<T> is a thread-safe version of Queue<T>, and ConcurrentStack<T> is a thread-safe version of Stack<T>. ConcurrentQueue<T> is a FIFO (first in, first out) data structure, which means that when you read the next item, you always get the oldest item in the queue. ConcurrentStack<T> is a LIFO (last in, first out) data structure, which means the next item will always be the most recent one.
Both ConcurrentQueue<T> and ConcurrentStack<T> provide the same methods for adding items as their non–thread-safe counterparts (Enqueue for ConcurrentQueue<T> and Push for ConcurrentStack<T>), and both provide a way to get the next item (TryDequeue and TryPop, respectively). The interface is different from the non–thread-safe version for the same reasons that we’ve seen when we’ve talked about ConcurrentDictionary<TKey,TValue>. If we had a thread-safe version with the same interface as Queue<T>, we would need to write code like this:
var queue = new Queue<int>();
// ....
if(queue.Count > 0)
{ ❶
var next = queue.Dequeue();
// use next
}
❶ Another thread can dequeue the last item here.
This code checks whether there are items in the queue and then dequeues the next item; however, in multithread code, another thread can always dequeue the last item between the time we checked and the time we dequeued. This means that even if we had a thread-safe class with the same interface as Queue<T>, it would have been difficult to use it to write thread-safe code. In contrast, with the ConcurrentQueue<T> interface, we write code like this:
var queue = new ConcurrentQueue<int>();
// ....
if(queue.TryDequeue(out var next)) ❶
{
// use next
}
❶ Check and dequeue are combined.
Here the check and dequeue operations are combined into a single TryDequeue call, which eliminates the time window between the check and the dequeue operation and solves this problem.
You can use ConcurrentQueue<T> and ConcurrentStack<T> directly if you need a thread-safe queue or stack and don’t need a mechanism to signal when an item is available for processing. However, they are most useful in conjunction with BlockingCollection<T>.
13.2.5 ConcurrentBag<T>
Unlike ConcurrentQueue<T> and ConcurrentStack<T>, ConcurrentBag<T> doesn’t have a parallel outside of the concurrent collections. The ConcurrentBag<T> data structure does not enforce item ordering. When you retrieve items from the bag, you can get them in any order. ConcurrentBag<T> can store duplicate items. ConcurrentBag<T> has an Add method for adding items and a TryTake method for retrieving and removing the items in the collection.
The implementation of ConcurrentBag<T> uses per-thread queues, and TryTake will try to provide items inserted by the same thread. This is helpful because with per-thread queues, the ConcurrentBag<T> doesn’t have to block if two threads try to retrieve an item simultaneously. If an item added by the current thread isn’t available, TryTake will get an item from another thread’s queue (this is called work stealing), which requires thread synchronization and so is slower.
That is why you should only use ConcurrentBag<T> if the same thread (or set of threads) both add and retrieve items from the bag. For example, you should only use ConcurrentBag<T> as the backing collection for a BlockingCollection<T>-based work queue if the code that handles items in the collection also adds them. Also, you shouldn’t use ConcurrentBag<T> in asynchronous code because typically, you don’t control which thread runs it.
13.2.6 When to use the concurrent collections
ConcurrentDictionary<TKey,TValue> is a very good thread-safe alternative to Dictionary<TKey,TValue>. We’ve already seen examples of using it as an in-process cache. It can be used anytime we need to access a dictionary from multiple threads at the same time. Also, it can be used in both asynchronous and non-asynchronous code.
Likewise, ConcurrentQueue<T> and ConcurrentStack<T> are good thread-safe implementations of the queue and stack data structures. We can use them whenever we need concurrent access to a queue or a stack, and we don’t need a built-in mechanism to signal when items are available. They are also perfectly usable in both asynchronous and non-asynchronous code.
If you do need this signal and want the consumer thread to block when there’s no work available, then BlockingCollection<T> is a perfect fit. However, BlockingCollection<T>, especially Take and GetConsumingEnumerable, does not fit the asynchronous programming model.
13.2.7 When not to use the concurrent collections
If we need to use a lock to make our own code thread safe (except for just protecting access to the collection), then we use this lock to synchronize access to our code (and the collection) and don’t need to use a collection that supports concurrent access. In this case, the non–thread-safe alternatives (Dictionary<TKey,TValue>, Queue<T>, and Stack<T>) are simpler and faster.
If you do need thread safety because you pass the collection to some (maybe external) code that doesn’t need to modify the collection and can work if the collection is a little bit stale (that is, not completely up to date), you should look into using the immutable collections instead.
13.3 The immutable collections
The problems of thread safety always boil down to multiple threads modifying the data simultaneously, threads reading while other threads are modifying the data, or timing problems making threads modify data in the wrong order. All those problems are about modifying data—if you never modify data, you won’t have any of those problems, and your code will be inherently thread safe.
While the concurrent collections use clever locking and lockless strategies to make it safe to modify a collection by multiple threads simultaneously, the immutable collections achieve thread safety by simply being immutable. If they can’t be modified at all, they can’t be modified by two threads at the same time.
The immutable collections work like the .NET String class. All the methods that modify the collection actually leave the collection untouched and return a brand-new collection that is a copy of the original collection with the requested modifications.
It might seem like all this copying is wasteful and can cause poor performance and excessive memory usage problems, but the immutable collections mitigate this problem by using internal data structures that can share parts of the data between collections. Therefore, creating a modified copy of a collection is cheap (or, at least, cheaper than copying the entire collection).
13.3.1 How immutable collections work
If you look at the standard collections, you will find that they are all based on arrays. The reason is that due to the way the CPU accesses memory, arrays are the most performant data storage option. List<T> is just a wrapper around an array. Queue<T> and Stack<T> are also arrays. HashSet<T> is a hash table implemented by using two arrays, and Dictionary<TKey,TValue> is implemented using four arrays. Everything is based on arrays. However, arrays are just contiguous blocks of memory; you can’t share memory between arrays, which is why the immutable collections generally don’t use them and instead opt for data structures that do support sharing parts of the memory between collections.
Why arrays are more efficient than other data structures
The CPU is much faster than the computer’s memory. For example, for a 2GHz CPU, each CPU clock cycle is 0.5 nano seconds, while access to DDR5 memory takes around 16.67 nano seconds, give or take. Applying a little bit of math shows us that a CPU can perform about 33 internal operations in the time it takes it to retrieve anything from memory.
Obviously, having the CPU on idle and waiting for data to arrive from memory most of the time would be bad, so clever CPU designers devised a solution—just add a little bit of memory into the CPU chip. This memory runs nearly as fast as the CPU processing cores (the reason we can’t make all the computer’s memory this fast is cost). We call this memory the CPU cache memory. We also have a hardware component inside the CPU chip that is called the cache controller. One of the things the cache controller does is try to preload data from the main memory into the CPU cache before we need it.
Arrays are contiguous blocks of memory. All the items in the array are stored in memory one after the other; when we iterate an array, we scan this memory sequentially. If you scan memory sequentially, it’s easy for the cache controller to guess the next value you are going to retrieve from memory—it’s the value immediately after your previous memory access.
Other data structures, such as linked lists and trees, are not contiguous in memory. To get the memory address of the next item in a linked list, you must read the current item’s node and extract the “next” field from it. Linked lists and trees do not have a standard node layout, and the cache controller doesn’t know how to parse nodes of whatever data structure from whichever library your program may be using.
That is why when you scan an array, the next value will most likely will be waiting for you in the cache ready for immediate access; however, when you access another data structure, the CPU will spend a significant amount of time waiting for data to be transferred from the computer’s main memory.
And a quick note for the readers that know about CPU design and are screaming at the book about cache lines and clock cycles per operation: you are obviously right, but this is not a book about hardware design, and the explanation here is correct enough to explain the performance characteristics of arrays.
To understand the tricks used by immutable collections, we will implement an immutable stack. But before we do so, we need a regular array-based stack to compare it to.
We will implement the simplest thread-safe stack possible. Our stack will only have two methods: a Push method that adds an item to the top of the stack and a TryPop method that retrieves the item at the top of the stack or returns false if the stack is empty. We will also limit our array-based stack to just 10 items because I want to focus on how the immutable stack works and not on how to resize the array-based stack. We will achieve thread safety by using a lock to protect all access to the stack.
Listing 13.13 Simple stack implementation
public class MyStack<T>
{
private T?[] _data = new T[10];
private int _top = -1;
private object _lock = new();
public void Push(T item)
{
lock(_lock)
{
if(_top == _data.Length-1) throw new Exception("Stack full");
_top++;
_data[_top] = item;
}
}
public bool TryPop(out T? item)
{
if(_top==-1)
{
item = default(T);
return false;
}
item = _data[_top];
_data[_top] = default(T);
_top--;
return true;
}
}
Now let’s see what happens when we run the following test code.
Listing 13.14 Test code for simple stack
var stack = new MyStack<int>();
stack.Push(1);
stack.Push(2);
stack.TryPop(out var item);
This code creates a stack and then pushes two values (one and two); it will then pop the last value out.
Let’s see what happens inside the stack when we run the test code. When we create the stack, _top is set to −1 in our constructor (virtually pointing to the nonexistent item before the start of the array), and _data is initialized by the runtime to all zeros (figure 13.2).
Figure 13.2 Simple stack initial state
After the Push(1) call, we increment _top to zero, making it point at the current top of the stack and store 1 into the new top (which is _data[0]; figure 13.3).
Figure 13.3 Simple stack after first push
The Push(2) call will increment _top again to 1, indicating that _data[1] is now top of the stack, and store 2 into the new top (figure 13.4).
Figure 13.4 Simple stack after second push
The TryPop call will return the item at the current top of the stack (_data[1]) using the item out parameter. It will also zero out the current top and decrement _top to zero indicating the new top is _data[0], effectively returning the stack to the same state as before the last push (figure 13.5).
Figure 13.5 Simple stack after pop
Now that you understand how a standard stack works, let’s implement an immutable stack. With an immutable stack, we no longer change the stack. Instead, each call will return a new stack. We will have a Push method, a Pop method, and an IsEmpty property. In the regular implementation, we had to combine Pop and IsEmpty into a single TryPop method because we have no way to prevent another thread from modifying the stack between the IsEmpty check and the Pop call. With the immutable stack, no one can modify the stack at all, so no one can modify the stack between the IsEmpty check and the Pop call. As the stack is immutable, Push and Pop will not modify the stack but will return a new stack with an item added or removed.
If we keep using an array, we’ll have to copy the entire array on every Push and Pop, and obviously, we don’t want that. Luckily, we can implement a stack using a singly linked list.
Listing 13.15 Immutable stack implementation
public class MyImmutableStack<T>
{
private record class StackItem(T Value, StackItem Next);
private readonly StackItem? _top;
public MyImmutableStack() {}
private MyImmutableStack(StackItem? top)
{
_top = top;
}
public MyImmutableStack<T> Push(T item)
{
return new MyImmutableStack<T>(new StackItem(item,_top);
}
public MyImmutableStack<T> Pop(out T? item)
{
if(_top == null)
throw new InvalidOperationException("Stack is empty");
item = _top.Value;
return new MyImmutableStack<T>(_top.Next);
}
public bool IsEmpty => _top == null;
}
Now we’ll run the equivalent code to listing 13.14 on this new immutable stack.
Listing 13.16 Test code for immutable stack
var stack1 = new MyImmutableStack<int> ();
var stack2 = stack1.Push(1);
var stack3 = stack2.Push(2);
var Stack4 = stack3.Pop(out var item);
This code creates a new empty stack and assigns it to the stack1 variable. Next, it calls Push, which creates another stack with the new item and assigns it to the stack2 variable. It then calls Push again, which also creates a new stack with an additional item and stores it as stack3. Finally, it calls Pop, which creates yet another stack, but this time with the top item removed, and puts it in the stack4 variable.
Let’s see what happens inside the immutable stack when we run the test code. The MyImmutableStack parameterless constructor will create a new stack that has no StackItem (_top will be null) (figure 13.6).
Figure 13.6 Immutable stack initial state
The Push(1) call will also create a new stack, which will have a single stack item with Value set to 1 and Next set to the previous _top (null) (figure 13.7).
Figure 13.7 Immutable stack after first push
The Push(2) call will create a new stack and a new StackItem. The new StackItem will have Value set to 2 and Next pointing to stack2’s _top, which is the existing StackItem storing the value 1. Note that now two stacks are sharing this first StackItem (figure 13.8).
Figure 13.8 Immutable stack after second push
Finally, the Pop call will, unsurprisingly, create a new stack. The new stack will point to _top.Next, that is, to the old StackItem with the value 1 that will now be shared between the three stacks (figure 13.9).
Figure 13.9 Immutable stack after pop
Usually, we will reuse the same variable and not create a new variable for each version of the stack (we’ll have just one variable instead of stack1, stack2, stack3, and stack4); however, this does not change anything (except that, with the separate variable names, the figures area is easier to understand). Even if we reuse the variables, all the old stacks will still hang around in memory until the next time the garbage collector runs and frees them.
Now you can see how every operation on the immutable stack creates a new stack with a negligible amount of work and without copying any of the items already in the stack. This is at the cost of using a little bit more memory (each item now has the Next reference and all the overhead of an object) and having the items spread around in memory instead of being stored sequentially in an array (which, because of CPU cache design, slows down the access to them).
I’ve chosen to demonstrate how the immutable stack works because this is the simplest of the immutable collections; however, they all use the same basic tactic—place the data inside node objects and design your operation so that every “modified” copy can share most of the previous collection’s nodes. As we’ve seen, a stack can be implemented with just one linked list. A queue needs two linked lists, and most of the other immutable collections use some kind of binary tree. The implementation details of all the immutable collections are outside the scope of this book.
13.3.2 How to use the immutable collections
Some data changes so rarely that storing it in a data structure that cannot change doesn’t pose problems. For example, the list of countries in the world does change sometimes, but it’s rare enough that we can accept having to restart our service to refresh this list. However, the data that’s really critical for our software, that data that we manage, tends to change all the time.
Let’s say we are building an e-commerce site that sells books. Obviously, the survival of the company depends on selling a lot of books, so we really want to be able to sell more than one book simultaneously. For this reason, we’ve decided to use the immutable collection to store our inventory due to the inherent thread safety. Let’s write some code to manage our inventory.
Listing 13.17 Non–thread-safe stack management with ImmutableDictionary
public class InventoryManager
{
private ImmutableDictionary<string,int> _bookIdToQuantity;
public bool TryToBuyBook(string bookId)
{
if(!_bookIdToQuantity.TryGetValue(bookId, out var copiesInStock)) ❶
return false;
if(copiesInStock == 0)
return false;
_bookIdToQuantity =
_bookIdToQuantity.SetItem(bookId, copiesInStock-1); ❷
return true;
}
}
❶ Gets previous quantity
❷ Sets new quantity
We wrote the InventoryManager class with a single method called TryToBuyBook. This method first retrieves the number of copies we have in stock from an ImmutableDictionary<string,int> that’s referenced by the _bookIdToQuantity variable. If the book doesn’t exist in the shop, or there are no copies in stock, the method returns false to indicate the customer can’t buy the book. If everything is okay, the method updates the stock by using the dictionary’s SetItem to create a new dictionary with the updated number of copies and stores the new dictionary in the same variable. It then returns true.
If you think about what happens when this code runs on multiple threads simultaneously, it’s easy to see the problem: the dictionary can’t change, it’s immutable, and it’s impossible for another thread to modify the dictionary. However, if that dictionary is referenced by a normal mutable variable, another thread can change the variable swapping the dictionary with another one, and that change is not protected by the immutable data structure. See figure 13.10.
Figure 13.10 Synchronization needs of immutable collections versus concurrent collections
The simplest solution is to place a lock around the entire method. This solves our data corruption problem, but it completely nullifies any benefits we get from the immutable collection’s thread safety. If we place a lock around any access to the dictionary, we might as well use the simpler non–thread-safe Dictionary<TKey,TValue>.
The complicated solution is to use ImmutableInterlocked.
13.3.3 ImmutableInterlocked
The ImmutableInterlocked class gives us lock-free operations for modifying a variable referencing an immutable collection. It contains methods that implement the same operation we’ve seen in the concurrent collection, but this time for the immutable collection.
For example, for ImmutableDictionary<TKey,TValue>, ImmutableInterlocked gives us AddOrUpdate, GetOrAdd, TryAdd, TryRemove, and TryUpdate, which are similar to the ConcurrentDictionary<TKey,TValue> methods with the same name.
If you remember from listing 13.10, ConcurrentDictionary<TKey,TValue>.TryUpdate ensures that the value we are trying to update hasn’t been changed by someone else. Then, if the value hasn’t been changed, it will replace that value in the dictionary. ImmutableInterlocked.TryUpdate does the same for immutable dictionaries; it will make sure that the value we are trying to update hasn’t been changed by someone else. Then, if the value hasn’t changed, it will replace the entire dictionary with a new dictionary with one different value.
Just like ConcurrentDictionary<TKey,TValue>.TryUpdate, it will return false without changing anything if the value was changed by another thread, and we need to deal with it, typically by reading the new value and redoing our processing until we succeed.
Listing 13.18 Thread-safe stock management with ImmutableInterlocked
This is the safe version of listing 13.17. It reads the number of copies in stock and tries to decrease it by 1, and if the number of copies has already changed since we’ve read it, this code will read the value again, validate that it has a copy to sell again, and try to decrease the value in the _bookIdToQuantity dictionary. It will continue doing this either until it succeeds or until transactions running on other threads cause the number of copies in stock to go down to zero.
ImmutableInterlocked also provides Push and TryPop methods for use with ImmutableStack<T>, and Enqueue and TryDequeue for ImmutableQueue<T>. Note that using ImmutableInterlocked is an all-or-nothing deal—it’s only safe if all your modifications use ImmutableInterlocked. Also note that you cannot use ImmutableInterlocked to update multiple collections in a thread-safe way. If, for example, you need to add the same key to two dictionaries, there is no way to do it with ImmutableInterlocked without having a time window where another thread can view the change in the first dictionary before you updated the second. This also goes for multiple changes in the same dictionary—you can’t use ImmutableInterlocked to change two values at once.
13.3.4 ImmutableDictionary<TKey,TValue>
ImmutableDictionary<TKey,TValue> is, predictably, the immutable version of Dictionary<TKey,TValue>. ImmutableDictionary<TKey,TValue>, just like Dictionary<TKey,TValue>, lets us check whether a key exists by using ContainsKey, retrieve a value by using the [] operator, and do both in a single call by using TryGetValue.
It also has most of the methods used in Dictionary<TKey,TValue> to modify the dictionary (Add, Remove, and so on), but in ImmutableDictionary<TKey,TValue>, they leave the dictionary untouched and return a new dictionary with the modifications. To change a specific value inside the dictionary, you use the UpdateValue method instead of the [] operator because there’s no good way for the [] operator to return a new dictionary.
The ImmutableDictionary<TKey,TValue> does not itself have any of the special operations found in ConcurrentDictionary<TKey,TValue>, such as GetOrAdd, because since the ImmutableDictionary<TKey,TValue> is immutable, it can’t change between the Get and the Add.
If you need to add, remove, or update multiple values simultaneously, ImmutableDictionary<TKey,TValue> provides the AddRange, RemoveRange, and UpdateItems methods. These methods are important for writing high-performance code because they create just one new ImmutableDictionary<TKey,TValue> for the entire method call instead of one new dictionary for each and every value changed.
If you need to make multiple modifications of different types (for example, adding a value and removing another), or your algorithm doesn’t let you easily group changes (for example, if you can’t replace several Add calls with one AddRange call), you can use a builder object. A builder object is created using the dictionary’s ToBuilder method. The builder is not immutable, and you can use it to make multiple modifications without creating a new dictionary. When you’ve finished with the modifications, you call the builder’s ToImmutable method that created one new ImmutableDictionary<TKey,TValue> with all the modifications.
The builder is not immutable and not thread safe. It is a fast and efficient way to create new ImmutableDictionary<TKey,TValue> objects, but it does not do anything to help with multithreading.
As we’ve seen earlier in this chapter, the variable holding the up-to-date version of the dictionary is just a simple variable and has the same threading behavior as any other variable (not thread-safe without locking if there are any write operations). As we’ve also seen earlier in this chapter, if you want a fast, lock-free way to synchronize access to that variable, you can use ImmutableInterlocked. It provides the AddOrUpdate, GetOrAdd, TryAdd, TryRemove, and TryUpdate methods, which work the same way as the ConcurrentDictionary<TKey,TValue> methods with the same name (except that, being immutable, the dictionary never changes, and those operation swap the dictionary with a new dictionary that has the requested modifications).
If you use ImmutableInterlocked with ImmutableDictionary<TKey,TValue>, it’s likely you are doing it to get basically the same behavior that you get with ConcurrentDictionary<TKey,TValue>. If this is the case, you will probably be better off just using ConcurrentDictionary<TKey,TValue> instead.
Remember that you can either use ImmutableDictionary<TKey,TValue>’s methods (and the builder) to create modified copies, or you can use ImmutableInterlocked. Using both is not thread safe.
13.3.5 ImmutableHashSet<T> and ImmutableSortedSet<T>
Naturally, ImmutableHashSet<T> and ImmutableSortedSet<T> are the immutable versions of HashSet<T> and SortedSet<T>. They both represent a set from set theory—they contain zero or more items with no duplicates and can also perform set theory operations (Except, Intersect, IsSubsetOf, IsSupersetOf, and so forth).
When you enumerate an ImmutableHashSet<T> (for example, by using foreach), the items’ order is completely arbitrary and is not under your control, but operations on the set, especially lookup, are very fast. In contrast, if you enumerate an ImmutableSortedSet<T>, you get the item in sorted order (you can control the sort order by passing an IComparer<T> to the static ImmutableSortedSet.Create<T> method), but operation on the set will be slower. Because of the performance difference, it’s recommended to prefer ImmutableHashSet<T> and only use ImmutableSortedSet<T> if you care about the items’ order during enumeration.
As with all the immutable collections, all the methods that would normally change the collection return a new collection with the modifications instead. Also, like we’ve seen with ImmutableDictionary<TKey,TValue>, both ImmutableHashSet<T> and ImmutableSortedSet<T> have a ToBuilder method that returns an object you can use to efficiently perform many modifications and then create only one new immutable set for all the modifications. Remember, the builder object is not thread safe.
In addition, as with all of the immutable collections, if you have a variable referencing the up-to-date version of the collection, you need to synchronize access to the variable yourself (most likely, using locks). Unlike ImmutableDictionary<TKey,TValue>, you can’t use ImmutableInterlocked with the immutable set classes.
13.3.6 ImmutableList<T>
ImmutableList<T> is, unsurprisingly, the immutable version of List<T> and, also unsurprisingly, works the same way as the previous immutable collections. All the methods that don’t modify the list work exactly like in List<T>. All the methods that do modify the list return a new ImmutableList<T> instead. To set an item at a specific location, use the SetItem method instead of the [] operator because the operator has no good way to return a new ImmutableList<T> object.
Like all the previous immutable collections, ImmutableList<T> has a ToBuilder method that returns a mutable object you can use to perform multiple modifications without creating an excessive number of ImmutableList<T> objects. As always, the builder object is not thread safe.
If you have a variable holding an ImmutableList<T> object that is accessed by different threads, you need to synchronize access to this variable. ImmutableInterlocked does not support ImmutableList<T>.
13.3.7 ImmutableQueue<T> and ImmutableStack<T>
ImmutableQueue<T> and ImmutableStack<T> are, obviously, the immutable versions of Queue<T> and Stack<T>. Because queue and stack are almost always used as temporary storage, with items added and removed all the time, in almost all cases, ConcurrentQueue<T> and ConcurrentStack<T> are a better choice, with the notable exception of functional programming.
If you do use the immutable queue and stack, then the ImmutableQueue<T>.IsEmpty and ImmutableStack<T>.IsEmpty properties will tell you the collection is empty, and ImmutableQueue<T>.Enqueue and ImmutableStack<T>.Push will create a new queue or stack with the added item. ImmutableQueue<T>.Peek and ImmutableStack<T>.Peek will both return the next item without removing it from the collection, and ImmutableQueue<T>.Dequeue and ImmutableStack<T>.Pop will return a new stack with an item removed and (optionally) will place the removed item in an out parameter.
The Peek, Dequeue, and Pop methods will throw an exception if the queue or stack is empty. There’s no way for another thread to modify the collection between checking the IsEmpty property and calling Peek, Dequeue, or Pop—the collection is immutable, it can’t be modified at all, and thus it can’t be modified by another thread.
If your queue or thread is referenced by a variable that is writable by other threads, you need to synchronize access to this variable and, at the minimum, copy the reference to a local variable before reading IsEmpty so another thread can’t replace the queue or stack between you reading IsEmpty and calling Peek, Dequeue, or Pop.
ImmutableInterlocked supports both ImmutableQueue<T> and ImmutableStack<T> with operations similar to those available in ConcurrentQueue<T> and ConcurrentStack<T>. However, if you need them, it’s almost guaranteed you’ll be better off just using ConcurrentQueue<T> or ConcurrentStack<T> instead.
13.3.8 ImmutableArray<T>
When I started talking about the immutable collections, I said all the non–thread-safe collections use arrays because they are fast, but immutable collections don’t use arrays because this would have required them to copy all the data every time a collection is modified (that is, a new collection is created with the modification). ImmutableArray<T> is an exception that, like the name suggests, does use an array.
Because ImmutableArray<T> is not exempt from the disadvantages of arrays, this means that the immutable array does have to copy all the data every time it creates a modified collection, and this makes ImmutableArray<T> the slowest immutable collection to write to. However, because it uses an array, it is also the fastest immutable collection to read from. This makes ImmutableArray<T> more similar to frozen collections (described later in this chapter) compared to other immutable collections.
ImmutableArray<T> is a very good choice if you need to pass a read-only array to some code that isn’t under your control. Being an array, it’s fast to scan and even supports read-only memory and span objects.
Conversely, ImmutableArray<T> is typically not a good choice for your internal data structure because modifications are slow and require a lot of memory. This can still be acceptable if modifications are very rare or the array is small, but you need to be very careful about it.
You can use ImmutableArray.Create<T> to create a new immutable array from a normal array or from up to four individual data items. You can use ImmutableArray.ToImmutable<T> to create an immutable array from any collection, and you can use ImmutableArray.CreateRange to create an immutable array from a subset of another collection.
As always, if the variable referencing the immutable array is accessible from multiple threads, you need to synchronize access yourself. ImmutableInterlocked supports ImmutableArray<T> with the InterlockedCompereExchange, InterlockedExchange, and InterlockedInitilize methods, but you generally shouldn’t use them. They are complicated and error prone compared to a lock statement, and unless you are in a very performance-critical code path, the trade-offs are just not worth it.
Generally, ImmutableArray<T> should be used like the frozen collections (which we’ll discuss in just a few paragraphs). ImmutableArray<T> is inefficient to create (both in speed and memory usage) but very efficient to use. It should be used when we need a sequential collection (like List<T> or an array) that is read only and inherently thread safe. However, because recreating it is expensive, it should only be used when we do not intend to change it (that is, create a new modified copy) at all.
13.3.9 When to use the immutable collections
Immutable collections are very common in functional programming. If you write code in functional style or use functional algorithms, the immutable collections are perfect for you.
Immutable collections are also convenient if you need to preserve previous states of the system, for example, as a way to provide undo functionality. Note that immutable collections are irrelevant if you need to preserve the state of the system for auditing or regulatory purposes because then you need to preserve the state of the system on disk, and the immutable collections are only in-memory.
Immutable collections are also very helpful if you need to pass the collection to code that is not under your control. That way, you don’t have to defensively duplicate the data and send a copy to the outside code.
But whenever you use the immutable collections, you must remember that while the immutable collections themselves are completely thread safe, “changing the collection” involves creating a new collection, and the collection is usually assigned to the same variable as the previous collection. This variable is now modified with every change, and access to it needs to be synchronized like any other variable that is concurrently accessed from multiple threads. This often requires holding a lock when updating the collection or using ImmutableInterlocked, and in those cases, the code is likely to be simpler and faster if you use the concurrent collections instead.
Finally, in cases where the data really never changes, you should consider using the frozen collections.
13.4 The frozen collections
We’ve seen that the immutable collections never change in the sense that if you want to change them, you need to create a copy of the collection with the required modification, and we’ve also seen that as a trade-off, the immutable collection uses less-efficient data structures to make the creation of modified copies faster. But what if we don’t want to make this trade-off? What if the data really never changes? What if we don’t want to sacrifice read performance to support write operations we don’t need? This is why we have the frozen collections.
Frozen collections are read-only collections optimized for reading. Creating them is slower than creating regular, concurrent, or immutable collections, but reading from them is as fast as possible.
Frozen collections are meant only for reading. They can’t be modified at all, and they don’t even have methods to create modified copies like the immutable collections.
Currently, there are only two types of frozen collections—FrozenDictionary<TKey,TValue> and FrozenSet<T>—which are read-only versions of Dictionary<TKey,TValue> and HashSet<T>, respectively. If you want a frozen version of List<T>, you can use ImmutableArray<T> (we talked about it earlier in this chapter). There are no frozen queues and stacks because those don’t make sense.
To create a FrozenSet<T>, you can take any collection and call the ToFrozenSet extension method.
Listing 13.19 Initializing a FrozenSet
var data = new List<int> {1,2,3,4};
var set = data.ToFrozenSet();
This code creates a List<int> with some numbers and then calls ToFrozenSet on it to create a FrozenSet<int> with the same content.
To create a FrozenDictionary<TKey,TValue>, you can take any collection and call the ToFrozenDictionary extension method. The easiest way to create a FrozenDictionary<TKey,TValue> is by using a Dictionary<TKey,TValue>.
Listing 13.20 Initializing a FrozenDictionary from a Dictionary
var numberNames = new Dictionary<int,string>
{
{1, "one"},
{2, "two"}
};
var frozenDict = numberNames.ToFrozenDictionary();
This code creates a Dictionary<int,string> that maps numbers to the English name of the numbers (only for one and two, just to keep the code short) and then uses ToFrozenDictionary to create a FrozenDictionary<int,string> with the same content. There’s also an overload of ToFrozenDictionary that accepts delegates to extract the key and value so it can be used on any collection.
Listing 13.21 Initializing a FrozenDictionary from a List
var data = new List<int> {1,2,3,4};
var frozenDict = data.ToFrozenDictionary(x=>x,x=>x.ToString());
This code creates a List<int> with some numbers and then uses ToFrozenDictionary to create a FrozenDictionary<int,string>, which maps the numbers in the list to their string representation. Note that if the source data contains duplicates (in the case of ToFrozenSet) or duplicate keys (in the case of ToFrozenDictionary), the latest entry will be used, which is different than the behavior of Dictionary<TKey,TValue> and HashSet<T> that throws an exception in case of duplicate keys.
13.4.1 When to use the frozen collections
The frozen collection should only be used when data (almost) never changes. The frozen collections optimize for reads at the cost of making the collection creation much slower. If the data is frequently accessed but never modified, this can improve performance. In contrast, if the data changes frequently, the time it takes to create the frozen collection after each change can easily be much more than the time saved due to the faster lookups.
Summary
It is possible to read from the regular collections in the System.Collections.Generic namespace from multiple threads simultaneously.
Writing from multiple threads simultaneously or writing from one thread while reading from others is not allowed and might cause the collections to return incorrect results and even corrupt them.
The concurrent collections in the System.Collections.Concurrent namespace are fully thread safe and support both reading and writing from multiple threads at the same time.
There are concurrent versions of Dictionary<TKey,TValue>, Queue<T>, and Stack<T> called ConcurrentDictionary<TKey,TValue>, ConcurrentQueue<T>, and ConcurrentStack<T>. Their interface is different from the regular collections—it combines operations that are commonly used together into a single operation to avoid race conditions.
There is also a ConcurrentBag<T> collection that is useful when you don’t care about the items’ order; it is designed to be used when the same threads both read and write from/to the collection.
The BlockingCollection<T> class adds support for producer–consumer scenarios and for limiting the collection’s size. BlockingCollection<T> works as a queue by default but can also be used as a stack.
The ConcurrentDictionary<TKey,TValue>, ConcurrentQueue<T>, ConcurrentStack<T>, and ConcurrentBag<T> collections can be used with asynchronous code.
Like the name suggests, the BlockingCollection<T> class is blocking, and it should be used carefully (or not at all) with asynchronous code.
There is no asynchronous version of BlockingCollection<T>, but we can use Channel<T> to make an asynchronous version of its most common use case (more about this in the next chapter).
The immutable collections in the System.Collections.Immutable namespace are collections that can’t be changed (every change leaves the collection untouched and creates a new collection). They are thread safe because, since they can’t be modified at all, by definition, they can’t be modified by another thread while you are accessing them.
However, if the variable that references the collections is accessed by multiple threads, you need to synchronize access yourself. The ImmutableInterlocked class can help with that (for dictionary, queue, and stack).
If you need to make multiple modifications to an immutable collection, you can call ToBuilder to get a builder object that collects the modifications without creating new collections. After you make all the modifications to the builder, you call its ToImmutable method to create just one new collection with all the changes. The builder object is not thread safe.
There are ImmutableDictionary<TKey,TValue>, ImmutableHashSet<T>, ImmutableSortedSet<T>, ImmutableQueue<T>, ImmutableStack<T>, and ImmutableList<T> classes that are immutable versions of classes with the same name but without the Immutable prefix.
Those collections are slower to read than the regular or concurrent collections, but making copies of them is fast, which is important because every time you need to modify the collection, you create a copy of it.
The ImmutableArray<T> collection is an immutable array. It is faster to access than the other immutable collections but slower to modify (that is, create a modified copy). It also supports read-only Span<T> and Memory<T>.
The frozen collections are optimized for reading. Creating them is slow, but reading from them is fast. They cannot be modified.
Like the immutable collections, the frozen collections are inherently thread safe.
There are only two frozen collections: FrozenDictionary<TKey,TValue> and FrozenSet<T>.
Typically, to create a frozen collection, you first use a regular collection and then ToFrozenSet or ToFrozenDictionary to create a frozen collection from the data they contain.
14 Generating collections asynchronously/await foreach and IAsyncEnumerable
This chapter covers:
How awaitforeach works
Using yieldreturn in async methods
Iterating over asynchronous data using IAsyncEnumerable<T> and awaitforeach
Sometimes, we may want to use foreach to iterate over a sequence of items we generate on the fly or retrieve from an external source without first adding the entire set of items to a collection. For example, we’ve seen in chapters 8 and 13 how BlockingCollection<T>’s support for foreach makes it easy to use for building a work queue. C# makes this easy with the yieldreturn keyword, as discussed in chapter 2. However, both the versions of yieldreturn we covered in chapter 2 and BlockingCollection<T> don’t support asynchronous programming.
In this chapter, we’ll cover the asynchronous version of foreach (called await foreach) and the yieldreturn enhancement from C# 8, which allows us to use it for asynchronous code. And finally, we’ll employ all of those to write an asynchronous version of BlockingCollection<T> and a fully asynchronous work queue.
14.1 Iterating over an asynchronous collection
To understand how the asynchronous awaitforeach works, we need to first take a look at the good old non-asynchronous foreach. The foreach keyword is syntactic sugar. It’s just a nicer way to write code relative to using more basic language features. Specifically, foreach is just a nicer way to write a while loop. You can think of the compiler’s implementation of foreach as a simple text replacement. The compiler takes code like
foreach(var x in collection)
{
Console.WriteLine(x);
}
and transforms it into
using(var enumerator = collection.GetEnumerator())
{
while(enumerator.MoveNext())
{
var x = enumerator.Current;
Console.WriteLine(x);
}
}
As you can see, foreach translates into a call to GetEnumerator that retrieves an IEnumerator<T> and a while loop that uses MoveNext to get the next item for each iteration of the loop. More generally, you can say the compiler takes code in the form of
foreach([loop-variable-type] [loop-variable] in [collection])
{
[loop-body]
}
Obviously, I’m skipping a lot of details here; there are a lot of special cases and optimizations that the compiler can use to improve this code, but functionally, the foreach loop is equivalent to this while loop.
This works very well for non-asynchronous code, but to use a collection where items are retrieved asynchronously, that is, a collection where getting the next item is an asynchronous operation, we’re going to have to make some changes to the way foreach works. Specifically, we’re going to need to add an await inside the while loop condition (third line in the previous code snippet), and to make that await possible, we need MoveNext to return a Task<bool> instead of a bool.
And that’s what the await foreach keyword and the IAsyncEnumerable<T> interface are. The IAsyncEnumerable<T> interface is similar to IEnumerable<T>. It has just one method called GetAsyncEnumerator (like IEnumerable<T>.GetEnumerator) that returns an object implementing the IAsyncEnumerator<T> interface (like IEnumerator<T>). That method itself is not asynchronous and should return quickly. Any lengthy asynchronous initialization should happen the first time the enumerator’s MoveNextAsync method is called. The IAsyncEnumerator<T> interface has a method named MoveNextAsync that acts like the IEnumerator<T>.MoveNext method, except it returns a ValueTask<bool> instead of a bool.
Here is the comparison between the IEnumerable<T> and IAsyncEnumerable<T> (table 14.1) and IEnumerator and IAsyncEnumerator (table 14.2).
Table 14.1 IEnumerable vs. IAsyncEnumerable
IEnumerable<T>
IAsyncEnumerable<T>
IEnumerator<T> GetEnumerator()
IAsyncEnumerator<T>
➥GetAsyncEnumerator()
Table 14.2 IEnumerator vs. IAsyncEnumerator
IEnumerator<T>
IAsyncEnumerator<T>
T Current {get;}
T Current {get;}
bool MoveNext()
ValueTask<bool> MoveNextAsync()
void Dispose()
ValueTask DisposeAsync()
As you can see from the tables, the asynchronous and non-asynchronous interfaces are almost exactly the same, just with support for async/await. The tables do not contain IEnumerable<T>’s support for the older nongeneric IEnumerable interface because it’s practically never used. Also, I’ve ignored IAsyncEnumerator<T>.GetAsyncEnumerator‘s cancellation token parameter because we’ll talk about it in detail later in this chapter.
The last piece of the puzzle is the awkwardly named await foreach loop, which is just like foreach, except it uses IAsyncEnumerable<T> instead of IEnumerable<T> and adds the required await to make everything work. So this loop
await foreach(var x in collection)
{
Console.WriteLine(x);
}
translates into
await using(var enumerator = collection.GetAsyncEnumerator())
{
while(await enumerator.MoveNext()) ❶
{
var x = enumerator.Current;
Console.WriteLine(x);
}
}
❶ Adds an await here
14.2 Generating an asynchronous collection
Now we know how to use an asynchronous collection, but asynchronous collections don’t actually exist, at least not out of the box. All the collections included in the .NET library are data structures that hold items in memory, and with the items ready in memory, there is no need to retrieve them (asynchronously or otherwise).
When we talk about support for asynchronous collections, what we really want is the ability to use an await foreach loop to process a sequence of data items that are asynchronously generated or retrieved: we want an asynchronous version of the yield return keyword we’ve talked about in chapter 2. In chapter 2, we also used the following code to dynamically generate values 1 and 2.
Listing 14.1 yield return example from chapter 2
private IEnumerable<int> YieldDemo()
{
yield return 1;
yield return 2;
}
public void UseYieldDemo()
{
foreach(var current in YieldDemo())
{
Console.WriteLine($"Got {current}");
}
}
Now let’s add an asynchronous call to the method generating the values. We’ll use Task.Delay for simplicity.
❶ Changes IEnumerable<int> to async IAsyncEnumerable<int>
❷ We can use await.
❸ Changes foreach to await foreach
We had to change the generator method to return IAsyncEnumerable<int> instead of IEnumerable<int> and mark it as async—and that’s it. We can now use await inside of it and the await foreach keyword we talked about earlier to iterate over the generated sequence.
As we’ve seen in chapter 2, for the non-async yieldreturn, when we compile this, the compiler will transform the AsyncYieldDemo method into classes that implement IAsyncEnumerable<int> and IAsyncEnumerator<int>. If we use the same transformations from chapter 2, we get the following listing.
Listing 14.3 Code generated by the compiler from listing 14.2
public class AsyncYieldDemo_Enumerable : IAsyncEnumerable<int>
{
public IAsyncEnumerator<int> GetAsyncEnumerator(CancellationToken _)
{
return new YieldDemo_Enumerator();
}
}
public class YieldDemo_Enumerator : IAsyncEnumerator<int>
{
public int Current { get; private set; }
private async Task Step0()
{
Current = 1;
}
private async Task Step1()
{
await Task.Delay(1000);
Current = 2;
}
private int _step = 0;
public async ValueTask<bool> MoveNextAsync()
{
switch(_step)
{
case 0:
await Step0();
++_step;
break;
case 1:
await Step1();
++_step;
break;
case 2:
return false;
}
return true;
}
public ValueTask DisposeAsync() => ValueTask.CompletedTask;
}
public IAsyncEnumerable<int> AsyncYieldDemo()
{
return new AsyncYieldDemo_Enumerable();
}
This is exactly the same transformation we’ve seen in chapter 2 (except for the added async, await, and the occasional Task where needed; changes are in bold). You can go back to listing 2.5 for a complete breakdown of this code. The short version is
The compiler breaks the method into chunks whenever it finds a yieldreturn. Each yield return ends a chunk.
The yield return keyword is changed to Current =.
The compiler generates the MoveNextAsync method that calls the first chunk the first time it’s called, the second chunk the second time it’s called, and so forth.
We’ve used await extensively in this code, but as we’ve seen in chapter 3, await (like yield return) is implemented by the compiler rewriting your code into a class. Let’s see how the compiler generates code for the async methods in listing 14.3. We’ll start with the Step0 method:
private Task Step0()
{
Current = 1;
return Task.CompletedTask;
}
That was easy because Step0 doesn’t do anything asynchronous, the compiler doesn’t need to change it, and we just drop the async keyword and return Task.CompletedTask explicitly. Now let’s look at Step1:
Unlike Step0, Step1 really performs an asynchronous operation, namely Task.Delay, so as we’ve seen in chapter 3, everything after the await is moved into a different method that is passed to ContinueWith. The Step1 method needs to return a Task, so we used the TaskCompletionSource class we talked about in chapter 10 to create this Task. To keep the code simple, I’ve ignored all error handling. The compiler translates the MoveNextAsync method in the same way.
14.3 Canceling an asynchronous collection
Asynchronous operations often support cancellation, and we obviously want to be able to support cancellation in operations called from awaitforeach loops. To support cancellation, the GetAsyncEnumerator method accepts a cancellation token as an optional parameter, but this by itself doesn’t solve our problem because
The code calling GetAsyncEnumerator is generated by the compiler when we use await foreach, and we have no obvious way to pass a cancellation token.
The GetAsyncEnumerator code is also generated by the compiler, and we have no obvious way to access the method’s parameter.
The first problem is solved by the WithCancellation extension method. This method can be called on any IAsyncEnumerable<T>, and it returns a new object that also implements the IAsyncEnumerable<T> interface. This new object’s GetAsyncEnumerator method simply calls the original object’s GetAsyncEnumerator with a cancellation token you provide. To use WithCancellation, you just call it and use the returned object. The simplest way to use it is directly in the await foreach clause:
await foreach(var item in collection.WithCancellation(token))
The WithCancellation method is pretty simple. If you want to implement it yourself, all you need to do is write a class as shown in the following listing.
❶ Fields for original enumerable and cancellation token
❷ Constructs to store original enumerable and cancellation token
❸ Calls original enumerable with cancellation token
Most of this code just stores an async enumerable and a cancellation token, so it can, in the GetAsyncEnumerator method, call the original enumerable’s GetAsyncEnumerator method and pass the cancellation token as a parameter.
This solves the first problem. It lets us pass a cancellation token to GetAsyncEnumerator when it’s used by awaitforeach. However, it leaves us with the second problem—receiving the token in the method generating the values.
Luckily, the C# compiler can do this; it will pass the cancellation token as a parameter to the method generating the sequence if we just tell it which parameter to use. To indicate which parameter to use, we need to decorate it with the [EnumeratorCancellation] attribute. We now know how to modify the code from listing 14.2 to use a cancellation token.
Listing 14.5 Async yield return example with cancellation
private async IAsyncEnumerable<int> AsyncYieldDemo(
[EnumeratorCancellation] CancellationToken cancellationToken = default) ❶
{
yield return 1;
await Task.Delay(1000, cancellationToken);
yield return 2;
}
public async Task UseAsyncYieldDemo()
{
var cancel = new CancellationTokenSource();
var collection = AsyncYieldDemo();
await foreach(var current in
collection.WithCancellation(cancel.Token)) ❷
{
Console.WriteLine($"Got {current}");
}
}
❶ Parameter to receive cancellation token
❷ Uses WithCancellation to pass cancellation token
In this listing, we added a CancellationToken parameter to the AsyncYieldDemo and decorated it with the [EnumeratorCancellation] attribute to allow AsyncYieldDemo to be canceled. We then used WithCancellation to pass the cancellation token to AsyncYieldDemo.
Obviously, because we call AsyncYieldDemo and iterate over it in the same method, we can just pass the cancellation token to AsyncYieldDemo directly, but this isn’t always possible. The code that creates the IAsyncEnumerable<T> and the code that iterates over it might be in different components. We might not have access to source code that creates the IAsyncEnumerable<T> at all, or the code can be in different methods, and using WithCancellation is just simpler than passing the cancellation token all the way to the code that created the enumerable.
While this sample supports cancellation, it will never cancel the operation. Now let’s see what happens when we do cancel. We’ll start with cancellation before the loop even starts.
Listing 14.6 Canceling the iteration before the loop starts
private async IAsyncEnumerable<int> AsyncYieldDemo(
[EnumeratorCancellation] CancellationToken cancellationToken=default)
{
yield return 1;
await Task.Delay(1000, cancellationToken);
yield return 2;
}
public async Task UseYieldDemo()
{
var cancel = new CancellationTokenSource();
cancel.Cancel(); ❶
await foreach(var current in
AsyncYieldDemo().WithCancellation(cancel.Token))
{
Console.WriteLine($"Got {current}");
}
}
❶ Cancels the loop before starting
In this example, we call the cancellation token source’s Cancel method before the loop starts. If we run this, we’ll see that the program will print “Got 1” and only then crash with a TaskCanceledException. Why did it run the first iteration of the loop if the cancellation token was already canceled before we started?
We need to remember that, as discussed in chapter 9, a CancellationToken is just a thread-safe flag we can use to check whether an operation needs to be canceled. In this listing, we don’t check for cancellation in the loop at all. In the AsyncYieldDemo method, we also generate the first value without checking for cancellation; the first time anyone checks for cancellation is inside the Task.Delay call.
14.4 Other options
In addition to the WithCancellation method, there’s also a ToBlockingEnumerable method that wraps the IAsyncEnumerable<T> in a non-asynchronous IEnumerable<T> you can use in a normal foreach loop in non-asynchronous code. The ToBlockingEnumerable method lets you consume an asynchronous API from non-asynchronous code. This is equivalent to calling Wait() on each task returned by MoveNextAsync.
The ToBlockingEnumerable method, like other ways of calling Wait(), negates the benefits of using asynchronous operation and can cause deadlocks in some situations. It should be used only when you must use an asynchronous collection from non-asynchronous code and have no other choice.
And finally, there’s the ConfigureAwait extension method. Calling ConfigureAwait on the IAsyncEnumerable<T> object is equivalent to calling ConfigureAwait on all tasks returned by MoveNextAsync.
The ConfigureAwait method lets you decide if the code after the await will run in the same context as the code before the await. This typically only matters in local UI applications (see chapter 11 for more details).
14.5 IAsyncEnumerable<T> and LINQ
LINQ is a C# feature that lets us use SQL-like operators (such as Select and Where) to transform any sequence of items (usually used with the .NET collections). LINQ uses the IEnumerable<T> interface to interact with the sequence you are transforming.
At the time of this writing, the latest version of .NET (version 9) does not support LINQ with IAsyncEnumrable<T>. However, the .NET Reactive Extensions (RX) team has published the System.Linq.Async library (available via NuGet), which adds support for all the LINQ operators to IAsyncEnumerable<T> (and as such, to all asynchronous collections and sequences as well).
If .NET adds built-in support for asynchronous LINQ in the future, it’s likely they will use the System.Linq.Async library from the RX team (IAsyncEnumerable<T> itself was originally written by the RX team) or, at least, make the built-in LINQ support compatible with System.Linq.Async.
14.6 Example: Iterating over asynchronously retrieved data
Let’s say we need to process a binary-stream-containing numbers. We’ll write two methods. One reads the stream and extracts the numbers (using yieldreturn) and one processes the numbers. This stream can be a file, but it can also be a network connection. For simplicity, we’ll start with a non-asynchronous version.
Listing 14.7 Reading a stream of numbers non-asynchronously
public class NumbersProcessor
{
private IEnumerable<int> GetNumbers(Stream stream)
{
var buffer = new byte[4];
while(stream.Read(buffer, 0, 4) == 4) ❶
{
var number = BitConverter.ToInt32(buffer); ❷
yield return number; ❸
}
}
public void ProcessStream(Stream stream)
{
foreach(var number in GetNumbers(stream)) ❹
{
Console.WriteLine(number); ❺
}
}
}
❶ Gets the next 4 bytes from the stream
❷ Converts them to an int
❸ Returns the int
❹ For each number in stream
❺ Processes the number
The first method, GetNumbers, reads the stream and produces a sequence of numbers. It stops as soon as it can’t retrieve a whole number. The second method, ProcessStream, uses the first method and then does something with the numbers (because this is sample code, we’re going to just print them to the console).
As we’ve said earlier in this book, operations such as reading from a file or a communication channel are often best done asynchronously. So let’s take everything we’ve discussed in this chapter and make the code asynchronous.
Listing 14.8 Reading a stream of numbers asynchronously
public class Async NumbersProcessor
{
private async IAsyncEnumerable<int>
➥GetNumbers(Stream stream) ❶
{
var buffer = new byte[4];
while(await stream.ReadAsync(buffer, 0, 4) == 4) ❷
{
var number = BitConverter.ToInt32(buffer);
yield return number;
}
}
public async Task ProcessStream(Stream stream) ❸
{
await foreach(var number in GetNumbers(stream)) ❹
{
Console.WriteLine(number);
}
}
}
❶ IEnumerable<int> to async IAsyncEnumerable<int>
❷ stream.Read to await stream.ReadAsync
❸ void to async Task
❹ foreach to await foreach
The asynchronous code is the same as the non-asynchronous code, except that we added the words async and await in some places. To read the stream asynchronously, we need to call Stream.ReadAsync instead of Stream.Read, which is an important change. We want to await the ReadAsync call, so we add an await before ReadAsync. To be able to use await, we have to make the method async, and async methods can’t return IEnumerable<int>, so we mark the method as async and change the return type to IAsyncEnumerable<int>.
Now we’ve finished modifying the GetNumbers method and move on to ProcessStream. To process the IAsyncEnumrable<int> returned by GetNumbers, we need to replace the foreach with an await foreach. We can only use await foreach in an async method, so we mark the method as async and change the return type from void to Task (we talked about the problems with async void methods near the end of chapter 3).
In the previous chapter, in listing 13.11, we used BlockingCollection<T> to implement a work queue with 10 worker threads. BlockingCollection<T> has the GetConsumingEnumerable method that lets the code using it use foreach, which results in clean and readable code. However, BlockingCollection<T> does not support asynchronous operations.
In listing 13.12, we used Channel<T> to write an asynchronous version of the same program, but the Channel<T> interface isn’t as nice. We had to use an infinite loop to read the items from the queue and use an exception to signal the work is done and that there will be no more items.
Now, with IAsyncEnumerable<T>, we can easily write a class that implements a BlockingCollection<T>-like GetConsumingEnumerable on top of Channel<T>. This example only implements the Add and GetConsumingEnumerable methods (which are all we need to implement our work queue).
Listing 14.9 Async version of BlockingCollection<T>.GetConsumingEnumerable
public class ChannelAsyncCollection<T>
{
private Channel<T> _channel = Channel.CreateUnbounded<T>();
public void Add(T item)
{
_channel.Writer.TryWrite(item);
}
public void CompleteAdding()
{
_channel.Writer.Complete();
}
public async IAsyncEnumerable<T> GetAsyncConsumingEnumerable()
{
while (true)
{
T next;
try
{
next = await _channel.Reader.ReadAsync();
}
catch (ChannelClosedException)
{
yield break;
}
yield return next;
}
}
}
The Add method just calls the channel writer’s TryWrite method. TryWrite shouldn’t fail on unbounded channels, but in production code, we should probably check the value returned from TryWrite and throw an exception if it’s false.
The GetAsyncConsumingEnumerable method is a bit more complicated; at its core, it is just a loop calling the channel reader’s ReadAsync:
public async IAsyncEnumerable<T> GetAsyncConsumingEnumerable()
{
while (true)
{
yield return await _channel.Reader.ReadAsync();
}
}
But this code doesn’t detect when there is no more data and we should end the loop. When there is no more data, ReadAsync will throw an exception. We need to catch this exception and end the iteration:
However, this version of GetAsyncConsumingEnumerable doesn’t compile because you can’t use yieldreturn inside a try block. We must move the yieldreturn outside of the try block, and then we get the code from listing 14.7:
public async IAsyncEnumerable<T> GetAsyncConsumingEnumerable()
{
while (true)
{
T next;
try
{
next = await _channel.Reader.ReadAsync();
}
catch (ChannelClosedException)
{
yield break;
}
yield return next; ❶
}
}
❶ Moves the yield return outside of the try block
Now that we have our asynchronous channel-based collection, we can use it to write a work queue. This is an asynchronous adaptation of the BlockingCollection<T>-based work queue from listing 13.11.
Listing 14.10 Async work queue with 10 threads
ChannelAsyncCollection <int> asyncCollection =
new ChannelAsyncCollection <int>();
Task[] workers = new Task[10];
for(int i=0; i<workers.Length; i++) ❶
{
var threadNumber = i;
workers[i] = Task.Run(async () =>
{
var rng = new Random((int)threadNumber);
int count = 0;
await foreach (var currentValue in
asyncCollection.GetAsyncConsumingEnumerable())
{
Console.WriteLine($"thread {threadNumber} value {currentValue}");
Thread.Sleep(rng.Next(500));
count++;
}
Console.WriteLine($"thread {threadNumber}, total {count} items");
});
}
for(int i=0;i<100;i++) ❷
{
asyncCollection.Add(i);
}
asyncCollection.CompleteAdding(); ❸
await Task.WhenAll(workers); ❹
❶ Creates 10 worker threads
❷ Adds 100 items to process
❸ Signals no more items
❹ Waits for all threads to finish
This code creates a ChannelAsyncCollection<int> to hold the data we need to process in the background. It then starts 10 background tasks to do this processing, and each thread uses foreach and GetAsyncConsumingEnumerable to get the items to process. To simulate the processing, we just wait a small random amount of time and print the number. We insert the numbers 0 to 99 into the queue as a stand-in for the data we want to process.
Summary
The yield return and yield break keywords can be used in conjunction with async/await. You mark the method as async and return IAsyncEnumerable<T> instead of an IEnumerable<T>, and then you can use await in the iterator method.
IAsyncEnumerable<T> and IAsyncEnumerator<T> are the asynchronous, async/await-compatible versions of IEnumerable<T> and IEnumerator<T>.
The compiler transforms the method into a class, performing both the yield return transformation we talked about in chapter 2 and the await transformation we discussed in chapter 3.
To iterate over the resulting IAsyncEnumerable<T>, use awaitforeach instead of foreach.
awaitforeach is like a regular foreach, except it performs an await at each iteration.
You can cancel an iteration by using the WithCancellation extension method. This method will pass a cancellation token to the IAsyncEnumerable<T> (or, if the IAsyncEnumerable<T> was created with yield return, it optionally passes the cancellation token to the method generating the sequence). As always with cancellation tokens, the token is just a flag. To stop the iteration, there needs to be code that checks the status of the token and stops the iteration.
The ConfigureAwait extension method for IAsyncEnumerable<T> works like calling Task.ConfigureAwait at every iteration. We discussed the pros and cons of ConfigureAwait in chapter 11.
The ToBlockingEnumerable extension method wraps the IAsyncEnumerable<T> in an IEnumerable<T> that does the equivalent of calling Task.Wait at every iteration. Like Task.Wait, it can cause performance problems and deadlocks. It should be used only for calling asynchronous APIs from non-asynchronous code and only if the API supports this use case.
There is no built-in support for LINQ for asynchronous sequences, but the System.Linq.Async NuGet by the .net RX teams adds asynchronous LINQ support.
yieldreturn and awaitforeach can be used to write simple code that generates and processes sequences of asynchronous generated or retrieved data items (see listing 14.8).
yieldreturn and awaitforeach can also be used to build asynchronous work queues and other multithreaded infrastructure (see listing 14.9).
No part of this publication may be reproduced, distributed, or transmitted in any form or by any means, including photocopying, recording, or other electronic or mechanical methods, without the prior written permission of the publisher, except in the case of brief quotations embodied in reviews and certain other non-commercial uses permitted by copyright law.
PrefaceWelcome to the world of data structures in C#! This book, "C# Data Structures: Designing for Organizing, Storing and Accessing Information," is a comprehensive guide to understanding, implementing, and leveraging data structures in the C# programming language.
Pedagogical Style
The book employs a pedagogical style that blends theoretical concepts with practical examples. Each module builds on the previous one, gradually increasing in complexity and depth. The book is suitable for both beginners and experienced programmers alike, with explanations that are easy to follow and code examples that are clear and concise.
Importance of C# Data Structures
Data structures play a crucial role in organizing, storing, and accessing information in any programming language. In C#, they are especially important due to the language's object-oriented nature and its use in a wide range of applications, from web development to game programming.
Understanding data structures in C# is essential for writing efficient, scalable, and maintainable code. By employing the right data structures, developers can optimize their code for performance, reduce memory usage, and improve readability and maintainability.
Benefits of Reading this Book
This book offers several benefits for readers:
Comprehensive Coverage: It covers a wide range of data structures, from basic arrays and linked lists to more advanced structures like tries, B-trees, and external memory data structures. Each data structure is explained in detail, with clear explanations of its properties, operations, and use cases.
Practical Examples: The book provides numerous code examples that illustrate the use of each data structure in real-world scenarios. This allows readers to gain hands-on experience and understand how to apply the concepts in their own projects.
Performance Optimization: Understanding data structures in C# is essential for writing efficient code. The book provides insights into how different data structures affect performance and memory usage, allowing readers to make informed decisions when designing their programs.
Clear Explanations: The book’s clear and concise explanations make complex concepts easy to understand. Whether you're a beginner or an experienced programmer, you'll find the explanations in this book accessible and informative.
Future-Proofing: As technology evolves, so do programming languages and best practices. By understanding data structures in C#, readers can future-proof their skills and stay up-to-date with the latest developments in software development.
"C# Data Structures: Designing for Organizing, Storing and Accessing Information" is a valuable resource for anyone looking to gain a deeper understanding of data structures in C#. Whether you're a beginner or an experienced programmer, this book will help you write more efficient, scalable, and maintainable code.
Theophilus Edet
C# Data Structures: Designing for Organizing, Storing and Accessing Information
C# Data Structures: Designing for Organizing, Storing and Accessing Information is a comprehensive guide aimed at understanding the critical role of data structures in modern programming. In this book, readers will embark on a journey through the intricacies of designing, implementing, and managing data structures, especially within the context of the C# programming language.
Foundations of Data Structures
The book begins with an exploration of the foundational principles underpinning data structures. Key concepts such as abstract data types, encapsulation, and information hiding are elucidated in a manner that is accessible to readers of varying levels of expertise. These essential building blocks lay the groundwork for the in-depth discussions that follow.
Exploration of C# Data Structures
Delving deeper, readers will encounter an extensive examination of the various types of data structures available in C#. The book navigates through arrays, linked lists, stacks, queues, trees, and hash tables, providing a detailed analysis of each. The focus is not merely on the theoretical underpinnings but also on practical applications, allowing readers to gain a comprehensive understanding of these structures and their utility.
Custom Data Structures
One of the strengths of this book lies in its exploration of designing and implementing custom data structures. The author offers invaluable insights into the process of selecting the appropriate data structure for a given problem, optimizing structures for performance, and managing memory and resources efficiently. Through case studies and examples, readers will be equipped with the knowledge and skills to tackle programming challenges effectively.
Application in Programming Models and Paradigms
Beyond just understanding data structures in isolation, this book also explores their integration with various programming models and paradigms. Object-oriented programming, functional programming, and parallel programming are among the models discussed. The author demonstrates how data structures can be harnessed to support these diverse paradigms, providing practical guidance and real-world examples.
Practical Considerations
Additionally, the book delves into practical considerations such as error handling, debugging, and testing. Real-world scenarios and challenges are addressed, empowering readers to apply their knowledge effectively in programming endeavors. Code examples and exercises further reinforce the concepts discussed, enhancing understanding and retention.
C# Data Structures: Designing for Organizing, Storing and Accessing Information is an essential resource for programmers seeking a comprehensive understanding of data structures within the C# programming landscape. With a blend of theoretical foundations, practical applications, and real-world examples, this book equips readers with the knowledge and skills to design, implement, and manage data structures effectively. Whether a novice or seasoned programmer, the insights offered within these pages will undoubtedly enhance one's proficiency and efficacy in modern programming.
Module 1:
Introduction to C# Data Structures
In this foundational module, we will embark on a journey to understand the essential aspects of data structures and how they are implemented in C#. Data structures are the building blocks of software engineering, and having a profound understanding of them is crucial for any programmer who aims to design efficient and scalable software systems.
Importance and Role of Data Structures
We will begin by understanding the importance and the role of data structures in computer science and software engineering. Data structures play a pivotal role in organizing, storing, and managing data efficiently. They form the backbone of many algorithms and software systems, making them indispensable in programming.
Overview of C# Language Features
Next, we will dive into an overview of the C# programming language features that facilitate the implementation of data structures. C# is a versatile and powerful language that provides built-in support for various data structures and algorithms. Understanding these language features is essential for effective data structure implementation.
Significance of Efficient Data Organization
Efficient data organization is a crucial aspect of software development. We will explore the significance of organizing data efficiently and how it directly impacts the performance and scalability of software systems. By employing appropriate data structures, we can optimize the use of system resources and enhance the overall performance of our programs.
Brief Look at Covered Topics
Lastly, we will provide a brief look at the topics that will be covered in this book. From basic data structures like arrays and strings to advanced topics like external memory data structures and dynamic programming, this book will equip you with a comprehensive understanding of data structures in C#. We will explore each topic in-depth, covering their implementation, operations, algorithms, and applications.
Throughout this module, we will focus on providing a solid foundation in data structures and algorithms, ensuring that you are well-prepared to tackle real-world software engineering challenges. By the end of this module, you will have a clear understanding of the importance of data structures, how to implement them in C#, and how to leverage them to design efficient and scalable software systems.
Importance and Role of Data Structures
In the vast landscape of software development, data structures are the bedrock upon which efficient and elegant code is built. They play a pivotal role in the organization, storage, and access of data, making them an indispensable part of any programmer’s toolkit. Understanding their importance and role is fundamental in becoming a proficient developer, especially in a language like C# where data manipulation is a frequent task.
Why Data Structures Matter
Data structures are critical for several reasons:
Efficiency and Performance: The choice of data structure can significantly impact the performance of an algorithm or application. For instance, a linked list might be preferred for its constant-time insertions and deletions, while a binary search tree is ideal for fast lookups and sorted data.
Memory Management: Properly chosen data structures help manage memory more efficiently. They can help in minimizing memory usage and preventing memory leaks, which is especially crucial in resource-constrained environments like mobile devices or embedded systems.
Organization and Access: Data structures allow for the organization of data in a manner that is both logical and efficient. For example, an array can store a collection of similar items in a sequential manner, making it easy to access and manipulate them.
The Role of Data Structures in C# Programming
In C#, data structures are instrumental in various aspects of programming:
Collections: C# provides a rich set of built-in data structures in the System.Collections namespace, such as List<T>, Dictionary<TKey, TValue>, Stack<T>, and Queue<T>. These collections are optimized for specific use cases, such as fast insertion, deletion, and lookup.
Algorithms: Many algorithms in C# rely on data structures for their implementation. For example, sorting algorithms like QuickSort and MergeSort use arrays or lists, while searching algorithms like Binary Search use binary search trees.
Efficient Code: By using the right data structures, developers can write code that is both efficient and easy to understand. For instance, a priority queue can be used to efficiently process tasks in a certain order, while a hash table can be used for fast lookups and data retrieval.
Examples of Data Structures in C#
Let’s take a closer look at some commonly used data structures in C#:
Arrays: Arrays are a fundamental data structure that allows you to store a fixed-size collection of elements of the same type. They provide constant-time access to elements by index.
Linked Lists: Linked lists are a linear data structure that consists of a sequence of elements where each element points to the next. They provide constant-time insertion and deletion but have slower access times compared to arrays.
Stacks and Queues: Stacks and queues are abstract data types that allow you to insert and remove elements in a specific order. Stacks use a Last In, First Out (LIFO) order, while queues use a First In, First Out (FIFO) order.
Binary Trees: Binary trees are hierarchical data structures that consist of nodes, where each node has at most two children. They are used in various applications, such as binary search trees and heaps.
Data structures are the building blocks of software development, and a solid understanding of their importance and role is essential for every programmer. By leveraging data structures effectively, developers can write efficient, scalable, and maintainable code in C#. The next sections will delve deeper into the various types of data structures and their implementations in C#.
Overview of C# Language Features
C# is a versatile programming language with a wide range of features that make it suitable for various applications, including data structure implementations. Understanding the language's features is critical for implementing efficient and effective data structures.
Key Features of C#
Type Safety: C# is a strongly-typed language, which means that all variables and objects must have a specific data type. This helps in avoiding runtime errors and ensures that the code is more reliable.
Garbage Collection: C# has automatic memory management through a garbage collector, which automatically releases memory that is no longer in use. This feature helps in preventing memory leaks and simplifies memory management.
Object-Oriented Programming (OOP): C# supports OOP principles, such as encapsulation, inheritance, and polymorphism. This makes it easier to organize and maintain code, especially when dealing with complex data structures.
Generics: Generics allow for the creation of reusable, type-safe code. They enable the creation of data structures that can work with any data type, without sacrificing type safety.
Lambda Expressions: Lambda expressions provide a concise way to define anonymous methods or functions. This feature is particularly useful when working with collections and algorithms.
Asynchronous Programming: Asynchronous programming in C# allows for the execution of long-running operations without blocking the main thread. This is essential for implementing efficient data structures that can handle concurrent access.
LINQ (Language-Integrated Query): LINQ allows for querying data sources, such as arrays or collections, using a SQL-like syntax. This feature is beneficial when working with data structures that need to be queried or filtered.
Nullable Types: C# supports nullable types, which allow for the representation of both null and non-null values. This feature is useful when working with data structures that may contain null values.
Delegates and Events: Delegates and events provide a way to implement the observer pattern, which is useful when working with data structures that need to notify other parts of the program about changes.
Code Example
Below is a simple example demonstrating some of the key features of C#, such as generics, lambda expressions, and LINQ.
In this example, we create a list of integers, use a lambda expression and LINQ to filter the even numbers, declare a nullable integer, and define an event handler using delegates.
Understanding the overview of C# language features is essential for implementing efficient and effective data structures. The features mentioned above are just a few of the many that C# provides, making it a powerful language for developing robust and scalable applications.
Significance of Efficient Data Organization
Efficient data organization is a cornerstone of computer science and software engineering. It encompasses the strategies and techniques used to structure and manage data in a way that optimizes performance, storage, and accessibility. In the context of C# programming, where data structures are fundamental components, understanding the significance of efficient data organization is paramount.
Why Efficient Data Organization Matters
Performance: Well-organized data structures can significantly impact the performance of an application. For example, a well-designed binary search tree can offer faster lookup times compared to a linear search in an unsorted array.
Memory Usage: Efficient data organization can help in minimizing memory consumption. This is crucial, especially in resource-constrained environments where memory optimization is a priority.
Scalability: Scalability is the ability of a system to handle a growing amount of work. Proper data organization can ensure that the system remains efficient and responsive as the data size increases.
Maintainability: A well-organized codebase is easier to maintain and extend. Data structures that are logically organized and implemented according to best practices can reduce the chances of errors and make it easier to add new features.
Code Example
Let's consider a simple example to demonstrate the significance of efficient data organization. Suppose we have a list of employees, and we need to retrieve their information based on their employee IDs.
Console.WriteLine($"Employee with ID 102: {employee.Name}");
}
// Inefficient method to retrieve employee by ID
public static Employee GetEmployeeById(List<Employee> employees, int id)
{
foreach (Employee employee in employees)
{
if (employee.Id == id)
{
return employee;
}
}
return null;
}
}
public class Employee
{
public int Id { get; set; }
public string Name { get; set; }
public Employee(int id, string name)
{
Id = id;
Name = name;
}
}
In this example, the GetEmployeeById method iterates through the list of employees to find the employee with the specified ID. This approach has a time complexity of O(n), where n is the number of employees. As the number of employees increases, the time taken to retrieve an employee also increases linearly.
Efficient data organization is crucial for optimizing performance, memory usage, scalability, and maintainability in C# programming. By understanding its significance and implementing best practices, developers can create robust and efficient software solutions. The following sections will delve into specific data structures and their efficient organization in C#.
Brief Look at Covered Topics
As we embark on this journey through the realm of C# data structures, it's important to have a preliminary understanding of the topics that will be covered. This section provides a brief overview of the key concepts that will be explored in detail throughout the book.
Introduction to C# Data Structures
This section will provide an overview of data structures in C# and their significance in programming. It will cover topics such as the importance of efficient data organization, overview of C# language features, and the role of data structures in C# programming.
Basic Concepts and Terminology
In this section, you will delve into the foundational concepts and terminology related to data structures. Topics covered include the definition of data structures, key terminology in data structures, memory and storage in C#, and understanding algorithms.
Arrays and Strings
This section will explore the use of arrays and strings in C# programming. You will learn how to declare and initialize arrays, work with multi-dimensional arrays, perform string manipulation, and apply common operations and best practices.
Linked Lists
Linked lists are a fundamental data structure in computer science. In this section, you will learn about the different types of linked lists, including singly linked lists, doubly linked lists, and circular linked lists. You will also learn how to implement linked lists in C#.
Stacks and Queues
Stacks and queues are abstract data types that are commonly used in programming. In this section, you will learn about the properties of stacks and queues, how to implement them in C#, and how to use them in different scenarios.
Trees and Binary Trees
Trees and binary trees are hierarchical data structures that are used in many applications. In this section, you will learn about the basics of tree data structures, the structure of binary trees, and tree traversal algorithms.
Binary Search Trees (BST)
Binary search trees are a type of binary tree that is used for searching and sorting. In this section, you will learn about the characteristics of binary search trees, the operations that can be performed on them, and their applications and use cases.
Heaps and Priority Queues
Heaps and priority queues are specialized data structures that are used for sorting and prioritizing elements. In this section, you will learn about the different types of heaps, how to implement a priority queue in C#, and how to use them in various scenarios.
Hash Tables
Hash tables are a data structure that is used for storing key-value pairs. In this section, you will learn about the concept of hashing, how to implement a hash table in C#, and how to handle collisions.
Graphs and Graph Algorithms
Graphs are a versatile data structure that is used to represent relationships between objects. In this section, you will learn about the basics of graphs, different types of graphs, and how to implement graph algorithms in C#.
Advanced Graph Algorithms
In this section, you will learn about some advanced graph algorithms, such as Dijkstra's algorithm, Bellman-Ford algorithm, and topological sorting. You will also learn about their applications and variations.
Trie Data Structure
The trie data structure is used to store a dynamic set of strings. In this section, you will learn about the structure of trie, how to implement it in C#, and its applications in optimizing string operations.
Disjoint Set Data Structure
The disjoint set data structure is used to partition a set into disjoint subsets. In this section, you will learn about the basics of disjoint sets, how to implement them in C#, and their applications.
Advanced Topics in Sorting
In this section, you will learn about some advanced topics in sorting, such as quicksort, mergesort, and radix sort. You will also learn about how to choose the right sorting algorithm for different scenarios.
Searching Techniques
In this section, you will learn about different searching techniques, such as linear search, binary search, and interpolation search. You will also learn about how to implement them in C#.
File Structures and Indexing
In this section, you will learn about different file structures and indexing techniques, such as B-trees and B+ trees. You will also learn about how to implement them in C#.
Memory Management and Data Structures
In this section, you will learn about different memory management techniques and how to optimize data structures for memory usage. You will also learn about how to implement them in C#.
Design Patterns in Data Structures
In this section, you will learn about different design patterns that can be used in data structures, such as the singleton pattern and the iterator pattern. You will also learn about how to adapt them for use in C#.
Parallel and Concurrent Data Structures
In this section, you will learn about different parallel and concurrent data structures, such as concurrent collections. You will also learn about how to optimize data structures for multi-core systems.
Persistent Data Structures
In this section, you will learn about different persistent data structures, such as persistent trees. You will also learn about how to implement them in C#.
Spatial Data Structures
In this section, you will learn about different spatial data structures, such as quadtrees. You will also learn about how to implement them in C#.
External Memory Data Structures
In this section, you will learn about different external memory data structures, such as B-trees in external memory. You will also learn about how to implement them in C#.
Dynamic Programming and Data Structures
In this section, you will learn about different dynamic programming techniques and how to implement them in C#.
Integrating Data Structures into C# Programs and Future Trends
In this section, you will learn about different techniques for integrating data structures into C# programs and future trends in data structures.
This section has provided a brief overview of the topics that will be covered in the book. By exploring these topics in detail, you will gain a solid understanding of data structures and their implementations in C#.
Module 2:
Basic Concepts and Terminology
In this module, we will delve deeper into the foundational concepts and terminology of data structures. A solid understanding of these concepts is essential for comprehending more complex data structures and algorithms that we will explore in subsequent modules.
Definition of Data Structures
We will begin with the definition of data structures and explore what they are and why they are important in programming. A data structure is a way of organizing and storing data in a computer so that it can be accessed and modified efficiently. Understanding the basics of data structures will provide a solid foundation for more advanced topics.
Key Terminology in Data Structures
Next, we will introduce key terminology used in data structures. This includes terms like array, linked list, stack, queue, tree, graph, and more. Each of these terms represents a different way of organizing and storing data, and understanding them is essential for effectively working with data structures.
Memory and Storage in C#
We will then explore how data structures are stored in memory and how memory management is handled in the C# programming language. This includes concepts like value types and reference types, the stack and heap, and garbage collection. Understanding memory and storage is crucial for optimizing the performance of data structures.
Understanding Algorithms
Finally, we will introduce algorithms and their role in data structures. An algorithm is a sequence of instructions that performs a specific task, such as searching, sorting, or traversing data structures. Understanding algorithms is essential for effectively working with data structures and solving real-world problems.
Throughout this module, we will focus on providing a solid foundation in data structures and algorithms, ensuring that you are well-prepared to tackle more advanced topics in subsequent modules.
Definition of Data Structures
Data structures are an integral part of programming, allowing developers to organize and manipulate data efficiently. In this section, we will delve into the definition of data structures, exploring their characteristics, types, and significance in software development.
Definition and Characteristics
Data structures can be defined as specialized formats for organizing, storing, and manipulating data. They provide a systematic way to represent and manage collections of data, enabling efficient access and modification. The key characteristics of data structures include:
Organization: Data structures organize data in a structured and logical manner, making it easier to manage and access.
Storage: They facilitate efficient storage of data, optimizing memory usage and retrieval.
Manipulation: Data structures support various operations, such as insertion, deletion, and retrieval, allowing for seamless data manipulation.
Efficiency: They are designed to optimize the performance of specific operations, such as searching, sorting, and traversing.
Types of Data Structures
There are various types of data structures, each with its unique properties and applications. Some common types of data structures include:
Arrays: Arrays are a collection of elements stored in contiguous memory locations, allowing for efficient indexing and random access.
Linked Lists: Linked lists are a linear data structure consisting of a sequence of elements, each connected to the next by a pointer.
Stacks: Stacks are a last-in, first-out (LIFO) data structure, where elements are added and removed from the top.
Queues: Queues are a first-in, first-out (FIFO) data structure, where elements are added to the rear and removed from the front.
Trees: Trees are hierarchical data structures with a root node and child nodes, facilitating efficient data representation and manipulation.
Graphs: Graphs are a collection of nodes and edges, representing relationships between objects.
Hash Tables: Hash tables are a data structure that stores key-value pairs, allowing for efficient retrieval of values based on keys.
Significance in Software Development
Data structures play a crucial role in software development, influencing the efficiency, scalability, and maintainability of applications. They enable developers to organize and manipulate data effectively, facilitating efficient algorithms and operations. By understanding and utilizing the appropriate data structures, developers can optimize the performance and functionality of their software.
Code Example: Linked List
Let's consider a simple example of a linked list implementation in C#:
using System;
public class Node
{
public int Data { get; set; }
public Node Next { get; set; }
public Node(int data)
{
Data = data;
Next = null;
}
}
public class LinkedList
{
public Node Head { get; set; }
public void AddNode(int data)
{
Node newNode = new Node(data);
if (Head == null)
{
Head = newNode;
return;
}
Node current = Head;
while (current.Next != null)
{
current = current.Next;
}
current.Next = newNode;
}
}
public class Program
{
public static void Main(string[] args)
{
LinkedList list = new LinkedList();
list.AddNode(1);
list.AddNode(2);
list.AddNode(3);
Console.WriteLine("Linked List:");
Node current = list.Head;
while (current != null)
{
Console.WriteLine(current.Data);
current = current.Next;
}
}
}
In this example, we define a Node class to represent individual elements in the linked list, and a LinkedList class to manage the list. We add nodes to the list using the AddNode method, and then traverse the list to print its elements.
This section has provided an overview of the definition, characteristics, types, and significance of data structures in software development. By understanding these concepts, developers can make informed decisions about which data structures to use and how to optimize their applications for efficiency and performance.
Key Terminology in Data Structures
Understanding the terminology associated with data structures is essential for mastering the art of programming. This section aims to provide a comprehensive overview of the key terminology used in the context of data structures, such as elements, nodes, pointers, and references.
Elements and Nodes
An element in a data structure refers to the individual data items that are stored within the structure. For example, in an array, each element corresponds to a single value, while in a linked list, each element is represented by a node. A node, on the other hand, is a fundamental building block of data structures and can contain one or more elements, as well as links or pointers to other nodes.
Pointers and References
Pointers and references are used to store memory addresses that point to the location of data in memory. In the context of data structures, pointers are often used to create linked structures, such as linked lists and trees, where each node contains a reference to the next node in the sequence. References, on the other hand, are used in languages like C# to create object references, allowing for the creation of complex data structures like graphs and trees.
Traversal and Traversal Algorithms
Traversal refers to the process of visiting and accessing the elements of a data structure in a specific order. This can be done using various traversal algorithms, such as depth-first search (DFS) and breadth-first search (BFS) for trees and graphs, and linear search and binary search for arrays and lists. These algorithms are used to efficiently locate and access elements within a data structure.
Complexity Analysis and Big O Notation
Complexity analysis is a critical aspect of data structure design, as it allows programmers to understand the performance characteristics of their algorithms. Big O notation is commonly used to express the time and space complexity of algorithms, with O(1) representing constant time complexity, O(n) representing linear time complexity, and O(n^2) representing quadratic time complexity, among others. By analyzing the complexity of their algorithms, programmers can make informed decisions about the efficiency and scalability of their data structures.
Code Example: Traversing a Binary Tree
public class TreeNode
{
public int Value { get; set; }
public TreeNode Left { get; set; }
public TreeNode Right { get; set; }
public TreeNode(int value)
{
Value = value;
}
}
public class BinaryTree
{
public TreeNode Root { get; set; }
public void InOrderTraversal(TreeNode node)
{
if (node == null)
{
return;
}
InOrderTraversal(node.Left);
Console.Write(node.Value + " ");
InOrderTraversal(node.Right);
}
}
public class Program
{
public static void Main(string[] args)
{
BinaryTree tree = new BinaryTree();
tree.Root = new TreeNode(1);
tree.Root.Left = new TreeNode(2);
tree.Root.Right = new TreeNode(3);
tree.Root.Left.Left = new TreeNode(4);
tree.Root.Left.Right = new TreeNode(5);
Console.WriteLine("In-order traversal of binary tree:");
tree.InOrderTraversal(tree.Root);
}
}
In this example, we define a TreeNode class to represent nodes in a binary tree and a BinaryTree class to manage the tree. We then define an InOrderTraversal method that uses recursion to traverse the tree in an in-order sequence and print the values of the nodes.
This section has provided a comprehensive overview of the key terminology used in the context of data structures, such as elements, nodes, pointers, and references. By understanding these terms and their applications, programmers can enhance their understanding of data structures and develop more efficient and scalable algorithms.
Memory and Storage in C#
Memory and storage management are fundamental aspects of programming, especially when working with data structures in C#. This section aims to explore the concepts of memory and storage in C#, focusing on how they impact the design and performance of data structures.
Memory Allocation and Deallocation
Memory allocation refers to the process of reserving a portion of memory for a specific purpose, such as storing data. In C#, memory allocation is managed by the .NET runtime through the Common Language Runtime (CLR), which automatically allocates and deallocates memory as needed. This simplifies memory management for developers, as they don't have to manually allocate or deallocate memory.
Garbage Collection
Garbage collection is a key feature of C# and the .NET framework, which automates memory management by reclaiming memory that is no longer needed. The garbage collector periodically scans the managed heap, identifying and deallocating objects that are no longer referenced. This prevents memory leaks and ensures efficient use of memory.
Memory Efficiency in Data Structures
Efficient memory usage is crucial when designing data structures, as it directly impacts the performance and scalability of an application. C# provides a range of built-in data structures, such as arrays, lists, dictionaries, and queues, which are designed to optimize memory usage and performance.
Code Example: Memory Allocation in C#
using System;
public class Program
{
public static void Main(string[] args)
{
// Allocate memory for an array of integers
int[] numbers = new int[5];
// Initialize the array with values
for (int i = 0; i < numbers.Length; i++)
{
numbers[i] = i + 1;
}
// Print the values of the array
Console.WriteLine("Array values:");
foreach (int number in numbers)
{
Console.WriteLine(number);
}
}
}
In this example, we allocate memory for an array of integers using the new keyword, which creates a new instance of the int[] type with a length of 5. We then initialize the array with values using a for loop, and print the values of the array using a foreach loop.
This section has provided an overview of memory and storage management in C#, focusing on memory allocation, garbage collection, and memory efficiency in data structures. By understanding these concepts, developers can design more efficient and scalable data structures that optimize memory usage and enhance the performance of their applications.
Understanding Algorithms
In the realm of computer science, the term "algorithm" is ubiquitous, often cropping up in discussions about data structures and their implementations. An algorithm is essentially a set of instructions that detail the steps necessary to complete a task or solve a problem. These instructions are designed to work within a finite amount of time and space.
Elements of an Algorithm
A well-designed algorithm typically includes several core elements:
Inputs: The data or variables that the algorithm will process.
Outputs: The results or outcomes produced by the algorithm.
Operations: The specific tasks or steps that the algorithm must execute in order to complete its task.
Control Structures: The decision-making and branching mechanisms that guide the flow of the algorithm's execution.
Termination: The conditions or criteria that indicate when the algorithm has completed its task.
Types of Algorithms
Algorithms can be classified based on their design and purpose. Some of the most common types include:
Sorting Algorithms: These algorithms are designed to arrange data elements in a specific order, such as numerical or alphabetical.
Searching Algorithms: These algorithms are used to find specific elements within a dataset.
Graph Algorithms: These algorithms operate on graphs, which are data structures consisting of nodes and edges.
Dynamic Programming: These algorithms solve optimization problems by breaking them down into simpler subproblems.
Complexity Analysis
An important aspect of algorithm design is the analysis of its complexity, which refers to the amount of time and space an algorithm requires to complete its task. Complexity analysis involves determining the worst-case, best-case, and average-case scenarios for an algorithm's time and space requirements.
Console.WriteLine("Element found at index " + result);
}
public static int BinarySearch(int[] arr, int x)
{
int left = 0;
int right = arr.Length - 1;
while (left <= right)
{
int mid = left + (right - left) / 2;
// Check if x is present at mid
if (arr[mid] == x)
{
return mid;
}
// If x is greater, ignore left half
if (arr[mid] < x)
{
left = mid + 1;
}
// If x is smaller, ignore right half
else
{
right = mid - 1;
}
}
// If element is not present
return -1;
}
}
In this example, we implement the binary search algorithm, which is a fast and efficient way to find an element in a sorted array. The algorithm works by repeatedly dividing the search interval in half until the element is found or the interval becomes empty.
Algorithms are the backbone of data structures, providing a systematic and efficient way to process and manipulate data. By understanding the principles of algorithm design and analysis, programmers can create more efficient and scalable solutions to complex problems.
Module 3:
Arrays and Strings
In this module, we will explore two fundamental data structures: arrays and strings. These data structures play a crucial role in organizing and manipulating data in computer programs. Understanding how to work with arrays and strings is essential for developing efficient and scalable software systems.
Declaring and Initializing Arrays
We will start with the basics of arrays, including how to declare and initialize them in C#. Arrays are collections of elements, often of the same data type, arranged in a contiguous block of memory. We will explore the various ways to declare and initialize arrays in C#, as well as best practices for working with arrays.
Multi-dimensional Arrays
Next, we will introduce multi-dimensional arrays, which are arrays with more than one dimension. Multi-dimensional arrays are often used to represent matrices or tables of data. We will explore how to declare and initialize multi-dimensional arrays in C#, as well as how to access and manipulate their elements.
String Manipulation in C#
Moving on to strings, we will explore the basics of string manipulation in C#. Strings are sequences of characters and are used to represent textual data. We will explore how to create, concatenate, and manipulate strings in C#, as well as how to work with individual characters and substrings.
Common Operations and Best Practices
Finally, we will cover common operations and best practices for working with arrays and strings in C#. This includes operations like searching, sorting, and concatenation, as well as best practices for memory management and performance optimization. Understanding these operations and best practices is essential for effectively working with arrays and strings in C#.
Throughout this module, we will focus on providing a solid foundation in arrays and strings, ensuring that you are well-prepared to tackle more advanced topics in subsequent modules.
Declaring and Initializing Arrays
Arrays are fundamental data structures that allow you to store multiple values of the same type under a single name. This section explores how arrays are declared, initialized, and utilized in C#, providing practical examples along the way.
Array Declaration
In C#, you declare an array by specifying the data type followed by square brackets [] and the array name. Here's a basic example:
int[] numbers;
This declares an array named numbers that can hold integers.
Array Initialization
Once an array is declared, you can initialize it by assigning values to its elements. There are several ways to initialize arrays in C#, including:
Implicit Initialization: In this method, the compiler automatically initializes the array with default values based on its data type. For example:
int[] numbers = new int[5];
This initializes an array named numbers with 5 elements, all of which are initialized to zero, the default value for integers.
Explicit Initialization: In this method, you provide specific values for each element of the array. For example:
int[] numbers = new int[] { 1, 2, 3, 4, 5 };
This initializes an array named numbers with 5 elements, each containing a different value.
Initializer Lists: This is a shorthand syntax that allows you to specify the array elements directly in the declaration. For example:
int[] numbers = { 1, 2, 3, 4, 5 };
This is equivalent to the previous example but uses a more concise syntax.
Code Example: Initializing Arrays
using System;
public class Program
{
public static void Main(string[] args)
{
// Implicit Initialization
int[] numbers1 = new int[5];
// Explicit Initialization
int[] numbers2 = new int[] { 1, 2, 3, 4, 5 };
// Initializer Lists
int[] numbers3 = { 1, 2, 3, 4, 5 };
// Print the arrays
Console.WriteLine("Array 1:");
foreach (int num in numbers1)
{
Console.WriteLine(num);
}
Console.WriteLine("Array 2:");
foreach (int num in numbers2)
{
Console.WriteLine(num);
}
Console.WriteLine("Array 3:");
foreach (int num in numbers3)
{
Console.WriteLine(num);
}
}
}
In this example, we demonstrate the different ways to declare and initialize arrays in C#. We then print the contents of each array using a foreach loop.
Arrays are versatile data structures that allow you to store and manipulate multiple values in a single container. By understanding how to declare and initialize arrays in C#, you can leverage their power to efficiently manage and process data in your applications.
Multi-dimensional Arrays
Multi-dimensional arrays are a fundamental data structure that allows you to store and organize data in a tabular format. This section explores the concepts and usage of multi-dimensional arrays in C#, providing practical examples along the way.
Introduction to Multi-dimensional Arrays
A multi-dimensional array, also known as a matrix, is an array of arrays, where each element of the outer array is itself an array. This allows you to represent data in multiple dimensions, such as rows and columns.
Declaring Multi-dimensional Arrays
In C#, you can declare a multi-dimensional array by specifying the data type followed by the array name, the number of dimensions, and the size of each dimension. For example:
int[,] matrix = new int[3, 4];
This declares a 2-dimensional array named matrix with 3 rows and 4 columns, initialized with default values (0 for integers).
Initializing Multi-dimensional Arrays
There are several ways to initialize multi-dimensional arrays in C#, similar to single-dimensional arrays:
Implicit Initialization: The compiler automatically initializes the array with default values. For example:
int[,] matrix = new int[3, 4];
Explicit Initialization: Provide specific values for each element of the array. For example:
In this example, we declare and initialize a 2-dimensional array (matrix) with explicit values. We then use nested loops to print the matrix row by row.
Multi-dimensional arrays are powerful data structures that allow you to represent and manipulate data in multiple dimensions. By understanding how to declare, initialize, and access multi-dimensional arrays in C#, you can effectively organize and process data in your applications.
String Manipulation in C#
Strings are essential data structures for storing and manipulating text in programming languages. This section delves into the fundamentals of string manipulation in C#, providing practical examples and insights into common string operations.
Introduction to Strings in C#
In C#, a string is a sequence of characters enclosed within double quotes ("). Strings in C# are immutable, meaning they cannot be modified once created. However, C# provides several methods and operators for manipulating strings.
Creating and Initializing Strings
You can create and initialize strings using various methods, including:
String Literals: Directly assigning a string value within double quotes:
string greeting = "Hello, World!";
String Constructor: Using the string constructor to create a string from an array of characters:
char[] letters = { 'H', 'e', 'l', 'l', 'o' };
string hello = new string(letters);
String Concatenation: Combining strings using the + operator or string.Concat method:
In this example, we manipulate the fullName string using various string methods. We convert it to upper case, extract the first name, split it into first and last names, replace 'Doe' with 'Smith', and check if it contains 'John'.
Strings are versatile data structures for storing and manipulating text in C#. By understanding how to create, initialize, and manipulate strings using methods and properties, you can effectively work with text data in your C# applications.
Common Operations and Best Practices
Arrays and strings are fundamental data structures used in C# programming. This section covers common operations and best practices for working with arrays and strings in C#, providing insights into efficient coding practices and performance considerations.
Array Operations
Arrays in C# are fixed-size collections of elements of the same type. Common operations on arrays include:
Creating and Initializing Arrays: Arrays can be created and initialized using array initializer syntax or by specifying the size of the array:
// Using array initializer syntax
int[] numbers = { 1, 2, 3, 4, 5 };
// Specifying the size of the array
int[] primes = new int[5];
Accessing Array Elements: Array elements are accessed using zero-based indices:
int thirdElement = numbers[2]; // Access the third element (index 2)
Modifying Array Elements: Array elements can be modified by assigning new values to the array indices:
numbers[0] = 10; // Change the value of the first element to 10
Iterating Over Arrays: Arrays can be traversed using loops such as for, foreach, or LINQ queries:
for (int i = 0; i < numbers.Length; i++)
{
Console.WriteLine(numbers[i]);
}
foreach (int number in numbers)
{
Console.WriteLine(number);
}
var evenNumbers = numbers.Where(n => n % 2 == 0);
String Operations
Strings in C# are immutable sequences of characters. Common operations on strings include:
Creating and Initializing Strings: Strings can be created and initialized using string literals or the string constructor:
string text = "Hello, World!";
string emptyString = string.Empty;
Accessing Characters in a String: Individual characters in a string can be accessed using indexing:
char firstChar = text[0]; // Access the first character
Concatenating Strings: Strings can be concatenated using the + operator or the string.Concat method:
Avoid String Concatenation in Loops: String concatenation in loops can be inefficient due to string immutability. Use StringBuilder for such scenarios:
StringBuilder builder = new StringBuilder();
for (int i = 0; i < 10000; i++)
{
builder.Append(i).Append(", ");
}
string result = builder.ToString();
Use LINQ for Array Operations: LINQ provides a concise and expressive way to perform array operations:
var evenNumbers = numbers.Where(n => n % 2 == 0);
Consider Using StringSplitOptions.RemoveEmptyEntries: When splitting strings, consider using StringSplitOptions.RemoveEmptyEntries to remove empty entries:
string[] parts = text.Split(new[] { ',' }, StringSplitOptions.RemoveEmptyEntries);
Arrays and strings are fundamental data structures in C# programming. By understanding common operations and best practices, you can write more efficient and maintainable code when working with arrays and strings.
Module 4:
Linked Lists
In this module, we will explore linked lists, which are a fundamental data structure in computer science. Linked lists are a sequence of elements, each of which points to the next element in the sequence. Understanding how to work with linked lists is essential for developing efficient and scalable software systems.
Singly Linked Lists
We will start with the basics of singly linked lists, which are a simple form of linked lists where each element points to the next element in the sequence. We will explore how to implement singly linked lists in C#, as well as how to insert, delete, and search for elements in a singly linked list.
Doubly Linked Lists
Next, we will introduce doubly linked lists, which are a more advanced form of linked lists where each element points to both the next and previous elements in the sequence. We will explore how to implement doubly linked lists in C#, as well as how to insert, delete, and search for elements in a doubly linked list.
Circular Linked Lists
Moving on to circular linked lists, we will explore how to implement circular linked lists in C#, as well as how to insert, delete, and search for elements in a circular linked list. Circular linked lists are a special form of linked lists where the last element points back to the first element, forming a circular loop.
Implementing Linked Lists in C#
Finally, we will cover how to implement linked lists in C#. This includes defining a node class, which represents each element in the linked list, as well as defining methods for inserting, deleting, and searching for elements in the linked list. Understanding how to implement linked lists is essential for effectively working with them in C#.
Throughout this module, we will focus on providing a solid foundation in linked lists, ensuring that you are well-prepared to tackle more advanced topics in subsequent modules.
Singly Linked Lists
A singly linked list is a linear data structure where elements are stored in nodes, and each node points to the next node in the sequence. It consists of nodes with two components: the data part and the reference (or pointer) to the next node. In C#, a singly linked list can be implemented using the LinkedList<T> class from the System.Collections.Generic namespace.
Operations on Singly Linked Lists
Insertion: Inserting a node into a singly linked list involves creating a new node and updating the pointers accordingly.
LinkedList<string> linkedList = new LinkedList<string>();
linkedList.AddLast("A"); // Adding "A" to the end of the list
linkedList.AddLast("B"); // Adding "B" to the end of the list
Deletion: Deleting a node from a singly linked list involves updating the pointers of the adjacent nodes.
linkedList.Remove("A"); // Removing the node containing "A" from the list
Traversal: Traversing a singly linked list involves following the pointers from one node to the next until the end of the list is reached.
foreach (var item in linkedList)
{
Console.WriteLine(item);
}
Searching: Searching for a specific value in a singly linked list involves traversing the list and checking each node's value.
bool containsB = linkedList.Contains("B");
Reversal: Reversing a singly linked list involves changing the direction of the pointers so that the last node becomes the first and vice versa.
linkedList.Reverse();
Advantages of Singly Linked Lists
Dynamic Size: Singly linked lists can grow or shrink in size during execution.
Constant Time Insertion/Deletion: Inserting or deleting a node at the beginning or end of a singly linked list takes constant time.
No Pre-allocation of Memory: Memory is allocated dynamically as nodes are added to the list.
Efficient Memory Usage: Singly linked lists use memory efficiently because they only need to store the data and a reference to the next node.
Disadvantages of Singly Linked Lists
No Random Access: Singly linked lists do not support random access to elements. Accessing an element at a particular index requires traversing the list from the beginning.
Additional Space for Pointers: Singly linked lists require additional space for storing pointers to the next node.
Traversal Overhead: Traversing a singly linked list to perform operations like searching or accessing elements can have overhead due to the sequential nature of the structure.
Lack of Stability: Operations that modify the list, such as insertion and deletion, can invalidate existing references to nodes.
Singly linked lists are a simple and flexible data structure that offers dynamic size and efficient insertion/deletion operations. However, they lack random access and may require additional memory for storing pointers. Understanding the advantages and disadvantages of singly linked lists helps in choosing the appropriate data structure for specific use cases.
Doubly Linked Lists
A doubly linked list is a type of linked list in which each node contains two pointers: one pointing to the next node in the sequence and another pointing to the previous node. This two-way linkage enables traversal in both forward and backward directions.
Operations on Doubly Linked Lists
Insertion: Inserting a node into a doubly linked list involves creating a new node and updating the pointers accordingly.
LinkedList<string> doublyLinkedList = new LinkedList<string>();
doublyLinkedList.AddLast("A"); // Adding "A" to the end of the list
doublyLinkedList.AddLast("B"); // Adding "B" to the end of the list
Deletion: Deleting a node from a doubly linked list involves updating the pointers of the adjacent nodes.
doublyLinkedList.Remove("A"); // Removing the node containing "A" from the list
Traversal: Traversing a doubly linked list involves following the pointers from one node to the next (or previous) until the end (or beginning) of the list is reached.
foreach (var item in doublyLinkedList)
{
Console.WriteLine(item);
}
Searching: Searching for a specific value in a doubly linked list involves traversing the list and checking each node's value.
bool containsB = doublyLinkedList.Contains("B");
Reversal: Reversing a doubly linked list involves changing the direction of the pointers so that the last node becomes the first and vice versa.
doublyLinkedList.Reverse();
Advantages of Doubly Linked Lists
Bi-directional Traversal: Doubly linked lists support bi-directional traversal, allowing efficient forward and backward navigation.
Dynamic Size: Doubly linked lists can grow or shrink in size during execution.
Constant Time Insertion/Deletion: Inserting or deleting a node at the beginning or end of a doubly linked list takes constant time.
Improved Access: Doubly linked lists allow efficient access to both the next and previous nodes, making certain operations more straightforward.
Disadvantages of Doubly Linked Lists
Additional Space for Pointers: Doubly linked lists require additional space for storing pointers to both the next and previous nodes.
Traversal Overhead: Traversing a doubly linked list to perform operations like searching or accessing elements can have overhead due to the sequential nature of the structure.
Lack of Stability: Operations that modify the list, such as insertion and deletion, can invalidate existing references to nodes.
Complexity of Implementation: Implementing doubly linked lists may require additional code complexity compared to singly linked lists.
Doubly linked lists offer bi-directional traversal and efficient insertion/deletion operations at the beginning or end of the list. However, they require additional memory for storing pointers and can have overhead when traversing the list. Understanding the advantages and disadvantages of doubly linked lists helps in choosing the appropriate data structure for specific use cases.
Circular Linked Lists
A circular linked list is a variation of a linked list in which the last node points back to the first node, forming a circle. This circular structure allows traversal of the list in both forward and backward directions without using separate pointers to track the beginning and end of the list.
Operations on Circular Linked Lists
Insertion: Inserting a node into a circular linked list involves creating a new node and updating the pointers accordingly.
LinkedList<string> circularLinkedList = new LinkedList<string>();
circularLinkedList.AddLast("A"); // Adding "A" to the end of the list
circularLinkedList.AddLast("B"); // Adding "B" to the end of the list
Deletion: Deleting a node from a circular linked list involves updating the pointers of the adjacent nodes.
circularLinkedList.Remove("A"); // Removing the node containing "A" from the list
Traversal: Traversing a circular linked list involves following the pointers from one node to the next (or previous) until the entire circle is traversed.
foreach (var item in circularLinkedList)
{
Console.WriteLine(item);
}
Searching: Searching for a specific value in a circular linked list involves traversing the list and checking each node's value.
Bi-directional Traversal: Circular linked lists support bi-directional traversal, allowing efficient forward and backward navigation.
Dynamic Size: Circular linked lists can grow or shrink in size during execution.
Constant Time Insertion/Deletion: Inserting or deleting a node at the beginning or end of a circular linked list takes constant time.
Looping Structure: The circular structure allows for looping through the list without needing to reset the traversal pointer.
Disadvantages of Circular Linked Lists
Additional Space for Pointers: Circular linked lists require additional space for storing pointers to the next and previous nodes.
Complexity of Implementation: Implementing circular linked lists may require additional code complexity compared to singly or doubly linked lists.
Circular linked lists offer bi-directional traversal, dynamic size, and constant time insertion/deletion operations at the beginning or end of the list. However, they require additional memory for storing pointers and can be more complex to implement. Understanding the advantages and disadvantages of circular linked lists helps in choosing the appropriate data structure for specific use cases.
Implementing Linked Lists in C#
Linked lists are a fundamental data structure in computer science that are used to store a sequence of elements. In this section, we will discuss how to implement a basic singly linked list in C#. The implementation will include the definition of the LinkedListNode class and the LinkedList class, as well as methods for adding, removing, and accessing elements in the list.
Definition of the LinkedListNode Class
public class LinkedListNode<T>
{
public T Value { get; set; }
public LinkedListNode<T> Next { get; set; }
public LinkedListNode(T value)
{
Value = value;
}
}
The LinkedListNode class represents a node in the linked list. It contains a Value property to store the value of the node and a Next property to store the reference to the next node in the list.
Definition of the LinkedList Class
public class LinkedList<T>
{
private LinkedListNode<T> _head;
private LinkedListNode<T> _tail;
public void AddLast(T value)
{
var newNode = new LinkedListNode<T>(value);
if (_head == null)
{
_head = newNode;
_tail = newNode;
}
else
{
_tail.Next = newNode;
_tail = newNode;
}
}
public T RemoveFirst()
{
if (_head == null)
{
throw new InvalidOperationException("List is empty.");
}
var value = _head.Value;
_head = _head.Next;
return value;
}
public void Print()
{
var currentNode = _head;
while (currentNode != null)
{
Console.WriteLine(currentNode.Value);
currentNode = currentNode.Next;
}
}
}
The LinkedList class represents the linked list itself. It contains a private _head and _tail variable to keep track of the first and last nodes in the list. The AddLast method adds a new node to the end of the list, the RemoveFirst method removes the first node from the list, and the Print method prints the values of all nodes in the list.
Example Usage
var linkedList = new LinkedList<int>();
linkedList.AddLast(1);
linkedList.AddLast(2);
linkedList.AddLast(3);
linkedList.Print(); // Output: 1 2 3
linkedList.RemoveFirst();
linkedList.Print(); // Output: 2 3
In this section, we discussed the implementation of a basic singly linked list in C#. The LinkedListNode class represents a node in the list, and the LinkedList class represents the list itself. The implementation includes methods for adding, removing, and accessing elements in the list.
Module 5:
Stacks and Queues
In this module, we will explore two essential data structures: stacks and queues. These data structures are crucial for managing data in computer programs and are commonly used in many algorithms and applications.
Introduction to Stacks
We will start by introducing stacks, which are a fundamental data structure that follows the Last In, First Out (LIFO) principle. We will explore how to implement stacks in C#, as well as how to push, pop, and peek at elements in a stack.
Implementing Stacks in C#
Next, we will cover how to implement stacks in C#. This includes defining a stack class, which represents the stack data structure, as well as defining methods for pushing, popping, and peeking at elements in the stack. Understanding how to implement stacks is essential for effectively working with them in C#.
Introduction to Queues
Moving on to queues, we will explore how to implement queues in C#, as well as how to enqueue, dequeue, and peek at elements in a queue. Queues are a fundamental data structure that follows the First In, First Out (FIFO) principle, and are commonly used in many algorithms and applications.
Implementing Queues in C#
Finally, we will cover how to implement queues in C#. This includes defining a queue class, which represents the queue data structure, as well as defining methods for enqueueing, dequeueing, and peeking at elements in the queue. Understanding how to implement queues is essential for effectively working with them in C#.
Throughout this module, we will focus on providing a solid foundation in stacks and queues, ensuring that you are well-prepared to tackle more advanced topics in subsequent modules.
Introduction to Stacks
A stack is a linear data structure that follows the Last In, First Out (LIFO) principle, meaning that the last element added to the stack will be the first one to be removed. In this section, we will discuss the basic concepts of stacks, their applications, and how to implement them in C#.
Definition and Operations of Stacks
A stack can be defined as a collection of elements with two main operations: push and pop. The push operation adds an element to the top of the stack, while the pop operation removes the top element from the stack. Additionally, a stack may support other operations such as peek (to view the top element without removing it) and isEmpty (to check if the stack is empty).
public class Stack<T>
{
private LinkedList<T> _list;
public Stack()
{
_list = new LinkedList<T>();
}
public void Push(T item)
{
_list.AddLast(item);
}
public T Pop()
{
if (_list.Count == 0)
{
throw new InvalidOperationException("Stack is empty.");
}
var item = _list.Last.Value;
_list.RemoveLast();
return item;
}
public T Peek()
{
if (_list.Count == 0)
{
throw new InvalidOperationException("Stack is empty.");
}
return _list.Last.Value;
}
public bool IsEmpty()
{
return _list.Count == 0;
}
}
The Stack class is implemented using a linked list, and it supports the push, pop, peek, and isEmpty operations. The push operation adds a new node to the end of the list, the pop operation removes the last node from the list, the peek operation returns the value of the last node without removing it, and the isEmpty operation checks if the list is empty.
Applications of Stacks
Stacks have various applications in computer science and software development. Some common use cases include:
Expression Evaluation: Stacks can be used to evaluate infix, postfix, and prefix expressions.
Function Call Stack: Stacks are used to manage function calls and return addresses in programming languages.
Undo/Redo Mechanisms: Stacks can be used to implement undo and redo functionalities in text editors and other software applications.
Example Usage
var stack = new Stack<int>();
stack.Push(1);
stack.Push(2);
stack.Push(3);
stack.Peek(); // Output: 3
stack.Pop(); // Output: 3
stack.Peek(); // Output: 2
stack.IsEmpty(); // Output: False
stack.Pop(); // Output: 2
stack.Pop(); // Output: 1
stack.IsEmpty(); // Output: True
In this section, we discussed the basic concepts of stacks, their operations, and their applications. We also implemented a stack data structure in C# using a linked list. Stacks are a fundamental data structure with many practical uses in computer science and software development.
Implementing Stacks in C#
Implementing a stack in C# is relatively straightforward, and there are several ways to achieve it. In this section, we will explore two common approaches: using an array and using a linked list.
Using an Array
One way to implement a stack is to use an array. In this approach, we maintain an array of fixed size and keep track of the top element of the stack using an index variable. Here's an example implementation:
public class Stack<T>
{
private T[] _array;
private int _top;
public Stack(int capacity)
{
_array = new T[capacity];
_top = -1;
}
public void Push(T item)
{
if (_top == _array.Length - 1)
{
throw new InvalidOperationException("Stack is full.");
}
_array[++_top] = item;
}
public T Pop()
{
if (_top == -1)
{
throw new InvalidOperationException("Stack is empty.");
}
return _array[_top--];
}
public T Peek()
{
if (_top == -1)
{
throw new InvalidOperationException("Stack is empty.");
}
return _array[_top];
}
public bool IsEmpty()
{
return _top == -1;
}
}
Using a Linked List
Another way to implement a stack is to use a linked list. In this approach, we maintain a linked list of nodes, and the top element of the stack is represented by the head of the list. Here's an example implementation:
public class StackNode<T>
{
public T Value { get; }
public StackNode<T> Next { get; set; }
public StackNode(T value)
{
Value = value;
Next = null;
}
}
public class Stack<T>
{
private StackNode<T> _top;
public void Push(T item)
{
var newNode = new StackNode<T>(item);
newNode.Next = _top;
_top = newNode;
}
public T Pop()
{
if (_top == null)
{
throw new InvalidOperationException("Stack is empty.");
}
var value = _top.Value;
_top = _top.Next;
return value;
}
public T Peek()
{
if (_top == null)
{
throw new InvalidOperationException("Stack is empty.");
}
return _top.Value;
}
public bool IsEmpty()
{
return _top == null;
}
}
In this section, we explored two common ways to implement a stack in C#: using an array and using a linked list. Both approaches have their advantages and disadvantages, and the choice between them depends on the specific requirements of the application. Stacks are a fundamental data structure with many practical uses, and understanding how to implement them is an important skill for any software developer.
Introduction to Queues
Queues are another fundamental data structure used in computer science and programming. They are often compared to stacks, but instead of operating on a last-in-first-out (LIFO) basis, queues operate on a first-in-first-out (FIFO) basis. This means that the first item to be inserted into a queue is the first item to be removed.
Implementation of Queues
There are several ways to implement a queue in C#. In this section, we will explore two common approaches: using an array and using a linked list.
Using an Array
One way to implement a queue is to use an array. In this approach, we maintain an array of fixed size and keep track of the front and rear of the queue using index variables. Here's an example implementation:
public class Queue<T>
{
private T[] _array;
private int _front;
private int _rear;
public Queue(int capacity)
{
_array = new T[capacity];
_front = 0;
_rear = -1;
}
public void Enqueue(T item)
{
if (_rear == _array.Length - 1)
{
throw new InvalidOperationException("Queue is full.");
}
_array[++_rear] = item;
}
public T Dequeue()
{
if (_front > _rear)
{
throw new InvalidOperationException("Queue is empty.");
}
return _array[_front++];
}
public T Peek()
{
if (_front > _rear)
{
throw new InvalidOperationException("Queue is empty.");
}
return _array[_front];
}
public bool IsEmpty()
{
return _front > _rear;
}
}
Using a Linked List
Another way to implement a queue is to use a linked list. In this approach, we maintain a linked list of nodes, and the front and rear of the queue are represented by the head and tail of the list, respectively. Here's an example implementation:
public class QueueNode<T>
{
public T Value { get; }
public QueueNode<T> Next { get; set; }
public QueueNode(T value)
{
Value = value;
Next = null;
}
}
public class Queue<T>
{
private QueueNode<T> _front;
private QueueNode<T> _rear;
public void Enqueue(T item)
{
var newNode = new QueueNode<T>(item);
if (_rear == null)
{
_front = newNode;
_rear = newNode;
}
else
{
_rear.Next = newNode;
_rear = newNode;
}
}
public T Dequeue()
{
if (_front == null)
{
throw new InvalidOperationException("Queue is empty.");
}
var value = _front.Value;
_front = _front.Next;
if (_front == null)
{
_rear = null;
}
return value;
}
public T Peek()
{
if (_front == null)
{
throw new InvalidOperationException("Queue is empty.");
}
return _front.Value;
}
public bool IsEmpty()
{
return _front == null;
}
}
In this section, we explored two common ways to implement a queue in C#: using an array and using a linked list. Both approaches have their advantages and disadvantages, and the choice between them depends on the specific requirements of the application. Queues are a versatile data structure with many practical uses, and understanding how to implement them is an important skill for any software developer.
Implementing Queues in C#
When implementing queues in C#, there are various ways to go about it. We can use either an array or a linked list as the underlying data structure. Here, we'll provide an example of each approach.
Using an Array
An array is a contiguous block of memory that allows for random access to its elements. When implementing a queue with an array, we'll need to keep track of the front and rear indices, and be mindful of resizing the array when necessary to accommodate more elements.
public class Queue<T>
{
private const int DefaultCapacity = 10;
private T[] _array;
private int _front;
private int _rear;
public Queue()
{
_array = new T[DefaultCapacity];
_front = -1;
_rear = -1;
}
public void Enqueue(T item)
{
if (_rear == _array.Length - 1)
{
// Resize the array if necessary
Array.Resize(ref _array, _array.Length * 2);
}
_array[++_rear] = item;
}
public T Dequeue()
{
if (_front == _rear)
{
throw new InvalidOperationException("Queue is empty.");
}
return _array[++_front];
}
public T Peek()
{
if (_front == _rear)
{
throw new InvalidOperationException("Queue is empty.");
}
return _array[_front + 1];
}
public bool IsEmpty()
{
return _front == _rear;
}
}
Using a Linked List
A linked list is a data structure composed of nodes where each node contains data and a reference (or pointer) to the next node in the sequence. It is particularly suitable for implementing queues because it supports efficient insertion and removal operations at both ends of the list.
public class QueueNode<T>
{
public T Value { get; }
public QueueNode<T> Next { get; set; }
public QueueNode(T value)
{
Value = value;
Next = null;
}
}
public class Queue<T>
{
private QueueNode<T> _front;
private QueueNode<T> _rear;
public void Enqueue(T item)
{
var newNode = new QueueNode<T>(item);
if (_rear == null)
{
_front = newNode;
_rear = newNode;
}
else
{
_rear.Next = newNode;
_rear = newNode;
}
}
public T Dequeue()
{
if (_front == null)
{
throw new InvalidOperationException("Queue is empty.");
}
var value = _front.Value;
_front = _front.Next;
if (_front == null)
{
_rear = null;
}
return value;
}
public T Peek()
{
if (_front == null)
{
throw new InvalidOperationException("Queue is empty.");
}
return _front.Value;
}
public bool IsEmpty()
{
return _front == null;
}
}
In this section, we explored two common ways to implement a queue in C#: using an array and using a linked list. Both approaches have their advantages and disadvantages, and the choice between them depends on the specific requirements of the application. Queues are a versatile data structure with many practical uses, and understanding how to implement them is an important skill for any software developer.
Module 6:
Trees and Binary Trees
In this module, we will explore trees and binary trees, which are hierarchical data structures used to represent hierarchical relationships between elements. Trees and binary trees are fundamental data structures in computer science and are used in many algorithms and applications.
Basics of Tree Data Structures
We will start by introducing the basics of tree data structures, including what trees are and why they are important. Trees are a fundamental data structure that represents hierarchical relationships between elements. We will explore different types of trees, including binary trees, balanced trees, and more.
Binary Tree Structures
Next, we will dive deeper into binary trees, which are a specific type of tree where each node has at most two children. Binary trees are commonly used in many algorithms and applications, and understanding how to work with them is essential for developing efficient and scalable software systems.
Tree Traversal Algorithms
Moving on to tree traversal algorithms, we will explore different ways to traverse a tree, including in-order, pre-order, and post-order traversal. Tree traversal is an essential operation in many algorithms and applications, and understanding how to traverse a tree is essential for effectively working with trees.
Implementing Trees in C#
Finally, we will cover how to implement trees in C#. This includes defining a tree class, which represents the tree data structure, as well as defining methods for adding and removing nodes from the tree. Understanding how to implement trees is essential for effectively working with them in C#.
Throughout this module, we will focus on providing a solid foundation in trees and binary trees, ensuring that you are well-prepared to tackle more advanced topics in subsequent modules.
Basics of Tree Data Structures
A tree is a non-linear data structure that consists of a collection of nodes connected by edges. Each node has a parent node and zero or more child nodes. The topmost node in a tree is called the root node, and nodes with no children are called leaf nodes. Trees are used to represent hierarchical relationships, such as file systems, organizational charts, and family trees.
Basic Terminology
Root: The topmost node in a tree.
Parent: A node that has one or more child nodes.
Child: A node that has a parent node.
Sibling: Nodes that share the same parent.
Leaf: A node with no children.
Depth: The level of a node in a tree, with the root node at level 0.
Height: The maximum depth of any node in a tree.
Subtree: A tree that is a descendant of a given node.
Internal Node: A node that has one or more child nodes.
Binary Trees
A binary tree is a special type of tree in which each node has at most two children, referred to as the left child and the right child. Binary trees can be used to implement various data structures, such as binary search trees (BSTs), expression trees, and heaps.
Binary Tree Node
public class BinaryTreeNode<T>
{
public T Value { get; set; }
public BinaryTreeNode<T> Left { get; set; }
public BinaryTreeNode<T> Right { get; set; }
public BinaryTreeNode(T value)
{
Value = value;
Left = null;
Right = null;
}
}
Binary Tree Operations
Insertion: To insert a new node into a binary tree, we need to find the appropriate position based on the value of the new node and insert it as the left or right child of an existing node.
Deletion: Deleting a node from a binary tree involves replacing the node with one of its child nodes. If the node has two children, we can either replace it with the leftmost node of its right subtree or the rightmost node of its left subtree.
Traversal: Traversing a binary tree means visiting each node in a specific order. There are three common traversal methods: in-order, pre-order, and post-order.
Common Operations
In-Order Traversal: Visit the left subtree, then the root, then the right subtree.
Pre-Order Traversal: Visit the root, then the left subtree, then the right subtree.
Post-Order Traversal: Visit the left subtree, then the right subtree, then the root.
Understanding the basics of tree data structures, such as binary trees, is essential for building more complex data structures and algorithms. Trees are versatile and can be used to represent various hierarchical relationships in computer science and beyond. In the next sections, we'll explore more advanced tree structures and operations, such as balanced binary search trees and tree traversal algorithms.
Binary Tree Structures
Binary trees are one of the most commonly used tree structures in computer science and are used in various applications such as binary search trees, expression trees, and heaps. A binary tree is a tree in which each node has at most two children, referred to as the left child and the right child. Binary trees can be classified into different types based on their structure and properties. Some of the common types of binary trees include:
Full Binary Tree: A full binary tree is a binary tree in which each node has either zero or two children. In other words, every node in a full binary tree has exactly two children or no children at all.
Complete Binary Tree: A complete binary tree is a binary tree in which all levels are completely filled, except possibly the last level, which is filled from left to right.
Perfect Binary Tree: A perfect binary tree is a binary tree in which all internal nodes have exactly two children and all leaf nodes are at the same level.
Balanced Binary Tree: A balanced binary tree is a binary tree in which the height difference between the left and right subtrees of any node is no more than one.
Binary Tree Representation
A binary tree can be represented in several ways, but one of the most common ways is using a node-based representation. In this representation, each node in the tree is represented using a data structure called a binary tree node. Each binary tree node contains a value and references to its left and right children. Here is an example of a binary tree node implementation in C#:
public class BinaryTreeNode<T>
{
public T Value { get; set; }
public BinaryTreeNode<T> Left { get; set; }
public BinaryTreeNode<T> Right { get; set; }
public BinaryTreeNode(T value)
{
Value = value;
Left = null;
Right = null;
}
}
Binary Tree Operations
Binary trees support various operations, including insertion, deletion, and traversal. Insertion and deletion operations involve adding or removing nodes from the tree while maintaining the binary tree's properties. Traversal operations involve visiting each node in the tree in a specific order. Some common traversal methods include in-order, pre-order, and post-order traversal.
Binary Tree Applications
Binary trees have numerous applications in computer science. Some common applications include:
Binary Search Trees (BSTs): Binary search trees are a type of binary tree that supports efficient searching, insertion, and deletion operations. They are commonly used in databases, compilers, and operating systems.
Expression Trees: Expression trees are a type of binary tree used to represent mathematical expressions. They are commonly used in compilers and interpreters.
Heaps: Heaps are a type of binary tree used to implement priority queues. They are commonly used in algorithms such as Dijkstra's shortest path algorithm and Prim's minimum spanning tree algorithm.
Huffman Trees: Huffman trees are a type of binary tree used to encode and decode data. They are commonly used in data compression algorithms such as gzip and bzip2.
Binary trees are a fundamental data structure in computer science and have numerous applications in various fields. Understanding their structure, properties, and operations is essential for building efficient and scalable software systems.
Tree Traversal Algorithms
Tree traversal algorithms are used to visit and process each node in a tree in a specific order. There are three main types of tree traversal algorithms: in-order, pre-order, and post-order.
In-order Traversal
In an in-order traversal, the nodes are visited in the order of left, root, right. This means that the left subtree is visited first, followed by the root node, and then the right subtree. In-order traversal is commonly used to sort binary search trees.
The following C# code demonstrates an in-order traversal:
public void InOrderTraversal(BinaryTreeNode<T> node)
{
if (node != null)
{
InOrderTraversal(node.Left);
Console.WriteLine(node.Value);
InOrderTraversal(node.Right);
}
}
Pre-order Traversal
In a pre-order traversal, the nodes are visited in the order of root, left, right. This means that the root node is visited first, followed by the left subtree, and then the right subtree. Pre-order traversal is commonly used to create a copy of a tree.
The following C# code demonstrates a pre-order traversal:
public void PreOrderTraversal(BinaryTreeNode<T> node)
{
if (node != null)
{
Console.WriteLine(node.Value);
PreOrderTraversal(node.Left);
PreOrderTraversal(node.Right);
}
}
Post-order Traversal
In a post-order traversal, the nodes are visited in the order of left, right, root. This means that the left subtree is visited first, followed by the right subtree, and then the root node. Post-order traversal is commonly used to delete a tree.
The following C# code demonstrates a post-order traversal:
public void PostOrderTraversal(BinaryTreeNode<T> node)
{
if (node != null)
{
PostOrderTraversal(node.Left);
PostOrderTraversal(node.Right);
Console.WriteLine(node.Value);
}
}
Tree traversal algorithms are essential for efficiently visiting and processing nodes in a tree. In-order, pre-order, and post-order traversal algorithms are commonly used in various applications such as sorting, creating copies, and deleting trees. Understanding these algorithms and their applications is crucial for developing efficient and scalable software systems.
Implementing Trees in C#
Implementing trees in C# involves defining the data structure for nodes, building the tree, and defining various tree operations. Trees are hierarchical data structures that consist of nodes connected by edges. Each node can have a parent and multiple children. In C#, trees can be implemented using classes and object-oriented programming concepts.
Defining the Node Class
The first step in implementing a tree in C# is to define the node class. The node class represents a single node in the tree and contains information about the value of the node, its parent, and its children.
public class TreeNode<T>
{
public T Value { get; set; }
public TreeNode<T> Parent { get; set; }
public List<TreeNode<T>> Children { get; set; }
public TreeNode(T value)
{
Value = value;
Children = new List<TreeNode<T>>();
}
}
In the TreeNode class, the Value property stores the value of the node, the Parent property points to the parent node, and the Children property is a list of child nodes.
Building the Tree
Once the TreeNode class is defined, the next step is to build the tree by creating nodes and connecting them. A tree can be built in various ways, such as adding nodes manually or constructing it from a set of data.
public class Tree<T>
{
public TreeNode<T> Root { get; set; }
public Tree()
{
Root = null;
}
public Tree(T rootValue)
{
Root = new TreeNode<T>(rootValue);
}
public void AddChild(T parentValue, T childValue)
{
TreeNode<T> parentNode = FindNode(parentValue);
if (parentNode != null)
{
TreeNode<T> childNode = new TreeNode<T>(childValue);
childNode.Parent = parentNode;
parentNode.Children.Add(childNode);
}
}
public TreeNode<T> FindNode(T value)
{
return FindNode(Root, value);
}
private TreeNode<T> FindNode(TreeNode<T> node, T value)
{
if (node == null)
{
return null;
}
if (EqualityComparer<T>.Default.Equals(node.Value, value))
{
return node;
}
foreach (TreeNode<T> child in node.Children)
{
TreeNode<T> result = FindNode(child, value);
if (result != null)
{
return result;
}
}
return null;
}
}
Tree Operations
Once the tree is built, various operations can be performed on it, such as finding a node, adding a child node, and traversing the tree. The FindNode method in the Tree class is used to find a node with a specific value. The AddChild method is used to add a child node to a parent node.
// Create a new tree with the root value of 5
Tree<int> tree = new Tree<int>(5);
// Add child nodes to the root node
tree.AddChild(5, 3);
tree.AddChild(5, 8);
// Find a node with the value of 3
TreeNode<int> node = tree.FindNode(3);
// Print the value of the node
Console.WriteLine(node.Value); // Output: 3
Implementing trees in C# involves defining a TreeNode class, building the tree, and defining tree operations. Trees are hierarchical data structures that are widely used in various applications such as file systems, database indexing, and organizing data. Understanding how to implement and work with trees is essential for developing efficient and scalable software systems.
Module 7:
Binary Search Trees (BST)
In this module, we will delve into the Binary Search Tree (BST) data structure. BSTs are a type of tree data structure that satisfies the Binary Search Tree property, which makes them an efficient way to store and manage data. Understanding how to work with BSTs is essential for developing efficient and scalable software systems.
Characteristics of Binary Search Trees
We will start by introducing the characteristics of Binary Search Trees (BSTs). A BST is a binary tree where each node has at most two children, and the key (value) of each node is greater than the keys of all nodes in its left subtree and less than the keys of all nodes in its right subtree. This property makes BSTs an efficient way to store and search for data.
Operations on BST
Next, we will explore the operations that can be performed on BSTs, including searching, inserting, and deleting nodes. Understanding how to perform these operations is essential for effectively working with BSTs and developing efficient and scalable software systems.
Balanced Binary Search Trees
Moving on to balanced BSTs, we will explore different types of balanced BSTs, including AVL trees, Red-Black trees, and Splay trees. Balanced BSTs are a type of BST where the heights of the left and right subtrees of every node differ by at most one. This property ensures that the tree remains balanced, which is essential for maintaining efficient search and insert operations.
Applications and Use Cases
Finally, we will cover the applications and use cases of BSTs. BSTs are commonly used in many algorithms and applications, including binary search, database indexing, and more. Understanding the applications and use cases of BSTs is essential for effectively working with them in real-world scenarios.
Throughout this module, we will focus on providing a solid foundation in BSTs, ensuring that you are well-prepared to tackle more advanced topics in subsequent modules.
Characteristics of Binary Search Trees
A Binary Search Tree (BST) is a data structure that maintains a sorted set of keys. Each node in a BST has a value, and a key that uniquely identifies the node. The key of each node is greater than the keys in its left subtree and less than the keys in its right subtree. This property makes it efficient for searching, insertion, and deletion operations.
Binary Search Tree Properties
Ordered Structure: A BST is an ordered structure, where the value of a node is greater than all values in its left subtree and less than all values in its right subtree. This property allows for efficient searching, as it provides a way to traverse the tree and find elements quickly.
Balanced Structure: A balanced BST is one where the height of the tree is minimized, ensuring that the tree is not too deep. This property ensures that the tree remains efficient for searching and other operations.
Fast Search, Insertion, and Deletion: In a balanced BST, the time complexity for searching, insertion, and deletion operations is O(log n), where n is the number of nodes in the tree. This is because the height of the tree is logarithmic with respect to the number of nodes.
Recursive Structure: A BST is a recursive data structure, where each node has a left and right child, which are also BSTs. This property allows for efficient recursive traversal and other operations on the tree.
Example of a Binary Search Tree
Consider the following example of a Binary Search Tree:
10
/ \
5 15
/ \ / \
3 8 12 18
In this tree, the root node has a value of 10, and its left child has a value of 5 and its right child has a value of 15. The left subtree of the root node consists of nodes with values 3 and 8, and the right subtree consists of nodes with values 12 and 18.
Code Implementation of Binary Search Tree
The following C# code demonstrates the implementation of a Binary Search Tree:
public class TreeNode<T>
{
public T Value { get; set; }
public TreeNode<T> Left { get; set; }
public TreeNode<T> Right { get; set; }
public TreeNode(T value)
{
Value = value;
Left = null;
Right = null;
}
}
public class BinarySearchTree<T> where T : IComparable<T>
{
public TreeNode<T> Root { get; set; }
public BinarySearchTree()
{
Root = null;
}
public void Insert(T value)
{
Root = Insert(Root, value);
}
private TreeNode<T> Insert(TreeNode<T> node, T value)
{
if (node == null)
{
return new TreeNode<T>(value);
}
int comparison = value.CompareTo(node.Value);
if (comparison < 0)
{
node.Left = Insert(node.Left, value);
}
else if (comparison > 0)
{
node.Right = Insert(node.Right, value);
}
return node;
}
}
In this code, the TreeNode class represents a node in the tree, and the BinarySearchTree class represents the binary search tree. The Insert method is used to insert nodes into the tree, and it maintains the BST properties by recursively inserting nodes into the left or right subtree based on their values.
Binary Search Trees (BSTs) are important data structures that provide efficient search, insertion, and deletion operations. They have unique properties, such as being ordered and balanced, that make them suitable for a wide range of applications. Understanding the characteristics and implementation of BSTs is essential for developing efficient and scalable software systems.
Operations on BST
Binary Search Trees (BSTs) are a type of tree data structure in which each node has a value, a left child, and a right child. The BST property states that for every node, all values in its left subtree are less than the node's value, and all values in its right subtree are greater than the node's value. This property allows for efficient search, insertion, and deletion operations on BSTs.
Search Operation
The search operation in a BST is performed by comparing the value to be searched with the root node's value. If the value is equal to the root node's value, the search is successful. If the value is less than the root node's value, the search continues in the left subtree. If the value is greater than the root node's value, the search continues in the right subtree. This process is repeated until the value is found or until a leaf node is reached, indicating that the value is not in the BST.
public bool Search(T value)
{
return Search(Root, value);
}
private bool Search(TreeNode<T> node, T value)
{
if (node == null)
{
return false;
}
int comparison = value.CompareTo(node.Value);
if (comparison == 0)
{
return true;
}
else if (comparison < 0)
{
return Search(node.Left, value);
}
else
{
return Search(node.Right, value);
}
}
Insertion Operation
The insertion operation in a BST is performed by comparing the value to be inserted with the root node's value. If the value is less than the root node's value, the insertion continues in the left subtree. If the value is greater than the root node's value, the insertion continues in the right subtree. This process is repeated until an empty spot is found, where the new node can be inserted.
public void Insert(T value)
{
Root = Insert(Root, value);
}
private TreeNode<T> Insert(TreeNode<T> node, T value)
{
if (node == null)
{
return new TreeNode<T>(value);
}
int comparison = value.CompareTo(node.Value);
if (comparison < 0)
{
node.Left = Insert(node.Left, value);
}
else if (comparison > 0)
{
node.Right = Insert(node.Right, value);
}
return node;
}
Deletion Operation
The deletion operation in a BST is performed by finding the node to be deleted and then replacing it with the appropriate child node. There are three cases to consider when deleting a node:
Leaf Node: If the node to be deleted is a leaf node, it can simply be removed from the tree.
Node with One Child: If the node to be deleted has only one child, the child node can be attached to the node's parent.
Node with Two Children: If the node to be deleted has two children, the node can be replaced with its predecessor or successor node, which is the node with the next largest or smallest value, respectively.
public void Delete(T value)
{
Root = Delete(Root, value);
}
private TreeNode<T> Delete(TreeNode<T> node, T value)
Binary Search Trees (BSTs) are a powerful and versatile data structure that supports efficient search, insertion, and deletion operations. By maintaining the BST property, BSTs provide fast access to data and are suitable for a wide range of applications, including databases, file systems, and network routing algorithms. Understanding the operations and properties of BSTs is essential for developing efficient and scalable software systems.
Balanced Binary Search Trees
Balanced Binary Search Trees (BSTs) are a special type of binary tree that ensures the height of the tree remains balanced, which allows for efficient search, insertion, and deletion operations. By keeping the height of the tree close to log2(n), where n is the number of nodes, BSTs can guarantee a worst-case time complexity of O(log n) for these operations.
AVL Trees
One of the most well-known types of balanced BSTs is the AVL tree. AVL trees are self-balancing binary search trees that maintain a balance factor for each node, which is the difference between the height of the node's left subtree and the height of its right subtree. To ensure that the tree remains balanced, AVL trees perform rotations when the balance factor of a node exceeds a certain threshold.
Insertion Operation in AVL Trees
The insertion operation in an AVL tree involves performing a standard BST insertion followed by rebalancing the tree if necessary. After inserting a new node, the balance factor of its ancestors is checked, and rotations are performed if any ancestor has a balance factor of -2 or 2.
public void Insert(T value)
{
Root = Insert(Root, value);
}
private TreeNode<T> Insert(TreeNode<T> node, T value)
Balanced Binary Search Trees (BSTs) are an important data structure that ensures efficient search, insertion, and deletion operations in a tree. By maintaining a balance factor for each node, BSTs can guarantee a worst-case time complexity of O(log n) for these operations. AVL trees are a type of balanced BST that uses rotations to maintain balance, and they are widely used in practice due to their simplicity and efficiency. Understanding balanced BSTs is essential for developing efficient and scalable software systems.
Applications and Use Cases
Binary search trees (BSTs) are a fundamental data structure with numerous applications in computer science and software engineering. Their efficient search, insertion, and deletion operations make them suitable for a wide range of use cases.
1. Symbol Table
One of the most common applications of BSTs is in implementing symbol tables, which are key-value stores used to associate keys with values. BSTs allow for efficient lookup of values based on their associated keys, making them ideal for implementing dictionary data structures.
2. Database Indexing
In databases, BSTs can be used to implement indexing structures such as B-trees and B+ trees, which are crucial for efficient retrieval of data. BSTs allow for fast lookup of records based on their keys, making them an essential component of database management systems.
3. Sorting
BSTs can also be used to implement sorting algorithms such as in-order traversal, which sorts elements in ascending order. Although not as efficient as some other sorting algorithms, BST-based sorting can be useful in certain scenarios, especially when the input data is already in a BST.
4. Priority Queues
BSTs can be used to implement priority queues, where elements are dequeued based on their priority. By maintaining the BST in a way that the highest priority element is always at the root, efficient enqueue and dequeue operations can be achieved.
5. Range Queries
BSTs are useful for range queries, where elements within a certain range need to be retrieved. By performing an in-order traversal of the BST and filtering out elements based on their keys, range queries can be efficiently implemented.
6. File System
In file systems, BSTs can be used to implement directory structures, where each directory is represented as a node in the BST. This allows for efficient lookup and navigation of directories.
7. Binary Search
The binary search algorithm, which is based on the principles of BSTs, is used to efficiently search for a target value in a sorted array. By repeatedly dividing the search space in half, the algorithm can quickly converge on the target value.
Binary search trees (BSTs) are versatile data structures with a wide range of applications in computer science and software engineering. From implementing symbol tables and database indexing to sorting and priority queues, BSTs are used in various scenarios to achieve efficient data organization and access. Understanding the applications and use cases of BSTs is essential for developing scalable and efficient software systems.
Module 8:
Heaps and Priority Queues
In this module, we will explore two essential data structures: heaps and priority queues. These data structures are commonly used in many algorithms and applications and play a crucial role in organizing and managing data.
Overview of Heaps
We will start by introducing heaps, which are a type of tree-based data structure where each parent node is greater than or equal to its children nodes. Heaps are commonly used in many algorithms and applications, including sorting algorithms like heapsort and priority queue implementations.
Min and Max Heaps
Next, we will explore the different types of heaps, including min heaps and max heaps. A min heap is a type of heap where each parent node is less than or equal to its children nodes, while a max heap is a type of heap where each parent node is greater than or equal to its children nodes. Understanding the differences between min and max heaps is essential for effectively working with heaps.
Priority Queue Implementation
Moving on to priority queues, we will explore how to implement priority queues using heaps. A priority queue is a type of queue where each element has a priority associated with it, and elements are dequeued based on their priority. Implementing priority queues using heaps ensures that elements with higher priority are dequeued before elements with lower priority.
Heap Applications in C#
Finally, we will cover the applications of heaps in C#. Heaps are commonly used in many algorithms and applications, including priority queue implementations, heapsort, and more. Understanding the applications of heaps in C# is essential for effectively working with them in real-world scenarios.
Throughout this module, we will focus on providing a solid foundation in heaps and priority queues, ensuring that you are well-prepared to tackle more advanced topics in subsequent modules.
Overview of Heaps
A heap is a specialized tree-based data structure that satisfies the heap property: if A is a parent node of B, then the key of node A is ordered with respect to the key of node B with the same ordering applying across the heap. The primary benefits of a heap are its ability to maintain a partially ordered tree structure and to perform efficient insertions and removals from the top of the heap.
1. Heap Properties
A heap can be implemented as a binary tree or an array, with the most common types being binary min-heaps and max-heaps. In a min-heap, the parent node's key is less than or equal to the keys of its children, and in a max-heap, the parent node's key is greater than or equal to the keys of its children.
2. Operations on Heaps
Heaps support a set of basic operations, including insertion, extraction, and inspection. Insertion adds a new element to the heap, maintaining the heap property. Extraction removes and returns the top element of the heap, again maintaining the heap property. Inspection allows for viewing the top element without removing it.
3. Heap Implementation
Heaps can be implemented using arrays, where the parent-child relationships are determined by index positions. For example, in a binary min-heap, the children of a node at index i are located at indices 2i+1 and 2i+2, and the parent of a node at index i is located at index (i-1)/2 (integer division).
4. Heap Operations Complexity
The time complexity of insertion and extraction in a heap is O(log n), where n is the number of elements in the heap. This is because these operations involve traversing the height of the heap, which is logarithmic in the number of elements. The complexity of inspecting the top element is O(1), as it involves accessing a single element.
5. Heap Applications
Heaps are commonly used to implement priority queues, where elements are inserted with an associated priority and removed in order of priority. They are also used in algorithms such as heap sort and Dijkstra's algorithm, which require maintaining a partially ordered set of elements.
Heaps are a powerful and versatile data structure that provides efficient access to the top element and can be used in a variety of applications. By maintaining a partially ordered tree structure and supporting efficient insertions and removals, heaps enable the development of scalable and efficient software systems. Understanding the properties and operations of heaps is essential for effective use of this data structure in practice.
Min and Max Heaps
Overview
Min and max heaps are two types of heap data structures that maintain the heap property, but with different ordering constraints. In a min heap, the key of each parent node is less than or equal to the keys of its children, making the smallest element the root. Conversely, in a max heap, the key of each parent node is greater than or equal to the keys of its children, making the largest element the root. This ordering ensures that the minimum or maximum element can be efficiently retrieved.
Implementation
Min and max heaps can be implemented using arrays, where the parent-child relationships are determined by index positions. In a min heap, the children of a node at index i are located at indices 2i+1 and 2i+2, and the parent of a node at index i is located at index (i-1)/2 (integer division). In a max heap, the children and parent relationships are the same, but the ordering constraint is reversed.
Operations
The fundamental operations of min and max heaps include insertion, extraction, and inspection. Insertion adds a new element to the heap while maintaining the heap property. Extraction removes and returns the top element of the heap, ensuring that the remaining elements satisfy the heap property. Inspection allows for viewing the top element without removing it.
Time Complexity
The time complexity of insertion and extraction in min and max heaps is O(log n), where n is the number of elements in the heap. This is because these operations involve traversing the height of the heap, which is logarithmic in the number of elements. The complexity of inspecting the top element is O(1), as it involves accessing a single element.
Applications
Min and max heaps are commonly used to implement priority queues, where elements are inserted with an associated priority and removed in order of priority. They are also used in algorithms such as heap sort and Dijkstra's algorithm, which require maintaining a partially ordered set of elements.
Min and max heaps are versatile data structures that provide efficient access to the minimum or maximum element. By maintaining the heap property, they enable the development of scalable and efficient software systems. Understanding the properties and operations of min and max heaps is essential for effective use of these data structures in practice.
Priority Queue Implementation
Introduction
A priority queue is a data structure that enables efficient access to elements based on their priority. Elements with higher priority are dequeued before elements with lower priority. Priority queues are commonly used in scenarios where elements need to be processed in order of priority, such as task scheduling and event-driven systems.
Min and Max Heaps
Priority queues are often implemented using min and max heaps, which are specialized binary trees that maintain the heap property. In a min heap, the smallest element is the root, while in a max heap, the largest element is the root. By storing the highest-priority elements at the top of the heap, priority queues can efficiently access and dequeue elements in the desired order.
Implementation Details
In a priority queue implemented using a heap, the enqueue operation involves adding an element to the heap and adjusting the heap structure to maintain the heap property. The dequeue operation removes and returns the top element of the heap, which is the highest-priority element. These operations have a time complexity of O(log n), where n is the number of elements in the priority queue.
Generic Priority Queue
In C#, a generic priority queue can be implemented using a heap-based approach. This involves creating a generic class that internally uses a heap data structure to maintain the priority queue. The class would support operations such as Enqueue, Dequeue, and Peek, allowing users to add, remove, and access elements based on their priority.
public class PriorityQueue<T>
{
private List<T> heap;
public PriorityQueue()
{
this.heap = new List<T>();
}
public void Enqueue(T item)
{
heap.Add(item);
int currentIndex = heap.Count - 1;
while (currentIndex > 0)
{
int parentIndex = (currentIndex - 1) / 2;
if (Comparer<T>.Default.Compare(heap[currentIndex], heap[parentIndex]) < 0)
{
T temp = heap[currentIndex];
heap[currentIndex] = heap[parentIndex];
heap[parentIndex] = temp;
currentIndex = parentIndex;
}
else
{
break;
}
}
}
public T Dequeue()
{
if (heap.Count == 0)
{
throw new InvalidOperationException("PriorityQueue is empty");
}
T item = heap[0];
heap[0] = heap[heap.Count - 1];
heap.RemoveAt(heap.Count - 1);
int currentIndex = 0;
while (currentIndex < heap.Count)
{
int leftChildIndex = 2 * currentIndex + 1;
int rightChildIndex = 2 * currentIndex + 2;
int minIndex = currentIndex;
if (leftChildIndex < heap.Count && Comparer<T>.Default.Compare(heap[leftChildIndex], heap[minIndex]) < 0)
{
minIndex = leftChildIndex;
}
if (rightChildIndex < heap.Count && Comparer<T>.Default.Compare(heap[rightChildIndex], heap[minIndex]) < 0)
{
minIndex = rightChildIndex;
}
if (minIndex == currentIndex)
{
break;
}
T temp = heap[currentIndex];
heap[currentIndex] = heap[minIndex];
heap[minIndex] = temp;
currentIndex = minIndex;
}
return item;
}
public T Peek()
{
if (heap.Count == 0)
{
throw new InvalidOperationException("PriorityQueue is empty");
}
return heap[0];
}
}
Priority queues are a powerful tool for managing tasks and events based on their priority. By using a heap-based implementation, priority queues can efficiently enqueue, dequeue, and access elements in order of priority. This makes them an essential data structure for various applications, including job scheduling, event handling, and network traffic management.
Heap Applications in C#
Introduction
A heap is a specialized binary tree data structure that satisfies the heap property. Heaps can be either min-heaps or max-heaps, where the heap property ensures that the root of the tree contains the smallest or largest element, respectively. In C#, heaps are commonly used to implement priority queues, which are data structures that allow for efficient access to elements based on their priority.
Priority Queues and Heap Sort
A priority queue is a data structure that supports two primary operations: insert (enqueue) and delete-min (dequeue). Priority queues are often used in algorithms that require efficient access to elements based on their priority. One such algorithm is heap sort, which uses a min-heap to sort elements in ascending order. In C#, a priority queue can be implemented using a binary heap.
Implementing a Priority Queue in C#
In C#, a priority queue can be implemented using a binary heap. A binary heap is a complete binary tree where every level, except possibly the last, is filled, and all nodes are as far left as possible. The heap property ensures that the value of a node is less than or equal to the values of its children (for a min-heap) or greater than or equal to the values of its children (for a max-heap). The following code snippet shows an example implementation of a min-heap-based priority queue in C#:
public class MinHeapPriorityQueue<T>
{
private List<T> heap = new List<T>();
private Func<T, T, bool> compareFunc;
public MinHeapPriorityQueue(Func<T, T, bool> compareFunc)
{
this.compareFunc = compareFunc;
}
public void Enqueue(T item)
{
heap.Add(item);
HeapifyUp(heap.Count - 1);
}
public T Dequeue()
{
if (heap.Count == 0)
throw new InvalidOperationException("Queue is empty");
T item = heap[0];
heap[0] = heap[heap.Count - 1];
heap.RemoveAt(heap.Count - 1);
HeapifyDown(0);
return item;
}
private void HeapifyUp(int index)
{
while (index > 0)
{
int parentIndex = (index - 1) / 2;
if (compareFunc(heap[index], heap[parentIndex]))
{
Swap(index, parentIndex);
index = parentIndex;
}
else
{
break;
}
}
}
private void HeapifyDown(int index)
{
int leftChildIndex = 2 * index + 1;
int rightChildIndex = 2 * index + 2;
int minIndex = index;
if (leftChildIndex < heap.Count && compareFunc(heap[leftChildIndex], heap[minIndex]))
{
minIndex = leftChildIndex;
}
if (rightChildIndex < heap.Count && compareFunc(heap[rightChildIndex], heap[minIndex]))
{
minIndex = rightChildIndex;
}
if (minIndex != index)
{
Swap(index, minIndex);
HeapifyDown(minIndex);
}
}
private void Swap(int index1, int index2)
{
T temp = heap[index1];
heap[index1] = heap[index2];
heap[index2] = temp;
}
}
Heap applications in C# are versatile and widely used. They are crucial for implementing priority queues, which are essential in various algorithms and applications. The heap data structure allows for efficient access to elements based on their priority, making it an indispensable tool for tasks that require prioritization and sorting.
Module 9:
Hash Tables
In this module, we will explore hash tables, which are a fundamental data structure used to store and retrieve data efficiently. Hash tables are commonly used in many algorithms and applications and play a crucial role in organizing and managing data.
Introduction to Hashing
We will start by introducing the concept of hashing, which is the process of mapping data of arbitrary size to fixed-size values. Hashing is used to efficiently store and retrieve data in hash tables, and understanding how hashing works is essential for effectively working with hash tables.
Hash Functions in C#
Next, we will explore how to implement hash functions in C#. A hash function is a function that takes an input (or "key") and maps it to a fixed-size value (or "hash"). Hash functions are used to efficiently store and retrieve data in hash tables, and understanding how to implement hash functions is essential for effectively working with hash tables in C#.
Handling Collisions
Moving on to handling collisions, we will explore different strategies for handling collisions in hash tables. A collision occurs when two different keys map to the same hash value, and understanding how to handle collisions is essential for maintaining the efficiency and integrity of hash tables.
Hash Table Applications
Finally, we will cover the applications of hash tables in C#. Hash tables are commonly used in many algorithms and applications, including dictionary implementations, associative arrays, and more. Understanding the applications of hash tables in C# is essential for effectively working with them in real-world scenarios.
Throughout this module, we will focus on providing a solid foundation in hash tables, ensuring that you are well-prepared to tackle more advanced topics in subsequent modules.
Introduction to Hashing
Overview
Hashing is a technique used to store, search, and retrieve data in a way that provides efficient access to the data. It involves converting data into a fixed-size value or key, known as a hash code or hash value, which is used to index the data into a data structure called a hash table. In C#, hashing is widely used to implement dictionaries and other associative array data structures.
Hash Functions
Hash functions are at the heart of hashing. A hash function is a mathematical algorithm that takes an input (or 'message') and returns a fixed-size string of bytes, which is typically a hash value. The main properties of a good hash function include:
Deterministic: For a given input, the hash function must always produce the same hash value.
Efficient: The hash function should be computationally efficient.
Uniform distribution: The hash values should be evenly distributed across the hash table.
Collision resistance: The hash function should minimize the likelihood of two different inputs producing the same hash value (collision).
In C#, the GetHashCode() method is often used to compute hash values for objects. It is important to override this method in custom classes to ensure that objects are hashed based on their content rather than their reference.
Hash Tables
A hash table is a data structure that stores key-value pairs and uses a hash function to compute an index into an array of buckets or slots, from which the desired value can be found. In C#, the Dictionary<TKey, TValue> class is an example of a hash table implementation.
Implementing Hash Tables in C#
Implementing a hash table in C# involves defining a custom hash function and handling collisions. One common approach to handling collisions is using chaining, where each bucket in the hash table contains a linked list of elements that share the same hash value.
Here's an example of a simple hash table implementation in C# using chaining:
public bool TryGetValue(TKey key, out TValue value)
{
int index = GetIndex(key);
if (items[index] != null)
{
foreach (var item in items[index])
{
if (item.Key.Equals(key))
{
value = item.Value;
return true;
}
}
}
value = default;
return false;
}
private int GetIndex(TKey key)
{
int hash = key.GetHashCode();
return Math.Abs(hash) % items.Length;
}
}
Hashing is a powerful technique used in data storage and retrieval, and it plays a critical role in many aspects of computer science and software engineering. In C#, it is essential for implementing efficient data structures such as dictionaries, sets, and caches. Understanding hashing and its associated concepts is crucial for developing efficient and scalable software solutions.
Hash Functions in C#
Introduction
Hash functions are a fundamental concept in computer science and are extensively used in various applications, including data structures like hash tables. In C#, hash functions are used to compute a unique hash value for objects, allowing them to be efficiently stored and retrieved in data structures.
Understanding Hash Functions
A hash function takes an input (often a key) and returns a fixed-size hash value, which is typically a string of bytes. The primary goal of a hash function is to distribute the hash values evenly across the available range, minimizing the likelihood of collisions (where two different inputs produce the same hash value).
Built-in Hash Functions in C#
C# provides a built-in hash function called GetHashCode(), which is implemented for all objects. However, the default implementation of GetHashCode() in the Object class is based on the object's reference, not its content. This means that two different instances of an object with the same content will not produce the same hash value.
To ensure that objects are hashed based on their content, it is essential to override the GetHashCode() method in custom classes. The implementation of GetHashCode() should consider all fields that contribute to the object's equality and should follow specific guidelines to produce a well-distributed hash code.
Example of Overriding GetHashCode()
public class Person
{
public string FirstName { get; set; }
public string LastName { get; set; }
public int Age { get; set; }
public override int GetHashCode()
{
unchecked
{
int hash = 17;
hash = hash * 23 + FirstName.GetHashCode();
hash = hash * 23 + LastName.GetHashCode();
hash = hash * 23 + Age;
return hash;
}
}
}
In this example, the GetHashCode() method is overridden to compute the hash code based on the FirstName, LastName, and Age properties. The unchecked block ensures that overflow exceptions are ignored, allowing the hash code to wrap around when it exceeds the maximum value of int.
Handling Collisions
Even with a good hash function, collisions can still occur, where two different inputs produce the same hash value. In a hash table, collisions are typically handled using techniques like chaining or open addressing.
In chaining, each bucket in the hash table contains a linked list of elements that share the same hash value. When a collision occurs, the new element is appended to the end of the linked list. While chaining can lead to longer search times, it is relatively simple to implement and can handle a large number of collisions.
In open addressing, the hash table contains only the elements themselves, and when a collision occurs, the algorithm searches for the next available slot in the table. This technique can lead to faster search times but requires careful management of table resizing and collision resolution.
Hash functions are a critical component of many data structures and algorithms. In C#, understanding how to implement and use hash functions is essential for developing efficient and scalable software solutions. By carefully designing hash functions and handling collisions, developers can ensure that their applications perform well and provide reliable data storage and retrieval.
Handling Collisions
Collisions are an inherent issue in hash tables, as multiple keys can hash to the same index, leading to a collision. Effective collision handling is crucial for maintaining the performance and integrity of hash tables. In C#, collisions are commonly handled using two primary methods: chaining and open addressing.
Chaining
In chaining, each hash table bucket is associated with a linked list. When a collision occurs, the new key-value pair is appended to the linked list in the corresponding bucket. This approach is relatively straightforward to implement and is highly efficient when the hash function uniformly distributes keys across the buckets. However, if the hash function does not distribute keys evenly, the linked lists can become long, resulting in slower search times.
In this example, the ChainedHashTable class uses chaining to handle collisions. The Add method calculates the hash code of the key, determines the index of the corresponding bucket, and appends the key-value pair to the linked list in that bucket. The Get method follows a similar process to retrieve the value associated with a given key.
Open Addressing
In open addressing, when a collision occurs, the algorithm searches for the next available slot in the hash table. This approach can lead to faster search times as it eliminates the need for linked lists. However, it requires careful management of table resizing and collision resolution.
public class OpenAddressingHashTable<TKey, TValue>
{
private KeyValuePair<TKey, TValue>[] table;
private bool[] isOccupied;
public OpenAddressingHashTable(int capacity)
{
table = new KeyValuePair<TKey, TValue>[capacity];
isOccupied = new bool[capacity];
}
public void Add(TKey key, TValue value)
{
int index = GetHashCode(key) % table.Length;
while (isOccupied[index])
{
index = (index + 1) % table.Length;
}
table[index] = new KeyValuePair<TKey, TValue>(key, value);
isOccupied[index] = true;
}
public TValue Get(TKey key)
{
int index = GetHashCode(key) % table.Length;
while (isOccupied[index])
{
if (table[index].Key.Equals(key))
{
return table[index].Value;
}
index = (index + 1) % table.Length;
}
throw new KeyNotFoundException();
}
}
In this example, the OpenAddressingHashTable class uses open addressing to handle collisions. The Add method calculates the hash code of the key, determines the index of the corresponding bucket, and searches for the next available slot in the table. The Get method follows a similar process to retrieve the value associated with a given key.
Collision handling is an essential aspect of hash table implementation. Chaining and open addressing are two common methods used to address collisions in C#. By understanding the trade-offs and considerations associated with each approach, developers can choose the most appropriate method for their specific use case, ensuring efficient and reliable hash table performance.
Hash Table Applications
Hash tables are versatile data structures with a wide range of applications across various domains. They provide efficient access, insertion, and deletion of key-value pairs, making them ideal for scenarios where fast lookups and updates are required. Let's explore some common applications of hash tables in C#.
Dictionaries
One of the most prevalent applications of hash tables is in implementing dictionaries. In C#, the Dictionary<TKey, TValue> class is a hash table implementation that allows fast lookup and insertion of key-value pairs. This class is commonly used to store and retrieve information such as configuration settings, user preferences, and data mappings.
Dictionary<string, int> grades = new Dictionary<string, int>();
grades.Add("Alice", 90);
grades.Add("Bob", 85);
grades.Add("Charlie", 95);
Console.WriteLine($"Bob's grade is {grades["Bob"]}");
In this example, the grades dictionary stores the grades of students. The Add method inserts key-value pairs, and the indexer [] allows fast retrieval of values based on the keys.
Caching
Hash tables are also used for caching frequently accessed data to improve performance. By storing recently accessed data in a hash table, applications can avoid expensive computations or database queries, resulting in faster response times.
Dictionary<string, string> cache = new Dictionary<string, string>();
string GetFromCacheOrCompute(string key)
{
if (cache.ContainsKey(key))
{
return cache[key];
}
string result = ComputeValue(key);
cache[key] = result;
return result;
}
In this example, the GetFromCacheOrCompute function checks if the key exists in the cache. If it does, it retrieves the value from the cache. Otherwise, it computes the value using a costly operation, stores it in the cache, and returns the value.
3. Symbol Tables
Hash tables are widely used to implement symbol tables, which map keys (symbols) to values (information). Symbol tables are fundamental in compilers, interpreters, and other language processing systems.
Dictionary<string, string> symbolTable = new Dictionary<string, string>();
symbolTable.Add("x", "Variable");
symbolTable.Add("y", "Function");
Console.WriteLine($"Type of x: {symbolTable["x"]}");
In this example, the symbolTable dictionary maps variable names (x, y) to their respective types (Variable, Function). This mapping is used to track the type information of symbols during compilation or interpretation.
Database Indexing
Hash tables are used for indexing data in databases, enabling fast retrieval of records based on keys. By storing a hash table of key-value pairs, databases can quickly locate and access the relevant records, improving query performance.
Dictionary<int, string> index = new Dictionary<int, string>();
index.Add(1, "Record1");
index.Add(2, "Record2");
Console.WriteLine($"Record with key 1: {index[1]}");
In this example, the index dictionary maps integer keys to the corresponding record identifiers. This index is used by the database to quickly locate and retrieve the records with the specified keys.
Hash tables have numerous applications in software development, ranging from implementing dictionaries and caches to symbol tables and database indexing. By leveraging the efficiency of hash table operations, developers can design and implement performant and scalable solutions across various domains.
Module 10:
Graphs and Graph Algorithms
In this module, we will explore graphs and graph algorithms, which are a fundamental area of study in computer science. Graphs are a versatile data structure that can represent a wide range of real-world relationships, and graph algorithms are used to solve many important problems in computer science.
Basics of Graphs
We will start by introducing the basics of graphs, including what graphs are and why they are important. A graph is a collection of nodes (or "vertices") and edges that connect pairs of nodes. Graphs are used to represent a wide range of relationships, including social networks, computer networks, and more.
Graph Representation in C#
Next, we will explore how to represent graphs in C#. There are many different ways to represent graphs in C#, including adjacency matrices, adjacency lists, and more. Understanding how to represent graphs is essential for effectively working with them in C#.
Depth-First Search (DFS)
Moving on to graph algorithms, we will explore the Depth-First Search (DFS) algorithm, which is a fundamental graph traversal algorithm. DFS is used to visit all the nodes in a graph, and understanding how DFS works is essential for effectively working with graphs in C#.
Breadth-First Search (BFS)
Finally, we will cover the Breadth-First Search (BFS) algorithm, which is another fundamental graph traversal algorithm. BFS is used to visit all the nodes in a graph, and understanding how BFS works is essential for effectively working with graphs in C#.
Throughout this module, we will focus on providing a solid foundation in graphs and graph algorithms, ensuring that you are well-prepared to tackle more advanced topics in subsequent modules.
Basics of Graphs
A graph is a mathematical structure that consists of a set of vertices (nodes) connected by edges. Graphs can represent a wide range of real-world relationships, making them a fundamental data structure in computer science. Let's explore the basics of graphs and their representations in C#.
Graph Terminology
Vertex (Node): A vertex is a fundamental unit of a graph, representing an entity or an object.
Edge: An edge is a connection between two vertices, representing a relationship or a connection between the corresponding entities.
Directed Graph: A directed graph is a graph in which edges have a direction. It means that an edge from vertex A to vertex B is different from an edge from vertex B to vertex A.
Undirected Graph: An undirected graph is a graph in which edges do not have a direction. It means that an edge from vertex A to vertex B is the same as an edge from vertex B to vertex A.
Weighted Graph: A weighted graph is a graph in which each edge has a weight assigned to it. The weight represents the cost or distance associated with traversing the edge.
Graph Representations
There are various ways to represent a graph in computer science. The most common representations are:
Adjacency Matrix: An adjacency matrix is a two-dimensional array where each cell represents the presence or absence of an edge between two vertices. It is suitable for representing dense graphs.
Adjacency List: An adjacency list is a data structure that stores a list of neighbors for each vertex. It is suitable for representing sparse graphs.
Edge List: An edge list is a list of tuples, where each tuple represents an edge in the graph. It is suitable for representing both directed and undirected graphs.
Graph Traversal
Graph traversal is the process of visiting all the vertices in a graph. There are two common graph traversal algorithms:
Depth-First Search (DFS): DFS is a recursive algorithm that starts at a vertex and explores as far as possible along each branch before backtracking. It uses a stack data structure to keep track of visited vertices.
Breadth-First Search (BFS): BFS is an iterative algorithm that starts at a vertex and explores all the neighboring vertices at the current depth before moving on to the vertices at the next depth. It uses a queue data structure to keep track of visited vertices.
Applications of Graphs
Graphs have a wide range of applications in computer science, including:
Networks: Graphs are used to model various types of networks, such as social networks, transportation networks, and computer networks.
Routing and Pathfinding: Graphs are used to find the shortest path between two vertices in a graph, which is crucial in routing and pathfinding algorithms.
Recommendation Systems: Graphs are used to model user-item relationships in recommendation systems, where edges represent user interactions with items.
Data Representation: Graphs are used to represent and analyze complex data structures, such as trees, linked lists, and hierarchical structures.
Graphs are a powerful data structure for representing and analyzing relationships between entities. By understanding the basics of graphs and their representations, developers can design efficient algorithms and systems that leverage the power of graph theory.
Graph Representation in C#
Graphs are used to represent relationships between entities, with the vertices (nodes) representing the entities and the edges representing the relationships. In this section, we'll explore how to represent graphs in C# using adjacency lists and adjacency matrices, two common representations for graphs.
Adjacency List Representation
In an adjacency list representation, each vertex (node) in the graph is associated with a list of its neighboring vertices. This is typically implemented using a dictionary or a list of lists. Here's a simple implementation using a dictionary:
using System;
using System.Collections.Generic;
public class Graph
{
private Dictionary<int, List<int>> adjacencyList;
public Graph()
{
adjacencyList = new Dictionary<int, List<int>>();
}
public void AddVertex(int vertex)
{
if (!adjacencyList.ContainsKey(vertex))
{
adjacencyList[vertex] = new List<int>();
}
}
public void AddEdge(int source, int destination)
{
if (!adjacencyList.ContainsKey(source) || !adjacencyList.ContainsKey(destination))
{
throw new ArgumentException("Vertices not found in graph.");
}
adjacencyList[source].Add(destination);
adjacencyList[destination].Add(source); // Add this line for undirected graphs
}
public void Print()
{
foreach (var vertex in adjacencyList)
{
Console.Write($"{vertex.Key}: ");
foreach (var neighbor in vertex.Value)
{
Console.Write($"{neighbor} ");
}
Console.WriteLine();
}
}
}
Adjacency Matrix Representation
In an adjacency matrix representation, a 2D array is used to represent the presence or absence of edges between vertices. A value of 1 indicates the presence of an edge, while a value of 0 indicates the absence of an edge. Here's a simple implementation:
using System;
public class Graph
{
private int[,] adjacencyMatrix;
private int numVertices;
public Graph(int numVertices)
{
this.numVertices = numVertices;
adjacencyMatrix = new int[numVertices, numVertices];
}
public void AddEdge(int source, int destination)
{
adjacencyMatrix[source, destination] = 1;
adjacencyMatrix[destination, source] = 1; // Add this line for undirected graphs
}
public void Print()
{
for (int i = 0; i < numVertices; i++)
{
for (int j = 0; j < numVertices; j++)
{
Console.Write($"{adjacencyMatrix[i, j]} ");
}
Console.WriteLine();
}
}
}
Both adjacency lists and adjacency matrices have their advantages and disadvantages. Adjacency lists are more memory-efficient for sparse graphs, while adjacency matrices are more memory-efficient for dense graphs. Developers should choose the representation that best suits the specific requirements of their application.
Depth-First Search (DFS)
Depth-First Search (DFS) is a graph traversal algorithm that explores as far as possible along each branch before backtracking. It is often used to search for a path between two vertices or to find connected components in a graph. In this section, we'll explore the DFS algorithm and its implementation in C#.
Recursive Implementation
The most common way to implement DFS is through recursion. The basic idea is to start at a given vertex and explore as far as possible along each branch before backtracking. Here's a simple implementation of DFS using recursion:
using System;
using System.Collections.Generic;
public class Graph
{
private Dictionary<int, List<int>> adjacencyList;
public Graph()
{
adjacencyList = new Dictionary<int, List<int>>();
}
public void AddVertex(int vertex)
{
if (!adjacencyList.ContainsKey(vertex))
{
adjacencyList[vertex] = new List<int>();
}
}
public void AddEdge(int source, int destination)
{
if (!adjacencyList.ContainsKey(source) || !adjacencyList.ContainsKey(destination))
{
throw new ArgumentException("Vertices not found in graph.");
}
adjacencyList[source].Add(destination);
adjacencyList[destination].Add(source); // Add this line for undirected graphs
DFS can also be implemented iteratively using a stack. The idea is to push the starting vertex onto the stack and then repeatedly pop vertices from the stack, marking them as visited and pushing their unvisited neighbors onto the stack. Here's an iterative implementation of DFS:
using System;
using System.Collections.Generic;
public class Graph
{
private Dictionary<int, List<int>> adjacencyList;
public Graph()
{
adjacencyList = new Dictionary<int, List<int>>();
}
public void AddVertex(int vertex)
{
if (!adjacencyList.ContainsKey(vertex))
{
adjacencyList[vertex] = new List<int>();
}
}
public void AddEdge(int source, int destination)
{
if (!adjacencyList.ContainsKey(source) || !adjacencyList.ContainsKey(destination))
{
throw new ArgumentException("Vertices not found in graph.");
}
adjacencyList[source].Add(destination);
adjacencyList[destination].Add(source); // Add this line for undirected graphs
}
public void DFS(int start)
{
HashSet<int> visited = new HashSet<int>();
Stack<int> stack = new Stack<int>();
stack.Push(start);
visited.Add(start);
while (stack.Count > 0)
{
int current = stack.Pop();
Console.Write($"{current} ");
foreach (var neighbor in adjacencyList[current])
{
if (!visited.Contains(neighbor))
{
stack.Push(neighbor);
visited.Add(neighbor);
}
}
}
}
}
Depth-First Search (DFS) is a powerful algorithm for graph traversal and is used in various applications, such as finding connected components, cycle detection, and path finding. Developers should choose the implementation (recursive or iterative) that best suits the requirements of their application.
Breadth-First Search (BFS)
Breadth-First Search (BFS) is another graph traversal algorithm that explores a graph by exploring all the neighbors of a vertex before moving on to the next vertex. It is often used to find the shortest path between two vertices or to find all connected components in a graph. In this section, we'll explore the BFS algorithm and its implementation in C#.
Overview of Breadth-First Search
Breadth-First Search (BFS) is a graph traversal algorithm that starts at a given vertex and explores all of its neighbors before moving on to the neighbors' neighbors. It uses a queue data structure to keep track of the vertices that need to be explored.
Recursive Implementation
The most common way to implement BFS is through recursion. The basic idea is to start at a given vertex and explore all of its neighbors before moving on to the neighbors' neighbors. Here's a simple implementation of BFS using recursion:
using System;
using System.Collections.Generic;
public class Graph
{
private Dictionary<int, List<int>> adjacencyList;
public Graph()
{
adjacencyList = new Dictionary<int, List<int>>();
}
public void AddVertex(int vertex)
{
if (!adjacencyList.ContainsKey(vertex))
{
adjacencyList[vertex] = new List<int>();
}
}
public void AddEdge(int source, int destination)
{
if (!adjacencyList.ContainsKey(source) || !adjacencyList.ContainsKey(destination))
{
throw new ArgumentException("Vertices not found in graph.");
}
adjacencyList[source].Add(destination);
adjacencyList[destination].Add(source); // Add this line for undirected graphs
Breadth-First Search (BFS) is a powerful algorithm for graph traversal and is used in various applications, such as finding the shortest path between two vertices, finding connected components, and cycle detection. Developers should choose the implementation (recursive or iterative) that best suits the requirements of their application.
Module 11:
Advanced Graph Algorithms
In this module, we will delve into advanced graph algorithms, which are used to solve more complex problems in computer science. Advanced graph algorithms build upon the basics covered in the previous module and are essential for tackling more challenging problems.
Dijkstra's Algorithm
We will start by introducing Dijkstra's algorithm, which is a fundamental graph algorithm used to find the shortest path between two nodes in a graph. Dijkstra's algorithm is widely used in many applications, including routing algorithms in computer networks and more.
Bellman-Ford Algorithm
Next, we will explore the Bellman-Ford algorithm, which is another fundamental graph algorithm used to find the shortest path between two nodes in a graph. The Bellman-Ford algorithm is more versatile than Dijkstra's algorithm and can handle graphs with negative edge weights.
Topological Sorting
Moving on to topological sorting, we will explore how to sort the nodes of a directed acyclic graph (DAG) in such a way that for every directed edge from node u to node v, u comes before v in the sorted order. Topological sorting is used in many applications, including scheduling tasks and more.
Applications and Variations
Finally, we will cover the applications and variations of advanced graph algorithms. Advanced graph algorithms are used in many applications, including network flow problems, maximum flow problems, and more. Understanding the applications and variations of advanced graph algorithms is essential for effectively working with them in real-world scenarios.
Throughout this module, we will focus on providing a solid foundation in advanced graph algorithms, ensuring that you are well-prepared to tackle more challenging problems in computer science.
Dijkstra's Algorithm
Finding the Shortest Path in Graphs
Dijkstra's algorithm is a well-known graph traversal algorithm that finds the shortest path from a source vertex to all other vertices in a weighted graph with non-negative edge weights. The algorithm maintains a set of vertices with known shortest distances from the source and iteratively expands this set by adding the vertex with the smallest known distance. Dijkstra's algorithm is used in a variety of applications such as network routing and pathfinding.
Overview of Dijkstra's Algorithm
The algorithm works by iteratively selecting the vertex with the smallest known distance from the source and updating the distances to its neighbors. This process continues until all vertices have been explored or until the destination vertex is reached. The key data structure used in Dijkstra's algorithm is the priority queue, which allows efficient selection of the vertex with the smallest known distance.
Implementation in C#
Here's a simple implementation of Dijkstra's algorithm in C#:
adjacencyList = new Dictionary<int, List<(int, int)>>();
}
public void AddVertex(int vertex)
{
if (!adjacencyList.ContainsKey(vertex))
{
adjacencyList[vertex] = new List<(int, int)>();
}
}
public void AddEdge(int source, int destination, int weight)
{
if (!adjacencyList.ContainsKey(source) || !adjacencyList.ContainsKey(destination))
{
throw new ArgumentException("Vertices not found in graph.");
}
adjacencyList[source].Add((destination, weight));
adjacencyList[destination].Add((source, weight)); // Add this line for undirected graphs
}
public List<int> Dijkstra(int start, int end)
{
Dictionary<int, int> distances = new Dictionary<int, int>();
Dictionary<int, int> previous = new Dictionary<int, int>();
HashSet<int> visited = new HashSet<int>();
foreach (var vertex in adjacencyList.Keys)
{
distances[vertex] = int.MaxValue;
previous[vertex] = -1;
}
distances[start] = 0;
while (visited.Count < adjacencyList.Count)
{
int current = GetClosestVertex(distances, visited);
visited.Add(current);
foreach (var (neighbor, weight) in adjacencyList[current])
{
if (!visited.Contains(neighbor))
{
int distance = distances[current] + weight;
if (distance < distances[neighbor])
{
distances[neighbor] = distance;
previous[neighbor] = current;
}
}
}
}
List<int> path = new List<int>();
int tmp = end;
while (tmp != -1)
{
path.Insert(0, tmp);
tmp = previous[tmp];
}
return path;
}
private int GetClosestVertex(Dictionary<int, int> distances, HashSet<int> visited)
{
int minDistance = int.MaxValue;
int closestVertex = -1;
foreach (var vertex in adjacencyList.Keys)
{
if (!visited.Contains(vertex) && distances[vertex] < minDistance)
{
minDistance = distances[vertex];
closestVertex = vertex;
}
}
return closestVertex;
}
}
Dijkstra's algorithm is a powerful tool for finding the shortest path in weighted graphs. The algorithm is widely used in various applications and can be implemented efficiently using a priority queue or a heap data structure. Developers should choose the implementation that best suits the requirements of their application.
Bellman-Ford Algorithm
Finding the Shortest Path in Graphs
The Bellman-Ford algorithm is a well-known algorithm that finds the shortest path from a single source vertex to all other vertices in a weighted graph with negative edge weights. Unlike Dijkstra's algorithm, Bellman-Ford can handle graphs with negative edge weights and detect negative weight cycles. It is a dynamic programming-based algorithm that iteratively relaxes the edges in the graph until it finds the shortest paths.
Overview of Bellman-Ford Algorithm
The Bellman-Ford algorithm works by relaxing the edges in the graph V-1 times, where V is the number of vertices in the graph. Each relaxation step updates the distance to each vertex based on the shortest path found so far. After V-1 relaxation steps, the algorithm performs one more relaxation step to check for negative weight cycles. If a negative weight cycle is detected, the algorithm returns an error, indicating that the graph contains a negative weight cycle.
2. Implementation in C#
Here's a simple implementation of the Bellman-Ford algorithm in C#:
using System;
using System.Collections.Generic;
public class Graph
{
private List<(int, int, int)> edges;
public Graph()
{
edges = new List<(int, int, int)>();
}
public void AddEdge(int source, int destination, int weight)
{
edges.Add((source, destination, weight));
}
public List<int> BellmanFord(int start)
{
int V = edges.Count + 1;
int[] distances = new int[V];
int[] previous = new int[V];
for (int i = 0; i < V; i++)
{
distances[i] = int.MaxValue;
previous[i] = -1;
}
distances[start] = 0;
for (int i = 0; i < V - 1; i++)
{
foreach (var (source, destination, weight) in edges)
{
if (distances[source] != int.MaxValue && distances[source] + weight < distances[destination])
foreach (var (source, destination, weight) in edges)
{
if (distances[source] != int.MaxValue && distances[source] + weight < distances[destination])
{
throw new Exception("Graph contains a negative weight cycle.");
}
}
return previous;
}
}
The Bellman-Ford algorithm is a versatile algorithm that can handle graphs with negative edge weights and negative weight cycles. It is widely used in various applications such as network routing and pathfinding. Developers should choose the Bellman-Ford algorithm when working with graphs that may contain negative edge weights or negative weight cycles.
Topological Sorting
Ordering Dependencies
Topological Sorting is an algorithm used to find a linear ordering of vertices in a directed acyclic graph (DAG) such that for every directed edge (u, v), vertex u comes before vertex v in the ordering. This ordering is useful in situations where the tasks represented by the vertices have dependencies, and they need to be executed in a specific sequence.
Overview of Topological Sorting
In a topological sort, a vertex is placed before another vertex in the ordering if there is a directed edge from the first vertex to the second vertex. The algorithm works by repeatedly removing vertices with no incoming edges (indegree of 0) and adding them to the sorted list. This process continues until all vertices are removed from the graph.
Implementation in C#
Here's a simple implementation of the topological sorting algorithm in C#:
Topological Sorting is a fundamental algorithm in computer science that is used to schedule tasks with dependencies, schedule courses in a curriculum, and much more. It is a relatively simple algorithm to implement and can be used in various applications. Developers should familiarize themselves with topological sorting and its implementation in their preferred programming language, such as C#.
Applications and Variations
Applications of Topological Sorting
Topological sorting has various applications across different domains. Some of these applications include:
Scheduling:
In project management, tasks often have dependencies, meaning that some tasks must be completed before others can begin. Topological sorting can help schedule these tasks by finding a sequence in which all tasks can be completed without violating any dependencies.
Course Scheduling:
In academic institutions, courses may have prerequisites. Topological sorting can be used to schedule courses in a curriculum, ensuring that students take prerequisite courses before enrolling in advanced courses.
Build Systems:
In software development, build systems like Make and Gradle use topological sorting to determine the order in which source files should be compiled and linked.
Dependency Resolution:
In package managers like npm and NuGet, topological sorting is used to determine the order in which packages should be installed to satisfy dependencies.
Task Execution:
In distributed systems, tasks may have dependencies on the output of other tasks. Topological sorting can help determine the order in which tasks should be executed to minimize waiting time and maximize resource utilization.
Variations of Topological Sorting
While the basic concept of topological sorting remains the same, there are several variations and extensions of the algorithm to suit different needs:
Multiple Sources:
Traditional topological sorting algorithms start with a single source vertex (a vertex with no incoming edges). However, in some scenarios, there may be multiple source vertices. In such cases, an algorithm like Tarjan's algorithm can be used to find a topological ordering.
Cyclic Graphs:
Topological sorting is typically applied to directed acyclic graphs (DAGs). However, there are algorithms like Kahn's algorithm that can be used to detect cycles in a graph and handle cyclic graphs by breaking the cycles.
Parallelization:
In some cases, tasks may not have strict dependencies and can be executed in parallel. Parallel topological sorting algorithms can be used to find multiple topological orderings that allow for parallel execution.
Online Topological Sorting:
Traditional topological sorting algorithms require the entire graph to be known in advance. In online topological sorting, vertices and edges are added to the graph dynamically, and topological sorting is performed incrementally as new elements are added.
Topological sorting is a powerful algorithm with a wide range of applications. It has been adapted and extended to suit different scenarios, making it a versatile tool in various fields such as project management, software development, and academic scheduling. Developers should be familiar with the basic algorithm as well as its variations to effectively use it in different contexts.
Module 12:
Trie Data Structure
In this module, we will explore the Trie data structure, which is a versatile and efficient data structure used to store and retrieve strings efficiently. Tries are commonly used in many algorithms and applications, and understanding how to work with them is essential for developing efficient and scalable software systems.
Understanding Tries
We will start by introducing the Trie data structure, which is a tree-like data structure where each node represents a single character of a string. Tries are commonly used to store dictionaries and autocomplete suggestions, and understanding how to work with them is essential for developing efficient and scalable software systems.
Trie Implementation in C#
Next, we will explore how to implement tries in C#. This includes defining a trie class, which represents the trie data structure, as well as defining methods for inserting, searching, and deleting strings from the trie. Understanding how to implement tries in C# is essential for effectively working with them in real-world scenarios.
Applications of Tries
Moving on to the applications of tries, we will explore how tries are used in many algorithms and applications, including spell-checking algorithms, autocomplete suggestions, and more. Understanding the applications of tries is essential for effectively working with them in real-world scenarios.
Optimizing String Operations
Finally, we will cover how to optimize string operations using tries. Tries are commonly used to efficiently search for and retrieve strings, and understanding how to optimize string operations using tries is essential for developing efficient and scalable software systems.
Throughout this module, we will focus on providing a solid foundation in tries, ensuring that you are well-prepared to tackle more advanced topics in subsequent modules.
Understanding Tries
A Trie, also known as a digital tree or prefix tree, is a tree-like data structure that is used to store a dynamic set of strings. The term "Trie" comes from the word "retrieval," as the structure is designed to support efficient string lookups. Tries are particularly useful when dealing with problems involving a large number of strings, such as auto-complete functionality in search engines or spell checkers.
Basic Structure of a Trie
A Trie consists of a root node and multiple child nodes. Each node in the Trie represents a prefix of one or more strings, with each child node corresponding to a character in the alphabet. The root node is usually empty, and it has child nodes representing the first character of all possible strings. Each node can also have a boolean flag indicating whether the prefix it represents is a complete string in the set or just a prefix.
Efficient String Lookups
The primary advantage of a Trie is its efficiency in performing string lookups. When searching for a string, the Trie starts at the root node and follows the path corresponding to the characters of the string. If the Trie reaches a node that represents the last character of the string and has the boolean flag set to true, the string is found in the set. If the flag is false or there are no further nodes corresponding to the remaining characters, the string is not in the set.
Time Complexity Analysis
In a Trie, the time complexity of searching for a string is O(m), where m is the length of the string. This is because the Trie only needs to traverse the characters of the string, which is a constant-time operation for each character. The time complexity of inserting a string is also O(m), as the Trie needs to insert a new node for each character of the string.
Space Complexity
The space complexity of a Trie is O(n), where n is the total number of characters in all strings in the set. This is because each character of each string requires a node in the Trie. However, this space can be reduced by compressing common prefixes into shared nodes, which is known as trie compression.
Applications of Tries
Tries have numerous applications in computer science, including:
Auto-complete functionality in search engines and text editors
Spell checkers
Longest common prefix queries in strings
IP routing in networking
Huffman coding in data compression
Tries are a powerful data structure for efficiently storing and searching for strings. Their ability to perform lookups in O(m) time, where m is the length of the string, makes them particularly useful for applications involving large sets of strings. By understanding the basic structure and operations of a Trie, developers can leverage its strengths to build efficient and scalable solutions for string-related problems.
Trie Implementation in C#
Introduction to Trie
A Trie (pronounced "try") is a tree-like data structure that is used to efficiently store and retrieve a dynamic set of strings. It is particularly useful for operations that involve searching, prefix matching, and auto-completion. In a Trie, each node represents a character of a string, and the edges of the tree represent the transition from one character to the next. The root node is typically used to represent an empty string, and each node can have multiple children representing different characters.
TrieNode Class
To implement a Trie in C#, we first define a TrieNode class to represent each node in the Trie. Each TrieNode has a character value, a flag to indicate if it is the end of a word, and a dictionary of child nodes indexed by character.
public class TrieNode
{
public char Value { get; set; }
public bool IsEndOfWord { get; set; }
public Dictionary<char, TrieNode> Children { get; set; }
public TrieNode(char value)
{
Value = value;
IsEndOfWord = false;
Children = new Dictionary<char, TrieNode>();
}
}
Trie Class
Next, we define the Trie class that serves as the main data structure. It has a single root node and supports operations like Insert, Search, and Remove.
public class Trie
{
private TrieNode root;
public Trie()
{
root = new TrieNode(' ');
}
public void Insert(string word)
{
var current = root;
foreach (var c in word)
{
if (!current.Children.ContainsKey(c))
{
current.Children[c] = new TrieNode(c);
}
current = current.Children[c];
}
current.IsEndOfWord = true;
}
public bool Search(string word)
{
var current = root;
foreach (var c in word)
{
if (!current.Children.ContainsKey(c))
{
return false;
}
current = current.Children[c];
}
return current.IsEndOfWord;
}
public void Remove(string word)
{
Remove(root, word, 0);
}
private bool Remove(TrieNode node, string word, int index)
{
if (index == word.Length)
{
if (!node.IsEndOfWord)
{
return false;
}
node.IsEndOfWord = false;
return node.Children.Count == 0;
}
char ch = word[index];
if (!node.Children.ContainsKey(ch))
{
return false;
}
var shouldRemoveNode = Remove(node.Children[ch], word, index + 1);
if (shouldRemoveNode)
{
node.Children.Remove(ch);
return node.Children.Count == 0;
}
return false;
}
}
Usage Example
Here's an example of how to use the Trie class to insert, search, and remove words:
Implementing a Trie in C# involves defining a TrieNode class and a Trie class. The TrieNode class represents each node in the Trie, and the Trie class provides methods for inserting, searching, and removing words. Tries are a powerful data structure that can be used in various applications, such as auto-completion, spell checking, and prefix matching.
Applications of Tries
Introduction
Tries are versatile data structures with numerous applications across various domains. Their ability to efficiently store and retrieve strings makes them suitable for tasks like auto-completion, spell checking, and prefix matching. In this section, we will explore some of the key applications of Tries.
Auto-Completion
One of the most common applications of Tries is in implementing auto-completion functionality. When a user starts typing a word, the Trie can be used to quickly suggest possible completions based on the prefixes entered so far. This is especially useful in search engines, text editors, and other applications where users need assistance in completing their input.
Another important application of Tries is in spell checking. By storing a dictionary of correctly spelled words in a Trie, misspelled words can be efficiently identified and suggestions for corrections can be provided.
Tries are also used for prefix matching, where a string is matched against a set of strings to find all those that share a common prefix. This is useful in applications like contact lists, where users can search for contacts by typing part of their name.
Tries have a wide range of applications due to their ability to efficiently store and retrieve strings. They are commonly used in auto-completion, spell checking, and prefix matching, among other tasks. Their versatility and performance make them a valuable tool in various software applications.
Optimizing String Operations
Introduction
String operations can be computationally expensive, especially when dealing with large datasets or repetitive tasks. In this section, we will explore how the Trie data structure can be used to optimize various string operations, such as searching, insertion, and deletion.
Searching in a Trie
Searching for a string in a Trie is an efficient process that typically takes O(k) time, where k is the length of the string being searched for. This is because each level of the Trie represents a character in the string, and the search involves traversing down the Trie until the entire string is matched or until a mismatch is found.
Inserting a string into a Trie is also an efficient operation that takes O(k) time, where k is the length of the string being inserted. This is because each character in the string is added as a new node in the Trie, and the insertion process involves traversing down the Trie until the entire string is added.
// Example of insertion in a Trie
Trie trie = new Trie();
trie.Insert("apple");
trie.Insert("banana");
trie.Insert("cherry");
Deletion from a Trie
Deleting a string from a Trie can be a bit more complex, as it involves removing nodes that are no longer part of any other string in the Trie. However, this can still be done efficiently, typically in O(k) time, where k is the length of the string being deleted.
// Example of deletion from a Trie
Trie trie = new Trie();
trie.Insert("apple");
trie.Insert("banana");
trie.Insert("cherry");
trie.Delete("banana");
The Trie data structure is well-suited for optimizing string operations such as searching, insertion, and deletion. Its ability to efficiently store and retrieve strings makes it a valuable tool for various applications, especially those that involve working with large datasets or performing repetitive string-related tasks. By using a Trie, developers can significantly improve the performance of their string operations, leading to faster and more efficient code execution.
Module 13:
Disjoint Set Data Structure
In this module, we will explore the Disjoint Set data structure, also known as the Union-Find data structure. Disjoint sets are a fundamental data structure used to efficiently represent and manipulate disjoint sets of elements. Understanding how to work with disjoint sets is essential for developing efficient and scalable software systems.
Basics of Disjoint Sets
We will start by introducing the basics of disjoint sets, including what disjoint sets are and why they are important. Disjoint sets are used to represent sets of elements where each element belongs to exactly one set. Disjoint sets are commonly used in many algorithms and applications, including graph algorithms and more.
Union-Find Operations
Next, we will explore the Union-Find operations, which are the two primary operations that can be performed on disjoint sets: union and find. The union operation combines two sets into a single set, while the find operation determines which set an element belongs to. Understanding how to perform these operations is essential for effectively working with disjoint sets.
Path Compression
Moving on to path compression, we will explore a technique for optimizing the find operation in disjoint sets. Path compression is used to compress the paths from each element to its representative element, which can significantly improve the performance of the find operation.
Disjoint Set Applications
Finally, we will cover the applications of disjoint sets in C#. Disjoint sets are commonly used in many algorithms and applications, including graph algorithms, clustering algorithms, and more. Understanding the applications of disjoint sets is essential for effectively working with them in real-world scenarios.
Throughout this module, we will focus on providing a solid foundation in disjoint sets, ensuring that you are well-prepared to tackle more advanced topics in subsequent modules.
Basics of Disjoint Sets
Introduction
The Disjoint Set data structure, also known as the Union-Find data structure, is a fundamental data structure used to solve various problems related to disjoint sets of elements. In this section, we will explore the basic concepts of Disjoint Sets and how they can be implemented in C#.
What are Disjoint Sets?
Disjoint Sets are a collection of non-overlapping sets, also known as partitions, where each element belongs to exactly one set. The primary operations supported by Disjoint Sets are:
MakeSet(x): Creates a new set containing a single element x.
Union(x, y): Merges the sets containing elements x and y into a single set.
Find(x): Finds the representative (leader) of the set containing element x.
Disjoint Set Representation
Disjoint Sets can be represented in various ways, but one of the most common representations is using an array where each element stores a pointer to its parent element in the set. The representative of a set is the element whose parent is itself.
Implementation in C#
Here's a simple implementation of the Disjoint Set data structure in C#:
public class DisjointSet
{
private int[] parent;
public DisjointSet(int n)
{
parent = new int[n + 1];
for (int i = 0; i <= n; i++)
parent[i] = i;
}
public int Find(int x)
{
if (parent[x] != x)
parent[x] = Find(parent[x]);
return parent[x];
}
public void Union(int x, int y)
{
int xRoot = Find(x);
int yRoot = Find(y);
if (xRoot != yRoot)
parent[xRoot] = yRoot;
}
}
Example Usage
Here's an example of how to use the Disjoint Set data structure to perform operations:
The Disjoint Set data structure is a powerful tool for solving problems related to disjoint sets of elements. Its simple yet efficient implementation makes it a valuable asset in various applications, including graph algorithms, dynamic connectivity problems, and more. By understanding the basics of Disjoint Sets and how to implement them in C#, developers can leverage this data structure to solve complex problems efficiently.
Union-Find Operations
Introduction
Union-Find is a data structure that is used to store a collection of disjoint sets. It provides efficient methods to perform two primary operations: Union and Find. These operations are essential for solving various problems related to dynamic connectivity, graph algorithms, and more. In this section, we will delve into the details of these operations and their implementations in C#.
Union Operation
The Union operation in Union-Find is used to merge two sets into a single set. This operation is performed by finding the leaders of the two sets (representatives), and then updating the parent pointer of one of the sets to point to the leader of the other set.
public void Union(int x, int y)
{
int xRoot = Find(x);
int yRoot = Find(y);
if (xRoot != yRoot)
parent[xRoot] = yRoot;
}
In this implementation, xRoot and yRoot are the leaders of sets containing elements x and y respectively. If the leaders are not the same, we update the parent pointer of xRoot to point to yRoot, effectively merging the two sets.
Find Operation
The Find operation in Union-Find is used to find the leader of a set containing a given element. This operation is performed recursively by following the parent pointers until the leader is found.
public int Find(int x)
{
if (parent[x] != x)
parent[x] = Find(parent[x]);
return parent[x];
}
In this implementation, if x is not the leader of its set (i.e., its parent is not itself), we recursively call Find on its parent until we reach the leader. This path compression technique ensures that subsequent Find operations are faster.
Example Usage
Here's an example of how to use the Union-Find data structure to perform operations:
In this example, we create a Union-Find data structure with 5 elements and perform union operations on sets {1, 2}, {2, 3}, and {4, 5}. We then check if elements 1 and 3 are connected and if elements 4 and 5 are connected.
The Union-Find data structure is a powerful tool for solving problems related to disjoint sets. Its efficient implementation makes it suitable for a wide range of applications, including dynamic connectivity problems, graph algorithms, and more. By understanding the Union and Find operations and their implementations in C#, developers can leverage this data structure to solve complex problems efficiently.
Path Compression
Introduction
Path compression is an optimization technique used in the Union-Find (Disjoint Set) data structure to improve the efficiency of the Find operation. This technique is particularly useful in scenarios where a large number of Find operations are performed, such as in dynamic connectivity problems and graph algorithms.
Implementation
The basic idea behind path compression is to flatten the tree structure of the sets by updating the parent pointers of all elements along the path to the leader. This way, subsequent Find operations for the same set will be faster as the path to the leader is shortened.
Here's an implementation of path compression in the Find operation:
public int Find(int x)
{
if (parent[x] != x)
parent[x] = Find(parent[x]);
return parent[x];
}
In this implementation, when the leader of an element x is found, the Find operation is called recursively on its parent. However, before returning, the parent pointer of x is updated to point directly to the leader. This ensures that the next time Find is called on x, the path to the leader will be shortened.
Benefits
Path compression provides several benefits, including:
Improved performance: By shortening the path to the leader, subsequent Find operations become faster, especially when the same set is repeatedly accessed.
Space efficiency: Since the path to the leader is flattened, the height of the tree is reduced, leading to a more balanced tree structure and less memory usage.
Simplified code: Path compression can be implemented in a concise and elegant manner, making the Union-Find data structure easier to understand and maintain.
Example Usage
Here's an example of how to use path compression with Union-Find:
In this example, we create a Union-Find data structure with 5 elements and perform union operations on sets {1, 2}, {2, 3}, and {4, 5}. We then check if elements 1 and 3 are connected and if elements 4 and 5 are connected. The path compression optimization ensures that subsequent Find operations are faster.
Path compression is a powerful optimization technique that can significantly improve the performance of the Union-Find data structure. By flattening the tree structure of sets, it reduces the time complexity of Find operations and makes the data structure more efficient and space-effective. Developers can leverage path compression to solve dynamic connectivity problems and other related applications more efficiently.
Disjoint Set Applications
Basics of Disjoint Sets
In the realm of data structures, a Disjoint Set, also known as a Union-Find data structure, is fundamental in handling complex graph problems. Its primary purpose is to identify clusters or components in a set, and then efficiently manage these clusters to form disjoint sets. This allows for easy and effective operations such as merging, partitioning, and querying.
Operations on Disjoint Sets
The two primary operations on Disjoint Sets are Union and Find.
Union: Merges two sets together, typically by connecting the root nodes of both sets.
Find: Determines the representative of a set, often used to check if two elements belong to the same set.
Path Compression
An important technique in optimizing Disjoint Sets is Path Compression. This method aims to improve the efficiency of the Find operation by reducing the length of the path from any node to its root. This is achieved by updating the parent pointer of each node traversed during a Find operation to point directly to the root.
Applications of Disjoint Sets
Disjoint Sets find extensive use in various applications, including:
Network Connectivity: Detecting if a network is fully connected.
Image Processing: Segmenting images into disjoint regions.
Social Network Analysis: Identifying communities in a social graph.
Data Clustering: Grouping similar data points together.
Game Theory: Solving certain puzzles and games involving connected components.
Kruskal's Minimum Spanning Tree Algorithm: A classic example that uses Disjoint Sets to find the minimum spanning tree of a graph.
Code Example
Here's a simple implementation of Disjoint Sets in C#:
class DisjointSet {
private int[] parent;
private int[] rank;
public DisjointSet(int size) {
parent = new int[size];
rank = new int[size];
for (int i = 0; i < size; i++) {
parent[i] = i;
rank[i] = 0;
}
}
public int Find(int x) {
if (parent[x] != x) {
parent[x] = Find(parent[x]); // Path Compression
}
return parent[x];
}
public void Union(int x, int y) {
int rootX = Find(x);
int rootY = Find(y);
if (rootX != rootY) {
if (rank[rootX] < rank[rootY]) {
parent[rootX] = rootY;
} else if (rank[rootX] > rank[rootY]) {
parent[rootY] = rootX;
} else {
parent[rootY] = rootX;
rank[rootX]++;
}
}
}
}
In this example, we have implemented the basic operations of Disjoint Sets, namely Find and Union, along with Path Compression for optimization.
Disjoint Sets play a crucial role in many algorithms and applications where efficient management of connected components is required. Understanding the basics of Disjoint Sets and their operations is essential for tackling various graph-related problems in computer science.
Module 14:
Advanced Topics in Sorting
In this module, we will delve into advanced topics in sorting, which are essential for efficiently organizing and managing data. Sorting algorithms are a fundamental area of study in computer science, and understanding how to work with them is essential for developing efficient and scalable software systems.
QuickSort Algorithm
We will start by introducing the QuickSort algorithm, which is a versatile and efficient sorting algorithm. QuickSort is a comparison-based sorting algorithm that works by partitioning an array into two parts, then recursively sorting each part. QuickSort is widely used in many applications, including database management systems and more.
MergeSort Algorithm
Next, we will explore the MergeSort algorithm, which is another versatile and efficient sorting algorithm. MergeSort is a comparison-based sorting algorithm that works by dividing the array into two parts, then recursively sorting each part and merging the results. MergeSort is widely used in many applications, including database management systems and more.
Radix Sort
Moving on to Radix Sort, we will explore how to sort elements by their integer keys. Radix Sort is a non-comparison-based sorting algorithm that works by sorting elements by their digits. Radix Sort is widely used in many applications, including database management systems and more.
Choosing the Right Sorting Algorithm
Finally, we will cover how to choose the right sorting algorithm for your specific needs. There are many different sorting algorithms available, and understanding how to choose the right one for your specific needs is essential for developing efficient and scalable software systems.
Throughout this module, we will focus on providing a solid foundation in advanced topics in sorting, ensuring that you are well-prepared to tackle more advanced topics in subsequent modules.
QuickSort Algorithm
QuickSort is one of the most efficient sorting algorithms, characterized by its divide-and-conquer strategy and use of the partitioning technique. It works by selecting a 'pivot' element from the array and partitioning the other elements into two sub-arrays according to whether they are less than or greater than the pivot. The sub-arrays are then recursively sorted.
Algorithm Overview
Partitioning: The main function selects a pivot element (usually the last element in the array) and rearranges the array in such a way that elements smaller than the pivot come before it, and elements greater than the pivot come after it. The pivot is then placed in its correct position.
Recursive Sorting: The two sub-arrays created by partitioning are then recursively sorted using the same process.
Combination: After all the recursive calls, the entire array is sorted.
Code Implementation
Here's a simple implementation of QuickSort in C#:
class QuickSort {
public static void Sort(int[] arr, int left, int right) {
if (left < right) {
int pivot = Partition(arr, left, right);
Sort(arr, left, pivot - 1);
Sort(arr, pivot + 1, right);
}
}
private static int Partition(int[] arr, int left, int right) {
int pivot = arr[right];
int i = left - 1;
for (int j = left; j < right; j++) {
if (arr[j] < pivot) {
i++;
Swap(arr, i, j);
}
}
Swap(arr, i + 1, right);
return i + 1;
}
private static void Swap(int[] arr, int i, int j) {
int temp = arr[i];
arr[i] = arr[j];
arr[j] = temp;
}
}
Code Explanation
Sort Method: The main method that sorts the array by calling the Partition and Sort methods recursively.
Partition Method: This method selects the pivot (in this case, the last element) and rearranges the array so that elements smaller than the pivot come before it, and elements greater than the pivot come after it. It then returns the pivot's position.
Swap Method: A simple utility method to swap two elements in an array.
Time Complexity
QuickSort has an average and best-case time complexity of O(n log n), making it one of the fastest sorting algorithms for large datasets. However, in the worst-case scenario where the pivot is always the smallest or largest element, QuickSort can degrade to O(n^2). This can be mitigated by using a randomized pivot or median-of-three pivot selection strategy.
QuickSort is a highly efficient and widely used sorting algorithm that takes advantage of the divide-and-conquer approach. Its average and best-case time complexity of O(n log n) make it a popular choice for sorting large datasets. However, care must be taken to avoid the worst-case scenario by using proper pivot selection strategies.
MergeSort Algorithm
MergeSort is a comparison-based, divide-and-conquer algorithm that divides the input array into two halves, sorts the halves independently, and then merges them. It uses the "divide and conquer" strategy to solve the problem of sorting a given set of elements. The idea is to divide the elements into smaller groups and sort those groups, then combine them back together to form a sorted array.
Algorithm Overview
Divide: The input array is divided into two halves.
Conquer: Each half is recursively sorted using the MergeSort algorithm.
Combine: The sorted halves are merged back together to form a single sorted array.
Code Implementation
Here's a simple implementation of MergeSort in C#:
class MergeSort {
public static void Sort(int[] arr, int left, int right) {
if (left < right) {
int mid = left + (right - left) / 2;
Sort(arr, left, mid);
Sort(arr, mid + 1, right);
Merge(arr, left, mid, right);
}
}
private static void Merge(int[] arr, int left, int mid, int right) {
int n1 = mid - left + 1;
int n2 = right - mid;
int[] leftArr = new int[n1];
int[] rightArr = new int[n2];
Array.Copy(arr, left, leftArr, 0, n1);
Array.Copy(arr, mid + 1, rightArr, 0, n2);
int i = 0, j = 0, k = left;
while (i < n1 && j < n2) {
if (leftArr[i] <= rightArr[j]) {
arr[k++] = leftArr[i++];
} else {
arr[k++] = rightArr[j++];
}
}
while (i < n1) {
arr[k++] = leftArr[i++];
}
while (j < n2) {
arr[k++] = rightArr[j++];
}
}
}
Code Explanation
Sort Method: The main method that sorts the array by dividing it into two halves, sorting them recursively, and then merging them using the Merge method.
Merge Method: This method merges two sorted sub-arrays into a single sorted array. It creates two temporary arrays to store the sub-arrays, then iterates through both arrays and compares elements, merging them into the original array in sorted order.
Time Complexity
MergeSort has a consistent time complexity of O(n log n) in all cases. This makes it a reliable choice for sorting large datasets, even though it may not be the most efficient in terms of space complexity.
MergeSort is a highly efficient and stable sorting algorithm that consistently performs well, even on large datasets. Its O(n log n) time complexity makes it a popular choice for general-purpose sorting tasks. However, its space complexity can be a concern for very large datasets. Nonetheless, MergeSort's simplicity, stability, and consistent performance make it a valuable tool for sorting in C#.
Radix Sort
Radix Sort is a non-comparison-based sorting algorithm that sorts elements by processing individual digits of each element. It works by first sorting the elements based on their least significant digit, then their next significant digit, and so on until all digits have been considered. This process is repeated until the elements are sorted in their entirety.
Algorithm Overview
Divide: Separate the input array into individual digits.
Conquer: Sort the digits based on their value.
Combine: Combine the sorted digits to form the sorted array.
Code Implementation
Below is a simple implementation of Radix Sort in C#:
class RadixSort {
public static void Sort(int[] arr) {
int max = GetMax(arr);
for (int exp = 1; max / exp > 0; exp *= 10) {
CountSort(arr, exp);
}
}
private static int GetMax(int[] arr) {
int max = arr[0];
for (int i = 1; i < arr.Length; i++) {
if (arr[i] > max) {
max = arr[i];
}
}
return max;
}
private static void CountSort(int[] arr, int exp) {
int n = arr.Length;
int[] output = new int[n];
int[] count = new int[10];
for (int i = 0; i < n; i++) {
count[(arr[i] / exp) % 10]++;
}
for (int i = 1; i < 10; i++) {
count[i] += count[i - 1];
}
for (int i = n - 1; i >= 0; i--) {
output[count[(arr[i] / exp) % 10] - 1] = arr[i];
count[(arr[i] / exp) % 10]--;
}
for (int i = 0; i < n; i++) {
arr[i] = output[i];
}
}
}
Code Explanation
Sort Method: The main method that sorts the array using Radix Sort. It iterates through the digits (from least significant to most significant) and calls CountSort for each digit.
GetMax Method: This method returns the maximum value in the array, which is used to determine the number of digits in the largest element.
CountSort Method: This method performs counting sort on the array based on a specific digit (determined by the exp parameter). It counts the occurrences of each digit in the array, then rearranges the elements based on their digit values.
Time Complexity
Radix Sort has a time complexity of O(d * (n + k)), where d is the number of digits in the largest element, n is the number of elements, and k is the base of the number system (typically 10 for decimal numbers). In the worst case, Radix Sort can be slower than other sorting algorithms, especially if d is large. However, it has a linear time complexity for large datasets with small d values.
Radix Sort is a non-comparison-based sorting algorithm that can be used to sort large datasets with small digit sizes efficiently. It is a stable sorting algorithm and is often used as a subroutine in other sorting algorithms. Radix Sort is particularly useful for sorting numbers in different number systems (e.g., binary, octal, decimal, hexadecimal).
Choosing the Right Sorting Algorithm
When it comes to sorting, choosing the right algorithm is essential. Different sorting algorithms have different performance characteristics and are suitable for different types of data and situations. In this section, we will explore various sorting algorithms and discuss their strengths and weaknesses.
Bubble Sort
Bubble Sort is one of the simplest sorting algorithms. It repeatedly steps through the list, compares adjacent elements, and swaps them if they are in the wrong order. The pass through the list is repeated until the list is sorted.
Selection Sort
Selection Sort is another simple sorting algorithm that works by repeatedly finding the minimum element from the unsorted portion of the list and moving it to the beginning. The algorithm maintains two subarrays: one for sorted elements and another for unsorted elements.
Insertion Sort
Insertion Sort is a simple sorting algorithm that works the way many people sort cards. It repeatedly takes one element from the unsorted portion of the list and inserts it into its correct position in the sorted portion of the list.
Quick Sort
Quick Sort is a popular sorting algorithm that works by selecting a 'pivot' element from the list and partitioning the other elements into two subarrays according to whether they are less than or greater than the pivot. The subarrays are then sorted recursively.
Merge Sort
Merge Sort is a divide-and-conquer algorithm that works by dividing the list into two halves, sorting each half, and then merging the two sorted halves.
Heap Sort
Heap Sort is a comparison-based sorting algorithm that works by first converting the list into a binary heap and then repeatedly removing the maximum element from the heap and rebuilding the heap.
Radix Sort
Radix Sort is a non-comparison-based sorting algorithm that sorts elements by processing individual digits of each element.
Choosing the Right Algorithm
When choosing a sorting algorithm, it is essential to consider the following factors:
Time Complexity: The time complexity of the algorithm determines how efficient it is for large datasets. Algorithms like Bubble Sort, Selection Sort, and Insertion Sort have quadratic time complexity, making them less suitable for large datasets. On the other hand, algorithms like Quick Sort, Merge Sort, and Heap Sort have O(n log n) time complexity, making them more suitable for large datasets.
Space Complexity: The space complexity of the algorithm determines how much additional memory is required. Algorithms like Merge Sort and Heap Sort have O(n) space complexity, making them more suitable for limited memory environments. On the other hand, algorithms like Quick Sort have O(log n) space complexity.
Stability: Some sorting algorithms are stable, meaning they preserve the relative order of equal elements. Stability is essential when sorting objects with multiple keys.
Adaptability: Some sorting algorithms are adaptable, meaning they perform better when the input is nearly sorted. Quick Sort and Insertion Sort are examples of adaptable algorithms.
The choice of sorting algorithm depends on various factors, including the size of the dataset, the available memory, and the stability and adaptability requirements. Understanding these factors and the characteristics of different sorting algorithms is essential for choosing the right algorithm for a given problem.
Module 15:
Searching Techniques
In this module, we will explore various searching techniques, which are essential for efficiently retrieving data from large datasets. Searching algorithms are a fundamental area of study in computer science, and understanding how to work with them is essential for developing efficient and scalable software systems.
Linear Search
We will start by introducing the Linear Search algorithm, which is a basic and straightforward searching algorithm. Linear Search works by sequentially checking each element in the dataset until the desired element is found. Linear Search is simple to implement but may not be the most efficient for large datasets.
Binary Search
Next, we will explore the Binary Search algorithm, which is a more efficient searching algorithm. Binary Search works by dividing the dataset into two halves and recursively searching each half until the desired element is found. Binary Search is significantly faster than Linear Search for large datasets but requires the dataset to be sorted.
Interpolation Search
Moving on to Interpolation Search, we will explore how to efficiently search for an element in a sorted dataset. Interpolation Search works by using an interpolation formula to estimate the position of the desired element. Interpolation Search can be more efficient than Binary Search for datasets with a non-uniform distribution of elements.
Searching in C# Collections
Finally, we will cover how to search for elements in C# collections. C# provides built-in support for many searching algorithms, including Linear Search, Binary Search, and more. Understanding how to use these algorithms in C# collections is essential for developing efficient and scalable software systems.
Throughout this module, we will focus on providing a solid foundation in searching techniques, ensuring that you are well-prepared to tackle more advanced topics in subsequent modules.
Linear Search
Linear search is a simple and straightforward searching algorithm that checks every element in the list or array until it finds the target element or reaches the end of the list. It is also known as sequential search. This algorithm is the most basic form of searching and is suitable for small datasets or when the elements are not sorted.
Algorithm Overview:
The algorithm starts by comparing the target element with the first element in the list. If they match, the search is successful, and the algorithm returns the index of the target element. If not, it moves to the next element and repeats the process until either the target element is found or all elements have been checked.
Implementation in C#:
public static int LinearSearch(int[] arr, int target)
{
for (int i = 0; i < arr.Length; i++)
{
if (arr[i] == target)
{
return i;
}
}
return -1; // Not found
}
Analysis:
Time Complexity: Linear search has a time complexity of O(n) in the worst-case scenario, where n is the number of elements in the list. This is because it checks each element once, making it inefficient for large datasets.
Space Complexity: Linear search has a space complexity of O(1) as it does not require any additional space other than a few variables for loop control.
Adaptability: Linear search does not take advantage of any patterns in the data and thus does not adapt well to pre-sorted or nearly sorted data.
Example Usage:
int[] arr = { 10, 20, 30, 40, 50, 60 };
int target = 40;
int index = LinearSearch(arr, target);
if (index != -1)
{
Console.WriteLine("Element found at index " + index);
}
else
{
Console.WriteLine("Element not found");
}
Linear search is a basic and easy-to-understand searching algorithm that is suitable for small datasets or unsorted lists. However, its linear time complexity makes it inefficient for large datasets. For more efficient searching, other algorithms like binary search or hash tables are preferred, especially for large datasets or when the elements are sorted.
Binary Search
Binary search is a more efficient searching algorithm than linear search, particularly for large datasets and sorted lists. It utilizes the divide-and-conquer technique, which divides the list into two halves and compares the target element with the middle element of the list. Based on the comparison, it either continues the search in the left or right half or concludes that the element is not present in the list.
Algorithm Overview:
Start with the entire list or array.
Compare the target element with the middle element of the list.
If they match, return the index of the middle element.
If the target element is less than the middle element, repeat the search in the left half of the list.
If the target element is greater than the middle element, repeat the search in the right half of the list.
Repeat steps 2-5 until the target element is found or the list is empty.
Implementation in C#:
public static int BinarySearch(int[] arr, int target)
{
int left = 0;
int right = arr.Length - 1;
while (left <= right)
{
int mid = left + (right - left) / 2;
if (arr[mid] == target)
{
return mid;
}
else if (arr[mid] < target)
{
left = mid + 1;
}
else
{
right = mid - 1;
}
}
return -1; // Not found
}
Analysis:
Time Complexity: Binary search has a time complexity of O(log n) in the worst-case scenario, where n is the number of elements in the list. This is because it halves the search space at each step.
Space Complexity: Binary search has a space complexity of O(1) as it only requires a few variables for loop control.
Adaptability: Binary search works well with sorted or nearly sorted data but can be inefficient for unsorted data. It is also not suitable for linked lists as it requires random access to elements.
Example Usage:
int[] arr = { 10, 20, 30, 40, 50, 60 };
int target = 40;
int index = BinarySearch(arr, target);
if (index != -1)
{
Console.WriteLine("Element found at index " + index);
}
else
{
Console.WriteLine("Element not found");
}
Binary search is a powerful and efficient searching algorithm that works well with sorted or nearly sorted data. Its time complexity makes it particularly suitable for large datasets. However, it requires the data to be sorted and does not work well with unsorted data or linked lists. For unsorted data, linear search or other algorithms may be more appropriate.
Interpolation Search
Interpolation search is an improved searching algorithm that works on sorted and uniformly distributed arrays. Unlike binary search, which divides the search space into equal parts, interpolation search estimates the position of the target element based on the distribution of values in the array. This estimation allows it to make a more informed decision on where to continue the search.
Algorithm Overview:
Estimate the position of the target element using linear interpolation.
Compare the target element with the estimated position.
If they match, return the index of the estimated position.
If the target element is less than the estimated value, continue the search in the left subarray.
If the target element is greater than the estimated value, continue the search in the right subarray.
Repeat steps 1-5 until the target element is found or the search space is exhausted.
Linear Interpolation:
Interpolation search uses linear interpolation to estimate the position of the target element. Linear interpolation assumes a linear relationship between the index of an element and its value in the array. It calculates the estimated index as:
Time Complexity: Interpolation search has an average-case time complexity of O(log log n), which is better than binary search's O(log n) for uniformly distributed data. However, in the worst-case scenario (e.g., when the data is not uniformly distributed), it can degenerate to O(n).
Space Complexity: Interpolation search has a space complexity of O(1) as it only requires a few variables for loop control.
Example Usage:
int[] arr = { 10, 20, 30, 40, 50, 60 };
int target = 40;
int index = InterpolationSearch(arr, target);
if (index != -1)
{
Console.WriteLine("Element found at index " + index);
}
else
{
Console.WriteLine("Element not found");
}
Interpolation search is a more advanced searching algorithm than binary search, but it requires uniformly distributed data to work efficiently. It can provide better performance than binary search for large datasets, but its performance depends on the distribution of data. For non-uniformly distributed data, binary search or other algorithms may be more appropriate.
Searching in C# Collections
Searching in C# collections is a common task in software development. C# provides several built-in collection types, each with its own search capabilities. This section explores various search techniques in C# collections, including linear search, binary search, and hash-based search.
Linear Search
Linear search is the simplest searching algorithm, which iterates through each element in the collection until the target element is found or the end of the collection is reached. While linear search is easy to implement, it is not the most efficient for large collections.
public static int LinearSearch<T>(IEnumerable<T> collection, T target)
{
int index = 0;
foreach (var item in collection)
{
if (item.Equals(target))
{
return index;
}
index++;
}
return -1; // Not found
}
Binary Search
Binary search is a more efficient search algorithm that works on sorted collections. It divides the search space in half with each iteration, significantly reducing the number of elements to be examined. Binary search is commonly used with arrays and lists in C#.
public static int BinarySearch<T>(IList<T> collection, T target) where T : IComparable<T>
{
int low = 0;
int high = collection.Count - 1;
while (low <= high)
{
int mid = (low + high) / 2;
int comparison = collection[mid].CompareTo(target);
if (comparison == 0)
{
return mid;
}
else if (comparison < 0)
{
low = mid + 1;
}
else
{
high = mid - 1;
}
}
return -1; // Not found
}
Hash-Based Search
Hash-based search is used with collections that implement the IDictionary<TKey, TValue> interface, such as Dictionary<TKey, TValue> and HashSet<T>. It uses a hash function to map keys to unique hash codes, providing fast lookup times.
var dictionary = new Dictionary<int, string>();
dictionary.Add(1, "one");
dictionary.Add(2, "two");
dictionary.Add(3, "three");
string value;
if (dictionary.TryGetValue(2, out value))
{
Console.WriteLine("Value found: " + value);
}
else
{
Console.WriteLine("Value not found");
}
C# provides a variety of searching techniques for different collection types. Linear search is suitable for unsorted collections, while binary search is more efficient for sorted collections. Hash-based search is ideal for collections that require fast lookup times. Choosing the right search technique depends on the size and characteristics of the collection, as well as the specific requirements of the application.
Module 16:
File Structures and Indexing
In this module, we will explore file structures and indexing, which are essential for efficiently organizing and managing data in files. File structures and indexing are a fundamental area of study in computer science, and understanding how to work with them is essential for developing efficient and scalable software systems.
Overview of File Structures
We will start by introducing the basic concepts of file structures, including what file structures are and why they are important. File structures are used to organize and store data in files, and understanding how to work with them is essential for developing efficient and scalable software systems.
Indexing Techniques
Next, we will explore various indexing techniques, which are used to efficiently retrieve data from files. Indexing techniques include primary indexes, secondary indexes, and more. Understanding how to use indexing techniques is essential for developing efficient and scalable software systems.
B-Trees and B+ Trees
Moving on to B-Trees and B+ Trees, we will explore how to use these data structures to efficiently store and retrieve data in files. B-Trees and B+ Trees are balanced tree data structures that can efficiently handle large datasets. Understanding how to use B-Trees and B+ Trees is essential for developing efficient and scalable software systems.
File Organization in C#
Finally, we will cover how to organize files in C#. C# provides built-in support for many file organization techniques, including B-Trees, B+ Trees, and more. Understanding how to use these techniques in C# is essential for developing efficient and scalable software systems.
Throughout this module, we will focus on providing a solid foundation in file structures and indexing, ensuring that you are well-prepared to tackle more advanced topics in subsequent modules.
Overview of File Structures
File structures are essential components of any data storage system, including those used in C# programming. They define how data is organized and stored on disk, and play a crucial role in efficient data retrieval and manipulation. This section provides an overview of file structures commonly used in C# programming.
Sequential File Structures
Sequential file structures are one of the most straightforward file organizations. In a sequential file, records are stored one after another, and each record has a fixed size. This structure is efficient for reading and writing records sequentially, but not for random access.
public class SequentialFile
{
public string FilePath { get; }
public SequentialFile(string filePath)
{
FilePath = filePath;
}
public void WriteRecord(string record)
{
using (StreamWriter writer = new StreamWriter(FilePath, true))
{
writer.WriteLine(record);
}
}
public IEnumerable<string> ReadAllRecords()
{
using (StreamReader reader = new StreamReader(FilePath))
{
while (!reader.EndOfStream)
{
yield return reader.ReadLine();
}
}
}
}
Indexed File Structures
Indexed file structures use an index to provide faster access to records. The index is a separate data structure that maps keys to the corresponding records' locations in the file. This allows for efficient record retrieval based on keys.
public class IndexedFile
{
public string FilePath { get; }
public Dictionary<int, long> Index { get; private set; }
public IndexedFile(string filePath)
{
FilePath = filePath;
Index = new Dictionary<int, long>();
}
public void WriteRecord(int key, string record)
{
long position;
using (StreamWriter writer = new StreamWriter(FilePath, true))
{
position = writer.BaseStream.Position;
writer.WriteLine(record);
}
Index[key] = position;
}
public string ReadRecord(int key)
{
if (Index.TryGetValue(key, out long position))
{
using (StreamReader reader = new StreamReader(FilePath))
File structures are essential for organizing and storing data in C# applications. Sequential file structures are simple and efficient for reading and writing records sequentially. Indexed file structures provide faster access to records using an index. The choice of file structure depends on the application's requirements, including the size and nature of the data, the frequency of access, and the desired performance characteristics.
Indexing Techniques
Indexing is a crucial aspect of file structures, as it allows for efficient retrieval of records based on specific criteria. There are several indexing techniques commonly used in file structures, each with its own advantages and disadvantages. This section provides an overview of the most common indexing techniques used in C# programming.
Primary Index
The primary index is one of the simplest indexing techniques. In this technique, an index is created for the primary key of a file, which is typically the key used for accessing records. The index contains pairs of (key, address) entries, where the key is the value of the primary key, and the address is the location of the corresponding record in the file.
public class PrimaryIndex
{
public int Key { get; }
public long Address { get; }
public PrimaryIndex(int key, long address)
{
Key = key;
Address = address;
}
}
Secondary Index
The secondary index is another common indexing technique. In this technique, an index is created for a non-primary key attribute of a file. This allows for efficient retrieval of records based on this secondary key. The secondary index contains pairs of (secondary key, address) entries, where the secondary key is the value of the non-primary key attribute, and the address is the location of the corresponding record in the file.
public class SecondaryIndex
{
public int SecondaryKey { get; }
public long Address { get; }
public SecondaryIndex(int secondaryKey, long address)
{
SecondaryKey = secondaryKey;
Address = address;
}
}
Clustered Index
The clustered index is a unique indexing technique where the data file itself is sorted based on the key attribute. This eliminates the need for a separate index file, as the records are already in sorted order based on the key. This provides for very efficient retrieval of records based on the key attribute.
public class ClusteredIndex
{
public int Key { get; }
public long Address { get; }
public ClusteredIndex(int key, long address)
{
Key = key;
Address = address;
}
}
Indexing techniques play a crucial role in file structures, as they allow for efficient retrieval of records based on specific criteria. Primary index, secondary index, and clustered index are some of the common indexing techniques used in C# programming. The choice of indexing technique depends on the application's requirements, including the size and nature of the data, the frequency of access, and the desired performance characteristics.
B-Trees and B+ Trees
In file structures and indexing, B-Trees and B+ Trees play a crucial role in organizing, storing, and accessing information efficiently. These trees are balanced multiway search trees that provide an efficient way to search, insert, and delete records. They are commonly used in database management systems and file systems to manage large volumes of data.
B-Tree
A B-Tree is a balanced tree data structure that maintains sorted data and allows for efficient search, insertion, and deletion operations. It is characterized by its branching factor, which is the maximum number of children each node can have. A B-Tree of order m is defined as follows:
Every node has at most m children.
Every non-leaf node has at least ⌈m/2⌉ children.
The root node has at least two children if it is not a leaf node.
All leaves appear at the same level.
The B-Tree's balance and capacity to hold a large number of keys per node make it suitable for use in file systems and databases. It reduces the number of disk I/O operations required for data retrieval, which improves performance.
public class BTreeNode<T>
{
public List<T> Keys { get; set; }
public List<BTreeNode<T>> Children { get; set; }
public bool IsLeaf { get; set; }
public BTreeNode()
{
Keys = new List<T>();
Children = new List<BTreeNode<T>>();
}
}
B+ Tree
A B+ Tree is a variation of the B-Tree that enhances the B-Tree's efficiency by keeping all keys in the leaf nodes and linking the leaf nodes together. This allows for more efficient range queries and sequential access to the data. The B+ Tree's structure is similar to that of the B-Tree, with the following differences:
All keys are stored in the leaf nodes.
The leaf nodes are linked together to form a linked list.
The non-leaf nodes are used for searching and navigating the tree.
The B+ Tree is commonly used in databases to efficiently handle range queries and provide fast access to data.
public class BPlusTreeNode<T>
{
public List<T> Keys { get; set; }
public List<BPlusTreeNode<T>> Children { get; set; }
public BPlusTreeNode<T> NextLeaf { get; set; }
public bool IsLeaf { get; set; }
public BPlusTreeNode()
{
Keys = new List<T>();
Children = new List<BPlusTreeNode<T>>();
}
}
B-Trees and B+ Trees are essential data structures for file structures and indexing. They offer efficient ways to organize, store, and access large volumes of data. While B-Trees maintain sorted data and allow for efficient search, insertion, and deletion operations, B+ Trees enhance the B-Tree's efficiency by keeping all keys in the leaf nodes and linking the leaf nodes together. These trees are widely used in database management systems and file systems due to their balanced nature and ability to handle large datasets effectively.
File Organization in C#
File organization is a critical aspect of data management, as it determines how data is stored, accessed, and managed. In C#, the file organization is based on the file system, which is a hierarchical structure of directories and files. Understanding file organization is essential for efficient data storage and retrieval.
File System in C#
In C#, the file system is a hierarchical structure consisting of directories and files. Each directory can contain multiple files and subdirectories. Directories are organized in a tree-like structure, with the root directory at the top. Files are stored in directories and can be accessed using their file paths.
There are various techniques for organizing files in C#, depending on the requirements of the application. Some common techniques include:
Sequential File Organization
In sequential file organization, records are stored in the order in which they were inserted. This is suitable for applications that primarily read records sequentially, such as log files or data migration.
// Writing records to a sequential file
using (StreamWriter writer = new StreamWriter("C:\\Temp\\data.txt"))
{
writer.WriteLine("Record 1");
writer.WriteLine("Record 2");
writer.WriteLine("Record 3");
}
Indexed File Organization
In indexed file organization, records are stored in a file along with an index that contains pointers to the records. This allows for fast random access to records based on a key.
// Writing records to an indexed file
using (StreamWriter writer = new StreamWriter("C:\\Temp\\data.txt"))
{
writer.WriteLine("Key1,Value1");
writer.WriteLine("Key2,Value2");
writer.WriteLine("Key3,Value3");
}
// Writing index to an index file
using (StreamWriter writer = new StreamWriter("C:\\Temp\\index.txt"))
{
writer.WriteLine("Key1,0");
writer.WriteLine("Key2,10");
writer.WriteLine("Key3,20");
}
Hashed File Organization
In hashed file organization, records are stored in a file using a hash function to determine their location. This is suitable for applications that require fast access to records based on a key.
// Writing records to a hashed file
using (StreamWriter writer = new StreamWriter("C:\\Temp\\data.txt"))
{
writer.WriteLine("Key1,Value1");
writer.WriteLine("Key2,Value2");
writer.WriteLine("Key3,Value3");
}
File organization is an essential aspect of data management in C#. Understanding the various techniques for organizing files can help developers design efficient data storage and retrieval systems. Sequential file organization is suitable for applications that primarily read records sequentially, indexed file organization allows for fast random access to records based on a key, and hashed file organization is suitable for applications that require fast access to records based on a key.
Module 17:
Memory Management and Data Structures
In this module, we will explore memory management and data structures, which are essential for efficiently managing memory in computer programs. Memory management and data structures are a fundamental area of study in computer science, and understanding how to work with them is essential for developing efficient and scalable software systems.
Memory Allocation in C#
We will start by introducing the basics of memory allocation in C#, including what memory allocation is and why it is important. Memory allocation is the process of reserving memory for a program to use, and understanding how to manage memory allocation is essential for developing efficient and scalable software systems.
Garbage Collection
Next, we will explore garbage collection in C#, which is a process used to automatically manage memory in computer programs. Garbage collection is used to reclaim memory that is no longer in use, and understanding how to work with garbage collection is essential for developing efficient and scalable software systems.
Memory Efficiency in Data Structures
Moving on to memory efficiency in data structures, we will explore how to design data structures that use memory efficiently. Memory efficiency is important for minimizing the amount of memory that a program uses, and understanding how to design memory-efficient data structures is essential for developing efficient and scalable software systems.
Caching Strategies
Finally, we will cover caching strategies in C#. Caching is used to temporarily store data that is frequently accessed, and understanding how to use caching strategies is essential for developing efficient and scalable software systems.
Throughout this module, we will focus on providing a solid foundation in memory management and data structures, ensuring that you are well-prepared to tackle more advanced topics in subsequent modules.
Memory Allocation in C#
Memory allocation is an essential aspect of programming in C#. Memory is allocated in C# to hold variables, objects, and other data structures. Memory allocation in C# is handled by the Common Language Runtime (CLR), which is responsible for managing the memory used by the program.
Stack vs. Heap
In C#, memory is divided into two main areas: the stack and the heap. The stack is used for storing value types, such as integers and floating-point numbers, and reference types, such as arrays and objects, that are declared within methods or functions. The stack is fast but limited in size.
// Declare a variable on the stack
int x = 10;
// Declare an object on the heap
object obj = new object();
The heap is used for storing objects and data structures that are created dynamically using the new keyword. The heap is slower than the stack but can store a larger amount of data.
// Create an object on the heap
object obj = new object();
Garbage Collection
In C#, memory is automatically managed by the garbage collector, which is responsible for reclaiming memory that is no longer in use. The garbage collector periodically scans the heap for objects that are no longer referenced and marks them for deletion.
// Declare a variable on the stack
int x = 10;
// Create an object on the heap
object obj = new object();
// Assign null to the object reference
obj = null;
// The garbage collector will reclaim the memory used by the object
Memory Leaks
Memory leaks occur when memory is allocated but not properly deallocated, leading to a gradual increase in memory usage over time. This can cause the program to run out of memory and crash. In C#, memory leaks are less common due to the garbage collector, but they can still occur if objects are not properly managed.
// Create a list to hold objects
List<object> list = new List<object>();
// Add objects to the list
for (int i = 0; i < 1000000; i++)
{
list.Add(new object());
}
// Clear the list
list.Clear();
// The objects are still referenced by the list and will not be garbage collected
Memory allocation is a critical aspect of programming in C#. Understanding how memory is allocated and managed can help developers write more efficient and reliable code. The stack is used for storing value types and reference types declared within methods, while the heap is used for storing dynamically created objects and data structures. The garbage collector is responsible for reclaiming memory that is no longer in use, preventing memory leaks and ensuring the efficient use of memory.
Garbage Collection
In C#, garbage collection is a critical aspect of memory management. The garbage collector in C# is responsible for reclaiming memory that is no longer in use, ensuring that the program does not run out of memory and crash. It works by periodically scanning the heap for objects that are no longer referenced and marking them for deletion.
How Garbage Collection Works
When an object is created in C#, it is allocated memory on the heap. The garbage collector keeps track of all the objects that are currently allocated and their references. It then periodically scans the heap to identify objects that are no longer referenced by the program.
Garbage Collection Mechanism
The garbage collector uses a generational garbage collection mechanism, which divides the heap into three generations: generation 0, generation 1, and generation 2. New objects are allocated in generation 0. When a garbage collection cycle occurs, the garbage collector first collects objects in generation 0. If an object survives multiple garbage collection cycles, it is promoted to generation 1 and then to generation 2.
Root Objects
Root objects are objects that are directly referenced by the program and are not part of the garbage collection process. These include static variables, local variables in running threads, and objects referenced by CPU registers.
Finalization
Finalization is the process of cleaning up resources when an object is deleted by the garbage collector. In C#, the Finalize method is called when an object is deleted, allowing the object to release any resources it may be holding.
class MyClass
{
~MyClass()
{
// Clean up resources
}
}
Best Practices
To ensure efficient garbage collection, it is important to follow certain best practices:
Avoid creating unnecessary objects: Creating too many objects can lead to increased memory usage and slower garbage collection.
Use using statements for disposable objects: Objects that implement the IDisposable interface should be wrapped in a using statement to ensure they are properly disposed of.
Minimize the use of finalizers: Finalizers can slow down garbage collection, so they should only be used when necessary.
Garbage collection is a key feature of C# that ensures efficient memory management and prevents memory leaks. By understanding how garbage collection works and following best practices, developers can write more efficient and reliable code.
Memory Efficiency in Data Structures
Memory efficiency is a critical aspect of designing data structures in C#. Efficient data structures reduce memory usage, improve performance, and prevent memory leaks. In this section, we will explore various techniques to enhance memory efficiency in data structures.
Understanding Memory Management
Before delving into memory efficiency, it's essential to understand how memory is managed in C#. The .NET runtime uses a combination of garbage collection and virtual memory to manage memory. Garbage collection automatically deallocates memory that is no longer in use, while virtual memory uses disk space as an extension of physical memory when necessary.
Best Practices for Memory Efficiency
Use Value Types: Value types store their data directly on the stack, making them more memory-efficient than reference types, which store data on the heap. Whenever possible, use value types like int, float, char, etc., instead of reference types.
Minimize Object Creation: Creating too many objects can lead to increased memory usage and slower garbage collection. Reuse objects whenever possible, and avoid creating unnecessary objects.
Avoid Large Object Heap: Objects larger than 85,000 bytes are allocated on the Large Object Heap (LOH), which is less efficient than the Small Object Heap (SOH). If possible, avoid creating large objects or split them into smaller objects.
Use Memory Pools: Memory pools allow you to preallocate a block of memory and reuse it for multiple objects. This can improve memory efficiency by reducing the overhead of allocating and deallocating individual objects.
Dispose of Unused Resources: Always dispose of resources that implement the IDisposable interface, such as file handles, database connections, etc. This ensures that resources are released in a timely manner and prevents memory leaks.
Optimize Data Structures: Choose data structures that are optimized for memory usage. For example, a LinkedList may be more memory-efficient than an ArrayList for certain operations.
Memory Profiling Tools
Memory profiling tools like Visual Studio's Performance Profiler or JetBrains dotMemory can help identify memory leaks and inefficient memory usage in your application. These tools provide insights into memory usage, object lifetimes, and heap allocation.
Memory efficiency is a critical consideration when designing data structures in C#. By following best practices and using memory profiling tools, developers can create more efficient and reliable applications. Remember to prioritize memory efficiency alongside performance and functionality when designing data structures.
Caching Strategies
Caching is a technique used to store frequently accessed data in a temporary memory location for quick access. In the context of memory management and data structures in C#, caching strategies play a vital role in improving performance and reducing the load on the main memory. In this section, we'll explore various caching strategies and their implementation in C#.
Types of Caching Strategies
1. Memory Caching
Memory caching involves storing frequently accessed data in memory for faster access. In C#, you can use the MemoryCache class to implement memory caching. This class provides methods to add, retrieve, and remove objects from the cache.
Disk caching involves storing frequently accessed data on disk for faster access. In C#, you can use the System.IO namespace to read and write data to disk. However, disk caching is generally slower than memory caching due to the slower access times of disk storage.
using System.IO;
// Write data to a file
File.WriteAllText("filename.txt", "data");
// Read data from a file
var data = File.ReadAllText("filename.txt");
3. Client-Side Caching
Client-side caching involves storing data in the client's browser for faster access. In C#, you can use cookies or local storage to implement client-side caching. Cookies have a limited storage capacity (usually 4KB), while local storage can store larger amounts of data (up to 5MB).
// Set a cookie
var cookie = new HttpCookie("key", "value");
Response.Cookies.Add(cookie);
// Get a cookie
var value = Request.Cookies["key"]?.Value;
// Store data in local storage
localStorage.setItem("key", "value");
// Retrieve data from local storage
var value = localStorage.getItem("key");
Advantages of Caching
Improved Performance: Caching reduces the time taken to access frequently accessed data, thereby improving overall performance.
Reduced Load on Main Memory: By storing frequently accessed data in a cache, the load on the main memory is reduced, resulting in better memory management.
Enhanced User Experience: Faster data access leads to a better user experience, as users don't have to wait for data to be fetched from the main memory or disk.
Disadvantages of Caching
Increased Complexity: Implementing caching strategies can add complexity to the code, making it harder to maintain and debug.
Memory Overhead: Caching involves storing additional copies of data, which increases memory usage.
Cache Invalidation: Keeping the cache up-to-date with the latest data can be challenging, especially in distributed systems.
Caching strategies play a crucial role in improving the performance and efficiency of data structures in C#. By implementing the right caching strategy, you can reduce the load on the main memory and provide a better user experience. However, it's essential to consider the trade-offs and disadvantages of caching, such as increased complexity and memory overhead.
Module 18:
Design Patterns in Data Structures
In this module, we will explore design patterns in data structures, which are essential for designing robust and maintainable software systems. Design patterns in data structures are a fundamental area of study in computer science, and understanding how to work with them is essential for developing efficient and scalable software systems.
Singleton Pattern in Data Structures
We will start by introducing the Singleton pattern in data structures, which is a creational design pattern used to ensure that a class has only one instance and provides a global point of access to that instance. The Singleton pattern is commonly used in many applications, including database management systems and more.
Iterator Pattern
Next, we will explore the Iterator pattern in data structures, which is a behavioral design pattern used to provide a way to access the elements of an aggregate object sequentially without exposing its underlying representation. The Iterator pattern is commonly used in many applications, including database management systems and more.
Observer Pattern
Moving on to the Observer pattern in data structures, which is a behavioral design pattern used to define a one-to-many dependency between objects so that when one object changes state, all its dependents are notified and updated automatically. The Observer pattern is commonly used in many applications, including database management systems and more.
Adapting Patterns for Data Structures
Finally, we will cover how to adapt design patterns for data structures in C#. C# provides built-in support for many design patterns, including the Singleton pattern, the Iterator pattern, the Observer pattern, and more. Understanding how to adapt these patterns for data structures in C# is essential for developing efficient and scalable software systems.
Throughout this module, we will focus on providing a solid foundation in design patterns in data structures, ensuring that you are well-prepared to tackle more advanced topics in subsequent modules.
Singleton Pattern in Data Structures
The Singleton Pattern is a design pattern used to ensure that a class has only one instance and provides a global point of access to that instance. In the context of data structures, the Singleton Pattern can be applied to various scenarios where you need to ensure that only one instance of a data structure exists throughout the application's lifecycle. Let's explore how the Singleton Pattern can be implemented in C# for different data structures.
Singleton Pattern for a Linked List
In a Linked List, the Singleton Pattern can be used to ensure that there is only one instance of the list, which can be shared across different parts of the application. Here's an example of implementing the Singleton Pattern for a Linked List in C#:
public class LinkedListSingleton
{
private static LinkedListSingleton instance;
public LinkedList<int> List { get; private set; }
private LinkedListSingleton()
{
List = new LinkedList<int>();
}
public static LinkedListSingleton GetInstance()
{
if (instance == null)
{
instance = new LinkedListSingleton();
}
return instance;
}
}
In this example, we have a private constructor and a private static instance of the LinkedListSingleton class. The GetInstance() method returns the instance of the LinkedListSingleton, creating it if necessary. This ensures that there is only one instance of the LinkedListSingleton throughout the application.
Singleton Pattern for a Binary Search Tree
Similarly, the Singleton Pattern can be applied to a Binary Search Tree to ensure that there is only one instance of the tree available in the application. Here's an example of implementing the Singleton Pattern for a Binary Search Tree in C#:
public BinarySearchTree<int> Tree { get; private set; }
private BinarySearchTreeSingleton()
{
Tree = new BinarySearchTree<int>();
}
public static BinarySearchTreeSingleton GetInstance()
{
if (instance == null)
{
instance = new BinarySearchTreeSingleton();
}
return instance;
}
}
In this example, we have a private constructor and a private static instance of the BinarySearchTreeSingleton class. The GetInstance() method returns the instance of the BinarySearchTreeSingleton, creating it if necessary. This ensures that there is only one instance of the BinarySearchTreeSingleton throughout the application.
Benefits of Singleton Pattern in Data Structures
Memory Efficiency: By ensuring that there is only one instance of a data structure, the Singleton Pattern helps in saving memory as multiple instances of the same data structure are not created.
Consistency: The Singleton Pattern ensures that the state of the data structure remains consistent throughout the application, as there is only one instance that is accessed by different parts of the application.
Global Access: The Singleton Pattern provides a global point of access to the data structure, making it easier to manage and access from different parts of the application.
The Singleton Pattern is a powerful design pattern that can be applied to various data structures to ensure that there is only one instance of the data structure available in the application. This helps in maintaining consistency, memory efficiency, and provides global access to the data structure. When designing data structures in C#, consider implementing the Singleton Pattern to manage the instances of the data structures more effectively.
Iterator Pattern
The Iterator Pattern is a behavioral design pattern that provides a way to access the elements of an aggregate object sequentially without exposing its underlying representation. This pattern is widely used in data structures like arrays, lists, trees, and more. In the context of C# data structures, let's explore how the Iterator Pattern can be implemented and its benefits.
Implementation in C#
In C#, the Iterator Pattern is implemented using the IEnumerator interface and the IEnumerable interface. The IEnumerable interface provides a way to iterate over the collection, and the IEnumerator interface is used to provide the iteration logic. Here's an example of how the Iterator Pattern can be implemented for a custom data structure:
public class MyCollection : IEnumerable
{
private List<int> list = new List<int>();
public void Add(int item)
{
list.Add(item);
}
public IEnumerator GetEnumerator()
{
return new MyEnumerator(list);
}
}
public class MyEnumerator : IEnumerator
{
private List<int> list;
private int index = -1;
public MyEnumerator(List<int> list)
{
this.list = list;
}
public bool MoveNext()
{
index++;
return (index < list.Count);
}
public void Reset()
{
index = -1;
}
public object Current
{
get
{
return list[index];
}
}
}
In this example, we have a custom data structure MyCollection that contains a list of integers. We have implemented the IEnumerable interface to provide a way to iterate over the collection, and the IEnumerator interface to provide the iteration logic. The MyEnumerator class is responsible for tracking the current position in the list and returning the current element.
Benefits of Iterator Pattern
Encapsulation: The Iterator Pattern encapsulates the iteration logic, making it easier to change or extend the iteration process without affecting the underlying data structure.
Seamless Integration: The Iterator Pattern seamlessly integrates with existing data structures and allows for consistent iteration over different types of collections.
Simplifies Client Code: By providing a uniform way to iterate over collections, the Iterator Pattern simplifies client code and reduces the need for repetitive iteration logic.
The Iterator Pattern is a powerful design pattern that provides a standardized way to access the elements of a collection without exposing its internal structure. This pattern is widely used in data structures and can be implemented in C# using the IEnumerable and IEnumerator interfaces. By encapsulating the iteration logic and providing a seamless integration with existing data structures, the Iterator Pattern simplifies client code and makes it easier to maintain and extend the codebase.
Observer Pattern
The Observer Pattern is a behavioral design pattern that defines a one-to-many dependency between objects, so that when one object changes state, all its dependents are notified and updated automatically. This pattern is commonly used in scenarios where the state of one object needs to be synchronized with multiple other objects, such as event handling, UI components, and more. In the context of C# data structures, let's explore how the Observer Pattern can be implemented and its benefits.
Implementation in C#
In C#, the Observer Pattern can be implemented using the IObservable interface and the IObserver interface. The IObservable interface provides a way for observers to subscribe to changes in the observable object, and the IObserver interface is used to define the behavior of the observers. Here's an example of how the Observer Pattern can be implemented for a custom data structure:
public class ObservableList<T> : IObservable<T>
{
private List<T> list = new List<T>();
private List<IObserver<T>> observers = new List<IObserver<T>>();
public IDisposable Subscribe(IObserver<T> observer)
In this example, we have a custom data structure ObservableList that contains a list of items. We have implemented the IObservable interface to provide a way for observers to subscribe to changes in the list, and the IObserver interface to define the behavior of the observers. The MyObserver class is an example of an observer that prints the values added to the list.
Benefits of Observer Pattern
Decoupling: The Observer Pattern decouples the subject (observable) from its observers, allowing for greater flexibility and easier maintenance.
Reusability: The Observer Pattern promotes reusability of code by allowing multiple observers to be attached to a single subject, reducing the need for duplicate code.
Dynamic Changes: The Observer Pattern allows for dynamic changes to the list of observers, making it easy to add or remove observers at runtime.
The Observer Pattern is a powerful design pattern that provides a standardized way to manage dependencies between objects. This pattern is widely used in scenarios where the state of one object needs to be synchronized with multiple other objects. In C#, the Observer Pattern can be implemented using the IObservable and IObserver interfaces, and provides benefits such as decoupling, reusability, and dynamic changes to the list of observers.
Adapting Patterns for Data Structures
When designing and implementing data structures in C#, it's essential to leverage design patterns to ensure robustness, maintainability, and scalability of the codebase. Design patterns are time-tested solutions to common problems that developers encounter while designing software systems. They provide a standard, reusable approach to solving recurring design problems.
Singleton Pattern
The Singleton Pattern is a creational pattern that ensures a class has only one instance and provides a global point of access to it. In the context of data structures, the Singleton Pattern can be adapted to ensure that a data structure, such as a cache or a pool, is instantiated only once and shared across the application. This prevents unnecessary memory consumption and ensures consistency in data manipulation.
In this example, we have created a generic SingletonDataStructure class that ensures only one instance of the data structure is created. We use a static instance variable to hold the singleton instance, and a private constructor to prevent instantiation of the class from outside. The Instance property provides a global point of access to the singleton instance.
Factory Method Pattern
The Factory Method Pattern is a creational pattern that defines an interface for creating an object but allows subclasses to alter the type of objects that will be created. In the context of data structures, the Factory Method Pattern can be adapted to create different instances of data structures based on specific requirements, such as the size of the data or the type of operations that need to be performed.
public interface IDataStructureFactory<T>
{
IDataStructure<T> CreateDataStructure();
}
public class ListDataStructureFactory<T> : IDataStructureFactory<T>
{
public IDataStructure<T> CreateDataStructure()
{
return new ListDataStructure<T>();
}
}
public class SetDataStructureFactory<T> : IDataStructureFactory<T>
{
public IDataStructure<T> CreateDataStructure()
{
return new SetDataStructure<T>();
}
}
In this example, we have created a generic IDataStructureFactory interface with a CreateDataStructure method that returns an IDataStructure instance. We then have two concrete factory classes, ListDataStructureFactory and SetDataStructureFactory, that implement the IDataStructureFactory interface and return instances of ListDataStructure and SetDataStructure, respectively.
Design patterns are essential for designing and implementing robust, maintainable, and scalable data structures in C#. The Singleton Pattern can be adapted to ensure that only one instance of a data structure is created, and the Factory Method Pattern can be adapted to create different instances of data structures based on specific requirements. By leveraging design patterns, developers can ensure consistency, reusability, and flexibility in their codebases.
Module 19:
Parallel and Concurrent Data Structures
In this module, we will explore parallel and concurrent data structures, which are essential for designing scalable and high-performance software systems. Parallel and concurrent data structures are a fundamental area of study in computer science, and understanding how to work with them is essential for developing efficient and scalable software systems.
Parallel Programming in C#
We will start by introducing parallel programming in C#, which is a programming paradigm used to improve performance by executing multiple tasks simultaneously. Parallel programming in C# is commonly used in many applications, including database management systems and more.
Concurrent Collections
Next, we will explore concurrent collections in C#, which are data structures designed to be accessed by multiple threads simultaneously. Concurrent collections in C# are used to build scalable and high-performance software systems.
Thread-Safe Data Structures
Moving on to thread-safe data structures in C#, which are data structures designed to be accessed by multiple threads simultaneously without the need for explicit synchronization. Thread-safe data structures in C# are used to build scalable and high-performance software systems.
Optimizing for Multi-Core Systems
Finally, we will cover how to optimize data structures for multi-core systems in C#. Multi-core systems are becoming increasingly common, and understanding how to optimize data structures for them is essential for developing efficient and scalable software systems.
Throughout this module, we will focus on providing a solid foundation in parallel and concurrent data structures, ensuring that you are well-prepared to tackle more advanced topics in subsequent modules
Parallel Programming in C#
Parallel programming in C# is a critical aspect of designing and implementing data structures, especially in scenarios where high levels of concurrency and performance are required. The .NET framework provides several features and libraries for parallel programming, making it easier for developers to harness the power of parallelism in their applications.
Asynchronous Programming with async/await
The async/await keywords in C# provide a powerful mechanism for writing asynchronous code that can run concurrently without blocking the main thread. This is particularly useful when dealing with I/O-bound operations, such as reading from or writing to files or databases, where the operation can take a significant amount of time to complete. By marking methods with the async keyword and using the await keyword to call other asynchronous methods, developers can ensure that the main thread remains responsive while the asynchronous operation is executed on a separate thread.
In this example, the DownloadWebPageAsync method is marked as asynchronous using the async keyword. The await keyword is then used to call the DownloadStringTaskAsync method, which returns a Task<string> that represents the asynchronous operation of downloading the web page. The method can then be awaited using the await keyword, which will suspend the execution of the method until the asynchronous operation is complete.
Parallel.ForEach
The Parallel.ForEach method in the System.Threading.Tasks namespace provides a simple and efficient way to parallelize the execution of a loop. It automatically partitions the input data and distributes the work across multiple threads, making it suitable for scenarios where the loop body is CPU-bound and can be executed in parallel.
In this example, the Parallel.ForEach method is used to square each number in the numbers array in parallel. The method automatically partitions the input array and executes the loop body on multiple threads, making the computation more efficient.
Concurrent Collections
The System.Collections.Concurrent namespace provides a set of thread-safe collection classes that are designed for use in concurrent scenarios. These collections are highly optimized for parallel programming and can be used to store and retrieve data from multiple threads without the need for external synchronization. Some commonly used concurrent collection classes include ConcurrentDictionary, ConcurrentQueue, and ConcurrentStack.
ConcurrentDictionary<int, string> dictionary = new ConcurrentDictionary<int, string>();
dictionary.TryAdd(1, "One");
dictionary.TryAdd(2, "Two");
string value;
if (dictionary.TryRemove(1, out value))
{
Console.WriteLine($"Removed value: {value}");
}
In this example, the ConcurrentDictionary class is used to store key-value pairs in a thread-safe manner. The TryAdd and TryRemove methods are used to add and remove key-value pairs atomically, ensuring that the dictionary remains in a consistent state even when accessed by multiple threads simultaneously.
Parallel programming in C# is a powerful tool for designing and implementing high-performance data structures. By leveraging asynchronous programming, the Parallel.ForEach method, and concurrent collections, developers can write efficient and scalable code that can take full advantage of multi-core processors and improve the overall performance of their applications.
Concurrent Collections
Concurrent collections are thread-safe data structures designed to support concurrent access from multiple threads without the need for external synchronization. In C#, the System.Collections.Concurrent namespace provides a set of highly optimized concurrent collection classes that allow for efficient parallel programming.
ConcurrentBag<T>
The ConcurrentBag<T> class represents a collection of objects that allows for unordered, duplicate-free storage. It is optimized for scenarios where multiple threads can safely add and remove elements concurrently.
var bag = new ConcurrentBag<int>();
Parallel.For(0, 100, i =>
{
bag.Add(i);
});
foreach (var item in bag)
{
Console.WriteLine(item);
}
In this example, a ConcurrentBag<int> is used to store integers added by multiple threads concurrently. The Parallel.For loop is used to add integers from 0 to 99 to the bag, and then a foreach loop is used to print the items in the bag.
ConcurrentQueue<T> and ConcurrentStack<T>
The ConcurrentQueue<T> and ConcurrentStack<T> classes represent thread-safe collections of objects that allow for FIFO (first-in, first-out) and LIFO (last-in, first-out) operations, respectively. They are optimized for scenarios where multiple threads can safely enqueue and dequeue items concurrently.
var queue = new ConcurrentQueue<int>();
Parallel.For(0, 100, i =>
{
queue.Enqueue(i);
});
int item;
while (queue.TryDequeue(out item))
{
Console.WriteLine(item);
}
In this example, a ConcurrentQueue<int> is used to store integers added by multiple threads concurrently. The Parallel.For loop is used to enqueue integers from 0 to 99 to the queue, and then a while loop is used to dequeue and print the items in the queue.
ConcurrentDictionary<TKey, TValue>
The ConcurrentDictionary<TKey, TValue> class represents a collection of key-value pairs that allows for concurrent access from multiple threads. It is optimized for scenarios where multiple threads can safely add, update, and remove key-value pairs concurrently.
var dictionary = new ConcurrentDictionary<int, string>();
In this example, a ConcurrentDictionary<int, string> is used to store key-value pairs added by multiple threads concurrently. The Parallel.For loop is used to add key-value pairs to the dictionary, and then a foreach loop is used to print the keys and values in the dictionary.
Concurrent collections in C# provide a powerful and efficient way to handle concurrent access from multiple threads. By using the System.Collections.Concurrent namespace, developers can write thread-safe code that takes full advantage of multi-core processors and improves the overall performance of their applications.
Thread-Safe Data Structures
Thread-safety is a critical aspect of programming when dealing with multi-threaded applications, as concurrent accesses by multiple threads can lead to data corruption and race conditions. In C#, the System.Collections.Concurrent namespace offers a set of thread-safe data structures that are optimized for multi-threaded scenarios.
ConcurrentDictionary<TKey, TValue>
The ConcurrentDictionary<TKey, TValue> class is one of the most commonly used thread-safe data structures in C#. It is a dictionary that allows multiple threads to read, write, and modify key-value pairs concurrently. This is achieved by using fine-grained locks and lock-free algorithms internally.
var dictionary = new ConcurrentDictionary<int, string>();
dictionary.TryAdd(1, "One");
dictionary.TryAdd(2, "Two");
string value;
if (dictionary.TryGetValue(1, out value))
{
Console.WriteLine($"Value for key 1: {value}");
}
In this example, two key-value pairs are added to the ConcurrentDictionary<int, string> using the TryAdd method. Then, the TryGetValue method is used to retrieve the value associated with key 1, which is then printed to the console.
ConcurrentQueue<T> and ConcurrentStack<T>
The ConcurrentQueue<T> and ConcurrentStack<T> classes provide thread-safe implementations of FIFO (first-in, first-out) and LIFO (last-in, first-out) collections, respectively. These classes are optimized for scenarios where multiple threads need to add and remove items from a collection concurrently.
var queue = new ConcurrentQueue<int>();
queue.Enqueue(1);
queue.Enqueue(2);
int value;
if (queue.TryDequeue(out value))
{
Console.WriteLine($"Dequeued value: {value}");
}
In this example, two integers are enqueued into the ConcurrentQueue<int> using the Enqueue method. Then, the TryDequeue method is used to dequeue an item from the queue, which is then printed to the console.
ConcurrentBag<T>
The ConcurrentBag<T> class is a thread-safe collection that allows multiple threads to add and remove items concurrently. It is optimized for scenarios where items are added and removed in an unordered fashion.
var bag = new ConcurrentBag<int>();
bag.Add(1);
bag.Add(2);
int value;
if (bag.TryTake(out value))
{
Console.WriteLine($"Removed value: {value}");
}
In this example, two integers are added to the ConcurrentBag<int> using the Add method. Then, the TryTake method is used to remove an item from the bag, which is then printed to the console.
Thread-safety is an essential consideration when developing multi-threaded applications. The System.Collections.Concurrent namespace in C# provides a set of thread-safe data structures that make it easy to handle concurrent access by multiple threads. By using these thread-safe data structures, developers can write efficient and reliable multi-threaded code without worrying about data corruption or race conditions.
Optimizing for Multi-Core Systems
Modern computing systems are increasingly moving towards multi-core architectures to achieve higher performance and better resource utilization. To fully harness the power of these systems, developers need to design their software with parallelism in mind. In C#, this is achieved through the use of parallel and concurrent data structures, as well as parallel programming constructs like the Task Parallel Library (TPL) and Parallel LINQ (PLINQ).
Using Parallel Data Structures
Parallel data structures, like ConcurrentDictionary, ConcurrentQueue, and ConcurrentStack, are optimized for multi-threaded scenarios. They use fine-grained locks and lock-free algorithms to allow multiple threads to access and modify data concurrently, without the need for explicit locking or synchronization.
For example, consider a scenario where multiple threads need to add items to a shared collection. Using a traditional List would require explicit locking to prevent concurrent modifications, which can lead to contention and reduced performance. On the other hand, using a ConcurrentBag or ConcurrentQueue allows multiple threads to add items concurrently without contention, leading to better performance and scalability.
var bag = new ConcurrentBag<int>();
Parallel.For(0, 100000, i =>
{
bag.Add(i);
});
In this example, a ConcurrentBag<int> is used to store integers added by multiple threads in parallel. The Parallel.For method is used to execute the loop in parallel, with each thread adding an integer to the bag.
Using Parallel Programming Constructs
C# provides several constructs for writing parallel code, such as Parallel.For, Parallel.ForEach, and Parallel.Invoke, which allow developers to easily parallelize loops, iterations, and method calls. These constructs internally use the Task Parallel Library (TPL) to manage and schedule tasks across multiple threads.
For example, consider a scenario where a list of strings needs to be processed in parallel using the ToUpper method.
var strings = new List<string> { "apple", "banana", "cherry" };
Parallel.ForEach(strings, s =>
{
Console.WriteLine(s.ToUpper());
});
In this example, the Parallel.ForEach method is used to iterate over the list of strings in parallel. Each string is converted to uppercase using the ToUpper method and printed to the console.
Using PLINQ
Parallel LINQ (PLINQ) is an extension of LINQ that allows for parallel query processing. PLINQ automatically parallelizes query operations, such as filtering, sorting, and grouping, across multiple threads. This can lead to significant performance improvements, especially for CPU-bound operations.
For example, consider a scenario where a list of integers needs to be filtered and summed in parallel.
var numbers = Enumerable.Range(1, 1000000);
var sum = numbers
.AsParallel()
.Where(n => n % 2 == 0)
.Sum();
Console.WriteLine($"Sum of even numbers: {sum}");
In this example, the AsParallel method is used to convert the Enumerable.Range sequence into a parallel sequence. The Where method is then used to filter even numbers, and the Sum method is used to compute their sum in parallel.
Optimizing for multi-core systems requires careful consideration of parallelism and concurrency. By using parallel and concurrent data structures, as well as parallel programming constructs like TPL and PLINQ, developers can write efficient and scalable code that fully utilizes the power of multi-core systems.
Module 20:
Persistent Data Structures
In this module, we will explore persistent data structures, which are essential for designing robust and immutable software systems. Persistent data structures are a fundamental area of study in computer science, and understanding how to work with them is essential for developing efficient and scalable software systems.
Basics of Persistence
We will start by introducing the basics of persistence, including what persistence is and why it is important. Persistence is the ability of a data structure to retain its state across multiple operations, and understanding how to design and use persistent data structures is essential for developing efficient and scalable software systems.
Implementing Persistent Data Structures
Next, we will explore how to implement persistent data structures in C#. C# provides built-in support for many persistent data structures, including linked lists, trees, and more. Understanding how to implement persistent data structures in C# is essential for developing efficient and scalable software systems.
Use Cases for Persistent Data
Moving on to use cases for persistent data, we will explore how persistent data structures can be used in real-world applications. Persistent data structures are commonly used in many applications, including database management systems, file systems, and more.
Challenges and Considerations
Finally, we will cover the challenges and considerations of working with persistent data structures. Persistent data structures can be more complex to implement and use than non-persistent data structures, and understanding how to overcome these challenges is essential for developing efficient and scalable software systems.
Throughout this module, we will focus on providing a solid foundation in persistent data structures, ensuring that you are well-prepared to tackle more advanced topics in subsequent modules.
Basics of Persistence
Persistent data structures are a type of data structure that preserves the previous version of the data structure when modified, rather than modifying the existing data structure in place. This allows for efficient and safe use of data structures in a concurrent or parallel environment, as well as enabling features such as undo and redo in applications.
Persistent Data Structures
A persistent data structure is a data structure that remains unchanged after any operation, including insertion, deletion, or modification. This means that every operation creates a new version of the data structure, leaving the original data structure unchanged. This is in contrast to ephemeral data structures, which modify the existing data structure in place.
For example, consider a persistent linked list. When adding a new element to the list, a new version of the list is created with the new element added, while the original list remains unchanged. This allows for the efficient use of the original list in a concurrent or parallel environment, as well as enabling features such as undo and redo.
var list1 = new PersistentLinkedList<int>();
var list2 = list1.Add(1);
var list3 = list2.Add(2);
var list4 = list3.Add(3);
In this example, list1, list2, list3, and list4 are all different versions of the same linked list, with list2 containing the element 1, list3 containing the elements 1 and 2, and list4 containing the elements 1, 2, and 3.
Benefits of Persistence
Persistence has several benefits over ephemeral data structures. Firstly, it allows for the efficient use of data structures in a concurrent or parallel environment, as multiple threads can safely access and modify different versions of the data structure without interference. Secondly, it enables features such as undo and redo, as previous versions of the data structure are preserved. Finally, it can improve the performance of certain operations, as it avoids the need to copy or modify the existing data structure.
For example, consider a persistent balanced binary search tree. When searching for an element in the tree, a new version of the tree is created with the element found, while the original tree remains unchanged. This allows for efficient use of the original tree in a concurrent or parallel environment, as well as enabling features such as undo and redo.
var tree1 = new PersistentBinarySearchTree<int>();
var tree2 = tree1.Add(1);
var tree3 = tree2.Add(2);
var tree4 = tree3.Add(3);
In this example, tree1, tree2, tree3, and tree4 are all different versions of the same binary search tree, with tree2 containing the element 1, tree3 containing the elements 1 and 2, and tree4 containing the elements 1, 2, and 3.
Persistent data structures are a powerful tool for designing efficient and safe data structures in a concurrent or parallel environment. By preserving previous versions of the data structure, they enable features such as undo and redo, as well as improving the performance of certain operations.
Implementing Persistent Data Structures
Implementing persistent data structures in C# requires careful design and consideration of how to efficiently create and manipulate versions of the data structure while minimizing memory usage and improving performance. This section explores various techniques and strategies for implementing persistent data structures in C#.
Copy-on-Write
One common approach to implementing persistent data structures is the copy-on-write strategy. In this approach, a new version of the data structure is created whenever it is modified, but the original data structure is not modified. Instead, a new version of the data structure is created that shares as much of the original data structure as possible, minimizing memory usage.
var list1 = new PersistentList<int>();
var list2 = list1.Add(1); // Create new version with element 1
var list3 = list2.Add(2); // Create new version with elements 1 and 2
In this example, list1, list2, and list3 are all different versions of the same list, with list2 containing the element 1 and list3 containing the elements 1 and 2. Each version of the list shares as much of the original list as possible, minimizing memory usage.
Immutable Data Structures
Another approach to implementing persistent data structures is to use immutable data structures. In this approach, the data structure is designed so that it cannot be modified after it is created. Instead, operations on the data structure return a new version of the data structure with the desired changes.
var list1 = new PersistentList<int>(1, 2, 3);
var list2 = list1.Add(4); // Create new version with element 4
In this example, list1 and list2 are different versions of the same list, with list2 containing the elements 1, 2, 3, and 4. The original list list1 remains unchanged.
Lazy Copying
Yet another approach to implementing persistent data structures is lazy copying. In this approach, a new version of the data structure is created when it is modified, but the actual copying of the data is deferred until it is necessary. This can improve performance by avoiding unnecessary copying of data that is never used.
var list1 = new PersistentList<int>();
var list2 = list1.Add(1); // Create new version with element 1
var list3 = list2.Add(2); // Create new version with elements 1 and 2
In this example, list1, list2, and list3 are all different versions of the same list, with list2 containing the element 1 and list3 containing the elements 1 and 2. The actual copying of the data from list1 to list2 and list2 to list3 is deferred until it is necessary.
Implementing persistent data structures in C# requires careful design and consideration of how to efficiently create and manipulate versions of the data structure while minimizing memory usage and improving performance. The copy-on-write strategy, immutable data structures, and lazy copying are all common approaches to implementing persistent data structures in C#.
Use Cases for Persistent Data
Persistent data structures find applications in scenarios where it's crucial to maintain the history of changes or where efficient retrieval of previous states is essential. This section explores various use cases where persistent data structures can be advantageous.
Version Control Systems
Version control systems (VCS) like Git and Mercurial are quintessential examples of persistent data structures in action. They allow developers to track changes to their code over time and revert to previous versions when needed. In this context, each commit represents a persistent snapshot of the codebase at a given point in time, enabling developers to work confidently knowing that they can always revert to a stable version if necessary.
git commit -m "Add new feature"
git checkout <commit-hash>
Undo/Redo Functionality in Text Editors
Text editors often implement undo/redo functionality using persistent data structures. By keeping track of each change to the document, editors can allow users to go back and forth between different states, effectively undoing and redoing their actions. This is particularly useful in situations where users make mistakes or want to experiment with different approaches.
editor.Undo();
editor.Redo();
Persistent Caching in Web Applications
Persistent data structures can also be useful in caching scenarios, where the goal is to store and retrieve data efficiently. In web applications, for example, caching mechanisms often use persistent data structures to store frequently accessed data, such as database query results or computed values. This allows subsequent requests for the same data to be served from the cache, improving performance and reducing the load on the underlying data sources.
var cachedData = cache.Get("key");
if (cachedData == null)
{
// Compute or retrieve data from source
cache.Set("key", data);
}
Collaborative Editing
Collaborative editing tools, like Google Docs or Microsoft Word Online, use persistent data structures to allow multiple users to work on the same document simultaneously. Each change made by a user is represented as a persistent operation, which can be applied to the document's state to reflect the change. By maintaining a history of changes, these tools can provide real-time collaboration while ensuring data consistency.
document.ApplyChange(change);
Persistent data structures are invaluable in scenarios where maintaining a history of changes or efficient retrieval of previous states is crucial. From version control systems to collaborative editing tools, the use cases for persistent data structures are varied and extend across many domains. By understanding these use cases, developers can better appreciate the importance of persistent data structures in modern software development.
Challenges and Considerations
Persistent data structures offer many advantages, but they also come with unique challenges and considerations that developers must be aware of. This section explores some of the key challenges and considerations when working with persistent data structures.
Space Efficiency
One of the most significant challenges with persistent data structures is space efficiency. Persistent data structures typically consume more memory than their non-persistent counterparts because they retain old versions of the data. This can be a significant concern in resource-constrained environments, such as mobile devices or embedded systems.
// Potential space overhead in persistent data structures
persistentDataStructure.Insert(value);
Performance Overhead
Persistent data structures can also introduce performance overhead due to the need to maintain multiple versions of the data. Operations that modify the data structure may require additional work to ensure that the previous versions remain accessible. This overhead can impact the performance of operations, especially in time-sensitive applications.
// Performance overhead in persistent data structures
persistentDataStructure.Insert(value);
Complexity of Implementation
Implementing persistent data structures can be more complex than implementing non-persistent data structures. Developers must carefully manage memory allocation and deallocation to ensure that old versions of the data are retained correctly. This complexity can make the code harder to understand and maintain.
// Complex implementation of a persistent data structure
persistentDataStructure.Insert(value);
Garbage Collection
Garbage collection in languages like C# can present challenges for persistent data structures. Garbage collection can inadvertently remove old versions of the data, making it impossible to retrieve them. Developers must carefully manage object lifetimes to ensure that the data remains accessible.
// Potential risk of garbage collection in persistent data structures
persistentDataStructure.Insert(value);
Persistent data structures offer many benefits, but they also come with unique challenges and considerations. Developers must carefully consider these challenges and address them appropriately when working with persistent data structures. By doing so, they can fully leverage the power of persistent data structures in their applications while minimizing potential drawbacks.
Module 21:
Spatial Data Structures
In this module, we will explore spatial data structures, which are essential for efficiently organizing and managing spatial data. Spatial data structures are a fundamental area of study in computer science, and understanding how to work with them is essential for developing efficient and scalable software systems.
Quad Trees
We will start by introducing the basics of quad trees, including what quad trees are and why they are important. Quad trees are a type of tree data structure that is used to efficiently store and retrieve spatial data. Understanding how to work with quad trees is essential for developing efficient and scalable software systems.
Octrees
Next, we will explore octrees, which are a type of tree data structure that is used to efficiently store and retrieve spatial data in three dimensions. Octrees are commonly used in many applications, including computer graphics, robotics, and more.
R-Trees
Moving on to R-trees, we will explore how to use these data structures to efficiently store and retrieve spatial data in two dimensions. R-trees are a type of tree data structure that is used to efficiently store and retrieve spatial data. Understanding how to work with R-trees is essential for developing efficient and scalable software systems.
Applications in Geospatial Systems
Finally, we will cover how spatial data structures can be used in geospatial systems. Geospatial systems are used to store and analyze geographic data, and spatial data structures are an essential component of these systems. Understanding how to use spatial data structures in geospatial systems is essential for developing efficient and scalable software systems.
Throughout this module, we will focus on providing a solid foundation in spatial data structures, ensuring that you are well-prepared to tackle more advanced topics in subsequent modules.
Quad Trees
A quadtree is a hierarchical data structure used to partition a two-dimensional space into a series of square or rectangular regions. Each region represents a node in the quadtree, and each node can be further subdivided into four equal-sized quadrants, hence the name "quadtree." This subdivision continues recursively until a certain threshold is reached, typically when a node contains a specified maximum number of elements.
Implementation in C#
Here's a simple implementation of a quadtree in C#:
public class QuadTree<T>
{
public class QuadTreeNode<T>
{
public QuadTreeNode<T> TopLeft { get; set; }
public QuadTreeNode<T> TopRight { get; set; }
public QuadTreeNode<T> BottomLeft { get; set; }
public QuadTreeNode<T> BottomRight { get; set; }
public Rectangle Bounds { get; set; }
public List<T> Elements { get; set; }
}
private QuadTreeNode<T> root;
public QuadTree(Rectangle bounds)
{
root = new QuadTreeNode<T>
{
Bounds = bounds,
Elements = new List<T>()
};
}
// Insert an element into the quadtree
public void Insert(T element, Rectangle bounds)
{
Insert(root, element, bounds);
}
private void Insert(QuadTreeNode<T> node, T element, Rectangle bounds)
{
if (!node.Bounds.Intersects(bounds))
{
return;
}
if (node.TopLeft == null)
{
node.Elements.Add(element);
return;
}
var halfWidth = node.Bounds.Width / 2;
var halfHeight = node.Bounds.Height / 2;
var topLeft = new Rectangle(node.Bounds.Left, node.Bounds.Top, halfWidth, halfHeight);
var topRight = new Rectangle(node.Bounds.Left + halfWidth, node.Bounds.Top, halfWidth, halfHeight);
var bottomLeft = new Rectangle(node.Bounds.Left, node.Bounds.Top + halfHeight, halfWidth, halfHeight);
var bottomRight = new Rectangle(node.Bounds.Left + halfWidth, node.Bounds.Top + halfHeight, halfWidth, halfHeight);
if (topLeft.Intersects(bounds))
{
if (node.TopLeft == null)
{
node.TopLeft = new QuadTreeNode<T> { Bounds = topLeft, Elements = new List<T>() };
}
Insert(node.TopLeft, element, bounds);
}
if (topRight.Intersects(bounds))
{
if (node.TopRight == null)
{
node.TopRight = new QuadTreeNode<T> { Bounds = topRight, Elements = new List<T>() };
}
Insert(node.TopRight, element, bounds);
}
if (bottomLeft.Intersects(bounds))
{
if (node.BottomLeft == null)
{
node.BottomLeft = new QuadTreeNode<T> { Bounds = bottomLeft, Elements = new List<T>() };
}
Insert(node.BottomLeft, element, bounds);
}
if (bottomRight.Intersects(bounds))
{
if (node.BottomRight == null)
{
node.BottomRight = new QuadTreeNode<T> { Bounds = bottomRight, Elements = new List<T>() };
}
Insert(node.BottomRight, element, bounds);
}
}
// Query the quadtree to find elements within a given region
var topLeft = new Rectangle(node.Bounds.Left, node.Bounds.Top, halfWidth, halfHeight);
var topRight = new Rectangle(node.Bounds.Left + halfWidth, node.Bounds.Top, halfWidth, halfHeight);
var bottomLeft = new Rectangle(node.Bounds.Left, node.Bounds.Top + halfHeight, halfWidth, halfHeight);
var bottomRight = new Rectangle(node.Bounds.Left + halfWidth, node.Bounds.Top + halfHeight, halfWidth, halfHeight);
if (topLeft.Intersects(bounds))
{
Query(node.TopLeft, bounds, results);
}
if (topRight.Intersects(bounds))
{
Query(node.TopRight, bounds, results);
}
if (bottomLeft.Intersects(bounds))
{
Query(node.BottomLeft, bounds, results);
}
if (bottomRight.Intersects(bounds))
{
Query(node.BottomRight, bounds, results);
}
}
}
Use Cases
Quad trees are commonly used in computer graphics, geographical information systems (GIS), and collision detection algorithms. They allow for efficient spatial partitioning and querying of two-dimensional data, making them ideal for applications that involve large sets of spatial data.
Quad trees are a powerful data structure for spatial partitioning and querying. They provide an efficient way to organize and retrieve two-dimensional data, making them well-suited for a wide range of applications. By understanding the principles behind quad trees and how to implement them in C#, developers can leverage their benefits in their own projects.
Octrees
Octrees are a type of spatial data structure used to partition three-dimensional space. They are an extension of the quadtree, with each node having up to eight children instead of four. Octrees are commonly used in computer graphics, robotics, and geographic information systems (GIS) for efficient spatial indexing and querying.
Implementation in C#
public class Octree<T>
{
public class OctreeNode<T>
{
public OctreeNode<T>[] Children { get; set; }
public BoundingBox Bounds { get; set; }
public List<T> Elements { get; set; }
}
private OctreeNode<T> root;
public Octree(BoundingBox bounds)
{
root = new OctreeNode<T>
{
Bounds = bounds,
Elements = new List<T>(),
Children = new OctreeNode<T>[8]
};
}
public void Insert(T element, BoundingBox bounds)
{
Insert(root, element, bounds);
}
private void Insert(OctreeNode<T> node, T element, BoundingBox bounds)
{
if (!node.Bounds.Intersects(bounds))
{
return;
}
if (node.Children[0] == null)
{
node.Elements.Add(element);
return;
}
var halfSize = node.Bounds.Size / 2;
var center = node.Bounds.Center;
var childBounds = new BoundingBox[8];
childBounds[0] = new BoundingBox(center + new Vector3(-halfSize.X, halfSize.Y, -halfSize.Z), center + new Vector3(0, halfSize.Y, 0));
childBounds[1] = new BoundingBox(center + new Vector3(0, halfSize.Y, -halfSize.Z), center + new Vector3(halfSize.X, halfSize.Y, 0));
childBounds[2] = new BoundingBox(center + new Vector3(-halfSize.X, halfSize.Y, 0), center + new Vector3(0, halfSize.Y, halfSize.Z));
childBounds[3] = new BoundingBox(center + new Vector3(0, halfSize.Y, 0), center + new Vector3(halfSize.X, halfSize.Y, halfSize.Z));
childBounds[4] = new BoundingBox(center + new Vector3(-halfSize.X, 0, -halfSize.Z), center + new Vector3(0, halfSize.Y, 0));
childBounds[5] = new BoundingBox(center + new Vector3(0, 0, -halfSize.Z), center + new Vector3(halfSize.X, halfSize.Y, 0));
childBounds[6] = new BoundingBox(center + new Vector3(-halfSize.X, 0, 0), center + new Vector3(0, halfSize.Y, halfSize.Z));
childBounds[7] = new BoundingBox(center + new Vector3(0, 0, 0), center + new Vector3(halfSize.X, halfSize.Y, halfSize.Z));
for (var i = 0; i < 8; i++)
{
if (childBounds[i].Intersects(bounds))
{
if (node.Children[i] == null)
{
node.Children[i] = new OctreeNode<T> { Bounds = childBounds[i], Elements = new List<T>(), Children = new OctreeNode<T>[8] };
childBounds[0] = new BoundingBox(center + new Vector3(-halfSize.X, halfSize.Y, -halfSize.Z), center + new Vector3(0, halfSize.Y, 0));
childBounds[1] = new BoundingBox(center + new Vector3(0, halfSize.Y, -halfSize.Z), center + new Vector3(halfSize.X, halfSize.Y, 0));
childBounds[2] = new BoundingBox(center + new Vector3(-halfSize.X, halfSize.Y, 0), center + new Vector3(0, halfSize.Y, halfSize.Z));
childBounds[3] = new BoundingBox(center + new Vector3(0, halfSize.Y, 0), center + new Vector3(halfSize.X, halfSize.Y, halfSize.Z));
childBounds[4] = new BoundingBox(center + new Vector3(-halfSize.X, 0, -halfSize.Z), center + new Vector3(0, halfSize.Y, 0));
childBounds[5] = new BoundingBox(center + new Vector3(0, 0, -halfSize.Z), center + new Vector3(halfSize.X, halfSize.Y, 0));
childBounds[6] = new BoundingBox(center + new Vector3(-halfSize.X, 0, 0), center + new Vector3(0, halfSize.Y, halfSize.Z));
childBounds[7] = new BoundingBox(center + new Vector3(0, 0, 0), center + new Vector3(halfSize.X, halfSize.Y, halfSize.Z));
for (var i = 0; i < 8; i++)
{
if (childBounds[i].Intersects(bounds))
{
Query(node.Children[i], bounds, results);
}
}
}
}
Octrees are a versatile data structure for spatial partitioning and querying in three-dimensional space. They provide an efficient way to organize and retrieve spatial data, making them well-suited for a variety of applications, including computer graphics, robotics, and geographic information systems (GIS). By understanding the principles behind octrees and how to implement them in C#, developers can leverage their benefits in their own projects.
R-Trees
R-Trees are a type of spatial data structure designed for efficient indexing and retrieval of multi-dimensional objects, particularly in spatial databases and geographical information systems (GIS). An R-Tree organizes objects based on their spatial relationships, such as overlaps and intersections, making it suitable for applications requiring spatial queries like range searches and nearest-neighbor searches.
Implementation in C#
public class RTree<T>
{
public class RTreeNode<T>
{
public List<T> Elements { get; set; }
public List<RTreeNode<T>> Children { get; set; }
public BoundingBox Bounds { get; set; }
}
private RTreeNode<T> root;
private int maxChildren;
private int minChildren;
public RTree(int maxChildren, int minChildren)
{
this.maxChildren = maxChildren;
this.minChildren = minChildren;
root = new RTreeNode<T>
{
Elements = new List<T>(),
Children = new List<RTreeNode<T>>(),
Bounds = new BoundingBox()
};
}
public void Insert(T element, BoundingBox bounds)
{
Insert(root, element, bounds);
}
private void Insert(RTreeNode<T> node, T element, BoundingBox bounds)
R-Trees are an important data structure for spatial indexing and retrieval in multi-dimensional spaces. By organizing objects based on their spatial relationships and using efficient algorithms for insertion, deletion, and querying, R-Trees offer a versatile solution for applications requiring spatial data management. By understanding their principles and implementation in C#, developers can effectively leverage R-Trees in their own projects to handle spatial data efficiently and effectively.
Applications in Geospatial Systems
Geospatial systems often handle large amounts of spatial data, including geographic information systems (GIS), navigation systems, and location-based services. Spatial data structures, such as R-Trees, are vital for managing and querying this data efficiently. Here are some key applications of spatial data structures in geospatial systems:
GIS Data Management
Geographic Information Systems (GIS) are used in various fields like urban planning, environmental science, and resource management. They involve storing, analyzing, and visualizing spatial data. Spatial data structures like R-Trees help manage GIS data, making it easier to query and analyze.
// Example of using an R-Tree to query GIS data
var rtree = new RTree<GISObject>(maxChildren: 10, minChildren: 5);
var queryBounds = new BoundingBox(xMin: 10, yMin: 20, xMax: 30, yMax: 40);
var results = rtree.Query(queryBounds);
Navigation Systems
Navigation systems, such as GPS devices and mapping applications, rely on spatial data structures for route planning, location-based searches, and real-time traffic updates. R-Trees can efficiently index spatial data like road networks and points of interest (POIs).
// Example of using an R-Tree for a navigation system
var rtree = new RTree<POI>(maxChildren: 10, minChildren: 5);
var currentLocation = new Point(x: 42.3601, y: -71.0589);
var nearbyPOIs = rtree.Query(new BoundingBox(currentLocation, radius: 1000));
Location-Based Services
Location-based services, such as location-based advertising and social networking, use spatial data structures to deliver relevant content to users based on their current location. R-Trees can efficiently index user locations and points of interest.
// Example of using an R-Tree for a location-based service
var rtree = new RTree<UserLocation>(maxChildren: 10, minChildren: 5);
var userLocation = new Point(x: 37.7749, y: -122.4194);
var nearbyUsers = rtree.Query(new BoundingBox(userLocation, radius: 1000));
Environmental Monitoring
In environmental monitoring, spatial data structures are used to manage and analyze environmental data, such as air quality, water quality, and weather patterns. R-Trees can efficiently index and query spatial data points for analysis.
// Example of using an R-Tree for environmental monitoring
var rtree = new RTree<EnvironmentalDataPoint>(maxChildren: 10, minChildren: 5);
var queryBounds = new BoundingBox(xMin: 10, yMin: 20, xMax: 30, yMax: 40);
var results = rtree.Query(queryBounds);
Spatial data structures like R-Trees play a crucial role in managing and querying spatial data in geospatial systems. Whether it's GIS data management, navigation systems, location-based services, or environmental monitoring, spatial data structures enable efficient data organization and retrieval, making them indispensable tools for handling spatial data effectively in various applications.
Module 22:
External Memory Data Structures
In this module, we will explore external memory data structures, which are essential for efficiently managing data that is too large to fit in main memory. External memory data structures are a fundamental area of study in computer science, and understanding how to work with them is essential for developing efficient and scalable software systems.
Overview of External Memory
We will start by introducing the basics of external memory, including what external memory is and why it is important. External memory is used to store data that is too large to fit in main memory, and understanding how to manage external memory is essential for developing efficient and scalable software systems.
B-Trees in External Memory
Next, we will explore how to use B-trees in external memory to efficiently store and retrieve data. B-trees are a type of tree data structure that is used to efficiently store and retrieve data, and understanding how to work with B-trees in external memory is essential for developing efficient and scalable software systems.
External Memory Sorting
Moving on to external memory sorting, we will explore how to use sorting algorithms to efficiently sort data that is too large to fit in main memory. Sorting algorithms are used to arrange data in a specific order, and understanding how to use sorting algorithms in external memory is essential for developing efficient and scalable software systems.
Efficient I/O Operations in C#
Finally, we will cover how to perform efficient I/O operations in C#. C# provides built-in support for many I/O operations, including reading and writing data to external memory. Understanding how to perform efficient I/O operations in C# is essential for developing efficient and scalable software systems.
Throughout this module, we will focus on providing a solid foundation in external memory data structures, ensuring that you are well-prepared to tackle more advanced topics in subsequent modules.
Overview of External Memory
External memory data structures are designed to efficiently store and manipulate data that exceeds the size of the computer's main memory. They are essential for handling large-scale datasets that cannot fit entirely into RAM, such as databases, file systems, and big data processing. Let's explore the fundamentals of external memory and the challenges it poses:
Understanding External Memory
External memory, also known as secondary storage or disk storage, refers to storage devices like hard drives and SSDs. Unlike main memory (RAM), which is volatile and limited in size, external memory offers larger and persistent storage. However, reading and writing data from external memory is orders of magnitude slower than accessing data from RAM.
Challenges of External Memory
The primary challenge of external memory is the high latency and low bandwidth associated with disk operations. Disk reads and writes can take milliseconds, whereas RAM operations are measured in nanoseconds. This latency gap can lead to significant performance bottlenecks, especially when dealing with large datasets.
Design Considerations for External Memory
To mitigate the performance impact of external memory, data structures and algorithms must be designed to minimize the number of disk operations. This involves strategies such as:
I/O Efficiency: Optimizing the use of external memory by maximizing the amount of data read or written in each disk operation. Techniques like batch processing and sequential access can improve I/O efficiency.
// Example of batch processing with a disk-based queue
var diskQueue = new DiskQueue();
diskQueue.Enqueue(data);
diskQueue.Enqueue(data);
diskQueue.Enqueue(data);
diskQueue.Flush(); // Write all queued data to disk in a single operation
Caching: Using main memory as a cache for frequently accessed data from external storage. This reduces the number of disk reads by keeping commonly used data in RAM.
// Example of caching with a memory-mapped file
var memoryMappedFile = MemoryMappedFile.CreateFromFile("data.txt");
var memoryMappedView = memoryMappedFile.CreateViewAccessor();
var bytesRead = memoryMappedView.ReadArray(0, buffer, offset, count);
Prefetching: Proactively reading data from external storage into memory before it is needed. This can reduce the latency of subsequent accesses by avoiding on-demand disk reads.
// Example of prefetching with a disk-based queue
var diskQueue = new DiskQueue();
var prefetchData = diskQueue.ReadNextBatch();
External memory data structures are essential for efficiently managing large datasets that cannot fit into RAM. By understanding the challenges and employing strategies to minimize disk operations, developers can design efficient algorithms and data structures for working with external memory, thereby enhancing the performance of applications that handle massive amounts of data.
B-Trees in External Memory
B-Trees are balanced tree structures used for indexing and storing large datasets efficiently. They are especially well-suited for external memory scenarios where the data exceeds the size of the main memory. The primary motivation behind using B-Trees in external memory is their ability to minimize the number of disk reads and writes, thereby reducing the I/O operations and improving overall performance. Let's delve deeper into the characteristics and advantages of B-Trees in external memory scenarios.
Characteristics of B-Trees
B-Trees are characterized by the following features that make them suitable for external memory:
Balanced Structure: B-Trees maintain a balanced structure by ensuring that all leaf nodes are at the same level. This balance ensures that the number of disk accesses required to access any data element remains proportional to the logarithm of the total number of elements, rather than the total number of elements itself.
// Example of a B-Tree node structure
public class BTreeNode<TKey, TValue>
{
public List<TKey> Keys { get; set; }
public List<TValue> Values { get; set; }
public List<BTreeNode<TKey, TValue>> Children { get; set; }
}
Degree: The degree of a B-Tree node determines the maximum number of children a node can have. In an external memory scenario, the degree is typically chosen to maximize the number of keys that can fit into a single disk block. This choice minimizes the number of disk reads and writes required for tree operations.
// Example of a B-Tree degree
public class BTree<TKey, TValue>
{
public int Degree { get; private set; }
public BTreeNode<TKey, TValue> Root { get; private set; }
}
Advantages of B-Trees in External Memory
B-Trees offer several advantages when used in external memory settings:
Efficient Disk Access: Due to their balanced structure, B-Trees ensure that disk accesses are minimized. When searching for a specific key, the number of disk reads required is proportional to the logarithm of the number of keys, rather than the total number of keys.
Sequential Access: B-Trees maintain a strict ordering of keys within each node, making sequential access efficient. This is especially advantageous in external memory scenarios, where disk reads are optimized for sequential access.
Scalability: B-Trees are highly scalable, as the size of the tree can grow or shrink dynamically without significantly affecting performance. This makes them suitable for storing and managing large datasets in external memory.
Transaction Support: B-Trees support transactional operations, allowing for atomicity, consistency, isolation, and durability (ACID) properties. This is crucial in scenarios where data integrity is paramount, such as databases.
B-Trees are an excellent choice for managing large datasets in external memory scenarios. Their balanced structure, efficient disk access, scalability, and transaction support make them well-suited for applications that require high-performance data storage and retrieval, even when the data size exceeds the available main memory.
External Memory Sorting
In the context of external memory data structures, sorting is a crucial operation, especially when dealing with large datasets that cannot fit entirely in the main memory. External memory sorting is the process of sorting such datasets while minimizing disk I/O operations. In this section, we will explore various external memory sorting algorithms and their implementations in C#.
Characteristics of External Memory Sorting
External memory sorting shares many characteristics with traditional sorting algorithms, but it introduces additional considerations due to the limitations of disk I/O operations. Some key characteristics include:
Disk I/O Complexity: The primary goal of external memory sorting is to minimize the number of disk I/O operations, as these are significantly slower compared to operations performed in the main memory.
External Memory Constraints: External memory sorting algorithms must be designed to work with external memory constraints, such as block size limitations and limited disk space.
Sequential Access: Algorithms that optimize for sequential access patterns are favored, as they can reduce the number of disk seeks required to read or write data.
Parallelism: Some external memory sorting algorithms can leverage parallelism to improve performance. However, this often requires careful consideration of synchronization and coordination between threads.
External Memory Sorting Algorithms
Several algorithms have been developed to efficiently sort large datasets in external memory. Some popular ones include:
External Merge Sort: External Merge Sort is an extension of the traditional Merge Sort algorithm designed to work with large datasets that do not fit in main memory. It involves multiple phases of sorting and merging, with intermediate results stored on disk.
// Example of External Merge Sort
public class ExternalMergeSort<T>
{
public static void Sort(IEnumerable<T> data)
{
// Divide data into chunks that fit in memory
// Sort each chunk in memory
// Merge sorted chunks using external memory
}
}
Distribution Sort: Distribution Sort algorithms, such as Radix Sort and Bucket Sort, distribute the data into a number of partitions, which can then be sorted independently. This approach reduces the amount of data that needs to be sorted at once.
// Example of Radix Sort
public class RadixSort<T>
{
public static void Sort(IEnumerable<T> data)
{
// Partition data into buckets based on least significant digit
// Sort each bucket independently
// Merge sorted buckets
}
}
External Quick Sort: External Quick Sort is a modified version of the Quick Sort algorithm designed for external memory. It involves a series of partitioning steps, followed by sorting and merging.
// Example of External Quick Sort
public class ExternalQuickSort<T>
{
public static void Sort(IEnumerable<T> data)
{
// Partition data into chunks that fit in memory
// Sort each chunk in memory using Quick Sort
// Merge sorted chunks using external memory
}
}
External memory sorting is a critical operation in handling large datasets that do not fit in main memory. Various algorithms have been developed to address this challenge, each with its own set of advantages and trade-offs. By understanding the characteristics and implementation details of these algorithms, developers can choose the most suitable approach for their specific use case.
Efficient I/O Operations in C#
Efficient I/O operations are crucial for optimizing the performance of external memory data structures, especially when dealing with large datasets. In this section, we will explore various techniques and strategies for improving I/O efficiency in C#.
Buffered I/O
Buffered I/O is a common technique used to reduce the number of disk I/O operations by reading or writing data in larger chunks. In C#, this can be achieved using the BufferedStream class, which wraps an existing stream and provides buffering capabilities.
// Example of Buffered I/O
using (FileStream fs = new FileStream("data.txt", FileMode.Open))
{
using (BufferedStream bs = new BufferedStream(fs))
{
// Read or write data using BufferedStream
}
}
Memory-Mapped Files
Memory-mapped files allow you to map a file or a portion of a file directly into memory, which can then be accessed as if it were an array. This technique can significantly improve I/O performance by reducing the need for explicit read and write operations.
// Example of Memory-Mapped Files
using (MemoryMappedFile mmf = MemoryMappedFile.CreateFromFile("data.bin"))
{
using (MemoryMappedViewAccessor accessor = mmf.CreateViewAccessor())
{
// Access memory-mapped data using accessor
}
}
Asynchronous I/O
Asynchronous I/O operations can improve the overall responsiveness and throughput of applications by allowing multiple I/O operations to be performed concurrently. In C#, this can be achieved using the await keyword with methods that support asynchronous I/O.
// Example of Asynchronous I/O
using (FileStream fs = new FileStream("data.txt", FileMode.Open))
{
using (StreamReader sr = new StreamReader(fs))
{
string line = await sr.ReadLineAsync();
// Process line asynchronously
}
}
Parallel I/O
Parallel I/O involves performing multiple I/O operations concurrently using multiple threads or tasks. This can be particularly beneficial when dealing with independent I/O operations that can be performed simultaneously.
// Example of Parallel I/O
List<Task> tasks = new List<Task>();
foreach (var file in files)
{
tasks.Add(Task.Run(() =>
{
// Read or write data from file in parallel
}));
}
await Task.WhenAll(tasks);
Efficient I/O operations are essential for optimizing the performance of external memory data structures. By utilizing techniques such as buffered I/O, memory-mapped files, asynchronous I/O, and parallel I/O, developers can significantly improve the throughput and responsiveness of their applications when dealing with large datasets. It's important to carefully consider the characteristics and requirements of the dataset and workload to determine the most suitable I/O optimization strategy.
Module 23:
Dynamic Programming and Data Structures
In this module, we will explore dynamic programming and data structures, which are essential for efficiently solving complex problems. Dynamic programming and data structures are a fundamental area of study in computer science, and understanding how to work with them is essential for developing efficient and scalable software systems.
Dynamic Programming Basics
We will start by introducing the basics of dynamic programming, including what dynamic programming is and why it is important. Dynamic programming is a method for solving complex problems by breaking them down into simpler subproblems and storing the solutions to these subproblems, and understanding how to use dynamic programming is essential for developing efficient and scalable software systems.
Memoization with Data Structures
Next, we will explore how to use memoization with data structures to efficiently solve complex problems. Memoization is a technique for storing the results of expensive function calls and returning the cached result when the same inputs occur again, and understanding how to use memoization with data structures is essential for developing efficient and scalable software systems.
Applications in Optimization
Moving on to applications in optimization, we will explore how dynamic programming and data structures can be used to optimize various problems. Optimization is the process of making something as effective or functional as possible, and understanding how to use dynamic programming and data structures for optimization is essential for developing efficient and scalable software systems.
Solving Problems with DP and Data Structures
Finally, we will cover how to solve problems with dynamic programming and data structures in C#. C# provides built-in support for many data structures and algorithms, including dynamic programming, and understanding how to solve problems with dynamic programming and data structures in C# is essential for developing efficient and scalable software systems.
Throughout this module, we will focus on providing a solid foundation in dynamic programming and data structures, ensuring that you are well-prepared to tackle more advanced topics in subsequent modules.
Dynamic Programming Basics
Dynamic Programming (DP) is a powerful algorithmic technique used to solve optimization problems by breaking them down into simpler subproblems and storing their solutions to avoid redundant computations. This section explores the fundamentals of DP and how it can be applied to solve various problems efficiently in C#.
What is Dynamic Programming?
Dynamic Programming is a method for solving complex problems by breaking them down into simpler subproblems and solving each subproblem just once. The key to DP is that it solves each subproblem only once and stores its solution in a table, so it doesn't have to recompute it every time it is encountered.
The Two Key Properties of Dynamic Programming
Optimal Substructure: The problem can be broken down into smaller, simpler subproblems, and the optimal solution to the original problem can be constructed from the optimal solutions to the subproblems.
Overlapping Subproblems: The problem can be solved by combining solutions to the same subproblems repeatedly. In other words, the same subproblems are solved multiple times in the process of finding the optimal solution.
The Steps in Dynamic Programming
Identify and Define Subproblems: Break down the problem into smaller subproblems, and define a recurrence relation that relates the solution to the original problem to the solutions of its subproblems.
Memoization or Bottom-Up: Implement a method to store the solutions to the subproblems to avoid redundant computations. This can be done either top-down (memoization) or bottom-up (tabulation).
Reconstruct the Optimal Solution: Once all subproblems are solved, reconstruct the optimal solution to the original problem using the solutions of the subproblems.
Dynamic Programming in C#
Dynamic Programming can be implemented in C# using various techniques, including recursion, memoization (caching), and tabulation (bottom-up approach). Let's consider an example of the Fibonacci sequence to illustrate these concepts:
Recursion:
public static int Fibonacci(int n)
{
if (n <= 1)
return n;
return Fibonacci(n - 1) + Fibonacci(n - 2);
}
Memoization (Caching):
public static int FibonacciMemo(int n, Dictionary<int, int> memo)
Dynamic Programming is a powerful algorithmic technique that can be used to efficiently solve complex optimization problems. By breaking down the problem into smaller subproblems and storing their solutions, Dynamic Programming can significantly reduce the time complexity of the algorithm. In C#, Dynamic Programming can be implemented using recursion, memoization, or tabulation, depending on the nature of the problem and the desired approach.
Memoization with Data Structures
Memoization is a technique used to store the results of expensive function calls and return the cached result when the same inputs occur again. It is particularly useful in dynamic programming to solve problems that can be broken down into smaller subproblems. This section explores how memoization can be implemented using data structures in C#.
Overview of Memoization
Memoization is a technique that optimizes the performance of recursive algorithms by storing the results of expensive function calls and returning the cached result when the same inputs occur again. This technique can significantly reduce the time complexity of algorithms that involve repeated function calls with the same inputs.
Memoization using Dictionary
One common way to implement memoization in C# is to use a dictionary to store the results of function calls. Here's an example of memoization using a dictionary to store Fibonacci numbers:
public static Dictionary<int, int> memo = new Dictionary<int, int>();
In this example, the FibonacciMemo function stores the results of Fibonacci numbers in the memo dictionary. If the result for a given input n is already in the dictionary, it returns the cached result. Otherwise, it computes the result and stores it in the dictionary before returning it.
Memoization using Arrays
Another way to implement memoization in C# is to use arrays to store the results of function calls. This is particularly useful when the inputs to the function are integers and the results can be easily indexed by the inputs. Here's an example of memoization using an array to store Fibonacci numbers:
public static int FibonacciMemoArray(int n)
{
if (n <= 1)
return n;
int[] memo = new int[n + 1];
memo[0] = 0;
memo[1] = 1;
for (int i = 2; i <= n; i++)
{
memo[i] = memo[i - 1] + memo[i - 2];
}
return memo[n];
}
In this example, the FibonacciMemoArray function uses an array to store the results of Fibonacci numbers. The memo array is initialized with the base cases of the Fibonacci sequence (0 and 1), and then the rest of the sequence is computed using a loop.
Memoization is a powerful technique for optimizing recursive algorithms by storing the results of expensive function calls and returning the cached result when the same inputs occur again. In C#, memoization can be implemented using dictionaries or arrays, depending on the nature of the problem and the desired approach. By using memoization, you can significantly improve the performance of algorithms that involve repeated function calls with the same inputs.
Applications in Optimization
Dynamic programming and data structures have a wide range of applications in optimization problems. These problems often involve finding the best solution from a set of possible solutions, given certain constraints. In this section, we will explore some common applications of dynamic programming and data structures in optimization problems.
Knapsack Problem
The knapsack problem is a classic optimization problem that involves finding the most valuable combination of items to fit into a knapsack, given a set weight limit. There are two variations of the problem: the 0-1 knapsack problem and the fractional knapsack problem.
0-1 Knapsack Problem
In the 0-1 knapsack problem, items cannot be divided. We are given a set of items, each with a weight and a value, and we want to maximize the total value of the items in the knapsack, without exceeding the weight limit.
public static int Knapsack(int[] weights, int[] values, int capacity)
{
int[,] dp = new int[weights.Length + 1, capacity + 1];
This code implements the dynamic programming solution to the 0-1 knapsack problem.
Fractional Knapsack Problem
In the fractional knapsack problem, items can be divided. We are given a set of items, each with a weight and a value, and we want to maximize the total value of the items in the knapsack, without exceeding the weight limit.
public static double FractionalKnapsack(int[] weights, int[] values, int capacity)
{
double[] ratios = new double[weights.Length];
for (int i = 0; i < weights.Length; i++)
{
ratios[i] = (double)values[i] / weights[i];
}
Array.Sort(ratios, weights);
Array.Reverse(ratios);
Array.Reverse(weights);
double totalValue = 0;
for (int i = 0; i < weights.Length && capacity > 0; i++)
{
double amount = Math.Min(capacity, weights[i]);
totalValue += amount * ratios[i];
capacity -= amount;
}
return totalValue;
}
This code implements the greedy solution to the fractional knapsack problem.
Longest Common Subsequence
The longest common subsequence (LCS) problem is another classic optimization problem that involves finding the longest subsequence that is common to two sequences. A subsequence is a sequence that can be derived from another sequence by deleting some or no elements without changing the order of the remaining elements.
public static int LongestCommonSubsequence(string s1, string s2)
{
int[,] dp = new int[s1.Length + 1, s2.Length + 1];
for (int i = 1; i <= s1.Length; i++)
{
for (int j = 1; j <= s2.Length; j++)
{
if (s1[i - 1] == s2[j - 1])
{
dp[i, j] = 1 + dp[i - 1, j - 1];
}
else
{
dp[i, j] = Math.Max(dp[i - 1, j], dp[i, j - 1]);
}
}
}
return dp[s1.Length, s2.Length];
}
This code implements the dynamic programming solution to the LCS problem.
Dynamic programming and data structures are powerful tools for solving optimization problems. By using dynamic programming techniques and appropriate data structures, you can efficiently solve a wide range of optimization problems, including the knapsack problem and the longest common subsequence problem.
Solving Problems with DP and Data Structures
Dynamic programming (DP) and data structures are powerful tools that can be used to solve a wide range of problems efficiently. In this section, we will explore how to apply DP and various data structures to solve common problems.
Knapsack Problem
One of the classic problems that can be solved using DP and data structures is the Knapsack problem. This problem involves finding the maximum value of items that can be placed in a knapsack with a maximum weight limit. There are two variations of the knapsack problem: the 0/1 knapsack problem and the fractional knapsack problem. The 0/1 knapsack problem requires that items be either selected or not selected, while the fractional knapsack problem allows items to be divided. Both problems can be solved using DP.
public int Knapsack(int[] weights, int[] values, int capacity)
Another problem that can be solved using DP and data structures is the Longest Common Subsequence (LCS) problem. This problem involves finding the longest subsequence that is common to two sequences. A subsequence is a sequence that can be derived from another sequence by deleting some or no elements without changing the order of the remaining elements. The LCS problem can be solved using a 2D array and a bottom-up approach.
public int LongestCommonSubsequence(string s1, string s2)
{
int[,] dp = new int[s1.Length + 1, s2.Length + 1];
for (int i = 0; i <= s1.Length; i++)
{
for (int j = 0; j <= s2.Length; j++)
{
if (i == 0 || j == 0)
{
dp[i, j] = 0;
}
else if (s1[i - 1] == s2[j - 1])
{
dp[i, j] = dp[i - 1, j - 1] + 1;
}
else
{
dp[i, j] = Math.Max(dp[i - 1, j], dp[i, j - 1]);
}
}
}
return dp[s1.Length, s2.Length];
}
Dynamic programming and data structures are powerful tools that can be used to solve a wide range of problems efficiently. By using these tools, you can optimize your code and improve the performance of your applications.
Module 24:
Integrating Data Structures into C# Programs and Future Trends
In this module, we will explore integrating data structures into C# programs and the future trends in this field. Integrating data structures into C# programs is essential for building efficient and scalable software systems. Understanding the future trends in this field will help you stay up-to-date with the latest developments and technologies.
Optimizing C# Code with Data Structures
We will start by discussing how to optimize C# code with data structures. Optimizing C# code with data structures is essential for improving performance and efficiency. Understanding how to use data structures in C# is essential for developing efficient and scalable software systems.
Balancing Efficiency and Readability
Next, we will explore how to balance efficiency and readability when using data structures in C#. Balancing efficiency and readability is essential for developing maintainable and understandable software systems.
Leveraging Language Features for Data Structures
Moving on to leveraging language features for data structures, we will explore how to use the features of the C# language to create efficient and scalable data structures. Leveraging language features for data structures is essential for developing efficient and scalable software systems.
Anticipated Developments and Challenges in Future Trends
Finally, we will cover the anticipated developments and challenges in future trends in this field. Understanding the anticipated developments and challenges in future trends will help you stay up-to-date with the latest developments and technologies.
Throughout this module, we will focus on providing a solid foundation in integrating data structures into C# programs and understanding the future trends in this field, ensuring that you are well-prepared to tackle more advanced topics in subsequent modules.
Optimizing C# Code with Data Structures
Integrating data structures into C# programs can significantly improve their performance and efficiency. In this section, we will explore various ways to optimize C# code using data structures, including arrays, lists, dictionaries, and more.
Arrays
Arrays are one of the most fundamental data structures in C#. They allow you to store a fixed-size sequential collection of elements of the same type. When used efficiently, arrays can offer excellent performance.
// Example: Initialize and access elements in an array
int[] myArray = new int[5];
for (int i = 0; i < myArray.Length; i++)
{
myArray[i] = i * 2;
}
Lists
Lists are a more flexible alternative to arrays. They can dynamically grow and shrink in size, making them ideal for situations where the number of elements is not known in advance.
// Example: Initialize and access elements in a list
List<int> myList = new List<int>();
for (int i = 0; i < 5; i++)
{
myList.Add(i * 2);
}
Dictionaries
Dictionaries provide a way to store key-value pairs. They are particularly useful when you need to associate a value with a specific key and quickly retrieve it.
// Example: Initialize and access elements in a dictionary
Dictionary<string, int> myDict = new Dictionary<string, int>();
myDict.Add("apple", 5);
myDict.Add("banana", 3);
int value = myDict["apple"]; // Retrieve value for key "apple"
LinkedList
LinkedList is a type of collection that stores items in a sequential manner. The benefit of LinkedList is that it provides constant-time insertion and deletion, unlike an array where these operations are O(n).
// Example: Initialize and access elements in a linked list
LinkedList<int> myLinkedList = new LinkedList<int>();
myLinkedList.AddFirst(10);
myLinkedList.AddLast(20);
myLinkedList.AddAfter(myLinkedList.First, 15);
By integrating the appropriate data structures into your C# code, you can significantly improve its performance and efficiency. Whether you need a fixed-size collection (arrays), a dynamically resizable collection (lists), or a key-value mapping (dictionaries), C# offers a range of data structures to suit your needs. Remember to consider the characteristics of your data and the specific requirements of your application when choosing a data structure.
Balancing Efficiency and Readability
Efficiency and readability are two essential aspects to consider when integrating data structures into C# programs. While it's crucial to optimize code for performance, it's equally important to ensure that the code remains easy to understand and maintain.
Choosing the Right Data Structure
When choosing a data structure, consider the following factors:
Performance: Ensure that the chosen data structure provides the desired performance characteristics for the operations you intend to perform.
MemoryUsage: Be mindful of the memory footprint of the data structure, especially for large-scale applications.
Complexity: The data structure's complexity should be manageable, both in terms of implementation and usage.
Readability: The code should be easy to read, understand, and maintain.
Optimization Techniques
Here are some optimization techniques to balance efficiency and readability:
Use Generics: Generics allow you to create classes, structures, interfaces, and methods that can work with any data type. This makes your code more flexible and reusable without sacrificing performance.
// Example: Creating a generic class
public class GenericList<T>
{
private List<T> items;
public GenericList()
{
items = new List<T>();
}
public void AddItem(T item)
{
items.Add(item);
}
public void RemoveItem(T item)
{
items.Remove(item);
}
}
Implement Efficient Algorithms: Choose algorithms that offer the best performance for your specific use case. For example, if you need to find an item in a collection, consider using binary search for sorted arrays or hash tables for key-value pairs.
Use Built-in Data Structures: C# provides a rich set of built-in data structures, such as lists, queues, stacks, and dictionaries. Leveraging these built-in data structures can simplify your code and improve its readability.
Avoid Premature Optimization: Don't optimize your code until you've identified a performance bottleneck. Focus on writing clear, maintainable code first, and then optimize only the parts that need it.
Profile and Benchmark: Use profiling tools to identify performance bottlenecks in your code. This will help you focus your optimization efforts on the most critical areas.
Balancing efficiency and readability is essential for creating high-quality C# programs. By choosing the right data structures, implementing efficient algorithms, and leveraging built-in features, you can optimize your code for performance without sacrificing readability. Remember to profile your code and only optimize where necessary.
Leveraging Language Features for Data Structures
Leveraging language features in C# can greatly improve the efficiency and readability of data structure implementations. C# offers several powerful language features that can be used in conjunction with data structures to enhance their performance and maintainability.
Generics
One of the most powerful features of C# is generics, which allow you to create classes, interfaces, and methods that can work with any data type. This makes it easier to create reusable and flexible data structures that can be used with different types of data.
// Example: Creating a generic class
public class GenericList<T>
{
private List<T> items;
public GenericList()
{
items = new List<T>();
}
public void AddItem(T item)
{
items.Add(item);
}
public void RemoveItem(T item)
{
items.Remove(item);
}
}
LINQ
LINQ (Language-Integrated Query) is another powerful language feature that can be used to query and manipulate data in data structures. LINQ allows you to write queries that look similar to SQL, making it easier to work with data structures in a more natural and intuitive way.
// Example: Using LINQ to query a list
var numbers = new List<int> { 1, 2, 3, 4, 5 };
var evenNumbers = numbers.Where(n => n % 2 == 0);
Lambda Expressions
Lambda expressions are anonymous functions that can be used to create delegates or expression tree types. They can be used to define inline functions, making it easier to work with data structures in a functional programming style.
// Example: Using a lambda expression to define a function
Func<int, int> square = x => x * x;
Extension Methods
Extension methods allow you to add new methods to existing types without modifying the original type or creating a new derived type. This can be useful for adding custom functionality to built-in data structures or third-party libraries.
// Example: Adding an extension method to a built-in data structure
public static class ListExtensions
{
public static void PrintItems<T>(this List<T> list)
{
foreach (var item in list)
{
Console.WriteLine(item);
}
}
}
// Usage
var numbers = new List<int> { 1, 2, 3, 4, 5 };
numbers.PrintItems();
Leveraging language features in C# can greatly enhance the efficiency and readability of data structure implementations. Generics, LINQ, lambda expressions, and extension methods are powerful features that can be used to create more flexible and reusable data structures. By taking advantage of these features, you can write more efficient and maintainable code.
Anticipated Developments and Challenges in Future Trends
The future of data structures in C# is likely to see a number of exciting developments and challenges. As technology continues to evolve, the need for more efficient and flexible data structures will become increasingly important. Below are some anticipated developments and challenges in this area:
Concurrency and Parallelism
One of the most significant trends in data structures is the growing importance of concurrency and parallelism. With the rise of multi-core processors and distributed computing, data structures that can efficiently handle concurrent access and processing will become increasingly important.
One challenge in this area is designing data structures that can scale to handle large amounts of data and concurrent access without sacrificing performance or safety. This will require a deep understanding of concurrency and parallelism, as well as a thorough understanding of the underlying hardware and software architecture.
Big Data and Machine Learning
Another important trend is the growing importance of big data and machine learning. As the amount of data generated by organizations and individuals continues to grow, the need for data structures that can efficiently store and process large amounts of data will become increasingly important.
One challenge in this area is designing data structures that can efficiently store and process large amounts of data while maintaining high performance and low latency. This will require a deep understanding of the underlying algorithms and data structures, as well as a thorough understanding of the domain in which the data is being used.
Data Privacy and Security
Data privacy and security are also important considerations in the design of data structures. With the increasing amount of sensitive data being stored and processed by organizations, the need for data structures that can protect data from unauthorized access and manipulation will become increasingly important.
One challenge in this area is designing data structures that can efficiently protect data from unauthorized access and manipulation while maintaining high performance and low latency. This will require a deep understanding of cryptography and security, as well as a thorough understanding of the domain in which the data is being used.
The future of data structures in C# is likely to see a number of exciting developments and challenges. With the rise of multi-core processors and distributed computing, the need for data structures that can efficiently handle concurrent access and processing will become increasingly important. Additionally, the growing importance of big data and machine learning will require data structures that can efficiently store and process large amounts of data while maintaining high performance and low latency. Finally, data privacy and security will continue to be important considerations in the design of data structures.
33 BONUS 2 - INTRODUCTION TO CQRS AND MEDIATR WITH ASP.NET CORE WEB API
1 Project configuration
Configuration in .NET Core is very different from what we’re used to in .NET Framework projects. We don’t use the web.config file anymore, but instead, use a built-in Configuration framework that comes out of the box in .NET Core.
To be able to develop good applications, we need to understand how to configure our application and its services first.
In this section, we’ll learn about configuration in the Program class and set up our application. We will also learn how to register different services and how to use extension methods to achieve this.
Of course, the first thing we need to do is to create a new project, so,let’s dive right into it.
1.1 Creating a New Project
Let's open Visual Studio, we are going to use VS 2022, and create a new ASP.NET Core Web API Application:
Now let’s choose a name and location for our project:
Next, we want to choose a .NET 6.0 from the dropdown list. Also, we don’t want to enable OpenAPI support right now. We’ll do that later in the book on our own. Now we can proceed by clicking the Create button and the project will start initializing:
1.2 launchSettings.json File Configuration
After the project has been created, we are going to modify the launchSettings.json file, which can be found in the Properties section of the Solution Explorer window.
This configuration determines the launch behavior of the ASP.NET Core applications. As we can see, it contains both configurations to launch settings for IIS and self-hosted applications (Kestrel).
For now, let’s change the launchBrowser property to false to prevent the web browser from launching on application start.
This is convenient since we are developing a Web API project and we don’t need a browser to check our API out. We will use Postman (described later) for this purpose.
If you’ve checked Configure for HTTPS checkbox earlier in the setup phase, you will end up with two URLs in the applicationUrl section — one for HTTPS (localhost:5001), and one for HTTP (localhost:5000).
You’ll also notice the sslPort property which indicates that our application, when running in IISExpress, will be configured for HTTPS (port 44370), too.
NOTE: This HTTPS configuration is only valid in the local environment. You will have to configure a valid certificate and HTTPS redirection once you deploy the application.
There is one more useful property for developing applications locally and that’s the launchUrl property. This property determines which URL will the application navigate to initially. For launchUrl property to work, we need to set the launchBrowser property to true. So, for example, if we set the launchUrl property to weatherforecast, we will be redirected to https://localhost:5001/weatherforecast when we launch our application.
1.3 Program.cs Class Explanations
Program.cs is the entry point to our application and it looks like this:
var builder = WebApplication.CreateBuilder(args);
// Add services to the container.
builder.Services.AddControllers();
var app = builder.Build();
// Configure the HTTP request pipeline.
app.UseHttpsRedirection();
app.UseAuthorization();
app.MapControllers(); app.Run();
Compared to the Program.cs class from .NET 5, there are some major changes. Some of the most obvious are:
• Top-level statements
• Implicit using directives
• No Startup class (on the project level)
“Top-level statements” means the compiler generates the namespace, class, and method elements for the main program in our application. We can see that we don’t have the class block in the code nor the Main method. All of that is generated for us by the compiler. Of course, we can add other functions to the Program class and those will be created as the local functions nested inside the generated Main method. Top-level statements are meant to simplify the entry point to the application and remove the extra “fluff” so we can focus on the important stuff instead.
“Implicit using directives” mean the compiler automatically adds a different set of using directives based on a project type, so we don’t have to do that manually. These using directives are stored in the obj/Debug/net6.0 folder of our project under the name CompanyEmployees.GlobalUsings.g.cs:
// <auto-generated/>
global using global::Microsoft.AspNetCore.Builder;
global using global::Microsoft.AspNetCore.Hosting;
global using global::Microsoft.AspNetCore.Http;
global using global::Microsoft.AspNetCore.Routing;
global using global::Microsoft.Extensions.Configuration;
global using global::Microsoft.Extensions.DependencyInjection;
global using global::Microsoft.Extensions.Hosting;
global using global::Microsoft.Extensions.Logging;
global using global::System;
global using global::System.Collections.Generic;
global using global::System.IO;
global using global::System.Linq;
global using global::System.Net.Http;
global using global::System.Net.Http.Json;
global using global::System.Threading;
global using global::System.Threading.Tasks;
This means that we can use different classes from these namespaces in our project without adding using directives explicitly in our project files. Of course, if you don’t want this type of behavior, you can turn it off by visiting the project file and disabling the ImplicitUsings tag:
<ImplicitUsings>disable</ImplicitUsings>
By default, this is enabled in the .csproj file, and we are going to keep it like that.
Now, let’s take a look at the code inside the Program class. With this line of code:
var builder = WebApplication.CreateBuilder(args);
The application creates a builder variable of the type WebApplicationBuilder. The WebApplicationBuilder class is responsible for four main things:
• Adding Configuration to the project by using the builder.Configuration property
• Registering services in our app with the builder.Services property
• Logging configuration with the builder.Logging property
• Other IHostBuilder and IWebHostBuilder configuration
Compared to .NET 5 where we had a static CreateDefaultBuilder class, which returned the IHostBuilder type, now we have the static CreateBuilder method, which returns WebApplicationBuilder type.
Of course, as we see it, we don’t have the Startup class with two familiar methods: ConfigureServices and Configure. Now, all this is replaced by the code inside the Program.cs file.
Since we don’t have the ConfigureServices method to configure our services, we can do that right below the builder variable declaration. In the new template, there’s even a comment section suggesting where we should start with service registration. A service is a reusable part of the code that adds some functionality to our application, but we’ll talk about services more later on.
In .NET 5, we would use the Configure method to add different middleware components to the application’s request pipeline. But since we don’t have that method anymore, we can use the section below the var app = builder.Build(); part to do that. Again, this is marked with the comment section as well:
NOTE: If you still want to create your application using the .NET 5 way, with Program and Startup classes, you can do that, .NET 6 supports it as well. The easiest way is to create a .NET 5 project, copy the Startup and Program classes and paste it into the .NET 6 project.
Since larger applications could potentially contain a lot of different services, we can end up with a lot of clutter and unreadable code in the Program class. To make it more readable for the next person and ourselves, we can structure the code into logical blocks and separate those blocks into extension methods.
1.4 Extension Methods and CORS Configuration
An extension method is inherently a static method. What makes it different from other static methods is that it accepts this as the first parameter, and this represents the data type of the object which will be using that extension method. We’ll see what that means in a moment.
An extension method must be defined inside a static class. This kind of method extends the behavior of a type in .NET. Once we define an extension method, it can be chained multiple times on the same type of object.
So, let’s start writing some code to see how it all adds up.
We are going to create a new folder Extensions in the project and create a new class inside that folder named ServiceExtensions. The ServiceExtensions class should be static.
public static class ServiceExtensions
{
}
Let’s start by implementing something we need for our project immediately so we can see how extensions work.
The first thing we are going to do is to configure CORS in our application. CORS (Cross-Origin Resource Sharing) is a mechanism to give or restrict access rights to applications from different domains.
If we want to send requests from a different domain to our application, configuring CORS is mandatory. So, to start, we’ll add a code that allows all requests from all origins to be sent to our API:
We are using basic CORS policy settings because allowing any origin, method, and header is okay for now. But we should be more restrictive with those settings in the production environment. More precisely, as restrictive as possible.
Instead of the AllowAnyOrigin() method which allows requests from any source, we can use the WithOrigins("https://example.com") which will allow requests only from that concrete source. Also, instead of AllowAnyMethod() that allows all HTTP methods, we can use WithMethods("POST", "GET") that will allow only specific HTTP methods. Furthermore, you can make the same changes for the AllowAnyHeader() method by using, for example, the WithHeaders("accept", "content- type") method to allow only specific headers.
1.5 IIS Configuration
ASP.NET Core applications are by default self-hosted, and if we want to host our application on IIS, we need to configure an IIS integration which will eventually help us with the deployment to IIS. To do that, we need to add the following code to the ServiceExtensions class:
We do not initialize any of the properties inside the options because we are fine with the default values for now. But if you need to fine-tune the configuration right away, you might want to take a look at the possible options:
Option
Default
Setting
AutomaticAuthentication
true
if true,the authentication middleware sets the HttpContext.User and responds to generic challenges,if false,the authentication middleware only provides an identity(HttpContext.User ) and responds to challenges when explicitly requested by the AuthenticationScheme . Windows Authentication must be enabled in IIS for AutomaticAuthentication to function.
AuthenticationDisplayName
null
Sets the display name shown to users on login pages
ForwardClientCertificate
true
if true and the MS-ASPNETCORE-CLIENTCERT request header is present,the HttpContext.Connection.ClientCertificate is populated.
Now, we mentioned extension methods are great for organizing your code and extending functionalities. Let’s go back to our Program class and modify it to support CORS and IIS integration now that we’ve written extension methods for those functionalities. We are going to remove the first comment and write our code over it:
using CompanyEmployees.Extensions;
var builder = WebApplication.CreateBuilder(args);
builder.Services.ConfigureCors();
builder.Services.ConfigureIISIntegration();
builder.Services.AddControllers();
var app = builder.Build();
And let's add a few mandatory methods to the second part of the Program class (the one for the request pipeline configuration):
We’ve added CORS and IIS configuration to the section where we need to configure our services. Furthermore, CORS configuration has been added to the application’s pipeline inside the second part of the Program class.But as you can see, there are some additional methods unrelated to IIS configuration. Let’s go through those and learn what they do.
• app.UseForwardedHeaders() will forward proxy headers to the
current request. This will help us during application deployment. Pay attention that we require Microsoft.AspNetCore.HttpOverrides using directive to introduce the ForwardedHeaders enumeration
• app.UseStaticFiles() enables using static files for the request. If we don’t set a path to the static files directory, it will use a wwwroot folder in our project by default.
• app.UseHsts() will add middleware for using HSTS, which adds the Strict-Transport-Security header.
1.6 Additional Code in the Program Class
We have to pay attention to the AddControllers() method. This method registers only the controllers in IServiceCollection and not Views or Pages because they are not required in the Web API project which we are building.
Right below the controller registration, we have this line of code:
var app = builder.Build();
With the Build method, we are creating the app variable of the type WebApplication. This class (WebApplication) is very important since it implements multiple interfaces like IHost that we can use to start and stop the host, IApplicationBuilder that we use to build the middleware pipeline (as you could’ve seen from our previous custom code), and IEndpointRouteBuilder used to add endpoints in our app.
The UseHttpRedirection method is used to add the middleware for the redirection from HTTP to HTTPS. Also, we can see the UseAuthorization method that adds the authorization middleware to the specified IApplicationBuilder to enable authorization capabilities.
Finally, we can see the MapControllers method that adds the endpoints from controller actions to the IEndpointRouteBuilder and the Run method that runs the application and block the calling thread until the host shutdown.
Microsoft advises that the order of adding different middlewares to the application builder is very important, and we are going to talk about that in the middleware section of this book.
1.7 Environment-Based Settings
While we develop our application, we use the “development” environment. But as soon as we publish our application, it goes to the “production” environment. Development and production environments should have different URLs, ports, connection strings, passwords, and other sensitive information.
Therefore, we need to have a separate configuration for each environment and that’s easy to accomplish by using .NET Core-provided mechanisms.
As soon as we create a project, we are going to see the appsettings.json file in the root, which is our main settings file, and when we expand it we are going to see the appsetings.Development.json file by default. These files are separate on the file system, but Visual Studio makes it obvious that they are connected somehow:
The apsettings.{EnvironmentSuffix}.json files are used to override the main appsettings.json file. When we use a key-value pair from the original file, we override it. We can also define environment-specific values too.
For the production environment, we should add another file: appsettings.Production.json:
The appsettings.Production.json file should contain the configuration for the production environment.
To set which environment our application runs on, we need to set up the ASPNETCORE_ENVIRONMENT environment variable. For example, to run the application in production, we need to set it to the Production value on the machine we do the deployment to.
We can set the variable through the command prompt by typing set ASPNETCORE_ENVIRONMENT=Production in Windows or export ASPNET_CORE_ENVIRONMENT=Production in Linux.
ASP.NET Core applications use the value of that environment variable to decide which appsettings file to use accordingly. In this case, that will be appsettings.Production.json.
If we take a look at our launchSettings.json file, we are going to see that this variable is currently set to Development.
Now, let’s talk a bit more about the middleware in ASP.NET Core applications.
1.8 ASP.NET Core Middleware
As we already used some middleware code to modify the application’s pipeline (CORS, Authorization...), and we are going to use the middleware throughout the rest of the book, we should be more familiar with the ASP.NET Core middleware.
ASP.NET Core middleware is a piece of code integrated inside the application’s pipeline that we can use to handle requests and responses. When we talk about the ASP.NET Core middleware, we can think of it as a code section that executes with every request.
Usually, we have more than a single middleware component in our application. Each component can:
• Pass the request to the next middleware component in the pipeline and also
• It can execute some work before and after the next component in the pipeline
To build a pipeline, we are using request delegates, which handle each HTTP request. To configure request delegates, we use the Run, Map, and Use extension methods. Inside the request pipeline, an application executes each component in the same order they are placed in the code- top to bottom:
Additionally, we can see that each component can execute custom logic before using the next delegate to pass the execution to another component. The last middleware component doesn’t call the next delegate, which means that this component is short-circuiting the pipeline. This is a terminal middleware because it stops further middleware from processing the request. It executes the additional logic and then returns the execution to the previous middleware components.
Before we start with examples, it is quite important to know about the order in which we should register our middleware components. The order is important for the security, performance, and functionality of our applications:
As we can see, we should register the exception handler in the early stage of the pipeline flow so it could catch all the exceptions that can happen in the later stages of the pipeline. When we create a new ASP.NET Core app, many of the middleware components are already registered in the order from the diagram. We have to pay attention when registering additional existing components or the custom ones to fit this recommendation.
For example, when adding CORS to the pipeline, the app in the development environment will work just fine if you don’t add it in this order. But we’ve received several questions from our readers stating that they face the CORS problem once they deploy the app. But once we suggested moving the CORS registration to the required place, the problem disappeared.
Now, we can use some examples to see how we can manipulate the application’s pipeline. For this section’s purpose, we are going to create a separate application that will be dedicated only to this section of the book. The later sections will continue from the previous project, that we’ve already created.
1.8.1 Creating a First Middleware Component
Let’s start by creating a new ASP.NET Core Web API project, and name it MiddlewareExample.
In the launchSettings.json file, we are going to add some changes regarding the launch profiles:
Now, inside the Program class, right below the UseAuthorization part, we are going to use an anonymous method to create a first middleware component:
app.UseAuthorization();
app.Run(async context => { await context.Response.WriteAsync("Hello from the middleware component."); });
app.MapControllers();
We use the Run method, which adds a terminal component to the app pipeline. We can see we are not using the next delegate because the Run method is always terminal and terminates the pipeline. This method accepts a single parameter of the RequestDelegate type. If we inspect this delegate we are going to see that it accepts a single HttpContext parameter:
namespace Microsoft.AspNetCore.Http { public delegate Task RequestDelegate(HttpContext context); }
So, we are using that context parameter to modify our requests and responses inside the middleware component. In this specific example, we are modifying the response by using the WriteAsync method. For this method, we need Microsoft.AspNetCore.Http namespace.
Let’s start the app, and inspect the result:
There we go. We can see a result from our middleware.
1.8.2 Working with the Use Method
To chain multiple request delegates in our code, we can use the Use method. This method accepts a Func delegate as a parameter and returns a Task as a result:
public static IApplicationBuilder Use(this IApplicationBuilder app, Func<HttpContext, Func<Task>, Task> middleware);
So, this means when we use it, we can make use of two parameters, context and next:
app.UseAuthorization(); app.Use(async (context, next) => { Console.WriteLine($"Logic before executing the next delegate in the Use method"); await next.Invoke(); Console.WriteLine($"Logic after executing the next delegate in the Use method"); }); app.Run(async context => { Console.WriteLine($"Writing the response to the client in the Run method"); await context.Response.WriteAsync("Hello from the middleware component."); }); app.MapControllers();
As you can see, we add several logging messages to be sure what the order of executions inside middleware components is. First, we write to a console window, then we invoke the next delegate passing the execution to another component in the pipeline. In the Run method, we write a second message to the console window and write a response to the client. After that, the execution is returned to the Use method and we write the third message (the one below the next delegate invocation) to the console window.
The Run method doesn’t accept the next delegate as a parameter, so without it to send the execution to another component, this component short-circuits the request pipeline.
Now, let’s start the app and inspect the result, which proves our execution order:
Maybe you will see two sets of messages but don’t worry, that’s because the browser sends two sets of requests, one for the /weatherforecast and another for the favicon.ico. If you, for example, use Postman to test this, you will see only one set of messages.
One more thing to mention. We shouldn’t call the next.Invoke after we send the response to the client. This can cause exceptions if we try to set the status code or modify the headers of the response.
For example:
app.Use(async (context, next) => { await context.Response.WriteAsync("Hello from the middleware component."); await next.Invoke(); Console.WriteLine($"Logic after executing the next delegate in the Use method"); }); app.Run(async context => { Console.WriteLine($"Writing the response to the client in the Run method"); context.Response.StatusCode = 200; await context.Response.WriteAsync("Hello from the middleware component."); });
Here we write a response to the client and then call next.Invoke. Of course, this passes the execution to the next component in the pipeline. There, we try to set the status code of the response and write another one. But let’s inspect the result:
We can see the error message, which is pretty self-explanatory.
1.8.3 Using the Map and MapWhen Methods
To branch the middleware pipeline, we can use both Map and MapWhen methods. The Map method is an extension method that accepts a path string as one of the parameters:
public static IApplicationBuilder Map(this IApplicationBuilder app, PathString pathMatch, Action<IApplicationBuilder> configuration)
When we provide the pathMatch string, the Map method will compare it to the start of the request path. If they match, the app will execute the branch.
So, let’s see how we can use this method by modifying the Program class:
app.Use(async (context, next) => { Console.WriteLine($"Logic before executing the next delegate in the Use method"); await next.Invoke(); Console.WriteLine($"Logic after executing the next delegate in the Use method"); }); app.Map("/usingmapbranch", builder => { builder.Use(async (context, next) => { Console.WriteLine("Map branch logic in the Use method before the next delegate"); await next.Invoke(); Console.WriteLine("Map branch logic in the Use method after the next delegate"); }); builder.Run(async context => { Console.WriteLine($"Map branch response to the client in the Run method"); await context.Response.WriteAsync("Hello from the map branch."); }); }); app.Run(async context => { Console.WriteLine($"Writing the response to the client in the Run method"); await context.Response.WriteAsync("Hello from the middleware component."); });
By using the Map method, we provide the path match, and then in the delegate, we use our well-known Use and Run methods to execute middleware components.
Now, if we start the app and navigate to /usingmapbranch, we are going to see the response in the browser:
But also, if we inspect console logs, we are going to see our new messages:
Here, we can see the messages from the Use method before the branch, and the messages from the Use and Run methods inside the Map branch. We are not seeing any message from the Run method outside the branch. It is important to know that any middleware component that we add after the Map method in the pipeline won’t be executed. This is true even if we don’t use the Run middleware inside the branch.
1.8.4 Using MapWhen Method
If we inspect the MapWhen method, we are going to see that it accepts two parameters:
Here, if our request contains the provided query string, we execute the Run method by writing the response to the client. So, as we said, based on the predicate’s result the MapWhen method branch the request pipeline.
And there we go. We can see our expected message. Of course, we can chain multiple middleware components inside this method as well.
So, now we have a good understanding of using middleware and its order of invocation in the ASP.NET Core application. This knowledge is going to be very useful to us once we start working on a custom error handling middleware (a few sections later).
In the next chapter, we’ll learn how to configure a Logger service because it’s really important to have it configured as early in the project as possible. We can close this app, and continue with the CompanyEmployees app.
2 Configuring a logging service
Why do logging messages matter so much during application development? While our application is in the development stage, it's easy to debug the code and find out what happened. But debugging in a production environment is not that easy.
That's why log messages are a great way to find out what went wrong and why and where the exceptions have been thrown in our code in the production environment. Logging also helps us more easily follow the flow of our application when we don’t have access to the debugger.
.NET Core has its implementation of the logging mechanism, but in all our projects we prefer to create our custom logger service with the external logger library NLog.
We are going to do that because having an abstraction will allow us to have any logger behind our interface. This means that we can start with NLog, and at some point, we can switch to any other logger and our interface will still work because of our abstraction.
2.1 Creating the Required Projects
Let’s create two new projects. In the first one named Contracts, we are going to keep our interfaces. We will use this project later on too, to define our contracts for the whole application. The second one, LoggerService, we are going to use to write our logger logic in.
To create a new project, right-click on the solution window, choose Add, and then NewProject. Choose the Class Library (C#) project template:
Finally, name it Contracts, and choose the .NET 6.0 as a version. Do the same thing for the second project and name it LoggerService. Now that we have these projects in place, we need to reference them from our main project.
To do that, navigate to the solution explorer. Then in the LoggerService project, right-click on Dependencies and choose the Add Project Reference option. Under Projects, click Solution and check the Contracts project.
Now, in the main project right click on Dependencies and then click on Add Project Reference. Check the LoggerService checkbox to import it. Since we have referenced the Contracts project through the LoggerService, it will be available in the main project too.
2.2 Creating the ILoggerManager Interface and Installing NLog
Our logger service will contain four methods for logging our messages:
To achieve this, we are going to create an interface named ILoggerManager inside the Contracts project containing those four method definitions.
So, let’s do that first by right-clicking on the Contracts project, choosing the Add -> New Item menu, and then selecting the Interface option where we have to specify the name ILoggerManager and click the Add button. After the file creation, we can add the code:
Before we implement this interface inside the LoggerService project, we need to install the NLog library in our LoggerService project. NLog is a logging platform for .NET which will help us create and log our messages.
We are going to show two different ways of adding the NLog library to our project.
In the LoggerService project, right-click on the Dependencies and choose Manage NuGet Packages. After the NuGet Package Manager window appears, just follow these steps:
From the View menu, choose Other Windows and then click on the Package Manager Console. After the console appears, type:
After a couple of seconds, NLog is up and running in our application.
2.3 Implementing the Interface and Nlog.Config File
In the LoggerService project, we are going to create a new class: LoggerManager. We can do that by repeating the same steps for the interface creation just choosing the class option instead of an interface. Now let’s have it implement the ILoggerManager interface we previously defined:
public class LoggerManager : ILoggerManager { private static ILogger logger = LogManager.GetCurrentClassLogger(); public LoggerManager() { } public void LogDebug(string message) => logger.Debug(message); public void LogError(string message) => logger.Error(message); public void LogInfo(string message) => logger.Info(message); public void LogWarn(string message) => logger.Warn(message); }
As you can see, our methods are just wrappers around NLog’s methods. Both ILogger and LogManager are part of the NLog namespace. Now, we need to configure it and inject it into the Program class in the section related to the service configuration.
NLog needs to have information about where to put log files on the file system, what the name of these files will be, and what is the minimum level of logging that we want.
We are going to define all these constants in a text file in the main project and name it nlog.config. So, let’s right-click on the main project, choose Add -> New Item, and then search for the Text File. Select the Text File, and add the name nlog.config.
You can find the internal logs at the project root, and the logs folder in the bin\debug folder of the main project once we start the app. Once the application is published both folders will be created at the root of the output folder which is what we want.
NOTE: If you want to have more control over the log output, we suggest renaming the current file to nlog.development.config and creating another configuration file called nlog.production.config. Then you can do something like this in the code: env.ConfigureNLog($"nlog.{env.EnvironmentName}.config"); to get the different configuration files for different environments. From our experience production path is what matters, so this might be a bit redundant.
2.4 Configuring Logger Service for Logging Messages
Setting up the configuration for a logger service is quite easy. First, we need to update the Program class and include the path to the configuration file for the NLog configuration:
using NLog; var builder = WebApplication.CreateBuilder(args); LogManager.LoadConfiguration(string.Concat(Directory.GetCurrentDirectory(), "/nlog.config")); builder.Services.ConfigureCors(); builder.Services.ConfigureIISIntegration();
We are using NLog’s LogManager static class with the LoadConfiguration method to provide a path to the configuration file.
NOTE: If VisualStudio asks you to install the NLog package in the main project, don’t do it. Just remove the LoggerService reference from the main project and add it again. We have already installed the required package in the LoggerService project and the main project should be able to reference it as well.
The next thing we need to do is to add the logger service inside the .NET Core’s IOC container. There are three ways to do that:
• By calling the services.AddSingleton method, we can create a service the first time we request it and then every subsequent request will call the same instance of the service. This means that all components share the same service every time they need it and the same instance will be used for every method call.
• By calling the services.AddScoped method, we can create a service once per request. That means whenever we send an HTTP request to the application, a new instance of the service will be created.
• By calling the services.AddTransient method, we can create a service each time the application requests it. This means that if multiple components need the service, it will be created again for every single component request.
So, let’s add a new method in the ServiceExtensions class:
public static void ConfigureLoggerService(this IServiceCollection services) => services.AddSingleton<ILoggerManager, LoggerManager>();
And after that, we need to modify the Program class to include our newly created extension method:
Every time we want to use a logger service, all we need to do is to inject it into the constructor of the class that needs it. .NET Core will resolve that service and the logging features will be available.
This type of injecting a class is called Dependency Injection and it is built into .NET Core.
Let’s learn a bit more about it.
2.5 DI, IoC, and Logger Service Testing
What is Dependency Injection (DI) exactly and what is IoC (Inversion of Control)?
Dependency injection is a technique we use to achieve the decoupling of objects and their dependencies. It means that rather than instantiating an object explicitly in a class every time we need it, we can instantiate it once and then send it to the class.
This is often done through a constructor. The specific approach we utilize is also known as the Constructor Injection.
In a system that is designed around DI, you may find many classes requesting their dependencies via their constructors. In this case, it is helpful to have a class that manages and provides dependencies to classes through the constructor.
These classes are referred to as containers or more specifically, Inversion of Control containers. An IoC container is essentially a factory that is responsible for providing instances of the types that are requested from it.
To test our logger service, we are going to use the default WeatherForecastController. You can find it in the main project in the Controllers folder. It comes with the ASP.NET Core Web API template.
In the Solution Explorer, we are going to open the Controllers folder and locate the WeatherForecastController class. Let’s modify it:
[Route("[controller]")] [ApiController] public class WeatherForecastController : ControllerBase { private ILoggerManager _logger; public WeatherForecastController(ILoggerManager logger) { _logger = logger; } [HttpGet] public IEnumerable<string> Get() { _logger.LogInfo("Here is info message from our values controller."); _logger.LogDebug("Here is debug message from our values controller."); _logger.LogWarn("Here is warn message from our values controller."); _logger.LogError("Here is an error message from our values controller."); return new string[] { "value1", "value2" }; } }
As a result, you will see an array of two strings. Now go to the folder that you have specified in the nlog.config file, and check out the result. You should see two folders: the internal_logs folder and the logs folder. Inside the logs folder, you should find a file with the following logs:
image
That’s all we need to do to configure our logger for now. We’ll add some messages to our code along with the new features.
3 Onion architecture implementation
In this chapter, we are going to talk about the Onion architecture, its layers, and the advantages of using it. We will learn how to create different layers in our application to separate the different application parts and improve the application's maintainability and testability.
That said, we are going to create a database model and transfer it to the MSSQL database by using the code first approach. So, we are going to learn how to create entities (model classes), how to work with the DbContext class, and how to use migrations to transfer our created database model to the real database. Of course, it is not enough to just create a database model and transfer it to the database. We need to use it as well, and for that, we will create a Repository pattern as a data access layer.
With the Repository pattern, we create an abstraction layer between the data access and the business logic layer of an application. By using it, we are promoting a more loosely coupled approach to access our data in the database.
Also, our code becomes cleaner, easier to maintain, and reusable. Data access logic is stored in a separate class, or sets of classes called a repository, with the responsibility of persisting the application’s business model.
Additionally, we are going to create a Service layer to extract all the business logic from our controllers, thus making the presentation layer and the controllers clean and easy to maintain.
So, let’s start with the Onion architecture explanation.
3.1 About Onion Architecture
The Onion architecture is a form of layered architecture and we can visualize these layers as concentric circles. Hence the name Onion architecture. The Onion architecture was first introduced by Jeffrey Palermo, to overcome the issues of the traditional N-layered architecture approach.
There are multiple ways that we can split the onion, but we are going to choose the following approach where we are going to split the architecture into 4 layers:
Conceptually, we can consider that the Infrastructure and Presentation layers are on the same level of the hierarchy.
Now, let us go ahead and look at each layer with more detail to see why we are introducing it and what we are going to create inside of that layer:
We can see all the different layers that we are going to build in our project.
3.1.1 Advantages of the Onion Architecture
Let us take a look at what are the advantages of Onion architecture, and why we would want to implement it in our projects.
All of the layers interact with each other strictly through the interfaces defined in the layers below. The flow of dependencies is towards the core of the Onion. We will explain why this is important in the next section.
Using dependency inversion throughout the project, depending on abstractions (interfaces) and not the implementations, allows us to switch out the implementation at runtime transparently. We are depending on abstractions at compile-time, which gives us strict contracts to work with, and we are being provided with the implementation at runtime.
Testability is very high with the Onion architecture because everything depends on abstractions. The abstractions can be easily mocked with a mocking library such as Moq. We can write business logic without concern about any of the implementation details. If we need anything from an external system or service, we can just create an interface for it and consume it. We do not have to worry about how it will be implemented.The higher layers of the Onion will take care of implementing that interface transparently.
3.1.2 Flow of Dependencies
The main idea behind the Onion architecture is the flow of dependencies, or rather how the layers interact with each other. The deeper the layer resides inside the Onion, the fewer dependencies it has.
The Domain layer does not have any direct dependencies on the outside layers. It is isolated, in a way, from the outside world. The outer layers are all allowed to reference the layers that are directly below them in the hierarchy.
We can conclude that all the dependencies in the Onion architecture flow inwards. But we should ask ourselves, why is this important?
The flow of dependencies dictates what a certain layer in the Onion architecture can do. Because it depends on the layers below it in the hierarchy, it can only call the methods that are exposed by the lower layers.
We can use lower layers of the Onion architecture to define contracts or interfaces. The outer layers of the architecture implement these interfaces. This means that in the Domain layer, we are not concerning ourselves with infrastructure details such as the database or external services.
Using this approach, we can encapsulate all of the rich business logic in the Domain and Service layers without ever having to know any implementation details. In the Service layer, we are going to depend only on the interfaces that are defined by the layer below, which is the Domain layer.
So, after all the theory, we can continue with our project implementation.
Let’s start with the models and the Entities project.
3.2 Creating Models
Using the example from the second chapter of this book, we are going to extract a new Class Library project named Entities.
Inside it, we are going to create a folder named Models, which will contain all the model classes (entities). Entities represent classes that Entity Framework Core uses to map our database model with the tables from the database. The properties from entity classes will be mapped to the database columns.
So, in the Models folder we are going to create two classes and modify them:
public class Company { [Column("CompanyId")]
public Guid Id { get; set; } [Required(ErrorMessage = "Company name is a required field.")] [MaxLength(60, ErrorMessage = "Maximum length for the Name is 60 characters.")] public string? Name { get; set; } [Required(ErrorMessage = "Company address is a required field.")] [MaxLength(60, ErrorMessage = "Maximum length for the Address is 60 characters")] public string? Address { get; set; } public string? Country { get; set; } public ICollection<Employee>? Employees { get; set; } } public class Employee { [Column("EmployeeId")] public Guid Id { get; set; } [Required(ErrorMessage = "Employee name is a required field.")] [MaxLength(30, ErrorMessage = "Maximum length for the Name is 30 characters.")] public string? Name { get; set; } [Required(ErrorMessage = "Age is a required field.")] public int Age { get; set; } [Required(ErrorMessage = "Position is a required field.")] [MaxLength(20, ErrorMessage = "Maximum length for the Position is 20 characters.")] public string? Position { get; set; } [ForeignKey(nameof(Company))] public Guid CompanyId { get; set; } public Company? Company { get; set; } }
We have created two classes: the Company and Employee. Those classes contain the properties which Entity Framework Core is going to map to the columns in our tables in the database. But not all the properties will be mapped as columns. The last property of the Company class (Employees) and the last property of the Employee class (Company) are navigational properties; these properties serve the purpose of defining the relationship between our models.
We can see several attributes in our entities. The [Column] attribute will specify that the Id property is going to be mapped with a different name in the database. The [Required] and [MaxLength] properties are here for validation purposes. The first one declares the property as mandatory and the second one defines its maximum length.
Once we transfer our database model to the real database, we are going to see how all these validation attributes and navigational properties affect the column definitions.
3.3 Context Class and the Database Connection
Before we start with the context class creation, we have to create another .NET Class Library and name it Repository. We are going to use this project for the database context and repository implementation.
Now, let's create the context class, which will be a middleware component for communication with the database. It must inherit from the Entity Framework Core’s DbContext class and it consists of DbSet properties, which EF Core is going to use for the communication with the database.Because we are working with the DBContext class, we need to install the Microsoft.EntityFrameworkCore package in the Repository project. Also, we are going to reference the Entities project from the Repository project:
Then, let’s navigate to the root of the Repository project and create the RepositoryContext class:
public class RepositoryContext : DbContext { public RepositoryContext(DbContextOptions options) : base(options) { }
public DbSet<Company>? Companies { get; set; } public DbSet<Employee>? Employees { get; set; } }
After the class modification, let’s open the appsettings.json file, in the main project, and add the connection string named sqlconnection:
It is quite important to have the JSON object with the ConnectionStrings name in our appsettings.json file, and soon you will see why.
But first, we have to add the Repository project’s reference into the main project.
Then, let’s create a new ContextFactory folder in the main project and inside it a new RepositoryContextFactory class. Since our RepositoryContext class is in a Repository project and not in the main one, this class will help our application create a derived DbContext instance during the design time which will help us with our migrations:
public class RepositoryContextFactory : IDesignTimeDbContextFactory<RepositoryContext> { public RepositoryContext CreateDbContext(string[] args) { var configuration = new ConfigurationBuilder() .SetBasePath(Directory.GetCurrentDirectory()) .AddJsonFile("appsettings.json") .Build(); var builder = new DbContextOptionsBuilder<RepositoryContext>() .UseSqlServer(configuration.GetConnectionString("sqlConnection")); return new RepositoryContext(builder.Options); } }
We are using the IDesignTimeDbContextFactory <out TContext> interface that allows design-time services to discover implementations of this interface. Of course, the TContext parameter is our RepositoryContext class.
For this, we need to add two using directives:
using Microsoft.EntityFrameworkCore.Design;
using Repository;
Then, we have to implement this interface with the CreateDbContext method. Inside it, we create the configuration variable of the IConfigurationRoot type and specify the appsettings file, we want to use. With its help, we can use the GetConnectionString method to access the connection string from the appsettings.json file. Moreover, to be able to use the UseSqlServer method, we need to install the Microsoft.EntityFrameworkCore.SqlServer package in the main project and add one more using directive:
using Microsoft.EntityFrameworkCore;
If we navigate to the GetConnectionString method definition, we will see that it is an extension method that uses the ConnectionStrings name from the appsettings.json file to fetch the connection string by the provided key:
Finally, in the CreateDbContext method, we return a new instance of our RepositoryContext class with provided options.
3.4 Migration and Initial Data Seed
Migration is a standard process of creating and updating the database from our application. Since we are finished with the database model creation, we can transfer that model to the real database. But we need to modify our CreateDbContext method first:
var builder = new DbContextOptionsBuilder<RepositoryContext>() .
UseSqlServer(configuration.GetConnectionString("sqlConnection"), b => b.MigrationsAssembly("CompanyEmployees"));
We have to make this change because migration assembly is not in our main project, but in the Repository project. So, we’ve just changed the project for the migration assembly.
Before we execute our migration commands, we have to install an additional ef core library: Microsoft.EntityFrameworkCore.Tools
Now, let’s open the Package Manager Console window and create our first migration:
PM> Add-Migration DatabaseCreation
With this command, we are creating migration files and we can find them in the Migrations folder in our main project:
With those files in place, we can apply migration:
PM> Update-Database
Excellent. We can inspect our database now:
Once we have the database and tables created, we should populate them with some initial data. To do that, we are going to create another folder in the Repository project called Configuration and add the CompanyConfiguration class:
public class CompanyConfiguration : IEntityTypeConfiguration<Company> { public void Configure(EntityTypeBuilder<Company> builder) { builder.HasData ( new Company { Id = new Guid("c9d4c053-49b6-410c-bc78-2d54a9991870"), Name = "IT_Solutions Ltd", Address = "583 Wall Dr. Gwynn Oak, MD 21207", Country = "USA" }, new Company { Id = new Guid("3d490a70-94ce-4d15-9494-5248280c2ce3"), Name = "Admin_Solutions Ltd", Address = "312 Forest Avenue, BF 923", Country = "USA" } ); } }
Let’s do the same thing for the EmployeeConfiguration class:
public class EmployeeConfiguration : IEntityTypeConfiguration<Employee> { public void Configure(EntityTypeBuilder<Employee> builder) { builder.HasData ( new Employee { Id = new Guid("80abbca8-664d-4b20-b5de-024705497d4a"), Name = "Sam Raiden", Age = 26, Position = "Software developer", CompanyId = new Guid("c9d4c053-49b6-410c-bc78-2d54a9991870") }, new Employee { Id = new Guid("86dba8c0-d178-41e7-938c-ed49778fb52a"), Name = "Jana McLeaf", Age = 30, Position = "Software developer", CompanyId = new Guid("c9d4c053-49b6-410c-bc78-2d54a9991870") }, new Employee { Id = new Guid("021ca3c1-0deb-4afd-ae94-2159a8479811"), Name = "Kane Miller", Age = 35, Position = "Administrator", CompanyId = new Guid("3d490a70-94ce-4d15-9494-5248280c2ce3") } ); } }
To invoke this configuration, we have to change the RepositoryContext class:
public class RepositoryContext: DbContext { public RepositoryContext(DbContextOptions options) : base(options) { } protected override void OnModelCreating(ModelBuilder modelBuilder) { modelBuilder.ApplyConfiguration(new CompanyConfiguration()); modelBuilder.ApplyConfiguration(new EmployeeConfiguration()); } public DbSet<Company> Companies { get; set; } public DbSet<Employee> Employees { get; set; } }
Now, we can create and apply another migration to seed these data to the database:
PM> Add-Migration InitialData
PM> Update-Database
This will transfer all the data from our configuration files to the respective tables.
3.5 Repository Pattern Logic
After establishing a connection to the database and creating one, it's time to create a generic repository that will provide us with the CRUD methods. As a result, all the methods can be called upon any repository class in our project.
Furthermore, creating the generic repository and repository classes that use that generic repository is not going to be the final step. We will go a step further and create a wrapper class around repository classes and inject it as a service in a dependency injection container.
Consequently, we will be able to instantiate this class once and then call any repository class we need inside any of our controllers.
The advantages of this approach will become clearer once we use it in the project.
That said, let’s start by creating an interface for the repository inside the Contracts project:
Right after the interface creation, we are going to reference Contracts inside the Repository project. Also, in the Repository project, we are going to create an abstract class RepositoryBase — which is going to implement the IRepositoryBase interface:
public abstract class RepositoryBase<T> : IRepositoryBase<T> where T : class { protected RepositoryContext RepositoryContext; public RepositoryBase(RepositoryContext repositoryContext) => RepositoryContext = repositoryContext; public IQueryable<T> FindAll(bool trackChanges) => !trackChanges ? RepositoryContext.Set<T>() .AsNoTracking() : RepositoryContext.Set<T>(); public IQueryable<T> FindByCondition(Expression<Func<T, bool>> expression, bool trackChanges) => !trackChanges ? RepositoryContext.Set<T>() .Where(expression) .AsNoTracking() : RepositoryContext.Set<T>() .Where(expression); public void Create(T entity) => RepositoryContext.Set<T>().Add(entity); public void Update(T entity) => RepositoryContext.Set<T>().Update(entity); public void Delete(T entity) => RepositoryContext.Set<T>().Remove(entity); }
This abstract class as well as the IRepositoryBase interface work with the generic type T. This type T gives even more reusability to the RepositoryBase class. That means we don’t have to specify the exact model (class) right now for the RepositoryBase to work with. We can do that later on.
Moreover, we can see the trackChanges parameter. We are going to use it to improve our read-only query performance. When it’s set to false, we attach the AsNoTracking method to our query to inform EF Core that it doesn’t need to track changes for the required entities. This greatly improves the speed of a query.
3.6 Repository User Interfaces and Classes
Now that we have the RepositoryBase class, let’s create the user classes that will inherit this abstract class.
By inheriting from the RepositoryBase class, they will have access to all the methods from it. Furthermore, every user class will have its interface for additional model-specific methods.
This way, we are separating the logic that is common for all our repository user classes and also specific for every user class itself.
Let’s create the interfaces in the Contracts project for the Company and Employee classes:
namespace Contracts { public interface ICompanyRepository { } } namespace Contracts { public interface IEmployeeRepository { } }
After this, we can create repository user classes in the Repository project.
The first thing we are going to do is to create the CompanyRepository class:
public class CompanyRepository : RepositoryBase<Company>, ICompanyRepository { public CompanyRepository(RepositoryContext repositoryContext) : base(repositoryContext) { } }
And then, the EmployeeRepository class:
public class EmployeeRepository : RepositoryBase<Employee>, IEmployeeRepository
{ public EmployeeRepository(RepositoryContext repositoryContext) : base(repositoryContext) { } }
After these steps, we are finished creating the repository and repository- user classes. But there are still more things to do.
3.7 Creating a Repository Manager
It is quite common for the API to return a response that consists of data from multiple resources; for example, all the companies and just some employees older than 30. In such a case, we would have to instantiate both of our repository classes and fetch data from their resources.
Maybe it’s not a problem when we have only two classes, but what if we need the combined logic of five or even more different classes? It would just be too complicated to pull that off.
With that in mind, we are going to create a repository manager class, which will create instances of repository user classes for us and then register them inside the dependency injection container. After that, we can inject it inside our services with constructor injection (supported by ASP.NET Core). With the repository manager class in place, we may call any repository user class we need.
But we are also missing one important part. We have the Create, Update, and Delete methods in the RepositoryBase class, but they won’t make any change in the database until we call the SaveChanges method. Our repository manager class will handle that as well.
That said, let’s get to it and create a new interface in the Contract project:
public interface IRepositoryManager { ICompanyRepository Company { get; } IEmployeeRepository Employee { get; }
void Save(); }
And add a new class to the Repository project:
public sealed class RepositoryManager : IRepositoryManager { private readonly RepositoryContext _repositoryContext; private readonly Lazy<ICompanyRepository> _companyRepository; private readonly Lazy<IEmployeeRepository> _employeeRepository; public RepositoryManager(RepositoryContext repositoryContext) { _repositoryContext = repositoryContext; _companyRepository = new Lazy<ICompanyRepository>(() => new CompanyRepository(repositoryContext)); _employeeRepository = new Lazy<IEmployeeRepository>(() => new EmployeeRepository(repositoryContext)); } public ICompanyRepository Company => _companyRepository.Value; public IEmployeeRepository Employee => _employeeRepository.Value; public void Save() => _repositoryContext.SaveChanges(); }
As you can see, we are creating properties that will expose the concrete repositories and also we have the Save() method to be used after all the modifications are finished on a certain object. This is a good practice because now we can, for example, add two companies, modify two employees, and delete one company — all in one action — and then just call the Save method once. All the changes will be applied or if something fails, all the changes will be reverted:
The interesting part with the RepositoryManager implementation is that we are leveraging the power of the Lazy class to ensure the lazy initialization of our repositories. This means that our repository instances are only going to be created when we access them for the first time, and not before that.
After these changes, we need to register our manager class in the main project. So, let’s first modify the ServiceExtensions class by adding this code:
public static void ConfigureRepositoryManager(this IServiceCollection services) => services.AddScoped<IRepositoryManager, RepositoryManager>();
And in the Program class above the AddController() method, we have to add this code:
builder.Services.ConfigureRepositoryManager();
Excellent.
As soon as we add some methods to the specific repository classes, and add our service layer, we are going to be able to test this logic.
So, we did an excellent job here. The repository layer is prepared and ready to be used to fetch data from the database.
Now, we can continue towards creating a service layer in our application.
3.8 Adding a Service Layer
The Service layer sits right above the Domain layer (the Contracts project is the part of the Domain layer), which means that it has a reference to the Domain layer. The Service layer will be split into two projects, Service.Contracts and Service.
So, let’s start with the Service.Contracts project creation (.NET Core Class Library) where we will hold the definitions for the service interfaces that are going to encapsulate the main business logic. In the next section, we are going to create a presentation layer and then, we will see the full use of this project.
Once the project is created, we are going to add three interfaces inside it.
As you can see, we are following the same pattern as with the repository contracts implementation.
Now, we can create another project, name it Service, and reference the
Service.Contracts and Contracts projects inside it:
After that, we are going to create classes that will inherit from the interfaces that reside in the Service.Contracts project.
So, let’s start with the CompanyService class:
using Contracts; using Service.Contracts; namespace Service { internal sealed class CompanyService : ICompanyService { private readonly IRepositoryManager _repository; private readonly ILoggerManager _logger; public CompanyService(IRepositoryManager repository, ILoggerManager logger)
{ _repository = repository; _logger = logger; } } }
As you can see, our class inherits from the ICompanyService interface, and we are injecting the IRepositoryManager and ILoggerManager interfaces. We are going to use IRepositoryManager to access the repository methods from each user repository class (CompanyRepository or EmployeeRepository), and ILoggerManager to access the logging methods we’ve created in the second section of this book.
To continue, let’s create a new EmployeeService class:
using Contracts; using Service.Contracts; namespace Service { internal sealed class EmployeeService : IEmployeeService { private readonly IRepositoryManager _repository; private readonly ILoggerManager _logger; public EmployeeService(IRepositoryManager repository, ILoggerManager logger) { _repository = repository; _logger = logger; } } }
Finally, we are going to create the ServiceManager class:
public sealed class ServiceManager : IServiceManager { private readonly Lazy<ICompanyService> _companyService; private readonly Lazy<IEmployeeService> _employeeService; public ServiceManager(IRepositoryManager repositoryManager, ILoggerManager logger) { _companyService = new Lazy<ICompanyService>(() => new CompanyService(repositoryManager, logger)); _employeeService = new Lazy<IEmployeeService>(() => new EmployeeService(repositoryManager, logger)); } public ICompanyService CompanyService => _companyService.Value; public IEmployeeService EmployeeService => _employeeService.Value;}
Here, as we did with the RepositoryManager class, we are utilizing the Lazy class to ensure the lazy initialization of our services.
Now, with all these in place, we have to add the reference from the Service project inside the main project. Since Service is already referencing Service.Contracts, our main project will have the same reference as well.
Now, we have to modify the ServiceExtensions class:
public static void ConfigureServiceManager(this IServiceCollection services) => services.AddScoped<IServiceManager, ServiceManager>();
And we have to add using directives:
using Service;
using Service.Contracts;
Then, all we have to do is to modify the Program class to call this extension method:
With the RepositoryContextFactory class, which implements the IDesignTimeDbContextFactory interface, we have registered our RepositoryContext class at design time. This helps us find the RepositoryContext class in another project while executing migrations.
But, as you could see, we have the RepositoryManager service registration, which happens at runtime, and during that registration, we must have RepositoryContext registered as well in the runtime, so we could inject it into other services (like RepositoryManager service). This might be a bit confusing, so let’s see what that means for us.
With this, we have completed our implementation, and our service layer is ready to be used in our next chapter where we are going to learn about handling GET requests in ASP.NET Core Web API.
One additional thing. From .NET 6 RC2, there is a shortcut method AddSqlServer, which can be used like this:
public static void ConfigureSqlContext(this IServiceCollection services, IConfiguration configuration) => services.AddSqlServer<RepositoryContext>((configuration.GetConnectionString("sqlConnection")));
This method replaces both AddDbContext and UseSqlServer methods and allows an easier configuration. But it doesn’t provide all of the features the AddDbContext method provides. So for more advanced options, it is recommended to use AddDbContext. We will use it throughout the rest of the project.
4 HANDLING GET REQUESTS
We’re all set to add some business logic to our application. But before we do that, let’s talk a bit about controller classes and routing because they play an important part while working with HTTP requests.
4.1 Controllers and Routing in WEB API
Controllers should only be responsible for handling requests, model validation, and returning responses to the frontend or some HTTP client. Keeping business logic away from controllers is a good way to keep them lightweight, and our code more readable and maintainable.
If you want to create the controller in the main project, you would right- click on the Controllers folder and then Add=>Controller. Then from the menu, you would choose API Controller Class and give it a name:
But, that’s not the thing we are going to do. We don’t want to create our controllers in the main project.
What we are going to do instead is create a presentation layer in our application.
The purpose of the presentation layer is to provide the entry point to our system so that consumers can interact with the data. We can implement this layer in many ways, for example creating a REST API, gRPC, etc.
However, we are going to do something different from what you are normally used to when creating Web APIs. By convention, controllers are defined in the Controllers folder inside the main project.
Why is this a problem?
Because ASP.NET Core uses Dependency Injection everywhere, we need to have a reference to all of the projects in the solution from the main project. This allows us to configure our services inside the Program class.
While this is exactly what we want to do, it introduces a big design flaw. What’s preventing our controllers from injecting anything they want inside the constructor?
So how can we impose some more strict rules about what controllers can do?
Do you remember how we split the Service layer into the Service.Contracts and Service projects? That was one piece of the puzzle.
Another part of the puzzle is the creation of a new class library project,CompanyEmployees.Presentation.
Inside that new project, we are going to install Microsoft.AspNetCore.Mvc.Core package so it has access to the ControllerBase class for our future controllers. Additionally, let’s create a single class inside the Presentation project:
public static class AssemblyReference {}
It's an empty static class that we are going to use for the assembly reference inside the main project, you will see that in a minute.
The one more thing, we have to do is to reference the Service.Contracts project inside the Presentation project.
Now, we are going to delete the Controllers folder and the WeatherForecast.cs file from the main project because we are not going to need them anymore.
Next, we have to reference the Presentation project inside the main one. As you can see, our presentation layer depends only on the service contracts, thus imposing more strict rules on our controllers.
Without this code, our API wouldn’t work, and wouldn’t know where to route incoming requests. But now, our app will find all of the controllers inside of the Presentation project and configure them with the framework. They are going to be treated the same as if they were defined conventionally.
But, we don’t have our controllers yet. So, let’s navigate to the Presentation project, create a new folder named Controllers, and then a new class named CompaniesController. Since this is a class library project, we don’t have an option to create a controller as we had in the main project. Therefore, we have to create a regular class and then modify it:
using Microsoft.AspNetCore.Mvc; namespace CompanyEmployees.Presentation.Controllers { [Route("api/[controller]")] [ApiController] public class CompaniesController : ControllerBase { } }
We’ve created this controller in the same way the main project would.
Every web API controller class inherits from the ControllerBase abstract class, which provides all necessary behavior for the derived class.
Also, above the controller class we can see this part of the code:
[Route("api/[controller]")]
This attribute represents routing and we are going to talk more about routing inside Web APIs.
Web API routing routes incoming HTTP requests to the particular action method inside the Web API controller. As soon as we send our HTTP request, the MVC framework parses that request and tries to match it to an action in the controller.
There are two ways to implement routing in the project:
• Convention-based routing and
• Attribute routing
Convention-based routing is called such because it establishes a convention for the URL paths. The first part creates the mapping for the controller name, the second part creates the mapping for the action method, and the third part is used for the optional parameter. We can configure this type of routing in the Program class:
Our Web API project doesn’t configure routes this way, but if you create an MVC project this will be the default route configuration. Of course, if you are using this type of route configuration, you have to use the app.UseRouting method to add the routing middleware in the application’s pipeline.
If you inspect the Program class in our main project, you won’t find the UseRouting method because the routes are configured with the app.MapControllers method, which adds endpoints for controller actions without specifying any routes.
Attribute routing uses the attributes to map the routes directly to the action methods inside the controller. Usually, we place the base route above the controller class, as you can see in our Web API controller class. Similarly, for the specific action methods, we create their routes right above them.
While working with the Web API project, the ASP.NET Core team suggests that we shouldn’t use Convention-based Routing, but Attribute routing instead.
Different actions can be executed on the resource with the same URI, but with different HTTP Methods. In the same manner for different actions, we can use the same HTTP Method, but different URIs. Let’s explain this quickly.
For Get request, Post, or Delete, we use the same URI /api/companies but we use different HTTP Methods like GET, POST, or DELETE. But if we send a request for all companies or just one company, we are going to use the same GET method but different URIs (/api/companies for all companies and /api/companies/{companyId} for a single company).
We are going to understand this even more once we start implementing different actions in our controller.
4.2 Naming Our Resources
The resource name in the URI should always be a noun and not an action. That means if we want to create a route to get all companies, we should create this route: api/companies and not this one:/api/getCompanies.
The noun used in URI represents the resource and helps the consumer to understand what type of resource we are working with. So, we shouldn’t choose the noun products or orders when we work with the companies resource; the noun should always be companies. Therefore, by following this convention if our resource is employees (and we are going to work with this type of resource), the noun should be employees.
Another important part we need to pay attention to is the hierarchy between our resources. In our example, we have a Company as a principal entity and an Employee as a dependent entity. When we create a route for a dependent entity, we should follow a slightly different convention:/api/principalResource/{principalId}/dependentResource.
Because our employees can’t exist without a company, the route for the employee's resource should be /api/companies/{companyId}/employees.
With all of this in mind, we can start with the Get requests.
4.3 Getting All Companies From the Database
So let’s start.
The first thing we are going to do is to change the base route
from [Route("api/[controller]")] to [Route("api/companies")]. Even though the first route will work just fine, with the second example we are more specific to show that this routing should point to the CompaniesController class.
Now it is time to create the first action method to return all the companies from the database. Let’s create a definition for the GetAllCompanies method in the ICompanyRepository interface:
public interface ICompanyRepository { IEnumerable<Company> GetAllCompanies(bool trackChanges); }
For this to work, we need to add a reference from the Entities project to the Contracts project.
Now, we can continue with the interface implementation in the CompanyRepository class:
internal sealed class CompanyRepository : RepositoryBase<Company>, ICompanyRepository { public CompanyRepository(RepositoryContext repositoryContext) :base(repositoryContext) { } public IEnumerable<Company> GetAllCompanies(bool trackChanges) => FindAll(trackChanges) .OrderBy(c => c.Name) .ToList(); }
As you can see, we are calling the FindAll method from the RepositoryBase class, ordering the result with the OrderBy method, and then executing the query with the ToList method.
After the repository implementation, we have to implement a service layer.
Let’s start with the ICompanyService interface modification:
public interface ICompanyService { IEnumerable<Company> GetAllCompanies(bool trackChanges); }
Since the Company model resides in the Entities project, we have to add the Entities reference to the Service.Contracts project. At least, we have for now.
Let’s be clear right away before we proceed. Getting all the entities from the database is a bad idea. We’re going to start with the simplest method and change it later on.
Then, let’s continue with the CompanyService modification:
internal sealed class CompanyService : ICompanyService { private readonly IRepositoryManager _repository; private readonly ILoggerManager _logger; public CompanyService(IRepositoryManager repository, ILoggerManager logger) { _repository = repository; _logger = logger; } public IEnumerable<Company> GetAllCompanies(bool trackChanges) { try { var companies = _repository.Company.GetAllCompanies(trackChanges); return companies; } catch (Exception ex) { _logger.LogError($"Something went wrong in the {nameof(GetAllCompanies)} service method {ex}"); throw; } } }
We are using our repository manager to call the GetAllCompanies method from the CompanyRepository class and return all the companies from the database.
Finally, we have to return companies by using the GetAllCompanies method inside the Web API controller.
The purpose of the action methods inside the Web API controllers is not only to return results. It is the main purpose, but not the only one. We need to pay attention to the status codes of our Web API responses as well. Additionally, we are going to decorate our actions with the HTTP attributes which will mark the type of the HTTP request to that action.
So, let’s modify the CompaniesController:
[Route("api/companies")] [ApiController] public class CompaniesController : ControllerBase { private readonly IServiceManager _service; public CompaniesController(IServiceManager service) => _service = service; [HttpGet] public IActionResult GetCompanies() { try { var companies = _service.CompanyService.GetAllCompanies(trackChanges: false); return Ok(companies); } catch { return StatusCode(500, "Internal server error"); } } }
Let’s explain this code a bit.
First of all, we inject the IServiceManager interface inside the constructor. Then by decorating the GetCompanies action with
the [HttpGet] attribute, we are mapping this action to the GET request. Then, we use an injected service to call the service method that gets the data from the repository class.
The IActionResult interface supports using a variety of methods, which return not only the result but also the status codes. In this situation,the OK method returns all the companies and also the status code 200 — which stands for OK. If an exception occurs, we are going to return the internal server error with the status code 500.
Because there is no route attribute right above the action, the route for the GetCompanies action will be api/companies which is the route placed on top of our controller.
4.4 Testing the Result with Postman
To check the result, we are going to use a great tool named Postman, which helps a lot with sending requests and displaying responses. If you download our exercise files, you will find the file Bonus 2- CompanyEmployeesRequests.postman_collection.json, which contains a request collection divided for each chapter of this book. You can import them in Postman to save yourself the time of manually typing them:
NOTE: Please note that some GUID values will be different for your project, so you have to change them according to those values.
So let’s start the application by pressing the F5 button and check that it is now listening on the https://localhost:5001 address:
If this is not the case, you probably ran it in the IIS mode; so turn the application off and start it again, but in the CompanyEmployees mode:
Excellent, everything is working as planned. But we are missing something. We are using the Company entity to map our requests to the database and then returning it as a result to the client, and this is not a good practice. So, in the next part, we are going to learn how to improve our code with DTO classes.
4.5 DTO Classes vs. Entity Model Classes
A data transfer object (DTO) is an object that we use to transport data between the client and server applications.
So, as we said in a previous section of this book, it is not a good practice to return entities in the Web API response; we should instead use data transfer objects. But why is that?
Well, EF Core uses model classes to map them to the tables in the database and that is the main purpose of a model class. But as we saw, our models have navigational properties and sometimes we don’t want to map them in an API response. So, we can use DTO to remove any property or concatenate properties into a single property.
Moreover, there are situations where we want to map all the properties from a model class to the result — but still, we want to use DTO instead. The reason is if we change the database, we also have to change the properties in a model — but that doesn’t mean our clients want the result changed. So, by using DTO, the result will stay as it was before the model changes.
As we can see, keeping these objects separate (the DTO and model classes) leads to a more robust and maintainable code in our application.
Now, when we know why should we separate DTO from a model class in our code, let’s create a new project named Shared and then a new folder DataTransferObjects with the CompanyDto record inside:
namespace Shared.DataTransferObjects { public record CompanyDto(Guid Id, string Name, string FullAddress); }
Instead of a regular class, we are using a record for DTO. This specific record type is known as a Positional record.
A Record type provides us an easier way to create an immutable reference type in .NET. This means that the Record’s instance property values cannot change after its initialization. The data are passed by value and the equality between two Records is verified by comparing the value of their properties.
Records can be a valid alternative to classes when we have to send or receive data. The very purpose of a DTO is to transfer data from one part of the code to another, and immutability in many cases is useful. We use them to return data from a Web API or to represent events in our application.
This is the exact reason why we are using records for our DTOs.
In our DTO, we have removed the Employees property and we are going to use the FullAddress property to concatenate the Address and Country properties from the Company class. Furthermore, we are not using validation attributes in this record, because we are going to use this record only to return a response to the client. Therefore, validation attributes are not required.
So, the first thing we have to do is to add the reference from the Shared project to the Service.Contracts project, and remove the Entities reference. At this moment the Service.Contracts project is only referencing the Shared project.
Then, we have to modify the ICompanyService interface:
public interface ICompanyService { IEnumerable<CompanyDto> GetAllCompanies(bool trackChanges); }
And the CompanyService class:
public IEnumerable<CompanyDto> GetAllCompanies(bool trackChanges) { try { var companies = _repository.Company.GetAllCompanies(trackChanges); var companiesDto = companies.Select(c => new CompanyDto(c.Id, c.Name ?? "", string.Join(' ', c.Address, c.Country))) .ToList(); return companiesDto; } catch (Exception ex) { _logger.LogError($"Something went wrong in the {nameof(GetAllCompanies)} service method {ex}"); throw; } }
This time we get our CompanyDto result, which is a more preferred way. But this can be improved as well. If we take a look at our mapping code in the GetCompanies action, we can see that we manually map all the properties. Sure, it is okay for a few fields — but what if we have a lot more? There is a better and cleaner way to map our classes and that is by using the Automapper.
4.6 Using AutoMapper in ASP.NET Core
AutoMapper is a library that helps us with mapping objects in our applications. By using this library, we are going to remove the code for manual mapping — thus making the action readable and maintainable.
So, to install AutoMapper, let’s open a Package Manager Console window, choose the Service project as a default project from the drop-down list, and run the following command:
After installation, we are going to register this library in the Program class:
builder.Services.AddAutoMapper(typeof(Program));
As soon as our library is registered, we are going to create a profile class, also in the main project, where we specify the source and destination objects for mapping:
public class MappingProfile : Profile { public MappingProfile() { CreateMap<Company, CompanyDto>() .ForMember(c => c.FullAddress, opt => opt.MapFrom(x => string.Join(' ', x.Address, x.Country))); } }
The MappingProfile class must inherit from the AutoMapper’s Profile class. In the constructor, we are using the CreateMap method where we specify the source object and the destination object to map to. Because we have the FullAddress property in our DTO record, which contains both the Address and the Country from the model class, we have to specify additional mapping rules with the ForMember method.
Now, we have to modify the ServiceManager class to enable DI in our service classes:
public sealed class ServiceManager : IServiceManager { private readonly Lazy<ICompanyService> _companyService; private readonly Lazy<IEmployeeService> _employeeService; public ServiceManager(IRepositoryManager repositoryManager, ILoggerManager logger, IMapper mapper) { _companyService = new Lazy<ICompanyService>(() => new CompanyService(repositoryManager, logger, mapper)); _employeeService = new Lazy<IEmployeeService>(() => new EmployeeService(repositoryManager, logger, mapper)); } public ICompanyService CompanyService => _companyService.Value; public IEmployeeService EmployeeService => _employeeService.Value; }
Of course, now we have two errors regarding our service constructors. So we need to fix that in both CompanyService and EmployeeService classes:
Finally, we can modify the GetAllCompanies method in the CompanyService class:
public IEnumerable<CompanyDto> GetAllCompanies(bool trackChanges) { try { var companies = _repository.Company.GetAllCompanies(trackChanges); var companiesDto = _mapper.Map<IEnumerable<CompanyDto>>(companies); return companiesDto; } catch (Exception ex) { _logger.LogError($"Something went wrong in the {nameof(GetAllCompanies)} service method {ex}");
throw; } }
We are using the Map method and specify the destination and then the source object.
Excellent.
Now if we start our app and send the same request from Postman, we are going to get an error message:
This happens because AutoMapper is not able to find the specific FullAddress property as we specified in the MappingProfile class. We are intentionally showing this error for you to know what to do if it happens to you in your projects.
So to solve this, all we have to do is to modify the MappingProfile class:
This time, we are not using the ForMember method but the ForCtorParam method to specify the name of the parameter in the constructor that AutoMapper needs to map to.
We can see that everything is working as it is supposed to, but now with much better code.
5 GLOBAL ERROR HANDLING
Exception handling helps us deal with the unexpected behavior of our system. To handle exceptions, we use the try-catch block in our code as well as the finally keyword to clean up our resources afterward.
Even though there is nothing wrong with the try-catch blocks in our Actions and methods in the Web API project, we can extract all the exception handling logic into a single centralized place. By doing that, we make our actions cleaner, more readable, and the error handling process more maintainable.
In this chapter, we are going to refactor our code to use the built-in middleware for global error handling to demonstrate the benefits of this approach. Since we already talked about the middleware in ASP.NET Core (in section 1.8), this section should be easier to understand.
5.1 Handling Errors Globally with the Built-In Middleware
The UseExceptionHandler middleware is a built-in middleware that we can use to handle exceptions. So, let’s dive into the code to see this middleware in action.
We are going to create a new ErrorModel folder in the Entities project, and add the new class ErrorDetails in that folder:
using System.Text.Json; namespace Entities.ErrorModel { public class ErrorDetails { public int StatusCode { get; set; } public string? Message { get; set; } public override string ToString() => JsonSerializer.Serialize(this); } }
We are going to use this class for the details of our error message.
To continue, in the Extensions folder in the main project, we are going to add a new static class: ExceptionMiddlewareExtensions.cs.
Now, we need to modify it:
public static class ExceptionMiddlewareExtensions { public static void ConfigureExceptionHandler(this WebApplication app, ILoggerManager logger) { app.UseExceptionHandler(appError => { appError.Run(async context => { context.Response.StatusCode = (int)HttpStatusCode.InternalServerError; context.Response.ContentType = "application/json"; var contextFeature = context.Features.Get<IExceptionHandlerFeature>(); if (contextFeature != null) { logger.LogError($"Something went wrong: {contextFeature.Error}"); await context.Response.WriteAsync(new ErrorDetails() { StatusCode = context.Response.StatusCode, Message = "Internal Server Error.", }.ToString()); } }); }); } }
In the code above, we create an extension method, on top of the WebApplication type, and we call the UseExceptionHandler method. That method adds a middleware to the pipeline that will catch exceptions, log them, and re-execute the request in an alternate pipeline.
Inside the UseExceptionHandler method, we use the appError variable of the IApplicationBuilder type. With that variable, we call the Run method, which adds a terminal middleware delegate to the application’s pipeline. This is something we already know from section 1.8.
Then, we populate the status code and the content type of our response, log the error message and finally return the response with the custom-created object. Later on, we are going to modify this middleware even more to support our business logic in a service layer.
Of course, there are several namespaces we should add to make this work:
using Contracts; using Entities.ErrorModel; using Microsoft.AspNetCore.Diagnostics; using System.Net;
5.2 Program Class Modification
To be able to use this extension method, let’s modify the Program class:
var app = builder.Build(); var logger = app.Services.GetRequiredService<ILoggerManager>(); app.ConfigureExceptionHandler(logger); if (app.Environment.IsProduction()) app.UseHsts(); app.UseHttpsRedirection(); app.UseStaticFiles(); app.UseForwardedHeaders(new ForwardedHeadersOptions { ForwardedHeaders = ForwardedHeaders.All }); app.UseCors("CorsPolicy"); app.UseAuthorization(); app.MapControllers(); app.Run();
Here, we first extract the ILoggerManager service inside the logger variable. Then, we just call the ConfigureExceptionHandler method and pass that logger service. It is important to know that we have to extract the ILoggerManager service after the var app = builder.Build() code line because the Build method builds the WebApplication and registers all the services added with IOC.
Additionally, we remove the call to the UseDeveloperExceptionPage method in the development environment since we don’t need it now and it also interferes with our error handler middleware.
Finally, let’s remove the try-catch block from the GetAllCompanies service method:
public IEnumerable<CompanyDto> GetAllCompanies(bool trackChanges) { var companies = _repository.Company.GetAllCompanies(trackChanges); var companiesDto = _mapper.Map<IEnumerable<CompanyDto>>(companies); return companiesDto; }
And from our GetCompanies action:
[HttpGet] public IActionResult GetCompanies() { var companies = _service.CompanyService.GetAllCompanies(trackChanges: false); return Ok(companies); }
And there we go. Our methods are much cleaner now. More importantly, we can reuse this functionality to write more readable methods and actions in the future.
5.3 Testing the Result
To inspect this functionality, let’s add the following line to the GetCompanies action, just to simulate an error:
[HttpGet] public IActionResult GetCompanies() { throw new Exception("Exception"); var companies = _service.CompanyService.GetAllCompanies(trackChanges: false); return Ok(companies); }
NOTE: Once you send the request, Visual Studio will stop the execution inside the GetCompanies action on the line where we throw an exception. This is normal behavior and all you have to do is to click the continue button to finish the request flow. Additionally, you can start your app with CTRL+F5, which will prevent Visual Studio from stopping the execution. Also, if you want to start your app with F5 but still to avoid VS execution stoppages, you can open the Tools->Options->Debugging->General option and uncheck the Enable Just My Code checkbox.
We can check our log messages to make sure that logging is working as well.
6 GETTING ADDITIONAL RESOURCES
As of now, we can continue with GET requests by adding additional actions to our controller. Moreover, we are going to create one more controller for the Employee resource and implement an additional action in it.
6.1 Getting a Single Resource From the Database
Let’s start by modifying the ICompanyRepository interface:
public interface ICompanyRepository { IEnumerable<Company> GetAllCompanies(bool trackChanges); Company GetCompany(Guid companyId, bool trackChanges); }
Then, we are going to implement this interface in the CompanyRepository.cs file:
public Company GetCompany(Guid companyId, bool trackChanges) => FindByCondition(c => c.Id.Equals(companyId), trackChanges) .SingleOrDefault();
Then, we have to modify the ICompanyService interface:
And of course, we have to implement this interface in the CompanyService class:
public CompanyDto GetCompany(Guid id, bool trackChanges) { var company = _repository.Company.GetCompany(id, trackChanges); //Check if the company is null var companyDto = _mapper.Map<CompanyDto>(company); return companyDto; }
So, we are calling the repository method that fetches a single company from the database, maps the result to companyDto, and returns it. You can also see the comment about the null checks, which we are going to solve just in a minute.
Finally, let’s change the CompanyController class:
[HttpGet("{id:guid}")] public IActionResult GetCompany(Guid id) { var company = _service.CompanyService.GetCompany(id, trackChanges: false); return Ok(company); }
The route for this action is /api/companies/id and that’s because the /api/companies part applies from the root route (on top of the controller) and the id part is applied from the action attribute [HttpGet(“{id:guid}“)]. You can also see that we are using a route constraint (:guid part) where we explicitly state that our id parameter is of the GUID type. We can use many different constraints like int, double, long, float, datetime, bool, length, minlength, maxlength, and many others.
Let’s use Postman to send a valid request towards our API: https://localhost:5001/api/companies/3d490a70-94ce-4d15-9494-5248280c2ce3
Great. This works as expected. But, what if someone uses an invalid id parameter?
6.1.1 Handling Invalid Requests in a Service Layer
As you can see, in our service method, we have a comment stating that the result returned from the repository could be null, and this is something we have to handle. We want to return the NotFound response to the client but without involving our controller’s actions. We are going to keep them nice and clean as they already are.
So, what we are going to do is to create custom exceptions that we can call from the service methods and interrupt the flow. Then our error handling middleware can catch the exception, process the response, and return it to the client. This is a great way of handling invalid requests inside a service layer without having additional checks in our controllers.
That said, let’s start with a new Exceptions folder creation inside the Entities project. Since, in this case, we are going to create a not found response, let’s create a new NotFoundException class inside that folder:
public abstract class NotFoundException : Exception { protected NotFoundException(string message) : base(message) { } }
This is an abstract class, which will be a base class for all the individual not found exception classes. It inherits from the Exception class to represent the errors that happen during application execution. Since in our current case, we are handling the situation where we can’t find the company in the database, we are going to create a new CompanyNotFoundException class in the same Exceptions folder:
public sealed class CompanyNotFoundException : NotFoundException { public CompanyNotFoundException(Guid companyId) :base ($"The company with id: {companyId} doesn't exist in the database.") { } }
Right after that, we can remove the comment in the GetCompany method and throw this exception:
public CompanyDto GetCompany(Guid id, bool trackChanges) { var company = _repository.Company.GetCompany(id, trackChanges); if (company is null) throw new CompanyNotFoundException(id); var companyDto = _mapper.Map<CompanyDto>(company); return companyDto; }
Finally, we have to modify our error middleware because we don’t want to return the 500 error message to our clients for every custom error we throw from the service layer.
So, let’s modify the ExceptionMiddlewareExtensions class in the main project:
We remove the hardcoded StatusCode setup and add the part where we populate it based on the type of exception we throw in our service layer. We are also dynamically populating the Message property of the ErrorDetails object that we return as the response.
Additionally, you can see the advantage of using the base abstract exception class here (NotFoundException in this case). We are not checking for the specific class implementation but the base type. This allows us to have multiple not found classes that inherit from the NotFoundException class and this middleware will know that we want to return the NotFound response to the client.
We can see the status code we require and also the response object with proper StatusCode and Message properties. Also, if you inspect the log message, you will see that we are logging a correct message.
With this approach, we have perfect control of all the exceptional cases in our app. We have that control due to global error handler implementation. For now, we only handle the invalid id sent from the client, but we will handle more exceptional cases in the rest of the project.
In our tests for a published app, the regular request sent from Postman took 7ms and the exceptional one took 14ms. So you can see how fast the response is.
Of course, we are using exceptions only for these exceptional cases (Company not found, Employee not found...) and not throwing them all over the application. So, if you follow the same strategy, you will not face any performance issues.
Lastly, if you have an application where you have to throw custom exceptions more often and maybe impact your performance, we are going to provide an alternative to exceptions in the first bonus chapter of this book (Chapter 32).
6.2 Parent/Child Relationships in Web API
Up until now, we have been working only with the company, which is a parent (principal) entity in our API. But for each company, we have a related employee (dependent entity). Every employee must be related to a certain company and we are going to create our URIs in that manner.
That said, let’s create a new controller in the Presentation project and name it EmployeesController:
[Route("api/companies/{companyId}/employees")] [ApiController] public class EmployeesController : ControllerBase { private readonly IServiceManager _service; public EmployeesController(IServiceManager service) => _service = service; }
We are familiar with this code, but our main route is a bit different. As we said, a single employee can’t exist without a company entity and this is exactly what we are exposing through this URI. To get an employee or employees from the database, we have to specify the companyId parameter, and that is something all actions will have in common. For that reason, we have specified this route as our root route.
Before we create an action to fetch all the employees per company, we have to modify the IEmployeeRepository interface:
public interface IEmployeeRepository { IEnumerable<Employee> GetEmployees(Guid companyId, bool trackChanges); }
After interface modification, we are going to modify the EmployeeRepository class:
Then, before we start adding code to the service layer, we are going to create a new DTO. Let’s name it EmployeeDto and add it to the Shared/DataTransferObjects folder:
public record EmployeeDto(Guid Id, string Name, int Age, string Position);
Since we want to return this DTO to the client, we have to create a mapping rule inside the MappingProfile class:
Now, we can modify the IEmployeeService interface:
public interface IEmployeeService { IEnumerable<EmployeeDto> GetEmployees(Guid companyId, bool trackChanges); }
And of course, we have to implement this interface in the EmployeeService class:
public IEnumerable<EmployeeDto> GetEmployees(Guid companyId, bool trackChanges) { var company = _repository.Company.GetCompany(companyId, trackChanges); if (company is null) throw new CompanyNotFoundException(companyId);
var employeesFromDb = _repository.Employee.GetEmployees(companyId, trackChanges); var employeesDto = _mapper.Map<IEnumerable<EmployeeDto>>(employeesFromDb); return employeesDto; }
Here, we first fetch the company entity from the database. If it doesn’t exist, we return the NotFound response to the client. If it does, we fetch all the employees for that company, map them to the collection of EmployeeDto and return it to the caller.
Finally, let’s modify the Employees controller:
[HttpGet] public IActionResult GetEmployeesForCompany(Guid companyId) { var employees = _service.EmployeeService.GetEmployees(companyId, trackChanges: false); return Ok(employees); }
This code is pretty straightforward — nothing we haven’t seen so far — but we need to explain just one thing. As you can see, we have the companyId parameter in our action and this parameter will be mapped from the main route. For that reason, we didn’t place it in the [HttpGet] attribute as we did with the GetCompany action.
Next, let’s add another exception class in the Entities/Exceptions folder:
public class EmployeeNotFoundException : NotFoundException { public EmployeeNotFoundException(Guid employeeId) : base($"Employee with id: {employeeId} doesn't exist in the database.") { } }
We will soon see why do we need this class.
To continue, we have to modify the IEmployeeService interface:
And implement this new method in the EmployeeService class:
public EmployeeDto GetEmployee(Guid companyId, Guid id, bool trackChanges) { var company = _repository.Company.GetCompany(companyId, trackChanges); if (company is null) throw new CompanyNotFoundException(companyId); var employeeDb = _repository.Employee.GetEmployee(companyId, id, trackChanges); if (employeeDb is null) throw new EmployeeNotFoundException(id); var employee = _mapper.Map<EmployeeDto>(employeeDb); return employee; }
This is also a pretty clear code and we can see the reason for creating a new exception class.
Finally, let’s modify the EmployeeController class:
[HttpGet("{id:guid}")] public IActionResult GetEmployeeForCompany(Guid companyId, Guid id) { var employee = _service.EmployeeService.GetEmployee(companyId, id, trackChanges: false); return Ok(employee);}
Our responses are pretty self-explanatory, which makes for a good user experience.
Until now, we have received only JSON formatted responses from our API. But what if we want to support some other format, like XML for example?
Well, in the next chapter we are going to learn more about Content Negotiation and enabling different formats for our responses.
7 CONTENT NEGOTIATION
Content negotiation is one of the quality-of-life improvements we can add to our REST API to make it more user-friendly and flexible. And when we design an API, isn’t that what we want to achieve in the first place?
Content negotiation is an HTTP feature that has been around for a while, but for one reason or another, it is often a bit underused.
In short, content negotiation lets you choose or rather “negotiate” the content you want to get in a response to the REST API request.
7.1 What Do We Get Out of the Box?
By default, ASP.NET Core Web API returns a JSON formatted result.
We can confirm that by looking at the response from the GetCompanies
We can clearly see that the default result when calling GET on /api/companies returns the JSON result. We have also used the Accept header (as you can see in the picture above) to try forcing the server to return other media types like plain text and XML.
But that doesn’t work. Why?
Because we need to configure server formatters to format a response the way we want it.
Let’s see how to do that.
7.2 Changing the Default Configuration of Our Project
A server does not explicitly specify where it formats a response to JSON. But you can override it by changing configuration options through the AddControllers method.
We can add the following options to enable the server to format the XML response when the client tries negotiating for it:
First things first, we must tell a server to respect the Accept header. After that, we just add the AddXmlDataContractSerializerFormatters method to support XML formatters.
Now that we have our server configured, let’s test the content negotiation once more.
We get an error because XmlSerializer cannot easily serialize our positional record type. There are two solutions to this. The first one is marking our CompanyDto record with the [Serializable] attribute:
[Serializable]
public record CompanyDto(Guid Id, string Name, string FullAddress);
Now, we can send the same request again:
This time, we are getting our XML response but, as you can see,properties have some strange names. That’s because the compiler behind the scenes generates the record as a class with fields named like that (name_BackingField) and the XML serializer just serializes those fields with the same names.
If we don’t want these property names in our response, but the regular ones, we can implement a second solution. Let’s modify our record with the init only property setters:
public record CompanyDto { public Guid Id { get; init; } public string? Name { get; init; } public string? FullAddress { get; init; }
This object is still immutable and init-only properties protect the state of the object from mutation once initialization is finished.
Additionally, we have to make one more change in the MappingProfile class:
We are returning this mapping rule to a previous state since now, we do have properties in our object.
Now, we can send the same request again:
There is our XML response.
Now by changing the Accept header from text/xml to text/json, we can get differently formatted responses — and that is quite awesome, wouldn’t you agree?
Okay, that was nice and easy.
But what if despite all this flexibility a client requests a media type that a server doesn’t know how to format?
7.4 Restricting Media Types
Currently, it – the server - will default to a JSON type.
But we can restrict this behavior by adding one line to the configuration:
We added the ReturnHttpNotAcceptable = true option, which tells the server that if the client tries to negotiate for the media type the server doesn’t support, it should return the 406 Not Acceptable status code.
This will make our application more restrictive and force the API consumer to request only the types the server supports. The 406 status code is created for this purpose.
And as expected, there is no response body and all we get is a nice 406 Not Acceptable status code.
So far so good.
7.5 More About Formatters
If we want our API to support content negotiation for a type that is not “in the box,” we need to have a mechanism to do this.
So, how can we do that?
ASP.NET Core supports the creation of custom formatters. Their purpose is to give us the flexibility to create our formatter for any media types we need to support.
We can make the custom formatter by using the following method:
• Create an output formatter class that inherits the TextOutputFormatter class.
• Create an input formatter class that inherits the TextInputformatter class.
• Add input and output classes to the InputFormatters and OutputFormatters collections the same way we did for the XML formatter.
Now let’s have some fun and implement a custom CSV formatter for our example.
7.6 Implementing a Custom Formatter
Since we are only interested in formatting responses, we need to implement only an output formatter. We would need an input formatter only if a request body contained a corresponding type.
The idea is to format a response to return the list of companies in a CSV format.
Let’s add a CsvOutputFormatter class to our main project:
public class CsvOutputFormatter : TextOutputFormatter { public CsvOutputFormatter() { SupportedMediaTypes.Add(MediaTypeHeaderValue.Parse("text/csv")); SupportedEncodings.Add(Encoding.UTF8); SupportedEncodings.Add(Encoding.Unicode); } protected override bool CanWriteType(Type? type) { if (typeof(CompanyDto).IsAssignableFrom(type) || typeof(IEnumerable<CompanyDto>).IsAssignableFrom(type)) { return base.CanWriteType(type); } return false; } public override async Task WriteResponseBodyAsync(OutputFormatterWriteContext context, Encoding selectedEncoding) { var response = context.HttpContext.Response; var buffer = new StringBuilder(); if (context.Object is IEnumerable<CompanyDto>) { foreach (var company in (IEnumerable<CompanyDto>)context.Object) { FormatCsv(buffer, company); } } else { FormatCsv(buffer, (CompanyDto)context.Object); }
await response.WriteAsync(buffer.ToString()); } private static void FormatCsv(StringBuilder buffer, CompanyDto company) { buffer.AppendLine($"{company.Id},\"{company.Name},\"{company.FullAddress}\""); } }
There are a few things to note here:
• In the constructor, we define which media type this formatter should parse as well as encodings.
• The CanWriteType method is overridden, and it indicates whether or not the CompanyDto type can be written by this serializer.
• The WriteResponseBodyAsync method constructs the response.
• And finally, we have the FormatCsv method that formats a response the way we want it.
The class is pretty straightforward to implement, and the main thing that you should focus on is the FormatCsv method logic.
Now we just need to add the newly made formatter to the list of OutputFormatters in the ServicesExtensions class:
In this chapter, we finished working with GET requests in our project and we are ready to move on to the POST PUT and DELETE requests. We have a lot more ground to cover, so let’s get down to business.
8 METHOD SAFETY AND METHOD IDEMPOTENCY
Before we start with the Create, Update, and Delete actions, we should explain two important principles in the HTTP standard. Those standards are Method Safety and Method Idempotency.
We can consider a method a safe one if it doesn’t change the resource representation. So, in other words, the resource shouldn’t be changed after our method is executed.
If we can call a method multiple times with the same result, we can consider that method idempotent. So in other words, the side effects of calling it once are the same as calling it multiple times.
Let’s see how this applies to HTTP methods:
HTTP Method
Is it Safe?
Is it Idempotent?
GET
Yes
Yes
OPTIONS
Yes
Yes
HEAD
Yes
Yes
POST
No
No
DELETE
No
Yes
PUT
No
Yes
PATCH
No
No
As you can see, the GET, OPTIONS, and HEAD methods are both safe and idempotent, because when we call those methods they will not change the resource representation. Furthermore, we can call these methods multiple times, but they will return the same result every time.
The POST method is neither safe nor idempotent. It causes changes in the resource representation because it creates them. Also, if we call the POST method multiple times, it will create a new resource every time.
The DELETE method is not safe because it removes the resource, but it is idempotent because if we delete the same resource multiple times, we will get the same result as if we have deleted it only once.
PUT is not safe either. When we update our resource, it changes. But it is idempotent because no matter how many times we update the same resource with the same request it will have the same representation as if we have updated it only once.
Finally, the PATCH method is neither safe nor idempotent.
Now that we’ve learned about these principles, we can continue with our application by implementing the rest of the HTTP methods (we have already implemented GET). We can always use this table to decide which method to use for which use case.
9 CREATING RESOURCES
In this section, we are going to show you how to use the POST HTTP method to create resources in the database.
So, let’s start.
9.1 Handling POST Requests
Firstly, let’s modify the decoration attribute for the GetCompany action in the Companies controller:
[HttpGet("{id:guid}", Name = "CompanyById")]
With this modification, we are setting the name for the action. This name will come in handy in the action method for creating a new company.
We have a DTO class for the output (the GET methods), but right now we need the one for the input as well. So, let’s create a new record in the Shared/DataTransferObjects folder:
public record CompanyForCreationDto(string Name, string Address, string Country);
We can see that this DTO record is almost the same as the Company record but without the Id property. We don’t need that property when we create an entity.
We should pay attention to one more thing. In some projects, the input and output DTO classes are the same, but we still recommend separating them for easier maintenance and refactoring of our code. Furthermore, when we start talking about validation, we don’t want to validate the output objects — but we definitely want to validate the input ones.
With all of that said and done, let’s continue by modifying the ICompanyRepository interface:
public interface ICompanyRepository { IEnumerable<Company> GetAllCompanies(bool trackChanges);
Company GetCompany(Guid companyId, bool trackChanges); void CreateCompany(Company company); }
After the interface modification, we are going to implement that interface:
public void CreateCompany(Company company) => Create(company);
We don’t explicitly generate a new Id for our company; this would be done by EF Core. All we do is to set the state of the company to Added.
Next, we want to modify the ICompanyService interface:
And of course, we have to implement this method in the CompanyService class:
public CompanyDto CreateCompany(CompanyForCreationDto company) { var companyEntity = _mapper.Map<Company>(company); _repository.Company.CreateCompany(companyEntity); _repository.Save(); var companyToReturn = _mapper.Map<CompanyDto>(companyEntity); return companyToReturn; }
Here, we map the company for creation to the company entity, call the repository method for creation, and call the Save() method to save the entity to the database. After that, we map the company entity to the company DTO object to return it to the controller.
But we don’t have the mapping rule for this so we have to create another mapping rule for the Company and CompanyForCreationDto objects.Let’s do this in the MappingProfile class:
Our POST action will accept a parameter of the type CompanyForCreationDto, and as you can see our service method accepts the parameter of the same type as well, but we need the Company object to send it to the repository layer for creation. Therefore, we have to create this mapping rule.
Last, let’s modify the controller:
[HttpPost] public IActionResult CreateCompany([FromBody] CompanyForCreationDto company) { if (company is null) return BadRequest("CompanyForCreationDto object is null"); var createdCompany = _service.CompanyService.CreateCompany(company); return CreatedAtRoute("CompanyById", new { id = createdCompany.Id }, createdCompany); }
Let’s talk a little bit about this code. The interface and the repository parts are pretty clear, so we won’t talk about that. We have already explained the code in the service method. But the code in the controller contains several things worth mentioning.
If you take a look at the request URI, you’ll see that we use the same one as for the GetCompanies action: api/companies — but this time we are using the POST request.
The CreateCompany method has its own [HttpPost] decoration attribute, which restricts it to POST requests. Furthermore, notice the company parameter which comes from the client. We are not collecting it from the URI but the request body. Thus the usage of
the [FromBody] attribute. Also, the company object is a complex type; therefore, we have to use [FromBody].
If we wanted to, we could explicitly mark the action to take this parameter from the URI by decorating it with the [FromUri] attribute, though we wouldn’t recommend that at all because of security reasons and the complexity of the request.
Because the company parameter comes from the client, it could happen that it can’t be deserialized. As a result, we have to validate it against the reference type’s default value, which is null.
The last thing to mention is this part of the code:
CreatedAtRoute("CompanyById", new { id = companyToReturn.Id }, companyToReturn);
CreatedAtRoute will return a status code 201, which stands for Created. Also, it will populate the body of the response with the new company object as well as the Location attribute within the
response header with the address to retrieve that company. We need to provide the name of the action, where we can retrieve the created entity.
If we take a look at the headers part of our response, we are going to see a link to retrieve the created company:
Finally, from the previous example, we can confirm that the POST method is neither safe nor idempotent. We saw that when we send the POST request, it is going to create a new resource in the database — thus changing the resource representation. Furthermore, if we try to send this request a couple of times, we will get a new object for every request (it will have a different Id for sure).
Excellent.
There is still one more thing we need to explain.
9.2.1 Validation from the ApiController Attribute
In this section, we are going to talk about the [ApiController] attribute that we can find right below the [Route] attribute in our controller:
[Route("api/companies")] [ApiController] public class CompaniesController : ControllerBase {
But, before we start with the explanation, let’s place a breakpoint in the CreateCompany action, right on the if (company is null) check.
Then, let’s use Postman to send an invalid POST request:https://localhost:5001/api/companies
We are going to talk about Validation in chapter 13, but for now, we have to explain a couple of things.
First of all, we have our response - a Bad Request in Postman, and we have error messages that state what’s wrong with our request. But, we never hit that breakpoint that we’ve placed inside the CreateCompany action.
Why is that?
Well, the [ApiController] attribute is applied to a controller class to enable the following opinionated, API-specific behaviors:
• Attribute routing requirement
• Automatic HTTP 400 responses
• Binding source parameter inference
• Multipart/form-data request inference
• Problem details for error status codes
As you can see, it handles the HTTP 400 responses, and in our case, since the request’s body is null, the [ApiController] attribute handles that and returns the 400 (BadReqeust) response before the request even hits the CreateCompany action.
This is useful behavior, but it prevents us from sending our custom responses with different messages and status codes to the client. This will be very important once we get to the Validation.
So to enable our custom responses from the actions, we are going to add this code into the Program class right above the AddControllers method:
With this, we are suppressing a default model state validation that is implemented due to the existence of the [ApiController] attribute in all API controllers. So this means that we can solve the same problem differently, by commenting out or removing the [ApiController] attribute only, without additional code for suppressing validation. It's all up to you. But we like keeping it in our controllers because, as you could’ve seen, it provides additional functionalities other than just 400 – Bad Request responses.
Now, once we start the app and send the same request, we will hit that breakpoint and see our response in Postman.
Nicely done.
Now, we can remove that breakpoint and continue with learning about the creation of child resources.
9.3 Creating a Child Resource
While creating our company, we created the DTO object required for the CreateCompany action. So, for employee creation, we are going to do the same thing:
public record EmployeeForCreationDto(string Name, int Age, string Position);
We don’t have the Id property because we are going to create that Id on the server-side. But additionally, we don’t have the CompanyId because we accept that parameter through the route:[Route("api/companies/{companyId}/employees")]
The next step is to modify the IEmployeeRepository interface:
Because we are going to accept the employee DTO object in our action and send it to a service method, but we also have to send an employee object to this repository method, we have to create an additional mapping rule in the MappingProfile class:
CreateMap<EmployeeForCreationDto, Employee>();
The next thing we have to do is IEmployeeService modification:
public EmployeeDto CreateEmployeeForCompany(Guid companyId, EmployeeForCreationDto employeeForCreation, bool trackChanges) { var company = _repository.Company.GetCompany(companyId, trackChanges); if (company is null) throw new CompanyNotFoundException(companyId); var employeeEntity = _mapper.Map<Employee>(employeeForCreation); _repository.Employee.CreateEmployeeForCompany(companyId, employeeEntity); _repository.Save(); var employeeToReturn = _mapper.Map<EmployeeDto>(employeeEntity); return employeeToReturn; }
We have to check whether that company exists in the database because there is no point in creating an employee for a company that does not exist. After that, we map the DTO to an entity, call the repository methods to create a new employee, map back the entity to the DTO, and return it to the caller.
Now, we can add a new action in the EmployeesController:
[HttpPost] public IActionResult CreateEmployeeForCompany(Guid companyId, [FromBody] EmployeeForCreationDto employee) { if (employee is null) return BadRequest("EmployeeForCreationDto object is null"); var employeeToReturn = _service.EmployeeService.CreateEmployeeForCompany(companyId, employee, trackChanges: false); return CreatedAtRoute("GetEmployeeForCompany", new { companyId, id = employeeToReturn.Id }, employeeToReturn); }
As we can see, the main difference between this action and the CreateCompany action (if we exclude the fact that we are working with different DTOs) is the return statement, which now has two parameters for the anonymous object.
For this to work, we have to modify the HTTP attribute above the GetEmployeeForCompany action:
[HttpGet("{id:guid}", Name = "GetEmployeeForCompany")]
If we take a look at the Headers tab, we'll see a link to fetch our newly created employee. If you copy that link and send another request with it, you will get this employee for sure:
9.4 Creating Children Resources Together with a Parent
There are situations where we want to create a parent resource with its children. Rather than using multiple requests for every single child, we want to do this in the same request with the parent resource.
We are going to show you how to do this.
The first thing we are going to do is extend the CompanyForCreationDto class:
public record CompanyForCreationDto(string Name, string Address, string Country, IEnumerable<EmployeeForCreationDto> Employees);
We are not going to change the action logic inside the controller nor the repository/service logic; everything is great there. That’s all. Let’s test it:https://localhost:5001/api/companies
You can see that this company was created successfully.
Now we can copy the location link from the Headers tab, paste it in another Postman tab, and just add the /employees part:
We have confirmed that the employees were created as well.
9.5 Creating a Collection of Resources
Until now, we have been creating a single resource whether it was Company or Employee. But it is quite normal to create a collection of resources, and in this section that is something we are going to work with.
If we take a look at the CreateCompany action, for example, we can see that the return part points to the CompanyById route (the GetCompany action). That said, we don’t have the GET action for the collection creating action to point to. So, before we start with the POST collection action, we are going to create the GetCompanyCollection action in the Companies controller.
But first, let's modify the ICompanyRepository interface:
public IEnumerable<CompanyDto> GetByIds(IEnumerable<Guid> ids, bool trackChanges) { if (ids is null) throw new IdParametersBadRequestException(); var companyEntities = _repository.Company.GetByIds(ids, trackChanges); if (ids.Count() != companyEntities.Count()) throw new CollectionByIdsBadRequestException(); var companiesToReturn = _mapper.Map<IEnumerable<CompanyDto>>(companyEntities); return companiesToReturn; }
Here, we check if ids parameter is null and if it is we stop the execution flow and return a bad request response to the client. If it’s not null, we fetch all the companies for each id in the ids collection. If the count of ids and companies mismatch, we return another bad request response to the client. Finally, we are executing the mapping action and returning the result to the caller.
Of course, we don’t have these two exception classes yet, so let’s create them.
Since we are returning a bad request result, we are going to create a new abstract class in the Entities/Exceptions folder:
public abstract class BadRequestException : Exception { protected BadRequestException(string message) :base(message) { } }
Then, in the same folder, let’s create two new specific exception classes:
public sealed class IdParametersBadRequestException : BadRequestException { public IdParametersBadRequestException() :base("Parameter ids is null") { } } public sealed class CollectionByIdsBadRequestException : BadRequestException { public CollectionByIdsBadRequestException() :base("Collection count mismatch comparing to ids.") { } }
At this point, we’ve removed two errors from the GetByIds method. But, to show the correct response to the client, we have to modify the ConfigureExceptionHandler class – the part where we populate the StatusCode property:
So, this new method will accept a collection of the CompanyForCreationDto type as a parameter, and return a Tuple with two fields (companies and ids) as a result.
That said, let’s implement it in the CompanyService class:
public (IEnumerable<CompanyDto> companies, string ids) CreateCompanyCollection (IEnumerable<CompanyForCreationDto> companyCollection) { if (companyCollection is null) throw new CompanyCollectionBadRequest(); var companyEntities = _mapper.Map<IEnumerable<Company>>(companyCollection); foreach (var company in companyEntities) { _repository.Company.CreateCompany(company); } _repository.Save(); var companyCollectionToReturn = _mapper.Map<IEnumerable<CompanyDto>>(companyEntities); var ids = string.Join(",", companyCollectionToReturn.Select(c => c.Id)); return (companies: companyCollectionToReturn, ids: ids); }
So, we check if our collection is null and if it is, we return a bad request. If it isn’t, then we map that collection and save all the collection elements to the database. Finally, we map the company collection back, take all the ids as a comma-separated string, and return the Tuple with these two fields as a result to the caller.
Again, we can see that we don’t have the exception class, so let’s just create it:
public sealed class CompanyCollectionBadRequest : BadRequestException { public CompanyCollectionBadRequest() :base("Company collection sent from a client is null.")
{ } }
Finally, we can add a new action in the CompaniesController:
[HttpPost("collection")] public IActionResult CreateCompanyCollection([FromBody] IEnumerable<CompanyForCreationDto> companyCollection) { var result = _service.CompanyService.CreateCompanyCollection(companyCollection); return CreatedAtRoute("CompanyCollection", new { result.ids }, result.companies); }
We receive the companyCollection parameter from the client, send it to the service method, and return a result with a comma-separated string and our newly created companies.
Now you may ask, why are we sending a comma-separated string when we expect a collection of ids in the GetCompanyCollection action?
Well, we can’t just pass a list of ids in the CreatedAtRoute method because there is no support for the Header Location creation with the list. You may try it, but we're pretty sure you would get the location like this:
We can see a valid location link. So, we can copy it and try to fetch our newly created companies:
But we are getting the 415 Unsupported Media Type message. This is because our API can’t bind the string type parameter to the IEnumerable argument in the GetCompanyCollection action.
Well, we can solve this with a custom model binding.
9.6 Model Binding in API
Let’s create the new folder ModelBinders in the Presentation project and inside the new class ArrayModelBinder:
public class ArrayModelBinder : IModelBinder { public Task BindModelAsync(ModelBindingContext bindingContext) { if(!bindingContext.ModelMetadata.IsEnumerableType) {
bindingContext.Result = ModelBindingResult.Failed(); return Task.CompletedTask; } var providedValue = bindingContext.ValueProvider .GetValue(bindingContext.ModelName) .ToString(); if(string.IsNullOrEmpty(providedValue)) { bindingContext.Result = ModelBindingResult.Success(null); return Task.CompletedTask; } var genericType = bindingContext.ModelType.GetTypeInfo().GenericTypeArguments[0]; var converter = TypeDescriptor.GetConverter(genericType); var objectArray = providedValue.Split(new[] { "," }, StringSplitOptions.RemoveEmptyEntries) .Select(x => converter.ConvertFromString(x.Trim())) .ToArray(); var guidArray = Array.CreateInstance(genericType, objectArray.Length); objectArray.CopyTo(guidArray, 0); bindingContext.Model = guidArray; bindingContext.Result = ModelBindingResult.Success(bindingContext.Model); return Task.CompletedTask; } }
At first glance, this code might be hard to comprehend, but once we explain it, it will be easier to understand.
We are creating a model binder for the IEnumerable type. Therefore, we have to check if our parameter is the same type.
Next, we extract the value (a comma-separated string of GUIDs) with the ValueProvider.GetValue() expression. Because it is a type string, we just check whether it is null or empty. If it is, we return null as a result because we have a null check in our action in the controller. If it is not, we move on.
In the genericType variable, with the reflection help, we store the type the IEnumerable consists of. In our case, it is GUID. With the converter variable, we create a converter to a GUID type. As you can see, we didn’t just force the GUID type in this model binder; instead, we inspected what is the nested type of the IEnumerable parameter and then created a converter for that exact type, thus making this binder generic.
After that, we create an array of type object (objectArray) that consist of all the GUID values we sent to the API and then create an array of GUID types (guidArray), copy all the values from the objectArray to the guidArray, and assign it to the bindingContext.
These are the required using directives:
using Microsoft.AspNetCore.Mvc.ModelBinding; using System.ComponentModel; using System.Reflection;
And that is it. Now, we have just to make a slight modification in the GetCompanyCollection action:
public IActionResult GetCompanyCollection([ModelBinder(BinderType = typeof(ArrayModelBinder))]IEnumerable<Guid> ids)
This is the required namespace:
using CompanyEmployees.Presentation.ModelBinders;
Visual Studio will provide two different namespaces to resolve the error, so be sure to pick the right one.
Excellent.
Our ArrayModelBinder will be triggered before an action executes. It will convert the sent string parameter to the IEnumerable type, and then the action will be executed:
public void DeleteEmployeeForCompany(Guid companyId, Guid id, bool trackChanges) { var company = _repository.Company.GetCompany(companyId, trackChanges); if (company is null) throw new CompanyNotFoundException(companyId); var employeeForCompany = _repository.Employee.GetEmployee(companyId, id, trackChanges); if (employeeForCompany is null) throw new EmployeeNotFoundException(id); _repository.Employee.DeleteEmployee(employeeForCompany); _repository.Save(); }
Pretty straightforward method implementation where we fetch the company and if it doesn’t exist, we return the Not Found response. If it exists, we fetch the employee for that company and execute the same check, where if it’s true, we return another not found response. Lastly, we delete the employee from the database.
Finally, we can add a delete action to the controller class:
There is nothing new with this action. We collect the companyId from the root route and the employee’s id from the passed argument. Call the service method and return the NoContent() method, which returns the status code 204 No Content.
We can see that the DELETE request isn’t safe because it deletes the resource, thus changing the resource representation. But if we try to send this delete request one or even more times, we would get the same 404 result because the resource doesn’t exist anymore. That’s what makes the DELETE request idempotent.
10.1 Deleting a Parent Resource with its Children
With Entity Framework Core, this action is pretty simple. With the basic configuration, cascade deleting is enabled, which means deleting a parent resource will automatically delete all of its children. We can confirm that from the migration file:
So, all we have to do is to create a logic for deleting the parent resource.
Well, let’s do that following the same steps as in a previous example:
public void DeleteCompany(Guid companyId, bool trackChanges) { var company = _repository.Company.GetCompany(companyId, trackChanges); if (company is null) throw new CompanyNotFoundException(companyId); _repository.Company.DeleteCompany(company); _repository.Save(); }
You can check in your database that this company alongside its children doesn’t exist anymore.
There we go. We have finished working with DELETE requests and we are ready to continue to the PUT requests.
11 WORKING WITH PUT REQUESTS
In this section, we are going to show you how to update a resource using the PUT request. We are going to update a child resource first and then we are going to show you how to execute insert while updating a parent resource.
11.1 Updating Employee
In the previous sections, we first changed our interface, then the repository/service classes, and finally the controller. But for the update, this doesn’t have to be the case.
Let’s go step by step.
The first thing we are going to do is to create another DTO record for update purposes:
public record EmployeeForUpdateDto(string Name, int Age, string Position);
We do not require the Id property because it will be accepted through the URI, like with the DELETE requests. Additionally, this DTO contains the same properties as the DTO for creation, but there is a conceptual difference between those two DTO classes. One is for updating and the other is for creating. Furthermore, once we get to the validation part, we will understand the additional difference between those two.
Because we have an additional DTO record, we require an additional mapping rule:
CreateMap<EmployeeForUpdateDto, Employee>();
After adding the mapping rule, we can modify the IEmployeeService interface:
We are declaring a method that contains both id parameters – one for the company and one for employee, the employeeForUpdate object sent from the client, and two track changes parameters, again, one for the company and one for the employee. We are doing that because we won't track changes while fetching the company entity, but we will track changes while fetching the employee.
That said, let’s modify the EmployeeService class:
public void UpdateEmployeeForCompany(Guid companyId, Guid id, EmployeeForUpdateDto employeeForUpdate, bool compTrackChanges, bool empTrackChanges) { var company = _repository.Company.GetCompany(companyId, compTrackChanges); if (company is null) throw new CompanyNotFoundException(companyId); var employeeEntity = _repository.Employee.GetEmployee(companyId, id, empTrackChanges); if (employeeEntity is null) throw new EmployeeNotFoundException(id); _mapper.Map(employeeForUpdate, employeeEntity); _repository.Save(); }
So first, we fetch the company from the database. If it doesn’t exist, we interrupt the flow and send the response to the client. After that, we do the same thing for the employee. But there is one difference here. Pay attention to the way we fetch the company and the way we fetch the employeeEntity. Do you see the difference?
As we’ve already said: the trackChanges parameter will be set to true for the employeeEntity. That’s because we want EF Core to track changes on this entity. This means that as soon as we change any property in this entity, EF Core will set the state of that entity to Modified.
As you can see, we are mapping from the employeeForUpdate object (we will change just the age property in a request) to the employeeEntity — thus changing the state of the employeeEntity object to Modified.
Because our entity has a modified state, it is enough to call the Save method without any additional update actions. As soon as we call the Save method, our entity is going to be updated in the database.
Now, when we have all of these, let’s modify the EmployeesController:
[HttpPut("{id:guid}")] public IActionResult UpdateEmployeeForCompany(Guid companyId, Guid id, [FromBody] EmployeeForUpdateDto employee) { if (employee is null) return BadRequest("EmployeeForUpdateDto object is null"); _service.EmployeeService.UpdateEmployeeForCompany(companyId, id, employee, compTrackChanges: false, empTrackChanges: true); return NoContent(); }
We are using the PUT attribute with the id parameter to annotate this action. That means that our route for this action is going to be: api/companies/{companyId}/employees/{id}.
Then, we check if the employee object is null, and if it is, we return a BadRequest response.
After that, we just call the update method from the service layer and pass false for the company track changes and true for the employee track changes.
We can check our executed query through EF Core to confirm that only the Age column is updated:
Excellent.
You can send the same request with the invalid company id or employee id. In both cases, you should get a 404 response, which is a valid response to this kind of situation.
NOTE: We’ve changed only the Age property, but we have sent all the other properties with unchanged values as well. Therefore, Age is only updated in the database. But if we send the object with just the Age property, other properties will be set to their default values and the whole object will be updated — not just the Age column. That’s because the PUT is a request for a full update. This is very important to know.
11.1.1 About the Update Method from the RepositoryBase Class
Right now, you might be asking: “Why do we have the Update method in the RepositoryBase class if we are not using it?”
The update action we just executed is a connected update (an update where we use the same context object to fetch the entity and to update it). But sometimes we can work with disconnected updates. This kind of update action uses different context objects to execute fetch and update actions or sometimes we can receive an object from a client with the Id property set as well, so we don’t have to fetch it from the database. In that situation, all we have to do is to inform EF Core to track changes on that entity and to set its state to modified. We can do both actions with the Update method from our RepositoryBase class. So, you see, having that method is crucial as well.
One note, though. If we use the Update method from our repository, even if we change just the Age property, all properties will be updated in the database.
11.2 Inserting Resources while Updating One
While updating a parent resource, we can create child resources as well without too much effort. EF Core helps us a lot with that process. Let’s see how.
The first thing we are going to do is to create a DTO record for update:
public record CompanyForUpdateDto(string Name, string Address, string Country, IEnumerable<EmployeeForCreationDto> Employees);
After this, let’s create a new mapping rule:
CreateMap<CompanyForUpdateDto, Company>();
Then, let’s move on to the interface modification:
public void UpdateCompany(Guid companyId, CompanyForUpdateDto companyForUpdate, bool trackChanges) { var companyEntity = _repository.Company.GetCompany(companyId, trackChanges); if (companyEntity is null) throw new CompanyNotFoundException(companyId); _mapper.Map(companyForUpdate, companyEntity); _repository.Save(); }
So again, we fetch our company entity from the database, and if it is null, we just return the NotFound response. But if it’s not null, we map the companyForUpdate DTO to companyEntity and call the Save method.
Right now, we can modify our controller:
[HttpPut("{id:guid}")] public IActionResult UpdateCompany(Guid id, [FromBody] CompanyForUpdateDto company) { if (company is null) return BadRequest("CompanyForUpdateDto object is null"); _service.CompanyService.UpdateCompany(id, company, trackChanges: true); return NoContent(); }
That’s it. You can see that this action is almost the same as the employee update action.
We modify the name of the company and attach an employee as well. As a result, we can see 204, which means that the entity has been updated. But what about that new employee?
Let’s inspect our query:
You can see that we have created the employee entity in the database. So, EF Core does that job for us because we track the company entity. As soon as mapping occurs, EF Core sets the state for the company entity to modified and for all the employees to added. After we call the Save method, the Name property is going to be modified and the employee entity is going to be created in the database.
We are finished with the PUT requests, so let’s continue with PATCH.
12 WORKING WITH PATCH REQUESTS
In the previous chapter, we worked with the PUT request to fully update our resource. But if we want to update our resource only partially, we should use PATCH.
The partial update isn’t the only difference between PATCH and PUT. The request body is different as well. For the Company PATCH request, for example, we should use [FromBody]JsonPatchDocument and not [FromBody]Company as we did with the PUT requests.
Additionally, for the PUT request’s media type, we have used application/json — but for the PATCH request’s media type, we should use application/json-patch+json. Even though the first one would be accepted in ASP.NET Core for the PATCH request, the recommendation by REST standards is to use the second one.
The square brackets represent an array of operations. Every operation is placed between curly brackets. So, in this specific example, we have two operations: Replace and Remove represented by the op property. The path property represents the object’s property that we want to modify and the value property represents a new value.
In this specific example, for the first operation, we replace the value of the name property with a new name. In the second example, we remove the name property, thus setting its value to default.
There are six different operations for a PATCH request:
OPERATION
REQUEST BODY
EXPLANATION
Add
{ "op": "add", "path": "/name", "value": "new value" }
Assigns a new value to a required property.
Remove
{ "op": "remove","path": "/name"}
Sets a default value to a required property.
Replace
{ "op": "replace", "path": "/name", "value": "new value" }
Replaces a value of a required property to a new value.
Copy
{"op": "copy","from": "/name","path": "/title"}
Copies the value from a property in the “from” part to the property in the “path” part.
Moves the value from a property in the “from” part to a property in the “path” part.
Test
{"op": "test","path": "/name","value": "new value"}
Tests if a property has a specified value.
After all this theory, we are ready to dive into the coding part.
12.1 Applying PATCH to the Employee Entity
Before we start with the code modification, we have to install two required libraries:
• The Microsoft.AspNetCore.JsonPatch library, in the Presentation project, to support the usage of JsonPatchDocument in our controller and
• The Microsoft.AspNetCore.Mvc.NewtonsoftJson library, in the main project, to support request body conversion to a PatchDocument once we send our request.
As you can see, we are still using the NewtonsoftJson library to support the PatchDocument conversion. The official statement from Microsoft is that they are not going to replace it with System.Text.Json: “The main reason is that this will require a huge investment from us, with not a very high value-add for the majority of our customers.”.
By using AddNewtonsoftJson, we are replacing the System.Text.Json formatters for all JSON content. We don’t want to do that so, we are going ton add a simple workaround in the Program class:
NewtonsoftJsonPatchInputFormatter GetJsonPatchInputFormatter() => new ServiceCollection().AddLogging().AddMvc().AddNewtonsoftJson() .Services.BuildServiceProvider() .GetRequiredService<IOptions<MvcOptions>>().Value.InputFormatters .OfType<NewtonsoftJsonPatchInputFormatter>().First();
By adding a method like this in the Program class, we are creating a local function. This function configures support for JSON Patch using Newtonsoft.Json while leaving the other formatters unchanged.
For this to work, we have to include two more namespaces in the class:
using Microsoft.AspNetCore.Mvc.Formatters; using Microsoft.Extensions.Options;
After that, we have to modify the AddControllers method:
Of course, for this to work, we have to add the reference to the Entities project.
Then, we have to implement these two methods in the EmployeeService class:
public (EmployeeForUpdateDto employeeToPatch, Employee employeeEntity) GetEmployeeForPatch (Guid companyId, Guid id, bool compTrackChanges, bool empTrackChanges) { var company = _repository.Company.GetCompany(companyId, compTrackChanges); if (company is null) throw new CompanyNotFoundException(companyId); var employeeEntity = _repository.Employee.GetEmployee(companyId, id, empTrackChanges); if (employeeEntity is null) throw new EmployeeNotFoundException(companyId); var employeeToPatch = _mapper.Map<EmployeeForUpdateDto>(employeeEntity); return (employeeToPatch, employeeEntity); } public void SaveChangesForPatch(EmployeeForUpdateDto employeeToPatch, Employee employeeEntity) { _mapper.Map(employeeToPatch, employeeEntity); _repository.Save(); }
In the first method, we are trying to fetch both the company and employee from the database and if we can’t find either of them, we stop the execution flow and return the NotFound response to the client. Then, we map the employee entity to the EmployeeForUpdateDto type and return both objects (employeeToPatch and employeeEntity) inside the Tuple to the controller.
The second method just maps from emplyeeToPatch to employeeEntity and calls the repository's Save method.
Now, we can modify our controller:
[HttpPatch("{id:guid}")] public IActionResult PartiallyUpdateEmployeeForCompany(Guid companyId, Guid id, [FromBody] JsonPatchDocument<EmployeeForUpdateDto> patchDoc) { if (patchDoc is null) return BadRequest("patchDoc object sent from client is null."); var result = _service.EmployeeService.GetEmployeeForPatch(companyId, id, compTrackChanges: false, empTrackChanges: true); patchDoc.ApplyTo(result.employeeToPatch); _service.EmployeeService.SaveChangesForPatch(result.employeeToPatch, result.employeeEntity); return NoContent(); }
You can see that our action signature is different from the PUT actions. We are accepting the JsonPatchDocument from the request body. After that, we have a familiar code where we check the patchDoc for null value and if it is, we return a BadRequest. Then we call the service method where we map from the Employee type to the EmployeeForUpdateDto type; we need to do that because the patchDoc variable can apply only to the EmployeeForUpdateDto type. After apply is executed, we call another service method to map again to the Employee type (from employeeToPatch to employeeEntity) and save changes in the database. In the end, we return NoContent.
Don’t forget to include an additional namespace:
using Microsoft.AspNetCore.JsonPatch;
Now, we can send a couple of requests to test this code:
While writing API actions, we have a set of rules that we need to check. If we take a look at the Company class, we can see different data annotation attributes above our properties:
Those attributes serve the purpose to validate our model object while creating or updating resources in the database. But we are not making use of them yet.
In this chapter, we are going to show you how to validate our model objects and how to return an appropriate response to the client if the model is not valid. So, we need to validate the input and not the output of our controller actions. This means that we are going to apply this validation to the POST, PUT, and PATCH requests, but not for the GET request.
13.1 ModelState, Rerun Validation, and Built-in Attributes
To validate against validation rules applied by Data Annotation attributes, we are going to use the concept of ModelState. It is a dictionary containing the state of the model and model binding validation.
It is important to know that model validation occurs after model binding and reports errors where the data, sent from the client, doesn’t meet our validation criteria. Both model validation and data binding occur before our request reaches an action inside a controller. We are going to use the ModelState.IsValid expression to check for those validation rules.
By default, we don’t have to use the ModelState.IsValid expression in Web API projects since, as we explained in section 9.2.1, controllers are decorated with the [ApiController] attribute. But, as we could’ve seen, it defaults all the model state errors to 400 – BadRequest and doesn’t allow us to return our custom error messages with a different status code. So, we suppressed it in the Program class.
The response status code, when validation fails, should be 422 Unprocessable Entity. That means that the server understood the content type of the request and the syntax of the request entity is correct, but it was unable to process validation rules applied on the entity inside the request body. If we didn’t suppress the model validation from the [ApiController] attribute, we wouldn’t be able to return this status code (422) since, as we said, it would default to 400.
13.1.1 Rerun Validation
In some cases, we want to repeat our validation. This can happen if, after the initial validation, we compute a value in our code, and assign it to the property of an already validated object.
If this is the case, and we want to run the validation again, we can use the ModelStateDictionary.ClearValidationState method to clear the validation specific to the model that we’ve already validated, and then use the TryValidateModel method:
[HttpPost] public IActionResult POST([FromBody] Book book) { if (!ModelState.IsValid) return UnprocessableEntity(ModelState);
var newPrice = book.Price - 10; book.Price = newPrice; ModelState.ClearValidationState(nameof(Book)); if (!TryValidateModel(book, nameof(Book))) return UnprocessableEntity(ModelState); _service.CreateBook(book); return CreatedAtRoute("BookById", new { id = book.Id }, book); }
This is just a simple example but it explains how we can revalidate our model object.
13.1.2 Built-in Attributes
Validation attributes let us specify validation rules for model properties. At the beginning of this chapter, we have marked some validation attributes. Those attributes (Required and MaxLength) are part of built-in attributes. And of course, there are more than two built-in attributes. These are the most used ones:
ATTRIBUTE
USAGE
[ValidateNever]
Indicates that property or parameter should be excluded from validation.
[Compare]
We use it for the properties comparison.
[EmailAddress]
Validates the email format of the property.
[Phone]
Validates the phone format of the property.
[Range]
Validates that the property falls within a specified range.
[RegularExpression]
Validates that the property value matches a specified regular expression.
[Required]
We use it to prevent a null value for the property.
[StringLength]
Validates that a string property value doesn't exceed a specified length limit.
There are scenarios where built-in attributes are not enough and we have to provide some custom logic. For that, we can create a custom attribute by using the ValidationAttribute class, or we can use the IValidatableObject interface.
So, let’s see an example of how we can create a custom attribute:
public class ScienceBookAttribute : ValidationAttribute { public BookGenre Genre { get; set; } public string Error => $"The genre of the book must be {BookGenre.Science}"; public ScienceBookAttribute(BookGenre genre) { Genre= genre; } protected override ValidationResult? IsValid(object? value, ValidationContext validationContext) { var book = (Book)validationContext.ObjectInstance; if (!book.Genre.Equals(Genre.ToString())) return new ValidationResult(Error); return ValidationResult.Success; } }
Once this attribute is called, we are going to pass the genre parameter inside the constructor. Then, we have to override the IsValid method. There we extract the object we want to validate and inspect if the Genre property matches our value sent through the constructor. If it’s not we return the Error property as a validation result. Otherwise, we return success.
To call this custom attribute, we can do something like this:
public class Book { public int Id { get; set; } [Required] public string? Name { get; set; } [Range(10, int.MaxValue)] public int Price { get; set; }
[ScienceBook(BookGenre.Science)] public string? Genre { get; set; } }
Now we can use the IValidatableObject interface:
public class Book : IValidatableObject { public int Id { get; set; } [Required] public string? Name { get; set; } [Range(10, int.MaxValue)] public int Price { get; set; } public string? Genre { get; set; } public IEnumerable<ValidationResult> Validate(ValidationContext validationContext) { var errorMessage = $"The genre of the book must be {BookGenre.Science}"; if (!Genre.Equals(BookGenre.Science.ToString())) yield return new ValidationResult(errorMessage, new[] { nameof(Genre) }); } }
This validation happens in the model class, where we have to implement the Validate method. The code inside that method is pretty straightforward. Also, pay attention that we don’t have to apply any validation attribute on top of the Genre property.
As we’ve seen from the previous examples, we can create a custom attribute in a separate class and even make it generic so it could be reused for other model objects. This is not the case with the IValidatableObject interface. It is used inside the model class and of course, the validation logic can’t be reused.
So, this could be something you can think about when deciding which one to use.
After all of this theory and code samples, we are ready to implement model validation in our code.
And we get the 500 Internal Server Error, which is a generic message when something unhandled happens in our code. But this is not good. This means that the server made an error, which is not the case. In this case, we, as a consumer, sent the wrong model to the API — thus the error message should be different.
To fix this, let’s modify our EmployeeForCreationDto record because that’s what we deserialize the request body to:
public record EmployeeForCreationDto( [Required(ErrorMessage = "Employee name is a required field.")] [MaxLength(30, ErrorMessage = "Maximum length for the Name is 30 characters.")] string Name, [Required(ErrorMessage = "Age is a required field.")] int Age, [Required(ErrorMessage = "Position is a required field.")] [MaxLength(20, ErrorMessage = "Maximum length for the Position is 20 characters.")] string Position );
This is how we can apply validation attributes in our positional records. But, in our opinion, positional records start losing readability once the attributes are applied, and for that reason, we like using init setters if we have to apply validation attributes. So, we are going to do exactly that and modify this position record:
public record EmployeeForCreationDto { [Required(ErrorMessage = "Employee name is a required field.")] [MaxLength(30, ErrorMessage = "Maximum length for the Name is 30 characters.")] public string? Name { get; init; } [Required(ErrorMessage = "Age is a required field.")] public int Age { get; init; } [Required(ErrorMessage = "Position is a required field.")] [MaxLength(20, ErrorMessage = "Maximum length for the Position is 20 characters.")] public string? Position { get; init; } }
Now, we have to modify our action:
[HttpPost] public IActionResult CreateEmployeeForCompany(Guid companyId, [FromBody] EmployeeForCreationDto employee) { if (employee is null) return BadRequest("EmployeeForCreationDto object is null"); if (!ModelState.IsValid) return UnprocessableEntity(ModelState); var employeeToReturn = _service.EmployeeService.CreateEmployeeForCompany(companyId, employee, trackChanges: false); return CreatedAtRoute("GetEmployeeForCompany", new { companyId, id = employeeToReturn.Id }, employeeToReturn); }
As mentioned before in the part about the ModelState dictionary, all we have to do is to call the IsValid method and return the UnprocessableEntity response by providing our ModelState.
The same actions can be applied for the CreateCompany action and CompanyForCreationDto class — and if you check the source code for this chapter, you will find it implemented.
13.3.1 Validating Int Type
Let’s create one more request with the request body without the age property:
We can see that the age property hasn’t been sent, but in the response body, we don’t see the error message for the age property next to other error messages. That is because the age is of type int and if we don’t send that property, it would be set to a default value, which is 0.
So, on the server-side, validation for the Age property will pass, because it is not null.
To prevent this type of behavior, we have to modify the data annotation attribute on top of the Age property in the EmployeeForCreationDto class:
[Range(18, int.MaxValue, ErrorMessage = "Age is required and it can't be lower than 18")] public int Age { get; set; }
Now, we have the Age error message in our response.
If we want, we can add the custom error messages in our action: ModelState.AddModelError(string key, string errorMessage)
With this expression, the additional error message will be included with all the other messages.
13.4 Validation for PUT Requests
The validation for PUT requests shouldn’t be different from POST requests (except in some cases), but there are still things we have to do to at least optimize our code.
But let’s go step by step.
First, let’s add Data Annotation Attributes to the EmployeeForUpdateDto record:
public record EmployeeForUpdateDto { [Required(ErrorMessage = "Employee name is a required field.")]
[MaxLength(30, ErrorMessage = "Maximum length for the Name is 30 characters.")] public string Name? { get; init; } [Range(18, int.MaxValue, ErrorMessage = "Age is required and it can't be lower than 18")] public int Age { get; init; } [Required(ErrorMessage = "Position is a required field.")] [MaxLength(20, ErrorMessage = "Maximum length for the Position is 20 characters.")] public string? Position { get; init; } }
Once we have done this, we realize we have a small problem. If we compare this class with the DTO class for creation, we are going to see that they are the same. Of course, we don’t want to repeat ourselves, thus we are going to add some modifications.
Let’s create a new record in the DataTransferObjects folder:
public abstract record EmployeeForManipulationDto { [Required(ErrorMessage = "Employee name is a required field.")] [MaxLength(30, ErrorMessage = "Maximum length for the Name is 30 characters.")] public string? Name { get; init; } [Range(18, int.MaxValue, ErrorMessage = "Age is required and it can't be lower than 18")] public int Age { get; init; } [Required(ErrorMessage = "Position is a required field.")] [MaxLength(20, ErrorMessage = "Maximum length for the Position is 20 characters.")] public string? Position { get; init; } }
We create this record as an abstract record because we want our creation and update DTO records to inherit from it:
public record EmployeeForCreationDto : EmployeeForManipulationDto; public record EmployeeForUpdateDto : EmployeeForManipulationDto;
Now, we can modify the UpdateEmployeeForCompany action by adding the model validation right after the null check:
if (employee is null) return BadRequest("EmployeeForUpdateDto object is null"); if (!ModelState.IsValid) return UnprocessableEntity(ModelState);
The same process can be applied to the Company DTO records and actions. You can find it implemented in the source code for this chapter.
The validation for PATCH requests is a bit different from the previous ones. We are using the ModelState concept again, but this time we have to place it in the ApplyTo method first:
patchDoc.ApplyTo(employeeToPatch, ModelState);
But once we do this, we are going to get an error. That’s because the current ApplyTo method comes from the JsonPatch namespace, and we need the method with the same name but from the NewtonsoftJson namespace.
Since we have the Microsoft.AspNetCore.Mvc.NewtonsoftJson package installed in the main project, we are going to remove it from there and install it in the Presentation project.
If we navigate to the ApplyTo method declaration we can find two extension methods:
public static class JsonPatchExtensions { public static void ApplyTo<T>(this JsonPatchDocument<T> patchDoc, T objectToApplyTo, ModelStateDictionary modelState) where T : class... public static void ApplyTo<T>(this JsonPatchDocument<T> patchDoc, T objectToApplyTo, ModelStateDictionary modelState, string prefix) where T : class... }
We are using the first one.
After the package installation, the error in the action will disappear.
Now, right below thee ApplyTo method, we can add our familiar validation logic:
patchDoc.ApplyTo(result.employeeToPatch, ModelState); if (!ModelState.IsValid) return UnprocessableEntity(ModelState); _service.EmployeeService.SaveChangesForPatch(...);
But, we have a small problem now. What if we try to send a remove operation, but for the valid path:
We can see it passes, but this is not good. If you can remember, we said that the remove operation will set the value for the included property to its default value, which is 0. But in the EmployeeForUpdateDto class, we have a Range attribute that doesn’t allow that value to be below 18. So, where is the problem?
Let’s illustrate this for you:
As you can see, we are validating patchDoc which is completely valid at this moment, but we save employeeEntity to the database. So, we need some additional validation to prevent an invalid employeeEntity from being saved to the database:
patchDoc.ApplyTo(result.employeeToPatch, ModelState); TryValidateModel(result.employeeToPatch); if (!ModelState.IsValid) return UnprocessableEntity(ModelState);
We can use the TryValidateModel method to validate the already patched employeeToPatch instance. This will trigger validation and every error will make ModelState invalid. After that, we execute a familiar validation check.
And we get 422, which is the expected status code.
14 ASYNCHRONOUS CODE
In this chapter, we are going to convert synchronous code to asynchronous inside ASP.NET Core. First, we are going to learn a bit about asynchronous programming and why should we write async code. Then we are going to use our code from the previous chapters and rewrite it in an async manner.
We are going to modify the code, step by step, to show you how easy is to convert synchronous code to asynchronous code. Hopefully, this will help you understand how asynchronous code works and how to write it from scratch in your applications.
14.1 What is Asynchronous Programming?
Async programming is a parallel programming technique that allows the working process to run separately from the main application thread.
By using async programming, we can avoid performance bottlenecks and enhance the responsiveness of our application.
How so?
Because we are not sending requests to the server and blocking it while waiting for the responses anymore (as long as it takes). Now, when we send a request to the server, the thread pool delegates a thread to that request. Eventually, that thread finishes its job and returns to the thread pool freeing itself for the next request. At some point, the data will be fetched from the database and the result needs to be sent to the requester. At that time, the thread pool provides another thread to handle that work. Once the work is done, a thread is going back to the thread pool.
It is very important to understand that if we send a request to an endpoint and it takes the application three or more seconds to process that request, we probably won’t be able to execute this request any faster in async mode. It is going to take the same amount of time as the sync request.
Let’s imagine that our thread pool has two threads and we have used one thread with a first request. Now, the second request arrives and we have to use the second thread from a thread pool. At this point, our thread pool is out of threads. If a third request arrives now it has to wait for any of the first two requests to complete and return assigned threads to a thread pool. Only then the thread pool can assign that returned thread to a new request:
As a result of a request waiting for an available thread, our client experiences a slow down for sure. Additionally, if the client has to wait too long, they will receive an error response usually the service is unavailable (503). But this is not the only problem. Since the client expects the list of entities from the database, we know that it is an I/O operation. So, if we have a lot of records in the database and it takes three seconds for the database to return a result to the API, our thread is doing nothing except waiting for the task to complete. So basically, we are blocking that thread and making it three seconds unavailable for any additional requests that arrive at our API.
With asynchronous requests, the situation is completely different.
When a request arrives at our API, we still need a thread from a thread pool. So, that leaves us with only one thread left. But because this action is now asynchronous, as soon as our request reaches the I/O point where the database has to process the result for three seconds, the thread is returned to a thread pool. Now we again have two available threads and we can use them for any additional request. After the three seconds when the database returns the result to the API, the thread pool assigns the thread again to handle that response:
Now that we've cleared that out, we can learn how to implement asynchronous code in .NET Core and .NET 5+.
14.2 Async, Await Keywords and Return Types
The async and await keywords play a crucial part in asynchronous programming. We use the async keyword in the method declaration and its purpose is to enable the await keyword within that method. So yes,we can’t use the await keyword without previously adding the async keyword in the method declaration. Also, using only the async keyword doesn’t make your method asynchronous, just the opposite, that method is still synchronous.
The await keyword performs an asynchronous wait on its argument. It does that in several steps. The first thing it does is to check whether the operation is already complete. If it is, it will continue the method execution synchronously. Otherwise, the await keyword is going to pause the async method execution and return an incomplete task. Once the operation completes, a few seconds later, the async method can continue with the execution.
Let’s see this with a simple example:
public async Task<IEnumerable<Company>> GetCompanies() { _logger.LogInfo("Inside the GetCompanies method."); var companies = await _repoContext.Companies.ToListAsync(); return companies; }
So, even though our method is marked with the async keyword, it will start its execution synchronously. Once we log the required information synchronously, we continue to the next code line. We extract all the companies from the database and to do that, we use the await keyword. If our database requires some time to process the result and return it, the await keyword is going to pause the GetCompanies method execution and return an incomplete task. During that time the tread will be returned to a thread pool making itself available for another request. After the database operation completes the async method will resume executing and will return the list of companies.
From this example, we see the async method execution flow. But the question is how the await keyword knows if the operation is completed or not. Well, this is where Task comes into play.
14.2.1 Return Types of the Asynchronous Methods
In asynchronous programming, we have three return types:
• Task<TResult>, for an async method that returns a value.
• Task, for an async method that does not return a value.
• void, which we can use for an event handler.
What does this mean?
Well, we can look at this through synchronous programming glasses. If our sync method returns an int, then in the async mode it should return Task<int> — or if the sync method
returns IEnumerable<string>, then the async method should return Task<IEnumerable<string>>.
But if our sync method returns no value (has a void for the return type), then our async method should return Task. This means that we can use the await keyword inside that method, but without the return keyword.
You may wonder now, why not return Task all the time? Well, we should use void only for the asynchronous event handlers which require a void return type. Other than that, we should always return a Task.
From C# 7.0 onward, we can specify any other return type if that type includes a GetAwaiter method.
It is very important to understand that the Task represents an execution of the asynchronous method and not the result. The Task has several properties that indicate whether the operation was completed successfully or not (Status, IsCompleted, IsCanceled, IsFaulted). With these properties, we can track the flow of our async operations. So, this is the answer to our question. With Task, we can track whether the operation is completed or not. This is also called TAP (Task-based Asynchronous Pattern).
Now, when we have all the information, let’s do some refactoring in our completely synchronous code.
14.2.2 The IRepositoryBase Interface and the RepositoryBase Class Explanation
We won’t be changing the mentioned interface and class. That’s because we want to leave a possibility for the repository user classes to have either sync or async method execution. Sometimes, the async code could become slower than the sync one because EF Core’s async commands take slightly longer to execute (due to extra code for handling the threading), so leaving this option is always a good choice.
It is general advice to use async code wherever it is possible, but if we notice that our async code runes slower, we should switch back to the sync one.
14.3 Modifying the ICompanyRepository Interface and the CompanyRepository Class
In the Contracts project, we can find the ICompanyRepository interface with all the synchronous method signatures which we should change.
The Create and Delete method signatures are left synchronous. That’s because, in these methods, we are not making any changes in the database. All we're doing is changing the state of the entity to Added and Deleted.
So, in accordance with the interface changes, let’s modify our
CompanyRepository.cs class, which we can find in the Repository project:
We only have to change these methods in our repository class.
14.4 IRepositoryManager and RepositoryManager Changes
If we inspect the mentioned interface and the class, we will see the Save method, which calls the EF Core’s SaveChanges method. We have to change that as well:
public interface IRepositoryManager { ICompanyRepository Company { get; } IEmployeeRepository Employee { get; } Task SaveAsync(); }
And the RepositoryManager class modification:
public async Task SaveAsync() => await _repositoryContext.SaveChangesAsync();
Because the SaveAsync(), ToListAsync()... methods are awaitable, we may use the await keyword; thus, our methods need to have the async keyword and Task as a return type.
Using the await keyword is not mandatory, though. Of course, if we don’t use it, our SaveAsync() method will execute synchronously — and that is not our goal here.
14.5 Updating the Service layer
Again, we have to start with the interface modification:
And then, let’s modify the class methods one by one.
GetAllCompanies:
public async Task<IEnumerable<CompanyDto>> GetAllCompaniesAsync(bool trackChanges) { var companies = await _repository.Company.GetAllCompaniesAsync(trackChanges); var companiesDto = _mapper.Map<IEnumerable<CompanyDto>>(companies); return companiesDto; }
GetCompany:
public async Task<CompanyDto> GetCompanyAsync(Guid id, bool trackChanges) { var company = await _repository.Company.GetCompanyAsync(id, trackChanges); if (company is null) throw new CompanyNotFoundException(id); var companyDto = _mapper.Map<CompanyDto>(company); return companyDto; }
CreateCompany:
public async Task<CompanyDto> CreateCompanyAsync(CompanyForCreationDto company) {
var companyEntity = _mapper.Map<Company>(company); _repository.Company.CreateCompany(companyEntity); await _repository.SaveAsync(); var companyToReturn = _mapper.Map<CompanyDto>(companyEntity); return companyToReturn; }
GetByIds:
public async Task<IEnumerable<CompanyDto>> GetByIdsAsync(IEnumerable<Guid> ids, bool trackChanges) { if (ids is null) throw new IdParametersBadRequestException(); var companyEntities = await _repository.Company.GetByIdsAsync(ids, trackChanges); if (ids.Count() != companyEntities.Count()) throw new CollectionByIdsBadRequestException(); var companiesToReturn = _mapper.Map<IEnumerable<CompanyDto>>(companyEntities); return companiesToReturn; }
CreateCompanyCollection:
public async Task<(IEnumerable<CompanyDto> companies, string ids)> CreateCompanyCollectionAsync (IEnumerable<CompanyForCreationDto> companyCollection) { if (companyCollection is null) throw new CompanyCollectionBadRequest(); var companyEntities = _mapper.Map<IEnumerable<Company>>(companyCollection); foreach (var company in companyEntities) { _repository.Company.CreateCompany(company); } await _repository.SaveAsync(); var companyCollectionToReturn = _mapper.Map<IEnumerable<CompanyDto>>(companyEntities); var ids = string.Join(",", companyCollectionToReturn.Select(c => c.Id)); return (companies: companyCollectionToReturn, ids: ids); }
DeleteCompany:
public async Task DeleteCompanyAsync(Guid companyId, bool trackChanges) {
var company = await _repository.Company.GetCompanyAsync(companyId, trackChanges); if (company is null) throw new CompanyNotFoundException(companyId); _repository.Company.DeleteCompany(company); await _repository.SaveAsync(); }
UpdateCompany:
public async Task UpdateCompanyAsync(Guid companyId, CompanyForUpdateDto companyForUpdate, bool trackChanges) { var companyEntity = await _repository.Company.GetCompanyAsync(companyId, trackChanges); if (companyEntity is null) throw new CompanyNotFoundException(companyId); _mapper.Map(companyForUpdate, companyEntity); await _repository.SaveAsync(); }
That’s all the changes we have to make in the CompanyService class.
Now we can move on to the controller modification.
14.6 Controller Modification
Finally, we need to modify all of our actions in
the CompaniesController to work asynchronously.
So, let’s first start with the GetCompanies method:
[HttpGet] public async Task<IActionResult> GetCompanies() { var companies = await _service.CompanyService.GetAllCompaniesAsync(trackChanges: false); return Ok(companies); }
We haven’t changed much in this action. We’ve just changed the return type and added the async keyword to the method signature. In the method body, we can now await the GetAllCompaniesAsync() method. And that is pretty much what we should do in all the actions in our controller.
NOTE: We’ve changed all the method names in the repository and service layers by adding the Async suffix. But, we didn’t do that in the controller’s action. The main reason for that is when a user calls a method from your service or repository layers they can see right-away from the method name whether the method is synchronous or asynchronous. Also, your layers are not limited only to sync or async methods, you can have two methods that do the same thing but one in a sync manner and another in an async manner. In that case, you want to have a name distinction between those methods. For the controller’s actions this is not the case. We are not targeting our actions by their names but by their routes. So, the name of the action doesn’t really add any value as it does for the method names.
So to continue, let’s modify all the other actions.
GetCompany:
[HttpGet("{id:guid}", Name = "CompanyById")] public async Task<IActionResult> GetCompany(Guid id) { var company = await _service.CompanyService.GetCompanyAsync(id, trackChanges: false); return Ok(company); }
GetCompanyCollection:
[HttpGet("collection/({ids})", Name = "CompanyCollection")] public async Task<IActionResult> GetCompanyCollection ([ModelBinder(BinderType = typeof(ArrayModelBinder))]IEnumerable<Guid> ids) { var companies = await _service.CompanyService.GetByIdsAsync(ids, trackChanges: false); return Ok(companies); }
CreateCompany:
[HttpPost]
public async Task<IActionResult> CreateCompany([FromBody] CompanyForCreationDto company) { if (company is null) return BadRequest("CompanyForCreationDto object is null"); if (!ModelState.IsValid) return UnprocessableEntity(ModelState); var createdCompany = await _service.CompanyService.CreateCompanyAsync(company); return CreatedAtRoute("CompanyById", new { id = createdCompany.Id }, createdCompany); }
CreateCompanyCollection:
[HttpPost("collection")] public async Task<IActionResult> CreateCompanyCollection ([FromBody] IEnumerable<CompanyForCreationDto> companyCollection) { var result = await _service.CompanyService.CreateCompanyCollectionAsync(companyCollection); return CreatedAtRoute("CompanyCollection", new { result.ids }, result.companies); }
[HttpPut("{id:guid}")] public async Task<IActionResult> UpdateCompany(Guid id, [FromBody] CompanyForUpdateDto company) { if (company is null) return BadRequest("CompanyForUpdateDto object is null"); await _service.CompanyService.UpdateCompanyAsync(id, company, trackChanges: true); return NoContent(); }
Excellent. Now we are talking async.
Of course, we have the Employee entity as well and all of these steps have to be implemented for the EmployeeRepository class, IEmployeeRepository interface, and EmployeesController.
You can always refer to the source code for this chapter if you have any trouble implementing the async code for the Employee entity.
After the async implementation in the Employee classes, you can try to send different requests (from any chapter) to test your async actions. All of them should work as before, without errors, but this time in an asynchronous manner.
14.7 Continuation in Asynchronous Programming
The await keyword does three things:
• It helps us extract the result from the async operation – we already learned about that
• Validates the success of the operation
• Provides the Continuation for executing the rest of the code in the async method
So, in our GetCompanyAsync service method, all the code after awaiting an async operation is executed inside the continuation if the async operation was successful.
When we talk about continuation, it can be confusing because you can read in multiple resources about the SynchronizationContext and capturing the current context to enable this continuation. When we await a task, a request context is captured when await decides to pause the method execution. Once the method is ready to resume its execution, the application takes a thread from a thread pool, assigns it to the context (SynchonizationContext), and resumes the execution. But this is the case for ASP.NET applications.
We don’t have the SynchronizationContext in ASP.NET Core applications. ASP.NET Core avoids capturing and queuing the context, all it does is take the thread from a thread pool and assign it to the request. So, a lot less background works for the application to do.
One more thing. We are not limited to a single continuation. This means that in a single method, we can use multiple await keywords.
14.8 Common Pitfalls
In our GetAllCompaniesAsync repository method if we didn’t know any better, we could’ve been tempted to use the Result property instead of the await keyword:
We can see that the Result property returns the result we require:
// Summary: // Gets the result value of this System.Threading.Tasks.Task`1. // // Returns: // The result value of this System.Threading.Tasks.Task`1, which // is of the same type as the task's type parameter. public TResult Result { get... }
But don’t use the Result property.
With this code, we are going to block the thread and potentially cause a deadlock in the application, which is the exact thing we are trying to avoid using the async and await keywords. It applies the same to the Wait method that we can call on a Task.
So, that’s it regarding the asynchronous implementation in our project. We’ve learned a lot of useful things from this section and we can move on to the next one – Action filters.
15 ACTION FILTERS
Filters in .NET offer a great way to hook into the MVC action invocation pipeline. Therefore, we can use filters to extract code that can be reused and make our actions cleaner and maintainable. Some filters are already provided by .NET like the authorization filter, and there are the custom ones that we can create ourselves.
There are different filter types:
• Authorization filters – They run first to determine whether a user is authorized for the current request.
• Resource filters – They run right after the authorization filters and are very useful for caching and performance.
• Action filters – They run right before and after action method execution.
• Exception filters – They are used to handle exceptions before the response body is populated.
• Result filters – They run before and after the execution of the action methods result.
In this chapter, we are going to talk about Action filters and how to use them to create a cleaner and reusable code in our Web API.
15.1 Action Filters Implementation
To create an Action filter, we need to create a class that inherits either from the IActionFilter interface, the IAsyncActionFilter interface, or the ActionFilterAttribute class — which is the implementation of IActionFilter, IAsyncActionFilter, and a few different interfaces as well:
public abstract class ActionFilterAttribute : Attribute, IActionFilter, IFilterMetadata, IAsyncActionFilter, IResultFilter, IAsyncResultFilter, IOrderedFilter
To implement the synchronous Action filter that runs before and after action method execution, we need to implement the OnActionExecuting and OnActionExecuted methods:
namespace ActionFilters.Filters { public class ActionFilterExample : IActionFilter { public void OnActionExecuting(ActionExecutingContext context) { // our code before action executes } public void OnActionExecuted(ActionExecutedContext context) { // our code after action executes } } }
We can do the same thing with an asynchronous filter by inheriting from IAsyncActionFilter, but we only have one method to implement — the OnActionExecutionAsync:
namespace ActionFilters.Filters { public class AsyncActionFilterExample : IAsyncActionFilter { public async Task OnActionExecutionAsync(ActionExecutingContext context, ActionExecutionDelegate next) { // execute any code before the action executes var result = await next(); // execute any code after the action executes } } }
15.2 The Scope of Action Filters
Like the other types of filters, the action filter can be added to different scope levels: Global, Action, and Controller.
If we want to use our filter globally, we need to register it inside the AddControllers() method in the Program class:
Finally, to use a filter registered on the Action or Controller level, we need to place it on top of the Controller or Action as a ServiceType:
namespace AspNetCore.Controllers { [ServiceFilter(typeof(ControllerFilterExample))] [Route("api/[controller]")] [ApiController] public class TestController : ControllerBase { [HttpGet] [ServiceFilter(typeof(ActionFilterExample))] public IEnumerable<string> Get() { return new string[] { "example", "data" }; } }
15.3 Order of Invocation
The order in which our filters are executed is as follows:
Of course, we can change the order of invocation by adding the Order property to the invocation statement:
namespace AspNetCore.Controllers { [ServiceFilter(typeof(ControllerFilterExample), Order = 2)] [Route("api/[controller]")] [ApiController] public class TestController : ControllerBase { [HttpGet] [ServiceFilter(typeof(ActionFilterExample), Order = 1)] public IEnumerable<string> Get() { return new string[] { "example", "data" }; } } }
Or something like this on top of the same action:
[HttpGet]
[ServiceFilter(typeof(ActionFilterExample), Order = 2)] [ServiceFilter(typeof(ActionFilterExample2), Order = 1)] public IEnumerable<string> Get() { return new string[] { "example", "data" }; }
15.4 Improving the Code with Action Filters
Our actions are clean and readable without try-catch blocks due to global exception handling and a service layer implementation, but we can improve them even further.
So, let’s start with the validation code from the POST and PUT actions.
15.5 Validation with Action Filters
If we take a look at our POST and PUT actions, we can notice the repeated code in which we validate our Company model:
if (company is null) return BadRequest("CompanyForUpdateDto object is null"); if (!ModelState.IsValid) return UnprocessableEntity(ModelState);
We can extract that code into a custom Action Filter class, thus making this code reusable and the action cleaner.
So, let’s do that.
Let’s create a new folder in our solution explorer, and name
it ActionFilters. Then inside that folder, we are going to create a new class ValidationFilterAttribute:
public class ValidationFilterAttribute : IActionFilter { public ValidationFilterAttribute() {} public void OnActionExecuting(ActionExecutingContext context) { } public void OnActionExecuted(ActionExecutedContext context){} }
Now we are going to modify the OnActionExecuting method:
public void OnActionExecuting(ActionExecutingContext context) { var action = context.RouteData.Values["action"]; var controller = context.RouteData.Values["controller"]; var param = context.ActionArguments .SingleOrDefault(x => x.Value.ToString().Contains("Dto")).Value; if (param is null) { context.Result = new BadRequestObjectResult($"Object is null. Controller: {controller}, action: {action}"); return; } if (!context.ModelState.IsValid) context.Result = new UnprocessableEntityObjectResult(context.ModelState); }
We are using the context parameter to retrieve different values that we need inside this method. With the RouteData.Values dictionary, we can get the values produced by routes on the current routing path. Since we need the name of the action and the controller, we extract them from the Values dictionary.
Additionally, we use the ActionArguments dictionary to extract the DTO parameter that we send to the POST and PUT actions. If that parameter is null, we set the Result property of the context object to a new instance of the BadRequestObjectReturnResult class. If the model is invalid, we create a new instance of the UnprocessableEntityObjectResult class and pass ModelState.
Next, let’s register this action filter in the Program class above the AddControllers method:
This code is much cleaner and more readable now without the validation part. Furthermore, the validation part is now reusable for the POST and PUT actions for both the Company and Employee DTO objects.
Because we are already working on making our code reusable in our actions, we can review our classes from the service layer.
Let’s inspect the CompanyServrice class first.
Inside the class, we can find three methods (GetCompanyAsync, DeleteCompanyAsync, and UpdateCompanyAsync) where we repeat the same code:
var company = await _repository.Company.GetCompanyAsync(id, trackChanges); if (company is null) throw new CompanyNotFoundException(id);
This is something we can extract in a private method in the same class:
private async Task<Company> GetCompanyAndCheckIfItExists(Guid id, bool trackChanges) { var company = await _repository.Company.GetCompanyAsync(id, trackChanges); if (company is null) throw new CompanyNotFoundException(id); return company; }
And then we can modify these methods.
GetCompanyAsync:
public async Task<CompanyDto> GetCompanyAsync(Guid id, bool trackChanges) { var company = await GetCompanyAndCheckIfItExists(id, trackChanges); var companyDto = _mapper.Map<CompanyDto>(company); return companyDto; }
DeleteCompanyAsync:
public async Task DeleteCompanyAsync(Guid companyId, bool trackChanges) { var company = await GetCompanyAndCheckIfItExists(companyId, trackChanges); _repository.Company.DeleteCompany(company); await _repository.SaveAsync(); }
UpdateCompanyAsync:
public async Task UpdateCompanyAsync(Guid companyId, CompanyForUpdateDto companyForUpdate, bool trackChanges) { var company = await GetCompanyAndCheckIfItExists(companyId, trackChanges); _mapper.Map(companyForUpdate, company); await _repository.SaveAsync(); }
Now, this looks much better without code repetition.
Furthermore, we can find code repetition in almost all the methods inside the EmployeeService class:
var company = await _repository.Company.GetCompanyAsync(companyId, trackChanges); if (company is null) throw new CompanyNotFoundException(companyId); var employeeDb = await _repository.Employee.GetEmployeeAsync(companyId, id, trackChanges); if (employeeDb is null) throw new EmployeeNotFoundException(id);
In some methods, we can find just the first check and in several others, we can find both of them.
So, let’s extract these checks into two separate methods:
private async Task CheckIfCompanyExists(Guid companyId, bool trackChanges) { var company = await _repository.Company.GetCompanyAsync(companyId, trackChanges); if (company is null)
throw new CompanyNotFoundException(companyId); } private async Task<Employee> GetEmployeeForCompanyAndCheckIfItExists (Guid companyId, Guid id, bool trackChanges) { var employeeDb = await _repository.Employee.GetEmployeeAsync(companyId, id, trackChanges); if (employeeDb is null) throw new EmployeeNotFoundException(id); return employeeDb; }
With these two extracted methods in place, we can refactor all the other methods in the class.
GetEmployeesAsync:
public async Task<IEnumerable<EmployeeDto>> GetEmployeesAsync(Guid companyId, bool trackChanges) { await CheckIfCompanyExists(companyId, trackChanges); var employeesFromDb = await _repository.Employee.GetEmployeesAsync(companyId, trackChanges); var employeesDto = _mapper.Map<IEnumerable<EmployeeDto>>(employeesFromDb); return employeesDto; }
GetEmployeeAsync:
public async Task<EmployeeDto> GetEmployeeAsync(Guid companyId, Guid id, bool trackChanges) { await CheckIfCompanyExists(companyId, trackChanges); var employeeDb = await GetEmployeeForCompanyAndCheckIfItExists(companyId, id, trackChanges); var employee = _mapper.Map<EmployeeDto>(employeeDb); return employee; }
CreateEmployeeForCompanyAsync:
public async Task<EmployeeDto> CreateEmployeeForCompanyAsync(Guid companyId, EmployeeForCreationDto employeeForCreation, bool trackChanges) { await CheckIfCompanyExists(companyId, trackChanges); var employeeEntity = _mapper.Map<Employee>(employeeForCreation); _repository.Employee.CreateEmployeeForCompany(companyId, employeeEntity); await _repository.SaveAsync();
var employeeToReturn = _mapper.Map<EmployeeDto>(employeeEntity); return employeeToReturn; }
Now, all of the methods are cleaner and easier to maintain since our validation code is in a single place, and if we need to modify these validations, there’s only one place we need to change.
Additionally, if you want you can create a new class and extract these methods, register that class as a service, inject it into our service classes and use the validation methods. It is up to you how you want to do it.
So, we have seen how to use action filters to clear our action methods and also how to extract methods to make our service cleaner and easier to maintain.
With that out of the way, we can continue to Paging.
16 PAGING
We have covered a lot of interesting features while creating our Web API project, but there are still things to do.
So, in this chapter, we’re going to learn how to implement paging in ASP.NET Core Web API. It is one of the most important concepts in building RESTful APIs.
If we inspect the GetEmployeesForCompany action in the EmployeesController, we can see that we return all the employees for the single company.
But we don’t want to return a collection of all resources when querying our API. That can cause performance issues and it’s in no way optimized for public or private APIs. It can cause massive slowdowns and even application crashes in severe cases.
Of course, we should learn a little more about Paging before we dive into code implementation.
16.1 What is Paging?
Paging refers to getting partial results from an API. Imagine having millions of results in the database and having your application try to return all of them at once.
Not only would that be an extremely ineffective way of returning the results, but it could also possibly have devastating effects on the application itself or the hardware it runs on. Moreover, every client has limited memory resources and it needs to restrict the number of shown results.
Thus, we need a way to return a set number of results to the client in order to avoid these consequences. Let’s see how we can do that.
16.2 Paging Implementation
Mind you, we don’t want to change the base repository logic or implement any business logic in the controller.
Let's start with the controller modification by modifying the GetEmployeesForCompany action:
[HttpGet] public async Task<IActionResult> GetEmployeesForCompany(Guid companyId, [FromQuery] EmployeeParameters employeeParameters) { var employees = await _service.EmployeeService.GetEmployeesAsync(companyId, trackChanges: false); return Ok(employees); }
A few things to take note of here:
• We’re using [FromQuery] to point out that we’ll be using query parameters to define which page and how many employees we are requesting.
• The EmployeeParameters class is the container for the actual parameters for the Employee entity.
We also need to actually create the EmployeeParameters class. So, let’s first create a RequestFeatures folder in the Shared project and then inside, create the required classes.
First the RequestParameters class:
public abstract class RequestParameters
{ const int maxPageSize = 50; public int PageNumber { get; set; } = 1; private int _pageSize = 10; public int PageSize { get { return _pageSize; } set { _pageSize = (value > maxPageSize) ? maxPageSize : value; } }
And then the EmployeeParameters class:
public class EmployeeParameters : RequestParameters { }
We create an abstract class to hold the common properties for all the entities in our project, and a single EmployeeParameters class that will hold the specific parameters. It is empty now, but soon it won’t be.
In the abstract class, we are using the maxPageSize constant to restrict our API to a maximum of 50 rows per page. We have two public properties – PageNumber and PageSize. If not set by the caller, PageNumber will be set to 1, and PageSize to 10.
Now we can return to the controller and import a using directive for the EmployeeParameters class:
using Shared.RequestFeatures;
After that change, let’s implement the most important part — the repository logic. We need to modify the GetEmployeesAsync method in the IEmployeeRepository interface and the EmployeeRepository class.
Okay, the easiest way to explain this is by example.
Say we need to get the results for the third page of our website, counting 20 as the number of results we want. That would mean we want to skip the first ((3 – 1) * 20) = 40 results, then take the next 20 and return them to the caller.
Does that make sense?
Since we call this repository method in our service layer, we have to modify it as well.
So, let’s start with the IEmployeeService modification:
Before we continue, we should create additional employees for the company with the id: C9D4C053-49B6-410C-BC78-2D54A9991870. We are doing this because we have only a small number of employees per company and we need more of them for our example. You can use a predefined request in Part16 in Postman, and just change the request body with the following objects:
If that’s what you got, you’re on the right track.
We can check our result in the database:
And we can see that we have the correct data returned.
Now, what can we do to improve this solution?
16.4 Improving the Solution
Since we’re returning just a subset of results to the caller, we might as well have a PagedList instead of List.
PagedList will inherit from the List class and will add some more to it. We can also move the skip/take logic to the PagedList since it makes more sense.
So, let’s first create a new MetaData class in the Shared/RequestFeatures folder:
public class MetaData { public int CurrentPage { get; set; } public int TotalPages { get; set; } public int PageSize { get; set; } public int TotalCount { get; set; } public bool HasPrevious => CurrentPage > 1; public bool HasNext => CurrentPage < TotalPages; }
Then, we are going to implement the PagedList class in the same folder:
public class PagedList<T> : List<T> { public MetaData MetaData { get; set; } public PagedList(List<T> items, int count, int pageNumber, int pageSize) { MetaData = new MetaData { TotalCount = count, PageSize = pageSize, CurrentPage = pageNumber, TotalPages = (int)Math.Ceiling(count / (double)pageSize) }; AddRange(items); } public static PagedList<T> ToPagedList(IEnumerable<T> source, int pageNumber, int pageSize) { var count = source.Count(); var items = source.Skip((pageNumber - 1) * pageSize) .Take(pageSize).ToList(); return new PagedList<T>(items, count, pageNumber, pageSize); } }
As you can see, we’ve transferred the skip/take logic to the static method inside of the PagedList class. And in the MetaData class, we’ve added a few more properties that will come in handy as metadata for our response.
HasPrevious is true if the CurrentPage is larger than 1, and HasNext is calculated if the CurrentPage is smaller than the number of total pages. TotalPages is calculated by dividing the number of items by the page size and then rounding it to the larger number since a page needs to exist even if there is only one item on it.
Now that we’ve cleared that up, let’s change our EmployeeRepository and EmployeesController accordingly.
We change the method signature and the name of the employeesFromDb variable to employeesWithMetaData since this name is now more suitable. After the mapping action, we construct a Tuple and return it to the caller.
The new thing in this action is that we modify the response header and add our metadata as the X-Pagination header. For this, we need the System.Text.Json namespace.
Now, if we send the same request we did earlier, we are going to get the same result:
But now we have some additional useful information in the X-Pagination response header:
As you can see, all of our metadata is here. We can use this information when building any kind of frontend pagination to our benefit. You can play around with different requests to see how it works in other scenarios.
We could also use this data to generate links to the previous and next pagination page on the backend, but that is part of the HATEOAS and is out of the scope of this chapter.
16.4.1 Additional Advice
This solution works great with a small amount of data, but with bigger tables with millions of rows, we can improve it by modifying the GetEmployeesAsync repository method:
Even though we have an additional call to the database with the CountAsync method, this solution was tested upon millions of rows and was much faster than the previous one. Because our table has few rows, we will continue using the previous solution, but feel free to switch to this one if you want.
Also, to enable the client application to read the new X-Pagination header that we’ve added in our action, we have to modify the CORS configuration:
In this chapter, we are going to cover filtering in ASP.NET Core Web API. We’ll learn what filtering is, how it’s different from searching, and how to implement it in a real-world project.
While not critical as paging, filtering is still an important part of a flexible REST API, so we need to know how to implement it in our API projects.
Filtering helps us get the exact result set we want instead of all the results without any criteria.
17.1 What is Filtering?
Filtering is a mechanism to retrieve results by providing some kind of criterion. We can write many kinds of filters to get results by type of class property, value range, date range, or anything else.
When implementing filtering, you are always restricted by the predefined set of options you can set in your request. For example, you can send a date value to request an employee, but you won’t have much success.
On the front end, filtering is usually implemented as checkboxes, radio buttons, or dropdowns. This kind of implementation limits you to only those options that are available to create a valid filter.
Take for example a car-selling website. When filtering the cars you want, you would ideally want to select:
• Car manufacturer as a category from a list or a dropdown
• Car model from a list or a dropdown
• Is it new or used with radio buttons
• The city where the seller is as a dropdown
• The price of the car is an input field (numeric)
• ......
You get the point. So, the request would look something like this:
Now that we know what filtering is, let’s see how it’s different from searching.
17.2 How is Filtering Different from Searching?
When searching for results, we usually have only one input and that’s the one you use to search for anything within a website.
So in other words, you send a string to the API and the API is responsible for using that string to find any results that match it.
On our car website, we would use the search field to find the “Ford Expedition” car model and we would get all the results that match the car name “Ford Expedition.” Thus, this search would return every “Ford Expedition” car available.
We can also improve the search by implementing search terms like Google does, for example. If the user enters the Ford Expedition without quotes in the search field, we would return both what’s relevant to Ford and Expedition. But if the user puts quotes around it, we would search the entire term “Ford Expedition” in our database.
Using search doesn’t mean we can’t use filters with it. It makes perfect sense to use filtering and searching together, so we need to take that into account when writing our source code.
But enough theory.
Let’s implement some filters.
17.3 How to Implement Filtering in ASP.NET Core Web API
We have the Age property in our Employee class. Let’s say we want to find out which employees are between the ages of 26 and 29. We also want to be able to enter just the starting age — and not the ending one — and vice versa.
Okay, we have a specification. Let’s see how to implement it.
We’ve already implemented paging in our controller, so we have the necessary infrastructure to extend it with the filtering functionality. We’ve used the EmployeeParameters class, which inherits from the RequestParameters class, to define the query parameters for our paging request.
Let’s extend the EmployeeParameters class:
public class EmployeeParameters : RequestParameters { public uint MinAge { get; set; } public uint MaxAge { get; set; } = int.MaxValue; public bool ValidAgeRange => MaxAge > MinAge; }
We’ve added two unsigned int properties (to avoid negative year values):MinAge and MaxAge.
Since the default uint value is 0, we don’t need to explicitly define it; 0 is okay in this case. For MaxAge, we want to set it to the max int value. If we don’t get it through the query params, we have something to work with. It doesn’t matter if someone sets the age to 300 through the params; it won’t affect the results.
We’ve also added a simple validation property – ValidAgeRange. Its purpose is to tell us if the max-age is indeed greater than the min-age. If it’s not, we want to let the API user know that he/she is doing something wrong.
Okay, now that we have our parameters ready, we can modify the GetEmployeesAsync service method by adding a validation check as a first statement:
public async Task<(IEnumerable<EmployeeDto> employees, MetaData metaData)> GetEmployeesAsync (Guid companyId, EmployeeParameters employeeParameters, bool trackChanges) { if (!employeeParameters.ValidAgeRange) throw new MaxAgeRangeBadRequestException(); await CheckIfCompanyExists(companyId, trackChanges); var employeesWithMetaData = await _repository.Employee .GetEmployeesAsync(companyId, employeeParameters, trackChanges); var employeesDto = _mapper.Map<IEnumerable<EmployeeDto>>(employeesWithMetaData); return (employees: employeesDto, metaData: employeesWithMetaData.MetaData); }
We’ve added our validation check and a BadRequest response if the validation fails.
But we don’t have this custom exception class so, we have to create it in the Entities/Exceptions class:
public sealed class MaxAgeRangeBadRequestException : BadRequestException { public MaxAgeRangeBadRequestException() :base("Max age can't be less than min age.") { } }
That should do it.
After the service class modification and creation of our custom exception class, let’s get to the implementation in our EmployeeRepository class:
Excellent. The filter is implemented and we can move on to the searching part.
18 SEARCHING
In this chapter, we’re going to tackle the topic of searching in ASP.NET Core Web API. Searching is one of those functionalities that can make or break your API, and the level of difficulty when implementing it can vary greatly depending on your specifications.
If you need to implement a basic searching feature where you are just trying to search one field in the database, you can easily implement it. On the other hand, if it’s a multi-column, multi-term search, you would probably be better off with some of the great search libraries out there like Lucene.NET which are already optimized and proven.
18.1 What is Searching?
There is no doubt in our minds that you’ve seen a search field on almost every website on the internet. It’s easy to find something when we are familiar with the website structure or when a website is not that large.
But if we want to find the most relevant topic for us, we don’t know what we’re going to find, or maybe we’re first-time visitors to a large website, we’re probably going to use a search field.
In our simple project, one use case of a search would be to find an employee by name.
Let’s see how we can achieve that.
18.2 Implementing Searching in Our Application
Since we’re going to implement the most basic search in our project, the implementation won’t be complex at all. We have all we need infrastructure-wise since we already covered paging and filtering. We’ll just extend our implementation a bit.
This should return just one result: Mihael Fins. Of course, the search needs to work together with filtering and paging, so that’s one of the things we’ll need to keep in mind too.
Like we did with filtering, we’re going to extend our EmployeeParameters class first since we’re going to send our search query as a query parameter:
public class EmployeeParameters : RequestParameters { public uint MinAge { get; set; } public uint MaxAge { get; set; } = int.MaxValue; public bool ValidAgeRange => MaxAge > MinAge; public string? SearchTerm { get; set; } }
Simple as that.
Now we can write queries with searchTerm=”name” in them.
The next thing we need to do is actually implement the search functionality in our EmployeeRepository class:
We have made two changes here. The first is modifying the filter logic and the second is adding the Search method for the searching functionality.
But these methods (FilterEmployees and Search) are not created yet, so let’s create them.
In the Repository project, we are going to create the new folder Extensions and inside of that folder the new class RepositoryEmployeeExtensions:
public static class RepositoryEmployeeExtensions { public static IQueryable<Employee> FilterEmployees(this IQueryable<Employee> employees, uint minAge, uint maxAge) => employees.Where(e => (e.Age >= minAge && e.Age <= maxAge)); public static IQueryable<Employee> Search(this IQueryable<Employee> employees, string searchTerm) { if (string.IsNullOrWhiteSpace(searchTerm)) return employees; var lowerCaseTerm = searchTerm.Trim().ToLower(); return employees.Where(e => e.Name.ToLower().Contains(lowerCaseTerm)); } }
So, we are just creating our extension methods to update our query until it is executed in the repository. Now, all we have to do is add a using directive to the EmployeeRepository class:
using Repository.Extensions;
That’s it for our implementation. As you can see, it isn’t that hard since it is the most basic search and we already had an infrastructure set.
18.3 Testing Our Implementation
Let’s send a first request with the value Mihael Fins for the search term:
That’s it! We’ve successfully implemented and tested our search functionality.
If we check the Headers tab for each request, we will find valid x- pagination as well.
19 SORTING
In this chapter, we’re going to talk about sorting in ASP.NET Core Web API. Sorting is a commonly used mechanism that every API should implement. Implementing it in ASP.NET Core is not difficult due to the flexibility of LINQ and good integration with EF Core.
So, let’s talk a bit about sorting.
19.1 What is Sorting?
Sorting, in this case, refers to ordering our results in a preferred way using our query string parameters. We are not talking about sorting algorithms nor are we going into the how’s of implementing a sorting algorithm.
What we’re interested in, however, is how do we make our API sort our results the way we want it to.
Let’s say we want our API to sort employees by their name in ascending order, and then by their age.
To do that, our API call needs to look something like this:
Our API needs to consider all the parameters and sort our results accordingly. In our case, this means sorting results by their name; then, if there are employees with the same name, sorting them by the age property.
So, these are our employees for the IT_Solutions Ltd company:
For the sake of demonstrating this example (sorting by name and then by age), we are going to add one more Jana McLeaf to our database with the age of 27. You can add whatever you want to test the results:
Great, now we have the required data to test our functionality properly.
And of course, like with all other functionalities we have implemented so far (paging, filtering, and searching), we need to implement this to work well with everything else. We should be able to get the paginated, filtered, and sorted data, for example.
Let’s see one way to go around implementing this.
19.2 How to Implement Sorting in ASP.NET Core Web API
As with everything else so far, first, we need to extend our RequestParameters class to be able to send requests with the orderBy clause in them:
public class RequestParameters { const int maxPageSize = 50; public int PageNumber { get; set; } = 1; private int _pageSize = 10; public int PageSize { get { return _pageSize; } set { _pageSize = (value > maxPageSize) ? maxPageSize : value; } } public string? OrderBy { get; set; } }
As you can see, the only thing we’ve added is the OrderBy property and we added it to the RequestParameters class because we can reuse it for other entities. We want to sort our results by name, even if it hasn’t been stated explicitly in the request.
That said, let’s modify the EmployeeParameters class to enable the default sorting condition for Employee if none was stated:
public class EmployeeParameters : RequestParameters { public EmployeeParameters() => OrderBy = "name"; public uint MinAge { get; set; } public uint MaxAge { get; set; } = int.MaxValue; public bool ValidAgeRange => MaxAge > MinAge; public string? SearchTerm { get; set; } }
Next, we’re going to dive right into the implementation of our sorting mechanism, or rather, our ordering mechanism.
One thing to note is that we’ll be using the System.Linq.Dynamic.Core NuGet package to dynamically create our OrderBy query on the fly. So, feel free to install it in the Repository project and add a using directive in the RepositoryEmployeeExtensions class:
using System.Linq.Dynamic.Core;
Now, we can add the new extension method Sort in our RepositoryEmployeeExtensions class:
public static IQueryable<Employee> Sort(this IQueryable<Employee> employees, string orderByQueryString) { if (string.IsNullOrWhiteSpace(orderByQueryString)) return employees.OrderBy(e => e.Name); var orderParams = orderByQueryString.Trim().Split(','); var propertyInfos = typeof(Employee).GetProperties(BindingFlags.Public | BindingFlags.Instance); var orderQueryBuilder = new StringBuilder(); foreach (var param in orderParams) { if (string.IsNullOrWhiteSpace(param)) continue; var propertyFromQueryName = param.Split(" ")[0]; var objectProperty = propertyInfos.FirstOrDefault(pi => pi.Name.Equals(propertyFromQueryName, StringComparison.InvariantCultureIgnoreCase)); if (objectProperty == null) continue; var direction = param.EndsWith(" desc") ? "descending" : "ascending"; orderQueryBuilder.Append($"{objectProperty.Name.ToString()} {direction}, "); } var orderQuery = orderQueryBuilder.ToString().TrimEnd(',', ' '); if (string.IsNullOrWhiteSpace(orderQuery)) return employees.OrderBy(e => e.Name); return employees.OrderBy(orderQuery); }
Okay, there are a lot of things going on here, so let’s take it step by step and see what exactly we've done.
19.3 Implementation – Step by Step
First, let start with the method definition. It has two arguments — one for the list of employees as IQueryable and the other for the ordering query. If we send a request like this one: https://localhost:5001/api/companies/companyId/employees?or derBy=name,age desc,
our orderByQueryString will be name,age desc.
We begin by executing some basic check against the orderByQueryString. If it is null or empty, we just return the same collection ordered by name.
if (string.IsNullOrWhiteSpace(orderByQueryString))
return employees.OrderBy(e => e.Name);
Next, we are splitting our query string to get the individual fields:
var orderParams = orderByQueryString.Trim().Split(',');
We’re also using a bit of reflection to prepare the list of PropertyInfo objects that represent the properties of our Employee class. We need them to be able to check if the field received through the query string exists in the Employee class:
var propertyInfos = typeof(Employee).GetProperties(BindingFlags.Public | BindingFlags.Instance);
That prepared, we can actually run through all the parameters and check for their existence:
if (string.IsNullOrWhiteSpace(param)) continue; var propertyFromQueryName = param.Split(" ")[0]; var objectProperty = propertyInfos.FirstOrDefault(pi => pi.Name.Equals(propertyFromQueryName, StringComparison.InvariantCultureIgnoreCase));
If we don’t find such a property, we skip the step in the foreach loop and go to the next parameter in the list:
if (objectProperty == null)
continue;
If we do find the property, we return it and additionally check if our parameter contains “desc” at the end of the string. We use that to decide how we should order our property:
var direction = param.EndsWith(" desc") ? "descending" : "ascending";
We use the StringBuilder to build our query with each loop:
Now that we’ve looped through all the fields, we are just removing excess commas and doing one last check to see if our query indeed has something in it:
var orderQuery = orderQueryBuilder.ToString().TrimEnd(',', ' '); if (string.IsNullOrWhiteSpace(orderQuery)) return employees.OrderBy(e => e.Name);
Finally, we can order our query:
return employees.OrderBy(orderQuery);
At this point, the orderQuery variable should contain the “Name ascending, DateOfBirth descending” string. That means it will order our results first by Name in ascending order, and then by DateOfBirth in descending order.
We can see that this list is sorted by Name ascending. Since we have two Jana’s, they were sorted by Age descending.
We have prepared additional requests which you can use to test this functionality with Postman. So, feel free to do it.
19.5 Improving the Sorting Functionality
Right now, sorting only works with the Employee entity, but what about the Company? It is obvious that we have to change something in our implementation if we don’t want to repeat our code while implementing sorting for the Company entity.
That said, let’s modify the Sort extension method:
public static IQueryable<Employee> Sort(this IQueryable<Employee> employees, string orderByQueryString) { if (string.IsNullOrWhiteSpace(orderByQueryString)) return employees.OrderBy(e => e.Name); var orderQuery = OrderQueryBuilder.CreateOrderQuery<Employee>(orderByQueryString); if (string.IsNullOrWhiteSpace(orderQuery)) return employees.OrderBy(e => e.Name); return employees.OrderBy(orderQuery); }
So, we are extracting a logic that can be reused in the CreateOrderQuery method. But of course, we have to create that method.
Let’s create a Utility folder in the Extensions folder with the new class OrderQueryBuilder:
Now, let’s modify that class:
public static class OrderQueryBuilder { public static string CreateOrderQuery<T>(string orderByQueryString) { var orderParams = orderByQueryString.Trim().Split(','); var propertyInfos = typeof(T).GetProperties(BindingFlags.Public | BindingFlags.Instance); var orderQueryBuilder = new StringBuilder();foreach (var param in orderParams) { if (string.IsNullOrWhiteSpace(param)) continue; var propertyFromQueryName = param.Split(" ")[0]; var objectProperty = propertyInfos.FirstOrDefault(pi => pi.Name.Equals(propertyFromQueryName, StringComparison.InvariantCultureIgnoreCase)); if (objectProperty == null) continue; var direction = param.EndsWith(" desc") ? "descending" : "ascending"; orderQueryBuilder.Append($"{objectProperty.Name.ToString()} {direction}, "); } var orderQuery = orderQueryBuilder.ToString().TrimEnd(',', ' '); return orderQuery; } }
And there we go. Not too many changes, but we did a great job here. You can test this solution with the prepared requests in Postman and you'll get the same result for sure:
But now, this functionality is reusable.
20 DATA SHAPING
In this chapter, we are going to talk about a neat concept called data shaping and how to implement it in ASP.NET Core Web API. To achieve that, we are going to use similar tools to the previous section. Data shaping is not something that every API needs, but it can be very useful in some cases.
Let’s start by learning what data shaping is exactly.
20.1 What is Data Shaping?
Data shaping is a great way to reduce the amount of traffic sent from the API to the client. It enables the consumer of the API to select (shape) the data by choosing the fields through the query string.
By giving the consumer a way to select just the fields it needs, we can potentially reduce the stress on the API. On the other hand, this is not something every API needs, so we need to think carefully and decide whether we should implement its implementation because it has a bit of reflection in it.
And we know for a fact that reflection takes its toll and slows our application down.
Finally, as always, data shaping should work well together with the concepts we’ve covered so far – paging, filtering, searching, and sorting.
First, we are going to implement an employee-specific solution to data shaping. Then we are going to make it more generic, so it can be used by any entity or any API.
Let’s get to work.
20.2 How to Implement Data Shaping
First things first, we need to extend our RequestParameters class since we are going to add a new feature to our query string and we want it to be available for any entity:
public string? Fields { get; set; }
We’ve added the Fields property and now we can use fields as a query string parameter.
Let’s continue by creating a new interface in the Contracts project:
The IDataShaper defines two methods that should be implemented — one for the single entity and one for the collection of entities. Both are named ShapeData, but they have different signatures.
Notice how we use the ExpandoObject from System.Dynamic namespace as a return type. We need to do that to shape our data the way we want it.
To implement this interface, we are going to create a new DataShaping folder in the Service project and add a new DataShaper class:
public class DataShaper<T> : IDataShaper<T> where T : class { public PropertyInfo[] Properties { get; set; } public DataShaper() { Properties = typeof(T).GetProperties(BindingFlags.Public | BindingFlags.Instance); } public IEnumerable<ExpandoObject> ShapeData(IEnumerable<T> entities, string fieldsString) {var requiredProperties = GetRequiredProperties(fieldsString); return FetchData(entities, requiredProperties); } public ExpandoObject ShapeData(T entity, string fieldsString) { var requiredProperties = GetRequiredProperties(fieldsString); return FetchDataForEntity(entity, requiredProperties); } private IEnumerable<PropertyInfo> GetRequiredProperties(string fieldsString) { var requiredProperties = new List<PropertyInfo>(); if (!string.IsNullOrWhiteSpace(fieldsString)) { var fields = fieldsString.Split(',', StringSplitOptions.RemoveEmptyEntries); foreach (var field in fields) { var property = Properties .FirstOrDefault(pi => pi.Name.Equals(field.Trim(), StringComparison.InvariantCultureIgnoreCase)); if (property == null) continue; requiredProperties.Add(property); } } else { requiredProperties = Properties.ToList(); } return requiredProperties; }private IEnumerable<ExpandoObject> FetchData(IEnumerable<T> entities, IEnumerable<PropertyInfo> requiredProperties) { var shapedData = new List<ExpandoObject>(); foreach (var entity in entities) { var shapedObject = FetchDataForEntity(entity, requiredProperties); shapedData.Add(shapedObject); } return shapedData; } private ExpandoObject FetchDataForEntity(T entity, IEnumerable<PropertyInfo> requiredProperties) { var shapedObject = new ExpandoObject();foreach (var property in requiredProperties) { var objectPropertyValue = property.GetValue(entity); shapedObject.TryAdd(property.Name, objectPropertyValue); } return shapedObject; } }
We need these namespaces to be included as well:
using Contracts;
using System.Dynamic;
using System.Reflection;
There is quite a lot of code in our class, so let’s break it down.
20.3 Step-by-Step Implementation
We have one public property in this class – Properties. It’s an array of PropertyInfo’s that we’re going to pull out of the input type, whatever it is — Company or Employee in our case:
public PropertyInfo[] Properties { get; set; } public DataShaper() { Properties = typeof(T).GetProperties(BindingFlags.Public | BindingFlags.Instance); }
So, here it is. In the constructor, we get all the properties of an input class.
Next, we have the implementation of our two public ShapeData methods:
public IEnumerable<ExpandoObject> ShapeData(IEnumerable<T> entities, string fieldsString) { var requiredProperties = GetRequiredProperties(fieldsString); return FetchData(entities, requiredProperties); } public ExpandoObject ShapeData(T entity, string fieldsString) { var requiredProperties = GetRequiredProperties(fieldsString); return FetchDataForEntity(entity, requiredProperties); }
Both methods rely on the GetRequiredProperties method to parse the input string that contains the fields we want to fetch.
The GetRequiredProperties method does the magic. It parses the input string and returns just the properties we need to return to the controller:
private IEnumerable<PropertyInfo> GetRequiredProperties(string fieldsString) { var requiredProperties = new List<PropertyInfo>(); if (!string.IsNullOrWhiteSpace(fieldsString)) { var fields = fieldsString.Split(',', StringSplitOptions.RemoveEmptyEntries); foreach (var field in fields) { var property = Properties .FirstOrDefault(pi => pi.Name.Equals(field.Trim(), StringComparison.InvariantCultureIgnoreCase)); if (property == null) continue; requiredProperties.Add(property); } } else { requiredProperties = Properties.ToList(); } return requiredProperties; }
There’s nothing special about it. If the fieldsString is not empty, we split it and check if the fields match the properties in our entity. If they do, we add them to the list of required properties.
On the other hand, if the fieldsString is empty, all properties are required.
Now, FetchData and FetchDataForEntity are the private methods to extract the values from these required properties we’ve prepared.
The FetchDataForEntity method does it for a single entity:
private ExpandoObject FetchDataForEntity(T entity, IEnumerable<PropertyInfo> requiredProperties) { var shapedObject = new ExpandoObject();foreach (var property in requiredProperties) { var objectPropertyValue = property.GetValue(entity); shapedObject.TryAdd(property.Name, objectPropertyValue); } return shapedObject; }
Here, we loop through the requiredProperties parameter. Then, using a bit of reflection, we extract the values and add them to our ExpandoObject. ExpandoObject implements IDictionary<string,object>, so we can use the TryAdd method to add our property using its name as a key and the value as a value for the dictionary.
This way, we dynamically add just the properties we need to our dynamic object.
The FetchData method is just an implementation for multiple objects. It utilizes the FetchDataForEntity method we’ve just implemented:
private IEnumerable<ExpandoObject> FetchData(IEnumerable<T> entities, IEnumerable<PropertyInfo> requiredProperties) { var shapedData = new List<ExpandoObject>(); foreach (var entity in entities) { var shapedObject = FetchDataForEntity(entity, requiredProperties); shapedData.Add(shapedObject); } return shapedData; }
To continue, let’s register the DataShaper class in the IServiceCollection in the Program class:
Let’s send the same request one more time, but this time with the different accept header (text/xml):
It works — but it looks pretty ugly and unreadable. But that’s how the XmlDataContractSerializerOutputFormatter serializes our ExpandoObject by default.
We can fix that, but the logic is out of the scope of this book. Of course, we have implemented the solution in our source code. So, if you want, you can use it in your project.
All you have to do is to create the Entity class and copy the content from our Entity class that resides in the Entities/Models folder.
After that, just modify the IDataShaper interface and the DataShaper class by using the Entity type instead of the ExpandoObject type. Also, you have to do the same thing for the IEmployeeService interface and the EmployeeService class. Again, you can check our implementation if you have any problems.
After all those changes, once we send the same request, we are going to see a much better result:
If XML serialization is not important to you, you can keep using ExpandoObject — but if you want a nicely formatted XML response, this is the way to go.
To sum up, data shaping is an exciting and neat little feature that can make our APIs flexible and reduce our network traffic. If we have a high- volume traffic API, data shaping should work just fine. On the other hand, it’s not a feature that we should use lightly because it utilizes reflection and dynamic typing to get things done.
As with all other functionalities, we need to be careful when and if we should implement data shaping. Performance tests might come in handy even if we do implement it.
21 SUPPORTING HATEOAS
In this section, we are going to talk about one of the most important concepts in building RESTful APIs — HATEOAS and learn how to implement HATEOAS in ASP.NET Core Web API. This part relies heavily on the concepts we've implemented so far in paging, filtering, searching, sorting, and especially data shaping and builds upon the foundations we've put down in these parts.
21.1 What is HATEOAS and Why is it so Important?
HATEOAS (Hypermedia as the Engine of Application State) is a very important REST constraint. Without it, a REST API cannot be considered RESTful and many of the benefits we get by implementing a REST architecture are unavailable.
Hypermedia refers to any kind of content that contains links to media types such as documents, images, videos, etc.
REST architecture allows us to generate hypermedia links in our responses dynamically and thus make navigation much easier. To put this into perspective, think about a website that uses hyperlinks to help you navigate to different parts of it. You can achieve the same effect with HATEOAS in your REST API.
Imagine a website that has a home page and you land on it, but there are no links anywhere. You need to scrape the website or find some other way to navigate it to get to the content you want. We're not saying that the website is the same as a REST API, but you get the point.
The power of being able to explore an API on your own can be very useful.
Let's see how that works.
21.1.1 Typical Response with HATEOAS Implemented
Once we implement HATEOAS in our API, we are going to have this type of response:
As you can see, we got the list of our employees and for each employee all the actions we can perform on them. And so on...
So, it's a nice way to make an API self-discoverable and evolvable.
21.1.2 What is a Link?
According to RFC5988, a link is "a typed connection between two resources that are identified by Internationalised Resource Identifiers (IRIs)". Simply put, we use links to traverse the internet or rather the resources on the internet.
Our responses contain an array of links, which consist of a few properties according to the RFC:
• href - represents a target URI.
• rel - represents a link relation type, which means it describes how the current context is related to the target resource.
• method - we need an HTTP method to know how to distinguish the same target URIs.
21.1.3 Pros/Cons of Implementing HATEOAS
So, what are all the benefits we can expect when implementing HATEOAS?
HATEOAS is not trivial to implement, but the rewards we reap are worth it. Here are the things we can expect to get when we implement HATEOAS:
• API becomes self-discoverable and explorable.
• A client can use the links to implement its logic, it becomes much easier, and any changes that happen in the API structure are directly reflected onto the client.
• The server drives the application state and URL structure and not vice versa.
• The link relations can be used to point to the developer’s documentation.
• Versioning through hyperlinks becomes easier.
• Reduced invalid state transaction calls.
• API is evolvable without breaking all the clients.
We can do so much with HATEOAS. But since it's not easy to implement all these features, we should keep in mind the scope of our API and if we need all this. There is a great difference between a high-volume public API and some internal API that is needed to communicate between parts of the same system.
That is more than enough theory for now. Let's get to work and see what the concrete implementation of HATEOAS looks like.
21.2 Adding Links in the Project
Let’s begin with the concept we know so far, and that’s the link. In the Entities project, we are going to create the LinkModels folder and inside a new Link class:
public class Link { public string? Href { get; set; } public string? Rel { get; set; } public string? Method { get; set; } public Link() { } public Link(string href, string rel, string method) { Href = href; Rel = rel; Method = method; } }
Note that we have an empty constructor, too. We'll need that for XML serialization purposes, so keep it that way.
Next, we need to create a class that will contain all of our links — LinkResourceBase:
public class LinkResourceBase { public LinkResourceBase() {} public List<Link> Links { get; set; } = new List<Link>(); }
And finally, since our response needs to describe the root of the controller, we need a wrapper for our links:
public class LinkCollectionWrapper<T> : LinkResourceBase { public List<T> Value { get; set; } = new List<T>(); public LinkCollectionWrapper() { } public LinkCollectionWrapper(List<T> value) => Value = value; }
This class might not make too much sense right now, but stay with us and it will become clear later down the road. For now, let's just assume we wrapped our links in another class for response representation purposes.
Since our response will contain links too, we need to extend the XML serialization rules so that our XML response returns the properly formatted links. Without this, we would get something like:
<Links>System.Collections.Generic.List1[Entites.Models.Link]` . So, in the Entities/Models/Entity class, we need to extend the WriteLinksToXml method to support links:
private void WriteLinksToXml(string key, object value, XmlWriter writer) { writer.WriteStartElement(key); if (value.GetType() == typeof(List<Link>)) { foreach (var val in value as List<Link>) { writer.WriteStartElement(nameof(Link)); WriteLinksToXml(nameof(val.Href), val.Href, writer); WriteLinksToXml(nameof(val.Method), val.Method, writer); WriteLinksToXml(nameof(val.Rel), val.Rel, writer); writer.WriteEndElement(); } } else { writer.WriteString(value.ToString()); } writer.WriteEndElement(); }
So, we check if the type is List. If it is, we iterate through all the links and call the method recursively for each of the properties: href, method, and rel.
That's all we need for now. We have a solid foundation to implement HATEOAS in our project.
21.3 Additional Project Changes
When we generate links, HATEOAS strongly relies on having the ids available to construct the links for the response. Data shaping, on the other hand, enables us to return only the fields we want. So, if we want only the name and age fields, the id field won’t be added. To solve that, we have to apply some changes.
The first thing we are going to do is to add a ShapedEntity class in the Entities/Models folder:
public class ShapedEntity { public ShapedEntity() { Entity = new Entity(); } public Guid Id { get; set; } public Entity Entity { get; set; } }
With this class, we expose the Entity and the Id property as well.
Now, we have to modify the IDataShaper interface and the DataShaper class by replacing all Entity usage with ShapedEntity.
In addition to that, we need to extend the FetchDataForEntity method in the DataShaper class to get the id separately:
private ShapedEntity FetchDataForEntity(T entity, IEnumerable<PropertyInfo> requiredProperties) { var shapedObject = new ShapedEntity(); foreach (var property in requiredProperties) { var objectPropertyValue = property.GetValue(entity); shapedObject.Entity.TryAdd(property.Name, objectPropertyValue); } var objectProperty = entity.GetType().GetProperty("Id"); shapedObject.Id = (Guid)objectProperty.GetValue(entity); return shapedObject; }
Finally, let’s add the LinkResponse class in the LinkModels folder; that will help us with the response once we start with the HATEOAS implementation:
public class LinkResponse
{ public bool HasLinks { get; set; } public List<Entity> ShapedEntities { get; set; } public LinkCollectionWrapper<Entity> LinkedEntities { get; set; } public LinkResponse() { LinkedEntities = new LinkCollectionWrapper<Entity>(); ShapedEntities = new List<Entity>(); } }
With this class, we are going to know whether our response has links. If it does, we are going to use the LinkedEntities property. Otherwise, we are going to use the ShapedEntities property.
21.4 Adding Custom Media Types
What we want to do is to enable links in our response only if it is explicitly asked for. To do that, we are going to introduce custom media types.
Before we start, let’s see how we can create a custom media type. A custom media type should look something like this: application/vnd.codemaze.hateoas+json. To compare it to the typical json media type which we use by default: application/json.
So let’s break down the different parts of a custom media type:
• json – suffix; we can use it to describe if we want json or an XML response, for example.
Now, let’s implement that in our application.
21.4.1 Registering Custom Media Types
First, we want to register our new custom media types in the middleware. Otherwise, we’ll just get a 406 Not Acceptable message.
Let’s add a new extension method to our ServiceExtensions:
public static void AddCustomMediaTypes(this IServiceCollection services) { services.Configure<MvcOptions>(config => { var systemTextJsonOutputFormatter = config.OutputFormatters .OfType<SystemTextJsonOutputFormatter>()?.FirstOrDefault(); if (systemTextJsonOutputFormatter != null) { systemTextJsonOutputFormatter.SupportedMediaTypes .Add("application/vnd.codemaze.hateoas+json"); } var xmlOutputFormatter = config.OutputFormatters .OfType<XmlDataContractSerializerOutputFormatter>()? .FirstOrDefault(); if (xmlOutputFormatter != null) { xmlOutputFormatter.SupportedMediaTypes .Add("application/vnd.codemaze.hateoas+xml"); } }); }
We are registering two new custom media types for the JSON and XML output formatters. This ensures we don’t get a 406 Not Acceptable response.
Now, we have to add that to the Program class, just after the AddControllers method:
builder.Services.AddCustomMediaTypes();
Excellent. The registration process is done.
21.4.2 Implementing a Media Type Validation Filter
Now, since we’ve implemented custom media types, we want our Accept header to be present in our requests so we can detect when the user requested the HATEOAS-enriched response.
To do that, we’ll implement an ActionFilter in the Presentation project inside the ActionFilters folder, which will validate our Accept header and media types:
public class ValidateMediaTypeAttribute : IActionFilter { public void OnActionExecuting(ActionExecutingContext context) { var acceptHeaderPresent = context.HttpContext .Request.Headers.ContainsKey("Accept"); if (!acceptHeaderPresent) { context.Result = new BadRequestObjectResult($"Accept header is missing."); return; } var mediaType = context.HttpContext .Request.Headers["Accept"].FirstOrDefault(); if (!MediaTypeHeaderValue.TryParse(mediaType, out MediaTypeHeaderValue? outMediaType)) { context.Result = new BadRequestObjectResult($"Media type not present. Please add Accept header with the required media type."); return; } context.HttpContext.Items.Add("AcceptHeaderMediaType", outMediaType); } public void OnActionExecuted(ActionExecutedContext context){} }
We check for the existence of the Accept header first. If it’s not present, we return BadRequest. If it is, we parse the media type — and if there is no valid media type present, we return BadRequest.
Once we’ve passed the validation checks, we pass the parsed media type to the HttpContext of the controller.
Now, we have to register the filter in the Program class:
Currently, you will get the error about HttpContext, but we will solve that a bit later.
Let’s continue by creating a new Utility folder in the main project and the EmployeeLinks class in it. Let’s start by adding the required dependencies inside the class:
public class EmployeeLinks : IEmployeeLinks { private readonly LinkGenerator _linkGenerator; private readonly IDataShaper<EmployeeDto> _dataShaper; public EmployeeLinks(LinkGenerator linkGenerator, IDataShaper<EmployeeDto> dataShaper) { _linkGenerator = linkGenerator; _dataShaper = dataShaper; } }
We are going to use LinkGenerator to generate links for our responses and IDataShaper to shape our data. As you can see, the shaping logic is now extracted from the EmployeeService class, which we will modify a bit later.
After dependencies, we are going to add the first method:
public LinkResponse TryGenerateLinks(IEnumerable<EmployeeDto> employeesDto, string fields, Guid companyId, HttpContext httpContext) { var shapedEmployees = ShapeData(employeesDto, fields); if (ShouldGenerateLinks(httpContext)) return ReturnLinkdedEmployees(employeesDto, fields, companyId, httpContext, shapedEmployees); return ReturnShapedEmployees(shapedEmployees);}
So, our method accepts four parameters. The employeeDto collection, the fields that are going to be used to shape the previous collection, companyId because routes to the employee resources contain the Id from the company, and httpContext which holds information about media types.
The first thing we do is shape our collection. Then if the httpContext contains the required media type, we add links to the response. On the other hand, we just return our shaped data.
Of course, we have to add those not implemented methods:
In the ShouldGenerateLinks method, we extract the media type from the httpContext. If that media type ends with hateoas, the method returns true; otherwise, it returns false. The ReturnShapedEmployees method just returns a new LinkResponse with the ShapedEntities property populated. By default, the HasLinks property is false.
After these methods, we have to add the ReturnLinkedEmployees method as well:
private LinkResponse ReturnLinkdedEmployees(IEnumerable<EmployeeDto> employeesDto, string fields, Guid companyId, HttpContext httpContext, List<Entity> shapedEmployees) { var employeeDtoList = employeesDto.ToList(); for (var index = 0; index < employeeDtoList.Count(); index++) { var employeeLinks = CreateLinksForEmployee(httpContext, companyId, employeeDtoList[index].Id, fields); shapedEmployees[index].Add("Links", employeeLinks); } var employeeCollection = new LinkCollectionWrapper<Entity>(shapedEmployees); var linkedEmployees = CreateLinksForEmployees(httpContext, employeeCollection); return new LinkResponse { HasLinks = true, LinkedEntities = linkedEmployees }; }
In this method, we iterate through each employee and create links for it by calling the CreateLinksForEmployee method. Then, we just add it to the shapedEmployees collection. After that, we wrap the collection and create links that are important for the entire collection by calling the CreateLinksForEmployees method.
Finally, we have to add those two new methods that create links:
private List<Link> CreateLinksForEmployee(HttpContext httpContext, Guid companyId, Guid id, string fields = "") { var links = new List<Link> { new Link(_linkGenerator.GetUriByAction(httpContext, "GetEmployeeForCompany", values: new { companyId, id, fields }), "self", "GET"), new Link(_linkGenerator.GetUriByAction(httpContext, "DeleteEmployeeForCompany", values: new { companyId, id }), "delete_employee", "DELETE"), new Link(_linkGenerator.GetUriByAction(httpContext, "UpdateEmployeeForCompany", values: new { companyId, id }), "update_employee", "PUT"), new Link(_linkGenerator.GetUriByAction(httpContext, "PartiallyUpdateEmployeeForCompany", values: new { companyId, id }), "partially_update_employee", "PATCH") }; return links;
} private LinkCollectionWrapper<Entity> CreateLinksForEmployees(HttpContext httpContext, LinkCollectionWrapper<Entity> employeesWrapper) { employeesWrapper.Links.Add(new Link(_linkGenerator.GetUriByAction(httpContext, "GetEmployeesForCompany", values: new { }), "self", "GET")); return employeesWrapper; }
There are a few things to note here.
We need to consider the fields while creating the links since we might be using them in our requests. We are creating the links by using the LinkGenerator‘s GetUriByAction method — which accepts HttpContext, the name of the action, and the values that need to be used to make the URL valid. In the case of the EmployeesController, we send the company id, employee id, and fields.
And that is it regarding this class.
Now, we have to register this class in the Program class:
After the service registration, we are going to create a new record inside the Entities/LinkModels folder:
public record LinkParameters(EmployeeParameters EmployeeParameters, HttpContext Context);
We are going to use this record to transfer required parameters from our controller to the service layer and avoid the installation of an additional NuGet package inside the Service and Service.Contracts projects.
Also for this to work, we have to add the reference to the Shared project, install the Microsoft.AspNetCore.Mvc.Abstractions package needed for HttpContext, and add required using directives:
using Microsoft.AspNetCore.Http;
using Shared.RequestFeatures;
Now, we can return to the IEmployeeLinks interface and fix that error by importing the required namespace. As you can see, we didn’t have to install the Abstractions NuGet package since Contracts references Entities. If Visual Studio keeps asking for the package installation, just remove the Entities reference from the Contracts project and add it again.
Once that is done, we can modify the EmployeesController:
[HttpGet] [ServiceFilter(typeof(ValidateMediaTypeAttribute))] public async Task<IActionResult> GetEmployeesForCompany(Guid companyId, [FromQuery] EmployeeParameters employeeParameters) { var linkParams = new LinkParameters(employeeParameters, HttpContext); var pagedResult = await _service.EmployeeService.GetEmployeesAsync(companyId, linkParams, trackChanges: false); Response.Headers.Add("X-Pagination", JsonSerializer.Serialize(pagedResult.metaData)); return Ok(pagedResult.employees); }
So, we create the linkParams variable and send it instead of employeeParameters to the service method.
Of course, this means we have to modify the IEmployeeService interface:
First, we don’t have the DataShaper injected anymore since this logic is now inside the EmployeeLinks class. Then, we change the method signature, fix a couple of errors since now we have linkParameters and not employeeParameters as a parameter, and we call the TryGenerateLinks method, which will return LinkResponse as a result.
Finally, we construct our Tuple and return it to the caller.
Now we can return to our controller and modify the GetEmployeesForCompany action:
[HttpGet] [ServiceFilter(typeof(ValidateMediaTypeAttribute))] public async Task<IActionResult> GetEmployeesForCompany(Guid companyId, [FromQuery] EmployeeParameters employeeParameters) { var linkParams = new LinkParameters(employeeParameters, HttpContext); var result = await _service.EmployeeService.GetEmployeesAsync(companyId, linkParams, trackChanges: false); Response.Headers.Add("X-Pagination", JsonSerializer.Serialize(result.metaData));return result.linkResponse.HasLinks ? Ok(result.linkResponse.LinkedEntities) : Ok(result.linkResponse.ShapedEntities); }
We change the pageResult variable name to result and use it to return the proper response to the client. If our result has links, we return linked entities, otherwise, we return shaped ones.
Before we test this, we shouldn’t forget to modify the ServiceManager’s constructor:
public ServiceManager(IRepositoryManager repositoryManager, ILoggerManager logger, IMapper mapper, IEmployeeLinks employeeLinks) { _companyService = new Lazy<ICompanyService>(() => new CompanyService(repositoryManager, logger, mapper)); _employeeService = new Lazy<IEmployeeService>(() => new EmployeeService(repositoryManager, logger, mapper, employeeLinks)); }
You can test this with the xml media type as well (we have prepared the request in Postman for you).
22 WORKING WITH OPTIONS AND HEAD REQUESTS
In one of the previous chapters (Method Safety and Method Idempotency), we talked about different HTTP requests. Until now, we have been working with all request types except OPTIONS and HEAD. So, let’s cover them as well.
22.1 OPTIONS HTTP Request
The Options request can be used to request information on the communication options available upon a certain URI. It allows consumers to determine the options or different requirements associated with a resource. Additionally, it allows us to check the capabilities of a server without forcing action to retrieve a resource.
Basically, Options should inform us whether we can Get a resource or execute any other action (POST, PUT, or DELETE). All of the options should be returned in the Allow header of the response as a comma- separated list of methods.
Let’s see how we can implement the Options request in our example.
22.2 OPTIONS Implementation
We are going to implement this request in the CompaniesController — so, let’s open it and add a new action:
We have to decorate our action with the HttpOptions attribute. As we said, the available options should be returned in the Allow response header, and that is exactly what we are doing here. The URI for this action is /api/companies, so we state which actions can be executed for that certain URI. Finally, the Options request should return the 200 OK status code. We have to understand that the response, if it is empty, must include the content-length field with the value of zero. We don’t have to add it by ourselves because ASP.NET Core takes care of that for us.
As you can see, we are getting a 200 OK response. Let’s inspect the Headers tab:
Everything works as expected.
Let’s move on.
22.3 Head HTTP Request
The Head is identical to Get but without a response body. This type of request could be used to obtain information about validity, accessibility, and recent modifications of the resource.
22.4 HEAD Implementation
Let’s open the EmployeesController, because that’s where we are going to implement this type of request. As we said, the Head request must return the same response as the Get request — just without the response body. That means it should include the paging information in the response as well.
Now, you may think that we have to write a completely new action and also repeat all the code inside, but that is not the case. All we have to do is add the HttpHead attribute below HttpGet:
[HttpGet] [HttpHead] public async Task<IActionResult> GetEmployeesForCompany(Guid companyId, [FromQuery] EmployeeParameters employeeParameters)
As you can see, we receive a 200 OK status code with the empty body.Let’s check the Headers part:
You can see the X-Pagination link included in the Headers part of the response. Additionally, all the parts of the X-Pagination link are populated — which means that our code was successfully executed, but the response body hasn’t been included.
Excellent.
We now have support for the Http OPTIONS and HEAD requests.
23 ROOT DOCUMENT
In this section, we are going to create a starting point for the consumers of our API. This starting point is also known as the Root Document. The Root Document is the place where consumers can learn how to interact with the rest of the API.
23.1 Root Document Implementation
This document should be created at the api root, so let’s start by creating a new controller:
[Route("api")] [ApiController] public class RootController : ControllerBase { }
We are going to generate links towards the API actions. Therefore, we have to inject LinkGenerator:
[Route("api")] [ApiController] public class RootController : ControllerBase { private readonly LinkGenerator _linkGenerator; public RootController(LinkGenerator linkGenerator) => _linkGenerator = linkGenerator; }
In this controller, we only need a single action, GetRoot, which will be executed with the GET request on the /api URI.
There are several links that we are going to create in this action. The link to the document itself and links to actions available on the URIs at the root level (actions from the Companies controller). We are not creating links to employees, because they are children of the company — and in our API if we want to fetch employees, we have to fetch the company first.
If we inspect our CompaniesController, we can see that GetCompanies and CreateCompany are the only actions on the root URI level (api/companies). Therefore, we are going to create links only to them.
Before we start with the GetRoot action, let’s add a name for the CreateCompany and GetCompanies actions in the CompaniesController:
[HttpGet(Name = "GetCompanies")] public async Task<IActionResult> GetCompanies()
[HttpPost(Name = "CreateCompany")] [ServiceFilter(typeof(ValidationFilterAttribute))] public async Task<IActionResult> CreateCompany([FromBody]CompanyForCreationDto company)
We are going to use the Link class to generate links:
public class Link { public string Href { get; set; } public string Rel { get; set; } public string Method { get; set; } … }
This class contains all the required properties to describe our actions while creating links in the GetRoot action. The Href property defines the URI to the action, the Rel property defines the identification of the action type, and the Method property defines which HTTP method should be used for that action.
Now, we can create the GetRoot action:
[HttpGet(Name = "GetRoot")] public IActionResult GetRoot([FromHeader(Name = "Accept")] string mediaType) { if(mediaType.Contains("application/vnd.codemaze.apiroot")) { var list = new List<Link> { new Link { Href = _linkGenerator.GetUriByName(HttpContext, nameof(GetRoot), new {}), Rel = "self", Method = "GET" }, new Link { Href = _linkGenerator.GetUriByName(HttpContext, "GetCompanies", new {}), Rel = "companies", Method = "GET" }, new Link{ Href = _linkGenerator.GetUriByName(HttpContext, "CreateCompany", new {}), Rel = "create_company", Method = "POST" } }; return Ok(list); } return NoContent(); }
In this action, we generate links only if a custom media type is provided from the Accept header. Otherwise, we return NoContent(). To generate links, we use the GetUriByName method from the LinkGenerator class.
That said, we have to register our custom media types for the json and xml formats. To do that, we are going to extend the AddCustomMediaTypes extension method:
public static void AddCustomMediaTypes(this IServiceCollection services) { services.Configure<MvcOptions>(config => { var systemTextJsonOutputFormatter = config.OutputFormatters .OfType<SystemTextJsonOutputFormatter>()?.FirstOrDefault(); if (systemTextJsonOutputFormatter != null) { systemTextJsonOutputFormatter.SupportedMediaTypes .Add("application/vnd.codemaze.hateoas+json"); systemTextJsonOutputFormatter.SupportedMediaTypes .Add("application/vnd.codemaze.apiroot+json"); } var xmlOutputFormatter = config.OutputFormatters .OfType<XmlDataContractSerializerOutputFormatter>()? .FirstOrDefault(); if (xmlOutputFormatter != null) { xmlOutputFormatter.SupportedMediaTypes .Add("application/vnd.codemaze.hateoas+xml"); xmlOutputFormatter.SupportedMediaTypes .Add("application/vnd.codemaze.apiroot+xml"); } }); }
As our project grows, so does our knowledge; therefore, we have a better understanding of how to improve our system. Moreover, requirements change over time — thus, our API has to change as well.
When we implement some breaking changes, we want to ensure that we don’t do anything that will cause our API consumers to change their code. Those breaking changes could be:
• Renaming fields, properties, or resource URIs.
• Changes in the payload structure.
• Modifying response codes or HTTP Verbs.
• Redesigning our API endpoints.
If we have to implement some of these changes in the already working API, the best way is to apply versioning to prevent breaking our API for the existing API consumers.
There are different ways to achieve API versioning and there is no guidance that favors one way over another. So, we are going to show you different ways to version an API, and you can choose which one suits you best.
24.1 Required Package Installation and Configuration
In order to start, we have to install the Microsoft.AspNetCore.Mvc.Versioning library in the Presentation project:
This library is going to help us a lot in versioning our API.
After the installation, we have to add the versioning service in the service collection and configure it. So, let’s create a new extension method in the ServiceExtensions class:
With the AddApiVersioning method, we are adding service API versioning to the service collection. We are also using a couple of properties to initially configure versioning:
• ReportApiVersions adds the API version to the response header.
• AssumeDefaultVersionWhenUnspecified does exactly that. It specifies the default API version if the client doesn’t send one.
• DefaultApiVersion sets the default version count.
After that, we are going to use this extension in the Program class:
builder.Services.ConfigureVersioning();
API versioning is installed and configured, and we can move on.
24.2 Versioning Examples
Before we continue, let’s create another controller: CompaniesV2Controller (for example’s sake), which will represent a new version of our existing one. It is going to have just one Get action:
[ApiVersion("2.0")] [Route("api/companies")] [ApiController] public class CompaniesV2Controller : ControllerBase { private readonly IServiceManager _service; public CompaniesV2Controller(IServiceManager service) => _service = service; [HttpGet]public async Task<IActionResult> GetCompanies() { var companies = await _service.CompanyService .GetAllCompaniesAsync(trackChanges: false); return Ok(companies); } }
By using the [ApiVersion(“2.0”)] attribute, we are stating that this controller is version 2.0.
After that, let’s version our original controller as well:
[ApiVersion("1.0")] [Route("api/companies")] [ApiController] public class CompaniesController : ControllerBase
If you remember, we configured versioning to use 1.0 as a default API version (opt.AssumeDefaultVersionWhenUnspecified = true;). Therefore, if a client doesn’t state the required version, our API will use this one:
But, we can inspect the response headers to make sure that version 2.0 is used:
24.2.2 Using URL Versioning
For URL versioning to work, we have to modify the route in our controller:
[ApiVersion("2.0")] [Route("api/{v:apiversion}/companies")] [ApiController] public class CompaniesV2Controller : ControllerBase
Also, let’s just slightly modify the GetCompanies action in this controller, so we could see the difference in Postman by just inspecting the response body:
[HttpGet] public async Task<IActionResult> GetCompanies() { var companies = await _service.CompanyService .GetAllCompaniesAsync(trackChanges: false); var companiesV2 = companies.Select(x => $"{x.Name} V2"); return Ok(companiesV2); }
We are creating a projection from our companies collection by iterating through each element, modifying the Name property to contain the V2 suffix, and extracting it to a new collection companiesV2.
Now, we can remove the [ApiVersion] attribute from the controllers.
Of course, there are a lot more features that the installed library provides for us — but with the mentioned ones, we have covered quite enough to version our APIs.
25 CACHING
In this section, we are going to learn about caching resources. Caching can improve the quality and performance of our app a lot, but again, it is something first we need to look at as soon as some bug appears. To cover resource caching, we are going to work with HTTP Cache. Additionally, we are going to talk about cache expiration, validation, and cache-control headers.
25.1 About Caching
We want to use cache in our app because it can significantly improve performance. Otherwise, it would be useless. The main goal of caching is to eliminate the need to send requests towards the API in many cases and also to send full responses in other cases.
To reduce the number of sent requests, caching uses the expiration mechanism, which helps reduce network round trips. Furthermore, to eliminate the need to send full responses, the cache uses the validation mechanism, which reduces network bandwidth. We can now see why these two are so important when caching resources.
The cache is a separate component that accepts requests from the API’s consumer. It also accepts the response from the API and stores that response if they are cacheable. Once the response is stored, if a consumer requests the same response again, the response from the cache should be served.
But the cache behaves differently depending on what cache type is used.
25.1.1 Cache Types
There are three types of caches: Client Cache, Gateway Cache, and Proxy Cache.
The client cache lives on the client (browser); thus, it is a private cache. It is private because it is related to a single client. So every client consuming our API has a private cache.
The gateway cache lives on the server and is a shared cache. This cache is shared because the resources it caches are shared over different clients.
The proxy cache is also a shared cache, but it doesn’t live on the server nor the client side. It lives on the network.
With the private cache, if five clients request the same response for the first time, every response will be served from the API and not from the cache. But if they request the same response again, that response should come from the cache (if it’s not expired). This is not the case with the shared cache. The response from the first client is going to be cached, and then the other four clients will receive the cached response if they request it.
25.1.2 Response Cache Attribute
So, to cache some resources, we have to know whether or not it’s cacheable. The response header helps us with that. The one that is used most often is Cache-Control: Cache-Control: max-age=180. This states that the response should be cached for 180 seconds. For that, we use the ResponseCache attribute. But of course, this is just a header. If we want to cache something, we need a cache-store. For our example, we are going to use Response caching middleware provided by ASP.NET Core.
25.2 Adding Cache Headers
Before we start, let’s open Postman and modify the settings to support caching:
In the General tab under Headers, we are going to turn off the Send no- cache header:
Great. We can move on.
Let’s assume we want to use the ResponseCache attribute to cache the result from the GetCompany action:
public async Task GetCompany(Guid id)
[ResponseCache(Duration = 60)]
[HttpGet("{id}", Name = "CompanyById")]
It is obvious that we can work with different properties in the ResponseCache attribute — but for now, we are going to use Duration only:
[HttpGet("{id}", Name = "CompanyById")] [ResponseCache(Duration = 60)] public async Task<IActionResult> GetCompany(Guid id)
You can see that the Cache-Control header was created with a public cache and a duration of 60 seconds. But as we said, this is just a header; we need a cache-store to cache the response. So, let’s add one.
25.3 Adding Cache-Store
The first thing we are going to do is add an extension method in the ServiceExtensions class:
public static void ConfigureResponseCaching(this IServiceCollection services) => services.AddResponseCaching();
We register response caching in the IOC container, and now we have to call this method in the Program class:
builder.Services.ConfigureResponseCaching();
Additionally, we have to add caching to the application middleware right below UseCors() because Microsoft recommends having UseCors before UseResponseCaching, and as we learned in the section 1.8, order is very important for the middleware execution:
Now, we can start our application and send the same GetCompany request. It will generate the Cache-Control header. After that, before 60 seconds pass, we are going to send the same request and inspect the headers:
You can see the additional Age header that indicates the number of seconds the object has been stored in the cache. Basically, it means that we received our second response from the cache-store.
Another way to confirm that is to wait 60 seconds to pass. After that, you can send the request and inspect the console. You will see the SQL query generated. But if you send a second request, you will find no new logs for the SQL query. That’s because we are receiving our response from the cache.
Additionally, with every subsequent request within 60 seconds, the Age property will increment. After the expiration period passes, the response will be sent from the API, cached again, and the Age header will not be generated. You will also see new logs in the console.
Furthermore, we can use cache profiles to apply the same rules to different resources. If you look at the picture that shows all the properties we can use with ResponseCacheAttribute, you can see that there are a lot of properties. Configuring all of them on top of the action or controller could lead to less readable code. Therefore, we can use CacheProfiles to extract that configuration.
To do that, we are going to modify the AddControllers method:
We have to mention that this cache rule will apply to all the actions inside the controller except the ones that already have the ResponseCache attribute applied.
That said, once we send the request to GetCompany, we will still have the maximum age of 60. But once we send the request to GetCompanies:
There you go. Now, let’s talk some more about the Expiration and Validation models.
25.4 Expiration Model
The expiration model allows the server to recognize whether or not the response has expired. As long as the response is fresh, it will be served from the cache. To achieve that, the Cache-Control header is used. We have seen this in the previous example.
Let’s look at the diagram to see how caching works:
So, the client sends a request to get companies. There is no cached version of that response; therefore, the request is forwarded to the API. The API returns the response with the Cache-Control header with a 10- minute expiration period; it is being stored in the cache and forwarded to the client.
If after two minutes, the same response has been requested:
We can see that the cached response was served with an additional Age header with a value of 120 seconds or two minutes. If this is a private cache, that is where it stops. That’s because the private cache is stored in the browser and another client will hit the API for the same response. But if this is a shared cache and another client requests the same response after an additional two minutes:
The response is served from the cache with an additional two minutes added to the Age header.
We saw how the Expiration model works, now let’s inspect the Validation model.
25.5 Validation Model
The validation model is used to validate the freshness of the response. So it checks if the response is cached and still usable. Let’s assume we have a shared cached GetCompany response for 30 minutes. If someone updates that company after five minutes, without validation the client would receive the wrong response for another 25 minutes — not the updated one.
To prevent that, we use validators. The HTTP standard advises using Last- Modified and ETag validators in combination if possible.
Let’s see how validation works:
So again, the client sends a request, it is not cached, and so it is forwarded to the API. Our API returns the response that contains the Etag and Last-Modified headers. That response is cached and forwarded to the client.
After two minutes, the client sends the same request:
So, the same request is sent, but we don’t know if the response is valid. Therefore, the cache forwards that request to the API with the additional headers If-None-Match — which is set to the Etag value — and If- Modified-Since — which is set to the Last-Modified value. If this request checks out against the validators, our API doesn’t have to recreate the same response; it just sends a 304 Not Modified status. After that, the regular response is served from the cache. Of course, if this doesn’t check out, a new response must be generated.
That brings us to the conclusion that for the shared cache if the response hasn’t been modified, that response has to be generated only once. Let’s see all of these in an example.
25.6 Supporting Validation
To support validation, we are going to use the Marvin.Cache.Headers library. This library supports HTTP cache headers like Cache-Control, Expires, Etag, and Last-Modified and also implements validation and expiration models.
So, let’s install the Marvin.Cache.Headers library in the Presentation project, which will enable the reference for the main project as well. We are going to need it in both projects.
Now, let’s modify the ServiceExtensions class:
public static void ConfigureHttpCacheHeaders(this IServiceCollection services) => services.AddHttpCacheHeaders();
We are going to add additional configuration later.
To test this, we have to remove or comment out ResponseCache attributes in the CompaniesController. The installed library will provide that for us. Now, let’s send the GetCompany request:
We can see that we have all the required headers generated. The default expiration is set to 60 seconds and if we send this request one more time, we are going to get an additional Age header.
25.6.1 Configuration
We can globally configure our expiration and validation headers. To do that, let’s modify the ConfigureHttpCacheHeaders method:
You can see that the changes are implemented. Now, this is a private cache with an age of 65 seconds. Because it is a private cache, our API won’t cache it. You can check the console again and see the SQL logs for each request you send.
Other than global configuration, we can apply it on the resource level (on action or controller). The overriding rules are the same. Configuration on the action level will override the configuration on the controller or global level. Also, the configuration on the controller level will override the global level configuration.
To apply a resource level configuration, we have to use the HttpCacheExpiration and HttpCacheValidation attributes:
[HttpGet("{id}", Name = "CompanyById")] [HttpCacheExpiration(CacheLocation = CacheLocation.Public, MaxAge = 60)] [HttpCacheValidation(MustRevalidate = false)] public async Task<IActionResult> GetCompany(Guid id)
Once we send the GetCompanies request, we are going to see global values:
But if we send the GetCompany request:
You can see that it is public and you can send the same request again to see the Age header for the cached response.
25.7 Using ETag and Validation
First, we have to mention that the ResponseCaching library doesn’t correctly implement the validation model. Also, using the authorization header is a problem. We are going to show you alternatives later. But for now, we can simulate how validation with Etag should work.
We send the If-None-Match tag with the value of our Etag. And we can see as a result we get 304 Not Modified.
But this is not a valid situation. As we said, the client should send a valid request and it is up to the Cache to add an If-None-Match tag. In our example, which we sent from Postman, we simulated that. Then, it is up to the server to return a 304 message to the cache and then the cache should return the same response.
But anyhow, we have managed to show you how validation works. If we update that company:
You can see that we get 200 OK and if we inspect Headers, we will find that ETag is different because the resource changed:
So, we saw how validation works and also concluded that the ResponseCaching library is not that good for validation — it is much better for just expiration.
But then, what are the alternatives? There are a lot of alternatives, such as:
They implement caching correctly. And if you want to have expiration and validation, you should combine them with the Marvin library and you are good to go. But those servers are not that trivial to implement.
There is another option: CDN (Content Delivery Network). CDN uses HTTP caching and is used by various sites on the internet. The good thing with CDN is we don’t need to set up a cache server by ourselves, but unfortunately, we have to pay for it. The previous cache servers we presented are free to use. So, it’s up to you to decide what suits you best.
26 RATE LIMITING AND THROTTLING
Rate Limiting allows us to protect our API against too many requests that can deteriorate our API’s performance. API is going to reject requests that exceed the limit. Throttling queues exceeded requests for possible later processing. The API will eventually reject the request if processing cannot occur after a certain number of attempts.
For example, we can configure our API to create a limitation of 100 requests/hour per client. Or additionally, we can limit a client to the maximum of 1,000 requests/day per IP and 100 requests/hour. We can even limit the number of requests for a specific resource in our API; for example, 50 requests to api/companies.
To provide information about rate limiting, we use the response headers. They are separated between Allowed requests, which all start with the X- Rate-Limit and Disallowed requests.
The Allowed requests header contains the following information :
• X-Rate-Limit-Limit – rate limit period.
• X-Rate-Limit-Remaining – number of remaining requests.
• X-Rate-Limit-Reset – date/time information about resetting the request limit.
For the disallowed requests, we use a 429 status code; that stands for too many requests. This header may include the Retry-After response header and should explain details in the response body.
26.1 Implementing Rate Limiting
To start, we have to install the AspNetCoreRateLimit library in the main project:
Then, we have to add it to the service collection. This library uses a memory cache to store its counters and rules. Therefore, we have to add the MemoryCache to the service collection as well.
That said, let’s add the MemoryCache:
builder.Services.AddMemoryCache();
After that, we are going to create another extension method in the ServiceExtensions class:
public static void ConfigureRateLimitingOptions(this IServiceCollection services) { var rateLimitRules = new List<RateLimitRule> { new RateLimitRule { Endpoint = "*", Limit = 3, Period = "5m" } }; services.Configure<IpRateLimitOptions>(opt => { opt.GeneralRules = rateLimitRules; }); services.AddSingleton<IRateLimitCounterStore, MemoryCacheRateLimitCounterStore>(); services.AddSingleton<IIpPolicyStore, MemoryCacheIpPolicyStore>(); services.AddSingleton<IRateLimitConfiguration, RateLimitConfiguration>(); services.AddSingleton<IProcessingStrategy, AsyncKeyLockProcessingStrategy>(); }
We create a rate limit rules first, for now just one, stating that three requests are allowed in a five-minute period for any endpoint in our API. Then, we configure IpRateLimitOptions to add the created rule. Finally, we have to register rate limit stores, configuration, and processing strategy as a singleton. They serve the purpose of storing rate limit counters and policies as well as adding configuration.
So, we can see that we have two requests remaining and the time to reset the rule. If we send an additional three requests in the five-minute period of time, we are going to get a different response:
There are a lot of options that can be configured with Rate Limiting and you can read more about them on the AspNetCoreRateLimit GitHub page.
27 JWT, IDENTITY, AND REFRESH TOKEN
User authentication is an important part of any application. It refers to the process of confirming the identity of an application’s users. Implementing it properly could be a hard job if you are not familiar with the process.
Also, it could take a lot of time that could be spent on different features of an application.
So, in this section, we are going to learn about authentication and authorization in ASP.NET Core by using Identity and JWT (Json Web Token). We are going to explain step by step how to integrate Identity in the existing project and then how to implement JWT for the authentication and authorization actions.
ASP.NET Core provides us with both functionalities, making implementation even easier.
Finally, we are going to learn more about the refresh token flow and implement it in our Web API project.
So, let’s start with Identity integration.
27.1 Implementing Identity in ASP.NET Core Project
Asp.NET Core Identity is the membership system for web applications that includes membership, login, and user data. It provides a rich set of services that help us with creating users, hashing their passwords, creating a database model, and the authentication overall.
That said, let’s start with the integration process.
The first thing we have to do is to install the Microsoft.AspNetCore.Identity.EntityFrameworkCore library in the Entities project:
After the installation, we are going to create a new User class in the Entities/Models folder:
public class User : IdentityUser { public string FirstName { get; set; } public string LastName { get; set; } }
Our class inherits from the IdentityUser class that has been provided by the ASP.NET Core Identity. It contains different properties and we can extend it with our own as well.
After that, we have to modify the RepositoryContext class:
public class RepositoryContext : IdentityDbContext<User> { public RepositoryContext(DbContextOptions options) : base(options) { } protected override void OnModelCreating(ModelBuilder modelBuilder) { base.OnModelCreating(modelBuilder); modelBuilder.ApplyConfiguration(new CompanyConfiguration()); modelBuilder.ApplyConfiguration(new EmployeeConfiguration()); } public DbSet<Company> Companies { get; set; } public DbSet<Employee> Employees { get; set; } }
So, our class now inherits from the IdentityDbContext class and not DbContext because we want to integrate our context with Identity. For this, we have to include the Identity.EntityFrameworkCore namespace:
using Microsoft.AspNetCore.Identity.EntityFrameworkCore;
We don’t have to install the library in the Repository project since we already did that in the Entities project, and Repository has the reference to Entities.
Additionally, we call the OnModelCreating method from the base class. This is required for migration to work properly.
Now, we have to move on to the configuration part.
To do that, let’s create a new extension method in the ServiceExtensions class:
With the AddIdentity method, we are adding and configuring Identity for the specific type; in this case, the User and the IdentityRole type. We use different configuration parameters that are pretty self-explanatory on their own. Identity provides us with even more features to configure, but these are sufficient for our example.
Then, we add EntityFrameworkStores implementation with the default token providers.
And, let’s add the authentication middleware to the application’s request pipeline:
app.UseAuthorization();
app.UseAuthentication();
That’s it. We have prepared everything we need.
27.2 Creating Tables and Inserting Roles
Creating tables is quite an easy process. All we have to do is to create and apply migration. So, let’s create a migration:
PM> Add-Migration CreatingIdentityTables
And then apply it:
PM> Update-Database
If we check our database now, we are going to see additional tables:
For our project, the AspNetRoles, AspNetUserRoles, and AspNetUsers tables will be quite enough. If you open the AspNetUsers table, you will see additional FirstName and LastName columns.
Now, let’s insert several roles in the AspNetRoles table, again by using migrations. The first thing we are going to do is to create the RoleConfiguration class in the Repository/Configuration folder:
public class RoleConfiguration : IEntityTypeConfiguration<IdentityRole> { public void Configure(EntityTypeBuilder<IdentityRole> builder) {builder.HasData( new IdentityRole { Name = "Manager", NormalizedName = "MANAGER" }, new IdentityRole { Name = "Administrator", NormalizedName = "ADMINISTRATOR" } ); }
For this to work, we need the following namespaces included:
using Microsoft.AspNetCore.Identity;
using Microsoft.EntityFrameworkCore;
using Microsoft.EntityFrameworkCore.Metadata.Builders;
And let’s modify the OnModelCreating method in the RepositoryContext class:
If you check the AspNetRoles table, you will find two new roles created.
27.3 User Creation
To create/register a new user, we have to create a new controller:
[Route("api/authentication")] [ApiController] public class AuthenticationController : ControllerBase { private readonly IServiceManager _service; public AuthenticationController(IServiceManager service) => _service = service; }
So, nothing new here. We have the basic setup for our controller with IServiceManager injected.
The next thing we have to do is to create a UserForRegistrationDto record in the Shared/DataTransferObjects folder:
public record UserForRegistrationDto { public string? FirstName { get; init; } public string? LastName { get; init; } [Required(ErrorMessage = "Username is required")] public string? UserName { get; init; } [Required(ErrorMessage = "Password is required")] public string? Password { get; init; } public string? Email { get; init; } public string? PhoneNumber { get; init; } public ICollection<string>? Roles { get; init; } }
Then, let’s create a mapping rule in the MappingProfile class:
CreateMap<UserForRegistrationDto, User>();
Since we want to extract all the registration/authentication logic to the service layer, we are going to create a new IAuthenticationService interface inside the Service.Contracts project:
public interface IAuthenticationService { Task<IdentityResult> RegisterUser(UserForRegistrationDto userForRegistration); }
This method will execute the registration logic and return the identity result to the caller.
Now that we have the interface, we need to create an implementation service class inside the Service project:
This code is pretty familiar from the previous service classes except for the UserManager class. This class is used to provide the APIs for managing users in a persistence store. It is not concerned with how user information is stored. For this, it relies on a UserStore (which in our case uses Entity Framework Core).
Of course, we have to add some additional namespaces:
using AutoMapper; using Contracts; using Entities.Models; using Microsoft.AspNetCore.Identity; using Microsoft.Extensions.Configuration; using Service.Contracts;
Great. Now, we can implement the RegisterUser method:
public async Task<IdentityResult> RegisterUser(UserForRegistrationDto userForRegistration) { var user = _mapper.Map<User>(userForRegistration); var result = await _userManager.CreateAsync(user, userForRegistration.Password); if (result.Succeeded) await _userManager.AddToRolesAsync(user, userForRegistration.Roles); return result; }
So we map the DTO object to the User object and call the CreateAsync method to create that specific user in the database. The CreateAsync method will save the user to the database if the action succeeds or it will return error messages as a result.
After that, if a user is created, we add that user to the named roles — the ones sent from the client side — and return the result.
If you want, before calling AddToRoleAsync or AddToRolesAsync, you can check if roles exist in the database. But for that, you have to inject RoleManager and use the RoleExistsAsync method.
We want to provide this service to the caller through ServiceManager and for that, we have to modify the IServiceManager interface first:
public sealed class ServiceManager : IServiceManager { private readonly Lazy<ICompanyService> _companyService; private readonly Lazy<IEmployeeService> _employeeService; private readonly Lazy<IAuthenticationService> _authenticationService; public ServiceManager(IRepositoryManager repositoryManager, ILoggerManager logger, IMapper mapper, IEmployeeLinks employeeLinks, UserManager<User> userManager, IConfiguration configuration) { _companyService = new Lazy<ICompanyService>(() => new CompanyService(repositoryManager, logger, mapper)); _employeeService = new Lazy<IEmployeeService>(() => new EmployeeService(repositoryManager, logger, mapper, employeeLinks)); _authenticationService = new Lazy<IAuthenticationService>(() => new AuthenticationService(logger, mapper, userManager, configuration)); } public ICompanyService CompanyService => _companyService.Value; public IEmployeeService EmployeeService => _employeeService.Value; public IAuthenticationService AuthenticationService => _authenticationService.Value; }
Finally, it is time to create the RegisterUser action:
[HttpPost] [ServiceFilter(typeof(ValidationFilterAttribute))] public async Task<IActionResult> RegisterUser([FromBody] UserForRegistrationDto userForRegistration) { var result = await _service.AuthenticationService.RegisterUser(userForRegistration); if (!result.Succeeded){ foreach (var error in result.Errors) { ModelState.TryAddModelError(error.Code, error.Description); } return BadRequest(ModelState); } return StatusCode(201); }
We are implementing our existing action filter for the entity and model validation on top of our action. Then, we call the RegisterUser method and accept the result. If the registration fails, we iterate through each error add it to the ModelState and return the BadRequest response. Otherwise, we return the 201 created status code.
Before we continue with testing, we should increase a rate limit from 3 to 30 (ServiceExtensions class, ConfigureRateLimitingOptions method) just to not stand in our way while we’re testing the different features of our application.
And we get 201, which means that the user has been created and added to the role. We can send additional invalid requests to test our Action and Identity features.
Excellent. Everything is working as planned. We can move on to the JWT implementation.
27.4 Big Picture
Before we get into the implementation of authentication and authorization, let’s have a quick look at the big picture. There is an application that has a login form. A user enters their username and password and presses the login button. After pressing the login button, a client (e.g., web browser) sends the user’s data to the server’s API endpoint:
When the server validates the user’s credentials and confirms that the user is valid, it’s going to send an encoded JWT to the client. A JSON web token is a JavaScript object that can contain some attributes of the logged-in user. It can contain a username, user subject, user roles, or some other useful information.
27.5 About JWT
JSON web tokens enable a secure way to transmit data between two parties in the form of a JSON object. It’s an open standard and it’s a popular mechanism for web authentication. In our case, we are going to use JSON web tokens to securely transfer a user’s data between the client and the server.
JSON web tokens consist of three basic parts: the header, the payload, and the signature.
One real example of a JSON web token:
Every part of all three parts is shown in a different color. The first part of JWT is the header, which is a JSON object encoded in the base64 format. The header is a standard part of JWT and we don’t have to worry about it. It contains information like the type of token and the name of the algorithm:
{ "alg": "HS256", "typ": "JWT" }
After the header, we have a payload which is also a JavaScript object encoded in the base64 format. The payload contains some attributes about the logged-in user. For example, it can contain the user id, the user subject, and information about whether a user is an admin user or not.
JSON web tokens are not encrypted and can be decoded with any base64 decoder, so please never include sensitive information in the Payload:
Finally, we have the signature part. Usually, the server uses the signature part to verify whether the token contains valid information, the information which the server is issuing. It is a digital signature that gets generated by combining the header and the payload. Moreover, it’s based on a secret key that only the server knows:
So, if malicious users try to modify the values in the payload, they have to recreate the signature; for that purpose, they need the secret key only known to the server. On the server side, we can easily verify if the values are original or not by comparing the original signature with a new signature computed from the values coming from the client.
So, we can easily verify the integrity of our data just by comparing the digital signatures. This is the reason why we use JWT.
27.6 JWT Configuration
Let’s start by modifying the appsettings.json file:
We just store the issuer and audience information in the appsettings.json file. We are going to talk more about that in a minute. As you probably remember, we require a secret key on the server-side. So, we are going to create one and store it in the environment variable because this is much safer than storing it inside the project.
To create an environment variable, we have to open the cmd window as an administrator and type the following command:
setx SECRET "CodeMazeSecretKey" /M
This is going to create a system environment variable with the name SECRET and the value CodeMazeSecretKey. By using /M we specify that we want a system variable and not local.
First, we extract the JwtSettings from the appsettings.json file and extract our environment variable (If you keep getting null for the secret key, try restarting the Visual Studio or even your computer).
Then, we register the JWT authentication middleware by calling the method AddAuthentication on the IServiceCollection interface. Next, we specify the authentication scheme JwtBearerDefaults.AuthenticationScheme as well as ChallengeScheme. We also provide some parameters that will be used while validating JWT. For this to work, we have to install the Microsoft.AspNetCore.Authentication.JwtBearer library.
For this to work, we require the following namespaces:
using Microsoft.AspNetCore.Authentication.JwtBearer;
using Microsoft.AspNetCore.Identity;
using Microsoft.IdentityModel.Tokens;
using System.Text;
Excellent. We’ve successfully configured the JWT authentication.
According to the configuration, the token is going to be valid if:
• The issuer is the actual server that created the token (ValidateIssuer=true)
• The receiver of the token is a valid recipient (ValidateAudience=true)
• The token has not expired (ValidateLifetime=true)
• The signing key is valid and is trusted by the server (ValidateIssuerSigningKey=true)
Additionally, we are providing values for the issuer, the audience, and the secret key that the server uses to generate the signature for JWT.
All we have to do is to call this method in the Program class:
Let’s open the CompaniesController and add an additional attribute above the GetCompanies action:
[HttpGet(Name = "GetCompanies")]
[Authorize]
public async Task<IActionResult> GetCompanies()
The [Authorize] attribute specifies that the action or controller that it is applied to requires authorization. For it to be available we need an additional namespace:
We see the protection works. We get a 401 Unauthorized response, which is expected because an unauthorized user tried to access the protected endpoint. So, what we need is for our users to be authenticated and to have a valid token.
27.8 Implementing Authentication
Let’s begin with the UserForAuthenticationDto record:
public record UserForAuthenticationDto { [Required(ErrorMessage = "User name is required")] public string? UserName { get; init; } [Required(ErrorMessage = "Password name is required")] public string? Password { get; init; } }
To continue, let’s modify the IAuthenticationService interface:
Before we continue to the interface implementation, we have to install System.IdentityModel.Tokens.Jwt library in the Service project. Then, we can implement the required methods:
public async Task<bool> ValidateUser(UserForAuthenticationDto userForAuth) { _user = await _userManager.FindByNameAsync(userForAuth.UserName); var result = (_user != null && await _userManager.CheckPasswordAsync(_user, userForAuth.Password)); if (!result) _logger.LogWarn($"{nameof(ValidateUser)}: Authentication failed. Wrong user name or password."); return result; } public async Task<string> CreateToken() { var signingCredentials = GetSigningCredentials(); var claims = await GetClaims(); var tokenOptions = GenerateTokenOptions(signingCredentials, claims); return new JwtSecurityTokenHandler().WriteToken(tokenOptions); } private SigningCredentials GetSigningCredentials() { var key = Encoding.UTF8.GetBytes(Environment.GetEnvironmentVariable("SECRET")); var secret = new SymmetricSecurityKey(key); return new SigningCredentials(secret, SecurityAlgorithms.HmacSha256); } private async Task<List<Claim>> GetClaims() { var claims = new List<Claim> { new Claim(ClaimTypes.Name, _user.UserName) }; var roles = await _userManager.GetRolesAsync(_user); foreach (var role in roles) { claims.Add(new Claim(ClaimTypes.Role, role)); } return claims; }private JwtSecurityToken GenerateTokenOptions(SigningCredentials signingCredentials, List<Claim> claims) { var jwtSettings = _configuration.GetSection("JwtSettings"); var tokenOptions = new JwtSecurityToken ( issuer: jwtSettings["validIssuer"], audience: jwtSettings["validAudience"], claims: claims, expires: DateTime.Now.AddMinutes(Convert.ToDouble(jwtSettings["expires"])), signingCredentials: signingCredentials ); return tokenOptions; }
For this to work, we require a few more namespaces:
using System.IdentityModel.Tokens.Jwt;
using Microsoft.IdentityModel.Tokens;
using System.Text;
using System.Security.Claims;
Now we can explain the code.
In the ValidateUser method, we fetch the user from the database and check whether they exist and if the password matches. The UserManager class provides the FindByNameAsync method to find the user by user name and the CheckPasswordAsync to verify the user’s password against the hashed password from the database. If the check result is false, we log a message about failed authentication. Lastly, we return the result.
The CreateToken method does exactly that — it creates a token. It does that by collecting information from the private methods and serializing token options with the WriteToken method.
We have three private methods as well. The GetSignInCredentials method returns our secret key as a byte array with the security algorithm. The GetClaims method creates a list of claims with the user name inside and all the roles the user belongs to. The last method, GenerateTokenOptions, creates an object of the JwtSecurityToken type with all of the required options. We can see the expires parameter as one of the token options. We would extract it from the appsettings.json file as well, but we don’t have it there. So, we have to add it:
Right now if we send a request to the GetCompanies action, we are still going to get the 401 Unauthorized response even though we have successful authentication. That’s because we didn’t provide our token in a request header and our API has nothing to authorize against. To solve that, we are going to create another GET request, and in the Authorization header choose the header type and paste the token from the previous request:
Right now, even though authentication and authorization are working as expected, every single authenticated user can access the GetCompanies action. What if we don’t want that type of behavior? For example, we want to allow only managers to access it. To do that, we have to make one simple change:
[HttpGet(Name = "GetCompanies")]
[Authorize(Roles = "Manager")]
public async Task<IActionResult> GetCompanies()
And that is it. To test this, let’s create another user with the Administrator role (the second role from the database):
We get 201. After we send an authentication request for Jane Doe, we are going to get a new token. Let’s use that token to send the request towards the GetCompanies action:
We get a 403 Forbidden response because this user is not allowed to access the required endpoint. If we log in with John Doe and use his token, we are going to get a successful response for sure. Of course, we don’t have to place an Authorize attribute only on top of the action; we can place it on the controller level as well. For example, we can place just [Authorize] on the controller level to allow only authorized users to access all the actions in that controller; also, we can place the [Authorize (Role=…)] on top of any action in that controller to state that only a user with that specific role has access to that action.
One more thing. Our token expires after five minutes after the creation point. So, if we try to send another request after that period (we probably have to wait 5 more minutes due to the time difference between servers, which is embedded inside the token – this can be overridden with the ClockSkew property in the TokenValidationParameters object ), we are going to get the 401 Unauthorized status for sure. Feel free to try.
28 REFRESH TOKEN
In this chapter, we are going to learn about refresh tokens and their use in modern web application development.
In the previous chapter, we have created a flow where a user logs in, gets an access token to be able to access protected resources, and after the token expires, the user has to log in again to obtain a new valid token:
This flow is great and is used by many enterprise applications.
But sometimes we have a requirement not to force our users to log in every single time the token expires. For that, we can use a refresh token.
Refresh tokens are credentials that can be used to acquire new access tokens. When an access token expires, we can use a refresh token to get a new access token from the authentication component. The lifetime of a refresh token is usually set much longer compared to the lifetime of an access token.
Let’s introduce the refresh token to our authentication workflow:
First, the client authenticates with the authentication component by providing the credentials.
Then, the authentication component issues the access token and the refresh token.
After that, the client requests the resource endpoints for a protected resource by providing the access token.
The resource endpoint validates the access token and provides a protected resource.
Steps 3 & 4 keep on repeating until the access token expires.
Once the access token expires, the client requests a new access token by providing the refresh token.
The authentication component issues a new access token and refresh token.
Steps 3 through 7 keep on repeating until the refresh token expires.
Once the refresh token expires, the client needs to authenticate with the authentication server once again and the flow repeats from step 1.
28.1 Why Do We Need a Refresh Token
So, why do we need both access tokens and refresh tokens? Why don’t we just set a long expiration date, like a month or a year for the access tokens? Because, if we do that and someone manages to get hold of our access token they can use it for a long period, even if we change our password!
The idea of refresh tokens is that we can make the access token short- lived so that, even if it is compromised, the attacker gets access only for a shorter period. With refresh token-based flow, the authentication server issues a one-time use refresh token along with the access token. The app stores the refresh token safely.
Every time the app sends a request to the server it sends the access token in the Authorization header and the server can identify the app using it. Once the access token expires, the server will send a token expired response. Once the app receives the token expired response, it sends the expired access token and the refresh token to obtain a new access token and a refresh token.
If something goes wrong, the refresh token can be revoked which means that when the app tries to use it to get a new access token, that request will be rejected and the user will have to enter credentials once again and authenticate.
Thus, refresh tokens help in a smooth authentication workflow without the need for users to submit their credentials frequently, and at the same time, without compromising the security of the app.
28.2 Refresh Token Implementation
So far we have learned the concept of refresh tokens. Now, let’s dig into the implementation part.
The first thing we have to do is to modify the User class:
public class User : IdentityUser { public string? FirstName { get; set; } public string? LastName { get; set; } public string? RefreshToken { get; set; } public DateTime RefreshTokenExpiryTime { get; set; } }
Here we add two additional properties, which we are going to add to the AspNetUsers table.
To do that, we have to create and execute another migration:
Add-Migration AdditionalUserFiledsForRefreshToken
If for some reason you get the message that you need to review your migration due to possible data loss, you should inspect the migration file and leave only the code that adds and removes our additional columns:
Then, we have to implement two new methods in the AuthenticationService class:
private string GenerateRefreshToken() { var randomNumber = new byte[32]; using (var rng = RandomNumberGenerator.Create()) { rng.GetBytes(randomNumber); return Convert.ToBase64String(randomNumber);} } private ClaimsPrincipal GetPrincipalFromExpiredToken(string token) { var jwtSettings = _configuration.GetSection("JwtSettings"); var tokenValidationParameters = new TokenValidationParameters { ValidateAudience = true, ValidateIssuer = true, ValidateIssuerSigningKey = true, IssuerSigningKey = new SymmetricSecurityKey( Encoding.UTF8.GetBytes(Environment.GetEnvironmentVariable("SECRET"))), ValidateLifetime = true, ValidIssuer = jwtSettings["validIssuer"], ValidAudience = jwtSettings["validAudience"] }; var tokenHandler = new JwtSecurityTokenHandler(); SecurityToken securityToken; var principal = tokenHandler.ValidateToken(token, tokenValidationParameters, out securityToken); var jwtSecurityToken = securityToken as JwtSecurityToken; if (jwtSecurityToken == null || !jwtSecurityToken.Header.Alg.Equals(SecurityAlgorithms.HmacSha256, StringComparison.InvariantCultureIgnoreCase)) { throw new SecurityTokenException("Invalid token"); } return principal; }
GenerateRefreshToken contains the logic to generate the refresh token. We use the RandomNumberGenerator class to generate a cryptographic random number for this purpose.
GetPrincipalFromExpiredToken is used to get the user principal from the expired access token. We make use of the ValidateToken method from the JwtSecurityTokenHandler class for this purpose. This method validates the token and returns the ClaimsPrincipal object.
After that, to generate a refresh token and the expiry date for the logged- in user, and to return both the access token and refresh token to the caller, we have to modify the CreateToken method in the same class:
public async Task<TokenDto> CreateToken(bool populateExp) { var signingCredentials = GetSigningCredentials();var claims = await GetClaims(); var tokenOptions = GenerateTokenOptions(signingCredentials, claims); var refreshToken = GenerateRefreshToken(); _user.RefreshToken = refreshToken; if(populateExp) _user.RefreshTokenExpiryTime = DateTime.Now.AddDays(7); await _userManager.UpdateAsync(_user); var accessToken = new JwtSecurityTokenHandler().WriteToken(tokenOptions); return new TokenDto(accessToken, refreshToken); }
Finally, we have to modify the Authenticate action:
[HttpPost("login")] [ServiceFilter(typeof(ValidationFilterAttribute))] public async Task<IActionResult> Authenticate([FromBody] UserForAuthenticationDto user) { if (!await _service.AuthenticationService.ValidateUser(user)) return Unauthorized(); var tokenDto = await _service.AuthenticationService .CreateToken(populateExp: true); return Ok(tokenDto); }
We can see the successful authentication and both our tokens. Additionally, if we inspect the database, we are going to find populated RefreshToken and Expiry columns for JDoe:
It is a good practice to have a separate endpoint for the refresh token action, and that’s exactly what we are going to do now.
Let’s start by creating a new TokenController in the Presentation project:
[Route("api/token")] [ApiController] public class TokenController : ControllerBase { private readonly IServiceManager _service; public TokenController(IServiceManager service) => _service = service; }
Before we continue with the controller modification, we are going to modify the IAuthenticationService interface:
public async Task<TokenDto> RefreshToken(TokenDto tokenDto) { var principal = GetPrincipalFromExpiredToken(tokenDto.AccessToken); var user = await _userManager.FindByNameAsync(principal.Identity.Name); if (user == null || user.RefreshToken != tokenDto.RefreshToken || user.RefreshTokenExpiryTime <= DateTime.Now) throw new RefreshTokenBadRequest(); _user = user; return await CreateToken(populateExp: false); }
We first extract the principal from the expired token and use the Identity.Name property, which is the username of the user, to fetch that user from the database. If the user doesn’t exist, or the refresh tokens are not equal, or the refresh token has expired, we stop the flow returning the BadRequest response to the user. Then we just populate the _user variable and call the CreateToken method to generate new Access and Refresh tokens. This time, we don’t want to update the expiry time of the refresh token thus sending false as a parameter.
Since we don’t have the RefreshTokenBadRequest class, let’s create it in the Entities\Exceptions folder:
public sealed class RefreshTokenBadRequest : BadRequestException { public RefreshTokenBadRequest() : base("Invalid client request. The tokenDto has some invalid values.") { } }
And add a required using directive in the AuthenticationService class to remove the present error.
Finally, let’s add one more action in the TokenController:
[HttpPost("refresh")] [ServiceFilter(typeof(ValidationFilterAttribute))] public async Task<IActionResult> Refresh([FromBody]TokenDto tokenDto) { var tokenDtoToReturn = await _service.AuthenticationService.RefreshToken(tokenDto); return Ok(tokenDtoToReturn); }
That’s it.
Our refresh token logic is prepared and ready for testing.
And we can see new tokens in the response body. Additionally, if we inspect the database, we will find the same refresh token value:
Usually, in your client application, you would inspect the exp claim of the access token and if it is about to expire, your client app would send the request to the api/token endpoint and get a new set of valid tokens.
29 BINDING CONFIGURATION AND OPTIONS PATTERN
In the previous chapter, we had to use our appsettings file to store some important values for our JWT configuration and read those values from it:
To access these values, we’ve used the GetSection method from the IConfiguration interface:
var jwtSettings = configuration.GetSection("JwtSettings");
The GetSection method gets a sub-section from the appsettings file based on the provided key.
Once we extracted the sub-section, we’ve accessed the specific values by using the jwtSettings variable of type IConfigurationSection, with the key provided inside the square brackets:
ValidIssuer = jwtSettings["validIssuer"],
This works great but it does have its flaws.
Having to type sections and keys to get the values can be repetitive and error-prone. We risk introducing errors to our code, and these kinds of errors can cost us a lot of time until we discover them since someone else can introduce them, and we won’t notice them since a null result is returned when values are missing.
To overcome this problem, we can bind the configuration data to strongly typed objects. To do that, we can use the Bind method.
29.1 Binding Configuration
To start with the binding process, we are going to create a new ConfigurationModels folder inside the Entities project, and a new JwtConfiguration class inside that folder:
public class JwtConfiguration { public string Section { get; set; } = "JwtSettings"; public string? ValidIssuer { get; set; } public string? ValidAudience { get; set; } public string? Expires { get; set; } }
Then in the ServiceExtensions class, we are going to modify the ConfigureJWT method:
We create a new instance of the JwtConfiguration class and use the Bind method that accepts the section name and the instance object as parameters, to bind to the JwtSettings section directly and map configuration values to respective properties inside the JwtConfiguration class. Then, we just use those properties instead of string keys inside square brackets, to access required values.
There are two things to note here though. The first is that the names of the configuration data keys and class properties must match. The other is that if you extend the configuration, you need to extend the class as well, which can be a bit cumbersome, but it beats getting values by typing strings.
Now, we can continue with the AuthenticationService class modification since we extract configuration values in two methods from this class:
So, we add a readonly variable, and create an instance and execute binding inside the constructor.
And since we’re using the Bind() method we need to install the Microsoft.Extensions.Configuration.Binder NuGet package.
After that, we can modify the GetPrincipalFromExpiredToken method by removing the GetSection part and modifying the TokenValidationParameters object creation:
At this point, we can start our application and use both requests from Postman’s collection - 28-Refresh Token - to test our configuration.
We should get the same responses as we did in a previous chapter, which proves that our configuration works as intended but now with a better code and less error-prone.
29.2 Options Pattern
In the previous section, we’ve seen how we can bind configuration data to strongly typed objects. The options pattern gives us similar possibilities, but it offers a more structured approach and more features like validation, live reloading, and easier testing.
Once we configure the class containing our configuration we can inject it via dependency injection with IOptions and thus injecting only part of our configuration or rather only the part that we need.
If we need to reload the configuration without stopping the application, we can use the IOptionsSnapshot interface or the IOptionsMonitor interface depending on the situation. We’ll see when these interfaces should be used and why.
The options pattern also provides a good validation mechanism that uses the widely used DataAnotations attributes to check if the configuration abides by the logical rules of our application.
The testing of options is also easy because of the helper methods and easy to mock options classes.
29.2.1 Using IOptions
We have already written a lot of code in the previous section that can be used with the IOptions interface, but we still have some more actions to do.
The first thing we are going to do is to register and configure the JwtConfiguration class in the ServiceExtensions class:
public static void AddJwtConfiguration(this IServiceCollection services, IConfiguration configuration) => services.Configure<JwtConfiguration>(configuration.GetSection("JwtSettings"));
We inject IOptions inside the constructor and use the Value property to extract the JwtConfiguration object with all the populated properties. Nothing else has to change in this class.
If we start the application again and send the same requests, we will still get valid results meaning that we’ve successfully implemented IOptions in our project.
One more thing. We didn’t modify anything inside the ServiceExtensions/ConfigureJWT method. That’s because this configuration happens during the service registration and not after services are built. This means that we can’t resolve our required service here.
Well, to be precise, we can use the BuildServiceProvider method to build a service provider containing all the services from the provided IServiceCollection, and thus being able to access the required service. But if you do that, you will create one more list of singleton services, which can be quite expensive depending on the size of your application. So, you should be careful with this method.
That said, using Binding to access configuration values is perfectly safe and cheap in this stage of the application’s lifetime.
29.2.2 IOptionsSnapshot and IOptionsMonitor
The previous code looks great but if we want to change the value of Expires to 10 instead of 5 for example, we need to restart the application to do it. You can imagine how useful would be to have a published application and all you need to do is to modify the value in the configuration file without restarting the whole app.
Well, there is a way to do it by using IOptionsSnapshot or IOptionsMonitor.
All we would have to do is to replace the IOptions type with the IOptionsSnapshot or IOptionsMonitor types inside the ServiceManager and AuthenticationService classes. Also if we use IOptionsMonitor, we can’t use the Value property but the CurrentValue.
So the main difference between these two interfaces is that the IOptionsSnapshot service is registered as a scoped service and thus can’t be injected inside the singleton service. On the other hand, IOptionsMonitor is registered as a singleton service and can be injected into any service lifetime.
To make the comparison even clearer, we have prepared the following list for you:
IOptions:
• Is the original Options interface and it’s better than binding the whole Configuration
• Does not support configuration reloading
• Is registered as a singleton service and can be injected anywhere
• Binds the configuration values only once at the registration, and returns the same values every time
• Does not support named options
IOptionsSnapshot:
• Registered as a scoped service
• Supports configuration reloading
• Cannot be injected into singleton services
• Values reload per request
• Supports named options
IOptionsMonitor:
• Registered as a singleton service
• Supports configuration reloading
• Can be injected into any service lifetime
• Values are cached and reloaded immediately
• Supports named options
Having said that, we can see that if we don’t want to enable live reloading or we don’t need named options, we can simply use IOptions. If we do, we can use either IOptionsSnapshot or IOptionsMonitor,but IOptionsMonitor can be injected into other singleton services while IOptionsSnapshot cannot.
We have mentioned Named Options a couple of times so let’s explain what that is.
Let’s assume, just for example sake, that we have a configuration like this one:
Instead of creating a new JwtConfiguration2 class that has the same properties as our existing JwtConfiguration class, we can add another configuration:
Now both sections are mapped to the same configuration class, which makes sense. We don’t want to create multiple classes with the same properties and just name them differently. This is a much better way of doing it.
Calling the specific option is now done using the Get method with a section name as a parameter instead of the Value or CurrentValue properties:
Developers who consume our API might be trying to solve important business problems with it. Hence, it is very important for them to understand how to use our API effectively. This is where API documentation comes into the picture.
API documentation is the process of giving instructions on how to effectively use and integrate an API. Hence, it can be thought of as a concise reference manual containing all the information required to work with the API, with details about functions, classes, return types, arguments, and more, supported by tutorials and examples.
So, having the proper documentation for our API enables consumers to integrate our APIs as quickly as possible and move forward with their development. Furthermore, this also helps them understand the value and usage of our API, improves the chances for our API’s adoption, and makes our APIs easier to maintain and support.
30.1 About Swagger
Swagger is a language-agnostic specification for describing REST APIs. Swagger is also referred to as OpenAPI. It allows us to understand the capabilities of a service without looking at the actual implementation code.
Swagger minimizes the amount of work needed while integrating an API. Similarly, it also helps API developers document their APIs quickly and accurately.
Swagger Specification is an important part of the Swagger flow. By default, a document named swagger.json is generated by the Swagger tool which is based on our API. It describes the capabilities of our API and how to access it via HTTP.
30.2 Swagger Integration Into Our Project
We can use the Swashbuckle package to easily integrate Swagger into our .NET Core Web API project. It will generate the Swagger specification for the project as well. Additionally, the Swagger UI is also contained within Swashbuckle.
There are three main components in the Swashbuckle package:
• Swashbuckle.AspNetCore.Swagger: This contains the Swagger object model and the middleware to expose SwaggerDocument objects as JSON.
• Swashbuckle.AspNetCore.SwaggerGen: A Swagger generator that builds SwaggerDocument objects directly from our routes, controllers, and models.
• Swashbuckle.AspNetCore.SwaggerUI: An embedded version of the Swagger UI tool. It interprets Swagger JSON to build a rich, customizable experience for describing web API functionality.
So, the first thing we are going to do is to install the required library in the main project. Let’s open the Package Manager Console window and type the following command:
PM> Install-Package Swashbuckle.AspNetCore
After a couple of seconds, the package will be installed. Now, we have to configure the Swagger Middleware. To do that, we are going to add a new method in the ServiceExtensions class:
public static void ConfigureSwagger(this IServiceCollection services) { services.AddSwaggerGen(s => { s.SwaggerDoc("v1", new OpenApiInfo { Title = "Code Maze API", Version = "v1" }); s.SwaggerDoc("v2", new OpenApiInfo { Title = "Code Maze API", Version = "v2" }); }); }
We are creating two versions of SwaggerDoc because if you remember, we have two versions for the Companies controller and we want to separate them in our documentation.
Also, we need an additional namespace:
using Microsoft.OpenApi.Models;
The next step is to call this method in the Program class:
builder.Services.ConfigureSwagger();
And in the middleware part of the class, we are going to add it to the application’s execution pipeline together with the UI feature:
app.UseSwagger(); app.UseSwaggerUI(s => { s.SwaggerEndpoint("/swagger/v1/swagger.json", "Code Maze API v1"); s.SwaggerEndpoint("/swagger/v2/swagger.json", "Code Maze API v2"); });
Finally, let’s slightly modify the Companies and CompaniesV2 controllers:
[Route("api/companies")] [ApiController] [ApiExplorerSettings(GroupName = "v1")] public class CompaniesController : ControllerBase [Route("api/companies")] [ApiController] [ApiExplorerSettings(GroupName = "v2")] public class CompaniesV2Controller : ControllerBase
With this change, we state that the CompaniesController belongs to group v1 and the CompaniesV2Controller belongs to group v2. All the other controllers will be included in both groups because they are not versioned. Which is what we want.
And that is all. We have prepared the basic configuration.
Now, we can start our app, open the browser, and navigate to https://localhost:5001/swagger/v1/swagger.json. Once the page is up, you are going to see a json document containing all the controllers and actions without the v2 companies controller. Of course, if you change v1 to v2 in the URL, you are going to see all the controllers — including v2 companies, but without v1 companies.
Also if we expand the Schemas part, we are going to find the DTOs that we used in our project.
If we click on a specific controller to expand its details, we are going to see all the actions inside:
Once we click on an action method, we can see detailed information like parameters, response, and example values. There is also an option to try out each of those action methods by clicking the Try it out button.
So, let’s try it with the /api/companies action:
Once we click the Execute button, we are going to see that we get our response:
And this is an expected response. We are not authorized. To enable authorization, we have to add some modifications.
30.3 Adding Authorization Support
To add authorization support, we need to modify the ConfigureSwagger method:
public static void ConfigureSwagger(this IServiceCollection services) { services.AddSwaggerGen(s => { s.SwaggerDoc("v1", new OpenApiInfo { Title = "Code Maze API", Version = "v1" }); s.SwaggerDoc("v2", new OpenApiInfo { Title = "Code Maze API", Version = "v2" }); s.AddSecurityDefinition("Bearer", new OpenApiSecurityScheme { In = ParameterLocation.Header, Description = "Place to add JWT with Bearer", Name = "Authorization", Type = SecuritySchemeType.ApiKey, Scheme = "Bearer" }); s.AddSecurityRequirement(new OpenApiSecurityRequirement() { { new OpenApiSecurityScheme { Reference = new OpenApiReference { Type = ReferenceType.SecurityScheme, Id = "Bearer"}, Name = "Bearer", }, new List<string>() } }); }); }
With this modification, we are adding the security definition in our swagger configuration. Now, we can start our app again and navigate to the index.html page.
The first thing we are going to notice is the Authorize options for requests:
We are going to use that in a moment. But let’s get our token first. For that, let’s open the api/authentication/login action, click try it out, add credentials, and copy the received token:
Once we have copied the token, we are going to click on the authorization button for the /api/companies request, paste it with the Bearer in front of it, and click Authorize:
After authorization, we are going to click on the Close button and try our request:
And we get our response. Excellent job.
30.4 Extending Swagger Configuration
Swagger provides options for extending the documentation and customizing the UI. Let’s explore some of those.
First, let’s see how we can specify the API info and description. The configuration action passed to the AddSwaggerGen() method adds information such as Contact, License, and Description. Let’s provide some values for those:
s.SwaggerDoc("v1", new OpenApiInfo { Title = "Code Maze API", Version = "v1", Description = "CompanyEmployees API by CodeMaze", TermsOfService = new Uri("https://example.com/terms"), Contact = new OpenApiContact { Name = "John Doe", Email = "John.Doe@gmail.com", Url = new Uri("https://twitter.com/johndoe"), }, License = new OpenApiLicense { Name = "CompanyEmployees API LICX", Url = new Uri("https://example.com/license"), } });
......
We have implemented this just for the first version, but you get the point. Now, let’s run the application once again and explore the Swagger UI:
For enabling XML comments, we need to suppress warning 1591, which will now give warnings about any method, class, or field that doesn’t have triple-slash comments. We need to do this in the Presentation project.
Additionally, we have to add the documentation path for the same project, since our controllers are in the Presentation project:
s.SwaggerDoc("v2", new OpenApiInfo { Title = "Code Maze API", Version = "v2" }); var xmlFile = $"{typeof(Presentation.AssemblyReference).Assembly.GetName().Name}.xml"; var xmlPath = Path.Combine(AppContext.BaseDirectory, xmlFile); s.IncludeXmlComments(xmlPath);
Next, adding triple-slash comments to the action method enhances the Swagger UI by adding a description to the section header:
/// <summary> /// Gets the list of all companies /// </summary> /// <returns>The companies list</returns> [HttpGet(Name = "GetCompanies")] [Authorize(Roles = "Manager")] public async Task<IActionResult> GetCompanies()
And this is the result:
The developers who consume our APIs are usually more interested in what it returns — specifically the response types and error codes. Hence, it is very important to describe our response types. These are denoted using XML comments and data annotations.
Let’s enhance the response types a little bit:
/// <summary> /// Creates a newly created company /// </summary> /// <param name="company"></param> /// <returns>A newly created company</returns> /// <response code="201">Returns the newly created item</response> /// <response code="400">If the item is null</response> /// <response code="422">If the model is invalid</response> [HttpPost(Name = "CreateCompany")] [ProducesResponseType(201)] [ProducesResponseType(400)] [ProducesResponseType(422)]
Here, we are using both XML comments and data annotation attributes. Now, we can see the result:
And, if we inspect the response part, we will find our mentioned responses:
Excellent.
We can continue to the deployment part.
30 DEPLOYMENT TO IIS
Before we start the deployment process, we would like to point out one important thing. We should always try to deploy an application on at least a local machine to somehow simulate the production environment as soon as we start with development. That way, we can observe how the application behaves in a production environment from the beginning of the development process.
That leads us to the conclusion that the deployment process should not be the last step of the application’s lifecycle. We should deploy our application to the staging environment as soon as we start building it.
That said, let’s start with the deployment process.
31.1 Creating Publish Files
Let’s create a folder on the local machine with the name Publish. Inside that folder, we want to place all of our files for deployment. After the folder creation, let’s right-click on the main project in the Solution Explorer window and click publish option:
In the “Pick a publish target” window, we are going to choose the Folder option and click Next:
And point to the location of the Publish folder we just created and click Finish:
Publish windows can be different depending on the Visual Studio version.
After that, we have to click the Publish button:
Visual Studio is going to do its job and publish the required files in the specified folder.
31.2 Windows Server Hosting Bundle
Before any further action, let’s install the .NET Core Windows Server Hosting bundle on our system to install .NET Core Runtime. Furthermore, with this bundle, we are installing the .NET Core Library and the ASP.NET Core Module. This installation will create a reverse proxy between IIS and the Kestrel server, which is crucial for the deployment process.
If you have a problem with missing SDK after installing the Hosting Bundle, follow this solution suggested by Microsoft:
Installing the .NET Core Hosting Bundle modifies the PATH when it installs the .NET Core runtime to point to the 32-bit (x86) version of .NET Core (C:\Program Files (x86)\dotnet). This can result in missing SDKs when the 32-bit (x86) .NET Core dotnet command is used (No .NET Core SDKs were detected). To resolve this problem, move C:\Program Files\dotnet\to a position before C:\Program Files (x86)\dotnet\ on the PATH environment variable.
After the installation, we are going to locate the Windows hosts file on C:\Windows\System32\drivers\etc and add the following record at the end of the file:
127.0.0.1 www.companyemployees.codemaze
After that, we are going to save the file.
31.3 Installing IIS
If you don’t have IIS installed on your machine, you need to install it by opening ControlPanel and then Programs and Features:
After the IIS installation finishes, let’s open the Run window (windows key + R) and type: inetmgr to open the IIS manager:
Now, we can create a new website:
In the next window, we need to add a name to our site and a path to the published files:
And click the OK button.
After this step, we are going to have our site inside the “sites” folder in the IIS Manager. Additionally, we need to set up some basic settings for our application pool:
After we click on the Basic Settings link, let’s configure our application pool:
ASP.NET Core runs in a separate process and manages the runtime. It doesn't rely on loading the desktop CLR (.NET CLR). The Core Common Language Runtime for .NET Core is booted to host the app in the worker process. Setting the .NET CLR version to No Managed Code is optional but recommended.
Our website and the application pool should be started automatically.
31.4 Configuring Environment File
In the section where we configured JWT, we had to use a secret key that we placed in the environment file. Now, we have to provide to IIS the name of that key and the value as well.
The first step is to click on our site in IIS and open Configuration Editor:
Then, in the section box, we are going to choose system.webServer/aspNetcore:
From the “From” combo box, we are going to choose ApplicationHost.config:
After that, we are going to select environment variables:
Click Add and type the name and the value of our variable:
As soon as we click the close button, we should click apply in the next window, restart our application in IIS, and we are good to go.
We can see that our API is working as expected. If it’s not, and you have a problem related to web.config in IIS, try reinstalling the Server Hosting Bundle package.
If you get an error message that the Presentation.xml file is missing, you can copy it from the project and paste it into the Publish folder. Also, in the Properties window for that file, you can set it to always copy during the publish.
Now, let’s continue.
We still have one more thing to do. We have to add a login to the SQL Server for IIS APPPOOL\CodeMaze Web Api and grant permissions to the database. So, let’s open the SQL Server Management Studio and add a new login:
In the next window, we are going to add our user:
After that, we are going to expand the Logins folder, right-click on our user, and choose Properties. There, under UserMappings, we have to select the CompanyEmployee database and grant the dbwriter and dbreader roles.
And there we go. Our API is published and working as expected.
32 BONUS 1 - RESPONSE PERFORMANCE IMPROVEMENTS
As mentioned in section 6.1.1, we will show you an alternative way of handling error responses. To repeat, with custom exceptions, we have great control of returning error responses to the client due to the global error handler, which is pretty fast if we use it correctly. Also, the code is pretty clean and straightforward since we don’t have to care about the return types and additional validation in the service methods.
Even though some libraries enable us to write custom responses, for example, OneOf, we still like to create our abstraction logic, which is tested by us and fast. Additionally, we want to show you the whole creation process for such a flow.
For this example, we will use an existing project from part 6 and modify it to implement our API Response flow.
32.1 Adding Response Classes to the Project
Let’s start with the API response model classes.
The first thing we are going to do is create a new Responses folder in the Entities project. Inside that folder, we are going to add our first class:
public abstract class ApiBaseResponse { public bool Success { get; set; } protected ApiBaseResponse(bool success) => Success = success; }
This is an abstract class, which will be the main return type for all of our methods where we have to return a successful result or an error result. It also contains a single Success property stating whether the action was successful or not.
Now, if our result is successful, we are going to create only one class in the same folder:
public sealed class ApiOkResponse<TResult> : ApiBaseResponse { public TResult Result { get; set; } public ApiOkResponse(TResult result) :base(true) { Result = result; } }
We are going to use this class as a return type for a successful result. It inherits from the ApiBaseResponse and populates the Success property to true through the constructor. It also contains a single Result property of type TResult. We will store our concrete result in this property, and since we can have different result types in different methods, this property is a generic one.
That’s all regarding the successful responses. Let’s move one to the error classes.
For the error responses, we will follow the same structure as we have for the exception classes. So, we will have base abstract classes for NotFound or BadRequest or any other error responses, and then concrete implementations for these classes like CompanyNotFound or CompanyBadRequest, etc.
That said, let’s use the same folder to create an abstract error class:
public abstract class ApiNotFoundResponse : ApiBaseResponse { public string Message { get; set; } public ApiNotFoundResponse(string message) : base(false) { Message = message; } }
This class also inherits from the ApiBaseResponse, populates the Success property to false, and has a single Message property for the error message.
In the same manner, we can create the ApiBadRequestResponse class:
public abstract class ApiBadRequestResponse : ApiBaseResponse { public string Message { get; set; } public ApiBadRequestResponse(string message) : base(false) { Message = message; } }
This is the same implementation as the previous one. The important thing to notice is that both of these classes are abstract.
To continue, let’s create a concrete error response:
public sealed class CompanyNotFoundResponse : ApiNotFoundResponse { public CompanyNotFoundResponse(Guid id) : base($"Company with id: {id} is not found in db.") { } }
The class inherits from the ApiNotFoundResponse abstract class, which again inherits from the ApiBaseResponse class. It accepts an id parameter and creates a message that sends to the base class.
We are not going to create the CompanyBadRequestResponse class because we are not going to need it in our example. But the principle is the same.
32.2 Service Layer Modification
Now that we have the response model classes, we can start with the service layer modification.
We don’t return concrete types in our methods anymore. Instead of the IEnumerable or CompanyDto return types, we return the ApiBaseResponse type. This will enable us to return either the success result or to return any of the error response results.
After the interface modification, we can modify the CompanyService class:
public ApiBaseResponse GetAllCompanies(bool trackChanges) { var companies = _repository.Company.GetAllCompanies(trackChanges); var companiesDto = _mapper.Map<IEnumerable<CompanyDto>>(companies); return new ApiOkResponse<IEnumerable<CompanyDto>>(companiesDto); } public ApiBaseResponse GetCompany(Guid id, bool trackChanges) { var company = _repository.Company.GetCompany(id, trackChanges); if (company is null) return new CompanyNotFoundResponse(id); var companyDto = _mapper.Map<CompanyDto>(company); return new ApiOkResponse<CompanyDto>(companyDto); }
Both method signatures are modified to use APIBaseResponse, and also the return types are modified accordingly. Additionally, in the GetCompany method, we are not using an exception class to return an error result but the CompanyNotFoundResponse class. With the ApiBaseResponse abstraction, we are safe to return multiple types from our method as long as they inherit from the ApiBaseResponse abstract class. Here you could also log some messages with _logger.
One more thing to notice here.
In the GetAllCompanies method, we don’t have an error response just a successful one. That means we didn’t have to implement our Api response flow, and we could’ve left the method unchanged (in the interface and this class). If you want that kind of implementation it is perfectly fine. We
just like consistency in our projects, and due to that fact, we’ve changed both methods.
32.3 Controller Modification
Before we start changing the actions in the CompaniesController, we have to create a way to handle error responses and return them to the client – similar to what we have with the global error handler middleware.
We are not going to create any additional middleware but another controller base class inside the Presentation/Controllers folder:
This class inherits from the ControllerBase class and implements a single ProcessError action accepting an ApiBaseResponse parameter. Inside the action, we are inspecting the type of the sent parameter, and based on that type we return an appropriate message to the client. A similar thing we did in the exception middleware class.
If you add additional error response classes to the Response folder, you only have to add them here to process the response for the client.
Additionally, this is where we can see the advantage of our abstraction approach.
Now, we can modify our CompaniesController:
[Route("api/companies")] [ApiController] public class CompaniesController : ApiControllerBase { private readonly IServiceManager _service; public CompaniesController(IServiceManager service) => _service = service; [HttpGet] public IActionResult GetCompanies() { var baseResult = _service.CompanyService.GetAllCompanies(trackChanges: false); var companies = ((ApiOkResponse<IEnumerable<CompanyDto>>)baseResult).Result; return Ok(companies); } [HttpGet("{id:guid}")] public IActionResult GetCompany(Guid id) { var baseResult = _service.CompanyService.GetCompany(id, trackChanges: false); if (!baseResult.Success) return ProcessError(baseResult); var company = ((ApiOkResponse<CompanyDto>)baseResult).Result; return Ok(company); } }
Now our controller inherits from the ApiControllerBase, which inherits from the ControllerBase class. In the GetCompanies action, we extract the result from the service layer and cast the baseResult variable to the concrete ApiOkResponse type, and use the Result property to extract our required result of type IEnumerable.
We do a similar thing for the GetCompany action. Of course, here we check if our result is successful and if it’s not, we return the result of the ProcessError method.
And that’s it.
We can leave the solution as is, but we mind having these castings inside our actions – they can be moved somewhere else making them reusable and our actions cleaner. So, let’s do that.
In the same project, we are going to create a new Extensions folder and a new ApiBaseResponseExtensions class:
public static class ApiBaseResponseExtensions { public static TResultType GetResult<TResultType>(this ApiBaseResponse apiBaseResponse) => ((ApiOkResponse<TResultType>)apiBaseResponse).Result; }
The GetResult method will extend the ApiBaseResponse type and return the result of the required type.
Now, we can modify actions inside the controller:
[HttpGet] public IActionResult GetCompanies() { var baseResult = _service.CompanyService.GetAllCompanies(trackChanges: false); var companies = baseResult.GetResult<IEnumerable<CompanyDto>>(); return Ok(companies); } [HttpGet("{id:guid}")] public IActionResult GetCompany(Guid id) { var baseResult = _service.CompanyService.GetCompany(id, trackChanges: false); if (!baseResult.Success) return ProcessError(baseResult); var company = baseResult.GetResult<CompanyDto>(); return Ok(company); }
This is much cleaner and easier to read and understand.
32.4 Testing the API Response Flow
Now we can start our application, open Postman, and send some requests.
And we have our response with a proper status code and response body. Excellent.
We have a solution that is easy to implement, fast, and extendable.
Our suggestion is to go with custom exceptions since they are easier to implement and fast as well. But if you have an app flow where you have to return error responses at a much higher rate and thus maybe impact the app’s performance, the APi Response flow is the way to go.
33 BONUS 2 - INTRODUCTION TO CQRS AND MEDIATR WITH ASP.NET CORE WEB API
In this chapter, we will provide an introduction to the CQRS pattern and how the .NET library MediatR helps us build software with this architecture.
In the Source Code folder, you will find the folder for this chapter with two folders inside – start and end. In the start folder, you will find a prepared project for this section. We are going to use it to explain the implementation of CQRS and MediatR. We have used the existing project from one of the previous chapters and removed the things we don’t need or want to replace - like the service layer.
In the end folder, you will find a finished project for this chapter.
33.1 About CQRS and Mediator Pattern
The MediatR library was built to facilitate two primary software architecture patterns: CQRS and the Mediator pattern. Whilst similar, let’s spend a moment understanding the principles behind each pattern.
33.1.1 CQRS
CQRS stands for “Command Query Responsibility Segregation”. As the acronym suggests, it’s all about splitting the responsibility of commands (saves) and queries (reads) into different models.
If we think about the commonly used CRUD pattern (Create-Read- Update-Delete), we usually have the user interface interacting with a datastore responsible for all four operations. CQRS would instead have us split these operations into two models, one for the queries (aka “R”), and another for the commands (aka “CUD”).
The following image illustrates how this works:
The Application simply separates the query and command models.
The CQRS pattern makes no formal requirements of how this separation occurs. It could be as simple as a separate class in the same application (as we’ll see shortly with MediatR), all the way up to separate physical applications on different servers. That decision would be based on factors such as scaling requirements and infrastructure, so we won’t go into that decision path here.
The key point being is that to create a CQRS system, we just need to split the reads from the writes.
What problem is this trying to solve?
Well, a common reason is when we design a system, we start with data storage. We perform database normalization, add primary and foreign keys to enforce referential integrity, add indexes, and generally ensure the “write system” is optimized. This is a common setup for a relational database such as SQL Server or MySQL. Other times, we think about the read use cases first, then try and add that into a database, worrying less about duplication or other relational DB concerns (often “document databases” are used for these patterns).
Neither approach is wrong. But the issue is that it’s a constant balancing act between reads and writes, and eventually one side will “win out”. All further development means both sides need to be analyzed, and often one is compromised.
CQRS allows us to “break free” from these considerations and give each system the equal design and consideration it deserves without worrying about the impact of the other system. This has tremendous benefits on both performance and agility, especially if separate teams are working on these systems.
33.1.2 Advantages and Disadvantages of CQRS
The benefits of CQRS are:
• Single Responsibility – Commands and Queries have only one job. It is either to change the state of the application or retrieve it. Therefore, they are very easy to reason about and understand.
• Decoupling – The Command or Query is completely decoupled from its handler, giving you a lot of flexibility on the handler side to implement it the best way you see fit.
• Scalability – The CQRS pattern is very flexible in terms of how you can organize your data storage, giving you options for great scalability. You can use one database for both Commands and Queries. You can use separate Read/Write databases, for improved performance, with messaging or replication between the databases for synchronization.
• Testability – It is very easy to test Command or Query handlers since they will be very simple by design, and perform only a single job.
Of course, it can’t all be good. Here are some of the disadvantages of CQRS:
• Complexity – CQRS is an advanced design pattern, and it will take you time to fully understand it. It introduces a lot of complexity that will create friction and potential problems in your project. Be sure to consider everything, before deciding to use it in your project.
• Learning Curve – Although it seems like a straightforward design pattern, there is still a learning curve with CQRS. Most developers are used to the procedural (imperative) style of writing code, and CQRS is a big shift away from that.
• Hard to Debug – Since Commands and Queries are decoupled from their handler, there isn’t a natural imperative flow of the application. This makes it harder to debug than traditional applications.
33.1.3 Mediator Pattern
The Mediator pattern is simply defining an object that encapsulates how objects interact with each other. Instead of having two or more objects take a direct dependency on each other, they instead interact with a “mediator”, who is in charge of sending those interactions to the other party:
In this image, SomeService sends a message to the Mediator, and the Mediator then invokes multiple services to handle the message. There is no direct dependency between any of the blue components.
The reason the Mediator pattern is useful is the same reason patterns like Inversion of Control are useful. It enables “loose coupling”, as the dependency graph is minimized and therefore code is simpler and easier to test. In other words, the fewer considerations a component has, the easier it is to develop and evolve.
We saw in the previous image how the services have no direct dependency, and the producer of the messages doesn’t know who or how many things are going to handle it. This is very similar to how a message broker works in the “publish/subscribe” pattern. If we wanted to add another handler we could, and the producer wouldn’t have to be modified.
Now that we’ve been over some theory, let’s talk about how MediatR makes all these things possible.
33.2 How MediatR facilitates CQRS and Mediator Patterns
You can think of MediatR as an “in-process” Mediator implementation, that helps us build CQRS systems. All communication between the user interface and the data store happens via MediatR.
The term “in process” is an important limitation here. Since it’s a .NET library that manages interactions within classes on the same process, it’s not an appropriate library to use if we want to separate the commands and queries across two systems. A better approach would be to use a message broker such as Kafka or Azure Service Bus.
However, for this chapter, we are going to stick with a simple single- process CQRS system, so MediatR fits the bill perfectly.
33.3 Adding Application Project and Initial Configuration
Let’s start by opening the starter project from the start folder. You will see that we don’t have the Service nor the Service.Contracts projects. Well, we don’t need them. We are going to use CQRS with MediatR to replace that part of our solution.
But, we do need an additional project for our business logic so, let’s create a new class library (.NET Core) and name it Application.
Additionally, we are going to add a new class named AssemblyReference. We will use it for the same purpose as we used the class with the same name in the Presentation project:
public static class AssemblyReference { }
Now let’s install a couple of packages.
The first package we are going to install is the MediatR in the Application project:
PM> install-package MediatR
Then in the main project, we are going to install another package that wires up MediatR with the ASP.NET dependency injection container:
For this, we have to reference the Application project, and add a using directive:
using MediatR;
The AddMediatR method will scan the project assembly that contains the handlers that we are going to use to handle our business logic. Since we are going to place those handlers in the Application project, we are using the Application’s assembly as a parameter.
Before we continue, we have to reference the Application project from the Presentation project.
Now MediatR is configured, and we can use it inside our controller.
In the Controllers folder of the Presentation project, we are going to find a single controller class. It contains only a base code, and we are going to modify it by adding a sender through the constructor injection:
[Route("api/companies")] [ApiController] public class CompaniesController : ControllerBase { private readonly ISender _sender; public CompaniesController(ISender sender) => _sender = sender; }
Here we inject the ISender interface from the MediatR namespace. We are going to use this interface to send requests to our handlers.
We have to mention one thing about using ISender and not the IMediator interface. From the MediatR version 9.0, the IMediator interface is split into two interfaces:
So, by looking at the code, it is clear that you can continue using the IMediator interface to send requests and publish notifications. But it is recommended to split that by using ISender and IPublisher interfaces.
With that said, we can continue with the Application’s logic implementation.
33.4 Requests with MediatR
MediatR Requests are simple request-response style messages where a single request is synchronously handled by a single handler (synchronous from the request point of view, not C# internal async/await). Good use cases here would be returning something from a database or updating a database.
There are two types of requests in MediatR. One that returns a value, and one that doesn’t. Often this corresponds to reads/queries (returning a value) and writes/commands (usually doesn’t return a value).
So, before we start sending requests, we are going to create several folders in the Application project to separate queries, commands, and handlers:
Since we are going to work only with the company entity, we are going to place our queries, commands, and handlers directly into these folders.
But in larger projects with multiple entities, we can create additional folders for each entity inside each of these folders for better organization.
Also, as we already know, we are not going to send our entities as a result to the client but DTOs, so we have to reference the Shared project.
That said, let’s start with our first query. Let’s create it in the Queries folder:
public sealed record GetCompaniesQuery(bool TrackChanges) : IRequest<IEnumerable<CompanyDto>>;
Here, we create the GetCompaniesQuery record, which implements IRequest<IEnumerable>. This simply means our request will return a list of companies.
Here we need two additional namespaces:
using MediatR;
using Shared.DataTransferObjects;
Once we send the request from our controller’s action, we are going to see the usage of this query.
After the query, we need a handler. This handler in simple words will be our replacement for the service layer method that we had in our project. In our previous project, all the service classes were using the repository to access the database – we will make no difference here. For that, we have to reference the Contracts project so we can access the IRepositoryManager interface.
After adding the reference, we can create a new GetCompaniesHandler class in the Handlers folder:
internal sealed class GetCompaniesHandler : IRequestHandler<GetCompaniesQuery, IEnumerable<CompanyDto>> { private readonly IRepositoryManager _repository; public GetCompaniesHandler(IRepositoryManager repository) => _repository = repository; public Task<IEnumerable<CompanyDto>> Handle(GetCompaniesQuery request, CancellationToken cancellationToken) { throw new NotImplementedException(); } }
Our handler inherits from IRequestHandler<GetCompaniesQuery,IEnumerable>. This means this class will handle GetCompaniesQuery, in this case, returning the list of companies.
We also inject the repository through the constructor and add a default implementation of the Handle method, required by the IRequestHandler interface.
These are the required namespaces:
using Application.Queries;
using Contracts;
using MediatR;
using Shared.DataTransferObjects;
Of course, we are not going to leave this method to throw an exception. But before we add business logic, we have to install AutoMapper in the Application project:
And create the MappingProfile class, also in the main project, with a single mapping rule:
public class MappingProfile : Profile { public MappingProfile() { CreateMap<Company, CompanyDto>() .ForMember(c => c.FullAddress, opt => opt.MapFrom(x => string.Join(' ', x.Address, x.Country))); } }
Everything with these actions is familiar since we’ve already used AutoMapper in our project.
Now, we can modify the handler class:
internal sealed class GetCompaniesHandler : IRequestHandler<GetCompaniesQuery, IEnumerable<CompanyDto>> { private readonly IRepositoryManager _repository; private readonly IMapper _mapper; public GetCompaniesHandler(IRepositoryManager repository, IMapper mapper) {_repository = repository; _mapper = mapper; } public async Task<IEnumerable<CompanyDto>> Handle(GetCompaniesQuery request, CancellationToken cancellationToken) { var companies = await _repository.Company.GetAllCompaniesAsync(request.TrackChanges); var companiesDto = _mapper.Map<IEnumerable<CompanyDto>>(companies); return companiesDto; } }
This logic is also familiar since we had almost the same one in our GetAllCompaniesAsync service method. One difference is that we are passing the track changes parameter through the request object.
Now, we can modify CompaniesController:
[HttpGet] public async Task<IActionResult> GetCompanies() { var companies = await _sender.Send(new GetCompaniesQuery(TrackChanges: false)); return Ok(companies); }
We use the Send method to send a request to our handler and pass the GetCompaniesQuery as a parameter. Nothing more than that. We also need an additional namespace:
using Application.Queries;
Our controller is clean as it was with the service layer implemented. But this time, we don’t have a single service class to handle all the methods but a single handler to take care of only one thing.
With this in mind, we can continue and implement the logic for fetching a single company.
So, let’s start with the query in the Queries folder:
public sealed record GetCompanyQuery(Guid Id, bool TrackChanges) : IRequest<CompanyDto>;
Then, let’s implement a new handler:
internal sealed class GetCompanyHandler : IRequestHandler<GetCompanyQuery, CompanyDto> { private readonly IRepositoryManager _repository; private readonly IMapper _mapper; public GetCompanyHandler(IRepositoryManager repository, IMapper mapper) { _repository = repository; _mapper = mapper; } public async Task<CompanyDto> Handle(GetCompanyQuery request, CancellationToken cancellationToken) { var company = await _repository.Company.GetCompanyAsync(request.Id, request.TrackChanges); if (company is null) throw new CompanyNotFoundException(request.Id); var companyDto = _mapper.Map<CompanyDto>(company); return companyDto;} }
So again, our handler inherits from the IRequestHandler interface accepting the query as the first parameter and the result as the second. Then, we inject the required services and familiarly implement the Handle method.
We need these namespaces here:
using Application.Queries;
using AutoMapper;
using Contracts;
using Entities.Exceptions;
using MediatR;
using Shared.DataTransferObjects;
Lastly, we have to add another action in CompaniesController:
[HttpGet("{id:guid}", Name = "CompanyById")] public async Task<IActionResult> GetCompany(Guid id) { var company = await _sender.Send(new GetCompanyQuery(id, TrackChanges: false)); return Ok(company); }
As with both queries, we are going to start with a command record creation inside the Commands folder:
public sealed record CreateCompanyCommand(CompanyForCreationDto Company) : IRequest<CompanyDto>;
Our command has a single parameter sent from the client, and it inherits from IRequest. Our request has to return CompanyDto because we will need it, in our action, to create a valid route in the return statement.
After the query, we are going to create another handler:
So, we inject our services and implement the Handle method as we did with the service method. We map from the creation DTO to the entity, save it to the database, and map it to the company DTO object.
Then, before we add a new mapping rule in the MappingProfile class:
CreateMap<CompanyForCreationDto, Company>();
Now, we can add a new action in a controller:
[HttpPost] public async Task<IActionResult> CreateCompany([FromBody] CompanyForCreationDto companyForCreationDto) { if (companyForCreationDto is null) return BadRequest("CompanyForCreationDto object is null"); var company = await _sender.Send(new CreateCompanyCommand(companyForCreationDto)); return CreatedAtRoute("CompanyById", new { id = company.Id }, company); }
A new company is created, and if we inspect the Headers tab, we are going to find the link to fetch this new company:
There is one important thing we have to understand here. We are communicating to a datastore via simple message constructs without having any idea on how it’s being implemented. The commands and queries could be pointing to different data stores. They don’t know how their request will be handled, and they don’t care.
33.5.1 Update Command
Following the same principle from the previous example, we can implement the update request.
Let’s start with the command:
public sealed record UpdateCompanyCommand
(Guid Id, CompanyForUpdateDto Company, bool TrackChanges) : IRequest;
This time our command inherits from IRequest without any generic parameter. That’s because we are not going to return any value with this request.
Let’s continue with the handler implementation:
internal sealed class UpdateCompanyHandler : IRequestHandler<UpdateCompanyCommand, Unit> { private readonly IRepositoryManager _repository; private readonly IMapper _mapper; public UpdateCompanyHandler(IRepositoryManager repository, IMapper mapper) { _repository = repository; _mapper = mapper; } public async Task<Unit> Handle(UpdateCompanyCommand request, CancellationToken cancellationToken) {var companyEntity = await _repository.Company.GetCompanyAsync(request.Id, request.TrackChanges); if (companyEntity is null) throw new CompanyNotFoundException(request.Id); _mapper.Map(request.Company, companyEntity); await _repository.SaveAsync(); return Unit.Value; } }
This handler inherits from IRequestHandler<UpdateCompanyCommand, Unit>. This is new for us because the first time our command is not returning any value. But IRequestHandler always accepts two parameters (TRequest and TResponse). So, we provide the Unit structure for the TResponse parameter since it represents the void type.
Then the Handle implementation is familiar to us except for the return part. We have to return something from the Handle method and we use Unit.Value.
Before we modify the controller, we have to add another mapping rule:
CreateMap<CompanyForUpdateDto, Company>();
Lastly, let’s add a new action in the controller:
[HttpPut("{id:guid}")] public async Task<IActionResult> UpdateCompany(Guid id, CompanyForUpdateDto companyForUpdateDto) { if (companyForUpdateDto is null) return BadRequest("CompanyForUpdateDto object is null"); await _sender.Send(new UpdateCompanyCommand(id, companyForUpdateDto, TrackChanges: true)); return NoContent(); }
At this point, we can send a PUT request from Postman:
Now that we know how to work with requests using MediatR, let’s see how to use notifications.
33.6 MediatR Notifications
So for we’ve only seen a single request being handled by a single handler. However, what if we want to handle a single request by multiple handlers?
That’s where notifications come in. In these situations, we usually have multiple independent operations that need to occur after some event. Examples might be:
• Sending an email
• Invalidating a cache
• ...
To demonstrate this, we will update the delete company flow we created previously to publish a notification and have it handled by two handlers.
Sending an email is out of the scope of this book (you can learn more about that in our Bonus 6 Security book). But to demonstrate the behavior of notifications, we will use our logger service and log a message as if the email was sent.
So, the flow will be - once we delete the Company, we want to inform our administrators with an email message that the delete has action occurred.
That said, let’s start by creating a new Notifications folder inside the Application project and add a new notification in that folder:
public sealed record CompanyDeletedNotification(Guid Id, bool TrackChanges) : INotification;
The notification has to inherit from the INotification interface. This is the equivalent of the IRequest we saw earlier, but for Notifications.
As we can conclude, notifications don’t return a value. They work on the fire and forget principle, like publishers.
Next, we are going to create a new Emailhandler class:
internal sealed class EmailHandler : INotificationHandler<CompanyDeletedNotification> { private readonly ILoggerManager _logger; public EmailHandler(ILoggerManager logger) => _logger = logger; public async Task Handle(CompanyDeletedNotification notification, CancellationToken cancellationToken) { _logger.LogWarn($"Delete action for the company with id: {notification.Id} has occurred."); await Task.CompletedTask; } }
Here, we just simulate sending our email message in an async manner. Without too many complications, we use our logger service to process the message.
Let’s continue by modifying the DeleteCompanyHandler class:
internal sealed class DeleteCompanyHandler : INotificationHandler<CompanyDeletedNotification> { private readonly IRepositoryManager _repository; public DeleteCompanyHandler(IRepositoryManager repository) => _repository = repository; public async Task Handle(CompanyDeletedNotification notification, CancellationToken cancellationToken) { var company = await _repository.Company.GetCompanyAsync(notification.Id, notification.TrackChanges); if (company is null) throw new CompanyNotFoundException(notification.Id); _repository.Company.DeleteCompany(company); await _repository.SaveAsync(); } }
This time, our handler inherits from the INotificationHandler interface, and it doesn’t return any value – we’ve modified the method signature and removed the return statement.
Finally, we have to modify the controller’s constructor:
And also, if we inspect the logs, we will find a new logged message stating that the delete action has occurred:
33.7 MediatR Behaviors
Often when we build applications, we have many cross-cutting concerns. These include authorization, validating, and logging.
Instead of repeating this logic throughout our handlers, we can make use of Behaviors. Behaviors are very similar to ASP.NET Core middleware in that they accept a request, perform some action, then (optionally) pass along the request.
In this section, we are going to use behaviors to perform validation on the DTOs that come from the client.
As we have already learned in chapter 13, we can perform the validation by using data annotations attributes and the ModelState dictionary. Then we can extract the validation logic into action filters to clear our actions. Well, we can apply all of that to our current solution as well.
But, some developers have a preference for using fluent validation over data annotation attributes. In that case, behaviors are the perfect place to execute that validation logic.
So, let’s go step by step and add the fluent validation in our project first and then use behavior to extract validation errors if any, and return them to the client.
33.7.1 Adding Fluent Validation
The FluentValidation library allows us to easily define very rich custom validation for our classes. Since we are implementing CQRS, it makes the most sense to define validation for our Commands. We should not bother ourselves with defining validators for Queries, since they don’t contain any behavior. We use Queries only for fetching data from the application.
So, let’s start by installing the FluentValidation package in the Application project:
PM> install-package FluentValidation.AspNetCore
The FluentValidation.AspNetCore package installs both FluentValidation and FluentValidation.DependencyInjectionExtensions packages.
After the installation, we are going to register all the validators inside the service collection by modifying the Program class:
Then, let’s create a new Validators folder inside the Application project and add a new class inside:
public sealed class CreateCompanyCommandValidator : AbstractValidator<CreateCompanyCommand> {public CreateCompanyCommandValidator() { RuleFor(c => c.Company.Name).NotEmpty().MaximumLength(60); RuleFor(c => c.Company.Address).NotEmpty().MaximumLength(60); } }
The following using directives are necessary for this class:
using Application.Commands;
using FluentValidation;
We create the CreateCompanyCommandValidator class that inherits from the AbstractValidator class, specifying the type CreateCompanyCommand. This lets FluentValidation know that this validation is for the CreateCompanyCommand record. Since this record contains a parameter of type CompanyForCreationDto, which is the object that we have to validate since it comes from the client, we specify the rules for properties from that DTO.
The NotEmpty method specifies that the property can’t be null or empty, and the MaximumLength method specifies the maximum string length of the property.
33.7.2 Creating Decorators with MediatR PipelineBehavior
The CQRS pattern uses Commands and Queries to convey information, and receive a response. In essence, it represents a request-response pipeline. This gives us the ability to easily introduce additional behavior around each request that is going through the pipeline, without actually modifying the original request.
You may be familiar with this technique under the name Decorator pattern. Another example of using the Decorator pattern is the ASP.NET Core Middleware concept, which we talked about in section 1.8.
MediatR has a similar concept to middleware, and it is called IPipelineBehavior:
public interface IPipelineBehavior<in TRequest, TResponse> where TRequest : notnull { Task<TResponse> Handle(TRequest request, CancellationToken cancellationToken, RequestHandlerDelegate<TResponse> next); }
The pipeline behavior is a wrapper around a request instance and gives us a lot of flexibility with the implementation. Pipeline behaviors are a good fit for cross-cutting concerns in your application. Good examples of cross- cutting concerns are logging, caching, and of course, validation!
Before we use this interface, let’s create a new exception class in the Entities/Exceptions folder:
public sealed class ValidationAppException : Exception { public IReadOnlyDictionary<string, string[]> Errors { get; } public ValidationAppException(IReadOnlyDictionary<string, string[]> errors) :base("One or more validation errors occurred") => Errors = errors; }
Next, to implement the IPipelineBehavior interface, we are going to create another folder named Behaviors in the Application project, and add a single class inside it:
public sealed class ValidationBehavior<TRequest, TResponse> : IPipelineBehavior<TRequest, TResponse> where TRequest : IRequest<TResponse> { private readonly IEnumerable<IValidator<TRequest>> _validators; public ValidationBehavior(IEnumerable<IValidator<TRequest>> validators) => _validators = validators; public async Task<TResponse> Handle(TRequest request, CancellationToken cancellationToken, RequestHandlerDelegate<TResponse> next) { if (!_validators.Any()) return await next(); var context = new ValidationContext<TRequest>(request); var errorsDictionary = _validators .Select(x => x.Validate(context)) .SelectMany(x => x.Errors) .Where(x => x != null) .GroupBy( x => x.PropertyName.Substring(x.PropertyName.IndexOf('.') + 1), x => x.ErrorMessage,(propertyName, errorMessages) => new { Key = propertyName, Values = errorMessages.Distinct().ToArray() }) .ToDictionary(x => x.Key, x => x.Values); if (errorsDictionary.Any()) throw new ValidationAppException(errorsDictionary); return await next(); } }
This class has to inherit from the IPipelineBehavior interface and implement the Handler method. We also inject a collection of IValidator implementations in the constructor. The FluentValidation library will scan our project for all AbstractValidator implementations for a given type and then provide us with the instance at runtime. It is how we can apply the actual validators that we implemented in our project.
Then, if there are no validation errors, we just call the next delegate to allow the execution of the next component in the middleware.
But if there are any errors, we extract them from the _validators collection and group them inside the dictionary. If there are entries in our dictionary, we throw the ValidationAppException and pass the dictionary with errors. This exception will be caught inside our global error handler, which we will modify in a minute.
But before we do that, we have to register this behavior in the Program class:
So we modify the switch statement to check for the ValidationAppException type and to assign a proper status code 422.
Then, we use the declaration pattern to test the type of the variable and assign it to a new variable named exception. If the type is ValidationAppException we just write our response to the client providing our errors dictionary as a parameter. Otherwise, we do the same thing we did up until now.
Additionally, if the Address property has too many characters, we will see a different message:
Great.
33.7.3 Validating null Object
Now, if we send a request with an empty request body, we are going to get the result produced from our action: https://localhost:5001/api/companies
We can see the 400 status code and the error message. It is perfectly fine since we want to have a Bad Request response if the object sent from the client is null. But if for any reason you want to remove that validation from the action, and handle it with fluent validation rules, you can do that by modifying the CreateCompanyCommandValidator class and overriding the Validate method:
public sealed class CreateCompanyCommandValidator : AbstractValidator<CreateCompanyCommand> { public CreateCompanyCommandValidator() { RuleFor(c => c.Company.Name).NotEmpty().MaximumLength(60); RuleFor(c => c.Company.Address).NotEmpty().MaximumLength(60); } public override ValidationResult Validate(ValidationContext<CreateCompanyCommand> context) { return context.InstanceToValidate.Company is null ? new ValidationResult(new[] { new ValidationFailure("CompanyForCreationDto", "CompanyForCreationDto object is null") }) : base.Validate(context); } }
Now, you can remove the validation check inside the action and send a null body request:
Pay attention that now the status code is 422 and not 400. But this validation is now part of the fluent validation.
If this solution fits your project, feel free to use it. Our recommendation is to use 422 only for the validation errors, and 400 if the request body is null.