Author Archives: user

Ultimate ASP.NET Core Web API 24 VERSIONING APIS

24 VERSIONING APIS
24 版本控制 API

As our project grows, so does our knowledge; therefore, we have a better understanding of how to improve our system. Moreover, requirements change over time — thus, our API has to change as well.‌
随着我们项目的发展,我们的知识也在增长;因此,我们对如何改进我们的系统有了更好的理解。此外,需求会随着时间的推移而变化——因此,我们的 API 也必须发生变化。

When we implement some breaking changes, we want to ensure that we don’t do anything that will cause our API consumers to change their code. Those breaking changes could be:
当我们实施一些重大更改时,我们希望确保我们不会执行任何会导致 API 使用者更改其代码的作。这些重大更改可能是:

• Renaming fields, properties, or resource URIs.
重命名字段、属性或资源 URI。

• Changes in the payload structure.
有效负载结构的更改。

• Modifying response codes or HTTP Verbs.
修改响应代码或 HTTP 动词。

• Redesigning our API endpoints.
重新设计我们的 API 端点。

If we have to implement some of these changes in the already working API, the best way is to apply versioning to prevent breaking our API for the existing API consumers.
如果我们必须在已经运行的 API 中实现其中一些更改,最好的方法是应用版本控制以防止破坏现有 API 使用者的 API。

There are different ways to achieve API versioning and there is no guidance that favors one way over another. So, we are going to show you different ways to version an API, and you can choose which one suits you best.
有多种方法可以实现 API 版本控制,并且没有支持一种方法的指导。因此,我们将向您展示对 API 进行版本控制的不同方法,您可以选择最适合您的方法。

24.1 Required Package Installation and Configuration

24.1 所需的软件包安装和配置

In order to start, we have to install the Microsoft.AspNetCore.Mvc.Versioning library in the Presentation project:‌
首先,我们必须在 Presentation 项目中安装 Microsoft.AspNetCore.Mvc.Versioning 库:

alt text

This library is going to help us a lot in versioning our API.
这个库将对我们的 API 版本控制有很大帮助。

After the installation, we have to add the versioning service in the service collection and configure it. So, let’s create a new extension method in the ServiceExtensions class:
安装完成后,我们必须在服务集合中添加版本控制服务并对其进行配置。因此,让我们在 ServiceExtensions 类中创建新的扩展方法:

public static void ConfigureVersioning(this IServiceCollection services) { services.AddApiVersioning(opt => { opt.ReportApiVersions = true; opt.AssumeDefaultVersionWhenUnspecified = true; opt.DefaultApiVersion = new ApiVersion(1, 0); }); }

With the AddApiVersioning method, we are adding service API versioning to the service collection. We are also using a couple of properties to initially configure versioning:
使用 AddApiVersioning 方法,我们将服务 API 版本控制添加到服务集合中。我们还使用几个属性来初始配置版本控制:

• ReportApiVersions adds the API version to the response header.
ReportApiVersions 将 API 版本添加到响应标头中。

• AssumeDefaultVersionWhenUnspecified does exactly that. It specifies the default API version if the client doesn’t send one.
AssumeDefaultVersionWhenUnspecified 正是这样做的。如果客户端未发送默认 API 版本,则它指定默认 API 版本。

• DefaultApiVersion sets the default version count.
DefaultApiVersion 设置默认版本计数。

After that, we are going to use this extension in the Program class:
之后,我们将在 Program 类中使用此扩展:

builder.Services.ConfigureVersioning();

API versioning is installed and configured, and we can move on.
API 版本控制已安装并配置完毕,我们可以继续前进。

24.2 Versioning Examples

24.2 版本控制示例

Before we continue, let’s create another controller: CompaniesV2Controller (for example’s sake), which will represent a new version of our existing one. It is going to have just one Get action:‌
在我们继续之前,让我们创建另一个控制器:CompaniesV2Controller(例如,为了起见),它将代表我们现有控制器的新版本。它将只有一个 Get作:

[ApiVersion("2.0")] [Route("api/companies")] [ApiController] public class CompaniesV2Controller : ControllerBase { private readonly IServiceManager _service; public CompaniesV2Controller(IServiceManager service) => _service = service; [HttpGet]public async Task<IActionResult> GetCompanies() { var companies = await _service.CompanyService .GetAllCompaniesAsync(trackChanges: false); return Ok(companies); } }

By using the [ApiVersion(“2.0”)] attribute, we are stating that this controller is version 2.0.
通过使用 [ApiVersion(“2.0”)] 属性,我们声明此控制器是 2.0 版。

After that, let’s version our original controller as well:
之后,让我们也对原始控制器进行版本控制:

[ApiVersion("1.0")] [Route("api/companies")] [ApiController] public class CompaniesController : ControllerBase

If you remember, we configured versioning to use 1.0 as a default API version (opt.AssumeDefaultVersionWhenUnspecified = true;). Therefore, if a client doesn’t state the required version, our API will use this one:
如果您还记得,我们将版本控制配置为使用 1.0 作为默认 API 版本(opt.AssumeDefaultVersionWhenUnspecified = true;因此,如果客户端没有说明所需的版本,我们的 API 将使用以下版本:
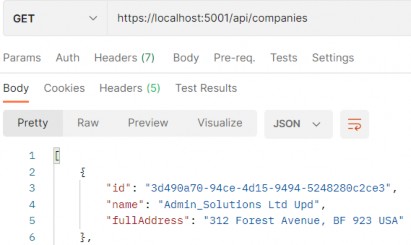
https://localhost:5001/api/companies

alt text

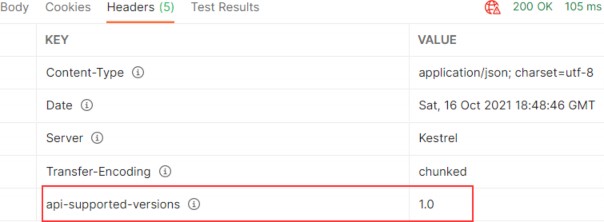
If we inspect the Headers tab of the response, we are going to find that the controller V1 was assigned for this request:
如果我们检查响应的 Headers 选项卡,我们将发现为此请求分配了控制器 V1:

alt text

Of course, you can place a breakpoint in GetCompanies actions in both controllers and confirm which endpoint was hit.
当然,您可以在两个控制器的 GetCompanies作中放置一个断点,并确认命中了哪个终端节点。

Now, let’s see how we can provide a version inside the request.
现在,让我们看看如何在请求中提供版本。

24.2.1 Using Query String‌

24.2.1 使用查询字符串

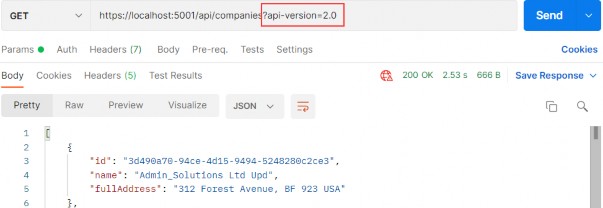
We can provide a version within the request by using a query string in the URI. Let’s test this with an example:
我们可以在 URI 中使用查询字符串在请求中提供版本。让我们用一个例子来测试一下:

https://localhost:5001/api/companies?api-version=2.0

alt text

So, we get the same response body.
因此,我们得到相同的响应正文。

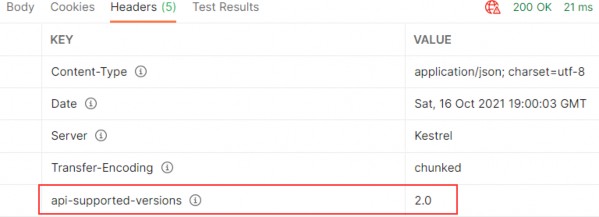
But, we can inspect the response headers to make sure that version 2.0 is used:
但是,我们可以检查响应标头以确保使用版本 2.0:

alt text

24.2.2 Using URL Versioning‌

24.2.2 使用 URL 版本控制

For URL versioning to work, we have to modify the route in our controller:
要使 URL 版本控制正常工作,我们必须在控制器中修改路由:

[ApiVersion("2.0")] [Route("api/{v:apiversion}/companies")] [ApiController] public class CompaniesV2Controller : ControllerBase

Also, let’s just slightly modify the GetCompanies action in this controller, so we could see the difference in Postman by just inspecting the response body:
此外,我们只需稍微修改此控制器中的 GetCompanies作,以便我们只需检查响应正文即可看到 Postman 中的差异:

[HttpGet] public async Task<IActionResult> GetCompanies() { var companies = await _service.CompanyService .GetAllCompaniesAsync(trackChanges: false); var companiesV2 = companies.Select(x => $"{x.Name} V2"); return Ok(companiesV2); }

We are creating a projection from our companies collection by iterating through each element, modifying the Name property to contain the V2 suffix, and extracting it to a new collection companiesV2.
我们将通过循环访问每个元素,修改 Name 属性以包含 V2 后缀,并将其提取到新的集合 companiesV2 中,从 companies 集合创建投影。

Now, we can test it:
现在,我们可以测试它:

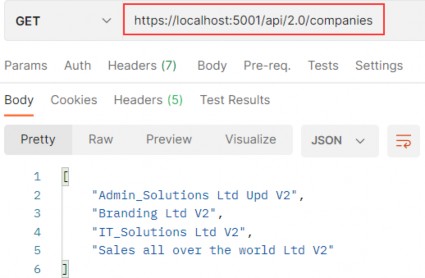
https://localhost:5001/api/2.0/companies

alt text

One thing to mention, we can’t use the query string pattern to call the companies v2 controller anymore. We can use it for version 1.0, though.
值得一提的是,我们不能再使用查询字符串模式来调用公司 v2 控制器。不过,我们可以在 1.0 版本中使用它。

24.2.3 HTTP Header Versioning‌

24.2.3 HTTP 标头版本控制

If we don’t want to change the URI of the API, we can send the version in the HTTP Header. To enable this, we have to modify our configuration:
如果我们不想更改 API 的 URI,我们可以在 HTTP Header 中发送版本。要启用此功能,我们必须修改我们的配置:

public static void ConfigureVersioning(this IServiceCollection services) { services.AddApiVersioning(opt => { opt.ReportApiVersions = true; opt.AssumeDefaultVersionWhenUnspecified = true; opt.DefaultApiVersion = new ApiVersion(1, 0); opt.ApiVersionReader = new HeaderApiVersionReader("api-version"); }); }

And to revert the Route change in our controller:
要在我们的控制器中恢复 Route 更改:

[Route("api/companies")]
[ApiVersion("2.0")]

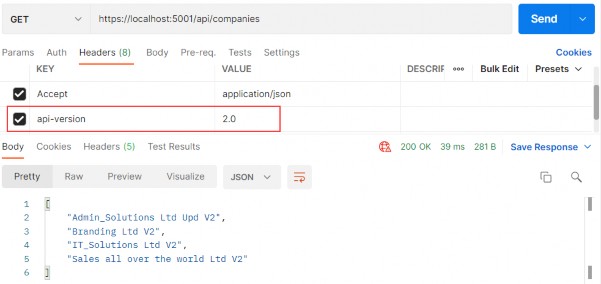
Let’s test these changes:
让我们测试一下这些变化:
https://localhost:5001/api/companies

alt text

If we want to support query string versioning, we should use a new QueryStringApiVersionReader class instead:
如果我们想支持查询字符串版本控制,我们应该改用新的 QueryStringApiVersionReader 类:

opt.ApiVersionReader = new QueryStringApiVersionReader("api-version");

24.2.4 Deprecating Versions‌

24.2.4 弃用版本

If we want to deprecate version of an API, but don’t want to remove it completely, we can use the Deprecated property for that purpose:
如果我们想弃用 API 的版本,但又不想完全删除它,我们可以为此目的使用 Deprecated 属性:

[ApiVersion("2.0", Deprecated = true)]

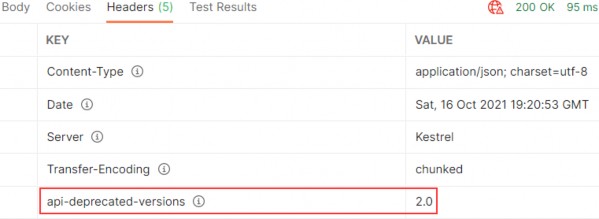
We will be able to work with that API, but we will be notified that this version is deprecated:
我们将能够使用该 API,但会收到此版本已弃用的通知:

alt text

24.2.5 Using Conventions

24.2.5 使用约定

If we have a lot of versions of a single controller, we can assign these versions in the configuration instead:
如果我们有很多单个控制器的版本,我们可以在配置中分配这些版本:

services.AddApiVersioning(opt => { opt.ReportApiVersions = true; opt.AssumeDefaultVersionWhenUnspecified = true; opt.DefaultApiVersion = new ApiVersion(1, 0); opt.ApiVersionReader = new HeaderApiVersionReader("api-version"); opt.Conventions.Controller<CompaniesController>() .HasApiVersion(new ApiVersion(1, 0)); opt.Conventions.Controller<CompaniesV2Controller>() .HasDeprecatedApiVersion(new ApiVersion(2, 0)); });

Now, we can remove the [ApiVersion] attribute from the controllers.
现在,我们可以从控制器中删除 [ApiVersion] 属性。

Of course, there are a lot more features that the installed library provides for us — but with the mentioned ones, we have covered quite enough to version our APIs.
当然,已安装的库为我们提供了更多功能 — 但对于上述功能,我们已经涵盖了足够多的功能来对我们的 API 进行版本控制。

Ultimate ASP.NET Core Web API 23 ROOT DOCUMENT

23 ROOT DOCUMENT
23 根文档

In this section, we are going to create a starting point for the consumers of our API. This starting point is also known as the Root Document. The Root Document is the place where consumers can learn how to interact with the rest of the API.‌
在本节中,我们将为 API 的使用者创建一个起点。此起点也称为根文档。根文档是使用者可以学习如何与 API 的其余部分进行交互的地方。

23.1 Root Document Implementation

23.1 根文档实现

This document should be created at the api root, so let’s start by creating‌ a new controller:
这个文档应该在 api 根目录下创建,所以让我们从创建一个新的控制器开始:

[Route("api")] [ApiController] public class RootController : ControllerBase { }

We are going to generate links towards the API actions. Therefore, we have to inject LinkGenerator:
我们将生成指向 API作的链接。因此,我们必须注入 LinkGenerator:

[Route("api")] [ApiController] public class RootController : ControllerBase { private readonly LinkGenerator _linkGenerator; public RootController(LinkGenerator linkGenerator) => _linkGenerator = linkGenerator; }

In this controller, we only need a single action, GetRoot, which will be executed with the GET request on the /api URI.
在此控制器中,我们只需要一个作 GetRoot,该作将使用 /api URI 上的 GET 请求执行。

There are several links that we are going to create in this action. The link to the document itself and links to actions available on the URIs at the root level (actions from the Companies controller). We are not creating links to employees, because they are children of the company — and in our API if we want to fetch employees, we have to fetch the company first.
我们将在此作中创建多个链接。指向文档本身的链接,以及指向根级别 URI 上可用作的链接(来自 Companies 控制器的作)。我们不会创建指向员工的链接,因为他们是公司的子公司 — 在我们的 API 中,如果我们想获取员工,我们必须先获取公司。

If we inspect our CompaniesController, we can see that GetCompanies and CreateCompany are the only actions on the root URI level (api/companies). Therefore, we are going to create links only to them.
如果我们检查 CompaniesController,我们可以看到 GetCompanies 和 CreateCompany 是根 URI 级别 (api/companies) 上的唯一作。因此,我们将仅创建指向它们的链接。

Before we start with the GetRoot action, let’s add a name for the CreateCompany and GetCompanies actions in the CompaniesController:
在开始 GetRoot作之前,让我们在 CompaniesController 中为 CreateCompany 和 GetCompanies作添加一个名称:

[HttpGet(Name = "GetCompanies")] public async Task<IActionResult> GetCompanies()
[HttpPost(Name = "CreateCompany")] [ServiceFilter(typeof(ValidationFilterAttribute))] public async Task<IActionResult> CreateCompany([FromBody]CompanyForCreationDto company)

We are going to use the Link class to generate links:
我们将使用 Link 类来生成链接:

public class Link { public string Href { get; set; } public string Rel { get; set; } public string Method { get; set; } … }

This class contains all the required properties to describe our actions while creating links in the GetRoot action. The Href property defines the URI to the action, the Rel property defines the identification of the action type, and the Method property defines which HTTP method should be used for that action.
此类包含描述 GetRoot作中创建链接时的作所需的所有属性。Href 属性定义作的 URI,Rel 属性定义作类型的标识,Method 属性定义应使用哪个 HTTP 方法执行该作。

Now, we can create the GetRoot action:
现在,我们可以创建 GetRoot作:

[HttpGet(Name = "GetRoot")] public IActionResult GetRoot([FromHeader(Name = "Accept")] string mediaType) { if(mediaType.Contains("application/vnd.codemaze.apiroot")) { var list = new List<Link> { new Link { Href = _linkGenerator.GetUriByName(HttpContext, nameof(GetRoot), new {}), Rel = "self", Method = "GET" }, new Link { Href = _linkGenerator.GetUriByName(HttpContext, "GetCompanies", new {}), Rel = "companies", Method = "GET" }, new Link{ Href = _linkGenerator.GetUriByName(HttpContext, "CreateCompany", new {}), Rel = "create_company", Method = "POST" } }; return Ok(list); } return NoContent(); }

In this action, we generate links only if a custom media type is provided from the Accept header. Otherwise, we return NoContent(). To generate links, we use the GetUriByName method from the LinkGenerator class.
在此作中,仅当 Accept 标头提供了自定义媒体类型时,我们才会生成链接。否则,我们将返回 NoContent()。要生成链接,我们使用 LinkGenerator 类中的 GetUriByName 方法。

That said, we have to register our custom media types for the json and xml formats. To do that, we are going to extend the AddCustomMediaTypes extension method:
也就是说,我们必须为 json 和 xml 格式注册自定义媒体类型。为此,我们将扩展 AddCustomMediaTypes 扩展方法:

public static void AddCustomMediaTypes(this IServiceCollection services) { services.Configure<MvcOptions>(config => { var systemTextJsonOutputFormatter = config.OutputFormatters .OfType<SystemTextJsonOutputFormatter>()?.FirstOrDefault(); if (systemTextJsonOutputFormatter != null) { systemTextJsonOutputFormatter.SupportedMediaTypes .Add("application/vnd.codemaze.hateoas+json"); systemTextJsonOutputFormatter.SupportedMediaTypes .Add("application/vnd.codemaze.apiroot+json"); } var xmlOutputFormatter = config.OutputFormatters .OfType<XmlDataContractSerializerOutputFormatter>()? .FirstOrDefault(); if (xmlOutputFormatter != null) { xmlOutputFormatter.SupportedMediaTypes .Add("application/vnd.codemaze.hateoas+xml"); xmlOutputFormatter.SupportedMediaTypes .Add("application/vnd.codemaze.apiroot+xml"); } }); }

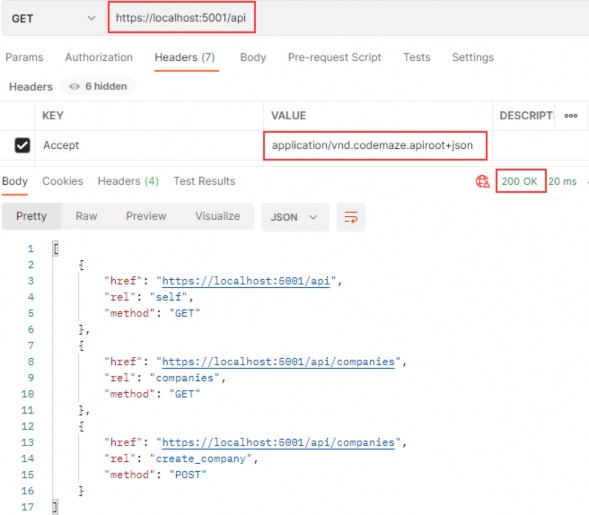
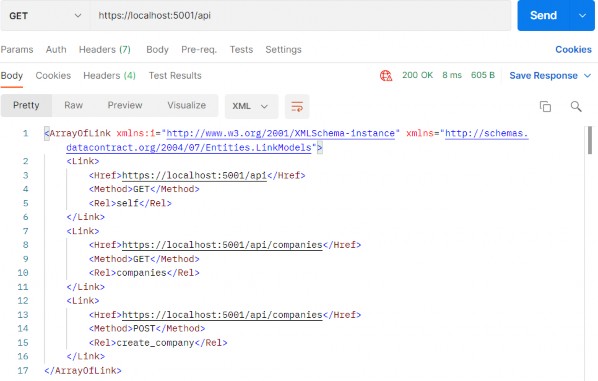
We can now inspect our result:
我们现在可以检查我们的结果:
https://localhost:5001/api

alt text

This works great.
这效果很好。

Let’s test what is going to happen if we don’t provide the custom media type:
让我们测试一下如果不提供自定义媒体类型会发生什么情况:

https://localhost:5001/api

alt text

Well, we get the 204 No Content message as expected. Of course, you can test the xml request as well:
好吧,我们如预期的那样收到了 204 No Content 消息。当然,您也可以测试 xml 请求:

https://localhost:5001/api

alt text

Great.
伟大。

Now we can move on to the versioning chapter.
现在我们可以继续进行版本控制章节。

Ultimate ASP.NET Core Web API 22 WORKING WITH OPTIONS AND HEAD REQUESTS

22 WORKING WITH OPTIONS AND HEAD REQUESTS
22 使用 OPTIONS 和 HEAD 请求

In one of the previous chapters (Method Safety and Method Idempotency), we talked about different HTTP requests. Until now, we have been working with all request types except OPTIONS and HEAD. So, let’s cover them as well.‌
在前面的一章(方法安全和方法幂等性)中,我们讨论了不同的 HTTP 请求。到目前为止,我们一直在处理除 OPTIONS 和 HEAD 之外的所有请求类型。那么,让我们也介绍一下它们。

22.1 OPTIONS HTTP Request

22.1 OPTIONS HTTP 请求

The Options request can be used to request information on the communication options available upon a certain URI. It allows consumers to determine the options or different requirements associated with a resource. Additionally, it allows us to check the capabilities of a server without forcing action to retrieve a resource.‌
Options 请求可用于请求有关特定 URI 上可用的通信选项的信息。它允许使用者确定与资源关联的选项或不同要求。此外,它还允许我们检查服务器的功能,而无需强制作来检索资源。

Basically, Options should inform us whether we can Get a resource or execute any other action (POST, PUT, or DELETE). All of the options should be returned in the Allow header of the response as a comma- separated list of methods.
基本上,Options 应该告诉我们是否可以获取资源或执行任何其他作(POST、PUT 或 DELETE)。所有选项都应在响应的 Allow 标头中作为逗号分隔的方法列表返回。

Let’s see how we can implement the Options request in our example.
让我们看看如何在示例中实现 Options 请求。

22.2 OPTIONS Implementation

22.2 OPTIONS 实现

We are going to implement this request in the CompaniesController — so, let’s open it and add a new action:‌
我们将在 CompaniesController 中实现此请求 — 因此,让我们打开它并添加新作:

[HttpOptions] public IActionResult GetCompaniesOptions() { Response.Headers.Add("Allow", "GET, OPTIONS, POST"); return Ok(); }

We have to decorate our action with the HttpOptions attribute. As we said, the available options should be returned in the Allow response header, and that is exactly what we are doing here. The URI for this action is /api/companies, so we state which actions can be executed for that certain URI. Finally, the Options request should return the 200 OK status code. We have to understand that the response, if it is empty, must include the content-length field with the value of zero. We don’t have to add it by ourselves because ASP.NET Core takes care of that for us.
我们必须使用 HttpOptions 属性来装饰我们的 action。正如我们所说,可用选项应该在 Allow 响应标头中返回,这正是我们在这里所做的。此作的 URI 是 /api/companies,因此我们说明可以针对该特定 URI 执行哪些作。最后,Options 请求应返回 200 OK 状态代码。我们必须了解,如果响应为空,则必须包含值为零的 content-length 字段。我们不必自己添加它,因为 ASP.NET Core 会为我们处理这些。

Let’s try this:
让我们试试这个:
https://localhost:5001/api/companies

alt text

As you can see, we are getting a 200 OK response. Let’s inspect the Headers tab:
如您所见,我们收到了 200 OK 响应。我们来检查 Headers 选项卡:

alt text

Everything works as expected.
一切都按预期进行。

Let’s move on.
让我们继续前进。

22.3 Head HTTP Request

22.3 头 HTTP 请求

The Head is identical to Get but without a response body. This type of request could be used to obtain information about validity, accessibility, and recent modifications of the resource.‌
Head 与 Get 相同,但没有响应正文。这种类型的请求可用于获取有关资源的有效性、可访问性和最近修改的信息。

22.4 HEAD Implementation

22.4 HEAD 实现

Let’s open the EmployeesController, because that’s where we are going to implement this type of request. As we said, the Head request must return the same response as the Get request — just without the response body. That means it should include the paging information in the response as well.‌
让我们打开 EmployeesController,因为这是我们要实现此类请求的地方。正如我们所说,Head 请求必须返回与 Get 请求相同的响应 — 只是没有响应正文。这意味着它还应该在响应中包含分页信息。

Now, you may think that we have to write a completely new action and also repeat all the code inside, but that is not the case. All we have to do is add the HttpHead attribute below HttpGet:
现在,您可能认为我们必须编写一个全新的作并重复其中的所有代码,但事实并非如此。我们所要做的就是在 HttpGet 下面添加 HttpHead 属性:

[HttpGet] [HttpHead] public async Task<IActionResult> GetEmployeesForCompany(Guid companyId, [FromQuery] EmployeeParameters employeeParameters)

We can test this now:
我们现在可以测试一下:

https://localhost:5001/api/companies/C9D4C053-49B6-410C-BC78-2D54A9991870/employees?pageNumber=2&pageSize=2

alt text

As you can see, we receive a 200 OK status code with the empty body.Let’s check the Headers part:
如您所见,我们收到一个 200 OK 状态代码,其中正文为空。让我们检查一下 Headers 部分:

alt text

You can see the X-Pagination link included in the Headers part of the response. Additionally, all the parts of the X-Pagination link are populated — which means that our code was successfully executed, but the response body hasn’t been included.
您可以看到响应的 Headers 部分中包含的 X-Pagination 链接。此外,X-Pagination 链接的所有部分都已填充 — 这意味着我们的代码已成功执行,但响应正文尚未包含。

Excellent.
非常好。

We now have support for the Http OPTIONS and HEAD requests.
我们现在支持 Http OPTIONS 和 HEAD 请求。

Ultimate ASP.NET Core Web API 21 SUPPORTING HATEOAS

21 SUPPORTING HATEOAS
21 支持 HATEOAS

In this section, we are going to talk about one of the most important concepts in building RESTful APIs — HATEOAS and learn how to implement HATEOAS in ASP.NET Core Web API. This part relies heavily on the concepts we've implemented so far in paging, filtering, searching, sorting, and especially data shaping and builds upon the foundations we've put down in these parts.‌
在本节中,我们将讨论构建 RESTful API 中最重要的概念之一 — HATEOAS,并学习如何在 ASP.NET Core Web API 中实现 HATEOAS。这部分在很大程度上依赖于我们到目前为止在分页、过滤、搜索、排序,尤其是数据调整方面实现的概念,并建立在我们在这些部分中奠定的基础之上。

21.1 What is HATEOAS and Why is it so Important?

21.1 什么是 HATEOAS,为什么它如此重要?

HATEOAS (Hypermedia as the Engine of Application State) is a very important REST constraint. Without it, a REST API cannot be considered RESTful and many of the benefits we get by implementing a REST architecture are unavailable.‌
HATEOAS(超媒体作为应用程序状态的引擎)是一个非常重要的 REST 约束。没有它,REST API 就不能被视为 RESTful,并且我们无法通过实施 REST 架构获得许多好处。

Hypermedia refers to any kind of content that contains links to media types such as documents, images, videos, etc.
超媒体是指包含指向媒体类型(如文档、图像、视频等)的链接的任何类型的内容。

REST architecture allows us to generate hypermedia links in our responses dynamically and thus make navigation much easier. To put this into perspective, think about a website that uses hyperlinks to help you navigate to different parts of it. You can achieve the same effect with HATEOAS in your REST API.
REST 架构允许我们在响应中动态生成超媒体链接,从而使导航变得更加容易。为了正确看待这一点,请考虑一个使用超链接来帮助您导航到其不同部分的网站。您可以在 REST API 中使用 HATEOAS 实现相同的效果。

Imagine a website that has a home page and you land on it, but there are no links anywhere. You need to scrape the website or find some other way to navigate it to get to the content you want. We're not saying that the website is the same as a REST API, but you get the point.
想象一下,一个网站有一个主页,你登陆它,但任何地方都没有链接。您需要抓取网站或找到其他方法来导航它以访问您想要的内容。我们并不是说该网站与 REST API 相同,但您明白了。

The power of being able to explore an API on your own can be very useful.
能够自行探索 API 的功能可能非常有用。

Let's see how that works.
让我们看看它是如何工作的。

21.1.1 Typical Response with HATEOAS Implemented

21.1.1 实施HATEOAS 的典型响应

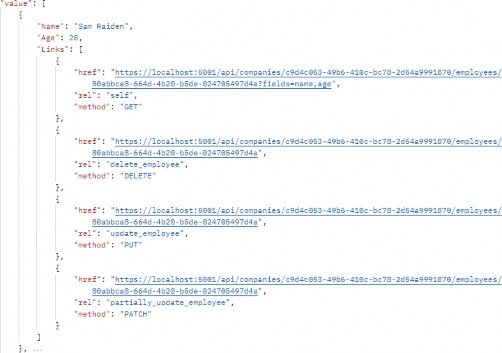
Once we implement HATEOAS in our API, we are going to have this type of response:‌
在 API 中实施 HATEOAS 后,我们将得到这种类型的响应:

alt text

As you can see, we got the list of our employees and for each employee all the actions we can perform on them. And so on...
如您所见,我们得到了我们的员工名单以及我们可以对每位员工执行的所有作。等等......

So, it's a nice way to make an API self-discoverable and evolvable.
因此,这是使 API 可自我发现和可演化的好方法。

21.1.2 What is a Link?‌

21.1.2 什么是链接?

According to RFC5988, a link is "a typed connection between two resources that are identified by Internationalised Resource Identifiers (IRIs)". Simply put, we use links to traverse the internet or rather the resources on the internet.
根据 RFC5988 的说法,链接是“由国际化资源标识符 (IRI) 标识的两个资源之间的类型化连接”。简而言之,我们使用链接来遍历 Internet,或者更确切地说是 Internet 上的资源。

Our responses contain an array of links, which consist of a few properties according to the RFC:
我们的响应包含一系列链接,根据 RFC,这些链接由一些属性组成:

• href - represents a target URI.
href - 表示目标 URI。

• rel - represents a link relation type, which means it describes how the current context is related to the target resource.
rel -表示链接关系类型,这意味着它描述当前上下文与目标资源的关系。

• method - we need an HTTP method to know how to distinguish the same target URIs.
method - 我们需要一个 HTTP 方法来了解如何区分相同的目标 URI。

21.1.3 Pros/Cons of Implementing HATEOAS

21.1.3 实施 HATEOAS 的利弊

So, what are all the benefits we can expect when implementing HATEOAS?
那么,实施 HATEOAS 时我们可以期待的所有好处是什么?

HATEOAS is not trivial to implement, but the rewards we reap are worth it. Here are the things we can expect to get when we implement HATEOAS:
HATEOAS 的实施并非易事,但我们获得的回报是值得的。以下是我们在实施 HATEOAS 时可以预期获得的东西:

• API becomes self-discoverable and explorable.
API 变得可自我发现和可探索。

• A client can use the links to implement its logic, it becomes much easier, and any changes that happen in the API structure are directly reflected onto the client.
客户端可以使用链接来实现其逻辑,这变得更加容易,并且 API 结构中发生的任何更改都会直接反映到客户端上。

• The server drives the application state and URL structure and not vice versa.
服务器驱动应用程序状态和 URL 结构,反之则不然。

• The link relations can be used to point to the developer’s documentation.
链接关系可用于指向开发人员的文档。

• Versioning through hyperlinks becomes easier.
通过超链接进行版本控制变得更加容易。

• Reduced invalid state transaction calls.
减少了无效状态事务调用。

• API is evolvable without breaking all the clients.
API 是可演化的,而不会破坏所有客户端。

We can do so much with HATEOAS. But since it's not easy to implement all these features, we should keep in mind the scope of our API and if we need all this. There is a great difference between a high-volume public API and some internal API that is needed to communicate between parts of the same system.
我们可以用 HATEOAS 做很多事情。但是由于实现所有这些功能并不容易,我们应该记住 API 的范围以及我们是否需要所有这些。大容量公共 API 与在同一系统的各个部分之间进行通信所需的一些内部 API 之间存在很大差异。

That is more than enough theory for now. Let's get to work and see what the concrete implementation of HATEOAS looks like.
目前,这已经足够了。让我们开始工作,看看 HATEOAS 的具体实现是什么样子。

21.2 Adding Links in the Project

21.2 在项目中添加链接

Let’s begin with the concept we know so far, and that’s the link. In the Entities project, we are going to create the LinkModels folder and inside a new Link class:‌
让我们从我们目前知道的概念开始,这就是链接。在 Entities 项目中,我们将创建 LinkModels 文件夹,并在新的 Link 类中:

public class Link { public string? Href { get; set; } public string? Rel { get; set; } public string? Method { get; set; } public Link() { } public Link(string href, string rel, string method) { Href = href; Rel = rel; Method = method; } }

Note that we have an empty constructor, too. We'll need that for XML serialization purposes, so keep it that way.
请注意,我们还有一个空的构造函数。我们将需要它来进行 XML 序列化,因此请保持这种方式。

Next, we need to create a class that will contain all of our links — LinkResourceBase:
接下来,我们需要创建一个包含所有链接的类 — LinkResourceBase:

public class LinkResourceBase { public LinkResourceBase() {} public List<Link> Links { get; set; } = new List<Link>(); }

And finally, since our response needs to describe the root of the controller, we need a wrapper for our links:
最后,由于我们的响应需要描述控制器的根,因此我们需要一个链接的包装器:

public class LinkCollectionWrapper<T> : LinkResourceBase { public List<T> Value { get; set; } = new List<T>(); public LinkCollectionWrapper() { } public LinkCollectionWrapper(List<T> value) => Value = value; }

This class might not make too much sense right now, but stay with us and it will become clear later down the road. For now, let's just assume we wrapped our links in another class for response representation purposes.
这门课现在可能没有太大意义,但请留在我们身边,稍后会变得清晰。现在,我们只假设我们将链接包装在另一个类中以用于响应表示目的。

Since our response will contain links too, we need to extend the XML serialization rules so that our XML response returns the properly formatted links. Without this, we would get something like:
由于我们的响应也将包含链接,因此我们需要扩展 XML 序列化规则,以便我们的 XML 响应返回格式正确的链接。如果没有这个,我们会得到这样的结果:

<Links>System.Collections.Generic.List1[Entites.Models.Link]. So, in the Entities/Models/Entity class, we need to extend the WriteLinksToXml method to support links: <Links>System.Collections.Generic.List1[Entites.Models.Link] .因此,在 Entities/Models/Entity 类中,我们需要扩展 WriteLinksToXml 方法以支持链接:

private void WriteLinksToXml(string key, object value, XmlWriter writer) { writer.WriteStartElement(key); if (value.GetType() == typeof(List<Link>)) { foreach (var val in value as List<Link>) { writer.WriteStartElement(nameof(Link)); WriteLinksToXml(nameof(val.Href), val.Href, writer); WriteLinksToXml(nameof(val.Method), val.Method, writer); WriteLinksToXml(nameof(val.Rel), val.Rel, writer); writer.WriteEndElement(); } } else { writer.WriteString(value.ToString()); } writer.WriteEndElement(); }

So, we check if the type is List<Link>. If it is, we iterate through all the links and call the method recursively for each of the properties: href, method, and rel.
因此,我们检查类型是否为List<Link>。如果是,我们遍历所有链接,并为每个属性递归调用该方法:href、method 和 rel。

That's all we need for now. We have a solid foundation to implement HATEOAS in our project.
这就是我们现在需要的。我们有坚实的基础来在我们的项目中实施 HATEOAS。

21.3 Additional Project Changes

21.3 其他 Project 更改

When we generate links, HATEOAS strongly relies on having the ids available to construct the links for the response. Data shaping, on the‌ other hand, enables us to return only the fields we want. So, if we want only the name and age fields, the id field won’t be added. To solve that, we have to apply some changes.
当我们生成链接时,HATEOAS 强烈依赖于可用的 id 来构建响应的链接。另一方面,数据整形使我们能够仅返回我们想要的字段。因此,如果我们只需要 name 和 age 字段,则不会添加 id 字段。为了解决这个问题,我们必须应用一些更改。

The first thing we are going to do is to add a ShapedEntity class in the Entities/Models folder:
我们要做的第一件事是在 Entities/Models 文件夹中添加一个 ShapedEntity 类:

public class ShapedEntity { public ShapedEntity() { Entity = new Entity(); } public Guid Id { get; set; } public Entity Entity { get; set; } }

With this class, we expose the Entity and the Id property as well.
使用此类,我们还公开了 Entity 和 Id 属性。

Now, we have to modify the IDataShaper interface and the DataShaper class by replacing all Entity usage with ShapedEntity.
现在,我们必须修改 IDataShaper 接口和 DataShaper 类,将所有 Entity 用法替换为 ShapedEntity。

In addition to that, we need to extend the FetchDataForEntity method in the DataShaper class to get the id separately:
除此之外,我们还需要在 DataShaper 类中扩展 FetchDataForEntity 方法,以单独获取 id:

private ShapedEntity FetchDataForEntity(T entity, IEnumerable<PropertyInfo> requiredProperties) { var shapedObject = new ShapedEntity(); foreach (var property in requiredProperties) { var objectPropertyValue = property.GetValue(entity); shapedObject.Entity.TryAdd(property.Name, objectPropertyValue); } var objectProperty = entity.GetType().GetProperty("Id"); shapedObject.Id = (Guid)objectProperty.GetValue(entity); return shapedObject; }

Finally, let’s add the LinkResponse class in the LinkModels folder; that will help us with the response once we start with the HATEOAS implementation:
最后,让我们在 LinkModels 文件夹中添加 LinkResponse 类;这将有助于我们在开始 HATEOAS 实现后做出响应:

public class LinkResponse
{ public bool HasLinks { get; set; } public List<Entity> ShapedEntities { get; set; } public LinkCollectionWrapper<Entity> LinkedEntities { get; set; } public LinkResponse() { LinkedEntities = new LinkCollectionWrapper<Entity>(); ShapedEntities = new List<Entity>(); } }

With this class, we are going to know whether our response has links. If it does, we are going to use the LinkedEntities property. Otherwise, we are going to use the ShapedEntities property.
通过这个类,我们将知道我们的响应是否有链接。如果是这样,我们将使用 LinkedEntities 属性。否则,我们将使用 ShapedEntities 属性。

21.4 Adding Custom Media Types

21.4 添加自定义媒体类型

What we want to do is to enable links in our response only if it is explicitly asked for. To do that, we are going to introduce custom media types.‌
我们想要做的是,只有在明确要求的情况下,才在我们的响应中启用链接。为此,我们将引入自定义媒体类型。

Before we start, let’s see how we can create a custom media type. A custom media type should look something like this: application/vnd.codemaze.hateoas+json. To compare it to the typical json media type which we use by default: application/json.
在开始之前,让我们看看如何创建自定义媒体类型。自定义媒体类型应如下所示:application/vnd.codemaze.hateoas+json。将其与我们默认使用的典型 json 媒体类型进行比较:application/json。

So let’s break down the different parts of a custom media type:
因此,让我们分解自定义媒体类型的不同部分:

• vnd – vendor prefix; it’s always there.

• codemaze – vendor identifier; we’ve chosen codemaze, because why not?

• hateoas – media type name.

• json – suffix; we can use it to describe if we want json or an XML response, for example.

Now, let’s implement that in our application.
现在,让我们在应用程序中实现它。

21.4.1 Registering Custom Media Types

21.4.1 注册自定义媒体类型

First, we want to register our new custom media types in the middleware. Otherwise, we’ll just get a 406 Not Acceptable message.
首先,我们想在中间件中注册新的自定义媒体类型。否则,我们只会收到 406 Not Acceptable 消息。

Let’s add a new extension method to our ServiceExtensions:
让我们向 ServiceExtensions 添加新的扩展方法:

public static void AddCustomMediaTypes(this IServiceCollection services) { services.Configure<MvcOptions>(config => { var systemTextJsonOutputFormatter = config.OutputFormatters .OfType<SystemTextJsonOutputFormatter>()?.FirstOrDefault(); if (systemTextJsonOutputFormatter != null) { systemTextJsonOutputFormatter.SupportedMediaTypes .Add("application/vnd.codemaze.hateoas+json"); } var xmlOutputFormatter = config.OutputFormatters .OfType<XmlDataContractSerializerOutputFormatter>()? .FirstOrDefault(); if (xmlOutputFormatter != null) { xmlOutputFormatter.SupportedMediaTypes .Add("application/vnd.codemaze.hateoas+xml"); } }); }

We are registering two new custom media types for the JSON and XML output formatters. This ensures we don’t get a 406 Not Acceptable response.
我们正在为 JSON 和 XML 输出格式化程序注册两种新的自定义媒体类型。这可确保我们不会收到 406 Not Acceptable 响应。

Now, we have to add that to the Program class, just after the AddControllers method:
现在,我们必须将其添加到 Program 类中,就在 AddControllers 方法之后:

builder.Services.AddCustomMediaTypes();

Excellent. The registration process is done.
非常好。注册过程已完成。

21.4.2 Implementing a Media Type Validation Filter

21.4.2 实现媒体类型验证过滤器

Now, since we’ve implemented custom media types, we want our Accept header to be present in our requests so we can detect when the user requested the HATEOAS-enriched response.
现在,由于我们已经实现了自定义媒体类型,因此我们希望 Accept 标头出现在我们的请求中,以便我们可以检测用户何时请求了 HATEOAS 扩充的响应。

To do that, we’ll implement an ActionFilter in the Presentation project inside the ActionFilters folder, which will validate our Accept header and media types:
为此,我们将在 ActionFilters 文件夹内的 Presentation 项目中实现一个 ActionFilter,它将验证我们的 Accept 标头和媒体类型:

public class ValidateMediaTypeAttribute : IActionFilter { public void OnActionExecuting(ActionExecutingContext context) { var acceptHeaderPresent = context.HttpContext .Request.Headers.ContainsKey("Accept"); if (!acceptHeaderPresent) { context.Result = new BadRequestObjectResult($"Accept header is missing."); return; } var mediaType = context.HttpContext .Request.Headers["Accept"].FirstOrDefault(); if (!MediaTypeHeaderValue.TryParse(mediaType, out MediaTypeHeaderValue? outMediaType)) { context.Result = new BadRequestObjectResult($"Media type not present. Please add Accept header with the required media type."); return; } context.HttpContext.Items.Add("AcceptHeaderMediaType", outMediaType); } public void OnActionExecuted(ActionExecutedContext context){} }

We check for the existence of the Accept header first. If it’s not present, we return BadRequest. If it is, we parse the media type — and if there is no valid media type present, we return BadRequest.
我们首先检查 Accept 标头是否存在。如果不存在,则返回 BadRequest。如果是,我们解析媒体类型——如果不存在有效的媒体类型,我们返回 BadRequest。

Once we’ve passed the validation checks, we pass the parsed media type to the HttpContext of the controller.
通过验证检查后,我们将解析的媒体类型传递给控制器的 HttpContext。

Now, we have to register the filter in the Program class:
现在,我们必须在 Program 类中注册过滤器:

builder.Services.AddScoped<ValidateMediaTypeAttribute>();

And to decorate the GetEmployeesForCompany action:
要修饰 GetEmployeesForCompany作,请执行以下作:

[HttpGet] [ServiceFilter(typeof(ValidateMediaTypeAttribute))] public async Task<IActionResult> GetEmployeesForCompany(Guid companyId, [FromQuery] EmployeeParameters employeeParameters)

Great job.
干得好。

Finally, we can work on the HATEOAS implementation.
最后,我们可以进行 HATEOAS 实现。

21.5 Implementing HATEOAS

21.5 实施 HATEOAS

We are going to start by creating a new interface in the Contracts‌ project:
首先,在 Contracts 项目中创建一个新接口:

public interface IEmployeeLinks { LinkResponse TryGenerateLinks(IEnumerable<EmployeeDto> employeesDto, string fields, Guid companyId, HttpContext httpContext); }

Currently, you will get the error about HttpContext, but we will solve that a bit later.
目前,您将收到有关 HttpContext 的错误,但我们稍后会解决这个问题。

Let’s continue by creating a new Utility folder in the main project and the EmployeeLinks class in it. Let’s start by adding the required dependencies inside the class:
让我们继续在主项目中创建一个新的 Utility 文件夹,并在其中创建一个 EmployeeLinks 类。让我们从在类中添加所需的依赖项开始:

public class EmployeeLinks : IEmployeeLinks { private readonly LinkGenerator _linkGenerator; private readonly IDataShaper<EmployeeDto> _dataShaper; public EmployeeLinks(LinkGenerator linkGenerator, IDataShaper<EmployeeDto> dataShaper) { _linkGenerator = linkGenerator; _dataShaper = dataShaper; } }

We are going to use LinkGenerator to generate links for our responses and IDataShaper to shape our data. As you can see, the shaping logic is now extracted from the EmployeeService class, which we will modify a bit later.
我们将使用 LinkGenerator 为我们的响应生成链接,并使用 IDataShaper 来塑造我们的数据。如您所见,调整逻辑现在是从 EmployeeService 类中提取的,我们稍后将对其进行修改。

After dependencies, we are going to add the first method:
在依赖项之后,我们将添加第一个方法:

public LinkResponse TryGenerateLinks(IEnumerable<EmployeeDto> employeesDto, string fields, Guid companyId, HttpContext httpContext) { var shapedEmployees = ShapeData(employeesDto, fields); if (ShouldGenerateLinks(httpContext)) return ReturnLinkdedEmployees(employeesDto, fields, companyId, httpContext, shapedEmployees); return ReturnShapedEmployees(shapedEmployees);}

So, our method accepts four parameters. The employeeDto collection, the fields that are going to be used to shape the previous collection, companyId because routes to the employee resources contain the Id from the company, and httpContext which holds information about media types.
因此,我们的方法接受四个参数。employeeDto 集合、将用于塑造前一个集合的字段、companyId(因为到员工资源的路由包含来自公司的 Id)和 httpContext(保存有关媒体类型的信息)。

The first thing we do is shape our collection. Then if the httpContext contains the required media type, we add links to the response. On the other hand, we just return our shaped data.
我们做的第一件事是塑造我们的收藏。然后,如果 httpContext 包含所需的媒体类型,我们将添加指向响应的链接。另一方面,我们只返回我们的 shaped 数据。

Of course, we have to add those not implemented methods:
当然,我们必须添加那些未实现的方法:

private List<Entity> ShapeData(IEnumerable<EmployeeDto> employeesDto, string fields) => _dataShaper.ShapeData(employeesDto, fields) .Select(e => e.Entity) .ToList();

The ShapeData method executes data shaping and extracts only the entity part without the Id property.
ShapeData 方法执行数据调整,并仅提取不带 Id 属性的实体部分。

Let’s add two additional methods:
让我们添加两个额外的方法:

private bool ShouldGenerateLinks(HttpContext httpContext) { var mediaType = (MediaTypeHeaderValue)httpContext.Items["AcceptHeaderMediaType"]; return mediaType.SubTypeWithoutSuffix.EndsWith("hateoas", StringComparison.InvariantCultureIgnoreCase); } private LinkResponse ReturnShapedEmployees(List<Entity> shapedEmployees) => new LinkResponse { ShapedEntities = shapedEmployees };

In the ShouldGenerateLinks method, we extract the media type from the httpContext. If that media type ends with hateoas, the method returns true; otherwise, it returns false. The ReturnShapedEmployees method just returns a new LinkResponse with the ShapedEntities property populated. By default, the HasLinks property is false.
在 ShouldGenerateLinks 方法中,我们从 httpContext 中提取媒体类型。如果该媒体类型以 hateoas 结尾,则该方法返回 true;否则,它将返回 false。ReturnShapedEmployees 方法只返回一个填充了 ShapedEntities 属性的新 LinkResponse。默认情况下,HasLinks 属性为 false。

After these methods, we have to add the ReturnLinkedEmployees method as well:
在这些方法之后,我们还必须添加 ReturnLinkedEmployees 方法:

private LinkResponse ReturnLinkdedEmployees(IEnumerable<EmployeeDto> employeesDto, string fields, Guid companyId, HttpContext httpContext, List<Entity> shapedEmployees) { var employeeDtoList = employeesDto.ToList(); for (var index = 0; index < employeeDtoList.Count(); index++) { var employeeLinks = CreateLinksForEmployee(httpContext, companyId, employeeDtoList[index].Id, fields); shapedEmployees[index].Add("Links", employeeLinks); } var employeeCollection = new LinkCollectionWrapper<Entity>(shapedEmployees); var linkedEmployees = CreateLinksForEmployees(httpContext, employeeCollection); return new LinkResponse { HasLinks = true, LinkedEntities = linkedEmployees }; }

In this method, we iterate through each employee and create links for it by calling the CreateLinksForEmployee method. Then, we just add it to the shapedEmployees collection. After that, we wrap the collection and create links that are important for the entire collection by calling the CreateLinksForEmployees method.
在此方法中,我们循环访问每个员工,并通过调用 CreateLinksForEmployee 方法为其创建链接。然后,我们只需将其添加到 shapedEmployees 集合中。之后,我们通过调用 CreateLinksForEmployees 方法包装集合并创建对整个集合很重要的链接。

Finally, we have to add those two new methods that create links:
最后,我们必须添加这两个创建链接的新方法:

private List<Link> CreateLinksForEmployee(HttpContext httpContext, Guid companyId, Guid id, string fields = "") { var links = new List<Link> { new Link(_linkGenerator.GetUriByAction(httpContext, "GetEmployeeForCompany", values: new { companyId, id, fields }), "self", "GET"), new Link(_linkGenerator.GetUriByAction(httpContext, "DeleteEmployeeForCompany", values: new { companyId, id }), "delete_employee", "DELETE"), new Link(_linkGenerator.GetUriByAction(httpContext, "UpdateEmployeeForCompany", values: new { companyId, id }), "update_employee", "PUT"), new Link(_linkGenerator.GetUriByAction(httpContext, "PartiallyUpdateEmployeeForCompany", values: new { companyId, id }), "partially_update_employee", "PATCH") }; return links;
} private LinkCollectionWrapper<Entity> CreateLinksForEmployees(HttpContext httpContext, LinkCollectionWrapper<Entity> employeesWrapper) { employeesWrapper.Links.Add(new Link(_linkGenerator.GetUriByAction(httpContext, "GetEmployeesForCompany", values: new { }), "self", "GET")); return employeesWrapper; }

There are a few things to note here.
这里有几点需要注意。

We need to consider the fields while creating the links since we might be using them in our requests. We are creating the links by using the LinkGenerator‘s GetUriByAction method — which accepts HttpContext, the name of the action, and the values that need to be used to make the URL valid. In the case of the EmployeesController, we send the company id, employee id, and fields.
我们在创建链接时需要考虑这些字段,因为我们可能会在请求中使用它们。我们使用 LinkGenerator 的 GetUriByAction 方法创建链接,该方法接受 HttpContext、作的名称以及需要用于使 URL 有效的值。对于 EmployeesController,我们发送公司 ID、员工 ID 和字段。

And that is it regarding this class.
这就是关于这个类的内容。

Now, we have to register this class in the Program class:
现在,我们必须在 Program 类中注册这个类:

builder.Services.AddScoped<IEmployeeLinks, EmployeeLinks>();

After the service registration, we are going to create a new record inside the Entities/LinkModels folder:
服务注册后,我们将在 Entities/LinkModels 文件夹中创建一个新记录:

public record LinkParameters(EmployeeParameters EmployeeParameters, HttpContext Context);

We are going to use this record to transfer required parameters from our controller to the service layer and avoid the installation of an additional NuGet package inside the Service and Service.Contracts projects.
我们将使用此记录将所需参数从控制器传输到服务层,并避免在 Service 和 Service.Contracts 项目中安装额外的 NuGet 包。

Also for this to work, we have to add the reference to the Shared project, install the Microsoft.AspNetCore.Mvc.Abstractions package needed for HttpContext, and add required using directives:
此外,要使其正常工作,我们必须添加对 Shared 项目的引用,安装 HttpContext 所需的 Microsoft.AspNetCore.Mvc.Abstractions 包,并添加所需的 using 指令:

using Microsoft.AspNetCore.Http; 
using Shared.RequestFeatures;

Now, we can return to the IEmployeeLinks interface and fix that error by importing the required namespace. As you can see, we didn’t have to install the Abstractions NuGet package since Contracts references Entities. If Visual Studio keeps asking for the package installation, just remove the Entities reference from the Contracts project and add it again.
现在,我们可以返回到 IEmployeeLinks 接口,并通过导入所需的命名空间来修复该错误。如你所见,我们不必安装抽象 NuGet 包,因为 Contracts 引用实体。如果 Visual Studio 不断要求安装包,只需从 Contracts 项目中删除 Entities 引用,然后再次添加它。

Once that is done, we can modify the EmployeesController:
完成后,我们可以修改 EmployeesController:

[HttpGet] [ServiceFilter(typeof(ValidateMediaTypeAttribute))] public async Task<IActionResult> GetEmployeesForCompany(Guid companyId, [FromQuery] EmployeeParameters employeeParameters) { var linkParams = new LinkParameters(employeeParameters, HttpContext); var pagedResult = await _service.EmployeeService.GetEmployeesAsync(companyId, linkParams, trackChanges: false); Response.Headers.Add("X-Pagination", JsonSerializer.Serialize(pagedResult.metaData)); return Ok(pagedResult.employees); }

So, we create the linkParams variable and send it instead of employeeParameters to the service method.
因此,我们创建 linkParams 变量并将其(而不是 employeeParameters)发送到 service 方法。

Of course, this means we have to modify the IEmployeeService interface:
当然,这意味着我们必须修改 IEmployeeService 接口:

Task<(LinkResponse linkResponse, MetaData metaData)> GetEmployeesAsync(Guid companyId, LinkParameters linkParameters, bool trackChanges);

Now the Tuple return type has the LinkResponse as the first field and also we have LinkParameters as the second parameter.
现在,Tuple 返回类型将 LinkResponse 作为第一个字段,并将 LinkParameters 作为第二个参数。

After we modified our interface, let’s modify the EmployeeService class:
修改接口后,让我们修改 EmployeeService 类:

private readonly IRepositoryManager _repository; private readonly ILoggerManager _logger; private readonly IMapper _mapper; private readonly IEmployeeLinks _employeeLinks; public EmployeeService(IRepositoryManager repository, ILoggerManager logger, IMapper mapper, IEmployeeLinks employeeLinks) {_repository = repository; _logger = logger; _mapper = mapper; _employeeLinks = employeeLinks; } public async Task<(LinkResponse linkResponse, MetaData metaData)> GetEmployeesAsync (Guid companyId, LinkParameters linkParameters, bool trackChanges) { if (!linkParameters.EmployeeParameters.ValidAgeRange) throw new MaxAgeRangeBadRequestException(); await CheckIfCompanyExists(companyId, trackChanges); var employeesWithMetaData = await _repository.Employee .GetEmployeesAsync(companyId, linkParameters.EmployeeParameters, trackChanges); var employeesDto = _mapper.Map<IEnumerable<EmployeeDto>>(employeesWithMetaData); var links = _employeeLinks.TryGenerateLinks(employeesDto, linkParameters.EmployeeParameters.Fields, companyId, linkParameters.Context); return (linkResponse: links, metaData: employeesWithMetaData.MetaData); }

First, we don’t have the DataShaper injected anymore since this logic is now inside the EmployeeLinks class. Then, we change the method signature, fix a couple of errors since now we have linkParameters and not employeeParameters as a parameter, and we call the TryGenerateLinks method, which will return LinkResponse as a result.
首先,我们不再注入 DataShaper,因为此逻辑现在位于 EmployeeLinks 类中。然后,我们更改方法签名,修复几个错误,因为现在我们有 linkParameters 而不是 employeeParameters 作为参数,并且我们调用 TryGenerateLinks 方法,该方法将返回 LinkResponse 作为结果。

Finally, we construct our Tuple and return it to the caller.
最后,我们构造 Tuple 并将其返回给调用者。

Now we can return to our controller and modify the GetEmployeesForCompany action:
现在我们可以返回到控制器并修改 GetEmployeesForCompany作:

[HttpGet] [ServiceFilter(typeof(ValidateMediaTypeAttribute))] public async Task<IActionResult> GetEmployeesForCompany(Guid companyId, [FromQuery] EmployeeParameters employeeParameters) { var linkParams = new LinkParameters(employeeParameters, HttpContext); var result = await _service.EmployeeService.GetEmployeesAsync(companyId, linkParams, trackChanges: false); Response.Headers.Add("X-Pagination", JsonSerializer.Serialize(result.metaData));return result.linkResponse.HasLinks ? Ok(result.linkResponse.LinkedEntities) : Ok(result.linkResponse.ShapedEntities); }

We change the pageResult variable name to result and use it to return the proper response to the client. If our result has links, we return linked entities, otherwise, we return shaped ones.
我们将 pageResult 变量名称更改为 result,并使用它向客户端返回正确的响应。如果我们的结果有链接,我们返回链接的实体,否则,我们返回有形状的实体。

Before we test this, we shouldn’t forget to modify the ServiceManager’s constructor:
在我们测试之前,我们不应该忘记修改 ServiceManager 的构造函数:

public ServiceManager(IRepositoryManager repositoryManager, ILoggerManager logger, IMapper mapper, IEmployeeLinks employeeLinks) { _companyService = new Lazy<ICompanyService>(() => new CompanyService(repositoryManager, logger, mapper)); _employeeService = new Lazy<IEmployeeService>(() => new EmployeeService(repositoryManager, logger, mapper, employeeLinks)); }

Excellent. We can test this now:
非常好。我们现在可以测试一下:
https://localhost:5001/api/companies/C9D4C053-49B6-410C-BC78-2D54A9991870/employees?pageNumber=1&pageSize=4&minAge=26&maxAge=32&searchTerm=A&orderBy=namedesc&fields=name,age
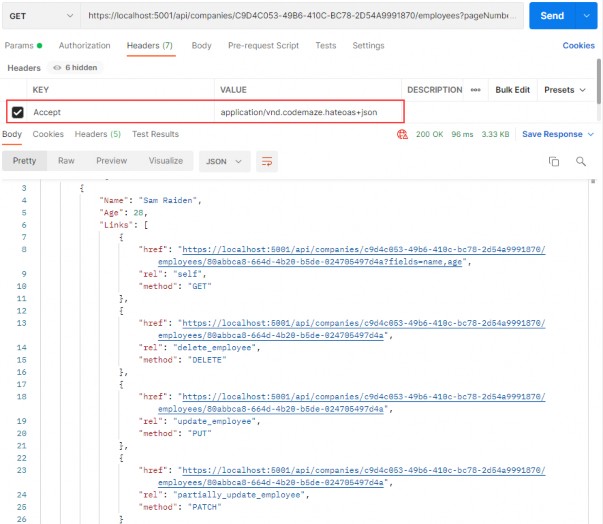
alt text

You can test this with the xml media type as well (we have prepared the request in Postman for you).
您也可以使用 xml 媒体类型对此进行测试(我们已经在 Postman 中为您准备了请求)。

Ultimate ASP.NET Core Web API 20 DATA SHAPING

20 DATA SHAPING
20 数据整形

In this chapter, we are going to talk about a neat concept called data shaping and how to implement it in ASP.NET Core Web API. To achieve that, we are going to use similar tools to the previous section. Data shaping is not something that every API needs, but it can be very useful in some cases.‌
在本章中,我们将讨论一个称为数据整形的简洁概念,以及如何在 ASP.NET Core Web API 中实现它。为此,我们将使用与上一节类似的工具。数据整形不是每个 API 都需要的,但在某些情况下它可能非常有用。
Let’s start by learning what data shaping is exactly.
让我们首先了解一下数据调整到底是什么。

20.1 What is Data Shaping?

20.1 什么是数据整形?

Data shaping is a great way to reduce the amount of traffic sent from the API to the client. It enables the consumer of the API to select (shape) the data by choosing the fields through the query string.‌
数据调整是减少从 API 发送到客户端的流量的好方法。它使 API 的使用者能够通过查询字符串选择字段来选择(调整)数据。

What this means is something like:
这意味着:
https://localhost:5001/api/companies/companyId/employees?fi elds=name,age

By giving the consumer a way to select just the fields it needs, we can potentially reduce the stress on the API. On the other hand, this is not something every API needs, so we need to think carefully and decide whether we should implement its implementation because it has a bit of reflection in it.
通过为消费者提供一种只选择它需要的字段的方法,我们有可能减轻 API 的压力。另一方面,这不是每个 API 都需要的,所以我们需要仔细考虑并决定是否应该实现它的实现,因为它有一点反射。

And we know for a fact that reflection takes its toll and slows our application down.
我们知道一个事实,反射会造成损失并减慢我们的应用程序速度。

Finally, as always, data shaping should work well together with the concepts we’ve covered so far – paging, filtering, searching, and sorting.
最后,与往常一样,数据调整应该与我们到目前为止介绍的概念(分页、筛选、搜索和排序)很好地协同工作。

First, we are going to implement an employee-specific solution to data shaping. Then we are going to make it more generic, so it can be used by any entity or any API.
首先,我们将实施一个特定于员工的数据整形解决方案。然后,我们将使其更加通用,以便任何实体或任何 API 都可以使用它。

Let’s get to work.
让我们开始工作吧。

20.2 How to Implement Data Shaping

20.2 如何实现数据调整

First things first, we need to extend our RequestParameters class since we are going to add a new feature to our query string and we want it to be available for any entity:‌
首先,我们需要扩展 RequestParameters 类,因为我们要向查询字符串添加新功能,并且我们希望它可用于任何实体:

public string? Fields { get; set; }

We’ve added the Fields property and now we can use fields as a query string parameter.
我们添加了 Fields 属性,现在可以将 fields 用作查询字符串参数。

Let’s continue by creating a new interface in the Contracts project:
让我们继续在 Contracts 项目中创建一个新界面:

public interface IDataShaper<T> { IEnumerable<ExpandoObject> ShapeData(IEnumerable<T> entities, string fieldsString); ExpandoObject ShapeData(T entity, string fieldsString); }

The IDataShaper defines two methods that should be implemented — one for the single entity and one for the collection of entities. Both are named ShapeData, but they have different signatures.
IDataShaper 定义了两个应该实现的方法 — 一个用于单个实体,一个用于实体集合。两者都名为 ShapeData,但它们具有不同的签名。

Notice how we use the ExpandoObject from System.Dynamic namespace as a return type. We need to do that to shape our data the way we want it.
请注意我们如何使用 System.Dynamic 命名空间中的 ExpandoObject 作为返回类型。我们需要这样做,以我们想要的方式塑造我们的数据。

To implement this interface, we are going to create a new DataShaping folder in the Service project and add a new DataShaper class:
为了实现这个接口,我们将在 Service 项目中创建一个新的 DataShaping 文件夹,并添加新的 DataShaper 类:

public class DataShaper<T> : IDataShaper<T> where T : class { public PropertyInfo[] Properties { get; set; } public DataShaper() { Properties = typeof(T).GetProperties(BindingFlags.Public | BindingFlags.Instance); } public IEnumerable<ExpandoObject> ShapeData(IEnumerable<T> entities, string fieldsString) {var requiredProperties = GetRequiredProperties(fieldsString); return FetchData(entities, requiredProperties); } public ExpandoObject ShapeData(T entity, string fieldsString) { var requiredProperties = GetRequiredProperties(fieldsString); return FetchDataForEntity(entity, requiredProperties); } private IEnumerable<PropertyInfo> GetRequiredProperties(string fieldsString) { var requiredProperties = new List<PropertyInfo>(); if (!string.IsNullOrWhiteSpace(fieldsString)) { var fields = fieldsString.Split(',', StringSplitOptions.RemoveEmptyEntries); foreach (var field in fields) { var property = Properties .FirstOrDefault(pi => pi.Name.Equals(field.Trim(), StringComparison.InvariantCultureIgnoreCase)); if (property == null) continue; requiredProperties.Add(property); } } else { requiredProperties = Properties.ToList(); } return requiredProperties; }private IEnumerable<ExpandoObject> FetchData(IEnumerable<T> entities, IEnumerable<PropertyInfo> requiredProperties) { var shapedData = new List<ExpandoObject>(); foreach (var entity in entities) { var shapedObject = FetchDataForEntity(entity, requiredProperties); shapedData.Add(shapedObject); } return shapedData; } private ExpandoObject FetchDataForEntity(T entity, IEnumerable<PropertyInfo> requiredProperties) { var shapedObject = new ExpandoObject();foreach (var property in requiredProperties) { var objectPropertyValue = property.GetValue(entity); shapedObject.TryAdd(property.Name, objectPropertyValue); } return shapedObject; } }

We need these namespaces to be included as well:
我们还需要包含这些命名空间:

using Contracts; 
using System.Dynamic; 
using System.Reflection;

There is quite a lot of code in our class, so let’s break it down.
我们的类中有相当多的代码,所以让我们分解一下。

20.3 Step-by-Step Implementation

20.3 分步实施

We have one public property in this class – Properties. It’s an array of PropertyInfo’s that we’re going to pull out of the input type, whatever it is‌ — Company or Employee in our case:
这个类中有一个公共属性 – Properties。这是一个 PropertyInfo 数组,我们将从输入类型中提取出来,无论它是什么 — 在我们的例子中是 Company 或 Employee:

public PropertyInfo[] Properties { get; set; } public DataShaper() { Properties = typeof(T).GetProperties(BindingFlags.Public | BindingFlags.Instance); }

So, here it is. In the constructor, we get all the properties of an input class.
所以,就在这里。在构造函数中,我们获取 input 类的所有属性。

Next, we have the implementation of our two public ShapeData methods:
接下来,我们实现了两个公共 ShapeData 方法:

public IEnumerable<ExpandoObject> ShapeData(IEnumerable<T> entities, string fieldsString) { var requiredProperties = GetRequiredProperties(fieldsString); return FetchData(entities, requiredProperties); } public ExpandoObject ShapeData(T entity, string fieldsString) { var requiredProperties = GetRequiredProperties(fieldsString); return FetchDataForEntity(entity, requiredProperties); }

Both methods rely on the GetRequiredProperties method to parse the input string that contains the fields we want to fetch.
这两种方法都依赖于 GetRequiredProperties 方法来解析包含我们要获取的字段的输入字符串。

The GetRequiredProperties method does the magic. It parses the input string and returns just the properties we need to return to the controller:
GetRequiredProperties 方法可以执行神奇的作。它解析输入字符串并仅返回我们需要返回给控制器的属性:

private IEnumerable<PropertyInfo> GetRequiredProperties(string fieldsString) { var requiredProperties = new List<PropertyInfo>(); if (!string.IsNullOrWhiteSpace(fieldsString)) { var fields = fieldsString.Split(',', StringSplitOptions.RemoveEmptyEntries); foreach (var field in fields) { var property = Properties .FirstOrDefault(pi => pi.Name.Equals(field.Trim(), StringComparison.InvariantCultureIgnoreCase)); if (property == null) continue; requiredProperties.Add(property); } } else { requiredProperties = Properties.ToList(); } return requiredProperties; }

There’s nothing special about it. If the fieldsString is not empty, we split it and check if the fields match the properties in our entity. If they do, we add them to the list of required properties.
它没有什么特别之处。如果 fieldsString 不为空,我们将其拆分并检查字段是否与实体中的属性匹配。如果出现,我们会将它们添加到必需属性列表中。

On the other hand, if the fieldsString is empty, all properties are required.
另一方面,如果 fieldsString 为空,则所有属性都是必需的。

Now, FetchData and FetchDataForEntity are the private methods to extract the values from these required properties we’ve prepared.
现在,FetchData 和 FetchDataForEntity 是从我们准备的这些必需属性中提取值的私有方法。

The FetchDataForEntity method does it for a single entity:
FetchDataForEntity 方法对单个实体执行此作:

private ExpandoObject FetchDataForEntity(T entity, IEnumerable<PropertyInfo> requiredProperties) { var shapedObject = new ExpandoObject();foreach (var property in requiredProperties) { var objectPropertyValue = property.GetValue(entity); shapedObject.TryAdd(property.Name, objectPropertyValue); } return shapedObject; }

Here, we loop through the requiredProperties parameter. Then, using a bit of reflection, we extract the values and add them to our ExpandoObject. ExpandoObject implements IDictionary<string,object>, so we can use the TryAdd method to add our property using its name as a key and the value as a value for the dictionary.
在这里,我们遍历 requiredProperties 参数。然后,使用一些反射,我们提取值并将它们添加到我们的 ExpandoObject 中。ExpandoObject 实现 IDictionary<string,object>,因此我们可以使用 TryAdd 方法添加属性,使用其名称作为键,将值用作字典的值。

This way, we dynamically add just the properties we need to our dynamic object.
这样,我们就可以动态地将所需的属性添加到动态对象中。

The FetchData method is just an implementation for multiple objects. It utilizes the FetchDataForEntity method we’ve just implemented:
FetchData 方法只是多个对象的实现。它利用了我们刚刚实现的 FetchDataForEntity 方法:

private IEnumerable<ExpandoObject> FetchData(IEnumerable<T> entities, IEnumerable<PropertyInfo> requiredProperties) { var shapedData = new List<ExpandoObject>(); foreach (var entity in entities) { var shapedObject = FetchDataForEntity(entity, requiredProperties); shapedData.Add(shapedObject); } return shapedData; }

To continue, let’s register the DataShaper class in the IServiceCollection in the Program class:
若要继续,让我们在 Program 类的 IServiceCollection 中注册 DataShaper 类:

builder.Services.AddScoped<IDataShaper<EmployeeDto>, DataShaper<EmployeeDto>>();

During the service registration, we provide the type to work with.
在服务注册期间,我们会提供要使用的类型。

Because we want to use the DataShaper class inside the service classes, we have to modify the constructor of the ServiceManager class first:
因为我们想在服务类中使用 DataShaper 类,所以我们必须先修改 ServiceManager 类的构造函数:

public ServiceManager(IRepositoryManager repositoryManager, ILoggerManager logger, IMapper mapper, IDataShaper<EmployeeDto> dataShaper) { _companyService = new Lazy<ICompanyService>(() => new CompanyService(repositoryManager, logger, mapper)); _employeeService = new Lazy<IEmployeeService>(() => new EmployeeService(repositoryManager, logger, mapper, dataShaper)); }

We are going to use it only in the EmployeeService class.
我们只在 EmployeeService 类中使用它。

Next, let’s add one more field and modify the constructor in the EmployeeService class:
接下来,让我们再添加一个字段并修改 EmployeeService 类中的构造函数:

... 
private readonly IDataShaper<EmployeeDto> _dataShaper; public EmployeeService(IRepositoryManager repository, ILoggerManager logger, IMapper mapper, IDataShaper<EmployeeDto> dataShaper) { _repository = repository; _logger = logger; _mapper = mapper; _dataShaper = dataShaper; }

Let’s also modify the GetEmployeesAsync method of the same class:
我们还修改同一类的 GetEmployeesAsync 方法:

public async Task<(IEnumerable<ExpandoObject> employees, MetaData metaData)> GetEmployeesAsync (Guid companyId, EmployeeParameters employeeParameters, bool trackChanges) { if (!employeeParameters.ValidAgeRange) throw new MaxAgeRangeBadRequestException(); await CheckIfCompanyExists(companyId, trackChanges); var employeesWithMetaData = await _repository.Employee .GetEmployeesAsync(companyId, employeeParameters, trackChanges); var employeesDto = _mapper.Map<IEnumerable<EmployeeDto>>(employeesWithMetaData); var shapedData = _dataShaper.ShapeData(employeesDto, employeeParameters.Fields); return (employees: shapedData, metaData: employeesWithMetaData.MetaData); }

We have changed the method signature so, we have to modify the interface as well:
我们已经更改了方法签名,因此,我们还必须修改接口:

Task<(IEnumerable<ExpandoObject> employees, MetaData metaData)> GetEmployeesAsync(Guid companyId, EmployeeParameters employeeParameters, bool trackChanges);

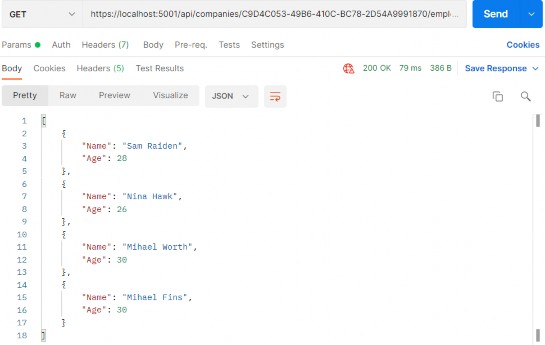
Now, we can test our solution:
现在,我们可以测试我们的解决方案:

https://localhost:5001/api/companies/C9D4C053-49B6-410C-BC78-2D54A9991870/employees?fields=name,age

alt text

It works great.
它效果很好。

Let’s also test this solution by combining all the functionalities that we’ve implemented in the previous chapters:
我们还通过组合我们在前几章中实现的所有功能来测试此解决方案:

https://localhost:5001/api/companies/C9D4C053-49B6-410C-BC78-2D54A9991870/employees?pageNumber=1&pageSize=4&minAge=26&maxAge=32&searchTerm=A&orderBy=name desc&fields=name,age

alt text

Excellent. Everything is working like a charm.
非常好。一切都像魅力一样运作。

20.4 Resolving XML Serialization Problems

20.4 解决 XML 序列化问题

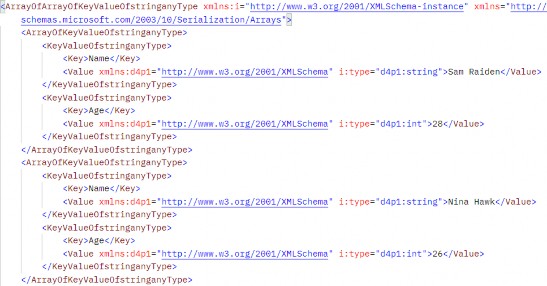
Let’s send the same request one more time, but this time with the‌ different accept header (text/xml):
让我们再发送一次相同的请求,但这次使用不同的 accept 标头 (text/xml):

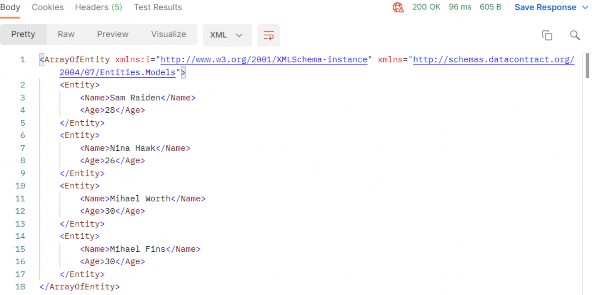
alt text

It works — but it looks pretty ugly and unreadable. But that’s how the XmlDataContractSerializerOutputFormatter serializes our ExpandoObject by default.
它有效 — 但它看起来非常丑陋且难以阅读。但默认情况下,这就是 XmlDataContractSerializerOutputFormatter 序列化 ExpandoObject 的方式。

We can fix that, but the logic is out of the scope of this book. Of course, we have implemented the solution in our source code. So, if you want, you can use it in your project.
我们可以解决这个问题,但逻辑超出了本书的范围。当然,我们已经在源代码中实现了解决方案。因此,如果您愿意,您可以在您的项目中使用它。

All you have to do is to create the Entity class and copy the content from our Entity class that resides in the Entities/Models folder.
您所要做的就是创建 Entity 类并从位于 Entities/Models 文件夹中的 Entity 类中复制内容。

After that, just modify the IDataShaper interface and the DataShaper class by using the Entity type instead of the ExpandoObject type. Also, you have to do the same thing for the IEmployeeService interface and the EmployeeService class. Again, you can check our implementation if you have any problems.
之后,只需使用 Entity 类型而不是 ExpandoObject 类型来修改 IDataShaper 接口和 DataShaper 类。此外,还必须对 IEmployeeService 接口和 EmployeeService 类执行相同的作。同样,如果您有任何问题,可以检查我们的实现。

After all those changes, once we send the same request, we are going to see a much better result:
在所有这些更改之后,一旦我们发送相同的请求,我们将看到更好的结果:

https://localhost:5001/api/companies/C9D4C053-49B6-410C-BC78-2D54A9991870/employees?pageNumber=1&pageSize=4&minAge=26&maxAge=32&searchTerm=A&orderBy=name desc&fields=name,age

alt text

If XML serialization is not important to you, you can keep using ExpandoObject — but if you want a nicely formatted XML response, this is the way to go.
如果 XML 序列化对您来说并不重要,您可以继续使用 ExpandoObject — 但如果您想要格式良好的 XML 响应,这就是要走的路。

To sum up, data shaping is an exciting and neat little feature that can make our APIs flexible and reduce our network traffic. If we have a high- volume traffic API, data shaping should work just fine. On the other hand, it’s not a feature that we should use lightly because it utilizes reflection and dynamic typing to get things done.
综上所述,数据整形是一个令人兴奋且简洁的小功能,它可以使我们的 API 变得灵活,减少我们的网络流量。如果我们有一个大容量流量 API,数据整形应该可以正常工作。另一方面,它不是一个我们应该轻易使用的功能,因为它利用反射和动态类型来完成工作。

As with all other functionalities, we need to be careful when and if we should implement data shaping. Performance tests might come in handy even if we do implement it.
与所有其他功能一样,我们需要小心何时以及是否应该实现数据整形。即使我们确实实施了性能测试,它也可能会派上用场。

Ultimate ASP.NET Core Web API 19 SORTING

19 SORTING
19 排序

In this chapter, we’re going to talk about sorting in ASP.NET Core Web API. Sorting is a commonly used mechanism that every API should implement. Implementing it in ASP.NET Core is not difficult due to the flexibility of LINQ and good integration with EF Core.‌
在本章中,我们将讨论 ASP.NET Core Web API 中的排序。排序是每个 API 都应该实现的常用机制。由于 LINQ 的灵活性以及与 EF Core 的良好集成,在 ASP.NET Core 中实现它并不困难。

So, let’s talk a bit about sorting.
那么,让我们谈谈排序。

19.1 What is Sorting?

19.1 什么是排序?

Sorting, in this case, refers to ordering our results in a preferred way using our query string parameters. We are not talking about sorting algorithms nor are we going into the how’s of implementing a sorting algorithm.‌
在这种情况下,排序是指使用我们的查询字符串参数以首选方式对结果进行排序。我们不是在谈论排序算法,也不打算讨论如何实现排序算法。

What we’re interested in, however, is how do we make our API sort our results the way we want it to.
然而,我们感兴趣的是我们如何让我们的 API 按照我们想要的方式对结果进行排序。

Let’s say we want our API to sort employees by their name in ascending order, and then by their age.
假设我们希望 API 先按员工姓名升序排序,然后再按年龄对员工进行排序。

To do that, our API call needs to look something like this:
为此,我们的 API 调用需要如下所示:

https://localhost:5001/api/companies/companyId/employees?orderBy=name,age desc

Our API needs to consider all the parameters and sort our results accordingly. In our case, this means sorting results by their name; then, if there are employees with the same name, sorting them by the age property.
我们的 API 需要考虑所有参数并相应地对结果进行排序。在我们的例子中,这意味着按名称对结果进行排序;然后,如果存在同名的员工,则按 age 属性对他们进行排序。

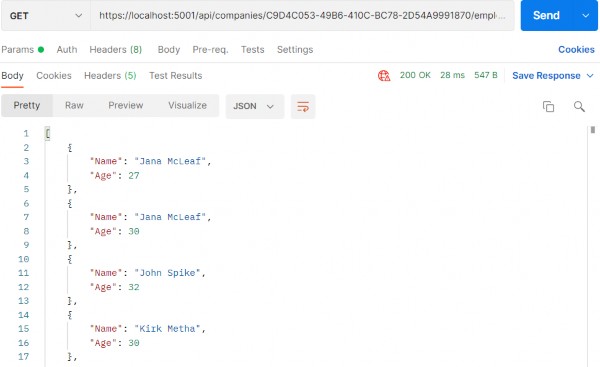
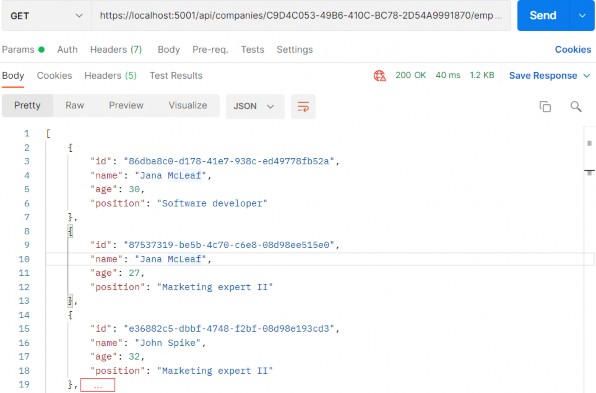
So, these are our employees for the IT_Solutions Ltd company:
那么,这些是我们 IT_Solutions Ltd 公司的员工:

alt text

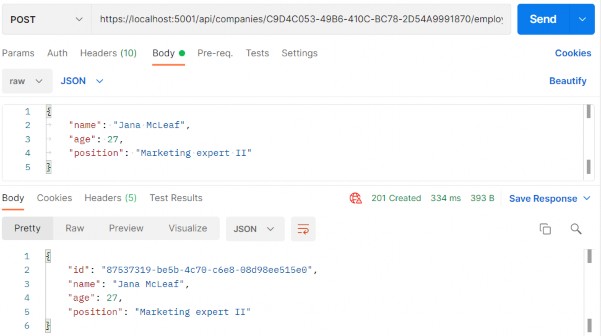
For the sake of demonstrating this example (sorting by name and then by age), we are going to add one more Jana McLeaf to our database with the age of 27. You can add whatever you want to test the results:
为了演示此示例(先按姓名排序,然后按年龄排序),我们将向数据库中再添加一个年龄为 27 的 Jana McLeaf。您可以添加任何您想要测试结果的内容:

https://localhost:5001/api/companies/C9D4C053-49B6-410C-BC78-2D54A9991870/employees

alt text

Great, now we have the required data to test our functionality properly.
太好了,现在我们有了正确测试我们的功能所需的数据。

And of course, like with all other functionalities we have implemented so far (paging, filtering, and searching), we need to implement this to work well with everything else. We should be able to get the paginated, filtered, and sorted data, for example.
当然,就像我们到目前为止实现的所有其他功能(分页、过滤和搜索)一样,我们需要实现它才能与其他所有功能很好地协同工作。例如,我们应该能够获取分页、过滤和排序的数据。

Let’s see one way to go around implementing this.
让我们看看实现它的方法。

19.2 How to Implement Sorting in ASP.NET Core Web API

19.2 如何在 ASP.NET Core Web API 中实现排序

As with everything else so far, first, we need to extend our RequestParameters class to be able to send requests with the orderBy clause in them:‌
与到目前为止的其他所有内容一样,首先,我们需要扩展 RequestParameters 类,以便能够发送包含 orderBy 子句的请求:

public class RequestParameters { const int maxPageSize = 50; public int PageNumber { get; set; } = 1; private int _pageSize = 10; public int PageSize { get { return _pageSize; } set { _pageSize = (value > maxPageSize) ? maxPageSize : value; } } public string? OrderBy { get; set; } }

As you can see, the only thing we’ve added is the OrderBy property and we added it to the RequestParameters class because we can reuse it for other entities. We want to sort our results by name, even if it hasn’t been stated explicitly in the request.
如您所见,我们添加的唯一内容是 OrderBy 属性,并将其添加到 RequestParameters 类中,因为我们可以将其重新用于其他实体。我们希望按名称对结果进行排序,即使请求中没有明确说明。

That said, let’s modify the EmployeeParameters class to enable the default sorting condition for Employee if none was stated:
也就是说,让我们修改 EmployeeParameters 类,以启用 Employee 的默认排序条件(如果未说明):

public class EmployeeParameters : RequestParameters { public EmployeeParameters() => OrderBy = "name"; public uint MinAge { get; set; } public uint MaxAge { get; set; } = int.MaxValue; public bool ValidAgeRange => MaxAge > MinAge; public string? SearchTerm { get; set; } }

Next, we’re going to dive right into the implementation of our sorting mechanism, or rather, our ordering mechanism.
接下来,我们将深入研究排序机制的实现,或者更确切地说,我们的排序机制。

One thing to note is that we’ll be using the System.Linq.Dynamic.Core NuGet package to dynamically create our OrderBy query on the fly. So, feel free to install it in the Repository project and add a using directive in the RepositoryEmployeeExtensions class:
需要注意的一点是,我们将使用 System.Linq.Dynamic.Core NuGet 包动态创建动态 OrderBy 查询。因此,请随意将其安装在 Repository 项目中,并在 RepositoryEmployeeExtensions 类中添加 using 指令:

using System.Linq.Dynamic.Core;

Now, we can add the new extension method Sort in our RepositoryEmployeeExtensions class:
现在,我们可以在 RepositoryEmployeeExtensions 类中添加新的扩展方法 Sort:

public static IQueryable<Employee> Sort(this IQueryable<Employee> employees, string orderByQueryString) { if (string.IsNullOrWhiteSpace(orderByQueryString)) return employees.OrderBy(e => e.Name); var orderParams = orderByQueryString.Trim().Split(','); var propertyInfos = typeof(Employee).GetProperties(BindingFlags.Public | BindingFlags.Instance); var orderQueryBuilder = new StringBuilder(); foreach (var param in orderParams) { if (string.IsNullOrWhiteSpace(param)) continue; var propertyFromQueryName = param.Split(" ")[0]; var objectProperty = propertyInfos.FirstOrDefault(pi => pi.Name.Equals(propertyFromQueryName, StringComparison.InvariantCultureIgnoreCase)); if (objectProperty == null) continue; var direction = param.EndsWith(" desc") ? "descending" : "ascending"; orderQueryBuilder.Append($"{objectProperty.Name.ToString()} {direction}, "); } var orderQuery = orderQueryBuilder.ToString().TrimEnd(',', ' '); if (string.IsNullOrWhiteSpace(orderQuery)) return employees.OrderBy(e => e.Name); return employees.OrderBy(orderQuery); }

Okay, there are a lot of things going on here, so let’s take it step by step and see what exactly we've done.
好了,这里发生了很多事情,所以让我们一步一步来,看看我们到底做了什么。

19.3 Implementation – Step by Step

19.3 实施 – 分步

First, let start with the method definition. It has two arguments — one for the list of employees as IQueryable and the other for the ordering query. If we send a request like this one:
首先,让我们从方法定义开始。它有两个参数 — 一个用于 IQueryable 的员工列表,另一个用于排序查询。如果我们发送如下请求:

https://localhost:5001/api/companies/companyId/employees?or derBy=name,age desc,

our orderByQueryString will be name,age desc.‌
我们的 orderByQueryString 将是 name,age desc。

We begin by executing some basic check against the orderByQueryString. If it is null or empty, we just return the same collection ordered by name.
我们首先对 orderByQueryString 执行一些基本检查。如果为 null 或为空,我们只返回按名称排序的相同集合。

if (string.IsNullOrWhiteSpace(orderByQueryString)) 
    return employees.OrderBy(e => e.Name);

Next, we are splitting our query string to get the individual fields:
接下来,我们将拆分查询字符串以获取各个字段:

var orderParams = orderByQueryString.Trim().Split(',');

We’re also using a bit of reflection to prepare the list of PropertyInfo objects that represent the properties of our Employee class. We need them to be able to check if the field received through the query string exists in the Employee class:
我们还使用了一些反射来准备表示 Employee 类属性的 PropertyInfo 对象列表。我们需要它们能够检查通过查询字符串接收的字段是否存在于 Employee 类中:

var propertyInfos = typeof(Employee).GetProperties(BindingFlags.Public | BindingFlags.Instance);

That prepared, we can actually run through all the parameters and check for their existence:
准备好了,我们实际上可以遍历所有参数并检查它们是否存在:

if (string.IsNullOrWhiteSpace(param)) continue; var propertyFromQueryName = param.Split(" ")[0]; var objectProperty = propertyInfos.FirstOrDefault(pi => pi.Name.Equals(propertyFromQueryName, StringComparison.InvariantCultureIgnoreCase));

If we don’t find such a property, we skip the step in the foreach loop and go to the next parameter in the list:
如果找不到这样的属性,我们将跳过 foreach 循环中的步骤,并转到列表中的下一个参数:

if (objectProperty == null) 
    continue;

If we do find the property, we return it and additionally check if our parameter contains “desc” at the end of the string. We use that to decide how we should order our property:
如果我们找到了该属性,则返回该属性,并另外检查我们的参数是否在字符串末尾包含 “desc”。我们使用它来决定我们应该如何排序我们的财产:

var direction = param.EndsWith(" desc") ? "descending" : "ascending";

We use the StringBuilder to build our query with each loop:
我们使用 StringBuilder 构建包含每个循环的查询:

orderQueryBuilder.Append($"{objectProperty.Name.ToString()} {direction}, ");

Now that we’ve looped through all the fields, we are just removing excess commas and doing one last check to see if our query indeed has something in it:
现在我们已经遍历了所有字段,我们只是删除多余的逗号并进行最后一次检查,看看我们的查询是否确实包含某些内容:

var orderQuery = orderQueryBuilder.ToString().TrimEnd(',', ' '); if (string.IsNullOrWhiteSpace(orderQuery)) return employees.OrderBy(e => e.Name);

Finally, we can order our query:
最后,我们可以对查询进行排序:

return employees.OrderBy(orderQuery);

At this point, the orderQuery variable should contain the “Name ascending, DateOfBirth descending” string. That means it will order our results first by Name in ascending order, and then by DateOfBirth in descending order.
此时,orderQuery 变量应包含“Name ascending, DateOfBirth descending”字符串。这意味着它将首先按 Name 升序对结果进行排序,然后按 DateOfBirth 降序排序。

The standard LINQ query for this would be:
对此的标准 LINQ 查询为:

employees.OrderBy(e => e.Name).ThenByDescending(o => o.Age);

This is a neat little trick to form a query when you don’t know in advance how you should sort.
当您事先不知道应该如何排序时,这是一个巧妙的小技巧来形成查询。

Once we have done this, all we have to do is to modify the GetEmployeesAsync repository method:
完成此作后,我们所要做的就是修改 GetEmployeesAsync 存储库方法:

public async Task<PagedList<Employee>> GetEmployeesAsync(Guid companyId, EmployeeParameters employeeParameters, bool trackChanges) { var employees = await FindByCondition(e => e.CompanyId.Equals(companyId), trackChanges) .FilterEmployees(employeeParameters.MinAge, employeeParameters.MaxAge).Search(employeeParameters.SearchTerm) .Sort(employeeParameters.OrderBy) .ToListAsync(); return PagedList<Employee> .ToPagedList(employees, employeeParameters.PageNumber, employeeParameters.PageSize); }

And that’s it! We can test this functionality now.
就是这样!我们现在可以测试此功能。

19.4 Testing Our Implementation

19.4 测试我们的实现

First, let’s try out the query we’ve been using as an example:‌
首先,让我们尝试一下我们一直用作示例的查询:

https://localhost:5001/api/companies/C9D4C053-49B6-410C-BC78- 2D54A9991870/employees?orderBy=name,age desc

And this is the result:
结果如下:

alt text

We can see that this list is sorted by Name ascending. Since we have two Jana’s, they were sorted by Age descending.
我们可以看到,这个列表是按 Name 升序排序的。由于我们有两个 Jana,因此它们按 Age 降序排序。

We have prepared additional requests which you can use to test this functionality with Postman. So, feel free to do it.
我们准备了其他请求,您可以使用这些请求来通过 Postman 测试此功能。所以,请随意去做。

19.5 Improving the Sorting Functionality

19.5 改进排序功能

Right now, sorting only works with the Employee entity, but what about the Company? It is obvious that we have to change something in our implementation if we don’t want to repeat our code while implementing sorting for the Company entity.‌
目前,排序仅适用于 Employee 实体,但 Company 呢?很明显,如果我们不想在为 Company 实体实现排序时重复我们的代码,我们必须在实现中更改某些内容。

That said, let’s modify the Sort extension method:
也就是说,让我们修改 Sort 扩展方法:

public static IQueryable<Employee> Sort(this IQueryable<Employee> employees, string orderByQueryString) { if (string.IsNullOrWhiteSpace(orderByQueryString)) return employees.OrderBy(e => e.Name); var orderQuery = OrderQueryBuilder.CreateOrderQuery<Employee>(orderByQueryString); if (string.IsNullOrWhiteSpace(orderQuery)) return employees.OrderBy(e => e.Name); return employees.OrderBy(orderQuery); }

So, we are extracting a logic that can be reused in the CreateOrderQuery method. But of course, we have to create that method.
因此,我们正在提取可在 CreateOrderQuery 方法中重复使用的逻辑。但当然,我们必须创建该方法。

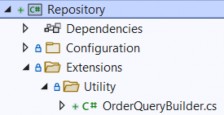
Let’s create a Utility folder in the Extensions folder with the new class OrderQueryBuilder:
让我们在 Extensions 文件夹中使用新类 OrderQueryBuilder 创建一个 Utility 文件夹:

alt text

Now, let’s modify that class:
现在,让我们修改该类:

public static class OrderQueryBuilder { public static string CreateOrderQuery<T>(string orderByQueryString) { var orderParams = orderByQueryString.Trim().Split(','); var propertyInfos = typeof(T).GetProperties(BindingFlags.Public | BindingFlags.Instance); var orderQueryBuilder = new StringBuilder();foreach (var param in orderParams) { if (string.IsNullOrWhiteSpace(param)) continue; var propertyFromQueryName = param.Split(" ")[0]; var objectProperty = propertyInfos.FirstOrDefault(pi => pi.Name.Equals(propertyFromQueryName, StringComparison.InvariantCultureIgnoreCase)); if (objectProperty == null) continue; var direction = param.EndsWith(" desc") ? "descending" : "ascending"; orderQueryBuilder.Append($"{objectProperty.Name.ToString()} {direction}, "); } var orderQuery = orderQueryBuilder.ToString().TrimEnd(',', ' '); return orderQuery; } }

And there we go. Not too many changes, but we did a great job here. You can test this solution with the prepared requests in Postman and you'll get the same result for sure:
好了。没有太多的变化,但我们在这里做得很好。您可以在 Postman 中使用准备好的请求测试此解决方案,您肯定会得到相同的结果:

alt text

But now, this functionality is reusable.
但现在,此功能是可重用的。

Ultimate ASP.NET Core Web API 18 SEARCHING

18 SEARCHING
18 搜索

In this chapter, we’re going to tackle the topic of searching in ASP.NET Core Web API. Searching is one of those functionalities that can make or break your API, and the level of difficulty when implementing it can vary greatly depending on your specifications.‌
在本章中,我们将讨论 ASP.NET Core Web API 中的搜索主题。搜索是可以成就或破坏 API 的功能之一,实现它的难度可能会因您的规范而有很大差异。

If you need to implement a basic searching feature where you are just trying to search one field in the database, you can easily implement it. On the other hand, if it’s a multi-column, multi-term search, you would probably be better off with some of the great search libraries out there like Lucene.NET which are already optimized and proven.
如果您需要实现一个基本的搜索功能,即您只是尝试搜索数据库中的一个字段,则可以轻松实现它。另一方面,如果它是一个多列、多词的搜索,你可能会最好使用一些很棒的搜索库,比如 Lucene.NET 已经经过优化和验证的搜索库。

18.1 What is Searching?

18.1 什么是搜索?

There is no doubt in our minds that you’ve seen a search field on almost every website on the internet. It’s easy to find something when we are familiar with the website structure or when a website is not that large.‌
毫无疑问,在我们看来,您几乎在互联网上的每个网站上都看到了搜索字段。当我们熟悉网站结构或网站不是那么大时,很容易找到一些东西。

But if we want to find the most relevant topic for us, we don’t know what we’re going to find, or maybe we’re first-time visitors to a large website, we’re probably going to use a search field.
但是,如果我们想找到与我们最相关的主题,我们不知道会找到什么,或者也许我们是第一次访问大型网站,我们可能会使用搜索字段。

In our simple project, one use case of a search would be to find an employee by name.
在我们的简单项目中,搜索的一个用例是按姓名查找员工。

Let’s see how we can achieve that.
让我们看看如何实现这一目标。

18.2 Implementing Searching in Our Application

18.2 在我们的应用程序中实现搜索

Since we’re going to implement the most basic search in our project, the implementation won’t be complex at all. We have all we need infrastructure-wise since we already covered paging and filtering. We’ll just extend our implementation a bit.‌
由于我们将在项目中实现最基本的搜索,因此实现起来一点也不复杂。我们已经在基础设施方面拥有了所需的一切,因为我们已经介绍了分页和过滤。我们只是稍微扩展一下我们的实现。

What we want to achieve is something like this:
我们想要实现的是这样的:
https://localhost:5001/api/companies/companyId/employees?searchTerm=MihaelFins

This should return just one result: Mihael Fins. Of course, the search needs to work together with filtering and paging, so that’s one of the things we’ll need to keep in mind too.
这应该只返回一个结果:Mihael Fins。当然,搜索需要与过滤和分页一起工作,所以这也是我们需要记住的事情之一。

Like we did with filtering, we’re going to extend our EmployeeParameters class first since we’re going to send our search query as a query parameter:
就像我们对筛选所做的那样,我们将首先扩展我们的 EmployeeParameters 类,因为我们要将搜索查询作为查询参数发送:

namespace Shared.RequestFeatures;

public class EmployeeParameters : RequestParameters
{
    public uint MinAge { get; set; }
    public uint MaxAge { get; set; } = int.MaxValue;
    public bool ValidAgeRange => MaxAge > MinAge;
    public string? SearchTerm { get; set; }
}

Simple as that.
就这么简单。

Now we can write queries with searchTerm=”name” in them.
现在我们可以编写包含 searchTerm=“name” 的查询。

The next thing we need to do is actually implement the search functionality in our EmployeeRepository class:
接下来我们需要做的是在我们的 EmployeeRepository 类中实际实现搜索功能:

public async Task<PagedList<Employee>> GetEmployeesAsync(Guid companyId,
    EmployeeParameters employeeParameters, bool trackChanges)
{
    var employees = await FindByCondition(e => e.CompanyId.Equals(companyId), trackChanges)
        .FilterEmployees(employeeParameters.MinAge, employeeParameters.MaxAge)
        .Search(employeeParameters.SearchTerm)
        .OrderBy(e => e.Name)
        .ToListAsync();

    return PagedList<Employee>
        .ToPagedList(employees, employeeParameters.PageNumber, employeeParameters.PageSize);
}

We have made two changes here. The first is modifying the filter logic and the second is adding the Search method for the searching functionality.
我们在此处进行了两项更改。第一个是修改筛选逻辑,第二个是添加 Search 搜索功能的方法。

But these methods (FilterEmployees and Search) are not created yet, so let’s create them.
但是这些方法(FilterEmployees 和 Search)尚未创建,因此让我们创建它们。

In the Repository project, we are going to create the new folder Extensions and inside of that folder the new class RepositoryEmployeeExtensions:
在 Repository 项目中,我们将创建新文件夹 Extensions,并在该文件夹内创建新类 RepositoryEmployeeExtensions:

using Entities.Models;

namespace Repository.Extensions;

public static class RepositoryEmployeeExtensions
{
    public static IQueryable<Employee> FilterEmployees(this IQueryable<Employee> employees, uint minAge, uint maxAge) =>
        employees.Where(e => (e.Age >= minAge && e.Age <= maxAge));

    public static IQueryable<Employee> Search(this IQueryable<Employee> employees, string searchTerm)
    {
        if (string.IsNullOrWhiteSpace(searchTerm))
            return employees;

        var lowerCaseTerm = searchTerm.Trim().ToLower();

        return employees.Where(e => e.Name.ToLower().Contains(lowerCaseTerm));
    }
}

So, we are just creating our extension methods to update our query until it is executed in the repository. Now, all we have to do is add a using directive to the EmployeeRepository class:
因此,我们只是在创建扩展方法来更新我们的查询,直到它在存储库中执行。现在,我们所要做的就是向 EmployeeRepository 类添加一个 using 指令:

using Repository.Extensions;

That’s it for our implementation. As you can see, it isn’t that hard since it is the most basic search and we already had an infrastructure set.
这就是我们的实施。如您所见,这并不难,因为它是最基本的搜索,而且我们已经设置了基础设施。

18.3 Testing Our Implementation

18.3 测试我们的实现

Let’s send a first request with the value Mihael Fins for the search term:‌
让我们发送第一个请求,搜索词的值为 Mihael Fins:

https://localhost:5001/api/companies/c9d4c053-49b6-410c-bc78-2d54a9991870/employees?searchTerm=MihaelFins

alt text

This is working great.
这效果很好。

Now, let’s find all employees that contain the letters “ae”:
现在,让我们查找包含字母 “ae” 的所有员工:

https://localhost:5001/api/companies/c9d4c053-49b6-410c-bc78-2d54a9991870/employees?searchTerm=ae

alt text

Great. One more request with the paging and filtering:
伟大。另一个带有分页和过滤的请求:

https://localhost:5001/api/companies/C9D4C053-49B6-410C-BC78-2D54A9991870/employees?pageNumber=1&pageSize=4&minAge=32&maxAge=35&searchTerm=MA

alt text

And this works as well.
这也有效。

That’s it! We’ve successfully implemented and tested our search functionality.
就是这样!我们已经成功实施并测试了我们的搜索功能。

If we check the Headers tab for each request, we will find valid x- pagination as well.
如果我们检查每个请求的 Headers 选项卡,我们也会发现有效的 x 分页。

Ultimate ASP.NET Core Web API 17 FILTERING

17 FILTERING
17 过滤

In this chapter, we are going to cover filtering in ASP.NET Core Web API. We’ll learn what filtering is, how it’s different from searching, and how to implement it in a real-world project.‌
在本章中,我们将介绍 ASP.NET Core Web API 中的筛选。我们将了解什么是筛选,它与搜索有何不同,以及如何在实际项目中实现它。

While not critical as paging, filtering is still an important part of a flexible REST API, so we need to know how to implement it in our API projects.
虽然过滤不像分页那样重要,但它仍然是灵活的 REST API 的重要组成部分,因此我们需要知道如何在我们的 API 项目中实现它。

Filtering helps us get the exact result set we want instead of all the results without any criteria.
筛选可以帮助我们获得所需的确切结果集,而不是没有任何条件的所有结果。

17.1 What is Filtering?

17.1 什么是过滤?

Filtering is a mechanism to retrieve results by providing some kind of criterion. We can write many kinds of filters to get results by type of class property, value range, date range, or anything else.‌
筛选是一种通过提供某种标准来检索结果的机制。我们可以编写多种过滤器来按类属性类型、值范围、日期范围或其他任何内容来获取结果。

When implementing filtering, you are always restricted by the predefined set of options you can set in your request. For example, you can send a date value to request an employee, but you won’t have much success.
实施筛选时,您始终受到可在请求中设置的预定义选项集的限制。例如,您可以发送日期值来请求员工,但不会有太大的成功。

On the front end, filtering is usually implemented as checkboxes, radio buttons, or dropdowns. This kind of implementation limits you to only those options that are available to create a valid filter.
在前端,筛选通常实现为复选框、单选按钮或下拉列表。这种实现将您限制为仅可用于创建有效过滤器的那些选项。

Take for example a car-selling website. When filtering the cars you want, you would ideally want to select:
以一个汽车销售网站为例。在筛选所需的汽车时,理想情况下需要选择:

• Car manufacturer as a category from a list or a dropdown
汽车制造商作为列表或下拉列表中的类别

• Car model from a list or a dropdown
来自列表或下拉列表的汽车模型

• Is it new or used with radio buttons
它是新的还是与单选按钮一起使用的

• The city where the seller is as a dropdown
卖家所在的城市作为下拉列表

• The price of the car is an input field (numeric)
汽车的价格是一个输入字段 (数字)

• ......

You get the point. So, the request would look something like this:
你明白了。因此,请求将如下所示:

https://bestcarswebsite.com/sale?manufacturer=ford&model=expedition&state=used&city=washington&price_from=30000&price_to=50000

Or even like this:
或者甚至像这样:

https://bestcarswebsite.com/sale/filter?data[manufacturer]=ford&[model]=expedition&[state]=used&[city]=washington&[price_from]=30000&[price_to]=50000

Now that we know what filtering is, let’s see how it’s different from searching.
现在我们知道了什么是筛选,让我们看看它与搜索有什么不同。

17.2 How is Filtering Different from Searching?

17.2 过滤与搜索有何不同?

When searching for results, we usually have only one input and that’s the‌ one you use to search for anything within a website.
在搜索结果中,我们通常只有一个输入,那就是您用来搜索网站内任何内容的输入。

So in other words, you send a string to the API and the API is responsible for using that string to find any results that match it.
换句话说,您向 API 发送一个字符串,API 负责使用该字符串查找与它匹配的任何结果。

On our car website, we would use the search field to find the “Ford Expedition” car model and we would get all the results that match the car name “Ford Expedition.” Thus, this search would return every “Ford Expedition” car available.
在我们的汽车网站上,我们将使用搜索字段查找“Ford Expedition”汽车模型,我们将获得与汽车名称“Ford Expedition”匹配的所有结果。因此,此搜索将返回所有可用的“Ford Expedition”汽车。

We can also improve the search by implementing search terms like Google does, for example. If the user enters the Ford Expedition without quotes in the search field, we would return both what’s relevant to Ford and Expedition. But if the user puts quotes around it, we would search the entire term “Ford Expedition” in our database.
例如,我们还可以通过像 Google 一样实施搜索词来改进搜索。如果用户在搜索字段中输入 Ford Expedition,但不包含引号,我们将同时返回与 Ford 和 Expedition 相关的内容。但是,如果用户用引号括起来,我们会在我们的数据库中搜索整个术语 “Ford Expedition”。

It makes a better user experience. Example:
它可以提供更好的用户体验。示例:
https://bestcarswebsite.com/sale/search?name=fordfocus

Using search doesn’t mean we can’t use filters with it. It makes perfect sense to use filtering and searching together, so we need to take that into account when writing our source code.
使用 search 并不意味着我们不能对它使用 filter。同时使用 filtering 和 search 非常有意义,因此我们在编写源代码时需要考虑到这一点。

But enough theory.
但理论已经足够了。

Let’s implement some filters.
让我们实现一些过滤器。

17.3 How to Implement Filtering in ASP.NET Core Web API

17.3 如何在 ASP.NET Core Web API 中实现过滤

We have the Age property in our Employee class. Let’s say we want to find out which employees are between the ages of 26 and 29. We also want to be able to enter just the starting age — and not the ending one — and vice versa.‌
我们的 Employee 类中有 Age 属性。假设我们想要了解哪些员工的年龄在 26 到 29 岁之间。我们还希望能够只输入起始年龄 — 而不是结束年龄 — 反之亦然。

We would need a query like this one:
我们需要一个这样的查询:

https://localhost:5001/api/companies/companyId/employees?minAge=26&maxAge=29

But, we want to be able to do this too:
但是,我们也希望能够做到这一点:
https://localhost:5001/api/companies/companyId/employees?minAge=26

Or like this:
或者像这样:
https://localhost:5001/api/companies/companyId/employees?maxAge=29

Okay, we have a specification. Let’s see how to implement it.
好的,我们有一个规范。让我们看看如何实现它。

We’ve already implemented paging in our controller, so we have the necessary infrastructure to extend it with the filtering functionality. We’ve used the EmployeeParameters class, which inherits from the RequestParameters class, to define the query parameters for our paging request.
我们已经在控制器中实现了分页,因此我们拥有必要的基础设施来使用过滤功能来扩展它。我们使用了 EmployeeParameters 类(继承自 RequestParameters 类)来定义分页请求的查询参数。

Let’s extend the EmployeeParameters class:
让我们扩展 EmployeeParameters 类:

namespace Shared.RequestFeatures;

public class EmployeeParameters : RequestParameters
{
    public uint MinAge { get; set; }
    public uint MaxAge { get; set; } = int.MaxValue;
    public bool ValidAgeRange => MaxAge > MinAge;
}

We’ve added two unsigned int properties (to avoid negative year values):MinAge and MaxAge.
我们添加了两个 unsigned int 属性(以避免负年份值):MinAge 和 MaxAge。

Since the default uint value is 0, we don’t need to explicitly define it; 0 is okay in this case. For MaxAge, we want to set it to the max int value. If we don’t get it through the query params, we have something to work with. It doesn’t matter if someone sets the age to 300 through the params; it won’t affect the results.
由于默认的 uint 值为 0,因此我们不需要显式定义它;在这种情况下,0 是可以的。对于 MaxAge,我们希望将其设置为 max int 值。如果我们没有通过 query params 获取它,我们有一些东西可以使用。如果有人通过 params 将 age 设置为 300 并不重要;它不会影响结果。

We’ve also added a simple validation property – ValidAgeRange. Its purpose is to tell us if the max-age is indeed greater than the min-age. If it’s not, we want to let the API user know that he/she is doing something wrong.
我们还添加了一个简单的验证属性 – ValidAgeRange。它的目的是告诉我们 max-age 是否确实大于 min-age。如果不是,我们想让 API 用户知道他/她做错了什么。

Okay, now that we have our parameters ready, we can modify the GetEmployeesAsync service method by adding a validation check as a first statement:
好了,现在我们已经准备好了参数,我们可以通过添加验证检查作为第一个语句来修改 GetEmployeesAsync 服务方法:

public async Task<(IEnumerable<EmployeeDto> employees, MetaData metaData)> GetEmployeesAsync
    (Guid companyId, EmployeeParameters employeeParameters, bool trackChanges)
{
    if (!employeeParameters.ValidAgeRange)
        throw new MaxAgeRangeBadRequestException();

    await CheckIfCompanyExists(companyId, trackChanges);

    var employeesWithMetaData = await _repository.Employee
        .GetEmployeesAsync(companyId, employeeParameters, trackChanges);
    var employeesDto = _mapper.Map<IEnumerable<EmployeeDto>>(employeesWithMetaData);

    return (employees: employeesDto, metaData: employeesWithMetaData.MetaData);
}

We’ve added our validation check and a BadRequest response if the validation fails.
我们添加了验证检查和验证失败时的 BadRequest 响应。

But we don’t have this custom exception class so, we have to create it in the Entities/Exceptions class:
但是我们没有这个自定义异常类,因此,我们必须在 Entities/Exceptions 类中创建它:

namespace Entities.Exceptions;

public sealed class MaxAgeRangeBadRequestException : BadRequestException
{
    public MaxAgeRangeBadRequestException()
        : base("Max age can't be less than min age.")
    {
    }
}

That should do it.
那应该可以。

After the service class modification and creation of our custom exception class, let’s get to the implementation in our EmployeeRepository class:
在修改服务类并创建自定义异常类之后,让我们开始 EmployeeRepository 类中的实现:

public async Task<PagedList<Employee>> GetEmployeesAsync(Guid companyId,
    EmployeeParameters employeeParameters, bool trackChanges)
{
    var employees = await FindByCondition(e => e.CompanyId.Equals(companyId) &&
        (e.Age >= employeeParameters.MinAge && e.Age <= employeeParameters.MaxAge), trackChanges)
        .OrderBy(e => e.Name)
        .ToListAsync();

    return PagedList<Employee>
        .ToPagedList(employees, employeeParameters.PageNumber, employeeParameters.PageSize);
}

Actually, at this point, the implementation is rather simple too.
实际上,在这一点上,实现也相当简单。

We are using the FindByCondition method to find all the employees with an Age between the MaxAge and the MinAge.
我们使用 FindByCondition 方法查找 Age 介于 MaxAge 和 MinAge 之间的所有员工。

Let’s try it out.
让我们试一试。

17.4 Sending and Testing a Query

17.4 发送和测试查询

Let’s send a first request with only a MinAge parameter:‌
让我们发送第一个只有一个 MinAge 参数的请求:
https://localhost:5001/api/companies/C9D4C053-49B6-410C-BC78-2D54A9991870/employees?minAge=32

alt text

Next, let’s send one with only a MaxAge parameter:
接下来,让我们发送一个仅包含 MaxAge 参数的 Cookie:
https://localhost:5001/api/companies/C9D4C053-49B6-410C-BC78-2D54A9991870/employees?maxAge=26

alt text

After that, we can combine those two:
之后,我们可以将这两者合并:
https://localhost:5001/api/companies/C9D4C053-49B6-410C-BC78- 2D54A9991870/employees?minAge=26&maxAge=30

alt text

And finally, we can test the filter with the paging:
最后,我们可以使用分页来测试过滤器:
https://localhost:5001/api/companies/C9D4C053-49B6-410C-BC78-2D54A9991870/employees?pageNumber=1&pageSize=4&minAge=32&maxAge=35

alt text

Excellent. The filter is implemented and we can move on to the searching part.
非常好。过滤器已实现,我们可以继续搜索部分。

Ultimate ASP.NET Core Web API 16 PAGING

16 PAGING

16 分页

We have covered a lot of interesting features while creating our Web API project, but there are still things to do.‌
在创建 Web API 项目时,我们已经介绍了许多有趣的功能,但仍有一些事情要做。

So, in this chapter, we’re going to learn how to implement paging in ASP.NET Core Web API. It is one of the most important concepts in building RESTful APIs.
因此,在本章中,我们将学习如何在 ASP.NET Core Web API 中实现分页。它是构建 RESTful API 中最重要的概念之一。

If we inspect the GetEmployeesForCompany action in the EmployeesController, we can see that we return all the employees for the single company.
如果我们检查 EmployeesController 中的 GetEmployeesForCompany作,我们可以看到我们返回了单个公司的所有员工。

But we don’t want to return a collection of all resources when querying our API. That can cause performance issues and it’s in no way optimized for public or private APIs. It can cause massive slowdowns and even application crashes in severe cases.
但是,在查询 API 时,我们不想返回所有资源的集合。这可能会导致性能问题,并且它绝不会针对公有或私有 API 进行优化。它可能会导致大规模减速,严重时甚至会导致应用程序崩溃。

Of course, we should learn a little more about Paging before we dive into code implementation.
当然,在深入研究代码实现之前,我们应该更多地了解 Paging。

16.1 What is Paging?

16.1 什么是分页?

Paging refers to getting partial results from an API. Imagine having millions of results in the database and having your application try to return all of them at once.‌
分页是指从 API 获取部分结果。想象一下,数据库中有数百万个结果,并让您的应用程序尝试一次返回所有结果。

Not only would that be an extremely ineffective way of returning the results, but it could also possibly have devastating effects on the application itself or the hardware it runs on. Moreover, every client has limited memory resources and it needs to restrict the number of shown results.
这不仅是一种极其无效的返回结果的方式,而且还可能对应用程序本身或运行它的硬件产生毁灭性的影响。此外,每个客户端的内存资源都是有限的,它需要限制显示的结果的数量。

Thus, we need a way to return a set number of results to the client in order to avoid these consequences. Let’s see how we can do that.
因此,我们需要一种方法将一定数量的结果返回给客户端,以避免这些后果。让我们看看如何做到这一点。

16.2 Paging Implementation

16.2 分页实现

Mind you, we don’t want to change the base repository logic or implement‌ any business logic in the controller.
请注意,我们不想更改基本存储库逻辑或在控制器中实现任何业务逻辑。

What we want to achieve is something like this: https://localhost:5001/api/companies/companyId/employees?pa geNumber=2&pageSize=2. This should return the second set of two employees we have in our database.
我们想要实现的是这样的:https://localhost:5001/api/companies/companyId/employees?pageNumber=2&pageSize=2。这应该返回我们数据库中的第二组两个员工

We also want to constrain our API not to return all the employees even if someone calls https://localhost:5001/api/companies/companyId/employees.
我们还希望约束我们的 API 不会返回所有员工,即使有人调用 https://localhost:5001/api/companies/companyId/employees

Let's start with the controller modification by modifying the GetEmployeesForCompany action:
让我们通过修改 GetEmployeesForCompany作来从控制器修改开始:

[HttpGet]
// public async Task<IActionResult> GetEmployeesForCompany(Guid companyId)
public async Task<IActionResult> GetEmployeesForCompany(Guid companyId, [FromQuery] EmployeeParameters employeeParameters)
{
    var employees = await _service.EmployeeService.GetEmployeesAsync(companyId, trackChanges: false);
    return Ok(employees);
}

A few things to take note of here:
这里需要注意以下几点:

• We’re using [FromQuery] to point out that we’ll be using query parameters to define which page and how many employees we are requesting.
我们使用 [FromQuery] 来指出,我们将使用查询参数来定义我们请求的页面和员工数量。

• The EmployeeParameters class is the container for the actual parameters for the Employee entity.
EmployeeParameters 类是 Employee 实体的实际参数的容器。

We also need to actually create the EmployeeParameters class. So, let’s first create a RequestFeatures folder in the Shared project and then inside, create the required classes.
我们还需要实际创建 EmployeeParameters 类。因此,让我们首先在 Shared 项目中创建一个 RequestFeatures 文件夹,然后在其中创建所需的类。

First the RequestParameters class:
首先是 RequestParameters 类:

namespace Shared.RequestFeatures
{
    public abstract class RequestParameters
    {
        const int maxPageSize = 50;
        public int PageNumber { get; set; } = 1;
        private int _pageSize = 10;
        public int PageSize
        {
            get { return _pageSize; }
            set { _pageSize = (value > maxPageSize) ? maxPageSize : value; }
        }
    }
}

And then the EmployeeParameters class:
然后是 EmployeeParameters 类:

namespace Shared.RequestFeatures
{
    public class EmployeeParameters : RequestParameters { }
}

We create an abstract class to hold the common properties for all the entities in our project, and a single EmployeeParameters class that will hold the specific parameters. It is empty now, but soon it won’t be.
我们创建一个抽象类来保存项目中所有实体的公共属性,并创建一个 EmployeeParameters 类来保存特定参数。它现在是空的,但很快就会空了。

In the abstract class, we are using the maxPageSize constant to restrict our API to a maximum of 50 rows per page. We have two public properties – PageNumber and PageSize. If not set by the caller, PageNumber will be set to 1, and PageSize to 10.
在抽象类中,我们使用 maxPageSize 常量将 API 限制为每页最多 50 行。我们有两个公共属性 – PageNumber 和 PageSize。如果调用方未设置,则 PageNumber 将设置为 1,PageSize 将设置为 10。

Now we can return to the controller and import a using directive for the EmployeeParameters class:
现在我们可以返回到控制器并导入 EmployeeParameters 类的 using 指令:

using Shared.RequestFeatures;

After that change, let’s implement the most important part — the repository logic. We need to modify the GetEmployeesAsync method in the IEmployeeRepository interface and the EmployeeRepository class.
更改之后,让我们实现最重要的部分 — 存储库逻辑。我们需要修改 IEmployeeRepository 接口中的 GetEmployeesAsync 方法和 EmployeeRepository 类。

So, first the interface modification:
所以,首先进行接口修改:

using Entities.Models;
using Shared.RequestFeatures;

namespace Contracts;

public interface IEmployeeRepository
{
    // Task<IEnumerable<Employee>> GetEmployeesAsync(Guid companyId, bool trackChanges);
    Task<IEnumerable<Employee>> GetEmployeesAsync(Guid companyId, EmployeeParameters employeeParameters, bool trackChanges);

    Task<Employee> GetEmployeeAsync(Guid companyId, Guid id, bool trackChanges);
    void CreateEmployeeForCompany(Guid companyId, Employee employee);
    void DeleteEmployee(Employee employee);
}

As Visual Studio suggests, we have to add the reference to the Shared project.
正如 Visual Studio 所建议的,我们必须添加对 Shared 项目的引用。

After that, let’s modify the repository logic:
之后,让我们修改仓库逻辑:

//public async Task<IEnumerable<Employee>> GetEmployeesAsync(Guid companyId, bool trackChanges) =>
//  await FindByCondition(e => e.CompanyId.Equals(companyId), trackChanges)
//  .OrderBy(e => e.Name)
//  .ToListAsync();

public async Task<IEnumerable<Employee>> GetEmployeesAsync(Guid companyId, EmployeeParameters employeeParameters, bool trackChanges) => 
    await FindByCondition(e => e.CompanyId.Equals(companyId), trackChanges)
    .OrderBy(e => e.Name)
    .Skip((employeeParameters.PageNumber - 1) * employeeParameters.PageSize)
    .Take(employeeParameters.PageSize)
    .ToListAsync();

Okay, the easiest way to explain this is by example.
好的,解释这一点的最简单方法是举例说明。

Say we need to get the results for the third page of our website, counting 20 as the number of results we want. That would mean we want to skip the first ((3 – 1) 20) = 40 results, then take the next 20 and return them to the caller.
假设我们需要获取网站第三页的结果,将 20 算作我们想要的结果数。这意味着我们要跳过第一个 ((3 – 1)
20) = 40 个结果,然后获取接下来的 20 个结果并将它们返回给调用者。

Does that make sense?
这有意义吗?

Since we call this repository method in our service layer, we have to modify it as well.
由于我们在服务层中调用此存储库方法,因此我们也必须对其进行修改。

So, let’s start with the IEmployeeService modification:
那么,让我们从 IEmployeeService 修改开始:

using Entities.Models;
using Shared.DataTransferObjects;
using Shared.RequestFeatures;

namespace Service.Contracts;

public interface IEmployeeService
{
    // Task<IEnumerable<EmployeeDto>> GetEmployeesAsync(Guid companyId, bool trackChanges);

    Task<IEnumerable<EmployeeDto>> GetEmployeesAsync(Guid companyId, EmployeeParameters employeeParameters, bool trackChanges);
    // ... 
}

In this interface, we only have to modify the GetEmployeesAsync method by adding a new parameter.
在此接口中,我们只需通过添加新参数来修改 GetEmployeesAsync 方法。

After that, let’s modify the EmployeeService class:
之后,我们来修改 EmployeeService 类:

//public async Task<IEnumerable<EmployeeDto>> GetEmployeesAsync(Guid companyId, bool trackChanges)
//{
//       await CheckIfCompanyExists(companyId, trackChanges);
//  var employeesFromDb = await _repository.Employee.GetEmployeesAsync(companyId, trackChanges);
//  var employeesDto = _mapper.Map<IEnumerable<EmployeeDto>>(employeesFromDb);
//  return employeesDto;
//}

public async Task<IEnumerable<EmployeeDto>> GetEmployeesAsync(Guid companyId, EmployeeParameters employeeParameters, bool trackChanges)
{
    await CheckIfCompanyExists(companyId, trackChanges); 
    var employeesFromDb = await _repository.Employee.GetEmployeesAsync(companyId, employeeParameters, trackChanges); 
    var employeesDto = _mapper.Map<IEnumerable<EmployeeDto>>(employeesFromDb); 
    return employeesDto;
}

Nothing too complicated here. We just accept an additional parameter and pass it to the repository method.
这里没什么太复杂的。我们只接受一个额外的参数并将其传递给 repository 方法。

Finally, we have to modify the GetEmployeesForCompany action and fix that error by adding another argument to the GetEmployeesAsync method call:
最后,我们必须修改 GetEmployeesForCompany作,并通过向 GetEmployeesAsync 方法调用添加另一个参数来修复该错误:

[HttpGet]
public async Task<IActionResult> GetEmployeesForCompany(Guid companyId, [FromQuery] EmployeeParameters employeeParameters)
{
    var employees = await _service.EmployeeService.GetEmployeesAsync(companyId, employeeParameters, trackChanges: false);
    return Ok(employees);
}

16.3 Concrete Query

16.3 具体查询

Before we continue, we should create additional employees for the company with the id: C9D4C053-49B6-410C-BC78-2D54A9991870. We are doing this because we have only a small number of employees per company and we need more of them for our example. You can use a predefined request in Part16 in Postman, and just change the request body with the following objects:‌
在我们继续之前,我们应该为 ID 为 C9D4C053-49B6-410C-BC78-2D54A9991870 的公司创建额外的员工。我们这样做是因为每家公司只有少量员工,我们需要更多的员工来证明我们的示例。您可以在 Postman 的 Part16 中使用预定义的请求,只需使用以下对象更改请求正文:

{"name": "Mihael Worth","age": 30,"position": "Marketing expert"} {"name": "John Spike","age": 32,"position": "Marketing expert II"} {"name": "Nina Hawk","age": 26,"position": "Marketing expert II"}
{"name": "Mihael Fins","age": 30,"position": "Marketing expert" } {"name": "Martha Grown","age": 35, "position": "Marketing expert II"} {"name": "Kirk Metha","age": 30,"position": "Marketing expert" }

Now we should have eight employees for this company, and we can try a request like this:
现在,这家公司应该有 8 名员工,我们可以尝试如下请求:

https://localhost:5001/api/companies/C9D4C053-49B6-410C-BC78-2D54A9991870/employees?pageNumber=2&pageSize=2

So, we request page two with two employees:
因此,我们请求第 2 页有两名员工:

https://localhost:5001/api/companies/C9D4C053-49B6-410C-BC78- 2D54A9991870/employees?pageNumber=2&pageSize=2

alt text

If that’s what you got, you’re on the right track. We can check our result in the database:
如果这就是你得到的,那你就走在正确的轨道上。我们可以在数据库中检查我们的结果:

alt text

And we can see that we have the correct data returned.
我们可以看到我们返回了正确的数据。

Now, what can we do to improve this solution?
现在,我们能做些什么来改进这个解决方案呢?

16.4 Improving the Solution

16.4 改进解决方案

Since we’re returning just a subset of results to the caller, we might as‌ well have a PagedList instead of List.
由于我们只向调用者返回结果的子集,因此我们也可以使用 PagedList 而不是 List。

PagedList will inherit from the List class and will add some more to it. We can also move the skip/take logic to the PagedList since it makes more sense.
PagedList 将从 List 类继承,并向其添加更多内容。我们还可以将 skip/take 逻辑移动到 PagedList,因为它更有意义。

So, let’s first create a new MetaData class in the Shared/RequestFeatures folder:
因此,让我们首先在 Shared/RequestFeatures 文件夹中创建一个新的 MetaData 类:

namespace Shared.RequestFeatures
{
    public class MetaData { 
        public int CurrentPage { get; set; } 
        public int TotalPages { get; set; } 
        public int PageSize { get; set; } 
        public int TotalCount { get; set; } 
        public bool HasPrevious => CurrentPage > 1; 
        public bool HasNext => CurrentPage < TotalPages; }
}

Then, we are going to implement the PagedList class in the same folder:
然后,我们将在同一文件夹中实现 PagedList 类:

namespace Shared.RequestFeatures
{
    public class PagedList<T> : List<T>
    {
        public MetaData MetaData { get; set; }
        public PagedList(List<T> items, int count, int pageNumber, int pageSize)
        {
            MetaData = new MetaData
            {
                TotalCount = count,
                PageSize = pageSize,
                CurrentPage = pageNumber,
                TotalPages = (int)Math.Ceiling(count / (double)pageSize)
            };
            AddRange(items);
        }

        public static PagedList<T> ToPagedList(IEnumerable<T> source, int pageNumber, int pageSize)
        {
            var count = source.Count();
            var items = source
                .Skip((pageNumber - 1) * pageSize)
                .Take(pageSize)
                .ToList();

            return new PagedList<T>(items, count, pageNumber, pageSize);
        }
    }
}

As you can see, we’ve transferred the skip/take logic to the static method inside of the PagedList class. And in the MetaData class, we’ve added a few more properties that will come in handy as metadata for our response.
如你所见,我们已将 skip/take 逻辑转移到 PagedList 类内的静态方法。在 MetaData 类中,我们添加了更多属性,这些属性将作为响应的元数据派上用场。

HasPrevious is true if the CurrentPage is larger than 1, and HasNext is calculated if the CurrentPage is smaller than the number of total pages. TotalPages is calculated by dividing the number of items by the page size and then rounding it to the larger number since a page needs to exist even if there is only one item on it.
如果 CurrentPage 大于 1,则 HasPrevious 为 true,如果 CurrentPage 小于总页数,则计算 HasNext。TotalPages 的计算方法是将项目数除以页面大小,然后将其四舍五入为更大的数字,因为即使页面上只有一个项目,页面也需要存在。

Now that we’ve cleared that up, let’s change our EmployeeRepository and EmployeesController accordingly.
现在我们已经清除了这个问题,让我们相应地更改我们的 EmployeeRepository 和 EmployeesController。

Let’s start with the interface modification:
让我们从接口修改开始:

// Task<IEnumerable<Employee>> GetEmployeesAsync(Guid companyId, EmployeeParameters employeeParameters, bool trackChanges);
Task<PagedList<Employee>> GetEmployeesAsync(Guid companyId, EmployeeParameters employeeParameters, bool trackChanges);

Then, let’s change the repository class:
然后,让我们更改 repository 类:

//  public async Task<IEnumerable<Employee>> GetEmployeesAsync(Guid companyId, EmployeeParameters employeeParameters, bool trackChanges) => 
//await FindByCondition(e => e.CompanyId.Equals(companyId), trackChanges)
//.OrderBy(e => e.Name)
//.Skip((employeeParameters.PageNumber - 1) * employeeParameters.PageSize)
//.Take(employeeParameters.PageSize)
//.ToListAsync();

public async Task<PagedList<Employee>> GetEmployeesAsync(Guid companyId, EmployeeParameters employeeParameters, bool trackChanges) { 
    var employees = await FindByCondition(e => e.CompanyId.Equals(companyId), trackChanges).OrderBy(e => e.Name).ToListAsync(); 
    return PagedList<Employee>.ToPagedList(employees, employeeParameters.PageNumber, employeeParameters.PageSize); 
}

After that, we are going to modify the IEmplyeeService interface:
之后,我们将修改 IEmplyeeService 接口:

// Task<IEnumerable<EmployeeDto>> GetEmployeesAsync(Guid companyId, EmployeeParameters employeeParameters, bool trackChanges);
Task<(IEnumerable<EmployeeDto> employees, MetaData metaData)> GetEmployeesAsync(Guid companyId, EmployeeParameters employeeParameters, bool trackChanges);

Now our method returns a Tuple containing two fields – employees and metadata.
现在,我们的方法返回一个包含两个字段的 Tuple – employees 和 metadata。

So, let’s implement that in the EmployeeService class:
因此,让我们在 EmployeeService 类中实现它:

public async Task<(IEnumerable<EmployeeDto> employees, MetaData metaData)> GetEmployeesAsync(Guid companyId, EmployeeParameters employeeParameters, bool trackChanges)
{
    await CheckIfCompanyExists(companyId, trackChanges);
    var employeesWithMetaData = await _repository.Employee.GetEmployeesAsync(companyId, employeeParameters, trackChanges);
    var employeesDto = _mapper.Map<IEnumerable<EmployeeDto>>(employeesWithMetaData);
    return (employees: employeesDto, metaData: employeesWithMetaData.MetaData);
}

We change the method signature and the name of the employeesFromDb variable to employeesWithMetaData since this name is now more suitable. After the mapping action, we construct a Tuple and return it to the caller.
我们将方法签名和 employeesFromDb 变量的名称更改为 employeesWithMetaData,因为此名称现在更合适。在 mapping作之后,我们构造一个 Tuple 并将其返回给调用者。

Finally, let’s modify the controller:
最后,我们来修改控制器:

[HttpGet]
public async Task<IActionResult> GetEmployeesForCompany(Guid companyId, [FromQuery] EmployeeParameters employeeParameters)
{
    var pagedResult = await _service.EmployeeService.GetEmployeesAsync(companyId, employeeParameters, trackChanges: false);
    Response.Headers.Add("X-Pagination", JsonSerializer.Serialize(pagedResult.metaData));
    return Ok(pagedResult.employees);
}  

The new thing in this action is that we modify the response header and add our metadata as the X-Pagination header. For this, we need the System.Text.Json namespace.
这个动作的新内容是我们修改响应标头并将我们的元数据添加为 X-Pagination 标头。为此,我们需要 System.Text.Json 命名空间。

Now, if we send the same request we did earlier, we are going to get the same result:
现在,如果我们发送之前所做的相同请求,我们将得到相同的结果:

https://localhost:5001/api/companies/C9D4C053-49B6-410C-BC78-2D54A9991870/employees?pageNumber=2&pageSize=2

alt text

But now we have some additional useful information in the X-Pagination response header:
但是现在我们在 X-Pagination 响应标头中有一些额外的有用信息:

alt text

As you can see, all of our metadata is here. We can use this information when building any kind of frontend pagination to our benefit. You can play around with different requests to see how it works in other scenarios.
如您所见,我们所有的元数据都在这里。我们可以在构建任何类型的前端分页时使用这些信息。您可以尝试不同的请求,以查看它在其他场景中的工作原理。

We could also use this data to generate links to the previous and next pagination page on the backend, but that is part of the HATEOAS and is out of the scope of this chapter.
我们也可以使用这些数据在后端生成指向上一个和下一个分页页面的链接,但这是 HATEOAS 的一部分,超出了本章的范围。

16.4.1 Additional Advice‌

16.4.1 其他建议

This solution works great with a small amount of data, but with bigger tables with millions of rows, we can improve it by modifying the GetEmployeesAsync repository method:
此解决方案适用于少量数据,但对于具有数百万行的较大表,我们可以通过修改 GetEmployeesAsync 存储库方法来改进它:

public async Task<PagedList<Employee>> GetEmployeesAsync(Guid companyId, EmployeeParameters employeeParameters, bool trackChanges)
{
    var employees = await FindByCondition(e => e.CompanyId.Equals(companyId), trackChanges)
        .OrderBy(e => e.Name)
        .Skip((employeeParameters.PageNumber - 1) * employeeParameters.PageSize)
        .Take(employeeParameters.PageSize)
        .ToListAsync();
    var count = await FindByCondition(e => e.CompanyId.Equals(companyId), trackChanges).CountAsync();
    return new PagedList<Employee>(employees, count, employeeParameters.PageNumber, employeeParameters.PageSize);
}

Even though we have an additional call to the database with the CountAsync method, this solution was tested upon millions of rows and was much faster than the previous one. Because our table has few rows, we will continue using the previous solution, but feel free to switch to this one if you want.
尽管我们使用 CountAsync 方法对数据库进行了额外的调用,但此解决方案已在数百万行上进行了测试,并且比以前的解决方案快得多。由于我们的表的行数很少,因此我们将继续使用以前的解决方案,但如果需要,请随时切换到此解决方案。

Also, to enable the client application to read the new X-Pagination header that we’ve added in our action, we have to modify the CORS configuration:
此外,要使客户端应用程序能够读取我们在作中添加的新 X-Pagination 标头,我们必须修改 CORS 配置:

public static class ServiceExtensions
{
    public static void ConfigureCors(this IServiceCollection services) =>
        services.AddCors(options =>
        {
            options.AddPolicy("CorsPolicy", builder =>
            builder.AllowAnyOrigin()
            .AllowAnyMethod()
            .AllowAnyHeader()
            .WithExposedHeaders("X-Pagination"));
        });

        // ...
}

Ultimate ASP.NET Core Web API 15 ACTION FILTERS

15 ACTION FILTERS
15 动作过滤器

Filters in .NET offer a great way to hook into the MVC action invocation pipeline. Therefore, we can use filters to extract code that can be reused and make our actions cleaner and maintainable. Some filters are already provided by .NET like the authorization filter, and there are the custom ones that we can create ourselves.‌
.NET 中的筛选器提供了一种与 MVC作调用管道挂钩的好方法。因此,我们可以使用 filters 来提取可重用的代码,并使我们的作更简洁、更易于维护。一些过滤器已经由 .NET 提供,例如授权过滤器,还有一些我们可以自己创建的自定义过滤器。

There are different filter types:
有不同的过滤器类型:

• Authorization filters – They run first to determine whether a user is authorized for the current request.
授权筛选条件 – 它们首先运行以确定用户是否有权处理当前请求。

• Resource filters – They run right after the authorization filters and are very useful for caching and performance.
资源筛选器 – 它们在授权筛选器之后运行,对于缓存和性能非常有用。

• Action filters – They run right before and after action method execution.
作筛选器 – 它们在作方法执行之前和之后立即运行。

• Exception filters – They are used to handle exceptions before the response body is populated.
异常筛选器 – 它们用于在填充响应正文之前处理异常。

• Result filters – They run before and after the execution of the action methods result.
结果筛选器 – 它们在执行作方法结果之前和之后运行。

In this chapter, we are going to talk about Action filters and how to use them to create a cleaner and reusable code in our Web API.
在本章中,我们将讨论 Action 过滤器以及如何使用它们在我们的 Web API 中创建更清晰且可重用的代码。

 15.1 Action Filters Implementation

15.1 动作过滤器实现

To create an Action filter, we need to create a class that inherits either from the IActionFilter interface, the IAsyncActionFilter interface, or the ActionFilterAttribute class — which is the implementation of IActionFilter, IAsyncActionFilter, and a few different interfaces as well:‌
要创建作筛选器,我们需要创建一个继承自 IActionFilter 接口、IAsyncActionFilter 接口或 ActionFilterAttribute 类的类,该类是 IActionFilter、IAsyncActionFilter 和一些不同接口的实现:

public abstract class ActionFilterAttribute : Attribute, IActionFilter, IFilterMetadata, IAsyncActionFilter, IResultFilter, IAsyncResultFilter, IOrderedFilter

To implement the synchronous Action filter that runs before and after action method execution, we need to implement the OnActionExecuting and OnActionExecuted methods:
要实现在作方法执行之前和之后运行的同步 Action 过滤器,我们需要实现 OnActionExecuting 和 OnActionExecuted 方法:

namespace ActionFilters.Filters
{
    public class ActionFilterExample : IActionFilter
    {
        public void OnActionExecuting(ActionExecutingContext context)
        {
            // our code before action executes
            //
        }
        public void OnActionExecuted(ActionExecutedContext context)
        {
            // our code after action executes
        }
    }
}

We can do the same thing with an asynchronous filter by inheriting from IAsyncActionFilter, but we only have one method to implement — the OnActionExecutionAsync:
我们可以通过从 IAsyncActionFilter 继承来对异步筛选器执行相同的作,但我们只有一种方法要实现 — OnActionExecutionAsync:

namespace ActionFilters.Filters
{
    public class AsyncActionFilterExample : IAsyncActionFilter
    {
        public async Task OnActionExecutionAsync(ActionExecutingContext context, ActionExecutionDelegate next)
        {
            // execute any code before the action executes
            var result = await next();
            // execute any code after the action executes
        }
    }
}

15.2 The Scope of Action Filters

15.2作筛选器的范围

Like the other types of filters, the action filter can be added to different scope levels: Global, Action, and Controller.‌
与其他类型的筛选器一样,作筛选器可以添加到不同的范围级别:Global、Action 和 Controller。

If we want to use our filter globally, we need to register it inside the AddControllers() method in the Program class:
如果我们想全局使用我们的过滤器,我们需要在 Program 类的 AddControllers() 方法中注册它:

builder.Services.AddControllers(config => { config.Filters.Add(new GlobalFilterExample()); });

But if we want to use our filter as a service type on the Action or Controller level, we need to register it, but as a service in the IoC container:
但是,如果我们想将过滤器用作 Action 或 Controller 级别的服务类型,则需要将其注册,但要作为 IoC 容器中的服务进行注册:

builder.Services.AddScoped<ActionFilterExample>(); 
builder.Services.AddScoped<ControllerFilterExample>();

Finally, to use a filter registered on the Action or Controller level, we need to place it on top of the Controller or Action as a ServiceType:
最后,要使用在 Action 或 Controller 级别注册的过滤器,我们需要将其作为 ServiceType 放在 Controller 或 Action 的顶部:

namespace AspNetCore.Controllers
{
    [ServiceFilter(typeof(ControllerFilterExample))]
    [Route("api/[controller]")]
    [ApiController]
    public class TestController : ControllerBase
    {
        [HttpGet]
        [ServiceFilter(typeof(ActionFilterExample))]
        public IEnumerable<string> Get()
        {
            return new string[] { "example", "data" };
        }
    }
}

15.3 Order of Invocation

15.3 调用顺序

The order in which our filters are executed is as follows:‌
过滤器的执行顺序如下:

alt text

Of course, we can change the order of invocation by adding the Order property to the invocation statement:
当然,我们可以通过将 Order 属性添加到调用语句来更改调用顺序:

namespace AspNetCore.Controllers
{
    [ServiceFilter(typeof(ControllerFilterExample), Order = 2)]
    [Route("api/[controller]")]
    [ApiController]
    public class TestController : ControllerBase
    {
        [HttpGet]
        [ServiceFilter(typeof(ActionFilterExample), Order = 1)]
        public IEnumerable<string> Get()
        {
            return new string[] { "example", "data" };
        }
    }
}

Or something like this on top of the same action:
或者,在相同的作之上,如下所示:

[HttpGet]
[ServiceFilter(typeof(ActionFilterExample), Order = 2)] 
[ServiceFilter(typeof(ActionFilterExample2), Order = 1)] 
public IEnumerable<string> Get() 
{ 
    return new string[] { "example", "data" }; 
}

15.4 Improving the Code with Action Filters

15.4 使用 Action Filters 改进代码

Our actions are clean and readable without try-catch blocks due to global exception handling and a service layer implementation, but we can improve them even further.‌
由于全局异常处理和服务层实现,我们的作干净且可读,没有 try-catch 块,但我们可以进一步改进它们。

So, let’s start with the validation code from the POST and PUT actions.
因此,让我们从 POST 和 PUT作中的验证代码开始。

15.5 Validation with Action Filters

15.5 使用动作过滤器进行验证

If we take a look at our POST and PUT actions, we can notice the repeated code in which we validate our Company model:‌
如果我们看一下 POST 和 PUT作,我们会注意到验证 Company 模型的重复代码:

if (company is null) 
    return BadRequest("CompanyForUpdateDto object is null"); 
if (!ModelState.IsValid) 
    return UnprocessableEntity(ModelState);

We can extract that code into a custom Action Filter class, thus making this code reusable and the action cleaner.
我们可以将该代码提取到自定义 Action Filter 类中,从而使此代码可重用且作更简洁。

So, let’s do that.
所以,让我们开始吧。

Let’s create a new folder in our solution explorer, and name it ActionFilters. Then inside that folder, we are going to create a new class ValidationFilterAttribute:
让我们在解决方案资源管理器CompanyEmployees.Presentation中创建一个新文件夹,并将它 ActionFilters 的 API 中。然后在该文件夹中,我们将创建一个新类 ValidationFilterAttribute:

using Microsoft.AspNetCore.Mvc.Filters;

namespace CompanyEmployees.Presentation.ActionFilters
{
    public class ValidationFilterAttribute : IActionFilter
    {
        public ValidationFilterAttribute() { }
        public void OnActionExecuting(ActionExecutingContext context) { }
        public void OnActionExecuted(ActionExecutedContext context) { }
    }
}

Now we are going to modify the OnActionExecuting method:
现在,我们将修改 OnActionExecuting 方法:

using Microsoft.AspNetCore.Mvc;
using Microsoft.AspNetCore.Mvc.Filters;

namespace CompanyEmployees.Presentation.ActionFilters
{
    public class ValidationFilterAttribute : IActionFilter
    {
        public ValidationFilterAttribute() { }
        // public void OnActionExecuting(ActionExecutingContext context) { }
        public void OnActionExecuting(ActionExecutingContext context)
        {
            var action = context.RouteData.Values["action"];
            var controller = context.RouteData.Values["controller"];

            var param = context.ActionArguments.SingleOrDefault(x => x.Value.ToString().Contains("Dto")).Value;
            if (param is null)
            {
                context.Result = new BadRequestObjectResult($"Object is null. Controller: {controller}, action: {action}"); 
                return;
            }
            if (!context.ModelState.IsValid) 
                context.Result = new UnprocessableEntityObjectResult(context.ModelState);
        }
        public void OnActionExecuted(ActionExecutedContext context) { }
    }
}

We are using the context parameter to retrieve different values that we need inside this method. With the RouteData.Values dictionary, we can get the values produced by routes on the current routing path. Since we need the name of the action and the controller, we extract them from the Values dictionary.
我们使用 context 参数来检索此方法中所需的不同值。使用 RouteData.Values 字典,我们可以获取当前路由路径上的路由生成的值。由于我们需要作和控制器的名称,因此我们从 Values 字典中提取它们。

Additionally, we use the ActionArguments dictionary to extract the DTO parameter that we send to the POST and PUT actions. If that parameter is null, we set the Result property of the context object to a new instance of the BadRequestObjectReturnResult class. If the model is invalid, we create a new instance of the UnprocessableEntityObjectResult class and pass ModelState.
此外,我们使用 ActionArguments 字典来提取我们发送到 POST 和 PUT作的 DTO 参数。如果该参数为 null,则我们将上下文对象的 Result 属性设置为 BadRequestObjectReturnResult 类的新实例。如果模型无效,我们将创建 UnprocessableEntityObjectResult 类的新实例并传递 ModelState。

Next, let’s register this action filter in the Program class above the AddControllers method:
接下来,让我们在 AddControllers 方法上方的 Program 类中注册此作筛选器:

builder.Services.AddScoped<ValidationFilterAttribute>();

Finally, let’s remove the mentioned validation code from our actions and call this action filter as a service.
最后,让我们从作中删除提到的验证代码,并将此作筛选条件作为服务调用。

POST:

[HttpPost]
[ServiceFilter(typeof(ValidationFilterAttribute))]
public async Task<IActionResult> CreateCompany([FromBody] CompanyForCreationDto company)
{
    if (company is null)
        return BadRequest("CompanyForCreationDto object is null");

    if (!ModelState.IsValid)
        return UnprocessableEntity(ModelState);

    var createdCompany = await _service.CompanyService.CreateCompanyAsync(company);

    return CreatedAtRoute("CompanyById", new { id = createdCompany.Id }, createdCompany);
}

PUT:

[HttpPut("{id:guid}")]
[ServiceFilter(typeof(ValidationFilterAttribute))]
public async Task<IActionResult> UpdateCompany(Guid id, [FromBody] CompanyForUpdateDto company)
{
    if (company is null)
        return BadRequest("CompanyForUpdateDto object is null");

    if (!ModelState.IsValid)
        return UnprocessableEntity(ModelState);

    await _service.CompanyService.UpdateCompanyAsync(id, company, trackChanges: true);

    return NoContent();
}

Excellent.
非常好。

This code is much cleaner and more readable now without the validation part. Furthermore, the validation part is now reusable for the POST and PUT actions for both the Company and Employee DTO objects.
现在,没有验证部分,此代码更加清晰易读。此外,验证部分现在可重复用于 Company 和 Employee DTO 对象的 POST 和 PUT作。

If we send a POST request, for example, with the invalid model we will get the required response:
例如,如果我们发送 POST 请求,使用无效模型,我们将获得所需的响应:

https://localhost:5001/api/companies

alt text

We can apply this action filter to the POST and PUT actions in the EmployeesController the same way we did in the CompaniesController and test it as well:
我们可以像在 CompaniesController 中一样,将此作筛选器应用于 EmployeesController 中的 POST 和 PUT作,并对其进行测试:

https://localhost:5001/api/companies/53a1237a-3ed3-4462-b9f0-5a7bb1056a33/employees

alt text

 15.6 Refactoring the Service Layer

15.6 重构服务层

Because we are already working on making our code reusable in our actions, we can review our classes from the service layer.‌
因为我们已经在努力使我们的代码在我们的作中可重用,所以我们可以从服务层查看我们的类。

Let’s inspect the CompanyServrice class first.
让我们先检查 CompanyServrice 类。

Inside the class, we can find three methods (GetCompanyAsync, DeleteCompanyAsync, and UpdateCompanyAsync) where we repeat the same code:
在该类中,我们可以找到三个方法(GetCompanyAsync、DeleteCompanyAsync 和 UpdateCompanyAsync),我们在其中重复相同的代码:

var company = await _repository.Company.GetCompanyAsync(id, trackChanges); 
if (company is null) 
    throw new CompanyNotFoundException(id);

This is something we can extract in a private method in the same class:
这是我们可以在同一个类的私有方法中提取的内容:

private async Task<Company> GetCompanyAndCheckIfItExists(Guid id, bool trackChanges) 
{ 
    var company = await _repository.Company.GetCompanyAsync(id, trackChanges); 
    if (company is null) 
        throw new CompanyNotFoundException(id); 
        return company; 
}

And then we can modify these methods.
然后我们可以修改这些方法。

GetCompanyAsync:

public async Task<CompanyDto> GetCompanyAsync(Guid id, bool trackChanges)
{
    // var company = await _repository.Company.GetCompanyAsync(id, trackChanges);
    var company = await GetCompanyAndCheckIfItExists(id, trackChanges);
    //     if (company is null)
    //      throw new CompanyNotFoundException(id);

    var companyDto = _mapper.Map<CompanyDto>(company);
    return companyDto;
}

DeleteCompanyAsync:

public async Task DeleteCompanyAsync(Guid companyId, bool trackChanges)
{
    //var company = await _repository.Company.GetCompanyAsync(companyId, trackChanges);
    var company = await GetCompanyAndCheckIfItExists(companyId, trackChanges);
    // if (company is null)
    //  throw new CompanyNotFoundException(companyId);
    _repository.Company.DeleteCompany(company);
    await _repository.SaveAsync();
}

UpdateCompanyAsync:

public async Task UpdateCompanyAsync(Guid companyId,
    CompanyForUpdateDto companyForUpdate, bool trackChanges)
{
    // var companyEntity = await _repository.Company.GetCompanyAsync(companyId, trackChanges);
    var company = await GetCompanyAndCheckIfItExists(companyId, trackChanges);

    // if (companyEntity is null)
    //      throw new CompanyNotFoundException(companyId);
    //_mapper.Map(companyForUpdate, companyEntity);
    _mapper.Map(companyForUpdate, company);
    await _repository.SaveAsync();
}

Now, this looks much better without code repetition.
现在,没有代码重复,这看起来要好得多。

Furthermore, we can find code repetition in almost all the methods inside the EmployeeService class:
此外,我们可以在 EmployeeService 类中的几乎所有方法中找到代码重复:

var company = await _repository.Company.GetCompanyAsync(companyId, trackChanges); 
if (company is null) 
    throw new CompanyNotFoundException(companyId); 

var employeeDb = await _repository.Employee.GetEmployeeAsync(companyId, id, trackChanges); if (employeeDb is null) 
    throw new EmployeeNotFoundException(id); 

In some methods, we can find just the first check and in several others, we can find both of them.
在某些方法中,我们可以只找到第一个检查,而在其他几种方法中,我们可以同时找到它们。

So, let’s extract these checks into two separate methods:
因此,让我们将这些检查提取为两个单独的方法:

private async Task CheckIfCompanyExists(Guid companyId, bool trackChanges)
{
    var company = await _repository.Company.GetCompanyAsync(companyId, trackChanges);
    if (company is null)
        throw new CompanyNotFoundException(companyId);
}
private async Task<Employee> GetEmployeeForCompanyAndCheckIfItExists(Guid companyId, Guid id, bool trackChanges)
{
    var employeeDb = await _repository.Employee.GetEmployeeAsync(companyId, id, trackChanges);
    if (employeeDb is null)
        throw new EmployeeNotFoundException(id);
    return employeeDb;
}

With these two extracted methods in place, we can refactor all the other methods in the class.
有了这两个提取的方法,我们可以重构类中的所有其他方法。

GetEmployeesAsync:

public async Task<IEnumerable<EmployeeDto>> GetEmployeesAsync(Guid companyId, bool trackChanges)
{
    // var company = await _repository.Company.GetCompanyAsync(companyId, trackChanges);
    await CheckIfCompanyExists(companyId, trackChanges);

    // if (company is null)
    //      throw new CompanyNotFoundException(companyId);

    var employeesFromDb = await _repository.Employee.GetEmployeesAsync(companyId, trackChanges);
    var employeesDto = _mapper.Map<IEnumerable<EmployeeDto>>(employeesFromDb);

    return employeesDto;
}

GetEmployeeAsync:

public async Task<EmployeeDto> GetEmployeeAsync(Guid companyId, Guid id, bool trackChanges)
{
    await CheckIfCompanyExists(companyId, trackChanges);
    var employeeDb = await GetEmployeeForCompanyAndCheckIfItExists(companyId, id, trackChanges);
    var employee = _mapper.Map<EmployeeDto>(employeeDb);
    return employee;
}

CreateEmployeeForCompanyAsync:

public async Task<EmployeeDto> CreateEmployeeForCompanyAsync(Guid companyId, EmployeeForCreationDto employeeForCreation, bool trackChanges)
{
    await CheckIfCompanyExists(companyId, trackChanges);
    var employeeEntity = _mapper.Map<Employee>(employeeForCreation);
    _repository.Employee.CreateEmployeeForCompany(companyId, employeeEntity);
    await _repository.SaveAsync();
    var employeeToReturn = _mapper.Map<EmployeeDto>(employeeEntity);
    return employeeToReturn;
}

DeleteEmployeeForCompanyAsync:

public async Task DeleteEmployeeForCompanyAsync(Guid companyId, Guid id, bool trackChanges)
{
    await CheckIfCompanyExists(companyId, trackChanges);
    var employeeDb = await GetEmployeeForCompanyAndCheckIfItExists(companyId, id, trackChanges);
    _repository.Employee.DeleteEmployee(employeeDb);
    await _repository.SaveAsync();
}

UpdateEmployeeForCompanyAsync:

public async Task UpdateEmployeeForCompanyAsync(Guid companyId, Guid id, EmployeeForUpdateDto employeeForUpdate, bool compTrackChanges, bool empTrackChanges)
{
    await CheckIfCompanyExists(companyId, compTrackChanges);
    var employeeDb = await GetEmployeeForCompanyAndCheckIfItExists(companyId, id, empTrackChanges);
    _mapper.Map(employeeForUpdate, employeeDb);
    await _repository.SaveAsync();
}

GetEmployeeForPatchAsync:

public async Task<(EmployeeForUpdateDto employeeToPatch, Employee employeeEntity)> GetEmployeeForPatchAsync(Guid companyId, Guid id, bool compTrackChanges, bool empTrackChanges)
{
    await CheckIfCompanyExists(companyId, compTrackChanges);
    var employeeDb = await GetEmployeeForCompanyAndCheckIfItExists(companyId, id, empTrackChanges);
    var employeeToPatch = _mapper.Map<EmployeeForUpdateDto>(employeeDb);
    return (employeeToPatch: employeeToPatch, employeeEntity: employeeDb);
}

Now, all of the methods are cleaner and easier to maintain since our validation code is in a single place, and if we need to modify these validations, there’s only one place we need to change.
现在,所有方法都更简洁、更易于维护,因为我们的验证代码位于一个位置,如果我们需要修改这些验证,只需更改一个位置。

Additionally, if you want you can create a new class and extract these methods, register that class as a service, inject it into our service classes and use the validation methods. It is up to you how you want to do it.
此外,如果需要,您可以创建一个新类并提取这些方法,将该类注册为服务,将其注入我们的服务类并使用验证方法。这取决于你想怎么做。

So, we have seen how to use action filters to clear our action methods and also how to extract methods to make our service cleaner and easier to maintain.
因此,我们已经了解了如何使用 action filters 来清除我们的 action methods,以及如何提取方法以使我们的服务更简洁、更易于维护。

With that out of the way, we can continue to Paging.
有了这些,我们可以继续进行 Paging。