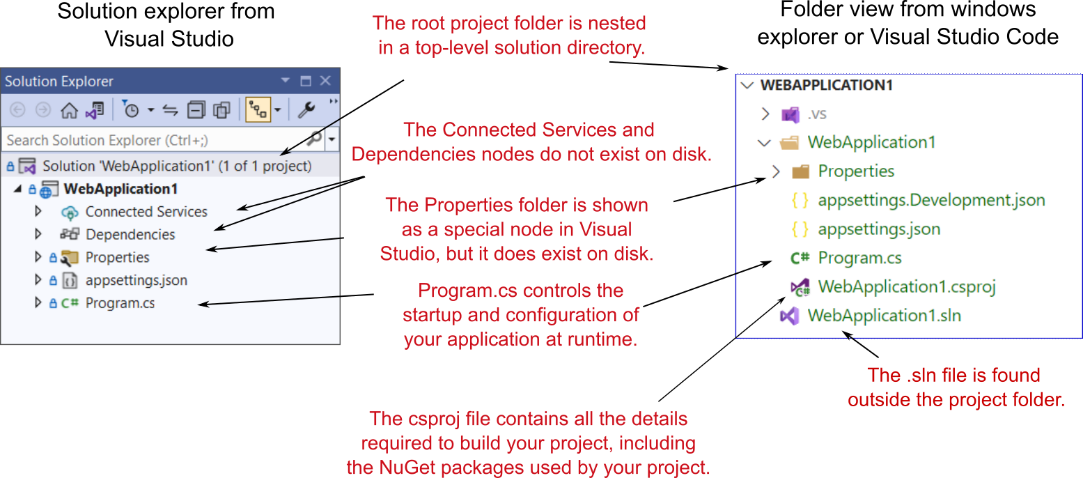
Part 2 Building complete applications
第 2 部分:构建完整的应用程序
We covered a lot of ground in part 1. You saw how an ASP.NET Core application is composed of middleware, and we focused heavily on minimal API endpoints. You saw how to use them to build JSON APIs, how to extract common code using filters and route groups, and how to validate your input data.
我们在第 1 部分中涵盖了很多内容。您了解了 ASP.NET Core 应用程序是如何由中间件组成的,我们主要关注最少的 API 端点。您了解了如何使用它们构建 JSON API,如何使用筛选条件和路由组提取通用代码,以及如何验证输入数据。
In part 2 we’ll dive deeper into the framework and look at a variety of components that you’ll inevitably need when you want to build more complex apps. By the end of this part, you’ll be able to build dynamic applications that can be deployed to multiple environments, each with a different configuration, saving data to a database.
在第 2 部分中,我们将更深入地研究该框架,并了解在构建更复杂的应用程序时不可避免地需要的各种组件。在本部分结束时,您将能够构建可部署到多个环境的动态应用程序,每个环境具有不同的配置,从而将数据保存到数据库。
ASP.NET Core uses dependency injection (DI) throughout its libraries, so it’s important that you understand how this design pattern works. In chapter 8 I introduce DI and discuss why it is used. In chapter 9 you’ll learn how to configure the services in your applications to use DI.
ASP.NET Core 在其整个库中使用依赖关系注入 (DI),因此了解此设计模式的工作原理非常重要。在第 8 章中,我将介绍 DI 并讨论使用它的原因。在第 9 章中,您将学习如何配置应用程序中的服务以使用 DI。
Chapter 10 looks at the ASP.NET Core configuration system, which lets you pass configuration values to your app from a range of sources—JSON files, environment variables, and many more. You’ll learn how to configure your app to use different values depending on the environment in which it is running, and how to bind strongly typed objects to your configuration to help reduce runtime errors.
第 10 章介绍了 ASP.NET Core 配置系统,它允许您将配置值从一系列来源(JSON 文件、环境变量等)传递给您的应用程序。您将学习如何将应用程序配置为根据运行环境使用不同的值,以及如何将强类型对象绑定到配置以帮助减少运行时错误。
In chapter 11 you’ll learn how to document your minimal APIs applications using the OpenAPI specification. Adding an OpenAPI document to your application makes it easier for others to interact with your app, but it has other benefits too. You’ll learn how to use Swagger UI to easily test your app from the browser, and code generation to automatically generate strongly-typed libraries for interacting with your API.
在第 11 章中,您将学习如何使用 OpenAPI 规范来记录您的最小 API 应用程序。将 OpenAPI 文档添加到您的应用程序可以使其他人更轻松地与您的应用程序交互,但它还有其他好处。您将学习如何使用 Swagger UI 从浏览器轻松测试您的应用程序,以及如何生成代码以自动生成用于与您的 API 交互的强类型库。
Most web applications require some sort of data storage, so in chapter 12 I’ll introduce Entity Framework Core (EF Core). This is a cross-platform library that makes it easier to connect your app to a database. EF Core is worthy of a book in and of itself, so I’ll only provide a brief introduction and point you to John Smith’s excellent book Entity Framework Core in Action, second edition (Manning, 2021). I’ll show you how to create a database and how to insert, update, and query simple data.
大多数 Web 应用程序都需要某种类型的数据存储,因此在第 12 章中,我将介绍 Entity Framework Core (EF Core)。这是一个跨平台库,可以更轻松地将应用程序连接到数据库。EF Core 本身就值得一本书,因此我只提供一个简短的介绍,并向您介绍 John Smith 的优秀著作 Entity Framework Core in Action,第二版(Manning,2021 年)。我将向您展示如何创建数据库以及如何插入、更新和查询简单数据。
8 An introduction to dependency injection
8 依赖注入简介
This chapter covers
本章涵盖
-
Understanding the benefits of dependency injection
了解依赖关系注入的好处 -
Seeing how ASP.NET Core uses dependency injection
了解 ASP.NET Core 如何使用依赖项注入 -
Retrieving services from the DI container
从 DI 容器中检索服务
In part 1 of this book you saw the bare bones of how to build applications with ASP.NET Core. You learned how to compose middleware to create your application and how to create minimal API endpoints to handle HTTP requests. This part gave you the tools to start building simple API applications.
在本书的第 1 部分中,您了解了如何使用 ASP.NET Core 构建应用程序的基本内容。您学习了如何编写中间件来创建应用程序,以及如何创建最小的 API 端点来处理 HTTP 请求。这部分为您提供了开始构建简单 API 应用程序的工具。
In this chapter you’ll see how to use dependency injection (DI)—a design pattern that helps you develop loosely coupled code—in your ASP.NET Core applications. ASP.NET Core uses the pattern extensively, both internally in the framework and in the applications you build, so you’ll need to use it in all but the most trivial applications.
在本章中,您将了解如何在 ASP.NET Core 应用程序中使用依赖关系注入 (DI),这是一种帮助您开发松散耦合代码的设计模式。ASP.NET Core 在框架内部和您构建的应用程序中广泛使用该模式,因此您需要在除最琐碎的应用程序之外的所有应用程序中使用它。
You may have heard of DI and possibly even used it in your own applications. If so, this chapter shouldn’t hold many surprises for you. If you haven’t used DI, never fear; I’ll make sure you’re up to speed by the time the chapter is done!
您可能听说过 DI,甚至可能在自己的应用程序中使用它。如果是这样,这一章应该不会给你带来太多惊喜。如果您还没有使用过 DI,请不要担心;我会确保你在章节完成时跟上进度!
This chapter introduces DI in general, the principles it drives, and why you should care about it. You’ll see how ASP.NET Core has embraced DI throughout its implementation and why you should do the same when writing your own applications. Finally, you’ll learn how to retrieve services from DI in your app.
本章介绍了 DI 的一般情况、它驱动的原则以及您应该关注它的原因。您将了解 ASP.NET Core 如何在整个实施过程中采用 DI,以及为什么在编写自己的应用程序时也应该这样做。最后,您将学习如何从应用程序中的 DI 检索服务。
When you finish this chapter, you’ll have a solid understanding of the DI concept. In chapter 9 you’ll see how to apply DI to your own classes. You’ll learn how to configure your app so that the ASP.NET Core framework can create your classes for you, removing the pain of having to create new objects in your code manually. You’ll learn how to control how long your objects are used and some of the pitfalls to be aware of when you write your own applications. In chapter 31 we’ll look at some advanced ways to use DI, including how to wire up a third-party DI container.
完成本章后,您将对 DI 概念有深入的理解。在第 9 章中,您将看到如何将 DI 应用于您自己的类。您将学习如何配置您的应用程序,以便 ASP.NET Core 框架可以为您创建类,从而消除必须在代码中手动创建新对象的痛苦。您将学习如何控制对象的使用时间,以及在编写自己的应用程序时需要注意的一些陷阱。在第 31 章中,我们将介绍一些使用 DI 的高级方法,包括如何连接第三方 DI 容器。
For now, though, let’s get back to basics. What is DI, and why should you care about it?
不过,现在让我们回到基础。什么是 DI,为什么要关心它?
8.1 Understanding the benefits of dependency injection
8.1 了解依赖关系注入的好处
This section aims to give you a basic understanding of what DI is and why you should care about it. The topic itself extends far beyond the reach of this single chapter. If you want a deeper background, I highly recommend checking out Martin Fowler’s articles online. This article from 2004, for example, is a classic: http://mng.bz/pPJ8.
本节旨在让您对 DI 是什么以及为什么您应该关心它有一个基本的了解。这个话题本身远远超出了这一章的范围。如果您想要更深入的背景知识,我强烈建议您在线查看 Martin Fowler 的文章。例如,2004 年的这篇文章就是经典之作:http://mng.bz/pPJ8。
Tip For a more directly applicable read with many examples in C#, I recommend picking up Dependency Injection Principles, Practices, and Patterns, by Steven van Deursen and Mark Seemann (Manning, 2019).
提示 要获得更直接适用的 C# 中许多示例,我建议您阅读 Steven van Deursen 和 Mark Seemann 编写的 Dependency Injection Principles, Practices, and Patterns(Manning,2019 年)。
The ASP.NET Core framework has been designed from the ground up to be modular and to adhere to good software engineering practices. As with anything in software, what is considered to be best practice varies over time, but for object-oriented programming, the SOLID principles have held up well.
ASP.NET Core 框架是从头开始设计的,采用模块化设计,并遵循良好的软件工程实践。与软件中的任何事物一样,被认为是最佳实践的内容会随着时间的推移而变化,但对于面向对象的编程,SOLID 原则一直保持得很好。
Definition SOLID is a mnemonic for “single responsibility principle, open-closed, Liskov substitution, interface segregation, and dependency inversion.” This course by Steve Smith introduces the principles using C#: http://mng.bz/Ox1R.
定义 SOLID 是“单一责任原则、开闭、Liskov 替换、接口分离和依赖关系倒置”的助记词。Steve Smith 的这门课程介绍了使用 C# 的原则:http://mng.bz/Ox1R。
On that basis, ASP.NET Core has DI (sometimes called dependency inversion or inversion of control [IoC]) baked into the heart of the framework. Regardless of whether you want to use DI within your own application code, the framework libraries themselves depend on it as a concept.
在此基础上,ASP.NET Core 将 DI(有时称为依赖关系反转或控制反转 [IoC])融入到框架的核心中。无论您是否想在自己的应用程序代码中使用 DI,框架库本身都将其作为一个概念。
Note Although related, dependency injection and dependency inversion are two different things. I cover both in a general sense in this chapter, but for a good explanation of the differences, see this post by Derick Bailey, titled “Dependency Injection Is NOT the Same As the Dependency Inversion Principle”: http://mng.bz/5jvB.
注意 尽管相关,但依赖注入和依赖倒置是两个不同的东西。在本章中,我将从一般意义上介绍两者,但要很好地解释这些差异,请参阅 Derick Bailey 的这篇文章,标题为“依赖注入与依赖倒置原则不同”:http://mng.bz/5jvB。
When you started programming, chances are that you didn’t use a DI framework immediately. That’s not surprising or even a bad thing; DI adds a certain amount of extra wiring that’s often not warranted in simple applications or when you’re getting started. But when things start to get more complex, DI comes into its own as a great tool to help keep that complexity under control.
当您开始编程时,您很可能没有立即使用 DI 框架。这并不奇怪,甚至不是一件坏事;DI 添加了一定数量的额外布线,这些布线在简单的应用程序中或您开始时通常是不需要的。但是当事情开始变得更加复杂时,DI 就会成为帮助控制这种复杂性的绝佳工具。
Let’s consider a simple example, written without any sort of DI. Suppose that a user has registered on your web app, and you want to send them an email. This listing shows how you might approach this task initially, using a minimal API endpoint handler.
让我们考虑一个简单的例子,它没有任何类型的 DI 编写。假设用户已在您的 Web 应用程序上注册,并且您希望向他们发送电子邮件。此清单显示了最初如何使用最小的 API 端点处理程序来处理此任务。
Listing 8.1 Sending an email without DI when there are no dependencies
清单 8.1 在没有依赖项的情况下发送没有 DI 的邮件
var builder = WebApplication.CreateBuilder(args);
var app = builder.Build();

app.MapGet("/register/{username}", RegisterUser); ❶

app.Run();

string RegisterUser(string username) ❷
{
    var emailSender = new EmailSender(); ❸
    emailSender.SendEmail(username); ❹
    return $"Email sent to {username}!";
}
❶ The endpoint is called when a new user is created.
创建新用户时调用 endpoint。
❷ The RegisterUser function is the handler for the endpoint.
RegisterUser 函数是端点的处理程序。
❸ Creates a new instance of EmailSender
创建 EmailSender 的新实例
❹ Uses the new instance to send the email
使用新实例发送电子邮件
In this example, the RegisterUser handler executes when a new user registers on your app, creating a new instance of an EmailSender class and calling SendEmail() to send the email. The EmailSender class is the class that actually sends the email. For the purposes of this example, you can imagine that it looks something like this:
在此示例中,当新用户在您的应用程序上注册时,将执行处理程序,创建类的新实例并调用以发送电子邮件。类是实际发送电子邮件的类。对于此示例,您可以想象它看起来像这样:
public class EmailSender
{
    public void SendEmail(string username)
    {
        Console.WriteLine($"Email sent to {username}!");
    }
}
Console.WriteLine stands in here for the real process of sending the email.
Console.WriteLine 在此处代替发送电子邮件的真实过程。
Note Although I’m using sending email as a simple example, in practice you may want to move this code out of your handler method. This type of asynchronous task is well suited to using message queues and a background process. For more details, see http://mng.bz/Y1AB.
注意 虽然我使用发送电子邮件作为一个简单的示例,但实际上您可能希望将此代码从 handler 方法中移出。这种类型的异步任务非常适合使用消息队列和后台进程。有关更多详细信息,请参阅 http://mng.bz/Y1AB。
If the EmailSender class is as simple as the previous example and has no dependencies, you may not see any need to adopt a different approach to creating objects. And to an extent, you’d be right. But what if you later update your implementation of EmailSender so that some of the email-sending logic is implemented by a different class?
如果 EmailSender 类与上一个示例一样简单,并且没有依赖项,则您可能不需要采用其他方法来创建对象。在某种程度上,你是对的。但是,如果您稍后更新 EmailSender 的实现,以便某些电子邮件发送逻辑由不同的类实现,该怎么办?
Currently, EmailSender would need to do many things to send an email. It would need to
目前,EmailSender 需要做很多事情来发送电子邮件。它需要
-
Create an email message.
创建电子邮件。 -
Configure the settings of the email server.
配置电子邮件服务器的设置。 -
Send the email to the email server.
将电子邮件发送到电子邮件服务器。
Doing all that in one class would go against the single-responsibility principle (SRP), so you’d likely end up with EmailSender depending on other services. Figure 8.1 shows how this web of dependencies might look. RegisterUser wants to send an email using EmailSender, but to do so, it also needs to create the MessageFactory, NetworkClient, and EmailServerSettings objects that EmailSender depends on.
在一个类中完成所有这些作将违反单一责任原则 (SRP),因此您最终可能会使用 EmailSender,具体取决于其他服务。图 8.1 显示了这个依赖关系网络可能是什么样子。RegisterUser 希望使用 EmailSender 发送电子邮件,但为此,它还需要创建 EmailSender 所依赖的 MessageFactory、NetworkClient 和 EmailServerSettings 对象。
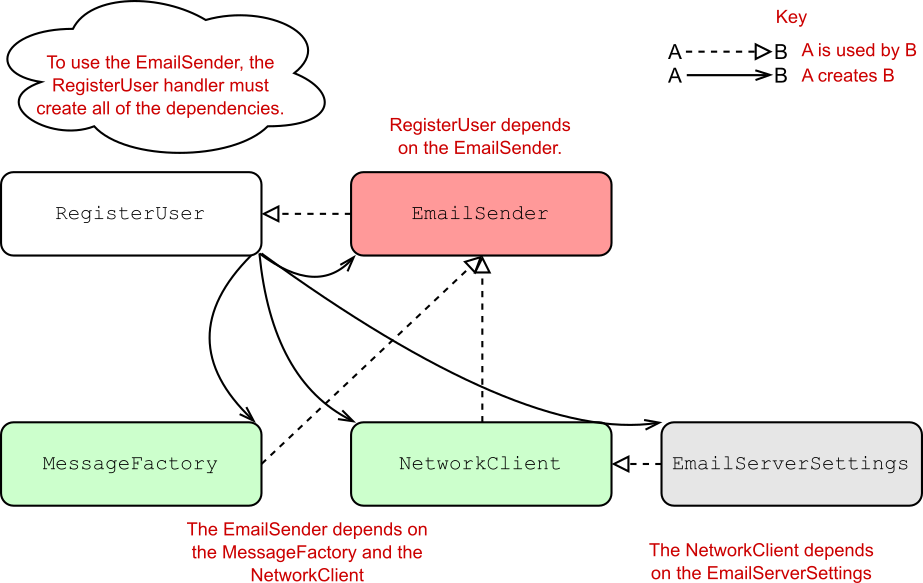
Figure 8.1 Dependency diagram without dependency injection. RegisterUser indirectly depends on all the other classes, so it must create them all.
图 8.1 没有依赖注入的依赖图。RegisterUser 间接依赖于所有其他类,因此它必须创建所有类。
Each class has several dependencies, so the “root” caller—in this case, the RegisterUser handler—needs to know how to create every class it depends on, as well as every class its dependencies depend on. This is sometimes called the dependency graph.
每个类都有多个依赖项,因此“根”调用方(在本例中为 RegisterUser 处理程序)需要知道如何作创建它所依赖的每个类,以及它的依赖项所依赖的每个类。这有时称为依赖关系图。
Definition The dependency graph is the set of objects that must be created to create a specific requested “root” object.
定义 依赖关系图是创建特定请求的 “root” 对象时必须创建的对象集。
EmailSender depends on the MessageFactory and NetworkClient objects, so they’re provided via the constructor, as shown in the following listing.
EmailSender 依赖于 MessageFactory 和 NetworkClient 对象,因此它们是通过构造函数提供的,如下面的清单所示。
Listing 8.2 A service with multiple dependencies
清单 8.2 具有多个依赖项的服务
public class EmailSender
{
    private readonly NetworkClient _client; ❶
    private readonly MessageFactory _factory; ❶
    public EmailSender(MessageFactory factory, NetworkClient client) ❷
    { ❷
        _factory = factory; ❷
        _client = client; ❷
    } ❷
    public void SendEmail(string username)
    {
        var email = _factory.Create(username); ❸
        _client.SendEmail(email); ❸
        Console.WriteLine($"Email sent to {username}!");
    }
}
❶ Now the EmailSender depends on two other classes.
现在 EmailSender 依赖于其他两个类。
❷ Instances of the dependencies are provided in the constructor.
构造函数中提供了依赖项的实例。
❸ The EmailSender coordinates the dependencies to create and send an email.
EmailSender 协调依赖项以创建和发送电子邮件。
On top of that, the NetworkClient class that EmailSender depends on also has a dependency on an EmailServerSettings object:
最重要的是,NetworkClient 类EmailSender 也依赖于EmailServerSettings 对象:
public class NetworkClient
{
    private readonly EmailServerSettings _settings;
    public NetworkClient(EmailServerSettings settings)
    {
        _settings = settings;
    }
}
This example might feel a little contrived, but it’s common to find this sort of chain of dependencies. In fact, if you don’t have it in your code, it’s probably a sign that your classes are too big and aren’t following the SRP.
这个例子可能感觉有点做作,但找到这种依赖关系链是很常见的。事实上,如果您的代码中没有它,则可能表明您的类太大并且没有遵循 SRP。
So how does this affect the code in RegisterUser? The following listing shows how you now have to send an email if you stick to newing up objects in the handler.
那么这对 RegisterUser 中的代码有什么影响呢?下面的清单显示了如果你坚持在处理程序中使用新的ing 对象,你现在必须如何发送电子邮件。
Listing 8.3 Sending email without DI when you create dependencies manually
清单 8.3 手动创建依赖项时发送没有 DI 的邮件
string RegisterUser(string username)
{
    var emailSender = new EmailSender( ❶
        new MessageFactory(), ❷
        new NetworkClient( ❸
            new EmailServerSettings ❹
            ( ❹
                Host: "smtp.server.com", ❹
                Port: 25 ❹
            )) ❹
        );
    emailSender.SendEmail(username); ❺
    return $"Email sent to {username}!";
}
❶ To create EmailSender, you must create all its dependencies.
要创建 EmailSender,您必须创建其所有依赖项。
❷ You need a new MessageFactory.
您需要一个新的 MessageFactory。
❸ The NetworkClient also has dependencies.
NetworkClient 也有依赖项。
❹ You’re already two layers deep, but there could feasibly be more.
您已经有两层了,但可能还有更多。
❺ Finally, you can send the email.
最后,您可以发送电子邮件。
This code is turning into something gnarly. Improving the design of EmailSender to separate out the responsibilities has made calling it from RegisterUser a real chore. This code has several problems:
这段代码正在变成一些粗糙的东西。改进 EmailSender 的设计以分离职责,这使得从 RegisterUser 调用它成为一件真正的苦差事。此代码有几个问题:
-
Not obeying the SRP—Now our code is responsible for both creating an EmailSender object and using it to send an email.
不遵守 SRP – 现在,我们的代码负责创建 EmailSender 对象并使用它来发送电子邮件。 -
Considerable ceremony—Ceremony refers to code that you have to write but that isn’t adding value directly. Of the 11 lines of code in the RegisterUser method, only the last two are doing anything useful, which makes it harder to read and harder to understand the intent of the methods.
相当大的仪式 — 仪式是指您必须编写的代码,但这不会直接增加价值。在 RegisterUser 方法的 11 行代码中,只有最后两行代码执行任何有用的作,这使得它更难阅读,也更难理解方法的意图。 -
Tied to the implementation—If you decide to refactor EmailSender and add another dependency, you’d need to update every place it’s used. Likewise, if any dependencies are refactored, you would need to update this code too.
与实现绑定 — 如果您决定重构 EmailSender 并添加另一个依赖项,则需要更新使用它的每个位置。同样,如果重构了任何依赖项,您也需要更新此代码。 -
Hard to reuse instance—In the example code we created new instances of all the objects. But what if creating a new NetworkClient is computationally expensive and we’d like to reuse instances? We’d have to add extra code to handle that task, further increasing the amount of boilerplate code.
难以重用实例 – 在示例代码中,我们创建了所有对象的新实例。但是,如果创建新的 NetworkClient 计算成本很高,并且我们想重用实例怎么办?我们必须添加额外的代码来处理该任务,从而进一步增加样板代码的数量。
RegisterUser has an implicit dependency on the EmailSender class, as it creates the object manually itself. The only way to know that RegisterUser uses EmailSender is to look at its source code. By contrast, EmailSender has explicit dependencies on NetworkClient and MessageFactory, which must be provided in the constructor. Similarly, NetworkClient has an explicit dependency on the EmailServerSettings class.
RegisterUser 对 EmailSender 类具有隐式依赖关系,因为它自己手动创建对象。要知道 RegisterUser 使用 EmailSender,唯一的方法是查看其源代码。相比之下,EmailSender 对 NetworkClient 和 MessageFactory 具有显式依赖项,必须在构造函数中提供。同样,NetworkClient 对 EmailServerSettings 类具有显式依赖项。
Tip Generally speaking, any dependencies in your code should be explicit, not implicit. Implicit dependencies are hard to reason about and difficult to test, so you should avoid them wherever you can. DI is useful for guiding you along this path.
提示 一般来说,代码中的任何依赖项都应该是显式的,而不是隐式的。隐式依赖关系很难推理且难以测试,因此您应该尽可能避免使用它们。DI 有助于指导您沿着这条道路前进。
DI aims to solve the problem of building a dependency graph by inverting the chain of dependencies. Instead of the RegisterUser handler creating its dependencies manually, deep inside the implementation details of the code, an already-created instance of EmailSender is passed as an argument to the RegisterUser method.
DI 旨在通过反转依赖关系链来解决构建依赖关系图的问题。RegisterUser 处理程序不是手动创建其依赖项,而是在代码的实现细节深处,将已创建的 EmailSender 实例作为参数传递给 RegisterUser 方法。
Now, obviously something needs to create the object, so the code to do that has to live somewhere. The service responsible for providing the instance is called a DI container or an IoC container, as shown in figure 8.2.
现在,显然需要创建对象,因此执行此作的代码必须位于某个位置。负责提供实例的服务称为 DI 容器或 IoC 容器,如图 8.2 所示。
Definition The DI container or IoC container is responsible for creating instances of services. It knows how to construct an instance of a service by creating all its dependencies and passing them to the constructor. I’ll refer to it as a DI container throughout this book.
定义 DI 容器或 IoC 容器负责创建服务实例。它知道如何通过创建服务的所有依赖项并将它们传递给构造函数来构造服务的实例。在本书中,我将它称为 DI 容器。

Figure 8.2 Dependency diagram using DI . RegisterUser indirectly depends on all the other classes but doesn’t need to know how to create them. The RegisterUser handler declares that it requires EmailSender, and the container provides it.
图 8.2 使用 DI 的依赖关系图 .RegisterUser 间接依赖于所有其他类,但不需要知道如何创建它们。RegisterUser 处理程序声明它需要 EmailSender,并且容器提供它。
The term DI is often used interchangeably with IoC. But DI is a specific version of the more general principle of IoC. In the context of ASP.NET Core,
术语 DI 通常与 IoC 互换使用。但 DI 是 IoC 更普遍原则的特定版本。在 ASP.NET Core 的上下文中,
-
Without IoC, you’d write the code to listen for requests, check which handler to invoke, and then invoke it. With IoC, the control flow is the other way around. You register your handlers with the framework, but it’s up to the framework to invoke your handler. Your handler is still responsible for creating its dependencies.
如果没有 IoC,您将编写代码来侦听请求,检查要调用的处理程序,然后调用它。对于 IoC,控制流正好相反。您可以向框架注册处理程序,但由框架来调用您的处理程序。您的处理程序仍负责创建其依赖项。 -
DI takes IoC one step further. As well as invoking your handler, with DI, the framework creates all your handler’s dependencies.
DI 使 IoC 更进一步。除了调用您的处理程序外,框架还使用 DI 创建所有处理程序的依赖项。
So when you use dependency injection, your RegisterUser handler is no longer responsible for controlling how to create an EmailSender instance. Instead, the framework provides an EmailSender to the handler directly.
因此,当您使用依赖项注入时,您的 RegisterUser 处理程序不再负责控制如何创建 EmailSender 实例。相反,框架直接向处理程序提供 EmailSender。
Note Many DI containers are available for .NET, including Autofac, Lamar, Unity, Ninject, and Simple Injector, and the list goes on! In chapter 31 you’ll see how to replace the default ASP.NET Core container with one of these alternatives.
注意 许多 DI 容器可用于 .NET,包括 Autofac、Lamar、Unity、Ninject 和 Simple Injector,不胜枚举!在第 31 章中,您将看到如何将default ASP.NET Core 容器中替换为这些替代项之一。
The advantage of adopting this pattern becomes apparent when you see how much it simplifies using dependencies. Listing 8.4 shows how the RegisterUser handler would look if you used DI to create EmailSender instead of creating it manually. All the new noise has gone, and you can focus purely on what the endpoint handler is doing: calling EmailSender and returning a string message.
当您看到采用此模式在多大程度上简化了依赖项的使用时,采用此模式的优势就变得显而易见了。清单 8.4 显示了如果使用 DI 创建 EmailSender 而不是手动创建 EmailSender,RegisterUser 处理程序会是什么样子。所有新的干扰都已消失,您可以专注于端点处理程序正在执行的作:调用 EmailSender 并返回字符串消息。
Listing 8.4 Sending an email using DI to inject dependencies
清单 8.4 使用 DI 发送邮件注入依赖
string RegisterUser(string username, EmailSender emailSender) ❶
{
    emailSender.SendEmail(username); ❷
    return $"Email sent to {username}!"; ❷
}
❶ Instead of creating the dependencies implicitly, injects them directly
不是隐式创建依赖项,而是直接注入它们
❷ The handler is easy to read and understand again.
处理程序易于阅读和理解。
One advantage of a DI container is that it has a single responsibility: creating objects or services. The minimal API infrastructure asks the DI container for an instance of a service, and the container takes care of figuring out how to create the dependency graph, based on how you configure it.
DI 容器的一个优点是它只有一个职责:创建对象或服务。最小的 API 基础设施向 DI 容器请求服务实例,容器负责根据您的配置方式确定如何创建依赖关系图。
Note It’s common to refer to services when talking about DI containers, which is slightly unfortunate, as services is one of the most overloaded terms in software engineering! In this context, a service refers to any class or interface that the DI container creates when required.
注意 在谈论 DI 容器时,通常会提到服务,这有点遗憾,因为服务是软件工程中最超载的术语之一!在这个context,服务是指 DI 容器在需要时创建的任何类或接口。
The beauty of this approach is that by using explicit dependencies, you never have to write the mess of code you saw in listing 8.3. The DI container can inspect your service’s constructor and work out how to write much of the code itself. DI containers are always configurable, so if you want to describe how to create an instance of a service manually, you can, but by default you shouldn’t need to.
这种方法的美妙之处在于,通过使用显式依赖项,您永远不必编写清单 8.3 中看到的混乱代码。DI 容器可以检查服务的构造函数,并找出如何编写大部分代码本身。DI 容器始终是可配置的,因此如果您想描述如何手动创建服务实例,您可以这样做,但默认情况下您不需要这样做。
Tip ASP.NET Core supports constructor injection and injection into endpoint handler methods out of the box. Technically, you can inject dependencies into a service in other ways, such as by using property injection, but these techniques aren’t supported by the built-in DI container.
提示 ASP.NET Core 支持构造函数注入和开箱即用的端点处理程序方法注入。从技术上讲,您可以通过其他方式将依赖项注入服务,例如使用属性注入,但内置 DI 容器不支持这些技术。
I hope that this example made the advantages of using DI in your code apparent, but in many ways these benefits are secondary to the main benefit of using DI. In particular, DI helps keep your code loosely coupled by coding to interfaces.
我希望这个例子清楚地表明了在代码中使用 DI 的优势,但在许多方面,这些好处是次要的,而不是使用 DI 的主要好处。特别是,DI 通过编码到接口来帮助保持代码松散耦合。
8.2 Creating loosely coupled code
8.2 创建松散耦合的代码
Coupling is an important concept in object-oriented programming, referring to how a given class depends on other classes to perform its function. Loosely coupled code doesn’t need to know a lot of details about a particular component to use it.
耦合是面向对象编程中的一个重要概念,指的是给定的类如何依赖其他类来执行其功能。松散耦合的代码不需要了解有关特定组件的大量详细信息即可使用它。
The initial example of RegisterUser and EmailSender was an example of tight coupling; you were creating the EmailSender object directly and needed to know exactly how to wire it up. On top of that, the code was difficult to test. Any attempts to test RegisterUser would result in an email’s being sent. If you were testing the controller with a suite of unit tests, that approach would be a surefire way to get your email server blacklisted for spam!
RegisterUser 和 EmailSender 的初始示例是紧密耦合的示例;您直接创建了 EmailSender 对象,并且需要确切地知道如何连接它。最重要的是,代码很难测试。任何测试 RegisterUser 的尝试都会导致发送电子邮件。如果你正在使用一套单元测试来测试控制器,那么这种方法将是让你的电子邮件服务器被列入垃圾邮件黑名单的可靠方法!
Taking EmailSender as a parameter and removing the responsibility of creating the object helps reduce the coupling in the system. If the EmailSender implementation changes so that it has another dependency, you no longer have to update RegisterUser at the same time.
将 EmailSender 作为参数并消除创建对象的责任有助于减少系统中的耦合。如果 EmailSender 实现发生更改,使其具有另一个依赖项,则不再需要同时更新 RegisterUser。
One problem that remains is that RegisterUser is still tied to an implementation rather than an abstraction. Coding to abstractions (often interfaces) is a common design pattern that helps further reduce the coupling of a system, as you’re not tied to a single implementation. This pattern is particularly useful for making classes testable, as you can create stub or mock implementations of your dependencies for testing purposes, as shown in figure 8.3.
仍然存在的一个问题是 RegisterUser 仍然与实现而不是抽象相关联。对抽象(通常是接口)进行编码是一种常见的设计模式,有助于进一步减少系统的耦合,因为您不受单个实现的束缚。此模式对于使类可测试特别有用,因为您可以创建依赖项的存根或模拟实现以进行测试,如图 8.3 所示。
Tip You can choose among many mocking frameworks. I’m most familiar with Moq, but NSubstitute and FakeItEasy are also popular options.
提示: 您可以在许多模拟框架中进行选择。我最熟悉 Moq,但 NSubstitute 和 FakeItEasy 也是受欢迎的选择。
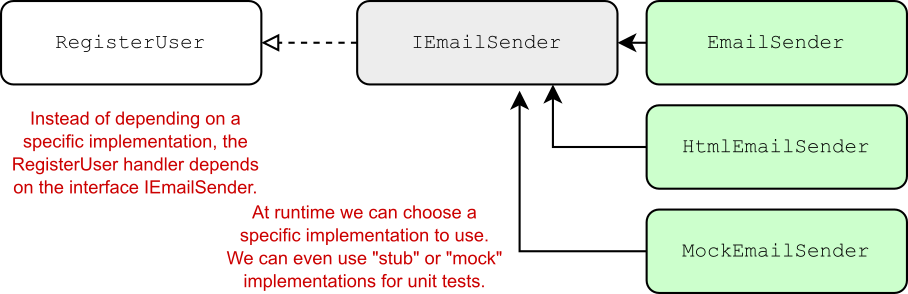
Figure 8.3 By coding to interfaces instead of an explicit implementation, you can use different IEmailSender implementations in different scenarios, such as a MockEmailSender in unit tests.
图 8.3 通过对接口进行编码而不是显式实现,可以在不同的场景中使用不同的 IEmailSender 实现,例如单元测试中的 MockEmailSender。
As an example, you might create an IEmailSender interface, which EmailSender would implement:
例如,您可以创建一个 IEmailSender接口,EmailSender 将实现该接口:
public interface IEmailSender
{
    public void SendEmail(string username);
}
Then RegisterUser could depend on this interface instead of the specific EmailSender implementation, as shown in the following listing, allowing you to use a different implementation during unit tests, such as a DummyEmailSender.
然后 RegisterUser 可以依赖于此接口而不是特定的 EmailSender 实现,如下面的清单所示,从而允许您在单元测试期间使用不同的实现,例如 DummyEmailSender。
Listing 8.5 Using interfaces with dependency injection
清单 8.5 使用带有依赖注入的接口
string RegisterUser(string username, IEmailSender emailSender) ❶
{
    emailSender.SendEmail(username); ❷
    return $"Email sent to {username}!";
}
❶ Now you depend on IEmailSender instead of the specific EmailSender
implementation.
现在您依赖于 IEmailSender 而不是特定的 EmailSender 实现。
❷ You don’t care what the implementation is as long as it implements
IEmailSender.
您不关心实现是什么,只要它实现 IEmailSender 即可。
The key point here is that the consuming code, RegisterUser, doesn’t care how the dependency is implemented—only that it implements the IEmailSender interface and exposes a SendEmail method. Now the application code is independent of the implementation.
此处的关键点是,使用代码 RegisterUser 并不关心依赖项是如何实现的,只关心它实现 IEmailSender 接口并公开 SendEmail 方法。现在,应用程序代码独立于实现。
I hope that the principles behind DI seem to be sound. Having loosely coupled code makes it easy to change or swap out implementations. But this still leaves a question: how does the application know to use EmailSender in production instead of DummyEmailSender? The process of telling your DI container “When you need IEmailSender, use EmailSender” is called registration.
我希望 DI 背后的原则似乎是合理的。拥有松散耦合的代码可以很容易地更改或换出实现。但这仍然留下了一个问题:应用程序如何知道在生产环境中使用 EmailSender 而不是 DummyEmailSender?告诉 DI 容器“当您需要 IEmailSender 时,请使用 EmailSender”的过程称为注册。
Definition You register services with a DI container so that it knows which implementation to use for each requested service. This registration typically takes the form “For interface X, use implementation Y.”
定义 您可以向 DI 容器注册服务,以便它知道要为每个请求的服务使用哪个实现。此注册通常采用“对于接口 X,使用实现 Y”的形式。
Exactly how you register your interfaces and types with a DI container can vary depending on the specific DI container implementation, but the principles are generally the same. ASP.NET Core includes a simple DI container out of the box, so let’s look at how it’s used during a typical request.
向 DI 容器注册接口和类型的具体方式可能因特定的 DI 容器而异实现,但原则通常是相同的。ASP.NET Core 包含一个简单的开箱即用的 DI 容器,因此让我们看看在典型请求期间如何使用它。
8.3 Using dependency injection in ASP.NET Core
在 ASP.NET Core 中使用依赖项注入
ASP.NET Core was designed from the outset to be modular and composable, with an almost plugin-style architecture, which is generally complemented by DI. Consequently, ASP.NET Core includes a simple DI container that all the framework libraries use to register themselves and their dependencies.
ASP.NET Core 从一开始就设计为模块化和可组合的,具有几乎插件式的架构,通常由 DI 补充。因此,ASP.NET Core 包含一个简单的 DI 容器,所有框架库都使用它来注册自身及其依赖项。
This container is used, for example, to register the minimal API infrastructure—the formatters, the Kestrel web server, and so on. It’s a basic container, so it exposes only a few methods for registering services, but you have the option to replace it with a third-party DI container that gives you extra capabilities, such as autoregistration and setter injection. The DI container is built into the ASP.NET Core hosting model, as shown in figure 8.4.
例如,此容器用于注册最小 API 基础设施 — 格式化程序、Kestrel Web 服务器等。它是一个基本容器,因此它只公开了几种用于注册服务的方法,但您可以选择将其替换为第三方 DI 容器,该容器为您提供额外的功能,例如自动注册和 setter 注入。DI 容器内置于 ASP.NET Core 托管模型中,如图 8.4 所示。

Figure 8.4 The ASP.NET Core hosting model uses the DI container to fulfill dependencies when creating minimal API endpoint handlers.
图 8.4 ASP.NET Core 托管模型在创建最小 API 端点处理程序时使用 DI 容器来实现依赖项。
The hosting model pulls dependencies from the DI container when they’re needed. If the framework determines that it must invoke RegisterHandler due to the incoming URL/route, the RequestDelegateFactory responsible for creating minimal APIs asks the DI container for an IEmailSender implementation.
托管模型在需要时从 DI 容器中提取依赖项。如果框架确定它必须调用 RegisterHandler,因为传入URL/路由,负责创建最小 API 的 RequestDelegateFactory 向 DI 容器请求 IEmailSender 实现。
Note RequestDelegateFactory is part of the minimal API framework that’s responsible for invoking your minimal API handlers. You won’t use or interact with it directly, but it’s behind the scenes interacting with the DI container. I have a detailed series exploring this type on my blog at http://mng.bz/Gy6v. But be warned: this post goes into far more detail than most developers will ever need (or want)!
注意: RequestDelegateFactory 是负责调用最小 API 处理程序的最小 API 框架的一部分。您不会直接使用它或与之交互,但它在幕后与 DI 容器交互。我在 http://mng.bz/Gy6v 的博客上有一个详细的系列来探索这种类型的类型。但请注意:这篇文章比大多数开发人员需要(或想要)的要详细得多!
The DI container needs to know what to create when asked for IEmailSender, so you must have registered an implementation, such as EmailSender, with the container. When an implementation is registered, the DI container can inject it anywhere, which means that you can inject framework-related services (such as LinkGenerator from chapter 6) into your own custom services. It also means that you can register alternative versions of framework services and have the framework automatically use those versions in place of the defaults.
DI 容器需要知道在请求 IEmailSender 时要创建什么,因此您必须已向容器注册一个实现,例如 EmailSender。注册实现后,DI 容器可以将其注入到任何位置,这意味着您可以将与框架相关的服务(例如第 6 章中的 LinkGenerator)注入到您自己的自定义服务中。这也意味着您可以注册框架服务的替代版本,并让框架自动使用这些版本来代替默认版本。
Other ASP.NET Core infrastructure, such as the Model-View-Controller (MVC) and Razor Pages frameworks (which you learn about in part 3), uses dependency injection in a similar way to minimal APIs. These frameworks use the DI container to create the dependencies required by their own handlers, such as for a Razor Page (figure 8.5).
其他 ASP.NET Core 基础结构,例如模型视图控制器 (MVC) 和 Razor Pages 框架(在第 3 部分中介绍),以与最小 API 类似的方式使用依赖项注入。这些框架使用 DI 容器创建其自己的处理程序所需的依赖项,例如 Razor Page(图 8.5)。
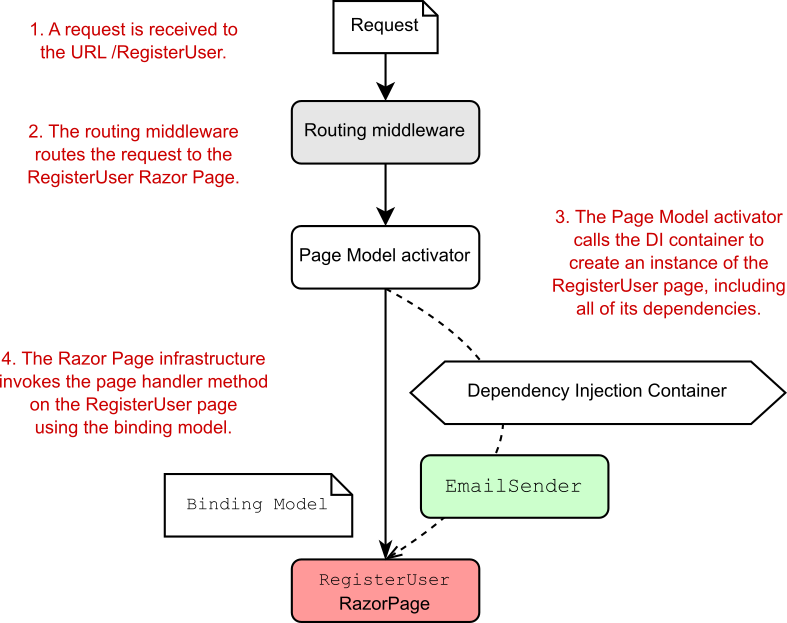
Figure 8.5 The ASP.NET Core hosting model uses the DI container to fulfill dependencies when creating Razor Pages.
图 8.5 ASP.NET Core 托管模型在创建 Razor Pages 时使用 DI 容器来实现依赖项。
The flexibility to choose exactly how and which components you combine in your applications is one of the selling points of DI. In section 8.4 you’ll learn how to configure DI in your own ASP.NET Core application, using the default, built-in container.
DI 的卖点之一是可以灵活地选择在应用程序中组合的组件以及组合哪些组件。在第 8.4 节中,您将学习如何在拥有 ASP.NET Core 应用程序,使用默认的内置容器。
8.4 Adding ASP.NET Core framework services to the container
8.4 将 ASP.NET Core Framework 服务添加到容器中
Before ASP.NET Core, using DI was optional. By contrast, to build all but the most trivial ASP.NET Core apps, some degree of DI is required. As I’ve mentioned, the underlying framework depends on it, so features such as Razor Pages and authentication require you to configure the required services. In this section you’ll see how to register these framework services with the built-in container. In chapter 9 you’ll learn how to register your own services with the DI container.
在 ASP.NET Core 之前,使用 DI 是可选的。相比之下,要构建除最琐碎的 ASP.NET Core 应用程序之外的所有应用程序,需要一定程度的 DI。正如我所提到的,底层框架依赖于它,因此 Razor Pages 和身份验证等功能要求您配置所需的服务。在本节中,您将了解如何使用内置容器注册这些框架服务。在第 9 章中,您将学习如何使用 DI 容器注册自己的服务。
ASP.NET Core uses DI to configure both its internal components, such as the Kestrel web server, and extra features, such as Razor Pages. To use these components at runtime, the DI container needs to know about all the classes it will need. You register these services with the Services property on the WebApplicationBuilder instance in Program.cs.
ASP.NET Core 使用 DI 来配置其内部组件(如 Kestrel Web 服务器)和额外功能(如 Razor Pages)。要在运行时使用这些组件,DI 容器需要了解它需要的所有类。使用 Program.cs 中 WebApplicationBuilder 实例上的 Services 属性注册这些服务。
Note The Services property of WebApplicationBuilder is of type IServiceCollection. This is where you register the collection of services that the DI container knows about.
注意 的 Services 属性WebApplicationBuilder 的类型为IServiceCollection 的 API API 的您可以在此处注册 DI 容器知道的服务集合。
If you’re thinking “Wait—I have to configure all the internal components myself?”, don’t panic. Most of the core services are registered automatically by WebApplicationBuilder, and you don’t need to do anything else. To use other features, such as Razor Pages or authentication, you do need to register the components explicitly with the container in your app, but that’s not as hard as it sounds. All the common libraries you use expose handy extension methods to take care of the nitty-gritty details. These extension methods configure everything you need in one fell swoop instead of leaving you to wire everything up manually.
如果您在想“等等 — 我必须自己配置所有内部组件”,请不要惊慌。大多数核心服务都是由 WebApplicationBuilder 自动注册的,您无需执行任何其他作。要使用其他功能(如 Razor Pages 或身份验证),您确实需要向应用程序中的容器显式注册组件,但这并不像听起来那么难。您使用的所有公共库都公开了方便的扩展方法,以处理细节。这些扩展方法一举配置了您需要的一切,而不是让您手动连接所有内容。
The Razor Pages framework exposes the AddRazorPages() extension method, for example, which adds all the necessary framework services to your app. Invoke the extension method on the Services property of WebApplicationBuilder in Program.cs, as shown in the following listing.
例如,Razor Pages 框架公开了 AddRazorPages() 扩展方法,该方法将所有必要的框架服务添加到您的应用程序。在 Program.cs 中调用 WebApplicationBuilder 的 Services 属性上的扩展方法,如下面的清单所示。
Listing 8.6 Registering the Razor Pages services with the DI container
WebApplicationBuilder builder = WebApplication.CreateBuilder(args);
builder.Services.AddRazorPages(); ❶

WebApplication app = builder.Build();
app.MapRazorPages(); ❷
app.Run();
❶ The AddRazorPages extension method adds all necessary services to the
IServiceCollection.
AddRazorPages 扩展方法将所有必要的服务添加到 IServiceCollection。
❷ Registers all the Razor Pages in your application as endpoints
将应用程序中的所有 Razor 页面注册为终结点
It’s as simple as that. Under the hood, this call is registering multiple components with the DI container, using the same APIs you’ll see in chapter 9 for registering your own services.
就这么简单。在后台,此调用使用您将在第 9 章中看到的相同 API 向 DI 容器注册多个组件,以注册您自己的服务。
Note Don’t worry about the Razor Pages aspect of this code; you’ll learn how Razor Pages work in part 3. The important point of listing 8.6 is to show how to register and enable various features in ASP.NET Core.
注意 不必担心此代码的 Razor Pages 方面;您将在第 3 部分中了解 Razor Pages 的工作原理。列出 8.6 的重要一点是展示如何在 ASP.NET Core 中注册和启用各种功能。
Most nontrivial libraries that you add to your application will have services that you need to add to the DI container. By convention, each library that has necessary services should expose an Add*() extension method that you can call on WebApplicationBuilder.Services.
您添加到应用程序中的大多数重要库都将包含您需要添加到 DI 容器中的服务。按照约定,每个具有必要服务的库都应该公开一个 Add*() 扩展方法,您可以在 WebApplicationBuilder.Services 上调用该方法。
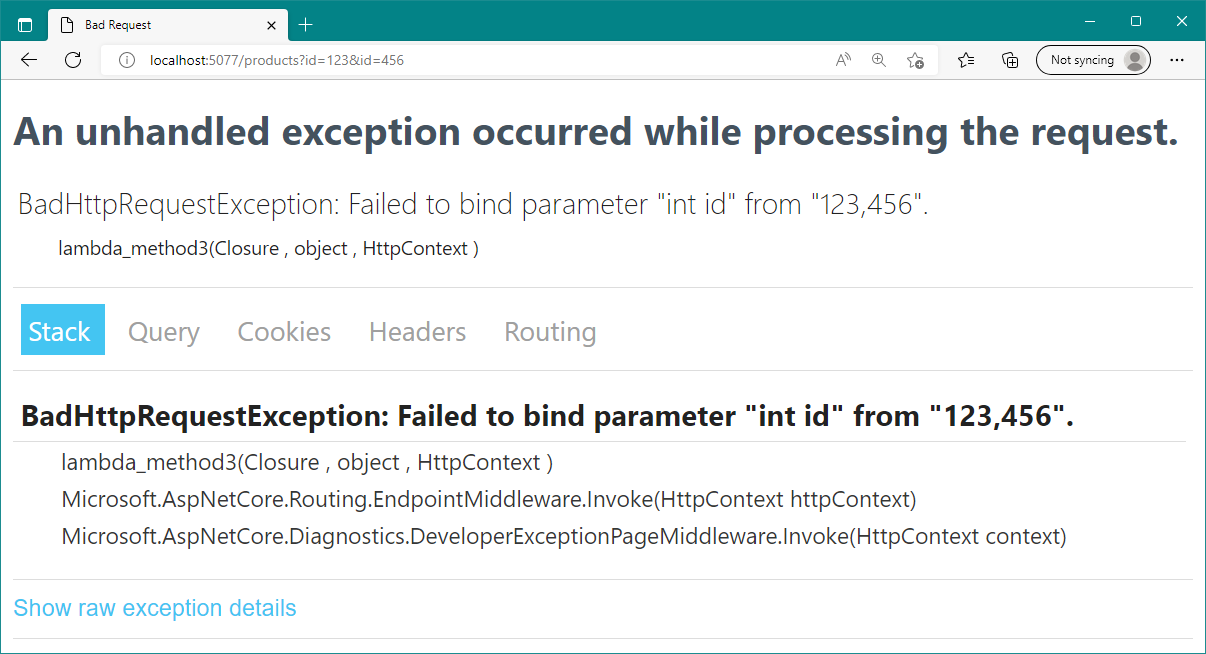
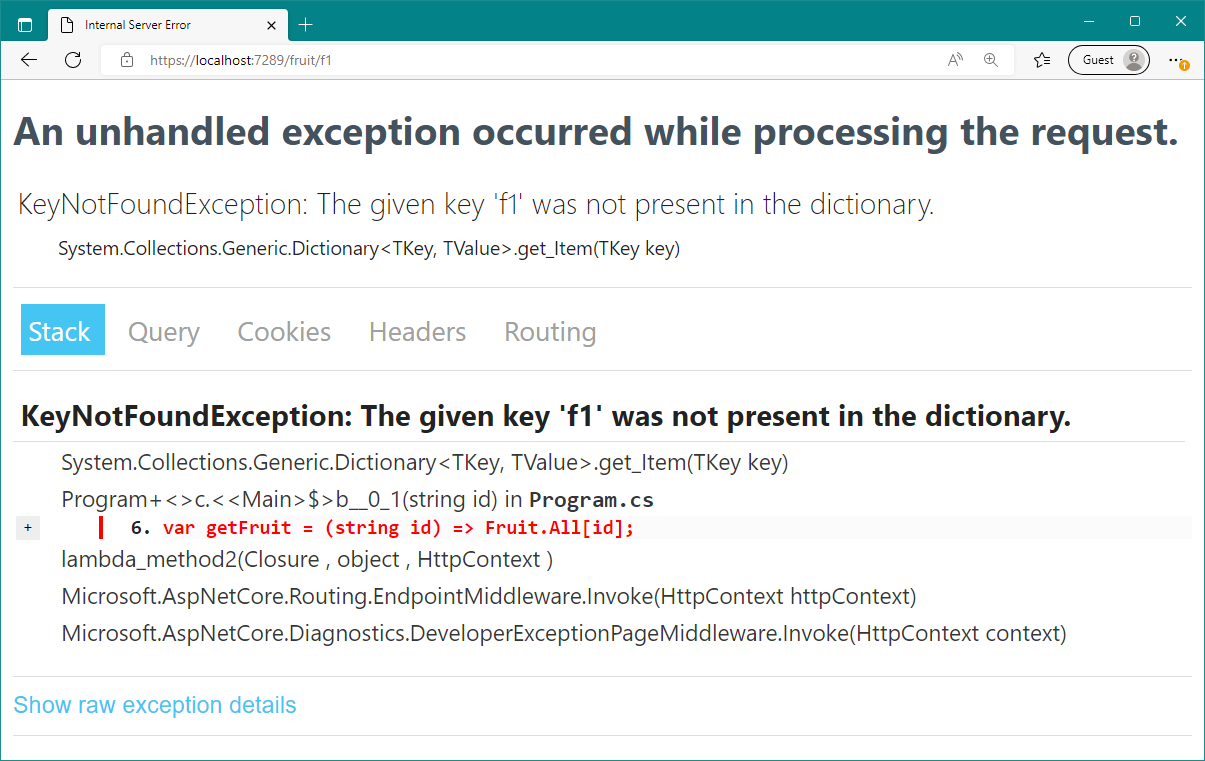
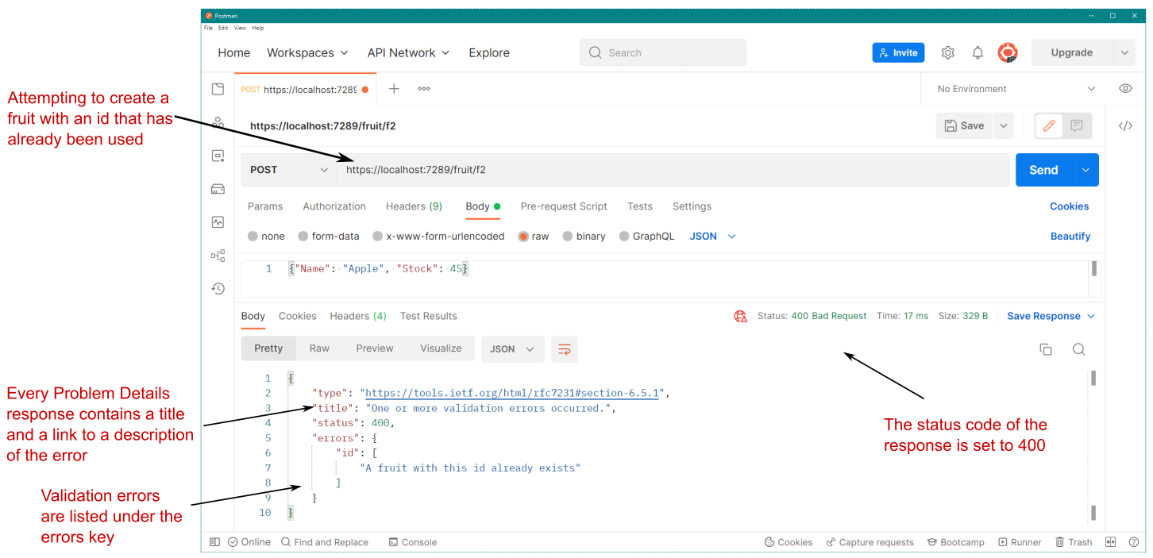
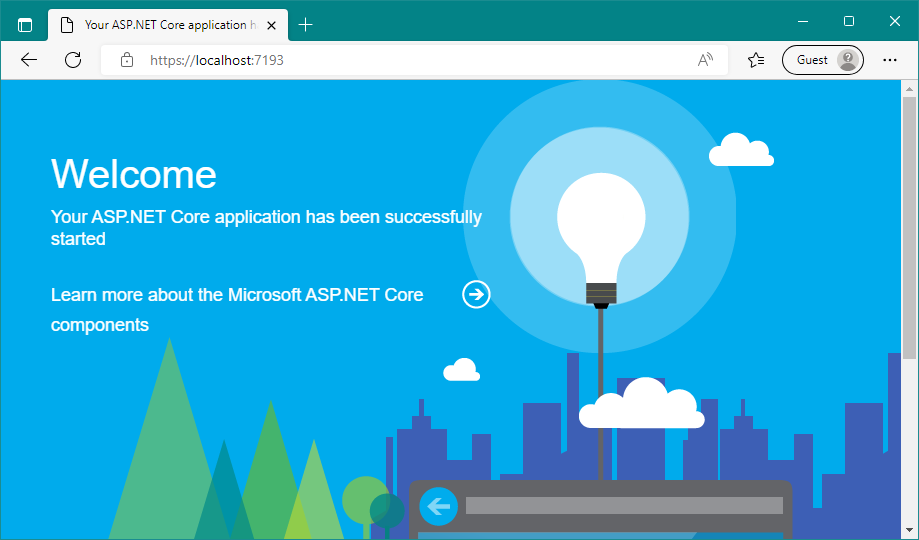
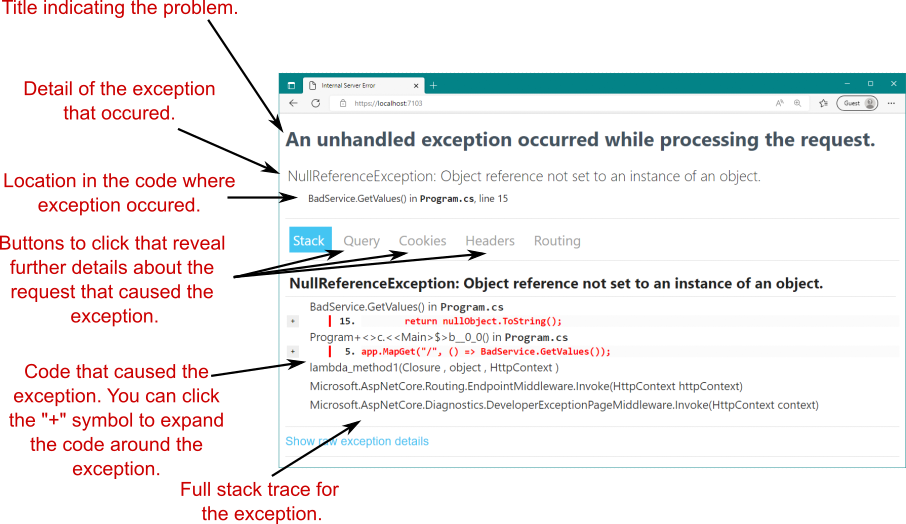
There’s no way of knowing exactly which libraries will require you to add services to the container; it’s generally a case of checking the documentation for any libraries you use. If you forget to add them, you may find that the functionality doesn’t work, or you might get a handy exception in your logs, like the one shown in figure 8.6. Keep an eye out for these exceptions, and be sure to register any services you need.
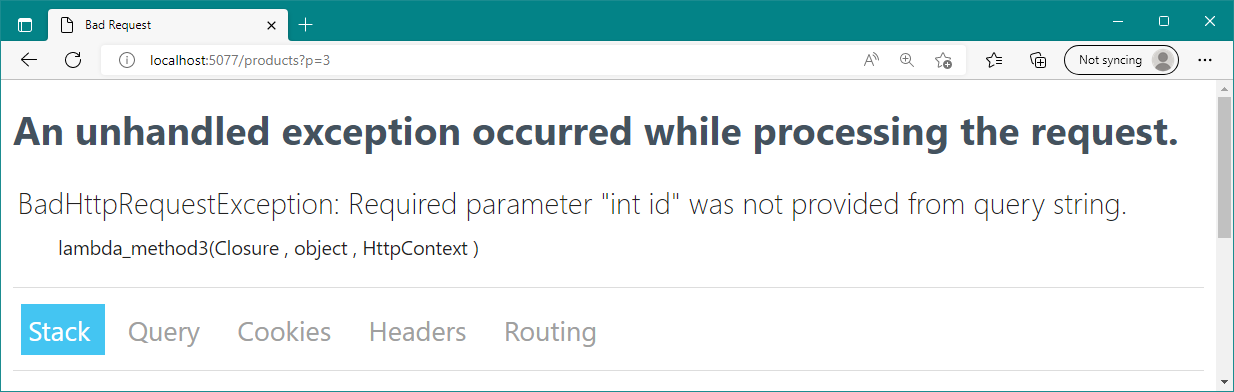
无法确切知道哪些库需要您向容器添加服务;通常是检查您使用的任何库的文档的情况。如果你忘记添加它们,你可能会发现该功能不起作用,或者你可能会在日志中得到一个方便的异常,如图 8.6 所示。请留意这些例外情况,并确保注册您需要的任何服务。
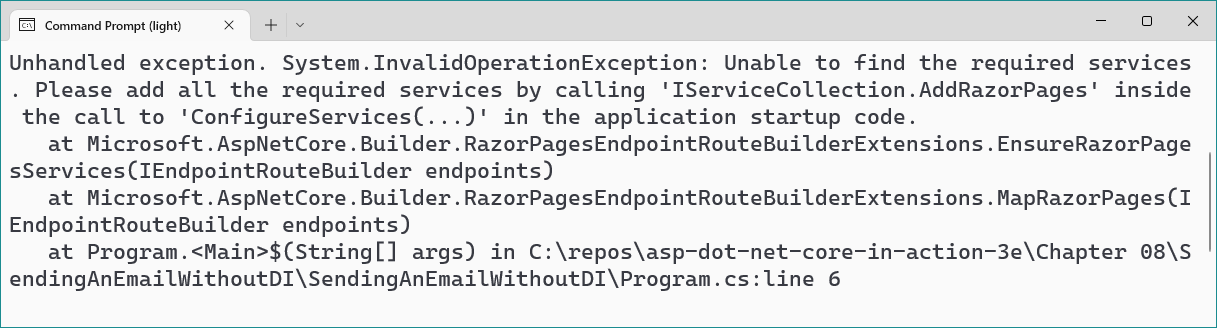
Figure 8.6 If you fail to call AddRazorPages(), you’ll get an exception when your app tries to start.
图 8.6 如果在使用 Razor Pages 的应用程序中调用 AddRazorPages() 失败,则当应用程序尝试启动时将出现异常。
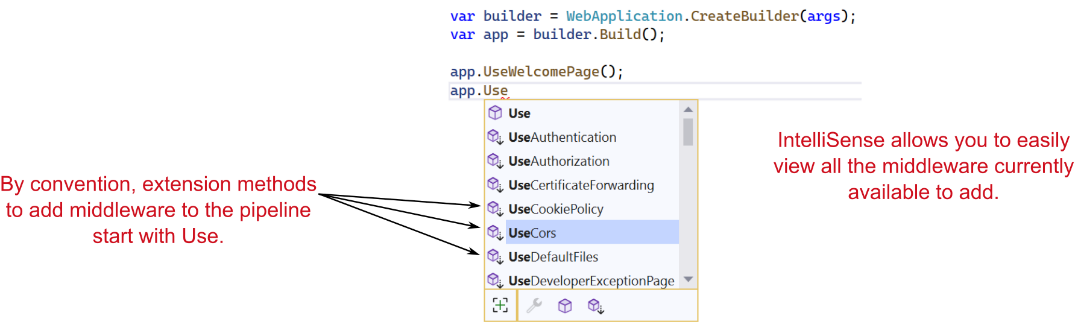
It’s also worth noting that some of the Add*() extension methods allow you to specify additional options when you call them, often by way of a lambda expression. You can think of these options as configuring the installation of a service into your application. The AddRazorPages method, for example, provides a wealth of options for fine-tuning its behavior if you want to get your hands dirty, as shown by the IntelliSense snippet in figure 8.7.
还值得注意的是,某些 Add*() 扩展方法允许您在调用它们时指定其他选项,通常是通过 lambda 表达式。您可以将这些选项视为在应用程序中配置服务安装。例如,AddRazorPages 方法提供了大量选项,用于微调其行为(如果您想动手),如图 8.7 中的 IntelliSense 代码段所示。
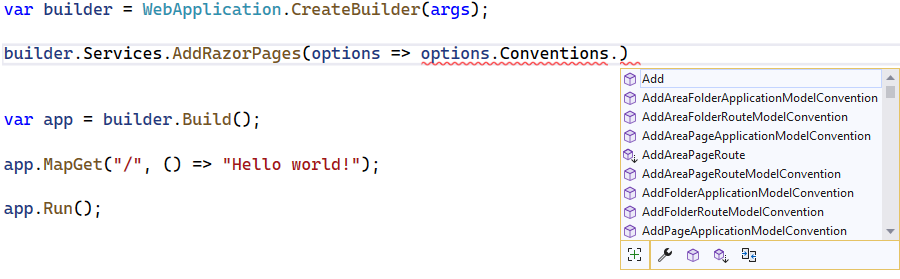
Figure 8.7 Configuring services when adding them to the service collection. The AddRazorPages() function allows you to configure a wealth of the internals of the framework.
图 8.7 在将服务添加到服务集合时配置服务。AddRazorPages() 函数允许您配置框架的大量内部结构。
It’s all very well registering services with the DI container, but the important question is how to use the container to get an instance of a registered service. In section 8.5 we look at two possible ways to access these services and discuss when you should choose one over the other.
向 DI 容器注册服务一切都很好,但重要的问题是如何使用容器来获取已注册服务的实例。在 Section 8.5 中,我们将介绍访问这些服务的两种可能方法,并讨论何时应该选择其中一种。
8.5 Using services from the DI container
8.5 使用 DI 容器中的服务
In a minimal API application, you have two main ways to access services from the DI container:
在最小 API 应用程序中,有两种主要方法可以从 DI 容器访问服务:
-
Inject services into an endpoint handler.
将服务注入到终端节点处理程序中。 -
Access the DI container directly in Program.cs.
直接在 Program.cs 中访问 DI 容器。
The first approach—injecting services into an endpoint handler—is the most common way to access the root of a dependency graph. You should use this approach in almost all cases in your minimal API applications. You can inject a service into an endpoint handler by adding it as a parameter to your endpoint handler method, as you saw in chapters 6 and 7 when you injected a LinkGenerator instance into your handler.
第一种方法 — 将服务注入终端节点处理程序 — 是访问依赖关系图根的最常用方法。在最小 API 应用程序中,几乎在所有情况下都应该使用此方法。您可以通过将服务作为参数添加到端点处理程序方法中,将服务注入到端点处理程序中,就像您在第 6 章和第 7 章中看到的那样,当您将 LinkGenerator 实例注入到处理程序中时。
Listing 8.7 Injecting the LinkGenerator service in an endpoint handler
app.MapGet("/links", (LinkGenerator links) => ❶
{
    string link = links.GetPathByName("products");
    return $"View the product at {link}";
});
❶ The DI container creates a LinkGenerator instance and passes it as the argument to the handler.
DI 容器创建一个 LinkGenerator 实例,并将其作为参数传递给处理程序。
The minimal API infrastructure sees that you need an instance of the LinkGenerator, which is a service registered in the container, and asks the DI container to provide an instance of the service. The DI container either creates a new instance of LinkGenerator (or reuses an existing one) and returns it to the minimal API infrastructure. Then the LinkGenerator is passed as an argument to invoke the endpoint handler.
最小的 API 基础结构看到您需要一个 LinkGenerator 的实例,该实例是在容器中注册的服务,并要求 DI 容器提供服务的实例。DI 容器创建 LinkGenerator 的新实例(或重用现有实例)并将其返回到最小的 API 基础结构。然后,将 LinkGenerator 作为参数传递以调用端点处理程序。
Note Whether the DI container creates a new instance or reuses an existing instance depends on the lifetime used to register the service. You’ll learn about lifetimes in chapter 9.
注意 DI 容器是创建新实例还是重用现有实例取决于用于注册服务的生命周期。您将在第 9 章中了解一生。
As already mentioned, the DI container creates an entire dependency graph. The LinkGenerator implementation registered with the DI container declares the dependencies it requires by having parameters in its constructor, just as the EmailSender type from section 8.1 declared its dependencies. When the DI container creates the LinkGenerator, it first creates all the service’s dependencies and uses them to create the final LinkGenerator instance.
如前所述,DI 容器会创建一个完整的依赖项关系图。向 DI 容器注册的 LinkGenerator 实现通过其构造函数中的参数来声明它所需的依赖项,就像第 8.1 节中的 EmailSender 类型声明其依赖项一样。当 DI 容器创建 LinkGenerator 时,它首先创建服务的所有依赖项,并使用它们创建最终的 LinkGenerator 实例。
Injecting services into your handlers is the canonical DI approach for minimal API endpoint handlers, but sometimes you need to access a service outside the context of a request. You may have lots of reasons to do this, but some of the most common relate to working with a database or logging. You may want to run some code when your app is starting to update a database’s schema before the app starts handling requests, for example. If you need to access services in Program.cs outside the context of a request, you can retrieve services from the DI container directly by using the WebApplication.Services property, which exposes the container as an IServiceProvider.
将服务注入处理程序是最小 API 端点处理程序的规范 DI 方法,但有时您需要在请求上下文之外访问服务。您可能有很多理由这样做,但其中一些最常见的原因与使用数据库或日志记录有关。例如,当应用程序开始更新数据库的架构时,您可能希望在应用程序开始处理请求之前运行一些代码。如果需要在请求上下文之外访问 Program.cs 中的服务,则可以使用 WebApplication 直接从 DI 容器中检索服务。Services 属性,该属性将容器公开为 IServiceProvider。
Note You register services with the IServiceCollection exposed on WebApplicationBuilder.Services. You request services with the IServiceProvider exposed on WebApplication.Services.
注意 向 IServiceCollection 注册服务在 WebApplicationBuilder.Services 上公开。你请求IServiceProvider 的服务WebApplication.Services 的 Web 应用程序。
The IServiceProvider acts as a service locator, so you can request services from it directly by using GetService() and GetRequiredService():
IServiceProvider 充当服务定位器,因此您可以使用 GetService() 和 GetRequiredService() 直接向它请求服务:
-
GetService<T>()—Returns the requested service T if it is available in the DI container; otherwise, returns null
GetService<T>()— 如果请求的服务 T 在 DI 容器中可用,则返回该服务 T;否则,返回 null -
GetRequiredService<T>()—Returns the requested service T if it is available in the DI container; otherwise, throws an InvalidOperationException
GetRequiredService<T>()— 如果请求的服务 T 在 DI 容器中可用,则返回该服务 T;否则,将引发 InvalidOperationException
I generally favor GetRequiredService over GetService, as it immediately tells you whether you have a configuration problem with your DI container by throwing an exception, and you don’t have to handle nulls.
我通常更喜欢 GetRequiredService 而不是 GetService,因为它通过引发异常立即告诉您 DI 容器是否存在配置问题,并且您不必处理 null。
You can use either of these methods in Program.cs to retrieve a service from DI. The following listing shows how to retrieve a LinkGenerator from the DI container, but you can access any service registered in the DI container here.
您可以在 Program.cs 中使用这两种方法中的任何一种从 DI 检索服务。下面的清单显示了如何从 DI 容器中检索 LinkGenerator,但您可以在此处访问在 DI 容器中注册的任何服务。
Listing 8.8 Retrieving a service from the DI container using WebApplication.Services
清单 8.8 从 DI 容器中检索服务使用 WebApplication.Services
WebApplicationBuilder builder = WebApplication.CreateBuilder(args);
WebApplication app = builder.Build();

app.MapGet("/", () => "Hello World!");

LinkGenerator links = ❶
    app.Services.GetRequiredService<LinkGenerator>(); ❶

app.Run(); ❷
❶ Retrieves a service from the DI container using the GetRequiredService<T>()
extension method
使用 GetRequiredService<T>() 扩展方法从 DI 容器中检索服务
❷ You must access services before app.Run(), as this call blocks until your app
exits.
您必须先访问服务,然后才能应用。Run(),因为此调用会一直阻止,直到您的应用退出。
This approach, in which you call the DI container directly to ask for a class, is called the service locator pattern. Generally speaking, you should try to avoid this pattern in your code; include your dependencies as constructor or endpoint handler arguments directly, and let the DI container provide them for you. This pattern is the only way to access DI services in the main loop of your application in Program.cs, however, so don’t worry about using it here. Still, you should absolutely avoid accessing WebApplication.Services from inside your endpoint handlers or other types whenever possible.
在这种方法中,您可以直接调用 DI 容器来请求一个类,这种方法称为服务定位器模式。一般来说,您应该尽量避免在代码中使用这种模式;直接将您的依赖项作为构造函数或终端节点处理程序参数包含在内,并让 DI 容器为您提供它们。但是,此模式是在 Program.cs 中访问应用程序主循环中的 DI 服务的唯一方法,因此不必担心在此处使用它。不过,您绝对应该避免访问 WebApplication 。尽可能从终端节点处理程序或其他类型内部获取服务。
Note You can read about the service locator antipattern in Dependency Injection Principles, Practices, and Patterns, by Steven van Deursen and Mark Seemann (Manning, 2019).
注意 您可以在 Steven van Deursen 和 Mark Seemann 编写的 Dependency Injection Principles, Practices, and Patterns(Manning,2019 年)中阅读有关服务定位器反模式的信息。
In this chapter we covered some of the reasons to use DI in your applications, how to enable optional ASP.NET Core features by adding services to the DI container, and how to access services from the DI container by using injection into your endpoint handlers. In chapter 9 you’ll learn about service lifetimes and how to register your own services with the DI container.
在本章中,我们介绍了在应用程序中使用 DI 的一些原因,如何通过向 DI 容器添加服务来启用可选的 ASP.NET Core 功能,以及如何通过使用注入到端点处理程序中来访问 DI 容器中的服务。在第 9 章中,您将了解服务生命周期以及如何向 DI 容器注册自己的服务。
8.6 Summary
8.6 总结
DI is baked into the ASP.NET Core framework. You need to ensure that your application adds all the framework’s dependencies for optional features in Program.cs; otherwise, you’ll get exceptions at runtime when the DI container can’t find the required services.
DI 已融入 ASP.NET Core 框架中。您需要确保您的应用程序为 Program.cs 中的可选功能添加了框架的所有依赖项;否则,当 DI 容器找不到所需的服务时,您将在运行时收到异常。
The dependency graph is the set of objects that must be created to create a specific requested root object. The DI container creates all these dependencies for you.
依赖关系图是创建特定请求的根对象时必须创建的对象集。DI 容器会为您创建所有这些依赖项。
You should aim to use explicit dependencies instead of implicit dependencies in most cases. ASP.NET Core uses constructor arguments and endpoint handler arguments to declare explicit dependencies.
在大多数情况下,您应该使用显式依赖项而不是隐式依赖项。ASP.NET Core 使用构造函数参数和终端节点处理程序参数来声明显式依赖项。
When discussing DI, the term service is used to describe any class or interface registered with the container.
在讨论 DI 时,术语 service 用于描述向容器注册的任何类或接口。
You register services with the DI container so that the container knows which implementation to use for each requested service. This registration typically takes the form “For interface X, use implementation Y.”
您可以向 DI 容器注册服务,以便容器知道要为每个请求的服务使用哪个实现。此注册通常采用“对于接口 X,使用实现 Y”的形式。
You must register services with the container by calling Addextension methods on the IServiceCollection exposed as WebApplicationBuilder.Services in Program.cs. If you forget to register a service that’s used by the framework or in your own code, you’ll get an InvalidOperationException at runtime.
必须通过在 Program.cs 中作为 WebApplicationBuilder.Services 公开的 IServiceCollection 上调用 Add扩展方法来向容器注册服务。如果您忘记注册框架使用的服务或在您自己的代码中注册的服务,您将在运行时收到 InvalidOperationException。
You can retrieve services from the DI container in your endpoint handlers by adding a parameter of the required type.
您可以通过添加所需类型的参数,从终端节点处理程序中的 DI 容器中检索服务。
You can retrieve services from the DI container in Program.cs via the service locator pattern by calling GetService<T>() or GetRequiredService<T>() on the IServiceProvider exposed as WebApplication.Services. Service location is generally considered to be an antipattern; generally, you shouldn’t use it inside your handler methods, but it’s fine to use it directly inside Program.cs.
您可以通过对公开为 WebApplication.Services 的 IServiceProvider 调用 GetService<T>() 或 GetRequiredService<T>() Program.cs 中的服务定位器模式从 DI 容器中检索服务。服务位置通常被视为反模式;通常,您不应该在 Handler 方法中使用它,但可以直接在 Program.cs 中使用它。
GetService<T>() returns null if the requested service isn’t registered with the DI container. By contrast, GetRequiredService<T>() throws an InvalidOperationException.
GetService<T>() 如果请求的服务未注册到 DI 容器,则返回 null。相比之下,GetRequiredService<T>() 会引发 InvalidOperationException。