ASP.NET Core in Action 3 Your first application
3 Your first application
3 您的第一个应用程序
This chapter covers
本章涵盖
- Creating your first ASP.NET Core web application Running your application
创建您的第一个 ASP.NET Core Web 应用程序运行您的应用程序
*Understanding the components of your application
了解应用程序的组件
In the previous chapters, I gave you an overview of how ASP.NET Core applications work and when you should use them. Now you should set up a development environment to use for building applications.
在前面的章节中,我概述了 ASP.NET Core 应用程序的工作原理以及何时应该使用它们。现在,您应该设置一个用于构建应用程序的开发环境。
TIP See appendix A for guidance on installing the .NET 7 software development kit (SDK) and choosing an editor/integrated development environment (IDE) for building ASP.NET Core apps.
提示:有关安装 .NET 7 软件开发工具包 (SDK) 和选择编辑器/集成开发环境 (IDE) 以构建 ASP.NET Core 应用程序的指导,请参阅附录 A。
In this chapter, you'll dive right in by creating your first web app. You'll get to kick the tires and poke around a little to get a feel for how it works. In later chapters, I’ll show you how to go about customizing and building your own applications.
在本章中,您将通过创建您的第一个 Web 应用程序来深入了解。您将可以踢轮胎并四处探查,以了解它的工作原理。在后面的章节中,我将向您展示如何自定义和构建自己的应用程序。
As you work through this chapter, you should begin to get a grasp of the various components that make up an ASP.NET Core application, as well as an understanding of the general application-building process. Most applications you create will start from a similar template, so it’s a good idea to get familiar with the setup as soon as possible.
在学习本章时,您应该开始掌握构成 ASP.NET Core 应用程序的各种组件,并了解一般的应用程序构建过程。您创建的大多数应用程序都将从类似的模板开始,因此最好尽快熟悉设置。
DEFINITION A template provides the basic code required to build an application. You can use a template as the starting point for building your own apps.
定义 模板提供构建应用程序所需的基本代码。您可以使用模板作为起点用于构建您自己的应用程序。
I’ll start by showing you how to create a basic ASP.NET Core application using one of the Visual Studio templates. If you’re using other tooling, such as the .NET command-line interface (CLI), you’ll have similar templates available. I use Visual Studio 2022 and ASP.NET Core 7 with .NET 7 in this chapter, but I also provide tips for working with the .NET CLI.
首先,我将向您展示如何使用其中一个 Visual Studio 模板创建基本的 ASP.NET Core 应用程序。如果您使用的是其他工具,例如 .NET 命令行界面 (CLI),您将有类似的模板可用。在本章中,我将 Visual Studio 2022 和 ASP.NET Core 7 与 .NET 7 结合使用,但我也提供了使用 .NET CLI 的提示。
TIP You can view the application code for this chapter in the GitHub repository for the book at http://mng.bz/5wj1.
提示 您可以在 http://mng.bz/5wj1 本书的 GitHub 存储库中查看本章的应用程序代码。
After you’ve created your application, I’ll show you how to restore all the necessary dependencies, compile your application, and run it to see the output. The application will be simple, containing the bare bones of an ASP.NET Core application that responds with "Hello World!"
创建应用程序后,我将向您展示如何恢复所有必要的依赖项、编译应用程序并运行它以查看输出。该应用程序将很简单,包含 ASP.NET Core 应用程序的基本框架,该应用程序以 “Hello World!
Having run your application, your next step is understanding what’s going on! We’ll take a journey through the ASP.NET Core application, looking at each file in the template in turn. You’ll get a feel for how an ASP.NET Core application is laid out and see what the C# code for the smallest possible app looks like.
运行应用程序后,下一步是了解发生了什么!我们将浏览 ASP.NET Core 应用程序,依次查看模板中的每个文件。您将了解 ASP.NET Core 应用程序的布局方式,并了解尽可能小的应用程序的 C# 代码是什么样子的。
As a final twist, you’ll see how to extend your application to handle requests for static files, as well as how to create a simple API that returns data in standard JavaScript Object Notation (JSON) format.
最后,您将了解如何扩展应用程序以处理对静态文件的请求,以及如何创建以标准 JavaScript 对象表示法 (JSON) 格式返回数据的简单 API。
At this stage, don’t worry if you find parts of the project confusing or complicated; you’ll be exploring each section in detail as you move through the book. By the end of the chapter, you should have a basic understanding of how ASP.NET Core applications are put together, from when your application is first run to when a response is generated. Before we begin, though, we’ll review how ASP.NET Core applications handle requests.
在这个阶段,如果您发现项目的某些部分令人困惑或复杂,请不要担心;在阅读本书时,您将详细探索每个部分。在本章结束时,您应该对 ASP.NET Core 应用程序是如何组合在一起的,从您的应用程序开始,您应该有一个基本的了解run 到生成响应时。不过,在开始之前,我们将回顾一下 ASP.NET Core 应用程序如何处理请求。
3.1 A brief overview of an ASP.NET Core application
3.1 ASP.NET Core 应用程序概述
In chapter 1, I described how a browser makes an HTTP request to a server and receives a response, which it uses to render HTML on the page. ASP.NET Core allows you to generate that HTML dynamically depending on the particulars of the request, so that (for example) you can display different data depending on the current logged-in user.
在第 1 章中,我介绍了浏览器如何向服务器发出 HTTP 请求并接收响应,并使用该响应在页面上呈现 HTML。ASP.NET Core 允许您根据请求的详细信息动态生成该 HTML,以便(例如)您可以根据当前登录的用户显示不同的数据。
Suppose that you want to create a web app to display information about your company. You could create a simple ASP.NET Core app to achieve this goal; later, you could add dynamic features to your app. Figure 3.1 shows how the application would handle a request for a page in your application.
假设您要创建一个 Web 应用程序来显示有关您公司的信息。您可以创建一个简单的 ASP.NET Core 应用程序来实现此目标;稍后,您可以向应用程序添加动态功能。图 3.1 显示了应用程序如何处理对应用程序中页面的请求。
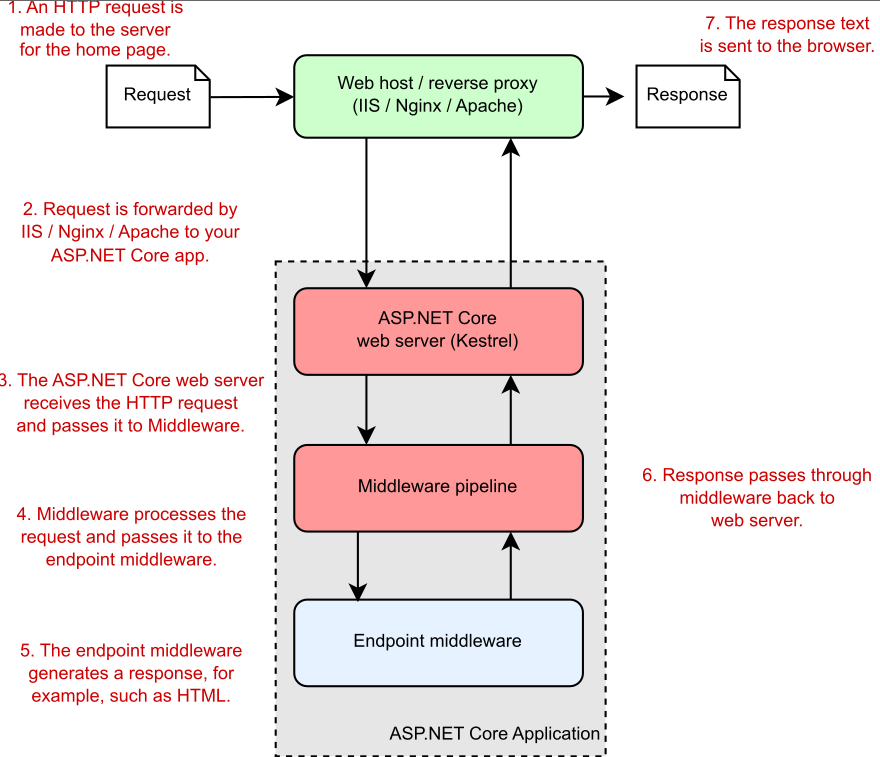
Figure 3.1 An overview of an ASP.NET Core application. The ASP.NET Core application receives an incoming HTTP request from the browser. Every request passes to the middleware pipeline, which potentially modifies it and then passes it to the endpoint middleware at the end of the pipeline to generate a response. The response passes back through the middleware to the server and finally out to the browser.
图 3.1 ASP.NET Core 应用程序概述。ASP.NET Core 应用程序从浏览器接收传入的 HTTP 请求。每个请求都会传递到中间件管道,中间件管道可能会对其进行修改,然后将其传递到管道末尾的终端节点中间件以生成响应。响应通过中间件传回服务器,最后传回浏览器。
Much of this diagram should be familiar to you from figure 1.3 in chapter 1; the request and response and the ASP.NET Core web server are still there. But you’ll notice that I’ve added a reverse proxy to show a common deployment pattern for ASP.NET Core applications. I’ve also expanded the ASP.NET Core application itself to show the middleware pipeline and the endpoint middleware—the main custom part of your app that goes into generating the response from a request.
您应该从第 1 章的图 1.3 中熟悉此图表的大部分内容;请求和响应以及 ASP.NET Core Web 服务器仍然存在。但您会注意到,我添加了一个反向代理来显示 ASP.NET Core 应用程序的常见部署模式。我还扩展了 ASP.NET Core 应用程序本身,以显示中间件管道和终端节点中间件,后者是应用程序的主要自定义部分,用于从请求生成响应。
The first port of call after the reverse proxy forwards a request is the ASP.NET Core web server, which is the default cross-platform Kestrel server. Kestrel takes the raw incoming network request and uses it to generate an HttpContext object that the rest of the application can use.
反向代理转发请求后的第一个调用端口是 ASP.NET Core Web 服务器,它是默认的跨平台 Kestrel 服务器。Kestrel 获取原始传入网络请求,并使用它来生成应用程序其余部分可以使用的 HttpContext 对象。
The HttpContext object
HttpContext 对象
The HttpContext constructed by the ASP.NET Core web server is used by the application as a sort of storage box for a single request. Anything that’s specific to this particular request and the subsequent response can be associated with it and stored in it, such as properties of the request, request-specific services, data that’s been loaded, or errors that have occurred. The web server fills the initial HttpContext with details of the original HTTP request and other configuration details and then passes it on to the rest of the application.
由 ASP.NET Core Web 服务器构建的 HttpContext 被应用程序用作单个请求的一种存储盒。特定于此特定请求和后续响应的任何内容都可以与该请求相关联并存储在其中,例如请求的属性、特定于请求的服务、已加载的数据或已发生的错误。Web 服务器使用原始 HTTP 请求的详细信息和其他配置详细信息填充初始 HttpContext,然后将其传递给应用程序的其余部分。
NOTE Kestrel isn’t the only HTTP server available in ASP.NET Core, but it’s the most performant and is cross-platform. I’ll refer only to Kestrel throughout the book. A different web server, IIS HTTP Server, is used when running in-process in Internet Information Services (IIS). The main alternative, HTTP.sys, runs only in Windows and can’t be used with IIS.1
注意 Kestrel 并不是 ASP.NET Core 中唯一可用的 HTTP 服务器,但它是性能最高的,并且是跨平台的。我在整本书中只提到红隼。在 Internet Information Services (IIS) 中进行进程内运行时,会使用不同的 Web 服务器 IIS HTTP Server。主要替代方案 HTTP.sys 仅在 Windows 中运行,不能与 IIS 一起使用。1
Kestrel is responsible for receiving the request data and constructing a .NET representation of the request, but it doesn’t attempt to generate a response directly. For that task, Kestrel hands the HttpContext to the middleware pipeline in every ASP.NET Core application. This pipeline is a series of components that process the incoming request to perform common operations such as logging, handling exceptions, and serving static files.
Kestrel 负责接收请求数据并构造请求的 .NET 表示形式,但它不会尝试直接生成响应。对于该任务,Kestrel 将 HttpContext 交给每个 ASP.NET Core 应用程序中的中间件管道。此管道是一系列组件,用于处理传入请求以执行常见作,例如日志记录、处理异常和提供静态文件。
NOTE You’ll learn about the middleware pipeline in detail in chapter 4.
注意:您将在第 4 章中详细了解中间件管道。
At the end of the middleware pipeline is the endpoint middleware, which is responsible for calling the code that generates the final response. In most applications that code will be a Model-View-Controller (MVC), Razor Pages, or minimal API endpoint.
中间件管道的末端是端点中间件,它负责调用生成最终响应的代码。在大多数应用程序中,该代码将是模型-视图-控制器 (MVC)、Razor Pages 或最小 API 终结点。
Most ASP.NET Core applications follow this basic architecture, and the example in this chapter is no different. First, you’ll see how to create and run your application; then you’ll look at how the code corresponds to the outline in figure 3.1. Without further ado, let’s create an application!
大多数 ASP.NET Core 应用程序都遵循此基本体系结构,本章中的示例也不例外。首先,您将了解如何创建和运行您的应用程序;然后,您将了解代码如何与图 3.1 中的大纲相对应。事不宜迟,让我们创建一个应用程序!
3.2 Creating your first ASP.NET Core application
3.2 创建您的第一个 ASP.NET Core 应用程序
In this section you’re going to create a minimal API application that returns "Hello World!" when you call the HTTP API. This application is about the simplest ASP.NET Core application you can create, but it demonstrates many of the fundamental concepts of building and running applications with .NET.
在本节中,您将创建一个返回 “Hello World!” 的最小 API 应用程序。当您调用 HTTP API 时。此应用程序是您可以创建的最简单的 ASP.NET Core 应用程序,但它演示了使用 .NET 构建和运行应用程序的许多基本概念。
You can start building applications with ASP.NET Core in many ways, depending on the tools and operating system you’re using. Each set of tools has slightly different templates, but the templates have many similarities. The example used throughout this chapter is based on a Visual Studio 2022 template, but you can easily follow along with templates from the .NET CLI or Visual Studio for Mac.
您可以通过多种方式开始使用 ASP.NET Core 构建应用程序,具体取决于您使用的工具和作系统。每组工具的模板略有不同,但模板有许多相似之处。本章中使用的示例基于 Visual Studio 2022 模板,但您可以轻松地使用 .NET CLI 或 Visual Studio for Mac 中的模板进行作。
NOTE As a reminder, I use Visual Studio 2022 and ASP.NET Core with .NET 7 throughout the book.
注意:提醒一下,我在整本书中使用了 Visual Studio 2022 和 ASP.NET Core 和 .NET 7。
Getting an application up and running locally typically involves four basic steps, which we’ll work through in this chapter:
在本地启动和运行应用程序通常涉及四个基本步骤,我们将在本章中介绍这些步骤:
-
Generate—Create the base application from a template to get started.
生成 - 从模板创建基本应用程序以开始使用。 -
Restore—Restore all the packages and dependencies to the local project folder using NuGet.
还原 - 使用 NuGet 将所有包和依赖项还原到本地项目文件夹。 -
Build—Compile the application, and generate all the necessary artifacts.
构建 - 编译应用程序,并生成所有必要的工件。 -
Run—Run the compiled application.
运行 - 运行编译后的应用程序。
Visual Studio and the .NET CLI include many ASP.NET Core templates for building different types of applications, such as
Visual Studio 和 .NET CLI 包含许多 ASP.NET Core 模板,用于构建不同类型的应用程序,例如
-
Minimal API applications—HTTP API applications that return data in JSON format, which can be consumed by single-page applications (SPAs) and mobile apps.They’re typically used in conjunction with client-side applications such as Angular and React.js or mobile applications.
最小 API 应用程序 — 以 JSON 格式返回数据的 HTTP API 应用程序,可供单页应用程序 (SPA) 和移动应用程序使用。它们通常与客户端应用程序(如 Angular 和 React.js)或移动应用程序结合使用。 -
Razor Pages web applications—Razor Pages applications generate HTML on the server and are designed to be viewed by users in a web browser directly.
Razor Pages Web 应用程序 - Razor Pages 应用程序在服务器上生成 HTML,旨在供用户在 Web 浏览器中直接查看。 -
MVC applications—MVC applications are similar to Razor Pages apps in that they generate HTML on the server and are designed to be viewed by users directly in a web browser. They use traditional MVC controllers instead of Razor Pages.
MVC 应用程序 - MVC 应用程序类似于 Razor Pages 应用程序,因为它们在服务器上生成 HTML,并且旨在供用户直接在 Web 浏览器中查看。它们使用传统的 MVC 控制器,而不是 Razor Pages。 -
Web API applications—Web API applications are similar to minimal API apps, in that they are typically consumed by SPAs and mobile apps. Web API apps provide additional functionality compared to minimal APIs, at the expense of some performance and convenience.
Web API 应用程序 - Web API 应用程序类似于最小 API 应用程序,因为它们通常由 SPA 和移动应用程序使用。与最小 API 相比,Web API 应用程序提供了额外的功能,但会牺牲一些性能和便利性。
We’ll look at each of these application types in this book, but in part 1 we focus on minimal APIs, so in section 3.2.1 we start by looking at the simplest ASP.NET Core app you can create.
在本书中,我们将介绍这些应用程序类型中的每一种,但在第 1 部分中,我们将重点介绍最小的 API,因此在第 3.2.1 节中,我们首先介绍您可以创建的最简单的 ASP.NET Core 应用程序。
3.2.1 Using a template to get started
3.2.1 使用模板开始
In this section you’ll use a template to create your first ASP.NET Core minimal API application. Using a template can get you up and running with an application quickly, automatically configuring many of the fundamental pieces. Both Visual Studio and the .NET CLI come with standard templates for building web applications, console applications, and class libraries.
在本部分中,您将使用模板创建您的第一个 ASP.NET Core 最小 API 应用程序。使用模板可以使您快速启动并运行应用程序,并自动配置许多基本部分。Visual Studio 和 .NET CLI 都附带了用于构建 Web 应用程序、控制台应用程序和类库的标准模板。
TIP In .NET, a project is a unit of deployment, which will be compiled into a .dll file or an executable, for example. Each separate app is a separate project. Multiple projects can be built and developed at the same time in a solution.
提示 在 .NET 中,项目是一个部署单元,例如,它将被编译成 .dll 文件或可执行文件。每个单独的应用程序都是一个单独的项目。可以在解决方案中同时生成和开发多个项目。
To create your first web application, open Visual Studio, and perform the following steps:
要创建您的第一个 Web 应用程序,请打开 Visual Studio,然后执行以下步骤:
-
Choose Create a New Project from the splash screen, or choose File > New > Project from the main Visual Studio screen.
从初始屏幕中选择 Create a New Project,或从 Visual Studio 主屏幕中选择 File > New > Project。 -
From the list of templates, choose ASP.NET Core Empty; select the C# language template, as shown in figure 3.2; and then choose Next.
从模板列表中,选择 ASP.NET Core Empty;选择 C# 语言模板,如图 3.2 所示;,然后选择 Next (下一步)
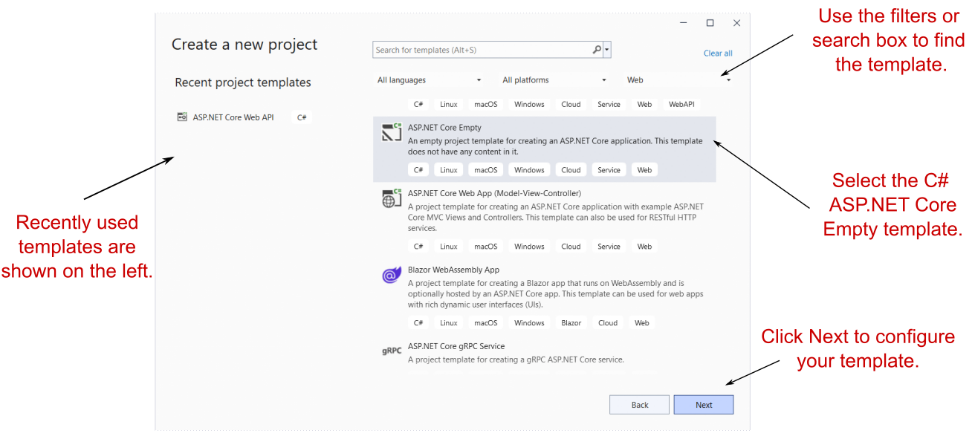
Figure 3.2 The Create a New Project dialog box. Select the C# ASP.NET Core Empty template in the list on the right side. When you next create a new project, you can choose a template from the Recent Project Templates list on the left side.
图 3.2 “创建新项目”对话框。在右侧的列表中选择 C# ASP.NET Core Empty 模板。下次创建新项目时,您可以从左侧的 Recent Project Templates (最近的项目模板) 列表中选择一个模板。
On the next screen, enter a project name, location, and solution name, and choose Create, as shown in figure 3.3. You might use WebApplication1 as both the project and solution name, for example.
在下一个屏幕上,输入项目名称、位置和解决方案名称,然后选择 Create(创建),如图3.3所示. 例如,您可以使用 WebApplication1 作为项目和解决方案名称。
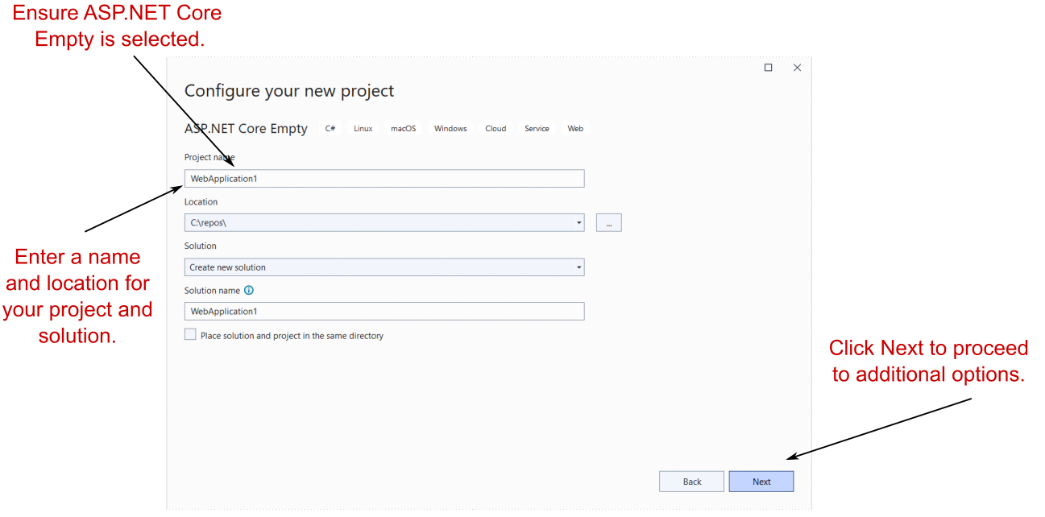
Figure 3.3 The Configure Your New Project dialog box. Enter a project name, location, and solution name, and choose Next.
图 3.3 “Configure Your New Project”(配置新项目)对话框。输入项目名称、位置和解决方案名称,然后选择 Next(下一步)。
- On the following screen (figure 3.4), do the following:
在以下屏幕(图 3.4)中,执行以下作:
a. Select .NET 7.0. If this option isn’t available, ensure that you have .NET 7 installed. See appendix A for details on configuring your environment.
a.选择 .NET 7.0。如果此选项不可用,请确保您已安装 .NET 7。有关配置环境的详细信息,请参阅附录 A。
b. Ensure that Configure for HTTPS is checked.
b.确保选中 Configure for HTTPS (为 HTTPS 配置)。
c. Ensure that Enable Docker is not checked.
c.确保未选中 Enable Docker。
d. Ensure that Do not use top-level statements is not checked. (I explain top-level statements in section 3.6.)
d.确保 Do not use top-level statements 未选中。(我在 3.6 节中解释了顶级语句)。
e. Choose Create.
e.选择 Create (创建)。
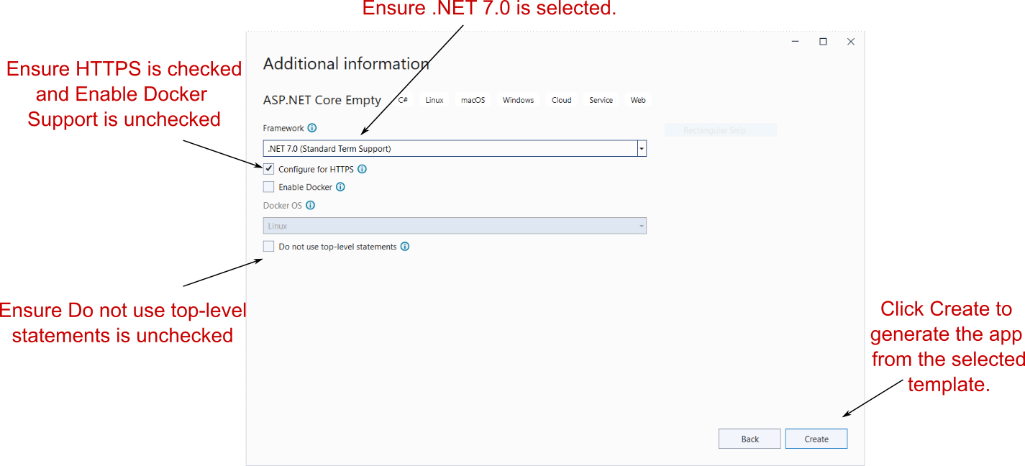
Figure 3.4 The Additional Information dialog box follows the Configure Your New Project dialog box and lets you customize the template that will generate your application. For this starter project, you’ll create an empty .NET 7 application that uses top-level statements.
图 3.4 “其他信息”对话框位于 “配置新项目” 对话框之后,并且用于自定义将生成应用程序的模板。对于此初学者项目,您将创建一个使用顶级语句的空 .NET 7 应用程序。
- Wait for Visual Studio to generate the application from the template. When Visual Studio finishes, an introductory page about ASP.NET Core appears; you should see that Visual Studio has created and added some files to your project, as shown in figure 3.5.
等待 Visual Studio 从模板生成应用程序。Visual Studio 完成后,将显示有关 ASP.NET Core 的介绍性页面;您应该看到 Visual Studio 已经创建了一些文件并将其添加到您的项目中,如图 3.5 所示。
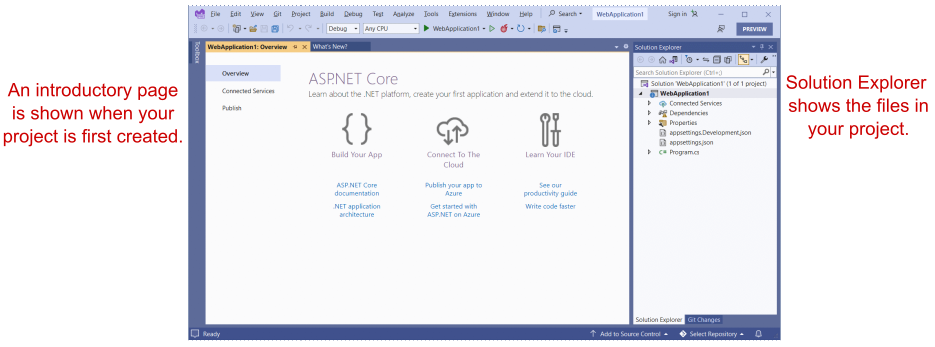
Figure 3.5 Visual Studio after creating a new ASP.NET Core application from a template. The Solution Explorer shows your newly created project. The introductory page has helpful links for learning about ASP.NET Core.
图 3.5 从模板创建新的 ASP.NET Core 应用程序后的 Visual Studio。Solution Explorer 将显示您新创建的项目。介绍性页面包含用于了解 ASP.NET Core 的有用链接。
If you’re not using Visual Studio, you can create a similar template by using the .NET CLI. Create a folder to hold your new project. Open a PowerShell or cmd prompt in the folder (Windows) or a terminal session (Linux or macOS), and run the commands in the following listing.
如果您不使用 Visual Studio,则可以使用 .NET CLI 创建类似的模板。创建一个文件夹来保存您的新文件夹项目。在文件夹 (Windows) 或终端会话 (Linux 或 macOS) 中打开 PowerShell 或 cmd 提示符,然后运行以下列表中的命令。
Listing 3.1 Creating a new minimal API application with the .NET CLI
清单 3.1 使用 .NET CLI 创建一个新的最小 API 应用程序
dotnet new sln -n WebApplication1 ❶
dotnet new web -o WebApplication1 ❷
dotnet sln add WebApplication1    ❸
❶ Creates a solution file called WebApplication1 in the current folder
在当前文件夹中创建名为 WebApplication1 的解决方案文件
❷ Creates an empty ASP.NET Core project in a subfolder, WebApplication1
在子文件夹 WebApplication1 中创建空的 ASP.NET Core 项目
❸ Adds the new project to the solution file
将新项目添加到解决方案文件中
NOTE Visual Studio uses the concept of a solution to work with multiple projects. The example solution consists of a single project, which is listed in the .sln file. If you use a CLI template to create your project, you won’t have a .sln file unless you generate it explicitly by using additional .NET CLI templates (listing 3.1).
注意:Visual Studio 使用解决方案的概念来处理多个项目。示例解决方案由一个项目组成,该项目在 .sln 文件中列出。如果使用 CLI 模板创建项目,则不会有 .sln 文件,除非使用其他 .NET CLI 模板(清单 3.1)显式生成该文件。
Whether you use Visual Studio or the .NET CLI, now you have the basic files required to build and run your first ASP.NET Core application.
无论您使用的是 Visual Studio 还是 .NET CLI,现在您都拥有构建和运行第一个 ASP.NET Core 应用程序所需的基本文件。
3.2.2 Building the application
3.2.2 构建应用程序
At this point, you have most of the files necessary to run your application, but you’ve got two steps left. First, you need to ensure all the dependencies used by your project are downloaded to your machine, and second, you need to compile your application so that it can be run.
此时,您拥有运行应用程序所需的大部分文件,但还剩下两个步骤。首先,您需要确保项目使用的所有依赖项都已下载到您的计算机上,其次,您需要编译应用程序,以便它可以运行。
The first step isn’t strictly necessary, as both Visual Studio and the .NET CLI automatically restore packages when they create your project, but it’s good to know what’s going on. In earlier versions of the .NET CLI, before 2.0, you needed to restore packages manually by using dotnet restore.
第一步并不是绝对必要的,因为 Visual Studio 和 .NET CLI 都会在创建项目时自动还原包,但最好了解发生了什么。在早期版本的 .NET CLI 中,在 2.0 之前,您需要使用 dotnet restore 手动还原包。
You can compile your application by choosing Build > Build Solution, pressing the shortcut Ctrl-Shift-B, or running dotnet build from the command line. If you build from Visual Studio, the output window shows the progress of the build, and assuming that everything is hunky-dory, Visual Studio compiles your application, ready for running. You can also run the dotnet build console commands from the Package Manager Console in Visual Studio.
您可以通过选择 Build > Build Solution(生成解决方案)、按快捷键 Ctrl-Shift-B 或从命令行运行 dotnet build 来编译应用程序。如果从 Visual Studio 进行构建,则输出窗口会显示构建进度,并假设一切都是 hunky-dory,则 Visual Studio 会编译您的应用程序,准备好运行。还可以从 Visual Studio 中的包管理器控制台运行 dotnet build 控制台命令。
TIP Visual Studio and the .NET CLI tools build your application automatically when you run it if they detect that a file has changed, so you generally won’t need to perform this step explicitly yourself.
提示 如果 Visual Studio 和 .NET CLI 工具检测到文件已更改,则它们在运行时会自动构建应用程序,因此您通常不需要自己显式执行此步骤。
NuGet packages and the .NET CLI
NuGet 包和 .NET CLI
One of the foundational components of .NET 7 cross-platform development is the .NET CLI, which provides several basic commands for creating, building, and running .NET 7 applications. Visual Studio effectively calls these commands automatically, but you can also invoke them directly from the command line if you’re using a different editor. The most common commands used during development are
.NET 7 跨平台开发的基础组件之一是.NET CLI,它提供了几个用于创建、构建和运行 .NET 7 应用程序的基本命令。Visual Studio 可以有效地自动调用这些命令,但如果您使用的是其他编辑器,也可以直接从命令行调用它们。开发过程中最常用的命令是
- dotnet restore
- dotnet build
- dotnet run
Each of these commands should be run inside your project folder and will act on that project alone. Except where explicitly noted, this is the case for all .NET CLI commands.
这些命令中的每一个都应该在你的项目文件夹中运行,并且将单独作用于该项目。除非明确说明,否则所有 .NET CLI 命令都是这种情况。
Most ASP.NET Core applications have dependencies on various external libraries, which are managed through the NuGet package manager. These dependencies are listed in the project, but the files of the libraries themselves aren’t included. Before you can build and run your application, you need to ensure that there are local copies of each dependency on your machine. The first command, dotnet restore, ensures that your application’s NuGet dependencies are downloaded and the files are referenced correctly by your project.
大多数 ASP.NET Core 应用程序都依赖于各种外部库,这些库通过 NuGet 包管理器进行管理。这些依赖项在项目中列出,但不包括库本身的文件。在构建和运行应用程序之前,您需要确保计算机上有每个依赖项的本地副本。第一个命令 dotnet restore 可确保下载应用程序的 NuGet 依赖项,并且项目正确引用这些文件。
ASP.NET Core projects list their dependencies in the project’s .csproj file, an XML file that lists each dependency as a PackageReference node. When you run dotnet restore, it uses this file to establish which NuGet packages to download. Any dependencies listed are available for use in your application.
ASP.NET Core 项目在项目的 .csproj 文件中列出其依赖项,该文件是一个将每个依赖项列为 PackageReference 节点的 XML 文件。运行 dotnet restore 时,它会使用此文件来确定要下载的 NuGet 包。列出的任何依赖项都可用于您的应用程序。
The restore process typically happens implicitly when you build or run your application, as shown in the following figure, but it can be useful sometimes to run it explicitly, such as in continuous-integration build pipelines.
还原过程通常在您构建或运行应用程序时隐式发生,如下图所示,但有时显式运行它可能很有用,例如在持续集成构建管道中。
The dotnet build command runs dotnet restore implicitly. Similarly, dotnet run runs dotnet build and dotnet restore. If you don’t want to run the previous steps automatically, you can use the --no-restore and --no- build flags, as in dotnet build --no-restore.
dotnet build 命令隐式运行 dotnet restore。同样,dotnet run 运行 dotnet build 和 dotnet restore。如果不想自动运行前面的步骤,可以使用 --no-restore 和 --no- build 标志,如 dotnet build --no-restore 中所示。
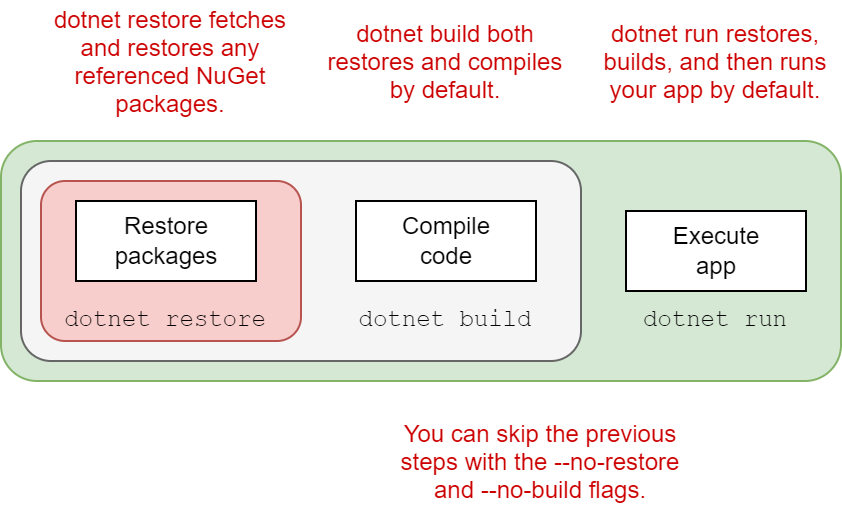
You can compile your application by using dotnet build, which checks for any errors in your application and, if it finds no problems, produces output binaries that can be run with dotnet run.
可以使用 dotnet build 编译应用程序,它会检查应用程序中的任何错误,如果未发现问题,则生成可以使用 dotnet run 运行的输出二进制文件。
Each command contains switches that can modify its behavior. To see the full list of available commands, run
每个命令都包含可以修改其行为的开关。要查看可用命令的完整列表,请运行
dotnet --help
To see the options available for a particular command, such as new, run
要查看特定命令的可用选项(如 new),请运行
dotnet new --help
3.3 Running the web application
3.3 运行 Web 应用程序
You’re ready to run your first application, and you have several ways to go about it. In Visual Studio, you can click the green arrow on the toolbar next to WebApplication1 or press the F5 shortcut. Visual Studio will automatically open a web browser window for you with the appropriate URL, and after a second or two, you should see the basic "Hello World!" response, as shown in figure 3.6.
您已准备好运行您的第一个应用程序,并且有几种方法可以开始运行。在 Visual Studio 中,您可以单击 WebApplication1 旁边的工具栏上的绿色箭头或按 F5 快捷方式。Visual Studio 将自动为您打开一个包含相应 URL 的 Web 浏览器窗口,一两秒钟后,您应该会看到基本的“Hello World! 响应,如图 3.6 所示。

Figure 3.6 The output of your new ASP.NET Core application. The template chooses a random port to use for your application’s URL, which will be opened in the browser automatically when you run from Visual Studio.
图 3.6 新的 ASP.NET Core 应用程序的输出。该模板选择一个随机端口用于应用程序的 URL,当您从 Visual Studio 运行时,该端口将自动在浏览器中打开。
Alternatively, instead of using Visual Studio, you can run the application from the command line with the .NET CLI tools by using dotnet run. Then you can open the URL in a web browser manually, using the address provided on the command line.
或者,您可以使用 dotnet run 使用 .NET CLI 工具从命令行运行应用程序,而不是使用 Visual Studio。然后,您可以使用命令行上提供的地址在 Web 浏览器中手动打开 URL。
Depending on whether you created your application with Visual Studio, you may see an http:// or https:// URL.
根据是否使用 Visual Studio 创建应用程序,您可能会看到 http:// 或 https:// URL。
TIP The first time you run the application from Visual Studio, you may be prompted to install the development certificate. Doing so ensures that your browser doesn’t display warnings about an invalid certificate.2 See chapter 28 for more about HTTPS certificates.
提示 首次从 Visual Studio 运行应用程序时,系统可能会提示您安装开发证书。这样做可以确保您的浏览器不会显示有关无效证书的警告。 2 有关 HTTPS 证书的更多信息,请参见第 28 章。
This basic application has a single endpoint that returns the plain-text response when you request the path /, as you saw in figure 3.6. There isn’t anything more you can do with this simple app, so let’s look at some code!
此基本应用程序具有单个终端节点,当您请求路径 / 时,该终端节点将返回纯文本响应,如图 3.6.这个简单的应用程序没有更多的事情可以做,所以让我们看看一些代码!
3.4 Understanding the project layout
3.4 了解项目布局
When you’re new to a framework, creating an application from a template can be a mixed blessing. On one hand, you can get an application up and running quickly, with little input required on your part. Conversely, the number of files can be overwhelming, leaving you scratching your head working out where to start. The basic web application template doesn’t contain a huge number of files and folders, as shown in figure 3.7, but I’ll run through the major ones to get you oriented.
当您不熟悉框架时,从模板创建应用程序可能是一件好坏参半的事情。一方面,您可以快速启动并运行应用程序,几乎不需要您输入。相反,文件的数量可能会让人不知所措,让您摸不着头脑,不知道从哪里开始。如图 3.7 所示,基本的 Web 应用程序模板不包含大量的文件和文件夹,但我将介绍主要的文件和文件夹,以便您了解情况。
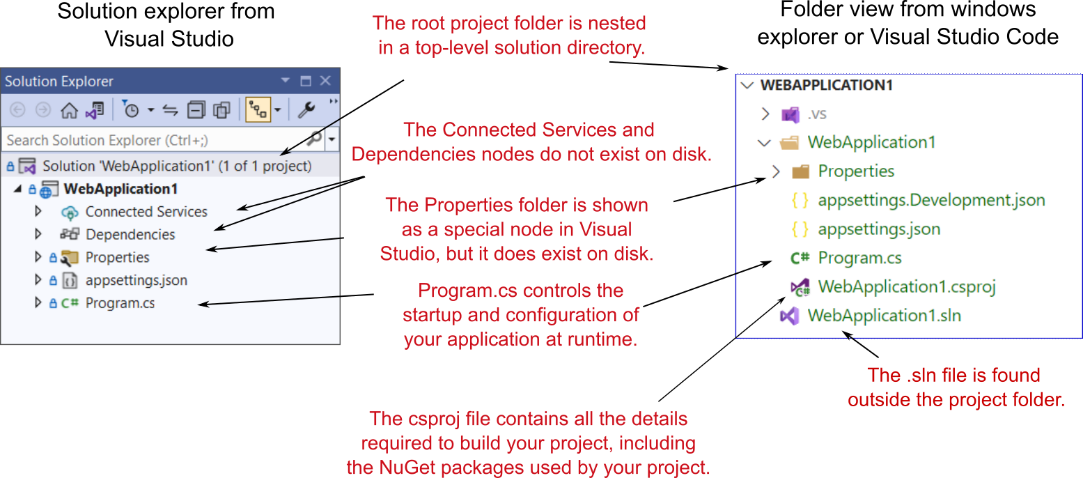
Figure 3.7 Solution Explorer and folder on disk for a new ASP.NET Core application. Solution Explorer also displays the Connected Services and Dependencies nodes, which list NuGet and other dependencies, though the folders themselves don’t exist on disk.
图 3.7 新 ASP.NET Core 应用程序的解决方案资源管理器和磁盘上的文件夹。“解决方案资源管理器”还显示“连接的服务”和“依赖项”节点,其中列出了 NuGet 和其他依赖项,但文件夹本身并不存在于磁盘上。
The first thing to notice is that the main project, WebApplication1, is nested in a top-level directory with the name of the solution, which is also WebApplication1 in this case. Within this top-level folder you’ll also find the solution (.sln) file used by Visual Studio, though this is hidden in Visual Studio’s Solution Explorer view.
首先要注意的是,主项目 WebApplication1 嵌套在具有解决方案名称的顶级目录中,在本例中也是 WebApplication1。在此顶级文件夹中,您还可以找到 Visual Studio 使用的解决方案 (.sln) 文件,尽管该文件隐藏在 Visual Studio 的“解决方案资源管理器”视图中。
Inside the solution folder you’ll find your project folder, which contains the most important file in your project: WebApplication1.csproj. This file describes how to build your project and lists any additional NuGet packages that it requires. Visual Studio doesn’t show the .csproj file explicitly, but you can edit it if you double-click the project name in Solution Explorer or right-click and choose Properties from the contextual menu. We’ll take a closer look at this project file in the next section.
在解决方案文件夹中,您将找到您的项目文件夹,其中包含项目中最重要的文件:WebApplication1.csproj。此文件描述了如何构建project 并列出它所需的任何其他 NuGet 包。Visual Studio 不会显式显示 .csproj 文件,但如果您在解决方案资源管理器中双击项目名称,或者右键单击并从上下文菜单中选择“属性”,则可以对其进行编辑。我们将在下一节中仔细研究此项目文件。
Your project folder contains a subfolder called Properties, which contains a single file: launchSettings.json. This file controls how Visual Studio will run and debug the application. Visual Studio shows the file as a special node in Solution Explorer, out of alphabetical order, near the top of your project. You’ve got two more special nodes in the project, Dependencies and Connected Services, but they don’t have corresponding folders on disk.
您的项目文件夹包含一个名为 Properties 的子文件夹,其中包含一个文件:launchSettings.json。此文件控制 Visual Studio 运行和调试应用程序的方式。Visual Studio 在“解决方案资源管理器”中将文件显示为一个特殊节点,不按字母顺序显示在项目顶部附近。项目中还有两个特殊节点,即 Dependencies 和 Connected Services,但它们在磁盘上没有相应的文件夹。
Instead, they show a collection of all the dependencies, such as NuGet packages, and remote services that the project relies on.In the root of your project folder, you’ll find two JSON files: appsettings.json and appsettings.Development.json. These files provide configuration settings that are used at runtime to control the behavior of your app.
相反,它们显示项目所依赖的所有依赖项(如 NuGet 包和远程服务)的集合。项目文件夹的根目录中,您将找到两个 JSON 文件:appsettings.json 和 appsettings。Development.json. 这些文件提供在运行时用于控制应用程序行为的配置设置。
Finally, Visual Studio shows one C# file in the project folder: Program.cs. In section 3.6 you’ll see how this file configures and runs your application.
最后,Visual Studio 在项目文件夹中显示一个 C# 文件:Program.cs。在 Section 3.6 中,您将看到此文件如何配置和运行您的应用程序。
3.5 The .csproj project file: Declaring your dependencies
3.5 .csproj 项目文件:声明依赖项
The .csproj file is the project file for .NET applications and contains the details required for the .NET tooling to build your project. It defines the type of project being built (web app, console app, or library), which platform the project targets (.NET Core 3.1, .NET 7 and so on), and which NuGet packages the project depends on.
.csproj 文件是 .NET 应用程序的项目文件,包含用于生成项目的 .NET 工具所需的详细信息。它定义正在生成的项目的类型 (Web 应用程序、控制台应用程序或库) ,以及项目面向的平台 (.NET Core 3.1、.NET 7 等)以及项目所依赖的 NuGet 包。
The project file has been a mainstay of .NET applications, but in ASP.NET Core it has had a facelift to make it easier to read and edit. These changes include
项目文件一直是 .NET 应用程序的支柱,但在 ASP.NET Core 中,它已经进行了改进,使其更易于阅读和编辑。这些更改包括
-
No GUIDs—Previously, globally unique identifiers (GUIDs) were used for many things, but now they’re rarely used in the project file.
无 GUID – 以前,全局唯一标识符 (GUID) 用于许多用途,但现在它们很少在项目文件中使用。 -
Implicit file includes—Previously, every file in the project had to be listed in the .csproj file to be included in the build. Now files are compiled automatically.
隐式文件包含 — 以前,项目中的每个文件都必须在 .csproj 文件中列出才能包含在生成中。现在文件会自动编译。 -
No paths to NuGet package .dll files—Previously, you had to include the path to the .dll files contained in NuGet packages in the .csproj, as well as list the dependencies in a packages.config file. Now you can reference the NuGet package directly in your .csproj, and you don’t need to specify the path on disk.
没有 NuGet 包.dll文件的路径 – 以前,必须在 .csproj 中包含 NuGet 包中包含的 .dll 文件的路径,并在 packages.config 文件中列出依赖项。现在,您可以直接在 .csproj 中引用 NuGet 包,而无需指定磁盘上的路径。
All these changes combine to make the project file far more compact than you’ll be used to from previous .NET projects. The following listing shows the entire .csproj file for your sample app.
所有这些更改结合在一起,使项目文件比您以前习惯的 .NET 项目要紧凑得多。以下清单显示了示例应用程序的整个 .csproj 文件。
Listing 3.2 The .csproj project file, showing SDK, target framework, and references
清单 3.2 .csproj 项目文件,显示 SDK、目标框架和引用
<Project Sdk="Microsoft.NET.Sdk.Web">             ❶
    <PropertyGroup>
        <TargetFramework>net7.0</TargetFramework> ❷
        <Nullable>enable</Nullable>               ❸
        <ImplicitUsings>enable</ImplicitUsings>   ❹
    </PropertyGroup>
</Project>
❶ The SDK attribute specifies the type of project you’re building.
SDK 属性指定要生成的项目类型。
❷ The TargetFramework is the framework you’ll run on—in this case, .NET 7.
TargetFramework 是你将在其上运行的框架,在本例中为 .NET 7。
❸ Enables the C# 8 feature “nullable reference types”
启用 C# 8 功能“可为 null 的引用类型”
❹ Enables the C# 10 feature “implicit using statements”
启用 C# 10 功能“隐式 using 语句”
For simple applications, you probably won’t need to change the project file much. The Sdk attribute on the Project element includes default settings that describe how to build your project, whereas the TargetFramework element describes the framework your application will run on. For .NET 6.0 projects, this element will have the net6.0 value; if you’re running on .NET 7, this will be net7.0. You can also enable and disable various features of the compiler, such as the C# 8 feature nullable reference types or the C# 10 feature implicit using statements.3
对于简单的应用程序,您可能不需要对项目文件进行太多更改。Project 元素上的 Sdk 属性包括描述如何生成项目的默认设置,而 TargetFramework 元素描述应用程序将在其上运行的框架。对于 .NET 6.0 项目,此元素将具有 net6.0 值;如果您在 .NET 7 上运行,则为 Net7.0。您还可以启用和禁用编译器的各种功能,例如 C# 8 功能可为 null 的引用类型或 C# 10 隐式 using 语句功能。 3
TIP With the new csproj style, Visual Studio users can double- click a project in Solution Explorer to edit the .csproj file without having to close the project first.
提示 使用新的 csproj 样式,Visual Studio 用户可以在“解决方案资源管理器”中双击项目来编辑 .csproj 文件,而不必先关闭项目。
The most common changes you’ll make to the project file are to add more NuGet packages by using the PackageReference element. By default, your app doesn’t reference any NuGet packages at all.
对项目文件进行的最常见更改是使用 PackageReference 元素添加更多 NuGet 包。默认情况下,您的应用根本不引用任何 NuGet 包。
Using NuGet libraries in your project
在项目中使用 NuGet 库Even though all apps are unique in some way, they also have common requirements. Most apps need to access a database, for example, or manipulate JSON- or XML-formatted data. Rather than having to reinvent that code in every project, you should use existing reusable libraries.
尽管所有应用程序在某种程度上都是唯一的,但它们也有共同的要求。例如,大多数应用程序需要访问数据库,或者作 JSON 或 XML 格式的数据。您不必在每个项目中重新创建该代码,而应该使用现有的可重用库。NuGet is the library package manager for .NET, where libraries are packaged in NuGet packages and published to https://www.nuget.org. You can use these packages in your project by referencing the unique package name in your .csproj file, making the package’s namespace and classes available in your code files.
NuGet 是 .NET 的库包管理器,其中的库打包在 NuGet 包中并发布到 https://www.nuget.org。您可以通过在 .csproj 文件中引用唯一的包名称来在项目中使用这些包,从而使包的命名空间和类在代码文件中可用。You can publish (and host) NuGet packages to repositories other than nuget.org; see https://learn.micro soft.com/en-us/nuget for details.
您可以将 NuGet 包发布(和托管)到 nuget.org 以外的存储库;有关详细信息 ,请参阅 https://learn.micro soft.com/en-us/nuget。You can add a NuGet reference to your project by running dotnet add package
可以通过运行 dotnet add package 将 NuGet 引用添加到项目from inside the project folder. This command updates your project file with a node and restores the NuGet package for your project. To install the popular Newtonsoft.Json library, for example, you would run 从项目文件夹内。此命令使用 节点更新项目文件,并还原项目的 NuGet 包。例如,要安装流行的 Newtonsoft.Json 库,您需要运行 dotnet add package Newtonsoft.Json
This command adds a reference to the latest version of the library to your project file, as shown next, and makes the Newtonsoft.Json namespace available in your source-code files:
此命令将对最新版本的库的引用添加到您的项目文件中,如下所示,并使 Newtonsoft.Json 命名空间在您的源代码文件中可用:
<Project Sdk="Microsoft.NET.Sdk.Web">
    <PropertyGroup>
        <TargetFramework>net7.0</TargetFramework>
            <Nullable>enable</Nullable>
        <ImplicitUsings>enable</ImplicitUsings>
    </PropertyGroup>
    <ItemGroup>
        <PackageReference Include="NewtonSoft.Json" Version="13.0.1" />
    </ItemGroup>
</Project>
If you’re using Visual Studio, you can manage packages with the NuGet Package Manager by right-clicking the solution name or a project and choosing Manage NuGet Packages from the contextual menu.
如果您使用的是 Visual Studio,则可以使用 NuGet 包管理器管理包,方法是右键单击解决方案名称或项目,然后从上下文菜单中选择 Manage NuGet Packages。As a point of interest, there’s no officially agreed-on pronunciation for NuGet. Feel free to use the popular “noo-get” or “nugget” style, or if you’re feeling especially posh, try “noo-jay”!
值得一提的是,NuGet 没有正式商定的发音。随意使用流行的 “no-get” 或 “nugget” 风格,或者如果你觉得特别时髦,试试 “no-jay”吧!
The simplified project file format is much easier to edit by hand than previous versions, which is great if you’re developing cross- platform. But if you’re using Visual Studio, don’t feel that you have to take this route. You can still use the GUI to add project references, exclude files, manage NuGet packages, and so on.
简化的项目文件格式比以前的版本更容易手动编辑,如果您正在跨平台开发,这非常有用。但是,如果您使用的是 Visual Studio,请不要觉得您必须走这条路。您仍然可以使用 GUI 添加项目引用、排除文件、管理 NuGet 包等。
Visual Studio will update the project file itself, as it always has.
Visual Studio 将一如既往地更新项目文件本身。
TIP For further details on the changes to the csproj format, see the documentation at http://mng.bz/vnzJ.
提示 有关对 csproj 格式的更改的更多详细信息,请参阅 http://mng.bz/vnzJ 中的文档。
The project file defines everything Visual Studio and the .NET CLI need to build your app—everything, that is, except the code! In the next section we’ll look at the file that defines your whole ASP.NET Core application: the Program.cs file.
项目文件定义了 Visual Studio 和 .NET CLI 构建应用程序所需的一切,即除代码之外的所有内容!在下一节中,我们将查看定义整个 ASP.NET Core 应用程序的文件:Program.cs 文件。
3.6 Program.cs file: Defining your application
3.6 Program.cs 文件:定义应用程序
All ASP.NET Core applications start life as a .NET Console application. As of .NET 6, that typically means a program written with top-level statements, in which the startup code for your application is written directly in a file instead of inside a static void Main function.
所有 ASP.NET Core 应用程序都以 .NET 控制台应用程序的形式开始运行。从 .NET 6 开始,这通常意味着使用顶级语句编写的程序,其中应用程序的启动代码直接写入文件中,而不是写入静态 void Main 函数中。
Top-level statements
顶级语句Before C# 9, every .NET program had to include a static void Main function (it could also return int, Task, or Task
), typically declared in a class called Program. This function, which must exist, defines the entry point for your program. This code runs when you start your application, as in this example:
在 C# 9 之前,每个 .NET 程序都必须包含一个静态 void Main 函数(它也可以返回 int、Task 或 Task),通常在名为 Program 的类中声明。此函数必须存在,用于定义程序的入口点。此代码在您启动应用程序时运行,如下例所示:
using System;
namespace MyApp
{
    public class Program
    {
        public static void Main(string[] args)
        {
            Console.WriteLine("Hello World!");
        }
    }
}
With top-level statements you can write the body of this method directly in the file, and the compiler generates the Main method for you.
使用顶级语句,您可以直接在文件中编写此方法的主体,编译器将为您生成 Main 方法。When combined with C# 10 features such as implicit using statements, this dramatically simplifies the entry-point code of your app to
当与 C# 10 功能(如隐式 using 语句)结合使用时,这会极大地简化应用的入口点代码,以便
Console.WriteLine("Hello World!");
When you use the explicit Main function you can access the command-line arguments provided when the app was run using the args parameter. With top- level statements the args variable is also available as a string[], even though it’s not declared explicitly. You could echo each argument provided by using
您使用显式 Main 函数时,您可以使用 args 参数访问在运行应用程序时提供的命令行参数。对于顶级语句,args 变量也可以作为 string[] 使用,即使它没有显式声明。您可以使用
foreach(string arg in args)
{
    Console.WriteLine(arg);
}
In .NET 7 all the default templates use top-level statements, and I use them throughout this book. Most of the templates include an option to use the explicit Main function if you prefer (using the --use-program-main option if you’re using the CLI). For more information on top-level statements and their limitations, see http://mng.bz/4DZa. If you decide to switch approaches later, you can always add or remove the Main function manually as required.
在 .NET 7 中,所有默认模板都使用顶级语句,我在本书中一直使用它们。如果您愿意,大多数模板都包含一个选项,可以使用显式的 Main 函数(如果您使用的是 CLI,请使用 --use-program-main 选项)。有关 top-level 语句及其限制的更多信息,请参阅 http://mng.bz/4DZa。如果您决定稍后切换方法,则始终可以根据需要手动添加或删除 Main 函数。
In .NET 7 ASP.NET Core applications the top-level statements build and run a WebApplication instance, as shown in the following listing, which shows the default Program.cs file. The WebApplication is the core of your ASP.NET Core application, containing the application configuration and the Kestrel server that listens for requests and sends responses.
在 .NET 7 ASP.NET Core 应用程序中,顶级语句构建并运行 WebApplication 实例,如下面的清单所示,其中显示了默认的 Program.cs 文件。WebApplication 是 ASP.NET Core 应用程序的核心,包含应用程序配置和侦听请求并发送响应的 Kestrel 服务器。
Listing 3.3 The default Program.cs file that configures and runs a WebApplication
列表 3.3 配置和运行 WebApplication 的默认 Program.cs 文件
WebApplicationBuilder builder = WebApplication.CreateBuilder(args); ❶
WebApplication app = builder.Build();                               ❷
app.MapGet("/", () => "Hello World!");                              ❸
app.Run();                                                          ❹
❶ Creates a WebApplicationBuilder using the CreateBuilder method
使用 CreateBuilder 方法创建 WebApplicationBuilder
❷ Builds and returns an instance of WebApplication from the WebApplicationBuilder
从 WebApplicationBuilder 构建并返回 WebApplication 的实例
❸ Defines an endpoint for your application, which returns Hello World! when the path “/” is called
为您的应用程序定义一个端点,当调用路径 “/” 时,该端点将返回 Hello World!
❹ Runs the WebApplication to start listening for requests and generating responses
运行 WebApplication 以开始侦听请求并生成响应
These four lines contain all the initialization code you need to create a web server and start listening for requests. It uses a WebApplicationBuilder, created by the call to CreateBuilder, to define how the WebApplication is configured, before instantiating the WebApplication with a call to Build().
这四行包含创建 Web 服务器和开始侦听请求所需的所有初始化代码。它使用通过调用 CreateBuilder 创建的 WebApplicationBuilder 来定义 WebApplication 的配置方式,然后通过调用 Build() 实例化 WebApplication。
NOTE You’ll find this pattern of using a builder object to configure a complex object repeated throughout the ASP.NET Core framework. This technique is useful for allowing users to configure an object, delaying its creation until all configuration has finished. It’s also one of the patterns described in the “Gang of Four” book Design Patterns: Elements of Reusable Object- Oriented Software, by Erich Gamma, Richard Helm, Ralph Johnson, and John Vlissides (Addison-Wesley, 1994).
注意 您会发现这种使用 builder 对象配置复杂对象的模式在整个 ASP.NET Core 框架中重复出现。此技术可用于允许用户配置对象,延迟其创建,直到所有配置完成。它也是 Erich Gamma、Richard Helm、Ralph Johnson 和 John Vlissides 合著的《设计模式:可重用面向对象软件的元素》(Addison-Wesley,1994 年)一书中描述的模式之一。
In this simple application we don’t make any changes to WebApplicationBuilder before calling Build(), but WebApplicationBuilder configures a lot of things by default, including
在这个简单的应用程序中,我们在调用 Build() 之前不会对 WebApplicationBuilder 进行任何更改,但 WebApplicationBuilder 默认配置了很多内容,包括
-
Configuration—Your app loads values from JSON files and environment variables that you can use to control the app’s runtime behavior, such as loading connection strings for a database. You’ll learn more about the configuration system in chapter 10.
配置 – 您的应用程序从 JSON 文件和环境变量加载值,您可以使用这些值来控制应用程序的运行时行为,例如加载数据库的连接字符串。您将在第 10 章中了解有关配置系统的更多信息。 -
Logging—ASP.NET Core includes an extensible logging system for observability and debugging. I cover the logging system in detail in chapter 26.
日志记录 — ASP.NET Core 包括一个可扩展的日志记录系统,用于可观察性和调试。我在第 26 章中详细介绍了日志记录系统。 -
Services—Any classes that your application depends on for providing functionality—both those used by the framework and those specific to your application— must be registered so that they can be instantiated correctly at runtime. The WebApplicationBuilder configures the minimal set of services needed for an ASP.NET Core app. Chapters 8 and 9 look at service configuration in detail.
服务 — 您的应用程序用于提供功能所依赖的任何类(框架使用的类和特定于您的应用程序的类)都必须注册,以便可以在运行时正确实例化它们。WebApplicationBuilder 配置 ASP.NET Core 应用程序所需的最小服务集。第 8 章和第 9 章详细介绍了服务配置。 -
Hosting—ASP.NET Core uses the Kestrel web server by default to handle requests.
托管 — 默认情况下,ASP.NET Core 使用 Kestrel Web 服务器来处理请求。
After configuring the WebApplicationBuilder you call Build() to create a WebApplication instance. The WebApplication instance is where you define how your application handles and responds to requests, using two building blocks:
配置 WebApplicationBuilder 后,调用 Build() 来创建 WebApplication 实例。WebApplication 实例是定义应用程序如何处理和响应请求的地方,它使用两个构建块:
-
Middleware—These small components execute in sequence when the application receives an HTTP request. They can perform a whole host of functions, such as logging, identifying the current user for a request, serving static files, and handling errors. We’ll look in detail at the middleware pipeline in chapter 4.
中间件 — 当应用程序收到 HTTP 请求时,这些小组件会按顺序执行。它们可以执行一系列功能,例如日志记录、识别请求的当前用户、提供静态文件以及处理错误。我们将在第 4 章中详细介绍中间件管道。 -
Endpoints—Endpoints define how the response should be generated for a specific request to a URL in your app.
端点 - 端点定义应如何为应用程序中 URL 的特定请求生成响应。
For the application in listing 3.3, we didn’t add any middleware, but we defined a single endpoint using a call to MapGet:
对于清单 3.3 中的应用程序,我们没有添加任何中间件,但我们使用对 MapGet 的调用定义了一个端点:
app.MapGet("/", () => "Hello World!");You use the MapGet function to define how to handle a request that uses the GET HTTP verb. There are other Map* functions for other HTTP verbs, such as MapPost.
使用 MapGet 函数定义如何处理使用 GET HTTP 动词的请求。还有其他 Map* 函数可用于其他 HTTP 动词,例如 MapPost。
DEFINITION Every HTTP request includes a verb that indicates the type of the request. When you’re browsing a website, the default verb is GET, which fetches a resource from the server so you can view it. The second-most-common verb is POST, which is used to send data to the server, such as when you’re completing a form.
定义 每个 HTTP 请求都包含一个动词,用于指示请求的类型。当您浏览网站时,默认动词是 GET,它从服务器获取资源以便您可以查看它。第二常见的动词是 POST,用于将数据发送到服务器,例如当您填写表单时。
The first argument passed to MapGet defines which URL path to respond to, and the second argument defines how to generate the response as a delegate that returns a string. In this simple case, the arguments say “When a request is made to the path / using the GET HTTP verb, respond with the plain-text value Hello World!”.
传递给 MapGet 的第一个参数定义要响应的 URL 路径,第二个参数定义如何将响应生成为返回字符串的委托。在这个简单的例子中,参数说“当使用 GET HTTP 动词向路径发出请求时,使用纯文本值 Hello World! 进行响应”。
DEFINITION A path is the remainder of the request URL after the domain has been removed. For a request to www.example.org/accout/manage, the path is /account/manage.
定义 路径是删除域后请求 URL 的其余部分。对于 www.example.org/accout/manage 的请求,路径为/account/manage 中。
While you’re configuring the WebApplication and WebApplicationBuilder the application isn’t handling HTTP requests. Only after the call to Run() does the HTTP server start listening for requests. At this point, your application is fully operational and can respond to its first request from a remote browser.
在配置 WebApplication 和 WebApplicationBuilder 时,应用程序不处理 HTTP 请求。只有在调用 Run() 之后,HTTP 服务器才会开始侦听请求。此时,您的应用程序已完全运行,并且可以响应来自远程浏览器的第一个请求。
NOTE The WebApplication and WebApplicationBuilder classes were introduced in .NET 6. The initialization code in previous versions of ASP.NET Core was more verbose but gave you more control of your application’s behavior. Configuration was typically split between two classes—Program and Startup and used different configuration types—IHostBuilder and IHost, which have fewer defaults than WebApplication. In chapter 30 I describe some of these differences in more detail and show how to configure your application by using the generic IHost instead of WebApplication.
注意 WebApplication 和 WebApplicationBuilder 类是在 .NET 6 中引入的。以前版本的 ASP.NET Core 中的初始化代码更冗长,但可以让您更好地控制应用程序的行为。配置通常分为两个类 — Program 和 Startup,并使用了不同的配置类型 - IHostBuilder 和IHost 的默认值比 WebApplication 少。在第 30 章中,我将更详细地描述其中的一些差异,并演示如何使用泛型 IHost 而不是 WebApplication 来配置应用程序。
So far in this chapter, we’ve looked at the simplest ASP.NET core application you can build: a Hello World minimal API application. For the remainder of this chapter, we’re going to build on this app to introduce some fundamental concepts of ASP.NET Core.
到目前为止,在本章中,我们已经了解了您可以构建的最简单的 ASP.NET 核心应用程序:Hello World 最小 API 应用程序。在本章的其余部分,我们将在此应用程序的基础上介绍 ASP.NET Core 的一些基本概念。
3.7 Adding functionality to your application
3.7 向应用程序添加功能
The application setup you’ve seen so far in Program.cs consists of only four lines of code but still shows the overall structure of a typical ASP.NET Core app entry point, which typically consists of six steps:
到目前为止,您在 Program.cs 中看到的应用程序设置仅包含四行代码,但仍显示了典型的 ASP.NET Core 应用程序入口点的整体结构,通常包括六个步骤:
-
Create a WebApplicationBuilder instance.
创建 WebApplicationBuilder 实例。 -
Register the required services and configuration with the WebApplicationBuilder.
向 WebApplicationBuilder 注册所需的服务和配置。 -
Call Build() on the builder instance to create a WebApplication instance.
在构建器实例上调用 Build() 以创建一个WebApplication 实例。 -
Add middleware to the WebApplication to create a pipeline.
将中间件添加到 WebApplication 以创建管道。 -
Map the endpoints in your application.
映射应用程序中的终端节点。 -
Call Run() on the WebApplication to start the server and handle requests.
在 WebApplication 上调用 Run() 以启动服务器并处理请求。
The basic minimal API app shown previously in listing 3.3 was simple enough that it didn’t need steps 2 and 4, but otherwise it followed this sequence in its Program.cs file. The following listing extends the default application to add more functionality, and in doing so it uses all six steps.
前面清单 3.3 中所示的基本最小 API 应用程序非常简单,它不需要步骤 2 和 4,但除此之外,它在其 Program.cs 文件中遵循此顺序。下面的清单扩展了默认应用程序以添加更多功能,在此过程中,它使用了所有 6 个步骤。
Listing 3.4 The Program.cs file for a more complex example minimal API
列表 3.4 更复杂的示例最小 API 的 Program.cs 文件
using Microsoft.AspNetCore.HttpLogging;

WebApplicationBuilder builder = WebApplication.CreateBuilder(args);

builder.Services.AddHttpLogging(opts =>  opts.LoggingFields = HttpLoggingFields.RequestProperties);    ❶

builder.Logging.AddFilter( "Microsoft.AspNetCore.HttpLogging", LogLevel.Information);                  ❷

WebApplication app = builder.Build();

if (app.Environment.IsDevelopment())                                                                   ❸
{
    app.UseHttpLogging();                                                                              ❹
}

app.MapGet("/", () => "Hello World!");
app.MapGet("/person", () => new Person("Andrew", "Lock"));                                             ❺

app.Run();

public record Person(string FirstName, string LastName);                                               ❻
❶ You can customize features by adding or customizing the services of the application.
您可以通过添加或自定义应用程序的服务来自定义功能。
❷ Ensures that logs added by the HTTP logging middleware are visible in the log output
确保 HTTP 日志记录中间件添加的日志在日志输出中可见
❸ You can add middleware conditionally, depending on the runtime environment.
您可以根据运行时环境有条件地添加中间件。
❹ The HTTP logging middleware logs each request to your application in the log output.
HTTP 日志记录中间件在日志输出中记录对应用程序的每个请求。
❺ Creates a new endpoint that returns the C# object serialized as JSON
创建一个新端点,该端点返回序列化为 JSON 的 C# 对象
❻ Creates a record type
创建记录类型
The application in listing 3.4 configures two new features:
清单 3.4 中的应用程序配置了两个新功能
-
When running in the Development environment, details about each request are logged using the HttpLoggingMiddleware.4
在 Development 环境中运行时,将使用 HttpLoggingMiddleware 记录有关每个请求的详细信息。4 -
Creates a new endpoint at /person that creates an instance of the C# record called Person and serializes it in the response as JSON.
在 /person 处创建一个新端点,该端点创建名为 Person 的 C# 记录实例,并在响应中将其序列化为 JSON。
When you run the application and send requests via a web browser, you see details about the request displayed in the console, as shown in figure 3.8. If you call the /person endpoint you’ll see the JSON representation of the Person record you created in the endpoint.
当您运行应用程序并通过 Web 浏览器发送请求时,您会在控制台中看到有关请求的详细信息,如图 3.8 所示。如果您调用 /person 终端节点,您将看到您在终端节点中创建的 Person 记录的 JSON 表示形式。
NOTE You can view the application only on the same computer that’s running it at the moment; your application isn’t exposed to the internet yet. You’ll learn how to publish and deploy your application in chapter 27.
注意 您只能在当前运行应用程序的同一台计算机上查看该应用程序;您的应用程序尚未暴露在 Internet 上。您将在第 27 章中学习如何发布和部署应用程序。
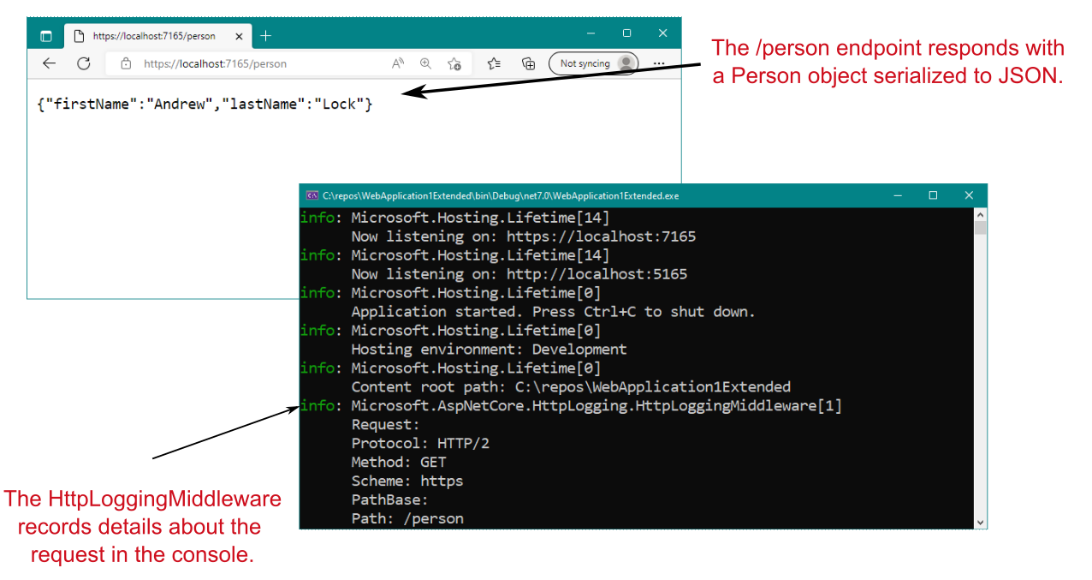
Figure 3.8 Calling the /person endpoint returns a JSON- serialized version of the Person record instance. Details about each request are logged to the console by the HttpLoggingMiddleware.
图 3.8 调用 /person 端点会返回 Person 记录实例的 JSON 序列化版本。有关每个请求的详细信息由 HttpLoggingMiddleware 记录到控制台中。
Configuring services, logging, middleware, and endpoints is fundamental to building ASP.NET Core applications, so the rest of section 3.7 walks you through each of these concepts to give you a taste of how they’re used. I won’t explain them in detail (we have the rest of the book for that!), but you should keep in mind how they follow on from each other and how they contribute to the application’s configuration as a whole.
配置服务、日志记录、中间件和端点是构建 ASP.NET Core 应用程序的基础,因此第 3.7 节的其余部分将引导您了解这些概念中的每一个,以便您了解它们的使用方式。我不会详细解释它们(我们还有本书的其余部分来解释),但您应该记住它们如何相互跟进,以及它们如何为整个应用程序的配置做出贡献。
3.7.1 Adding and configuring services
3.7.1 添加和配置服务
ASP.NET Core uses small modular components for each distinct feature. This approach allows individual features to evolve separately, with only a loose coupling to others, and it’s generally considered to be good design practice. The downside to this approach is that it places the burden on the consumer of a feature to instantiate it correctly. Within your application, these modular components are exposed as one or more services that are used by the application.
ASP.NET Core 为每个不同的功能使用小型模块化组件。这种方法允许单个功能单独发展,只与其他功能松散耦合,这通常被认为是良好的设计实践。这种方法的缺点是,它给 Feature 的使用者带来了正确实例化它的负担。在您的应用程序中,这些模块化组件将作为应用程序使用的一个或多个服务公开。
DEFINITION Within the context of ASP.Net Core, service refers to any class that provides functionality to an application.
定义 在 ASP.Net Core 的上下文中,service 是指为应用程序提供功能的任何类。
Services could be classes exposed by a library or code you’ve written for your application.
服务可以是由您为应用程序编写的库或代码公开的类。
In an e-commerce app, for example, you might have a TaxCalculator that calculates the tax due on a particular product, taking into account the user’s location in the world. Or you might have a ShippingCostService that calculates the cost of shipping to a user’s location. A third service, OrderTotalCalculator, might use both of these services to work out the total price the user must pay for an order. Each service provides a small piece of independent functionality, but you can combine them to create a complete application. This design methodology scenario is known as the single- responsibility principle.
例如,在电子商务应用程序中,您可能有一个 TaxCalculator,它计算特定产品的应缴税款,同时考虑用户在世界上的位置。或者,您可能有一个 ShippingCostService,用于计算运送到用户位置的费用。第三个服务 OrderTotalCalculator 可能会使用这两个服务来计算用户必须为订单支付的总价。每个服务都提供一小部分独立的功能,但您可以将它们组合起来创建一个完整的应用程序。这种设计方法场景称为单一责任原则。
DEFINITION The single-responsibility principle (SRP) states that every class should be responsible for only a single piece of functionality; it should need to change only if that required functionality changes. SRP is one of the five main design principles promoted by Robert C. Martin in Agile Software Development, Principles, Patterns, and Practices (Pearson, 2013).
定义 单一责任原则 (SRP) 规定,每个类只应负责一项功能;仅当所需的功能发生变化时,才需要更改。SRP 是 Robert C. Martin 在 Agile Software 中推广的五个主要设计原则之一发展、原则、模式和实践(皮尔逊,2013 年)。
OrderTotalCalculator needs access to an instance of ShippingCostService and TaxCalculator. A naive approach to this problem is to use the new keyword and create an instance of a service whenever you need it. Unfortunately, this approach tightly couples your code to the specific implementation you’re using and can undo all the good you achieved by modularizing the features in the first place. In some cases, it may break the SRP by making you perform initialization code in addition to using the service you created.
OrderTotalCalculator 需要访问 ShippingCostService 和 TaxCalculator 的实例。解决这个问题的一个天真方法是使用 new 关键字,并在需要时创建一个服务实例。不幸的是,这种方法将您的代码与您正在使用的特定实现紧密耦合,并且可能会抵消您最初通过模块化功能获得的所有好处。在某些情况下,除了使用您创建的服务之外,它还会让您执行初始化代码,从而破坏 SRP。
One solution to this problem is to make it somebody else’s problem. When writing a service, you can declare your dependencies and let another class fill those dependencies for you. Then your service can focus on the functionality for which it was designed instead of trying to work out how to build its dependencies.
这个问题的一个解决方案是让它成为别人的问题。在编写服务时,您可以声明您的依赖项,并让另一个类为您填充这些依赖项。然后,您的服务可以专注于它所设计的功能,而不是尝试弄清楚如何构建其依赖项。
This technique is called dependency injection or the Inversion of Control (IoC) principle, a well-recognized design pattern that is used extensively. Typically, you’ll register the dependencies of your application into a container, which you can use to create any service. You can use the container to create both your own custom application services and the framework services used by ASP.NET Core. You must register each service with the container before using it in your application.
这种技术称为依赖关系注入或控制反转 (IoC) 原则,这是一种被广泛使用且公认的设计模式。通常,您会将应用程序的依赖项注册到容器中,您可以使用该容器创建任何服务。您可以使用容器创建自己的自定义应用程序服务和 ASP.NET Core 使用的框架服务。您必须先在容器中注册每个服务,然后才能在应用程序中使用它。
NOTE I describe the dependency inversion principle and the IoC container used in ASP.NET Core in detail in chapters 8 and 9.
注意:我在第 8 章和第 9 章中详细介绍了 ASP.NET Core 中使用的依赖反转原则和 IoC 容器。
In an ASP.NET Core application, this registration is performed by using the Services property of WebApplicationBuilder.
在 ASP.NET Core 应用程序中,此注册是使用 WebApplicationBuilder 的 Services 属性执行的。
Whenever you use a new ASP.NET Core feature in your application, you need to come back to Program.cs and add the necessary services. This task isn’t always as arduous as it sounds, typically requiring only a line or two of code to configure your applications.
每当在应用程序中使用新的 ASP.NET Core 功能时,都需要返回 Program.cs 并添加必要的服务。这项任务并不总是像听起来那么艰巨,通常只需要一两行代码来配置您的应用程序。
In listing 3.4 we configured an optional service for the HTTP logging middleware by using the line
在清单 3.4 中,我们使用
builder.Services.AddHttpLogging(opts =>
    opts.LoggingFields = HttpLoggingFields.RequestProperties);
Calling AddHttpLogging() adds the necessary services for the HTTP logging middleware to the IoC container and customizes the options used by the middleware for what to display.
调用 AddHttpLogging() 会将 HTTP 日志记录中间件的必要服务添加到 IoC 容器中,并自定义中间件用于显示内容的选项。
AddHttpLogging isn’t exposed directly on the Services property; it’s an extension method that provides a convenient way to encapsulate all the code required to set up HTTP logging. This pattern of encapsulating setup behind extension methods is common in ASP.NET Core.
AddHttpLogging 不会直接在服务上公开财产;它是一种扩展方法,提供了一种便捷的方式来封装设置 HTTP 日志记录所需的所有代码。这种将设置封装在扩展方法后面的模式在 ASP.NET Core 中很常见。
As well as registering framework-related services, the Services property is where you’d register any custom services you have in your application, such as the example TaxCalculator discussed previously. The Services property is an IServiceCollection, which is a list of every known service that your application will need to use. By adding a new service to it, you ensure that whenever a class declares a dependency on your service, the IoC container will know how to provide it.
除了注册与框架相关的服务外,您还可以在 Services 属性中注册应用程序中的任何自定义服务,例如前面讨论的示例 TaxCalculator。Services 属性是一个 IServiceCollection,它是应用程序需要使用的每个已知服务的列表。通过向其添加新服务,您可以确保每当类声明对您的服务的依赖项时,IoC 容器将知道如何提供它。
As well as configuring services, WebApplicationBuilder is where you customize other cross-cutting concerns, such as logging. In listing 3.4, I showed how you can add a logging filter to ensure that the logs generated by the HttpLoggingMiddleware are written to the console:
除了配置服务之外,WebApplicationBuilder 还可以自定义其他横切关注点,例如日志记录。在列表 3.4 中,我展示了如何添加日志过滤器确保HttpLoggingMiddleware 写入控制台:
builder.Logging.AddFilter(
    "Microsoft.AspNetCore.HttpLogging", LogLevel.Information);
This line ensures that logs of severity Information or greater created in the Microsoft .AspNetCore.HttpLogging namespace will be included in the log output.
此行可确保在 Microsoft 中创建严重性 Information 或更高级别的日志。AspNetCore.HttpLogging 命名空间将包含在日志输出中。
NOTE I show configuring log filters in code here for convenience, but this isn’t the idiomatic approach for configuring filters in ASP.NET Core. Typically, you control which levels are shown by adding values to appsettings.json instead, as shown in the source code accompanying this chapter. You’ll learn more about logging and log filtering in chapter 26.
注意 为方便起见,我在此处演示了在代码中配置日志筛选器,但这不是在 ASP.NET Core 中配置筛选器的惯用方法。通常,您可以通过向 Levels 添加值来控制显示哪些级别 appsettings.json 如本章随附的源代码所示。您将在第 26 章中了解有关日志记录和日志过滤的更多信息。
After you call Build() on the WebApplicationBuilder instance, you can’t register any more services or change your logging configuration; the services defined for the WebApplication instance are set in stone. The next step is defining how your application responds to HTTP requests.
在 WebApplicationBuilder 实例上调用 Build() 后,您将无法再注册任何其他服务或更改日志记录配置;为 WebApplication 实例定义的服务是一成不变的。下一步是定义应用程序如何响应 HTTP 请求。
3.7.2 Defining how requests are handled with middleware and endpoints
3.7.2 定义如何使用中间件和终端节点处理请求
After registering your services with the IoC container on WebApplicationBuilder and doing any further customization, you create a WebApplication instance. You can do three main things with the WebApplication instance:
在 WebApplicationBuilder 上向 IoC 容器注册服务并执行任何进一步的自定义后,您将创建一个 WebApplication 实例。您可以使用 WebApplication 实例执行三项主要作:
-
Add middleware to the pipeline.
将中间件添加到管道中。 -
Map endpoints that generate a response for a request.
映射为请求生成响应的终端节点。 -
Run the application by calling Run().
通过调用 Run() 运行应用程序。
As I described previously, middleware consists of small components that execute in sequence when the application receives an HTTP request. They can perform a host of functions, such as logging, identifying the current user for a request, serving static files, and handling errors. Middleware is typically added to WebApplication by calling Use* extension methods. In listing 3.4, I showed an example of adding the HttpLoggingMiddleware to the middleware pipeline conditionally by calling UseHttpLogging():
如前所述,中间件由一些小组件组成,当应用程序收到 HTTP 请求时,这些小组件会按顺序执行。它们可以执行许多功能,例如日志记录、识别请求的当前用户、提供静态文件以及处理错误。中间件通常通过调用 Use* 扩展方法添加到 WebApplication。在示例 3.4 中,我展示了一个通过调用 UseHttpLogging() 有条件地将 HttpLoggingMiddleware 添加到中间件管道的示例:
if (app.Environment.IsDevelopment())
{
    app.UseHttpLogging();
}
We added only a single piece of middleware to the pipeline in this example, but when you’re adding multiple pieces of middleware, the order of the Use* calls is important: the order in which they’re added to the builder is the order in which they’ll execute in the final pipeline. Middleware can use only objects created by previous middleware in the pipeline; it can’t access objects created by later middleware.
在此示例中,我们只向管道添加了一个中间件,但是当您添加多个中间件时,Use* 调用的顺序很重要:它们添加到构建器的顺序就是它们在最终管道中的执行顺序。中间件只能使用管道中先前中间件创建的对象;它无法访问由更高版本的 middleware 创建的对象。
WARNING It’s important to consider the order of middleware when adding it to the pipeline, as middleware can use only objects created earlier in the pipeline.
警告 将中间件添加到管道时,请务必考虑中间件的顺序,因为中间件只能使用在管道中较早创建的对象。
You should also note that listing 3.4 uses the WebApplication.Environment property (an instance of IWebHostEnvironment) to provide different behavior when you’re in a development environment. The HttpLoggingMiddleware is added to the pipeline only when you’re running in development; when you’re running in production (or, rather, when EnvironmentName is not set to "Development"), the HttpLoggingMiddleware will not be added.
您还应该注意,清单 3.4 使用 WebApplication.Environment 属性(IWebHostEnvironment 的一个实例)在开发环境中提供不同的行为。这HttpLoggingMiddleware 仅在你在开发中运行时才会添加到管道中;当您在生产环境中运行时(或者更确切地说,当 EnvironmentName 未设置为 “Development” 时),将不会添加 HttpLoggingMiddleware。
NOTE You’ll learn about hosting environments and how to change the current environment in chapter 10.
注意: 您将在第 10 章中了解托管环境以及如何更改当前环境。
The WebApplicationBuilder builds an IWebHostEnvironment object and sets it on the Environment property. IWebHostEnvironment exposes several environment-related properties, such as
WebApplicationBuilder 构建一个 IWebHostEnvironment 对象,并在 Environment 属性上设置它。IWebHostEnvironment 公开了几个与环境相关的属性,例如
-
ContentRootPath—Location of the working directory for the app, typically the folder in which the application is running
ContentRootPath - 应用程序工作目录的位置,通常是运行应用程序的文件夹 -
WebRootPath—Location of the wwwroot folder that contains static files
WebRootPath — 包含静态文件的 wwwroot 文件夹的位置 -
EnvironmentName—Whether the current environment is a development or production environment
EnvironmentName - 当前环境是开发环境还是生产环境
IWebHostEnvironment is already set by the time the WebApplication instance is created. EnvironmentName is typically set externally by using an environment variable when your application starts.
IWebHostEnvironment 在创建 WebApplication 实例时已设置。 EnvironmentName 通常是在应用程序启动时使用环境变量在外部设置的。
Listing 3.4 added only a single piece of middleware to the pipeline, but WebApplication automatically adds more middleware, including two of the most important and substantial pieces of middleware in the pipeline: the routing middleware and the endpoint middleware. The routing middleware is added automatically to the start of the pipeline, before any of the additional middleware added in Program.cs (so before the HttpLoggingMiddleware). The endpoint middleware is added to the end of the pipeline, after all the other middleware added in Program.cs.
清单 3.4 只向管道添加了一个中间件,但 WebApplication 自动添加了更多中间件,包括管道中两个最重要和最重要的中间件部分:路由中间件和端点 中间件。路由中间件会自动添加到管道的开头,在 Program.cs 中添加的任何其他中间件之前(因此在 HttpLoggingMiddleware 之前)。端点中间件将添加到管道的末尾,在 Program.cs 中添加所有其他中间件之后。
NOTE WebApplication adds several more pieces of middleware to the pipeline by default. It automatically adds error-handling middleware when you’re running in the development environment, for example. I discuss some of this autoadded middleware in detail in chapter 4.
注意: 默认情况下,WebApplication 会向管道添加更多的中间件。例如,当您在开发环境中运行时,它会自动添加错误处理中间件。我在第 4 章中详细讨论了一些自动添加的中间件。
Together, this pair of middleware is responsible for interpreting the request to determine which endpoint to invoke, for reading parameters from the request, and for generating the final response. For each request, the routing middleware uses the request’s URL to determine which endpoint to invoke. Then the rest of the middleware pipeline executes until the request reaches the endpoint middleware, at which point the endpoint middleware executes the endpoint to generate the final response.
这对中间件共同负责解释请求以确定要调用的终端节点、从请求中读取参数以及生成最终响应。对于每个请求,路由中间件使用请求的 URL 来确定要调用的终端节点。然后,中间件管道的其余部分执行,直到请求到达终端节点中间件,此时终端节点中间件执行终端节点以生成最终响应。
The routing and endpoint middleware work in tandem, using the set of endpoints defined for your application. In listing 3.4 we defined two endpoints:
路由和终端节点中间件使用为您的应用程序定义的终端节点集协同工作。在清单 3.4 中,我们定义了两个端点:
app.MapGet("/", () => "Hello World!");
app.MapGet("/person", () => new Person("Andrew", "Lock"));
You’ve already seen the default "Hello World!" endpoint. When you send a GET request to /, the routing middleware selects the "Hello World!" endpoint. The request continues down the middleware pipeline until it reaches the endpoint middleware, which executes the lambda and returns the string value in the response body.
您已经看到了默认的 “Hello World!” 端点。当您向 / 发送 GET 请求时,路由中间件会选择 “Hello World!” 端点。请求继续沿中间件管道向下移动,直到到达终端节点middleware,它执行 lambda 并返回字符串值。
The other endpoint defines a lambda to run for GET requests to the /person path, but it returns a C# record instead of a string. When you return a C# object from a minimal API endpoint, the object is serialized to JSON automatically and returned in the response body, as you saw in figure 3.8. In chapter 6 you’ll learn how to customize this response, as well as return other types of responses.
另一个终端节点定义一个 lambda,用于对 /person 路径的 GET 请求运行,但它返回 C# 记录而不是字符串。当您从最小 API 端点返回 C# 对象时,该对象会自动序列化为 JSON 并在响应正文中返回,如图 3.8 所示。在第 6 章中,您将学习如何自定义此响应,以及返回其他类型的响应。
And there you have it. You’ve finished the tour of your first ASP.NET Core application! Before we move on, let’s take one last look at how our application handles a request. Figure 3.9 shows a request to the /person path being handled by the sample application. You’ve seen everything here already, so the process of handling a request should be familiar. The figure shows how the request passes through the middleware pipeline before being handled by the endpoint middleware. The endpoint executes the lambda method and generates the JSON response, which passes back through the middleware to the ASP.NET Core web server before being sent to the user’s browser.
你有它。您已经完成了第一个 ASP.NET Core 应用程序的浏览!在继续之前,让我们最后看一下我们的应用程序如何处理请求。图 3.9 显示了对示例应用程序正在处理的 /person 路径的请求。您已经在这里看到了所有内容,因此处理请求的过程应该很熟悉。该图显示了请求在由终端节点中间件处理之前如何通过中间件管道。终端节点执行 lambda 方法并生成 JSON 响应,该响应通过中间件传回 ASP.NET Core Web 服务器,然后再发送到用户的浏览器。
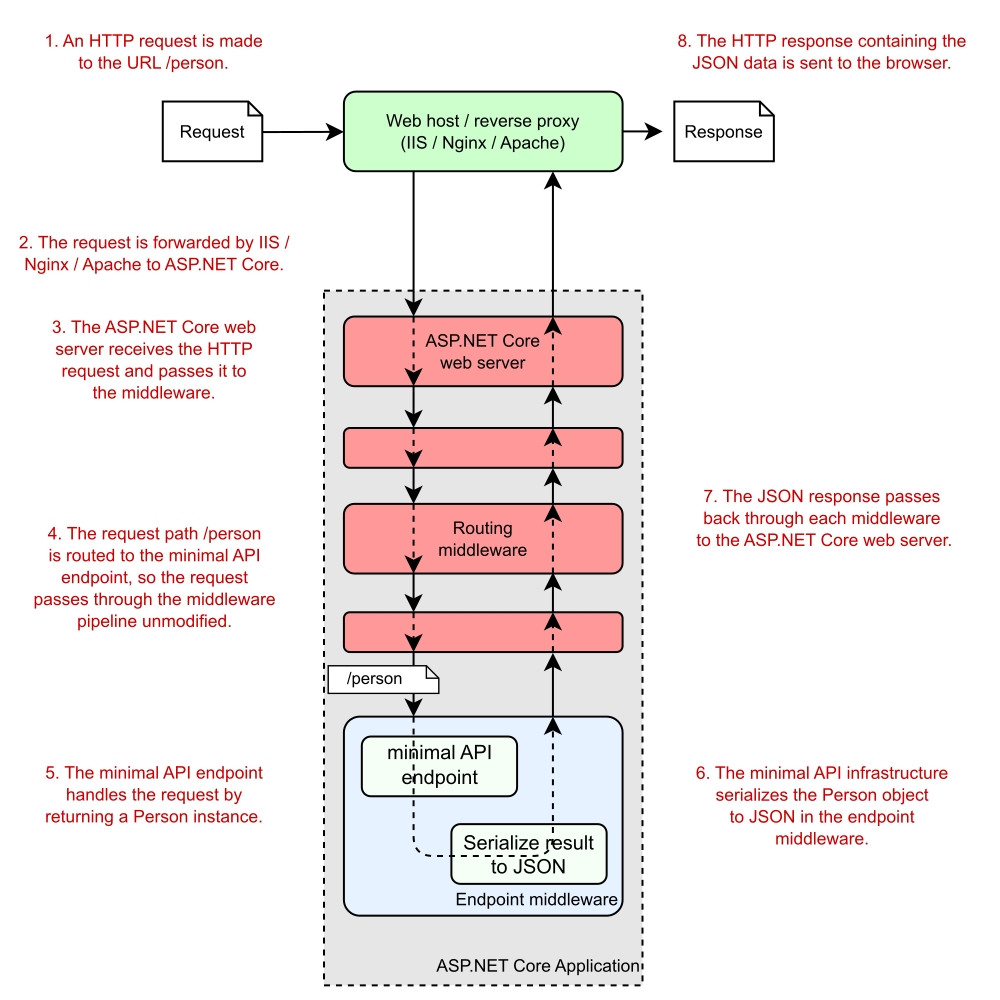
Figure 3.9 An overview of a request to the /person URL for the extended ASP.NET Core minimal API application. The routing middleware routes the request to the correct lambda method. The endpoint generates a JSON response by executing the method and passes the response back through the middleware pipeline to the browser.
图 3.9 对扩展 ASP.NET Core 最小 API 应用程序的 /person URL 的请求概述。路由中间件将请求路由到正确的 lambda 方法。终端节点通过执行该方法生成 JSON 响应,并通过中间件管道将响应传递回浏览器。
The trip has been pretty intense, but now you have a good overview of how an entire application is configured and how it handles a request by using minimal APIs. In chapter 4, you’ll take a closer look at the middleware pipeline that exists in all ASP.NET Core applications. You’ll learn how it’s composed, how you can use it to add functionality to your application, and how you can use it to create simple HTTP services.
这次旅行非常紧张,但现在您已经很好地了解了整个应用程序的配置方式以及它如何使用最少的 API 处理请求。在第 4 章中,您将仔细研究所有 ASP.NET Core 应用程序中存在的中间件管道。您将了解它是如何编写的,如何使用它来向应用程序添加功能,以及如何使用它来创建简单的 HTTP 服务。
Summary
总结
The .csproj file contains the details of how to build your project, including which NuGet packages it depends on. Visual Studio and the .NET CLI use this file to build your application.
.csproj 文件包含有关如何生成项目的详细信息,包括它所依赖的 NuGet 包。Visual Studio 和 .NET CLI 使用此文件构建应用程序。
Restoring the NuGet packages for an ASP.NET Core application downloads all your project’s dependencies so that it can be built and run.
还原 ASP.NET Core 应用程序的 NuGet 包会下载项目的所有依赖项,以便可以生成和运行它。
Program.cs is where you define the code that runs when your app starts. You can create a WebApplicationBuilder by using WebApplication.CreateBuilder() and call methods on the builder to create your application.
Program.cs 是您定义应用程序启动时运行的代码的位置。您可以使用 WebApplication.CreateBuilder() 创建 WebApplicationBuilder,并在生成器上调用方法来创建应用程序。
All services, both framework and custom application services, must be registered with the WebApplicationBuilder by means of the Services property, to be accessed later in your application.
所有服务(包括框架服务和自定义应用程序服务)都必须通过 Services 属性向 WebApplicationBuilder 注册,以便稍后在应用程序中访问。
After your services are configured you call Build() on the WebApplicationBuilder instance to create a WebApplication instance. You use WebApplication to configure your app’s middleware pipeline, to register the endpoints, and to start the server listening for requests.
配置服务后,在 WebApplicationBuilder 实例上调用 Build() 以创建 WebApplication 实例。您可以使用 WebApplication 配置应用程序的中间件管道、注册终端节点以及启动服务器侦听请求。
Middleware defines how your application responds to requests. The order in which middleware is registered defines the final order of the middleware pipeline for the application.
中间件定义应用程序如何响应请求。中间件的注册顺序定义了应用程序的中间件管道的最终顺序。
The WebApplication instance automatically adds RoutingMiddleware to the start of the middleware pipeline and EndpointMiddleware as the last middleware in the pipeline.
WebApplication 实例自动将 RoutingMiddleware 添加到中间件管道的开头,并将 EndpointMiddleware 作为管道中的最后一个中间件。
Endpoints define how a response should be generated for a given request and are typically tied to a request’s path. With minimal APIs, a simple function is used to generate a response.
终端节点定义应如何为给定请求生成响应,并且通常与请求的路径相关联。使用最少的 API,使用一个简单的函数来生成响应。
You can start the web server and begin accepting HTTP requests by calling Run on the WebApplication instance.
您可以通过在 WebApplication 实例上调用 Run 来启动 Web 服务器并开始接受 HTTP 请求。
-
If you want to learn more about Kestrel, IIS HTTP Server, and HTTP.sys, this documentation describes the differences among them: http://mng.bz/6DgD.
如果您想了解有关 Kestrel、IIS HTTP Server 和 HTTP.sys 的更多信息,本文档介绍了它们之间的区别:http://mng.bz/6DgD。 -
You can install the development certificate in Windows and macOS. For instructions on trusting the certificate on Linux, see your distribution’s instructions. Not all browsers (Mozilla Firefox, for example) use the certificate store, so follow your browser’s guidelines for trusting the certificate. If you still have difficulties, see the troubleshooting tips at http://mng.bz/o1pr.
您可以在 Windows 和 macOS 中安装开发证书。有关在 Linux 上信任证书的说明,请参阅您的分配的说明。并非所有浏览器(例如 Mozilla Firefox)都使用证书存储,因此请遵循浏览器的信任证书指南。如果您仍遇到困难,请参阅 http://mng.bz/o1pr 中的故障排除提示。 -
You can read about the new C# features included in .NET 7 and C# 11 at http://mng.bz/nWMg.
您可以在 http://mng.bz/nWMg 上阅读 .NET 7 和 C# 11 中包含的新 C# 功能。 -
You can read in more detail about HTTP logging in the documentation at http://mng.bz/QPmw.
您可以在 http://mng.bz/QPmw 上的文档中阅读有关 HTTP 日志记录的更多详细信息。