2 Configuring a logging service
2 配置日志记录服务
Why do logging messages matter so much during application development? While our application is in the development stage, it's easy to debug the code and find out what happened. But debugging in a production environment is not that easy.
为什么在应用程序开发过程中,日志记录消息如此重要?虽然我们的应用程序处于开发阶段,但很容易调试代码并找出发生了什么。但是在生产环境中进行调试并不是那么容易。
That's why log messages are a great way to find out what went wrong and why and where the exceptions have been thrown in our code in the production environment. Logging also helps us more easily follow the flow of our application when we don’t have access to the debugger.
这就是为什么日志消息是找出问题所在以及生产环境中代码中引发异常的原因和位置的好方法。日志记录还有助于我们在无法访问调试器时更轻松地跟踪应用程序的流程。
.NET Core has its implementation of the logging mechanism, but in all our projects we prefer to create our custom logger service with the external logger library NLog.
.NET Core 具有日志记录机制的实现,但在我们所有的项目中,我们更喜欢使用外部记录器库 NLog 创建自定义记录器服务。
We are going to do that because having an abstraction will allow us to have any logger behind our interface. This means that we can start with NLog, and at some point, we can switch to any other logger and our interface will still work because of our abstraction.
我们之所以这样做,是因为有一个抽象将允许我们在接口后面拥有任何 Logger。这意味着我们可以从 NLog 开始,在某些时候,我们可以切换到任何其他 logger,并且由于我们的抽象,我们的接口仍然可以工作。
2.1 Creating the Required Projects
2.1 创建所需的项目
Let’s create two new projects. In the first one named Contracts, we are going to keep our interfaces. We will use this project later on too, to define our contracts for the whole application. The second one, LoggerService, we are going to use to write our logger logic in.
让我们创建两个新项目。在第一个名为 Contract,我们将保留我们的接口。我们稍后也将使用这个项目来定义整个应用程序的 Contract。第二个是 LoggerService,我们将使用它来编写我们的 Logger 逻辑。
To create a new project, right-click on the solution window, choose Add, and then NewProject. Choose the Class Library (C#) project template:
要创建新项目,请右键单击解决方案窗口,选择 Add(添加),然后选择 NewProject。选择 Class Library (C#) 项目模板:
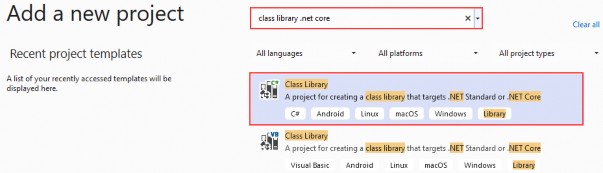
Finally, name it Contracts, and choose the .NET 6.0 as a version. Do the same thing for the second project and name it LoggerService. Now that we have these projects in place, we need to reference them from our main project.
最后,将其命名为 Contracts,并选择 .NET 6.0 作为版本。对第二个项目执行相同的作,并将其命名为 LoggerService。现在我们已经准备好了这些项目,我们需要从主项目中引用它们。
To do that, navigate to the solution explorer. Then in the LoggerService project, right-click on Dependencies and choose the Add Project Reference option. Under Projects, click Solution and check the Contracts project.
为此,请导航到解决方案资源管理器。然后在 LoggerService 项目中,右键单击 Dependencies 并选择 Add Project Reference 选项。在 Projects 下,单击 Solution 并选中 Contracts 项目。
Now, in the main project right click on Dependencies and then click on Add Project Reference. Check the LoggerService checkbox to import it. Since we have referenced the Contracts project through the LoggerService, it will be available in the main project too.
现在,在主项目中,右键单击 Dependencies,然后单击 Add Project Reference。选中 LoggerService 复选框以导入它。由于我们已经通过 LoggerService 引用了 Contracts 项目,因此它也将在主项目中可用。
2.2 Creating the ILoggerManager Interface and Installing NLog
2.2 创建 ILoggerManager 接口并安装 NLog
Our logger service will contain four methods for logging our messages:
我们的 logger 服务将包含四种记录消息的方法:
• Info messages
• 信息消息
• Debug messages
• 调试消息
• Warning messages
• 警告消息
• Error messages
• 错误消息
To achieve this, we are going to create an interface named ILoggerManager inside the Contracts project containing those four method definitions.
为此,我们将在包含这四个方法定义的 Contracts 项目中创建一个名为 ILoggerManager 的接口。
So, let’s do that first by right-clicking on the Contracts project, choosing the Add -> New Item menu, and then selecting the Interface option where we have to specify the name ILoggerManager and click the Add button. After the file creation, we can add the code:
因此,让我们首先右键单击 Contracts 项目,选择 Add -> New Item 菜单,然后选择 Interface 选项,我们必须在其中指定名称 ILoggerManager 并单击 Add 按钮。创建文件后,我们可以添加代码:
namespace Contract
{
    public interface ILoggerManager
    {
            void LogInfo(string message);
            void LogWarn(string message);
            void LogDebug(string message);
            void LogError(string message);
    }
}
Before we implement this interface inside the LoggerService project, we need to install the NLog library in our LoggerService project. NLog is a logging platform for .NET which will help us create and log our messages.
在 LoggerService 项目中实现此接口之前,我们需要在 LoggerService 项目中安装 NLog 库。NLog 是一个 .NET 的日志记录平台,它将帮助我们创建和记录我们的消息。
We are going to show two different ways of adding the NLog library to our project.
我们将展示将 NLog 库添加到项目中的两种不同方法。
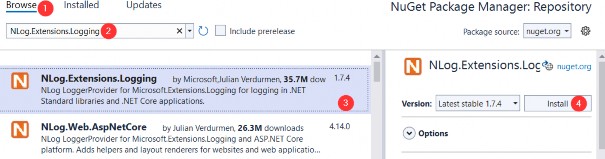
- In the LoggerService project, right-click on the Dependencies and choose Manage NuGet Packages. After the NuGet Package Manager window appears, just follow these steps:
在 LoggerService 项目中,右键单击 Dependencies 并选择 Manage NuGet Packages。出现 NuGet 包管理器窗口后,只需按照以下步骤作:
- From the View menu, choose Other Windows and then click on the Package Manager Console. After the console appears, type:
从 View (视图) 菜单中,选择 Other Windows (其他窗口),然后单击 Package Manager 控制台。控制台出现后,键入:
Install-Package NLog.Extensions.Logging -Version 1.7.4After a couple of seconds, NLog is up and running in our application.
几秒钟后,NLog 在我们的应用程序中启动并运行。
2.3 Implementing the Interface and Nlog.Config File
2.3 实现接口和 Nlog.Config 文件
In the LoggerService project, we are going to create a new class: LoggerManager. We can do that by repeating the same steps for the interface creation just choosing the class option instead of an interface. Now let’s have it implement the ILoggerManager interface we previously defined:
在 LoggerService 项目中,我们将创建一个新类:LoggerManager。为此,只需选择 class 选项而不是 interface,即可对界面创建重复相同的步骤。现在让我们让它实现我们之前定义的 ILoggerManager 接口:
using Contract;
using NLog;

namespace LoggerService
{
    public class LoggerManager : ILoggerManager
    {
        private static ILogger logger = LogManager.GetCurrentClassLogger();
        public LoggerManager() { }
        public void LogDebug(string message) => logger.Debug(message);
        public void LogError(string message) => logger.Error(message);
        public void LogInfo(string message) => logger.Info(message);
        public void LogWarn(string message) => logger.Warn(message);
    }
}
As you can see, our methods are just wrappers around NLog’s methods. Both ILogger and LogManager are part of the NLog namespace. Now, we need to configure it and inject it into the Program class in the section related to the service configuration.
如你所见,我们的方法只是 NLog 方法的包装器。ILogger 和 LogManager 都是 NLog 命名空间的一部分。现在,我们需要配置它并将其注入到与服务配置相关的部分的 Program 类中。
NLog needs to have information about where to put log files on the file system, what the name of these files will be, and what is the minimum level of logging that we want.
NLog 需要了解将日志文件放在文件系统上的哪个位置、这些文件的名称以及我们所需的最低日志记录级别的信息。
We are going to define all these constants in a text file in the main project and name it nlog.config. So, let’s right-click on the main project, choose Add -> New Item, and then search for the Text File. Select the Text File, and add the name nlog.config.
我们将在主项目的文本文件中定义所有这些常量,并将其命名为 nlog.config。因此,让我们右键单击主项目,选择 Add -> New Item,然后搜索 Text File。选择文本文件,并添加名称 nlog.config。
<?xml version="1.0" encoding="utf-8" ?>
<nlog xmlns="http://www.nlog-project.org/schemas/NLog.xsd"
      xmlns:xsi="http://www.w3.org/2001/XMLSchema-instance"
      autoReload="true"
      internalLogLevel="Trace"
      internalLogFile=".\internal_logs\internallog.txt">
    <targets>
        <target name="logfile"
                xsi:type="File"
                fileName=".\logs\${shortdate}_logfile.txt"
                layout="${longdate} ${level:uppercase=true} ${message}"/>
    </targets>
    <rules>
        <logger name="*" minlevel="Debug" writeTo="logfile" />
    </rules>
</nlog>
You can find the internal logs at the project root, and the logs folder in the bin\debug folder of the main project once we start the app. Once the application is published both folders will be created at the root of the output folder which is what we want.
您可以在项目根目录下找到内部日志,并在启动应用程序后在主项目的 bin\debug 文件夹中找到 logs 文件夹。应用程序发布后,将在输出文件夹的根目录下创建两个文件夹,这就是我们想要的。
NOTE: If you want to have more control over the log output, we suggest renaming the current file to nlog.development.config and creating another configuration file called nlog.production.config. Then you can do something like this in the code: env.ConfigureNLog($"nlog.{env.EnvironmentName}.config"); to get the different configuration files for different environments. From our experience production path is what matters, so this might be a bit redundant.
注意:如果您想对日志输出进行更多控制,我们建议将当前文件重命名为 nlog.development.config,并创建另一个名为 nlog.production.config 的配置文件。然后,您可以在代码中执行如下作:env.ConfigureNLog($"nlog.{env.EnvironmentName}.config");以获取不同环境的不同配置文件。根据我们的经验,生产路径才是最重要的,所以这可能有点多余。
2.4 Configuring Logger Service for Logging Messages
2.4 配置 Logger 服务以记录消息
Setting up the configuration for a logger service is quite easy. First, we need to update the Program class and include the path to the configuration file for the NLog configuration:
为 Logger 服务设置配置非常简单。首先,我们需要更新 Program 类并包含 NLog 配置的配置文件路径:
using CompanyEmployees.Extensions;
using Microsoft.AspNetCore.HttpOverrides;
using NLog;

var builder = WebApplication.CreateBuilder(args);

// Add services to the container.

// 这个方法在net8的nlog5.4中提示已过时
LogManager.LoadConfiguration(
    string.Concat(Directory.GetCurrentDirectory(),
    "/nlog.config"));
builder.Services.ConfigureCors();
builder.Services.ConfigureIISIntegration();
We are using NLog’s LogManager static class with the LoadConfiguration method to provide a path to the configuration file.
我们将 NLog 的 LogManager 静态类与 LoadConfiguration 方法结合使用,以提供配置文件的路径。
NOTE: If VisualStudio asks you to install the NLog package in the main project, don’t do it. Just remove the LoggerService reference from the main project and add it again. We have already installed the required package in the LoggerService project and the main project should be able to reference it as well.
注意:如果 VisualStudio 要求您在主项目中安装 NLog 包,请不要这样做。只需从主项目中删除 LoggerService 引用,然后再次添加即可。我们已经在 LoggerService 项目中安装了所需的包,主项目也应该能够引用它。
The next thing we need to do is to add the logger service inside the .NET Core’s IOC container. There are three ways to do that:
接下来我们需要做的是在 .NET Core 的 IOC 容器中添加记录器服务。有三种方法可以做到这一点:
• By calling the services.AddSingleton method, we can create a service the first time we request it and then every subsequent request will call the same instance of the service. This means that all components share the same service every time they need it and the same instance will be used for every method call.
• 通过调用services.AddSingleton 方法,我们可以在第一次请求服务时创建一个服务,然后每个后续请求都将调用该服务的同一实例。这意味着所有组件每次需要时都共享相同的服务,并且每个方法调用都将使用相同的实例。
• By calling the services.AddScoped method, we can create a service once per request. That means whenever we send an HTTP request to the application, a new instance of the service will be created.
• 通过调用services.AddScoped 方法,我们可以为每个请求创建一次服务。这意味着每当我们向应用程序发送 HTTP 请求时,都会创建一个新的服务实例。
• By calling the services.AddTransient method, we can create a service each time the application requests it. This means that if multiple components need the service, it will be created again for every single component request.
• 通过调用services.AddTransient方法,我们可以在每次应用程序请求时创建一个服务。这意味着,如果多个组件需要该服务,将为每个组件请求再次创建该服务。
So, let’s add a new method in the ServiceExtensions class:
因此,让我们在 ServiceExtensions 类中添加一个新方法:
using Contract;
using LoggerService;

namespace CompanyEmployees.Extensions
{
    public static class ServiceExtensions
    {
        public static void ConfigureCors(this IServiceCollection services) =>
            services.AddCors(options =>
            {
                options.AddPolicy("CorsPolicy", builder =>
                builder.AllowAnyOrigin()
                       .AllowAnyMethod()
                       .AllowAnyHeader());
            });

        public static void ConfigureIISIntegration(this IServiceCollection services) =>
            services.Configure<IISOptions>(options =>
            {
            });

        public static void ConfigureLoggerService(this IServiceCollection services) =>
            services.AddSingleton<ILoggerManager, LoggerManager>();
    }
}
And after that, we need to modify the Program class to include our newly created extension method:
之后,我们需要修改 Program 类以包含我们新创建的扩展方法:
builder.Services.AddControllers();
builder.Services.ConfigureLoggerService();
builder.Services.ConfigureCors();
builder.Services.ConfigureIISIntegration();
Every time we want to use a logger service, all we need to do is to inject it into the constructor of the class that needs it. .NET Core will resolve that service and the logging features will be available.
每次我们想使用 Logger 服务时,我们需要做的就是将其注入到需要它的类的构造函数中。.NET Core 将解析该服务,并且日志记录功能将可用。
This type of injecting a class is called Dependency Injection and it is built into .NET Core.
这种类型的注入类称为依赖项注入,它内置于 .NET Core 中。
Let’s learn a bit more about it.
让我们更多地了解它。
2.5 DI, IoC, and Logger Service Testing
2.5 DI、IoC 和 Logger 服务测试
What is Dependency Injection (DI) exactly and what is IoC (Inversion of Control)?
究竟什么是依赖注入 (DI),什么是 IoC(控制反转)?
Dependency injection is a technique we use to achieve the decoupling of objects and their dependencies. It means that rather than instantiating an object explicitly in a class every time we need it, we can instantiate it once and then send it to the class.
依赖注入是我们用来实现对象及其依赖的解耦的一种技术。这意味着,与其每次需要时都在类中显式实例化对象,不如实例化它一次,然后将其发送到类。
This is often done through a constructor. The specific approach we utilize is also known as the Constructor Injection.
这通常是通过构造函数完成的。我们使用的特定方法也称为 Constructor Injection。
In a system that is designed around DI, you may find many classes requesting their dependencies via their constructors. In this case, it is helpful to have a class that manages and provides dependencies to classes through the constructor.
在围绕 DI 设计的系统中,您可能会发现许多类通过其构造函数请求其依赖项。在这种情况下,拥有一个通过构造函数管理类并提供类依赖项的类会很有帮助。
These classes are referred to as containers or more specifically, Inversion of Control containers. An IoC container is essentially a factory that is responsible for providing instances of the types that are requested from it.
这些类称为容器,或者更具体地说,称为控制反转容器。IoC 容器本质上是一个工厂,负责提供从它请求的类型的实例。
To test our logger service, we are going to use the default WeatherForecastController. You can find it in the main project in the Controllers folder. It comes with the ASP.NET Core Web API template.
为了测试我们的 logger 服务,我们将使用默认的 WeatherForecastController。您可以在主项目的 Controllers 文件夹中找到它。它附带 ASP.NET Core Web API 模板。
In the Solution Explorer, we are going to open the Controllers folder and locate the WeatherForecastController class. Let’s modify it:
在解决方案资源管理器中,我们将打开 Controllers 文件夹并找到 WeatherForecastController 类。让我们修改一下:
using Contract;
using Microsoft.AspNetCore.Mvc;

[Route("[controller]")]
[ApiController]
public class WeatherForecastController : ControllerBase
{
    private ILoggerManager _logger;
    public WeatherForecastController(ILoggerManager logger) { _logger = logger; }
    [HttpGet]
    public IEnumerable<string> Get()
    {
        _logger.LogInfo("Here is info message from our values controller.");
        _logger.LogDebug("Here is debug message from our values controller.");
        _logger.LogWarn("Here is warn message from our values controller.");
        _logger.LogError("Here is an error message from our values controller.");
        return new string[] { "value1", "value2" };
    }
}
Now let’s start the application and browse to :
现在,让我们启动应用程序并浏览到:
https://localhost:5001/weatherforecast.
As a result, you will see an array of two strings. Now go to the folder that you have specified in the nlog.config file, and check out the result. You should see two folders: the internal_logs folder and the logs folder. Inside the logs folder, you should find a file with the following logs:
结果,您将看到一个包含两个字符串的数组。现在转到您在 nlog.config 文件中指定的文件夹,并查看结果。您应该看到两个文件夹:internal_logs 文件夹和 logs 文件夹。在 logs 文件夹中,您应该会找到一个包含以下日志的文件:

That’s all we need to do to configure our logger for now. We’ll add some messages to our code along with the new features.
这就是我们现在需要做的配置 logger 的全部工作。我们将向代码中添加一些消息以及新功能。