3 Onion architecture implementation
3 洋葱架构实现
In this chapter, we are going to talk about the Onion architecture, its layers, and the advantages of using it. We will learn how to create different layers in our application to separate the different application parts and improve the application's maintainability and testability.
在本章中,我们将讨论 Onion 架构、它的层以及使用它的优势。我们将学习如何在应用程序中创建不同的层,以分离不同的应用程序部分并提高应用程序的可维护性和可测试性。
That said, we are going to create a database model and transfer it to the MSSQL database by using the code first approach. So, we are going to learn how to create entities (model classes), how to work with the DbContext class, and how to use migrations to transfer our created database model to the real database. Of course, it is not enough to just create a database model and transfer it to the database. We need to use it as well, and for that, we will create a Repository pattern as a data access layer.
也就是说,我们将创建一个数据库模型,并使用 Code First 方法将其传输到 MSSQL 数据库。因此,我们将学习如何创建实体(模型类),如何使用 DbContext 类,以及如何使用迁移将我们创建的数据库模型传输到真实数据库。当然,仅仅创建一个数据库模型并将其传输到数据库是不够的。我们也需要使用它,为此,我们将创建一个 Repository 模式作为数据访问层。
With the Repository pattern, we create an abstraction layer between the data access and the business logic layer of an application. By using it, we are promoting a more loosely coupled approach to access our data in the database.
使用 Repository 模式,我们在应用程序的数据访问和业务逻辑层之间创建一个抽象层。通过使用它,我们正在推广一种更松散耦合的方法来访问数据库中的数据。
Also, our code becomes cleaner, easier to maintain, and reusable. Data access logic is stored in a separate class, or sets of classes called a repository, with the responsibility of persisting the application’s business model.
此外,我们的代码变得更干净、更易于维护和可重用。数据访问逻辑存储在单独的类或称为存储库的类集中,负责持久化应用程序的业务模型。
Additionally, we are going to create a Service layer to extract all the business logic from our controllers, thus making the presentation layer and the controllers clean and easy to maintain.
此外,我们将创建一个 Service 层,从控制器中提取所有业务逻辑,从而使表示层和控制器干净且易于维护。
So, let’s start with the Onion architecture explanation.
那么,让我们从 Onion 架构解释开始。
3.1 About Onion Architecture
3.1 关于 Onion 架构
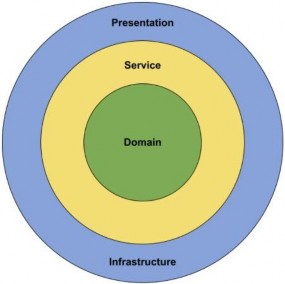
The Onion architecture is a form of layered architecture and we can visualize these layers as concentric circles. Hence the name Onion architecture. The Onion architecture was first introduced by Jeffrey Palermo, to overcome the issues of the traditional N-layered architecture approach.
洋葱架构是分层架构的一种形式,我们可以将这些层可视化为同心圆。因此得名 Onion 架构。Onion 架构最初由 Jeffrey Palermo 引入,以克服传统 N 层架构方法的问题。
There are multiple ways that we can split the onion, but we are going to choose the following approach where we are going to split the architecture into 4 layers:
我们可以通过多种方式拆分洋葱,但我们将选择以下方法,我们将架构拆分为 4 层:
• Domain Layer 域层
• Service Layer 服务层
• Infrastructure Layer 基础设施层
• Presentation Layer 表示层
Conceptually, we can consider that the Infrastructure and Presentation layers are on the same level of the hierarchy.
从概念上讲,我们可以认为 Infrastructure 和 Presentation 层位于层次结构的同一级别。
Now, let us go ahead and look at each layer with more detail to see why we are introducing it and what we are going to create inside of that layer:
现在,让我们继续更详细地了解每个层,以了解我们为什么要引入它以及我们将在该层中创建什么:
We can see all the different layers that we are going to build in our project.
我们可以看到要在项目中构建的所有不同层
3.1.1 Advantages of the Onion Architecture
3.1.1 Onion 架构的优势
Let us take a look at what are the advantages of Onion architecture, and why we would want to implement it in our projects.
让我们看一下 Onion 架构的优势是什么,以及为什么我们想在我们的项目中实现它。
All of the layers interact with each other strictly through the interfaces defined in the layers below. The flow of dependencies is towards the core of the Onion. We will explain why this is important in the next section.
所有层都严格通过下面层中定义的接口相互交互。依赖项的流向 Onion 的核心。我们将在下一节中解释为什么这很重要。
Using dependency inversion throughout the project, depending on abstractions (interfaces) and not the implementations, allows us to switch out the implementation at runtime transparently. We are depending on abstractions at compile-time, which gives us strict contracts to work with, and we are being provided with the implementation at runtime.
在整个项目中使用依赖反转,取决于抽象 (接口) 而不是实现,允许我们在运行时透明地切换实现。我们在编译时依赖于抽象,这为我们提供了严格的契约,并且我们在运行时获得了实现。
Testability is very high with the Onion architecture because everything depends on abstractions. The abstractions can be easily mocked with a mocking library such as Moq. We can write business logic without concern about any of the implementation details. If we need anything from an external system or service, we can just create an interface for it and consume it. We do not have to worry about how it will be implemented.The higher layers of the Onion will take care of implementing that interface transparently.
Onion 架构的可测试性非常高,因为一切都依赖于抽象。可以使用模拟库(如 Moq)轻松模拟抽象。我们可以编写业务逻辑,而无需担心任何实现细节。如果我们需要来自外部系统或服务的任何内容,我们只需为它创建一个接口并使用它。我们不必担心它将如何实施。Onion 的较高层将负责透明地实现该接口。
3.1.2 Flow of Dependencies
3.1.2 依赖流程
The main idea behind the Onion architecture is the flow of dependencies, or rather how the layers interact with each other. The deeper the layer resides inside the Onion, the fewer dependencies it has.
Onion 架构背后的主要思想是依赖关系的流动,或者更确切地说是各层如何相互交互。该层位于 Onion 内部的深度越深,它的依赖项就越少。
The Domain layer does not have any direct dependencies on the outside layers. It is isolated, in a way, from the outside world. The outer layers are all allowed to reference the layers that are directly below them in the hierarchy.
Domain 层对外部层没有任何直接的依赖关系。在某种程度上,它与外界隔绝。外部层都允许引用层次结构中位于其正下方的层。
We can conclude that all the dependencies in the Onion architecture flow inwards. But we should ask ourselves, why is this important?
我们可以得出结论,Onion 架构中的所有依赖项都是向内流动的。但我们应该问问自己,为什么这很重要?
The flow of dependencies dictates what a certain layer in the Onion architecture can do. Because it depends on the layers below it in the hierarchy, it can only call the methods that are exposed by the lower layers.
依赖项的流程决定了 Onion 架构中的某个层可以做什么。因为它依赖于层次结构中低于它的层,所以它只能调用由较低层公开的方法。
We can use lower layers of the Onion architecture to define contracts or interfaces. The outer layers of the architecture implement these interfaces. This means that in the Domain layer, we are not concerning ourselves with infrastructure details such as the database or external services.
我们可以使用 Onion 架构的较低层来定义合约或接口。体系结构的外部层实现这些接口。这意味着在域层,我们不关心基础设施细节,例如数据库或外部服务。
Using this approach, we can encapsulate all of the rich business logic in the Domain and Service layers without ever having to know any implementation details. In the Service layer, we are going to depend only on the interfaces that are defined by the layer below, which is the Domain layer.
使用这种方法,我们可以将所有丰富的业务逻辑封装在 Domain 和 Service 层中,而无需了解任何实现细节。在 Service 层中,我们将仅依赖于由下面的层定义的接口,即 Domain 层。
So, after all the theory, we can continue with our project implementation.
所以,在所有理论之后,我们可以继续我们的项目实施。
Let’s start with the models and the Entities project.
让我们从模型和实体项目开始。
3.2 Creating Models
3.2 创建模型
Using the example from the second chapter of this book, we are going to extract a new Class Library project named Entities.
使用本书第二章中的示例,我们将提取一个名为 Entities 的新类库项目。
Inside it, we are going to create a folder named Models, which will contain all the model classes (entities). Entities represent classes that Entity Framework Core uses to map our database model with the tables from the database. The properties from entity classes will be mapped to the database columns.
So, in the Models folder we are going to create two classes and modify them:
//Company.cs

using System.ComponentModel.DataAnnotations;
using System.ComponentModel.DataAnnotations.Schema;

namespace Entities.Models
{
    public class Company
    {
        [Column("CompanyId")]
        public Guid Id { get; set; }

        [Required(ErrorMessage = "Company name is a required field.")]
        [MaxLength(60, ErrorMessage = "Maximum length for the Name is 60 characters.")]

        public string? Name { get; set; }
        [Required(ErrorMessage = "Company address is a required field.")]
        [MaxLength(60, ErrorMessage = "Maximum length for the Address is 60 characters")]
        public string? Address { get; set; }

        public string? Country { get; set; }

        public ICollection<Employee>? Employees { get; set; }
    }
}
//Employee.cs
using System.ComponentModel.DataAnnotations;
using System.ComponentModel.DataAnnotations.Schema;
namespace Entities.Models
{
public class Employee
{
[Column("EmployeeId")]
public Guid Id { get; set; }
[Required(ErrorMessage = "Employee name is a required field.")]
[MaxLength(30, ErrorMessage = "Maximum length for the Name is 30 characters.")]
public string? Name { get; set; }
[Required(ErrorMessage = "Age is a required field.")]
public int Age { get; set; }
[Required(ErrorMessage = "Position is a required field.")]
[MaxLength(20, ErrorMessage = "Maximum length for the Position is 20 characters.")]
public string? Position { get; set; }
[ForeignKey(nameof(Company))]
public Guid CompanyId { get; set; }
public Company? Company { get; set; }
}
}We have created two classes: the Company and Employee. Those classes contain the properties which Entity Framework Core is going to map to the columns in our tables in the database. But not all the properties will be mapped as columns. The last property of the Company class (Employees) and the last property of the Employee class (Company) are navigational properties; these properties serve the purpose of defining the relationship between our models.
我们创建了两个类:Company 和 Employee。这些类包含 Entity Framework Core 将映射到数据库中表中列的属性。但并非所有属性都将映射为列。Company 类的最后一个属性 (Employees) 和 Employee 类的最后一个属性 (Company) 是导航属性;这些属性用于定义模型之间的关系。
We can see several attributes in our entities. The [Column] attribute will specify that the Id property is going to be mapped with a different name in the database. The [Required] and [MaxLength] properties are here for validation purposes. The first one declares the property as mandatory and the second one defines its maximum length.
我们可以在实体中看到几个属性。[Column] 属性将指定 Id 属性将在数据库中使用不同的名称进行映射。此处的 [Required] 和 [MaxLength] 属性用于验证目的。第一个选项将属性声明为 mandatory 属性,第二个选项定义其最大长度。
Once we transfer our database model to the real database, we are going to see how all these validation attributes and navigational properties affect the column definitions.
一旦我们将数据库模型传输到真实数据库,我们将看到所有这些验证属性和导航属性如何影响列定义。
3.3 Context Class and the Database Connection
3.3 Context 类和数据库连接
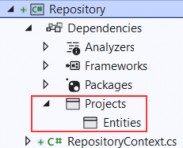
Before we start with the context class creation, we have to create another .NET Class Library and name it Repository. We are going to use this project for the database context and repository implementation.
在开始创建上下文类之前,我们必须创建另一个 .NET 类库并将其命名为 Repository。我们将使用此项目进行数据库上下文和存储库实现。
Now, let's create the context class, which will be a middleware component for communication with the database. It must inherit from the Entity Framework Core’s DbContext class and it consists of DbSet properties, which EF Core is going to use for the communication with the database.Because we are working with the DBContext class, we need to install the Microsoft.EntityFrameworkCore package in the Repository project. Also, we are going to reference the Entities project from the Repository project:
现在,让我们创建 context 类,它将是一个用于与数据库通信的中间件组件。它必须继承自 Entity Framework Core 的 DbContext 类,并且由 DbSet 属性组成,EF Core 将使用这些属性与数据库通信。由于我们正在使用 DBContext 类,因此需要在 Repository 项目中安装 Microsoft.EntityFrameworkCore 包。此外,我们还将从 Repository 项目中引用 Entities 项目:
Then, let’s navigate to the root of the Repository project and create the RepositoryContext class:
然后,让我们导航到 Repository 项目的根目录并创建 RepositoryContext 类:
// RepositoryContext.cs
using Entities.Models;
using Microsoft.EntityFrameworkCore;

namespace Repository
{
    public class RepositoryContext : DbContext
    {
        public RepositoryContext(DbContextOptions options) : base(options) { }
        public DbSet<Company>? Companies { get; set; }
        public DbSet<Employee>? Employees { get; set; }
    }
}
After the class modification, let’s open the appsettings.json file, in the main project, and add the connection string named sqlconnection:
修改类后,让我们在主项目中打开 appsettings.json 文件,并添加名为 sqlconnection 的连接字符串:
{
    "Logging": {
        "LogLevel": { "Default": "Warning" }
    },
    "ConnectionStrings": {
        "sqlConnection": "server=.; database=CompanyEmployee; Integrated Security=true"
    },
    "AllowedHosts": "*"
}
It is quite important to have the JSON object with the ConnectionStrings name in our appsettings.json file, and soon you will see why.
在我们的 appsettings.json 文件中拥有具有 ConnectionStrings 名称的 JSON 对象非常重要,您很快就会明白原因。
But first, we have to add the Repository project’s reference into the main project.
但首先,我们必须将 Repository 项目的引用添加到主项目中。
Then, let’s create a new ContextFactory folder in the main project and inside it a new RepositoryContextFactory class. Since our RepositoryContext class is in a Repository project and not in the main one, this class will help our application create a derived DbContext instance during the design time which will help us with our migrations:
然后,让我们在主项目中创建一个新的 ContextFactory 文件夹,并在其中创建一个新的 RepositoryContextFactory 类。由于我们的 RepositoryContext 类位于 Repository 项目中,而不是在主项目中,因此此类将帮助我们的应用程序在设计时创建一个派生的 DbContext 实例,这将有助于我们进行迁移:
// RepositoryContextFactory.cs

using Microsoft.EntityFrameworkCore;
using Microsoft.EntityFrameworkCore.Design;
using Repository;

namespace CompanyEmployees.ContextFactory
{
    public class RepositoryContextFactory : IDesignTimeDbContextFactory<RepositoryContext>
    {
        public RepositoryContext CreateDbContext(string[] args)
        {
            var configuration = new ConfigurationBuilder().SetBasePath(
                Directory.GetCurrentDirectory()).AddJsonFile("appsettings.json").Build();
            var builder = new DbContextOptionsBuilder<RepositoryContext>().
                UseSqlServer(configuration.GetConnectionString("sqlConnection"));
            return new RepositoryContext(builder.Options);
        }
    }
}
We are using the IDesignTimeDbContextFactory<out TContext> interface that allows design-time services to discover implementations of this interface. Of course, the TContext parameter is our RepositoryContext class.
我们正在使用 IDesignTimeDbContextFactory<out TContext> 接口,该接口允许设计时服务发现此接口的实现。当然,TContext 参数是我们的 RepositoryContext 类。
For this, we need to add two using directives:
为此,我们需要添加两个 using 指令:
using Microsoft.EntityFrameworkCore.Design;
using Repository;
Then, we have to implement this interface with the CreateDbContext method. Inside it, we create the configuration variable of the IConfigurationRoot type and specify the appsettings file, we want to use. With its help, we can use the GetConnectionString method to access the connection string from the appsettings.json file. Moreover, to be able to use the UseSqlServer method, we need to install the Microsoft.EntityFrameworkCore.SqlServer package in the main project and add one more using directive:
然后,我们必须使用 CreateDbContext 方法实现此接口。在其中,我们创建 IConfigurationRoot 类型的配置变量,并指定我们要使用的 appsettings 文件。在它的帮助下,我们可以使用 GetConnectionString 方法从 appsettings.json 文件访问连接字符串。此外,为了能够使用 UseSqlServer 方法,我们需要在主项目中安装 Microsoft.EntityFrameworkCore.SqlServer 包,并再添加一个 using 指令:
using Microsoft.EntityFrameworkCore;If we navigate to the GetConnectionString method definition, we will see that it is an extension method that uses the ConnectionStrings name from the appsettings.json file to fetch the connection string by the provided key:
如果我们导航到 GetConnectionString 方法定义,我们将看到它是一个扩展方法,它使用 appsettings.json 文件中的 ConnectionStrings 名称通过提供的键获取连接字符串:

Finally, in the CreateDbContext method, we return a new instance of our RepositoryContext class with provided options.
最后,在 CreateDbContext 方法中,我们返回 RepositoryContext 类的新实例,其中包含提供的选项。
3.4 Migration and Initial Data Seed
3.4 迁移和初始数据种子
Migration is a standard process of creating and updating the database from our application. Since we are finished with the database model creation, we can transfer that model to the real database. But we need to modify our CreateDbContext method first:
迁移是从我们的应用程序创建和更新数据库的标准过程。由于我们已经完成了数据库模型的创建,因此我们可以将该模型传输到真实数据库。但是我们需要先修改我们的 CreateDbContext 方法:
using Microsoft.EntityFrameworkCore;
using Microsoft.EntityFrameworkCore.Design;
using Repository;

namespace CompanyEmployees.ContextFactory
{
    public class RepositoryContextFactory : IDesignTimeDbContextFactory<RepositoryContext>
    {
        public RepositoryContext CreateDbContext(string[] args)
        {
            var configuration = new ConfigurationBuilder().SetBasePath(
                Directory.GetCurrentDirectory()).AddJsonFile("appsettings.json").Build();

            //var builder = new DbContextOptionsBuilder<RepositoryContext>().
            //    UseSqlServer(configuration.GetConnectionString("sqlConnection"));

            var builder = new DbContextOptionsBuilder<RepositoryContext>().
                    UseSqlServer(configuration.GetConnectionString("sqlConnection"),
                    b => b.MigrationsAssembly("CompanyEmployees"));

            return new RepositoryContext(builder.Options);
        }
    }
}
We have to make this change because migration assembly is not in our main project, but in the Repository project. So, we’ve just changed the project for the migration assembly.
我们必须进行此更改,因为迁移程序集不在我们的主项目中,而是在 Repository 项目中。因此,我们刚刚更改了迁移程序集的项目。
Before we execute our migration commands, we have to install an additional ef core library: Microsoft.EntityFrameworkCore.Tools
在执行迁移命令之前,我们必须安装一个额外的 ef 核心库:Microsoft.EntityFrameworkCore.Tools
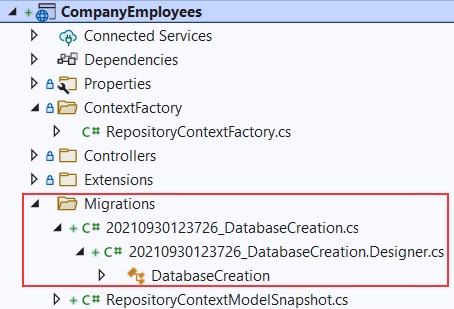
Now, let’s open the Package Manager Console window and create our first migration:
现在,让我们打开 Package Manager Console 窗口并创建我们的第一个迁移:
PM> Add-Migration DatabaseCreationnet8使用以下命令
PS C:\CompanyEmployees\CompanyEmployees> dotnet ef migrations add DatabaseCreation
Build started...
Build succeeded.
Done. To undo this action, use 'ef migrations remove'
PS
With this command, we are creating migration files and we can find them in the Migrations folder in our main project:
使用此命令,我们正在创建迁移文件,并且可以在主项目的 Migrations 文件夹中找到它们:
With those files in place, we can apply migration:
这些文件就位后,我们可以应用迁移:
PM> Update-Databasenet8使用以下命令
PS C:\CompanyEmployees\CompanyEmployees> dotnet ef database update
Build started...
Build succeeded.
Applying migration '20250503152559_DatabaseCreation'.
Done.
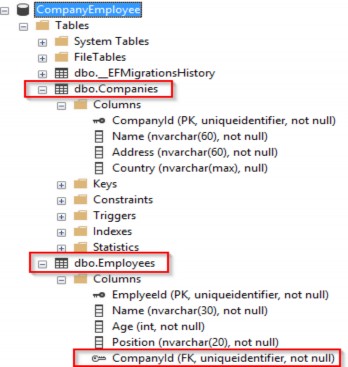
Excellent. We can inspect our database now:
非常好。我们现在可以检查我们的数据库:
Once we have the database and tables created, we should populate them with some initial data. To do that, we are going to create another folder in the Repository project called Configuration and add the CompanyConfiguration class:
创建数据库和表后,我们应该使用一些初始数据填充它们。为此,我们将在 Repository 项目中创建另一个名为 Configuration 的文件夹,并添加 CompanyConfiguration 类:
// CompanyConfiguration.cs

using Entities.Models;
using Microsoft.EntityFrameworkCore;
using Microsoft.EntityFrameworkCore.Metadata.Builders;

namespace Repository.Configuration
{
    public class CompanyConfiguration : IEntityTypeConfiguration<Company>
    {
        public void Configure(EntityTypeBuilder<Company> builder)
        {
            builder.HasData(
                new Company
                {
                    Id = new Guid("c9d4c053-49b6-410c-bc78-2d54a9991870"),
                    Name = "IT_Solutions Ltd",
                    Address = "583 Wall Dr. Gwynn Oak, MD 21207",
                    Country = "USA"
                },
                new Company
                {
                    Id = new Guid("3d490a70-94ce-4d15-9494-5248280c2ce3"),
                    Name = "Admin_Solutions Ltd",
                    Address = "312 Forest Avenue, BF 923",
                    Country = "USA"
                });
        }
    }
}
Let’s do the same thing for the EmployeeConfiguration class:
让我们对 EmployeeConfiguration 类执行相同的作:
// EmployeeConfiguration.cs

using Entities.Models;
using Microsoft.EntityFrameworkCore;
using Microsoft.EntityFrameworkCore.Metadata.Builders;

namespace Repository.Configuration
{
    public class EmployeeConfiguration : IEntityTypeConfiguration<Employee>
    {
        public void Configure(EntityTypeBuilder<Employee> builder)
        {
            builder.HasData(
                new Employee
                {
                    Id = new Guid("80abbca8-664d-4b20-b5de-024705497d4a"),
                    Name = "Sam Raiden",
                    Age = 26,
                    Position = "Software developer",
                    CompanyId = new Guid("c9d4c053-49b6-410c-bc78-2d54a9991870")
                },
                new Employee
                {
                    Id = new Guid("86dba8c0-d178-41e7-938c-ed49778fb52a"),
                    Name = "Jana McLeaf",
                    Age = 30,
                    Position = "Software developer",
                    CompanyId = new Guid("c9d4c053-49b6-410c-bc78-2d54a9991870")
                },
                new Employee
                {
                    Id = new Guid("021ca3c1-0deb-4afd-ae94-2159a8479811"),
                    Name = "Kane Miller",
                    Age = 35,
                    Position = "Administrator",
                    CompanyId = new Guid("3d490a70-94ce-4d15-9494-5248280c2ce3")
                });
        }
    }
}
To invoke this configuration, we have to change the RepositoryContext class:
要调用此配置,我们必须更改 RepositoryContext 类:
// /Repository/RepositoryContext.cs
using Entities.Models;
using Microsoft.EntityFrameworkCore;
using Repository.Configuration;

namespace Repository
{
    //public class RepositoryContext : DbContext
    //{
    //    public RepositoryContext(DbContextOptions options) : base(options) { }
    //    public DbSet<Company>? Companies { get; set; }
    //    public DbSet<Employee>? Employees { get; set; }
    //}

    public class RepositoryContext : DbContext {
        public RepositoryContext(DbContextOptions options) : base(options) { }
        protected override void OnModelCreating(ModelBuilder modelBuilder) {
            modelBuilder.ApplyConfiguration(new CompanyConfiguration());
            modelBuilder.ApplyConfiguration(new EmployeeConfiguration());
        }
        public DbSet<Company> Companies { get; set; }
        public DbSet<Employee> Employees { get; set; } }
}
Now, we can create and apply another migration to seed these data to the database:
现在,我们可以创建并应用另一个迁移,以将这些数据播种到数据库:
dotnet ef migrations add InitialData
dotnet ef database update
This will transfer all the data from our configuration files to the respective tables.
这会将配置文件中的所有数据传输到相应的表中。
3.5 Repository Pattern Logic
3.5 存储库模式逻辑
After establishing a connection to the database and creating one, it's time to create a generic repository that will provide us with the CRUD methods. As a result, all the methods can be called upon any repository class in our project.
在建立与数据库的连接并创建一个连接后,是时候创建一个通用存储库了,它将为我们提供 CRUD 方法。因此,所有方法都可以在我们项目中的任何存储库类上调用。
Furthermore, creating the generic repository and repository classes that use that generic repository is not going to be the final step. We will go a step further and create a wrapper class around repository classes and inject it as a service in a dependency injection container.
此外,创建使用该泛型存储库的泛型存储库和存储库类不会是最后一步。我们将更进一步,围绕存储库类创建一个包装器类,并将其作为服务注入到依赖项注入容器中。
Consequently, we will be able to instantiate this class once and then call any repository class we need inside any of our controllers.
因此,我们将能够实例化这个类一次,然后在我们的任何控制器中调用我们需要的任何仓库类。
The advantages of this approach will become clearer once we use it in the project.
一旦我们在项目中使用它,这种方法的优势就会变得更加明显。
That said, let’s start by creating an interface for the repository inside the Contracts project:
也就是说,让我们从 Contracts 项目中的存储库创建一个接口开始:
// /Contract/IRepositoryBase.cs

using System.Linq.Expressions;

namespace Contract
{
    public interface IRepositoryBase<T>
    {
        IQueryable<T> FindAll(bool trackChanges);
        IQueryable<T> FindByCondition(Expression<Func<T, bool>> expression, bool trackChanges);
        void Create(T entity);
        void Update(T entity);
        void Delete(T entity);
    }
}
Right after the interface creation, we are going to reference Contracts inside the Repository project. Also, in the Repository project, we are going to create an abstract class RepositoryBase — which is going to implement the IRepositoryBase interface:
在创建接口后,我们将引用 Repository 项目中的 Contracts。此外,在 Repository 项目中,我们将创建一个抽象类 RepositoryBase — 它将实现 IRepositoryBase 接口:
// /Repository/RepositoryBase.cs

using System.Linq.Expressions;
using Contract;
using Microsoft.EntityFrameworkCore;

namespace Repository
{
    public abstract class RepositoryBase<T> : IRepositoryBase<T> where T : class
    {
        protected RepositoryContext RepositoryContext;
        public RepositoryBase(RepositoryContext repositoryContext) => RepositoryContext = repositoryContext;
        public IQueryable<T> FindAll(bool trackChanges) => !trackChanges ? RepositoryContext.Set<T>().AsNoTracking() : RepositoryContext.Set<T>();
        public IQueryable<T> FindByCondition(Expression<Func<T, bool>> expression, bool trackChanges) => !trackChanges ? RepositoryContext.Set<T>().Where(expression).AsNoTracking() : RepositoryContext.Set<T>().Where(expression);
        public void Create(T entity) => RepositoryContext.Set<T>().Add(entity);
        public void Update(T entity) => RepositoryContext.Set<T>().Update(entity);
        public void Delete(T entity) => RepositoryContext.Set<T>().Remove(entity);
    }
}
This abstract class as well as the IRepositoryBase interface work with the generic type T. This type T gives even more reusability to the RepositoryBase class. That means we don’t have to specify the exact model (class) right now for the RepositoryBase to work with. We can do that later on.
此抽象类以及 IRepositoryBase 接口使用泛型类型 T。此类型 T 为 RepositoryBase 类提供了更多的可重用性。这意味着我们现在不必为 RepositoryBase 指定确切的模型(类)。我们以后再做。
Moreover, we can see the trackChanges parameter. We are going to use it to improve our read-only query performance. When it’s set to false, we attach the AsNoTracking method to our query to inform EF Core that it doesn’t need to track changes for the required entities. This greatly improves the speed of a query.
此外,我们可以看到 trackChanges 参数。我们将使用它来提高只读查询性能。当它设置为 false 时,我们将 AsNoTracking 方法附加到我们的查询,以通知 EF Core 它不需要跟踪所需实体的更改。这大大提高了查询的速度。
3.6 Repository User Interfaces and Classes
3.6 存储库接口和类
Now that we have the RepositoryBase class, let’s create the user classes that will inherit this abstract class.
现在我们有了 RepositoryBase 类,让我们创建将继承此抽象类的用户类。
By inheriting from the RepositoryBase class, they will have access to all the methods from it. Furthermore, every user class will have its interface for additional model-specific methods.
通过继承 RepositoryBase 类,他们将可以访问该类中的所有方法。此外,每个 user class 都将具有其用于其他特定于模型的方法的接口。
This way, we are separating the logic that is common for all our repository user classes and also specific for every user class itself.
这样,我们将所有存储库用户类通用的逻辑以及每个用户类本身的特定逻辑分开。
Let’s create the interfaces in the Contracts project for the Company and Employee classes:
让我们在 Contracts 项目中为 Company 和 Employee 类创建接口:
// /Contract/ICompanyRepository.cs

namespace Contract
{
    public interface ICompanyRepository { }
}
// /Contract/IEmployeeRepository.cs
namespace Contract
{
public interface IEmployeeRepository { }
}
After this, we can create repository user classes in the Repository project.
在此之后,我们可以在 Repository 项目中创建存储库用户类。
The first thing we are going to do is to create the CompanyRepository class:
我们要做的第一件事是创建 CompanyRepository 类:
// /Repository/CompanyRepository.cs

using Contract;
using Entities.Models;

namespace Repository
{
    public class CompanyRepository : RepositoryBase<Company>, ICompanyRepository
    {
        public CompanyRepository(RepositoryContext repositoryContext) : base(repositoryContext) { }
    }
}
And then, the EmployeeRepository class:
然后,EmployeeRepository 类:
// /Repository/EmployeeRepository.cs

using Contract;
using Entities.Models;

namespace Repository
{
    public class EmployeeRepository : RepositoryBase<Employee>, IEmployeeRepository
    {
        public EmployeeRepository(RepositoryContext repositoryContext) : base(repositoryContext) { }
    }
}
After these steps, we are finished creating the repository and repository- user classes. But there are still more things to do.
完成这些步骤后,我们完成了 repository 和 repository- user 类的创建。但还有更多的事情要做。
3.7 Creating a Repository Manager
3.7 创建仓库管理器
It is quite common for the API to return a response that consists of data from multiple resources; for example, all the companies and just some employees older than 30. In such a case, we would have to instantiate both of our repository classes and fetch data from their resources.
API 返回由来自多个资源的数据组成的响应是很常见的;例如,所有公司和一些 30 岁以上的员工。在这种情况下,我们将不得不实例化我们的两个存储库类并从它们的资源中获取数据。
Maybe it’s not a problem when we have only two classes, but what if we need the combined logic of five or even more different classes? It would just be too complicated to pull that off.
当我们只有两个类时,也许这不是问题,但如果我们需要五个甚至更多不同类的组合逻辑呢?要做到这一点太复杂了。
With that in mind, we are going to create a repository manager class, which will create instances of repository user classes for us and then register them inside the dependency injection container. After that, we can inject it inside our services with constructor injection (supported by ASP.NET Core). With the repository manager class in place, we may call any repository user class we need.
考虑到这一点,我们将创建一个存储库管理器类,它将为我们创建存储库用户类的实例,然后在依赖项注入容器中注册它们。之后,我们可以通过构造函数注入(由 ASP.NET Core 支持)将其注入我们的服务中。有了 repository manager 类,我们可以调用我们需要的任何 repository user 类。
But we are also missing one important part. We have the Create, Update, and Delete methods in the RepositoryBase class, but they won’t make any change in the database until we call the SaveChanges method. Our repository manager class will handle that as well.
但我们也缺少一个重要的部分。我们在 RepositoryBase 类中有 Create、Update 和 Delete 方法,但在调用 SaveChanges 方法之前,它们不会在数据库中进行任何更改。我们的仓库管理器类也会处理这个问题。
That said, let’s get to it and create a new interface in the Contract project:
也就是说,让我们开始在 Contract 项目中创建一个新界面:
// /Contract/IRepositoryManager.cs

namespace Contract
{
    public interface IRepositoryManager
    {
        ICompanyRepository Company { get; }
        IEmployeeRepository Employee { get; }
        void Save();
    }
}
And add a new class to the Repository project:
并将一个新类添加到 Repository 项目中:
// /Repository/RepositoryManager.cs

using Contract;

namespace Repository
{
    public sealed class RepositoryManager : IRepositoryManager
    {
        private readonly RepositoryContext _repositoryContext;
        private readonly Lazy<ICompanyRepository> _companyRepository;
        private readonly Lazy<IEmployeeRepository> _employeeRepository;
        public RepositoryManager(RepositoryContext repositoryContext)
        {
            _repositoryContext = repositoryContext;
            _companyRepository = new Lazy<ICompanyRepository>(() => new CompanyRepository(repositoryContext));
            _employeeRepository = new Lazy<IEmployeeRepository>(() => new EmployeeRepository(repositoryContext));
        }
        public ICompanyRepository Company => _companyRepository.Value;
        public IEmployeeRepository Employee => _employeeRepository.Value;
        public void Save() => _repositoryContext.SaveChanges();
    }
}
As you can see, we are creating properties that will expose the concrete repositories and also we have the Save() method to be used after all the modifications are finished on a certain object. This is a good practice because now we can, for example, add two companies, modify two employees, and delete one company — all in one action — and then just call the Save method once. All the changes will be applied or if something fails, all the changes will be reverted:
如您所见,我们正在创建将公开具体存储库的属性,并且我们还有 Save() 方法,可在完成对某个对象的所有修改后使用。这是一种很好的做法,因为现在我们可以添加两个公司,修改两个员工,删除一个公司 - 所有这些都在一个作中完成 - 然后只需调用 Save 方法一次。将应用所有更改,或者如果失败,则所有更改都将被还原:
_repository.Company.Create(company);
_repository.Company.Create(anotherCompany); _repository.Employee.Update(employee);
_repository.Employee.Update(anotherEmployee); _repository.Company.Delete(oldCompany);
_repository.Save();
The interesting part with the RepositoryManager implementation is that we are leveraging the power of the Lazy class to ensure the lazy initialization of our repositories. This means that our repository instances are only going to be created when we access them for the first time, and not before that.
RepositoryManager 实现的有趣之处在于,我们利用 Lazy 类的强大功能来确保存储库的延迟初始化。这意味着我们的存储库实例只会在我们第一次访问它们时创建,而不是在此之前。
After these changes, we need to register our manager class in the main project. So, let’s first modify the ServiceExtensions class by adding this code:
完成这些更改后,我们需要在主项目中注册我们的 manager 类。因此,让我们首先通过添加以下代码来修改 ServiceExtensions 类:
// /CompanyEmployees.Extensions/ServiceExtensions.cs

using Contract;
using LoggerService;
using Repository;

namespace CompanyEmployees.Extensions
{
    public static class ServiceExtensions
    {
        public static void ConfigureCors(this IServiceCollection services) =>
            services.AddCors(options =>
            {
                options.AddPolicy("CorsPolicy", builder =>
                builder.AllowAnyOrigin()
                       .AllowAnyMethod()
                       .AllowAnyHeader());
            });

        public static void ConfigureIISIntegration(this IServiceCollection services) =>
            services.Configure<IISOptions>(options =>
            {
            });

        public static void ConfigureLoggerService(this IServiceCollection services) =>
            services.AddSingleton<ILoggerManager, LoggerManager>();

        public static void ConfigureRepositoryManager(this IServiceCollection services) =>
            services.AddScoped<IRepositoryManager, RepositoryManager>();
    }
}
And in the Program class above the AddController() method, we have to add this code:
builder.Services.ConfigureCors();
builder.Services.ConfigureIISIntegration();
builder.Services.ConfigureRepositoryManager();

builder.Services.AddControllers();
Excellent.
非常好。
As soon as we add some methods to the specific repository classes, and add our service layer, we are going to be able to test this logic.
一旦我们将一些方法添加到特定的存储库类中,并添加我们的服务层,我们就可以测试这个逻辑。
So, we did an excellent job here. The repository layer is prepared and ready to be used to fetch data from the database.
所以,我们在这里做得很好。存储库层已准备就绪,可用于从数据库中获取数据。
Now, we can continue towards creating a service layer in our application.
现在,我们可以继续在我们的应用程序中创建一个服务层。
3.8 Adding a Service Layer
3.8 添加服务层
The Service layer sits right above the Domain layer (the Contracts project is the part of the Domain layer), which means that it has a reference to the Domain layer. The Service layer will be split into two projects, Service.Contracts and Service.
Service 层位于 Domain 层的正上方(Contracts 项目是 Domain 层的一部分),这意味着它具有对 Domain 层的引用。Service 层将拆分为两个项目:Service.Contract 和 Service。
So, let’s start with the Service.Contracts project creation (.NET Core Class Library) where we will hold the definitions for the service interfaces that are going to encapsulate the main business logic. In the next section, we are going to create a presentation layer and then, we will see the full use of this project.
因此,让我们从 Service.Contracts 项目创建(.NET Core 类库)开始,我们将在其中保存将封装主业务逻辑的服务接口的定义。在下一节中,我们将创建一个表示层,然后,我们将看到此项目的完整使用。
Once the project is created, we are going to add three interfaces inside it.
创建项目后,我们将在其中添加三个接口。
ICompanyService:
// /Service.Contracts/ICompanyService.cs

namespace Service.Contracts
{
    public interface ICompanyService { }
}
IEmployeeService:
// /Service.Contracts/IEmployeeService.cs

namespace Service.Contracts
{
    public interface IEmployeeService { }
}
And IServiceManager:
// /Service.Contracts/IServiceManager.cs

namespace Service.Contracts
{
    public interface IServiceManager
    {
        ICompanyService CompanyService { get; }
        IEmployeeService EmployeeService { get; }
    }
}
As you can see, we are following the same pattern as with the repository contracts implementation.
如您所见,我们遵循与 repository contracts 实现相同的模式。
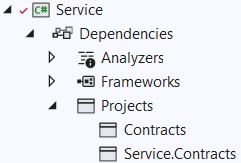
Now, we can create another project, name it Service, and reference the Service.Contracts and Contracts projects inside it:
现在,我们可以创建另一个项目,将其命名为 Service,并引用Service.Contracts 和 Contracts 项目:
After that, we are going to create classes that will inherit from the interfaces that reside in the Service.Contracts project.
之后,我们将创建将从驻留在 Service.Contracts 项目中的接口继承的类。
So, let’s start with the CompanyService class:
因此,让我们从 CompanyService 类开始:
// /Service/CompanyService.cs

using Contract;
using Service.Contracts;

namespace Service
{
    internal sealed class CompanyService : ICompanyService
    {
        private readonly IRepositoryManager _repository;
        private readonly ILoggerManager _logger;
        public CompanyService(IRepositoryManager repository, ILoggerManager logger)
        {
            _repository = repository; _logger = logger;
        }
    }
}
As you can see, our class inherits from the ICompanyService interface, and we are injecting the IRepositoryManager and ILoggerManager interfaces. We are going to use IRepositoryManager to access the repository methods from each user repository class (CompanyRepository or EmployeeRepository), and ILoggerManager to access the logging methods we’ve created in the second section of this book.
如您所见,我们的类继承自 ICompanyService 接口,并且我们正在注入 IRepositoryManager 和 ILoggerManager 接口。我们将使用 IRepositoryManager 访问每个用户存储库类(CompanyRepository 或 EmployeeRepository)中的存储库方法,并使用 ILoggerManager 访问我们在本书的第二部分中创建的日志记录方法。
To continue, let’s create a new EmployeeService class:
要继续,让我们创建一个新的 EmployeeService 类:
// /Service/EmployeeService.cs

using Contract;
using Service.Contracts;

namespace Service
{
    internal sealed class EmployeeService : IEmployeeService
    {
        private readonly IRepositoryManager _repository;
        private readonly ILoggerManager _logger;
        public EmployeeService(IRepositoryManager repository, ILoggerManager logger)
        {
            _repository = repository; _logger = logger;
        }
    }
}
Finally, we are going to create the ServiceManager class:
最后,我们将创建 ServiceManager 类:
// /Service/ServiceManager.cs

using Contract;
using Service.Contracts;
using Service;

public sealed class ServiceManager : IServiceManager
{
    private readonly Lazy<ICompanyService> _companyService; private readonly Lazy<IEmployeeService> _employeeService;
    public ServiceManager(IRepositoryManager repositoryManager, ILoggerManager logger)
    {
        _companyService = new Lazy<ICompanyService>(() => new CompanyService(repositoryManager, logger));
        _employeeService = new Lazy<IEmployeeService>(() => new EmployeeService(repositoryManager, logger));
    }
    public ICompanyService CompanyService => _companyService.Value;
    public IEmployeeService EmployeeService => _employeeService.Value;
}
Here, as we did with the RepositoryManager class, we are utilizing the Lazy class to ensure the lazy initialization of our services.
在这里,正如我们对 RepositoryManager 类所做的那样,我们利用 Lazy 类来确保服务的延迟初始化。
Now, with all these in place, we have to add the reference from the Service project inside the main project. Since Service is already referencing Service.Contracts, our main project will have the same reference as well.
现在,完成所有这些作后,我们必须在主项目中添加来自 Service 项目的引用。由于 Service 已经引用了 Service.Contracts,因此我们的主项目也将具有相同的引用。
Now, we have to modify the ServiceExtensions class:
现在,我们必须修改 ServiceExtensions 类:
using Contract;
using LoggerService;
using Repository;
using Service.Contracts;

namespace CompanyEmployees.Extensions
{
    public static class ServiceExtensions
    {
        public static void ConfigureCors(this IServiceCollection services) =>
            services.AddCors(options =>
            {
                options.AddPolicy("CorsPolicy", builder =>
                builder.AllowAnyOrigin()
                       .AllowAnyMethod()
                       .AllowAnyHeader());
            });

        public static void ConfigureIISIntegration(this IServiceCollection services) =>
            services.Configure<IISOptions>(options =>
            {
            });

        public static void ConfigureLoggerService(this IServiceCollection services) =>
            services.AddSingleton<ILoggerManager, LoggerManager>();

        public static void ConfigureRepositoryManager(this IServiceCollection services) =>
            services.AddScoped<IRepositoryManager, RepositoryManager>();

        public static void ConfigureServiceManager(this IServiceCollection services) =>
            services.AddScoped<IServiceManager, ServiceManager>();
    }
}
And we have to add using directives:
我们必须添加 using 指令:
using Service;
using Service.Contracts;
Then, all we have to do is to modify the Program class to call this extension method:
然后,我们所要做的就是修改 Program 类以调用此扩展方法:
builder.Services.ConfigureIISIntegration();
builder.Services.ConfigureRepositoryManager();
builder.Services.ConfigureServiceManager();

builder.Services.AddControllers();
3.9 Registering RepositoryContext at a Runtime
3.9 在运行时注册 RepositoryContext
With the RepositoryContextFactory class, which implements the IDesignTimeDbContextFactory interface, we have registered our RepositoryContext class at design time. This helps us find the RepositoryContext class in another project while executing migrations.
使用实现 IDesignTimeDbContextFactory 接口的 RepositoryContextFactory 类,我们在设计时注册了 RepositoryContext 类。这有助于我们在执行迁移时在另一个项目中找到 RepositoryContext 类。
But, as you could see, we have the RepositoryManager service registration, which happens at runtime, and during that registration, we must have RepositoryContext registered as well in the runtime, so we could inject it into other services (like RepositoryManager service). This might be a bit confusing, so let’s see what that means for us.
但是,正如你所看到的,我们有 RepositoryManager 服务注册,这发生在运行时,在注册期间,我们也必须在运行时注册 RepositoryContext,以便我们可以将其注入到其他服务(如 RepositoryManager 服务)中。这可能有点令人困惑,所以让我们看看这对我们意味着什么。
Let’s modify the ServiceExtensions class:
让我们修改 ServiceExtensions 类:
using Contract;
using LoggerService;
using Microsoft.EntityFrameworkCore;
using Repository;
using Service.Contracts;

namespace CompanyEmployees.Extensions
{
    public static class ServiceExtensions
    {
        public static void ConfigureCors(this IServiceCollection services) =>
            services.AddCors(options =>
            {
                options.AddPolicy("CorsPolicy", builder =>
                builder.AllowAnyOrigin()
                       .AllowAnyMethod()
                       .AllowAnyHeader());
            });

        public static void ConfigureIISIntegration(this IServiceCollection services) =>
            services.Configure<IISOptions>(options =>
            {
            });

        public static void ConfigureLoggerService(this IServiceCollection services) =>
            services.AddSingleton<ILoggerManager, LoggerManager>();

        public static void ConfigureRepositoryManager(this IServiceCollection services) =>
            services.AddScoped<IRepositoryManager, RepositoryManager>();

        public static void ConfigureServiceManager(this IServiceCollection services) =>
            services.AddScoped<IServiceManager, ServiceManager>();

        public static void ConfigureSqlContext(this IServiceCollection services, IConfiguration configuration) =>
            services.AddDbContext<RepositoryContext>(opts => opts.UseSqlServer(configuration.GetConnectionString("sqlConnection")));
    }
}
We are not specifying the MigrationAssembly inside the UseSqlServer method. We don’t need it in this case.
我们没有在 UseSqlServer 方法中指定 MigrationAssembly。在这种情况下,我们不需要它。
As the final step, we have to call this method in the Program class:
作为最后一步,我们必须在 Program 类中调用此方法:
builder.Services.ConfigureRepositoryManager();
builder.Services.ConfigureServiceManager();
builder.Services.ConfigureSqlContext(builder.Configuration);

builder.Services.AddControllers();
With this, we have completed our implementation, and our service layer is ready to be used in our next chapter where we are going to learn about handling GET requests in ASP.NET Core Web API.
这样,我们已经完成了我们的实现,我们的服务层已准备好在下一章中使用,我们将在下一章中学习如何在 ASP.NET Core Web API 中处理 GET 请求。
One additional thing. From .NET 6 RC2, there is a shortcut method AddSqlServer, which can be used like this:
还有一件事。从 .NET 6 RC2 开始,有一个快捷方法 AddSqlServer,可以像这样使用:
public static void ConfigureSqlContext(this IServiceCollection services, IConfiguration configuration) => services.AddSqlServer<RepositoryContext>((configuration.GetConnectionString("sqlConnection")));This method replaces both AddDbContext and UseSqlServer methods and allows an easier configuration. But it doesn’t provide all of the features the AddDbContext method provides. So for more advanced options, it is recommended to use AddDbContext. We will use it throughout the rest of the project.
此方法替换了 AddDbContext 和 UseSqlServer 方法,并允许更轻松地进行配置。但它不提供 AddDbContext 方法提供的所有功能。因此,对于更高级的选项,建议使用 AddDbContext。我们将在项目的其余部分使用它。