20 Creating an HTTP API using web API controllers
20 使用 Web API 控制器创建 HTTP API
This chapter covers
本章涵盖
• Creating a web API controller to return JavaScript Object Notation (JSON) to clients
创建 Web API 控制器以将 JavaScript 对象表示法 (JSON) 返回给客户端
• Using attribute routing to customize your URLs
使用属性路由自定义 URL
• Generating a response using content negotiation
使用内容协商生成响应
• Applying common conventions with the [ApiController] attribute
使用 [ApiController] 属性应用常见约定
In chapters 13 through 19 you worked through each layer of a server-side rendered ASP.NET Core application, using Razor Pages and Model-View-Controller (MVC) controllers to render HTML to the browser. In part 1 of this book you saw a different type of ASP.NET Core application, using minimal APIs to serve JSON for client-side SPAs or mobile apps. In this chapter you’ll learn about web API controllers, which fit somewhere in between!
在第 13 章到第 19 章中,您完成了 ASP.NET Core 应用程序呈现的服务器端的每一层,使用 Razor Pages 和模型-视图-控制器 (MVC) 控制器将 HTML 呈现到浏览器。在本书的第 1 部分中,您了解了不同类型的 ASP.NET Core 应用程序,它使用最少的 API 为客户端 SPA 或移动应用程序提供 JSON。在本章中,您将了解 Web API 控制器,它们介于两者之间!
You can apply much of what you’ve already learned to web API controllers; they use the same routing system as minimal APIs and the same MVC design pattern, model binding, and validation as Razor Pages.
您可以将已经学到的大部分知识应用到 Web API 控制器中;它们使用与最小 API 相同的路由系统,以及与 Razor Pages 相同的 MVC 设计模式、模型绑定和验证。
In this chapter you’ll learn how to define web API controllers and actions, and see how similar they are to the Razor Pages and controllers you already know. You’ll learn how to create an API model to return data and HTTP status codes in response to a request, in a way that client apps can understand.
在本章中,您将学习如何定义 Web API 控制器和作,并了解它们与您已经知道的 Razor Pages 和控制器的相似之处。您将学习如何创建 API 模型,以客户端应用程序可以理解的方式返回数据和 HTTP 状态代码以响应请求。
After exploring how the MVC design pattern applies to web API controllers, you’ll see how a related topic works with web APIs: routing. We’ll look at how explicit attribute routing works with action methods, touching on many of the same concepts we covered in chapters 6 and 14.
在探索了 MVC 设计模式如何应用于 Web API 控制器之后,您将了解相关主题如何与 Web API 配合使用:路由。我们将了解显式属性路由如何与 action 方法一起工作,并涉及我们在第 6 章和第 14 章中介绍的许多相同概念。
One of the big features added in ASP.NET Core 2.1 was the [ApiController] attribute. This attribute applies several common conventions used in web APIs, reducing the amount of code you must write yourself. In section 20.5 you’ll learn how automatic 400 Bad Requests for invalid requests, model-binding parameter inference, and ProblemDetails support make building APIs easier and more consistent.
ASP.NET Core 2.1 中添加的重要功能之一是 [ApiController] 属性。此属性应用 Web API 中使用的几个常见约定,从而减少您必须自己编写的代码量。在第 20.5 节中,您将了解针对无效请求的自动 400 错误请求、模型绑定参数推理和 ProblemDetails 支持如何使构建 API 更轻松、更一致。
You’ll also learn how to format the API models returned by your action methods using content negotiation, to ensure that you generate a response that the calling client can understand. As part of this, you’ll learn how to add support for additional format types, such as Extensible Markup Language (XML), so that you can generate XML responses if the client requests it.
您还将学习如何使用内容协商来格式化作方法返回的 API 模型,以确保您生成的响应是调用客户端可以理解的。作为其中的一部分,您将学习如何添加对其他格式类型(如可扩展标记语言 (XML))的支持,以便在客户端请求时生成 XML 响应。
Finally, I discuss some of the differences between API controllers and minimal API applications, and when you should choose one over the other. Before we get to that, we look at how to get started. In section 20.1 you’ll see how to create a web API project and add your first API controller.
最后,我将讨论 API 控制器和最小 API 应用程序之间的一些差异,以及何时应该选择一个而不是另一个。在开始之前,我们先看看如何开始。在 Section 20.1 中,您将看到如何创建 Web API 项目并添加您的第一个 API 控制器。
20.1 Creating your first web API project
20.1 创建您的第一个 Web API 项目
In this section you’ll learn how to create an ASP.NET Core web API project and create your first web API controllers. You’ll see how to use controller action methods to handle HTTP requests and how to use ActionResults to generate a response.
在本部分中,你将了解如何创建 ASP.NET Core Web API 项目并创建你的第一个 Web API 控制器。您将了解如何使用控制器作方法处理 HTTP 请求,以及如何使用 ActionResults 生成响应。
NOTE as I mentioned previously that a web API project is a standard ASP.NET Core project, which uses the MVC framework and web API controllers.
注意:如前所述,Web API 项目是标准的 ASP.NET Core 项目,它使用 MVC 框架和 Web API 控制器。
Some people think of the MVC design pattern as applying only to applications that render their UI directly, like the Razor views you’ve seen in previous chapters or MVC controllers with Razor views. However, in ASP.NET Core, I feel the MVC pattern applies equally well when building a web API. For web APIs, the view part of the MVC pattern involves generating a machine-friendly response rather than a user-friendly response.
有些人认为 MVC 设计模式仅适用于直接呈现其 UI 的应用程序,例如您在前几章中看到的 Razor 视图或具有 Razor 视图的 MVC 控制器。但是,在 ASP.NET Core 中,我觉得 MVC 模式在构建 Web API 时同样适用。对于 Web API,MVC 模式的视图部分涉及生成计算机友好的响应,而不是用户友好的响应。
As a parallel to this, you create web API controllers in ASP.NET Core in the same way you create traditional MVC controllers. The only thing that differentiates them from a code perspective is the type of data they return. MVC controllers typically return a ViewResult; web API controllers generally return raw .NET objects from their action methods, or an IActionResult instance such as StatusCodeResult, as you saw in chapter 15.
与此并行,您可以在 ASP.NET Core 中创建 Web API 控制器,其方式与创建传统 MVC 控制器的方式相同。从代码角度来看,它们的唯一区别是它们返回的数据类型。MVC 控制器通常返回 ViewResult;Web API 控制器通常从其作方法或 IActionResult 实例(如 StatusCodeResult)返回原始 .NET 对象,如第 15 章所示。
You can create a new web API project in Visual Studio using the same process you’ve seen previously in Visual Studio. Choose File > New, and in the Create a new project dialog box, select the ASP.NET Core Web API template. Enter your project name in the Configure your new project dialog box, and review the Additional information box, shown in figure 20.1, before choosing Create. If you’re using the command-line interface (CLI), you can create a similar template using dotnet new webapi.
您可以使用之前在 Visual Studio 中看到的相同过程在 Visual Studio 中创建新的 Web API 项目。选择 File > New,然后在 Create a new project (创建新项目) 对话框中,选择 ASP.NET Core Web API 模板。在 Configure your new project (配置您的新项目) 对话框中输入您的项目名称,然后查看 Additional information (其他信息) 框,如图 20.1 所示,然后选择 Create (创建)。如果您使用的是命令行界面 (CLI),则可以使用 dotnet new webapi 创建类似的模板。
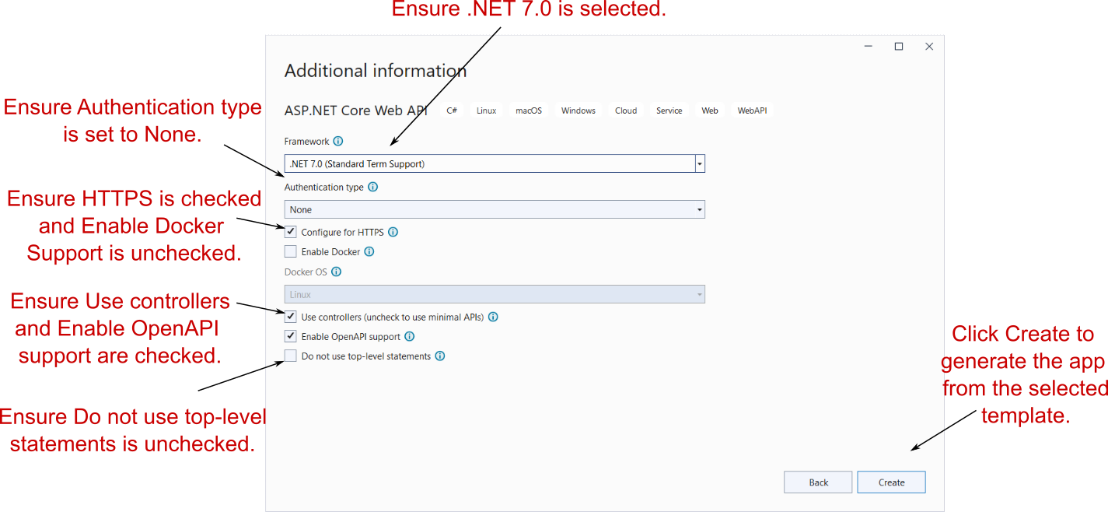
Figure 20.1 The Additional information screen. This screen follows on from the Configure your new project dialog box and lets you customize the template that generates your application.
图 20.1 “其他信息”屏幕。此屏幕是 Configure your new project 对话框的后续屏幕,允许您自定义生成应用程序的模板。
The web API template configures the ASP.NET Core project for web API controllers only in Program.cs, as shown in listing 20.1. If you compare this template with the MVC controller project in chapter 19, you’ll see that the web API project uses AddControllers() instead of AddControllersWithViews(). This adds only the services needed for controllers but omits the services for rendering Razor views. Also, the API controllers are added using MapControllers() instead of MapControllerRoute(), as web API controller typically use explicit routing instead of conventional routing. The default web API template also adds the OpenAPI services and endpoints required by the Swagger UI, as you saw in chapter 11.
Web API 模板仅在 Program.cs 中为 Web API 控制器配置 ASP.NET Core 项目,如清单 20.1 所示。如果将此模板与第 19 章中的 MVC 控制器项目进行比较,你将看到 Web API 项目使用 AddControllers() 而不是 AddControllersWithViews()。这仅添加控制器所需的服务,但省略了用于呈现 Razor 视图的服务。此外,API 控制器是使用 MapControllers() 而不是 MapControllerRoute() 添加的,因为 Web API 控制器通常使用显式路由而不是传统路由。默认 Web API 模板还添加了 Swagger UI 所需的 OpenAPI 服务和端点,如第 11 章所示。
Listing 20.1 Program.cs for the default web API project
清单 20.1 默认 Web API 项目的 Program.cs
WebApplicationBuilder builder = WebApplication.CreateBuilder(args);

builder.Services.AddControllers();  #A

builder.Services.AddEndpointsApiExplorer();    #B
builder.Services.AddSwaggerGen();    #B

WebApplication app = builder.Build();

if (app.Environment.IsDevelopment())
{
    app.UseSwagger();    #C
    app.UseSwaggerUI();  #C
}

app.UseHttpsRedirection();
app.UseAuthorization();

app.MapControllers();  #D

app.Run();
❶ AddControllers adds the necessary services for web API controllers to your application.
AddControllers 将 Web API 控制器的必要服务添加到您的应用程序中。
❷ Adds services required to generate the Swagger/OpenAPI specification document
添加生成 Swagger/OpenAPI 规范文档所需的服务
❸ Adds Swagger UI middleware for exploring your web API endpoints
添加用于探索 Web API 端点的 Swagger UI 中间件
❹ MapControllers configures the web API controller actions in your app as endpoints.
MapControllers 将应用程序中的 Web API 控制器作配置为端点。
The program in listing 20.1 instructs your application to find all the web API controllers in your application and configure them in the EndpointMiddleware. Each action method becomes an endpoint and can receive requests when the RoutingMiddleware maps an incoming URL to the action method.
清单 20.1 中的程序指示您的应用程序查找应用程序中的所有 Web API 控制器,并在 EndpointMiddleware 中配置它们。每个作方法都成为一个端点,当 RoutingMiddleware 将传入的 URL 映射到作方法时,可以接收请求。
NOTE Technically, you can include Razor Pages, minimal APIs, and web API controllers in the same app, but I prefer to keep them separate where possible. There are certain aspects (such as error handling and authentication) that are made easier by keeping them separate. Of course, running two separate applications has its own difficulties!
注意:从技术上讲,您可以在同一个应用程序中包含 Razor Pages、最小 API 和 Web API 控制器,但我更喜欢尽可能将它们分开。通过将某些方面 (例如错误处理和身份验证) 分开,可以更轻松地使用它们。当然,运行两个单独的应用程序有其自身的困难!
You can add a web API controller to your project by creating a new .cs file anywhere in your project. Traditionally, this file is placed in a folder called Controllers, but that’s not a technical requirement.
您可以通过在项目中的任何位置创建新的 .cs 文件,将 Web API 控制器添加到项目中。传统上,此文件放置在名为 Controllers 的文件夹中,但这不是技术要求。
Tip Vertical slice architecture and feature folders are (fortunately) becoming more popular in .NET circles. With these approaches, you organize your project based on features instead of technical concepts like controllers and models.
提示:垂直切片体系结构和功能文件夹(幸运的是)在 .NET 圈子中越来越流行。使用这些方法,您可以根据功能而不是控制器和模型等技术概念来组织项目。
Listing 20.2 shows an example of a simple controller, with a single endpoint, that returns an IEnumerable
清单 20.2 展示了一个简单的控制器示例,它只有一个端点,执行时返回一个 IEnumerable。此示例突出了与传统 MVC 控制器(使用作方法和基类)和最小 API(直接返回响应对象以供稍后序列化)的相似性。
Listing 20.2 A simple web API controller
[ApiController]    #A
public class FruitController : ControllerBase         #B
{
    List<string> _fruit = new List<string>    #C
    {                                         #C
        "Pear",                               #C
        "Lemon",                              #C
        "Peach"                               #C
    };                                        #C
    [HttpGet("fruit")]                           #D
    public IEnumerable<string> Index()      #E
    {                      #F
        return _fruit;     #F
    }                      #F
}
❶ The [ApiController] attribute opts in to common conventions.
[ApiController] 属性选择加入常见约定。
❷ The ControllerBase class provides helper functions.
ControllerBase 类提供了帮助程序函数。
❸ This would typically come from a dependency injection (DI) injected service instead.
这通常来自依赖注入 (DI) 注入的服务。
❹ The [HttpGet] attribute defines the route template used to call the action.
[HttpGet] 属性定义用于调用作的路由模板。
❺ The name of the action method, Index, isn’t used for routing. It can be anything you like.
action方法的名称 Index 不用于路由。它可以是你喜欢的任何东西。
❻ The controller exposes a single action method that returns the list of fruit.
控制器公开一个返回 fruit 列表的 action 方法。
When invoked, this endpoint returns the list of strings serialized to JSON, as shown in figure 20.2.
调用时,此终端节点返回序列化为 JSON 的字符串列表,如图 20.2 所示。

Figure 20.2 Testing the web API in listing 20.2 by accessing the URL in the browser. A GET request is made to the /fruit URL, which returns a List<string> that is serialized to JSON.
图 20.2 通过在浏览器中访问 URL 来测试清单 20.2 中的 Web API。向 /fruit URL 发出 GET 请求,该请求返回序列化为 JSON 的 List<string>。
Web API controllers typically use the [ApiController] attribute (introduced in .NET Core 2.1) and derive from the ControllerBase class. The base class provides several helper methods for generating results, and the [ApiController] attribute automatically applies some common conventions, as you’ll see in section 20.5.
Web API 控制器通常使用 [ApiController] 属性(在 .NET Core 2.1 中引入)并从 ControllerBase 类派生。基类提供了几个用于生成结果的帮助程序方法,并且 [ApiController] 属性会自动应用一些常见约定,如第 20.5 节所示。
Tip The Controller base class is typically used when you use MVC controllers with Razor views. You don’t need to return Razor views with web API controllers, so ControllerBase is the better option.
提示:将 Controller 基类通常用于 Razor 视图的 MVC 控制器。无需使用 Web API 控制器返回 Razor 视图,因此 ControllerBase 是更好的选择。
In listing 20.2 you can see that the action method, Index, returns a list of strings directly from the action method. When you return data from an action like this, you’re providing the API model for the request. The client will receive this data. It’s formatted into an appropriate response, a JSON representation of the list in the case of figure 20.2, and sent back to the browser with a 200 OK status code.
在清单 20.2 中,你可以看到作方法 Index 直接从作方法返回一个字符串列表。当您从此类作返回数据时,您将为请求提供 API 模型。客户端将收到此数据。它被格式化为适当的响应,即图 20.2 中列表的 JSON 表示形式,并使用 200 OK 状态代码发送回浏览器。
Tip Web API controllers format data as JSON by default. You’ll see how to format the returned data in other ways in section 20.6. Minimal API endpoints that return data directly (rather than via an IResult) will format data only as JSON; there are no other options.
提示:默认情况下,Web API 控制器将数据格式化为 JSON。您将在 Section 20.6 中看到如何以其他方式格式化返回的数据。直接返回数据(而不是通过 IResult)的最小 API 端点将仅将数据格式化为 JSON;没有其他选择。
The URL at which a web API controller action is exposed is handled in the same way as for traditional MVC controllers and Razor Pages: using routing. The [HttpGet("fruit")] attribute applied to the Index method indicates that the method should use the route template "fruit" and should respond to HTTP GET requests. You’ll learn more about attribute routing in section 20.4, but it’s similar to the minimal API routing that you’re already familiar with.
公开 Web API 控制器作的 URL 的处理方式与传统 MVC 控制器和 Razor Pages 的处理方式相同:使用路由。应用于 Index 方法的 [HttpGet(“fruit”)] 属性指示该方法应使用路由模板 “fruit” 并应响应 HTTP GET 请求。您将在 Section 20.4 中了解有关 attribute routing 的更多信息,但它类似于您已经熟悉的最小 API 路由。
In listing 20.2 data is returned directly from the action method, but you don’t have to do that. You’re free to return an IActionResult instead, and often this is required. Depending on the desired behavior of your API, you sometimes want to return data, and other times you may want to return a raw HTTP status code, indicating whether the request was successful. For example, if an API call is made requesting details of a product that does not exist, you might want to return a 404 Not Found status code.
在示例 20.2 中,数据直接从 action 方法返回,但你不必这样做。您可以自由地返回 IActionResult,这通常是必需的。根据 API 的所需行为,您有时希望返回数据,有时您可能希望返回原始 HTTP 状态代码,以指示请求是否成功。例如,如果进行 API 调用,请求不存在的产品的详细信息,则可能需要返回 404 Not Found 状态代码。
NOTE This is similar to the patterns you used in minimal APIs. But remember, minimal APIs use IResult, web API controllers, MVC controllers, and Razor Pages use IActionResult.
注意:这类似于您在最小 API 中使用的模式。但请记住,最小的 API 使用 IResult,Web API 控制器、MVC 控制器和 Razor 页面使用 IActionResult。
Listing 20.3 shows an example of where you must return an IActionResult. It shows another action on the same FruitController as before. This method exposes a way for clients to fetch a specific fruit by an id, which we’ll assume for this example is an index into the list of _fruit you defined in the previous listing. Model binding is used to set the value of the id parameter from the request.
清单 20.3 显示了一个必须返回 IActionResult 的示例。它显示了与以前一样,在同一个 FruitController 上的另一个作。此方法为 Client 端提供了一种通过 id 获取特定水果的方法,在本例中,我们假设该 ID 是您在上一个清单中定义的 _fruit 列表的索引。模型绑定用于设置请求中 id 参数的值。
NOTE API controllers use the same model binding infrastructure as Razor Pages to bind action method parameters to the incoming request. Model binding and validation work the same way you saw in chapter 16: you can bind the request to simple primitives, as well as to complex C# objects. The only difference is that there isn’t a PageModel with [BindProperty] properties; you can bind only to action method parameters.
注意:API 控制器使用与 Razor Pages 相同的模型绑定基础结构将作方法参数绑定到传入请求。模型绑定和验证的工作方式与第 16 章中介绍的相同:可以将请求绑定到简单的基元,也可以绑定到复杂的 C# 对象。唯一的区别是没有具有 [BindProperty] 属性的 PageModel;您只能绑定到作方法参数。
Listing 20.3 A web API action returning IActionResult to handle error conditions
列表 20.3 返回 IActionResult 以处理错误条件的 Web API action
[HttpGet("fruit/{id}")]                #A
public ActionResult<string> View(int id)    #B
{
    if (id >= 0 && id < _fruit.Count)   #C
    {
        return _fruit[id];    #D
    }
    return NotFound();    #E
}
❶ Defines the route template for the action method
定义action方法的路由模板
❷ The action method returns an ActionResult<string>, so it can return a string or an IActionResult.
作方法返回 ActionResult<string>,因此它可以返回字符串或 IActionResult。
❸ An element can be returned only if the id value is a valid _fruit element index.
仅当 id 值是有效的 _fruit 元素索引时,才能返回元素。
❹ Returning the data directly returns the data with a 200 status code.
返回数据直接返回状态代码为 200 的数据。
❺ NotFound returns a NotFoundResult, which sends a 404 status code.
NotFound 返回 NotFoundResult, ,这会发送 404 状态代码。
In the successful path for the action method, the id parameter has a value greater than 0 and less than the number of elements in _fruit. When that’s true, the value of the element is returned to the caller. As in listing 20.2, this is achieved by simply returning the data directly, which generates a 200 status code and returns the element in the response body, as shown in figure 20.3. You could also have returned the data using an OkResult, by returning Ok(_fruit[id]), using the Ok helper method on the ControllerBase class; under the hood, the result is identical.
在作方法的成功路径中, id 参数的值大于 0 且小于 _fruit 中的元素数。如果为 true,则元素的值将返回给调用方。与清单 20.2 一样,这是通过简单地直接返回数据来实现的,这会生成一个 200 状态代码并返回响应正文中的元素,如图 20.3 所示。您还可以通过 OkResult 返回 Ok(_fruit[id]),使用 ControllerBase 类上的 Ok 帮助程序方法返回数据;在后台,结果是相同的。
NOTE Some people get uneasy when they see the phrase helper method, but there’s nothing magic about the ControllerBase helpers; they’re shorthand for creating a new IActionResult of a given type. You don’t have to take my word for it, though. You can always view the source code for the base class on GitHub at http://mng.bz/5wQB.
注意:有些人在看到短语 helper method 时会感到不安,但 ControllerBase helpers 并没有什么神奇之处;它们是创建给定类型的新 IActionResult 的简写。不过,你不必相信我的话。您始终可以在 GitHub 上查看基类的源代码,网址为 http://mng.bz/5wQB。
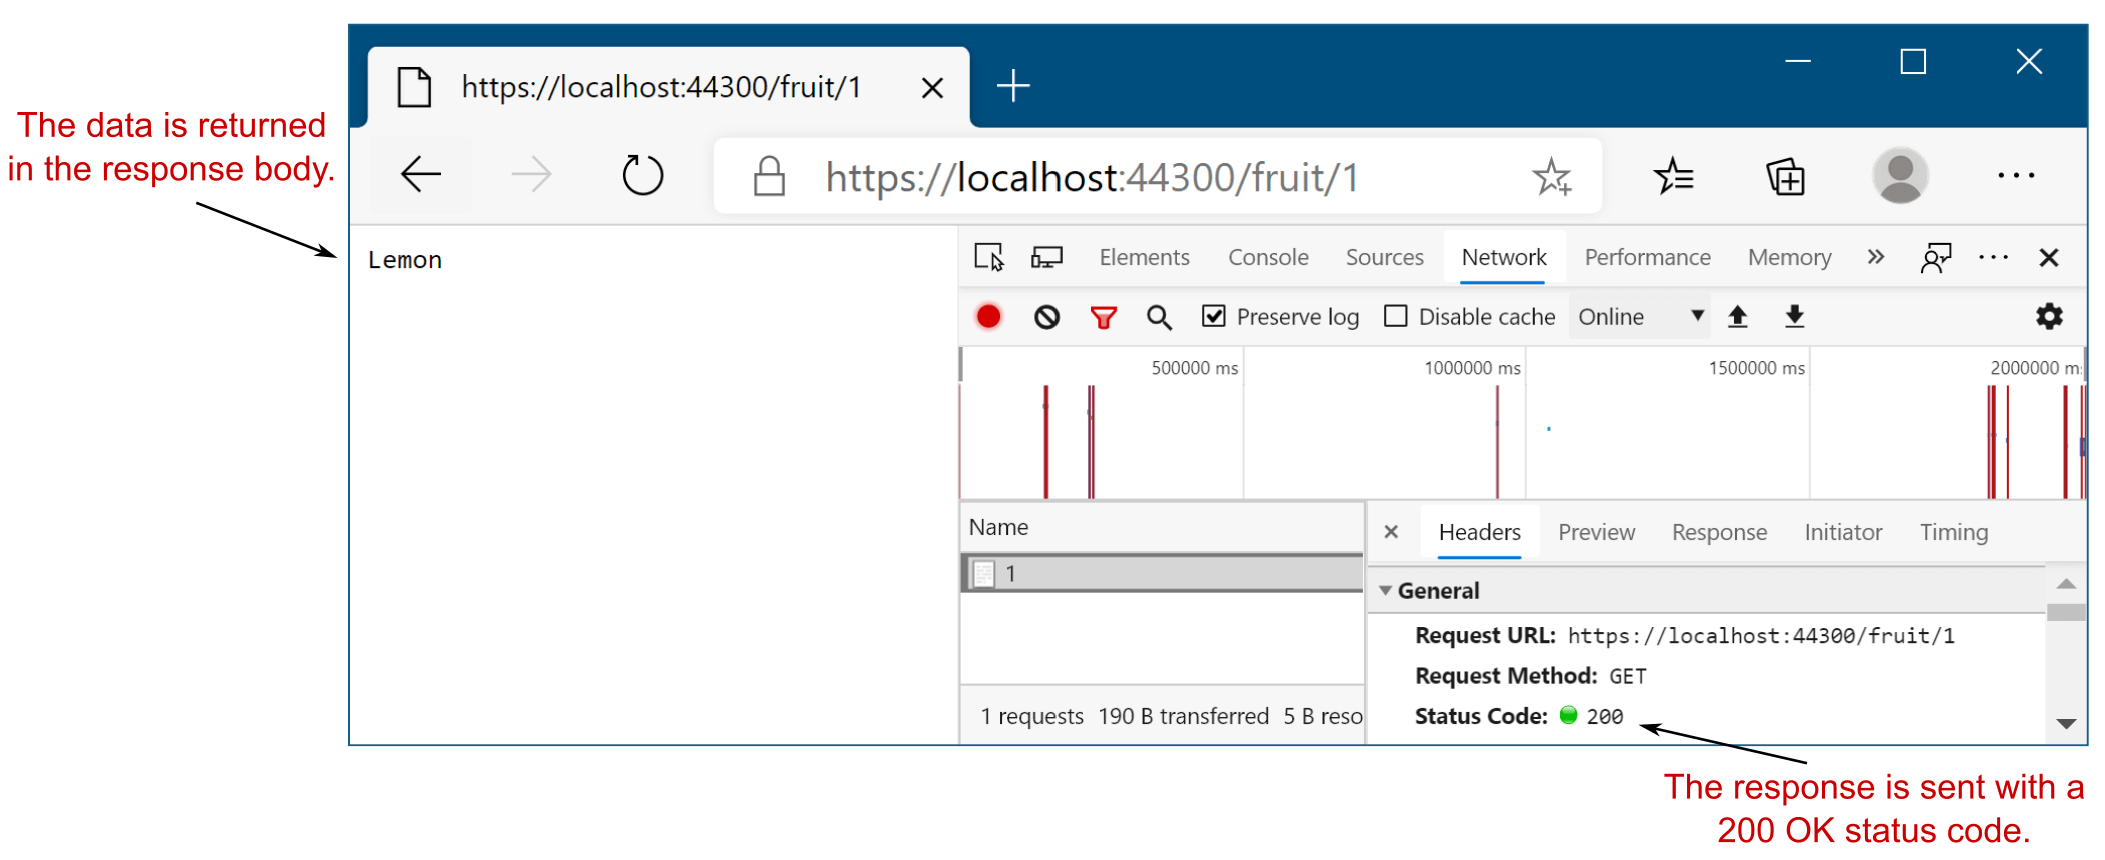
Figure 20.3 Data returned from an action method is serialized into the response body, and it generates a response with status code 200 OK.
图 20.3 从作方法返回的数据被序列化到响应正文中,并生成状态码为 200 OK 的响应。
If the id is outside the bounds of the _fruit list, the method calls NotFound() to create a NotFoundResult. When executed, this method generates a 404 Not Found status code response. The [ApiController] attribute automatically converts the response into a standard ProblemDetails instance, as shown in figure 20.4.
如果 ID 超出 _fruit 列表的边界,该方法将调用 NotFound() 来创建 NotFoundResult。执行时,此方法会生成 404 Not Found 状态代码响应。[ApiController] 属性会自动将响应转换为标准 ProblemDetails 实例,如图 20.4 所示。
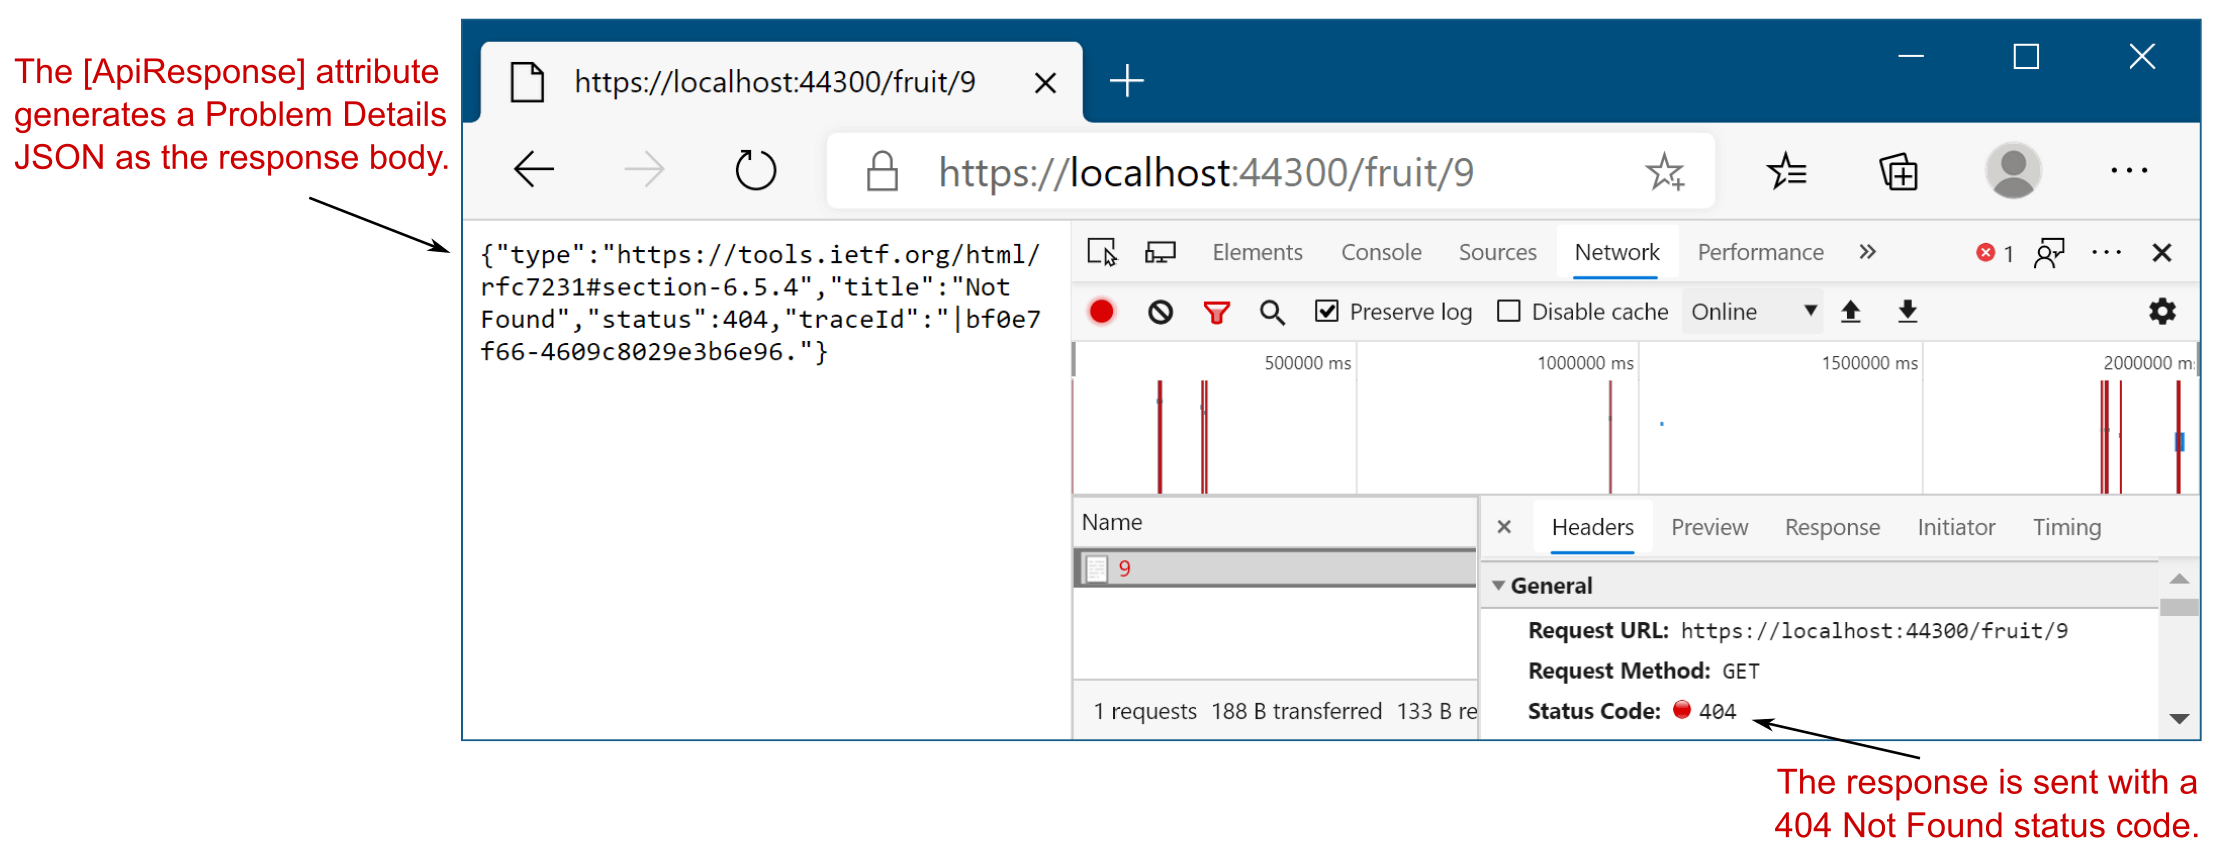
Figure 20.4 The [ApiController] attribute converts error responses (in this case a 404 response) into the standard ProblemDetails format.
图 20.4 [ApiController] 属性将错误响应(在本例中为 404 响应)转换为标准 ProblemDetails 格式。
One aspect you might find confusing from listing 20.3 is that for the successful case, we return a string, but the method signature of View says we return an ActionResult<string>. How is that possible? Why isn’t there a compiler error?
清单 20.3 中您可能会感到困惑的一个方面是,对于成功的情况,我们返回一个字符串,但 View 的方法签名说我们返回一个 ActionResult<string>.这怎么可能呢?为什么没有编译器错误?
The generic ActionResult<T> uses some fancy C# gymnastics with implicit conversions to make this possible. Using ActionResult<T> has two benefits:
泛型ActionResult<T>使用一些带有隐式转换的花哨 C# 体来实现这一点。使用ActionResult<T> 有两个好处:
• You can return either an instance of T or an ActionResult implementation like NotFoundResult from the same method. This can be convenient, as in listing 20.3.
您可以从同一方法返回 T 的实例或 ActionResult 实现(如 NotFoundResult)。这很方便,如 清单 20.3 所示。
• It enables better integration with ASP.NET Core’s OpenAPI support.
它支持更好地与 ASP.NET Core 的 OpenAPI 支持集成。
You’re free to return any type of ActionResult from your web API controllers, but you’ll commonly return StatusCodeResult instances, which set the response to a specific status code, with or without associated data. NotFoundResult and OkResult both derive from StatusCodeResult, for example. Another commonly used status code is 400 Bad Request, which is normally returned when the data provided in the request fails validation. You can generate this using a BadRequestResult, but in many cases the [ApiController] attribute can automatically generate 400 responses for you, as you’ll see in section 20.5.
您可以自由地从 Web API 控制器返回任何类型的 ActionResult,但通常会返回 StatusCodeResult 实例,这些实例将响应设置为特定状态代码,无论是否包含关联数据。例如,NotFoundResult 和 OkResult 都派生自 StatusCodeResult。另一个常用的状态代码是 400 Bad Request,通常在请求中提供的数据未通过验证时返回。你可以使用 BadRequestResult 来生成它,但在许多情况下, [ApiController] 属性可以自动生成 400 个响应,如第 20.5 节所示。
Tip You learned about various ActionResults in chapter 15. BadRequestResult, OkResult, and NotFoundResult all inherit from StatusCodeResult and set the appropriate status code for their type (400, 200, and 404, respectively). Using these wrapper classes makes the intention of your code clearer than relying on other developers to understand the significance of the various status code numbers.
提示您在第 15 章中了解了各种 ActionResult。BadRequestResult、OkResult 和 NotFoundResult 都继承自 StatusCodeResult,并为其类型设置适当的状态代码(分别为 400、200 和 404)。使用这些包装类可以比依赖其他开发人员来了解各种状态代码编号的重要性更清楚地了解代码的意图。
Once you’ve returned an ActionResult (or other object) from your controller, it’s serialized to an appropriate response. This works in several ways, depending on
从控制器返回 ActionResult(或其他对象)后,它将被序列化为适当的响应。这以多种方式工作,具体取决于
• The formatters that your app supports
您的应用程序支持的格式化程序
• The data you return from your method
您从方法返回的数据
• The data formats the requesting client can handle
请求客户端可以处理的数据格式
You’ll learn more about formatters and serializing data in section 20.6, but before we go any further, it’s worth zooming out a little and exploring the parallels between traditional server-side rendered applications and web API endpoints. The two are similar, so it’s important to establish the patterns that they share and where they differ.
您将在 Section 20.6 中了解有关格式化程序和序列化数据的更多信息,但在我们进一步讨论之前,值得稍微缩小并探索传统服务器端渲染的应用程序和 Web API 端点之间的相似之处。这两者相似,因此确定它们的共同模式和不同之处非常重要。
20.2 Applying the MVC design pattern to a web API
20.2 将 MVC 设计模式应用于 Web API
In ASP.NET Core, the same underlying framework is used in conjunction with web API controllers, Razor Pages, and MVC controllers with views. You’ve already seen this yourself; the web API FruitController you created in section 20.2 looks similar to the MVC controllers you saw in chapter 19.
在 ASP.NET Core 中,相同的基础框架与 Web API 控制器、Razor Pages 和具有视图的 MVC 控制器结合使用。你自己已经见过了;您在第 20.2 节中创建的 Web API FruitController 看起来类似于您在第 19 章中看到的 MVC 控制器。
Consequently, even if you’re building an application that consists entirely of web APIs, using no server-side rendering of HTML, the MVC design pattern still applies. Whether you’re building traditional web applications or web APIs, you can structure your application virtually identically.
因此,即使您正在构建一个完全由 Web API 组成的应用程序,不使用服务器端的 HTML 呈现,MVC 设计模式仍然适用。无论您是构建传统的 Web 应用程序还是 Web API,您都可以以几乎相同的方式构建您的应用程序。
By now I hope you’re nicely familiar with how ASP.NET Core handles a request. But in case you’re not, figure 20.5 shows how the framework handles a typical Razor Pages request after it passes through the middleware pipeline. This example shows how a request to view the available fruit on a traditional grocery store website might look.
到目前为止,我希望您已经非常熟悉 ASP.NET Core 如何处理请求。但如果你不是,图 20.5 显示了框架在典型的 Razor Pages 请求通过中间件管道后如何处理该请求。此示例显示了在传统杂货店网站上查看可用水果的请求可能是什么样子的。
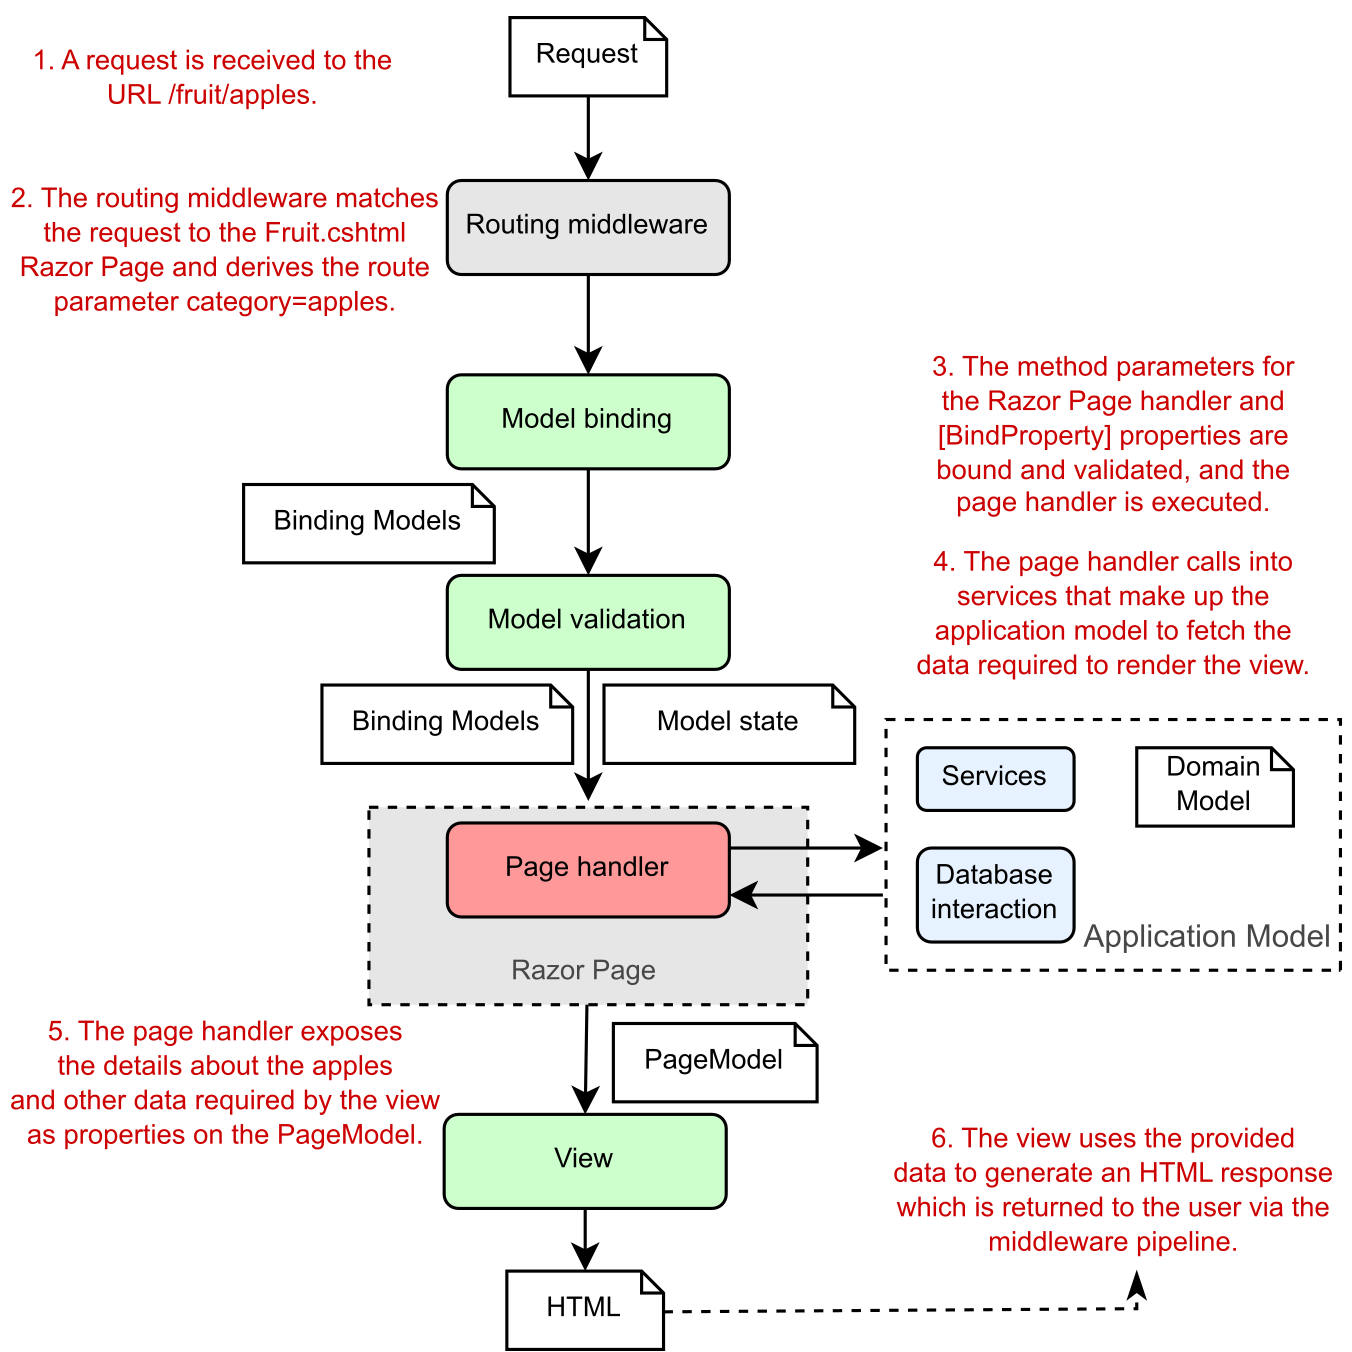
Figure 20.5 Handling a request to a traditional Razor Pages application, in which the view generates an HTML response that’s sent back to the user. This diagram should be familiar by now!
图 20.5 处理对传统 Razor Pages 应用程序的请求,其中视图生成 HTML 响应,该响应将发送回给用户。这张图现在应该很熟悉了!
The RoutingMiddleware routes the request to view all the fruit listed in the apples category to the Fruit.cshtml Razor Page. The EndpointMiddleware then constructs a binding model, validates it, sets it as a property on the Razor Page’s PageModel, and sets the ModelState property on the PageModel base class with details of any validation errors. The page handler interacts with the application model by calling into services, talking to a database, and fetching any necessary data.
RoutingMiddleware 将请求路由到 Fruit.cshtml Razor 页面,以查看 apples 类别中列出的所有水果。然后,EndpointMiddleware 构造一个绑定模型,对其进行验证,将其设置为 Razor 页面的 PageModel 上的属性,并在 PageModel 基类上设置 ModelState 属性,其中包含任何验证错误的详细信息。页面处理程序通过调用服务、与数据库通信以及获取任何必要的数据来与应用程序模型进行交互。
Finally, the Razor Page executes its Razor view using the PageModel to generate the HTML response. The response returns through the middleware pipeline and out to the user’s browser.
最后,Razor 页面使用 PageModel 执行其 Razor 视图以生成 HTML 响应。响应通过中间件管道返回并输出到用户的浏览器。
How would this change if the request came from a client-side or mobile application? If you want to serve machine-readable JSON instead of HTML, what is different for web API controllers? As shown in figure 20.6, the answer is “very little.” The main changes are related to switching from Razor Pages to controllers and actions, but as you saw in chapter 19, both approaches use the same general paradigms.
如果请求来自客户端或移动应用程序,情况会如何变化?如果要提供机器可读的 JSON 而不是 HTML,那么 Web API 控制器有什么不同?如图 20.6 所示,答案是 “very little”。主要更改与从 Razor Pages 切换到控制器和作有关,但正如您在第 19 章中看到的那样,这两种方法都使用相同的通用范例。
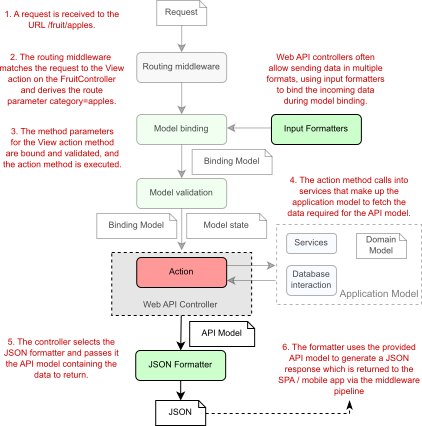
Figure 20.6 A call to a web API endpoint in an e-commerce ASP.NET Core web application. The ghosted portion of the diagram is identical to figure 20.5.
图 20.6 对电子商务 ASP.NET Core Web 应用程序中的 Web API 终端节点的调用。该图的重影部分与图 20.5 相同。
As before, the routing middleware selects an endpoint to invoke based on the incoming URL. For API controllers this is a controller and action instead of a Razor Page.
与以前一样,路由中间件根据传入 URL 选择要调用的终端节点。对于 API 控制器,这是控制器和作,而不是 Razor 页面。
After routing comes model-binding, in which the binder creates a binding model and populates it with values from the request. web API controllers often accept data in more formats than Razor Pages, such as XML, but otherwise the model-binding process is the same as for the Razor Pages request. Validation also occurs in the same way, and the ModelState property on the ControllerBase base class is populated with any validation errors.
路由之后是模型绑定,其中 Binder 创建一个绑定模型,并使用请求中的值填充它。Web API 控制器通常接受比 Razor Pages 更多格式的数据(例如 XML),但其他方面,模型绑定过程与 Razor Pages 请求相同。验证也以相同的方式进行,并且 ControllerBase 基类上的 ModelState 属性中填充了任何验证错误。
NOTE Web APIs use input formatters to accept data sent to them in a variety of formats. Commonly these formats are JSON or XML, but you can create input formatters for any sort of type, such as CSV. I show how to enable the XML input formatter in section 20.6. You can see how to create a custom input formatter at http://mng.bz/e5gG.
注意:Web API 使用输入格式化程序来接受以各种格式发送给它们的数据。这些格式通常为 JSON 或 XML,但您可以为任何类型的输入格式化程序创建,例如 CSV。我在 Section 20.6 中展示了如何启用 XML input 格式化程序。您可以在 http://mng.bz/e5gG 中了解如何创建自定义输入格式化程序。
The action method is the equivalent of the Razor Page handler; it interacts with the application model in the same way. This is an important point; by separating the behavior of your app into an application model instead of incorporating it into your pages and controllers themselves, you’re able to reuse the business logic of your application with multiple UI paradigms.
action方法等效于 Razor Page 处理程序;它以相同的方式与应用程序模型交互。这是很重要的一点;通过将应用程序的行为分离到应用程序模型中,而不是将其合并到页面和控制器本身中,您可以利用多个 UI 范例重用应用程序的业务逻辑。
Tip Where possible, keep your page handlers and controllers as simple as practicable. Move all your business logic decisions into the services that make up your application model, and keep your Razor Pages and API controllers focused on the mechanics of interacting with a user or client.
提示:在可能的情况下,请尽可能保持页面处理程序和控制器的简单性。将所有业务逻辑决策移动到构成应用程序模型的服务中,并使 Razor Pages 和 API 控制器专注于与用户或客户端交互的机制。
After the application model has returned the data necessary to service the request—the fruit objects in the apples category—you see the first significant difference between API controllers and Razor Pages. Instead of adding values to the PageModel to be used in a Razor view, the action method creates an API model. This is analogous to the PageModel, but rather than containing data used to generate an HTML view, it contains the data that will be sent back in the response.
在应用程序模型返回为请求提供服务所需的数据(apples 类别中的 fruit 对象)后,您会看到 API 控制器和 Razor Pages 之间的第一个显著差异。作方法不是向 PageModel 添加值以在 Razor 视图中使用的,而是创建一个 API 模型。这类似于 PageModel,但它不包含用于生成 HTML 视图的数据,而是包含将在响应中发回的数据。
DEFINITION View models and PageModels contain both the data required to build a response and metadata about how to build the response. API models typically contain only the data to be returned in the response.
定义:视图模型和 PageModel 包含构建响应所需的数据以及有关如何构建响应的元数据。API 模型通常仅包含要在响应中返回的数据。
When we looked at the Razor Pages app, we used the PageModel in conjunction with a Razor view template to build the final response. With the web API app, we use the API model in conjunction with an output formatter. An output formatter, as the name suggests, serializes the API model into a machine-readable response, such as JSON or XML. The output formatter forms the V in the web API version of MVC by choosing an appropriate representation of the data to return.
当我们查看 Razor Pages 应用时,我们将 PageModel 与 Razor 视图模板结合使用来构建最终响应。对于 Web API 应用程序,我们将 API 模型与输出格式化程序结合使用。顾名思义,输出格式化程序将 API 模型序列化为机器可读的响应,例如 JSON 或 XML。输出格式化程序通过选择要返回的数据的适当表示形式,在 MVC 的 Web API 版本中形成 V。
Finally, as for the Razor Pages app, the generated response is sent back through the middleware pipeline, passing through each of the configured middleware components, and back to the original caller.
最后,对于 Razor Pages 应用,生成的响应通过中间件管道发送回,通过每个配置的中间件组件,并返回给原始调用方。
I hope the parallels between Razor Pages and web APIs are clear. The majority of the behavior is identical; only the response varies. Everything from when the request arrives to the interaction with the application model is similar between the paradigms.
我希望 Razor Pages 和 Web API 之间的相似之处是明确的。大多数行为是相同的;只是反应不同。从请求到达到与应用程序模型的交互,范例之间的一切都是相似的。
Most of the differences between Razor Pages and web APIs have less to do with the way the framework works under the hood and are instead related to how the different paradigms are used. For example, in the next section you’ll learn how the routing constructs you learned about in chapters 6 and 15 are used with web APIs, using attribute routing.
Razor Pages 和 Web API 之间的大多数差异与框架在后台的工作方式关系不大,而是与不同范例的使用方式有关。例如,在下一节中,您将了解如何使用属性路由将您在第 6 章和第 15 章中学到的路由结构与 Web API 一起使用。
20.3 Attribute routing: Linking action methods to URLs
20.3 属性路由:将作方法链接到 URL
In this section you’ll learn about attribute routing: the mechanism for associating web API controller actions with a given route template. You’ll see how to associate controller actions with specific HTTP verbs like GET and POST and how to avoid duplication in your templates.
在本节中,您将了解属性路由:将 Web API 控制器作与给定路由模板关联的机制。您将了解如何将控制器作与特定的 HTTP 动词(如 GET 和 POST)相关联,以及如何避免模板中的重复。
We covered route templates in depth in chapter 6 in the context of minimal APIs, and again in chapter 14 with Razor Pages, and you’ll be pleased to know that you use exactly the same route templates with API controllers. The only difference is how you specify the templates. With Razor Pages you use the @page directive, and with minimal APIs you use MapGet() or MapPost(), whereas with API controllers you use routing attributes.
我们在第 6 章中深入介绍了最小 API 的路由模板,并在第 14 章中再次介绍了 Razor Pages,您会很高兴地知道您对 API 控制器使用完全相同的路由模板。唯一的区别是指定模板的方式。对于 Razor Pages,您可以使用 @page 指令,对于最少的 API,您可以使用 MapGet() 或 MapPost(),而对于 API 控制器,您可以使用路由属性。
NOTE All three paradigms use explicit routing under the hood. The alternative, conventional routing, is typically used with traditional MVC controllers and views, as described in chapter 19. As I’ve mentioned, I don’t recommend using that approach generally, so I don’t cover conventional routing in this book.
注意:这三种范例都在后台使用显式路由。另一种选择,即传统路由,通常与传统的 MVC 控制器和视图一起使用,如第 19 章所述。正如我所提到的,我不建议通常使用这种方法,因此我在本书中不介绍传统路由。
With attribute routing, you decorate each action method in an API controller with an attribute and provide the associated route template for the action method, as shown in the following listing.
使用属性路由,您可以使用属性修饰 API 控制器中的每个作方法,并为作方法提供关联的路由模板,如下面的清单所示。
Listing 20.4 Attribute routing example
列表 20.4 属性路由示例
public class HomeController: Controller
{
    [Route("")]                  #A
    public IActionResult Index()
    {
         /* method implementation*/
    }

    [Route("contact")]             #B
    public IActionResult Contact()
    {
         /* method implementation*/
    }
}
❶ The Index action will be executed when the / URL is requested.
请求 / URL 时,将执行 Index action。
❷ The Contact action will be executed when the /contact URL is requested.
请求 /contact URL 时,将执行 Contact action。
Each [Route] attribute defines a route template that should be associated with the action method. In the example provided, the / URL maps directly to the Index method and the /contact URL maps to the Contact method.
每个 [Route] 属性都定义一个应与作方法关联的路由模板。在提供的示例中,/ URL 直接映射到 Index 方法,而 /contact URL 映射到 Contact 方法。
Attribute routing maps URLs to a specific action method, but a single action method can still have multiple route templates and hence can correspond to multiple URLs. Each template must be declared with its own RouteAttribute, as shown in this listing, which shows the skeleton of a web API for a car-racing game.
属性路由将 URL 映射到特定的作方法,但单个作方法仍可以具有多个路由模板,因此可以对应于多个 URL。每个模板都必须使用自己的 RouteAttribute 进行声明,如下面的清单所示,它显示了一个赛车游戏的 Web API 的框架。
Listing 20.5 Attribute routing with multiple attributes
示例 20.5 具有多个属性的属性路由
public class CarController
{
    [Route("car/start")]         #A
    [Route("car/ignition")]      #A
    [Route("start-car")]         #A
    public IActionResult Start()    #B
    {
         /* method implementation*/
    }

    [Route("car/speed/{speed}")]             #C
    [Route("set-speed/{speed}")]             #C
    public IActionResult SetCarSpeed(int speed)
    {
         /* method implementation*/
    }
}
❶ The Start method will be executed when any of these route templates is matched.
当这些路由模板中的任何一个匹配时,将执行 Start 方法。
❷ The name of the action method has no effect on the route template.
action方法的名称对路由模板没有影响。
❸ The RouteAttribute template can contain route parameters, in this case {speed}.
RouteAttribute 模板可以包含路由参数,在本例中为 {speed}。
The listing shows two different action methods, both of which can be accessed from multiple URLs. For example, the Start method will be executed when any of the following URLs is requested:
该列表显示了两种不同的作方法,这两种方法都可以从多个 URL 访问。例如,当请求以下任一 URL 时,将执行 Start 方法:
/car/start
/car/ignition
/start-car
These URLs are completely independent of the controller and action method names; only the value in the RouteAttribute matters.
这些 URL 完全独立于控制器和作方法名称;只有 RouteAttribute 中的值才重要。
NOTE By default, the controller and action name have no bearing on the URLs or route templates when RouteAttributes are used.
注意:默认情况下,当使用 RouteAttributes 时,控制器和作名称与 URL 或路由模板无关。
The templates used in route attributes are standard route templates, the same as you used in chapter 6. You can use literal segments, and you’re free to define route parameters that will extract values from the URL, as shown by the SetCarSpeed method in listing 20.5. That method defines two route templates, both of which define a route parameter, {speed}.
路由属性中使用的模板是标准路由模板,与您在第 6 章中使用的模板相同。您可以使用文字段,并且可以自由定义将从 URL 中提取值的路由参数,如清单 20.5 中的 SetCarSpeed 方法所示。该方法定义了两个路由模板,这两个模板都定义了一个路由参数 {speed}。
Tip I’ve used multiple [Route] attributes on each action in this example, but it’s best practice to expose your action at a single URL. This will make your API easier to understand and for other applications to consume.
提示:在此示例中,我对每个作使用了多个 [Route] 属性,但最佳做法是在单个 URL 上公开您的作。这将使您的 API 更易于理解,并可供其他应用程序使用。
As in all parts of ASP.NET Core, route parameters represent a segment of the URL that can vary. As with minimal APIs, and Razor Pages, the route parameters in your RouteAttribute templates can
与 ASP.NET Core 的所有部分一样,路由参数表示 URL 中可以变化的一段。与最少的 API 和 Razor Pages 一样,RouteAttribute 模板中的路由参数可以
• Be optional
• Have default values
• Use route constraints
For example, you could update the SetCarSpeed method in the previous listing to constrain {speed} to an integer and to default to 20 like so:
例如,您可以更新上一个清单中的 SetCarSpeed 方法,将 {speed} 约束为整数,并默认为 20,如下所示:
[Route("car/speed/{speed=20:int}")]
[Route("set-speed/{speed=20:int}")]
public IActionResult SetCarSpeed(int speed)
NOTE As discussed in chapter 6, don’t use route constraints for validation. For example, if you call the preceding "set-speed/{speed=20:int}" route with an invalid value for speed, /set-speed/oops, you will get a 404 Not Found response, as the route does not match. Without the int constraint, you would receive the more sensible 400 Bad Request response.
注意:如第 6 章所述,不要使用 route constraints 进行验证。例如,如果您使用无效的 speed 值 /set-speed/oops 调用前面的 “set-speed/{speed=20:int}” 路由,您将收到 404 Not Found 响应,因为路由不匹配。如果没有 int 约束,您将收到更明智的 400 Bad Request 响应。
If you managed to get your head around routing in chapter 6, routing with web API controllers shouldn’t hold any surprises for you. One thing you might begin noticing when you start using attribute routing with web API controllers is the amount you repeat yourself. Minimal APIs use route groups to reduce duplication, and Razor Pages removes a lot of the repetition by using conventions to calculate route templates based on the Razor Page’s filename. So what can we use with web API controllers?
如果您在第 6 章中设法了解了路由,那么使用 Web API 控制器进行路由应该不会给您带来任何惊喜。当您开始将属性路由与 Web API 控制器一起使用时,您可能会开始注意到的一件事是您自己重复的量。最小 API 使用路由组来减少重复,而 Razor Pages 通过使用约定根据 Razor Page 的文件名计算路由模板来消除大量重复。那么我们可以用什么来配合 Web API 控制器呢?
20.3.1 Combining route attributes to keep your route templates DRY
20.3.1 组合路由属性以保持路由模板 DRY
Adding route attributes to all of your web API controllers can get a bit tedious, especially if you’re mostly following conventions where your routes have a standard prefix, such as "api" or the controller name. Generally, you’ll want to ensure that you don’t repeat yourself (DRY) when it comes to these strings. The following listing shows two action methods with several [Route] attributes. (This is for demonstration purposes only. Stick to one per action if you can!)
向所有 Web API 控制器添加路由属性可能会有点乏味,尤其是当您主要遵循路由具有标准前缀(例如“api”或控制器名称)的约定时。通常,您需要确保在涉及这些字符串时不会重复自己 (DRY)。下面的列表显示了具有多个 [Route] 属性的两种作方法。(这仅用于演示目的。如果可以的话,每个动作坚持一个!
Listing 20.6 Duplication in RouteAttribute templates
列表 20.6 RouteAttribute 模板中的重复
public class CarController
{
    [Route("api/car/start")]             #A
    [Route("api/car/ignition")]          #A
    [Route("start-car")]
    public IActionResult Start()
    {
         /* method implementation*/
    }

    [Route("api/car/speed/{speed}")]     #A
    [Route("set-speed/{speed}")]
    public IActionResult SetCarSpeed(int speed)
    {
         /* method implementation*/
    }
}
❶ Multiple route templates use the same “api/car” prefix.
多个路由模板使用相同的 “api/car” 前缀。
There’s quite a lot of duplication here; you’re adding "api/car" to most of your routes. Presumably, if you decided to change this to "api/vehicles", you’d have to go through each attribute and update it. Code like that is asking for a typo to creep in!
这里有很多重复;您正在将 “api/car” 添加到大多数路线中。据推测,如果您决定将其更改为 “api/vehicles”,则必须检查每个属性并更新它。像这样的代码就是要求一个拼写错误悄悄溜进来!
To alleviate this pain, it’s possible to apply RouteAttributes to controllers, in addition to action methods. When a controller and an action method both have a route attribute, the overall route template for the method is calculated by combining the two templates.
为了减轻这种痛苦,除了作方法之外,还可以将 RouteAttributes 应用于控制器。当控制器和作方法都具有 route 属性时,该方法的总体路由模板是通过组合两个模板来计算的。
Listing 20.7 Combining RouteAttribute templates
示例 20.7 组合 RouteAttribute 模板
[Route("api/car")]
public class CarController
{
    [Route("start")]          #A
    [Route("ignition")]       #B
    [Route("/start-car")]          #C
    public IActionResult Start()
    {
         /* method implementation*/
    }

    [Route("speed/{speed}")]          #D
    [Route("/set-speed/{speed}")]                  #E
    public IActionResult SetCarSpeed(int speed)
    {
         /* method implementation*/
    }
}
❶ Combines to give “api/car/start”
❷ Combines to give “api/car/ignition”
❸ Does not combine because it starts with /; gives the “start-car” template
❹ Combines to give “api/car/speed/{speed}”
❺ Does not combine because it starts with /; gives the “set-speed/{speed}” template
Combining attributes in this way can reduce some of the duplication in your route templates and makes it easier to add or change the prefixes (such as switching "car" to "vehicle") for multiple action methods. To ignore the RouteAttribute on the controller and create an absolute route template, start your action method route template with a slash (/). Using a controller RouteAttribute reduces a lot of the duplication, but you can go one better by using token replacement.
以这种方式组合属性可以减少路线模板中的一些重复,并可以更轻松地为多个作方法添加或更改前缀(例如将 “car” 切换为 “vehicle”)。要忽略控制器上的 RouteAttribute 并创建绝对路由模板,请使用斜杠 (/) 启动作方法路由模板。使用控制器 RouteAttribute 可以减少很多重复,但您可以通过使用令牌替换来更好地进行一次重复。
20.3.2 Using token replacement to reduce duplication in attribute routing
20.3.2 使用令牌替换来减少属性路由中的重复
The ability to combine attribute routes is handy, but you’re still left with some duplication if you’re prefixing your routes with the name of the controller, or if your route templates always use the action name. If you wish, you can simplify even further!
组合属性路由的功能很方便,但如果您在路由前加上控制器的名称,或者如果您的路由模板始终使用作名称,则仍然会留下一些重复。如果您愿意,您可以进一步简化!
Attribute routes support the automatic replacement of [action] and [controller] tokens in your attribute routes. These will be replaced with the name of the action and the controller (without the “Controller” suffix), respectively. The tokens are replaced after all attributes have been combined, which can be useful when you have controller inheritance hierarchies. This listing shows how you can create a BaseController class that applies a consistent route template prefix to all the web API controllers in your application.
属性路由支持自动替换属性路由中的 [action] 和 [controller] 令牌。这些将分别替换为作和控制器的名称(不带 “Controller” 后缀)。在合并所有属性后,将替换令牌,这在具有控制器继承层次结构时非常有用。此清单显示了如何创建一个 BaseController 类,该类将一致的路由模板前缀应用于应用程序中的所有 Web API 控制器。
Listing 20.8 Token replacement in RouteAttributes
清单 20.8 RouteAttributes 中的 Token 替换
[Route("api/[controller]")]                      #A
public abstract class BaseController { }       #B

public class CarController : BaseController
{
    [Route("[action]")]          #C
    [Route("ignition")]             #D
    [Route("/start-car")]          #E
    public IActionResult Start()
    {
         /* method implementation*/
    }
}
❶ You can apply attributes to a base class, and derived classes will inherit them.
❷ Token replacement happens last, so [controller] is replaced with “car” not “base”.
❸ Combines and replaces tokens to give the “api/car/start” template
❹ Combines and replaces tokens to give the “api/car/ignition” template
❺ Does not combine with base attributes because it starts with /, so it remains as “start-car”
Warning If you use token replacement for [controller] or [action], remember that renaming classes and methods will change your public API. If that worries you, you can stick to using static strings like "car" instead.
警告:如果你对 [controller] 或 [action] 使用令牌替换,请记住重命名类和方法将更改你的公共 API。如果这让您感到担忧,您可以坚持使用像 “car” 这样的静态字符串。
When combined with everything you learned in chapter 6, we’ve covered pretty much everything there is to know about attribute routing. There’s just one more thing to consider: handling different HTTP request types like GET and POST.
结合您在第 6 章中学到的所有内容,我们几乎涵盖了有关属性路由的所有知识。还有一件事需要考虑:处理不同的 HTTP 请求类型,如 GET 和 POST。
20.3.3 Handling HTTP verbs with attribute routing
20.3.3 使用属性路由处理 HTTP 动词
In Razor Pages, the HTTP verb, such as GET or POST, isn’t part of the routing process. The RoutingMiddleware determines which Razor Page to execute based solely on the route template associated with the Razor Page. It’s only when a Razor Page is about to be executed that the HTTP verb is used to decide which page handler to execute: OnGet for the GET verb, or OnPost for the POST verb, for example.
在 Razor Pages 中,HTTP 谓词(如 GET 或 POST)不是路由过程的一部分。RoutingMiddleware 仅根据与 Razor Page 关联的路由模板来确定要执行的 Razor Page。仅当即将执行 Razor 页面时,才会使用 HTTP 谓词来决定要执行哪个页面处理程序:例如,OnGet 用于 GET 谓词,或 OnPost 用于 POST 谓词。
Web API controllers work like minimal API endpoints: the HTTP verb takes part in the routing process itself. So a GET request may be routed to one action, and a POST request may be routed to a different action, even if the request used the same URL.
Web API 控制器的工作方式类似于最小 API 端点:HTTP 动词参与路由过程本身。因此,GET 请求可以路由到一个作,而 POST 请求可以路由到不同的作,即使请求使用相同的 URL。
The [Route] attribute we’ve used so far responds to all HTTP verbs. Instead, an action should typically only handle a single verb. Instead of the [Route] attribute, you can use
到目前为止,我们使用的 [Route] 属性响应所有 HTTP 动词。相反,一个作通常应该只处理一个动词。您可以使用 [Route] 属性
• [HttpPost] to handle POST requests
• [HttpGet] to handle GET requests
• [HttpPut] to handle PUT requests
There are similar attributes for all the standard HTTP verbs, like DELETE and OPTIONS. You can use these attributes instead of the [Route] attribute to specify that an action method should correspond to a single verb, as shown in the following listing.
所有标准 HTTP 动词都有类似的属性,例如 DELETE 和 OPTIONS。可以使用这些属性而不是 [Route] 属性来指定作方法应对应于单个谓词,如下面的列表所示。
Listing 20.9 Using HTTP verb attributes with attribute routing
清单 20.9 在属性路由中使用 HTTP 动词属性
public class AppointmentController
{
    [HttpGet("/appointments")]                #A
    public IActionResult ListAppointments()   #A
    {                                         #A
        /* method implementation */           #A
    }                                         #A

    [HttpPost("/appointments")]                 #B
    public IActionResult CreateAppointment()    #B
    {                                           #B
        /* method implementation */             #B
    }                                           #B
}
❶ Executed only in response to GET /appointments
❷ Executed only in response to POST /appointments
If your application receives a request that matches the route template of an action method but doesn’t match the required HTTP verb, you’ll get a 405 Method not allowed error response. For example, if you send a DELETE request to the /appointments URL in the previous listing, you’ll get a 405 error response.
如果您的应用程序收到与作方法的路由模板匹配但与所需的 HTTP 动词不匹配的请求,您将收到 405 Method not allowed 错误响应。例如,如果您向上一个列表中的 /appointments URL 发送 DELETE 请求,您将收到 405 错误响应。
When you’re building web API controllers, there is some code that you’ll find yourself writing repeatedly. The [ApiController] attribute is designed to handle some of this for you and reduce the amount of boilerplate you need.
在构建 Web API 控制器时,您会发现自己需要重复编写一些代码。[ApiController] 属性旨在为您处理其中的一些问题,并减少您需要的样板数量。
20.4 Using common conventions with [ApiController]
20.4 在 [ApiController] 中使用通用约定
In this section you’ll learn about the [ApiController] attribute and how it can reduce the amount of code you need to write to create consistent web API controllers. You’ll learn about the conventions it applies, why they’re useful, and how to turn them off if you need to.
在本部分中,你将了解 [ApiController] 属性,以及它如何减少创建一致的 Web API 控制器所需的代码量。您将了解它适用的约定、它们为什么有用,以及如何在需要时关闭它们。
The [ApiController] attribute was introduced in .NET Core 2.1 to simplify the process of creating web API controllers. To understand what it does, it’s useful to look at an example of how you might write a web API controller without the [ApiController] attribute and compare that with the code required to achieve the same thing with the attribute.
[ApiController] 属性是在 .NET Core 2.1 中引入的,用于简化创建 Web API 控制器的过程。要了解它的作用,查看一个示例,了解如何编写没有 [ApiController] 属性的 Web API 控制器,并将其与使用该属性实现相同作所需的代码进行比较,这非常有用。
Listing 20.10 Creating a web API controller without the [ApiController] attribute
清单 20.10 创建不带 [ApiController] 属性的 Web API 控制器
public class FruitController : ControllerBase
{
    List<string> _fruit = new List<string>     #A
    {                                          #A
        "Pear", "Lemon", "Peach"               #A
    };                                         #A

    [HttpPost("fruit")]                              #B
    public ActionResult Update([FromBody] UpdateModel model)     #C
    {
        if (!ModelState.IsValid)                             #D
        {                                                    #D
             return BadRequest(                              #D
                new ValidationProblemDetails(ModelState));   #D
        }                                                    #D

        if (model.Id < 0 || model.Id > _fruit.Count)
        {
            return NotFound(new ProblemDetails()              #E
            {                                                 #E
                Status = 404,                                 #E
                Title = "Not Found",                          #E
                Type = "https://tools.ietf.org/html/rfc7231"  #E
                       + "#section-6.5.4",                    #E
            });                                               #E
        }                                                     #E
        _fruit[model.Id] = model.Name;    #F
        return Ok();                      #F
    }

    public class UpdateModel
    {
        public int Id { get; set; }

        [Required]                         #G
        public string Name { get; set; }   #G
    }
}
❶ The list of strings serves as the application model in this example.
在此示例中,字符串列表用作应用程序模型。
❷ Web APIs use attribute routing to define the route templates.
Web API 使用属性路由来定义路由模板。
❸ The [FromBody] attribute indicates that the parameter should be bound to the request body.
[FromBody] 属性指示参数应绑定到请求正文。
❹ You need to check if model validation succeeded and return a 400 response if it failed.
您需要检查模型验证是否成功,如果失败,则返回 400 响应。
❺ If the data sent does not contain a valid ID, returns a 404 ProblemDetails response
如果发送的数据不包含有效的 ID,则返回 404 ProblemDetails 响应
❻ Updates the model and returns a 200 Response
更新模型并返回 200 响应
❼ UpdateModel is valid only if the Name value is provided, as set by the [Required] attribute.
UpdateModel 仅在提供 Name 值时有效,如 [Required] 属性所设置。
This example demonstrates many common features and patterns used with web API controllers:
此示例演示了与 Web API 控制器一起使用的许多常见功能和模式:
• Web API controllers read data from the body of a request, typically sent as JSON. To ensure the body is read as JSON and not as form values, you have to apply the [FromBody] attribute to the method parameters to ensure it is model-bound correctly.
Web API 控制器从请求正文中读取数据,通常以 JSON 形式发送。若要确保将正文读取为 JSON 而不是表单值,必须将 [FromBody] 属性应用于方法参数,以确保其模型绑定正确。
• As discussed in chapter 16, after model binding, the model is validated, but it’s up to you to act on the validation results. You should return a 400 Bad Request response if the values provided failed validation. You typically want to provide details of why the request was invalid: this is done in listing 20.10 by returning a ValidationProblemDetails object in the response body, built from the ModelState.
如第 16 章所述,在模型绑定之后,将验证模型,但由您根据验证结果执行作。如果提供的值验证失败,则应返回 400 Bad Request 响应。您通常希望提供有关请求无效原因的详细信息:这是在清单 20.10 中通过在响应正文中返回一个 ValidationProblemDetails 对象来完成的,该对象是从 ModelState 构建的。
• Whenever you return an error status, such as a 404 Not Found, where possible you should return details of the problem that will allow the caller to diagnose the issue. The ProblemDetails class is the recommended way of doing that in ASP.NET Core.
每当返回错误状态(如 404 Not Found)时,应尽可能返回问题的详细信息,以便调用方诊断问题。ProblemDetails 类是在 ASP.NET Core 中执行此作的推荐方法。
The code in listing 20.10 is representative of what you might see in an ASP.NET Core API controller before .NET Core 2.1. The introduction of the [ApiController] attribute in .NET Core 2.1 (and subsequent refinement in later versions) makes this same code much simpler, as shown in the following listing.
清单 20.10 中的代码代表了您在 .NET Core 2.1 之前的 ASP.NET Core API 控制器中可能看到的内容。在 .NET Core 2.1 中引入 [ApiController] 属性(以及更高版本中的后续优化)使相同的代码变得更加简单,如下面的清单所示。
Listing 20.11 Creating a web API controller with the [ApiController] attribute
清单 20.11 创建具有 [ApiController] 属性的 Web API 控制器
[ApiController]                               #A
public class FruitController : ControllerBase
{
    List<string> _fruit = new List<string>
    {
        "Pear", "Lemon", "Peach"
    };

    [HttpPost("fruit")]
    public ActionResult Update(UpdateModel model)    #B
    {                                                    #C
        if (model.Id < 0 || model.Id > _fruit.Count)
        {
            return NotFound();   #D
        }

        _fruit[model.Id] = model.Name;

        return Ok();
    }

    public class UpdateModel
    {
        public int Id { get; set; }

        [Required]
        public string Name { get; set; }
    }
}
❶ Adding the [ApiController] attribute applies several conventions common to API controllers.
添加 [ApiController] 属性将应用 API 控制器通用的几个约定。
❷ The [FromBody] attribute is assumed for complex action method parameters.
[FromBody] 属性假定用于复杂的作方法参数。
❸ The model validation is automatically checked, and if invalid, returns a 400 response.
系统会自动检查模型验证,如果无效,则返回 400 响应。
❹ Error status codes are automatically converted to a ProblemDetails object.
错误状态代码会自动转换为 ProblemDetails 对象。
If you compare listing 20.10 with listing 20.11, you’ll see that all the bold code in listing 20.10 can be removed and replaced with the [ApiController] attribute in listing 20.11. The [ApiController] attribute automatically applies several conventions to your controllers:
如果你比较清单 20.10 和清单 20.11,你会发现清单 20.10 中的所有粗体代码都可以删除,并替换为清单 20.11 中的 [ApiController] 属性。[ApiController] 属性会自动将多个约定应用于控制器:
• Attribute routing—You must use attribute routing with your controllers; you can’t use conventional routing—not that you would, as we’ve discussed this approach only for API controllers anyway.
属性路由 - 必须对控制器使用属性路由;您不能使用传统路由 — 并不是说您会这样做,因为无论如何,我们只针对 API 控制器讨论了这种方法。
• Automatic 400 responses—I said in chapter 16 that you should always check the value of ModelState.IsValid in your Razor Page handlers and MVC actions, but the [ApiController] attribute does this for you by adding a filter, as we did with minimal APIs in chapter 7. We’ll cover MVC filters in detail in chapters 21 and 22.
自动 400 响应 - 我在第 16 章中说过,您应该始终在 Razor 页面处理程序和 MVC作中检查 ModelState.IsValid 的值,但 [ApiController] 属性通过添加过滤器来为您执行此作,就像我们在第 7 章中对最少的 API 所做的那样。我们将在第 21 章和第 22 章中详细介绍 MVC 过滤器。
• Model binding source inference—Without the [ApiController] attribute, complex types are assumed to be passed as form values in the request body. For web APIs, it’s much more common to pass data as JSON, which ordinarily requires adding the [FromBody] attribute. The [ApiController] attribute takes care of that for you.
模型绑定源推理 - 如果没有 [ApiController] 属性,则假定复杂类型在请求正文中作为表单值传递。对于 Web API,将数据作为 JSON 传递更为常见,这通常需要添加 [FromBody] 属性。[ApiController] 属性会为您处理该问题。
• ProblemDetails for error codes—You often want to return a consistent set of data when an error occurs in your API. The [ApiController] attribute intercepts any error status codes returned by your controller (for example, a 404 Not Found response), and converts them to ProblemDetails responses.
错误代码的 ProblemDetails - 当 API 中发生错误时,您通常希望返回一组一致的数据。[ApiController] 属性截获控制器返回的任何错误状态代码(例如,404 Not Found 响应),并将其转换为 ProblemDetails 响应。
When it was introduced, a key feature of the [ApiController] attribute was the Problem Details support, but as I described in chapter 5, the same automatic conversion to Problem Details is now supported by the default ExceptionHandlerMiddleware and StatusCodePagesMiddleware. Nevertheless, the [ApiController] conventions can significantly reduce the amount of boilerplate code you have to write and ensure that validation failures are handled automatically, for example.
引入 [ApiController] 属性时,它的一个关键功能是 Problem Details 支持,但正如我在第 5 章中描述的,默认的 ExceptionHandlerMiddleware 和 StatusCodePagesMiddleware 现在支持相同的自动转换为 Problem Details。尽管如此,[ApiController] 约定可以显著减少您必须编写的样板代码量,并确保自动处理验证失败。
As is common in ASP.NET Core, you will be most productive if you follow the conventions rather than trying to fight them. However, if you don’t like some of the conventions introduced by [ApiController],or want to customize them, you can easily do so.
正如 ASP.NET Core 中的常见做法一样,如果您遵循惯例而不是试图与之抗争,您将最有效率。但是,如果您不喜欢 [ApiController] 引入的某些约定,或者想要自定义它们,则可以轻松完成。
You can customize the web API controller conventions your application uses by calling ConfigureApiBehaviorOptions() on the IMvcBuilder object returned from the AddControllers() method in your Program.cs file. For example, you could disable the automatic 400 responses on validation failure, as shown in the following listing.
您可以通过对从 Program.cs 文件中的 AddControllers() 方法返回的 IMvcBuilder 对象调用 ConfigureApiBehaviorOptions() 来自定义应用程序使用的 Web API 控制器约定。例如,您可以在验证失败时禁用自动 400 响应,如下面的清单所示。
Listing 20.12 Customizing [ApiAttribute] behaviors
清单 20.12 自定义 [ApiAttribute] 行为
WebApplicationBuilder builder = WebApplication.CreateBuilder(args);

builder.Services.AddControllers();
    .ConfigureApiBehaviorOptions(options =>         #A
    {
        options.SuppressModelStateInvalidFilter = true;    #B
    });

// ...
❶ Controls which conventions are applied by providing a configuration lambda
通过提供配置 lambda来控制应用哪些约定
❷ This would disable the automatic 400 responses for invalid requests.
将禁用无效请求的自动 400 响应。
Tip You can disable all the automatic features enabled by the [ApiController] attribute, but I encourage you to stick to the defaults unless you really need to change them. You can read more about disabling features in the documentation at https://docs.microsoft.com/aspnet/core/web-api.
提示:您可以禁用 [ApiController] 属性启用的所有自动功能,但我建议您坚持使用默认值,除非您确实需要更改它们。您可以在 https://docs.microsoft.com/aspnet/core/web-api 上的文档中阅读有关禁用功能的更多信息。
The ability to customize each aspect of your web API controllers is one of the key differentiators with minimal APIs. In the next section you’ll learn how to control the format of the data returned by your web API controllers—whether that’s JSON, XML, or a different, custom format.
自定义 Web API 控制器各个方面的能力是最少 API 的关键区别之一。在下一节中,您将学习如何控制 Web API 控制器返回的数据的格式,无论是 JSON、XML 还是其他自定义格式。
20.5 Generating a response from a model
20.5 从模型生成响应
This brings us to the final topic in this chapter: formatting a response. It’s common for API controllers to return JSON these days, but that’s not always the case. In this section you’ll learn about content negotiation and how to enable additional output formats such as XML.
这就引出了本章的最后一个主题:格式化响应。如今,API 控制器返回 JSON 很常见,但情况并非总是如此。在本节中,您将了解内容协商以及如何启用其他输出格式,例如 XML。
Consider this scenario: you’ve created a web API action method for returning a list of cars, as in the following listing. It invokes a method on your application model, which hands back the list of data to the controller. Now you need to format the response and return it to the caller.
请考虑以下场景:您创建了一个 Web API作方法,用于返回汽车列表,如下面的清单所示。它调用应用程序模型上的一个方法,该方法将数据列表返回给控制器。现在,您需要设置响应的格式并将其返回给调用方。
Listing 20.13 A web API controller to return a list of cars
列表 20.13 返回汽车列表的 Web API 控制器
[ApiController]
public class CarsController : Controller
{
    [HttpGet("api/cars")]              #A
    public IEnumerable<string> ListCars()      #B
    {
        return new string[]                      #C
            { "Nissan Micra", "Ford Focus" };    #C
    }
}
❶ The action is executed with a request to GET /api/cars.
通过请求 GET /api/cars 来执行作。
❷ The API model containing the data is an IEnumerable<string>.
包含数据的 API 模型是 IEnumerable<string>。
❸ This data would normally be fetched from the application model.
此数据通常从应用程序模型中提取。
You saw in section 20.2 that it’s possible to return data directly from an action method, in which case the middleware formats it and returns the formatted data to the caller. But how does the middleware know which format to use? After all, you could serialize it as JSON, as XML, or even with a simple ToString() call.
你在 Section 20.2 中看到,可以直接从 action 方法返回数据,在这种情况下,中间件会对其进行格式化并将格式化的数据返回给调用者。但是中间件如何知道要使用哪种格式呢?毕竟,您可以将其序列化为 JSON、XML,甚至使用简单的 ToString() 调用。
Warning Remember that in this chapter I’m talking only about web API controller responses. Minimal APIs support only automatic serialization to JSON, nothing else.
警告:请记住,在本章中,我只讨论 Web API 控制器响应。Minimal API 仅支持自动序列化为 JSON,不支持其他任何内容。
The process of determining the format of data to send to clients is known generally as content negotiation (conneg). At a high level, the client sends a header indicating the types of content it can understand—the Accept header—and the server picks one of these, formats the response, and sends a Content-Type header in the response, indicating which type it chose.
确定要发送给客户端的数据格式的过程通常称为内容协商 (conneg)。概括地说,客户端发送一个标头(指示它可以理解的内容类型)(Accept 标头),服务器选择其中一个标头,设置响应的格式,并在响应中发送 Content-Type 标头,指示它选择了哪种类型。
The Accept and Content-Type headers
Accept 和 Content-Type 标头The Accept header is sent by a client as part of a request to indicate the type of content that the client can handle. It consists of a number of MIME types, with optional weightings (from 0 to 1) to indicate which type would be preferred. For example, the application/json,text/xml;q=0.9,text/plain;q=0.6 header indicates that the client can accept JSON, XML, and plain text, with weightings of 1.0, 0.9, and 0.6, respectively. JSON has a weighting of 1.0, as no explicit weighting was provided. The weightings can be used during content negotiation to choose an optimal representation for both parties.
Accept 标头由客户端作为请求的一部分发送,用于指示客户端可以处理的内容类型。它由许多 MIME 类型组成,具有可选的权重(从 0 到 1)以指示首选类型。例如,application/json,text/xml;q=0.9,text/plain;q=0.6 标头表示客户端可以接受 JSON、XML 和纯文本,权重分别为 1.0、0.9 和 0.6。JSON 的权重为 1.0,因为未提供显式权重。在内容协商期间,可以使用权重来为双方选择最佳表示形式。The Content-Type header describes the data sent in a request or response. It contains the MIME type of the data, with an optional character encoding. For example, the application/json; charset=utf-8 header would indicate that the body of the request or response is JSON, encoded using UTF-8.
Content-Type 标头描述在请求或响应中发送的数据。它包含数据的 MIME 类型,以及可选的字符编码。例如,application/json;charset=utf-8 标头表示请求或响应的正文是使用 UTF-8 编码的 JSON。For more on MIME types, see the Mozilla documentation: http://mng.bz/gop8. You can find the RFC for content negotiation at http://mng.bz/6DXo.
有关 MIME 类型的更多信息,请参阅 Mozilla 文档:http://mng.bz/gop8。您可以在 http://mng.bz/6DXo 中找到内容协商的 RFC。
You’re not forced into sending only a Content-Type the client expects, and in some cases, you may not even be able to handle the types it requests. What if a request stipulates that it can accept only Microsoft Excel spreadsheets? It’s unlikely you’d support that, even if that’s the only Accept type the request contains.
你不会被迫只发送客户端期望的 Content-Type,在某些情况下,你甚至可能无法处理它请求的类型。如果请求规定它只能接受 Microsoft Excel 电子表格,该怎么办?您不太可能支持这一点,即使这是请求包含的唯一 Accept 类型。
When you return an API model from an action method, whether directly (as in listing 20.13) or via an OkResult or other StatusCodeResult, ASP.NET Core always returns something in the response. If it can’t honor any of the types stipulated in the Accept header, it will fall back to returning JSON by default. Figure 20.7 shows that even though XML was requested, the API controller formatted the response as JSON.
当你从作方法返回 API 模型时,无论是直接返回(如清单 20.13 所示)还是通过 OkResult 或其他 StatusCodeResult,ASP.NET Core 始终在响应中返回一些内容。如果它不能接受 Accept 标头中规定的任何类型,它将默认回退到返回 JSON。图 20.7 显示,即使请求了 XML,API 控制器也将响应格式化为 JSON。
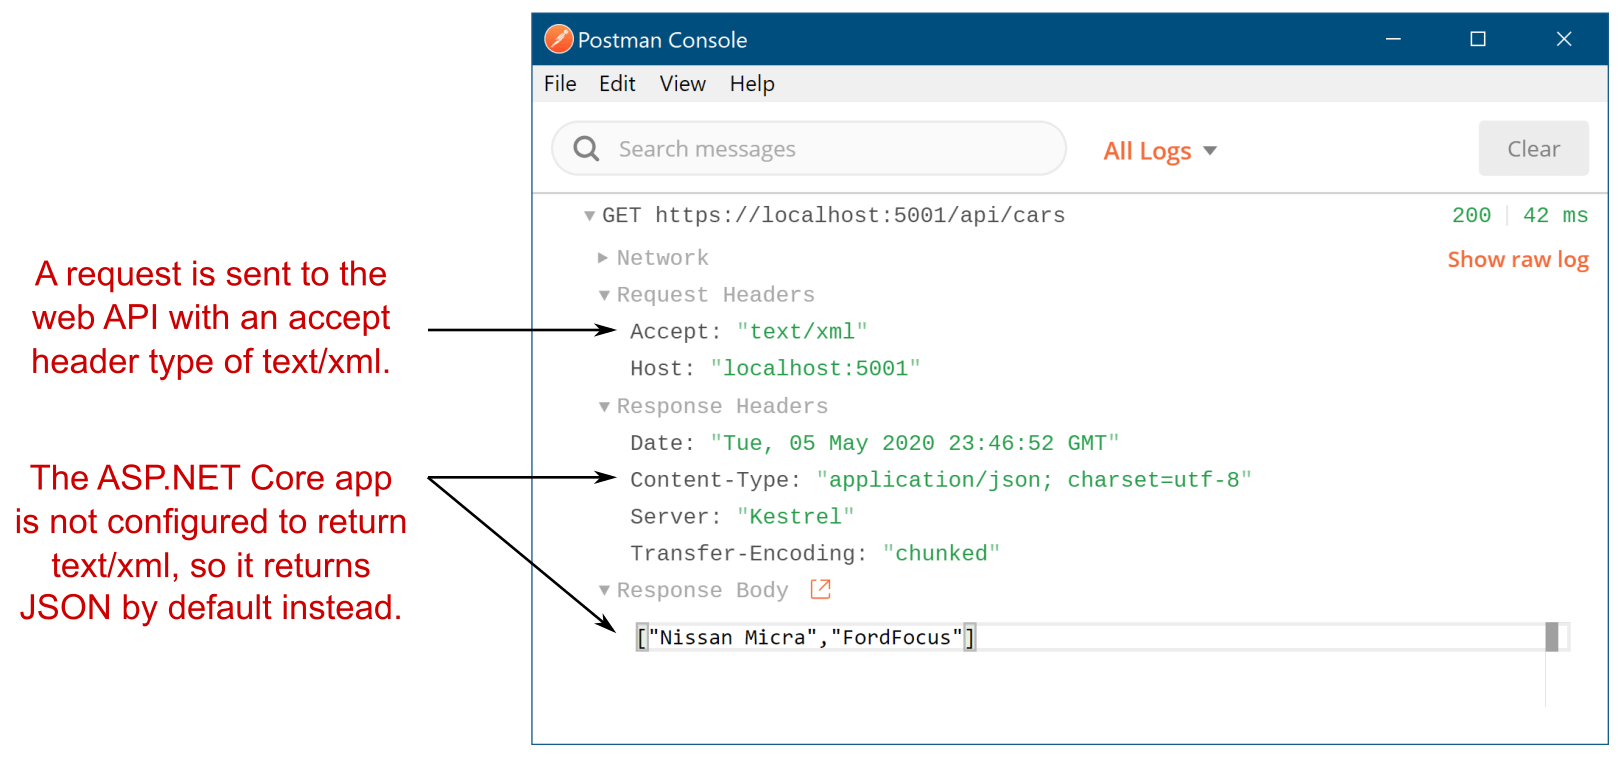
Figure 20.7 Even though the request was made with an Accept header of text/xml, the response returned was JSON, as the server was not configured to return XML.
图 20.7 即使请求是使用 text/xml 的 Accept 标头发出的,返回的响应也是 JSON,因为服务器未配置为返回 XML。
Warning In legacy ASP.NET, objects were serialized to JSON using PascalCase, where properties start with a capital letter. In ASP.NET Core, objects are serialized using camelCase by default, where properties start with a lowercase letter.
警告:在旧版 ASP.NET 中,对象使用 PascalCase 序列化为 JSON,其中属性以大写字母开头。在 ASP.NET Core 中,默认情况下使用 camelCase 序列化对象,其中属性以小写字母开头。
However the data is sent, it’s serialized by an IOutputFormatter implementation. ASP.NET Core ships with a limited number of output formatters out of the box, but as always, it’s easy to add additional ones or change the way the defaults work.
无论数据如何发送,它都会由 IOutputFormatter 实现进行序列化。ASP.NET Core 附带了有限数量的开箱即用输出格式化程序,但与往常一样,添加其他格式化程序或更改默认值的工作方式很容易。
20.5.1 Customizing the default formatters: Adding XML support
20.5.1 自定义默认格式化程序:添加 XML 支持
As with most of ASP.NET Core, the Web API formatters are completely customizable. By default, only formatters for plain text (text/plain), HTML (text/html), and JSON (application/json) are configured. Given the common use case of single-page application (SPAs) and mobile applications, this will get you a long way. But sometimes you need to be able to return data in a different format, such as XML.
与大多数 ASP.NET Core 一样,Web API 格式化程序是完全可自定义的。默认情况下,仅配置纯文本 (text/plain)、HTML (text/html) 和 JSON (application/json) 的格式化程序。鉴于单页应用程序 (SPA) 和移动应用程序的常见用例,这将使您大有帮助。但有时您需要能够以不同的格式(如 XML)返回数据。
Newtonsoft.Json vs. System.Text.Json
Newtonsoft.Json, also known as Json.NET, has for a long time been the canonical way to work with JSON in .NET. It’s compatible with every version of .NET under the sun, and it will no doubt be familiar to virtually all .NET developers. Its reach was so great that even ASP.NET Core took a dependency on it!
Newtonsoft.Json,也称为 Json.NET,长期以来一直是在 .NET 中使用 JSON 的规范方式。它与全球所有版本的 .NET 兼容,毫无疑问,几乎所有 .NET 开发人员都熟悉它。它的覆盖范围如此之大,以至于 ASP.NET Core 都依赖于它!That all changed with the introduction of a new library in ASP.NET Core 3.0, System .Text.Json, which focuses on performance. In .NET Core 3.0 onward, ASP.NET Core uses System.Text.Json by default instead of Newtonsoft.Json.
随着 ASP.NET Core 3.0 中引入新库 System ,这一切都发生了变化。Text.Json,它侧重于性能。在 .NET Core 3.0 及更高版本中,ASP.NET Core 默认使用 System.Text.Json,而不是 Newtonsoft.Json。The main difference between the libraries is that System.Text.Json is picky about its JSON. It will generally only deserialize JSON that matches its expectations. For example, System.Text.Json won’t deserialize JSON that uses single quotes around strings; you have to use double quotes.
这两个库之间的主要区别在于 System.Text.Json 对其 JSON 很挑剔。它通常只会反序列化符合其预期的 JSON。例如,System.Text.Json 不会反序列化在字符串周围使用单引号的 JSON;您必须使用双引号。If you’re creating a new application, this is generally not a problem; you quickly learn to generate the correct JSON. But if you’re converting an application to ASP.NET Core or are sending JSON to a third party you don’t control, these limitations can be real stumbling blocks.
如果要创建新应用程序,这通常不是问题;您很快就学会了生成正确的 JSON。但是,如果您要将应用程序转换为 ASP.NET Core 或将 JSON 发送给您无法控制的第三方,则这些限制可能会成为真正的绊脚石。Luckily, you can easily switch back to the Newtonsoft.Json library instead. Install the Microsoft.AspNetCore.Mvc.NewtonsoftJson package into your project and update the AddControllers() method in Program.cs to the following:
幸运的是,您可以轻松地切换回 Newtonsoft.Json 库。将 Microsoft.AspNetCore.Mvc.NewtonsoftJson 包安装到项目中,并将 Program.cs 中的 AddControllers() 方法更新为以下内容:
builder.Services.AddControllers()
    .AddNewtonsoftJson();
This will switch ASP.NET Core’s formatters to use Newtonsoft.Json behind the scenes, instead of System.Text.Json. For more details on the differences between the libraries, see Microsoft’s article “Compare Newtonsoft.Json to System.Text.Json, and migrate to System.Text.Json”: http://mng.bz/0mRJ. For more advice on when to switch to the Newtonsoft.Json formatter, see the section “Add Newtonsoft.Json-based JSON format support” in Microsoft’s “Format response data in ASP.NET Core Web API” documentation: http://mng.bz/zx11.
这会将 ASP.NET Core 的格式化程序切换为在后台使用 Newtonsoft.Json,而不是 System.Text.Json。有关库之间差异的更多详细信息,请参阅 Microsoft 的文章“将 Newtonsoft.Json 与 System.Text.Json 进行比较,并迁移到 System.Text.Json”:http://mng.bz/0mRJ。有关何时切换到 Newtonsoft.Json 格式化程序的更多建议,请参阅 Microsoft 的“在 ASP.NET Core Web API 中格式化响应数据”文档中的“添加基于 Newtonsoft.Json 的 JSON 格式支持”部分:http://mng.bz/zx11。
You can add XML output to your application by adding an output formatter. You configure your application’s formatters in Program.cs by customizing the IMvcBuilder object returned from AddControllers(). To add the XML output formatter, use the following:
您可以通过添加输出格式化程序将 XML 输出添加到您的应用程序中。通过自定义从 AddControllers() 返回的 IMvcBuilder 对象,可以在 Program.cs 中配置应用程序的格式化程序。要添加 XML 输出格式化程序,请使用以下命令:
services.AddControllers()
    .AddXmlSerializerFormatters();
NOTE Technically, this also adds an XML input formatter, which means your application can now receive XML in requests too. Previously, sending a request with XML in the body would respond with a 415 Unsupported Media Type response. For a detailed look at formatters, including creating a custom formatter, see the documentation at http://mng.bz/e5gG.
注意:从技术上讲,这还添加了一个 XML 输入格式化程序,这意味着您的应用程序现在也可以在请求中接收 XML。以前,发送正文中包含 XML 的请求将响应 415 Unsupported Media Type 响应。有关格式化程序的详细信息,包括创建自定义格式化程序,请参阅 http://mng.bz/e5gG 中的文档。
With this simple change, your API controllers can now format responses as XML as well as JSON. Running the same request as shown in figure 20.7 with XML support enabled means the app will respect the text/xml accept header. The formatter serializes the string array to XML as requested instead of defaulting to JSON, as shown in figure 20.8.
通过这个简单的更改,您的 API 控制器现在可以将响应格式化为 XML 和 JSON。在启用 XML 支持的情况下运行如图 20.7 所示的相同请求意味着应用程序将遵循 text/xml accept 标头。格式化程序根据请求将字符串数组序列化为 XML,而不是默认为 JSON,如图 20.8 所示。
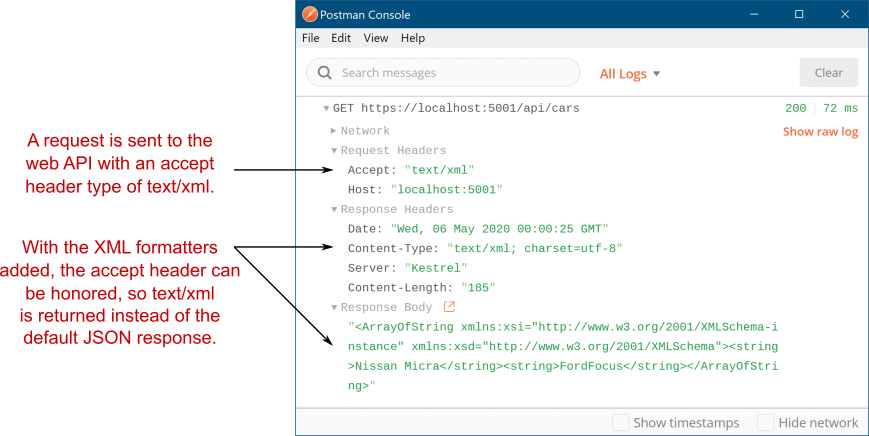
Figure 20.8 With the XML output formatters added, the Accept header’ text/xml value is respected, and the response is serialized to XML.
图 20.8 添加 XML 输出格式化程序后,将遵循 Accept 标头的 text/xml 值,并将响应序列化为 XML。
This is an example of content negotiation, where the client has specified which formats it can handle and the server selects one of those, based on what it can produce. This approach is part of the HTTP protocol, but there are some quirks to be aware of when relying on it in ASP.NET Core. You won’t often run into these, but if you’re not aware of them when they hit you, they could have you scratching your head for hours!
这是内容协商的一个示例,其中客户端指定了它可以处理的格式,服务器根据它可以生成的格式选择其中一种。此方法是 HTTP 协议的一部分,但在 ASP.NET Core 中依赖它时,需要注意一些怪癖。你不会经常遇到这些,但如果它们在它们击中你时没有意识到它们,它们可能会让你挠头几个小时!
20.5.2 Choosing a response format with content negotiation
20.5.2 使用内容协商选择响应格式
Content negotiation is where a client says which types of data it can accept using the Accept header and the server picks the best one it can handle. Generally speaking, this works as you’d hope: the server formats the data using a type the client can understand.
内容协商是客户端使用 Accept 标头说明它可以接受哪些类型的数据,服务器选择它可以处理的最佳数据类型。一般来说,这就像你希望的那样工作:服务器使用客户端可以理解的类型来格式化数据。
The ASP.NET Core implementation has some special cases that are worth bearing in mind:
ASP.NET Core 实现有一些值得牢记的特殊情况:
• By default, ASP.NET Core returns only application/json, text/plain, and text/html MIME types. You can add IOutputFormatters to make other types available, as you saw in the previous section for text/xml.
默认情况下,ASP.NET Core 仅返回 application/json、text/plain 和 text/html MIME 类型。您可以添加 IOutputFormatters 以使其他类型可用,如上一节 text/xml 中所示。
• By default, if you return null as your API model, whether from an action method or by passing null in a StatusCodeResult, the middleware returns a 204 No Content response.
默认情况下,如果返回 null 作为 API 模型 (无论是从作方法还是通过在 StatusCodeResult 中传递 null),中间件都会返回 204 No Content 响应。
• When you return a string as your API model, if no Accept header is set, ASP.NET Core formats the response as text/plain.
当您将字符串作为 API 模型返回时,如果未设置 Accept 标头,则 ASP.NET Core 会将响应格式设置为 text/plain。
• When you use any other class as your API model, and there’s no Accept header or none of the supported formats was requested, the first formatter that can generate a response is used (typically JSON by default).
当您使用任何其他类作为 API 模型,并且没有 Accept 标头或未请求任何支持的格式时,将使用第一个可以生成响应的格式化程序 (通常默认为 JSON)。
• If the middleware detects that the request is probably from a browser (the accept header contains /), it will not use conneg. Instead, it formats the response as though an Accept header was not provided, using the default formatter (typically JSON).
如果中间件检测到请求可能来自浏览器 (accept 标头包含 /) ,则不会使用 conneg。相反,它使用默认格式化程序(通常为 JSON)格式化响应,就像未提供 Accept 标头一样。
These defaults are relatively sane, but they can certainly bite you if you’re not aware of them. That last point in particular, where the response to a request from a browser is virtually always formatted as JSON, has certainly caught me out when trying to test XML requests locally!
这些违约相对来说是理智的,但如果你不知道它们,它们肯定会咬你一口。特别是最后一点,对来自浏览器的请求的响应几乎总是格式化为 JSON,在尝试在本地测试 XML 请求时,这无疑让我感到困惑!
As you should expect by now, all these rules are configurable; you can easily change the default behavior in your application if it doesn’t fit your requirements. For example, the following listing, taken from Program.cs, shows how you can force the middleware to respect the browser’s Accept header and remove the text/plain formatter for strings.
正如您现在应该预料的那样,所有这些规则都是可配置的;如果应用程序的默认行为不符合您的要求,您可以轻松更改应用程序的默认行为。例如,以下清单取自 Program.cs,展示了如何强制中间件遵守浏览器的 Accept 标头并删除字符串的文本/纯格式化程序。
Listing 20.14 Customizing MVC to respect the browser’s Accept header in web APIs
清单 20.14 在 Web API 中自定义 MVC 以遵循浏览器的 Accept 标头
WebApplicationBuilder builder = WebApplication.CreateBuilder(args);

builder.Services.AddControllers(options =>      #A
{
    options.RespectBrowserAcceptHeader = true;         #B
    options.OutputFormatters.RemoveType<StringOutputFormatter>();   #C
});
❶ AddControllers has an overload that takes a lambda function.
AddControllers 具有采用 lambda 函数的重载。
❷ False by default; several other properties are also available to be set.
默认为 False;还可以设置其他几个属性。
❸ Removes the output formatter that formats strings as text/plain
删除将字符串格式化为 text/plain 的输出格式化程序
In most cases, conneg should work well for you out of the box, whether you’re building an SPA or a mobile application. In some cases, you may find you need to bypass the usual conneg mechanisms for specific action methods, and there are various ways to achieve this, but I won’t cover them in this book as I’ve found I rarely need to use them. For details, see Microsoft’s “Format response data in ASP.NET Core Web API” documentation: http://mng.bz/zx11.
在大多数情况下,conneg 应该可以立即为您工作,无论您是构建 SPA 还是移动应用程序。在某些情况下,你可能会发现你需要绕过特定动作方法的通常连接机制,并且有多种方法可以实现这一点,但我不会在本书中介绍它们,因为我发现我很少需要使用它们。有关详细信息,请参阅 Microsoft 的“在 ASP.NET Core Web API 中设置响应数据的格式”文档:http://mng.bz/zx11。
At this point we’ve covered the main points of using API controllers, but you probably still have one major question: why would I use web API controllers over minimal APIs? That’s a great question, and one we’ll look at in section 20.6.
在这一点上,我们已经介绍了使用 API 控制器的要点,但您可能仍然有一个主要问题:为什么我要使用 Web API 控制器而不是最小的 API?这是一个很好的问题,我们将在 20.6 节中讨论这个问题。
20.6 Choosing between web API controllers and minimal APIs
20.6 在 Web API 控制器和最小 API 之间进行选择
In part 1 of this book you learned all about using minimal APIs to build a JSON API. Minimal APIs are the new kid on the block, being introduced in .NET 6, but they are growing up quickly. With all the new features introduced in .NET 7 (discussed in chapter 5), minimal APIs are emerging as a great way to build HTTP APIs in modern .NET.
在本书的第 1 部分中,您了解了如何使用最小 API 构建 JSON API 的所有信息。最小 API 是 .NET 6 中引入的新成员,但它们正在迅速发展。随着 .NET 7 中引入的所有新功能(在第 5 章中讨论),最小 API 正在成为在现代 .NET 中构建 HTTP API 的好方法。
By contrast, web API controllers have been around since day one. They were introduced in their current form in ASP.NET Core 1.0 and were heavily inspired by the web API framework from legacy ASP.NET. The designs, patterns, and concepts used by web API controllers haven’t changed much since then, so if you’ve ever used web API controllers, they should look familiar in .NET 7.
相比之下,Web API 控制器从第一天起就已经存在。它们是在 ASP.NET Core 1.0 中以当前形式引入的,并受到旧版 ASP.NET 的 Web API 框架的严重启发。从那时起,Web API 控制器使用的设计、模式和概念没有太大变化,因此,如果您曾经使用过 Web API 控制器,它们在 .NET 7 中应该看起来很熟悉。
The difficult question in .NET 7 is if you need to build an API, which should you use, minimal APIs or web API controllers? Both have their pros and cons, and a large part of the decision will be personal preference, but to help your decision, you should ask yourself several questions:
.NET 7 中的难题是,您是否需要构建一个 API,您应该使用哪个 API,最小 API 还是 Web API 控制器?两者都有其优点和缺点,很大一部分决定将是个人喜好,但为了帮助你做出决定,你应该问自己几个问题:
- Do you need to return data in multiple formats using content negotiation?
您是否需要使用 Content Negotiation 以多种格式返回数据? - Is performance critical to your application?
性能对应用程序至关重要吗? - Do you have complex filtering requirements?
您是否有复杂的筛选要求? - Is this a new project?
这是一个新项目吗? - Do you already have experience with web API controllers?
您是否已经有使用 Web API 控制器的经验? - Do you prefer convention over configuration?
您更喜欢约定而不是配置吗?
Questions 1-3 in this list are focused on technical differences between minimal APIs and web API controllers. Web API controllers support content negotiation (conneg), which allows clients to request data be returned in a particular format: JSON, XML, or CSV, for example, as you learned in section 20.5. Web API controllers support this feature out of the box, so if it’s crucial for your application, it may be better to choose web API controllers over minimal APIs.
此列表中的问题 1-3 侧重于最小 API 和 Web API 控制器之间的技术差异。Web API 控制器支持内容协商 (conneg),它允许 Client 端请求以特定格式返回数据:JSON、XML 或 CSV,例如,如您在第 20.5 节中学到的那样。Web API 控制器支持开箱即用的此功能,因此如果它对您的应用程序至关重要,最好选择 Web API 控制器而不是最少的 API。
Tip If you want to use content negotiation with minimal APIs, it’s possible but not built in. I show how to add conneg to minimal APIs using the open-source library Carter on my blog: http://mng.bz/o12d.
提示:如果您想通过最少的 API 使用内容协商,这是可能的,但不是内置的。我展示了如何使用开源库 Carter 将 conneg 添加到最小的 API:http://mng.bz/o12d。
Question 2 is about performance. Everyone wants the most performant app, but there’s a real question of how important it is. Are you going to be regularly benchmarking your application and looking for any regressions? If so, minimal APIs are probably going to be a better choice, as they’re often more performant than web API controllers.
问题 2 是关于性能的。每个人都希望获得性能最高的应用程序,但存在一个真正的问题,即它有多重要。您是否会定期对应用程序进行基准测试并寻找任何回归?如果是这样,最小 API 可能是更好的选择,因为它们通常比 Web API 控制器性能更高。
The MVC framework that web API controllers use relies on a lot of conventions and reflection for discovering your controllers and a complex filter pipeline. These are obviously highly optimized, but if you’re writing an application where you need to squeeze out every little bit of throughput, minimal APIs will likely help get you there more easily. For most applications, the overhead of the MVC framework will be negligible when compared with any database or network access in your app, so this is worth worrying about only for performance-sensitive apps.
Web API 控制器使用的 MVC 框架依赖于许多约定和反射来发现控制器和复杂的筛选器管道。这些显然是高度优化的,但如果您正在编写一个需要挤出每一点吞吐量的应用程序,那么最少的 API 可能会帮助您更轻松地实现目标。对于大多数应用程序,与应用程序中的任何数据库或网络访问相比,MVC 框架的开销可以忽略不计,因此,仅对于性能敏感的应用程序,才值得担心。
Question 3 focuses on filtering. You learned about filtering with minimal APIs in chapter 5: filters allow you to attach a processing pipeline to your minimal API endpoints and can be used to do things like automatic validation. Web API controllers (as well as MVC controllers and Razor Pages) also have a filter pipeline, but it’s much more complex than the simple pipeline used by minimal APIs, as you’ll see in chapters 21 and 22.
问题 3 侧重于筛选。您在第 5 章中学习了如何使用最少的 API 进行过滤:过滤器允许您将处理管道附加到最小的 API 端点,并可用于执行自动验证等作。Web API 控制器(以及 MVC 控制器和 Razor Pages)也有一个筛选器管道,但它比最小 API 使用的简单管道要复杂得多,如第 21 章和第 22 章所示。
In most cases the filtering provided by minimal APIs will be perfectly adequate for your needs. The main cases where minimal API filtering will fall down will be when you already have an application that uses web API controllers and want to reuse some complex filters. In these cases, there may be no way to translate your existing web API filters to minimal API filters. If the filtering is important, then you may need to stick with web API controllers.
在大多数情况下,最小 API 提供的过滤将完全满足您的需求。最小 API 过滤失败的主要情况是,您已经有一个使用 Web API 控制器的应用程序,并且想要重用一些复杂的过滤器。在这些情况下,可能无法将现有的 Web API 筛选器转换为最小的 API 筛选器。如果筛选很重要,那么你可能需要坚持使用 Web API 控制器。
This leads to question 4: are you building a new application or working on an existing application? If this is a new application, I would be strongly in favor of using minimal APIs. Minimal APIs are conceptually simpler than web API controllers, are faster because of this, and are receiving a lot of improvements from the ASP.NET Core team. If there’s no other compelling reason to choose web API controllers in your new project, I suggest defaulting to minimal APIs.
这就引出了问题 4:您是构建新应用程序还是正在处理现有应用程序?如果这是一个新应用程序,我强烈赞成使用最少的 API。最小 API 在概念上比 Web API 控制器更简单,因此速度更快,并且从 ASP.NET Core 团队获得了很多改进。如果没有其他令人信服的理由在你的新项目中选择 Web API 控制器,我建议默认使用最小 API。
On the other hand, if you have an existing web API controller application, I would be strongly inclined to stick with web API controllers. While it’s perfectly possible to mix minimal APIs and web API controllers in the same application, I would favor consistency over using the new hotness.
另一方面,如果你有一个现有的 Web API 控制器应用程序,我强烈倾向于坚持使用 Web API 控制器。虽然完全可以在同一个应用程序中混合使用最少的 API 和 Web API 控制器,但我更喜欢一致性,而不是使用新的热度。
Question 5 considers how familiar you already are with web API controllers. If you’re coming from legacy ASP.NET or have already used web API controllers in ASP.NET Core and need to be productive quickly, you might decide to stick with web API controllers.
问题 5 考虑您对 Web API 控制器的熟悉程度。如果您来自传统 ASP.NET 或已经在 ASP.NET Core 中使用过 Web API 控制器,并且需要快速提高工作效率,则可以决定继续使用 Web API 控制器。
I consider this one of the weaker arguments, as minimal APIs are conceptually simpler than web API controllers; if you already know web API controllers, you will likely pick up minimal APIs easily. That said, the differences in the model binding approaches can be a little confusing, and you may decide it’s not worth the investment or frustration if things don’t work as you expect.
我认为这是较弱的论点之一,因为最小的 API 在概念上比 Web API 控制器简单;如果您已经了解 Web API 控制器,则可能会轻松掌握最少的 API。也就是说,模型绑定方法的差异可能有点令人困惑,如果事情没有按预期进行,您可能会认为不值得投资或感到沮丧。
The final question comes down entirely to taste and preference: do you like minimal APIs? web API controllers heavily follow the “convention over configuration” paradigm (though not to the extent of MVC controllers and Razor Pages). By contrast, you must be far more explicit with minimal APIs. Minimal APIs also don’t enforce any particular grouping, unlike web API controllers, which all follow the “action methods in a controller class” pattern.
最后一个问题完全归结为品味和偏好:您喜欢最少的 API 吗?Web API 控制器在很大程度上遵循“约定优于配置”范例(尽管没有达到 MVC 控制器和 Razor Pages 的范围)。相比之下,您必须使用最少的 API 更加明确。与 Web API 控制器不同,最小 API 也不强制执行任何特定的分组,它们都遵循“控制器类中的作方法”模式。
Different people prefer different approaches. Web API controllers mean less manual wiring up of components, but this necessarily means more magic and more rigidity around how you structure your applications.
不同的人喜欢不同的方法。Web API 控制器意味着更少的组件手动连接,但这必然意味着在构建应用程序的方式上更神奇、更严格。
By contrast, minimal API endpoints must be explicitly added to the WebApplication instance, but this also means you have more flexibility around how to group your endpoints. You can put all your endpoints in Program.cs, create natural groupings for them in separate classes, or create a file per endpoint or any pattern you choose.
相比之下,必须将最少的 API 端点显式添加到 WebApplication 实例中,但这也意味着您在如何对端点进行分组方面具有更大的灵活性。您可以将所有终端节点放在Program.cs中,在单独的类中为它们创建自然分组,或者为每个终端节点或您选择的任何模式创建一个文件。
Tip You can also more easily layer on helper frameworks to minimal APIs, such as Carter (https://github.com/CarterCommunity/Carter), which can provide some structure and support functionality if you want it.
提示:您还可以更轻松地将帮助程序框架分层到最小的 API,例如 Carter (https://github.com/CarterCommunity/Carter),如果需要,它可以提供一些结构和支持功能。
Overall, the choice is up to you whether web API controllers or minimal APIs are better for your application. Table 20.1 summarizes the questions and where you should favor one approach over the other, but the final choice is up to you!
总的来说,Web API 控制器还是最小的 API 更适合您的应用程序,由您决定。表 20.1 总结了这些问题以及您应该在哪些方面更喜欢一种方法,但最终选择取决于您!
Table 20.1 Choosing between minimal APIs with web API controllers
表 20.1 在最小 API 和 Web API 控制器之间进行选择
| Question | Minimal APIs | Web API controllers |
|---|---|---|
| 1. Do you need conneg? | Can’t use conneg out of the box | Built-in and extensible |
| 2. How critical is performance? | More performant than web API controllers | Less performant than minimal APIs |
| 3. Complex filtering? | Have a simple, extensible filter pipeline | Have a complex, nonlinear, filter pipeline |
| 4. Is this a new project? | Minimal APIs are getting many new features and are a focus of the ASP.NET Core team | The MVC framework is receiving small new features, but is less of a focus. |
| 5. Do you have experience with web API controllers? | Minimal APIs share many of the same concepts, but have subtle differences in model binding | Web API controllers may be familiar to users of legacy ASP.NET or older ASP.NET Core versions |
| 6. Do you prefer convention over configuration? | Requires a lot of explicit configuration | Convention- and discovery-based, which can appear more magic when you’re unfamiliar |
That brings us to the end of this chapter on web APIs. In the next chapter we’ll look at one of more advanced topics of MVC and Razor Pages: the filter pipeline and how you can use it to reduce duplication in your code. The good news is that it’s similar to minimal API filters in principle. The bad news is that it’s far more complicated!
这让我们结束了本章关于 Web API 的内容。在下一章中,我们将介绍 MVC 和 Razor Pages 的更高级主题之一:筛选器管道以及如何使用它来减少代码中的重复。好消息是,它在原则上类似于最小 API 过滤器。坏消息是它要复杂得多!
20.7 Summary
20.7 总结
Web API action methods can return data directly or can use ActionResult<T> to generate an arbitrary response. If you return more than one type of result from an action method, the method signature must return ActionResult<T>.
Web API作方法可以直接返回数据,也可以用于 ActionResult<T>生成任意响应。如果从作方法返回多种类型的结果,则方法签名必须返回 ActionResult<T>。
The data returned by a web API action is sometimes called an API model. It contains the data that will be serialized and send back to the client. This differs from view models and PageModels, which contain both data and metadata about how to generate the response.
Web API作返回的数据有时称为 API 模型。它包含将被序列化并发送回客户端的数据。这与视图模型和 PageModel 不同,后者包含有关如何生成响应的数据和元数据。
Web APIs are associated with route templates by applying RouteAttributes to your action methods. These give you complete control over the URLs that make up your application’s API.
通过将 RouteAttributes 应用于作方法,Web API 与路由模板相关联。这些 URL 使您可以完全控制构成应用程序 API 的 URL。
Route attributes applied to a controller combine with the attributes on action methods to form the final template. These are also combined with attributes on inherited base classes. You can use inherited attributes to reduce the amount of duplication in the attributes, such as where you’re using a common prefix on your routes.
应用于控制器的路由属性与作方法上的属性相结合,形成最终模板。这些还与继承的基类上的属性相结合。您可以使用继承的属性来减少属性中的重复数量,例如在路由上使用通用前缀的位置。
By default, the controller and action name have no bearing on the URLs or route templates when you use attribute routing. However, you can use the "[controller]" and "[action]" tokens in your route templates to reduce repetition. They’ll be replaced with the current controller and action name.
默认情况下,在使用属性路由时,控制器和作名称与 URL 或路由模板无关。但是,您可以在路由模板中使用 “[controller]” 和 “[action]” 令牌来减少重复。它们将替换为当前控制器和作名称。
The [HttpPost] and [HttpGet] attributes allow you to choose between actions based on the request’s HTTP verb when two actions correspond to the same URL. This is a common pattern in RESTful applications.
[HttpPost] 和 [HttpGet] 属性允许您在两个作对应于同一 URL 时根据请求的 HTTP 谓词在作之间进行选择。这是 RESTful 应用程序中的常见模式。
The [ApiController] attribute applies several common conventions to your controllers. Controllers decorated with the attribute automatically bind to a request’s body instead of using form values, automatically generate a 400 Bad Request response for invalid requests, and return ProblemDetails objects for status code errors. This can dramatically reduce the amount of boilerplate code you must write.
[ApiController] 属性将几个常见约定应用于控制器。使用 该属性修饰的控制器会自动绑定到请求正文,而不是使用表单值,为无效请求自动生成 400 Bad Request 响应,并为状态代码错误返回 ProblemDetails 对象。这可以显著减少您必须编写的样板代码量。
You can control which of the conventions to apply by using the ConfigureApiBehaviorOptions() method and providing a configuration lambda. This is useful if you need to fit your API to an existing specification, for example.
您可以通过使用 ConfigureApiBehaviorOptions() 方法并提供配置 lambda 来控制要应用的约定。例如,如果您需要使 API 适应现有规范,这将非常有用。
By default, ASP.NET Core formats the API model returned from a web API controller as JSON. In contrast to legacy ASP.NET, JSON data is serialized using camelCase rather than PascalCase. You should consider this change if you get errors or missing values when using data from your API.
默认情况下,ASP.NET Core 将从 Web API 控制器返回的 API 模型格式化为 JSON。与传统 ASP.NET 相比,JSON 数据使用 camelCase 而不是 PascalCase 进行序列化。如果您在使用 API 中的数据时出现错误或缺失值,则应考虑此更改。
ASP.NET Core 3.0 onwards uses System.Text.Json, which is a strict, high performance library for JSON serialization and deserialization. You can replace this serializer with the common Newtonsoft.Json formatter by calling AddNewtonsoftJson() on the return value from services.AddControllers().
ASP.NET Core 3.0 及更高版本使用 System.Text.Json,这是一个严格的高性能库,用于 JSON 序列化和反序列化。您可以通过对服务的返回值调用 AddNewtonsoftJson() 来将此序列化程序替换为通用的 Newtonsoft.Json 格式化程序。AddControllers() 的 Controller。
Content negotiation occurs when the client specifies the type of data it can handle and the server chooses a return format based on this. It allows multiple clients to call your API and receive data in a format they can understand.
当客户端指定它可以处理的数据类型,并且服务器根据此选择返回格式时,就会发生内容协商。它允许多个客户端调用您的 API 并以他们可以理解的格式接收数据。
By default, ASP.NET Core can return text/plain, text/html, and application/json, but you can add formatters if you need to support other formats.
默认情况下,ASP.NET Core 可以返回 text/plain、text/html 和 application/json,但如果您需要支持其他格式,则可以添加格式化程序。
You can add XML formatters by calling AddXmlSerializerFormatters() on the return value from services.AddControllers() in your Startup class. These can format the response as XML, as well as receive XML in a request body.
您可以通过对服务的返回值调用 AddXmlSerializerFormatters() 来添加 XML 格式化程序。AddControllers() 的 Startup。这些选项可以将响应格式化为 XML,并在请求正文中接收 XML。
Content negotiation isn’t used when the Accept header contains /, such as in most browsers. Instead, your application uses the default formatter, JSON. You can disable this option by setting the RespectBrowserAcceptHeader option to true when adding your controller services in Program.cs.
当 Accept 标头包含 / 时,不会使用内容协商,例如在大多数浏览器中。相反,您的应用程序使用默认格式化程序 JSON。在 Program.cs 中添加控制器服务时,您可以通过将 RespectBrowserAcceptHeader 选项设置为 true 来禁用此选项。
You can mix web API Controllers and minimal API endpoints in the same application, but you may find it easier to use one or the other.
您可以在同一应用程序中混合使用 Web API 控制器和最小 API 终端节点,但您可能会发现使用其中一种更容易。
Choose web API controllers when you need content negotiation, when you have complex filtering requirements, when you have experience with web controllers, or when you prefer convention over configuration for your apps.
当您需要内容协商、有复杂的筛选要求、具有 Web 控制器使用经验时,或者当您更喜欢应用程序的约定而不是配置时,请选择 Web API 控制器。
Choose minimal API endpoints when performance is critical, when you prefer explicit configuration over automatic conventions, or when you’re starting a new app.
当性能至关重要时,当您更喜欢显式配置而不是自动约定时,或者当您启动新应用程序时,请选择最少的 API 终端节点。