14 ASYNCHRONOUS CODE
14 异步代码
In this chapter, we are going to convert synchronous code to asynchronous inside ASP.NET Core. First, we are going to learn a bit about asynchronous programming and why should we write async code. Then we are going to use our code from the previous chapters and rewrite it in an async manner.
在本章中,我们将在 ASP.NET Core 中将同步代码转换为异步代码。首先,我们将学习一些关于异步编程的知识,以及为什么我们应该编写异步代码。然后,我们将使用前几章中的代码,并以异步方式重写它。
We are going to modify the code, step by step, to show you how easy is to convert synchronous code to asynchronous code. Hopefully, this will help you understand how asynchronous code works and how to write it from scratch in your applications.
我们将逐步修改代码,向您展示将同步代码转换为异步代码是多么容易。希望这将帮助您了解异步代码的工作原理,以及如何在应用程序中从头开始编写异步代码。
14.1 What is Asynchronous Programming?
14.1 什么是异步编程?
Async programming is a parallel programming technique that allows the working process to run separately from the main application thread.
异步编程是一种并行编程技术,它允许工作进程独立于主应用程序线程运行。
By using async programming, we can avoid performance bottlenecks and enhance the responsiveness of our application.
通过使用异步编程,我们可以避免性能瓶颈并提高应用程序的响应能力。
How so?
怎么会这样呢?
Because we are not sending requests to the server and blocking it while waiting for the responses anymore (as long as it takes). Now, when we send a request to the server, the thread pool delegates a thread to that request. Eventually, that thread finishes its job and returns to the thread pool freeing itself for the next request. At some point, the data will be fetched from the database and the result needs to be sent to the requester. At that time, the thread pool provides another thread to handle that work. Once the work is done, a thread is going back to the thread pool.
因为我们不再向服务器发送请求并在等待响应时阻止它(只要需要)。现在,当我们向服务器发送请求时,线程池会将线程委托给该请求。最终,该线程完成其作业并返回到线程池,从而为下一个请求释放自身。在某些时候,将从数据库中获取数据,并且需要将结果发送给请求者。此时,线程池会提供另一个线程来处理该工作。工作完成后,线程将返回到线程池。
It is very important to understand that if we send a request to an endpoint and it takes the application three or more seconds to process that request, we probably won’t be able to execute this request any faster in async mode. It is going to take the same amount of time as the sync request.
请务必了解,如果我们向终端节点发送请求,并且应用程序需要 3 秒或更长时间来处理该请求,则我们可能无法在异步模式下更快地执行此请求。它将花费与同步请求相同的时间。
Let’s imagine that our thread pool has two threads and we have used one thread with a first request. Now, the second request arrives and we have to use the second thread from a thread pool. At this point, our thread pool is out of threads. If a third request arrives now it has to wait for any of the first two requests to complete and return assigned threads to a thread pool. Only then the thread pool can assign that returned thread to a new request:
假设我们的线程池有两个线程,并且我们在第一个请求中使用了一个线程。现在,第二个请求到达,我们必须使用线程池中的第二个线程。此时,我们的线程池已用完线程。如果现在收到第三个请求,则必须等待前两个请求中的任何一个完成并将分配的线程返回到线程池。只有这样,线程池才能将返回的线程分配给新请求:
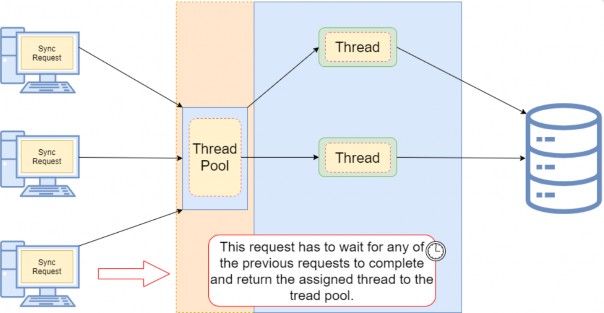
As a result of a request waiting for an available thread, our client experiences a slow down for sure. Additionally, if the client has to wait too long, they will receive an error response usually the service is unavailable (503). But this is not the only problem. Since the client expects the list of entities from the database, we know that it is an I/O operation. So, if we have a lot of records in the database and it takes three seconds for the database to return a result to the API, our thread is doing nothing except waiting for the task to complete. So basically, we are blocking that thread and making it three seconds unavailable for any additional requests that arrive at our API.
由于请求等待可用线程,我们的客户肯定会遇到速度变慢的情况。此外,如果客户端必须等待太长时间,他们将收到错误响应,通常是服务不可用 (503)。但这并不是唯一的问题。由于客户端需要数据库中的实体列表,因此我们知道这是一个 I/O作。因此,如果我们在数据库中有很多记录,并且数据库需要 3 秒钟才能将结果返回给 API,那么我们的线程除了等待任务完成外,什么都不做。所以基本上,我们阻止了该线程,并使其在 3 秒内无法用于到达我们 API 的任何其他请求。
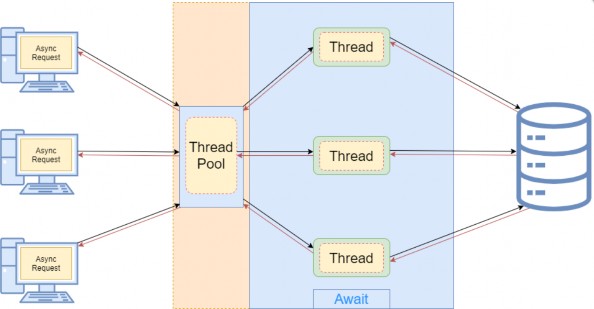
With asynchronous requests, the situation is completely different.
对于异步请求,情况完全不同。
When a request arrives at our API, we still need a thread from a thread pool. So, that leaves us with only one thread left. But because this action is now asynchronous, as soon as our request reaches the I/O point where the database has to process the result for three seconds, the thread is returned to a thread pool. Now we again have two available threads and we can use them for any additional request. After the three seconds when the database returns the result to the API, the thread pool assigns the thread again to handle that response:
当请求到达我们的 API 时,我们仍然需要来自线程池的线程。所以,我们只剩下一条线索了。但是,由于此作现在是异步的,因此一旦我们的请求到达数据库必须处理结果三秒钟的 I/O 点,线程就会返回到线程池。现在我们又有两个可用的线程,我们可以将它们用于任何其他请求。在数据库将结果返回给 API 的三秒后,线程池会再次分配线程来处理该响应:
Now that we've cleared that out, we can learn how to implement asynchronous code in .NET Core and .NET 5+.
现在我们已经解决了这个问题,我们可以学习如何在 .NET Core 和 .NET 5+ 中实现异步代码。
14.2 Async, Await Keywords and Return Types
14.2 async、await 关键字和返回类型
The async and await keywords play a crucial part in asynchronous programming. We use the async keyword in the method declaration and its purpose is to enable the await keyword within that method. So yes,we can’t use the await keyword without previously adding the async keyword in the method declaration. Also, using only the async keyword doesn’t make your method asynchronous, just the opposite, that method is still synchronous.
async 和 await 关键字在异步编程中起着至关重要的作用。我们在方法声明中使用 async 关键字,其目的是在该方法中启用 await 关键字。所以,是的,如果不事先在方法声明中添加 async 关键字,我们就不能使用 await 关键字。此外,仅使用 async 关键字不会使您的方法异步,恰恰相反,该方法仍然是同步的。
The await keyword performs an asynchronous wait on its argument. It does that in several steps. The first thing it does is to check whether the operation is already complete. If it is, it will continue the method execution synchronously. Otherwise, the await keyword is going to pause the async method execution and return an incomplete task. Once the operation completes, a few seconds later, the async method can continue with the execution.
await 关键字对其参数执行异步等待。它分几个步骤来实现。它做的第一件事是检查作是否已经完成。如果是,它将同步继续方法执行。否则,await 关键字将暂停异步方法的执行并返回未完成的任务。作完成后,几秒钟后,async 方法可以继续执行。
Let’s see this with a simple example:
让我们通过一个简单的例子来了解这一点:
public async Task<IEnumerable<Company>> GetCompanies()
{
    _logger.LogInfo("Inside the GetCompanies method.");
    var companies = await _repoContext.Companies.ToListAsync();
    return companies;
}
So, even though our method is marked with the async keyword, it will start its execution synchronously. Once we log the required information synchronously, we continue to the next code line. We extract all the companies from the database and to do that, we use the await keyword. If our database requires some time to process the result and return it, the await keyword is going to pause the GetCompanies method execution and return an incomplete task. During that time the tread will be returned to a thread pool making itself available for another request. After the database operation completes the async method will resume executing and will return the list of companies.
因此,即使我们的方法标有 async 关键字,它也会同步开始执行。同步记录所需信息后,我们将继续下一个代码行。我们从数据库中提取所有公司,为此,我们使用 await 关键字。如果我们的数据库需要一些时间来处理结果并返回它,则 await 关键字将暂停 GetCompanies 方法的执行并返回一个未完成的任务。在此期间,tread 将返回到线程池,使其可用于另一个请求。数据库作完成后,异步方法将继续执行并返回公司列表。
From this example, we see the async method execution flow. But the question is how the await keyword knows if the operation is completed or not. Well, this is where Task comes into play.
在此示例中,我们可以看到异步方法执行流程。但问题是 await 关键字如何知道作是否完成。嗯,这就是 Task 发挥作用的地方。
14.2.1 Return Types of the Asynchronous Methods
14.2.1 异步方法的返回类型
In asynchronous programming, we have three return types:
在异步编程中,我们有三种返回类型:
• Task<TResult>, for an async method that returns a value.
Task<TResult>,有返回值的异步方法。
• Task, for an async method that does not return a value.
Task 没有返回值的异步方法。
• void, which we can use for an event handler.
void,我们可以将其用于事件处理程序。
What does this mean?
这是什么意思?
Well, we can look at this through synchronous programming glasses. If our sync method returns an int, then in the async mode it should return Task<int> — or if the sync method returns IEnumerable<string>, then the async method should return Task<IEnumerable<string>>.
好吧,我们可以通过同步编程眼镜来看待这个问题。如果我们的 sync 方法返回一个 int,那么在异步模式下它应该返回 Task<int> — 或者如果 sync 方法返回IEnumerable<string> ,则异步方法应返回Task<IEnumerable<string>> 。
But if our sync method returns no value (has a void for the return type), then our async method should return Task. This means that we can use the await keyword inside that method, but without the return keyword.
但是,如果我们的 sync 方法没有返回任何值(返回类型为 void),则我们的 async 方法应返回 Task。这意味着我们可以在该方法中使用 await 关键字,但不需要 return 关键字。
You may wonder now, why not return Task all the time? Well, we should use void only for the asynchronous event handlers which require a void return type. Other than that, we should always return a Task.
您现在可能想知道,为什么不一直返回 Task 呢?好吧,我们应该只对需要 void 返回类型的异步事件处理程序使用 void。除此之外,我们应该始终返回一个 Task。
From C# 7.0 onward, we can specify any other return type if that type includes a GetAwaiter method.
从 C# 7.0 开始,我们可以指定任何其他返回类型(如果该类型包含 GetAwaiter 方法)。
It is very important to understand that the Task represents an execution of the asynchronous method and not the result. The Task has several properties that indicate whether the operation was completed successfully or not (Status, IsCompleted, IsCanceled, IsFaulted). With these properties, we can track the flow of our async operations. So, this is the answer to our question. With Task, we can track whether the operation is completed or not. This is also called TAP (Task-based Asynchronous Pattern).
了解 Task 表示异步方法的执行而不是结果,这一点非常重要。Task 具有多个属性,用于指示作是否已成功完成(Status、IsCompleted、IsCanceled、IsFaulted)。通过这些属性,我们可以跟踪异步作的流程。所以,这就是我们问题的答案。使用 Task,我们可以跟踪作是否完成。这也称为 TAP (基于任务的异步模式)。
Now, when we have all the information, let’s do some refactoring in our completely synchronous code.
现在,当我们获得所有信息时,让我们在完全同步的代码中进行一些重构。
14.2.2 The IRepositoryBase Interface and the RepositoryBase Class Explanation
14.2.2 IRepositoryBase 接口和 RepositoryBase 类说明
We won’t be changing the mentioned interface and class. That’s because we want to leave a possibility for the repository user classes to have either sync or async method execution. Sometimes, the async code could become slower than the sync one because EF Core’s async commands take slightly longer to execute (due to extra code for handling the threading), so leaving this option is always a good choice.
我们不会更改上述接口和类。这是因为我们希望为存储库用户类保留执行 sync 或 async 方法的可能性。有时,异步代码可能会变得比同步代码慢,因为 EF Core 的异步命令的执行时间略长(由于处理线程的额外代码),因此保留此选项始终是一个不错的选择。
It is general advice to use async code wherever it is possible, but if we notice that our async code runes slower, we should switch back to the sync one.
一般建议尽可能使用异步代码,但如果我们注意到异步代码符文速度较慢,我们应该切换回同步代码。
14.3 Modifying the ICompanyRepository Interface and the CompanyRepository Class
14.3 修改 ICompanyRepository 接口和 CompanyRepository 类
In the Contracts project, we can find the ICompanyRepository interface with all the synchronous method signatures which we should change.
在 Contracts 项目中,我们可以找到 ICompanyRepository 接口,其中包含我们应该更改的所有同步方法签名。
So, let’s do that:
所以,让我们这样做:
using Entities.Models;

namespace Contracts
{
    public interface ICompanyRepository
    {
    //    IEnumerable<Company> GetAllCompanies(bool trackChanges);
    //    Company GetCompany(Guid companyId, bool trackChanges);
    //    void CreateCompany(Company company);
    //    IEnumerable<Company> GetByIds(IEnumerable<Guid> ids, bool trackChanges);
    //    void DeleteCompany(Company company);

        Task<IEnumerable<Company>> GetAllCompaniesAsync(bool trackChanges);
        Task<Company> GetCompanyAsync(Guid companyId, bool trackChanges);
        void CreateCompany(Company company);
        Task<IEnumerable<Company>> GetByIdsAsync(IEnumerable<Guid> ids, bool trackChanges);
        void DeleteCompany(Company company);
    }
}
The Create and Delete method signatures are left synchronous. That’s because, in these methods, we are not making any changes in the database. All we're doing is changing the state of the entity to Added and Deleted.
Create 和 Delete 方法签名保持同步。这是因为,在这些方法中,我们不会对数据库进行任何更改。我们所做的只是将实体的状态更改为 Added 和 Deleted。
So, in accordance with the interface changes, let’s modify our CompanyRepository.cs class, which we can find in the Repository project:
因此,根据接口的变化,让我们修改CompanyRepository.cs类,我们可以在 Repository 项目中找到它:
using Contracts;
using Entities.Models;
using Microsoft.EntityFrameworkCore;

namespace Repository
{
    public class CompanyRepository : RepositoryBase<Company>, ICompanyRepository
    {
        public CompanyRepository(RepositoryContext repositoryContext) : base(repositoryContext) { }

        //public IEnumerable<Company> GetAllCompanies(bool trackChanges) => FindAll(trackChanges).OrderBy(c => c.Name).ToList();
        //public Company GetCompany(Guid companyId, bool trackChanges) => FindByCondition(c => c.Id.Equals(companyId), trackChanges).SingleOrDefault();
        //public void CreateCompany(Company company) => Create(company);
        //public IEnumerable<Company> GetByIds(IEnumerable<Guid> ids, bool trackChanges) => FindByCondition(x => ids.Contains(x.Id), trackChanges).ToList();
        //public void DeleteCompany(Company company) => Delete(company);

        public async Task<IEnumerable<Company>> GetAllCompaniesAsync(bool trackChanges) => await FindAll(trackChanges).OrderBy(c => c.Name).ToListAsync();
        public async Task<Company> GetCompanyAsync(Guid companyId, bool trackChanges) => await FindByCondition(c => c.Id.Equals(companyId), trackChanges).SingleOrDefaultAsync();
        public void CreateCompany(Company company) => Create(company);
        public async Task<IEnumerable<Company>> GetByIdsAsync(IEnumerable<Guid> ids, bool trackChanges) => await FindByCondition(x => ids.Contains(x.Id), trackChanges).ToListAsync();
        public void DeleteCompany(Company company) => Delete(company);
    }
}
We only have to change these methods in our repository class.
我们只需要在我们的 repository 类中更改这些方法。
14.4 IRepositoryManager and RepositoryManager Changes
14.4 IRepositoryManager 和 RepositoryManager 更改
If we inspect the mentioned interface and the class, we will see the Save method, which calls the EF Core’s SaveChanges method. We have to change that as well:
如果我们检查上述接口和类,我们将看到 Save 方法,该方法调用 EF Core 的 SaveChanges 方法。我们也必须改变这一点:
namespace Contracts
{
    public interface IRepositoryManager
    {
        ICompanyRepository Company { get; }
        IEmployeeRepository Employee { get; }

        // void Save();
        Task SaveAsync();
    }
}
And the RepositoryManager class modification:
以及 RepositoryManager 类的修改:
// public void Save() => _repositoryContext.SaveChanges();
public async Task SaveAsync() => await _repositoryContext.SaveChangesAsync();
Because the SaveAsync(), ToListAsync()... methods are awaitable, we may use the await keyword; thus, our methods need to have the async keyword and Task as a return type.
由于 SaveAsync()、ToListAsync()...methods 是 awaitable 的,我们可以使用 await 关键字;因此,我们的方法需要将 async 关键字和 Task 作为返回类型。
Using the await keyword is not mandatory, though. Of course, if we don’t use it, our SaveAsync() method will execute synchronously — and that is not our goal here.
但是,使用 await 关键字不是必需的。当然,如果我们不使用它,我们的 SaveAsync() 方法将同步执行 — 这不是我们的目标。
14.5 Updating the Service layer
14.5 更新 Service 层
Again, we have to start with the interface modification:
同样,我们必须从接口修改开始:
using Shared.DataTransferObjects;

namespace Service.Contracts
{
    public interface ICompanyService
    {
        //IEnumerable<CompanyDto> GetAllCompanies(bool trackChanges);
        //CompanyDto GetCompany(Guid companyId, bool trackChanges);
        //CompanyDto CreateCompany(CompanyForCreationDto company);
        //IEnumerable<CompanyDto> GetByIds(IEnumerable<Guid> ids, bool trackChanges);
        //(IEnumerable<CompanyDto> companies, string ids) CreateCompanyCollection(IEnumerable<CompanyForCreationDto> companyCollection);
        //void DeleteCompany(Guid companyId, bool trackChanges);
        //void UpdateCompany(Guid companyid, CompanyForUpdateDto companyForUpdate, bool trackChanges);

        Task<IEnumerable<CompanyDto>> GetAllCompaniesAsync(bool trackChanges);
        Task<CompanyDto> GetCompanyAsync(Guid companyId, bool trackChanges);
        Task<CompanyDto> CreateCompanyAsync(CompanyForCreationDto company);
        Task<IEnumerable<CompanyDto>> GetByIdsAsync(IEnumerable<Guid> ids, bool trackChanges);
        Task<(IEnumerable<CompanyDto> companies, string ids)> CreateCompanyCollectionAsync(IEnumerable<CompanyForCreationDto> companyCollection);
        Task DeleteCompanyAsync(Guid companyId, bool trackChanges);
        Task UpdateCompanyAsync(Guid companyid, CompanyForUpdateDto companyForUpdate, bool trackChanges);
    }
}
And then, let’s modify the class methods one by one.
然后,让我们逐个修改类方法。
GetAllCompanies:
//public IEnumerable<CompanyDto> GetAllCompanies(bool trackChanges)
//{
//    var companies = _repository.Company.GetAllCompanies(trackChanges);
//    var companiesDto = _mapper.Map<IEnumerable<CompanyDto>>(companies);
//    return companiesDto;
//}

public async Task<IEnumerable<CompanyDto>> GetAllCompaniesAsync(bool trackChanges)
{
    var companies = await _repository.Company.GetAllCompaniesAsync(trackChanges);
    var companiesDto = _mapper.Map<IEnumerable<CompanyDto>>(companies);
    return companiesDto;
}
GetCompany:
//public CompanyDto GetCompany(Guid id, bool trackChanges)
//{
//    var company = _repository.Company.GetCompany(id, trackChanges);
//    if (company is null) throw new CompanyNotFoundException(id);
//    var companyDto = _mapper.Map<CompanyDto>(company);
//    return companyDto;
//}

public async Task<CompanyDto> GetCompanyAsync(Guid id, bool trackChanges)
{
    var company = await _repository.Company.GetCompanyAsync(id, trackChanges);
    if (company is null)
        throw new CompanyNotFoundException(id);
    var companyDto = _mapper.Map<CompanyDto>(company);
    return companyDto;
}
CreateCompany:
//public CompanyDto CreateCompany(CompanyForCreationDto company)
//{
//    var companyEntity = _mapper.Map<Company>(company);
//    _repository.Company.CreateCompany(companyEntity);
//    _repository.Save();
//    var companyToReturn = _mapper.Map<CompanyDto>(companyEntity);
//    return companyToReturn;
//}

public async Task<CompanyDto> CreateCompanyAsync(CompanyForCreationDto company)
{
    var companyEntity = _mapper.Map<Company>(company);
    _repository.Company.CreateCompany(companyEntity);
    await _repository.SaveAsync();
    var companyToReturn = _mapper.Map<CompanyDto>(companyEntity);
    return companyToReturn;
}
GetByIds:
//public IEnumerable<CompanyDto> GetByIds(IEnumerable<Guid> ids, bool trackChanges)
//{
//    if (ids is null)
//        throw new IdParametersBadRequestException();
//    var companyEntities = _repository.Company.GetByIds(ids, trackChanges);
//    if (ids.Count() != companyEntities.Count())
//        throw new CollectionByIdsBadRequestException();
//    var companiesToReturn = _mapper.Map<IEnumerable<CompanyDto>>(companyEntities);
//    return companiesToReturn;
//}

public async Task<IEnumerable<CompanyDto>> GetByIdsAsync(IEnumerable<Guid> ids, bool trackChanges)
{
    if (ids is null) throw new IdParametersBadRequestException();
    var companyEntities = await _repository.Company.GetByIdsAsync(ids, trackChanges);
    if (ids.Count() != companyEntities.Count())
        throw new CollectionByIdsBadRequestException();
    var companiesToReturn = _mapper.Map<IEnumerable<CompanyDto>>(companyEntities);
    return companiesToReturn;
}
CreateCompanyCollection:
//public (IEnumerable<CompanyDto> companies, string ids) CreateCompanyCollection(IEnumerable<CompanyForCreationDto> companyCollection)
//{
//    if (companyCollection is null)
//        throw new CompanyCollectionBadRequest();
//    var companyEntities = _mapper.Map<IEnumerable<Company>>(companyCollection);
//    foreach (var company in companyEntities)
//    {
//        _repository.Company.CreateCompany(company);
//    }
//    _repository.Save();
//    var companyCollectionToReturn = _mapper.Map<IEnumerable<CompanyDto>>(companyEntities);
//    var ids = string.Join(",", companyCollectionToReturn.Select(c => c.Id));
//    return (companies: companyCollectionToReturn, ids: ids);
//}

public async Task<(IEnumerable<CompanyDto> companies, string ids)> CreateCompanyCollectionAsync(IEnumerable<CompanyForCreationDto> companyCollection)
{
    if (companyCollection is null)
        throw new CompanyCollectionBadRequest();
    var companyEntities = _mapper.Map<IEnumerable<Company>>(companyCollection);
    foreach (var company in companyEntities)
    {
        _repository.Company.CreateCompany(company);
    }
    await _repository.SaveAsync();
    var companyCollectionToReturn = _mapper.Map<IEnumerable<CompanyDto>>(companyEntities);
    var ids = string.Join(",", companyCollectionToReturn.Select(c => c.Id));
    return (companies: companyCollectionToReturn, ids: ids);
}
DeleteCompany:
//public void DeleteCompany(Guid companyId, bool trackChanges)
//{
//    var company = _repository.Company.GetCompany(companyId, trackChanges);
//    if (company is null)
//        throw new CompanyNotFoundException(companyId);
//    _repository.Company.DeleteCompany(company);
//    _repository.Save();
//}

public async Task DeleteCompanyAsync(Guid companyId, bool trackChanges)
{
    var company = await _repository.Company.GetCompanyAsync(companyId, trackChanges);
    if (company is null)
        throw new CompanyNotFoundException(companyId);
    _repository.Company.DeleteCompany(company);
    await _repository.SaveAsync();
}
UpdateCompany:
//public void UpdateCompany(Guid companyId, CompanyForUpdateDto companyForUpdate, bool trackChanges)
//{
//    var companyEntity = _repository.Company.GetCompany(companyId, trackChanges);
//    if (companyEntity is null)
//        throw new CompanyNotFoundException(companyId);
//    _mapper.Map(companyForUpdate, companyEntity);
//    _repository.Save();
//}

public async Task UpdateCompanyAsync(Guid companyId, CompanyForUpdateDto companyForUpdate, bool trackChanges)
{
    var companyEntity = await _repository.Company.GetCompanyAsync(companyId, trackChanges);
    if (companyEntity is null)
        throw new CompanyNotFoundException(companyId);
    _mapper.Map(companyForUpdate, companyEntity);
    await _repository.SaveAsync();
}}
That’s all the changes we have to make in the CompanyService class.
这就是我们在 CompanyService 类中必须进行的所有更改。
Now we can move on to the controller modification.
现在我们可以继续进行控制器修改。
14.6 Controller Modification
14.6 控制器修改
Finally, we need to modify all of our actions in the CompaniesController to work asynchronously.
最后,我们需要修改CompaniesController 异步工作。
So, let’s first start with the GetCompanies method:
因此,让我们首先从 GetCompanies 方法开始:
//[HttpGet]
//public IActionResult GetCompanies()
//{
// // throw new Exception("Exception");
// var companies = _service.CompanyService.GetAllCompanies(trackChanges: false);
// return Ok(companies);
//}
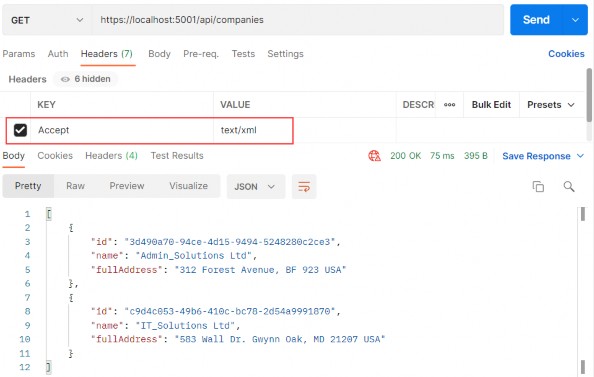
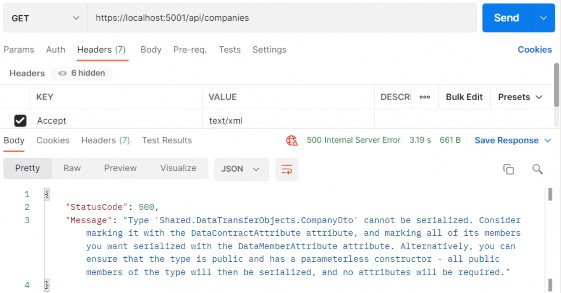
[HttpGet]
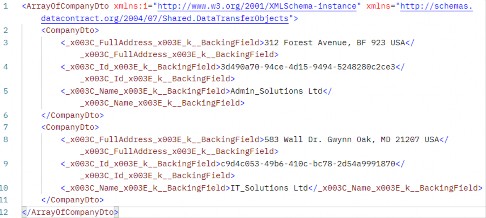
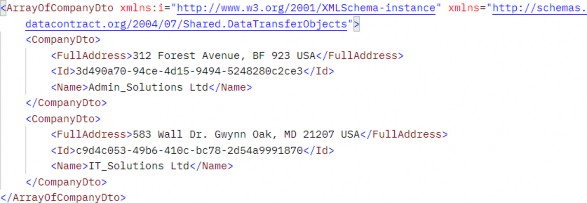
public async Task<IActionResult> GetCompanies()
{
var companies = await _service.CompanyService.GetAllCompaniesAsync(trackChanges: false);
return Ok(companies);
}We haven’t changed much in this action. We’ve just changed the return type and added the async keyword to the method signature. In the method body, we can now await the GetAllCompaniesAsync() method. And that is pretty much what we should do in all the actions in our controller.
我们在这次行动中没有太大变化。我们刚刚更改了返回类型,并将 async 关键字添加到方法签名中。在方法主体中,我们现在可以等待 GetAllCompaniesAsync() 方法。这几乎就是我们在控制器中的所有作中应该做的事情。
NOTE: We’ve changed all the method names in the repository and service layers by adding the Async suffix. But, we didn’t do that in the controller’s action. The main reason for that is when a user calls a method from your service or repository layers they can see right-away from the method name whether the method is synchronous or asynchronous. Also, your layers are not limited only to sync or async methods, you can have two methods that do the same thing but one in a sync manner and another in an async manner. In that case, you want to have a name distinction between those methods. For the controller’s actions this is not the case. We are not targeting our actions by their names but by their routes. So, the name of the action doesn’t really add any value as it does for the method names.
注意:我们通过添加 Async 后缀更改了存储库和服务层中的所有方法名称。但是,我们没有在控制器的作中执行此作。主要原因是,当用户从您的服务或存储库层调用方法时,他们可以立即从方法名称中看到该方法是同步的还是异步的。此外,您的图层不仅限于同步或异步方法,您还可以有两个方法执行相同的作,但一个以同步方式,另一个以异步方式。在这种情况下,您希望在这些方法之间进行名称区分。对于控制器的作,情况并非如此。我们不是根据他们的名字来定位我们的行动,而是根据他们的路线来定位我们的行动。因此,作的名称并不像方法名称那样真正增加任何值。
So to continue, let’s modify all the other actions.
因此,要继续,让我们修改所有其他作。
GetCompany:
//[HttpGet("{id:guid}", Name = "CompanyById")]
//public IActionResult GetCompany(Guid id)
//{
// var company = _service.CompanyService.GetCompany(id, trackChanges: false);
// return Ok(company);
//}
[HttpGet("{id:guid}", Name = "CompanyById")]
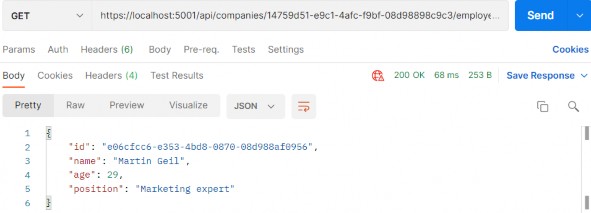
public async Task<IActionResult> GetCompany(Guid id)
{
var company = await _service.CompanyService.GetCompanyAsync(id, trackChanges: false);
return Ok(company);
}GetCompanyCollection:
//[HttpGet("collection/({ids})", Name = "CompanyCollection")]
//public IActionResult GetCompanyCollection([ModelBinder(BinderType = typeof(ArrayModelBinder))] IEnumerable<Guid> ids)
//{
// var companies = _service.CompanyService.GetByIds(ids, trackChanges: false);
// return Ok(companies);
//}
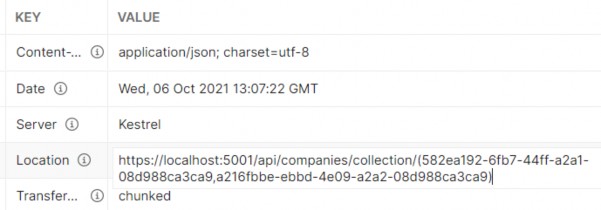
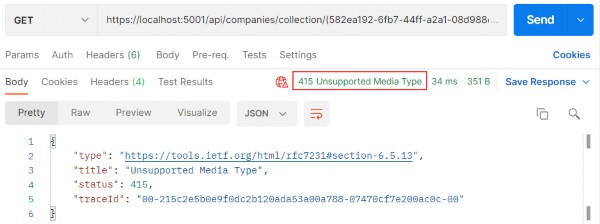
[HttpGet("collection/({ids})", Name = "CompanyCollection")]
public async Task<IActionResult> GetCompanyCollection([ModelBinder(BinderType = typeof(ArrayModelBinder))] IEnumerable<Guid> ids)
{
var companies = await _service.CompanyService.GetByIdsAsync(ids, trackChanges: false);
return Ok(companies);
}CreateCompany:
//[HttpPost]
//public IActionResult CreateCompany([FromBody] CompanyForCreationDto company)
//{
// if (company is null)
// return BadRequest("CompanyForCreationDto object is null");
// var createdCompany = _service.CompanyService.CreateCompany(company);
// return CreatedAtRoute("CompanyById", new { id = createdCompany.Id }, createdCompany);
//}
[HttpPost]
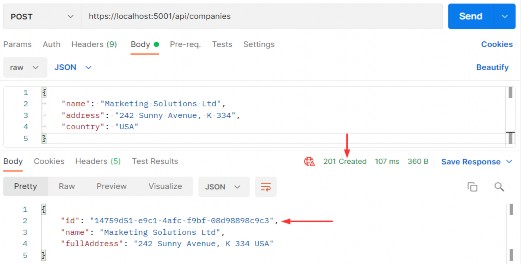
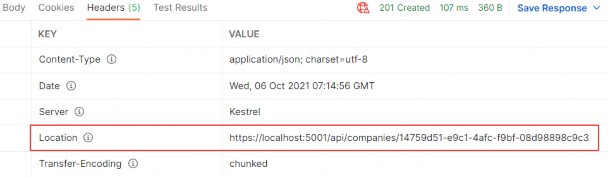
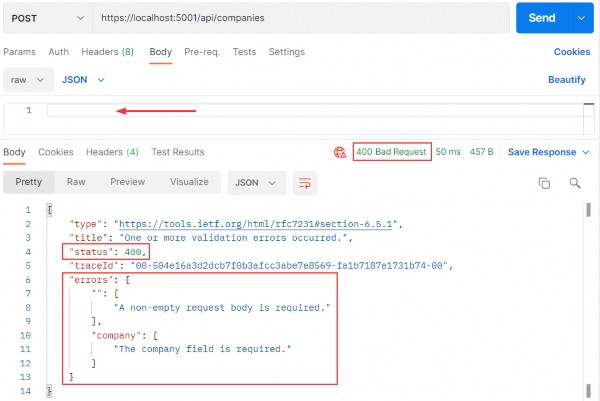
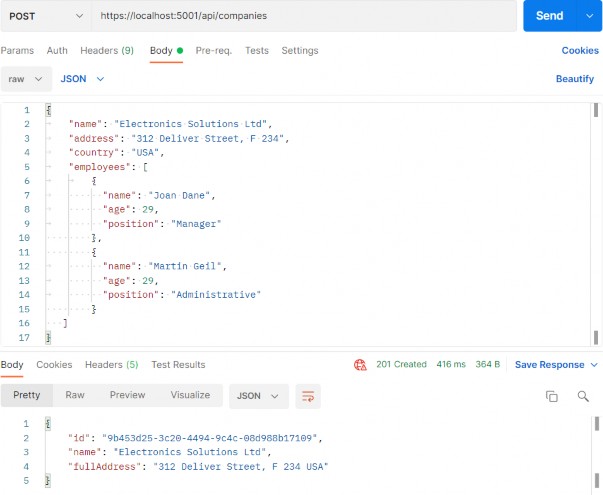
public async Task<IActionResult> CreateCompany([FromBody] CompanyForCreationDto company)
{
if (company is null)
return BadRequest("CompanyForCreationDto object is null");
if (!ModelState.IsValid)
return UnprocessableEntity(ModelState);
var createdCompany = await _service.CompanyService.CreateCompanyAsync(company);
return CreatedAtRoute("CompanyById", new { id = createdCompany.Id }, createdCompany);
}CreateCompanyCollection:
//[HttpPost("collection")]
//public IActionResult CreateCompanyCollection([FromBody] IEnumerable<CompanyForCreationDto> companyCollection)
//{
// var result = _service.CompanyService.CreateCompanyCollection(companyCollection);
// return CreatedAtRoute("CompanyCollection", new { result.ids }, result.companies);
//}
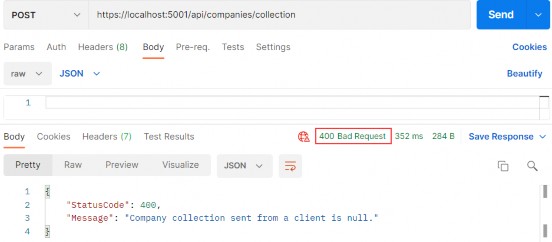
[HttpPost("collection")]
public async Task<IActionResult> CreateCompanyCollection([FromBody] IEnumerable<CompanyForCreationDto> companyCollection)
{
var result = await _service.CompanyService.CreateCompanyCollectionAsync(companyCollection);
return CreatedAtRoute("CompanyCollection", new { result.ids }, result.companies);
}DeleteCompany:
//[HttpDelete("{id:guid}")]
//public IActionResult DeleteCompany(Guid id)
//{
//    _service.CompanyService.DeleteCompany(id, trackChanges: false);
//    return NoContent();
//}

[HttpDelete("{id:guid}")]
public async Task<IActionResult> DeleteCompany(Guid id)
{
    await _service.CompanyService.DeleteCompanyAsync(id, trackChanges: false);
    return NoContent();
}
UpdateCompany:
//[HttpPut("{id:guid}")]
//public IActionResult UpdateCompany(Guid id, [FromBody] CompanyForUpdateDto company)
//{
//    if (company is null)
//        return BadRequest("CompanyForUpdateDto object is null");
//    _service.CompanyService.UpdateCompany(id, company, trackChanges: true);
//    return NoContent();
//}

[HttpPut("{id:guid}")]
public async Task<IActionResult> UpdateCompany(Guid id, [FromBody] CompanyForUpdateDto company)
{
    if (company is null)
        return BadRequest("CompanyForUpdateDto object is null");
    await _service.CompanyService.UpdateCompanyAsync(id, company, trackChanges: true);
    return NoContent();
}
Excellent. Now we are talking async.
非常好。现在我们谈论的是异步。
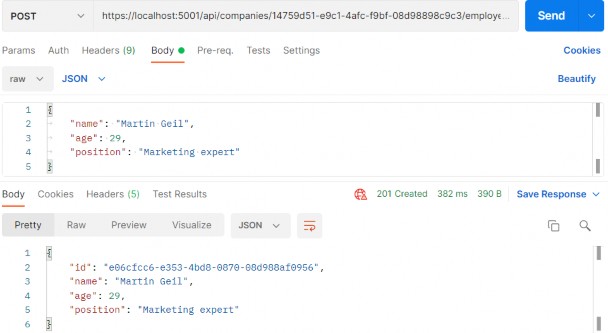
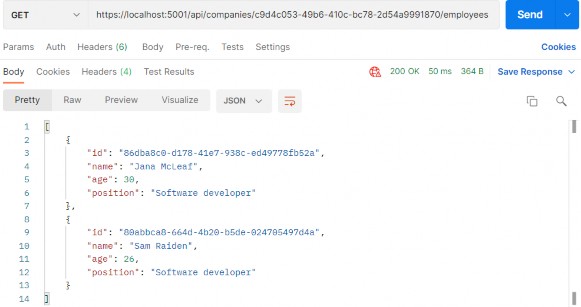
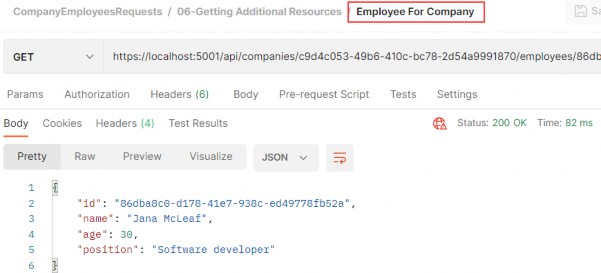
Of course, we have the Employee entity as well and all of these steps have to be implemented for the EmployeeRepository class, IEmployeeRepository interface, and EmployeesController.
当然,我们也有 Employee 实体,所有这些步骤都必须为 EmployeeRepository 类、IEmployeeRepository 接口和 EmployeesController 实现。
You can always refer to the source code for this chapter if you have any trouble implementing the async code for the Employee entity.
如果您在实现 Employee 实体的异步代码时遇到任何问题,您始终可以参考本章的源代码。
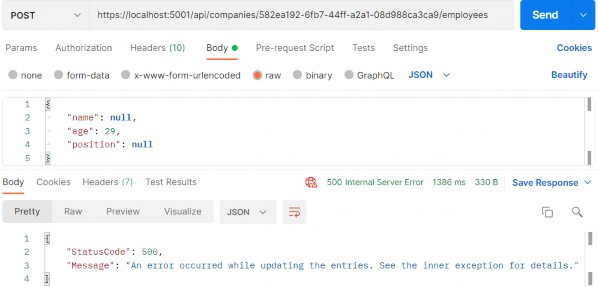
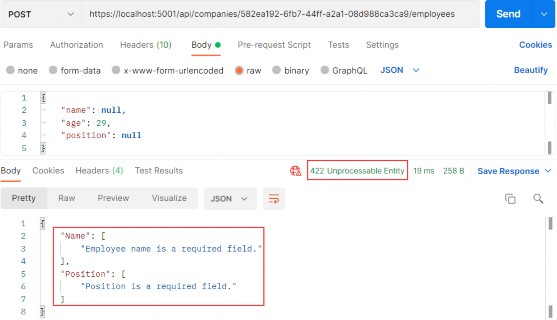
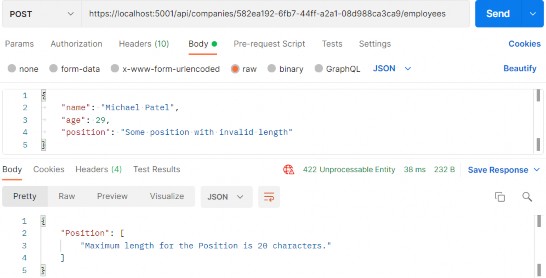
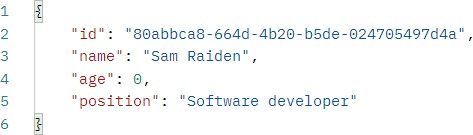
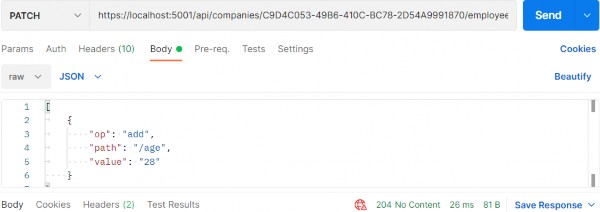
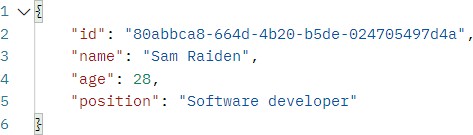
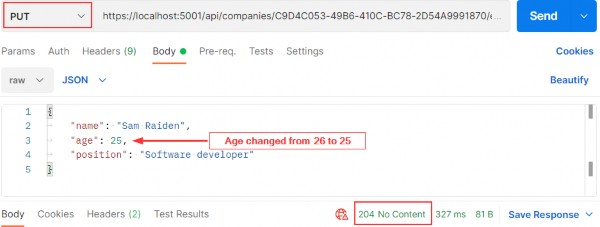
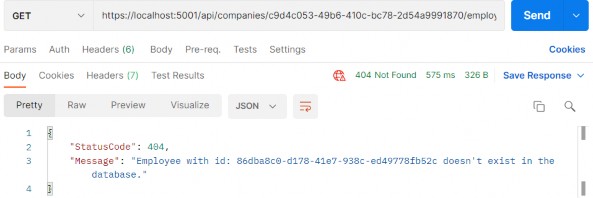
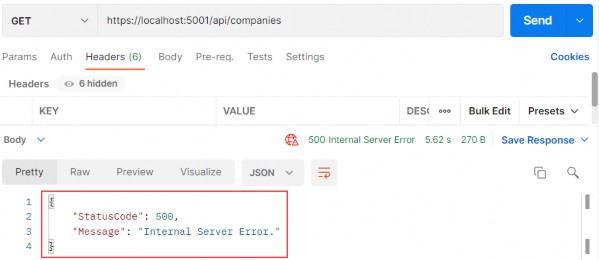
After the async implementation in the Employee classes, you can try to send different requests (from any chapter) to test your async actions. All of them should work as before, without errors, but this time in an asynchronous manner.
在 Employee 类中异步实现之后,您可以尝试发送不同的请求(来自任何章节)来测试您的异步作。它们都应该像以前一样工作,没有错误,但这次以异步方式。
14.7 Continuation in Asynchronous Programming
14.7 异步编程中的延续
The await keyword does three things:
await 关键字执行三项作:
• It helps us extract the result from the async operation – we already learned about that
它帮助我们从异步作中提取结果——我们已经了解了这一点
• Validates the success of the operation
验证作是否成功
• Provides the Continuation for executing the rest of the code in the async method
提供 Continuation,用于在 async 方法中执行其余代码
So, in our GetCompanyAsync service method, all the code after awaiting an async operation is executed inside the continuation if the async operation was successful.
因此,在我们的 GetCompanyAsync 服务方法中,如果异步作成功,则等待异步作后的所有代码都将在延续内执行。
When we talk about continuation, it can be confusing because you can read in multiple resources about the SynchronizationContext and capturing the current context to enable this continuation. When we await a task, a request context is captured when await decides to pause the method execution. Once the method is ready to resume its execution, the application takes a thread from a thread pool, assigns it to the context (SynchonizationContext), and resumes the execution. But this is the case for ASP.NET applications.
当我们谈论 continuation 时,可能会令人困惑,因为您可以读取有关 SynchronizationContext 的多个资源并捕获当前上下文以启用此 continuation。当我们等待任务时,当 await 决定暂停方法执行时,会捕获请求上下文。一旦方法准备好恢复执行,应用程序就会从线程池中获取一个线程,将其分配给上下文 (SynchonizationContext),然后恢复执行。但 ASP.NET 应用程序就是这种情况。
We don’t have the SynchronizationContext in ASP.NET Core applications. ASP.NET Core avoids capturing and queuing the context, all it does is take the thread from a thread pool and assign it to the request. So, a lot less background works for the application to do.
我们在 ASP.NET Core 应用程序中没有 SynchronizationContext。ASP.NET Core 避免了捕获和排队上下文,但它所做的只是从线程池中获取线程并将其分配给请求。因此,应用程序需要完成的后台工作要少得多。
One more thing. We are not limited to a single continuation. This means that in a single method, we can use multiple await keywords.
还有一件事。我们不限于单一的延续。这意味着在单个方法中,我们可以使用多个 await 关键字。
14.8 Common Pitfalls
14.8 常见陷阱
In our GetAllCompaniesAsync repository method if we didn’t know any better, we could’ve been tempted to use the Result property instead of the await keyword:
在我们的 GetAllCompaniesAsync 存储库方法中,如果我们不知道更多,我们可能会想使用 Result 属性而不是 await 关键字:
public async Task<IEnumerable<Company>> GetAllCompaniesAsync(bool trackChanges) =>
    FindAll(trackChanges)
    .OrderBy(c => c.Name)
    .ToListAsync()
    .Result;
We can see that the Result property returns the result we require:
我们可以看到 Result 属性返回我们需要的结果:
// Summary:
// Gets the result value of this System.Threading.Tasks.Task`1.
//
// Returns:
// The result value of this System.Threading.Tasks.Task`1, which
// is of the same type as the task's type parameter.
public TResult Result
{
    get...
}
But don’t use the Result property.
但不要使用 Result 属性。
With this code, we are going to block the thread and potentially cause a deadlock in the application, which is the exact thing we are trying to avoid using the async and await keywords. It applies the same to the Wait method that we can call on a Task.
使用此代码,我们将阻止线程并可能导致应用程序中的死锁,这正是我们试图避免使用 async 和 await 关键字的事情。它同样适用于我们可以在 Task 上调用的 Wait 方法。
So, that’s it regarding the asynchronous implementation in our project. We’ve learned a lot of useful things from this section and we can move on to the next one – Action filters.
所以,这就是我们项目中的异步实现。我们从本节中学到了很多有用的东西,我们可以继续下一个 –作过滤器。