4 HANDLING GET REQUESTS
4 处理 GET 请求
We’re all set to add some business logic to our application. But before we do that, let’s talk a bit about controller classes and routing because they play an important part while working with HTTP requests.
我们已准备好向应用程序添加一些业务逻辑。但在我们这样做之前,让我们先谈谈控制器类和路由,因为它们在处理 HTTP 请求时起着重要的作用。
4.1 Controllers and Routing in WEB API
4.1 WEB API 中的控制器和路由
Controllers should only be responsible for handling requests, model validation, and returning responses to the frontend or some HTTP client. Keeping business logic away from controllers is a good way to keep them lightweight, and our code more readable and maintainable.
控制器应该只负责处理请求、模型验证以及将响应返回给前端或某些 HTTP 客户端。让业务逻辑远离控制器是保持它们轻量级的好方法,并且我们的代码更具可读性和可维护性。
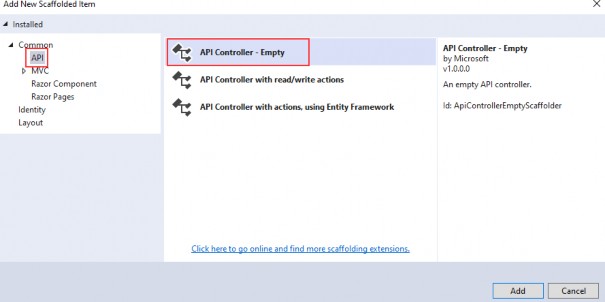
If you want to create the controller in the main project, you would right- click on the Controllers folder and then Add=>Controller. Then from the menu, you would choose API Controller Class and give it a name:
如果要在主项目中创建控制器,请右键单击 Controllers 文件夹,然后单击 Add=>Controller。然后从菜单中选择 API Controller Class 并为其命名:
But, that’s not the thing we are going to do. We don’t want to create our controllers in the main project.
但是,这不是我们要做的事情。我们不想在主项目中创建控制器。
What we are going to do instead is create a presentation layer in our application.
相反,我们要做的是在我们的应用程序中创建一个表示层。
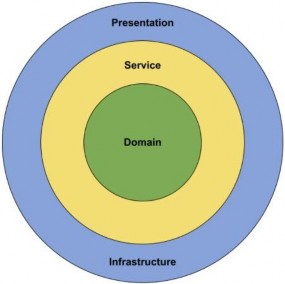
The purpose of the presentation layer is to provide the entry point to our system so that consumers can interact with the data. We can implement this layer in many ways, for example creating a REST API, gRPC, etc.
表示层的目的是提供我们系统的入口点,以便消费者可以与数据进行交互。我们可以通过多种方式实现此层,例如创建 REST API、gRPC 等。
However, we are going to do something different from what you are normally used to when creating Web APIs. By convention, controllers are defined in the Controllers folder inside the main project.
但是,我们将做一些与您通常习惯的创建 Web API 不同的事情。按照约定,控制器在主项目内的 Controllers 文件夹中定义。
Why is this a problem?
为什么这是一个问题?
Because ASP.NET Core uses Dependency Injection everywhere, we need to have a reference to all of the projects in the solution from the main project. This allows us to configure our services inside the Program class.
由于 ASP.NET Core 在任何地方都使用依赖关系注入,因此我们需要从主项目引用解决方案中的所有项目。这允许我们在 Program 类中配置我们的服务。
While this is exactly what we want to do, it introduces a big design flaw. What’s preventing our controllers from injecting anything they want inside the constructor?
虽然这正是我们想要做的,但它引入了一个很大的设计缺陷。是什么阻止了我们的控制器在构造函数中注入他们想要的任何东西?
So how can we impose some more strict rules about what controllers can do?
那么,我们如何对控制器可以做什么施加一些更严格的规则呢?
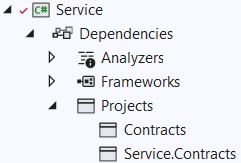
Do you remember how we split the Service layer into the Service.Contracts and Service projects? That was one piece of the puzzle.
你还记得我们是如何将 Service 层拆分为 Service.Contracts 和 Service 项目的吗?这是拼图的一部分。
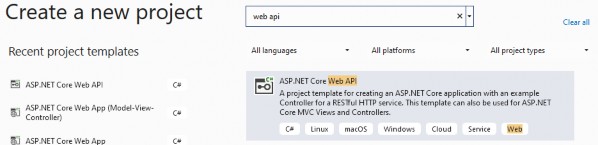
Another part of the puzzle is the creation of a new class library project,CompanyEmployees.Presentation.
难题的另一部分是创建一个新的类库项目 CompanyEmployees.Presentation。
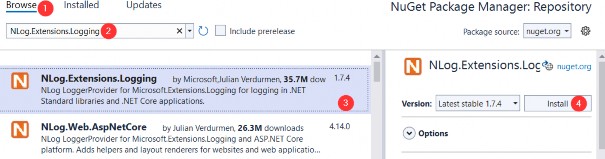
Inside that new project, we are going to install Microsoft.AspNetCore.Mvc.Core package so it has access to the ControllerBase class for our future controllers. Additionally, let’s create a single class inside the Presentation project:
在该新项目中,我们将安装 Microsoft.AspNetCore.Mvc.Core 包,以便它可以访问我们未来控制器的 ControllerBase 类。此外,让我们在 Presentation 项目中创建一个类:
namespace CompanyEmployees.Presentation
{
    public static class AssemblyReference { }
}
It's an empty static class that we are going to use for the assembly reference inside the main project, you will see that in a minute.
这是一个空的静态类,我们将用于主项目中的程序集引用,您稍后会看到它。
The one more thing, we have to do is to reference the Service.Contracts project inside the Presentation project.
我们还要做的另一件事是引用 Presentation 项目中的 Service.Contracts 项目。
Now, we are going to delete the Controllers folder and the WeatherForecast.cs file from the main project because we are not going to need them anymore.
现在,我们将从主项目中删除 Controllers 文件夹和 WeatherForecast.cs 文件,因为我们不再需要它们。
Next, we have to reference the Presentation project inside the main one. As you can see, our presentation layer depends only on the service contracts, thus imposing more strict rules on our controllers.
接下来,我们必须在主项目中引用 Presentation 项目。正如你所看到的,我们的表示层只依赖于服务契约,因此对我们的控制器施加了更严格的规则。
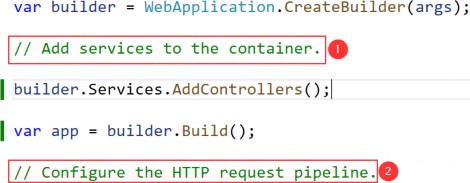
Then, we have to modify the Program.cs file:
然后,我们必须修改 Program.cs 文件:
//builder.Services.AddControllers();
builder.Services.AddControllers().AddApplicationPart(typeof(CompanyEmployees.Presentation.AssemblyReference).Assembly);
Without this code, our API wouldn’t work, and wouldn’t know where to route incoming requests. But now, our app will find all of the controllers inside of the Presentation project and configure them with the framework. They are going to be treated the same as if they were defined conventionally.
如果没有这些代码,我们的 API 将无法工作,并且不知道将传入请求路由到何处。但现在,我们的应用程序将在 Presentation 项目中找到所有控制器,并使用框架对其进行配置。它们将被当作按约定定义的一样对待。
But, we don’t have our controllers yet. So, let’s navigate to the Presentation project, create a new folder named Controllers, and then a new class named CompaniesController. Since this is a class library project, we don’t have an option to create a controller as we had in the main project. Therefore, we have to create a regular class and then modify it:
但是,我们还没有控制器。因此,让我们导航到 Presentation 项目,创建一个名为 Controllers 的新文件夹,然后创建一个名为 CompaniesController 的新类。由于这是一个类库项目,因此我们无法像在主项目中那样创建控制器。因此,我们必须创建一个常规类,然后对其进行修改:
using Microsoft.AspNetCore.Mvc;

namespace CompanyEmployees.Presentation.Controllers
{
    [Route("api/[controller]")]
    [ApiController]
    public class CompaniesController : ControllerBase
    { }
}
We’ve created this controller in the same way the main project would.
我们以与主项目相同的方式创建此控制器。
Every web API controller class inherits from the ControllerBase abstract class, which provides all necessary behavior for the derived class.
每个 Web API 控制器类都继承自 ControllerBase 抽象类,该抽象类为派生类提供所有必要的行为。
Also, above the controller class we can see this part of the code:
此外,在 controller 类的上方,我们可以看到这部分代码:
[Route("api/[controller]")]This attribute represents routing and we are going to talk more about routing inside Web APIs.
这个属性表示路由,我们将更多地讨论 Web API 中的路由。
Web API routing routes incoming HTTP requests to the particular action method inside the Web API controller. As soon as we send our HTTP request, the MVC framework parses that request and tries to match it to an action in the controller.
Web API 路由将传入的 HTTP 请求路由到 Web API 控制器内的特定作方法。一旦我们发送 HTTP 请求,MVC 框架就会解析该请求并尝试将其与控制器中的作匹配。
There are two ways to implement routing in the project:
有两种方法可以在项目中实现路由:
• Convention-based routing and
• 基于约定的路由和
• Attribute routing
• 属性路由
Convention-based routing is called such because it establishes a convention for the URL paths. The first part creates the mapping for the controller name, the second part creates the mapping for the action method, and the third part is used for the optional parameter. We can configure this type of routing in the Program class:
之所以称为基于约定的路由,是因为它为 URL 路径建立了约定。第一部分为控制器名称创建映射,第二部分为作方法创建映射,第三部分用于可选参数。我们可以在 Program 类中配置这种类型的路由:

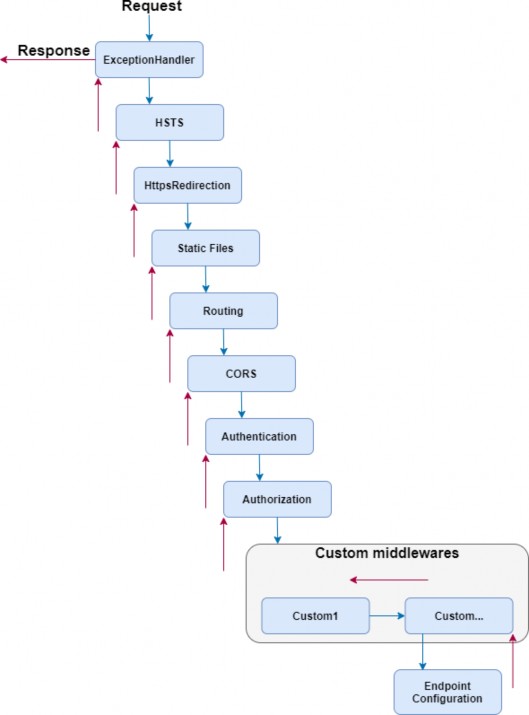
Our Web API project doesn’t configure routes this way, but if you create an MVC project this will be the default route configuration. Of course, if you are using this type of route configuration, you have to use the app.UseRouting method to add the routing middleware in the application’s pipeline.
我们的 Web API 项目不会以这种方式配置路由,但如果您创建一个 MVC 项目,这将是默认路由配置。当然,如果您使用的是这种类型的路由配置,则必须使用该应用程序。UseRouting 方法在应用程序的管道中添加路由中间件。
If you inspect the Program class in our main project, you won’t find the UseRouting method because the routes are configured with the app.MapControllers method, which adds endpoints for controller actions without specifying any routes.
如果你检查主项目中的 Program 类,则不会找到 UseRouting 方法,因为路由是使用应用程序配置的app.MapControllers 方法,该方法为控制器作添加端点,而无需指定任何路由。
Attribute routing uses the attributes to map the routes directly to the action methods inside the controller. Usually, we place the base route above the controller class, as you can see in our Web API controller class. Similarly, for the specific action methods, we create their routes right above them.
属性路由 (Attribute routing) 使用属性将路由直接映射到控制器内的作方法。通常,我们将基路由放在 controller 类之上,正如您在 Web API controller 类中看到的那样。同样,对于特定的 action methods,我们在它们的正上方创建它们的 route。
While working with the Web API project, the ASP.NET Core team suggests that we shouldn’t use Convention-based Routing, but Attribute routing instead.
在使用 Web API 项目时,ASP.NET Core 团队建议我们不应使用基于约定的路由,而应使用属性路由。
Different actions can be executed on the resource with the same URI, but with different HTTP Methods. In the same manner for different actions, we can use the same HTTP Method, but different URIs. Let’s explain this quickly.
可以对具有相同 URI 但使用不同的 HTTP 方法的资源执行不同的作。以相同的方式用于不同的作,我们可以使用相同的 HTTP 方法,但使用不同的 URI。让我们快速解释一下。
For Get request, Post, or Delete, we use the same URI /api/companies but we use different HTTP Methods like GET, POST, or DELETE. But if we send a request for all companies or just one company, we are going to use the same GET method but different URIs (/api/companies for all companies and /api/companies/{companyId} for a single company).
对于 Get 请求、Post 或 Delete,我们使用相同的 URI /api/companies,但我们使用不同的 HTTP 方法,如 GET、POST 或 DELETE。但是,如果我们向所有公司或仅向一家公司发送请求,我们将使用相同的 GET 方法,但使用不同的 URI(所有公司的 /api/companies,单个公司的 /api/companies/{companyId})。
We are going to understand this even more once we start implementing different actions in our controller.
一旦我们开始在控制器中实现不同的作,我们将更加了解这一点。
4.2 Naming Our Resources
4.2 命名我们的资源
The resource name in the URI should always be a noun and not an action. That means if we want to create a route to get all companies, we should create this route: api/companies and not this one:/api/getCompanies.
URI 中的资源名称应始终是名词,而不是作。这意味着,如果我们想创建一个路由来获取所有公司,我们应该创建这个路由:api/companies,而不是这个:/api/getCompanies。
The noun used in URI represents the resource and helps the consumer to understand what type of resource we are working with. So, we shouldn’t choose the noun products or orders when we work with the companies resource; the noun should always be companies. Therefore, by following this convention if our resource is employees (and we are going to work with this type of resource), the noun should be employees.
URI 中使用的名词代表资源,并帮助使用者了解我们正在使用的资源类型。因此,当我们使用 companies 资源时,我们不应该选择名词 products 或 orders;名词应始终为 companies。因此,如果我们的资源是 employees(并且我们将使用这种类型的资源),则名词应该是 employees,请遵循此约定。
Another important part we need to pay attention to is the hierarchy between our resources. In our example, we have a Company as a principal entity and an Employee as a dependent entity. When we create a route for a dependent entity, we should follow a slightly different convention:/api/principalResource/{principalId}/dependentResource.
我们需要注意的另一个重要部分是我们资源之间的层次结构。在我们的示例中,我们将 Company 作为委托人实体,将 Employee 作为依赖实体。当我们为依赖实体创建路由时,我们应该遵循略有不同的约定:/api/principalResource/{principalId}/dependentResource。
Because our employees can’t exist without a company, the route for the employee's resource should be /api/companies/{companyId}/employees.
因为我们的员工没有公司就无法存在,所以员工资源的路由应该是 /api/companies/{companyId}/employees。
With all of this in mind, we can start with the Get requests.
考虑到所有这些,我们可以从 Get 请求开始。
4.3 Getting All Companies From the Database
4.3 从数据库中获取所有公司
So let’s start.
那么让我们开始吧。
The first thing we are going to do is to change the base route from [Route("api/[controller]")] to [Route("api/companies")]. Even though the first route will work just fine, with the second example we are more specific to show that this routing should point to the CompaniesController class.
我们要做的第一件事是更改 base 路由从 [Route(“api/[controller]”)] 到 [Route(“api/companies”)]。尽管第一个路由可以正常工作,但在第二个示例中,我们更具体地表明此路由应指向 CompaniesController 类。
Now it is time to create the first action method to return all the companies from the database. Let’s create a definition for the GetAllCompanies method in the ICompanyRepository interface:
现在,是时候创建第一个作方法以从数据库中返回所有公司了。让我们在 ICompanyRepository 接口中为 GetAllCompanies 方法创建一个定义:
using Entities.Models;
namespace Contract
{
public interface ICompanyRepository
{
IEnumerable<Company> GetAllCompanies(bool trackChanges);
}
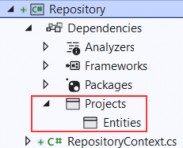
}For this to work, we need to add a reference from the Entities project to the Contracts project.
为此,我们需要添加从 Entities 项目到 Contracts 项目的引用。
Now, we can continue with the interface implementation in the CompanyRepository class:
现在,我们可以继续在 CompanyRepository 类中实现接口:
using Contract;
using Entities.Models;

namespace Repository
{
    //public class CompanyRepository : RepositoryBase<Company>, ICompanyRepository
    //{
    //    public CompanyRepository(RepositoryContext repositoryContext) : base(repositoryContext) { }
    //}

    internal sealed class CompanyRepository : RepositoryBase<Company>, ICompanyRepository
    {
        public CompanyRepository(RepositoryContext repositoryContext) : base(repositoryContext) { }
        public IEnumerable<Company> GetAllCompanies(bool trackChanges) => FindAll(trackChanges).OrderBy(c => c.Name).ToList();
    }
}
As you can see, we are calling the FindAll method from the RepositoryBase class, ordering the result with the OrderBy method, and then executing the query with the ToList method.
如您所见,我们从 RepositoryBase 类调用 FindAll 方法,使用 OrderBy 方法对结果进行排序,然后使用 ToList 方法执行查询。
After the repository implementation, we have to implement a service layer.
在仓库实现之后,我们必须实现一个服务层。
Let’s start with the ICompanyService interface modification:
让我们从 ICompanyService 接口修改开始:
using Entities.Models;

namespace Service.Contracts
{
    public interface ICompanyService
    {
        IEnumerable<Company> GetAllCompanies(bool trackChanges);
    }
}
Since the Company model resides in the Entities project, we have to add the Entities reference to the Service.Contracts project. At least, we have for now.
由于 Company 模型驻留在 Entities 项目中,因此我们必须将 Entities 引用添加到 Service.Contracts 项目中。至少,我们现在有。
Let’s be clear right away before we proceed. Getting all the entities from the database is a bad idea. We’re going to start with the simplest method and change it later on.
在我们继续之前,让我们马上弄清楚。从数据库中获取所有实体是一个坏主意。我们将从最简单的方法开始,稍后再进行更改。
Then, let’s continue with the CompanyService modification:
然后,让我们继续进行 CompanyService 修改:
internal sealed class CompanyService : ICompanyService { private readonly IRepositoryManager _repository; private readonly ILoggerManager _logger; public CompanyService(IRepositoryManager repository, ILoggerManager logger) { _repository = repository; _logger = logger; } public IEnumerable<Company> GetAllCompanies(bool trackChanges) { try { var companies = _repository.Company.GetAllCompanies(trackChanges); return companies; } catch (Exception ex) { _logger.LogError($"Something went wrong in the {nameof(GetAllCompanies)} service method {ex}"); throw; } } }We are using our repository manager to call the GetAllCompanies method from the CompanyRepository class and return all the companies from the database.
我们使用存储库管理器从 CompanyRepository 类调用 GetAllCompanies 方法,并返回数据库中的所有公司。
Finally, we have to return companies by using the GetAllCompanies method inside the Web API controller.
最后,我们必须在 Web API 控制器中使用 GetAllCompanies 方法返回公司。
The purpose of the action methods inside the Web API controllers is not only to return results. It is the main purpose, but not the only one. We need to pay attention to the status codes of our Web API responses as well. Additionally, we are going to decorate our actions with the HTTP attributes which will mark the type of the HTTP request to that action.
Web API 控制器中的作方法的目的不仅仅是返回结果。这是主要目的,但不是唯一目的。我们还需要注意 Web API 响应的状态代码。此外,我们将使用 HTTP 属性来装饰我们的作,这些属性将标记该作的 HTTP 请求的类型。
So, let’s modify the CompaniesController:
那么,让我们修改 CompaniesController:
using Microsoft.AspNetCore.Mvc;
using Service.Contracts;

namespace CompanyEmployees.Presentation.Controllers
{
    [Route("api/companies")]
    [ApiController]
    public class CompaniesController : ControllerBase
    {
        private readonly IServiceManager _service;
        public CompaniesController(IServiceManager service) => _service = service;
        [HttpGet]
        public IActionResult GetCompanies()
        {
            try
            {
                var companies = _service.CompanyService.GetAllCompanies(trackChanges: false);
                return Ok(companies);
            }
            catch
            {
                return StatusCode(500, "Internal server error");
            }
        }
    }
}
Let’s explain this code a bit.
让我们稍微解释一下这段代码。
First of all, we inject the IServiceManager interface inside the constructor. Then by decorating the GetCompanies action with the [HttpGet] attribute, we are mapping this action to the GET request. Then, we use an injected service to call the service method that gets the data from the repository class.
首先,我们在构造函数中注入 IServiceManager 接口。然后,通过使用 GetCompanies的[HttpGet] 属性,我们将此作映射到 GET 请求。然后,我们使用注入的服务来调用从 repository 类获取数据的 service 方法。
The IActionResult interface supports using a variety of methods, which return not only the result but also the status codes. In this situation,the OK method returns all the companies and also the status code 200 — which stands for OK. If an exception occurs, we are going to return the internal server error with the status code 500.
IActionResult 接口支持使用多种方法,这些方法不仅返回结果,还返回状态代码。在这种情况下,OK 方法返回所有公司以及状态代码 200 — 代表 OK。如果发生异常,我们将返回状态代码为 500 的内部服务器错误。
Because there is no route attribute right above the action, the route for the GetCompanies action will be api/companies which is the route placed on top of our controller.
由于作正上方没有 route 属性,因此 GetCompanies作的路由将是 api/companies,这是放置在控制器顶部的路由。
4.4 Testing the Result with Postman
4.4 使用 Postman 测试结果
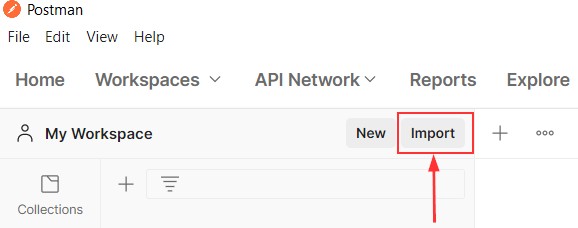
To check the result, we are going to use a great tool named Postman, which helps a lot with sending requests and displaying responses. If you download our exercise files, you will find the file Bonus 2- CompanyEmployeesRequests.postman_collection.json, which contains a request collection divided for each chapter of this book. You can import them in Postman to save yourself the time of manually typing them:
为了检查结果,我们将使用一个名为 Postman 的出色工具,它对发送请求和显示响应有很大帮助。如果您下载我们的练习文件,您将找到文件 Bonus 2- CompanyEmployeesRequests.postman_collection.json,其中包含为本书的每一章划分的请求集合。您可以在 Postman 中导入它们,以节省手动输入它们的时间:
NOTE: Please note that some GUID values will be different for your project, so you have to change them according to those values.
注意:请注意,某些 GUID 值对于您的项目会有所不同,因此您必须根据这些值更改它们。
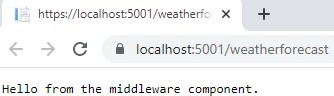
So let’s start the application by pressing the F5 button and check that it is now listening on the https://localhost:5001 address:
因此,让我们按 F5 按钮启动应用程序,并检查它现在是否正在侦听 https://localhost:5001 地址:
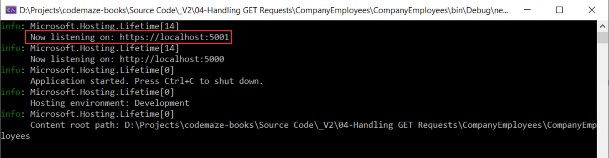
If this is not the case, you probably ran it in the IIS mode; so turn the application off and start it again, but in the CompanyEmployees mode:
如果不是这种情况,您可能在 IIS 模式下运行了它;因此,请关闭应用程序并再次启动它,但在 CompanyEmployees 模式下:

Now, we can use Postman to test the result:
现在,我们可以使用 Postman 来测试结果:
https://localhost:5001/api/companies
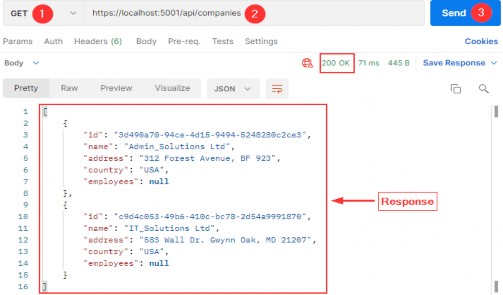
Excellent, everything is working as planned. But we are missing something. We are using the Company entity to map our requests to the database and then returning it as a result to the client, and this is not a good practice. So, in the next part, we are going to learn how to improve our code with DTO classes.
太好了,一切都按计划进行。但我们缺少一些东西。我们使用 Company 实体将请求映射到数据库,然后将其作为结果返回给客户端,这不是一个好的做法。因此,在下一部分中,我们将学习如何使用 DTO 类改进我们的代码。
4.5 DTO Classes vs. Entity Model Classes
4.5 DTO 类与实体模型类
A data transfer object (DTO) is an object that we use to transport data between the client and server applications.
数据传输对象 (DTO) 是我们用来在客户端和服务器应用程序之间传输数据的对象。
So, as we said in a previous section of this book, it is not a good practice to return entities in the Web API response; we should instead use data transfer objects. But why is that?
因此,正如我们在本书的上一节中所说,在 Web API 响应中返回实体不是一个好的做法;我们应该改用 Data Transfer 对象。但这是为什么呢?
Well, EF Core uses model classes to map them to the tables in the database and that is the main purpose of a model class. But as we saw, our models have navigational properties and sometimes we don’t want to map them in an API response. So, we can use DTO to remove any property or concatenate properties into a single property.
EF Core 使用模型类将它们映射到数据库中的表,这就是模型类的主要用途。但正如我们所看到的,我们的模型具有导航属性,有时我们不想在 API 响应中映射它们。因此,我们可以使用 DTO 删除任何属性或将属性连接成单个属性。
Moreover, there are situations where we want to map all the properties from a model class to the result — but still, we want to use DTO instead. The reason is if we change the database, we also have to change the properties in a model — but that doesn’t mean our clients want the result changed. So, by using DTO, the result will stay as it was before the model changes.
此外,在某些情况下,我们希望将模型类中的所有属性映射到结果——但我们仍然希望使用 DTO 来代替。原因是如果我们更改数据库,我们也必须更改模型中的属性 — 但这并不意味着我们的客户希望更改结果。因此,通过使用 DTO,结果将保持与模型更改之前相同。
As we can see, keeping these objects separate (the DTO and model classes) leads to a more robust and maintainable code in our application.
正如我们所看到的,将这些对象分开(DTO 和模型类)会导致我们的应用程序代码更加健壮和可维护。
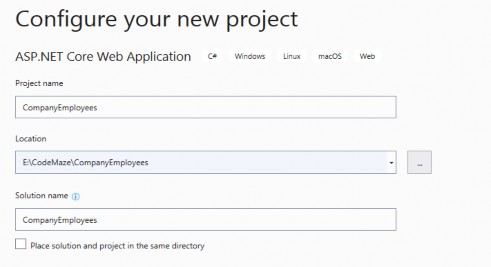
Now, when we know why should we separate DTO from a model class in our code, let’s create a new project named Shared and then a new folder DataTransferObjects with the CompanyDto record inside:
现在,当我们知道为什么应该在代码中将 DTO 与模型类分开时,让我们创建一个名为 Shared 的新项目,然后创建一个新文件夹 DataTransferObjects,创建CompanyDto 类:
namespace Shared.DataTransferObjects
{
    public record CompanyDto(Guid Id, string Name, string FullAddress);
}
Instead of a regular class, we are using a record for DTO. This specific record type is known as a Positional record.
我们使用的不是常规类,而是 DTO 的记录。此特定记录类型称为 Positional record。
A Record type provides us an easier way to create an immutable reference type in .NET. This means that the Record’s instance property values cannot change after its initialization. The data are passed by value and the equality between two Records is verified by comparing the value of their properties.
Record 类型为我们提供了一种在 .NET 中创建不可变引用类型的更简单方法。这意味着 Record 的实例属性值在初始化后无法更改。数据按值传递,并通过比较两个 Record 的属性值来验证它们之间的相等性。
Records can be a valid alternative to classes when we have to send or receive data. The very purpose of a DTO is to transfer data from one part of the code to another, and immutability in many cases is useful. We use them to return data from a Web API or to represent events in our application.
当我们必须发送或接收数据时,记录可以是类的有效替代方案。DTO 的真正目的是将数据从代码的一部分传输到另一部分,在许多情况下,不变性很有用。我们使用它们从 Web API 返回数据或表示应用程序中的事件。
This is the exact reason why we are using records for our DTOs.
这就是我们为 DTO 使用记录的确切原因。
In our DTO, we have removed the Employees property and we are going to use the FullAddress property to concatenate the Address and Country properties from the Company class. Furthermore, we are not using validation attributes in this record, because we are going to use this record only to return a response to the client. Therefore, validation attributes are not required.
在我们的 DTO 中,我们删除了 Employees 属性,我们将使用 FullAddress 属性来连接 Company 类中的 Address 和 Country 属性。此外,我们没有在此记录中使用验证属性,因为我们仅将使用此记录将响应返回给客户端。因此,验证属性不是必需的。
So, the first thing we have to do is to add the reference from the Shared project to the Service.Contracts project, and remove the Entities reference. At this moment the Service.Contracts project is only referencing the Shared project.
因此,我们要做的第一件事是将 Shared 项目中的引用添加到 Service.Contracts 项目中,并删除 Entities 引用。此时,Service.Contracts 项目仅引用 Shared 项目。
Then, we have to modify the ICompanyService interface:
然后,我们必须修改 ICompanyService 接口:
using Shared.DataTransferObjects;

namespace Service.Contracts
{
    public interface ICompanyService
    {
        IEnumerable<CompanyDto> GetAllCompanies(bool trackChanges);
    }
}
And the CompanyService class:
以及 CompanyService 类:
using Contract;
using Service.Contracts;
using Shared.DataTransferObjects;

namespace Service
{
    internal sealed class CompanyService : ICompanyService
    {
        private readonly IRepositoryManager _repository;
        private readonly ILoggerManager _logger;
        public CompanyService(IRepositoryManager repository, ILoggerManager logger)
        {
            _repository = repository;
            _logger = logger;
        }
        public IEnumerable<CompanyDto> GetAllCompanies(bool trackChanges)
        {
            try
            {
                var companies = _repository.Company.GetAllCompanies(trackChanges);
                var companiesDto = companies.Select(c => new CompanyDto(c.Id, c.Name ?? "", string.Join(' ', c.Address, c.Country))).ToList();
                return companiesDto;
            }
            catch (Exception ex)
            {
                _logger.LogError($"Something went wrong in the {nameof(GetAllCompanies)} service method {ex}");
                throw;
            }
        }
    }
}
Let’s start our application and test it with the same request from Postman:https://localhost:5001/api/companies
让我们启动我们的应用程序,并使用来自 Postman:https://localhost:5001/api/companies 的相同请求对其进行测试
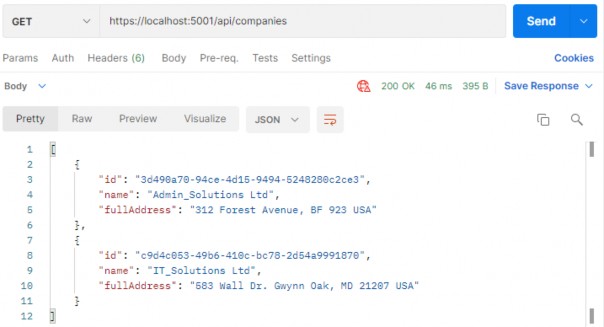
This time we get our CompanyDto result, which is a more preferred way. But this can be improved as well. If we take a look at our mapping code in the GetCompanies action, we can see that we manually map all the properties. Sure, it is okay for a few fields — but what if we have a lot more? There is a better and cleaner way to map our classes and that is by using the Automapper.
这次我们得到 CompanyDto 结果,这是一种更可取的方法。但这也可以改进。如果我们查看 GetCompanies作中的映射代码,我们可以看到我们手动映射了所有属性。当然,对于一些领域来说,这是可以的——但如果我们有更多的领域呢?有一种更好、更简洁的方法来映射我们的类,那就是使用 Automapper。
4.6 Using AutoMapper in ASP.NET Core
4.6 在 ASP.NET Core 中使用 AutoMapper
AutoMapper is a library that helps us with mapping objects in our applications. By using this library, we are going to remove the code for manual mapping — thus making the action readable and maintainable.
AutoMapper 是一个库,可帮助我们在应用程序中映射对象。通过使用这个库,我们将删除用于手动映射的代码 — 从而使作可读且可维护。
So, to install AutoMapper, let’s open a Package Manager Console window, choose the Service project as a default project from the drop-down list, and run the following command:
因此,要安装 AutoMapper,让我们打开一个 Package Manager Console 窗口,从下拉列表中选择 Service 项目作为默认项目,然后运行以下命令:
PM> Install-Package AutoMapper.Extensions.Microsoft.DependencyInjectionAfter installation, we are going to register this library in the Program class:
安装后,我们将在 Program 类中注册此库:
builder.Services.AddAutoMapper(typeof(Program));As soon as our library is registered, we are going to create a profile class, also in the main project, where we specify the source and destination objects for mapping:
注册库后,我们将创建一个 profile 类,也是在主项目中,我们在其中指定要映射的源和目标对象:
using AutoMapper;
using Entities.Models;
using Shared.DataTransferObjects;

namespace CompanyEmployees
{
    public class MappingProfile : Profile
    {
        public MappingProfile()
        {
            CreateMap<Company, CompanyDto>().ForMember(c => c.FullAddress, opt => opt.MapFrom(x => string.Join(' ', x.Address, x.Country)));
        }
    }
}
The MappingProfile class must inherit from the AutoMapper’s Profile class. In the constructor, we are using the CreateMap method where we specify the source object and the destination object to map to. Because we have the FullAddress property in our DTO record, which contains both the Address and the Country from the model class, we have to specify additional mapping rules with the ForMember method.
MappingProfile 类必须继承自 AutoMapper 的 Profile 类。在构造函数中,我们使用 CreateMap 方法,在其中指定要映射到的源对象和目标对象。由于我们的 DTO 记录中有 FullAddress 属性,其中包含模型类中的 Address 和 Country,因此我们必须使用 ForMember 方法指定其他映射规则。
Now, we have to modify the ServiceManager class to enable DI in our service classes:
现在,我们必须修改 ServiceManager 类以在我们的服务类中启用 DI:
using Contract;
using Service.Contracts;
using Service;
using AutoMapper;

//public sealed class ServiceManager : IServiceManager
//{
//    private readonly Lazy<ICompanyService> _companyService; private readonly Lazy<IEmployeeService> _employeeService;
//    public ServiceManager(IRepositoryManager repositoryManager, ILoggerManager logger)
//    {
//        _companyService = new Lazy<ICompanyService>(() => new CompanyService(repositoryManager, logger));
//        _employeeService = new Lazy<IEmployeeService>(() => new EmployeeService(repositoryManager, logger));
//    }
//    public ICompanyService CompanyService => _companyService.Value;
//    public IEmployeeService EmployeeService => _employeeService.Value;
//}

public sealed class ServiceManager : IServiceManager
{
    private readonly Lazy<ICompanyService> _companyService;
    private readonly Lazy<IEmployeeService> _employeeService;
    public ServiceManager(IRepositoryManager repositoryManager, ILoggerManager logger, IMapper mapper)
    {
        _companyService = new Lazy<ICompanyService>(() => new CompanyService(repositoryManager, logger, mapper));
        _employeeService = new Lazy<IEmployeeService>(() => new EmployeeService(repositoryManager, logger, mapper));
    }
    public ICompanyService CompanyService => _companyService.Value;
    public IEmployeeService EmployeeService => _employeeService.Value;
}
Of course, now we have two errors regarding our service constructors. So we need to fix that in both CompanyService and EmployeeService classes:
当然,现在我们有两个关于服务构造函数的错误。因此,我们需要在 CompanyService 和 EmployeeService 类中修复该问题:
using AutoMapper;
using Contract;
using Service.Contracts;
using Shared.DataTransferObjects;

namespace Service
{
    //internal sealed class CompanyService : ICompanyService
    //{
    //    private readonly IRepositoryManager _repository;
    //    private readonly ILoggerManager _logger;
    //    public CompanyService(IRepositoryManager repository, ILoggerManager logger)
    //    {
    //        _repository = repository;
    //        _logger = logger;
    //    }
    //}

    //internal sealed class CompanyService : ICompanyService
    //{
    //    private readonly IRepositoryManager _repository;
    //    private readonly ILoggerManager _logger;
    //    public CompanyService(IRepositoryManager repository, ILoggerManager logger)
    //    {
    //        _repository = repository;
    //        _logger = logger;
    //    }
    //    public IEnumerable<Company> GetAllCompanies(bool trackChanges)
    //    {
    //        try
    //        {
    //            var companies = _repository.Company.GetAllCompanies(trackChanges);
    //            return companies;
    //        }
    //        catch (Exception ex)
    //        {
    //            _logger.LogError($"Something went wrong in the {nameof(GetAllCompanies)} service method {ex}");
    //            throw;
    //        }
    //    }
    //}

    internal sealed class CompanyService : ICompanyService
    {
        private readonly IRepositoryManager _repository;
        private readonly ILoggerManager _logger;
        private readonly IMapper _mapper;
        public CompanyService(IRepositoryManager repository, ILoggerManager logger, IMapper mapper)
        {
            _repository = repository;
            _logger = logger;
            _mapper = mapper;
        }
        public IEnumerable<CompanyDto> GetAllCompanies(bool trackChanges)
        {
            try
            {
                var companies = _repository.Company.GetAllCompanies(trackChanges);
                var companiesDto = companies.Select(c => new CompanyDto(c.Id, c.Name ?? "", string.Join(' ', c.Address, c.Country))).ToList();
                return companiesDto;
            }
            catch (Exception ex)
            {
                _logger.LogError($"Something went wrong in the {nameof(GetAllCompanies)} service method {ex}");
                throw;
            }
        }
    }
}
We should do the same in the EmployeeService class:
我们应该在 EmployeeService 类中做同样的事情:
using AutoMapper;
using Contract;
using Service.Contracts;

namespace Service
{
    internal sealed class EmployeeService : IEmployeeService
    {
        private readonly IRepositoryManager _repository;
        private readonly ILoggerManager _logger;
        private readonly IMapper _mapper;
        public EmployeeService(IRepositoryManager repository, ILoggerManager logger, IMapper mapper)
        {
            _repository = repository;
            _logger = logger;
            _mapper = mapper;
        }
    }
}
Finally, we can modify the GetAllCompanies method in the CompanyService class:
最后,我们可以修改 CompanyService 类中的 GetAllCompanies 方法:
using AutoMapper;
using Contract;
using Service.Contracts;
using Shared.DataTransferObjects;

namespace Service
{
    internal sealed class CompanyService : ICompanyService
    {
        private readonly IRepositoryManager _repository;
        private readonly ILoggerManager _logger;
        private readonly IMapper _mapper;
        public CompanyService(IRepositoryManager repository, ILoggerManager logger, IMapper mapper)
        {
            _repository = repository;
            _logger = logger;
            _mapper = mapper;
        }

        public IEnumerable<CompanyDto> GetAllCompanies(bool trackChanges)
        {
            try
            {
                var companies = _repository.Company.GetAllCompanies(trackChanges);
                var companiesDto = _mapper.Map<IEnumerable<CompanyDto>>(companies);
                return companiesDto;
            }
            catch (Exception ex)
            {
                _logger.LogError($"Something went wrong in the {nameof(GetAllCompanies)} service method {ex}");
                throw;
            }
        }
    }
}
We are using the Map method and specify the destination and then the source object.
我们使用的是 Map 方法,并指定目标对象,然后指定源对象。
Excellent.
非常好。
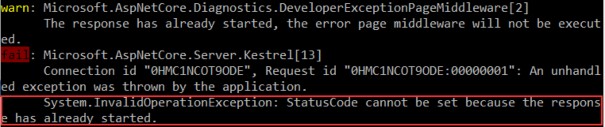
Now if we start our app and send the same request from Postman, we are going to get an error message:
现在,如果我们启动应用程序并从 Postman 发送相同的请求,我们将收到一条错误消息:
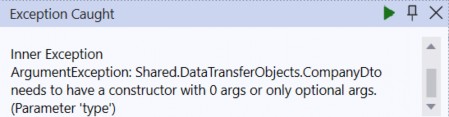
This happens because AutoMapper is not able to find the specific FullAddress property as we specified in the MappingProfile class. We are intentionally showing this error for you to know what to do if it happens to you in your projects.
发生这种情况是因为 AutoMapper 无法找到我们在 MappingProfile 类中指定的特定 FullAddress 属性。我们有意显示此错误,以便您知道如果在您的项目中发生该怎么做。
So to solve this, all we have to do is to modify the MappingProfile class:
因此,要解决此问题,我们所要做的就是修改 MappingProfile 类:
using AutoMapper;
using Entities.Models;
using Shared.DataTransferObjects;

namespace CompanyEmployees
{
    public class MappingProfile : Profile
    {
        //public MappingProfile()
        //{
        //    CreateMap<Company, CompanyDto>().ForMember(c => c.FullAddress, opt => opt.MapFrom(x => string.Join(' ', x.Address, x.Country)));
        //}

        public MappingProfile() { CreateMap<Company, CompanyDto>().ForCtorParam("FullAddress", opt => opt.MapFrom(x => string.Join(' ', x.Address, x.Country))); }
    }
}
This time, we are not using the ForMember method but the ForCtorParam method to specify the name of the parameter in the constructor that AutoMapper needs to map to.
这一次,我们不使用 ForMember 方法,而是使用 ForCtorParam 方法来指定 AutoMapper 需要映射到的构造函数中的参数名称。
Now, let’s use Postman again to send the request to test our app:
现在,让我们再次使用 Postman 发送请求来测试我们的 app:
https://localhost:5001/api/companies

We can see that everything is working as it is supposed to, but now with much better code.
我们可以看到一切都按预期工作,但现在代码要好得多。