10 Configuring an ASP.NET Core application
10 配置 ASP.NET Core 应用程序
This chapter covers
本章涵盖
-
Loading settings from multiple configuration providers
从多个配置提供程序加载设置 -
Storing sensitive settings safely
安全地存储敏感设置 -
Using strongly typed settings objects
使用强类型设置对象 -
Using different settings in different hosting environments
在不同的托管环境中使用不同的设置
In part 1 of this book, you learned the basics of getting an ASP.NET Core app up and running, and how to use minimal API endpoints to create an HTTP API. When you start building real applications, you’ll quickly find that you want to tweak various settings at deploy time without necessarily having to recompile your application. This chapter looks at how you can achieve this task in ASP.NET Core by using configuration.
在本书的第 1 部分中,您学习了启动和运行 ASP.NET Core 应用程序的基础知识,以及如何使用最少的 API 端点来创建 HTTP API。当您开始构建真正的应用程序时,您很快就会发现您希望在部署时调整各种设置,而不必重新编译您的应用程序。本章介绍如何使用 configuration 在 ASP.NET Core 中完成此任务。
I know. Configuration sounds boring, right? But I have to confess that the configuration model is one of my favorite parts of ASP.NET Core; it’s so easy to use and so much more elegant than some approaches in old versions of .NET Framework. In section 10.2 you’ll learn how to load values from a plethora of sources—JavaScript Object Notation (JSON) files, environment variables, and command-line arguments—and combine them into a unified configuration object.
我知道。配置听起来很无聊,对吧?但我不得不承认,配置模型是 ASP.NET Core 中我最喜欢的部分之一;它非常易于使用,并且比旧版本的 .NET Framework 中的某些方法要优雅得多。在第 10.2 节中,您将学习如何从大量来源(JavaScript 对象表示法 (JSON) 文件、环境变量和命令行参数)加载值,并将它们组合到一个统一的配置对象中。
On top of that, ASP.NET Core makes it easy to bind this configuration to strongly typed options objects—simple plain old CLR object (POCO) classes that are populated from the configuration object, which you can inject into your services, as you’ll see in section 10.3. Binding to strongly typed options objects lets you nicely encapsulate settings for different features in your app.
最重要的是,ASP.NET Core 可以轻松地将此配置绑定到强类型选项对象 — 从配置对象填充的简单普通旧 CLR 对象 (POCO) 类,您可以将其注入到您的服务中,如第 10.3 节所示。绑定到强类型选项对象可以让您很好地封装应用程序中不同功能的设置。
In the final section of this chapter, you’ll learn about the ASP.NET Core hosting environments. You often want your app to run differently in different situations, such as running it on your developer machine compared with deploying it to a production server. These situations are known as environments. When the app knows the environment in which it’s running, it can load a different configuration and vary its behavior accordingly.
在本章的最后一节中,您将了解 ASP.NET Core 托管环境。您通常希望您的应用程序在不同情况下以不同的方式运行,例如在开发人员计算机上运行它与将其部署到生产服务器。这些情况称为环境。当应用程序知道它运行的环境时,它可以加载不同的配置并相应地改变其行为。
Before we get to that topic, let’s cover the basics. What is configuration, why do we need it, and how does ASP.NET Core handle these requirements?
在我们进入该主题之前,让我们先了解一下基础知识。什么是配置,我们为什么需要它,以及 ASP.NET Core 如何处理这些要求?
10.1 Introducing the ASP.NET Core configuration model
10.1 ASP.NET Core 配置模型简介
In this section I provide a brief description of configuration and what you can use it for in ASP.NET Core applications. Configuration is the set of external parameters provided to an application that controls the application’s behavior in some way. It typically consists of a mixture of settings and secrets that the application loads at runtime.
在本节中,我将简要介绍配置以及您可以在 ASP.NET Core 应用程序中使用它的用途。Configuration 是提供给应用程序的一组外部参数,它以某种方式控制应用程序的行为。它通常由应用程序在运行时加载的设置和密钥的混合组成。
Definition A setting is any value that changes the behavior of your application. A secret is a special type of setting that contains sensitive data, such as a password, an API key for a third-party service, or a connection string.
定义 设置是更改应用程序行为的任何值。密钥是一种特殊类型的设置,其中包含敏感数据,例如密码、第三方服务的 API 密钥或连接字符串。
The obvious things to consider before we get started are why we need app configuration and what sort of things we need to configure. Normally, you move anything that you can consider to be a setting or a secret out of your application code. That way, you can change these values at deploy time easily without having to recompile your application.
在开始之前,要考虑的明显事项是为什么需要应用程序配置以及需要配置哪些类型的内容。通常,您将任何可以视为设置或密钥的内容从应用程序代码中移出。这样,您就可以在部署时轻松更改这些值,而无需重新编译应用程序。
You might have an application that shows the locations of your bricks-and-mortar stores. You could have a setting for the connection string to the database in which you store the details on the stores, but also settings such as the default location to display on a map, the default zoom level to use, and the API key for accessing the Google Maps API (figure 10.1). Storing these settings and secrets outside your compiled code is good practice, as it makes it easy to tweak them without having to recompile your code.
您可能有一个显示实体店位置的应用程序。你可以设置存储商店详细信息的数据库的连接字符串,也可以设置地图上显示的默认位置、要使用的默认缩放级别以及用于访问 Google Maps API 的 API 密钥等设置(图 10.1)。将这些设置和密钥存储在已编译代码之外是一种很好的做法,因为它可以轻松调整它们,而无需重新编译代码。
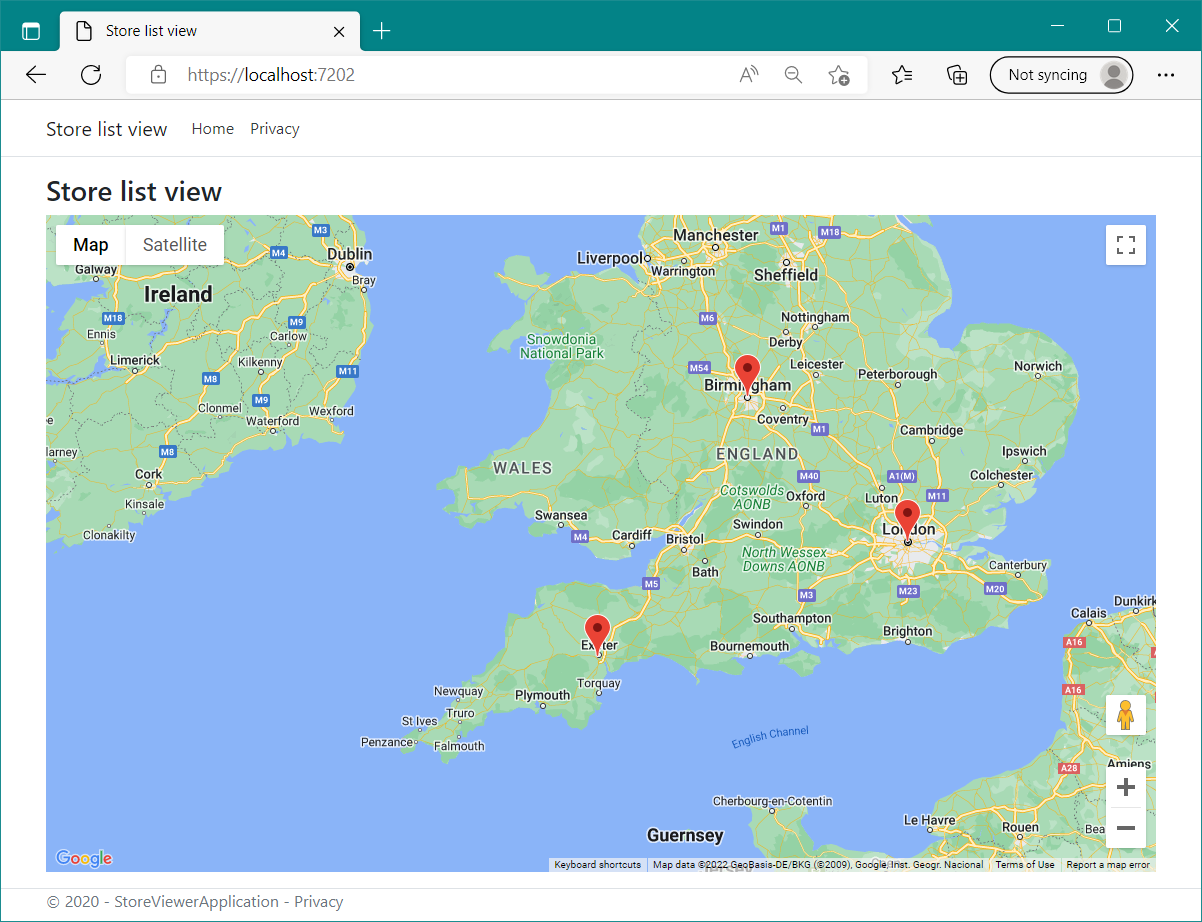
Figure 10.1 You can store the default map location, zoom level, and mapping API Key in configuration and load them at runtime. It’s important to keep secrets such as API keys in configuration out of your code.
图 10.1 您可以在配置中存储默认地图位置、缩放级别和地图 API Key,并在运行时加载它们。请务必将 configuration 中的 API 密钥等机密信息保留在代码之外。
There’s also a security aspect: you don’t want to hardcode secret values such as API keys or passwords into your code, where they could be committed to source control and made publicly available. Even values embedded in your compiled application can be extracted, so it’s best to externalize them whenever possible.
还有一个安全方面:您不希望将 API 密钥或密码等秘密值硬编码到代码中,因为这些值可以提交到源代码管理中并公开可用。甚至可以提取嵌入在已编译应用程序中的值,因此最好尽可能将它们外部化。
Virtually every web framework provides a mechanism for loading configuration, and the old .NET Framework version of ASP.NET was no different. It used the
实际上,每个 Web 框架都提供了加载配置的机制,旧版 ASP.NET 也不例外。它使用 web.config 文件中的
ASP.NET Core gives you a totally revamped experience. At the most basic level, you’re still specifying key-value pairs as strings, but instead of getting those values from a single file, now you can load them from multiple sources. You can load values from files, but now they can be in any format you like: JSON, XML, YAML, and so on. Further, you can load values from environment variables, from command-line arguments, from a database, or from a remote service. Or you can create your own custom configuration provider.
ASP.NET Core 为您提供全新的体验。在最基本的层面上,您仍然将键值对指定为字符串,但现在您可以从多个源加载它们,而不是从单个文件中获取这些值。您可以从文件中加载值,但现在它们可以采用您喜欢的任何格式:JSON、XML、YAML 等。此外,还可以从环境变量、命令行参数、数据库或远程服务加载值。或者,您可以创建自己的自定义配置提供程序。
Definition ASP.NET Core uses configuration providers to load key-value pairs from a variety of sources. Applications can use multiple configuration providers.
定义 ASP.NET Core 使用配置提供程序从各种来源加载键值对。应用程序可以使用多个配置提供程序。ASP.NET Core 配置模型还具有覆盖设置的概念。每个配置提供程序都可以定义自己的设置,也可以覆盖先前提供程序的设置。您将在 10.2 节中看到这个非常有用的功能。
The ASP.NET Core configuration model also has the concept of overriding settings. Each configuration provider can define its own settings, or it can overwrite settings from a previous provider. You’ll see this incredibly useful feature in action in section 10.2.
ASP.NET Core 为您提供全新的体验。在最基本的层面上,您仍然将键值对指定为字符串,但现在您可以从多个源加载它们,而不是从单个文件中获取这些值。您可以从文件中加载值,但现在它们可以采用您喜欢的任何格式:JSON、XML、YAML 等。此外,还可以从环境变量、命令行参数、数据库或远程服务加载值。或者,您可以创建自己的自定义配置提供程序。
ASP.NET Core makes it simple to bind these key-value pairs, which are defined as strings, to POCO-setting classes that you define in your code. This model of strongly typed configuration, described in section 10.3, makes it easy to group settings logically around a given feature and lends itself well to unit testing.
ASP.NET Core 使将这些定义为字符串的键值对绑定到您在代码中定义的 POCO 设置类变得简单。这种强类型配置模型(在 Section 10.3 中描述)可以很容易地围绕给定功能对设置进行逻辑分组,并且非常适合 unit testing。
Before we get to strongly typed settings, we’ll look at how you load the settings and secrets for your app, whether they’re stored in JSON files, environment variables, or command-line arguments.
在开始强类型设置之前,我们将了解如何加载应用程序的设置和 Secret,无论它们是存储在 JSON 文件、环境变量还是命令行参数中。
10.2 Building a configuration object for your app
10.2 为您的应用程序构建配置对象
In this section we’ll get into the meat of the configuration system. You’ll learn how to load settings from multiple sources, how they’re stored internally in ASP.NET Core, and how settings can override other values to produce layers of configuration. You’ll also learn how to store secrets securely while ensuring that they’re still available when you run your app.
在本节中,我们将深入介绍配置系统的核心内容。您将学习如何从多个来源加载设置,如何将它们内部存储在 ASP.NET Core 中,以及设置如何覆盖其他值以生成配置层。您还将学习如何安全地存储密钥,同时确保在运行应用程序时它们仍然可用。
ASP.NET Core’s configuration model has been essentially the same since .NET Core 1.0, but in .NET 6, ASP.NET Core introduced the ConfigurationManager class. ConfigurationManager simplifies common patterns for working with configuration by implementing both of the two main configuration-related interfaces: IConfigurationBuilder and IConfigurationRoot.
自 .NET Core 1.0 以来,ASP.NET Core 的配置模型基本相同,但在 .NET 6 中,ASP.NET Core 引入了 ConfigurationManager 类。ConfigurationManager 简化了通过实现两个主要的与配置相关的接口来处理配置:IConfigurationBuilder 和IConfigurationRoot。
Note IConfigurationBuilder describes how to construct the final configuration representation for your app, and IConfigurationRoot holds the configuration values themselves.
注意 IConfigurationBuilder 描述了如何为您的应用程序构建最终的配置表示形式,而 IConfigurationRoot 本身保存了配置值。
You describe your configuration by adding IConfigurationProviders to the ConfigurationManager. Configuration providers describe how to load the key-value pairs from a particular source, such as a JSON file or environment variables (figure 10.2). When you add a provider, the ConfigurationManager queries it and adds all the values returned to the IConfigurationRoot implementation.
您可以通过将 IConfigurationProvider添加到 ConfigurationManager 来描述您的配置。配置提供程序描述了如何从特定源(例如 JSON 文件或环境变量)加载键值对(图 10.2)。当您添加提供程序时,ConfigurationManager 会查询它,并将返回给 IConfigurationRoot 实现的所有值添加。
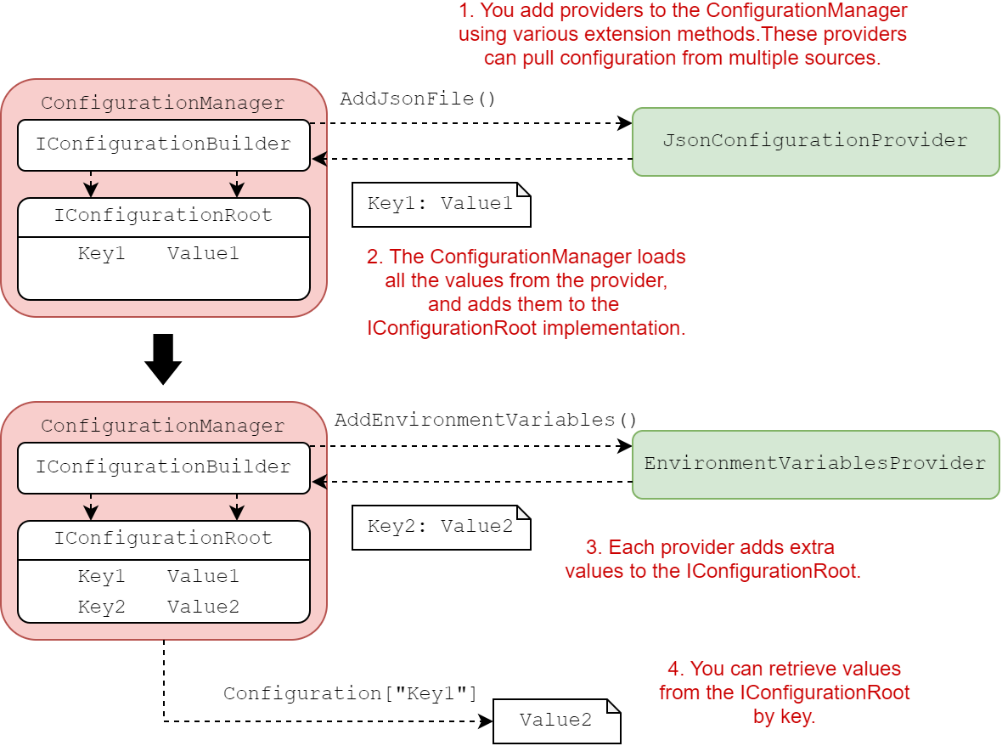
Figure 10.2 Using ConfigurationManager to populate IConfiguration. Configuration providers are added to the ConfigurationManager with extension methods. The manager queries the provider and adds all the returned values to the IConfigurationRoot, which implements IConfiguration.
图 10.2 使用 ConfigurationManager 填充 IConfiguration。配置提供程序使用扩展方法添加到 ConfigurationManager。经理查询提供程序,并将所有返回的值添加到实现 IConfiguration 的 IConfigurationRoot。
Note Adding a provider to the ConfigurationManager adds the configuration values to the IConfigurationRoot instance, which implements IConfiguration. You’ll generally work with the IConfiguration interface in your code.
注意 将提供程序添加到 ConfigurationManager 会将配置值添加到实现 IConfiguration 的 IConfigurationRoot 实例。您通常会在代码中使用IConfiguration 接口。
ASP.NET Core ships with configuration providers for loading data from common locations:
ASP.NET Core 附带了用于从常见位置加载数据的配置提供程序:
-
JSON files
JSON 文件 -
Extensible Markup Language (XML) files
可扩展标记语言 (XML) 文件 -
Environment variables
环境变量 -
Command-line arguments
命令行参数 -
Initialization (INI) files
初始化 (INI) 文件
If these providers don’t fit your requirements, you can find a host of alternatives on GitHub and NuGet, and it’s not difficult to create your own custom provider. You could use the official Microsoft Azure Key Vault provider NuGet package or the YAML file provider I wrote.
如果这些提供程序不符合您的要求,您可以在 GitHub 和 NuGet 上找到许多替代方案,并且创建自己的自定义提供程序并不难。您可以使用官方的 Microsoft Azure Key Vault 提供程序 NuGet 包或我编写的 YAML 文件提供程序。
Note The Azure Key Vault provider is available on NuGet at http://mng.bz/0KrN, and you can find my YAML provider on GitHub at http://mng.bz/Yqdj.
注意: Azure Key Vault 提供程序在 NuGet 上以 http://mng.bz/ 0KrN 提供,您可以在 GitHub 上找到我的 YAML 提供程序,网址为 http://mng.bz/Yqdj。
In many cases, the default providers are sufficient. In particular, most templates start with an appsettings.json file, which contains a variety of settings depending on the template you choose. The following listing shows the default file generated by the ASP.NET Core 7.0 Empty template without authentication.
在许多情况下,默认提供程序就足够了。特别是,大多数模板都以 appsettings.json 文件开头,该文件包含各种设置,具体取决于您选择的模板。以下清单显示了 ASP.NET Core 7.0 Empty 模板生成的默认文件,无需身份验证。
Listing 10.1 Default appsettings.json file created by an ASP.NET Core
清单 10.1 由 ASP.NET Core Empty 模板创建的默认 appsettings.json 文件
{
  "Logging": {
    "LogLevel": {
      "Default": "Information",
      "Microsoft.AspNetCore": "Warning"
    }
  },
  "AllowedHosts": "*"
}
As you can see, this file contains mostly settings to control logging, but you can add extra configuration for your app here too.
如您所见,此文件主要包含用于控制日志记录的设置,但您也可以在此处为您的应用程序添加额外的配置。
Warning Don’t store sensitive values—such as passwords, API keys, and connection strings—in this file. You’ll see how to store these values securely in section 10.2.3.
警告 不要在此文件中存储敏感值,例如密码、API 密钥和连接字符串。您将在 Section 10.2.3 中看到如何安全地存储这些值。
Adding your own configuration values involves adding a key-value pair to the JSON. It’s a good idea to namespace your settings by creating a base object for related settings, as in the MapSettings object shown in the following listing.
添加您自己的配置值涉及向 JSON 添加键值对。通过为相关设置创建基本对象来命名设置是一个好主意,如下面的清单所示的 MapSettings 对象。
Listing 10.2 Adding configuration values to an appsettings.json file
示例 10.2 向 appsettings.json 文件添加配置值
{
    "Logging": {
        "LogLevel": {
            "Default": "Information",
            "Microsoft": "Warning",
            "Microsoft.Hosting.Lifetime": "Information"
        }
    },
    "AllowedHosts": "*",
    "MapSettings": { ❶
        "DefaultZoomLevel": 9, ❷
        "DefaultLocation": { ❸
        "latitude": 50.500, ❸
        "longitude": -4.000 ❸
        }
    }
}
❶ Nest all the configuration under the MapSettings key.
将所有配置嵌套在 MapSettings 键下。
❷ Values can be numbers in the JSON file, but they’ll be converted to strings when they’re read.
值可以是 JSON 文件中的数字,但在读取时它们会转换为字符串。
❸ You can create deeply nested structures to organize your configuration values better.
您可以创建深度嵌套的结构来更好地组织您的配置值。
I’ve nested the new configuration inside the MapSettings parent key to create a section that will be useful later for binding values to a POCO object. I also nested the latitude and longitude keys under the DefaultLocation key. You can create any structure of values you like; the configuration provider will read them fine. Also, you can store the values as any data type—numbers, in this case—but be aware that the provider will read and store them internally as strings.
我已将新配置嵌套在 MapSettings 父键中,以创建一个部分,该部分稍后将用于将值绑定到 POCO 对象。我还将纬度和经度键嵌套在 DefaultLocation 键下。您可以创建任何您喜欢的值结构;配置提供程序将读取它们。此外,您可以将值存储为任何数据类型(在本例中为数字),但请注意,提供程序将在内部将它们读取并存储为字符串。
Tip The configuration keys are not case-sensitive in your app, so bear that fact in mind when loading from providers in which the keys are case-sensitive. If you have a YAML file with keys name and NAME, for example, only one will appear in the final IConfiguration.
提示 配置键在您的应用程序中不区分大小写,因此在从键区分大小写的提供程序加载时,请记住这一事实。例如,如果您有一个具有键 name 和 NAME 的 YAML 文件,则最终的 IConfiguration 中只会显示一个。
Now that you have a configuration file, it’s time for your app to load it into the ConfigurationManager.
现在你有了一个配置文件,是时候让你的应用程序将其加载到 ConfigurationManager 中了。
10.2.1 Adding a configuration provider in Program.cs
10.2.1 在 Program.cs 中添加配置提供程序
As you’ve seen throughout this book, ASP.NET Core (from .NET 6 onward) uses the WebApplicationBuilder class to bootstrap your application. As part of the bootstrap process, WebApplicationBuilder creates a ConfigurationManager instance and exposes it as the property Configuration.
正如您在本书中所看到的,ASP.NET Core(从 .NET 6 开始)使用WebApplicationBuilder 类来引导您的应用程序。作为引导过程的一部分,WebApplicationBuilder 创建一个 ConfigurationManager 实例,并将其公开为属性 Configuration。
Tip You can access the ConfigurationManager directly on WebApplicationBuilder.Configuration and WebApplication.Configuration. Both properties reference the same ConfigurationManager instance.
提示 您可以直接在 WebApplicationBuilder 上访问 ConfigurationManager。Configuration 和 WebApplication.Configuration 的 Configuration。这两个属性引用同一个 ConfigurationManager 实例。
WebApplicationBuilder adds several default configuration providers to the ConfigurationManager, which we’ll look at in more detail throughout this chapter:
WebApplicationBuilder 向 ConfigurationManager 添加了几个默认配置提供程序,我们将在本章中更详细地介绍它们:
-
JSON file provider—Loads settings from an optional JSON file called appsettings.json. It also loads settings from an optional environment-specific JSON file called appsettings.ENVIRONMENT.json. I show how to use environment-specific files in section 10.4.
JSON 文件提供程序 - 从名为 appsettings.json 的可选 JSON 文件加载设置。它还从名为 appsettings 的可选特定于环境的 JSON 文件加载设置。ENVIRONMENT.json 的。我在 Section 10.4 中展示了如何使用特定于环境的文件。 -
User Secrets—Loads secrets that are stored safely during development.
User Secrets (用户密钥) - 加载在开发过程中安全存储的密钥。 -
Environment variables—Loads environment variables as configuration variables, which are great for storing secrets in production.
环境变量 — 将环境变量加载为配置变量,这非常适合在生产中存储密钥。 -
Command-line arguments—Uses values passed as arguments when you run your app.
命令行参数 - 使用在运行应用程序时作为参数传递的值。
The ConfigurationManager is configured with all these sources automatically, but you can easily add more providers. You can also start from scratch and clear the default providers as shown in the following listing, which completely customizes where configuration is loaded from.
ConfigurationManager 会自动配置所有这些源,但您可以轻松添加更多提供程序。您还可以从头开始并清除默认提供程序,如下面的清单所示,它完全自定义了加载配置的位置。
Listing 10.3 Loading appsettings.json by clearing the configuration sources
WebApplicationBuilder builder = WebApplication.CreateBuilder(args);

builder.Configuration.Sources.Clear(); ❶
builder.Configuration.AddJsonFile("appsettings.json", optional: true); ❷

WebApplication app = builder.Build();

app.MapGet("/", () => app.Configuration.AsEnumerable()); ❸

app.Run();
❶ Clears the providers configured by default in WebApplicationBuilder
清除 WebApplicationBuilder 中默认配置的提供程序
❷ Adds a JSON configuration provider, providing the name of the configuration file
添加 JSON 配置提供程序,提供配置文件的名称
❸ Returns all the configuration key-value pairs for display purposes
返回所有配置键值对以供显示
This example added a single JSON configuration provider by calling the AddJsonFile() extension method and providing a filename. It also set the value of optional to true, telling the configuration provider to skip files that it can’t find at runtime instead of throwing FileNotFoundException. When the provider is added, the ConfigurationManager requests all the available values from the provider and adds them to the IConfiguration implementation.
此示例通过调用 AddJsonFile() 扩展方法并提供文件名来添加单个 JSON 配置提供程序。它还将 optional 的值设置为 true,告知配置提供程序跳过在运行时找不到的文件,而不是引发 FileNotFoundException。添加提供程序后, ConfigurationManager 从提供程序请求所有可用值,并将它们添加到 IConfiguration 实现中。
ConfigurationBuilder vs. ConfigurationManager
ConfigurationBuilder 与 ConfigurationManager
Before .NET 6 and the introduction of ConfigurationManager, configuration in ASP.NET Core was implemented with ConfigurationBuilder. You’d add configuration providers to the builder type the same way you do with ConfigurationManager, but the configuration values weren’t loaded until you called Build(), which created the final IConfigurationRoot object.
在 .NET 6 和 ConfigurationManager 引入之前,ASP.NET Core 中的配置是使用 ConfigurationBuilder 实现的。您可以像使用 ConfigurationManager 一样将配置提供程序添加到生成器类型中,但在调用 Build() 之前不会加载配置值,这将创建最终的 IConfigurationRoot 对象。
By contrast, in .NET 6 and .NET 7 ConfigurationManager acts as both the builder and the final IConfigurationRoot. When you add a new configuration provider, the configuration values are added to the IConfigurationRoot immediately, without the need to call Build() first.
相比之下,在 .NET 6 和 .NET 7 中,ConfigurationManager 既充当生成器,又充当最终的 IConfigurationRoot。添加新的配置提供程序时,配置值会立即添加到 IConfigurationRoot,而无需先调用 Build()。
The ConfigurationBuilder approach using the builder pattern is cleaner in some ways, as it has a clearer separation of concerns, but the common use patterns for configuration mean that the new ConfigurationManager approach is often easier to use.
使用 builder 模式的 ConfigurationBuilder 方法在某些方面更简洁,因为它具有更清晰的关注点分离,但配置的常见使用模式意味着新的 ConfigurationManager 方法通常更易于使用。
If you prefer, you can still use the builder pattern by accessing WebApplicationBuilder.Host.ConfigureAppConfiguration. You can read about some of these patterns and the differences between the two approaches on my blog at http://mng.bz/Ke4j.
如果您愿意,您仍然可以通过访问 WebApplicationBuilder.Host.ConfigureAppConfiguration 来使用构建器模式。您可以在我的博客 http://mng.bz/Ke4j 上阅读其中一些模式以及两种方法之间的差异。
You can access the IConfiguration object directly in Program.cs, as in listing 10.3, but the ConfigurationManager is also registered as IConfiguration in the dependency injection (DI) container, so you can inject it into your classes and endpoint handlers. You could rewrite the endpoint handler in listing 10.3 as the following, and the IConfiguration object would be injected into the handler using DI:
你可以直接在 Program.cs 中访问 IConfiguration 对象,如清单 10.3 所示,但 ConfigurationManager 也在依赖注入 (DI) 容器中注册为 IConfiguration,因此你可以将其注入到你的类和端点处理程序中。您可以将清单 10.3 中的端点处理程序重写为以下内容,并且 IConfiguration 对象将使用 DI 注入到处理程序中:
app.MapGet("/", (IConfiguration config) => config.AsEnumerable());Note The ConfigurationManager implements IConfigurationRoot, which also implements IConfiguration. The ConfigurationManager is registered in the DI container as an IConfiguration, not an IConfigurationRoot.
注意 ConfigurationManager 实现 IConfigurationRoot,后者也实现 IConfiguration。ConfigurationManager 在 DI 容器中注册为 IConfiguration,而不是 IConfigurationRoot。
You’ve seen how to add values to the ConfigurationManager by using providers such as the JSON file provider. and listing 10.3 showed an example of iterating over every configuration value, but normally you want to retrieve a specific configuration value.
您已经了解了如何使用诸如 JSON 文件提供程序之类的提供程序向 ConfigurationManager 添加值,清单 10.3 显示了一个迭代每个配置值的示例,但通常您希望检索特定的配置值。
IConfiguration stores configuration as a set of key-value string pairs. You can access any value by its key, using standard dictionary syntax. You could use
IConfiguration 将配置存储为一组键值字符串对。您可以使用标准字典语法通过其键访问任何值。您可以使用
var zoomLevel = builder.Configuration["MapSettings:DefaultZoomLevel"];to retrieve the configured zoom level for your application (using the settings shown in listing 10.2). Note that I used a colon (:) to designate a separate section. Similarly, to retrieve the latitude key, you could use
检索为应用程序配置的缩放级别(使用清单 10.2 中所示的设置)。请注意,我使用冒号 (:) 来指定一个单独的部分。同样,要检索纬度键,您可以使用
var lat = builder.Configuration["MapSettings:DefaultLocation:Latitude"];Note If the requested configuration key doesn’t exist, you get a null value.
注意 如果请求的配置键不存在,您将获得一个null 值。
You can also grab a whole section of the configuration by using the GetSection(section) method, which returns an IConfigurationSection, which also implements IConfiguration. This method grabs a chunk of the configuration and resets the namespace. Another way to get the latitude key is
您还可以使用 GetSection (section) 方法获取配置的整个部分,该方法返回 IConfigurationSection,该方法还实现 IConfiguration。此方法获取配置块并重置命名空间。获取纬度键的另一种方法是
var lat = builder.Configuration
    .GetSection("MapSettings")["DefaultLocation:Latitude"];
Accessing setting values this way is useful in Program.cs when you’re defining your application. When you’re setting up your application to connect to a database, for example, you’ll often load a connection string from the IConfiguration object. You’ll see a concrete example in chapter 12, which looks at Entity Framework Core.
以这种方式访问设置值在 Program.cs 定义应用程序时非常有用。例如,在设置应用程序以连接到数据库时,通常会从 IConfiguration 对象加载连接字符串。您将在第 12 章中看到一个具体示例,该示例介绍了 Entity Framework Core。
If you need to access the configuration object in places other than Program.cs, you can use DI to inject it as a dependency into your service’s constructor. But accessing configuration by using string keys this way isn’t particularly convenient; you should try to use strongly typed configuration instead, as you’ll see in section 10.3.
如果您需要在 Program.cs 以外的位置访问配置对象,则可以使用 DI 将其作为依赖项注入到服务的构造函数中。但是以这种方式使用字符串键访问配置并不是特别方便;你应该尝试使用强类型配置,正如你将在 Section 10.3 中看到的那样。
So far, this process probably feels a bit too convoluted and run-of-the-mill to load settings from a JSON file, and I’ll grant you that it is. Where the ASP.NET Core configuration system shines is when you have multiple providers.
到目前为止,从 JSON 文件加载设置,这个过程可能感觉有点太复杂和普通了,我承认确实如此。ASP.NET Core 配置系统的亮点是当您拥有多个提供商时。
10.2.2 Using multiple providers to override configuration values
10.2.2 使用多个提供程序覆盖配置值
You’ve seen how to add a configuration provider to the ConfigurationManager and retrieve the configuration values, but so far, you’ve configured only a single provider. When you add providers, it’s important to consider the order in which you add them, as that defines the order in which the configuration values will be added to the underlying dictionary. Configuration values from later providers overwrite values with the same key from earlier providers.
您已经了解了如何将配置提供程序添加到 ConfigurationManager 并检索配置值,但到目前为止,您只配置了一个提供程序。添加提供程序时,请务必考虑添加它们的顺序,因为这定义了将配置值添加到底层字典的顺序。来自更高提供程序的配置值会使用来自早期提供程序的相同键覆盖值。
Note This sentence bears repeating: the order in which you add configuration providers to ConfigurationManager is important. Later configuration providers can overwrite the values of earlier providers.
注意 这句话值得重复:将配置提供程序添加到 ConfigurationManager 的顺序很重要。更高版本的配置提供程序可以覆盖早期提供程序的值。
Think of the configuration providers as adding layers of configuration values to a stack, where each layer may overlap some or all of the layers below, as shown in figure 10.3. If the new provider contains any keys that are already known to the ConfigurationManager, they overwrite the old values to create the final set of configuration values stored in IConfiguration.
将配置提供程序视为向堆栈中添加配置值层,其中每个层可能与下面的部分或全部层重叠,如图 10.3 所示。如果新提供程序包含任何ConfigurationManager 中,它们会覆盖旧值以创建存储在 IConfiguration 中的最终配置值集。
Tip Instead of thinking in layers, you can think of the ConfigurationManager as a simple dictionary. When you add a provider, you’re setting some key-value pairs. When you add a second provider, the provider can add new keys or overwrite the value of existing keys.
提示 您可以将 ConfigurationManager 视为一个简单的字典,而不是分层思考。添加提供程序时,您将设置一些键值对。当您添加第二个提供程序时,该提供程序可以添加新键或覆盖现有键的值。

Figure 10.3 Each configuration provider adds a layer of values to ConfigurationBuilder. Calling Build() collapses that configuration. Later providers overwrite configuration values with the same keys from earlier providers.
图 10.3 每个配置提供程序都会向 ConfigurationBuilder 添加一层值。调用 Build() 会折叠该配置。后面的 provider 会用早期 providers的相同键覆盖配置值。
Update your code to load configuration from three different configuration providers—two JSON providers and an environment variable provider—by adding them to ConfigurationManager as shown in the following listing.
更新您的代码以从三个不同的配置提供程序(两个 JSON 提供程序和一个环境)加载配置变量提供程序 - 通过将它们添加到 ConfigurationManager如下面的清单所示。
Listing 10.4 Loading from multiple providers in Program.cs
清单 10.4 在 Program.cs 中从多个提供商加载
WebApplicationBuilder builder = WebApplication.CreateBuilder(args);

builder.Configuration.Sources.Clear();
builder.Configuration ❶
    .AddJsonFile("sharedSettings.json", optional: true); ❶
builder.Configuration.AddJsonFile("appsettings.json", optional: true);
builder.Configuration.AddEnvironmentVariables(); ❷

WebApplication app = builder.Build();

app.MapGet("/", () => app.Configuration.AsEnumerable());

app.Run();
❶ Loads configuration from a different JSON configuration file before the
appsettings.json file
在 appsettings.json 文件之前从不同的 JSON 配置文件加载配置
❷ Adds the machine’s environment variables as a configuration provider
将计算机的环境变量添加为配置提供程序
This layered design can be useful for several things. Fundamentally, it allows you to aggregate configuration values from multiple sources into a single, cohesive object. To cement this design in place, consider the configuration values in figure 10.4.
这种分层设计可用于多种用途。从根本上说,它允许您将来自多个源的配置值聚合到一个内聚对象中。为了巩固此设计,请考虑图 10.4 中的配置值。
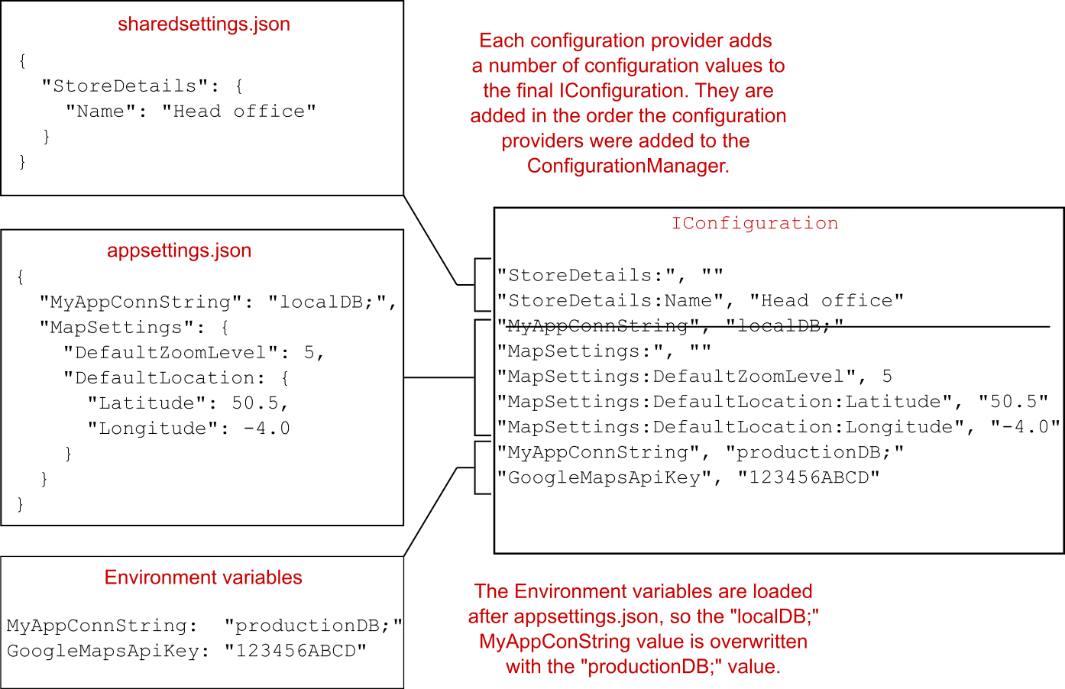
Figure 10.4 The final IConfiguration includes the values from each of the providers. Both appsettings.json and the environment variables include the MyAppConnString key. As the environment variables are added later, that configuration value is used.
图 10.4 最终的 IConfiguration 包括来自每个提供程序的值。appsettings.json 和环境变量都包含 MyAppConnString 键。由于稍后添加环境变量,因此将使用该配置值。
Most of the settings in each provider are unique and are added to the final IConfiguration. But the "MyAppConnString" key appears both in appsettings.json and as an environment variable. Because the environment variable provider is added after the JSON providers, the environment variable configuration value is used in IConfiguration.
每个提供程序中的大多数设置都是唯一的,并添加到最终的 IConfiguration 中。但是 “MyAppConnString” key 既显示在 appsettings.json 中,也显示为环境变量。由于环境变量提供程序是在 JSON 提供程序之后添加的,因此在 IConfiguration 中使用环境变量配置值。
The ability to collate configuration from multiple providers is handy on its own, but this design is especially useful for handling sensitive configuration values, such as connection strings and passwords. Section 10.2.3 shows how to deal with this problem, both locally on your development machine and on production servers.
整理来自多个提供商的配置的能力本身很方便,但这种设计对于处理敏感的配置值(例如连接字符串和密码)特别有用。Section 10.2.3 展示了如何在开发计算机和 生产服务器上本地处理此问题。
10.2.3 Storing configuration secrets safely
10.2.3 安全地存储配置密钥
As soon as you build a nontrivial app, you’ll find that you need to store some sort of sensitive data as a setting somewhere. This data could be a password, a connection string, or an API key for a remote service, for example.
一旦你构建了一个重要的应用程序,你就会发现你需要在某个地方存储某种敏感数据作为设置。例如,此数据可以是密码、连接字符串或远程服务的 API 密钥。
Storing these values in appsettings.json is generally a bad idea, as you should never commit secrets to source control; the number of secret API keys people have committed to GitHub is scary! Instead, it’s much better to store these values outside your project folder, where they won’t get committed accidentally.
将这些值存储在 appsettings.json 中通常是一个坏主意,因为您永远不应该将 secret 提交到源代码管理;人们提交到 GitHub 的秘密 API 密钥的数量是可怕的!相反,最好将这些值存储在项目文件夹之外,这样它们就不会意外提交。
You can do this in a few ways, but the easiest and most common approaches are to use environment variables for secrets on your production server and User Secrets locally. Neither approach is truly secure, in that neither stores values in an encrypted format. If your machine is compromised, attackers will be able to read the stored values because they’re stored in plain text. These approaches are intended mainly to help you avoid committing secrets to source control.
您可以通过多种方式执行此作,但最简单和最常见的方法是将环境变量用于生产服务器上的密钥和本地的 User Secrets。这两种方法都不是真正安全的,因为两者都不会以加密格式存储值。如果您的计算机遭到入侵,攻击者将能够读取存储的值,因为它们以纯文本形式存储。这些方法主要是为了帮助您避免将密钥提交到源代码管理。
Tip Azure Key Vault is a secure alternative, in that it stores the values encrypted in Azure, but you still need to use User Secrets and environment variables to store the Azure Key Vault connection details. See the documentation for instructions on using Azure Key Vault in your apps http://mng.bz/BR7v. Another popular option is Vault by Hashicorp (www.vaultproject.io), which can be run on-premises or in the cloud.
提示 Azure Key Vault 是一种安全的替代方案,因为它将加密的值存储在 Azure 中,但您仍然需要使用用户密钥和环境变量来存储 Azure Key Vault 连接详细信息。有关在应用 http://mng.bz/BR7v 中使用 Azure Key Vault 的说明,请参阅文档。另一个流行的选项是 Hashicorp 的 Vault (www.vaultproject.io),它可以在本地或云中运行。
Whichever approach you use to store your application secrets, make sure that you aren’t storing them in source control. Even private repositories may not stay private forever, so it’s best to err on the side of caution.
无论您使用哪种方法来存储应用程序密钥,请确保您没有将它们存储在源代码管理中。即使是私有存储库也可能不会永远保持私有,因此最好谨慎行事。
Storing secrets in environment variables in production
在生产环境中的环境变量中执行 SECRET
You can add the environment variable configuration provider by using the AddEnvironmentVariables extension method, as you saw in listing 10.4. This method adds all the environment variables on your machine as key-value pairs to ConfigurationManager.
您可以使用 AddEnvironmentVariables 扩展方法添加环境变量配置提供程序,如清单 10.4 所示。此方法将计算机上的所有环境变量作为键值对添加到 ConfigurationManager。
Note The WebApplicationBuilder adds the environment variable provider to the ConfigurationManager by default.
注意 默认情况下,WebApplicationBuilder 将环境变量提供程序添加到 ConfigurationManager。
You can create the same hierarchical sections in environment variables that you typically see in JSON files by using a colon (:) or a double underscore () to demarcate a section, as in MapSettings:MaxNumberOfPoints or MapSettingsMaxNumberOfPoints.
您可以使用冒号 (:) 或双下划线 ( ) 来划分部分,从而在环境变量中创建通常在 JSON 文件中看到的相同分层部分,如下所示MapSettings:MaxNumberOfPoints 或MapSettings MaxNumberOfPoints 的 MapSettings MaxNumberOfPoints 的 Points。
Tip Some environments, such as Linux, don’t allow the colon in environment variables. You must use the double-underscore approach in these environments instead. A double underscore in an environment variable is converted to a colon when it’s imported into the IConfiguration object. You should always use the colon when retrieving values from an IConfiguration in your app.
提示 某些环境(如 Linux)不允许在环境变量中使用冒号。您必须在这些环境中改用双下划线方法。环境变量中的双下划线在导入 IConfiguration 对象时将转换为冒号。从应用程序中的 IConfiguration 检索值时,应始终使用冒号。
The environment-variable approach is particularly useful when you’re publishing your app to a self-contained environment, such as a dedicated server, Azure, or a Docker container. You can set environment variables on your production machine or on your Docker container, and the provider reads them at runtime, overriding the defaults specified in your appsettings.json files.
将应用发布到独立环境(如专用服务器、Azure 或 Docker 容器)时,环境变量方法特别有用。您可以在生产计算机或 Docker 容器上设置环境变量,提供程序会在运行时读取这些变量,从而覆盖 appsettings.json 文件中指定的默认值。
Tip For instructions on setting environment variables for your operating system, see Microsoft’s “Use multiple environments in ASP.NET Core” documentation at http://mng.bz/d4OD.
提示 有关为作系统设置环境变量的说明,请参阅 http://mng.bz/d4OD Microsoft的“在 ASP.NET Core 中使用多个环境”文档。
For a development machine, environment variables are less useful, as all your apps would use the same values. If you set the ConnectionStrings__ DefaultConnection environment variable, for example, that variable would be added to every app you run locally, which sounds like more of a hassle than a benefit!
对于开发计算机,环境变量不太有用,因为您的所有应用程序都将使用相同的值。例如,如果您设置 ConnectionStrings DefaultConnection 环境变量,则该变量将被添加到您在本地运行的每个应用程序中,这听起来更麻烦而不是好处!
Tip To avoid collisions, you can add only environment variables that have a given prefix, such as AddEnvironmentVariables("SomePrefix"). The prefix is removed from the key before it’s added to the ConfigurationManager, so the variable SomePrefix_MyValue is added to configuration as MyValue.
提示 为避免冲突,您可以仅添加具有给定前缀的环境变量,例如 AddEnvironmentVariables(“SomePrefix”)。在将前缀添加到ConfigurationManager 中,因此变量SomePrefix_MyValue 将作为 MyValue 添加到配置中。
For development scenarios, you can use the User Secrets Manager, which effectively adds per-app environment variables, so you can have different settings for each app but store them in a different location from the app itself.
对于开发场景,您可以使用 User Secrets Manager,它可以有效地添加每个应用程序的环境变量,因此您可以为每个应用程序设置不同的设置,但将它们存储在与应用程序本身不同的位置。
Storing secrets with the User Secrets Manager in development
STORING SECRETS 与 US系列 S ECRETS MANAGER 在开发中
The idea behind User Secrets is to simplify storing per-app secrets outside your app’s project tree. This approach is similar to environment variables, but you use a unique key for each app to keep the secrets segregated.
User Secrets 背后的理念是简化在应用程序项目树之外存储每个应用程序 Secret 的过程。此方法类似于环境变量,但您可以为每个应用程序使用唯一的键来保持密钥隔离。
Warning The secrets aren’t encrypted, so don’t consider them to be secure. Nevertheless, it’s an improvement on storing them in your project folder.
警告 密钥未加密,因此不要认为它们是安全的。不过,与将它们存储在项目文件夹中相比,这是一个改进。
Setting up User Secrets takes a bit more effort than using environment variables, as you need to configure a tool to read and write them, add the User Secrets configuration provider, and define a unique key for your application. To add User Secrets to your app, follow these steps:
设置用户密钥比使用环境变量需要更多的工作,因为您需要配置一个工具来读取和写入它们,添加用户密钥配置提供程序,并为您的应用程序定义唯一密钥。要将 User Secrets 添加到您的应用程序,请执行以下步骤:
-
WebApplicationBuilder adds the User Secrets provider by default. The .NET SDK includes a global tool for working with secrets from the command line.
默认情况下,WebApplicationBuilder 会添加 User Secrets 提供程序。.NET SDK 包括一个全局工具,用于从命令行处理机密。 -
If you’re using Visual Studio, right-click your project and choose Manage User Secrets from the contextual menu. This command opens an editor for a secrets.json file in which you can store your key-value pairs as though it were an appsettings.json file, as shown in figure 10.5.
如果您使用的是 Visual Studio,请右键单击您的项目,然后从上下文菜单中选择 Manage User Secrets (管理用户密钥)。此命令将打开一个 secrets.json 文件的编辑器,您可以在其中存储键值对,就像它是一个 appsettings.json 文件一样,如图 10.5 所示。
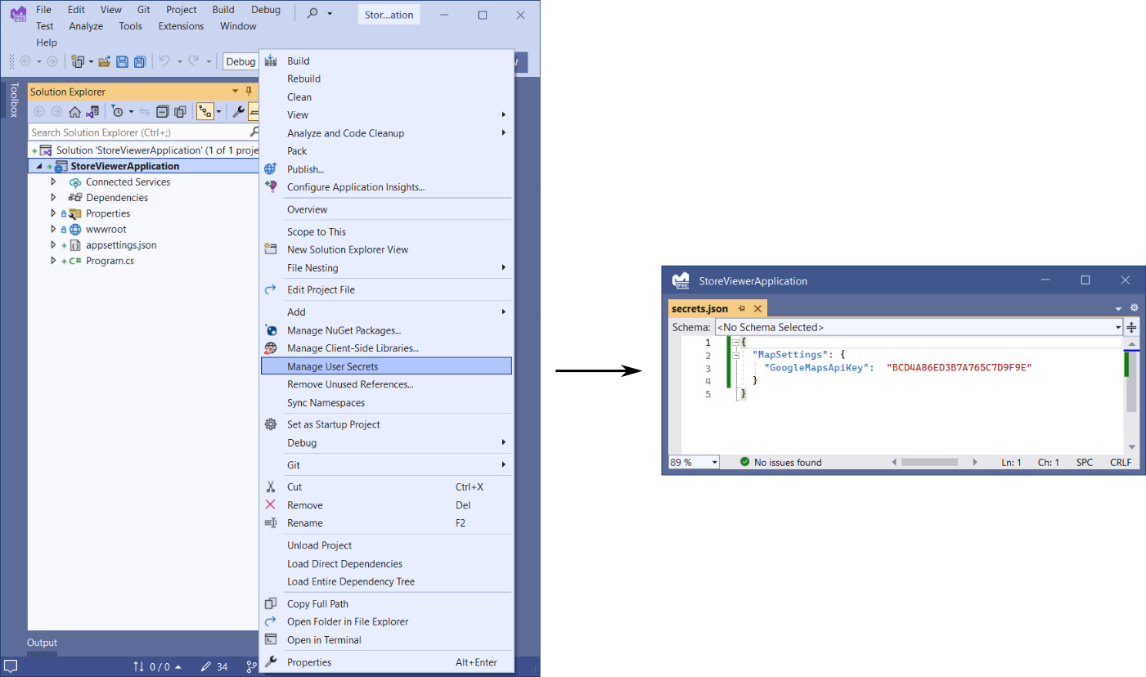
Figure 10.5 Choose Manage User Secrets to open an editor for the User Secrets app. You can use this file to store secrets when developing your app locally. These secrets are stored outside your project folder, so they won’t be committed to source control accidentally.
图 10.5 选择 Manage User Secrets(管理用户密钥)以打开 User Secrets 应用程序的编辑器。在本地开发应用程序时,您可以使用此文件来存储密钥。这些密钥存储在您的项目文件夹之外,因此它们不会意外提交到源代码管理。
- Add a unique identifier to your .csproj file. Visual Studio does this automatically when you choose Manage User Secrets, but if you’re using the command line, you’ll need to add it yourself. Typically, you’d use a unique ID, such as a globally unique identifier (GUID):
向 .csproj 文件添加唯一标识符。当您选择 Manage User Secrets (管理用户密码) 时,Visual Studio 会自动执行此作,但如果您使用的是命令行,则需要自己添加它。通常,您会使用唯一 ID,例如全局唯一标识符 (GUID):<PropertyGroup> <UserSecretsId>96eb2a39-1ef9-4d8e-8b20-8e8bd14038aa</UserSecretsId> </PropertyGroup>
You can also generate the UserSecretsId property with a random value using the .NET command-line interface (CLI) by running the following command from your project folder:
您还可以使用 .NET 命令行界面 (CLI) 生成具有随机值的 UserSecretsId 属性,方法是从项目文件夹运行以下命令:
dotnet user-secrets init- Add User Secrets by using the command line
使用命令行添加用户密钥dotnet user-secrets set "MapSettings:GoogleMapsApiKey" F5RJT9GFHKR7
or edit the secret.json file directly by using your favorite editor. The exact location of this file depends on your operating system and may vary. Check the documentation for details at http://mng.bz/ryAg.
或者使用您最喜欢的编辑器直接编辑 secret.json 文件。此文件的确切位置取决于您的作系统,并且可能会有所不同。有关详细信息,请查看 http://mng.bz/ryAg 中的文档。
Note The Secret Manager tool is included in the .NET CLI, but you can also use the CLI to install additional .NET tools. You can find more about .NET tools in general in Microsoft’s “How to manage .NET tools” documentation: http://mng.bz/VdmX.
注意 Secret Manager 工具包含在 .NET CLI 中,但您也可以使用 CLI 安装其他 .NET 工具。您可以在 Microsoft 的“如何管理 .NET 工具”文档中找到有关 .NET 工具的更多信息:http://mng.bz/VdmX。
Phew! That’s a lot of setup, and if you’re adding providers to ConfigurationManager manually, you’re not done yet! You need to update your app to load the User Secrets at runtime by using the AddUserSecrets extension method:
唷!这需要大量的设置,如果您手动将提供程序添加到 ConfigurationManager,那么您还没有完成!您需要使用 AddUserSecrets 扩展方法更新应用程序以在运行时加载用户密钥:
if (builder.Environment.IsDevelopment())
{
    builder.Configuration.AddUserSecrets<Program>();
}
Note You should use the User Secrets provider only in development, not in production, so in the preceding snippet you add the provider conditionally to ConfigurationManager. In production you should use environment variables or Azure Key Vault, as discussed earlier. All this is configured correctly by default when you use the default WebApplicationBuilder.
注意 您应该仅在开发中使用 User Secrets 提供程序,而不应在生产中使用,因此在前面的代码段中,您将有条件地将提供程序添加到 ConfigurationManager。如前所述,在生产环境中,应使用环境变量或 Azure Key Vault。默认情况下,当您使用默认的 WebApplicationBuilder 时,所有这些都是正确配置的。
The AddUserSecrets method has several overloads, but the simplest is a generic method that you can call by passing your application’s Program class as a generic argument, as shown in the preceding example. The User Secrets provider needs to read the UserSecretsId property that you (or Visual Studio) added to the .csproj file. The Program class acts as a simple marker to indicate which assembly contains this property.
AddUserSecrets 方法具有多个重载,但最简单的是泛型方法,您可以通过将应用程序的 Program 类作为泛型参数传递来调用该方法,如前面的示例所示。用户机密提供程序需要读取你(或 Visual Studio)添加到 .csproj 文件的 UserSecretsId 属性。Program 类充当一个简单的标记,用于指示哪个程序集包含此属性。
Note If you’re interested, the .NET software development kit (SDK) uses the UserSecretsId property in your .csproj file to generate an assembly-level UserSecretsIdAttribute. Then the provider reads this attribute at runtime to determine the UserSecretsId of the app and generates the path to the secrets.json file.
注意 如果您感兴趣,.NET SDK 使用 .csproj 文件中的 UserSecretsId 属性生成程序集级 UserSecretsIdAttribute。然后,提供程序在运行时读取此属性以确定应用的 UserSecretsId 并生成secrets.json文件的路径。
And there you have it—safe storage of your secrets outside your project folder during development. This cautious approach may seem like overkill, but if you have anything you consider to be remotely sensitive that you need to load into configuration, I strongly urge you to use environment variables or User Secrets.
这就是 — 在开发过程中将密钥安全地存储在项目文件夹之外。这种谨慎的方法可能会似乎有点矫枉过正,但如果您有任何您认为远程敏感的东西需要加载到配置中,我强烈建议您使用环境变量或用户密钥。
It’s almost time to leave configuration providers behind, but before we do, I’d like to show you the ASP.NET Core configuration system’s party trick: reloading files on the fly.
现在差不多该抛弃配置提供程序了,但在此之前,我想向您展示 ASP.NET Core 配置系统的派对技巧:动态重新加载文件。
10.2.4 Reloading configuration values when they change
10.2.4 在配置值更改时重新加载配置值
Besides security, not having to recompile your application every time you want to tweak a value is one of the advantages of using configuration and settings. In the previous version of ASP.NET, changing a setting by editing web.config would cause your app to restart. This feature beat having to recompile, but waiting for the app to start up before it could serve requests was a bit of a drag.
除了安全性之外,不必在每次要调整值时都重新编译应用程序是使用 configuration 和 settings 的优势之一。在早期版本的 ASP.NET 中,通过编辑 web.config 来更改设置将导致应用程序重启。此功能比必须重新编译要好,但等待应用程序启动后才能处理请求有点麻烦。
In ASP.NET Core, you finally get the ability to edit a file and have the configuration of your application update automatically, without your having to recompile or restart. An often-cited scenario in which you might find this ability useful is when you’re trying to debug an app you have in production. You typically configure logging to one of several levels:
在 ASP.NET Core 中,您最终能够编辑文件并自动更新应用程序的配置,而无需重新编译或重新启动。您可能会发现此功能非常有用的一个经常被引用的场景是,当您尝试调试生产环境中的应用程序时。通常将日志记录配置为以下几个级别之一:
- Error
错误 - Warning
警告 - Information
信息 - Debug
调试
Each of these settings is more verbose than the last, but it also provides more context. By default, you might configure your app to log only warning and error-level logs in production so that you don’t generate too many superfluous log entries. Conversely, if you’re trying to debug a problem, you want as much information as possible, so you may want to use the debug log level.
这些设置中的每一个都比上一个设置更详细,但它也提供了更多的上下文。默认情况下,您可以将应用程序配置为在生产环境中仅记录警告和错误级别的日志,这样就不会生成太多多余的日志条目。相反,如果您尝试调试问题,则需要尽可能多的信息,因此可能需要使用 debug log 级别。
Being able to change configuration at runtime means that you can easily switch on extra logs when you encounter a problem and switch them back afterward by editing your appsettings.json file.
能够在运行时更改配置意味着您可以在遇到问题时轻松打开额外的日志,并在之后通过编辑 appsettings.json 文件将它们切换回来。
Note Reloading is generally available only for file-based configuration providers, such as the JSON provider, as opposed to the environment variable provider, for example.
注意 重新加载通常仅适用于基于文件的配置提供程序,例如 JSON 提供程序,而不是环境变量提供程序。
You can enable the reloading of configuration files when you add any of the file-based providers to your ConfigurationManager. The Add*File extension methods include an overload with a reloadOnChange parameter. If this parameter is set to true, the app monitors the filesystem for changes to the file and triggers a complete rebuild of the IConfiguration, if needs be. The following listing shows how to add configuration reloading to the appsettings.json file added manually to the ConfigurationManager.
当您将任何基于文件的提供程序添加到 ConfigurationManager 时,您可以启用配置文件的重新加载。Add*File 扩展名方法包括带有 reloadOnChange 参数的重载。如果此参数设置为 true,则应用程序会监视文件系统中对文件的更改,并在需要时触发 IConfiguration 的完全重建。下面的清单显示了如何将配置重新加载添加到手动添加到 ConfigurationManager 的 appsettings.json 文件中。
Listing 10.5 Reloading appsettings.json when the file changes
示例 10.5 当文件更改时重新加载 appsettings.json
WebApplicationBuilder builder = WebApplication.CreateBuilder(args);

builder.Configuration.Sources.Clear();
builder.Configuration
    .AddJsonFile(
        "appsettings.json",
        optional: true,
        reloadOnChange: true); ❶

WebApplication app = builder.Build();

app.MapGet("/", () => app.Configuration.AsEnumerable());

app.Run();
❶ IConfiguration will be rebuilt if the appsettings.json file changes.
如果 IConfiguration 文件发生更改,appsettings.json 将重建。
Throughout section 10.2, you’ve seen how to customize the ConfigurationManager providers by clearing the default sources and adding your own, but in most cases, that won’t be necessary. As described in section 10.2.1, the default providers added by WebApplicationBuilder are normally good enough unless you want to add a new provider, such as Azure Key Vault. As a bonus, WebApplicationBuilder configures the appsettings.json with reloadOnChange:true by default. It’s worth sticking with the defaults initially and clear the sources and start again only if you really need to.
在整个 10.2 节中,您已经了解了如何通过清除默认源并添加您自己的源来自定义 ConfigurationManager 提供程序,但在大多数情况下,这不是必需的。如第 10.2.1 节所述,WebApplicationBuilder 添加的默认提供程序通常足够好,除非您要添加新的提供程序,例如 Azure Key Vault。作为奖励,WebApplicationBuilder 默认使用 reloadOnChange:true 配置appsettings.json。最初坚持使用默认值并清除源并仅在您确实需要时才重新开始是值得的。
Warning Adding a file configuration source using reloadOnChange:true isn’t entirely free, as ASP.NET Core sets up a file watcher in the background. Normally, this situation isn’t problematic, but if you set up a configuration watching thousands of files, you could run into difficulties!
警告 使用 reloadOnChange:true 添加文件配置源并非完全免费,因为 ASP.NET Core 在后台设置了文件侦听器。通常,这种情况没有问题,但如果您设置一个监视数千个文件的配置,您可能会遇到困难!
In listing 10.5, any changes you make to the file will be mirrored in the IConfiguration. But as I said at the start of this chapter, IConfiguration isn’t the preferred way to pass settings around in your application. Instead, as you’ll see in section 10.3, you should favor strongly typed objects.
在清单 10.5 中,您对文件所做的任何更改都将镜像到 IConfiguration 中。但正如我在本章开头所说,IConfiguration 并不是在应用程序中传递设置的首选方法。相反,正如您将在 10.3 节中看到的那样,您应该首选强类型对象。
10.3 Using strongly typed settings with the options pattern
10.3 将强类型设置与 options 模式一起使用
In this section you’ll learn about strongly typed configuration and the options pattern, the preferred way of accessing configuration in ASP.NET Core. By using strongly typed configuration, you can avoid problems with typos when accessing configuration. It also makes classes easier to test, as you can use simple POCO objects for configuration instead of relying on the IConfiguration abstraction.
在本节中,您将了解强类型配置和选项模式,这是在 ASP.NET Core 中访问配置的首选方式。通过使用强类型配置,您可以避免在访问配置时出现拼写错误问题。它还使类更易于测试,因为您可以使用简单的 POCO 对象进行配置,而不是依赖 IConfiguration 抽象。
Most of the examples I’ve shown so far have been about how to get values into IConfiguration, as opposed to how to use them. You’ve seen that you can access a key by using the builder.Configuration["key"] dictionary syntax, but using string keys this way feels messy and prone to typos, and the value retrieved is always a string, so you often need to convert it to another type. Instead, ASP.NET Core promotes the use of strongly typed settings—POCO objects that you define and create and that represent a small collection of settings, scoped to a single feature in your app.
到目前为止,我展示的大多数示例都是关于如何将值导入 IConfiguration,而不是如何使用它们。 您已经看到,您可以使用生成器访问密钥。Configuration[“key”] 字典语法,但以这种方式使用字符串键感觉很混乱,容易出现拼写错误,而且检索到的值总是字符串,所以你经常需要把它转换成另一种类型。相反,ASP.NET Core 促进了强类型设置的使用,即您定义和创建的 POCO 对象,这些对象表示一小部分设置,范围限定为应用程序中的单个功能。
The following listing shows both the settings for your store locator component and display settings to customize the home page of the app. They’re separated into two different objects with "MapSettings" and "AppDisplaySettings" keys, corresponding to the different areas of the app that they affect.
以下清单显示了 store locator 组件的地图设置和显示设置,以自定义应用程序的主页。它们被分成两个不同的对象,分别具有“MapSettings”和“AppDisplaySettings”键,对应于它们影响的应用的不同区域。
Listing 10.6 Separating settings into different objects in appsettings.json
清单 10.6 在 appsettings.json 中将设置分离到不同的对象中
{
    "MapSettings": { ❶
        "DefaultZoomLevel": 6, ❶
        "DefaultLocation": { ❶
            "latitude": 50.500, ❶
            "longitude": -4.000 ❶
    }
},
    "AppDisplaySettings": { ❷
        "Title": "Acme Store Locator", ❷
        "ShowCopyright": true ❷
    }
}
❶ Settings related to the store locator section of the app
与应用程序的商店定位器部分相关的设置
❷ General settings related to displaying the app
与显示应用程序相关的常规设置
The simplest approach to exposing the home-page settings in an endpoint handler is to inject IConfiguration into the endpoint handler and access the values by using the dictionary syntax:
在终结点处理程序中公开主页设置的最简单方法是将 IConfiguration 注入到终结点处理程序中,并使用字典语法访问值:
app.MapGet("/display-settings", (Iconfiguration config) =>
{
    string title = config["AppDisplaySettings:Title"];
    bool showCopyright = bool.Parse(
            config["AppDisplaySettings:ShowCopyright"]);

    return new { title, showCopyright };
});
But you don’t want to do this; there are too many strings for my liking! And that bool.Parse? Yuck! Instead, you can use custom strongly typed objects, with all the type safety and IntelliSense goodness that brings, as shown in the following listing.
但你不想这样做;琴弦太多了,我不喜欢!还有那个 bool。解析?呸!相反,您可以使用自定义的强类型对象,这些对象具有带来的所有类型安全性和 IntelliSense 优点,如下面的清单所示。
Listing 10.7 Injecting strongly typed options into a handler using IOptions
清单 10.7 使用 IOptions
app.MapGet("/display-settings",
    (IOptions<AppDisplaySettings> options) => ❶
{
    AppDisplaySettings settings = options.Value; ❷
    string title = settings.Title; ❸

    bool showCopyright = settings.ShowCopyright; ❹

    return new { title, showCopyright };
});
❶ You can inject a strongly typed options class using the IOptions<> wrapper interface.
您可以使用 IOptions<> 包装器接口注入强类型选项类。
❷ The Value property exposes the POCO settings object.
Value 属性公开 POCO 设置对象。
❸ The settings object contains properties that are bound to configuration values at runtime.
settings 对象包含在运行时绑定到配置值的属性。
❹ The binder can also convert string values directly to built-in types.
Binder 还可以将字符串值直接转换为内置类型。
The ASP.NET Core configuration system includes a binder, which can take a collection of configuration values and bind them to a strongly typed object, called an options class. This binding is similar to the concept of JSON deserialization for creating types from chapter 6 and the model binding used by Model-View-Controller (MVC) and Razor Pages, which you’ll learn about in part 3.
ASP.NET Core 配置系统包括一个 Binder,它可以获取配置值的集合并将它们绑定到一个强类型对象,称为 options 类。此绑定类似于第 6 章中用于创建类型的 JSON 反序列化概念,以及模型-视图-控制器 (MVC) 和 Razor Pages 使用的模型绑定,您将在第 3 部分中了解。
Section 10.3.1 shows how to set up the binding of configuration values to a POCO options class, and section 10.3.2 shows how to make sure that it reloads when the underlying configuration values change. We’ll look at the different sorts of objects you can bind in section 10.3.3.
Section 10.3.1 显示了如何设置配置值到 POCO options 类的绑定,而Section 10.3.2 显示了如何确保在底层配置值更改时重新加载它。我们将在 10.3.3 节中看看你可以绑定的不同种类的对象。
10.3.1 Introducing the IOptions interface
10.3.1 IOptions 接口简介
ASP.NET Core introduced strongly typed settings as a way of letting configuration code adhere to the single-responsibility principle (SRP) and to allow the injection of configuration classes as explicit dependencies. Such settings also make testing easier; instead of having to create an instance of IConfiguration to test a service, you can create an instance of the POCO options class.
ASP.NET Core 引入了强类型设置,以此方式让配置代码遵循单一职责原则 (SRP),并允许将配置类作为显式依赖项注入。此类设置还使测试更容易;您不必创建 IConfiguration 的实例来测试服务,而是可以创建 POCO 选项类的实例。
The AppDisplaySettings class shown in the previous example could be simple, exposing only the values related to the home page:
上例所示的 AppDisplaySettings 类可能很简单,只公开与主页相关的值:
public class AppDisplaySettings
{
    public string Title { get; set; }
    public bool ShowCopyright { get; set; }
}
Your options classes need to be nonabstract and have a public parameterless constructor to be eligible for binding. The binder sets any public properties that match configuration values, as you’ll see in section 10.3.3.
你的 options 类必须是非抽象的,并且有一个公共的无参数构造函数才有资格进行绑定。Binders 设置与 configuration 值匹配的任何公共属性,如 Section 10.3.3 所示。
Tip You’re not restricted to built-in types such as string and bool; you can use nested complex types too. The options system binds sections to complex properties. See the associated source code for examples.
提示 您不仅限于 string 和 bool 等内置类型;您也可以使用嵌套的复杂类型。options 系统将 sections 绑定到 complex 属性。有关示例,请参阅关联的源代码。
To help facilitate the binding of configuration values to your custom POCO options classes, ASP.NET Core introduces the IOptions
为了帮助将配置值绑定到自定义 POCO 选项类,ASP.NET Core 引入了 IOptions
Listing 10.8 Configuring the options classes using Configure
清单 10.8 在 Startup.cs 中使用Configure
WebApplicationBuilder builder = WebApplication.CreateBuilder(args);

builder.Services.Configure<MapSettings>(
    builder.Configuration.GetSection("MapSettings")); ❶
builder.Services.Configure<AppDisplaySettings>(
    builder.Configuration.GetSection("AppDisplaySettings")); ❷
❶ Binds the MapSettings section to the POCO options class MapSettings
将 MapSettings 部分绑定到 POCO 选项类 MapSettings
❷ Binds the AppDisplaySettings section to the POCO options class AppDisplaySettings
将 AppDisplaySettings 部分绑定到 POCO 选项类 AppDisplaySettings
Tip You don’t have to use the same name for both the section and class, as I do in listing 10.8; it’s simply a convention I like to follow. With this convention, you can also use the nameof() operator to further reduce the chance of typos, such as by calling GetSection(nameof(MapSettings)).
提示 您不必像在清单 10.8 中那样对 section 和 class 使用相同的名称;这只是我喜欢遵循的惯例。通过此约定,您还可以使用 nameof() 运算符来进一步减少拼写错误的可能性,例如通过调用 GetSection(nameof(MapSettings))。
Each call to Configure
每次调用 Configure
-
Creates an instance of ConfigureOptions
, which indicates that IOptions should be configured based on configuration.
创建 ConfigureOptions的实例,这表示应根据配置配置 IOptions 。
If Configureis called multiple times, multiple ConfigureOptions objects will be used, all of which can be applied to create the final object in much the same way that IConfiguration is built from multiple layers.
如果多次调用 Configure,则将使用多个 ConfigureOptions 对象,所有这些对象都可以应用于创建最终对象,其方式与从多个层构建 IConfiguration 的方式大致相同。 -
Each ConfigureOptions
instance binds a section of IConfiguration to an instance of the T POCO class, setting any public properties on the options class based on the keys in the provided ConfigurationSection.
每个 ConfigureOptions实例将 IConfiguration 的一个部分绑定到 T POCO 类的实例,根据提供的 ConfigurationSection 中的键设置选项类上的任何公共属性。
Remember that the section name ("MapSettings" in listing 10.8) can have any value; it doesn’t have to match the name of your options class.
请记住,部分名称(清单 10.8 中的 “MapSettings”)可以有任何值;它不必与 Options 类的名称匹配。
- The IOptions
interface is registered in the DI container as a singleton, with the final bound POCO object in the Value property.
IOptions接口在 DI 容器中注册为单一实例,最终绑定的 POCO 对象位于 Value 属性中。
This last step lets you inject your options classes into handlers and services by injecting IOptions
最后一步允许你通过注入 IOptions
Warning If you forget to call Configure
警告 如果您忘记调用 Configure
The binding of the T options class to ConfigurationSection happens when you first request IOptions
T options 类与 ConfigurationSection 的绑定发生在您首次请求 IOptions
This setup has one catch: you can’t use the reloadOnChange parameter I described in section 10.2.4 to reload your strongly typed options classes when using IOptions
此设置有一个问题:在使用 IOptions
If that fact seems like a step backward or even a deal-breaker, don’t worry. IOptions
如果这个事实似乎是倒退,甚至是破坏交易,请不要担心。 IOptions
10.3.2 Reloading strongly typed options with IOptionsSnapshot
10.3.2 使用 IOptionsSnapshot 重新加载强类型选项
In section 10.3.1, you used IOptions
在第 10.3.1 节中,您使用了 IOptions
This situation isn’t always a problem (you generally shouldn’t be modifying files on live production servers anyway), but if you need this functionality, you can use the IOptionsSnapshot
这种情况并不总是问题(通常无论如何都不应该在实时生产服务器上修改文件),但如果您需要此功能,则可以使用 IOptionsSnapshot
-
IOptions
—The instance is created once, when first needed. It always contains the configuration from when the object instance was first created.
IOptions– 首次需要时,将创建一次实例。它始终包含首次创建对象实例时的配置。 -
IOptionsSnapshot
—A new instance is created, when needed, if the underlying configuration has changed since the last instance was created.
IOptionsSnapshot– 如果自创建上一个实例以来底层配置已更改,则在需要时创建新实例。
Warning IOptionsSnapshot
警告 IOptionsSnapshot
IOptionsSnaphot
IOptionsSnaphot
Listing 10.9 Injecting reloadable options using IOptionsSnapshot
清单 10.9 使用IOptionsSnapshot
app.MapGet("/display-settings",
    (IOptionsSnapshot<AppDisplaySettings> options) => ❶
{
    AppDisplaySettings settings = options.Value; ❷

    return new
    {
        title = settings.Title, ❸
        showCopyright = settings.ShowCopyright, ❸
    };
});
❶ IOptionsSnapshot<T> updates automatically if the underlying configuration values
change.
如果底层配置值发生更改,IOptionsSnapshot<T> 会自动更新。
❷ The Value property exposes the POCO settings object, the same as for IOptions<T>.
Value 属性公开 POCO 设置对象,与 IOptions<T> 相同。
❸ The settings match the configuration values at that point in time instead of at first
run.
这些设置与该时间点的配置值匹配,而不是在首次运行时匹配。
As IOptionsSnapshot<AppDisplaySettings> is registered as a scoped service, it’s re-created at every request. If you edit the settings file and cause IConfiguration to reload, IOptionsSnapshot<AppDisplaySettings> shows the new values on the next request. A new AppDisplaySettings object is created with the new configuration values and is used for all future DI—until you edit the file again, of course!
由于 IOptionsSnapshot<AppDisplaySettings> 注册为作用域服务,因此会在每次请求时重新创建它。如果编辑设置文件并导致 IConfiguration 重新加载,则 IOptionsSnapshot<AppDisplaySettings> 将在下一个请求中显示新值。使用新的配置值创建一个新的 AppDisplaySettings 对象,并将其用于所有未来的 DI — 当然,直到您再次编辑该文件为止!
Reloading your settings automatically is as simple as that: update your code to use IOptionsSnapshot<T> instead of IOptions<T> wherever you need it. But be aware that this change isn’t free. You’re rebinding and reconfiguring your options object with every request, which may have performance implications. In practice, reloading settings isn’t common in production, so you may decide that the developer convenience isn’t worth the performance impact.
自动重新加载设置非常简单:更新代码以使用 IOptionsSnapshot<T>而不是IOptions<T>,无论您需要什么地方。但请注意,此更改不是免费的。您正在使用每个请求重新绑定和重新配置 options 对象,这可能会对性能产生影响。在实践中,重新加载设置在生产中并不常见,因此您可能会认为开发人员的便利性不值得对性能造成影响。
An important consideration in using the options pattern is the design of your POCO options classes themselves. These classes typically are simple collections of properties, but there are a few things to bear in mind so that you don’t get stuck debugging why the binding seemingly hasn’t worked.
使用选项模式的一个重要考虑因素是 POCO 选项类本身的设计。这些类通常是简单的属性集合,但需要记住一些事项,这样您就不会陷入调试绑定似乎不起作用的原因。
10.3.3 Designing your options classes for automatic binding
10.3.3 为自动绑定设计 options 类
I’ve already touched on some of the requirements for POCO classes to work with the IOptions<T> binder, but there are a few rules to remember. The first key point is that the binder creates instances of your options classes by using reflection, so your POCO options classes need to
我已经谈到了 POCO 类与 IOptions<T> Binder 一起使用的一些要求,但有一些规则需要记住。第一个关键点是 Binder 使用反射创建选项类的实例,因此您的 POCO 选项类需要
-
Be nonabstract
非抽象 -
Have a default (public parameterless) constructor
具有默认 (public parameterless) 构造函数
If your classes satisfy these two points, the binder will loop through all the properties on your class and bind any that it can. In the broadest sense, the binder can bind any property that
如果您的类满足这两点,则 Binder 将遍历类上的所有属性,并绑定它可以绑定的任何属性。从最广泛的意义上讲,Binder 可以绑定
-
Is public
是公开的 -
Has a getter (the binder won’t write set-only properties)
具有 getter(Binder 不会写入仅 set-only 属性) -
Has a setter or, for complex types, a non-null value
具有 setter,或者对于复杂类型,具有非 null 值 -
Isn’t an indexer
不是索引器
Listing 10.10 shows two extensive options class with a host of different types of properties. All the properties on BindableOptions are valid to bind, and all the properties on UnbindableOptions are not.
清单 10.10 展示了两个扩展的选项类,它们具有许多不同类型的属性。BindableOptions 上的所有属性都对 bind 有效,而 UnbindableOptions 上的所有属性都不是。
Listing 10.10 An options class containing binding and nonbinding properties
清单 10.10 包含 binding 和 nonbinding 属性的 options 类
public class BindableOptions
{
    public string String { get; set; } ❶
    public int Integer { get; set; } ❶
    public SubClass Object { get; set; } ❶
    public SubClass ReadOnly { get; } = new SubClass(); ❶
    public Dictionary<string, SubClass> Dictionary { get; set; } ❷
    public List<SubClass> List { get; set; } ❷
    public IDictionary<string, SubClass> IDictionary { get; set; } ❷
    public IEnumerable<SubClass> IEnumerable { get; set; } ❷
    public ICollection<SubClass> ReadOnlyCollection { get; } ❷
        = new List<SubClass>(); ❷

    public class SubClass
    {
    public string Value { get; set; }
    }
}

public class UnbindableOptions
{
    internal string NotPublic { get; set; } ❸
    public SubClass SetOnly { set => _setOnly = value; } ❸
    public SubClass NullReadOnly { get; } = null; ❸
    public SubClass NullPrivateSetter { get; private set; } = null; ❸
    public SubClass this[int i] { ❸
        get => _indexerList[i]; ❸
        set => _indexerList[i] = value; ❸
    }
    public List<SubClass> NullList { get; } ❹
    public Dictionary<int, SubClass> IntegerKeys { get; set; } ❹
    public IEnumerable<SubClass> ReadOnlyEnumerable { get; } ❹
        = new List<SubClass>(); ❹

    public SubClass _setOnly = null; ❺
    private readonly List<SubClass> _indexerList ❺
        = new List<SubClass>(); ❺

    public class SubClass
    {
        public string Value { get; set; }
    }
}
❶ The binder can bind simple and complex object types, and read-only properties with
a default.
Binder 可以将简单和复杂的对象类型以及只读属性与默认值绑定。
❷ The binder will also bind collections, including interfaces.
Binder 还将绑定集合,包括接口。
❸ The binder can’t bind nonpublic, set-only, null-read-only, or indexer properties.
Binder 无法绑定 non-public、set-only、null-read-only 或 indexer 属性。
❹ These collection properties can’t be bound.
这些集合属性无法绑定。
❺ The backing fields for implementing SetOnly and Indexer properties—not bound
directly
用于实现 SetOnly 和 Indexer 属性的支持字段 - 不直接绑定
As shown in the listing, the binder generally supports collections—both implementations and interfaces. If the collection property is already initialized, the binder uses the initialized value; otherwise, the binder may be able to create the collection instance automatically. If your property implements any of the following interfaces, the binder creates a List<> of the appropriate type as the backing object:
如清单所示,Binder 通常支持集合— 包括实现和接口。如果 collection 属性已初始化,则 Binder 将使用初始化的值;否则,Binder 可能能够自动创建 collection 实例。如果您的属性实现以下任何接口,则 Binder 会创建一个 List<> 作为后备对象:
IReadOnlyList<>IReadOnlyCollection<>ICollection<>IEnumerable<>
Warning You can’t bind to an IEnumerable<> property that has already been initialized, as this interface doesn’t expose an Add function, and the binder won’t replace the backing value. You can bind to an IEnumerable<> if you leave its initial value null.
警告 您不能绑定到已初始化的 IEnumerable<> 属性,因为此接口不会公开 Add 函数,并且 Binder 不会替换后备值。如果保留 IEnumerable 的初始值<>则可以绑定到 IEnumerable null 的.
Similarly, the binder creates a Dictionary<,> as the backing field for properties with dictionary interfaces as long as they use string keys:
同样,Binder 会创建一个 Dictionary<,> 作为具有字典接口的属性的后备字段,只要它们使用 string、enum 或 integer(int、short、byte 等)键:
- IDictionary<string,>
- IReadOnlyDictionary<string,>
Warning You can’t bind dictionaries with non-string keys, such as int. For examples of binding collection types, see the associated source code for this book.
警告 您不能绑定使用非字符串或非整数键的字典,例如 custom classes 或 double。有关绑定集合类型的示例,请参阅本书的相关源代码。
Clearly, there are quite a few nuances here, but if you stick to the simple cases from the preceding example, you’ll be fine. Be sure to check for typos in your JSON files! You could also consider using explicit options validation, as described in this post: http://mng.bz/jPjr.
显然,这里有很多细微差别,但如果你坚持使用前面示例中的简单情况,你会没事的。请务必检查 JSON 文件中是否有拼写错误!你也可以考虑使用显式选项验证,如本文所述:http://mng.bz/jPjr。
Tip The options pattern is most commonly used to bind POCO classes to configuration, but you can also configure your strongly typed settings classes in code by providing a lambda to the Configure function;, as in services.Configure
提示 选项模式最常用于将 POCO 类绑定到配置,但您也可以通过向 Configure 函数提供 lambda 来在代码中配置强类型设置类,就像在服务中一样.Configure
The Options pattern is used throughout ASP.NET Core, but not everyone is a fan. In section 10.3.4 you’ll see how to use strongly typed settings and the configuration binder without the Options pattern.
Options 模式在整个 ASP.NET Core 中使用,但并非每个人都是粉丝。在 Section 10.3.4 中,您将看到如何使用强类型设置和没有 Options 模式的配置 Binder。
10.3.4 Binding strongly typed settings without the IOptions interface
10.3.4 在没有 IOptions 接口的情况下绑定强类型设置
The IOptions interface is canonical in ASP.NET Core; it’s used by the core ASP.NET Core libraries and has various convenience functions for binding strongly typed settings, as you’ve already seen. In many cases, however, the IOptions interface doesn’t give many benefits for consumers of the strongly typed settings objects. Services must take a dependency on the IOptions interface but then immediately extract the real object by calling IOptions<T>.Value. This situation can be especially annoying if you’re building a reusable library that isn’t inherently tied to ASP.NET Core, as you must expose the IOptions<T> interface in all your public APIs.
IOptions 接口在 ASP.NET Core 中是规范的;正如您已经看到的,它由 Core ASP.NET Core 库使用,并且具有用于绑定强类型设置的各种便捷函数。但是,在许多情况下,IOptions 接口并没有为强类型设置对象的使用者带来很多好处。服务必须依赖于 IOptions 接口,但随后通过调用 IOptions<T> 立即提取真实对象。值。如果您正在构建一个本质上不绑定到 ASP.NET Core 的可重用库,则这种情况可能尤其令人烦恼,因为您必须在所有公共 API 中公开 IOptions<T> 接口。
Luckily, the configuration binder that maps IConfiguration objects to strongly typed settings objects isn’t inherently tied to IOptions. Listing 10.11 shows how you can bind a strongly typed settings object to a configuration section manually, register it with the DI container, and inject the MapSettings object directly into a handler or service without the additional ceremony required to use IOptions
幸运的是,将 IConfiguration 对象映射到强类型设置对象的配置绑定器本身并不与 IOptions 相关联。清单 10.11 展示了如何手动将强类型设置对象绑定到配置部分,将其注册到 DI 容器中,并将 MapSettings 对象直接注入处理程序或服务中,而无需使用 IOptions<MapSettings> 所需的额外仪式。
Listing 10.11 Configuring strongly typed settings without IOptions in Program.cs
清单 10.11 配置没有Program.cs 中的 IOptions
WebApplicationBuilder builder = WebApplication.CreateBuilder(args);

var settings = new MapSettings (); ❶
builder.Configuration.GetSection("MapSettings").Bind(settings); ❷
builder.Services.AddSingleton(settings); ❸

WebApplication app = builder.Build();

app.MapGet("/", (MapSettings mapSettings) => mapSettings); ❹

app.Run();
❶ Creates a new instance of the MapSettings object
创建 MapSettings 对象的新实例
❷ Binds the MapSettings section in IConfiguration to the settings object
将 IConfiguration 中的 MapSettings 部分绑定到设置对象
❸ Registers the settings object as a singleton
将 settings 对象注册为单例
❹ Injects the MapSettings object directly using DI
使用 DI 直接注入 MapSettings 对象
Alternatively, you can register the IOptions type in the DI container but then use a lambda to additionally register MapSettings as a singleton so it can be directly injected, as shown in listing 10.12.
或者,你可以在 DI 容器中注册 IOptions 类型,然后使用 lambda 另外将 MapSettings 注册为单例,以便可以直接注入,如清单 10.12 所示。
Listing 10.12 Configuring strongly typed settings for direct injection
示例 10.12 为直接注入配置强类型设置
WebApplicationBuilder builder = WebApplication.CreateBuilder(args);

builder.Services.Configure<MapSettings>( ❶
    builder.Configuration.GetSection("MapSettings")); ❶
builder.Services.AddSingleton(provider => ❷
    provider.GetRequiredService<IOptions<MapSettings>>().Value); ❷

WebApplication app = builder.Build();

app.MapGet("/", (MapSettings mapSettings) => mapSettings); ❸

app.Run();
❶ Configures the IOptions as normal
正常配置 IOptions
❷ Registers the MapSettings object in DI by delegating to the IOptions registration
通过委托 IOptions 注册,在 DI 中注册 MapSettings 对象
❸ Injects the MapSettings object directly DI
直接注入 MapSettings 对象 DI
If you use either of these approaches, you won’t benefit from the ability to reload strongly typed settings without further work or from some of the more advanced uses of IOptions, but in most cases, that’s not a big problem. I’m a fan of these approaches generally, but as always, consider what you’re losing before adopting them wholeheartedly.
如果使用这两种方法中的任何一种,则不会从无需进一步工作即可重新加载强类型设置的能力中受益,也不会受益于 IOptions 的一些更高级的用法,但在大多数情况下,这不是一个大问题。我通常是这些方法的粉丝,但与往常一样,在全心全意采用它们之前,请考虑一下你失去了什么。
Tip In chapter 31 I show one such advanced scenario in which you configure an IOptions object using services in your DI container. For other scenarios, see Microsoft’s “Options pattern in ASP.NET Core” documentation at http://mng.bz/DR7y, or see the various IOptions posts on my blog, such as this one: http://mng.bz/l1Aj.
提示 在第 31 章中,我将展示一个这样的高级场景,在该场景中,您可以使用 DI 容器中的服务配置 IOptions 对象。对于其他方案,请参阅 http://mng.bz/DR7y 上 Microsoft 的“ASP.NET Core 中的选项模式”文档,或查看我博客上的各种 IOptions 帖子,例如:http://mng.bz/l1Aj。
That brings us to the end of this section on strongly typed settings. In section 10.4 we’ll look at how you can change your settings dynamically at runtime, based on the environment in which your app is running.
这将我们带到本节关于强类型设置的结尾。在 Section 10.4 中,我们将了解如何根据应用程序的运行环境在运行时动态更改设置。
10.4 Configuring an application for multiple environments
10.4 为多个环境配置应用程序
In this section you’ll learn about hosting environments in ASP.NET Core. You’ll learn how to set and determine which environment an application is running in and how to change which configuration values are used, based on the environment. Using environments lets you switch easily among different sets of configuration values in production compared with development, for example.
在本节中,您将了解如何在 ASP.NET Core 中托管环境。您将学习如何设置和确定应用程序在哪个环境中运行,以及如何根据环境更改使用的配置值。例如,与开发相比,使用环境可以让您在生产中的不同配置值集之间轻松切换。
Any application that makes it to production will likely have to run in multiple environments. If you’re building an application with database access, for example, you’ll probably have a small database running on your machine that you use for development. In production, you’ll have a completely different database running on a server somewhere else.
任何进入生产环境的应用程序都可能必须在多个环境中运行。例如,如果您正在构建具有数据库访问权限的应用程序,则您的计算机上可能会运行一个用于开发的小型数据库。在生产环境中,您将在其他位置的服务器上运行一个完全不同的数据库。
Another common requirement is to have different amounts of logging depending on where your app is running. In development, it’s great to generate lots of logs, which help with debugging, but when you get to production, too many logs can be overwhelming. You’ll want to log warnings, errors, and maybe information-level logs, but definitely not debug-level logs!
另一个常见要求是,根据应用程序的运行位置,具有不同的日志记录量。在开发中,生成大量日志非常有用,这有助于调试,但是当您进入生产环境时,过多的日志可能会让人不知所措。您需要记录警告、错误,也许还需要信息级日志,但绝对不是调试级日志!
To handle these requirements, you need to make sure that your app loads different configuration values depending on the environment it’s running in: load the production database connection string when in production, and so on. You need to consider three aspects:
要满足这些要求,您需要确保您的应用程序根据其运行环境加载不同的配置值:在生产环境中加载生产数据库连接字符串,依此类推。您需要考虑三个方面:
-
How your app identifies the environment it’s running in
您的应用如何识别它正在运行的环境 -
How you load different configuration values based on the current environment
如何根据当前环境加载不同的配置值 -
How to change the environment for a particular machine
如何更改特定计算机的环境
This section tackles these aspects in turn so that you can easily tell your development machine apart from your production servers and act accordingly.
本节依次处理这些方面,以便您可以轻松地将开发计算机与生产服务器区分开来,并采取相应的措施。
10.4.1 Identifying the hosting environment
10.4.1 确定托管环境
When you create a WebApplicationBuilder instance in Program.cs, it automatically sets up the hosting environment for your application. By default, WebApplicationBuilder uses, perhaps unsurprisingly, an environment variable to identify the current environment. The WebApplicationBuilder looks for a magic environment variable called ASPNETCORE_ENVIRONMENT, uses it to create an IHostEnvironment object, and exposes it as WebApplicationBuilder.Environment.
当您在 Program.cs 中创建 WebApplicationBuilder 实例时,它会自动为您的应用程序设置托管环境。默认情况下,WebApplicationBuilder 使用环境变量来标识当前环境,这也许不足为奇。WebApplicationBuilder 查找一个名为 ASPNETCORE_ENVIRONMENT 的神奇环境变量,使用它来创建一个IHostEnvironment 对象,并将其公开为WebApplicationBuilder.Environment 的 Web 应用程序。
Note You can use either the DOTNET_ENVIRONMENT or ASPNETCOREENVIRONMENT environment variable. The ASPNETCORE value overrides the DOTNET value if both are set. I use the ASPNETCORE version throughout this book.
注意 您可以使用 DOTNET_ENVIRONMENT 或 ASPNETCOREENVIRONMENT 环境变量。如果同时设置了两者,则 ASPNETCORE 值将覆盖 DOTNET_ 值。我在本书中都使用ASPNETCORE_版本。
The IHostEnvironment interface exposes several useful properties about the running context of your app. The ContentRootPath property, for example, tells the application in which directory it can find any configuration files, such as appsettings.json. This folder is typically the one in which the application is running.
IHostEnvironment 接口公开了有关应用程序运行上下文的几个有用属性。例如,ContentRootPath 属性告诉应用程序它可以在哪个目录中找到任何配置文件,比如 appsettings.json。此文件夹通常是运行应用程序的文件夹。
TIP ContentRootPath is not where you store static files that the browser can access directly; that’s the WebRootPath, typically wwwroot. WebRootPath is also exposed on the Environment property via the IWebHostEnvironment interface.
提示 ContentRootPath 不是存储浏览器可以直接访问的静态文件的位置;即 WebRootPath,通常为 wwwroot。WebRootPath 还通过 IWebHostEnvironment 接口在 Environment 属性上公开。
The IHostEnvironment.EnvironmentName property is what interests us in this section. It’s set to the value of the ASPNETCORE_ENVIRONMENT environment variable, so it can be any value, but you should stick to three commonly used values in most cases:
IHostEnvironment.EnvironmentName 属性是本节中我们感兴趣的内容。它设置为 ASPNETCORE_ENVIRONMENT 环境变量的值,因此它可以是任何值,但在大多数情况下,您应该坚持使用三个常用的值:
- "Development" 开发
- "Staging" 暂存
- "Production" 生产
ASP.NET Core includes several helper methods for working with these three values, so you’ll have an easier time if you stick to them. In particular, whenever you’re testing whether your app is running in a particular environment, you should use one of the following extension methods:
ASP.NET Core 包含多个用于处理这三个值的帮助程序方法,因此,如果坚持使用它们,您将会更轻松。具体而言,每当测试应用程序是否在特定环境中运行时,都应使用以下扩展方法之一:
- IHostEnvironment.IsDevelopment()
- IHostEnvironment.IsStaging()
- IHostEnvironment.IsProduction()
- IHostEnvironment.IsEnvironment(string environmentName)
All these methods make sure that they do case-insensitive checks of the environment variable, so you won’t get any wonky errors at runtime if you don’t capitalize the environment variable value.
所有这些方法都确保它们对环境变量执行不区分大小写的检查,因此如果不将环境变量值大写,在运行时不会收到任何不稳定的错误。
Tip Where possible, use the IHostEnvironment extension methods instead of direct string comparison with EnvironmentName, as the methods provide case-insensitive matching.
提示 如果可能,请使用 IHostEnvironment 扩展方法,而不是直接与 EnvironmentName 进行字符串比较,因为这些方法提供不区分大小写的匹配。
IHostEnvironment doesn’t do anything other than expose the details of your current environment, but you can use it in various ways. In chapter 4 you saw that WebApplication adds the DeveloperExceptionMiddleware to your middleware pipeline only in the development environment. Now you know where WebApplication was getting its information about the environment: IHostEnvironment.
IHostEnvironment 除了公开当前环境的详细信息外,不执行任何其他作,但您可以通过多种方式使用它。在第 4 章中,您看到 WebApplication 仅在开发环境中将 DeveloperExceptionMiddleware 添加到您的中间件管道中。现在,您知道 WebApplication 从何处获取有关环境的信息:IHostEnvironment。
You can use a similar approach to customize which configuration values you load at runtime by loading different files when running in development versus production. This approach is common; it’s included out of the box in most ASP.NET Core templates and by default when you use the default ConfigurationManager included with WebApplicationBuilder.
您可以使用类似的方法来自定义在运行时加载的配置值,方法是在在开发环境中运行与生产环境。这种方法很常见;它在大多数 ASP.NET Core 模板中都是开箱即用的,并且在您使用 WebApplicationBuilder 中包含的默认 ConfigurationManager 时默认包含。
10.4.2 Loading environment-specific configuration files
10.4.2 加载特定于环境的配置文件
The EnvironmentName value is determined early in the process of bootstrapping your application, before the default ConfigurationManager is fully populated by WebApplicationBuilder. As a result, you can dynamically change which configuration providers are added to the builder and, hence, which configuration values are loaded when the IConfiguration is built.
EnvironmentName 值是在引导应用程序的早期确定的,在默认 ConfigurationManager 由 WebApplicationBuilder 完全填充之前。因此,您可以动态更改将哪些配置提供程序添加到生成器中,从而在构建 IConfiguration 时加载哪些配置值。
A common pattern is to have an optional, environment-specific appsettings .ENVIRONMENT.json file that’s loaded after the default appsettings.json file. The following listing shows how you could achieve this task if you’re customizing the ConfigurationMaanger in Program.cs, but it’s also effectively what WebApplicationBuilder does by default.
一种常见模式是具有可选的、特定于环境的 appsettings 。ENVIRONMENT.json 在默认 appsettings.json 文件之后加载的文件。下面的清单显示了如果您在 Program.cs 中自定义 ConfigurationManager,如何完成此任务,但这也是 WebApplication-Builder 默认所做的。
Listing 10.13 Adding environment-specific appsettings.json files
WebApplicationBuilder builder = WebApplication.CreateBuilder(args);

IHostEnvironment env = builder.Environment; ❶

builder.Configuration.Sources.Clear();
builder.Configuration
    .AddJsonFile(
        "appsettings.json",
        optional: false) ❷
    .AddJsonFile( ❸
        $”appsettings.{env.EnvironmentName}.json”, ❸
        Optional: true); ❸

WebApplication app = builder.Build();

app.MapGet("/", () =>"Hello world!");

app.Run();
❶ The current IHostEnvironment is available on WebApplicationBuilder.
当前的 IHostEnvironment 在 WebApplicationBuilder 上可用。
❷ It’s common to make the base appsettings.json compulsory.
将 base appsettings.json 设为必修是很常见的。
❸ Adds an optional environment-specific JSON file where the filename varies with the
environment
添加一个可选的特定于环境的 JSON 文件,其中文件名随环境而变化
With this pattern, a global appsettings.json file contains settings applicable to most environments. Additional optional JSON files called appsettings.Development.json, appsettings.Staging.json, and appsettings.Production.json are subsequently added to ConfigurationManager, depending on the current EnvironmentName.
使用此模式时,全局appsettings.json文件包含适用于大多数环境的设置。名为 appsettings 的其他可选 JSON 文件。Development.json,appsettings。Staging.json 和 appsettings 中。Production.json随后会添加到 ConfigurationManager,具体取决于当前的 EnvironmentName。
Any settings in these files will overwrite values from the global appsettings.json if they have the same key, as you’ve seen previously. Using environment-specific settings files lets you do things like set the logging to be verbose only in the development environment and switch to more selective logs in production.
这些文件中的任何设置都将覆盖全局appsettings.json的值,如果它们具有相同的键,就像您之前看到的那样。使用特定于环境的设置文件,您可以执行一些作,例如在开发环境中将日志记录设置为仅详细,并在生产环境中切换到更具选择性的日志。
Another common pattern is to add or remove configuration providers depending on the environment. You might use the User Secrets provider when developing locally, for example, but Azure Key Vault in production. Listing 10.14 shows how you can use IHostEnvironment to include the User Secrets provider conditionally only in development. Again, WebApplicationBuilder uses this pattern by default.
另一种常见模式是根据环境添加或删除配置提供程序。例如,在本地开发时使用用户机密提供程序,但在生产环境中使用 Azure Key Vault。清单 10.14 展示了如何使用 IHostEnvironment 仅在开发中有条件地包含 User Secrets 提供程序。同样,WebApplicationBuilder 默认使用此模式。
Listing 10.14 Conditionally including the User Secrets configuration provider
清单 10.14 有条件地包含 User Secrets 配置提供程序
WebApplicationBuilder builder = WebApplication.CreateBuilder(args);

IHostEnvironment env = builder.Environment;

builder.Configuration.Sources.Clear();
builder.Configuration
    .AddJsonFile(
        "appsettings.json",
        optional: false)
    .AddJsonFile(
        $"appsettings.{env}.json",
        Optional: true);

if(env.IsDevelopment()) ❶
{
    builder.Configuration.AddUserSecrets(); ❷
}

WebApplication app = builder.Build();

app.MapGet("/", () =>"Hello world!");

app.Run();
❶ Extension methods make checking the environment simple and explicit.
将问题详情服务添加到 DI 容器中,供 ExceptionHandlerMiddleware 使用
❷ In Staging and Production, the User Secrets provider won’t be used.
当不在开发中时,管道使用 ExceptionHandlerMiddleware。
As already mentioned, it’s also common to customize your application’s middleware pipeline based on the environment. In chapter 4 you learned that WebApplication adds the DeveloperExceptionPageMiddleware conditionally when developing locally. The following listing shows how you can use IHostEnvironment to control your pipeline in this way so that when you’re in staging or production, your app uses ExceptionHandlerMiddleware instead.
如前所述,根据环境自定义应用程序的中间件管道也很常见。在第 4 章中,您了解了 WebApplication 在本地开发时有条件地添加 DeveloperExceptionPageMiddleware。下面的清单显示了如何以这种方式使用 IHostEnvironment 来控制管道,以便在暂存或生产环境中,应用程序改用 ExceptionHandlerMiddleware。
Listing 10.15 Using the hosting environment to customize your middleware pipeline
清单 10.15 使用托管环境自定义中间件管道
WebApplicationBuilder builder = WebApplication.CreateBuilder(args);

builder.AddProblemDetails(); ❶

WebApplication app = builder.Build();

if (!builder.Environment.IsDevelopment()) ❷
{ ❷
    app.UseExceptionHandler(); ❷
} ❷

app.MapGet("/", () =>"Hello world!");

app.Run();
❶ Adds the problem details service to the DI container for use by the ExceptionHandlerMiddleware
将问题详情服务添加到 DI 容器中,供 ExceptionHandlerMiddleware 使用
❷ When not in development, the pipeline uses ExceptionHandlerMiddleware.
当不在开发中时,管道使用 ExceptionHandlerMiddleware。
Note In listing 10.15 you added the Problem Details services to the DI container so that the ExceptionHandlerMiddleware can generate a Problem Details response automatically. As you’re adding the extra middleware only in Staging and Production, you could add the services conditionally to the DI container too instead of always adding them as we did here.
注意 在示例 10.15 中,你向 DI 容器添加了 Problem Details 服务,以便 ExceptionHandlerMiddleware 可以自动生成 Problem Details 响应。由于您仅在 Staging 和 Production 中添加额外的中间件,因此您也可以有条件地将服务添加到 DI 容器中,而不是像我们在这里所做的那样总是添加它们。
You can inject IHostEnvironment anywhere in your app, but I advise against using it in your own services outside Program.cs. It’s far better to use the configuration providers to customize strongly typed settings based on the current hosting environment and inject these settings into your application instead.
您可以在应用程序中的任何位置注入 IHostEnvironment,但我建议不要在 Program.cs 之外的您自己的服务中使用它。最好使用配置提供程序根据当前托管环境自定义强类型设置,并将这些设置注入到应用程序中。
As useful as it is, setting IHostEnvironment with an environment variable can be a little cumbersome if you want to switch back and forth among different environments during testing. Personally, I’m always forgetting how to set environment variables on the various operating systems I use. The final skill I’d like to teach you is how to set the hosting environment when you’re developing locally.
尽管它很有用,但如果您想在测试期间在不同环境之间来回切换,则使用环境变量设置 IHostEnvironment 可能会有点麻烦。就我个人而言,我总是忘记如何在我使用的各种作系统上设置环境变量。最终技能我想教你在本地开发时如何设置托管环境。
10.4.3 Setting the hosting environment
10.4.3 设置托管环境
In this section I show you a couple of ways to set the hosting environment when you’re developing. These techniques make it easy to test a specific app’s behavior in different environments without having to change the environment for all the apps on your machine.
在本节中,我将向您展示在开发时设置托管环境的几种方法。通过这些技术,可以轻松测试特定应用程序在不同环境中的行为,而无需更改计算机上所有应用程序的环境。
If your ASP.NET Core application can’t find an ASPNETCORE_ENVIRONMENT environment variable when it starts up, it defaults to a production environment, as shown in figure 10.6. So when you deploy to production, you’ll be using the correct environment by default.
如果您的 ASP.NET Core 应用程序在启动时找不到 ASPNETCORE_ENVIRONMENT 环境变量,则默认使用生产环境,如图 10.6 所示。因此,当您部署到生产环境时,默认情况下将使用正确的环境。
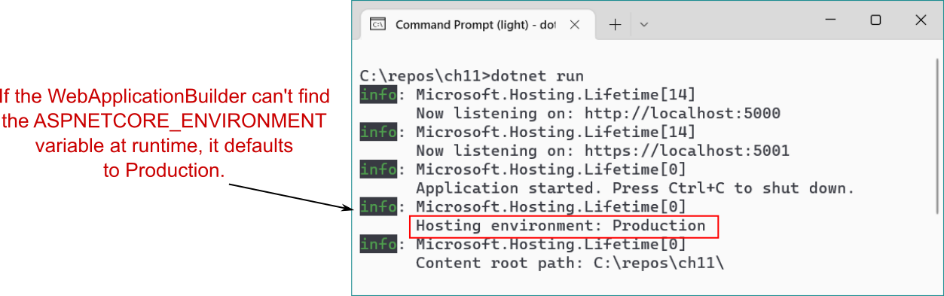
Figure 10.6 By default, ASP.NET Core applications run in the production hosting environment. You can override this default by setting the ASPNETCORE_ENVIRONMENT variable.
图 10.6 默认情况下,ASP.NET Core 应用程序在生产托管环境中运行。您可以覆盖此默认值通过设置 ASPNETCORE_ENVIRONMENT 变量。
Tip By default, the current hosting environment is logged to the console at startup, which can be useful for checking that the environment variable has been picked up correctly.
提示 默认情况下,当前托管环境在启动时记录到控制台中,这对于检查是否已正确选取环境变量非常有用。
Another option is to use a launchSettings.json file to control the environment. All the default ASP.NET Core applications include this file in the Properties folder. LaunchSettings.json defines profiles for running your application.
另一种选择是使用 launchSettings.json 文件来控制环境。所有默认的 ASP.NET Core 应用程序都将此文件包含在 Properties 文件夹中。LaunchSettings.json 定义用于运行应用程序的配置文件。
Tip You can use profiles to run your application with different environment variables. You can also use profiles to emulate running on Windows behind Internet Information Services (IIS) by using the IIS Express profile. I rarely use this profile, even in Windows, and always choose the http or https profile.
提示 您可以使用配置文件来运行具有不同环境变量的应用程序。您还可以使用配置文件来模拟使用 IIS Express 配置文件在 Internet Information Services (IIS) 后面的 Windows 上运行。我很少使用此配置文件,即使在 Windows 中也是如此,并且总是选择 http 或 https 配置文件。
Listing 10.16 shows a typical launchSettings.json file that defines three profiles: http, https, and IIS Express. The first two profiles are equivalent to using dotnet run to run the project. The http profile listens only for http:// requests, whereas https listens for both http:// and https://. The IIS Express profile can be used only in Windows and uses IIS Express to run your application.
清单 10.16 显示了一个典型的 launchSettings.json 文件,它定义了三个配置文件:http、https 和 IIS Express。前两个配置文件等效于使用 dotnet run 运行项目。http 配置文件仅侦听 http:// 请求,而 https 同时侦听 http:// 和 https://。IIS Express 配置文件只能在 Windows 中使用,并使用 IIS Express 运行应用程序。
Listing 10.16 A typical launchSettings.json file defining three profiles
清单 10.16 定义三个配置文件的典型 launchSettings.json 文件
{
    "iisSettings": { ❶
        "windowsAuthentication": false, ❶
        "anonymousAuthentication": true, ❶
        "iisExpress": { ❶
            "applicationUrl": "http://localhost:53846", ❶
            "sslPort": 44399 ❶
            }
            },
            "profiles": {
            "http": { ❷
                "commandName": "Project", ❸
                "dotnetRunMessages": true, ❹
                "launchBrowser": true, ❺
                "applicationUrl": "http://localhost:5063", ❻
                "environmentVariables": { ❼
                "ASPNETCORE_ENVIRONMENT": "Development" ❼
            } ❼
            },
            "https": { ❽
                "commandName": "Project",
                "dotnetRunMessages": true,
                "launchBrowser": true,
                "applicationUrl": "https://localhost:7202;http://localhost:5063", ❾
                "environmentVariables": {
                "ASPNETCORE_ENVIRONMENT": "Development"
            }
            },
                "IIS Express": { ❿
                "commandName": "IISExpress",
                "launchBrowser": true,
                "environmentVariables": { ⓫
                "ASPNETCORE_ENVIRONMENT": "Development" ⓫
            } ⓫
        }
    }
}
❶ Defines settings for running behind IIS or using the IIS Express profile
定义在 IIS 后面运行或使用 IIS Express 配置文件的设置
❷ The “http” profile is used by default in macOS.
macOS 中默认使用 “http” 配置文件。
❸ The “project” command is equivalent to calling dotnet run on the project.
“project” 命令等效于在项目上调用 dotnet run。
❹ If true, gives feedback when dotnet run is executing a build or restore
如果为 true,则在 dotnet run 执行生成或还原时提供反馈
❺ If true, launches the browser when you run the application
如果为 true,则在运行应用程序时启动浏览器
❻ Defines the URLs the application will listen on in this profile
定义应用程序将在此配置文件中侦听的 URL
❼ Defines custom environment variables for the profile and sets the environment to
Development
为配置文件定义自定义环境变量,并将环境设置为 Development
❽ The https profile is used by default in Visual Studio in Windows.
默认情况下,https 配置文件在 Windows 的 Visual Studio 中使用。
❾ The https profile listens on both http:// and https:// URLs.
https 配置文件同时侦听 http:// 和 https:// URL。
❿ Runs the application behind IIS Express (Windows only)
在 IIS Express 后面运行应用程序(仅限 Windows)
⓫ Each profile can have different environment variables.
每个配置文件可以具有不同的环境变量。
The advantage of using the launchSettings.json file locally is that it allows you to set local environment variables for a project. In listing 10.16 the environment is set to the development environment, for example. Setting environment variables with launchSettings.json means you can use different environment variables for each project and even for each profile, and store them in source control.
在本地使用 launchSettings.json 文件的优点是,它允许为项目设置本地环境变量。例如,在列表 10.16 中,环境被设置为开发环境。使用 launchSettings.json 设置环境变量意味着您可以为每个项目甚至每个配置文件使用不同的环境变量,并将它们存储在源代码控制中。
You can choose a profile to use in Visual Studio by choosing it from the drop-down menu next to the Debug button on the toolbar, as shown in figure 10.7. You can choose a profile to run from the command line by using `dotnet run --launch-profile <Profile Name>`. If you don’t specify a profile, the first profile listed in launchSettings.json is used. If you don’t want to use any profile, you must explicitly ignore the launchSettings.json file by using dotnet run --no-launch-profile.
您可以从工具栏上 Debug (调试) 按钮旁边的下拉菜单中选择要在 Visual Studio 中使用的配置文件,如图 10.7 所示。您可以使用 `dotnet run --launch- profile <Profile Name>`从命令行选择要运行的配置文件。如果未指定配置文件,则使用 launchSettings .json中列出的第一个配置文件。如果不想使用任何配置文件,则必须使用 dotnet run --no-launch- profile 显式忽略 launchSettings.json 文件。
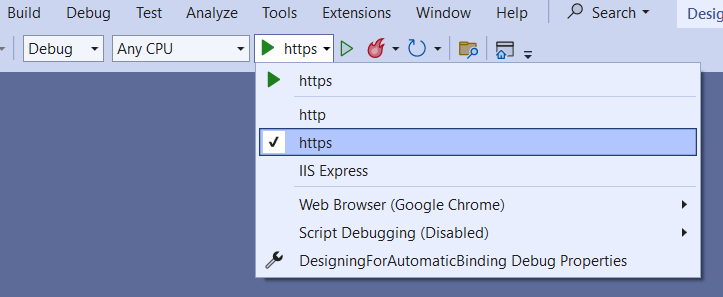
Figure 10.7 You can select the profile to use from Visual Studio by choosing it from the Debug drop-down menu. Visual Studio defaults to using the https profile.
图 10.7 您可以从 Debug 下拉菜单中选择要使用的配置文件,从 Visual Studio 中选择它。Visual Studio 默认使用 https 配置文件。
If you’re using Visual Studio, you can edit the launchSettings.json file visually: double-click the Properties node, choose the Debug tab, and choose Open debug launch profiles UI. You can see in figure 10.8 that the ASPNETCORE_ENVIRONMENT is set to Development; any changes made on this tab are mirrored in launchSettings.json.
如果您使用的是 Visual Studio,则可以直观地编辑 launchSettings.json 文件:双击 Properties (属性) 节点,选择 Debug (调试) 选项卡,然后选择 Open debug launch profiles UI (打开调试启动配置文件 UI)。在图 10.8 中可以看到,ASPNETCORE_ENVIRONMENT 设置为 Development;在此选项卡上所做的任何更改都会镜像到 launchSettings.json 中。
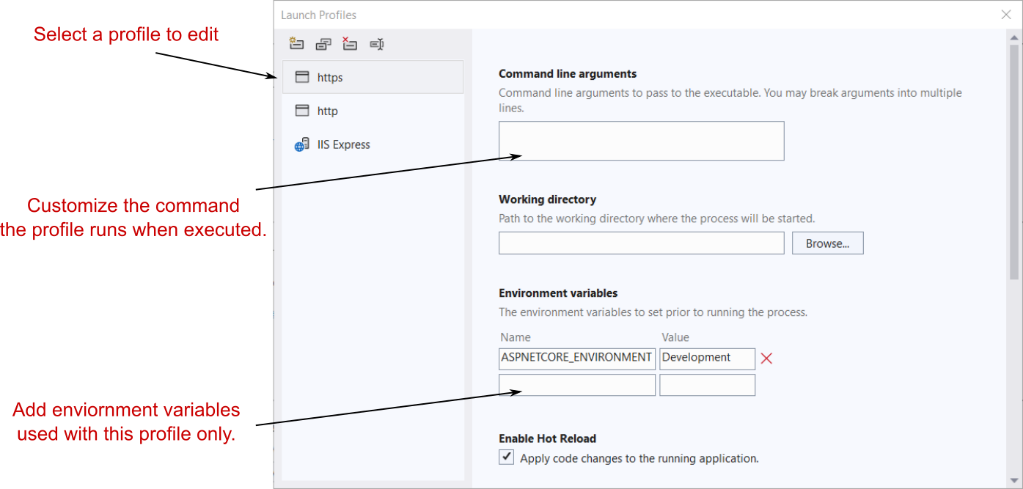
Figure 10.8 You can use Visual Studio to edit the launchSettings.json file, if you prefer. Changes will be mirrored between the launchSettings.json file and the Properties dialog box.
图 10.8 如果您愿意,可以使用 Visual Studio 编辑 launchSettings.json 文件。更改将在 launchSettings.json 文件和 Properties (属性) 对话框之间镜像。
The launchSettings.json file is intended for local development only; by default, the file isn’t deployed to production servers. Although you can deploy and use the file in production, doing so generally isn’t worth the hassle. Environment variables are a better fit.
launchSettings.json 文件仅用于本地开发;默认情况下,文件不会部署到生产服务器。尽管您可以在生产环境中部署和使用该文件,但这样做通常不值得。环境变量更合适。
One final trick I’ve used to set the environment in production is to use command-line arguments. You could set the environment to staging like this:
我在生产环境中设置环境时使用的最后一个技巧是使用命令行参数。您可以将环境设置为 stage,如下所示:
dotnet run --no-launch-profile --environment StagingNote that you also have to pass --no-launch-profile if there’s a launchSettings.json file; otherwise, the values in the file take precedence.
注意 如果有 launchSettings.json 文件,您还必须传递 --no-launch-profile;否则,文件中的值优先。
That brings us to the end of this chapter on configuration. Configuration isn’t glamorous, but it’s an essential part of all apps. The ASP.NET Core configuration provider model handles a wide range of scenarios, letting you store settings and secrets in a variety of locations.
这让我们结束了本章关于配置的章节。配置并不迷人,但它是所有应用程序的重要组成部分。ASP.NET Core 配置提供程序模型可处理各种方案,让您能够在各种位置存储设置和机密。
Simple settings can be stored in appsettings.json, where they’re easy to tweak and modify during development, and they can be overwritten by using environment-specific JSON files. Meanwhile, your secrets and sensitive settings can be stored outside the project file in the User Secrets manager or as environment variables. This approach gives you both flexibility and safety—as long as you don’t go writing your secrets to appsettings.json!
简单的设置可以存储在 appsettings.json 中,在开发过程中很容易调整和修改,并且可以使用特定于环境的 JSON 文件覆盖它们。同时,您的 Secret 和敏感设置可以存储在 User Secrets Manager 中的项目文件外部或作为环境变量存储。这种方法为您提供了灵活性和安全性 - 只要您不将您的秘密写给 appsettings.json!
In chapter 11 we take a look at the OpenAPI specification and how you can use it for documenting your APIs, testing your endpoints, and generating strongly typed clients.
在第 11 章中,我们将了解 OpenAPI 规范,以及如何使用它来记录 API、测试端点和生成强类型客户端。
10.5 Summary
10.5 总结
Anything that could be considered to be a setting or a secret is normally stored as a configuration value. Externalizing these values means that you can change them without recompiling your app.
任何可被视为设置或密钥的内容通常存储为配置值。外部化这些值意味着您无需重新编译应用程序即可更改它们。
ASP.NET Core uses configuration providers to load key-value pairs from a variety of sources. Applications can use many configuration providers.
ASP.NET Core 使用配置提供程序从各种来源加载键值对。应用程序可以使用许多配置提供程序。
You can add configuration providers to an instance of ConfigurationManager by using extension methods such as AddJsonFile().
您可以使用扩展方法(如 AddJsonFile())将配置提供程序添加到 ConfigurationManager 实例。
The order in which you add providers to ConfigurationManager is important; subsequent providers replace the values of the same settings defined in earlier providers while preserving unique settings.
向 ConfigurationManager 添加提供程序的顺序很重要;后续提供程序将替换早期提供程序中定义的相同设置的值,同时保留唯一设置。
ASP.NET Core includes built-in providers for JSON files, XML files, environment files, and command-line arguments, among others. NuGet packages exist for many other providers, such as YAML files and Azure Key Vault.
ASP.NET Core 包括用于 JSON 文件、XML 文件、环境文件和命令行参数等的内置提供程序。NuGet 包适用于许多其他提供程序,例如 YAML 文件和 Azure Key Vault。
ConfigurationManager implements IConfiguration as well as IConfigurationBuilder, so you can retrieve configuration values from it directly.
ConfigurationManager 实现 IConfiguration 和 IConfigurationBuilder,因此您可以直接从中检索配置值。
Configuration keys aren’t case-sensitive, so you must take care not to lose values when loading settings from case-sensitive sources such as YAML.
配置键不区分大小写,因此在从区分大小写的源(如 YAML)加载设置时,必须注意不要丢失值。
You can retrieve settings from IConfiguration directly by using the indexer syntax, such as Configuration["MySettings:Value"]. This technique is often useful for accessing configuration values in Program.cs.
可以使用索引器语法(如 Configuration[“MySettings:Value”])直接从 IConfiguration 检索设置。此方法通常用于访问 Program.cs 中的配置值。
WebApplicationBuilder automatically configures a ConfigurationManager with JSON, environment variables, command-line arguments, and User Secret providers. This combination provides in-repository storage in JSON files, secret storage in both development and production, and the ability to override settings easily at runtime.
WebApplicationBuilder 使用 JSON、环境变量、命令行参数和用户密钥提供程序自动配置 ConfigurationManager。这种组合在 JSON 文件中提供存储库内存储、开发和生产中的秘密存储,以及在运行时轻松覆盖设置的能力。
In production, store secrets in environment variables to reduce the chance of incorrectly exposing the secrets in your code repository. These secrets can be loaded after your file-based settings in the configuration builder.
在生产环境中,将密钥存储在环境变量中,以减少在代码存储库中错误地暴露密钥的可能性。这些密钥可以在配置生成器中基于文件的设置之后加载。
On development machines, the User Secrets Manager is a more convenient tool than using environment variables. It stores secrets in your operating system’s user profile, outside the project folder, reducing the risk of accidentally exposing secrets in your code repository.
在开发计算机上,User Secrets Manager 是比使用环境变量更方便的工具。它将密钥存储在作系统的用户配置文件中,位于项目文件夹之外,从而降低了在代码存储库中意外暴露密钥的风险。
Be aware that neither environment variables nor the User Secrets Manager tool encrypts secrets. They merely store them in locations that are less likely to be made public, as they’re outside your project folder.
请注意,环境变量和 User Secrets Manager 工具都不会加密密钥。它们仅将它们存储在不太可能公开的位置,因为它们位于工程文件夹之外。
File-based providers such as the JSON provider can reload configuration values automatically when the file changes, allowing you to update configuration values in real time without restarting your app.
基于文件的提供程序(如 JSON 提供程序)可以在文件更改时自动重新加载配置值,从而允许您实时更新配置值,而无需重新启动应用程序。
Use strongly typed POCO options classes to access configuration in your app. Using strongly typed options reduces coupling in your app and ensures that classes are dependent only on the configuration values they use.
使用强类型 POCO 选项类访问应用程序中的配置。使用强类型选项可以减少应用程序中的耦合,并确保类仅依赖于它们使用的配置值。
Use the Configure<T>() extension method in ConfigureServices to bind your POCO options objects to ConfigurationSection. Alternatively, you can configure IOptions<T> objects in code instead of using configuration values by passing a lambda to the Configure() method.
使用 ConfigureServices 中的 Configure<T>() 扩展方法将 POCO 选项对象绑定到 ConfigurationSection。或者,您也可以在代码中配置 IOptions<T> 对象,而不是通过将 lambda 传递给 Configure() 方法来使用配置值。
You can inject the IOptions<T> interface into your services by using DI. You can access the strongly typed options object on the Value property. IOptions<T> values are registered in DI as singletons, so they remain the same even if the underlying configuration changes.
您可以通过 DI 将 IOptions<T> 接口注入到您的服务中。您可以在 Value 属性上访问强类型 options 对象。IOptions<T> 值在 DI 中注册为单一实例,因此即使底层配置发生更改,它们也保持不变。
If you want to reload your POCO options objects when your configuration changes, use the IOptionsSnapshot<T> interface instead. These instances are registered in DI with a scoped lifetime, so they’re re-created for every request. Using the IOptionsSnapshot<T> interface has performance implications due to binding to the options object repeatedly, so use it only when that effect is acceptable.
如果要在配置更改时重新加载 POCO 选项对象,请改用 IOptionsSnapshot<T> 接口。这些实例在 DI 中注册,具有作用域生命周期,因此会为每个请求重新创建它们。由于重复绑定到 options 对象,因此使用 IOptionsSnapshot<T> 接口会影响性能,因此请仅在该成本可接受时使用它。
Applications running in different environments, such as development versus production , often require different configuration values. ASP.NET Core determines the current hosting environment by using the ASPNETCORE_ENVIRONMENT environment variable. If this variable isn’t set, the environment is assumed to be production.
在不同环境(例如开发环境与生产环境)中运行的应用程序通常需要不同的配置值。ASP.NET Core 使用 ASPNETCORE_ENVIRONMENT 环境变量确定当前托管环境。如果未设置此变量,则假定环境为 production。
You can set the hosting environment locally by using the launchSettings.json file, which allows you to scope environment variables to a specific project.
您可以使用 launchSettings.json 文件在本地设置托管环境,该文件允许您将环境变量的范围限定为特定项目。
The current hosting environment is exposed as an IHostEnvironment interface. You can check for specific environments by using IsDevelopment(), IsStaging(), and IsProduction(). Then you can use the IHostEnvironment object to load files specific to the current environment, such as appsettings.Production.json.
当前托管环境作为 IHostEnvironment 接口公开。您可以使用 IsDevelopment()、IsStaging() 和 IsProduction() 检查特定环境。然后,您可以使用 IHostEnvironment 对象加载特定于当前环境的文件,例如 appsettings。Production.json。