11 Documenting APIs with OpenAPI
11 使用 OpenAPI 记录 API
This chapter covers
本章涵盖
- Understanding OpenAPI and seeing why it’s useful
了解 OpenAPI 并了解它为何有用 - Adding an OpenAPI description to your app
将 OpenAPI 描述添加到您的应用程序 - Improving your OpenAPI descriptions by adding metadata to endpoints
通过向终端节点添加元数据来改进 OpenAPI 描述 - Generating a C# client from your OpenAPI description
从 OpenAPI 描述生成 C# 客户端
In this chapter I introduce the OpenAPI specification for describing RESTful APIs, demonstrate how to use OpenAPI to describe a minimal API application, and discuss some of the reasons you might want to do so.
在本章中,我将介绍用于描述 RESTful API 的 OpenAPI 规范,演示如何使用 OpenAPI 来描述最小的 API 应用程序,并讨论您可能希望这样做的一些原因。
In section 11.1 you’ll learn about the OpenAPI specification itself and where it fits in to an ASP.NET Core application. You’ll learn about the libraries you can use to enable OpenAPI documentation generation in your app and how to expose the document using middleware.
在第 11.1 节中,您将了解 OpenAPI 规范本身以及它在 ASP.NET Core 应用程序中的位置。您将了解可用于在应用程序中启用 OpenAPI 文档生成的库,以及如何使用中间件公开文档。
Once you have an OpenAPI document, you’ll see how to do something useful with it in section 11.2, where we add Swagger UI to your app. Swagger UI uses your app’s OpenAPI document to generate a UI for testing and inspecting the endpoints in your app, which can be especially useful for local testing.
拥有 OpenAPI 文档后,您将在第 11.2 节中看到如何使用它执行一些有用的作,我们将在其中将 Swagger UI 添加到您的应用程序。Swagger UI 使用应用程序的 OpenAPI 文档生成用于测试和检查应用程序中的端点的 UI,这对于本地测试特别有用。
After seeing your app described in Swagger UI, it’s time to head back to the code in section 11.3. OpenAPI and Swagger UI need rich metadata about your endpoints to provide the best functionality, so we look at some of the basic metadata you can add to your endpoints.
在 Swagger UI 中看到您的应用程序描述后,是时候返回第 11.3 节中的代码了。OpenAPI 和 Swagger UI 需要有关终端节点的丰富元数据才能提供最佳功能,因此我们来看看您可以添加到终端节点的一些基本元数据。
In section 11.4 you’ll learn about one of the best tooling features that comes from creating an OpenAPI description of your app: automatically generated clients. Using a third-party library called NSwag, you’ll learn how to automatically generate C# code and classes for interacting with your API based on the OpenAPI description you added in the previous sections. You’ll learn how to generate your client, customize the generated code, and rebuild the client when your app’s OpenAPI description changes.
在 Section 11.4 中,您将了解创建应用程序的 OpenAPI 描述所带来的最佳工具功能之一:自动生成的客户端。使用名为 NSwag 的第三方库,您将学习如何根据您在前面部分中添加的 OpenAPI 描述自动生成用于与 API 交互的 C# 代码和类。您将学习如何生成客户端、自定义生成的代码,以及在应用程序的 OpenAPI 描述发生更改时重新构建客户端。
Finally, in section 11.5, you’ll learn more ways to add metadata to your endpoints to give the best experience for your generated clients. You’ll learn how to add summaries and descriptions to your endpoints by using method calls and attributes and by extracting the XML documentation comments from your C# code.
最后,在第 11.5 节中,您将了解将元数据添加到终端节点的更多方法,以便为生成的客户端提供最佳体验。您将学习如何使用方法调用和属性以及从 C# 代码中提取 XML 文档注释,从而向终端节点添加摘要和说明。
Before we consider those advanced scenarios, we’ll look at the OpenAPI specification, what it is, and how you can add an OpenAPI document to your app.
在考虑这些高级方案之前,我们将了解 OpenAPI 规范、它是什么以及如何将 OpenAPI 文档添加到您的应用程序。
11.1 Adding an OpenAPI description to your app
11.1 将 OpenAPI 描述添加到您的应用程序
OpenAPI (previously called Swagger) is a language-agnostic specification for describing RESTful APIs. At its core, OpenAPI describes the schema of a JavaScript Object Notation (JSON) document which in turn describes the URLs available in your application, how to invoke them, and the data types they return. In this section you’ll learn how to generate an OpenAPI document for your minimal API application.
OpenAPI(以前称为 Swagger)是一种与语言无关的规范,用于描述 RESTful API。OpenAPI 的核心是描述 JavaScript 对象表示法 (JSON) 文档的架构,而 JSON 文档又描述了应用程序中可用的 URL、如何调用它们以及它们返回的数据类型。在本节中,您将学习如何为最小 API 应用程序生成 OpenAPI 文档。
Providing an OpenAPI document for your application makes it possible to add various types of automation for your app. You can do the following things, for example:
为您的应用程序提供 OpenAPI 文档可以为您的应用程序添加各种类型的自动化。例如,您可以执行以下作:
-
Explore your app using Swagger UI (section 11.2).
使用 Swagger UI 浏览您的应用程序(第 11.2 节)。 -
Generate strongly-typed clients for interacting with your app (section 11.4).
生成用于与您的应用程序交互的强类型客户端(第 11.4 节)。 -
Automatically integrate into third-party services such as Azure API Management
自动集成到第三方服务中,例如 Azure API 管理。
Note If you’re familiar with SOAP from the old ASP.NET days, you can think of OpenAPI as being the HTTP/REST equivalent of Web Service Description Language (WSDL). Just as a .wsdl file described your XML SOAP services, so the OpenAPI document describes your REST API.
注意 如果您熟悉 ASP.NET 年代的 SOAP,则可以将 OpenAPI 视为 Web 服务描述语言 (WSDL) 的 HTTP/REST 等效项。正如 .wsdl 文件描述 XML SOAP 服务一样,OpenAPI 文档也描述了 REST API。
ASP.NET Core includes some support for OpenAPI documents out of the box, but to take advantage of them you’ll need to use a third-party library. The two best-known libraries to use are called NSwag and Swashbuckle. In this chapter I use Swashbuckle to add an OpenAPI document to an ASP.NET Core app. You can read how to use NSwag instead at http://mng.bz/6Dmy.
ASP.NET Core 包含一些开箱即用的 OpenAPI 文档支持,但要利用它们,您需要使用第三方库。两个最著名的库称为 NSwag 和 Swashbuckle。在本章中,我将使用 Swashbuckle 将 OpenAPI 文档添加到 ASP.NET Core 应用程序。您可以在 http://mng.bz/6Dmy 阅读如何使用 NSwag。
Note NSwag and Swashbuckle provide similar functionality for generating OpenAPI documents, though you’ll find slight differences in how to use them and in the features they support. NSwag also supports client generation, as you’ll see in section 11.4.
注意 NSwag 和 Swashbuckle 为生成 OpenAPI 文档提供了类似的功能,但您会发现它们的使用方式和它们支持的功能略有不同。NSwag 还支持客户端生成,您将在 11.4 节中看到。
Add the Swashbuckle.AspNetCore NuGet package to your project by using the NuGet Package Manager in Visual Studio, or use the .NET CLI by running
使用 Visual Studio 中的 NuGet 包管理器将 Swashbuckle.AspNetCore NuGet 包添加到项目中,或使用.NET CLI 通过运行
dotnet add package Swashbuckle.AspNetCorefrom your project’s folder. Swashbuckle uses ASP.NET Core metadata services to retrieve information about all the endpoints in your application and to generate an OpenAPI document. Then this document is served by middleware provided by Swashbuckle, as shown in figure 11.1. Swashbuckle also includes middleware for visualizing your OpenAPI document, as you’ll see in section 11.2.
从项目的文件夹中。Swashbuckle 使用 ASP.NET Core 元数据服务来检索有关应用程序中所有终端节点的信息并生成 OpenAPI 文档。然后这个文档由 Swashbuckle 提供的中间件提供,如图 11.1 所示。Swashbuckle 还包括用于可视化 OpenAPI 文档的中间件,您将在 11.2 节中看到。
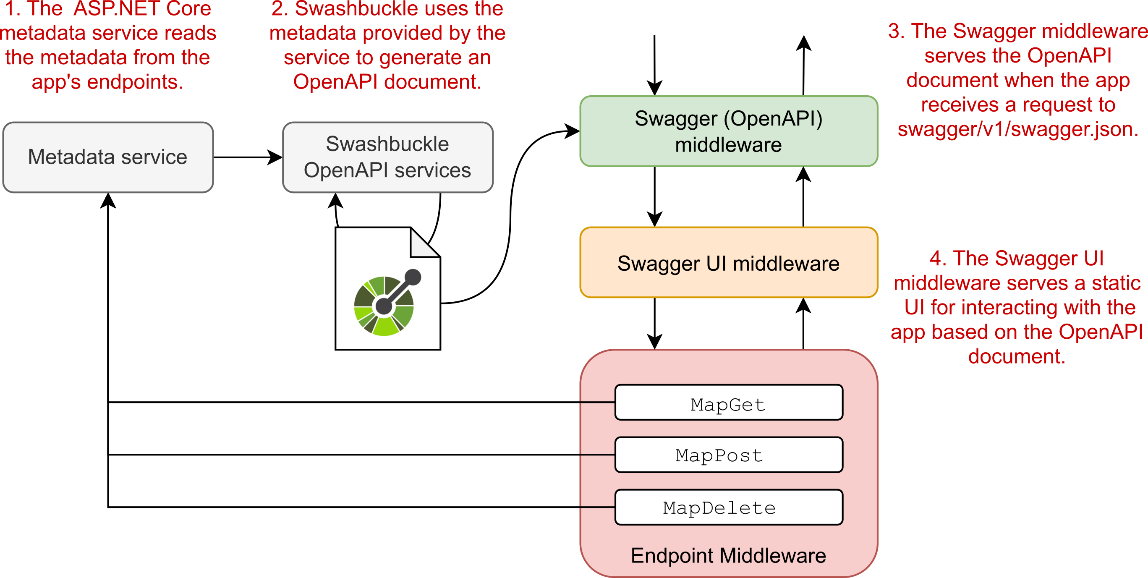
Figure 11.1 Swashbuckle uses ASP.NET Core metadata services to retrieve information about the endpoints in your application and builds an OpenAPI document. The OpenAPI middleware serves this document when requested. Swashbuckle also includes optional middleware for visualizing the OpenAPI document using Swagger UI.
图 11.1 Swashbuckle 使用 ASP.NET Core 元数据服务检索有关应用程序中终端节点的信息并构建 OpenAPI 文档。OpenAPI 中间件在请求时提供此文档。Swashbuckle 还包括用于使用 Swagger UI 可视化 OpenAPI 文档的可选中间件。
After installing Swashbuckle, configure your application to generate an OpenAPI document as shown in listing 11.1. This listing shows a reduced version of the fruit API from chapter 5, with only the GET and POST methods included for simplicity. The OpenAPI-related additions are in bold.
安装 Swashbuckle 后,配置您的应用程序以生成一个 OpenAPI 文档,如清单 11.1 所示。此清单显示了第 5 章中 fruit API 的简化版本,为简单起见,仅包含 GET 和 POST 方法。与 OpenAPI 相关的添加内容以粗体显示。
Note Swashbuckle uses the old Swagger nomenclature rather than OpenAPI in its method names. You should think of OpenAPI as the name of the specification and Swagger as the name of the tooling related to OpenAPI, as described in this post: http://mng.bz/o18M.
注意 Swashbuckle 在其方法名称中使用旧的 Swagger 命名法,而不是 OpenAPI。您应该将 OpenAPI 视为规范的名称,将 Swagger 视为与 OpenAPI 相关的工具的名称,如本文所述:http://mng.bz/o18M。
Listing 11.1 Adding OpenAPI support to a minimal API app using Swashbuckle
清单 11.1 使用 Swashbuckle 向最小 API 应用程序添加 OpenAPI 支持
using System.Collections.Concurrent;

WebApplicationBuilder builder = WebApplication.CreateBuilder(args);

builder.Services.AddEndpointsApiExplorer(); ❶
builder.Services.AddSwaggerGen(); ❷

WebApplication app = builder.Build();

var _fruit = new ConcurrentDictionary<string, Fruit>();

app.UseSwagger(); ❸
app.UseSwaggerUI(); ❹

app.MapGet("/fruit/{id}", (string id) =>
    _fruit.TryGetValue(id, out var fruit)
        ? TypedResults.Ok(fruit)
        : Results.Problem(statusCode: 404));

app.MapPost("/fruit/{id}", (string id, Fruit fruit) =>
    _fruit.TryAdd(id, fruit)
        ? TypedResults.Created($"/fruit/{id}", fruit)
        : Results.ValidationProblem(new Dictionary<string, string[]>
            {
             { "id", new[] { "A fruit with this id already exists" } }
        }));

app.Run();

record Fruit(string Name, int Stock);
❶ Adds the endpoint-discovery features of ASP.NET Core that Swashbuckle requires
添加了 Swashbuckle 所需的 ASP.NET Core 的端点发现功能
❷ Adds the Swashbuckle services required for creating OpenApi Documents
添加了创建 OpenApi 文档所需的 Swashbuckle 服务
❸ Adds middleware to expose the OpenAPI document for your app
添加中间件以公开应用程序的 OpenAPI 文档
❹ Adds middleware that serves the Swagger UI
添加为 Swagger UI 提供服务的中间件
With the changes in this listing, your application exposes an OpenAPI description of its endpoints. If you run the app and navigate to /swagger/v1/swagger.json, you’ll find a large JSON file, similar to the one shown in figure 11.2. This file is the OpenAPI Document description of your application.
通过此清单中的更改,您的应用程序将公开其终端节点的 OpenAPI 描述。如果您运行应用程序并导航到 /swagger/v1/swagger.json,您将找到一个大型 JSON 文件,类似于图 11.2 中所示的文件。此文件是应用程序的 OpenAPI 文档描述。
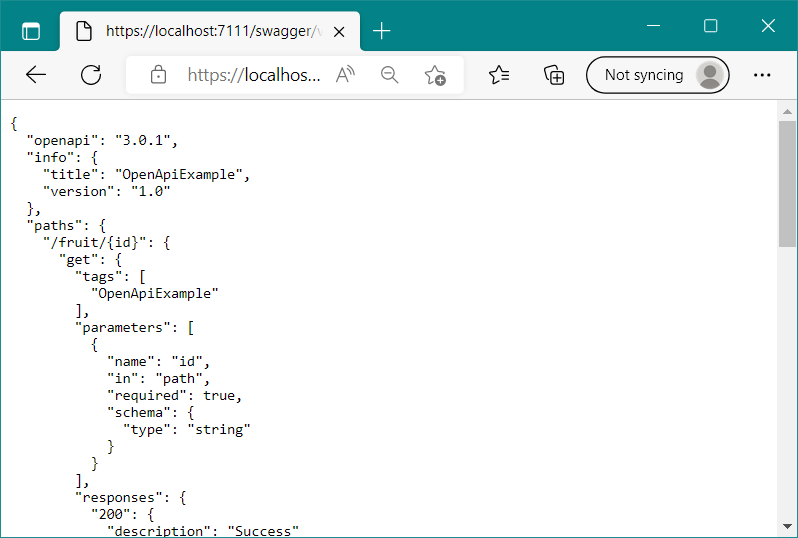
Figure 11.2 The OpenAPI Document for the app described in listing 11.1, generated with NSwag.
图 11.2 清单 11.1 中描述的应用程序的 OpenAPI 文档,使用 NSwag 生成
The OpenAPI document includes a general description of your app, such as a title and version, as well as specific details about each of the endpoints. In figure 11.2, for example, the /fruit/{id} endpoint describes the fact that it needs a GET verb and takes an id parameter in the path.
OpenAPI 文档包括应用程序的一般描述,例如标题和版本,以及有关每个终端节点的具体详细信息。例如,在图 11.2 中,/fruit/{id} 端点描述它需要一个 GETverb 并在 path 中采用 id 参数。
You can change some of the document values, such as the title, by adding configuration to the AddSwaggerGen() method. You can set the title of the app to "Fruitify" and add a description for the document:
您可以通过向 AddSwaggerGen() 方法添加配置来更改某些文档值,例如标题。您可以将应用程序的标题设置为 “Fruitify” 并为文档添加描述:
builder.Services.AddSwaggerGen(x =>
    x.SwaggerDoc("v1", new OpenApiInfo()
    {
        Title = "Fruitify",
        Description = "An API for interacting with fruit stock",
        Version = "1.0"
    }));
You can also change settings such as the path used to expose the document and various minutia about how Swashbuckle generates the final JSON. See the documentation for details: http://mng.bz/OxQR.
您还可以更改设置,例如用于公开文档的路径以及有关 Swashbuckle 如何生成最终 JSON 的各种细节。有关详细信息,请参阅文档:http://mng.bz/OxQR。
All that is clever, but if you’re shrugging and asking “So what?”, where OpenAPI really shines is the hooks it provides for other tooling. And you’ve already added one such piece of tooling to your app: Swagger UI.
所有这些都很聪明,但如果你耸耸肩问“那又怎样”,OpenAPI 真正闪耀的地方是它为其他工具提供的钩子。您已经向应用程序添加了这样一个工具:Swagger UI。
11.2 Testing your APIs with Swagger UI
11.2 使用 Swagger UI 测试 API
In this section you’ll learn about Swagger UI (https://swagger.io/tools/swagger-ui), an open-source web UI that makes it easy to visualize and test your OpenAPI apps. In some ways you can think of Swagger UI as being a light version of Postman, which I used in previous chapters to interact with minimal API applications. Swagger UI provides an easy way to view all the endpoints in your application and send requests to them. Postman provides many extra features, such as creating collections and sharing them with your team, but if all you’re trying to do is test your application locally, Swagger UI is a great option.
在本节中,您将了解 Swagger UI (https://swagger.io/tools/swagger-ui),这是一种开源 Web UI,可让您轻松可视化和测试 OpenAPI 应用程序。在某些方面,您可以将 Swagger UI 视为 Postman 的轻量级版本,我在前面的章节中使用它来与之交互最少的 API 应用程序。Swagger UI 提供了一种简单的方法来查看应用程序中的所有终端节点并向它们发送请求。Postman 提供了许多额外的功能,例如创建集合并与您的团队共享它们,但如果您只想在本地测试您的应用程序,那么 Swagger UI 是一个不错的选择。
You can add Swagger UI to your ASP.NET Core application using Swashbuckle by calling
您可以通过调用 Swashbuckle 将 Swagger UI 添加到您的 ASP.NET Core 应用程序中
app.UseSwaggerUI()to add the Swagger UI middleware, as you saw in listing 11.1. The Swagger UI middleware automatically integrates with the OpenAPI document middleware and exposes the Swagger UI web UI in your app at the path /swagger by default. Navigate to /swagger in your app, and you see a page like the one in figure 11.3.
添加 Swagger UI 中间件,如清单 11.1 所示。默认情况下,Swagger UI 中间件会自动与 OpenAPI 文档中间件集成,并在应用程序中的路径 /swagger 中公开 Swagger UI Web UI。导航到/swagger 添加到您的应用程序中,您会看到一个类似于图 11.3 中的页面。
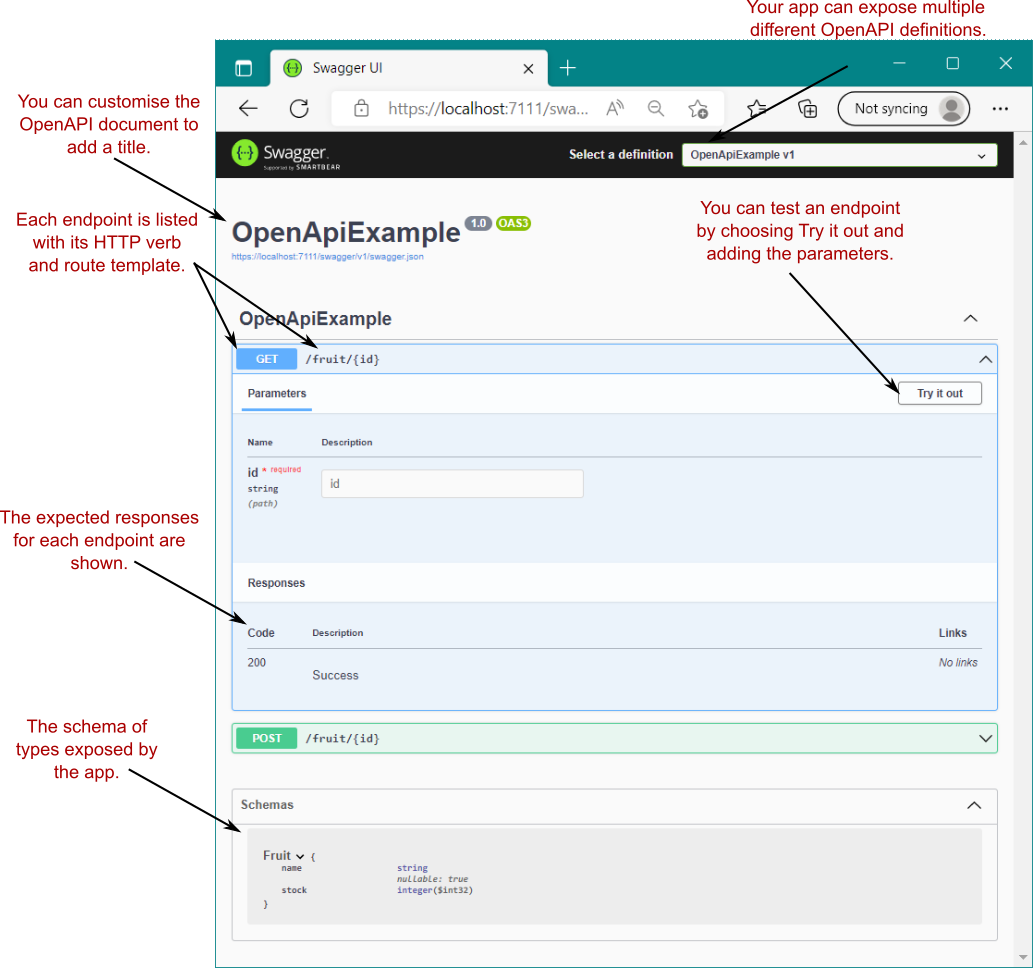
Figure 11.3 The Swagger UI endpoint for the app. With this UI you can view all the endpoints in your app, the schema of objects that are sent and returned, and even test the APIs by providing parameters and sending requests.
图 11.3 应用程序的 Swagger UI 端点。使用此 UI,您可以查看应用程序中的所有端点、已发送和返回的对象的 schema,甚至通过提供参数和发送请求来测试 API。
Swagger UI lists all the endpoints described in the OpenAPI document, the schema of objects that are sent to and received from each API, and all the possible responses that each endpoint can return. You can even test an API from the UI by choosing Try it out, entering a value for the parameter, and choosing Execute. Swagger UI shows the command executed, the response headers, and the response body (figure 11.4).
Swagger UI 列出了 OpenAPI 文档中描述的所有端点、发送到每个 API 和从每个 API 接收的对象架构,以及每个端点可以返回的所有可能响应。您甚至可以从 UI 中测试 API,方法是选择 Try it out (试用),输入参数值,然后选择 Execute (执行)。Swagger UI 显示执行的命令、响应标头和响应正文(图 11.4)。
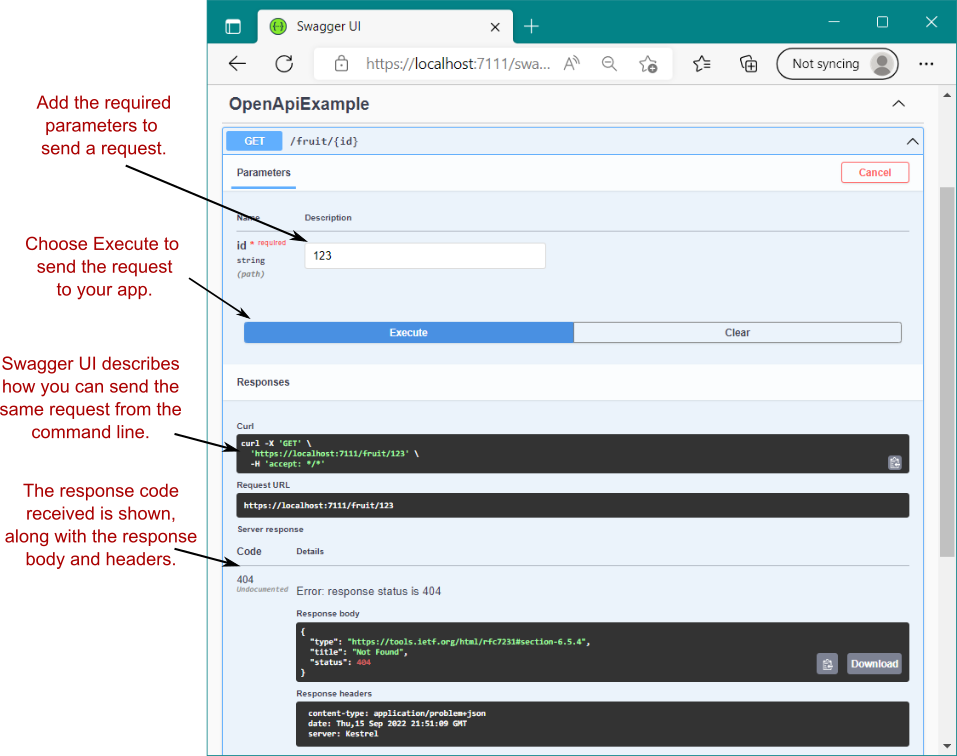
Figure 11.4 You can send requests using the Swagger UI by choosing an API, entering the required parameters, and choosing Execute. Swagger UI shows the response received.
图 11.4 您可以通过选择 API、输入所需参数并选择 Execute (执行) 来使用 Swagger UI 发送请求。Swagger UI 显示收到的响应。
Swagger UI is a useful tool for exploring your APIs and can replace a tool like Postman in some cases. But the examples we’ve shown so far reveal a problem with our API: the responses described for the GET endpoint in figure 11.3 mentioned a 200 response, but our execution in figure 11.4 reveals that it can also return a 404. To solve that documentation issue, we need to add extra metadata to our APIs.
Swagger UI 是探索 API 的有用工具,在某些情况下可以取代 Postman 等工具。但是,到目前为止我们展示的示例揭示了 API 的一个问题:图 11.3 中为 GET 端点描述的响应提到了 200 响应,但我们在图 11.4 中的执行表明它也可以返回 404。为了解决该文档问题,我们需要向 API 添加额外的元数据。
11.3 Adding metadata to your minimal APIs
11.3 将元数据添加到最小 API
Metadata is information about an API that doesn’t change the execution of the API itself. You used metadata in chapter 5 when you added names to your endpoints, using WithName(), so that you could reference them by using LinkGenerator. The name doesn’t change anything about how the endpoint executes, but it provides information for other features to hook into.
元数据是有关 API 的信息,它不会更改 API 本身的执行。在第 5 章中,当您使用 WithName() 向终端节点添加名称时,您使用了元数据,以便您可以使用 LinkGenerator 引用它们。该名称不会更改终端节点的执行方式,但它为要挂接的其他功能提供了信息。
Currently, you can add three broad categories of metadata to minimal API endpoints:
目前,您可以将三大类元数据添加到最小 API 终端节点:
-
Routing metadata—As you’ve already seen, the WithName() methods adds a globally unique name to an endpoint that’s used for URL generation.
路由元数据 – 如您所见,WithName() 方法将全局唯一名称添加到用于 URL 生成的终端节点。 -
Metadata for other middleware—Several pieces of middleware can be customized on a per-request basis by adding metadata to an endpoint. When the middleware runs, it checks the selected endpoint’s metadata and acts accordingly. Examples include authorization, hostname filtering, and output caching.
其他中间件的元数据 — 通过向终端节点添加元数据,可以按请求自定义多个中间件。当中间件运行时,它会检查所选终端节点的元数据并采取相应的行动。示例包括授权、主机名筛选和输出缓存。 -
OpenAPI metadata—OpenAPI document generation is driven by the metadata exposed by endpoints, which in turn controls the UI exposed by Swagger UI.
OpenAPI 元数据 - OpenAPI 文档生成由终端节点公开的元数据驱动,而终端节点又控制 Swagger UI 公开的 UI。
We look at how to add authorization metadata to your endpoints in chapter 25, so for now we’ll focus on improving the OpenAPI description of your app using metadata. You can provide a lot of details to document your APIs, some of which Swashbuckle uses during OpenAPI generation and some of which it doesn’t. The following listing shows how to add a tag for each API and how to explicitly describe the responses that are returned, using Produces().
我们将在第 25 章中介绍如何将授权元数据添加到您的终端节点,因此现在我们将专注于使用元数据改进应用程序的 OpenAPI 描述。您可以提供大量详细信息来记录您的 API,其中一些 Swashbuckle 在 OpenAPI 生成期间使用,而另一些则不使用。下面的清单显示了如何为每个 API 添加一个标签,以及如何使用 Produces() 显式描述返回的响应。
Listing 11.2 Adding OpenAPI metadata to improve endpoint documentation
清单 11.2 添加 OpenAPI 元数据以改进端点文档
using System.Collections.Concurrent;

WebApplicationBuilder builder = WebApplication.CreateBuilder(args);

builder.Services.AddEndpointsApiExplorer();
builder.Services.AddSwaggerGen();

WebApplication app = builder.Build();

var _fruit = new ConcurrentDictionary<string, Fruit>();

app.UseSwagger();
app.UseSwaggerUI();

app.MapGet("/fruit/{id}", (string id) =>
    _fruit.TryGetValue(id, out var fruit)
        ? TypedResults.Ok(fruit)
        : Results.Problem(statusCode: 404))
    .WithTags("fruit") ❶
    .Produces<Fruit>() ❷
    .ProducesProblem(404); ❸

app.MapPost("/fruit/{id}", (string id, Fruit fruit) =>
    _fruit.TryAdd(id, fruit)
        ? TypedResults.Created($"/fruit/{id}", fruit)
        : Results.ValidationProblem(new Dictionary<string, string[]>
            {
            { "id", new[] { "A fruit with this id already exists" } }
            }))
    .WithTags("fruit") ❹
    .Produces<Fruit>(201) ❺
    .ProducesValidationProblem(); ❻

app.Run();
record Fruit(string Name, int stock);
❶ Adding a tag groups the endpoints in Swagger UI. Each endpoint can have multiple
tags.
添加标签对 Swagger UI 中的端点进行分组。每个终端节点可以有多个标签。
❷ The endpoint can return a Fruit object. When not specified, a 200 response is
assumed.
端点可以返回 Fruit 对象。如果未指定,则假定响应为 200。
❸ If the id isn’t found, the endpoint returns a 404 Problem Details response.
如果未找到 ID,则终端节点将返回 404 Problem Details 响应。
❹ Adding a tag groups the endpoints in Swagger UI. Each endpoint can have multiple
tags.
在 Swagger UI 中添加标签对端点进行分组。每个终端节点可以有多个标签。
❺ This endpoint also returns a Fruit object but uses a 201 response instead of 200.
此端点还返回一个 Fruit 对象,但使用 201 响应而不是 200。
❻ If the ID already exists, it returns a 400 Problem Details response with validation
errors.
如果 ID 已存在,则返回 400 Problem Details 响应,其中包含验证错误。
With these changes, Swagger UI shows the correct responses for each endpoint, as shown in figure 11.5. It also groups the endpoints under the tag "fruit" instead of the default tag inferred from the project name when no tags are provided.
通过这些更改,Swagger UI 会为每个端点显示正确的响应,如图 11.5 所示。它还将终端节点分组在标签 “fruit” 下,而不是在未提供标签时从项目名称推断的默认标签下。

Figure 11.5 Swagger UI groups the endpoints in your application based on the Tag metadata attached to them. The UI uses the metadata added by calling Produces() to document the expected return types and status codes for each endpoint.
图 11.5 Swagger UI 根据附加到终端节点的 Tag 元数据对应用程序中的终端节点进行分组。UI 使用通过调用 Produces() 添加的元数据来记录每个端点的预期返回类型和状态代码。
If adding all this extra metadata feels like a bit of a chore, don’t worry. Adding the extra OpenAPI metadata is optional, necessary only if you plan to expose your OpenAPI document for others to consume. If all you want is an easy way to test your minimal APIs, you can go a long way without many of these extra method calls.
如果添加所有这些额外的元数据感觉有点麻烦,请不要担心。添加额外的 OpenAPI 元数据是可选的,只有当您计划公开 OpenAPI 文档供其他人使用时,才需要添加元数据。如果你想要的只是一种简单的方法来测试你的最小API,您可以在没有许多额外方法调用的情况下走很长的路。
Tip Remember that you can also use route groups (described in chapter 5) to apply metadata to multiple APIs at the same time.
提示 请记住,您还可以使用路由组(如第 5 章所述)同时将元数据应用于多个 API。
One of the strongest arguments for making your OpenAPI descriptions as rich as possible is that it makes the tooling around your API easier to use. Swagger UI is one example. But an arguably even more useful tool lets you automatically generate C# clients for interacting with your APIs.
使 OpenAPI 描述尽可能丰富的最有力的论据之一是,它使围绕 API 的工具更易于使用。Swagger UI 就是一个例子。但是,一个可以说更有用的工具允许您自动生成用于与 API 交互的 C# 客户端。
11.4 Generating strongly typed clients with NSwag
11.4 使用 NSwag 生成强类型客户端
In this section you’ll learn how to use your OpenAPI description to automatically generate a client class that you can use to call your API from another C# project. You’ll create a console application, use a .NET tool to generate a C# client for interacting with your API, and finally customize the generated types. The generated code includes automatic serialization and deserialization of request types, and makes interacting with your API from another C# project much easier than the alternative method of crafting HTTP requests manually.
在本节中,您将学习如何使用 OpenAPI 描述自动生成可用于从另一个 C# 项目调用 API 的客户端类。您将创建一个控制台应用程序,使用 .NET 工具生成用于与 API 交互的 C# 客户端,最后自定义生成的类型。生成的代码包括请求类型的自动序列化和反序列化,并且与手动创建 HTTP 请求的替代方法相比,从另一个 C# 项目与 API 交互要容易得多。
Note Generating a strongly typed client is optional. It makes it easier to consume your APIs from C#, but if you don’t need this functionality, you can still test your APIs by using Postman or another HTTP client.
注意 生成强类型客户端是可选的。它使从 C# 使用 API 变得更加容易,但如果您不需要此功能,您仍然可以使用 Postman 或其他 HTTP 客户端来测试 API。
You could use any of several tools to automatically generate a C# client from an OpenAPI description, such as OpenAPI Generator (http://mng.bz/Y1wB), but in this chapter I use NSwag. You may remember from section 11.1 that NSwag can be used instead of Swashbuckle to generate an OpenAPI description for your API. But unlike Swashbuckle, NSwag also contains a client generator. NSwag is also the default library used by both Visual Studio and the Microsoft .NET OpenAPI global tool to generate C# client code.
您可以使用多种工具中的任何一种从 OpenAPI 描述自动生成 C# 客户端,例如 OpenAPIGenerator (http://mng.bz/Y1wB),但在本章中我使用 NSwag。你可能还记得 11.1 节 中,可以使用 NSwag 代替 Swashbuckle 来为你的 API 生成 OpenAPI 描述。但与 Swashbuckle 不同的是,NSwag 还包含一个客户端生成器。NSwag 也是 Visual Studio 和 Microsoft .NET OpenAPI 全局工具用来生成 C# 客户端代码的默认库。
Code generation based on an OpenAPI description works via the process shown in figure 11.6. First, Visual Studio or the .NET tool downloads the OpenAPI description JSON file so that it’s available locally. The code generation tool reads the OpenAPI description, identifies all the endpoints and schemas described by the document, and generates a C# client class that you can use to call the API described in the document. The code generation tool hooks into the build process so that any time the local OpenAPI description file changes, the code generator runs to regenerate the client.
基于 OpenAPI 描述的代码生成工作过程如图 11.6 所示。首先,Visual Studio 或 .NET 工具下载 OpenAPI 描述 JSON 文件,以便它在本地可用。代码生成工具读取 OpenAPI 描述,识别文档描述的所有端点和架构,并生成一个 C# 客户端类,您可以使用该类来调用文档中描述的 API。代码生成工具挂接到构建过程中,因此,每当本地 OpenAPI 描述文件发生更改时,代码生成器都会运行以重新生成客户端。
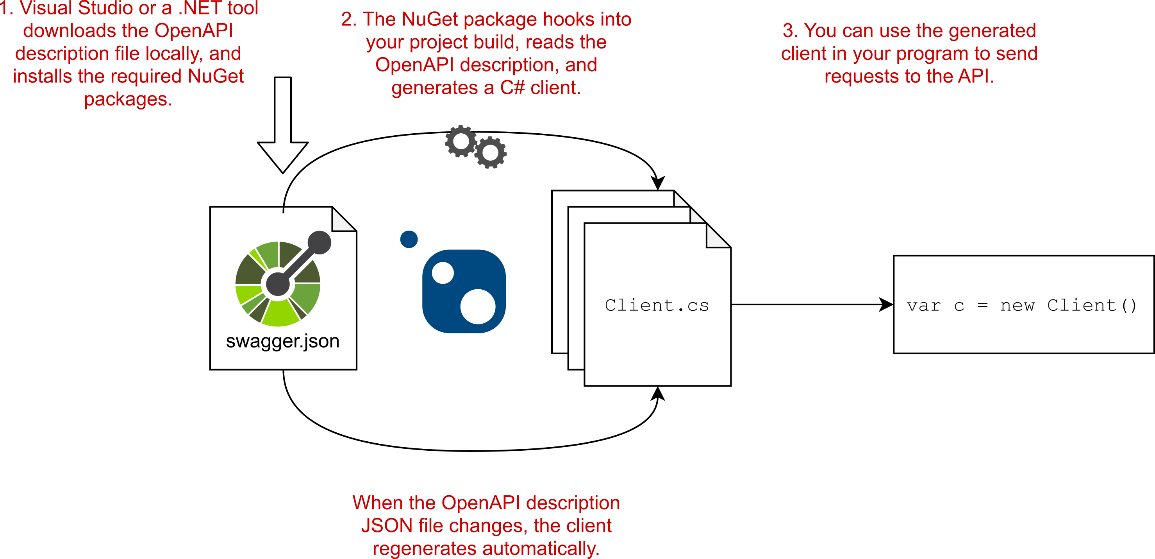
Figure 11.6 Visual Studio or a .NET tool downloads the OpenAPI description locally and installs the code-generation tool from NuGet. When your project builds, the generation tool reads the OpenAPI description and generates a C# class for interacting with the API.
图 11.6 Visual Studio 或 .NET 工具在本地下载 OpenAPI 描述,并从 NuGet 安装代码生成工具。生成项目时,生成工具会读取 OpenAPI 描述并生成用于与 API 交互的 C# 类。
You can generate clients by using Visual Studio, as shown in section 11.4.1, or a .NET tool, as shown in section 11.4.2. Both approaches produce the same result, so your choice is a matter of personal preference.
您可以使用 Visual Studio(如第 11.4.1 节所示)或 .NET 工具(如第 11.4.2 节所示)生成客户端。这两种方法都会产生相同的结果,因此您的选择取决于个人喜好。
11.4.1 Generating a client using Visual Studio
11.4.1 使用 Visual Studio 生成客户端
In this section I show how to generate a client by using Visual Studio’s built-in support. For this section I assume that you have a simple .NET 7 console app that needs to interact with your minimal API app.
在本节中,我将介绍如何使用 Visual Studio 的内置支持生成客户端。在本部分中,我假设你有一个简单的 .NET 7 控制台应用程序,它需要与最小 API 应用程序交互。
Note In the sample code for this chapter, both applications are in the same solution for simplicity, but they don’t need to be. You don’t even need the source code for the API; as long as you have the OpenAPI description of an API, you can generate a client for it.
注意 在本章的示例代码中,为简单起见,这两个应用程序位于同一解决方案中,但并非必须如此。您甚至不需要 API 的源代码;只要您具有 API 的 OpenAPI 描述,就可以为其生成客户端。
To generate the client, follow these steps:
要生成客户端,请执行以下步骤:
-
Ensure that the API application is running and that the OpenAPI description JSON file is accessible. Note the URL at which the JSON file is exposed. If you’re following along with the source code for the book, run the OpenApiExample project.
确保 API 应用程序正在运行,并且 OpenAPI 描述 JSON 文件可访问。记下公开 JSON 文件的 URL。如果您按照本书的源代码进行作,请运行 OpenApiExample 项目。 -
In the client project, right-click the project file and then choose from the contextual menu, as shown in figure 11.7. This command opens the Add Service Reference dialog box.
在客户端项目中,右键单击项目文件,然后从上下文菜单中选择 Add > Service Reference,如图 11.7 所示。此命令将打开 Add Service Reference 对话框。
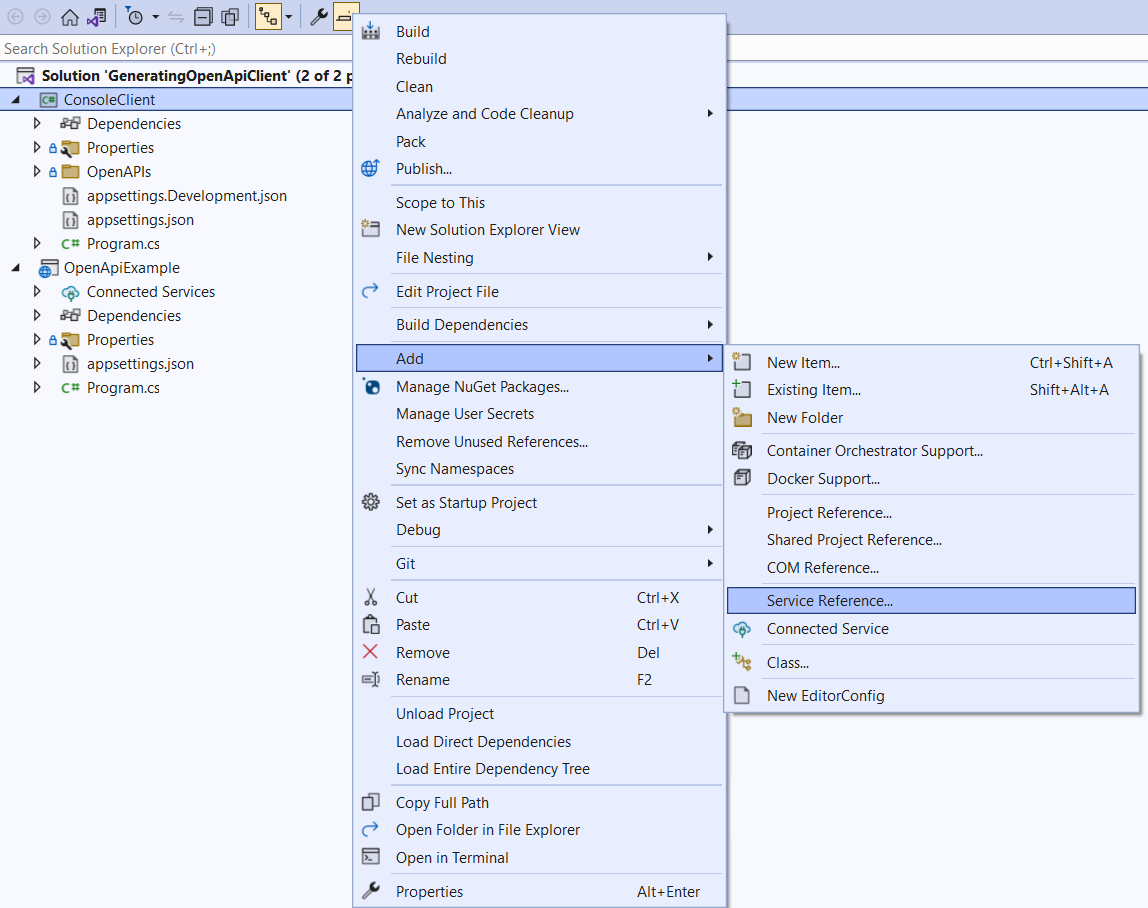
Figure 11.7 Adding a service reference using Visual Studio. Right-click the project that will call the API, and choose Add > Service Reference.
图 11.7 使用 Visual Studio 添加服务引用。右键单击将调用 API 的项目,然后选择 Add > Service Reference。
- In the Add Service Reference dialog box, select OpenAPI and then choose Next. On the Add New OpenAPI Service Reference page, enter the URL where the OpenAPI document is located. Enter a namespace for the generated code and a name for the generated client class, as shown in figure 11.8, and then choose Finish.
在 Add Service Reference (添加服务引用) 对话框中,选择 OpenAPI (OpenAPI),然后选择 Next (下一步)。在 Add New OpenAPI Service Reference 页面上,输入 OpenAPI 文档所在的 URL。输入生成的代码的命名空间和生成的客户端类的名称,如图 11.8 所示,然后选择 Finish。

Figure 11.8 Adding an OpenAPI service reference using Visual Studio. Add the link to the OpenAPI document, the code generation parameters, and click Finish. Visual Studio downloads the OpenAPI document and saves it to the project to use for code generation.
图 11.8 使用 Visual Studio 添加 OpenAPI 服务引用。将链接添加到 OpenAPI document,代码生成参数,然后单击 Finish。Visual Studio 下载 OpenAPI 文档并将其保存到项目中以用于代码生成。
The Service Reference Configuration Progress screen shows the changes Visual Studio makes to your application, such as installing various NuGet packages and downloading the OpenAPI document.
Service Reference Configuration Progress 屏幕显示 Visual Studio 对应用程序所做的更改,例如安装各种 NuGet 包和下载 OpenAPI 文档。
Tip If you’re running the sample code with Visual Studio, you can find the OpenAPI document at https://localhost:7186/swagger/v1/swagger.json. This location is also displayed in the Swagger UI.
提示 如果使用 Visual Studio 运行示例代码,则可以在 https://localhost:7186/swagger/v1/swagger.json 中找到 OpenAPI 文档。此位置也显示在 Swagger UI 中。
After performing these steps, look at the csproj file of your console app. You’ll see that several NuGet package references were added, as well as a new
执行这些步骤后,请查看控制台应用的 csproj 文件。您将看到添加了多个 NuGet 包引用,以及一个新的
Listing 11.3 Adding a service reference for OpenAPI client generation with Visual Studio
清单 11.3 为使用 Visual Studio 生成 OpenAPI 客户端添加服务引用
<Project Sdk="Microsoft.NET.Sdk">
    <PropertyGroup>
        <OutputType>Exe</OutputType>
        <TargetFramework>net7.0</TargetFramework>
        <ImplicitUsings>enable</ImplicitUsings>
        <Nullable>enable</Nullable>
    </PropertyGroup>

    <ItemGroup>
        <OpenApiReference ❶
            Include="OpenAPIs\swagger.json"
            CodeGenerator="NSwagCSharp"
            Namespace="Fruit"
            ClassName="FruitClient">
        <SourceUri>https://localhost:7186/swagger/v1/swagger.json</SourceUri>
        </OpenApiReference>
    </ItemGroup>

    <ItemGroup>
        <PackageReference ❷
            Include="Microsoft.Extensions.ApiDescription.Client"
            Version="3.0.0">
            <PrivateAssets>all</PrivateAssets>
            <IncludeAssets>runtime; build; native; contentfiles; analyzers;
                buildtransitive</IncludeAssets>
        </PackageReference>

        <PackageReference Include="Newtonsoft.Json" Version="13.0.1" />

        <PackageReference Include="NSwag.ApiDescription.Client"
            Version="13.0.5">
                <PrivateAssets>all</PrivateAssets>
                <IncludeAssets>runtime; build; native; contentfiles; analyzers;
                    buildtransitive</IncludeAssets>
        </PackageReference>
    </ItemGroup>
</Project>
❶ Defines where the OpenAPI description was loaded from and code generation settings
定义 OpenAPI 描述的加载位置和代码生成设置
❷ Extra NuGet packages are required by the code generator.
代码生成器需要额外的 NuGet 包。
Theoretically, this code should be everything you need to generate the client. Unfortunately, Visual Studio adds some out-of-date packages that you’ll need to update before your project will build, as follows:
从理论上讲,此代码应该是生成客户端所需的一切。遗憾的是,Visual Studio 添加了一些过时的包,您需要在构建项目之前更新这些包,如下所示:
-
Update NSwag.ApiDescription.Client to the latest version (currently, 13.18.2). This package does the code generation based on the OpenAPI description.
将 NSwag.ApiDescription.Client 更新到最新版本(当前为 13.18.2)。此包根据 OpenAPI 描述执行代码生成。 -
Update Microsoft.Extensions.ApiDescription.Client to the latest version (7.0.0 at the time of the .NET 7 release). This package is referenced transitively by NSwag.ApiDescription.Client anyway, so you don’t have to reference it directly, but doing so ensures that you have the latest version of the package.
将 Microsoft.Extensions.ApiDescription.Client 更新到最新版本(.NET 7 版本发布时为 7.0.0)。无论如何,此包都由 NSwag.ApiDescription.Client 以传递方式引用,因此您不必直接引用它,但这样做可以确保您拥有最新版本的包。
NOTE By default, the generated client uses Newtonsoft.Json to serializes the requests and responses. In section 11.4.4 you’ll see how to replace it with the built-in System.Text.Json.
注意 默认情况下,生成的客户端使用 Newtonsoft.Json 来序列化请求和响应。在第 11.4.4 节中,你将了解如何将其替换为内置的 System.Text.Json。
After you make these changes, your project should look similar to the following listing.
进行这些更改后,您的项目应类似于下面的清单。
Listing 11.4 Updating package versions for OpenAPI generation
清单 11.4 更新包版本以生成 OpenAPI
<Project Sdk="Microsoft.NET.Sdk">

  <PropertyGroup>
    <OutputType>Exe</OutputType>
    <TargetFramework>net7.0</TargetFramework>
    <ImplicitUsings>enable</ImplicitUsings>
    <Nullable>enable</Nullable>
  </PropertyGroup>
  <ItemGroup>
    <OpenApiReference
        Include="OpenAPIs\swagger.json"
        CodeGenerator="NSwagCSharp"
        Namespace="Fruit"
        ClassName="FruitClient">
      <SourceUri>https://localhost:7186/swagger/v1/swagger.json</SourceUri>
    </OpenApiReference>
  </ItemGroup>

  <ItemGroup>
    <PackageReference
      Include="Microsoft.Extensions.ApiDescription.Client"
      Version="7.0.0">  ❶
        <PrivateAssets>all</PrivateAssets>
        <IncludeAssets>runtime; build; native; contentfiles; analyzers;
          buildtransitive</IncludeAssets>
    </PackageReference>
    <PackageReference Include="Newtonsoft.Json" Version="13.0.1" />
    <PackageReference Include="NSwag.ApiDescription.Client"
      Version="13.18.2">  ❶
        <PrivateAssets>all</PrivateAssets>
        <IncludeAssets>runtime; build; native; contentfiles; analyzers;
          buildtransitive</IncludeAssets>
    </PackageReference>
  </ItemGroup>

</Project>
❶ Updates to the latest version
更新到最新版本
With the packages updated, you can build your project and generate the FruitClient. In section 11.4.3 you’ll see how to use this client to call your API, but first we’ll look at how to generate the client with a .NET global tool if you’re not using Visual Studio.
更新包后,您可以构建项目并生成 FruitClient。在 11.4.3 节中,您将看到如何使用此客户端来调用您的 API,但首先我们将了解如何如果您使用 Visual Studio,请使用 .NET 全局工具生成客户端。
11.4.2 Generating a client using the .NET Global tool
11.4.2 使用.NET 全局工具
In this section you’ll learn how to generate a client from an OpenAPI definition by using a .NET global tool instead of Visual Studio. The result is essentially the same, so if you’ve followed the steps in section 11.4.1 in Visual Studio, you can skip this section.
在本部分中,你将了解如何使用 .NET 全局工具而不是 Visual Studio 从 OpenAPI 定义生成客户端。结果基本相同,因此,如果您已按照 Visual Studio 中 11.4.1 节中的步骤作,则可以跳过此部分。
Note You don’t have to use Visual Studio or a .NET tool. Ultimately ,you need a csproj file that looks like listing 11.4 and an OpenAPI definition JSON file in your project, so if you’re happy editing the project file and downloading the definition manually, you can take that approach. Visual Studio and the .NET tool simplify and automate some of these steps.
注意 您不必使用 Visual Studio 或 .NET 工具。最后,您需要一个类似于清单 11.4 的 csproj 文件和一个项目中的 OpenAPI 定义 JSON 文件,因此,如果您愿意编辑项目文件并手动下载定义,则可以采用这种方法。Visual Studio 和 .NET 工具简化并自动执行其中一些步骤。
As in section 11.4.1, the instructions in 11.4.2 assume that you have a console app that needs to call your API, that the API is accessible, and that it has an OpenAPI description. To generate a client by using NSwag, follow these steps:
与第 11.4.1 节一样,11.4.2 中的说明假定您有一个需要调用 API 的控制台应用程序,该 API 是可访问的,并且它具有 OpenAPI 描述。要使用 NSwag 生成客户端,请执行以下步骤:
-
Ensure that the API application is running and that the OpenAPI description JSON file is accessible. Note the URL at which the JSON file is exposed. In the source code associated with the book, run the OpenApiExample project.
确保 API 应用程序正在运行,并且 OpenAPI 描述 JSON 文件可访问。记下公开 JSON 文件的 URL。在与本书关联的源代码中,运行 OpenApiExample 项目。 -
Install the .NET OpenAPI tool (http://mng.bz/GyOv) globally by running
通过运行 .NET OpenAPI 工具 (http://mng.bz/GyOv) 全局安装
dotnet tool install -g Microsoft.dotnet-openapi- From the project folder of your console app, add an OpenAPI reference by using the following command, substituting the path to the OpenAPI document and the location to download the JSON file to:
在控制台应用程序的项目文件夹中,使用以下命令添加 OpenAPI 引用,将 OpenAPI 文档的路径和将 JSON 文件下载到的位置替换为:dotnet openapi add url http://localhost:5062/swagger/v1/swagger.json --output-file OpenAPIs\fruit.json
Tip If you’re running the sample code by using dotnet run, you can find the OpenAPI document at the preceding URL. This location is also displayed in the Swagger UI.
提示 如果使用 dotnet run 运行示例代码,则可以在前面的 URL 中找到 OpenAPI 文档。此位置也显示在 Swagger UI 中。
- Update the packages added to your project by running the following commands from the project folder:
通过从项目文件夹运行以下命令来更新添加到项目中的包:
dotnet add package NSwag.ApiDescription.Client
dotnet add package Microsoft.Extensions.ApiDescription.Client
dotnet add package Newtonsoft.Json
After you run all these steps, your OpenAPI description file should have been downloaded to OpenAPIs\fruit.json, and your project file should look similar to the following listing (elements added by the tool highlighted in bold).
运行所有这些步骤后,您的 OpenAPI 描述文件应已下载到 OpenAPIs\fruit.json,并且您的项目文件应类似于以下清单(由该工具添加的元素以粗体突出显示)。
Listing 11.5 Adding an OpenAPI reference using the .NET OpenAPI tool
清单 11.5 使用 .NET OpenAPI 工具添加 OpenAPI 引用
<Project Sdk="Microsoft.NET.Sdk">

  <PropertyGroup>
    <OutputType>Exe</OutputType>
    <TargetFramework>net7.0</TargetFramework>
    <ImplicitUsings>enable</ImplicitUsings>
    <Nullable>enable</Nullable>
  </PropertyGroup>

  <ItemGroup>
    <PackageReference
      Include="Microsoft.Extensions.ApiDescription.Client"
      Version="7.0.0">
        <IncludeAssets>runtime; build; native; contentfiles; analyzers;
          buildtransitive</IncludeAssets>
      <PrivateAssets>all</PrivateAssets>
    </PackageReference>
    <PackageReference Include="Newtonsoft.Json" Version="13.0.1" />
    <PackageReference Include="NSwag.ApiDescription.Client"
      Version="13.18.2">
        <IncludeAssets>runtime; build; native; contentfiles; analyzers;
          buildtransitive</IncludeAssets>
      <PrivateAssets>all</PrivateAssets>
    </PackageReference>
  </ItemGroup>

  <ItemGroup>
    <OpenApiReference Include="OpenAPIs\fruit.json"
      SourceUrl="http://localhost:5062/swagger/v1/swagger.json" />
  </ItemGroup>
</Project>
Other than minor ordering differences, the main difference between the Visual Studio approach and the .NET tool approach is that Visual Studio lets you specify the class name and namespace for your new client, whereas the .NET Tool uses the default values. For consistency, add the ClassName and Namespace attributes to the <OpenApiReference> element added by the tool:
除了细微的排序差异外,Visual Studio 方法和 .NET 工具方法之间的主要区别在于,Visual Studio 允许您为新客户端指定类名和命名空间,而 .NET 工具使用默认值。为了保持一致性,请将 ClassName 和 Namespace 属性添加到工具添加的 <OpenApiReference> 元素中:
<OpenApiReference Include="OpenAPIs\fruit.json"
  SourceUrl="http://localhost:5062/swagger/v1/swagger.json"
  Namespace="Fruit"
  ClassName="FruitClient" />
In section 11.4.4 you’ll learn how to customize the generated code further, but before we get to that topic, let’s look at the generated FruitClient and how to use it.
在 Section 11.4.4 中,您将学习如何进一步自定义生成的代码,但在我们进入该主题之前,让我们看看生成的 FruitClient 以及如何使用它。
11.4.3 Using a generated client to call your API
11.4.3 使用生成的客户端调用 API
So far, you’ve been taking my word for it that a client is magically generated for your application, so in this section you get to try it out. The NSwag.ApiDescription.Client package added to your project works with the Microsoft.Extensions.ApiDescription.Client package to read the OpenAPI description file in your project. From this description it can work out what APIs you have and what types you need to serialize to and from. Finally, it outputs a C# class with the class name and namespace you specified in the OpenApiReference element.
到目前为止,您一直相信我的话,即 Client 是为您的应用程序神奇生成的,因此在本节中,您将快来试试吧。添加到项目的 NSwag.ApiDescription.Client 包与 Microsoft.Extensions.ApiDescription.Client 包配合使用,以读取项目中的 OpenAPI 描述文件。从此描述中,它可以计算出您拥有哪些 API 以及需要序列化到哪些类型或从中序列化。最后,它输出一个 C# 类,其中包含您在 OpenApiReference 元素中指定的类名和命名空间。
Note The generated file is typically saved to your project’s obj folder. After building your project, you can find the fruitClient.cs file in this folder. Alternatively, use Visual Studio’s Go To Definition (F12) functionality on an instance of FruitClient to navigate to the code in your integrated development environment (IDE).
注意 生成的文件通常保存到项目的 obj 文件夹中。构建项目后,您可以在此文件夹中找到 fruitClient.cs 文件。或者,在 FruitClient 实例上使用 Visual Studio 的转到定义 (F12) 功能导航到集成开发环境 (IDE) 中的代码。
To use the FruitClient to call your API, you must create an instance of it, passing in the base address of your API and an HttpClient instance. Then you can send HTTP requests to the discovered endpoints. A client generated from the OpenAPI description of the simple minimal API in listing 11.2, for example, would have methods called FruitPOSTAsync() and FruitGETASync(), corresponding to the two exposed methods, as shown in listing 11.6.
要使用 FruitClient 调用 API,您必须创建一个 API 实例,并传入 API 的基址和 HttpClient 实例。然后,您可以向发现的终端节点发送 HTTP 请求。例如,从清单 11.2 中简单最小 API 的 OpenAPI 描述生成的客户端将具有名为 FruitPOSTAsync() 和 FruitGETASync() 的方法,对应于两个公开的方法,如下面的清单所示。
Listing 11.6 Calling the API from listing 11.2 using a generated client
清单 11.6 使用生成的客户端调用 清单 11.2 中的 API
using Fruit; ❶

var client = new FruitClient( ❷
    "https://localhost:7186", ❸
    new HttpClient()); ❹

Fruit.Fruit created = await client.FruitPOSTAsync("123", ❺
    new Fruit.Fruit { Name = "Banana", Stock = 100 }); ❻
Console.WriteLine($"Created {created.Name}");

Fruit.Fruit fetched = await client.FruitGETAsync("123"); ❼
Console.WriteLine($"Fetched {fetched.Name}");
❶ The code is generated in the Fruit namespace.
代码在 Fruit 命名空间中生成。
❷ Uses the generated FruitClient
使用生成的 FruitClient
❸ Specifies the base address of the API
指定 API 的基址
❹ The provided HttpClient is used to call the API.
提供的 HttpClient 用于调用 API。
❺ Calls the MapPost endpoint of the API
调用 API 的 MapPost 端点
❻ The Fruit type is generated automatically by NSwag.
Fruit 类型由 NSwag 自动生成。
❼ Calls the MapGet endpoint of the API
调用 API 的 MapGet 端点
This code is simultaneously impressive and somewhat horrible:
这段代码既令人印象深刻,又有些可怕:
-
It’s impressive that you’re able to generate all the boilerplate code for interacting with the API. You don’t have to do any string interpolation to calculate the path. You don’t have to serialize the request body or deserialize the response. You don’t have to check for error status codes. The generated code takes care of all those tasks.
令人印象深刻的是,您能够生成用于与 API 交互的所有样板代码。您不必执行任何字符串插值来计算路径。您不必序列化请求正文或反序列化响应。您不必检查错误状态代码。生成的代码会处理所有这些任务。 -
Those FruitPOSTAsync and FruitGETAsync methods have really ugly names!
那些 FruitPOSTAsync 和 FruitGETAsync 方法的名字真的很丑陋!
Luckily, you can fix the ugly method names: improve your API’s OpenAPI definition by adding WithName() to every API. The name you provide for your endpoint is used as the OperationID in the OpenAPI description; then NSwag uses it to generate the client methods. This scenario is a prime example of adding more metadata to your OpenAPI, making the tooling better for your consumers.
幸运的是,您可以修复丑陋的方法名称:通过向每个 API 添加 WithName() 来改进 API 的 OpenAPI 定义。您为终端节点提供的名称将用作 OpenAPI 描述中的 OperationID;然后 NSwag 使用它来生成客户端方法。此方案是向 OpenAPI 添加更多元数据的一个典型示例,使工具更适合您的使用者。
As well as improve your OpenAPI description, you can customize the code generation directly, as you’ll see in the next section.
除了改进 OpenAPI 描述外,您还可以直接自定义代码生成,如下一节所示。
11.4.4 Customizing the generated code
11.4.4 自定义生成的代码
In this section you’ll learn about some of the customization options available with the NSwag generator and why you might want to use them. I look at three customization options in this section:
在本节中,您将了解 NSwag 生成器提供的一些自定义选项以及您可能希望使用它们的原因。在本节中,我将查看三个自定义选项:
-
Using System.Text.Json instead of Newtonsoft.Json for JSON serialization
使用 System.Text.Json 而不是 Newtonsoft.Json 进行 JSON 序列化 -
Generating an interface for the generated client implementation
为生成的客户端实现生成接口 -
Not requiring an explicit BaseAddress parameter in the constructor
在构造函数中不需要显式 BaseAddress 参数
By default, NSwag uses Newtonsoft.Json to serialize requests and deserialize responses. Newtonsoft.Json is a popular, battle-hardened JSON library, but .NET 7 has a built-in JSON library, System.Text.Json, that ASP.NET Core uses by default for JSON serialization. Instead of using two JSON libraries, you may want to replace the serialization used in your client to use System.Text.Json.
默认情况下,NSwag 使用 Newtonsoft.Json 来序列化请求和反序列化响应。Newtonsoft.Json 是一个常用的、久经考验的 JSON 库,但 .NET 7 有一个内置的 JSON 库 System.Text.Json,ASP.NET Core 默认使用该库进行 JSON 序列化。您可能希望将客户端中使用的序列化替换为 System.Text.Json,而不是使用两个 JSON 库。
When NSwag generates a client, it marks the class as partial, which means that you can define your own partial class FruitClient (for example) and add any methods that you think are useful to the client. The generated client also provides partial methods that act as hooks just before a request is sent or received.
当 NSwag 生成客户端时,它会将类标记为 partial,这意味着您可以定义自己的部分类 FruitClient(例如)并添加您认为对客户端有用的任何方法。生成的 Client 端还提供了部分方法,这些方法在发送或接收请求之前充当 hook。
Definition Partial methods in C# (http://mng.bz/zXEB) are void-returning methods that don’t have an implementation. You can define the implementation of the method in a separate partial class file. If you don’t define the implementation, the method is removed at compile time, so you use partial methods as highly performant event handlers.
定义 C# (http://mng.bz/zXEB) 中的分部方法是没有实现的返回 void 的方法。您可以在单独的Partial 类文件。如果未定义实现,则会在编译时删除该方法,因此将分部方法用作高性能事件处理程序。
Extending your generated clients is useful, but during testing it’s common to also want to substitute your generated client by using interfaces. Interfaces let you substitute fake or mock versions of a service so that your tests aren’t calling the API for real, as you learned in chapter 8. NSwag can help with this process by automatically generating an IFruitClient interface that the FruitClient implements.
扩展生成的 Client 端很有用,但在测试期间,通常还希望使用 interfaces 替换生成的 Client 端。接口允许你替换服务的 fake 或 mock 版本,这样你的测试就不会真正调用 API,正如你在第 8 章中学到的那样。NSwag 可以通过自动生成 FruitClient 实现的 IFruitClient 接口来帮助完成此过程。
Finally, providing a base address where the API is hosted makes sense on the face of it. But as we discussed in chapter 9, primitive constructor arguments such as string and int don’t play well with dependency injection. Given that HttpClient contains a BaseAddress property, you can configure NSwag to not require that the base address be passed as a constructor argument and instead set it on the HttpClient type directly. This approach helps in dependency injection (DI) scenarios, as you’ll when we discuss IHttpClientFactory in chapter 33.
最后,提供托管 API 的基址从表面上看是有意义的。但是正如我们在第 9 章中讨论的那样,像 string 和 int 这样的原始构造函数参数不能很好地与依赖注入配合。鉴于 HttpClient 包含 BaseAddress 属性,您可以将 NSwag 配置为不要求将基址作为构造函数参数传递,而是直接在 HttpClient 类型上设置它。这种方法在依赖关系注入 (DI) 场景中有所帮助,正如我们在第 33 章讨论 IHttpClientFactory 时所看到的那样。
These three seemingly unrelated options are all configured in NSwag in the same way: by adding an Options element to the <OpenApiReference> element in your project file. The options are provided as command-line switches and must be provided on one line, without line breaks. The switches for the three settings described are
这三个看似无关的选项在 NSwag 中都以相同的方式配置:通过在<OpenApiReference> 元素。这些选项以命令行开关的形式提供,并且必须在一行中提供,没有换行符。用于描述的三种设置的开关是
-
/UseBaseUrl:false—When false, NSwag removes the baseUrl parameter from the generated client’s constructor and instead relies on HttpClient to have the correct base address. It defaults to true.
/UseBaseUrl:false — 当 false 时,NSwag 从生成的客户端的构造函数中删除 baseUrl 参数,而是依赖 HttpClient 具有正确的基址。它默认为 true。 -
/GenerateClientInterfaces:true—When true, NSwag generates an interface for the client, containing all the endpoints. The generated client implements this interface. It defaults to false.
/GenerateClientInterfaces:true — 如果为 true,则 NSwag 会为客户端生成一个接口,其中包含所有端点。生成的 Client 端实现此接口。它默认为 false。 -
/JsonLibrary:SystemTextJson—This switch specifies the JSON serialization library to use. It defaults to using Newtonsoft.Json.
/JsonLibrary:SystemTextJson - 此开关指定要使用的 JSON 序列化库。它默认使用 Newtonsoft.Json。
Tip A vast number of configuration options is available for NSwag. I find that the best documentation is available in the NSwag .NET tool. You can install the tool by using dotnet tool install -g NSwag.ConsoleCore, and you can view the available options by running nswag help openapi2csclient.
提示 NSwag 有大量的配置选项可用。我发现 NSwag .NET 工具中提供了最好的文档。可以使用 dotnet tool install -g NSwag.ConsoleCore 安装该工具,并且可以通过运行 nswag help openapi2csclient 来查看可用选项。
You can set all three of these options by adding an <Options> element to the <OpenApiReference> element, as shown in the following listing. Make sure that you open and close both elements correctly so the XML stays valid; it’s an easy mistake to make when editing by hand!
您可以通过向 <<OpenApiReference> 元素添加 <Options> 元素来设置所有这三个选项,如下面的清单所示。确保正确打开和关闭这两个元素,以便 XML 保持有效;手动编辑时很容易犯错误!
Listing 11.7 Customizing NSwag generator options
清单 11.7 自定义 NSwag 生成器选项
<OpenApiReference Include="OpenAPIs\fruit.json"
  SourceUrl="http://localhost:5062/swagger/v1/swagger.json"
  Namespace="Fruit"
  ClassName="FruitClient" >
    <Options>/UseBaseUrl:false /GenerateClientInterfaces:true
[CA]/JsonLibrary:SystemTextJson</Options>  ❶
</OpenApiReference>  ❷
❶ Customizes the options NSwag uses for code generation
自定义 NSwag 用于代码生成的选项
❷ Make sure to close the outer XML element to keep the XML valid.
确保关闭外部 XML 元素以保持 XML 有效。
You’d be forgiven for thinking that after making these changes, NSwag would update the generated code next time you build. Unfortunately, it’s not necessarily that simple. NSwag watches for changes to the OpenAPI description JSON file saved in your project and will regenerate the code any time the file changes, but it won’t necessarily update when you change options in your csproj file. Even worse, doing a clean or rebuild similarly has no effect. If you find yourself in this situation, it’s best to delete the obj folder for your project to ensure that everything regenerates correctly.
如果你认为在进行这些更改后,NSwag 会在你下次构建时更新生成的代码,这是可以理解的。不幸的是,事情不一定那么简单。NSwag 会监视项目中保存的 OpenAPI 描述 JSON 文件的更改,并在文件更改时重新生成代码,但当您更改 csproj 文件中的选项时,它不一定会更新。更糟糕的是,以类似的方式进行清理或重建也没有效果。如果您发现自己处于这种情况,最好删除项目的 obj 文件夹,以确保所有内容都能正确重新生成。
Tip Another option is to make a tiny change in the OpenAPI document so that NSwag updates the generated code when you build your project. Then you can revert the OpenAPI document change.
提示 另一种选择是对 OpenAPI 文档进行微小的更改,以便 NSwag 在您构建项目时更新生成的代码。然后,您可以还原 OpenAPI 文档更改。
After you’ve persuaded NSwag to regenerate the client, you should update your code to use the new features. You can remove the Newtonsoft.Json reference from your csproj file and update your Program.cs as shown in the following listing.
在你说服 NSwag 重新生成客户端之后,你应该更新你的代码以使用新功能。您可以从 csproj 文件中删除 Newtonsoft.Json 引用并更新Program.cs,如下面的清单所示。
Listing 11.8 Using the updated NSwag client
清单 11.8 使用更新的 NSwag 客户端
using Fruit;

IFruitClient client = new FruitClient(    ❶
    new HttpClient() { BaseAddress =     ❷
        new Uri("https://localhost:7186") });    ❷

Fruit.Fruit created = await client.FruitPOSTAsync("123",
    new Fruit.Fruit { Name = "Banana", Stock = 100 });
Console.WriteLine($"Created {created.Name}");

Fruit.Fruit fetched = await client.FruitGETAsync("123");
Console.WriteLine($"Fetched {fetched.Name}");
❶ FruitClient now implements IFruitClient.
FruitClient 现在实现 IFruitClient。
❷ Sets the base address on HttpClient instead of passing as a constructor argument
在 HttpClient 上设置基址,而不是作为构造函数参数传递
If you updated the operation IDs for your API endpoints using WithName(), you may be a little surprised to see that you still have the ugly FruitPOSTAsync and FruitGETAsync methods, even though you regenerated the client. That’s because the OpenAPI description saved to your project is downloaded only once, when you initially add it. Let’s look at how to update the local OpenAPI document to reflect the changes to your remote API.
如果您使用 WithName() 更新了 API 终端节点的作 ID,您可能会有点惊讶地发现,即使您重新生成了客户端,您仍然拥有丑陋的 FruitPOSTAsync 和 FruitGETAsync 方法。这是因为保存到项目的 OpenAPI 描述在您最初添加时仅下载一次。让我们看看如何更新本地 OpenAPI 文档以反映对远程 API 的更改。
11.4.5 Refreshing the OpenAPI description
11.4.5 刷新 OpenAPI 描述
In this section you’ll learn how to update the OpenAPI description document saved to your project that’s used for generation. This document doesn’t update automatically, so the client generated by NSwag may not reflect the latest OpenAPI description for your API.
在本节中,您将了解如何更新保存到项目中用于生成的 OpenAPI 描述文档。本文档不会自动更新,因此 NSwag 生成的客户端可能无法反映您的 API 的最新 OpenAPI 描述。
Whether you used Visual Studio (as in section 11.4.1) or the .NET OpenAPI tool (as in section 11.4.2), the OpenAPI description saved as a JSON file to your project is a point-in-time snapshot of the API. If you add more metadata to your API, you need to download the OpenAPI description to your project again.
无论您使用的是 Visual Studio(如第 11.4.1 节所示)还是 .NET OpenAPI 工具(如第 11.4.2 节所示),以 JSON 文件形式保存到项目中的 OpenAPI 描述都是 API 的时间点快照。如果您向 API 添加更多元数据,则需要再次将 OpenAPI 描述下载到您的项目中。
Tip My preferred approach is low-tech: I simply navigate to the OpenAPI description in the browser, copy the JSON contents, and paste it into the JSON file in my project.
提示 我的首选方法是低技术含量的方法:我只需在浏览器中导航到 OpenAPI 描述,复制 JSON 内容,然后将其粘贴到我项目的 JSON 文件中。
If you don’t want to update the OpenAPI description manually, you can use Visual Studio or the .NET OpenAPI tool to refresh the saved document for you.
如果不想手动更新 OpenAPI 说明,可以使用 Visual Studio 或 .NET OpenAPI 工具刷新为您保存文档。
Warning If you originally used Visual Studio, you can’t refresh the document by using the OpenAPI tool and vice versa. The reason is that Visual Studio uses the SourceUri attribute on the OpenApiReference element and the .NET tool uses the SourceUrl attribute. And yes, that situation is arbitrary and annoying!
警告 如果您最初使用的是 Visual Studio,则无法使用 OpenAPI 工具刷新文档,反之亦然。原因是 Visual Studio 使用 OpenApiReference 元素上的 SourceUri 属性,而 .NET 工具使用 SourceUrl 属性。是的,这种情况是武断和烦人的!
To update your OpenAPI description by using Visual Studio, follow these steps:
要使用 Visual Studio 更新 OpenAPI 描述,请执行以下步骤:
-
Ensure that your API is running and that the OpenAPI description document is available.
确保您的 API 正在运行,并且 OpenAPI 描述文档可用。 -
Navigate to the connected services page for your project by choosing Project > Connected Services > Manage Connected Services.
通过选择 Project > Connected Services 导航到项目的 Connected Services 页面> 管理连接的服务。
3.Select the overflow button next to your OpenAPI reference and choose Refresh, as shown in figure 11.9. Then choose Yes in the dialog box to update your OpenAPI document.
选择 OpenAPI 引用旁边的溢出按钮,然后选择 Refresh,如图11.9所示. 然后在对话框中选择 Yes 以更新您的 OpenAPI 文档。
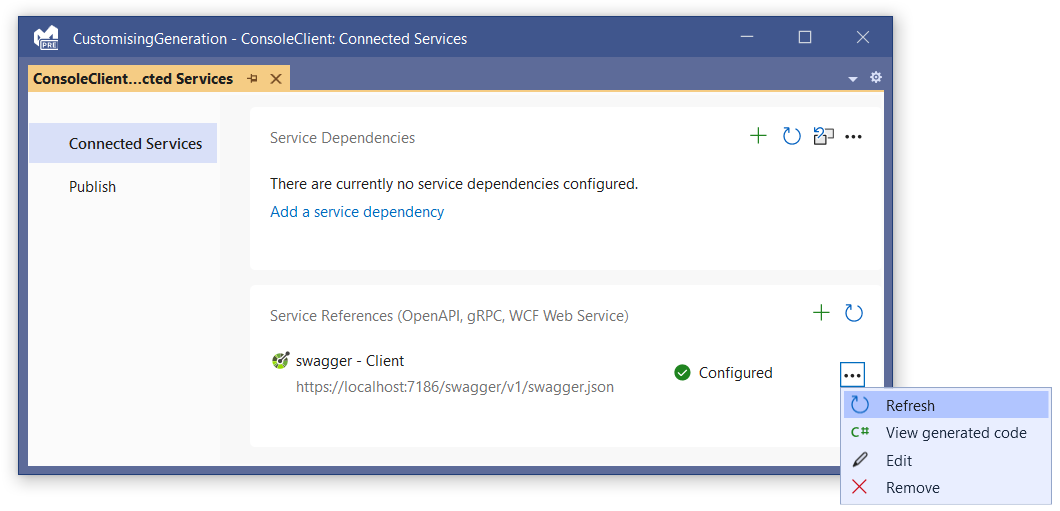
Figure 11.9 Updating the OpenAPI description for an API. Choose Refresh to download the OpenAPI description again and save it to your project. Then NSwag will generate an updated client on the next build.
图 11.9 更新 API 的 OpenAPI 描述。选择 Refresh (刷新) 以再次下载 OpenAPI 描述并将其保存到您的项目中。然后 NSwag 将在下一个构建中生成更新的客户端。
To update your OpenAPI description by using the .NET OpenAPI tool, follow these steps:
若要使用 .NET OpenAPI 工具更新 OpenAPI 说明,请执行以下步骤:
-
Ensure that your API is running and that the OpenAPI description document is available.
确保您的 API 正在运行,并且 OpenAPI 描述文档可用。 -
From your project folder, run the following command, using the same URL you used to add the OpenAPI description originally:
在项目文件夹中,使用最初用于添加 OpenAPI 描述的相同 URL 运行以下命令:
dotnet openapi refresh http://localhost:5062/swagger/v1/swagger.jsonAfter updating your OpenAPI description by using either Visual Studio or the .NET tool, build your application to trigger NSwag to regenerate your client. Any changes you made to your OpenAPI description (such as adding operation IDs) will be reflected in the generated code.
使用 Visual Studio 或 .NET 工具更新 OpenAPI 描述后,构建应用程序以触发 NSwag 重新生成客户端。您对 OpenAPI 描述所做的任何更改(例如添加作 ID)都将反映在生成的代码中。
I think that client generation is the killer app for OpenAPI descriptions, but it works best when you use metadata to add extensive documentation to your APIs. In section 11.5 you’ll learn how to go one step further by adding summaries and descriptions to your endpoints.
我认为客户端生成是 OpenAPI 描述的杀手级应用程序,但当您使用元数据向 API 添加大量文档时,它的效果最佳。在 Section 11.5 中,您将学习如何通过向终端节点添加摘要和描述来更进一步。
11.5 Adding descriptions and summaries to your endpoints
11.5 向终端节点 添加描述和摘要
In this section you’ll learn how to add extra descriptions and summaries to your OpenAPI description document. Tools such as Swagger UI and NSwag use these extra descriptions and summaries to provide a better developer experience working with your API. You’ll also learn about alternative ways to add metadata to your minimal API endpoints.
在本节中,您将学习如何向 OpenAPI 描述文档添加额外的描述和摘要。Swagger UI 和 NSwag 等工具使用这些额外的描述和摘要来提供更好的开发人员使用 API 的体验。您还将了解将元数据添加到最小 API 终端节点的替代方法。
11.5.1 Using fluent methods to add descriptions
11.5.1 使用 Fluent 方法添加描述
Whilst working with your minimal API endpoints and calling methods such as WithName() and WithTags(), you may have noticed the methods WithSummary() and WithDescription(). These methods add metadata to your endpoint in exactly the same way as the other With* methods, but unfortunately, they don’t update your OpenAPI description without some extra changes.
在使用最小 API 端点并调用 WithName() 和 WithTags() 等方法时,您可能已经注意到了 WithSummary() 和 WithDescription() 方法。这些方法以与其他 With* 方法完全相同的方式将元数据添加到您的终端节点,但遗憾的是,如果不进行一些额外更改,它们不会更新您的 OpenAPI 描述。
To make use of the summary and description metadata, you must add an extra NuGet package, Microsoft.AspNetCore.OpenApi, and call WithOpenApi() on your endpoint. This method ensures that the summary and description metadata are added correctly to the OpenAPI description when Swashbuckle generates the document. Add this package via the NuGet package manager or the .NET CLI by calling
若要使用摘要和说明元数据,必须添加额外的 NuGet 包 Microsoft.AspNetCore.OpenApi,并在终结点上调用 WithOpenApi()。此方法可确保在 Swashbuckle 生成文档时将摘要和描述元数据正确添加到 OpenAPI 描述中。通过 NuGet 包管理器或 .NET CLI 添加此包
dotnet add package Microsoft.AspNetCore.OpenApifrom the project folder. Then update your endpoints to add summaries and/or descriptions, making sure to call WithOpenApi(), as shown in the following listing.
从项目文件夹中。然后更新您的终端节点以添加摘要和/或描述,确保调用 WithOpenApi(),如下面的清单所示。
Listing 11.9 Adding summaries and descriptions to endpoints using WithOpenApi()
列表 11.9 使用 WithOpenApi() 向端点添加摘要和描述
using System.Collections.Concurrent;

WebApplicationBuilder builder = WebApplication.CreateBuilder(args);

builder.Services.AddEndpointsApiExplorer();
builder.Services.AddSwaggerGen();

WebApplication app = builder.Build();

app.UseSwagger();
app.UseSwaggerUI();

var _fruit = new ConcurrentDictionary<string, Fruit>();

app.MapGet("/fruit/{id}", (string id) =>
    _fruit.TryGetValue(id, out var fruit)
        ? TypedResults.Ok(fruit)
        : Results.Problem(statusCode: 404))
    .WithName("GetFruit")
    .WithTags("fruit")
    .Produces<Fruit>()
    .ProducesProblem(404)
    .WithSummary("Fetches a fruit")    ❶
    .WithDescription("Fetches a fruit by id, or returns 404" +    ❷
      " if no fruit with the ID exists")    ❷
    .WithOpenApi();    ❸

app.Run();
record Fruit(string Name, int Stock);
❶ Adds a summary to the endpoint
向端点添加摘要
❷ Adds a description to the endpoint
向端点添加描述
❸ Exposes the metadata added by summary and description to the OpenAPI description
将 summary 和 description 添加的元数据公开到 OpenAPI 描述
With these changes, Swagger UI reflects the extra metadata, as shown in figure 11.10. NSwag also uses the summary as a documentation comment when it generates the endpoints on the client. You can see in figure 11.10, however, that one piece of documentation is missing: a description of the parameter id.
通过这些更改,Swagger UI 会反映额外的元数据,如图 11.10 所示。NSwag 在客户端上生成端点时,还会将摘要用作文档注释。但是,您可以在图 11.10 中看到缺少一条文档:参数 id 的描述。
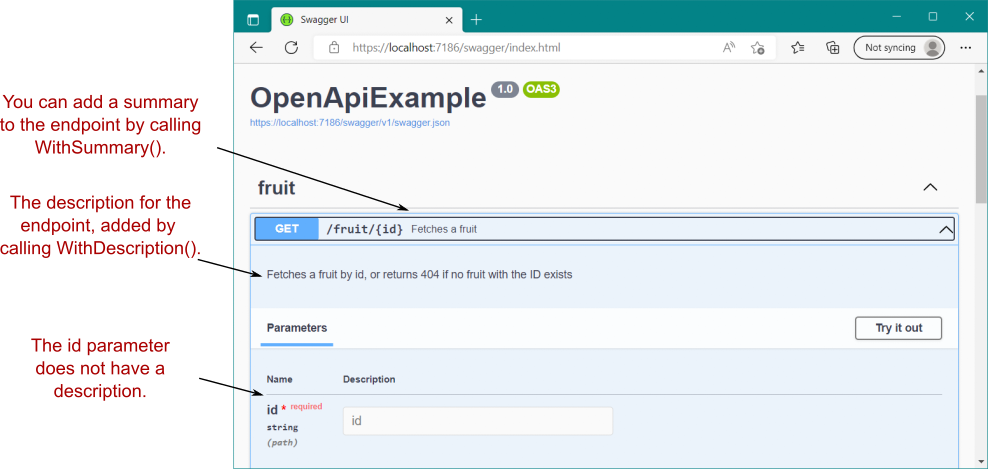
Figure 11.10 The summary and description metadata displayed in the Swagger UI. Note that no description is displayed for the id parameter.
图 11.10 Swagger UI 中显示的摘要和描述元数据。请注意,不显示 id 参数的描述。
Unfortunately, you don’t have a particularly elegant way to add documentation for your parameters. The suggested approach is to use an overload of the WithOpenApi() method, which takes a lambda method where you can add a description for the parameter:
遗憾的是,您没有一种特别优雅的方法来为您的参数添加文档。建议的方法是使用 WithOpenApi() 方法的重载,该方法采用 lambda 方法,您可以在其中添加参数的描述:
.WithOpenApi(o =>
{
    o.Parameters[0].Description = "The id of the fruit to fetch";
    o.Summary = "Fetches a fruit";
    return o;
});
This example shows that you can use the WithOpenApi() method to set any of the OpenAPI metadata for the endpoint, so you can use this single method to set (for example) the summary and tags instead of using the dedicated WithSummary() or WithTags() method.
此示例显示,您可以使用 WithOpenApi() 方法为终端节点设置任何 OpenAPI 元数据,因此您可以使用此单一方法来设置(例如)摘要和标签,而不是使用专用的 WithSummary() 或 WithTags() 方法。
Adding all this metadata undoubtedly documents your API in more detail and makes your generated code easier to understand. But if you’re anything like me, the sheer number of methods you have to call makes it hard to see where your endpoint ends and the metadata begins! In section 11.5.2 we’ll look at an alternative approach that involves using attributes.
添加所有这些元数据无疑可以更详细地记录您的 API,并使您生成的代码更易于理解。但是,如果您和我一样,您必须调用的方法数量之多使得很难看到您的终端节点从何处结束,元数据从何处开始!在 Section 11.5.2 中,我们将介绍一种涉及使用 attributes 的替代方法。
11.5.2 Using attributes to add metadata
11.5.2 使用属性添加元数据
I’m a fan of fluent interfaces in many cases, as I feel that they make code easier to understand. But the endpoint metadata extensions, such as those shown in listing 11.9, go to extremes. It’s hard to understand what the endpoint is doing with all the noise from the metadata methods! Ever since version 1.0, C# has had a canonical way to add metadata to code—attributes—and you can replace your endpoint extension methods with dedicated attributes if you prefer.
在许多情况下,我是 Fluent 接口的粉丝,因为我觉得它们使代码更容易理解。但是端点元数据扩展(如清单 11.9 中所示的扩展)走向了极端。很难理解终端节点对元数据方法的所有干扰做了什么!从 1.0 版开始,C# 就有一种将元数据添加到代码中的规范方法 — 属性 — 如果您愿意,可以将端点扩展方法替换为专用属性。
Almost all the extension methods that you add to your endpoint have an equivalent attribute you can use instead. These attributes should be applied directly to the handler method (the lambda function, if that’s what you’re using). Listing 11.10 shows the equivalent of listing 11.9, using attributes instead of fluent methods where possible. The WithOpenApi() method is the only call that can’t be replaced; it must be included so that Swashbuckle reads the OpenAPI metadata correctly.
您添加到终端节点的几乎所有扩展方法都具有您可以改用的等效属性。这些属性应直接应用于处理程序方法(lambda 函数,如果您使用的是 lambda 函数)。清单 11.10 显示了与清单 11.9 等效的清单,尽可能使用属性而不是连贯方法。WithOpenApi() 方法是唯一无法替换的调用;必须包含它,以便 Swashbuckle 正确读取 OpenAPI 元数据。
Listing 11.10 Using attributes to describe your API
清单 11.10 使用属性来描述 API
using System.Collections.Concurrent;

WebApplicationBuilder builder = WebApplication.CreateBuilder(args);

builder.Services.AddEndpointsApiExplorer();
builder.Services.AddSwaggerGen();

WebApplication app = builder.Build();

app.UseSwagger();
app.UseSwaggerUI();

var _fruit = new ConcurrentDictionary<string, Fruit>();

app.MapGet("/fruit/{id}",
    [EndpointName("GetFruit")]  ❶
    [EndpointSummary("Fetches a fruit")]  ❶
    [EndpointDescription("Fetches a fruit by id, or returns 404" + ❶
        " if no fruit with the ID exists")]  ❶
    [ProducesResponseType(typeof(Fruit), 200)]  ❶
    [ProducesResponseType(typeof(HttpValidationProblemDetails), 404, ❶
        "application/problem+json")]  ❶
    [Tags("fruit")]  ❶
    (string id) =>
        _fruit.TryGetValue(id, out var fruit)
            ? TypedResults.Ok(fruit)
            : Results.Problem(statusCode: 404))
    .WithOpenApi(o =>
    {
        o.Parameters[0].Description = "The id of the fruit to fetch";
        return o;
    });

app.Run();
record Fruit(string Name, int Stock);
❶ You can use attributes instead of fluent method calls.
您可以使用属性而不是 Fluent 方法调用。
Whether you think listing 11.10 is better than listing 11.9 is largely a matter of taste, but the reality is that neither is particularly elegant. In both cases the metadata significantly obscures the intent of the API, so it’s important to consider which metadata is worth adding and which is unnecessary noise. That balance may shift depending on who your audience is (internal or external customers), how mature your API is, and how much you can extract to helper functions.
你是否认为列出 11.10 比列出 11.9 更好,这在很大程度上是一个品味问题,但现实是两者都不是特别优雅。在这两种情况下,元数据都会严重掩盖 API 的意图,因此重要的是要考虑哪些元数据值得添加,哪些是不必要的干扰。这种平衡可能会根据您的受众群体(内部或外部客户)、API 的成熟度以及可以提取到帮助程序函数的数量。
11.5.3 Using XML documentation comments to add metadata
11.5.3 使用 XML 文档注释添加元数据
One understandable complaint about both the attribute and method approaches for attaching OpenAPI metadata is that the summary and parameter descriptions are divorced from the endpoint handler to which they apply. In this section you’ll see how an alternative approach that uses Extensible Markup Language (XML) documentation comments.
关于附加 OpenAPI 元数据的属性和方法方法的一个可以理解的抱怨是,摘要和参数描述与它们所应用的端点处理程序分离。在本节中,您将了解如何使用可扩展标记语言 (XML) 文档注释的替代方法。
Every C# developer user will be used to the handy descriptions about methods and parameters you get in your IDE from IntelliSense. You can add these descriptions to your own methods by using XML documentation comments, for example:
每个 C# 开发人员用户都将习惯于从 IntelliSense 获得的有关 IDE 中的方法和参数的便捷说明。您可以使用 XML 文档注释将这些描述添加到您自己的方法中,例如:
/// <summary>
/// Adds one to the provided value and returns it
/// </summary>
/// <param name="value">The value to increment</param>
public int Increment(int value) => value + 1;
In your IDE—whether that’s Visual Studio, JetBrains Rider, or Visual Studio Code—this description appears when you try to invoke the method. Wouldn’t it be nice to use the same syntax to define the summary and parameter descriptions for our OpenAPI endpoints? Well, the good news is that we can!
在您的 IDE 中(无论是 Visual Studio、JetBrains Rider 还是 Visual Studio Code),当您尝试调用该方法时,会显示此描述。使用相同的语法来定义 OpenAPI 端点的摘要和参数描述不是很好吗?好吧,好消息是我们可以!
Warning The use of XML documentation comments is only partially supported in .NET 7. These comments work only when you have static or instance method endpoint handlers, not lambda methods or local functions. You can find the issue tracking full support for XML comments at https://github.com/dotnet/aspnetcore/issues/39927.
警告 .NET 7 仅部分支持使用 XML 文档注释。这些注释仅在您具有静态或实例方法终端节点处理程序,而不是 lambda 方法或本地函数时有效。您可以找到问题在 https://github.com/dotnet/aspnetcore/issues/39927 跟踪对 XML 注释的完全支持。
Swashbuckle can use the XML comments you add to your endpoint handlers as the descriptions for your OpenAPI description. When enabled, the .NET software development kit (SDK) generates an XML file containing all your documentation comments. Swashbuckle can read this file on startup and use it to generate the OpenAPI descriptions, as shown in figure 11.11.
Swashbuckle 可以使用您添加到终端节点处理程序的 XML 注释作为 OpenAPI 描述的描述。启用后,.NET SDK 会生成一个包含所有文档注释的 XML 文件。Swashbuckle 可以在启动时读取此文件并使用它来生成 OpenAPI 描述,如图 11.11 所示。
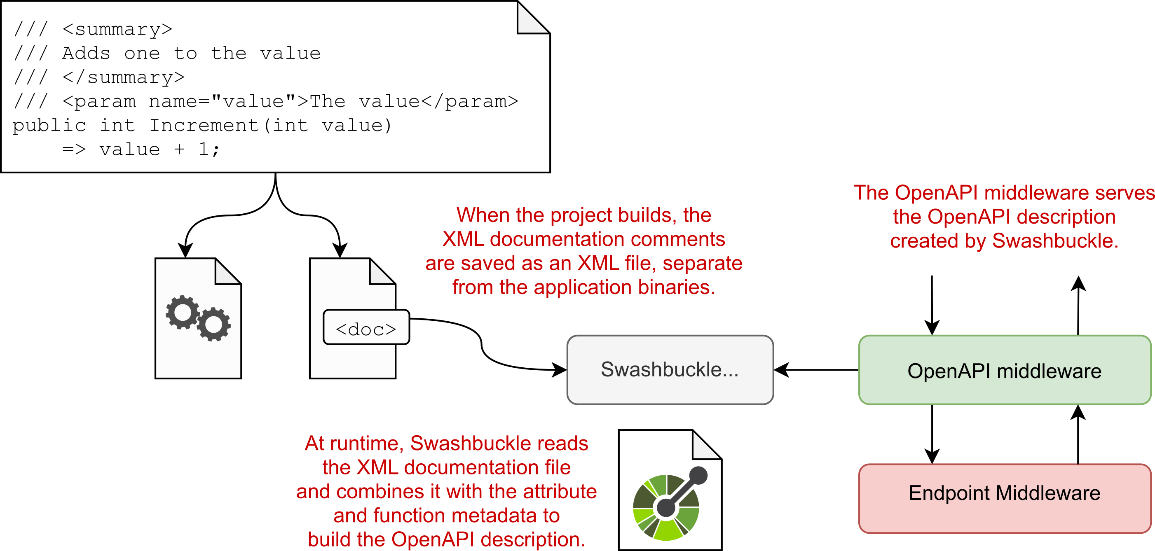
Figure 11.11 You can configure a .NET application to export documentation comments to a dedicated XML file when it builds. Swashbuckle reads this documentation file at runtime, combining it with the attribute and fluent method metadata for an endpoint to generate the final OpenAPI description.
图 11.11 您可以配置 .NET 应用程序以将文档注释导出到专用 XML 文件当它构建时。Swashbuckle 在运行时读取此文档文件,将其与终端节点的属性和 Fluent 方法元数据相结合,以生成最终的 OpenAPI 描述。
To enable XML documentation comment extraction for your OpenAPI description document you must do three things:
要为您的 OpenAPI 描述文档启用 XML 文档注释提取,您必须执行以下三项作:
- Enable documentation generation for your project. Add the
<GenerateDocumentationFile>inside a<PropertyGroup>in your csproj file, and set it to true:
为您的项目启用文档生成。在<GenerateDocumentationFile>中添加<PropertyGroup>,并将其设置为
true:
<PropertyGroup>
  <GenerateDocumentationFile>true</GenerateDocumentationFile>
</PropertyGroup>- Configure Swashbuckle to read the generated XML document in SwaggerGen():
配置 Swashbuckle 以读取 SwaggerGen() 中生成的 XML 文档:
builder.Services.AddSwaggerGen(opts =>
{
    var file = $"{Assembly.GetExecutingAssembly().GetName().Name}.xml";
    opts.IncludeXmlComments(Path.Combine(AppContext.BaseDirectory, file));
});
3.Use a static or instance method handler and add the XML comments, as shown in the following listing.
使用静态或实例方法处理程序并添加 XML 注释,如下面的清单所示。
Listing 11.11 Adding documentation comments to an endpoint handler
Listing 11.11 向端点处理程序添加文档注释
using Microsoft.AspNetCore.Mvc;
using System.Collections.Concurrent;
using System.Reflection;

WebApplicationBuilder builder = WebApplication.CreateBuilder(args);

builder.Services.AddEndpointsApiExplorer();
builder.Services.AddSwaggerGen(opts =>  ❶
{
    var file = $"{Assembly.GetExecutingAssembly().GetName().Name}.xml";
    opts.IncludeXmlComments(Path.Combine(AppContext.BaseDirectory, file));
});

WebApplication app = builder.Build();

app.UseSwagger();
app.UseSwaggerUI();

var _fruit = new ConcurrentDictionary<string, Fruit>();

var handler = new FruitHandler(fruit);  ❷
app.MapGet("/fruit/{id}", handler.GetFruit)  ❷
    .WithName("GetFruit");  ❸

app.Run();
record Fruit(string Name, int Stock);

internal class FruitHandler
{
    private readonly ConcurrentDictionary<string, Fruit> _fruit;
    public FruitHandler(ConcurrentDictionary<string, Fruit> fruit)
    {
        _fruit = fruit;
    }

    /// <summary>    ❹
    /// Fetches a fruit by id, or returns 404 if it does not exist   ❹
    /// </summary>    ❹
    /// <param name="id" >The ID of the fruit to fetch</param>    ❹
    /// <response code="200">Returns the fruit if it exists</response>  ❹
    /// <response code="404">If the fruit doesn't exist</response>   ❹
    [ProducesResponseType(typeof(Fruit), 200)]    ❺
    [ProducesResponseType(typeof(HttpValidationProblemDetails),   ❺
        404, "application/problem+json")]    ❺
    [Tags("fruit")]    ❺
    public IResult GetFruit(string id)
        => _fruit.TryGetValue(id, out var fruit)
            ? TypedResults.Ok(fruit)
            : Results.Problem(statusCode: 404);
}
❶ Enables XML comments for your OpenAPI descriptions
为您的 OpenAPI 描述启用 XML 注释
❷ You must use static or instance handlers, not lambda methods.
您必须使用静态或实例处理程序,而不是 lambda 方法。
❸ You can add extra metadata by using methods.
您可以使用 methods 添加额外的元数据。
❹ The XML comments are used in the OpenAPI description.
XML 注释用于 OpenAPI 描述。
❺ You can also add extra metadata by using attributes on the handler method.
您还可以通过在 handler 方法上使用 attributes 来添加额外的元数据。
I like the XML comment approach, as it feels much more natural for C# and the comments are often deemphasized in IDEs, reducing visual clutter. You’ll still need to use attributes and/or fluent methods to fully describe your endpoints for OpenAPI, but every little bit helps!
我喜欢 XML 注释方法,因为它对 C# 来说感觉更自然,而且注释在 IDE 中经常被淡化,从而减少了视觉混乱。您仍然需要使用属性和/或 Fluent 方法来完整描述 OpenAPI 的端点,但每一点都有帮助!
As I’ve mentioned several times, how far you go with your OpenAPI description is up to you and how much value you get from it. If you want to use OpenAPI only for local testing with Swagger UI, it doesn’t make sense to clutter your code with lots of extra metadata. In fact, in those cases it would be best to add the swagger services and middleware conditionally only when you’re in development, as in this example:
正如我多次提到的,您对 OpenAPI 描述的了解程度取决于您,以及您从中获得多少价值。如果您只想将 OpenAPI 用于 Swagger UI 的本地测试,那么用大量额外的元数据来杂乱无章的代码是没有意义的。事实上,在这些情况下,最好仅在开发过程中有条件地添加 swagger 服务和中间件,如下例所示:
WebApplicationBuilder builder = WebApplication.CreateBuilder(args);

if(builder.Environment.IsDevelopment())
{
    builder.Services.AddEndpointsApiExplorer();
    builder.Services.AddSwaggerGen();
}

WebApplication app = builder.Build();
if(app.Environment.IsDevelopment())
{
    app.UseSwagger();
    app.UseSwaggerUI();
}

app.Run();
On the other hand, if you’re generating C# clients for calling your API or exposing your API for public consumption, the more metadata you add, the better! It’s also worth noting that you can add OpenAPI descriptions for all the endpoints in your application, not only your minimal API endpoints. When you create web API controllers in chapter 20, you can include them = too.
另一方面,如果要生成 C# 客户端来调用 API 或公开 API 以供公众使用,则添加的元数据越多越好!还值得注意的是,您可以为应用程序中的所有终端节点添加 OpenAPI 描述,而不仅仅是您的最小 API 终端节点。在第 20 章中创建 Web API 控制器时,也可以包含它们。
11.6 Knowing the limitations of OpenAPI
11.6 了解 OpenAPI 的局限性
In this chapter I’ve described the benefits of OpenAPI, both for simple testing with Swagger UI and for code generation. But like most things in software, it’s not all sweetness and light. OpenAPI and Swagger have limitations that you may run into, particularly as your APIs increase in complexity. In this section I describe some of the challenges to watch out for.
在本章中,我介绍了 OpenAPI 的好处,无论是使用 Swagger UI 进行简单测试还是代码生成。但就像软件中的大多数东西一样,它并不全是甜蜜和轻松。OpenAPI 和 Swagger 存在您可能会遇到的限制,尤其是在 API 复杂性增加时。在本节中,我将介绍一些需要注意的挑战。
11.6.1 Not all APIs can be described by OpenAPI
11.6.1 并非所有 API 都可以由 OpenAPI 描述
The OpenAPI specification is meant to describe your API so that any client knows how to call it. Unfortunately, OpenAPI can’t describe all APIs, which isn’t an accident. The OpenAPI specification says “Not all services can be described by OpenAPI—this specification is not intended to cover every possible style of REST APIs.” So,= the important question is which APIs can’t it describe?
OpenAPI 规范旨在描述您的 API,以便任何客户端都知道如何调用它。不幸的是,OpenAPI 无法描述所有 API,这并非偶然。OpenAPI 规范指出“并非所有服务都可以由 OpenAPI 描述— 此规范并不打算涵盖所有可能的 REST API 样式。那么,重要的问题是哪些 API 不能描述?
One classic example is an API that follows the REST design known as Hypertext As the Engine of Application State (HATEOAS). In this design, each request to an API endpoint includes a list of links describing the actions you can take and the paths to use for each action, enabling clients to discover which actions are available for a given resource. The server can add or remove links dynamically, depending on the state of the resource and which user is making the request.
一个典型的示例是遵循 REST 设计的 API,称为超文本作为应用程序状态引擎 (HATEOAS)。在此设计中,对 API 终端节点的每个请求都包含一个链接列表,这些链接描述了您可以执行的作以及用于每个作的路径,使客户端能够发现哪些作可用于给定资源。服务器可以动态添加或删除链接,具体取决于资源的状态和发出请求的用户。
Tip Martin Fowler has a great description of the REST maturity models, in which HATEOAS is the highest level of maturity, at http://mng.bz/0K1N.
提示 Martin Fowler 对 REST 成熟度模型进行了很好的描述,其中 HATEOAS 是最高级别的成熟度,达到 http://mng.bz/0K1N。
HATEOAS generally introduces more complexity than is worthwhile for small projects, but it’s a great way to decouple your client-side applications from your server APIs so that they can evolve separately. This approach can be invaluable when you have large or independent teams. The problem for OpenAPI is that it wasn’t designed for these kinds of dynamic APIs. OpenAPI wants to know up front what the responses are for each of your endpoints, which isn’t information that you can give it if you’re following HATEOAS.
HATEOAS 通常会带来比小型项目所值得的更多的复杂性,但这是将客户端应用程序与服务器 API 分离的好方法,以便它们可以单独发展。当您拥有大型或独立团队时,这种方法可能非常宝贵。OpenAPI 的问题在于它不是为这些类型的动态 API 设计的。OpenAPI 希望提前知道每个终端节点的响应是什么,如果您遵循 HATEOAS,则无法提供这些信息。
In a different scenario, you may have multiple backend APIs, each with its own OpenAPI specification. You expose a single, unified API gateway app, with which all your clients interact. Unfortunately, even though each backend API has an OpenAPI specification, there’s no easy way to combine the APIs into a single unified document that you can expose in your API gateway and which clients can use for testing and code generation.
在不同的情况下,您可能有多个后端 API,每个 API 都有自己的 OpenAPI 规范。您公开一个统一的 API Gateway 应用程序,所有客户端都与该应用程序进行交互。遗憾的是,即使每个后端 API 都有一个 OpenAPI 规范,也没有简单的方法可以将这些 API 组合成一个统一的文档,您可以在 API 网关中公开该文档,客户端可以使用该文档进行测试和代码生成。
Another common problem centers on securing your APIs with authentication and authorization. The OpenAPI specification contains a section about describing your authentication requirements, and Swagger UI supports them. Where things fall down is if you’re using any extensions to the common authentication protocols or advanced features. Although some of these workflows are possible, in some cases Swagger UI simply may not support your workflow, rendering Swagger UI unusable.
另一个常见问题集中在使用身份验证和授权保护您的 API 上。OpenAPI 规范包含有关描述身份验证的部分要求,并且 Swagger UI 支持它们。出现问题的地方是如果您使用了常见身份验证协议或高级功能的任何扩展。尽管其中一些工作流程是可能的,但在某些情况下,Swagger UI 可能根本不支持您的工作流程,从而导致 Swagger UI 不可用。
11.6.2 Generated code is opinionated
11.6.2 生成的代码是固执己见的
At the end of section 11.4 I said that code generation is the killer feature for Open API documents, and in many cases it is. That statement, however, assumes that you like the generated code. If the tooling you use—whether that’s NSwag or some other code generator—doesn’t generate the code you want, you may find yourself spending a lot of effort customizing and tweaking the output. At some point and for some APIs, it may be simpler and easier to write your own client!
在 11.4 节的结尾,我说过代码生成是 Open API 文档的杀手级功能,在许多情况下确实如此。但是,该语句假定您喜欢生成的代码。如果您使用的工具(无论是 NSwag 还是其他代码生成器)没有生成您想要的代码,您可能会发现自己花费了大量精力来自定义和调整输出。在某些时候,对于某些 API,编写自己的客户端可能会更简单、更容易!
Note A classic complaint (with which I sympathize) is the use of exceptions for process flow whenever an error or unexpected status code is returned. Not all errors are exceptional, throwing exceptions is relatively expensive computationally, and it often means that every call made with a client needs custom exception handling. This design sometimes makes code generation seem more like a burden than a benefit.
注意 一个典型的抱怨(我对此表示同情)是每当返回错误或意外状态代码时,都会对流程使用异常。并非所有错误都是异常的,引发异常的计算成本相对较高,这通常意味着使用客户端进行的每个调用都需要自定义异常处理。这种设计有时使代码生成看起来更像是一种负担,而不是一种好处。
Another, subtler issue arises when you use code generation with two separate but related OpenAPI documents, such as a products API and a cart API. If you use the techniques in this chapter to generate the clients and then try to follow this simple sequence, you’ll run into trouble:
当您将代码生成与两个独立但相关的 OpenAPI 文档(例如产品 API 和购物车 API)一起使用时,会出现另一个更微妙的问题。如果使用本章中的技术生成客户端,然后尝试遵循以下简单顺序,则会遇到麻烦:
-
Retrieve a Product instance from the products API by using ProductsClient.Get()
使用 ProductsClient.Get() 从 products API 检索 Product 实例。 -
Send the retrieved Product to the cart API by using CartClient.Add(Product)
使用 将检索到的 Product 发送到购物车 API CartClient.Add(Product) 的
Unfortunately, the generated Product type retrieved from the products API is a different type from the generated Product type that the CartClient requires, so this code won’t compile. Even if the type has the same properties and is serialized to the same JSON when it’s sent to the client, C# considers the objects to be different types and won’t let them swap places. You must copy the values manually from the first Product instance to a new instance. These complaints are mostly small niggles and paper cuts, but they can add up when you run into them often.
遗憾的是,从 products API 检索到的生成的 Product 类型与 CartClient 需要的生成的 Product 类型不同,因此此代码无法编译。即使类型具有相同的属性,并且在发送到客户端时序列化为相同的 JSON,C# 也会将对象视为不同的类型,并且不允许它们交换位置。您必须手动将值从第一个 Product 实例复制到新实例。这些抱怨大多是小问题和剪纸,但当您经常遇到它们时,它们会累积起来。
11.6.3 Tooling often lags the specification
11.6.3 工具经常滞后于规格
Another factor to consider is the many groups that are involved in generating an OpenAPI document and generating a client:
另一个需要考虑的因素是生成 OpenAPI 文档和生成客户端所涉及的许多组:
-
The Open API specification is a community-driven project written by the OpenAPI Initiative group.
Open API 规范是由 OpenAPI Initiative 小组编写的社区驱动型项目。 -
Microsoft provides the tooling built into ASP.NET Core for supplying the metadata about your API endpoints.
Microsoft 提供了 ASP.NET Core 中内置的工具,用于提供有关 API 终端节点的元数据。 -
Swashbuckle is an open-source project that uses the ASP.NET Core metadata to generate an OpenAPI-compatible document.
Swashbuckle 是一个开源项目,它使用 ASP.NET Core 元数据生成与 OpenAPI 兼容的文档。 -
NSwag is an open-source project that takes an OpenAPI-compatible document and generates clients (and has many other features!).
NSwag 是一个开源项目,它采用与 OpenAPI 兼容的文档并生成客户端(并且具有许多其他功能!) -
Swagger UI is an open-source project for interacting with APIs based on the OpenAPI document.
Swagger UI 是一个开源项目,用于与基于 OpenAPI 文档的 API 交互。
Some of these projects have direct dependencies on others (everything depends on the OpenAPI specification, for example), but they may evolve at difference paces. If Swashbuckle doesn’t support some new feature of the OpenAPI specification, it won’t appear in your documents, and NSwag won’t be able to use it.
其中一些项目直接依赖于其他项目(例如,一切都取决于 OpenAPI 规范),但它们的发展速度可能不同。如果 Swashbuckle 不支持 OpenAPI 规范的某些新功能,它不会出现在你的文档中,NSwag 也无法使用它。
Most of the tools provide ways to override the behavior to work around these rough edges, but the reality is that if you’re using newer or less popular features, you may have more difficulty persuading all the tools in your tool chain to play together nicely.
大多数工具都提供了覆盖行为的方法,以解决这些粗糙的边缘,但现实情况是,如果您使用的是较新或不太流行的功能,则说服工具链中的所有工具很好地协同工作可能会更加困难。
Overall, the important thing to remember is that OpenAPI documents may work well if you have simple requirements or want to use Swagger UI only for testing. In these cases, there’s little investment required to add OpenAPI support, and it can improve your workflow, so you might find it worthwhile to try.
总的来说,要记住的重要一点是,如果您有简单的要求或只想使用 Swagger UI 进行测试,OpenAPI 文档可能会很好地工作。在这些情况下,添加 OpenAPI 支持只需要很少的投资,而且它可以改善您的工作流程,因此您可能会发现值得尝试。
If you have more complex requirements, are creating an API that OpenAPI can’t easily describe or aren’t a fan of the code generation, it may not be worth your time to invest heavily in OpenAPI for your documents.
如果您有更复杂的要求,正在创建 OpenAPI 无法轻松描述的 API,或者不喜欢代码生成,那么可能不值得您花时间为您的文档投入大量 OpenAPI。
Tip If you’re a fan of code generation but prefer more of a remote procedure call (RPC) style of programming, it’s worthwhile to look at gRPC. Code generation for gRPC is robust, supported across multiple languages, and has great support in .NET. You can read more in the documentation at https://learn.microsoft.com/aspnet/core/grpc.
提示 如果您喜欢代码生成,但更喜欢远程过程调用 (RPC) 风格的编程,那么值得考虑一下 gRPC。gRPC 的代码生成非常健壮,支持多种语言,并您可以在 https://learn.microsoft.com/aspnet/core/grpc 上的文档中阅读更多内容。
In chapter 12 we’ll take a brief look at the new object-relational mapper that fits well with ASP.NET Core: Entity Framework Core. You’ll get only a taste of it in this book, but you’ll learn how to load and save data, build a database from your code, and migrate the database as your code evolves.
在第 12 章中,我们将简要介绍非常适合 ASP.NET Core 的新对象关系映射器:Entity Framework Core。在本书中,您只会对它有所了解,但您将学习如何加载和保存数据、从代码构建数据库,以及随着代码的发展迁移数据库。
11.7 Summary
11.7 总结
OpenAPI is a specification for describing HTTP APIs in a machine-readable format, as a JSON document. You can use this document to drive other tooling, such as code generators or API testers.
OpenAPI 是一种规范,用于以机器可读格式(如 JSON 文档)描述 HTTP API。您可以使用本文档来驱动其他工具,例如代码生成器或 API 测试器。
You can add OpenAPI document generation to an ASP.NET Core app by using the NSwag or Swashbuckle NuGet package. These packages work with ASP.NET Core services to read metadata about all the endpoints in your application to build an OpenAPI document.
您可以使用 NSwag 或 Swashbuckle NuGet 包将 OpenAPI 文档生成添加到 ASP.NET Core 应用程序。这些软件包与 ASP.NET Core 服务配合使用,以读取有关应用程序中所有终端节点的元数据,以构建 OpenAPI 文档。
The Swashbuckle Swagger middleware exposes the OpenAPI Document for your application at the path /swagger/v1/swagger.json by default. Exposing the document in this way makes it easy for other tools to understand the endpoints in your application.
Swashbuckle Swagger 中间件在路径中公开应用程序的 OpenAPI 文档/swagger/v1/swagger.json 中。暴露该文档使其他工具能够轻松理解应用程序中的端点。
You can explore and test your API by using Swagger UI. The Swashbuckle Swagger UI middleware exposes the UI at the path /swagger by default. You can use Swagger UI to explore your API, send test requests to your endpoints, and check how well your API is documented.
您可以使用 Swagger UI 探索和测试您的 API。默认情况下,Swashbuckle Swagger UI 中间件在路径 /swagger 处公开 UI。您可以使用 Swagger UI 来浏览 API,向终端节点发送测试请求,并检查 API 的文档记录情况。
You can customize the OpenAPI description of your endpoints by adding metadata. You can provide tags, for example, by calling WithTags() on an endpoint and specify that an endpoint returns a type T with a 201 status code using Produces<T>(201). Adding metadata improves your API OpenAPI description, which in turn improves tooling such as Swagger UI.
您可以通过添加元数据来自定义终端节点的 OpenAPI 描述。例如,您可以通过在终端节点上调用 WithTags() 来提供标签,并使用 Produces<T>(201) 指定终端节点返回状态代码为 201 的类型 T。添加元数据可以改进 API 的 OpenAPI 描述,从而改进 Swagger UI 等工具。
You can use NSwag to generate a C# client from an OpenAPI description. This approach takes care of using the correct paths to call the API, substituting parameters in the path, and serializing and deserializing requests to the API, removing much of the boilerplate associated with interacting with an API.
您可以使用 NSwag 从 OpenAPI 描述生成 C# 客户端。此方法负责使用正确的路径调用 API、替换路径中的参数以及序列化和反序列化对 API 的请求,从而删除与与 API 交互相关的大部分样板。
You can add code generation to your project by using Visual Studio or the .NET API tool or by making manual changes to your project. Visual Studio and the .NET tool automate downloading the OpenAPI description to your local project and adding the necessary NuGet packages. You should update the NuGet packages to the latest versions to ensure that you have the latest bug or security fixes.
您可以使用 Visual Studio 或 .NET API 工具,或者通过手动更改项目来向项目添加代码生成。Visual Studio 和 .NET 工具会自动将 OpenAPI 描述下载到本地项目,并添加必要的 NuGet 包。应将 NuGet 包更新到最新版本,以确保您拥有最新的 bug 或安全修复。
NSwag automatically generates a C# method name on the main client class for each endpoint in the OpenAPI description. If the endpoint’s OperationID is missing, NSwag generates a name, which may not be optimal. You can specify the OperationID to use for an endpoint in your OpenAPI description by calling WithName() on the endpoint.
NSwag 在 OpenAPI 描述中的每个端点的主客户端类上自动生成一个 C# 方法名称。如果缺少终结点的 OperationID,NSwag 会生成一个名称,这可能不是最佳名称。您可以通过在终端节点上调用 WithName() 来指定 OpenAPI 描述中要用于终端节点的 OperationID。
You can customize the client NSwag generates by adding an <Options> element inside the <OpenApiReference> in your .csproj file. These options are specified as command-line switches such as /JsonLibrary:SystemTextJson. You can change many things about the generated code with these switches, such as the serialization library to use and whether to generate an interface for the client.
您可以通过在<OpenApiReference> 在 .csproj 文件中。这些选项指定为命令行开关,例如 /JsonLibrary:SystemTextJson。您可以使用这些开关更改有关生成代码的许多内容,例如要使用的序列化库以及是否为 Client 端生成接口。
If the OpenAPI description for a remote API changes, you need to download the document to your project again for the generated client to reflect these changes. If you originally added the OpenAPI reference by using Visual Studio, you should use Visual Studio to refresh the document, and the same applies to the .NET API tool. NSwag automatically updates the generated code when the downloaded OpenAPI document changes.
如果远程 API 的 OpenAPI 描述发生更改,您需要再次将文档下载到您的项目中,以便生成的客户端反映这些更改。如果最初使用 Visual Studio 添加了 OpenAPI 引用,则应使用 Visual Studio 刷新文档,这同样适用于 .NET API 工具。当下载的 OpenAPI 文档发生更改时,NSwag 会自动更新生成的代码。
You can add an OpenAPI summary and description to an endpoint by installing the Microsoft.AspNetCore.OpenApi package, calling WithOpenApi() on the endpoint, and adding calls to WithSummary() or WithDescription(). This metadata is shown in Swagger UI, and NSwag uses the summary to generate documentation comments in the C# client.
您可以通过安装 Microsoft.AspNetCore.OpenApi 包,在端点上调用 WithOpenApi(),然后添加对 WithSummary() 或 WithDescription() 的调用,将 OpenAPI 摘要和说明添加到端点。此元数据显示在 Swagger UI 中,NSwag 使用摘要在 C# 客户端中生成文档注释。
You can use attributes instead of fluent methods to add OpenAPI metadata if you prefer. This approach sometimes helps improve readability of your endpoints. You must still call WithOpenApi() on the endpoint to read the metadata attributes.
如果需要,可以使用属性而不是 Fluent 方法来添加 OpenAPI 元数据。此方法有时有助于提高终端节点的可读性。您仍必须在终端节点上调用 WithOpenApi() 才能读取元数据属性。
You can use XML documentation comments to document your OpenAPIs to reduce the clutter of extra method calls and attributes. To use this approach, you must enable documentation generation for the project, configure Swashbuckle to read the XML documentation file on startup, and use static or instance handler methods instead of lambda methods.
您可以使用 XML 文档注释来记录 OpenAPI,以减少额外方法调用和属性的混乱。要使用此方法,您必须为项目启用文档生成,将 Swashbuckle 配置为在启动时读取 XML 文档文件,并使用静态或实例处理程序方法而不是 lambda 方法。
Not all APIs can be described by the OpenAPI specification. Some styles, such as HATEOAS, are naturally dynamic and don’t lend themselves to the static design of OpenAPI. You may also have difficulty with complex authentication requirements, as well as combining OpenAPI documents. In these cases, you may find that OpenAPI brings little value to your application.
并非所有 API 都可以用 OpenAPI 规范来描述。某些样式(如 HATEOAS)自然是动态的,并不适合 OpenAPI 的静态设计。您可能还难以满足复杂的身份验证要求以及组合 OpenAPI 文档。在这些情况下,您可能会发现 OpenAPI 为您的应用程序带来什么价值。