14 Mapping URLs to Razor Pages using routing
14 使用路由将 URL 映射到 Razor Pages
This chapter covers
本章介绍以下内容
• Routing requests to Razor Pages
将请求路由到 Razor Pages
• Customizing Razor Page route templates
自定义 Razor Page 路由模板
• Generating URLs for Razor Pages
为 Razor Pages 生成 URL
In chapter 13 you learned about the Model-View-Controller (MVC) design pattern and how ASP.NET Core uses it to generate the UI for an application using Razor Pages. Razor Pages contain page handlers that act as mini controllers for a request. The page handler calls the application model to retrieve or save data. Then the handler passes data from the application model to the Razor view, which generates an HTML response.
在第 13 章中,您了解了模型-视图-控制器 (MVC) 设计模式,以及 ASP.NET Core 如何使用它为使用 Razor Pages 的应用程序生成 UI。Razor Pages 包含充当请求的微型控制器的页面处理程序。页面处理程序调用应用程序模型来检索或保存数据。然后,处理程序将数据从应用程序模型传递到 Razor 视图,该视图会生成 HTML 响应。
Although not part of the MVC design pattern per se, one crucial part of Razor Pages is selecting which Razor Page to invoke in response to a given request. Razor Pages use the same routing system as minimal APIs (introduced in chapter 6); this chapter focuses on how routing works with Razor Pages.
虽然 Razor Pages 本身不是 MVC 设计模式的一部分,但 Razor Pages 的一个关键部分是选择要调用的 Razor Page 以响应给定请求。Razor Pages 使用与最小 API 相同的路由系统(在第 6 章中介绍);本章重点介绍路由如何与 Razor Pages 配合使用。
I start this chapter with a brief reminder about how routing works in ASP.NET Core. I’ll touch on the two pieces of middleware that are crucial to endpoint routing in .NET 7 and the approach Razor Pages uses of mixing conventions with explicit route templates.
本章开始时,我将简要介绍路由在 ASP.NET Core 中的工作原理。我将介绍对 .NET 7 中的终结点路由至关重要的两个中间件,以及 Razor Pages 使用将约定与显式路由模板混合的方法。
In section 14.3 we look at the default routing behavior of Razor Pages, and in section 14.4 you’ll learn how to customize the behavior by adding or changing route templates. Razor Pages have access to the same route template features that you learned about in chapter 6, and in section 14.4 you’ll learn how to them.
在第 14.3 节中,我们介绍了 Razor Pages 的默认路由行为,在第 14.4 节中,您将了解如何通过添加或更改路由模板来自定义行为。Razor Pages 可以访问您在第 6 章中了解的相同路由模板功能,在第 14.4 节中,您将了解如何使用它们。
In section 14.5 I describe how to use the routing system to generate URLs for Razor Pages. Razor Pages provide some helper methods to simplify URL generation compared with minimal APIs, so I compare the two approaches and discuss the benefits of each.
在第 14.5 节中,我将介绍如何使用路由系统为 Razor Pages 生成 URL。与最少的 API 相比,Razor Pages 提供了一些帮助程序方法来简化 URL 生成,因此我比较了这两种方法并讨论了每种方法的优点。
Finally, in section 14.6 I describe how to customize the conventions Razor Pages uses, giving you complete control of the URLs in your application. You’ll see how to change the built-in conventions, such as using lowercase for your URLs, as well as how to write your own convention and apply it globally to your application.
最后,在第 14.6 节中,我将介绍如何自定义 Razor Pages 使用的约定,从而让您完全控制应用程序中的 URL。您将了解如何更改内置约定,例如对 URL 使用小写,以及如何编写自己的约定并将其全局应用于应用程序。
By the end of this chapter you should have a much clearer understanding of how an ASP.NET Core application works. You can think of routing as the glue that ties the middleware pipeline to Razor Pages and the MVC framework. With middleware, Razor Pages, and routing under your belt, you’ll be writing web apps in no time!
在本章结束时,您应该对 ASP.NET Core 应用程序的工作原理有了更清晰的了解。可以将路由视为将中间件管道与 Razor Pages 和 MVC 框架绑定的粘附。借助中间件、Razor Pages 和路由,您将立即编写 Web 应用程序!
14.1 Routing in ASP.NET Core
14.1 ASP.NET Core 中的路由
In chapter 6 we looked in detail at routing and some of the benefits it brings, such as the ability to have multiple URLs pointing to the same endpoint and extracting segments from the URL. You also learned how it’s implemented in ASP.NET Core apps, using two pieces of middleware:
在第 6 章中,我们详细研究了路由及其带来的一些好处,例如让多个 URL 指向同一端点并从 URL 中提取片段的能力。您还了解了如何使用两个中间件在 ASP.NET Core 应用程序中实现它:
• EndpointMiddleware—You use this middleware to register the endpoints in the routing system when you start your application. The middleware executes one of the endpoints at runtime.
EndpointMiddleware — 启动应用程序时,您可以使用此中间件在路由系统中注册终端节点。中间件在运行时执行其中一个端点。
• RoutingMiddleware—This middleware chooses which of the endpoints registered by the EndpointMiddleware should execute for a given request at runtime.
RoutingMiddleware — 此中间件选择 EndpointMiddleware 注册的端点应在运行时为给定请求执行。
The EndpointMiddleware is where you register all the endpoints in your app, including minimal APIs, Razor Pages, and MVC controllers. It’s easy to register all the Razor Pages in your application using the MapRazorPages() extension method, as shown in the following listing.
在 EndpointMiddleware 中,你可以注册应用中的所有终结点,包括最小的 API、Razor Pages 和 MVC 控制器。使用 MapRazorPages() 扩展方法在应用程序中注册所有 Razor Pages 很容易,如下面的清单所示。
Listing 14.1 Registering Razor Pages in Startup.Configure
示例 14.1 在 Startup.Configure 中注册 Razor 页面
WebApplicationBuilder builder = WebApplication.CreateBuilder(args);
builder.Services.AddRazorPages(); ❶
var app = builder.Build();
app.UseStaticFiles();
app.UseRouting(); ❷
app.UseAuthorization();
app.MapRazorPages(); ❸
app.Run();
❶ Adds the required Razor Pages services to dependency injection
将所需的 Razor Pages 服务添加到依赖项注入
❷ Adds the RoutingMiddleware to the middleware pipeline
将 RoutingMiddleware 添加到中间件管道
❸ Registers all the Razor Pages in the application with the EndpointMiddleware
使用 EndpointMiddleware 注册应用程序中的所有 Razor Pages
Each endpoint, whether it’s a Razor Page or a minimal API, has an associated route template that defines which URLs the endpoint should match. The EndpointMiddleware stores these route templates and endpoints in a dictionary, which it shares with the RoutingMiddleware. At runtime the RoutingMiddleware compares the incoming request with the routes in the dictionary and selects the matching endpoint. When the request reaches the EndpointMiddleware, the middleware checks to see which endpoint was selected and executes it, as shown in figure 14.1.
每个终结点(无论是 Razor Page 还是最小 API)都有一个关联的路由模板,用于定义终结点应匹配的 URL。EndpointMiddleware 将这些路由模板和端点存储在一个字典中,它与 RoutingMiddleware 共享该字典。在运行时,RoutingMiddleware 将传入请求与字典中的路由进行比较,并选择匹配的端点。当请求到达 EndpointMiddleware 时,中间件会检查并选择了哪个端点并执行它,如图 14.1 所示。
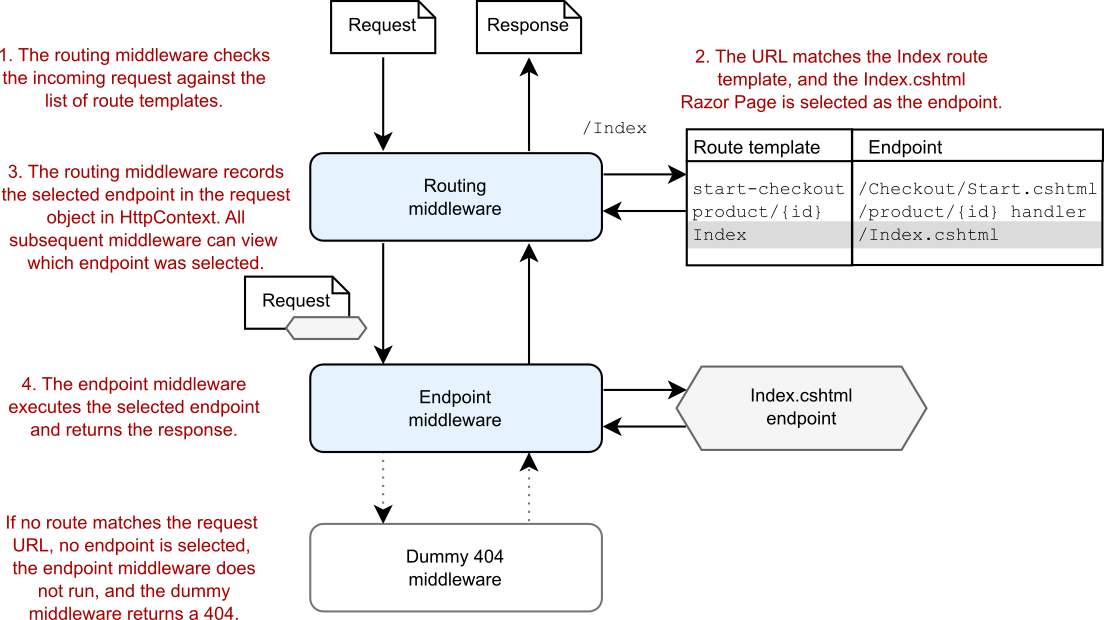
Figure 14.1 Endpoint routing uses a two-step process. The RoutingMiddleware selects which endpoint to execute, and the EndpointMiddleware executes it. If the request URL doesn’t match a route template, the endpoint middleware will not generate a response.
图 14.1 终端节点路由使用两步过程。RoutingMiddleware 选择要执行的端点,EndpointMiddleware 执行它。如果请求 URL 与路由模板不匹配,则终端节点中间件不会生成响应。
As discussed in chapter 6, the advantage of having two separate pieces of middleware to handle this process is that any middleware placed after the RoutingMiddleware can see which endpoint is going to be executed before it is. You’ll see this benefit in action when we look at authorization in chapter 24.
如第 6 章所述,拥有两个独立的中间件来处理此过程的好处是,放置在 RoutingMiddleware 之后的任何中间件都可以在执行之前看到哪个端点将被执行。当我们在第 24 章中查看授权时,您将看到此好处的实际效果。
Routing in ASP.NET Core uses the same infrastructure and middleware whether you’re building minimal APIs, Razor Pages, or MVC controllers, but there are some differences in how you define the mapping between your route templates and your handlers in each case. In section 14.2 you’ll learn the different approaches each paradigm takes.
无论是构建最小的 API、Razor Pages 还是 MVC 控制器,ASP.NET Core 中的路由都使用相同的基础结构和中间件,但在每种情况下定义路由模板和处理程序之间的映射的方式存在一些差异。在 14.2 节中,您将学习每种范例采用的不同方法。
14.2 Convention-based routing vs. explicit routing
14.2 基于约定的路由与显式路由
Routing is a key part of ASP.NET Core, as it maps the incoming request’s URL to a specific endpoint to execute. You have two ways to define these URL-endpoint mappings in your application:
路由是 ASP.NET Core 的关键部分,因为它将传入请求的 URL 映射到要执行的特定终端节点。您可以通过两种方式在应用程序中定义这些 URL-终端节点映射:
• Using global, convention-based routing
使用基于约定的全局路由
• Using explicit routing, where each endpoint is mapped with a single route template
使用显式路由,其中每个端点都使用单个路由模板进行映射
Which approach you use typically depends on whether you’re using minimal APIs, Razor Pages, or MVC controllers and whether you’re building an API or a website (using HTML). These days I lean heavily toward explicit routing, as you’ll see.
使用哪种方法通常取决于你使用的是最小 API、Razor Pages 还是 MVC 控制器,以及你是构建 API 还是网站(使用 HTML)。正如您将看到的,这些天我非常倾向于显式路由。
Convention-based routing is defined globally for your application. You can use convention-based routes to map endpoints (MVC controller actions specifically) to URLs, but those MVC controllers must adhere strictly to the conventions you define. Traditionally, applications using MVC controllers to generate HTML tend to use this approach to routing. The downside of this approach is that customizing URLs for a subset of controllers and actions is tricky.
基于约定的路由是为您的应用程序全局定义的。您可以使用基于约定的路由将端点(特别是 MVC 控制器作)映射到 URL,但这些 MVC 控制器必须严格遵守您定义的约定。传统上,使用 MVC 控制器生成 HTML 的应用程序倾向于使用这种方法进行路由。这种方法的缺点是,为控制器和作的子集自定义 URL 很棘手。
Alternatively, you can use explicit routing to tie a given URL to a specific endpoint. You’ve seen this approach with minimal APIs, where each endpoint is directly associated with a route template. You can also use explicit routing with MVC controllers by placing [Route] attributes on the action methods themselves, hence explicit-routing is also often called attribute-routing.
或者,您可以使用显式路由将给定的 URL 绑定到特定的端点。您已经见过这种方法使用最少的 API,其中每个终端节点都直接与路由模板关联。您还可以通过在作方法本身上放置 [Route] 属性来将显式路由与 MVC 控制器一起使用,因此显式路由通常也称为属性路由。
Explicit routing provides more flexibility than convention-based based routing, as you can explicitly define the route template for every action method. Explicit routing is generally more verbose than the convention-based approach, as it requires applying attributes to every action method in your application. Despite this, the extra flexibility can be useful, especially when building APIs.
显式路由比基于约定的路由提供了更大的灵活性,因为您可以为每个作方法显式定义路由模板。显式路由通常比基于约定的方法更详细,因为它需要将属性应用于应用程序中的每个作方法。尽管如此,额外的灵活性还是很有用的,尤其是在构建 API 时。
Somewhat confusingly, Razor Pages use conventions to generate explicit routes! In many ways this combination gives you the best of both worlds: the predictability and terseness of convention-based routing with the easy customization of explicit routing. There are tradeoffs to each of the approaches, as shown in table 14.1.
有点令人困惑的是,Razor Pages 使用约定来生成显式路由!在许多方面,这种组合为您提供了两全其美的效果:基于约定的路由的可预测性和简洁性,以及显式路由的轻松自定义。每种方法都有权衡,如表 14.1 所示。
Table 14.1 The advantages and disadvantages of the routing styles available in ASP.NET Core
表 14.1 ASP.NET Core 中可用的路由样式的优缺点
| Routing style | Typical use | Advantages | Disadvantages |
|---|---|---|---|
| Convention-based routes 基于约定的路由 |
HTML-generating MVC controllers HTML 生成 MVC 控制器 |
Terse definition in one location in your application. Forces a consistent layout of MVC controllers. 在应用程序中的一个位置进行简洁定义。强制 MVC 控制器布局一致。 |
Routes are defined in a different place from your controllers. Overriding the route conventions can be tricky and error-prone. Adds an extra layer of indirection when routing a request. 路由定义在与控制器不同的位置。覆盖路由约定可能很棘手且容易出错。在路由请求时添加额外的间接层。 |
| Explicit routes 显式路由 |
Minimal API endpoints, Web API MVC controllers 最小 API 端点、Web API MVC 控制器 |
Gives complete control of route templates for every endpoint.Routes are defined next to the endpoint they execute. 提供对每个终端节点的路由模板的完全控制。路由在它们执行的终端节点旁边定义。 |
Verbose compared with convention-based routing.Can be easy to overcustomize route templates.Route templates may be scattered throughout your application rather than defined in one location. 与基于约定的路由相比,比较详细。可以很容易地过度定制路线模板。路由模板可能分散在整个应用程序中,而不是在一个位置定义。 |
| Convention-based generation of explicit routes 基于约定的显式路由生成 |
Razor Pages Razor 页面 |
Encourages consistent set of exposed URLs. Terse when you stick to the conventions. Easily override the route template for a single page. Customize conventions globally to change exposed URLs. 鼓励使用一组一致的公开 URL。当你坚持惯例时,简洁。轻松覆盖单个页面的路由模板。全局自定义约定以更改公开的 URL。 |
Possible to overcustomize route templates. You must calculate what the route template for a page is, rather than its being explicitly defined in your app. 可以过度自定义路由模板。您必须计算页面的路由模板是什么,而不是在应用程序中显式定义它。 |
So which approach should you use? I believe that convention-based routing is not worth the effort in 99 percent of cases and that you should stick to explicit routing. If you’re following my advice to use Razor Pages for server-rendered applications, you’re already using explicit routing under the covers. Also, if you’re creating APIs using minimal APIs or MVC controllers, explicit routing is the best option and the recommended approach.
那么您应该使用哪种方法呢?我认为,在 99% 的情况下,基于约定的路由不值得付出努力,您应该坚持使用显式路由。如果您按照我的建议将 Razor Pages 用于服务器渲染的应用程序,那么您已经在幕后使用了显式路由。此外,如果要使用最少的 API 或 MVC 控制器创建 API,则显式路由是最佳选项和推荐的方法。
The only scenario where convention-based routing is used traditionally is if you’re using MVC controllers to generate HTML. But if you’re following my advice from chapter 13, you’ll be using Razor Pages for HTML-generating applications and falling back to MVC controllers only when necessary, as I discuss in more detail in chapter 19. For consistency, I would often stick with explicit routing with attributes in that scenario too.
传统上使用基于约定的路由的唯一情况是使用 MVC 控制器生成 HTML。但是,如果您遵循我在第 13 章中的建议,您将使用 Razor Pages 生成 HTML 的应用程序,并且仅在必要时回退到 MVC 控制器,正如我在第 19 章中更详细地讨论的那样。为了保持一致性,在这种情况下,我通常也会坚持使用带有属性的显式路由。
NOTE For the reasons above, this book focuses on explicit/attribute routing. For details on convention-based routing, see Microsoft’s “Routing to controller actions in ASP.NET Core” documentation at http://mng.bz/ZP0O.
注意:由于上述原因,本书重点介绍显式/属性路由。有关基于约定的路由的详细信息,请参阅 Microsoft 的“路由到 ASP.NET Core 中的控制器作”文档,网址为 http://mng.bz/ZP0O。
You learned about routing and route templates in chapter 6 in the context of minimal APIs. The good news is that exactly the same patterns and features are available with Razor Pages. The main difference with minimal APIs is that Razor Pages use conventions to generate the route template for a page, though you can easily change the template on a page-by-page basis. In section 14.3 we look at the default conventions and how routing maps a request’s URL to a Razor Page in detail.
您在第 6 章中了解了最小 API 上下文中的路由和路由模板。好消息是,Razor Pages 提供了完全相同的模式和功能。与最小 API 的主要区别在于,Razor Pages 使用约定为页面生成路由模板,但你可以轻松地逐页更改模板。在第 14.3 节中,我们将详细介绍默认约定以及路由如何将请求的 URL 映射到 Razor 页面。
14.3 Routing requests to Razor Pages
14.3 将请求路由到 Razor Pages
As I mentioned in section 14.2, Razor Pages use explicit routing by creating route templates based on conventions. ASP.NET Core creates a route template for every Razor Page in your app during app startup, when you call MapRazorPages() in Program.cs:
正如我在第 14.2 节中提到的,Razor Pages 通过基于约定创建路由模板来使用显式路由。ASP.NET Core 在应用启动期间,当您在 Program.cs 中调用 MapRazorPages() 时,会为应用中的每个 Razor 页面创建一个路由模板:
app.endpoints.MapRazorPages();For every Razor Page in your application, the framework uses the path of the Razor Page file relative to the Razor Pages root directory (Pages/), excluding the file extension (.cshtml). If you have a Razor Page located at the path Pages/Products/View.cshtml, the framework creates a route template with the value "Products/View", as shown in figure 14.2.
对于应用程序中的每个 Razor 页面,框架使用 Razor 页面文件相对于 Razor 页面根目录 (Pages/) 的路径,不包括文件扩展名 (.cshtml)。如果你的 Razor 页面位于路径 Pages/Products/View.cshtml,则框架会创建一个值为“Products/View”的路由模板,如图 14.2 所示。
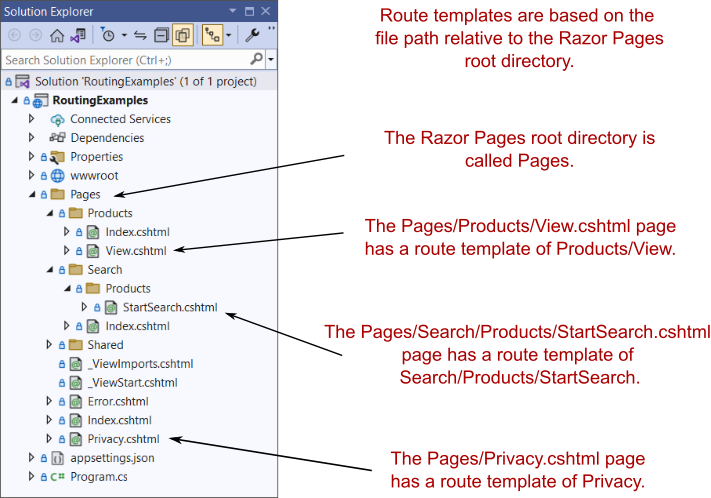
Figure 14.2 By default, route templates are generated for Razor Pages based on the path of the file relative to the root directory, Pages.
图 14.2 默认情况下,将根据文件相对于根目录 Pages 的路径为 Razor Pages 生成路由模板。
Requests to the URL /products/view match the route template "Products/View", which in turn corresponds to the View.cshtml Razor Page in the Pages/Products folder. The RoutingMiddleware selects the View.cshtml Razor Page as the endpoint for the request, and the EndpointMiddleware executes the page’s handler when the request reaches it in the middleware pipeline.
对 URL /products/view 的请求与路由模板“Products/View”匹配,而路由模板又对应于 Pages/Products 文件夹中的 View.cshtml Razor 页面。RoutingMiddleware 选择 View.cshtml Razor Page 作为请求的终结点,当请求在中间件管道中到达页面时,EndpointMiddleware 将执行页面的处理程序。
NOTE Remember that routing is not case-sensitive, so the request URL will match even if it has a different URL casing from the route template.
注意:请记住,路由不区分大小写,因此即使请求 URL 的 URL 大小写与路由模板不同,请求 URL 也会匹配。
In chapter 13 you learned that Razor Page handlers are the methods that are invoked on a Razor Page, such as OnGet. When we say “a Razor Page is executed,” we really mean “an instance of the Razor Page’s PageModel is created, and a page handler on the model is invoked.” Razor Pages can have multiple page handlers, so once the RoutingMiddleware selects a Razor Page, the EndpointMiddleware still needs to choose which handler to execute. You’ll learn how the framework selects which page handler to invoke in chapter 15.
在第 13 章中,你了解了 Razor Page 处理程序是在 Razor Page 上调用的方法,例如 OnGet。当我们说“执行 Razor 页面”时,我们实际上是指“创建 Razor 页面的 PageModel 的实例,并调用模型上的页面处理程序”。Razor Pages 可以有多个页面处理程序,因此,一旦 RoutingMiddleware 选择了 Razor Page,EndpointMiddleware 仍需要选择要执行的处理程序。在第 15 章中,您将了解框架如何选择要调用的页面处理程序。
By default, each Razor Page creates a single route template based on its file path. The exception to this rule is for Razor Pages that are called Index.cshtml. Index.cshtml pages create two route templates, one ending with "Index" and the other without this suffix. If you have a Razor Page at the path Pages/ToDo/Index.cshtml, you have two route templates that point to the same page:
默认情况下,每个 Razor 页面都会根据其文件路径创建一个路由模板。此规则的例外情况是名为 Index.cshtml 的 Razor 页面。Index.cshtml 页面创建两个路由模板,一个以“Index”结尾,另一个不带此后缀。如果在路径 Pages/ToDo/Index.cshtml 中有一个 Razor 页面,则有两个指向同一页面的路由模板:
• "ToDo"
• "ToDo/Index"
When either of these routes is matched, the same Index.cshtml Razor Page is selected. If your application is running at the URL https://example.org, you can view the page by executing https://example.org/ToDo or https://example.org/ToDo/Index.
当这些路由中的任何一个匹配时,将选择相同的 Index.cshtml Razor 页面。如果您的应用程序在 URL https://example.org 上运行,您可以通过执行 https://example.org/ToDo 或 https://example.org/ToDo/Index 来查看页面。
Warning You must watch out for overlapping routes when using Index.cshtml pages. For example, if you add the Pages/ToDo/Index.cshtml page in the above example you must not add a Pages/ToDo.cshtml page, as you’ll get an exception at runtime when you navigate to /todo, as you’ll see in section 14.6.
警告:使用 Index.cshtml 页面时,必须注意重叠的路由。例如,如果在上述示例中添加 Pages/ToDo/Index.cshtml 页面,则不得添加 Pages/ToDo.cshtml 页面,因为在导航到 /todo 时,将在运行时收到异常,如第 14.6 节所示。
As a final example, consider the Razor Pages created by default when you create a Razor Pages application by using Visual Studio or running dotnet new razor using the .NET command-line interface (CLI), as we did in chapter 13. The standard template includes three Razor Pages in the Pages directory:
作为最后一个示例,请考虑使用 Visual Studio 或使用 .NET 命令行界面 (CLI) 运行 dotnet new razor 创建 Razor Pages 应用程序时默认创建的 Razor Pages,就像我们在第 13 章中所做的那样。标准模板在 Pages 目录中包含三个 Razor Pages:
• Pages/Error.cshtml
• Pages/Index.cshtml
• Pages/Privacy.cshtml
That creates a collection of four routes for the application, defined by the following templates:
这将为应用程序创建四个路由的集合,由以下模板定义:
• "" maps to Index.cshtml.
• "Index" maps to Index.cshtml.
• "Error" maps to Error.cshtml.
• "Privacy" maps to Privacy.cshtml.
At this point, Razor Page routing probably feels laughably trivial, but this is the basics that you get for free with the default Razor Pages conventions, which are often sufficient for a large portion of any website. At some point, though, you’ll find you need something more dynamic, such as using route parameters to include an ID in the URL. This is where the ability to customize your Razor Page route templates becomes useful.
在这一点上,Razor Page 路由可能感觉微不足道,但这是您通过默认 Razor Pages 约定免费获得的基础知识,这些约定通常足以满足任何网站的大部分需求。但是,在某些时候,您会发现您需要更动态的东西,例如使用路由参数在 URL 中包含 ID。这是自定义 Razor Page 路由模板的功能变得有用的地方。
14.4 Customizing Razor Page route templates
14.4 自定义 Razor Page 路由模板
The route templates for a Razor Page are based on the file path by default, but you’re also able to customize the final template for each page or even replace it. In this section I show how to customize the route templates for individual pages so you can customize your application’s URLs and map multiple URLs to a single Razor Page.
默认情况下,Razor 页面的路由模板基于文件路径,但你也可以为每个页面自定义最终模板,甚至替换它。在本节中,我将介绍如何自定义各个页面的路由模板,以便您可以自定义应用程序的 URL 并将多个 URL 映射到单个 Razor 页面。
You may remember from chapter 6 that route templates consist of both literal segments and route parameters, as shown in figure 14.3. By default, Razor Pages have URLs consisting of a series of literal segments, such as "ToDo/Index".
您可能还记得第 6 章中的路由模板由文字段和路由参数组成,如图 14.3 所示。默认情况下,Razor Pages 的 URL 由一系列文本段组成,例如“ToDo/Index”。
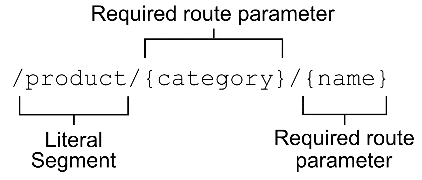
Figure 14.3 A simple route template showing a literal segment and two required route parameters
图 14.3 一个简单的路由模板,显示了一个文字段和两个必需的路由参数
Literal segments and route parameters are the two cornerstones of ASP.NET Core route templates, but how can you customize a Razor Page to use one of these patterns? In section 14.4.1 you’ll see how to add a segment to the end of a Razor Page’s route template, and in section 14.4.2 you’ll see how to replace the route template completely.
文本段和路由参数是 ASP.NET Core 路由模板的两个基石,但如何自定义 Razor 页面以使用这些模式之一?在第 14.4.1 节中,你将了解如何将段添加到 Razor 页面路由模板的末尾,在第 14.4.2 节中,你将了解如何完全替换路由模板。
14.4.1 Adding a segment to a Razor Page route template
14.4.1 向 Razor Page 路由模板添加区段
To customize the Razor Page route template, you update the @page directive at the top of the Razor Page’s .cshtml file. This directive must be the first thing in the Razor Page file for the page to be registered correctly.
若要自定义 Razor Page 路由模板,请更新 Razor Page 的 .cshtml 文件顶部的 @page 指令。此指令必须是 Razor Page 文件中的第一项作,才能正确注册页面。
To add an extra segment to a Razor Page’s route template, add a space followed by the extra route template segment, after the @page statement. To add "Extra" to a Razor Page’s route template, for example, use
若要向 Razor Page 的路由模板添加额外段,请在 @page 语句后添加一个空格,后跟额外的路由模板段。例如,要将“Extra”添加到 Razor Page 的路由模板,请使用
@page "Extra"This appends the provided route template to the default template generated for the Razor Page. The default route template for the Razor Page at Pages/Privacy.html, for example, is "Privacy". With the preceding directive, the new route template for the page would be "Privacy/Extra".
这会将提供的路由模板追加到为 Razor 页面生成的默认模板。例如,Pages/Privacy.html 的 Razor Page 的默认路由模板为“隐私”。使用上述指令,页面的新路由模板将为 “Privacy/Extra”。
The most common reason for customizing a Razor Page’s route template like this is to add a route parameter. You could have a single Razor Page for displaying the products in an e-commerce site at the path Pages/Products.cshtml and use a route parameter in the @page directive
像这样自定义 Razor Page 的路由模板的最常见原因是添加路由参数。可以有一个 Razor 页面,用于在路径 Pages/Products.cshtml 的电子商务站点中显示产品,并在 @page 指令中使用 route 参数
@page "{category}/{name}"This would give a final route template of Products/{category}/{name}, which would match all the following URLs:
这将提供 Products/{category}/{name} 的最终路由模板,该模板将匹配以下所有 URL:
• /products/bags/white-rucksack
• /products/shoes/black-size9
• /Products/phones/iPhoneX
NOTE You can use the same routing features you learned about in chapter 6 with Razor Pages, including optional parameters, default parameters, and constraints.
注意:您可以将在第 6 章中学到的相同路由功能用于 Razor Pages,包括可选参数、默认参数和约束。
It’s common to add route segments to the Razor Page template like this, but what if that’s not enough? Maybe you don’t want to have the /products segment at the start of the preceding URLs, or you want to use a completely custom URL for a page. Luckily, that’s just as easy to achieve.
像这样向 Razor Page 模板添加路线段是很常见的,但如果这还不够怎么办?也许您不希望在前面的 URL 开头有 /products 段,或者您希望对页面使用完全自定义的 URL。幸运的是,这同样容易实现。
14.4.2 Replacing a Razor Page route template completely
14.4.2 完全替换 Razor Page 路由模板
You’ll be most productive working with Razor Pages if you can stick to the default routing conventions where possible, adding extra segments for route parameters where necessary. But sometimes you need more control. That’s often the case for important pages in your application, such as the checkout page for an e-commerce application or even product pages, as you saw in the previous section.
如果您可以尽可能坚持默认路由约定,并在必要时为路由参数添加额外的段,那么使用 Razor Pages 的效率将最高。但有时你需要更多的控制。应用程序中的重要页面通常就是这种情况,例如电子商务应用程序的结帐页面,甚至是产品页面,如上一节所示。
To specify a custom route for a Razor Page, prefix the route with / in the @page directive. To remove the "product/" prefix from the route templates in section 14.4.1, use this directive:
若要为 Razor Page 指定自定义路由,请在 @page 指令中为路由添加 / 前缀。要从第 14.4.1 节中的路由模板中删除 “product/” 前缀,请使用以下指令:
@page "/{category}/{name}"Note that this directive includes the "/" at the start of the route, indicating that this is a custom route template, instead of an addition. The route template for this page will be "{category}/{name}" no matter which Razor Page it is applied to.
请注意,此指令在路由的开头包含 “/”,表示这是一个自定义路由模板,而不是附加模板。此页面的路由模板将为“{category}/{name}”,无论它应用于哪个 Razor 页面。
Similarly, you can create a static custom template for a page by starting the template with a "/" and using only literal segments:
同样,您可以通过以 “/” 开头并仅使用文字段来为页面创建静态自定义模板:
@page "/checkout"Wherever you place your checkout Razor Page within the Pages folder, using this directive ensures that it always has the route template "checkout", so it always matches the request URL /checkout.
将 checkout Razor Page 放在 Pages 文件夹中的哪个位置,使用此指令可确保它始终具有路由模板“checkout”,因此它始终与请求 URL /checkout 匹配。
Tip You can also think of custom route templates that start with “/” as absolute route templates, whereas other route templates are relative to their location in the file hierarchy.
提示:您还可以将以 “/” 开头的自定义路由模板视为绝对路由模板,而其他路由模板则是相对于它们在文件层次结构中的位置的模板。
It’s important to note that when you customize the route template for a Razor Page, both when appending to the default and when replacing it with a custom route, the default template is no longer valid. If you use the "checkout" route template above on a Razor Page located at Pages/Payment.cshtml, you can access it only by using the URL /checkout; the URL /Payment is no longer valid and won’t execute the Razor Page.
请务必注意,当您自定义 Razor 页面的路由模板时,无论是追加到默认模板还是将其替换为自定义路由,默认模板都不再有效。如果在位于 Pages/Payment.cshtml 的 Razor 页面上使用上述“checkout”路由模板,则只能使用 URL /checkout 访问它;URL /Payment 不再有效,并且不会执行 Razor 页面。
Tip Customizing the route template for a Razor Page using the @page directive replaces the default route template for the page. In section 14.6 I show how you can add extra routes while preserving the default route template.
提示:使用 @page 指令自定义 Razor 页面的路由模板会替换页面的默认路由模板。在第 14.6 节中,我将介绍如何在保留默认路由模板的同时添加额外的路由。
In this section you learned how to customize the route template for a Razor Page. For the most part, routing to Razor Pages works like minimal APIs, the main difference being that the route templates are created using conventions. When it comes to the other half of routing—generating URLs—Razor Pages and minimal APIs are also similar, but Razor Pages gives you some nice helpers.
在本部分中,你学习了如何自定义 Razor Page 的路由模板。在大多数情况下,路由到 Razor Pages 的工作方式类似于最小的 API,主要区别在于路由模板是使用约定创建的。当涉及到路由的另一半(生成 URL)时,Razor Pages 和最小 API 也类似,但 Razor Pages 提供了一些不错的帮手。
14.5 Generating URLs for Razor Pages
14.5 为 Razor Pages 生成 URL
In this section you’ll learn how to generate URLs for your Razor Pages using the IUrlHelper that’s part of the Razor Pages PageModel type. You’ll also learn to use the LinkGenerator service you saw in chapter 6 for generating URLs with minimal APIs.
在本部分中,你将了解如何使用 IUrlHelper(属于 Razor Pages PageModel 类型的一部分)为 Razor Pages 生成 URL。您还将学习使用您在第 6 章中看到的 LinkGenerator 服务来生成具有最少 API 的 URL。
One of the benefits of using convention-based routing in Razor Pages is that your URLs can be somewhat fluid. If you rename a Razor Page, the URL associated with that page also changes. Renaming the Pages/Cart.cshtml page to Pages/Basket/View.cshtml, for example, causes the URL you use to access the page to change from /Cart to /Basket/View.
在 Razor Pages 中使用基于约定的路由的好处之一是,您的 URL 可以保持一定的流动性。如果重命名 Razor 页面,则与该页面关联的 URL 也会更改。例如,将 Pages/Cart.cshtml 页面重命名为 Pages/Basket/View.cshtml 会导致用于访问页面的 URL 从 /Cart 更改为 /Basket/View。
To track these changes (and to avoid broken links), you can use the routing infrastructure to generate the URLs that you output in your Razor Page HTML and that you include in your HTTP responses. In chapter 6 you saw how to generate URLs for your minimal API endpoints, and in this section, you’ll see how to do the same for your Razor Pages. I also describe how to generate URLs for MVC controllers, as the mechanism is virtually identical to that used by Razor Pages.
若要跟踪这些更改(并避免链接断开),可以使用路由基础结构生成在 Razor 页面 HTML 中输出并包含在 HTTP 响应中的 URL。在第 6 章中,您了解了如何为最小 API 端点生成 URL,在本部分中,您将了解如何为 Razor 页面执行相同的作。我还介绍了如何为 MVC 控制器生成 URL,因为该机制与 Razor Pages 使用的机制几乎相同。
14.5.1 Generating URLs for a Razor Page
14.5.1 为 Razor 页面生成 URL
You’ll need to generate URLs in various places in your application, and one common location is in your Razor Pages and MVC controllers. The following listing shows how you could generate a link to the Pages/Currency/View.cshtml Razor Page, using the Url helper from the PageModel base class.
您需要在应用程序的不同位置生成 URL,一个常见位置位于 Razor Pages 和 MVC 控制器中。以下列表显示了如何使用 PageModel 基类中的 Url 帮助程序生成指向 Pages/Currency/View.cshtml Razor 页面的链接。
Listing 14.2 Generating a URL using IUrlHelper and the Razor Page name
列表 14.2 使用 IUrlHelper 和 Razor 页面名称生成 URL
public class IndexModel : PageModel ❶
{
public void OnGet()
{
var url = Url.Page("Currency/View", new { code = "USD" }); ❷
}
}
❶ Deriving from PageModel gives access to the Url property.
从 PageModel 派生提供对 Url 属性的访问权限。
❷ You provide the relative path to the Razor Page, along with any additional route values.
提供 Razor 页面的相对路径,以及任何其他路由值。
The Url property is an instance of IUrlHelper that allows you to easily generate URLs for your application by referencing other Razor Pages by their file path.
Url 属性是 IUrlHelper 的一个实例,它允许你通过按文件路径引用其他 Razor 页面,轻松地为应用程序生成 URL。
NOTE IUrlHelper is a wrapper around the LinkGenerator class you learned about in chapter 6. IUrlHelper adds some shortcuts for generating URLs based on the current request.
注意:IUrlHelper 是您在第 6 章中了解的 LinkGenerator 类的包装器。IUrlHelper 添加了一些快捷方式,用于根据当前请求生成 URL。
IUrlHelper exposes a Page() method to which you pass the name of the Razor Page and any additional route data as an anonymous object. Then the helper generates a URL based on the referenced page’s route template.
IUrlHelper 公开一个 Page() 方法,将 Razor Page 的名称和任何其他路由数据作为匿名对象传递给该方法。然后,帮助程序根据引用页面的路由模板生成 URL。
Tip You can provide the relative file path to the Razor Page, as shown in listing 14.2. Alternatively, you can provide the absolute file path (relative to the Pages folder) by starting the path with a "/", such as "/Currency/View".
提示:您可以提供 Razor Page 的相对文件路径,如清单 14.2 所示。或者,您也可以通过以“/”开头来提供绝对文件路径(相对于 Pages 文件夹),例如“/Currency/View”。
IUrlHelper has several different overloads of the Page() method. Some of these methods allow you to specify a specific page handler, others let you generate an absolute URL instead of a relative URL, and some let you pass in additional route values.
IUrlHelper 具有 Page() 方法的几个不同的重载。其中一些方法允许您指定特定的页面处理程序,其他方法允许您生成绝对 URL 而不是相对 URL,而另一些方法允许您传入其他路由值。
In listing 14.2, as well as providing the file path I passed in an anonymous object, new { code = "USD" }. This object provides additional route values when generating the URL, in this case setting the code parameter to "USD", as you did when generating URLs for minimal APIs with LinkGenerator in chapter 6. As before, the code value is used in the URL directly if it corresponds to a route parameter. Otherwise, it’s appended as additional data in the query string.
在清单 14.2 中,除了提供我在匿名对象中传递的文件路径外,new { code = “USD” }.此对象在生成 URL 时提供额外的路由值,在本例中将 code 参数设置为 “USD”,就像您在第 6 章中使用 LinkGenerator 为最小 API 生成 URL 时所做的那样。与以前一样,如果 code 值对应于 route 参数,则直接在 URL 中使用 code 值。否则,它将作为附加数据附加到查询字符串中。
Generating URLs based on the page you want to execute is convenient, and it’s the usual approach taken in most cases. If you’re using MVC controllers for your APIs, the process is much the same as for Razor Pages, though the methods are slightly different.
根据您要执行的页面生成 URL 很方便,这是大多数情况下通常采用的方法。如果对 API 使用 MVC 控制器,则过程与 Razor Pages 大致相同,但方法略有不同。
14.5.2 Generating URLs for an MVC controller
14.5.2 为 MVC 控制器生成 URL
Generating URLs for MVC controllers is similar to Razor Pages. The main difference is that you use the Action method on the IUrlHelper, and you provide an MVC controller name and action name instead of a page path.
为 MVC 控制器生成 URL 类似于 Razor Pages。主要区别在于,在 IUrlHelper 上使用 Action 方法,并提供 MVC 控制器名称和作名称,而不是页面路径。
NOTE I’ve covered MVC controllers only in passing, as I generally don’t recommend them over Razor Pages or minimal APIs, so don’t worry too much about them. We’ll come back to MVC controllers in chapters 19 and 20; the main reason for mentioning them here is to point out how similar MVC controllers are to Razor Pages.
注意:我只是顺便介绍了 MVC 控制器,因为我通常不建议在 Razor Pages 或最小 API 上使用它们,因此不必太担心它们。我们将在第 19 章和第 20 章回到 MVC 控制器;在这里提到它们的主要原因是指出 MVC 控制器与 Razor Pages 的相似之处。
The following listing shows an MVC controller generating a link from one action method to another, using the Url helper from the Controller base class.
下面的清单显示了一个 MVC 控制器,它使用 Controller 基类中的 Url 帮助程序生成从一个作方法到另一个作方法的链接。
Listing 14.3 Generating a URL using IUrlHelper and the action name
示例 14.3 使用 IUrlHelper 和作名称生成 URL
public class CurrencyController : Controller ❶
{
[HttpGet("currency/index")] ❷
public IActionResult Index()
{
var url = Url.Action("View", "Currency", ❸
new { code = "USD" }); ❸
return Content($"The URL is {url}"); ❹
}
[HttpGet("currency/view/{code}")]
public IActionResult View(string code) ❺
{
    /* method implementation*/
}
}
❶ Deriving from Controller gives access to the Url property.
从 Controller 派生可访问 Url 属性。
❷ Explicit route templates using attributes
使用属性的显式路由模板
❸ You provide the action and controller name to generate, along with any additional route values.
您提供要生成的作和控制器名称,以及任何其他路由值。
❹ Returns “The URL is /Currency/View/USD”
返回“URL is /Currency/View/USD”
❺ The URL generated a route to this action method.
URL 生成了到此作方法的路由。
You can call the Action and Page methods on IUrlHelper from both Razor Pages and MVC controllers, so you can generate links back and forth between them if you need to. The important question is, what is the destination of the URL? If the URL you need refers to a Razor Page, use the Page() method. If the destination is an MVC action, use the Action() method.
可以从 Razor Pages 和 MVC 控制器调用 IUrlHelper 上的 Action 和 Page 方法,以便在需要时可以在它们之间来回生成链接。重要的问题是,URL 的目的地是什么?如果您需要的 URL 引用 Razor 页面,请使用 Page() 方法。如果目标是 MVC作,请使用 Action() 方法。
Tip Instead of using strings for the name of the action method, use the C# 6 nameof operator to make the value refactor-safe, such as nameof(View).
提示:不要使用字符串作为作方法的名称,而是使用 C# 6 nameof 运算符使值成为重构安全的,例如 nameof(View)。
If you’re routing to an action in the same controller, you can use a different overload of Action() that omits the controller name when generating the URL. The IUrlHelper uses ambient values from the current request and overrides them with any specific values you provide.
如果要路由到同一控制器中的作,则可以使用不同的 Action() 重载,在生成 URL 时省略控制器名称。IUrlHelper 使用当前请求中的环境值,并使用你提供的任何特定值替代它们。
DEFINITION Ambient values are the route values for the current request. They include Controller and Action when called from an MVC controller and Page when called from a Razor Page. Ambient values can also include additional route values that were set when the action or Razor Page was initially located using routing. See Microsoft’s “Routing in ASP.NET Core” documentation for further details: http://mng.bz/OxoE.
定义:Ambient 值是当前请求的路由值。它们包括从 MVC 控制器调用时的 Controller 和 Action,以及从 Razor 页面调用时的 Page。环境值还可以包括最初使用路由定位作或 Razor 页面时设置的其他路由值。有关更多详细信息,请参阅 Microsoft 的“ASP.NET Core 中的路由”文档:http://mng.bz/OxoE。
IUrlHelper can make it simpler to generate URLs by reusing ambient values from the current request, though it also adds a layer of complexity, as the same method arguments can give a different generated URL depending on the page the method is called from.
IUrlHelper 可以通过重用当前请求中的环境值来简化生成 URL 的过程,但它也增加了一层复杂性,因为相同的方法参数可能会根据调用该方法的页面提供不同的生成 URL。
If you need to generate URLs from parts of your application outside the Razor Page or MVC infrastructure, you won’t be able to use the IUrlHelper helper. Instead, you can use the LinkGenerator class.
如果需要从 Razor Page 或 MVC 基础结构外部的应用程序部分生成 URL,则无法使用 IUrlHelper 帮助程序。相反,您可以使用 LinkGenerator 类。
14.5.3 Generating URLs with LinkGenerator
14.5.3 使用 LinkGenerator 生成 URL
In chapter 6 I described how to generate links to minimal API endpoints using the LinkGenerator class. By contrast with IUrlHelper, LinkGenerator requires that you always provide sufficient arguments to uniquely define the URL to generate. This makes it more verbose but also more consistent and has the advantage that it can be used anywhere in your application. This differs from IUrlHelper, which should be used only inside the context of a request.
在第 6 章中,我介绍了如何使用 LinkGenerator 类生成指向最小 API 端点的链接。与 IUrlHelper 相比,LinkGenerator 要求您始终提供足够的参数来唯一定义要生成的 URL。这使得它更详细,但也更一致,并且其优点是它可以在应用程序中的任何位置使用。这与 IUrlHelper 不同,后者应仅在请求的上下文中使用。
If you’re writing your Razor Pages and MVC controllers following the advice from chapter 13, you should be trying to keep your Razor Pages relatively simple. That requires you to execute your application’s business and domain logic in separate classes and services.
如果你按照第 13 章中的建议编写 Razor Pages 和 MVC 控制器,你应该尽量保持 Razor Pages 相对简单。这要求您在单独的类和服务中执行应用程序的业务和域逻辑。
For the most part, the URLs your application uses shouldn’t be part of your domain logic. That makes it easier for your application to evolve over time or even to change completely. You may want to create a mobile application that reuses the business logic from an ASP.NET Core app, for example. In that case, using URLs in the business logic wouldn’t make sense, as they wouldn’t be correct when the logic is called from the mobile app!
在大多数情况下,您的应用程序使用的 URL 不应成为域逻辑的一部分。这使您的应用程序更容易随着时间的推移而发展,甚至更容易完全改变。例如,您可能希望创建一个移动应用程序,该应用程序重用 ASP.NET Core 应用程序中的业务逻辑。在这种情况下,在业务逻辑中使用 URL 就没有意义了,因为当从移动应用程序调用逻辑时,它们将不正确!
Tip Where possible, try to keep knowledge of the frontend application design out of your business logic. This pattern is known generally as the Dependency Inversion principle.
提示:在可能的情况下,尽量将前端应用程序设计知识排除在您的业务逻辑之外。此模式通常称为 Dependency Inversion 原则。
Unfortunately, sometimes that separation is not possible, or it makes things significantly more complicated. One example might be when you’re creating emails in a background service; it’s likely you’ll need to include a link to your application in the email. The LinkGenerator class lets you generate that URL so that it updates automatically if the routes in your application change.
不幸的是,有时这种分离是不可能的,或者它使事情变得更加复杂。例如,当您在后台服务中创建电子邮件时;您可能需要在电子邮件中包含指向您的应用程序的链接。LinkGenerator 类允许您生成该 URL,以便在应用程序中的路由发生更改时自动更新。
As you saw in chapter 6, the LinkGenerator class is available everywhere in your application, so you can use it inside middleware, minimal API endpoints, or any other services. You can use it from Razor Pages and MVC too, if you want, though the IUrlHelper is often more convenient and hides some details of using the LinkGenerator.
正如您在第 6 章中所看到的,LinkGenerator 类在应用程序中随处可见,因此您可以在中间件、最小 API 端点或任何其他服务中使用它。如果需要,您也可以从 Razor Pages 和 MVC 使用它,尽管 IUrlHelper 通常更方便,并且隐藏了使用 LinkGenerator 的一些细节。
You’ve already seen how to generate links to minimal API endpoints with LinkGenerator using methods like GetPathByName() and GetUriByName(). LinkGenerator has various analogous methods for generating URLs for Razor Pages and MVC actions, such as GetPathByPage(), GetPathByAction(), and GetUriByPage(), as shown in the following listing.
您已经了解了如何使用 GetPathByName() 和 GetUriByName() 等方法通过 LinkGenerator 生成指向最小 API 端点的链接。LinkGenerator 具有各种类似的方法,用于为 Razor Pages 和 MVC作生成 URL,例如 GetPathByPage()、GetPathByAction() 和 GetUriByPage(),如下面的清单所示。
Listing 14.4 Generating URLs using the LinkGeneratorClass
清单 14.4 使用 LinkGeneratorClass 生成 URL
public class CurrencyModel : PageModel
{
private readonly LinkGenerator _link; ❶
public CurrencyModel(LinkGenerator linkGenerator) ❶
{ ❶
_link = linkGenerator; ❶
} ❶
public void OnGet ()
{
var url1 = Url.Page("Currency/View", new { id = 5 }); ❷
var url3 = _link.GetPathByPage( ❸
HttpContext, ❸
"/Currency/View", ❸
values: new { id = 5 }); ❸
var url2 = _link.GetPathByPage( ❹
"/Currency/View", ❹
values: new { id = 5 }); ❹
var url4 = _link.GetUriByPage( ❺
page: "/Currency/View", ❺
handler: null, ❺
values: new { id = 5 }, ❺
scheme: "https", ❺
host: new HostString("example.com")); ❺
}
}
❶ LinkGenerator can be accessed using dependency injection.
LinkGenerator 可以使用依赖项注入进行访问。
❷ You can generate relative paths using Url.Page. You can use relative or absolute Page paths.
您可以使用 Url.Page 生成相对路径。您可以使用相对或绝对 Page 路径。
❸ GetPathByPage is equivalent to Url.Page and generates a relative URL.
GetPathByPage 等效于 Url.Page 并生成相对 URL。
❹ Other overloads don’t require an HttpContext.
其他重载不需要 HttpContext。
❺ GetUriByPage generates an absolute URL instead of a relative URL.
GetUriByPage 生成绝对 URL 而不是相对 URL。
Warning As always, you need to be careful when generating URLs, whether you’re using IUrlHelper or LinkGenerator. If you get anything wrong—use the wrong path or don’t provide a required route parameter—the URL generated will be null.
警告:与往常一样,在生成 URL 时需要小心,无论您使用的是 IUrlHelper 还是 LinkGenerator。如果出现任何错误(使用错误的路径或未提供必需的路由参数),则生成的 URL 将为 null。
At this point we’ve covered mapping request URLs to Razor Pages and generating URLs, but most of the URLs we’ve used have been kind of ugly. If seeing capital letters in your URLs bothers you, the next section is for you. In section 14.6 we customize the conventions your application uses to calculate route templates.
在这一点上,我们已经介绍了将请求 URL 映射到 Razor Pages 和生成 URL,但我们使用的大多数 URL 都有些难看。如果在 URL 中看到大写字母让您感到困扰,那么下一部分适合您。在 Section 14.6 中,我们自定义了应用程序用于计算路由模板的约定。
14.6 Customizing conventions with Razor Pages
使用 Razor Pages 自定义约定
Razor Pages is built on a series of conventions that are designed to reduce the amount of boilerplate code you need to write. In this section you’ll see some of the ways you can customize those conventions. By customizing the conventions Razor Pages uses in your application, you get full control of your application’s URLs without having to customize every Razor Page’s route template manually.
Razor Pages 基于一系列约定构建,旨在减少需要编写的样板代码量。在本节中,您将看到一些可以自定义这些约定的方法。通过自定义 Razor Pages 在应用程序中使用的约定,可以完全控制应用程序的 URL,而无需手动自定义每个 Razor Page 的路由模板。
By default, ASP.NET Core generates URLs that match the filenames of your Razor Pages very closely. The Razor Page located at the path Pages/Products/ProductDetails.cshtml, for example, corresponds to the route template Products/ProductDetails.
默认情况下,ASP.NET Core 生成的 URL 与 Razor Pages 的文件名非常匹配。例如,位于路径 Pages/Products/ProductDetails.cshtml 的 Razor 页面对应于路由模板 Products/ProductDetails。
These days, it’s not common to see capital letters in URLs. Similarly, words in URLs are usually separated using kebab-case rather than PascalCase—product-details instead of ProductDetails. Finally, it’s also common to ensure that your URLs always end with a slash, for example—/product-details/ instead of /product-details. Razor Pages gives you complete control of the conventions your application uses to generate route templates, but these are some of the common changes I often make.
如今,在 URL 中看到大写字母并不常见。同样,URL 中的单词通常使用 kebab-case 而不是 PascalCase 分隔,即 product-details 而不是 ProductDetails。最后,确保您的 URL 始终以斜杠结尾也是很常见的,例如 /product-details/ 而不是 /product-details。Razor Pages 让您可以完全控制应用程序用于生成路由模板的约定,但这些是我经常进行的一些常见更改。
You saw how to make some of these changes in chapter 6, by customizing the RouteOptions for your application. You can make your URLs lowercase and ensure that they already have a trailing slash as shown in the following listing.
您在第 6 章中了解了如何通过自定义应用程序的 RouteOptions 来进行其中一些更改。您可以将 URL 设置为小写,并确保它们已经有一个尾部斜杠,如下面的清单所示。
Listing 14.5 Configuring routing conventions using RouteOptions in Program.cs
列表 14.5 在 Program.cs 中使用 RouteOptions 配置路由约定
WebApplicationBuilder builder = WebApplication.CreateBuilder(args);
builder.Services.AddRazorPages();
builder.Services.Configure<RouteOptions>(o => ❶
{ ❶
o.LowercaseUrls = true; ❶
o.LowercaseQueryStrings = true; ❶
o.AppendTrailingSlash = true; ❶
});
WebApplication app = builder.Build();
app.MapRazorPages();
app.Run();
❶ Changes the conventions used to generate URLs. By default, these properties are false.
更改用于生成 URL 的约定。默认情况下,这些属性为 false。
To use kebab-case for your application, annoyingly you must create a custom parameter transformer. This is a somewhat advanced topic, but it’s relatively simple to implement in this case. The following listing shows how you can create a parameter transformer that uses a regular expression to replace PascalCase values in a generated URL with kebab-case.
要为您的应用程序使用 kebab-case,令人讨厌的是,您必须创建一个自定义参数 transformer。这是一个有点高级的主题,但在这种情况下实现起来相对简单。下面的清单显示了如何创建一个参数转换器,该转换器使用正则表达式将生成的 URL 中的 PascalCase 值替换为 kebab-case。
Listing 14.6 Creating a kebab-case parameter transformer
Listing 14.6 创建一个 kebab-case 参数转换器
public class KebabCaseParameterTransformer ❶
: IOutboundParameterTransformer ❶
{
public string TransformOutbound(object? value)
{
if (value is null) return null; ❷
return Regex.Replace(value.ToString(), ❸
"([a-z])([A-Z])", "$1-$2").ToLower(); ❸
}
}
❶ Creates a class that implements the parameter transformer interface
创建一个实现参数 transformer 接口的类
❷ Guards against null values to prevent runtime exceptions
防止空值以防止运行时异常
❸ The regular expression replaces PascalCase patterns with kebab-case.
正则表达式将 PascalCase 模式替换为 kebab-case。
Source generators in .NET 7
.NET 7 中的源生成器One of the exciting features introduced in C# 9 was source generators. Source generators are a compiler feature that let you inspect code as it’s compiled and generate new C# files on the fly, which are included in the compilation. Source generators have the potential to dramatically reduce the boilerplate required for some features and to improve performance by relying on compile-time analysis instead of runtime reflection.
C# 9 中引入的一个令人兴奋的功能是源生成器。源生成器是一项编译器功能,可让您在编译代码时检查代码,并动态生成新的 C# 文件,这些文件包含在编译中。源生成器有可能显著减少某些功能所需的样板,并通过依赖编译时分析而不是运行时反射来提高性能。.NET 6 introduced several source generator implementations, such as a high-performance logging API, which I discuss in this post: http://mng.bz/Y1GA. Even the Razor compiler used to compile .cshtml files was rewritten to use source generators!
.NET 6 引入了几个源生成器实现,例如高性能日志记录 API,我将在本文中讨论:http://mng.bz/Y1GA。甚至用于编译 .cshtml 文件的 Razor 编译器也被重写为使用源生成器!In .NET 7, many new source generators were added. One such generator is the regular-expression generator, which can improve performance of your Regex instances, such as the one in listing 14.6. In fact, if you’re using an IDE like Visual Studio, you should see a code fix suggesting that you use the new pattern. After you apply the code fix, listing 14.6 should look like the following instead, which is functionally identical but will likely be faster:
在 .NET 7 中,添加了许多新的源生成器。一个这样的生成器是正则表达式生成器,它可以提高 Regex 实例的性能,例如清单 14.6 中的那个。事实上,如果您使用的是 Visual Studio 之类的 IDE,您应该会看到一个代码修复,建议您使用新模式。应用代码修复后,清单 14.6 应如下所示,它在功能上相同,但可能会更快:
partial class KebabCaseParameterTransformer : IOutboundParameterTransformer
{
    public string? TransformOutbound(object? value)
    {
        if (value is null) return null;
        return MyRegex().Replace(value.ToString(), "$1-$2").ToLower();
    }
    [GeneratedRegex("([a-z])([A-Z])")]
    private static partial Regex MyRegex();
}
If you’d like to know more about how this source generator works and how it can improve performance, see this post at http://mng.bz/GyEO. If you’d like to learn more about source generators or even write your own, see my series on the process at http://mng.bz/zX4Q.
如果您想进一步了解此源代码生成器的工作原理以及它如何提高性能,请参阅 http://mng.bz/GyEO 上的这篇文章。如果您想了解有关源生成器的更多信息,甚至编写自己的源生成器,请参阅我在 http://mng.bz/zX4Q 上关于该过程的系列文章。
You can register the parameter transformer in your application with the AddRazorPagesOptions() extension method in Program.cs. This method is chained after the AddRazorPages() method and can be used to customize the conventions used by Razor Pages. The following listing shows how to register the kebab-case transformer. It also shows how to add an extra page route convention for a given Razor Page.
您可以在 Program.cs 中使用 AddRazorPagesOptions() 扩展方法在应用程序中注册参数转换器。此方法在 AddRazorPages() 方法之后链接,可用于自定义 Razor Pages 使用的约定。下面的清单显示了如何注册 kebab-case 转换器。它还演示如何为给定的 Razor 页面添加额外的页面路由约定。
Listing 14.7 Registering a parameter transformer using RazorPagesOptions
清单 14.7 使用 RazorPagesOptions 注册参数转换器
WebApplicationBuilder builder = WebApplication.CreateBuilder(args);
builder.Services.AddRazorPages()
.AddRazorPagesOptions(opts => ❶
{
opts.Conventions.Add( ❷
new PageRouteTransformerConvention( ❷
new KebabCaseParameterTransformer())); ❷
opts.Conventions.AddPageRoute( ❸
"/Search/Products/StartSearch", "/search-products"); ❸
});
WebApplication app = builder.Build();
app.MapRazorPages();
app.Run();
❶ AddRazorPagesOptions can be used to customize the conventions used by Razor Pages
AddRazorPagesOptions 可用于自定义 Razor Pages使用的约定
❷ Registers the parameter transformer as a convention used by all Razor Pages
将参数转换器注册为所有 Razor Pages使用的约定
❸ AddPageRoute adds a route template to Pages/Search/Products/StartSearch.cshtml.
AddPageRoute 将路由模板添加到 Pages/Search/Products/StartSearch.cshtml。
The AddPageRoute() convention adds an alternative way to execute a single Razor Page. Unlike when you customize the route template for a Razor Page using the @page directive, using AddPageRoute() adds an extra route template to the page instead of replacing the default. That means there are two route templates that can access the page.
AddPageRoute() 约定添加了一种执行单个 Razor Page 的替代方法。与使用 @page 指令自定义 Razor 页面的路由模板不同,使用 AddPageRoute() 会向页面添加额外的路由模板,而不是替换默认值。这意味着有两个路由模板可以访问该页面。
Tip Even the name of the Pages root folder is a convention that you can customize! You can customize it by setting the RootDirectory property inside the AddRazorPageOptions() configuration lambda.
提示:甚至 Pages 根文件夹的名称也是您可以自定义的约定!您可以通过在 AddRazorPageOptions() 配置 lambda 中设置 RootDirectory 属性来自定义它。
If you want even more control of your Razor Pages route templates, you can implement a custom convention by implementing the IPageRouteModelConvention interface and registering it as a custom convention. IPageRouteModelConvention is one of three powerful Razor Pages interfaces which let you customize how your Razor Pages app works:
如果要对 Razor Pages 路由模板进行更多控制,可以通过实现 IPageRouteModelConvention 接口并将其注册为自定义约定来实现自定义约定。IPageRouteModelConvention 是三个功能强大的 Razor Pages 接口之一,可用于自定义 Razor Pages 应用的工作方式:
• IPageRouteModelConvention—Used to customize the route templates for all the Razor Pages in your app.
IPageRouteModelConvention - 用于自定义应用程序中所有 Razor 页面的路由模板。
• IPageApplicationModelConvention—Used to customize how the Razor Page is processed, such as to add filters to your Razor Page automatically. You’ll learn about filters in Razor Pages in chapters 21 and 22.
IPageApplicationModelConvention - 用于自定义 Razor 页面的处理方式,例如自动向 Razor 页面添加筛选器。您将在第 21 章和第 22 章中了解 Razor Pages 中的过滤器。
• IPageHandlerModelConvention—Used to customize how page handlers are discovered and selected.
IPageHandlerModelConvention - 用于自定义发现和选择页面处理程序的方式。
These interfaces are powerful, as they give you access to all the internals of your Razor Page conventions and configuration. You can use the IPageRouteModelConvention, for example, to rewrite all the route templates for your Razor Pages or to add routes automatically. This is particularly useful if you need to localize an application so that you can use URLs in multiple languages, all of which map to the same Razor Page.
这些接口功能强大,因为它们使你能够访问 Razor Page 约定和配置的所有内部结构。例如,可以使用 IPageRouteModelConvention 重写 Razor Pages 的所有路由模板或自动添加路由。如果您需要本地化应用程序,以便可以使用多种语言的 URL,所有这些 URL 都映射到同一个 Razor 页面,这将特别有用。
Listing 14.8 shows a simple example of an IPageRouteModelConvention that adds a fixed prefix, "page", to all the routes in your application. If you have a Razor Page at Pages/Privacy.cshtml, with a default route template of "Privacy", after adding the following convention it would also have the route template "page/Privacy”.
清单 14.8 显示了一个 IPageRouteModelConvention 的简单示例,该示例为应用程序中的所有路由添加了固定前缀 “page”。如果你在 Pages/Privacy.cshtml 上有一个 Razor 页面,并且默认路由模板为“Privacy”,则在添加以下约定后,它还将具有路由模板“page/Privacy”。
Listing 14.8 Creating a custom IPageRouteModelConvention
清单 14.8 创建自定义 IPageRouteModelConvention
public class PrefixingPageRouteModelConvention
: IpageRouteModelConvention ❶
{
public void Apply(PageRouteModel model) ❷
{
var selectors = model.Selectors
.Select(selector => new SelectorModel ❸
{ ❸
AttributeRouteModel = new AttributeRouteModel ❸
{ ❸
Template = AttributeRouteModel.CombineTemplates( ❸
"page", ❸
selector.AttributeRouteModel!.Template), ❸
} ❸
}) ❸
.ToList();
foreach(var newSelector in selectors) ❹
{
model.Selectors.Add(newSelector);
}
}
}
❶ The convention implements IPageRouteModelConvention.
该约定实现 IPageRouteModelConvention。
❷ ASP.NET Core calls Apply on app startup.
ASP.NET Core 在应用程序启动时调用 Apply。
❸ Creates a new SelectorModel, defining a new route template for the page
创建一个新的 SelectorModel,为页面定义一个新的路由模板
❹ Adds the new selector to the page’s route template collection
将新的选择器添加到页面的路由模板集合中
You can add the convention to your application inside the call to AddRazorPagesOptions(). The following applies the contention to all pages:
您可以在对 AddRazorPagesOptions() 的调用中将约定添加到您的应用程序。以下将争用应用于所有页面:
builder.Services.AddRazorPages().AddRazorPagesOptions(opts =>
{
    opts.Conventions.Add(new PrefixingPageRouteModelConvention());
});
There are many ways you can customize the conventions in your Razor Page applications, but a lot of the time that’s not necessary. If you do find you need to customize all the pages in your application in some way, Microsoft’s “Razor Pages route and app conventions in ASP.NET Core” documentation contains further details on everything that’s available: http://mng.bz/A0BK.
您可以通过多种方式自定义 Razor Page 应用程序中的约定,但很多时候这不是必需的。如果你确实发现需要以某种方式自定义应用程序中的所有页面,Microsoft 的“ASP.NET Core 中的 Razor Pages 路由和应用约定”文档包含有关所有可用内容的更多详细信息:http://mng.bz/A0BK。
Conventions are a key feature of Razor Pages, and you should lean on them whenever you can. Although you can override the route templates for individual Razor Pages manually, as you’ve seen in previous sections, I advise against it where possible. In particular,
约定是 Razor Pages 的一项关键功能,您应该尽可能依赖它们。尽管您可以手动覆盖单个 Razor Pages 的路由模板,但正如您在前面的部分中看到的那样,我建议尽可能不要这样做。特别
• Avoid replacing the route template with an absolute path in a page’s @page directive.
避免在页面的 @page 指令中将路由模板替换为绝对路径。
• Avoid adding literal segments to the @page directive. Rely on the file hierarchy instead.
避免向 @page 指令添加文字段。请改用文件层次结构。
• Avoid adding additional route templates to a Razor Page with the AddPageRoute() convention. Having multiple URLs to access a page can often be confusing.
避免使用 AddPageRoute() 约定向 Razor 页面添加其他路由模板。使用多个 URL 来访问页面通常会令人困惑。
• Do add route parameters to the @page directive to make your routes dynamic, as in @page “{name}".
务必将路由参数添加到 @page 指令中,以使您的路由动态化,如 @page “{name}”。
• Do consider using global conventions when you want to change the route templates for all your Razor Pages, such as using kebab-case, as you saw earlier.
当您想要更改所有 Razor 页面的路由模板时,请考虑使用全局约定,例如使用 kebab-case,如前所述。
In a nutshell, these rules say “Stick to the conventions.” The danger, if you don’t, is that you may accidentally create two Razor Pages that have overlapping route templates. Unfortunately, if you end up in that situation, you won’t get an error at compile time. Instead, you’ll get an exception at runtime when your application receives a request that matches multiple route templates, as shown in figure 14.4.
简而言之,这些规则说 “Adhere the conventions”。如果不这样做,危险在于可能会意外创建两个具有重叠路由模板的 Razor 页面。不幸的是,如果你最终遇到这种情况,你不会在编译时收到错误。相反,当您的应用程序收到与多个路由模板匹配的请求时,您将在运行时收到异常,如图 14.4 所示。
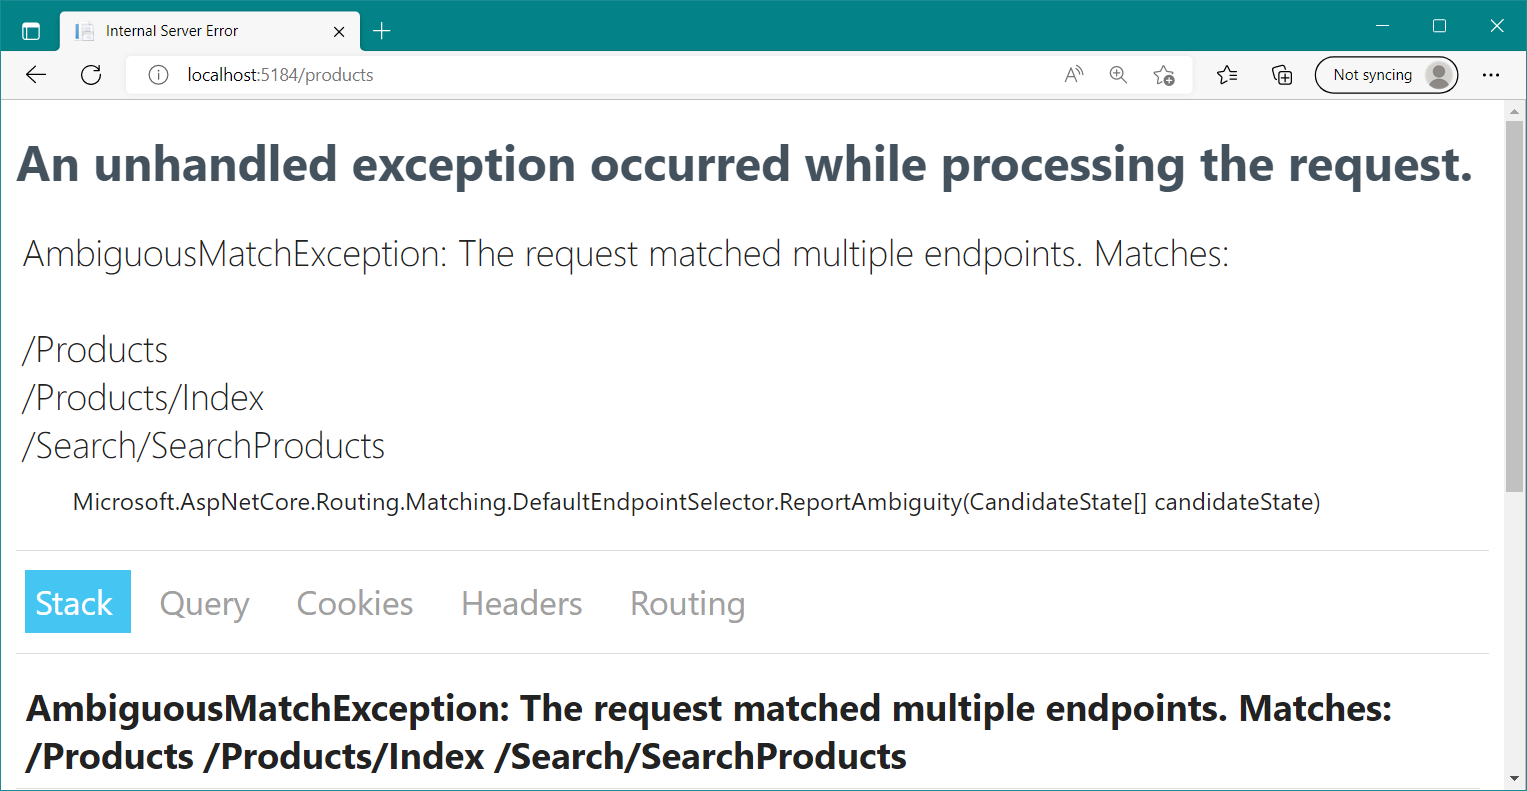
Figure 14.4 If multiple Razor Pages are registered with overlapping route templates, you’ll get an exception at runtime when the router can’t work out which one to select.
图 14.4 如果多个 Razor 页面注册了重叠的路由模板,则当路由器无法确定要选择哪个页面时,您将在运行时收到异常。
We’ve covered pretty much everything about routing to Razor Pages now. For the most part, routing to Razor Pages works like minimal APIs, the main difference being that the route templates are created using conventions. When it comes to the other half of routing—generating URLs—Razor Pages and minimal APIs are also similar, but Razor Pages gives you some nice helpers.
我们现在已经介绍了几乎所有关于路由到 Razor Pages 的内容。在大多数情况下,路由到 Razor Pages 的工作方式类似于最小的 API,主要区别在于路由模板是使用约定创建的。当涉及到路由的另一半(生成 URL)时,Razor Pages 和最小 API 也类似,但 Razor Pages 提供了一些不错的帮手。
Congratulations—you’ve made it all the way through this detailed discussion on Razor Page routing! I hope you weren’t too fazed by the differences from minimal API routing. We’ll revisit routing again when I describe how to create Web APIs in chapter 20, but rest assured that we’ve already covered all the tricky details in this chapter!
恭喜 — 您已经完成了有关 Razor Page 路由的详细讨论!我希望您不会对最小 API 路由的差异感到太困扰。当我在第 20 章中描述如何创建 Web API 时,我们将再次回顾路由,但请放心,我们已经在本章中介绍了所有棘手的细节!
Routing controls how incoming requests are bound to your Razor Page, but we haven’t seen where page handlers come into it. In chapter 15 you’ll learn all about page handlers—how they’re selected, how they generate responses, and how to handle error responses gracefully.
路由控制传入请求如何绑定到 Razor 页面,但我们尚未看到页面处理程序的来源。在第 15 章中,您将了解有关页面处理程序的所有信息 — 如何选择它们,如何生成响应,以及如何优雅地处理错误响应。
14.7 Summary
14.7 总结
Routing is the process of mapping an incoming request URL to an endpoint that will execute to generate a response. Each Razor Page is an endpoint, and a single page handler executes for each request.
路由是将传入请求 URL 映射到将执行以生成响应的终端节点的过程。每个 Razor 页面都是一个端点,每个请求都会执行一个页面处理程序。
You can define the mapping between URLs and endpoint in your application using either convention-based routing or explicit routing. Minimal APIs use explicit routing, where each endpoint has a corresponding route template. MVC controllers often use conventional routing in which a single pattern matches multiple controllers but may also use explicit/attribute routing. Razor Pages lies in between; it uses conventions to generate explicit route templates for each page.
您可以使用基于约定的路由或显式路由来定义应用程序中 URL 和 endpoint 之间的映射。最小 API 使用显式路由,其中每个终端节点都有相应的路由模板。MVC 控制器通常使用传统路由,其中单个模式匹配多个控制器,但也可能使用显式/属性路由。Razor Pages 介于两者之间;它使用约定为每个页面生成显式路由模板。
By default, each Razor Page has a single route template that matches its path inside the Pages folder, so the Razor Page Pages/Products/View.cshtml has route template Products/View. These file-based defaults make it easy to visualize the URLs your application exposes.
默认情况下,每个 Razor 页面都有一个路由模板,该模板与其在 Pages 文件夹中的路径匹配,因此 Razor Page Pages/Products/View.cshtml 具有路由模板 Products/View。这些基于文件的默认值使可视化应用程序公开的 URL 变得容易。
Index.cshtml Razor Pages have two route templates, one with an /Index suffix and one without. Pages/Products/Index.cshtml, for example, has two route templates: Products/Index and Products. This is in keeping with the common behavior of index.html files in traditional HTML applications.
Index.cshtml Razor Pages 有两个路由模板,一个带有 /Index 后缀,另一个没有。例如,Pages/Products/Index.cshtml 有两个路由模板:Products/Index 和 Products。这与传统 HTML 应用程序中index.html文件的常见行为一致。
You can add segments to a Razor Page’s template by appending it to the @page directive, as in @page "{id}". Any extra segments are appended to the Razor Page’s default route template. You can include both literal and route template segments, which can be used to make your Razor Pages dynamic. You can replace the route template for a Razor Page by starting the template with a "/", as in @page "/contact".
您可以通过将 Razor 页面的模板附加到 @page 指令来向 Razor 页面的模板添加区段,就像@page “{id}” 一样。任何额外的段都将附加到 Razor Page 的默认路由模板中。您可以同时包含文本和路由模板段,这可用于使 Razor 页面动态化。可以通过使用“/”开头来替换 Razor 页面的路由模板,如@page“/contact”。
You can use IUrlHelper to generate URLs as a string based on an action name or Razor Page. IUrlHelper can be used only in the context of a request and uses ambient routing values from the current request. This makes it easier to generate links for Razor Pages in the same folder as the currently executing request but also adds inconsistency, as the same method call generates different URLs depending on where it’s called.
可以使用 IUrlHelper 根据作名称或 Razor 页面将 URL 生成为字符串。IUrlHelper 只能在请求的上下文中使用,并使用当前请求中的环境路由值。这样可以更轻松地在与当前执行的请求相同的文件夹中为 Razor Pages 生成链接,但也增加了不一致性,因为相同的方法调用会根据调用位置生成不同的 URL。
The LinkGenerator can be used to generate URLs from other services in your application, where you don’t have access to an HttpContext object. The LinkGenerator methods are more verbose than the equivalents on IUrlHelper, but they are unambiguous as they don’t use ambient values from the current request.
LinkGenerator 可用于从应用程序中的其他服务生成 URL,在这些服务中,您无权访问 HttpContext 对象。LinkGenerator 方法比 IUrlHelper 上的等效方法更详细,但它们是明确的,因为它们不使用当前请求中的环境值。
You can control the routing conventions used by ASP.NET Core by configuring the RouteOptions object, such as to force all URLs to be lowercase or to always append a trailing slash.
您可以通过配置 RouteOptions 对象来控制 ASP.NET Core 使用的路由约定,例如强制所有 URL 为小写或始终附加尾部斜杠。
You can add extra routing conventions for Razor Pages by calling AddRazorPagesOptions() after AddRazorPages() in Program.cs. These conventions can control how route parameters are displayed and can add extra route templates for specific Razor Pages.
可以通过在 Program.cs 中的 AddRazorPages() 后调用 AddRazorPagesOptions() 来为 Razor Pages 添加额外的路由约定。这些约定可以控制路由参数的显示方式,并且可以为特定 Razor 页面添加额外的路由模板。