25 Authentication and authorization for APIs
25 API 的身份验证和授权
This chapter covers
本章涵盖
• Seeing how authentication works for APIs in ASP.NET Core
了解 ASP.NET Core中 API 的身份验证工作原理
• Using bearer tokens for authentication
使用不记名令牌进行身份验证
• Testing APIs locally with JSON Web Tokens
使用 JSON Web 令牌在本地测试 API
• Applying authorization policies to minimal APIs
将授权策略应用于最少的 API
In chapter 23 you learned how authentication works with traditional web apps, such as those you would build with Razor Pages or Model-View-Controller (MVC) controllers. Traditional web apps typically use encrypted cookies to store the identity of a user for a request, which the AuthenticationMiddleware then decodes. In this chapter you’ll learn how authentication works for API applications, how it differs from traditional web apps, and what options are available.
在第 23 章中,您了解了身份验证如何适用于传统 Web 应用程序,例如使用 Razor Pages 或模型-视图-控制器 (MVC) 控制器构建的应用程序。传统的 Web 应用程序通常使用加密的 cookie 来存储请求的用户身份,然后 AuthenticationMiddleware 对其进行解码。在本章中,您将了解身份验证如何用于 API 应用程序、它与传统 Web 应用程序有何不同,以及有哪些可用选项。
We start by taking a high-level look at how authentication works for APIs, both in isolation and when they’re part of a larger application or distributed system. You’ll learn about some of the protocols involved, such as OAuth 2.0 and OpenID Connect; patterns you can use to protect your APIs; and the tokens used to control access, typically JSON Web Tokens, called JWTs.
我们首先从高层次上了解身份验证如何用于 API,无论是在隔离状态下,还是在它们属于大型应用程序或分布式系统时。您将了解一些涉及的协议,例如 OAuth 2.0 和 OpenID Connect;可用于保护 API 的模式;以及用于控制访问的令牌,通常是 JSON Web 令牌,称为 JWT。
In section 25.3 you’ll learn how to put this knowledge into practice, adding authentication to a minimal API application using JWTs. In section 25.4 you’ll learn how to use the .NET command-line interface (CLI) to generate JWTs for testing your API locally.
在 Section 25.3 中,您将学习如何将这些知识付诸实践,使用 JWT 将身份验证添加到最小的 API 应用程序中。在第 25.4 节中,您将学习如何使用 .NET 命令行界面 (CLI) 生成 JWT 以在本地测试您的 API。
The .NET CLI works well for generating tokens, but you need a way to add this token to a request. Specifically, if you’re using OpenAPI definitions and Swagger UI as described in chapter 11, you need a way to tell Swagger about your authentication requirements. In section 25.5 you’ll learn about some of the authentication configuration options for your OpenAPI documents and how to use Swagger UI to send authenticated requests to your API.
.NET CLI 非常适合生成令牌,但您需要一种方法来将此令牌添加到请求中。具体来说,如果你正在使用 OpenAPI 定义和 Swagger UI,如第 11 章所述,你需要一种方法来告诉 Swagger 你的身份验证要求。在第 25.5 节中,您将了解 OpenAPI 文档的一些身份验证配置选项,以及如何使用 Swagger UI 将经过身份验证的请求发送到 API。
Finally, in section 25.6 I show how to apply authorization policies to minimal API endpoints to restrict which users can call your APIs. The authorization concepts you learned about in chapter 24 for Razor Pages are the same for APIs, so you’re still using claims, requirements, handlers, and polices.
最后,在第 25.6 节中,我将展示如何将授权策略应用于最小的 API 端点,以限制哪些用户可以调用您的 API。您在第 24 章中学到的 Razor Pages 授权概念与 API 相同,因此您仍在使用声明、要求、处理程序和策略。
We’ll start off by looking at how authentication works when you have an API application. Many of the authentication concepts are similar to traditional apps, but the requirement to support multiple types of users, traditional apps, client-side apps, and mobile apps has led to subtly different solutions.
首先,我们将了解当您拥有 API 应用程序时身份验证的工作原理。许多身份验证概念与传统应用程序类似,但需要支持多种类型的用户、传统应用程序、客户端应用程序和移动应用程序,这导致了略有不同的解决方案。
25.1 Authentication for APIs and distributed applications
25.1 API 和分布式应用程序的身份验证
In this section you’ll learn about the authentication process for API applications, why it typically differs from authentication for traditional web apps, and some of the common patterns and protocols that are involved.
在本节中,您将了解 API 应用程序的身份验证过程、为什么它通常不同于传统 Web 应用程序的身份验证,以及涉及的一些常见模式和协议。
25.1.1 Extending authentication to multiple apps
25.1.1 将身份验证扩展到多个应用程序
I outlined the authentication process for traditional web apps in chapter 23. When a user signs in to your application, you set an encrypted cookie. This cookie contains a serialized version of the ClaimsPrincipal of the user, including their ID and any associated claims. When you make a second request, the browser automatically sends this cookie. The AuthenticationMiddleware then decodes the cookie, deserializes the ClaimsPrincipal, and sets the current user for the request, as shown previously in figure 23.3 and reproduced in figure 25.1.
我在第 23 章中概述了传统 Web 应用程序的身份验证过程。当用户登录到您的应用程序时,您需要设置一个加密的 Cookie。此 Cookie 包含用户的 ClaimsPrincipal 的序列化版本,包括其 ID 和任何关联的声明。当您发出第二个请求时,浏览器会自动发送此 cookie。然后,AuthenticationMiddleware 对 cookie 进行解码,反序列化 ClaimsPrincipal,并为请求设置当前用户,如前面的图 23.3 所示,并在图 25.1 中重现。
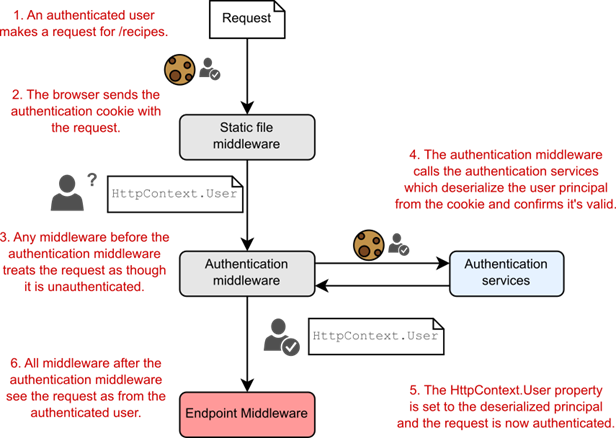
Figure 25.1 When a user first signs in to an app, the app sets an encrypted cookie containing the ClaimsPrincipal. On subsequent requests, the cookie sent with the request contains the user principal, which is deserialized, validated, and used to authenticate the request.
图 25.1 当用户首次登录应用程序时,应用程序会设置一个包含 ClaimsPrincipal 的加密 Cookie。在后续请求中,与请求一起发送的 Cookie 包含用户主体,该主体经过反序列化、验证并用于对请求进行身份验证。
This flow works particularly well when you have a single traditional web app that’s doing all the work. The app is responsible for authenticating and managing users, as well as serving your app data and executing business logic, as shown in figure 25.2.
当您有一个执行所有工作的传统 Web 应用程序时,此流程特别有效。该应用程序负责验证和管理用户,以及提供应用程序数据和执行业务逻辑,如图 25.2 所示。
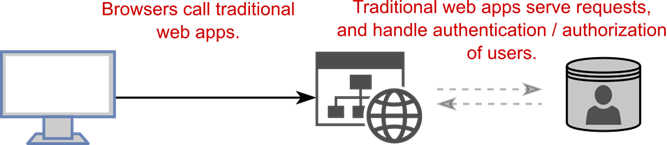
Figure 25.2 Traditional apps typically handle all the functionality of an app: the business logic, generating the UI, authentication, and user management.
图 25.2 传统应用程序通常处理应用程序的所有功能:业务逻辑、生成 UI、身份验证和用户管理。
In addition to traditional web apps, it’s common to use ASP.NET Core as an API to serve data for mobile and client-side single-page applications (SPAs). Similarly, even traditional web apps using Razor Pages often need to call API applications behind the scenes, as shown in figure 25.3.
除了传统的 Web 应用程序之外,通常将 ASP.NET Core 用作 API,为移动和客户端单页应用程序 (SPA) 提供数据。同样,即使是使用 Razor Pages 的传统 Web 应用程序也经常需要在后台调用 API 应用程序,如图 25.3 所示。

Figure 25.3 Modern applications typically need to expose web APIs for mobile and client-side apps, as well as potentially calling APIs on the backend. When all these services need to authenticate and manage users, this becomes logistically complicated.
图 25.3 现代应用程序通常需要为移动和客户端应用程序公开 Web API,并可能在后端调用 API。当所有这些服务都需要对用户进行身份验证和管理时,这在逻辑上变得复杂。
In this situation you have multiple apps and APIs, all of which need to understand that the same user is logically making a request across all the apps and APIs. If you keep the same approach as before, where each app manages its own users, things can quickly become unmanageable!
在这种情况下,您有多个应用程序和 API,所有这些应用程序和 API 都需要了解同一用户在逻辑上跨所有应用程序和 API 发出请求。如果您保持与以前相同的方法,即每个应用程序管理自己的用户,事情很快就会变得难以管理!
You’d need to duplicate all the sign-in logic between the apps and APIs, as well as have some central database holding the user details. Users would likely need to sign in multiple times to access different parts of the service. On top of that, using cookies becomes problematic for some mobile clients in particular or where you’re making requests to multiple domains (as cookies belong to only a single domain). So how can we improve this? By moving the authentication responsibilities to a separate service.
您需要在应用程序和 API 之间复制所有登录逻辑,并拥有一些包含用户详细信息的中央数据库。用户可能需要多次登录才能访问服务的不同部分。最重要的是,使用 cookie 对于某些移动客户端来说会成为问题,特别是当您向多个域发出请求时(因为 cookie 只属于一个域)。那么我们如何改进这一点呢?通过将身份验证责任转移到单独的服务。
25.1.2 Centralizing authentication in an identity provider
25.1.2 在身份提供程序中集中验证
Modern systems often have many moving parts, each of which requires some level of authentication and authorization to protect each app from unauthorized use. Instead of embedding authentication responsibilities in each application, a common approach is to extract the code that’s common to all the apps and APIs and then move it to an identity provider, as shown in figure 25.4.
现代系统通常有许多移动部件,每个部件都需要一定程度的身份验证和授权,以保护每个应用程序免受未经授权的使用。一种常见的方法是提取所有应用程序和 API 通用的代码,然后将其移动到身份提供者,而不是在每个应用程序中嵌入身份验证责任,如图 25.4 所示。
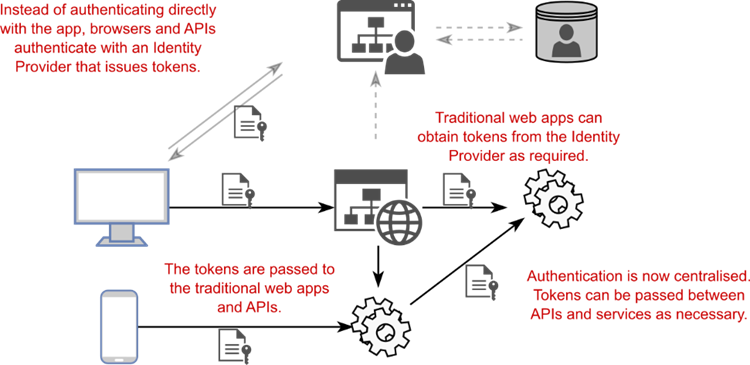
Figure 25.4 An alternative architecture involves using a central identity provider to handle all the authentication and user management for the system. Tokens are passed back and forth among the identity provider, apps, and APIs.
图 25.4 另一种架构涉及使用中央身份提供商来处理系统的所有身份验证和用户管理。令牌在身份提供商、应用程序和 API 之间来回传递。
Instead of signing in to an app directly, the app redirects to an identity provider. The user signs in to this identity provider, which passes bearer tokens back to the client (a browser or mobile app, for example) to indicate who the user is and what they’re allowed to access. The client can pass these tokens to the APIs to provide information about the logged-in user without needing to reauthenticate or manage users directly in the API.
应用程序不是直接登录到应用程序,而是重定向到身份提供商。用户登录到此身份提供商,该身份提供商将不记名令牌传递回客户端(例如浏览器或移动应用程序),以指示用户是谁以及允许他们访问的内容。客户端可以将这些令牌传递给 API,以提供有关已登录用户的信息,而无需直接在 API 中重新验证或管理用户。
DEFINITION Bearer tokens are strings that contain authentication details about a user or app. They may or may not be encrypted but are typically signed to avoid tampering. JWTs are the most common format. We’ll look more at JWTs in section 25.2.
定义:持有者令牌是包含有关用户或应用程序的身份验证详细信息的字符串。它们可能已加密,也可能未加密,但通常会进行签名以避免篡改。JWT 是最常见的格式。我们将在 25.2 节中更多地了解 JWT。
Using a separate identity provider is clearly more complicated on the face of it, as you’ve thrown a whole new service into the mix, but in the long run this has several advantages:
使用单独的身份提供商从表面上看显然更复杂,因为您已经将一个全新的服务投入其中,但从长远来看,这有几个好处:
• Users can share their identity among multiple services. As you’re logged in to the central identity provider, you’re essentially logged in to all apps that use that service. This gives you the single-sign-on experience, where you don’t have to keep logging in to multiple services.
用户可以在多个服务之间共享其身份。当您登录到中央身份提供商时,您实际上已经登录到使用该服务的所有应用程序。这为您提供了单点登录体验,您不必一直登录到多个服务。
• You don’t need to duplicate sign-in logic between multiple services. All the sign-in logic is encapsulated in the identity provider, so you don’t need to add sign-in screens to all your apps.
您无需在多个服务之间复制登录逻辑。所有登录逻辑都封装在身份提供商中,因此您无需向所有应用程序添加登录屏幕。
• The identity provider has a single responsibility. The identity provider is responsible only for authentication and managing users. In many cases, this is generic enough that you can (and should!) use a third-party identity service, such as Auth0 or Azure Active Directory, instead of building your own.
身份提供商有单一职责。身份提供商仅负责身份验证和管理用户。在许多情况下,这足够通用,您可以(并且应该)使用第三方身份服务,例如 Auth0 或 Azure Active Directory,而不是构建自己的身份服务。
• You can easily add new sign-in mechanisms. Whether you use the identity provider approach or the traditional approach, it’s possible to use external services to handle the authentication of users. You’ll have seen this in apps that allow you to “log in using Facebook” or “log in using Google,” for example. If you use a centralized identity provider, you can add support for more providers in one place instead of having to configure every app and API explicitly.
您可以轻松添加新的登录机制。无论您使用身份提供商方法还是传统方法,都可以使用外部服务来处理用户的身份验证。例如,您会在允许您 “使用 Facebook 登录” 或 “使用 Google 登录” 的应用程序中看到这一点。如果您使用集中式身份提供商,则可以在一个位置添加对更多提供商的支持,而不必显式配置每个应用程序和 API。
Out of the box, ASP.NET Core supports architectures like this and for consuming bearer tokens from identity providers, but it doesn’t include support for issuing those tokens in the core framework. That means you’ll need to use another library or service as the identity provider.
开箱即用的 ASP.NET Core 支持此类架构,并支持使用来自身份提供商的不记名令牌,但它不包括对在核心框架中颁发这些令牌的支持。这意味着您需要使用其他库或服务作为身份提供商。
As I mentioned in chapter 23, one excellent option is to use a third-party identity provider, such as Facebook, Google, Okta, Auth0, or Azure Active Directory. These providers take care of storing user passwords, authenticating using modern standards like WebAuthn (https://webauthn.guide), and looking for malicious attempts to impersonate users.
正如我在第 23 章中提到的,一个很好的选择是使用第三方身份提供商,比如 Facebook、Google、Okta、Auth0 或 Azure Active Directory。这些提供商负责存储用户密码、使用 WebAuthn (https://webauthn.guide) 等现代标准进行身份验证,并寻找冒充用户的恶意尝试。
By using an identity provider, you leave the tricky security details to the experts and can focus on the core purpose of your business, whichever domain that is. Not all providers are equal, though: For some providers (such as Auth0) you own the profiles, whereas for others (Facebook or Google) you don’t. Make sure to choose a provider that matches your requirements.
通过使用身份提供商,您可以将棘手的安全细节留给专家,并且可以专注于业务的核心目的,无论哪个域。但是,并非所有提供商都是平等的:对于某些提供商(例如 Auth0),您拥有配置文件,而对于其他提供商(Facebook 或 Google),您则不拥有。确保选择符合您要求的提供商。
Tip Wherever possible, I recommend using a third-party identity provider. Well-respected identity providers have many experts working solely on securing your customers’ details, proactively preventing attacks and ensuring that the data is safe. By leaving this tricky job to the experts, you’re free to focus on the core business of your app, whatever that may be.
提示:我建议尽可能使用第三方身份提供商。备受尊敬的身份提供商拥有许多专家,专门致力于保护客户的详细信息、主动防止攻击并确保数据安全。通过将这项棘手的工作留给专家,您可以自由地专注于应用程序的核心业务,无论它是什么。
Another common option is to build your own identity provider. This may sound like a lot of work (and it is!), but thanks to excellent libraries like OpenIddict (https://github.com/openiddict) and Duende’s IdentityServer (https://duendesoftware.com), it’s perfectly possible to write your own identity provider to serve bearer tokens that can be consumed by your apps and APIs.
另一个常见的选项是构建自己的身份提供商。这听起来像是很多工作(确实如此),但多亏了 OpenIddict (https://github.com/openiddict) 和 Duende 的 IdentityServer (https://duendesoftware.com) 等优秀库,您完全可以编写自己的身份提供商来提供可供您的应用程序和 API 使用的不记名令牌。
WARNING You should consider carefully whether the effort and risks associated with creating your own identity provider are worthwhile. Bugs are a fact of life, and a bug in your identity provider could easily result in a security vulnerability. Nevertheless, if you have specific identity requirements, creating your own identity provider may be a reasonable or necessary option.
警告:您应该仔细考虑与创建自己的身份提供商相关的努力和风险是否值得。错误是事实,身份提供商中的错误很容易导致安全漏洞。不过,如果您有特定的身份要求,创建自己的身份提供商可能是一个合理或必要的选择。
An aspect often overlooked by people getting started with OpenIddict and IdentityServer is that they aren’t prefabricated solutions. They consist of a set of services and middleware that you add to a standard ASP.NET Core app, providing an implementation of relevant identity standards, according to the specification. You, as a developer, still need to write the profile management code that knows how to create a new user (normally in a database), load a user’s details, validate their password, and manage their associated claims. On top of that, you need to provide all the UI code for the user to log in, manage their passwords, and configure two-factor authentication (2FA). It’s not for the faint of heart!
开始使用 OpenIddict 和 IdentityServer 的人经常忽略的一个方面是,它们不是预制的解决方案。它们由一组服务和中间件组成,您可以将其添加到标准 ASP.NET Core 应用程序中,根据规范提供相关身份标准的实现。作为开发人员,您仍然需要编写 Profile Management 代码,该代码知道如何创建新用户(通常在数据库中)、加载用户的详细信息、验证其密码以及管理其关联的声明。最重要的是,您需要为用户提供所有 UI 代码以登录、管理他们的密码和配置双因素身份验证 (2FA)。不适合胆小的人!
In many ways, you can think of an identity provider as a traditional web app that has only account management pages. If you want to take on building your own identity provider, ASP.NET Core Identity, described in chapter 23, provides a good basis for the user management side. Adding IdentityServer or OpenIddict gives you the ability to generate tokens for other services, using the OpenID Connect standard, for maximum interoperability with other services.
在许多方面,您可以将身份提供商视为只有账户管理页面的传统 Web 应用程序。如果您想构建自己的身份提供商,第 23 章中描述的 ASP.NET Core Identity 为用户管理方面提供了良好的基础。添加 IdentityServer 或 OpenIddict 后,您可以使用 OpenID Connect 标准为其他服务生成令牌,以实现与其他服务的最大互作性。
25.1.3 OpenID Connect and OAuth 2.0
25.1.3 OpenID Connect 和 OAuth 2.0
OpenID Connect (OIDC) (http://openid.net/connect) is an authentication protocol built on top of the OAuth 2.0 (https://oauth.net/2) specification. It’s designed to facilitate the kind of approaches described in section 25.1.2, where you want to leave the responsibility of storing user credentials to someone else (an identity provider). It provides an answer to the question “Which user sent this request?” without your having to manage the user yourself.
OpenID Connect (OIDC) (http://openid.net/connect) 是在 OAuth 2.0 (https://oauth.net/2) 规范之上构建的身份验证协议。它旨在促进第 25.1.2 节中描述的那种方法,您希望将存储用户凭据的责任留给其他人(身份提供商)。它为“哪个用户发送了此请求”问题提供答案,而无需您自己管理用户。
NOTE It isn’t strictly necessary to understand these protocols to add authentication to your APIs, but I think it’s best to have a basic understanding of them so that you understand where your APIs fit into the security landscape. If you want to learn more about OpenID Connect, OpenID Connect in Action, by Prabath Siriwardena (Manning, 2023), provides lots more details.
注意:为您的 API 添加身份验证并不是绝对必要的,但我认为最好对它们有一个基本的了解,以便您了解您的 API 在安全环境中的位置。如果您想了解有关 OpenID Connect 的更多信息,Prabath Siriwardena(曼宁,2023 年)的 OpenID Connect in Action 提供了更多详细信息。
Open ID Connect is built on top of the OAuth 2.0 protocol, so it helps to understand that protocol a little first. OAuth 2.0 is an authorization protocol. It allows a user to delegate access of a resource to a different service in a controlled manner without revealing any additional details, such as your identity or any other information.
Open ID Connect 构建在 OAuth 2.0 协议之上,因此首先了解该协议会有所帮助。OAuth 2.0 是一种授权协议。它允许用户以受控方式将资源的访问权限委托给其他服务,而无需透露任何其他详细信息,例如您的身份或任何其他信息。
That’s all a bit abstract, so let’s consider an example. You want to print some photos of your dog through a photo printing service, dogphotos.com. You sign up to the dogphotos.com service, and they give you two options for uploading your photos:
这一切都有点抽象,所以让我们考虑一个例子。您想通过照片打印服务打印一些您的狗的照片,dogphotos.com。您注册了 dogphotos.com 服务,他们为您提供了两种上传照片的选项:
• Upload from your computer.
从您的计算机上传。
• Download directly from Facebook using OAuth 2.0.
使用 OAuth 2.0 直接从 Facebook 下载。
As you’re using a new laptop, you haven’t downloaded all the photos of your dog to your computer, so you choose to use OAuth 2.0 instead, as shown in figure 25.5. This triggers the following sequence:
由于您使用的是新笔记本电脑,因此您尚未将狗的所有照片下载到计算机上,因此您选择使用 OAuth 2.0,如图 25.5 所示。这将触发以下序列:
-
dogphotos.com redirects you to Facebook, where you must sign in (if you haven’t already).
dogphotos.com 会将您重定向到 Facebook,您必须在此处登录(如果您尚未登录)。 -
Once you’re authenticated, Facebook shows a consent screen, which describes the data dogphotos.com wants to access, which should be your photos only in this case.
通过身份验证后,Facebook 会显示一个同意屏幕,其中描述了 dogphotos.com 想要访问的数据,在这种情况下,这些数据应该只是您的照片。 -
When you choose OK, Facebook automatically redirects you to a URL on dogphotos.com and includes an authorization code in the URL.
当您选择 OK (确定) 时,Facebook 会自动将您重定向到 dogphotos.com 上的 URL,并在 URL 中包含授权代码。 -
dogphotos.com uses this code, in combination with a secret known only by Facebook and dogphotos.com, to retrieve an access token from Facebook.
dogphotos.com 将此代码与只有 Facebook 和 dogphotos.com 知道的密钥结合使用,从 Facebook 检索访问令牌。 -
Finally, dogphotos.com uses the token to call the Facebook API and retrieve your dog photos!
最后,dogphotos.com 使用令牌调用 Facebook API 并检索您的狗照片!
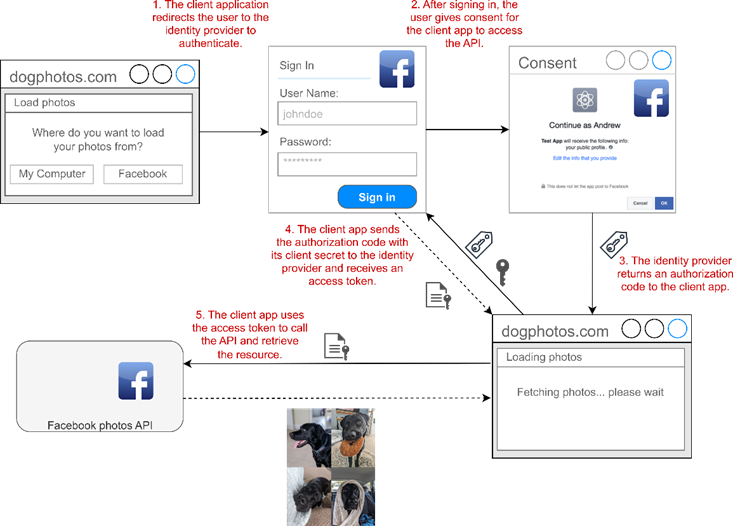
Figure 25.5 Using OAuth 2.0 to authorize dogphotos.com to access your photos on Facebook
图 25.5 使用 OAuth 2.0 授权 dogphotos.com 访问您在 Facebook 上的照片
There’s a lot going on in this example, but it gives some nice benefits:
这个例子中有很多内容,但它提供了一些不错的好处:
• You didn’t have to give your Facebook credentials to dogphotos.com. You simply signed in to Facebook as normal.
您不必将您的 Facebook 凭据提供给 dogphotos.com。您只需照常登录 Facebook。
• You had control of which details dogphotos.com could access on your behalf via the Facebook photos API.
您可以控制 dogphotos.com 可以通过 Facebook 照片 API 代表您访问哪些详细信息。
• You didn’t have to give dogphotos.com any of your identity information (though in practice, this is often requested).
您不必向 dogphotos.com 提供任何身份信息(尽管在实践中,这经常被要求)。
Effectively, you delegated your access of the Facebook photos API to dogphotos.com. This approach is why OAuth 2.0 is described as an authorization protocol, not an authentication protocol. dogphotos.com doesn’t know your identity on Facebook; it is authorized only to access the photos API on behalf of someone.
实际上,您将 Facebook 照片 API 的访问权限委托给了 dogphotos.com。这种方法就是为什么 OAuth 2.0 被描述为授权协议,而不是身份验证协议的原因。dogphotos.com 不知道您在 Facebook 上的身份;它仅被授权代表某人访问 Photos API。
OAuth 2.0 authorization flows and grant types
OAuth 2.0 授权流程和授权类型
The OAuth 2.0 example shows in this section uses a common flow or grant type, as it’s called in OAuth 2.0, for obtaining a token from an identity provider. Oauth 2.0 defines several grant types and extensions, each designed for a different scenario:
本节中所示的 OAuth 2.0 示例使用通用流程或授权类型(在 OAuth 2.0 中称为)从身份提供商处获取令牌。Oauth 2.0 定义了多种授权类型和扩展,每种类型和扩展都针对不同的场景而设计:
• Authorization code—This is the flow I described in figure 25.5, in which an application uses the combination of an authorization code and a secret to retrieve a token.
授权码 - 这是我在图 25.5 中描述的流程,其中应用程序使用授权码和密钥的组合来检索令牌。• Proof Key for Code Exchange (PKCE)—This is an extension to the authorization code that you should always favor, if possible, as it provides additional protections against certain attacks, as described in the RFC at https://www.rfc-editor.org/rfc/rfc7636.
代码交换证明密钥 (PKCE) - 这是授权码的扩展,如果可能,您应该始终使用该扩展,因为它提供了针对某些攻击的额外保护,如 RFC https://www.rfc-editor.org/rfc/rfc7636 中所述。• Client credentials—This is used when no user is involved, such as when you have an API talking to another API.
客户端凭据 - 当不涉及用户时 (例如,当 API 与其他 API 通信时) 使用此凭据。Many more grants are available (see https://oauth.net/2/grant-types), and each grant is suited to a different situation. The examples are the most common types, but if your scenario doesn’t match these, it’s worth exploring the other OAuth 2.0 grants available before thinking you need to invent your own! And with Oauth 2.1 coming soon (http://mng.bz/XNav), there may well be updated guidance to be aware of.
还有更多的资助金可供选择(见 https://oauth.net/2/grant-types),每种资助金都适用于不同的情况。这些示例是最常见的类型,但如果您的方案与这些不匹配,则值得先探索其他可用的 OAuth 2.0 授权,然后再考虑您需要创建自己的授权!随着 Oauth 2.1 的即将推出 (http://mng.bz/XNav),可能会有更新的指南需要注意。
OAuth 2.0 is great for the scenario I’ve described so far, in which you want to delegate access to a resource (your photos) to someone else (dogphotos.com). But it’s also common for apps to want to know your identity in addition to accessing an API. For example, dogphotos.com may want to be able to contact you via Facebook if there’s a problem with your photos.
OAuth 2.0 非常适合我到目前为止描述的方案,在该方案中,您希望将对资源(您的照片)的访问权限委派给其他人 (dogphotos.com)。但是,除了访问 API 之外,应用程序还想知道您的身份也很常见。例如,如果您的照片有问题,dogphotos.com 可能希望能够通过 Facebook 与您联系。
This is where OpenID Connect comes in. OpenID Connect takes the same basic flows as OAuth 2.0 and adds some conventions, discoverability, and authentication. At a high level, OpenID Connect treats your identity (such as an ID or email address) as a resource that is protected in the same way as any other API. You still need to consent to give dogphotos.com access to your identity details, but once you do, it’s an extra API call for dogphotos.com to retrieve your identity details, as shown in figure 25.6.
这就是 OpenID Connect 的用武之地。OpenID Connect 采用与 OAuth 2.0 相同的基本流程,并添加了一些约定、可发现性和身份验证。概括地说,OpenID Connect 将您的身份(例如 ID 或电子邮件地址)视为一种资源,其保护方式与任何其他 API 相同。您仍然需要同意才能授予 dogphotos.com 访问您的身份详细信息的权限,但是一旦同意,dogphotos.com 将进行额外的 API 调用来检索您的身份详细信息,如图 25.6 所示。
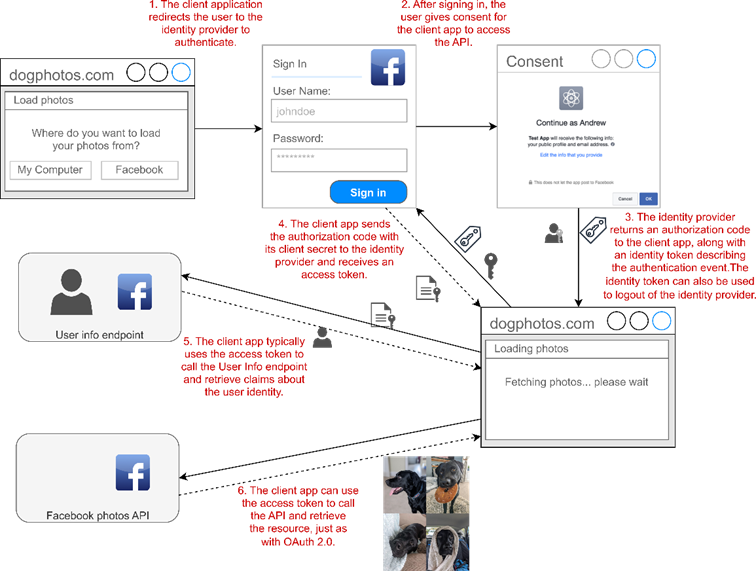
Figure 25.6 Using OpenID Connect to authenticate with Facebook and retrieve identity information. The overall flow is the same as with Oauth 2.0, as shown in figure 25.5, but with an additional identity token describing the authentication event and API call to retrieve the identity details.
图 25.6 使用 OpenID Connect 向 Facebook 进行身份验证并检索身份信息。整个流程与 Oauth 2.0 相同,如图 25.5 所示,但使用一个额外的身份令牌来描述身份验证事件和 API 调用来检索身份详细信息。
OpenID Connect is a crucial authentication component in many systems, but if you’re building the API only (for example, the Facebook photos API from figures 25.5 and 25.6), all you really care about are the tokens in the requests; how that token was obtained is less important from a technical standpoint. In the next section we’ll look in detail at these tokens and how they work.
OpenID Connect 是许多系统中的关键身份验证组件,但如果您只构建 API(例如,图 25.5 和 25.6 中的 Facebook 照片 API),那么您真正关心的只是请求中的令牌;从技术角度来看,该代币是如何获得的并不重要。在下一节中,我们将详细介绍这些令牌及其工作原理。
25.2 Understanding bearer token authentication
25.2 了解持有者令牌身份验证
In this section you’ll learn about bearer tokens: what they are, how they can be used for security with APIs, and the common JWT format for tokens. You’ll learn about some of the limitations of the tokens, approaches to work around these, and some common concepts such as audiences and scopes.
在本节中,您将了解不记名令牌:它们是什么,如何通过 API 使用它们来确保安全性,以及令牌的常见 JWT 格式。您将了解令牌的一些限制、解决这些问题的方法,以及一些常见概念,例如受众和范围。
The name bearer token consists of two parts that describe its use:
名称持有者令牌由描述其用途的两个部分组成:
• Token—A security token is a string that provides access to a protected resource.
令牌 - 安全令牌是提供对受保护资源的访问权限的字符串。
• Bearer—A bearer token is one in which anyone who has the token (the bearer) can use it like anyone else. You don’t need to prove that you were the one who received the token originally or have access to any additional key. You can think of a bearer token as being a bit like money: if it’s in your possession, you can spend it!
Bearer - 在“不记名令牌”中,任何拥有该令牌 (“Bearer”) 的人都可以像其他任何人一样使用它。您无需证明您是最初接收令牌的人,也无需证明您有权访问任何其他密钥。您可以将不记名代币想象成有点像金钱:如果您拥有它,您就可以花掉它!
If the second point makes you a little uneasy, that’s good. You should think of bearer tokens as being a lot like passwords: you must protect them at all costs! You should avoid including bearer tokens in URL query strings, for example, as these may be automatically logged, exposing the token accidentally.
如果第二点让你有点不安,那很好。您应该将不记名令牌视为很像密码:您必须不惜一切代价保护它们!例如,您应该避免在 URL 查询字符串中包含不记名令牌,因为这些令牌可能会被自动记录,从而意外地暴露令牌。
Everything old is new again: Cookies for APIs
旧事物又是新的:API的 CookieBearer token authentication is extremely common for APIs, but as with everything in tech, the landscape is constantly evolving. One area that has seen a lot of change is the process of securing SPAs like React, Angular, and Blazor WASM. The advice for some years was to use the Authorization code with PKCE grant (https://www.rfc-editor.org/rfc/rfc8252#section-6), but the big problem with this pattern is that the bearer tokens for calling the API are ultimately stored in the browser.
不记名令牌身份验证对于 API 来说极为常见,但与技术领域的一切一样,形势也在不断发展。一个发生很大变化的领域是保护 React、Angular 和 Blazor WASM 等 SPA 的过程。几年来,人们的建议是将授权码与 PKCE grant (https://www.rfc-editor.org/rfc/rfc8252#section-6) 一起使用,但这种模式的最大问题是,用于调用 API 的不记名令牌最终存储在浏览器中。An alternative pattern has emerged recently: the Backend for Frontend (BFF) pattern. In this approach, you have a traditional ASP.NET Core application (the backend, which hosts the Blazor WASM or other SPA application (the frontend). The main job of the ASP.NET Core application is to handle OpenID Connect authentication, store the bearer tokens securely, and set an authentication cookie, exactly like a traditional web app.
最近出现了另一种模式:Backend for Frontend (BFF) 模式。在此方法中,你有一个传统的 ASP.NET Core 应用程序(后端,托管 Blazor WASM 或其他 SPA 应用程序(前端)。ASP.NET Core 应用程序的主要工作是处理 OpenID Connect 身份验证,安全地存储持有者令牌,并设置身份验证 Cookie,就像传统的 Web 应用程序一样。The frontend app in the browser sends requests to the backend app, which automatically includes the cookie. The backend swaps out the authentication cookie for the appropriate bearer token and forwards the request to the real API.
浏览器中的前端应用程序将请求发送到后端应用程序,后端应用程序会自动包含 Cookie。后端将身份验证 Cookie 换成相应的不记名令牌,并将请求转发到实际 API。The big advantages of this approach are that no bearer tokens are ever sent to the browser, and much of the frontend code is significantly simplified. The main down side is that you need to run the additional backend service to support the frontend app. Nevertheless, this is quickly becoming the recommended approach. You can read more about the pattern in Duende’s documentation at http://mng.bz/yQdB. Alternatively, you can find a project template for the BFF pattern from Damien Boden at http://mng.bz/MBlW.
这种方法的一大优点是不会向浏览器发送不记名令牌,并且大部分前端代码都得到了显著简化。主要缺点是您需要运行额外的后端服务来支持前端应用程序。尽管如此,这正迅速成为推荐的方法。您可以在 Duende 的文档 http://mng.bz/yQdB 中阅读有关该模式的更多信息。或者,您可以在 http://mng.bz/MBlW 上找到 Damien Boden 提供的 BFF 模式的项目模板。
Bearer tokens don’t have to have any particular value; they could be a completely random string, for example. However, the most common format and the format used by OpenID Connect is a JWT. JWTs (defined in https://www.rfc-editor.org/rfc/rfc7519.html) consist of three parts:
不记名令牌不必具有任何特定值;例如,它们可以是一个完全随机的字符串。但是,最常见的格式和 OpenID Connect 使用的格式是 JWT。JWT(在 https://www.rfc-editor.org/rfc/rfc7519.html 中定义)由三个部分组成:
• A JavaScript Object Notation (JSON) header describing the token
描述令牌的 JavaScript 对象表示法 (JSON) 标头
• A JSON payload containing the claims
包含声明的 JSON 有效负载
• A binary signature created from the header and the payload
从标头和有效负载创建的二进制签名
Each part is base64-encoded and concatenated with a '.' into a single string that can be safely passed in HTTP headers, for example, as shown in figure 25.7. The signature is created using key material that must be shared by the provider that created the token and any API that consumes it. This ensures that the JWT can’t be tampered with, such as to add extra claims to a token.
每个部分都经过 base64 编码,并用 '.' 连接成一个字符串,该字符串可以在 HTTP 标头中安全地传递,例如,如图 25.7 所示。签名是使用密钥材料创建的,该密钥材料必须由创建令牌的提供商和使用令牌的任何 API 共享。这可确保 JWT 无法被篡改,例如向令牌添加额外的声明。
WARNING Always validate the signature of any JWTs you consume, as described in the JWT Best Current Practices RFC (https://www.rfc-editor.org/rfc/rfc8725). ASP.NET Core does this by default.
警告:始终验证您使用的任何 JWT 的签名,如 JWT 当前最佳实践 RFC (https://www.rfc-editor.org/rfc/rfc8725) 中所述。默认情况下,ASP.NET Core 执行此作。
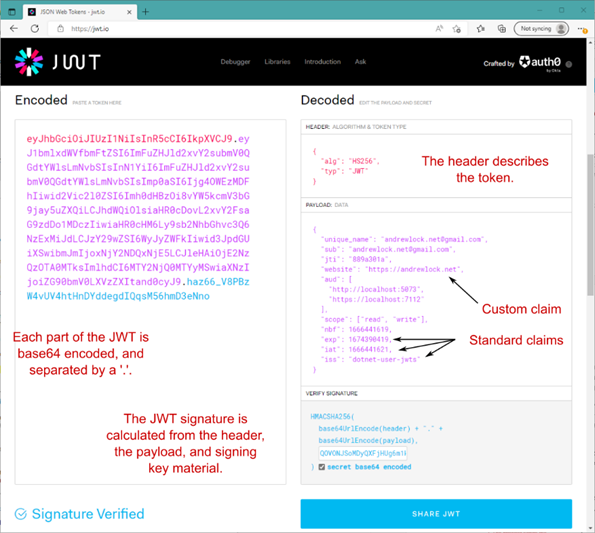
Figure 25.7 An example JWT, decoded using the website https://jwt.io. The JWT consists of three parts: the header, the payload, and the signature. You must always verify the signature of any JWTs you receive.
图 25.7 使用 website https://jwt.io 解码的 JWT 示例JWT 由三部分组成:标头、有效负载和签名。您必须始终验证您收到的任何 JWT 的签名。
Figure 25.7 shows the claims included in the JWT, some of which have cryptic names like iss and iat. These are standard claim names used in OpenID Connect (standing for “Issuer” and “Issued at,” respectively). You generally don’t need to worry about these, as they’re automatically handled by ASP.NET Core when it decodes the token. Nevertheless, it’s helpful to understand what some of these claims mean, as it will help when things go wrong:
图 25.7 显示了 JWT 中包含的声明,其中一些声明具有晦涩难懂的名称,如 iss 和 iat。这些是 OpenID Connect 中使用的标准声明名称(分别代表“颁发者”和“颁发者”)。您通常无需担心这些,因为它们由 ASP.NET Core 在解码令牌时自动处理。尽管如此,了解其中一些索赔的含义会有所帮助,因为当出现问题时它会有所帮助:
• sub—The subject of the token, the unique identifier of the subject it’s describing. This will often be a user, in which case it may be the identity provider’s unique ID for the user.
sub - 令牌的主题,即它所描述的主题的唯一标识符。这通常是一个用户,在这种情况下,它可能是身份提供商的用户唯一 ID。
• aud—The audience of the token, specifying the domains for which this token was created. When an API validates the token, the API should confirm that the JWT’s aud claim contains the domain of the API.
aud - 令牌的受众,指定为其创建此令牌的域。当 API 验证令牌时,API 应确认 JWT 的 aud 声明包含 API 的域。
• scope—The scopes granted in the token. Scopes define what the user/app consented to (and is allowed to do). Taking the example from section 25.1, dogphotos.com may have requested the photos.read and photos.edit scopes, but if the user consented only to the photos.read scope, the photos.edit scope would not be in the JWT it receives for use with the Facebook photos API. It’s up to the API itself to interpret what each scope means for the business logic of the request.
scope - 令牌中授予的范围。范围定义用户/应用程序同意 (和允许) 执行的作。以第 25.1 节为例,dogphotos.com 可能已经请求了photos.read和photos.edit范围,但是如果用户只同意photos.read范围,则photos.edit范围将不在它收到的用于 Facebook 照片 API 的 JWT 中。由 API 本身来解释每个范围对请求的业务逻辑的含义。
• exp—The expiration time of the token, after which it is no longer valid, expressed as the number of seconds since midnight on January 1, 1970 (known as the Unix timestamp).
exp - 令牌的过期时间 (超过此时间后) 不再有效,表示为自 1970 年 1 月 1 日午夜以来的秒数 (称为 Unix 时间戳)。
An important point to realize is that JWTs are not encrypted. That means anyone can read the contents of a JWT by default. Another standard, JSON Web Encryption (JWE), can be used to wrap a JWT in an encrypted envelope that can’t be read unless you have the key. Many identity providers include support for using JWEs with nested JWTs, and ASP.NET Core includes support for both out of the box, so it’s something to consider.
需要注意的一个重要点是 JWT 未加密。这意味着默认情况下,任何人都可以读取 JWT 的内容。另一个标准 JSON Web 加密 (JWE) 可用于将 JWT 包装在加密信封中,除非您拥有密钥,否则无法读取该信封。许多身份提供商都支持将 JWE 与嵌套的 JWT 一起使用,而 ASP.NET Core 也支持开箱即用,因此需要考虑这一点。
Bearer tokens, access tokens, reference tokens, oh my!
不记名令牌、访问令牌、引用令牌,天哪!The concept of a bearer token described in this section is a generic idea that can be used in several ways and for different purposes. You’ve already read about access tokens and identity tokens used in OpenID Connect. These are both bearer tokens; their different names describe the purpose of the token.
本节中描述的 bearer token 的概念是一个通用概念,可以以多种方式用于不同的目的。您已经阅读了 OpenID Connect 中使用的访问令牌和身份令牌。这些都是不记名令牌;它们的不同名称描述了令牌的用途。The following list describes some of the types of tokens you might read about or run into:
以下列表描述了您可能会阅读或遇到的一些令牌类型:• Access token—Access tokens are used to authorize access to a resource. These are the tokens typically referred to when you talk about bearer authentication. They come in two flavors:
访问令牌 - 访问令牌用于授权访问资源。这些是您在谈论不记名身份验证时通常提到的令牌。它们有两种口味:
Self-contained—These are the most common tokens, with JWT as the most common format. They contain metadata, claims, and a signature. The strength of self-contained tokens—that they contain all the data and can be validated offline—is also their weakness, as they can’t be revoked. Due to this, they typically have a limited valid lifespan. They can also become large if they contain many claims, which increases request sizes.
自包含 — 这些是最常见的令牌,其中 JWT 是最常见的格式。它们包含元数据、声明和签名。自包含令牌的优势(它们包含所有数据并且可以离线验证)也是它们的弱点,因为它们无法撤销。因此,它们的有效寿命通常有限。如果它们包含许多声明,它们也会变得很大,这会增加请求大小。
Reference token—These don’t contain any data and are typically a random string. When a protected API receives a reference token, it must exchange the reference token with the identity provider for the claims (for example, a JWT). This approach ensures more privacy, as the claims are never exposed to the client, and the token can be revoked at the identity provider. However, it requires an extra HTTP round trip every time the API receives a request. This makes reference tokens a good option for high-security environments, where the performance effect is less critical.
引用令牌 – 这些不包含任何数据,通常是随机字符串。当受保护的 API 收到引用令牌时,它必须与身份提供商交换引用令牌以获取声明(例如 JWT)。此方法可确保更多隐私,因为声明永远不会向客户端公开,并且可以在身份提供商处撤销令牌。但是,每次 API 收到请求时,它都需要额外的 HTTP 往返。这使得 reference tokens 成为高安全性环境的不错选择,因为在这种环境中,性能影响不太重要。
• ID token—This token is used in OpenID Connect (http://mng.bz/a1M7) to describe an authentication event. It may contain additional claims about the authenticated user, but this is not required; if the claims aren’t provided in the ID token, they can be retrieved from the identity provider’s UserInfo endpoint. The ID token is always a JWT, but you should never send it to other APIs; it is not an access token. The ID token can also be used to log out the user at the identity provider.
ID 令牌 - 此令牌在 OpenID Connect (http://mng.bz/a1M7) 中用于描述身份验证事件。它可能包含有关经过身份验证的用户的其他声明,但这不是必需的;如果 ID 令牌中未提供声明,则可以从身份提供商的 UserInfo 终端节点检索它们。ID 令牌始终是 JWT,但您绝不应将其发送到其他 API;它不是访问令牌。ID 令牌还可用于在身份提供商处注销用户。• Refresh token—For security reasons, access tokens typically have relatively short lifetimes, sometimes as low as 5 minutes. After this time, the access token is no longer valid, and you need to retrieve a new one. Making users log in to their identity provider every 5 minutes is clearly a bad experience, so as part of the OAuth or OpenID Connect flow you can also request a refresh token.
刷新令牌 - 出于安全原因,访问令牌的生命周期通常相对较短,有时低至 5 分钟。在此时间之后,访问令牌不再有效,您需要检索新的访问令牌。让用户每 5 分钟登录一次身份提供商显然是一种糟糕的体验,因此作为 OAuth 或 OpenID Connect 流程的一部分,您还可以请求刷新令牌。When an access token expires, you can send the refresh token to an identity provider, and it returns a new access token without the user’s needing to log in again. The power to obtain valid access tokens means that it’s critical to protect refresh tokens; should an attacker obtain a refresh token, they effectively have the power to impersonate a user.
当访问令牌过期时,您可以将刷新令牌发送给身份提供商,它会返回新的访问令牌,而无需用户再次登录。获取有效访问令牌的能力意味着保护刷新令牌至关重要;如果攻击者获取了刷新令牌,他们实际上就有能力模拟用户。In most of your work building and interacting with APIs, you’ll likely be using self-contained JWT access tokens. These are what I’m primarily referring to in this chapter whenever I mention bearer tokens or bearer authentication.
在构建 API 和与 API 交互的大部分工作中,您可能会使用自包含的 JWT 访问令牌。这些是我在本章中提到 bearer tokens 或 bearer authentication 时主要引用的内容。
Now you know what a token is, as well as how they’re issued by identity providers using the OpenID Connect and OAuth 2.0 protocols. Before we get to some code in section 25.3, we’ll see what a typical authentication flow looks like for an ASP.NET Core API app using JWT bearer tokens for authentication.
现在,您知道什么是令牌,以及身份提供商如何使用 OpenID Connect 和 OAuth 2.0 协议颁发令牌。在我们进入第 25.3 节中的一些代码之前,我们将了解使用 JWT 不记名令牌进行身份验证的 ASP.NET Core API 应用程序的典型身份验证流程是什么样的。
At a high level, authenticating using bearer tokens is identical to authenticating using cookies for a traditional app that has already authenticated, which you saw in figure 25.1. The request to the API contains the bearer token in a header. Any middleware before the authentication middleware sees the request as unauthenticated, exactly the same as for cookie authentication, as shown in figure 25.8.
在高级别上,使用 bearer tokens 进行身份验证与使用 cookie 对已经进行身份验证的传统应用程序相同,如图 25.1 所示。对 API 的请求在标头中包含不记名令牌。身份验证中间件之前的任何中间件都将请求视为未经身份验证,这与 cookie 身份验证完全相同,如图 25.8 所示。
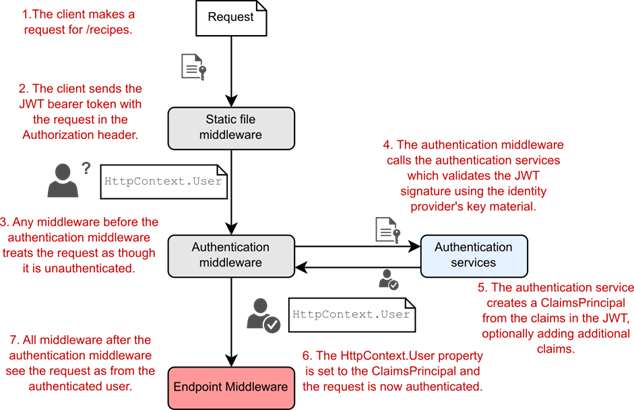
Figure 25.8 When an API request contains a bearer token, the token is validated and deserialized by the authentication middleware. The middleware creates a ClaimsPrincipal from the token, optionally transforming it with additional claims, and sets the HttpContext.User property. Subsequent middleware sees the request as authenticated.
图 25.8 当 API 请求包含不记名令牌时,身份验证中间件会验证和反序列化该令牌。中间件从令牌创建 ClaimsPrincipal,可以选择使用其他声明对其进行转换,并设置 HttpContext.User 属性。后续中间件将请求视为已验证。
Things are a bit different in the AuthenticationMiddleware. Instead of deserializing a cookie containing the ClaimsPrincipal, the middleware decodes the JWT token in the Authorization header. It validates the signature using the signing keys from the identity provider, and verifies that the audience has the expected value and that the token has not expired.
AuthenticationMiddleware 中的情况略有不同。中间件不是反序列化包含 ClaimsPrincipal 的 Cookie,而是解码 Authorization 标头中的 JWT 令牌。它使用来自身份提供商的签名密钥验证签名,并验证受众是否具有预期值以及令牌是否未过期。
If the token is valid, the authentication middleware creates a ClaimsPrincipal representing the authenticated request and sets it on HttpContext.User. All middleware after the authentication middleware sees the request as authenticated.
如果令牌有效,则身份验证中间件将创建一个 ClaimsPrincipal,表示经过身份验证的请求,并在 HttpContext.User 上设置它。身份验证中间件之后的所有中间件都将请求视为已验证。
TIP If the claims in the token don’t match the key values you’re expecting, you can use claims transformation to remap claims. This applies to cookie authentication too, but it’s particularly common when you’re receiving tokens from third-party identity providers, where you don’t control the names of claims. You can also use this approach to add extra claims for a user, which weren’t in the original token. To learn more about claims transformation, see http://mng.bz/gBJV.
提示:如果令牌中的声明与预期的键值不匹配,则可以使用声明转换来重新映射声明。这也适用于 Cookie 身份验证,但当您从第三方身份提供商接收令牌时,这种情况尤其常见,因为您无法控制声明的名称。您还可以使用此方法为用户添加原始令牌中没有的额外声明。要了解有关声明转换的更多信息,请参阅 http://mng.bz/gBJV。
We’ve covered a lot of theory about JWT tokens in this chapter, so you’ll be pleased to hear it’s time to look at some code!
在本章中,我们已经介绍了许多关于 JWT 令牌的理论,因此您会很高兴听到是时候查看一些代码了!
25.3 Adding JWT bearer authentication to minimal APIs
25.3 将 JWT 不记名身份验证添加到最小 API
In this section you’ll learn how to add JWT bearer token authentication to an ASP.NET Core app. I use the minimal API Recipe API application we started in chapter 12 in this chapter, but the process is identical if you’re building an API application using web API controllers.
在本节中,您将了解如何将 JWT 不记名令牌身份验证添加到 ASP.NET Core 应用程序。我使用我们在本章第 12 章中开始的最小 API Recipe API 应用程序,但如果您使用 Web API 控制器构建 API 应用程序,则过程是相同的。
.NET 7 significantly simplified the number of steps you need to get started with JWT authentication by adding some conventions, which we’ll discuss shortly. To add JWT to an existing API application, first install the Microsoft.AspNetCore.Authentication.JwtBearer NuGet package using the .NET CLI
.NET 7 通过添加一些约定,大大简化了开始使用 JWT 身份验证所需的步骤数,我们稍后将对此进行讨论。要将 JWT 添加到现有 API 应用程序,请首先使用 .NET CLI 安装 Microsoft.AspNetCore.Authentication.JwtBearer NuGet 包
dotnet add package Microsoft.AspNetCore.Authentication.JwtBeareror by adding the
或者直接将 添加到您的项目中:
<PackageReference Include="Microsoft.AspNetCore.Authentication.JwtBearer"
    Version="7.0.0" />
Next, add the required services to configure JWT authentication for your application, as shown in listing 25.1. As you may remember, the authentication and authorization middleware are automatically added to your middleware pipeline by WebApplication, but if you want to control the position of the middleware, you can override the location, as I do here.
接下来,添加所需的服务来为您的应用程序配置 JWT 身份验证,如清单 25.1 所示。您可能还记得,身份验证和授权中间件由 WebApplication 自动添加到您的中间件管道中,但如果您想控制中间件的位置,您可以覆盖该位置,就像我在这里所做的那样。
Listing 25.1 Adding JWT bearer authentication to a minimal API application
示例 25.1 向最小 API 应用程序添加 JWT 不记名身份验证
WebApplicationBuilder builder = WebApplication.CreateBuilder(args);
builder.Services.AddAuthentication() ❶
.AddJwtBearer(); ❷
builder.Services.AddAuthorization(); ❸
builder.Services.AddScoped<RecipeService>();
WebApplication app = builder.Build();
app.UseAuthentication(); ❹
app.UseAuthorization(); ❺
app.MapGet("/recipe", async (RecipeService service) =>
{
return await service.GetRecipes();
}).RequireAuthorization(); ❻
app.Run();
❶ Adds the core authentication services
添加核心身份验证服务
❷ Adds and configures JWT authentication
添加和配置 JWT 身份验证
❸ Adds the core authorization services
添加核心授权服务
❹ Adds the authentication middleware
添加身份验证中间件
❺ Adds the authorization middleware
添加授权中间件
❻ Adds an authorization policy to the minimal API endpoint
将授权策略添加到最小 API 端点
As well as configuring the JWT authentication, listing 25.1 adds an authorization policy to the one minimal API endpoint shown in the app. The RequireAuthorization() function adds a simple “Is authenticated” authorization policy to the endpoint. This is exactly analgous to when you add an [Authorize] attribute to MVC or Web API controllers. Any requests for this endpoint must be authenticated; otherwise, the request is rejected by the authorization middleware with a 401 Unauthorized reponse, as shown in figure 25.9.
除了配置 JWT 身份验证之外,清单 25.1 还向应用程序中显示的一个最小 API 端点添加了一个授权策略。RequireAuthorization() 函数向终端节点添加一个简单的 “Is authenticated” 授权策略。这与向 MVC 或 Web API 控制器添加 [Authorize] 属性时完全相同。对此终端节点的任何请求都必须进行身份验证;否则,授权中间件会拒绝该请求,并给出 401 Unauthorized 响应,如图 25.9 所示。
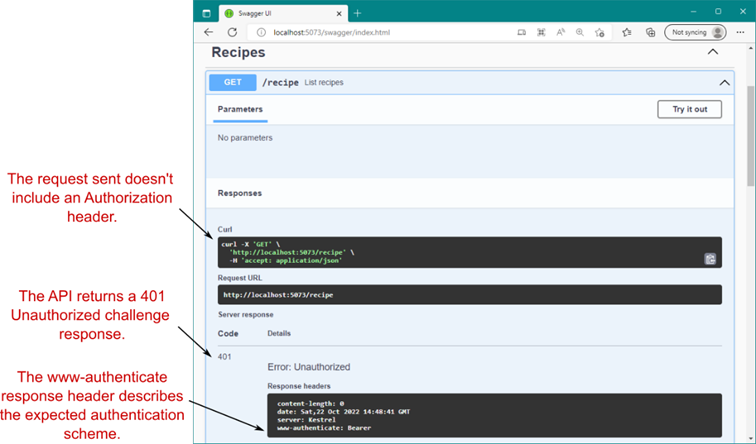
Figure 25.9 If you send a request to an API protected with JWT bearer authentication and don’t include a token, you’ll receive a 401 Unauthorized challenge response.
图 25.9 如果您向受 JWT 不记名身份验证保护的 API 发送请求,并且不包含令牌,您将收到 401 Unauthorized 质询响应。
Authentication schemes: Choosing between cookies and bearer tokens
身份验证方案:在 Cookie 和 Bearer Tokens之间进行选择One question you may have while reading about bearer authentication is how the authentication middleware knows whether to look for the cookie or a header. The answer is authentication schemes.
在阅读有关Bearer Authentication的文章时,您可能会遇到一个问题,即身份验证中间件如何知道是查找 Cookie 还是标头。答案是身份验证方案。An authentication scheme in ASP.NET Core has an ID and an associated authentication handler that controls how the user is authenticated, as well as how authentication and authorization failures should be handled.
ASP.NET Core 中的身份验证方案具有一个 ID 和一个关联的身份验证处理程序,用于控制如何对用户进行身份验证,以及应如何处理身份验证和授权失败。For example, in chapter 23 the cookie authentication scheme was used implicitly by ASP.NET Core Identity. The cookie authentication handler in this case authenticates users by looking for a cookie and redirects users to the login or “access denied” pages for authentication or authorization failures.
例如,在第 23 章中,ASP.NET Core Identity 隐式使用了 cookie 身份验证方案。在这种情况下,Cookie 身份验证处理程序通过查找 Cookie 来验证用户,并将用户重定向到登录页或“拒绝访问”页,以查找验证或授权失败。In listing 25.1 you registered the JWT Bearer authentication scheme. The JWT bearer authentication handler reads tokens from the Authorization header and returns 401 and 403 responses for authentication or authorization failures.
在列表 25.1 中,您注册了 JWT Bearer 身份验证方案。JWT 不记名身份验证处理程序从 Authorization 标头中读取令牌,并返回 401 和 403 身份验证或授权失败的响应。When you register only a single authentication scheme, such as in listing 25.1, ASP.NET Core automatically sets that as the default, but it’s possible to register multiple authentication schemes. This is particularly common if you are using OpenID Connect with a traditional web app, for example. In these cases you can choose which scheme is used for authentication events or authentication failures and how the schemes should interact.
当您仅注册单个身份验证方案时,例如清单 25.1 中,ASP.NET Core 会自动将其设置为默认值,但可以注册多个身份验证方案。例如,如果您将 OpenID Connect 与传统 Web 应用程序一起使用,这种情况尤其常见。在这些情况下,您可以选择将哪个方案用于身份验证事件或身份验证失败,以及这些方案应如何交互。Using multiple authentication schemes can be confusing, so it’s important to follow the documentation closely when configuring authentication for your app. You can read more about authentication schemes at http://mng.bz/5w1a. If you need only a single scheme, you shouldn’t have any problems, but otherwise, here be dragons!
使用多个身份验证方案可能会造成混淆,因此在为应用程序配置身份验证时,请务必严格遵循文档。您可以在 http://mng.bz/5w1a 上阅读有关身份验证方案的更多信息。如果你只需要一个方案,你应该不会有任何问题,但除此之外,这里有龙!
Great! The 401 response in figure 25.9 verifies that the app is behaving correctly for unauthenticated requests. The obvious next step is to send a request to your API that includes a valid JWT bearer token. Unfortunately, this is where things traditionally get tricky. How do you generate a valid JWT? Luckily, in .NET 7, the .NET CLI comes with a tool to make creating test tokens easy.
伟大!图 25.9 中的 401 响应验证了应用程序是否对未经身份验证的请求行为正确。显而易见的下一步是向 API 发送包含有效 JWT 不记名令牌的请求。不幸的是,这是传统上事情变得棘手的地方。如何生成有效的 JWT?幸运的是,在 .NET 7 中,.NET CLI 附带了一个工具,可以轻松创建测试令牌。
25.4 Using the user-jwts tool for local JWT testing
25.4 使用 user-jwts 工具进行本地 JWT 测试
In section 25.3 you added JWT authentication to your application and protected your API with a basic authorization policy. The problem is that you can’t test your API unless you can generate JWT tokens. In production you’ll likely have an identity provider such as Auth0, Azure Active Directory, or IdentityServer to generate tokens for you using OpenID Connect. But that can make for cumbersome local testing. In this section you’ll learn how to use the .NET CLI to generate JWTs for local testing.
在第 25.3 节中,您向应用程序添加了 JWT 身份验证,并使用基本授权策略保护您的 API。问题是,除非可以生成 JWT 令牌,否则无法测试 API。在生产环境中,您可能会有一个身份提供商(如 Auth0、Azure Active Directory 或 IdentityServer)来使用 OpenID Connect 为您生成令牌。但这可能会导致本地测试变得繁琐。在本节中,您将学习如何使用 .NET CLI 生成用于本地测试的 JWT。
In .NET 7, the .NET CLI includes a tool called user-jwts that you can use to generate tokens. This tool acts as a mini identity provider, meaning that you can generate tokens with any claims you may need, and your API can verify them using signing key material generated by the tool.
在 .NET 7 中,.NET CLI 包括一个名为 user-jwts 的工具,您可以使用它来生成令牌。此工具充当微型身份提供商,这意味着您可以使用可能需要的任何声明生成令牌,并且您的 API 可以使用该工具生成的签名密钥材料对其进行验证。
TIP The user-jwts tool is built into the software development kit (SDK), so there’s nothing extra to install. You need to enable User Secrets for your project, but user-jwts will do this for you if you haven’t already. The user-jwts tool uses User Secrets to store the signing key material used to generate the JWTs, which your app uses to validate the JWT signatures.
提示: user-jwts 工具内置于软件开发工具包 (SDK) 中,因此无需安装任何额外内容。您需要为项目启用 User Secrets,但如果您尚未启用 user-jwts,则 user-jwts 将为您执行此作。user-jwts 工具使用用户密钥来存储用于生成 JWT 的签名密钥材料,您的应用程序可以使用该材料来验证 JWT 签名。
Let’s look at how to create a JWT with the user-jwts tool and use that to send a request to our application.
让我们看看如何使用 user-jwts 工具创建 JWT,并使用它向我们的应用程序发送请求。
25.4.1 Creating JWTs with the user-jwts tool
25.4.1 使用 user-jwts 工具创建 JWT
To create a JWT that you can use in requests to your API, run the following with the user-jwts tool from inside your project folder:
要创建可在 API 请求中使用的 JWT,请使用 user-jwts 工具从项目文件夹内运行以下命令:
dotnet user-jwts createThis command does several things:
此命令执行以下几项作:
• Enables User Secrets in the project if they’re not already configured, as though you had manually run dotnet user-secrets init.
如果尚未配置用户密钥,请在项目中启用用户密钥,就像您手动运行 dotnet user-secrets init 一样。
• Adds the signing key material to User Secrets, which you can view by running dotnet user-secrets list as described in chapter 10, which prints out the key material configuration, as in this example:
将签名密钥材料添加到用户密钥中,您可以通过运行 dotnet user-secrets list 来查看,如第 10 章所述,该列表将打印出密钥材料配置,如下例所示:
Authentication:Schemes:Bearer:SigningKeys:0:Value =
    rIhUzB3DIbtbUwiIxkgoKfFDkLpY+gIJOB4eaQzczq8=
Authentication:Schemes:Bearer:SigningKeys:0:Length = 32
Authentication:Schemes:Bearer:SigningKeys:0:Issuer = dotnet-user-jwts
Authentication:Schemes:Bearer:SigningKeys:0:Id = c99a872d
• Configures the JWT authentication services to support tokens generated by the user-jwts tool by adding configuration to appsettings.Development.json, as follows:
通过向 appsettings 添加配置,配置 JWT 身份验证服务以支持 user-jwts 工具生成的令牌。Development.json,如下所示:
{
  "Authentication": {
    "Schemes": {
      "Bearer": {
        "ValidAudiences": [
          "http://localhost:5073",
          "https://localhost:7112"
        ],
        "ValidIssuer": "dotnet-user-jwts"
      }
    }
  }
}
The user-jwts tool automatically configures the valid audiences based on the profiles in your launchSettings.json file. All the applicationUrls listed in launchSettings.json are listed as valid audiences, so it doesn’t matter which profile you use to run your app; the generated token should be valid. The JWT bearer authentication service automatically reads this configuration and configures itself to support user-jwts JWTs.
user-jwts 工具会根据 launchSettings.json 文件中的用户档案自动配置有效受众。launchSettings.json中列出的所有 applicationUrls 都列为有效受众,因此使用哪个配置文件来运行应用程序并不重要;生成的 Token 应该是有效的。JWT 不记名身份验证服务会自动读取此配置,并将自身配置为支持 user-jwts JWT。
• Creates a JWT. By default, the token is created with a sub and unique_claim set to your operating system’s username, with aud claims for each of the applicationUrls in your launchSettings.json and an issuer of dotnet-user-jwts. You’ll notice that these match the values added to your APIs configuration file.
After calling dotnet user-jwts create, the JWT token is printed to the console, along with the sub name used and the ID of the token. I’ve truncated the tokens throughout this chapter for brevity:
创建 JWT。默认情况下,令牌是使用 sub 创建的,unique_claim设置为作系统的用户名,launchSettings.json中的每个 applicationUrls 都有 aud 声明,并且颁发者是 dotnet-user-jwts。您会注意到,这些值与添加到 API 配置文件的值匹配。
调用 dotnet user-jwts create 后,JWT 令牌以及使用的子名称和令牌的 ID 将打印到控制台。为简洁起见,我在本章中截断了标记:
New JWT saved with ID 'f2080e51'.
Name: andrewlock

Token: eyJhbGciOiJIUzI1NiIsInR5cCI6IkpXVCJ9.eyJ1bmlxdWVfbmFtZSI6ImFuZHJl…
TIP You can visualize exactly what’s in the token by copy and pasting it into https://jwt.io, as I showed in figure 25.7.
提示:您可以通过将令牌复制并粘贴到 https://jwt.io 中来准确可视化令牌中的内容,如图 25.7 所示。
Now that you have a token, it’s time to test it. To use the token, you need to add an Authorization header to requests using the following format (where <token> is the full token printed by user-jwts):
现在您有了一个令牌,是时候测试它了。要使用该令牌,您需要使用以下格式向请求添加 Authorization 标头(其中<token> 是 user-jwts 打印的完整令牌):
Authorization: Bearer <token>If any part of this header is incorrect—if you misspell Authorization, misspell Bearer, don’t include a space between Bearer and your token, or mistype your token—you’ll get a 401 Unauthorized response.
如果此标头的任何部分不正确(如果拼写错误 Authorization、拼写错误 Bearer、在 Bearer 和令牌之间不包含空格或键入错误令牌),您将收到 401 Unauthorized 响应。
TIP If you get 401 Unauthorized responses even after adding an Authorization header to your requests, double-check your spelling, and make sure that the token is added correct with the "Bearer " prefix. Typos have a way of creeping in here! You can also increase the logging level in your API to see why failures are happening, as you’ll learn in chapter 26.
提示:如果在向请求添加 Authorization 标头后仍收到 401 Unauthorized 响应,请仔细检查您的拼写,并确保使用“Bearer”前缀正确添加令牌。错别字总有办法悄悄溜进来!您还可以提高 API 中的日志记录级别,以查看失败发生的原因,您将在第 26 章中学到。
Once you have added the token you can call your API, which should now return successfully, as shown in figure 25.10.
添加令牌后,您可以调用您的 API,现在应该成功返回,如图 25.10 所示。
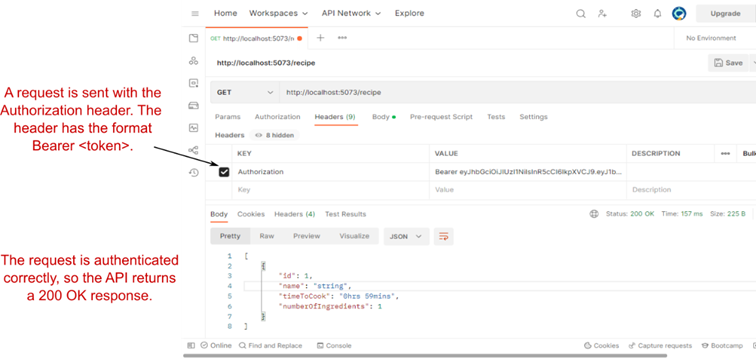
Figure 25.10 Sending a request with an Authorization Bearer using Postman. The Authorization header must have the format Bearer <token>. You can also configure this in the Authorization tab of Postman.
图 25.10 使用 Postman 向授权持有者发送请求。Authorization 标头必须具有 Bearer <token>格式。您还可以在 Postman 的 Authorization (授权) 选项卡中配置此项。
The default token created by the JWT is sufficient to authenticate with your API, but depending on your requirements, you may want to customize the JWT to add or change claims. In the next section you’ll learn how.
JWT 创建的默认令牌足以使用 API 进行身份验证,但根据您的要求,您可能需要自定义 JWT 以添加或更改声明。在下一节中,您将了解如何作。
25.4.2 Customizing your JWTs
25.4.2 自定义 JWT
By default, the user-jwts tool creates a bare-bones JWT that you can use to call your app. If you need more customization, you can pass extra options to the dotnet user-jwts create command to control the JWT it generates. Some of the most useful options are
默认情况下,user-jwts 工具会创建一个基本 JWT,您可以使用它来调用您的应用程序。如果需要更多自定义,可以将额外的选项传递给 dotnet user-jwts create 命令,以控制它生成的 JWT。一些最有用的选项是
• --name sets the sub and unique_name claims for the JWT instead of using the operating system user as the name.
--name 设置 JWT 的 sub 和 unique_name 声明,而不是使用作系统用户作为名称。
• --claim <key>=<value> adds a claim called <key> with value <value> to the JWT. Use this option multiple times to add claims.
--claim <key>=<value> 将调用<key>的 value <value> 声明添加到 JWT。多次使用此选项可添加声明。
• --scope <value> adds a scope claim called <value> to the JWT. Use this option multiple times to add scopes.
--scope <value> 添加一个<value>调用 JWT 的 scope 声明。多次使用此选项可添加范围。
These aren’t the only options; you can control essentially everything about the generated JWT. Run dotnet user-jwts create --help to see all the options available. One option that may be useful in certain automated scripts or tests is the --output option. This controls how the JWT is printed to the console after creation. The default value, default, prints a summary of the JWT and the token itself, as you saw previously:
这些并不是唯一的选择;您基本上可以控制有关生成的 JWT 的所有内容。运行 dotnet user-jwts create --help 查看所有可用选项。在某些自动化脚本或测试中可能有用的一个选项是 --output 选项。这控制了 JWT 在创建后如何打印到控制台。默认值 default 打印 JWT 和令牌本身的摘要,如您之前所见:
New JWT saved with ID 'f2080e51'.
Name: andrewlock

Token: eyJhbGciOiJIUzI1NiIsInR5cCI6IkpXVCJ9.eyJ1bmlxdWVfbmFtZSI6ImFuZHJl…
This is handy if you’re creating tokens ad hoc at the command line, but the alternative output options may be more useful for scripts. For example, running
如果您在命令行中临时创建令牌,这很方便,但替代输出选项可能对脚本更有用。例如,运行
dotnet user-jwts create --output tokenoutputs the token only,
仅输出 token,
eyJhbGciOiJIUzI1NiIsInR5cCI6IkpXVCJ9.eyJ1bmlxdWVfbmFtZSI6ImFuZHJl…which is much more convenient if you’re trying to parse the output in a script, for example. Alternatively, you can pass --output json, which prints details about the JWT instead, as in this example:
例如,如果您尝试在脚本中解析输出,这会更方便。或者,您可以传递 --output json,它改为打印有关 JWT 的详细信息,如以下示例所示:
{
  "Id": "8bf9b2fd",
  "Scheme": "Bearer",
  "Name": "andrewlock",
  "Audience": " https://localhost:7236, http://localhost:5229",
  "NotBefore": "2022-10-22T17:50:26+00:00",
  "Expires": "2023-01-22T17:50:26+00:00",
  "Issued": "2022-10-22T17:50:26+00:00",
  "Token": "eyJhbGciOiJIUzI1NiIsInR5cCI6IkpXVCJ9.eyJ1bmlxdWVfbmFtZSI6Im…",
  "Scopes": [],
  "Roles": [],
  "CustomClaims": {}
}
Note that this isn’t the payload of the token; it’s the configuration details used to create the JWT. The token itself is exposed in the Token field. Again, this may be useful if you’re generating JWTs using a script and need to parse the output.
请注意,这不是令牌的有效负载;它是用于创建 JWT 的配置详细信息。令牌本身在 Token 字段中公开。同样,如果您使用脚本生成 JWT 并需要解析输出,这可能很有用。
25.4.3 Managing your local JWTs
25.4.3 管理本地 JWT
When you’re generating a JWT, the user-jwts tool automatically saves the JWT configuration (the JSON shown in section 25.4.2) to your hard drive. This is stored next to the secrets.json file that contains the User Secrets, in a location that varies depending on your operating system and the <UserSecretsId> in your project file:
生成 JWT 时,user-jwts 工具会自动将 JWT 配置(第 25.4.2 节中显示的 JSON)保存到您的硬盘驱动器。它存储在包含 User Secrets 的 secrets.json 文件旁边,其<UserSecretsId>位置因作系统和项目文件而异:
• Windows—%APPDATA%\Microsoft\UserSecrets\<UserSecretsId>\user-jwts.json
• Linux and macOS—~/.microsoft/usersecrets/<UserSecretsId>/user-jwts.json
As for User Secrets, JWTs created by user-jwts aren’t encrypted, but they’re outside your project directory, so they are a better approach to managing secrets locally. The generated JWTs should be used only for local testing; you should be using a real identity provider for production systems to securely produce JWTs for a logged-in user. This is the reason why the user-jwts tool updates only appsettings.Development.json with the required configuration, not appsettings.json; it stops you from accidentally using user-jwts in production. You should add your production identity provider details in appsettings.json instead.
对于用户密钥,由 user-jwts 创建的 JWT 未加密,但它们位于项目目录之外,因此它们是在本地管理密钥的更好方法。生成的 JWT 应仅用于本地测试;您应该为生产系统使用真实身份提供程序,以便为登录用户安全地生成 JWT。这就是 user-jwts 工具仅更新 appsettings 的原因。Development.json 使用所需的配置,而不是 appsettings.json;它可以防止您在生产环境中意外使用 user-jwt。您应该改为在 appsettings.json 中添加生产身份提供商详细信息。
As well as editing the user-jwts.json file manually, you can use the user-jwts tool to manage the JWTs stored locally. In addition to using create, you can call dotnet user-jwts <command> from the project folder, where <command> is one of the following options:
除了手动编辑 user-jwts.json 文件外,您还可以使用 user-jwts 工具来管理本地存储的 JWT。除了使用 create 之外,还可以从项目文件夹调用 dotnet user-jwts<command> ,其中<command> 是以下选项之一:
• list—Lists a summary of all the tokens stored in user-jwts.json for the project.
list - 列出项目user-jwts.json中存储的所有标记的摘要。
• clear—Deletes all the tokens created for a project.
clear - 删除为项目创建的所有标记。
• remove—Deletes a single token for the project, using the token ID displayed by the list command.
remove - 使用 list 命令显示的令牌 ID 删除项目的单个令牌。
• print—Outputs the details of a single JWT, using the token ID, as key value pairs.
print - 使用令牌 ID 作为键值对输出单个 JWT 的详细信息。
• key—Can be used to view or reset the signing key material of tokens stored in the User Secrets Manager. Note that resetting the key material renders all previous JWTs generated by the tool invalid.
key - 可用于查看或重置存储在 User Secrets Manager 中的令牌的签名密钥材料。请注意,重置密钥材料会使该工具之前生成的所有 JWT 无效。
The user-jwts tool is handy for generating JWTs locally, but you must remember to add it to your local testing tool for all requests. If you’re using Postman for testing, you need to add the JWT to your request, as I showed in figure 25.10. However, if you’re using Swagger UI as I described in chapter 11, things aren’t quite that simple. In the next section you’ll learn how to describe your authorization requirements in your OpenAPI document.
user-jwts 工具对于在本地生成 JWT 非常方便,但您必须记住将其添加到所有请求的本地测试工具中。如果您使用 Postman 进行测试,则需要将 JWT 添加到您的请求中,如图 25.10 所示。但是,如果您使用的是我在第 11 章中描述的 Swagger UI,事情就没有那么简单了。在下一节中,您将学习如何在 OpenAPI 文档中描述您的授权要求。
25.5 Describing your authentication requirements to OpenAPI
25.5 向 OpenAPI 描述您的身份验证要求
In chapter 11 you learned how to add an OpenAPI document to your ASP.NET Core app that describes your API. This is used to power tooling such as automatic client generation, as well as Swagger UI. In this section you’ll learn how to add authentication requirements to your OpenAPI document so you can test your API using Swagger UI with tokens generated by the user-jwts tool.
在第 11 章中,您学习了如何将 OpenAPI 文档添加到您的 ASP.NET Core 应用程序中,以描述 API。这用于支持自动客户端生成以及 Swagger UI 等工具。在本节中,您将了解如何向 OpenAPI 文档添加身份验证要求,以便您可以使用 Swagger UI 和 user-jwts 工具生成的令牌来测试您的 API。
One of the slightly annoying things about adding authentication and authorization to your APIs is that it makes testing harder. You can’t just fire a web request from a browser; you must use a tool like Postman that you can add headers to. Even for command-line aficionados, curl commands can become unwieldy once you need to add authorization headers. And tokens expire and are typically harder to generate. The list goes on!
向 API 添加身份验证和授权的一个稍微令人讨厌的事情是,它使测试变得更加困难。您不能只从浏览器触发 Web 请求;您必须使用像 Postman 这样可以添加标头的工具。即使对于命令行爱好者来说,一旦您需要添加授权标头,curl 命令也会变得笨拙。令牌会过期,通常更难生成。名单还在继续!
I’ve seen these difficulties lead people to disable authentication requirements for local testing or to try to add them only late in a product’s life cycle. I strongly suggest you don’t do this! Trying to add real authentication late in a project is likely to cause headaches and bugs that you could easily have caught if you weren’t trying to work around the security complexity.
我看到这些困难导致人们禁用本地测试的身份验证要求,或者尝试仅在产品生命周期的后期才添加它们。我强烈建议你不要这样做!尝试在项目后期添加真正的身份验证可能会导致令人头疼和错误,如果您不尝试解决安全性复杂性,您很容易发现这些错误。
TIP Add real authentication and authorization to your APIs as soon as you understand the requirements, as you will likely catch more security-related bugs.
提示:了解要求后,立即向 API 添加真正的身份验证和授权,因为您可能会发现更多与安全相关的错误。
The user-jwts tool can help significantly with these challenges, as you can easily generate tokens in a format you need, optionally with a long expiration (so you don’t need to keep renewing them) without having to wrestle with an identity provider directly. Nevertheless, you need a way to add these tokens to whichever tool you use for testing, such as Swagger UI.
user-jwts 工具可以极大地帮助解决这些挑战,因为您可以轻松地以所需的格式生成令牌,并且可以选择具有较长的过期时间(因此您无需不断续订它们),而无需直接与身份提供商搏斗。不过,您需要一种方法将这些令牌添加到用于测试的任何工具中,例如 Swagger UI。
Swagger UI is based on the OpenAPI definition of your API, so the best (and easiest) way to add support for authentication to Swagger UI is to update the security requirements of your application in your OpenAPI document. This consists of two steps:
Swagger UI 基于 API 的 OpenAPI 定义,因此向 Swagger UI 添加身份验证支持的最佳(也是最简单的)方法是在 OpenAPI 文档中更新应用程序的安全要求。这包括两个步骤:
• Define the security scheme your API uses, such as OAuth 2.0, OpenID Connect, or simple Bearer authentication.
定义 API 使用的安全方案,例如 OAuth 2.0、OpenID Connect 或简单的 Bearer 身份验证。
• Declare which endpoints in your API use the security scheme.
声明 API 中的哪些端点使用安全方案。
The following listing shows how to configure an OpenAPI document using Swashbuckle for an API that uses JWT bearer authentication. The values defined on OpenApiSecurityScheme match the default settings configured by the user-jwts tool when you use AddJwtBearer(). AddSecurityDefinition() defines a security scheme for your API, and AddSecurityRequirement() declares that the whole API is protected using the security scheme.
下面的清单显示了如何使用 Swashbuckle 为使用 JWT 不记名身份验证的 API 配置 OpenAPI 文档。在 OpenApiSecurityScheme 上定义的值与使用 AddJwtBearer() 时 user-jwts 工具配置的默认设置匹配。AddSecurityDefinition() 为您的 API 定义一个安全方案,AddSecurityRequirement() 声明使用该安全方案保护整个 API。
Listing 25.2 Adding bearer authentication to an OpenAPI document using Swashbuckle
清单 25.2 使用 Swashbuckle 向 OpenAPI 文档添加不记名身份验证
WebApplicationBuilder = WebApplication.CreateBuilder(args);

builder.Services.AddAuthentication().AddJwtBearer();
builder.Services.AddAuthorization();

builder.Services.AddEndpointsApiExplorer();
builder.Services.AddSwaggerGen(x =>
{
    x.SwaggerDoc("v1", new OpenApiInfo {
        Title = "Recipe App", Version = "v1" });

    var security = new OpenApiSecurityScheme    #A
    {
        Name = HeaderNames.Authorization,    #B
        Type = SecuritySchemeType.ApiKey,    #C
        In = ParameterLocation.Header,    #D
        Description = "JWT Authorization header",  #E
        Reference = new OpenApiReference
        {
            Id = JwtBearerDefaults.AuthenticationScheme,  #F
            Type = ReferenceType.SecurityScheme   #G
        }
    };

    x.AddSecurityDefinition(security.Reference.Id, security);  #H
    x.AddSecurityRequirement(new OpenApiSecurityRequirement   #I
        {{security, Array.Empty<string>()}});  #I
});

var app = builder.Build();

app.UseSwagger();
app.UseSwaggerUI();

app.UseRouting();
app.UseAuthentication();
app.UseAuthorization();

app.MapGet("/", () => "Hello world!").RequireAuthorization();
app.Run();
❶ Defines the security used by your API
定义 API使用的安全性
❷ The name of the header to use (required)
要使用的标头的名称(必需)
❸ The type of security; may be OAuth2 or OpenIdConnect if using those (required)
安全性的类型;可能是 OAuth2 或 OpenIdConnect(如果需要)
❹ Where the token will be provided (required)
将提供令牌的位置(必需)
❺ A friendly description of the scheme, used in the UI
在UI中使用方案的友好描述
❻ A unique ID for the scheme. This uses the default JWT scheme name.
方案的唯一 ID。这将使用默认的 JWT 方案名称。
❼ The type of OpenID object (required)
OpenID 对象的类型(必需)
❽ Adds the security definition to the OpenAPI document
将安全定义添加到 OpenAPI 文档
❾ Marks the whole API as protected by the security definition
将整个 API 标记为受安全定义保护
When you run your application after adding the definition to your OpenAPI document, you should see an Authorize button in the top-right corner of Swagger UI, as shown in figure 25.11. Choosing this button opens a dialog box describing your authentication scheme, including a text box to enter your token. You must enter Bearer
在将定义添加到 OpenAPI 文档后运行应用程序时,您应该会在 Swagger UI 的右上角看到一个 Authorize 按钮,如图 25.11 所示。选择此按钮将打开一个描述您的身份验证方案的对话框,其中包括一个用于输入令牌的文本框。您必须在此框中输入 Bearer ,并在它们之间留出空格。选择 Authorize (授权) 以保存值,然后选择 Close (关闭)。现在,当您向 API 发送请求时,Swagger UI 会在 Authorization 标头中附加令牌,并且请求成功。
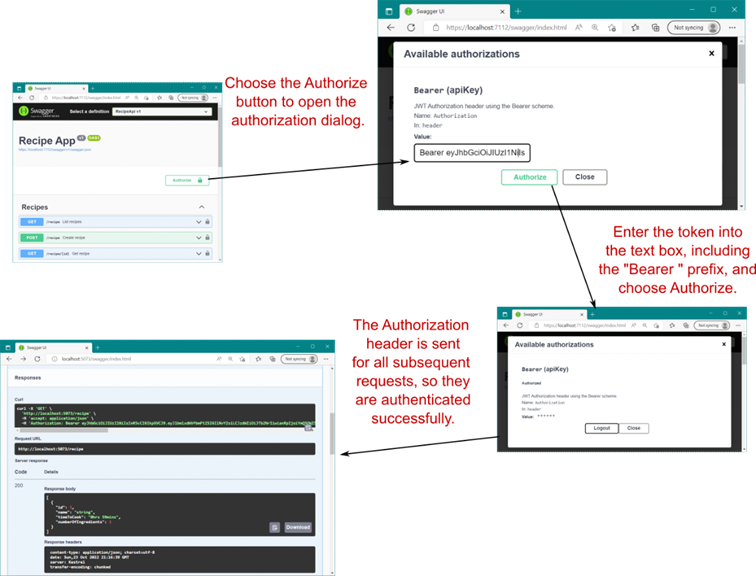
Figure 25.11 Adding an Authorization header using Swagger UI. When adding the token, ensure that you enter Bearer
图 25.11 使用 Swagger UI 添加 Authorization 标头。添加令牌时,请确保输入 Bearer ,包括 Bearer 前缀。然后,Swagger UI 会将令牌附加到所有后续请求,以便您有权调用 API。
If you’re specifically using OpenID Connect or OAuth 2.0 to protect your APIs, you can configure these in the OpenApiSecurityScheme document instead of using bearer authentication. In that case, choosing Authorize in Swagger UI would redirect you to your identity provider to sign in and retrieve a token without your having to copy and paste anything. That’s extremely useful if you’re running an identity provider locally or exposing Swagger UI in production.
如果您专门使用 OpenID Connect 或 OAuth 2.0 来保护 API,则可以在 OpenApiSecurityScheme 文档中配置这些 API,而不是使用不记名身份验证。在这种情况下,在 Swagger UI 中选择 Authorize (授权) 会将您重定向到您的身份提供商以登录并检索令牌,而无需复制和粘贴任何内容。如果您在本地运行身份提供商或在生产环境中公开 Swagger UI,这将非常有用。
The example in listing 25.2 shows the configuration when your whole API is protected by an authorization requirement. That’s the most common situation in my experience, but you may want to expose certain endpoints to anonymous users without any authorization requirements. In that case, you can configure Swashbuckle to conditionally apply the requirement to only those endpoints with a requirement.
清单 25.2 中的示例显示了整个 API 受授权需求保护时的配置。根据我的经验,这是最常见的情况,但您可能希望将某些端点公开给匿名用户,而无需任何授权要求。在这种情况下,您可以将 Swashbuckle 配置为有条件地仅将要求应用于具有要求的终端节点。
TIP See the Swashbuckle documentation to learn how to configure this and many other features related to OpenAPI document generation: http://mng.bz/6D1A. Swashbuckle is highly extensible, but as always, it’s worth considering whether the added complexity you introduce to achieve perfect documentation of your API is worth the tradeoff. For publicly exposed OpenAPI documents, this may well be the case, but for local testing or internal APIs, the argument may be harder to make.
提示:请参阅 Swashbuckle 文档,了解如何配置此功能以及与 OpenAPI 文档生成相关的许多其他功能:http://mng.bz/6D1A。Swashbuckle 具有高度可扩展性,但与往常一样,值得考虑为实现 API 的完美文档而引入的额外复杂性是否值得权衡。对于公开公开的 OpenAPI 文档,情况很可能如此,但对于本地测试或内部 API,可能更难提出论点。
In this chapter we’ve looked in depth at using JWT bearer tokens for authentication and explored the parallels with cookie authentication for traditional apps. In the final section of this chapter we look at authorization and how you can apply different authorization policies to your minimal API endpoints.
在本章中,我们深入探讨了如何使用 JWT 不记名令牌进行身份验证,并探讨了与传统应用程序的 cookie 身份验证的相似之处。在本章的最后一节中,我们将介绍授权以及如何将不同的授权策略应用于您的最小 API 终端节点。
25.6 Applying authorization policies to minimal API endpoints
25.6 将授权策略应用于最小 API 端点
So far in this chapter we’ve focused on authentication: the process of validating the identity of the request initiator. For APIs, this typically requires decoding and validating a JWT bearer token in the authentication middleware and setting the ClaimsPrincipal for the request, as you saw in section 25.2. In this section we look at the next stage in protecting your APIs, authorization, and how you can apply different authorization requirements to your minimal API endpoints.
到目前为止,在本章中,我们重点介绍了身份验证:验证请求发起者身份的过程。对于 API,这通常需要在身份验证中间件中解码和验证 JWT 不记名令牌,并为请求设置 ClaimsPrincipal,如第 25.2 节所示。在本节中,我们将介绍保护 API 的下一阶段、授权,以及如何将不同的授权要求应用于最小 API 终端节点。
The good news is that authorization for minimal APIs is essentially identical to the authorization process you learned about in chapter 24 for Razor Pages and MVC controllers. The same concept of authorization policies, requirements, handlers, and claims-based authorization apply in the same way and use the exact same services. Figure 25.12 shows how this looks for a request to a minimal API endpoint protected with bearer authentication, which is remarkably similar to the Razor Pages equivalent in figure 24.2.
好消息是,最小 API 的授权与您在第 24 章中了解的 Razor Pages 和 MVC 控制器的授权过程基本相同。相同的授权策略、要求、处理程序和基于声明的授权概念以相同的方式应用,并使用完全相同的服务。图 25.12 显示了如何查找对受不记名身份验证保护的最小 API 端点的请求,这与图 24.2 中的 Razor Pages 等效项非常相似。
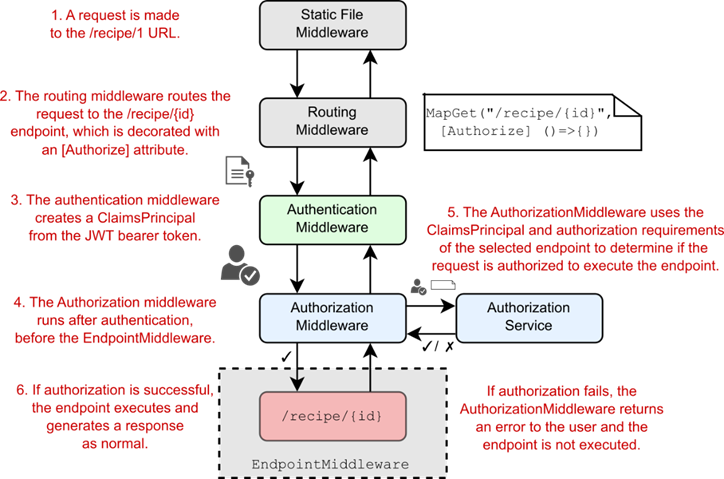
Figure 25.12 Authorizing a request to a minimal API endpoint. The routing middleware selects an endpoint that is protected by an authorization requirement. The authentication middleware decodes and verifies the bearer token, creating a ClaimsPrincipal, which the authorization middleware uses along with the endpoint metadata to determine whether the request is authorized.
图 25.12 授权对最小 API 端点的请求。路由中间件选择受授权要求保护的终端节点。身份验证中间件对持有者令牌进行解码和验证,创建一个 ClaimsPrincipal,授权中间件将其与终结点元数据一起使用,以确定请求是否获得授权。
You’ve already seen that you can apply a general authorization requirement by calling RequireAuthorization() on an endpoint or a route group. This is directly equivalent to adding the [Authorize] attribute to a Razor Page or MVC controller action. In fact, you can use the same [Authorize] attribute on an endpoint if you wish, so the following two endpoint definitions are equivalent:
您已经看到,您可以通过在终端节点或路由组上调用 RequireAuthorization() 来应用常规授权要求。这直接等效于将 [Authorize] 属性添加到 Razor Page 或 MVC 控制器作。事实上,如果需要,可以在终结点上使用相同的 [Authorize] 属性,因此以下两个终结点定义是等效的:
app.MapGet("/", () => "Hello world!").RequireAuthorization();
app.MapGet("/", [Authorize] () => "Hello world!");
If you want to require a specific policy (the "CanCreate" policy, for example), you can pass the policy names to the RequireAuthorization() method the same way you would for the [Authorize] attribute:
如果要要求特定策略(例如“CanCreate”策略),则可以将策略名称传递给 RequireAuthorization() 方法,就像对 [Authorize] 属性所做的那样:
app.MapGet("/", () => "Hello world!").RequireAuthorization("CanCreate");
app.MapGet("/", [Authorize("CanCreate")] () => "Hello world!");
Similarly, you can exclude endpoints from authentication requirements using the AllowAnonymous() function or [AllowAnonymous] attribute:
同样,您可以使用 AllowAnonymous() 函数或 [AllowAnonymous] 属性从身份验证要求中排除端点:
app.MapGet("/", () => "Hello world!").AllowAnonymous();
app.MapGet("/", [AllowAnonymous] () => "Hello world!");
This is a good start, but as you saw in chapter 24, you often need to perform resource-based authorization. For example, in the context of the recipe API, users should be allowed to edit or delete only recipes that they created; they can’t edit someone else’s recipe. That means you need to know details about the resource (the recipe) before determining whether a request is authorized.
这是一个好的开始,但正如您在第 24 章中看到的那样,您通常需要执行基于资源的授权。例如,在配方 API 的上下文中,应仅允许用户编辑或删除他们创建的配方;他们无法编辑其他人的配方。这意味着在确定请求是否获得授权之前,您需要了解有关资源(配方)的详细信息。
Resource-based authorization is essentially the same for minimal API endpoints as for Razor Pages or MVC controllers. You must follow several steps, most of which we covered in chapter 24:
最小 API 端点的基于资源的授权与 Razor Pages 或 MVC 控制器的授权基本相同。您必须遵循几个步骤,其中大部分我们在第 24 章中介绍:
-
Create an
AuthorizationHandler<TRequirement, TResource>, and register it in the DI container, as shown in chapter 24.
创建一个AuthorizationHandler<TRequirement, TResource>,并在 DI 容器中注册它,如第 24 章所示。 -
Inject the IAuthorizationService into your endpoint handler.
将 IAuthorizationService 注入到终端节点处理程序中。 -
Call IAuthorizationService.AuthorizeAsync(user, resource, policy), passing in the ClaimsPrincipal for the request, the resource to authorize access to, and the policy to apply.
调用 IAuthorizationService.AuthorizeAsync(user, resource, policy),传入请求的 ClaimsPrincipal、要授权访问的资源以及要应用的策略。
The first step is identical to the process shown in chapter 24, so you can reuse the same authorization handlers whether you’re using Razor Pages, minimal APIs, or both! You can access the IAuthorizationService from a minimal API endpoint using standard dependency injection (DI), which you learned about in chapters 8 and 9.
第一步与第 24 章中所示的过程相同,因此无论您使用的是 Razor Pages、最少的 API,还是同时使用这两者,您都可以重复使用相同的授权处理程序!您可以使用标准依赖关系注入 (DI) 从最小 API 终端节点访问 IAuthorizationService,您在第 8 章和第 9 章中对此进行了了解。
Listing 25.3 shows an example minimal API endpoint that uses resource-based authorization to protect the “delete” action for a recipe. The IAuthorizationService and HttpContext.User property are injected into the handler method along with the RecipeService. The endpoint then retrieves the recipe and calls AuthorizeAsync() to determine whether to continue with the delete or return a 403 Forbidden response.
清单 25.3 显示了一个示例最小 API 端点,它使用基于资源的授权来保护配方的 “delete”作。IAuthorizationService 和 HttpContext.User 属性与 RecipeService 一起注入处理程序方法中。然后,终端节点检索配方并调用 AuthorizeAsync() 以确定是继续删除还是返回 403 Forbidden 响应。
Listing 25.3 Using resource authorization to protect a minimal API endpoint
清单 25.3 使用资源授权保护最小 API 端点
app.MapDelete("recipe/{id}", async (
    int id, RecipeService service,
    IAuthorizationService authService,    #A
    ClaimsPrincipal user) =>    #B
{
    var recipe = await service.GetRecipe(id);    #C
    var result = await authService.AuthorizeAsync(    #D
        user, recipe, "CanManageRecipe");    #D

    if (!result.Succeeded)    #E
    {    #E
        return Results.Forbid();    #E
    }    #E

    await service.DeleteRecipe(id);  #F
    return Results.NoContent();  #F
});
❶ Injected to perform resource-based authorization
注入以执行基于资源的授权
❷ The HttpContext.User claims principal for the request
HttpContext.User 声明请求的主体
❸ Fetches the recipe to access
获取配方以访问
❹ Performs resource-based authorization, passing in the user, resource, and the policy name
执行基于资源的授权,传入用户、资源和策略名称
❺ If authorization failed, returns 403 Forbidden
如果授权失败,则返回 403 Forbidden
❻ If authorization succeeded, executes the endpoint as normal
如果授权成功,则照常执行端点
As is common when you start adding functionality, the logic at the heart of the endpoint has become a bit muddled as the endpoint has grown. There are several possible approaches you could take now:
当您开始添加功能时,通常情况下,随着终端节点的增长,终端节点核心的逻辑变得有点混乱。您现在可以采取几种可能的方法:
• Do nothing. The logic isn’t that confusing, and this is only one endpoint. This may be a good approach initially but can become problematic if the logic is duplicated across multiple endpoints.
什么都不做。逻辑并不那么令人困惑,这只是一个端点。这在最初可能是一种很好的方法,但如果 logic 在多个 endpoints 之间重复,则可能会产生问题。
• Pull the authorization out into a filter. As you saw in chapters 5 and 7, endpoint filters can be useful for extracting common cross-cutting concerns, such as validation and authorization. You may find that endpoint filters help reduce the duplication in your endpoint handlers, though this often comes at the expense of additional complexity in the filter itself, as well as a layer of indirection in your handlers. You can see this approach in the source code accompanying this chapter.
将授权拉出到过滤器中。正如您在第 5 章和第 7 章中看到的那样,端点过滤器可用于提取常见的横切关注点,例如验证和授权。您可能会发现终端节点筛选条件有助于减少终端节点处理程序中的重复,尽管这通常是以筛选条件本身的额外复杂性以及处理程序中的间接层为代价的。您可以在本章随附的源代码中看到这种方法。
• Push the authorization responsibilities down into the domain. Instead of performing the resource-based authorization in your endpoint handlers, you could run the checks inside the domain instead, in the RecipeService in this case. This has advantages, in that it often reduces duplication, keeps your endpoints simpler, and ensures that authorization checks are always applied regardless of how you call the domain methods.
将授权责任向下推送到域中。您可以在域内运行检查,而不是在终端节点处理程序中执行基于资源的授权,在本例中为 RecipeService。这样做的好处是,它通常可以减少重复,使您的端点更简单,并确保无论您如何调用域方法,都始终应用授权检查。
• The downside to this approach is that it may cause your domain/application model to depend directly on ASP.NET Core-specific constructs such as IAuthorizationService. You can work around this by creating a wrapper façade around the IAuthorizationService, but this may also add some complexity. Even if you take this approach, you typically want to apply declarative authorization policies to your endpoints as well to ensure that the endpoint executes only for users who could possibly be authorized.
此方法的缺点是,它可能会导致域/应用程序模型直接依赖于特定于 ASP.NET Core 的构造,例如 IAuthorizationService。您可以通过围绕 IAuthorizationService 创建包装器外观来解决此问题,但这也可能增加一些复杂性。即使您采用此方法,您通常也希望将声明式授权策略应用于终端节点,以确保终端节点仅对可能获得授权的用户执行。
There’s no single best answer on which approach to take; it will vary depending on what works best for your application. Authentication and authorization are inevitably tricky subjects, so it’s important to consider them early and design your application with security in mind.
关于采取哪种方法,没有单一的最佳答案;它会根据最适合您的应用程序的方法而有所不同。身份验证和授权不可避免地是棘手的主题,因此尽早考虑它们并在设计应用程序时考虑安全性非常重要。
Scope-based authorization policies
基于范围的授权策略In section 15.2 I described the role of scopes in the authentication process. When you obtain a bearer token from an identity provider—whether you’re using OpenID Connect or OAuth 2.0—you define the scopes that you wish to retrieve. The user can then choose to grant or deny some or all of those requested scopes. Additionally, the identity provider might allow certain client applications access only to specific scopes. The final access token you receive from the identity provider, which is sent to the API, may have some or none of the requested scopes.
在 Section 15.2 中,我描述了范围在身份验证过程中的作用。当您从身份提供商处获取不记名令牌时(无论您使用的是 OpenID Connect 还是 OAuth 2.0),您都可以定义要检索的范围。然后,用户可以选择授予或拒绝部分或全部请求的范围。此外,身份提供商可能仅允许某些客户端应用程序访问特定范围。您从身份提供商处收到的最终访问令牌(发送到 API)可能具有部分或没有请求的范围。It’s up to the API itself to decide what each scope means and how it should be used to enforce authorization policies. Scopes have no inherent functionality on their own, much like claims, but you can build functionality on top. For example, you can create authorization polices that require a token has the scope "recipe.edit" using
由 API 本身决定每个范围的含义以及如何使用它来实施授权策略。范围本身没有固有的功能,就像声明一样,但你可以在其上构建功能。例如,您可以使用
builder.Services.AddAuthorizationBuilder()
.AddPolicy("RecipeEditScope", policy =>
policy.RequireClaim("scope", " recipe.edit "));
This policy could then be applied to any endpoints that edit a recipe.
然后,此策略可应用于编辑配方的任何终端节点。Another common pattern is to require a specific scope for you to be authorized to make any requests to a given ASP.NET Core app, such as a "receipeApi" scope. This approach can often replace audience validation in bearer token authorization and may be more flexible, as it doesn’t require your identity provider to know the domain at which your API app will be hosted.
另一种常见模式是要求特定范围,以便您有权向给定的 ASP.NET Core 应用程序发出任何请求,例如“receipeApi”范围。这种方法通常可以取代不记名令牌授权中的受众验证,并且可能更灵活,因为它不需要您的身份提供商知道将托管您的 API 应用程序的域。Alternatively, you can use scopes to partition your APIs into groups that can only be accessed by certain types of clients. For example, you might have one set of APIs that can be accessed only by internal machine-to-machine clients, another set that can be accessed only by admin users, and another set that can be accessed only by nonadmin users.
或者,您可以使用范围将 API 划分为只能由某些类型的客户端访问的组。例如,您可能有一组只能由内部计算机到计算机客户端访问的 API,另一组只能由管理员用户访问,另一组只能由非管理员用户访问。Duende has many practical examples of approaches to authorization and authentication using OpenID Connect at http://mng.bz/o1Jp. The examples are geared to IdentityServer users but show many best practices and patterns you can use with identity provider services as well.
Duende 在 http://mng.bz/o1Jp 上提供了许多使用 OpenID Connect 进行授权和身份验证的方法的实际示例。这些示例面向 IdentityServer 用户,但也展示了许多可用于身份提供商服务的最佳实践和模式。
That brings us to the end of this chapter on authentication and authorization. We’re not completely done with security, though; in chapter 27 we look at potential security threats and how to mitigate them. But first, in chapter 26 you’ll learn about the logging abstractions in ASP.NET Core and how you can use them to keep tabs on exactly what your app’s up to.
这将我们带到了本章关于身份验证和授权的结尾。不过,我们还没有完全完成安全性;在第 27 章中,我们将介绍潜在的安全威胁以及如何缓解这些威胁。但首先,在第 26 章中,您将了解 ASP.NET Core 中的日志记录抽象,以及如何使用它们来密切关注您的应用程序的确切动态。
25.7 Summary
25.7 总结
In large systems with multiple applications or APIs, you can use an identity provider to centralize authentication and user management. This often reduces the authentication responsibilities of apps, reducing duplication and making it easier to add new user management features.
在具有多个应用程序或 API 的大型系统中,您可以使用身份提供商来集中身份验证和用户管理。这通常可以减少应用程序的身份验证责任,减少重复,并更轻松地添加新的用户管理功能。
You should strongly consider using a third-party identity provider service instead of building your own. User management is rarely core to your business, and by delegating responsibility to a third-party you can leave protecting your most vulnerable assets to the experts.
您应该强烈考虑使用第三方身份提供商服务,而不是构建自己的服务。用户管理很少是您的业务核心,通过将责任委托给第三方,您可以将保护最脆弱的资产的工作留给专家。
If you do need to build your own identity provider, you can use the IdentityServer or OpenIddict library. These libraries implement the OpenID Connect protocol, adding token generation to a standard ASP.NET Core application. You must build the user management and UI components yourself.
如果您确实需要构建自己的身份提供商,则可以使用 IdentityServer 或 OpenIddict 库。这些库实现 OpenID Connect 协议,将令牌生成添加到标准 ASP.NET Core 应用程序中。您必须自己构建用户管理和 UI 组件。
OAuth 2.0 is an authorization protocol that allows a user to delegate authorization for accessing a resource to another application. This standard allows applications to interoperate without compromising on security.
OAuth 2.0 是一种授权协议,允许用户将访问资源的授权委托给另一个应用程序。此标准允许应用程序在不影响安全性的情况下进行互作。
OAuth 2.0 has multiple grant types representing common authorization flows. The authorization code flow with PKCE is the most common interactive grant type when a user initiates an interaction. For machine-only workflows, such as an API calling another API, you can use the client credentials grant type.
OAuth 2.0 具有多种授权类型,代表常见的授权流程。当用户发起交互时,使用 PKCE 的授权代码流是最常见的交互式授权类型。对于仅限计算机的工作流,例如调用其他 API 的 API,您可以使用客户端凭证授权类型。
OpenID Connect is built on top of OAuth 2.0. It adds conventions, discoverability, and authentication to OAuth 2.0, making it easier to interact with third-party providers and retrieve identity information about a user.
OpenID Connect 基于 OAuth 2.0 构建。它为 OAuth 2.0 添加了约定、可发现性和身份验证,从而可以更轻松地与第三方提供商交互并检索有关用户的身份信息。
JWTs are the most common bearer token format. They consist of a header, a payload, and a signature, and are base64-encoded. When receiving a JWT you must always verify the signature to ensure that it hasn’t been tampered with.
JWT 是最常见的不记名令牌格式。它们由标头、有效负载和签名组成,并且采用 base64 编码。收到 JWT 时,您必须始终验证签名以确保它未被篡改。
JWTs are not encrypted, so anyone can read them by default. JWE is a standard that wraps the JWT and encrypts it, protecting the contents. Many identity providers support generating JWEs, and ASP.NET Core supports decoding JWEs automatically.
JWT 未加密,因此默认情况下任何人都可以读取它们。JWE 是一种包装 JWT 并对其进行加密的标准,可保护其内容。许多身份提供商支持生成 JWE,而 ASP.NET Core 支持自动解码 JWE。
Bearer token authentication in ASP.NET Core is similar to cookie authentication with traditional web apps. The authentication middleware deserializes the token and validates it. If the token is valid, the middleware creates a ClaimsPrincipal and sets HttpContext.User.
ASP.NET Core 中的持有者令牌身份验证类似于传统 Web 应用程序的 Cookie 身份验证。身份验证中间件反序列化令牌并对其进行验证。如果令牌有效,中间件将创建一个 ClaimsPrincipal 并设置 HttpContext.User。
Configure JWT bearer authentication by adding the Microsoft.AspNetCore.Authentication.JwtBearer NuGet Package and calling AddAuthentication().AddJwtBearer() to add the required services to your app.
通过添加 Microsoft.AspNetCore.Authentication.JwtBearer NuGet 包并调用 AddAuthentication() 来配置 JWT 不记名身份验证。AddJwtBearer() 将所需的服务添加到您的应用程序中。
To generate a JWT for local testing, run dotnet user-jwts create. This configures your API to support JWTs created by the tool and prints a token to the terminal, which you can use for local testing of your API. Add the token to requests in the Authorization header, using the format "Bearer <token>".
要生成用于本地测试的 JWT,请运行 dotnet user-jwts create。这会将您的 API 配置为支持该工具创建的 JWT,并将令牌打印到终端,您可以使用该令牌对 API 进行本地测试。使用 “Bearer <token>” 格式将令牌添加到 Authorization 标头中的请求。
Pass additional options to the dotnet user-jwts create command to customize the generated JWT. Add extra claims to the generated JWT using the --claim option, change the sub claim name using --name, or add scope claims to the JWT using --scope.
将其他选项传递给 dotnet user-jwts create 命令以自定义生成的 JWT。使用 --claim 选项向生成的 JWT 添加额外的声明,使用 --name 更改子声明名称,或使用 --scope 向 JWT 添加范围声明。
To enable authorization in Swagger UI, you should add a security scheme to your OpenAPI document. Create an OpenApiSecurityScheme object, and register it with the OpenAPI document by calling AddSecurityDefinition(). Apply it to all the APIs in your app by calling AddSecurityRequirement(), passing in the scheme object.
要在 Swagger UI 中启用授权,您应该向 OpenAPI 文档添加安全方案。创建一个 OpenApiSecurityScheme 对象,并通过调用 AddSecurityDefinition() 将其注册到 OpenAPI 文档中。通过调用 AddSecurityRequirement() 并将其应用于应用中的所有 API,并传入 scheme 对象。
To add authorization to minimal API endpoints, call RequireAuthorization() or add the [Authorize] attribute to your endpoint handler. This optionally takes the name of an authorization policy to apply, n the same way as you would apply policies to Razor Pages and MVC controllers. You can call RequireAuthorization() on route groups to apply authorization to multiple APIs at the same time.
若要向最小 API 终结点添加授权,请调用 RequireAuthorization() 或将 [Authorize] 属性添加到终结点处理程序。这可以选择采用要应用的授权策略的名称,其方式与将策略应用于 Razor Pages 和 MVC 控制器的方式相同。您可以在路由组上调用 RequireAuthorization() 以同时将授权应用于多个 API。
Override an authorization requirement on an endpoint by calling AllowAnonymous() or by adding the [AllowAnonymous] attribute to an endpoint handler. This removes any authentication requirements from the endpoint, so users can call the endpoint without a bearer token in the request.
通过调用 AllowAnonymous() 或将 [AllowAnonymous] 属性添加到终结点处理程序来替代终结点上的授权要求。这将删除终端节点中的任何身份验证要求,因此用户可以在请求中没有持有者令牌的情况下调用终端节点。