29 Improving your application’s security
29 提高应用程序的安全性
This chapter covers
本章涵盖
• Defending against cross-site scripting attacks
防御跨站点脚本攻击
• Protecting from cross-site request forgery attacks
防止跨站点请求伪造攻击
• Allowing calls to your API from other apps using CORS
允许使用 CORS从其他应用程序调用您的 API
• Avoiding attach vectors such as SQL injection attacks
避免 SQL 注入攻击等附加向量
In chapter 28 you learned how and why you should use HTTPS in your application: to protect your HTTP requests from attackers. In this chapter we look at more ways to protect your application and your application’s users from attackers. Because security is an extremely broad topic that covers lots of avenues, this chapter is by no means an exhaustive guide. It’s intended to make you aware of some of the most common threats to your app and how to counteract them, and also to highlight areas where you can inadvertently introduce vulnerabilities if you’re not careful.
在第 28 章中,您了解了如何以及为什么应该在应用程序中使用 HTTPS:保护您的 HTTP 请求免受攻击者的攻击。在本章中,我们将介绍更多方法来保护您的应用程序和应用程序用户免受攻击者的攻击。由于安全性是一个非常广泛的主题,涵盖了许多途径,因此本章绝不是详尽的指南。它旨在让您了解应用程序面临的一些最常见威胁以及如何应对这些威胁,并突出显示如果您不小心可能会无意中引入漏洞的区域。
TIP I strongly advise exploring additional resources around security after you’ve read this chapter. The Open Web Application Security Project (OWASP) (www.owasp.org) is an excellent resource. Alternatively, Troy Hunt has some excellent courses and workshops on security, geared toward .NET developers (https://www.troyhunt.com).
提示:我强烈建议您在阅读本章后探索有关安全性的其他资源。开放 Web 应用程序安全项目 (OWASP) (www.owasp.org) 是一个很好的资源。或者,Troy Hunt 有一些面向 .NET 开发人员 (https://www.troyhunt.com) 的优秀安全课程和研讨会。
In sections 29.1 and 29.2 you’ll start by learning about two potential attacks that should be on your radar: cross-site scripting (XSS) and cross-site request forgery (CSRF). We’ll explore how the attacks work and how you can prevent them in your apps. ASP.NET Core has built-in protection against both types of attacks, but you have to remember to use the protection correctly and resist the temptation to circumvent it unless you’re certain it’s safe to do so.
在第 29.1 节和第 29.2 节中,您将首先了解应该引起注意的两种潜在攻击:跨站点脚本 (XSS) 和跨站点请求伪造 (CSRF)。我们将探讨这些攻击的工作原理,以及如何在您的应用程序中防止它们。ASP.NET Core 具有针对这两种类型的攻击的内置保护,但您必须记住正确使用保护并抵制规避它的诱惑,除非您确定这样做是安全的。
Section 29.3 deals with a common scenario: you have an application that wants to use JavaScript requests to retrieve data from a second app. By default, web browsers block requests to other apps, so you need to enable cross-origin resource sharing (CORS) in your API to achieve this. We’ll look at how CORS works, how to create a CORS policy for your app, and how to apply it to specific endpoints.
Section 29.3 处理一个常见情况:您有一个应用程序,它想要使用 JavaScript 请求从第二个应用程序检索数据。默认情况下,Web 浏览器会阻止对其他应用程序的请求,因此您需要在 API 中启用跨域资源共享 (CORS) 才能实现此目的。我们将了解 CORS 的工作原理、如何为您的应用程序创建 CORS 策略以及如何将其应用于特定终端节点。
The final section of this chapter, section 29.4, covers a collection of common threats to your application. Each one represents a potentially critical flaw that an attacker could use to compromise your application. The solutions to each threat are generally relatively simple; the important thing is to recognize where the flaws could exist in your own apps so you can ensure that you don’t leave yourself vulnerable.
本章的最后一部分,即 29.4 节,涵盖了应用程序的一系列常见威胁。每个漏洞都代表一个潜在的严重缺陷,攻击者可以利用该漏洞来破坏您的应用程序。每种威胁的解决方案通常相对简单;重要的是识别您自己的应用程序中可能存在的缺陷,这样您就可以确保不会让自己容易受到攻击。
As I mentioned in chapter 28, you should always start by adding HTTPS to your app to encrypt the traffic between your users’ browsers and your app. Without HTTPS, attackers could subvert many of the safeguards you add to your app, so it’s an important first step to take.
正如我在第 28 章中提到的,您应该始终从将 HTTPS 添加到您的应用程序开始,以加密用户浏览器和应用程序之间的流量。如果没有 HTTPS,攻击者可能会破坏您添加到应用程序的许多保护措施,因此这是重要的第一步。
Unfortunately, most other security practices require rather more vigilance to ensure that you don’t accidentally introduce vulnerabilities into your app as it grows and develops. Many attacks are conceptually simple and have been known about for years, yet they’re still commonly found in new applications. In the next section we’ll look at one such attack and see how to defend against it when building apps using Razor Pages.
不幸的是,大多数其他安全实践都需要更加警惕,以确保您不会在应用程序的成长和发展过程中意外地将漏洞引入应用程序。许多攻击在概念上很简单,并且已经为人所知多年,但它们仍然常见于新应用程序。在下一节中,我们将介绍一种此类攻击,并了解如何在使用 Razor Pages 构建应用程序时防御它。
29.1 Defending against cross- site scripting (XSS) attacks
29.1 防御跨站点脚本 (XSS) 攻击
In this section I describe XSS attacks and how attackers can use them to compromise your users. I show how the Razor Pages framework protects you from these attacks, how to disable the protections when you need to, and what to look out for. I also discuss the difference between HTML encoding and JavaScript encoding, and the effect of using the wrong encoder.
在本节中,我将介绍 XSS 攻击以及攻击者如何利用它们来危害您的用户。我将展示 Razor Pages 框架如何保护您免受这些攻击,如何在需要时禁用保护,以及需要注意的事项。我还讨论了 HTML 编码和 JavaScript 编码之间的区别,以及使用错误编码器的影响。
Attackers can exploit a vulnerability in your app to create XSS attacks that execute code in another user’s browser. Commonly, attackers submit content using a legitimate approach, such as an input form, that is later rendered somewhere to the page. By carefully crafting malicious input, the attacker can execute arbitrary JavaScript on a user’s browser and so can steal cookies, impersonate the user, and generally do bad things.
攻击者可以利用您应用程序中的漏洞来创建 XSS 攻击,从而在其他用户的浏览器中执行代码。通常,攻击者使用合法方法(如输入表单)提交内容,这些方法稍后会呈现在页面的某个位置。通过精心设计恶意输入,攻击者可以在用户的浏览器上执行任意 JavaScript,从而窃取 Cookie、冒充用户,并通常会做坏事。
TIP For a detailed discussion of XSS attacks, see the “Cross Site Scripting (XSS)” article on the OWASP site: https://owasp.org/www-community/attacks/xss.
提示:有关 XSS 攻击的详细讨论,请参阅 OWASP 站点上的“跨站点脚本 (XSS)”文章:https://owasp.org/www-community/attacks/xss。
Figure 29.1 shows a basic example of an XSS attack. Legitimate users of your app can send their name to your app by submitting a form. The app then adds the name to an internal list and renders the whole list to the page. If the names are not rendered safely, a malicious user can execute JavaScript in the browser of every other user who views the list.
图 29.1 显示了 XSS 攻击的一个基本示例。您应用的合法用户可以通过提交表单将其名称发送到您的应用。然后,应用程序将名称添加到内部列表,并将整个列表呈现到页面。如果名称未安全呈现,恶意用户可以在查看列表的所有其他用户的浏览器中执行 JavaScript。
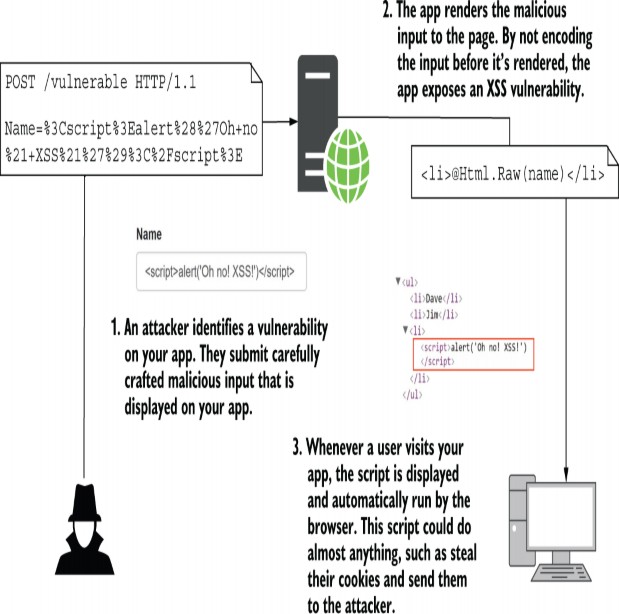
Figure 29.1 How an XSS vulnerability is exploited. An attacker submits malicious content to your app, which is displayed in the browsers of other users. If the app doesn’t encode the content when writing to the page, the input becomes part of the HTML of the page and can run arbitrary JavaScript.
图 29.1 XSS 漏洞是如何被利用的。攻击者向您的应用提交恶意内容,这些内容会显示在其他用户的浏览器中。如果应用程序在写入页面时未对内容进行编码,则输入将成为页面 HTML 的一部分,并且可以运行任意 JavaScript。
In figure 29.1 the user entered a snippet of HTML, such as their name. When users view the list of names, the Razor template renders the names using @Html.Raw(), which writes the <script> tag directly to the document. The user’s input has become part of the page’s HTML structure. As soon as the page is loaded in a user’s browser, the<script> tag executes, and the user is compromised. Once an attacker can execute arbitrary JavaScript on a user’s browser, they can do pretty much anything.
在图 29.1 中,用户输入了一个 HTML 片段,例如他们的名称。当用户查看名称列表时,Razor 模板使用 @Html.Raw() 呈现名称,后者将<script>标记直接写入文档。用户的输入已成为页面 HTML 结构的一部分。一旦页面加载到用户的浏览器中,<script>标记就会执行,并且用户会受到威胁。一旦攻击者可以在用户的浏览器上执行任意 JavaScript,他们几乎可以做任何事情。
TIP You can dramatically limit the control an attacker has even if they exploit an XSS vulnerability using a Content- Security-Policy (CSP). You can read about CSP at http://mng.bz/nWW2. I have an open-source library you can use to integrate a CSP into your app available on NuGet at http://mng.bz/vnn4.
提示:您可以极大地限制攻击者的控制权,即使他们使用内容安全策略 (CSP) 利用 XSS 漏洞。您可以在 http://mng.bz/nWW2 上阅读有关 CSP 的信息。我有一个开源库,您可以使用它将 CSP 集成到 NuGet 上提供的应用程序中,网址为 http://mng.bz/vnn4。
The vulnerability here is due to rendering the user input in an unsafe way. If the data isn’t encoded to make it safe before it’s rendered, you could open your users to attack. By default, Razor protects against XSS attacks by HTML- encoding any data written using Tag Helpers, HTML Helpers, or the @ syntax. So generally you should be safe, as you saw in chapter 17.
此处的漏洞是由于以不安全的方式呈现用户输入。如果数据在呈现之前没有进行编码以确保其安全,则可能会使用户受到攻击。默认情况下,Razor 通过对使用标记帮助程序、HTML 帮助程序或 @ 语法写入的任何数据进行 HTML 编码来防止 XSS 攻击。所以一般来说你应该是安全的,就像你在第 17 章中看到的那样。
Using @Html.Raw() is where the danger lies: if the HTML you’re rendering contains user input (even indirectly), you could have an XSS vulnerability. By rendering the user input with @ instead, the content is encoded before it’s written to the output, as shown in figure 29.2.
使用 @Html.Raw() 是危险所在:如果您渲染的 HTML 包含用户输入(即使是间接的),则可能存在 XSS 漏洞。通过使用 @ 来呈现用户输入,内容在写入输出之前进行编码,如图 29.2 所示。
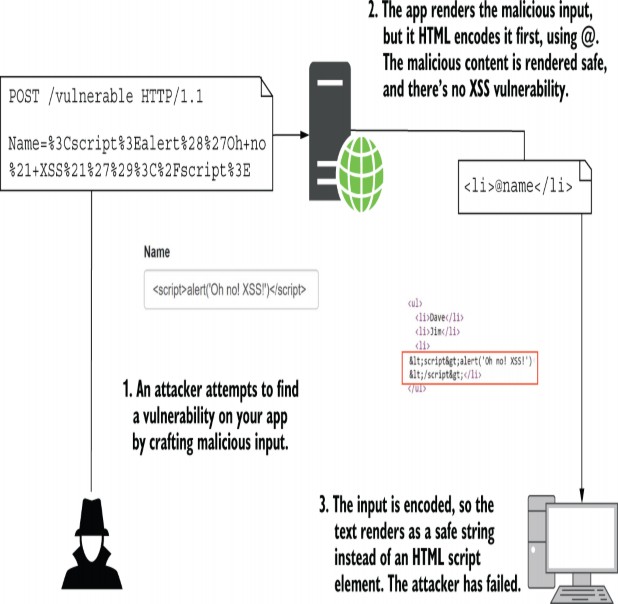
Figure 29.2 Protecting against XSS attacks by HTML- encoding user input using @ in Razor templates. The <script> tag is encoded so that it is no longer rendered as HTML and can’t be used to compromise your app.
图 29.2 在 Razor 模板中使用 @ 对用户输入进行 HTML 编码来防范 XSS 攻击。该 <script>标记经过编码,因此它不再呈现为 HTML,也不能用于危害您的应用。
This example demonstrates using HTML encoding to prevent elements being directly added to the HTML Document Object Model (DOM), but it’s not the only case you have to think about. If you’re passing untrusted data to JavaScript or using untrusted data in URL query values, you must make sure to encode the data correctly.
此示例演示了如何使用 HTML 编码来防止元素被直接添加到 HTML 文档对象模型 (DOM) 中,但这并不是您必须考虑的唯一情况。如果要将不受信任的数据传递给 JavaScript 或在 URL 查询值中使用不受信任的数据,则必须确保正确编码数据。
A common scenario is when you’re using JavaScript with Razor Pages, and you want to pass a value from the server to the client. If you use the standard @ symbol to render the data to the page, the output will be HTML-encoded.
一种常见情况是,将 JavaScript 与 Razor Pages 配合使用,并且想要将值从服务器传递到客户端。如果使用标准 @ 符号将数据呈现到页面,则输出将采用 HTML 编码。
Unfortunately, if you HTML-encode a string and inject it directly into JavaScript, you probably won’t get what you expect.
不幸的是,如果你对字符串进行 HTML 编码并将其直接注入到 JavaScript 中,你可能不会得到你所期望的结果。
For example, if you have a variable in your Razor file called name, and you want to make it available in JavaScript, you might be tempted to use something like this:
例如,如果您的 Razor 文件中有一个名为 name 的变量,并且您希望在 JavaScript 中使其可用,您可能会想使用如下内容:
<script>var name = '@name'</script>If the name contains special characters, Razor will encode them using HTML encoding, which probably isn’t what you want in this JavaScript context. For example, if name was Arnold "Arnie" Schwarzenegger, rendering it as you did previously would give this:
如果名称包含特殊字符,Razor 将使用 HTML 编码对其进行编码,这可能不是你在此 JavaScript 上下文中想要的。例如,如果 name 是 Arnold “Arnie” Schwarzenegger,则像以前一样呈现它将得到以下结果:
<script>var name = 'Arnold "Arnie" Schwarzenegger';</script>Note that the double quotation marks (") have been HTML- encoded to ". If you use this value in JavaScript directly, expecting it to be a safe encoded value, it’s going to look wrong, as shown in figure 29.3.
请注意,双引号 (“) 已 HTML 编码为 ”.如果你直接在 JavaScript 中使用这个值,期望它是一个安全的编码值,它看起来会出错,如图 29.3 所示。
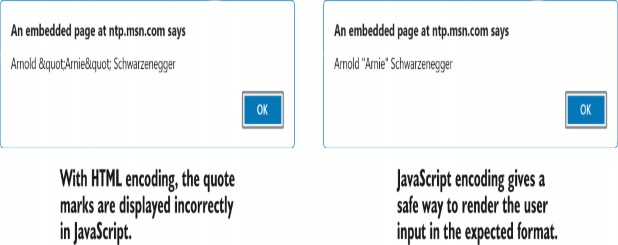
Figure 29.3 Comparison of alerts when using JavaScript encoding compared with HTML encoding
图 29.3 使用 JavaScript 编码与 HTML 编码时的警报比较
Instead, you should encode the variable using JavaScript encoding so that the double-quote character is rendered as a safe Unicode character, \u0022. You can achieve this by injecting a JavaScriptEncoder into the view and calling Encode() on the name variable:
相反,您应该使用 JavaScript 编码对变量进行编码,以便将双引号字符呈现为安全的 Unicode 字符 \u0022。您可以通过将 JavaScriptEncoder 注入视图并在 name 变量上调用 Encode() 来实现这一点:
@inject System.Text.Encodings.Web.JavaScriptEncoder encoder;
<script>var name = '@encoder.Encode(name)'</script>
To avoid having to remember to use JavaScript encoding, I recommend that you don’t write values into JavaScript like this. Instead, write the value to an HTML element’s attributes, and then read that into the JavaScript variable later, as shown in the following listing. That prevents the need for the JavaScript encoder entirely.
为避免记住使用 JavaScript 编码,我建议您不要像这样将值写入 JavaScript。相反,将值写入 HTML 元素的属性,然后稍后将其读取到 JavaScript 变量中,如下面的清单所示。这完全不需要 JavaScript 编码器。
Listing 29.1 Passing values to JavaScript by writing them to HTML attributes
清单 29.1 通过将值写入 HTML 属性来将值传递给 JavaScript
<div id="data" data-name="@name"></div>
<script> ❶
var ele = document.getElementById('data'); ❷
var name = ele.getAttribute('data-name'); ❸
</script>
❶ Write the value you want in JavaScript to a data-* attribute. This HTML-encodes the data.
在 JavaScript 中将你想要的值写入 data- 属性。此 HTML 对数据进行编码。
❷ Gets a reference to the HTML element
获取对 HTML 元素的引用
❸ Reads the data-* attribute into JavaScript, which converts it to JavaScript encoding
将 data- 属性读取到 JavaScript 中,从而将其转换为 JavaScript 编码
XSS attacks are still common, and it’s easy to expose yourself to them whenever you allow users to input data. Validation of the incoming data can help sometimes, but it’s often a tricky problem. For example, a naive name validator might require that you use only letters, which would prevent most attacks. Unfortunately, that doesn’t account for users with hyphens or apostrophes in their name, let alone users with non-Western names. People get (understandably) upset when you tell them that their name is invalid, so be wary of this approach!
XSS 攻击仍然很常见,只要您允许用户输入数据,就很容易将自己暴露在它们面前。验证传入数据有时会有所帮助,但这通常是一个棘手的问题。例如,一个 naive name validator 可能要求您只使用字母,这样可以防止大多数攻击。不幸的是,这并未考虑名称中包含连字符或撇号的用户,更不用说具有非西方名称的用户了。当你告诉他们他们的名字无效时,人们会(可以理解地)不安,所以要警惕这种做法!
Whether or not you use strict validation, you should always encode the data when you render it to the page. Think carefully whenever you find yourself writing @Html.Raw(). Is there any way, no matter how contrived, for a user to get malicious data into that field? If so, you’ll need to find another way to display the data.
无论是否使用严格验证,在将数据呈现到页面时,都应始终对数据进行编码。每当您发现自己编写 @Html.Raw() 时,请仔细考虑。无论多么人为,用户是否有任何方法可以将恶意数据导入该字段?如果是这样,您将需要找到另一种显示数据的方法。
XSS vulnerabilities allow attackers to execute JavaScript on a user’s browser. The next vulnerability we’re going to consider lets them make requests to your API as though they’re a different logged-in user, even when the user isn’t using your app. Scared? I hope so!
XSS 漏洞允许攻击者在用户的浏览器上执行 JavaScript。我们将要考虑的下一个漏洞允许他们向您的 API 发出请求,就好像他们是不同的登录用户一样,即使该用户没有使用您的应用程序。害怕吗?希望如此!
29.2 Protecting from cross-site request forgery (CSRF) attacks
29.2 防止跨站点请求伪造 (CSRF) 攻击
In this section you’ll learn about CSRF attacks, how attackers can use them to impersonate a user on your site, and how to protect against them using antiforgery tokens. Razor Pages protects you from these attacks by default, but you can disable these verifications, so it’s important to understand the implications of doing so.
在本节中,您将了解 CSRF 攻击、攻击者如何使用它们来冒充您网站上的用户,以及如何使用防伪令牌来防范它们。默认情况下,Razor Pages 会保护您免受这些攻击,但您可以禁用这些验证,因此请务必了解这样做的含义。
CSRF attacks can be a problem for websites or APIs that use cookies for authentication. A CSRF attack involves a malicious website making an authenticated request to your API on behalf of the user, without the user’s initiating the request. In this section we’ll explore how these attacks work and how you can mitigate them with antiforgery tokens.
对于使用 cookie 进行身份验证的网站或 API 来说,CSRF 攻击可能是一个问题。CSRF 攻击涉及恶意网站代表用户向您的 API 发出经过身份验证的请求,而无需用户发起请求。在本节中,我们将探讨这些攻击的工作原理,以及如何使用防伪令牌来缓解它们。
The canonical example of this attack is a bank transfer/withdrawal. Imagine you have a banking application that stores authentication tokens in a cookie, as is common (especially in traditional server-side rendered applications).Browsers automatically send the cookies associated with a domain with every request so the app knows whether a user is authenticated.
这种攻击的典型示例是银行转账/取款。假设您有一个银行应用程序,它将身份验证令牌存储在 Cookie 中,这很常见(尤其是在传统的服务器端呈现的应用程序中)。浏览器会自动将与域关联的 Cookie 与每个请求一起发送,以便应用程序知道用户是否经过身份验证。
Now imagine your application has a page that lets a user transfer funds from their account to another account using a POST request to the Balance Razor Page. You have to be logged in to access the form (you’ve protected the Razor Page with the [Authorize] attribute or global authorization requirements), but otherwise you post a form that says how much you want to transfer and where you want to transfer it. Seems simple enough?
现在,假设你的应用程序有一个页面,该页面允许用户使用对 Balance Razor 页面的 POST 请求将资金从其帐户转移到另一个帐户。您必须登录才能访问该表单(您已使用 [Authorize] 属性或全局授权要求保护了 Razor 页面),但除此之外,您需要发布一个表单,说明您要转移的金额以及要转移的位置。看起来很简单?
Suppose that a user visits your site, logs in, and performs a transaction. Then they visit a second website that the attacker has control of. The attacker has embedded a form in their website that performs a POST to your bank’s website, identical to the transfer-funds form on your banking website. This form does something malicious, such as transfer all the user’s funds to the attacker, as shown in figure 29.4.
假设用户访问您的网站、登录并执行事务。然后,他们访问攻击者可以控制的第二个网站。攻击者在其网站中嵌入了一个表单,该表单会向您的银行网站执行 POST,该表单与您的银行网站上的转账资金表单相同。这种形式会做一些恶意的事情,比如把用户的所有资金都转移给攻击者,如图 29.4 所示。
Browsers automatically send the cookies for the application when the page does a full form post, and the banking app has no way of knowing that this is a malicious request. The unsuspecting user has given all their money to the attacker!
当页面执行完整表单发布时,浏览器会自动发送应用程序的 Cookie,而银行应用程序无法知道这是恶意请求。毫无戒心的用户已经把他们所有的钱都给了攻击者!
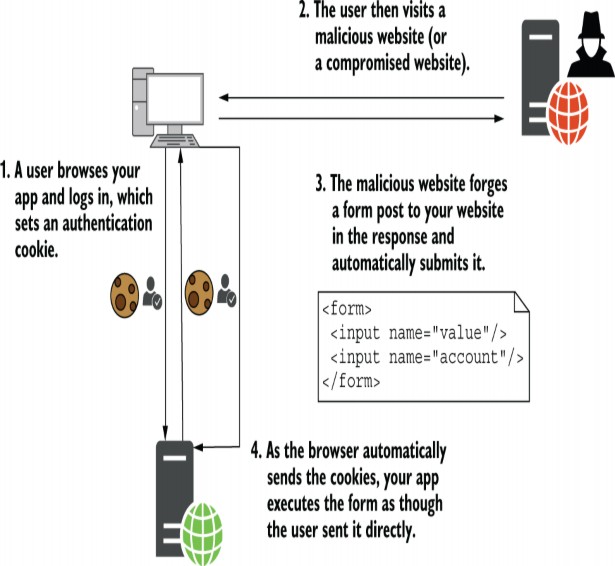
Figure 29.4 A CSRF attack occurs when a logged-in user visits a malicious site. The malicious site crafts a form that matches one on your app and POSTs it to your app. The browser sends the authentication cookie automatically, so your app sees the request as a valid request from the user.
图 29.4 当登录用户访问恶意站点时,会发生 CSRF 攻击。恶意网站会制作一个与您的应用程序匹配的表单,并将其 POST 到您的应用程序。浏览器会自动发送身份验证 Cookie,因此您的应用会将该请求视为来自用户的有效请求。
The vulnerability here revolves around the fact that browsers automatically send cookies when a page is requested (using a GET request) or a form is POSTed. There’s no difference between a legitimate POST of the form in your banking app and the attacker’s malicious POST. Unfortunately, this behavior is baked into the web; it’s what allows you to navigate websites seamlessly after initially logging in.
此处的漏洞围绕以下事实展开:浏览器在请求页面(使用 GET 请求)或发布表单时自动发送 Cookie。您的银行应用程序中形式的合法 POST 与攻击者的恶意 POST 之间没有区别。不幸的是,这种行为已经融入了 Web;它允许您在初始登录后无缝浏览网站。
TIP Browsers have additional protections to prevent cookies being sent in this situation, called SameSite cookies. By default, most browsers use SameSite=Lax, which prevents this vulnerable behavior. You can read about SameSite cookies and how to work with them in ASP.NET Core at http://mng.bz/4DDj.
提示:浏览器具有额外的保护措施来防止在这种情况下发送 Cookie,称为 SameSite Cookie。默认情况下,大多数浏览器使用 SameSite=Lax,这可以防止这种易受攻击的行为。您可以在 http://mng.bz/4DDj 阅读有关 SameSite Cookie 以及如何在 ASP.NET Core 中使用它们的信息。
A common solution to this CSRF attack is the synchronizer token pattern, which uses user-specific, unique antiforgery tokens to enforce a difference between a legitimate POST and a forged POST from an attacker. One token is stored in a cookie, and another is added to the form you wish to protect. Your app generates the tokens at runtime based on the current logged-in user, so there’s no way for an attacker to create one for their forged form.
这种 CSRF 攻击的常见解决方案是同步器令牌模式,它使用特定于用户的唯一防伪令牌来强制区分来自攻击者的合法 POST 和伪造的 POST。一个令牌存储在 Cookie 中,另一个令牌将添加到您要保护的表单中。您的应用在运行时根据当前登录用户生成令牌,因此攻击者无法为其伪造表单创建令牌。
TIP The “Cross-Site Request Forgery Prevention Cheat Sheet” article on the OWASP site (http://mng.bz/5jRa) has a thorough discussion of the CSRF vulnerability, including the synchronizer token pattern.
提示:OWASP 站点 (http://mng.bz/5jRa) 上的“跨站点请求伪造预防备忘单”一文对 CSRF 漏洞进行了深入讨论,包括同步器令牌模式。
When the Balance Razor Page receives a form POST, it compares the value in the form with the value in the cookie. If either value is missing or the values don’t match, the request is rejected. If an attacker creates a POST, the browser posts the cookie token as usual, but there won’t be a token in the form itself or the token won’t be valid. The Razor Page rejects the request, protecting from the CSRF attack, as in figure 29.5.
当 Balance Razor 页面收到表单 POST 时,它会将表单中的值与 Cookie 中的值进行比较。如果缺少任一值或值不匹配,则请求将被拒绝。如果攻击者创建 POST,浏览器会照常发布 cookie 令牌,但表单本身不会有令牌,或者令牌无效。Razor Page 拒绝请求,防止 CSRF 攻击,如图 29.5 所示。
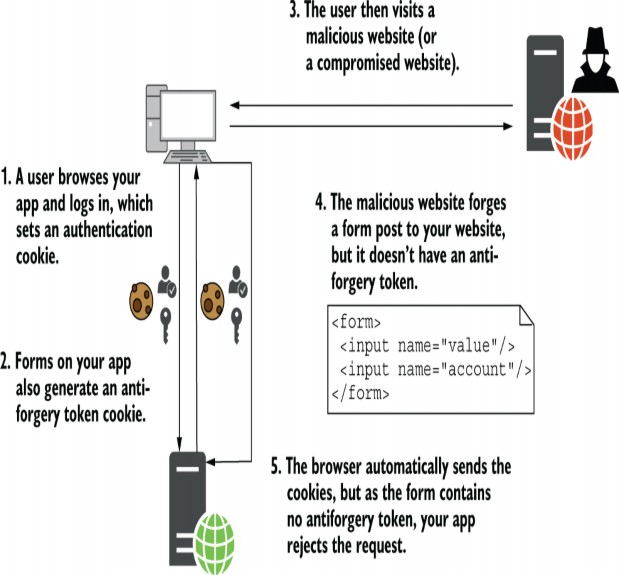
Figure 29.5 Protecting against a CSRF attack using antiforgery tokens. The browser automatically forwards the cookie token, but the malicious site can’t read it and so can’t include a token in the form.The app rejects the malicious request because the tokens don’t match.
图 29.5 使用防伪令牌防范 CSRF 攻击。浏览器会自动转发 Cookie 令牌,但恶意站点无法读取它,因此无法在表单中包含令牌。应用程序拒绝恶意请求,因为令牌不匹配。
The good news is that Razor Pages automatically protects you against CSRF attacks. The Form Tag Helper automatically sets an antiforgery token cookie and renders the token to a hidden field called _RequestVerificationToken for every <form> element in your app (unless you specifically disable them). For example, take this simple Razor template that posts back to the same Razor Page:
好消息是 Razor Pages 会自动保护您免受 CSRF 攻击。Form Tag Helper 会自动设置防伪令牌 Cookie,并将该令牌呈现到应用中每个<form>元素的名为 _RequestVerificationToken 的隐藏字段(除非您专门禁用它们)。例如,以这个简单的 Razor 模板为例,该模板回发到同一 Razor 页面:
<form method="post">
<label>Amount</label>
<input type="number" name="amount" />
<button type="submit">Withdraw funds</button>
</form>
When rendered to HTML, the antiforgery token is stored in the hidden field and is posted back with a legitimate request:
当呈现为 HTML 时,防伪令牌存储在 hidden 字段中,并通过合法请求发回:
<form method="post">
<label>Amount</label>
<input type="number" name="amount" />
<button type="submit" >Withdraw funds</button>
<input name="__RequestVerificationToken" type="hidden"

value="CfDJ8Daz26qb0hBGsw7QCK"/>

</form>
ASP.NET Core automatically adds the antiforgery tokens to every form, and Razor Pages automatically validates them. The framework ensures that the antiforgery tokens exist in both the cookie and the form data, ensures that they match, and rejects any requests where they don’t.
ASP.NET Core 会自动将防伪令牌添加到每个表单,Razor Pages 会自动验证它们。该框架确保防伪令牌同时存在于 Cookie 和表单数据中,确保它们匹配,并拒绝任何不匹配的请求。
If you’re using Model-View-Controller (MVC) controllers with views instead of Razor Pages, ASP.NET Core still adds the antiforgery tokens to every form. Unfortunately, it doesn’t validate them for you. Instead, you must decorate your controllers and actions with the [ValidateAntiForgeryToken] attribute. This ensures that the antiforgery tokens exist in both the cookie and the form data, checks that they match, and rejects any requests in which they don’t.
如果将模型-视图-控制器 (MVC) 控制器与视图而不是 Razor Pages 一起使用,则 ASP.NET Core 仍会将防伪令牌添加到每个表单中。不幸的是,它不会为您验证它们。相反,您必须使用 [ValidateAntiForgeryToken] 属性修饰控制器和作。这可确保防伪令牌同时存在于 Cookie 和表单数据中,检查它们是否匹配,并拒绝它们不匹配的任何请求。
WARNING ASP.NET Core doesn’t automatically validate antiforgery tokens if you’re using MVC controllers with Views. You must make sure to mark all vulnerable methods with [ValidateAntiForgeryToken] attributes instead, as described in the “Prevent Cross-Site Request Forgery (XSRF/CSRF) attacks in ASP.NET Core” documentation: http://mng.bz/QPPv. Note that if you’re not using cookies for authentication, you are not vulnerable to CSRF attacks: CSRF attacks arise from attackers exploiting the fact that browsers automatically attach cookies to requests. No cookies, no problem!
警告:ASP.NET 如果您将 MVC 控制器与视图一起使用,Core 不会自动验证防伪令牌。您必须确保使用 [ValidateAntiForgeryToken] 属性标记所有易受攻击的方法,如“防止 ASP.NET Core 中的跨站点请求伪造 (XSRF/CSRF) 攻击”文档中所述:http://mng.bz/QPPv。请注意,如果您不使用 cookie 进行身份验证,则不易受到 CSRF 攻击:CSRF 攻击是由于攻击者利用浏览器自动将 cookie 附加到请求这一事实而引起的。没有 cookie,没问题!
Generally, you need to use antiforgery tokens only for POST, DELETE, and other dangerous request types that are used for modifying state. GET requests shouldn’t be used for this purpose, so the framework doesn’t require valid antiforgery tokens to call them. Razor Pages validates antiforgery tokens for dangerous verbs like POST and ignores safe verbs like GET. As long as you create your app following this pattern (and you should!), the framework does the right thing to keep you safe.
通常,您只需将防伪令牌用于 POST、DELETE 和其他用于修改状态的危险请求类型。GET 请求不应用于此目的,因此框架不需要有效的防伪令牌来调用它们。Razor Pages 会验证危险动词(如 POST)的防伪令牌,并忽略安全动词(如 GET)。只要你按照这种模式创建你的应用程序(你应该这样做),框架就会做正确的事情来保证你的安全。
If you need to explicitly ignore antiforgery tokens on a Razor Page for some reason, you can disable the validation by applying the [IgnoreAntiforgeryToken] attribute to a Razor Page’s PageModel. This bypasses the framework protections for those cases when you’re doing something that you know is safe and doesn’t need protecting, but in most cases it’s better to play it safe and validate.
如果出于某种原因需要显式忽略 Razor 页面上的防伪令牌,可以通过将 [IgnoreAntiforgeryToken] 属性应用于 Razor 页面的 PageModel 来禁用验证。当您执行一些已知安全且不需要保护的作时,这将绕过框架保护,但在大多数情况下,最好谨慎行事并进行验证。
CSRF attacks can be a tricky thing to get your head around from a technical point of view, but for the most part everything should work without much effort on your part.
从技术角度来看,CSRF 攻击可能是一件棘手的事情,但在大多数情况下,一切都应该可以正常工作,而无需您付出太多努力。
Razor adds antiforgery tokens to your forms, and the Razor Pages framework takes care of validation for you.
Razor 将防伪令牌添加到您的表单中,Razor Pages 框架会为您处理验证。
Things get trickier if you’re making a lot of requests to an API using JavaScript, and you’re posting JavaScript Object Notation (JSON) objects rather than form data. In these cases, you won’t be able to send the verification token as part of a form (because you’re sending JSON), so you’ll need to add it as a header in the request instead. Microsoft’s documentation “Prevent Cross-Site Request Forgery (XSRF/ CSRF) attacks in ASP.NET Core” contains an example of adding the header in JavaScript and validating it in your application. See http://mng.bz/XNNa.
如果您使用 JavaScript 向 API 发出大量请求,并且您发布的是 JavaScript 对象表示法 (JSON) 对象而不是表单数据,那么事情就会变得更加棘手。在这些情况下,您将无法将验证令牌作为表单的一部分发送(因为您发送的是 JSON),因此您需要将其作为标头添加到请求中。Microsoft 的文档“防止 ASP.NET Core 中的跨站点请求伪造 (XSRF/CSRF) 攻击”包含在 JavaScript 中添加标头并在应用程序中验证它的示例。请参阅 http://mng.bz/XNNa。
TIP If you’re not using cookie authentication and instead have a single-page application (SPA) that sends authentication tokens in a header, the good news is that you don’t have to worry about CSRF at all! Malicious sites can send only cookies, not headers, to your API, so they can’t make authenticated requests.
提示:如果您不使用 cookie 身份验证,而是拥有在 Headers 中发送身份验证令牌的单页应用程序 (SPA),那么好消息是,您根本不需要担心 CSRF!恶意网站只能向您的 API 发送 Cookie,而不能发送标头,因此它们无法发出经过身份验证的请求。
Generating unique tokens with the data protection APIs
使用数据保护 API 生成唯一令牌The antiforgery tokens used to prevent CSRF attacks rely on the ability of the framework to use strong symmetric encryption to encrypt and decrypt data. Encryption algorithms typically rely on one or more keys, which are used to initialize the encryption and to make the process reproducible. If you have the key, you can encrypt and decrypt data; without it, the data is secure.
用于防止 CSRF 攻击的防伪令牌依赖于框架使用强对称加密来加密和解密数据的能力。加密算法通常依赖于一个或多个密钥,这些密钥用于初始化加密并使过程可重现。如果你有密钥,你可以加密和解密数据;没有它,数据是安全的。In ASP.NET Core, encryption is handled by the data protection APIs. They’re used to create the antiforgery tokens, encrypt authentication cookies, and generate secure tokens in general. Crucially, they also control the management of the key files that are used for encryption. A key file is a small XML file that contains the random key value used for encryption in ASP.NET Core apps. It’s critical that it’s stored securely. If an attacker got hold of it, they could impersonate any user of your app and generally do bad things!
在 ASP.NET Core 中,加密由数据保护 API 处理。它们通常用于创建防伪令牌、加密身份验证 Cookie 和生成安全令牌。至关重要的是,它们还控制用于加密的密钥文件的管理。密钥文件是一个小型 XML 文件,其中包含用于在 ASP.NET Core 应用程序中加密的随机密钥值。安全存储至关重要。如果攻击者掌握了它,他们就可以冒充您应用程序的任何用户,并且通常会做坏事!The data protection system stores the keys in a safe location, depending on how and where you host your app:
数据保护系统会将密钥存储在安全的位置,具体取决于您托管应用的方式和位置:
• Azure Web App—In a special synced folder, shared between regions
Azure Web 应用程序 - 位于特殊同步文件夹中,在区域之间共享
• IIS without user profile—Encrypted in the registry
没有用户配置文件的 IIS - 在注册表中加密
• Account with user profile—In %LOCALAPPDATA%\ASP.NET\DataProtection-Keys on Windows, or ~/.aspnet/DataProtection-Keys on Linux or macOS
具有用户配置文件的帐户 - 在 Windows 上位于 %LOCALAPPDATA%\ASP.NET\DataProtection-Keys 中,在 Linux 或 macOS 上位于 ~/.aspnet/DataProtection-Keys 中
• All other cases—In memory; when the app restarts, the keys will be lost
所有其他情况 - 在内存中;当应用程序重新启动时,密钥将丢失
So why do you care? For your app to be able to read your users’ authentication cookies, it must decrypt them by using the same key that was used to encrypt them. If you’re running in a web-farm scenario, by default each server has its own key and won’t be able to read cookies encrypted by other servers.
那么,您为什么关心呢?为了使您的应用程序能够读取用户的身份验证 Cookie,它必须使用用于加密用户的相同密钥对其进行解密。如果您在 Web 场方案中运行,则默认情况下,每个服务器都有自己的密钥,并且无法读取由其他服务器加密的 Cookie。To get around this, you must configure your app to store its data protection keys in a central location. This could be a shared folder on a hard drive, a Redis instance, or an Azure blob storage instance, for example.
要解决此问题,您必须将应用程序配置为将其数据保护密钥存储在一个中心位置。例如,这可以是硬盘驱动器上的共享文件夹、Redis 实例或 Azure Blob 存储实例。Microsoft’s documentation on the data protection APIs is extremely detailed, but it can be overwhelming. I recommend reading the section on configuring data protection, (“Configure ASP.NET Core Data Protection,” http://mng.bz/d40i) and configuring a key storage provider for use in a web- farm scenario (“Key storage providers in ASP.NET Core,” http://mng.bz/5pW6). I also have an introduction to the data protection APIs on my blog at http://mng.bz/yQQd.
Microsoft 关于数据保护 API 的文档非常详细,但可能会让人不知所措。我建议阅读有关配置数据保护的部分(“配置 ASP.NET Core 数据保护”,http://mng.bz/d40i 年)和配置用于 Web 场方案的密钥存储提供程序(“ASP.NET Core 中的密钥存储提供程序”,http://mng.bz/5pW6 年)。我还在我的博客 http://mng.bz/yQQd 上介绍了数据保护 API。
It’s worth clarifying that the CSRF vulnerability discussed in this section requires that a malicious site does a full form POST to your app. The malicious site can’t make the request to your API using client-side-only JavaScript, as browsers block JavaScript requests to your API that are from a different origin.
值得澄清的是,本节中讨论的 CSRF 漏洞要求恶意网站对您的应用程序执行完整形式的 POST。恶意站点无法使用仅限客户端的 JavaScript 向您的 API 发出请求,因为浏览器会阻止来自不同来源的 JavaScript 请求。
This is a safety feature, but it can often cause you problems. If you’re building a client-side SPA, or even if you have a little JavaScript on an otherwise server-side rendered app, you may need to make such cross-origin requests. In the next section I describe a common scenario you’re likely to run into and show how you can modify your apps to work around Pit.
这是一项安全功能,但它通常会给您带来麻烦。如果您正在构建客户端 SPA,或者即使您在其他服务器端呈现的应用程序上有一点 JavaScript,也可能需要发出此类跨域请求。在下一节中,我将介绍您可能会遇到的常见场景,并展示如何修改您的应用程序以解决 Pit 问题。
29.3 Calling your web APIs from other domains using CORS
29.3 使用 CORS 从其他域调用 Web API
In this section you’ll learn about cross-origin resource sharing (CORS), a protocol to allow JavaScript to make requests from one domain to another. CORS is a frequent area of confusion for many developers, so this section describes why it’s necessary and how CORS headers work. You’ll then learn how to add CORS to both your whole application and specific web API actions, and how to configure multiple CORS policies for your application.
在本节中,您将了解跨域资源共享 (CORS),这是一种允许 JavaScript 从一个域向另一个域发出请求的协议。CORS 是许多开发人员经常混淆的领域,因此本节介绍为什么需要 CORS 以及 CORS 标头的工作原理。然后,您将了解如何将 CORS 添加到整个应用程序和特定 Web API作,以及如何为应用程序配置多个 CORS 策略。
As you’ve already seen, CSRF attacks can be powerful, but they would be even more dangerous if it weren’t for browsers implementing the same-origin policy. This policy blocks apps from using JavaScript to call a web API at a different location unless the web API explicitly allows it.
正如你已经看到的,CSRF 攻击可能很强大,但如果不是浏览器实施同源策略,它们会更加危险。此政策禁止应用使用 JavaScript 调用位于其他位置的 Web API,除非 Web API 明确允许。
DEFINITION Origins are deemed to be the same if they match the scheme (HTTP or HTTPS), domain (example.com), and port (80 by default for HTTP and 443 for HTTPS). If an app attempts to access a resource using JavaScript, and the origins aren’t identical, the browser blocks the request.
定义:如果源与方案(HTTP 或 HTTPS)、域 (example.com) 和端口(HTTP 默认为 80,HTTPS 为 443)匹配,则认为源相同。如果应用程序尝试使用 JavaScript 访问资源,并且来源不相同,则浏览器会阻止该请求。
The same-origin policy is strict. The origins of the two URLs must be identical for the request to be allowed. For example, the following origins are the same:
同源策略很严格。两个 URL 的来源必须相同,才能允许请求。例如,以下来源是相同的:
• http://example.com/home
• http://example.com/site.css
The paths are different for these two URLs (/home and /site.css), but the scheme, domain, and port (80) are identical. So if you were on the home page of your app, you could request the /site.css file using JavaScript without any problems.
这两个 URL (/home 和 /site.css) 的路径不同,但 scheme、domain 和 port (80) 相同。因此,如果你在应用程序的主页上,你可以使用 JavaScript 请求 /site.css 文件,而不会出现任何问题。
By contrast, the origins of the following sites are different, so you couldn’t request any of these URLs using JavaScript from the http://example.com origin:
相比之下,以下网站的来源不同,因此您无法使用 JavaScript 从 http://example.com 来源请求这些 URL 中的任何一个:
• https://example.com—Different scheme (https)
• http://www.example.com—Different domain (includes a subdomain)
• http://example.com:5000—Different port (default HTTP port is 80)
For simple apps, where you have a single web app handling all your functionality, this limitation might not be a problem, but it’s extremely common for an app to make requests to another domain. For example, you might have an e- commerce site hosted at http://shopping.com, and you’re attempting to load data from http://api.shop ping.com to display details about the products available for sale. With this configuration, you’ll fall foul of the same-origin policy.Any attempt to make a request using JavaScript to the API domain will fail, with an error similar to figure 29.6.
对于简单的应用程序,您有一个 Web 应用程序处理您的所有功能,此限制可能不是问题,但应用程序向另一个域发出请求的情况非常常见。例如,您可能在 http://shopping.com 上托管了一个电子商务网站,并且您正在尝试从 http://api.shop ping.com 加载数据以显示有关可供销售产品的详细信息。使用此配置,您将违反同源策略。任何使用 JavaScript 向 API 域发出请求的尝试都将失败,并出现类似于图 29.6 的错误。
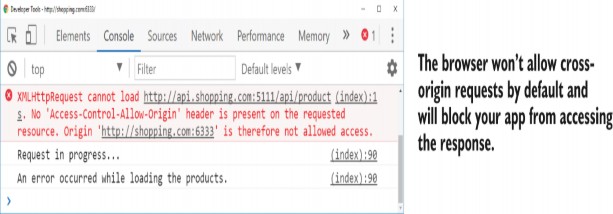
Figure 29.6 The console log for a failed cross-origin request. Chrome has blocked a cross-origin request from the app http://shopping.com:6333 to the API at http://api.shopping.com:5111.
图 29.6 失败的跨域请求的控制台日志。Chrome 在 http://api.shopping.com:5111 时阻止了应用 http://shopping.com:6333 向 API 发出的跨域请求。
The need to make cross-origin requests from JavaScript is increasingly common with the rise of client-side SPAs and the move away from monolithic apps. Luckily, there’s a web standard that lets you work around this in a safe way; this standard is CORS. You can use CORS to control which apps can call your API, so you can enable scenarios like this one.
随着客户端 SPA 的兴起和从整体式应用程序的转变,从 JavaScript 发出跨域请求的需求越来越普遍。幸运的是,有一个 Web 标准可以让您以安全的方式解决这个问题;这个标准是 CORS。您可以使用 CORS 来控制哪些应用程序可以调用您的 API,因此您可以启用此类方案。
29.3.1 Understanding CORS and how it works
29.3.1 了解 CORS 及其工作原理
CORS is a web standard that allows your web API to make statements about who can make cross-origin requests to it. For example, you could make statements such as these:
CORS 是一种 Web 标准,它允许您的 Web API 声明谁可以向其发出跨域请求。例如,您可以做出如下陈述:
• Allow cross-origin requests from https://shopping.com and https://app.shopping.com.
允许来自 https://shopping.com 和 https://app.shopping.com 的跨域请求。
• Allow only GET cross-origin requests.
仅允许 GET 跨域请求。
• Allow returning the Server header in responses to cross-origin requests.
允许在响应跨域请求时返回 Server 标头。
• Allow credentials (such as authentication cookies or authorization headers) to be sent with cross- origin requests.
允许通过跨域请求发送凭据 (例如身份验证 Cookie 或授权标头)。
You can combine these rules into a policy and apply different policies to different endpoints of your API. You could apply a policy to your entire application or a different policy to every API action.
您可以将这些规则合并到一个策略中,并将不同的策略应用于 API 的不同终端节点。您可以将策略应用于整个应用程序,也可以将不同的策略应用于每个 API作。
CORS works using HTTP headers. When your web API application receives a request, it sets special headers on the response to indicate whether cross-origin requests are allowed, which origins they’re allowed from, and which HTTP verbs and headers the request can use—pretty much everything about the request.
CORS 使用 HTTP 标头工作。当您的 Web API 应用程序收到请求时,它会在响应上设置特殊标头,以指示是否允许跨域请求、允许它们来自哪些来源以及请求可以使用哪些 HTTP 动词和标头 — 几乎涵盖了有关请求的所有内容。
In some cases, before sending a real request to your API, the browser sends a preflight request, a request sent using the OPTIONS verb, which the browser uses to check whether it’s allowed to make the real request. If the API sends back the correct headers, the browser sends the true cross-origin request, as shown in figure 29.7.
在某些情况下,在向 API 发送实际请求之前,浏览器会发送预检请求,即使用 OPTIONS 谓词发送的请求,浏览器使用该请求来检查是否允许发出实际请求。如果 API 发回正确的 Headers,则浏览器会发送真正的跨域请求,如图 29.7 所示。
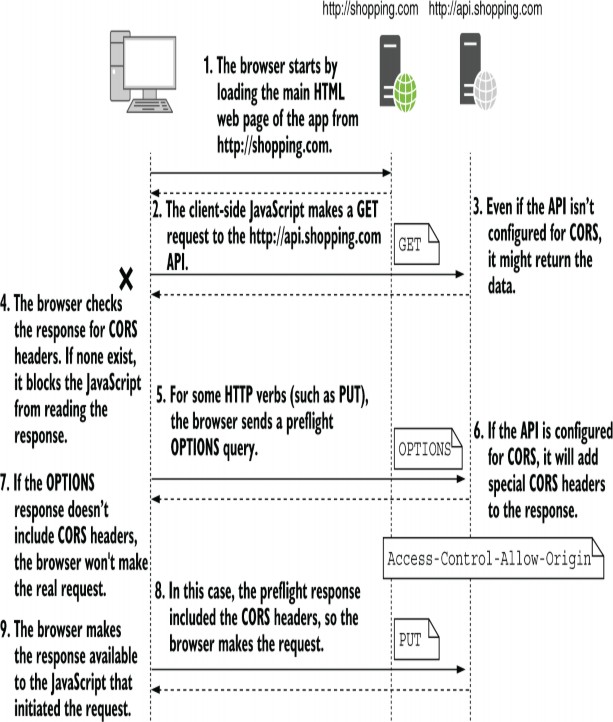
Figure 29.7 Two cross-origin requests. The response to the GET request doesn’t contain any CORS headers, so the browser blocks the app from reading it, even though the response may contain data from the server. The second request requires a preflight OPTIONS request to check whether CORS is enabled. As the response contains CORS headers, the browser makes the real request and provides the response to the JavaScript app.
图 29.7 两个跨域请求。对 GET 请求的响应不包含任何 CORS 标头,因此浏览器会阻止应用程序读取它,即使响应可能包含来自服务器的数据。第二个请求需要预检 OPTIONS 请求来检查是否启用了 CORS。由于响应包含 CORS 标头,因此浏览器会发出真正的请求并向 JavaScript 应用程序提供响应。
TIP For a more detailed discussion of CORS, see CORS in Action, by Monsur Hossain (Manning, 2014), http://mng.bz/aD41.
提示:有关 CORS 的更详细讨论,请参阅 CORS in Action,Monsur Hossain 著(Manning,2014 年),http://mng.bz/aD41。
The CORS specification, which you can find at http://mng.bz/MBBB, is complicated, with a variety of headers, processes, and terminology to contend with. Fortunately, ASP.NET Core handles the details of the specification for you, so your main concern is working out exactly who needs to access your API, and under what circumstances.
CORS 规范(您可以在 http://mng.bz/MBBB 上找到)很复杂,需要处理各种标头、流程和术语。幸运的是,ASP.NET Core 会为您处理规范的细节,因此您主要关心的是准确确定谁需要访问您的 API,以及在什么情况下需要访问您的 API。
29.3.2 Adding a global CORS policy to your whole app
29.3.2 向整个应用程序添加全局 CORS 策略
Typically, you shouldn’t set up CORS for your APIs until you need it. Browsers block cross-origin communication for a reason: it closes an avenue of attack. They’re not being awkward. Wait until you have an API hosted on a different domain to the app that needs to access it.
通常,除非需要,否则不应为 API 设置 CORS。浏览器阻止跨域通信是有原因的:它关闭了攻击途径。他们没有尴尬。等待,直到您将 API 托管在与需要访问它的应用程序不同的域上。
Adding CORS support to your application requires you to do four things:
向应用程序添加 CORS 支持需要您执行以下四项作:
• Add the CORS services to your app.
将 CORS 服务添加到应用程序。
• Configure at least one CORS policy.
至少配置一个 CORS 策略。
• Add the CORS middleware to your middleware pipeline.
将 CORS 中间件添加到您的中间件管道中。
• Set a default CORS policy for your entire app or decorate your endpoints with EnableCors metadata to selectively enable CORS for specific endpoints.
为整个应用程序设置默认 CORS 策略,或使用 EnableCors 元数据装饰终端节点,以选择性地为特定终端节点启用 CORS。
To add the CORS services to your application, call AddCors() on your WebApplicationBuilder instance in Program.cs:
要将 CORS 服务添加到应用程序中,请在 Program.cs 中的 WebApplicationBuilder 实例上调用 AddCors():
builder.Services.AddCors();The bulk of your effort in configuring CORS will go into policy configuration. A CORS policy controls how your application responds to cross-origin requests. It defines which origins are allowed, which headers to return, which HTTP methods to allow, and so on. You normally define your policies inline when you add the CORS services to your application.
配置 CORS 的大部分工作将用于策略配置。CORS 策略控制应用程序如何响应跨域请求。它定义允许哪些源、要返回哪些标头、允许哪些 HTTP 方法等。通常在将 CORS 服务添加到应用程序时,以内联方式定义策略。
Consider the previous e-commerce site example. You want your API that is hosted at http://api.shopping.com to be available from the main app via client-side JavaScript, hosted at http://shopping.com. You therefore need to configure the API to allow cross-origin requests.
考虑前面的电子商务网站示例。您希望托管在 http://api.shopping.com 的 API 可以通过托管在 http://shopping.com 的客户端 JavaScript 从主应用程序访问。因此,您需要配置 API 以允许跨域请求。
NOTE Remember, it’s the app that will get errors when attempting to make cross-origin requests, but it’s the API you’re accessing that you need to add CORS to, not the app making the requests.
注意:请记住,在尝试发出跨域请求时,应用程序会遇到错误,但需要将 CORS 添加到您正在访问的 API 上,而不是发出请求的应用程序。
The following listing shows how to configure a policy called "AllowShoppingApp" to enable cross-origin requests from http://shopping.com to the API. Additionally, we explicitly allow any HTTP verb type; without this call, only simple methods (GET, HEAD, and POST) are allowed. The policies are built up using the familiar fluent builder style you’ve seen throughout this book.
以下清单显示了如何配置一个名为 “AllowShoppingApp” 的策略,以启用从 http://shopping.com 到 API 的跨域请求。此外,我们明确允许任何 HTTP 动词类型;如果没有此调用,则只允许使用简单的方法 (GET、HEAD 和 POST) 。这些策略是使用您在本书中看到的熟悉的 Fluent Builder 风格构建的。
Listing 29.2 Configuring a CORS policy to allow requests from a specific origin
示例 29.2 配置 CORS 策略以允许来自特定源的请求
public void ConfigureServices(IServiceCollection services)
{
services.AddCors(options => { ❶
options.AddPolicy("AllowShoppingApp", policy => ❷
policy.WithOrigins("http://shopping.com") ❸
.AllowAnyMethod()); ❹
});
// other service configuration
}
❶ The AddCors method exposes an Action<CorsOptions> overload.
AddCors 方法公开Action<CorsOptions> 重载。
❷ Every policy has a unique name.
每个策略都有一个唯一的名称。
❸ The WithOrigins method specifies which origins are allowed. Note that the URL has no trailing /.
WithOrigins 方法指定允许的源。请注意,该 URL 没有尾部 /。
❹ Allows all HTTP verbs to call the API
允许所有 HTTP 动词调用 API
WARNING When listing origins in WithOrigins(), ensure that they don’t have a trailing "/"; otherwise, the origin will never match, and your cross-origin requests will fail.
警告:在 WithOrigins() 中列出源时,请确保它们没有尾随的 “/”;否则,源将永远不会匹配,并且您的跨源请求将失败。
Once you’ve defined a CORS policy, you can apply it to your application. In the following listing, you apply the "AllowShoppingApp" policy to the whole application using CorsMiddleware by calling UseCors().
定义 CORS 策略后,您可以将其应用于您的应用程序。在下面的清单中,通过调用 UseCors() 使用 CorsMiddleware 将 “AllowShoppingApp” 策略应用于整个应用程序。
Listing 29.3 Adding the CORS middleware and configuring a default CORS policy
清单 29.3 添加 CORS 中间件并配置默认 CORS 策略
var builder = WebApplication.CreateBuilder(args);
builder.Services.AddCors(options => {
options.AddPolicy("AllowShoppingApp", policy =>
policy.WithOrigins("http://shopping.com")
.AllowAnyMethod());
});
var app = builder.Build();
app.UseRouting();
app.UseCors("AllowShoppingApp"); ❶
app.UseAuthentication();
app.UseAuthorization();
app.MapGet("/api/products", () => new string[] {});
app.Run();
❶ Adds the CORS middleware and uses AllowShoppingApp as the default policy
添加 CORS 中间件并使用 AllowShoppingApp 作为默认策略
NOTE As with all middleware, the order of the CORS middleware is important. You must place the call to UseCors() after UseRouting(). The CORS middleware needs to intercept cross-origin requests to your web API actions so it can generate the correct responses to preflight requests and add the necessary headers. It’s common to place the CORS middleware before a call to UseAuthentication().
注意:与所有中间件一样,CORS 中间件的顺序也很重要。您必须在 UseRouting() 之后调用 UseCors()。CORS 中间件需要拦截对 Web API作的跨域请求,以便它可以生成对预检请求的正确响应并添加必要的标头。通常将 CORS 中间件放在调用 UseAuthentication() 之前。
With the CORS middleware in place for the API, the shopping app can now make cross-origin requests. You can call the API from the http://shopping.com site, and the browser lets the CORS request through, as shown in figure 29.8. If you make the same request from a domain other than http://shopping.com, the request continues to be blocked.
为 API 部署 CORS 中间件后,购物应用程序现在可以发出跨域请求。您可以从 http://shopping.com 站点调用 API,浏览器允许 CORS 请求通过,如图 29.8 所示。如果您从 http://shopping.com 以外的域发出相同的请求,该请求将继续被阻止。
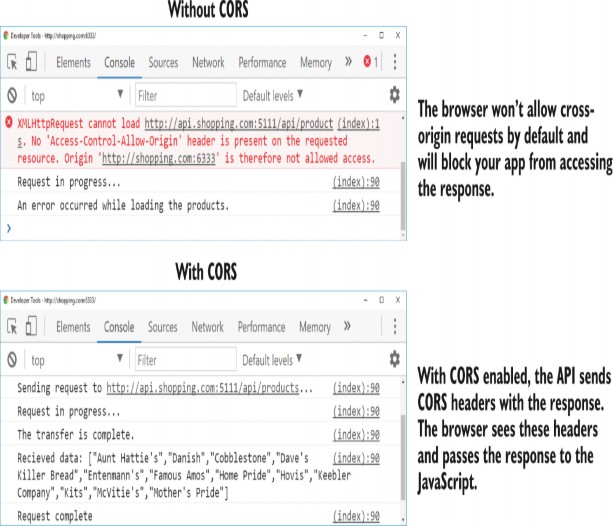
Figure 29.8 With CORS enabled, as in the bottom image, cross-origin requests can be made, and the browser will make the response available to the JavaScript. Compare this to the top image, in which the request was blocked.
图 29.8 启用 CORS 后,如下图所示,可以发出跨域请求,并且浏览器会将响应提供给 JavaScript。将此图像与请求被阻止的顶部图像进行比较。
Applying a CORS policy globally to your application in this way may be overkill. If there’s only a subset of actions in your API that need to be accessed from other origins, it’s prudent to enable CORS only for those specific actions. This can be achieved by adding metadata to your endpoints.
以这种方式将 CORS 策略全局应用于您的应用程序可能有点矫枉过正。如果您的 API 中只有一个作子集需要从其他源访问,则谨慎的做法是仅为这些特定作启用 CORS。这可以通过向终端节点添加元数据来实现。
29.3.3 Adding CORS to specific endpoints with EnableCors metadata
29.3.3 使用 EnableCors 元数据将 CORS 添加到特定端点
Browsers block cross-origin requests by default for good reason: they have the potential to be abused by malicious or compromised sites. Enabling CORS for your entire app may not be worth the risk if you know that only a subset of actions will ever need to be accessed cross-origin.
默认情况下,浏览器会阻止跨域请求,这是有充分理由的:它们有可能被恶意或受感染的网站滥用。如果您知道只需要跨域访问一部分作,那么为整个应用程序启用 CORS 可能不值得冒险。
If that’s the case, it’s best to enable a CORS policy only for those specific endpoints. ASP.NET Core provides the RequireCors() method, which you can apply to your minimal API endpoints or route groups, and the [EnableCors] attribute, which lets you select a policy to apply to a given controller or action method.
如果是这种情况,最好仅为这些特定终端节点启用 CORS 策略。ASP.NET Core 提供了 RequireCors() 方法(可应用于最小 API 终端节点或路由组)和 [EnableCors] 属性(可用于选择要应用于给定控制器或作方法的策略)。
NOTE Both these methods add CORS metadata to the endpoint, which is used by the CorsMiddleware to determine the policy to apply. This is why the CorsMiddleware should be placed after the RoutingMiddleware, so that the CorsMiddleware knows which endpoint was selected and so which CORS policy to apply.
注意:这两种方法都会将 CORS 元数据添加到终端节点,CorsMiddleware 使用该元数据来确定要应用的策略。这就是为什么 CorsMiddleware 应该放在 RoutingMiddleware 之后,这样 CorsMiddleware 就知道选择了哪个端点,以及要应用哪个 CORS 策略。
With the RequireCors() method and [EnableCors] attribute, you can apply different CORS policies to different endpoints. For example, you could allow GET requests access to your entire API from the http://shopping.com domain but allow other HTTP verbs only for a specific endpoint while allowing anyone to access your product list endpoints.
使用 RequireCors() 方法和 [EnableCors] 属性,您可以将不同的 CORS 策略应用于不同的端点。例如,您可以允许 GET 请求从 http://shopping.com 域访问您的整个 API,但仅允许特定终端节点使用其他 HTTP 动词,同时允许任何人访问您的产品列表终端节点。
You define CORS policies in the call to AddCors() by calling AddPolicy() and giving the policy a name, as you saw in listing 29.2. If you’re using endpoint-specific policies, instead of calling UseCors("AllowShoppingApp") as you saw in listing 29.3, you should add the middleware without a default policy by calling UseCors() only.
通过调用 AddPolicy() 并为策略命名,您可以在对 AddCors() 的调用中定义 CORS 策略,如清单 29.2 所示。如果您使用的是特定于端点的策略,而不是像您在清单 29.3 中看到的那样调用 UseCors(“AllowShoppingApp”),您应该仅通过调用 UseCors() 来添加没有默认策略的中间件。
You can then selectively enable CORS for individual endpoints and specifying the policy to apply. To apply CORS to a minimal API endpoint or route group, call RequireCors("AllowShoppingApp"), as shown in the following listing. To apply a policy to a controller or an action method, apply the [EnableCors("AllowShoppingApp"] attribute. You can disable cross-origin access for an endpoint by applying the [DisableCors] attribute.
然后,您可以有选择地为单个终端节点启用 CORS 并指定要应用的策略。要将 CORS 应用于最小 API 终端节点或路由组,请调用 RequireCors(“AllowShoppingApp”),如下面的清单所示。要将策略应用于控制器或作方法,请应用 [EnableCors(“AllowShoppingApp”] 属性。您可以通过应用 [DisableCors] 属性来禁用终端节点的跨域访问。
Listing 29.4 Applying a CORS policy to minimal API endpoints
清单 29.4 将 CORS 策略应用于最小的 API 端点
WebApplicationBuilder builder = WebApplication.CreateBuilder(args);
builder.Services.AddCors(options => { /* Config not shown*/});
var app = builder.Build();
app.UseCors(); ❶
app.MapGet("/api/products", () => new string[] {})
.RequireCors("AllowShoppingApp"); ❷
app.MapGet("/api/products",
[EnableCors("AllowShoppingApp")] () => new { }); ❸
app.MapGroup("/api/categories")
.RequireCors("AllowAnyOrigin"); ❹
app.MapDelete("/api/products",
[DisableCors] () => Results.NoContent()); ❺
app.Run();
❶ Adds the CorsMiddleware without configuring a default policy
添加 CorsMiddleware 而不配置默认策略
❷ Applies the AllowShoppingApp CORS policy to the endpoint
将 AllowShoppingApp CORS 策略应用于终端节点
❸ You can apply attributes to the lamba or handler method, as well as to MVC action methods.
您可以将属性应用于 lamba 或处理程序方法,以及 MVC动作方法。
❹ You can apply CORS policies to whole route groups.
您可以将 CORS 策略应用于整个路由组。
❺ The DisableCors attribute disables CORS for the endpoint completely.
DisableCors 属性完全禁用终端节点的 CORS。
If you define a default policy but then also call RequireCors() or add an [EnableCors] attribute, then both policies are applied. This can get confusing, so I recommend not applying a default CORS policy in the middleware and specifying the policy at the route group or endpoint level. Alternatively, if you do want to apply a policy to your whole app, avoid applying individual policies to endpoints as well.
如果定义了默认策略,但随后还调用 RequireCors() 或添加 [EnableCors] 属性,则会应用这两个策略。这可能会造成混淆,因此我建议不要在中间件中应用默认 CORS 策略,而是在路由组或终端节点级别指定策略。或者,如果您确实希望将策略应用于整个应用程序,请避免将单个策略也应用于终端节点。
Whether you choose to use a single default CORS policy or multiple policies, you need to configure the CORS policies for your application in the call to AddCors. Many options are available when configuring CORS. In the next section I provide an overview of the possibilities.
无论您选择使用单个默认 CORS 策略还是多个策略,都需要在对 AddCors 的调用中为应用程序配置 CORS 策略。配置 CORS 时,有许多选项可用。在下一节中,我将概述各种可能性。
29.3.4 Configuring CORS policies
29.3.4 配置 CORS 策略
Browsers implement the cross-origin policy for security reasons, so you should carefully consider the implications of relaxing any of the restrictions they impose. Even if you enable cross-origin requests, you can still control what data cross-origin requests can send and what your API returns. For example, you can configure
浏览器出于安全原因实施跨域策略,因此您应该仔细考虑放宽它们施加的任何限制的影响。即使您启用了跨域请求,您仍然可以控制跨域请求可以发送的数据以及 API 返回的数据。例如,您可以配置
• The origins that may make a cross-origin request to your API
可能向您的 API 发出跨源请求的源
• The HTTP verbs (such as GET, POST, and DELETE) that can be used
可以使用的 HTTP 动词 (如 GET、POST 和 DELETE)
• The headers the browser can send
浏览器可以发送的标头
• The headers the browser can read from your app’s response
浏览器可以从应用的响应中读取的标头
• Whether the browser will send authentication credentials with the request
浏览器是否会随请求发送身份验证凭证
You define all these options when creating a CORS policy in your call to AddCors() using the CorsPolicyBuilder, as you saw in listing 29.2. A policy can set all or none of these options, so you can customize the results to your heart’s content. Table 29.1 shows some of the options available and their effects.
使用 CorsPolicyBuilder 在调用 AddCors() 中创建 CORS 策略时,您可以定义所有这些选项,如清单 29.2 所示。策略可以设置所有这些选项,也可以不设置这些选项,因此您可以根据自己的喜好自定义结果。Table 29.1 显示了一些可用的选项及其效果。
Table 29.1 The methods available for configuring a CORS policy and their effect on the policy
表 29.1 可用于配置 CORS 策略的方法及其对策略的影响
| CorsPolicyBuilder method example | Result |
|---|---|
| WithOrigins("http://shopping.com") | Allows cross-origin requests from http:/ /shopping.com 允许来自 http:/ /shopping.com 的跨域请求 |
| AllowAnyOrigin() | Allows cross-origin requests from any origin. This means any website can make JavaScript requests to your API. 允许来自任何源的跨域请求。这意味着任何网站都可以向您的 API 发出 JavaScript 请求。 |
| WithMethods()/AllowAnyMethod() | Sets the allowed methods (such as GET, POST, and DELETE) that can be made to your API 设置允许对 API 进行的方法(例如 GET、POST 和 DELETE) |
| WithHeaders()/AllowAnyHeader() | Sets the headers that the browser may send to your API. If you restrict the headers, you must include at least Accept, Content-Type, and Origin to allow valid requests. 设置浏览器可以发送到 API 的标头。如果您限制标头,则必须至少包含 Accept、Content-Type 和 Origin 才能允许有效请求。 |
| WithExposedHeaders() | Allows your API to send extra headers to the browser. By default, only the Cache-Control, Content-Language,Content-Type, Expires, Last-Modified,and Pragma headers are sent in the response. 允许 API 向浏览器发送额外的标头。默认情况下,响应中仅发送 Cache-Control、Content-Language、Content-Type、Expires、Last-Modified 和 Pragma 标头。 |
| AllowCredentials() | By default, the browser won’t send authentication details with cross- origin requests unless you explicitly allow it. You must also enable sending credentials client-side in JavaScript when making the request. 默认情况下,除非您明确允许,否则浏览器不会通过跨域请求发送身份验证详细信息。发出请求时,您还必须在 JavaScript 中启用客户端发送凭证。 |
One of the first problems in setting up CORS is realizing you have a cross-origin problem at all. Several times I’ve been stumped trying to figure out why a request won’t work, until I realize the request is going cross-domain or from HTTP to HTTPS, for example.
设置 CORS 的首要问题之一是意识到您根本存在跨域问题。有好几次,我试图弄清楚为什么一个请求不起作用,直到我意识到请求是跨域的,或者从 HTTP 到 HTTPS,例如。
Whenever possible, I recommend avoiding cross-origin requests. You can end up with subtle differences in the way browsers handle them, which can cause more headaches. In particular, avoid HTTP to HTTPS cross-domain problems by running all your applications behind HTTPS. As discussed in chapter 28, that’s a best practice anyway, and it’ll help prevent a whole class of CORS headaches.
我建议尽可能避免跨源请求。您最终可能会在浏览器处理它们的方式上产生细微的差异,这可能会导致更多麻烦。特别是,通过在 HTTPS 后面运行所有应用程序来避免 HTTP 到 HTTPS 的跨域问题。正如第 28 章所讨论的,无论如何,这都是最佳实践,它将有助于防止一整类 CORS 头痛。
TIP Another (often preferable) option is to configure CORS policies in your reverse proxy or application gateway. You can configure Azure App Service with allowed origins, for example, so that you don’t need to modify your application code.
提示:另一个(通常更可取的)选项是在反向代理或应用程序网关中配置 CORS 策略。例如,可以使用允许的源配置 Azure 应用服务,这样就无需修改应用程序代码。
Once I’ve established that I definitely need a CORS policy, I typically start with the WithOrigins() method. Then I expand or restrict the policy further, as need be, to provide cross-origin lockdown of my API while still allowing the required functionality. CORS can be tricky to work around, but remember, the restrictions are there for your safety.
一旦我确定我肯定需要一个 CORS 策略,我通常从 WithOrigins() 方法开始。然后,我根据需要进一步扩展或限制策略,以提供 API 的跨域锁定,同时仍然允许所需的功能。CORS 可能很难解决,但请记住,这些限制是为了您的安全。
Cross-origin requests are only one of many potential avenues attackers could use to compromise your app. Many of these are trivial to defend against, but you need to be aware of them and know how to mitigate them. In the next section we’ll look at common threats and how to avoid them.
跨域请求只是攻击者可能用来破坏您的应用的众多潜在途径之一。其中许多是微不足道的防御,但您需要了解它们并知道如何减轻它们。在下一节中,我们将介绍常见的威胁以及如何避免它们。
29.4 Exploring other attack vectors
29.4 探索其他攻击媒介
So far in this chapter, I’ve described two potential ways attackers can compromise your apps—XSS and CSRF attacks and how to prevent them. Both of these vulnerabilities regularly appear in the OWASP top ten list of most critical web app risks, so it’s important to be aware of them and to avoid introducing them into your apps.
到目前为止,在本章中,我已经介绍了攻击者破坏您的应用程序的两种潜在方式 — XSS 和 CSRF 攻击以及如何预防它们。这两个漏洞经常出现在 OWASP 十大最关键的 Web 应用程序风险列表中,因此了解它们并避免将它们引入您的应用程序非常重要。
TIP OWASP publishes the list online, with descriptions of each attack and how to prevent those attacks. There’s a cheat sheet for staying safe here: https://cheatsheetseries.owasp.org.
提示:OWASP 在线发布该列表,其中包含每种攻击的描述以及如何防止这些攻击。这里有一张保持安全的备忘单:https://cheatsheetseries.owasp.org。
In this section I’ll provide an overview of some of the other most common vulnerabilities and how to avoid them in your apps.
在本节中,我将概述其他一些最常见的漏洞,以及如何在您的应用程序中避免它们。
29.4.1 Detecting and avoiding open redirect attacks
29.4.1 检测和避免开放重定向攻击
A common OWASP vulnerability is due to open redirect attacks. An open redirect attack occurs when a user clicks a link to an otherwise-safe app and ends up being redirected to a malicious website, such as one that serves malware. The safe app contains no direct links to the malicious website, so how does this happen?
一个常见的 OWASP 漏洞是由于开放重定向攻击造成的。当用户点击指向其他安全应用程序的链接并最终被重定向到恶意网站(例如提供恶意软件的网站)时,就会发生开放重定向攻击。安全应用程序不包含指向恶意网站的直接链接,那么这是怎么发生的呢?
Open redirect attacks occur where the next page is passed as a parameter to an endpoint. The most common example is when you’re logging in to an app. Typically, apps remember the page a user is on before redirecting them to a login page by passing the current page as a returnUrl query string parameter. After the user logs in, the app redirects the user to the returnUrl to carry on where they left off.
当下一页作为参数传递给终端节点时,会发生开放重定向攻击。最常见的示例是当您登录应用程序时。通常,应用程序会记住用户所在的页面,然后通过将当前页面作为 returnUrl 查询字符串参数传递,将用户重定向到登录页面。用户登录后,应用程序会将用户重定向到 returnUrl 以从他们离开的位置继续。
Imagine a user is browsing an e-commerce site. They click Buy for a product and are redirected to the login page. The product page they were on is passed as the returnUrl, so after they log in, they’re redirected to the product page instead of being dumped back to the home screen.
假设用户正在浏览一个电子商务网站。他们单击产品的 Buy (购买) 并被重定向到登录页面。他们所在的产品页面作为 returnUrl 传递,因此在他们登录后,他们会被重定向到产品页面,而不是被转储回主屏幕。
An open redirect attack takes advantage of this common pattern, as shown in figure 29.9. A malicious attacker creates a login URL where the returnUrl is set to the website they want to send the user to and convinces the user to click the link to your web app. After the user logs in, a vulnerable app redirects the user to the malicious site.
开放重定向攻击利用了这种常见模式,如图 29.9 所示。恶意攻击者创建一个登录 URL,其中 returnUrl 设置为他们要将用户发送到的网站,并说服用户单击指向您的 Web 应用程序的链接。用户登录后,易受攻击的应用程序会将用户重定向到恶意站点。
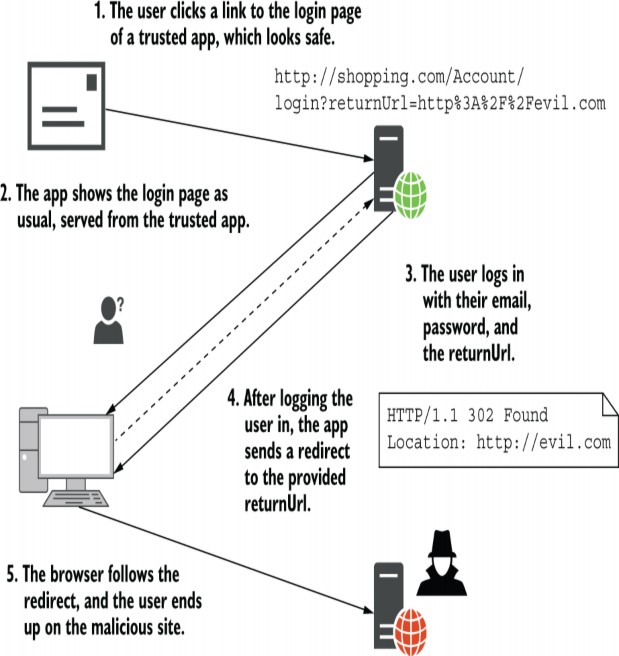
Figure 29.9 An open redirect makes use of the common return URL pattern. This is typically used for login pages but may be used in other areas of your app too. If your app doesn’t verify that the URL is safe before redirecting the user, it could redirect users to malicious sites.
图 29.9 开放重定向使用常见的返回 URL 模式。这通常用于登录页面,但也可能用于应用程序的其他区域。如果您的应用程序在重定向用户之前未验证 URL 是否安全,则可能会将用户重定向到恶意网站。
The simple solution to this attack is to always validate that the returnUrl is a local URL that belongs to your app before redirecting users to it. The default Identity UI does this already, so you shouldn’t have to worry about the login page if you’re using Identity, as described in chapter 23.
这种攻击的简单解决方案是在将用户重定向到 returnUrl 之前,始终验证 returnUrl 是否是属于您的应用程序的本地 URL。默认的 Identity UI 已经这样做了,因此如果您使用的是 Identity,则不必担心登录页面,如第 23 章所述。
If you have redirects in other parts of your app, ASP.NET Core provides a couple of helper methods for staying safe, the most useful of which is Url.IsLocalUrl(). Listing 29.5 shows how you could verify that a provided return URL is safe and, if not, redirect to the app’s home page.
如果您在应用程序的其他部分有重定向,ASP.NET Core 提供了几个帮助程序方法来保持安全,其中最有用的是 Url.IsLocalUrl()。清单 29.5 显示了如何验证提供的返回 URL 是否安全,如果不是,则重定向到应用程序的主页。
You can also use the LocalRedirect() helper method on the ControllerBase and Razor Page PageModel classes, which throw an exception if the provided URL isn’t local.
还可以在 ControllerBase 和 Razor Page PageModel 类上使用 LocalRedirect() 帮助程序方法,如果提供的 URL 不是本地的,则会引发异常。
Listing 29.5 Detecting open redirect attacks by checking for local return URLs
清单 29.5 通过检查本地返回 URL 来检测开放重定向攻击
[HttpPost]
public async Task<IActionResult> Login(
LoginViewModel model, string returnUrl = null) ❶
{
// Verify password, and sign user in
if (Url.IsLocalUrl(returnUrl)) ❷
{
return Redirect(returnUrl); ❸
}
else
{
return RedirectToPage("Index"); ❹
}
}
❶ The return URL is provided as an argument to the action method.
返回 URL 作为作方法的参数提供。
❷ Returns true if the return URL starts with / or ~/
如果返回 URL 以 / 或 ~/开头,则返回 true
❸ The URL is local, so it’s safe to redirect to it.
该 URL 是本地的,因此可以安全地重定向到它。
❹ The URL was not local and could be an open redirect attack, so redirect to the homepage for safety.
该 URL 不是本地的,可能是公开重定向攻击,因此为了安全起见,请重定向到主页。
This simple pattern protects against open redirect attacks that could otherwise expose your users to malicious content. Whenever you’re redirecting to a URL that comes from a query string or other user input, you should use this pattern.
这种简单的模式可以防止开放重定向攻击,否则可能会使您的用户接触到恶意内容。每当重定向到来自查询字符串或其他用户输入的 URL 时,都应使用此模式。
TIP In some authentication flows, such as when authenticating with OpenID Connect, you can’t redirect to a local URL, so you can’t use this pattern. Instead, OpenID Connect requires that you preregister the allowed redirect URLs and redirect only to a registered URL. You should consider using this pattern when you can’t enforce a local- only redirect.
提示:在某些身份验证流中,例如使用 OpenID Connect 进行身份验证时,您无法重定向到本地 URL,因此不能使用此模式。相反,OpenID Connect 要求您预先注册允许的重定向 URL,并且仅重定向到已注册的 URL。当您无法强制执行仅限本地的重定向时,您应该考虑使用此模式。
Open redirect attacks present a risk to your users rather than to your app directly. The next vulnerability represents a critical vulnerability in your app itself.
开放重定向攻击会给您的用户带来风险,而不是直接给您的应用程序带来风险。下一个漏洞表示应用程序本身的严重漏洞。
29.4.2 Avoiding SQL injection attacks with EF Core and parameterization
29.4.2 使用 EF Core 和参数化避免 SQL 注入攻击
SQL injection attacks represent one of the most dangerous threats to your application. Attackers craft simple malicious input, which they send to your application as traditional form-based input or by customizing URLs and query strings to execute arbitrary code against your database. An SQL injection vulnerability could expose your entire database to attackers, so it’s critical that you spot and remove any such vulnerabilities in your apps.
SQL 注入攻击是应用程序面临的最危险的威胁之一。攻击者制作简单的恶意输入,这些输入作为传统的基于表单的输入发送到您的应用程序,或者通过自定义 URL 和查询字符串来针对您的数据库执行任意代码。SQL 注入漏洞可能会将您的整个数据库暴露给攻击者,因此发现并删除应用程序中的任何此类漏洞至关重要。
I hope I’ve scared you a little with that introduction, so now for the good news: if you’re using Entity Framework Core (EF Core) or pretty much any other object-relational mapper (ORM) in a standard way, you should be safe. EF Core has built-in protections against SQL injection, so as long as you’re not doing anything funky, you should be fine.
我希望我的介绍让您有点害怕,所以现在好消息是:如果您以标准方式使用 Entity Framework Core (EF Core) 或几乎任何其他对象关系映射器 (ORM),您应该是安全的。EF Core 具有针对 SQL 注入的内置保护功能,因此只要您不做任何时髦的事情,应该没问题。
SQL injection vulnerabilities occur when you build SQL statements yourself and include dynamic input that an attacker provides, even indirectly. EF Core provides the ability to create raw SQL queries using the FromSqlRaw() method, so you must be careful when using this method.
当您自己构建 SQL 语句并包含攻击者提供的动态输入(甚至是间接提供的)时,就会出现 SQL 注入漏洞。EF Core 提供了使用 FromSqlRaw() 方法创建原始 SQL 查询的功能,因此在使用此方法时必须小心。
Imagine your recipe app has a search form that lets you search for a recipe by name. If you write the query using LINQ extension methods (as discussed in chapter 12), you would have no risk of SQL injection attacks. However, if you decide to write your SQL query by hand, you open yourself to such a vulnerability, as shown in the following listing.
假设您的食谱应用程序有一个搜索表单,可让您按名称搜索食谱。如果使用 LINQ 扩展方法编写查询(如第 12 章所述),则不会有 SQL 注入攻击的风险。但是,如果您决定手动编写 SQL 查询,则可能会面临此类漏洞,如下面的清单所示。
Listing 29.6 An SQL injection vulnerability in EF Core due to string concatenation
列表 29.6 由于字符串串联而导致的 EF Core 中的 SQL 注入漏洞
public IList<User> FindRecipe(string search) ❶
{
return _context.Recipes ❷
.FromSqlRaw("SELECT * FROM Recipes" + ❸
"WHERE Name = '" + search + "'") ❹
.ToList();
}
❶ The search parameter comes from user input, so it’s unsafe.
search 参数来自用户输入,因此不安全。
❷ The current EF Core DbContext is held in the _context field.
当前 EF Core DbContext 保存在 _context 字段中。
❸ You can write queries by hand using the FromSqlRaw extension method.
您可以使用 FromSqlRaw 扩展方法手动编写查询。
❹ This introduces the vulnerability—including unsafe content directly in an SQL string.
这会引入漏洞 — 直接在 SQL字符串中包含不安全的内容。
In this listing, the user input held in search is included directly in the SQL query. By crafting malicious input, users can potentially perform any operation on your database.
在此清单中,搜索中保存的用户输入直接包含在 SQL 查询中。通过精心设计恶意输入,用户可能会对您的数据库执行任何作。
Imagine an attacker searches your website using the text
想象一下,攻击者使用文本
'; DROP TABLE Recipes; --Your app assigns this to the search parameter, and the SQL query executed against your database becomes
您的应用程序将此参数分配给 search 参数,并且针对您的数据库执行的 SQL 查询将变为
SELECT * FROM Recipes WHERE Name = ''; DROP TABLE Recipes; --'Simply by entering text into the search form of your app, the attacker has deleted the entire Recipes table from your app! That’s catastrophic, but an SQL injection vulnerability provides more or less unfettered access to your database.Even if you’ve set up database permissions correctly to prevent this sort of destructive action, attackers will likely be able to read all the data from your database, including your users’ details.
只需在应用的搜索表单中输入文本,攻击者就从您的应用中删除了整个 Recipes 表!这是灾难性的,但 SQL 注入漏洞或多或少提供了对数据库的不受限制的访问。即使您已正确设置数据库权限以防止此类破坏性作,攻击者也可能能够从您的数据库读取所有数据,包括您的用户的详细信息。
The simple way to prevent this from happening is to avoid creating SQL queries by hand this way. If you do need to write your own SQL queries, don’t use string concatenation, as in listing 29.6. Instead, use parameterized queries, in which the (potentially unsafe) input data is separate from the query itself, as shown here.
防止这种情况发生的简单方法是避免以这种方式手动创建 SQL 查询。如果你确实需要编写自己的 SQL 查询,请不要使用字符串连接,如清单 29.6 所示。相反,请使用参数化查询,其中(可能不安全的)输入数据与查询本身是分开的,如下所示。
Listing 29.7 Avoiding SQL injection by using parameterization
示例 29.7 使用参数化避免 SQL 注入
public IList<User> FindRecipe(string search)
{
return _context.Recipes
.FromSqlRaw( "SELECT * FROM Recipes WHERE Name = '{0}'", ❶
search) ❷
.ToList();
}
❶ The SQL query uses a placeholder {0} for the parameter.
SQL 查询使用参数的占位符{0}。
❷ The dangerous input is passed as a parameter, separate from the query.
危险输入作为参数传递,与查询分开。
Parameterized queries are not vulnerable to SQL injection attacks, so the attack presented earlier won’t work. If you use EF Core or other ORMs to access data using standard LINQ queries, you won’t be vulnerable to injection attacks. EF Core automatically creates all SQL queries using parameterized queries to protect you. Even if you’re using the low-level ADO.NET database APIs, stick to parameterized queries!
参数化查询不易受到 SQL 注入攻击,因此前面介绍的攻击不起作用。如果使用 EF Core 或其他 ORM 通过标准 LINQ 查询访问数据,则不会容易受到注入攻击。EF Core 使用参数化查询自动创建所有 SQL 查询以保护你。即使您使用的是低级 ADO.NET 数据库 API,也请坚持使用参数化查询!
NOTE I’ve talked about SQL injection attacks only in terms of a relational database, but this vulnerability can appear in NoSQL and document databases too. Always use parameterized queries or the equivalent, and don’t craft queries by concatenating strings with user input.
注意:我仅从关系数据库的角度讨论了 SQL 注入攻击,但此漏洞也可能出现在 NoSQL 和文档数据库中。始终使用参数化查询或等效查询,并且不要通过将字符串与用户输入连接起来来创建查询。
Injection attacks have been the number-one vulnerability on the web for more than a decade, so it’s crucial to be aware of them and how they arise. Whenever you need to write raw SQL queries, make sure that you always use parameterized queries.
十多年来,注入攻击一直是 Web 上的头号漏洞,因此了解它们及其出现方式至关重要。每当需要编写原始 SQL 查询时,请确保始终使用参数化查询。
The next vulnerability is also related to attackers accessing data they shouldn’t be able to. It’s a little subtler than a direct injection attack but is trivial to perform; the only skill the attacker needs is the ability to count.
下一个漏洞还与攻击者访问他们不应该访问的数据有关。它比直接注入攻击更微妙一些,但执行起来很简单;攻击者唯一需要的技能是计数能力。
29.4.3 Preventing insecure direct object references
29.4.3 防止不安全的直接对象引用
Insecure direct object reference is a bit of a mouthful, but it means users accessing things they shouldn’t by noticing patterns in URLs. Let’s revisit our old friend the recipe app. As a reminder, the app shows you a list of recipes. You can view any of them, but you can edit only recipes you created yourself. When you view someone else’s recipe, there’s no Edit button visible.
不安全的直接对象引用有点拗口,但这意味着用户通过注意到 URL 中的模式来访问他们不应该访问的内容。让我们重温一下我们的老朋友食谱应用程序。提醒一下,该应用程序会向您显示食谱列表。您可以查看其中任何一个,但只能编辑您自己创建的配方。当您查看其他人的配方时,没有可见的 Edit (编辑) 按钮。
A user clicks the Edit button on one of their recipes and notices that the URL is /Recipes/Edit/120. That 120 is a dead giveaway as being the underlying database ID of the entity you’re editing. A simple attack would be to change that ID to gain access to a different entity, one that you wouldn’t normally have access to. The user could try entering /Recipes/Edit/121. If that lets them edit or view a recipe that they shouldn’t be able to, you have an insecure direct object reference vulnerability.
用户单击其中一个配方上的 Edit (编辑) 按钮,并注意到 URL 为 /Recipes/Edit/120。这 120 是一个死的赠品,因为这是您正在编辑的实体的基础数据库 ID。一个简单的攻击是更改该 ID 以获得对不同实体的访问权限,该实体通常无权访问。用户可以尝试输入 /Recipes/Edit/121。如果这允许他们编辑或查看他们不应该能够编辑或查看的配方,则您存在不安全的直接对象引用漏洞。
The solution to this problem is simple: you should have resource-based authorization in your endpoint handlers. If a user attempts to access an entity they’re not allowed to access, they should get a permission-denied error. They shouldn’t be able to bypass your authorization by typing a URL directly into the search bar of their browser.
此问题的解决方案很简单:您应该在终端节点处理程序中具有基于资源的授权。如果用户尝试访问不允许他们访问的实体,他们应该会收到 permission-denied 错误。他们不应该能够通过在浏览器的搜索栏中直接输入 URL 来绕过您的授权。
In ASP.NET Core apps, this vulnerability typically arises when you attempt to restrict users by hiding elements from your UI, such as by hiding the Edit button. Instead, you should use resource-based authorization, as discussed in chapter 24.
在 ASP.NET Core 应用程序中,当您尝试通过隐藏 UI 中的元素(例如隐藏 Edit 按钮)来限制用户时,通常会出现此漏洞。相反,您应该使用基于资源的授权,如 Chapter 24 中所述。
WARNING You must always use resource-based authorization to restrict which entities a user can access. Hiding or disabling UI elements provides an improved user experience, but it isn’t a security measure.
警告您必须始终使用基于资源的授权来限制用户可以访问的实体。隐藏或禁用 UI 元素可以提供更好的用户体验,但这不是一项安全措施。
You can sidestep this vulnerability somewhat by avoiding integer IDs for your entities in the URLs, perhaps by using a pseudorandom globally unique identifier (GUID) such as C2E296BA-7EA8-4195-9CA7-C323304CCD12 instead.
您可以通过避免在 URL 中使用实体的整数 ID 来稍微回避此漏洞,也许可以改用伪随机全局唯一标识符 (GUID),例如 C2E296BA-7EA8-4195-9CA7-C323304CCD12。
This makes the process of guessing other entities harder, as you can’t simply add 1 to an existing number, but it’s masking the problem rather than fixing it. Nevertheless, using GUIDs can be useful when you want to have publicly accessible pages that don’t require authentication but don’t want their IDs to be easily discoverable.
这使得猜测其他实体的过程更加困难,因为你不能简单地将 1 添加到现有数字上,但它掩盖了问题,而不是解决问题。不过,当您希望拥有不需要身份验证但又不希望其 ID 易于发现的可公开访问页面时,使用 GUID 可能很有用。
The final section in this chapter doesn’t deal with a single vulnerability. Instead, I discuss a separate but related problem: protecting your users’ data.
本章的最后一节不涉及单个漏洞。相反,我讨论了一个单独但相关的问题:保护用户的数据。
29.4.4 Protecting your users’ passwords and data
29.4.4 保护用户的口令和数据
For many apps, the most sensitive data you’ll be storing is the personal data of your users. This could include emails, passwords, address details, or payment information. You should be careful when storing any of this data. As well as presenting an inviting target for attackers, you may have legal obligations for how you handle it, such as data protection laws and Payment Card Industry (PCI) compliance requirements.
对于许多应用程序,您将存储的最敏感数据是用户的个人数据。这可能包括电子邮件、密码、地址详细信息或付款信息。在存储任何此类数据时,您应该小心。除了为攻击者提供诱人的目标外,您可能还对如何处理它负有法律义务,例如数据保护法和支付卡行业 (PCI) 合规性要求。
The easiest way to protect yourself is to not store data you don’t need. If you don’t need your user’s address, don’t ask for it. That way, you can’t lose it! Similarly, if you use a third- party identity service to store user details, as described in chapter 23, you won’t have to work as hard to protect your users’ personal information.
保护自己的最简单方法是不存储您不需要的数据。如果您不需要用户的地址,请不要询问。这样,你就不会丢失它!同样,如果您使用第三方身份服务来存储用户详细信息,如第 23 章所述,则不必费力地保护用户的个人信息。
If you store user details in your own app or build your own identity provider, then you need to make sure to follow best practices when handling user information. The new project templates that use ASP.NET Core Identity follow most of these practices by default, so I highly recommend you start from one of these. You need to consider many aspects, too many to go into detail here,1 but they include the following:
如果您将用户详细信息存储在自己的应用程序中或构建自己的身份提供商,则需要确保在处理用户信息时遵循最佳实践。默认情况下,使用 ASP.NET Core Identity 的新项目模板遵循其中的大部分做法,因此我强烈建议您从其中一种做法开始。您需要考虑许多方面,太多了,无法在这里详细介绍,1但它们包括以下内容:
• Never store user passwords anywhere directly. You should store only cryptographic hashes computed using an expensive hashing algorithm, such as BCrypt or PBKDF2.
切勿将用户密码直接存储在任何位置。您应该只存储使用昂贵的哈希算法(如 BCrypt 或 PBKDF2)计算的加密哈希。
• Don’t store more data than you need. You should never store credit card details.
不要存储超出您需要的数据。您永远不应该存储信用卡详细信息。
• Allow users to use multifactor authentication (MFA) to sign in to your site.
允许用户使用多重身份验证 (MFA) 登录您的网站。
• Prevent users from using passwords that are known to be weak or compromised, such as disallowing dictionary words, sequential characters, and so on.
防止用户使用已知较弱或已泄露的密码,例如不允许使用字典单词、连续字符等。
• Mark authentication cookies as http (so that they can’t be read using JavaScript) and secure so they’ll be sent only over an HTTPS connection, never over HTTP. Where possible, you should also mark your cookies as SameSite=strict. See the documentation for details: http://mng.bz/a11m.
将身份验证 Cookie 标记为 http(这样就无法使用 JavaScript 读取它们)和安全,这样它们将仅通过 HTTPS 连接发送,而不是通过 HTTP。在可能的情况下,还应将 Cookie 标记为 SameSite=strict。有关详细信息,请参阅文档:http://mng.bz/a11m。
• Don’t expose whether a user is already registered with your app. Leaking this information can expose you to enumeration attacks.
不要暴露用户是否已在您的应用程序中注册。泄露此信息可能会使您面临枚举攻击。
TIP You can learn more about website enumeration in this video tutorial by Troy Hunt: http://mng.bz/PAAA.
提示:您可以在 Troy Hunt 提供的此视频教程中了解有关网站枚举的更多信息:http://mng.bz/PAAA。
These guidelines represent the minimum you should be doing to protect your users. The most important thing is to be aware of potential security problems as you’re building your app. Trying to bolt on security at the end is always harder than thinking about it from the start, so it’s best to think about it earlier rather than later.
这些准则代表了为保护用户而应采取的最低限度作。最重要的是在构建应用程序时了解潜在的安全问题。试图在最后加强安全性总是比从一开始就考虑它更难,因此最好尽早考虑而不是晚点考虑。
This chapter has been a whistle-stop tour of things to look out for. We’ve touched on most of the big names in security vulnerabilities, but I strongly encourage you to check out the other resources mentioned in this chapter. They provide a more exhaustive list of things to consider, complementing the defenses mentioned in this chapter. On top of that, don’t forget about input validation and mass assignment/overposting, as discussed in chapter 16. ASP.NET Core includes basic protections against some of the most common attacks, but you can still shoot yourself in the foot. Make sure it’s not your app making headlines for being breached!
本章是对需要注意的事项的简要介绍。我们已经触及了安全漏洞中的大多数知名专家,但我强烈建议您查看本章中提到的其他资源。它们提供了更详尽的需要考虑的事项列表,以补充本章中提到的防御措施。最重要的是,不要忘记 input validation 和 mass assignment / overposting,如 Chapter 16 所述。ASP.NET Core 包括针对一些最常见攻击的基本保护,但您仍然可以搬起石头砸自己的脚。确保不是您的应用因被泄露而成为头条新闻!
29.5 Summary
29.5 总结
XSS attacks involve malicious users injecting content into your app, typically to run malicious JavaScript when users browse your app. You can prevent XSS injection attacks by always encoding unsafe input before writing it to a page. Razor Pages do this automatically unless you use the @Html.Raw() method, so use it sparingly and carefully.
XSS 攻击涉及恶意用户将内容注入您的应用程序,通常是在用户浏览您的应用程序时运行恶意 JavaScript。您可以通过在将不安全的输入写入页面之前始终对其进行编码来防止 XSS 注入攻击。除非您使用 @Html.Raw() 方法,否则 Razor Pages 会自动执行此作,因此请谨慎使用。
CSRF attacks are a problem for apps that use cookie-based authentication, such as ASP.NET Core Identity. These attacks rely on the fact that browsers automatically send cookies to a website. A malicious website could create a form that POSTs to your site, and the browser will send the authentication cookie with the request. This allows malicious websites to send requests as though they’re the logged-in user.
CSRF 攻击对于使用基于 Cookie 的身份验证(例如 ASP.NET Core Identity)的应用程序来说是一个问题。这些攻击依赖于浏览器自动向网站发送 cookie 的事实。恶意网站可能会创建一个表单,该表单将 POST 到您的网站,并且浏览器会将身份验证 Cookie 与请求一起发送。这允许恶意网站像登录用户一样发送请求。
You can mitigate CSRF attacks using antiforgery tokens, which involve writing a hidden field in every form that contains a random string based on the current user. A similar token is stored in a cookie. A legitimate request will have both parts, but a forged request from a malicious website will have only the cookie half; it cannot re-create the hidden field in the form. By validating these tokens, your API can reject forged requests.
您可以使用防伪令牌缓解 CSRF 攻击,这涉及以每种形式编写一个隐藏字段,其中包含基于当前用户的随机字符串。类似的令牌存储在 Cookie 中。合法请求将包含两个部分,但来自恶意网站的伪造请求将只有 cookie 的一半;它无法在表单中重新创建隐藏字段。通过验证这些令牌,您的 API 可以拒绝伪造的请求。
The Razor Pages framework automatically adds antiforgery tokens to any forms you create using Razor and validates the tokens for inbound requests. You can disable the validation check if necessary, using the [IgnoreAntiForgeryToken] attribute.
Razor Pages 框架会自动将防伪令牌添加到您使用 Razor 创建的任何表单中,并验证入站请求的令牌。如有必要,您可以使用 [IgnoreAntiForgeryToken] 属性禁用验证检查。
Browsers won’t allow websites to make JavaScript AJAX requests from one app to others at different origins. To match the origin, the app must have the same scheme, domain, and port. If you wish to make cross-origin requests like this, you must enable CORS in your API.
浏览器不允许网站从一个应用程序向不同来源的其他应用程序发出 JavaScript AJAX 请求。要匹配源,应用程序必须具有相同的 scheme、domain 和 port。如果您希望发出这样的跨域请求,则必须在 API 中启用 CORS。
CORS uses HTTP headers to communicate with browsers and defines which origins can call your API. In ASP.NET Core, you can define multiple policies, which can be applied globally to your whole app or to specific controllers and actions.
CORS 使用 HTTP 标头与浏览器通信,并定义哪些源可以调用您的 API。在 ASP.NET Core 中,您可以定义多个策略,这些策略可以全局应用于整个应用程序或特定控制器和作。
You can add the CORS middleware by calling UseCors() on WebApplication and optionally providing the name of the default CORS policy to apply. You can also apply CORS to endpoints by calling RequireCors() or adding the [EnableCors] attribute and providing the name of the policy to apply.
您可以通过在 WebApplication 上调用 UseCors() 并选择性地提供要应用的默认 CORS 策略的名称来添加 CORS 中间件。您还可以通过调用 RequireCors() 或添加 [EnableCors] 属性并提供要应用的策略的名称,将 CORS 应用于终端节点。
Configure the policies for your application by calling AddCors() on WebApplicationBuilder and adding policies in the lambda using AddPolicy(). A policy defines which origins are allowed to call an endpoint, which HTTP methods they can use, and which headers are allowed.
通过在 WebApplicationBuilder 上调用 AddCors() 并使用 AddPolicy() 在 lambda 中添加策略来配置应用程序的策略。策略定义允许哪些源调用终端节点、它们可以使用哪些 HTTP 方法以及允许哪些标头。
Open redirect attacks use the common returnURL mechanism after logging in to redirect users to malicious websites. You can prevent this attack by ensuring that you redirect only to local URLs—URLs that belong to your app.
Open 重定向攻击在登录后使用常见的 returnURL 机制将用户重定向到恶意网站。您可以通过确保仅重定向到本地 URL(属于您的应用程序的 URL)来防止此攻击。
Insecure direct object references are a common problem where you expose the ID of database entities in the URL. You should always verify that users have permission to access or change the requested resource by using resource-based authorization in your action methods.
不安全的直接对象引用是一个常见问题,即在 URL 中公开数据库实体的 ID。您应该始终通过在作方法中使用基于资源的授权来验证用户是否有权访问或更改请求的资源。
SQL injection attacks are a common attack vector when you build SQL requests manually. Always use parameterized queries when building requests or use a framework like EF Core, which isn’t vulnerable to SQL injection.
当您手动构建 SQL 请求时,SQL 注入攻击是一种常见的攻击媒介。在生成请求时,请始终使用参数化查询,或使用 EF Core 等框架,该框架不易受到 SQL 注入的攻击。
The most sensitive data in your app is often the data of your users. Mitigate this risk by storing only data that you need. Ensure that you store passwords only as a hash, protect against weak or compromised passwords, and provide the option for MFA. ASP.NET Core Identity provides all of this out of the box, so it’s a great choice if you need to create an identity provider.
应用程序中最敏感的数据通常是用户的数据。通过仅存储您需要的数据来降低此风险。确保仅将密码存储为哈希值,防止弱密码或泄露密码,并提供 MFA 选项。ASP.NET Core Identity 提供了所有这些开箱即用的功能,因此如果您需要创建身份提供商,它是一个不错的选择。
- In 2020 the National Institute of Standards and Technology (NIST) updated its Digital Identity Guidelines on handling user details, which contains some great advice. See http://mng.bz/6gRA.
- 2020 年,美国国家标准与技术研究院 (NIST) 更新了关于处理用户详细信息的数字身份指南,其中包含一些很好的建议。请参阅 http://mng.bz/6gRA。