28 Adding HTTPS to an application
28 将 HTTPS 添加到应用程序
This chapter covers
本章涵盖
• Encrypting traffic between clients and your app using HTTPS
使用 HTTPS加密客户端和应用程序之间的流量
• Using the HTTPS development certificate for local development
使用 HTTPS 开发证书进行本地开发
• Configuring Kestrel with a custom HTTPS certificate
使用自定义 HTTPS 证书配置 Kestrel
• Enforcing HTTPS for your whole app
为整个应用程序强制实施 HTTPS
Web application security is a hot topic at the moment. Practically every week another breach is reported, or confidential details are leaked. It may seem like the situation is hopeless, but the reality is that the vast majority of breaches could have been prevented with the smallest amount of effort.
Web 应用程序安全是目前的一个热门话题。几乎每周都会报告另一起数据泄露事件,或泄露机密细节。情况似乎没有希望,但现实是,绝大多数数据泄露本可以通过最小的努力来预防。
In chapter 29 we’ll look at a range of common attacks and how to protect against them in your ASP.NET Core app. In this chapter we start by looking at one of the most basic security measures: encrypting the traffic between a client such as a browser and your application.
在第 29 章中,我们将介绍一系列常见攻击,以及如何在 ASP.NET Core 应用程序中防范这些攻击。在本章中,我们首先介绍最基本的安全措施之一:加密客户端(如浏览器)和应用程序之间的流量。
Without HTTPS encryption, you risk third parties spying on or modifying the requests and responses as they travel over the internet. The risks associated with unencrypted traffic mean that HTTPS is effectively mandatory for production apps these days, and it is heavily encouraged by the makers of modern browsers such as Chrome and Firefox. In section 28.1 you’ll learn more about these risks and some of the approaches you can take to protect your application.
如果没有 HTTPS 加密,当请求和响应通过 Internet 传输时,您可能会面临第三方监视或修改它们的风险。与未加密流量相关的风险意味着 HTTPS 如今实际上是生产应用程序的强制性要求,并且 Chrome 和 Firefox 等现代浏览器的制造商强烈鼓励 HTTPS。在 Section 28.1 中,您将了解有关这些风险的更多信息以及您可以采取的一些方法来保护您的应用程序。
In section 28.2 you’ll see how to get started with HTTPS locally using the ASP.NET Core development certificate. I describe what it is, how to trust it on your application, and what to do if it’s not working as you expect.
在 Section 28.2 中,您将看到如何使用 ASP.NET Core 开发证书在本地开始使用 HTTPS。我将介绍它是什么,如何在您的应用程序上信任它,以及如果它没有按预期工作该怎么办。
The development certificate is great for local work, but in production you’ll need to configure a real, production certificate. I don’t describe the process of obtaining a certificate in section 28.3, as that will vary by provider; instead, I show how to configure Kestrel to use a custom certificate you’ve acquired.
开发证书非常适合本地工作,但在生产环境中,您需要配置一个真实的生产证书。我没有在第 28.3 节中描述获取证书的过程,因为这会因提供商而异;相反,我将介绍如何将 Kestrel 配置为使用您获取的自定义证书。
In section 28.4 I describe some of the approaches to enforcing HTTPS in your application. Unfortunately, web browsers still expect apps to be available over HTTP by default, so you typically need to expose your application on both HTTP and HTTPS ports. Nevertheless, there are things you can do to push clients toward the HTTPS endpoint, which are considered security best practices these days.
在 Section 28.4 中,我描述了在应用程序中强制执行 HTTPS 的一些方法。遗憾的是,默认情况下,Web 浏览器仍然希望应用程序通过 HTTP 可用,因此您通常需要在 HTTP 和 HTTPS 端口上公开您的应用程序。不过,您可以采取一些措施来将客户端推送到 HTTPS 终端节点,这如今被认为是安全最佳实践。
Before we look at HTTPS in ASP.NET Core specifically, we’ll start by looking at HTTPS in general and why you should use it in all your applications.
在我们具体研究 ASP.NET Core 中的 HTTPS 之前,我们首先一般地了解一下 HTTPS,以及为什么您应该在所有应用程序中使用它。
28.1 Why do I need HTTPS?
28.1 为什么我需要 HTTPS?
In this section you’ll learn about HTTPS: what it is, and why you need to be aware of it for all your production applications. We’re not going to go into details about the protocol or how certificates work at this point, instead focusing on why you need to use HTTPS. You’ll see two approaches to adding HTTPS to your application: supporting HTTPS directly in your application and using SSL/TLS-offloading with a reverse proxy.
在本节中,您将了解 HTTPS:它是什么,以及为什么您需要在所有生产应用程序中了解 HTTPS。此时,我们不会详细介绍协议或证书的工作原理,而是重点介绍为什么需要使用 HTTPS。您将看到两种将 HTTPS 添加到应用程序的方法:直接在应用程序中支持 HTTPS,以及将 SSL/TLS 卸载与反向代理一起使用。
So far in this book, I’ve shown how the user’s browser sends a request across the internet to your app using the HTTP protocol. We haven’t looked too much into the details of that protocol other than to establish that it uses verbs to describe the type of request (such as GET and POST), that it contains headers with metadata about the request, and optionally includes a body payload of data.
到目前为止,在本书中,我已经展示了用户的浏览器如何使用 HTTP 协议通过 Internet 向您的应用程序发送请求。我们没有深入研究该协议的细节,只是确定它使用动词来描述请求类型(例如 GET 和 POST),它包含带有请求元数据的标头,以及可选的数据正文有效负载。
By default, HTTP requests are unencrypted; they’re plain-text files being sent over the internet. Anyone on the same network as a user (such as someone using the same public Wi-Fi in a coffee shop) can read the requests and responses sent back and forth. Attackers can even modify the requests or responses as they’re in transit, as shown in figure 28.1.
默认情况下,HTTP 请求未加密;它们是通过 Internet 发送的纯文本文件。与用户位于同一网络上的任何人(例如在咖啡店使用同一公共 Wi-Fi 的人)都可以阅读来回发送的请求和响应。攻击者甚至可以在传输过程中修改请求或响应,如图 28.1 所示。

Figure 28.1 Unencrypted HTTP requests can be read by users on the same network. Attackers can even intercept the request and response, reading or changing the data. HTTPS requests can’t be read or manipulated by attackers.
图 28.1 同一网络上的用户可以读取未加密的 HTTP 请求。攻击者甚至可以拦截请求和响应,读取或更改数据。攻击者无法读取或纵 HTTPS 请求。
Using unencrypted web apps in this way presents both a privacy and a security risk to your users. Attackers could read sensitive details such as passwords and personally identifiable information (PII), they could inject malicious code into your responses to attack users, or they could steal authentication cookies and impersonate the user on your app.
以这种方式使用未加密的 Web 应用程序会给用户带来隐私和安全风险。攻击者可以读取密码和个人身份信息 (PII) 等敏感详细信息,他们可能会将恶意代码注入您的响应中以攻击用户,或者他们可能会窃取身份验证 Cookie 并在您的应用程序上冒充用户。
To protect your users, your app should encrypt the traffic between the user’s browser and your app as it travels over the network by using the HTTPS protocol. This is similar to HTTP traffic, but it uses an SSL/TLS certificate to encrypt requests and responses, so attackers cannot read or modify the contents.
为了保护您的用户,您的应用应使用 HTTPS 协议加密用户浏览器和您的应用之间的流量。这类似于 HTTP 流量,但它使用 SSL/TLS 证书来加密请求和响应,因此攻击者无法读取或修改内容。
DEFINITION Secure Sockets Layer (SSL) is an older standard that facilitates HTTPS. The SSL protocol has been superseded by Transport Layer Security (TLS), so I’ll be using TLS preferentially throughout this chapter. Normally, if you hear someone talking about SSL or SSL certificates, they actually mean TLS. You can find the RFC for the latest version of the TLS protocol at https://www.rfc-editor.org/rfc/rfc8446.
定义:SSL是一种促进 HTTPS 的旧标准。SSL 协议已被传输层安全性 (TLS) 取代,因此在本章中,我将优先使用 TLS。通常,如果您听到有人谈论 SSL 或 SSL 证书,他们实际上指的是 TLS。您可以在 https://www.rfc-editor.org/rfc/rfc8446 中找到最新版本的 TLS 协议的 RFC。
In browsers, you can tell that a site is using HTTPS by the https:// prefix to URLs (notice the s), or sometimes by a padlock, as shown in figure 28.2. Most modern browsers these days deemphasize that a site is using HTTPS, as most sites use HTTPS, and instead highlight when you’re on a site that isn’t using HTTPS, flagging it as insecure.
在浏览器中,您可以通过 URL 的 https:// 前缀(注意 s)或有时通过挂锁来判断站点正在使用 HTTPS,如图 28.2 所示。如今,大多数现代浏览器都不再强调网站正在使用 HTTPS,因为大多数网站都使用 HTTPS,而是在您访问未使用 HTTPS 的网站上时突出显示,将其标记为不安全。

Figure 28.2 Encrypted apps using HTTPS and unencrypted apps using HTTP in Edge. Using HTTPS protects your application from being viewed or tampered with by attackers.
图 28.2 Edge 中使用 HTTPS 的加密应用程序和使用 HTTP 的未加密应用程序。使用 HTTPS 可以保护您的应用程序不被攻击者查看或篡改。
The reality is that these days, you should always serve your production websites over HTTPS. The industry is pushing toward HTTPS by default, with most browsers marking HTTP sites as explicitly not secure. Skipping HTTPS will hurt the perception of your app in the long run, so even if you’re not interested in the security benefits, it’s in your best interest to set up HTTPS.
现实情况是,如今,您应该始终通过 HTTPS 为您的生产网站提供服务。默认情况下,该行业正在推动 HTTPS,大多数浏览器将 HTTP 站点标记为明确不安全。从长远来看,跳过 HTTPS 会损害您的应用程序的看法,因此即使您对安全优势不感兴趣,设置 HTTPS 也符合您的最佳利益。
TIP You can find a good cheat sheet for HTTPS by OWASP at http://mng.bz/PzxY. ASP.NET Core takes care of most of the points in this list for you, but there are some important ones in the Application section specifically.
提示:您可以在 http://mng.bz/PzxY 上找到 OWASP 的 HTTPS 优秀备忘单。ASP.NET Core 为您处理了此列表中的大部分要点,但 Application (应用程序) 部分中还有一些重要的要点。
Another reason to support HTTPS is that many browser features are available only when your site is served over HTTPS. Some of these features are JavaScript browser APIs, such as location APIs, microphone APIs, and storage APIs. These are available only over HTTPS to protect users from attackers that could modify insecure HTTP requests. Other features apply to server-side apps too, such as Brotli compression and HTTP/2 support.
支持 HTTPS 的另一个原因是,许多浏览器功能仅在您的网站通过 HTTPS 提供服务时可用。其中一些功能是 JavaScript 浏览器 API,例如位置 API、麦克风 API 和存储 API。这些选项仅通过 HTTPS 提供,以保护用户免受可能修改不安全 HTTP 请求的攻击者的攻击。其他功能也适用于服务器端应用程序,例如 Brotli 压缩和 HTTP/2 支持。
TIP For details on how the SSL/TLS protocols work, see chapter 9 of Real-World Cryptography, by David Wong (Manning, 2021), http://mng.bz/zxz1.
提示:有关 SSL/TLS 协议如何工作的详细信息,请参阅 David Wong (Manning, 2021) http://mng.bz/zxz1 合著的《真实世界密码学》第 9 章。
To enable HTTPS, you need to obtain and configure a TLS certificate for your server. Unfortunately, although that process is a lot easier than it used to be and is now essentially free thanks to Let’s Encrypt (https://letsencrypt.org), it’s still far from simple in many cases. If you’re setting up a production server, I recommend carefully following the tutorials on the Let’s Encrypt site. It’s easy to get it wrong, so take your time.
要启用 HTTPS,您需要为您的服务器获取并配置 TLS 证书。不幸的是,尽管这个过程比以前容易得多,并且现在由于 Let's Encrypt (https://letsencrypt.org) 而基本上是免费的,但在许多情况下,它仍然远非简单。如果您正在设置生产服务器,我建议您仔细按照 Let's Encrypt 站点上的教程进行作。很容易出错,所以要慢慢来。
TIP If you’re hosting your app in the cloud, most providers will provide one-click TLS certificates so that you don’t have to manage certificates yourself. This is extremely useful, and I highly recommend it for everyone. You don’t even have to host your application in the cloud to take advantage of this. Cloudflare (https://www.cloudflare.com) provides a CDN service that you can add TLS to. You can even use it for free.
提示:如果您在云中托管应用程序,大多数提供商将提供一键式 TLS 证书,这样您就不必自己管理证书。这非常有用,我强烈推荐给大家。您甚至不必在云中托管您的应用程序即可利用这一点。Cloudflare (https://www.cloudflare.com) 提供 CDN 服务,您可以将 TLS 添加到该服务中。您甚至可以免费使用它。
As an ASP.NET Core application developer, you can often get away without directly supporting HTTPS in your app by taking advantage of the reverse-proxy architecture, as shown in figure 28.3, in a process called SSL/TLS offloading/termination. This is generally standard in Platform as a Service (PaaS) cloud services, such as Azure App Service.
作为 ASP.NET Core 应用程序开发人员,您通常可以通过利用反向代理架构(如图 28.3 所示)在称为 SSL/TLS 卸载/终止的过程中,无需直接在应用程序中支持 HTTPS。这通常是平台即服务 (PaaS) 云服务(如 Azure 应用服务)中的标准。
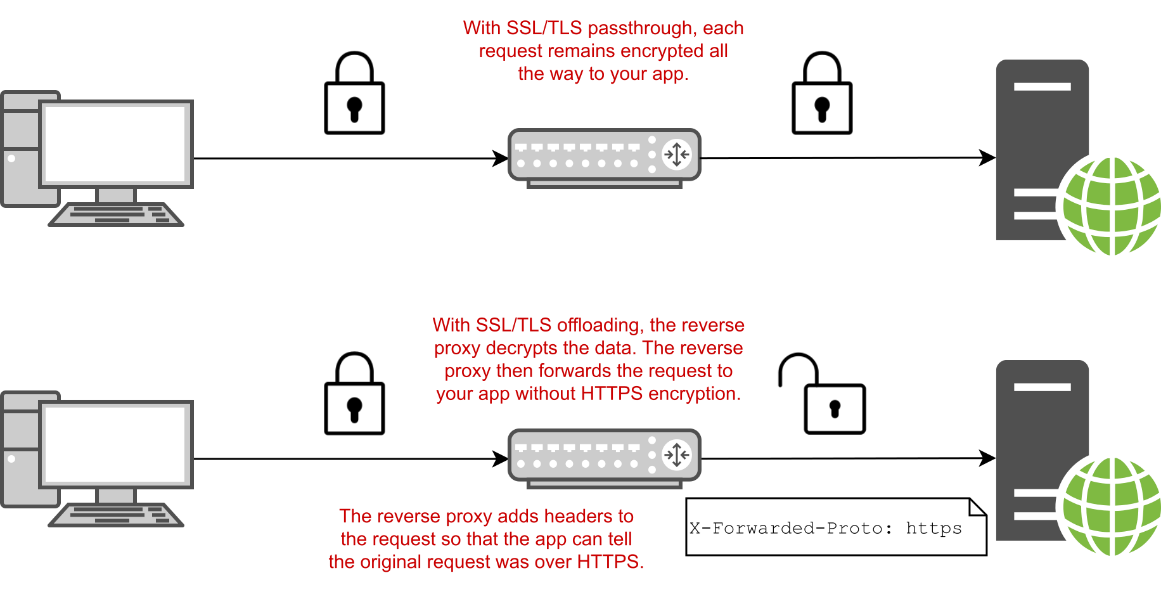
Figure 28.3 You have two options when using HTTPS with a reverse proxy: SSL/TLS passthrough and SSL/TLS offloading. In SSL/TLS passthrough, the data is encrypted all the way to your ASP.NET Core app. For SSL/TLS offloading, the reverse proxy handles decrypting the data, so your app doesn’t have to.
图 28.3 将 HTTPS 与反向代理一起使用时,您有两个选项:SSL/TLS 直通和 SSL/TLS 卸载。在 SSL/TLS 直通中,数据会一直加密到 ASP.NET Core 应用程序。对于 SSL/TLS 卸载,反向代理会处理解密数据,因此您的应用不必这样做。
With SSL/TLS offloading, instead of your application handling requests using HTTPS directly, your app continues to use HTTP. The reverse proxy is responsible for encrypting and decrypting HTTPS traffic to the browser. This often gives you the best of both worlds: data is encrypted between the user’s browser and the server, but you don’t have to worry about configuring certificates in your application.
使用 SSL/TLS 卸载时,您的应用将继续使用 HTTP,而不是直接使用 HTTPS 处理请求。反向代理负责加密和解密到浏览器的 HTTPS 流量。这通常可以为您提供两全其美的效果:数据在用户的浏览器和服务器之间加密,但您不必担心在应用程序中配置证书。
NOTE If you’re concerned that the traffic is unencrypted between the reverse proxy and your app, I recommend reading Troy Hunt’s post “CloudFlare, SSL and unhealthy security absolutism”: http://mng.bz/eHCi. It discusses the pros and cons of the problem as it relates to decrypting on the reverse proxy and why you must consider the most likely attacks on your website, in a process called threat modeling.
注意:如果您担心反向代理和您的应用程序之间的流量未加密,我建议您阅读 Troy Hunt 的博文“CloudFlare、SSL 和不健康的安全绝对主义”:http://mng.bz/eHCi。它讨论了与反向代理解密相关的问题的利弊,以及为什么您必须在称为威胁建模的过程中考虑最有可能对您网站的攻击。
Depending on the specific infrastructure where you’re hosting your app, SSL/TLS could be offloaded to a dedicated device on your network, a third-party service like Cloudflare, or a reverse proxy (such as Internet Information Services [IIS], NGINX, or HAProxy) running on the same or a different server. Nevertheless, in some situations, you may need to handle SSL/TLS directly in your app:
根据您托管应用程序的特定基础设施,SSL/TLS 可以卸载到您网络上的专用设备、第三方服务(如 Cloudflare)或反向代理(如 Internet Information Services [IIS]、NGINX 或 HAProxy)在相同或不同的服务器上运行。不过,在某些情况下,您可能需要直接在应用程序中处理 SSL/TLS:
• If you’re exposing Kestrel to the internet directly, without a reverse proxy—This is a supported approach since ASP.NET Core 3.0, and can give high performance. It is also often the case when you’re developing your app locally.
如果您将 Kestrel 直接暴露在 Internet 上,而不使用反向代理 - 这是自 ASP.NET Core 3.0 以来受支持的方法,并且可以提供高性能。在本地开发应用程序时,也经常会出现这种情况。
• If having HTTP between the reverse proxy and your app is not acceptable—While securing traffic inside your network is less critical compared with external traffic, it is undoubtedly more secure to use HTTPS for internal traffic too. This may be a hard requirement for some applications or sectors.
如果不能接受在反向代理和应用程序之间使用 HTTP – 虽然与外部流量相比,保护网络内部流量不那么重要,但对内部流量使用 HTTPS 无疑也更安全。对于某些应用程序或部门来说,这可能是一个硬性要求。
• If you’re using technology that requires HTTPS—Some newer network protocols, such as gRPC and HTTP/2, generally require an end-to-end HTTPS connection.
如果使用需要 HTTPS 的技术 - 某些较新的网络协议 (如 gRPC 和 HTTP/2) 通常需要端到端 HTTPS 连接。
In each of these scenarios, you’ll need to configure a TLS certificate for your application so Kestrel can receive HTTPS traffic. In section 28.2 you’ll see the easiest way to get started with HTTPS when developing locally, using the ASP.NET Core development certificate.
在上述每种情况下,您都需要为应用程序配置 TLS 证书,以便 Kestrel 可以接收 HTTPS 流量。在 Section 28.2 中,您将看到在本地开发时使用 ASP.NET Core 开发证书开始使用 HTTPS 的最简单方法。
28.2 Using the ASP.NET Core HTTPS development certificates
28.2 使用 ASP.NET Core HTTPS 开发证书
Working with HTTPS certificates is easier than it used to be, but unfortunately it can still be a confusing topic, especially if you’re a newcomer to the web. In this section you’ll learn how the .NET software development kit (SDK), Visual Studio, and IIS Express try to improve this experience by handling a lot of the grunt work for you, and what to do when things go wrong.
使用 HTTPS 证书比以前更容易,但不幸的是,它仍然是一个令人困惑的话题,尤其是如果您是 Web 新手。在本节中,您将了解 .NET 软件开发工具包 (SDK)、Visual Studio 和 IIS Express 如何通过为您处理大量繁重的工作来尝试改善这种体验,以及出现问题时该怎么做。
The first time you run a dotnet command using the .NET SDK, the SDK installs an HTTPS development certificate on your machine. Any ASP.NET Core application you create using the default templates (or for which you don’t explicitly configure certificates) will use this development certificate to handle HTTPS traffic. However, the development certificate is not trusted by default. If you access a site that’s using an untrusted certificate, you’ll get a browser warning, as shown in figure 28.4.
首次使用 .NET SDK 运行 dotnet 命令时,SDK 会在计算机上安装 HTTPS 开发证书。您使用默认模板(或未为其明确配置证书)创建的任何 ASP.NET Core 应用程序都将使用此开发证书来处理 HTTPS 流量。但是,默认情况下,开发证书不受信任。如果您访问的站点使用不受信任的证书,您将收到浏览器警告,如图 28.4 所示。

Figure 28.4 The developer certificate is not trusted by default, so apps serving HTTPS traffic using it will be marked as insecure by browsers. Although you can bypass the warnings if necessary, you should instead update the certificate to be trusted.
图 28.4 默认情况下,开发者证书不受信任,因此使用该证书提供 HTTPS 流量的应用程序将被浏览器标记为不安全。尽管您可以根据需要绕过警告,但您应该更新要信任的证书。
A brief primer on certificates and signing
证书和签名HTTPS uses public key cryptography as part of the data-encryption process. This uses two keys: a public key that anyone can see and a private key that only your server can see. Anything encrypted with the public key can be decrypted only with the private key. That way, a browser can encrypt something with your server’s public key, and only your server can decrypt it. A complete TLS certificate consists of both the public and private parts.
HTTPS 的简要入门使用公钥加密作为数据加密过程的一部分。这使用两个密钥:任何人都可以看到的公钥和只有您的服务器可以看到的私钥。使用公钥加密的任何内容都只能使用私钥解密。这样,浏览器可以使用您服务器的公钥加密某些内容,并且只有您的服务器可以解密它。完整的 TLS 证书由公有部分和私有部分组成。When a browser connects to your app, the server sends the public key part of the TLS certificate. But how does the browser know that it was definitely your server that sent the certificate? To achieve this, your TLS certificate contains additional certificates, including one or more certificates from a third party, a certificate authority (CA). At the end of the certificate chain is the root certificate.
当浏览器连接到您的应用时,服务器会发送 TLS 证书的公钥部分。但是浏览器如何知道发送证书的绝对是您的服务器呢?为此,您的 TLS 证书包含其他证书,包括来自第三方(证书颁发机构 (CA))的一个或多个证书。证书链的末尾是根证书。CAs are special trusted entities, and browsers are hardcoded to trust specific root certificates. For the TLS certificate for your app to be trusted, it must contain (or be signed by) a trusted root certificate. Browsers periodically update their internal list of root certificates and revoke root certificates that can no longer be trusted.
CA 是特殊的受信任实体,浏览器被硬编码为信任特定的根证书。要使应用的 TLS 证书受信任,它必须包含受信任的根证书(或由其签名)。浏览器会定期更新其内部根证书列表,并吊销不再受信任的根证书。When you use the ASP.NET Core development certificate, or if you create your own self-signed certificate, your site’s HTTPS is missing that trusted root certificate. That means browsers won’t trust your certificate and won’t connect to your server by default. To get around this, you need to tell your development machine to explicitly trust the certificate.
当您使用 ASP.NET Core 开发证书时,或者如果您创建自己的自签名证书,则站点的 HTTPS 缺少该受信任的根证书。这意味着浏览器不会信任您的证书,默认情况下不会连接到您的服务器。要解决此问题,您需要告诉开发计算机显式信任该证书。In production, you can’t use a development or self-signed certificate, as a user’s browser won’t trust it. Instead, you need to obtain a signed HTTPS certificate from a service like Let’s Encrypt or from a cloud provider like AWS, Azure, or Cloudflare. These certificates are already signed by a trusted CA, so they are automatically trusted by browsers.
在生产环境中,您不能使用开发证书或自签名证书,因为用户的浏览器不会信任它。相反,您需要从 Let's Encrypt 等服务或 AWS、Azure 或 Cloudflare 等云提供商处获取签名的 HTTPS 证书。这些证书已由受信任的 CA 签名,因此浏览器会自动信任它们。
To solve these browser warnings, you need to trust the certificate. Trusting a certificate is a sensitive operation; it’s saying “I know this certificate doesn’t look quite right, but ignore that,” so it’s hard to do automatically. If you’re running on Windows or macOS, you can trust the development certificate by running
要解决这些浏览器警告,您需要信任该证书。信任证书是一项敏感作;它说“我知道这个证书看起来不太对劲,但请忽略它”,所以很难自动完成。如果您在 Windows 或 macOS 上运行,则可以通过在 Windows 或 macOS 上运行
dotnet dev-certs https --trustThis command trusts the certificate by registering it in the operating system’s certificate store. After you run this command, you should be able to access your websites without seeing any warnings or “not secure” labels, as shown in figure 28.5.
此命令通过在作系统的证书存储中注册证书来信任证书。运行此命令后,您应该能够访问您的网站,而不会看到任何警告或 “not secure” 标签,如图 28.5 所示。
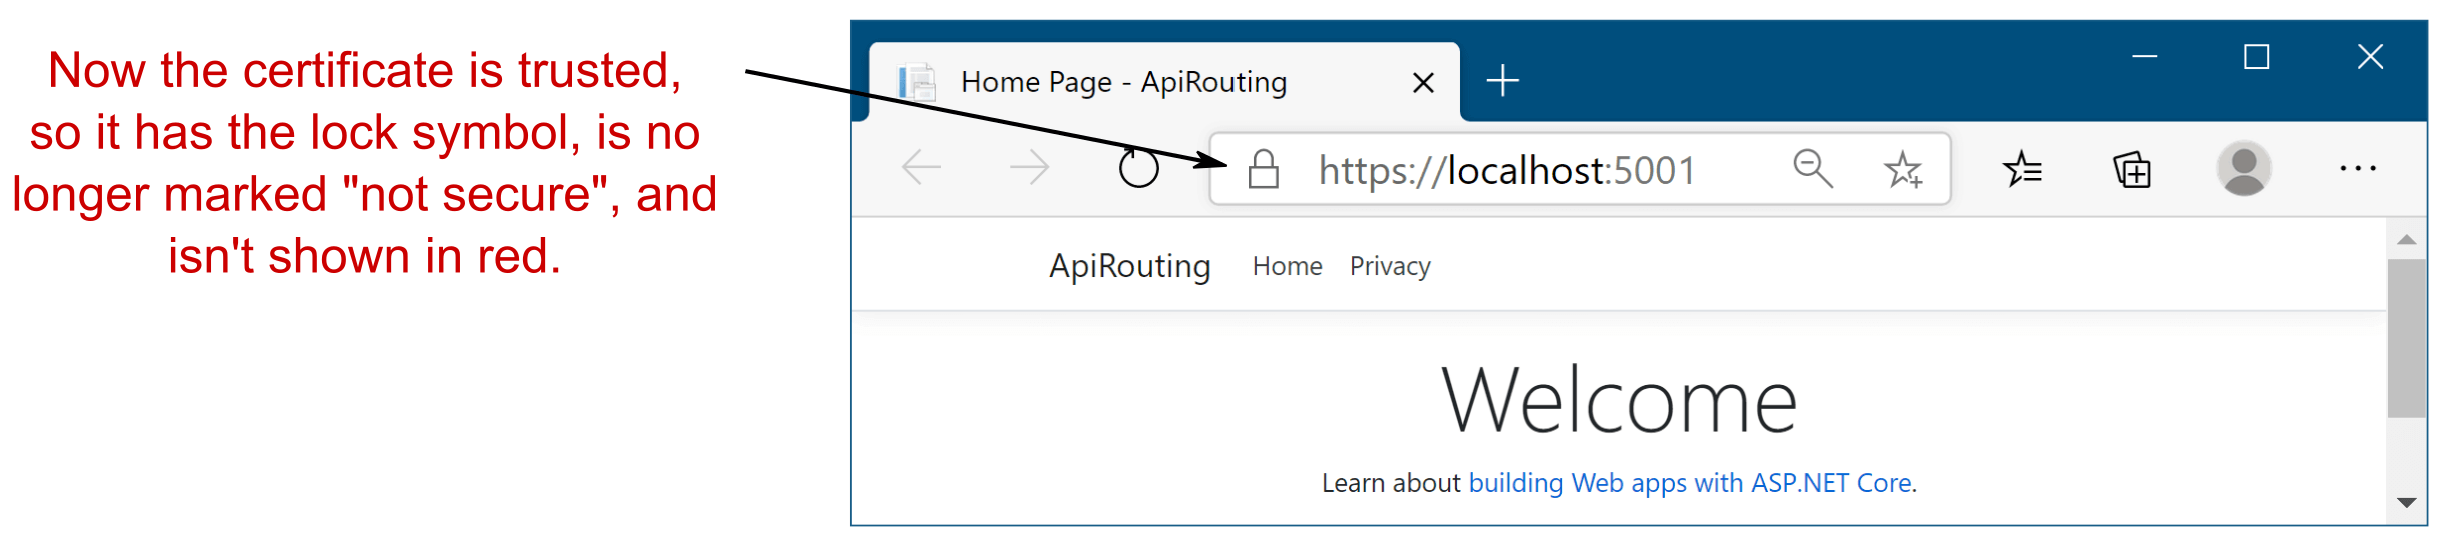
Figure 28.5 Once the development certificate is trusted, you will no longer see browser warnings about the connection.
图 28.5 一旦开发证书被信任,您将不再看到有关连接的浏览器警告。
TIP You may need to close your browser after trusting the certificate to clear the browser’s cache.
提示:您可能需要在信任证书后关闭浏览器以清除浏览器的缓存。
If you’re using Windows, Visual Studio, and IIS Express for development, then you might not need to explicitly trust the development certificate. IIS Express acts as a reverse proxy when you’re developing locally, so it handles the SSL/TLS setup itself. On top of that, Visual Studio should trust the IIS development certificate as part of installation, so you may never see the browser warnings at all.
如果您使用 Windows、Visual Studio 和 IIS Express 进行开发,则可能不需要显式信任开发证书。在本地开发时,IIS Express 充当反向代理,因此它会自行处理 SSL/TLS 设置。最重要的是,Visual Studio 应该信任 IIS 开发证书作为安装的一部分,因此您可能根本看不到浏览器警告。
TIP In macOS, before .NET 7, you would have to retrust the developer certificate repeatedly for every new app. In .NET 7, the process is a lot smoother, so you shouldn’t have to retrust it anything like as often!
提示:在 macOS 中,在 .NET 7 之前,您必须为每个新应用程序反复重新信任开发人员证书。在 .NET 7 中,该过程要顺畅得多,因此您不必像以前那样经常重新信任它!
Trusting the developer certificate works smoothly in Windows and macOS, in most cases. Unfortunately, trusting the certificate in Linux is a little trickier and depends on the specific flavor of Linux you’re using. On top of that, software in Linux often uses its own certificate store, so you’ll probably need to add the certificate directly to your favorite browser. If you’re using any of the following scenarios, you’ll need to do more work:
在大多数情况下,信任开发人员证书在 Windows 和 macOS 中可以顺利运行。不幸的是,在 Linux 中信任证书有点棘手,具体取决于您使用的 Linux 的特定风格。最重要的是,Linux 中的软件通常使用自己的证书存储,因此您可能需要将证书直接添加到您最喜欢的浏览器中。如果您使用的是以下任何方案,则需要执行更多工作:
• Firefox browser in Windows, macOS, or Linux
• Edge or Chrome browsers in Linux
• API-to-API communication in Linux
• An app running in Windows Subsystem for Linux (WSL)
• Running applications in Docker
Each of these scenarios requires a slightly different approach. In many cases it’s one or two commands, so I suggest following the documentation for your scenario carefully at http://mng.bz/JglK.
这些方案中的每一种都需要略有不同的方法。在许多情况下,它只有一个或两个命令,因此我建议您在 http://mng.bz/JglK 中仔细遵循适用于您的方案的文档。
TIP If you’ve tried trusting the certificate, and your app is still giving errors, try closing all your browser windows and running dotnet dev-certs https --clean followed by dotnet dev-certs https --trust. Browsers cache certificate trust, so the close and open step is important!
提示:如果已尝试信任证书,但应用仍然提供错误,请尝试关闭所有浏览器窗口并运行 dotnet dev-certs https --clean,然后运行 dotnet dev-certs https --trust。浏览器会缓存证书信任,因此关闭和打开步骤很重要!
The ASP.NET Core and IIS development certificates make it easy to use Kestrel with HTTPS locally, but those certificates won’t help once you move to production. In the next section I show how to configure Kestrel to use a production TLS certificate.
ASP.NET Core 和 IIS 开发证书使在本地使用 Kestrel 和 HTTPS 变得容易,但一旦您迁移到生产环境,这些证书将无济于事。在下一节中,我将介绍如何配置 Kestrel 以使用生产 TLS 证书。
28.3 Configuring Kestrel with a production HTTPS certificate
28.3 使用生产 HTTPS 证书配置 Kestrel
Creating a TLS certificate for production is often a laborious process, as it requires proving to a third-party CA that you own the domain you’re creating the certificate for. This is an important step in the trust process and ensures that attackers can’t impersonate your servers. The result of the process is one or more files, which is the HTTPS certificate you need to configure for your app.
创建用于生产的 TLS 证书通常是一个费力的过程,因为它需要向第三方 CA 证明您拥有要为其创建证书的域。这是信任过程中的一个重要步骤,可确保攻击者无法模拟您的服务器。该过程的结果是一个或多个文件,这是您需要为应用程序配置的 HTTPS 证书。
TIP The specifics of how to obtain a certificate vary by provider and by your OS platform, so follow your provider’s documentation carefully. The vagaries and complexities of this process are one of the reasons I strongly favor the SSL/TLS-offloading or “one-click” approaches described previously. Those approaches mean my apps don’t need to deal with certificates, and I don’t need to use the approaches described in this section; I delegate that responsibility to another piece of the network, or to the underlying platform.
提示:如何获取证书的具体内容因提供商和 OS 平台而异,因此请仔细遵循提供商的文档。此过程的变幻莫测和复杂性是我强烈支持前面描述的 SSL/TLS 卸载或“一键式”方法的原因之一。这些方法意味着我的应用程序不需要处理证书,也不需要使用本节中描述的方法;我将该责任委托给网络的另一个部分或底层平台。
Once you have a certificate, you need to configure Kestrel to use it to serve HTTPS traffic. In chapter 27 you saw how to set the port your application listens on with the ASPNETCORE_URLS environment variable or via the command line, and you saw that you could provide an HTTPS URL. As you didn’t provide any certificate configuration, Kestrel used the development certificate by default. In production you need to tell Kestrel which certificate to use.
获得证书后,您需要配置 Kestrel 以使用它来提供 HTTPS 流量。在第 27 章中,您了解了如何使用 ASPNETCORE_URLS 环境变量或通过命令行设置应用程序侦听的端口,并且您还了解了可以提供 HTTPS URL。由于您未提供任何证书配置,因此 Kestrel 默认使用开发证书。在生产环境中,您需要告诉 Kestrel 要使用哪个证书。
You can configure the certificates Kestrel uses in multiple ways. For a start, you can load the certificate from multiple locations: from a .pfx file, from .pem/.crt and .key files, or from the OS certificate store. You can also use different certificates for different ports, use a different configuration for each URL endpoint you expose, or configure Server Name Indication (SNI). For full details, see the “Replace the default certificate from configuration” section of Microsoft’s “Configure endpoints for the ASP.NET Core Kestrel web server” documentation: http://mng.bz/wvv2.
您可以通过多种方式配置 Kestrel 使用的证书。首先,您可以从多个位置加载证书:从 .pfx 文件、从 .pem/.crt 和 .key 文件或从 OS 证书存储。您还可以对不同的端口使用不同的证书,对您公开的每个 URL 终端节点使用不同的配置,或配置服务器名称指示 (SNI)。有关完整详细信息,请参阅 Microsoft 的“为 ASP.NET Core Kestrel Web 服务器配置端点”文档的“从配置中替换默认证书”部分:http://mng.bz/wvv2。
The following listing shows one possible way to set a custom HTTPS certificate for your production app by configuring the default certificate Kestrel uses for HTTPS connections. You can add the “Kestrel:Certificates:Default” section to your appsettings.json file (or use any other configuration source, as described in chapter 10) to define the .pfx file of the certificate to use. You must also provide the password for accessing the certificate.
以下清单显示了一种可能的方法,即通过配置 Kestrel 用于 HTTPS 连接的默认证书来为生产应用程序设置自定义 HTTPS 证书。您可以将 “Kestrel:Certificates:Default” 部分添加到您的 appsettings.json 文件中(或使用任何其他配置源,如第 10 章所述)来定义要使用的证书的 .pfx 文件。您还必须提供用于访问证书的密码。
Listing 28.1 Configuring the default HTTPS certificate for Kestrel using a .pfx file
清单 28.1 使用 .pfx 文件为 Kestrel 配置默认 HTTPS 证书
{
  “Kestrel”: {             #A
    “Certificates”: {      #A
      “Default”: {         #A
        “Path”: “localhost.pfx”,     #B
        “Password”: “testpassword”   #C
      }
    }
  }
}
❶ Creates a configuration section at Kestrel:Certificates:Default
在 Kestrel创建配置部分:Certificates:Default
❷ The relative or absolute path to the certificate
证书的相对或绝对路径
❸ The password for opening the certificate
打开证书的密码
The preceding example is the simplest way to replace the HTTPS certificate, as it doesn’t require changing any of Kestrel’s defaults. You can use a similar approach to load the HTTPS certificate from the OS certificate store (Windows or macOS), as shown in the “Replace the default certificate from configuration” documentation mentioned previously (http://mng.bz/wvv2).
前面的示例是替换 HTTPS 证书的最简单方法,因为它不需要更改 Kestrel 的任何默认值。您可以使用类似的方法从作系统证书存储区(Windows 或 macOS)加载 HTTPS 证书,如前面提到的“从配置中替换默认证书”文档 (http://mng.bz/wvv2) 中所示。
WARNING Listing 28.1 hardcoded the certificate filename and password for demonstration, but you should never do this in production. Either load these from a configuration store like user-secrets, as you saw in chapter 10, or load the certificate from the local store. Never put production passwords in your appsettings.json files.
警告:Listing 28.1 对证书文件名和密码进行了硬编码以进行演示,但是您永远不应该在 production 中这样做。如第 10 章所示,从配置存储(如 user-secrets)加载这些证书,或者从本地存储加载证书。切勿将生产密码放入 appsettings.json 文件中。
All the default ASP.NET Core templates configure your application to serve both HTTP and HTTPS traffic, and with the configuration you’ve seen so far, you can ensure that your application can handle both HTTP and HTTPS in development and in production.
所有默认的 ASP.NET Core 模板都将您的应用程序配置为同时提供 HTTP 和 HTTPS 流量,并且使用您目前看到的配置,您可以确保您的应用程序可以在开发和生产中同时处理 HTTP 和 HTTPS。
However, whether you use HTTP or HTTPS may depend on the URL users click when they first browse to your app. For example, imagine you have an app that listens using the default ASP.NET Core URLs: http://localhost:5000 for HTTP traffic and https://localhost:5001 for HTTPS traffic. The HTTPS endpoint is available, but if a user doesn’t know that and uses the HTTP URL (the default option in browsers), their traffic is unencrypted. Seeing as you’ve gone to all the trouble to set up HTTPS, it’s probably best that you force users to use it.
但是,您使用的是 HTTP 还是 HTTPS 可能取决于用户首次浏览到您的应用程序时单击的 URL。例如,假设您有一个应用程序使用默认的 ASP.NET 核心网址进行监听:http://localhost:5000 用于 HTTP 流量,https://localhost:5001 用于 HTTPS 流量。HTTPS 终端节点可用,但如果用户不知道并使用 HTTP URL(浏览器中的默认选项),则其流量将未加密。鉴于您已经费尽心思设置 HTTPS,最好强制用户使用它。
28.4 Enforcing HTTPS for your whole app
28.4 为整个应用程序强制执行 HTTPS
Enforcing HTTPS across your whole website is practically required these days. Browsers are beginning to explicitly label HTTP pages as insecure; for security reasons, you must use TLS any time you’re transmitting sensitive data across the internet. Additionally, thanks to HTTP/2 (and the upcoming HTTP/3), adding TLS can improve your app’s performance. In this section you’ll learn three techniques for enforcing HTTPS in your application.
如今,在整个网站上强制实施 HTTPS 实际上是必要的。浏览器开始明确地将 HTTP 页面标记为不安全;出于安全原因,您在通过 Internet 传输敏感数据时必须使用 TLS。此外,得益于 HTTP/2(以及即将推出的 HTTP/3),添加 TLS 可以提高应用程序的性能。在本节中,您将学习在应用程序中强制实施 HTTPS 的三种技术。
TIP HTTP/2 offers many performance improvements over HTTP/1.x, and all modern browsers require HTTPS to enable it. For a great introduction to HTTP/2, see Google’s “Introduction to HTTP/2” at http://mng.bz/9M8j. ASP.NET Core even includes support for HTTP/3, the next version of the protocol! You can read about HTTP/3 at http://mng.bz/qrrJ.
提示HTTP/2 提供了许多优于 HTTP/1.x 的性能改进,所有现代浏览器都需要 HTTPS 才能启用它。有关 HTTP/2 的精彩介绍,请参阅 Google 的“HTTP/2 简介”,网址为 http://mng.bz/9M8j。ASP.NET Core 甚至包括对 HTTP/3 的支持,这是该协议的下一个版本!您可以在 http://mng.bz/qrrJ 上阅读有关 HTTP/3 的信息。
There are multiple approaches to enforcing HTTPS for your application. If you’re using a reverse proxy with SSL/TLS-offloading, it might be handled for you anyway, without your having to worry about it within your apps. If that’s the case, you may be able to disregard some of the steps in this section.
有多种方法可以为您的应用程序强制实施 HTTPS。如果您使用的是具有 SSL/TLS 卸载功能的反向代理,则它可能无论如何都会为您处理,而无需您在应用程序中担心它。如果是这种情况,您可以忽略本节中的某些步骤。
WARNING If you’re building a web API rather than a Razor Pages app, it’s common to reject insecure HTTP requests entirely. You’ll see this approach in section 28.4.3.
警告:如果要构建 Web API 而不是 Razor Pages 应用,则通常会完全拒绝不安全的 HTTP 请求。您将在 Section 28.4.3 中看到这种方法。
One approach to improving the security of your app is to use HTTP security headers. These are HTTP headers sent as part of your HTTP response that tell the browser how it should behave. There are many headers available, most of which restrict the features your app can use in exchange for increased security. In chapter 30 you’ll see how to add your own custom headers to your HTTP responses by creating custom middleware.
提高应用程序安全性的一种方法是使用 HTTP 安全标头。这些是作为 HTTP 响应的一部分发送的 HTTP 标头,用于告诉浏览器它应该如何运行。有许多可用的标头,其中大多数都限制了您的应用程序可以使用的功能,以换取更高的安全性。在第 30 章中,您将看到如何通过创建自定义中间件将自己的自定义标头添加到 HTTP 响应中。
TIP Scott Helme has some great guidance on this and other security headers you can add to your site, such as the Content Security Policy (CSP) header. See “Hardening your HTTP response headers” on his website at http://mng.bz/7DDe.
提示:Scott Helme 对此标头以及您可以添加到站点中的其他安全标头提供了一些很好的指导,例如内容安全策略 (CSP) 标头。请参阅其网站上的“强化 HTTP 响应标头”,网址为 http://mng.bz/7DDe。
One of these security headers, the HTTP Strict Transport Security (HSTS) header, can help ensure that browsers use HTTPS where it’s available instead of defaulting to HTTP.
其中一个安全标头,即 HTTP 严格传输安全 (HSTS) 标头,可以帮助确保浏览器在可用的情况下使用 HTTPS,而不是默认使用 HTTP。
28.4.1 Enforcing HTTPS with HTTP Strict Transport Security headers
28.4.1 使用 HTTP 严格传输安全标头强制执行 HTTPS
It’s unfortunate, but by default, browsers load apps over HTTP unless otherwise specified. That means your apps must typically support both HTTP and HTTPS, even if you don’t want to serve any traffic over HTTP, as shown in figure 28.6. On top of that, if the initial request is over HTTP, the browser may end up sending subsequent requests over HTTP too.
很遗憾,但默认情况下,除非另有说明,否则浏览器会通过 HTTP 加载应用程序。这意味着您的应用程序通常必须同时支持 HTTP 和 HTTPS,即使您不想通过 HTTP 提供任何流量,如图 28.6 所示。最重要的是,如果初始请求是通过 HTTP 发送的,浏览器最终也可能通过 HTTP 发送后续请求。
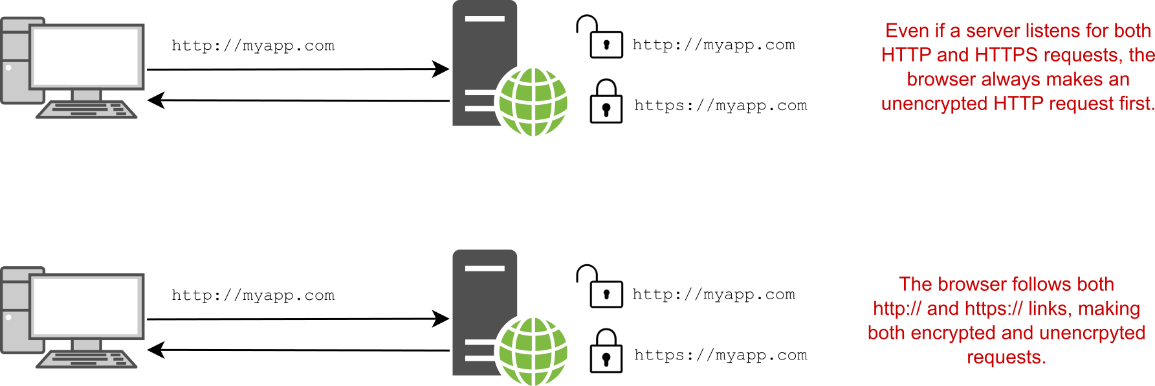
Figure 28.6 When you type in a URL, browsers load the app over HTTP by default. Depending on the links returned by your app or the URLs entered, the browser may make HTTP or HTTPS requests.
图 28.6 当您键入 URL 时,浏览器默认通过 HTTP 加载应用程序。根据应用程序返回的链接或输入的 URL,浏览器可能会发出 HTTP 或 HTTPS 请求。
One partial mitigation (and a security best practice) is to add HTTP Strict Transport Security headers to your responses.
一种部分缓解措施(也是安全最佳实践)是将 HTTP Strict Transport Security 标头添加到您的响应中。
DEFINITION HTTP Strict Transport Security (HSTS) is a specification (https://www.rfc-editor.org/rfc/rfc6797) for the Strict-Transport-Security header that instructs the browser to use HTTPS for all subsequent requests to your application. The HSTS header can be sent only with responses to HTTPS requests. It is also relevant only for requests originating from a browser; it has no effect on server-to-server communication or on mobile apps.
定义:HTTP 严格传输安全 (HSTS) 是 Strict-Transport-Security 标头的规范 (https://www.rfc-editor.org/rfc/rfc6797),它指示浏览器对应用程序的所有后续请求使用 HTTPS。HSTS 标头只能与对 HTTPS 请求的响应一起发送。它也仅与来自浏览器的请求相关;它对服务器到服务器的通信或移动应用程序没有影响。
After a browser receives a valid HSTS header, the browser stops sending HTTP requests to your app and uses only HTTPS instead, as shown in figure 28.7. Even if your app has an http:// link or the user enters http:// in the URL bar of the app, the browser automatically replaces the request with an https:// version.
在浏览器收到有效的 HSTS 标头后,浏览器将停止向您的应用程序发送 HTTP 请求,并仅使用 HTTPS,如图 28.7 所示。即使您的应用程序具有 http:// 链接或用户在应用程序的 URL 栏中输入 http://,浏览器也会自动将请求替换为 https:// 版本。
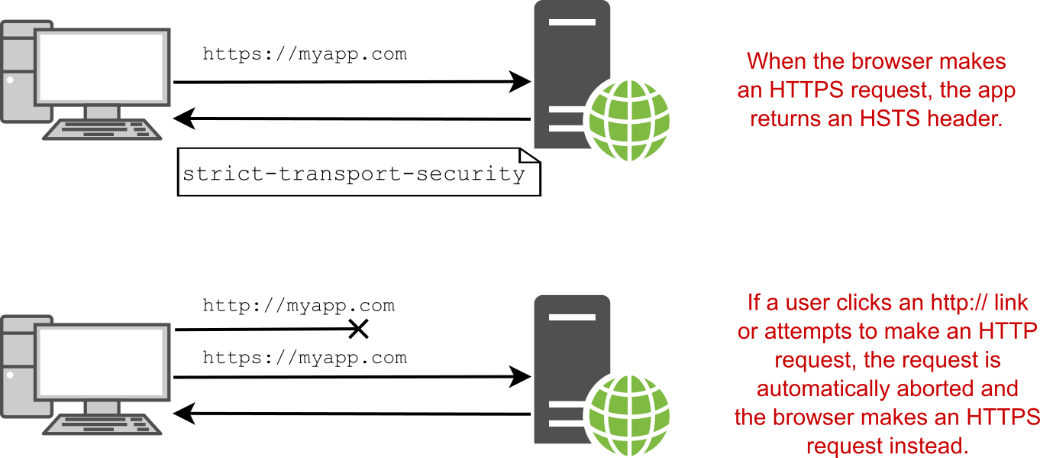
Figure 28.7 After a browser sends an HTTPS request, the app returns an HSTS header, instructing the browser to always send requests over HTTPS. The next time the user attempts to make an http:// request, the browser aborts the request and makes an https:// request instead.
图 28.7 浏览器发送 HTTPS 请求后,应用程序返回 HSTS 标头,指示浏览器始终通过 HTTPS 发送请求。下次用户尝试发出 http:// 请求时,浏览器会中止该请求并改为发出 https:// 请求。
TIP You can achieve a similar upgrading of HTTP to HTTPS requests using the Upgrade-Insecure-Requests directive in the Content-Security-Policy (CSP) header. This provides fewer protections than the HSTS header but can be used in combination with it. For more details on this directive and CSP in general, see http://mng.bz/mVV4.
提示:您可以使用 Content-Security-Policy (CSP) 标头中的 Upgrade-Insecure-Requests 指令实现从 HTTP 到 HTTPS 请求的类似升级。这提供的保护比 HSTS 标头少,但可以与之结合使用。有关此指令和 CSP 的更多详细信息,请参阅 http://mng.bz/mVV4。
HSTS headers are strongly recommended for production apps. You generally don’t want to enable them for local development, as that would mean you could never run a non-HTTPS app locally. In a similar fashion, you should use HSTS only on sites for which you always intend to use HTTPS, as it’s hard (sometimes impossible) to turn off HTTPS once it’s enforced with HSTS.
强烈建议将 HSTS 标头用于生产应用程序。您通常不希望为本地开发启用它们,因为这意味着您永远无法在本地运行非 HTTPS 应用程序。以类似的方式,您应该仅在您始终打算使用 HTTPS 的站点上使用 HSTS,因为一旦使用 HSTS 强制实施 HTTPS,就很难(有时不可能)关闭 HTTPS。
ASP.NET Core comes with built-in middleware for setting HSTS headers, which is included in some of the default templates automatically. The following listing shows how you can configure the HSTS headers for your application using the HstsMiddleware in Program.cs.
ASP.NET Core 附带用于设置 HSTS 标头的内置中间件,该中间件自动包含在一些默认模板中。下面的清单显示了如何使用 Program.cs 中的 HstsMiddleware 为应用程序配置 HSTS 头文件。
Listing 28.2 Using HstsMiddleware to add HSTS headers to an application
Listing 28.2 使用 HstsMiddleware 向应用程序添加 HSTS 头文件
WebApplicationBuilder builder = WebApplication.CreateBuilder(args);

builder.Services.AddRazorPages();
builder.Services.AddHsts(options =>    #A
{    #A
    options.MaxAge = TimeSpan.FromHours(1);    #A
});    #A

WebApplication app = builder.Build();

if(app.Environment.IsProduction())  #B
{
    app.UseHsts();    #C
}

app.UseStaticFiles();
app.UseRouting();

app.MapRazorPages();

app.Run();
❶ Configures your HSTS header settings and changes the MaxAge from the default of 30 days
配置您的 HSTS 标头设置并将 MaxAge 从默认的更改为 30 天
❷ You shouldn’t use HSTS in local environments.
您不应在本地环境中使用 HSTS。
❸ Adds the HstsMiddleware
新增 HstsMiddleware
The preceding example shows how to change the MaxAge sent in the HSTS header. It’s a good idea to start with a small value initially. Once you’re sure your app’s HTTPS is functioning correctly, you can increase the age for greater security. A typical value for production deployments is one year.
前面的示例显示了如何更改 HSTS 标头中发送的 MaxAge。最好先从较小的值开始。确定应用的 HTTPS 正常运行后,您可以提高使用期限以提高安全性。生产部署的典型值为一年。
WARNING Once client browsers have received the HSTS header, browsers will default to using HTTPS for all requests to your application. That means you must commit to always using HTTPS for as long as you set MaxAge. If you disable HTTPS, browsers will not revert to using HTTP until this duration has expired, so your application may be inaccessible until then if you aren’t listening on HTTPS! You can notify the browser that your app no longer supports HSTS by setting MaxAge to 0.
警告:客户端浏览器收到 HSTS 标头后,浏览器将默认对应用程序的所有请求使用 HTTPS。这意味着,只要您设置了 MaxAge,就必须承诺始终使用 HTTPS。如果您禁用 HTTPS,浏览器在此持续时间到期之前不会恢复为使用 HTTP,因此如果您不监听 HTTPS,您的应用程序在此之前可能无法访问!您可以通过将 MaxAge 设置为 0 来通知浏览器您的应用程序不再支持 HSTS。
One limitation with the HSTS header is that you must make an initial request over HTTPS before you can receive the header. If the browser makes only HTTP requests, the app never has a chance to send the HSTS header, so the browser never knows to use HTTPS. One potential solution is called HSTS preload.
HSTS 标头的一个限制是,必须先通过 HTTPS 发出初始请求,然后才能接收标头。如果浏览器仅发出 HTTP 请求,则应用程序永远没有机会发送 HSTS 标头,因此浏览器永远不知道使用 HTTPS。一种可能的解决方案称为 HSTS 预加载。
HSTS preload isn’t part of the HSTS specification, but it’s supported by all modern browsers. Preload bakes your HSTS header into the browser so that the browser knows it should make only HTTPS requests to your site. That removes the “first request” problem entirely, but be aware that HSTS preload commits you to HTTPS forever, as it can’t easily be undone.
HSTS 预加载不是 HSTS 规范的一部分,但所有现代浏览器都支持它。Preload 将您的 HSTS 标头烘焙到浏览器中,以便浏览器知道它应该只向您的网站发出 HTTPS 请求。这完全消除了“第一个请求”问题,但请注意,HSTS 预加载会永久提交您到 HTTPS,因为它不能轻易撤消。
Once you’re comfortable with your application’s HTTPS configuration, you can prepare your app for HSTS preload by configuring an HSTS header that
一旦您对应用程序的 HTTPS 配置感到满意,就可以通过配置 HSTS 标头来为 HSTS 预加载准备应用程序,该标头
• Has a MaxAge of at least one year, though two years are recommended
MaxAge 至少为一年,但建议为两年
• Has the includeSubDomains directive
具有 includeSubDomains 指令
• Has the preload directive
具有 preload 指令
Listing 28.3 shows how you can configure these directives in your app. The listing also shows how to exclude the domain never-https.com so that if you host your app at this domain, HSTS headers won’t be sent. This can be useful for testing purposes.
清单 28.3 展示了如何在应用程序中配置这些指令。该清单还显示了如何排除域 never-https.com,以便在此域中托管应用程序时,不会发送 HSTS 标头。这对于测试目的非常有用。
Listing 28.3 Configuring the application HSTS header for preload
清单 28.3 配置应用程序 HSTS 头文件以进行预加载
builder.Services.AddHsts(options =>
{
    options.Preload = true;    #A
    options.IncludeSubDomains = true;    #B
    options.MaxAge = TimeSpan.FromDays(365);    #C
    options.ExcludedHosts.Add("never-https.com");    #D
});
❶ Sends the preload directive
发送 preload 指令
❷ Sends the includeSubDomains directive
发送 includeSubDomains 指令
❸ You must use a max-age directive of at least one year.
您必须使用至少一年的 max-age 指令。
❹ Don’t send the HSTS header in responses to requests for this domain.
不要发送 HSTS 标头来响应此域的请求。
Once you’ve prepared your application for HSTS preload, you can submit your app for inclusion in the HSTS preload list that ships with modern browsers. Visit the site https://hstspreload.org, confirm that your application meets the requirements, and submit your domain. If all goes well, your domain will be included in a future release of all modern browsers!
为 HSTS 预加载准备应用程序后,您可以提交应用程序以包含在现代浏览器附带的 HSTS 预加载列表中。https://hstspreload.org 访问网站,确认您的申请符合要求,然后提交您的域。如果一切顺利,您的域将包含在所有现代浏览器的未来版本中!
TIP For more details on HSTS and attacks it can mitigate, see Scott Helme’s article “HSTS—The missing link in Transport Layer Security,” at http://mng.bz/5wwa.
提示有关 HSTS 及其可缓解的攻击的更多详细信息,请参阅 Scott Helme 的文章“HSTS — 传输层安全性中缺失的环节”,第 http://mng.bz/5wwa 页。
HSTS is a great option for forcing users to use HTTPS on your website, and if you can use HSTS preload, you can ensure that modern clients never send requests over HTTP. Nevertheless, HSTS preload can take months to enforce, and you won’t always want to take that approach. In the meantime, if a browser makes an initial request over HTTP, it won’t receive the HSTS header and may stay on HTTP! That’s unfortunate, but you can mitigate the problem by redirecting insecure requests to HTTPS immediately.
HSTS 是强制用户在您的网站上使用 HTTPS 的绝佳选择,如果您可以使用 HSTS 预加载,则可以确保现代客户端永远不会通过 HTTP 发送请求。尽管如此,HSTS 预加载可能需要几个月的时间才能执行,并且您并不总是希望采用这种方法。同时,如果浏览器通过 HTTP 发出初始请求,它将不会收到 HSTS 标头,并且可能会停留在 HTTP!这很遗憾,但您可以通过立即将不安全的请求重定向到 HTTPS 来缓解问题。
28.4.2 Redirecting from HTTP to HTTPS with HTTPS redirection middleware
28.4.2 使用 HTTPS 重定向中间件从 HTTP 重定向到 HTTPS
The HstsMiddleware should always be used in conjunction with middleware that redirects all HTTP requests to HTTPS.
HstsMiddleware 应始终与将所有 HTTP 请求重定向到 HTTPS 的中间件结合使用。
TIP It’s possible to apply HTTPS redirection only to specific parts of your application, such as to specific Razor Pages, but I don’t recommend that, as it’s too easy to open a security hole in your application.
提示:可以仅将 HTTPS 重定向应用于应用程序的特定部分,例如特定的 Razor Pages,但我不建议这样做,因为很容易在应用程序中打开安全漏洞。
ASP.NET Core comes with HttpsRedirectionMiddleware, which you can use to enforce HTTPS across your whole app. You add it to the middleware pipeline in Program.cs, and it ensures that any requests that pass through it are secure. If an HTTP request reaches the HttpsRedirectionMiddleware, the middleware immediately short-circuits the pipeline with a redirect to the HTTPS version of the request. The browser then repeats the request using HTTPS instead of HTTP, as shown in figure 28.8.
ASP.NET Core 附带 HttpsRedirectionMiddleware,可用于在整个应用程序中强制实施 HTTPS。您可以将其添加到 Program.cs 中的中间件管道中,并确保通过它的任何请求都是安全的。如果 HTTP 请求到达 HttpsRedirectionMiddleware,中间件会立即通过重定向到请求的 HTTPS 版本来使管道短路。然后,浏览器使用 HTTPS 而不是 HTTP 重复请求,如图 28.8 所示。

Figure 28.8 The HttpsRedirectionMiddleware works with the HstsMiddleware to ensure that all requests after the initial request are always sent over HTTPS.
图 28.8 HttpsRedirectionMiddleware 与 HstsMiddleware 配合使用,以确保初始请求之后的所有请求始终通过 HTTPS 发送。
NOTE Even with HSTS and the HTTPS redirection middleware, there is still an inherent weakness: by default, browsers always make an initial insecure request over HTTP to your app. The only way to prevent this is with HSTS preload, which tells browsers to always use HTTPS.
注意:即使使用 HSTS 和 HTTPS 重定向中间件,仍然存在一个固有的弱点:默认情况下,浏览器总是通过 HTTP 向您的应用程序发出初始不安全的请求。防止这种情况的唯一方法是使用 HSTS 预加载,它告诉浏览器始终使用 HTTPS。
The HttpsRedirectionMiddleware is added in some of the default ASP.NET Core templates. It is typically placed after the error handling and HstsMiddleware, as shown in the following listing. By default, the middleware redirects all HTTP requests to the secure endpoint, using an HTTP 307 Temporary Redirect status code.
HttpsRedirectionMiddleware 已添加到一些默认的 ASP.NET Core 模板中。它通常放在 error handling 和 HstsMiddleware 之后,如下面的清单所示。默认情况下,中间件使用 HTTP 307 临时重定向状态代码将所有 HTTP 请求重定向到安全终端节点。
Listing 28.4 Using HttpsRedirectionMiddleware to enforce HTTPS for an application
列表 28.4 使用 HttpsRedirectionMiddleware 为应用程序强制执行 HTTPS
WebApplicationBuilder builder = WebApplication.CreateBuilder(args);

builder.Services.AddRazorPages();
builder.Services.AddHsts(o => options.MaxAge = TimeSpan.FromHours(1));

WebApplication app = builder.Build();

if(app.Environment.IsProduction())
{
    app.UseHsts();
}

app.UseHttpsRedirection();     #A

app.UseStaticFiles();
app.UseRouting();

app.MapRazorPages();

app.Run();
❶ Adds the HttpsRedirectionMiddleware to the pipeline and redirects all HTTP requests to HTTPS
将 HttpsRedirectionMiddleware 添加到管道并将所有 HTTP 请求重定向到 HTTPS
The HttpsRedirectionMiddleware automatically redirects HTTP requests to the first configured HTTPS endpoint for your application. If your application isn’t configured for HTTPS, the middleware won’t redirect and instead logs a warning:
HttpsRedirectionMiddleware 会自动将 HTTP 请求重定向到应用程序的第一个配置的 HTTPS 终结点。如果您的应用程序未配置 HTTPS,则中间件不会重定向,而是会记录警告:
warn: Microsoft.AspNetCore.HttpsPolicy.HttpsRedirectionMiddleware[3]
      Failed to determine the https port for redirect.
If you want the middleware to redirect to a different port than Kestrel knows about, you can configure that by setting the ASPNETCORE_HTTPS_PORT environment variable. This is sometimes necessary if you’re using a reverse proxy, and it can be set in alternative ways, as described in Microsoft’s “Enforce HTTPS in ASP.NET Core” documentation: http://mng.bz/6DDA.
如果您希望中间件重定向到 Kestrel 所知道的不同端口,您可以通过设置 ASPNETCORE_HTTPS_PORT 环境变量来配置它。如果您使用的是反向代理,这有时是必需的,并且可以以其他方式进行设置,如 Microsoft 的“在 ASP.NET Core 中强制实施 HTTPS”文档中所述:http://mng.bz/6DDA。
SSL/TLS offloading, header forwarding, and detecting secure requests
SSL/TLS 卸载、标头转发和检测安全请求At the start of section 28.1 I encouraged you to consider terminating HTTPS requests at a reverse proxy. That way, the user uses HTTPS to talk to the reverse proxy, and the reverse proxy talks to your app using HTTP. With this setup, your users are protected, but your app doesn’t have to deal with TLS certificates itself.
在第 28.1 节开始时,我鼓励您考虑在反向代理上终止 HTTPS 请求。这样,用户使用 HTTPS 与反向代理通信,而反向代理使用 HTTP 与你的应用通信。通过此设置,您的用户会受到保护,但您的应用程序不必自行处理 TLS 证书。For the HttpsRedirectionMiddleware to work correctly, Kestrel needs some way of knowing whether the original request that the reverse proxy received was over HTTP or HTTPS. The reverse proxy communicates to your app over HTTP, so Kestrel can’t figure that out without extra help.
为了使 HttpsRedirectionMiddleware 正常工作,Kestrel 需要某种方式来了解反向代理收到的原始请求是通过 HTTP 还是 HTTPS。反向代理通过 HTTP 与您的应用程序通信,因此如果没有额外的帮助,Kestrel 无法解决这个问题。The standard approach used by most reverse proxies (such as IIS, NGINX, and HAProxy) is to add headers to the request before forwarding it to your app. Specifically, a header called X-Forwarded-Proto is added, indicating whether the original request protocol was HTTP or HTTPS.
大多数反向代理(例如 IIS、NGINX 和 HAProxy)使用的标准方法是在将请求转发到应用程序之前向请求添加标头。具体来说,添加了一个名为 X-Forwarded-Proto 的标头,指示原始请求协议是 HTTP 还是 HTTPS。ASP.NET Core includes ForwardedHeadersMiddleware to look for this header (and others) and update the request accordingly, so your app treats a request that was originally secured by HTTPS as secure for all intents and purposes.
ASP.NET Core 包含 ForwardedHeadersMiddleware 来查找此标头(和其他标头)并相应地更新请求,因此您的应用会将最初由 HTTPS 保护的请求视为对所有 intent 和目的都是安全的。If you’re using IIS with the UseIisIntegration() extension, the header forwarding is handled for you automatically. If you’re using a different reverse proxy, such as NGINX or HAProxy, you can enable the middleware by setting the environment variable ASPNETCORE_FORWARDEDHEADERS_ENABLED=true, as you saw in chapter 27. Alternatively, you can add the middleware to your application manually, as shown in section 27.3.2.
如果将 IIS 与 UseIisIntegration() 扩展一起使用,则会自动处理标头转发。如果你正在使用不同的反向代理,比如 NGINX 或 HAProxy,你可以通过设置环境变量 ASPNETCORE_FORWARDEDHEADERS_ENABLED=true 来启用中间件,就像你在第 27 章中看到的那样。或者,您可以手动将中间件添加到应用程序中,如 Section 27.3.2 所示。When the reverse proxy forwards a request, the ForwardedHeadersMiddleware looks for the X-Forwarded-Proto header and updates the request details as appropriate. For all subsequent middleware, the request is considered secure. When adding the middleware manually, it’s important that you place ForwardedHeadersMiddleware before the call to UseHsts() or UseHttpsRedirection() so that the forwarded headers are read and the request is marked secure, as appropriate.
当反向代理转发请求时,ForwardedHeadersMiddleware 会查找 X-Forwarded-Proto 标头并根据需要更新请求详细信息。对于所有后续中间件,该请求都被视为安全请求。手动添加中间件时,请务必将 ForwardedHeadersMiddleware 放在调用 UseHsts() 或 UseHttpsRedirection() 之前,以便读取转发的标头并根据需要将请求标记为安全。
Using the HSTS and HTTPS redirection middleware is best practice when you’re building a server-side application such as a Razor Pages app that will always be accessed in the browser. If you’re building an API application. however, a better approach is to not listen for insecure HTTP requests at all!
在构建始终在浏览器中访问的服务器端应用程序(如 Razor Pages 应用)时,最佳做法是使用 HSTS 和 HTTPS 重定向中间件。如果您正在构建 API 应用程序。但是,更好的方法是根本不监听不安全的 HTTP 请求!
28.4.3 Rejecting HTTP requests in API applications
28.4.3 在 API 应用程序中拒绝 HTTP 请求
Browsers have been adding more and more protections, such as the HSTS header, to try to protect users from using insecure HTTP requests. But not all clients are using a web browser. In this section you’ll learn why API applications should generally disable HTTP entirely.
浏览器一直在添加越来越多的保护措施,例如 HSTS 标头,以尝试保护用户免受使用不安全的 HTTP 请求的侵害。但并非所有客户端都使用 Web 浏览器。在本节中,您将了解为什么 API 应用程序通常应该完全禁用 HTTP。
If you’re building an API application, you often can’t rely on requests coming from a browser. Your API application may primarily serve a client-side framework in the browser, but it may also serve mobile applications or provide an API to other backend services. That means you can’t rely on the protections built into web browsers to use HTTPS for your API apps.
如果您正在构建 API 应用程序,则通常不能依赖来自浏览器的请求。您的 API 应用程序可能主要在浏览器中提供客户端框架,但它也可能提供移动应用程序或为其他后端服务提供 API。这意味着您不能依赖 Web 浏览器中内置的保护措施来将 HTTPS 用于 API 应用程序。
On top of that, even if you know all your users are using a browser, the only way to prevent sending all requests over HTTP is to use HSTS preload, as you saw in section 28.4.2. Sending even one request over HTTP can compromise a user, so the safest approach is to listen only for HTTPS requests, not HTTP requests. This is the best option for API apps.
最重要的是,即使您知道所有用户都在使用浏览器,防止通过 HTTP 发送所有请求的唯一方法是使用 HSTS 预加载,如您在 Section 28.4.2 中看到的那样。即使通过 HTTP 发送一个请求也可能危及用户,因此最安全的方法是仅侦听 HTTPS 请求,而不是 HTTP 请求。这是 API 应用程序的最佳选择。
NOTE It would be safest to take this same approach for your browser apps, but unfortunately, browsers currently default to the HTTP versions of apps by default.
注意:对浏览器应用程序采用相同的方法是最安全的,但遗憾的是,浏览器目前默认使用应用程序的 HTTP 版本。
You can disable HTTP requests for your application by setting the URLs for your app to include only https:// requests, using ASPNETCORE_URLS or another approach, as described in chapter 27. Setting
您可以通过使用 ASPNETCORE_URLS 或其他方法将应用程序的 URL 设置为仅包含 https:// 请求来禁用应用程序的 HTTP 请求,如第 27 章所述。设置
ASPNETCORE_URLS=https://*:5001would ensure that your app serves only HTTPS requests on port 5001 and won’t handle HTTP connections at all. This protects your clients, as they can’t incorrectly make HTTP requests, and it may even make things simpler on your side, as you don’t need to add the HTTP redirection middleware.
将确保您的应用程序仅在端口 5001 上提供 HTTPS 请求,并且根本不处理 HTTP 连接。这可以保护你的客户端,因为它们不会错误地发出 HTTP 请求,甚至可能使你的事情变得更简单,因为你不需要添加 HTTP 重定向中间件。
HTTPS is one of the most basic requirements for adding security to your application these days. It can be tricky to set up initially, but once you’re up and running, you can largely forget about it, especially if you’re using SSL/TLS termination at a reverse proxy.
HTTPS 是当今为应用程序添加安全性的最基本要求之一。最初设置可能很棘手,但是一旦您启动并运行,您基本上可以忘记它,尤其是在反向代理上使用 SSL/TLS 终止时。
Unfortunately, most other security practices require rather more vigilance to ensure that you don’t accidentally introduce vulnerabilities into your app as it grows and develops. In the next chapter we’ll look at several common attacks, learn how ASP.NET Core protects you, and see a few things you need to watch out for.
不幸的是,大多数其他安全实践都需要更加警惕,以确保您不会在应用程序的成长和发展过程中意外地将漏洞引入应用程序。在下一章中,我们将介绍几种常见的攻击,了解 ASP.NET Core 如何保护您,并了解您需要注意的一些事项。
28.5 Summary
28.5 总结
HTTPS is used to encrypt your app’s data as it travels from the server to the browser and back. This encryption prevents third parties from seeing or modifying it.
HTTPS 用于加密应用程序的数据,因为它在服务器和浏览器之间传输。此加密可防止第三方查看或修改它。
HTTPS is virtually mandatory for production apps, as modern browsers like Chrome and Firefox mark non-HTTPS apps as explicitly “not secure.”
HTTPS 对于生产应用程序几乎是必需的,因为 Chrome 和 Firefox 等现代浏览器将非 HTTPS 应用程序明确标记为“不安全”。
In production, you can avoid handling the TLS in your app by using SSL/TLS offloading. This is where a reverse proxy uses HTTPS to talk to the browser, but the traffic is unencrypted between your app and the reverse proxy. The reverse proxy could be on the same or a different server, such as IIS or NGINX, or it could be a third-party service, such as Cloudflare.
在生产环境中,您可以通过使用 SSL/TLS 卸载来避免在应用程序中处理 TLS。这是反向代理使用 HTTPS 与浏览器通信,但应用与反向代理之间的流量未加密的位置。反向代理可以位于相同或不同的服务器上,例如 IIS 或 NGINX,也可以是第三方服务,例如 Cloudflare。
You can use the ASP.NET Core developer certificate or the IIS express developer certificate to enable HTTPS during development. This can’t be used for production, but it’s sufficient for testing locally. You must run dotnet dev-certs https --trust when you first install the .NET SDK to trust the certificate.
在开发过程中,您可以使用 ASP.NET Core 开发人员证书或 IIS Express 开发人员证书来启用 HTTPS。这不能用于生产,但足以在本地进行测试。首次安装 .NET SDK 时,必须运行 dotnet dev-certs https --trust 才能信任证书。
Kestrel is the default web server in ASP.NET Core. It is responsible for reading and writing data from and to the network, parsing the bytes based on the underlying HTTP and network protocols and converting from raw bytes to .NET objects you can use in your apps.
Kestrel 是 ASP.NET Core 中的默认 Web 服务器。它负责从网络读取和写入数据,根据底层 HTTP 和网络协议解析字节,以及将原始字节转换为可在应用程序中使用的 .NET 对象。
You can configure an HTTPS certificate for Kestrel in production using the Kestrel:Certificates:Default configuration section. This does not require any code changes to your application; Kestrel automatically loads the certificate when your app starts and uses it to serve HTTPS requests.
您可以使用 Kestrel:Certificates:Default 配置部分在生产中为 Kestrel 配置 HTTPS 证书。这不需要对应用程序进行任何代码更改;Kestrel 会在您的应用程序启动时自动加载证书,并使用它来处理 HTTPS 请求。
You can use the HstsMiddleware to set HSTS headers for your application to ensure that the browser always sends HTTPS requests to your app instead of HTTP requests. HSTS can be enforced only when an initial HTTPS request is made to your app, so it’s best used in conjunction with HTTP to HTTPS redirection.
你可以使用 HstsMiddleware 为你的应用设置 HSTS 头,确保浏览器总是向你的应用发送 HTTPS 请求,而不是 HTTP 请求。只有在向应用程序发出初始 HTTPS 请求时,才能强制执行 HSTS,因此最好将其与 HTTP 到 HTTPS 重定向结合使用。
You can enable HSTS preload for your application to ensure that HTTP requests from browsers are never sent and are always upgraded to HTTPS. You must configure your app as shown in listing 28.3, deploy your app with a TLS certificate, and register your app at the URL https://hstspreload.org. This will schedule your app to be included in browsers’ built-in list of HTTPS only sites.
您可以为您的应用程序启用 HSTS 预加载,以确保来自浏览器的 HTTP 请求永远不会发送,并且始终升级到 HTTPS。您必须按照清单 28.3 中所示配置您的应用程序,使用 TLS 证书部署您的应用程序,并在 URL https://hstspreload.org 处注册您的应用程序。这将安排您的应用程序包含在浏览器的内置仅限 HTTPS 站点列表中。
You can enforce HTTPS for your whole app using the HttpsRedirectionMiddleware. This will redirect any HTTP requests to the HTTPS version of endpoints.
你可以使用 HttpsRedirectionMiddleware 为整个应用程序强制实施 HTTPS。这会将任何 HTTP 请求重定向到终端节点的 HTTPS 版本。
If you’re building an API application, you should avoid exposing your application over HTTP entirely and use only HTTPS. Mobile and other nonbrowser clients don’t have protections such as HSTS, so there’s no safe way to support both HTTP and HTTPS. Disable HTTP for your app by listening only on https:// URLs, such as by setting ASPNETCORE_URLS=https://*:5001.
如果您正在构建 API 应用程序,则应避免完全通过 HTTP 公开应用程序,而仅使用 HTTPS。移动客户端和其他非浏览器客户端没有 HSTS 等保护措施,因此没有安全的方法可以同时支持 HTTP 和 HTTPS。通过仅侦听 https:// URL 来禁用应用程序的 HTTP,例如通过设置 ASPNETCORE_URLS=https://*:5001。