27 Publishing and deploying your application
27 发布和部署应用程序
This chapter covers
本章涵盖
• Publishing an ASP.NET Core application
发布 ASP.NET Core 应用程序
• Hosting an ASP.NET Core application in IIS
在 IIS中托管 ASP.NET Core 应用程序
• Customizing the URLs for an ASP.NET Core app
自定义 ASP.NET Core 应用程序的 URL
We’ve covered a vast amount of ground so far in this book. We’ve gone over the basic mechanics of building an ASP.NET Core application, such as configuring dependency injection (DI), loading app settings, and building a middleware pipeline. We’ve looked at building APIs using minimal APIs and web API controllers. We’ve looked at the server-rendered UI side, using Razor templates and layouts to build an HTML response. And we’ve looked at higher-level abstractions, such as Entity Framework Core (EF Core) and ASP.NET Core Identity, that let you interact with a database and add users to your application. In this chapter we’re taking a slightly different route. Instead of looking at ways to build bigger and better applications, we’ll focus on what it means to deploy your application so that users can access it.
到目前为止,我们在这本书中已经涵盖了大量的内容。我们已经介绍了构建 ASP.NET Core 应用程序的基本机制,例如配置依赖项注入 (DI)、加载应用程序设置和构建中间件管道。我们已经研究了使用最少的 API 和 Web API 控制器来构建 API。我们已经了解了服务器呈现的 UI 端,使用 Razor 模板和布局来构建 HTML 响应。我们还研究了更高级别的抽象,例如 Entity Framework Core (EF Core) 和 ASP.NET Core Identity,它们允许您与数据库交互并将用户添加到您的应用程序。在本章中,我们采取了略有不同的路线。我们不会研究构建更大、更好的应用程序的方法,而是重点介绍部署应用程序以便用户可以访问它意味着什么。
We’ll start by looking again at the ASP.NET Core hosting model in section 27.1 and examining why you might want to host your application behind a reverse proxy instead of exposing your app directly to the internet. I show you the difference between running an ASP.NET Core app in development using dotnet run and publishing the app for use on a remote server. Finally, I describe some of the options available when you’re deciding how and where to deploy your app.
首先,我们将再次查看第 27.1 节中的 ASP.NET Core 托管模型,并研究为什么您可能希望将应用程序托管在反向代理后面,而不是直接向 Internet 公开应用程序。我将向您展示使用 dotnet run 在开发中运行 ASP.NET Core 应用程序与发布应用程序以在远程服务器上使用之间的区别。最后,我将介绍在决定如何以及在何处部署应用程序时可用的一些选项。
In section 27.2 I show you how to deploy your app to one such option: a Windows server running Internet Information Services (IIS). This is a typical deployment scenario for many developers who are familiar with the legacy .NET Framework version of ASP.NET, so it acts as a useful case study, but it’s certainly not the only possibility. I don’t go into all the technical details of configuring the venerable IIS system; instead, I show you the bare minimum required to get it up and running. If your focus is cross-platform development, don’t worry, because I don’t dwell on IIS for too long.
在第 27.2 节中,我将向您展示如何将您的应用程序部署到这样一个选项:运行 Internet Information Services (IIS) 的 Windows 服务器。对于许多熟悉旧版 ASP.NET 的 .NET Framework 版本的开发人员来说,这是一个典型的部署方案,因此它是一个有用的案例研究,但肯定不是唯一的可能性。我不会深入介绍配置古老的 IIS 系统的所有技术细节;相反,我向您展示了启动和运行它所需的最低限度。如果您的重点是跨平台开发,请不要担心,因为我不会在 IIS 上停留太久。
In section 27.3 I provide an introduction to hosting on Linux. You’ll see how it differs from hosting applications on Windows, learn the changes you need to make to your apps, and find out about some gotchas to look out for. I describe how reverse proxies on Linux differ from IIS and point you to some resources you can use to configure your environments rather than give exhaustive instructions in this book.
在 Section 27.3 中,我介绍了在 Linux 上托管。您将了解它与在 Windows 上托管应用程序有何不同,了解您需要对应用程序进行的更改,并了解一些需要注意的问题。我将介绍 Linux 上的反向代理与 IIS 的不同之处,并向您指出一些可用于配置环境的资源,而不是在本书中提供详尽的说明。
If you’re not hosting your application using IIS, you’ll likely need to set the URL that your ASP.NET Core app is using when you deploy your application. In section 27.4 I show two approaches: using the special ASPNETCORE_URLS environment variable and using command-line arguments. Although this task generally is not a problem during development, setting the correct URLs for your app is critical when you need to deploy it.
如果不使用 IIS 托管应用程序,则可能需要设置 ASP.NET Core 应用在部署应用程序时使用的 URL。在 Section 27.4 中,我展示了两种方法:使用特殊的 ASPNETCORE_URLS 环境变量和使用命令行参数。尽管此任务在开发过程中通常不是问题,但当您需要部署应用程序时,为应用程序设置正确的 URL 至关重要。
This chapter covers a relatively wide array of topics, all related to deploying your app. But before we get into the nitty-gritty, I’ll go over the hosting model for ASP.NET Core so that we’re on the same page. This is significantly different from the hosting model of the legacy version of ASP.NET, so if you’re coming from that background, it’s best to try to forget what you know!
本章涵盖了相对广泛的主题,所有主题都与部署应用程序有关。但在我们进入细节之前,我将介绍 ASP.NET Core 的托管模型,以便我们达成共识。这与旧版 ASP.NET 的托管模式有很大不同,因此如果您来自该背景,最好尝试忘记您所知道的!
27.1 Understanding the ASP.NET Core hosting model
27.1 了解 ASP.NET Core 托管模型
If you think back to part 1 of this book, you may remember that we discussed the hosting model of ASP.NET Core. ASP.NET Core applications are, essentially, console applications. They have a static void Main function that is the entry point for the application, as a standard .NET console app would.
如果您回想一下本书的第 1 部分,您可能还记得我们讨论了 ASP.NET Core 的托管模型。ASP.NET Core 应用程序本质上是控制台应用程序。它们具有一个静态 void Main 函数,该函数是应用程序的入口点,就像标准 .NET 控制台应用程序一样。
NOTE The entry point for programs using top-level statements is automatically generated by the compiler. It’s not called Main (it typically has an “invalid” name, such as <Main>$ ), but otherwise it has the same signature as the classic static void Main function you would write by hand.
注意使用 top-level 语句的程序的入口点由编译器自动生成。它不称为 Main (它通常具有“无效”名称,例如 <Main>$ ),但除此之外,它与你手动编写的经典静态 void Main 函数具有相同的签名。
What makes a .NET app an ASP.NET Core app is that it runs a web server, typically Kestrel, inside the console app process. Kestrel provides the HTTP functionality to receive requests and return responses to clients. Kestrel passes any requests it receives to the body of your application and generates a response, as shown in figure 27.1. This hosting model decouples the server and reverse proxy from the application itself so that the same application can run unchanged in multiple environments.
使 .NET 应用程序成为 ASP.NET Core 应用程序的原因是它在控制台应用程序进程中运行 Web 服务器,通常是 Kestrel。Kestrel 提供 HTTP 功能来接收请求并将响应返回给客户端。Kestrel 将其收到的任何请求传递到应用程序的主体并生成响应,如图 27.1 所示。此托管模型将服务器和反向代理与应用程序本身分离,以便同一应用程序可以在多个环境中保持不变地运行。
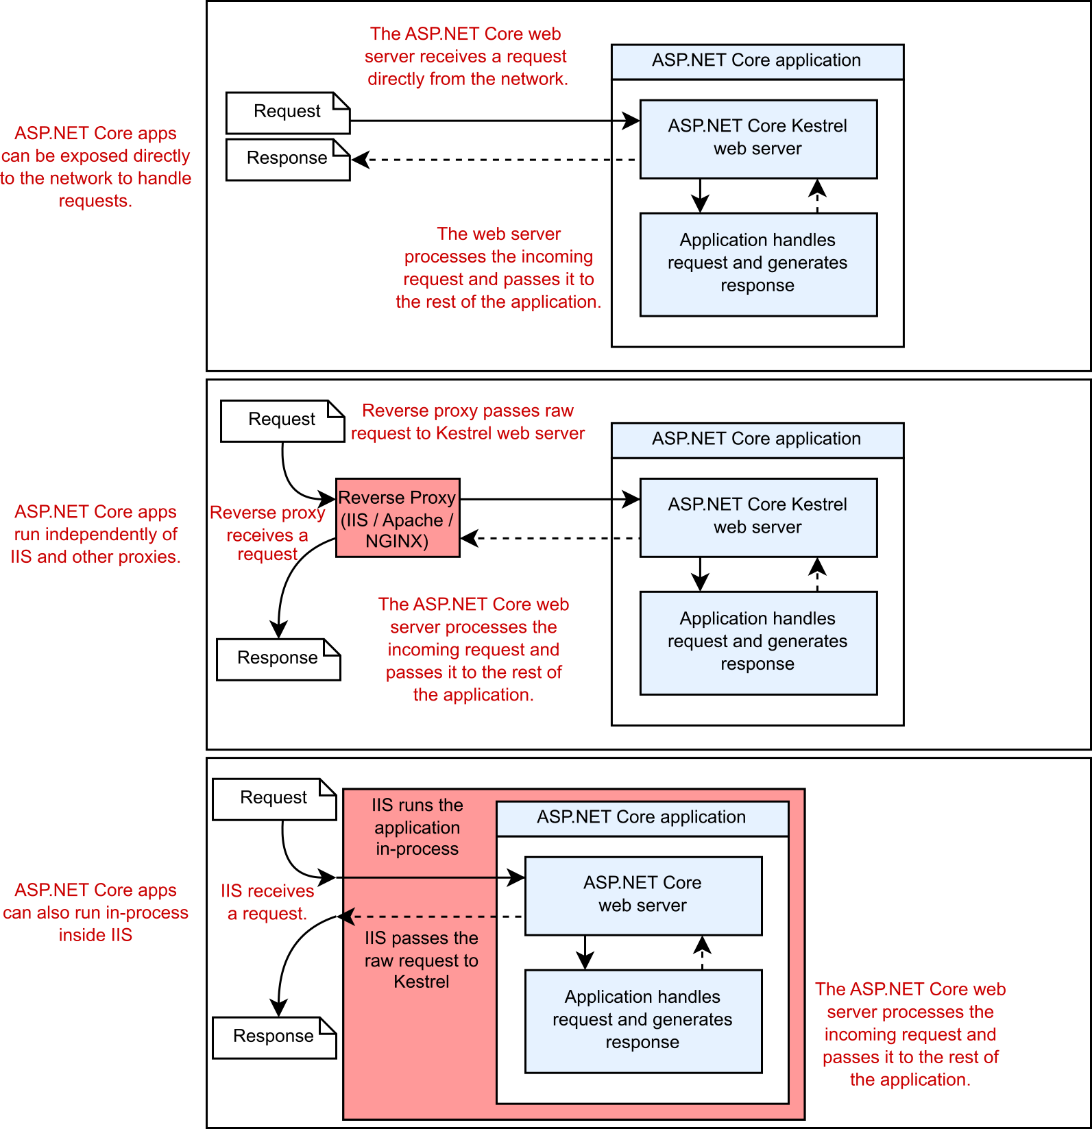
Figure 27.1 The hosting model for ASP.NET Core gives flexibility. The same application can run exposed directly to the network, behind various reverse proxies without modification, and even inside the IIS process.
图 27.1 ASP.NET Core 的托管模型提供了灵活性。同一个应用程序可以直接暴露在网络中,无需修改即可在各种反向代理后面运行,甚至可以在 IIS 进程内部运行。
In this book we’ve focused on the “application” part of figure 27.1—the ASP.NET Core application itself—but the reality is that sometimes you’ll want to place your ASP.NET Core apps behind a reverse proxy, such as IIS in Windows or NGINX or Apache in Linux. The reverse proxy is the program that listens for HTTP requests from the internet and then makes requests to your app as though the request came from the internet directly.
在本书中,我们重点介绍了图 27.1 的 “应用程序” 部分 — ASP.NET Core 应用程序本身 — 但现实情况是,有时您希望将 ASP.NET Core 应用程序放在反向代理后面,例如 Windows 中的 IIS,Linux 中的 NGINX 或 Apache。反向代理是侦听来自 Internet 的 HTTP 请求,然后向应用程序发出请求的程序,就像请求直接来自 Internet 一样。
DEFINITION A reverse proxy is software that’s responsible for receiving requests and forwarding them to the appropriate web server. The reverse proxy is exposed directly to the internet, whereas the underlying web server is exposed only to the proxy.
定义:反向代理是负责接收请求并将其转发到适当的 Web 服务器的软件。反向代理直接向 Internet 公开,而底层 Web 服务器仅向代理公开。
If you’re running your application using a Platform as a Service (PaaS) offering such as Azure App Service, you’re using a reverse proxy there too—one that is managed by Azure. Using a reverse proxy has many benefits:
如果使用平台即服务 (PaaS) 产品(如 Azure 应用服务)运行应用程序,则也会使用由 Azure 管理的反向代理。使用反向代理有很多好处:
• Security—Reverse proxies are specifically designed to be exposed to malicious internet traffic, so they’re typically extremely well-tested and battle-hardened.
安全性 - 反向代理专门设计用于暴露于恶意 Internet 流量,因此它们通常经过极其严格的测试和战斗。
• Performance—You can configure reverse proxies to provide performance improvements by aggressively caching responses to requests.
性能 - 您可以配置反向代理,通过主动缓存对请求的响应来提高性能。
• Process management—An unfortunate reality is that apps sometimes crash. Some reverse proxies can act as monitors/schedulers to ensure that if an app crashes, the proxy can automatically restart it.
进程管理 - 一个不幸的现实是,应用程序有时会崩溃。一些反向代理可以充当监视器/调度程序,以确保如果应用程序崩溃,代理可以自动重新启动它。
• Support for multiple apps—It’s common to have multiple apps running on a single server. Using a reverse proxy makes it easier to support this scenario by using the host name of a request to decide which app should receive the request.
支持多个应用程序 - 在单个服务器上运行多个应用程序是很常见的。使用反向代理可以更轻松地支持此方案,方法是使用请求的主机名来决定哪个应用应接收请求。
I don’t want to make it seem like using a reverse proxy is all sunshine and roses. There are some downsides:
我不想让使用反向代理看起来全是阳光和玫瑰。有一些缺点:
• Complexity—One of the biggest complaints is how complex reverse proxies can be. If you’re managing the proxy yourself (as opposed to relying on a PaaS implementation), there can be lots of proxy-specific pitfalls to look out for.
复杂性 - 最大的抱怨之一是反向代理的复杂程度。如果您自己管理代理(而不是依赖 PaaS 实现),则可能会有许多特定于代理的陷阱需要注意。
• Inter-process communication—Most reverse proxies require two processes: a reverse proxy and your web app. Communicating between the two is often slower than if you directly exposed your web app to requests from the internet.
进程间通信 - 大多数反向代理需要两个进程:反向代理和 Web 应用程序。两者之间的通信通常比直接将 Web 应用程序公开给来自 Internet 的请求要慢。
• Restricted features—Not all reverse proxies support all the same features as an ASP.NET Core app. For example, Kestrel supports HTTP/2, but if your reverse proxy doesn’t, you won’t see the benefits.
受限功能 - 并非所有反向代理都支持与 ASP.NET Core 应用程序相同的所有功能。例如,Kestrel 支持 HTTP/2,但如果您的反向代理不支持,您将看不到好处。
Whether you choose to use a reverse proxy or not, when the time comes to host your app, you can’t copy your code files directly to the server. First, you need to publish your ASP.NET Core app to optimize it for production. In section 27.1.1 we’ll look at building an ASP.NET Core app so that it can be run on your development machine, compared with publishing it so that it can be run on a server.
无论您是否选择使用反向代理,当需要托管您的应用程序时,您都无法将代码文件直接复制到服务器。首先,您需要发布 ASP.NET Core 应用程序以针对生产环境进行优化。在 Section 27.1.1 中,我们将介绍如何构建 ASP.NET Core 应用程序,使其可以在开发计算机上运行,而不是发布应用程序,使其可以在服务器上运行。
27.1.1 Running vs. publishing an ASP.NET Core app
27.1.1 运行与发布 ASP.NET Core 应用程序
One of the key changes in ASP.NET Core from previous versions of ASP.NET is making it easy to build apps using your favorite code editors and integrated development environments (IDEs). Previously, Visual Studio was required for ASP.NET development, but with the .NET command-line interface (CLI), you can build apps with the tools you’re comfortable with on any platform.
ASP.NET Core 与以前的 ASP.NET 版本相比,其中一项关键变化是,使用您最喜欢的代码编辑器和集成开发环境 (IDE) 可以轻松构建应用程序。以前,ASP.NET 开发需要 Visual Studio,但借助 .NET 命令行界面 (CLI),您可以使用熟悉的工具在任何平台上构建应用程序。
As a result, whether you build using Visual Studio or the .NET CLI, the same tools are being used under the hood. Visual Studio provides an additional graphical user interface (GUI), functionality, and wrappers for building your app, but it (mostly) executes the same commands as the .NET CLI behind the scenes.
因此,无论您是使用 Visual Studio 还是 .NET CLI 进行构建,都在后台使用相同的工具。Visual Studio 提供了用于构建应用程序的额外图形用户界面 (GUI)、功能和包装器,但它(主要)在后台执行与 .NET CLI 相同的命令。
As a refresher, you’ve used four main .NET CLI commands so far to build your apps:
作为复习,到目前为止,您已经使用了四个主要的 .NET CLI 命令来构建您的应用程序:
• dotnet new—Creates an ASP.NET Core application from a template
dotnet new - 从模板创建 ASP.NET Core 应用程序
• dotnet restore—Downloads and installs any referenced NuGet packages for your project
dotnet restore - 下载并安装项目的任何引用的 NuGet 包
• dotnet build—Compiles and builds your project
dotnet build - 编译和生成项目
• dotnet run—Executes your app so you can send requests to it
dotnet run - 执行应用程序,以便您可以向其发送请求
If you’ve ever built a .NET application, whether it’s a legacy ASP.NET app or a .NET Framework console app, you’ll know that the output of the build process is written to the bin folder by default. The same is true for ASP.NET Core applications.
如果您曾经构建过 .NET 应用程序,无论是旧版 ASP.NET 应用程序还是 .NET Framework 控制台应用程序,您都会知道默认情况下,构建过程的输出会写入 bin 文件夹。ASP.NET Core 应用程序也是如此。
If your project compiles successfully when you call dotnet build, the .NET CLI writes the artifacts to a bin folder in your project’s directory. Inside this bin folder are several files required to run your app, including a .dll file that contains the code for your application. Figure 27.2 shows the output of the bin folder for a basic ASP.NET Core application.
如果在调用 dotnet build 时项目编译成功,则 .NET CLI 会将项目写入项目目录中的 bin 文件夹。此 bin 文件夹中包含运行应用程序所需的多个文件,包括一个包含应用程序代码的 .dll 文件。图 27.2 显示了基本 ASP.NET Core 应用程序的 bin 文件夹的输出。
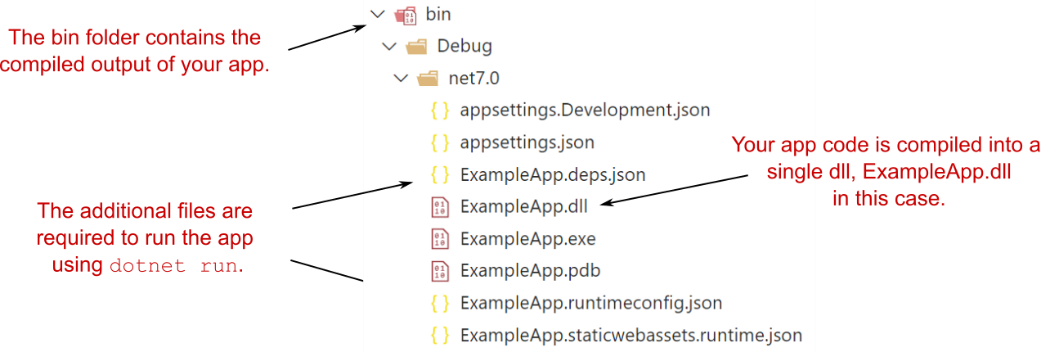
Figure 27.2 The bin folder for an ASP.NET Core app after running dotnet build. The application is compiled into a single .dll file, ExampleApp.dll.
图 27.2 运行 dotnet build 后 ASP.NET Core 应用的 bin 文件夹。该应用程序被编译成一个 .dll 文件 ExampleApp.dll。
NOTE In Windows you also have an executable .exe file, ExampleApp.exe. This is a simple wrapper file for convenience that makes it easier to run the application contained in ExampleApp.dll.
注意:在 Windows 中,您还有一个可执行的 .exe 文件 ExampleApp.exe。为方便起见,这是一个简单的包装文件,可以更轻松地运行 ExampleApp.dll 中包含的应用程序。
When you call dotnet run in your project folder (or run your application using Visual Studio), the .NET CLI uses the .dll to run your application. But this file doesn’t contain everything you need to deploy your app.
在项目文件夹中调用 dotnet run (或使用 Visual Studio 运行应用程序) 时,.NET CLI 会使用.dll运行应用程序。但此文件并不包含部署应用程序所需的一切。
To host and deploy your app on a server, you first need to publish it. You can publish your ASP.NET Core app from the command line using the dotnet publish command, which builds and packages everything your app needs to run. The following command packages the app from the current directory and builds it to a subfolder called publish. I’ve used the Release configuration instead of the default Debug configuration so that the output will be fully optimized for running in production:
要在服务器上托管和部署您的应用程序,您首先需要发布它。可以使用 dotnet publish 命令从命令行发布 ASP.NET Core 应用,该命令将生成和打包应用运行所需的一切。以下命令将当前目录中的应用程序打包,并将其构建到名为 publish 的子文件夹中。我使用了 Release 配置而不是默认的 Debug 配置,以便输出将得到全面优化,以便在生产环境中运行:
dotnet publish --output publish --configuration ReleaseTIP Always use the Release configuration when publishing your app for deployment. This ensures that the compiler generates optimized code for your app.
提示:在发布应用程序进行部署时,请始终使用 Release (发布) 配置。这可确保编译器为您的应用生成优化的代码。
Once the command completes, you’ll find your published application in the publish folder, as shown in figure 27.3.
命令完成后,您将在 publish 文件夹中找到已发布的应用程序,如图 27.3 所示。
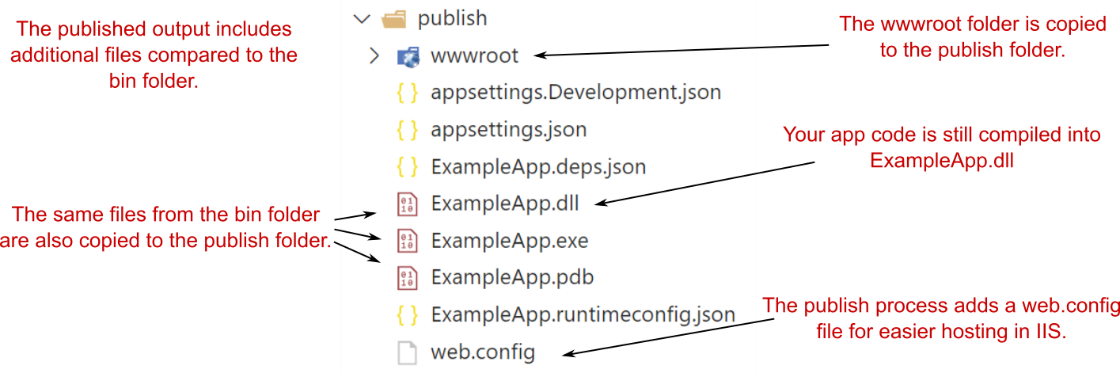
Figure 27.3 The publish folder for the app after running dotnet publish. The app is still compiled into a single .dll file, but all the additional files, such as wwwroot, are also copied to the output.
图 27.3 运行 dotnet publish 后应用程序的 publish 文件夹。该应用程序仍编译为单个 .dll 文件,但所有其他文件(如 wwwroot)也会复制到输出中。
As you can see, the ExampleApp.dll file is still there, along with some additional files. Most notably, the publish process has copied across the wwwroot folder of static files. When running your application locally with dotnet run, the .NET CLI uses these files from your application’s project folder directly. Running dotnet publish copies the files to the output directory, so they’re included when you deploy your app to a server.
如您所见,ExampleApp.dll 文件仍然存在,还有一些其他文件。最值得注意的是,发布过程已复制静态文件的 wwwroot 文件夹。使用 dotnet run 在本地运行应用程序时,.NET CLI 会直接使用应用程序项目文件夹中的这些文件。运行 dotnet publish 会将文件复制到输出目录,以便在将应用部署到服务器时包含这些文件。
If your first instinct is to try running the application in the publish folder using the dotnet run command you already know and love, you’ll be disappointed. Instead of seeing the application starting up, you’ll see a somewhat confusing message: Couldn’t find a project to run.
如果您的第一反应是尝试使用您已经熟悉和喜爱的 dotnet run 命令在 publish 文件夹中运行应用程序,那么您会感到失望。您将看到一条有点令人困惑的消息,而不是看到应用程序启动:Couldn't find a project to run。
To run a published application, you need to use a slightly different command. Instead of calling dotnet run, you must pass the path to your application’s .dll file to the dotnet command. If you’re running the command from the publish folder, for the example app in figure 27.3, it would look something like
要运行已发布的应用程序,您需要使用略有不同的命令。必须将应用程序的 .dll 文件的路径传递给 dotnet 命令,而不是调用 dotnet run。如果您从 publish 文件夹运行命令,对于图 27.3 中的示例应用程序,它看起来类似于
dotnet ExampleApp.dllThis is the command that your server will run when running your application in production.
这是您的服务器在生产环境中运行应用程序时将运行的命令。
TIP You can also use the dotnet exec command to achieve the same thing, such as dotnet exec ExampleApp.dll. This makes some advanced runtime options available, as described in the docs at http://mng.bz/x4d8.
提示:您还可以使用 dotnet exec 命令来实现相同的作,例如 dotnet exec ExampleApp.dll。这使得一些高级运行时选项可用,如 http://mng.bz/x4d8 中的文档中所述。
When you’re developing, the dotnet run command does a whole load of work to make things easier on you. It makes sure that your application is built, looks for a project file in the current folder, works out where the corresponding .dlls will be (in the bin folder), and finally runs your app.
在开发时,dotnet run 命令会执行大量工作,以简化您的作。它确保您的应用程序已构建,在当前文件夹中查找项目文件,计算出相应的 .dll 将位于何处(在 bin 文件夹中),最后运行您的应用程序。
In production, you don’t need any of this extra work. Your app is already built; it only needs to be run. The dotnet <dll> syntax does this alone, so your app starts much faster.
在生产环境中,您不需要任何额外的工作。您的应用程序已构建完毕;它只需要运行。dotnet <dll>语法单独执行此作,因此您的应用启动速度要快得多。
NOTE The dotnet command used to run your published application is part of the .NET Runtime. The (identically named) dotnet command used to build and run your application during development is part of the .NET software development kit (SDK).
注意:用于运行已发布应用程序的 dotnet 命令是 .NET 运行时的一部分。在开发过程中用于生成和运行应用程序的(同名)dotnet 命令是 .NET 软件开发工具包 (SDK) 的一部分。
Framework-dependent deployments vs. self-contained deployments
依赖于框架的部署与独立部署:.NET Core applications can be deployed in two ways: runtime-dependent deployments (RDD) and self-contained deployments (SCD).
.NET Core 应用程序可以通过两种方式进行部署:依赖于运行时的部署 (RDD) 和独立部署 (SCD)。By default, you’ll use an RDD. This relies on the .NET 7 runtime being installed on the target machine that runs your published app, but you can run your app on any platform—Windows, Linux, or macOS—without having to recompile.
默认情况下,您将使用 RDD。这依赖于在运行已发布应用程序的目标计算机上安装的 .NET 7 运行时,但您可以在任何平台(Windows、Linux 或 macOS)上运行您的应用程序,而无需重新编译。By contrast, an SCD contains all the code required to run your app, so the target machine doesn’t need to have .NET 7 installed. Instead, publishing your app packages up the .NET 7 runtime with your app’s code and libraries.
相比之下,SCD 包含运行应用程序所需的所有代码,因此目标计算机不需要安装 .NET 7。相反,将应用与应用的代码和库一起发布到 .NET 7 运行时中。Each approach has its pros and cons, but in most cases I tend to create RDDs. The final size of RDDs is much smaller, as they contain only your app code instead of the whole .NET 7 framework, which SCDs contain. Also, you can deploy your RDD apps to any platform, whereas SCDs must be compiled specifically for the target machine’s operating system, such as Windows 10 64-bit or Red Hat Enterprise Linux 64-bit.
每种方法都有其优点和缺点,但在大多数情况下,我倾向于创建 RDD。RDD 的最终大小要小得多,因为它们仅包含您的应用程序代码,而不是 SCD 包含的整个 .NET 7 框架。此外,您可以将 RDD 应用程序部署到任何平台,而 SCD 必须专门为目标计算机的作系统(例如 Windows 10 64 位或 Red Hat Enterprise Linux 64 位)进行编译。That said, SCDs are excellent for isolating your application from dependencies on the hosting machine. SCDs don’t rely on the version of .NET installed on a hosting provider, so you can (for example) use preview versions of .NET in Azure App Service without needing the preview version to be supported.
也就是说,SCD 非常适合将您的应用程序与主机上的依赖项隔离开来。SCD 不依赖于托管提供商上安装的 .NET 版本,因此你可以(例如)在 Azure 应用服务中使用 .NET 的预览版,而无需支持预览版。Another advantage of SCDs is for regulated industries that require certification or procedure to change applications. In RDDs (such as in Azure App Service) the underlying runtime may be patched at any time without your intervention, potentially leading to noncompliance. With SCDs, your app contains a fixed runtime and can be considered an immutable snapshot of your app. Of course, that means you must make sure to patch the runtime of your SCDs manually, performing regular deployments. Patch versions of the .NET runtime are generally released every month, so make sure to plan for at least monthly releases of your SCD apps.
SCD 的另一个优势是适用于需要认证或程序来更改应用程序的受监管行业。在 RDD 中(例如在 Azure 应用服务中),可能随时修补基础运行时,而无需您的干预,这可能会导致不合规。使用 SCD 时,您的应用程序包含固定的运行时,并且可以被视为应用程序的不可变快照。当然,这意味着您必须确保手动修补 SCD 的运行时,并执行定期部署。.NET 运行时的补丁版本通常每个月发布一次,因此请确保至少每月发布一次 SCD 应用程序。In this book I discuss RDDs only for simplicity, but if you want to create an SCD, provide a runtime identifier (in this case, Windows 10 64-bit) when you publish your app:
在本书中,我讨论 RDD 只是为了简单起见,但如果您想创建一个 SCD,请在发布应用程序时提供运行时标识符(在本例中为 Windows 10 64 位):
dotnet publish -c Release -r win10-x64 --self-contained -o publish_folderThe output will contain an .exe file, which is your application, and a ton of .dlls (about 100 MB of .dlls for a default sample app), which are the .NET 7 framework. You need to deploy this whole folder to the target machine to run your app. Note that you need to publish for a specific operating system and architecture. The list of available runtime identifiers is available in the documentation at http://mng.bz/Aolp.
输出将包含一个 .exe 文件(即您的应用程序)和大量 .dll(默认示例应用程序约为 100 MB 的 .dll),即 .NET 7 框架。您需要将整个文件夹部署到目标计算机才能运行您的应用程序。请注意,您需要针对特定的作系统和架构进行发布。可用运行时标识符的列表可在 http://mng.bz/Aolp 的文档中找到。In .NET 7 it’s possible to trim these assemblies during the publish process, but this comes with risks in some scenarios. You can also bundle this folder into a single file automatically for easier deployments. For more details, see Microsoft’s “.NET application publishing overview” documentation at https://learn.microsoft.com/dotnet/core/deploying.
在 .NET 7 中,可以在发布过程中剪裁这些程序集,但在某些情况下,这会带来风险。您还可以自动将此文件夹捆绑到一个文件中,以便于部署。有关更多详细信息,请参阅 https://learn.microsoft.com/dotnet/core/deploying Microsoft的“.NET 应用程序发布概述”文档。
We’ve established that publishing your app is important for preparing it to run in production, but how do you go about deploying it? How do you get the files from your computer onto a server so that people can access your app? You have many, many options, so in the next section I’ll give you a brief list of approaches to consider.
我们已经确定,发布您的应用程序对于准备在生产环境中运行非常重要,但您如何部署它呢?如何将文件从计算机传输到服务器上,以便人们可以访问您的应用程序?您有很多很多选择,因此在下一节中,我将简要列出要考虑的方法。
27.1.2 Choosing a deployment method for your application
27.1.2 为应用程序选择部署方法
To deploy any application to production, you generally have two fundamental requirements:
要将任何应用程序部署到生产环境,您通常有两个基本要求:
• A server that can run your app
可以运行应用程序的服务器
• A means of loading your app onto the server
将应用程序加载到服务器上的方法
Historically, putting an app into production was a laborious and error-prone process. For many people, this is still true. If you’re working at a company that hasn’t changed practices in recent years, you may need to request a server or virtual machine for your app and provide your application to an operations team that will install it for you. If that’s the case, you may have your hands tied regarding how you deploy.
从历史上看,将应用程序投入生产是一个费力且容易出错的过程。对许多人来说,这仍然是正确的。如果你在一家近年来没有改变做法的公司工作,你可能需要为你的应用程序请求一个服务器或虚拟机,并将你的应用程序提供给运营团队,由他们为你安装它。如果是这种情况,您可能会在部署方式上束手无策。
For those who have embraced continuous integration (CI) or continuous delivery/deployment (CD), there are many more possibilities. CI/CD is the process of detecting changes in your version control system (for example, Git, SVN, Mercurial, or Team Foundation Version Control) and automatically building, and potentially deploying, your application to a server with little to no human intervention.
对于那些已经接受持续集成 (CI) 或持续交付/部署 (CD) 的人来说,还有更多的可能性。CI/CD 是检测版本控制系统(例如 Git、SVN、Mercurial 或 Team Foundation 版本控制)中的更改并自动构建应用程序并可能将应用程序部署到服务器的过程,几乎不需要人工干预。
NOTE There are important but subtle differences between these terms. Atlassian has a good comparison article, “Continuous integration vs. continuous delivery vs. continuous deployment,” at http://mng.bz/vzp4.
注意:这些术语之间存在重要但细微的差异。Atlassian 在 http://mng.bz/vzp4 上有一篇很好的比较文章“持续集成、持续交付与持续部署”。
There are many CI/CD systems out there—Azure DevOps, GitHub Actions, Jenkins, TeamCity, AppVeyor, Travis, and Octopus Deploy, to name a few. Each can manage some or all of the CI/CD process and can integrate with many systems.
有许多 CI/CD 系统,包括 Azure DevOps、GitHub Actions、Jenkins、TeamCity、AppVeyor、Travis 和 Octopus Deploy 等。每个系统都可以管理部分或全部 CI/CD 流程,并且可以与许多系统集成。
Rather than push any particular system, I suggest trying some of the services available and seeing which works best for you. Some are better suited to open-source projects, and some are better when you’re deploying to cloud services; it all depends on your particular situation.
与其推动任何特定的系统,我建议尝试一些可用的服务,看看哪种最适合您。有些更适合开源项目,有些更适合部署到云服务;这完全取决于您的具体情况。
If you’re getting started with ASP.NET Core and don’t want to have to go through the setup process of getting CI working, you still have lots of options. The easiest way to get started with Visual Studio is to use the built-in deployment options. These are available from Visual Studio via the Build > Publish <AppName> command, which presents the screen shown in figure 27.4.
如果您刚开始使用 ASP.NET Core,并且不想完成让 CI 正常工作的设置过程,那么您仍然有很多选择。开始使用 Visual Studio 的最简单方法是使用内置的部署选项。这些可以通过命令从 Visual Studio Build > Publish <AppName> 获得,该命令显示图 27.4 所示的屏幕。
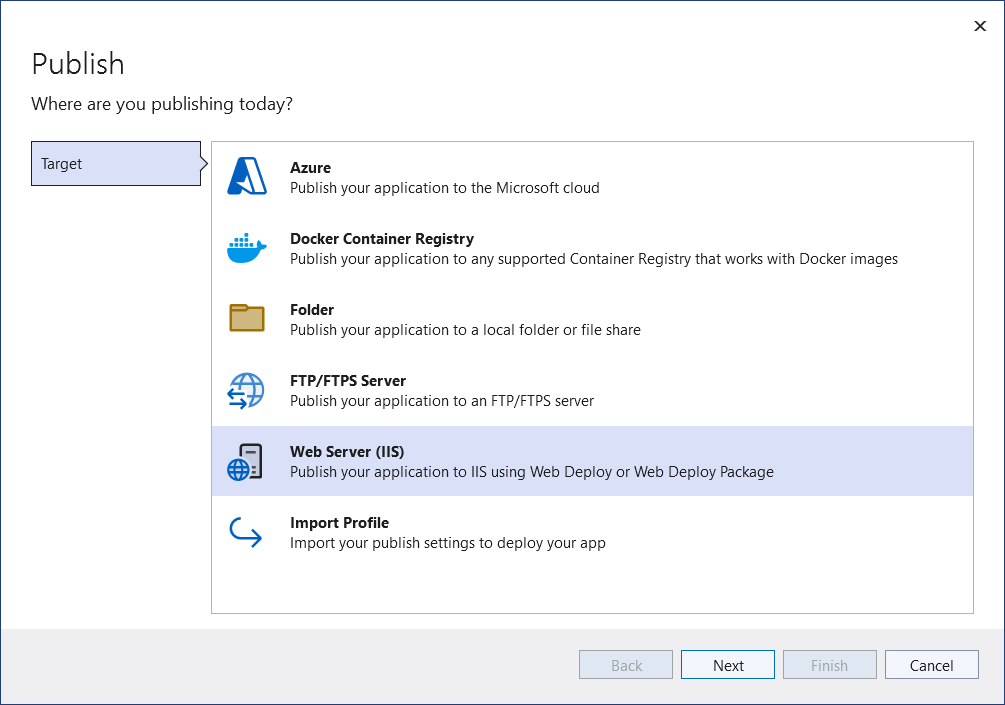
Figure 27.4 The Publish application screen in Visual Studio 2022. This provides easy options for publishing your application directly to Azure App Service, to IIS, to an FTP site, or to a folder on the local machine.
图 27.4 Visual Studio 2022 中的 Publish application(发布应用程序)屏幕。这为将应用程序直接发布到 Azure 应用服务、IIS、FTP 站点或本地计算机上的文件夹提供了简单的选项。
From here, you can publish your application directly from Visual Studio to many locations. This is great when you’re getting started, though I recommend looking at a more automated and controlled approach when you have a larger application or a whole team working on a single app.
在这里,您可以直接从 Visual Studio 将应用程序发布到许多位置。这在您开始时非常有用,但当您有更大的应用程序或整个团队在开发单个应用程序时,我建议您考虑一种更加自动化和可控的方法。
TIP For guidance on choosing your Visual Studio publishing options, see Microsoft’s “Deploy your app to a folder, IIS, Azure, or another destination” documentation at http://mng.bz/4Z8j.
提示:有关选择 Visual Studio 发布选项的指导,请参阅 http://mng.bz/4Z8j Microsoft的“将应用程序部署到文件夹、IIS、Azure 或其他目标”文档。
Given the number of possibilities available in this space and the speed with which these options change, I’m going to focus on one specific scenario in this chapter: you’ve built an ASP.NET Core application, and you need to deploy it. You have access to a Windows server that’s already serving legacy .NET Framework ASP.NET applications using IIS, and you want to run your ASP.NET Core app alongside them.
考虑到此领域中可用的可能性数量以及这些选项变化的速度,我将在本章中重点介绍一个特定场景:您已经构建了一个 ASP.NET Core 应用程序,并且需要部署它。您可以访问已使用 IIS 为旧版 .NET Framework ASP.NET 应用程序提供服务的 Windows 服务器,并且您希望与它们一起运行 ASP.NET Core 应用程序。
In the next section you’ll see an overview of the steps required to run an ASP.NET Core application in production, using IIS as a reverse proxy. It won’t be a master class in configuring IIS (there’s so much depth to the 25-year-old product that I wouldn’t know where to start!), but I’ll cover the basics needed to get your application serving requests.
在下一部分中,你将看到使用 IIS 作为反向代理在生产中运行 ASP.NET Core 应用程序所需步骤的概述。它不会是配置 IIS 的大师课程(这个 25 年前的产品有太多的深度,我不知道从哪里开始!),但我将介绍让您的应用程序为请求提供服务所需的基础知识。
27.2 Publishing your app to IIS
27.2 将应用程序发布到 IIS
In this section I briefly show you how to publish your first app to IIS. You’ll add an application pool and website to IIS and ensure that your app has the necessary configuration to work with IIS as a reverse proxy. The deployment itself will be as simple as copying your published app to IIS’s hosting folder.
在本节中,我将简要介绍如何将第一个应用程序发布到 IIS。你将向 IIS 添加应用程序池和网站,并确保你的应用程序具有将 IIS 用作反向代理所需的配置。部署本身就像将您发布的应用程序复制到 IIS 的托管文件夹一样简单。
In section 27.1 you learned about the need to publish an app before you deploy it and the benefits of using a reverse proxy when you run an ASP.NET Core app in production. If you’re deploying your application to Windows, IIS will likely be your reverse proxy and will be responsible for managing your application.
在第 27.1 节中,您了解了在部署应用程序之前发布应用程序的必要性,以及在生产环境中运行 ASP.NET Core 应用程序时使用反向代理的好处。如果要将应用程序部署到 Windows,IIS 可能是您的反向代理,并负责管理您的应用程序。
IIS is an old and complex beast, and I can’t possibly cover everything related to configuring it in this book. Neither would you want me to; that discussion would be boring! Instead, in this section I’ll provide an overview of the basic requirements for running ASP.NET Core behind IIS, along with the changes you may need to make to your application to support IIS.
IIS 是一个古老而复杂的野兽,我不可能在本书中涵盖与配置它相关的所有内容。你也不希望我这样做;那个讨论会很无聊!相反,在本节中,我将概述在 IIS 后面运行 ASP.NET Core 的基本要求,以及您可能需要对应用程序进行的更改以支持 IIS。
If you’re on Windows and want to try these steps locally, you’ll need to enable IIS manually on your development machine. If you’ve done this with older versions of Windows, nothing much has changed. You can find a step-by-step guide to configuring IIS and troubleshooting tips in the ASP.NET Core documentation at http://mng.bz/6g2R.
如果您使用的是 Windows 并希望在本地尝试这些步骤,则需要在开发计算机上手动启用 IIS。如果你在旧版本的 Windows 上这样做了,那么没有什么太大的变化。您可以在 http://mng.bz/6g2R 的 ASP.NET Core 文档中找到配置 IIS 的分步指南和故障排除提示。
27.2.1 Configuring IIS for ASP.NET Core
27.2.1 为 ASP.NET Core 配置 IIS
The first step in preparing IIS to host ASP.NET Core applications is installing the ASP.NET Core Windows Hosting Bundle (http://mng.bz/opED). This includes several components needed to run .NET apps:
准备 IIS 以托管 ASP.NET Core 应用程序的第一步是安装 ASP.NET Core Windows 托管捆绑包 (http://mng.bz/opED)。这包括运行 .NET 应用所需的几个组件:
• The .NET Runtime—Runs your .NET 7 application
.NET 运行时 - 运行 .NET 7 应用程序
• The ASP.NET Core Runtime—Required to run ASP.NET Core apps
ASP.NET Core 运行时 - 运行 ASP.NET Core 应用程序所需
• The IIS AspNetCore Module—Provides the link between IIS and your app so that IIS can act as a reverse proxy
IIS AspNetCore 模块 - 提供 IIS 和应用程序之间的链接,以便 IIS 可以充当反向代理
If you’re going to be running IIS on your development machine, make sure that you install the bundle as well; otherwise, you’ll get strange errors from IIS.
如果要在开发计算机上运行 IIS,请确保同时安装捆绑包;否则,您将从 IIS 收到奇怪的错误。
TIP The Windows Hosting Bundle provides everything you need for running ASP.NET Core behind IIS in Windows. If you’re hosting your application in Linux or Mac, or aren’t using IIS in Windows, you need to install only the .NET Runtime and ASP.NET Core Runtime to run runtime-dependent ASP.NET Core apps. Note that you need to install the IIS AspNetCore Module even if you are using SCDs.
提示:Windows 托管捆绑包提供了在 Windows 中在 IIS 后面运行 ASP.NET Core 所需的一切。如果您在 Linux 或 Mac 中托管应用程序,或者不在 Windows 中使用 IIS,则只需安装 .NET 运行时和 ASP.NET Core 运行时即可运行依赖于运行时的 ASP.NET Core 应用程序。请注意,即使您使用的是 SCD,也需要安装 IIS AspNetCore 模块。
Once you’ve installed the bundle, you need to configure an application pool in IIS for your ASP.NET Core apps. Previous versions of ASP.NET would run in a managed app pool that used .NET Framework, but for ASP.NET Core you should create a No Managed Code pool. The native ASP.NET Core Module runs inside the pool, which boots the .NET 7 Runtime itself.
安装捆绑包后,您需要在 IIS 中为 ASP.NET Core 应用程序配置应用程序池。早期版本的 ASP.NET 将在使用 .NET Framework 的托管应用程序池中运行,但对于 ASP.NET Core,您应该创建一个无托管代码池。本机 ASP.NET Core Module 在池内运行,该池启动 .NET 7 运行时本身。
DEFINITION An application pool in IIS represents an application process. You can run each app in IIS in a separate application pool to keep the apps isolated from one another.
定义:IIS 中的应用程序池表示应用程序进程。您可以在 IIS 中的单独应用程序池中运行每个应用程序,以使应用程序彼此隔离。
To create an unmanaged application pool, right-click Application Pools in IIS and choose Add Application Pool from the contextual menu. Provide a name for the app pool in the resulting dialog box, such as dotnet7, and set the .NET CLR version to No Managed Code, as shown in figure 27.5.
要创建非托管应用程序池,请右键单击 IIS 中的应用程序池,然后从上下文菜单中选择添加应用程序池。在生成的对话框中为应用程序池提供一个名称,例如 dotnet7,并将 .NET CLR 版本设置为“无托管代码”,如图 27.5 所示。
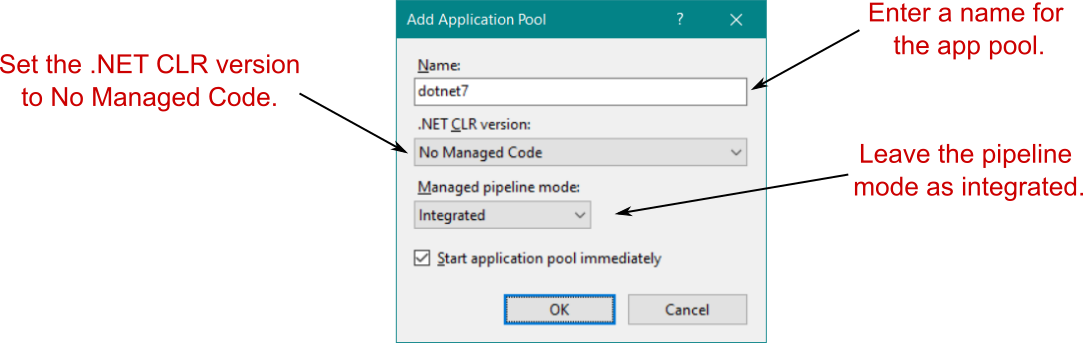
Figure 27.5 Creating an app pool in IIS for your ASP.NET Core app. The .NET CLR version should be set to No Managed Code.
图 27.5 在 IIS 中为您的 ASP.NET Core 应用程序创建应用程序池。.NET CLR 版本应设置为无托管代码。
Now that you have an app pool, you can add a new website to IIS. Right-click the Sites node, and choose Add Website from the contextual menu. In the Add Website dialog box, shown in figure 27.6, you provide a name for the website and the path to the folder where you’ll publish your website. I created a folder that I’ll use to deploy the Recipe app from previous chapters. It’s important to change the Application Pool for the app to the new dotnet7 app pool you created. In production, you’d also provide a hostname for the application, but I’ve left it blank for now in this example and changed the port to 81 so the application will bind to the URL http://localhost:81.
现在,您已拥有应用程序池,可以向 IIS 添加新网站。右键单击 Sites 节点,然后从上下文菜单中选择 Add Website。在 Add Website 对话框中(如图 27.6 所示),您需要提供网站的名称以及要发布网站的文件夹的路径。我创建了一个文件夹,我将使用它来部署前面章节中的 Recipe 应用程序。请务必将应用的 Application Pool(应用程序池)更改为您创建的新 dotnet7 应用程序池。在生产环境中,您还需要为应用程序提供主机名,但在此示例中,我暂时将其留空,并将端口更改为 81,以便应用程序将绑定到 URL http://localhost:81。
NOTE When you deploy an application to production, you need to register a hostname with a domain registrar so that your site is accessible by people on the internet. Use that hostname when configuring your application in IIS, as shown in figure 27.6.
注意:当您将应用程序部署到生产环境时,您需要向域注册商注册主机名,以便 Internet 上的用户可以访问您的站点。在 IIS 中配置应用程序时,请使用该主机名,如图 27.6 所示。
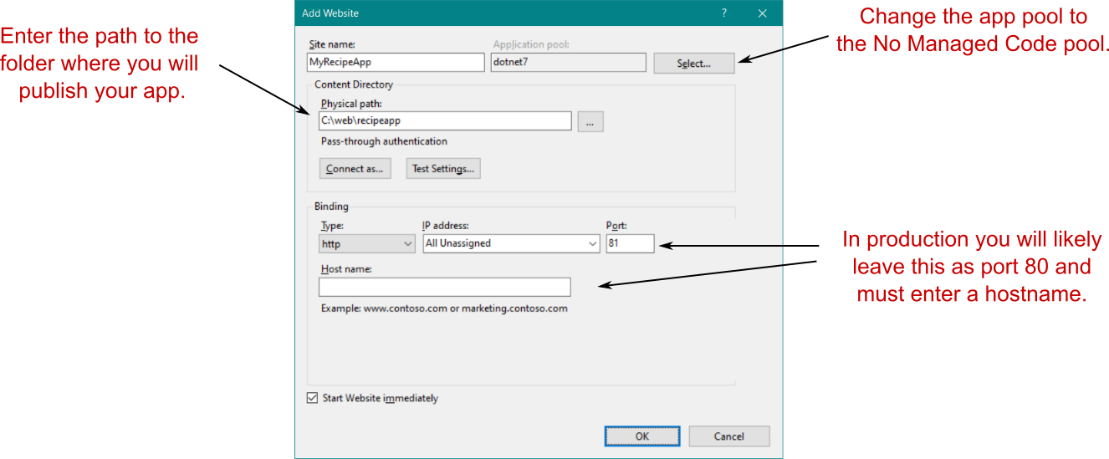
Figure 27.6 Adding a new website to IIS for your app. Be sure to change the Application Pool to the No Managed Code pool created in the previous step. You also provide a name, the path where you’ll publish your app files, and the URL that IIS will use for your app.
图 27.6 为您的应用程序向 IIS 添加新网站。请务必将 Application Pool(应用程序池)更改为在上一步中创建的 No Managed Code (无托管代码) 池。您还提供名称、发布应用程序文件的路径以及 IIS 将用于应用程序的 URL。
Once you click OK, IIS creates the application and attempts to start it. But you haven’t published your app to the folder, so you won’t be able to view it in a browser yet.
单击“确定”后,IIS 将创建应用程序并尝试启动它。但是您尚未将应用程序发布到该文件夹,因此您尚无法在浏览器中查看它。
You need to carry out one more critical setup step before you can publish and run your app: grant permissions for the dotnet7 app pool to access the path where you’ll publish your app. To do this, right-click the folder that will host your app in Windows File Explorer, and choose Properties from the contextual menu. In the Properties dialog box, choose Security > Edit > Add. Enter IIS AppPool\dotnet7 in the text box, as shown in figure 27.7, where dotnet7 is the name of your app pool; then choose OK. Close all the dialog boxes by choosing OK, and you’re all set.
在发布和运行应用之前,还需要执行一个关键的设置步骤:为 dotnet7 应用池授予访问将发布应用的路径的权限。为此,请右键单击将在 Windows 文件资源管理器中托管您的应用程序的文件夹,然后从上下文菜单中选择 Properties (属性)。在 Properties (属性) 对话框中,选择 Security > Edit > Add。在文本框中输入 IIS AppPool\dotnet7,如图 27.7 所示,其中 dotnet7 是应用程序池的名称;然后选择 OK (确定)。选择 OK (确定) 关闭所有对话框,一切就绪。Security > Edit > Add
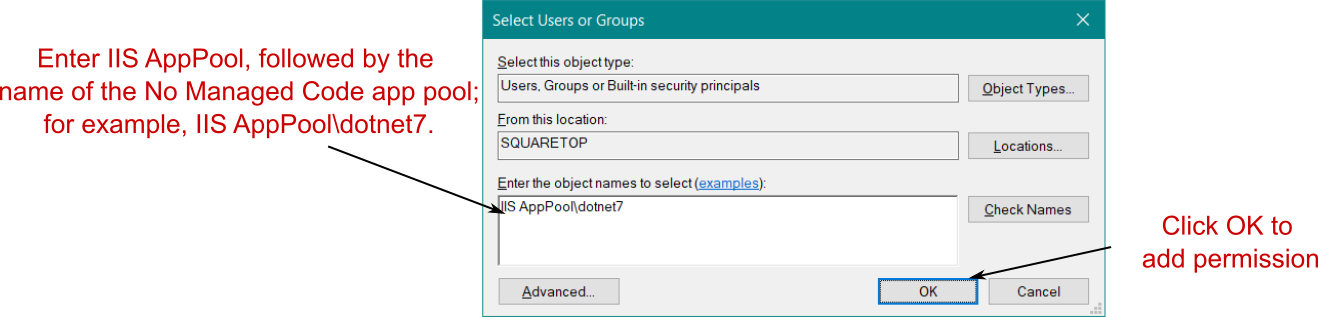
Figure 27.7 Adding permission for the dotnet7 app pool to the website’s publish folder
图 27.7 将 dotnet7 应用池的权限添加到网站的发布文件夹
Out of the box, the ASP.NET Core templates are configured to work seamlessly with IIS, but if you’ve created an app from scratch, you may need to make a couple of changes. In the next section I’ll briefly show the changes you need to make and explain why they’re necessary.
开箱即用的 ASP.NET Core 模板配置为与 IIS 无缝协作,但如果您从头开始创建应用程序,则可能需要进行一些更改。在下一节中,我将简要介绍您需要进行的更改,并解释为什么这些更改是必需的。
27.2.2 Preparing and publishing your application to IIS
27.2.2 准备应用程序并将其发布到 IIS
As I discussed in section 27.1, IIS acts as a reverse proxy for your ASP.NET Core app. That means IIS needs to be able to communicate directly with your app to forward incoming requests to and outgoing responses from your app.
正如我在 Section 27.1 中所讨论的,IIS 充当 ASP.NET Core 应用程序的反向代理。这意味着 IIS 需要能够直接与你的应用程序通信,以将传入请求转发到你的应用程序以及从你的应用程序转发传出响应。
IIS handles this with the ASP.NET Core Module, but a certain degree of negotiation is required between IIS and your app. For this to work correctly, you need to configure your app to use IIS integration.
IIS 使用 ASP.NET 核心模块处理此问题,但 IIS 和你的应用程序之间需要一定程度的协商。要使其正常工作,您需要将应用程序配置为使用 IIS 集成。
IIS integration is added automatically when you use WebApplicationBuilder, so there’s typically nothing more to do. However, in chapter 30 you’ll learn about the generic host and how to create custom application builders using HostBuilder. If your app uses a customer application builder and you want to use IIS, you need to ensure that you add IIS integration with the UseIIS() or UseIISIntegration() extension methods:
当您使用 WebApplicationBuilder 时,会自动添加 IIS 集成,因此通常无需执行更多作。但是,在第 30 章中,您将了解通用主机以及如何使用 HostBuilder 创建自定义应用程序构建器。如果您的应用程序使用客户应用程序构建器,并且您想要使用 IIS,则需要确保添加与 UseIIS() 或 UseIISIntegration() 扩展方法的 IIS 集成:
• UseIIS() configures your application to support IIS with an in-process hosting model.
UseIIS() 将应用程序配置为使用进程内托管模型支持 IIS。
• UseIISIntegration() configures your application to support IIS with an out-of-process hosting model.
UseIISIntegration() 将应用程序配置为使用进程外托管模型支持 IIS。
These methods are automatically called by WebApplicationBuilder, but if you’re not using your application with IIS, the UseIIS() and UseIISIntegration() methods will have no effect on your app, so it’s safe to include them anyway.
这些方法由 WebApplicationBuilder 自动调用,但如果您未将应用程序与 IIS 一起使用,则 UseIIS() 和 UseIISIntegration() 方法将对您的应用程序没有影响,因此无论如何都包含它们是安全的。
In-process vs. out-of-process hosting in IIS
IIS中的进程内托管与进程外托管The common reverse-proxy description assumes that your application is running in a separate process from the reverse proxy itself. That is the case if you’re running on Linux and was the default for IIS up until ASP.NET Core 3.0.
常见的反向代理描述假定应用程序在与反向代理本身不同的进程中运行。如果您在 Linux 上运行,并且在 ASP.NET Core 3.0 之前是 IIS 的默认设置,则会出现这种情况。In ASP.NET Core 3.0, ASP.NET Core switched to using an in-process hosting model by default for applications deployed to IIS. In this model, IIS hosts your application directly inside the IIS process, reducing interprocess communication and boosting performance.
在 ASP.NET Core 3.0 中,ASP.NET Core 默认切换到对部署到 IIS 的应用程序使用进程内托管模型。在此模型中,IIS 直接在 IIS 进程内托管您的应用程序,从而减少进程间通信并提高性能。You can switch to the out-of-process hosting model with IIS if you wish, which can sometimes be useful for troubleshooting problems. Rick Strahl has an excellent post on the differences between the hosting models, how to switch between them, and the advantages of each: “ASP.NET Core In Process Hosting on IIS with ASP.NET Core” at http://mng.bz/QmEv.
如果需要,可以使用 IIS 切换到进程外托管模型,这有时可用于解决问题。Rick Strahl 有一篇关于托管模型之间的差异、如何在它们之间切换以及每种模型的优点的优秀文章:http://mng.bz/QmEv 上的“使用 ASP.NET Core 在 IIS 上进行 ASP.NET Core In Process 托管”。In general, you shouldn’t need to worry about the differences between the hosting models, but it’s something to be aware of if you’re deploying to IIS. If you choose to use the out-of-process hosting model, you should use the UseIISIntegration() extension method. If you use the in-process model, use UseIIS(). Alternatively, play it safe and use both; the correct extension method is activated based on the hosting model used in production. Neither extension does anything if you don’t use IIS.
通常,您不需要担心托管模型之间的差异,但如果您要部署到 IIS,则需要注意这一点。如果您选择使用进程外托管模型,则应使用 UseIISIntegration() 扩展方法。如果使用进程内模型,请使用 UseIIS()。或者,安全起见,两者兼而有之;根据生产中使用的托管模型激活正确的扩展方法。如果您不使用 IIS,则两个扩展都不会执行任何作。
When running behind IIS, these extension methods configure your app to pair with IIS so that it can seamlessly accept requests. Among other things, the extensions do the following:
在 IIS 后面运行时,这些扩展方法将你的应用配置为与 IIS 配对,以便它可以无缝接受请求。此外,扩展还执行以下作:
• Define the URL that IIS uses to forward requests to your app and configures your app to listen on this URL
定义 IIS 用于将请求转发到应用程序的 URL,并将应用程序配置为侦听此 URL
• Configure your app to interpret requests coming from IIS as coming from the client by setting up header forwarding
通过设置标头转发,将应用程序配置为将来自 IIS 的请求解释为来自客户端的请求
• Enable Windows authentication if required
根据需要启用 Windows 身份验证
Adding the IIS extension methods is the only change you need to make to your application to host in IIS (and even then, only when using a custom application builder). But there’s one additional aspect to be aware of when you publish your app. As with legacy .NET Framework ASP.NET, IIS relies on a web.config file to configure the applications it runs. It’s important that your application include a web.config file when it’s published to IIS; otherwise you could get broken behavior or even expose files that shouldn’t be exposed.
添加 IIS 扩展方法是您需要对要在 IIS 中托管的应用程序进行的唯一更改(即使这样,也仅在使用自定义应用程序构建器时)。但是,在发布应用程序时,还有一个方面需要注意。与旧版 .NET Framework ASP.NET 一样,IIS 依赖于 web.config 文件来配置它运行的应用程序。应用程序在发布到 IIS 时必须包含 web.config 文件;否则,您可能会破坏行为,甚至暴露不应公开的文件。
TIP For details on using web.config to customize the IIS AspNetCore Module, see Microsoft’s “ASP.NET Core Module” documentation: http://mng.bz/Xdna.
提示:有关使用 web.config 自定义 IIS AspNetCore 模块的详细信息,请参阅 Microsoft 的“ASP.NET Core Module”文档:http://mng.bz/Xdna。
If your ASP.NET Core project already includes a web.config file, the .NET CLI or Visual Studio copies it to the publish directory when you publish your app. If your app doesn’t include a web.config file, the publish command creates the correct one for you. If you don’t need to customize the web.config file, it’s generally best not to include one in your project and let the CLI create the correct file for you.
如果您的 ASP.NET Core 项目已包含 web.config 文件,则 .NET CLI 或 Visual Studio 会在您发布应用程序时将其复制到发布目录。如果您的应用程序不包含 web.config 文件,则 publish 命令将为您创建正确的文件。如果您不需要自定义 web.config 文件,通常最好不要在项目中包含一个文件,并让 CLI 为您创建正确的文件。
With these changes, you’re finally in a position to publish your application to IIS. Publish your ASP.NET Core app to a folder, either from Visual Studio or with the .NET CLI, by running
通过这些更改,您终于可以将应用程序发布到 IIS。通过运行 Visual Studio 或使用 .NET CLI 将 ASP.NET Core 应用发布到文件夹
dotnet publish --output publish_folder --configuration ReleaseThis will publish your application to the publish_folder folder. You can then copy your application to the path specified in IIS, as shown in figure 27.6. At this point, if all has gone smoothly, you should be able to navigate to the URL you specified for your app (http://localhost:81, in my case) and see it running, as shown in figure 27.8.
这会将您的应用程序发布到 publish_folder 文件夹。然后,您可以将应用程序复制到 IIS 中指定的路径,如图 27.6 所示。此时,如果一切顺利,您应该能够导航到您为应用程序指定的 URL(在本例中为 http://localhost:81 URL)并看到它正在运行,如图 27.8 所示。
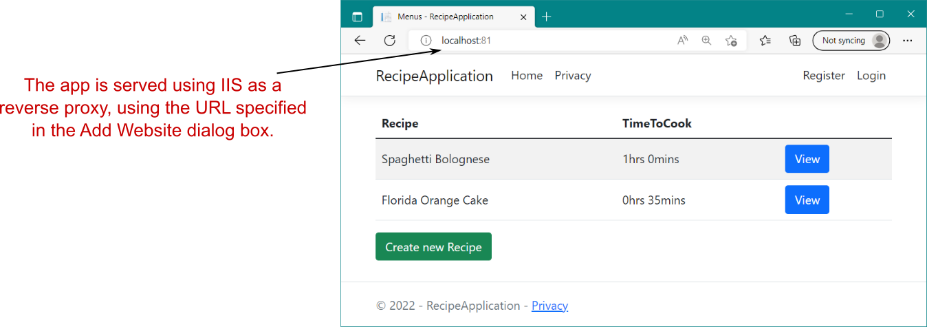
Figure 27.8 The published application, using IIS as a reverse proxy listening at the URL http://localhost:81
图 27.8 已发布的应用程序,使用 IIS 作为反向代理侦听 URL http://localhost:81
And there you have it—your first application running behind a reverse proxy. Even though ASP.NET Core uses a different hosting model from previous versions of ASP.NET, the process of configuring IIS is similar.
这就是 - 在反向代理后面运行的第一个应用程序。尽管 ASP.NET Core 使用的托管模型与以前版本的 ASP.NET 不同,但配置 IIS 的过程是相似的。
As is often the case when it comes to deployment, the success you have is highly dependent on your precise environment and your app itself. If, after following these steps, you find that you can’t get your application to start, I highly recommend checking out the documentation at http://mng.bz/Zqom. This contains many troubleshooting steps to get you back on track if IIS decides to throw a hissy fit.
与部署时的情况一样,您获得的成功在很大程度上取决于您的精确环境和应用程序本身。如果在执行这些步骤后,您发现无法启动应用程序,我强烈建议您查看 http://mng.bz/Zqom 上的文档。这包含许多故障排除步骤,以便在 IIS 决定发出嘶嘶声时让您回到正轨。
This section was deliberately tailored to deploying to IIS, as it provides a great segue for developers who are used to deploying legacy ASP.NET apps and want to deploy their first ASP.NET Core app. But that’s not to say that IIS is the only, or best, place to host your application.
本部分专为部署到 IIS 而定制,因为它为习惯于部署旧版 ASP.NET 应用并希望部署其第一个 ASP.NET Core 应用的开发人员提供了一个很好的 segue。但这并不是说 IIS 是托管应用程序的唯一或最佳位置。
In the next section I provide a brief introduction to hosting your app on Linux, behind a reverse proxy like NGINX or Apache. I won’t go into configuration of the reverse proxy itself, but I will provide an overview of things to consider and resources you can use to run your applications on Linux.
在下一节中,我将简要介绍如何在 Linux 上托管您的应用程序,在 NGINX 或 Apache 等反向代理后面。我不会介绍反向代理本身的配置,但我将概述需要考虑的事项以及可用于在 Linux 上运行应用程序的资源。
27.3 Hosting an application in Linux
27.3 在 Linux 中托管应用程序
One of the great new features in ASP.NET Core is the ability to develop and deploy applications cross-platform, whether on Windows, Linux, or macOS. The ability to run on Linux in particular opens the possibility of cheaper deployments to cloud hosting, deploying to small devices like a Raspberry Pi or to Docker containers.
ASP.NET Core 中的一项出色的新功能是能够跨平台开发和部署应用程序,无论是在 Windows、Linux 还是 macOS 上。特别是在 Linux 上运行的能力为以更便宜的价格部署到云托管、部署到 Raspberry Pi 等小型设备或 Docker 容器提供了可能性。
One of the characteristics of Linux is that it’s almost infinitely configurable. Although that’s definitely a feature, it can also be extremely daunting, especially if you’re coming from the Windows world of wizards and GUIs. This section provides an overview of what it takes to run an application on Linux. It focuses on the broad steps you need to take rather than the somewhat-tedious details of the configuration itself. Instead, I point to resources you can refer to as necessary.
Linux 的一个特点是它几乎可以无限配置。虽然这绝对是一个功能,但它也可能非常令人生畏,特别是如果您来自向导和 GUI 的 Windows 世界。本节概述了在 Linux 上运行应用程序所需的条件。它侧重于您需要采取的广泛步骤,而不是配置本身的有点乏味的细节。相反,我指出了您可以根据需要参考的资源。
27.3.1 Running an ASP.NET Core app behind a reverse proxy in Linux
27.3.1 在 Linux 中的反向代理后面运行 ASP.NET Core 应用程序
You’ll be glad to hear that running your application on Linux is broadly the same as running your application on Windows with IIS:
您会很高兴地听到,在 Linux 上运行应用程序与使用 IIS 在 Windows 上运行应用程序大致相同:
-
Publish your app using dotnet publish. If you’re creating an RDD, the output is the same as you’d use with IIS. For an SCD, you must provide the runtime identifier, as described in section 27.1.1.
使用 dotnet publish 发布应用。如果要创建 RDD,则输出与用于 IIS 的输出相同。对于 SCD,您必须提供运行时标识符,如第 27.1.1 节中所述。 -
Install the necessary prerequisites on the server. For an RDD deployment, you must install the .NET 7 Runtime and the necessary prerequisites. You can find details on this in Microsoft’s “Install .NET on Linux” documentation at http://mng.bz/Rxlj.
在服务器上安装必要的先决条件。对于 RDD 部署,您必须安装 .NET 7 运行时和必要的先决条件。您可以在 http://mng.bz/Rxlj 的 Microsoft 的“在 Linux 上安装 .NET”文档中找到有关此内容的详细信息。 -
Copy your app to the server. You can use any mechanism you like: FTP, USB stick, or whatever you need to get your files onto the server!
将您的应用复制到服务器。您可以使用任何您喜欢的机制:FTP、U 盘或任何您需要将文件放到服务器上的机制! -
Configure a reverse proxy, and point it to your app. As you know by now, you may want to run your app behind a reverse proxy, for the reasons described in section 27.1. In Windows you’d use IIS, but in Linux you have more options. NGINX, Apache, and HAProxy are commonly used options. The ASP.NET Core-based YARP is also an option (https://microsoft.github.io/reverse-proxy). Alternatively, go without, and expose your app directly to the network.
配置反向代理,并将其指向您的应用。正如您现在所知,出于第 27.1 节中描述的原因,您可能希望在反向代理后面运行您的应用程序。在 Windows 中,您将使用 IIS,但在 Linux 中,您有更多选择。NGINX、Apache 和 HAProxy 是常用的选项。基于 ASP.NET Core 的 YARP 也是一个选项 (https://microsoft.github.io/reverse-proxy)。或者,不这样做,直接将你的应用公开给网络。 -
Configure a process-management tool for your app. In Windows, IIS acts as both a reverse proxy and a process manager, restarting your app if it crashes or stops responding. In Linux, you typically need to configure a separate process manager to handle these duties; the reverse proxies won’t do them for you.
为您的应用程序配置进程管理工具。在 Windows 中,IIS 既充当反向代理又充当进程管理器,如果应用程序崩溃或停止响应,则会重新启动应用程序。在 Linux 中,通常需要配置单独的进程管理器来处理这些任务;反向代理不会为您做这些事情。
The first three steps are generally the same, whether you’re running in Windows with IIS or in Linux, but the last two steps are more interesting. By contrast with the monolithic IIS, Linux has a philosophy of small applications, each with a single responsibility.
无论您是在带有 IIS 的 Windows 中运行,还是在 Linux 中运行,前三个步骤通常是相同的,但最后两个步骤更有趣。与整体式 IIS 相比,Linux 的理念是小型应用程序,每个应用程序都有单一的责任。
IIS runs on the same server as your app and takes on multiple duties—proxying traffic from the internet to your app, but also monitoring the app process itself. If your app crashes or stops responding, IIS restarts the process to ensure that you can keep handling requests.
IIS 与您的应用程序运行在同一台服务器上,并承担多项任务 — 将流量从 Internet 代理到您的应用程序,同时还要监控应用程序进程本身。如果您的应用程序崩溃或停止响应,IIS 将重新启动该过程以确保您可以继续处理请求。
In Linux, the reverse proxy might be running on the same server as your app, but it’s also common for it to be running on a different server, as shown in figure 27.9. This is similarly true if you choose to deploy your app to Docker; your app would typically be deployed in a container without a reverse proxy, and a reverse proxy on a server would point to your Docker container.
在 Linux 中,反向代理可能与您的应用程序运行在同一台服务器上,但它在不同的服务器上运行也很常见,如图 27.9 所示。如果您选择将应用程序部署到 Docker,则情况类似;您的应用程序通常会部署在没有反向代理的容器中,而服务器上的反向代理将指向您的 Docker 容器。
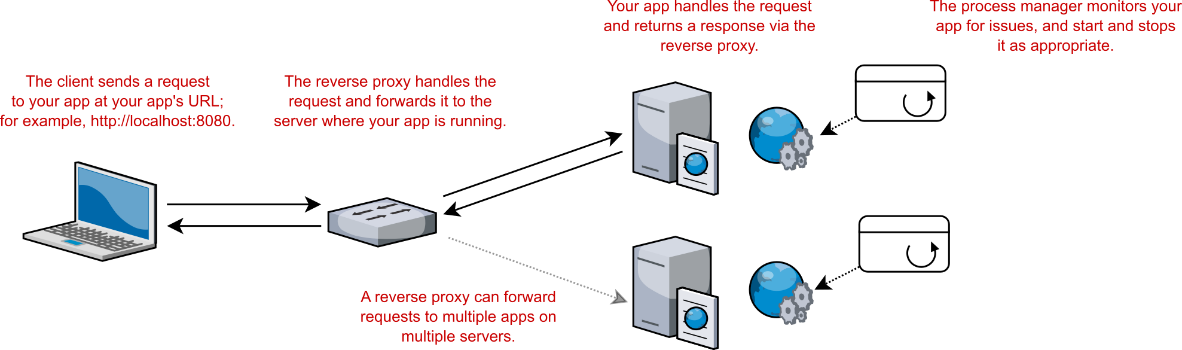
Figure 27.9 In Linux, it’s common for a reverse proxy to be on a different server from your app. The reverse proxy forwards incoming requests to your app, while a process manager, such as systemd, monitors your apps for crashes and restarts it as appropriate.
图 27.9 在 Linux 中,反向代理与你的应用程序位于不同的服务器上是很常见的。反向代理将传入请求转发到您的应用程序,而进程管理器(如 systemd)会监控您的应用程序是否崩溃并根据需要重新启动它。
As the reverse proxies aren’t necessarily on the same server as your app, they can’t be used to restart your app if it crashes. Instead, you need to use a process manager such as systemd to monitor your app. If you’re using Docker, you typically use a container orchestrator such as Kubernetes (https://kubernetes.io) to monitor the health of your containers.
由于反向代理不一定与您的应用程序位于同一服务器上,因此如果应用程序崩溃,它们不能用于重新启动应用程序。相反,您需要使用进程管理器(如 systemd)来监控您的应用程序。如果您使用的是 Docker,则通常使用 Kubernetes (https://kubernetes.io) 等容器编排器来监控容器的运行状况。
Running ASP.NET Core applications in Docker
在 Docker中运行 ASP.NET Core 应用程序Docker is the most commonly used engine for containerizing your applications. A container is like a small, lightweight virtual machine, specific to your app. It contains an operating system, your app, and any dependencies for your app. This container can then be run on any machine that runs Docker, and your app will run exactly the same, regardless of the host operating system and what’s installed on it. This makes deployments highly repeatable: you can be confident that if the container runs on your machine, it will run on the server too.
Docker 是容器化应用程序最常用的引擎。容器类似于特定于您的应用程序的小型轻量级虚拟机。它包含作系统、应用程序以及应用程序的任何依赖项。然后,此容器可以在任何运行 Docker 的计算机上运行,并且无论主机作系统及其上安装的内容如何,您的应用程序都将以完全相同的方式运行。这使得部署具有高度的可重复性:您可以确信,如果容器在您的计算机上运行,它也将在服务器上运行。All the major cloud vendors have support for running containers, either standalone or as part of an orchestration service. For example, in Azure, you can run containers in Azure App Service, Azure Container Instances, Azure Container Apps, and Azure Kubernetes Service. One advantage of containers is that you can easily use the same container in all these services or even move to a different cloud provider, and your app will run the same.
所有主要的云供应商都支持运行容器,无论是独立的还是作为编排服务的一部分。例如,在 Azure 中,可以在 Azure 应用服务、Azure 容器实例、Azure 容器应用和 Azure Kubernetes 服务中运行容器。容器的一个优点是,您可以轻松地在所有这些服务中使用相同的容器,甚至可以迁移到不同的云提供商,并且您的应用程序将以相同的方式运行。ASP.NET Core is well suited to container deployments, but moving to Docker involves a big shift in your deployment methodology and may or may not be right for you and your apps. If you’re interested in the possibilities afforded by Docker and want to learn more, I suggest checking out the following resources:
ASP.NET Core 非常适合容器部署,但迁移到 Docker 涉及部署方法的重大转变,并且可能适合也可能不适合您和您的应用程序。如果您对 Docker 提供的可能性感兴趣并想了解更多信息,我建议您查看以下资源:
• Docker in Practice, 2nd ed., by Ian Miell and Aidan Hobson Sayers (Manning, 2019) provides a vast array of practical techniques to help you get the most out of Docker (http://mng.bz/nM8d).
Docker in Practice,第 2 版,由 Ian Miell 和 Aidan Hobson Sayers 编写(Manning,2019 年),提供了大量实用技术来帮助您充分利用 Docker (http://mng.bz/nM8d)。
• Even if you’re not deploying to Linux, you can use Docker with Docker for Windows. Check out the free e-book Introduction to Windows Containers, by John McCabe and Michael Friis (Microsoft Press, 2017), at https://aka.ms/containersebook.
即使您没有部署到 Linux,也可以将 Docker 与适用于 Windows 的 Docker 结合使用。查看 John McCabe 和 Michael Friis 合著的免费电子书 Introduction to Windows Containers(Microsoft出版社,2017 年),网址为 https://aka.ms/containersebook。
• You can find a lot of details on building and running your ASP.NET Core applications on Docker in the .NET documentation at http://mng.bz/vz5a.
您可以在 http://mng.bz/vz5a 的 .NET 文档中找到有关在 Docker 上构建和运行 ASP.NET Core 应用程序的许多详细信息。
• Steve Gordon has an excellent blog post series on Docker for ASP.NET Core developers at http://mng.bz/2Da8.
Steve Gordon 在 http://mng.bz/2Da8 上为 ASP.NET Core 开发人员撰写了一篇关于 Docker 的优秀博客文章系列。
Configuring a reverse proxy and process manager on Linux is a laborious task that makes for dry reading, so I won’t detail it here. Instead, I recommend checking out the ASP.NET Core docs. They have a guide for NGINX and systemd, “Host ASP.NET Core on Linux with Nginx” (http://mng.bz/yYGd), and a guide for configuring Apache with systemd, “Host ASP.NET Core on Linux with Apache” (http://mng.bz/MXVB).
在 Linux 上配置反向代理和进程管理器是一项费力的任务,因此会枯燥阅读,因此我不会在这里详细说明。相反,我建议查看 ASP.NET Core 文档。他们有 NGINX 和 systemd 指南“使用 Nginx 在 Linux 上托管 ASP.NET Core”(http://mng.bz/yYGd),以及使用 systemd 配置 Apache 的指南“使用 Apache 在 Linux 上托管 ASP.NET Core”(http://mng.bz/MXVB)。
Both guides cover the basic configuration of the respective reverse proxies and systemd supervisors, but more important, they also show how to configure them securely. The reverse proxy sits between your app and the unfettered internet, so it’s important to get it right!
这两个指南都涵盖了相应的反向代理和 systemd 监控器的基本配置,但更重要的是,它们还展示了如何安全地配置它们。反向代理位于您的应用程序和不受限制的互联网之间,因此正确使用很重要!
Configuring the reverse proxy and the process manager is typically the most complex part of deploying to Linux, and that isn’t specific to .NET development: the same would be true if you were deploying a Node.js web app. But you need to consider a few things inside your application when you’re going to be deploying to Linux, as you’ll see in the next section.
配置反向代理和进程管理器通常是部署到 Linux 的最复杂的部分,这并非特定于 .NET 开发:如果要部署 Node.js Web 应用程序,情况也是如此。但是,当您要部署到 Linux 时,您需要在应用程序中考虑一些事项,您将在下一节中看到。
27.3.2 Preparing your app for deployment to Linux
27.3.2 准备将应用程序部署到 Linux
Generally speaking, your app doesn’t care which reverse proxy it sits behind, whether it’s NGINX, Apache, or IIS; your app receives requests and responds to them without the reverse proxy affecting things. When you’re hosting behind IIS, you need UseIISIntegration() to tell your app about IIS’s configuration; when you’re hosting on Linux, you need a similar method.
一般来说,你的应用并不关心它位于哪个反向代理后面,无论是 NGINX、Apache 还是 IIS;你的应用接收请求并响应这些请求,而反向代理不会影响事情。当您在 IIS 后面托管时,您需要 UseIISIntegration() 来告知您的应用程序 IIS 的配置;当您在 Linux 上托管时,您需要类似的方法。
When a request arrives at the reverse proxy, it contains some information that is lost after the request is forwarded to your app. For example, the original request comes with the IP address of the client/browser connecting to your app; once the request is forwarded from the reverse proxy, the IP address is that of the reverse proxy, not the browser. Also, if the reverse proxy is used for SSL/TLS offloading (see chapter 28), then a request that was originally made using HTTPS may arrive at your app as an HTTP request.
当请求到达反向代理时,它包含一些在请求转发到您的应用后丢失的信息。例如,原始请求附带连接到您的应用程序的客户端/浏览器的 IP 地址;从反向代理转发请求后,IP 地址是反向代理的 IP 地址,而不是浏览器的 IP 地址。此外,如果反向代理用于 SSL/TLS 卸载(参见第 28 章),那么最初使用 HTTPS 发出的请求可能会作为 HTTP 请求到达您的应用程序。
The standard solution to these problems is for the reverse proxy to add more headers before forwarding requests to your app. For example, the X-Forwarded-For header identifies the original client’s IP address, whereas the X-Forwarded-Proto header indicates the original scheme of the request (http or https).
这些问题的标准解决方案是让反向代理在将请求转发到您的应用程序之前添加更多标头。例如,X-Forwarded-For 标头标识原始客户端的 IP 地址,而 X-Forwarded-Proto 标头指示请求的原始方案(http 或 https)。
For your app to behave correctly, it needs to look for these headers in incoming requests and modify the request as appropriate. A request to http://localhost with the X-Forwarded-Proto header set to https should be treated the same as if the request were to https://localhost.
为了使您的应用程序正常运行,它需要在传入请求中查找这些标头并根据需要修改请求。如果 X-Forwarded-Proto 标头设置为 https http://localhost,则请求的处理方式应与请求 https://localhost 相同。
You can use ForwardedHeadersMiddleware in your middleware pipeline to achieve this. This middleware overrides Request.Scheme and other properties on HttpContext to correspond to the forwarded headers. WebApplicationBuilder partially handles this for you; the middleware is automatically added to the pipeline in a disabled state. To enable it, set the environment variable ASPNETCORE_FORWARDEDHEADERS_ENABLED=true.
您可以在中间件管道中使用 ForwardedHeadersMiddleware 来实现此目的。此中间件将覆盖 HttpContext 上的 Request.Scheme 和其他属性,以对应于转发的标头。WebApplicationBuilder 为您部分处理此问题;中间件会自动以 Disabled 状态添加到管道中。要启用它,请将环境变量设置为 ASPNETCORE_FORWARDEDHEADERS_ENABLED=true。
If you don’t want to use the automatically added middleware for some reason, or if you’re using the generic host (which you’ll learn about in chapter 30), you can add the middleware to the start of your middleware pipeline manually, as shown in listing 27.1, and configure it with the headers to look for.
如果由于某种原因不想使用自动添加的中间件,或者正在使用通用主机(您将在第 30 章中学习),则可以手动将中间件添加到中间件管道的开头,如清单 27.1 所示,并使用要查找的标头对其进行配置。
WARNING It’s important that ForwardedHeadersMiddleware be placed early in the middleware pipeline to correct Request.Scheme before any middleware that depends on the scheme runs.
警告:请务必将 ForwardedHeadersMiddleware 放在中间件管道的早期,以便在任何依赖于 scheme 的中间件运行之前更正 Request.Scheme。
Listing 27.1 Configuring an app to use forwarded headers in Startup.cs
清单 27.1 配置应用程序以在 Startup.cs 中使用转发的 Headers
WebApplicationBuilder builder = WebApplication.CreateBuilder(args);
WebApplication app = builder.Build();

app.UseForwardedHeaders(new ForwardedHeadersOptions      #A
{
    ForwardedHeaders = ForwardedHeaders.XForwardedFor |     #B
                       ForwardedHeaders.XForwardedProto     #B
});
app.UseHttpsRedirection();    #C
app.UseRouting();             #C
app.MapGet("/", () => "Hello world!");
app.Run();
❶ Adds ForwardedHeadersMiddleware early in your pipeline
在管道的早期添加 ForwardedHeadersMiddleware
❷ Configures the headers the middleware should look for and use
配置中间件应该查找和使用的标头
❸ The forwarded headers middleware must be placed before all other middleware.
转发的标头中间件必须放在所有其他中间件之前。
NOTE This behavior isn’t specific to reverse proxies on Linux; the UseIis() extension adds ForwardedHeadersMiddleware under the hood as part of its configuration when your app is running behind IIS.
注意:此行为并非特定于 Linux 上的反向代理;当应用在 IIS 后面运行时,UseIis() 扩展会在后台添加 ForwardedHeadersMiddleware 作为其配置的一部分。
Aside from considering the forwarded headers, you need to consider a few minor things when deploying your app to Linux that may trip you up if you’re used to deploying to Windows alone:
除了考虑转发的标头之外,在将应用程序部署到 Linux 时,还需要考虑一些小事项,如果您习惯于单独部署到 Windows,这些事项可能会让您感到困惑:
• Line endings (LF in Linux versus CRLF in Windows)—Windows and Linux use different character codes in text to indicate the end of a line. This isn’t often a problem for ASP.NET Core apps, but if you’re writing text files on one platform and reading them on a different platform, it’s something to bear in mind.
行尾 (Linux 中的 LF 与 Windows 中的 CRLF) - Windows 和 Linux 在文本中使用不同的字符代码来指示行尾。对于 ASP.NET Core 应用程序来说,这通常不是问题,但如果您在一个平台上编写文本文件并在另一个平台上阅读它们,则需要记住这一点。
• Path directory separator ("\" on Windows, "/" on Linux)—This is one of the most common bugs I see when Windows developers move to Linux. Each platform uses a different separator in file paths, so although loading a file using the "subdir\myfile.json" path will work fine in Windows, it won’t in Linux. Instead, you should use Path.Combine to create the appropriate separator for the current platform, such as Path.Combine("subdir", "myfile.json").
路径目录分隔符 (Windows 上为 “\”,Linux 上为 “/”) - 这是我在 Windows 开发人员迁移到 Linux 时看到的最常见的错误之一。每个平台在文件路径中使用不同的分隔符,因此尽管使用 “subdir\myfile.json” 路径加载文件在 Windows 中可以正常工作,但在 Linux 中则无法。相反,您应该使用 Path.Combine 为当前平台创建适当的分隔符,例如 Path.Combine(“subdir”, “myfile.json”)。
• ":" in environment variables—In some Linux distributions, the colon character (:) isn’t allowed in environment variables. As you saw in chapter 10, this character is typically used to denote different sections in ASP.NET Core configuration, so you often need to use it in environment variables. Instead, you can use a double underscore in your environment variables (); ASP.NET Core will treat it the same as though you’d used a colon.
环境变量中的 “:” - 在某些 Linux 发行版中,环境变量中不允许使用冒号字符 (:)。正如你在第 10 章中看到的,这个字符通常用于表示 ASP.NET Core 配置中的不同部分,因此你经常需要在环境变量中使用它。相反,您可以在环境变量 () 中使用双下划线;ASP.NET Core 会像使用冒号一样对待它。
• Missing time zone and culture data—Linux distributions don’t always come with time zone or culture data, which can cause localization problems and exceptions at runtime. You can install the time zone data using your distribution’s package manager.[1] It also may be organized differently. The hierarchy of Norwegian cultures is different in Linux, for example.
缺少时区和文化数据 - Linux 发行版并不总是附带时区或文化数据,这可能会导致运行时出现本地化问题和异常。您可以使用分配的软件包管理器安装时区数据。[1] 它的组织方式也可能不同。例如,挪威文化的层次结构在 Linux 中是不同的。
• Different directory structures—Linux distributions use a different folder structure from Windows, so you need to bear that in mind if your app hardcodes paths. In particular, consider differences in temporary/cache folders.
不同的目录结构 - Linux 发行版使用与 Windows 不同的文件夹结构,因此,如果您的应用程序对路径进行硬编码,则需要记住这一点。特别是,请考虑临时/缓存文件夹的差异。
The preceding list is not exhaustive by any means, but as long as you set up ForwardedHeadersMiddleware and take care to use cross-platform constructs like Path.Combine, you shouldn’t have too many problems running your applications on Linux. But configuring a reverse proxy isn’t the simplest of activities, so wherever you’re planning on hosting your app, I suggest checking the documentation for guidance at http://mng.bz/1qM1.
前面的列表无论如何都不是详尽无遗的,但只要您设置了 ForwardedHeadersMiddleware 并注意使用像 Path.Combine 这样的跨平台结构,在 Linux 上运行应用程序应该不会有太多问题。但是配置反向代理并不是最简单的活动,因此无论您打算在哪里托管您的应用程序,我建议您查看 http://mng.bz/1qM1 上的文档以获取指导。
27.4 Configuring the URLs for your application
27.4 为应用程序配置 URL
At this point, you’ve deployed an application, but there’s one aspect you haven’t configured: the URLs for your application. When you’re using IIS as a reverse proxy, you don’t have to worry about this inside your app. IIS integration with the ASP.NET Core Module works by dynamically creating a URL that’s used to forward requests between IIS and your app. The hostname you configure in IIS (in figure 27.6) is the URL that external users see for your app; the internal URL that IIS uses when forwarding requests is never exposed.
此时,您已经部署了一个应用程序,但有一个方面尚未配置:应用程序的 URL。当您使用 IIS 作为反向代理时,您不必担心应用程序内部的这个问题。IIS 与 ASP.NET 核心模块的集成的工作原理是动态创建一个 URL,该 URL 用于在 IIS 和您的应用程序之间转发请求。您在 IIS 中配置的主机名(如图 27.6 所示)是外部用户看到的应用程序的 URL;IIS 在转发请求时使用的内部 URL 永远不会公开。
If you’re not using IIS as a reverse proxy—maybe you’re using NGINX or exposing your app directly to the internet—you may find you need to configure the URLs your application listens to directly.
如果您没有将 IIS 用作反向代理(也许您使用的是 NGINX 或直接向 Internet 公开您的应用程序),您可能会发现您需要配置应用程序直接侦听的 URL。
By default, ASP.NET Core listens for requests on the URL http://localhost:5000. There are lots of ways to set this URL, but in this section I describe two: using environment variables or using command-line arguments. These are the two most common approaches I see (outside of IIS) for controlling which URLs your app uses.
默认情况下,ASP.NET Core 侦听 URL http://localhost:5000 上的请求。设置此 URL 的方法有很多种,但在本节中,我将介绍两种方法:使用环境变量或使用命令行参数。这是我看到的两种最常见的方法(在 IIS 之外),用于控制您的应用程序使用的 URL。
TIP For further ways to set your application’s URL, see my “5 ways to set the URLs for an ASP.NET Core app” blog post: http://mng.bz/go0v.
提示:有关设置应用程序 URL 的更多方法,请参阅我的“为 ASP.NET Core 应用程序设置 URL 的 5 种方法”博客文章:http://mng.bz/go0v。
In chapter 10 you learned about configuration in ASP.NET Core, and in particular about the concept of hosting environments so that you can use different settings when running in development compared with production. You choose the hosting environment by setting an environment variable on your machine called ASPNETCORE_ENVIRONMENT. The ASP.NET Core framework magically picks up this variable when your app starts and uses it to set the hosting environment.
在第 10 章中,您了解了 ASP.NET Core 中的配置,特别是托管环境的概念,以便在开发环境中运行时与在生产环境中运行时可以使用不同的设置。您可以通过在计算机上设置名为 ASPNETCORE_ENVIRONMENT 的环境变量来选择托管环境。ASP.NET Core 框架会在您的应用启动时神奇地选取此变量,并使用它来设置托管环境。
You can use a similar special environment variable to specify the URL that your app uses; this variable is called ASPNETCORE_URLS. When your app starts up, it looks for this value and uses it as the application’s URL. By changing this value, you can change the default URL used by all ASP.NET Core apps on the machine. For example, you could set a temporary environment variable in Windows from the command window using
您可以使用类似的特殊环境变量来指定您的应用程序使用的 URL;此变量称为 ASPNETCORE_URLS。当您的应用程序启动时,它会查找此值并将其用作应用程序的 URL。通过更改此值,您可以更改计算机上所有 ASP.NET Core 应用程序使用的默认 URL。例如,您可以在命令窗口中使用
set ASPNETCORE_URLS=http://localhost:8000Running a published application using dotnet <app.dll> within the same command window, as shown in figure 27.10, shows that the app is now listening on the URL provided in the ASPNETCORE_URLS variable.
如图 27.10 所示,在同一命令窗口中使用 dotnet <app.dll> 运行已发布的应用程序,显示该应用程序现在正在侦听 ASPNETCORE_URLS 变量中提供的 URL。
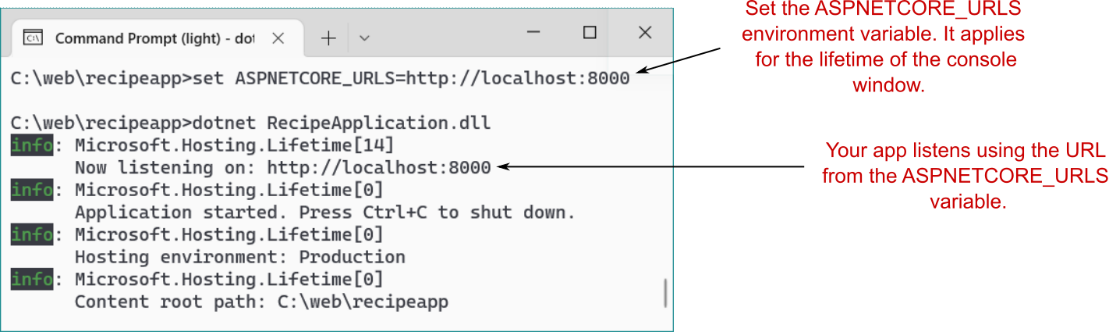
Figure 27.10 Change the ASPNETCORE_URLS environment variable to change the URL used by ASP.NET Core apps.
图 27.10 更改 ASPNETCORE_URLS 环境变量以更改 ASP.NET Core 应用程序使用的 URL。
You can instruct an app to listen on multiple URLs by separating them with a semicolon, or you can listen to a specific port without specifying the localhost hostname. If you set the ASPNETCORE_URLS environment variable to
您可以通过用分号分隔多个 URL 来指示应用程序侦听这些 URL,也可以在不指定 localhost 主机名的情况下侦听特定端口。如果将 ASPNETCORE_URLS 环境变量设置为
http://localhost:5001;http://*:5002
your ASP.NET Core apps will listen for requests sent to the following:
您的 ASP.NET Core 应用程序将侦听发送到以下各项的请求:
• http://localhost:5001 — This address is accessible only on your local computer, so it will not accept requests from the wider internet.
http://localhost:5001 - 此地址只能在您的本地计算机上访问,因此它不会接受来自更广泛 Internet 的请求。
• http://*:5002—Any URL on port 5002. External requests from the internet can access the app on port 5002, using any URL that maps to your computer.
• http://*:5002 - 端口 5002 上的任何 URL。来自 Internet 的外部请求可以使用映射到您计算机的任何 URL 访问端口 5002 上的应用程序。
Note that you can’t specify a different hostname, like tastyrecipes.com. ASP.NET Core listens to all requests on a given port; it doesn’t listen for specific domain names. The exception is the localhost hostname, which allows only requests that came from your own computer.
请注意,您不能指定其他主机名,例如 tastyrecipes.com。ASP.NET Core 侦听给定端口上的所有请求;它不侦听特定的域名。localhost 主机名例外,它只允许来自您自己的计算机的请求。
NOTE If you find the ASPNETCORE_URLS variable isn’t working properly, ensure that you don’t have a launchSettings.json file in the directory. When present, the values in this file take precedence. By default, launchSettings.json isn’t included in the publish output, so this generally won’t be a problem in production.
注意:如果您发现 ASPNETCORE_URLS 变量无法正常工作,请确保目录中没有 launchSettings.json 文件。如果存在,则此文件中的值优先。默认情况下,launchSettings.json 不包含在发布输出中,因此这在生产中通常不会成为问题。
Setting the URL of an app using a single environment variable works great for some scenarios, most notably when you’re running a single application in a virtual machine, or within a Docker container.
使用单个环境变量设置应用程序的 URL 适用于某些场景,尤其是当您在虚拟机或 Docker 容器中运行单个应用程序时。
TIP ASP.NET Core is well suited to running in containers but working with containers is a separate book in its own right. For details on hosting and publishing apps using Docker, see Microsoft’s “Host ASP.NET Core in Docker containers” documentation: http://mng.bz/e5GV.
提示: ASP.NET Core 非常适合在容器中运行,但使用容器本身是一本单独的书。有关使用 Docker 托管和发布应用程序的详细信息,请参阅 Microsoft 的“在 Docker 容器中托管 ASP.NET Core”文档:http://mng.bz/e5GV。
If you’re not using Docker containers or a PaaS offering, chances are that you’re hosting multiple apps side-by-side on the same machine. A single environment variable is no good for setting URLs in this case, as it would change the URL of every app.
如果您没有使用 Docker 容器或 PaaS 产品,则很可能在同一台计算机上并排托管多个应用程序。在这种情况下,单个环境变量不适合设置 URL,因为它会更改每个应用程序的 URL。
In chapter 10 you saw that you could set the hosting environment using the ASPNETCORE_ENVIRONMENT variable, but you could also set the environment using the --environment flag when calling dotnet run:
在第 10 章中,您看到可以使用 ASPNETCORE_ENVIRONMENT 变量设置托管环境,但也可以在调用 dotnet run 时使用 --environment 标志设置环境:
dotnet run --no-launch-profile --environment StagingYou can set the URLs for your application in a similar way, using the --urls parameter. Using command-line arguments enables you to have multiple ASP.NET Core applications running on the same machine, listening to different ports. For example, the following command would run the recipe application, set it to listen on port 8081, and set the environment to staging (figure 27.11):
您可以使用 --urls 参数以类似的方式为应用程序设置 URL。使用命令行参数,您可以在同一台计算机上运行多个 ASP.NET Core 应用程序,侦听不同的端口。例如,以下命令将运行 recipe 应用程序,将其设置为侦听端口 8081,并将环境设置为 staging (图 27.11):
dotnet RecipeApplication.dll --urls "http://*:8081" --environment Staging
Figure 27.11 Setting the hosting environment and URLs for an application using command-line arguments. The values passed at the command line override values provided from appSettings.json or environment variables.
图 27.11 使用命令行参数设置应用程序的托管环境和 URL。在命令行中传递的值将覆盖appSettings.json或环境变量提供的值。
Remember that you don’t need to set your URLs in this way if you’re using IIS as a reverse proxy; IIS integration handles this for you. Setting the URLs is necessary only when you’re manually configuring the URL your app is listening on, such as if you’re using NGINX or are exposing Kestrel directly to clients.
请记住,如果您使用 IIS 作为反向代理,则无需以这种方式设置 URL;IIS 集成会为您处理此问题。只有当您手动配置应用程序正在侦听的 URL 时(例如,如果您使用的是 NGINX 或将 Kestrel 直接公开给客户端),才需要设置 URL。
WARNING If you are running your ASP.NET Core application without a reverse proxy, you should use host filtering for security reasons to ensure that your app only responds to requests for hostnames you expect. For more details, see my “Adding host filtering to Kestrel in ASP.NET Core” blog entry: http://mng.bz/pVXK.
警告:如果您在没有反向代理的情况下运行 ASP.NET Core 应用程序,则出于安全原因,您应该使用主机筛选,以确保您的应用程序仅响应您期望的主机名请求。有关更多详细信息,请参阅我的“在 ASP.NET Core 中向 Kestrel 添加主机筛选”博客文章:http://mng.bz/pVXK。
That brings us to the end of this chapter on publishing your app. This last mile of app development—deploying an application to a server where users can access it—is a notoriously thorny problem. Publishing an ASP.NET Core application is easy enough, but the multitude of hosting options available makes providing concise steps for every situation difficult.
到此,我们来到了本章关于发布您的应用的结尾。众所周知,应用程序开发的最后一英里 — 将应用程序部署到用户可以访问它的服务器上 — 是一个非常棘手的问题。发布 ASP.NET Core 应用程序非常简单,但可用的大量托管选项使得为每种情况提供简洁的步骤变得困难。
Whichever hosting option you choose, there’s one critical topic that you mustn’t overlook: security. In the next chapter you’ll learn about HTTPS, how to use it when testing locally, and why it’s important your production apps all use HTTPS.
无论您选择哪种托管选项,都有一个关键主题是您不容忽视的:安全性。在下一章中,您将了解 HTTPS,在本地测试时如何使用 HTTPS,以及为什么您的生产应用程序都使用 HTTPS 很重要。
27.5 Summary
27.5 总结
ASP.NET Core apps are console applications that self-host a web server. In production, you may use a reverse proxy, which handles the initial request and passes it to your app. Reverse proxies can provide additional security, operations, and performance benefits, but they can also add complexity to your deployments.
ASP.NET Core 应用程序是自托管 Web 服务器的控制台应用程序。在生产环境中,您可以使用反向代理来处理初始请求并将其传递给您的应用程序。反向代理可以提供额外的安全性、作和性能优势,但它们也会增加部署的复杂性。
.NET has two parts: the .NET SDK (also known as the .NET CLI) and the .NET Runtime. When you’re developing an application, you use the .NET CLI to restore, build, and run your application. Visual Studio uses the same .NET CLI commands from the IDE.
.NET 有两个部分:.NET SDK(也称为 .NET CLI)和 .NET 运行时。在开发应用程序时,您可以使用 .NET CLI 来还原、构建和运行应用程序。Visual Studio 使用与 IDE 相同的 .NET CLI 命令。
When you want to deploy your app to production, you need to publish your application, using dotnet publish. This creates a folder containing your application as a DLL, along with all its dependencies.
如果要将应用部署到生产环境,则需要使用 dotnet publish 发布应用程序。这将创建一个文件夹,其中包含作为 DLL 的应用程序及其所有依赖项。
To run a published application, you don’t need the .NET CLI because you won’t be building the app. You need only the .NET Runtime to run a published app. You can run a published application using the dotnet app.dll command, where app.dll is the application .dll created by the dotnet publish command.
要运行已发布的应用程序,您不需要 .NET CLI,因为您不会构建应用程序。只需 .NET 运行时即可运行已发布的应用程序。可以使用 dotnet app.dll 命令运行已发布的应用程序,其中 app.dll 是由 dotnet publish 命令创建的应用程序.dll。
To host ASP.NET Core applications in IIS, you must install the ASP.NET Core Module. This allows IIS to act as a reverse proxy for your ASP.NET Core app. You must also install the .NET Runtime and the ASP.NET Core Runtime, which are installed as part of the ASP.NET Core Windows Hosting Bundle.
要在 IIS 中托管 ASP.NET Core 应用程序,必须安装 ASP.NET Core Module。这允许 IIS 充当 ASP.NET Core 应用程序的反向代理。您还必须安装 .NET 运行时和 ASP.NET Core 运行时,它们作为 ASP.NET Core Windows 托管捆绑包的一部分安装。
IIS can host ASP.NET Core applications using one of two modes: in-process and out-of-process. The out-of-process mode runs your application as a separate process, as is typical for most reverse proxies. The in-process mode runs your application as part of the IIS process. This has performance benefits, as no interprocess communication is required.
IIS 可以使用以下两种模式之一托管 ASP.NET Core 应用程序:进程内和进程外。进程外模式将您的应用程序作为单独的进程运行,这是大多数反向代理的典型特征。进程内模式将应用程序作为 IIS 进程的一部分运行。这具有性能优势,因为不需要进程间通信。
If you are using a custom web application builder with IIS, ensure that you call UseIISIntegration() and UseIIS() so that IIS forwards the request to your app correctly. If you’re using the default WebApplicationBuilder, these methods are called automatically for you.
如果将自定义 Web 应用程序生成器与 IIS 一起使用,请确保调用 UseIISIntegration() 和 UseIIS(),以便 IIS 将请求正确转发到应用。如果您使用的是默认的 WebApplicationBuilder,则会自动为您调用这些方法。
When you publish your application using the .NET CLI, a web.config file is added to the output folder. It’s important that this file be deployed with your application when publishing to IIS, as it defines how your application should run.
当您使用 .NET CLI 发布应用程序时,web.config 文件将添加到输出文件夹中。在发布到 IIS 时,此文件必须与应用程序一起部署,因为它定义了应用程序的运行方式。
The URL that your app listens on is specified by default using the environment variable ASPNETCORE_URLS. Setting this value changes the URL for all the apps on your machine. Alternatively, pass the --urls command-line argument when running your app, as in this example: dotnet app.dll --urls http://localhost:80.
默认情况下,您的应用程序侦听的 URL 是使用环境变量 ASPNETCORE_URLS 指定的。设置此值会更改计算机上所有应用程序的 URL。或者,在运行应用时传递 --urls 命令行参数,如以下示例所示:dotnet app.dll --urls http://localhost:80。
[1] I ran into this problem myself. You can read about it in detail and how I solved it on my blog: http://mng.bz/aoem.
[1] 我自己也遇到过这个问题。您可以在我的博客上详细阅读它以及我是如何解决的:http://mng.bz/aoem。