31 Advanced configuration of ASP.NET Core
This chapter covers
• Building custom middleware
• Using dependency injection (DI) services in IOptions configuration
• Replacing the built-in DI container with a third-party container
When you’re building apps with ASP.NET Core, most of your creativity and specialization go into the services and models that make up your business logic and the Razor Pages and APIs that expose them. Eventually, however, you’re likely to find that you can’t quite achieve a desired feature using the components that come out of the box. At that point, you may need to look to more complex uses of the built- in features.
This chapter shows some of the ways you can customize cross-cutting parts of your application, such as your DI container or your middleware pipeline. These approaches are particularly useful if you’re coming from a legacy application or are working on an existing project, and you want to continue to use the patterns and libraries you’re familiar with.
We’ll start by looking at the middleware pipeline. You saw how to build pipelines by piecing together existing
middleware in chapter 4, but in this chapter you’ll create your own custom middleware. You’ll explore the basic middleware constructs of the Map, Use, and Run methods and learn how to create standalone middleware classes.
You’ll use these to build middleware components that can add headers to all your responses as well as middleware that returns responses. Finally, you’ll learn how to turn your custom middleware into a simple endpoint, using endpoint routing.
In chapter 10 you learned about strongly typed configuration using the IOptions<T> pattern, and in section 31.2 you’ll learn how to take this further. You’ll learn how to use the OptionsBuilder<T> type to fluently build your IOptions<T> object with the builder pattern. You’ll also see how to use services from DI when configuring your IOptions objects—something that’s not possible using the methods you’ve seen so far.
We stick with DI in section 31.3, where I’ll show you how to replace the built-in DI container with a third-party alternative. The built-in container is fine for most small apps, but your ConfigureServices function can quickly get bloated as your app grows and you register more services.
I’ll show you how to integrate the third-party Lamar library into an existing app, so you can use extra features such as automatic service registration by convention.
The components and techniques shown in this chapter are more advanced than most features you’ve seen so far. You likely won’t need them in every ASP.NET Core project, but they’re good to have in your back pocket should the need arise!
31.1 Customizing your middleware pipeline
In this section you’ll learn how to create custom middleware. You’ll learn how to use the Map, Run, and Use extension methods to create simple middleware using lambda expressions. You’ll then see how to create equivalent middleware components using dedicated classes. You’ll also learn how to split the middleware pipeline into branches, and you’ll find out when this is useful.
The middleware pipeline is one of the building blocks of ASP.NET Core apps, so we covered it in depth in chapter 4. Every request passes through the middleware pipeline, and each middleware component in turn gets an opportunity to modify the request or to handle it and return a response.
ASP.NET Core includes middleware for handling common scenarios out of the box. You’ll find middleware for serving static files, handling errors, authentication, and many more tasks.
You’ll spend most of your time during development working with Razor Pages, minimal API endpoints, or web API controllers. These are exposed as the endpoints for most of your app’s business logic, and they call methods on your app’s various business services and models. However, you’ve also seen middleware like the Swagger middleware and the WelcomePageMiddleware that returns a response without using the endpoint routing system. The various improvements to the routing system in .NET 7 mean I rarely find the need to create “terminal” middleware like this, as endpoint routing is easy to work with and extensible.Nevertheless, it may occasionally be preferable to create small, custom, terminal middleware components like these.
At other times, you might have requirements that lie outside the remit of Razor Pages or minimal API endpoints. For example, you might want to ensure that all responses generated by your app include a specific header. This sort of cross-cutting concern is a perfect fit for custom middleware. You could add the custom middleware early in your middleware pipeline to ensure that every response from your app includes the required header, whether it comes from the static-file middleware, the error handling middleware, or a Razor Page.
In this section I show three ways to create custom middleware components, as well as how to create branches in your middleware pipeline where a request can flow down either one branch or another. By combining the methods demonstrated in this section, you’ll be able to create custom solutions to handle your specific requirements.
We start by creating a middleware component that returns the current time as plain text whenever the app receives a request. From there we’ll look at branching the pipeline, creating general-purpose middleware components, and encapsulating your middleware into standalone classes.
Finally, in section 31.1.5 you’ll see how to turn your custom middleware component into an endpoint and integrate it with the endpoint routing system.
31.1.1 Creating simple apps with the Run extension
As you’ve seen in previous chapters, you define the middleware pipeline for your app in Program.cs by adding middleware to a WebApplication object, typically using extension methods, as in this example:
WebApplicationBuilder builder = WebApplication.CreateBuilder(args);
WebApplication app = builder.Build();
app.UseExceptionHandler();
app.UseStaticFiles();
app.Run();
When your app receives a request, the request passes through each middleware component, each of which gets a chance to modify the request or handle it by generating a response. If a middleware component generates a response, it effectively short-circuits the pipeline; no subsequent middleware in the pipeline sees the request. The response passes back through the earlier middleware components on its way back to the browser.
You can use the Run extension method to build a simple middleware component that always generates a response. This extension takes a single lambda function that runs whenever a request reaches the component. The Run extension always generates a response, so no middleware placed after it ever executes. For that reason, you should always place the Run middleware last in a middleware pipeline.
TIP Remember that middleware components run in the order in which you add them to the pipeline. If a middleware component handles a request and generates a response, later middleware never sees the request.
The Run extension method provides access to the request in the form of the HttpContext object you saw in chapter 4. This contains all the details of the request in the Request property, such as the URL path, the headers, and the body of the request. It also contains a Response property you can use to return a response.
The following listing shows how you could build a simple middleware component that returns the current time. It uses the provided HttpContext context object and the Response property to set the Content-Type header of the response (not strictly necessary in this case, as text/plain is used if an alternative content type is not set) and writes the body of the response using WriteAsync(text).
Listing 31.1 Creating simple middleware using the Run extension
app.Run(async (HttpContext context) => ❶
{
context.Response.ContentType = "text/plain"; ❷
await context.Response.WriteAsync( ❸
DateTimeOffset.UtcNow.ToString()); ❸
});
app.UseStaticFiles(); ❹
❶ Uses the Run extension to create simple middleware that always returns a response
❷ You should set the content-type of the response you’re generating; text/plain is the default value.
❸ Returns the time as a string in the response. The 200 OK status code is used if not explicitly set.
❹ Any middleware added after the Run extension will never execute.
The Run extension is useful for two different things:
• Creating simple middleware that always generates a response
• Creating complex middleware that hijacks the whole request to build an additional framework on top of ASP.NET Core
Whether you’re using the Run extension to create basic endpoints or a complex extra framework layer, the middleware always generates some sort of response.
Therefore, you must always place it at the end of the pipeline, as no middleware placed after it will execute.
TIP Using the Run extension to unconditionally generate a response is rare these days. The endpoint routing system used by minimal APIs provides many extra niceties such as model binding, routing, integration with other middleware such as authentication and authorization, and so on.
There may be occasional situations where you want to unconditionally generate a response, but a more common scenario is where you want your middleware component to respond only to a specific URL path, such as the way the Swagger UI middleware responds only to the /swagger path. In the next section you’ll see how you can combine Run with the Map extension method to create branching middleware pipelines.
31.1.2 Branching middleware pipelines with the Map extension
So far when discussing the middleware pipeline, we’ve always considered it to be a single pipeline of sequential components. Each request passes through every middleware component until one component generates a response; then the response passes back through the previous middleware.
The Map extension method lets you change that simple pipeline into a branching structure. Each branch of the pipeline is independent; a request passes through one branch or the other but not both, as shown in figure 31.1. The Map extension method looks at the path of the request’s URL. If the path starts with the required pattern, the request travels down the branch of the pipeline; otherwise, it remains on the main trunk. This lets you have completely different behavior in different branches of your middleware pipeline.
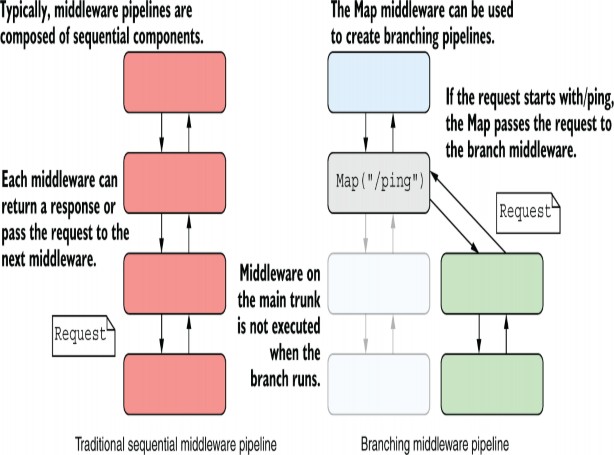
Figure 31.1 A sequential middleware pipeline compared with a branching pipeline created with the Map extension. In branching middleware, requests pass through only one of the branches at most. Middleware on the other branch never see the request and aren’t executed.
NOTE The URL-matching used by Map is conceptually similar to the routing you’ve seen throughout the book, but it is much more basic, with many limitations. For example, it uses a simple string-prefix match, and you can’t use route parameters. Generally, you should favor using endpoint routing instead of branching using Map. A similar extension, MapWhen, allows matching based on anything in HttpContext, such as headers or query string parameters.
For example, imagine you want to add a simple health-check endpoint to your existing app. This endpoint is a simple URL you can call that indicates whether your app is running correctly. You could easily create a health-check middleware using the Run extension, as you saw in listing 31.1, but then that’s all your app can do. You want the health-check to respond only to a specific URL, /ping. Your Razor Pages should handle all other requests as normal.
TIP The health-check scenario is a simple example for demonstrating the Map method, but ASP.NET Core includes built-in support for health-check endpoints, which integrate into the endpoint routing system. You should use these instead of creating your own. You can learn more about creating health checks in Microsoft’s “Health checks in ASP.NET Core” documentation: http://mng.bz/nMA2.
One solution would be to create a branch using the Map extension method and to place the health-check middleware on that branch, as shown in figure 31.1. Only those requests that match the Map pattern /ping will execute the branch; all other requests are handled by the standard routing middleware and Razor Pages on the main trunk instead, as shown in the following listing.
Listing 31.2 Using the Map extension to create branching middleware pipelines
app.UseStatusCodePages(); ❶
app.Map("/ping", (IApplicationBuilder branch) => ❷
{
branch.UseExceptionHandler(); ❸
branch.Run(async (HttpContext context) => ❹
{ ❹
context.Response.ContentType = "text/plain"; ❹
await context.Response.WriteAsync("pong"); ❹
}); ❹
});
app.UseStaticFiles(); ❺
app.UseRouting(); ❺
app.MapRazorPages(); ❺
app.Run();
❶ Every request passes through this middleware.
❷ The Map extension method branches if a request starts with /ping.
❸ This middleware runs only for requests matching the /ping branch.
❹ The Run extension always returns a response, but only on the /ping branch.
❺ The rest of the middleware pipeline run for requests that don’t match the /ping branch.
The Map middleware creates a completely new IApplicationBuilder (called branch in the listing), which you can customize as you would your main app pipeline. Middleware added to the branch builder are added only to the branch pipeline, not the main trunk pipeline.
TIP The WebApplication object you typically add middleware to implements the IApplicationBuilder interface. Most extension methods for adding middleware use the IApplicationBuilder interface, so you can use the extension methods in branches as well as your main middleware pipeline.
In this example, you add the Run middleware to the branch, so it executes only for requests that start with /ping, such as /ping, /ping/go, and /ping?id=123. Any requests that don’t start with /ping are ignored by the Map extension. Those requests stay on the main trunk pipeline and execute the next middleware in the pipeline after Map (in this case, the StaticFilesMiddleware).
WARNING There are several Map extension method overloads. Some of these are extension methods on IApplicationBuilder and are used to branch the pipeline, as you saw in listing 31.2. Other overloads are extensions on IEndpointRouteBuilder and are used to create minimal endpoints, using the endpoint routing system. If you’re struggling to make your app compile, make sure that you’re not accidentally using the wrong Map overload!
If you need to, you can create sprawling branched pipelines using Map, where each branch is independent of every other. You could also nest calls to Map so you have branches coming off branches.
The Map extension can be useful, but if you try to get too elaborate, it can quickly get confusing. Remember that you should use middleware for implementing cross-cutting concerns or simple endpoints. The endpoint routing mechanism of minimal APIs and Razor Pages is better suited to more complex routing requirements, so always favor it over Map where possible.
One situation where Map can be useful is when you want to have two independent subapplications but don’t want the hassle of multiple deployments. You can use Map to keep these pipelines separate, with separate routing and endpoints inside each branch of the pipeline.
TIP This approach can be useful, for example, if you’re embedding an OpenID Connect server such as IdentityServer in your application. By mapping IdentityServer to a branch, you ensure that the endpoints and controllers in your main app can’t interfere with the endpoints exposed by IdentityServer.
Be aware that these branches share configuration and a DI container, so they’re independent only from the middleware pipeline’s point of view. You must also remember that WebApplication adds lots of middleware to the pipeline by default, so you may need to override these by explicitly calling UseRouting() in all your branches, for example.
NOTE Achieving truly independent branches in the same application requires a lot of effort. See Filip Wojcieszyn’s blog post, “Running multiple independent ASP.NET Core pipelines side by side in the same application,” for guidance: http://mng.bz/vzA4.
The final point you should be aware of when using the Map extension is that it modifies the effective Path seen by middleware on the branch. When it matches a URL prefix, the Map extension cuts off the matched segment from the path, as shown in figure 31.2. The removed segments are stored on a property of HttpContext called PathBase, so they’re still accessible if you need them.
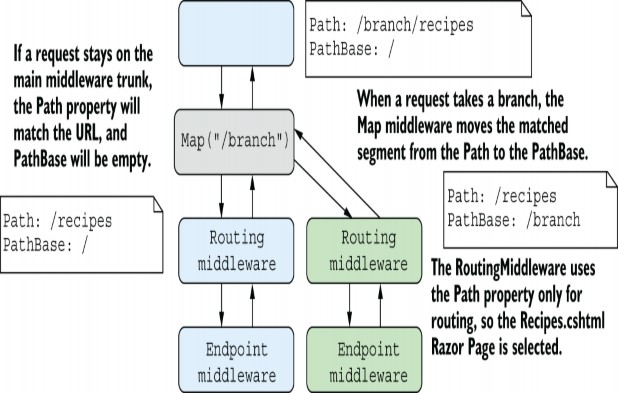
Figure 31.2 When the Map extension diverts a request to a branch, it removes the matched segment from the Path property and adds it to the PathBase property.
NOTE ASP.NET Core’s link generator (used in Razor and minimal APIs, as discussed in chapter 6) uses PathBase to ensure that it generates URLs that include the PathBase as a prefix.
You’ve seen the Run extension, which always returns a response, and the Map extension, which creates a branch in the pipeline. The next extension we’ll look at is the general- purpose Use extension.
31.1.3 Adding to the pipeline with the Use extension
You can use the Use extension method to add a general- purpose piece of middleware. You can use it to view and modify requests as they arrive, to generate a response, or to pass the request on to subsequent middleware in the pipeline.
As with the Run extension, when you add the Use extension to your pipeline, you specify a lambda function that runs when a request reaches the middleware. ASP.NET Core passes two parameters to this function:
• The HttpContext representing the current request and response—You can use this to inspect the request or generate a response, as you saw with the Run extension.
• A pointer to the rest of the pipeline as a Func
By providing a pointer to the rest of the pipeline, you can use the Use extension to control exactly how and when the rest of the pipeline executes, as shown in figure 31.3. If you don’t call the provided Func
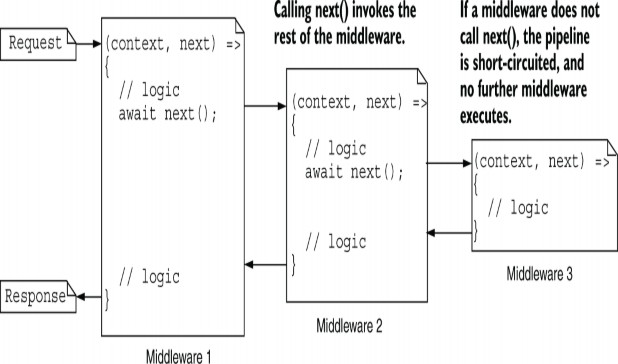
Figure 31.3 Three pieces of middleware, created with the Use extension. Invoking the provided Func
Exposing the rest of the pipeline as a Func
many scenarios. Instead of branching the pipeline to implement the health-check middleware with Map and Run, as you did in listing 31.2, you could use a single instance of the Use extension, as shown in the following listing. This provides the same required functionality as before but does so without branching the pipeline.
Listing 31.3 Using the Use extension method to create a health-check middleware
app.Use(async (HttpContext context, Func<Task> next) => ❶
{
if (context.Request.Path.StartsWithSegments("/ping")) ❷
{
context.Response.ContentType = "text/plain"; ❸
await context.Response.WriteAsync("pong"); ❸
}
else
{
await next(); ❹
}
});
app.UseStaticFiles();
❶ The Use extension takes a lambda with HttpContext (context) and Func<Task> (next) parameters.
❷ The StartsWithSegments method looks for the provided segment in the current path.
❸ If the path matches, generates a response and short-circuits the pipeline
❹ If the path doesn’t match, calls the next middleware in the pipeline—in this case UseStaticFiles()\
If the incoming request starts with the required path segment (/ping), the middleware responds and doesn’t call the rest of the pipeline. If the incoming request doesn’t start with /ping, the extension calls the next middleware in the pipeline, with no branching necessary.
With the Use extension, you have control of when and whether you call the rest of the middleware pipeline. But it’s important to note that you generally shouldn’t modify the Response object after calling next(). Calling next() runs the rest of the middleware pipeline, so subsequent middleware may start streaming the response to the browser. If you try to modify the response after executing the pipeline, you may end up corrupting the response or sending invalid data.
WARNING Don’t modify the Response object after calling next(). Also, don’t call next() if you’ve written to the Response.Body; writing to this Stream can trigger Kestrel to start streaming the response to the browser, and you could cause invalid data to be sent. You can generally read from the Response object safely, such as to inspect the final StatusCode or ContentType of the response.
Another common use for the Use extension method is to modify every request or response that passes through it. For example, you should send various HTTP headers with all your applications for security reasons. These headers often disable old, insecure legacy behaviors by browsers or restrict the features enabled by the browser. You learned about the HSTS header in chapter 28, but you can add other headers for additional security.
TIP You can test the security headers for your app at https://securityheaders.com, which also provides information about what headers you should add to your application and why.
Imagine you’ve been tasked with adding one such header— X-Content-Type-Options: nosniff, which provides added protection against cross-site scripting (XSS) attacks— to every response generated by your app. This sort of cross- cutting concern is perfect for middleware. You can use the Use extension method to intercept every request, set the response header, and then execute the rest of the middleware pipeline. No matter what response the pipeline generates, whether it’s a static file, an error, or a Razor Page, the response will always have the security header.
Listing 31.4 shows a robust way to achieve this. When the middleware receives a request, it registers a callback that runs before Kestrel starts sending the response back to the browser. It then calls next() to run the rest of the middleware pipeline. When the pipeline generates a response, likely in some later middleware, Kestrel executes the callback and adds the header. This approach ensures that the header isn’t accidentally removed by other middleware in the pipeline and also ensures that you don’t try to modify the headers after the response has started streaming to the browser.
Listing 31.4 Adding headers to a response with the Use extension
app.Use(async (HttpContext context, Func<Task> next) => ❶
{
context.Response.OnStarting(() => ❷
{
context.Response.Headers["X-Content-Type-Options"] = "nosniff"; ❸
return Task.CompletedTask; ❹
});
await next(); ❺
}
app.UseStaticFiles(); ❻
app.UseRouting(); ❻
app.MapRazorPages ❻
❶ Adds the middleware at the start of the pipeline
❷ Sets a function that runs before the response is sent to the browser
❸ Adds the header to the response for added protection against XSS attacks
❹ The function passed to OnStarting must return a Task.
❺ Invokes the rest of the middleware pipeline
❻ No matter what response is generated, it’ll have the security header added.
Simple cross-cutting middleware like the security header example is common, but it can quickly clutter your Program.cs configuration and make it difficult to understand the pipeline at a glance. Instead, it’s common to encapsulate your middleware in a class that’s functionally equivalent to the Use extension but that can be easily tested and reused.
31.1.4 Building a custom middleware component
Creating middleware with the Use extension, as you did in listings 31.3 and 31.4, is convenient, but it’s not easy to test, and you’re somewhat limited in what you can do. For example, you can’t easily use DI to inject scoped services inside these basic middleware components. Normally, rather than call the Use extension directly, you’ll encapsulate your middleware into a class that’s functionally equivalent.
Custom middleware components don’t have to derive from a specific base class or implement an interface, but they have a certain shape, as shown in listing 31.5. ASP.NET Core uses reflection to execute the method at runtime. Middleware classes should have a constructor that takes a RequestDelegate object, which represents the rest of the middleware pipeline, and they should have an Invoke function with a signature similar to
public Task Invoke(HttpContext context);The Invoke() function is equivalent to the lambda function from the Use extension, and it is called when a request is received. The following listing shows how you could convert the headers middleware from listing 31.4 into a standalone middleware class.
Listing 31.5 Adding headers to a Response using a custom middleware component
public class HeadersMiddleware
{
private readonly RequestDelegate _next; ❶
public HeadersMiddleware(RequestDelegate next) ❶
{ ❶
_next = next; ❶
} ❶
public async Task Invoke(HttpContext context) ❷
{
context.Response.OnStarting(() => ❸
{ ❸
context.Response.Headers["X-Content-Type-Options"] = ❸
"nosniff"; ❸
return Task.CompletedTask; ❸
}); ❸
await _next(context); ❹
}
}
❶ The RequestDelegate represents the rest of the middleware pipeline.
❷ The Invoke method is called with HttpContext when a request is received.
❸ Adds the header to the response as before
❹ Invokes the rest of the middleware pipeline. Note that you must pass in the
provided HttpContext.
NOTE Using this shape approach makes the middleware more flexible. In particular, it means you can easily use DI to inject services into the Invoke method. This wouldn’t be possible if the Invoke method were an overridden base class method or an interface. However, if you prefer, you can implement the IMiddleware interface, which defines the basic Invoke method.
This middleware is effectively identical to the example in listing 31.4, but it’s encapsulated in a class called HeadersMiddleware. You can add this middleware to your app in Startup.Configure by calling
app.UseMiddleware<HeadersMiddleware>();A common pattern is to create helper extension methods to make it easy to consume your extension method from
Program.cs (so that IntelliSense reveals it as an option on the WebApplication instance). The following listing shows how you could create a simple extension method for HeadersMiddleware.
Listing 31.6 Creating an extension method to expose HeadersMiddleware
public static class MiddlewareExtensions
{
public static IApplicationBuilder UseSecurityHeaders( ❶
this IApplicationBuilder app) ❶
{
return app.UseMiddleware<HeadersMiddleware>(); ❷
}
}
❶ By convention, the extension method should return an IApplicationBuilder to allow chaining.
❷ Adds the middleware to the pipeline
With this extension method, you can now add the headers middleware to your app using
app.UseSecurityHeaders();TIP My SecurityHeaders NuGet package makes it easy to add security headers using middleware without having to write your own. The package provides a fluent interface for adding the recommended security headers to your app. You can find instructions on how to install it at http://mng.bz/JggK.
Listing 31.5 is a simple example, but you can create middleware for many purposes. In some cases you may need to use DI to inject services and use them to handle a request. You can inject singleton services into the constructor of your middleware component, or you can inject services with any lifetime into the Invoke method of your middleware, as demonstrated in the following listing.
Listing 31.7 Using DI in middleware components
public class ExampleMiddleware
{
private readonly RequestDelegate _next;
private readonly ServiceA _a; ❶
public HeadersMiddleware(RequestDelegate next, ServiceA a) ❶
{ ❶
_next = next; ❶
_a = a; ❶
}
public async Task Invoke(
HttpContext context, ServiceB b, ServiceC c) ❷
{
// use services a, b, and c
// and/or call _next.Invoke(context);
}
}
❶ You can inject additional services in the constructor. These must be singletons.
❷ You can inject services into the Invoke method. These may have any lifetime.
WARNING ASP.NET Core creates the middleware only once for the lifetime of your app, so any dependencies injected in the constructor must be singletons. If you need to use scoped or transient dependencies, inject them into the Invoke method.
In addition to cross-cutting concerns, a good use for middleware is creating simple handlers with as few dependencies as possible that respond to a fixed URL, similar to the Use extension method you learned about in section 31.1.3. These simple handlers can be dropped into multiple applications, regardless of how the app’s routing is configured.
So-called well-known Uniform Resource Identifiers (URIs) are a good use case for these simple middleware handlers, such as the security.txt well-known URI (https://www.rfc- editor.org/rfc/rfc9116) and the OpenID Connect URIs (http://mng.bz/wvj2). These handlers always respond to a single path, so they can neatly encapsulate all the logic without risk of interfering with any other routing configuration.
Listing 31.8 shows a simple example of a security.txt handler implemented as middleware. It always responds to the well- known path with a fixed value and is easy to add to any application by calling app.UseMiddleware
Listing 31.8 A Security.txt handler implemented as middleware
public class SecurityTxtHandler
{
private readonly RequestDelegate _next;
public SecurityTxtHandler(RequestDelegate next)
{
_next = next;
}
public Task Invoke(HttpContext context)
{
var path = context.Request.Path;
if(path.StartsWithSegments("/.well-known/security.txt")) ❶
{
context.Response.ContentType = "text/plain"; ❷
return context.Response.WriteAsync( ❷
"Contact: mailto:security@example.com"); ❷
}
return _next.Invoke(context); ❸
}
}
❶ The middleware looks for a fixed, well-known path.
❷ If the path is matched, the middleware returns a response.
❸ If the path didn’t match, the next middleware in the pipeline is called.
That covers pretty much everything you need to start building your own middleware components. By encapsulating your middleware in custom classes, you can easily test their behavior or distribute them in NuGet packages, so I strongly recommend taking this approach. Apart from anything else, it will make Program.cs file less cluttered and easier to understand.
31.1.5 Converting middleware into endpoint routing endpoints
In this section you’ll learn how you can take the custom middleware you created in section 31.1.2 and convert it to a simple middleware endpoint that integrates into the endpoint routing system. Then you can take advantage of features such as routing and authorization.
In section 31.1.2 I described creating a simple ping-pong endpoint, using the Map and Run extension methods, that returns a plain-text pong response whenever a /ping request is received by branching the middleware pipeline.This is fine because it’s so simple, but what if you have more complex requirements?
Consider a basic enhancement of this ping-pong example. How would you add authorization to the request? The AuthorizationMiddleware looks for metadata on endpoints like Razor Pages or minimal APIs to see whether there’s any authorization metadata, but it doesn’t know how to work with the ping-pong Map extension.
Similarly, what if you wanted to use more complex routing? Maybe you want to be able to call /ping/3 and have your ping-pong middleware reply pong-pong-pong. (No, I can’t think why you would either!) You now have to try to parse that integer from the URL, make sure it’s valid, and so on.That’s sounding like a lot more work and seems to be a clear indicator you should have created a minimal API endpoint using endpoint routing!
For our simple ping-pong endpoint, that wouldn’t be hard to do, but what if you have a more complex middleware component that you don’t want to rewrite completely? Is there some way to convert the middleware to an endpoint?
Let’s imagine that you need to apply authorization to the simple ping-pong endpoint you created in section 31.1.2. This is much easier to achieve with endpoint routing than simple middleware branches like Map or Use, but let’s imagine you want to stick to using middleware instead of a traditional minimal API endpoint. The first step is creating a standalone middleware component for the functionality,using the approach you saw in section 31.1.4, as shown in the following listing.
Listing 31.9 The PingPongMiddleware implemented as a middleware component
public class PingPongMiddleware
{
public PingPongMiddleware(RequestDelegate next) ❶
{
}
public async Task Invoke(HttpContext context) ❷
{
context.Response.ContentType = "text/plain"; ❸
await context.Response.WriteAsync("pong"); ❸
}
}
❶ Even though it isn’t used in this case, you must inject a RequestDelegate in the
constructor.
❷ Invoke is called to execute the middleware.
❸ The middleware always returns a “pong” response.
Note that this middleware always returns a "pong" response regardless of the request URL; we will configure the "/ping" path later. We can use this class to convert a middleware pipeline from the branching version shown in figure 31.1, to the endpoint version shown in figure 31.4.
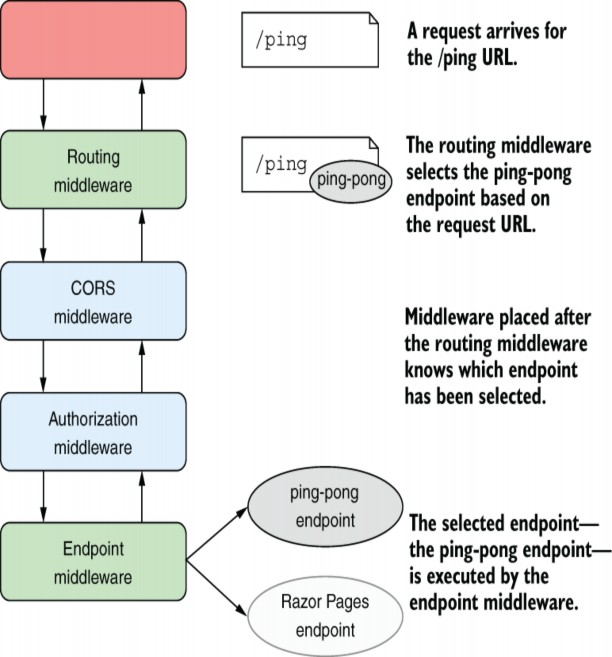
Figure 31.4 Endpoint routing separates the selection of an endpoint from the execution of an endpoint. The routing middleware selects an endpoint based on the incoming request and exposes metadata about the endpoint. Middleware placed before the endpoint middleware can act based on the selected endpoint, such as short-circuiting unauthorized requests. If the request is authorized, the endpoint middleware executes the selected endpoint and generates a response.
Converting the ping-pong middleware to an endpoint doesn’t require any changes to the middleware itself. Instead, you need to create a mini middleware pipeline containing only your ping-pong middleware.
TIP Converting response-generating middleware to an endpoint essentially requires converting it to its own mini pipeline, so you can even include additional middleware in the endpoint pipeline if you wish.
To create the mini pipeline, you call CreateApplicationBuilder() on IEndpointRouteBuilder instance, which creates a new IApplicationBuilder. There are two ways to access the IEndpointRouteBuilder: call UseEndpoints(endpoints =>{}) and use the endpoints variable or explicitly cast WebApplication to IEndpointRouteBuilder.
NOTE Although WebApplication implements IEndpointRouteBuilder, it deliberately hides the advanced CreateApplicationBuilder() method from you! This should be a good indication that you’re in advanced territory and should probably consider using minimal API endpoints instead.
In the following listing, we create a new IApplicationBuilder, add the middleware that makes up the endpoint to it, and then call Build() to create the pipeline. Once you have a pipeline, you can associate it with a given route by calling Map() on the IEndpointRouteBuilder instance and passing in a route template.
Listing 31.10 Mapping the ping-pong endpoint in UseEndpoints
WebApplicationBuilder builder = WebApplication.CreateBuilder(args);
WebApplication app = builder.Build();
app.UseRouting();
app.UseAuthentication();
app.UseAuthorization();
var endpoint = ((IEndpointRouteBuilder)app) ❶
.CreateApplicationBuilder() ❷
.UseMiddleware<PingPongMiddleware>() ❸
.Build(); ❸
app.Map("/ping", endpoint); ❹
app.MapRazorPages();
app.MapHealthChecks("/healthz");
app.Run();
❶ Casts the WebApplication to IEndpointRouteBuilder so you can call
CreateApplicationBuilider
❷ Creates a miniature, standalone IApplicationBuilder to build your endpoint
❸ Adds the middleware and builds the final endpoint. This is executed when the
endpoint is executed.
❹ Maps the new endpoint with the route template “/ping”
TIP Note that the Map() function on IEndpointRouteBuilder creates a new endpoint (consisting of your mini-pipeline) with an associated route.
Although it has the same name, this is conceptually different from the Map function on IApplicationBuilder from section 31.1.2, which is used to branch the middleware pipeline. It is analogous to the MapGet (and kin) methods you use to create minimal API endpoints.
As is common with ASP.NET Core, you can extract this somewhat-verbose functionality into an extension method to make your endpoint easier to read and discover. The following listing extracts the code to create an endpoint from listing 31.10 into a separate class, taking the route template to use as a method parameter.
Listing 31.11 An extension method for using the PingPongMiddleware as an endpoint
public static class EndpointRouteBuilderExtensions
{
public static IEndpointConventionBuilder MapPingPong( ❶
this IEndpointRouteBuilder endpoints, ❶
string route) ❷
{
var pipeline = endpoints
.CreateApplicationBuilder() ❸
.UseMiddleware<PingPongMiddleware>() ❸
.Build(); ❸
return endpoints ❹
.Map(route, pipeline) ❹
.RequireAuthorization(); ❺
}
}
❶ Creates an extension method for registering the PingPongMiddleware as an endpoint
❷ Allows the caller to pass in a route template for the endpoint
❸ Creates the endpoint pipeline
❹ Adds the new endpoint to the provided endpoint collection, using the provide route template
❺ You can add additional metadata here directly, or the caller can add metadata themselves.
Now that you have an extension method, MapPingPong(), you can update your mapping code to be simpler and easier to understand:
app.MapPingPong("/ping");
app.MapRazorPages(); app.MapHealthChecks("/healthz");
Congratulations—you’ve created your first custom endpoint from middleware! By turning the middleware into an endpoint, you can now add extra metadata, as shown in listing 31.11. Your middleware is hooked into the endpoint routing system and benefits from everything it offers.
The example in listing 31.11 used a basic route template, "/ping", but you can also use templates that contain route parameters, such as "/ping/{count}", as you would with minimal APIs. The big difference is that you don’t get the benefits of model binding that you get from minimal APIs, and it clearly takes more effort than using minimal APIs!
TIP For examples of how to access the route data from your middleware, as well as best-practice advice, see my blog entry titled “Accessing route values in endpoint middleware in ASP.NET Core 3.0” at http://mng.bz/4ZRj.
Converting existing middleware like PingPongMiddleware to work with endpoint routing can be useful when you have already implemented that middleware, but it’s a lot of boilerplate to write if you want to create a new simple endpoint. In almost all cases you should use minimal API endpoints instead. But if you ever find yourself needing to reuse some existing middleware as an endpoint, now you know how!
In the next section we’ll move away from the middleware pipeline and look at how to handle a common configuration requirement: using DI services to build a strongly typed IOptions objects.
31.2 Using DI with OptionsBuilder and IConfigureOptions
In this section I describe how to handle a common scenario: you want to use services registered in DI to configure IOptions
In chapter 10 we discussed the ASP.NET Core configuration system in depth. You saw how an IConfiguration object is built from multiple layers, where subsequent layers can add to or replace configuration values from previous layers. Each layer is added by a configuration provider, which reads values from a file, from environment variables, from User Secrets, or from any number of possible locations.
A common and encouraged practice is to bind your configuration object to strongly typed IOptionsbuilder.Services.Configure<T>() and providing an IConfiguration object or a configuration section to bind.
For example, to bind a strongly typed object called CurrencyOptions to the "Currencies" section of an IConfiguration object, you could use the following:
builder.services.Configure<CurrencyOptions>( Configuration.GetSection("Currencies"));TIP You can see an example of the CurrencyOptions type and the associated "Currencies" section of appsetttings.json in the source code for this chapter.
This sets the properties of the CurrencyOptions object, based on the values in the "Currencies" section of your IConfiguration object. Simple binding like this is common, but sometimes you might not want to rely on configuring your IOptions<T> objects via the configuration system; you might want to configure them in code instead.The IOptions pattern requires only that you configure a strongly typed object before it’s injected into a dependent service; it doesn’t mandate that you have to bind it to an IConfiguration section.
TIP Technically, even if you don’t configure an IOptions
The Configure
Listing 31.12 Configuring an IOptions object using a lambda function
WebApplicationBuilder builder = WebApplication.CreateBuilder(args);
builder.Services.Configure<CurrencyOptions>( ❶
builder.Configuration.GetSection("Currencies")); ❶
builder.services.Configure<CurrencyOptions>(options => ❷
options.Currencies = new string[] { "GBP", "USD"}); ❷
WebApplication app = builder.Build();
app.MapGet("/", (IOptions<CurrencyOptions> opts) => opts.Value); ❸
app.Run();
❶ Configures the IOptions object by binding to an IConfiguration section
❷ Configures the IOptions object by executing a lambda function
❸ The injected IOptions value is built by first binding to configuration and then applying the lambda.
Each call to Configure<T>(), both the binding to IConfiguration and the lambda function, adds another configuration step to the CurrencyOptions object. When the DI container first requires an instance of IOptions

Figure 31.5 Configuring a CurrencyOptions object. When the DI container needs an IOptions<> instance of a strongly typed object, the container creates the object and then uses each of the registered Configure() methods to set the object’s properties.
In the previous code snippet, you set the Currencies property to a static array of strings in a lambda function. But what if you don’t know the correct values ahead of time? You might need to load the available currencies from a database or from some remote service, such as an ICurrencyProvider.
This situation, in which you need a configured service to configure your IOptions<T>, is potentially hard to resolve. Remember that you declared your IOptions<T> configuration as part of your app’s DI configuration. But if you need to resolve a service from DI to configure the IOptions object, you’re stuck with a chicken-and-egg problem: how can you access a service from the DI container before you’ve finished configuring the DI container?
This circular problem has several potential solutions, but the easiest approach is to use an alternative API for configuring IOptions instances, using the OptionsBuilder
TIP Another helpful feature of OptionsBuilder
The following listing shows the equivalent of listing 31.12 but using OptionsBuilder<T> instead. You create an OptionsBuilder<T> instance by calling AddOptions<T> (), and then chain additional methods such as BindConfiguration() and Configure() to configure your final IOptions<T> object, building up layers of options configuration, as shown previously in figure 31.5.
Listing 31.13 Configuring an IOptions<T> object using OptionsBuilder<T>
WebApplicationBuilder builder = WebApplication.CreateBuilder(args);
builder.Services
.AddOptions<CurrencyOptions>() ❶
.BindConfiguration("Currencies") ❷
.Configure(opts => ❸
opts.Currencies = new string[] { "GBP", "USD"}); ❸
WebApplication app = builder.Build();
app.MapGet("/", (IOptions<CurrencyOptions> opts) => opts.Value);
app.Run();
❶ Creates an OptionsBuilder
❷ Binds to the Currencies section of the IConfiguration
❸ Configures the IOptions object by executing a lambda function
You’ve seen the builder pattern many times throughout the book, and the pattern in this case is no different. The builder exposes methods that you can chain together fluently. One of the benefits of the builder pattern is that it’s easy to discover all the methods it exposes. In this case, if you explore the type in your integrated development environment (IDE), you may notice that OptionsBuilder<T> exposes multiple Configure overloads, such as
• Configure
• Configure<TDep1,TDep2>(Action<T, TDep1, TDep2> config);
• Configure<TDep1,TDep2,TDep3> (Action<T,TDep1,TDep2,TDep3> config);
These methods allow you to specify dependencies that are automatically retrieved from the DI container and passed to the config action when the IOptions object is fetched from DI, as shown in figure 31.6. Five overloads for Configure
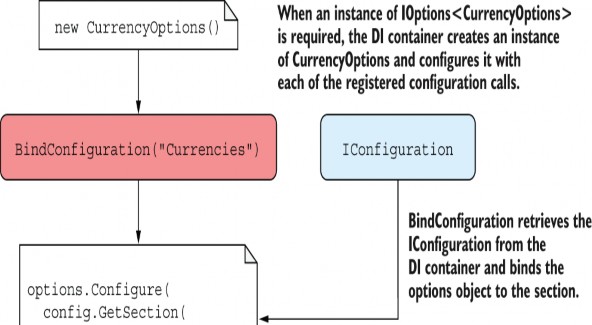
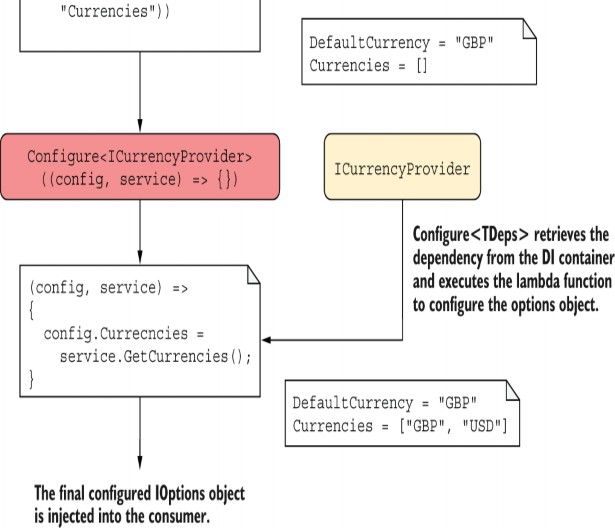
Figure 31.6 Using OptionsBuilder to build an IOptions object. Dependencies that are requested via the Configure
Using this pattern, we can update the code from listing 31.13 to use the ICurrencyProvider whenever our app needs to create the CurrencyOptions object. We can register the service in the DI container and know that the DI will take
care of providing it to the lambda function at runtime, as shown in the following listing.
Listing 31.14 Using a DI service
WebApplicationBuilder builder = WebApplication.CreateBuilder(args);
builder.Services
.AddOptions<CurrencyOptions>()
.BindConfiguration("Currencies")
.Configure<ICurrencyProvider>((opts, service) => ❶
opts.Currencies = service.GetCurrencies()); ❶
builder.Services.AddSingleton<ICurrencyProvider, CurrencyProvider>(); ❷
WebApplication app = builder.Build();
app.MapGet("/", (IOptions<CurrencyOptions> opts) => opts.Value); ❸
app.Run();
❶ Configures the Ioptions object using a service from DI
❷ Registers the service with the DI container
❸ Retrieves the IOptions object, which retrieves the service from DI and runs the lambda method
With the configuration in listing 31.14, when the IOptions<CurrencyOptions> is first injected into the minimal API endpoint, the IOptions<CurrencyOptions> object is built as described by the OptionsBuilder. First, the "Currencies" section of the app IConfiguration is bound to a new CurrencyOptions object. Then the ICurrencyProvider is retrieved from DI and passed to the Configure<TDep> lambda, along with the options object. Finally, the IOptions object is injected into the endpoint.
WARNING You must inject only singleton services using Configure<TDeps> methods. If you try to inject a scoped service, such as a DbContext, you will get an error in development warning you about a captive dependency. I describe how to work around this on my blog at http://mng.bz/7Dve.
The OptionsBuilder<T> is a convenient way to configure your IOptions objects using dependencies, but you can use an alternative approach: implementing the IConfigureOptions<T> interface. You implement this interface in a configuration class and use it to configure the IOptions
Listing 31.15 Implementing IConfigureOptions<T> to configure an options object
public class ConfigureCurrencyOptions : IConfigureOptions<CurrencyOptions>
{
private readonly ICurrencyProvider _currencyProvider; ❶
public ConfigureCurrencyOptions(ICurrencyProvider currencyProvider)
{
_currencyProvider = currencyProvider; ❶
}
public void Configure(CurrencyOptions options) ❷
{
options.Currencies = _currencyProvider.GetCurrencies(); ❸
}
}
❶ You can inject services that are available only after the DI is completely configured.
❷ Configure is called when an instance of IOptions<CurrencyOptions> is required.
❸ Uses the injected service to load the values
All that remains is to register the implementation in the DI container. As always, order is important, so if you want ConfigureCurrencyOptions to run after binding to configuration, you must add it after configuring your OptionsBuilder<T>:
builder.Services.AddOptions<CurrencyOptions>()
.BindConfiguration("Currencies");
builder.AddSingleton
<IConfigureOptions<CurrencyOptions>, ConfigureCurrencyOptions>();
TIP The order in which you configure your options matters. If you want to always run your configuration last, after all other configuration methods, you can use the PostConfigure() method on OptionsBuilder, or the IPostConfigureOptions interface. You can read more about this approach on my blog at http://mng.bz/mVj4.
With this configuration, when IOptions
WARNING The CurrencyConfigureOptions object is registered as a singleton, so it will capture any injected services of scoped or transient lifetimes.
Whether you use the OptionsBuilder
builder.Services.AddSingleton<ICurrencyProvider, CurrencyProvider>();As your app grows and you add extra features and services, you’ll probably find yourself writing more of these simple DI registrations, where you register a Service that implements IService. The built-in ASP.NET Core DI container requires you to explicitly register each of these services manually. If you find this requirement frustrating, it may be time to look at third-party DI containers that can take care of some of the boilerplate for you.
31.3 Using a third-party dependency injection container
In this section I show you how to replace the default DI container with a third-party alternative, Lamar. Third-party containers often provide additional features compared with the built-in container, such as assembly scanning, automatic service registration, and property injection. Replacing the built-in container can also be useful when you’re porting an existing app that uses a third-party DI container to ASP.NET Core.
The .NET community had used DI containers for years before ASP.NET Core decided to include a built-in one. The ASP.NET Core team wanted a way to use DI in their own framework libraries, and they wanted to create a common abstraction1 that allows you to replace the built-in container with your favorite third-party alternative, such as Autofac, StructureMap/Lamar, Ninject, Simple Injector, or Unity.
The built-in container is intentionally limited in the features it provides, and realistically, it won’t be getting many more. By contrast, third-party containers can provide a host of extra features. These are some of the features available in Lamar (https://jasperfx.github.io/lamar/guide/ioc), the spiritual successor to StructureMap (https://structuremap.github.io):
• Assembly scanning for interface/implementation pairs based on conventions
• Automatic concrete class registration Property injection and constructor selection
• Automatic Lazy
• Debugging/testing tools for viewing inside your container
None of these features is a requirement for getting an application up and running, so using the built-in container makes a lot of sense if you’re building a small app or are new to DI containers in general. But if at some undefined tipping point, the simplicity of the built-in container becomes too much of a burden, it may be worth replacing.
TIP A middle-of-the-road approach is to use the Scrutor NuGet package, which adds some features to the built-in DI container without replacing it. For an introduction and examples, see my blog post, “Using Scrutor to automatically register your services with the ASP.NET Core DI container” at http://mng.bz/MX7B.
In this section I show how you can configure an ASP.NET Core app to use Lamar for dependency resolution. It won’t be a complex example or an in-depth discussion of Lamar itself.Instead, I’ll cover the bare minimum to get you up and running.
Whichever third-party container you choose to install in an existing app, the overall process is pretty much the same:
-
Install the container NuGet package.
-
Register the third-party container with WebApplicationBuilder in Program.cs.
-
Configure the third-party container to register your services.
Most of the major .NET DI containers include adapters and extension methods to hook easily into your ASP.NET Core app. For details, it’s worth consulting the specific guidance for the container you’re using. For Lamar, the process looks like this:
-
Install the Lamar.Microsoft.DependencyInjection NuGet package using the NuGet package manager, by running dotnet add package
dotnet add package Lamar.Microsoft.DependencyInjectionor by adding a
to your .csproj file: <PackageReference Include="Lamar.Microsoft.DependencyInjection" Version="8.1.0" /> -
Call UseLamar() on WebApplicationBuilder.Host in Program.cs:
WebApplicationBuilder builder = WebApplication.CreateBuilder(args); builder.Host.UseLamar(services => {}) WebApplication app = builder.Build(); -
Configure the Lamar ServiceRegistry in the lambda method passed to UseLamar(), as shown in the following listing. This is a basic configuration, but you can see a more complex example in the source code for this chapter.
Listing 31.16 Configuring Lamar as a third-party DI container
builder.Host.UseLamar(services => ❶
{
services.AddAuthorization(); ❷
services.AddControllers() ❷
.AddControllersAsServices(); ❸
services.Scan(_ => { ❹
_.AssemblyContainingType(typeof(Program)); ❹
_.WithDefaultConventions(); ❹
}); ❹
}
❶ Configures your services in UseLamar() instead of on builder.Services
❷ You can (and should) add ASP.NET Core framework services to the
ServiceRegistry, as usual.
❸ Required so that Lamar is used to build your web API controllers
❹ Lamar can automatically scan your assemblies for services to register.
In this example I’ve used the default conventions to register services. This automatically registers concrete classes and services that are named following expected conventions (for example, Service implements IService). You can change these conventions or add other registrations in the UseLamar() lambda.
The ServiceRegistry passed into UseLamar() implements IServiceCollection, which means you can use all the built-in extension methods, such as AddControllers() and AddAuthorization(), to add framework services to your container.
WARNING If you’re using DI in your Model-View-Controller (MVC) controllers (almost certainly!), and you register those dependencies with Lamar rather than the built-in container, you may need to call AddControllersAsServices(), as shown in listing 31.16. This is due to an implementation detail in the way your MVC controllers are created by the framework. For details, see my blog entry titled “Controller activation and dependency injection in ASP.NET Core MVC” at http://mng.bz/aogm.
With this configuration in place, whenever your app needs to create a service, it will request it from the Lamar container, which will create the dependency tree for the class and create an instance. This example doesn’t show off the power of Lamar, so be sure to check out the documentation (https://jasperfx.github.io/lamar) and the associated source code for this chapter for more examples. Even in modest-size applications, Lamar can greatly simplify your service registration code, but its party trick is showing all the services you have registered and any associated issues.
TIP Third-party containers typically add configuration approaches but don’t change any of the fundamentals of how DI works in ASP.NET Core. All the techniques you’ve seen in this book will work whether you’re using the built-in container or a third-party container, so you can use the IConfigureOptions
That brings us to the end of this chapter on advanced configuration. In this chapter I focused on some of the core components of any ASP.NET Core app: middleware, configuration, and DI. In the next chapter you’ll learn about more custom components, with a focus on Razor Pages and web API controllers.
Summary
Use the Run extension method to create middleware components that always return a response. You should always place the Run extension at the end of a middleware pipeline or branch, as middleware placed after it will never execute.
You can create branches in the middleware pipeline with the Map extension. If an incoming request matches the specified path prefix, the request will execute the pipeline branch; otherwise, it will execute the trunk.
When the Map extension matches a request path segment, it removes the segment from the request’s HttpContext.Path and moves it to the PathBase property. This ensures that routing in branches works correctly.
You can use the Use extension method to create generalized middleware components that can generate a response, modify the request, or pass the request on to subsequent middleware in the pipeline. This is useful for cross-cutting concerns, like adding a header to all responses.
You can encapsulate middleware in a reusable class. The class should take a RequestDelegate object in the constructor and should have a public Invoke() method that takes an HttpContext and returns a Task. To call the next middleware component in the pipeline, invoke the RequestDelegate with the provided HttpContext.
To create endpoints that generate a response, build a miniature pipeline containing the response- generating middleware, and call endpoints.Map(route, pipeline). Endpoint routing will be used to map incoming requests to your endpoint.
You can configure IOptions<T> objects using a fluent builder interface. Call AddOptions<T>() to create an OptionsBuilder<T> instance and then chain configuration calls.
OptionsBuilder<T> allows easy access to dependencies for configuration, as well as features such as validation.
You can also use services from the DI container to configure an IOptions<T> object by creating a separate class that implements IConfigureOptions<T>. This class can use DI in the constructor and is used to lazily build a requested IOptions<T> object at runtime.
You can replace the built-in DI container with a third-party container. Third-party containers often provide additional features, such as convention- based dependency registration, assembly scanning, and property injection.
- Although the promotion of DI as a core practice has been applauded, this abstraction has seen some controversy. This post, titled “What’s wrong with the ASP.NET Core DI abstraction?”, from one of the maintainers of the SimpleInjector DI library, describes many of the arguments and concerns: http://mng.bz/yYAd. You can also read more about the decisions at http://mng.bz/6DnA.