32 Building custom MVC and Razor Pages components
This chapter covers
• Creating custom Razor Tag Helpers
• Using view components to create complex Razor views
• Creating a custom DataAnnotations validation attribute
• Replacing the DataAnnotations validation framework with an alternative
In the previous chapter you learned how to customize and extend some of the core systems in ASP.NET Core: configuration, dependency injection (DI), and your middleware pipeline. These components form the basis of all ASP.NET Core apps. In this chapter we’re focusing on Razor Pages and Model-View-Controller (MVC)/API controllers. You’ll learn how to build custom components that work with Razor views. You’ll also learn how to build components that work with the validation framework used by both Razor Pages and API controllers.
We’ll start by looking at Tag Helpers. In section 32.1 I show how to create two Tag Helpers: one that generates HTML to describe the current machine and one that lets you write if statements in Razor templates without having to use C#.
These will give you the details you need to create your own custom Tag Helpers in your own apps if the need arises.
In section 32.2 you’ll learn about a new Razor concept: view components. View components are a bit like partial views, but they can contain business logic and database access. For example, on an e-commerce site you might have a shopping cart, a dynamically populated menu, and a login widget all on one page. Each of those sections is independent of the main page content and has its own logic and data-access needs. In an ASP.NET Core app using Razor Pages, you’d implement each of those as a view component.
In section 32.3 I’ll show you how to create a custom validation attribute. As you saw in chapter 6, validation is a key responsibility of Razor Page handlers and action methods, and the DataAnnotations attributes provide a clean, declarative way of doing so. We previously looked only at the built-in attributes, but you’ll often find you need to add attributes tailored to your app’s domain. In section 32.3 you’ll see how to create a simple validation attribute and how to extend it to use services registered with the DI container.
Throughout this book I’ve mentioned that you can easily swap out core parts of the ASP.NET Core framework if you wish. In section 32.4 you’ll do that by replacing the built-in attribute-based validation framework with a popular alternative, FluentValidation. This open-source library allows you to separate your binding models from the validation rules, which makes building certain validation logic easier.Many people prefer this approach of separating concerns to the declarative approach of DataAnnotations.
When you’re building pages with Razor Pages, one of the best productivity features is Tag Helpers, and in the next section you’ll see how you can create your own.
32.1 Creating a custom Razor Tag Helper
In this section you’ll learn how to create your own Tag Helpers, which allow you to customize your HTML output. You’ll learn how to create Tag Helpers that add new elements to your HTML markup, as well as Tag Helpers that can remove or customize existing markup. You’ll also see that your custom Tag Helpers integrate with the tooling of your integrated development environment (IDE) to provide rich IntelliSense in the same way as the built-in Tag Helpers.
In my opinion, Tag Helpers are one of the best additions to the venerable Razor template language in ASP.NET Core.They allow you to write Razor templates that are easier to read, as they require less switching between C# and HTML, and they augment your HTML tags rather than replace them (as opposed to the HTML Helpers used extensively in the legacy version of ASP.NET).
ASP.NET Core comes with a wide variety of Tag Helpers (see chapter 18), which cover many of your day-to-day requirements, especially when it comes to building forms.For example, you can use the Input Tag Helper by adding an
asp-for attribute to an <input> tag and passing a reference to a property on your PageModel, in this case Input.Email:
`
`
The Tag Helper is activated by the presence of the attribute and gets a chance to augment the tag when rendering to HTML. The Input Tag Helper uses the name of the property to set the tag’s name and id properties, the value of the model to set the value property, and the presence of attributes such as [Required] or [EmailAddress] to add attributes for validations:
<input type="email" id="Input_Email" name="Input.Email" value="test@example.com" data-val="true"
data-val-email="The Email Address field is not a valid e-mail address."

data-val-required="The Email Address field is required."
/>
Tag Helpers help reduce the duplication in your code, or they can simplify common patterns. In this section I show how you can create your own custom Tag Helpers.
In section 32.1.1 you’ll create a system information Tag Helper, which prints details about the name and operating system of the server your app is running on. In section 32.1.2 you’ll create a Tag Helper that you can use to conditionally show or hide an element based on a C# Boolean property. In section 32.1.3 you’ll create a Tag Helper that reads the Razor content written inside the Tag Helper and transforms it.
32.1.1 Printing environment information with a custom Tag Helper
A common problem you may run into when you start running your web applications in production, especially if you’re using a server-farm setup, is working out which machine rendered the page you’re currently looking at. Similarly, when deploying frequently, it can be useful to know which version of the application is running. When I’m developing and testing, I sometimes like to add a little “info dump” at the bottom of my layouts so I can easily work out which server generated the current page, which environment it’s running in, and so on.
In this section I’m going to show you how to build a custom Tag Helper to output system information to your layout. You’ll be able to toggle the information it displays, but by default it displays the machine name and operating system on which the app is running, as shown in figure 32.1.
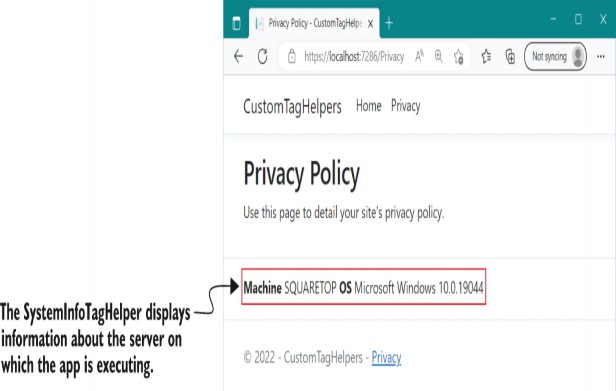
Figure 32.1 The SystemInfoTagHelper displays the machine name and operating system on which the application is running. It can be useful for identifying which instance of your app handled the request when running in a web-farm scenario.
You can call this Tag Helper from Razor by creating a <system-info> element in your template:
<footer>
<system-info></system-info>
</footer>
TIP You might not want to expose this sort of information in production, so you could also wrap it in an
The easiest way to create a custom Tag Helper is to derive from the TagHelper base class and override the Process() or ProcessAsync() function that describes how the class should render itself. The following listing shows your complete custom Tag Helper, SystemInfoTagHelper, which renders the system information to a
Listing 32.1 SystemInfoTagHelper to render system information to a view
public class SystemInfoTagHelper : TagHelper ❶
{
private readonly HtmlEncoder _htmlEncoder; ❷
public SystemInfoTagHelper(HtmlEncoder htmlEncoder) ❷
{
_htmlEncoder = htmlEncoder;
}
[HtmlAttributeName("add-machine")] ❸
public bool IncludeMachine { get; set; } = true;
[HtmlAttributeName("add-os")] ❸
public bool IncludeOS { get; set; } = true;
public override void Process( ❹
TagHelperContext context, TagHelperOutput output) ❹
{
output.TagName = "div"; ❺
output.TagMode = TagMode.StartTagAndEndTag; ❻
var sb = new StringBuilder();
if (IncludeMachine) ❼
{ ❼
sb.Append(" <strong>Machine</strong> "); ❼
sb.Append(_htmlEncoder.Encode(Environment.MachineName)); ❼
} ❼
if (IncludeOS) ❽
{ ❽
sb.Append(" <strong>OS</strong> "); ❽
sb.Append( ❽
_htmlEncoder.Encode(RuntimeInformation.OSDescription)); ❽
} ❽
output.Content.SetHtmlContent(sb.ToString()); ❾
}
}
❶ Derives from the TagHelper base class
❷ An HtmlEncoder is necessary when writing HTML content to the page.
❸ Decorating properties with HtmlAttributeName allows you to set their values from Razor markup.
❹ The main function called when an element is rendered.
❺ Replaces the <system-info> element with a <div> element
❻ Renders both the <div> </div> start and end tag
❼ If required, adds a <strong> element and the HTML-encoded machine name
❽ If required, adds a <strong> element and the HTML-encoded OS name
❾ Sets the inner content of the
There’s a lot of new code in this example, so we’ll work through it line by line. First, the class name of the Tag Helper defines the name of the element you must create in your Razor template, with the suffix removed and converted to kebab-case. As this Tag Helper is called SystemInfoTagHelper, you must create a <system- info> element.
TIP If you want to customize the name of the element, for example to <env-info>, but you want to keep the same class name, you can apply [HtmlTargetElement] with the desired name, such as [HtmlTargetElement("Env-Info")]. HTML tags are not case-sensitive, so you could use "Env-Info" or "env-info".
Inject an HtmlEncoder into your Tag Helper so you can HTML-encode any data you write to the page. As you saw in chapter 29, you should always HTML-encode data you write to the page to avoid cross-site scripting (XSS) vulnerabilities and to ensure that the data is displayed correctly.
You’ve defined two properties on your Tag Helper, IncludeMachine and IncludeOS, which you’ll use to control which data is written to the page. These are decorated with a corresponding [HtmlAttributeName], which enables setting the properties from the Razor template. In Visual Studio you’ll even get IntelliSense and type-checking for these values, as shown in figure 32.2.
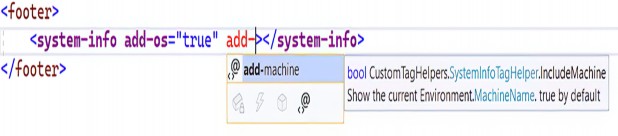
Figure 32.2 In Visual Studio, Tag Helpers are shown in a purple font, and you get IntelliSense for properties decorated with [HtmlAttributeName].
Finally, we come to the Process() method. The Razor engine calls this method to execute the Tag Helper when it identifies the target element in a view template. The Process() method defines the type of tag to render (<div>), whether it should render a start and end tag (or a self-closing tag—it depends on the type of tag you’re rendering), and the HTML content of the <div>. You set the HTML content to be rendered inside the tag by calling Content.SetHtmlContent() on the provided instance of TagHelperOutput.
WARNING Always HTML-encode your output before writing to your tag with SetHtmlContent(). Alternatively, pass unencoded input to SetContent(), and the output will be automatically HTML-encoded for you.
Before you can use your new Tag Helper in a Razor template, you need to register it. You can do this in the _ViewImports.cshtml file, using the @addTagHelper directive and specifying the fully qualified name of the Tag Helper and the assembly, as in this example:
@addTagHelper CustomTagHelpers.SystemInfoTagHelper, CustomTagHelpersAlternatively, you can add all the Tag Helpers from a given assembly by using the wildcard syntax, *, and specifying the assembly name:
@addTagHelper *, CustomTagHelpersWith your custom Tag Helper created and registered, you’re now free to use it in any of your Razor views, partial views, or layouts.
TIP If you’re not seeing IntelliSense for your Tag Helper in Visual Studio, and the Tag Helper isn’t rendered in the bold font used by Visual Studio, you probably haven’t registered your Tag Helpers correctly in _ViewImports .cshtml using @addTagHelper.
The SystemInfoTagHelper is an example of a Tag Helper that generates content, but you can also use Tag Helpers to control how existing elements are rendered. In the next section you’ll create a simple Tag Helper that can control whether an element is rendered based on an HTML attribute.
32.1.2 Creating a custom Tag Helper to conditionally hide elements
If you want to control whether an element is displayed in a Razor template based on some C# variable, you’d typically wrap the element in a C# if statement:
@{
var showContent = true;
}
@if(showContent)
{
<p>The content to show</p>
}
Falling back to C# constructs like this can be useful, as it allows you to generate any markup you like. Unfortunately, it can be mentally disruptive having to switch back and forth between C# and HTML, and it makes it harder to use HTML editors that don’t understand Razor syntax.
In this section you’ll create a simple Tag Helper to avoid the cognitive dissonance problem. You can apply this Tag Helper to existing elements to achieve the same result as shown previously but without having to fall back to C#:
@{
var showContent = true;
}
<p if="showContent" >
The content to show
</p>
When rendered at runtime, this Razor template would return the HTML
<p>
The content to show
</p>
Instead of creating a new element, as you did for SystemInfoTagHelper (<system-info>), you’ll create a Tag Helper that you apply as an attribute to existing HTML elements. This Tag Helper does one thing: controls the visibility of the element it’s attached to. If the value passed in the if attribute is true, the element and its content is rendered as normal. If the value passed is false, the Tag Helper removes the element and its content from the template. The following listing shows how you could achieve this.
Listing 32.2 Creating an IfTagHelper to conditionally render elements
[HtmlTargetElement(Attributes = "if")] ❶
public class IfTagHelper : TagHelper
{
[HtmlAttributeName("if")] ❷
public bool RenderContent { get; set; } = true;
public override void Process( ❸
TagHelperContext context, TagHelperOutput output) ❸
{
if(RenderContent == false) ❹
{
output.TagName = null; ❺
output.SuppressOutput(); ❻
}
}
public override int Order => int.MinValue; ❼
}
❶ Setting the Attributes property ensures that the Tag Helper is triggered by an if attribute.
❷ Binds the value of the if attribute to the RenderContent property
❸ The Razor engine calls Process() to execute the Tag Helper.
❹ If the RenderContent property evaluates to false, removes the element
❺ Sets the element the Tag Helper resides on to null, removing it from the page
❻ Doesn’t render or evaluate the inner content of the element
❼ Ensures that this Tag Helper runs before any others attached to the element
Instead of a standalone <if> element, the Razor engine executes the IfTagHelper whenever it finds an element with an if attribute. This can be applied to any HTML element: <p>, <div>, <input>, whatever you need. You should define a Boolean property specifying whether you should render the content, which is bound to the value in the if attribute.
The Process() function is much simpler here. If RenderContent is false, it sets the TagHelperOutput.TagName to null, which removes the element from the page. It also calls SuppressOutput(), which prevents any content inside the attributed element from being rendered. If RenderContent is true, you skip these steps, and the content is rendered as normal.
One other point of note is the overridden Order property. This controls the order in which Tag Helpers run when multiple Tag Helpers are applied to an element. By setting Order to int.MinValue, you ensure that IfTagHelper always runs first, removing the element if required, before other Tag Helpers execute. There’s generally no point running other Tag Helpers if the element is going to be removed from the page anyway.
NOTE Remember to register your custom Tag Helpers in _ViewImports .cshtml with the @addTagHelper directive.
With a simple HTML attribute, you can now conditionally render elements in Razor templates without having to fall back to C#. This Tag Helper can show and hide content without needing to know what the content is. In the next section we’ll create a Tag Helper that does need to know the content.
32.1.3 Creating a Tag Helper to convert Markdown to HTML
The two Tag Helpers shown so far are agnostic to the content written inside the Tag Helper, but it can also be useful to create Tag Helpers that inspect, retrieve, and modify this
content. In this section you’ll see an example of one such Tag Helper that converts Markdown content written inside it to HTML.
DEFINITION Markdown is a commonly used text-based markup language that is easy to read but can also be converted to HTML. It is the common format used by README files on GitHub, and I use it to write blog posts, for example. For an introduction to Markdown, see the GitHub guide at http://mng.bz/o1rp.
We’ll use the popular Markdig library (https://github.com/xoofx/markdig) to create the Markdown Tag Helper. This library converts a string containing Markdown to an HTML string. You can install Markdig using Visual Studio by running dotnet add package Markdig or by adding a <PackageReference> to your .csproj file:
<PackageReference Include="Markdig" Version="0.30.4" />The Markdown Tag Helper that we’ll create shortly can be used by adding
Listing 32.3 Using a Markdown Tag Helper in a Razor Page
@page
@model IndexModel
@{
var showContent = true;
}
<markdown> ❶
## This is a markdown title ❷
This is a markdown list: ❸
* Item 1 ❸
* Item 2 ❸
<div if="showContent"> ❹
Content is shown when showContent is true ❹
</div> ❹
</markdown>
❶ Adds the Markdown Tag Helper using the <markdown> element
❷ Creates titles in Markdown using # to denote h1, ## to denote h2, and so on
❸ Markdown converts simple lists to HTML <ul> elements.
❹ Razor content can be nested inside other Tag Helpers.
The Markdown Tag Helper renders content with these steps:
-
Render any Razor content inside the Tag Helper. This includes executing any nested Tag Helpers and C# code inside the Tag Helper. Listing 32.3 uses the IfTagHelper, for example.
-
Convert the resulting string to HTML using the Markdig library.
-
Replace the content with the rendered HTML and remove the Tag Helper
<markdown>element.
The following listing shows a simple approach to implementing a Markdown Tag Helper using Markdig. Markdig supports many additional extensions and features that you could enable, but the overall pattern of the Tag Helper would be the same.
Listing 32.4 Implementing a Markdown Tag Helper using Markdig
public class MarkdownTagHelper: TagHelper ❶
{
public override async Task ProcessAsync(
TagHelperContext context, TagHelperOutput output)
{
TagHelperContent markdownRazorContent = await ❷
output.GetChildContentAsync(); ❷
string markdown = ❸
markdownRazorContent.GetContent(); ❸
string html = Markdig.Markdown.ToHtml(markdown); ❹
output.Content.SetHtmlContent(html); ❺
output.TagName = null; ❻
}
}
❶ The Markdown Tag Helper will use the <markdown> element.
❷ Retrieves the contents of the <markdown> element
❸ Renders the Razor contents to a string
❹ Converts the Markdown string to HTML using Markdig
❺ Writes the HTML content to the output
❻ Removes the <markdown> element from the content
When rendered to HTML, the Markdown content in listing 32.3 becomes
<h2>This is a markdown title</h2>
<p>This is a markdown list:</p>
<ul>
<li>Item 1</li>
<li>Item 2</li>
</ul>
<div>
Content is shown when showContent is true
</div>
NOTE In listing 32.4 we implemented ProcessAsync() instead of Process() because we called the async method GetChildContentAsync(). You must call async methods only from other async methods; otherwise, you can get problems such as thread starvation. For more details, see Microsoft’s “ASP.NET Core Best Practices” at http://mng.bz/KM7X.
The Tag Helpers in this section represent a small sample of possible avenues you could explore, but they cover the two broad categories: Tag Helpers for rendering new content and Tag Helpers for controlling the rendering of other elements.
TIP For further details and examples, see Microsoft’s “Author Tag Helpers in ASP.NET Core” documentation at http://mng.bz/Idb0.
Tag Helpers can be useful for providing small pieces of isolated, reusable functionality like this, but they’re not designed to provide larger, application-specific sections of an app or to make calls to business-logic services. Instead, you should use view components, as you’ll see in the next section.
32.2 View components: Adding logic to partial views
In this section you’ll learn about view components, which operate independently of the main Razor Page and can be used to encapsulate complex business logic. You can use view components to keep your main Razor Page focused on a single task—rendering the main content—instead of also being responsible for other sections of the page.
If you think about a typical website, you’ll notice that it may have multiple independent dynamic sections in addition to the main content. Consider Stack Overflow, shown in figure 32.3. As well as the main body of the page, which shows questions and answers, there’s a section showing the current logged-in user, a panel for blog posts and related items, and a section for job suggestions.
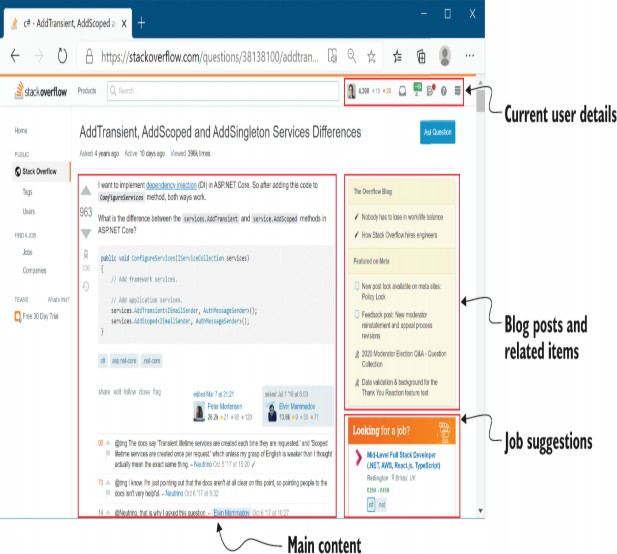
Figure 32.3 The Stack Overflow website has multiple sections that are independent of the main content but contain business logic and complex rendering logic.
Each of these sections could be rendered as a view component in ASP.NET Core.
Each of these sections is effectively independent of the main content. Each section contains business logic (deciding which posts or ads to show), database access (loading the details of the posts), and rendering logic for how to display the data.
In chapter 7 you saw that you can use layouts and partial views to split the rendering of a view template into similar sections, but partial views aren’t a good fit for this example. Partial views let you encapsulate view rendering logic but not business logic that’s independent of the main page content. Instead, view components provide this functionality, encapsulating both the business logic and rendering logic for displaying a small section of the page. You can use DI to provide access to a database context, and you can test view components independently of the view they generate, much like MVC and API controllers. Think of them as being a bit like mini MVC controllers or mini Razor Pages, but you invoke them directly from a Razor view instead of in response to an HTTP request.
TIP View components are comparable to child actions from the legacy .NET Framework version of ASP.NET, in that they provide similar functionality. Child actions don’t exist in ASP.NET Core.
View components vs. Razor Components and Blazor
In this book I focus on server-side rendered applications using Razor Pages and API applications using minimal APIs and web API controllers. .NET 7 also has a different approach to building ASP.NET Core applications: Blazor. I don’t cover Blazor in this book, so I recommend reading Blazor in Action, by Chris Sainty (Manning, 2021).
Blazor has two programming models, client-side and server-side, but both approaches use Blazor components (confusingly, officially called Razor components). Blazor components have a lot of parallels with view components, but they live in a fundamentally different world. Blazor components can interact easily, but you can’t use them with Tag Helpers or view components, and it’s hard to combine them with Razor Page form posts.
Nevertheless, if you need an island of rich client-side interactivity in a single Razor Page, you can embed a Blazor component in a Razor Page, as shown in the “Render components from a page or view” section of the “Prerender and integrate ASP.NET Core Razor components” documentation at http://mng.bz/PPen. You could also use Blazor components as a way to replace Asynchronous JavaScript and XML (AJAX) calls in your Razor Pages, as I show in my blog entry “Replacing AJAX calls in Razor Pages with Razor Components and Blazor” at http://mng.bz/9MJj.
If you don’t need the client-side interactivity of Blazor, view components are still the best option for isolated sections in Razor Pages. They interoperate cleanly with your Razor Pages; have no additional operational overhead; and use familiar concepts like layouts, partial views, and Tag Helpers. For more details on why you should continue to use view components, see my “Don’t replace your View Components with Razor Components” blog entry at http://mng.bz/1rKq.
In this section you’ll see how to create a custom view component for the recipe app you built in previous chapters, as shown in figure 32.4. If the current user is logged in, the view component displays a panel with a list of links to the user’s recently created recipes. For unauthenticated users, the view component displays links to the login and register actions.
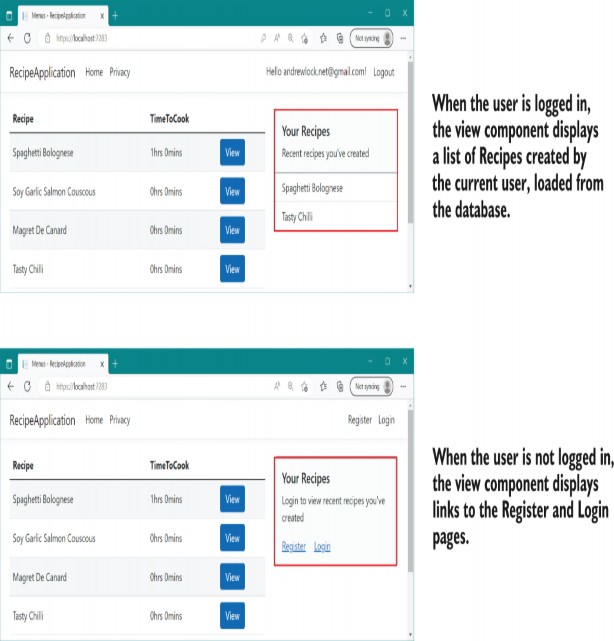
Figure 32.4 The view component displays different content based on the currently logged-in user. It includes both business logic (determining which recipes to load from the database) and rendering logic (specifying how to display the data).
This component is a great candidate for a view component, as it contains database access and business logic (choosing which recipes to display) as well as rendering logic (deciding how the panel should be displayed).
TIP Use partial views when you want to encapsulate the rendering of a specific view model or part of a view model. Consider using a view component when you have rendering logic that requires business logic or database access or when the section is logically distinct from the main page content.
You invoke view components directly from Razor views and layouts using a Tag Helper-style syntax with a vc: prefix:
<vc:my-recipes number-of-recipes="3">
</vc:my-recipes>
Custom view components typically derive from the ViewComponent base class and implement an InvokeAsync() method, as shown in listing 32.5. Deriving from this base class allows access to useful helper methods in much the same way that deriving from the ControllerBase class does for API controllers. Unlike with API controllers, the parameters passed to InvokeAsync don’t come from model binding. Instead, you pass the parameters to the view component using properties on the Tag Helper element in your Razor view.
Listing 32.5 A custom view component to display the current user’s recipes
public class MyRecipesViewComponent : ViewComponent ❶
{
private readonly RecipeService _recipeService; ❷
private readonly UserManager<ApplicationUser> _userManager; ❷
public MyRecipesViewComponent(RecipeService recipeService, ❷
UserManager<ApplicationUser> userManager) ❷
{ ❷
_recipeService = recipeService; ❷
_userManager = userManager; ❷
} ❷
public async Task<IViewComponentResult> InvokeAsync( ❸
int numberOfRecipes) ❹
{
if(!User.Identity.IsAuthenticated)
{
return View("Unauthenticated"); ❺
}
var userId = _userManager.GetUserId(HttpContext.User); ❻
var recipes = await _recipeService.GetRecipesForUser( ❻
userId, numberOfRecipes);
return View(recipes); ❼
}
}
❶ Deriving from the ViewComponent base class provides useful methods like
View().
❷ You can use DI in a view component.
❸ InvokeAsync renders the view component. It should return a
Task<IViewComponentResult>.
❹ You can pass parameters to the component from the view.
❺ Calling View() will render a partial view with the provided name.
❻ You can use async external services, allowing you to encapsulate logic in your
business domain.
❼ You can pass a view model to the partial view. Default.cshtml is used by
default.
This custom view component handles all the logic you need to render a list of recipes when the user is logged in or a different view if the user isn’t authenticated. The name of the view component is derived from the class name, like Tag Helpers. Alternatively, you can apply the [ViewComponent] attribute to the class and set a different name entirely.
The InvokeAsync method must return a Task<IViewComponentResult>. This is similar to the way you can return IActionResult from an action method or a page handler, but it’s more restrictive; view components must render some sort of content, so you can’t return status codes or redirects. You’ll typically use the View() helper method to render a partial view template (as in the previous listing), though you can also return a string directly using the Content() helper method, which will HTML-encode the content and render it to the page directly.
You can pass any number of parameters to the InvokeAsync method. The name of the parameters (in this case, numberOfRecipes) is converted to kebab-case and exposed as a property in the view component’s Tag Helper (<number-of-recipes>). You can provide these parameters when you invoke the view component from a view, and you’ll get IntelliSense support, as shown in figure 32.5.

Figure 32.5 Visual Studio provides IntelliSense support for the method parameters of a view component’s InvokeAsync method. The parameter name, in this case numberOfRecipes, is converted to kebab-case for use as an attribute in the Tag Helper.
View components have access to the current request and HttpContext. In listing 32.5 you can see that we’re checking whether the current request was from an authenticated user. You can also see that we’ve used some conditional logic. If the user isn’t authenticated, we render the “Unauthenticated” Razor template; if they’re authenticated, we render the default Razor template and pass in the view models loaded from the database.
NOTE If you don’t specify a specific Razor view template to use in the View() function, view components use the template name Default.cshtml.
The partial views for view components work similarly to other Razor partial views that you learned about in chapter 7, but they’re stored separately from them. You must create partial views for view components at one of these locations:
• Views/Shared/Components/ComponentName/Templ ateName
• Pages/Shared/Components/ComponentName/Templ ateName
Both locations work, so for Razor Pages apps I typically use the Pages/ folder. For the view component in listing 32.5, for example, you’d create your view templates at
• Pages/Shared/Components/MyRecipes/Def ault.cshtml
• Pages/Shared/Components/MyRecipes/Una uthenticated.cshtml
This was a quick introduction to view components, but it should get you a long way. View components are a simple way to embed pockets of isolated, complex logic in your Razor layouts. Having said that, be mindful of these caveats:
• View component classes must be public, non- nested, and nonabstract classes.
• Although they’re similar to MVC controllers, you can’t use filters with view components.
• You can use layouts in your view components’ views to extract rendering logic common to a specific view component. This layout may contain @sections, as you saw in chapter 7, but these sections are independent of the main Razor view’s layout.
• View components are isolated from the Razor Page they’re rendered in, so you can’t, for example, define a @section in a Razor Page layout and then add that content from a view component; the contexts are completely separate.
• When using the <vc:my-recipes> Tag Helper syntax to invoke your view component, you must import it as a custom Tag Helper, as you saw in section 32.1.
• Instead of using the Tag Helper syntax, you may invoke the view component from a view directly by using IViewComponentHelper Component, though I don’t recommend using this syntax, as in this example:
@await Component.InvokeAsync("MyRecipes", new { numberOfRecipes = 3 })We’ve covered Tag Helpers and view components, which are both features of the Razor engine in ASP.NET Core. In the next section you’ll learn about a different but related topic: how to create a custom DataAnnotations attribute. If you’ve used older versions of ASP.NET, this will be familiar, but ASP.NET Core has a couple of tricks up its sleeve to help you out.
32.3 Building a custom validation attribute
In this section you’ll learn how to create a custom DataAnnotations validation attribute that specifies specific values a string property may take. You’ll then learn how you can expand the functionality to be more generic by delegating to a separate service that is configured in your DI controller. This will allow you to create custom domain-specific validations for your apps.
We looked at model binding in chapter 7, where you saw how to use the built-in DataAnnotations attributes in your binding models to validate user input. These provide several built-in validations, such as
• [Required]—The property isn’t optional and must be provided.
• [StringLength(min, max)]—The length of the string value must be between min and max characters.
• [EmailAddress]—The value must have a valid email address format.
But what if these attributes don’t meet your requirements? Consider the following listing, which shows a binding model from a currency converter application. The model contains three properties: the currency to convert from, the currency to convert to, and the quantity.
Listing 32.6 Currency converter initial binding model
public class CurrencyConverterModel
{
[Required] ❶
[StringLength(3, MinimumLength = 3)] ❷
public string CurrencyFrom { get; set; }
[Required] ❶
[StringLength(3, MinimumLength = 3)] ❷
public string CurrencyTo { get; set; }
[Required] ❶
[Range(1, 1000)] ❸
public decimal Quantity { get; set; }
}
❶ All the properties are required.
❷ The strings must be exactly three characters.
❸ The quantity can be between 1 and 1000.
There’s some basic validation on this model, but during testing you identify a problem: users can enter any three- letter string for the CurrencyFrom and CurrencyTo properties. Users should be able to choose only a valid currency code, like "USD" or "GBP", but someone attacking your application could easily send "XXX" or "£$%".
Assuming that you support a limited set of currencies—say, GBP, USD, EUR, and CAD—you could handle the validation in a few ways. One way would be to validate the CurrencyFrom and CurrencyTo values within the Razor Page handler method, after model binding and attribute validation has already occurred.
Another way would be to use a [RegularExpresssion] attribute to look for the allowed strings. The approach I’m going to take here is to create a custom ValidationAttribute. The goal is to have a custom validation attribute you can apply to the CurrencyFrom and CurrencyTo attributes, to restrict the range of valid values. This will look something like the following example.
Listing 32.7 Applying custom validation attributes to the binding model
public class CurrencyConverterModel
{
[Required]
[StringLength(3, MinimumLength = 3)]
[CurrencyCode("GBP", "USD", "CAD", "EUR")] ❶
public string CurrencyFrom { get; set; }
[Required]
[StringLength(3, MinimumLength = 3)]
[CurrencyCode("GBP", "USD", "CAD", "EUR")] ❶
public string CurrencyTo { get; set; }
[Required]
[Range(1, 1000)]
public decimal Quantity { get; set; }
}
❶ CurrencyCodeAttribute validates that the property has one of the provided
values.
Creating a custom validation attribute is simple; you can start with the ValidationAttribute base class, and you have to override only a single method. The next listing shows how you could implement CurrencyCodeAttribute to ensure that the currency codes provided match the expected values.
Listing 32.8 Custom validation attribute for currency codes
public class CurrencyCodeAttribute : ValidationAttribute ❶
{
private readonly string[] _allowedCodes; ❷
public CurrencyCodeAttribute(params string[] allowedCodes) ❷
{ ❷
_allowedCodes = allowedCodes; ❷
} ❷
protected override ValidationResult IsValid( ❸
object value, ValidationContext context) ❸
{
if(value is not string code ❹
|| !_allowedCodes.Contains(code)) ❺
{ ❺
return new ValidationResult("Not a valid currency code"); ❺
}
return ValidationResult.Success; ❻
}
}
❶ Derives from ValidationAttribute to ensure that your attribute is used during validation
❷ The attribute takes in an array of allowed currency codes.
❸ The IsValid method is passed the value to validate and a context object.
❹ Tries to cast the value to a string and store it in the code variable
❺ If the value provided isn’t a string, is null, or isn’t an allowed code, returns an error . . .
❻ . . .otherwise, returns a success result.
As you know from chapter 16, Validation occurs in the filter pipeline after model binding, before the action or Razor Page handler executes. The validation framework calls IsValid() for each instance of ValidationAttribute on the model property being validated. The framework passes in value (the value of the property being validated) and the ValidationContext to each attribute in turn. The context object contains details that you can use to validate the property.
Of particular note is the ObjectInstance property. You can use this to access the top-level model being validated when you validate a subproperty. For example, if the CurrencyFrom property of the CurrencyConvertModel is being validated, you can access the top-level object from the ValidationAttribute as follows:
var model = validationContext.ObjectInstance as CurrencyConverterModel;This can be useful if the validity of a property depends on the value of another property of the model. For example, you might want a validation rule that says that GBP is a valid value for CurrencyTo except when CurrencyFrom is also GBP. ObjectInstance makes these sorts of comparison validations easy.
NOTE Although using ObjectInstance makes it easy to make model-level comparisons like these, it reduces the portability of your validation attribute. In this case, you would be able to use the attribute only in the application that defines CurrencyConverterModel.
Within the IsValid() method, you can cast the value provided to the required data type (in this case, string) and check against the list of allowed codes. If the code isn’t allowed, the attribute returns a ValidationResult with an error message indicating that there was a problem. If the code is allowed, ValidationResult.Success is returned, and the validation succeeds.
Putting your attribute to the test in figure 32.6 shows that when CurrencyTo is an invalid value (£$%), the validation for the property fails, and an error is added to the ModelState. You could do some tidying-up of this attribute to set a custom message, allow nulls, or display the name of the property that’s invalid, but all the important features are there.
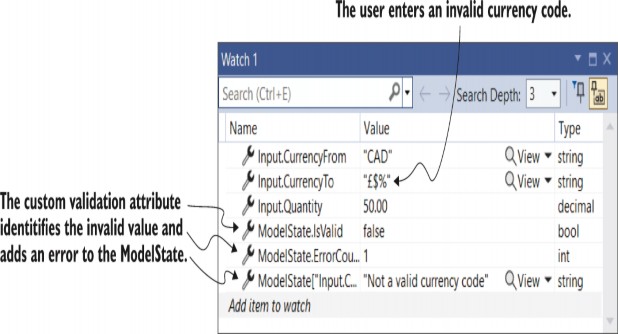
Figure 32.6 The Watch window of Visual Studio showing the result of validation using the custom ValidationAttribute. The user has provided an invalid currencyTo value, £$%. Consequently, ModelState isn’t valid and contains a single error with the message "Not a valid currency code".
The main feature missing from this custom attribute is client- side validation. You’ve seen that the attribute works well on the server side, but if the user entered an invalid value, they wouldn’t be informed until after the invalid value had been sent to the server. That’s safe, and it’s as much as you need to do for security and data-consistency purposes, but client- side validation can improve the user experience by providing immediate feedback.
You can implement client-side validation in several ways, but it’s heavily dependent on the JavaScript libraries you use to provide the functionality. Currently, ASP.NET Core Razor templates rely on jQuery for client-side validation. See the “Custom client-side validation” section of Microsoft’s “Model validation in ASP.NET Core MVC and Razor Pages” documentation for an example of creating a jQuery Validation adapter for your attributes: http://mng.bz/Wd6g.
TIP Instead of using the official jQuery-based validation libraries, you could use the open source aspnet-client- validation library (https://github.com/haacked/aspnet-client- validation) as I describe on my blog at http://mng.bz/AoXe.
Another improvement to your custom validation attribute would be to load the list of currencies from a DI service, such as an ICurrencyProvider. Unfortunately, you can’t use constructor DI in your CurrencyCodeAttribute, as you can pass only constant values to the constructor of an Attribute in .NET. In chapter 22 we worked around this limitation for filters by using [TypeFilter] or [ServiceFilter], but there’s no such solution for ValidationAttribute.
Instead, for validation attributes you must use the service locator pattern. As I discussed in chapter 9, this antipattern is best avoided where possible, but unfortunately it’s necessary in this case. Instead of declaring an explicit dependency via a constructor, you must ask the DI container directly for an instance of the required service.
Listing 32.9 shows how you could rewrite listing 32.8 to load the allowed currencies from an instance of ICurrencyProvider instead of hardcoding the allowed values in the attribute’s constructor. The attribute calls the GetService
Listing 32.9 Using the service-locator pattern to access services
public class CurrencyCodeAttribute : ValidationAttribute
{
protected override ValidationResult IsValid(
object value, ValidationContext context)
{
var provider = context ❶
.GetRequiredService<ICurrencyProvider>(); ❶
var allowedCodes = provider.GetCurrencies(); ❷
if(value is not string code ❸
|| !_allowedCodes.Contains(code)) ❸
{ ❸
return new ValidationResult("Not a valid currency code"); ❸
} ❸
return ValidationResult.Success; ❸
}
}
❶ Retrieves an instance of ICurrencyProvider directly from the DI container
❷ Fetches the currency codes using the provider
❸ Validates the property as before
TIP The generic GetRequiredService<T> method is an extension method available in the Microsoft.Extensions.DependencyInjection namespace.
The default DataAnnotations validation system can be convenient due to its declarative nature, but this has tradeoffs, as shown by the dependency injection problem above. Luckily, you can replace the validation system your application uses, as shown in the following section.
32.4 Replacing the validation framework with FluentValidation
In this section you’ll learn how to replace the DataAnnotations-based validation framework that’s used by default in Razor Pages and MVC Controllers. You’ll see the arguments for why you might want to do this and learn how to use a third-party alternative: FluentValidation. This open- source project allows you to define the validation requirements of your models separately from the models themselves. This separation can make some types of validation easier and ensures that each class in your application has a single responsibility.
Validation is an important part of the model-binding process in ASP.NET Core. In chapter 7 you learned that minimal APIs don’t have any validation built in, so you’re free to choose whichever framework you like. I demonstrated using DataAnnotations, but you could easily choose a different validation framework.
In Razor Pages and MVC, however, the DataAnnotations validation framework is built into ASP.NET Core. You can apply DataAnnotations attributes to properties of your binding models to define your requirements, and ASP.NET Core automatically validates them. In section 32.3 we even created a custom validation attribute.
But ASP.NET Core is flexible. You can replace whole chunks of the Razor Pages and MVC frameworks if you like. The validation system is one such area that many people choose to replace.
FluentValidation (https://fluentvalidation.net) is a popular alternative validation framework for ASP.NET Core. It is a mature library, with roots going back well before ASP.NET Core was conceived of. With FluentValidation you write your validation code separately from your binding model code.This gives several advantages:
• You’re not restricted to the limitations of Attributes, such as the dependency injection problem we had to work around in listing 32.9.
• It’s much easier to create validation rules that apply to multiple properties, such as to ensure that an EndDate property contains a later value than a StartDate property. Achieving this with DataAnnotations attributes is possible but difficult.
• It’s generally easier to test FluentValidation validators than DataAnnotations attributes.
• The validation is strongly typed compared with DataAnnotations attributes where it’s possible to apply attributes in ways that don’t make sense, such as applying an [EmailAddress] attribute to an int property.
• Separating your validation logic from the model itself arguably better conforms to the single- responsibility principle (SRP).
That final point is sometimes given as a reason not to use FluentValidation: FluentValidation separates a binding model from its validation rules. Some people are happy to accept the limitations of DataAnnotations to keep the model and validation rules together.
Before I show how to add FluentValidation to your application, let’s see what FluentValidation validators look like.
32.4.1 Comparing FluentValidation with DataAnnotations attributes
To better understand the difference between the DataAnnotations approach and FluentValidation, we’ll convert the binding models from section 32.3 to use FluentValidation. The following listing shows what the binding model from listing 32.7 would look like when used with FluentValidation. It is structurally identical but has no validation attributes.
Listing 32.10 Currency converter initial binding model for use with FluentValidation
public class CurrencyConverterModel
{
public string CurrencyFrom { get; set; }
public string CurrencyTo { get; set; }
public decimal Quantity { get; set; }
}
In FluentValidation you define your validation rules in a separate class, with a class per model to be validated. Typically, these rules derive from the AbstractValidator<> base class, which provides a set of extension methods for defining your validation rules.
The following listing shows a validator for the CurrencyConverterModel, which matches the validations added using attributes in listing 32.7. You create a set of validation rules for a property by calling RuleFor() and chaining method calls such as NotEmpty() from it. This style of method chaining is called a fluent interface, hence the name.
Listing 32.11 A FluentValidation validator for the currency converter binding model
public class CurrencyConverterModelValidator ❶
: AbstractValidator<CurrencyConverterModel> ❶
{
private readonly string[] _allowedValues ❷
= new []{ "GBP", "USD", "CAD", "EUR" }; ❷
public CurrencyConverterModelValidator() ❸
{
RuleFor(x => x.CurrencyFrom) ❹
.NotEmpty() ❺
.Length(3) ❺
.Must(value => _allowedValues.Contains(value)) ❻
.WithMessage("Not a valid currency code"); ❻
RuleFor(x => x.CurrencyTo)
.NotEmpty()
.Length(3)
.Must(value => _allowedValues.Contains(value))
.WithMessage("Not a valid currency code");
RuleFor(x => x.Quantity)
.NotNull()
.InclusiveBetween(1, 1000); ❼
}
}
❶ The validator inherits from AbstractValidator.
❷ Defines the static list of currency codes that are supported
❸ You define validation rules in the validator’s constructor.
❹ RuleFor is used to add a new validation rule. The lambda syntax allows for strong typing.
❺ There are equivalent rules for common DataAnnotations validation attributes.
❻ You can easily add custom validation rules without having to create separate
classes.
❼ Thanks to strong typing, the rules available depend on the property being
validated.
Your first impression of this code might be that it’s quite verbose compared with listing 32.7, but remember that listing 32.7 used a custom validation attribute, [CurrencyCode]. The validation in listing 32.11 doesn’t require anything else. The logic implemented by the [CurrencyCode] attribute is right there in the validator, making it easy to reason about. The Must() method can be used to perform arbitrarily complex validations without having the additional layers of indirection required by custom DataAnnotations attributes.
On top of that, you’ll notice that you can define only validation rules that make sense for the property being validated. Previously, there was nothing to stop us from applying the [CurrencyCode] attribute to the Quantity property; that’s not possible with FluentValidation.
Of course, just because you can write the custom [CurrencyCode] logic in-line doesn’t necessarily mean you have to. If a rule is used in multiple parts of your application, it may make sense to extract it into a helper class. The following listing shows how you could extract the currency code logic into an extension method that can be used in multiple validators.
Listing 32.12 An extension method for currency validation
public static class ValidationExtensions
{
    public static IRuleBuilderOptions<T, string> ❶
MustBeCurrencyCode<T>( ❶
this IRuleBuilder<T, string> ruleBuilder) ❶
{
return ruleBuilder ❷
.Must(value => _allowedValues.Contains(value)) ❷
.WithMessage("Not a valid currency code"); ❷
}
private static readonly string[] _allowedValues = ❸
new []{ "GBP", "USD", "CAD", "EUR" }; ❸
}
❶ Creates an extension method that can be chained from RuleFor() for string
properties
❷ Applies the same validation logic as before
❸ The currency code values to allow
You can then update your CurrencyConverterModelValidator to use the new extension method, removing the duplication in your validator and ensuring consistency across country-code fields:
RuleFor(x => x.CurrencyTo)
.NotEmpty()
.Length(3)
.MustBeCurrencyCode();
Another advantage of the FluentValidation approach of using standalone validation classes is that they are created using DI, so you can inject services into them. As an example, consider the [CurrencyCode] validation attribute from listing 32.9, which used a service, ICurrencyProvider, from the DI container. This requires using service location to obtain an instance of ICurrencyProvider using an injected context object.
With the FluentValidation library, you can inject the ICurrencyProvider directly into your validator, as shown in the following listing. This requires fewer gymnastics to get the desired functionality and makes your validator’s dependencies explicit.
Listing 32.13 Currency converter validator using dependency injection
public class CurrencyConverterModelValidator
: AbstractValidator<CurrencyConverterModel>
{
public CurrencyConverterModelValidator(ICurrencyProvider provider) ❶
{
RuleFor(x => x.CurrencyFrom)
.NotEmpty()
.Length(3)
.Must(value => provider ❷
.GetCurrencies() ❷
.Contains(value)) ❷
.WithMessage("Not a valid currency code");
RuleFor(x => x.CurrencyTo)
.NotEmpty()
.Length(3)
.MustBeCurrencyCode(provider.GetCurrencies()); ❸
RuleFor(x => x.Quantity)
.NotNull()
.InclusiveBetween(1, 1000);
}
}
❶ Injects the service using standard constructor dependency injection
❷ Uses the injected service in a Must() rule
❸ Uses the injected service with an extension method
The final feature I’ll show demonstrates how much easier it is to write validators that span multiple properties with FluentValidation. For example, imagine we want to validate that the value of CurrencyTo is different from CurrencyFrom. Using FluentValidation, you can implement this with an overload of Must(), which provides both the model and the property being validated, as shown in the following listing.
Listing 32.14 Using Must() to validate that two properties are different
RuleFor(x => x.CurrencyTo) ❶
.NotEmpty()
.Length(3)
.MustBeCurrencyCode()
.Must((InputModel model, string currencyTo) ❷
=> currencyTo != model.CurrencyFrom) ❸
.WithMessage("Cannot convert currency to itself"); ❹
❶ The error message will be associated with the CurrencyTo property.
❷ The Must function passes the top-level model being validated and the current property.
❸ Performs the validation. The currencies must be different.
❹ Uses the provided message as the error message
Creating a validator like this is certainly possible with DataAnnotations attributes, but it requires far more ceremony than the FluentValidation equivalent and is generally harder to test. FluentValidation has many more features for making it easier to write and test your validators, too:
• Complex property validations—Validators can be applied to complex types as well as to the primitive types like string and int shown here in this section.
• Custom property validators—In addition to simple extension methods, you can create your own property validators for complex validation scenarios.
• Collection rules—When types contain collections, such as List<T>, you can apply validation to each item in the list, as well as to the overall collection.
• RuleSets—You can create multiple collections of rules that can be applied to an object in different circumstances. These can be especially useful if you’re using FluentValidation in additional areas of your application.
• Client-side validation—FluentValidation is a server- side framework, but it emits the same attributes as DataAnnotations attributes to enable client- side validation using jQuery.
There are many more features, so be sure to browse the documentation at https://docs.fluentvalidation.net for details. In the next section you’ll see how to add FluentValidation to your ASP.NET Core application.
32.4.2 Adding FluentValidation to your application
Replacing the whole validation system of ASP.NET Core sounds like a big step, but the FluentValidation library makes it easy to add to your application. Simply follow these steps:
-
Install the FluentValidation.AspNetCore NuGet package using Visual Studio’s NuGet package manager via the command-line interface (CLI) by running dotnet add package FluentValidation.AspNetCore or by adding a
<PackageReference>to your .csproj file:<PackageReference Include="FluentValidation.AspNetCore" Version="11.2.2" /> -
Configure the FluentValidation library for MVC and Razor Pages in Program.cs by calling builder.Services.AddFluentValidationA utoValidation(). You can further configure the library as shown in listing 32.15.
-
Register your validators (such as the CurrencyConverterModelValidator from listing 32.13) with the DI container. These can be registered manually, using any scope you choose:
WebApplicationBuilder builder = WebApplication.CreateBuilder(args); builder.Services.AddRazorPages(); builder.Services.AddFluentValidationAutoValidation(); builder.services.AddScoped<IValidator<CurrencyConverterModelValidator>, CurrencyConverterModelValidator>();
Alternatively, you can allow FluentValidation to automatically register all your validators using the options shown in listing 32.15.
For such a mature library, FluentValidation has relatively few configuration options to decipher. The following listing shows some of the options available; in particular, it shows how to automatically register all the custom validators in your application and disable DataAnnotations validation.
Listing 32.15 Configuring FluentValidation in an ASP.NET Core application
var builder = WebApplication.CreateBuilder(args);
builder.Services.AddRazorPages();
builder.Services.AddValidatorsFromAssemblyContaining<Program>(); ❶
builder.Services.AddFluentValidationAutoValidation( ❷
x => x.DisableDataAnnotationsValidation = true) ❷
.AddFluentValidationClientsideAdapters(); ❸
ValidatorOptions.Global.LanguageManager.Enabled = false; ❹
❶ Instead of manually registering validators, FluentValidation can autoregister them for you.
❷ Setting to true disables DataAnnotations validation completely for model binding.
❸ Enables integration with client-side validation via data-* attributes
❹ FluentValidation has full localization support, but you can disable it if you don’t need it.
It’s important to understand that if you don’t set DisableDataAnnotationsValidation to true, ASP.NET Core will run validation with both DataAnnotations and FluentValidation. That may be useful if you’re in the process of migrating from one system to the other, but otherwise, I recommend disabling it. Having your validation split between both places seems like the worst of both worlds!
One final thing to consider is where to put your validators in your solution. There are no technical requirements for this; if you’ve registered your validator with the DI container, it will be used correctly, so the choice is up to you. I prefer to place validators close to the models they’re validating.
For Razor Pages binding-model validators, I create the validator as a nested class of the PageModel, in the same place as I create the InputModel, as described in chapter 16. That gives a class hierarchy in the Razor Page similar to the following:
public class IndexPage : PageModel
{
public class InputModel { }
public class InputModelValidator: AbstractValidator<InputModel> { }
}
That’s my preference. Of course, you’re free to adopt another approach if you prefer.
That brings us to the end of this chapter on custom Razor Pages components. When you combine it with the components in the previous chapter, you’ve got a great base for extending your ASP.NET Core applications to meet your needs. It’s a testament to ASP.NET Core’s design that you can swap out whole sections like the Validation framework entirely. If you don’t like how some part of the framework works, see whether someone has written an alternative!
Summary
With Tag Helpers, you can bind your data model to HTML elements, making it easier to generate dynamic HTML. Tag Helpers can customize the elements they’re attached to, add attributes, and customize how they’re rendered to HTML. This can greatly reduce the amount of markup you need to write.
The name of a Tag Helper class dictates the name of the element in the Razor templates, so the SystemInfoTagHelper corresponds to the
<system-info> element. You can choose a different element name by adding the [HtmlTargetElement] attribute to your Tag Helper.
You can set properties on your Tag Helper object from Razor syntax by decorating the property with an [HtmlAttributeName("name")] attribute and providing a name. You can set these properties from Razor using HTML attributes, as in <system- info name="value">.
The TagHelperOutput parameter passed to the Process or ProcessAsync methods control the HTML that’s rendered to the page. You can set the element type with the TagName property and set the inner content using Content.SetContent() or Content.SetHtmlContent().
You can prevent inner Tag Helper content from being processed by calling SupressOutput(), and you can remove the element by setting TagName=null. This is useful if you want to conditionally render elements to the response.
You can retrieve the contents of a Tag Helper by calling GetChildContentAsync() on the TagHelperOutput parameter. You can then render this content to a string by calling GetContent(). This will render any Razor expressions and Tag Helpers to HTML, allowing you to manipulate the contents.
View components are like partial views, but they allow you to use complex business and rendering logic. You can use them for sections of a page, such as the shopping cart, a dynamic navigation menu, or suggested articles.
Create a view component by deriving from the ViewComponent base class and implementing InvokeAsync(). You can pass parameters to this function from the Razor view template using HTML attributes, in a similar way to Tag Helpers.
View components can use DI, access the HttpContext, and render partial views. The partial views should be stored in the Pages/Shared/Components/<Name>/ folder, where Name is the name of the view component. If not specified, view components will look for a default view named Default.cshtml.
You can create a custom DataAnnotations attribute by deriving from ValidationAttribute and overriding the IsValid method. You can use this to decorate your binding model properties and perform arbitrary validation.
You can’t use constructor DI with custom validation attributes. If the validation attribute needs access to services from the DI container, you must use the Service Locator pattern to load them from the validation context, using the GetService<T> method.
FluentValidation is an alternative validation system that can replace the default DataAnnotations validation system. It is not based on attributes, which makes it easier to write custom validations for your validation rules and makes those rules easier to test.
To create a validator for a model, create a class derived from AbstractValidator<> and call RuleFor<>() in the constructor to add validation rules. You can chain multiple requirements on RuleFor<>() in the same way that you could add multiple DataAnnotations attributes to a model.
If you need to create a custom validation rule, you can use the Must() method to specify a predicate. If you wish to reuse the validation rule across multiple models, encapsulate the rule as an extension method to reduce duplication.
To add FluentValidation to your application, install the FluentValidation .AspNetCore NuGet package, call AddFluentValidationAutoValidation() in Program.cs, and register your validators with the DI container. This will add FluentValidation validations in addition to the built-in DataAnnotations system.
To remove the DataAnnotations validation system and use FluentValidation only, set the DisableDataAnnotationsValidation option to true in your call to AddFluentValidationAutoValidation().
Favor this approach where possible to avoid running validation methods from two different systems.
You can allow FluentValidation to automatically discover and register all the validators in your application by calling AddValidatorsFromAssemblyContaining<T>(), where T is a type in the assembly to scan. This means you don’t have to register each validator in your application with the DI container individually.