36 Testing ASP.NET Core applications
This chapter covers
• Writing unit tests for custom middleware, API controllers, and minimal API endpoints
• Using the Test Host package to write integration tests Testing your real application’s behavior with WebApplicationFactory
• Testing code dependent on Entity Framework Core with the in-memory database provider
In chapter 35 I described how to test .NET 7 applications using the xUnit test project and the .NET Test software development kit (SDK). You learned how to create a test project, add a project reference to your application, and write unit tests for services in your app.
In this chapter we focus on testing ASP.NET Core applications specifically. In sections 36.1 and 36.2 we’ll look at how to test common features of your ASP.NET Core apps: custom middleware, API controllers, and minimal API endpoints. I show you how to write isolated unit tests for both, much like you would any other service, and I’ll point out the tripping points to watch for.
To ensure that components work correctly, it’s important to test them in isolation. But you also need to test that they work correctly in a middleware pipeline. ASP.NET Core provides a handy Test Host package that lets you easily write these integration tests for your components. You can even go one step further with the WebApplicationFactory helper class and test that your app is working correctly. In section 36.3 you’ll see how to use WebApplicationFactory to simulate requests to your application and verify that it generates the correct response.
In the final section of this chapter I’ll demonstrate how to use the SQLite database provider for Entity Framework Core (EF Core) with an in-memory database. You can use this provider to test services that depend on an EF Core DbContext without having to use a real database. That prevents the pain of having unknown database infrastructure and resetting the database between tests, with different people having slightly different database configurations.
In chapter 35 I showed how to write unit tests for an exchange-rate calculator service, such as you might find in your application’s domain model. If well designed, domain services are normally relatively easy to unit-test. But domain services only make up a portion of your application. It can also be useful to test your ASP.NET Core-specific constructs, such as custom middleware, as you’ll see in the next section.
36.1 Unit testing custom middleware
In this section you’ll learn how to test custom middleware in isolation. You’ll see how to test whether your middleware handled a request or whether it called the next middleware in the pipeline. You’ll also see how to read the response stream for your middleware.
In chapter 31 you saw how to create custom middleware and encapsulate middleware as a class with an Invoke function. In this section you’ll create unit tests for a simple health- check middleware component, similar to the one in chapter 31. This is a basic implementation, but it demonstrates the approach you can take for more complex middleware components.
The middleware you’ll be testing is shown in listing 36.1. When invoked, this middleware checks that the path starts with /ping and, if it does, returns a plain text "pong" response. If the request doesn’t match, it calls the next middleware in the pipeline (the provided RequestDelegate).
Listing 36.1 StatusMiddleware to be tested, which returns a "pong" response
public class StatusMiddleware
{
private readonly RequestDelegate _next; ❶
public StatusMiddleware(RequestDelegate next) ❶
{
_next = next;
}
public async Task Invoke(HttpContext context) ❷
{
if(context.Request.Path.StartsWithSegments("/ping")) ❸
{ ❸
context.Response.ContentType = "text/plain"; ❸
await context.Response.WriteAsync("pong"); ❸
return; ❸
} ❸
await _next(context); ❹
}
}
❶ The RequestDelegate representing the rest of the middleware pipeline
❷ Called when the middleware is executed
❸ If the path starts with “/ping”, a “pong” response is returned . . .
❹ . . . otherwise, the next middleware in the pipeline is invoked.
In this section, you’re going to test two simple cases:
• When a request is made with a path of "/ping"
• When a request is made with a different path
WARNING Where possible, I recommend that you don’t directly inspect paths in your middleware like this. A better approach is to use endpoint routing instead, as I discussed in chapter 31. The middleware in this section is for demonstration purposes only.
Middleware is slightly complicated to unit-test because the HttpContext object is conceptually a big class. It contains all the details for the request and the response, which can mean there’s a lot of surface area for your middleware to interact with. For that reason, I find unit tests tend to be tightly coupled to the middleware implementation, which is generally undesirable.
For the first test, you’ll look at the case where the incoming request Path doesn’t start with /ping. In this case,StatusMiddleware should leave the HttpContext unchanged and call the RequestDelegate provided in the constructor, which represents the next middleware in the pipeline.
You could test this behavior in several ways, but in listing 36.2 you test that the RequestDelegate (essentially a one-parameter function) is executed by setting a local variable to true. In the Assert at the end of the method, you verify that the variable was set and therefore that the delegate was invoked. To invoke StatusMiddleware, create and pass in a DefaultHttpContext, which is an implementation of HttpContext.
NOTE The DefaultHttpContext derives from HttpContext and is part of the base ASP.NET Core framework abstractions. If you’re so inclined, you can explore the source code for it on GitHub at http://mng.bz/MB9Q.
Listing 36.2 Unit testing StatusMiddleware when a nonmatching path is provided
[Fact]
public async Task ForNonMatchingRequest_CallsNextDelegate()
{
var context = new DefaultHttpContext(); ❶
context.Request.Path = "/somethingelse"; ❶
var wasExecuted = false; ❷
RequestDelegate next = (HttpContext ctx) => ❸
{ ❸
wasExecuted = true; ❸
return Task.CompletedTask; ❸
}; ❸
var middleware = new StatusMiddleware(next); ❹
await middleware.Invoke(context); ❺
Assert.True(wasExecuted); ❻
}
❶ Creates a DefaultHttpContext and sets the path for the request
❷ Tracks whether the RequestDelegate was executed
❸ The RequestDelegate representing the next middleware should be invoked in
this example.
❹ Creates an instance of the middleware, passing in the next RequestDelegate
❺ Invokes the middleware with the HttpContext; should invoke the
RequestDelegate
❻ Verifies that RequestDelegate was invoked
When the middleware is invoked, it checks the provided Path and finds that it doesn’t match the required value of /ping. The middleware therefore calls the next RequestDelegate and returns.
The other obvious case to test is when the request Path is "/ping"; the middleware should generate an appropriate response. You could test several characteristics of the response:
• The response should have a 200 OK status code.
• The response should have a Content-Type of text/plain.
• The response body should contain the "pong" string.
Each of these characteristics represents a different requirement, so you’d typically codify each as a separate unit test. This makes it easier to tell exactly which requirement hasn’t been met when a test fails. For simplicity, in listing 36.3 I show all these assertions in the same test.
The positive case unit test is made more complex by the need to read the response body to confirm it contains "pong". DefaultHttpContext uses Stream.Null for the Response .Body object, which means anything written to Body is lost. To capture the response and read it out to verify the contents, you must replace the Body with a MemoryStream. After the middleware executes, you can use a StreamReader to read the contents of the MemoryStream into a string and verify it.
Listing 36.3 Unit testing StatusMiddleware when a matching Path is provided
[Fact]
public async Task ReturnsPongBodyContent()
{
var bodyStream = new MemoryStream(); ❶
var context = new DefaultHttpContext(); ❶
context.Response.Body = bodyStream; ❶
context.Request.Path = "/ping"; ❷
RequestDelegate next = (ctx) => Task.CompletedTask; ❸
var middleware = new StatusMiddleware(next: next); ❸
await middleware.Invoke(context); ❹
string response; ❺
bodyStream.Seek(0, SeekOrigin.Begin); ❺
using (var stringReader = new StreamReader(bodyStream)) ❺
{ ❺
response = await stringReader.ReadToEndAsync(); ❺
} ❺
Assert.Equal("pong", response); ❻
Assert.Equal("text/plain", context.Response.ContentType); ❼
Assert.Equal(200, context.Response.StatusCode); ❽
}
❶ Creates a DefaultHttpContext and initializes the body with a MemoryStream
❷ The path is set to the required value for the StatusMiddleware.
❸ Creates an instance of the middleware and passes in a simple RequestDelegate
❹ Invokes the middleware
❺ Rewinds the MemoryStream and reads the response body into a string
❻ Verifies that the response has the correct value
❼ Verifies that the ContentType response is correct
❽ Verifies that the Status Code response is correct
As you can see, unit testing middleware requires a lot of setup. On the positive side, it allows you to test your middleware in isolation, but in some cases, especially for simple middleware without any dependencies on databases or other services, integration testing can (somewhat surprisingly) be easier. In section 36.3 you’ll create integration tests for this middleware to see the difference.
Custom middleware is common in ASP.NET Core projects, but far more common are Razor Pages, API controllers, and minimal API endpoints. In the next section you’ll see how you can unit test them in isolation from other components.
36.2 Unit testing API controllers and minimal API endpoints
In this section you’ll learn how to unit-test API controllers and minimal API endpoints. You’ll learn about the benefits and difficulties of testing these components in isolation and the situations when it can be useful.
Unit tests are all about isolating behavior; you want to test only the logic contained in the component itself, separate from the behavior of any dependencies. The Razor Pages and MVC/API frameworks use the filter pipeline, routing, and model-binding systems, but these are all external to the controller or PageModels. The PageModels and controllers themselves are responsible for a limited number of things:
• For invalid requests (that have failed validation, for example), return an appropriate ActionResult (API controllers) or redisplay a form (Razor Pages).
• For valid requests, call the required business logic services and return an appropriate ActionResult (API controllers), or show or redirect to a success page (Razor Pages).
• Optionally, apply resource-based authorization as required.
Controllers and Razor Pages generally shouldn’t contain business logic themselves; instead, they should call out to other services. Think of them more as orchestrators, serving as the intermediary between the HTTP interfaces your app exposes and your business logic services.
If you follow this separation, you’ll find it easier to write unit tests for your business logic, and you’ll benefit from greater flexibility when you want to change your controllers to meet your needs. With that in mind, there’s often a drive to make your controllers and page handlers as thin as possible, to the point where there’s not much left to test!
TIP One of my first introductions to this idea was a series of posts by Jimmy Bogard. The following link points to the last post in the series, but it contains links to all the earlier posts too. Bogard is also behind the MediatR library (https://github.com/jbogard/MediatR), which makes creating thin controllers even easier. See “Put your controllers on a diet: POSTs and commands”: http://mng.bz/7VNQ.
All that said, controllers and actions are classes and methods, so you can write unit tests for them. The difficulty is deciding what you want to test. As an example, we’ll consider the simple API controller in the following listing, which converts a value using a provided exchange rate and returns a response.
Listing 36.4 The API controller under test
[Route("api/[controller]")]
public class CurrencyController : ControllerBase
{
private readonly CurrencyConverter _converter ❶
= new CurrencyConverter(); ❶
[HttpGet]
public ActionResult<decimal> Convert(InputModel model) ❷
{
if (!ModelState.IsValid) ❸
{ ❸
return BadRequest(ModelState); ❸
} ❸
decimal result = _converter.ConvertToGbp(model) ❹
return result; ❺
}
}
❶ The CurrencyConverter would normally be injected using DI and is created here
for simplicity.
❷ The Convert method returns an Action-Result
❸ If the input is invalid, returns a 400 Bad Request result, including the ModelState
❹ If the model is valid, calculates the result
❺ Returns the result directly
Let’s first consider the happy path, when the controller receives a valid request. The following listing shows that you can create an instance of the API controller, call an action method, and receive an ActionResult
Listing 36.5 A simple API controller unit test
public class CurrencyControllerTest
{
[Fact]
public void Convert_ReturnsValue()
{
var controller = new CurrencyController(); ❶
var model = new InputModel ❶
{ ❶
Value = 1, ❶
ExchangeRate = 3, ❶
DecimalPlaces = 2, ❶
}; ❶
ActionResult<decimal> result = controller.Convert(model); ❷
Assert.NotNull(result); ❸
}
}
❶ Creates an instance of the ConvertController to test and a model to send to the
API
❷ Invokes the ConvertToGbp method and captures the value returned
❸ Asserts that the IActionResult is not null
An important point to note here is that you’re testing only the return value of the action, the ActionResult
When you unit-test controllers, you’re testing them separately from the MVC infrastructure, such as formatting, model binding, routing, and authentication. This is obviously by design, but as with testing middleware in section 36.1, it can make testing some aspects of your controller somewhat complex.
Consider model validation. As you saw in chapter 6, one of the key responsibilities of action methods and Razor Page handlers is to check the ModelState.IsValid property and act accordingly if a binding model is invalid. Testing that your controllers and PageModels handle validation failures correctly seems like a good candidate for a unit test.
Unfortunately, things aren’t simple here either. The Razor Page/MVC framework automatically sets the ModelState property as part of the model-binding process. In practice, when your action method or page handler is invoked in your running app, you know that the ModelState will match the binding model values. But in a unit test, there’s no model binding, so you must set the ModelState yourself manually.
Imagine you’re interested in testing the error path for the controller in listing 36.4, where the model is invalid and the controller should return BadRequestObjectResult. In a unit test, you can’t rely on the ModelState property being correct for the binding model. Instead, you must add a model-binding error to the controller’s ModelState manually before calling the action, as shown in the following listing.
Listing 36.6 Testing handling of validation errors in MVC controllers
[Fact]
public void Convert_ReturnsBadRequestWhenInvalid()
{
var controller = new CurrencyController(); ❶
var model = new ConvertInputModel ❷
{ ❷
Value = 1, ❷
ExchangeRate = -2, ❷
DecimalPlaces = 2, ❷
}; ❷
controller.ModelState.AddModelError( ❸
nameof(model.ExchangeRate), ❸
"Exchange rate must be greater than zero" ❸
); ❸
ActionResult<decimal> result = controller.Convert(model); ❹
Assert.IsType<BadRequestObjectResult>(result.Result); ❺
}
❶ Creates an instance of the Controller to test
❷ Creates an invalid binding model by using a negative ExchangeRate
❸ Manually adds a model error to the Controller’s ModelState. This sets ModelState.IsValid to false.
❹ Invokes the action method, passing in the binding models
❺ Verifies that the action method returned a BadRequestObjectResult
NOTE In listing 36.6, I passed in an invalid model, but I could just as easily have passed in a valid model or even null; the controller doesn’t use the binding model if the ModelState isn’t valid, so the test would still pass. But if you’re writing unit tests like this one, I recommend trying to keep your model consistent with your ModelState; otherwise, your unit tests won’t be testing a situation that occurs in practice.
I tend to shy away from unit testing API controllers directly in this way. As you’ve seen with model binding, the controllers are somewhat dependent on earlier stages of the MVC framework, which you often need to emulate. Similarly, if your controllers access the HttpContext (available on the ControllerBase base classes), you may need to perform additional setup.
NOTE You can read more about why I generally don’t unit- test my controllers in my blog article “Should you unit-test API/MVC controllers in ASP.NET Core?” at http://mng.bz/YqMo.
So what about minimal API endpoints? There’s both good news and bad news here. On one hand, minimal API endpoints are simple lambda functions, so you can unit-test them, but these tests also suffer from many drawbacks:
• You must write your endpoint handlers as static or instance methods on a class, not as lambda methods or local functions, so that you can reference them from the test project.
• You are testing only the execution of the endpoint handler, outside any filters applied to the endpoint or route group that execute in the real app.
• You are not testing model-binding or result serialization—two common sources of errors in practice.
• If your endpoint is simple, as it should be, there’s not much to test!
I find unit tests for minimal APIs to be overly restrictive and limited in value, so I avoid them, but you can see an example of a minimal API unit test in the source code for this chapter.
NOTE I haven’t discussed Razor Pages much in this section, as they suffer from many of the same problems, in that they are dependent on the supporting infrastructure of the framework. Nevertheless, if you do wish to test your Razor Page PageModel, you can read about it in Microsoft’s “Razor Pages unit tests in ASP.NET Core” documentation: http://mng.bz/GxmM.
Instead of using unit testing, I try to keep my minimal API endpoints, controllers, and Razor Pages as thin as possible. I push as much of the behavior in these classes into business logic services that can be easily unit-tested, or into middleware and filters, which can be more easily tested independently.
NOTE This is a personal preference. Some people like to get as close to 100 percent test coverage for their code base as possible, but I find testing orchestration classes is often more hassle than it’s worth.
Although I tend to forgo unit-testing my ASP.NET Core endpoints, I often write integration tests that test them in the context of a complete application. In the next section, we’ll look at ways to write integration tests for your app so you can test its various components in the context of the ASP.NET Core framework as a whole.
36.3 Integration testing: Testing your whole app in-memory
In this section you’ll learn how to create integration tests that test component interactions. You’ll learn to create a TestServer that sends HTTP requests in-memory to test custom middleware components more easily. You’ll then learn how to run integration tests for a real application, using your real app’s configuration, services, and middleware pipeline. Finally, you’ll learn how to use WebApplicationFactory to replace services in your app with test versions to avoid depending on third-party APIs in your tests.
If you search the internet for types of testing, you’ll find a host of types to choose among. The differences are sometimes subtle, and people don’t universally agree on the definitions. I chose not to dwell on that topic in this book. I consider unit tests to be isolated tests of a component and integration tests to be tests that exercise multiple components at the same time.
In this section I’m going to show how you can write integration tests for the StatusMiddleware from section 36.1 and the API controller from section 36.2. Instead of isolating the components from the surrounding framework and invoking them directly, you’ll specifically test them in a context similar to how you use them in practice.
Integration tests are an important part of confirming that your components function correctly, but they don’t remove the need for unit tests. Unit tests are excellent for testing small pieces of logic contained in your components and are typically quick to execute. Integration tests are normally significantly slower, as they require much more configuration and may rely on external infrastructure, such as a database.
Consequently, it’s normal to have far more unit tests for an app than integration tests. As you saw in chapter 35, unit tests typically verify the behavior of a component, using valid inputs, edge cases, and invalid inputs to ensure that the component behaves correctly in all cases. Once you have an extensive suite of unit tests, you’ll likely need only a few integration tests to be confident your application is working correctly.
You could write many types of integration tests for an application. You could test that a service can write to a database correctly, integrate with a third-party service (for sending emails, for example), or handle HTTP requests made to it.
In this section we’re going to focus on the last point: verifying that your app can handle requests made to it, as it would if you were accessing the app from a browser. For this, we’re going to use a library provided by the ASP.NET Core team called Microsoft.AspNetCore.TestHost.
36.3.1 Creating a TestServer using the Test Host package
Imagine you want to write some integration tests for the StatusMiddleware from section 36.1. You’ve already written unit tests for it, but you want to have at least one integration test that tests the middleware in the context of the ASP.NET Core infrastructure.
You could go about this in many ways. Perhaps the most complete approach would be to create a separate project and configure StatusMiddleware as the only middleware in the pipeline. You’d then need to run this project, wait for it to start up, send requests to it, and inspect the responses.
This would possibly make for a good test, but it would also require a lot of configuration, and it would be fragile and error-prone. What if the test app can’t start because it tries to use an already-taken port? What if the test app doesn’t shut down correctly? How long should the integration test wait for the app to start?
The ASP.NET Core Test Host package lets you get close to this setup without having the added complexity of spinning up a separate app. You add the Test Host to your test project by adding the Microsoft.AspNetCore.TestHost NuGet package, using the Visual Studio NuGet GUI, Package Manager Console, or .NET command-line interface (CLI). Alternatively, add the
<PackageReference Include="Microsoft.AspNetCore.TestHost" Version="7.0.0"/>In a typical ASP.NET Core app, you create a HostBuilder in your Program class; configure a web server (Kestrel); and define your application’s configuration, services, and middleware pipeline (using a Startup file). Finally, you call Build() on the HostBuilder to create an instance of an IHost that can be run and that will listen for requests on a given URL and port.
NOTE All this happens behind the scenes when you use the minimal hosting WebApplicationBuilder and WebApplication APIs. I have an in-depth post exploring the code behind WebApplicationBuilder and how it relates to HostBuilder on my blog at http://mng.bz/a1mj.
The Test Host package uses the same HostBuilder to define your test application, but instead of listening for requests at the network level, it creates an IHost that uses in-memory request objects, as shown in figure 36.1.

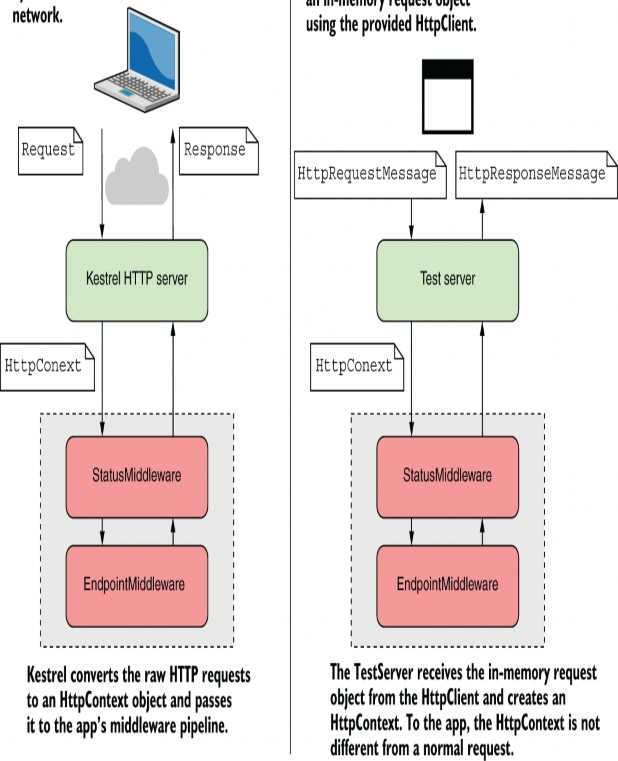
Figure 36.1 When your app runs normally, it uses the Kestrel server. This listens for HTTP requests and converts the requests to an HttpContext, which is passed to the middleware pipeline. The TestServer doesn’t listen for requests on the network. Instead, you use an HttpClient to make in-memory requests.From the point of view of the middleware, there’s no difference.
It even exposes an HttpClient that you can use to send requests to the test app. You can interact with the HttpClient as though it were sending requests over the network, but in reality, the requests are kept entirely in memory.
Listing 36.7 shows how to use the Test Host package to create a simple integration test for the StatusMiddleware. First, create a HostBuilder, and call ConfigureWebHost() to define your application by adding middleware in the Configure method. This is equivalent to the Startup.Configure() method you would typically use to configure your application when using the generic host approach.
NOTE You can write a similar test using WebApplicationBuilder, but this sets up lots of extra defaults such as configuration, extra dependency injection (DI) services, and automatically added middleware, which can generally slow and add some confusion to simple tests. You can see an example of this approach in StatusMiddlewareTestHostTests in the source code for this book, but I recommend using the approach in listing 36.7, using HostBuilder, in most cases.
Call the UseTestServer() extension method in ConfigureWebHost(), which replaces the default Kestrel server with the TestServer from the Test Host package.
The TestServer is the main component in the Test Host package, which makes all the magic possible. After configuring the HostBuilder, call StartAsync() to build and start the test application. You can then create an HttpClient using the extension method GetTestClient(). This returns an HttpClient configured to make in-memory requests to the TestServer, as shown in the following listing.
Listing 36.7 Creating an integration test with TestServer
public class StatusMiddlewareTests
{
[Fact]
public async Task StatusMiddlewareReturnsPong()
{
var hostBuilder = new HostBuilder() ❶
.ConfigureWebHost(webHost => ❶
{
webHost.Configure(app => ❷
app.UseMiddleware<StatusMiddleware>()); ❷
webHost.UseTestServer(); ❸
});
IHost host = await hostBuilder.StartAsync(); ❹
HttpClient client = host.GetTestClient(); ❺
var response = await client.GetAsync("/ping"); ❻
response.EnsureSuccessStatusCode(); ❼
var content = await response.Content.ReadAsStringAsync(); ❽
Assert.Equal("pong", content); ❽
}
}
❶ Configures a HostBuilder to define the in-memory test app
❷ Adds the Status-Middleware as the only middleware in the pipeline
❸ Configures the host to use the TestServer instead of Kestrel
❹ Builds and starts the host
❺ Creates an HttpClient, or you can interact directly with the server object
❻ Makes an in-memory request, which is handled by the app as normal
❼ Verifies that the response was a success (2xx) status code
❽ Reads the body content and verifies that it contains “pong”
This test ensures that the test application defined by HostBuilder returns the expected value when it receives a request to the /ping path. The request is entirely in- memory, but from the point of view of StatusMiddleware, it’s the same as if the request came from the network.
The HostBuilder configuration in this example is simple. Even though I’ve called this an integration test, you’re specifically testing the StatusMiddleware on its own rather than in the context of a real application. I think this setup is preferable for testing custom middleware compared with the “proper” unit tests I showed in section 36.1.
Regardless of what you call it, this test relies on simple configuration for the test app. You may also want to test the middleware in the context of your real application so that the result is representative of your app’s real configuration.
If you want to run integration tests based on an existing app, you don’t want to have to configure the test HostBuilder manually, as you did in listing 36.7. Instead, you can use another helper package, Microsoft.AspNetCore.Mvc.Testing.
36.3.2 Testing your application with WebApplicationFactory
Building up a HostBuilder and using the Test Host package, as you did in section 36.3.1, can be useful when you want to test isolated infrastructure components, such as middleware. However, it’s also common to want to test your real app, with the full middleware pipeline configured and all the required services added to DI. This gives you the most confidence that your application is going to work in production.
The TestServer that provides the in-memory server can be used for testing your real app, but in principle, a lot more configuration is required. Your real app likely loads configuration files or static files; it may use Razor Pages and views, as well as using WebApplicationBuilder instead of the generic host. Fortunately, the Microsoft.AspNetCore.Mvc.Testing NuGet package and WebApplicationFactory largely solve these configuration problems for you.
NOTE Don’t be put off by the Mvc in the package name; you can use this package for testing ASP.NET Core apps that don’t use any MVC or Razor Pages services or components.
You can use the WebApplicationFactory class (provided by the Microsoft.AspNetCore.Mvc.Testing NuGet package) to run an in-memory version of your real application. It uses the TestServer behind the scenes, but it uses your app’s real configuration, DI service registration, and middleware pipeline. The following listing shows an example that tests that when your application receives a "/ping" request, it responds with "pong".
Listing 36.8 Creating an integration test with WebApplicationFactory
public class IntegrationTests: ❶
IClassFixture<WebApplicationFactory<Program>> ❶
{
private readonly WebApplicationFactory<Program> _fixture; ❷
public IntegrationTests( ❷
WebApplicationFactory<Startup> fixture) ❷
{ ❷
_fixture = fixture; ❷
} ❷
[Fact]
public async Task PingRequest_ReturnsPong()
{
HttpClient client = _fixture.CreateClient(); ❸
var response = await client.GetAsync("/ping"); ❹
response.EnsureSuccessStatusCode(); ❹
var content = await response.Content.ReadAsStringAsync(); ❹
Assert.Equal("pong", content); ❹
}
}
❶ Implementing the interface allows sharing an instance across tests.
❷ Injects an instance of WebApplicationFactory
❸ Creates an HttpClient that sends requests to the in-memory TestServer
❹ Makes requests and verifies the response as before
One of the advantages of using WebApplicationFactory as shown in listing 36.8 is that it requires less manual configuration than using the TestServer directly, as shown in listing 36.13, despite performing more configuration behind the scenes. The WebApplicationFactory tests your app using the configuration defined in your Program.cs and Startup.cs files.
NOTE The generic WebApplicationFactory
Listings 36.8 and 36.7 are conceptually quite different too. Listing 36.7 tests that the StatusMiddleware behaves as expected in the context of a dummy ASP.NET Core app; listing 36.7 tests that your app behaves as expected for a given input. It doesn’t say anything specific about how that happens. Your app doesn’t have to use the StatusMiddleware for the test in listing 36.7 to pass; it simply has to respond correctly to the given request. That means the test knows less about the internal implementation details of your app and is concerned only with its behavior.
DEFINITION Tests that fail whenever you change your app slightly are called brittle or fragile. Try to avoid brittle tests by ensuring that they aren’t dependent on the implementation details of your app.
To create tests that use WebApplicationFactory, follow these steps:
-
Install the Microsoft.AspNetCore.Mvc.Testing NuGet package in your project by running dotnet add package Microsoft.AspNetCore.Mvc.Testing, by using the NuGet explorer in Visual Studio, or by adding a
<PackageReference>element to your project file as follows:<PackageReference Include="Microsoft.AspNetCore.Mvc.Testing" Version="7.0.0" /> -
Update the
<Project>element in your test project’s .csproj file to the following:
<Project Sdk="Microsoft.NET.Sdk.Web">This is required by WebApplicationFactory so that it can find your configuration files and static files.
- Implement
IClassFixture<WebApplicationFactory<T>>in your xUnit test class, where T is a class in your real application’s project. By convention, you typically use your application’s Program class for T.
• WebApplicationFactory uses the T reference to find the entry point for your application, running the application in memory, and dynamically replacing Kestrel with a TestServer for tests.
• If you’re using C# top-level statements and using the Program class for T, you need to make sure that the Program class is accessible from the test project. You can change the visibility of the automatically generated Program class by adding public partial class Program {} to your app.
• The IClassFixture<TFixture> is an xUnit marker interface that tells xUnit to build an instance of TFixture before building the test class and to inject the instance into the test class’s constructor. You can read more about fixtures at https://xunit.net/docs/shared- context.
- Inject an instance of WebApplicationFactory
in your test class’s constructor. You can use this fixture to create an HttpClient for sending in-memory requests to the TestServer. Those requests emulate your application’s production behavior, as your application’s real configuration, services, and middleware are all used.
The big advantage of WebApplicationFactory is that you can easily test your real app’s behavior. That power comes with responsibility: your app will behave as it would in real life, so it will write to a database and send to third-party APIs! Depending on what you’re testing, you may want to replace some of your dependencies to avoid this, as well as to make testing easier.
36.3.3 Replacing dependencies in WebApplicationFactory
When you use WebApplicationFactory to run integration tests on your app, your app will be running in-memory, but other than that, it’s as though you’re running your application using dotnet run. That means any connection strings, secrets, or API keys that can be loaded locally will also be used to run your application.
TIP By default, WebApplicationFactory uses the "Development" hosting environment, the same as when you run locally.
On the plus side, that means you have a genuine test that your application can start correctly. For example, if you’ve forgotten to register a required DI dependency that is detected on application startup, any tests that use WebApplicationFactory will fail.
On the downside, that means all your tests will be using the same database connection and services as when you run your application locally. It’s common to want to replace those with alternative test versions of your services.
As a simple example, imagine the CurrencyConverter that you’ve been testing in this app uses IHttpClientFactory to call a third-party API to retrieve the latest exchange rates. You don’t want to hit that API repeatedly in your integration tests, so you want to replace the CurrencyConverter with your own StubCurrencyConverter.
The first step is to ensure that the service CurrencyConverter implements an interface— ICurrencyConverter for example—and that your app uses this interface throughout, not the implementation. For our simple example, the interface would probably look like the following:
public interface ICurrencyConverter
{
decimal ConvertToGbp(decimal value, decimal rate, int dps);
}
You would register your real CurrencyConverter service in Program.cs using
builder.Services.AddScoped<ICurrencyConverter, CurrencyConverter>();Now that your application depends on CurrencyConverter only indirectly, you can provide an alternative implementation in your tests.
TIP Using an interface decouples your application services from a specific implementation, allowing you to substitute alternative implementations. This is a key practice for making classes testable.
We’ll create a simple alternative implementation of ICurrencyConverter for our tests that always returns the same value, 3. It’s obviously not terribly useful as an actual converter, but that’s not the point: you have complete control! Create the following class in your test project:
public class StubCurrencyConverter : ICurrencyConverter
{
public decimal ConvertToGbp(decimal value, decimal rate, int dps)
{
return 3;
}
}
You now have all the pieces you need to replace the implementation in your tests. To achieve that, we’ll use a feature of WebApplicationFactory that lets you customize the DI container before starting the test server.
TIP It’s important to remember that you want to replace the implementation only when running in the test project. I’ve seen some people try to configure their real apps to replace live services for fake services when a specific value is set, for example. That is often unnecessary, bloats your apps with test services, and generally adds confusion!
WebApplicationFactory exposes a method, WithWebHostBuilder, that allows you to customize your application before the in-memory TestServer starts. The following listing shows an integration test that uses this builder to replace the default ICurrencyConverter implementation with our test stub.
Listing 36.9 Replacing a dependency in a test using WithWebHostBuilder
public class IntegrationTests: ❶
IClassFixture<WebApplicationFactory<Startup>> ❶
{ ❶
private readonly WebApplicationFactory<Startup> _fixture; ❶
public IntegrationTests(WebApplicationFactory<Startup> fixture) ❶
{ ❶
_fixture = fixture; ❶
} ❶
[Fact]
public async Task ConvertReturnsExpectedValue()
{
var customFactory = _fixture.WithWebHostBuilder( ❷
(IWebHostBuilder hostBuilder) => ❷
{
hostBuilder.ConfigureTestServices(services => ❸
{
services.RemoveAll<ICurrencyConverter>(); ❹
services.AddScoped
<ICurrencyConverter, StubCurrencyConverter>(); ❺
});
});
HttpClient client = customFactory.CreateClient(); ❻
var response = await client.GetAsync("/api/currency"); ❼
response.EnsureSuccessStatusCode(); ❼
var content = await response.Content.ReadAsStringAsync(); ❼
Assert.Equal("3", content); ❽
}
}
❶ Implements the required interface and injects it into the constructor
❷ Creates a custom factory with the additional configuration
❸ ConfigureTestServices executes after all other DI services are configured in
your real app.
❹ Removes all implementations of ICurrency-Converter from the DI container
❺ Adds the test service as a replacement
❻ Calling CreateClient bootstraps the application and starts the TestServer.
❼ Invokes the currency converter endpoint
❽ As the test converter always returns 3, so does the API endpoint.
There are a couple of important points to note in this example:
• WithWebHostBuilder() returns a new WebApplicationFactory instance. The new instance has your custom configuration, and the original injected _fixture instance remains unchanged.
• ConfigureTestServices() is called after your real app’s ConfigureServices() method. That means you can replace services that have been previously registered. You can also use this to override configuration values, as you’ll see in section 36.4.
WithWebHostBuilder() is handy when you want to replace a service for a single test. But what if you want to replace the ICurrencyConverter in every test? All that boiler- plate would quickly become cumbersome. Instead, you can create a custom WebApplicationFactory.
36.3.4 Reducing duplication by creating a custom WebApplicationFactory
If you find yourself writing WithWebHostBuilder() a lot in your integration tests, it might be worth creating a custom WebApplicationFactory instead. The follow- ing listing shows how to centralize the test service we used in listing 36.9 into a custom WebApplicationFactory.
Listing 36.10 Creating a custom WebApplicationFactory to reduce duplication
public class CustomWebApplicationFactory ❶
: WebApplicationFactory<Program> ❶
{
protected override void ConfigureWebHost( ❷
IWebHostBuilder builder) ❷
{
builder.ConfigureTestServices(services => ❸
{ ❸
services.RemoveAll<ICurrencyConverter>(); ❸
services.AddScoped ❸
<ICurrencyConverter, StubCurrencyConverter>(); ❸
}); ❸
}
}
In this example, we override ConfigureWebHost and configure the test services for the factory.1 You can use your custom factory in any test by injecting it as an IClassFixture, as you have before. The following listing shows how you would update listing 36.9 to use the custom factory defined in listing 36.10.
Listing 36.11 Using a custom WebApplicationFactory in an integration test
public class IntegrationTests: ❶
IClassFixture<CustomWebApplicationFactory> ❶
{
private readonly CustomWebApplicationFactory _fixture; ❷
public IntegrationTests(CustomWebApplicationFactory fixture) ❷
{
_fixture = fixture;
}
[Fact]
public async Task ConvertReturnsExpectedValue()
{
HttpClient client = _fixture.CreateClient(); ❸
var response = await client.GetAsync("/api/currency");
response.EnsureSuccessStatusCode();
var content = await response.Content.ReadAsStringAsync();
Assert.Equal("3", content); ❹
}
}
❶ Implements the IClassFixture interface for the custom factory
❷ Injects an instance of the factory in the constructor
❸ The client already contains the test service configuration.
❹ The result confirms that the test service was used.
You can also combine your custom WebApplicationFactory, which substitutes services that you always want to replace, with the WithWebHostBuilder() method to override additional services on a per-test basis. That combination gives you the best of both worlds: reduced duplication with the custom factory and control with the per-test configuration.
Running integration tests using your real app’s configuration provides about the closest thing you’ll get to a guarantee that your app is working correctly. The sticking point in that guarantee is nearly always external dependencies, such as third-party APIs and databases.
In the final section of this chapter we’ll look at how to use the SQLite provider for EF Core with an in-memory database. You can use this approach to write tests for services that use an EF Core database context without needing access to a real database.
36.4 Isolating the database with an in-memory EF Core provider
In this section you’ll learn how to write unit tests for code that relies on an EF Core DbContext. You’ll learn how to create an in-memory database, and you’ll see the difference between the EF in-memory provider and the SQLite in- memory provider. Finally, you’ll see how to use the in- memory SQLite provider to create fast, isolated tests for code that relies on a DbContext.
As you saw in chapter 12, EF Core is an object-relational mapper (ORM) that is used primarily with relational databases. In this section I’m going to discuss one way to test services that depend on an EF Core DbContext without having to configure or interact with a real database.
NOTE To learn more about testing your EF Core code, see Entity Framework Core in Action, 2nd ed., by Jon P. Smith (Manning, 2021), http://mng.bz/QPpR.
The following listing shows a highly stripped-down version of the RecipeService you created in chapter 12 for the recipe app. It shows a single method to fetch the details of a recipe using an injected EF Core DbContext.
Listing 36.12 RecipeService to test, which uses EF Core to store and load entities
public class RecipeService
{
readonly AppDbContext _context; ❶
public RecipeService(AppDbContext context) ❶
{ ❶
_context = context; ❶
} ❶
public RecipeViewModel GetRecipe(int id)
{
return _context.Recipes ❷
.Where(x => x.RecipeId == id)
.Select(x => new RecipeViewModel
{
Id = x.RecipeId,
Name = x.Name
})
.SingleOrDefault();
}
}
❶ An EF Core DbContext is injected in the constructor.
❷ Uses the DbSet<Recipes> property to load recipes and creates a
RecipeViewModel
Writing unit tests for this class is a bit of a problem. Unit tests should be fast, repeatable, and isolated from other dependencies, but you have a dependency on your app’s DbContext. You probably don’t want to be writing to a real database in unit tests, as it would make the tests slow, potentially unrepeatable, and highly dependent on the configuration of the database—a failure on all three requirements!
NOTE Depending on your development environment, you may want to use a real database for your integration tests, despite these drawbacks. Using a database like the one you’ll use in production increases the likelihood that you’ll detect any problems in your tests. You can find an example of using Docker to achieve this in Microsoft’s “Testing ASP.NET Core services and web apps” documentation at http://mng.bz/zxDw.
Luckily, Microsoft ships two in-memory database providers for this scenario. Recall from chapter 12 that when you configure your app’s DbContext in Program.cs, you configure a specific database provider, such as SQL Server:
builder.Services.AddDbContext<AppDbContext>(options => options.UseSqlServer(connectionString);The in-memory database providers are alternative providers designed only for testing. Microsoft includes two in-memory providers in ASP.NET Core:
• Microsoft.EntityFrameworkCore.InMemory—This provider doesn’t simulate a database. Instead, it stores objects directly in memory. It isn’t a relational database as such, so it doesn’t have all the features of a normal database. You can’t execute SQL against it directly, and it won’t enforce constraints, but it’s fast. These limitations are large enough that Microsoft generally advise against using it. See http://mng.bz/e1E9.
• Microsoft.EntityFrameworkCore.Sqlite—SQLite is a relational database. It’s limited in features compared with a database like SQL Server, but it’s a true relational database, unlike the in-memory database provider. Normally a SQLite database is written to a file, but the provider includes an in- memory mode, in which the database stays in memory. This makes it much faster and easier to create and use for testing.
Unfortunately, EF Core migrations are tailored to a specific database, which means you can’t run migrations created for SQL Server or PostreSQL against a SQLite database. It’s possible to create multiple sets of migrations, as described in the documentation (http://mng.bz/pP15), but this can add a lot of complexity. Consequently, always use EnsureCreated() with SQLite tests, which creates the database without running migrations, as you’ll see in listing 36.13.
Instead of storing data in a database on disk, both of these providers store data in memory, as shown in figure 36.2. This makes them fast and easy to create and tear down, which allows you to create a new database for every test to ensure that your tests stay isolated from one another.
Figure 36.2 The in-memory database provider and SQLite provider (in-memory mode) compared with the SQL Server database provider. The in-memory database provider doesn’t simulate a database as such. Instead, it stores objects in memory and executes LINQ queries against them directly.
NOTE In this section I describe how to use the SQLite provider as an in-memory database, as it’s more full-featured than the in-memory provider. For details on using the in- memory provider, see Microsoft’s “EF Core In-Memory Database Provider” documentation: http://mng.bz/hdIq.
To use the SQLite provider in memory, add the Microsoft.EntityFrameworkCore.Sqlite package to your test project’s .csproj file. This adds the UseSqlite() extension method, which you’ll use to configure the database provider for your unit tests.
Listing 36.13 shows how you could use the in-memory SQLite provider to test the GetRecipe() method of RecipeService. Start by creating a SqliteConnection object and using the "DataSource=:memory:" connection string. This tells the provider to store the database in memory and then open the connection. This is typically faster than using a file-based connection-string and means you can easily run multiple tests in parallel, as there’s no shared database.
WARNING The SQlite in-memory database is destroyed when the connection is closed. If you don’t open the connection yourself, EF Core closes the connection to the in- memory database when you dispose of the DbContext. If you want to share an in-memory database between DbContexts, you must explicitly open the connection yourself.
Next, pass the SqliteConnection instance into the DbContextOptionsBuilder<> and call UseSqlite(). This configures the resulting DbContextOptions<> object with the necessary services for the SQLite provider and provides the connection to the in-memory database.Because you’re passing this options object in to an instance of AppDbContext, all calls to the DbContext result in calls to the in-memory database provider.
Listing 36.13 Using the in-memory database provider to test an EF Core DbContext
[Fact]
public void GetRecipeDetails_CanLoadFromContext()
{
var connection = new SqliteConnection("DataSource=:memory:"); ❶
connection.Open(); ❷
var options = new DbContextOptionsBuilder<AppDbContext>() ❸
.UseSqlite(connection) ❸
.Options; ❸
using (var context = new AppDbContext(options)) ❹
{
context.Database.EnsureCreated(); ❺
context.Recipes.AddRange( ❻
new Recipe { RecipeId = 1, Name = "Recipe1" }, ❻
new Recipe { RecipeId = 2, Name = "Recipe2" }, ❻
new Recipe { RecipeId = 3, Name = "Recipe3" }); ❻
context.SaveChanges(); ❼
}
using (var context = new AppDbContext(options)) ❽
{
var service = new RecipeService(context); ❾
var recipe = service.GetRecipe (id: 2); ❿
Assert.NotNull(recipe); ⓫
Assert.Equal(2, recipe.Id); ⓫
Assert.Equal("Recipe2", recipe.Name); ⓫
}
}
❶ Configures an in-memory SQLite connection using the special “in-memory” connection string
❷ Opens the connection so EF Core won’t close it automatically
❸ Creates an instance of DbContextOptions<> and configures it to use the SQLite connection
❹ Creates a DbContext and passes in the options
❺ Ensures that the in-memory database matches EF Core’s model (similar to running migrations)
❻ Adds some recipes to the DbContext
❼ Saves the changes to the in-memory database
❽ Creates a fresh DbContext to test that you can retrieve data from the DbContext
❾ Creates the Recipe-Service to test and pass in the fresh DbContext
❿ Executes the GetRecipe function. This executes the query against the inmemory database.
⓫ Verifies that you retrieved the recipe correctly from the in-memory database
This example follows the standard format for any time you need to test a class that depends on an EF Core DbContext:
-
Create a SqliteConnection with the "DataSource=:memory:" connection string, and open the connection.
-
Create a
DbContextOptionsBuilder<>and call UseSqlite(), passing in the open connection. -
Retrieve the DbContextOptions object from the Options property.
-
Pass the options to an instance of your DbContext and ensure the database matches EF Core’s model by calling context.Database.EnsureCreated(). This is similar to running migrations on your database, but it should be used only on test databases. Create and add any required test data to the in- memory database, and call SaveChanges() to persist the data.
-
Create a new instance of your DbContext and inject it into your test class. All queries will be executed against the in-memory database.
By using a separate DbContext for each purpose, you can avoid bugs in your tests due to EF Core caching data without writing it to the database. With this approach, you can be sure that any data read in the second DbContext was persisted to the underlying in-memory database provider.
This was a brief introduction to using the SQLite provider as an in-memory database provider and EF Core testing in general, but if you follow the setup shown in listing 36.13, it should take you a long way. The source code for this chapter shows how you can combine this code with a custom WebApplicationFactory to use an in-memory database for your integration tests. For more details on testing EF Core, including additional options and strategies, see Entity Framework Core in Action, 2nd ed., by Jon P. Smith (Manning, 2021).
Summary
Use the DefaultHttpContext class to unit-test your custom middleware components. If you need access to the response body, you must replace the default Stream.Null with a MemoryStream instance and read the stream manually after invoking the middleware.
API controllers, minimal APIs, and Razor Page models can be unit-tested like other classes, but they should generally contain little business logic, so it may not be worth the effort. For example, the API controller is tested independently of routing, model validation, and filters, so you can’t easily test logic that depends on any of these aspects.
Integration tests allow you to test multiple components of your app at the same time, typically within the context of the ASP.NET Core framework itself. The Microsoft.AspNetCore.TestHost package provides a TestServer object that you can use to create a simple web host for testing. This creates an in- memory server that you can make requests to and receive responses from. You can use the TestServer directly when you wish to create integration tests for custom components like middleware.
For more extensive integration tests of a real application, you should use the WebApplicationFactory class in the Microsoft.AspNetCore.Mvc.Testing package.
Implement IClassFixture<WebApplicationFactory<P rogram>> on your test class, and inject an instance of WebApplicationFactory<Program> into the constructor. This creates an in-memory version of your whole app, using the same configuration, DI services, and middleware pipeline. You can send in- memory requests to your app to get the best idea of how your application will behave in production.
To customize the WebApplicationFactory, call WithWebHostBuilder() and then call ConfigureTestServices(). This method is invoked after your app’s standard DI configuration. This enables you to add or remove the default services for your app, such as to replace a class that contacts a third-party API with a stub implementation.
If you need to customize the services for every test, you can create a custom WebApplicationFactory by deriving from it and overriding the ConfigureWebHost method. You can place all your configuration in the custom factory and implement IClassFixture<CustomWebApplicationFac tory> in your test classes instead of calling WithWebHostBuilder() in every test method.
You can use the EF Core SQLite provider as an in- memory database to test code that depends on an EF Core database context. You configure the in- memory provider by creating a SqliteConnection with a "DataSource=:memory:" connection string.
Create a DbContextOptionsBuilder<> object and call UseSqlite(), passing in the connection. Finally, pass DbContextOptions<> into an instance of your app’s DbContext, and call context.Database.EnsureCreated() to prepare the in-memory database for use with EF Core.
The SQLite in-memory database is maintained as long as there’s an open SqliteConnection.
When you open the connection manually, the database can be used with multiple DbContexts. If you don’t call Open() on the connection, EF Core will close the connection (and delete the in- memory database) when the DbContext is disposed of.
- WebApplicationFactory has many other methods you could override for other scenarios. For details, see https://learn.microsoft.com/aspnet/core/test/integration-tests.