35 Testing applications with xUnit
This chapter covers
• Testing in ASP.NET Core
• Creating unit test projects with xUnit Creating Fact and Theory tests
When I started programming, I didn’t understand the benefits of automated testing. It involved writing so much more code. Wouldn’t it be more productive to be working on new features instead? It was only when my projects started getting bigger that I appreciated the advantages. Instead of having to run my app and test each scenario manually, I could click Play on a suite of tests and have my code tested for me automatically.
Testing is universally accepted as good practice, but how it fits into your development process can often turn into a religious debate. How many tests do you need? Should you write tests before, during, or after the main code? Is anything less than 100 percent coverage of your code base adequate? What about 80 percent?
This chapter won’t address any of those questions. Instead, I focus on the mechanics of creating a test project in .NET. In this chapter I show you how to use isolated unit tests to verify the behavior of your services in isolation. In chapter 36 we build on these basics to create unit tests for an ASP.NET Core application, as well as create integration tests that exercise multiple components of your application at the same time.
TIP For a broader discussion of testing, or if you’re brand-new to unit testing, see The Art of Unit Testing, 3rd ed., by Roy Osherove (Manning, 2024). If you want to explore unit test best practices using C# examples, see Unit Testing Principles, Practices, and Patterns, by Vladimir Khorikov (Manning, 2020). Effective Software Testing: A Developers Guide, by Maurício Aniche (Manning, 2022), uses Java examples but covers a broad range of topics and techniques. Alternatively, for an in- depth look at testing with xUnit in .NET Core, see .NET in Action, 2nd ed., by Dustin Metzgar (Manning, 2023).
In section 35.1 I introduce the .NET software development kit (SDK) testing framework and show how you can use it to create unit testing apps. I describe the components involved, including the testing SDK and the testing frameworks themselves, like xUnit and MSTest. Finally, I cover some of the terminology I use throughout this chapter and chapter 36.
This chapter focuses on the mechanics of getting started with xUnit. You’ll learn how to create unit test projects, reference classes in other projects, and run tests with Visual Studio or the .NET command-line interface (CLI). You’ll create a test project and use it to test the behavior of a basic currency- converter service. Finally, you’ll write some simple unit tests that check whether the service returns the expected results and throws exceptions when you expect it to.
Let’s start by looking at the overall testing landscape for ASP.NET Core, the options available to you, and the components involved.
35.1 An introduction to testing in ASP.NET Core
In this section you’ll learn about the basics of testing in ASP.NET Core. You’ll learn about the types of tests you can write, such as unit tests and integration tests, and why you should write both types. Finally, you’ll see how testing fits into ASP.NET Core.
If you have experience building apps with the full .NET Framework or mobile apps with Xamarin, you might have some experience with unit testing frameworks. If you were building apps in Visual Studio, the steps for creating a test project differed among testing frameworks (such as xUnit, NUnit, and MSTest), and running the tests in Visual Studio often required installing a plugin. Similarly, running tests from the command line varied among frameworks.
With the .NET SDK, testing in ASP.NET Core and .NET Core is a first-class citizen, on a par with building, restoring packages, and running your application. Just as you can run dotnet build to build a project, or dotnet run to execute it, you can use dotnet test to execute the tests in a test project, regardless of the testing framework used.
The dotnet test command uses the underlying .NET SDK to execute the tests for a given project. This is the same as when you run your tests using the Visual Studio test runner, so whichever approach you prefer, the results are the same.
Test projects are console apps that contain several tests. A test is typically a method that evaluates whether a given class in your app behaves as expected. The test project typically has dependencies on at least three components:
• The .NET Test SDK
• A unit testing framework, such as xUnit, NUnit, Fixie, or MSTest
• A test-runner adapter for your chosen testing framework so that you can execute your tests by calling dotnet test
These dependencies are normal NuGet packages that you can add to a project, but they allow you to hook in to the dotnet test command and the Visual Studio test runner. You’ll see an example .csproj file from a test app in the next section.
Typically, a test consists of a method that runs a small piece of your app in isolation and checks whether it has the desired behavior. If you were testing a Calculator class, you might have a test that checks that passing the values 1 and 2 to the Add() method returns the expected result, 3.
You can write lots of small, isolated tests like this for your app’s classes to verify that each component is working correctly, independent of any other components. Small isolated tests like these are called unit tests.
Using the ASP.NET Core framework, you can build apps that you can easily unit-test. You can test some aspects of your API controllers in isolation from your action filters and model binding, for example, because the framework
• Avoids static types
• Uses interfaces instead of concrete implementations
• Has a highly modular architecture, allowing you to test your API controllers in isolation from your action filters and model binding
But the fact that all your components work correctly independently doesn’t mean they’ll work when you put them together. For that, you need integration tests, which test the interaction between multiple components.
The definition of an integration test is another somewhat- contentious problem, but I think of integration tests as testing multiple components together or testing large vertical slices of your app—testing a user manager class that can save values to a database, for example, or testing that a request made to a health-check endpoint returns the expected response.Integration tests don’t necessarily include the entire app, but they use more components than unit tests.
NOTE I don’t cover UI tests, which (for example) interact with a browser to provide true end-to-end automated testing. Playwright (https://playwright.dev) and Cypress (https://www.cypress.io) are two of the most popular modern tools for UI testing.
ASP.NET Core has a couple of tricks up its sleeve when it comes to integration testing, as you’ll see in chapter 36. You can use the Test Host package to run an in-process ASP.NET Core server, which you can send requests to and inspect the responses. This saves you from the orchestration headache of trying to spin up a web server on a different process, making sure ports are available, and so on, but still allows you to exercise your whole app.
At the other end of the scale, the Entity Framework Core (EF Core) SQLite in-memory database provider lets you isolate your tests from the database. Interacting with and configuring a database is often one of the hardest aspects of automating tests, so this provider lets you sidestep the problem. You’ll see how to use it in chapter 36.
The easiest way to get to grips with testing is to give it a try, so in the next section you’ll create your first test project and use it to write unit tests for a simple custom service.
35.2 Creating your first test project with xUnit
As I described in section 35.1, to create a test project you need to use a testing framework. You have many options, such as NUnit and MSTest, but (anecdotally) the most used test framework with ASP.NET Core is xUnit (https://xunit.net). The ASP.NET Core framework project itself uses xUnit as its testing framework, so it’s become somewhat of a convention. If you’re familiar with a different testing framework, feel free to use that instead.
Visual Studio includes a template to create a .NET 7 xUnit test project, as shown in figure 35.1. Choose File > New > Project, and choose xUnit Test Project in the New Project dialog box. Alternatively, you could choose MSTest Project or
NUnit Test Project if you’re more comfortable with those frameworks.
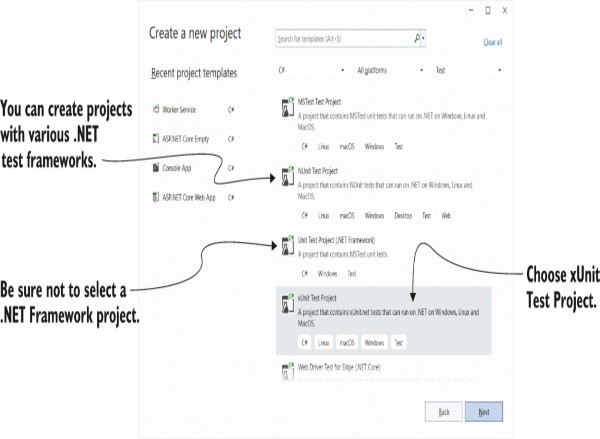
Figure 35.1 The New Project dialog box in Visual Studio. Choose xUnit Test Project to create an xUnit project, or choose Unit Test Project to create an MSTest project.
Alternatively, if you’re not using Visual Studio, you can create a similar template using the .NET CLI with
dotnet new xunitWhether you use Visual Studio or the .NET CLI, the template creates a console project and adds the required testing NuGet
packages to your .csproj file, as shown in the following listing. If you chose to create an MSTest (or other framework) test project, the xUnit and xUnit runner packages would be replaced by packages appropriate to your testing framework of choice.
Listing 35.1 The .csproj file for an xUnit test project
<Project Sdk="Microsoft.NET.Sdk"> ❶
<PropertyGroup> ❶
<TargetFramework>net7.0</TargetFramework> ❶
<IsPackable>false</IsPackable>
</PropertyGroup>
<ItemGroup>
<PackageReference
Include="Microsoft.NET.Test.Sdk" Version="17.3.2" /> ❷
<PackageReference Include="xunit" Version="2.4.2" /> ❸
<PackageReference
Include="xunit.runner.visualstudio" Version="2.4.5" /> ❹
<PackageReference Include="coverlet.collector" Version="3.1.2" /> ❺
</ItemGroup>
</Project>
❶ The test project is a standard .NET 7.0 project.
❷ The .NET Test SDK, required by all test projects
❸ The xUnit test framework
❹ The xUnit test adapter for the .NET Test SDK
❺ An optional package that collects metrics about how much of your code base is covered by tests
TIP Adding the Microsoft.NET.Test.Sdk package marks the project as a test project by setting the IsTestProject MsBuild property.
In addition to the NuGet packages, the template includes a single example unit test. This doesn’t do anything, but it’s a valid xUnit test all the same, as shown in the following listing.
In xUnit, a test is a method on a public class, decorated with a [Fact] attribute.
Listing 35.2 An example xUnit unit test, created by the default template
public class UnitTest1 ❶
{
[Fact] ❷
public void Test1() ❸
{
}
}
Even though this test doesn’t test anything, it highlights some characteristics of xUnit [Fact] tests:
• Tests are denoted by the [Fact] attribute.
• The method should be public, with no method arguments.
• The method is void. It could also be an async method and return Task.
• The method resides inside a public, nonstatic class.
NOTE The [Fact] attribute and these restrictions are specific to the xUnit testing framework. Other frameworks have other ways to denote test classes and different restrictions on the classes and methods themselves.
It’s also worth noting that although I said test projects are console apps, there’s no Program class or static void Main method. Instead, the app looks more like a class library because the test SDK automatically injects a Program class at build time. It’s not something you have to worry about in general, but you may have problems if you try to add your own Program.cs file to your test project.
NOTE This isn’t a common thing to do, but I’ve seen it done occasionally. I describe this problem in detail and how to fix it in my blog post “Fixing the error ‘Program has more than one entry point defined’ for console apps containing xUnit tests,” at http://mng.bz/w9q5.
Before we go any further and create some useful tests, we’ll run the test project as it is, using both Visual Studio and the .NET SDK tooling, to see the expected output.
35.3 Running tests with dotnet test
When you create a test app that uses the .NET Test SDK, you can run your tests by using Visual Studio or the .NET CLI. In Visual Studio, you run tests by choosing Test > Run All Tests or by choosing Run All in the Test Explorer window, as shown in figure 35.2.
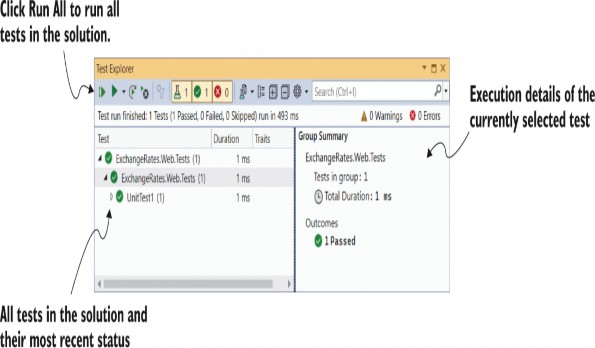
Figure 35.2 The Test Explorer window in Visual Studio lists all tests found in the solution and their most recent pass/fail status. Click a test in the left pane to see details about the most recent test run in the right pane.
The Test Explorer window lists all the tests found in your solution and the results of each test. In xUnit, a test passes if it doesn’t throw an exception, so UnitTest1.Test1 passed successfully.
NOTE The Test Explorer in Visual Studio uses the open-source VSTest protocol (https://github.com/microsoft/vstest) for listing and debugging tests. It’s also used by Visual Studio for Mac and Visual Studio Code, for example.
Alternatively, you can run your tests from the command line using the .NET CLI by running dotnet test from the unit-test project’s folder, as shown in figure 35.3.
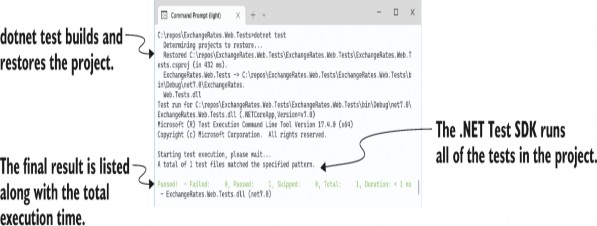
Figure 35.3 You can run tests from the command line using dotnet test. This restores and builds the test project before executing all the tests in the project.
NOTE You can also run dotnet test from the solution folder. This runs all test projects referenced in the .sln solution file.
Calling dotnet test runs a restore and build of your test project and then runs the tests, as you can see from the console output in figure 35.3. Under the hood, the .NET CLI calls in to the same underlying infrastructure that Visual Studio does (the .NET SDK), so you can use whichever approach better suits your development style.
You’ve seen a successful test run, so it’s time to replace that placeholder test with something useful. First things first, though: you need something to test.
35.4 Referencing your app from your test project
In test-driven development (TDD), you typically write your unit tests before you write the actual class you’re testing, but I’m going to take a more traditional route here and create the class to test first. You’ll write the tests for it afterward.
Let’s assume you’ve created an app called ExchangeRates.Web, which exposes an API that converts among different currencies, and you want to add tests for it. You’ve added a test project to your solution as described in section 35.2.1, so your solution looks like figure 35.4.
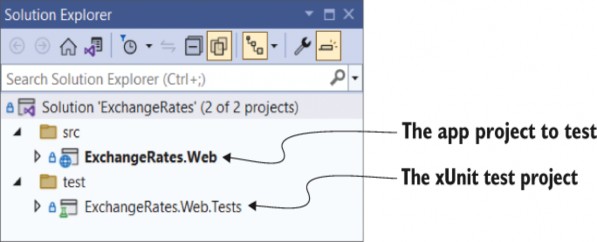
Figure 35.4 A basic solution containing an ASP.NET Core app called ExchangeRates.Web and a test project called ExchangeRates.Web.Tests
For the ExchangeRates.Web.Tests project to test the classes in the ExchangeRates.Web project, you need to add a reference to the web project from your test project. In Visual Studio, you can do this by right-clicking the Dependencies node of your test project and choosing Add Project Reference from the contextual menu, as shown in figure 35.5. You can then select the web project in the Reference Manager dialog box. After adding it to your project, it shows up inside the Dependencies node, under Projects.
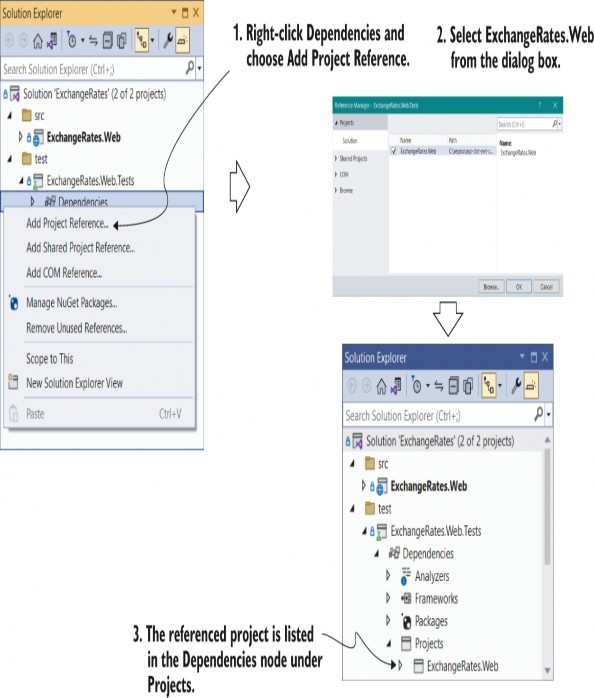
Figure 35.5 To test your app project, you need to add a reference to it from the test project. Right-click the Dependencies node, and choose Add Project Reference from the contextual menu. The app project is referenced inside the Dependencies node, under Projects.
Alternatively, you can edit the .csproj file directly and add a <ProjectReference> element inside an <ItemGroup> element with the relative path to the referenced project’s .csproj file:
<ItemGroup>
<ProjectReference
Include="..\..\src\ExchangeRates.Web\ExchangeRates.Web.csproj" />
</ItemGroup>
Note that the path is the relative path. A ".." in the path means the parent folder, so the relative path shown correctly traverses the directory structure for the solution, including both the src and test folders shown in Solution Explorer in figure 35.5.
TIP Remember that you can edit the .csproj file directly in Visual Studio by double-clicking the project in Solution Explorer.
Common conventions for project layout
The layout and naming of projects within a solution are completely up to you, but ASP.NET Core projects have generally settled on a couple of conventions that differ slightly from the Visual Studio File > New defaults. These conventions are used by the ASP.NET team on GitHub, as well as by many other open-source C# projects.
The following figure shows an example of these layout conventions. In summary, these are as follows:
The .sln solution file is in the root directory.
The main projects are placed in a src subdirectory.
The test projects are placed in a test or tests subdirectory.
Each main project has a test project equivalent, named the same as the associated main project with a .Test or .Tests suffix.
Other folders (such as samples, tools, and docs) contain sample projects, tools for building the project, or documentation.
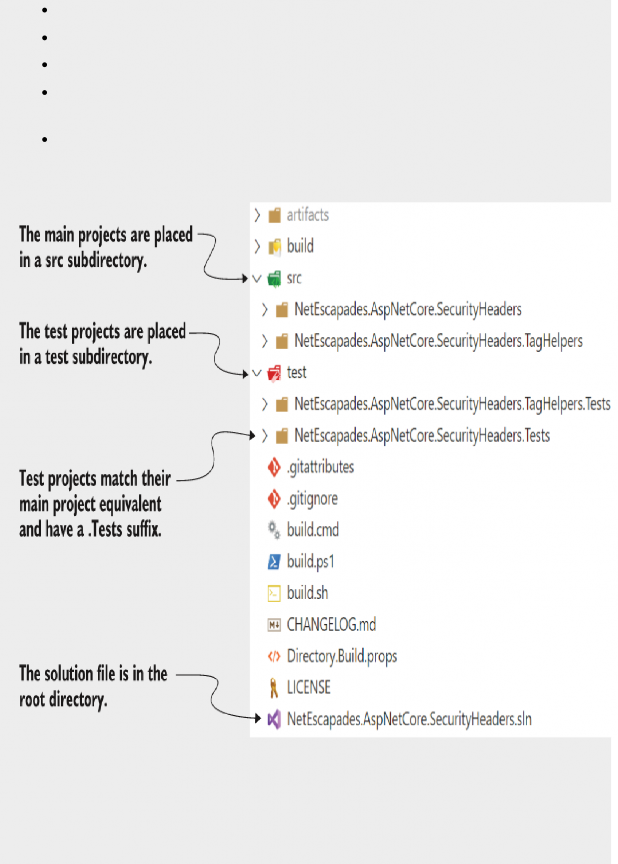
Conventions for project structures have emerged in the ASP.NET Core framework libraries and open- source projects on GitHub. You don’t have to follow them for your own project, but it’s worth being aware of them.
All these conventions are optional. Whether to follow them is entirely up to you. Either way, it’s good to be aware of them so you can easily navigate other projects on GitHub.
Your test project is now referencing your web project, so you can write tests for classes in the web project. You’re going to be testing a simple class used for converting among currencies, as shown in the following listing.
Listing 35.3 Example CurrencyConverter class to convert currencies to GBP
public class CurrencyConverter
{
public decimal ConvertToGbp( ❶
decimal value, decimal exchangeRate, int decimalPlaces) ❶
{
if (exchangeRate <= 0) ❷
{ ❷
throw new ArgumentException( ❷
"Exchange rate must be greater than zero", ❷
nameof(exchangeRate)); ❷
} ❷
var valueInGbp = value / exchangeRate; ❸
return decimal.Round(valueInGbp, decimalPlaces); ❹
}
}
❶ The ConvertToGbp method converts a value using the provided exchange rate
and rounds it.
❷ Guard clause, as only positive exchange rates are valid
❸ Converts the value
❹ Rounds the result and returns it
This class has a single method, ConvertToGbp(), that converts a value from one currency into GBP, given the provided exchangeRate. Then it rounds the value to the required number of decimal places and returns it.
WARNING This class is a basic implementation. In practice, you’d need to handle arithmetic overflow/underflow for large or negative values, as well as consider other edge cases. This example is for demonstration purposes only!
Imagine you want to convert 5.27 USD to GBP, and the exchange rate from GBP to USD is 1.31. If you want to round to four decimal places, you’d make this call:
converter.ConvertToGbp(value: 5.27, exchangeRate: 1.31, decimalPlaces: 4);You have your sample application, a class to test, and a test project, so it’s about time you wrote some tests.
35.5 Adding Fact and Theory unit tests
When I write unit tests, I usually target one of three paths through the method under test:
• The happy path—Where typical arguments with expected values are provided
• The error path—Where the arguments passed are invalid and tested for
• Edge cases—Where the provided arguments are right on the edge of expected values
I realize that this is a broad classification, but it helps me think about the various scenarios I need to consider.
TIP A completely different approach to testing is property- based testing. This fascinating approach is common in functional programming communities, like F#. You can find a great introduction by Scott Wlaschin in his blog post series “The ‘Property Based Testing’ Series” at http://mng.bz/o1eZ. That post uses F#, but it is still highly accessible even if you’re new to the language.
Let’s start with the happy path, writing a unit test that verifies that the ConvertToGbp() method is working as expected with typical input values, as shown in the following listing.
Listing 35.4 Unit test for ConvertToGbp using expected arguments
[Fact] ❶
public void ConvertToGbp_ConvertsCorrectly() ❷
{
var converter = new CurrencyConverter(); ❸
decimal value = 3; ❹
decimal rate = 1.5m; ❹
int dp = 4; ❹
decimal expected = 2; ❺
var actual = converter.ConvertToGbp(value, rate, dp); ❻
Assert.Equal(expected, actual); ❼
}
❶ The [Fact] attribute marks the method as a test method.
❷ You can call the test anything you like.
❸ The class to test, commonly called the “system under test”
❹ The parameters of the test that will be passed to ConvertToGbp
❺ The result you expect
❻ Executes the method and captures the result
❼ Verifies that the expected and actual values match; if they don’t, throws an exception
This is your first proper unit test, which has been configured using Arrange, Act, Assert (AAA) style:
• Arrange—Define all the parameters and create an instance of the system (class) under test (SUT).
• Act—Execute the method being tested, and capture the result.
• Assert—Verify that the result of the Act stage had the expected value.
Most of the code in this test is standard C#, but if you’re new to testing, the Assert call will be unfamiliar. This is a helper class provided by xUnit for making assertions about your code. If the parameters provided to Assert.Equal() aren’t equal, the Equal() call will throw an exception and fail the test. If you change the expected variable in listing 35.4 to 2.5 instead of 2, for example, and run the test, Test Explorer shows a failure, as you see in figure 35.6.
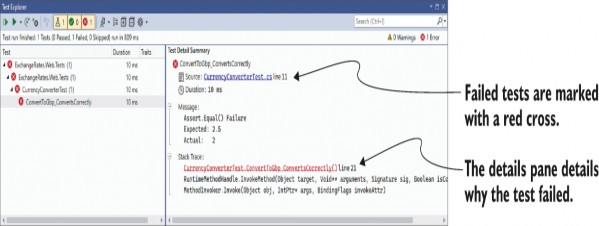
Figure 35.6 When a test fails, it’s marked with a red cross in Test Explorer. Clicking the test in the left pane shows the reason for the failure in the right pane. In this case, the expected value was 2.5, but the actual value was 2.
TIP Alternative assertion libraries such as Fluent Assertions (https://fluentassertions.com) and Shouldly (https://github.com/shouldly/shouldly) allow you to write your assertions in a more natural style, such as actual.Should().Be(expected). These libraries are optional, but I find they make tests more readable and error messages easier to understand.
In listing 35.4 you chose specific values for value, exchangeRate, and decimalPlaces to test the happy path. But this is only one set of values in an infinite number of possibilities, so you probably should test at least a few different combinations. One way to achieve this would be to copy and paste the test multiple times, tweak the parameters, and change the test method name to make it unique. xUnit provides an alternative way to achieve the same thing without requiring so much duplication.
NOTE The names of your test class and method are used throughout the test framework to describe your test. You can customize how these are displayed in Visual Studio and in the CLI by configuring an xunit.runner.json file, as described at https://xunit.net/docs/configuration-files.
Instead of creating a [Fact] test method, you can create a [Theory] test method. A theory provides a way of parameterizing your test methods, effectively taking your test method and running it multiple times with different arguments. Each set of arguments is considered a different test.
You could rewrite the [Fact] test in listing 35.4 to be a [Theory] test, as shown in the next listing. Instead of specifying the variables in the method body, pass them as parameters to the method and then decorate the method with three [InlineData] attributes. Each instance of the attribute provides the parameters for a single run of the test.
Listing 35.5 Theory test for ConvertToGbp testing multiple sets of values
[Theory] ❶
[InlineData(0, 3, 0)] ❷
[InlineData(3, 1.5, 2)] ❷
[InlineData(3.75, 2.5, 1.5)] ❷
public void ConvertToGbp_ConvertsCorrectly ( ❸
decimal value, decimal rate, decimal expected) ❸
{
var converter = new CurrencyConverter();
int dps = 4; ❹
var actual = converter.ConvertToGbp(value, rate, dps); ❺
Assert.Equal(expected, actual); ❻
}
❶ Marks the method as a parameterized test
❷ Each [InlineData] attribute provides all the parameters for a single run of the test method.
❸ The method takes parameters, which are provided by the [InlineData] attributes.
❹ The dps variable doesn’t change, so there’s no need to include it in [InlineData].
❺ Executes the SUT
❻ Verifies the result
If you run this [Theory] test using dotnet test or Visual Studio, it will show up as three separate tests, one for each set of [InlineData], as shown in figure 35.7.
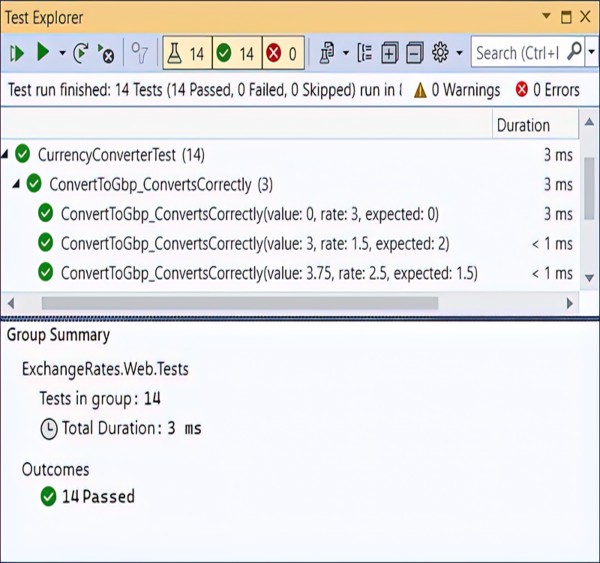
Figure 35.7 Each set of parameters in an [InlineData] attribute for a [Theory] test creates a separate test run. In this example, a single [Theory] has three [InlineData] attributes, so it creates three tests, named according to the method name and the provided parameters.
[InlineData] isn’t the only way to provide the parameters for your theory tests, but it’s one of the most commonly used. You can also use a static property on your test class with the
[MemberData] attribute or a class itself using the
[ClassData] attribute.
TIP I describe how you can use the [ClassData] and [MemberData] attributes in my blog post “Creating parameterised tests in xUnit with [InlineData], [ClassData], and [MemberData]”: http://mng.bz/8ayP.
You now have some tests for the happy path of the ConvertToGbp() method, and I even sneaked an edge case into listing 35.5 by testing the case where value = 0. The final concept I’ll cover is testing error cases, where invalid values are passed to the method under test.
35.6 Testing failure conditions
A key part of unit testing is checking whether the system under test handles edge cases and errors correctly. For the CurrencyConverter, that would mean checking how the class handles negative values, small or zero exchange rates, large values and rates, and so on.
Some of these edge cases might be rare but valid cases, whereas other cases might be technically invalid. Calling ConvertToGbp with a negative value is probably valid; the converted result should be negative too. On the other hand, a negative exchange rate doesn’t make sense conceptually, so it should be considered an invalid value.
Depending on the design of the method, it’s common to throw exceptions when invalid values are passed to a method. In listing 35.3 you saw that we throw an ArgumentException if the exchangeRate parameter is less than or equal to 0.
xUnit includes a variety of helpers on the Assert class for testing whether a method throws an exception of an expected type. You can then make further assertions on the exception, such as to test whether the exception had an expected message.
WARNING Take care not to tie your test methods too closely to the internal implementation of a method. Doing so can make your tests brittle, and trivial changes to a class may break the unit tests.
The following listing shows a [Fact] test to check the behavior of the ConvertToGbp() method when you pass it a 0 exchangeRate. The Assert.Throws method takes a lambda function that describes the action to execute, which should throw an exception when run.
Listing 35.6 Using Assert.Throws<> to test whether a method throws an exception
[Fact]
public void ThrowsExceptionIfRateIsZero()
{
var converter = new CurrencyConverter();
const decimal value = 1;
const decimal rate = 0; ❶
const int dp = 2;
var ex = Assert.Throws<ArgumentException>( ❷
() => converter.ConvertToGbp(value, rate, dp)); ❸
// Further assertions on the exception thrown, ex
}
❶ An invalid value
❷ You expect an Argument-Exception to be thrown.
❸ The method to execute, which should throw an exception
The Assert.Throws method executes the lambda and catches the exception. If the exception thrown matches the expected type, the test passes. If no exception is thrown or the exception thrown isn’t of the expected type, the Assert.Throws method throws an exception and fails the test.
That brings us to the end of this brief introduction to unit testing with xUnit. The examples in this section described how to use the new .NET Test SDK, but we didn’t cover anything specific to ASP.NET Core. In chapter 36 we’ll focus on applying these techniques to testing ASP.NET Core projects specifically.
Summary
Unit test apps are console apps that have a dependency on the .NET Test SDK, a test framework such as xUnit, MSTest, or NUnit, and a test runner adapter. You can run the tests in a test project by calling dotnet test from the command line in your test project or by using Test Explorer in Visual Studio.
Many testing frameworks are compatible with the .NET Test SDK, but xUnit has emerged as an almost de facto standard for ASP.NET Core projects. The ASP.NET Core team themselves use it to test the framework.
To create an xUnit test project, choose xUnit Test Project in Visual Studio or use the dotnet new xunit CLI command. This creates a test project containing the Microsoft.NET.Test.Sdk, xunit, and xunit.runner.visualstudio NuGet packages.
xUnit includes two attributes to identify test methods. [Fact] methods should be public and parameterless. [Theory] methods can contain parameters, so they can be used to run a similar test repeatedly with different parameters. You can provide the data for each [Theory] run using the [InlineData], [ClassData], or [MemberData] attributes.
Use assertions in your test methods to verify that the SUT returned an expected value. Assertions exist for most common scenarios, including verifying that a method call raised an exception of a specific type. If your code raises an unhandled exception, the test will fail.