34 Building background tasks and ser vices
This chapter covers
• Creating tasks that run in the background for your application
• Using the generic IHost to create Windows Services and Linux daemons
• Using Quartz.NET to run tasks on a schedule in a clustered environment
We’ve covered a lot of ground in the book so far. You’ve learned how to create page-based applications using Razor Pages and how to create APIs for mobile clients and services. You’ve seen how to add authentication and authorization to your application, use Entity Framework Core (EF Core) for storing state in the database, and create custom components to meet your requirements.
As well as using these UI-focused apps, you may find you need to build background or batch-task services. These services aren’t meant to interact with users directly. Rather, they stay running in the background, processing items from a queue or periodically executing a long-running process.
For example, you might want to have a background service that sends email confirmations for e-commerce orders or a batch job that calculates sales and losses for retail stores after the shops close. ASP.NET Core includes support for these background tasks by providing abstractions for running a task in the background when your application starts.
In section 34.1 you’ll learn about the background task support provided in ASP.NET Core by the IHostedService interface. You’ll learn how to use the BackgroundService helper class to create tasks that run on a timer and how to manage your DI lifetimes correctly in a long-running task.
In section 34.2 we’ll take the background service concept one step further to create headless worker services using the generic IHost. Worker services don’t use Razor Pages, API controllers, or minimal API endpoints; instead, they consist only of IHostedService services running tasks in the background. You’ll also see how to configure and install a worker service app as a Windows Service or as a Linux daemon.
In section 34.3 I introduce the open-source library Quartz.NET, which provides extensive scheduling capabilities for creating background services. You’ll learn how to install Quartz.NET in your applications, create complex schedules for your tasks, and add redundancy to your worker services using clustering.
Before we get to more complex scenarios, we’ll start by looking at the built-in support for running background tasks in your apps.
34.1 Running background tasks with IHostedService
In most applications, it’s common to create tasks that happen in the background rather than in response to a request. This could be a task to process a queue of emails, handling events published to some sort of a message bus or running a batch process to calculate daily profits. By moving this work to a background task, your user interface can stay responsive. Instead of trying to send an email immediately, for example, you could add the request to a queue and return a response to the user immediately. The background task can consume that queue in the background at its leisure.
In ASP.NET Core, you can use the IHostedService interface to run tasks in the background. Classes that implement this interface are started when your application starts, shortly after your application starts handling requests, and they are stopped shortly before your application is stopped. This provides the hooks you need to perform most tasks.
NOTE Even the default ASP.NET Core server, Kestrel, runs as an IHosted-Service. In one sense, almost everything in an ASP.NET Core app is a background task.
In this section you’ll see how to use the IHostedService to create a background task that runs continuously throughout the lifetime of your app. This could be used for many things, but in the next section you’ll see how to use it to populate a simple cache. You’ll also learn how to use services with a scoped lifetime in your singleton background tasks by managing container scopes yourself.
34.1.1 Running background tasks on a timer
In this section you’ll learn how to create a background task that runs periodically on a timer throughout the lifetime of your app. Running background tasks can be useful for many reasons, such as scheduling work to be performed later or performing work in advance.
In chapter 33 we used IHttpClientFactory and a typed client to call a third-party service to retrieve the current exchange rate between various currencies and returned them in an API endpoint, as shown in the following listing.
Listing 34.1 Using a typed client to return exchange rates from a third-party service
app.MapGet("/", async (ExchangeRatesClient ratesClient) => ❶
await ratesClient.GetLatestRatesAsync()); ❷
A typed client created using IHttpClientFactory is injected using dependency
injection (DI).
❷ The typed client is used to retrieve exchange rates from the remote API and
returns them.
A simple optimization for this code might be to cache the exchange rate values for a period. There are multiple ways you could implement that, but in this section we’ll use a simple cache that preemptively fetches the exchange rates in the background, as shown in figure 34.1. The API endpoint simply reads from the cache; it never has to make HTTP calls itself, so it remains fast.
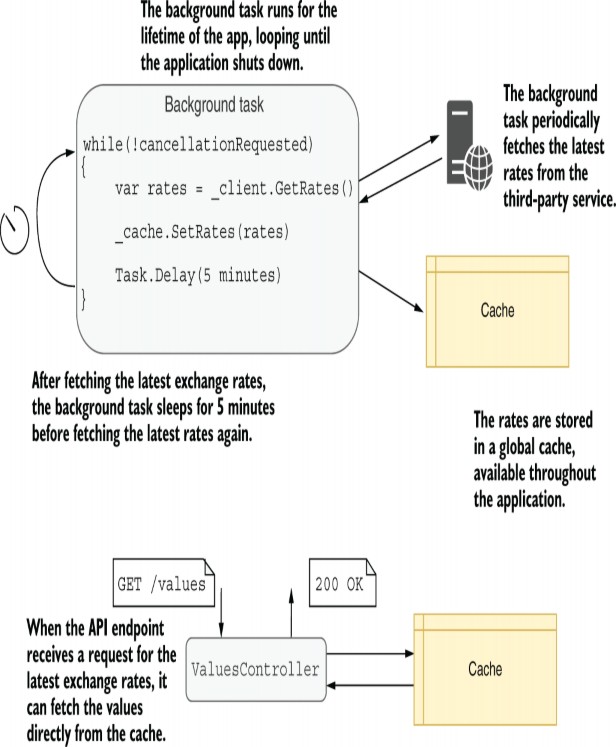
Figure 34.1 You can use a background task to cache the results from a third-party API on a schedule. The API controller can then read directly from the cache instead of calling the third-party API itself. This reduces the latency of requests to your API controller while ensuring that the data remains fresh.
NOTE An alternative approach might add caching to your strongly typed client, ExchangeRatesClient. The downside is that when you need to update the rates, you will have to perform the request immediately, making the overall response slower. Using a background service keeps your API endpoint consistently fast.
You can implement a background task using the IHostedService interface. This consists of two methods:
public interface IHostedService
{
Task StartAsync(CancellationToken cancellationToken);
Task StopAsync(CancellationToken cancellationToken);
}
There are subtleties to implementing the interface correctly. In particular, the StartAsync() method, although asynchronous, runs inline as part of your application startup. Background tasks that are expected to run for the lifetime of your application must return a Task immediately and schedule background work on a different thread.
WARNING Calling await in the IHostedService.StartAsync() method blocks your application from starting until the method completes. This can be useful in some cases, when you don’t want the application to start handling requests until the IHostedService task has completed, but that’s often not the desired behavior for background tasks.
To make it easier to create background services using best- practice patterns, ASP.NET Core provides the abstract base class BackgroundService, which implements IHostedService and is designed to be used for long- running tasks. To create a background task, you must override a single method of this class, ExecuteAsync(). You’re free to use async-await inside this method, and you can keep running the method for the lifetime of your app.
The following listing shows a background service that fetches the latest interest rates using a typed client and saves them in a cache, as you saw in figure 34.1. The ExecuteAsync() method keeps looping and updating the cache until the Cancellation-Token passed as an argument indicates that the application is shutting down.
Listing 34.2 Implementing a BackgroundService that calls a remote HTTP API
public class ExchangeRatesHostedService : BackgroundService ❶
{
private readonly IServiceProvider _provider; ❷
private readonly ExchangeRatesCache _cache; ❸
public ExchangeRatesHostedService(
IServiceProvider provider, ExchangeRatesCache cache)
{
_provider = provider;
_cache = cache;
}
protected override async Task ExecuteAsync( ❹
CancellationToken stoppingToken) ❺
{
while (!stoppingToken.IsCancellationRequested) ❻
{
var client = _provider ❼
.GetRequiredService<ExchangeRatesClient>(); ❼
string rates = await client.GetLatestRatesAsync(); ❽
_cache.SetRates(rates); ❾
await Task.Delay(TimeSpan.FromMinutes(5), stoppingToken); ❿
}
}
}
❶ Derives from BackgroundService to create a task that runs for the lifetime of
your app
❷ Injects an IServiceProvider so you can create instances of the typed client
❸ A simple cache for exchange rates
❹ You must override ExecuteAsync to set the service’s behavior.
❺ The CancellationToken passed as an argument is triggered when the
application shuts down.
❻ Keeps looping until the application shuts down
❼ Creates a new instance of the typed client so that the HttpClient is short-lived
❽ Fetches the latest rates from the remote API
❾ Stores the rates in the cache
❿ Waits for 5 minutes (or for the application to shut down) before updating the
cache
The ExchangeRateCache in listing 34.2 is a simple singleton that stores the latest rates. It must be thread-safe, as it is accessed concurrently by your API endpoint. You can see a simple implementation in the source code for this chapter.
To register your background service with the dependency injection (DI) container, use the AddHostedService() extension method in Program.cs, which registers the service using a singleton lifetime, as shown in the following listing.
Listing 34.3 Registering an IHostedService with the DI container
WebApplicationBuilder builder = WebApplication.CreateBuilder(args);
builder.Services.AddHttpClient<ExchangeRatesClient>(); ❶
builder.Services.AddSingleton<ExchangeRatesCache>(); ❷
builder.Services.AddHostedService<ExchangeRatesHostedService>(); ❸
❶ Registers the typed client as before
❷ Adds the cache object as a singleton so it is shared throughout your app
❸ Registers ExchangeRatesHostedService as an IHostedService
By using a background service to fetch the exchange rates, your API endpoint becomes even simpler. Instead of fetching the latest rates itself, it returns the value from the cache, which is kept up to date by the background service:
app.MapGet("/", (ExchangeRatesCache cache) =>
cache.GetLatestRatesAsync());
This approach to caching works to simplify the API, but you may have noticed a potential risk: if the API receives a request before the background service has successfully updated the rates, the API will fail to return any rates.
This may be OK, but you could take another approach. As well as updating the rates periodically, you could use the StartAsync method to block app startup until the rates have successfully updated. That way, you guarantee that the rates are available before the app starts handling requests, so the API will always return successfully. Listing 34.4 shows how you could update listing 34.2 to block startup until the rates have been updated while still updating periodically in the background.
Listing 34.4 Implementing StartAsync to block startup in an IHostedService
public class ExchangeRatesHostedService : BackgroundService
{
private readonly IServiceProvider _provider;
private readonly ExchangeRatesCache _cache;
public ExchangeRatesHostedService(
IServiceProvider provider, ExchangeRatesCache cache)
{
_provider = provider;
_cache = cache;
}
public override async Task StartAsync( ❶
CancellationToken cancellationToken) ❶
{
var success = false;
while(!success && !cancellationToken.IsCancellationRequested) ❷
{ ❷
success = await TryUpdateRatesAsync(); ❷
} ❷
await base.StartAsync(cancellationToken); ❸
}
protected override async Task ExecuteAsync(
CancellationToken stoppingToken)
{
while (!stoppingToken.IsCancellationRequested)
{
await Task.Delay(TimeSpan.FromMinutes(5), stoppingToken);
await TryUpdateRatesAsync();
}
}
private async Task<bool> TryUpdateRatesAsync()
{
try
{
var client = _provider
.GetRequiredService<ExchangeRatesClient>();
string rates = await client.GetLatestRatesAsync();
_cache.SetRates(rates);
return true;
}
catch(Exception ex)
{
    return false;
}
}
}
❶ The StartAsync method runs on start, before the app starts handling requests.
❷ Keeps trying to update the rates until it succeeds
❸ Once the update succeeds, starts the background process
WARNING The downside to listing 34.4 is that if there’s a problem retrieving the rates, the app won’t ever start up and start listening for requests. Whether you consider that a bug or a feature will depend on your deployment process! Many orchestrators, for example, will use rolling updates, which ensure that a new deployment is listening for requests before shutting down the old deployment instances.
One slightly messy aspect of both listings 34.2 and 34.4 is that I used the Service Locator pattern to retrieve the typed client. This isn’t ideal, but you shouldn’t inject typed clients into background services directly. Typed clients are designed to be short-lived to ensure that you take advantage of the HttpClient handler rotation, as described in chapter 21.By contrast, background services are singletons that live for the lifetime of your application.
TIP If you wish, you can avoid the Service Locator pattern in listing 34.2 by using the factory pattern described in Steve Gordon’s post titled “IHttpClientFactory Patterns: Using Typed Clients from Singleton Services”: http://mng.bz/opDZ.
The need for short-lived services leads to another common question: how can you use scoped services in a background service?
34.1.2 Using scoped services in background tasks
Background services that implement IHostedService are created once when your application starts. That means they are by necessity singletons, as there will be only a single instance of the class.
That leads to a problem if you need to use services registered with a scoped lifetime. Any services you inject into the constructor of your singleton IHostedService must themselves be registered as singletons. Does that mean there’s no way to use scoped dependencies in a background service?
NOTE As I discussed in chapter 9, the dependencies of a service must always have a lifetime that’s the same as or longer than that of the service itself, to avoid captive dependencies.
Imagine a slight variation on the caching example from section 34.1.1. Instead of storing the exchange rates in a singleton cache object, you want to save the exchange rates to a database so you can look up the historic rates.
Most database providers, including EF Core’s DbContext, register their services with scoped lifetimes. That means you need to access the scoped DbContext from inside the singleton ExchangeRatesHostedService, which precludes injecting the DbContext with constructor injection. The solution is to create a new container scope every time you update the exchange rates.
In typical ASP.NET Core applications, the framework creates a new container scope every time a new request is received, immediately before the middleware pipeline executes. All the services that are used in that request are fetched from the scoped container. When the request ends, the scoped container is disposed, along with any of the IDisposable scoped and transient services that were obtained from it. In a background service, however, there are no requests, so no container scopes are created. The solution is to create your own.
You can create a new container scope anywhere you have access to an IServiceProvider by calling IServiceProvider.CreateScope(). This creates a scoped container, which you can use to safely retrieve scoped and transient services.
WARNING Always make sure to dispose of the IServiceScope returned by CreateScope() when you’re finished with it, typically with a using statement. This disposes of any IDisposable services that were created by the scoped container and prevents memory leaks.
The following listing shows a version of the ExchangeRatesHostedService that stores the latest exchange rates as an EF Core entity in the database. It creates a new scope for each iteration of the while loop and retrieves the scoped AppDbContext from the scoped container.
Listing 34.5 Consuming scoped services from an IHostedService
public class ExchangeRatesHostedService : BackgroundService ❶
{
private readonly IServiceProvider _provider; ❷
public ExchangeRatesHostedService(IServiceProvider provider) ❷
{
_provider = provider;
}
protected override async Task ExecuteAsync(
CancellationToken stoppingToken)
{
while (!stoppingToken.IsCancellationRequested)
{
using(IServiceScope scope = _provider.CreateScope()) ❸
{
var scopedProvider = scope.ServiceProvider; ❹
var client = scope.ServiceProvider ❺
.GetRequiredService<ExchangeRatesClient>(); ❺
var context = scope.ServiceProvider ❻
.GetRequiredService<AppDbContext>(); ❻
var rates = await client.GetLatestRatesAsync(); ❻
context.Add(rates); ❻
await context.SaveChanges(rates); ❻
} ❼
await Task.Delay(TimeSpan.FromMinutes(5), stoppingToken); ❽
}
}
}
❶ Background-Service is registered as a singleton.
❷ The injected IServiceProvider can be used to retrieve singleton services or to
create scopes.
❸ Creates a new scope using the root IServiceProvider
❹ The scope exposes an IServiceProvider that can be used to retrieve scoped
components.
❺ Retrieves the scoped services from the container
❻ Fetches the latest rates, and saves using EF Core
❼ Disposes of the scope with the using statement
❽ Waits for the next iteration. A new scope is created on the next iteration.
Creating scopes like this is a general solution whenever you need to access scoped services and you’re not running in the context of a request. For example, if you need to access scoped or transient services in Program.cs, you can create a new scope by calling WebApplication.Services.CreateScope(). You can then retrieve the services you need, do your work, and dispose the scope to clean up the services.
Another prime example is when you’re injecting services into an OptionsBuilder instance, as you saw in chapter 31. You can take exactly the same approach—create a new scope—as shown in my blog post titled “The dangers and gotchas of using scoped services in OptionsBuilder”: http://mng.bz/4D6j.
TIP Using service location in this way always feels a bit convoluted. I typically try to extract the body of the task to a separate class and use service location to retrieve that class only. You can see an example of this approach in the “Consuming a scoped service in a background task” section of Microsoft’s “Background tasks with hosted services in ASP.NET Core” documentation: http://mng.bz/4ZER.
IHostedService is available in ASP.NET Core, so you can run background tasks in your Razor Pages and minimal API applications. However, sometimes all you want is the background task; you don’t need any UI. For those cases, you can use the generic IHost abstraction without having to bother with HTTP handling at all.
34.2 Creating headless worker services using IHost
In this section you’ll learn about worker services, which are ASP.NET Core applications that do not handle HTTP traffic. You’ll learn how to create a new worker service from a template and compare the generated code with a traditional ASP.NET Core application. You’ll also learn how to install the worker service as a Windows Service or as a systemd daemon in Linux.
In section 34.1 we cached exchange rates based on the assumption that they’re being consumed directly by the UI part of your application, such as by Razor Pages or minimal API endpoints. However, in the section 34.1.2 example we saved the rates to a database instead of storing them in- process. That raises the possibility that other applications with access to the database will use the rates too. Taking that one step further, could we create an application which is responsible only for caching these rates and has no UI at all?
Since .NET Core 3.0, ASP.NET Core has been built on top of a generic IHost implementation, as you learned in chapter 30. The IHost implementation provides features such as configuration, logging, and DI. ASP.NET Core adds the middleware pipeline for handling HTTP requests, as well as paradigms such as Razor Pages or Model-View-Controller (MVC) controllers on top of that, as shown in figure 34.2.
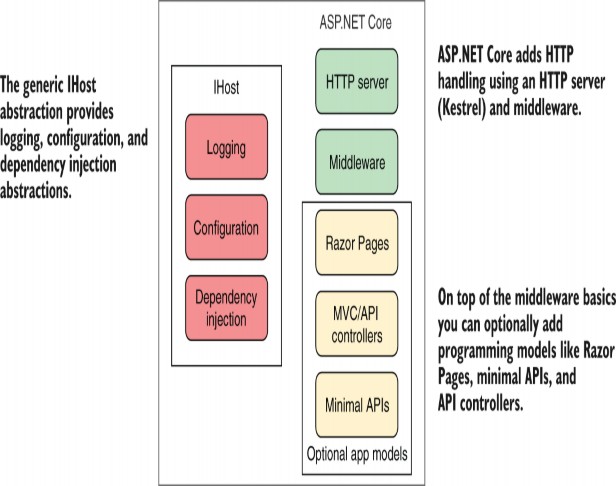
Figure 34.2 ASP.NET Core builds on the generic IHost implementation. IHost provides features such as configuration, DI, and configuration. ASP.NET Core adds HTTP handling on top of that by way of the middleware pipeline, Razor Pages, and API controllers. If you don’t need HTTP handling, you can use IHost without the additional ASP.NET Core libraries to create a smaller application.
If your application doesn’t need to handle HTTP requests, there’s no real reason to use ASP.NET Core. You can use the IHost implementation alone to create an application that has a lower memory footprint, faster startup, and less surface area to worry about from a security perspective than a full ASP.NET Core application. .NET applications that use this approach are commonly called worker services or workers.
DEFINITION A worker is a .NET application that uses the generic IHost but doesn’t include the ASP.NET Core libraries for handling HTTP requests. They are sometimes called headless services, as they don’t expose a UI for you to interact with.
Workers are commonly used for running background tasks (IHostedService implementations) that don’t require a UI. These tasks could be for running batch jobs, running tasks repeatedly on a schedule, or handling events using some sort of message bus. In the next section we’ll create a worker for retrieving the latest exchange rates from a remote API instead of adding the background task to an ASP.NET Core application.
34.2.1 Creating a worker service from a template
In this section you’ll see how to create a basic worker service from a template. Visual Studio includes a template for creating worker services: choose File > New > Project > Worker Service. You can create a similar template using the .NET command-line interface (CLI) by running dotnet new worker. The resulting template consists of two C# files:
• Worker.cs—This simple BackgroundService implementation writes to the log every second, as shown in listing 34.6. You can replace this class with your own BackgroundService implementation, such as the example from listing 34.5.
• Program.cs—As in a typical ASP.NET Core application, this contains the entry point for your application, and it’s where the IHost is built and run. By contrast with a typical .NET 7 ASP.NET Core app, it uses the generic host instead of the minimal hosting WebApplication and WebApplicationBuilder.
Listing 34.6 Default BackgroundService implementation for worker service template
public class Worker : BackgroundService ❶
{
private readonly ILogger<Worker> _logger;
public Worker(ILogger<Worker> logger)
{
_logger = logger;
}
protected override async Task ExecuteAsync( ❷
CancellationToken stoppingToken)
{
while (!stoppingToken.IsCancellationRequested) ❸
{
_logger.LogInformation(
"Worker running at: {time}", DateTimeOffset.Now);
await Task.Delay(1000, stoppingToken); ❹
}
}
}
❶ The Worker service derives from BackgroundService.
❷ ExecuteAsync starts the main execution loop for the service.
❸ When the app is shutting down, the CancellationToken is canceled.
❹ The service writes a log message every second until the app shuts down.
The most notable difference between the worker service template and an ASP.NET Core template is that Program.cs doesn’t use the WebApplicationBuilder and WebApplication APIs for minimal hosting. Instead, it uses the Host.CreateDefaultBuilder() helper method you learned about in chapter 30 to create an IHostBuilder.
NOTE .NET 8 will change the worker service template to use a new type, HostApplicationBuilder, which is analogous to WebApplicationBuilder.
HostApplicationBuilder brings the familiar script-like setup experience of minimal hosting to worker services, instead of using the callback-based approach of IHostBuilder.
You configure your DI services in Program.cs using the ConfigureServices() method on IHostBuilder, as shown in listing 34.7. This method takes a lambda method, which takes two arguments:
• A HostBuilderContext object. This context object exposes the IConfiguration for your app as the property Configuration, and the IHostEnvironment as the property HostingEnvironment.
• An ISeviceCollection object. You add your services to this collection in the same way you add them to WebApplicationBuilder.Services in typical ASP.NET Core apps.
The following listing shows how to configure EF Core, the exchange rates typed client from chapter 33, and the background service that saves exchange rates to the database, as you saw in section 34.1.2. It uses C#’s top-level statements, so no static void Main entry point is shown.
Listing 34.7 Program.cs for a worker service that saves exchange rates using EF Core
using Microsoft.EntityFrameworkCore;
IHost host = Host.CreateDefaultBuilder(args) ❶
.ConfigureServices((hostContext, services) => ❷
{
services.AddHttpClient<ExchangeRatesClient>(); ❸
services.AddHostedService<ExchangeRatesHostedService>(); ❸
var connectionString = hostContext.Configuration ❹
.GetConnectionString("SqlLiteConnection")) ❹
services.AddDbContext<AppDbContext>(options => ❺
options.UseSqlite(connectionString)); ❺
})
.Build(); ❻
host.Run();
❶ Creates an IHostBuilder using the default helper
❷ Configures your DI services
❸ Adds services to the IServiceCollection
❹ IConfiguration can be accessed from the HostBuilderContext parameter.
❺ Adds services to the IServiceCollection
❻ Builds an IHost instance
❼ Runs the app and waits for shutdown
The changes in Program.cs to use the generic host instead of minimal hosting are the most obvious differences between a worker service and an ASP.NET Core app, but there are some important differences in the .csproj project file too. The following listing shows the project file for a worker service that uses IHttpClientFactory and EF Core, and highlights some of the differences with a similar ASP.NET Core application.
Listing 34.8 Project file for a worker service
<Project Sdk="Microsoft.NET.Sdk.Worker"> ❶
<PropertyGroup>
<TargetFramework>net7.0</TargetFramework> ❷
<Nullable>enable</Nullable>
<ImplicitUsings>enable</ImplicitUsings>
<UserSecretsId>5088-4277-B226-DC0A790AB790</UserSecretsId> ❸
</PropertyGroup>
<ItemGroup>
<PackageReference Include="Microsoft.Extensions.Hosting" ❹
Version="7.0.0" /> ❹
<PackageReference Include="Microsoft.Extensions.Http" ❺
Version="7.0.0" /> ❺
<PackageReference Include="Microsoft.EntityFrameworkCore.Design" ❻
Version="7.0.0" PrivateAssets="All" /> ❻
<PackageReference Include="Microsoft.EntityFrameworkCore.Sqlite" ❻
Version="7.0.0" /> ❻
</ItemGroup>
</Project>
❶ Worker services use a different project software development kit (SDK) type
from ASP.NET Core apps.
❷ The target framework is the same as for ASP.NET Core apps.
❸ Worker services use configuration so they can use User Secrets, like ASP.NET
Core apps.
❹ All worker services must explicitly add this package. ASP.NET Core apps add it
implicitly.
❺ If you’re using IHttpClient-Factory, you’ll need to add this package in worker
services.
❻ EF Core packages must be explicitly added, the same as for ASP.NET Core apps.
Some parts of the project file are the same for both worker services and ASP.NET Core apps:
• Both types of apps must specify a <TargetFramework>, such as net7.0 for .NET 7.
• Both types of apps use the configuration system, so you can use <UserSecretsId> to manage secrets in development, as discussed in chapter 10.
• Both types of apps must explicitly add references to the EF Core NuGet packages to use EF Core in the app.
There are also several differences in the project template:
• The <Project> element’s Sdk for a worker service should be Microsoft.NET.Sdk.Worker, whereas for an ASP.NET Core app it is Microsoft.NET.Sdk.Web. The Web SDK includes implicit references to additional packages that are not generally required in worker services.
• The worker service must include an explicit PackageReference for the Microsoft.Extensions.Hosting NuGet package. This package includes the generic IHost implementation used by worker services.
• You may need to include additional packages to reference the same functionality as in an ASP.NET Core app. An example is the Microsoft.Extensions.Http package (which provides IHttpClientFactory). This package is referenced implicitly in ASP.NET Core apps but must be explicitly referenced in worker services.
Running a worker service is the same as running an ASP.NET Core application: use dotnet run from the command line or press F5 in Visual Studio. A worker service is essentially a console application (as are ASP.NET Core applications), so they both run the same way.
You can run worker services in most of the same places you would run an ASP.NET Core application, though as a worker service doesn’t handle HTTP traffic, some options make more sense than others. In the next section we’ll look at two supported ways of running your application: as a Windows Service or as a Linux systemd daemon.
34.2.2 Running worker services in production
In this section you’ll learn how to run worker services in production. You’ll learn how to install a worker service as a Windows Service so that the operating system monitors and starts your worker service automatically. You’ll also see how to prepare your application for installation as a systemd daemon in Linux.
Worker services, like ASP.NET Core applications, are fundamentally .NET console applications. The difference is that they are typically intended to be long-running applications. The common approach for running these types of applications on Windows is to use a Windows Service or to use a systemd daemon in Linux.
NOTE It’s also common to run applications in the cloud using Docker containers or dedicated platform services like Azure App Service. The process for deploying a worker service to these managed services is typically identical to deploying an ASP.NET Core application.
Adding support for Windows Services or systemd is easy, thanks to two optional NuGet packages:
• Microsoft.Extensions.Hosting.Systemd—Adds support for running the application as a systemd application. To enable systemd integration, call UseSystemd() on your IHostBuilder in Program.cs.
• Microsoft.Extensions.Hosting.WindowsServices— Adds support for running the application as a Windows Service. To enable the integration, call UseWindowsService() on your IHostBuilder in Program.cs.
These packages each add a single extension method to IHostBuilder that enables the appropriate integration when running as a systemd daemon or as a Windows Service. The following listing shows how to enable Windows Service support.
Listing 34.9 Adding Windows Service support to a worker service
IHost host = Host.CreateDefaultBuilder(args) ❶
.ConfigureServices((hostContext, services) => ❶
{ ❶
Services.AddHostedService<Worker>(); ❶
}) ❶
.UseWindowsService() ❷
.Build();
host.Run();
❶ Configures your worker service as you would normally
❷ Adds support for running as a Windows Service.
During development, or if you run your application as a console app, UseWindowsService() does nothing; your application runs exactly the same as it would without the method call. However, your application can now be installed as a Windows Service, as your app now has the required integration hooks to work with the Windows Service system. The following basic steps show how to install a worker service app as a Windows Service:
- Add the Microsoft.Extensions.Hosting.WindowsServices NuGet package to your application using Visual Studio by running dotnet add package Microsoft.Extensions.Hosting.WindowsServices in the project folder, or by adding a
<PackageReference>to your .csproj file:
<PackageReference Include="Microsoft.Extensions.Hosting.WindowsServices" Version="7.0.0" />-
Add a call to UseWindowsService() on your IHostBuilder, as shown in listing 34.9.
-
Publish your application, as described in chapter 27. From the command line you could run dotnet publish -c Release from the project folder.
-
Open a command prompt as Administrator and install the application using the Windows sc utility. You need to provide the path to your published project’s .exe file and a name to use for the service, such as My Test Service:
sc create "My Test Service" BinPath="C:\path\to\MyService.exe" -
You can manage the service from the Services control panel in Windows, as shown in figure 34.3. Alternatively, to start the service from the command line run sc start "My Test Service", or to delete the service run sc delete "My Test Service".
After you complete the preceding steps, your worker service will be running as a Windows Service.
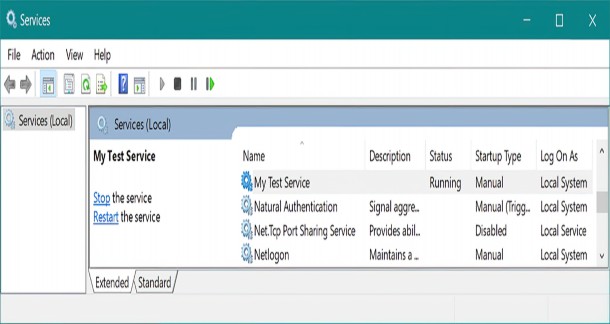
Figure 34.3 The Services control panel in Windows. After installing a worker service as a Windows Service using the sc utility, you can manage your worker service from here. This control panel allows you to control when the Windows Service starts and stops, the user account that the application runs under, and how to handle errors.
WARNING These steps are the bare minimum required to install a Windows Service. When running in production, you must consider many security aspects not covered here. For more details, see Microsoft’s “Host ASP.NET Core in a Windows Service” documentation: http://mng.bz/Xdy9.
An interesting point of note is that installing as a Windows Service or system daemon isn’t limited to worker services; you can install an ASP.NET Core application in the same way. Simply follow the preceding instructions, add the call to UseWindowsService(), and install your ASP.NET Core app. You can do this thanks to the fact that the ASP.NET Core functionality is built directly on top of the generic Host functionality.
NOTE Hosting an ASP.NET Core app as a Windows Service can be useful if you don’t want to (or can’t) use Internet Information Services (IIS). Some older versions of IIS don’t support gRPC, for example. By hosting as a Windows Service, your application can be restarted automatically if it crashes.
You can follow a similar process to install a worker service as a system daemon by installing the Microsoft.Extensions.Hosting.Systemd package and calling UseSystemd() on your IHostBuilder. For more details on configuring system, see the “Monitor the app” section of Microsoft’s “Host ASP.NET Core on Linux with Nginx” documentation: http://mng.bz/yYDp.
So far in this chapter we’ve used IHostedService and the BackgroundService to run tasks that repeat on an interval, and you’ve seen how to install worker services as long-running applications by installing as a Windows Service.
In the final section of this chapter we’ll look at how you can create more advanced schedules for your background tasks, as well as how to add resiliency to your application by running multiple instances of your workers. To achieve that, we’ll use a mature third-party library, Quartz.NET.
34.3 Coordinating background tasks using Quartz.NET
In this section you’ll learn how to use the open-source scheduler library Quartz.NET. You’ll learn how to install and configure the library and how to add a background job to run on a schedule. You’ll also learn how to enable clustering for your applications so that you can run multiple instances of your worker service and share jobs among them.
All the background tasks you’ve seen so far in this chapter repeat a task on an interval indefinitely, from the moment the application starts. However, sometimes you want more control of this timing. Maybe you always want to run the application at 15 minutes past each hour. Or maybe you want to run a task only on the second Tuesday of the month at 3 a.m. Additionally, maybe you want to run multiple instances of your application for redundancy but ensure that only one of the services runs a task at any time.
It would certainly be possible to build all this extra functionality into your app yourself, but excellent libraries already provide all this functionality for you. Two of the most well known in the .NET space are Hangfire (https://www.hangfire.io) and Quartz.NET (https://www.quartz-scheduler.net).
Hangfire is an open-source library that also has a Pro subscription option. One of its most popular features is a dashboard UI that shows the state of all your running jobs, each task’s history, and any errors that have occurred.
Quartz.NET is completely open-source and essentially offers a beefed-up version of the BackgroundService functionality. It has extensive scheduling functionality, as well as support for running in a clustered environment, where multiple instances of your application coordinate to distribute the jobs among themselves.
NOTE Quartz.NET is based on a similar Java library called Quartz Scheduler. When looking for information on Quartz.NET, be sure you’re looking at the correct Quartz!
Quartz.NET is based on four main concepts:
• Jobs—The background tasks that implement your logic.
• Triggers—Control when a job runs based on a schedule, such as “every five minutes” or “every second Tuesday.” A job can have multiple triggers.
• Job factory—Responsible for creating instances of your jobs. Quartz.NET integrates with ASP.NET Core’s DI container, so you can use DI in your job classes.
• Scheduler—Keeps track of the triggers in your application, creates jobs using the job factory, and runs your jobs. The scheduler typically runs as an IHostedService for the lifetime of your app.
Background services vs. cron jobs
It’s common to use cron jobs to run tasks on a schedule in Linux, and Windows has similar functionality with Task Scheduler, used to periodically run an application or script file, which is typically a short-lived task.
By contrast, .NET apps using background services are designed to be long- lived, even if they are used only to run tasks on a schedule. This allows your application to do things like adjust its schedule as required or perform optimizations. In addition, being long-lived means your app doesn’t only have to run tasks on a schedule. It can respond to ad hoc events, such as events in a message queue.
Of course, if you don’t need those capabilities and would rather not have a long-running application, you can use .NET in combination with cron jobs. You could create a simple .NET console app that runs your task and then shuts down, and you could schedule it to execute periodically as a cron job. The choice is yours!
In this section I show you how to install Quartz.NET and configure a background service to run on a schedule. Then I explain how to enable clustering so that you can run multiple instances of your application and distribute the jobs among them.
34.3.1 Installing Quartz.NET in an ASP.NET Core application
In this section I show how to install the Quartz.NET scheduler into an ASP.NET Core application. Quartz.NET runs in the background in the same way as the IHostedService implementations do. In fact, Quartz.NET uses the IHostedService abstractions to schedule and run jobs.
DEFINITION A job in Quartz.NET is a task to be executed that implements the IJob interface. It is where you define the logic that your tasks execute.
Quartz.NET can be installed in any .NET 7 application, so in this chapter I show how to install Quartz.NET in a worker service using the generic host rather than an ASP.NET Core app using minimal hosting. You’ll install the necessary dependencies and configure the Quartz.NET scheduler to run as a background service. In section 34.3.2 we’ll convert the exchange-rate downloader task from section 34.1 to a Quartz.NET IJob and configure triggers to run on a schedule.
NOTE The instructions in this section can be used to install Quartz.NET in either a worker service or a full ASP.NET Core application. The only difference is whether you use the generic host in Program.cs or WebApplicationBuilder.
To install Quartz.NET, follow these steps:
- Install the Quartz.AspNetCore NuGet package in your project by running dotnet add package Quartz.Extensions.Hosting, by using the NuGet explorer in Visual Studio, or by adding a
<PackageReference>element to your project file as follows:
<PackageReference Include="Quartz.Extensions.Hosting" Version="3.5.0" />- Add the Quartz.NET IHostedService scheduler by calling AddQuartzHostedService() on the IServiceCollection in ConfigureServices (or on WebApplicationBuilder.Services) as follows. Set WaitForJobsToComplete=true so that your app will wait for any jobs in progress to finish when shutting down.
services.AddQuartzHostedService(q => q.WaitForJobsToComplete = true);- Configure the required Quartz.NET services. The example in the following listing configures the Quartz.NET job factory to retrieve job implementations from the DI container and adds the required hosted service.
Listing 34.10 Configuring Quartz.NET
using Quartz;
IHost host = Host.CreateDefaultBuilder(args)
.ConfigureServices((hostContext, services) => ❶
{
services.AddQuartz(q => ❷
{
q. UseMicrosoftDependencyInjectionJobFactory(); ❸
});
services.AddQuartzHostedService( ❹
q => q.WaitForJobsToComplete = true); ❹
})
.Build();
host.Run();
❶ Adds Quartz.NET in ConfigureServices for worker services
❷ Registers Quartz.NET services with the DI container
❸ Configures Quartz.NET to load jobs from the DI container
❹ Adds the Quartz.NET IHostedService that runs the Quartz.NET scheduler
This configuration registers all Quartz.NET’s required components, so you can now run your application using dotnet run or by pressing F5 in Visual Studio. When your app starts, the Quartz.NET IHostedService starts its scheduler, as shown in figure 34.4. We haven’t configured any jobs to run yet, so the scheduler doesn’t have anything to schedule. The app will sit there, periodically checking whether any jobs have been added.
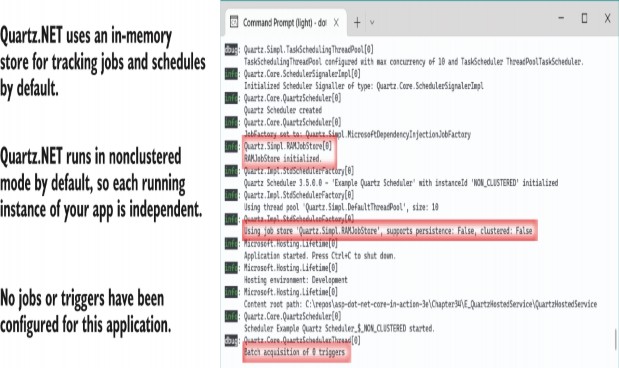
Figure 34.4 The Quartz.NET scheduler starts on app startup and logs its configuration. The default configuration stores the list of jobs and their schedules in memory and runs in a nonclustered state. In this example, you can see that no jobs or triggers have been registered, so the scheduler has nothing to schedule yet.
TIP Running your application before you’ve added any jobs is good practice. It lets you check that you have installed and configured Quartz.NET correctly before you get to more advanced configuration.
A job scheduler without any jobs to schedule isn’t a lot of use, so in the next section we’ll create a job and add a trigger for it to run on a timer.
34.3.2 Configuring a job to run on a schedule with Quartz.NET
In section 34.1 we created an IHostedService that downloads exchange rates from a remote service and saves the results to a database using EF Core. In this section you’ll see how you can create a similar Quartz.NET IJob and configure it to run on a schedule.
The following listing shows an implementation of IJob that downloads the latest exchange rates from a remote API using a typed client, ExchangeRatesClient. The results are then saved using an EF Core DbContext, AppDbContext.
Listing 34.11 A Quartz.NET IJob for downloading and saving exchange rates
public class UpdateExchangeRatesJob : IJob ❶
{
private readonly ILogger<UpdateExchangeRatesJob> _logger; ❷
private readonly ExchangeRatesClient _typedClient; ❷
private readonly AppDbContext _dbContext; ❷
public UpdateExchangeRatesJob( ❷
ILogger<UpdateExchangeRatesJob> logger, ❷
ExchangeRatesClient typedClient, ❷
AppDbContext dbContext) ❷
{ ❷
_logger = logger; ❷
_typedClient = typedClient; ❷
_dbContext = dbContext; ❷
} ❷
public async Task Execute(IJobExecutionContext context) ❸
{
    _logger.LogInformation("Fetching latest rates");
var latestRates = await _typedClient.GetLatestRatesAsync(); ❹
_dbContext.Add(latestRates); ❺
await _dbContext.SaveChangesAsync(); ❺
_logger.LogInformation("Latest rates updated");
}
}
❶ Quartz.NET jobs must implement the IJob interface.
❷ You can use standard DI to inject any dependencies.
❸ IJob requires you to implement a single asynchronous method, Execute.
❹ Downloads the rates from the remote API
❺ Saves the rates to the database
Functionally, the IJob in listing 34.11 is doing a similar task to the BackgroundService implementation in listing 34.5, with a few notable exceptions:
• The IJob defines only the task to execute; it doesn’t define timing information. In the BackgroundService implementation, we also had to control how often the task was executed.
• A new IJob instance is created every time the job is executed. By contrast, the BackgroundService implementation is created only once, and its Execute method is invoked only once.
• We can inject scoped dependencies directly into the IJob implementation. To use scoped dependencies in the IHostedService implementation, we had to create our own scope manually and use service location to load dependencies. Quartz.NET takes care of that for us, allowing us to use pure constructor injection. Every time the job is executed, a new scope is created and used to create a new instance of the IJob.
The IJob defines what to execute, but it doesn’t define when to execute it. For that, Quartz.NET uses triggers.Triggers can define arbitrarily complex blocks of time during which a job should execute. For example, you can specify start and end times, how many times to repeat, and blocks of time when a job should or shouldn’t run (such as only 9 a.m. to 5 p.m. Monday to Friday).
In the following listing, we register the UpdateExchangeRatesJob with the DI container using the AddJob
Listing 34.12 Configuring a Quartz.NET IJob and trigger
using Quartz;
IHost host = Host.CreateDefaultBuilder(args)
.ConfigureServices((hostContext, services) =>
{
services.AddQuartz(q =>
{
q. UseMicrosoftDependencyInjectionJobFactory();
var jobKey = new JobKey("Update exchange rates"); ❶
q.AddJob<UpdateExchangeRatesJob>(opts => ❷
opts.WithIdentity(jobKey)); ❷
q.AddTrigger(opts => opts ❸
.ForJob(jobKey) ❸
.WithIdentity(jobKey.Name + " trigger") ❹
.StartNow() ❺
.WithSimpleSchedule(x => x ❻
.WithInterval(TimeSpan.FromMinutes(5)) ❻
.RepeatForever())
);
});
services.AddQuartzHostedService(
q => q.WaitForJobsToComplete = true);
})
.Build();
host.Run();
❶ Creates a unique key for the job, used to associate it with a trigger
❷ Adds the IJob to the DI container and associates it with the job key
❸ Registers a trigger for the IJob via the job key
❹ Provides a unique name for the trigger for use in logging and in clustered
scenarios
❺ Fires the trigger as soon as the Quartz.NET scheduler runs on app startup
❻ Fires the trigger every 5 minutes until the app shuts down
Simple triggers like the schedule defined here are common, but you can also achieve more complex configurations using other schedules. The following configuration would set a trigger to fire every week on a Friday at 5:30 p.m.:
q.AddTrigger(opts => opts
.ForJob(jobKey)
.WithIdentity("Update exchange rates trigger")
.WithSchedule(CronScheduleBuilder
.WeeklyOnDayAndHourAndMinute(DayOfWeek.Friday, 17, 30)));
You can configure a wide array of time- and calendar-based triggers with Quartz.NET. You can also control how Quartz.NET handles missed triggers—that is, triggers that should have fired, but your app wasn’t running at the time. For a detailed description of the trigger configuration options and more examples, see the Quartz.NET documentation at https://www.quartz-scheduler.net/documentation.
TIP A common problem people run into with long-running jobs is that Quartz.NET keeps starting new instances of the job when a trigger fires, even though it’s already running. To avoid that, tell Quartz.NET to not start another instance by decorating your IJob implementation with the [DisallowConcurrentExecution] attribute.
The ability to configure advanced schedules, the simple use of DI in background tasks, and the separation of jobs from triggers are reasons enough for me to recommend Quartz.NET if you have anything more than the most basic background service needs. However, the real tipping point is when you need to scale your application for redundancy or performance reasons; that’s when Quartz.NET’s clustering capabilities make it shine.
34.3.3 Using clustering to add redundancy to your background tasks
In this section you’ll learn how to configure Quartz.NET to persist its configuration to a database. This is a necessary step in enabling clustering so that multiple instances of your application can coordinate to run your Quartz.NET jobs.
As your applications become more popular, you may need to run more instances of your app to handle the traffic they receive. If you keep your ASP.NET Core applications stateless, the process of scaling is relatively simple: the more applications you have, the more traffic you can handle, everything else being equal.
However, scaling applications that use IHostedService to run background tasks might not be as simple. For example, imagine your application includes the BackgroundService that we created in section 34.1.2, which saves exchange rates to the database every five minutes. When you’re running a single instance of your app, the task runs every five minutes as expected.
But what happens if you scale your application and run 10 instances of it? Every one of those applications will be running the BackgroundService, and they’ll all be updating every five minutes from the time each instance started!
One option would be to move the BackgroundService to a separate worker service app. You could then continue to scale your ASP.NET Core application to handle the traffic as required but deploy a single instance of the worker service. As only a single instance of the BackgroundService would be running, the exchange rates would be updated on the correct schedule again.
TIP Differing scaling requirements, as in this example, are one of the best reasons for splitting bigger apps into smaller microservices. Breaking up an app like this has a maintenance overhead, however, so think about the tradeoffs if you take this route. For more on this tradeoff, I recommend Microservices in .NET Core, 2nd ed., by Christian Horsdal Gammelgaard (Manning, 2021).
However, if you take this route, you add a hard limitation that you can have only a single instance of your worker service. If you need to run more instances of your worker service to handle additional load, you’ll be stuck.
An alternative option to enforcing a single service is using clustering, which allows you to run multiple instances of your application, with tasks distributed among the instances.Quartz.NET achieves clustering by using a database as a backing store. When a trigger indicates that a job needs to execute, the Quartz.NET schedulers in each app attempt to obtain a lock to execute the job, as shown in figure 34.5.Only a single app can be successful, ensuring that a single app handles the trigger for the IJob.
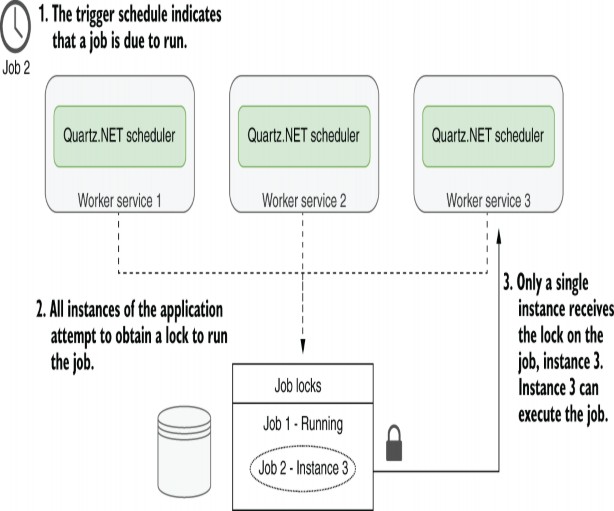
Figure 34.5 Using clustering with Quartz.NET allows horizontal scaling. Quartz.NET uses a database as a backing store, ensuring that only a single instance of the application handles a trigger at a time. This makes it possible to run multiple instances of your application to meet scalability requirements.
Quartz.NET relies on a persistent database for its clustering functionality. Quartz .NET stores descriptions of the jobs and triggers in the database, including when the trigger last fired. The locking features of the database ensure that only a single application can execute a task at a time.
TIP You can also enable persistence without enabling clustering, allowing the Quartz.NET scheduler to catch up with missed triggers.
Listing 34.13 shows how to enable persistence for Quartz.NET and how to enable clustering. This example stores data in a Microsoft SQL Server (or LocalDB) server, but Quartz.NET supports many other databases. This example uses the recommended values for enabling clustering and persistence as outlined in the documentation.
TIP The Quartz.NET documentation discusses many configuration setting controls for persistence. See the “Job Stores” documentation at http://mng.bz/PP0R. To use the recommended JSON serializer for persistence, you must also install the Quartz.Serialization.Json NuGet package.
Listing 34.13 Enabling persistence and clustering for Quartz.NET
using Quartz;
IHost host = Host.CreateDefaultBuilder(args)
.ConfigureServices((hostContext, services) => ❶
{
var connectionString = Configuration ❷
.GetConnectionString("DefaultConnection"); ❷
services.AddQuartz(q =>
{
q.SchedulerId = "AUTO"; ❸
q. UseMicrosoftDependencyInjectionJobFactory();
q.UsePersistentStore(s => ❹
{
s.UseSqlServer(connectionString); ❺
s.UseClustering(); ❻
s.UseProperties = true; ❼
s.UseJsonSerializer(); ❼
});
var jobKey = new JobKey("Update_exchange_rates");
q.AddJob<UpdateExchangeRatesJob>(opts =>
opts.WithIdentity(jobKey));
q.AddTrigger(opts => opts
.ForJob(jobKey)
.WithIdentity(jobKey.Name + " trigger")
.StartNow()
.WithSimpleSchedule(x => x
.WithInterval(TimeSpan.FromMinutes(5))
.RepeatForever())
);
});
services.AddQuartzHostedService(
q => q.WaitForJobsToComplete = true);
})
.Build();
host.Run();
❶ Configuration is identical for both ASP.NET Core apps and worker services.
❷ Obtains the connection string for your database from configuration
❸ Each instance of your app must have a unique SchedulerId. AUTO takes care of this for you.
❹ Enables database persistence for the Quartz.NET scheduler data
❺ Stores the scheduler data in a SQL Server (or LocalDb) database
❻ Enables clustering between multiple instances of your app
❼ Adds the recommended configuration for job persistence
With this configuration, Quartz.NET stores a list of jobs and triggers in the database, and uses database locking to ensure that only a single instance of your app handles a trigger and runs the associated job.
WARNING SQLite doesn’t support the database locking primitives required for clustering. You can use SQLite as a persistence store, but you won’t be able to use clustering. Quartz.NET stores data in your database, but it doesn’t attempt to create the tables it uses itself. Instead, you must add the required tables manually. Quartz.NET provides SQL scripts on GitHub for all the supported database server types, including SQL Server, SQLite, PostgreSQL, MySQL, and many more; see http://mng.bz/JDeZ.
TIP If you’re using EF Core migrations to manage your database, I suggest using them even for ad hoc scripts like these. In the code sample associated with this chapter, you can see a migration that creates the required tables using the Quartz.NET scripts.
Clustering is one of those advanced features that is necessary only as you start to scale your application, but it’s an important tool to have in your belt. It gives you the ability to safely scale your services as you add more jobs. There are some important things to bear in mind, however, so I suggest reading the warnings in the Quartz.NET documentation at http://mng.bz/aozj.
That brings us to the end of this chapter on background services. In the final chapters of this book I describe an important aspect of web development that sometimes, despite the best intentions, is left until last: testing. You’ll learn how to write simple unit tests for your classes, design for testability, and build integration tests that test your whole app.
Summary
You can use the IHostedService interface to run tasks in the background of your ASP.NET Core apps. Call AddHostedService<T>() to add an implementation T to the DI container.IHostedService is useful for implementing long- running tasks.
Typically, you should derive from BackgroundService to create an IHostedService, as this implements best practices required for long-running tasks. You must override a single method, ExecuteAsync, that is called when your app starts. You should run your tasks within this method until the provided CancellationToken indicates that the app is shutting down.
You can create DI scopes manually using IServiceProvider.CreateScope(). This is useful for accessing scoped lifetime services from within a singleton lifetime component, such as from an IHostedService implementation.
A worker service is a .NET Core application that uses the generic IHost but doesn’t include the ASP.NET Core libraries for handling HTTP requests. It generally has a smaller memory and disk footprint than an ASP.NET Core equivalent.
Worker services use the same logging, configuration, and DI systems as ASP.NET Core apps. However, they don’t use the WebApplicationBuilder minimal hosting APIs, so you must configure your app using the generic host APIs. For example, configure your DI services using IHostBuilder.ConfigureServices().
To run a worker service or ASP.NET Core app as a Windows Service, add the Microsoft.Extensions.Hosting.WindowsServices NuGet package, and call UseWindowsService() on IHostBuilder. You can install and manage your app with the Windows sc utility.
To install a Linux systemd daemon, add the Microsoft.Extensions.Hosting.Systemd NuGet package and call AddSystemd() on IHostBuilder. Both the Systemd and Windows Service integration packages do nothing when running the application as a console app, which is great for testing your app. You can even add both packages so that your app can run as a service in both Windows and Linux.
Quartz.NET runs jobs based on triggers using advanced schedules. It builds on the IHostedService implementation to add extra features and scalability. You can install Quartz by adding the Quartz.AspNetCore NuGet package and calling AddQuartz() and AddQuartzHostedService() in ConfigureServices().
You can create a Quartz.NET job by implementing the IJob interface. This requires implementing a single method, Execute. You can enable DI for the job by calling UseMicrosoftDependencyInjectionJobFac tory in AddQuartz(). This allows you to directly inject scoped (or transient) services into your job without having to create your own scopes.
You must register your job, T, with DI by calling AddJob<T>() and providing a JobKey name for the job. You can add an associated trigger by calling AddTrigger() and providing the JobKey. Triggers have a wide variety of schedules available for controlling when a job should be executed.
By default, triggers spawn new instances of a job as often as necessary. For long-running jobs scheduled with a short interval, that will result in many instances of your job running concurrently. If you want a trigger to execute a job only when an instance is not already running, decorate your job with the [DisallowConcurrentExecution] attribute.
Quartz.NET supports database persistence for storing when triggers have executed. To enable persistence, call UsePersistentStore() in your AddQuartz() configuration method, and configure a database, using UseSqlServer() for example. With persistence, Quartz.NET can persist details about jobs and triggers between application restarts.
Enabling persistence also allows you to use clustering. Clustering enables multiple apps using Quartz.NET to coordinate, so that jobs are spread across multiple schedulers. To enable clustering, first enable database persistence and then call UseClustering(). SQLite does not support clustering due to limitations of the database itself.