16 Binding and validating requests with Razor Pages
16 使用 Razor Pages 绑定和验证请求
This chapter covers
本章涵盖
• Using request values to create binding models
使用请求值创建绑定模型
• Customizing the model-binding process
自定义模型绑定过程
• Validating user input using DataAnnotations attributes
使用 DataAnnotations 属性验证用户输入
In chapter 7 we looked at the process of model binding and validation in minimal APIs. In this chapter we look at the Razor Pages equivalent: extracting values from a request using model binding and validating user input.
在第 7 章中,我们了解了最小 API 中的模型绑定和验证过程。在本章中,我们将介绍等效的 Razor Pages:使用模型绑定从请求中提取值并验证用户输入。
In the first half of this chapter, we look at using binding models to retrieve those parameters from the request so that you can use them in your Razor Pages by creating C# objects. These objects are passed to your Razor Page handlers as method parameters or are set as properties on your Razor Page PageModel.
在本章的前半部分,我们将介绍如何使用绑定模型从请求中检索这些参数,以便你可以通过创建 C# 对象在 Razor Pages 中使用它们。这些对象作为方法参数传递给 Razor Page 处理程序,或设置为 Razor Page PageModel 上的属性。
Once your code is executing in a page handler method, you can’t simply use the binding model without any further thought. Any time you’re using data provided by a user, you need to validate it! The second half of the chapter focuses on how to validate your binding models with Razor Pages.
一旦你的代码在页面处理程序方法中执行,你就不能简单地使用绑定模型而不做任何进一步的考虑。任何时候您使用用户提供的数据时,都需要对其进行验证!本章的后半部分重点介绍如何使用 Razor Pages 验证绑定模型。
We covered model binding and validation for minimal APIs in chapter 7, and conceptually, binding and validation are the same for Razor Pages. However, the details and mechanics of both binding and validation are quite different for Razor Pages.
我们在第 7 章中介绍了最小 API 的模型绑定和验证,从概念上讲,Razor Pages 的绑定和验证是相同的。但是,Razor Pages 的绑定和验证的详细信息和机制完全不同。
The binding models populated by the Razor Pages infrastructure are passed to page handlers when they execute. Once the page handler has run, you’re all set up to use the output models in ASP.NET Core’s implementation of Model-View-Controller (MVC): the view models and API models. These are used to generate a response to the user’s request. We’ll cover them in chapters 19 and 20.
Razor Pages 基础结构填充的绑定模型在执行时传递给页面处理程序。页面处理程序运行后,您就可以使用 ASP.NET Core 的模型-视图-控制器 (MVC) 实现中的输出模型:视图模型和 API 模型。这些用于生成对用户请求的响应。我们将在第 19 章和第 20 章中介绍它们。
Before we go any further, let’s recap the MVC design pattern and how binding models fit into ASP.NET Core.
在进一步讨论之前,让我们回顾一下 MVC 设计模式以及绑定模型如何适应 ASP.NET Core。
16.1 Understanding the models in Razor Pages and MVC
16.1 了解 Razor Pages 和 MVC 中的模型
In this section I describe how binding models fit into the MVC design pattern we covered in chapter 13. I describe the difference between binding models and the other “model” concepts in the MVC pattern and how they’re each used in ASP.NET Core.
在本节中,我将介绍绑定模型如何适应我们在第 13 章中介绍的 MVC 设计模式。我将介绍绑定模型与 MVC 模式中的其他“模型”概念之间的区别,以及它们在 ASP.NET Core 中的使用方式。
MVC is all about the separation of concerns. The premise is that isolating each aspect of your application to focus on a single responsibility reduces the interdependencies in your system. This separation makes it easier to make changes without affecting other parts of your application.
MVC 就是关注点分离。前提是,将应用程序的每个方面隔离起来,专注于单一职责,可以减少系统中的相互依赖关系。这种分离可以更轻松地进行更改,而不会影响应用程序的其他部分。
The classic MVC design pattern has three independent components:
经典 MVC 设计模式具有三个独立的组件:
• Model—The data to display and the methods for updating this data
模型 - 要显示的数据和更新此数据的方法
• View—Displays a representation of data that makes up the model
视图 - 显示构成模型的数据的表示形式
• Controller—Calls methods on the model and selects a view
控制器 - 调用模型的方法并选择视图
In this representation, there’s only one model, the application model, which represents all the business logic for the application as well as how to update and modify its internal state. ASP.NET Core has multiple models, which takes the single-responsibility principle (SRP) one step further than some views of MVC.
在这种表示形式中,只有一个模型,即应用程序模型,它表示应用程序的所有业务逻辑以及如何更新和修改其内部状态。ASP.NET Core 具有多个模型,这使得单一责任原则 (SRP) 比 MVC 的某些视图更进一步。
In chapter 13 we looked at an example of a to-do list application that can show all the to-do items for a given category and username. With this application, you make a request to a URL that’s routed using todo/listcategory/{category}/{username}. This returns a response showing all the relevant to-do items, as shown in figure 16.1.
在第 13 章中,我们看了一个待办事项列表应用程序的示例,它可以显示给定类别和用户名的所有待办事项。使用此应用程序,您可以向使用 todo/listcategory/{category}/{username} 路由的 URL 发出请求。这将返回一个响应,其中显示了所有相关的待办事项,如图 16.1 所示。

Figure 16.1 A basic to-do list application that displays to-do list items. A user can filter the list of items by changing the category and username parameters in the URL.
图 16.1 显示待办事项列表项的基本待办事项列表应用程序。用户可以通过更改 URL 中的 category 和 username 参数来筛选项目列表。
The application uses the same MVC constructs you’ve already seen, such as routing to a Razor Page handler, as well as various models. Figure 16.2 shows how a request to this application maps to the MVC design pattern and how it generates the final response, including additional details around the model binding and validation of the request.
该应用程序使用您已经看到的相同 MVC 构造,例如路由到 Razor Page 处理程序以及各种模型。图 16.2 显示了对此应用程序的请求如何映射到 MVC 设计模式,以及它如何生成最终响应,包括有关请求的模型绑定和验证的其他详细信息。
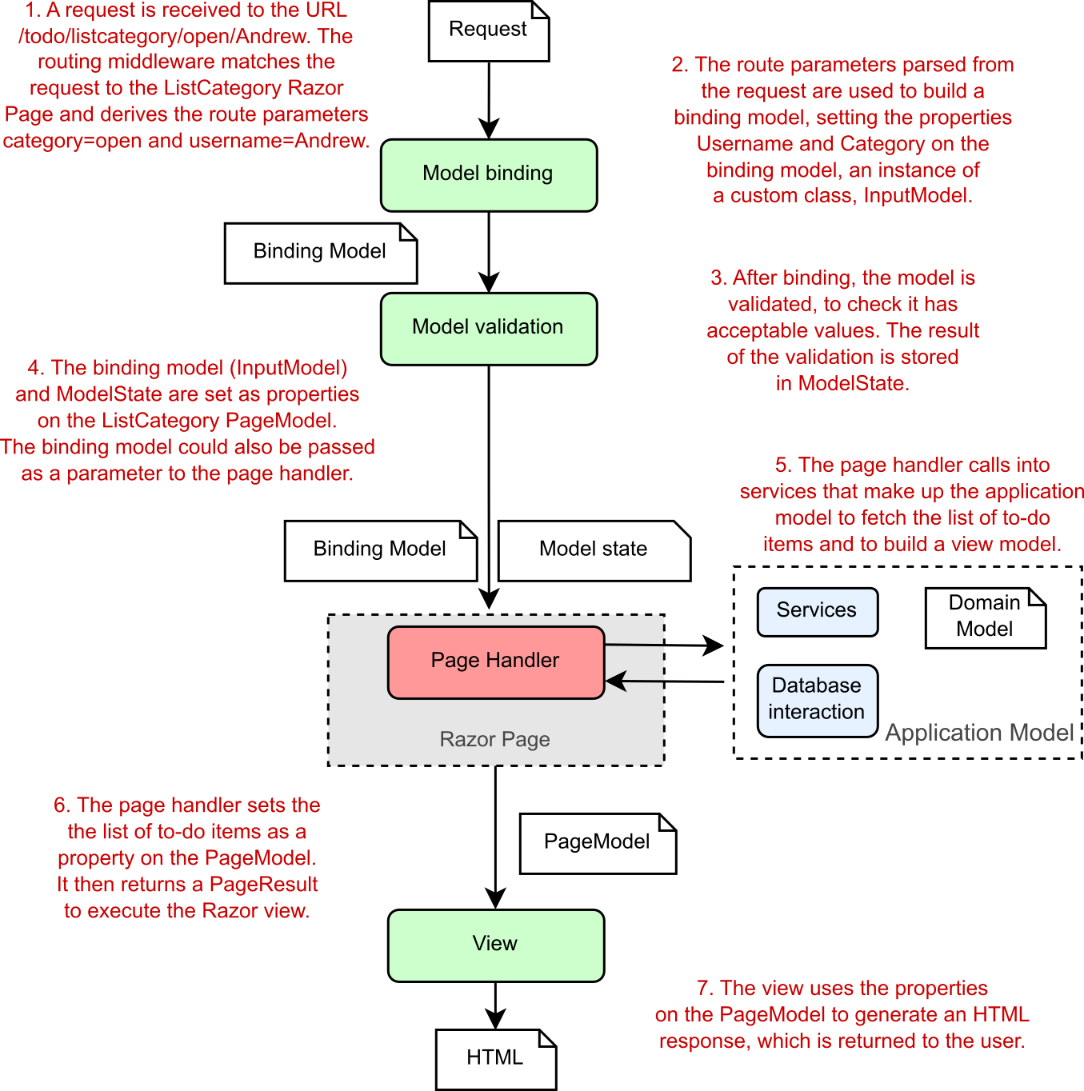
Figure 16.2 The MVC pattern in ASP.NET Core handling a request to view a subset of items in a to-do list Razor Pages application
图 16.2 ASP.NET Core 中的 MVC 模式处理查看待办事项列表 Razor Pages 应用程序中项子集的请求
ASP.NET Core Razor Pages uses several models, most of which are plain old CLR objects (POCOs), and the application model, which is more of a concept around a collection of services. Each of the models in ASP.NET Core is responsible for handling a different aspect of the overall request:
ASP.NET Core Razor Pages 使用多个模型,其中大多数是普通的旧 CLR 对象 (POCO),以及应用程序模型,后者更像是围绕服务集合的概念。ASP.NET Core 中的每个模型都负责处理整个请求的不同方面:
• Binding model—The binding model is all the information that’s provided by the user when making a request, as well as additional contextual data. This includes things like route parameters parsed from the URL, the query string, and form or JavaScript Object Notation (JSON) data in the request body. The binding model itself is one or more POCO objects that you define. Binding models in Razor Pages are typically defined by creating a public property on the page’s PageModel and decorating it with the [BindProperty] attribute. They can also be passed to a page handler as parameters.
For this example, the binding model would include the name of the category, open, and the username, Andrew. The Razor Pages infrastructure inspects the binding model before the page handler executes to check whether the provided values are valid, though the page handler executes even if they’re not, as you’ll see when we discuss validation in section 16.3.
绑定模型 - 绑定模型是用户在发出请求时提供的所有信息,以及其他上下文数据。这包括从 URL 解析的路由参数、查询字符串以及请求正文中的表单或 JavaScript 对象表示法 (JSON) 数据等内容。绑定模型本身是您定义的一个或多个 POCO 对象。Razor Pages 中的绑定模型通常是通过在页面的 PageModel 上创建公共属性并使用 [BindProperty] 属性对其进行修饰来定义的。它们也可以作为参数传递给页面处理程序。
在此示例中,绑定模型将包括 category 的名称 open 和用户名 Andrew。Razor Pages 基础结构在执行页面处理程序之前检查绑定模型,以检查提供的值是否有效,但页面处理程序即使无效也会执行,正如我们在第 16.3 节中讨论验证时所看到的那样
• Application model—The application model isn’t really an ASP.NET Core model at all. It’s typically a whole group of different services and classes and is more of a concept—anything needed to perform some sort of business action in your application. It may include the domain model (which represents the thing your app is trying to describe) and database models (which represent the data stored in a database), as well as any other, additional services.
In the to-do list application, the application model would contain the complete list of to-do items, probably stored in a database, and would know how to find only those to-do items in the open category assigned to Andrew.
应用程序模型 - 应用程序模型根本不是真正的 ASP.NET Core 模型。它通常是一整套不同的服务和类,更像是一个概念 — 在应用程序中执行某种业务作所需的任何内容。它可能包括域模型(表示您的应用程序尝试描述的事物)和数据库模型(表示存储在数据库中的数据),以及任何其他附加服务。
在待办事项列表应用程序中,应用程序模型将包含待办事项的完整列表,这些项目可能存储在数据库中,并且知道如何在分配给 Andrew 的打开类别中仅查找那些待办事项。
• Page model—The PageModel of a Razor Page serves two main functions: it acts as the controller for the application by exposing page handler methods, and it acts as the view model for a Razor view. All the data required for the view to generate a response is exposed on the PageModel, such as the list of to-dos in the open category assigned to Andrew.
页面模型 - Razor 页面的 PageModel 有两个主要功能:它通过公开页面处理程序方法充当应用程序的控制器,以及充当 Razor 视图的视图模型。视图生成响应所需的所有数据都在 PageModel 上公开,例如分配给 Andrew 的打开类别中的待办事项列表。
The PageModel base class that you derive your Razor Pages from contains various helper properties and methods. One of these, the ModelState property, contains the result of the model validation as a series of key-value pairs. You’ll learn more about validation and the ModelState property in section 16.3.
从中派生 Razor Pages 的 PageModel 基类包含各种帮助程序属性和方法。其中一个属性 ModelState 包含模型验证的结果,作为一系列键值对。您将在第 16.3 节中了解有关验证和 ModelState 属性的更多信息。
These models make up the bulk of any Razor Pages application, handling the input, business logic, and output of each page handler. Imagine you have an e-commerce application that allows users to search for clothes by sending requests to the /search/{query} URL, where {query} holds their search term:
这些模型构成了任何 Razor Pages 应用程序的大部分,处理每个页面处理程序的输入、业务逻辑和输出。假设您有一个电子商务应用程序,它允许用户通过向 /search/{query} URL 发送请求来搜索衣服,其中 {query} 保存他们的搜索词:
• Binding model—This would take the {query} route parameter from the URL and any values posted in the request body (maybe a sort order, or the number of items to show), and bind them to a C# class, which typically acts as a throwaway data transport class. This would be set as a property on the PageModel when the page handler is invoked.
绑定模型 - 这将从 URL 和请求正文中发布的任何值 (可能是排序顺序或要显示的项目数) 中获取 {query} 路由参数,并将它们绑定到 C# 类,该类通常充当一次性数据传输类。调用页面处理程序时,这将设置为 PageModel 上的属性。
• Application model—This is the services and classes that perform the logic. When invoked by the page handler, this model would load all the clothes that match the query, applying the necessary sorting and filters, and return the results to the controller.
应用程序模型 - 这是执行逻辑的服务和类。当页面处理程序调用时,此模型将加载与查询匹配的所有衣服,应用必要的排序和过滤器,并将结果返回给控制器。
• Page model—The values provided by the application model would be set as properties on the Razor Page’s PageModel, along with other metadata, such as the total number of items available or whether the user can currently check out. The Razor view would use this data to render the Razor view to HTML.
页面模型 - 应用程序模型提供的值将与其他元数据 (例如可用项的总数或用户当前是否可以签出) 一起设置为 Razor 页面的 PageModel 上的属性。Razor 视图将使用此数据将 Razor 视图呈现为 HTML。
The important point about all these models is that their responsibilities are well defined and distinct. Keeping them separate and avoiding reuse helps ensure that your application stays agile and easy to update.
所有这些模型的重要一点是,它们的责任是明确和不同的。将它们分开并避免重复使用有助于确保您的应用程序保持敏捷且易于更新。
The obvious exception to this separation is the PageModel, as it is where the binding models and page handlers are defined, and it also holds the data required for rendering the view. Some people may consider the apparent lack of separation to be sacrilege, but it’s not generally a problem. The lines of demarcation are pretty apparent. So long as you don’t try to, for example, invoke a page handler from inside a Razor view, you shouldn’t run into any problems!
这种分离的明显例外是 PageModel,因为它是定义绑定模型和页面处理程序的地方,并且它还保存呈现视图所需的数据。有些人可能认为明显缺乏分离是亵渎神明,但这通常不是问题。分界线非常明显。例如,只要您不尝试从 Razor 视图内部调用页面处理程序,就不会遇到任何问题!
Now that you’ve been properly introduced to the various models in ASP.NET Core, it’s time to focus on how to use them. This chapter looks at the binding models that are built from incoming requests—how are they created, and where do the values come from?
现在,您已经正确介绍了 ASP.NET Core 中的各种模型,是时候专注于如何使用它们了。本章介绍从传入请求构建的绑定模型 — 它们是如何创建的,这些值来自何处?
16.2 From request to model: Making the request useful
16.2 从请求到模型:使请求有用
In this section you will learn
在本节中,您将学习
• How ASP.NET Core creates binding models from a request
ASP.NET Core 如何从请求创建绑定模型
• How to bind simple types, like int and string, as well as complex classes
如何绑定简单类型(如 int 和 string)以及复杂类
• How to choose which parts of a request are used in the binding model
如何选择在绑定模型中使用请求的哪些部分
By now, you should be familiar with how ASP.NET Core handles a request by executing a page handler on a Razor Page. Page handlers are normal C# methods, so the ASP.NET Core framework needs to be able to call them in the usual way. The process of extracting values from the request and creating C# objects from them is called model binding.
到目前为止,你应该熟悉 ASP.NET Core 如何通过在 Razor 页面上执行页面处理程序来处理请求。页面处理程序是普通的 C# 方法,因此 ASP.NET Core 框架需要能够以常规方式调用它们。从请求中提取值并从中创建 C# 对象的过程称为模型绑定。
Any publicly settable properties on your Razor Page’s PageModel (in the .cshtml.cs file for your Razor Page), that are decorated with the [BindProperty] attribute are created from the incoming request using model binding, as shown in listing 16.1. Similarly, if your page handler method has any parameters, these are also created using model binding.
Razor 页面的 PageModel(在 Razor 页面的 .cshtml.cs 文件中)上用 [BindProperty] 属性修饰的任何可公开设置的属性都是使用模型绑定从传入请求创建的,如清单 16.1 所示。同样,如果您的页面处理程序方法具有任何参数,则这些参数也是使用模型绑定创建的。
Warning Properties decorated with [BindProperty] must have a public setter; otherwise, binding will silently fail.
警告:使用 [BindProperty] 修饰的属性必须具有公共 setter;否则,绑定将失败。
Listing 16.1 Model binding requests to properties in a Razor Page
列表 16.1 将请求绑定到 Razor 页面中的属性
public class IndexModel: PageModel
{
[BindProperty] ❶
public string Category { get; set; } ❶
[BindProperty(SupportsGet = true)] ❷
public string Username { get; set; } ❷
public void OnGet()
{
}
public void OnPost(ProductModel model) ❸
{
}
}
❶ Properties decorated with [BindProperty] take part in model binding.
用 [BindProperty] 修饰的属性参与模型绑定。
❷ Properties are not model-bound for GET requests unless you use SupportsGet.
除非使用 SupportsGet,否则 GET 请求的属性不受模型绑定。
❸ Parameters to page handlers are also model-bound when that handler is selected.
选择该处理程序时,页面处理程序的参数也是模型绑定的。
As described in chapter 15 and shown in the preceding listing, PageModel properties are not model-bound for GET requests, even if you add the [BindProperty] attribute. For security reasons, only requests using verbs like POST and PUT are bound. If you do want to bind GET requests, you can set the SupportsGet property on the [BindProperty] attribute to opt in to model binding.
如第 15 章中所述,如前面的清单所示,PageModel 属性不是 GET 请求的模型绑定的,即使你添加了 [BindProperty] 属性也是如此。出于安全原因,仅绑定使用 POST 和 PUT 等动词的请求。如果您确实想要绑定 GET 请求,则可以在 [BindProperty] 属性上设置 SupportsGet 属性,以选择加入模型绑定。
Which part is the binding model?
哪个部分是绑定模型?
Listing 16.1 shows a Razor Page that uses multiple binding models: the Category property, the Username property, and the ProductModel property (in the OnPost handler) are all model-bound.
清单 16.1 显示了一个使用多个绑定模型的 Razor Page:Category 属性、Username 属性和 ProductModel 属性(在 OnPost 处理程序中)都是模型绑定的。
Using multiple models in this way is fine, but I prefer to use an approach that keeps all the model binding in a single, nested class, which I often call InputModel. With this approach, the Razor Page in listing 16.1 could be written as follows:
以这种方式使用多个模型很好,但我更喜欢使用一种方法,将所有模型绑定保存在一个嵌套类中,我通常将其称为 InputModel。使用这种方法,清单 16.1 中的 Razor Page 可以编写如下:
public class IndexModel: PageModel
{
    [BindProperty]
    public InputModel Input { get; set; }
    public void OnGet()
    {
    }

    public class InputModel
    {
        public string Category { get; set; }
        public string Username { get; set; }
        public ProductModel Model { get; set; }
    }
}
This approach has some organizational benefits that you’ll learn more about in section 16.4.
这种方法具有一些组织优势,您将在 Section 16.4 中了解更多信息。
ASP.NET Core automatically populates your binding models for you using properties of the request, such as the request URL, any headers sent in the HTTP request, any data explicitly POSTed in the request body, and so on.
ASP.NET Core 使用请求的属性(例如请求 URL、HTTP 请求中发送的任何标头、请求正文中显式 POST 的任何数据等)自动填充您的绑定模型。
NOTE In this chapter I describe how to bind your models to an incoming request, but I don’t show how Razor Pages uses your binding models to help generate that request using HTML forms. In chapter 17 you’ll learn about Razor syntax, which renders HTML, and in chapter 18 you’ll learn about Razor Tag Helpers, which generate form fields based on your binding model.
注意:在本章中,我将介绍如何将模型绑定到传入请求,但不会展示 Razor Pages 如何使用绑定模型来帮助使用 HTML 表单生成该请求。在第 17 章中,您将了解呈现 HTML 的 Razor 语法,在第 18 章中,您将了解基于绑定模型生成表单字段的 Razor 标记帮助程序。
By default, ASP.NET Core uses three different binding sources when creating your binding models in Razor Pages. It looks through each of these in order and takes the first value it finds (if any) that matches the name of the binding model:
默认情况下,ASP.NET Core 在 Razor Pages 中创建绑定模型时使用三种不同的绑定源。它按顺序查看每个值,并获取找到的与绑定模型名称匹配的第一个值(如果有):
• Form values—Sent in the body of an HTTP request when a form is sent to the server using a POST
表单值 - 使用 POST将表单发送到服务器时,在 HTTP 请求的正文中发送
• Route values—Obtained from URL segments or through default values after matching a route, as you saw in chapter 14
路由值 - 从 URL 段获取,或在匹配路由后通过默认值获取,如第 14 章所示
• Query string values—Passed at the end of the URL, not used during routing
查询字符串值 - 在 URL 末尾传递,在路由期间不使用
Warning Even though conceptually similar, the Razor Page binding process works quite differently from the approach used by minimal APIs.
警告:尽管在概念上相似,但 Razor 页面绑定过程的工作方式与最小 API 使用的方法完全不同。
The model binding process for Razor Pages is shown in figure 16.3. The model binder checks each binding source to see whether it contains a value that could be set on the model. Alternatively, the model can choose the specific source the value should come from, as you’ll see in section 16.2.3. Once each property is bound, the model is validated and is set as a property on the PageModel or passed as a parameter to the page handler. You’ll learn about the validation process in the second half of this chapter.
Razor Pages 的模型绑定过程如图 16.3 所示。模型绑定器检查每个绑定源,以查看它是否包含可在模型上设置的值。或者,模型可以选择值应来自的特定来源,如第 16.2.3 节所示。绑定每个属性后,将验证模型并将其设置为 PageModel 上的属性或作为参数传递给页面处理程序。您将在本章的后半部分了解验证过程。
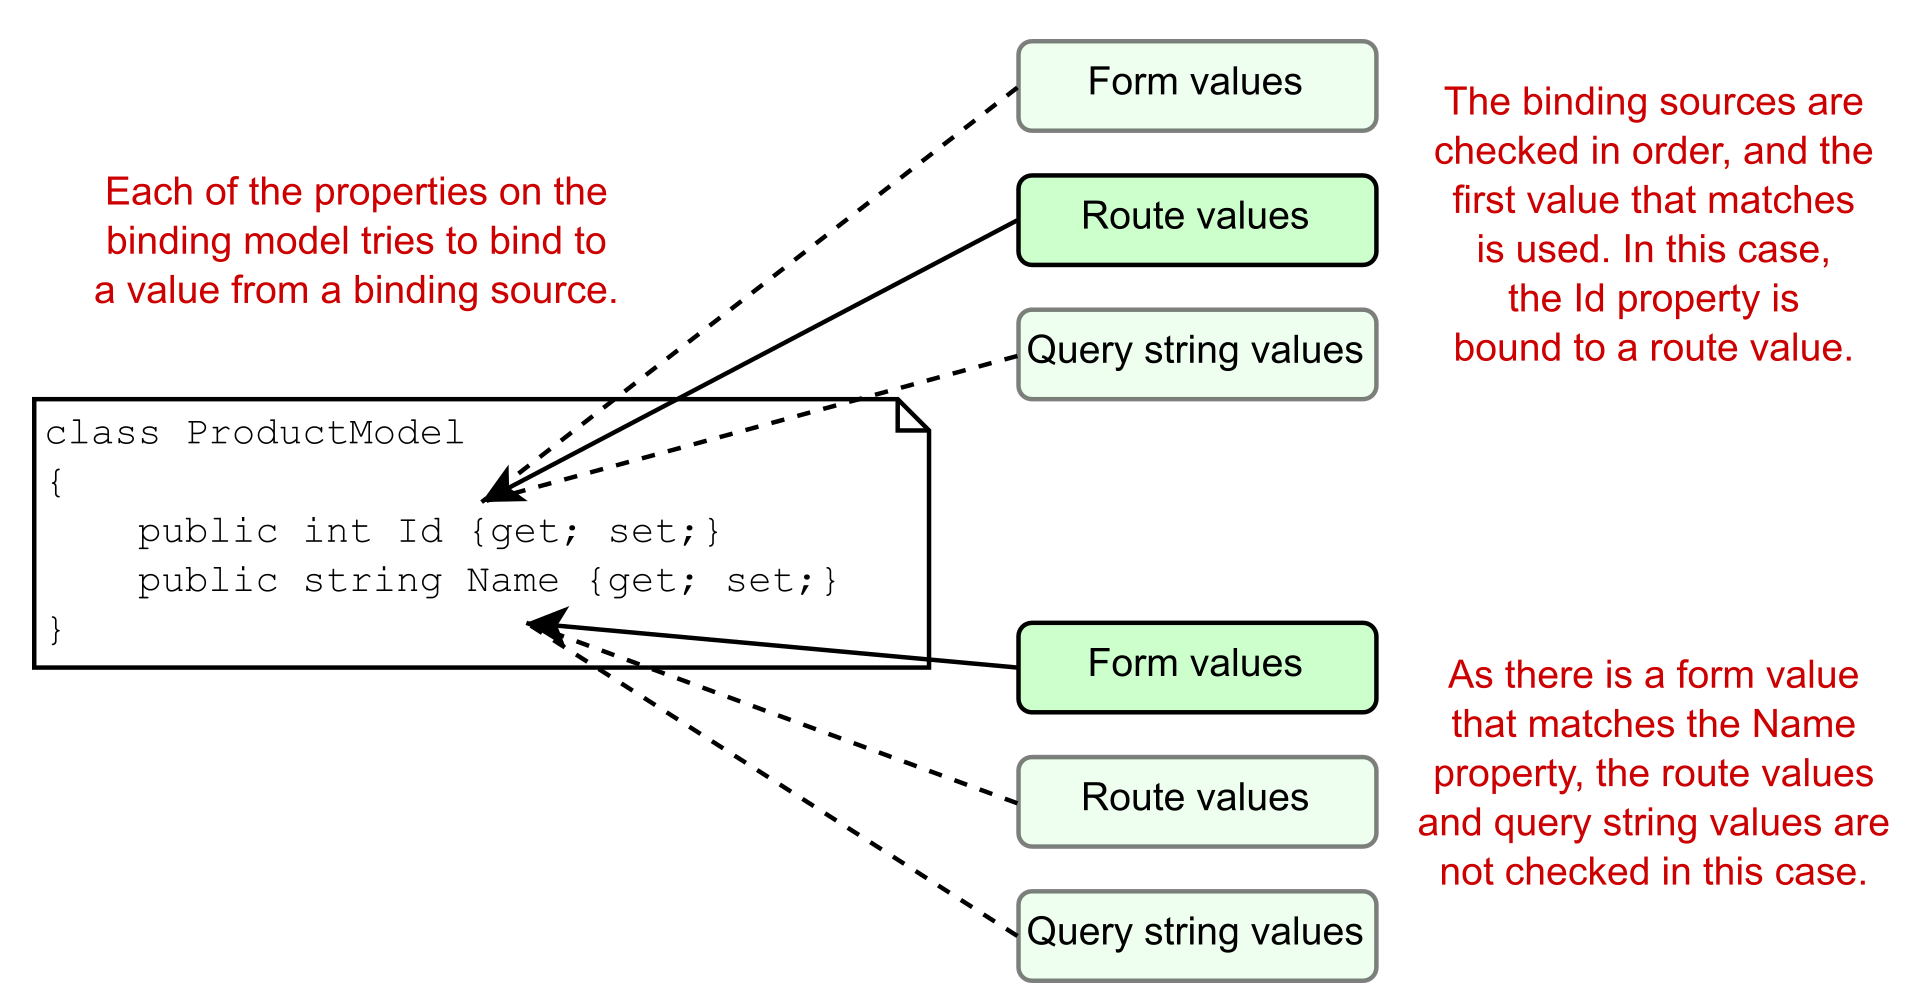
Figure 16.3 Model binding involves mapping values from binding sources, which correspond to different parts of a request.
图 16.3 模型绑定涉及映射来自绑定源的值,这些值对应于请求的不同部分。
NOTE In Razor Pages, different properties of a complex model can be model-bound to different sources. This differs from minimal APIs, where the whole object would be bound from a single source, and “partial” binding is not possible. Razor Pages also bind to form bodies by default, while minimal APIs cannot. These differences are partly for historical reasons and partly because minimal APIs opts for performance over convenience in this respect.
注意:在 Razor Pages 中,复杂模型的不同属性可以通过模型绑定到不同的源。这与最小 API 不同,在最小 API 中,整个对象将从单个源绑定,并且不可能进行“部分”绑定。默认情况下,Razor Pages 还会绑定到表单正文,而最小的 API 则不能。这些差异部分是由于历史原因,部分是因为在这方面,最小的 API 选择了性能而不是便利性。
PageModel properties or page handler parameters?
PageModel 属性还是页面处理程序参数?
There are three ways to use model binding in Razor Pages:
有三种方法可以在 Razor Pages 中使用模型绑定:
• Decorate properties on your PageModel with the [BindProperty] attribute.
使用 [BindProperty] 属性修饰 PageModel 上的属性。
• Add parameters to your page handler method.
将参数添加到页面处理程序方法。
• Decorate the whole PageModel with [BindProperties].
使用 [BindProperties] 装饰整个 PageModel。
Which of these approaches should you choose?
您应该选择哪种方法?This answer to this question is largely a matter of taste. Setting properties on the PageModel and marking them with [BindProperty] is the approach you’ll see most often in examples. If you use this approach, you’ll be able to access the binding model when the view is rendered, as you’ll see in chapters 17 and 18.
这个问题的答案在很大程度上是一个品味问题。在 PageModel 上设置属性并使用 [BindProperty] 标记它们是示例中最常见的方法。如果使用这种方法,您将能够在呈现视图时访问绑定模型,如第 17 章和第 18 章所示。The second approach, adding parameters to page handler methods, provides more separation between the different MVC stages, because you won’t be able to access the parameters outside the page handler. On the downside, if you do need to display those values in the Razor view, you’ll have to copy the parameters across manually to properties that can be accessed in the view.
第二种方法(向页面处理程序方法添加参数)在不同的 MVC 阶段之间提供了更多的分离,因为您将无法在页面处理程序之外访问参数。缺点是,如果您确实需要在 Razor 视图中显示这些值,则必须手动将参数复制到可在视图中访问的属性。I avoid the final approach, decorating the PageModel itself with [BindProperties]. With this approach, every property on your PageModel takes part in model binding. I don’t like the indirection this gives and the risk of accidentally binding properties I didn’t want to be model-bound.
我避免使用最后一种方法,即使用 [BindProperties] 修饰 PageModel 本身。使用这种方法,PageModel 上的每个属性都参与模型绑定。我不喜欢这提供的间接性,以及意外绑定我不想被模型绑定的属性的风险。The approach I choose tends to depend on the specific Razor Page I’m building. If I’m creating a form, I will favor the [BindProperty] approach, as I typically need access to the request values inside the Razor view. For simple pages, where the binding model is a product ID, for example, I tend to favor the page handler parameter approach for its simplicity, especially if the handler is for a GET request. I give some more specific advice on my approach in section 16.4.
我选择的方法往往取决于我正在构建的特定 Razor 页面。如果我要创建表单,我将倾向于使用 [BindProperty] 方法,因为我通常需要访问 Razor 视图中的请求值。例如,对于绑定模型是产品 ID 的简单页面,我倾向于使用页面处理程序参数方法,因为它简单,尤其是在处理程序用于 GET 请求时。我在 16.4 节中对我的方法给出了一些更具体的建议。
Figure 16.4 shows an example of a request creating the ProductModel method argument using model binding for the example shown at the start of this section:
图 16.4 显示了使用模型绑定创建 ProductModel 方法参数的请求示例,该示例位于本节开头所示:
public void OnPost(ProductModel product)
Figure 16.4 Using model binding to create an instance of a model that’s used to execute a Razor Page
图 16.4 使用模型绑定创建用于执行 Razor 页面的模型实例
The Id property has been bound from a URL route parameter, but the Name and SellPrice properties have been bound from the request body. The big advantage of using model binding is that you don’t have to write the code to parse requests and map the data yourself. This sort of code is typically repetitive and error-prone, so using the built-in conventional approach lets you focus on the important aspects of your application: the business requirements.
Id 属性已从 URL 路由参数绑定,但 Name 和 SellPrice 属性已从请求正文绑定。使用模型绑定的一大优点是,您不必自己编写代码来解析请求和映射数据。此类代码通常是重复的且容易出错,因此使用内置的常规方法可以让您专注于应用程序的重要方面:业务需求。
Tip Model binding is great for reducing repetitive code. Take advantage of it whenever possible, and you’ll rarely find yourself having to access the Request object directly.
提示:模型绑定非常适合减少重复代码。尽可能利用它,您很少会发现自己必须直接访问 Request 对象。
If you need to, the capabilities are there to let you completely customize the way model binding works, but it’s relatively rare that you’ll find yourself needing to dig too deep into this. For the majority of cases, it works as is, as you’ll see in the remainder of this section.
如果需要,这些功能可以让您完全自定义模型绑定的工作方式,但相对较少的情况是,您会发现自己需要对此进行深入的研究。在大多数情况下,它按原样工作,如本节的其余部分所示。
16.2.1 Binding simple types
16.2.1 绑定简单类型
We’ll start our journey into model binding by considering a simple Razor Page handler. The next listing shows a simple Razor Page that takes one number as a method parameter and squares it by multiplying the number by itself.
我们将通过考虑一个简单的 Razor Page 处理程序来开始模型绑定之旅。下一个清单显示了一个简单的 Razor Page,它采用一个数字作为方法参数,并通过将数字本身乘以来平方。
Listing 16.2 A Razor Page accepting a simple parameter
列表 16.2 接受简单参数的 Razor 页面
public class CalculateSquareModel : PageModel
{
public void OnGet(int number) ❶
{
Square = number * number; ❷
}
public int Square { get; set; } ❸
}
❶ The method parameter is the binding model.
method 参数是绑定模型。
❷ A more complex example would do this work in an external service, in the application model.
一个更复杂的示例是在应用程序模型中的外部服务中完成这项工作。
❸ The result is exposed as a property and is used by the view to generate a response.
结果作为属性公开,并由视图用于生成响应。
In chapters 6 and 14, you learned about routing and how it selects a Razor Page to execute. You can update the route template for the Razor Page to be "CalculateSquare/{number}" by adding a {number} segment to the Razor Page’s @page directive in the .cshtml file:
在第 6 章和第 14 章中,您了解了路由以及它如何选择要执行的 Razor 页面。可以通过在 .cshtml 文件中将 {number} 段添加到 Razor 页面的 @page 指令,将 Razor 页面的路由模板更新为“CalculateSquare/{number}”:
@page "{number}"When a client requests the URL /CalculateSquare/5, the Razor Page framework uses routing to parse it for route parameters. This produces the route value pair
当客户端请求 URL /CalculateSquare/5 时,Razor Page 框架使用路由来分析路由参数。这将生成路由值对
number=5The Razor Page’s OnGet page handler contains a single parameter—an integer called number—which is your binding model. When ASP.NET Core executes this page handler method, it will spot the expected parameter, flick through the route values associated with the request, and find the number=5 pair. Then it can bind the number parameter to this route value and execute the method. The page handler method itself doesn’t care where this value came from; it goes along its merry way, calculating the square of the value and setting it on the Square property.
Razor Page 的 OnGet 页面处理程序包含一个参数(称为 number 的整数),该参数是绑定模型。当 ASP.NET Core 执行此页面处理程序方法时,它将发现预期的参数,浏览与请求关联的路由值,并找到 number=5 对。然后它可以将 number 参数绑定到这个路由值上,并执行该方法。页面处理程序方法本身并不关心此值的来源;它沿着快乐的方式前进,计算值的平方并将其设置为 Square 属性。
The key thing to appreciate is that you didn’t have to write any extra code to try to extract the number from the URL when the method executed. All you needed to do was create a method parameter (or public property) with the right name and let model binding do its magic.
需要注意的关键是,在方法执行时,您不必编写任何额外的代码来尝试从 URL 中提取数字。您需要做的就是创建一个具有正确名称的方法参数(或公共属性),然后让模型绑定发挥它的魔力。
Route values aren’t the only values the Razor Pages model binder can use to create your binding models. As you saw previously, the framework will look through three default binding sources to find a match for your binding models:
路由值并不是 Razor Pages 模型绑定器可用于创建绑定模型的唯一值。如前所述,框架将遍历三个默认绑定源,以查找绑定模型的匹配项:
• Form values
• Route values
• Query string values
Each of these binding sources store values as name-value pairs. If none of the binding sources contains the required value, the binding model is set to a new, default instance of the type instead. The exact value the binding model will have in this case depends on the type of the variable:
这些绑定源中的每一个都将值存储为名称-值对。如果没有任何绑定源包含所需的值,则绑定模型将改为该类型的新默认实例。在这种情况下,绑定模型将具有的确切值取决于变量的类型:
• For value types, the value will be default(T). For an int parameter this would be 0, and for a bool it would be false.
对于值类型,该值将为 default(T)。对于 int 参数,此值为 0,对于 bool 参数,此值为 false。
• For reference types, the type is created using the default (parameterless) constructor. For custom types like ProductModel, that will create a new object. For nullable types like int? or bool?, the value will be null.
对于引用类型,类型是使用默认 (无参数) 构造函数创建的。对于像 ProductModel 这样的自定义类型,这将创建一个新对象。对于像 int 这样的可空类型?或 bool?,则值为 null。
• For string types, the value will be null.
对于字符串类型,该值将为 null。
Warning It’s important to consider the behavior of your page handler when model binding fails to bind your method parameters. If none of the binding sources contains the value, the value passed to the method could be null or could unexpectedly have a default value (for value types).
警告:当模型绑定无法绑定方法参数时,请务必考虑页面处理程序的行为。如果没有任何绑定源包含该值,则传递给该方法的值可能为 null,或者可能意外地具有默认值(对于值类型)。
Listing 16.2 showed how to bind a single method parameter. Let’s take the next logical step and look at how you’d bind multiple method parameters.
清单 16.2 展示了如何绑定单个方法参数。让我们进行下一个逻辑步骤,看看如何绑定多个方法参数。
Let’s say you’re building a currency converter application. As the first step you need to create a method in which the user provides a value in one currency, and you must convert it to another. You first create a Razor Page called Convert.cshtml and then customize the route template for the page using the @page directive to use an absolute path containing two route values:
假设您正在构建一个货币转换器应用程序。第一步,您需要创建一个方法,在该方法中,用户以一种货币提供值,并且必须将其转换为另一种货币。首先创建一个名为 Convert.cshtml 的 Razor 页面,然后使用 @page 指令自定义页面的路由模板,以使用包含两个路由值的绝对路径:
@page "/{currencyIn}/{currencyOut}"Then you create a page handler that accepts the three values you need, as shown in the following listing.
然后,创建一个接受您需要的 3 个值的页面处理程序,如下面的清单所示。
Listing 16.3 A Razor Page handler accepting multiple binding parameters
列表 16.3 接受多个绑定参数的 Razor Page 处理程序
public class ConvertModel : PageModel
{
    public void OnGet(
        string currencyIn,
        string currencyOut,
        int qty
)
    {
        /* method implementation */
    }
}
As you can see, there are three different parameters to bind. The question is, where will the values come from and what will they be set to? The answer is, it depends! Table 16.1 shows a whole variety of possibilities. All these examples use the same route template and page handler, but depending on the data sent, different values will be bound. The actual values might differ from what you expect, as the available binding sources offer conflicting values!
如您所见,有三个不同的参数需要绑定。问题是,这些值从何而来,它们将设置为什么?答案是,这要看情况!表 16.1 显示了各种可能性。所有这些示例都使用相同的路由模板和页面处理程序,但根据发送的数据,将绑定不同的值。实际值可能与您的预期不同,因为可用的绑定源提供的值相互冲突!
Table 16.1 Binding request data to page handler parameters from multiple binding sources
表 16.1 将请求数据绑定到来自多个绑定源的页面处理程序参数
| URL (route values) | HTTP body data (form values) | Parameter values bound |
|---|---|---|
| /GBP/USD | - | currencyIn=GBP currencyOut=USD qty=0 |
| /GBP/USD?currencyIn=CAD | QTY=50 | currencyIn=GBP currencyOut=USD qty=50 |
| /GBP/USD?qty=100 | qty=50 | currencyIn=GBP currencyOut=USD qty=50 |
| /GBP/USD?qty=100 | currencyIn=CAD& currencyOut=EUR&qty=50 | currencyIn=CAD currencyOut=EUR qty=50 |
For each example, be sure you understand why the bound values have the values that they do. In the first example, the qty value isn’t found in the form data, in the route values, or in the query string, so it has the default value of 0. In each of the other examples, the request contains one or more duplicated values; in these cases, it’s important to bear in mind the order in which the model binder consults the binding sources. By default, form values will take precedence over other binding sources, including route values!
对于每个示例,请确保您了解为什么绑定值具有它们所具有的值。在第一个示例中,在表单数据、路由值或查询字符串中找不到 qty 值,因此它的默认值为 0。在所有其他示例中,请求都包含一个或多个重复值;在这些情况下,请务必记住 Model Binder 查询 Binding 源的顺序。默认情况下,表单值将优先于其他绑定源,包括路由值!
NOTE The default model binder isn’t case-sensitive, so a binding value of QTY=50 will happily bind to the qty parameter.
注意:默认模型绑定器不区分大小写,因此 QTY=50 的绑定值将很高兴地绑定到 qty 参数。
Although this may seem a little overwhelming, it’s relatively unusual to be binding from all these different sources at once. It’s more common to have your values all come from the request body as form values, maybe with an ID from URL route values. This scenario serves as more of a cautionary tale about the knots you can twist yourself into if you’re not sure how things work under the hood.
虽然这看起来有点让人不知所措,但同时从所有这些不同的来源绑定是相对不寻常的。更常见的做法是,你的值都来自请求正文作为表单值,可能带有来自 URL 路由值的 ID。这个场景更像是一个警示故事,如果你不确定引擎盖下的事情是如何运作的,你可以把自己扭成一团。
In these examples, you happily bound the qty integer property to incoming values, but as I mentioned earlier, the values stored in binding sources are all strings. What types can you convert a string to?
在这些示例中,您愉快地将 qty integer 属性绑定到传入值,但正如我前面提到的,存储在绑定源中的值都是字符串。你可以将字符串转换为哪些类型?
The model binder will convert pretty much any primitive .NET type such as int, float, decimal (and string obviously), any custom type that has a TryParse method (like minimal APIs, as you saw in chapter 7) plus anything that has a TypeConverter.
模型绑定器将转换几乎任何基元 .NET 类型,如 int、float、decimal(显然还有 string)、任何具有 TryParse 方法的自定义类型(如第 7 章中所看到的最小 API)以及任何具有 TypeConverter 的类型。
NOTE TypeConverters can be found in the System.ComponentModel.TypeConverter package. You can read more about them in Microsoft’s “Type conversion in .NET” documentation: http://mng.bz/A0GK.
注意:TypeConverters 可以在 System.ComponentModel.TypeConverter 包中找到。您可以在 Microsoft 的“.NET 中的类型转换”文档中阅读有关它们的更多信息:http://mng.bz/A0GK。
There are a few other special cases that can be converted from a string, such as Type, but thinking of it as built-in types only will get you a long way there!
还有一些其他特殊情况可以从字符串转换,例如 Type,但仅将其视为内置类型将使您大有帮助!
16.2.2 Binding complex types
16.2.2 绑定复杂类型
If it seems like only being able to bind simple built-in types is a bit limiting, you’re right! Luckily, that’s not the case for the model binder. Although it can only convert strings directly to those simple types, it’s also able to bind complex types by traversing any properties your binding models expose, binding each of those properties to strings instead.
如果看起来只能绑定简单的内置类型有点限制,那你是对的!幸运的是,模型 Binder 并非如此。虽然它只能将字符串直接转换为这些简单类型,但它也能够通过遍历绑定模型公开的任何属性来绑定复杂类型,而是将每个属性绑定到字符串。
If this doesn’t make you happy straight off the bat, let’s look at how you’d have to build your page handlers if simple types were your only option. Imagine a user of your currency converter application has reached a checkout page and is going to exchange some currency. Great! All you need now is to collect their name, email address, and phone number. Unfortunately, your page handler method would have to look something like this:
如果这不能让你立即满意,让我们看看如果简单类型是你唯一的选择,你将如何构建你的页面处理程序。想象一下,您的货币转换器应用程序的用户已到达结帐页面并准备兑换一些货币。伟大!您现在需要做的就是收集他们的姓名、电子邮件地址和电话号码。不幸的是,您的页面处理程序方法必须如下所示:
public IActionResult OnPost(string firstName, string lastName, string phoneNumber, string email)Yuck! Four parameters might not seem that bad right now, but what happens when the requirements change and you need to collect other details? The method signature will keep growing. The model binder will bind the values quite happily, but it’s not exactly clean code. Using the [BindProperty] approach doesn’t really help either; you still have to clutter your PageModel with lots of properties and attributes!
呸!四个参数现在看起来可能还不错,但是当需求发生变化并且您需要收集其他详细信息时会发生什么?方法签名将不断增长。模型 Binder 会非常愉快地绑定这些值,但它并不是完全干净的代码。使用 [BindProperty] 方法也没有真正的帮助;你仍然需要用大量的属性和特性来整理你的 PageModel!
Simplifying method parameters by binding to complex objects
通过绑定到复杂对象来简化方法参数
A common pattern for any C# code when you have many method parameters is to extract a class that encapsulates the data the method requires. If extra parameters need to be added, you can add a new property to this class. This class becomes your binding model, and it might look something like the following listing.
当有许多方法参数时,任何 C# 代码的常见模式是提取一个封装方法所需数据的类。如果需要添加额外的参数,您可以向此类添加新属性。这个类将成为您的绑定模型,它可能类似于下面的清单。
Listing 16.4 A binding model for capturing a user’s details
清单 16.4 用于捕获用户详细信息的绑定模型
public class UserBindingModel
{
    public string FirstName { get; set; }
    public string LastName { get; set; }
    public string Email { get; set; }
    public string PhoneNumber { get; set; }
}
NOTE In this book I primarily use class instead of record for my binding models, but you can use record if you prefer. I find the terseness that the record positional syntax provides is lost if you want to add attributes to properties, such as to add validation attributes, as you’ll see in section 16.3. You can see the required syntax for positional property attributes in the documentation at http://mng.bz/Kex0.
注意:在本书中,我主要使用 class 而不是 record 作为我的绑定模型,但如果您愿意,也可以使用 record。我发现,如果您想向属性添加属性(例如添加验证属性),则记录位置语法提供的简洁性会丢失,如第 16.3 节所示。您可以在 http://mng.bz/Kex0 文档中查看位置属性属性所需的语法。
With this model, you can update your page handler’s method signature to
使用此模型,您可以将页面处理程序的方法签名更新为
public IActionResult OnPost(UserBindingModel user)Alternatively, using the [BindProperty] approach, create a property on the PageModel:
或者,使用 [BindProperty] 方法,在 PageModel 上创建一个属性:
[BindProperty]
public UserBindingModel User { get; set; }
Now you can simplify the page handler signature even further:
现在,您可以进一步简化页面处理程序签名:
public IActionResult OnPost()Functionally, the model binder treats this new complex type a little differently. Rather than look for parameters with a value that matches the parameter name (user, or User for the property), the model binder creates a new instance of the model using new UserBindingModel().
从功能上讲,模型 Binder 对这种新的复杂类型的处理方式略有不同。模型绑定器不会查找值与参数名称(或属性的 User)匹配的参数,而是使用 new UserBindingModel() 创建模型的新实例。
NOTE You don’t have to use custom classes for your methods; it depends on your requirements. If your page handler needs only a single integer, it makes more sense to bind to the simple parameter.
注意:您不必为您的方法使用自定义类;这取决于您的要求。如果您的页面处理程序只需要一个整数,则绑定到 simple 参数更有意义。
Next, the model binder loops through all the properties your binding model has, such as FirstName and LastName in listing 16.4. For each of these properties, it consults the collection of binding sources and attempts to find a name-value pair that matches. If it finds one, it sets the value on the property and moves on to the next.
接下来,模型 Binders 遍历绑定模型具有的所有属性,例如清单 16.4 中的 FirstName 和 LastName。对于其中每个属性,它都会查询绑定源的集合,并尝试查找匹配的名称/值对。如果找到一个,它将设置该属性的值,然后继续执行下一个属性。
Tip Although the name of the model isn’t necessary in this example, the model binder will also look for properties prefixed with the name of the property, such as user.FirstName and user.LastName for a property called User. You can use this approach when you have multiple complex parameters to a page handler or multiple complex [BindProperty] properties. In general, for simplicity, you should avoid this situation if possible. As for all model binding, the casing of the prefix does not matter.
提示:尽管在此示例中不需要模型名称,但模型绑定器还将查找以属性名称为前缀的属性,例如 user。FirstName 和 user。名为 User 的属性的 LastName。当页面处理程序具有多个复杂参数或多个复杂 [BindProperty] 属性时,可以使用此方法。通常,为简单起见,应尽可能避免这种情况。对于所有模型绑定,前缀的大小写无关紧要。
Once all the properties that can be bound on the binding model are set, the model is passed to the page handler (or the [BindProperty] property is set), and the handler is executed as usual. The behavior from this point on is identical to when you have lots of individual parameters—you’ll end up with the same values set on your binding model—but the code is cleaner and easier to work with.
设置了可在绑定模型上绑定的所有属性后,模型将传递给页面处理程序 (或设置了 [BindProperty] 属性) ,并照常执行处理程序。从此时开始,行为与具有大量单个参数时的行为相同 — 您最终将在绑定模型上设置相同的值 — 但代码更简洁,更易于使用。
Tip For a class to be model-bound, it must have a default public constructor. You can bind only properties that are public and settable.
提示:对于要进行模型绑定的类,它必须具有默认的 public 构造函数。您只能绑定 public 和 settable 属性。
With this technique you can bind complex hierarchical models whose properties are themselves complex models. As long as each property exposes a type that can be model-bound, the binder can traverse it with ease.
使用这种技术,您可以绑定复杂的分层模型,这些模型的属性本身就是复杂模型。只要每个属性都公开一个可以进行模型绑定的类型,Binders 就可以轻松遍历它。
Binding collections and dictionaries
绑定集合和词典
As well as binding to ordinary custom classes and primitives, you can bind to collections, lists, and dictionaries. Imagine you had a page in which a user selected all the currencies they were interested in; you’d display the rates for all those selected, as shown in figure 16.5.
除了绑定到普通自定义类和基元外,还可以绑定到集合、列表和词典。想象一下,您有一个页面,用户在其中选择了他们感兴趣的所有货币;将显示所有选定项目的 Rate,如图 16.5 所示。
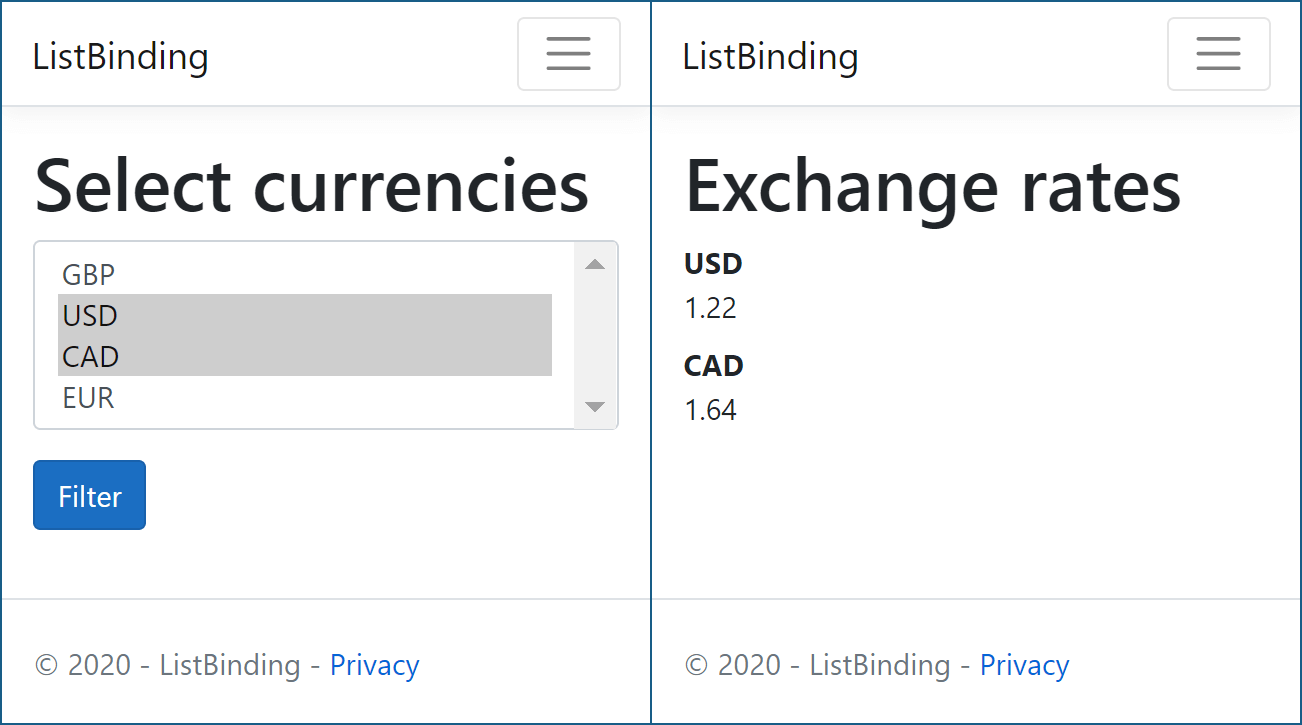
Figure 16.5 The select list in the currency converter application sends a list of selected currencies to the application. Model binding binds the selected currencies and customizes the view for the user to show the equivalent cost in the selected currencies.
图 16.5 货币转换器应用程序中的选择列表将所选货币的列表发送到应用程序。模型绑定绑定所选货币并自定义视图,以便用户显示所选货币的等效成本。
To achieve this, you could create a page handler that accepts a List
为此,您可以创建一个接受 List 类型的页面处理程序,例如
public void OnPost(List<string> currencies);You could then POST data to this method by providing values in several different formats:
然后,您可以通过提供几种不同格式的值来将数据 POST 到此方法:
• currencies[index]—Where currencies is the name of the parameter to bind and index is the index of the item to bind, such as currencies[0]= GBP¤cies[1]=USD.
currencies[index] - 其中 currencies 是要绑定的参数的名称,index 是要绑定的项目的索引,例如 currencies[0]= GBP¤cies[1]=USD。
• [index]—If you’re binding to a single list (as in this example), you can omit the name of the parameter, such as [0]=GBP&[1]=USD.
[index] - 如果要绑定到单个列表 (如本例所示),则可以省略参数的名称,例如 [0]=GBP&[1]=USD。
• currencies—Alternatively, you can omit the index and send currencies as the key for every value, such as currencies=GBP¤cies=USD.
currencies - 或者,您可以省略索引并将 currencies 作为每个值的键发送,例如 currencies=GBP¤cies=USD。
The key values can come from route values and query values, but it’s far more common to POST them in a form. Dictionaries can use similar binding, where the dictionary key replaces the index both when the parameter is named and when it’s omitted.
键值可以来自路由值和查询值,但在表单中 POST 它们更为常见。字典可以使用类似的绑定,其中字典键在命名参数和省略参数时替换索引。
Tip In the previous example I showed a collection using the built-in string type, but you can also bind collections of complex type, such as a List<UserBindingModel>.
提示:在前面的示例中,我展示了一个使用内置字符串类型的集合,但您也可以绑定复杂类型的集合,例如 List<UserBindingModel>。
If this all seems a bit confusing, don’t feel too alarmed. If you’re building a traditional web application and using Razor views to generate HTML, the framework will take care of generating the correct names for you. As you’ll see in chapter 18, the Razor view ensures that any form data you POST is generated in the correct format.
如果这一切看起来有点令人困惑,请不要太惊慌。如果您正在构建传统的 Web 应用程序并使用 Razor 视图生成 HTML,框架将负责为您生成正确的名称。正如您将在第 18 章中看到的那样,Razor 视图可确保您 POST 的任何表单数据都以正确的格式生成。
Binding file uploads with IFormFile
将文件上传与 IFormFile绑定
Razor Pages supports users uploading files by exposing the IFormFile and IFormFileCollection interfaces. You can use these interfaces as your binding model, either as a method parameter to your page handler or using the [BindProperty] approach, and they will be populated with the details of the file upload:
Razor Pages 支持用户通过公开 IFormFile 和 IFormFileCollection 接口来上传文件。您可以将这些接口用作绑定模型,作为页面处理程序的方法参数或使用 [BindProperty] 方法,它们将填充文件上传的详细信息:public void OnPost(IFormFile file);
If you need to accept multiple files, you can use IFormFileCollection, IEnumerable<IFormFile>, or List<IFormFile>:
如果需要接受多个文件,可以使用 IFormFileCollection、IEnumerable<IFormFile> 或List<IFormFile>:
public void OnPost(IEnumerable<IFormFile> file);You already learned how to use IFormFile in chapter 7 when you looked at minimal API binding. The process is the same for Razor Pages. I’ll reiterate one point here: if you don’t need users to upload files, great! There are so many potential threats to consider when handling files—from malicious attacks, to accidental denial-of-service vulnerabilities—that I avoid them whenever possible.
在第 7 章中,您已经学习了如何使用 IFormFile,当时您了解了最小 API 绑定。Razor Pages 的过程相同。我在这里重申一点:如果您不需要用户上传文件,那就太好了!在处理文件时,需要考虑许多潜在威胁 — 从恶意攻击到意外的拒绝服务漏洞 — 因此我尽可能避免它们。
For the vast majority of Razor Pages, the default configuration of model binding for simple and complex types works perfectly well, but you may find some situations where you need to take a bit more control. Luckily, that’s perfectly possible, and you can completely override the process if necessary by replacing the ModelBinders used in the guts of the framework.
对于绝大多数 Razor Pages,简单类型和复杂类型的模型绑定的默认配置运行良好,但你可能会发现在某些情况下需要进行更多控制。幸运的是,这是完全可能的,如有必要,您可以通过替换框架内部中使用的 ModelBinders 来完全覆盖该过程。
However, it’s rare to need that level of customization. I’ve found it’s more common to want to specify which binding source to use for a page’s binding instead.
但是,很少需要这种级别的自定义。我发现,更常见的做法是指定要用于页面绑定的绑定源。
16.2.3 Choosing a binding source
16.2.3 选择绑定源
As you’ve already seen, by default the ASP.NET Core model binder attempts to bind your binding models from three binding sources: form data, route data, and the query string.
如您所见,默认情况下,ASP.NET Core 模型 Binder 会尝试从三个绑定源绑定您的绑定模型:表单数据、路由数据和查询字符串。
Occasionally, you may find it necessary to specifically declare which binding source to bind to. In other cases, these three sources won’t be sufficient at all. The most common scenarios are when you want to bind a method parameter to a request header value or when the body of a request contains JSON-formatted data that you want to bind to a parameter. In these cases, you can decorate your binding models with attributes that say where to bind from, as shown in the following listing.
有时,您可能会发现有必要专门声明要绑定到的绑定源。在其他情况下,这三个来源根本不够。最常见的情况是,当您要将方法参数绑定到请求标头值时,或者当请求正文包含要绑定到参数的 JSON 格式数据时。在这些情况下,您可以使用说明绑定位置的属性来装饰您的绑定模型,如下面的清单所示。
Listing 16.5 Choosing a binding source for model binding
清单 16.5 为模型绑定选择绑定源
public class PhotosModel: PageModel
{
    public void OnPost(
        [FromHeader] string userId,     ❶
        [FromBody] List<Photo> photos)      ❷
    {
        /* method implementation */
    }
}
❶ The userId is bound from an HTTP header in the request.
userId 从请求中的 HTTP 标头绑定。
❷ The list of photo objects is bound to the body of the request, typically in JSON format.
照片对象列表绑定到请求的正文,通常采用 JSON 格式。
In this example, a page handler updates a collection of photos with a user ID. There are method parameters for the ID of the user to be tagged in the photos, userId, and a list of Photo objects to tag, photos.
在此示例中,页面处理程序使用用户 ID 更新照片集合。有方法参数,用于在 photos 中标记的用户 ID、userId 和要标记的 Photo 对象列表 photos。
Rather than binding these method parameters using the standard binding sources, I’ve added attributes to each parameter, indicating the binding source to use. The [FromHeader] attribute has been applied to the userId parameter. This tells the model binder to bind the value to an HTTP request header value called userId.
我没有使用标准绑定源来绑定这些方法参数,而是向每个参数添加了属性,以指示要使用的绑定源。[FromHeader] 属性已应用于 userId 参数。这会告知模型绑定器将值绑定到名为 userId 的 HTTP 请求标头值。
We’re also binding a list of photos to the body of the HTTP request by using the [FromBody] attribute. This tells the binder to read JSON from the body of the request and bind it to the List<Photo> method parameter.
我们还使用 [FromBody] 属性将照片列表绑定到 HTTP 请求的正文。这会告知 Binder 从请求正文中读取 JSON,并将其绑定到 List<Photo> 方法参数。
Warning Developers coming from .NET Framework and the legacy version of ASP.NET should take note that the [FromBody] attribute is explicitly required when binding to JSON requests in Razor Pages. This differs from the legacy ASP.NET behavior, in which no attribute was required.
警告:来自 .NET Framework 和旧版 ASP.NET 的开发人员应注意,在 Razor Pages 中绑定到 JSON 请求时,显式需要 [FromBody] 属性。这与 legacy ASP.NET 行为不同,后者不需要任何属性。
You aren’t limited to binding JSON data from the request body. You can use other formats too, depending on which InputFormatters you configure the framework to use. By default, only a JSON input formatter is configured. You’ll see how to add an XML formatter in chapter 20, when I discuss web APIs.
您不仅限于从请求正文绑定 JSON 数据。您也可以使用其他格式,具体取决于您配置框架要使用的 InputFormatters。默认情况下,仅配置 JSON 输入格式化程序。在第 20 章中,我将介绍如何添加 XML 格式化程序,届时我将讨论 Web API。
Tip Automatic binding of multiple formats from the request body is one of the features specific to Razor Pages and MVC controllers, which is missing from minimal APIs.
提示:从请求正文自动绑定多种格式是特定于 Razor Pages 和 MVC 控制器的功能之一,而最小 API 中缺少此功能。
You can use a few different attributes to override the defaults and to specify a binding source for each binding model (or each property on the binding model). These are the same attributes you used in chapter 7 with minimal APIs:
可以使用几个不同的属性来覆盖默认值,并为每个绑定模型(或绑定模型上的每个属性)指定绑定源。这些是您在第 7 章中使用的相同属性,具有最少的 API:
• [FromHeader]—Bind to a header value.
• [FromQuery]—Bind to a query string value.
• [FromRoute]—Bind to route parameters.
• [FromForm]—Bind to form data posted in the body of the request. This attribute is not available in minimal APIs.
• [FromBody]—Bind to the request’s body content.
You can apply each of these to any number of handler method parameters or properties, as you saw in listing 16.5, with the exception of the [FromBody] attribute. Only one value may be decorated with the [FromBody] attribute. Also, as form data is sent in the body of a request, the [FromBody] and [FromForm] attributes are effectively mutually exclusive.
您可以将这些参数中的每一个应用于任意数量的处理程序方法参数或属性,如清单 16.5 中所示,但 [FromBody] 属性除外。只能用 [FromBody] 属性修饰一个值。此外,由于表单数据是在请求正文中发送的,因此 [FromBody] 和 [FromForm] 属性实际上是互斥的。
Tip Only one parameter may use the [FromBody] attribute. This attribute consumes the incoming request as HTTP request bodies can be safely read only once.
提示:只有一个参数可以使用 [FromBody] 属性。此属性使用传入请求,因为 HTTP 请求正文只能安全地读取一次。
As well as these attributes for specifying binding sources, there are a few attributes for customizing the binding process even further:
除了这些用于指定绑定源的属性外,还有一些属性可用于进一步自定义绑定过程:
• [BindNever]—The model binder will skip this parameter completely. You can use this attribute to prevent mass assignment, as discussed in these two posts on my blog: http://mng.bz/QvfG and http://mng.bz/Vd90.
[BindNever] - 模型绑定器将完全跳过此参数。您可以使用此属性来防止批量分配,如我博客上的以下两篇文章所述:http://mng.bz/QvfG 和 http://mng.bz/Vd90。
• [BindRequired]—If the parameter was not provided or was empty, the binder will add a validation error.
[BindRequired] - 如果参数未提供或为空,则 Binder 将添加验证错误。
• [FromServices]—This is used to indicate the parameter should be provided using dependency injection (DI). This attribute isn’t required in most cases, as .NET 7 is smart enough to know that a parameter is a service registered in DI, but you can be explicit if you prefer.
[FromServices] - 这用于指示应使用依赖关系注入 (DI) 提供参数。在大多数情况下,此属性不是必需的,因为 .NET 7 足够智能,可以知道参数是在 DI 中注册的服务,但如果你愿意,可以明确表示。
In addition, you have the [ModelBinder] attribute, which puts you into “God mode” with respect to model binding. With this attribute, you can specify the exact binding source, override the name of the parameter to bind to, and specify the type of binding to perform. It’ll be rare that you need this one, but when you do, at least it’s there!
此外,您还有 [ModelBinder] 属性,该属性将您置于模型绑定的“上帝模式”。使用此属性,您可以指定确切的绑定源,覆盖要绑定到的参数的名称,并指定要执行的绑定类型。你很少需要这个,但当你需要时,至少它就在那里!
By combining all these attributes, you should find you’re able to configure the model binder to bind to pretty much any request data your page handler wants to use. In general, though, you’ll probably find you rarely need to use them; the defaults should work well for you in most cases.
通过组合所有这些属性,您应该能够配置模型 Binders 以绑定到页面处理程序想要使用的几乎所有请求数据。不过,一般来说,您可能会发现您很少需要使用它们;在大多数情况下,默认值应该对您来说效果很好。
That brings us to the end of this section on model binding. At the end of the model binding process, your page handler should have access to a populated binding model, and it’s ready to execute its logic. But before you use that user input for anything, you must always validate your data, which is the focus of the second half of this chapter. Razor Pages automatically does validation for you out-of-the-box, but you have to actually check the results.
这让我们结束了本节关于模型绑定的内容。在模型绑定过程结束时,您的页面处理程序应该可以访问填充的绑定模型,并且它已准备好执行其逻辑。但是,在将该用户输入用于任何作之前,必须始终验证数据,这是本章后半部分的重点。Razor Pages 会自动为你执行开箱即用的验证,但你必须实际检查结果。
16.3 Validating binding models
16.3 验证绑定模型
In this section I discuss how validation works in Razor Pages. You already learned how important it is to validate user input in chapter 7, as well as how you can use DataAnnotation attributes to declaratively describe your validation requirements of a model. In this section you’ll learn how to reuse this knowledge to validate your Razor Page binding models. The good news is that validation is built into the Razor Pages framework.
在本节中,我将讨论验证在 Razor Pages 中的工作原理。您已经在第 7 章中了解了验证用户输入的重要性,以及如何使用 DataAnnotation 属性以声明方式描述模型的验证要求。在本部分中,你将了解如何重复使用此知识来验证 Razor 页面绑定模型。好消息是,验证内置于 Razor Pages 框架中。
16.3.1 Validation in Razor Pages
16.3.1 Razor Pages 中的验证
In chapter 7 you learned that validation is an essential part of any web application. Nevertheless, minimal APIs don’t have any direct support for validation in the framework; you have to layer it on top using filters and additional packages.
在第 7 章中,您了解到验证是任何 Web 应用程序的重要组成部分。尽管如此,最小的 API 在框架中没有任何对验证的直接支持;您必须使用过滤器和附加包将其分层。
In Razor Pages, validation is built in. Validation occurs automatically after model binding but before the page handler executes, as you saw in figure 16.2. Figure 16.6 shows a more compact view of where model validation fits in this process, demonstrating how a request to a checkout page that requests a user’s personal details is bound and validated.
在 Razor Pages 中,验证是内置的。验证在模型绑定之后但在页面处理程序执行之前自动进行,如图 16.2 所示。图 16.6 显示了模型验证在此过程中的适用位置的更紧凑视图,演示了如何绑定和验证对请求用户个人详细信息的结帐页面的请求。
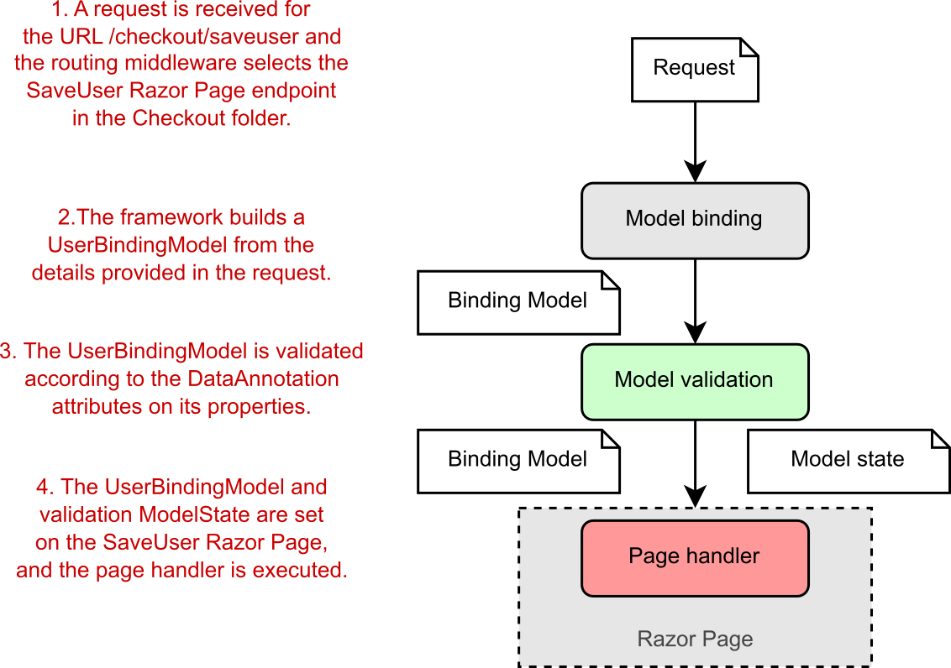
Figure 16.6 Validation occurs after model binding but before the page handler executes. The page handler executes whether or not validation is successful.
图 16.6 验证发生在模型绑定之后,但在页面处理程序执行之前。无论验证是否成功,页面处理程序都会执行。
As discussed in chapter 7, validation isn’t only about protecting against security threats, it’s also about ensuring that
如第 7 章所述,验证不仅要防止安全威胁,还要确保
• Data is formatted correctly. (Email fields have a valid email format.)
数据格式正确。(电子邮件字段具有有效的电子邮件格式。)
• Numbers are in a particular range. (You can’t buy -1 copies of a product.)
数字在特定范围内。(您不能购买 -1 份产品。)
• Required values are provided while others are optional. (Name may be required, but phone number is optional.)
提供必需值,而其他值为可选值。(姓名可能是必需的,但电话号码是可选的。)
• Values conform to your business requirements. (You can’t convert a currency to itself, it needs to be converted to a different currency.)
值符合您的业务需求。(您无法将货币转换为自身,它需要转换为其他货币。)
It might seem like some of these can be dealt with easily enough in the browser. For example, if a user is selecting a currency to convert to, don’t let them pick the same currency; and we’ve all seen the “please enter a valid email address” messages.
其中一些似乎可以在浏览器中轻松处理。例如,如果用户选择要转换为的货币,请不要让他们选择相同的货币;我们都见过 “Please enter a valid email address” 消息。
Unfortunately, although this client-side validation is useful for users, as it gives them instant feedback, you can never rely on it, as it will always be possible to bypass these browser protections. It’s always necessary to validate the data as it arrives at your web application using server-side validation.
不幸的是,尽管这种客户端验证对用户很有用,因为它为他们提供了即时反馈,但您永远不能依赖它,因为总是可以绕过这些浏览器保护。当数据到达 Web 应用程序时,始终有必要使用服务器端验证来验证数据。
Warning Always validate user input on the server side of your application.
警告:始终在应用程序的服务器端验证用户输入。
If that feels a little redundant, like you’ll be duplicating logic and code between your client and server applications, I’m afraid you’re right. It’s one of the unfortunate aspects of web development; the duplication is a necessary evil. Fortunately, ASP.NET Core provides several features to try to reduce this burden.
如果这感觉有点多余,比如您将在客户端和服务器应用程序之间复制逻辑和代码,那么恐怕您是对的。这是 Web 开发不幸的方面之一;重复是一种必要的邪恶。幸运的是,ASP.NET Core 提供了多项功能来尝试减轻这种负担。
Tip Blazor, the new C# single-page application (SPA) framework, promises to solve some of these problems. For details, see http://mng.bz/9D51 and Blazor in Action, by Chris Sainty (Manning, 2021).
提示:新的 C# 单页应用程序 (SPA) 框架 Blazor 有望解决其中的一些问题。有关详细信息,请参阅 Chris Sainty 的 http://mng.bz/9D51 和 Blazor 的实际应用(Manning,2021 年)。
If you had to write this validation code fresh for every app, it would be tedious and likely error-prone. Luckily, you can use DataAnnotations attributes to declaratively describe the validation requirements for your binding models. The following listing, first shown in chapter 7, shows how you can decorate a binding model with various validation attributes. This expands on the example you saw earlier in listing 16.4.
如果您必须为每个应用程序重新编写此验证代码,这将是乏味的,并且可能容易出错。幸运的是,您可以使用 DataAnnotations 属性以声明方式描述绑定模型的验证要求。下面的清单首先在第 7 章中显示,它显示了如何使用各种验证属性来装饰绑定模型。这扩展了您之前在 Listing 16.4 中看到的示例。
Listing 16.6 Adding DataAnnotations to a binding model to provide metadata
清单 16.6 向绑定模型添加 DataAnnotations 以提供元数据
public class UserBindingModel
{
[Required] ❶
[StringLength(100)] ❷
[Display(Name = "Your name")] ❸
public string FirstName { get; set; }
[Required]
[StringLength(100)]
[Display(Name = "Last name")]
public string LastName { get; set; }
[Required]
[EmailAddress] ❹
public string Email { get; set; }
[Phone] ❺
[Display(Name = "Phone number")]
public string PhoneNumber { get; set; }
}
❶ Values marked Required must be provided.
必须提供标记为 Required 的值。
❷ The StringLengthAttribute sets the maximum length for the property.
StringLengthAttribute 设置属性的最大长度。
❸ Customizes the name used to describe the property
自定义用于描述属性的名称
❹ Validates that the value of Email is a valid email address
验证 Email 的值是否为有效的电子邮件地址
❺ Validates that the value of PhoneNumber has a valid telephone format
验证 PhoneNumber 的值是否具有有效的电话格式
For validation requirements that don’t lend themselves to attributes, such as when the validity of one property depends on the value of another, you can implement IValidatableObject, as described in chapter 7. Alternatively, you can use a different validation framework, such as FluentValidation, as you’ll see in chapter 32.
对于不适合属性的验证要求,例如当一个属性的有效性取决于另一个属性的值时,您可以实现 IValidatableObject,如第 7 章所述。或者,你可以使用不同的验证框架,比如 FluentValidation,你将在第 32 章中看到。
Whichever validation approach you use, it’s important to remember that these techniques don’t protect your application by themselves. The Razor Pages framework automatically executes the validation code after model binding, but it doesn’t do anything different if validation fails! In the next section we’ll look at how to check the validation result on the server and handle the case where validation has failed.
无论您使用哪种验证方法,请务必记住,这些技术本身并不能保护您的应用程序。Razor Pages 框架会在模型绑定后自动执行验证代码,但如果验证失败,它不会执行任何不同的作!在下一节中,我们将了解如何在服务器上检查验证结果并处理验证失败的情况。
16.3.2 Validating on the server for safety
16.3.2 在服务器上验证安全性
Validation of the binding model occurs before the page handler executes, but note that the handler always executes, whether the validation failed or succeeded. It’s the responsibility of the page handler to check the result of the validation.
绑定模型的验证发生在页面处理程序执行之前,但请注意,无论验证失败还是成功,处理程序始终执行。页面处理程序负责检查验证结果。
NOTE Validation happens automatically, but handling validation failures is the responsibility of the page handler.
注意:验证会自动进行,但处理验证失败是页面处理程序的责任。
The Razor Pages framework stores the output of the validation attempt in a property on the PageModel called ModelState. This property is a ModelStateDictionary object, which contains a list of all the validation errors that occurred after model binding, as well as some utility properties for working with it.
Razor Pages 框架将验证尝试的输出存储在 PageModel 上名为 ModelState 的属性中。此属性是一个 ModelStateDictionary 对象,它包含模型绑定后发生的所有验证错误的列表,以及用于处理它的一些实用程序属性。
As an example, listing 16.7 shows the OnPost page handler for the Checkout.cshtml Razor Page. The Input property is marked for binding and uses the UserBindingModel type shown previously in listing 16.6. This page handler doesn’t do anything with the data currently, but the pattern of checking ModelState early in the method is the key takeaway here.
例如,列表 16.7 显示了 Checkout.cshtml Razor 页面的 OnPost 页面处理程序。Input 属性标记为绑定,并使用前面列表 16.6 中所示的 UserBindingModel 类型。此页面处理程序目前不对数据执行任何作,但在方法的早期检查 ModelState 的模式是这里的关键要点。
Listing 16.7 Checking model state to view the validation result
示例 16.7 检查模型状态以查看验证结果
public class CheckoutModel : PageModel ❶
{
[BindProperty] ❷
public UserBindingModel Input { get; set; } ❷
public IActionResult OnPost() ❸
{
if (!ModelState.IsValid) ❹
{
return Page(); ❺
}
/* Save to the database, update user, return success */ ❻
return RedirectToPage("Success");
}
}
❶ The ModelState property is available on the PageModel base class.
ModelState 属性在 PageModel 基类中可用。
❷ The Input property contains the model-bound data.
Input 属性包含模型绑定数据。
❸ The binding model is validated before the page handler is executed.
在执行页面处理程序之前验证绑定模型。
❹ If there were validation errors, IsValid will be false.
如果存在验证错误,IsValid 将为 false。
❺ Validation failed, so redisplay the form with errors and finish the method early.
验证失败,因此请重新显示有错误的表单并提前完成该方法。
❻ Validation passed, so it’s safe to use the data provided in the model.
验证通过,因此可以安全地使用模型中提供的数据。
If the ModelState property indicates that an error occurred, the method immediately calls the Page() helper method. This returns a PageResult that ultimately generates HTML to return to the user, as you saw in chapter 15. The view uses the (invalid) values provided in the Input property to repopulate the form when it’s displayed, as shown in figure 16.7. Also, helpful messages for the user are added automatically, using the validation errors in the ModelState property.
如果 ModelState 属性指示发生了错误,该方法会立即调用 Page() 帮助程序方法。这将返回一个 PageResult,该结果最终生成 HTML 并返回给用户,如第 15 章所示。视图使用 Input 属性中提供的(无效)值在显示表单时重新填充表单,如图 16.7 所示。此外,将使用 ModelState 属性中的验证错误自动添加对用户有用的消息。
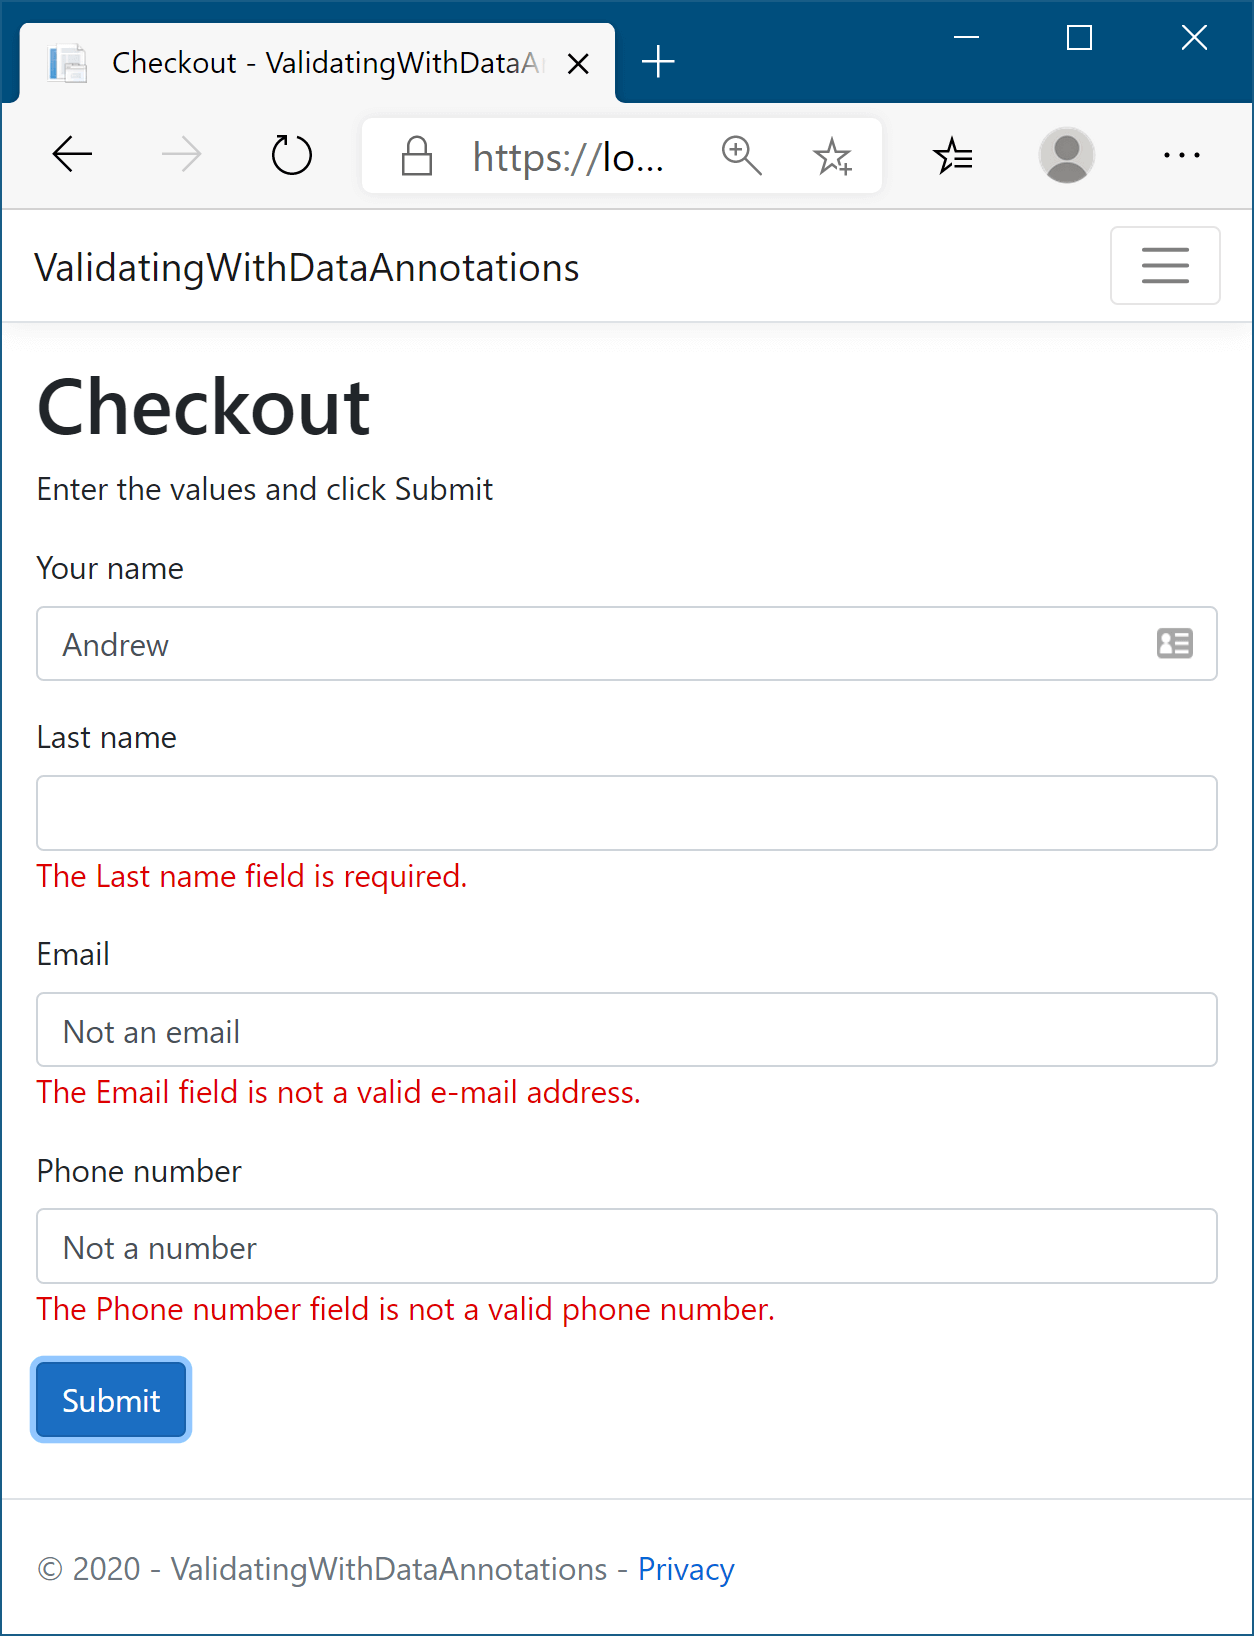
Figure 16.7 When validation fails, you can redisplay the form to display ModelState validation errors to the user. Note that the Your Name field has no associated validation errors, unlike the other fields.
图 16.7 验证失败时,您可以重新显示表单以向用户显示 ModelState 验证错误。请注意,与其他字段不同,Your Name 字段没有关联的验证错误。
NOTE The error messages displayed on the form are the default values for each validation attribute. You can customize the message by setting the ErrorMessage property on any of the validation attributes. For example, you could customize a [Required] attribute using [Required(ErrorMessage="Required")].
注意表单上显示的错误消息是每个 validation 属性的默认值。您可以通过在任何验证属性上设置 ErrorMessage 属性来自定义消息。例如,您可以使用 [Required(ErrorMessage=“Required”)] 自定义 [Required] 属性。
If the request is successful, the page handler returns a RedirectToPageResult (using the RedirectToPage() helper method) that redirects the user to the Success.cshtml Razor Page. This pattern of returning a redirect response after a successful POST is called the POST-REDIRECT-GET pattern.
如果请求成功,页面处理程序将返回一个 RedirectToPageResult(使用 RedirectToPage() 帮助程序方法),将用户重定向到 Success.cshtml Razor 页面。这种在成功 POST 后返回重定向响应的模式称为 POST-REDIRECT-GET 模式。
POST-REDIRECT-GET
The POST-REDIRECT-GET design pattern is a web development pattern that prevents users from accidentally submitting the same form multiple times. Users typically submit a form using the standard browser POST mechanism, sending data to the server. This is the normal way by which you might take a payment, for example.
POST-REDIRECT-GET 设计模式是一种 Web 开发模式,可防止用户意外地多次提交相同的表单。用户通常使用标准浏览器 POST 机制提交表单,并将数据发送到服务器。例如,这是您可能接受付款的正常方式。If a server takes the naive approach and responds with a 200 OK response and some HTML to display, the user will still be on the same URL. If the user refreshes their browser, they will be making an additional POST to the server, potentially making another payment! Browsers have some mechanisms to prevent this, such as in the following figure, but the user experience isn’t desirable.
如果服务器采用简单的方法,并以 200 OK 响应和一些要显示的 HTML 进行响应,则用户仍将位于同一 URL 上。如果用户刷新浏览器,他们将向服务器进行额外的 POST,可能会再次付款!浏览器有一些机制可以防止这种情况,如下图所示,但用户体验并不理想。
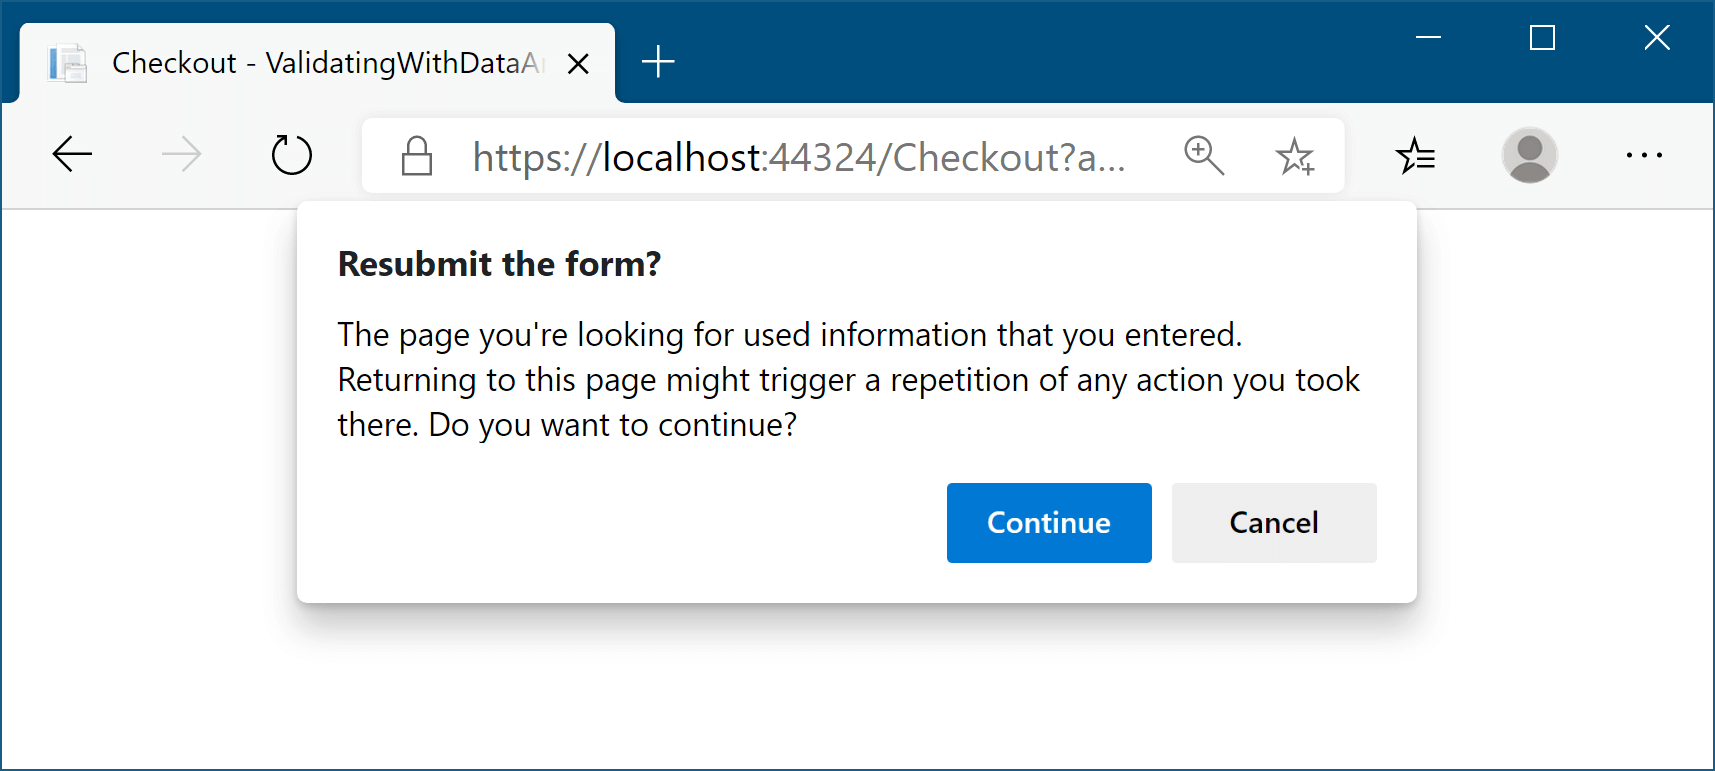
Refreshing a browser window after a POST causes a warning message to be shown to the user
在 POST 后刷新浏览器窗口会导致向用户显示警告消息The POST-REDIRECT-GET pattern says that in response to a successful POST, you should return a REDIRECT response to a new URL, which will be followed by the browser making a GET to the new URL. If the user refreshes their browser now, they’ll be refreshing the final GET call to the new URL. No additional POST is made, so no additional payments or side effects should occur.
POST-REDIRECT-GET 模式表示,为了响应成功的 POST,您应该返回对新 URL 的 REDIRECT 响应,然后浏览器将对新 URL 进行 GET。如果用户现在刷新浏览器,他们将刷新对新 URL 的最终 GET 调用。不会进行额外的 POST,因此不会发生额外的付款或副作用。This pattern is easy to achieve in ASP.NET Core applications using the pattern shown in listing 16.7. By returning a RedirectToPageResult after a successful POST, your application will be safe if the user refreshes the page in their browser.
在 ASP.NET Core 应用程序中,使用清单 16.7 中所示的模式很容易实现这种模式。通过在成功 POST 后返回 RedirectToPageResult,如果用户在浏览器中刷新页面,您的应用程序将是安全的。
You might be wondering why ASP.NET Core doesn’t handle invalid requests for you automatically; if validation has failed, and you have the result, why does the page handler get executed at all? Isn’t there a risk that you might forget to check the validation result?
您可能想知道为什么 ASP.NET Core 不自动为您处理无效请求;如果验证失败,并且您有结果,为什么还要执行页面处理程序呢?是否有忘记检查验证结果的风险?
This is true, and in some cases the best thing to do is to make the generation of the validation check and response automatic. In fact, this is exactly the approach we will use for web APIs using MVC controllers with the [ApiController] attribute when we cover them in chapter 20.
这是真的,在某些情况下,最好的办法是自动生成验证检查和响应。事实上,这正是我们在第 20 章中介绍时将用于使用带有 [ApiController] 属性的 MVC 控制器的 Web API 的方法。
For Razor Pages apps, however, you typically still want to generate an HTML response, even when validation failed. This allows the user to see the problem and potentially correct it. This is much harder to make automatic.
但是,对于 Razor Pages 应用程序,即使验证失败,您通常仍希望生成 HTML 响应。这样,用户就可以看到问题,并可能纠正问题。这要自动化要困难得多。
For example, you might find you need to load additional data before you can redisplay the Razor Page, such as loading a list of available currencies. That becomes simpler and more explicit with the ModelState.IsValid pattern. Trying to do that automatically would likely end up with you fighting against edge cases and workarounds.
例如,你可能会发现需要先加载其他数据,然后才能重新显示 Razor 页面,例如加载可用货币的列表。使用 ModelState.IsValid 模式,这将变得更简单、更明确。尝试自动执行此作可能最终会让您与边缘情况和解决方法作斗争。
Also, by including the IsValid check explicitly in your page handlers, it’s easier to control what happens when additional validation checks fail. For example, if the user tries to update a product, the DataAnnotation validation won’t know whether a product with the requested ID exists, only whether the ID has the correct format. By moving the validation to the handler method, you can treat data and business rule validation failures in the same way.
此外,通过在页面处理程序中显式包含 IsValid 检查,可以更轻松地控制其他验证检查失败时发生的情况。例如,如果用户尝试更新产品,则 DataAnnotation 验证将不知道具有请求的 ID 的产品是否存在,而只知道 ID 是否具有正确的格式。通过将验证移至处理程序方法,您可以以相同的方式处理数据和业务规则验证失败。
Tip You can also add extra validation errors to the collection, such as business rule validation errors that come from a different system. You can add errors to ModelState by calling AddModelError(), which will be displayed to users on the form alongside the DataAnnotation attribute errors.
提示:您还可以向集合中添加额外的验证错误,例如来自不同系统的业务规则验证错误。您可以通过调用 AddModelError() 向 ModelState 添加错误,该错误将与 DataAnnotation 属性错误一起显示在表单上的用户。
I hope I’ve hammered home how important it is to validate user input in ASP.NET Core, but just in case: VALIDATE! There, we’re good. Having said that, performing validation only on the server can leave users with a slightly poor experience. How many times have you filled out a form online, submitted it, gone to get a snack, and come back to find out you mistyped something and have to redo it? Wouldn’t it be nicer to have that feedback immediately?
我希望我已经清楚地认识到在 ASP.NET Core 中验证用户输入的重要性,但以防万一:验证!好了,我们很好。话虽如此,仅在服务器上执行验证可能会给用户带来略微糟糕的体验。你有多少次在网上填写了一份表格,提交了它,去买了点零食,然后回来发现你打错了东西,不得不重做一遍?立即获得这些反馈不是更好吗?
16.3.3 Validating on the client for user experience
16.3.3 在客户端上验证用户体验
You can add client-side validation to your application in a few different ways. HTML5 has several built-in validation behaviors that many browsers use. If you display an email address field on a page and use the “email” HTML input type, the browser automatically stops you from submitting an invalid format, as shown in figure 16.8. Your application doesn’t control this validation; it’s built into modern HTML5 browsers.
您可以通过几种不同的方式将客户端验证添加到您的应用程序中。HTML5 具有许多浏览器使用的几个内置验证行为。如果您在页面上显示电子邮件地址字段并使用 “email” HTML 输入类型,浏览器会自动阻止您提交无效格式,如图 16.8 所示。您的应用程序不控制此验证;它内置于现代 HTML5 浏览器中。
NOTE HTML5 constraint validation support varies by browser. For details on the available constraints, see the Mozilla documentation (http://mng.bz/daX3) and https://caniuse.com/#feat=constraint-validation.
注意:HTML5 约束验证支持因浏览器而异。有关可用约束的详细信息,请参阅 Mozilla 文档 (http://mng.bz/daX3) 和 https://caniuse.com/#feat=constraint-validation。
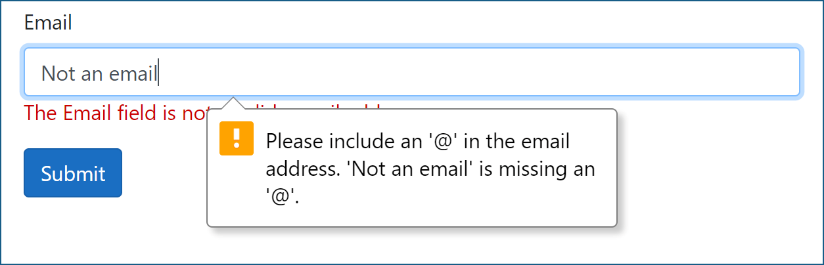
Figure 16.8 By default, modern browsers automatically validate fields of the email type before a form is submitted.
图 16.8 默认情况下,现代浏览器会在提交表单之前自动验证电子邮件类型的字段。
The alternative approach to HTML validation is to perform client-side validation by running JavaScript on the page and checking the values the user entered before submitting the form. This is the most common approach used in Razor Pages.
HTML 验证的另一种方法是通过在页面上运行 JavaScript 并在提交表单之前检查用户输入的值来执行客户端验证。这是 Razor Pages 中最常用的方法。
I’ll go into detail on how to generate the client-side validation helpers in chapter 18, where you’ll see the DataAnnotation attributes come to the fore once again. By decorating a view model with these attributes, you provide the necessary metadata to the Razor engine for it to generate the appropriate validation HTML.
在第 18 章中,我将详细介绍如何生成客户端验证帮助程序,届时您将看到 DataAnnotation 属性再次出现。通过使用这些属性修饰视图模型,您可以向 Razor 引擎提供必要的元数据,以便它生成适当的验证 HTML。
With this approach, the user sees any errors with their form immediately, even before the request is sent to the server, as shown in figure 16.9. This gives a much shorter feedback cycle, providing a better user experience.
使用这种方法,用户会立即看到其表单中的任何错误,甚至在请求发送到服务器之前,如图 16.9 所示。这提供了更短的反馈周期,从而提供更好的用户体验。
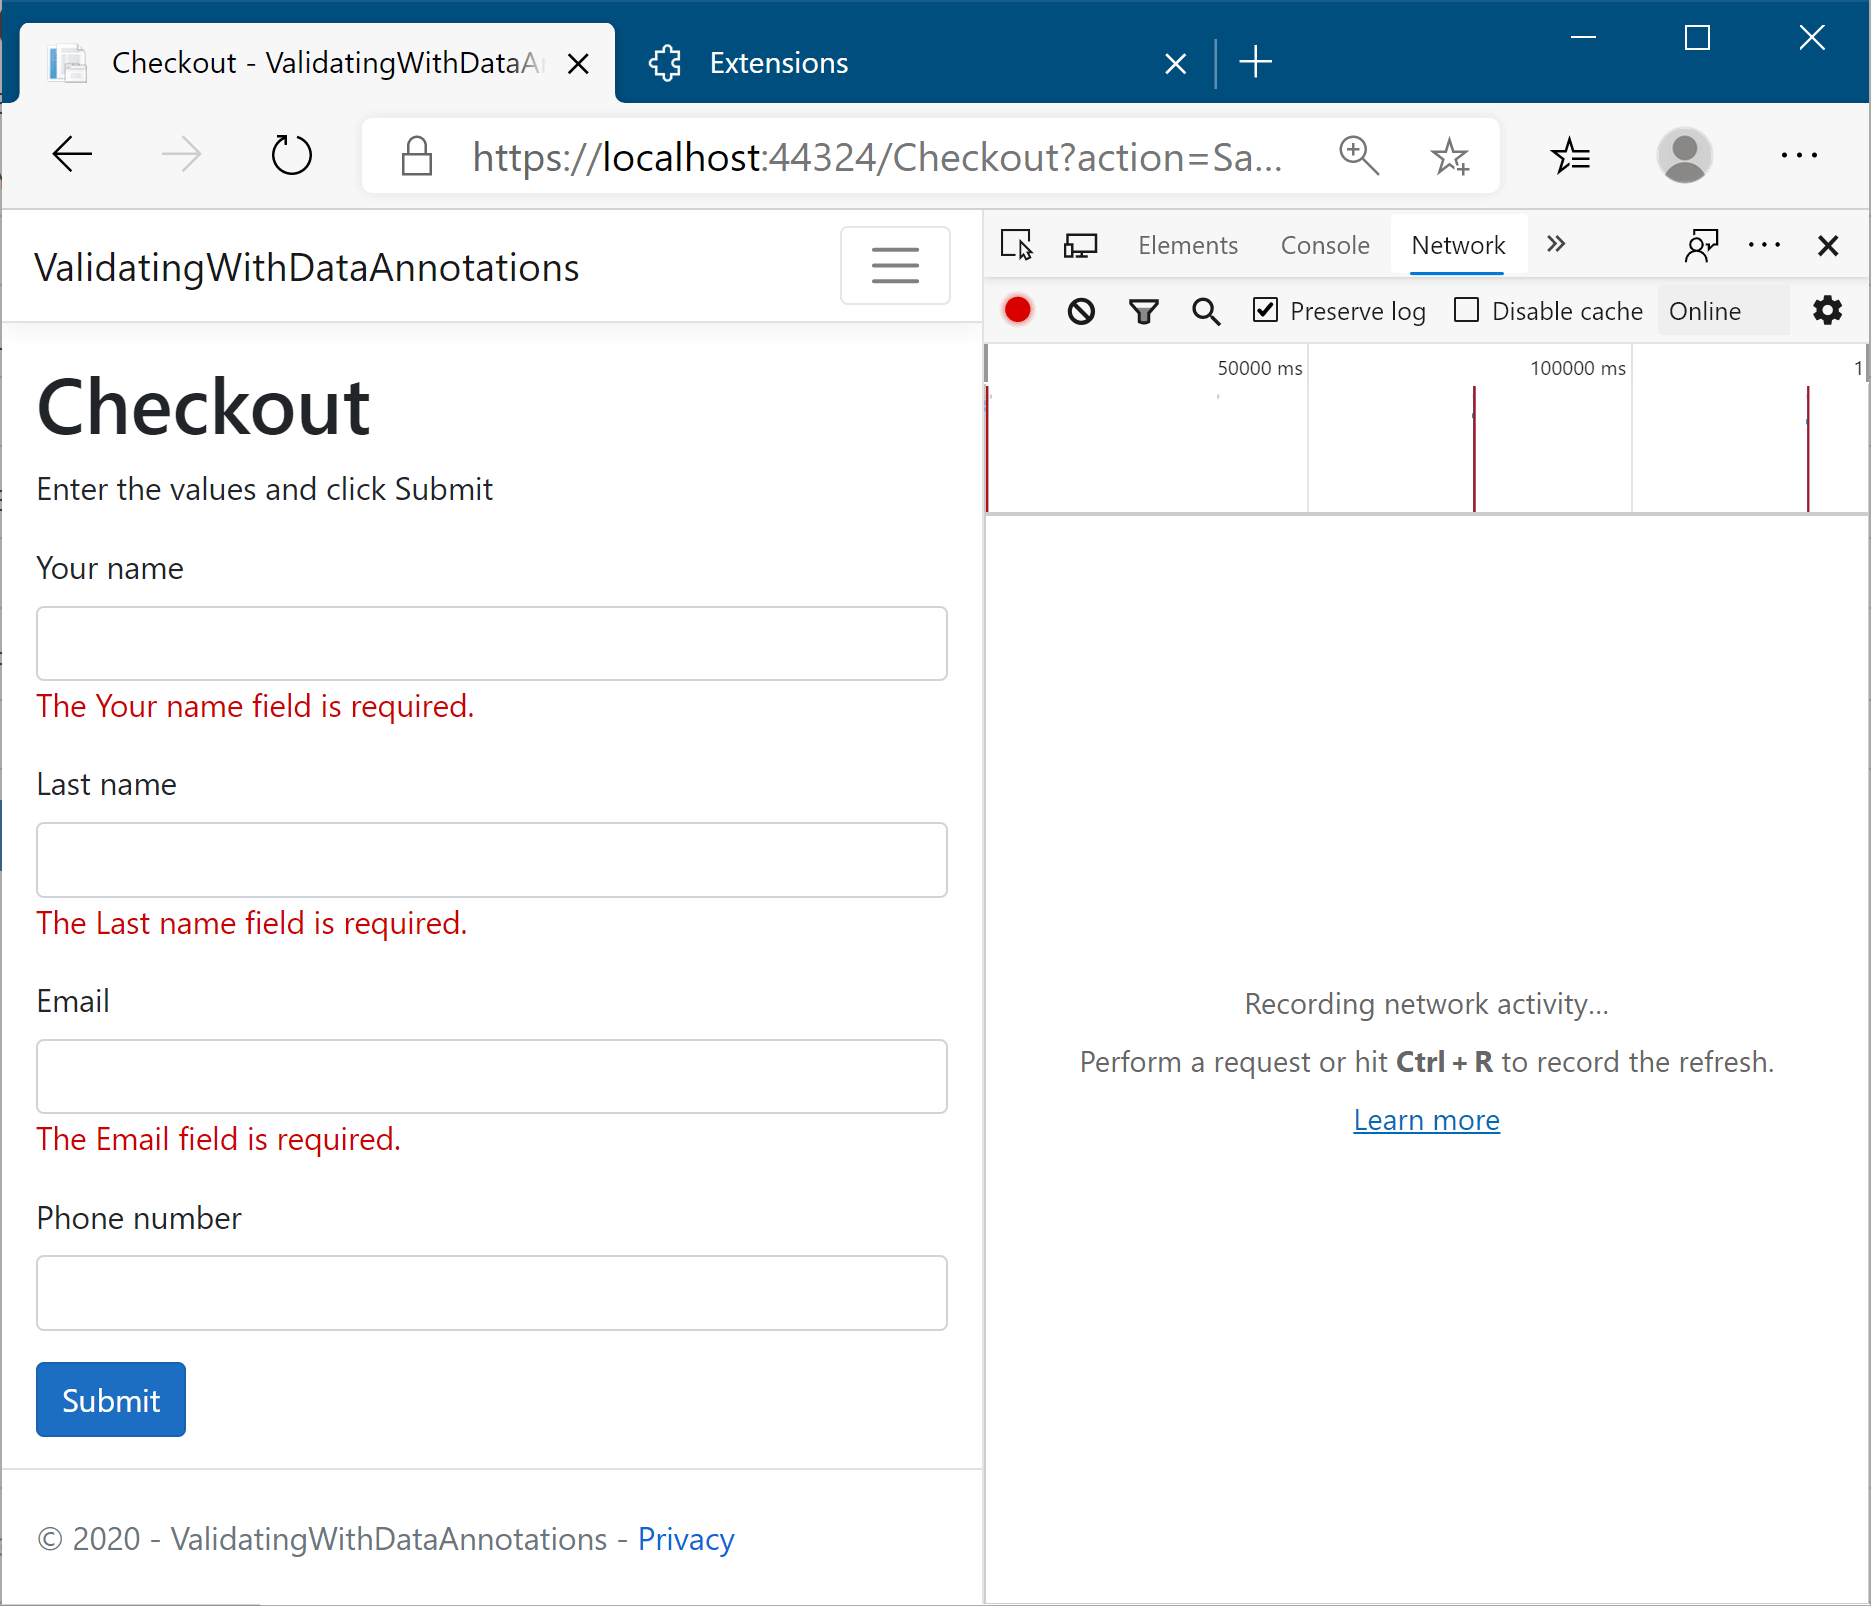
Figure 16.9 With client-side validation, clicking Submit triggers validation to be shown in the browser before the request is sent to the server. As shown in the right pane, no request is sent.
图 16.9 使用客户端验证时,单击“提交”会触发验证,在将请求发送到服务器之前,将在浏览器中显示。如右窗格中所示,未发送任何请求。
If you’re building an SPA, the onus is on the client-side framework to validate the data on the client side before posting it to the API. The API must still validate the data when it arrives at the server, but the client-side framework is responsible for providing the smooth user experience.
如果您正在构建 SPA,则客户端框架有责任在将数据发布到 API 之前在客户端验证数据。当数据到达服务器时,API 仍必须验证数据,但客户端框架负责提供流畅的用户体验。
When you use Razor Pages to generate your HTML, you get much of this validation code for free. Razor Pages automatically configures client-side validation for most of the built-in attributes without requiring additional work, as you’ll see in chapter 18. Unfortunately, if you’ve used custom ValidationAttributes, these will run only on the server by default; you need to do some additional wiring up of the attribute to make it work on the client side too. Despite this, custom validation attributes can be useful for handling common validation scenarios in your application, as you’ll see in chapter 31.
使用 Razor Pages 生成 HTML 时,可以免费获得大部分验证代码。Razor Pages 会自动为大多数内置属性配置客户端验证,而无需执行其他工作,如第 18 章所示。遗憾的是,如果你使用了自定义 ValidationAttributes,默认情况下,这些属性将仅在服务器上运行;您需要对 attribute 进行一些额外的连接,使其也可以在 Client 端工作。尽管如此,自定义验证属性对于处理应用程序中的常见验证场景非常有用,如第 31 章所示。
The model binding framework in ASP.NET Core gives you a lot of options on how to organize your Razor Pages: page handler parameters or PageModel properties; one binding model or multiple; options for where to define your binding model classes. In the next section I give some advice on how I like to organize my Razor Pages.
ASP.NET Core 中的模型绑定框架提供了许多有关如何组织 Razor 页面的选项:页面处理程序参数或 PageModel 属性;一个或多个装订模型;用于定义绑定模型类的位置的选项。在下一节中,我将就如何组织我的 Razor 页面提供一些建议。
16.4 Organizing your binding models in Razor Pages
16.4 在 Razor Pages 中组织绑定模型
In this section I give some general advice on how I like to configure the binding models in my Razor Pages. If you follow the patterns in this section, your Razor Pages will follow a consistent layout, making it easier for others to understand how each Razor Page in your app works.
在本节中,我将就如何在 Razor Pages 中配置绑定模型提供一些一般性建议。如果遵循本部分中的模式,则 Razor 页面将遵循一致的布局,使其他人更容易了解应用中的每个 Razor 页面的工作原理。
NOTE This advice is just personal preference, so feel free to adapt it if there are aspects you don’t agree with. The important thing is to understand why I make each suggestion, and to take that on board. Where appropriate, I deviate from these guidelines too!
注意:此建议只是个人喜好,因此如果您有不同意的方面,请随时对其进行调整。重要的是理解我为什么提出每个建议,并采纳它。在适当的情况下,我也会偏离这些准则!
Model binding in ASP.NET Core has a lot of equivalent approaches to take, so there is no “correct” way to do it. Listing 16.8 shows an example of how I would design a simple Razor Page. This Razor Page displays a form for a product with a given ID and allows you to edit the details using a POST request. It’s a much longer sample than we’ve looked at so far, but I highlight the important points.
ASP.NET Core 中的模型绑定有很多等效的方法可供采用,因此没有“正确”的方法。清单 16.8 显示了如何设计一个简单的 Razor Page 的示例。此 Razor 页面显示具有给定 ID 的产品的表单,并允许您使用 POST 请求编辑详细信息。这个样本比我们目前看到的要长得多,但我强调了要点。
Listing 16.8 Designing an edit product Razor Page
清单 16.8 设计编辑产品 Razor 页面
public class EditProductModel : PageModel
{
private readonly ProductService _productService; ❶
public EditProductModel(ProductService productService) ❶
{ ❶
_productService = productService; ❶
} ❶
[BindProperty] ❷
public InputModel Input { get; set; } ❷
public IActionResult OnGet(int id) ❸
{
var product = _productService.GetProduct(id); ❹
Input = new InputModel ❺
{ ❺
Name = product.ProductName, ❺
Price = product.SellPrice, ❺
}; ❺
return Page(); ❺
}
public IActionResult OnPost(int id) ❻
{
if (!ModelState.IsValid) ❼
{ ❼
return Page(); ❼
} ❼
_productService.UpdateProduct(id, Input.Name, Input.Price); ❽
return RedirectToPage("Index"); ❾
}
public class InputModel ❿
{ ❿
[Required] ❿
public string Name { get; set; } ❿
[Range(0, int.MaxValue)] ❿
public decimal Price { get; set; } ❿
} ❿
}
❶ The ProductService is injected using DI and provides access to the application model.
ProductService 使用 DI 注入,并提供对应用程序模型的访问。
❷ A single property is marked with BindProperty.
单个属性使用 BindProperty 进行标记。
❸ The id parameter is model-bound from the route template for both OnGet and OnPost handlers.
id 参数是 OnGet 和 OnPost 处理程序的路由模板的模型绑定的。
❹ Loads the product details from the application model
从应用程序模型加载产品详细信息
❺ Builds an instance of the InputModel for editing in the form from the existing product’s details
构建 InputModel 的实例,以便根据现有产品的详细信息在表单中进行编辑
❻ The id parameter is model-bound from the route template for both OnGet and OnPost handlers.
id 参数与 OnGet 和 OnPost 处理程序的路由模板进行模型绑定。
❼ If the request was not valid, redisplays the form without saving
如果请求无效,则重新显示表单而不保存
❽ Updates the product in the application model using the ProductService
使用 ProductService更新应用程序模型中的产品
❾ Redirects to a new page using the POST-REDIRECT-GET pattern
使用 POST-REDIRECT-GET 模式重定向到新页面
❿ Defines the InputModel as a nested class in the Razor Page
将 InputModel 定义为 Razor 页面中的嵌套类
This page shows the PageModel for a typical “edit form.” These are common in many line-of-business applications, among others, and it’s a scenario that Razor Pages works well for. You’ll see how to create the HTML side of forms in chapter 18.
此页面显示了典型的 “编辑表单” 的 PageModel。这些在许多业务线应用程序中很常见,这是 Razor Pages 非常适合的方案。您将在第 18 章中了解如何创建表单的 HTML 端。
NOTE The purpose of this example is to highlight the model-binding approach. The code is overly simplistic from a logic point of view. For example, it doesn’t check that the product with the provided ID exists or include any error handling.
注意:此示例的目的是强调模型绑定方法。从逻辑的角度来看,代码过于简单。例如,它不会检查具有所提供 ID 的产品是否存在,也不包含任何错误处理。
This form shows several patterns related to model binding that I try to adhere to when building Razor Pages:
此表单显示了我在构建 Razor Pages 时尝试遵循的几种与模型绑定相关的模式:
• Bind only a single property with [BindProperty]. I favor having a single property decorated with [BindProperty] for model binding in general. When more than one value needs to be bound, I create a separate class, InputModel, to hold the values, and I decorate that single property with [BindProperty]. Decorating a single property like this makes it harder to forget to add the attribute, and it means all your Razor Pages use the same pattern.
仅将单个属性与 [BindProperty] 绑定。通常,我赞成使用 [BindProperty] 修饰单个属性以进行模型绑定。当需要绑定多个值时,我创建一个单独的类 InputModel 来保存这些值,并使用 [BindProperty] 修饰该单个属性。像这样修饰单个属性会让人更难忘记添加属性,这意味着你的所有 Razor 页面都使用相同的模式。
• Define your binding model as a nested class. I define the InputModel as a nested class inside my Razor Page. The binding model is normally highly specific to that single page, so doing this keeps everything you’re working on together. Additionally, I normally use that exact class name, InputModel, for all my pages. Again, this adds consistency to your Razor Pages.
将绑定模型定义为嵌套类。我将 InputModel 定义为 Razor Page 中的嵌套类。绑定模型通常高度特定于该单个页面,因此这样做会将您正在处理的所有内容放在一起。此外,我通常对我的所有页面使用该确切的类名 InputModel。同样,这增加了 Razor 页面的一致性。
• Don’t use [BindProperties]. In addition to the [BindProperty] attribute, there is a [BindProperties] attribute (note the different spelling) that can be applied to the Razor Page PageModel directly. This will cause all properties in your model to be model-bound, which can leave you open to overposting attacks if you’re not careful. I suggest you don’t use the [BindProperties] attribute and stick to binding a single property with [BindProperty] instead.
不要使用 [BindProperties]。除了 [BindProperty] 属性之外,还有一个 [BindProperties] 属性(请注意不同的拼写),该属性可以直接应用于 Razor Page PageModel。这将导致模型中的所有属性都受模型限制,如果您不小心,可能会使您面临过度发布攻击。我建议您不要使用 [BindProperties] 属性,而是坚持使用 [BindProperty] 绑定单个属性。
• Accept route parameters in the page handler. For simple route parameters, such as the id passed into the OnGet and OnPost handlers in listing 16.8, I add parameters to the page handler method itself. This avoids the clunky SupportsGet=true syntax for GET requests.
在页面处理程序中接受路由参数。对于简单的路由参数,例如在清单 16.8 中传递给 OnGet 和 OnPost 处理程序的 id,我将参数添加到页面处理程序方法本身。这避免了 GET 请求的笨拙 SupportsGet=true 语法。
• Always validate before using data. I said it before, so I’ll say it again: validate user input!
使用数据之前始终进行验证。我之前说过,所以我再说一遍:验证用户输入!
That concludes this look at model binding in Razor Pages. You saw how the ASP.NET Core framework uses model binding to simplify the process of extracting values from a request and turning them into normal .NET objects you can work with quickly. The most important aspect of this chapter is the focus on validation. This is a common concern for all web applications, and the use of DataAnnotations can make it easy to add validation to your models.
Razor Pages 中的模型绑定到此结束。您了解了 ASP.NET Core 框架如何使用模型绑定来简化从请求中提取值并将其转换为可快速使用的普通 .NET 对象的过程。本章最重要的方面是关注验证。这是所有 Web 应用程序的共同关注点,使用 DataAnnotations 可以轻松地向模型添加验证。
In the next chapter we’ll continue our journey through Razor Pages by looking at how to create views. In particular, you’ll learn how to generate HTML in response to a request using the Razor templating engine.
在下一章中,我们将通过了解如何创建视图来继续浏览 Razor 页面。具体而言,您将学习如何使用 Razor 模板引擎生成 HTML 以响应请求。
16.5 Summary
16.5 总结
Razor Pages uses three distinct models, each responsible for a different aspect of a request. The binding model encapsulates data sent as part of a request. The application model represents the state of the application. The PageModel is the backing class for the Razor Page, and it exposes the data used by the Razor view to generate a response.
Razor Pages 使用三种不同的模型,每种模型负责请求的不同方面。绑定模型封装作为请求的一部分发送的数据。应用程序模型表示应用程序的状态。PageModel 是 Razor Page 的支持类,它公开 Razor 视图用于生成响应的数据。
Model binding extracts values from a request and uses them to create .NET objects the page handler can use when they execute. Any properties on the PageModel marked with the [BindProperty] attribute and method parameters of the page handlers will take part in model binding.
模型绑定从请求中提取值,并使用它们创建页面处理程序在执行时可以使用的 .NET 对象。PageModel 上标有 [BindProperty] 属性和页面处理程序的方法参数的任何属性都将参与模型绑定。
By default, there are three binding sources for Razor Pages: POSTed form values, route values, and the query string. The binder will interrogate these sources in order when trying to bind your binding models.
默认情况下,Razor Pages 有三个绑定源:POST 表单值、路由值和查询字符串。Binder 将在尝试绑定 Binding Models 时按顺序询问这些源。
When binding values to models, the names of the parameters and properties aren’t case-sensitive.
将值绑定到模型时,参数和属性的名称不区分大小写。
You can bind to simple types or to the properties of complex types. Simple types must be convertible from strings to be bound automatically, such as numbers, dates, Boolean values, and custom types with a TryParse method.
可以绑定到简单类型或复杂类型的属性。简单类型必须可从字符串转换而来,以便使用 TryParse 方法自动绑定,例如数字、日期、布尔值和自定义类型。
To bind complex types, the types must have a default constructor and public, settable properties. The Razor Pages model binder binds each property of a complex type using values from the binding sources.
若要绑定复杂类型,类型必须具有默认构造函数和公共的可设置属性。Razor Pages 模型绑定器使用绑定源中的值绑定复杂类型的每个属性。
You can bind collections and dictionaries using the [index]=value and [key] =value syntax, respectively.
您可以分别使用 [index]=value 和 [key] =value 语法绑定集合和字典。
You can customize the binding source for a binding model using [From] attributes applied to the method, such as [FromHeader] and [FromBody]. These can be used to bind to nondefault binding sources, such as headers or JSON body content. The [FromBody] attribute is always required when binding to a JSON body.
您可以使用应用于方法的 [From] 属性(如 [FromHeader] 和 [FromBody])自定义绑定模型的绑定源。这些可用于绑定到非默认绑定源,例如标头或 JSON 正文内容。绑定到 JSON 正文时,始终需要 [FromBody] 属性。
Validation is necessary to check for security threats. Check that data is formatted correctly and confirm that it conforms to expected values and that it meets your business rules.
验证对于检查安全威胁是必要的。检查数据的格式是否正确,并确认它符合预期值以及是否符合您的业务规则。
Validation in Razor Pages occurs automatically after model binding, but you must manually check the result of the validation and act accordingly in your page handler by interrogating the ModelState.IsValid property.
Razor Pages 中的验证在模型绑定后自动进行,但您必须手动检查验证结果,并通过询问 ModelState.IsValid 属性在页面处理程序中采取相应措施。
Client-side validation provides a better user experience than server-side validation alone, but you should always use server-side validation. Client-side validation typically uses JavaScript and attributes applied to your HTML elements to validate form values.
与单独的服务器端验证相比,客户端验证提供了更好的用户体验,但您应该始终使用服务器端验证。客户端验证通常使用应用于 HTML 元素的 JavaScript 和属性来验证表单值。