17 Rendering HTML using Razor views
17 使用 Razor 视图呈现 HTML
This chapter covers
本章涵盖
• Creating Razor views to display HTML to a user
创建 Razor 视图以向用户显示 HTML
• Using C# and the Razor markup syntax to generate HTML dynamically
使用 C# 和 Razor 标记语法动态生成 HTML
• Reusing common code with layouts and partial views
将通用代码与布局和部分视图重复使用
It’s easy to get confused between the terms involved in Razor Pages—PageModel, page handlers, Razor views—especially as some of the terms describe concrete features, and others describe patterns and concepts. We’ve touched on all these terms in detail in previous chapters, but it’s important to get them straight in your mind:
Razor Pages 中涉及的术语(PageModel、页面处理程序、Razor 视图)很容易混淆,尤其是当其中一些术语描述具体功能,而另一些术语描述模式和概念时。我们在前面的章节中详细介绍了所有这些术语,但请务必将它们清晰地记在脑海中:
• Razor Pages—Razor Pages generally refers to the page-based paradigm that combines routing, model binding, and HTML generation using Razor views.
Razor Pages - Razor Pages 通常是指基于 Page 的范例,它使用 Razor 视图将路由、模型绑定和 HTML 生成相结合。
• Razor Page—A single Razor Page represents a single page or endpoint. It typically consists of two files: a .cshtml file containing the Razor view and a .cshtml.cs file containing the page’s PageModel.
Razor 页面 - 单个 Razor 页面表示单个页面或端点。它通常由两个文件组成:一个包含 Razor 视图的 .cshtml 文件和一个包含页面 PageModel 的 .cshtml.cs 文件。
• PageModel—The PageModel for a Razor Page is where most of the action happens. It’s where you define the binding models for a page, which extracts data from the incoming request. It’s also where you define the page’s page handlers.
PageModel - Razor 页面的 PageModel 是大多数作发生的位置。您可以在此处定义页面的绑定模型,该页面从传入请求中提取数据。您还可以在此处定义页面的页面处理程序。
• Page handler—Each Razor Page typically handles a single route, but it can handle multiple HTTP verbs such as GET and POST. Each page handler typically handles a single HTTP verb.
页面处理程序 - 每个 Razor 页面通常处理单个路由,但也可以处理多个 HTTP 动词,例如 GET 和 POST。每个页面处理程序通常处理一个 HTTP 动词。
• Razor view—Razor views (also called Razor templates) are used to generate HTML. They are typically used in the final stage of a Razor Page to generate the HTML response to send back to the user.
Razor 视图 - Razor 视图 (也称为 Razor 模板) 用于生成 HTML。它们通常用于 Razor 页面的最后阶段,以生成 HTML 响应以发送回用户。
In the previous four chapters, I covered a whole cross section of Razor Pages, including the Model-View-Controller (MVC) design pattern, the Razor Page PageModel, page handlers, routing, and binding models. This chapter covers the last part of the MVC pattern: using a view to generate the HTML that’s delivered to the user’s browser.
在前四章中,我介绍了 Razor Pages 的整个横截面,包括模型-视图-控制器 (MVC) 设计模式、Razor Page PageModel、页面处理程序、路由和绑定模型。本章介绍 MVC 模式的最后一部分:使用视图生成传送到用户浏览器的 HTML。
In ASP.NET Core, views are normally created using the Razor markup syntax (sometimes described as a templating language), which uses a mixture of HTML and C# to generate the final HTML. This chapter covers some of the features of Razor and how to use it to build the view templates for your application. Generally speaking, users will have two sorts of interactions with your app: they’ll read data that your app displays, and they’ll send data or commands back to it. The Razor language contains several constructs that make it simple to build both types of applications.
在 ASP.NET Core 中,视图通常使用 Razor 标记语法(有时描述为模板语言)创建,该语法使用 HTML 和 C# 的混合来生成最终的 HTML。本章介绍 Razor 的一些功能,以及如何使用它来为您的应用程序构建视图模板。一般来说,用户将与你的应用进行两种类型的交互:他们将读取你的应用显示的数据,并将数据或命令发送回它。Razor 语言包含多个构造,使构建这两种类型的应用程序变得简单。
When displaying data, you can use the Razor language to easily combine static HTML with values from your PageModel. Razor can use C# as a control mechanism, so adding conditional elements and loops is simple—something you couldn’t achieve with HTML alone.
显示数据时,您可以使用 Razor 语言轻松地将静态 HTML 与 PageModel 中的值组合在一起。Razor 可以使用 C# 作为控制机制,因此添加条件元素和循环很简单,这是单独使用 HTML 无法实现的。
The normal approach to sending data to web applications is with HTML forms. Virtually every dynamic app you build will use forms; some applications will be pretty much nothing but forms! ASP.NET Core and the Razor templating language include Tag Helpers that make generating HTML forms easy.
将数据发送到 Web 应用程序的正常方法是使用 HTML 表单。您构建的几乎每个动态应用程序都将使用表单;有些应用程序几乎只不过是表单!ASP.NET Core 和 Razor 模板语言包括标记帮助程序,使生成 HTML 表单变得容易。
NOTE You’ll get a brief glimpse of Tag Helpers in section 17.1, but I explore them in detail in chapter 18.
注意:您将在 17.1 节中简要了解标记帮助程序,但我会在第 18 章中详细探讨它们。
In this chapter we’ll be focusing primarily on displaying data and generating HTML using Razor rather than creating forms. You’ll see how to render values from your PageModel to the HTML, and how to use C# to control the generated output. Finally, you’ll learn how to extract the common elements of your views into subviews called layouts and partial views, and how to compose them to create the final HTML page.
在本章中,我们将主要关注使用 Razor 显示数据和生成 HTML,而不是创建表单。您将了解如何将 PageModel 中的值呈现到 HTML,以及如何使用 C# 控制生成的输出。最后,您将学习如何将视图的常见元素提取到称为布局和分部视图的子视图中,以及如何编写它们以创建最终的 HTML 页面。
17.1 Views: Rendering the user interface
17.1 视图:渲染用户界面
In this section I provide a quick introduction to rendering HTML using Razor views. We’ll recap the MVC design pattern used by Razor Pages and where the view fits in. Then I’ll show how Razor syntax allows you to mix C# and HTML to generate dynamic UIs.
在本节中,我将简要介绍如何使用 Razor 视图呈现 HTML。我们将回顾 Razor Pages 使用的 MVC 设计模式以及视图的适用位置。然后,我将展示 Razor 语法如何允许您混合使用 C# 和 HTML 来生成动态 UI。
As you know from earlier chapters on the MVC design pattern, it’s the job of the Razor Page’s page handler to choose what to return to the client. For example, if you’re developing a to-do list application, imagine a request to view a particular to-do item, as shown in figure 17.1.
正如您在前面有关 MVC 设计模式的章节中所知,Razor Page 的页面处理程序的工作是选择要返回给客户端的内容。例如,如果您正在开发一个待办事项列表应用程序,请想象一个查看特定待办事项的请求,如图 17.1 所示。
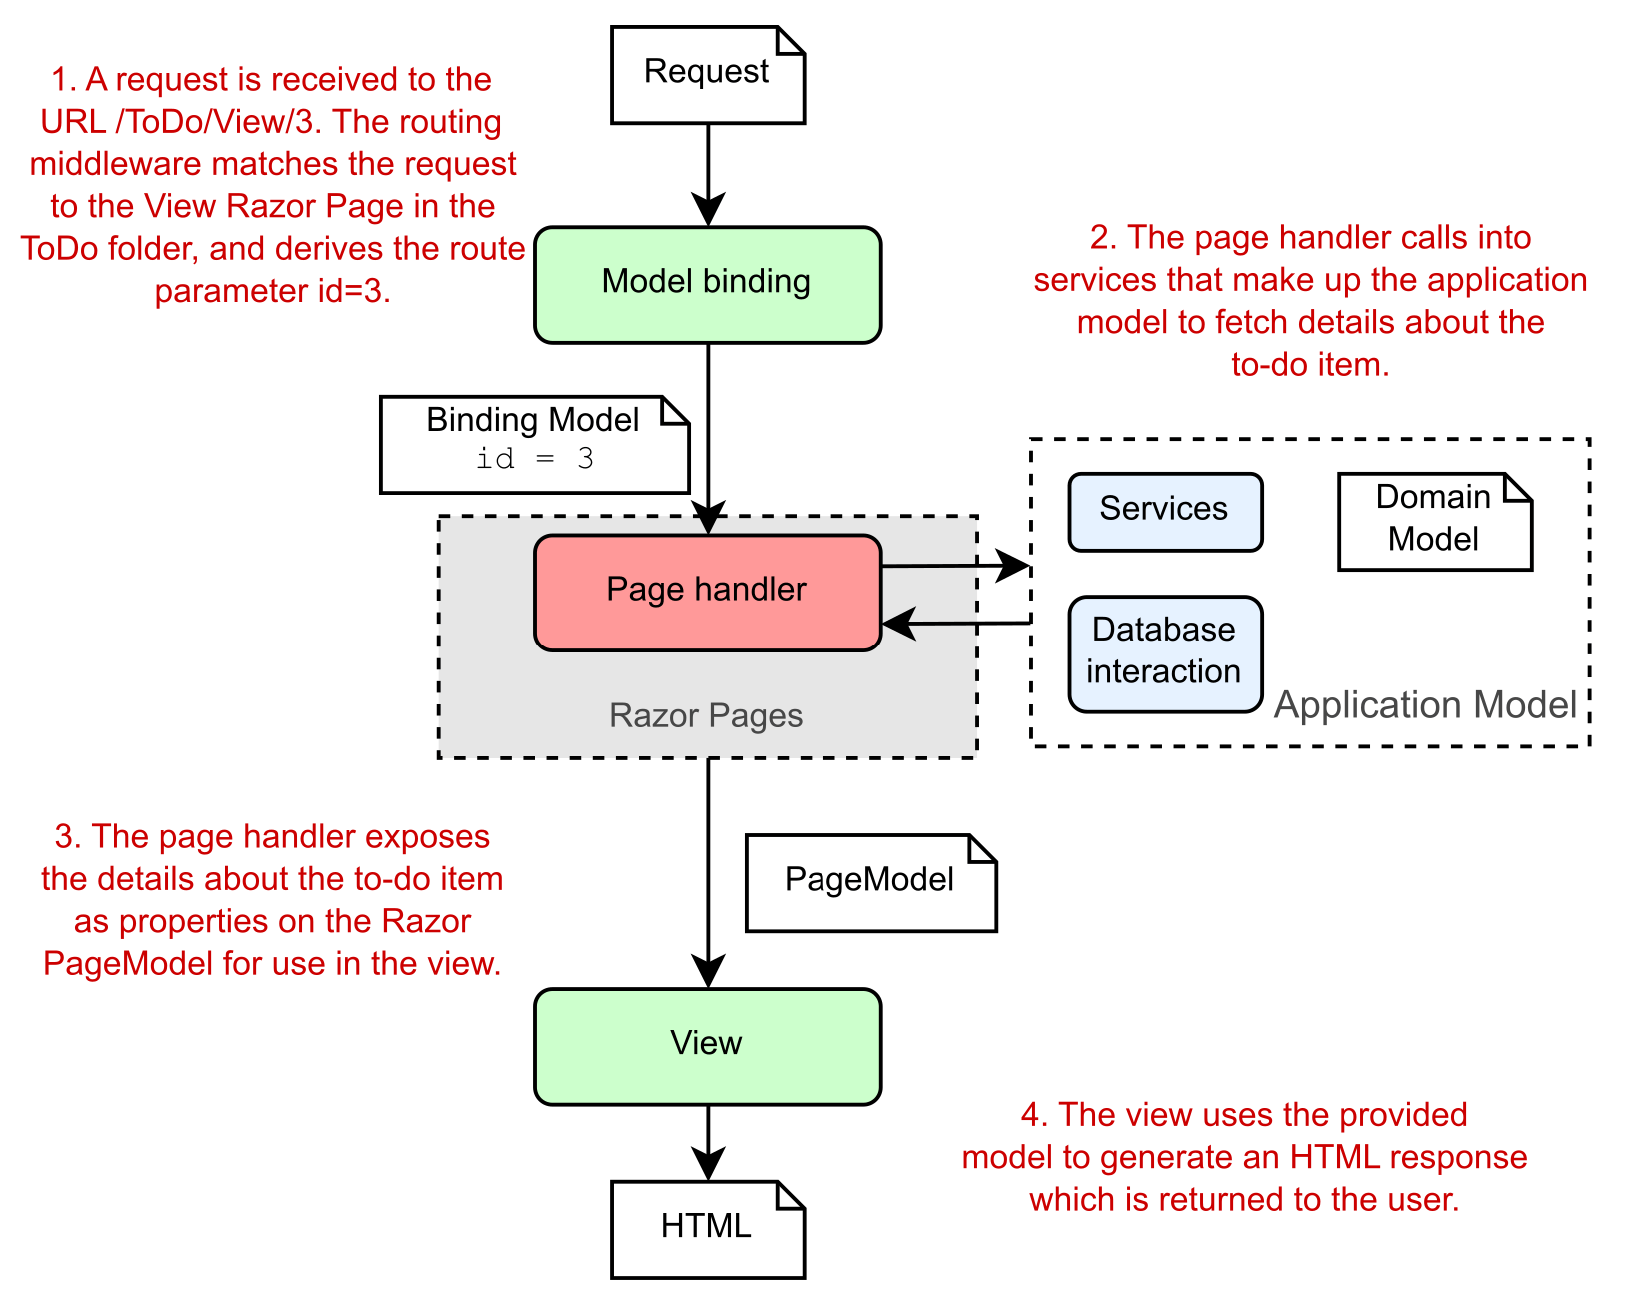
Figure 17.1 Handling a request for a to-do list item using ASP.NET Core Razor Pages. The page handler builds the data required by the view and exposes it as properties on the PageModel. The view generates HTML based only on the data provided; it doesn’t need to know where that data comes from.
图 17.1 使用 ASP.NET Core Razor Pages 处理待办事项列表项的请求。页面处理程序构建视图所需的数据,并将其作为 PageModel 上的属性公开。视图仅根据提供的数据生成 HTML;它不需要知道这些数据来自哪里。
A typical request follows the steps shown in figure 17.1:
典型的请求遵循图 17.1 中所示的步骤:
• The middleware pipeline receives the request, and the routing middleware determines the endpoint to invoke—in this case, the View Razor Page in the ToDo folder.
中间件管道接收请求,路由中间件确定要调用的终结点 - 在本例中为 ToDo 文件夹中的 View Razor Page。
• The model binder (part of the Razor Pages framework) uses the request to build the binding models for the page, as you saw in chapter 16. The binding models are set as properties on the Razor Page or are passed to the page handler method as arguments when the handler is executed. The page handler checks that you passed a valid id for the to-do item and marks the ModelState as valid if so.
模型绑定器 (Razor Pages 框架的一部分) 使用请求为页面构建绑定模型,如第 16 章所示。绑定模型在 Razor Page 上设置为属性,或者在执行处理程序时作为参数传递给页面处理程序方法。页面处理程序检查您是否为待办事项传递了有效的 ID,如果是,则将 ModelState 标记为有效。
• If the request is valid, the page handler calls out to the various services that make up the application model. This might load the details about the to-do from a database or from the filesystem, returning them to the handler. As part of this process, either the application model or the page handler itself generates values to pass to the view and sets them as properties on the Razor Page PageModel.
如果请求有效,则页面处理程序将调用构成应用程序模型的各种服务。这可能会从数据库或文件系统加载有关 to-do 的详细信息,并将它们返回给处理程序。在此过程中,应用程序模型或页面处理程序本身会生成要传递给视图的值,并将其设置为 Razor Page PageModel 上的属性。
Once the page handler has executed, the PageModel should contain all the data required to render a view. In this example, it contains details about the to-do itself, but it might also contain other data, such as how many to-dos you have left, whether you have any to-dos scheduled for today, your username, and so on—anything that controls how to generate the end UI for the request.
执行页面处理程序后, PageModel 应包含呈现视图所需的所有数据。在此示例中,它包含有关待办事项本身的详细信息,但它也可能包含其他数据,例如您还剩下多少个待办事项、您今天是否安排了任何待办事项、您的用户名等 — 控制如何为请求生成最终 UI 的任何内容。
• The Razor view template uses the PageModel to generate the final response and returns it to the user via the middleware pipeline.
Razor 视图模板使用 PageModel 生成最终响应,并通过中间件管道将其返回给用户。
A common thread throughout this discussion of MVC is the separation of concerns MVC brings, and it’s no different when it comes to your views. It would be easy enough to generate the HTML directly in your application model or in your controller actions, but instead you delegate that responsibility to a single component: the view.
贯穿本次 MVC 讨论的一个共同点是 MVC 带来的关注点分离,对于您的视图来说,这没有什么不同。直接在应用程序模型或控制器作中生成 HTML 很容易,但您将该责任委托给单个组件:视图。
But even more than that, you separate the data required to build the view from the process of building it by using properties on the PageModel. These properties should contain all the dynamic data the view needs to generate the final output.
但更重要的是,通过使用 PageModel 上的属性,将构建视图所需的数据与构建视图的过程分开。这些属性应包含视图生成最终输出所需的所有动态数据。
Tip Views shouldn’t call methods on the PageModel. The view should generally only be accessing data that has already been collected and exposed as properties.
提示:视图不应调用 PageModel 上的方法。视图通常应仅访问已收集并作为属性公开的数据。
Razor Page handlers indicate that the Razor view should be rendered by returning a PageResult (or by returning void), as you saw in chapter 15. The Razor Pages infrastructure executes the Razor view associated with a given Razor Page to generate the final response. The use of C# in the Razor template means you can dynamically generate the final HTML sent to the browser. This allows you to, for example, display the name of the current user in the page, hide links the current user doesn’t have access to, or render a button for every item in a list.
Razor Page 处理程序指示应通过返回 PageResult(或返回 void)来呈现 Razor 视图,如第 15 章所示。Razor Pages 基础结构执行与给定 Razor 页面关联的 Razor 视图,以生成最终响应。在 Razor 模板中使用 C# 意味着您可以动态生成发送到浏览器的最终 HTML。例如,这允许您在页面中显示当前用户的名称,隐藏当前用户无权访问的链接,或者为列表中的每个项目呈现一个按钮。
Imagine your boss asks you to add a page to your application that displays a list of the application’s users. You should also be able to view a user from the page or create a new one, as shown in figure 17.2.
假设您的老板要求您向应用程序添加一个页面,该页面显示应用程序的用户列表。您还应该能够从页面查看用户或创建新用户,如图 17.2 所示。
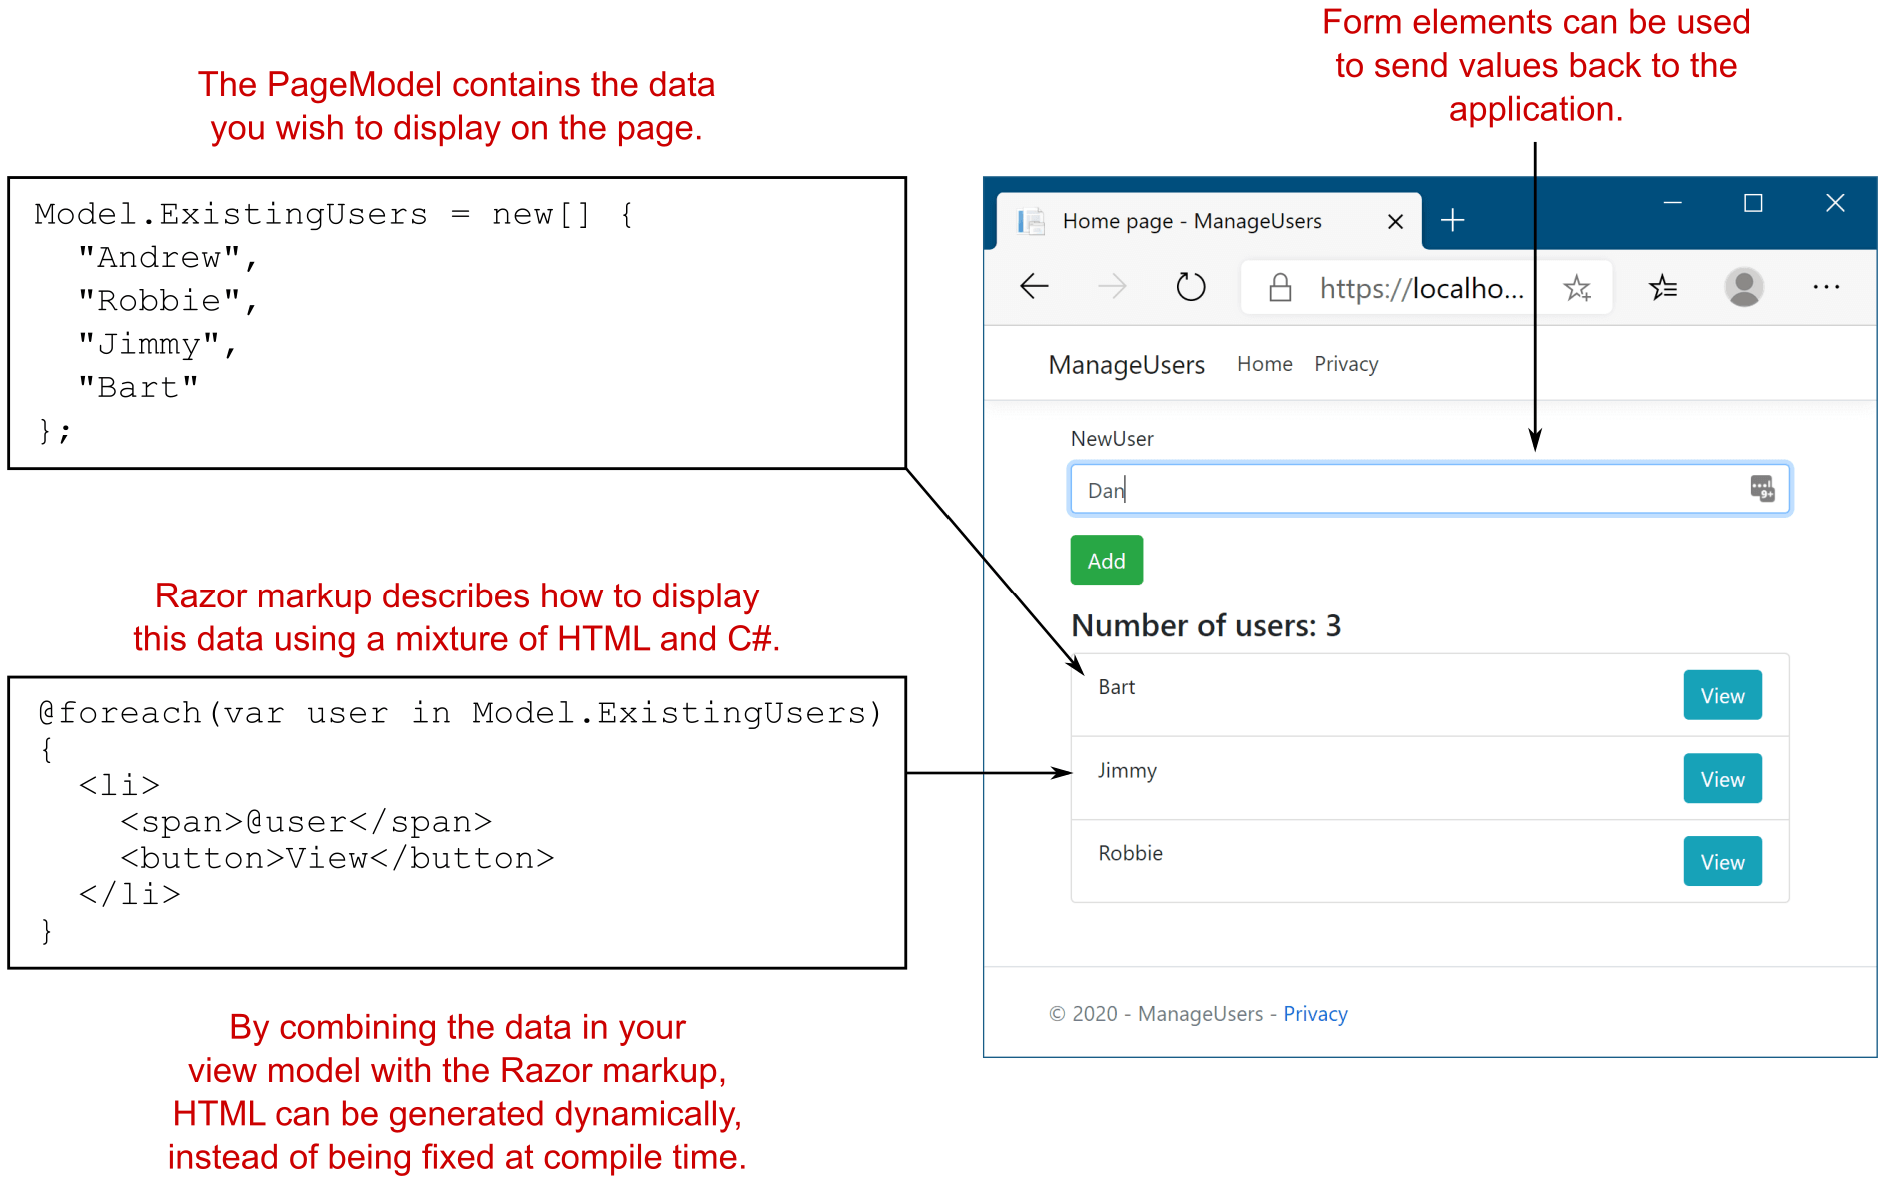
Figure 17.2 The use of C# in Razor lets you easily generate dynamic HTML that varies at runtime. In this example, using a foreach loop inside the Razor view dramatically reduces the duplication in the HTML that you would otherwise have to write.
图 17.2 在 Razor 中使用 C# 可让您轻松生成在运行时变化的动态 HTML。在此示例中,在 Razor 视图中使用 foreach 循环可显著减少 HTML 中必须编写的重复项。
With Razor templates, generating this sort of dynamic content is simple. Listing 17.1 shows a template that could be used to generate the interface in figure 17.2. It combines standard HTML with C# statements and uses Tag Helpers to generate the form elements.
使用 Razor 模板,生成此类动态内容非常简单。清单 17.1 显示了一个可用于生成图 17.2 中接口的模板。它将标准 HTML 与 C# 语句相结合,并使用标记帮助程序生成表单元素。
Listing 17.1 A Razor template to list users and a form for adding a new user
清单 17.1 用于列出用户的 Razor 模板和用于添加新用户的表单
@page
@model IndexViewModel
<div class="row"> ❶
<div class="col-md-6"> ❶
<form method="post">
<div class="form-group">
<label asp-for="NewUser"></label> ❷
<input class="form-control" asp-for="NewUser" /> ❷
<span asp-validation-for="NewUser"></span> ❷
</div>
<div class="form-group">
<button type="submit"
class="btn btn-success">Add</button>
</div>
</form>
</div>
</div>
<h4>Number of users: @Model.ExistingUsers.Count</h4> ❸
<div class="row">
<div class="col-md-6">
<ul class="list-group">
@foreach (var user in Model.ExistingUsers) ❹
{
<li class="list-group-item d-flex justify-content-between">
<span>@user</span>
<a class="btn btn-info"
asp-page="ViewUser" ❺
asp-route-userName="@user">View</a> ❺
</li>
}
</ul>
</div>
</div>
❶ Normal HTML is sent to the browser unchanged.
普通 HTML 原封不动地发送到浏览器。
❷ Tag Helpers attach to HTML elements to create forms.
标签助手附加到 HTML 元素以创建表单。
❸ Values can be written from C# objects to the HTML.
值可以从 C# 对象写入 HTML。
❹ C# constructs such as for loops can be used in Razor.
可以在 Razor 中使用 for 循环等 C# 构造。
❺ Tag Helpers can also be used outside forms to help in other HTML generation.
标签助手也可以在表单之外使用,以帮助生成其他 HTML。
This example demonstrates a variety of Razor features. There’s a mixture of HTML that’s written unmodified to the response output, and there are various C# constructs used to generate HTML dynamically. In addition, you can see several Tag Helpers. These look like normal HTML attributes that start with asp-, but they’re part of the Razor language. They can customize the HTML element they’re attached to, changing how it’s rendered. They make building HTML forms much simpler than they would be otherwise. Don’t worry if this template is a bit overwhelming at the moment; we’ll break it all down as you progress through this chapter and the next.
此示例演示了各种 Razor 功能。响应输出中混合了未经修改的 HTML,并且有各种 C# 构造用于动态生成 HTML。此外,您还可以看到多个 Tag Helpers。这些看起来类似于以 asp- 开头的普通 HTML 属性,但它们是 Razor 语言的一部分。他们可以自定义附加到的 HTML 元素,从而更改其呈现方式。它们使构建 HTML 表单比其他方式简单得多。如果这个模板目前有点让人不知所措,请不要担心;随着您完成本章和下一章,我们将对其进行全部分解。
Razor Pages are compiled when you build your application. Behind the scenes, they become another C# class in your application. It’s also possible to enable runtime compilation of your Razor Pages. This allows you to modify your Razor Pages while your app is running without having to explicitly stop and rebuild. This can be handy when developing locally, but it’s best avoided when you deploy to production. You can read how to enable this at http://mng.bz/jP2P.
Razor Pages 是在构建应用程序时编译的。在后台,它们成为应用程序中的另一个 C# 类。还可以启用 Razor Pages 的运行时编译。这样,您就可以在应用运行时修改 Razor Pages,而无需显式停止和重新生成。在本地开发时,这可能很方便,但在部署到生产环境时最好避免。您可以在 http://mng.bz/jP2P 阅读如何启用此功能。
NOTE As with most things in ASP.NET Core, it’s possible to swap out the Razor templating engine and replace it with your own server-side rendering engine. You can’t replace Razor with a client-side framework like Angular or React. If you want to take this approach, you’d use minimal APIs or web API controllers instead and a separate client-side framework.
注意:与 ASP.NET Core 中的大多数内容一样,可以换出 Razor 模板引擎,并将其替换为您自己的服务器端渲染引擎。您不能将 Razor 替换为 Angular 或 React 等客户端框架。如果要采用此方法,则需要使用最少的 API 或 Web API 控制器以及单独的客户端框架。
In the next section we’ll look in more detail at how Razor views fit into the Razor Pages framework and how you can pass data from your Razor Page handlers to the Razor view to help build the HTML response.
在下一部分中,我们将更详细地了解 Razor 视图如何适应 Razor Pages 框架,以及如何将数据从 Razor Page 处理程序传递到 Razor 视图以帮助构建 HTML 响应。
17.2 Creating Razor views
17.2 创建 Razor 视图
In this section we’ll look at how Razor views fit into the Razor Pages framework. You’ll learn how to pass data from your page handlers to your Razor views and how you can use that data to generate dynamic HTML.
在本部分中,我们将了解 Razor 视图如何适应 Razor Pages 框架。您将了解如何将数据从页面处理程序传递到 Razor 视图,以及如何使用该数据生成动态 HTML。
With ASP.NET Core, whenever you need to display an HTML response to the user, you should use a view to generate it. Although it’s possible to directly generate a string from your page handlers, which will be rendered as HTML in the browser, this approach doesn’t adhere to the MVC separation of concerns and will quickly leave you tearing your hair out.
使用 ASP.NET Core,每当需要向用户显示 HTML 响应时,都应该使用视图来生成它。尽管可以直接从页面处理程序生成字符串,该字符串将在浏览器中呈现为 HTML,但这种方法不符合 MVC 关注点分离,并且很快就会让您感到困惑。
NOTE Some middleware, such as the WelcomePageMiddleware you saw in chapter 4, may generate HTML responses without using a view, which can make sense in some situations. But your Razor Page and MVC controllers should always generate HTML using views.
注意:一些中间件,比如你在第 4 章中看到的 WelcomePageMiddleware,可能会在不使用视图的情况下生成 HTML 响应,这在某些情况下是有意义的。但 Razor Page 和 MVC 控制器应始终使用视图生成 HTML。
Instead, by relying on Razor views to generate the response, you get access to a wide variety of features, as well as editor tooling to help. This section serves as a gentle introduction to Razor views, the things you can do with them, and the various ways you can pass data to them.
相反,通过依靠 Razor 视图生成响应,您可以访问各种功能以及提供帮助的编辑器工具。本节简要介绍了 Razor 视图、您可以使用它们执行的作以及向它们传递数据的各种方式。
17.2.1 Razor views and code-behind
17.2.1 Razor 视图和代码隐藏
In this book you’ve already seen that Razor Pages typically consist of two files:
在本书中,您已经看到 Razor Pages 通常由两个文件组成:
• The .cshtml file, commonly called the Razor view
.cshtml 文件,通常称为 Razor 视图
• The .cshtml.cs file, commonly called the code-behind, which contains the PageModel
.cshtml.cs 文件,通常称为代码隐藏,其中包含 PageModel
The Razor view contains the @page directive, which makes it a Razor Page, as you’ve seen previously. Without this directive, the Razor Pages framework will not route requests to the page, and the file is ignored for most purposes.
Razor 视图包含 @page 指令,这使其成为 Razor 页面,如前所述。如果没有此指令,Razor Pages 框架不会将请求路由到页面,并且在大多数情况下会忽略该文件。
DEFINITION A directive is a statement in a Razor file that changes the way the template is parsed or compiled. Another common directive is the @using newNamespace directive, which makes objects in the newNamespace namespace available.
定义:指令是 Razor 文件中的一条语句,用于更改模板的分析或编译方式。另一个常见指令是 @using newNamespace 指令,它使 newNamespace 命名空间中的对象可用。
The code-behind .cshtml.cs file contains the PageModel for an associated Razor Page. It contains the page handlers that respond to requests, and it is where the Razor Page typically interacts with other parts of your application.
代码隐藏 .cshtml.cs 文件包含关联 Razor 页面的 PageModel。它包含响应请求的页面处理程序,并且是 Razor Page 通常与应用程序的其他部分交互的位置。
Even though the .cshtml and .cshtml.cs files have the same name, such as ToDoItem.cshtml and ToDoItem.cshtml.cs, it’s not the filename that’s linking them. But if it’s not by filename, how does the Razor Pages framework know which PageModel is associated with a given Razor Page view file?
即使 .cshtml 和 .cshtml.cs 文件具有相同的名称(如 ToDoItem.cshtml 和 ToDoItem.cshtml.cs),也不是链接它们的文件名。但是,如果不是按文件名,Razor Pages 框架如何知道哪个 PageModel 与给定的 Razor Page 视图文件相关联?
At the top of each Razor Page, after the @page directive, is the @model directive with a Type, indicating which PageModel is associated with the Razor view. The following directives indicate that the ToDoItemModel is the PageModel associated with the Razor Page:
在每个 Razor 页面的顶部,@page 指令后面是带有 Type 的 @model 指令,指示哪个 PageModel 与 Razor 视图相关联。以下指令指示 ToDoItemModel 是与 Razor Page 关联的 PageModel:
@page
@model ToDoItemModel
Once a request is routed to a Razor Page, as covered in chapter 14, the framework looks for the @model directive to decide which PageModel to use. Based on the PageModel selected, it then binds to any properties in the PageModel marked with the [BindProperty] attribute (as we covered in chapter 16) and executes the appropriate page handler (based on the request’s HTTP verb, as described in chapter 15).
将请求路由到 Razor Page 后(如第 14 章所述),框架会查找 @model 指令来决定使用哪个 PageModel。然后,根据所选的 PageModel,它绑定到 PageModel 中标有 [BindProperty] 属性的任何属性(如第 16 章所述),并执行相应的页面处理程序(基于请求的 HTTP 动词,如第 15 章所述)。
NOTE Technically, the PageModel and @model directive are optional. If you don’t specify a PageModel, the framework executes an implicit page handler, as you saw in chapter 15, and renders the view directly. It’s also possible to combine the .cshtml and .cshtml.cs files into a single .cshtml file. You can read more about this approach in Razor Pages in Action, by Mark Brind (Manning, 2022).
注意:从技术上讲,PageModel 和 @model 指令是可选的。如果你没有指定 PageModel,框架将执行一个隐式页面处理程序,就像你在第 15 章中看到的那样,并直接渲染视图。还可以将 .cshtml 和 .cshtml.cs 文件合并到单个 .cshtml 文件中。您可以在 Mark Brind 的 Razor Pages in Action(Manning,2022 年)中阅读有关此方法的更多信息。
In addition to the @page and @model directives, the Razor view file contains the Razor template that is executed to generate the HTML response.
除了 @page 和 @model 指令之外,Razor 视图文件还包含为生成 HTML 响应而执行的 Razor 模板。
17.2.2 Introducing Razor templates
17.2.2 Razor 模板简介
Razor view templates contain a mixture of HTML and C# code interspersed with one another. The HTML markup lets you easily describe exactly what should be sent to the browser, whereas the C# code can be used to dynamically change what is rendered. The following listing shows an example of Razor rendering a list of strings representing to-do items.
Razor 视图模板包含相互穿插的 HTML 和 C# 代码的混合。HTML 标记可让您轻松准确描述应发送到浏览器的内容,而 C# 代码可用于动态更改呈现的内容。以下清单显示了 Razor 呈现表示待办事项的字符串列表的示例。
Listing 17.2 Razor template for rendering a list of strings
清单 17.2 用于渲染字符串列表的 Razor 模板
@page
@{ ❶
var tasks = new List<string> ❶
{ "Buy milk", "Buy eggs", "Buy bread" }; ❶
} ❶
<h1>Tasks to complete</h1> ❷
<ul>
@for(var i=0; i< tasks.Count; i++) ❸
{ ❸
var task = tasks[i]; ❸
<li>@i - @task</li> ❸
} ❸
</ul>
❶ Arbitrary C# can be executed in a template. Variables remain in scope throughout the page.
可以在模板中执行任意 C#。变量在整个页面中保持范围内。
❷ Standard HTML markup will be rendered to the output unchanged.
标准 HTML 标记将原封不动地呈现到输出。
❸ Mixing C# and HTML allows you to create HTML dynamically at runtime.
混合使用 C# 和 HTML 允许您在运行时动态创建 HTML。
The pure HTML sections in this template are in the angle brackets. The Razor engine copies this HTML directly to the output, unchanged, as though you were writing a normal HTML file.
此模板中的纯 HTML 部分位于尖括号中。Razor 引擎将此 HTML 直接复制到输出中,保持不变,就像您正在编写普通的 HTML 文件一样。
NOTE The ability of Razor syntax to know when you are switching between HTML and C# can be both uncanny and infuriating at times. I discuss how to control this transition in section 17.3.
注意:Razor 语法能够知道您何时在 HTML 和 C# 之间切换,这有时既不可思议又令人恼火。我在 17.3 节中讨论了如何控制这种转换。
As well as HTML, you can see several C# statements in there. The advantage of being able to, for example, use a for loop rather than having to explicitly write out each <li> element should be self-evident. I’ll dive a little deeper into more of the C# features of Razor in the next section. When rendered, the template in listing 17.2 produces the following HTML.
除了 HTML,您还可以在其中看到几个 C# 语句。例如,能够使用 for 循环而不是显式写出每个<li> 元素应该是不言而喻的。在下一节中,我将更深入地介绍 Razor 的更多 C# 功能。呈现后,清单 17.2 中的模板将生成以下 HTML。
Listing 17.3 HTML output produced by rendering a Razor template
列表 17.3 通过呈现 Razor 模板生成的 HTML 输出
<h1>Tasks to complete</h1> ❶
<ul> ❶
<li>0 - Buy milk</li> ❷
<li>1 - Buy eggs</li> ❷
<li>2 - Buy bread</li> ❷
</ul>
❶ HTML from the Razor template is written directly to the output.
Razor 模板中的 HTML 直接写入输出。
❷ The <li> elements are generated dynamically by the for loop, based on the data provided.
该<li> 元素由 for 循环根据提供的数据动态生成。
❸ HTML from the Razor template is written directly to the output.
Razor 模板中的 HTML 直接写入输出。
As you can see, the final output of a Razor template after it’s rendered is simple HTML. There’s nothing complicated left, only straight HTML markup that can be sent to the browser and rendered. Figure 17.3 shows how a browser would render it.
如你所见,Razor 模板在呈现后的最终输出是简单的 HTML。没有留下任何复杂的内容,只有可以直接发送到浏览器并呈现的 HTML 标记。图 17.3 显示了浏览器如何呈现它。
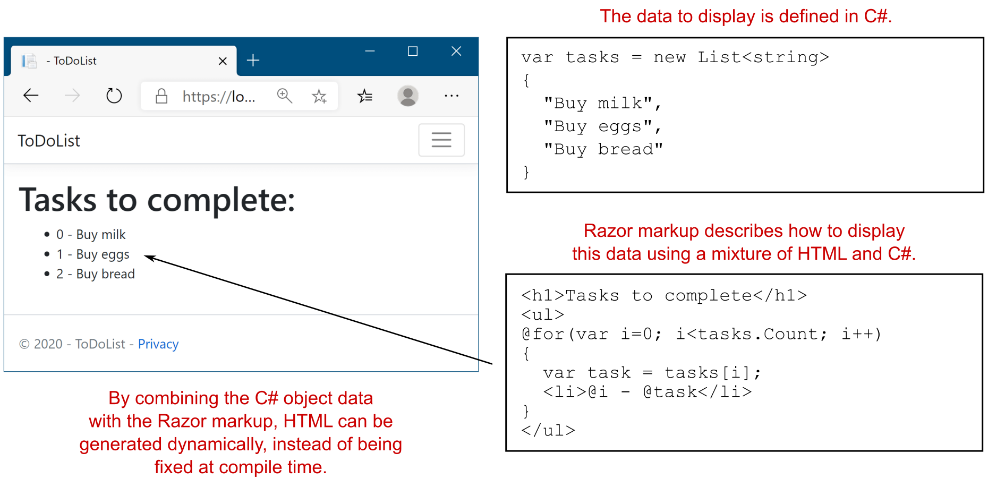
Figure 17.3 Razor templates can be used to generate the HTML dynamically at runtime from C# objects. In this case, a for loop is used to create repetitive HTML <li> elements.
图 17.3 Razor 模板可用于在运行时从 C# 对象动态生成 HTML。在这种情况下,使用 for 循环创建重复的 HTML<li> 元素。
In this example, I hardcoded the list values for simplicity; no dynamic data was provided. This is often the case on simple Razor Pages, like those you might have on your home page; you need to display an almost static page. For the rest of your application, it will be far more common to have some sort of data you need to display, typically exposed as properties on your PageModel.
在此示例中,为简单起见,我对列表值进行了硬编码;未提供动态数据。这在简单的 Razor 页面上通常就是这种情况,就像你在主页上可能拥有的那些一样;您需要显示一个几乎静态的页面。对于应用程序的其余部分,需要显示某种类型的数据(通常作为 PageModel 上的属性公开)将更加常见。
17.2.3 Passing data to views
17.2.3 将数据传递给视图
In ASP.NET Core, you have several ways of passing data from a page handler in a Razor Page to its view. Which approach is best depends on the data you’re trying to pass through, but in general you should use the mechanisms in the following order:
在 ASP.NET Core 中,可以通过多种方式将数据从 Razor 页面中的页面处理程序传递到其视图。哪种方法最好取决于您尝试传递的数据,但通常应按以下顺序使用机制:
• PageModel properties—You should generally expose any data that needs to be displayed as properties on your PageModel. Any data that is specific to the associated Razor view should be exposed this way. The PageModel object is available in the view when it’s rendered, as you’ll see shortly.
PageModel 属性 - 通常应公开需要在 PageModel 上显示为属性的任何数据。特定于关联 Razor 视图的任何数据都应以这种方式公开。PageModel 对象在呈现时在视图中可用,您很快就会看到。
• ViewData—This is a dictionary of objects with string keys that can be used to pass arbitrary data from the page handler to the view. In addition, it allows you to pass data to layout files, as you’ll see in section 17.4. Layout files are the main reason for using ViewData instead of setting properties on the PageModel.
ViewData - 这是带有字符串键的对象字典,可用于将任意数据从页面处理程序传递到视图。此外,它还允许您将数据传递给 layout 文件,如 Section 17.4 所示。布局文件是使用 ViewData 而不是在 PageModel 上设置属性的主要原因。
• TempData—TempData is a dictionary of objects with string keys, similar to ViewData, that is stored until it’s read in a different request. This is commonly used to temporarily persist data when using the POST-REDIRECT-GET pattern. By default TempData stores the data in an encrypted cookie, but other storage options are available, as described in the documentation at http://mng.bz/Wzx1.
TempData - TempData 是具有字符串键的对象字典,类似于 ViewData,在读取其他请求之前会一直存储。这通常用于在使用 POST-REDIRECT-GET 模式时临时保留数据。默认情况下,TempData 将数据存储在加密的 Cookie 中,但也提供了其他存储选项,如 http://mng.bz/Wzx1 中的文档中所述。
• HttpContext—Technically, the HttpContext object is available in both the page handler and Razor view, so you could use it to transfer data between them. But don’t—there’s no need for it with the other methods available to you.
HttpContext - 从技术上讲,HttpContext 对象在页面处理程序和 Razor 视图中均可用,因此您可以使用它来在它们之间传输数据。但不要 - 没有必要使用其他可用的方法。
• @inject services—You can use dependency injection (DI) to make services available in your views, though this should normally be used sparingly. Using the directive @inject Service myService injects a variable called myService of type Service from the DI container, which you can use in your Razor view.
@inject服务 - 您可以使用依赖关系注入 (DI) 使服务在视图中可用,但通常应谨慎使用。使用指令 @inject Service myService 会从 DI 容器中注入一个名为 myService 的 Service 类型变量,您可以在 Razor 视图中使用该变量。
Far and away the best approach for passing data from a page handler to a view is to use properties on the PageModel. There’s nothing special about the properties themselves; you can store anything there to hold the data you require.
将数据从页面处理程序传递到视图的最佳方法无疑是使用 PageModel 上的属性。属性本身并没有什么特别之处;您可以在那里存储任何内容来保存您需要的数据。
NOTE Many frameworks have the concept of a data context for binding UI components. The PageModel is a similar concept, in that it contains values to display in the UI, but the binding is one-directional; the PageModel provides values to the UI, and once the UI is built and sent as a response, the PageModel is destroyed.
注意:许多框架具有用于绑定 UI 组件的数据上下文的概念。PageModel 是一个类似的概念,因为它包含要在 UI 中显示的值,但绑定是单向的;PageModel 向 UI 提供值,一旦构建了 UI 并将其作为响应发送,PageModel 就会被销毁。
As I described in section 17.2.1, the @model directive at the top of your Razor view describes which Type of PageModel is associated with a given Razor Page. The PageModel associated with a Razor Page contains one or more page handlers and exposes data as properties for use in the Razor view, as shown in the following listing.
如第 17.2.1 节所述,Razor 视图顶部的 @model 指令描述了与给定 Razor 页面关联的 PageModel 类型。与 Razor 页面关联的 PageModel 包含一个或多个页面处理程序,并将数据公开为属性,以便在 Razor 视图中使用,如下面的清单所示。
Listing 17.4 Exposing data as properties on a PageModel
清单 17.4 将数据作为 PageModel 上的属性公开
public class ToDoItemModel : PageModel ❶
{
public List<string> Tasks { get; set; } ❷
public string Title { get; set; } ❷
public void OnGet(int id)
{
Title = "Tasks for today"; ❸
Tasks = new List<string> ❸
{ ❸
"Get fuel", ❸
"Check oil", ❸
"Check tyre pressure" ❸
}; ❸
}
}
❶ The PageModel is passed to the Razor view when it executes.
PageModel 在执行时传递到 Razor 视图。
❷ The public properties can be accessed from the Razor view.
可以从 Razor 视图访问公共属性。
❸ Building the required data: this would normally call out to a service or database to load the data.
构建所需的数据:这通常会调用服务或数据库来加载数据。
You can access the PageModel instance itself from the Razor view using the Model property. For example, to display the Title property of the ToDoItemModel in the Razor view, you’d use <h1>@Model.Title</h1>. This would render the string provided in the ToDoItemModel.Title property, producing the <h1>Tasks for today</h1> HTML.
可以使用 Model 属性从 Razor 视图访问 PageModel 实例本身。例如,要在 Razor 视图中显示 ToDoItemModel 的 Title 属性,请使用 <h1>@Model.Title</h1>.这将呈现 ToDoItemModel.Title 属性中提供的字符串,从而生成 HTML <h1>Tasks for today</h1>。
Tip Note that the @model directive should be at the top of your view, immediately after the @page directive, and it has a lowercase m. The Model property can be accessed anywhere in the view and has an uppercase M.
提示:请注意,@model 指令应位于视图顶部,紧跟在 @page 指令之后,并且它有一个小写的 m。Model 属性可以在视图中的任意位置访问,并且具有大写的 M。
In most cases, using public properties on your PageModel is the way to go; it’s the standard mechanism for passing data between the page handler and the view. But in some circumstances, properties on your PageModel might not be the best fit. This is often the case when you want to pass data between view layouts. You’ll see how this works in section 17.4.
在大多数情况下,在 PageModel 上使用公共属性是可行的方法;它是在 Page 处理程序和 View 之间传递数据的标准机制。但在某些情况下,PageModel 上的属性可能不是最合适的。当您想在视图布局之间传递数据时,通常会出现这种情况。您将在 Section 17.4 中看到它是如何工作的。
A common example is the title of the page. You need to provide a title for every page in your application, so you could create a base class with a Title property and make every PageModel inherit from it. But that’s cumbersome, so a common approach for this situation is to use the ViewData collection to pass data around.
一个常见的示例是页面的标题。您需要为应用程序中的每个页面提供一个标题,以便您可以创建一个具有 Title 属性的基类,并使每个 PageModel 都继承自该基类。但这很麻烦,因此这种情况的常见方法是使用 ViewData 集合来传递数据。
In fact, the standard Razor Page templates use this approach by default, by setting values on the ViewData dictionary from within the view itself:
事实上,标准 Razor 页面模板默认使用此方法,方法是从视图本身中设置 ViewData 字典的值:
@{
    ViewData["Title"] = "Home Page";
}
<h2>@ViewData["Title"].</h2>
This template sets the value of the "Title" key in the ViewData dictionary to "Home Page" and then fetches the key to render in the template. This set and immediate fetch might seem superfluous, but as the ViewData dictionary is shared throughout the request, it makes the title of the page available in layouts, as you’ll see later. When rendered, the preceding template would produce the following output:
此模板将 ViewData 字典中 “Title” 键的值设置为 “Home Page”,然后获取要在模板中呈现的键。这种 set 和 immediate fetch 可能看起来是多余的,但是由于 ViewData 字典在整个请求中是共享的,因此它使页面的标题在布局中可用,您稍后将看到。渲染时,前面的模板将生成以下输出:
<h2>Home Page.</h2>You can also set values in the ViewData dictionary from your page handlers in two different ways, as shown in the following listing.
您还可以通过两种不同的方式从页面处理程序中设置 ViewData 字典中的值,如下面的清单所示。
Listing 17.5 Setting ViewData values using an attribute
示例 17.5 使用属性设置 ViewData 值
public class IndexModel: PageModel
{
    [ViewData]                        #A
    public string Title { get; set; }

    public void OnGet()
    {
        Title = "Home Page";             #B
        ViewData["Subtitle"] = "Welcome";     #C
    }
}
You can display the values in the template in the same way as before:
您可以像以前一样在模板中显示值:
<h1>@ViewData["Title"]</h3>
<h2>@ViewData["Subtitle"]</h3>
Tip I don’t find the [ViewData] attribute especially useful, but it’s another feature to look out for. Instead, I create a set of global, static constants for any ViewData keys, and I reference those instead of typing "Title" repeatedly. You’ll get IntelliSense for the values, they’re refactor-safe, and you’ll avoid hard-to-spot typos.
提示:我不觉得 [ViewData] 属性特别有用,但它是另一个需要注意的功能。相反,我为任何 ViewData 键创建一组全局静态常量,并引用这些常量,而不是重复键入“Title”。您将获得值的 IntelliSense,它们是重构安全的,并且您将避免难以发现的拼写错误。
As I mentioned previously, there are mechanisms besides PageModel properties and ViewData that you can use to pass data around, but these two are the only ones I use personally, as you can do everything you need with them. As a reminder, always use PageModel properties where possible, as you benefit from strong typing and IntelliSense. Only fall back to ViewData for values that need to be accessed outside of your Razor view.
正如我前面提到的,除了 PageModel 属性和 ViewData 之外,还有一些机制可用于传递数据,但这两种机制是我个人唯一使用的机制,因为您可以使用它们执行任何需要的作。提醒一下,请尽可能使用 PageModel 属性,因为强类型化和 IntelliSense 会让您受益。对于需要在 Razor 视图之外访问的值,请仅回退到 ViewData。
You’ve had a small taste of the power available to you in Razor templates, but in the next section we’ll dive a little deeper into some of the available C# capabilities.
您已经对 Razor 模板中可用的功能有了一些了解,但在下一节中,我们将更深入地介绍一些可用的 C# 功能。
17.3 Creating dynamic web pages with Razor
17.3 使用 Razor 创建动态网页
You might be glad to know that pretty much anything you can do in C# is possible in Razor syntax. Under the covers, the .cshtml files are compiled into normal C# code (with string for the raw HTML sections), so whatever weird and wonderful behavior you need can be created!
您可能很高兴地知道,在 C# 中可以执行的几乎任何事情都可以在 Razor 语法中完成。在后台,.cshtml 文件被编译成普通的 C# 代码(原始 HTML 部分带有字符串),因此你可以创建你需要的任何奇怪而美妙的行为!
Having said that, just because you can do something doesn’t mean you should. You’ll find it much easier to work with, and maintain, your files if you keep them as simple as possible. This is true of pretty much all programming, but I find it to be especially so with Razor templates.
话虽如此,仅仅因为您可以做某事并不意味着您应该这样做。您会发现,如果您尽可能简化文件,那么处理和维护文件会容易得多。几乎所有编程都是如此,但我发现 Razor 模板尤其如此。
This section covers some of the more common C# constructs you can use. If you find you need to achieve something a bit more exotic, refer to the Razor syntax documentation at http://mng.bz/8rMw.
本部分介绍一些可以使用的更常见的 C# 构造。如果您发现需要实现一些更奇特的东西,请参阅 http://mng.bz/8rMw 上的 Razor 语法文档。
17.3.1 Using C# in Razor templates
17.3.1 在 Razor 模板中使用 C#
One of the most common requirements when working with Razor templates is to render a value you’ve calculated in C# to the HTML. For example, you might want to print the current year to use with a copyright statement in your HTML, to give this result:
使用 Razor 模板时,最常见的要求之一是将您在 C# 中计算的值呈现到 HTML。例如,您可能希望打印当前年份以与 HTML 中的版权声明一起使用,以得到以下结果:
<p>Copyright 2022 ©</p>Or you might want to print the result of a calculation:
或者您可能希望打印计算结果:
<p>The sum of 1 and 2 is <i>3</i><p>You can do this in two ways, depending on the exact C# code you need to execute. If the code is a single statement, you can use the @ symbol to indicate you want to write the result to the HTML output, as shown in figure 17.4. You’ve already seen this used to write out values from the PageModel or from ViewData.
您可以通过两种方式执行此作,具体取决于您需要执行的确切 C# 代码。如果代码是单个语句,则可以使用 @ 符号来指示要将结果写入 HTML 输出,如图 17.4 所示。您已经看到它用于从 PageModel 或 ViewData 中写出值。
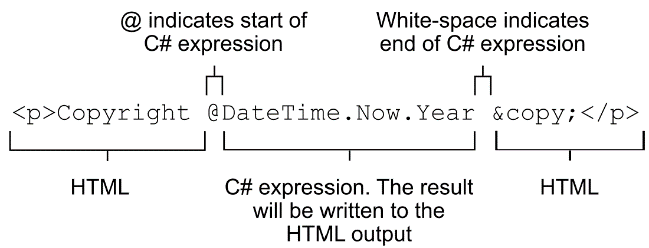
Figure 17.4 Writing the result of a C# expression to HTML. The @ symbol indicates where the C# code begins, and the expression ends at the end of the statement, in this case at the space.
图 17.4 将 C# 表达式的结果写入 HTML。@ 符号指示 C# 代码的开始位置,表达式在语句的末尾结束,在本例中在空格处。
If the C# you want to execute is something that needs a space, you need to use parentheses to demarcate the C#, as shown in figure 17.5.
如果要执行的 C# 需要空格,则需要使用括号来分隔 C#,如图 17.5 所示。
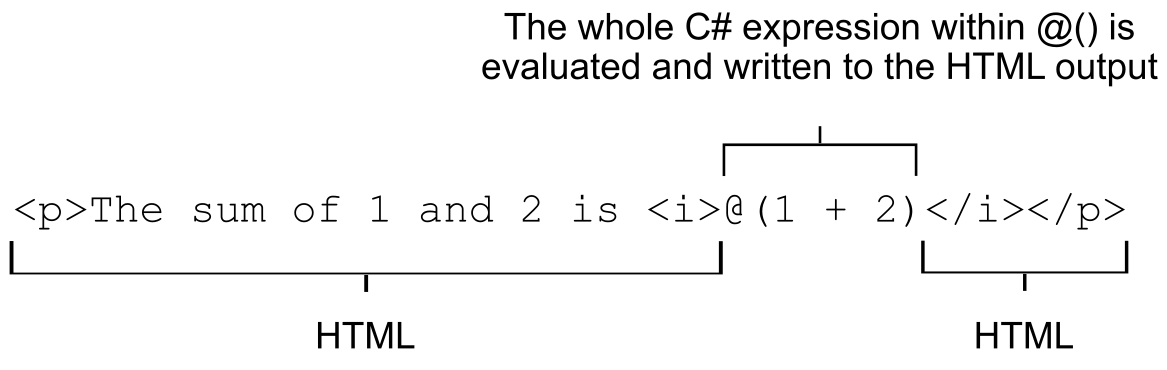
Figure 17.5 When a C# expression contains whitespace, you must wrap it in parentheses using @() so the Razor engine knows where the C# stops and HTML begins.
图 17.5 当 C# 表达式包含空格时,必须使用 @() 将其括在括号中,以便 Razor 引擎知道 C# 停止和 HTML 开始的位置。
These two approaches, in which C# is evaluated and written directly to the HTML output, are called Razor expressions.
这两种方法(其中 C# 被计算并直接写入 HTML 输出)称为 Razor 表达式。
Tip If you want to write a literal @ character rather than a C# expression, use a second @ character: @@.
提示:如果要编写文本 @ 字符而不是 C# 表达式,请使用第二个 @ 字符:@@。
Sometimes you’ll want to execute some C#, but you don’t need to output the values. We used this technique when we were setting values in ViewData:
有时,您需要执行一些 C#,但不需要输出值。我们在 ViewData 中设置值时使用了这种技术:
@{
    ViewData["Title"] = "Home Page";
}
This example demonstrates a Razor code block, which is normal C# code, identified by the @{} structure. Nothing is written to the HTML output here; it’s all compiled as though you’d written it in any other normal C# file.
此示例演示 Razor 代码块,这是由 @{} 结构标识的普通 C# 代码。此处的 HTML 输出不会写入任何内容;它全部编译,就像您用任何其他普通的 C# 文件编写它一样。
Tip When you execute code within code blocks, it must be valid C#, so you need to add semicolons. Conversely, when you’re writing values directly to the response using Razor expressions, you don’t need them. If your output HTML breaks unexpectedly, keep an eye out for missing or rogue extra semicolons.
提示:在代码块中执行代码时,它必须是有效的 C#,因此需要添加分号。相反,当您使用 Razor 表达式将值直接写入响应时,您不需要它们。如果输出 HTML 意外中断,请留意缺失或流氓的额外分号。
Razor expressions are one of the most common ways of writing data from your PageModel to the HTML output. You’ll see the other approach, using Tag Helpers, in the next chapter. Razor’s capabilities extend far further than this, however, as you’ll see in section 17.3.2, where you’ll learn how to include traditional C# structures in your templates.
Razor 表达式是将数据从 PageModel 写入 HTML 输出的最常用方法之一。您将在下一章中看到另一种方法,即使用 Tag Helpers。但是,Razor 的功能远不止于此,如第 17.3.2 节所示,您将在其中学习如何在模板中包含传统的 C# 结构。
17.3.2 Adding loops and conditionals to Razor templates
17.3.2 向 Razor 模板添加循环和条件语句
One of the biggest advantages of using Razor templates over static HTML is the ability to generate the output dynamically. Being able to write values from your PageModel to the HTML using Razor expressions is a key part of that, but another common use is loops and conditionals. With these, you can hide sections of the UI, or produce HTML for every item in a list, for example.
与静态 HTML 相比,使用 Razor 模板的最大优势之一是能够动态生成输出。能够使用 Razor 表达式将值从 PageModel 写入 HTML 是其中的关键部分,但另一个常见用途是循环和条件。例如,您可以使用这些功能隐藏 UI 的各个部分,或者为列表中的每个项目生成 HTML。
Loops and conditionals include constructs such as if and for loops. Using them in Razor templates is almost identical to C#, but you need to prefix their usage with the @ symbol. In case you’re not getting the hang of Razor yet, when in doubt, throw in another @!
循环和条件包括诸如 if 和 for 循环之类的结构。在 Razor 模板中使用它们与 C# 几乎相同,但您需要在它们的用法前面加上 @ 符号。如果您还没有掌握 Razor 的窍门,如有疑问,请再输入一个 @!
One of the big advantages of Razor in the context of ASP.NET Core is that it uses languages you’re already familiar with: C# and HTML. There’s no need to learn a whole new set of primitives for some other templating language: it’s the same if, foreach, and while constructs you already know. And when you don’t need them, you’re writing raw HTML, so you can see exactly what the user is getting in their browser.
Razor 在 ASP.NET Core 上下文中的一大优势是它使用您已经熟悉的语言:C# 和 HTML。没有必要为其他模板语言学习一整套新的原语:它与你已经知道的 if、foreach 和 while 结构相同。当您不需要它们时,您正在编写原始 HTML,因此您可以准确地看到用户在浏览器中获得的内容。
In listing 17.6, I’ve applied a few of these techniques in a template to display a to-do item. The PageModel has a bool IsComplete property, as well as a List
在列表 17.6 中,我在模板中应用了一些技术来显示待办事项。PageModel 具有一个 bool IsComplete 属性,以及一个名为 Tasks 的 List 属性,其中包含任何未完成的任务。
Listing 17.6 Razor template for rendering a ToDoItemViewModel
列表 17.6 用于呈现 ToDoItemViewModel 的 Razor 模板
@page
@model ToDoItemModel ❶
<div>
@if (Model.IsComplete)
{ ❷
<strong>Well done, you’re all done!</strong> ❷
} ❷
else
{
<strong>The following tasks remain:</strong>
<ul>
@foreach (var task in Model.Tasks) ❸
{
<li>@task</li> ❹
}
</ul>
}
</div>
❶ The @model directive indicates the type of PageModel in Model.
@model 指令指示 Model 中 PageModel 的类型。
❷ The if control structure checks the value of the PageModel’s IsComplete property at runtime.
if 控件结构在运行时检查 PageModel 的 IsComplete 属性的值。
❸ The foreach structure will generate the <li> elements once for each task in Model.Tasks.
foreach 结构体将生成<li>元素。
❹ A Razor expression is used to write the task to the HTML output.
Razor 表达式用于将任务写入 HTML 输出。
This code definitely lives up to the promise of mixing C# and HTML! There are traditional C# control structures, such as if and foreach, that you’d expect in any normal C# program, interspersed with the HTML markup that you want to send to the browser. As you can see, the @ symbol is used to indicate when you’re starting a control statement, but you generally let the Razor template infer when you’re switching back and forth between HTML and C#.
这段代码绝对兑现了混合 C# 和 HTML 的承诺!在任何普通 C# 程序中,都有您期望使用的传统 C# 控制结构,例如 if 和 foreach,其中穿插着要发送到浏览器的 HTML 标记。如你所见,@ 符号用于指示何时启动控制语句,但你通常会让 Razor 模板推断你在 HTML 和 C# 之间来回切换。
The template shows how to generate dynamic HTML at runtime, depending on the exact data provided. If the model has outstanding Tasks, the HTML generates a list item for each task, producing output something like that shown in figure 17.6.
该模板演示如何在运行时生成动态 HTML,具体取决于提供的确切数据。如果模型有未完成的任务,HTML 会为每个任务生成一个列表项,产生如图 17.6 所示的输出。
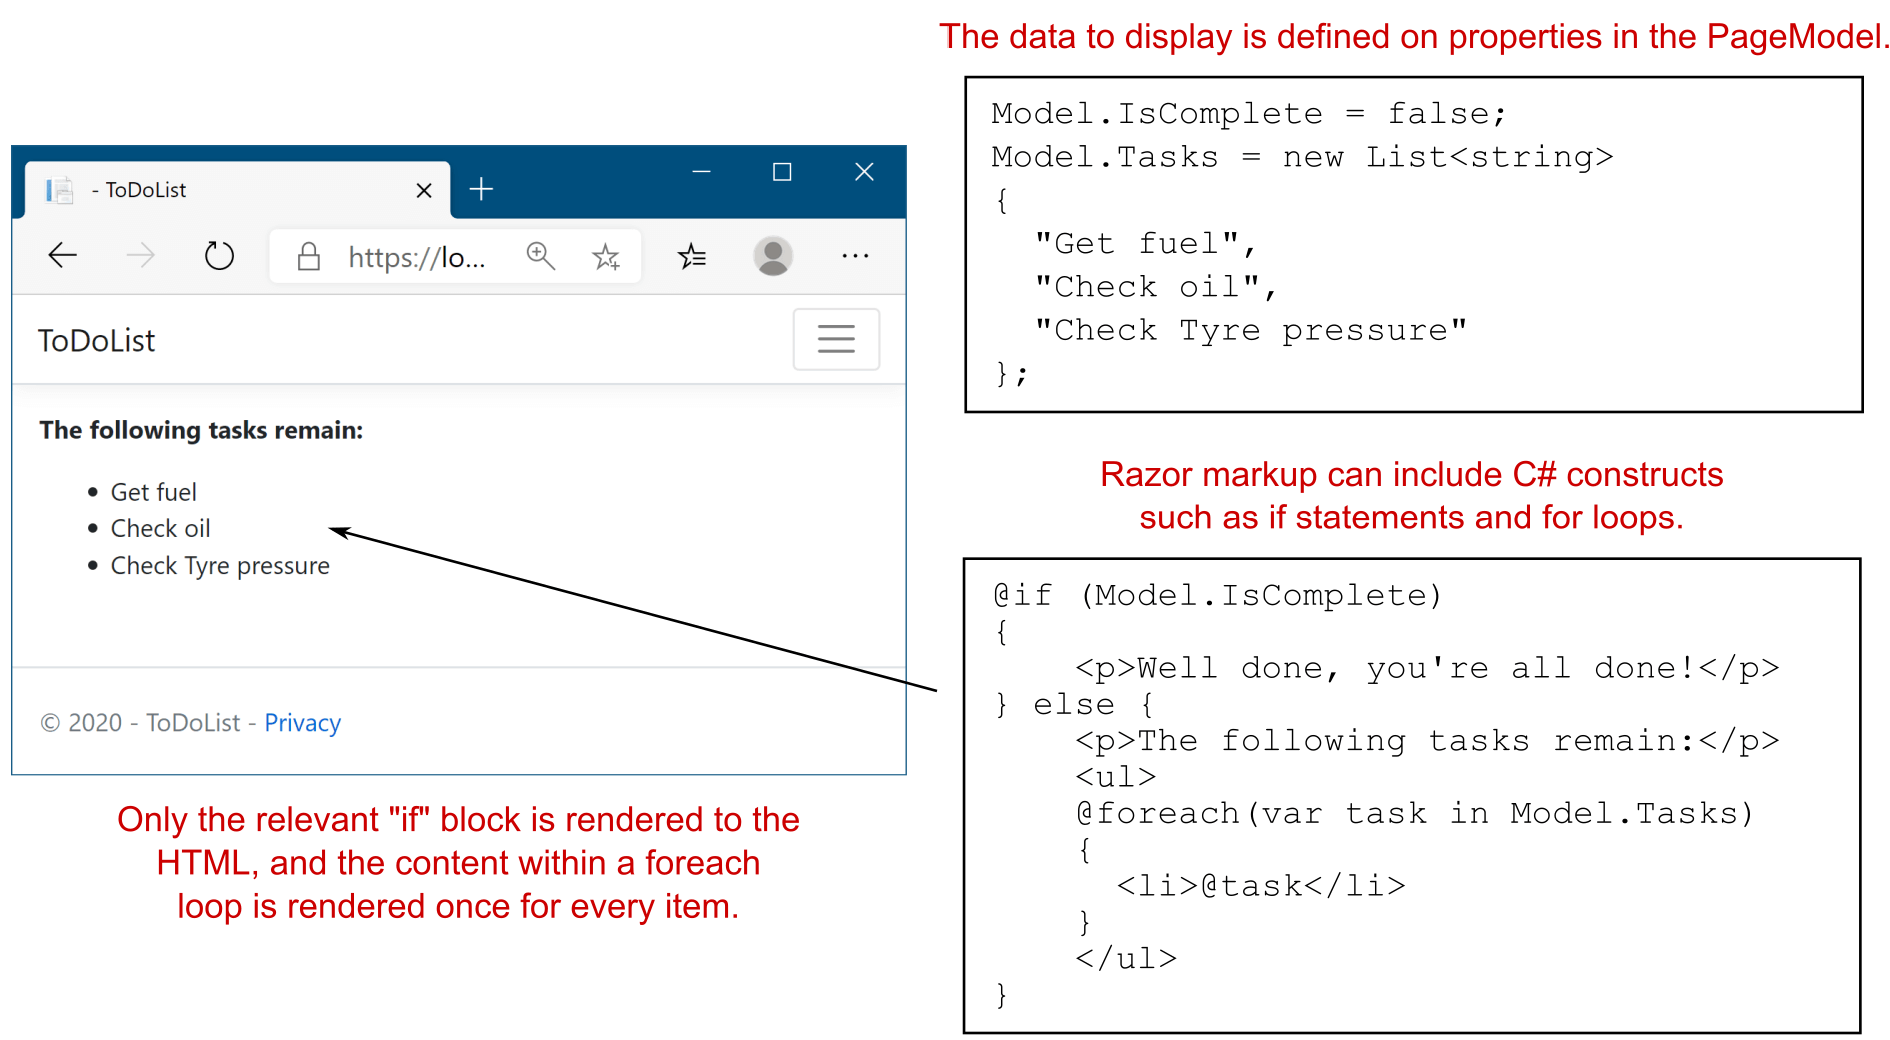
Figure 17.6 The Razor template generates a <li> item for each remaining task, depending on the data passed to the view at runtime. You can use an if block to render completely different HTML depending on the values in your model.
图 17.6 Razor 模板会生成一个<li> item 的 SET 任务,具体取决于在运行时传递给视图的数据。您可以使用 if 块根据模型中的值呈现完全不同的 HTML。
IntelliSense and tooling support
IntelliSense 和工具支持The mixture of C# and HTML might seem hard to read in the book, and that’s a reasonable complaint. It’s also another valid argument for trying to keep your Razor templates as simple as possible.
C# 和 HTML 的混合在书中似乎很难阅读,这是一个合理的抱怨。这也是尝试使 Razor 模板尽可能简单的另一个有效论点。Luckily, if you’re using an editor like Visual Studio or Visual Studio Code, the tooling can help somewhat. As you can see in this figure, Visual Studio highlights the transition between the C# portions of the code and the surrounding HTML, though this is less pronounced in recent versions of Visual Studio.
幸运的是,如果您使用的是 Visual Studio 或 Visual Studio Code 等编辑器,这些工具可能会有所帮助。正如您在此图中所看到的,Visual Studio 突出显示了代码的 C# 部分与周围 HTML 之间的转换,尽管这在最新版本的 Visual Studio 中不太明显。
Visual Studio highlights the @ symbols where C# transitions to HTML and uses C# syntax coloring for C# code. This makes the Razor templates somewhat easier to read that than the pure plain text.
Visual Studio 突出显示 C# 转换为 HTML 的 @ 符号,并对 C# 代码使用 C# 语法着色。这使得 Razor 模板比纯文本更容易阅读。Although the ability to use loops and conditionals is powerful—they’re one of the advantages of Razor over static HTML—they also add to the complexity of your view. Try to limit the amount of logic in your views to make them as easy to understand and maintain as possible.
尽管使用循环和条件的功能非常强大(它们是 Razor 相对于静态 HTML 的优势之一),但它们也增加了视图的复杂性。尝试限制视图中的逻辑数量,使其尽可能易于理解和维护。
A common trope of the ASP.NET Core team is that they try to ensure you “fall into the pit of success” when building an application. This refers to the idea that by default, the easiest way to do something should be the correct way of doing it. This is a great philosophy, as it means you shouldn’t get burned by, for example, security problems if you follow the standard approaches. Occasionally, however, you may need to step beyond the safety rails; a common use case is when you need to render some HTML contained in a C# object to the output, as you’ll see in the next section.
ASP.NET Core 团队的一个常见比喻是,他们试图确保您在构建应用程序时 “掉进成功的坑”。这指的是默认情况下,执行某项作的最简单方法应该是正确的执行方式。这是一个很棒的理念,因为它意味着如果您遵循标准方法,您就不应该被安全问题等问题所困扰。但是,有时您可能需要跨出安全栏杆;一个常见的用例是当您需要将 C# 对象中包含的一些 HTML 渲染到输出时,您将在下一节中看到。
17.3.3 Rendering HTML with Raw
17.3.3 使用 Raw 渲染 HTML
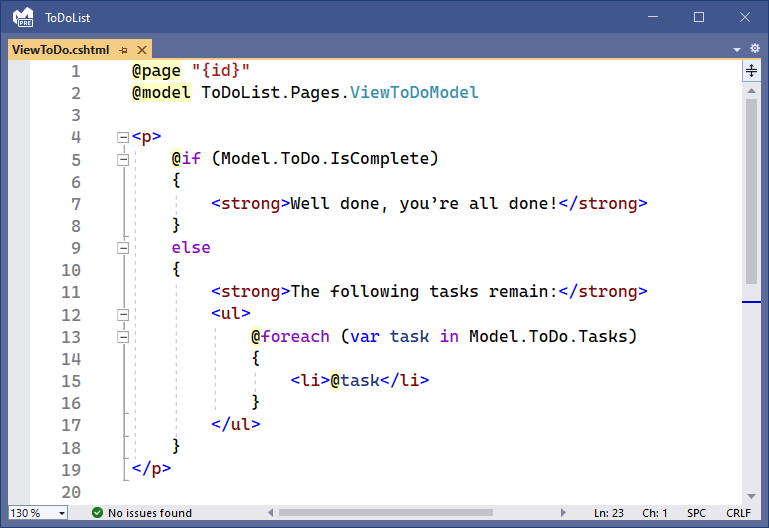
In the previous example, we rendered the list of tasks to HTML by writing the string task using the @task Razor expression. But what if the task variable contains HTML you want to display, so instead of "Check oil" it contains "<strong>Check oil</strong>"? If you use a Razor expression to output this as you did previously, you might hope to get this:
在前面的示例中,我们通过使用 @task Razor 表达式编写字符串 task 将任务列表呈现为 HTML。但是,如果任务变量包含要显示的 HTML,那么它不是“Check oil”,而是"<strong>Check oil</strong>",该怎么办?如果您像以前一样使用 Razor 表达式来输出此表达式,您可能希望得到以下内容:
<li><strong>Check oil</strong></li>But that’s not the case. The HTML generated comes out like this:
但事实并非如此。生成的 HTML 如下所示:
<li><strong>Check oil</strong></li>Hmm, looks odd, right? What’s happened here? Why did the template not write your variable to the HTML, like it has in previous examples? If you look at how a browser displays this HTML, like in figure 17.7, I hope that it makes more sense.
嗯,看起来很奇怪,对吧?这里发生了什么?为什么模板没有像前面的示例那样将变量写入 HTML?如果您查看浏览器如何显示此 HTML,如图 17.7 所示,我希望它更有意义。
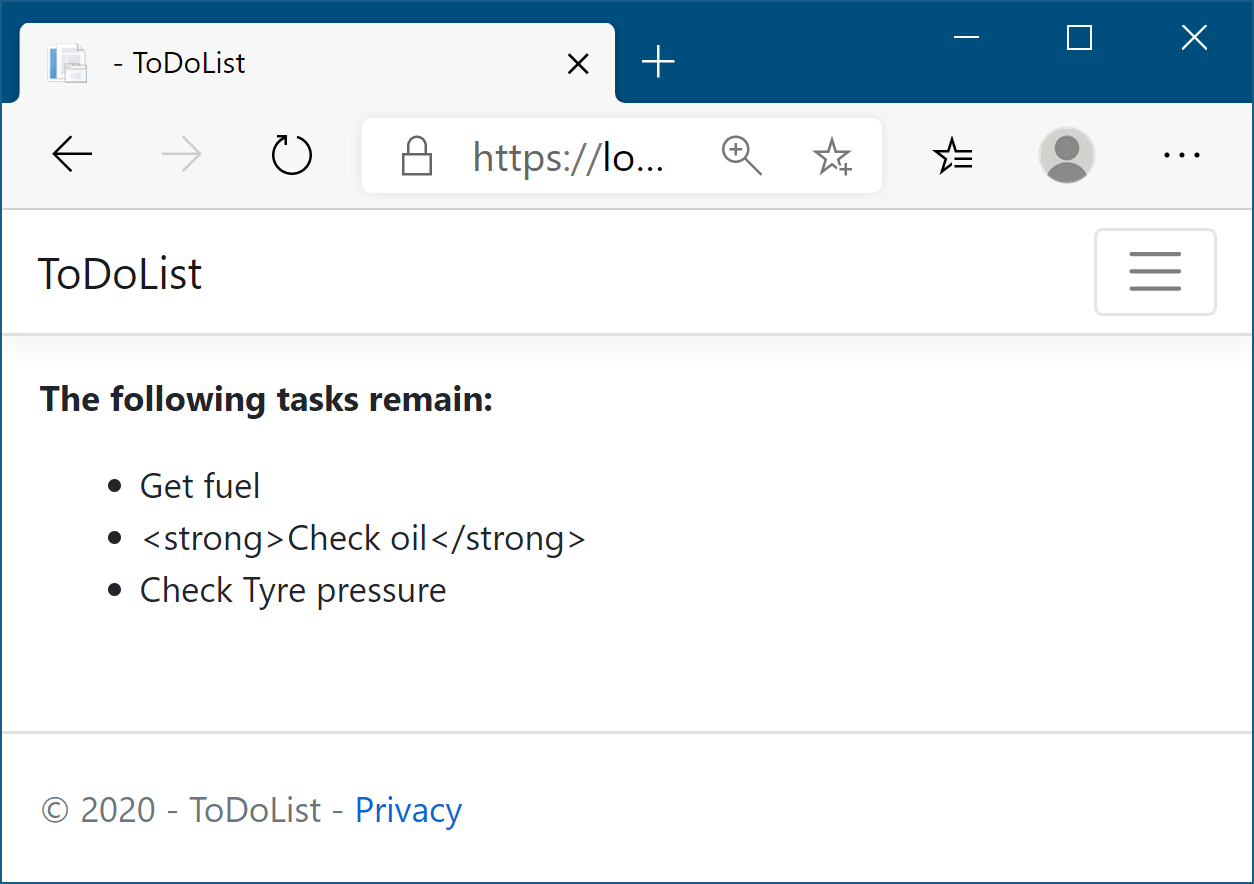
Figure 17.7 The second item, "<strong>Check oil</strong>" has been HTML-encoded, so the <strong> elements are visible to the user as part of the task. This prevents any security problems, as users can’t inject malicious scripts into your HTML.
图 17.7 第二项 "<strong>Check oil</strong>" 已经过 HTML 编码,因此 <strong> 元素作为任务的一部分对用户可见。这可以防止任何安全问题,因为用户无法将恶意脚本注入您的 HTML。
Razor templates HTML-encode C# expressions before they’re written to the output stream. This is primarily for security reasons; writing out arbitrary strings to your HTML could allow users to inject malicious data and JavaScript into your website. Consequently, the C# variables you print in your Razor template get written as HTML-encoded values.
Razor 模板在将 C# 表达式写入输出流之前对其进行 HTML 编码。这主要是出于安全原因;将任意字符串写出到 HTML 中可能会允许用户将恶意数据和 JavaScript 注入您的网站。因此,在 Razor 模板中打印的 C# 变量将写入 HTML 编码的值。
NOTE Razor also renders non-ASCII Unicode characters, such as ó and è, as HTML entities: ó and è. You can customize this behavior using WebEncoderOptions in Program.cs, as in this example: builder.Services.Configure<WebEncoderOptions>(o => o.AllowCharacter('ó')) .
注意:Razor 还将非 ASCII Unicode 字符(如 ó 和 è)呈现为 HTML 实体:ó 和 è。您可以使用 Program.cs 中的 WebEncoderOptions 自定义此行为,如以下示例所示:。 `builder.Services.Configure
In some cases, you might need to directly write out HTML contained in a string to the response. If you find yourself in this situation, first, stop. Do you really need to do this? If the values you’re writing have been entered by a user, or were created based on values provided by users, there’s a serious risk of creating a security hole in your website.
在某些情况下,您可能需要直接将字符串中包含的 HTML 写出到响应中。如果您发现自己处于这种情况,请先停止。您真的需要这样做吗?如果您编写的值是由用户输入的,或者是根据用户提供的值创建的,则存在在您的网站中创建安全漏洞的严重风险。
If you really need to write the variable out to the HTML stream, you can do so using the Html property on the view page and calling the Raw method:
如果您确实需要将变量写出到 HTML 流中,则可以使用视图页面上的 Html 属性并调用 Raw 方法来实现:
<li>@Html.Raw(task)</li>With this approach, the string in task is directly written to the output stream, without encoding, producing the HTML you originally wanted, <li><strong>Check oil</strong></li>, which renders as shown in figure 17.8.
使用这种方法,task 中的字符串被直接写入输出流,无需编码,生成你最初想要的 HTML <li><strong>Check oil</strong></li>,如图 17.8 所示。
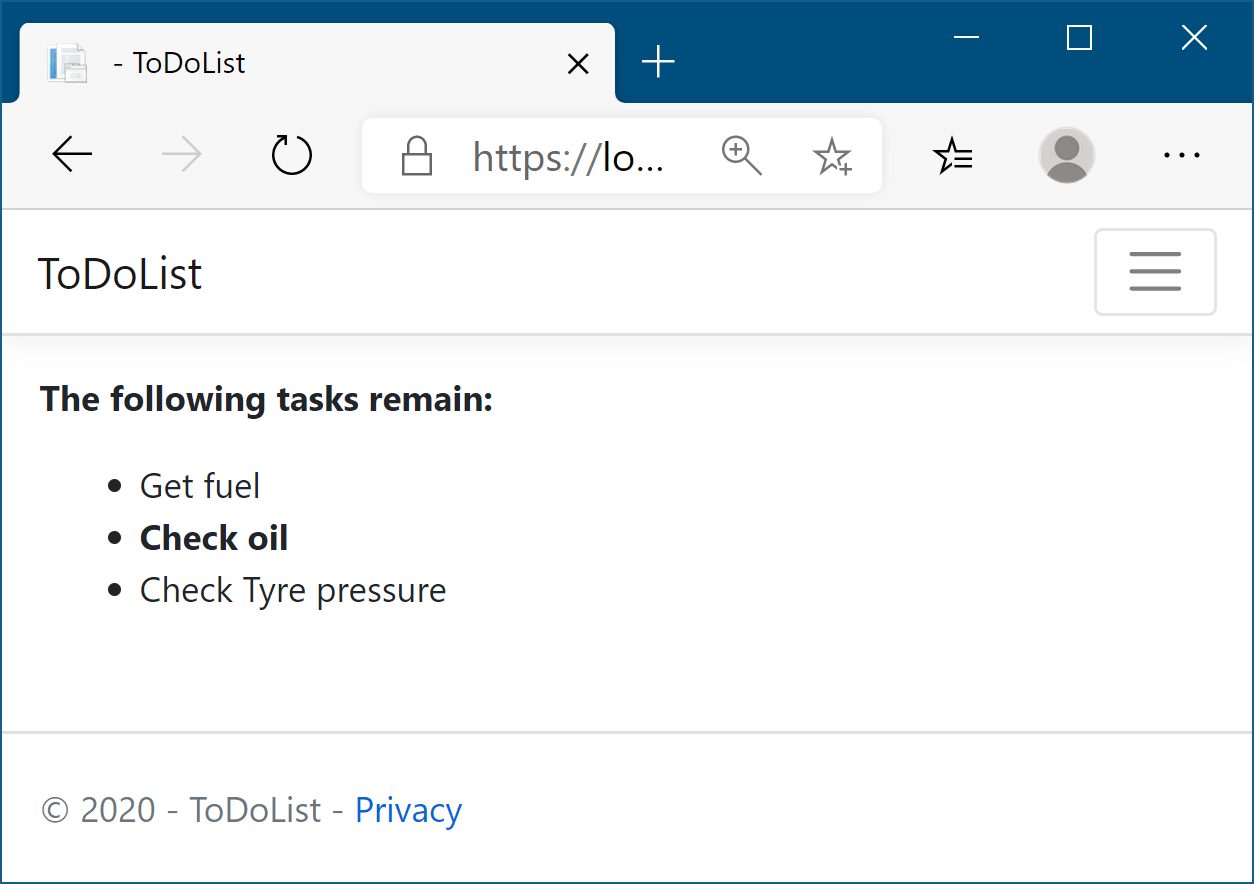
Figure 17.8 The second item, "<strong>Check oil<strong>" has been output using Html.Raw(), so it hasn’t been HTML-encoded. The <strong> elements result in the second item being shown in bold instead. Using Html.Raw() in this way should be avoided where possible, as it is a security risk.
图 17.8 第二项是使用 Html.Raw() 输出的 "<strong>Check oil<strong>" ,因此尚未进行 HTML 编码。这些 <strong> 元素会导致第二个项目以粗体显示。应尽可能避免以这种方式使用 Html.Raw(),因为这会带来安全风险。
Warning Using Html.Raw on user input creates a security risk that users could use to inject malicious code into your website. Avoid using Html.Raw if possible.
警告:在用户输入上使用 Html.Raw 会带来安全风险,用户可能会利用该风险将恶意代码注入您的网站。如果可能,请避免使用 Html.Raw。
The C# constructs shown in this section can be useful, but they can make your templates harder to read. It’s generally easier to understand the intention of Razor templates that are predominantly HTML markup rather than C#.
本节中所示的 C# 构造可能很有用,但它们可能会使模板更难阅读。通常更容易理解主要是 HTML 标记而不是 C# 的 Razor 模板的意图。
In the previous version of ASP.NET, these constructs, and in particular the Html helper property, were the standard way to generate dynamic markup. You can still use this approach in ASP.NET Core by using the various HtmlHelper methods on the Html property, but these have largely been superseded by a cleaner technique: Tag Helpers.
在早期版本的 ASP.NET 中,这些构造(特别是 Html 帮助程序属性)是生成动态标记的标准方法。您仍然可以在 ASP.NET Core 中通过使用 Html 属性上的各种 HtmlHelper 方法,但这些方法在很大程度上已被一种更简洁的技术所取代:Tag Helpers。
NOTE I discuss Tag Helpers and how to use them to build HTML forms in chapter 18. HtmlHelper is essentially obsolete, though it’s still available if you prefer to use it.
注意:我在第 18 章中讨论了 Tag Helpers 以及如何使用它们来构建 HTML 表单。HtmlHelper 基本上已过时,但如果您愿意使用它,它仍然可用。
Tag Helpers are a useful feature that’s new to Razor in ASP.NET Core, but many other features have been carried through from the legacy (.NET Framework) ASP.NET. In the next section of this chapter, you’ll see how you can create nested Razor templates and use partial views to reduce the amount of duplication in your views.
标记帮助程序是 ASP.NET Core 中 Razor 新增的一项有用功能,但许多其他功能已从旧版 (.NET Framework) ASP.NET 中继承而来。在本章的下一部分中,您将了解如何创建嵌套的 Razor 模板并使用分部视图来减少视图中的重复数量。
17.4 Layouts, partial views, and _ViewStart
17.4 布局、分部视图和_ViewStart
In this section you’ll learn about layouts and partial views, which allow you to extract common code to reduce duplication. These files make it easier to make changes to your HTML that affect multiple pages at once. You’ll also learn how to run common code for every Razor Page using _ViewStart and _ViewImports, and how to include optional sections in your pages.
在本节中,您将了解布局和分部视图,它们允许您提取通用代码以减少重复。通过这些文件,可以更轻松地对 HTML 进行一次影响多个页面的更改。您还将了解如何使用 _ViewStart 和 _ViewImports 为每个 Razor 页面运行通用代码,以及如何在页面中包含可选部分。
Every HTML document has a certain number of elements that are required: <html>, <head>, and <body>. As well, there are often common sections that are repeated on every page of your application, such as the header and footer, as shown in figure 17.9. Also, each page in your application will probably reference the same CSS and JavaScript files.
每个 HTML 文档都有一定数量的必需元素:<html>, <head>和 <body>.此外,在应用程序的每个页面上通常都有重复的常见部分,例如 header 和 footer,如图 17.9 所示。此外,应用程序中的每个页面都可能引用相同的 CSS 和 JavaScript 文件。
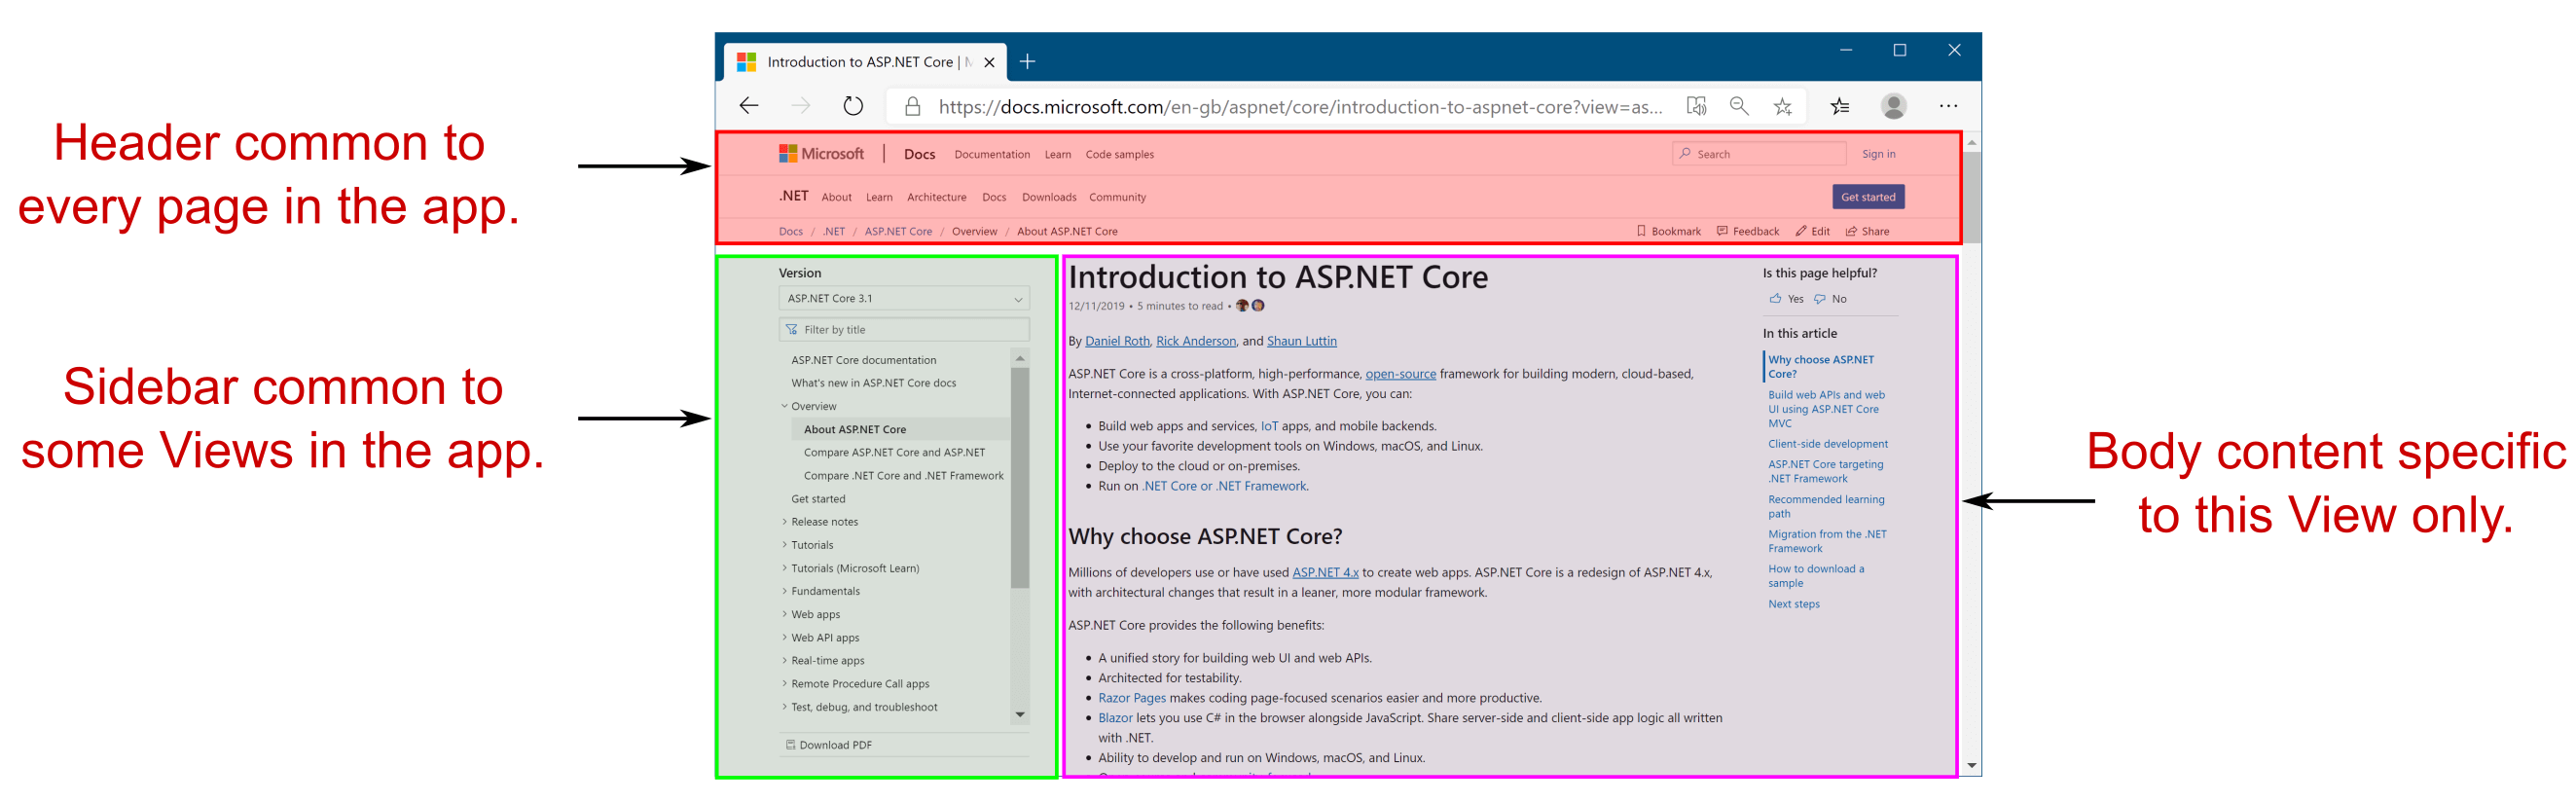
Figure 17.9 A typical web application has a block-based layout, where some blocks are common to every page of your application. The header block will likely be identical across your whole application, but the sidebar may be identical only for the pages in one section. The body content will differ for every page in your application.
图 17.9 典型的 Web 应用程序具有基于块的布局,其中某些块对于应用程序的每个页面都是通用的。标题块在整个应用程序中可能相同,但侧边栏可能仅对一个部分中的页面相同。应用程序中每个页面的正文内容都不同。
All these different elements add up to a maintenance nightmare. If you had to include these manually in every view, making any changes would be a laborious, error-prone process involving editing every page. Instead, Razor lets you extract these common elements into layouts.
所有这些不同的因素加起来就是一场维护噩梦。如果您必须在每个视图中手动包含这些内容,则进行任何更改都将是一个费力且容易出错的过程,涉及编辑每个页面。相反,Razor 允许您将这些常见元素提取到布局中。
DEFINITION A layout in Razor is a template that includes common code. It can’t be rendered directly, but it can be rendered in conjunction with normal Razor views.
定义:Razor 中的布局是包含通用代码的模板。它不能直接呈现,但可以与普通 Razor 视图一起呈现。
By extracting your common markup into layouts, you can reduce the duplication in your app. This makes changes easier, makes your views easier to manage and maintain, and is generally good practice!
通过将通用标记提取到布局中,您可以减少应用程序中的重复。这使得更改更容易,使您的视图更易于管理和维护,并且通常是很好的做法!
17.4.1 Using layouts for shared markup
17.4.1 将布局用于共享标记
Layout files are, for the most part, normal Razor templates that contain markup common to more than one page. An ASP.NET Core app can have multiple layouts, and layouts can reference other layouts. A common use for this is to have different layouts for different sections of your application. For example, an e-commerce website might use a three-column view for most pages but a single-column layout when you come to the checkout pages, as shown in figure 17.10.
布局文件在大多数情况下是普通的 Razor 模板,其中包含多个页面通用的标记。ASP.NET Core 应用程序可以有多个布局,并且布局可以引用其他布局。这样做的一个常见用途是为应用程序的不同部分使用不同的布局。例如,电子商务网站可能在大多数页面中使用三列视图,但在您进入结帐页面时使用单列布局,如图 17.10 所示。
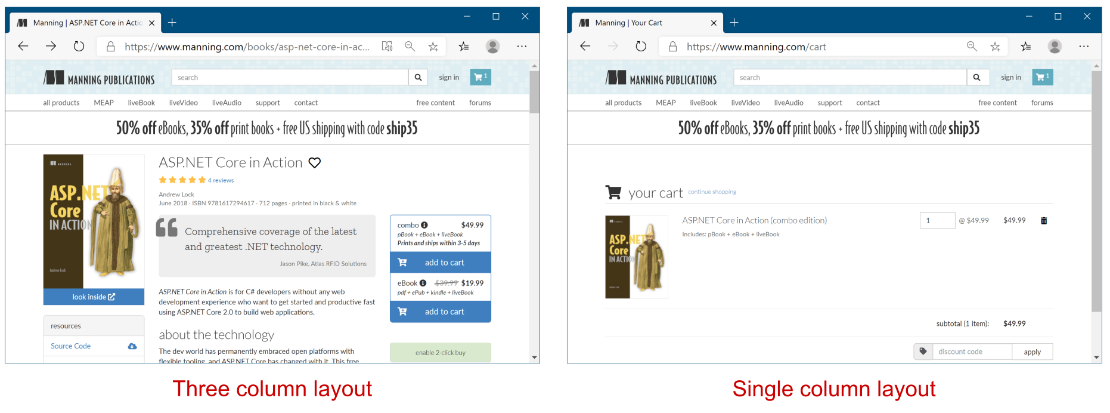
Figure 17.10 The https://manning.com website uses different layouts for different parts of the web application. The product pages use a three-column layout, but the cart page uses a single-column layout.
图 17.10 https://manning.com 网站对 Web 应用程序的不同部分使用不同的布局。产品页面使用三列布局,但购物车页面使用单列布局。
You’ll often use layouts across many different Razor Pages, so they’re typically placed in the Pages/Shared folder. You can name them anything you like, but there’s a common convention to use _Layout.cshtml as the filename for the base layout in your application. This is the default name used by the Razor Page templates in Visual Studio and the .NET CLI.
您经常在许多不同的 Razor Pages 中使用布局,因此它们通常位于 Pages/Shared 文件夹中。你可以为它们命名任何你喜欢的名字,但有一个常见的约定,即使用 _Layout.cshtml 作为应用程序中基本布局的文件名。这是 Visual Studio 和 .NET CLI 中的 Razor 页面模板使用的默认名称。
Tip A common convention is to prefix your layout files with an underscore (_) to distinguish them from standard Razor templates in your Pages folder. Placing them in Pages/Shared means you can refer to them by the short name, such as "Layout", without having to specify the full path to the layout file.
提示:一个常见的约定是在布局文件前面加上下划线 (),以将它们与 Pages 文件夹中的标准 Razor 模板区分开来。将它们放在 Pages/Shared 中意味着您可以通过短名称(如“_Layout”)来引用它们,而不必指定布局文件的完整路径。
A layout file looks similar to a normal Razor template, with one exception: every layout must call the @RenderBody() function. This tells the templating engine where to insert the content from the child views. A simple layout is shown in listing 17.7. Typically, your application references all your CSS and JavaScript files in the layout and includes all the common elements, such as headers and footers, but this example includes pretty much the bare minimum HTML.
布局文件看起来类似于普通的 Razor 模板,但有一个例外:每个布局都必须调用 @RenderBody() 函数。这会告诉模板引擎将子视图中的内容插入到何处。一个简单的布局如清单 17.7 所示。通常,您的应用程序会引用布局中的所有 CSS 和 JavaScript 文件,并包含所有常见元素,例如页眉和页脚,但此示例包含的 HTML 几乎是最低限度的。
Listing 17.7 A basic _Layout.cshtml file calling RenderBody
清单 17.7 一个调用 RenderBody 的基本 _Layout.cshtml 文件
<!DOCTYPE html>
<html>
<head>
<meta charset="utf-8" />
<title>@ViewData["Title"]</title> ❶
<link rel="stylesheet" href="~/css/site.css" /> ❷
</head>
<body>
@RenderBody() ❸
</body>
</html>
❶ ViewData is the standard mechanism for passing data to a layout from a view.
ViewData 是从视图向布局传递数据的标准机制。
❷ Elements common to every page, such as your CSS, are typically found in the layout.
每个页面通用的元素(例如 CSS)通常位于布局中。
❸ Tells the templating engine where to insert the child view’s content
告诉模板引擎在何处插入子视图的内容
As you can see, the layout file includes the required elements, such as <html> and <head>, as well as elements you need on every page, such as <title> and <link>. This example also shows the benefit of storing the page title in ViewData; the layout can render it in the <title> element so that it shows in the browser’s tab, as shown in figure 17.11.
如您所见,布局文件包括所需的元素,如 <html> 和 <head>,以及每个页面上所需的元素,如 <title> 和 <link>。此示例还显示了在 ViewData 中存储页面标题的好处;布局可以在<title> 元素中渲染它,使其显示在浏览器的选项卡中,如图 17.11 所示。

Figure 17.11 The content of the <title> element is used to name the tab in the user’s browser, in this case Home Page.
图 17.11 <title>元素的内容用于命名用户浏览器中的选项卡,在本例中为 Home Page。
NOTE Layout files are not standalone Razor Pages and do not take part in routing, so they do not start with the @page directive.
注意:布局文件不是独立的 Razor 页面,不参与路由,因此它们不以 @page 指令开头。
Views can specify a layout file to use by setting the Layout property inside a Razor code block, as shown in the following listing.
视图可以通过在 Razor 代码块中设置 Layout 属性来指定要使用的布局文件,如下面的清单所示。
Listing 17.8 Setting the Layout property from a view
示例 17.8 从视图设置 Layout 属性
@{
Layout = "_Layout"; ❶
ViewData["Title"] = "Home Page"; ❷
}
<h1>@ViewData["Title"]</h1> ❸
<p>This is the home page</p> ❸
❶ Sets the layout for the page to _Layout.cshtml
将页面的布局设置为 _Layout.cshtml
❷ ViewData is a convenient way of passing data from a Razor view to the layout.
ViewData 是将数据从 Razor 视图传递到布局的便捷方法。
❸ The content in the Razor view to render inside the layout
要在布局内呈现的 Razor 视图中的内容
Any contents in the view are be rendered inside the layout, where the call to @RenderBody() occurs. Combining the two previous listings generates the following HTML.
视图中的任何内容都将在布局中呈现,其中会调用 @RenderBody()。将前面的两个列表组合在一起将生成以下 HTML。
Listing 17.9 Rendered output from combining a view with its layout
列表 17.9 将视图与其布局组合在一起的渲染输出
<!DOCTYPE html>
<html>
<head>
<meta charset="utf-8" />
<title>Home Page</title> ❶
<link rel="stylesheet" href="/css/site.css" />
</head>
<body>
<h1>Home Page</h1> ❷
<p>This is the home page</p> ❷
</body>
<html>
❶ ViewData set in the view is used to render the layout.
ViewData 中设置的view 用于渲染布局。
❷ The RenderBody call renders the contents of the view.
RenderBody 调用渲染视图的内容。
Judicious use of layouts can be extremely useful in reducing the duplication between pages. By default, layouts provide only a single location where you can render content from the view, at the call to @RenderBody. In cases where this is too restrictive, you can render content using sections.
明智地使用布局对于减少页面之间的重复非常有用。默认情况下,布局仅提供一个位置,您可以在调用 @RenderBody时从视图中呈现内容。如果这过于严格,您可以使用部分来呈现内容。
17.4.2 Overriding parent layouts using sections
使用部分覆盖父布局
A common requirement when you start using multiple layouts in your application is to be able to render content from child views in more than one place in your layout. Consider the case of a layout that uses two columns. The view needs a mechanism for saying “render this content in the left column” and “render this other content in the right column.” This is achieved using sections.
当您在应用程序中开始使用多个布局时,一个常见的要求是能够在布局中的多个位置呈现子视图中的内容。考虑使用两列的布局的情况。视图需要一种机制来表示 “render this content in the left column” 和 “render this other content in the right column”这是使用部分实现的。
NOTE Remember, all the features outlined in this chapter are specific to Razor, which is a server-side rendering engine. If you’re using a client-side single-page application (SPA) framework to build your application, you’ll likely handle these requirements in other ways, within the client.
注意:请记住,本章中概述的所有功能都是特定于 Razor 的,Razor 是一个服务器端渲染引擎。如果您使用客户端单页应用程序 (SPA) 框架来构建应用程序,则可能会在客户端内以其他方式处理这些要求。
Sections provide a way of organizing where view elements should be placed within a layout. They’re defined in the view using an @section definition, as shown in the following listing, which defines the HTML content for a sidebar separate from the main content, in a section called Sidebar. The @section can be placed anywhere in the file, top or bottom, wherever is convenient.
Sections 提供了一种组织视图元素在布局中应放置的位置的方法。它们是在视图中使用 @section 定义定义的,如下面的清单所示,该清单在名为 Sidebar 的部分中定义与主要内容分开的侧边栏的 HTML 内容。@section可以放置在文件中的任何位置,顶部或底部,只要方便即可。
Listing 17.10 Defining a section in a view template
清单 17.10 在视图模板中定义部分
@{
    Layout = "_TwoColumn";
}
@section Sidebar {                         #A
    <p>This is the sidebar content</p>     #A
}                                          #A
<p>This is the main content </p>     #B
❶ All content inside the braces is part of the Sidebar section, not the main body content.
大括号内的所有内容都是 Sidebar 部分的一部分,而不是主体内容。
❷ Any content not inside an @section will be rendered by the @RenderBody call.
不在 @section 中的任何内容都将由 @RenderBody 调用呈现。
The section is rendered in the parent layout with a call to @RenderSection(). This renders the content contained in the child section into the layout. Sections can be either required or optional. If they’re required, a view must declare the given @section; if they’re optional, they can be omitted, and the layout will skip them. Skipped sections won’t appear in the rendered HTML. The following listing shows a layout that has a required section called Sidebar and an optional section called Scripts.
该部分通过调用 @RenderSection() 在父布局中呈现。这会将子部分中包含的内容呈现到布局中。部分可以是必需的,也可以是可选的。如果需要,视图必须声明给定的@section;如果它们是可选的,则可以省略它们,布局将跳过它们。跳过的部分不会显示在呈现的 HTML 中。下面的清单显示了一个布局,该布局具有一个名为 Sidebar 的必需部分和一个名为 Scripts 的可选部分。
Listing 17.11 Rendering a section in a layout file, _TwoColumn.cshtml
清单 17.11 在布局文件中渲染部分 _TwoColumn.cshtml
@{
    Layout = "_Layout";     #A
}
<div class="main-content">
    @RenderBody()          #B
</div>
<div class="side-bar">
    @RenderSection("Sidebar", required: true)     #C
</div>
@RenderSection("Scripts", required: false)    #D
❶ This layout is nested inside a layout itself.
此布局嵌套在布局本身内。
❷ Renders all the content from a view that isn’t part of a section
从不属于某个部分的视图中呈现所有内容
❸ Renders the Sidebar section; if the Sidebar section isn’t defined in the view, throws an error
呈现侧边栏部分;如果视图中未定义 Sidebar 部分,则抛出错误
❹ Renders the Scripts section; if the Scripts section isn’t defined in the view, ignores it
呈现 Scripts 部分;如果 Scripts 部分未在视图中定义,则忽略它
Tip It’s common to have an optional section called Scripts in your layout pages. This can be used to render additional JavaScript that’s required by some views but isn’t needed on every view. A common example is the jQuery Unobtrusive Validation scripts for client-side validation. If a view requires the scripts, it adds the appropriate @section Scripts to the Razor markup.
提示:布局页面中通常有一个名为 Scripts 的可选部分。这可用于呈现某些视图需要但并非每个视图都需要的其他 JavaScript。一个常见的示例是用于客户端验证的 jQuery Unobtrusive Validation 脚本。如果视图需要脚本,它会将相应的 @section 脚本添加到 Razor 标记。
You may notice that the previous listing defines a Layout property, even though it’s a layout itself, not a view. This is perfectly acceptable and lets you create nested hierarchies of layouts, as shown in figure 17.12.
您可能会注意到,前面的清单定义了一个 Layout 属性,即使它本身是一个布局,而不是一个视图。这是完全可以接受的,并且允许您创建布局的嵌套层次结构,如图 17.12 所示。
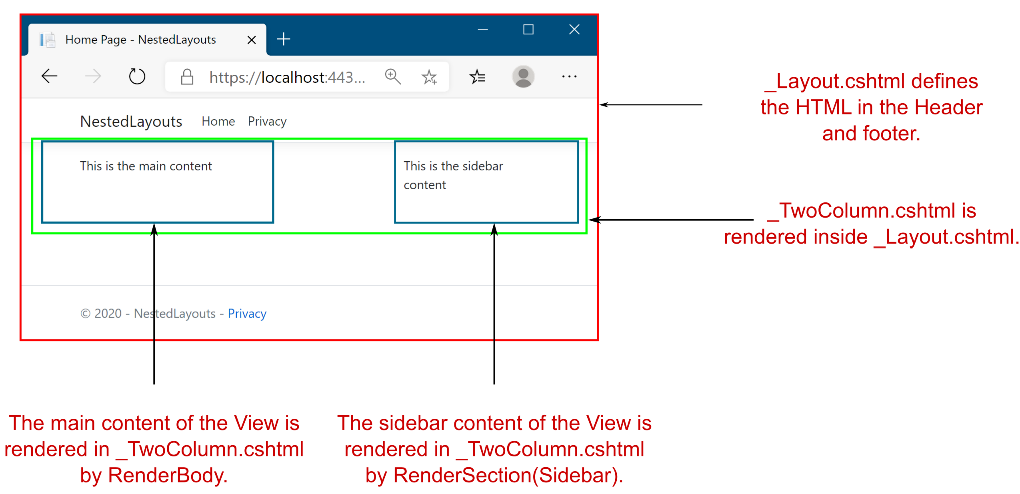
Figure 17.12 Multiple layouts can be nested to create complex hierarchies. This allows you to keep the elements common to all views in your base layout and extract layout common to multiple views into sub-layouts.
图 17.12 可以嵌套多个布局以创建复杂的层次结构。这样,您就可以保持基本布局中所有视图通用的元素,并将多个视图通用的布局提取到子布局中。
Tip Most websites these days need to be responsive, so they work on a wide variety of devices. You generally shouldn’t use layouts for this. Don’t serve different layouts for a single page based on the device making the request. Instead, serve the same HTML to all devices, and use CSS on the client side to adapt the display of your web page as required.
提示:如今,大多数网站都需要响应式,因此它们可以在各种设备上运行。通常,您不应该为此使用布局。不要根据发出请求的设备为单个页面提供不同的布局。相反,应向所有设备提供相同的 HTML,并在客户端使用 CSS 来根据需要调整网页的显示。
As well as the simple optional/required flags for sections, Razor Pages have several other messages that you can use for flow control in your layout pages:
除了部分的简单可选/必需标志外,Razor Pages 还有其他几条消息可用于布局页面中的流控制:
• IsSectionDefined(string section)—Returns true if a Razor Page has defined the named section.
IsSectionDefined(string section) - 如果 Razor 页面已定义命名部分,则返回 true。
• IgnoreSection(string section)—Ignores an unrendered section. If a section is defined in a page but not rendered, the Razor Page throws an exception unless the section is ignored.
IgnoreSection(string section) - 忽略未渲染的部分。如果在页面中定义了某个部分但未呈现,则 Razor Page 会引发异常,除非忽略该部分。
• IgnoreBody()—Ignores the unrendered body of the Razor Page. Layouts must call either RenderBody() or IgnoreBody(); otherwise, they will throw an InvalidOperationException.
IgnoreBody() - 忽略 Razor Page 的未渲染主体。布局必须调用 RenderBody() 或 IgnoreBody();否则,它们将引发 InvalidOperationException。
Layout files and sections provide a lot of flexibility for building sophisticated UIs, but one of their most important uses is in reducing the duplication of code in your application. They’re perfect for avoiding duplication of content that you’d need to write for every view. But what about those times when you find you want to reuse part of a view somewhere else? For those cases, you have partial views.
布局文件和部分为构建复杂的 UI 提供了很大的灵活性,但它们最重要的用途之一是减少应用程序中的代码重复。它们非常适合避免您需要为每个视图编写的内容重复。但是,当您发现想要在其他地方重用视图的一部分时,该怎么办?对于这些情况,您有 partial views。
17.4.3 Using partial views to encapsulate markup
17.4.3 使用分部视图封装标记
Partial views are exactly what they sound like: part of a view. They provide a means of breaking up a larger view into smaller, reusable chunks. This can be useful for both reducing the complexity in a large view by splitting it into multiple partial views or for allowing you to reuse part of a view inside another.
部分视图正是它们听起来的样子:视图的一部分。它们提供了一种将较大的视图分解为更小的、可重用的块的方法。这既可以通过将大型视图拆分为多个部分视图来降低大型视图的复杂性,也可以允许您在另一个视图中重用某个视图的一部分。
Most web frameworks that use server-side rendering have this capability. Ruby on Rails has partial views, Django has inclusion tags, and Zend has partials. These all work in the same way, extracting common code into small, reusable templates. Even client-side templating engines such as Mustache and Handlebars, used by client-side frameworks like Angular and Ember, have similar “partial view” concepts.
大多数使用服务器端渲染的 Web 框架都具有此功能。Ruby on Rails 有 partial 视图,Django 有 inclusion 标签,而 Zend 有 partials。这些都以相同的方式工作,将通用代码提取到小型、可重用的模板中。即使是 Angular 和 Ember 等客户端框架使用的客户端模板引擎(如 Mustache 和 Handlebars)也具有类似的“部分视图”概念。
Consider a to-do list application again. You might find you have a Razor Page called ViewToDo.cshtml that displays a single to-do with a given id. Later, you create a new Razor Page, RecentToDos.cshtml, that displays the five most recent to-do items. Instead of copying and pasting the code from one page to the other, you could create a partial view, called _ToDo.cshtml, as in the following listing.
再次考虑一个待办事项列表应用程序。你可能会发现你有一个名为 ViewToDo.cshtml 的 Razor 页面,它显示具有给定 ID 的单个待办事项。稍后,您将创建一个新的 Razor 页面 RecentToDos.cshtml,该页面显示五个最新的待办事项。您可以创建一个名为 _ToDo.cshtml 的分部视图,而不是将代码从一个页面复制并粘贴到另一个页面,如下面的清单所示。
Listing 17.12 Partial view _ToDo.cshtml for displaying a ToDoItemViewModel
列表 17.12 用于显示 ToDoItemViewModel 的分部视图 _ToDo.cshtml
@model ToDoItemViewModel                                  #A
<h2>@Model.Title</h2>                   #B
<ul>                                    #B
    @foreach (var task in Model.Tasks)  #B
    {                                   #B
        <li>@task</li>                  #B
    }                                   #B
</ul>                                   #B
❶ Partial views can bind to data in the Model property, like a normal Razor Page uses a PageModel.
分部视图可以绑定到 Model 属性中的数据,就像普通的 Razor Page 使用 PageModel 一样。
❷ The content of the partial view, which previously existed in the ViewToDo.cshtml file
分部视图的内容,以前存在于 ViewToDo.cshtml 文件中
Partial views are a bit like Razor Pages without the PageModel and handlers. Partial views are purely about rendering small sections of HTML rather than handling requests, model binding, and validation, and calling the application model. They are great for encapsulating small usable bits of HTML that you need to generate on multiple Razor Pages.
分部视图有点像没有 PageModel 和处理程序的 Razor Pages。分部视图纯粹是关于呈现 HTML 的一小部分,而不是处理请求、模型绑定和验证以及调用应用程序模型。它们非常适合封装您需要在多个 Razor 页面上生成的少量可用 HTML。
Both the ViewToDo.cshtml and RecentToDos.cshtml Razor Pages can render the _ToDo.cshtml partial view, which handles generating the HTML for a single class. Partial views are rendered using the <partial /> Tag Helper, providing the name of the partial view to render and the data (the model) to render. For example, the RecentToDos.cshtml view could achieve this as shown in the following listing.
ViewToDo.cshtml 和 RecentToDos.cshtml Razor 页面都可以呈现 _ToDo.cshtml 分部视图,该视图处理为单个类生成 HTML。部分视图使用<partial /> Tag Helper 进行渲染,提供要渲染的分部视图的名称和要渲染的数据(模型)。例如,RecentToDos.cshtml 视图可以实现此目的,如下面的清单所示。
Listing 17.13 Rendering a partial view from a Razor Page
清单 17.13 从 Razor 页面渲染部分视图
@page                    #A
@model RecentToDoListModel                   #B

@foreach(var todo in Model.RecentItems)     #C
{
    <partial name="_ToDo" model="todo" />   #D
}
❶ This is a Razor Page, so it uses the @page directive. Partial views do not use @page.
这是一个 Razor 页面,因此它使用 @page 指令。分部视图不使用@page。
❷ The PageModel contains the list of recent items to render.
PageModel 包含要渲染的最近项目的列表。
❸ Loops through the recent items. todo is a ToDoItemViewModel, as required by the partial view.
循环浏览最近的项目。todo 是 ToDoItemViewModel,这是分部视图所需的。
❹ Uses the partial tag helper to render the _ToDo partial view, passing in the model to render
使用 partial 标签辅助函数渲染_ToDo 部分视图,传入模型以渲染
When you render a partial view without providing an absolute path or file extension, such as _ToDo in listing 17.13, the framework tries to locate the view by searching the Pages folder, starting from the Razor Page that invoked it. For example, if your Razor Page is located at Pages/Agenda/ToDos/RecentToDos.chstml, the framework would look in the following places for a file called _ToDo.chstml:
当您在不提供绝对路径或文件扩展名的情况下呈现部分视图时(如清单 17.13 中的 _ToDo),框架会尝试通过搜索 Pages 文件夹来查找视图,从调用它的 Razor Page 开始。例如,如果您的 Razor 页面位于 Pages/Agenda/ToDos/RecentToDos.chstml,则框架将在以下位置查找名为 _ToDo.chstml 的文件:
• Pages/Agenda/ToDos/ (the current Razor Page’s folder)
• Pages/Agenda/
• Pages/
• Pages/Shared/
• Views/Shared/
The first location that contains a file called _ToDo.cshtml will be selected. If you include the .cshtml file extension when you reference the partial view, the framework will look only in the current Razor Page’s folder. Also, if you provide an absolute path to the partial, such as /Pages/Agenda/ToDo.cshtml, that’s the only place the framework will look.
将选择包含名为 _ToDo.cshtml 的文件的第一个位置。如果在引用分部视图时包含 .cshtml 文件扩展名,则框架将仅在当前 Razor Page 的文件夹中查找。此外,如果提供部分的绝对路径(如 /Pages/Agenda/ToDo.cshtml),则这是框架将查看的唯一位置。
Tip As with most of Razor Pages, the search locations are conventions that you can customize. If you find the need, you can customize the paths as shown here: http://mng.bz/nM9e.
提示:与大多数 Razor Pages 一样,搜索位置是可以自定义的约定。如果找到需求,可以自定义路径,如下所示:http://mng.bz/nM9e。
The Razor code contained in a partial view is almost identical to a standard view. The main difference is the fact that partial views are called only from other views. The other difference is that partial views don’t run _ViewStart.cshtml when they execute. You’ll learn about _ViewStart.cshtml shortly in section 17.4.4.
分部视图中包含的 Razor 代码与标准视图几乎相同。主要区别在于分部视图仅从其他视图调用。另一个区别是,分部视图在执行时不会运行 _ViewStart.cshtml。您很快就会在第 17.4.4 节中了解 _ViewStart.cshtml。
NOTE Like layouts, partial views are typically named with a leading underscore.
注意:与布局一样,分部视图通常使用前导下划线命名。
Child actions in ASP.NET Core
In the legacy .NET Framework version of ASP.NET, there was the concept of a child action. This was an MVC controller action method that could be invoked from inside a view. This was the main mechanism for rendering discrete sections of a complex layout that had nothing to do with the main action method. For example, a child action method might render the shopping cart in the corner of every page on an e-commerce site.
在 ASP.NET 的旧版 .NET Framework 中,存在子作的概念。这是一个可以从视图内部调用的 MVC 控制器作方法。这是渲染复杂布局的离散部分的主要机制,与主作方法无关。例如,子作方法可能会在电子商务网站上每个页面的一角呈现购物车。This approach meant you didn’t have to pollute every page’s view model with the view model items required to render the shopping cart, but it fundamentally broke the MVC design pattern by referencing controllers from a view.
这种方法意味着你不必用渲染购物车所需的视图模型项来污染每个页面的视图模型,但它通过从视图中引用控制器,从根本上打破了 MVC 设计模式。In ASP.NET Core, child actions are no more. View components have replaced them. These are conceptually quite similar in that they allow both the execution of arbitrary code and the rendering of HTML, but they don’t directly invoke controller actions. You can think of them as a more powerful partial view that you should use anywhere a partial view needs to contain significant code or business logic. You’ll see how to build a small view component in chapter 32.
在 ASP.NET Core 中,子作不再存在。视图组件已取代它们。它们在概念上非常相似,因为它们都允许执行任意代码和呈现 HTML,但它们不直接调用控制器作。您可以将它们视为一个功能更强大的分部视图,您应该在分部视图需要包含重要代码或业务逻辑的任何位置使用它。您将在第 32 章中看到如何构建一个小的视图组件。
Partial views aren’t the only way to reduce duplication in your view templates. Razor also allows you to put common elements such as namespace declarations and layout configuration in centralized files. In the next section you’ll see how to wield these files to clean up your templates.
分部视图并不是减少视图样板中重复的唯一方法。Razor 还允许将命名空间声明和布局配置等常见元素放在集中式文件中。在下一节中,您将看到如何使用这些文件来清理模板。
17.4.4 Running code on every view with _ViewStart and _ViewImports
17.4.4 使用 _ViewStart 和 _ViewImports 在每个视图上运行代码
Due to the nature of views, you’ll inevitably find yourself writing certain things repeatedly. If all your views use the same layout, adding the following code to the top of every page feels a little redundant:
由于视图的性质,您不可避免地会发现自己重复编写某些内容。如果所有视图都使用相同的布局,则将以下代码添加到每个页面的顶部感觉有点多余:
@{
    Layout = "_Layout";
}
Similarly, if you find you need to reference objects from a different namespace in your Razor views, then having to add @using WebApplication1.Models to the top of every page can get to be a chore. Fortunately, ASP.NET Core includes two mechanisms for handling these common tasks: _ViewImports.cshtml and _ViewStart.cshtml.
同样,如果你发现需要在 Razor 视图中引用来自不同命名空间的对象,则必须将 WebApplication1.Models 添加到每个页面的顶部@using这可能是一件苦差事。幸运的是,ASP.NET Core 包含两种用于处理这些常见任务的机制:_ViewImports.cshtml 和 _ViewStart.cshtml。
Importing common directives with _ViewImports
使用 _ViewImports 导入通用指令The _ViewImports.cshtml file contains directives that are inserted at the top of every Razor view. This can include things like the @using and @model statements that you’ve already seen—basically any Razor directive. For example, to avoid adding a using statement to every view, you can include it in _ViewImports.cshtml instead of in your Razor Pages, as shown in the following listing.
_ViewImports.cshtml 文件包含插入到每个 Razor 视图顶部的指令。这可以包括您已经看到的 @using 和 @model 语句等内容,基本上是任何 Razor 指令。例如,若要避免将 using 语句添加到每个视图,可以将其包含在 _ViewImports.cshtml 中,而不是包含在 Razor Pages 中,如下面的清单所示。
Listing 17.14 A typical _ViewImports.cshtml file importing additional namespaces
列表 17.14 一个典型的 _ViewImports.cshtml 文件导入额外的命名空间
@using WebApplication1            #A
@using WebApplication1.Pages      #A
@using WebApplication1.Models                            #B
@addTagHelper *, Microsoft.AspNetCore.Mvc.TagHelpers    #C
❶ The default namespace of your application and the Pages folder
应用程序的默认命名空间和 Pages 文件夹
❷ Adds this directive to avoid placing it in every view
添加此指令以避免将其放置在每个视图中
❸ Makes Tag Helpers available in your views, added by default
使标签帮助程序在您的视图中可用,默认添加
The _ViewImports.cshtml file can be placed in any folder, and it will apply to all views and subfolders in that folder. Typically, it’s placed in the root Pages folder so that it applies to every Razor Page and partial view in your app.
_ViewImports.cshtml 文件可以放置在任何文件夹中,并且它将应用于该文件夹中的所有视图和子文件夹。通常,它位于根 Pages 文件夹中,以便应用于应用中的每个 Razor 页面和部分视图。
It’s important to note that you should put Razor directives only in _ViewImports.cshtml; you can’t put any old C# in there. As you can see in the previous listing, this is limited to things like @using or the @addTagHelper directive that you’ll learn about in chapter 18. If you want to run some arbitrary C# at the start of every view in your application, such as to set the Layout property, you should use the _ViewStart.cshtml file instead.
请务必注意,应仅将 Razor 指令放在 _ViewImports.cshtml 中;你不能把任何旧的 C# 放进去。正如您在前面的清单中所看到的,这仅限于 @using 或 @addTagHelper 指令之类的内容,您将在第 18 章中学习这些内容。如果要在应用程序中的每个视图的开头运行一些任意 C#,例如设置 Layout 属性,则应改用 _ViewStart.cshtml 文件。
Running code for every view with _ViewStart
使用 _ViewStart 为每个视图运行代码You can easily run common code at the start of every Razor Page by adding a _ViewStart.cshtml file to the Pages folder in your application. This file can contain any Razor code, but it’s typically used to set the Layout for all the pages in your application, as shown in the following listing. Then you can omit the Layout statement from all pages that use the default layout. If a view needs to use a nondefault layout, you can override it by setting the value in the Razor Page itself.
通过将 _ViewStart.cshtml 文件添加到应用程序的 Pages 文件夹,可以轻松地在每个 Razor 页面的开头运行通用代码。此文件可以包含任何 Razor 代码,但它通常用于为应用程序中的所有页面设置 Layout,如下面的清单所示。然后,您可以从使用默认布局的所有页面中省略 Layout 语句。如果视图需要使用非默认布局,您可以通过在 Razor 页面本身中设置值来覆盖它。
Listing 17.15 A typical _ViewStart.cshtml file setting the default layout
列表 17.15 设置默认布局的典型 _ViewStart.cshtml 文件
@{
    Layout = "_Layout";
}
Any code in the _ViewStart.cshtml file runs before the view executes. Note that _ViewStart.cshtml runs only for Razor Page views; it doesn’t run for layouts or partial views. Also note that the names for these special Razor files are enforced and can’t be changed by conventions.
_ViewStart.cshtml 文件中的任何代码在视图执行之前运行。请注意,_ViewStart.cshtml 仅针对 Razor 页面视图运行;它不针对布局或分部视图运行。另请注意,这些特殊 Razor 文件的名称是强制性的,不能通过约定进行更改。
Warning You must use the names _ViewStart.cshtml and _ViewImports.cshtml for the Razor engine to locate and execute them correctly. To apply them to all your app’s pages, add them to the root of the Pages folder, not to the Shared subfolder.
警告:必须使用名称 _ViewStart.cshtml 和 _ViewImports.cshtml 以便 Razor 引擎正确查找和执行它们。要将它们应用于应用程序的所有页面,请将它们添加到 Pages 文件夹的根目录,而不是 Shared 子文件夹。
You can specify additional _ViewStart.cshtml or _ViewImports.cshtml files to run for a subset of your views by including them in a subfolder in Pages. The files in the subfolders run after the files in the root Pages folder.
您可以通过将视图子集包含在 Pages 的子文件夹中来指定要为视图子集运行的其他 _ViewStart.cs_ViewImports html 文件。子文件夹中的文件在根 Pages 文件夹中的文件之后运行。
Partial views, layouts, and AJAX
分部视图、布局和 AJAXThis chapter describes using Razor to render full HTML pages server-side, which are then sent to the user’s browser in traditional web apps. A common alternative approach when building web apps is to use a JavaScript client-side framework to build an SPA, which renders the HTML client-side in the browser.
本章介绍如何使用 Razor 在服务器端呈现完整的 HTML 页面,然后将其发送到传统 Web 应用程序中的用户浏览器。构建 Web 应用程序时,一种常见的替代方法是使用 JavaScript 客户端框架构建 SPA,该 SPA 在浏览器中呈现 HTML 客户端。One of the technologies SPAs typically use is AJAX (Asynchronous JavaScript and XML), in which the browser sends requests to your ASP.NET Core app without reloading a whole new page. It’s also possible to use AJAX requests with apps that use server-side rendering. To do so, you’d use JavaScript to request an update for part of a page.
SPA 通常使用的技术之一是 AJAX(异步 JavaScript 和 XML),在这种技术中,浏览器将请求发送到您的 ASP.NET Core 应用程序,而无需重新加载全新的页面。还可以将 AJAX 请求与使用服务器端渲染的应用程序一起使用。为此,您需要使用 JavaScript 请求更新页面的一部分。If you want to use AJAX with an app that uses Razor, you should consider making extensive use of partial views. Then you can expose these via additional Razor Page handlers, as shown in this article: http://mng.bz/vzB1. Using AJAX can reduce the overall amount of data that needs to be sent back and forth between the browser and your app, and it can make your app feel smoother and more responsive, as it requires fewer full-page loads. But using AJAX with Razor can add complexity, especially for larger apps. If you foresee yourself making extensive use of AJAX to build a highly dynamic web app, you might want to consider using minimal APIs or web API controllers with a client-side framework, or consider using Blazor instead.
如果要将 AJAX 与使用 Razor 的应用程序一起使用,则应考虑广泛使用分部视图。然后,您可以通过其他 Razor Page 处理程序公开这些内容,如本文所示:http://mng.bz/vzB1。使用 AJAX 可以减少需要在浏览器和应用程序之间来回发送的数据总量,并且可以使您的应用程序感觉更流畅、响应更快,因为它需要的整页加载更少。但是,将 AJAX 与 Razor 结合使用可能会增加复杂性,尤其是对于较大的应用程序。如果你预见到自己会广泛使用 AJAX 来构建高度动态的 Web 应用,则可能需要考虑将最少的 API 或 Web API 控制器与客户端框架结合使用,或者考虑改用 Blazor。
That concludes our first look at rendering HTML using the Razor templating engine. In the next chapter you’ll learn about Tag Helpers and how to use them to build HTML forms, a staple of modern web applications. Tag Helpers are one of the biggest improvements to Razor in ASP.NET Core over legacy ASP.NET, so getting to grips with them will make editing your views an overall more pleasant experience!
我们第一次使用 Razor 模板引擎渲染 HTML 到此结束。在下一章中,您将了解标记帮助程序以及如何使用它们来构建 HTML 表单,这是现代 Web 应用程序的主要内容。标签帮助程序是 ASP.NET Core 中 Razor 相对于旧版 ASP.NET 的最大改进之一,因此掌握它们将使编辑视图的整体体验更加愉快!
17.5 Summary
17.5 总结
Razor is a templating language that allows you to generate dynamic HTML using a mixture of HTML and C#. This provides the power of C# without your having to build up an HTML response manually using strings.
Razor 是一种模板语言,允许您使用 HTML 和 C# 的混合生成动态 HTML。这提供了 C# 的强大功能,而无需使用字符串手动构建 HTML 响应。
Razor Pages can pass strongly typed data to a Razor view by setting public properties on the PageModel. To access the properties on the view model, the view should declare the model type using the @model directive.
Razor Pages 可以通过在 PageModel 上设置公共属性,将强类型数据传递给 Razor 视图。要访问视图模型上的属性,视图应使用 @model 指令声明模型类型。
Page handlers can pass key-value pairs to the view using the ViewData dictionary. This is useful for implicitly passing shared data to layouts and partial views.
页面处理程序可以使用 ViewData 字典将键值对传递给视图。这对于将共享数据隐式传递给布局和分部视图非常有用。
Razor expressions render C# values to the HTML output using @ or @(). You don’t need to include a semicolon after the statement when using Razor expressions.
Razor 表达式使用 @ 或 @() 将 C# 值呈现到 HTML 输出。使用 Razor 表达式时,无需在语句后包含分号。
Razor code blocks, defined using @{}, execute C# without outputting HTML. The C# in Razor code blocks must be complete statements, so it must include semicolons.
使用 @{} 定义的 Razor 代码块执行 C# 而不输出 HTML。Razor 代码块中的 C# 必须是完整语句,因此它必须包含分号。
Loops and conditionals can be used to easily generate dynamic HTML in templates, but it’s a good idea to limit the number of if statements in particular, to keep your views easy to read.
循环和条件可用于在模板中轻松生成动态 HTML,但最好特别限制 if 语句的数量,以保持视图易于阅读。
If you need to render a string as raw HTML you can use Html.Raw, but do so sparingly; rendering raw user input can create a security vulnerability in your application.
如果需要将字符串呈现为原始 HTML,则可以使用 Html.Raw,但要谨慎使用;呈现原始用户输入可能会在您的应用程序中创建安全漏洞。
Tag Helpers allow you to bind your data model to HTML elements, making it easier to generate dynamic HTML while staying editor-friendly.
标签帮助程序允许您将数据模型绑定到 HTML 元素,从而更轻松地生成动态 HTML,同时保持编辑器友好性。
You can place HTML common to multiple views in a layout to reduce duplication. The layout will render any content from the child view at the location @RenderBody is called.
您可以将多个视图通用的 HTML 放置在布局中,以减少重复。布局将在调用子视图的位置呈现子视图中的任何内容@RenderBody。
Encapsulate commonly used snippets of Razor code in a partial view. A partial view can be rendered using the
在分部视图中封装 Razor 代码的常用代码片段。可以使用 tag 呈现部分视图。
_ViewImports.cshtml can be used to include common directives, such as @using statements, in every view.
_ViewImports.cshtml 可用于在每个视图中包含常见指令,例如 @using 语句。
_ViewStart.cshtml is called before the execution of each Razor Page and can be used to execute code common to all Razor Pages, such as setting a default layout page. It doesn’t execute for layouts or partial views.
_ViewStart.cshtml 在执行每个 Razor 页面之前调用,可用于执行所有 Razor 页面通用的代码,例如设置默认布局页面。它不会对布局或分部视图执行。
_ViewImports.cshtml and _ViewStart.cshtml are hierarchical. Files in the root folder execute first, followed by files in controller-specific view folders.
_ViewImports.cshtml 和 _ViewStart.cshtml 是分层的。首先执行根文件夹中的文件,然后是特定于控制器的视图文件夹中的文件。