Author Archives: user

ASP.NET Core in Action 26 Monitoring and troubleshooting errors with logging

26 Monitoring and troubleshooting errors with logging
26 使用日志记录监控和排除错误

This chapter covers
本章涵盖

• Understanding the components of a log message
了解日志消息的组成部分

• Writing logs to multiple output locations
将日志写入多个输出位置

• Controlling log verbosity in different environments using filtering
使用筛选控制不同环境中的日志详细程度

• Using structured logging to make logs searchable
使用结构化日志记录使日志可搜索

Logging is one of those topics that seems unnecessary, right up until you desperately need it! There’s nothing more frustrating than finding a problem that you can reproduce only in production and then discovering there are no logs to help you debug it.
日志记录是那些似乎不必要的主题之一,直到您迫切需要它为止!没有什么比找到只能在生产环境中重现的问题,然后发现没有日志可以帮助您调试它更令人沮丧的了。

Logging is the process of recording events or activities in an app, and it often involves writing a record to a console, a file, the Windows Event Log, or some other system. You can record anything in a log message, though there are generally two different types of messages:
日志记录是在应用程序中记录事件或活动的过程,它通常涉及将记录写入控制台、文件、Windows 事件日志或其他系统。您可以在日志消息中记录任何内容,但通常有两种不同类型的消息:

• Informational messages—A standard event occurred: a user logged in, a product was placed in a shopping cart, or a new post was created on a blogging app.
信息性消息 - 发生标准事件:用户登录、产品放入购物车或在博客应用程序上创建新帖子。

• Warnings and errors—An error or unexpected condition occurred: a user had a negative total in the shopping cart, or an exception occurred.
警告和错误 - 发生错误或意外情况:用户购物车中的总数为负数,或发生异常。

Historically, a common problem with logging in larger applications was that each library and framework would generate logs in a slightly different format, if at all. When an error occurred in your app and you were trying to diagnose it, this inconsistency made it harder to connect the dots in your app to get the full picture and understand the problem.
从历史上看,在大型应用程序中登录的一个常见问题是,每个库和框架都会以略有不同的格式生成日志(如果有的话)。当您的应用程序发生错误并且您尝试诊断它时,这种不一致使得您更难将应用程序中的各个点连接起来以获得完整的图片并了解问题。

Luckily, ASP.NET Core includes a new generic logging interface that you can plug into. It’s used throughout the ASP.NET Core framework code itself, as well as by third-party libraries, and you can easily use it to create logs in your own code. With the ASP.NET Core logging framework, you can control the verbosity of logs coming from each part of your code, including the framework and libraries, and you can write the log output to any destination that plugs into the framework.
幸运的是,ASP.NET Core 包含一个可以插入的新通用日志记录接口。它在整个 ASP.NET Core 框架代码本身以及第三方库中使用,您可以轻松地使用它在自己的代码中创建日志。使用 ASP.NET Core 日志记录框架,您可以控制来自代码每个部分(包括框架和库)的日志的详细程度,并且可以将日志输出写入插入框架的任何目标。

In this chapter I cover the .NET logging framework ASP.NET Core uses in detail, and I explain how you can use it to record events and diagnose errors in your own apps. In section 26.1 I’ll describe the architecture of the logging framework. You’ll learn how dependency injection (DI) makes it easy for both libraries and apps to create log messages, as well as to write those logs to multiple destinations.
在本章中,我将详细介绍 Core 使用的 .NET 日志记录框架 ASP.NET 并说明如何使用它来记录事件和诊断您自己的应用程序中的错误。在 Section 26.1 中,我将描述 logging 框架的架构。您将了解依赖关系注入 (DI) 如何使库和应用程序轻松创建日志消息,以及将这些日志写入多个目标。

In section 26.2 you’ll learn how to write your own log messages in your apps with the ILogger interface. We’ll break down the anatomy of a typical log record and look at its properties, such as the log level, category, and message.
在第 26.2 节中,您将学习如何使用 ILogger 接口在应用程序中编写自己的日志消息。我们将分解典型日志记录的剖析,并查看其属性,例如日志级别、类别和消息。

Writing logs is useful only if you can read them, so in section 26.3 you’ll learn how to add logging providers to your application. Logging providers control where your app writes your log messages, such as to the console, to a file, or even to an external service.
只有当您可以阅读日志时,编写日志才有用,因此在 Section 26.3 中,您将学习如何将日志记录提供程序添加到您的应用程序中。日志记录提供程序控制应用程序将日志消息写入何处,例如写入控制台、文件甚至外部服务。

Logging is an important part of any application, but determining how much logging is enough can be a tricky question. On one hand, you want to provide sufficient information to be able to diagnose any problems. On the other hand, you don’t want to fill your logs with data that makes it hard to find the important information when you need it. Even worse, what is sufficient in development might be far too much once you’re running in production.
日志记录是任何应用程序的重要组成部分,但确定多少日志记录就足够了可能是一个棘手的问题。一方面,您希望提供足够的信息以便能够诊断任何问题。另一方面,您不希望在日志中填充数据,从而在需要时难以找到重要信息。更糟糕的是,一旦你在生产环境中运行,开发中足够的资源可能就太多了。

In section 26.4 I’ll explain how you can filter log messages from various sections of your app, such as the ASP.NET Core infrastructure libraries, so that your logging providers write only the important messages. This lets you keep that balance between extensive logging in development and writing only important logs in production.
在 Section 26.4 中,我将解释如何过滤来自应用程序各个部分的日志消息,例如 ASP.NET Core 基础设施库,以便日志记录提供程序仅写入重要消息。这使您可以在 development 中的大量日志记录和在 production 中仅写入重要日志之间保持平衡。

In the final section of this chapter I’ll touch on some of the benefits of structured logging, an approach to logging that you can use with some providers for the ASP.NET Core logging framework. Structured logging involves attaching data to log messages as key-value pairs to make it easier to search and query logs. You might attach a unique customer ID to every log message generated by your app, for example. Finding all the log messages associated with a user is much simpler with this approach, compared with recording the customer ID in an inconsistent manner as part of the log message.
在本章的最后一节中,我将介绍结构化日志记录的一些好处,结构化日志记录是一种日志记录方法,您可以将其与 ASP.NET Core 日志记录框架的某些提供程序一起使用。结构化日志记录涉及将数据作为键值对附加到日志消息中,以便更轻松地搜索和查询日志。例如,您可以将唯一的客户 ID 附加到应用程序生成的每条日志消息中。与以不一致的方式将客户 ID 记录为日志消息的一部分相比,使用此方法查找与用户关联的所有日志消息要简单得多。

We’ll start this chapter by digging into what logging involves and why your future self will thank you for using logging effectively in your application. Then we’ll look at the pieces of the ASP.NET Core logging framework you’ll use directly in your apps and how they fit together.
在本章开始时,我们将深入研究日志记录涉及什么,以及为什么未来的自己会感谢您在应用程序中有效地使用日志记录。然后,我们将了解您将直接在应用程序中使用的 ASP.NET Core 日志记录框架的各个部分,以及它们如何组合在一起。

26.1 Using logging effectively in a production app

26.1 在 生产应用程序中有效地使用日志记录

Imagine you’ve just deployed a new app to production when a customer calls saying that they’re getting an error message using your app. How would you identify what caused the problem? You could ask the customer what steps they were taking and potentially try to re-create the error yourself, but if that doesn’t work, you’re left trawling through the code, trying to spot errors with nothing else to go on.
假设您刚刚将一个新应用程序部署到生产环境中,这时客户打电话说他们在使用您的应用时收到了一条错误消息。您将如何确定导致问题的原因?您可以询问客户他们正在采取哪些步骤,并可能尝试自己重新创建错误,但如果这不起作用,您就只能浏览代码,试图发现错误,而没有其他事情可做。

Logging can provide the extra context you need to quickly diagnose a problem. Arguably, the most important logs capture the details about the error itself, but the events that led to the error can be equally useful in diagnosing the cause of an error.
日志记录可以提供快速诊断问题所需的额外上下文。可以说,最重要的日志捕获了有关错误本身的详细信息,但导致错误的事件在诊断错误原因方面同样有用。

There are many reasons for adding logging to an application, but typically, the reasons fall into one of three categories:
向应用程序添加日志记录的原因有很多,但通常,原因分为以下三类之一:

• Logging for auditing or analytics reasons, to trace when events have occurred
出于审核或分析原因进行日志记录,以跟踪事件发生的时间

• Logging errors
记录错误

• Logging nonerror events to provide a breadcrumb trail of events when an error does occur
记录非错误事件,以便在发生错误时提供事件的痕迹导航跟踪

The first of these reasons is simple. You may be required to keep a record of every time a user logs in, for example, or you may want to keep track of how many times a particular API method is called. Logging is an easy way to record the behavior of your app by writing a message to the log every time an interesting event occurs.
第一个原因很简单。例如,您可能需要保留用户每次登录的记录,或者您可能希望跟踪特定 API 方法被调用的次数。日志记录是一种记录应用程序行为的简单方法,每次发生有趣的事件时,都会向日志写入一条消息。

I find the second reason for logging to be the most common. When an app is working perfectly, logs often go completely untouched. It’s when there’s a problem and a customer comes calling that logs become invaluable. A good set of logs can help you understand the conditions in your app that caused an error, including the context of the error itself, but also the context in previous requests.
我发现日志记录的第二个原因是最常见的。当应用程序完美运行时,日志通常完全保持不变。当出现问题并且客户打电话时,日志就会变得非常宝贵。一组好的日志可以帮助您了解应用中导致错误的条件,包括错误本身的上下文,以及之前请求中的上下文。

TIP Even with extensive logging in place, you may not realize you have a problem in your app unless you look through your logs regularly. For any medium-size to large app, this becomes impractical, so monitoring services such as Sentry (https://sentry.io) can be invaluable for notifying you of problems quickly.
提示:即使有大量的日志记录,除非您定期查看日志,否则您也可能不会意识到您的应用程序存在问题。对于任何大中型应用程序,这都变得不切实际,因此 Sentry (https://sentry.io) 等监控服务对于快速通知您问题非常宝贵。

If this sounds like a lot of work, you’re in luck. ASP.NET Core does a ton of the “breadcrumb logging” for you so that you can focus on creating high-quality log messages that provide the most value when diagnosing problems.
如果这听起来像是很多工作,那么您很幸运。ASP.NET Core 为您执行了大量的“痕迹导航日志记录”,以便您可以专注于创建高质量的日志消息,从而在诊断问题时提供最大价值。

26.1.1 Highlighting problems using custom log messages

26.1.1 使用自定义日志消息高亮显示问题

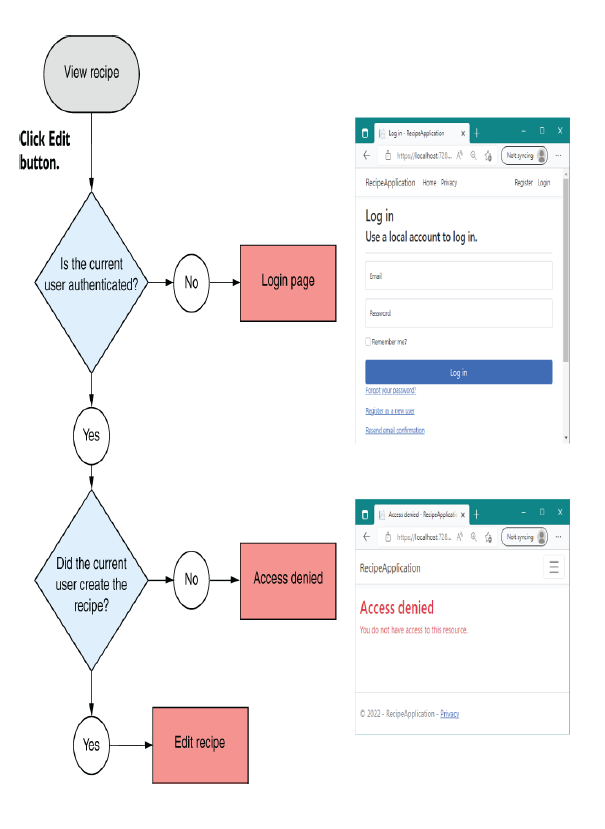
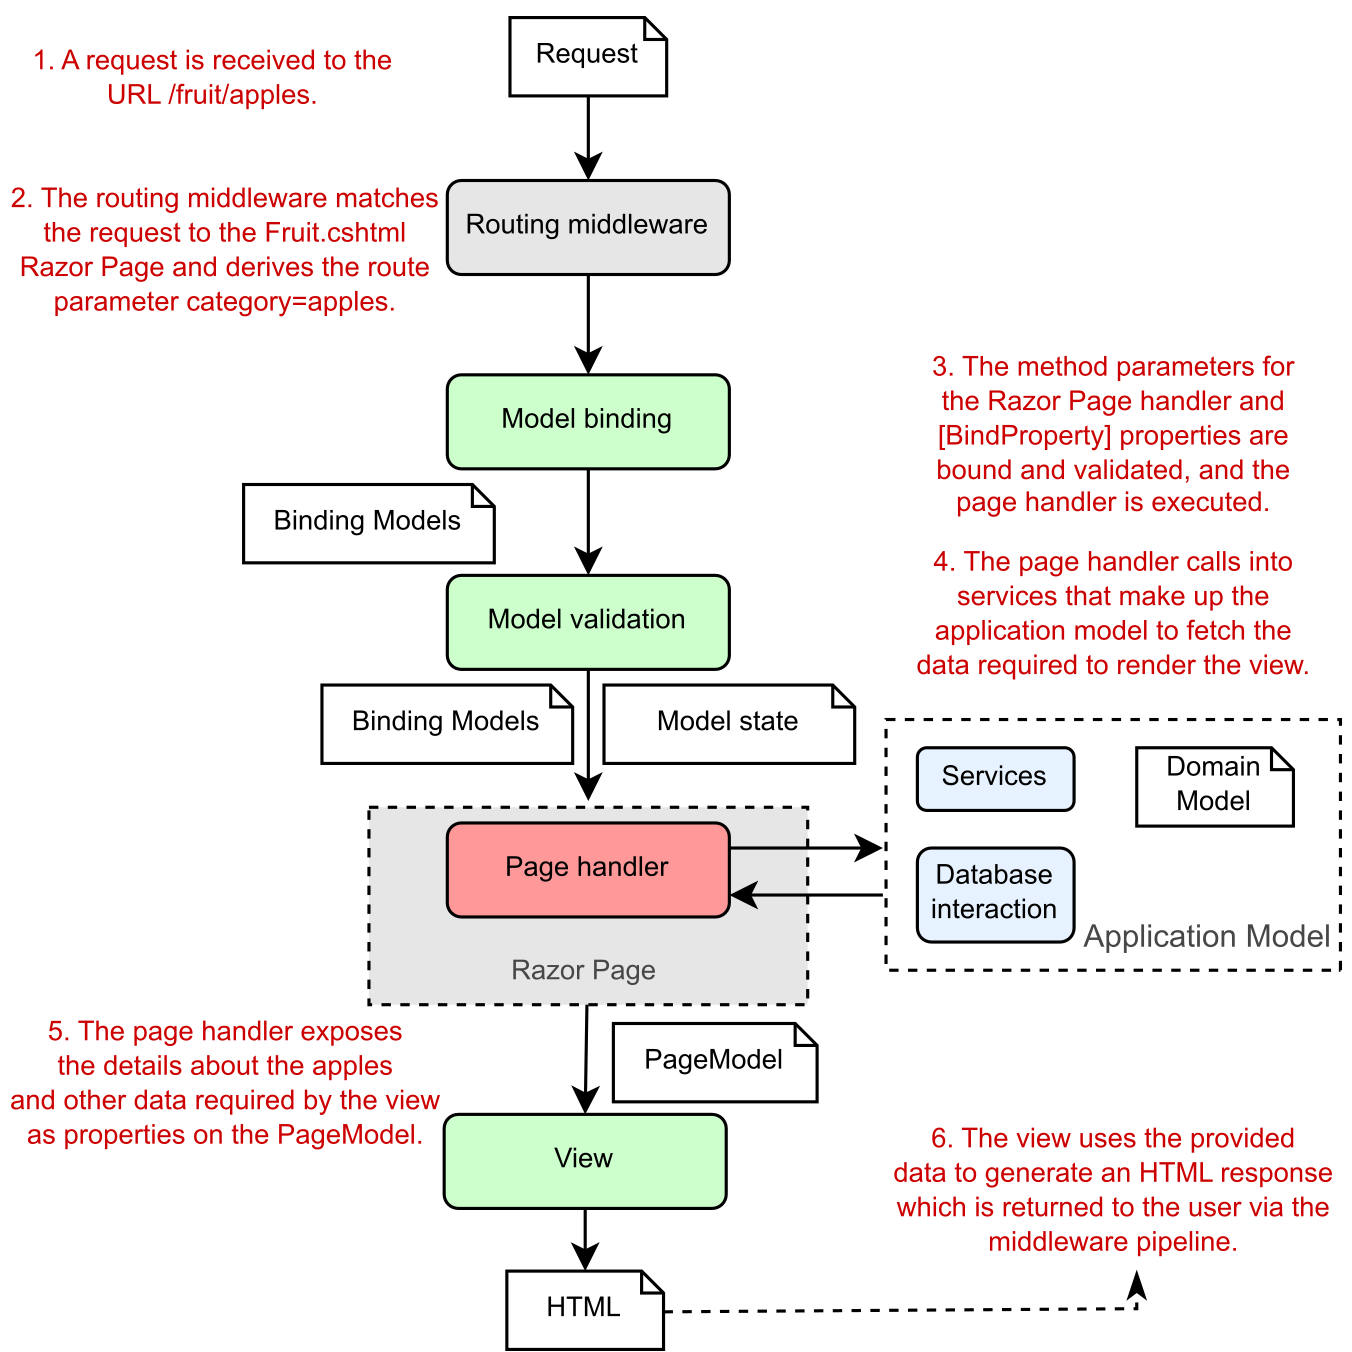
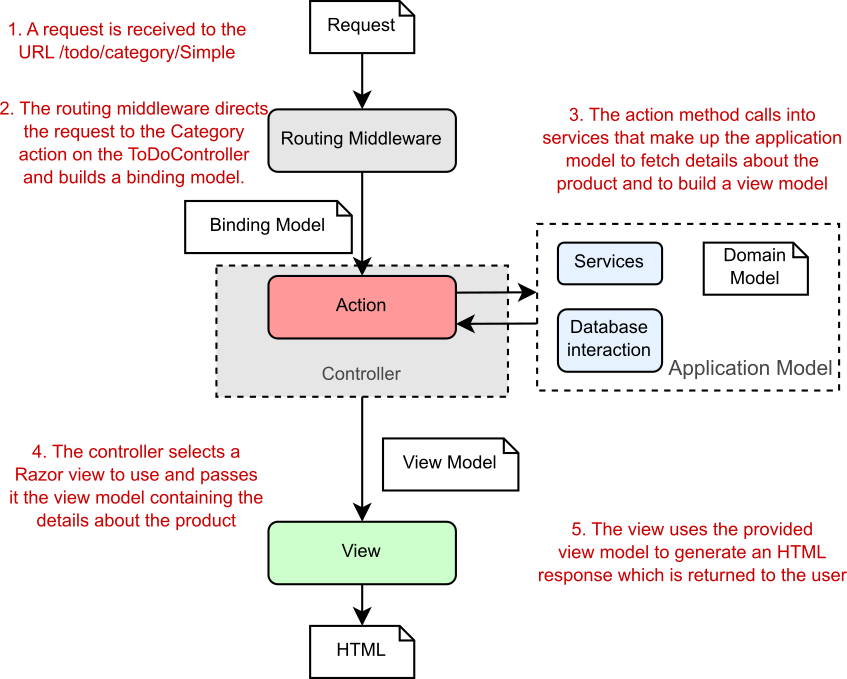
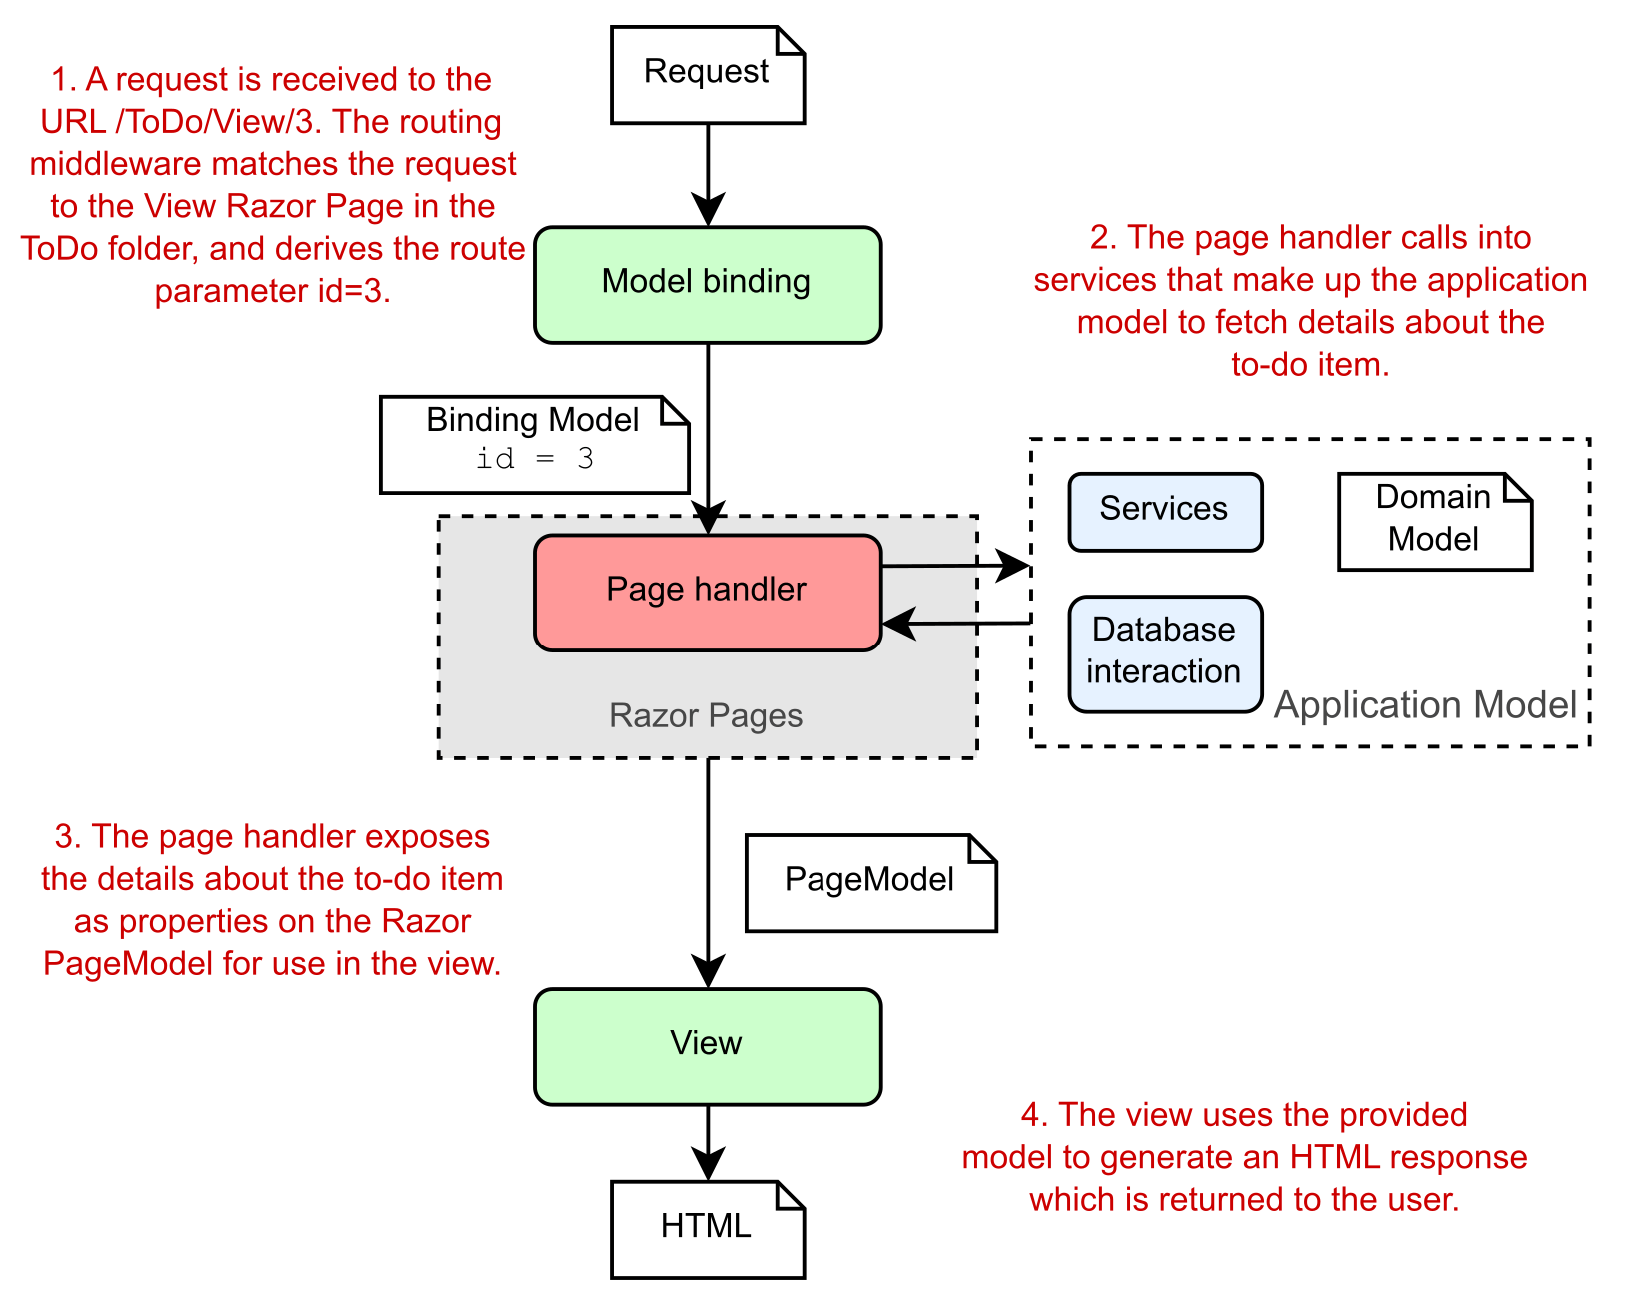
ASP.NET Core uses logging throughout its libraries. Depending on how you configure your app, you’ll have access to the details of each request and EF Core query, even without adding logging messages to your own code. In figure 26.1 you can see the log messages created when you view a single recipe in the recipe application.
ASP.NET Core 在其整个库中使用日志记录。根据你的应用配置方式,你将有权访问每个请求和 EF Core 查询的详细信息,即使不向你自己的代码添加日志记录消息也是如此。在图 26.1 中,您可以看到在配方应用程序中查看单个配方时创建的日志消息。

alt text

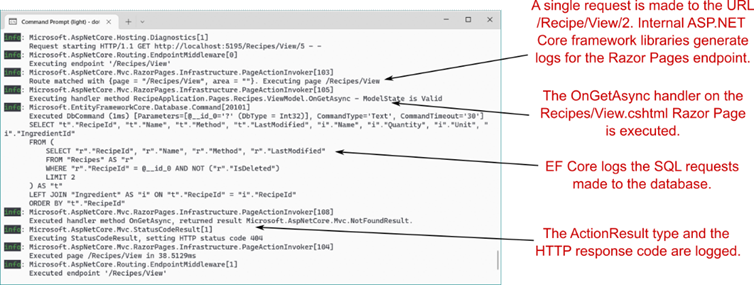
Figure 26.1 The ASP.NET Core Framework libraries use logging throughout. A single request generates multiple log messages that describe the flow of the request through your application.
图 26.1 ASP.NET Core Framework 库全程使用日志记录。单个请求会生成多条日志消息,用于描述请求通过应用程序的流向。

This gives you a lot of useful information. You can see which URL was requested, the Razor Page and page handler that were invoked (for a Razor Pages app), the Entity Framework Core (EF Core )database command, the action result executed, and the response. This information can be invaluable when you’re trying to isolate a problem, whether it’s a bug in a production app or a feature in development when you’re working locally.
这为您提供了很多有用的信息。您可以查看请求的 URL、调用的 Razor Page 和页面处理程序(针对 Razor Pages 应用)、Entity Framework Core (EF Core) 数据库命令、执行的作结果和响应。当您尝试隔离问题时,无论是生产应用程序中的错误还是本地工作时开发中的功能,这些信息都非常宝贵。

This infrastructure logging can be useful, but log messages that you create yourself can have even greater value. For example, you may be able to spot the cause of the error from the log messages in figure 26.1; we’re attempting to view a recipe with an unknown RecipeId of 5, but it’s far from obvious. If you explicitly add a log message to your app when this happens, as in figure 26.2, the problem is much more apparent.
此基础结构日志记录可能很有用,但您自己创建的日志消息可能具有更大的价值。例如,您可能能够从图 26.1 中的日志消息中发现错误的原因;我们正在尝试查看 RecipeId 未知为 5 的配方,但这远非显而易见。如果你在发生这种情况时显式地向你的应用程序添加一条日志消息,如图 26.2 所示,问题会更加明显。

alt text

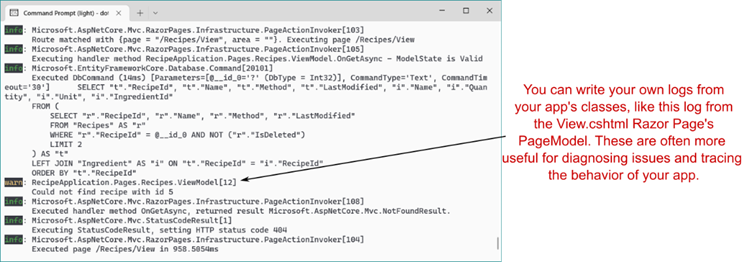
Figure 26.2 You can write your own logs. These are often more useful for identifying problems and interesting events in your apps.
图 26.2 您可以编写自己的日志。这些通常对于识别应用程序中的问题和有趣的事件更有用。

This custom log message easily stands out and clearly states both the problem (the recipe with the requested ID doesn’t exist) and the parameters/variables that led to it (the ID value of 5). Adding similar log messages to your own applications will make it easier for you to diagnose problems, track important events, and generally know what your app is doing.
此自定义日志消息很容易脱颖而出,并清楚地说明了问题(具有请求 ID 的配方不存在)和导致问题的参数/变量(ID 值为 5)。将类似的日志消息添加到您自己的应用程序将使您更容易诊断问题、跟踪重要事件,并且通常可以了解应用程序正在做什么。

I hope you’re now motivated to add logging to your apps, so we’ll dig into the details of what that involves. In section 26.1.2 you’ll see how to create a log message and how to define where the log messages are written. We’ll look in detail at these two aspects in sections 26.2 and 26.3; first, though, we’ll look at where they fit in terms of the ASP.NET Core logging framework as a whole.
我希望您现在有动力将日志记录添加到您的应用程序中,因此我们将深入研究其中涉及的细节。在 Section 26.1.2 中,您将看到如何创建日志消息以及如何定义日志消息的写入位置。我们将在 26.2 和 26.3 节中详细介绍这两个方面;不过,首先,我们将看看它们在整个 ASP.NET Core 日志记录框架中的位置。

26.1.2 The ASP.NET Core logging abstractions

26.1.2 ASP.NET Core 日志记录抽象

The ASP.NET Core logging framework consists of several abstractions (interfaces, implementations, and helper classes), the most important of which are shown in figure 26.3:
ASP.NET Core 日志记录框架由几个抽象(接口、实现和帮助程序类)组成,其中最重要的如图 26.3 所示:

• ILogger—This is the interface you’ll interact with in your code. It has a Log() method, which is used to write a log message.
ILogger - 这是您将在代码中与之交互的界面。它有一个 Log() 方法,用于编写日志消息。

• ILoggerProvider—This is used to create a custom instance of an ILogger, depending on the provider. A console ILoggerProvider would create an ILogger that writes to the console, whereas a file ILoggerProvider would create an ILogger that writes to a file.
ILoggerProvider - 用于创建 ILogger 的自定义实例,具体取决于提供程序。控制台 ILoggerProvider 将创建写入控制台的 ILogger,而文件 ILoggerProvider 将创建写入文件的 ILogger。

• ILoggerFactory—This is the glue between the ILoggerProvider instances and the ILogger you use in your code. You register ILoggerProvider instances with an ILoggerFactory and call CreateLogger() on the ILoggerFactory when you need an ILogger. The factory creates an ILogger that wraps each of the providers, so when you call the Log() method, the log is written to every provider.
ILoggerFactory - 这是 ILoggerProvider 实例和您在代码中使用的 ILogger 之间的粘附。使用 ILoggerFactory 注册 ILoggerProvider 实例,并在需要 ILogger 时对 ILoggerFactory 调用 CreateLogger () 。工厂会创建一个 ILogger 来包装每个提供程序,因此当您调用 Log() 方法时,日志将写入每个提供程序。

alt text

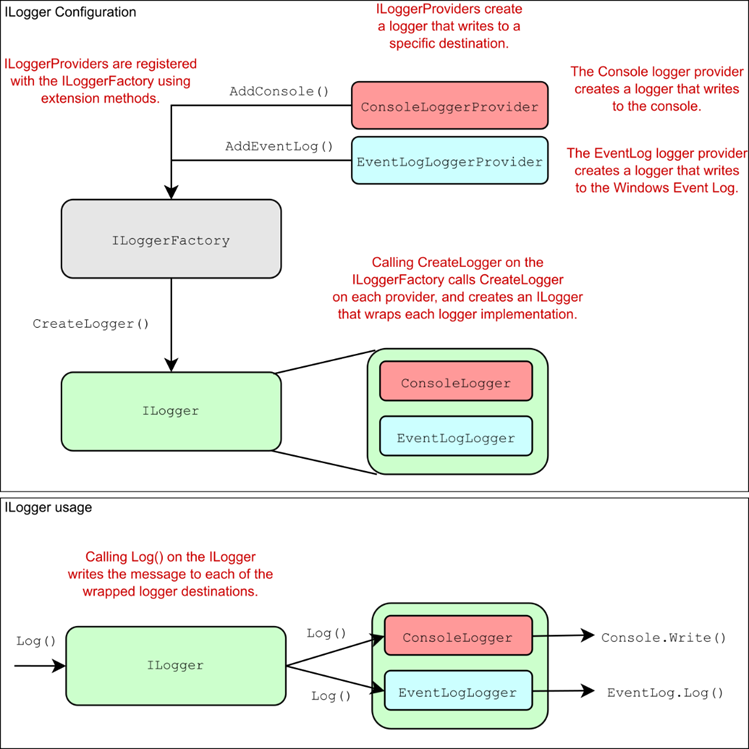
Figure 26.3 The components of the ASP.NET Core logging framework. You register logging providers with an ILoggerFactory, which creates implementations of ILogger. You write logs to the ILogger, which delegates to the ILogger implementations that write logs to the console or a file. You can send logs to multiple locations with this design without having to configure the locations when you create a log message.
图 26.3 ASP.NET Core 日志记录框架的组件。向 ILoggerFactory 注册日志记录提供程序,这将创建 ILogger 的实现。将日志写入 ILogger,ILogger 将委托给将日志写入控制台或文件的 ILogger 实现。您可以使用此设计将日志发送到多个位置,而无需在创建日志消息时配置位置。

The design in figure 26.3 makes it easy to add or change where your application writes the log messages without having to change your application code. The following listing shows all the code required to add an ILoggerProvider that writes logs to the console.
图 26.3 中的设计使添加或更改应用程序写入日志消息的位置变得容易,而无需更改应用程序代码。下面的清单显示了添加将日志写入控制台的 ILoggerProvider 所需的所有代码。

Listing 26.1 Adding a console log provider in Program.cs
清单 26.1 在 Program.cs 中添加控制台日志提供程序

WebApplicationBuilder builder = WebApplication.CreateBuilder(args);
builder.Logging.AddConsole() ❶

WebApplication app = builder.Build();

app.MapGet("/", () => "Hello World!");

app.Run();

❶ Adds a new provider using the Logging property on WebApplicationBuilder
使用 WebApplicationBuilder 上的 Logging 属性添加新的提供程序

NOTE The console logger is added by default by WebApplicationBuilder, as you’ll see in section 26.3.
注意:默认情况下,控制台 Logger 由 WebApplicationBuilder 添加,如第 26.3 节所示。

Other than this configuration on WebApplicationBuilder, you don’t interact with ILoggerProvider instances directly. Instead, you write logs using an instance of ILogger, as you’ll see in the next section.
除了 WebApplicationBuilder 上的此配置之外,您不直接与 ILoggerProvider 实例交互。相反,您可以使用 ILogger 的实例编写日志,如下一节所示。

26.2 Adding log messages to your application

26.2 向应用程序添加日志消息

In this section we’ll look in detail at how to create log messages in your own application. You’ll learn how to create an instance of ILogger, and how to use it to add logging to an existing application. Finally, we’ll look at the properties that make up a logging record, what they mean, and what you can use them for.
在本节中,我们将详细介绍如何在您自己的应用程序中创建日志消息。您将学习如何创建 ILogger 的实例,以及如何使用它来向现有应用程序添加日志记录。最后,我们将了解构成日志记录的属性、它们的含义以及您可以使用它们的用途。

Logging, like almost everything in ASP.NET Core, is available through DI. To add logging to your own services, you need only inject an instance of ILogger<T>, where T is the type of your service.
与 ASP.NET Core 中的几乎所有内容一样,日志记录可通过 DI 获得。要将日志记录添加到您自己的服务中,您只需注入ILogger<T>的实例,其中 T 是您的服务类型。

NOTE When you inject ILogger<T>, the DI container indirectly calls ILoggerFactory.CreateLogger() to create the wrapped ILogger of figure 26.3. In section 26.2.2 you’ll see how to work directly with ILoggerFactory if you prefer. The ILogger<T> interface also implements the nongeneric ILogger interface but includes additional convenience methods.
注意当您注入 ILogger<T> 时,DI 容器会间接调用 ILoggerFactory.CreateLogger() 来创建图 26.3 中包装的 ILogger。在第 26.2.2 节中,如果您愿意,您将看到如何直接使用 ILoggerFactory。ILogger<T>接口还实现非泛型 ILogger 接口,但包含其他便捷方法。

You can use the injected ILogger instance to create log messages, which it writes to each configured ILoggerProvider. The following listing shows how to inject an ILogger<> instance into the PageModel of the Index.cshtml Razor Page for the recipe application from previous chapters and how to write a log message indicating how many recipes were found.
您可以使用注入的 ILogger 实例创建日志消息,并将其写入每个配置的 ILoggerProvider。以下列表显示了如何将 ILogger<> 实例注入前面章节中配方应用程序的 Index.cshtml Razor Page 的 PageModel,以及如何编写指示找到的配方数的日志消息。

Listing 26.2 Injecting ILogger into a class and writing a log message
清单 26.2 将 ILogger 注入到类中并编写日志消息

public class IndexModel : PageModel
{
    private readonly RecipeService _service;
    private readonly ILogger<IndexModel> _log;      #A

    public ICollection<RecipeSummaryViewModel> Recipes { get; set; }

    public IndexModel(
        RecipeService service,
        ILogger<IndexModel> log)                   #A
    {
        _service = service;
        _log = log;                                #A
    }

    public void OnGet()
    {
        Recipes = _service.GetRecipes();
        _log.LogInformation(                                  #B
            "Loaded {RecipeCount} recipes", Recipes.Count);   #B
    }
}

❶ Injects the generic ILogger using DI, which implements ILogger
使用 DI 注入泛型 ILogger,它实现 ILogger

❷ Writes an Information-level log. The RecipeCount variable is substituted in the message.
写入信息级日志。RecipeCount 变量在消息中被替换。

In this example you’re using one of the many extension methods on ILogger to create the log message, LogInformation(). There are many extension methods on ILogger that let you easily specify a LogLevel for the message.
在此示例中,您将使用 ILogger 上的众多扩展方法之一来创建日志消息 LogInformation()。ILogger 上有许多扩展方法,可让您轻松指定消息的 LogLevel。

DEFINITION The log level of a log is how important it is and is defined by the LogLevel enum. Every log message has a log level.
定义:日志的日志级别是它的重要性,由 LogLevel 枚举定义。每条日志消息都有一个日志级别。

You can also see that the message you pass to the LogInformation method has a placeholder indicated by braces, {RecipeCount}, and you pass an additional parameter, Recipes.Count, to the logger. The logger replaces the placeholder with the parameter at runtime. Placeholders are matched with parameters by position, so if you include two placeholders, for example, the second placeholder is matched with the second parameter.
您还可以看到,传递给 LogInformation 方法的消息具有由大括号指示的占位符 {RecipeCount},并且您将附加参数 Recipes.Count 传递给记录器。记录器在运行时将占位符替换为参数。占位符按位置与参数匹配,因此,例如,如果您包括两个占位符,则第二个占位符将与第二个参数匹配。

TIP You could have used normal string interpolation to create the log message, as in $"Loaded {Recipes.Count} recipes". But I recommend always using placeholders, as they provide additional information for the logger that can be used for structured logging, as you’ll see in section 26.5.
提示:您可以使用普通字符串插值来创建日志消息,如 $“Loaded {Recipes.Count} recipes”。但是我建议始终使用占位符,因为它们为 Logger 提供了可用于结构化日志记录的附加信息,如您将在Section 26.5中看到的那样。

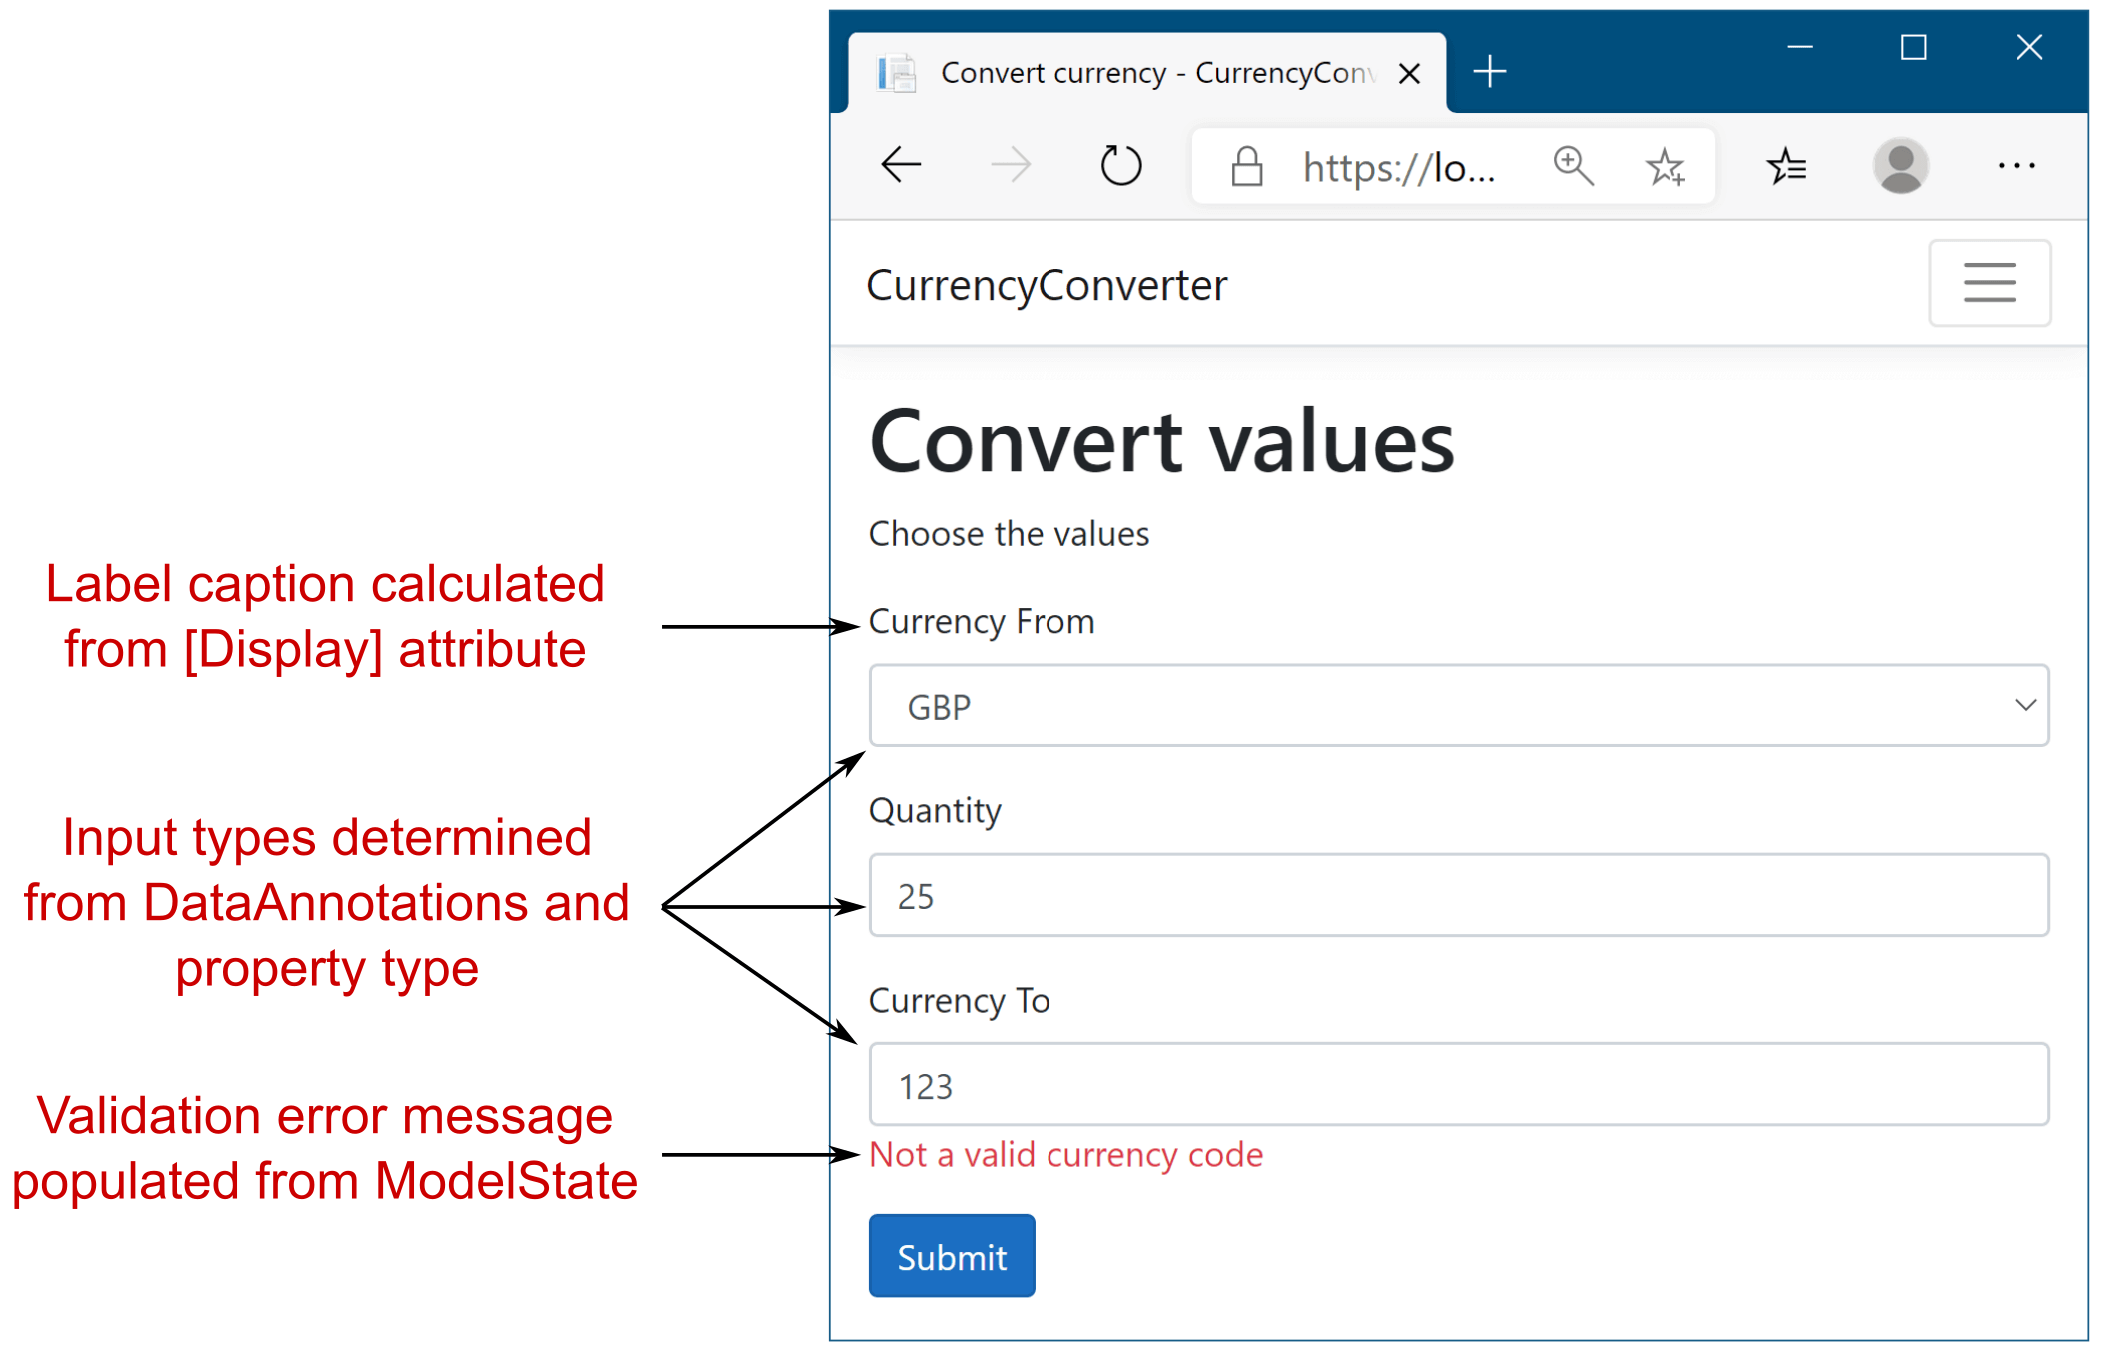
When the OnGet page handler in the IndexModel executes, ILogger writes a message to any configured logging providers. The exact format of the log message varies from provider to provider, but figure 26.4 shows how the console provider displays the log message from listing 26.2.
当 IndexModel 中的 OnGet 页面处理程序执行时, ILogger 会将消息写入任何已配置的日志记录提供程序。日志消息的确切格式因提供者而异,但图 26.4 显示了控制台提供者如何显示清单 26.2 中的日志消息。

alt text

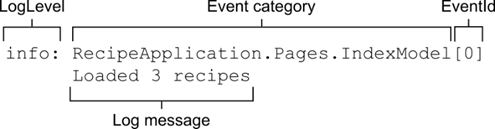
Figure 26.4 An example log message as it’s written to the default console provider. The log-level category provides information about how important the message is and where it was generated. The EventId provides a way to identify similar log messages.
图 26.4 写入默认控制台提供程序时的日志消息示例。日志级别类别提供有关消息的重要性以及消息生成位置的信息。EventId 提供了一种识别类似日志消息的方法。

The exact presentation of the message will vary depending on where the log is written, but each log record includes up to six common elements:
消息的确切表示方式会因日志的写入位置而异,但每条日志记录最多包含六个常见元素:

• Log level—The log level of the log is how important it is and is defined by the LogLevel enum.
日志级别 - 日志的日志级别是它的重要性,由 LogLevel 枚举定义。

• Event category—The category may be any string value, but it’s typically set to the name of the class creating the log. For ILogger<T>, the full name of the type T is the category.
事件类别 - 类别可以是任何字符串值,但通常设置为创建日志的类的名称。对于ILogger<T>,类型 T 的全名是类别。

• Message—This is the content of the log message. It can be a static string, or it can contain placeholders for variables, as shown in listing 26.2. Placeholders are indicated by braces, {} and are replaced by the provided parameter values.
Message - 这是日志消息的内容。它可以是一个静态字符串,也可以包含变量的占位符,如清单 26.2 所示。占位符由大括号 {} 表示,并替换为提供的参数值。

• Parameters—If the message contains placeholders, they’re associated with the provided parameters. For the example in listing 26.2, the value of Recipes.Count is assigned to the placeholder called RecipeCount. Some loggers can extract these values and expose them in your logs, as you’ll see in section 26.5.
参数 - 如果消息包含占位符,则它们与提供的参数相关联。对于清单 26.2 中的示例,Recipes.Count 的值被分配给名为 RecipeCount 的占位符。一些 Logger 可以提取这些值并在您的日志中公开它们,正如您将在Section 26.5中看到的那样。

• Exception—If an exception occurs, you can pass the exception object to the logging function along with the message and other parameters. The logger records the exception in addition to the message itself.
Exception - 如果发生异常,可以将 exception 对象与消息和其他参数一起传递给日志记录函数。除了消息本身之外,Logger 还会记录异常。

• EventId—This is an optional integer identifier for the error, which can be used to quickly find all similar logs in a series of log messages. You might use an EventId of 1000 when a user attempts to load a non-existent recipe and an EventId of 1001 when a user attempts to access a recipe they don’t have permission to access. If you don’t provide an EventId, the value 0 is used.
EventId - 这是错误的可选整数标识符,可用于在一系列日志消息中快速查找所有相似日志。当用户尝试加载不存在的配方时,您可以使用 EventId 1000,当用户尝试访问他们无权访问的配方时,您可以使用 EventId 1001。如果您未提供 EventId,则使用值 0。

High-performance logging with source generators
使用源生成器进行高性能日志记录源

Source generators are a compiler feature introduced in C# 9. Using this feature, you can automatically generate boilerplate code when your project compiles. .NET 7 includes several built-in source generators, such as the Regex generator I described in chapter 14. There’s also a source generator that works with ILogger, which can help you avoid pitfalls such as accidentally using interpolated strings, and makes more advanced and performant logging patterns easy to use.
生成器是 C# 9 中引入的一项编译器功能。使用此功能,您可以在项目编译时自动生成样板代码。.NET 7 包括几个内置的源生成器,例如我在第 14 章中描述的 Regex 生成器。还有一个与 ILogger 配合使用的源生成器,它可以帮助您避免误区,例如意外使用内插字符串,并使更高级和高性能的日志记录模式易于使用。

To use the logging source generator in the OnGet handler from listing 26.2, define a partial method in the IndexModel class, decorate it with a [LoggerMessage] attribute, and invoke the method inside the OnGet handler method:
要在清单 26.2 中的 OnGet 处理程序中使用日志记录源生成器,请在 IndexModel 类中定义一个分部方法,用 [LoggerMessage] 属性修饰它,并在 OnGet 处理程序方法中调用该方法:

[LoggerMessage(10, LogLevel.Information, "Loaded {RecipeCount} recipes")]
partial void LogLoadedRecipes(int recipeCount);

public void OnGet()
{
Recipes = _service.GetRecipes();
LogLoadedRecipes(Recipes.Count);
}

The [LoggerMessage] attribute defines the event ID, log level, and message the log message uses, and the parameters of the partial method it decorates are substituted into the message at runtime. This pattern also comes with several analyzers to make sure you use it correctly in your code while optimizing the generated code behind the scenes to prevent allocations where possible.
该 [LoggerMessage] 属性定义日志消息使用的事件 ID、日志级别和消息,并且它修饰的分部方法的参数在运行时替换为消息。此模式还附带了多个分析器,以确保您在代码中正确使用它,同时在后台优化生成的代码,以尽可能防止分配。

The logging source generator is optional, so it’s up to you whether to use it. You can read more about the source generator, the extra configuration options, and how it works on my blog at http://mng.bz/vn14 and in the documentation at http://mng.bz/4D1j.
日志记录源生成器是可选的,因此是否使用它取决于您。您可以在我的博客 http://mng.bz/vn14 和文档 http://mng.bz/4D1j 中阅读有关源生成器、额外配置选项及其工作原理的更多信息。

Not every log message will have all the possible elements. You won’t always have an Exception or parameters, for example, and it’s common to omit the EventId. There are various overloads to the logging methods that take these elements as additional method parameters. Besides these optional elements, each message has, at very least, a level, category, and message. These are the key features of the log, so we’ll look at each in turn.
并非每条日志消息都包含所有可能的元素。例如,您不会总是有 Exception 或参数,省略 EventId 是很常见的。日志记录方法存在各种重载,这些重载将这些元素作为附加方法参数。除了这些可选元素之外,每条消息至少具有 level、category 和 message。这些是日志的主要功能,因此我们将依次查看每个功能。

26.2.1 Log level: How important is the log message?

26.2.1 日志级别:日志消息有多重要?

Whenever you create a log using ILogger, you must specify the log level. This indicates how serious or important the log message is, and it’s an important factor when it comes to filtering which logs are written by a provider, as well as finding the important log messages after the fact.
每当使用 ILogger 创建日志时,都必须指定日志级别。这表明日志消息的严重性或重要性,在筛选提供商写入的日志以及事后查找重要日志消息时,这是一个重要因素。

You might create an Information level log when a user starts to edit a recipe. This is useful for tracing the application’s flow and behavior, but it’s not important, because everything is normal. But if an exception is thrown when the user attempts to save the recipe, you might create a Warning or Error level log.
当用户开始编辑配方时,您可以创建 Information level log(信息级别日志)。这对于跟踪应用程序的流和行为很有用,但并不重要,因为一切都很正常。但是,如果在用户尝试保存配方时引发异常,则可以创建 Warning (警告) 或 Error (错误) 级别日志。

The log level is typically set by using one of several extension methods on the ILogger interface, as shown in listing 26.3. This example creates an Information level log when the View method executes and a Warning level error if the requested recipe isn’t found.
日志级别通常是通过使用 ILogger 接口上的几种扩展方法之一来设置的,如清单 26.3 所示。此示例在执行 View 方法时创建 Information 级别日志,如果未找到请求的配方,则创建 Warning 级别错误。

Listing 26.3 Specifying the log level using extension methods on ILogger
清单 26.3 在 ILogger 上使用扩展方法指定日志级别

private readonly ILogger _log;          #A
public async IActionResult OnGet(int id)
{
    _log.LogInformation(                            #B
        "Loading recipe with id {RecipeId}", id);   #B

    Recipe = _service.GetRecipeDetail(id);
    if (Recipe is null)
    {
        _log.LogWarning(                                      #C
            "Could not find recipe with id {RecipeId}", id);  #C
        return NotFound();
    }
    return Page();
}

❶ An ILogger instance is injected into the Razor Page using constructor injection.
使用构造函数注入将 ILogger 实例注入 Razor 页面。

❷ Writes an Information level log message
写入信息级别日志消息

❸ Writes a Warning level log message
写入警告级别日志消息

The LogInformation and LogWarning extension methods create log messages with a log level of Information and Warning, respectively. There are six log levels to choose among, ordered here from most to least serious:
LogInformation 和 LogWarning 扩展方法分别创建日志级别为 Information 和 Warning 的日志消息。有六个日志级别可供选择,此处按从最严重到最不严重的顺序排序:

• Critical—For disastrous failures that may leave the app unable to function correctly, such as out-of-memory exceptions or if the hard drive is out of disk space or the server is on fire.
严重 - 对于可能导致应用程序无法正常工作的灾难性故障,例如内存不足异常、硬盘驱动器磁盘空间不足或服务器着火。

• Error—For errors and exceptions that you can’t handle gracefully, such as exceptions thrown when saving an edited entity in EF Core. The operation failed, but the app can continue to function for other requests and users.
错误 - 对于无法正常处理的错误和异常,例如在 EF Core 中保存已编辑的实体时引发的异常。作失败,但应用程序可以继续为其他请求和用户运行。

• Warning—For when an unexpected or error condition arises that you can work around. You might log a Warning for handled exceptions or when an entity isn’t found, as in listing 26.3.
“警告”(Warning) - 当出现可解决的意外或错误情况时。对于已处理的异常或未找到实体,您可以记录 Warning,如清单 26.3 所示。

• Information—For tracking normal application flow, such as logging when a user signs in or when they view a specific page in your app. Typically these log messages provide context when you need to understand the steps leading up to an error message.
信息 - 用于跟踪正常的应用程序流,例如在用户登录或查看应用程序中的特定页面时进行日志记录。通常,当您需要了解导致错误消息的步骤时,这些日志消息会提供上下文。

• Debug—For tracking detailed information that’s particularly useful during development. Generally, this level has only short-term usefulness.
调试 (Debug) - 用于跟踪开发过程中特别有用的详细信息。一般来说,这个级别只有短期的用处。

• Trace—For tracking extremely detailed information, which may contain sensitive information like passwords or keys. It’s rarely used and not used at all by the framework libraries.
跟踪 - 用于跟踪极其详细的信息,其中可能包含密码或密钥等敏感信息。它很少被框架库使用,也根本不被使用。

Think of these log levels in terms of a pyramid, as shown in figure 26.5. As you progress down the log levels, the importance of the messages goes down, but the frequency goes up. Typically, you’ll find many Debug level log messages in your application, but (I hope) few Critical- or Error-level messages.
将这些对数级别想象成金字塔,如图 26.5 所示。随着日志级别的降低,消息的重要性会下降,但频率会上升。通常,您会在应用程序中找到许多 Debug 级别的日志消息,但 (我希望) 很少的 Critical- 或 Error 级别的消息。

alt text

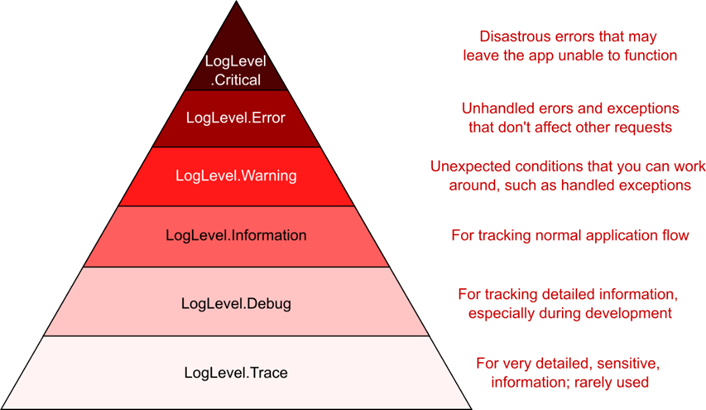
Figure 26.5 The pyramid of log levels. Logs with a level near the base of the pyramid are used more frequently but are less important. Logs with a level near the top should be rare but are important.
图 26.5 对数水平的金字塔。水平仪靠近金字塔底部的原木使用频率更高,但不太重要。级别接近顶部的日志应该很少见,但很重要。

This pyramid shape will become more meaningful when we look at filtering in section 26.4. When an app is in production, you typically don’t want to record all the Debug-level messages generated by your application. The sheer volume of messages would be overwhelming to sort through and could end up filling your disk with messages that say “Everything’s OK!” Additionally, Trace messages shouldn’t be enabled in production, as they may leak sensitive data. By filtering out the lower log levels, you can ensure that you generate a sane number of logs in production but have access to all the log levels in development.
当我们查看 26.4 节中的过滤时,这个金字塔形状将变得更加有意义。当应用程序处于生产环境中时,您通常不希望记录应用程序生成的所有 Debug 级别消息。庞大的消息量会让人不知所措,最终可能会用“一切都很好”的消息填满您的磁盘。此外,不应在生产环境中启用 Trace 消息,因为它们可能会泄露敏感数据。通过筛选出较低的日志级别,您可以确保在生产环境中生成一定数量的日志,但可以访问开发中的所有日志级别。

In general, higher-level logs are more important than lower-level logs, so a Warning log is more important than an Information log, but there’s another aspect to consider. Where the log came from, or who created the log, is a key piece of information that’s recorded with each log message and is called the category.
通常,较高级别的日志比较低级别的日志更重要,因此 Warning 日志比 Information 日志更重要,但还有另一个方面需要考虑。日志的来源或日志的创建者是每条日志消息中记录的关键信息,称为类别。

26.2.2 Log category: Which component created the log

26.2.2 日志类别:哪个组件创建了日志

As well as a log level, every log message also has a category. You set the log level independently for every log message, but the category is set when you create the ILogger instance. Like log levels, the category is particularly useful for filtering, as you’ll see in section 26.4. It’s written to every log message, as shown in figure 26.6.
除了日志级别外,每条日志消息也有一个类别。您可以为每个日志消息单独设置日志级别,但类别是在创建 ILogger 实例时设置的。与日志级别一样,该类别对于过滤特别有用,如第 26.4 节所示。它被写入每个日志消息,如图 26.6 所示。

alt text

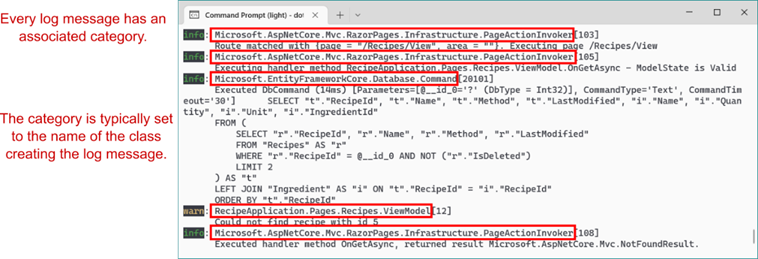
Figure 26.6 Every log message has an associated category, which is typically the class name of the component creating the log. The default console logging provider outputs the log category for every log.
图 26.6 每条日志消息都有一个关联的类别,通常是创建日志的组件的类名。默认控制台日志记录提供程序输出每个日志的日志类别。

The category is a string, so you can set it to anything, but the convention is to set it to the fully qualified name of the type that’s using ILogger. In section 26.2 I achieved this by injecting ILogger into RecipeController; the generic parameter T is used to set the category of the ILogger.
category 是一个字符串,因此您可以将其设置为任何值,但惯例是将其设置为使用 ILogger 的类型的完全限定名称。在第 26.2 节中,我通过将 ILogger 注入 RecipeController 来实现这一点;泛型参数 T 用于设置 ILogger 的类别。

Alternatively, you can inject ILoggerFactory into your methods and pass an explicit category when creating an ILogger instance, as shown in the following listing. This lets you change the category to an arbitrary string.
或者,可以将 ILoggerFactory 注入到方法中,并在创建 ILogger 实例时传递显式类别,如下面的清单所示。这允许您将类别更改为任意字符串。

Listing 26.4 Injecting ILoggerFactory to use a custom category
列表 26.4 注入 ILoggerFactory 以使用自定义类别

public class RecipeService
{
    private readonly ILogger _log;
    public RecipeService(ILoggerFactory factory)    #A
    {
        _log = factory.CreateLogger("RecipeApp.RecipeService");     #B
    }
}

❶ Injects an ILoggerFactory instead of an ILogger directly
直接注入 ILoggerFactory 而不是 ILogger

❷ Passes a category as a string when calling CreateLogger
调用 CreateLogger 时将类别作为字符串传递

There is also an overload of CreateLogger() with a generic parameter that uses the provided class to set the category. If the RecipeService in listing 26.4 were in the RecipeApp namespace, the CreateLogger call could be written equivalently as
还有一个 CreateLogger() 的重载,其中包含一个泛型参数,该参数使用提供的类来设置类别。如果清单 26.4 中的 RecipeService 位于 RecipeApp 命名空间中,则 CreateLogger 调用可以等效地写为

_log = factory.CreateLogger<RecipeService>();

Similarly, the final ILogger instance created by this call would be the same as if you’d directly injected ILogger<RecipeService> instead of ILoggerFactory.
同样,此调用创建的最终 ILogger 实例与直接注入 ILogger<RecipeService> 而不是 ILoggerFactory 时相同。

TIP Unless you’re using heavily customized categories for some reason, favor injecting ILogger<T> into your methods over ILoggerFactory.
提示:除非出于某种原因使用高度自定义的类别,否则最好将 ILogger<T> 注入到方法中,而不是 ILoggerFactory。

The final compulsory part of every log entry is fairly obvious: the log message. At the simplest level, this can be any string, but it’s worth thinking carefully about what information would be useful to record—anything that will help you diagnose problems later on.
每个日志条目的最后一个强制部分相当明显:日志消息。在最简单的级别上,这可以是任何字符串,但值得仔细考虑记录哪些信息是有用的 — 任何有助于您稍后诊断问题的信息。

26.2.3 Formatting messages and capturing parameter values

26.2.3 格式化消息和捕获参数值

Whenever you create a log entry, you must provide a message. This can be any string you like, but as you saw in listing 26.2, you can also include placeholders indicated by braces, {}, in the message string:
无论何时创建日志条目,都必须提供一条消息。这可以是你喜欢的任何字符串,但正如你在 清单 26.2 中看到的,你也可以在消息字符串中包含由大括号 {} 指示的占位符:

_log.LogInformation("Loaded {RecipeCount} recipes", Recipes.Count);

Including a placeholder and a parameter value in your log message effectively creates a key-value pair, which some logging providers can store as additional information associated with the log. The previous log message would assign the value of Recipes.Count to a key, RecipeCount, and the log message itself is generated by replacing the placeholder with the parameter value, to give the following (where Recipes.Count=3):
在日志消息中包含占位符和参数值可以有效地创建一个键值对,一些日志记录提供商可以将其存储为与日志关联的其他信息。前面的日志消息会将 Recipes.Count 的值分配给键 RecipeCount,并且日志消息本身是通过将占位符替换为参数值来生成的,以给出以下内容(其中 Recipes.Count=3):

"Loaded 3 recipes"

You can include multiple placeholders in a log message, and they’re associated with the additional parameters passed to the log method. The order of the placeholders in the format string must match the order of the parameters you provide.
您可以在日志消息中包含多个占位符,它们与传递给 log 方法的其他参数相关联。格式字符串中占位符的顺序必须与您提供的参数的顺序匹配。

WARNING You must pass at least as many parameters to the log method as there are placeholders in the message. If you don’t pass enough parameters, you’ll get an exception at runtime.
警告:向 log 方法传递的参数必须至少与消息中的占位符数量相同。如果您没有传递足够的参数,您将在运行时收到异常。

For example, the log message
例如,日志消息

_log.LogInformation("User {UserId} loaded recipe {RecipeId}", 123, 456)

would create the parameters UserId=123 and RecipeId=456. Structured logging providers could store these values, in addition to the formatted log message "User 123 loaded recipe 456". This makes it easier to search the logs for a particular UserId or RecipeId.
将创建参数 UserId=123 和 RecipeId=456。结构化日志记录提供程序可以存储这些值,以及格式化的日志消息“User 123 loaded recipe 456”。这样可以更轻松地在日志中搜索特定 UserId 或 RecipeId。

DEFINITION Structured or semantic logging attaches additional structure to log messages to make them more easily searchable and filterable. Rather than storing only text, it stores additional contextual information, typically as key-value pairs. JavaScript Object Notation (JSON) is a common format used for structured log messages.
定义:结构化或语义日志记录将其他结构附加到日志消息,使其更易于搜索和筛选。它不仅存储文本,还存储其他上下文信息,通常作为键值对。JavaScript 对象表示法 (JSON) 是用于结构化日志消息的常用格式。

Not all logging providers use semantic logging. The default console logging provider format doesn’t, for example; the message is formatted to replace the placeholders, but there’s no way of searching the console by key-value.
并非所有日志记录提供程序都使用语义日志记录。例如,默认的控制台日志记录提供程序格式不会;消息的格式设置为替换占位符,但无法按 Key-Value 搜索控制台。

TIP You can enable JSON output for the console provider by calling WebApplicationBuilder.Logging.AddJsonConsole(). You can further customize the format of the provider, as described in the documentation at http://mng.bz/QP8v.
提示:您可以通过调用 WebApplicationBuilder.Logging.AddJsonConsole() 为控制台提供程序启用 JSON 输出。您可以进一步自定义提供程序的格式,如 http://mng.bz/QP8v 中的文档中所述。

Even if you’re not using structured logging initially, I recommend writing your log messages as though you are, with explicit placeholders and parameters. That way, if you decide to add a structured logging provider later, you’ll immediately see the benefits. Additionally, I find that thinking about the parameters that you can log in this way prompts you to record more parameter values instead of only a log message. There’s nothing more frustrating than seeing a message like "Cannot insert record due to duplicate key" but not having the key value logged!
即使您最初没有使用结构化日志记录,我也建议您像使用结构化日志记录一样编写日志消息,并使用明确的占位符和参数。这样,如果您决定稍后添加结构化日志记录提供商,您将立即看到好处。此外,我发现,考虑可以以这种方式记录的参数会提示您记录更多参数值,而不仅仅是日志消息。没有什么比看到类似 “Cannot insert record due to duplicate key” 的消息但没有记录键值更令人沮丧的了!

TIP Generally speaking, I’m a fan of C#’s interpolated strings, but don’t use them for your log messages when a placeholder and parameter would also make sense. Using placeholders instead of interpolated strings gives you the same output message but also creates key-value pairs that can be searched later.
提示:一般来说,我是 C# 的插值字符串的粉丝,但当占位符和参数也有意义时,不要将它们用于日志消息。使用占位符而不是内插字符串会为您提供相同的输出消息,但也会创建稍后可搜索的键值对。

We’ve looked a lot at how you can create log messages in your app, but we haven’t focused on where those logs are written. In the next section we’ll look at the built-in ASP.NET Core logging providers, how they’re configured, and how you can add a third-party provider.
我们已经研究了很多关于如何在应用程序中创建日志消息的研究,但我们没有关注这些日志的写入位置。在下一节中,我们将了解内置的 ASP.NET Core 日志记录提供程序、它们的配置方式以及如何添加第三方提供程序。

26.3 Controlling where logs are written using logging providers

26.3 使用日志记录提供程序控制日志的写入位置

In this section you’ll learn how to control where your log messages are written by adding ILoggerProviders to your application. As an example, you’ll see how to add a simple file logger provider that writes your log messages to a file, in addition to the existing console logger provider.
在本节中,您将了解如何通过将 ILoggerProviders 添加到您的应用程序来控制日志消息的写入位置。例如,除了现有的控制台记录器提供程序之外,您还将了解如何添加一个简单的文件记录器提供程序,用于将日志消息写入文件。

Up to this point, we’ve been writing all our log messages to the console. If you’ve run any ASP.NET Core sample apps locally, you’ll probably have seen the log messages written to the console window.
到目前为止,我们一直在将所有日志消息写入控制台。如果您在本地运行了任何 ASP.NET Core 示例应用程序,则可能已经看到写入控制台窗口的日志消息。

NOTE If you’re using Visual Studio and debugging by using the Internet Information Services (IIS) Express option, you won’t see the console window (though the log messages are written to the Debug Output window instead).
注意:如果您使用的是 Visual Studio 并使用 Internet Information Services (IIS) Express 选项进行调试,则不会看到控制台窗口(尽管日志消息会写入“调试输出”窗口)。

Writing log messages to the console is great when you’re debugging, but it’s not much use for production. No one’s going to be monitoring a console window on a server, and the logs wouldn’t be saved anywhere or be searchable. Clearly, you’ll need to write your production logs somewhere else.
在调试时,将日志消息写入控制台非常有用,但对生产没有多大用处。没有人会监控服务器上的控制台窗口,日志不会保存在任何地方,也无法搜索。显然,您需要将生产日志写入其他位置。

As you saw in section 26.1, logging providers control the destination of your log messages in ASP.NET Core. They take the messages you create using the ILogger interface and write them to an output location, which varies depending on the provider.
正如您在第 26.1 节中看到的那样,日志记录提供程序控制 ASP.NET Core 中日志消息的目的地。它们获取您使用 ILogger 接口创建的消息,并将其写入输出位置,该位置因提供商而异。

NOTE This name always gets to me: the log provider effectively consumes the log messages you create and outputs them to a destination. You can probably see the origin of the name from figure 26.3, but I still find it somewhat counterintuitive.
注意:我总是能想到这个名字:日志提供程序会有效地使用您创建的日志消息,并将它们输出到目标。你可能可以从图 26.3 中看到这个名字的由来,但我仍然觉得它有点违反直觉。

Microsoft has written several first-party log providers for ASP.NET Core that are available out of the box in ASP.NET Core. These providers include
Microsoft 为 ASP.NET Core 编写了几个第一方日志提供程序,这些提供程序在 ASP.NET Core 中开箱即用。这些提供商包括

• Console provider—Writes messages to the console, as you’ve already seen
控制台提供程序 - 如您所见,将消息写入控制台

• Debug provider—Writes messages to the debug window when you’re debugging an app in Visual Studio or Visual Studio Code, for example
调试提供程序 - 例如,当您在 Visual Studio 或 Visual Studio Code 中调试应用程序时,将消息写入调试窗口

• EventLog provider—Writes messages to the Windows Event Log and outputs log messages only when running in Windows, as it requires Windows-specific APIs
EventLog 提供程序 - 仅在 Windows 中运行时将消息写入 Windows 事件日志并输出日志消息,因为它需要特定于 Windows 的 API

• EventSource provider—Writes messages using Event Tracing for Windows (ETW) or LTTng tracing on Linux
EventSource 提供程序 - 使用 Windows 事件跟踪 (ETW) 或 Linux 上的 LTTng 跟踪编写消息

There are also many third-party logging provider implementations, such as an Azure App Service provider, an elmah.io provider, and an Elasticsearch provider. On top of that, there are integrations with other existing logging frameworks like NLog and Serilog. It’s always worth looking to see whether your favorite .NET logging library or service has a provider for ASP.NET Core, as most do.
还有许多第三方日志记录提供程序实现,例如 Azure 应用服务提供商、elmah.io 提供程序和 Elasticsearch 提供程序。最重要的是,它还与其他现有的日志记录框架(如 NLog 和 Serilog)集成。看看您最喜欢的 .NET 日志记录库或服务是否像大多数一样具有 ASP.NET Core 的提供程序,始终值得一试。

TIP Serilog (https://serilog.net) is my go-to logging framework. It’s a mature framework with a huge number of supported destinations for writing logs. See Serilog’s ASP.NET Core integration repository for details on how to use Serilog with ASP.NET Core apps: https://github.com/serilog/serilog-aspnetcore.
提示:Serilog (https://serilog.net) 是我的首选日志记录框架。它是一个成熟的框架,具有大量支持写入日志的目标。有关如何将 Serilog 与 ASP.NET Core 应用程序结合使用的详细信息,请参阅 Serilog 的 ASP.NET Core 集成存储库:https://github.com/serilog/serilog-aspnetcore

You configure the logging providers for your app in Program.cs. WebApplicationBuilder configures the console and debug providers for your application automatically, but it’s likely that you’ll want to change or add to these.
您可以在 Program.cs 中为您的应用程序配置日志记录提供程序。WebApplicationBuilder 会自动为您的应用程序配置控制台和调试提供程序,但您可能希望更改或添加这些提供程序。

In this section I show how to add a simple third-party logging provider that writes to a rolling file so our application writes logs to a new file each day. We’ll continue to log using the console and debug providers as well, because they’re more useful than the file provider when developing locally.
在本节中,我将介绍如何添加一个简单的第三方日志记录提供程序,该提供程序将写入滚动文件,以便我们的应用程序每天将日志写入新文件。我们还将继续使用控制台和调试提供程序进行日志记录,因为在本地开发时,它们比文件提供程序更有用。

To add a third-party logging provider in ASP.NET Core, follow these steps:
要在 ASP.NET Core 中添加第三方日志记录提供程序,请执行以下步骤:

  1. Add the logging provider NuGet package to the solution. I’m going to be using a provider called NetEscapades.Extensions.Logging.RollingFile, which is available on NuGet and GitHub. You can add it to your solution using the NuGet Package Manager in Visual Studio or using the .NET command-line interface (CLI) by running
    将日志记录提供程序 NuGet 包添加到解决方案中。我将使用一个名为 NetEscapades.Extensions.Logging.RollingFile 的提供程序,该提供程序可在 NuGet 和 GitHub 上找到。您可以使用 Visual Studio 中的 NuGet 包管理器或使用 .NET 命令行界面 (CLI) 将其添加到解决方案中,方法是运行
dotnet add package NetEscapades.Extensions.Logging.RollingFile

from your application’s project folder.
从应用程序的 Project 文件夹中。

  1. Add the logging provider to WebApplicationBuilder.Logging. You can add the file provider by calling AddFile(), as shown in the next listing. AddFile() is an extension method provided by the logging provider package to simplify adding the provider to your app.
    将日志记录提供程序添加到 WebApplicationBuilder.Logging。您可以通过调用 AddFile() 来添加文件提供程序,如下一个清单所示。AddFile() 是日志记录提供程序包提供的扩展方法,用于简化向应用程序添加提供程序的过程。

NOTE This package is a simple file logging provider, available at http://mng.bz/XN5a. It’s based on the Azure App Service logging provider. If you need a more robust package, consider using Serilog’s file providers instead.
注意:此包是一个简单的文件日志记录提供程序,可从 http://mng.bz/XN5a 获取。它基于 Azure 应用服务日志记录提供程序。如果您需要更健壮的包,请考虑改用 Serilog 的文件提供程序。

Listing 26.5 Adding a third-party logging provider to WebApplicationBuilder
清单 26.5 向 WebApplicationBuilder 添加第三方日志提供程序

WebApplicationBuilder builder = WebApplication.CreateBuilder(args); ❶
builder.Logging.AddFile(); ❷

WebApplication app = builder.Build();

app.MapGet("/", () => "Hello world!");

app.Run();

❶ The WebApplicationBuilder configures the console and debug providers as normal.
WebApplicationBuilder 照常配置控制台和调试提供程序。

❷ Adds the new file logging provider to the logger factory
将新的文件日志记录提供程序添加到 Logger 工厂

NOTE Adding a new provider doesn’t replace existing providers. WebApplicationBuilder automatically adds the console and debug logging providers in listing 26.5. To remove them, call builder.Logging.ClearProviders() before adding the file provider.
注意:添加新的提供商不会替换现有的提供商。WebApplicationBuilder 在清单 26.5 中自动添加控制台和调试日志提供程序。要删除它们,请调用 builder。Logging.ClearProviders() 的调用。

With the file logging provider configured, you can run the application and generate logs. Every time your application writes a log using an ILogger instance, ILogger writes the message to all configured providers, as shown in figure 26.7. The console messages are conveniently available, but you also have a persistent record of the logs stored in a file.
配置文件日志记录提供程序后,您可以运行应用程序并生成日志。每次您的应用程序使用 ILogger 实例写入日志时,ILogger 都会将消息写入所有配置的提供程序,如图 26.7 所示。控制台消息非常方便,但您也有存储在文件中的日志的持久记录。

alt text

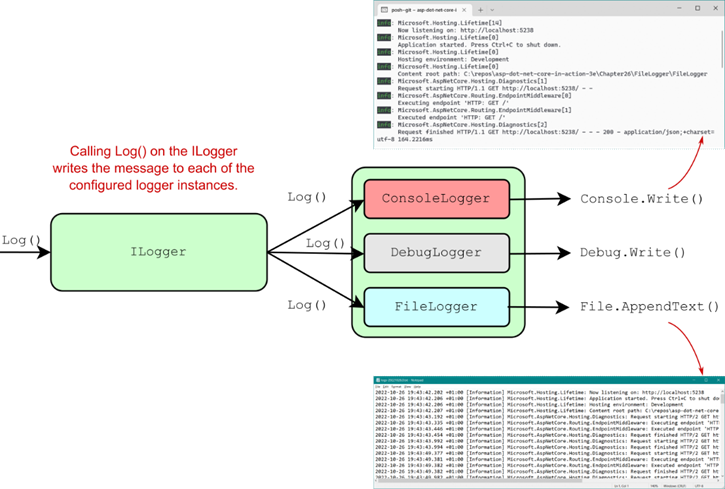
Figure 26.7 Logging a message with ILogger writes the log using all the configured providers. This lets you, for example, log a convenient message to the console while also persisting the logs to a file.
图 26.7 使用 ILogger 记录消息会使用所有配置的提供程序写入日志。例如,这样,您就可以将方便的消息记录到控制台,同时将日志保存到文件中。

TIP By default, the rolling file provider writes logs to a subdirectory of your application. You can specify additional options such as filenames and file size limits using overloads of AddFile(). For production, I recommend using a more established logging provider, such as Serilog.
提示:默认情况下,滚动文件提供程序将日志写入应用程序的子目录。您可以使用 AddFile() 的重载指定其他选项,例如文件名和文件大小限制。对于生产环境,我建议使用更成熟的日志记录提供程序,例如 Serilog。

The key takeaway from listing 26.5 is that the provider system makes it easy to integrate existing logging frameworks and providers with the ASP.NET Core logging abstractions. Whichever logging provider you choose to use in your application, the principles are the same: add a new logging provider to WebApplicationBuilder.Logging using extension methods like AddConsole(), or AddFile() in this case.
清单 26.5 的关键要点是,provider 系统可以轻松地将现有的日志框架和提供程序与 ASP.NET Core 日志抽象集成。无论您选择在应用程序中使用哪种日志记录提供程序,原则都是相同的:使用AddConsole()或AddFile()等扩展方法向WebApplicationBuilder.Logging添加新的日志记录提供程序。

Logging your application messages to a file can be useful in some scenarios, and it’s certainly better than logging to a nonexistent console window in production, but it may still not be the best option.
在某些情况下,将应用程序消息记录到文件中可能很有用,这肯定比在生产环境中记录到不存在的控制台窗口要好,但它可能仍然不是最佳选择。

If you discovered a bug in production and needed to look at the logs quickly to see what happened, for example, you’d need to log on to the remote server, find the log files on disk, and trawl through them to find the problem. If you have multiple web servers, you’d have a mammoth job to fetch all the logs before you could even start to tackle the bug—assuming that you even have remote access to the production servers! Not fun. Add to that the possibility of file permission or drive space problems, and file logging seems less attractive.
例如,如果您在生产中发现了一个错误,并且需要快速查看日志以了解发生了什么,则需要登录到远程服务器,在磁盘上找到日志文件,然后浏览它们以查找问题。如果您有多个 Web 服务器,那么您将面临一项艰巨的工作来获取所有日志,然后才能开始处理错误 — 假设您甚至可以远程访问生产服务器!不好玩。再加上文件权限或驱动器空间问题的可能性,文件日志记录似乎不那么有吸引力。

Instead, it’s often better to send your logs to a centralized location, separate from your application. Exactly where this location may be is up to you; the key is that each instance of your app sends its logs to the same location, separate from the app itself.
相反,通常最好将日志发送到与应用程序分开的集中位置。这个位置的确切位置取决于您;关键是应用程序的每个实例都将其日志发送到同一位置,与应用程序本身分开。

If you’re running your app on Microsoft Azure, you get centralized logging for free because you can collect logs using the Azure App Service provider. Alternatively, you could send your logs to a third-party log aggregator service such as elmah.io (https://elmah.io) or Seq (https://getseq.net). You can find ASP.NET Core logging providers for each of these services on NuGet, so adding them is the same process as adding the file provider you’ve seen already.
如果您在 Microsoft Azure 上运行应用程序,则可以免费获得集中式日志记录,因为您可以使用 Azure 应用程序服务提供商收集日志。或者,您也可以将日志发送到第三方日志聚合器服务,例如 elmah.io (https://elmah.io) 或 Seq (https://getseq.net)。可以在 NuGet 上找到每个服务的 ASP.NET Core 日志记录提供程序,因此添加它们的过程与添加已看到的文件提供程序的过程相同。

Whichever providers you add, once you start running your apps in production, you’ll quickly discover a new problem: the sheer number of log messages your app generates! In the next section you’ll learn how to keep this under control without affecting your local development.
无论您添加哪个提供商,一旦您开始在生产环境中运行应用程序,您很快就会发现一个新问题:您的应用程序生成的日志消息数量庞大!在下一节中,您将学习如何在不影响本地开发的情况下控制这种情况。

26.4 Changing log verbosity with filtering

26.4 通过过滤更改日志详细程度

In this section you’ll see how to reduce the number of log messages written to the logger providers. You’ll learn how to apply a base level filter, filter out messages from specific namespaces, and use logging provider-specific filters.
在本节中,您将了解如何减少写入 Logger 提供程序的日志消息数量。您将学习如何应用基本级别的过滤器、过滤掉来自特定命名空间的消息以及使用特定于日志记录提供商的过滤器。

If you’ve been playing around with the logging samples, you’ll probably have noticed that you get a lot of log messages, even for a single request like the one in figure 26.2: messages from the Kestrel server and messages from EF Core, not to mention your own custom messages. When you’re debugging locally, having access to all that detailed information is extremely useful, but in production you’ll be so swamped by noise that picking out the important messages will be difficult.
如果您一直在使用日志记录示例,则可能已经注意到,即使对于如图 26.2 所示的单个请求:来自 Kestrel 服务器的消息和来自 EF Core 的消息,您也会收到大量日志消息,更不用说您自己的自定义消息了。在本地调试时,访问所有这些详细信息非常有用,但在生产环境中,您将被噪音所淹没,以至于很难挑选出重要的消息。

ASP.NET Core includes the ability to filter out log messages before they’re written, based on a combination of three things:
ASP.NET Core 包括在写入日志消息之前根据以下三项组合筛选出日志消息的功能:

• The log level of the message
消息的日志级别

• The category of the logger (who created the log)
记录器的类别(创建日志的人)

• The logger provider (where the log will be written)
记录器提供程序(将写入日志的位置)

You can create multiple rules using these properties, and for each log that’s created, the most specific rule is applied to determine whether the log should be written to the output. You could create the following three rules:
您可以使用这些属性创建多个规则,对于创建的每个日志,将应用最具体的规则来确定是否应将日志写入输出。您可以创建以下三条规则:

• The default minimum log level is Information. If no other rules apply, only logs with a log level of Information or above will be written to providers.
默认的最小日志级别为 Information。如果没有其他规则适用,则只会将日志级别为 Information 或更高的日志写入提供程序。

• For categories that start with Microsoft, the minimum log level is Warning. Any logger created in a namespace that starts with Microsoft will write only logs that have a log level of Warning or above. This would filter out the noisy framework messages you saw in figure 26.6.
对于以 Microsoft 开头的类别,最低日志级别为“警告”。在以 Microsoft 开头的命名空间中创建的任何 Logger 都将仅写入日志级别为 Warning 或更高的日志。这将过滤掉你在图 26.6 中看到的嘈杂的框架消息。

• For the console provider, the minimum log level is Error. Logs written to the console provider must have a minimum log level of Error. Logs with a lower level won’t be written to the console, though they might be written using other providers.
对于控制台提供商,最低日志级别为 Error。写入控制台提供程序的日志必须具有 Error (错误) 的最低日志级别。具有较低级别的日志不会写入控制台,尽管它们可能是使用其他提供程序写入的。

Typically, the goal with log filtering is to reduce the number of logs written to certain providers or from certain namespaces (based on the log category). Figure 26.8 shows a possible set of filtering rules that apply to the console and file logging providers.
通常,日志筛选的目标是减少写入某些提供程序或某些命名空间(基于日志类别)的日志数量。图 26.8 显示了一组可能的过滤规则,这些规则适用于控制台和文件日志记录提供程序。

alt text

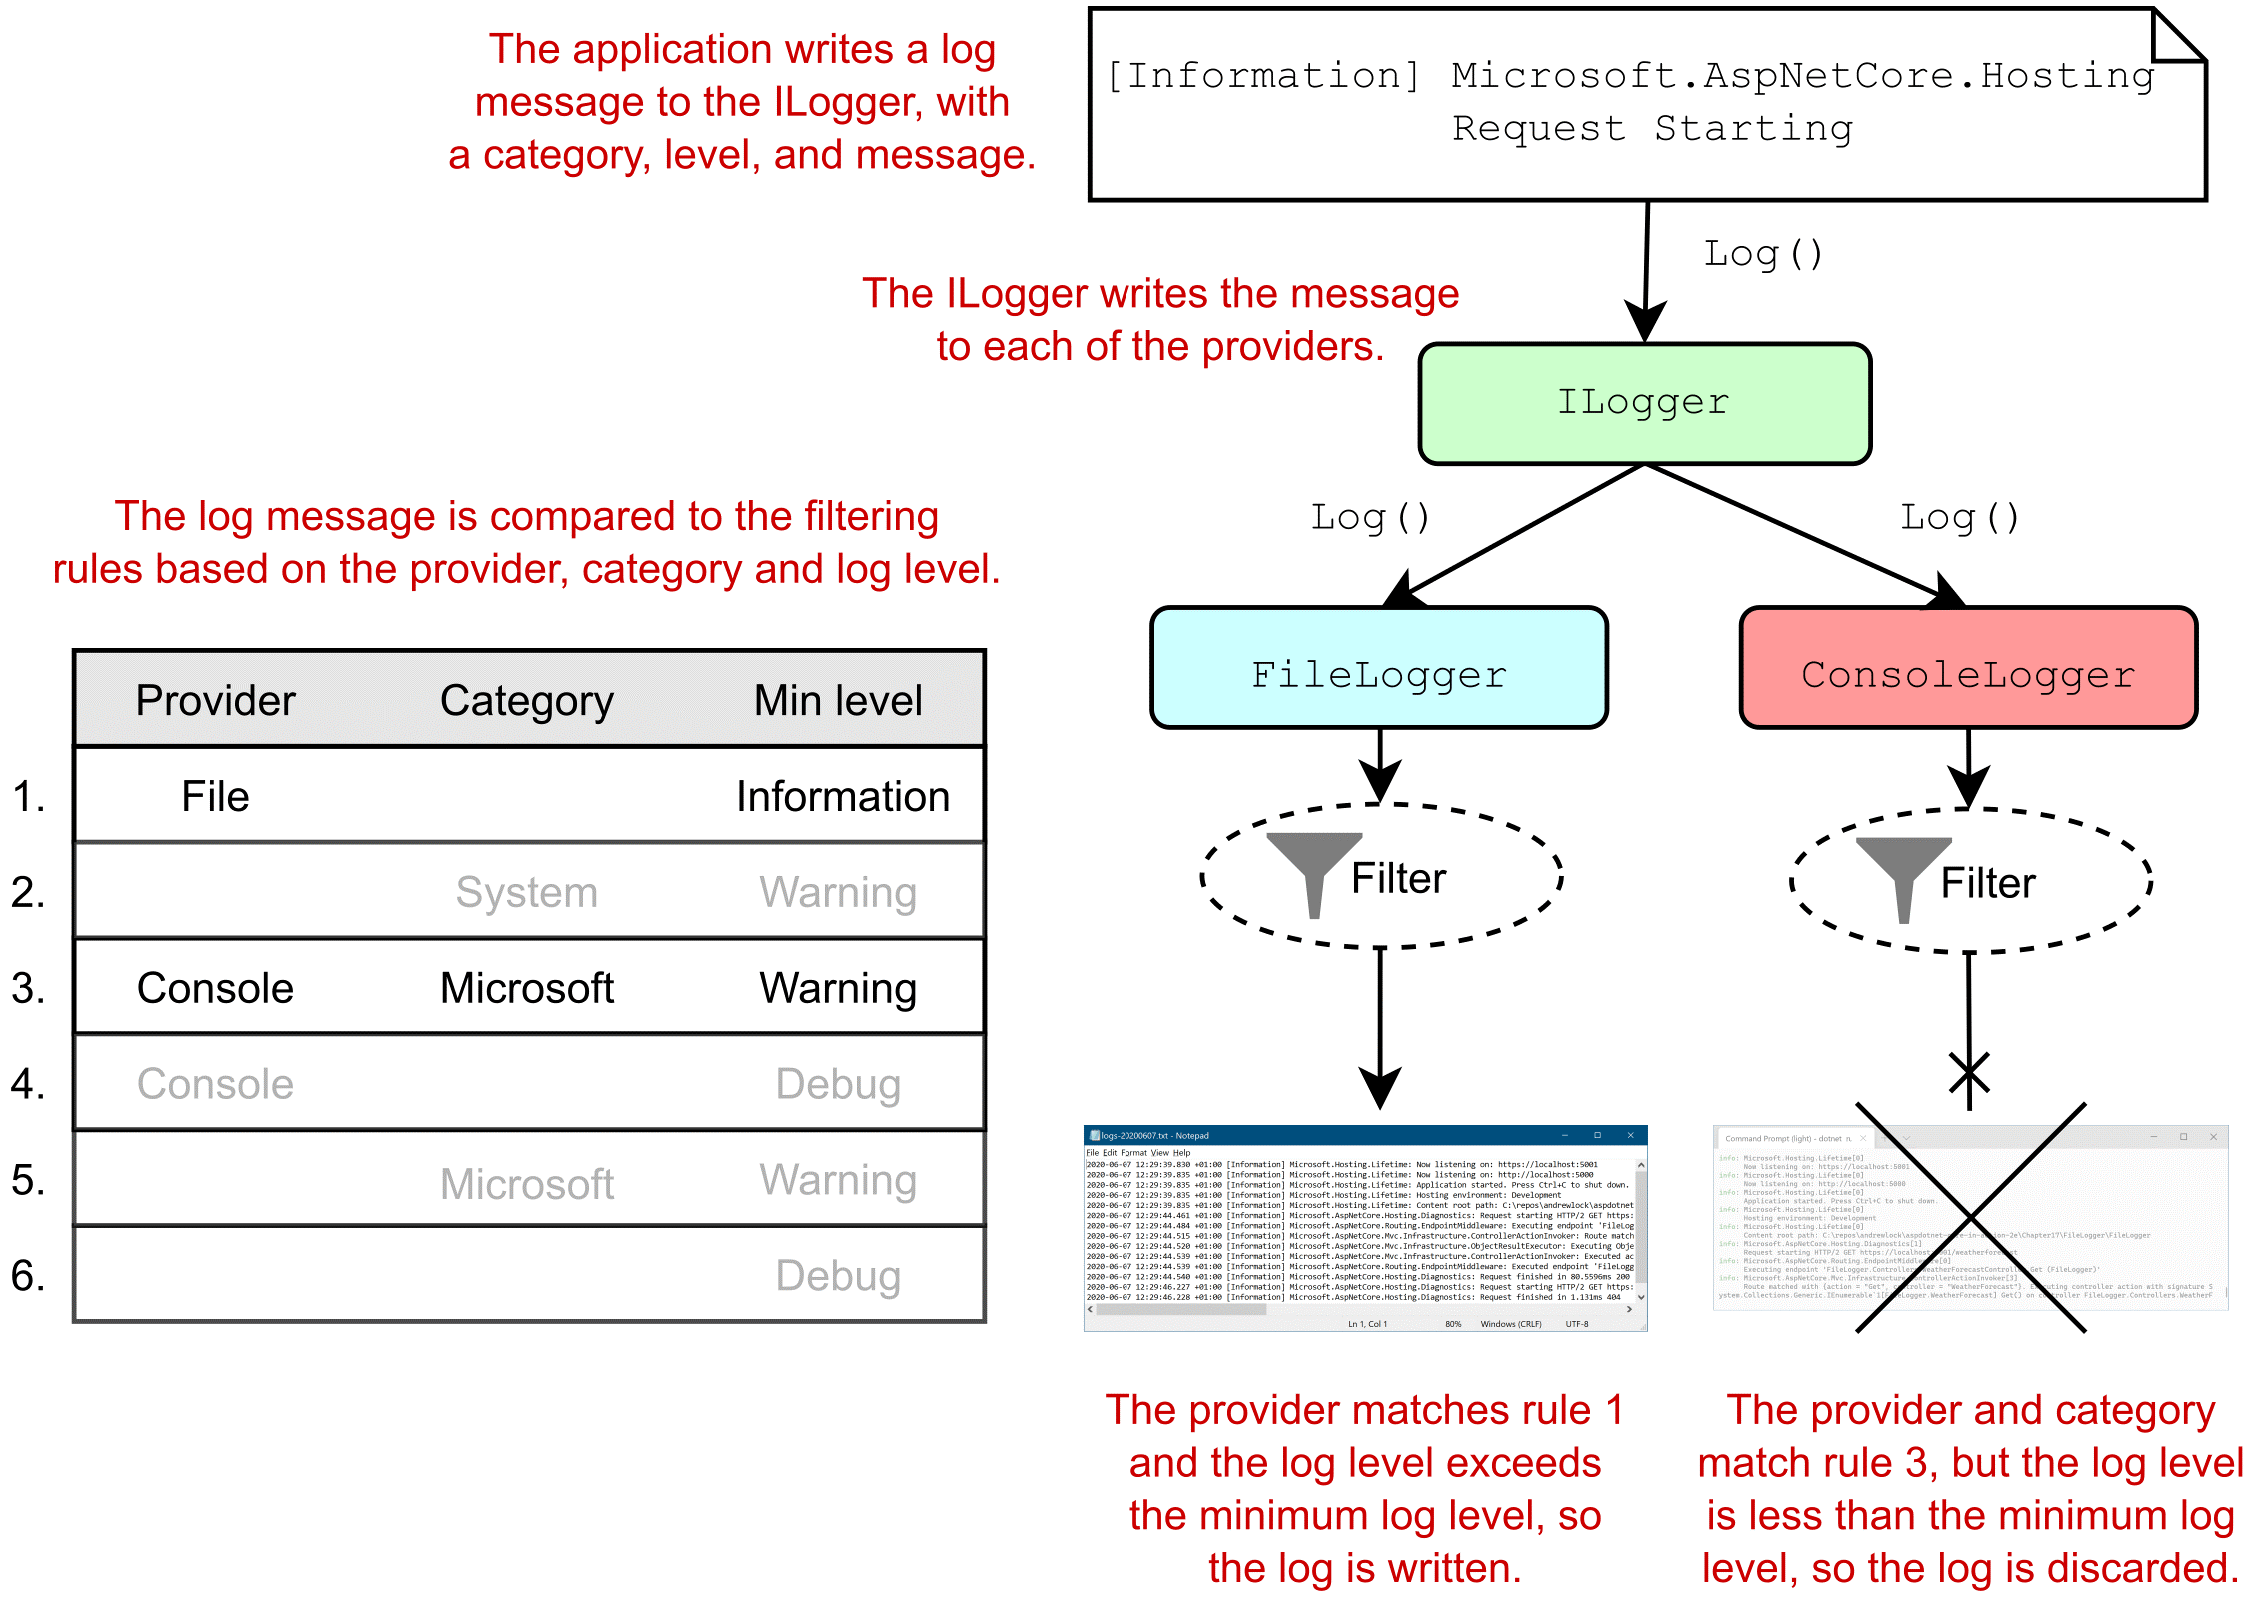
Figure 26.8 Applying filtering rules to a log message to determine whether a log should be written. For each provider, the most specific rule is selected. If the log exceeds the rule’s required minimum level, the provider writes the log; otherwise, it discards it.
图 26.8 将过滤规则应用于日志消息以确定是否应写入日志。对于每个提供商,将选择最具体的规则。如果日志超过规则所需的最低级别,则提供程序将写入日志;否则,它将丢弃它。

In this example, the console logger explicitly restricts logs written in the Microsoft namespace to Warning or above, so the console logger ignores the log message shown. Conversely, the file logger doesn’t have a rule that explicitly restricts the Microsoft namespace, so it uses the configured minimum level of Information and writes the log to the output.
在此示例中,控制台记录器明确将 Microsoft 命名空间中写入的日志限制为 Warning 或更高级别,因此控制台记录器会忽略显示的日志消息。相反,文件记录器没有明确限制 Microsoft 命名空间的规则,因此它使用配置的最低级别 Information 并将日志写入输出。

TIP Only a single rule is chosen when deciding whether a log message should be written; rules aren’t combined. In figure 26.8, rule 1 is considered to be more specific than rule 5, so the log is written to the file provider, even though technically, both rules could apply.
提示:在决定是否应写入日志消息时,只选择一个规则;规则不会合并。在图 26.8 中,规则 1 被认为比规则 5 更具体,因此日志被写入文件提供程序,即使从技术上讲,这两个规则都适用。

You typically define your app’s set of logging rules using the layered configuration approach discussed in chapter 10, because this lets you easily have different rules when running in development and production.
您通常使用第 10 章中讨论的分层配置方法来定义应用程序的日志记录规则集,因为这可以让您在开发和生产环境中运行时轻松拥有不同的规则。

TIP As you saw in chapter 11, you can load configuration settings from multiple sources, like JSON files and environment variables, and can load them conditionally based on the IHostingEnvironment. A common practice is to include logging settings for your production environment in appsettings.json and overrides for your local development environment in appsettings.Development.json.
提示:正如您在第 11 章中所看到的,您可以从多个源(如 JSON 文件和环境变量)加载配置设置,并且可以基于 IHostingEnvironment 有条件地加载它们。一种常见的做法是在 appsettings.json 中包含生产环境的日志记录设置,并在 appsettings 中包含本地开发环境的覆盖。Development.json。

WebApplicationBuilder automatically loads configuration rules from the "Logging" section of the IConfiguration object. This happens automatically, and you rarely need to customize it, but listing 26.6 shows how you could also add configuration rules from the "LoggingRules" section using AddConfiguration().
WebApplicationBuilder 会自动从 IConfiguration 对象的 “Logging” 部分加载配置规则。这是自动发生的,您很少需要自定义它,但是清单 26.6 显示了如何使用 AddConfiguration() 从 “LoggingRules” 部分添加配置规则。

NOTE WebApplicationBuilder always adds the configuration to load from the "Logging" section; you can’t remove this. For this reason, it’s rarely worth adding configuration yourself; instead, use the default "Logging" configuration section where possible.
注意:WebApplicationBuilder 始终从 “Logging” 部分添加要加载的配置;您无法删除此内容。因此,您自己添加配置很少值得;相反,请尽可能使用默认的 “Logging” 配置部分。

Listing 26.6 Loading logging configuration using AddConfiguration()
列表 26.6 使用 AddConfiguration() 加载日志配置

WebApplicationBuilder builder = WebApplication.CreateBuilder(args);
builder.Logging.AddConfiguration(
    builder.Configuration.GetSection("LoggingRules")); ❶

var app = builder.Build();

app.MapGet("/", () => "Hello world!");
app.Run();

❶ Loads the log filtering configuration from the LoggingRules section
从 LoggingRules 部分加载日志过滤配置

Assuming that you don’t override the configuration section, your appsettings.json will typically contain a "Logging" section, which defines the configuration rules for your app. Listing 26.8 shows how this might look to define all the rules shown in figure 26.8.
假设你没有覆盖 configuration 部分,你的 appsettings.json 通常会包含一个 “Logging” 部分,它定义了你的应用程序的配置规则。清单 26.8 显示了如何定义图 26.8 中所示的所有规则。

Listing 26.7 The log filtering configuration section of appsettings.json
清单 26.7 appsettings.json 的日志过滤配置部分

{
  "Logging": {
    "LogLevel": {             #A
      "Default": "Debug",     #A
      "System": "Warning",    #A
      "Microsoft": "Warning"  #A
    },
    "File": {                      #B
      "LogLevel": {                #B
        "Default": "Information"   #B
      }
    },
    "Console": {                 #C
      "LogLevel": {              #C
        "Default": "Debug",      #C
        "Microsoft": "Warning"   #C
      }
    }
  }
}

❶ Rules to apply if there are no specific rules for a provider
如果提供程序没有特定规则,则要应用的规则

❷ Rules to apply to the File provider
应用于文件提供程序的规则

❸ Rules to apply to the Console provider
应用于控制台提供程序的规则

When creating your logging rules, the important thing to bear in mind is that if you have any provider-specific rules, these will take precedence over the category-based rules defined in the "LogLevel" section. Therefore, for the configuration defined in listing 26.7, if your app uses only the file or console logging providers, the rules in the "LogLevel" section will effectively never apply.
在创建日志记录规则时,要记住的重要一点是,如果您有任何特定于提供程序的规则,这些规则将优先于 “LogLevel” 部分中定义的基于类别的规则。因此,对于清单 26.7 中定义的配置,如果您的应用程序仅使用文件或控制台日志记录提供程序,则“LogLevel”部分中的规则实际上将永远不会适用。

If you find this confusing, don’t worry; so do I. Whenever I’m setting up logging, I check the algorithm used to determine which rule applies for a given provider and category, which is as follows:
如果您觉得这令人困惑,请不要担心;我也是。每当我设置日志记录时,我都会检查用于确定哪个规则适用于给定提供程序和类别的算法,如下所示:

  1. Select all rules for the given provider. If no rules apply, select all rules that don’t define a provider (the top "LogLevel" section from listing 26.7).
    选择给定提供程序的所有规则。如果没有适用的规则,请选择所有未定义提供程序的规则(清单 26.7 中的顶部“LogLevel”部分)。

  2. From the selected rules, select rules with the longest matching category prefix. If no selected rules match the category prefix, select the "Default" if present.
    从所选规则中,选择具有最长匹配类别前缀的规则。如果没有选定的规则与类别前缀匹配,请选择“Default”(默认)(如果存在)。

  3. If multiple rules are selected, use the last one.
    如果选择了多个规则,请使用最后一个规则。

  4. If no rules are selected, use the global minimum level, "LogLevel:Default" (Debug in listing 26.7).
    如果未选择任何规则,请使用全局最小级别 “LogLevel:Default” (列表 26.7 中的 Debug)。

Each of these steps except the last narrows down the applicable rules for a log message until you’re left with a single rule. You saw this in effect for a "Microsoft" category log in figure 26.8. Figure 26.9 shows the process in more detail.
除最后一个步骤外,这些步骤中的每一个步骤都会缩小日志消息的适用规则范围,直到您只剩下一条规则。您在图 26.8 中看到了 “Microsoft” 类别日志的效果。图 26.9 更详细地显示了该过程。

alt text

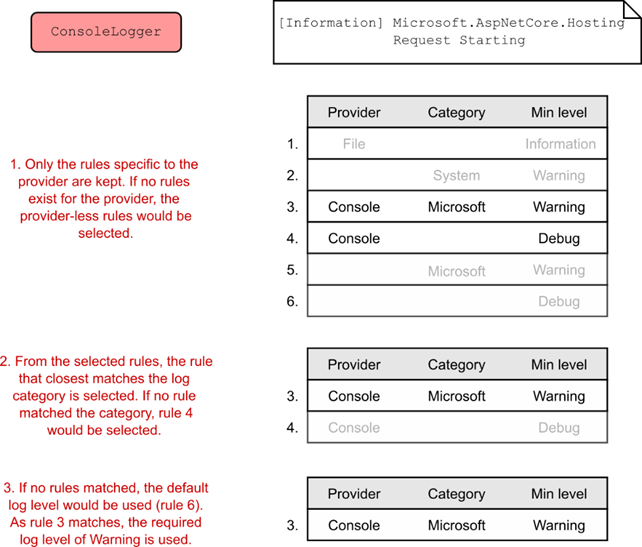
Figure 26.9 Selecting a rule to apply from the available set for the console provider and an Information level log. Each step reduces the number of rules that apply until you’re left with only one.
图 26.9 从控制台提供程序的可用集和信息级别日志中选择要应用的规则。每个步骤都会减少适用的规则数,直到只剩下一个规则。

WARNING Log filtering rules aren’t merged; a single rule is selected. Including provider-specific rules will override global category-specific rules, so I tend to stick to category-specific rules where possible to make the overall set of rules easier to understand.
警告:日志筛选规则不会合并;将选择单个规则。包含特定于提供商的规则将覆盖全局特定于类别的规则,因此我倾向于尽可能坚持使用特定于类别的规则,以使整个规则集更易于理解。

With some effective filtering in place, your production logs should be much more manageable, as shown in figure 26.10. Generally, I find it’s best to limit the logs from the ASP.NET Core infrastructure and referenced libraries to Warning or above while keeping logs that my app writes to Debug in development and Information in production.
通过一些有效的过滤,您的 生产日志应该更易于管理,如图 26.10 所示。通常,我发现最好将来自 ASP.NET Core 基础设施和引用库的日志限制为 Warning 或更高级别,同时保留我的应用程序写入 Debug in development 和 Information in production的日志。

alt text

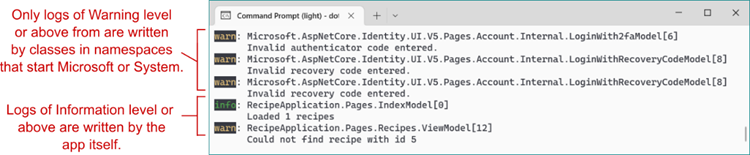
Figure 26.10 Using filtering to reduce the number of logs written. In this example, category filters have been added to the Microsoft and System namespaces, so only logs of Warning and above are recorded. That increases the proportion of logs that are directly relevant to your application.
图 26.10 使用过滤来减少写入的日志数量。在此示例中,类别筛选器已添加到 Microsoft 和 System 命名空间,因此仅记录 Warning 及以上的日志。这会增加与您的应用程序直接相关的日志的比例。

This is close to the default configuration used in the ASP.NET Core templates. You may find you need to add additional category-specific filters, depending on which NuGet libraries you use and the categories they write to. The best way to find out is generally to run your app and see whether you get flooded with uninteresting log messages.
这接近 ASP.NET Core 模板中使用的默认配置。你可能会发现需要添加其他特定于类别的筛选器,具体取决于你使用的 NuGet 库以及它们写入的类别。找出答案的最佳方法通常是运行您的应用程序,看看您是否被不感兴趣的日志消息淹没。

TIP Most logging providers listen for configuration changes and update their filters dynamically. That means you should be able to modify your appsettings.json or appsettings.Development.json file and check the effect on the log messages, iterating quickly without restarting your app.
提示:大多数日志记录提供程序侦听配置更改并动态更新其过滤器。这意味着您应该能够修改 appsettings.json 或 appsettings。Development.json文件并检查对日志消息的影响,在不重新启动应用程序的情况下快速迭代。

Even with your log verbosity under control, if you stick to the default logging providers like the file or console loggers, you’ll probably regret it in the long run. These log providers work perfectly well, but when it comes to finding specific error messages or analyzing your logs, you’ll have your work cut out for you. In the next section you’ll see how structured logging can help you tackle this problem.
即使你的日志详细程度得到控制,如果你坚持使用默认的日志提供程序,如文件或控制台记录器,从长远来看,你可能会后悔。这些日志提供程序运行良好,但是在查找特定错误消息或分析日志时,您将需要完成大量工作。在下一节中,您将了解结构化日志记录如何帮助您解决这个问题。

26.5 Structured logging: Creating searchable, useful logs

26.5 结构化日志记录:创建可搜索的有用日志

In this section you’ll learn how structured logging makes working with log messages easier. You’ll learn to attach key-value pairs to log messages and how to store and query for key values using the structured logging provider Seq. Finally, you’ll learn how to use scopes to attach key-value pairs to all log messages within a block.
在本节中,您将了解结构化日志记录如何更轻松地处理日志消息。您将学习如何将键值对附加到日志消息,以及如何使用结构化日志记录提供程序 Seq 存储和查询键值。最后,您将学习如何使用范围将键值对附加到块中的所有日志消息。

Let’s imagine you’ve rolled out the recipe application we’ve been working on to production. You’ve added logging to the app so that you can keep track of any errors in your application, and you’re storing the logs in a file.
假设您已经将我们一直在开发的配方应用程序推广到生产环境中。您已将日志记录添加到应用程序,以便您可以跟踪应用程序中的任何错误,并且您将日志存储在文件中。

One day, a customer calls and says they can’t view their recipe. Sure enough, when you look through the log messages, you a see a warning:
有一天,一位客户打电话说他们无法查看他们的配方。果然,当您查看日志消息时,您会看到一条警告:

warn: RecipeApplication.Pages.Recipes.ViewModel [12]
      Could not find recipe with id 3245

This piques your interest. Why did this happen? Has it happened before for this customer? Has it happened before for this recipe? Has it happened for other recipes? Does it happen regularly?
这激起了您的兴趣。为什么会这样?此客户以前发生过吗?这个食谱以前发生过吗?其他食谱也发生过吗?它经常发生吗?

How would you go about answering these questions? Given that the logs are stored in a text file, you might start doing basic text searches in your editor of choice, looking for the phrase "Could not find recipe with id". Depending on your notepad-fu skills, you could probably get a fair way in answering your questions, but it would likely be a laborious, error-prone, and painful process.
您将如何回答这些问题?鉴于日志存储在文本文件中,您可以开始在所选编辑器中进行基本文本搜索,查找短语“Could not find recipe with id”。根据你的记事本技能,你可能会得到一个公平的方式来回答你的问题,但这可能是一个费力、容易出错和痛苦的过程。

The limiting factor is that the logs are stored as unstructured text, so text processing is the only option available to you. A better approach is to store the logs in a structured format so that you can easily query the logs, filter them, and create analytics. Structured logs could be stored in any format, but these days they’re typically represented as JSON. A structured version of the same recipe warning log might look something like this:
限制因素是日志存储为非结构化文本,因此文本处理是您唯一可用的选项。更好的方法是以结构化格式存储日志,以便您可以轻松查询日志、筛选日志并创建分析。结构化日志可以以任何格式存储,但现在它们通常表示为 JSON。同一配方警告日志的结构化版本可能如下所示:

{
  "eventLevel": "Warning",
  "category": "RecipeApplication.Pages.Recipes.ViewModel",
  "eventId": "12",
  "messageTemplate": "Could not find recipe with {recipeId}",
  "message": "Could not find recipe with id 3245",
  "recipeId": "3245"
}

This structured log message contains all the same details as the unstructured version, but in a format that would easily let you search for specific log entries. It makes it simple to filter logs by their EventLevel or to show only those logs relating to a specific recipe ID.
此结构化日志消息包含与非结构化版本相同的所有详细信息,但格式可让您轻松搜索特定日志条目。它使按日志的 EventLevel 筛选日志或仅显示与特定配方 ID 相关的日志变得简单。

NOTE This is only an example of what a structured log could look like. The format used for the logs will vary depending on the logging provider used and could be anything. The main point is that properties of the log are available as key-value pairs.
注意:这只是结构化日志的一个示例。用于日志的格式将根据所使用的日志记录提供程序而有所不同,可以是任何内容。要点是日志的属性可用作键值对。

Adding structured logging to your app requires a logging provider that can create and store structured logs. Elasticsearch is a popular general search and analytics engine that can be used to store and query your logs. One big advantage of using a central store such as Elasticsearch is the ability to aggregate the logs from all your apps in one place and analyze them together. You can add the Elasticsearch.Extensions.Logging provider to your app in the same way as you added the file sink in section 26.3.
向应用添加结构化日志记录需要可以创建和存储结构化日志的日志记录提供程序。Elasticsearch 是一种流行的通用搜索和分析引擎,可用于存储和查询您的日志。使用 Elasticsearch 等中央存储的一大优势是能够将来自所有应用程序的日志聚合到一个位置并一起分析它们。您可以按照在第 26.3 节中添加文件接收器的相同方式将 Elasticsearch.Extensions.Logging 提供程序添加到您的应用程序中。

NOTE Elasticsearch is a REST-based search engine that’s often used for aggregating logs. You can find out more at https://www.elastic.co/elasticsearch.
注意:Elasticsearch 是一个基于 REST 的搜索引擎,通常用于聚合日志。您可以在 https://www.elastic.co/elasticsearch 了解更多信息。

Elasticsearch is a powerful production-scale engine for storing your logs, but setting it up and running it in production isn’t easy. Even after you’ve got it up and running, there’s a somewhat steep learning curve associated with the query syntax. If you’re interested in something more user-friendly for your structured logging needs, Seq (https://getseq.net) is a great option. In the next section I’ll show you how adding Seq as a structured logging provider makes analyzing your logs that much easier.
Elasticsearch 是一个强大的生产规模引擎,用于存储您的日志,但在生产环境中设置和运行它并不容易。即使在您启动并运行它之后,与查询语法相关的学习曲线也会有些陡峭。如果您对更用户友好的结构化日志记录需求感兴趣,Seq (https://getseq.net) 是一个不错的选择。在下一节中,我将向您展示将 Seq 添加为结构化日志记录提供程序如何使分析日志变得更加容易。

26.5.1 Adding a structured logging provider to your app

26.5.1 向应用程序添加结构化日志记录提供程序

To demonstrate the advantages of structured logging, in this section you’ll configure an app to write logs to Seq. You’ll see that the configuration is essentially identical to unstructured providers, but the possibilities afforded by structured logging make considering it a no-brainer.
为了演示结构化日志记录的优势,在本节中,您将配置一个应用程序以将日志写入 Seq。您将看到该配置与非结构化提供程序基本相同,但结构化日志记录提供的可能性使得考虑它变得轻而易举。

Seq is installed on a server or your local machine and collects structured log messages over HTTP, providing a web interface for you to view and analyze your logs. It is currently available as a Windows app or a Linux Docker container. You can install a free version for development, which allows you to experiment with structured logging in general.
Seq 安装在服务器或本地计算机上,通过 HTTP 收集结构化日志消息,为您提供一个 Web 界面来查看和分析您的日志。它目前以 Windows 应用程序或 Linux Docker 容器的形式提供。您可以安装用于开发的免费版本,这样您就可以尝试一般的结构化日志记录。

TIP You can download Seq from https://getseq.net/Download.
提示:您可以从 https://getseq.net/Download 下载 Seq。

From the point of view of your app, the process for adding the Seq provider should be familiar:
从应用程序的角度来看,添加 Seq 提供程序的过程应该很熟悉:

  1. Install the Seq logging provider using Visual Studio or the .NET CLI with
    使用 Visual Studio 或 .NET CLI 安装 Seq 日志记录提供程序
dotnet add package Seq.Extensions.Logging
  1. Add the Seq logging provider in Program.cs. To add the Seq provider call AddSeq():
    在 Program.cs 中添加 Seq 日志记录提供程序。要添加 Seq 提供程序,请调用 AddSeq():
WebApplicationBuilder builder = WebApplication.CreateBuilder(args);
builder.Logging.AddSeq();

That’s all you need to add Seq to your app. This will send logs to the default local URL when you have Seq installed in your local environment. The AddSeq() extension method includes additional overloads to customize Seq when you move to production, but this is all you need to start experimenting locally.
这就是将 Seq 添加到您的应用程序所需的全部内容。当您在本地环境中安装了 Seq 时,这会将日志发送到默认的本地 URL。AddSeq() 扩展方法包括额外的重载,以便在您迁移到生产环境时自定义 Seq,但这就是您开始在本地实验所需的全部内容。

If you haven’t already, install Seq on your development machine (or run the Docker container) and navigate to the Seq app at http://localhost:5341. In a different tab, open your app, and start browsing your app and generating logs. Back in Seq, if you refresh the page, you’ll see a list of logs, something like figure 26.11. Clicking a log expands it and shows you the structured data recorded for the log.
如果您尚未在开发计算机上安装 Seq(或运行 Docker 容器),并在 http://localhost:5341 导航到 Seq 应用程序。在另一个选项卡中,打开您的应用,然后开始浏览您的应用并生成日志。回到 Seq,如果你刷新页面,你会看到一个日志列表,类似于图 26.11。单击日志可将其展开,并显示为该日志记录的结构化数据。

alt text

Figure 26.11 The Seq UI. Logs are presented as a list. You can view the structured logging details of individual logs, view analytics for logs in aggregate, and search by log properties.
图 26.11 Seq UI。日志以列表形式显示。您可以查看单个日志的结构化日志记录详细信息,查看聚合日志的分析,并按日志属性进行搜索。

ASP.NET Core supports structured logging by treating each captured parameter from your message format string as a key-value pair. If you create a log message using the following format string,
ASP.NET Core 通过将消息格式字符串中捕获的每个参数视为键值对来支持结构化日志记录。如果使用以下格式字符串创建日志消息,

_log.LogInformation("Loaded {RecipeCount} recipes", Recipes.Count);

the Seq logging provider creates a RecipeCount parameter with a value of Recipes.Count. These parameters are added as properties to each structured log, as you can see in figure 26.11.
Seq 日志记录提供程序会创建一个值为 Recipes.Count 的 RecipeCount 参数。这些参数作为属性添加到每个结构化日志中,如图 26.11 所示。

Structured logs are generally easier to read than your standard-issue console output, but their real power comes when you need to answer a specific question. Consider the problem from before, where you see this error:
结构化日志通常比标准问题控制台输出更易于阅读,但当您需要回答特定问题时,它们的真正功能就来了。考虑之前的问题,您会看到以下错误:

Could not find recipe with id 3245

You want to get a feel for how widespread the problem is. The first step would be to identify how many times this error has occurred and to see whether it’s happened to any other recipes. Seq lets you filter your logs, but it also lets you craft SQL queries to analyze your data, so finding the answer to the question takes a matter of seconds, as shown in figure 26.12.
您想了解这个问题的普遍性。第一步是确定此错误发生了多少次,并查看任何其他配方是否发生过此错误。Seq 允许您过滤日志,但它也允许您制作 SQL 查询来分析数据,因此找到问题的答案需要几秒钟,如图 26.12 所示。

alt text

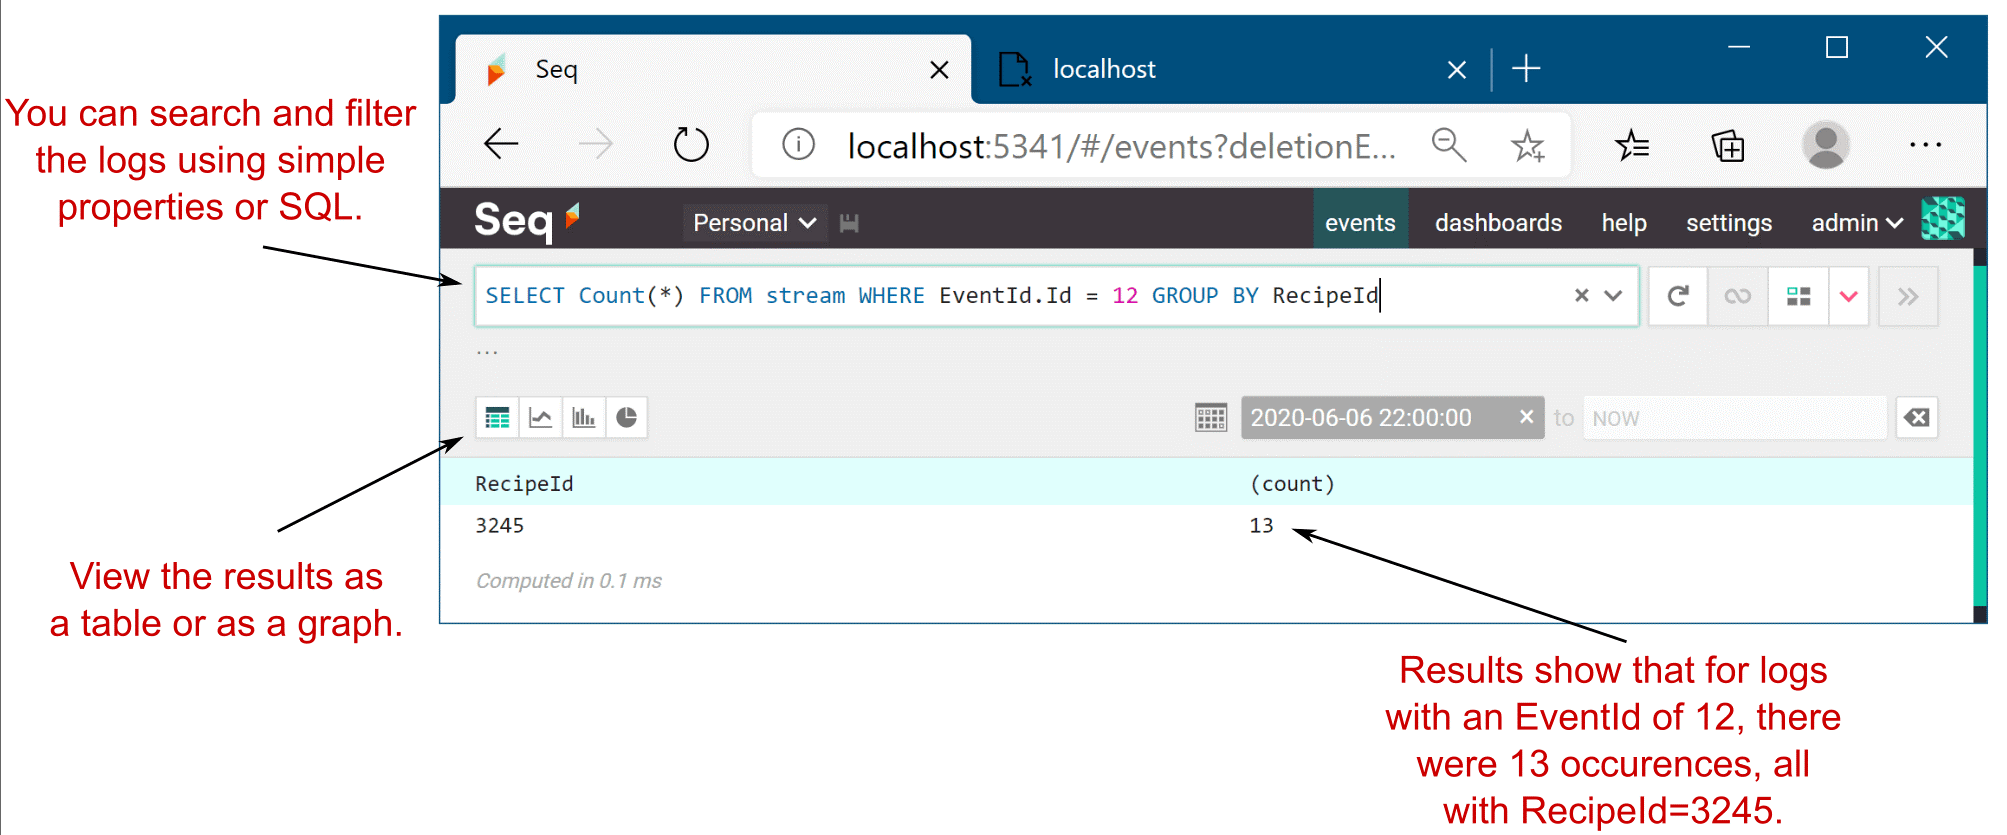
Figure 26.12 Querying logs in Seq. Structured logging makes log analysis like this example easy.
图 26.12 在 Seq 中查询日志。结构化日志记录使像这个例子一样的日志分析变得容易。

NOTE You don’t need query languages like SQL for simple queries, but they make digging into the data easier. Other structured logging providers may provide query languages other than SQL, but the principle is the same as in this Seq example.
注意:您不需要像 SQL 这样的查询语言进行简单的查询,但它们可以更轻松地挖掘数据。其他结构化日志记录提供程序可能会提供 SQL 以外的查询语言,但原理与此 Seq 示例中的相同。

A quick search shows that you’ve recorded the log message with EventId.Id=12 (the EventId of the warning we’re interested in) 13 times, and every time, the offending RecipeId was 3245. This suggests that there may be something wrong with that recipe specifically, which points you in the right direction to find the problem.
快速搜索显示,您已经使用 EventId.Id=12(我们感兴趣的警告的 EventId)记录了 13 次日志消息,每次违规的 RecipeId 都是 3245。这表明该配方可能存在问题,这为您指明了查找问题的正确方向。

More often than not, figuring out errors in production involves logging detective work like this to isolate where the problem occurred. Structured logging makes this process significantly easier, so it’s well worth considering, whether you choose Seq, Elasticsearch, or a different provider.
通常情况下,找出生产中的错误涉及记录此类侦探工作以隔离问题发生的位置。结构化日志记录使此过程变得更加容易,因此,无论您选择 Seq、Elasticsearch 还是其他提供商,都值得考虑。

I’ve already described how you can add structured properties to your log messages using variables and parameters from the message. But as you can see in figure 26.11, there are far more properties visible than exist in the message alone.
我已经介绍了如何使用消息中的变量和参数将结构化属性添加到日志消息中。但是正如你在图 26.11 中看到的,可见的属性比单独的消息中要多得多。

Scopes provide a way to add arbitrary data to your log messages. They’re available in some unstructured logging providers, but they shine when used with structured logging providers. In the final section of this chapter I’ll demonstrate how you can use them to add data to your log messages.
范围提供了一种将任意数据添加到日志消息的方法。它们在一些非结构化日志记录提供商中可用,但在与结构化日志记录提供商一起使用时,它们会大放异彩。在本章的最后一节中,我将演示如何使用它们向日志消息添加数据。

26.5.2 Using scopes to add properties to your logs

26.5.2 使用范围向日志添加属性

You’ll often find in your apps that you have a group of operations that all use the same data, which would be useful to attach to logs. For example, you might have a series of database operations that all use the same transaction ID, or you might be performing multiple operations with the same user ID or recipe ID. Logging scopes provide a way of associating the same data to every log message in such a group.
您经常会在应用程序中发现,有一组作都使用相同的数据,这对于附加到日志非常有用。例如,您可能有一系列数据库作,这些作都使用相同的事务 ID,或者您可能正在使用相同的用户 ID 或配方 ID 执行多个作。日志记录范围提供了一种将相同数据与此类组中的每个日志消息相关联的方法。

DEFINITION Logging scopes are used to group multiple operations by adding relevant data to multiple log message.
定义:日志记录范围用于通过将相关数据添加到多个日志消息来对多个作进行分组。

Logging scopes in ASP.NET Core are created by calling ILogger.BeginScope(T state) and providing the state data to be logged. You create scopes inside a using block; any log messages written inside the scope block will have the associated data, whereas those outside won’t.
ASP.NET Core 中的日志记录范围是通过调用 ILogger.BeginScope(T state) 并提供要记录的状态数据来创建的。您可以在 using 块中创建范围;写入 scope 块内的任何日志消息都将包含关联的数据,而 scope 块外的日志消息则没有。

Listing 26.8 Adding scope properties to log messages with BeginScope
示例 26.8 使用 BeginScope 添加 scope 属性以记录消息

_logger.LogInformation("No, I don't have scope");   #A
using(_logger.BeginScope("Scope value"))                #B
using(_logger.BeginScope(new Dictionary<string, object>     #C
    {{ "CustomValue1", 12345 } }))                          #C
{
    _logger.LogInformation("Yes, I have the scope!");    #D
}
_logger.LogInformation("No, I lost it again");      #A

❶ Log messages written outside the scope block don’t include the scope state.
在 scope 块之外写入的日志消息不包含 scope 状态。

❷ Calling BeginScope starts a scope block, with a scope state of “Scope value”.
调用 BeginScope 将启动一个范围块,其范围状态为“范围值”。

❸ You can pass anything as the state for a scope.
你可以将任何内容作为 scope 的状态传递。

❹ Log messages written inside the scope block include the scope state.
写入 scope 块内的日志消息包括 scope 状态。

The scope state can be any object at all: an int, a string, or a Dictionary, for example. It’s up to each logging provider implementation to decide how to handle the state you provide in the BeginScope call, but typically, it is serialized using ToString().
范围 state 可以是任何对象:例如 int、string 或 Dictionary。由每个日志记录提供程序实现决定如何处理您在 BeginScope 调用中提供的状态,但通常,它是使用 ToString() 序列化的。

TIP The most common use for scopes I’ve found is to attach additional key-value pairs to logs. To achieve this behavior in Seq, you need to pass Dictionary<string, object> as the state object. Nicholas Blumhardt, the creator of Serilog and Seq, has examples and the reasoning for this on his blog in the “The semantics of ILogger.BeginScope()” article: http://mng.bz/GxDD.
提示:我发现的 scope 最常见的用途是将额外的键值对附加到日志。要在 Seq 中实现此行为,您需要将 Dictionary<string, object> 作为状态对象传递。Serilog 和 Seq 的创建者 Nicholas Blumhardt 在他的博客“ILogger.BeginScope() 的语义”一文中提供了示例和原因:http://mng.bz/GxDD

When the log messages inside the scope block are written, the scope state is captured and written as part of the log, as shown in figure 26.13. The Dictionary<> of key-value pairs is added directly to the log message (CustomValue1), and the remaining state values are added to the Scope property. You will likely find the dictionary approach the more useful of the two, as the added properties are more easily filtered on, as you saw in figure 26.12.
当写入 scope 块内的日志消息时,将捕获 scope 状态并将其作为日志的一部分写入,如图 26.13 所示。键值对的 Dictionary<> 将直接添加到日志消息 (CustomValue1) 中,其余状态值将添加到 Scope 属性中。你可能会发现字典方法在两者中更有用,因为添加的属性更容易过滤,如图 26.12 所示。

alt text

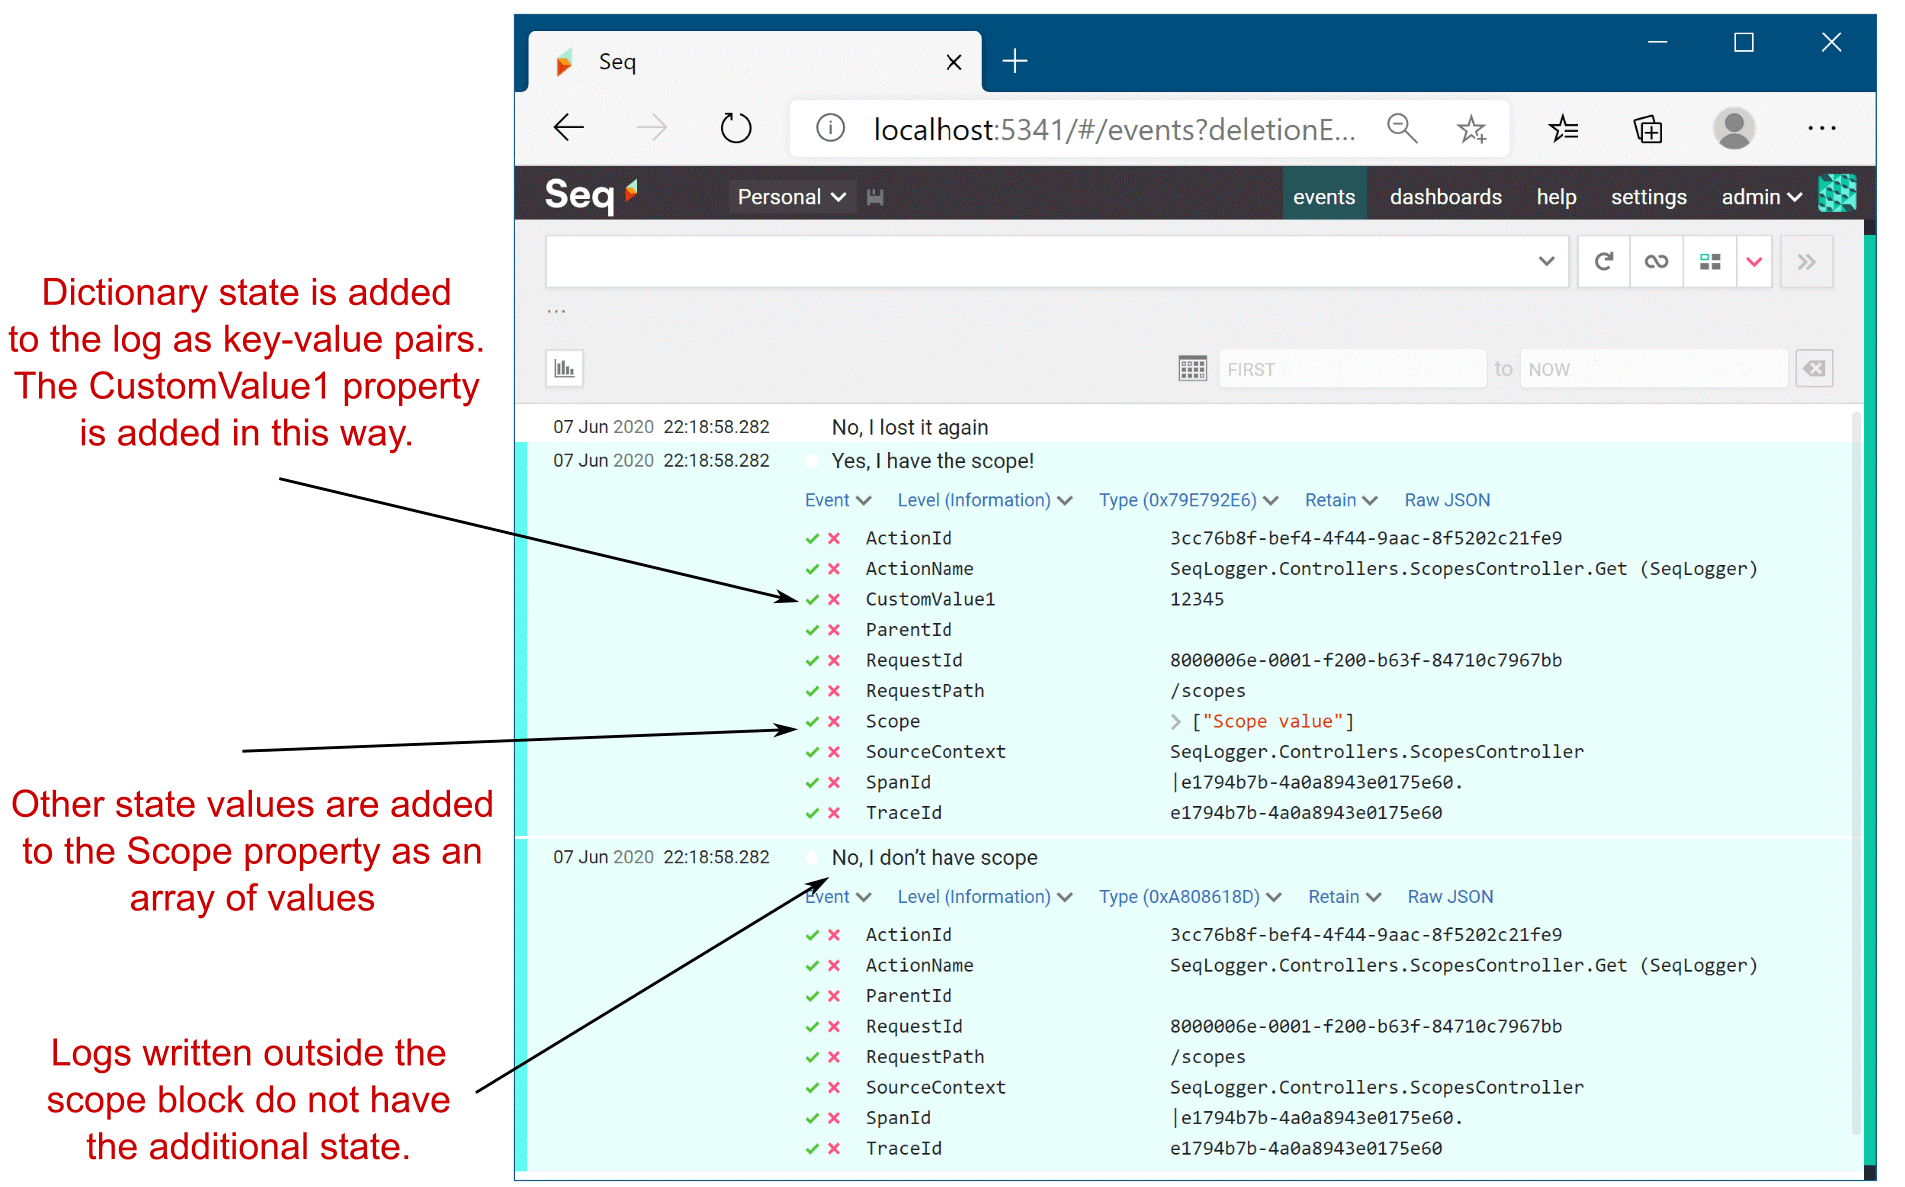
Figure 26.13 Adding properties to logs using scopes. Any scope state that is added using the dictionary approach is added as structured logging properties, but other state is added to the Scope property. Adding properties makes it easier to associate related logs with one another.
图 26.13 使用范围向日志添加属性。使用字典方法添加的任何范围状态都将添加为结构化日志记录属性,但其他状态将添加到 Scope 属性中。添加属性可以更轻松地将相关日志彼此关联。

That brings us to the end of this chapter on logging. Whether you use the built-in logging providers or opt to use a third-party provider like Serilog or NLog, ASP.NET Core makes it easy to get detailed logs not only for your app code, but also for the libraries that make up your app’s infrastructure, like Kestrel and EF Core. Whichever you choose, I encourage you to add more logs than you think you’ll need; you’ll thank me when it comes time to track down a problem.
这将我们带到了本章关于日志记录的结尾。无论您是使用内置日志记录提供程序,还是选择使用 Serilog 或 NLog 等第三方提供程序,ASP.NET Core 都可以轻松获取应用程序代码的详细日志,还可以轻松获取构成应用程序基础结构的库(如 Kestrel 和 EF Core)的详细日志。无论您选择哪种方式,我都鼓励您添加比您认为需要的更多的日志;当需要追踪问题时,您会感谢我。

In the next chapter we’re going to be looking at your ASP.NET Core application from a different point of view. Instead of focusing on the code and logic behind your app, we’re going to look at how you prepare an app for production. You’ll see how to specify the URLs your application uses and how to publish an app so that it can be hosted in IIS. Finally, you’ll learn about the bundling and minification of client-side assets, why you should care, and how to use BundlerMinifier in ASP.NET Core.
在下一章中,我们将从不同的角度看待您的 ASP.NET Core 应用程序。我们不会关注应用程序背后的代码和逻辑,而是要了解如何为生产准备应用程序。您将了解如何指定应用程序使用的 URL,以及如何发布应用程序,以便它可以托管在 IIS 中。最后,您将了解客户端资产的捆绑和缩小、为什么应该关注,以及如何在 ASP.NET Core 中使用 BundlerMinifier。

26.6 Summary

26.6 总结

Logging is critical for quickly diagnosing errors in production apps. You should always configure logging for your application so that logs are written to a durable location such as a filesystem or other service, not just to the console, where they will be lost if the window closes or the server restarts.
日志记录对于快速诊断生产应用程序中的错误至关重要。您应该始终为应用程序配置日志记录,以便将日志写入持久位置(如文件系统或其他服务),而不仅仅是写入控制台,如果窗口关闭或服务器重新启动,日志将丢失。

You can add logging to your own services by injecting ILogger, where T is the name of the service. Alternatively, inject ILoggerFactory and call CreateLogger().
您可以通过注入 ILogger 将日志记录添加到您自己的服务中,其中 T 是服务的名称。或者,注入 ILoggerFactory 并调用 CreateLogger()。

The log level of a message indicates how important it is and ranges from Trace to Critical. Typically, you’ll create many low-importance log messages and a few high-importance log messages.
消息的日志级别表示它的重要性,范围从 Trace 到 Critical 不等。通常,您将创建许多低重要性的日志消息和一些高重要性的日志消息。

You specify the log level of a log by using the appropriate extension method of ILogger to create your log. To write an Information level log, use ILogger.LogInformation(message).
通过使用 ILogger 的相应扩展方法来指定日志的日志级别来创建日志。若要编写信息级别日志,请使用 ILogger.LogInformation(message)。

The log category indicates which component created the log. It is typically set to the fully qualified name of the class creating the log, but you can set it to any string if you wish. ILogger<T> will have a log category of T.
日志类别指示创建日志的组件。它通常设置为创建日志的类的完全限定名称,但您可以根据需要将其设置为任何字符串。ILogger<T> 的日志类别为 T。

You can format messages with placeholder values, similar to the string.Format method, but with meaningful names for the parameters. Calling logger.LogInfo("Loading Recipe with id {RecipeId}", 1234) would create a log reading "Loading Recipe with id 1234", but it would also capture the value RecipeId=1234. This structured logging makes analyzing log messages much easier.
您可以使用占位符值设置消息格式,类似于字符串。Format 方法,但参数具有有意义的名称。调用 logger。LogInfo(“Loading Recipe with id {RecipeId}”, 1234) 将创建一个日志,显示“Loading Recipe with id 1234”,但它也会捕获值 RecipeId=1234。这种结构化日志记录使分析日志消息变得更加容易。

ASP.NET Core includes many logging providers out of the box, including the console, debug, EventLog, and EventSource providers. Alternatively, you can add third-party logging providers.
ASP.NET Core 包含许多开箱即用的日志记录提供程序,包括 console、debug、EventLog 和 EventSource 提供程序。或者,您可以添加第三方日志记录提供商。

You can configure multiple ILoggerProvider instances in ASP.NET Core, which define where logs are output. WebApplicationBuilder adds the console and debug providers, and you can add providers using the Logging property.
您可以在 ASP.NET Core 中配置多个 ILoggerProvider 实例,这些实例定义日志的输出位置。WebApplicationBuilder 添加控制台和调试提供程序,您可以使用 Logging 属性添加提供程序。

You can control logging output verbosity using configuration. WebApplicationBuilder uses the "Logging" configuration section to control output verbosity. You typically filter out more logs in production than when developing your application.
您可以使用 configuration 控制日志记录输出的详细程度。WebApplicationBuilder 使用 “Logging” 配置部分来控制输出详细程度。与开发应用程序时相比,您在生产中筛选出的日志通常更多。

Only a single log filtering rule is selected for each logging provider when determining whether to output a log message. The most specific rule is selected based on the logging provider and the category of the log message.
在确定是否输出日志消息时,仅为每个日志记录提供程序选择一个日志筛选规则。根据日志记录提供程序和日志消息的类别选择最具体的规则。

Structured logging involves recording logs so that they can be easily queried and filtered, instead of the default unstructured format that’s output to the console. This makes analyzing logs, searching for problems, and identifying patterns easier.
结构化日志记录涉及记录日志,以便可以轻松查询和筛选日志,而不是输出到控制台的默认非结构化格式。这使得分析日志、搜索问题和识别模式变得更加容易。

You can add properties to a structured log by using scope blocks. A scope block is created by calling ILogger.BeginScope(state) in a using block. The state can be any object and is added to all log messages inside the scope block.
您可以使用范围块将属性添加到结构化日志中。通过在 using 块中调用 ILogger.BeginScope(state) 来创建范围块。state 可以是任何对象,并添加到 scope 块内的所有日志消息中。

ASP.NET Core in Action 25 Authentication and authorization for APIs

25 Authentication and authorization for APIs
25 API 的身份验证和授权

This chapter covers
本章涵盖

• Seeing how authentication works for APIs in ASP.NET Core
了解 ASP.NET Core中 API 的身份验证工作原理

• Using bearer tokens for authentication
使用不记名令牌进行身份验证

• Testing APIs locally with JSON Web Tokens
使用 JSON Web 令牌在本地测试 API

• Applying authorization policies to minimal APIs
将授权策略应用于最少的 API

In chapter 23 you learned how authentication works with traditional web apps, such as those you would build with Razor Pages or Model-View-Controller (MVC) controllers. Traditional web apps typically use encrypted cookies to store the identity of a user for a request, which the AuthenticationMiddleware then decodes. In this chapter you’ll learn how authentication works for API applications, how it differs from traditional web apps, and what options are available.
在第 23 章中,您了解了身份验证如何适用于传统 Web 应用程序,例如使用 Razor Pages 或模型-视图-控制器 (MVC) 控制器构建的应用程序。传统的 Web 应用程序通常使用加密的 cookie 来存储请求的用户身份,然后 AuthenticationMiddleware 对其进行解码。在本章中,您将了解身份验证如何用于 API 应用程序、它与传统 Web 应用程序有何不同,以及有哪些可用选项。

We start by taking a high-level look at how authentication works for APIs, both in isolation and when they’re part of a larger application or distributed system. You’ll learn about some of the protocols involved, such as OAuth 2.0 and OpenID Connect; patterns you can use to protect your APIs; and the tokens used to control access, typically JSON Web Tokens, called JWTs.
我们首先从高层次上了解身份验证如何用于 API,无论是在隔离状态下,还是在它们属于大型应用程序或分布式系统时。您将了解一些涉及的协议,例如 OAuth 2.0 和 OpenID Connect;可用于保护 API 的模式;以及用于控制访问的令牌,通常是 JSON Web 令牌,称为 JWT。

In section 25.3 you’ll learn how to put this knowledge into practice, adding authentication to a minimal API application using JWTs. In section 25.4 you’ll learn how to use the .NET command-line interface (CLI) to generate JWTs for testing your API locally.
在 Section 25.3 中,您将学习如何将这些知识付诸实践,使用 JWT 将身份验证添加到最小的 API 应用程序中。在第 25.4 节中,您将学习如何使用 .NET 命令行界面 (CLI) 生成 JWT 以在本地测试您的 API。

The .NET CLI works well for generating tokens, but you need a way to add this token to a request. Specifically, if you’re using OpenAPI definitions and Swagger UI as described in chapter 11, you need a way to tell Swagger about your authentication requirements. In section 25.5 you’ll learn about some of the authentication configuration options for your OpenAPI documents and how to use Swagger UI to send authenticated requests to your API.
.NET CLI 非常适合生成令牌,但您需要一种方法来将此令牌添加到请求中。具体来说,如果你正在使用 OpenAPI 定义和 Swagger UI,如第 11 章所述,你需要一种方法来告诉 Swagger 你的身份验证要求。在第 25.5 节中,您将了解 OpenAPI 文档的一些身份验证配置选项,以及如何使用 Swagger UI 将经过身份验证的请求发送到 API。

Finally, in section 25.6 I show how to apply authorization policies to minimal API endpoints to restrict which users can call your APIs. The authorization concepts you learned about in chapter 24 for Razor Pages are the same for APIs, so you’re still using claims, requirements, handlers, and polices.
最后,在第 25.6 节中,我将展示如何将授权策略应用于最小的 API 端点,以限制哪些用户可以调用您的 API。您在第 24 章中学到的 Razor Pages 授权概念与 API 相同,因此您仍在使用声明、要求、处理程序和策略。

We’ll start off by looking at how authentication works when you have an API application. Many of the authentication concepts are similar to traditional apps, but the requirement to support multiple types of users, traditional apps, client-side apps, and mobile apps has led to subtly different solutions.
首先,我们将了解当您拥有 API 应用程序时身份验证的工作原理。许多身份验证概念与传统应用程序类似,但需要支持多种类型的用户、传统应用程序、客户端应用程序和移动应用程序,这导致了略有不同的解决方案。

25.1 Authentication for APIs and distributed applications

25.1 API 和分布式应用程序的身份验证

In this section you’ll learn about the authentication process for API applications, why it typically differs from authentication for traditional web apps, and some of the common patterns and protocols that are involved.
在本节中,您将了解 API 应用程序的身份验证过程、为什么它通常不同于传统 Web 应用程序的身份验证,以及涉及的一些常见模式和协议。

25.1.1 Extending authentication to multiple apps

25.1.1 将身份验证扩展到多个应用程序

I outlined the authentication process for traditional web apps in chapter 23. When a user signs in to your application, you set an encrypted cookie. This cookie contains a serialized version of the ClaimsPrincipal of the user, including their ID and any associated claims. When you make a second request, the browser automatically sends this cookie. The AuthenticationMiddleware then decodes the cookie, deserializes the ClaimsPrincipal, and sets the current user for the request, as shown previously in figure 23.3 and reproduced in figure 25.1.
我在第 23 章中概述了传统 Web 应用程序的身份验证过程。当用户登录到您的应用程序时,您需要设置一个加密的 Cookie。此 Cookie 包含用户的 ClaimsPrincipal 的序列化版本,包括其 ID 和任何关联的声明。当您发出第二个请求时,浏览器会自动发送此 cookie。然后,AuthenticationMiddleware 对 cookie 进行解码,反序列化 ClaimsPrincipal,并为请求设置当前用户,如前面的图 23.3 所示,并在图 25.1 中重现。

alt text

Figure 25.1 When a user first signs in to an app, the app sets an encrypted cookie containing the ClaimsPrincipal. On subsequent requests, the cookie sent with the request contains the user principal, which is deserialized, validated, and used to authenticate the request.
图 25.1 当用户首次登录应用程序时,应用程序会设置一个包含 ClaimsPrincipal 的加密 Cookie。在后续请求中,与请求一起发送的 Cookie 包含用户主体,该主体经过反序列化、验证并用于对请求进行身份验证。

This flow works particularly well when you have a single traditional web app that’s doing all the work. The app is responsible for authenticating and managing users, as well as serving your app data and executing business logic, as shown in figure 25.2.
当您有一个执行所有工作的传统 Web 应用程序时,此流程特别有效。该应用程序负责验证和管理用户,以及提供应用程序数据和执行业务逻辑,如图 25.2 所示。

alt text

Figure 25.2 Traditional apps typically handle all the functionality of an app: the business logic, generating the UI, authentication, and user management.
图 25.2 传统应用程序通常处理应用程序的所有功能:业务逻辑、生成 UI、身份验证和用户管理。

In addition to traditional web apps, it’s common to use ASP.NET Core as an API to serve data for mobile and client-side single-page applications (SPAs). Similarly, even traditional web apps using Razor Pages often need to call API applications behind the scenes, as shown in figure 25.3.
除了传统的 Web 应用程序之外,通常将 ASP.NET Core 用作 API,为移动和客户端单页应用程序 (SPA) 提供数据。同样,即使是使用 Razor Pages 的传统 Web 应用程序也经常需要在后台调用 API 应用程序,如图 25.3 所示。

alt text

Figure 25.3 Modern applications typically need to expose web APIs for mobile and client-side apps, as well as potentially calling APIs on the backend. When all these services need to authenticate and manage users, this becomes logistically complicated.
图 25.3 现代应用程序通常需要为移动和客户端应用程序公开 Web API,并可能在后端调用 API。当所有这些服务都需要对用户进行身份验证和管理时,这在逻辑上变得复杂。

In this situation you have multiple apps and APIs, all of which need to understand that the same user is logically making a request across all the apps and APIs. If you keep the same approach as before, where each app manages its own users, things can quickly become unmanageable!
在这种情况下,您有多个应用程序和 API,所有这些应用程序和 API 都需要了解同一用户在逻辑上跨所有应用程序和 API 发出请求。如果您保持与以前相同的方法,即每个应用程序管理自己的用户,事情很快就会变得难以管理!

You’d need to duplicate all the sign-in logic between the apps and APIs, as well as have some central database holding the user details. Users would likely need to sign in multiple times to access different parts of the service. On top of that, using cookies becomes problematic for some mobile clients in particular or where you’re making requests to multiple domains (as cookies belong to only a single domain). So how can we improve this? By moving the authentication responsibilities to a separate service.
您需要在应用程序和 API 之间复制所有登录逻辑,并拥有一些包含用户详细信息的中央数据库。用户可能需要多次登录才能访问服务的不同部分。最重要的是,使用 cookie 对于某些移动客户端来说会成为问题,特别是当您向多个域发出请求时(因为 cookie 只属于一个域)。那么我们如何改进这一点呢?通过将身份验证责任转移到单独的服务。

25.1.2 Centralizing authentication in an identity provider

25.1.2 在身份提供程序中集中验证

Modern systems often have many moving parts, each of which requires some level of authentication and authorization to protect each app from unauthorized use. Instead of embedding authentication responsibilities in each application, a common approach is to extract the code that’s common to all the apps and APIs and then move it to an identity provider, as shown in figure 25.4.
现代系统通常有许多移动部件,每个部件都需要一定程度的身份验证和授权,以保护每个应用程序免受未经授权的使用。一种常见的方法是提取所有应用程序和 API 通用的代码,然后将其移动到身份提供者,而不是在每个应用程序中嵌入身份验证责任,如图 25.4 所示。

alt text

Figure 25.4 An alternative architecture involves using a central identity provider to handle all the authentication and user management for the system. Tokens are passed back and forth among the identity provider, apps, and APIs.
图 25.4 另一种架构涉及使用中央身份提供商来处理系统的所有身份验证和用户管理。令牌在身份提供商、应用程序和 API 之间来回传递。

Instead of signing in to an app directly, the app redirects to an identity provider. The user signs in to this identity provider, which passes bearer tokens back to the client (a browser or mobile app, for example) to indicate who the user is and what they’re allowed to access. The client can pass these tokens to the APIs to provide information about the logged-in user without needing to reauthenticate or manage users directly in the API.
应用程序不是直接登录到应用程序,而是重定向到身份提供商。用户登录到此身份提供商,该身份提供商将不记名令牌传递回客户端(例如浏览器或移动应用程序),以指示用户是谁以及允许他们访问的内容。客户端可以将这些令牌传递给 API,以提供有关已登录用户的信息,而无需直接在 API 中重新验证或管理用户。

DEFINITION Bearer tokens are strings that contain authentication details about a user or app. They may or may not be encrypted but are typically signed to avoid tampering. JWTs are the most common format. We’ll look more at JWTs in section 25.2.
定义:持有者令牌是包含有关用户或应用程序的身份验证详细信息的字符串。它们可能已加密,也可能未加密,但通常会进行签名以避免篡改。JWT 是最常见的格式。我们将在 25.2 节中更多地了解 JWT。

Using a separate identity provider is clearly more complicated on the face of it, as you’ve thrown a whole new service into the mix, but in the long run this has several advantages:
使用单独的身份提供商从表面上看显然更复杂,因为您已经将一个全新的服务投入其中,但从长远来看,这有几个好处:

• Users can share their identity among multiple services. As you’re logged in to the central identity provider, you’re essentially logged in to all apps that use that service. This gives you the single-sign-on experience, where you don’t have to keep logging in to multiple services.
用户可以在多个服务之间共享其身份。当您登录到中央身份提供商时,您实际上已经登录到使用该服务的所有应用程序。这为您提供了单点登录体验,您不必一直登录到多个服务。

• You don’t need to duplicate sign-in logic between multiple services. All the sign-in logic is encapsulated in the identity provider, so you don’t need to add sign-in screens to all your apps.
您无需在多个服务之间复制登录逻辑。所有登录逻辑都封装在身份提供商中,因此您无需向所有应用程序添加登录屏幕。

• The identity provider has a single responsibility. The identity provider is responsible only for authentication and managing users. In many cases, this is generic enough that you can (and should!) use a third-party identity service, such as Auth0 or Azure Active Directory, instead of building your own.
身份提供商有单一职责。身份提供商仅负责身份验证和管理用户。在许多情况下,这足够通用,您可以(并且应该)使用第三方身份服务,例如 Auth0 或 Azure Active Directory,而不是构建自己的身份服务。

• You can easily add new sign-in mechanisms. Whether you use the identity provider approach or the traditional approach, it’s possible to use external services to handle the authentication of users. You’ll have seen this in apps that allow you to “log in using Facebook” or “log in using Google,” for example. If you use a centralized identity provider, you can add support for more providers in one place instead of having to configure every app and API explicitly.
您可以轻松添加新的登录机制。无论您使用身份提供商方法还是传统方法,都可以使用外部服务来处理用户的身份验证。例如,您会在允许您 “使用 Facebook 登录” 或 “使用 Google 登录” 的应用程序中看到这一点。如果您使用集中式身份提供商,则可以在一个位置添加对更多提供商的支持,而不必显式配置每个应用程序和 API。

Out of the box, ASP.NET Core supports architectures like this and for consuming bearer tokens from identity providers, but it doesn’t include support for issuing those tokens in the core framework. That means you’ll need to use another library or service as the identity provider.
开箱即用的 ASP.NET Core 支持此类架构,并支持使用来自身份提供商的不记名令牌,但它不包括对在核心框架中颁发这些令牌的支持。这意味着您需要使用其他库或服务作为身份提供商。

As I mentioned in chapter 23, one excellent option is to use a third-party identity provider, such as Facebook, Google, Okta, Auth0, or Azure Active Directory. These providers take care of storing user passwords, authenticating using modern standards like WebAuthn (https://webauthn.guide), and looking for malicious attempts to impersonate users.
正如我在第 23 章中提到的,一个很好的选择是使用第三方身份提供商,比如 Facebook、Google、Okta、Auth0 或 Azure Active Directory。这些提供商负责存储用户密码、使用 WebAuthn (https://webauthn.guide) 等现代标准进行身份验证,并寻找冒充用户的恶意尝试。

By using an identity provider, you leave the tricky security details to the experts and can focus on the core purpose of your business, whichever domain that is. Not all providers are equal, though: For some providers (such as Auth0) you own the profiles, whereas for others (Facebook or Google) you don’t. Make sure to choose a provider that matches your requirements.
通过使用身份提供商,您可以将棘手的安全细节留给专家,并且可以专注于业务的核心目的,无论哪个域。但是,并非所有提供商都是平等的:对于某些提供商(例如 Auth0),您拥有配置文件,而对于其他提供商(Facebook 或 Google),您则不拥有。确保选择符合您要求的提供商。

Tip Wherever possible, I recommend using a third-party identity provider. Well-respected identity providers have many experts working solely on securing your customers’ details, proactively preventing attacks and ensuring that the data is safe. By leaving this tricky job to the experts, you’re free to focus on the core business of your app, whatever that may be.
提示:我建议尽可能使用第三方身份提供商。备受尊敬的身份提供商拥有许多专家,专门致力于保护客户的详细信息、主动防止攻击并确保数据安全。通过将这项棘手的工作留给专家,您可以自由地专注于应用程序的核心业务,无论它是什么。

Another common option is to build your own identity provider. This may sound like a lot of work (and it is!), but thanks to excellent libraries like OpenIddict (https://github.com/openiddict) and Duende’s IdentityServer (https://duendesoftware.com), it’s perfectly possible to write your own identity provider to serve bearer tokens that can be consumed by your apps and APIs.
另一个常见的选项是构建自己的身份提供商。这听起来像是很多工作(确实如此),但多亏了 OpenIddict (https://github.com/openiddict) 和 Duende 的 IdentityServer (https://duendesoftware.com) 等优秀库,您完全可以编写自己的身份提供商来提供可供您的应用程序和 API 使用的不记名令牌。

WARNING You should consider carefully whether the effort and risks associated with creating your own identity provider are worthwhile. Bugs are a fact of life, and a bug in your identity provider could easily result in a security vulnerability. Nevertheless, if you have specific identity requirements, creating your own identity provider may be a reasonable or necessary option.
警告:您应该仔细考虑与创建自己的身份提供商相关的努力和风险是否值得。错误是事实,身份提供商中的错误很容易导致安全漏洞。不过,如果您有特定的身份要求,创建自己的身份提供商可能是一个合理或必要的选择。

An aspect often overlooked by people getting started with OpenIddict and IdentityServer is that they aren’t prefabricated solutions. They consist of a set of services and middleware that you add to a standard ASP.NET Core app, providing an implementation of relevant identity standards, according to the specification. You, as a developer, still need to write the profile management code that knows how to create a new user (normally in a database), load a user’s details, validate their password, and manage their associated claims. On top of that, you need to provide all the UI code for the user to log in, manage their passwords, and configure two-factor authentication (2FA). It’s not for the faint of heart!
开始使用 OpenIddict 和 IdentityServer 的人经常忽略的一个方面是,它们不是预制的解决方案。它们由一组服务和中间件组成,您可以将其添加到标准 ASP.NET Core 应用程序中,根据规范提供相关身份标准的实现。作为开发人员,您仍然需要编写 Profile Management 代码,该代码知道如何创建新用户(通常在数据库中)、加载用户的详细信息、验证其密码以及管理其关联的声明。最重要的是,您需要为用户提供所有 UI 代码以登录、管理他们的密码和配置双因素身份验证 (2FA)。不适合胆小的人!

In many ways, you can think of an identity provider as a traditional web app that has only account management pages. If you want to take on building your own identity provider, ASP.NET Core Identity, described in chapter 23, provides a good basis for the user management side. Adding IdentityServer or OpenIddict gives you the ability to generate tokens for other services, using the OpenID Connect standard, for maximum interoperability with other services.
在许多方面,您可以将身份提供商视为只有账户管理页面的传统 Web 应用程序。如果您想构建自己的身份提供商,第 23 章中描述的 ASP.NET Core Identity 为用户管理方面提供了良好的基础。添加 IdentityServer 或 OpenIddict 后,您可以使用 OpenID Connect 标准为其他服务生成令牌,以实现与其他服务的最大互作性。

25.1.3 OpenID Connect and OAuth 2.0

25.1.3 OpenID Connect 和 OAuth 2.0

OpenID Connect (OIDC) (http://openid.net/connect) is an authentication protocol built on top of the OAuth 2.0 (https://oauth.net/2) specification. It’s designed to facilitate the kind of approaches described in section 25.1.2, where you want to leave the responsibility of storing user credentials to someone else (an identity provider). It provides an answer to the question “Which user sent this request?” without your having to manage the user yourself.
OpenID Connect (OIDC) (http://openid.net/connect) 是在 OAuth 2.0 (https://oauth.net/2) 规范之上构建的身份验证协议。它旨在促进第 25.1.2 节中描述的那种方法,您希望将存储用户凭据的责任留给其他人(身份提供商)。它为“哪个用户发送了此请求”问题提供答案,而无需您自己管理用户。

NOTE It isn’t strictly necessary to understand these protocols to add authentication to your APIs, but I think it’s best to have a basic understanding of them so that you understand where your APIs fit into the security landscape. If you want to learn more about OpenID Connect, OpenID Connect in Action, by Prabath Siriwardena (Manning, 2023), provides lots more details.
注意:为您的 API 添加身份验证并不是绝对必要的,但我认为最好对它们有一个基本的了解,以便您了解您的 API 在安全环境中的位置。如果您想了解有关 OpenID Connect 的更多信息,Prabath Siriwardena(曼宁,2023 年)的 OpenID Connect in Action 提供了更多详细信息。

Open ID Connect is built on top of the OAuth 2.0 protocol, so it helps to understand that protocol a little first. OAuth 2.0 is an authorization protocol. It allows a user to delegate access of a resource to a different service in a controlled manner without revealing any additional details, such as your identity or any other information.
Open ID Connect 构建在 OAuth 2.0 协议之上,因此首先了解该协议会有所帮助。OAuth 2.0 是一种授权协议。它允许用户以受控方式将资源的访问权限委托给其他服务,而无需透露任何其他详细信息,例如您的身份或任何其他信息。

That’s all a bit abstract, so let’s consider an example. You want to print some photos of your dog through a photo printing service, dogphotos.com. You sign up to the dogphotos.com service, and they give you two options for uploading your photos:
这一切都有点抽象,所以让我们考虑一个例子。您想通过照片打印服务打印一些您的狗的照片,dogphotos.com。您注册了 dogphotos.com 服务,他们为您提供了两种上传照片的选项:

• Upload from your computer.
从您的计算机上传。

• Download directly from Facebook using OAuth 2.0.
使用 OAuth 2.0 直接从 Facebook 下载。

As you’re using a new laptop, you haven’t downloaded all the photos of your dog to your computer, so you choose to use OAuth 2.0 instead, as shown in figure 25.5. This triggers the following sequence:
由于您使用的是新笔记本电脑,因此您尚未将狗的所有照片下载到计算机上,因此您选择使用 OAuth 2.0,如图 25.5 所示。这将触发以下序列:

  1. dogphotos.com redirects you to Facebook, where you must sign in (if you haven’t already).
    dogphotos.com 会将您重定向到 Facebook,您必须在此处登录(如果您尚未登录)。

  2. Once you’re authenticated, Facebook shows a consent screen, which describes the data dogphotos.com wants to access, which should be your photos only in this case.
    通过身份验证后,Facebook 会显示一个同意屏幕,其中描述了 dogphotos.com 想要访问的数据,在这种情况下,这些数据应该只是您的照片。

  3. When you choose OK, Facebook automatically redirects you to a URL on dogphotos.com and includes an authorization code in the URL.
    当您选择 OK (确定) 时,Facebook 会自动将您重定向到 dogphotos.com 上的 URL,并在 URL 中包含授权代码。

  4. dogphotos.com uses this code, in combination with a secret known only by Facebook and dogphotos.com, to retrieve an access token from Facebook.
    dogphotos.com 将此代码与只有 Facebook 和 dogphotos.com 知道的密钥结合使用,从 Facebook 检索访问令牌。

  5. Finally, dogphotos.com uses the token to call the Facebook API and retrieve your dog photos!
    最后,dogphotos.com 使用令牌调用 Facebook API 并检索您的狗照片!

alt text

Figure 25.5 Using OAuth 2.0 to authorize dogphotos.com to access your photos on Facebook
图 25.5 使用 OAuth 2.0 授权 dogphotos.com 访问您在 Facebook 上的照片

There’s a lot going on in this example, but it gives some nice benefits:
这个例子中有很多内容,但它提供了一些不错的好处:

• You didn’t have to give your Facebook credentials to dogphotos.com. You simply signed in to Facebook as normal.
您不必将您的 Facebook 凭据提供给 dogphotos.com。您只需照常登录 Facebook。

• You had control of which details dogphotos.com could access on your behalf via the Facebook photos API.
您可以控制 dogphotos.com 可以通过 Facebook 照片 API 代表您访问哪些详细信息。

• You didn’t have to give dogphotos.com any of your identity information (though in practice, this is often requested).
您不必向 dogphotos.com 提供任何身份信息(尽管在实践中,这经常被要求)。

Effectively, you delegated your access of the Facebook photos API to dogphotos.com. This approach is why OAuth 2.0 is described as an authorization protocol, not an authentication protocol. dogphotos.com doesn’t know your identity on Facebook; it is authorized only to access the photos API on behalf of someone.
实际上,您将 Facebook 照片 API 的访问权限委托给了 dogphotos.com。这种方法就是为什么 OAuth 2.0 被描述为授权协议,而不是身份验证协议的原因。dogphotos.com 不知道您在 Facebook 上的身份;它仅被授权代表某人访问 Photos API。

OAuth 2.0 authorization flows and grant types
OAuth 2.0 授权流程和授权类型

The OAuth 2.0 example shows in this section uses a common flow or grant type, as it’s called in OAuth 2.0, for obtaining a token from an identity provider. Oauth 2.0 defines several grant types and extensions, each designed for a different scenario:
本节中所示的 OAuth 2.0 示例使用通用流程或授权类型(在 OAuth 2.0 中称为)从身份提供商处获取令牌。Oauth 2.0 定义了多种授权类型和扩展,每种类型和扩展都针对不同的场景而设计:

• Authorization code—This is the flow I described in figure 25.5, in which an application uses the combination of an authorization code and a secret to retrieve a token.
授权码 - 这是我在图 25.5 中描述的流程,其中应用程序使用授权码和密钥的组合来检索令牌。

• Proof Key for Code Exchange (PKCE)—This is an extension to the authorization code that you should always favor, if possible, as it provides additional protections against certain attacks, as described in the RFC at https://www.rfc-editor.org/rfc/rfc7636.
代码交换证明密钥 (PKCE) - 这是授权码的扩展,如果可能,您应该始终使用该扩展,因为它提供了针对某些攻击的额外保护,如 RFC https://www.rfc-editor.org/rfc/rfc7636 中所述。

• Client credentials—This is used when no user is involved, such as when you have an API talking to another API.
客户端凭据 - 当不涉及用户时 (例如,当 API 与其他 API 通信时) 使用此凭据。

Many more grants are available (see https://oauth.net/2/grant-types), and each grant is suited to a different situation. The examples are the most common types, but if your scenario doesn’t match these, it’s worth exploring the other OAuth 2.0 grants available before thinking you need to invent your own! And with Oauth 2.1 coming soon (http://mng.bz/XNav), there may well be updated guidance to be aware of.
还有更多的资助金可供选择(见 https://oauth.net/2/grant-types),每种资助金都适用于不同的情况。这些示例是最常见的类型,但如果您的方案与这些不匹配,则值得先探索其他可用的 OAuth 2.0 授权,然后再考虑您需要创建自己的授权!随着 Oauth 2.1 的即将推出 (http://mng.bz/XNav),可能会有更新的指南需要注意

OAuth 2.0 is great for the scenario I’ve described so far, in which you want to delegate access to a resource (your photos) to someone else (dogphotos.com). But it’s also common for apps to want to know your identity in addition to accessing an API. For example, dogphotos.com may want to be able to contact you via Facebook if there’s a problem with your photos.
OAuth 2.0 非常适合我到目前为止描述的方案,在该方案中,您希望将对资源(您的照片)的访问权限委派给其他人 (dogphotos.com)。但是,除了访问 API 之外,应用程序还想知道您的身份也很常见。例如,如果您的照片有问题,dogphotos.com 可能希望能够通过 Facebook 与您联系。

This is where OpenID Connect comes in. OpenID Connect takes the same basic flows as OAuth 2.0 and adds some conventions, discoverability, and authentication. At a high level, OpenID Connect treats your identity (such as an ID or email address) as a resource that is protected in the same way as any other API. You still need to consent to give dogphotos.com access to your identity details, but once you do, it’s an extra API call for dogphotos.com to retrieve your identity details, as shown in figure 25.6.
这就是 OpenID Connect 的用武之地。OpenID Connect 采用与 OAuth 2.0 相同的基本流程,并添加了一些约定、可发现性和身份验证。概括地说,OpenID Connect 将您的身份(例如 ID 或电子邮件地址)视为一种资源,其保护方式与任何其他 API 相同。您仍然需要同意才能授予 dogphotos.com 访问您的身份详细信息的权限,但是一旦同意,dogphotos.com 将进行额外的 API 调用来检索您的身份详细信息,如图 25.6 所示。

alt text

Figure 25.6 Using OpenID Connect to authenticate with Facebook and retrieve identity information. The overall flow is the same as with Oauth 2.0, as shown in figure 25.5, but with an additional identity token describing the authentication event and API call to retrieve the identity details.
图 25.6 使用 OpenID Connect 向 Facebook 进行身份验证并检索身份信息。整个流程与 Oauth 2.0 相同,如图 25.5 所示,但使用一个额外的身份令牌来描述身份验证事件和 API 调用来检索身份详细信息。

OpenID Connect is a crucial authentication component in many systems, but if you’re building the API only (for example, the Facebook photos API from figures 25.5 and 25.6), all you really care about are the tokens in the requests; how that token was obtained is less important from a technical standpoint. In the next section we’ll look in detail at these tokens and how they work.
OpenID Connect 是许多系统中的关键身份验证组件,但如果您只构建 API(例如,图 25.5 和 25.6 中的 Facebook 照片 API),那么您真正关心的只是请求中的令牌;从技术角度来看,该代币是如何获得的并不重要。在下一节中,我们将详细介绍这些令牌及其工作原理。

25.2 Understanding bearer token authentication

25.2 了解持有者令牌身份验证

In this section you’ll learn about bearer tokens: what they are, how they can be used for security with APIs, and the common JWT format for tokens. You’ll learn about some of the limitations of the tokens, approaches to work around these, and some common concepts such as audiences and scopes.
在本节中,您将了解不记名令牌:它们是什么,如何通过 API 使用它们来确保安全性,以及令牌的常见 JWT 格式。您将了解令牌的一些限制、解决这些问题的方法,以及一些常见概念,例如受众和范围。

The name bearer token consists of two parts that describe its use:
名称持有者令牌由描述其用途的两个部分组成:

• Token—A security token is a string that provides access to a protected resource.
令牌 - 安全令牌是提供对受保护资源的访问权限的字符串。

• Bearer—A bearer token is one in which anyone who has the token (the bearer) can use it like anyone else. You don’t need to prove that you were the one who received the token originally or have access to any additional key. You can think of a bearer token as being a bit like money: if it’s in your possession, you can spend it!
Bearer - 在“不记名令牌”中,任何拥有该令牌 (“Bearer”) 的人都可以像其他任何人一样使用它。您无需证明您是最初接收令牌的人,也无需证明您有权访问任何其他密钥。您可以将不记名代币想象成有点像金钱:如果您拥有它,您就可以花掉它!

If the second point makes you a little uneasy, that’s good. You should think of bearer tokens as being a lot like passwords: you must protect them at all costs! You should avoid including bearer tokens in URL query strings, for example, as these may be automatically logged, exposing the token accidentally.
如果第二点让你有点不安,那很好。您应该将不记名令牌视为很像密码:您必须不惜一切代价保护它们!例如,您应该避免在 URL 查询字符串中包含不记名令牌,因为这些令牌可能会被自动记录,从而意外地暴露令牌。

Everything old is new again: Cookies for APIs
旧事物又是新的:API的 Cookie

Bearer token authentication is extremely common for APIs, but as with everything in tech, the landscape is constantly evolving. One area that has seen a lot of change is the process of securing SPAs like React, Angular, and Blazor WASM. The advice for some years was to use the Authorization code with PKCE grant (https://www.rfc-editor.org/rfc/rfc8252#section-6), but the big problem with this pattern is that the bearer tokens for calling the API are ultimately stored in the browser.
不记名令牌身份验证对于 API 来说极为常见,但与技术领域的一切一样,形势也在不断发展。一个发生很大变化的领域是保护 React、Angular 和 Blazor WASM 等 SPA 的过程。几年来,人们的建议是将授权码与 PKCE grant (https://www.rfc-editor.org/rfc/rfc8252#section-6) 一起使用,但这种模式的最大问题是,用于调用 API 的不记名令牌最终存储在浏览器中。

An alternative pattern has emerged recently: the Backend for Frontend (BFF) pattern. In this approach, you have a traditional ASP.NET Core application (the backend, which hosts the Blazor WASM or other SPA application (the frontend). The main job of the ASP.NET Core application is to handle OpenID Connect authentication, store the bearer tokens securely, and set an authentication cookie, exactly like a traditional web app.
最近出现了另一种模式:Backend for Frontend (BFF) 模式。在此方法中,你有一个传统的 ASP.NET Core 应用程序(后端,托管 Blazor WASM 或其他 SPA 应用程序(前端)。ASP.NET Core 应用程序的主要工作是处理 OpenID Connect 身份验证,安全地存储持有者令牌,并设置身份验证 Cookie,就像传统的 Web 应用程序一样。

The frontend app in the browser sends requests to the backend app, which automatically includes the cookie. The backend swaps out the authentication cookie for the appropriate bearer token and forwards the request to the real API.
浏览器中的前端应用程序将请求发送到后端应用程序,后端应用程序会自动包含 Cookie。后端将身份验证 Cookie 换成相应的不记名令牌,并将请求转发到实际 API。

The big advantages of this approach are that no bearer tokens are ever sent to the browser, and much of the frontend code is significantly simplified. The main down side is that you need to run the additional backend service to support the frontend app. Nevertheless, this is quickly becoming the recommended approach. You can read more about the pattern in Duende’s documentation at http://mng.bz/yQdB. Alternatively, you can find a project template for the BFF pattern from Damien Boden at http://mng.bz/MBlW.
这种方法的一大优点是不会向浏览器发送不记名令牌,并且大部分前端代码都得到了显著简化。主要缺点是您需要运行额外的后端服务来支持前端应用程序。尽管如此,这正迅速成为推荐的方法。您可以在 Duende 的文档 http://mng.bz/yQdB 中阅读有关该模式的更多信息。或者,您可以在 http://mng.bz/MBlW 上找到 Damien Boden 提供的 BFF 模式的项目模板。

Bearer tokens don’t have to have any particular value; they could be a completely random string, for example. However, the most common format and the format used by OpenID Connect is a JWT. JWTs (defined in https://www.rfc-editor.org/rfc/rfc7519.html) consist of three parts:
不记名令牌不必具有任何特定值;例如,它们可以是一个完全随机的字符串。但是,最常见的格式和 OpenID Connect 使用的格式是 JWT。JWT(在 https://www.rfc-editor.org/rfc/rfc7519.html 中定义)由三个部分组成:

• A JavaScript Object Notation (JSON) header describing the token
描述令牌的 JavaScript 对象表示法 (JSON) 标头

• A JSON payload containing the claims
包含声明的 JSON 有效负载

• A binary signature created from the header and the payload
从标头和有效负载创建的二进制签名

Each part is base64-encoded and concatenated with a '.' into a single string that can be safely passed in HTTP headers, for example, as shown in figure 25.7. The signature is created using key material that must be shared by the provider that created the token and any API that consumes it. This ensures that the JWT can’t be tampered with, such as to add extra claims to a token.
每个部分都经过 base64 编码,并用 '.' 连接成一个字符串,该字符串可以在 HTTP 标头中安全地传递,例如,如图 25.7 所示。签名是使用密钥材料创建的,该密钥材料必须由创建令牌的提供商和使用令牌的任何 API 共享。这可确保 JWT 无法被篡改,例如向令牌添加额外的声明。

WARNING Always validate the signature of any JWTs you consume, as described in the JWT Best Current Practices RFC (https://www.rfc-editor.org/rfc/rfc8725). ASP.NET Core does this by default.
警告:始终验证您使用的任何 JWT 的签名,如 JWT 当前最佳实践 RFC (https://www.rfc-editor.org/rfc/rfc8725) 中所述。默认情况下,ASP.NET Core 执行此作。

alt text

Figure 25.7 An example JWT, decoded using the website https://jwt.io. The JWT consists of three parts: the header, the payload, and the signature. You must always verify the signature of any JWTs you receive.
图 25.7 使用 website https://jwt.io 解码的 JWT 示例JWT 由三部分组成:标头、有效负载和签名。您必须始终验证您收到的任何 JWT 的签名。

Figure 25.7 shows the claims included in the JWT, some of which have cryptic names like iss and iat. These are standard claim names used in OpenID Connect (standing for “Issuer” and “Issued at,” respectively). You generally don’t need to worry about these, as they’re automatically handled by ASP.NET Core when it decodes the token. Nevertheless, it’s helpful to understand what some of these claims mean, as it will help when things go wrong:
图 25.7 显示了 JWT 中包含的声明,其中一些声明具有晦涩难懂的名称,如 iss 和 iat。这些是 OpenID Connect 中使用的标准声明名称(分别代表“颁发者”和“颁发者”)。您通常无需担心这些,因为它们由 ASP.NET Core 在解码令牌时自动处理。尽管如此,了解其中一些索赔的含义会有所帮助,因为当出现问题时它会有所帮助:

• sub—The subject of the token, the unique identifier of the subject it’s describing. This will often be a user, in which case it may be the identity provider’s unique ID for the user.
sub - 令牌的主题,即它所描述的主题的唯一标识符。这通常是一个用户,在这种情况下,它可能是身份提供商的用户唯一 ID。

• aud—The audience of the token, specifying the domains for which this token was created. When an API validates the token, the API should confirm that the JWT’s aud claim contains the domain of the API.
aud - 令牌的受众,指定为其创建此令牌的域。当 API 验证令牌时,API 应确认 JWT 的 aud 声明包含 API 的域。

• scope—The scopes granted in the token. Scopes define what the user/app consented to (and is allowed to do). Taking the example from section 25.1, dogphotos.com may have requested the photos.read and photos.edit scopes, but if the user consented only to the photos.read scope, the photos.edit scope would not be in the JWT it receives for use with the Facebook photos API. It’s up to the API itself to interpret what each scope means for the business logic of the request.
scope - 令牌中授予的范围。范围定义用户/应用程序同意 (和允许) 执行的作。以第 25.1 节为例,dogphotos.com 可能已经请求了photos.read和photos.edit范围,但是如果用户只同意photos.read范围,则photos.edit范围将不在它收到的用于 Facebook 照片 API 的 JWT 中。由 API 本身来解释每个范围对请求的业务逻辑的含义。

• exp—The expiration time of the token, after which it is no longer valid, expressed as the number of seconds since midnight on January 1, 1970 (known as the Unix timestamp).
exp - 令牌的过期时间 (超过此时间后) 不再有效,表示为自 1970 年 1 月 1 日午夜以来的秒数 (称为 Unix 时间戳)。

An important point to realize is that JWTs are not encrypted. That means anyone can read the contents of a JWT by default. Another standard, JSON Web Encryption (JWE), can be used to wrap a JWT in an encrypted envelope that can’t be read unless you have the key. Many identity providers include support for using JWEs with nested JWTs, and ASP.NET Core includes support for both out of the box, so it’s something to consider.
需要注意的一个重要点是 JWT 未加密。这意味着默认情况下,任何人都可以读取 JWT 的内容。另一个标准 JSON Web 加密 (JWE) 可用于将 JWT 包装在加密信封中,除非您拥有密钥,否则无法读取该信封。许多身份提供商都支持将 JWE 与嵌套的 JWT 一起使用,而 ASP.NET Core 也支持开箱即用,因此需要考虑这一点。

Bearer tokens, access tokens, reference tokens, oh my!
不记名令牌、访问令牌、引用令牌,天哪!

The concept of a bearer token described in this section is a generic idea that can be used in several ways and for different purposes. You’ve already read about access tokens and identity tokens used in OpenID Connect. These are both bearer tokens; their different names describe the purpose of the token.
本节中描述的 bearer token 的概念是一个通用概念,可以以多种方式用于不同的目的。您已经阅读了 OpenID Connect 中使用的访问令牌和身份令牌。这些都是不记名令牌;它们的不同名称描述了令牌的用途。

The following list describes some of the types of tokens you might read about or run into:
以下列表描述了您可能会阅读或遇到的一些令牌类型:

• Access token—Access tokens are used to authorize access to a resource. These are the tokens typically referred to when you talk about bearer authentication. They come in two flavors:
访问令牌 - 访问令牌用于授权访问资源。这些是您在谈论不记名身份验证时通常提到的令牌。它们有两种口味:

Self-contained—These are the most common tokens, with JWT as the most common format. They contain metadata, claims, and a signature. The strength of self-contained tokens—that they contain all the data and can be validated offline—is also their weakness, as they can’t be revoked. Due to this, they typically have a limited valid lifespan. They can also become large if they contain many claims, which increases request sizes.
自包含 — 这些是最常见的令牌,其中 JWT 是最常见的格式。它们包含元数据、声明和签名。自包含令牌的优势(它们包含所有数据并且可以离线验证)也是它们的弱点,因为它们无法撤销。因此,它们的有效寿命通常有限。如果它们包含许多声明,它们也会变得很大,这会增加请求大小。

Reference token—These don’t contain any data and are typically a random string. When a protected API receives a reference token, it must exchange the reference token with the identity provider for the claims (for example, a JWT). This approach ensures more privacy, as the claims are never exposed to the client, and the token can be revoked at the identity provider. However, it requires an extra HTTP round trip every time the API receives a request. This makes reference tokens a good option for high-security environments, where the performance effect is less critical.
引用令牌 – 这些不包含任何数据,通常是随机字符串。当受保护的 API 收到引用令牌时,它必须与身份提供商交换引用令牌以获取声明(例如 JWT)。此方法可确保更多隐私,因为声明永远不会向客户端公开,并且可以在身份提供商处撤销令牌。但是,每次 API 收到请求时,它都需要额外的 HTTP 往返。这使得 reference tokens 成为高安全性环境的不错选择,因为在这种环境中,性能影响不太重要。

• ID token—This token is used in OpenID Connect (http://mng.bz/a1M7) to describe an authentication event. It may contain additional claims about the authenticated user, but this is not required; if the claims aren’t provided in the ID token, they can be retrieved from the identity provider’s UserInfo endpoint. The ID token is always a JWT, but you should never send it to other APIs; it is not an access token. The ID token can also be used to log out the user at the identity provider.
ID 令牌 - 此令牌在 OpenID Connect (http://mng.bz/a1M7) 中用于描述身份验证事件。它可能包含有关经过身份验证的用户的其他声明,但这不是必需的;如果 ID 令牌中未提供声明,则可以从身份提供商的 UserInfo 终端节点检索它们。ID 令牌始终是 JWT,但您绝不应将其发送到其他 API;它不是访问令牌。ID 令牌还可用于在身份提供商处注销用户。

• Refresh token—For security reasons, access tokens typically have relatively short lifetimes, sometimes as low as 5 minutes. After this time, the access token is no longer valid, and you need to retrieve a new one. Making users log in to their identity provider every 5 minutes is clearly a bad experience, so as part of the OAuth or OpenID Connect flow you can also request a refresh token.
刷新令牌 - 出于安全原因,访问令牌的生命周期通常相对较短,有时低至 5 分钟。在此时间之后,访问令牌不再有效,您需要检索新的访问令牌。让用户每 5 分钟登录一次身份提供商显然是一种糟糕的体验,因此作为 OAuth 或 OpenID Connect 流程的一部分,您还可以请求刷新令牌。

When an access token expires, you can send the refresh token to an identity provider, and it returns a new access token without the user’s needing to log in again. The power to obtain valid access tokens means that it’s critical to protect refresh tokens; should an attacker obtain a refresh token, they effectively have the power to impersonate a user.
当访问令牌过期时,您可以将刷新令牌发送给身份提供商,它会返回新的访问令牌,而无需用户再次登录。获取有效访问令牌的能力意味着保护刷新令牌至关重要;如果攻击者获取了刷新令牌,他们实际上就有能力模拟用户。

In most of your work building and interacting with APIs, you’ll likely be using self-contained JWT access tokens. These are what I’m primarily referring to in this chapter whenever I mention bearer tokens or bearer authentication.
在构建 API 和与 API 交互的大部分工作中,您可能会使用自包含的 JWT 访问令牌。这些是我在本章中提到 bearer tokens 或 bearer authentication 时主要引用的内容。

Now you know what a token is, as well as how they’re issued by identity providers using the OpenID Connect and OAuth 2.0 protocols. Before we get to some code in section 25.3, we’ll see what a typical authentication flow looks like for an ASP.NET Core API app using JWT bearer tokens for authentication.
现在,您知道什么是令牌,以及身份提供商如何使用 OpenID Connect 和 OAuth 2.0 协议颁发令牌。在我们进入第 25.3 节中的一些代码之前,我们将了解使用 JWT 不记名令牌进行身份验证的 ASP.NET Core API 应用程序的典型身份验证流程是什么样的。

At a high level, authenticating using bearer tokens is identical to authenticating using cookies for a traditional app that has already authenticated, which you saw in figure 25.1. The request to the API contains the bearer token in a header. Any middleware before the authentication middleware sees the request as unauthenticated, exactly the same as for cookie authentication, as shown in figure 25.8.
在高级别上,使用 bearer tokens 进行身份验证与使用 cookie 对已经进行身份验证的传统应用程序相同,如图 25.1 所示。对 API 的请求在标头中包含不记名令牌。身份验证中间件之前的任何中间件都将请求视为未经身份验证,这与 cookie 身份验证完全相同,如图 25.8 所示。

alt text

Figure 25.8 When an API request contains a bearer token, the token is validated and deserialized by the authentication middleware. The middleware creates a ClaimsPrincipal from the token, optionally transforming it with additional claims, and sets the HttpContext.User property. Subsequent middleware sees the request as authenticated.
图 25.8 当 API 请求包含不记名令牌时,身份验证中间件会验证和反序列化该令牌。中间件从令牌创建 ClaimsPrincipal,可以选择使用其他声明对其进行转换,并设置 HttpContext.User 属性。后续中间件将请求视为已验证。

Things are a bit different in the AuthenticationMiddleware. Instead of deserializing a cookie containing the ClaimsPrincipal, the middleware decodes the JWT token in the Authorization header. It validates the signature using the signing keys from the identity provider, and verifies that the audience has the expected value and that the token has not expired.
AuthenticationMiddleware 中的情况略有不同。中间件不是反序列化包含 ClaimsPrincipal 的 Cookie,而是解码 Authorization 标头中的 JWT 令牌。它使用来自身份提供商的签名密钥验证签名,并验证受众是否具有预期值以及令牌是否未过期。

If the token is valid, the authentication middleware creates a ClaimsPrincipal representing the authenticated request and sets it on HttpContext.User. All middleware after the authentication middleware sees the request as authenticated.
如果令牌有效,则身份验证中间件将创建一个 ClaimsPrincipal,表示经过身份验证的请求,并在 HttpContext.User 上设置它。身份验证中间件之后的所有中间件都将请求视为已验证。

TIP If the claims in the token don’t match the key values you’re expecting, you can use claims transformation to remap claims. This applies to cookie authentication too, but it’s particularly common when you’re receiving tokens from third-party identity providers, where you don’t control the names of claims. You can also use this approach to add extra claims for a user, which weren’t in the original token. To learn more about claims transformation, see http://mng.bz/gBJV.
提示:如果令牌中的声明与预期的键值不匹配,则可以使用声明转换来重新映射声明。这也适用于 Cookie 身份验证,但当您从第三方身份提供商接收令牌时,这种情况尤其常见,因为您无法控制声明的名称。您还可以使用此方法为用户添加原始令牌中没有的额外声明。要了解有关声明转换的更多信息,请参阅 http://mng.bz/gBJV

We’ve covered a lot of theory about JWT tokens in this chapter, so you’ll be pleased to hear it’s time to look at some code!
在本章中,我们已经介绍了许多关于 JWT 令牌的理论,因此您会很高兴听到是时候查看一些代码了!

25.3 Adding JWT bearer authentication to minimal APIs

25.3 将 JWT 不记名身份验证添加到最小 API

In this section you’ll learn how to add JWT bearer token authentication to an ASP.NET Core app. I use the minimal API Recipe API application we started in chapter 12 in this chapter, but the process is identical if you’re building an API application using web API controllers.
在本节中,您将了解如何将 JWT 不记名令牌身份验证添加到 ASP.NET Core 应用程序。我使用我们在本章第 12 章中开始的最小 API Recipe API 应用程序,但如果您使用 Web API 控制器构建 API 应用程序,则过程是相同的。

.NET 7 significantly simplified the number of steps you need to get started with JWT authentication by adding some conventions, which we’ll discuss shortly. To add JWT to an existing API application, first install the Microsoft.AspNetCore.Authentication.JwtBearer NuGet package using the .NET CLI
.NET 7 通过添加一些约定,大大简化了开始使用 JWT 身份验证所需的步骤数,我们稍后将对此进行讨论。要将 JWT 添加到现有 API 应用程序,请首先使用 .NET CLI 安装 Microsoft.AspNetCore.Authentication.JwtBearer NuGet 包

dotnet add package Microsoft.AspNetCore.Authentication.JwtBearer

or by adding the to your project directly:
或者直接将 添加到您的项目中:

<PackageReference Include="Microsoft.AspNetCore.Authentication.JwtBearer"
    Version="7.0.0" />

Next, add the required services to configure JWT authentication for your application, as shown in listing 25.1. As you may remember, the authentication and authorization middleware are automatically added to your middleware pipeline by WebApplication, but if you want to control the position of the middleware, you can override the location, as I do here.
接下来,添加所需的服务来为您的应用程序配置 JWT 身份验证,如清单 25.1 所示。您可能还记得,身份验证和授权中间件由 WebApplication 自动添加到您的中间件管道中,但如果您想控制中间件的位置,您可以覆盖该位置,就像我在这里所做的那样。

Listing 25.1 Adding JWT bearer authentication to a minimal API application
示例 25.1 向最小 API 应用程序添加 JWT 不记名身份验证

WebApplicationBuilder builder = WebApplication.CreateBuilder(args);
builder.Services.AddAuthentication() ❶
.AddJwtBearer(); ❷
builder.Services.AddAuthorization(); ❸
builder.Services.AddScoped<RecipeService>();
WebApplication app = builder.Build();
app.UseAuthentication(); ❹
app.UseAuthorization(); ❺
app.MapGet("/recipe", async (RecipeService service) =>
{
return await service.GetRecipes();
}).RequireAuthorization(); ❻
app.Run();

❶ Adds the core authentication services
添加核心身份验证服务

❷ Adds and configures JWT authentication
添加和配置 JWT 身份验证

❸ Adds the core authorization services
添加核心授权服务

❹ Adds the authentication middleware
添加身份验证中间件

❺ Adds the authorization middleware
添加授权中间件

❻ Adds an authorization policy to the minimal API endpoint
将授权策略添加到最小 API 端点

As well as configuring the JWT authentication, listing 25.1 adds an authorization policy to the one minimal API endpoint shown in the app. The RequireAuthorization() function adds a simple “Is authenticated” authorization policy to the endpoint. This is exactly analgous to when you add an [Authorize] attribute to MVC or Web API controllers. Any requests for this endpoint must be authenticated; otherwise, the request is rejected by the authorization middleware with a 401 Unauthorized reponse, as shown in figure 25.9.
除了配置 JWT 身份验证之外,清单 25.1 还向应用程序中显示的一个最小 API 端点添加了一个授权策略。RequireAuthorization() 函数向终端节点添加一个简单的 “Is authenticated” 授权策略。这与向 MVC 或 Web API 控制器添加 [Authorize] 属性时完全相同。对此终端节点的任何请求都必须进行身份验证;否则,授权中间件会拒绝该请求,并给出 401 Unauthorized 响应,如图 25.9 所示。

alt text

Figure 25.9 If you send a request to an API protected with JWT bearer authentication and don’t include a token, you’ll receive a 401 Unauthorized challenge response.
图 25.9 如果您向受 JWT 不记名身份验证保护的 API 发送请求,并且不包含令牌,您将收到 401 Unauthorized 质询响应。

Authentication schemes: Choosing between cookies and bearer tokens
身份验证方案:在 Cookie 和 Bearer Tokens之间进行选择

One question you may have while reading about bearer authentication is how the authentication middleware knows whether to look for the cookie or a header. The answer is authentication schemes.
在阅读有关Bearer Authentication的文章时,您可能会遇到一个问题,即身份验证中间件如何知道是查找 Cookie 还是标头。答案是身份验证方案。

An authentication scheme in ASP.NET Core has an ID and an associated authentication handler that controls how the user is authenticated, as well as how authentication and authorization failures should be handled.
ASP.NET Core 中的身份验证方案具有一个 ID 和一个关联的身份验证处理程序,用于控制如何对用户进行身份验证,以及应如何处理身份验证和授权失败。

For example, in chapter 23 the cookie authentication scheme was used implicitly by ASP.NET Core Identity. The cookie authentication handler in this case authenticates users by looking for a cookie and redirects users to the login or “access denied” pages for authentication or authorization failures.
例如,在第 23 章中,ASP.NET Core Identity 隐式使用了 cookie 身份验证方案。在这种情况下,Cookie 身份验证处理程序通过查找 Cookie 来验证用户,并将用户重定向到登录页或“拒绝访问”页,以查找验证或授权失败。

In listing 25.1 you registered the JWT Bearer authentication scheme. The JWT bearer authentication handler reads tokens from the Authorization header and returns 401 and 403 responses for authentication or authorization failures.
在列表 25.1 中,您注册了 JWT Bearer 身份验证方案。JWT 不记名身份验证处理程序从 Authorization 标头中读取令牌,并返回 401 和 403 身份验证或授权失败的响应。

When you register only a single authentication scheme, such as in listing 25.1, ASP.NET Core automatically sets that as the default, but it’s possible to register multiple authentication schemes. This is particularly common if you are using OpenID Connect with a traditional web app, for example. In these cases you can choose which scheme is used for authentication events or authentication failures and how the schemes should interact.
当您仅注册单个身份验证方案时,例如清单 25.1 中,ASP.NET Core 会自动将其设置为默认值,但可以注册多个身份验证方案。例如,如果您将 OpenID Connect 与传统 Web 应用程序一起使用,这种情况尤其常见。在这些情况下,您可以选择将哪个方案用于身份验证事件或身份验证失败,以及这些方案应如何交互。

Using multiple authentication schemes can be confusing, so it’s important to follow the documentation closely when configuring authentication for your app. You can read more about authentication schemes at http://mng.bz/5w1a. If you need only a single scheme, you shouldn’t have any problems, but otherwise, here be dragons!
使用多个身份验证方案可能会造成混淆,因此在为应用程序配置身份验证时,请务必严格遵循文档。您可以在 http://mng.bz/5w1a 上阅读有关身份验证方案的更多信息。如果你只需要一个方案,你应该不会有任何问题,但除此之外,这里有龙!

Great! The 401 response in figure 25.9 verifies that the app is behaving correctly for unauthenticated requests. The obvious next step is to send a request to your API that includes a valid JWT bearer token. Unfortunately, this is where things traditionally get tricky. How do you generate a valid JWT? Luckily, in .NET 7, the .NET CLI comes with a tool to make creating test tokens easy.
伟大!图 25.9 中的 401 响应验证了应用程序是否对未经身份验证的请求行为正确。显而易见的下一步是向 API 发送包含有效 JWT 不记名令牌的请求。不幸的是,这是传统上事情变得棘手的地方。如何生成有效的 JWT?幸运的是,在 .NET 7 中,.NET CLI 附带了一个工具,可以轻松创建测试令牌。

25.4 Using the user-jwts tool for local JWT testing

25.4 使用 user-jwts 工具进行本地 JWT 测试

In section 25.3 you added JWT authentication to your application and protected your API with a basic authorization policy. The problem is that you can’t test your API unless you can generate JWT tokens. In production you’ll likely have an identity provider such as Auth0, Azure Active Directory, or IdentityServer to generate tokens for you using OpenID Connect. But that can make for cumbersome local testing. In this section you’ll learn how to use the .NET CLI to generate JWTs for local testing.
在第 25.3 节中,您向应用程序添加了 JWT 身份验证,并使用基本授权策略保护您的 API。问题是,除非可以生成 JWT 令牌,否则无法测试 API。在生产环境中,您可能会有一个身份提供商(如 Auth0、Azure Active Directory 或 IdentityServer)来使用 OpenID Connect 为您生成令牌。但这可能会导致本地测试变得繁琐。在本节中,您将学习如何使用 .NET CLI 生成用于本地测试的 JWT。

In .NET 7, the .NET CLI includes a tool called user-jwts that you can use to generate tokens. This tool acts as a mini identity provider, meaning that you can generate tokens with any claims you may need, and your API can verify them using signing key material generated by the tool.
在 .NET 7 中,.NET CLI 包括一个名为 user-jwts 的工具,您可以使用它来生成令牌。此工具充当微型身份提供商,这意味着您可以使用可能需要的任何声明生成令牌,并且您的 API 可以使用该工具生成的签名密钥材料对其进行验证。

TIP The user-jwts tool is built into the software development kit (SDK), so there’s nothing extra to install. You need to enable User Secrets for your project, but user-jwts will do this for you if you haven’t already. The user-jwts tool uses User Secrets to store the signing key material used to generate the JWTs, which your app uses to validate the JWT signatures.
提示: user-jwts 工具内置于软件开发工具包 (SDK) 中,因此无需安装任何额外内容。您需要为项目启用 User Secrets,但如果您尚未启用 user-jwts,则 user-jwts 将为您执行此作。user-jwts 工具使用用户密钥来存储用于生成 JWT 的签名密钥材料,您的应用程序可以使用该材料来验证 JWT 签名。

Let’s look at how to create a JWT with the user-jwts tool and use that to send a request to our application.
让我们看看如何使用 user-jwts 工具创建 JWT,并使用它向我们的应用程序发送请求。

25.4.1 Creating JWTs with the user-jwts tool

25.4.1 使用 user-jwts 工具创建 JWT

To create a JWT that you can use in requests to your API, run the following with the user-jwts tool from inside your project folder:
要创建可在 API 请求中使用的 JWT,请使用 user-jwts 工具从项目文件夹内运行以下命令:

dotnet user-jwts create

This command does several things:
此命令执行以下几项作:

• Enables User Secrets in the project if they’re not already configured, as though you had manually run dotnet user-secrets init.
如果尚未配置用户密钥,请在项目中启用用户密钥,就像您手动运行 dotnet user-secrets init 一样。

• Adds the signing key material to User Secrets, which you can view by running dotnet user-secrets list as described in chapter 10, which prints out the key material configuration, as in this example:
将签名密钥材料添加到用户密钥中,您可以通过运行 dotnet user-secrets list 来查看,如第 10 章所述,该列表将打印出密钥材料配置,如下例所示:

Authentication:Schemes:Bearer:SigningKeys:0:Value =
    rIhUzB3DIbtbUwiIxkgoKfFDkLpY+gIJOB4eaQzczq8=
Authentication:Schemes:Bearer:SigningKeys:0:Length = 32
Authentication:Schemes:Bearer:SigningKeys:0:Issuer = dotnet-user-jwts
Authentication:Schemes:Bearer:SigningKeys:0:Id = c99a872d

• Configures the JWT authentication services to support tokens generated by the user-jwts tool by adding configuration to appsettings.Development.json, as follows:
通过向 appsettings 添加配置,配置 JWT 身份验证服务以支持 user-jwts 工具生成的令牌。Development.json,如下所示:

{
  "Authentication": {
    "Schemes": {
      "Bearer": {
        "ValidAudiences": [
          "http://localhost:5073",
          "https://localhost:7112"
        ],
        "ValidIssuer": "dotnet-user-jwts"
      }
    }
  }
}

The user-jwts tool automatically configures the valid audiences based on the profiles in your launchSettings.json file. All the applicationUrls listed in launchSettings.json are listed as valid audiences, so it doesn’t matter which profile you use to run your app; the generated token should be valid. The JWT bearer authentication service automatically reads this configuration and configures itself to support user-jwts JWTs.
user-jwts 工具会根据 launchSettings.json 文件中的用户档案自动配置有效受众。launchSettings.json中列出的所有 applicationUrls 都列为有效受众,因此使用哪个配置文件来运行应用程序并不重要;生成的 Token 应该是有效的。JWT 不记名身份验证服务会自动读取此配置,并将自身配置为支持 user-jwts JWT。

• Creates a JWT. By default, the token is created with a sub and unique_claim set to your operating system’s username, with aud claims for each of the applicationUrls in your launchSettings.json and an issuer of dotnet-user-jwts. You’ll notice that these match the values added to your APIs configuration file.
After calling dotnet user-jwts create, the JWT token is printed to the console, along with the sub name used and the ID of the token. I’ve truncated the tokens throughout this chapter for brevity:
创建 JWT。默认情况下,令牌是使用 sub 创建的,unique_claim设置为作系统的用户名,launchSettings.json中的每个 applicationUrls 都有 aud 声明,并且颁发者是 dotnet-user-jwts。您会注意到,这些值与添加到 API 配置文件的值匹配。
调用 dotnet user-jwts create 后,JWT 令牌以及使用的子名称和令牌的 ID 将打印到控制台。为简洁起见,我在本章中截断了标记:

New JWT saved with ID 'f2080e51'.
Name: andrewlock

Token: eyJhbGciOiJIUzI1NiIsInR5cCI6IkpXVCJ9.eyJ1bmlxdWVfbmFtZSI6ImFuZHJl…

TIP You can visualize exactly what’s in the token by copy and pasting it into https://jwt.io, as I showed in figure 25.7.
提示:您可以通过将令牌复制并粘贴到 https://jwt.io 中来准确可视化令牌中的内容,如图 25.7 所示。

Now that you have a token, it’s time to test it. To use the token, you need to add an Authorization header to requests using the following format (where <token> is the full token printed by user-jwts):
现在您有了一个令牌,是时候测试它了。要使用该令牌,您需要使用以下格式向请求添加 Authorization 标头(其中<token> 是 user-jwts 打印的完整令牌):

Authorization: Bearer <token>

If any part of this header is incorrect—if you misspell Authorization, misspell Bearer, don’t include a space between Bearer and your token, or mistype your token—you’ll get a 401 Unauthorized response.
如果此标头的任何部分不正确(如果拼写错误 Authorization、拼写错误 Bearer、在 Bearer 和令牌之间不包含空格或键入错误令牌),您将收到 401 Unauthorized 响应。

TIP If you get 401 Unauthorized responses even after adding an Authorization header to your requests, double-check your spelling, and make sure that the token is added correct with the "Bearer " prefix. Typos have a way of creeping in here! You can also increase the logging level in your API to see why failures are happening, as you’ll learn in chapter 26.
提示:如果在向请求添加 Authorization 标头后仍收到 401 Unauthorized 响应,请仔细检查您的拼写,并确保使用“Bearer”前缀正确添加令牌。错别字总有办法悄悄溜进来!您还可以提高 API 中的日志记录级别,以查看失败发生的原因,您将在第 26 章中学到。

Once you have added the token you can call your API, which should now return successfully, as shown in figure 25.10.
添加令牌后,您可以调用您的 API,现在应该成功返回,如图 25.10 所示。

alt text

Figure 25.10 Sending a request with an Authorization Bearer using Postman. The Authorization header must have the format Bearer <token>. You can also configure this in the Authorization tab of Postman.
图 25.10 使用 Postman 向授权持有者发送请求。Authorization 标头必须具有 Bearer <token>格式。您还可以在 Postman 的 Authorization (授权) 选项卡中配置此项。

The default token created by the JWT is sufficient to authenticate with your API, but depending on your requirements, you may want to customize the JWT to add or change claims. In the next section you’ll learn how.
JWT 创建的默认令牌足以使用 API 进行身份验证,但根据您的要求,您可能需要自定义 JWT 以添加或更改声明。在下一节中,您将了解如何作。

25.4.2 Customizing your JWTs

25.4.2 自定义 JWT

By default, the user-jwts tool creates a bare-bones JWT that you can use to call your app. If you need more customization, you can pass extra options to the dotnet user-jwts create command to control the JWT it generates. Some of the most useful options are
默认情况下,user-jwts 工具会创建一个基本 JWT,您可以使用它来调用您的应用程序。如果需要更多自定义,可以将额外的选项传递给 dotnet user-jwts create 命令,以控制它生成的 JWT。一些最有用的选项是

• --name sets the sub and unique_name claims for the JWT instead of using the operating system user as the name.
--name 设置 JWT 的 sub 和 unique_name 声明,而不是使用作系统用户作为名称。

• --claim <key>=<value> adds a claim called <key> with value <value> to the JWT. Use this option multiple times to add claims.
--claim <key>=<value> 将调用<key>的 value <value> 声明添加到 JWT。多次使用此选项可添加声明。

• --scope <value> adds a scope claim called <value> to the JWT. Use this option multiple times to add scopes.
--scope <value> 添加一个<value>调用 JWT 的 scope 声明。多次使用此选项可添加范围。

These aren’t the only options; you can control essentially everything about the generated JWT. Run dotnet user-jwts create --help to see all the options available. One option that may be useful in certain automated scripts or tests is the --output option. This controls how the JWT is printed to the console after creation. The default value, default, prints a summary of the JWT and the token itself, as you saw previously:
这些并不是唯一的选择;您基本上可以控制有关生成的 JWT 的所有内容。运行 dotnet user-jwts create --help 查看所有可用选项。在某些自动化脚本或测试中可能有用的一个选项是 --output 选项。这控制了 JWT 在创建后如何打印到控制台。默认值 default 打印 JWT 和令牌本身的摘要,如您之前所见:

New JWT saved with ID 'f2080e51'.
Name: andrewlock

Token: eyJhbGciOiJIUzI1NiIsInR5cCI6IkpXVCJ9.eyJ1bmlxdWVfbmFtZSI6ImFuZHJl…

This is handy if you’re creating tokens ad hoc at the command line, but the alternative output options may be more useful for scripts. For example, running
如果您在命令行中临时创建令牌,这很方便,但替代输出选项可能对脚本更有用。例如,运行

dotnet user-jwts create --output token

outputs the token only,
仅输出 token,

eyJhbGciOiJIUzI1NiIsInR5cCI6IkpXVCJ9.eyJ1bmlxdWVfbmFtZSI6ImFuZHJl…

which is much more convenient if you’re trying to parse the output in a script, for example. Alternatively, you can pass --output json, which prints details about the JWT instead, as in this example:
例如,如果您尝试在脚本中解析输出,这会更方便。或者,您可以传递 --output json,它改为打印有关 JWT 的详细信息,如以下示例所示:

{
  "Id": "8bf9b2fd",
  "Scheme": "Bearer",
  "Name": "andrewlock",
  "Audience": " https://localhost:7236, http://localhost:5229",
  "NotBefore": "2022-10-22T17:50:26+00:00",
  "Expires": "2023-01-22T17:50:26+00:00",
  "Issued": "2022-10-22T17:50:26+00:00",
  "Token": "eyJhbGciOiJIUzI1NiIsInR5cCI6IkpXVCJ9.eyJ1bmlxdWVfbmFtZSI6Im…",
  "Scopes": [],
  "Roles": [],
  "CustomClaims": {}
}

Note that this isn’t the payload of the token; it’s the configuration details used to create the JWT. The token itself is exposed in the Token field. Again, this may be useful if you’re generating JWTs using a script and need to parse the output.
请注意,这不是令牌的有效负载;它是用于创建 JWT 的配置详细信息。令牌本身在 Token 字段中公开。同样,如果您使用脚本生成 JWT 并需要解析输出,这可能很有用。

25.4.3 Managing your local JWTs

25.4.3 管理本地 JWT

When you’re generating a JWT, the user-jwts tool automatically saves the JWT configuration (the JSON shown in section 25.4.2) to your hard drive. This is stored next to the secrets.json file that contains the User Secrets, in a location that varies depending on your operating system and the <UserSecretsId> in your project file:
生成 JWT 时,user-jwts 工具会自动将 JWT 配置(第 25.4.2 节中显示的 JSON)保存到您的硬盘驱动器。它存储在包含 User Secrets 的 secrets.json 文件旁边,其<UserSecretsId>位置因作系统和项目文件而异:

• Windows—%APPDATA%\Microsoft\UserSecrets\<UserSecretsId>\user-jwts.json
• Linux and macOS—~/.microsoft/usersecrets/<UserSecretsId>/user-jwts.json

As for User Secrets, JWTs created by user-jwts aren’t encrypted, but they’re outside your project directory, so they are a better approach to managing secrets locally. The generated JWTs should be used only for local testing; you should be using a real identity provider for production systems to securely produce JWTs for a logged-in user. This is the reason why the user-jwts tool updates only appsettings.Development.json with the required configuration, not appsettings.json; it stops you from accidentally using user-jwts in production. You should add your production identity provider details in appsettings.json instead.
对于用户密钥,由 user-jwts 创建的 JWT 未加密,但它们位于项目目录之外,因此它们是在本地管理密钥的更好方法。生成的 JWT 应仅用于本地测试;您应该为生产系统使用真实身份提供程序,以便为登录用户安全地生成 JWT。这就是 user-jwts 工具仅更新 appsettings 的原因。Development.json 使用所需的配置,而不是 appsettings.json;它可以防止您在生产环境中意外使用 user-jwt。您应该改为在 appsettings.json 中添加生产身份提供商详细信息。

As well as editing the user-jwts.json file manually, you can use the user-jwts tool to manage the JWTs stored locally. In addition to using create, you can call dotnet user-jwts <command> from the project folder, where <command> is one of the following options:
除了手动编辑 user-jwts.json 文件外,您还可以使用 user-jwts 工具来管理本地存储的 JWT。除了使用 create 之外,还可以从项目文件夹调用 dotnet user-jwts<command> ,其中<command> 是以下选项之一:

• list—Lists a summary of all the tokens stored in user-jwts.json for the project.
list - 列出项目user-jwts.json中存储的所有标记的摘要。

• clear—Deletes all the tokens created for a project.
clear - 删除为项目创建的所有标记。

• remove—Deletes a single token for the project, using the token ID displayed by the list command.
remove - 使用 list 命令显示的令牌 ID 删除项目的单个令牌。

• print—Outputs the details of a single JWT, using the token ID, as key value pairs.
print - 使用令牌 ID 作为键值对输出单个 JWT 的详细信息。

• key—Can be used to view or reset the signing key material of tokens stored in the User Secrets Manager. Note that resetting the key material renders all previous JWTs generated by the tool invalid.
key - 可用于查看或重置存储在 User Secrets Manager 中的令牌的签名密钥材料。请注意,重置密钥材料会使该工具之前生成的所有 JWT 无效。

The user-jwts tool is handy for generating JWTs locally, but you must remember to add it to your local testing tool for all requests. If you’re using Postman for testing, you need to add the JWT to your request, as I showed in figure 25.10. However, if you’re using Swagger UI as I described in chapter 11, things aren’t quite that simple. In the next section you’ll learn how to describe your authorization requirements in your OpenAPI document.
user-jwts 工具对于在本地生成 JWT 非常方便,但您必须记住将其添加到所有请求的本地测试工具中。如果您使用 Postman 进行测试,则需要将 JWT 添加到您的请求中,如图 25.10 所示。但是,如果您使用的是我在第 11 章中描述的 Swagger UI,事情就没有那么简单了。在下一节中,您将学习如何在 OpenAPI 文档中描述您的授权要求。

25.5 Describing your authentication requirements to OpenAPI

25.5 向 OpenAPI 描述您的身份验证要求

In chapter 11 you learned how to add an OpenAPI document to your ASP.NET Core app that describes your API. This is used to power tooling such as automatic client generation, as well as Swagger UI. In this section you’ll learn how to add authentication requirements to your OpenAPI document so you can test your API using Swagger UI with tokens generated by the user-jwts tool.
在第 11 章中,您学习了如何将 OpenAPI 文档添加到您的 ASP.NET Core 应用程序中,以描述 API。这用于支持自动客户端生成以及 Swagger UI 等工具。在本节中,您将了解如何向 OpenAPI 文档添加身份验证要求,以便您可以使用 Swagger UI 和 user-jwts 工具生成的令牌来测试您的 API。

One of the slightly annoying things about adding authentication and authorization to your APIs is that it makes testing harder. You can’t just fire a web request from a browser; you must use a tool like Postman that you can add headers to. Even for command-line aficionados, curl commands can become unwieldy once you need to add authorization headers. And tokens expire and are typically harder to generate. The list goes on!
向 API 添加身份验证和授权的一个稍微令人讨厌的事情是,它使测试变得更加困难。您不能只从浏览器触发 Web 请求;您必须使用像 Postman 这样可以添加标头的工具。即使对于命令行爱好者来说,一旦您需要添加授权标头,curl 命令也会变得笨拙。令牌会过期,通常更难生成。名单还在继续!

I’ve seen these difficulties lead people to disable authentication requirements for local testing or to try to add them only late in a product’s life cycle. I strongly suggest you don’t do this! Trying to add real authentication late in a project is likely to cause headaches and bugs that you could easily have caught if you weren’t trying to work around the security complexity.
我看到这些困难导致人们禁用本地测试的身份验证要求,或者尝试仅在产品生命周期的后期才添加它们。我强烈建议你不要这样做!尝试在项目后期添加真正的身份验证可能会导致令人头疼和错误,如果您不尝试解决安全性复杂性,您很容易发现这些错误。

TIP Add real authentication and authorization to your APIs as soon as you understand the requirements, as you will likely catch more security-related bugs.
提示:了解要求后,立即向 API 添加真正的身份验证和授权,因为您可能会发现更多与安全相关的错误。

The user-jwts tool can help significantly with these challenges, as you can easily generate tokens in a format you need, optionally with a long expiration (so you don’t need to keep renewing them) without having to wrestle with an identity provider directly. Nevertheless, you need a way to add these tokens to whichever tool you use for testing, such as Swagger UI.
user-jwts 工具可以极大地帮助解决这些挑战,因为您可以轻松地以所需的格式生成令牌,并且可以选择具有较长的过期时间(因此您无需不断续订它们),而无需直接与身份提供商搏斗。不过,您需要一种方法将这些令牌添加到用于测试的任何工具中,例如 Swagger UI。

Swagger UI is based on the OpenAPI definition of your API, so the best (and easiest) way to add support for authentication to Swagger UI is to update the security requirements of your application in your OpenAPI document. This consists of two steps:
Swagger UI 基于 API 的 OpenAPI 定义,因此向 Swagger UI 添加身份验证支持的最佳(也是最简单的)方法是在 OpenAPI 文档中更新应用程序的安全要求。这包括两个步骤:

• Define the security scheme your API uses, such as OAuth 2.0, OpenID Connect, or simple Bearer authentication.
定义 API 使用的安全方案,例如 OAuth 2.0、OpenID Connect 或简单的 Bearer 身份验证。

• Declare which endpoints in your API use the security scheme.
声明 API 中的哪些端点使用安全方案。

The following listing shows how to configure an OpenAPI document using Swashbuckle for an API that uses JWT bearer authentication. The values defined on OpenApiSecurityScheme match the default settings configured by the user-jwts tool when you use AddJwtBearer(). AddSecurityDefinition() defines a security scheme for your API, and AddSecurityRequirement() declares that the whole API is protected using the security scheme.
下面的清单显示了如何使用 Swashbuckle 为使用 JWT 不记名身份验证的 API 配置 OpenAPI 文档。在 OpenApiSecurityScheme 上定义的值与使用 AddJwtBearer() 时 user-jwts 工具配置的默认设置匹配。AddSecurityDefinition() 为您的 API 定义一个安全方案,AddSecurityRequirement() 声明使用该安全方案保护整个 API。

Listing 25.2 Adding bearer authentication to an OpenAPI document using Swashbuckle
清单 25.2 使用 Swashbuckle 向 OpenAPI 文档添加不记名身份验证

WebApplicationBuilder = WebApplication.CreateBuilder(args);

builder.Services.AddAuthentication().AddJwtBearer();
builder.Services.AddAuthorization();

builder.Services.AddEndpointsApiExplorer();
builder.Services.AddSwaggerGen(x =>
{
    x.SwaggerDoc("v1", new OpenApiInfo {
        Title = "Recipe App", Version = "v1" });

    var security = new OpenApiSecurityScheme    #A
    {
        Name = HeaderNames.Authorization,    #B
        Type = SecuritySchemeType.ApiKey,    #C
        In = ParameterLocation.Header,    #D
        Description = "JWT Authorization header",  #E
        Reference = new OpenApiReference
        {
            Id = JwtBearerDefaults.AuthenticationScheme,  #F
            Type = ReferenceType.SecurityScheme   #G
        }
    };

    x.AddSecurityDefinition(security.Reference.Id, security);  #H
    x.AddSecurityRequirement(new OpenApiSecurityRequirement   #I
        {{security, Array.Empty<string>()}});  #I
});

var app = builder.Build();

app.UseSwagger();
app.UseSwaggerUI();

app.UseRouting();
app.UseAuthentication();
app.UseAuthorization();

app.MapGet("/", () => "Hello world!").RequireAuthorization();
app.Run();

❶ Defines the security used by your API
定义 API使用的安全性

❷ The name of the header to use (required)
要使用的标头的名称(必需)

❸ The type of security; may be OAuth2 or OpenIdConnect if using those (required)
安全性的类型;可能是 OAuth2 或 OpenIdConnect(如果需要)

❹ Where the token will be provided (required)
将提供令牌的位置(必需)

❺ A friendly description of the scheme, used in the UI
在UI中使用方案的友好描述

❻ A unique ID for the scheme. This uses the default JWT scheme name.
方案的唯一 ID。这将使用默认的 JWT 方案名称。

❼ The type of OpenID object (required)
OpenID 对象的类型(必需)

❽ Adds the security definition to the OpenAPI document
将安全定义添加到 OpenAPI 文档

❾ Marks the whole API as protected by the security definition
将整个 API 标记为受安全定义保护

When you run your application after adding the definition to your OpenAPI document, you should see an Authorize button in the top-right corner of Swagger UI, as shown in figure 25.11. Choosing this button opens a dialog box describing your authentication scheme, including a text box to enter your token. You must enter Bearer in this box with a space between them. Choose Authorize, which saves the value, and then Close. Now when you send a request to the API, Swagger UI attaches the token in the Authorization header, and the request succeeds.
在将定义添加到 OpenAPI 文档后运行应用程序时,您应该会在 Swagger UI 的右上角看到一个 Authorize 按钮,如图 25.11 所示。选择此按钮将打开一个描述您的身份验证方案的对话框,其中包括一个用于输入令牌的文本框。您必须在此框中输入 Bearer ,并在它们之间留出空格。选择 Authorize (授权) 以保存值,然后选择 Close (关闭)。现在,当您向 API 发送请求时,Swagger UI 会在 Authorization 标头中附加令牌,并且请求成功。

alt text

Figure 25.11 Adding an Authorization header using Swagger UI. When adding the token, ensure that you enter Bearer , including the Bearer prefix. Swagger UI then attaches the token to all subsequent requests, so you are authorized to call the API.
图 25.11 使用 Swagger UI 添加 Authorization 标头。添加令牌时,请确保输入 Bearer ,包括 Bearer 前缀。然后,Swagger UI 会将令牌附加到所有后续请求,以便您有权调用 API。

If you’re specifically using OpenID Connect or OAuth 2.0 to protect your APIs, you can configure these in the OpenApiSecurityScheme document instead of using bearer authentication. In that case, choosing Authorize in Swagger UI would redirect you to your identity provider to sign in and retrieve a token without your having to copy and paste anything. That’s extremely useful if you’re running an identity provider locally or exposing Swagger UI in production.
如果您专门使用 OpenID Connect 或 OAuth 2.0 来保护 API,则可以在 OpenApiSecurityScheme 文档中配置这些 API,而不是使用不记名身份验证。在这种情况下,在 Swagger UI 中选择 Authorize (授权) 会将您重定向到您的身份提供商以登录并检索令牌,而无需复制和粘贴任何内容。如果您在本地运行身份提供商或在生产环境中公开 Swagger UI,这将非常有用。

The example in listing 25.2 shows the configuration when your whole API is protected by an authorization requirement. That’s the most common situation in my experience, but you may want to expose certain endpoints to anonymous users without any authorization requirements. In that case, you can configure Swashbuckle to conditionally apply the requirement to only those endpoints with a requirement.
清单 25.2 中的示例显示了整个 API 受授权需求保护时的配置。根据我的经验,这是最常见的情况,但您可能希望将某些端点公开给匿名用户,而无需任何授权要求。在这种情况下,您可以将 Swashbuckle 配置为有条件地仅将要求应用于具有要求的终端节点。

TIP See the Swashbuckle documentation to learn how to configure this and many other features related to OpenAPI document generation: http://mng.bz/6D1A. Swashbuckle is highly extensible, but as always, it’s worth considering whether the added complexity you introduce to achieve perfect documentation of your API is worth the tradeoff. For publicly exposed OpenAPI documents, this may well be the case, but for local testing or internal APIs, the argument may be harder to make.
提示:请参阅 Swashbuckle 文档,了解如何配置此功能以及与 OpenAPI 文档生成相关的许多其他功能:http://mng.bz/6D1A。Swashbuckle 具有高度可扩展性,但与往常一样,值得考虑为实现 API 的完美文档而引入的额外复杂性是否值得权衡。对于公开公开的 OpenAPI 文档,情况很可能如此,但对于本地测试或内部 API,可能更难提出论点。

In this chapter we’ve looked in depth at using JWT bearer tokens for authentication and explored the parallels with cookie authentication for traditional apps. In the final section of this chapter we look at authorization and how you can apply different authorization policies to your minimal API endpoints.
在本章中,我们深入探讨了如何使用 JWT 不记名令牌进行身份验证,并探讨了与传统应用程序的 cookie 身份验证的相似之处。在本章的最后一节中,我们将介绍授权以及如何将不同的授权策略应用于您的最小 API 终端节点。

25.6 Applying authorization policies to minimal API endpoints

25.6 将授权策略应用于最小 API 端点

So far in this chapter we’ve focused on authentication: the process of validating the identity of the request initiator. For APIs, this typically requires decoding and validating a JWT bearer token in the authentication middleware and setting the ClaimsPrincipal for the request, as you saw in section 25.2. In this section we look at the next stage in protecting your APIs, authorization, and how you can apply different authorization requirements to your minimal API endpoints.
到目前为止,在本章中,我们重点介绍了身份验证:验证请求发起者身份的过程。对于 API,这通常需要在身份验证中间件中解码和验证 JWT 不记名令牌,并为请求设置 ClaimsPrincipal,如第 25.2 节所示。在本节中,我们将介绍保护 API 的下一阶段、授权,以及如何将不同的授权要求应用于最小 API 终端节点。

The good news is that authorization for minimal APIs is essentially identical to the authorization process you learned about in chapter 24 for Razor Pages and MVC controllers. The same concept of authorization policies, requirements, handlers, and claims-based authorization apply in the same way and use the exact same services. Figure 25.12 shows how this looks for a request to a minimal API endpoint protected with bearer authentication, which is remarkably similar to the Razor Pages equivalent in figure 24.2.
好消息是,最小 API 的授权与您在第 24 章中了解的 Razor Pages 和 MVC 控制器的授权过程基本相同。相同的授权策略、要求、处理程序和基于声明的授权概念以相同的方式应用,并使用完全相同的服务。图 25.12 显示了如何查找对受不记名身份验证保护的最小 API 端点的请求,这与图 24.2 中的 Razor Pages 等效项非常相似。

alt text

Figure 25.12 Authorizing a request to a minimal API endpoint. The routing middleware selects an endpoint that is protected by an authorization requirement. The authentication middleware decodes and verifies the bearer token, creating a ClaimsPrincipal, which the authorization middleware uses along with the endpoint metadata to determine whether the request is authorized.
图 25.12 授权对最小 API 端点的请求。路由中间件选择受授权要求保护的终端节点。身份验证中间件对持有者令牌进行解码和验证,创建一个 ClaimsPrincipal,授权中间件将其与终结点元数据一起使用,以确定请求是否获得授权。

You’ve already seen that you can apply a general authorization requirement by calling RequireAuthorization() on an endpoint or a route group. This is directly equivalent to adding the [Authorize] attribute to a Razor Page or MVC controller action. In fact, you can use the same [Authorize] attribute on an endpoint if you wish, so the following two endpoint definitions are equivalent:
您已经看到,您可以通过在终端节点或路由组上调用 RequireAuthorization() 来应用常规授权要求。这直接等效于将 [Authorize] 属性添加到 Razor Page 或 MVC 控制器作。事实上,如果需要,可以在终结点上使用相同的 [Authorize] 属性,因此以下两个终结点定义是等效的:

app.MapGet("/", () => "Hello world!").RequireAuthorization();
app.MapGet("/", [Authorize] () => "Hello world!");

If you want to require a specific policy (the "CanCreate" policy, for example), you can pass the policy names to the RequireAuthorization() method the same way you would for the [Authorize] attribute:
如果要要求特定策略(例如“CanCreate”策略),则可以将策略名称传递给 RequireAuthorization() 方法,就像对 [Authorize] 属性所做的那样:

app.MapGet("/", () => "Hello world!").RequireAuthorization("CanCreate");
app.MapGet("/", [Authorize("CanCreate")] () => "Hello world!");

Similarly, you can exclude endpoints from authentication requirements using the AllowAnonymous() function or [AllowAnonymous] attribute:
同样,您可以使用 AllowAnonymous() 函数或 [AllowAnonymous] 属性从身份验证要求中排除端点:

app.MapGet("/", () => "Hello world!").AllowAnonymous();
app.MapGet("/", [AllowAnonymous] () => "Hello world!");

This is a good start, but as you saw in chapter 24, you often need to perform resource-based authorization. For example, in the context of the recipe API, users should be allowed to edit or delete only recipes that they created; they can’t edit someone else’s recipe. That means you need to know details about the resource (the recipe) before determining whether a request is authorized.
这是一个好的开始,但正如您在第 24 章中看到的那样,您通常需要执行基于资源的授权。例如,在配方 API 的上下文中,应仅允许用户编辑或删除他们创建的配方;他们无法编辑其他人的配方。这意味着在确定请求是否获得授权之前,您需要了解有关资源(配方)的详细信息。

Resource-based authorization is essentially the same for minimal API endpoints as for Razor Pages or MVC controllers. You must follow several steps, most of which we covered in chapter 24:
最小 API 端点的基于资源的授权与 Razor Pages 或 MVC 控制器的授权基本相同。您必须遵循几个步骤,其中大部分我们在第 24 章中介绍:

  1. Create an AuthorizationHandler<TRequirement, TResource>, and register it in the DI container, as shown in chapter 24.
    创建一个AuthorizationHandler<TRequirement, TResource> ,并在 DI 容器中注册它,如第 24 章所示。

  2. Inject the IAuthorizationService into your endpoint handler.
    将 IAuthorizationService 注入到终端节点处理程序中。

  3. Call IAuthorizationService.AuthorizeAsync(user, resource, policy), passing in the ClaimsPrincipal for the request, the resource to authorize access to, and the policy to apply.
    调用 IAuthorizationService.AuthorizeAsync(user, resource, policy),传入请求的 ClaimsPrincipal、要授权访问的资源以及要应用的策略。

The first step is identical to the process shown in chapter 24, so you can reuse the same authorization handlers whether you’re using Razor Pages, minimal APIs, or both! You can access the IAuthorizationService from a minimal API endpoint using standard dependency injection (DI), which you learned about in chapters 8 and 9.
第一步与第 24 章中所示的过程相同,因此无论您使用的是 Razor Pages、最少的 API,还是同时使用这两者,您都可以重复使用相同的授权处理程序!您可以使用标准依赖关系注入 (DI) 从最小 API 终端节点访问 IAuthorizationService,您在第 8 章和第 9 章中对此进行了了解。

Listing 25.3 shows an example minimal API endpoint that uses resource-based authorization to protect the “delete” action for a recipe. The IAuthorizationService and HttpContext.User property are injected into the handler method along with the RecipeService. The endpoint then retrieves the recipe and calls AuthorizeAsync() to determine whether to continue with the delete or return a 403 Forbidden response.
清单 25.3 显示了一个示例最小 API 端点,它使用基于资源的授权来保护配方的 “delete”作。IAuthorizationService 和 HttpContext.User 属性与 RecipeService 一起注入处理程序方法中。然后,终端节点检索配方并调用 AuthorizeAsync() 以确定是继续删除还是返回 403 Forbidden 响应。

Listing 25.3 Using resource authorization to protect a minimal API endpoint
清单 25.3 使用资源授权保护最小 API 端点

app.MapDelete("recipe/{id}", async (
    int id, RecipeService service,
    IAuthorizationService authService,    #A
    ClaimsPrincipal user) =>    #B
{
    var recipe = await service.GetRecipe(id);    #C
    var result = await authService.AuthorizeAsync(    #D
        user, recipe, "CanManageRecipe");    #D

    if (!result.Succeeded)    #E
    {    #E
        return Results.Forbid();    #E
    }    #E

    await service.DeleteRecipe(id);  #F
    return Results.NoContent();  #F
});

❶ Injected to perform resource-based authorization
注入以执行基于资源的授权

❷ The HttpContext.User claims principal for the request
HttpContext.User 声明请求的主体

❸ Fetches the recipe to access
获取配方以访问

❹ Performs resource-based authorization, passing in the user, resource, and the policy name
执行基于资源的授权,传入用户、资源和策略名称

❺ If authorization failed, returns 403 Forbidden
如果授权失败,则返回 403 Forbidden

❻ If authorization succeeded, executes the endpoint as normal
如果授权成功,则照常执行端点

As is common when you start adding functionality, the logic at the heart of the endpoint has become a bit muddled as the endpoint has grown. There are several possible approaches you could take now:
当您开始添加功能时,通常情况下,随着终端节点的增长,终端节点核心的逻辑变得有点混乱。您现在可以采取几种可能的方法:

• Do nothing. The logic isn’t that confusing, and this is only one endpoint. This may be a good approach initially but can become problematic if the logic is duplicated across multiple endpoints.
什么都不做。逻辑并不那么令人困惑,这只是一个端点。这在最初可能是一种很好的方法,但如果 logic 在多个 endpoints 之间重复,则可能会产生问题。

• Pull the authorization out into a filter. As you saw in chapters 5 and 7, endpoint filters can be useful for extracting common cross-cutting concerns, such as validation and authorization. You may find that endpoint filters help reduce the duplication in your endpoint handlers, though this often comes at the expense of additional complexity in the filter itself, as well as a layer of indirection in your handlers. You can see this approach in the source code accompanying this chapter.
将授权拉出到过滤器中。正如您在第 5 章和第 7 章中看到的那样,端点过滤器可用于提取常见的横切关注点,例如验证和授权。您可能会发现终端节点筛选条件有助于减少终端节点处理程序中的重复,尽管这通常是以筛选条件本身的额外复杂性以及处理程序中的间接层为代价的。您可以在本章随附的源代码中看到这种方法。

• Push the authorization responsibilities down into the domain. Instead of performing the resource-based authorization in your endpoint handlers, you could run the checks inside the domain instead, in the RecipeService in this case. This has advantages, in that it often reduces duplication, keeps your endpoints simpler, and ensures that authorization checks are always applied regardless of how you call the domain methods.
将授权责任向下推送到域中。您可以在域内运行检查,而不是在终端节点处理程序中执行基于资源的授权,在本例中为 RecipeService。这样做的好处是,它通常可以减少重复,使您的端点更简单,并确保无论您如何调用域方法,都始终应用授权检查。

• The downside to this approach is that it may cause your domain/application model to depend directly on ASP.NET Core-specific constructs such as IAuthorizationService. You can work around this by creating a wrapper façade around the IAuthorizationService, but this may also add some complexity. Even if you take this approach, you typically want to apply declarative authorization policies to your endpoints as well to ensure that the endpoint executes only for users who could possibly be authorized.
此方法的缺点是,它可能会导致域/应用程序模型直接依赖于特定于 ASP.NET Core 的构造,例如 IAuthorizationService。您可以通过围绕 IAuthorizationService 创建包装器外观来解决此问题,但这也可能增加一些复杂性。即使您采用此方法,您通常也希望将声明式授权策略应用于终端节点,以确保终端节点仅对可能获得授权的用户执行。

There’s no single best answer on which approach to take; it will vary depending on what works best for your application. Authentication and authorization are inevitably tricky subjects, so it’s important to consider them early and design your application with security in mind.
关于采取哪种方法,没有单一的最佳答案;它会根据最适合您的应用程序的方法而有所不同。身份验证和授权不可避免地是棘手的主题,因此尽早考虑它们并在设计应用程序时考虑安全性非常重要。

Scope-based authorization policies
基于范围的授权策略

In section 15.2 I described the role of scopes in the authentication process. When you obtain a bearer token from an identity provider—whether you’re using OpenID Connect or OAuth 2.0—you define the scopes that you wish to retrieve. The user can then choose to grant or deny some or all of those requested scopes. Additionally, the identity provider might allow certain client applications access only to specific scopes. The final access token you receive from the identity provider, which is sent to the API, may have some or none of the requested scopes.
在 Section 15.2 中,我描述了范围在身份验证过程中的作用。当您从身份提供商处获取不记名令牌时(无论您使用的是 OpenID Connect 还是 OAuth 2.0),您都可以定义要检索的范围。然后,用户可以选择授予或拒绝部分或全部请求的范围。此外,身份提供商可能仅允许某些客户端应用程序访问特定范围。您从身份提供商处收到的最终访问令牌(发送到 API)可能具有部分或没有请求的范围。

It’s up to the API itself to decide what each scope means and how it should be used to enforce authorization policies. Scopes have no inherent functionality on their own, much like claims, but you can build functionality on top. For example, you can create authorization polices that require a token has the scope "recipe.edit" using
由 API 本身决定每个范围的含义以及如何使用它来实施授权策略。范围本身没有固有的功能,就像声明一样,但你可以在其上构建功能。例如,您可以使用

builder.Services.AddAuthorizationBuilder()
.AddPolicy("RecipeEditScope", policy =>
policy.RequireClaim("scope", " recipe.edit "));

This policy could then be applied to any endpoints that edit a recipe.
然后,此策略可应用于编辑配方的任何终端节点。

Another common pattern is to require a specific scope for you to be authorized to make any requests to a given ASP.NET Core app, such as a "receipeApi" scope. This approach can often replace audience validation in bearer token authorization and may be more flexible, as it doesn’t require your identity provider to know the domain at which your API app will be hosted.
另一种常见模式是要求特定范围,以便您有权向给定的 ASP.NET Core 应用程序发出任何请求,例如“receipeApi”范围。这种方法通常可以取代不记名令牌授权中的受众验证,并且可能更灵活,因为它不需要您的身份提供商知道将托管您的 API 应用程序的域。

Alternatively, you can use scopes to partition your APIs into groups that can only be accessed by certain types of clients. For example, you might have one set of APIs that can be accessed only by internal machine-to-machine clients, another set that can be accessed only by admin users, and another set that can be accessed only by nonadmin users.
或者,您可以使用范围将 API 划分为只能由某些类型的客户端访问的组。例如,您可能有一组只能由内部计算机到计算机客户端访问的 API,另一组只能由管理员用户访问,另一组只能由非管理员用户访问。

Duende has many practical examples of approaches to authorization and authentication using OpenID Connect at http://mng.bz/o1Jp. The examples are geared to IdentityServer users but show many best practices and patterns you can use with identity provider services as well.
Duende 在 http://mng.bz/o1Jp 上提供了许多使用 OpenID Connect 进行授权和身份验证的方法的实际示例。这些示例面向 IdentityServer 用户,但也展示了许多可用于身份提供商服务的最佳实践和模式。

That brings us to the end of this chapter on authentication and authorization. We’re not completely done with security, though; in chapter 27 we look at potential security threats and how to mitigate them. But first, in chapter 26 you’ll learn about the logging abstractions in ASP.NET Core and how you can use them to keep tabs on exactly what your app’s up to.
这将我们带到了本章关于身份验证和授权的结尾。不过,我们还没有完全完成安全性;在第 27 章中,我们将介绍潜在的安全威胁以及如何缓解这些威胁。但首先,在第 26 章中,您将了解 ASP.NET Core 中的日志记录抽象,以及如何使用它们来密切关注您的应用程序的确切动态。

25.7 Summary

25.7 总结

In large systems with multiple applications or APIs, you can use an identity provider to centralize authentication and user management. This often reduces the authentication responsibilities of apps, reducing duplication and making it easier to add new user management features.
在具有多个应用程序或 API 的大型系统中,您可以使用身份提供商来集中身份验证和用户管理。这通常可以减少应用程序的身份验证责任,减少重复,并更轻松地添加新的用户管理功能。

You should strongly consider using a third-party identity provider service instead of building your own. User management is rarely core to your business, and by delegating responsibility to a third-party you can leave protecting your most vulnerable assets to the experts.
您应该强烈考虑使用第三方身份提供商服务,而不是构建自己的服务。用户管理很少是您的业务核心,通过将责任委托给第三方,您可以将保护最脆弱的资产的工作留给专家。

If you do need to build your own identity provider, you can use the IdentityServer or OpenIddict library. These libraries implement the OpenID Connect protocol, adding token generation to a standard ASP.NET Core application. You must build the user management and UI components yourself.
如果您确实需要构建自己的身份提供商,则可以使用 IdentityServer 或 OpenIddict 库。这些库实现 OpenID Connect 协议,将令牌生成添加到标准 ASP.NET Core 应用程序中。您必须自己构建用户管理和 UI 组件。

OAuth 2.0 is an authorization protocol that allows a user to delegate authorization for accessing a resource to another application. This standard allows applications to interoperate without compromising on security.
OAuth 2.0 是一种授权协议,允许用户将访问资源的授权委托给另一个应用程序。此标准允许应用程序在不影响安全性的情况下进行互作。

OAuth 2.0 has multiple grant types representing common authorization flows. The authorization code flow with PKCE is the most common interactive grant type when a user initiates an interaction. For machine-only workflows, such as an API calling another API, you can use the client credentials grant type.
OAuth 2.0 具有多种授权类型,代表常见的授权流程。当用户发起交互时,使用 PKCE 的授权代码流是最常见的交互式授权类型。对于仅限计算机的工作流,例如调用其他 API 的 API,您可以使用客户端凭证授权类型。

OpenID Connect is built on top of OAuth 2.0. It adds conventions, discoverability, and authentication to OAuth 2.0, making it easier to interact with third-party providers and retrieve identity information about a user.
OpenID Connect 基于 OAuth 2.0 构建。它为 OAuth 2.0 添加了约定、可发现性和身份验证,从而可以更轻松地与第三方提供商交互并检索有关用户的身份信息。

JWTs are the most common bearer token format. They consist of a header, a payload, and a signature, and are base64-encoded. When receiving a JWT you must always verify the signature to ensure that it hasn’t been tampered with.
JWT 是最常见的不记名令牌格式。它们由标头、有效负载和签名组成,并且采用 base64 编码。收到 JWT 时,您必须始终验证签名以确保它未被篡改。

JWTs are not encrypted, so anyone can read them by default. JWE is a standard that wraps the JWT and encrypts it, protecting the contents. Many identity providers support generating JWEs, and ASP.NET Core supports decoding JWEs automatically.
JWT 未加密,因此默认情况下任何人都可以读取它们。JWE 是一种包装 JWT 并对其进行加密的标准,可保护其内容。许多身份提供商支持生成 JWE,而 ASP.NET Core 支持自动解码 JWE。

Bearer token authentication in ASP.NET Core is similar to cookie authentication with traditional web apps. The authentication middleware deserializes the token and validates it. If the token is valid, the middleware creates a ClaimsPrincipal and sets HttpContext.User.
ASP.NET Core 中的持有者令牌身份验证类似于传统 Web 应用程序的 Cookie 身份验证。身份验证中间件反序列化令牌并对其进行验证。如果令牌有效,中间件将创建一个 ClaimsPrincipal 并设置 HttpContext.User。

Configure JWT bearer authentication by adding the Microsoft.AspNetCore.Authentication.JwtBearer NuGet Package and calling AddAuthentication().AddJwtBearer() to add the required services to your app.
通过添加 Microsoft.AspNetCore.Authentication.JwtBearer NuGet 包并调用 AddAuthentication() 来配置 JWT 不记名身份验证。AddJwtBearer() 将所需的服务添加到您的应用程序中。

To generate a JWT for local testing, run dotnet user-jwts create. This configures your API to support JWTs created by the tool and prints a token to the terminal, which you can use for local testing of your API. Add the token to requests in the Authorization header, using the format "Bearer <token>".
要生成用于本地测试的 JWT,请运行 dotnet user-jwts create。这会将您的 API 配置为支持该工具创建的 JWT,并将令牌打印到终端,您可以使用该令牌对 API 进行本地测试。使用 “Bearer <token>” 格式将令牌添加到 Authorization 标头中的请求。

Pass additional options to the dotnet user-jwts create command to customize the generated JWT. Add extra claims to the generated JWT using the --claim option, change the sub claim name using --name, or add scope claims to the JWT using --scope.
将其他选项传递给 dotnet user-jwts create 命令以自定义生成的 JWT。使用 --claim 选项向生成的 JWT 添加额外的声明,使用 --name 更改子声明名称,或使用 --scope 向 JWT 添加范围声明。

To enable authorization in Swagger UI, you should add a security scheme to your OpenAPI document. Create an OpenApiSecurityScheme object, and register it with the OpenAPI document by calling AddSecurityDefinition(). Apply it to all the APIs in your app by calling AddSecurityRequirement(), passing in the scheme object.
要在 Swagger UI 中启用授权,您应该向 OpenAPI 文档添加安全方案。创建一个 OpenApiSecurityScheme 对象,并通过调用 AddSecurityDefinition() 将其注册到 OpenAPI 文档中。通过调用 AddSecurityRequirement() 并将其应用于应用中的所有 API,并传入 scheme 对象。

To add authorization to minimal API endpoints, call RequireAuthorization() or add the [Authorize] attribute to your endpoint handler. This optionally takes the name of an authorization policy to apply, n the same way as you would apply policies to Razor Pages and MVC controllers. You can call RequireAuthorization() on route groups to apply authorization to multiple APIs at the same time.
若要向最小 API 终结点添加授权,请调用 RequireAuthorization() 或将 [Authorize] 属性添加到终结点处理程序。这可以选择采用要应用的授权策略的名称,其方式与将策略应用于 Razor Pages 和 MVC 控制器的方式相同。您可以在路由组上调用 RequireAuthorization() 以同时将授权应用于多个 API。

Override an authorization requirement on an endpoint by calling AllowAnonymous() or by adding the [AllowAnonymous] attribute to an endpoint handler. This removes any authentication requirements from the endpoint, so users can call the endpoint without a bearer token in the request.
通过调用 AllowAnonymous() 或将 [AllowAnonymous] 属性添加到终结点处理程序来替代终结点上的授权要求。这将删除终端节点中的任何身份验证要求,因此用户可以在请求中没有持有者令牌的情况下调用终端节点。

ASP.NET Core in Action 24 Authorization: Securing your application

24 Authorization: Securing your application‌
24 Authorization: 保护您的应用程序

This chapter covers

本章涵盖

• Using authorization to control who can use your app
使用授权来控制谁可以使用你的应用
• Using claims-based authorization with policies
将基于声明的授权与策略结合使用
• Creating custom policies to handle complex requirements
创建自定义策略以处理复杂要求
• Authorizing a request depending upon the resource being accessed
根据正在访问的资源授权请求
• Hiding elements from a Razor template that the user is unauthorized to access
隐藏用户无权访问的 Razor 模板中的元素

In chapter 23 I showed you how to add users to an ASP.NET Core application by adding authentication. With authentication, users can register and log in to your app using an email address and password. Whenever you add authentication to an app, you inevitably find you want to be able to restrict what some users can do. The process of determining whether a user can perform a given action on your app is called authorization.
在第 23 章中,我向您展示了如何通过添加身份验证将用户添加到 ASP.NET Core 应用程序。通过身份验证,用户可以使用电子邮件地址和密码注册和登录您的应用。每当向应用程序添加身份验证时,您都不可避免地会发现您希望能够限制某些用户可以执行的作。确定用户是否可以对您的应用执行给定作的过程称为授权。

On an e-commerce site, for example, you may have admin users who are allowed to add new products and change prices, sales users who are allowed to view completed orders, and customer users who are allowed only to place orders and buy products.
例如,在电子商务网站上,您可能拥有允许添加新产品和更改价格的管理员用户、允许查看已完成订单的销售用户以及仅允许下订单和购买产品的客户用户。

In this chapter I show how to use authorization in an app to control what your users can do. In section 24.1 I introduce authorization and put it in the context of a real-life scenario you’ve probably experienced: an airport. I describe the sequence of events, from checking in, to passing through security, to entering an airport lounge, and you’ll see how these relate to the authorization concepts in this chapter.
在本章中,我将介绍如何在应用程序中使用授权来控制用户可以执行的作。在 Section 24.1 中,我介绍了 Authorization 并将其置于您可能经历过的真实场景的上下文中:机场。我将介绍事件的顺序,从办理登机手续到通过安检,再到进入机场休息室,您将了解这些事件与本章中的授权概念有何关系。

In section 24.2 I show how authorization fits into an ASP.NET Core web application and how it relates to the ClaimsPrincipal class you saw in the previous chapter. You’ll see how to enforce the simplest level of authorization in an ASP.NET Core app, ensuring that only authenticated users can execute a Razor Page or MVC action. This chapter focuses on authorization in Razor Pages and Model-View- Controller (MVC) controllers; in chapter 25 you’ll learn how the same principles apply to minimal API applications.
在第 24.2 节中,我将展示授权如何适应 ASP.NET Core Web 应用程序,以及它与您在上一章中看到的 ClaimsPrincipal 类的关系。你将了解如何在 ASP.NET Core 应用程序中强制实施最简单的授权级别,确保只有经过身份验证的用户才能执行 Razor Page 或 MVC作。本章重点介绍 Razor Pages 和模型视图控制器 (MVC) 控制器中的授权;在第 25 章中,您将了解相同的原则如何应用于最小的 API 应用程序。

We’ll extend that approach in section 24.3 by adding the concept of policies. These let you set specific requirements for a given authenticated user, requiring that they have specific pieces of information to execute an action or Razor Page.
我们将在 Section 24.3 中通过添加 policies 的概念来扩展该方法。这些允许您为给定的经过身份验证的用户设置特定要求,要求他们具有执行作或 Razor 页面的特定信息。

You’ll use policies extensively in the ASP.NET Core authorization system, so in section 24.4 we’ll explore how to handle more complex scenarios. You’ll learn about authorization requirements and handlers, and how you can combine them to create specific policies that you can apply to your Razor Pages and actions.
您将在 ASP.NET Core 授权系统中广泛使用策略,因此在第 24.4 节中,我们将探讨如何处理更复杂的情况。你将了解授权要求和处理程序,以及如何将它们组合起来以创建可应用于 Razor Pages 和作的特定策略。

Sometimes whether a user is authorized depends on which resource or document they’re attempting to access. A resource is anything that you’re trying to protect, so it could be a document or a post in a social media app. For example, you may allow users to create documents or to read documents from other users, but to edit only documents that they created themselves. This type of authorization, where you need the details of the document to determine if the user is authorized, is called resource-based authorization, and it’s the focus of section 24.5.
有时,用户是否获得授权取决于他们尝试访问的资源或文档。资源是您尝试保护的任何内容,因此它可以是社交媒体应用程序中的文档或帖子。例如,您可以允许用户创建文档或读取其他用户的文档,但只能编辑他们自己创建的文档。这种类型的授权,您需要文档的详细信息来确定用户是否获得授权,称为基于资源的授权,这是 Section 24.5 的重点。

In the final section of this chapter I show how you can extend the resource-based authorization approach to your Razor view templates. This lets you modify the UI to hide elements that users aren’t authorized to interact with. In particular, you’ll see how to hide the Edit button when a user isn’t authorized to edit the entity.
在本章的最后一节中,我将介绍如何将基于资源的授权方法扩展到 Razor 视图模板。这样,您就可以修改 UI 以隐藏用户无权与之交互的元素。具体而言,您将了解如何在用户无权编辑实体时隐藏 Edit (编辑) 按钮。

We’ll start by looking more closely at the concept of authorization, how it differs from authentication, and how it relates to real-life concepts you might see in an airport.
首先,我们将更仔细地研究授权的概念,它与身份验证有何不同,以及它与您可能在机场看到的现实生活中的概念有何关系。

24.1 Introduction to authorization‌

24.1 授权简介

In this section I provide an introduction to authorization and discuss how it compares with authentication. I use the real- life example of an airport as a case study to illustrate how claims-based authorization works.
在本节中,我将介绍授权并讨论它与身份验证的比较。我使用机场的真实示例作为案例研究来说明基于索赔的授权是如何运作的。

For people who are new to web apps and security, authentication and authorization can be a little daunting. It certainly doesn’t help that the words look so similar! The two concepts are often used together, but they’re definitely distinct:
对于刚接触 Web 应用程序和安全性的人来说,身份验证和授权可能有点令人生畏。这些词看起来如此相似当然无济于事!这两个概念经常一起使用,但它们绝对是不同的:

• Authentication—The process of determining who made a request
身份验证 - 确定请求发出者的过程
• Authorization—The process of determining whether the requested action is allowed
授权 - 确定是否允许请求的作的过程

Typically, authentication occurs first so that you know who is making a request to your app. For traditional web apps, your app authenticates a request by checking the encrypted cookie that was set when the user logged in (as you saw in chapter 23). API applications typically use a header instead of a cookie for authentication, but the overall process is the same, as you’ll see in chapter 25.
通常,首先进行身份验证,以便您知道谁在向您的应用发出请求。对于传统的 Web 应用程序,您的应用程序通过检查用户登录时设置的加密 cookie 来验证请求(如第 23 章所示)。API 应用程序通常使用 Headers 而不是 cookie 进行身份验证,但整个过程是相同的,您将在第 25 章中看到。

Once a request is authenticated and you know who is making the request, you can determine whether they’re allowed to execute an action on your server. This process is called authorization and is the focus of this chapter.
在请求经过身份验证并且您知道谁在发出请求后,您可以确定是否允许他们在您的服务器上执行作。此过程称为 authorization,是本章的重点。

Before we dive into code and start looking at authorization in ASP.NET Core, I’ll put these concepts into a real-life scenario that I hope you’re familiar with: checking in at an airport. To enter an airport and board a plane, you must pass through several steps: an initial step to prove who you are (authentication) and subsequent steps that check whether you’re allowed to proceed (authorization). In simplified form, these might look like this:
在我们深入研究代码并开始研究 ASP.NET Core 中的授权之前,我将把这些概念放入一个我希望您熟悉的真实场景中:在机场办理登机手续。要进入机场并登机,您必须通过几个步骤:证明您的身份的初始步骤(身份验证)和检查您是否被允许继续的后续步骤(授权)。在简化形式中,这些可能如下所示:

  1. Show your passport at the check-in desk. Receive a boarding pass.
    在值机柜台出示您的护照。收到登机牌。
  2. Show your boarding pass to enter security. Pass through security.
    出示登机牌进入安检。通过安检。
  3. Show your frequent-flyer card to enter the airline lounge. Enter the lounge.
    出示您的常旅客卡进入航空公司休息室。进入休息室。
  4. Show your boarding pass to board the flight. Enter the airplane.
    出示您的登机牌登机。进入飞机。

Obviously, these steps, also shown in figure 24.1, will vary somewhat in real life (I don’t have a frequent-flyer card!), but we’ll go with them for now. Let’s explore each step a little further.
显然,这些步骤(如图 24.1 所示)在现实生活中会有所不同(我没有常旅客卡!),但我们现在就来介绍一下。让我们进一步探讨每个步骤。

alt text
alt text

Figure 24.1 When boarding a plane at an airport, you pass through several authorization steps. At each authorization step, you must present a claim in the form of a boarding pass or a frequent-flyer card. If you’re not authorized, access is denied.
图 24.1 在机场登机时,您需要完成几个授权步骤。在每个授权步骤中,您必须以登机牌或常旅客卡的形式出示索赔。如果您未获得授权,则访问将被拒绝。

When you arrive at the airport, the first thing you do is go to the check-in counter. Here, you can purchase a plane ticket, but to do so, you need to prove who you are by providing a passport; you authenticate yourself. If you’ve forgotten your passport, you can’t authenticate, and you can’t go any further.
当您到达机场时,您做的第一件事是前往值机柜台。在这里,您可以购买机票,但要购买机票,您需要通过提供护照来证明您的身份;您验证自己。如果您忘记了护照,则无法进行身份验证,也无法继续。

Once you’ve purchased your ticket, you’re issued a boarding pass, which says which flight you’re on. We’ll assume that it also includes a BoardingPassNumber. You can think of this number as an additional claim associated with your identity.
购买机票后,您将收到一张登机牌,上面写着您乘坐的航班。我们假设它还包括 BoardingPassNumber。您可以将此号码视为与您的身份关联的附加声明。

DEFINITION A claim is a piece of information about a user that consists of a type and an optional value.
定义:声明是有关用户的一条信息,由类型和可选值组成。

The next step is security. The security guards ask you to present your boarding pass for inspection, which they use to check that you have a flight and so are allowed deeper into the airport. This is an authorization process: you must have the required claim (a BoardingPassNumber) to proceed.
下一步是安全性。保安要求您出示登机牌以供检查,他们用它来检查您是否有航班,因此可以进入机场更深处。这是一个授权过程:您必须拥有所需的声明 (BoardingPassNumber) 才能继续。

If you don’t have a valid BoardingPassNumber, there are two possibilities for what happens next:
如果您没有有效的 BoardingPassNumber,则接下来有两种可能的情况:

• If you haven’t yet purchased a ticket—You’ll be directed back to the check-in desk, where you can authenticate and purchase a ticket. At that point, you can try to enter security again.
如果您尚未购买机票 - 您将被引导回值机柜台,在那里您可以进行身份验证和购买机票。此时,您可以尝试再次进入安检。

• If you have an invalid ticket—You won’t be allowed through security, and there’s nothing else you can do. If, for example, you show up with a boarding pass a week late for your flight, they probably won’t let you through. (Ask me how I know!)
如果您的机票无效 - 您将不被允许通过安检,并且您无能为力。例如,如果您的航班登机牌晚了一周,他们可能不会让您通过。(问我怎么知道的!)

Once you’re through security, you need to wait for your flight to start boarding, but unfortunately, there aren’t any seats free. Typical! Luckily, you’re a regular flyer, and you’ve notched up enough miles to achieve Gold frequent-flyer status, so you can use the airline lounge.
通过安检后,您需要等待航班开始登机,但不幸的是,没有任何空位。典型!幸运的是,您是一名普通乘客,并且您已经积累了足够的里程来获得金卡常旅客身份,因此您可以使用航空公司休息室。

You head to the lounge, where you’re asked to present your Gold frequent-flyer card to the attendant, and they let you in. This is another example of authorization. You must have a FrequentFlyerClass claim with a value of Gold to proceed.
您前往休息室,在那里您被要求向服务员出示您的黄金常旅客卡,他们让您进入。这是授权的另一个示例。您必须有一个价值为 Gold 的 FrequentFlyerClass 索赔才能继续。

NOTE You’ve used authorization twice so far in this scenario. Each time, you presented a claim to proceed. In the first case, the presence of any BoardingPassNumber was sufficient, whereas for the FrequentFlyerClass claim, you needed the specific value of Gold.
注意:到目前为止,在此方案中,你已使用两次授权。每次,您都会提出要继续的索赔。在第一种情况下,任何 BoardingPassNumber 的存在就足够了,而对于 FrequentFlyerClass 声明,您需要 Gold 的特定值。

When you’re boarding the airplane, you have one final authorization step, in which you must present the BoardingPassNumber claim again. You presented this claim earlier, but boarding the aircraft is a distinct action from entering security, so you have to present it again.
当您登机时,您有一个最后的授权步骤,在该步骤中,您必须再次提供 BoardingPassNumber 声明。您之前提交了此声明,但登机与进入安检是不同的作,因此您必须再次提交。

This whole scenario has lots of parallels with requests to a web app:
整个场景与对 Web 应用程序的请求有很多相似之处:

• Both processes start with authentication.
两个过程都从身份验证开始。
• You must prove who you are to retrieve the claims you need for authorization.
您必须证明您是谁才能检索授权所需的索赔。
• You use authorization to protect sensitive actions like entering security and the airline lounge.
您使用授权来保护敏感作,例如进入安检和航空公司休息室。

I’ll reuse this airport scenario throughout the chapter to build a simple web application that simulates the steps you take in an airport. We’ve covered the concept of authorization in general, so in the next section we’ll look at how authorization works in ASP.NET Core. We’ll start with the most basic level of authorization, ensuring that only authenticated users can execute an action, and look at what happens when you try to execute such an action.
我将在本章中重用这个机场场景来构建一个简单的 Web 应用程序,用于模拟您在机场中采取的步骤。我们已经大致介绍了授权的概念,因此在下一节中,我们将了解如何在 ASP.NET Core 中工作。我们将从最基本的授权级别开始,确保只有经过身份验证的用户才能执行作,并查看当您尝试执行此类作时会发生什么。

24.2 Authorization in ASP.NET Core‌

24.2 ASP.NET Core 中的授权

In this section you’ll see how the authorization principles described in the previous section apply to an ASP.NET Core application. You’ll learn about the role of the [Authorize] attribute and AuthorizationMiddleware in authorizing requests to Razor Pages and MVC actions. Finally, you’ll learn about the process of preventing unauthenticated users from executing endpoints and what happens when users are unauthorized.‌
在本节中,您将了解上一节中描述的授权原则如何应用于 ASP.NET Core 应用程序。你将了解 [Authorize] 属性和 AuthorizationMiddleware 在授权对 Razor Pages 和 MVC作的请求中的作用。最后,您将了解防止未经身份验证的用户执行终端节点的过程,以及当用户未经授权时会发生什么。

The ASP.NET Core framework has authorization built in, so you can use it anywhere in your app, but it’s most common to apply authorization via the AuthorizationMiddleware. The AuthorizationMiddleware should be placed after both the routing middleware and the authentication middleware but before the endpoint middleware, as shown in figure 24.2.
ASP.NET Core 框架内置了授权,因此您可以在应用程序中的任何位置使用它,但最常见的是通过 AuthorizationMiddleware 应用授权。AuthorizationMiddleware 应该放在 routing 中间件和 authentication 中间件之后,但在 endpoint middleware 之前,如图 24.2 所示。

alt text

Figure 24.2 Authorization occurs after an endpoint has been selected and after the request is authenticated, but before the action method or Razor Page endpoint is executed.
图 24.2 在选择终结点之后和对请求进行身份验证之后,但在执行作方法或 Razor Page 终结点之前,进行授权。

NOTE Remember that in ASP.NET Core, an endpoint refers to the handler selected by the routing middleware, which generates a response when executed. It is typically a Razor Page, a web API controller action method, or a minimal API endpoint handler.
注意请记住,在 ASP.NET Core 中,终端节点是指路由中间件选择的处理程序,该处理程序在执行时生成响应。它通常是 Razor Page、Web API 控制器作方法或最小 API 端点处理程序。

With this configuration, the RoutingMiddleware selects an endpoint to execute based on the request’s URL, such as a Razor Page, as you saw in chapter 14. Metadata about the selected endpoint is available to all middleware that occurs after the routing middleware. This metadata includes details about any authorization requirements for the endpoint, and it’s typically attached by decorating an action or Razor Page with an [Authorize] attribute.
使用此配置,RoutingMiddleware 根据请求的 URL 选择要执行的终结点,例如 Razor Page,如第 14 章所示。有关所选终端节点的元数据可用于路由中间件之后出现的所有中间件。此元数据包括有关终结点的任何授权要求的详细信息,通常通过使用 [Authorize] 属性修饰作或 Razor 页面来附加。

The AuthenticationMiddleware deserializes the encrypted cookie (or bearer token for APIs) associated with the request to create a ClaimsPrincipal. This object is set as the HttpContext.User for the request, so all subsequent middleware can access this value. It contains all the Claims that were added to the cookie when the user authenticated.
AuthenticationMiddleware 反序列化与创建 ClaimsPrincipal 的请求关联的加密 Cookie(或 API 的持有者令牌)。此对象设置为请求的 HttpContext.User,因此所有后续中间件都可以访问此值。它包含在用户进行身份验证时添加到 Cookie 的所有声明。

NOTE Remember that the authentication middleware may be placed before the routing middleware when the authentication process is the same for all endpoints.
注意:请记住,当所有端点的身份验证过程都相同时,可以将身份验证中间件放在路由中间件之前。

Nevertheless, I prefer to place it as shown in figure 24.2, after the routing middleware, and always before the authorization middleware.
尽管如此,我更喜欢将它如图 24.2 所示,放在 routing middleware 之后,并且总是放在 authorization middleware 之前。

Now we come to the AuthorizationMiddleware. This middleware checks whether the selected endpoint has any authorization requirements, based on the metadata provided by the RoutingMiddleware. If the endpoint has authorization requirements, the AuthorizationMiddleware uses the HttpContext.User to determine whether the current request is authorized to execute the endpoint.
现在我们来看看 AuthorizationMiddleware。此中间件根据 RoutingMiddleware 提供的元数据检查所选端点是否具有任何授权要求。如果端点有授权要求,则 AuthorizationMiddleware 使用 HttpContext.User 来确定当前请求是否被授权执行端点。

If the request is authorized, the next middleware in the pipeline executes as normal. If the request is not authorized, the AuthorizationMiddleware short-circuits the middleware pipeline, and the endpoint middleware is never executed.
如果请求获得授权,则管道中的下一个中间件将正常执行。如果请求未获得授权,则 AuthorizationMiddleware 将使中间件管道短路,并且永远不会执行端点中间件。

NOTE The call to UseAuthorization() must always be placed after UseRouting() and UseAuthentication(), but before UseEndpoints(). WebApplication automatically adds all this middleware in the correct order, but if you override the position in the pipeline, such as by calling UseRouting(), you must make sure to maintain this overall order.
注意:对 UseAuthorization() 的调用必须始终放在 UseRouting() 和 UseAuthentication() 之后,但在 UseEndpoints() 之前。WebApplication 会自动以正确的顺序添加所有这些中间件,但是如果你覆盖管道中的位置,例如通过调用 UseRouting(),则必须确保保持这个整体顺序。

The AuthorizationMiddleware is responsible for applying authorization requirements and ensuring that only authorized users can execute protected endpoints. In section you’ll learn how to apply the simplest authorization requirement to an endpoint, and in section 24.2.2 you’ll see how the framework responds when a user is not authorized to execute an endpoint.
AuthorizationMiddleware 负责应用授权要求并确保只有授权用户才能执行受保护的端点。在部分您将学习如何将最简单的授权要求应用于 Endpoint,在 Section 24.2.2 中,您将看到当用户无权执行 Endpoint 时框架如何响应。

24.2.1 Preventing anonymous users from accessing your application‌

24.2.1 阻止匿名用户访问您的应用程序

When you think about authorization, you typically think about checking whether a particular user has permission to execute an endpoint. In ASP.NET Core you normally achieve this by checking whether a user has a given claim.
在考虑授权时,通常会考虑检查特定用户是否具有执行终端节点的权限。在 ASP.NET Core 中,通常通过检查用户是否具有给定的声明来实现此目的。

There’s an even more basic level of authorization we haven’t considered yet: allowing only authenticated users to execute an endpoint. This is even simpler than the claims scenario (which we’ll come to later), as there are only two possibilities:
还有一个更基本的授权级别我们还没有考虑:只允许经过身份验证的用户执行端点。这甚至比 claims 场景(我们稍后会介绍)还要简单,因为只有两种可能性:

• The user is authenticated—The action executes as normal.
用户已通过 AUTHENTICATED -作将正常执行。
• The user is unauthenticated—The user can’t execute the endpoint.
用户未经身份验证 - 用户无法执行端点。

You can achieve this basic level of authorization by using the [Authorize] attribute, which you saw in chapter 22 when we discussed authorization filters. You can apply this attribute to your actions and Razor Pages, as shown in the following listing, to restrict them to authenticated (logged-in) users only. If an unauthenticated user tries to execute an action or Razor Page protected with the [Authorize] attribute, they’ll be redirected to the login page.
您可以使用 [Authorize] 属性来实现此基本级别的授权,您在第 22 章讨论授权过滤器时看到了该属性。可以将此属性应用于作和 Razor Pages,如下面的清单所示,以将它们限制为仅经过身份验证(已登录)的用户。如果未经身份验证的用户尝试执行受 [Authorize] 属性保护的作或 Razor 页面,他们将被重定向到登录页面。

Listing 24.1 Applying [Authorize] to an action
清单 24.1 将 [Authorize] 应用于作

public class RecipeApiController : ControllerBase
{
    public IActionResult List() ❶
{
return Ok();
}
[Authorize] ❷
public IActionResult View() ❸
{
return Ok();
}
}

❶ This action can be executed by anyone, even when not logged in.
任何人都可以执行此作,即使未登录。
❷ Applies [Authorize] to individual actions, whole controllers, or Razor Pages
将 [授权] 应用于单个作、整个控制器或 Razor 页面
❸ This action can be executed only by authenticated users.
此作只能由经过身份验证的用户执行。

Applying the [Authorize] attribute to an endpoint attaches metadata to it, indicating that only authenticated users may access the endpoint. As you saw in figure 24.2, this metadata is made available to the AuthorizationMiddleware when an endpoint is selected by the RoutingMiddleware.
将 [Authorize] 属性应用于终端节点会将元数据附加到该终端节点,指示只有经过身份验证的用户才能访问该终端节点。如图 24.2 所示,当 RoutingMiddleware 选择端点时,此元数据可供 AuthorizationMiddleware 使用。

You can apply the [Authorize] attribute at the action scope, controller scope, Razor Page scope, or globally, as you saw in chapter 21. Any action or Razor Page that has the [Authorize] attribute applied in this way can be executed only by an authenticated user. Unauthenticated users will be redirected to the login page.
可以在作范围、控制器范围、Razor Page 范围或全局应用 [Authorize] 属性,如第 21 章所示。以这种方式应用了 [Authorize] 属性的任何作或 Razor 页面只能由经过身份验证的用户执行。未经身份验证的用户将被重定向到登录页面。

TIP There are several ways to apply the [Authorize] attribute globally. You can read about the options and when to choose which option on my blog: http://mng.bz/opQp.
提示:有几种方法可以全局应用 [Authorize] 属性。您可以在我的博客上阅读有关选项以及何时选择哪个选项的信息:http://mng.bz/opQp

Sometimes, especially when you apply the [Authorize] attribute globally, you might need to poke holes in this authorization requirement. If you apply the [Authorize] attribute globally, any unauthenticated requests are redirected to the login page for your app. But if the [Authorize] attribute is global, when the login page tries to load, you’ll be unauthenticated and redirected to the login page again. And now you’re stuck in an infinite redirect loop.
有时,尤其是在全局应用 [Authorize] 属性时,可能需要在此授权要求中戳漏洞。如果全局应用 [Authorize] 属性,则任何未经身份验证的请求都将重定向到应用的登录页面。但是,如果 [Authorize] 属性是全局属性,则当登录页尝试加载时,你将被取消身份验证并再次重定向到登录页。现在你陷入了一个无限的重定向循环中。

To get around this, you can direct specific endpoints to ignore the [Authorize] attribute by applying the [AllowAnonymous] attribute to an action or Razor Page, as shown in the next listing. This allows unauthenticated users to execute the action, so you can avoid the redirect loop that would otherwise result.
若要解决此问题,可以通过将 [AllowAnonymous] 属性应用于作或 Razor 页面,指示特定终结点忽略 [Authorize] 属性,如下一个列表所示。这允许未经身份验证的用户执行作,因此您可以避免否则会导致的重定向循环。

Listing 24.2 Applying [AllowAnonymous] to allow unauthenticated access
清单 24.2 应用 [AllowAnonymous] 以允许未经身份验证的访问

[Authorize] ❶
public class AccountController : ControllerBase
{
public IActionResult ManageAccount() ❷
{
return Ok();
}
[AllowAnonymous] ❸
public IActionResult Login() ❹
{
return Ok();
}
}

❶ Applied at the controller scope, so the user must be authenticated for all actions on the controller
在控制器范围内应用,因此用户必须对控制器上的所有作进行身份验证
❷ Only authenticated users may execute ManageAccount.
只有经过身份验证的用户才能执行 ManageAccount。
❸ [AllowAnonymous] overrides [Authorize] to allow unauthenticated users.
[AllowAnonymous] 覆盖 [Authorize] 以允许未经身份验证的用户。
❹ Login can be executed by anonymous users.
匿名用户可以执行登录。

WARNING If you apply the [Authorize] attribute globally, be sure to add the [AllowAnonymous] attribute to your login actions, error actions, password reset actions, and any other actions that you need unauthenticated users to execute. If you’re using the default Identity UI described in chapter 23, this is already configured for you.
警告:如果全局应用 [Authorize] 属性,请确保将 [AllowAnonymous] 属性添加到登录作、错误作、密码重置作以及需要未经身份验证的用户执行的任何其他作。如果您使用的是第 23 章中描述的默认身份 UI,则已为您配置了此 UI。

If an unauthenticated user attempts to execute an action protected by the [Authorize] attribute, traditional web apps redirect them to the login page. But what about APIs that don’t have a user interface? And what about more complex scenarios, where a user is logged in but doesn’t have the necessary claims to execute an action? In section we’ll look at how the ASP.NET Core authentication services handle all this for you.
如果未经身份验证的用户尝试执行受 [Authorize] 属性保护的作,则传统 Web 应用程序会将其重定向到登录页面。但是没有用户界面的 API 呢?对于更复杂的情况,即用户已登录但没有执行作所需的声明,该怎么办?在部分我们将了解 ASP.NET Core 身份验证服务如何为您处理所有这些。

24.2.2 Handling unauthorized requests‌

24.2.2 处理未经授权的请求

In the previous section you saw how to apply the [Authorize] attribute to an action to ensure that only authenticated users can execute it. In section 24.3 we’ll look at more complex examples that require you to also have a specific claim. In both cases, you must meet one or more authorization requirements (for example, you must be authenticated) to execute the action.‌
在上一节中,您了解了如何将 [Authorize] 属性应用于作,以确保只有经过身份验证的用户才能执行该作。在 Section 24.3 中,我们将查看更复杂的示例,这些示例要求您也有一个特定的声明。在这两种情况下,您都必须满足一个或多个授权要求(例如,您必须经过身份验证)才能执行作。

If the user meets the authorization requirements, the request passes unimpeded through the AuthorizationMiddleware, and the endpoint is executed in the EndpointMiddleware. If they don’t meet the requirements for the selected endpoint, the AuthorizationMiddleware will short-circuit the request. Depending on why the request failed authorization, the AuthorizationMiddleware generates one of two different types of responses, as shown in figure 24.3:
如果用户满足授权要求,则请求通过 AuthorizationMiddleware 畅通无阻,端点在 EndpointMiddleware 中执行。如果它们不满足所选终端节点的要求,则 AuthorizationMiddleware 将使请求短路。根据请求授权失败的原因, AuthorizationMiddleware 生成两种不同类型的响应之一,如图 24.3 所示:

• Challenge—This response indicates that the user was not authorized to execute the action because they weren’t yet logged in.
• 质询 - 此响应表示用户由于尚未登录而无权执行作。

• Forbid—This response indicates that the user was logged in but didn’t meet the requirements to execute the action. They didn’t have a required claim, for example.
• 禁止 - 此响应表示用户已登录,但不符合执行作的要求。例如,他们没有必需的索赔。

alt text

Figure 24.3 The three types of response to an authorization attempt. In the left example, the request contains an authentication cookie, so the user is authenticated in the AuthenticationMiddleware. The AuthorizationMiddleware confirms that the authenticated user can access the selected endpoint, so the endpoint is executed. In the center example, the request is not authenticated, so the Authorization- Middleware generates a challenge response. In the right example, the request is authenticated, but the user does not have permission to execute the endpoint, so a forbid response is generated.
图 24.3 对授权尝试的三种响应类型。在左侧示例中,请求包含一个身份验证 cookie,因此在 AuthenticationMiddleware 中对用户进行身份验证。AuthorizationMiddleware 确认经过身份验证的用户可以访问选定的终端节点,因此将执行终端节点。在中间的示例中,请求未经过身份验证,因此 Authorization- Middleware 生成质询响应。在正确的示例中,请求已经过身份验证,但用户没有执行终端节点的权限,因此会生成 forbid 响应。

NOTE If you apply the [Authorize] attribute in basic form, as you did in section 24.2.1, you will generate only challenge responses. In this case, a challenge response will be generated for unauthenticated users, but authenticated users will always be authorized.
注意:如果以基本形式应用 [Authorize] 属性,就像在第 24.2.1 节中所做的那样,您将仅生成质询响应。在这种情况下,将为未经身份验证的用户生成质询响应,但经过身份验证的用户将始终获得授权。

The exact HTTP response generated by a challenge or forbid response typically depends on the type of application you’re building and so the type of authentication your application uses: a traditional web application with Razor Pages, or an API application.
质询或禁止响应生成的确切 HTTP 响应通常取决于要构建的应用程序类型,因此应用程序使用的身份验证类型:具有 Razor Pages 的传统 Web 应用程序或 API 应用程序。

For traditional web apps using cookie authentication, such as when you use ASP.NET Core Identity, as in chapter 23, the challenge and forbid responses generate an HTTP redirect to a page in your application. A challenge response indicates the user isn’t yet authenticated, so they’re redirected to the login page for the app. After logging in, they can attempt to execute the protected resource again. A forbid response means the request was from a user that already logged in, but they’re still not allowed to execute the action.
对于使用 Cookie 身份验证的传统 Web 应用程序,例如当您使用 ASP.NET Core Identity 时(如第 23 章所示),challenge 和 forbid 响应会生成指向应用程序中页面的 HTTP 重定向。质询响应指示用户尚未通过身份验证,因此他们将被重定向到应用程序的登录页面。登录后,他们可以尝试再次执行受保护的资源。禁止响应表示请求来自已登录的用户,但仍不允许他们执行该作。

Consequently, the user is redirected to a “forbidden” or “access denied” web page, as shown in figure 24.4, which informs them they can’t execute the action or Razor Page.
因此,用户将被重定向到 “forbidden” 或 “access denied” 网页,如图 24.4 所示,该网页通知他们无法执行作或 Razor Page。

alt text

Figure 24.4 A forbid response in traditional web apps using cookie authentication. If you don’t have permission to execute a Razor Page and you’re already logged in, you’ll be redirected to an “access denied” page.
图 24.4 传统 Web 应用程序中使用 cookie 身份验证的 forbid 响应。如果您没有执行 Razor 页面的权限,并且您已经登录,您将被重定向到“拒绝访问”页面。

The preceding behavior is standard for traditional web apps, but API apps typically use a different approach to authentication, as you’ll see in chapter 25. Instead of logging in and using the API directly, you’d typically log in to a third- party application that provides a token to the client-sidesingle-page application (SPA) or mobile app. The client-side app sends this token when it makes a request to your API.
上述行为是传统 Web 应用程序的标准行为,但 API 应用程序通常使用不同的身份验证方法,如第 25 章所示。您通常不会直接登录并使用 API,而是登录到向客户端提供令牌的第三方应用程序单页应用程序 (SPA) 或移动应用程序。客户端应用程序在向 API 发出请求时发送此令牌。

Authenticating a request for an API app is essentially identical to a traditional web app that uses cookies, as you’ll see in chapter 25; AuthenticationMiddleware deserializes the credentials to create the ClaimsPrincipal. The difference is in how an API handles authorization failures.
对 API 应用程序的请求进行身份验证与使用 cookie 的传统 Web 应用程序基本相同,如第 25 章所示;AuthenticationMiddleware 反序列化凭据以创建 ClaimsPrincipal。区别在于 API 处理授权失败的方式。

When an API app generates a challenge response, it returns a 401 Unauthorized error response to the caller. Similarly, when the app generates a forbid response, it returns a 403 Forbidden response. The traditional web app essentially handled these errors by automatically redirecting unauthorized users to the login or “access denied” page, but the API app doesn’t do this. It’s up to the client-side SPA or mobile app to detect these errors and handle them as appropriate.
当 API 应用生成质询响应时,它会向调用方返回 401 Unauthorized 错误响应。同样,当应用程序生成 forbid 响应时,它会返回 403 Forbidden 响应。传统的 Web 应用程序基本上是通过自动将未经授权的用户重定向到登录或 “access denied” 页面来处理这些错误,但 API 应用程序不会这样做。客户端 SPA 或移动应用程序负责检测这些错误并根据需要处理它们。

TIP This difference in authorization behavior is one of the reasons I generally recommend creating separate apps for your APIs and Razor pages apps; it’s possible to have both in the same app, but the configuration is often more complex.
提示:授权行为的这种差异是我通常建议为您的 API 和 Razor 页面应用程序创建单独应用程序的原因之一;可以在同一个应用程序中同时拥有两者,但配置通常更复杂。

The different behavior between traditional web apps and SPAs can be confusing initially, but you generally don’t need to worry about that too much in practice. Whether you’re building an API app or a traditional MVC web app, the authorization code in your app looks the same in both cases.
传统 Web 应用程序和 SPA 之间的不同行为最初可能会令人困惑,但在实践中,您通常不需要太担心这一点。无论您是构建 API 应用程序还是传统的 MVC Web 应用程序,应用程序中的授权代码在这两种情况下看起来都相同。

Apply [Authorize] attributes to your endpoints, and let the framework take care of the differences for you.
将 [Authorize] 属性应用于您的终端节点,让框架为您处理差异。

NOTE In chapter 23 you saw how to configure ASP.NET Core Identity in a Razor Pages app. This chapter assumes that you’re building a Razor Pages app too, but the chapter is equally applicable if you’re building an API, as you’ll see in chapter 25. Authorization policies are applied in the same way, whichever style of app you’re building. Only the final response of unauthorized requests differs.
注意:在第 23 章中,你了解了如何在 Razor Pages 应用中配置 ASP.NET 核心标识。本章假定你也在构建 Razor Pages 应用,但如果你正在构建 API,则本章同样适用,如第 25 章所示。无论您正在构建哪种风格的应用程序,授权策略都以相同的方式应用。只有未授权请求的最终响应不同。

You’ve seen how to apply the most basic authorization requirement—restricting an endpoint to authenticated users —but most apps need something more subtle than this all-or- nothing approach. Consider the airport scenario from section 24.1. Being authenticated (having a passport) isn’t enough to get you through security. Instead, you also need a specific claim: BoardingPassNumber. In the next section we’ll look at how you can implement a similar requirement in ASP.NET Core.‌
您已经了解了如何应用最基本的授权要求,即将终端节点限制为经过身份验证的用户,但大多数应用程序需要比这种全有或全无方法更微妙的东西。考虑 24.1 节中的机场场景。通过身份验证(拥有护照)不足以让您通过安检。相反,您还需要一个特定的声明:BoardingPassNumber。在下一节中,我们将了解如何在 ASP.NET Core 中实现类似的要求。

24.3 Using policies for claims- based authorization‌

24.3 使用策略进行基于声明的授权

In the previous section, you saw how to require that users be logged in to access an endpoint. In this section you’ll see how to apply additional requirements. You’ll learn to use authorization policies to perform claims-based authorization to require that a logged-in user have the required claims to execute a given endpoint.
在上一节中,您了解了如何要求用户登录才能访问终端节点。在本节中,您将了解如何应用其他要求。您将学习如何使用授权策略来执行基于声明的授权,以要求登录用户具有执行给定终端节点所需的声明。

In chapter 23 you saw that authentication in ASP.NET Core centers on a ClaimsPrincipal object, which represents the user. This object has a collection of claims that contain pieces of information about the user, such as their name, email, and date of birth.
在第 23 章中,您看到 ASP.NET Core 中的身份验证以表示用户的 ClaimsPrincipal 对象为中心。此对象具有一组声明,其中包含有关用户的信息片段,例如其姓名、电子邮件和出生日期。

You can use this information to customize the app for each user, by displaying a welcome message addressing the user by name, for example, but you can also use claims for authorization. For example, you might authorize a user only if they have a specific claim (such as BoardingPassNumber) or if a claim has a specific value (FrequentFlyerClass claim with the value Gold).
您可以使用此信息为每个用户自定义应用程序,例如,通过显示按名称称呼用户的欢迎消息,但您也可以使用声明进行授权。例如,仅当用户具有特定声明(如 BoardingPassNumber)或声明具有特定值(值为 Gold 的 FrequentFlyerClass 声明)时,你才可以授权用户。

In ASP.NET Core the rules that define whether a user is authorized are encapsulated in a policy.
在 ASP.NET Core 中,定义用户是否获得授权的规则封装在策略中。

DEFINITION A policy defines the requirements you must meet for a request to be authorized.
定义:策略定义要授权请求必须满足的要求。

Policies can be applied to an endpoint using the [Authorize] attribute, similar to the way you saw in section 24.2.1. This listing shows a Razor Page PageModel that represents the first authorization step in the airport scenario. The AirportSecurity.cshtml Razor Page is protected by an [Authorize] attribute, but you’ve also provided a policy name, "CanEnterSecurity", as shown in the following listing.
可以使用 [Authorize] 属性将策略应用于终端节点,类似于您在第 24.2.1 节中看到的方式。此列表显示了一个 Razor Page PageModel,它表示 airport 场景中的第一个授权步骤。AirportSecurity.cshtml Razor 页面受 [Authorize] 属性保护,但你还提供了策略名称“CanEnterSecurity”,如以下列表所示。

Listing 24.3 Applying an authorization policy to a Razor Page
清单 24.3 将授权策略应用于 Razor 页面

[Authorize("CanEnterSecurity")] ❶
public class AirportSecurityModel : PageModel
{
public void OnGet() ❷
{
}
}

❶ Applying the “CanEnterSecurity” policy using [Authorize]
使用 [Authorize]应用“CanEnterSecurity”策略

❷ Only users that satisfy the “CanEnterSecurity” policy can execute the Razor Page.
只有满足“CanEnterSecurity”策略的用户才能执行 Razor 页面。

If a user attempts to execute the AirportSecurity.cshtml Razor Page, the authorization middleware verifies whether the user satisfies the policy’s requirements (we’ll look at the policy itself shortly). This gives one of three possible outcomes:
如果用户尝试执行 AirportSecurity.cshtml Razor 页面,授权中间件会验证用户是否满足策略的要求(我们稍后将介绍策略本身)。这将给出以下三种可能的结果之一:

• The user satisfies the policy—The middleware pipeline continues, and the EndpointMiddleware executes the Razor Page as normal.
用户满足策略 - 中间件管道继续,并且 EndpointMiddleware 照常执行 Razor Page。

• The user is unauthenticated—The user is redirected to the login page.
用户未通过 IF - 用户被重定向到登录页面。

• The user is authenticated but doesn’t satisfy the policy—The user is redirected to a “forbidden” or “access denied” page.
用户已通过身份验证,但不满足策略 - 用户被重定向到“禁止”或“拒绝访问”页面。

These three outcomes correlate with real-life outcomes you might expect when trying to pass through security at the airport:
这三种结果与您在尝试通过机场安检时可能预期的现实结果相关:

• You have a valid boarding pass—You can enter security as normal.
您持有有效的登机牌 - 您可以正常进入安检。

• You don’t have a boarding pass—You’re redirected to purchase a ticket.
您没有登机牌 - 您将被重定向到购买机票。

• Your boarding pass is invalid (you turned up a day late, for example)—You’re blocked from entering.
您的登机牌无效(例如,您迟到一天)- 您被阻止进入。

Listing 24.3 shows how you can apply a policy to a Razor Page using the [Authorize] attribute, but you still need to define the CanEnterSecurity policy.
清单 24.3 显示了如何使用 [Authorize] 属性将策略应用于 Razor 页面,但您仍然需要定义 CanEnterSecurity 策略。

You add policies to an ASP.NET Core application in Program.cs, as shown in listing 24.4. First, you add the authorization services and return an AuthorizationBuilder object using AddAuthorizationBuilder(). You can then add policies to the builder by calling AddPolicy(). You define the policy itself by calling methods in a lambda method on a AuthorizationPolicyBuilder (called policyBuilder here).
您可以在 Program.cs 中将策略添加到 ASP.NET Core 应用程序,如清单 24.4 所示。首先,添加授权服务并使用 AddAuthorizationBuilder() 返回 AuthorizationBuilder 对象。然后,您可以通过调用 AddPolicy() 将策略添加到生成器中。您可以通过在 AuthorizationPolicyBuilder(此处称为 policyBuilder)上调用 lambda 方法中的方法来定义策略本身。

Listing 24.4 Adding an authorization policy using AuthorizationPolicyBuilder
清单 24.4 使用 AuthorizationPolicyBuilder 添加授权策略

WebApplicationBuilder builder = WebApplication.CreateBuilder(args);
builder.Services.AddAuthorizationBuilder() ❶
.AddPolicy( ❷
"CanEnterSecurity", ❸
policyBuilder => policyBuilder ❹
.RequireClaim("BoardingPassNumber")); ❹
});
// Additional configuration

❶ Calls AddAuthorizationBuilder to add the required authorization services
调用 AddAuthorizationBuilder 以添加所需的授权服务
❷ Adds a new policy
添加新策略
❸ Provides a name for the policy
为策略提供名称
❹ Defines the policy requirements using AuthorizationPolicyBuilder
使用 AuthorizationPolicyBuilder 定义策略要求

When you call AddPolicy you provide a name for the policy, which should match the value you use in your [Authorize] attributes, and you define the requirements of the policy. In this example, you have a single simple requirement: the user must have a claim of type BoardingPassNumber. If a user has this claim, whatever its value, the policy is satisfied, and the user will be authorized.
调用 AddPolicy 时,您需要为策略提供一个名称,该名称应与您在 [Authorize] 属性中使用的值匹配,并定义策略的要求。在此示例中,您有一个简单的要求:用户必须具有 BoardingPassNumber 类型的声明。如果用户具有此声明,则无论其值如何,都满足策略,并且用户将获得授权。

NOTE A claim is information about the user, as a key-value pair. A policy defines the requirements for successful authorization. A policy may require that a user have a given claim, or it may specify more complex requirements, as you’ll see shortly.
注意:声明是有关用户的信息,以键值对的形式。策略定义成功授权的要求。策略可能要求用户具有给定的声明,或者它可能指定更复杂的要求,您很快就会看到。

AuthorizationPolicyBuilder contains several methods for creating simple policies like this, as shown in table 24.1. For example, an overload of the RequireClaim() method lets you specify a specific value that a claim must have. The following would let you create a policy where the "BoardingPassNumber" claim must have a value of "A1234":
AuthorizationPolicyBuilder包含几种用于创建此类简单策略的方法,如表 24.1 所示。例如,RequireClaim() 方法的重载允许您指定声明必须具有的特定值。下面将允许你创建一个策略,其中 “BoardingPassNumber” 声明的值必须为“A1234”:

policyBuilder => policyBuilder.RequireClaim("BoardingPassNumber", "A1234");

Table 24.1 Simple policy builder methods on AuthorizationPolicyBuilder
表 24.1 AuthorizationPolicyBuilder 上的简单策略生成器方法

Method Policy behavior
RequireAuthenticatedUser() The required user must be authenticated. Creates a policy similar to the default [Authorize] attribute, where you don’t set a policy.
RequireClaim(claim, values) The user must have the specified claim. If provided, the claim must be one of the specified values.
RequireUsername(username) The user must have the specified username.
RequireAssertion(function) Executes the provided lambda function, which returns a bool, indicating whether the policy was satisfied.

Role-based authorization vs. claims-based authorization
基于角色的授权与基于声明的授权

If you look at all of the methods available on the AuthorizationPolicyBuilder type using IntelliSense, you might notice that there’s a method I didn’t mention in table 24.1: RequireRole(). This is a remnant of the role-based approach to authorization used in previous versions of ASP.NET, and I don’t recommend using it.
如果您使用 IntelliSense 查看 AuthorizationPolicyBuilder 类型上的所有可用方法,您可能会注意到我在表 24.1 中没有提到的方法:RequireRole()。这是 ASP.NET 早期版本中使用的基于角色的授权方法的残余部分,我不建议使用它。

Before Microsoft adopted the claims-based authorization used by ASP.NET, role-based authorization was the norm. Users were assigned to one or more roles, such as Administrator or Manager, and authorization involved checking whether the current user was in the required role.‌
在 Microsoft 采用 ASP.NET 使用的基于声明的授权之前,基于角色的授权是常态。将用户分配给一个或多个角色,例如 Administrator 或 Manager,授权涉及检查当前用户是否位于所需的角色中。

This role-based approach to authorization is possible in ASP.NET Core, but it’s used primarily for legacy compatibility reasons. Claims-based authorization is the suggested approach. Unless you’re porting a legacy app that uses roles, I suggest that you embrace claims-based authorization and leave those roles behind.
这种基于角色的授权方法在 ASP.NET Core 中是可能的,但它主要用于旧版兼容性原因。基于声明的授权是建议的方法。除非您要移植使用角色的旧应用程序,否则我建议您采用基于声明的授权,并将这些角色抛在脑后。

Note that the fact that you’re using claims-based permissions doesn’t mean you need to get rid of roles entirely, but you should use roles as a basis for assigning claims to a user rather than authorize that a user belongs to one or more roles.
请注意,使用基于声明的权限这一事实并不意味着需要完全删除角色,但应使用角色作为将声明分配给用户的基础,而不是授权用户属于一个或多个角色。

You can use these methods to build simple policies that can handle basic situations, but often you’ll need something more complicated. What if you want to create a policy that enforces that only users over the age of 18 can execute an endpoint?
您可以使用这些方法来构建可以处理基本情况的简单策略,但通常需要更复杂的策略。如果要创建一个策略,强制要求只有 18 岁以上的用户才能执行终端节点,该怎么办?

The DateOfBirth claim provides the information you need, but there’s no single correct value, so you couldn’t use the RequireClaim() method. You could use the RequireAssertion() method and provide a function that calculates the age from the DateOfBirth claim, but that could get messy pretty quickly.
DateOfBirth 声明提供所需的信息,但没有单个正确的值,因此无法使用 RequireClaim() 方法。您可以使用 RequireAssertion() 方法并提供一个函数,该函数根据 DateOfBirth 声明计算年龄,但这很快就会变得混乱。

For more complex policies that can’t be easily defined using the RequireClaim() method, I recommend that you take a different approach and create a custom policy, as you’ll see in the following section.‌
对于无法使用 RequireClaim() 方法轻松定义的更复杂的策略,我建议您采用不同的方法并创建自定义策略,如下一节所示。

27.4 Creating custom policies for authorization‌

27.4 创建自定义授权策略

You’ve already seen how to create a policy by requiring a specific claim or requiring a specific claim with a specific value, but often the requirements will be more complex than that. In this section you’ll learn how to create custom authorization requirements and handlers. You’ll also see how to configure authorization requirements where there are multiple ways to satisfy a policy, any of which are valid.
您已经了解了如何通过要求特定声明或要求具有特定值的特定声明来创建策略,但要求通常比这更复杂。在本节中,您将了解如何创建自定义授权要求和处理程序。您还将了解如何配置授权要求,其中有多种方法可以满足策略,其中任何一种都是有效的。

Let’s return to the airport example. You’ve already configured the policy for passing through security, and now you’re going to configure the policy that controls whether you’re authorized to enter the airline lounge.
让我们回到机场的例子。您已经配置了通过安检的策略,现在您将配置控制您是否有权进入航空公司休息室的策略。

As you saw in figure 24.1, you’re allowed to enter the lounge if you have a FrequentFlyerClass claim with a value of Gold. If this was the only requirement, you could use AuthorizationPolicyBuilder to create a policy like this:
如图 24.1 所示,如果您有价值为 Gold 的 FrequentFlyerClass 索赔,则可以进入休息室。如果这是唯一的要求,则可以使用 AuthorizationPolicyBuilder 创建如下所示的策略:

options.AddPolicy("CanAccessLounge", policyBuilder => policyBuilder.RequireClaim("FrequentFlyerClass", "Gold"));

But what if the requirements are more complicated? For example, suppose you can enter the lounge if you’re at least 18 years old (as calculated from the DateOfBirth claim) and you’re one of the following:
但是,如果要求更复杂呢?例如,假设您至少年满 18 岁(根据 DateOfBirth 声明计算)并且您是以下之一,则可以进入休息室:

• You’re a Gold-class frequent flyer (have a FrequentFlyerClass claim with value "Gold")
您是金卡级常旅客(有价值为“金卡”的 FrequentFlyerClass 索赔)
• You’re an employee of the airline (have an EmployeeNumber claim).
您是航空公司的员工(有 EmployeeNumber 索赔)。

If you’ve ever been banned from the lounge (you have an IsBannedFromLounge claim), you won’t be allowed in, even if you satisfy the other requirements.
如果您曾经被禁止进入休息室(您有 IsBannedFromLounge 索赔),即使您满足其他要求,也不会被允许进入。

There’s no way of achieving this complex set of requirements with the basic use of AuthorizationPolicyBuilder you’ve seen so far. Luckily, these methods are a wrapper around a set of building blocks that you can combine to achieve the desired policy.
到目前为止,您所看到的 AuthorizationPolicyBuilder 的基本用法无法实现这组复杂的要求。幸运的是,这些方法是一组构建块的包装器,您可以组合这些构建块来实现所需的策略。

24.4.1 Requirements and handlers: The building blocks of a policy‌

24.4.1 要求和处理程序:策略的构建块

Every policy in ASP.NET Core consists of one or more requirements, and every requirement can have one or more handlers. For the airport lounge example, you have a single policy ("CanAccessLounge"), two requirements (MinimumAgeRequirement and AllowedInLoungeRequirement), and several handlers, as shown in figure 24.5.
ASP.NET Core 中的每个策略都包含一个或多个要求,每个要求可以有一个或多个处理程序。对于机场休息室示例,您有一个策略(“CanAccessLounge”)、两个要求(MinimumAgeRequirement 和 AllowedInLoungeRequirement)和多个处理程序,如图 24.5 所示。

alt text

Figure 24.5 A policy can have many requirements, and every requirement can have many handlers. By combining multiple requirements in a policy and providing multiple handler implementations, you can create complex authorization policies that meet any of your business requirements.
图 24.5 一个策略可以有很多需求,每个需求可以有很多处理程序。通过在策略中组合多个要求并提供多个处理程序实施,您可以创建满足任何业务需求的复杂授权策略。

For a policy to be satisfied, a user must fulfill all the requirements. If the user fails any of the requirements, the authorize middleware won’t allow the protected endpoint to be executed. In this example, a user must be allowed to access the lounge and must be over 18 years old.
要满足策略,用户必须满足所有要求。如果用户不符合任何要求,则 authorize 中间件将不允许执行受保护的终端节点。在此示例中,必须允许用户访问休息室,并且必须年满 18 岁。

Each requirement can have one or more handlers, which will confirm that the requirement has been satisfied. For example, as shown in figure 24.5, AllowedInLoungeRequirement has two handlers that can satisfy the requirement:
每个要求都可以有一个或多个处理程序,这些处理程序将确认已满足要求。例如,如图 24.5 所示,AllowedInLoungeRequirement 有两个可以满足要求的处理程序:

• FrequentFlyerHandler
• IsAirlineEmployeeHandler

If the user satisfies either of these handlers, AllowedInLoungeRequirement is satisfied. You don’t need all handlers for a requirement to be satisfied; you need only one.
如果用户满足其中任一处理程序,则满足 AllowedInLoungeRequirement。您不需要满足所有处理程序即可满足需求;你只需要一个。

NOTE Figure 24.5 shows a third handler,BannedFromLoungeHandler, which I’ll cover in section 24.4.2. It’s slightly different in that it can fail a requirement but not satisfy it.
注意:图 24.5 显示了第三个处理程序 BannedFromLoungeHandler,我将在 24.4.2 节中介绍。它略有不同,因为它可能不符合要求,但不能满足它。

You can use requirements and handlers to achieve most any combination of behavior you need for a policy. By combining handlers for a requirement, you can validate conditions using a logical OR: if any of the handlers is satisfied, the requirement is satisfied. By combining requirements, you create a logical AND: all the requirements must be satisfied for the policy to be satisfied, as shown in figure 24.6.‌
您可以使用要求和处理程序来实现策略所需的大多数行为组合。通过组合需求的处理程序,您可以使用逻辑 OR 验证条件:如果满足任何处理程序,则满足需求。通过组合需求,您可以创建一个逻辑 AND:必须满足所有要求才能满足策略,如图 24.6 所示。

alt text

Figure 24.6 For a policy to be satisfied, every requirement must be satisfied. A requirement is satisfied if any of the handlers is satisfied.
图 24.6 要满足策略,必须满足所有要求。如果满足任何处理程序,则满足要求。

TIP You can add multiple policies to a Razor Page or action method by applying the [Authorize] attribute multiple times, as in [Authorize ("Policy1"), Authorize("Policy2")]. All policies must be satisfied for the request to be authorized.
提示:可以通过多次应用 [Authorize] 属性,将多个策略添加到 Razor 页面或作方法,如 [Authorize (“Policy1”), Authorize(“Policy2”)] 中所示。必须满足所有策略,请求才能获得授权。

I’ve highlighted requirements and handlers that will make up your "CanAccessLounge" policy, so in the next section you’ll build each of the components and apply them to the airport sample app.
我已经重点介绍了构成“CanAccessLounge”策略的要求和处理程序,因此在下一节中,您将构建每个组件并将它们应用于 airport 示例应用程序。

24.4.2 Creating a policy with a custom requirement and handler‌

24.4.2 创建具有自定义要求和处理程序的策略

You’ve seen all the pieces that make up a custom authorization policy, so in this section we’ll explore the implementation of the "CanAccessLounge" policy.
您已经了解了构成自定义授权策略的所有部分,因此在本节中,我们将探讨 “CanAccessLounge” 策略的实现。

CREATING AN IAUTHORIZATIONREQUIREMENT TO REPRESENT A REQUIREMENT
创建 IAUTHORIZATIONREQUIREMENT 以表示要求

As you’ve seen, a custom policy can have multiple requirements, but what is a requirement in code terms? Authorization requirements in ASP.NET Core are any class that implements the IAuthorizationRequirement interface. This is a blank marker interface, which you can apply to any class to indicate that it represents a requirement.
如您所见,自定义策略可以有多个要求,但代码术语中的要求是什么?ASP.NET Core 中的授权要求是实现 IAuthorizationRequirement 接口的任何类。这是一个空白标记接口,您可以将其应用于任何类,以指示它表示要求。

If the interface doesn’t have any members, you might be wondering what the requirement class needs to look like. Typically, they’re simple plain old CLR object (POCO) classes. The following listing shows AllowedInLoungeRequirement, which is about as simple as a requirement can get. It has no properties or methods; it implements the required IAuthorizationRequirement interface.
如果接口没有任何成员,您可能想知道 requirement 类需要是什么样子。通常,它们是简单的普通旧 CLR 对象 (POCO) 类。下面的清单显示了 AllowedInLoungeRequirement,这与要求所能获得的最低要求差不多。它没有属性或方法;它实现所需的 IAuthorizationRequirement 接口。

Listing 24.5 AllowedInLoungeRequirement

public class AllowedInLoungeRequirement
    : IAuthorizationRequirement { } ❶

❶ The interface identifies the class as an authorization requirement.
接口将类标识为授权要求。

This is the simplest form of requirement, but it’s also common to have one or two properties that make the requirement more generalized. For example, instead of creating the highly specific MustBe18YearsOldRequirement, you could create a parameterized MinimumAgeRequirement, as shown in the following listing. By providing the minimum age as a parameter to the requirement, you can reuse the requirement for other policies with different minimum-age requirements.
这是最简单的要求形式,但通常具有一两个使要求更通用的属性。例如,您可以创建参数化的 MinimumAgeRequirement,而不是创建高度具体的 MustBe18YearsOldRequirement,如下面的清单所示。通过提供最低年龄作为要求的参数,您可以将该要求重新用于具有不同最低年龄要求的其他保单。

Listing 24.6 The parameterized MinimumAgeRequirement
清单 24.6 参数化的 MinimumAgeRequirement

public class MinimumAgeRequirement : IAuthorizationRequirement ❶
{
public MinimumAgeRequirement(int minimumAge) ❷
{
MinimumAge = minimumAge;
}
public int MinimumAge { get; } ❸
}

❶ The interface identifies the class as an authorization requirement.
接口将类标识为授权要求。

❷ The minimum age is provided when the requirement is created.
创建要求时提供最低年龄。

❸ Handlers can use the exposed minimum age to determine whether the requirement is satisfied.
处理程序可以使用公开的最小年龄来确定是否满足要求。

The requirements are the easy part. They represent each of the components of the policy that must be satisfied for the policy to be satisfied overall. Note that requirements are meant to be lightweight objects that can be created “manually.” So while you can have constructor parameters, as shown in listing 24.6, you can’t use dependency injection (DI) here. That’s not as limiting as it sounds, because your handlers can use DI.
要求是最简单的部分。它们表示策略的每个组成部分,必须满足这些组成部分才能使策略总体上得到满足。请注意,需求是可以 “手动” 创建的轻量级对象。因此,虽然你可以有构造函数参数,如清单 24.6 所示,但你不能在这里使用依赖注入 (DI)。这并不像听起来那么限制,因为你的处理程序可以使用 DI。

CREATING A POLICY WITH MULTIPLE REQUIREMENTS
创建具有多个要求的策略

You’ve created the two requirements, so now you can configure the "CanAccessLounge" policy to use them. You configure your policies as you did before, in Program.cs.
您已经创建了这两个要求,因此现在可以配置 “CanAccessLounge” 策略来使用它们。您可以像以前一样在 Program.cs 中配置策略。

Listing 24.7 shows how to do this by creating an instance of each requirement and passing them to AuthorizationPolicyBuilder. The authorization handlers use these requirement objects when attempting to authorize the policy.
清单 24.7 展示了如何通过创建每个需求的实例并将它们传递给AuthorizationPolicyBuilder来做到这一点。授权处理程序在尝试授权策略时使用这些要求对象。

Listing 24.7 Creating an authorization policy with multiple requirements
清单 24.7 创建具有多个需求的授权策略

WebApplicationBuilder builder = WebApplication.CreateBuilder(args);
builder.services.AddAuthorization(options =>
{ ❶
options.AddPolicy( ❶
"CanEnterSecurity", ❶
policyBuilder => policyBuilder ❶
.RequireClaim(Claims.BoardingPassNumber)); ❶
options.AddPolicy( ❷
"CanAccessLounge", ❷
policyBuilder => policyBuilder.AddRequirements( ❸
new MinimumAgeRequirement(18), ❸
new AllowedInLoungeRequirement() ❸
));
});
// Additional configuration

❶ Adds the previous simple policy for passing through security
新增之前简单的通过安检策略

❷ Adds a new policy for the airport lounge, called CanAccessLounge
为机场贵宾室添加一项名为 CanAccessLounge 的新政策
❸ Adds an instance of each IAuthorizationRequirement object
添加每个 IAuthorizationRequirement 对象的实例

You now have a policy called "CanAccessLounge" with two requirements, so you can apply it to a Razor Page or action method using the [Authorize] attribute, in exactly the same way you did for the "CanEnterSecurity" policy:
现在,您有一个名为“CanAccessLounge”的策略,其中包含两个要求,因此您可以使用 [Authorize] 属性将其应用于 Razor 页面或作方法,其方式与对“CanEnterSecurity”策略执行的作完全相同:

[Authorize("CanAccessLounge")]
public class AirportLoungeModel : PageModel
{
public void OnGet() { }
}

When a request is routed to the AirportLounge.cshtml Razor Page, the authorize middleware executes the authorization policy and each of the requirements is inspected. But you saw earlier that the requirements are purely data; they indicate what needs to be fulfilled, but they don’t describe how that has to happen. For that, you need to write some handlers.
将请求路由到 AirportLounge.cshtml Razor 页面时,authorize 中间件将执行授权策略并检查每个要求。但您之前看到,这些要求纯粹是数据;它们指出了需要满足什么,但没有描述必须如何实现。为此,您需要编写一些处理程序。

CREATING AUTHORIZATION HANDLERS TO SATISFY YOUR REQUIREMENTS
创建授权处理程序以满足您的要求

Authorization handlers contain the logic of how a specific IAuthorizationRequirement can be satisfied. When executed, a handler can do one of three things:
授权处理程序包含如何满足特定 IAuthorizationRequirement 的逻辑。执行时,处理程序可以执行以下三项作之一:

• Mark the requirement handling as a success.
将需求处理标记为成功。

• Do nothing.
什么都不做。

• Explicitly fail the requirement.
明确不符合要求。

Handlers should implement AuthorizationHandler, where T is the type of requirement they handle. For example, the following listing shows a handler for AllowedInLoungeRequirement that checks whether the user has a claim called FrequentFlyerClass with a value of Gold.
处理程序应实现 AuthorizationHandler,其中 T 是它们处理的需求类型。例如,下面的清单显示了 AllowedInLoungeRequirement 的处理程序,该处理程序检查用户是否具有名为 FrequentFlyerClass 且值为 Gold 的声明。

Listing 24.8 FrequentFlyerHandler for AllowedInLoungeRequirement
清单 24.8 AllowedInLoungeRequirement 的 FrequentFlyerHandler

public class FrequentFlyerHandler :
AuthorizationHandler<AllowedInLoungeRequirement> ❶
{
protected override Task HandleRequirementAsync( ❷
AuthorizationHandlerContext context, ❸
AllowedInLoungeRequirement requirement) ❹
{
if(context.User.HasClaim("FrequentFlyerClass", "Gold")) ❺
{
context.Succeed(requirement); ❻
}
return Task.CompletedTask; ❼
}
}

❶ The handler implements AuthorizationHandler<T>.
处理程序实现 AuthorizationHandler<T>

❷ You must override the abstract HandleRequirementAsync method.
您必须重写抽象 HandleRequirementAsync 方法。

❸ The context contains details such as the ClaimsPrincipal user object.
上下文包含诸如 ClaimsPrincipal 用户对象之类的详细信息。

❹ The requirement instance to handle
要处理的要求实例

❺ Checks whether the user has the Frequent-FlyerClass claim with the Gold value
检查用户是否具有值为 Gold 的Frequent-FlyerClass 声明

❻ If the user had the necessary claim, marks the requirement as satisfied by calling Succeed
如果用户具有必要的声明,则通过调用 Succeed将要求标记为满足

❼ If the requirement wasn’t satisfied, does nothing
如果未满足要求,则不执行任何作

This handler is functionally equivalent to the simple RequireClaim() handler you saw at the start of section 24.4, but using the requirement and handler approach instead.
这个处理程序在功能上等同于你在 24.4 节开头看到的简单RequireClaim()处理程序,但使用的是需求和处理程序方法。

When a request is routed to the AirportLounge.cshtml Razor Page, the authorization middleware sees the [Authorize] attribute on the endpoint with the "CanAccessLounge" policy. It loops through all the requirements in the policy and all the handlers for each requirement, calling the HandleRequirementAsync method for each.‌
当请求路由到 AirportLounge.cshtml Razor 页面时,授权中间件会在具有“CanAccessLounge”策略的终结点上看到 [Authorize] 属性。它循环访问策略中的所有要求和每个要求的所有处理程序,并为每个要求调用 HandleRequirementAsync 方法。

The authorization middleware passes the current AuthorizationHandlerContext and the requirement to be checked to each handler. The current ClaimsPrincipal being authorized is exposed on the context as the User property. In listing 24.8, FrequentFlyerHandler uses the context to check for a claim called FrequentFlyerClass with the Gold value, and if it exists, indicates that the user is allowed to enter the airline lounge by calling Succeed().
授权中间件将当前 AuthorizationHandlerContext 和要检查的要求传递给每个处理程序。当前被授权的 ClaimsPrincipal 在上下文中作为 User 属性公开。在列表 24.8 中,FrequentFlyerHandler 使用上下文来检查名为 FrequentFlyerClass 且值为 Gold 的声明,如果存在,则表示允许用户通过调用 Succeed() 进入航空公司休息室。

NOTE Handlers mark a requirement as being satisfied by calling context .Succeed() and passing the requirement as an argument.
注意处理程序通过调用 context 将需求标记为满足。Succeed() 并将需求作为参数传递。

It’s important to note the behavior when the user doesn’t have the claim. FrequentFlyerHandler doesn’t do anything in this case; it returns a completed Task to satisfy the method signature.
请务必注意用户没有声明时的行为。在这种情况下,FrequentFlyerHandler 不执行任何作;它返回一个已完成的 Task 以满足方法签名。

NOTE Remember that if any of the handlers associated with a requirement passes, the requirement is a success. Only one of the handlers must succeed for the requirement to be satisfied.
注意:请记住,如果与要求关联的任何处理程序通过,则要求成功。只有一个处理程序必须成功才能满足要求。

This behavior, whereby you either call context.Succeed() or do nothing, is typical for authorization handlers. The following listing shows the implementation of IsAirlineEmployeeHandler, which uses a similar claim check to determine whether the requirement is satisfied.
此行为,即调用 context.Succeed() 或不执行任何作,是授权处理程序的典型特征。下面的清单显示了 IsAirlineEmployeeHandler 的实现,它使用类似的声明检查来确定是否满足要求。

Listing 24.9 IsAirlineEmployeeHandler

public class IsAirlineEmployeeHandler :
AuthorizationHandler<AllowedInLoungeRequirement> ❶
{
protected override Task HandleRequirementAsync( ❷
AuthorizationHandlerContext context, ❷
AllowedInLoungeRequirement requirement) ❷
{
if(context.User.HasClaim(c => c.Type == "EmployeeNumber")) ❸
{
context.Succeed(requirement); ❹
}
return Task.CompletedTask; ❺
}
}

❶ The handler implements AuthorizationHandler<T>.
处理程序实现 AuthorizationHandler<T>

❷ You must override the abstract HandleRequirementAsync method.
您必须覆盖抽象的 HandleRequirementAsync 方法。

❸ Checks whether the user has the EmployeeNumber claim
检查用户是否具有 EmployeeNumber 声明

❹ If the user has the necessary claim, marks the requirement as satisfied by calling Succeed
如果用户具有必要的声明,则通过调用 Succeed 将需求标记为满足

❺ If the requirement wasn’t satisfied, does nothing
如果不满足要求,则不执行任何作

I’ve left the implementation of MinimumAgeHandler for MinimumAgeRequirement as an exercise for the reader, as it’s similar to the handlers you have already seen. You can find an example implementation in the code samples for the chapter.
我将 MinimumAgeRequirement 的 MinimumAgeHandler 的实现留给读者作为练习,因为它类似于您已经看到的处理程序。您可以在本章的代码示例中找到示例实现。

TIP It’s possible to write generic handlers that can be used with multiple requirements, but I suggest sticking to handling a single requirement. If you need to extract some common functionality, move it to an external service, and call that from both handlers.
提示:可以编写可用于多个需求的通用处理程序,但我建议坚持处理单个需求。如果需要提取一些常用功能,请将其移动到外部服务,然后从两个处理程序中调用它。

This pattern of authorization handler is common, but in some cases, instead of checking for a success condition, you might want to check for a failure condition. In the airport example, you don’t want to authorize someone who was previously banned from the lounge, even if they would otherwise be allowed to enter.
这种授权处理程序模式很常见,但在某些情况下,您可能希望检查失败条件,而不是检查成功条件。在 airport 示例中,您不希望授权之前被禁止进入贵宾室的人,即使他们本来可以进入。

You can handle this scenario by using the context.Fail() method exposed on the context, as shown in the following listing. Calling Fail() in a handler always causes the requirement, and hence the whole policy, to fail. You should use it only when you want to guarantee failure, even if other handlers indicate success.
您可以使用上下文处理此方案。Fail() 方法,如下面的清单所示。在处理程序中调用 Fail() 总是会导致需求失败,从而导致整个策略失败。仅当您希望保证失败时,才应使用它,即使其他处理程序指示成功。

Listing 24.10 Calling context.Fail() in a handler to fail the requirement
清单 24.10 调用context.Fail()使需求失败

public class BannedFromLoungeHandler :
AuthorizationHandler<AllowedInLoungeRequirement> ❶
{
protected override Task HandleRequirementAsync( ❷
AuthorizationHandlerContext context, ❷
AllowedInLoungeRequirement requirement) ❷
{
if(context.User.HasClaim(c => c.Type == "IsBannedFromLounge")) ❸
{
context.Fail(); ❹
}
return Task.CompletedTask; ❺
}
}

❶ The handler implements AuthorizationHandler<T>.
处理程序实现 AuthorizationHandler<T>

❷ You must override the abstract HandleRequirementAsync method.
您必须重写抽象的 HandleRequirementAsync 方法。

❸ Checks whether the user has the IsBannedFromLounge claim
检查用户是否具有 IsBannedFromLounge 声明

❹ If the user has the claim, fails the requirement by calling Fail. The whole policy fails.
如果用户具有声明,则通过调用 Fail 来满足要求。整个策略失败了。

❺ If the claim wasn’t found, does nothing
如果未找到索赔,则不执行任何作

In most cases, your handlers will either call Succeed() or will do nothing, but the Fail() method is useful when you need a kill switch to guarantee that a requirement won’t be satisfied.
在大多数情况下,处理程序将调用 Succeed() 或不执行任何作,但当你需要一个终止开关来保证不会满足要求时,Fail() 方法非常有用。

NOTE Whether a handler calls Succeed(), Fail(), or neither, the authorization system always executes all the handlers for a requirement and all the requirements for a policy, so you can be sure your handlers will always be called.
注意:无论处理程序是调用 Succeed()、Fail(),还是两者都不调用,授权系统始终执行要求的所有处理程序和策略的所有要求,因此您可以确保始终调用处理程序。

The final step to complete your authorization implementation for the app is to register the authorization handlers with the DI container, as shown in the following listing.
完成应用程序的授权实现的最后一步是向 DI 容器注册授权处理程序,如下面的清单所示。

Listing 24.11 Registering the authorization handlers with the DI container
Listing 24.11 向 DI 容器注册授权处理程序

WebApplicationBuilder builder = WebApplication.CreateBuilder(args);
builder.Services.AddAuthorization(options =>
options.AddPolicy(
"CanEnterSecurity",
policyBuilder => policyBuilder
.RequireClaim(Claims.BoardingPassNumber));
options.AddPolicy(
"CanAccessLounge",
policyBuilder => policyBuilder.AddRequirements(
new MinimumAgeRequirement(18),
new AllowedInLoungeRequirement()
));
});
services.AddSingleton<IAuthorizationHandler, MinimumAgeHandler>();
services.AddSingleton<IAuthorizationHandler, FrequentFlyerHandler>();
services.AddSingleton<IAuthorizationHandler, BannedFromLoungeHandler>();
services.AddSingleton<IAuthorizationHandler, IsAirlineEmployeeHandler>();
// Additional configuration

For this app, the handlers don’t have any constructor dependencies, so I’ve registered them as singletons with the container. If your handlers have scoped or transient dependencies (the EF Core DbContext, for example), you might want to register them as scoped instead, as appropriate.
对于此应用程序,处理程序没有任何构造函数依赖项,因此我已将它们注册为容器中的单例。如果处理程序具有范围或暂时性依赖项(例如 EF Core DbContext),则可能需要根据需要将它们注册为范围依赖项。

NOTE Services are registered with a lifetime of transient, scoped, or singleton, as discussed in chapter 9.
注意:服务注册的生命周期为 transient、scoped 或 singleton,如第 9 章所述。

You can combine the concepts of policies, requirements, and handlers in many ways to achieve your goals for authorization in your application. The example in this section, although contrived, demonstrates the components you need to apply authorization declaratively at the action method or Razor Page level by creating policies and applying the [Authorize] attribute as appropriate.
您可以通过多种方式组合策略、要求和处理程序的概念,以实现应用程序中的授权目标。本部分中的示例虽然是人为的,但演示了通过创建策略并根据需要应用 [Authorize] 属性,在作方法或 Razor 页面级别以声明方式应用授权所需的组件。

As well as applying the [Authorize] attribute explicitly to actions and Razor Pages, you can configure it globally, so that a policy is applied to every endpoint in your application. Additionally, for Razor Pages you can apply different authorization policies to different folders. You can read more about applying authorization policies using conventions in Microsoft’s “Razor Pages authorization conventions in ASP.NET Core” documentation: http://mng.bz/nMm2.
除了将 [Authorize] 属性显式应用于作和 Razor Pages 之外,还可以全局配置它,以便将策略应用于应用程序中的每个终结点。此外,对于 Razor Pages,可以将不同的授权策略应用于不同的文件夹。您可以在 Microsoft 的“ASP.NET Core 中的 Razor Pages 授权约定”文档中阅读有关使用约定应用授权策略的更多信息:http://mng.bz/nMm2

There’s one area, however, where the [Authorize] attribute falls short: resource-based authorization. The [Authorize] attribute attaches metadata to an endpoint, so the authorization middleware can authorize the user before an endpoint is executed. But what if you need to authorize the action from within the endpoint?
但是,[Authorize] 属性在一个方面存在不足:基于资源的授权。[Authorize] 属性将元数据附加到终结点,以便授权中间件可以在执行终结点之前对用户进行授权。但是,如果您需要从终端节点内部授权作,该怎么办?

This is common when you’re applying authorization at the document or resource level. If users are allowed to edit only documents they created, you need to load the document before you can tell whether they’re allowed to edit it! This isn’t easy with the declarative [Authorize] attribute approach, so you must often use an alternative, imperative approach. In the next section you’ll see how to apply this resource-based authorization in a Razor Page handler.‌
当您在文档或资源级别应用授权时,这种情况很常见。如果仅允许用户编辑他们创建的文档,则需要先加载文档,然后才能判断是否允许他们编辑该文档!使用声明性 [Authorize] 属性方法,这并不容易,因此您必须经常使用替代的命令式方法。在下一部分中,你将了解如何在 Razor Page 处理程序中应用此基于资源的授权。

24.5 Controlling access with resource-based authorization‌

24.5 使用基于资源的授权控制访问

In this section you’ll learn about resource-based authorization. This is used when you need to know details about the resource being protected to determine whether a user is authorized. You’ll learn how to apply authorization policies manually using the IAuthorizationService and how to create resource-based AuthorizationHandlers.
在本节中,您将了解基于资源的授权。当您需要了解有关受保护资源的详细信息以确定用户是否获得授权时,可以使用此方法。您将了解如何使用 IAuthorizationService 手动应用授权策略,以及如何创建基于资源的 AuthorizationHandlers。

Resource-based authorization is a common problem for applications, especially when you have users who can create or edit some sort of document. Consider the recipe application you worked on in chapter 23. This app lets users create, view, and edit recipes.
基于资源的授权是应用程序的常见问题,尤其是当您拥有可以创建或编辑某种文档的用户时。考虑您在第 23 章中处理的配方应用程序。此应用程序允许用户创建、查看和编辑配方。

Up to this point, everyone can create new recipes, and anyone can edit any recipe, even if they haven’t logged in. Now you want to add some additional behavior:
到目前为止,每个人都可以创建新配方,任何人都可以编辑任何配方,即使他们尚未登录。现在,您需要添加一些其他行为:

• Only authenticated users should be able to create new recipes.
只有经过身份验证的用户才能创建新配方。

• You can edit only the recipes you created.
您只能编辑您创建的配方。

You’ve already seen how to achieve the first of these requirements: decorate the Create .cshtml Razor Page with an [Authorize] attribute and don’t specify a policy, as shown in the following listing. This will force the user to authenticate before they can create a new recipe.
你已了解如何实现这些要求中的第一个:使用 [Authorize] 属性装饰 Create .cshtml Razor 页面,并且不指定策略,如下面的列表所示。这将强制用户在创建新配方之前进行身份验证。

Listing 24.12 Adding AuthorizeAttribute to the Create.cshtml Razor Page
列表 24.12 将 AuthorizeAttribute 添加到 Create.cshtml Razor 页面

[Authorize] ❶
public class CreateModel : PageModel
{[BindProperty]
public CreateRecipeCommand Input { get; set; }
public void OnGet() ❷
{ ❷
Input = new CreateRecipeCommand(); ❷
} ❷
public async Task<IActionResult> OnPost() ❷
{ ❷
// Method body not shown for brevity ❷
} ❷
}

❶ Users must be authenticated to execute the Create.cshtml Razor Page.
用户必须经过身份验证才能执行 Create.cshtml Razor 页面。
❷ All page handlers are protected. You can apply [Authorize] only to the PageModel, not handlers.
所有页面处理程序都受到保护。只能将 [Authorize] 应用于 PageModel,而不能应用于处理程序。

TIP As with all filters, you can apply the [Authorize] attribute only to the Razor Page, not to individual page handlers. The attribute applies to all page handlers in the Razor Page.
提示:与所有筛选器一样,只能将 [Authorize] 属性应用于 Razor 页面,而不能应用于单个页面处理程序。该属性适用于 Razor 页面中的所有页面处理程序。

Adding the [Authorize] attribute fulfills your first requirement, but unfortunately, with the techniques you’ve seen so far, you have no way to fulfill the second. You could apply a policy that either permits or denies a user the ability to edit all recipes, but there’s currently no easy way to restrict this so that a user can only edit their own recipes.
添加 [Authorize] 属性可以满足第一个要求,但遗憾的是,使用你目前看到的技术,无法满足第二个要求。您可以应用一个策略来允许或拒绝用户编辑所有配方,但目前没有简单的方法来限制这一点,以便用户只能编辑自己的配方。

To find out who created the Recipe, you must first load it from the database. Only then can you attempt to authorize the user, taking the specific recipe (resource) into account. The following listing shows a partially implemented page handler for how this might look, where authorization occurs partway through the method, after the Recipe object has been loaded.
要找出 Recipe 的创建者,您必须先从数据库中加载它。只有这样,您才能尝试授权用户,同时考虑特定的配方(资源)。下面的清单显示了一个部分实现的页面处理程序,其中授权发生在方法的中途,在 Recipe 对象加载之后。

Listing 24.13 The Edit.cshtml page must load the Recipe
清单 24.13 Edit.cshtml 页面必须加载 Recipe

public IActionResult OnGet(int id) ❶
{
var recipe = _service.GetRecipe(id); ❷
var createdById = recipe.CreatedById; ❷
// Authorize user based on createdById ❸
if(isAuthorized) ❹
{ ❹
return View(recipe); ❹
} ❹
}

❶ The id of the recipe to edit is provided by model binding.
要编辑的配方的 id 由模型绑定提供。
❷ You must load the Recipe from the database before you know who created it.
您必须先从数据库中加载 Recipe,然后才能知道谁创建了它。
❸ You must authorize the current user to verify that they’re allowed to edit this specific Recipe.
您必须授权当前用户验证是否允许他们编辑此特定配方。
❹ The action method can continue only if the user was authorized.
只有在用户获得授权的情况下,作方法才能继续。

You need access to the resource (in this case, the Recipe entity) to perform the authorization, so the declarative [Authorize] attribute can’t help you. In section 24.5.1 you’ll see the approach you need to take to handle these situations and to apply authorization inside your endpoints.
您需要访问资源(在本例中为 Recipe 实体)才能执行授权,因此声明性 [Authorize] 属性无法为您提供帮助。在 Section 24.5.1 中,您将看到处理这些情况并在 endpoints 内应用授权所需采用的方法。

WARNING Be careful when exposing the integer ID of your entities in the URL, as in listing 24.13. Users will be able to edit every entity by modifying the ID in the URL to access a different entity. Be sure to apply authorization checks, or you could expose a security vulnerability called insecure direct object reference (IDOR). You can read more about IDOR at http://mng.bz/QPnG.
警告:在 URL 中公开实体的整数 ID 时要小心,如清单 24.13 所示。用户将能够通过修改 URL 中的 ID 来编辑每个实体,以访问不同的实体。请务必应用授权检查,否则可能会暴露称为不安全直接对象引用 (IDOR) 的安全漏洞。您可以在 http://mng.bz/QPnG 上阅读有关 IDOR 的更多信息。

24.5.1 Manually authorizing requests with IAuthorizationService‌

24.5.1 使用 IAuthorizationService 手动授权请求

All of the approaches to authorization so far have been declarative. You apply the [Authorize] attribute, with or without a policy name, and you let the framework take care of performing the authorization itself.
到目前为止,所有授权方法都是声明性的。您可以应用 [Authorize] 属性(无论是否具有策略名称),并让框架自行执行授权。

For this recipe-editing example, you need to use imperative authorization, so you can authorize the user after you’ve loaded the Recipe from the database. Instead of applying a marker saying “Authorize this method,” you need to write some of the authorization code yourself.
对于此配方编辑示例,您需要使用命令式授权,以便您可以在从数据库加载配方后授权用户。您需要自己编写一些授权代码,而不是应用“Authorize this method”标记。

DEFINITION Declarative and imperative are two different styles of programming. Declarative programming describes what you’re trying to achieve and lets the framework figure out how to achieve it. Imperative programming describes how to achieve something by providing each of the steps needed.‌
定义:声明式和命令式是两种不同的编程风格。声明式编程描述了您要实现的目标,并让框架弄清楚如何实现它。命令式编程描述了如何通过提供所需的每个步骤来实现某些目标。

ASP.NET Core exposes IAuthorizationService, which you can inject into any of your services or endpoints for imperative authorization. The following listing shows how you could update the Edit.cshtml Razor Page (shown partially in listing 24.13) to use the IAuthorizationService to verify whether the action is allowed to continue execution.
ASP.NET Core 公开了 IAuthorizationService,您可以将其注入到任何服务或终端节点中,以实现命令式授权。以下列表显示了如何更新 Edit.cshtml Razor 页面(部分显示在列表 24.13 中),以使用 IAuthorizationService 来验证是否允许作继续执行。

Listing 24.14 Using IAuthorizationService for resource-based authorization
清单 24.14 使用 IAuthorizationService 进行基于资源的授权

[Authorize] ❶
public class EditModel : PageModel
{
[BindProperty]
public Recipe Recipe { get; set; }
private readonly RecipeService _service;
private readonly IAuthorizationService _authService; ❷
public EditModel(
RecipeService service,
IAuthorizationService authService) ❷
{
_service = service;
_authService = authService; ❷
}
public async Task<IActionResult> OnGet(int id)
{
Recipe = _service.GetRecipe(id); ❸
AuthorizationResult authResult = await _authService ❹
.AuthorizeAsync(User, Recipe, "CanManageRecipe"); ❹
if (!authResult.Succeeded) ❺
{ ❺
return new ForbidResult(); ❺
} ❺
return Page(); ❻
}
}

❶ Only authenticated users should be allowed to edit recipes.
只允许经过身份验证的用户编辑配方。
❷ IAuthorizationService is injected into the class constructor using DI.
使用 DI 将 IAuthorizationService 注入到类构造函数中。
❸ Loads the Recipe from the database
从数据库加载配方
❹ Calls IAuthorizationService, providing ClaimsPrinicipal, resource, and the policy name
调用 IAuthorizationService,提供 ClaimsPrinicipal、资源和策略名称
❺ If authorization failed, returns a Forbidden result
如果授权失败,则返回 Forbidden 结果
❻ If authorization was successful, continues displaying the Razor Page
如果授权成功,则继续显示 Razor 页面

IAuthorizationService exposes an AuthorizeAsync method, which requires three things to authorize the request:
IAuthorizationService 公开了一个 AuthorizeAsync 方法,该方法需要三项内容来授权请求:

• The ClaimsPrincipal user object, exposed on the PageModel as User
ClaimsPrincipal 用户对象,在 PageModel 上作为 User 公开

• The resource being authorized: Recipe
正在授权的资源:Recipe

• The policy to evaluate: "CanManageRecipe"
要评估的策略:“CanManageRecipe”

The authorization attempt returns an AuthorizationResult object, which indicates whether the attempt was successful via the Succeeded property. If the attempt wasn’t successful, you should return a new ForbidResult, which is converted to an HTTP 403 Forbidden response or redirects the user to the “access denied” page, depending on whether you’re building a traditional web app or an API app.‌‌‌
授权尝试返回一个 AuthorizationResult 对象,该对象通过 Succeeded 属性指示尝试是否成功。如果尝试不成功,您应该返回一个新的 ForbidResult,该结果将转换为 HTTP 403 Forbidden 响应或将用户重定向到“access denied”页面,具体取决于您是构建传统的 Web 应用程序还是 API 应用程序。

NOTE As mentioned in section 24.2.2, which type of response is generated depends on which authentication services are configured. The default Identity configuration, used by Razor Pages, generates redirects. API apps typically generate HTTP 401 and 403 responses instead.
注意:如第 24.2.2 节所述,生成的响应类型取决于配置的身份验证服务。Razor Pages 使用的默认标识配置会生成重定向。API 应用程序通常会生成 HTTP 401 和 403 响应。

You’ve configured the imperative authorization in the Edit.cshtml Razor Page itself, but you still need to define the "CanManageRecipe" policy that you use to authorize the user. This is the same process as for declarative authorization, so you have to do the following:
你已在 Edit.cshtml Razor 页面本身中配置了命令性授权,但仍需要定义用于授权用户的“CanManageRecipe”策略。此过程与声明式授权的过程相同,因此您必须执行以下作:

• Create a policy in Program.cs by calling AddAuthorization().
通过调用 AddAuthorization() 在 Program.cs 中创建策略。
• Define one or more requirements for the policy.
定义策略的一个或多个要求。
• Define one or more handlers for each requirement.
为每个要求定义一个或多个处理程序。
• Register the handlers in the DI container.
在 DI 容器中注册处理程序。

With the exception of the handler, these steps are identical to the declarative authorization approach with the [Authorize] attribute, so I run through them only briefly here.
除了处理程序之外,这些步骤与具有 [Authorize] 属性的声明性授权方法相同,因此我在这里只简要介绍一下它们。

First, you can create a simple IAuthorizationRequirement. As with many requirements, this contains no data and simply implements the marker interface:
首先,您可以创建一个简单的 IAuthorizationRequirement。与许多要求一样,这不包含任何数据,只实现 marker 接口:

public class IsRecipeOwnerRequirement : IAuthorizationRequirement { }

Defining the policy in Program.cs is similarly simple, as you have only a single requirement. Note that there’s nothing resource-specific in any of this code so far:
在 Program.cs 中定义策略同样简单,因为您只有一个需求。请注意,到目前为止,此代码中没有任何特定于资源的内容:

builder.Services.AddAuthorization(options => { options.AddPolicy("CanManageRecipe", policyBuilder =>
policyBuilder.AddRequirements(new IsRecipeOwnerRequirement()));
});

You’re halfway there. All you need to do now is create an authorization handler for IsRecipeOwnerRequirement and register it with the DI container.
你已经成功了一半。现在,您需要做的就是为 IsRecipeOwnerRequirement 创建一个授权处理程序,并将其注册到 DI 容器中。

24.5.2 Creating a resource-based AuthorizationHandler‌

24.5.2 创建基于资源的 AuthorizationHandler

Resource-based authorization handlers are essentially the same as the authorization handler implementations you saw in section 24.4.2. The only difference is that the handler also has access to the resource being authorized.
基于资源的授权处理程序本质上与您在 Section 24.4.2 中看到的授权处理程序实现相同。唯一的区别是处理程序还可以访问被授权的资源。

To create a resource-based handler, you should derive from the AuthorizationHandler<TRequirement, TResource> base class, where TRequirement is the type of requirement to handle and TResource is the type of resource that you provide when calling IAuthorizationService. Compare this with the AuthorizationHandler<T> class you implemented previously, where you specified only the requirement.
若要创建基于资源的处理程序,应从AuthorizationHandler<TRequirement, TResource> 基类派生,其中 TRequirement 是要处理的要求类型,TResource 是调用 IAuthorizationService 时提供的资源类型。将此类与您之前实现的类进行比较,在AuthorizationHandler<T> 该类中,您只指定了要求。

The next listing shows the handler implementation for your recipe application. You can see that you’ve specified the requirement as IsRecipeOwnerRequirement and the resource as Recipe, and you have implemented the HandleRequirementAsync method.
下一个清单显示了配方应用程序的处理程序实现。您可以看到,您已将要求指定为 IsRecipeOwnerRequirement,将资源指定为 Recipe,并且已实现 HandleRequirementAsync 方法。

Listing 24.15 IsRecipeOwnerHandler for resource-based authorization
列表 24.15 IsRecipeOwnerHandler 用于基于资源的授权

public class IsRecipeOwnerHandler :
AuthorizationHandler<IsRecipeOwnerRequirement, Recipe> ❶
{
private readonly UserManager<ApplicationUser> _userManager; ❷
public IsRecipeOwnerHandler( ❷
UserManager<ApplicationUser> userManager) ❷
{ ❷
_userManager = userManager; ❷
} ❷
protected override async Task HandleRequirementAsync(
AuthorizationHandlerContext context,
IsRecipeOwnerRequirement requirement,
Recipe resource) ❸
{
var appUser = await _userManager.GetUserAsync(context.User);
if(appUser == null) ❹
{
return;
}
if(resource.CreatedById == appUser.Id) ❺
{
context.Succeed(requirement); ❻
}
}
}

❶ Implements the necessary base class, specifying the requirement and resource type
实现必要的基类,指定需求和资源类型
❷ Injects an instance of the UserManager<T> class using DI
使用 DI 注入 UserManager<T> 类的实例
❸ As well as the context and requirement, you’re provided the resource instance.
除了上下文和需求外,还为您提供资源实例。
❹ If you aren’t authenticated, appUser will be null.
如果您未通过身份验证,appUser 将为 null。
❺ Checks whether the current user created the Recipe by checking the CreatedById property
通过检查CreatedById 属性来检查当前用户是否创建了配方
❻ If the user created the document, Succeeds the requirement; otherwise, does nothing
如果用户创建了文档,则 Succeeds the requirement;否则,不执行任何作

This handler is slightly more complicated than the examples you’ve seen previously, primarily because you’re using an additional service, UserManager<>, to load the ApplicationUser entity based on ClaimsPrincipal from the request.
此处理程序比您之前看到的示例稍微复杂一些,主要是因为您正在使用附加服务UserManager<> 来根据请求中的 ClaimsPrincipal 加载 ApplicationUser 实体。

NOTE In practice, the ClaimsPrincipal will likely already have the Id added as a claim, making the extra step unnecessary in this case. This example shows the general pattern if you need to use dependency-injected services.
注意:实际上,ClaimsPrincipal 可能已将 Id 添加为声明,因此在这种情况下不需要额外的步骤。此示例显示了需要使用 dependency-injected 服务时的一般模式。

The other significant difference is that the HandleRequirementAsync method has provided the Recipe resource as a method argument. This is the same object you provided when calling AuthorizeAsync on IAuthorizationService. You can use this resource to verify whether the current user created it. If so, you Succeed() the requirement; otherwise, you do nothing.
另一个显著区别是 HandleRequirementAsync 方法已将 Recipe 资源作为方法参数提供。这与您在 IAuthorizationService 上调用 AuthorizeAsync 时提供的对象相同。您可以使用此资源来验证它是否为当前用户创建。如果是这样,则 Succeed() 要求;否则,您什么都不做。

The final task is adding IsRecipeOwnerHandler to the DI container. Your handler uses an additional dependency, UserManager<>, that uses EF Core, so you should register the handler as a scoped service:
最后一项任务是将 IsRecipeOwnerHandler 添加到 DI 容器中。处理程序使用使用 EF Core 的附加依赖项 UserManager<>,因此应将处理程序注册为范围服务:

services.AddScoped<IAuthorizationHandler, IsRecipeOwnerHandler>();

TIP If you’re wondering how to know whether you register a handler as scoped or a singleton, think back to chapter 9.
提示:如果您想知道如何知道将处理程序注册为 scoped 还是 singleton,请回想第 9 章。

Essentially, if you have scoped dependencies, you must register the handler as scoped; otherwise, singleton is fine.
本质上,如果你有 scoped 依赖项,则必须将处理程序注册为 scoped;否则,Singleton 就可以了。

With everything hooked up, you can take the application for a spin. If you try to edit a recipe you didn’t create by clicking the Edit button on the recipe, you’ll either be redirected to the login page (if you hadn’t yet authenticated) or see an “access denied” page, as shown in figure 24.7.
连接好所有内容后,您可以试用该应用程序。如果您尝试通过单击配方上的 Edit 按钮来编辑不是创建的配方,您将被重定向到登录页面(如果您尚未进行身份验证)或看到 “access denied” 页面,如图 24.7 所示。

alt text

Figure 24.7 If you’re logged in but not authorized to edit a recipe, you’ll be redirected to an “Access Denied” page. If you’re not logged in, you’ll be redirected to the Login page.
图 24.7 如果您已登录但无权编辑配方,您将被重定向到“Access Denied”页面。如果您尚未登录,您将被重定向到 Login (登录页面)。

By using resource-based authorization, you’re able to enact more fine-grained authorization requirements that you can apply at the level of an individual document or resource.
通过使用基于资源的授权,您可以制定更精细的授权要求,这些要求可以应用于单个文档或资源级别。

Instead of being able to authorize only that a user can edit any recipe, you can authorize whether a user can edit this recipe.
您可以授权用户是否可以编辑此配方,而不是仅授权用户可以编辑任何配方。

All the authorization techniques you’ve seen so far have focused on server-side checks. Both the [Authorize] attribute and resource-based authorization approaches focus on stopping users from executing a protected endpoint on the server. This is important from a security point of view, but there’s another aspect you should consider: the user experience when they don’t have permission.
到目前为止,您看到的所有授权技术都集中在服务器端检查上。[Authorize] 属性和基于资源的授权方法都侧重于阻止用户在服务器上执行受保护的终结点。从安全角度来看,这很重要,但您应该考虑另一个方面:用户没有权限时的体验。

You’ve protected the code executing on the server, but arguably the Edit button should never have been visible to the user if they weren’t going to be allowed to edit the recipe! In the next section we’ll look at how you can conditionally hide the Edit button by using resource-based authorization in your view models.‌
您已经保护了在服务器上执行的代码,但可以说,如果不允许用户编辑配方,则 Edit (编辑) 按钮永远不应该对用户可见!在下一节中,我们将了解如何在视图模型中使用基于资源的授权来有条件地隐藏 Edit 按钮。

Resource-based authorization versus business-logic checks
基于资源的授权与业务逻辑检查

The value proposition of using the ASP.NET Core framework’s resource- based authorization approach isn’t always clear compared with using simple, manual, business-logic based checks (as in listing 24.13). Using IAuthorizationService and the authorization infrastructure adds an explicit dependency on the ASP.NET Core framework that you may not want to use if you’re performing authorization checks in your domain model services.
与使用简单的、手动的、基于业务逻辑的检查(如清单 24.13 所示)相比,使用 ASP.NET Core 框架基于资源的授权方法的价值主张并不总是很清楚。使用 IAuthorizationService 和授权基础结构会添加对 ASP.NET Core 框架的显式依赖项,如果您在域模型服务中执行授权检查,则可能不想使用该框架。

This is a valid concern without an easy answer. I tend to favor simple business-logic checks inside the domain, without relying on the framework’s authorization infrastructure, to make my domain easier to test and framework-independent. But doing so loses some of the benefits of such a framework:
这是一个合理的担忧,没有一个简单的答案。我倾向于在域内进行简单的业务逻辑检查,而不依赖框架的授权基础设施,以使我的域更易于测试且独立于框架。但这样做会失去这种框架的一些好处:

• The IAuthorizationService uses declarative policies, even though you are calling the authorization framework imperatively.
IAuthorizationService 使用声明性策略,即使您以命令方式调用授权框架也是如此。

• You can decouple the need to authorize an action from the actual requirements.
您可以将授权作的需要与实际要求分离。

• You can easily rely on peripheral services and properties of the request, which may be harder (or undesirable) with business logic checks.
您可以轻松依赖请求的外围服务和属性,这对于业务逻辑检查可能更难(或不可取)。

You can achieve these benefits in business-logic checks, but that typically requires creating a lot of infrastructure too, so you lose a lot of the benefits of keeping things simple. Which approach is best will depend on the specifics of your application design, and there may well be cases for using both.
你可以在业务逻辑检查中实现这些好处,但这通常需要创建大量的基础设施,所以你会失去很多保持简单的好处。哪种方法最好,将取决于应用程序设计的具体情况,并且很可能会出现同时使用这两种方法的情况。

For example, one possible approach is to use the basic [Authorize] attribute as described in section 24.2.1 to prevent anonymous access to your APIs, potentially with simple, coarse policies applied to your APIs. You would then rely on “manual” business-logic checks against the ClaimsPrincipal in your domain as required. This may reduce a lot of the complexity and indirection associated with the ASP.NET Core authorization system.
例如,一种可能的方法是使用第 24.2.1 节中所述的基本 [Authorize] 属性来防止匿名访问您的 API,可能会使用简单、粗略的策略应用于您的 API。然后,您可以根据需要对域中的 ClaimsPrincipal 进行“手动”业务逻辑检查。这可能会降低与 ASP.NET Core 授权系统相关的许多复杂性和间接性。

24.6 Hiding HTML elements from unauthorized users‌

24.6 对未经授权的用户隐藏 HTML 元素

All the authorization code you’ve seen so far has revolved around protecting endpoints on the server side, rather than modifying the UI for users. This is important and should be the starting point whenever you add authorization to an app.
到目前为止,您看到的所有授权代码都围绕着保护服务器端的端点,而不是为用户修改 UI。这很重要,每当您向应用程序添加授权时,都应该从此作为起点。

WARNING Malicious users can easily circumvent your UI, so it’s important to always authorize your endpoints on the server, never on the client alone.
警告:恶意用户可以轻松绕过您的 UI,因此请务必始终在服务器上授权您的终端节点,而不是仅在客户端上授权。

From a user-experience point of view, however, it’s not friendly to have buttons or links that look like they’re available but present an “access denied” page when they’re clicked. A better experience would be for the links to be disabled or not visible at all.
然而,从用户体验的角度来看,让按钮或链接看起来可用但在点击时显示 “拒绝访问” 页面并不友好。更好的体验是禁用链接或根本不显示链接。

You can achieve this in several ways in your own Razor templates. In this section I’m going to show you how to add an additional property to the PageModel, called CanEditRecipe, which the Razor view template will use to change the rendered HTML.
您可以在自己的 Razor 模板中通过多种方式实现此目的。在本节中,我将向您展示如何向 PageModel 添加一个名为 CanEditRecipe 的附加属性,Razor 视图模板将使用该属性来更改呈现的 HTML。

TIP An alternative approach would be to inject IAuthorizationService directly into the view template using the @inject directive, as you saw in chapter 9, but you should generally prefer to keep logic like this in the page handler.
提示:另一种方法是使用 @inject 指令将 IAuthorizationService 直接注入视图模板中,如第 9 章所示,但您通常更愿意在页面处理程序中保留这样的逻辑。

When you’re finished, the rendered HTML looks unchanged for recipes you created, but the Edit button will be hidden when viewing a recipe someone else created, as shown in figure 24.8.
完成后,您创建的配方的渲染 HTML 看起来没有变化,但是在查看其他人创建的配方时,Edit (编辑) 按钮将被隐藏,如图 24.8 所示。

alt text

Figure 24.8 Although the HTML will appear unchanged for recipes you created, the Edit button is hidden when you view recipes created by a different user.
图 24.8 虽然您创建的配方的 HTML 看起来不变,但当您查看其他用户创建的配方时,Edit(编辑)按钮会隐藏。

Listing 24.16 shows the PageModel for the View.cshtml Razor Page, which is used to render the recipe page shown in figure 24.8. As you’ve already seen for resource-based authorization, you can use the IAuthorizationService to determine whether the current user has permission to edit the Recipe by calling AuthorizeAsync.
列表 24.16 显示了 View.cshtml Razor 页面的 PageModel,它用于呈现图 24.8 中所示的配方页面。正如您已经看到的基于资源的授权,您可以使用 IAuthorizationService 通过调用 AuthorizeAsync 来确定当前用户是否有权编辑配方。

You can then set this value as an additional property on the PageModel, called CanEditRecipe.
然后,您可以将此值设置为 PageModel 上的附加属性,称为 CanEditRecipe。

Listing 24.16 Setting the CanEditRecipe property in the View.cshtml Razor Page
列表 24.16 在 View.cshtml Razor 页面中设置 CanEditRecipe 属性

public class ViewModel : PageModel
{
public Recipe Recipe { get; set; }
public bool CanEditRecipe { get; set; } ❶
private readonly RecipeService _service;
private readonly IAuthorizationService _authService;
public ViewModel(
RecipeService service,
IAuthorizationService authService)
{
_service = service;
_authService = authService;
}
public async Task<IActionResult> OnGetAsync(int id)
{
Recipe = _service.GetRecipe(id); ❷
AuthorizationResult isAuthorised = await _authService ❸
.AuthorizeAsync(User, recipe, "CanManageRecipe"); ❸
CanEditRecipe = isAuthorised.Succeeded; ❹
return Page();
}
}

❶ The CanEditRecipe property will be used to control whether the Edit button is rendered.
CanEditRecipe 属性将用于控制是否呈现 Edit 按钮。

❷ Loads the Recipe resource for use with IAuthorizationService
加载 Recipe 资源以用于 IAuthorizationService

❸ Verifies whether the user is authorized to edit the Recipe
验证用户是否有权编辑Recipe

❹ Sets the CanEditRecipe property on the PageModel as appropriate
根据需要在 PageModel 上设置 CanEditRecipe 属性

Instead of blocking execution of the Razor Page (as you did previously in the Edit.cshtml page handler), use the result of the call to AuthorizeAsync to set the CanEditRecipe value on the PageModel. You can then make a simple change to the View.chstml Razor template, adding an if clause around the rendering of the Edit link:
不要阻止 Razor 页面的执行(就像之前在 Edit.cshtml 页面处理程序中所做的那样),而是使用对 AuthorizeAsync 的调用结果在 PageModel 上设置 CanEditRecipe 值。然后,您可以对 View.chstml Razor 模板进行简单的更改,在 Edit 链接的呈现周围添加 if 子句:

@if(Model.CanEditRecipe)
{
<a asp-page="Edit" asp-route-id="@Model.Id" class="btn btn-primary">Edit</a>
}

This ensures that only users who will be able to execute the Edit.cshtml Razor Page can see the link to that page.
这可确保只有能够执行 Edit.cshtml Razor 页面的用户才能看到指向该页面的链接。

WARNING The if clause means that the Edit link will not be displayed unless the current user created the recipe, but you should never rely on client-side security alone. It’s important to keep the server-side authorization check in your Edit.cshtml page handler to protect against any direct access attempts. Even if a malicious user circumvents your UI, the server-side authorization ensures that your application is secure.
警告:if 子句表示除非当前用户创建了配方,否则不会显示 Edit 链接,但您绝不应仅依赖客户端安全性。请务必在 Edit.cshtml 页面处理程序中保留服务器端授权检查,以防止任何直接访问尝试。即使恶意用户绕过了您的 UI,服务器端授权也可以确保您的应用程序是安全的。

With that final change, you’ve finished adding authorization to the recipe application. Anonymous users can browse the recipes created by others, but they must log in to create new recipes. Additionally, authenticated users can edit only the recipes that they created, and they won’t see an Edit link for other people’s recipes.
完成最后的更改后,您已完成向配方应用程序添加授权。匿名用户可以浏览其他人创建的配方,但他们必须登录才能创建新配方。此外,经过身份验证的用户只能编辑他们创建的配方,并且不会看到其他人的配方的 Edit (编辑) 链接。

Authorization is a key aspect of most apps, so it’s important to bear it in mind from an early point. Although it’s possible to add authorization later, as you did with the recipe app, it’s normally preferable to consider authorization sooner rather than later in the app’s development.
授权是大多数应用程序的关键方面,因此尽早牢记这一点非常重要。尽管可以稍后添加授权,就像您对配方应用程序所做的那样,但通常最好在应用程序开发中尽早考虑授权。

In chapters 23 and 24 we focused on authentication and authorization for traditional web applications using Razor. In chapter 25 we’ll look at API applications, how authentication works with tokens, and how to add authorization policies to minimal APIs.
在第 23 章和第 24 章中,我们重点介绍了使用 Razor 对传统 Web 应用程序的身份验证和授权。在第 25 章中,我们将介绍 API 应用程序、身份验证如何与令牌配合使用,以及如何将授权策略添加到最小的 API。

27.7 Summary

27.7 总结

Authentication is the process of determining who a user is. It’s distinct from authorization, the process of determining what a user can do. Authentication typically occurs before authorization.
身份验证是确定用户身份的过程。它与 authorization 不同,授权是确定用户可以做什么的过程。身份验证通常在授权之前进行。

You can use the authorization services in any part of your application, but it’s typically applied using the AuthorizationMiddleware by calling UseAuthorization(). This should be placed after the calls to UseRouting() and UseAuthentication(), and before the call to UseEndpoints() for correct operation.
您可以在应用程序的任何部分使用授权服务,但通常通过调用 UseAuthorization() 使用 AuthorizationMiddleware 来应用授权服务。这应该放在调用 UseRouting() 和 UseAuthentication() 之后,以及调用 UseEndpoints() 之前,以便正确作。

You can protect Razor Pages and MVC actions by applying the [Authorize] attribute. The routing middleware records the presence of the attribute as metadata with the selected endpoint. The authorization middleware uses this metadata to determine how to authorize the request.
可以通过应用 [Authorize] 属性来保护 Razor Pages 和 MVC作。路由中间件将属性的存在记录为所选终端节点的元数据。授权中间件使用此元数据来确定如何授权请求。

The simplest form of authorization requires that a user be authenticated before executing an action. You can achieve this by applying the [Authorize] attribute to a Razor Page, action, controller, or globally. You can also apply attributes conventionally to a subset of Razor Pages.
最简单的授权形式要求在执行作之前对用户进行身份验证。可以通过将 [Authorize] 属性应用于 Razor 页面、作、控制器或全局来实现此目的。您还可以按惯例将属性应用于 Razor Pages 的子集。

Claims-based authorization uses the current user’s claims to determine whether they’re authorized to execute an action. You define the claims needed to execute an action in a policy.
基于声明的授权使用当前用户的声明来确定他们是否有权执行作。您可以定义在策略中执行作所需的声明。

Policies have a name and are configured in Program.cs as part of the call to AddAuthorization() in ConfigureServices. You define the policy using AddPolicy(), passing in a name and a lambda that defines the claims needed.
策略有一个名称,并在 Program.cs 中作为对 ConfigureServices 中 AddAuthorization() 的调用的一部分进行配置。您可以使用 AddPolicy() 定义策略,传入定义所需声明的名称和 lambda。

You can apply a policy to an action or Razor Page by specifying the policy in the authorize attribute; for example, [Authorize("CanAccessLounge")]. This policy will be used by the AuthorizationMiddleware to determine whether the user is allowed to execute the selected endpoint.
您可以通过在 authorize 属性中指定策略,将策略应用于作或 Razor 页面;例如,[Authorize(“CanAccessLounge”)]。AuthorizationMiddleware 将使用此策略来确定是否允许用户执行所选端点。

In a Razor Pages app, if an unauthenticated user attempts to execute a protected action, they’ll be redirected to the login page for your app. If they’re already authenticated but don’t have the required claims, they’ll be shown an “access denied” page instead.
在 Razor Pages 应用中,如果未经身份验证的用户尝试执行受保护的作,他们将被重定向到应用的登录页面。如果他们已经通过身份验证但没有所需的声明,则会显示“access denied”页面。

For complex authorization policies, you can build a custom policy. A custom policy consists of one or more requirements, and a requirement can have one or more handlers. You can combine requirements and handlers to create policies of arbitrary complexity.
对于复杂的授权策略,您可以构建自定义策略。自定义策略由一个或多个要求组成,一个要求可以有一个或多个处理程序。您可以组合需求和处理程序来创建任意复杂度的策略。

For a policy to be authorized, every requirement must be satisfied. For a requirement to be satisfied, one or more of the associated handlers must indicate success, and none must indicate explicit failure.
要授权策略,必须满足所有要求。要满足要求,一个或多个关联的处理程序必须指示成功,并且没有处理程序必须指示显式失败。

AuthorizationHandler<T> contains the logic that determines whether a requirement is satisfied. For example, if a requirement requires that users be over 18, the handler could look for a DateOfBirth claim and calculate the user’s age.
AuthorizationHandler<T> 包含确定是否满足要求的逻辑。例如,如果要求要求用户年满 18 岁,则处理程序可以查找 DateOfBirth 声明并计算用户的年龄。

Handlers can mark a requirement as satisfied by calling context.Succeed (requirement). If a handler can’t satisfy the requirement, it shouldn’t call anything on the context, as a different handler could call Succeed() and satisfy the requirement.
处理程序可以通过调用 context 将需求标记为满足。成功 (要求)。如果处理程序无法满足要求,则它不应在上下文中调用任何内容,因为其他处理程序可以调用 Succeed() 并满足要求。

If a handler calls context.Fail(), the requirement fails, even if a different handler marked it as a success using Succeed(). Use this method only if you want to override any calls to Succeed() from other handlers to ensure that the authorization policy will fail authorization.
如果处理程序调用 context.Fail(),则要求失败,即使其他处理程序使用 Succeed() 将其标记为成功也是如此。仅当您想要覆盖其他处理程序对 Succeed() 的任何调用以确保授权策略授权失败时,才使用此方法。

Resource-based authorization uses details of the resource being protected to determine whether the current user is authorized. For example, if a user is allowed to edit only their own documents, you need to know the author of the document before you can determine whether they’re authorized.
基于资源的授权使用受保护资源的详细信息来确定当前用户是否获得授权。例如,如果只允许用户编辑自己的文档,则需要先知道文档的作者,然后才能确定他们是否获得授权。

Resource-based authorization uses the same policy, requirements, and handler system as before. Instead of applying authorization with the [Authorize] attribute, you must manually call IAuthorizationService and provide the resource you’re protecting.
基于资源的授权使用与以前相同的策略、要求和处理程序系统。您必须手动调用 IAuthorizationService 并提供您正在保护的资源,而不是使用 [Authorize] 属性应用授权。

You can modify the user interface to account for user authorization by adding additional properties to your PageModel. If a user isn’t authorized to execute an action, you can remove or disable the link to that action method in the UI. You should always authorize on the server, even if you’ve removed links from the UI.
您可以通过向 PageModel 添加其他属性来修改用户界面以考虑用户授权。如果用户无权执行作,您可以在 UI 中删除或禁用指向该作方法的链接。您应该始终在服务器上授权,即使您已从 UI 中删除了链接。

ASP.NET Core in Action 23 Authentication: Adding users to your application with Identity

Part 4 Securing and deploying your applications
第 4 部分:保护和部署应用程序

So far in the book you’ve learned how to use minimal APIs,Razor Pages, and Model-View-Controller (MVC) controllers to build both server-rendered applications and APIs. You know how to dynamically generate JavaScript Object Notation (JSON) and HTML code based on incoming requests, and how to use configuration and dependency injection to customize your app’s behavior at runtime. In part 4 you’ll learn how to add users and profiles to your app and how to publish and secure your apps.
到目前为止,在本书中,您已经学习了如何使用最少的 API、Razor Pages 和模型-视图-控制器 (MVC) 控制器来构建服务器渲染的应用程序和 API。您知道如何根据传入请求动态生成 JavaScript 对象表示法 (JSON) 和 HTML 代码,以及如何使用配置和依赖项注入来自定义应用程序在运行时的行为。在第 4 部分中,您将学习如何将用户和配置文件添加到您的应用程序,以及如何发布和保护您的应用程序。

In chapters 23 through 25 you’ll learn how to protect your applications with authentication and authorization. In chapter 23 you’ll see how you can add ASP.NET Core Identity to your apps so that users can log in and enjoy a customized experience. You’ll learn how to protect your Razor Pages apps using authorization in chapter 24 so that only some users can access certain pages in your app. In chapter 25 you’ll learn how to apply the same protections to your minimal API and web API applications.
在第 23 章到第 25 章中,您将学习如何使用身份验证和授权保护您的应用程序。在第 23 章中,您将了解如何将 ASP.NET Core Identity 添加到您的应用程序中,以便用户可以登录并享受自定义体验。您将在第 24 章中了解如何使用授权保护 Razor Pages 应用程序,以便只有部分用户可以访问应用程序中的某些页面。在第 25 章中,您将学习如何将相同的保护应用于您的最小 API 和 Web API 应用程序。

Adding logging to your application is one of those activities that’s often left until after you discover a problem in production. Adding sensible logging from the get-go will help you quickly diagnose and fix errors as they arise. Chapter 26 introduces the logging framework built into ASP.NET Core. You’ll see how you can use it to write log messages to a wide variety of locations, whether it’s the console, a file, or a third-party remote-logging service.
向应用程序添加日志记录是通常要等到您在生产中发现问题后才进行的活动之一。从一开始就添加合理的日志记录将帮助您快速诊断和修复出现的错误。第 26 章介绍了 ASP.NET Core 中内置的日志记录框架。您将了解如何使用它将日志消息写入各种位置,无论是控制台、文件还是第三方远程日志记录服务。

By this point you’ll have all the fundamentals to build a production application with ASP.NET Core. In chapter 27 I cover the steps required to make your app live, including how to publish an app to Internet Information Services (IIS) and how to configure the URLs your app listens on.
此时,您将拥有使用 ASP.NET Core 构建生产应用程序的所有基础知识。在第 27 章中,我将介绍使您的应用程序上线所需的步骤,包括如何将应用程序发布到 Internet Information Services (IIS) 以及如何配置您的应用程序侦听的 URL。

Before you expose your application to the world, an important part of web development is securing your app correctly. Even if you don’t feel you have any sensitive data in your application, you must make sure to protect your users from attacks by adhering to security best practices. You’ll learn how to configure HTTPS for your application in chapter 28 and why this is a vital step for modern web development. Similarly, in chapter 29 I describe some common security vulnerabilities, how attackers can exploit them, and what you can do to protect your applications.
在向全世界公开您的应用程序之前,Web 开发的一个重要部分是正确保护您的应用程序。即使您认为应用程序中没有任何敏感数据,也必须确保通过遵守安全最佳实践来保护您的用户免受攻击。您将在第 28 章中学习如何为您的应用程序配置 HTTPS,以及为什么这是现代 Web 开发的关键步骤。同样,在第 29 章中,我描述了一些常见的安全漏洞,攻击者如何利用它们,以及您可以采取哪些措施来保护您的应用程序。

23 Authentication: Adding users to your application with Identity
23 身份验证:使用 Identity 将用户添加到您的应用程序

This chapter covers
本章介绍

• Seeing how authentication works in web apps in ASP.NET Core
了解身份验证在 ASP.NET Core中的 Web 应用程序中的工作原理
• Creating a project using the ASP.NET Core Identity system
使用 ASP.NET Core Identity 系统创建项目
• Adding user functionality to an existing web app
向现有 Web 应用程序添加用户功能
• Customizing the default ASP.NET Core Identity UI
自定义默认 ASP.NET Core Identity UI

One of the selling points of a web framework like ASP.NET Core is the ability to provide a dynamic app, customized to individual users. Many apps have the concept of an “account” with the service, which you can “sign in” to and get a different experience.
像 ASP.NET Core 这样的 Web 框架的卖点之一是能够提供针对个人用户定制的动态应用程序。许多应用程序都具有该服务的“帐户”概念,您可以“登录”该帐户并获得不同的体验。

Depending on the service, an account gives you varying things. On some apps you may have to sign in to get access to additional features, and on others you might see suggested articles. On an e-commerce app, you’d be able to place orders and view your past orders; on Stack Overflow you can post questions and answers; on a news site you might get a customized experience based on previous articles you’ve viewed.
根据服务的不同,账户会为您提供不同的内容。在某些应用程序上,您可能必须登录才能访问其他功能,而在其他应用程序上,您可能会看到推荐的文章。在电子商务应用程序上,您将能够下订单并查看您过去的订单;在 Stack Overflow 上,您可以发布问题和答案;在新闻网站上,您可能会根据您以前查看过的文章获得自定义体验。

When you think about adding users to your application, you typically have two aspects to consider:
当您考虑向应用程序添加用户时,通常需要考虑两个方面:

• Authentication—The process of creating users and letting them log in to your app
身份验证 - 创建用户并允许其登录应用程序的过程
• Authorization—Customizing the experience and controlling what users can do, based on the current logged-in user
授权 - 根据当前登录的用户自定义体验并控制用户可以执行的作

In this chapter I’m going to be discussing the first of these points, authentication and membership. In the next chapter I’ll tackle the second point, authorization. In section 23.1 I discuss the difference between authentication and authorization, how authentication works in a traditional ASP.NET Core web app, and ways you can architect your system to provide sign-in functionality. I don’t discuss API applications in detail in this chapter, though many of the authentication principles apply to both styles of app. I discuss API applications chapter 25.
在本章中,我将讨论第一点,身份验证和成员资格。在下一章中,我将讨论第二点,授权。在第 23.1 节中,我将讨论身份验证和授权之间的区别、身份验证在传统 ASP.NET Core Web 应用程序中的工作原理,以及构建系统以提供登录功能的方法。在本章中,我不会详细讨论 API 应用程序,尽管许多身份验证原则适用于这两种类型的应用程序。我将讨论 API 应用程序第 25 章。

In section 23.2 I introduce a user-management system called ASP.NET Core Identity (Identity for short). Identity integrates with Entity Framework Core (EF Core) and provides services for creating and managing users, storing and validating passwords, and signing users in and out of your app.
在 Section 23.2 中,我介绍了一个名为 ASP.NET Core Identity(简称 Identity)的用户管理系统。Identity 与 Entity Framework Core (EF Core) 集成,并提供用于创建和管理用户、存储和验证密码以及让用户登录和注销应用程序的服务。

In section 23.3 you’ll create an app using a default template that includes ASP.NET Core Identity out of the box. This gives you an app to explore and see the features Identity provides, as well as everything it doesn’t.
在 Section 23.3 中,您将使用默认模板创建一个应用程序,该模板包含开箱即用 ASP.NET Core Identity。这为您提供了一个应用程序来探索和查看 Identity 提供的功能,以及它不提供的所有内容。

Creating an app is great for seeing how the pieces fit together, but you’ll often need to add users and authentication to an existing app. In section 23.4 you’ll see the steps required to add ASP.NET Core Identity to an existing app.
创建应用程序非常适合查看各个部分如何组合在一起,但您通常需要向现有应用程序添加用户和身份验证。在 Section 23.4 中,您将看到将 ASP.NET Core Identity 添加到现有应用程序所需的步骤。

In sections 23.5 and 23.6 you’ll learn how to replace pages from the default Identity UI by scaffolding individual pages. In section 23.5 you’ll see how to customize the Razor templates to generate different HTML on the user registration page, and in section 23.6 you’ll learn how to customize the logic associated with a Razor Page. You’ll see how to store additional information about a user (such as their name or date of birth) and how to provide them permissions that you can later use to customize the app’s behavior (if the user is a VIP, for example).
在第 23.5 节和第 23.6 节中,您将学习如何通过搭建单个页面的基架来替换默认 Identity UI 中的页面。在第 23.5 节中,你将了解如何自定义 Razor 模板以在用户注册页上生成不同的 HTML,在第 23.6 节中,你将了解如何自定义与 Razor 页面关联的逻辑。您将了解如何存储有关用户的其他信息(例如他们的姓名或出生日期),以及如何为他们提供稍后可用于自定义应用程序行为的权限(例如,如果用户是 VIP)。

Before we look at the ASP.NET Core Identity system specifically, let’s take a look at authentication and authorization in ASP.NET Core—what’s happening when you sign in to a website and how you can design your apps to provide this functionality.
在我们具体研究 ASP.NET Core Identity 系统之前,让我们先看一下 ASP.NET Core 中的身份验证和授权 - 当您登录网站时会发生什么,以及如何设计您的应用程序来提供此功能。

23.1 Introducing authentication and authorization

23.1 身份验证和授权简介

When you add sign-in functionality to your app and control access to certain functions based on the currently signed-in user, you’re using two distinct aspects of security:
当您向应用添加登录功能并根据当前登录的用户控制对某些功能的访问时,您将使用两个不同的安全性方面:

• Authentication—The process of determining who you are
身份验证 - 确定您是谁的过程
• Authorization—The process of determining what you’re allowed to do
授权 - 确定允许您执行的作的过程

Generally you need to know who the user is before you can determine what they’re allowed to do, so authentication always comes first, followed by authorization. In this chapter we’re looking only at authentication; we’ll cover authorization in chapter 24.
通常,您需要先知道用户是谁,然后才能确定允许他们做什么,因此身份验证始终排在第一位,然后是授权。在本章中,我们只关注身份验证;我们将在第 24 章中介绍授权。

In this section I start by discussing how ASP.NET Core thinks about users, and I cover some of the terminology and concepts that are central to authentication. I found this to be the hardest part to grasp when I learned about authentication, so I’ll take it slow.
在本节中,我首先讨论 ASP.NET Core 如何看待用户,并介绍一些对身份验证至关重要的术语和概念。当我了解身份验证时,我发现这是最难掌握的部分,因此我会慢慢来。

Next, we’ll look at what it means to sign in to a traditional web app. After all, you only provide your password and sign into an app on a single page; how does the app know the request came from you for subsequent requests?
接下来,我们将了解登录到传统 Web 应用程序意味着什么。毕竟,您只需在单个页面上提供密码并登录应用程序;应用程序如何知道您的后续请求来自您?

23.1.1 Understanding users and claims in ASP.NET Core

23.1.1 了解 ASP.NET Core 中的用户和声明

The concept of a user is baked into ASP.NET Core. In chapter 3 you learned that the HTTP server, Kestrel, creates an HttpContext object for every request it receives. This object is responsible for storing all the details related to that request, such as the request URL, any headers sent, and the body of the request.
用户的概念已融入 ASP.NET Core。在第 3 章中,您了解了 HTTP 服务器 Kestrel 为它收到的每个请求创建一个 HttpContext 对象。此对象负责存储与该请求相关的所有详细信息,例如请求 URL、发送的任何标头以及请求正文。

The HttpContext object also exposes the current principal for a request as the User property. This is ASP.NET Core’s view of which user made the request. Any time your app needs to know who the current user is or what they’re allowed to do, it can look at the HttpContext.User principal.
HttpContext 对象还将请求的当前主体公开为 User 属性。这是 ASP.NET Core 对哪个用户发出请求的视图。每当你的应用程序需要知道当前用户是谁或允许他们做什么时,它都可以查看 HttpContext.User 主体。

DEFINITION You can think of the principal as the user of your app.
定义:您可以将主体视为应用程序的用户。

In ASP.NET Core, principals are implemented using the ClaimsPrincipal class, which has a collection of claims associated with it, as shown in figure 23.1.
在 ASP.NET Core 中,主体是使用 ClaimsPrincipal 类实现的,该类具有与之关联的声明集合,如图 23.1 所示。

alt text

Figure 23.1 The principal is the current user, implemented as ClaimsPrincipal. It contains a collection of Claims that describe the user.
图 23.1 主体是当前用户,实现为 ClaimsPrincipal。它包含描述用户的 Claims 集合。

You can think about claims as properties of the current user. For example, you could have claims for things like email, name, and date of birth.
您可以将声明视为当前用户的属性。例如,您可以对电子邮件、姓名和出生日期等内容提出索赔。

DEFINITION A claim is a single piece of information about a principal; it consists of a claim type and an optional value.
定义:索赔是有关委托人的单个信息;它由 Claim 类型和 Optional Value 组成。

Claims can also be indirectly related to permissions and authorization, so you could have a claim called HasAdminAccess or IsVipCustomer. These would be stored in the same way—as claims associated with the user principal.
声明也可以与权限和授权间接相关,因此您可以有一个名为 HasAdminAccess 或 IsVipCustomer 的声明。这些请求的存储方式与与用户主体关联的声明相同。

NOTE Earlier versions of ASP.NET used a role-based approach to security rather than a claims-based approach. The ClaimsPrincipal used in ASP.NET Core is compatible with this approach for legacy reasons, but you should use the claims-based approach for new apps.
注意:早期版本的 ASP.NET 使用基于角色的安全方法,而不是基于声明的方法。由于遗留原因,ASP.NET Core 中使用的 ClaimsPrincipal 与此方法兼容,但对于新应用,应使用基于声明的方法。

Kestrel assigns a user principal to every request that arrives at your app. Initially, that principal is a generic, anonymous, unauthenticated principal with no claims. How do you log in, and how does ASP.NET Core know that you’ve logged in on subsequent requests?
Kestrel 为到达应用程序的每个请求分配一个用户主体。最初,该委托人是通用的、匿名的、未经身份验证的委托人,没有声明。您如何登录,ASP.NET Core 如何知道您已登录后续请求?

In the next section we’ll look at how authentication works in a traditional web app using ASP.NET Core and the process of signing into a user account.
在下一节中,我们将了解使用 ASP.NET Core 在传统 Web 应用程序中进行身份验证的工作原理,以及登录用户帐户的过程。

23.1.2 Authentication in ASP.NET Core: Services and middleware

23.1.2 ASP.NET Core 中的身份验证:服务和中间件

Adding authentication to any web app involves a few moving parts. The same general process applies whether you’re building a traditional web app or a client-side app (though there are often differences in the latter, as I discuss in chapter 25):
向任何 Web 应用程序添加身份验证都涉及一些移动部件。无论您是构建传统的 Web 应用程序还是客户端应用程序,相同的一般过程都适用(尽管后者经常存在差异,正如我在第 25 章中讨论的那样):

  1. The client sends an identifier and a secret to the app to identify the current user. For example, you could send an email address (identifier) and a password (secret).
    客户端向应用程序发送标识符和密钥以识别当前用户。例如,您可以发送电子邮件地址 (identifier) 和密码 (secret)。

  2. The app verifies that the identifier corresponds to a user known by the app and that the corresponding secret is correct.
    应用程序验证标识符是否对应于应用程序已知的用户,以及相应的密钥是否正确。

  3. If the identifier and secret are valid, the app can set the principal for the current request, but it also needs a way of storing these details for subsequent requests. For traditional web apps, this is typically achieved by storing an encrypted version of the user principal in a cookie.
    如果标识符和密钥有效,则应用程序可以为当前请求设置主体,但它还需要一种方法来存储这些详细信息以供后续请求使用。对于传统的 Web 应用程序,这通常是通过将用户主体的加密版本存储在 Cookie 中来实现的。

This is the typical flow for most web apps, but in this section I’m going to look at how it works in ASP.NET Core. The overall process is the same, but it’s good to see how this pattern fits into the services, middleware, and Model-View-Controller (MVC) aspects of an ASP.NET Core application. We’ll step through the various pieces at play in a typical app when you sign in as a user, what that means, and how you can make subsequent requests as that user.
这是大多数 Web 应用程序的典型流程,但在本节中,我将介绍它在 ASP.NET Core 中的工作原理。整个过程是相同的,但很高兴看到此模式如何适应 ASP.NET Core 应用程序的服务、中间件和模型-视图-控制器 (MVC) 方面。我们将逐步介绍当您以用户身份登录时,典型应用程序中的各个部分、这意味着什么,以及您如何以该用户身份发出后续请求。

Signing in to an ASP.NET Core application
登录到 ASP.NET Core 应用程序

When you first arrive on a site and sign in to a traditional web app, the app will send you to a sign-in page and ask you to enter your username and password. After you submit the form to the server, the app redirects you to a new page, and you’re magically logged in! Figure 23.2 shows what’s happening behind the scenes in an ASP.NET Core app when you submit the form.
当您首次访问站点并登录到传统的 Web 应用程序时,该应用程序会将您转到登录页面,并要求您输入用户名和密码。将表单提交到服务器后,应用程序会将您重定向到新页面,然后您神奇地登录了!图 23.2 显示了当您提交表单时 ASP.NET Core 应用程序中的幕后情况。

alt text
Figure 23.2 Signing in to an ASP.NET Core application. SignInManager is responsible for setting HttpContext.User to the new principal and serializing the principal to the encrypted cookie.
图 23.2 登录到 ASP.NET Core 应用程序。SignInManager 负责将 HttpContext.User 设置为新主体,并将主体序列化为加密的 Cookie。

This figure shows the series of steps from the moment you submit the login form on a Razor Page to the point the redirect is returned to the browser. When the request first arrives, Kestrel creates an anonymous user principal and assigns it to the HttpContext.User property. The request is then routed to the Login.cshtml Razor Page, which reads the email and password from the request using model binding.
此图显示了从您在 Razor 页面上提交登录表单到将重定向返回到浏览器的一系列步骤。当请求首次到达时,Kestrel 会创建一个匿名用户主体,并将其分配给 HttpContext.User 属性。然后,该请求将路由到 Login.cshtml Razor 页面,该页面使用模型绑定从请求中读取电子邮件和密码。

The meaty work happens inside the SignInManager service. This is responsible for loading a user entity with the provided username from the database and validating that the password they provided is correct.
繁重的工作发生在 SignInManager 服务内部。这负责使用从数据库中提供的用户名加载用户实体,并验证他们提供的密码是否正确。

Warning Never store passwords in the database directly. They should be hashed using a strong one-way algorithm. The ASP.NET Core Identity system does this for you, but it’s always wise to reiterate this point!
警告:切勿将密码直接存储在数据库中。它们应该使用强大的单向算法进行哈希处理。ASP.NET Core Identity 系统为您执行此作,但重申这一点始终是明智的!

If the password is correct, SignInManager creates a new ClaimsPrincipal from the user entity it loaded from the database and adds the appropriate claims, such as the email address. It then replaces the old, anonymous HttpContext.User principal with the new, authenticated principal.
如果密码正确,SignInManager 将从它从数据库中加载的用户实体创建新的 ClaimsPrincipal,并添加相应的声明,例如电子邮件地址。然后,它将旧的匿名 HttpContext.User 主体替换为经过身份验证的新主体。

Finally, SignInManager serializes the principal, encrypts it, and stores it as a cookie. A cookie is a small piece of text that’s sent back and forth between the browser and your app along with each request, consisting of a name and a value.
最后,SignInManager 序列化主体,对其进行加密,并将其存储为 Cookie。Cookie 是一小段文本,它与每个请求一起在浏览器和应用程序之间来回发送,由名称和值组成。

This authentication process explains how you can set the user for a request when they first log in to your app, but what about subsequent requests? You send your password only when you first log in to an app, so how does the app know that it’s the same user making the request?
此身份验证过程说明了如何在用户首次登录您的应用程序时为用户设置请求,但后续请求呢?您仅在首次登录应用程序时发送密码,那么该应用程序如何知道它是发出请求的同一用户?

Authenticating users for subsequent requests
为后续请求对用户进行身份验证

The key to persisting your identity across multiple requests lies in the final step of figure 23.2, where you serialized the principal in a cookie. Browsers automatically send this cookie with all requests made to your app, so you don’t need to provide your password with every request.
在多个请求中保留身份的关键在于图 23.2 的最后一步,在该步骤中,您在 cookie 中序列化了主体。浏览器会自动将此 Cookie 与向您的应用发出的所有请求一起发送,因此您无需为每个请求提供密码。

ASP.NET Core uses the authentication cookie sent with the requests to rehydrate a ClaimsPrincipal and set the HttpContext.User principal for the request, as shown in figure 23.3. The important thing to note is when this process happens—in the AuthenticationMiddleware.
ASP.NET Core 使用随请求发送的身份验证 Cookie 来解除冻结 ClaimsPrincipal 并为请求设置 HttpContext.User 主体,如图 23.3 所示。需要注意的重要一点是此过程何时发生 — 在 AuthenticationMiddleware 中。

alt text

Figure 23.3 A subsequent request after signing in to an application. The cookie sent with the request contains the user principal, which is validated and used to authenticate the request.
图 23.3 登录应用程序后的后续请求。随请求发送的 Cookie 包含用户主体,该主体经过验证并用于对请求进行身份验证。

When a request containing the authentication cookie is received, Kestrel creates the default, unauthenticated, anonymous principal and assigns it to the HttpContext.User principal. Any middleware that runs before the AuthenticationMiddleware sees the request as unauthenticated, even if there’s a valid cookie.
收到包含身份验证 Cookie 的请求时,Kestrel 会创建默认的、未经身份验证的匿名主体,并将其分配给 HttpContext.User 主体。在 AuthenticationMiddleware 之前运行的任何中间件都会将请求视为未经身份验证,即使存在有效的 cookie。

Tip If it looks like your authentication system isn’t working, double-check your middleware pipeline. Only middleware that runs after AuthenticationMiddleware will see the request as authenticated.
提示:如果您的身份验证系统看起来无法正常工作,请仔细检查您的中间件管道。只有在 AuthenticationMiddleware 之后运行的中间件才会看到请求经过身份验证。

The AuthenticationMiddleware is responsible for setting the current user for a request. The middleware calls the authentication services, which reads the cookie from the request, decrypts it, and deserializes it to obtain the ClaimsPrincipal created when the user logged in.
AuthenticationMiddleware 负责为请求设置当前用户。中间件调用身份验证服务,该服务从请求中读取 Cookie,对其进行解密,然后对其进行反序列化,以获取在用户登录时创建的 ClaimsPrincipal。

The AuthenticationMiddleware sets the HttpContext.User principal to the new, authenticated principal. All subsequent middleware now knows the user principal for the request and can adjust its behavior accordingly (for example, displaying the user’s name on the home page or restricting access to some areas of the app).
AuthenticationMiddleware 将 HttpContext.User 主体设置为经过身份验证的新主体。现在,所有后续中间件都知道请求的用户主体,并可以相应地调整其行为(例如,在主页上显示用户名或限制对应用程序某些区域的访问)。

NOTE The AuthenticationMiddleware is responsible only for authenticating incoming requests and setting the ClaimsPrincipal if the request contains an authentication cookie. It is not responsible for redirecting unauthenticated requests to the login page or rejecting unauthorized requests; that is handled by the AuthorizationMiddleware, as you’ll see in chapter 24.
注意:AuthenticationMiddleware 只负责对传入请求进行身份验证,并在请求包含身份验证 Cookie 时设置 ClaimsPrincipal。它不负责将未经身份验证的请求重定向到登录页面或拒绝未经授权的请求;它由 AuthorizationMiddleware 处理,您将在第 24 章中看到。

The process described so far, in which a single app authenticates the user when they log in and sets a cookie that’s read on subsequent requests, is common with traditional web apps, but it isn’t the only possibility. In chapter 25 we’ll take a look at authentication for web API applications, used by client-side and mobile apps and at how the authentication system changes for those scenarios.
到目前为止描述的过程,即单个应用程序在用户登录时对用户进行身份验证,并设置在后续请求中读取的 cookie,这在传统 Web 应用程序中很常见,但并不是唯一的可能性。在第 25 章中,我们将介绍客户端和移动应用程序使用的 Web API 应用程序的身份验证,以及这些场景的身份验证系统如何变化。

Another thing to consider is where you store the authentication details for users of your app. In figure 23.2 I showed the authentication services loading the user authentication details from your app’s database, but that’s only one option.
要考虑的另一件事是存储应用程序用户的身份验证详细信息的位置。在图 23.2 中,我展示了从应用程序数据库中加载用户身份验证详细信息的身份验证服务,但这只是一个选项。

Another option is to delegate the authentication responsibilities to a third-party identity provider, such as Okta, Auth0, Azure Active Directory B2B/B2C, or even Facebook. These manage users for you, so user information and passwords are stored in their database rather than your own. The biggest advantage of this approach is that you don’t have to worry about making sure your customer data is safe; you can be pretty sure that a third party will protect it, as it’s their whole business.
另一种选择是将身份验证责任委托给第三方身份提供商,例如 Okta、Auth0、Azure Active Directory B2B/B2C 甚至 Facebook。这些 Bug 会为您管理用户,因此用户信息和密码存储在他们的数据库中,而不是您自己的数据库中。这种方法的最大优点是您不必担心确保客户数据的安全;您可以非常确定第三方会保护它,因为这是他们的全部业务。

Tip Wherever possible, I recommend this approach, as it delegates security responsibilities to someone else. You can’t lose your users’ details if you never had them! Make sure to understand the differences in providers, however. With a provider like Auth0, you would own the profiles created, whereas with a provider like Facebook, you don’t!
提示:我尽可能推荐这种方法,因为它将安全责任委托给其他人。如果您从未拥有用户的详细信息,您就不会丢失它们!但是,请务必了解提供程序之间的差异。使用像 Auth0 这样的提供商,您将拥有创建的配置文件,而使用像 Facebook 这样的提供商,您将不拥有!

Each provider provides instructions on how to integrate with their identity services, ideally using the OpenID Connect (OIDC) specification. This typically involves configuring some authentication services in your application, adding some configuration, and delegating the authentication process itself to the external provider. These providers can be used with your API apps too, as I discuss in chapter 25.
每个提供商都提供了有关如何与其身份服务集成的说明,最好使用 OpenID Connect (OIDC) 规范。这通常涉及在应用程序中配置一些身份验证服务、添加一些配置以及将身份验证过程本身委托给外部提供商。这些提供程序也可以用于您的 API 应用程序,正如我在第 25 章中讨论的那样。

NOTE Hooking up your apps and APIs to use an identity provider can require a fair amount of tedious configuration, both in the app and the identity provider, but if you follow the provider’s documentation you should have plain sailing. For example, you can follow the documentation for adding authentication to a traditional web app using Microsoft’s Identity Platform here: http://mng.bz/4D9w.
注意:将应用程序和 API 挂接以使用身份提供商可能需要在应用程序和身份提供商中进行大量繁琐的配置,但如果您遵循提供商的文档,您应该会一帆风顺。例如,您可以按照以下文档使用 Microsoft 的 Identity Platform 将身份验证添加到传统 Web 应用程序:http://mng.bz/4D9w

While I recommend using an external identity provider where possible, sometimes you really want to store all the authentication details of your users directly in your app. That’s the approach I describe in this chapter.
虽然我建议尽可能使用外部身份提供商,但有时您确实希望将用户的所有身份验证详细信息直接存储在您的应用程序中。这就是我在本章中描述的方法。

ASP.NET Core Identity (hereafter shortened to Identity) is a system that makes building the user-management aspect of your app. It handles all the boilerplate for saving and loading users to a database, as well as best practices for security, such as user lockout, password hashing, and multifactor authentication.
ASP.NET Core Identity(以下简称 Identity)是一个用于构建应用程序的用户管理方面的系统。它处理将用户保存和加载到数据库的所有样板,以及安全性最佳实践,例如用户锁定、密码哈希和多重身份验证。

DEFINITION Multifactor authentication (MFA), and the subset two-factor authentication (2FA) require both a password and an extra piece of information to sign in. This could involve sending a code to a user’s phone by Short Message Service (SMS) or using a mobile app to generate a code, for example.
定义:多重身份验证 (MFA) 和子集双重身份验证 (2FA) 需要密码和额外的信息才能登录。例如,这可能涉及通过短信服务 (SMS) 向用户的手机发送验证码,或使用移动应用生成验证码。

In the next section I’m going to talk about the ASP.NET Core Identity system, the problems it solves, when you’d want to use it, and when you might not want to use it. In section 23.3 we take a look at some code and see ASP.NET Core Identity in action.
在下一节中,我将讨论 ASP.NET Core Identity 系统、它解决的问题、何时要使用它以及何时可能不想使用它。在 Section 23.3 中,我们看了一些代码,并看到了 Core Identity ASP.NET 实际应用。

23.2 What is ASP.NET Core Identity?

23.2 什么是 ASP.NET Core Identity?

Whenever you need to add nontrivial behaviors to your application, you typically need to add users and authentication. That means you’ll need a way of persisting details about your users, such as their usernames and passwords.
每当需要向应用程序添加重要行为时,通常需要添加用户和身份验证。这意味着您需要一种方法来保留有关用户的详细信息,例如他们的用户名和密码。

This might seem like a relatively simple requirement, but given that this is related to security and people’s personal details, it’s important you get it right. As well as storing the claims for each user, it’s important to store passwords using a strong hashing algorithm to allow users to use MFA where possible and to protect against brute-force attacks, to name a few of the many requirements. Although it’s perfectly possible to write all the code to do this manually and to build your own authentication and membership system, I highly recommend you don’t.
这似乎是一个相对简单的要求,但考虑到这与安全和人们的个人详细信息有关,因此请务必正确处理。除了存储每个用户的声明外,使用强大的哈希算法存储密码也很重要,这样用户就可以尽可能使用 MFA 并防止暴力攻击,仅举几例。尽管完全可以编写所有代码来手动执行此作并构建您自己的身份验证和成员资格系统,但我强烈建议您不要这样做。

I’ve already mentioned third-party identity providers such as Auth0 and Azure Active Directory. These Software as a Service (SaaS) solutions take care of the user-management and authentication aspects of your app for you. If you’re in the process of moving apps to the cloud generally, solutions like these can make a lot of sense.
我已经提到了第三方身份提供商,例如 Auth0 和 Azure Active Directory。这些软件即服务 (SaaS) 解决方案为您处理应用程序的用户管理和身份验证方面。如果您通常正在将应用程序迁移到云,那么像这样的解决方案可能非常有意义。

If you can’t or don’t want to use these third-party solutions, I recommend you consider using the ASP.NET Core Identity system to store and manage user details in your database. ASP.NET Core Identity takes care of most of the boilerplate associated with authentication, but it remains flexible and lets you control the login process for users if you need to.
如果您不能或不想使用这些第三方解决方案,我建议您考虑使用 ASP.NET Core Identity 系统在您的数据库中存储和管理用户详细信息。ASP.NET Core Identity 负责与身份验证相关的大部分样板,但它仍然保持灵活性,并允许您根据需要控制用户的登录过程。

NOTE ASP.NET Core Identity is an evolution of the legacy .NET Framework ASP.NET Identity system, with some design improvements and update to work with ASP.NET Core.
注意: ASP.NET Core Identity 是旧版 .NET Framework ASP.NET Identity 系统的演变,经过一些设计改进和更新以与 ASP.NET Core 配合使用。

By default, ASP.NET Core Identity uses EF Core to store user details in the database. If you’re already using EF Core in your project, this is a perfect fit. Alternatively, it’s possible to write your own stores for loading and saving user details in another way.
默认情况下,ASP.NET Core Identity 使用 EF Core 将用户详细信息存储在数据库中。如果你已在项目中使用 EF Core,则这是一个完美的选择。或者,可以编写自己的 store 以另一种方式加载和保存用户详细信息。

Identity takes care of the low-level parts of user management, as shown in table 23.1. As you can see from this list, Identity gives you a lot, but not everything—by a long shot!
Identity 负责用户 Management 的低级部分,如 Table 23.1 所示。从这个列表中可以看出,Identity 能给你很多,但不是全部——很长一段时间!

Table 23.1 Which services are and aren’t handled by ASP.NET Core Identity
表 23.1 哪些服务由 ASP.NET Core Identity 处理,哪些服务不由 Core Identity 处理

Managed by ASP.NET Core Identity Requires implementing by the developer
Database schema for storing users and claims UI for logging in, creating, and managing users (Razor Pages or controllers); included in an optional package that provides a default UI
Creating a user in the database Sending email messages
Password validation and rules Customizing claims for users (adding new claims)
Handling user account lockout (to prevent brute-force attacks) Configuring third-party identity providers
Managing and generating MFA/2FA codes Integration into MFA such as sending SMS messages, time-based one-time password (TOTP) authenticator apps, or hardware keys
Generating password-reset tokens -
Saving additional claims to the database -
Managing third-party identity providers (for example, Facebook, Google, and Twitter) -

The biggest missing piece is the fact that you need to provide all the UI for the application, as well as tying all the individual Identity services together to create a functioning sign-in process. That’s a big missing piece, but it makes the Identity system extremely flexible.
最大的缺失部分是您需要为应用程序提供所有 UI,以及将所有单独的 Identity 服务捆绑在一起以创建有效的登录过程。这是一个很大的缺失部分,但它使 Identity 系统非常灵活。

Luckily, ASP.NET Core includes a helper NuGet library, Microsoft.AspNetCore.Identity.UI, that gives you the whole of the UI boilerplate for free. That’s over 30 Razor Pages with functionality for logging in, registering users, using 2FA, and using external login providers, among other features. You can still customize these pages if you need to, but having a whole login process working out of the box, with no code required on your part, is a huge win. We’ll look at this library and how you use it in sections 23.3 and 23.4.
幸运的是,ASP.NET Core 包含一个帮助程序 NuGet 库 Microsoft.AspNetCore.Identity.UI,它免费为您提供整个 UI 样板。这是 30 多个 Razor 页面,具有登录、注册用户、使用 2FA 和使用外部登录提供程序等功能。如果需要,您仍然可以自定义这些页面,但是拥有一个开箱即用的整个登录过程,而无需您编写任何代码,这是一个巨大的胜利。我们将在 23.3 和 23.4 节中介绍这个库以及你如何使用它。

For that reason, I strongly recommend using the default UI as a starting point, whether you’re creating an app or adding user management to an existing app. But the question remains as to when you should use Identity and when you should consider rolling your own.
因此,我强烈建议使用默认 UI 作为起点,无论您是创建应用程序还是向现有应用程序添加用户管理。但问题仍然存在,何时应该使用 Identity 以及何时应该考虑推出自己的 Identity。

I’m a big fan of Identity when you need to store your own users, so I tend to suggest it in most situations, as it handles a lot of security-related things for you that are easy to mess up. I’ve heard several arguments against it, some valid and others less so:
当您需要存储自己的用户时,我是 Identity 的忠实粉丝,因此我倾向于在大多数情况下建议使用它,因为它可以为您处理很多与安全相关的事情,这些事情很容易搞砸。我听到了几个反对它的论点,有些是有效的,有些则不太有效:

• I already have user authentication in my app. Great! In that case, you’re probably right, Identity may not be necessary. But does your custom implementation use MFA? Do you have account lockout? If not, and if you need to add them, considering Identity may be worthwhile.
我的应用程序中已经有用户身份验证。太好了!在这种情况下,您可能是对的,Identity 可能不是必需的。但是您的自定义实施是否使用 MFA?您是否有帐户锁定?如果没有,并且您需要添加它们,考虑 Identity 可能是值得的。

• I don’t want to use EF Core. That’s a reasonable stance. You could be using Dapper, some other object-relational mapper (ORM), or even a document database for your database access. Luckily, the database integration in Identity is pluggable, so you could swap out the EF Core integration and use your own database integration libraries instead.
我不想使用 EF Core。这是一个合理的立场。您可以使用 Dapper、其他一些对象关系映射器 (ORM),甚至是文档数据库来访问数据库。幸运的是,Identity 中的数据库集成是可插拔的,因此您可以换掉 EF Core 集成并改用自己的数据库集成库。

• My use case is too complex for Identity. Identity provides lower-level services for authentication, so you can compose the pieces however you like. It’s also extensible, so if you need to, for example, transform claims before creating a principal, you can.
我的用例对于 Identity 来说太复杂了。Identity 提供较低级别的身份验证服务,因此您可以根据自己的喜好组合各个部分。它也是可扩展的,因此,如果需要在创建主体之前转换声明,则可以。

• I don’t like the default Razor Pages UI. The default UI for Identity is entirely optional. You can still use the Identity services and user management but provide your own UI for logging in and registering users. However, be aware that although doing this gives you a lot of flexibility, it’s also easy to introduce a security flaw in your user-management system—the last place you want security flaws!
我不喜欢默认的 Razor Pages UI。Identity 的默认 UI 完全是可选的。您仍然可以使用 Identity 服务和用户管理,但提供自己的 UI 来登录和注册用户。但是,请注意,尽管这样做可以为您提供很大的灵活性,但也很容易在用户管理系统中引入安全漏洞 - 这是您最不希望出现安全漏洞的地方!

• I’m not using Bootstrap to style my application. The default Identity UI uses Bootstrap as a styling framework, the same as the default ASP.NET Core templates. Unfortunately, you can’t easily change that, so if you’re using a different framework or need to customize the HTML generated, you can still use Identity, but you’ll need to provide your own UI.
我没有使用 Bootstrap 来设置应用程序的样式。默认身份 UI 使用 Bootstrap 作为样式框架,与默认的 ASP.NET Core 模板相同。遗憾的是,您无法轻松更改此设置,因此,如果您使用的是其他框架或需要自定义生成的 HTML,您仍然可以使用 Identity,但需要提供自己的 UI。

• I don’t want to build my own identity system. I’m glad to hear it. Using an external identity provider like Azure Active Directory or Auth0 is a great way of shifting the responsibility and risk associated with storing users’ personal information to a third party.
我不想构建自己的身份系统。我很高兴听到这个消息。使用 Azure Active Directory 或 Auth0 等外部身份提供商是将与存储用户个人信息相关的责任和风险转移给第三方的好方法。

Any time you’re considering adding user management to your ASP.NET Core application, I’d recommend looking at Identity as a great option for doing so. In the next section I’ll demonstrate what Identity provides by creating a new Razor Pages application using the default Identity UI. In section 23.4 we’ll take that template and apply it to an existing app instead, and in sections 23.5 and 23.6 you’ll see how to override the default pages.
每当你考虑向 ASP.NET Core 应用程序添加用户管理时,我建议将 Identity 视为一个不错的选择。在下一节中,我将通过使用默认标识 UI 创建新的 Razor Pages 应用程序来演示标识提供的功能。在 23.4 节中,我们将获取该模板并将其应用于现有应用程序,在 23.5 和 23.6 节中,您将看到如何覆盖默认页面。

23.3 Creating a project that uses ASP.NET Core Identity

23.3 创建使用 ASP.NET Core Identity 的项目

I’ve covered authentication and Identity in general terms, but the best way to get a feel for it is to see some working code. In this section we’re going to look at the default code generated by the ASP.NET Core templates with Identity, how the project works, and where Identity fits in.
我已经大致介绍了身份验证和标识,但了解它的最佳方法是查看一些工作代码。在本节中,我们将了解使用 Identity 的 ASP.NET Core 模板生成的默认代码、项目的工作原理以及 Identity 的适用范围。

23.3.1 Creating the project from a template

23.3.1 从模板创建项目

You’ll start by using the Visual Studio templates to generate a simple Razor Pages application that uses Identity for storing individual user accounts in a database.
首先,使用 Visual Studio 模板生成一个简单的 Razor Pages 应用程序,该应用程序使用 Identity 将各个用户帐户存储在数据库中。

Tip You can create a similar project using the .NET CLI by running dotnet new webapp -au Individual. The Visual Studio template uses a LocalDB database, but the dotnet new template uses SQLite by default. To use LocalDB instead, run dotnet new webapp -au Individual --use-local-db.
提示:您可以通过运行 dotnet new webapp -au Individual 来使用 .NET CLI 创建类似的项目。Visual Studio 模板使用 LocalDB 数据库,但 dotnet 新模板默认使用 SQLite。要改用 LocalDB,请运行 dotnet new webapp -au Individual --use-local-db。

To create the template using Visual Studio, you must be using the 2022 version or later and have the .NET 7 software development kit (SDK) installed. Follow these steps:
要使用 Visual Studio 创建模板,您必须使用 2022 版本或更高版本,并安装 .NET 7 软件开发工具包 (SDK)。请执行以下步骤:

  1. Choose File > New > Project or choose Create a New Project on the splash screen.
    在初始屏幕上选择File > New > Project 创建新项目。

  2. From the list of templates, choose ASP.NET Core Web Application, ensuring that you select the C# language template.
    从模板列表中,选择 ASP.NET Core Web Application(核心 Web 应用程序),确保选择 C# 语言模板。

  3. On the next screen, enter a project name, location, and a solution name, and choose Create.
    在下一个屏幕上,输入项目名称、位置和解决方案名称,然后选择 Create (创建)。

  4. On the Additional Information screen, change the Authentication type to Individual Accounts, as shown in figure 23.4. Leave the other settings at their defaults, and choose Create to create the application.
    在 Additional Information 屏幕上,将 Authentication type 更改为 Individual Accounts,如图 23.4 所示。将其他设置保留为默认值,然后选择 Create (创建) 以创建应用程序。

Visual Studio automatically runs dotnet restore to restore all the necessary NuGet packages for the project.
Visual Studio 会自动运行 dotnet restore 来还原项目所需的所有 NuGet 包。

alt text
Figure 23.4 Choosing the authentication mode of the new ASP.NET Core application template in VS 2022
图 23.4 在 VS 2022 中选择新 ASP.NET Core 应用程序模板的身份验证模式

  1. Run the application to see the default app, as shown in figure 23.5.
    运行应用程序以查看默认应用程序,如图 23.5 所示。

NOTE The Visual Studio template configures the application to use LocalDB and includes EF Core migrations for SQL Server. If you want to use a different database provider, you can replace the configuration and migrations with your database of choice, as described in chapter 12.
注意:Visual Studio 模板将应用程序配置为使用 LocalDB,并包括 SQL Server 的 EF Core 迁移。如果要使用不同的数据库提供程序,可以将配置和迁移替换为您选择的数据库,如第 12 章所述。

alt text

Figure 23.5 The default template with individual account authentication looks similar to the no authentication template, with the addition of a Login widget at the top right of the page.
图 23.5 具有个人帐户身份验证的默认模板看起来类似于无身份验证模板,只是在页面右上角添加了一个 Login 小部件。

This template should look familiar, with one twist: you now have Register and Login buttons! Feel free to play with the template—creating a user, logging in and out—to get a feel for the app. Once you’re happy, look at the code generated by the template and the boilerplate it saved you from writing.
这个模板应该看起来很熟悉,但有一个变化:您现在有 Register 和 Login 按钮了!您可以随意使用模板 — 创建用户、登录和注销 — 以感受应用程序。满意后,请查看模板生成的代码以及它使您免于编写的样板。

Tip Don’t forget to run the included EF Core migrations before trying to create users. Run dotnet ef database update from the project folder.
提示:在尝试创建用户之前,请不要忘记运行包含的 EF Core 迁移。从项目文件夹运行 dotnet ef database update。

23.3.2 Exploring the template in Solution Explorer

23.3.2 在解决方案资源管理器中浏览模板

The project generated by the template, shown in figure 23.6, is similar to the default no-authentication template. That’s largely due to the default UI library, which brings in a big chunk of functionality without exposing you to the nitty-gritty details.
该模板生成的项目(如图 23.6 所示)类似于默认的 no-authentication 模板。这主要是由于默认的 UI 库,它带来了大量功能,而不会让您了解细节。

alt text

Figure 23.6 The project layout of the default template with individual authentication
图 23.6 使用单独身份验证的默认模板的项目布局

The biggest addition is the Areas folder in the root of your project, which contains an Identity subfolder. Areas are sometimes used for organizing sections of functionality. Each area can contain its own Pages folder, which is analogous to the main Pages folder in your application.
最大的新增功能是项目根目录中的 Areas 文件夹,其中包含一个 Identity 子文件夹。区域有时用于组织功能部分。每个区域都可以包含自己的 Pages 文件夹,该文件夹类似于应用程序中的主 Pages 文件夹。

DEFINITION Areas are used to group Razor Pages into separate hierarchies for organizational purposes. I rarely use areas and prefer to create subfolders in the main Pages folder instead. The one exception is the Identity UI, which uses a separate Identity area by default. For more details on areas, see Microsoft’s “Areas in ASP.NET Core” documentation: http://mng.bz/7Vw9.
定义:区域用于将 Razor 页面分组到单独的层次结构中,以便进行组织。我很少使用区域,更喜欢在主 Pages 文件夹中创建子文件夹。一个例外是 Identity UI,默认情况下,它使用单独的 Identity 区域。有关区域的更多详细信息,请参阅 Microsoft 的“ASP.NET Core 中的区域”文档:http://mng.bz/7Vw9

The Microsoft.AspNetCore.Identity.UI package creates Razor Pages in the Identity area. You can override any page in this default UI by creating a corresponding page in the Areas/Identity/Pages folder in your application. In figure 23.6, the default template adds a _ViewStart.cshtml file that overrides the template that is included as part of the default UI. This file contains the following code, which sets the default Identity UI Razor Pages to use your project’s default _Layout.cshtml file:
Microsoft.AspNetCore.Identity.UI 包在“标识”区域中创建 Razor Pages。您可以通过在应用程序的 Areas/Identity/Pages 文件夹中创建相应的页面来覆盖此默认 UI 中的任何页面。在图 23.6 中,默认模板添加了一个 _ViewStart.cshtml 文件,该文件将替代作为默认 UI 的一部分包含的模板。此文件包含以下代码,该代码将默认标识 UI Razor 页面设置为使用项目的默认 _Layout.cshtml 文件:

@{
    Layout = "/Pages/Shared/_Layout.cshtml";
}

Some obvious questions at this point are “How do you know what’s included in the default UI?” and “Which files can you override?” You’ll see the answers to both in section 23.5, but in general you should try to avoid overriding files where possible. After all, the goal with the default UI is to reduce the amount of code you have to write!
此时,一些明显的问题是“您如何知道默认 UI 中包含哪些内容”和“您可以覆盖哪些文件?您将在 Section 23.5 中看到这两个问题的答案,但一般来说,您应该尽可能避免覆盖文件。毕竟,默认 UI 的目标是减少您必须编写的代码量!

The Data folder in your new project template contains your application’s EF Core DbContext, called ApplicationDbContext, and the migrations for configuring the database schema to use Identity. I’ll discuss this schema in more detail in section 23.3.3.
新项目模板中的 Data 文件夹包含应用程序的 EF Core DbContext(称为 ApplicationDbContext)和用于将数据库架构配置为使用 Identity 的迁移。我将在 Section 23.3.3 中更详细地讨论这个模式。

The final additional file included in this template compared with the no-authentication version is the partial Razor view Pages/Shared/_LoginPartial.cshtml. This provides the Register and Login links you saw in figure 23.5, and it’s rendered in the default Razor layout, _Layout.cshtml.
与无身份验证版本相比,此模板中包含的最后一个附加文件是部分 Razor 视图 Pages/Shared/_LoginPartial.cshtml。这提供了你在图 23.5 中看到的 Register 和 Login 链接,并呈现在默认的 Razor 布局 _Layout.cshtml 中。

If you look inside _LoginPartial.cshtml, you can see how routing works with areas by combining the Razor Page path with an {area} route parameter using Tag Helpers. For example, the Login link specifies that the Razor Page /Account/Login is in the Identity area using the asp-area attribute:
如果查看 _LoginPartial.cshtml,则可以通过使用标记帮助程序将 Razor Page 路径与 {area} 路由参数组合在一起,了解路由如何与区域配合使用。例如,Login 链接使用 asp-area 属性指定 Razor Page /Account/Login 位于 Identity 区域中:

<a asp-area="Identity" asp-page="/Account/Login">Login</a>

Tip You can reference Razor Pages in the Identity area by setting the area route value to Identity. You can use the asp-area attribute in Tag Helpers that generate links.
提示:可以通过将区域路由值设置为 Identity 来引用 Identity 区域中的 Razor Pages。您可以在生成链接的标记帮助程序中使用 asp-area 属性。

In addition to viewing the new files included thanks to ASP.NET Core Identity, open Program.cs and look at the changes there. The most obvious change is the additional configuration, which adds all the services Identity requires, as shown in the following listing.
除了查看 ASP.NET Core Identity 包含的新文件外,还可以打开 Program.cs 并查看其中的更改。最明显的变化是额外的配置,它添加了 Identity 所需的所有服务,如下面的清单所示。

Listing 23.1 Adding ASP.NET Core Identity services to ConfigureServices
清单 23.1 向 ConfigureServices 添加 ASP.NET Core Identity 服务

WebApplicationBuilder builder = WebApplication.CreateBuilder(args);

string connectionString = builder.Configuration     #A
    .GetConnectionString("DefaultConnection");    #A
builder.Services.AddDbContext<ApplicationDbContext>(options =>  #A
    options.UseSqlServer(connectionString));    #A

builder.Services.AddDatabaseDeveloperPageExceptionFilter();   #B

builder.Services.AddDefaultIdentity<IdentityUser>(options =>    #C
    options.SignIn.RequireConfirmedAccount = true)    #D
        .AddEntityFrameworkStores<ApplicationDbContext>();    #E
builder.Services.AddRazorPages();

// remaining configuration not show

❶ ASP.NET Core Identity uses EF Core, so it includes the standard EF Core configuration.
ASP.NET Core Identity 使用 EF Core,因此它包括标准 EF Core 配置。
❷ Adds optional database services to enhance the DeveloperExceptionPage
添加可选的数据库服务以增强 DeveloperExceptionPage
❸ Adds the Identity system, including the default UI, and configures the user type as IdentityUser
添加标识系统,包括默认 UI,并将用户类型配置为 IdentityUser
❹ Requires users to confirm their accounts (typically by email) before they log in
要求用户在登录前确认其帐户(通常通过电子邮件)
❺ Configures Identity to store its data in EF Core
配置标识以将其数据存储在 EF Core 中

The AddDefaultIdentity() extension method does several things:
AddDefaultIdentity() 扩展方法执行以下几项作:

• Adds the core ASP.NET Core Identity services.
添加核心 ASP.NET 核心身份服务。
• Configures the application user type to be IdentityUser. This is the entity model that is stored in the database and represents a “user” in your application. You can extend this type if you need to, but that’s not always necessary, as you’ll see in section 23.6.
将应用程序用户类型配置为 IdentityUser。这是存储在数据库中的实体模型,表示应用程序中的 “用户”。如果需要,您可以扩展此类型,但这并不总是必要的,如第 23.6 节所示。
• Adds the default UI Razor Pages for registering, logging in, and managing users.
添加用于注册、登录和管理用户的默认 UI Razor Pages。
• Configures token providers for generating MFA and email confirmation tokens.
配置用于生成 MFA 和电子邮件确认令牌的令牌提供程序。

Where is the authentication middleware?
身份验证中间件在哪里?

If you’re already familiar with previous versions of ASP.NET Core, you might be surprised to notice the lack of any authentication middleware in the default template. Given everything you’ve learned about how authentication works, that should be surprising!
如果您已经熟悉 ASP.NET Core 的早期版本,您可能会惊讶地注意到默认模板中缺少任何身份验证中间件。鉴于您学到的有关身份验证工作原理的所有信息,这应该令人惊讶!

The answer to this riddle is that the authentication middleware is in the pipeline, even though you can’t see it. As I discussed in chapter 4, WebApplication automatically adds many middleware components to the pipeline for you, including the routing middleware, the endpoint middleware, and—yes—the authentication middleware. So the reason you don’t see it in the pipeline is that it’s already been added.
这个谜题的答案是,身份验证中间件正在开发中,即使您看不到它。正如我在第 4 章中所讨论的,WebApplication 会自动将许多中间件组件添加到管道中,包括路由中间件、端点中间件,是的,还有身份验证中间件。因此,您在管道中没有看到它的原因是它已被添加。

In fact, WebApplication also automatically adds the authorization middleware to the pipeline, but in this case the template still calls UseAuthorization(). Why? For the same reason that the template also calls UseRouting(): to control exactly where in the pipeline the middleware is added.
事实上,WebApplication 还会自动将授权中间件添加到管道中,但在这种情况下,模板仍然调用 UseAuthorization()。为什么?出于与模板还调用 UseRouting() 相同的原因:以准确控制中间件在管道中的添加位置。

As I mentioned in chapter 4, you can override the automatically added middleware by adding it yourself manually. It’s crucial that the authorization middleware be placed after the routing middleware, and as mentioned in chapter 4, you typically want to place your routing middleware after the static file middleware. As the routing middleware needs to move, so does the authorization middleware!
正如我在第 4 章中提到的,你可以通过自己手动添加来覆盖自动添加的中间件。将授权中间件放在路由中间件之后至关重要,如第 4 章所述,您通常希望将路由中间件放在静态文件中间件之后。由于路由中间件需要移动,授权中间件也需要移动!

Traditionally, the authentication middleware is also placed after the routing middleware, before the authorization middleware, but this isn’t crucial. The only requirement is that it’s placed before any middleware that requires an authenticated user, such as the authorization middleware.
传统上,身份验证中间件也放在路由中间件之后,授权中间件之前,但这并不重要。唯一的要求是,它位于任何需要经过身份验证的用户的中间件(例如授权中间件)之前。

》If you wish, you can move the location of the authentication middleware by calling UseAuthentication() at the appropriate point. I prefer to limit the work done on requests where possible, so I typically take this approach, moving it between the call to UseRouting() and UseAuthorization():
如果需要,可以通过在适当的位置调用 UseAuthentication() 来移动身份验证中间件的位置。我更喜欢尽可能限制对请求所做的工作,因此我通常采用这种方法,在对 UseRouting() 和 UseAuthorization() 的调用之间移动它:

app.UseRouting();
app.UseAuthentication();
app.UseAuthorization();
app.MapRazorPages();
app.Run();

If you don’t place the authentication middleware at the correct point in the pipeline, you can run into strange bugs where users aren’t authenticated correctly or authorization policies aren’t applied correctly. The templates work out of the box, but you need to take care if you’re working with an existing application or moving middleware around.
如果您没有将身份验证中间件放置在管道中的正确位置,则可能会遇到奇怪的错误,即用户未正确进行身份验证或授权策略未正确应用。这些模板开箱即用,但如果您正在使用现有应用程序或移动中间件,则需要小心。

Now that you’ve got an overview of the additions made by Identity, we’ll look in a bit more detail at the database schema and how Identity stores users in the database.
现在,您已经大致了解了 Identity 所做的添加,我们将更详细地了解数据库架构以及 Identity 如何在数据库中存储用户。

23.3.3 The ASP.NET Core Identity data model

23.3.3 ASP.NET Core Identity 数据模型

Out of the box, and in the default templates, Identity uses EF Core to store user accounts. It provides a base DbContext that you can inherit from, called IdentityDbContext, which uses an IdentityUser as the user entity for your application.
在默认模板中,Identity 使用 EF Core 来存储用户帐户。它提供了一个可以从中继承的基本 DbContext,称为 IdentityDbContext,它使用 IdentityUser 作为应用程序的用户实体。

In the template, the app’s DbContext is called ApplicationDbContext. If you open this file, you’ll see it’s sparse; it inherits from the IdentityDbContext base class I described earlier, and that’s it. What does this base class give you? The easiest way to see is to update a database with the migrations and take a look.
在模板中,应用的 DbContext 称为 ApplicationDbContext。如果打开此文件,您将看到它是稀疏的;它继承自我前面介绍的 IdentityDbContext 基类,仅此而已。这个基类为您提供了什么?最简单的方法是使用迁移更新数据库并查看。

Applying the migrations is the same process as in chapter 12. Ensure that the connection string points to where you want to create the database, open a command prompt in your project folder, and run this command to update the database with the migrations:
应用迁移的过程与第 12 章中的过程相同。确保连接字符串指向要创建数据库的位置,在项目文件夹中打开命令提示符,然后运行以下命令以使用迁移更新数据库:

dotnet ef database update

Tip If you see an error after running the dotnet ef command, ensure that you have the .NET tool installed by following the instructions provided in section 12.3.1. Also make sure that you run the command from the project folder, not the solution folder.
提示:如果在运行 dotnet ef 命令后看到错误,请确保按照第 12.3.1 节中提供的说明安装了 .NET 工具。此外,请确保从项目文件夹(而不是解决方案文件夹)运行命令。

If the database doesn’t exist, the command-line interface (CLI) creates it. Figure 23.7 shows what the database looks like for the default template.
如果数据库不存在,则命令行界面 (CLI) 会创建该数据库。图 23.7 显示了默认模板的数据库外观。

Tip If you’re using MS SQL Server (or LocalDB), you can use the SQL Server Object Explorer in Visual Studio to browse tables and objects in your database. See Microsoft’s “How to: Connect to a Database and Browse Existing Objects” article for details: http://mng.bz/mg8r.
提示:如果您使用的是 MS SQL Server(或 LocalDB),则可以使用 Visual Studio 中的 SQL Server 对象资源管理器浏览数据库中的表和对象。有关详细信息,请参阅 Microsoft 的“如何:连接到数据库并浏览现有对象”一文:http://mng.bz/mg8r

alt text

Figure 23.7 The database schema used by ASP.NET Core Identity
图 23.7 ASP.NET Core Identity 使用的数据库架构

That’s a lot of tables! You shouldn’t need to interact with these tables directly (Identity handles that for you), but it doesn’t hurt to have a basic grasp of what they’re for:
好多表啊!您不需要直接与这些表交互(Identity 会为您处理),但对它们的用途有基本的了解并没有什么坏处:

EFMigrationsHistory—The standard EF Core migrations table that records which migrations have been applied.
EFMigrationsHistory - 标准 EF Core 迁移表,用于记录已应用的迁移。

• AspNetUsers—The user profile table itself. This is where IdentityUser is serialized to. We’ll take a closer look at this table shortly.
AspNetUsers — 用户配置文件表本身。这是 IdentityUser 序列化到的位置。我们稍后会仔细看看这个表格。

• AspNetUserClaims—The claims associated with a given user. A user can have many claims, so it’s modeled as a many-to-one relationship.
AspNetUserClaims - 与给定用户关联的声明。一个用户可以有多个声明,因此它被建模为多对一关系。

• AspNetUserLogins and AspNetUserTokens—These are related to third-party logins. When configured, these let users sign in with a Google or Facebook account (for example) instead of creating a password on your app.
AspNetUserLogins 和 AspNetUserTokens - 这些与第三方登录相关。配置后,这些表允许用户使用 Google 或 Facebook 帐户 (例如) 登录,而不是在您的应用程序上创建密码。

• AspNetUserRoles, AspNetRoles, and AspNetRoleClaims—These tables are somewhat of a legacy left over from the old role-based permission model of the pre-.NET 4.5 days, instead of the claims-based permission model. These tables let you define roles that multiple users can belong to. Each role can be assigned multiple claims. These claims are effectively inherited by a user principal when they are assigned that role.
AspNetUserRoles、AspNetRoles 和 AspNetRoleClaims - 这些表在某种程度上是 pre-.NET 4.5 天的基于角色的旧权限模型遗留下来的遗留问题,而不是基于声明的权限模型。这些表允许您定义多个用户可以属于的角色。每个角色都可以分配多个声明。当为用户主体分配该角色时,这些声明将由用户主体有效地继承。

You can explore these tables yourself, but the most interesting of them is the AspNetUsers table, shown in figure 23.8.
您可以自己浏览这些表,但其中最有趣的是 AspNetUsers 表,如图 23.8 所示。

alt text

Figure 23.8 The AspNetUsers table is used to store all the details required to authenticate a user.
图 23.8 AspNetUsers 表用于存储验证用户所需的所有详细信息。

Most of the columns in the AspNetUsers table are security-related—the user’s email, password hash, whether they have confirmed their email, whether they have MFA enabled, and so on. By default, there are no columns for additional information, like the user’s name.
AspNetUsers 表中的大多数列都与安全相关 — 用户的电子邮件、密码哈希、他们是否已确认其电子邮件、他们是否启用了 MFA 等。默认情况下,没有其他信息(如用户名)的列。

NOTE You can see from figure 23.8 that the primary key Id is stored as a string column. By default, Identity uses Guid for the identifier. To customize the data type, see the “Change the primary key type” section of Microsoft’s “Identity model customization in ASP.NET Core” documentation: http://mng.bz/5jdB.
注意:从图 23.8 中可以看出,主键 Id 存储为字符串列。默认情况下,Identity 使用 Guid 作为标识符。要自定义数据类型,请参阅 Microsoft 的“ASP.NET Core 中的身份模型自定义”文档的“更改主键类型”部分:http://mng.bz/5jdB

Any additional properties of the user are stored as claims in the AspNetUserClaims table associated with that user. This lets you add arbitrary additional information without having to change the database schema to accommodate it. Want to store the user’s date of birth? You could add a claim to that user; there’s no need to change the database schema. You’ll see this in action in section 23.6, when you add a Name claim to every new user.
用户的任何其他属性都作为声明存储在与该用户关联的 AspNetUserClaims 表中。这样,您就可以添加任意的附加信息,而不必更改数据库架构来容纳它。想要存储用户的出生日期?您可以向该用户添加声明;无需更改数据库架构。您将在第 23.6 节中看到这一点,当您为每个新用户添加 Name 声明时。

NOTE Adding claims is often the easiest way to extend the default IdentityUser, but you can add properties to the IdentityUser directly. This requires database changes but is nevertheless useful in many situations. You can read how to add custom data using this approach here: http://mng.bz/Xd61.
注意:添加声明通常是扩展默认 IdentityUser 的最简单方法,但您可以直接向 IdentityUser 添加属性。这需要更改数据库,但在许多情况下仍然很有用。您可以在此处阅读如何使用此方法添加自定义数据:http://mng.bz/Xd61

It’s important to understand the difference between the IdentityUser entity (stored in the AspNetUsers table) and the ClaimsPrincipal, which is exposed on HttpContext.User. When a user first logs in, an IdentityUser is loaded from the database. This entity is combined with additional claims for the user from the AspNetUserClaims table to create a ClaimsPrincipal. It’s this ClaimsPrincipal that is used for authentication and is serialized to the authentication cookie, not the IdentityUser.
了解 IdentityUser 实体(存储在 AspNetUsers 表中)和 ClaimsPrincipal(在 HttpContext.User 上公开)之间的区别非常重要。当用户首次登录时,将从数据库中加载 IdentityUser。此实体与 AspNetUserClaims 表中用户的其他声明组合在一起,以创建 ClaimsPrincipal。此 ClaimsPrincipal 用于身份验证,并序列化为身份验证 Cookie,而不是 IdentityUser。

It’s useful to have a mental model of the underlying database schema Identity uses, but in day-to-day work, you shouldn’t have to interact with it directly. That’s what Identity is for, after all! In the next section we’ll look at the other end of the scale: the UI of the app and what you get out of the box with the default UI.
拥有 Identity 使用的基础数据库架构的心智模型很有用,但在日常工作中,您不应该直接与之交互。毕竟,这就是 Identity 的意义所在!在下一节中,我们将了解天平的另一端:应用程序的 UI 以及您使用默认 UI 开箱即用的功能。

23.3.4 Interacting with ASP.NET Core Identity

23.3.4 与 ASP.NET Core Identity 交互

You’ll want to explore the default UI yourself to get a feel for how the pieces fit together, but in this section I’ll highlight what you get out of the box, as well as areas that typically require additional attention right away.
您需要亲自探索默认 UI,以了解各个部分是如何组合在一起的,但在本节中,我将重点介绍您开箱即用的功能,以及通常需要立即额外注意的领域。

The entry point to the default UI is the user registration page of the application, shown in figure 23.9. The register page enables users to sign up to your application by creating a new IdentityUser with an email and a password. After creating an account, users are redirected to a screen indicating that they should confirm their email. No email service is enabled by default, as this is dependent on your configuring an external email service. You can read how to enable email sending in Microsoft’s “Account confirmation and password recovery in ASP.NET Core” documentation at http://mng.bz/6gBo. Once you configure this, users will automatically receive an email with a link to confirm their account.
默认 UI 的入口点是应用程序的用户注册页面,如图 23.9 所示。通过注册页面,用户可以通过使用电子邮件和密码创建新的 IdentityUser 来注册您的应用程序。创建账户后,用户将被重定向到一个屏幕,指示他们应该确认他们的电子邮件。默认情况下,不启用任何电子邮件服务,因为这取决于您配置外部电子邮件服务。您可以在 http://mng.bz/6gBo 的 Microsoft 的“ASP.NET Core 中的帐户确认和密码恢复”文档中阅读如何启用电子邮件发送。配置此项后,用户将自动收到一封电子邮件,其中包含用于确认其帐户的链接。

alt text

Figure 23.9 The registration flow for users using the default Identity UI. Users enter an email and password and are redirected to a “confirm your email” page. This is a placeholder page by default, but if you enable email confirmation, this page will update appropriately.
图 23.9 使用默认 Identity UI 的用户的注册流程。用户输入电子邮件和密码,并被重定向到“确认您的电子邮件”页面。默认情况下,这是一个占位符页面,但如果您启用电子邮件确认,此页面将相应地更新。

By default, user emails must be unique (you can’t have two users with the same email), and the password must meet various length and complexity requirements. You can customize these options and more in the configuration lambda of the call to AddDefaultIdentity() in Program.cs, as shown in the following listing.
默认情况下,用户电子邮件必须是唯一的(您不能让两个用户使用同一电子邮件),并且密码必须满足各种长度和复杂性要求。您可以在 Program.cs 中调用 AddDefaultIdentity() 的配置 lambda 中自定义这些选项以及更多选项,如下面的清单所示。

Listing 23.2 Customizing Identity settings in ConfigureServices in Startup.cs
清单 23.2 在 Startup.cs 的 ConfigureServices 中自定义身份设置

builder.Services.AddDefaultIdentity<IdentityUser>(options =>
{
    options.SignIn.RequireConfirmedAccount = true;     #A
    options.Lockout.AllowedForNewUsers = true;    #B
    options.Password.RequiredLength = 12;               #C
    options.Password.RequireNonAlphanumeric = false;    #C
    options.Password.RequireDigit = false;              #C
})
.AddEntityFrameworkStores<AppDbContext>();

❶ Requires users to confirm their account by email before they can log in
要求用户在登录之前通过电子邮件确认其帐户
❷ Enables user lockout, to prevent brute-force attacks against user passwords
启用用户锁定,以防止对用户密码的暴力攻击
❸ Updates password requirements. Current guidance is to require long passwords.
更新密码要求。当前的指导是要求使用长密码。

After a user has registered with your application, they need to log in, as shown in figure 23.10. On the right side of the login page, the default UI templates describe how you, the developer, can configure external login providers, such as Facebook and Google. This is useful information for you, but it’s one of the reasons you may need to customize the default UI templates, as you’ll see in section 23.5.
用户注册到您的应用程序后,他们需要登录,如图 23.10 所示。在登录页面的右侧,默认 UI 模板描述了您(开发人员)如何配置外部登录提供程序,例如 Facebook 和 Google。这对您有用,但这也是您可能需要自定义默认 UI 模板的原因之一,如第 23.5 节所示。

alt text

Figure 23.10 Logging in with an existing user and managing the user account. The Login page describes how to configure external login providers, such as Facebook and Google. The user-management pages allow users to change their email and password and to configure MFA.
图 23.10 使用现有用户登录并管理用户帐户。Login (登录) 页面介绍了如何配置外部登录提供程序,例如 Facebook 和 Google。用户管理页面允许用户更改其电子邮件和密码以及配置 MFA。

Once a user has signed in, they can access the management pages of the identity UI. These allow users to change their email, change their password, configure MFA with an authenticator app, or delete all their personal data. Most of these functions work without any effort on your part, assuming that you’ve already configured an email-sending service.
用户登录后,他们可以访问身份 UI 的管理页面。这些允许用户更改他们的电子邮件、更改他们的密码、使用身份验证器应用程序配置 MFA 或删除他们的所有个人数据。这些函数中的大多数都无需您执行任何作即可工作,前提是您已经配置了电子邮件发送服务。

That covers everything you get in the default UI templates. It may seem somewhat minimal, but it covers a lot of the requirements that are common to almost all apps. Nevertheless, there are a few things you’ll nearly always want to customize:
这涵盖了您在默认 UI 模板中获得的所有内容。它可能看起来有些微不足道,但它涵盖了几乎所有应用程序通用的许多要求。不过,您几乎总是需要自定义一些内容:

• Configure an email-sending service, to enable account confirmation and password recovery, as described in Microsoft’s “Account confirmation and password recovery in ASP.NET Core” documentation: http://mng.bz/vzy7.
配置电子邮件发送服务,以启用帐户确认和密码恢复,如 Microsoft 的“ASP.NET Core 中的帐户确认和密码恢复”文档中所述:http://mng.bz/vzy7

• Add a QR code generator for the enable MFA page, as described in Microsoft’s “Enable QR Code generation for TOTP authenticator apps in ASP.NET Core” documentation: http://mng.bz/4Zmw.
为启用 MFA 页面添加 QR 码生成器,如 Microsoft 的“在 ASP.NET Core 中为 TOTP 验证器应用程序启用 QR 码生成”文档中所述:http://mng.bz/4Zmw

• Customize the register and login pages to remove the documentation link for enabling external services. You’ll see how to do this in section 23.5. Alternatively, you may want to disable user registration entirely, as described in Microsoft’s “Scaffold Identity in ASP.NET Core projects” documentation: http://mng.bz/QmMG.
自定义注册和登录页面,以删除用于启用外部服务的文档链接。您将在 Section 23.5 中看到如何执行此作。或者,您可能希望完全禁用用户注册,如 Microsoft 的“ASP.NET Core 项目中的基架身份”文档中所述:http://mng.bz/QmMG

• Collect additional information about users on the registration page. You’ll see how to do this in section 23.6.
在注册页面上收集有关用户的其他信息。您将在 Section 23.6 中看到如何执行此作。

There are many more ways you can extend or update the Identity system and lots of options available, so I encourage you to explore Microsoft’s “Overview of ASP.NET Core authentication” at http://mng.bz/XdGv to see your options. In the next section you’ll see how to achieve another common requirement: adding users to an existing application.
还有更多方法可以扩展或更新 Identity 系统,并且有很多可用选项,因此我鼓励您在 http://mng.bz/XdGv 上浏览 Microsoft 的“ASP.NET Core 身份验证概述”以查看您的选项。在下一节中,您将了解如何实现另一个常见要求:将用户添加到现有应用程序。

23.4 Adding ASP.NET Core Identity to an existing project

23.4 将 ASP.NET Core Identity 添加到现有工程

In this section we’re going to add users to an existing application. The initial app is a Razor Pages app, based on recipe application from chapter 12. This is a working app that you want to add user functionality to. In chapter 24 we’ll extend this work to restrict control regarding who’s allowed to edit recipes on the app.
在本节中,我们将向现有应用程序添加用户。初始应用是 Razor Pages 应用,基于第 12 章中的配方应用。这是您要向其添加用户功能的工作应用程序。在第 24 章中,我们将扩展这项工作,以限制对谁可以在应用程序上编辑配方的控制。

By the end of this section, you’ll have an application with a registration page, a login screen, and a manage account screen, like the default templates. You’ll also have a persistent widget in the top right of the screen showing the login status of the current user, as shown in figure 23.11.
在本部分结束时,您将拥有一个应用程序,其中包含注册页面、登录屏幕和管理帐户屏幕,就像默认模板一样。屏幕右上角还有一个持久小部件,显示当前用户的登录状态,如图 23.11 所示。

alt text

Figure 23.11 The recipe app after adding authentication, showing the login widget
图 23.11 添加身份验证后的配方应用程序,显示登录小部件

As in section 23.3, I’m not going to customize any of the defaults at this point, so we won’t set up external login providers, email confirmation, or MFA. I’m concerned only with adding ASP.NET Core Identity to an existing app that’s already using EF Core.
与 Section 23.3 一样,我此时不打算自定义任何默认值,因此我们不会设置外部登录提供程序、电子邮件确认或 MFA。我只关心将 ASP.NET Core Identity 添加到已在使用 EF Core 的现有应用程序。

Tip It’s worth making sure you’re comfortable with the new project templates before you go about adding Identity to an existing project. Create a test app, and consider setting up an external login provider, configuring an email provider, and enabling MFA. This will take a bit of time, but it’ll be invaluable for deciphering errors when you come to adding Identity to existing apps.
提示在将 Identity 添加到现有项目之前,值得确保您熟悉新的项目模板。创建测试应用程序,并考虑设置外部登录提供程序、配置电子邮件提供程序并启用 MFA。这将花费一些时间,但在您将 Identity 添加到现有应用程序时,它对于破译错误非常宝贵。

To add Identity to your app, you’ll need to do the following:
要将 Identity 添加到您的应用程序,您需要执行以下作:

  1. Add the ASP.NET Core Identity NuGet packages.
    添加 ASP.NET Core Identity NuGet 包。
  2. Add the required Identity services to the dependency injection (DI) container.
    将所需的身份服务添加到依赖关系注入 (DI) 容器中。
  3. Update the EF Core data model with the Identity entities.
    使用 Identity 实体更新 EF Core 数据模型。
  4. Update your Razor Pages and layouts to provide links to the Identity UI.
    更新 Razor 页面和布局,以提供指向标识 UI 的链接。

This section tackles each of these steps in turn. At the end of section 23.4 you’ll have successfully added user accounts to the recipe app.
本节将依次介绍这些步骤中的每一个。在第 23.4 节结束时,您将成功地将用户帐户添加到配方应用程序。

23.4.1 Configuring the ASP.NET Core Identity services

23.4.1 配置 ASP.NET Core Identity 服务
You can add ASP.NET Core Identity with the default UI to an existing app by referencing two NuGet packages:
您可以通过引用两个 NuGet 包,将带有默认 UI 的 ASP.NET Core Identity 添加到现有应用程序:

• Microsoft.AspNetCore.Identity.EntityFrameworkCore—Provides all the core Identity services and integration with EF Core
Microsoft.AspNetCore.Identity.EntityFrameworkCore - 提供所有核心身份服务以及与 EF Core的集成
• Microsoft.AspNetCore.Identity.UI—Provides the default UI Razor Pages
Microsoft.AspNetCore.Identity.UI - 提供默认 UI Razor 页面

Update your project .csproj file to include these two packages:
更新项目 .csproj 文件以包含以下两个包:

<PackageReference
    Include="Microsoft.AspNetCore.Identity.EntityFrameworkCore"
    Version="7.0.0" />
<PackageReference
    Include="Microsoft.AspNetCore.Identity.UI" Version="7.0.0" />

These packages bring in all the additional required dependencies you need to add Identity with the default UI. Be sure to run dotnet restore after adding them to your project.
这些包引入了使用默认 UI 添加 Identity 所需的所有额外必需依赖项。请务必在将它们添加到项目后运行 dotnet restore。

Once you’ve added the Identity packages, you can update your Program.cs file to include the Identity services, as shown in the following listing. This is similar to the default template setup you saw in listing 23.1, but make sure to reference your existing AppDbContext.
添加 Identity 包后,您可以更新 Program.cs 文件以包含 Identity 服务,如以下清单所示。这类似于您在清单 23.1 中看到的默认模板设置,但请确保引用您现有的 AppDbContext。

Listing 23.3 Adding ASP.NET Core Identity services to the recipe app
清单 23.3 将 ASP.NET Core Identity 服务添加到 recipe 应用程序

WebApplicationBuilder builder = WebApplication.CreateBuilder(args);

builder.Services.AddDbContext<AppDbContext>(options =>   #A
    options.UseSqlite(builder.Configuration    #A
        .GetConnectionString("DefaultConnection")!));   #A

builder.Services.AddDefaultIdentity<ApplicationUser>(options =>      #B
        options.SignIn.RequireConfirmedAccount = true)       #B
    .AddEntityFrameworkStores<AppDbContext>();     #C

builder.Services.AddRazorPages();
builder.Services.AddScoped<RecipeService>();

❶ The existing service configuration is unchanged.
现有服务配置保持不变。
❷ Adds the Identity services to the DI container and uses a custom user type, ApplicationUser
将身份服务添加到 DI 容器并使用自定义用户类型 ApplicationUser
❸ Makes sure you use the name of your existing DbContext app
确保您使用现有 DbContext 应用程序的名称

This adds all the necessary services and configures Identity to use EF Core. I’ve introduced a new type here, ApplicationUser, which we’ll use to customize our user entity later. You’ll see how to add this type in section 23.4.2.
这将添加所有必要的服务,并将 Identity 配置为使用 EF Core。我在这里引入了一个新类型 ApplicationUser,我们稍后将使用它来自定义我们的用户实体。您将在 Section 23.4.2 中看到如何添加此类型。

The next step is optional: add the AuthenticationMiddleware after the call to UseRouting() on WebApplication, as shown in the following listing. As I mentioned previously, the authentication middleware is added automatically by WebApplication, so this step is optional. I prefer to delay authentication until after the call to UseRouting(), as it eliminates the need to perform unnecessary work decrypting the authentication cookie for requests that don’t reach the routing middleware, such as requests for static files.
下一步是可选的:在调用 WebApplication 上的 UseRouting() 之后添加 AuthenticationMiddleware,如下面的清单所示。正如我前面提到的,身份验证中间件是由 WebApplication 自动添加的,因此此步骤是可选的。我更喜欢将身份验证延迟到调用 UseRouting() 之后,因为这样就无需为未到达路由中间件的请求(例如静态文件请求)执行不必要的身份验证 Cookie 解密工作。

Listing 23.4 Adding AuthenticationMiddleware to the recipe app
列表 23.4 将 AuthenticationMiddleware 添加到 recipe 应用程序

app.UseStaticFiles();            #A

app.UseRouting();

app.UseAuthentication();        #B
app.UseAuthorization();          #C

app.MapRazorPages();
app.Run

❶ StaticFileMiddleware will never see requests as authenticated, even after you sign in.
StaticFileMiddleware 永远不会将请求视为已验证,即使在你登录后也是如此。
❷ Adds AuthenticationMiddleware after UseRouting() and before UseAuthorization
在 UseRouting() 之后和 UseAuthorization之前添加 AuthenticationMiddleware
❸ Middleware after AuthenticationMiddleware can read the user principal from HttpContext.User.
AuthenticationMiddleware 之后的中间件可以从 HttpContext.User 读取用户主体。

You’ve configured your app to use Identity, so the next step is updating EF Core’s data model. You’re already using EF Core in this app, so you need to update your database schema to include the tables that Identity requires.
你已将应用配置为使用 Identity,因此下一步是更新 EF Core 的数据模型。你已在此应用中使用 EF Core,因此需要更新数据库架构以包含 Identity 所需的表。

23.4.2 Updating the EF Core data model to support Identity

23.4.2 更新 EF Core 数据模型以支持身份

The code in listing 23.3 won’t compile, as it references the ApplicationUser type, which doesn’t yet exist. Create the ApplicationUser in the Data folder, using the following line:
清单 23.3 中的代码无法编译,因为它引用了尚不存在的 ApplicationUser 类型。使用以下行在 Data 文件夹中创建 ApplicationUser:

public class ApplicationUser : IdentityUser { }

It’s not strictly necessary to create a custom user type in this case (for example, the default templates use the raw IdentityUser), but I find it’s easier to add the derived type now rather than try to retrofit it later if you need to add extra properties to your user type.
在这种情况下,并非绝对需要创建自定义用户类型(例如,默认模板使用原始 IdentityUser),但我发现,如果您需要向用户类型添加额外的属性,现在添加派生类型比以后尝试修改它更容易。

In section 23.3.3 you saw that Identity provides a DbContext called IdentityDbContext, which you can inherit from. The IdentityDbContext base class includes the necessary DbSet to store your user entities using EF Core.
在第 23.3.3 节中,您看到 Identity 提供了一个名为 IdentityDbContext 的 DbContext,您可以从中继承。IdentityDbContext 基类包括使用 EF Core 存储用户实体所需的 DbSet。

Updating an existing DbContext for Identity is simple: update your app’s DbContext to inherit from IdentityDbContext (which itself inherits from DbContext), as shown in the following listing. We’re using the generic version of the base Identity context in this case and providing the ApplicationUser type.
更新现有的 DbContext for Identity 很简单:更新应用程序的 DbContext 以从 IdentityDbContext(它本身继承自 DbContext)继承,如下面的清单所示。在本例中,我们使用基本 Identity 上下文的通用版本,并提供 ApplicationUser 类型。

Listing 23.5 Updating AppDbContext to use IdentityDbContext
列表 23.5 更新 AppDbContext 以使用 IdentityDbContext

public class AppDbContext : IdentityDbContext<ApplicationUser>    #A
{
    public AppDbContext(DbContextOptions<AppDbContext> options)  #B
        : base(options)                                          #B
    { }                                                          #B

    public DbSet<Recipe> Recipes { get; set; }                   #B
}

❶ Updates to inherit from the Identity context instead of directly from DbContext
更新以从 Identity 上下文继承,而不是直接从 DbContext继承
❷ The remainder of the class remains the same.
类的其余部分保持不变。

Effectively, by updating the base class of your context in this way, you’ve added a whole load of new entities to EF Core’s data model. As you saw in chapter 12, whenever EF Core’s data model changes, you need to create a new migration and apply those changes to the database.
实际上,通过以这种方式更新上下文的基类,你已向 EF Core 的数据模型添加了大量新实体。如第 12 章所示,每当 EF Core 的数据模型发生更改时,都需要创建新的迁移并将这些更改应用于数据库。

At this point, your app should compile, so you can add a new migration called AddIdentitySchema using
此时,你的应用应该会编译,因此你可以使用 AddIdentitySchema 添加名为 AddIdentitySchema 的新迁移

dotnet ef migrations add AddIdentitySchema

The final step is updating your application’s Razor Pages and layouts to reference the default identity UI. Normally, adding 30 new Razor Pages to your application would be a lot of work, but using the default Identity UI makes it a breeze.
最后一步是更新应用程序的 Razor Pages 和布局以引用默认标识 UI。通常,向应用程序添加 30 个新的 Razor 页面会是一项艰巨的工作,但使用默认标识 UI 会变得轻而易举。

23.4.3 Updating the Razor views to link to the Identity UI

23.4.3 更新 Razor 视图以链接到身份 UI

Technically, you don’t have to update your Razor Pages to reference the pages included in the default UI, but you probably want to add the login widget to your app’s layout at a minimum. You’ll also want to make sure that your Identity Razor Pages use the same base Layout.cshtml as the rest of your application.
从技术上讲,您不必更新 Razor Pages 来引用默认 UI 中包含的页面,但您可能希望至少将登录小组件添加到应用程序的布局中。还需要确保 Identity Razor 页面使用与应用程序其余部分相同的基 Layout.cshtml。

We’ll start by fixing the layout for your Identity pages. Create a file at the “magic” path Areas/Identity/Pages/_ViewStart.cshtml, and add the following contents:
首先,我们将修复 Identity 页面的布局。在“magic”路径 Areas/Identity/Pages/_ViewStart.cshtml 处创建一个文件,并添加以下内容:

@{ Layout = "/Pages/Shared/_Layout.cshtml"; }

This sets the default layout for your Identity pages to your application’s default layout. Next, add a _LoginPartial.cshtml file in Pages/Shared to define the login widget, as shown in the following listing. This is pretty much identical to the template generated by the default template, but it uses our custom ApplicationUser instead of the default IdentityUser.
这会将 Identity 页面的默认布局设置为应用程序的默认布局。接下来,在 Pages/Shared 中添加 _LoginPartial.cshtml 文件以定义登录小组件,如下面的清单所示。这与默认模板生成的模板几乎相同,但它使用我们的自定义 ApplicationUser 而不是默认的 IdentityUser。

Listing 23.6 Adding a _LoginPartial.cshtml to an existing app
列表 23.6 将 _LoginPartial.cshtml 添加到现有应用程序

@using Microsoft.AspNetCore.Identity
@using RecipeApplication.Data;                 #A
@inject SignInManager<ApplicationUser> SignInManager    #B
@inject UserManager<ApplicationUser> UserManager        #B

<ul class="navbar-nav">
@if (SignInManager.IsSignedIn(User))
{
  <li class="nav-item">
    <a  class="nav-link text-dark" asp-area="Identity"
    asp-page="/Account/Manage/Index" title="Manage">
        Hello @User.Identity.Name!</a>
  </li>
    <li class="nav-item">
      <form class="form-inline" asp-page="/Account/Logout"
      asp-route-returnUrl="@Url.Page("/", new { area = "" })"
      asp-area="Identity" method="post" >
        <button  class="nav-link btn btn-link text-dark"
          type="submit">Logout</button>
        </form>
    </li>
}
else
{
  <li class="nav-item">
    <a class="nav-link text-dark" asp-area="Identity"
      asp-page="/Account/Register">Register</a>
  </li>
  <li class="nav-item">
    <a class="nav-link text-dark" asp-area="Identity"
      asp-page="/Account/Login">Login</a>
  </li>
}
</ul>

❶ Updates to your project’s namespace that contains ApplicationUser
更新包含 ApplicationUser的项目命名空间
❷ The default template uses IdentityUser. Update to use ApplicationUser instead.
默认模板使用 IdentityUser。更新以改用 ApplicationUser。

This partial shows the current login status of the user and provides links to register or sign in. All that remains is to render the partial by calling
此部分显示用户的当前登录状态,并提供用于注册或登录的链接。剩下的就是通过调用

<partial name="_LoginPartial" />

in the main layout file of your app, _Layout.cshtml.
在应用程序的主布局文件中,_Layout.cshtml。

And there you have it: you’ve added Identity to an existing application. The default UI makes doing this relatively simple, and you can be sure you haven’t introduced any security holes by building your own UI!
好了:您已将 Identity 添加到现有应用程序。默认 UI 使此作相对简单,您可以确保通过构建自己的 UI 没有引入任何安全漏洞!

As I described in section 23.3.4, there are some features that the default UI doesn’t provide and you need to implement yourself, such as email confirmation and MFA QR code generation. It’s also common to find that you want to update a single page here and there. In the next section I’ll show how you can replace a page in the default UI, without having to rebuild the entire UI yourself.
正如我在第 23.3.4 节中所描述的,默认 UI 不提供一些功能,您需要自行实现,例如电子邮件确认和 MFA QR 码生成。你也经常会发现你想在这里和那里更新单个页面。在下一节中,我将展示如何替换默认 UI 中的页面,而不必自己重新构建整个 UI。

23.5 Customizing a page in ASP.NET Core Identity’s default UI

23.5 在 ASP.NET Core Identity 的默认 UI 中自定义页面

In this section you’ll learn how to use scaffolding to replace individual pages in the default Identity UI. You’ll learn to scaffold a page so that it overrides the default UI, allowing you to customize both the Razor template and the PageModel page handlers.
在本节中,您将学习如何使用基架替换默认 Identity UI 中的各个页面。您将学习如何搭建页面基架,使其覆盖默认 UI,从而允许您自定义 Razor 模板和 PageModel 页面处理程序。

Having Identity provide the whole UI for your application is great in theory, but in practice there are a few wrinkles, as you saw in section 23.3.4. The default UI provides as much as it can, but there are some things you may want to tweak. For example, both the login and register pages describe how to configure external login providers for your ASP.NET Core applications, as you saw in figures 23.12 and 23.13. That’s useful information for you as a developer, but it’s not something you want to be showing to your users. Another often-cited requirement is the desire to change the look and feel of one or more pages.
让 Identity 为您的应用程序提供整个 UI 在理论上很好,但在实践中存在一些问题,正如您在第 23.3.4 节中看到的那样。默认 UI 提供了尽可能多的功能,但您可能需要调整一些内容。例如,登录和注册页面都描述了如何为 ASP.NET Core 应用程序配置外部登录提供程序,如图 23.12 和 23.13 所示。这对开发人员来说很有用,但不是您希望向用户展示的信息。另一个经常被引用的要求是希望更改一个或多个页面的外观。

Luckily, the default Identity UI is designed to be incrementally replaceable, so you can override a single page without having to rebuild the entire UI yourself. On top of that, both Visual Studio and the .NET CLI have functions that allow you to scaffold any (or all) of the pages in the default UI so that you don’t have to start from scratch when you want to tweak a page.
幸运的是,默认的 Identity UI 设计为可增量替换,因此您可以覆盖单个页面,而无需自己重新构建整个 UI。最重要的是,Visual Studio 和 .NET CLI 都具有允许您在默认 UI 中搭建任何(或所有)页面的基架的功能,这样当您想要调整页面时,就不必从头开始。

DEFINITION Scaffolding is the process of generating files in your project that serve as the basis for customization. The Identity scaffolder adds Razor Pages in the correct locations so they override equivalent pages with the default UI. Initially, the code in the scaffolded pages matches that in the default Identity UI, but you are free to customize it.
定义:基架是在项目中生成文件作为自定义基础的过程。Identity 基架将 Razor Pages 添加到正确的位置,以便它们使用默认 UI 覆盖等效页面。最初,基架页面中的代码与默认 Identity UI 中的代码匹配,但您可以自由自定义它。

As an example of the changes you can easily make, we’ll scaffold the registration page and remove the additional information section about external providers. The following steps describe how to scaffold the Register.cshtml page in Visual Studio:
作为您可以轻松进行的更改的示例,我们将搭建注册页面并删除有关外部提供商的其他信息部分。以下步骤介绍如何在 Visual Studio 中搭建 Register.cshtml 页面的基架:

  1. Add the Microsoft.VisualStudio.Web.CodeGeneration.Design and Microsoft .EntityFrameworkCore.Tools NuGet packages to your project file, if they’re not already added. Visual Studio uses these packages to scaffold your application correctly, and without them you may get an error running the scaffolder:
    添加 Microsoft.VisualStudio.Web.CodeGeneration.Design 和 Microsoft 。EntityFrameworkCore.Tools NuGet 包添加到项目文件中(如果尚未添加)。Visual Studio 使用这些包来正确搭建应用程序基架,如果没有它们,运行 Scaffolder 时可能会遇到错误:
<PackageReference Version="7.0.0"
    Include="Microsoft.VisualStudio.Web.CodeGeneration.Design" />
<PackageReference Version="7.0.0"
    Include="Microsoft.EntityFrameworkCore.Tools" />
  1. Ensure that your project builds. If it doesn’t build, the scaffolder will fail before adding your new pages.
    确保您的项目构建成功。如果它没有构建,则 scaffolder 将在添加新页面之前失败。

  2. Right-click your project, and choose Add > New Scaffolded Item from the contextual menu.
    右键单击您的项目,然后从上下文菜单中选择 Add > New Scaffolded Item (添加新基架项)。

  3. In the selection dialog box, choose Identity from the category, and choose Add.
    在选择对话框中,从类别中选择 Identity (身份),然后选择 Add (添加)。

  4. In the Add Identity dialog box, select the Account/Register page, and select your application’s AppDbContext as the Data context class, as shown in figure 23.12. Choose Add to scaffold the page.
    在 Add Identity 对话框中,选择 Account/Register 页面,然后选择应用程序的 AppDbContext 作为 Data 上下文类,如图 23.12 所示。选择 Add (添加) 以搭建页面基架。

alt text

Figure 23.12 Using Visual Studio to scaffold Identity pages. The generated Razor Pages will override the versions provided by the default UI.
图 23.12 使用 Visual Studio 搭建 Identity 页面的基架。生成的 Razor Pages 将替代默认 UI 提供的版本。

Tip To scaffold the registration page using the .NET CLI, install the required tools and packages as described in Microsoft’s “Scaffold Identity in ASP.NET Core projects” documentation: http://mng.bz/QPRv. Then run dotnet aspnet-codegenerator identity -dc RecipeApplication.Data.AppDbContext --files "Account.Register".
提示:要使用 .NET CLI 搭建注册页面的基架,请按照 Microsoft 的“ASP.NET Core 项目中的基架标识”文档中所述安装所需的工具和包:http://mng.bz/QPRv。然后运行 dotnet aspnet-codegenerator identity -dc RecipeApplication.Data.AppDbContext --files “Account.Register”。

Visual Studio builds your application and then generates the Register.cshtml page for you, placing it in the Areas/Identity/Pages/Account folder. It also generates several supporting files, as shown in figure 23.13. These are required mostly to ensure that your new Register.cshtml page can reference the remaining pages in the default Identity UI.
Visual Studio 生成应用程序,然后生成 Register.cshtml 页面,将其放置在 Areas/Identity/Pages/Account 文件夹中。它还会生成几个支持文件,如图 23.13 所示。这些主要是为了确保新的 Register.cshtml 页面可以引用默认标识 UI 中的其余页面。

alt text

Figure 23.13 The scaffolder generates the Register.cshtml Razor Page, along with supporting files required to integrate with the remainder of the default Identity UI.
图 23.13 基架生成 Register.cshtml Razor 页面,以及与默认标识 UI 的其余部分集成所需的支持文件。

We’re interested in the Register.cshtml page, as we want to customize the UI on the Register page, but if we look inside the code-behind page, Register.cshtml.cs, we see how much complexity the default Identity UI is hiding from us. It’s not insurmountable (we’ll customize the page handler in section 23.6), but it’s always good to avoid writing code if we can help it.
我们对 Register.cshtml 页面感兴趣,因为我们希望自定义 Register 页面上的 UI,但如果我们查看代码隐藏页面 Register.cshtml.cs,我们会看到默认身份 UI 对我们隐藏了多少复杂性。这并不是不可克服的(我们将在 Section 23.6 中自定义页面处理程序),但如果我们可以提供帮助,避免编写代码总是好的。

Now that you have the Razor template in your application, you can customize it to your heart’s content. The downside is that you’re now maintaining more code than you were with the default UI. You didn’t have to write it, but you may still have to update it when a new version of ASP.NET Core is released.
现在,您的应用程序中已有 Razor 模板,您可以根据自己的喜好对其进行自定义。缺点是,您现在维护的代码比使用默认 UI 时要多。您不必编写它,但在 ASP.NET Core 的新版本发布时,您可能仍需要更新它。

I like to use a bit of a trick when it comes to overriding the default Identity UI like this. In many cases, you don’t want to change the page handlers for the Razor Page—only the Razor view. You can achieve this by deleting the Register.cshtml.cs PageModel file, and pointing your newly scaffolded .cshtml file at the original PageModel, which is part of the default UI NuGet package.
在覆盖像这样的默认身份 UI 时,我喜欢使用一些技巧。在许多情况下,您不希望更改 Razor 页面的页面处理程序,而只需要更改 Razor 视图。为此,您可以删除Register.cshtml.cs PageModel 文件,并将新搭建的 .cshtml 文件指向原始 PageModel,该 PageModel 是默认 UI NuGet 包的一部分。

The other benefit of this approach is that you can delete some of the other files that were autoscaffolded. In total, you can make the following changes:
此方法的另一个好处是,您可以删除一些自动基架的其他文件。总的来说,您可以进行以下更改:

• Update the @model directive in Register.cshtml to point to the default UI PageModel:
更新 Register.cshtml 中的 @model 指令以指向默认 UI PageModel:

@model Microsoft.AspNetCore.Identity.UI.V5.Pages.Account.Internal.RegisterModel

• Update Areas/Identity/Pages/_ViewImports.cshtml to the following:
将 Areas/Identity/Pages/_ViewImports.cshtml 更新为以下内容:

@addTagHelper *, Microsoft.AspNetCore.Mvc.TagHelpers

• Delete Areas/Identity/Pages/_ValidationScriptsPartial.cshtml.
• Delete Areas/Identity/Pages/Account/Register.cshtml.cs.
• Delete Areas/Identity/Pages/Account/_ViewImports.cshtml.

After making all these changes, you’ll have the best of both worlds: you can update the default UI Razor Pages HTML without taking on the responsibility of maintaining the default UI code-behind.
进行所有这些更改后,你将获得两全其美的效果:可以更新默认 UI Razor Pages HTML,而无需负责维护默认 UI 代码隐藏。

Tip In the source code for the book, you can see these changes in action, where the Register view has been customized to remove the references to external identity providers.
提示:在本书的源代码中,您可以看到这些实际更改,其中 Register 视图已自定义以删除对外部身份提供者的引用。

Unfortunately, it’s not always possible to use the default UI PageModel. Sometimes you need to update the page handlers, such as when you want to change the functionality of your Identity area rather than only the look and feel. A common requirement is needing to store additional information about a user, as you’ll see in the next section.
遗憾的是,并非总是可以使用默认的 UI PageModel。有时,您需要更新页面处理程序,例如,当您想要更改 Identity 区域的功能,而不仅仅是外观时。一个常见的要求是需要存储有关用户的其他信息,您将在下一节中看到。

23.6 Managing users: Adding custom data to users

23.6 管理用户:向用户添加自定义数据

In this section you’ll see how to customize the ClaimsPrincipal assigned to your users by adding claims to the AspNetUserClaims table when the user is created. You’ll also see how to access these claims in your Razor Pages and templates.
在本节中,您将了解如何通过在创建用户时向 AspNetUserClaims 表添加声明来自定义分配给用户的 ClaimsPrincipal。您还将了解如何在 Razor 页面和模板中访问这些声明。

Often, the next step after adding Identity to an application is customizing it. The default templates require only an email and password to register. What if you need more details, like a friendly name for the user? Also, I’ve mentioned that we use claims for security, so what if you want to add a claim called IsAdmin to certain users?
通常,将 Identity 添加到应用程序后的下一步是对其进行自定义。默认模板只需要电子邮件和密码即可注册。如果您需要更多详细信息,例如用户的友好名称,该怎么办?此外,我还提到过我们使用声明来实现安全性,那么,如果您想向某些用户添加一个名为 IsAdmin 的声明,该怎么办?

You know that every user principal has a collection of claims, so conceptually, adding any claim requires adding it to the user’s collection. There are two main times that you would want to grant a claim to a user:
您知道每个用户主体都有一个声明集合,因此从概念上讲,添加任何声明都需要将其添加到用户的集合中。您希望向用户授予声明的主要时间有两个:

• For every user, when they register on the app—For example, you might want to add a Name field to the Register form and add that as a claim to the user when they register.
对于每个用户,当他们在应用程序上注册时 - 例如,您可能希望将“名称”字段添加到“注册”表单中,并在用户注册时将其作为声明添加到用户。
• Manually, after the user has registered—This is common for claims used as permissions, where an existing user might want to add an IsAdmin claim to a specific user after they have registered on the app.
在用户注册后手动 - 这在用作权限的声明中很常见,其中现有用户可能希望在特定用户注册应用程序后向特定用户添加 IsAdmin 声明。

In this section I’ll show you the first approach, automatically adding new claims to a user when they’re created. The latter approach is more flexible and ultimately is the approach many apps will need, especially line-of-business apps. Luckily, there’s nothing conceptually difficult to it; it requires a simple UI that lets you view users and add a claim through the same mechanism I’ll show here.
在本节中,我将向您展示第一种方法,即在创建用户时自动向用户添加新声明。后一种方法更灵活,最终是许多应用程序需要的方法,尤其是业务线应用程序。幸运的是,它在概念上没有什么困难;它需要一个简单的 UI,允许您通过我将在此处展示的相同机制查看用户并添加声明。

Tip Another common approach is to customize the IdentityUser entity, by adding a Name property, for example. This approach is sometimes easier to work with if you want to give users the ability to edit that property. Microsoft’s “Add, download, and delete custom user data to Identity in an ASP.NET Core project” documentation describes the steps required to achieve that: http://mng.bz/aoe7.
提示:另一种常见方法是自定义 IdentityUser 实体,例如,通过添加 Name 属性。如果您想让用户能够编辑该属性,这种方法有时更容易使用。Microsoft 的“在 ASP.NET Core 项目中向 Identity 添加、下载和删除自定义用户数据”文档介绍了实现此目的所需的步骤:http://mng.bz/aoe7

Let’s say you want to add a new Claim to a user, called FullName. A typical approach would be as follows:
假设您要向名为 FullName 的用户添加新声明。典型的方法如下:

  1. Scaffold the Register.cshtml Razor Page, as you did in section 23.5.
    搭建 Register.cshtml Razor 页面的基架,就像在第 23.5 节中所做的那样。

  2. Add a Name field to the InputModel in the Register.cshtml.cs PageModel.
    将 Name 字段添加到 Register.cshtml.cs PageModel 中的 InputModel。

  3. Add a Name input field to the Register.cshtml Razor view template.
    将 Name 输入字段添加到 Register.cshtml Razor 视图模板。

  4. Create the new ApplicationUser entity as before in the OnPost() page handler by calling CreateAsync on UserManager<ApplicationUser>.
    像以前一样,通过在 UserManager 上调用 CreateAsync 在 OnPost() 页面处理程序中创建新的 UserManager<ApplicationUser>实体。

  5. Add a new Claim to the user by calling UserManager.AddClaimAsync().
    通过调用 UserManager.AddClaimAsync() 向用户添加新的声明。

  6. Continue the method as before, sending a confirmation email or signing the user in if email confirmation is not required.
    像以前一样继续该方法,发送确认电子邮件,如果不需要电子邮件确认,则让用户登录。

Steps 1–3 are fairly self-explanatory and require only updating the existing templates with the new field. Steps 4–6 take place in Register.cshtml.cs in the OnPostAsync() page handler, which is summarized in the following listing. In practice, the page handler has more error checking, boilerplate, extra features, and abstraction. I’ve simplified the code in listing 23.7 to focus on the additional lines that add the extra Claim to the ApplicationUser; you can find the full code in the sample code for this chapter.
步骤 1-3 相当不言自明,只需要使用新字段更新现有模板。步骤 4-6 在 OnPostAsync() 页面处理程序中Register.cshtml.cs进行,下面的清单对此进行了总结。在实践中,页面处理程序具有更多的错误检查、样板、额外功能和抽象。我简化了清单 23.7 中的代码,以专注于向 ApplicationUser 添加额外 Claim 的其他行;您可以在本章的示例代码中找到完整代码。

Listing 23.7 Adding a custom claim to a new user in the Register.cshtml.cs page
清单 23.7 在 Register.cshtml.cs 页面中为新用户添加自定义声明

public async Task<IActionResult> OnPostAsync(string returnUrl = null)
{
    if (ModelState.IsValid)
    {
        var user = new ApplicationUser {                    #A
            UserName = Input.Email, Email = Input.Email };  #A
        var result = await _userManager.CreateAsync(      #B
            user, Input.Password);                        #B
        if (result.Succeeded)
        {
            var claim = new Claim("FullName", Input.Name);   #C
            await _userManager.AddClaimAsync(user, claim);   #D
            var code = await _userManager                      #E
                .GenerateEmailConfirmationTokenAsync(user);    #E
            await _emailSender.SendEmailAsync(                 #E
                 Input.Email, "Confirm your email", code );    #E
            await _signInManager.SignInAsync(user);   #F
            return LocalRedirect(returnUrl);
        }
        foreach (var error in result.Errors)         #G
        {                                            #G
            ModelState.AddModelError(                #G
                string.Empty, error.Description);    #G
        }                                            #G
    }
       return Page();                                #G
}

❶ Creates an instance of the ApplicationUser entity
创建 ApplicationUser 实体的实例
❷ Validates that the provided password meets requirements, and creates the user in the database
验证提供的密码是否满足要求,并在数据库中创建用户
❸ Creates a claim, with a string name of “FullName” and the provided value
创建字符串名称为“FullName”且提供的值的声明
❹ Adds the new claim to the ApplicationUser’s collection
将新声明添加到 ApplicationUser 的集合
❺ Sends a confirmation email to the user, if you have configured the email sender
向用户发送确认电子邮件(如果您已配置电子邮件发件人)
❻ Signs the user in by setting the HttpContext.User; the principal will include the custom claim
通过设置 HttpContext.User 来登录用户;主体将包含自定义声明
❼ There was a problem creating the user. Adds the errors to the ModelState and redisplays the page.
创建用户时出现问题。将错误添加到 ModelState 并重新显示页面。

Tip Listing 23.7 shows how you can add extra claims at registration time, but you will often need to add more data later, such as permission-related claims or other information. You will need to create additional endpoints and pages for adding this data, securing the pages as appropriate (so that users can’t update their own permissions, for example).
提示:清单 23.7 展示了如何在注册时添加额外的声明,但您通常需要稍后添加更多数据,例如与权限相关的声明或其他信息。您需要创建其他终端节点和页面来添加此数据,并根据需要保护页面(例如,使用户无法更新自己的权限)。

This is all that’s required to add the new claim, but you’re not using it anywhere currently. What if you want to display it? Well, you’ve added a claim to the ClaimsPrincipal, which was assigned to the HttpContext.User property when you called SignInAsync. That means you can retrieve the claims anywhere you have access to the ClaimsPrincipal—including in your page handlers and in view templates. For example, you could display the user’s FullName claim anywhere in a Razor template with the following statement:
这就是添加新声明所需的全部内容,但您目前没有在任何地方使用它。如果要显示它怎么办?嗯,您已经向 ClaimsPrincipal 添加了一个声明,该声明在调用 SignInAsync 时分配给 HttpContext.User 属性。这意味着您可以在任何有权访问 ClaimsPrincipal 的位置检索声明,包括在页面处理程序和视图模板中。例如,您可以使用以下语句在 Razor 模板中的任意位置显示用户的 FullName 声明:

@User.Claims.FirstOrDefault(x=>x.Type == "FullName")?.Value

This finds the first claim on the current user principal with a Type of "FullName" and prints the assigned value (or, if the claim is not found, prints nothing). The Identity system even includes a handy extension method that tidies up this LINQ expression (found in the System.Security.Claims namespace):
这将在当前用户主体上查找 Type 为 “FullName” 的第一个声明,并打印分配的值(或者,如果未找到声明,则不打印任何内容)。Identity 系统甚至包括一个方便的扩展方法,用于整理此 LINQ 表达式(位于 System.Security.Claims 命名空间中):

@User.FindFirstValue("FullName")

With that last tidbit, we’ve reached the end of this chapter on ASP.NET Core Identity. I hope you’ve come to appreciate the amount of effort using Identity can save you, especially when you make use of the default Identity UI package.
说到最后的花絮,我们关于 ASP.NET Core Identity 的本章已经结束了。我希望您已经意识到使用 Identity 可以节省大量精力,尤其是在使用默认的 Identity UI 包时。

Adding user accounts and authentication to an app is typically the first step in customizing your app further. Once you have authentication, you can have authorization, which lets you lock down certain actions in your app, based on the current user. In the next chapter you’ll learn about the ASP.NET Core authorization system and how you can use it to customize your apps; in particular, the recipe application, which is coming along nicely!
向应用程序添加用户帐户和身份验证通常是进一步自定义应用程序的第一步。获得身份验证后,您可以获得授权,从而允许您根据当前用户锁定应用程序中的某些作。在下一章中,您将了解 ASP.NET Core 授权系统以及如何使用它来自定义您的应用程序;特别是 recipe 应用程序,它进展顺利!

23.7 Summary

23.7 总结

Authentication is the process of determining who you are, and authorization is the process of determining what you’re allowed to do. You need to authenticate users before you can apply authorization.
身份验证是确定您是谁的过程,授权是确定允许您执行哪些作的过程。您需要先对用户进行身份验证,然后才能应用授权。

Every request in ASP.NET Core is associated with a user, also known as a principal. By default, without authentication, this is an anonymous user. You can use the claims principal to behave differently depending on who made a request.
ASP.NET Core 中的每个请求都与一个用户(也称为委托人)相关联。默认情况下,如果不进行身份验证,则此用户为匿名用户。您可以使用 claims principal 根据发出请求的人员来执行不同的行为。

The current principal for a request is exposed on HttpContext.User. You can access this value from your Razor Pages and views to find out properties of the user such as their, ID, name, or email.
请求的当前主体在 HttpContext.User 上公开。可以从 Razor 页面和视图访问此值,以查找用户的属性,例如他们的 ID、名称或电子邮件。

Every user has a collection of claims. These claims are single pieces of information about the user. Claims could be properties of the physical user, such as Name and Email, or they could be related to things the user has, such as HasAdminAccess or IsVipCustomer.
每个用户都有一个声明集合。这些声明是有关用户的单个信息。声明可以是物理用户的属性,例如 Name 和 Email,也可以与用户拥有的内容相关,例如 HasAdminAccess 或 IsVipCustomer。

Legacy versions of ASP.NET used roles instead of claims. You can still use roles if you need to, but you should typically use claims where possible.
旧版本的 ASP.NET 使用角色而不是声明。如果需要,您仍然可以使用角色,但通常应尽可能使用声明。

Authentication in ASP.NET Core is provided by AuthenticationMiddleware and a number of authentication services. These services are responsible for setting the current principal when a user logs in, saving it to a cookie, and loading the principal from the cookie on subsequent requests.
ASP.NET Core 中的身份验证由 AuthenticationMiddleware 和许多身份验证服务提供。这些服务负责在用户登录时设置当前主体,将其保存到 Cookie,并在后续请求中从 Cookie 加载主体。

The AuthenticationMiddleware is added automatically by WebApplication. You can ensure that it’s inserted at a specific point in the middleware pipeline by calling UseAuthentication(). It must be placed before any middleware that requires authentication, such as UseAuthorization().
AuthenticationMiddleware 由 WebApplication 自动添加。您可以通过调用 UseAuthentication() 来确保它插入到中间件管道中的特定点。它必须放在任何需要身份验证的中间件之前,例如 UseAuthorization()。

ASP.NET Core Identity handles low-level services needed for storing users in a database, ensuring that their passwords are stored safely, and for logging users in and out. You must provide the UI for the functionality yourself and wire it up to the Identity subsystem.
ASP.NET Core Identity 处理将用户存储在数据库中、确保其密码安全存储以及登录和注销用户所需的低级服务。您必须自己提供该功能的 UI,并将其连接到 Identity 子系统。

The Microsoft.AspNetCore.Identity.UI package provides a default UI for the Identity system and includes email confirmation, MFA, and external login provider support. You need to do some additional configuration to enable these features.
Microsoft.AspNetCore.Identity.UI 包为标识系统提供默认 UI,并包括电子邮件确认、MFA 和外部登录提供程序支持。您需要进行一些额外的配置才能启用这些功能。

The default template for Web Application with Individual Account Authentication uses ASP.NET Core Identity to store users in the database with EF Core. It includes all the boilerplate code required to wire the UI up to the Identity system.
具有个人帐户身份验证的 Web 应用程序的默认模板使用 ASP.NET Core Identity 将用户存储在具有 EF Core 的数据库中。它包括将 UI 连接到标识系统所需的所有样板代码。

You can use the UserManager<T> class to create new user accounts, load them from the database, and change their passwords. SignInManager is used to sign a user in and out by assigning the principal for the request and by setting an authentication cookie. The default UI uses these classes for you, to facilitate user registration and login.
您可以使用UserManager<T>该类创建新的用户帐户,从数据库中加载它们,并更改其密码。SignInManager 用于通过为请求分配主体和设置身份验证 cookie 来登录和注销用户。默认 UI 会为您使用这些类,以方便用户注册和登录。

You can update an EF Core DbContext to support Identity by deriving from IdentityDbContext, where TUser is a class that derives from IdentityUser.
您可以通过从 IdentityDbContext 派生来更新 EF Core DbContext 以支持 Identity,其中 TUser 是从 IdentityUser 派生的类。

You can add additional claims to a user using the UserManager.AddClaimAsync(TUser user, Claim claim) method. These claims are added to the HttpContext.User object when the user logs in to your app.
您可以使用 UserManager 向用户添加其他声明。AddClaimAsync(TUser user, Claim claim) 方法。当用户登录到您的应用时,这些声明将添加到 HttpContext.User 对象中。

Claims consist of a type and a value. Both values are strings. You can use standard values for types exposed on the ClaimTypes class, such as ClaimTypes.GivenName and ClaimTypes.FirstName, or you can use a custom string, such as "FullName".
声明由类型和值组成。这两个值都是字符串。您可以对 ClaimTypes 类上公开的类型使用标准值,例如 ClaimTypes.GivenName 和 ClaimTypes.FirstName,也可以使用自定义字符串,例如“FullName”。

ASP.NET Core in Action 22 Creating custom MVC and Razor Page filters

22 Creating custom MVC and Razor Page filters
22 创建自定义 MVC 和 Razor 页面筛选器

This chapter covers
本章涵盖

• Creating custom filters to refactor complex action methods
创建自定义筛选器以重构复杂的作方法
• Using authorization filters to protect your action methods and Razor Pages
使用授权筛选器保护作方法和 Razor 页面
• Short-circuiting the filter pipeline to bypass action and page handler execution
使筛选器管道短路以绕过作和页面处理程序执行
• Injecting dependencies into filters
将依赖项注入筛选器

In chapter 21 I introduced the Model-View-Controller (MVC) and Razor Pages filter pipeline and showed where it fits into the life cycle of a request. You learned how to apply filters to your action method, controllers, and Razor Pages, and the effect of scope on the filter execution order.
在第 21 章中,我介绍了模型-视图-控制器 (MVC) 和 Razor Pages 过滤器管道,并展示了它在请求生命周期中的位置。你了解了如何将筛选器应用于作方法、控制器和 Razor Pages,以及范围对筛选器执行顺序的影响。

In this chapter you’ll take that knowledge and apply it to a concrete example. You’ll learn to create custom filters that you can use in your own apps and how to use them to reduce duplicate code in your action methods.
在本章中,您将利用这些知识并将其应用于具体示例。您将学习如何创建可在自己的应用程序中使用的自定义过滤器,以及如何使用它们来减少作方法中的重复代码。

In section 22.1 I take you through the filter types in detail, how they fit into the MVC pipeline, and what to use them for. For each one, I’ll provide example implementations that you might use in your own application and describe the built-in options available.
在 Section 22.1 中,我将向您详细介绍过滤器类型,它们如何适应 MVC 管道,以及使用它们的用途。对于每个选项,我将提供您可以在自己的应用程序中使用的示例实现,并描述可用的内置选项。

A key feature of filters is the ability to short-circuit a request by generating a response and halting progression through the filter pipeline. This is similar to the way short-circuiting works in middleware, but there are subtle differences for MVC filters. On top of that, the exact behavior is slightly different for each filter, and I cover that in section 22.2.
过滤器的一个关键功能是能够通过生成响应并停止通过过滤器管道的进程来短路请求。这类似于中间件中短路的工作方式,但 MVC 筛选器存在细微的差异。最重要的是,每个过滤器的确切行为略有不同,我在 22.2 节中介绍了这一点。

You typically add MVC filters to the pipeline by implementing them as attributes added to your controller classes, action methods, and Razor Pages. Unfortunately, you can’t easily use dependency injection (DI) with attributes due to the limitations of C#. In section 22.3 I show you how to use the ServiceFilterAttribute and TypeFilterAttribute base classes to enable DI in your filters.
通常,通过将 MVC 筛选器实现为添加到控制器类、作方法和 Razor Pages 的属性,将 MVC 筛选器添加到管道中。遗憾的是,由于 C# 的限制,你不能轻松地将依赖项注入 (DI) 与属性一起使用。在第 22.3 节中,我将向您展示如何使用 ServiceFilterAttribute 和 TypeFilterAttribute 基类在过滤器中启用 DI。

We covered all the background for filters in chapter 21, so in the next section we jump straight into the code and start creating custom MVC filters.
我们在第 21 章中介绍了过滤器的所有背景,因此在下一节中,我们将直接进入代码并开始创建自定义 MVC 过滤器。

22.1 Creating custom filters for your application

22.1 为您的应用程序创建自定义过滤器

ASP.NET Core includes several filters that you can use out of the box, but often the most useful filters are the custom ones that are specific to your own apps. In this section we’ll work through each of the six types of filters I covered in chapter 21. I’ll explain in more detail what they’re for and when you should use them. I’ll point out examples of these filters that are part of ASP.NET Core itself, and you’ll see how to create custom filters for an example application.
ASP.NET Core 包含多个开箱即用的筛选器,但通常最有用的筛选器是特定于你自己的应用程序的自定义筛选器。在本节中,我们将介绍我在第 21 章中介绍的六种类型的过滤器中的每一种。我将更详细地解释它们的用途以及何时应该使用它们。我将指出这些筛选器的示例,这些筛选器是 ASP.NET Core 本身的一部分,您将了解如何为示例应用程序创建自定义筛选器。

To give you something realistic to work with, we’ll start with a web API controller for accessing the recipe application from chapter 12. This controller contains two actions: one for fetching a RecipeDetailViewModel and another for updating a Recipe with new values. The following listing shows your starting point for this chapter, including both action methods.
为了给你一些实际的使用,我们将从一个 Web API 控制器开始,用于访问第 12 章中的配方应用程序。此控制器包含两个作:一个用于获取 RecipeDetailViewModel,另一个用于使用新值更新 Recipe。下面的清单显示了本章的起点,包括两种作方法。

Listing 22.1 Recipe web API controller before refactoring to use filters
列表 22.1 重构以使用过滤器之前的配方 Web API 控制器

[Route("api/recipe")]
public class RecipeApiController : ControllerBase
{
    private readonly bool IsEnabled = true;            #A
    public RecipeService _service; 
    public RecipeApiController(RecipeService service) 
    { 
        _service = service;
    } 

    [HttpGet("{id}")]
    public IActionResult Get(int id)
    {
        if (!IsEnabled) { return BadRequest(); }   #B
        try
        {
            if (!_service.DoesRecipeExist(id))   #C
            {                                    #C
                return NotFound();               #C
            }                                    #C
            var detail = _service.GetRecipeDetail(id);    #D
            Response.GetTypedHeaders().LastModified =     #E
                detail.LastModified;                      #E
            return Ok(detail);    #F
        }
        catch (Exception ex)                #G
        {                                   #G
            return GetErrorResponse(ex);    #G
        }                                   #G
    }

    [HttpPost("{id}")]
    public IActionResult Edit(
        int id, [FromBody] UpdateRecipeCommand command)
    {
        if (!IsEnabled) { return BadRequest(); }     #H
        try
        {
            if (!ModelState.IsValid)             #I
            {                                    #I
                return BadRequest(ModelState);   #I
            }                                    #I
            if (!_service.DoesRecipeExist(id))    #J
            {                                     #J
                return NotFound();                #J
            }                                     #J
            _service.UpdateRecipe(command);    #K
            return Ok();                       #K
        }
        catch (Exception ex)               #L
        {                                  #L
            return GetErrorResponse(ex);   #L
        }                                  #L
    }

    private static IActionResult GetErrorResponse(Exception ex)
    {
        var error = new ProblemDetails         
        {
            Title = "An error occurred",         
            Detail = context.Exception.Message,
            Status = 500,                      
            Type = "https://httpstatuses.com/500"
        };                                              

        return new ObjectResult(error)
        {
            StatusCode = 500
        };
    }
}

❶ This field would be passed in as configuration and is used to control access to actions.
此字段将作为配置传入,用于控制对作的访问。
❷ If the API isn’t enabled, blocks further execution
如果未启用 API,则阻止进一步执行
❸ If the requested Recipe doesn’t exist, returns a 404 response
如果请求的配方不存在,则返回 404 响应
❹ Fetches RecipeDetailViewModel
获取 RecipeDetailViewModel
❺ Sets the Last-Modified response header to the value in the model
将 Last-Modified 响应标头设置为模型中的值
❻ Returns the view model with a 200 response
返回响应为 200 的视图模型
❼ If an exception occurs, catches it and returns the error in an expected format, as a 500 error
如果发生异常,则捕获它并以预期的格式返回错误, 作为 500 错误
❽ If the API isn’t enabled, blocks further execution
如果未启用 API,则阻止进一步执行
❾ Validates the binding model and returns a 400 response if there are errors
验证绑定模型并在出现错误时返回 400 响应
❿ If the requested Recipe doesn’t exist, returns a 404 response
如果请求的配方不存在,则返回 404 响应
⓫ Updates the Recipe from the command and returns a 200 response
从命令更新配方并返回 200 响应
⓬ If an exception occurs, catches it and returns the error in an expected format, as a 500 error
如果发生异常,则捕获它并以预期的格式返回错误, 作为 500 错误

These action methods currently have a lot of code to them, which hides the intent of each action. There’s also quite a lot of duplication between the methods, such as checking that the Recipe entity exists and formatting exceptions.
这些 action method 目前有很多代码,这隐藏了每个 action 的意图。方法之间也存在相当多的重复,例如检查 Recipe 实体是否存在和格式化异常。

In this section you’re going to refactor this controller to use filters for all the code in the methods that’s unrelated to the intent of each action. By the end of the chapter you’ll have a much simpler controller controller that’s far easier to understand, as shown here.
在本节中,您将重构此控制器,以便对方法中与每个作的意图无关的所有代码使用过滤器。在本章结束时,您将拥有一个更简单的控制器控制器,它更容易理解,如下所示。

Listing 22.2 Recipe web API controller after refactoring to use filters
列表 22.2 重构为使用过滤器后的配方 Web API 控制器

[Route("api/recipe")]
[ValidateModel]      #A
[HandleException]    #A
[FeatureEnabled(IsEnabled = true)]     #A
public class RecipeApiController : ControllerBase
{
    public RecipeService _service;
    public RecipeApiController(RecipeService service)
    {
        _service = service;
    }

    [HttpGet("{id}")]
    [EnsureRecipeExists]    #B
    [AddLastModifiedHeader]    #B
    public IActionResult Get(int id)
    {
        var detail = _service.GetRecipeDetail(id);     #C
        return Ok(detail);                             #C
    }

    [HttpPost("{id}")]
    [EnsureRecipeExists]        #D
    public IActionResult Edit(
        int id, [FromBody] UpdateRecipeCommand command)
    {
        _service.UpdateRecipe(command);    #E
        return Ok();                       #E
    }
}

❶ The filters encapsulate the majority of logic common to multiple action methods.
过滤器封装了多个方法通用的大多数逻辑。
❷ Placing filters at the action level limits them to a single action.
将过滤器放在作级别会将它们限制为单个作。
❸ The intent of the action, return a Recipe view model, is much clearer.
作的意图(返回配方视图模型)要清晰得多。
❹ Placing filters at the action level can control the order in which they execute.
将过滤器放在作级别可以控制它们的执行顺序。
❺ The intent of the action, update a Recipe, is much clearer.
作 update a Recipe 的意图要明确得多。

I think you’ll have to agree that the controller in listing 22.2 is much easier to read! In this section you’ll refactor the controller bit by bit, removing cross-cutting code to get to something more manageable. All the filters we’ll create in this section will use the sync filter interfaces. I’ll leave it to you, as an exercise, to create their async counterparts. We’ll start by looking at authorization filters and how they relate to security in ASP.NET Core.
我想你得同意,清单 22.2 中的控制器要容易得多!在本节中,您将逐步重构控制器,删除横切代码以获得更易于管理的内容。我们将在本节中创建的所有过滤器都将使用 sync 过滤器接口。作为练习,我将留给您创建它们的异步对应项。首先,我们将了解授权筛选器以及它们与 ASP.NET Core 中的安全性有何关系。

22.1.1 Authorization filters: Protecting your APIs

22.1.1 授权过滤器:保护您的 API

Authentication and authorization are related, fundamental concepts in security that we’ll be looking at in detail in chapters 23 and 24.
身份验证和授权是安全中相关的基本概念,我们将在第 23 章和第 24 章中详细介绍。

DEFINITION Authentication is concerned with determining who made a request. Authorization is concerned with what a user is allowed to access.
定义:身份验证与确定谁发出了请求有关。授权与允许用户访问的内容有关。

Authorization filters run first in the MVC filter pipeline, before any other filters. They control access to the action method by immediately short-circuiting the pipeline when a request doesn’t meet the necessary requirements.
授权筛选器首先在 MVC 筛选器管道中运行,然后再运行任何其他筛选器。当请求不满足必要的要求时,它们通过立即使管道短路来控制对作方法的访问。

ASP.NET Core has a built-in authorization framework that you should use when you need to protect your MVC application or your web APIs. You can configure this framework with custom policies that let you finely control access to your actions.
ASP.NET Core 有一个内置的授权框架,当您需要保护 MVC 应用程序或 Web API 时,您应该使用该框架。您可以使用自定义策略配置此框架,以便精细控制对作的访问。

Tip It’s possible to write your own authorization filters by implementing IAuthorizationFilter or IAsyncAuthorizationFilter, but I strongly advise against it. The ASP.NET Core authorization framework is highly configurable and should meet all your needs.
提示:通过实现 IAuthorizationFilter 或 IAsyncAuthorizationFilter 可以编写自己的授权筛选器,但我强烈建议不要这样做。ASP.NET Core 授权框架是高度可配置的,应该可以满足您的所有需求。

At the heart of MVC authorization is an authorization filter, AuthorizeFilter, which you can add to the filter pipeline by decorating your actions or controllers with the [Authorize] attribute. In its simplest form, adding the [Authorize] attribute to an action, as in the following listing, means that the request must be made by an authenticated user to be allowed to continue. If you’re not logged in, it will short-circuit the pipeline, returning a 401 Unauthorized response to the browser.
MVC 授权的核心是授权筛选器 AuthorizeFilter,您可以通过使用 [Authorize] 属性修饰作或控制器来将其添加到筛选器管道中。在最简单的形式中,将 [Authorize] 属性添加到作中,如下面的清单所示,意味着请求必须由经过身份验证的用户发出才能继续。如果您未登录,它将使管道短路,向浏览器返回 401 Unauthorized 响应。

Listing 22.3 Adding [Authorize] to an action method
清单 22.3 向作方法添加 [Authorize]

public class RecipeApiController : ControllerBase
{
    public IActionResult Get(int id)    #A
    {
        // method body
    }

    [Authorize]                  #B
    public IActionResult Edit(                             #C
        int id, [FromBody] UpdateRecipeCommand command)    #C
    {
        // method body
    }
}

❶ The Get method has no [Authorize] attribute, so it can be executed by anyone.
Get 方法没有 [Authorize] 属性,因此任何人都可以执行它。
❷ Adds the AuthorizeFilter to the filter pipeline using [Authorize]
使用 [Authorize]将 AuthorizeFilter 添加到筛选器管道
❸ The Edit method can be executed only if you’re logged in.
只有在您登录后才能执行 Edit 方法。

As with all filters, you can apply the [Authorize] attribute at the controller level to protect all the actions on a controller, to a Razor Page to protect all the page handler methods in a page, or even globally to protect every endpoint in your app.
与所有筛选器一样,可以在控制器级别应用 [Authorize] 属性以保护控制器上的所有作,将 [Authorize] 属性应用于 Razor 页面以保护页面中的所有页面处理程序方法,甚至可以全局应用以保护应用中的每个终结点。

NOTE We’ll explore authorization in detail in chapter 24, including how to add more detailed requirements so that only specific sets of users can execute an action.
注意:我们将在第 24 章中详细探讨授权,包括如何添加更详细的要求,以便只有特定的用户集才能执行作。

The next filters in the pipeline are resource filters. In the next section you’ll extract some of the common code from RecipeApiController and see how easy it is to create a short-circuiting filter.
管道中的下一个筛选器是资源筛选器。在下一节中,您将从 RecipeApiController 中提取一些通用代码,并了解创建短路过滤器是多么容易。

22.1.2 Resource filters: Short-circuiting your action methods

22.1.2 资源过滤器:使作方法短路

Resource filters are the first general-purpose filters in the MVC filter pipeline. In chapter 21 you saw minimal examples of both sync and async resource filters, which logged to the console. In your own apps, you can use resource filters for a wide range of purposes, thanks to the fact that they execute so early (and late) in the filter pipeline.
资源筛选器是 MVC 筛选器管道中的第一个通用筛选器。在第 21 章中,您看到了 sync 和 async 资源过滤器的最小示例,它们记录到控制台中。在您自己的应用程序中,您可以将资源筛选条件用于多种用途,这要归功于它们在筛选管道中执行得如此早(和延迟)的事实。

The ASP.NET Core framework includes a few implementations of resource filters you can use in your apps:
ASP.NET Core 框架包含一些可在应用中使用的资源筛选器实现:

• ConsumesAttribute—Can be used to restrict the allowed formats an action method can accept. If your action is decorated with [Consumes("application/json")], but the client sends the request as Extensible Markup Language (XML), the resource filter will short-circuit the pipeline and return a 415 Unsupported Media Type response.
ConsumesAttribute - 可用于限制作方法可以接受的允许格式。如果您的作使用 [Consumes(“application/json”)] 修饰,但客户端以可扩展标记语言 (XML) 的形式发送请求,则资源筛选器将使管道短路并返回 415 不支持的媒体类型响应。
• SkipStatusCodePagesAttribute—This filter prevents the StatusCodePagesMiddleware from running for the response. This can be useful if, for example, you have both web API controllers and Razor Pages in the same application. You can apply this attribute to the controllers to ensure that API error responses are passed untouched, but all error responses from Razor Pages are handled by the middleware.
SkipStatusCodePagesAttribute - 此筛选器可防止 StatusCodePagesMiddleware 针对响应运行。例如,如果同一应用程序中同时具有 Web API 控制器和 Razor Pages,这可能非常有用。可以将此属性应用于控制器,以确保 API 错误响应原封不动地传递,但来自 Razor Pages 的所有错误响应都由中间件处理。

Resource filters are useful when you want to ensure that the filter runs early in the pipeline, before model binding. They provide an early hook into the pipeline for your logic so you can quickly short-circuit the request if you need to.
当您想要确保筛选条件在模型绑定之前在管道中尽早运行时,资源筛选条件非常有用。它们为您的 logic 提供了管道的早期钩子,因此您可以在需要时快速短路请求。

Look back at listing 22.1 and see whether you can refactor any of the code into a resource filter. One candidate line appears at the start of both the Get and Edit methods:
回顾一下清单 22.1,看看你是否可以将任何代码重构为资源过滤器。一个候选行出现在 Get 和 Edit 方法的开头:

if (!IsEnabled) { return BadRequest(); }

This line of code is a feature toggle that you can use to disable the availability of the whole API, based on the IsEnabled field. In practice, you’d probably load the IsEnabled field from a database or configuration file so you could control the availability dynamically at runtime, but for this example I’m using a hardcoded value.
这行代码是一个功能切换,可用于根据 IsEnabled 字段禁用整个 API 的可用性。在实践中,您可能会从数据库或配置文件加载 IsEnabled 字段,以便您可以在运行时动态控制可用性,但对于此示例,我使用的是硬编码值。

Tip To read more about using feature toggles in your applications, see my series “Adding feature flags to an ASP.NET Core app” at http://mng.bz/2e40.
提示:要了解有关在应用程序中使用功能切换的更多信息,请参阅我在 http://mng.bz/2e40 上的系列文章“向 ASP.NET Core 应用程序添加功能标志”。

This piece of code is self-contained cross-cutting logic, which is somewhat orthogonal to the main intent of each action method—a perfect candidate for a filter. You want to execute the feature toggle early in the pipeline, before any other logic, so a resource filter makes sense.
这段代码是自包含的横切逻辑,它与每个作方法的主要意图在某种程度上正交,是过滤器的完美候选者。您希望在管道的早期、任何其他逻辑之前执行功能切换,因此资源筛选条件是有意义的。

Tip Technically, you could also use an authorization filter for this example, but I’m following my own advice of “Don’t write your own authorization filters!”
提示:从技术上讲,您也可以对此示例使用授权过滤器,但我遵循我自己的建议,即“不要编写自己的授权过滤器!

The next listing shows an implementation of FeatureEnabledAttribute, which extracts the logic from the action methods and moves it into the filter. I’ve also exposed the IsEnabled field as a property on the filter.
下一个清单显示了 FeatureEnabledAttribute 的实现,它从作方法中提取逻辑并将其移动到过滤器中。我还将 IsEnabled 字段作为筛选器上的属性公开。

Listing 22.4 The FeatureEnabledAttribute resource filter
列表 22.4 FeatureEnabledAttribute 资源过滤器

public class FeatureEnabledAttribute : Attribute, IResourceFilter
{
    public bool IsEnabled { get; set; }   #A
    public void OnResourceExecuting(        #B
        ResourceExecutingContext context)   #B
    {
        if (!IsEnabled)                                #C
        {                                              #C
            context.Result = new BadRequestResult();   #C
        }                                              #C
    }
    public void OnResourceExecuted(             #D
        ResourceExecutedContext context) { }    #D
}

❶ Defines whether the feature is enabled
定义是否启用该功能
❷ Executes before model binding, early in the filter pipeline
在模型绑定之前执行,在过滤器管道的早期
❸ If the feature isn’t enabled, short-circuits the pipeline by setting the context.Result property
如果未启用该功能,则通过设置上下文来短路管道。结果属性
❹ Must be implemented to satisfy IResourceFilter, but not needed in this case
必须实现以满足 IResourceFilter,但在这种情况下不需要

This simple resource filter demonstrates a few important concepts, which are applicable to most filter types:
这个简单的资源筛选条件演示了几个重要的概念,这些概念适用于大多数筛选条件类型:

• The filter is an attribute as well as a filter. This lets you decorate your controller, action methods, and Razor Pages with it using [FeatureEnabled(IsEnabled = true)].
过滤器既是属性又是过滤器。这样,您就可以使用 [FeatureEnabled(IsEnabled = true)] 使用它来装饰控制器、作方法和 Razor 页面。

• The filter interface consists of two methods: Executing, which runs before model binding, and Executed, which runs after the result has executed. You must implement both, even if you only need one for your use case.
筛选器接口由两种方法组成:Executing (在模型绑定之前运行)和 Executed (在结果执行之后运行)。您必须同时实施这两个项目,即使您的用例只需要一个项目。

• The filter execution methods provide a context object. This provides access to, among other things, the HttpContext for the request and metadata about the action method that was selected.
过滤器执行方法提供上下文对象。这提供了对请求的 HttpContext 和有关所选作方法的元数据等的访问。

• To short-circuit the pipeline, set the context.Result property to an IactionResult instance. The framework will execute this result to generate the response, bypassing any remaining filters in the pipeline and skipping the action method (or page handler) entirely. In this example, if the feature isn’t enabled, you bypass the pipeline by returning BadRequestResult, which returns a 400 error to the client.
要使管道短路,请设置上下文。Result 属性设置为 IactionResult 实例。框架将执行此结果以生成响应,绕过管道中的任何剩余筛选器,并完全跳过作方法(或页面处理程序)。在此示例中,如果未启用该功能,则通过返回 BadRequestResult 来绕过管道,这会向客户端返回 400 错误。

By moving this logic into the resource filter, you can remove it from your action methods and instead decorate the whole API controller with a simple attribute:
通过将此逻辑移动到资源过滤器中,您可以将其从 action 方法中删除,而是使用 simple 属性装饰整个 API 控制器:

[FeatureEnabled(IsEnabled = true)]
[Route("api/recipe")]
public class RecipeApiController : ControllerBase

You’ve extracted only two lines of code from your action methods so far, but you’re on the right track. In the next section we’ll move on to action filters and extract two more filters from the action method code.
到目前为止,您只从 action 方法中提取了两行代码,但您走在正确的轨道上。在下一节中,我们将继续讨论作筛选器,并从作方法代码中提取另外两个筛选器。

22.1.3 Action filters: Customizing model binding and action results

22.1.3作过滤器:自定义模型绑定和作结果

Action filters run just after model binding, before the action method executes. Thanks to this positioning, action filters can access all the arguments that will be used to execute the action method, which makes them a powerful way of extracting common logic out of your actions.
Action筛选器在模型绑定之后,在作方法执行之前运行。由于这种定位,动作过滤器可以访问将用于执行动作方法的所有参数,这使它们成为从动作中提取通用逻辑的强大方式。

On top of this, they run after the action method has executed and can completely change or replace the IActionResult returned by the action if you want. They can even handle exceptions thrown in the action.
最重要的是,它们在作方法执行后运行,并且可以根据需要完全更改或替换作返回的 IActionResult。它们甚至可以处理作中引发的异常。

NOTE Action filters don’t execute for Razor Pages. Similarly, page filters don’t execute for action methods.
注意:不会对 Razor Pages 执行作筛选器。同样,页面过滤器不会对作方法执行。

The ASP.NET Core framework includes several action filters out of the box. One of these commonly used filters is ResponseCacheFilter, which sets HTTP caching headers on your action-method responses.
ASP.NET Core 框架包含多个现成的作筛选器。其中一个常用的过滤器是 ResponseCacheFilter,它在作方法响应上设置 HTTP 缓存标头。

NOTE I have described filters as being attributes, but that’s not always the case. For example, the action filter is called ResponseCacheFilter, but this type is internal to the ASP.NET Core framework. To apply the filter, you use the public [ResponseCache] attribute instead, and the framework automatically configures the ResponseCacheFilter as appropriate. This separation between attribute and filter is largely an artifact of the internal design, but it can be useful, as you’ll see in section 22.3.
注意:我曾将过滤器描述为属性,但情况并非总是如此。例如,作筛选器称为 ResponseCacheFilter,但此类型是 ASP.NET Core 框架的内部类型。若要应用筛选器,请改用公共 [ResponseCache] 属性,框架会根据需要自动配置 ResponseCacheFilter。attribute 和 filter 之间的这种分离在很大程度上是内部设计的产物,但它可能很有用,正如您将在 Section 22.3 中看到的那样。

Response caching vs. output caching
响应缓存与输出缓存

Caching is a broad topic that aims to improve the performance of an application over the naive approach. But caching can also make debugging issues difficult and may even be undesirable in some situations. Consequently, I often apply ResponseCacheFilter to my action methods to set HTTP caching headers that disable caching! You can read about this and other approaches to caching in Microsoft’s “Response caching in ASP.NET Core” documentation at http://mng.bz/2eGd.
缓存是一个广泛的主题,旨在通过简单的方法提高应用程序的性能。但是,缓存也会使调试问题变得困难,在某些情况下甚至可能是不可取的。因此,我经常将 ResponseCacheFilter 应用于我的作方法,以设置禁用缓存的 HTTP 缓存标头!您可以在 http://mng.bz/2eGd 的 Microsoft 的“ASP.NET Core 中的响应缓存”文档中阅读有关此方法和其他缓存方法的信息。

Note that the ResponseCacheFilter applies cache control headers only to your outgoing responses; it doesn’t cache the response on the server. These headers tell the client (such as a browser) whether it can skip sending a request and reuse the response. If you have relatively static endpoints, this can massively reduce the load on your app.
请注意,ResponseCacheFilter 仅将缓存控制标头应用于您的传出响应;它不会在服务器上缓存响应。这些标头告诉客户端(例如浏览器)是否可以跳过发送请求并重用响应。如果您有相对静态的终端节点,这可以大大减少应用程序的负载。

This is different from output caching, introduced in .NET 7. Output caching involves storing a generated response on the server and reusing it for subsequent requests. In the simplest case, the response is stored in memory and reused for appropriate requests, but you can configure ASP.NET Core to store the output elsewhere, such as a database.
这与 .NET 7 中引入的输出缓存不同。输出缓存涉及将生成的响应存储在服务器上,并将其重新用于后续请求。在最简单的情况下,响应存储在内存中并重复用于适当的请求,但您可以将 ASP.NET Core 配置为将输出存储在其他位置,例如数据库。

Output caching is generally more configurable than response caching, as you can choose exactly what to cache and when to invalidate it, but it is also much more resource-heavy. For details on how to enable output caching for an endpoint, see the documentation at http://mng.bz/Bmlv.
输出缓存通常比响应缓存更易于配置,因为您可以准确选择要缓存的内容以及何时使其失效,但它的资源消耗也要大得多。有关如何为终端节点启用输出缓存的详细信息,请参阅 http://mng.bz/Bmlv 中的文档。

The real power of action filters comes when you build filters tailored to your own apps by extracting common code from your action methods. To demonstrate, I’m going to create two custom filters for RecipeApiController:
当您通过从作方法中提取通用代码来构建针对自己的应用程序量身定制的过滤器时,作过滤器的真正强大之处在于。为了演示,我将为 RecipeApiController 创建两个自定义过滤器:

• ValidateModelAttribute—This will return BadRequestResult if the model state indicates that the binding model is invalid and will short-circuit the action execution. This attribute used to be a staple of my web API applications, but the [ApiController] attribute now handles this (and more) for you. Nevertheless, I think it’s useful to understand what’s going on behind the scenes.
ValidateModelAttribute - 如果模型状态指示绑定模型无效,并且将使作执行短路,则将返回 BadRequestResult。此属性曾经是我的 Web API 应用程序的主要内容,但 [ApiController] 属性现在为您处理此 (以及更多) 。尽管如此,我认为了解幕后发生的事情是有用的。

• EnsureRecipeExistsAttribute—This uses each action method’s id argument to validate that the requested Recipe entity exists before the action method runs. If the Recipe doesn’t exist, the filter returns NotFoundResult and short-circuits the pipeline.
EnsureRecipeExistsAttribute - 在作方法运行之前,使用每个作方法的 id 参数来验证请求的配方实体是否存在。如果 Recipe 不存在,则筛选条件将返回 NotFoundResult 并使管道短路。

As you saw in chapter 16, the MVC framework automatically validates your binding models before executing your actions and Razor Page handlers, but it’s up to you to decide what to do about it. For web API controllers, it’s common to return a 400 Bad Request response containing a list of the errors, as shown in figure 22.1.
正如您在第 16 章中所看到的,MVC 框架会在执行您的作和 Razor Page 处理程序之前自动验证您的绑定模型,但由您决定如何处理它。对于 Web API 控制器,通常会返回包含错误列表的 400 Bad Request 响应,如图 22.1 所示。

alt text

Figure 22.1 Posting data to a web API using Postman. The data is bound to the action method’s binding model and validated. If validation fails, it’s common to return a 400 Bad Request response with a list of the validation errors.
图 22.1 使用 Postman 将数据发布到 Web API。数据将绑定到作方法的绑定模型并进行验证。如果验证失败,通常会返回 400 Bad Request 响应,其中包含验证错误列表。

You should ordinarily use the [ApiController] attribute on your web API controllers, which gives you this behavior (and uses Problem Details responses) automatically. But if you can’t or don’t want to use that attribute, you can create a custom action filter instead. The following listing shows a basic implementation that is similar to the behavior you get with the [ApiController] attribute.
通常应在 Web API 控制器上使用 [ApiController] 属性,该属性会自动提供此行为 (并使用问题详细信息响应) 。但是,如果您不能或不想使用该属性,则可以改为创建自定义作筛选条件。下面的列表显示了一个基本实现,它类似于您使用 [ApiController] 属性获得的行为。

Listing 22.5 The action filter for validating ModelState
列表 22.5 用于验证 ModelState 的动作过滤器

public class ValidateModelAttribute : ActionFilterAttribute      #A
{
    public override void OnActionExecuting(    #B
        ActionExecutingContext context)        #B
    {
        if (!context.ModelState.IsValid)    #C
        {
            context.Result =                                      #D
                new BadRequestObjectResult(context.ModelState);   #D
        }
    }
}

❶ For convenience, you derive from the ActionFilterAttribute base class.
为方便起见,您可以从 ActionFilterAttribute 基类派生。
❷ Overrides the Executing method to run the filter before the Action executes
重写 Executing 方法以在 Action 执行之前运行过滤器
❸ Model binding and validation have already run at this point, so you can check the state.
此时模型绑定和验证已经运行,因此您可以检查状态。
❹ If the model isn’t valid, sets the Result property, which short-circuits the action execution
如果模型无效,则设置 Result 属性,这将使作执行短路

This attribute is self-explanatory and follows a similar pattern to the resource filter in section 22.1.2, but with a few interesting points:
此属性是不言自明的,并且遵循与第 22.1.2 节中的资源过滤器类似的模式,但有一些有趣的点:

• I have derived from the abstract ActionFilterAttribute. This class implements IActionFilter and IResultFilter, as well as their async counterparts, so you can override the methods you need as appropriate. This prevents needing to add an unused OnActionExecuted() method, but using the base class is entirely optional and a matter of preference.
我从抽象的 ActionFilterAttribute 派生而来。此类实现 IActionFilter 和 IResultFilter 以及它们的异步对应项,因此您可以根据需要重写所需的方法。这样就不需要添加未使用的 OnActionExecuted() 方法,但使用基类完全是可选的,并且是首选项问题。

• Action filters run after model binding has taken place, so context.ModelState contains the validation errors if validation failed.
Action筛选器在模型绑定发生后运行,因此 context.ModelState 包含验证错误(如果验证失败)。

• Setting the Result property on context short-circuits the pipeline. But due to the position of the action filter stage, only the action method execution and later action filters are bypassed; all the other stages of the pipeline run as though the action executed as normal.
在上下文上设置 Result 属性会使管道短路。但是,由于作筛选器阶段的位置,仅绕过作方法执行和以后的作筛选器;管道的所有其他阶段都像正常执行作一样运行。

If you apply this action filter to your RecipeApiController, you can remove this code from the start of both the action methods, as it will run automatically in the filter pipeline:
如果你将此作筛选器应用于 RecipeApiController,则可以从两个作方法的开头删除此代码,因为它将在筛选器管道中自动运行:

if (!ModelState.IsValid)
{
    return BadRequest(ModelState);
}

You’ll use a similar approach to remove the duplicate code that checks whether the id provided as an argument to the action methods corresponds to an existing Recipe entity.
您将使用类似的方法来删除重复代码,该代码检查作为作方法的参数提供的 id 是否对应于现有 Recipe 实体。

The following listing shows the EnsureRecipeExistsAttribute action filter. This uses an instance of RecipeService to check whether the Recipe exists and returns a 404 Not Found if it doesn’t.
以下清单显示了 EnsureRecipeExistsAttribute作筛选器。这将使用 RecipeService 的实例来检查 Recipe 是否存在,如果不存在,则返回 404 Not Found。

Listing 22.6 An action filter to check whether a Recipe exists
清单 22.6 用于检查 Recipe 是否存在的 action filter

public class EnsureRecipeExistsAtribute : ActionFilterAttribute
{
    public override void OnActionExecuting(
        ActionExecutingContext context)
    {
        var service = context.HttpContext.RequestServices    #A
            .GetService<RecipeService>();    #A
        var recipeId = (int) context.ActionArguments["id"];  #B
        if (!service.DoesRecipeExist(recipeId))    #C
        {
            context.Result = new NotFoundResult();    #D
        }
    }
}

❶ Fetches an instance of RecipeService from the DI container
从 DI 容器中获取 RecipeService 的实例
❷ Retrieves the id parameter that will be passed to the action method when it executes
检索执行时将传递给作方法的 id 参数
❸ Checks whether a Recipe entity with the given RecipeId exists
检查具有给定 RecipeId 的 Recipe 实体是否存在
❹ If it doesn’t exist, returns a 404 Not Found result and short-circuits the pipeline
如果不存在,则返回 404 Not Found 结果并短路管道

As before, you’ve derived from ActionFilterAttribute for simplicity and overridden the OnActionExecuting method. The main functionality of the filter relies on the DoesRecipeExist() method of RecipeService, so the first step is to obtain an instance of RecipeService. The context parameter provides access to the HttpContext for the request, which in turn lets you access the DI container and use RequestServices.GetService() to return an instance of RecipeService.
与以前一样,为了简单起见,您从 ActionFilterAttribute 派生并重写了 OnActionExecuting 方法。过滤器的主要功能依赖于 RecipeService 的 DoesRecipeExist() 方法,因此第一步是获取 RecipeService 的实例。context 参数提供对请求的 HttpContext 的访问,这反过来又允许您访问 DI 容器并使用 RequestServices.GetService() 返回 RecipeService 的实例。

Warning This technique for obtaining dependencies is known as service location and is generally considered to be an antipattern. In section 22.3 I’ll show you a better way to use the DI container to inject dependencies into your filters.
警告:这种用于获取依赖项的技术称为 服务定位,通常被视为反模式。在 Section 22.3 中,我将向您展示一种更好的方法 使用 DI 容器将依赖项注入过滤器。

As well as RecipeService, the other piece of information you need is the id argument of the Get and Edit action methods. In action filters, model binding has already occurred, so the arguments that the framework will use to execute the action method are already known and are exposed on context.ActionArguments.
除了 RecipeService 之外,您还需要的另一条信息是 Get 和 Edit作方法的 id 参数。在作筛选器中,模型绑定已经发生,因此框架将用于执行作方法的参数是已知的,并在上下文中公开。ActionArguments 的 API 参数。

The action arguments are exposed as Dictionary<string, object>, so you can obtain the id parameter using the "id" string key. Remember to cast the object to the correct type.
action参数公开为 Dictionary<string, object>,因此您可以使用 “id” 字符串键获取 id 参数。请记住将对象强制转换为正确的类型。

Tip Whenever I see magic strings like this, I always try to replace them by using the nameof operator. Unfortunately, nameof won’t work for method arguments like this, so be careful when refactoring your code. I suggest explicitly applying the action filter to the action method (instead of globally, or to a controller) to remind you about that implicit coupling.
提示:每当我看到这样的魔术字符串时,我总是尝试使用 nameof 运算符替换它们。不幸的是,nameof 不适用于这样的方法参数,因此在重构代码时要小心。我建议将 action 过滤器显式地应用于 action 方法(而不是全局应用,或应用于控制器),以提醒您这种隐式耦合。

With RecipeService and id in place, it’s a case of checking whether the identifier corresponds to an existing Recipe entity and if not, setting context.Result to NotFoundResult. This short-circuits the pipeline and bypasses the action method altogether.
有了 RecipeService 和 id,就可以检查标识符是否对应于现有的 Recipe 实体,如果不是,则设置 context。Result 设置为 NotFoundResult。这会使管道短路并完全绕过 action 方法。

NOTE Remember that you can have multiple action filters running in a single stage. Short-circuiting the pipeline by setting context.Result prevents later filters in the stage from running and bypasses the action method execution.
注意:请记住,您可以在单个阶段中运行多个作筛选器。通过设置 context 使管道短路。Result 会阻止阶段中以后的过滤器运行,并绕过作方法的执行。

Before we move on, it’s worth mentioning a special case for action filters. The ControllerBase base class implements IActionFilter and IAsyncActionFilter itself. If you find yourself creating an action filter for a single controller and want to apply it to every action in that controller, you can override the appropriate methods on your controller instead, as in the following listing.
在我们继续之前,值得一提的是作过滤器的一个特殊情况。ControllerBase 基类实现 IActionFilter 和 IAsyncActionFilter 本身。如果您发现自己为单个控制器创建了一个作过滤器,并希望将其应用于该控制器中的每个作,则可以改为覆盖控制器上的相应方法,如下面的清单所示。

Listing 22.7 Overriding action filter methods directly on ControllerBase
清单 22.7 直接在 ControllerBase 上覆盖动作过滤器方法

public class HomeController : ControllerBase      #A
{
    public override void OnActionExecuting(     #B
        ActionExecutingContext context)         #B
    { }                                         #B
    public override void OnActionExecuted(    #C
        ActionExecutedContext context)        #C
    { }                                       #C
}

❶ Derives from the ControllerBase class
派生自 ControllerBase 类
❷ Runs before any other action filters for every action in the controller
在控制器中每个动作的任何其他动作过滤器之前运行
❸ Runs after all other action filters for every action in the controller
在控制器中每个动作的所有其他动作过滤器之后运行

If you override these methods on your controller, they’ll run in the action filter stage of the filter pipeline for every action on the controller. The OnActionExecuting method runs before any other action filters, regardless of ordering or scope, and the OnActionExecuted method runs after all other action filters.
如果您在控制器上覆盖这些方法,则它们将在控制器上每个作的过滤器管道的作过滤器阶段中运行。OnActionExecuting 方法在任何其他作筛选器之前运行,而不管顺序或范围如何,而 OnActionExecuted 方法在所有其他作筛选器之后运行。

Tip The controller implementation can be useful in some cases, but you can’t control the ordering related to other filters. Personally, I generally prefer to break logic into explicit, declarative filter attributes, but it depends on the situation, and as always, the choice is yours.
提示:控制器实现在某些情况下可能很有用,但您无法控制与其他过滤器相关的 Sequences。就个人而言,我通常更喜欢将 logic 分解为显式的声明性 filter 属性,但这取决于具体情况,并且一如既往,选择权在您手中。

With the resource and action filters complete, your controller is looking much tidier, but there’s one aspect in particular that would be nice to remove: the exception handling. In the next section we’ll look at how to create a custom exception filter for your controller and why you might want to do this instead of using exception handling middleware.
完成资源和作筛选器后,您的控制器看起来更加整洁,但有一个方面特别值得删除:异常处理。在下一节中,我们将了解如何为控制器创建自定义异常筛选器,以及为什么您可能希望执行此作而不是使用异常处理中间件。

22.1.4 Exception filters: Custom exception handling for your action methods

22.1.4 异常过滤器:作方法的自定义异常处理

In chapter 4 I went into some depth about types of error-handling middleware you can add to your apps. These let you catch exceptions thrown from any later middleware and handle them appropriately. If you’re using exception handling middleware, you may be wondering why we need exception filters at all.
在第 4 章中,我深入探讨了您可以添加到应用程序中的错误处理中间件的类型。这些允许您捕获任何后续中间件引发的异常并适当地处理它们。如果你正在使用异常处理中间件,你可能想知道为什么我们需要异常过滤器。

The answer to this is pretty much the same as I outlined in chapter 21: filters are great for cross-cutting concerns, when you need behavior that’s specific to MVC or that should only apply to certain routes.
这个问题的答案与我在第 21 章中概述的几乎相同:当您需要特定于 MVC 的行为或应仅适用于某些路由的行为时,过滤器非常适合横切关注点。

Both of these can apply in exception handling. Exception filters are part of the MVC framework, so they have access to the context in which the error occurred, such as the action or Razor Page that was executing. This can be useful for logging additional details when errors occur, such as the action parameters that caused the error.
这两者都可以应用于异常处理。异常筛选器是 MVC 框架的一部分,因此它们有权访问发生错误的上下文,例如正在执行的作或 Razor Page。这对于在发生错误时记录其他详细信息(如导致错误的作参数)非常有用。

Warning If you use exception filters to record action method arguments, make sure you’re not storing sensitive data in your logs, such as passwords or credit card details.
警告:如果您使用异常筛选条件来记录作方法参数,请确保您没有在日志中存储敏感数据,例如密码或信用卡详细信息。

You can also use exception filters to handle errors from different routes in different ways. Imagine you have both Razor Pages and web API controllers in your app, as we do in the recipe app. What happens when an exception is thrown by a Razor Page?
您还可以使用异常筛选条件以不同方式处理来自不同路由的错误。假设您的应用程序中同时有 Razor Pages 和 Web API 控制器,就像我们在配方应用程序中所做的那样。当 Razor Page 引发异常时会发生什么情况?

As you saw in chapter 4, the exception travels back up the middleware pipeline and is caught by exception handler middleware. The exception handler middleware reexecutes the pipeline and generates an HTML error page.
正如您在第 4 章中看到的,异常沿中间件管道向上传输,并被异常处理程序中间件捕获。异常处理程序中间件将重新执行管道并生成 HTML 错误页。

That’s great for your Razor Pages, but what about exceptions in your web API controllers? If your API throws an exception and consequently returns HTML generated by the exception handler middleware, that’s going to break a client that called the API expecting a JavaScript Object Notation (JSON) response!
这对 Razor Pages 来说非常有用,但 Web API 控制器中的异常呢?如果您的 API 引发异常,并因此返回异常处理程序中间件生成的 HTML,这将破坏调用 API 的客户端,该客户端需要 JavaScript 对象表示法 (JSON) 响应!

Tip The added complexity introduced by having to handle these two very different clients is the reason I prefer to create separate applications for APIs and server-rendered apps.
提示:必须处理这两个截然不同的客户端所带来的复杂性增加了,这就是我更喜欢为 API 和服务器呈现的应用程序创建单独的应用程序的原因。

Instead, exception filters let you handle the exception in the filter pipeline and generate an appropriate response body for API clients. The exception handler middleware intercepts only errors without a body, so it will let the modified web API response pass untouched.
相反,异常筛选条件允许您处理筛选条件管道中的异常,并为 API 客户端生成适当的响应正文。异常处理程序中间件仅拦截没有正文的错误,因此它将允许修改后的 Web API 响应原封不动地通过。

NOTE The [ApiController] attribute converts error StatusCodeResults to a ProblemDetails object, but it doesn’t catch exceptions.
注意:[ApiController] 属性将错误 StatusCodeResults 转换为 ProblemDetails 对象,但它不会捕获异常。

Exception filters can catch exceptions from more than your action methods and page handlers. They’ll run if an exception occurs at these times:
异常筛选器可以捕获来自多个作方法和页面处理程序的异常。如果在以下时间发生异常,它们将运行:

• During model binding or validation
在模型绑定或验证期间
• When the action method or page handler is executing
当作方法或页面处理程序正在执行时
• When an action filter or page filter is executing
当作过滤器或页面过滤器正在执行时

You should note that exception filters won’t catch exceptions thrown in any filters other than action and page filters, so it’s important that your resource and result filters don’t throw exceptions. Similarly, they won’t catch exceptions thrown when executing an IActionResult, such as when rendering a Razor view to HTML.
您应该注意,异常筛选器不会捕获除作和页面筛选器之外的任何筛选器中引发的异常,因此您的资源和结果筛选器不会引发异常非常重要。同样,它们不会捕获在执行 IActionResult 时引发的异常,例如在将 Razor 视图呈现为 HTML 时。

Now that you know why you might want an exception filter, go ahead and implement one for RecipeApiController, as shown next. This lets you safely remove the try-catch block from your action methods, knowing that your filter will catch any errors.
现在,您知道为什么可能需要异常过滤器,请继续为 RecipeApiController 实现一个异常过滤器,如下所示。这样,您就可以安全地从作方法中删除 try-catch 块,因为您知道过滤器将捕获任何错误。

Listing 22.8 The HandleExceptionAttribute exception filter
示例 22.8 HandleExceptionAttribute 异常过滤器

public class HandleExceptionAttribute : ExceptionFilterAttribute      #A
{
    public override void OnException(ExceptionContext context)      #B
    {
        var error = new ProblemDetails               #C
        {                                            #C
            Title = "An error occurred",             #C
            Detail = context.Exception.Message,      #C
            Status = 500,                            #C
            Type = " https://httpwg.org/specs/rfc9110.html#status.500"  #C
        };                                           #C

        context.Result = new ObjectResult(error)    #D
        {                                           #D
            StatusCode = 500                        #D
        };                                          #D
        context.ExceptionHandled = true;    #E
    }
}

❶ ExceptionFilterAttribute is an abstract base class that implements IExceptionFilter.
ExceptionFilterAttribute 是实现IExceptionFilter 的抽象基类。

❷ There’s only a single method to override for IExceptionFilter.
只有一个方法可以覆盖 IExceptionFilter。

❸ Building a problem details object to return in the response
构建要在响应中返回的问题详细信息对象

❹ Creates an ObjectResult to serialize the ProblemDetails and to set the response status code
创建一个 ObjectResult 来序列化 ProblemDetails 并设置响应状态代码

❺ Marks the exception as handled to prevent it propagating into the middleware pipeline
将异常标记为已处理,以防止其传播到中间件管道中

It’s quite common to have an exception filter in your application if you are mixing API controllers and Razor Pages in your application, but they’re not always necessary. If you can handle all the exceptions in your application with a single piece of middleware, ditch the exception filters and go with that instead.
如果在应用程序中混合使用 API 控制器和 Razor Pages,则应用程序中的异常筛选器很常见,但它们并不总是必要的。如果可以使用单个中间件处理应用程序中的所有异常,请放弃异常筛选器,改用它。

You’re almost done refactoring your RecipeApiController. You have one more filter type to add: result filters. Custom result filters tend to be relatively rare in the apps I’ve written, but they have their uses, as you’ll see.
您几乎完成了 RecipeApiController 的重构。您还需要添加一种筛选条件类型:结果筛选条件。自定义结果过滤器在我编写的应用程序中往往相对较少,但正如您将看到的,它们有其用途。

22.1.5 Result filters: Customizing action results before they execute

22.1.5 结果过滤器:在执行作结果之前自定义作结果

If everything runs successfully in the pipeline, and there’s no short-circuiting, the next stage of the pipeline after action filters is result filters. These run before and after the IActionResult returned by the action method (or action filters) is executed.
如果管道中的所有内容都成功运行,并且没有短路,则作筛选器后管道的下一阶段是结果筛选器。这些作在执行作方法(或作筛选器)返回的 IActionResult 之前和之后运行。

Warning If the pipeline is short-circuited by setting context.Result, the result filter stage won’t run, but the IActionResult will still be executed to generate the response. The exceptions to this rule are action and page filters, which only short-circuit the action execution, as you saw in chapter 21. Result filters run as normal, as though the action or page handler itself generated the response.
警告:如果通过设置 context 使 pipeline 短路。Result,则结果筛选阶段不会运行,但仍会执行 IActionResult 以生成响应。此规则的例外情况是 action 和 page 过滤器,它们只会使 action 执行短路,如第 21 章所示。结果筛选器照常运行,就像作或页面处理程序本身生成响应一样。

Result filters run immediately after action filters, so many of their use cases are similar, but you typically use result filters to customize the way the IActionResult executes. For example, ASP.NET Core has several result filters built into its framework:
结果筛选条件在作筛选条件之后立即运行,因此它们的许多使用案例相似,但您通常使用结果筛选条件来自定义 IActionResult 的执行方式。例如,ASP.NET Core 的框架中内置了多个结果筛选器:

• ProducesAttribute—This forces a web API result to be serialized to a specific output format. For example, decorating your action method with [Produces ("application/xml")] forces the formatters to try to format the response as XML, even if the client doesn’t list XML in its Accept header.
ProducesAttribute - 强制将 Web API 结果序列化为特定输出格式。例如,使用 [Produces (“application/xml”)] 修饰作方法会强制格式化程序尝试将响应格式化为 XML,即使客户端未在其 Accept 标头中列出 XML。

• FormatFilterAttribute—Decorating an action method with this filter tells the formatter to look for a route value or query string parameter called format and to use that to determine the output format. For example, you could call /api/recipe/11?format=json and FormatFilter will format the response as JSON or call api/recipe/11?format=xml and get the response as XML.
FormatFilterAttribute - 使用此过滤器修饰作方法会告知格式化程序查找名为 format 的路由值或查询字符串参数,并使用它来确定输出格式。例如,您可以调用 /api/recipe/11?format=json,FormatFilter 会将响应格式化为 JSON,或者调用 api/recipe/11?format=xml 并获取 XML 形式的响应。

NOTE Remember that you need to explicitly configure the XML formatters if you want to serialize to XML, as described in chapter 20. For details on formatting results based on the URL, see my blog entry on the topic: http://mng.bz/1rYV.
注意:请记住,如果要序列化为 XML,则需要显式配置 XML 格式化程序,如第 20 章所述。有关基于 URL 设置结果格式的详细信息,请参阅我关于主题 http://mng.bz/1rYV 的博客文章。

As well as controlling the output formatters, you can use result filters to make any last-minute adjustments before IActionResult is executed and the response is generated.
除了控制输出格式化程序外,您还可以使用结果筛选器在执行 IActionResult 并生成响应之前进行任何最后一刻的调整。

As an example of the kind of flexibility available, in the following listing I demonstrate setting the LastModified header, based on the object returned from the action. This is a somewhat contrived example—it’s specific enough to a single action that it likely doesn’t warrant being moved to a result filter—but I hope you get the idea.
作为可用灵活性类型的一个示例,在下面的清单中,我演示了如何根据从作返回的对象设置 LastModified 标头。这是一个有点人为的示例 — 它对单个作足够具体,以至于它不一定需要移动到结果筛选器 — 但我希望您能理解。

Listing 22.9 Setting a response header in a result filter
清单 22.9 在结果过滤器中设置响应头

public class AddLastModifedHeaderAttribute : ResultFilterAttribute    #A
{
    public override void OnResultExecuting(     #B
        ResultExecutingContext context)         #B
    {
        if (context.Result is OkObjectResult result          #C
            && result.Value is RecipeDetailViewModel detail)    #D
        {
            var viewModelDate = detail.LastModified;            #E
            context.HttpContext.Response                        #E
              .GetTypedHeaders().LastModified = viewModelDate;  #E
        }
    }
}

❶ ResultFilterAttribute provides a useful base class you can override.
ResultFilterAttribute 提供了一个可以重写的有用基类。
❷ You could also override the Executed method, but the response would already be sent by then.
你也可以重写 Executed 方法,但那时响应已经发送了。
❸ Checks whether the action result returned a 200 Ok result with a view model.
检查作结果是否返回了视图模型的 200 Ok 结果。
❹ Checks whether the view model type is RecipeDetailViewModel . . .
检查视图模型类型是否为 RecipeDetailViewModel . . .
❺ . . . and if it is, fetches the LastModified property and sets the Last-Modified header in the response
. . . .如果是,则获取 LastModified 属性并在响应中设置 Last-Modified 标头

I’ve used another helper base class here, ResultFilterAttribute, so you need to override only a single method to implement the filter. Fetch the current IActionResult, exposed on context.Result, and check that it’s an OkObjectResult instance with a RecipeDetailViewModel value. If it is, fetch the LastModified field from the view model and add a Last-Modified header to the response.
我在这里使用了另一个帮助程序基类 ResultFilterAttribute,因此您只需重写一个方法即可实现筛选器。提取在上下文中公开的当前 IActionResult。Result,并检查它是否是具有 RecipeDetailViewModel 值的 OkObjectResult 实例。如果是,请从视图模型中提取 LastModified 字段,并将 Last-Modified 标头添加到响应中。

Tip GetTypedHeaders() is an extension method that provides strongly typed access to request and response headers. It takes care of parsing and formatting the values for you. You can find it in the Microsoft.AspNetCore.Http namespace.
提示GetTypedHeaders() 是一种扩展方法,它提供对请求和响应标头的强类型访问。它负责为您解析和格式化值。您可以在 Microsoft.AspNetCore.Http 命名空间中找到它。

As with resource and action filters, result filters can implement a method that runs after the result has executed: OnResultExecuted. You can use this method, for example, to inspect exceptions that happened during the execution of IActionResult.
与资源和作筛选器一样,结果筛选器可以实现在结果执行后运行的方法:OnResultExecuted。例如,您可以使用此方法检查在执行 IActionResult 期间发生的异常。

Warning Generally, you can’t modify the response in the OnResultExecuted method, as you may have already started streaming the response to the client.
警告:通常,您无法在 OnResultExecuted 方法中修改响应,因为您可能已经开始将响应流式传输到客户端。

We’ve finished simplifying the RecipeApiController now. By extracting various pieces of functionality to filters, the original controller in listing 22.1 has been simplified to the version in listing 22.2. This is obviously a somewhat extreme and contrived demonstration, and I’m not advocating that filters should always be your go-to option.
我们现在已经完成了 RecipeApiController 的简化。通过将各种功能提取到过滤器中,清单 22.1 中的原始控制器已简化为清单 22.2 中的版本。这显然是一个有点极端和做作的演示,我并不是提倡过滤器应该始终是您的首选。

Tip Filters should be a last resort in most cases. Where possible, it is often preferable to use a simple private method in a controller, or to push functionality into the domain instead of using filters. Filters should generally be used to extract repetitive, HTTP-related, or common cross-cutting code from your controllers.
提示:在大多数情况下,过滤器应该是最后的手段。在可能的情况下,通常最好在控制器中使用简单的私有方法,或者将功能推送到域中而不是使用过滤器。过滤器通常用于从控制器中提取重复的、与 HTTP 相关的或常见的横切代码。

There’s still one more filter we haven’t looked at yet, because it applies only to Razor Pages: page filters.
还有一个筛选器我们还没有查看,因为它仅适用于 Razor Pages:页面筛选器。

22.1.6 Page filters: Customizing model binding for Razor Pages

22.1.6 页面筛选器:自定义 Razor 页面的模型绑定

As already discussed, action filters apply only to controllers and actions; they have no effect on Razor Pages. Similarly, page filters have no effect on controllers and actions. Nevertheless, page filters and action filters fulfill similar roles.
如前所述,作筛选器仅适用于控制器和作;它们对 Razor Pages 没有影响。同样,页面过滤器对控制器和作也没有影响。不过,页面过滤器和作过滤器的作用相似。

As is the case for action filters, the ASP.NET Core framework includes several page filters out of the box. One of these is the Razor Page equivalent of the caching action filter, ResponseCacheFilter, called PageResponseCacheFilter. This works identically to the action-filter equivalent I described in section 22.1.3, setting HTTP caching headers on your Razor Page responses.
与作筛选器一样,ASP.NET Core 框架包含多个现成的页面筛选器。其中一个是缓存作筛选器的 Razor Page 等效项 ResponseCacheFilter,称为 PageResponseCacheFilter。这与我在第 22.1.3 节 在 Razor Page 响应上设置 HTTP 缓存标头中描述的等效作过滤器的工作原理相同。

Page filters are somewhat unusual, as they implement three methods, as discussed in section 22.1.2. In practice, I’ve rarely seen a page filter that implements all three. It’s unusual to need to run code immediately after page handler selection and before model validation. It’s far more common to perform a role directly analogous to action filters. The following listing shows a page filter equivalent to the EnsureRecipeExistsAttribute action filter.
页面过滤器有些不寻常,因为它们实现了三种方法,如 Section 22.1.2 中所述。在实践中,我很少见过实现所有这三个的页面过滤器。在选择页面处理程序之后和模型验证之前需要立即运行代码是不常见的。执行直接类似于作筛选器的角色更为常见。以下清单显示了与 EnsureRecipeExistsAttribute作筛选器等效的页面筛选器。

Listing 22.10 A page filter to check whether a Recipe exists
清单 22.10 用于检查 Recipe 是否存在的页面过滤器

public class PageEnsureRecipeExistsAttribute : Attribute, IPageFilter  #A
{
    public void OnPageHandlerSelected(          #B
        PageHandlerSelectedContext context)     #B
    {}                                          #B

    public void OnPageHandlerExecuting(         #C
        PageHandlerExecutingContext context)    #C
    {
        var service = context.HttpContext.RequestServices        #D
            .GetService<RecipeService>();  #D
        var recipeId = (int) context.HandlerArguments["id"];     #E
        if (!service.DoesRecipeExist(recipeId))        #F
        {
            context.Result = new NotFoundResult();   #G
        }
    }

    public void OnPageHandlerExecuted(        #H
        PageHandlerExecutedContext context)   #H
    { }                                       #H
}

❶ Implements IPageFilter and as an attribute so you can decorate the Razor Page PageModel
实现 IPageFilter 并作为属性,以便您可以装饰 Razor Page PageModel

❷ Executed after handler selection and before model binding—not used in this example
在处理程序选择之后和模型绑定之前执行 - 本例中未使用

❸ Executed after model binding and validation, and before page handler execution
在模型绑定和验证之后以及页面处理程序执行之前执行

❹ Fetches an instance of RecipeService from the DI container
从 DI 容器中获取 RecipeService 的实例

❺ Retrieves the id parameter that will be passed to the page handler method when it executes
检索 id 参数,该参数将在执行时传递给页面处理程序方法

❻ Checks whether a Recipe entity with the given RecipeId exists . . .
检查是否存在具有给定 RecipeId 的 Recipe 实体 . . .

❼ . . . and if it doesn’t exist, returns a 404 Not Found result and short-circuits the pipeline
. . . .如果不存在,则返回 404 Not Found 结果,并在页面处理程序执行(或短路)后将管道

❽ Executed after page handler execution (or short-circuiting)—not used in this example
Executed 短路 — 本例中未使用

The page filter is similar to the action filter equivalent. The most obvious difference is the need to implement three methods to satisfy the IPageFilter interface. You’ll commonly want to implement the OnPageHandlerExecuting method, which runs after model binding and validation, and before the page handler executes.
页面过滤器类似于等效的动作过滤器。最明显的区别是需要实现三种方法来满足 IPageFilter 接口。您通常需要实现 OnPageHandlerExecuting 方法,该方法在模型绑定和验证之后、页面处理程序执行之前运行。

A subtle difference between the action filter code and the page filter code is that the action filter accesses the model-bound action arguments using context.ActionArguments. The page filter uses context.HandlerArguments in the example, but there’s also another option.
作筛选条件代码和页面筛选条件代码之间的细微差别是,作筛选条件使用上下文访问模型绑定的作参数。ActionArguments 的 API 参数。页面过滤器使用 context。HandlerArguments 的 HandlerArguments 进行匹配,但还有另一个选项。

Remember from chapter 16 that Razor Pages often bind to public properties on the PageModel using the [BindProperty] attribute. You can access those properties directly instead of using magic strings by casting a HandlerInstance property to the correct PageModel type and accessing the property directly, as in this example:
请记住,在第 16 章中,Razor Pages 通常使用 [BindProperty] 属性绑定到 PageModel 上的公共属性。你可以通过将 HandlerInstance 属性强制转换为正确的 PageModel 类型并直接访问该属性,直接访问这些属性,而不是使用魔术字符串,如下例所示:

var recipeId = ((ViewRecipePageModel)context.HandlerInstance).Id

This is similar to the way the ControllerBase class implements IActionFilter and PageModel implements IPageFilter and IAsyncPageFilterT. If you want to create an action filter for a single Razor Page, you could save yourself the trouble of creating a separate page filter and override these methods directly in your Razor Page.
这类似于 ControllerBase 类实现 IActionFilter 和 PageModel 实现 IPageFilter 和 IAsyncPageFilterT 的方式。如果要为单个 Razor 页面创建作筛选器,则可以省去创建单独页面筛选器的麻烦,并直接在 Razor 页面中重写这些方法。

Tip I generally find it’s not worth the hassle of using page filters unless you have a common requirement. The extra level of indirection that page filters add, coupled with the typically bespoke nature of individual Razor Pages, means that I normally find they aren’t worth using. Your mileage may vary, of course, but don’t jump to them as a first option.
提示:我通常发现不值得使用页面过滤器的麻烦,除非你有共同的要求。页面过滤器添加的额外间接级别,再加上单个 Razor 页面的典型定制性质,意味着我通常会发现它们不值得使用。当然,您的里程可能会有所不同,但不要将它们作为首选。

That brings us to the end of this detailed look at each of the filters in the MVC pipeline. Looking back and comparing listings 22.1 and 22.2, you can see filters allowed us to refactor the controllers and make the intent of each action method much clearer. Writing your code in this way makes it easier to reason about, as each filter and action has a single responsibility.
这样,我们就结束了对 MVC 管道中每个过滤器的详细介绍。回顾并比较清单 22.1 和 22.2,您可以看到过滤器允许我们重构控制器,并使每个作方法的意图更加清晰。以这种方式编写代码可以更轻松地进行推理,因为每个过滤器和作都有单一的责任。

In the next section we’ll take a slight detour into exactly what happens when you short-circuit a filter. I’ve described how to do this, by setting the context.Result property on a filter, but I haven’t described exactly what happens. For example, what if there are multiple filters in the stage when it’s short-circuited? Do those still run?
在下一节中,我们将稍微绕道介绍一下当 filter 短路时会发生什么。我已经介绍了如何通过设置上下文来执行此作。Result 属性,但我还没有具体描述会发生什么。例如,如果 stage 中有多个 filter 短路怎么办?那些还在运行吗?

22.2 Understanding pipeline short-circuiting

22.2 了解管道短路

In this short section you’ll learn about the details of filter-pipeline short-circuiting. You’ll see what happens to the other filters in a stage when the pipeline is short-circuited and how to short-circuit each type of filter.
在这个简短的部分中,您将了解 filter-pipeline 短路的详细信息。您将看到当管道短路时,某个阶段中的其他过滤器会发生什么情况,以及如何使每种类型的过滤器短路。

A brief warning: the topic of filter short-circuiting can be a little confusing. Unlike middleware short-circuiting, which is cut-and-dried, the filter pipeline is a bit more nuanced. Luckily, you won’t often need to dig into it, but when you do, you’ll be glad for the detail.
一个简短的警告:滤波器短路的话题可能有点令人困惑。与中间件短路不同,筛选器管道更加微妙。幸运的是,您通常不需要深入研究它,但当您这样做时,您会为细节感到高兴。

You short-circuit the authorization, resource, action, page, and result filters by setting context.Result to IActionResult. Setting an action result in this way causes some or all of the remaining pipeline to be bypassed. But the filter pipeline isn’t entirely linear, as you saw in chapter 21, so short-circuiting doesn’t always do an about-face back down the pipeline. For example, short-circuited action filters bypass only action method execution; the result filters and result execution stages still run.
您可以通过设置 context 来短路 authorization、resource、action、page 和 result 过滤器。Result 设置为 IActionResult。以这种方式设置作结果会导致绕过部分或全部剩余管道。但是 filter pipeline 并不是完全线性的,正如你在第 21 章中看到的那样,所以短路并不总是在管道上做一个反转。例如,短路的动作过滤器仅绕过动作方法的执行;结果筛选条件和结果执行阶段仍在运行。

The other difficultly is what happens if you have more than one filter in a stage. Let’s say you have three resource filters executing in a pipeline. What happens if the second filter causes a short circuit? Any remaining filters are bypassed, but the first resource filter has already run its Executing command, as shown in figure 22.2. This earlier filter gets to run its Executed command too, with context.Cancelled = true, indicating that a filter in that stage (the resource filter stage) short-circuited the pipeline.
另一个困难是在一个阶段中有多个过滤器时会发生什么。假设您在一个管道中执行了三个资源筛选器。如果第二个滤波器导致短路怎么办?任何剩余的过滤器都将被绕过,但第一个资源过滤器已经运行了其 Executing 命令,如图 22.2 所示。这个前面的过滤器也可以运行它的 Executed 命令,其中包含 context。Cancelled = true,指示该阶段(资源筛选器阶段)中的筛选器使管道短路。

alt text

Figure 22.2 The effect of short-circuiting a resource filter on other resource filters in that stage. Later filters in the stage won’t run at all, but earlier filters run their OnResourceExecuted function.
图 22.2 在该阶段中,将资源过滤器短路对其他资源过滤器的影响。阶段中较晚的筛选器根本不会运行,但较早的筛选器会运行其 OnResourceExecuted 函数。

Running result filters after short-circuits with IAlwaysRunResultFilter
使用 IAlwaysRunResultFilter

Result filters are designed to wrap the execution of an IActionResult returned by an action method or action filter so that you can customize how the action result is executed. However, this customization doesn’t apply to the IActionResult set when you short-circuit the filter pipeline by setting context.Result in an authorization filter, resource filter, or exception filter.
在短路后运行结果筛选器 结果筛选器旨在包装作方法或作筛选器返回的 IActionResult 的执行,以便您可以自定义作结果的执行方式。但是,当您通过设置 context 使筛选器管道短路时,此自定义不适用于 IActionResult 集。生成授权筛选条件、资源筛选条件或异常筛选条件。

That’s often not a problem, as many result filters are designed to handle “happy path” transformations. But sometimes you want to make sure that a transformation is always applied to an IActionResult, regardless of whether it was returned by an action method or a short-circuiting filter.
这通常不是问题,因为许多结果筛选器都旨在处理 “happy path” 转换。但有时你希望确保转换始终应用于 IActionResult,而不管它是由作方法还是短路筛选器返回的。

For those cases, you can implement IAlwaysRunResultFilter or IAsyncAlwaysRunResultFilter. These interfaces extend (and are identical) to the standard result filter interfaces, so they run like normal result filters in the filter pipeline. But these interfaces mark the filter to also run after an authorization filter, resource filter, or exception filter short-circuits the pipeline, where standard result filters won’t run.
对于这些情况,您可以实现 IAlwaysRunResultFilter 或 IAsyncAlwaysRunResultFilter。这些接口扩展(并且相同)到标准结果筛选器接口,因此它们像筛选器管道中的普通结果筛选器一样运行。但是,这些接口将筛选器标记为在授权筛选器、资源筛选器或异常筛选器使管道短路后也运行,其中标准结果筛选器不会运行。

You can use IAlwaysRunResultFilter to ensure that certain action results are always updated. For example, the documentation shows how to use an IAlwaysRunResultFilter to convert a 415 StatusCodeResult to a 422 StatusCodeResult, regardless of the source of the action result. See the “IAlwaysRunResultFilter and IAsyncAlwaysRunResultFilter” section of Microsoft’s “Filters in ASP.NET Core” documentation: http://mng.bz/JDo0.
您可以使用 IAlwaysRunResultFilter 来确保某些作结果始终更新。例如,该文档显示了如何使用 IAlwaysRunResultFilter 将 415 StatusCodeResult 转换为 422 StatusCodeResult,而不管作结果的来源如何。请参阅 Microsoft 的“ASP.NET Core 中的筛选器”文档的“IAlwaysRunResultFilter 和 IAsyncAlwaysRunResultFilter”部分:http://mng.bz/JDo0

Understanding which other filters run when you short-circuit a filter can be somewhat of a chore, but I’ve summarized each filter in table 22.1. You’ll also find it useful to refer to the pipeline diagrams in chapter 21 to visualize the shape of the pipeline when thinking about short circuits.
了解在使 filter 短路时运行哪些其他 filters 可能有点麻烦,但我在表 22.1 中总结了每个 filter 。在考虑短路时,您还会发现参考第 21 章中的流水线图以可视化流水线的形状很有用。

Table 22.1 The effect of short-circuiting filters on filter-pipeline execution
表 22.1 短路 filters 对 filter-pipeline 执行的影响

Filter type How to short-circuit? What else runs?
Authorization filters Set context.Result. Runs only IAlwaysRunResultFilters.
Resource filters Set context.Result. Resource-filter *Executed functions from earlier filters run with context.Cancelled = true. Runs IAlwaysRunResultFilters before executing the IActionResult.
Action filters Set context.Result. Bypasses only action method execution. Action filters earlier in the pipeline run their Executed methods with context.Cancelled = true, then result filters, result execution, and resource filters’ Executed methods all run as normal.
Page filters Set context.Result in OnPageHandlerSelected. Bypasses only page handler execution. Page filters earlier in the pipeline run their Executed methods with context.Cancelled = true, then result filters, result execution, and resource filters’ Executed methods all run as normal.
Exception filters Set context.Result and Exception.Handled = true. All resource-filter *Executed functions run. Runs IAlwaysRunResultFilters before executing the IActionResult.
Result filters Set context.Cancelled = true. Result filters earlier in the pipeline run their Executed functions with context.Cancelled = true. All resource-filter Executed functions run as normal.

The most interesting point here is that short-circuiting an action filter (or a page filter) doesn’t short-circuit much of the pipeline at all. In fact, it bypasses only later action filters and the action method execution itself. By building primarily action filters, you can ensure that other filters, such as result filters that define the output format, run as usual, even when your action filters short-circuit.
这里最有趣的一点是,短路作筛选器(或页面筛选器)根本不会使管道的大部分短路。事实上,它只绕过后面的作筛选器和作方法执行本身。通过主要构建作筛选器,您可以确保其他筛选器(例如定义输出格式的结果筛选器)照常运行,即使作筛选器短路时也是如此。

The last thing I’d like to talk about in this chapter is how to use DI with your filters. You saw in chapters 8 and 9 that DI is integral to ASP.NET Core, and in the next section you’ll see how to design your filters so that the framework can inject service dependencies into them for you.
本章我想谈的最后一件事是如何将 DI 与你的过滤器一起使用。您在第 8 章和第 9 章中看到了 DI 是 ASP.NET Core 不可或缺的一部分,在下一节中,您将了解如何设计过滤器,以便框架可以为您注入服务依赖项。

22.3 Using dependency injection with filter attributes

22.3 将依赖项注入与 filter 属性一起使用

In this section you’ll learn how to inject services into your filters so you can take advantage of the simplicity of DI in your filters. You’ll learn to use two helper filters to achieve this, TypeFilterAttribute and ServiceFilterAttribute, and you’ll see how they can be used to simplify the action filter you defined in section 22.1.3.
在本节中,您将学习如何将服务注入过滤器,以便您可以在过滤器中利用 DI 的简单性。您将学习使用两个辅助过滤器来实现此目的,TypeFilterAttribute和ServiceFilterAttribute,并且您将了解如何使用它们来简化您在第 22.1.3 节中定义的作过滤器。

The filters we’ve created so far have been created as attributes. This is useful for applying filters to action methods and controllers, but it means you can’t use DI to inject services into the constructor. C# attributes don’t let you pass dependencies into their constructors (other than constant values), and they’re created as singletons, so there’s only a single instance of an attribute for the lifetime of your app. So what happens if you need to access a transient or scoped service from inside the singleton attribute?
到目前为止,我们创建的过滤器已创建为 attributes。这对于将筛选器应用于作方法和控制器非常有用,但这意味着您不能使用 DI 将服务注入构造函数。C# 属性不允许将依赖项传递到其构造函数中(常量值除外),并且它们被创建为单一实例,因此在应用的生命周期内只有一个属性实例。那么,如果您需要从 singleton 属性内部访问临时或范围服务,会发生什么情况呢?

Listing 22.6 showed one way of doing this, using a pseudo-service locator pattern to reach into the DI container and pluck out RecipeService at runtime. This works but is generally frowned upon as a pattern in favor of proper DI. So how can you add DI to your filters?
清单 22.6 展示了一种实现此目的的方法,使用伪服务定位器模式进入 DI 容器并在运行时提取 RecipeService。这有效,但通常不被看作是一种支持适当 DI 的模式。那么如何将 DI 添加到过滤器中呢?

The key is to split the filter in two. Instead of creating a class that’s both an attribute and a filter, create a filter class that contains the functionality and an attribute that tells the framework when and where to use the filter.
关键是将过滤器一分为二。不要创建一个既是属性又是筛选器的类,而应创建一个包含功能和属性的筛选器类,该类告诉框架何时何地使用筛选器。

Let’s apply this to the action filter from listing 22.6. Previously, I derived from ActionFilterAttribute and obtained an instance of RecipeService from the context passed to the method. In the following listing I show two classes, EnsureRecipeExistsFilter and EnsureRecipeExistsAttribute. The filter class is responsible for the functionality and takes in RecipeService as a constructor dependency.
让我们将其应用于清单 22.6 中的 action filter。以前,我从 ActionFilterAttribute 派生,并从传递给该方法的上下文中获取 RecipeService 的实例。在下面的清单中,我显示了两个类,EnsureRecipeExistsFilter 和 EnsureRecipeExistsAttribute。filter 类负责功能,并将 RecipeService 作为构造函数依赖项。

Listing 22.11 Using DI in a filter by not deriving from Attribute
清单 22.11 在过滤器中使用 DI 而不是从 Attribute 派生

public class EnsureRecipeExistsFilter : IActionFilter    #A
{
    private readonly RecipeService _service;                #B
    public EnsureRecipeExistsFilter(RecipeService service)  #B
    {                                                       #B
        _service = service;                                 #B
    }                                                       #B
    public void OnActionExecuting(ActionExecutingContext context)  #C
    {                                                              #C
        var recipeId = (int) context.ActionArguments["id"];        #C
        if (!_service.DoesRecipeExist(recipeId))                   #C
        {                                                          #C
            context.Result = new NotFoundResult();                 #C
        }                                                          #C
    }                                                              #C

    public void OnActionExecuted(ActionExecutedContext context) { }   #D
}

public class EnsureRecipeExistsAttribute : TypeFilterAttribute    #E
{
    public EnsureRecipeExistsAttribute()               #F
        : base(typeof(EnsureRecipeExistsFilter)) {}    #F
}

❶ Doesn’t derive from an Attribute class
不从 Attribute 类派生
❷ RecipeService is injected into the constructor.
RecipeService 被注入到构造函数中。
❸ The rest of the method remains the same.
方法的其余部分保持不变。
❹ You must implement the Executed action to satisfy the interface.
您必须实现 Executed作才能满足接口。
❺ Derives from TypeFilter, which is used to fill dependencies using the DI container
派生自 TypeFilter,用于使用 DI 容器填充依赖项
❻ Passes the type EnsureRecipeExistsFilter as an argument to the base TypeFilter constructor
将类型 EnsureRecipeExistsFilter 作为参数传递给基本 TypeFilter 构造函数

EnsureRecipeExistsFilter is a valid filter; you could use it on its own by adding it as a global filter (as global filters don’t need to be attributes). But you can’t use it directly by decorating controller classes and action methods, as it’s not an attribute. That’s where EnsureRecipeExistsAttribute comes in.
EnsureRecipeExistsFilter 是有效的筛选器;您可以通过将其添加为全局过滤器来单独使用它(因为全局过滤器不需要是属性)。但是你不能通过装饰控制器类和作方法来直接使用它,因为它不是一个属性。这就是 EnsureRecipeExistsAttribute 的用武之地。

You can decorate your methods with EnsureRecipeExistsAttribute instead. This attribute inherits from TypeFilterAttribute and passes the Type of filter to create as an argument to the base constructor. This attribute acts as a factory for EnsureRecipeExistsFilter by implementing IFilterFactory.
您可以改用 EnsureRecipeExistsAttribute 来修饰您的方法。此属性继承自 TypeFilterAttribute,并将要创建的过滤器的 Type 作为参数传递给基本构造函数。此属性通过实现 IFilterFactory 充当 EnsureRecipeExistsFilter 的工厂。

When ASP.NET Core initially loads your app, it scans your actions and controllers, looking for filters and filter factories. It uses these to form a filter pipeline for every action in your app, as shown in figure 22.3.
当 ASP.NET Core 最初加载您的应用程序时,它会扫描您的作和控制器,查找过滤器和过滤器工厂。它使用这些数据为应用程序中的每个作形成一个 filter pipeline ,如图 22.3 所示。

alt text

Figure 22.3 The framework scans your app on startup to find both filters and attributes that implement IFilterFactory. At runtime, the framework calls CreateInstance() to get an instance of the filter
图 22.3 框架在启动时扫描您的应用程序,以查找实现 IFilterFactory 的过滤器和属性。在运行时,框架调用 CreateInstance() 来获取过滤器的实例

When an action decorated with EnsureRecipeExistsAttribute is called, the framework calls CreateInstance() on the IFilterFactory attribute. This creates a new instance of EnsureRecipeExistsFilter and uses the DI container to populate its dependencies (RecipeService).
调用使用 EnsureRecipeExistsAttribute 修饰的作时,框架将对 IFilterFactory 属性调用 CreateInstance()。这将创建一个新的 EnsureRecipeExistsFilter 实例,并使用 DI 容器填充其依赖项 (RecipeService)。

By using this IFilterFactory approach, you get the best of both worlds: you can decorate your controllers and actions with attributes, and you can use DI in your filters. Out of the box, two similar classes provide this functionality, which have slightly different behaviors:
通过使用这种 IFilterFactory 方法,您可以两全其美:您可以使用属性装饰控制器和作,并且可以在过滤器中使用 DI。开箱即用,两个类似的类提供了此功能,它们的行为略有不同:

• TypeFilterAttribute—Loads all the filter’s dependencies from the DI container and uses them to create a new instance of the filter.
TypeFilterAttribute - 从 DI 容器中加载所有筛选器的依赖项,并使用它们创建筛选器的新实例。

• ServiceFilterAttribute—Loads the filter itself from the DI container. The DI container takes care of the service lifetime and building the dependency graph. Unfortunately, you must also explicitly register your filter with the DI container:
ServiceFilterAttribute - 从 DI 容器加载筛选器本身。DI 容器负责服务生命周期并构建依赖项关系图。遗憾的是,您还必须向 DI 容器显式注册过滤器:

builder.Services.AddTransient<EnsureRecipeExistsFilter>();

Tip You can register your services with any lifetime you choose. If your service is registered as a singleton, you can consider setting the IsReusable flag, as described in the documentation: http://mng.bz/d1JD.
提示您可以使用您选择的任何生命周期来注册您的服务。如果您的服务注册为单一实例,则可以考虑设置 IsReusable 标志,如文档中所述:http://mng.bz/d1JD

If you choose to use ServiceFilterAttribute instead of TypeFilterAttribute, and register the EnsureRecipeExistsFilter as a service in the DI container, you can apply the ServiceFilterAttribute directly to an action method:
如果您选择使用 ServiceFilterAttribute 而不是 TypeFilterAttribute,并在 DI 容器中将 EnsureRecipeExistsFilter 注册为服务,则可以将 ServiceFilterAttribute 直接应用于作方法:

[ServiceFilter(typeof(EnsureRecipeExistsFilter))]
public IActionResult Index() => Ok();

Whether you choose to use TypeFilterAttribute or ServiceFilterAttribute is somewhat a matter of preference, and you can always implement a custom IFilterFactory if you need to. The key takeaway is that you can now use DI in your filters. If you don’t need to use DI for a filter, implement it as an attribute directly, for simplicity.
选择使用 TypeFilterAttribute 还是 ServiceFilterAttribute 在某种程度上是一个首选项问题,如果需要,您始终可以实现自定义 IFilterFactory。关键要点是您现在可以在过滤器中使用 DI。如果您不需要将 DI 用于过滤器,请直接将其作为属性实现,以便简单起见。

Tip I like to create my filters as a nested class of the attribute class when using this pattern. This keeps all the code nicely contained in a single file and indicates the relationship between the classes.
提示:使用此模式时,我喜欢将过滤器创建为 attribute 类的嵌套类。这将使所有代码很好地包含在单个文件中,并指示类之间的关系。

That brings us to the end of this chapter on the filter pipeline. Filters are a somewhat advanced topic, in that they aren’t strictly necessary for building basic apps, but I find them extremely useful for ensuring that my controller and action methods are simple and easy to understand.
这将我们带到了本章关于过滤器管道的结尾。筛选器是一个比较高级的主题,因为它们对于构建基本应用程序并不是绝对必要的,但我发现它们对于确保我的控制器和作方法简单易懂非常有用。

In the next chapter we’ll take our first look at securing your app. We’ll discuss the difference between authentication and authorization, the concept of identity in ASP.NET Core, and how you can use the ASP.NET Core Identity system to let users register and log in to your app.
在下一章中,我们将首先了解如何保护您的应用程序。我们将讨论身份验证和授权之间的区别、ASP.NET Core 中的身份概念,以及如何使用 ASP.NET Core Identity 系统让用户注册和登录您的应用。

22.4 Summary

22.4 总结

The filter pipeline executes as part of the MVC or Razor Pages execution. It consists of authorization filters, resource filters, action filters, page filters, exception filters, and result filters.
筛选器管道作为 MVC 或 Razor Pages 执行的一部分执行。它由授权筛选条件、资源筛选条件、作筛选条件、页面筛选条件、异常筛选条件和结果筛选条件组成。

ASP.NET Core includes many built-in filters, but you can also create custom filters tailored to your application. You can use custom filters to extract common cross-cutting functionality out of your MVC controllers and Razor Pages, reducing duplication and ensuring consistency across your endpoints.
ASP.NET Core 包含许多内置筛选器,但您也可以创建针对您的应用程序定制的自定义筛选器。您可以使用自定义筛选器从 MVC 控制器和 Razor 页面中提取常见的横切功能,从而减少重复并确保端点之间的一致性。

Authorization filters run first in the pipeline and control access to APIs. ASP.NET Core includes an [Authorization] attribute that you can apply to action methods so that only logged-in users can execute the action.
授权过滤器首先在管道中运行并控制对 API 的访问。ASP.NET Core 包含一个 [Authorization] 属性,您可以将其应用于作方法,以便只有登录用户才能执行该作。

Resource filters run after authorization filters and again after an IActionResult has been executed. They can be used to short-circuit the pipeline so that an action method is never executed. They can also be used to customize the model-binding process for an action method.
资源筛选条件在授权筛选条件之后运行,并在执行 IActionResult 后再次运行。它们可用于使管道短路,以便永远不会执行作方法。它们还可用于自定义作方法的模型绑定过程。

Action filters run after model binding has occurred and before an action method executes. They also run after the action method has executed. They can be used to extract common code out of an action method to prevent duplication. They don’t execute for Razor Pages, only for MVC controllers.
作筛选器在模型绑定发生之后和作方法执行之前运行。它们还会在执行作方法后运行。它们可用于从 action method 中提取公共代码,以防止重复。它们不为 Razor Pages 执行,只为 MVC 控制器执行。

The ControllerBase base class also implements IActionFilter and IAsyncActionFilter. They run at the start and end of the action filter pipeline, regardless of the ordering or scope of other action filters. They can be used to create action filters that are specific to one controller.
ControllerBase 基类还实现 IActionFilter 和 IAsyncActionFilter。它们在作筛选器管道的开头和结尾运行,而不管其他作筛选器的顺序或范围如何。它们可用于创建特定于一个控制器的作筛选器。

Page filters run three times: after page handler selection, after model binding, and after the page handler method executes. You can use page filters for similar purposes as action filters. Page filters execute only for Razor Pages; they don’t run for MVC controllers.
页面过滤器运行三次:选择页面处理程序后、模型绑定后和页面处理程序方法执行后。您可以将页面过滤器用于与作过滤器类似的目的。页面筛选器仅对 Razor Pages 执行;它们不为 MVC 控制器运行。

Razor Page PageModels implement IPageFilter and IAsyncPageFilter, so they can be used to implement page-specific page filters. These are rarely used, as you can typically achieve similar results with simple private methods.
Razor Page PageModel 实现 IPageFilter 和 IAsyncPageFilter,因此它们可用于实现特定于页面的页面筛选器。这些方法很少使用,因为通常可以使用简单的私有方法获得类似的结果。

Exception filters execute after action and page filters, when an action method or page handler has thrown an exception. They can be used to provide custom error handling specific to the action executed.
当作方法或页面处理程序引发异常时,异常筛选器在作和页面筛选器之后执行。它们可用于提供特定于所执行作的自定义错误处理。

Generally, you should handle exceptions at the middleware level, but you can use exception filters to customize how you handle exceptions for specific actions, controllers, or Razor Pages.
通常,您应该在中间件级别处理异常,但您可以使用异常筛选器来自定义处理特定作、控制器或 Razor Pages 的异常的方式。

Result filters run before and after an IActionResult is executed. You can use them to control how the action result is executed or to completely change the action result that will be executed.
结果筛选器在执行 IActionResult 之前和之后运行。您可以使用它们来控制作结果的执行方式,或完全更改将要执行的作结果。

All filters can short-circuit the pipeline by setting a response. This generally prevents the request progressing further in the filter pipeline, but the exact behavior varies with the type of filter that is short-circuited.
所有过滤器都可以通过设置响应来短路管道。这通常可以防止请求在筛选条件管道中进一步进行,但具体行为会因短路的筛选条件类型而异。

Result filters aren’t executed when you short-circuit the pipeline using authorization, resource, or exception filters. You can ensure that result filters also run for these short-circuit cases by implementing a result filter as IAlwaysRunResultFilter or IAsyncAlwaysRunResultFilter.
当您使用授权、资源或异常筛选条件对管道进行短路时,不会执行结果筛选条件。您可以通过将结果筛选器实现为 IAlwaysRunResultFilter 或 IAsyncAlwaysRunResultFilter 来确保结果筛选器也针对这些短路情况运行。

You can use ServiceFilterAttribute and TypeFilterAttribute to allow dependency injection in your custom filters. ServiceFilterAttribute requires that you register your filter and all its dependencies with the DI container, whereas TypeFilterAttribute requires only that the filter’s dependencies have been registered.
您可以使用 ServiceFilterAttribute 和 TypeFilterAttribute 在自定义筛选条件中允许依赖项注入。ServiceFilterAttribute 要求您向 DI 容器注册过滤器及其所有依赖项,而 TypeFilterAttribute 仅要求已注册过滤器的依赖项。

ASP.NET Core in Action 21 The MVC and Razor Pages filter pipeline

21 The MVC and Razor Pages filter pipeline
21 MVC 和 Razor Pages 筛选器管道

This chapter covers
本章涵盖
• The filter pipeline and how it differs from middleware
过滤器管道及其与中间件的区别
• The different types of filters
过滤器的不同类型的
• Filter ordering
过滤器排序

Part 3 of this book has covered the Model-View-Controller (MVC) and Razor Pages frameworks of ASP.NET Core in some detail. You learned how routing is used to select a Razor Page or action to execute. You also saw model binding, validation, and how to generate a response by returning an IActionResult from your actions and page handlers. In this chapter I’m going to head deeper into the MVC/Razor Pages frameworks and look at the filter pipeline, sometimes called the action invocation pipeline, which is analogous to the minimal API endpoint filter pipeline you learned about in chapter 5.
本书的第 3 部分详细介绍了 ASP.NET Core 的模型-视图-控制器 (MVC) 和 Razor Pages 框架。你了解了如何使用路由来选择要执行的 Razor 页面或作。您还了解了模型绑定、验证以及如何通过从作和页面处理程序返回 IActionResult 来生成响应。在本章中,我将更深入地研究 MVC/Razor Pages 框架,并查看筛选器管道,有时称为作调用管道,它类似于您在第 5 章中了解的最小 API 端点筛选器管道。

MVC and Razor Pages use several built-in filters to handle cross-cutting concerns, such as authorization (controlling which users can access which action methods and pages in your application). Any application that has the concept of users will use authorization filters as a minimum, but filters are much more powerful than this single use case. In sections 21.1 and 21.2 you’ll learn about all the different types of filters and how they combine to create the MVC filter pipeline for a request that reaches the MVC or Razor Pages framework.
MVC 和 Razor Pages 使用多个内置筛选器来处理横切关注点,例如授权(控制哪些用户可以访问应用程序中的哪些作方法和页面)。任何具有用户概念的应用程序都将至少使用授权过滤器,但过滤器比这个单一用例强大得多。在第 21.1 节和第 21.2 节中,您将了解所有不同类型的筛选器,以及它们如何组合起来为到达 MVC 或 Razor Pages 框架的请求创建 MVC 筛选器管道。

Think of the MVC filter pipeline as a mini middleware pipeline running inside the MVC and Razor Pages frameworks, like the minimal API endpoint filter pipeline. Like the middleware pipeline in ASP.NET Core, the MVC filter pipeline consists of a series of components connected as a pipe, so the output of one filter feeds into the input of the next. In section 21.3 we’ll look at the similarities and differences between these two pipelines, and when you should choose one over the other.
将 MVC 筛选器管道视为在 MVC 和 Razor Pages 框架内运行的微型中间件管道,就像最小 API 终结点筛选器管道一样。与 ASP.NET Core 中的中间件管道一样,MVC 筛选器管道由一系列作为管道连接的组件组成,因此一个筛选器的输出会馈送到下一个筛选器的输入中。在 Section 21.3 中,我们将了解这两个 pipelines 之间的相似之处和不同之处,以及何时应该选择一个而不是另一个。

In section 21.4 you’ll see how to create a simple custom filter. Rather than focus on the functionality of the filter itself, you’ll learn how to apply it to multiple endpoints in section 21.5. In section 21.6 you’ll see how the choice of where you apply your attributes affects the order in which your filters execute.
在 Section 21.4 中,您将看到如何创建简单的自定义过滤器。您将学习 21.5 节中的如何将它应用于多个端点,而不是关注过滤器本身的功能。在 Section 21.6 中,您将看到选择应用属性的位置如何影响过滤器的执行顺序。

The filter pipeline is a complex topic, but it can enable some advanced behaviors in your app and potentially reduce overall complexity. In this chapter you’ll learn the basics of the pipeline and how it works. In chapter 22 we dig into practical examples of filters, looking at the filters that come out of the box in ASP.NET Core, as well as building custom filters to extract common code from your controllers and Razor Pages.
筛选管道是一个复杂的主题,但它可以在您的应用中启用一些高级行为,并可能降低整体复杂性。在本章中,您将学习管道的基础知识及其工作原理。在第 22 章中,我们深入探讨了筛选器的实际示例,查看了 ASP.NET Core 中开箱即用的筛选器,并构建了自定义筛选器以从控制器和 Razor 页面中提取常见代码。

Before we can start writing code, we should get to grips with the basics of the filter pipeline. The first section of this chapter explains what the pipeline is, why you might want to use it, and how it differs from the middleware pipeline.
在开始编写代码之前,我们应该先了解过滤器管道的基础知识。本章的第一部分介绍了管道是什么,为什么您可能希望使用它,以及它与中间件管道有何不同。

21.1 Understanding the MVC filter pipeline

21.1 了解 MVC 过滤器管道

In this section you’ll learn all about the MVC filter pipeline. You’ll see where it fits in the life cycle of a typical request and the roles of the six types of filters available.
在本节中,您将了解有关 MVC 筛选器管道的所有信息。您将看到它在典型请求的生命周期中的位置,以及可用的六种筛选器的角色。

The filter pipeline is a relatively simple concept in that it provides hooks into the normal MVC request, as shown in figure 21.1. For example, say you wanted to ensure that users can create or edit products on an e-commerce app only if they’re logged in. The app would redirect anonymous users to a login page instead of executing the action.
过滤器管道是一个相对简单的概念,因为它为普通的 MVC 请求提供了钩子,如图 21.1 所示。例如,假设您希望确保用户只有在登录后才能在电子商务应用程序上创建或编辑产品。该应用程序会将匿名用户重定向到登录页面,而不是执行作。

alt text

Figure 21.1 Filters run at multiple points in the EndpointMiddleware as part of the normal handling of an MVC request. A similar pipeline exists for Razor Page requests.
图 21.1 过滤器在 EndpointMiddleware 中的多个点运行,作为 MVC 请求的正常处理的一部分。Razor Page 请求存在类似的管道。

Without filters, you’d need to include the same code to check for a logged-in user at the start of each specific action method. With this approach, the MVC framework would still execute the model binding and validation, even if the user were not logged in.
如果没有筛选器,则需要在每个特定作方法的开头包含相同的代码来检查已登录的用户。使用这种方法,MVC 框架仍将执行模型绑定和验证,即使用户未登录。

With filters, you can use the hooks in the MVC request to run common code across all requests or a subset of requests. This way you can do a wide range of things, such as
借助筛选器,您可以使用 MVC 请求中的挂钩在所有请求或请求子集中运行通用代码。通过这种方式,您可以执行各种作,例如

• Ensure that a user is logged in before an action method, model binding, or validation runs.
确保在作方法、模型绑定或验证运行之前登录用户。
• Customize the output format of particular action methods.
自定义特定作方法的输出格式。
• Handle model validation failures before an action method is invoked.
在调用作方法之前处理模型验证失败。
• Catch exceptions from an action method and handle them in a special way.
从作方法捕获异常,并以特殊方式处理它们。

In many ways, the MVC filter pipeline is like an extra middleware pipeline, restricted to MVC and Razor Pages requests only. Like middleware, filters are good for handling cross-cutting concerns for your application and are useful tools for reducing code duplication in many cases.
在许多方面,MVC 筛选器管道就像一个额外的中间件管道,仅限于 MVC 和 Razor Pages 请求。与 middleware 一样,过滤器非常适合处理应用程序的横切关注点,并且在许多情况下是减少代码重复的有用工具。

The linear1 view of an MVC request and the filter pipeline that I’ve used so far doesn’t quite match up with how these filters execute. There are five types of filters that apply to MVC requests, each of which runs at a different stage in the MVC framework, as shown in figure 21.2.
到目前为止,我使用的 MVC 请求的 linear1 视图和筛选器管道与这些筛选器的执行方式并不完全匹配。有五种类型的过滤器适用于 MVC 请求,每一种都在 MVC 框架的不同阶段运行,如图 21.2 所示。

alt text

Figure 21.2 The MVC filter pipeline, including the five filter stages. Some filter stages (resource, action, and result) run twice, before and after the remainder of the pipeline.
图 21.2 MVC 过滤器管道,包括 5 个过滤器阶段。某些筛选阶段(resource、action 和 result)在管道的其余部分之前和之后运行两次。

Each filter stage lends itself to a particular use case, thanks to its specific location in the pipeline, with respect to model binding, action execution, and result execution:
每个过滤器阶段都适用于特定的用例,这要归功于它在管道中的特定位置,包括模型绑定、作执行和结果执行:

• Authorization filters—These run first in the pipeline, so they’re useful for protecting your APIs and action methods. If an authorization filter deems the request unauthorized, it short-circuits the request, preventing the rest of the filter pipeline (or action) from running.
授权过滤器 - 这些过滤器首先在管道中运行,因此它们可用于保护您的 API 和作方法。如果授权筛选条件认为请求未经授权,则会使请求短路,从而阻止筛选条件管道(或作)的其余部分运行。
• Resource filters—After authorization, resource filters are the next filters to run in the pipeline. They can also execute at the end of the pipeline, in much the same way that middleware components can handle both the incoming request and the outgoing response. Alternatively, resource filters can completely short-circuit the request pipeline and return a response directly.
资源过滤器 - 授权后,资源过滤器是管道中运行的下一个过滤器。它们还可以在管道的末尾执行,就像中间件组件可以同时处理传入请求和传出响应一样。或者,资源筛选条件可以完全短路请求管道并直接返回响应。

Thanks to their early position in the pipeline, resource filters can have a variety of uses. You could add metrics to an action method; prevent an action method from executing if an unsupported content type is requested; or, as they run before model binding, control the way model binding works for that request.
由于它们在管道中的早期位置,资源过滤器可以有多种用途。您可以向作方法添加度量;在请求不受支持的内容类型时阻止执行作方法;或者,当它们在模型绑定之前运行时,控制模型绑定对该请求的工作方式。

• Action filters—Action filters run immediately before and after an action method is executed. As model binding has already happened, action filters let you manipulate the arguments to the method—before it executes—or they can short-circuit the action completely and return a different IActionResult. Because they also run after the action executes, they can optionally customize an IActionResult returned by the action before the action result is executed.
作筛选器 -作筛选器在执行作方法之前和之后立即运行。由于模型绑定已经发生,因此作筛选器允许您在方法执行之前作方法的参数,或者它们可以完全短路作并返回不同的 IActionResult。由于它们也在作执行后运行,因此可以选择在执行作结果之前自定义作返回的 IActionResult。
• Exception filters—Exception filters catch exceptions that occur in the filter pipeline and handle them appropriately. You can use exception filters to write custom, MVC-specific error-handling code, which can be useful in some situations. For example, you could catch exceptions in API actions and format them differently from exceptions in your Razor Pages.
异常过滤器 - 异常过滤器可捕获过滤器管道中发生的异常并对其进行适当处理。您可以使用异常筛选器编写特定于 MVC 的自定义错误处理代码,这在某些情况下可能很有用。例如,可以在 API作中捕获异常,并对其进行不同于 Razor Pages 中的异常格式设置。
• Result filters—Result filters run before and after an action method’s IActionResult is executed. You can use result filters to control the execution of the result or even to short-circuit the execution of the result.
结果筛选器 - 结果筛选器在执行作方法的 IActionResult 之前和之后运行。您可以使用结果筛选器来控制结果的执行,甚至可以缩短结果的执行。

Exactly which filter you pick to implement will depend on the functionality you’re trying to introduce. Want to short-circuit a request as early as possible? Resource filters are a good fit. Need access to the action method parameters? Use an action filter.
您选择实施哪个过滤器将取决于您尝试引入的功能。想要尽早使请求短路?资源筛选器非常适合。需要访问作方法参数?使用作筛选器。

Think of the filter pipeline as a small middleware pipeline that lives by itself in the MVC framework. Alternatively, you could think of filters as hooks into the MVC action invocation process that let you run code at a particular point in a request’s life cycle.
将过滤器管道视为一个小型中间件管道,它独立存在于 MVC 框架中。或者,您可以将筛选器视为 MVC作调用过程的挂钩,允许您在请求生命周期的特定点运行代码。

NOTE The design of the MVC filter pipeline is quite different from the minimal API endpoint filter pipeline you saw in chapter 5. The endpoint filter pipeline is linear and doesn’t have multiple types of filters.
注意:MVC 过滤器管道的设计与您在第 5 章中看到的最小 API 端点过滤器管道完全不同。终端节点筛选条件管道是线性的,没有多种类型的筛选条件。

This section described how the filter pipeline works for MVC and Web API controllers; Razor Pages use an almost-identical filter pipeline.
本部分介绍了筛选器管道如何用于 MVC 和 Web API 控制器;Razor Pages 使用几乎相同的筛选管道。

21.2 The Razor Pages filter pipeline

21.2 Razor Pages 筛选器管道

The Razor Pages framework uses the same underlying architecture as MVC and Web API controllers, so it’s perhaps not surprising that the filter pipeline is virtually identical. The only difference between the pipelines is that Razor Pages do not use action filters. Instead, they use page filters, as shown in figure 21.3.
Razor Pages 框架使用与 MVC 和 Web API 控制器相同的底层体系结构,因此筛选器管道几乎相同可能不足为奇。管道之间的唯一区别是 Razor Pages 不使用作筛选器。相反,它们使用页面过滤器,如图 21.3 所示。

alt text

Figure 21.3 The Razor Pages filter pipeline, including the five filter stages. Authorization, resource, exception, and result filters execute in exactly the same way as for the MVC pipeline. Page filters are specific to Razor Pages and execute in three places: after page hander selection, after model binding and validation, and after page handler execution.
图 21.3 Razor Pages 筛选器管道,包括 5 个筛选器阶段。授权、资源、异常和结果筛选器的执行方式与 MVC 管道的执行方式完全相同。页面筛选器特定于 Razor 页面,并在三个位置执行:选择页面处理程序后、模型绑定和验证后以及页面处理程序执行后。

The authorization, resource, exception, and result filters are exactly the same filters you saw for the MVC pipeline. They execute in the same way, serve the same purposes, and can be short-circuited in the same way.
authorization、resource、exception 和 result 过滤器与您在 MVC 管道中看到的过滤器完全相同。它们以相同的方式执行,服务于相同的目的,并且可以以相同的方式短路。

NOTE These filters are literally the same classes shared between the Razor Pages and MVC frameworks.
注意:这些筛选器实际上是 Razor Pages 和 MVC 框架之间共享的相同类。

The difference with the Razor Pages filter pipeline is that it uses page filters instead of action filters. By contrast with other filter types, page filters run three times in the filter pipeline:
与 Razor Pages 筛选器管道的不同之处在于,它使用页面筛选器而不是作筛选器。与其他筛选器类型相比,页面筛选器在筛选器管道中运行三次:

• After page handler selection—After the resource filters have executed, a page handler is selected, based on the request’s HTTP verb and the {handler} route value, as you learned in chapter 15. After page handler selection, a page filter method executes for the first time. You can’t short-circuit the pipeline at this stage, and model binding and validation have not yet executed.
选择页面处理程序后 - 执行资源过滤器后,将根据请求的 HTTP 动词和 {handler} 路由值选择页面处理程序,如第 15 章所述。选择页面处理程序后,将首次执行页面筛选方法。在此阶段,您不能使管道短路,并且模型绑定和验证尚未执行。

• After model binding—After the first page filter execution, the request is model-bound to the Razor Page’s binding models and is validated. This execution is highly analogous to the action filter execution for API controllers. At this point you could manipulate the model-bound data or short-circuit the page handler execution completely by returning a different IActionResult.
模型绑定后 - 在执行第一个页面筛选器后,请求将模型绑定到 Razor 页面的绑定模型并进行验证。此执行与 API 控制器的 action filter 执行高度相似。此时,您可以通过返回不同的 IActionResult 来作模型绑定数据或完全短路页面处理程序执行。

• After page handler execution—If you don’t short-circuit the page handler execution, the page filter runs a third and final time after the page handler has executed. At this point you could customize the IActionResult returned by the page handler before the result is executed.
页面处理程序执行后 - 如果不使页面处理程序执行短路,则页面过滤器将在页面处理程序执行后第三次也是最后一次运行。此时,您可以在执行结果之前自定义页面处理程序返回的 IActionResult。

The triple execution of page filters makes it a bit harder to visualize the pipeline, but you can generally think of them as beefed-up action filters. Everything you can do with an action filter, you can do with a page filter, and you can hook in after page handler selection if necessary.
页面过滤器的三重执行使得可视化管道有点困难,但您通常可以将它们视为增强的作过滤器。你可以用 action filter 做的所有事情,都可以用 page filter 做,如果需要,你可以在 Page handler 选择后挂接。

Tip Each execution of a filter executes a different method of the appropriate interface, so it’s easy to know where you are in the pipeline and to execute a filter in only one of its possible locations if you wish.
提示:每次执行筛选条件都会执行相应接口的不同方法,因此很容易知道您在管道中的位置,并且如果您愿意,只需在其一个可能的位置执行筛选条件。

One of the main questions I hear when people learn about filters in ASP.NET Core is “Why do we need them?” If the filter pipeline is like a mini middleware pipeline, why not use a middleware component directly, instead of introducing the filter concept? That’s an excellent point, which I’ll tackle in the next section.
当人们了解 ASP.NET Core 中的过滤器时,我听到的主要问题之一是“我们为什么需要它们?如果 filter pipeline 就像一个迷你的 middleware pipeline ,为什么不直接使用一个 middleware 组件,而不是引入 filter 概念呢?这是一个很好的观点,我将在下一节中讨论。

21.3 Filters or middleware: Which should you choose?

21.3 过滤器或中间件:您应该选择哪个?

The filter pipeline is similar to the middleware pipeline in many ways, but there are several subtle differences that you should consider when deciding which approach to use. The considerations are essentially the same as those for the minimal API endpoint filter I discussed in chapter 5. MVC filters and middleware are similar in three ways:
filter 管道在许多方面与中间件管道相似,但在决定使用哪种方法时,应考虑几个细微的差异。这些注意事项与我在第 5 章中讨论的最小 API 端点过滤器的注意事项基本相同。MVC 筛选器和中间件在三个方面相似:

• Requests pass through a middleware component on the way “in,” and responses pass through again on the way “out.” Resource, action, and result filters are also two-way, though authorization and exception filters run only once for a request, and page filters run three times.
请求在“in”途中通过中间件组件,响应在“out”途中再次传递。资源、作和结果筛选器也是双向的,但授权和异常筛选器只为请求运行一次,而页面筛选器运行三次。
• Middleware can short-circuit a request by returning a response instead of passing it on to later middleware. MVC and page filters can also short-circuit the filter pipeline by returning a response.
中间件可以通过返回响应而不是将其传递给后续中间件来使请求短路。MVC 和页面筛选器还可以通过返回响应来使筛选器管道短路。
• Middleware is often used for cross-cutting application concerns, such as logging, performance profiling, and exception handling. Filters also lend themselves to cross-cutting concerns.
中间件通常用于横切应用程序问题,例如日志记录、性能分析和异常处理。过滤器还适用于横切关注点。

Filters and middleware also differ primarily in three ways:
筛选器和中间件也主要在三个方面有所不同:

• Middleware can run for all requests; filters run only for requests that reach the EndpointMiddleware and execute a controller action or Razor Page handler.
中间件可以针对所有请求运行筛选器仅针对到达 EndpointMiddleware 并执行控制器作或 Razor Page 处理程序的请求运行。
• Filters have access to MVC constructs such as ModelState and IActionResults. Middleware in general is independent from MVC and Razor Pages and works at a lower level, so it can’t use these concepts.
筛选器可以访问 MVC 构造,例如 ModelState 和 IActionResults。中间件通常独立于 MVC 和 Razor Pages,并且在较低级别工作,因此它不能使用这些概念。
• Filters can be easily applied to a subset of requests, such as all actions on a single controller or a single Razor Page. Middleware generally applies to all requests that reach a given point in the middleware pipeline.
筛选器可以轻松应用于请求的子集,例如单个控制器或单个 Razor 页面上的所有作。中间件通常适用于到达中间件管道中给定点的所有请求。

As for the endpoint filter pipeline, I like to think of middleware versus MVC filters as a question of specificity. Middleware is the more general concept, so it has the wider reach. But if you need to access to MVC constructs or want to behave differently for some MVC actions or Razor Pages, you should consider using a filter.
至于端点过滤器管道,我喜欢将中间件与 MVC 过滤器视为一个特异性问题。中间件是更通用的概念,因此它的范围更广。但是,如果需要访问 MVC 构造或希望对某些 MVC作或 Razor Pages 采取不同的行为,则应考虑使用筛选器。

The middleware-versus-filters argument is a subtle one, and it doesn’t matter which you choose as long as it works for you. You can even use middleware components inside the MVC filter pipeline, effectively turning a middleware component into a filter!
middleware-versus-filters 的参数是一个微妙的参数,只要它适合你,你选择哪一个并不重要。您甚至可以在 MVC 过滤器管道中使用中间件组件,从而有效地将中间件组件转换为过滤器!

Tip The middleware-as-filters feature was introduced in ASP.NET Core 1.1 and is also available in later versions. The canonical use case is for localizing requests to multiple languages. I have a blog series on how to use the feature here: http://mng.bz/RXa0.
提示middleware-as-filters 功能是在 ASP.NET Core 1.1 中引入的,在以后的版本中也可用。规范用例是将请求本地化为多种语言。我有一个关于如何使用该功能的博客系列:http://mng.bz/RXa0

Filters can be a little abstract in isolation, so in the next section we’ll look at some code and learn how to write a custom MVC filter in ASP.NET Core.
筛选器可以单独使用一些抽象,因此在下一节中,我们将查看一些代码并学习如何在 ASP.NET Core 中编写自定义 MVC 筛选器。

21.4 Creating a simple filter

21.4 创建简单过滤器

In this section, I show you how to create your first filters; in section 21.5 you’ll see how to apply them to MVC controllers and actions. We’ll start small, creating filters that only write to the console, but in chapter 22 we look at some more practical examples and discuss some of their nuances.
在本节中,我将向您展示如何创建您的第一个过滤器;在 Section 21.5 中,您将看到如何将它们应用于 MVC 控制器和作。我们将从小处着手,创建仅写入控制台的过滤器,但在第 22 章中,我们将查看一些更实际的示例并讨论它们的一些细微差别。

You implement a filter for a given stage by implementing one of a pair of interfaces, one synchronous (sync) and one asynchronous (async):
您可以通过实现一对接口之一(一个同步 (sync)和一个异步 (async))来为给定阶段实现筛选器:

• Authorization filters—IAuthorizationFilter or IAsyncAuthorizationFilter
授权筛选器 - IAuthorizationFilter 或 IAsyncAuthorizationFilter
• Resource filters—IResourceFilter or IAsyncResourceFilter
资源筛选器 - IResourceFilter 或 IAsyncResourceFilter
• Action filters—IActionFilter or IAsyncActionFilter
动作筛选器 - IActionFilter 或 IAsyncActionFilter
• Page filters—IPageFilter or IAsyncPageFilter
页面筛选器 - IPageFilter 或 IAsyncPageFilter
• Exception filters—IExceptionFilter or IAsyncExceptionFilter
异常筛选器 - IExceptionFilter 或 IAsyncExceptionFilter
• Result filters—IResultFilter or IAsyncResultFilter
结果筛选器 - IResultFilter 或 IAsyncResultFilter

You can use any plain old CLR object (POCO) class to implement a filter, but you’ll typically implement them as C# attributes, which you can use to decorate your controllers, actions, and Razor Pages, as you’ll see in section 21.5. You can achieve the same results with either the sync or async interface, so which you choose should depend on whether any services you call in the filter require async support.
您可以使用任何普通的旧 CLR 对象 (POCO) 类来实现过滤器,但您通常会将它们实现为 C# 属性,您可以使用这些属性来装饰您的控制器、作和 Razor 页面,如第 21.5 节所示。您可以使用 sync 或 async 接口实现相同的结果,因此您选择哪个接口取决于您在过滤器中调用的任何服务是否需要异步支持。

NOTE You should implement either the sync interface or the async interface, not both. If you implement both, only the async interface will be used.
注意:您应该实现 sync 接口或 async 接口,而不是两者兼而有之。如果同时实现这两个接口,则仅使用异步接口。

Listing 21.1 shows a resource filter that implements IResourceFilter and writes to the console when it executes. The OnResourceExecuting method is called when a request first reaches the resource filter stage of the filter pipeline. By contrast, the OnResourceExecuted method is called after the rest of the pipeline has executed: after model binding, action execution, result execution, and all intermediate filters have run.
清单 21.1 显示了一个资源过滤器,它实现 IResourceFilter 并在执行时写入控制台。当请求首次到达筛选管道的资源筛选阶段时,将调用 OnResourceExecuting 方法。相比之下,OnResourceExecuted 方法是在管道的其余部分执行之后调用的:在模型绑定、作执行、结果执行和所有中间筛选器运行之后。

Listing 21.1 Example resource filter implementing IResourceFilter
清单 21.1 实现 IResourceFilter 的示例资源过滤器

public class LogResourceFilter : Attribute, IResourceFilter
{
    public void OnResourceExecuting(          #A
        ResourceExecutingContext context)    #B
    {
        Console.WriteLine("Executing!");
    }

    public void OnResourceExecuted(             #C
        ResourceExecutedContext context)    #D
    {
        Console.WriteLine("Executed");
    }
}

❶ Executed at the start of the pipeline, after authorization filters
在管道开始时执行,在授权过滤器之后
❷ The context contains the HttpContext, routing details, and information about the current action.
上下文包含 HttpContext、路由详细信息和有关当前作的信息。
❸ Executed after model binding, action execution, and result execution
在模型绑定、作执行和结果执行之后执行
❹ Contains additional context information, such as the IActionResult returned by the action
包含其他上下文信息,例如作返回的 IActionResult

The interface methods are simple and are similar for each stage in the filter pipeline, passing a context object as a method parameter. Each of the two-method sync filters has an Executing and an Executed method. The type of the argument is different for each filter, but it contains all the details for the filter pipeline.
接口方法很简单,并且对于筛选器管道中的每个阶段都类似,将上下文对象作为方法参数传递。两种方法的同步筛选器中的每一个都有一个 Executing 和一个 Executed 方法。每个筛选条件的参数类型都不同,但它包含筛选条件管道的所有详细信息。

For example, the ResourceExecutingContext passed to the resource filter contains the HttpContext object itself, details about the route that selected this action, details about the action itself, and so on. Contexts for later filters contain additional details, such as the action method arguments for an action filter and the ModelState.
例如,传递给资源筛选器的 ResourceExecutingContext 包含 HttpContext 对象本身、有关选择此作的路由的详细信息、有关作本身的详细信息等。更高筛选器的上下文包含其他详细信息,例如作筛选器的作方法参数和 ModelState。

The context object for the ResourceExecutedContext method is similar, but it also contains details about how the rest of the pipeline executed. You can check whether an unhandled exception occurred, you can see if another filter from the same stage short-circuited the pipeline, or you can see the IActionResult used to generate the response.
ResourceExecutedContext 方法的上下文对象类似,但它还包含有关管道其余部分如何执行的详细信息。您可以检查是否发生了未经处理的异常,可以查看同一阶段中的另一个筛选器是否使管道短路,或者您可以查看用于生成响应的 IActionResult。

These context objects are powerful and are the key to advanced filter behaviors like short-circuiting the pipeline and handling exceptions. We’ll make use of them in chapter 22 when we create more complex filter examples.
这些上下文对象功能强大,是高级筛选行为(如短路管道和处理异常)的关键。我们将在第 22 章创建更复杂的过滤器示例时使用它们。

The async version of the resource filter requires implementing a single method, as shown in listing 21.2. As for the sync version, you’re passed a ResourceExecutingContext object as an argument, and you’re passed a delegate representing the remainder of the filter pipeline. You must call this delegate (asynchronously) to execute the remainder of the pipeline, which returns an instance of ResourceExecutedContext.
资源过滤器的异步版本需要实现一个方法,如清单 21.2 所示。对于同步版本,将向您传递一个 ResourceExecutingContext 对象作为参数,并传递一个表示筛选管道其余部分的委托。您必须(异步)调用此委托来执行管道的其余部分,该管道将返回 ResourceExecutedContext 的实例。

Listing 21.2 Example resource filter implementing IAsyncResourceFilter
列表 21.2 实现 IAsyncResourceFilter 的示例资源过滤器

public class LogAsyncResourceFilter : Attribute, IAsyncResourceFilter
{
public async Task OnResourceExecutionAsync( ❶
ResourceExecutingContext context,
ResourceExecutionDelegate next) ❷
{
Console.WriteLine("Executing async!"); ❸
ResourceExecutedContext executedContext = await next(); ❹
Console.WriteLine("Executed async!"); ❺
}
}

❶ Executed at the start of the pipeline, after authorization filters
在管道开始时执行,授权过滤器之后
❷ You’re provided a delegate, which encapsulates the remainder of the filter pipeline.
为您提供一个委托,它封装了过滤器管道的其余部分。
❸ Called before the rest of the pipeline executes
在管道的其余部分执行之前调用
❹ Executes the rest of the pipeline and obtains a ResourceExecutedContext instance
执行管道的其余部分并获取 ResourceExecutedContext 实例
❺ Called after the rest of the pipeline executes
在管道的其余部分执行之后调用

The sync and async filter implementations have subtle differences, but for most purposes they’re identical. I recommend implementing the sync version for simplicity, falling back to the async version only if you need to.
sync 和 async filter 实现有细微的差异,但在大多数情况下它们是相同的。为简单起见,我建议实现同步版本,仅在需要时回退到异步版本。

You’ve created a couple of filters now, so we should look at how to use them in the application. In the next section we’ll tackle two specific issues: how to control which requests execute your new filters and how to control the order in which they execute.
您现在已经创建了几个过滤器,因此我们应该看看如何在应用程序中使用它们。在下一节中,我们将解决两个具体问题:如何控制哪些请求执行您的新过滤器,以及如何控制它们的执行顺序。

21.5 Adding filters to your actions and Razor Pages

向动作和 Razor 页面添加过滤器

In section 21.3 I discussed the similarities and differences between middleware and filters. One of those differences is that filters can be scoped to specific actions or controllers so that they run only for certain requests. Alternatively, you can apply a filter globally so that it runs for every MVC action and Razor Page.
在 Section 21.3 中,我讨论了 middleware 和 filters 之间的异同。其中一个区别是,过滤器的范围可以限定为特定的作或控制器,以便它们仅针对特定请求运行。或者,您可以全局应用筛选器,以便它针对每个 MVC作和 Razor 页面运行。

By adding filters in different ways, you can achieve several different results. Imagine you have a filter that forces you to log in to execute an action. How you add the filter to your app will significantly change your app’s behavior:
通过以不同的方式添加过滤器,您可以获得多种不同的结果。假设您有一个过滤器,它强制您登录以执行作。向应用程序添加过滤器的方式将显著改变应用程序的行为:

• Apply the filter to a single action or Razor Page. Anonymous users could browse the app as normal, but if they tried to access the protected action or Razor Page, they would be forced to log in.
将筛选器应用于单个作或 Razor 页面。匿名用户可以正常浏览应用程序,但如果他们尝试访问受保护的作或 Razor 页面,他们将被迫登录。
• Apply the filter to a controller. Anonymous users could access actions from other controllers, but accessing any action on the protected controller would force them to log in.
将过滤器应用于控制器。匿名用户可以访问来自其他控制器的作,但访问受保护控制器上的任何作都会强制他们登录。
• Apply the filter globally. Users couldn’t use the app without logging in. Any attempt to access an action or Razor Page would redirect the user to the login page.
全局应用筛选器。用户如果不登录就无法使用该应用程序。任何访问作或 Razor 页面的尝试都会将用户重定向到登录页面。

NOTE ASP.NET Core comes with such a filter out of the box: AuthorizeFilter. I discuss this filter in chapter 22, and you’ll be seeing a lot more of it in chapter 24.
注意: ASP.NET Core 附带了这样一个开箱即用的筛选器:AuthorizeFilter。我在第 22 章中讨论了这个过滤器,您将在第 24 章中看到更多内容。

As I described in the previous section, you normally create filters as attributes, and for good reason: it makes it easy for you to apply them to MVC controllers, actions, and Razor Pages. In this section you’ll see how to apply LogResourceFilter from listing 21.1 to an action, a controller, a Razor Page, and globally. The level at which the filter applies is called its scope.
正如我在上一节中所描述的,您通常将筛选器创建为属性,这是有充分理由的:它使您可以轻松地将它们应用于 MVC 控制器、作和 Razor 页面。在本节中,您将了解如何将清单 21.1 中的 LogResourceFilter 应用于作、控制器、Razor Page 和全局应用。筛选器应用的级别称为其范围。

DEFINITION The scope of a filter refers to how many different actions it applies to. A filter can be scoped to the action method, to the controller, to a Razor Page, or globally.
定义:筛选器的范围是指它应用于多少个不同的作。筛选器的范围可以限定为作方法、控制器、Razor 页面或全局。

You’ll start at the most specific scope: applying filters to a single action. The following listing shows an example of an MVC controller that has two action methods, one with LogResourceFilter and one without.
您将从最具体的范围开始:将筛选条件应用于单个作。下面的清单显示了一个 MVC 控制器的示例,该控制器具有两个作方法,一个带有 LogResourceFilter,另一个没有。

Listing 21.3 Applying filters to an action method
清单 21.3 将过滤器应用于作方法

public class RecipeController : ControllerBase
{
    [LogResourceFilter]            #A
    public IActionResult Index()   #A
    {                              #A
        return Ok();               #A
    }                              #A
    public IActionResult View()   #B
    {                             #B
        return OK();              #B
    }                             #B
}

❶ LogResourceFilter runs as part of the pipeline when executing this action.
LogResourceFilter 在执行此作时作为管道的一部分运行。
❷ This action method has no filters at the action level.
此作方法在作级别没有筛选器。

Alternatively, if you want to apply the same filter to every action method, you could add the attribute at the controller scope, as in the next listing. Every action method in the controller uses LogResourceFilter without having to specifically decorate each method.
或者,如果要将相同的过滤器应用于每个作方法,则可以在控制器范围内添加该属性,如下一个清单所示。控制器中的每个 action method 都使用 LogResourceFilter,而不必专门修饰每个方法。

Listing 21.4 Applying filters to a controller
清单 21.4 将过滤器应用于控制器

[LogResourceFilter]                             #A
public class RecipeController : ControllerBase
{
    public IActionResult Index ()   #B
    {                               #B
        return Ok();                #B
    }                               #B
    public IActionResult View()     #B
    {                               #B
        return Ok();                #B
    }                               #B
}

❶ The LogResourceFilter is added to every action on the controller.
LogResourceFilter 被添加到控制器上的每个作中。
❷ Every action in the controller is decorated with the filter.
控制器中的每个作都用过滤器装饰。

For Razor Pages, you can apply attributes to your PageModel, as shown in the following listing. The filter applies to all page handlers in the Razor Page. It’s not possible to apply filters to a single page handler; you must apply them at the page level.
对于 Razor Pages,您可以将属性应用于 PageModel,如下面的清单所示。筛选器适用于 Razor 页面中的所有页面处理程序。无法将过滤器应用于单个页面处理程序;您必须在页面级别应用它们。

Listing 21.5 Applying filters to a Razor Page
清单 21.5 将过滤器应用于 Razor 页面

[LogResourceFilter]             #A
public class IndexModel : PageModel
{
    public void OnGet()    #B
    {                      #B
    }                      #B

    public void OnPost()   #B
    {                      #B
    }                      #B
}

❶ The LogResourceFilter is added to the Razor Page’s PageModel.
LogResourceFilter 已添加到 Razor 页面的 PageModel。
❷ The filter applies to every page handler in the page.
过滤器适用于页面中的每个页面处理程序。

Filters you apply as attributes to controllers, actions, and Razor Pages are automatically discovered by the framework when your application starts up. For common attributes, you can go one step further and apply filters globally without having to decorate individual classes.
当应用程序启动时,框架会自动发现作为属性应用于控制器、作和 Razor 页面的筛选器。对于通用属性,您可以更进一步,全局应用过滤器,而不必装饰单个类。

You add global filters in a different way from controller- or action-scoped filters—by adding a filter directly to the MVC services when configuring your controllers and Razor Pages. The next listing shows three equivalent ways to add a globally scoped filter.
添加全局筛选器的方式与控制器或作范围的筛选器不同,即在配置控制器和 Razor Pages 时直接向 MVC 服务添加筛选器。下一个清单显示了添加全局范围过滤器的三种等效方法。

Listing 21.6 Applying filters globally to an application
清单 21.6 将过滤器全局应用于应用程序

WebApplicationBuilder builder = WebApplication.CreateBuilder(args);

builder.Services.AddControllers(options =>    #A
{
    options.Filters.Add(new LogResourceFilter());     #B
    options.Filters.Add(typeof(LogResourceFilter));   #C
    options.Filters.Add<LogResourceFilter>();    #D
});

❶ Adds filters using the MvcOptions object
使用 MvcOptions 对象添加过滤器
❷ You can pass an instance of the filter directly. . .
您可以直接传递过滤器的实例。 . .
❸ . . . or pass in the Type of the filter and let the framework create it.
. . . .或者传入过滤器的 Type 并让框架创建它。
❹ Alternatively, the framework can create a global filter using a generic type parameter.
或者,框架可以使用泛型类型参数创建全局过滤器。

You can configure the MvcOptions by using the AddControllers() overload. When you configure filters globally, they apply both to controllers and to any Razor Pages in your application. If you wish to configure a global filter for a Razor Pages application, there isn’t an overload for configuring the MvcOptions. Instead, you need to use the AddMvcOptions() extension method to configure the filters, as shown in the following listing.
您可以使用 AddControllers() 重载配置 MvcOptions。全局配置筛选器时,它们将同时应用于控制器和应用程序中的任何 Razor Pages。如果要为 Razor Pages 应用程序配置全局筛选器,则不会有用于配置 MvcOptions 的重载。相反,您需要使用 AddMvcOptions() 扩展方法来配置过滤器,如下面的清单所示。

Listing 21.7 Applying filters globally to a Razor Pages application
列表 21.7 将过滤器全局应用于 Razor Pages 应用程序

WebApplicationBuilder builder = WebApplication.CreateBuilder(args);

builder.Services.RazorPages()  #A
    .AddMvcOptions(options =>    #B
    {
        options.Filters.Add(new LogResourceFilter());     #C
        options.Filters.Add(typeof(LogResourceFilter));   #C
        options.Filters.Add<LogResourceFilter>();    #C
    });

❶ This method doesn’t let you pass a lambda to configure the MvcOptions.
此方法不允许您传递 lambda 来配置 MvcOptions。
❷ You must use an extension method to add the filters to the MvcOptions object.
必须使用扩展方法将筛选器添加到 MvcOptions 对象。
❸ You can configure the filters in any of the ways shown previously.
您可以按照前面显示的任何方式配置过滤器。

With potentially three different scopes in play, you’ll often find action methods that have multiple filters applied to them, some applied directly to the action method and others inherited from the controller or globally. Then the question becomes which filter runs first.
由于可能有三种不同的范围,您通常会发现应用了多个过滤器的作方法,其中一些直接应用于作方法,而另一些则从控制器或全局继承。然后问题就变成了哪个过滤器先运行。

21.6 Understanding the order of filter execution

21.6 了解过滤器的执行顺序

You’ve seen that the filter pipeline contains five stages, one for each type of filter. These stages always run in the fixed order I described in sections 21.1 and 21.2. But within each stage, you can also have multiple filters of the same type (for example, multiple resource filters) that are part of a single action method’s pipeline. These could all have multiple scopes, depending on how you added them, as you saw in the preceding section.
您已经看到 filter 管道包含 5 个阶段,每种类型的 filter 对应一个阶段。这些阶段始终按照我在第 21.1 节和第 21.2 节中描述的固定顺序运行。但在每个阶段中,您还可以拥有多个相同类型的筛选条件(例如,多个资源筛选条件),这些筛选条件是单个作方法的管道的一部分。这些范围可能都具有多个范围,具体取决于您添加它们的方式,如上一节所示。

In this section we’re thinking about the order of filters within a given stage and how scope affects this. We’ll start by looking at the default order and then move on to ways to customize the order to your own requirements.
在本节中,我们将考虑给定阶段中过滤器的顺序以及范围如何影响这一点。我们将首先查看默认顺序,然后继续讨论根据自己的要求自定义顺序的方法。

21.6.1 The default scope execution order

21.6.1 默认范围执行顺序

When thinking about filter ordering, it’s important to remember that resource, action, and result filters implement two methods: an Executing before method and an Executed after method. On top of that, page filters implement three methods! The order in which each method executes depends on the scope of the filter, as shown in figure 21.4 for the resource filter stage.
在考虑筛选器排序时,请务必记住,资源、作和结果筛选器实现两种方法:Executing before 方法和 Executed after 方法。最重要的是,页面过滤器实现了三种方法!每个方法的执行顺序取决于过滤器的范围,如图 21.4 所示,用于资源过滤器阶段。

alt text

Figure 21.4 The default filter ordering within a given stage, based on the scope of the filters. For the Executing method, globally scoped filters run first, followed by controller-scoped, and finally action-scoped filters. For the Executed method, the filters run in reverse order.
图 21.4 给定阶段中基于过滤器范围的默认过滤器排序。对于 Executing 方法,全局范围的筛选器首先运行,然后是控制器范围的筛选器,最后是作范围的筛选器。对于 Executed 方法,筛选器按相反的顺序运行。

By default, filters execute from the broadest scope (global) to the narrowest (action) when running the Executing method for each stage. The filters’ Executed methods run in reverse order, from the narrowest scope (action) to the broadest (global).
默认情况下,在为每个阶段运行 Executing 方法时,筛选器从最广泛的范围 (全局) 到最窄的 (作) 执行。筛选器的 Executed 方法按相反的顺序运行,从最窄的范围 (作) 到最广泛的范围 (全局)。

The ordering for Razor Pages is somewhat simpler, given that you have only two scopes: global scope filters and Razor Page scope filters. For Razor Pages, global scope filters run the Executing and PageHandlerSelected methods first, followed by the page scope filters. For the Executed methods, the filters run in reverse order.
Razor Pages 的排序稍微简单一些,因为你只有两个范围:全局范围筛选器和 Razor Page 范围筛选器。对于 Razor Pages,全局范围筛选器首先运行 Executing 和 PageHandlerSelected 方法,然后运行页面范围筛选器。对于 Executed 方法,筛选器按相反的顺序运行。

You’ll sometimes find you need a bit more control over this order, especially if you have, for example, multiple action filters applied at the same scope. The filter pipeline caters to this requirement by way of the IOrderedFilter interface.
您有时会发现需要对此顺序进行更多控制,尤其是在您在同一范围内应用了多个作筛选器时。筛选器管道通过 IOrderedFilter 接口满足此要求。

21.6.2 Overriding the default order of filter execution with IOrderedFilter

21.6.2 使用 IOrderedFilter 覆盖过滤器执行的默认顺序

Filters are great for extracting cross-cutting concerns from your controller actions and Razor Page, but if you have multiple filters applied to an action, you’ll often need to control the precise order in which they execute.
筛选器非常适合从控制器作和 Razor Page 中提取横切关注点,但如果将多个筛选器应用于一个作,则通常需要控制它们的执行精确顺序。

Scope can get you some of the way, but for those other cases, you can implement IOrderedFilter. This interface consists of a single property, Order:
Scope 可以为您提供一些方法,但对于其他情况,您可以实现 IOrderedFilter。此接口由单个属性 Order 组成:

public interface IOrderedFilter
{
    int Order { get; }
}

You can implement this property in your filters to set the order in which they execute. The filter pipeline orders the filters in each stage based on the Order property first, from lowest to highest, and uses the default scope order to handle ties, as shown in figure 21.5.
您可以在筛选条件中实现此属性,以设置筛选条件的执行顺序。filter 管道首先根据 Order 属性从最低到最高对每个阶段中的过滤器进行排序,并使用默认的作用域 order 来处理平局,如图 21.5 所示。

alt text

Figure 21.5 Controlling the filter order for a stage using the IOrderedFilter interface. Filters are ordered by the Order property first, and then by scope.
图 21.5 使用 IOrderedFilter 接口控制阶段的过滤器顺序。筛选器首先按 Order 属性排序,然后按范围排序。

The filters for Order = -1 execute first, as they have the lowest Order value. The controller filter executes first because it has a broader scope than the action-scope filter. The filters with Order = 0 execute next, in the default scope order, as shown in figure 21.5. Finally, the filter with Order = 1 executes.
首先执行 Order = -1 的筛选器,因为它们具有最低的 Order 值。首先执行 controller 筛选器,因为它的范围比 action-scope 筛选器更广。Order = 0 的 filters 接下来以默认的 scope 顺序执行,如图 21.5 所示。最后,执行 Order = 1 的筛选器。

By default, if a filter doesn’t implement IOrderedFilter, it’s assumed to have Order = 0. All the filters that ship as part of ASP.NET Core have Order = 0, so you can implement your own filters relative to these.
默认情况下,如果筛选器未实现 IOrderedFilter,则假定其 Order = 0。作为 ASP.NET Core 的一部分提供的所有筛选器的 Order = 0,因此您可以实现自己的筛选器。

NOTE You can completely customize how the filter pipeline is built by customizing the MVC frameworks application model conventions. These control everything about how controllers and Razor Pages are discovered, how they’re added to the pipeline, and how filters are discovered. This is an advanced concept, that you won’t often need, but it may occasionally come in handy. You can read about the MVC application model in the documentation at http://mng.bz/nWNa.
注意:您可以通过自定义 MVC 框架应用程序模型约定来完全自定义筛选器管道的构建方式。它们控制有关如何发现控制器和 Razor 页面、如何将它们添加到管道以及如何发现筛选器的所有内容。这是一个高级概念,您通常不需要它,但它偶尔可能会派上用场。您可以在 http://mng.bz/nWNa 的文档 中阅读有关 MVC 应用程序模型的信息。

This chapter has provided a lot of background on the MVC filter pipeline, and we covered most of the technical details you need to use filters and create custom implementations for your own application. In chapter 22 you’ll see some of the built-in filters provided by ASP.NET Core, as well as some practical examples of filters you might want to use in your own applications.
本章提供了许多关于 MVC 过滤器管道的背景知识,我们介绍了使用过滤器和为自己的应用程序创建自定义实现所需的大部分技术细节。在第 22 章中,您将看到 ASP.NET Core 提供的一些内置过滤器,以及您可能希望在自己的应用程序中使用的一些过滤器的实际示例。

21.7 Summary

21.7 总结

The filter pipeline provides hooks into an MVC request so you can run functions at various points within an MVC request. With filters you can run code at specific points in the MVC process across all requests or a subset of requests. This is particularly useful for handling cross-cutting concerns that are specific to MVC.
筛选器管道提供 MVC 请求的挂钩,以便您可以在 MVC 请求中的不同点运行函数。使用筛选器,您可以在 MVC 进程中的特定点跨所有请求或请求子集运行代码。这对于处理特定于 MVC 的横切关注点特别有用。

The filter pipeline executes as part of the MVC or Razor Pages execution. It consists of authorization filters, resource filters, action filters, page filters, exception filters, and result filters. Each filter type is grouped in a stage and can be used to achieve effects specific to that stage.
筛选器管道作为 MVC 或 Razor Pages 执行的一部分执行。它由授权筛选条件、资源筛选条件、作筛选条件、页面筛选条件、异常筛选条件和结果筛选条件组成。每种滤镜类型都分组在一个阶段中,可用于实现特定于该阶段的效果。

Resource, action, and result filters run twice in the pipeline: an Executing method on the way in and an Executed method on the way out. Page filters run three times: after page handler selection, and before and after page handler execution.
资源、作和结果筛选器在管道中运行两次:一个 Executing 方法在流入中,一个 Executed 方法在流出。页面过滤器运行三次:选择页面处理程序之后,以及页面处理程序执行之前和之后。

Authorization and exception filters run only once as part of the pipeline; they don’t run after a response has been generated.
授权和异常筛选器仅作为管道的一部分运行一次;它们在生成响应后不会运行。

Each type of filter has both a sync and an async version. For example, resource filters can implement either the IResourceFilter interface or the IAsync-ResourceFilter interface. You should use the synchronous interface unless your filter needs to use asynchronous method calls.
每种类型的筛选器都有同步版本和异步版本。例如,资源筛选器可以实现 IResourceFilter 接口或 IAsync-ResourceFilter 接口。除非 filter 需要使用异步方法调用,否则应使用 synchronous interface。

You can add filters globally, at the controller level, at the Razor Page level, or at the action level. This is called the scope of the filter. Which scope you should choose depends on how broadly you want to apply the filter.
您可以在控制器级别、Razor Page 级别或作级别全局添加筛选器。这称为筛选器的范围。您应该选择哪个范围取决于您要应用过滤器的范围。

Within a given stage, global-scoped filters run first, then controller-scoped, and finally action-scoped. You can also override the default order by implementing the IOrderedFilter interface. Filters run from lowest to highest Order and use scope to break ties.
在给定的阶段中,全局范围的过滤器首先运行,然后是控制器范围的,最后是作范围的。您还可以通过实现 IOrderedFilter 接口来覆盖默认顺序。筛选器从最低顺序到最高顺序运行,并使用范围来打破关系。

ASP.NET Core in Action 20 Creating an HTTP API using web API controllers

20 Creating an HTTP API using web API controllers
20 使用 Web API 控制器创建 HTTP API

This chapter covers
本章涵盖
• Creating a web API controller to return JavaScript Object Notation (JSON) to clients
创建 Web API 控制器以将 JavaScript 对象表示法 (JSON) 返回给客户端
• Using attribute routing to customize your URLs
使用属性路由自定义 URL
• Generating a response using content negotiation
使用内容协商生成响应
• Applying common conventions with the [ApiController] attribute
使用 [ApiController] 属性应用常见约定

In chapters 13 through 19 you worked through each layer of a server-side rendered ASP.NET Core application, using Razor Pages and Model-View-Controller (MVC) controllers to render HTML to the browser. In part 1 of this book you saw a different type of ASP.NET Core application, using minimal APIs to serve JSON for client-side SPAs or mobile apps. In this chapter you’ll learn about web API controllers, which fit somewhere in between!
在第 13 章到第 19 章中,您完成了 ASP.NET Core 应用程序呈现的服务器端的每一层,使用 Razor Pages 和模型-视图-控制器 (MVC) 控制器将 HTML 呈现到浏览器。在本书的第 1 部分中,您了解了不同类型的 ASP.NET Core 应用程序,它使用最少的 API 为客户端 SPA 或移动应用程序提供 JSON。在本章中,您将了解 Web API 控制器,它们介于两者之间!

You can apply much of what you’ve already learned to web API controllers; they use the same routing system as minimal APIs and the same MVC design pattern, model binding, and validation as Razor Pages.
您可以将已经学到的大部分知识应用到 Web API 控制器中;它们使用与最小 API 相同的路由系统,以及与 Razor Pages 相同的 MVC 设计模式、模型绑定和验证。

In this chapter you’ll learn how to define web API controllers and actions, and see how similar they are to the Razor Pages and controllers you already know. You’ll learn how to create an API model to return data and HTTP status codes in response to a request, in a way that client apps can understand.
在本章中,您将学习如何定义 Web API 控制器和作,并了解它们与您已经知道的 Razor Pages 和控制器的相似之处。您将学习如何创建 API 模型,以客户端应用程序可以理解的方式返回数据和 HTTP 状态代码以响应请求。

After exploring how the MVC design pattern applies to web API controllers, you’ll see how a related topic works with web APIs: routing. We’ll look at how explicit attribute routing works with action methods, touching on many of the same concepts we covered in chapters 6 and 14.
在探索了 MVC 设计模式如何应用于 Web API 控制器之后,您将了解相关主题如何与 Web API 配合使用:路由。我们将了解显式属性路由如何与 action 方法一起工作,并涉及我们在第 6 章和第 14 章中介绍的许多相同概念。

One of the big features added in ASP.NET Core 2.1 was the [ApiController] attribute. This attribute applies several common conventions used in web APIs, reducing the amount of code you must write yourself. In section 20.5 you’ll learn how automatic 400 Bad Requests for invalid requests, model-binding parameter inference, and ProblemDetails support make building APIs easier and more consistent.
ASP.NET Core 2.1 中添加的重要功能之一是 [ApiController] 属性。此属性应用 Web API 中使用的几个常见约定,从而减少您必须自己编写的代码量。在第 20.5 节中,您将了解针对无效请求的自动 400 错误请求、模型绑定参数推理和 ProblemDetails 支持如何使构建 API 更轻松、更一致。

You’ll also learn how to format the API models returned by your action methods using content negotiation, to ensure that you generate a response that the calling client can understand. As part of this, you’ll learn how to add support for additional format types, such as Extensible Markup Language (XML), so that you can generate XML responses if the client requests it.
您还将学习如何使用内容协商来格式化作方法返回的 API 模型,以确保您生成的响应是调用客户端可以理解的。作为其中的一部分,您将学习如何添加对其他格式类型(如可扩展标记语言 (XML))的支持,以便在客户端请求时生成 XML 响应。

Finally, I discuss some of the differences between API controllers and minimal API applications, and when you should choose one over the other. Before we get to that, we look at how to get started. In section 20.1 you’ll see how to create a web API project and add your first API controller.
最后,我将讨论 API 控制器和最小 API 应用程序之间的一些差异,以及何时应该选择一个而不是另一个。在开始之前,我们先看看如何开始。在 Section 20.1 中,您将看到如何创建 Web API 项目并添加您的第一个 API 控制器。

20.1 Creating your first web API project

20.1 创建您的第一个 Web API 项目

In this section you’ll learn how to create an ASP.NET Core web API project and create your first web API controllers. You’ll see how to use controller action methods to handle HTTP requests and how to use ActionResults to generate a response.
在本部分中,你将了解如何创建 ASP.NET Core Web API 项目并创建你的第一个 Web API 控制器。您将了解如何使用控制器作方法处理 HTTP 请求,以及如何使用 ActionResults 生成响应。

NOTE as I mentioned previously that a web API project is a standard ASP.NET Core project, which uses the MVC framework and web API controllers.
注意:如前所述,Web API 项目是标准的 ASP.NET Core 项目,它使用 MVC 框架和 Web API 控制器。

Some people think of the MVC design pattern as applying only to applications that render their UI directly, like the Razor views you’ve seen in previous chapters or MVC controllers with Razor views. However, in ASP.NET Core, I feel the MVC pattern applies equally well when building a web API. For web APIs, the view part of the MVC pattern involves generating a machine-friendly response rather than a user-friendly response.
有些人认为 MVC 设计模式仅适用于直接呈现其 UI 的应用程序,例如您在前几章中看到的 Razor 视图或具有 Razor 视图的 MVC 控制器。但是,在 ASP.NET Core 中,我觉得 MVC 模式在构建 Web API 时同样适用。对于 Web API,MVC 模式的视图部分涉及生成计算机友好的响应,而不是用户友好的响应。

As a parallel to this, you create web API controllers in ASP.NET Core in the same way you create traditional MVC controllers. The only thing that differentiates them from a code perspective is the type of data they return. MVC controllers typically return a ViewResult; web API controllers generally return raw .NET objects from their action methods, or an IActionResult instance such as StatusCodeResult, as you saw in chapter 15.
与此并行,您可以在 ASP.NET Core 中创建 Web API 控制器,其方式与创建传统 MVC 控制器的方式相同。从代码角度来看,它们的唯一区别是它们返回的数据类型。MVC 控制器通常返回 ViewResult;Web API 控制器通常从其作方法或 IActionResult 实例(如 StatusCodeResult)返回原始 .NET 对象,如第 15 章所示。

You can create a new web API project in Visual Studio using the same process you’ve seen previously in Visual Studio. Choose File > New, and in the Create a new project dialog box, select the ASP.NET Core Web API template. Enter your project name in the Configure your new project dialog box, and review the Additional information box, shown in figure 20.1, before choosing Create. If you’re using the command-line interface (CLI), you can create a similar template using dotnet new webapi.
您可以使用之前在 Visual Studio 中看到的相同过程在 Visual Studio 中创建新的 Web API 项目。选择 File > New,然后在 Create a new project (创建新项目) 对话框中,选择 ASP.NET Core Web API 模板。在 Configure your new project (配置您的新项目) 对话框中输入您的项目名称,然后查看 Additional information (其他信息) 框,如图 20.1 所示,然后选择 Create (创建)。如果您使用的是命令行界面 (CLI),则可以使用 dotnet new webapi 创建类似的模板。

alt text

Figure 20.1 The Additional information screen. This screen follows on from the Configure your new project dialog box and lets you customize the template that generates your application.
图 20.1 “其他信息”屏幕。此屏幕是 Configure your new project 对话框的后续屏幕,允许您自定义生成应用程序的模板。

The web API template configures the ASP.NET Core project for web API controllers only in Program.cs, as shown in listing 20.1. If you compare this template with the MVC controller project in chapter 19, you’ll see that the web API project uses AddControllers() instead of AddControllersWithViews(). This adds only the services needed for controllers but omits the services for rendering Razor views. Also, the API controllers are added using MapControllers() instead of MapControllerRoute(), as web API controller typically use explicit routing instead of conventional routing. The default web API template also adds the OpenAPI services and endpoints required by the Swagger UI, as you saw in chapter 11.
Web API 模板仅在 Program.cs 中为 Web API 控制器配置 ASP.NET Core 项目,如清单 20.1 所示。如果将此模板与第 19 章中的 MVC 控制器项目进行比较,你将看到 Web API 项目使用 AddControllers() 而不是 AddControllersWithViews()。这仅添加控制器所需的服务,但省略了用于呈现 Razor 视图的服务。此外,API 控制器是使用 MapControllers() 而不是 MapControllerRoute() 添加的,因为 Web API 控制器通常使用显式路由而不是传统路由。默认 Web API 模板还添加了 Swagger UI 所需的 OpenAPI 服务和端点,如第 11 章所示。

Listing 20.1 Program.cs for the default web API project
清单 20.1 默认 Web API 项目的 Program.cs

WebApplicationBuilder builder = WebApplication.CreateBuilder(args);

builder.Services.AddControllers();  #A

builder.Services.AddEndpointsApiExplorer();    #B
builder.Services.AddSwaggerGen();    #B

WebApplication app = builder.Build();

if (app.Environment.IsDevelopment())
{
    app.UseSwagger();    #C
    app.UseSwaggerUI();  #C
}

app.UseHttpsRedirection();
app.UseAuthorization();

app.MapControllers();  #D

app.Run();

❶ AddControllers adds the necessary services for web API controllers to your application.
AddControllers 将 Web API 控制器的必要服务添加到您的应用程序中。
❷ Adds services required to generate the Swagger/OpenAPI specification document
添加生成 Swagger/OpenAPI 规范文档所需的服务
❸ Adds Swagger UI middleware for exploring your web API endpoints
添加用于探索 Web API 端点的 Swagger UI 中间件
❹ MapControllers configures the web API controller actions in your app as endpoints.
MapControllers 将应用程序中的 Web API 控制器作配置为端点。

The program in listing 20.1 instructs your application to find all the web API controllers in your application and configure them in the EndpointMiddleware. Each action method becomes an endpoint and can receive requests when the RoutingMiddleware maps an incoming URL to the action method.
清单 20.1 中的程序指示您的应用程序查找应用程序中的所有 Web API 控制器,并在 EndpointMiddleware 中配置它们。每个作方法都成为一个端点,当 RoutingMiddleware 将传入的 URL 映射到作方法时,可以接收请求。

NOTE Technically, you can include Razor Pages, minimal APIs, and web API controllers in the same app, but I prefer to keep them separate where possible. There are certain aspects (such as error handling and authentication) that are made easier by keeping them separate. Of course, running two separate applications has its own difficulties!
注意:从技术上讲,您可以在同一个应用程序中包含 Razor Pages、最小 API 和 Web API 控制器,但我更喜欢尽可能将它们分开。通过将某些方面 (例如错误处理和身份验证) 分开,可以更轻松地使用它们。当然,运行两个单独的应用程序有其自身的困难!

You can add a web API controller to your project by creating a new .cs file anywhere in your project. Traditionally, this file is placed in a folder called Controllers, but that’s not a technical requirement.
您可以通过在项目中的任何位置创建新的 .cs 文件,将 Web API 控制器添加到项目中。传统上,此文件放置在名为 Controllers 的文件夹中,但这不是技术要求。

Tip Vertical slice architecture and feature folders are (fortunately) becoming more popular in .NET circles. With these approaches, you organize your project based on features instead of technical concepts like controllers and models.
提示:垂直切片体系结构和功能文件夹(幸运的是)在 .NET 圈子中越来越流行。使用这些方法,您可以根据功能而不是控制器和模型等技术概念来组织项目。

Listing 20.2 shows an example of a simple controller, with a single endpoint, that returns an IEnumerable when executed. This example highlights the similarity with traditional MVC controllers (using action methods and a base class) and minimal APIs (returning the response object directly to be serialized later).
清单 20.2 展示了一个简单的控制器示例,它只有一个端点,执行时返回一个 IEnumerable。此示例突出了与传统 MVC 控制器(使用作方法和基类)和最小 API(直接返回响应对象以供稍后序列化)的相似性。

Listing 20.2 A simple web API controller

[ApiController]    #A
public class FruitController : ControllerBase         #B
{
    List<string> _fruit = new List<string>    #C
    {                                         #C
        "Pear",                               #C
        "Lemon",                              #C
        "Peach"                               #C
    };                                        #C
    [HttpGet("fruit")]                           #D
    public IEnumerable<string> Index()      #E
    {                      #F
        return _fruit;     #F
    }                      #F
}

❶ The [ApiController] attribute opts in to common conventions.
[ApiController] 属性选择加入常见约定。
❷ The ControllerBase class provides helper functions.
ControllerBase 类提供了帮助程序函数。
❸ This would typically come from a dependency injection (DI) injected service instead.
这通常来自依赖注入 (DI) 注入的服务。
❹ The [HttpGet] attribute defines the route template used to call the action.
[HttpGet] 属性定义用于调用作的路由模板。
❺ The name of the action method, Index, isn’t used for routing. It can be anything you like.
action方法的名称 Index 不用于路由。它可以是你喜欢的任何东西。
❻ The controller exposes a single action method that returns the list of fruit.
控制器公开一个返回 fruit 列表的 action 方法。

When invoked, this endpoint returns the list of strings serialized to JSON, as shown in figure 20.2.
调用时,此终端节点返回序列化为 JSON 的字符串列表,如图 20.2 所示。

alt text

Figure 20.2 Testing the web API in listing 20.2 by accessing the URL in the browser. A GET request is made to the /fruit URL, which returns a List<string> that is serialized to JSON.
图 20.2 通过在浏览器中访问 URL 来测试清单 20.2 中的 Web API。向 /fruit URL 发出 GET 请求,该请求返回序列化为 JSON 的 List<string>

Web API controllers typically use the [ApiController] attribute (introduced in .NET Core 2.1) and derive from the ControllerBase class. The base class provides several helper methods for generating results, and the [ApiController] attribute automatically applies some common conventions, as you’ll see in section 20.5.
Web API 控制器通常使用 [ApiController] 属性(在 .NET Core 2.1 中引入)并从 ControllerBase 类派生。基类提供了几个用于生成结果的帮助程序方法,并且 [ApiController] 属性会自动应用一些常见约定,如第 20.5 节所示。

Tip The Controller base class is typically used when you use MVC controllers with Razor views. You don’t need to return Razor views with web API controllers, so ControllerBase is the better option.
提示:将 Controller 基类通常用于 Razor 视图的 MVC 控制器。无需使用 Web API 控制器返回 Razor 视图,因此 ControllerBase 是更好的选择。

In listing 20.2 you can see that the action method, Index, returns a list of strings directly from the action method. When you return data from an action like this, you’re providing the API model for the request. The client will receive this data. It’s formatted into an appropriate response, a JSON representation of the list in the case of figure 20.2, and sent back to the browser with a 200 OK status code.
在清单 20.2 中,你可以看到作方法 Index 直接从作方法返回一个字符串列表。当您从此类作返回数据时,您将为请求提供 API 模型。客户端将收到此数据。它被格式化为适当的响应,即图 20.2 中列表的 JSON 表示形式,并使用 200 OK 状态代码发送回浏览器。

Tip Web API controllers format data as JSON by default. You’ll see how to format the returned data in other ways in section 20.6. Minimal API endpoints that return data directly (rather than via an IResult) will format data only as JSON; there are no other options.
提示:默认情况下,Web API 控制器将数据格式化为 JSON。您将在 Section 20.6 中看到如何以其他方式格式化返回的数据。直接返回数据(而不是通过 IResult)的最小 API 端点将仅将数据格式化为 JSON;没有其他选择。

The URL at which a web API controller action is exposed is handled in the same way as for traditional MVC controllers and Razor Pages: using routing. The [HttpGet("fruit")] attribute applied to the Index method indicates that the method should use the route template "fruit" and should respond to HTTP GET requests. You’ll learn more about attribute routing in section 20.4, but it’s similar to the minimal API routing that you’re already familiar with.
公开 Web API 控制器作的 URL 的处理方式与传统 MVC 控制器和 Razor Pages 的处理方式相同:使用路由。应用于 Index 方法的 [HttpGet(“fruit”)] 属性指示该方法应使用路由模板 “fruit” 并应响应 HTTP GET 请求。您将在 Section 20.4 中了解有关 attribute routing 的更多信息,但它类似于您已经熟悉的最小 API 路由。

In listing 20.2 data is returned directly from the action method, but you don’t have to do that. You’re free to return an IActionResult instead, and often this is required. Depending on the desired behavior of your API, you sometimes want to return data, and other times you may want to return a raw HTTP status code, indicating whether the request was successful. For example, if an API call is made requesting details of a product that does not exist, you might want to return a 404 Not Found status code.
在示例 20.2 中,数据直接从 action 方法返回,但你不必这样做。您可以自由地返回 IActionResult,这通常是必需的。根据 API 的所需行为,您有时希望返回数据,有时您可能希望返回原始 HTTP 状态代码,以指示请求是否成功。例如,如果进行 API 调用,请求不存在的产品的详细信息,则可能需要返回 404 Not Found 状态代码。

NOTE This is similar to the patterns you used in minimal APIs. But remember, minimal APIs use IResult, web API controllers, MVC controllers, and Razor Pages use IActionResult.
注意:这类似于您在最小 API 中使用的模式。但请记住,最小的 API 使用 IResult,Web API 控制器、MVC 控制器和 Razor 页面使用 IActionResult。

Listing 20.3 shows an example of where you must return an IActionResult. It shows another action on the same FruitController as before. This method exposes a way for clients to fetch a specific fruit by an id, which we’ll assume for this example is an index into the list of _fruit you defined in the previous listing. Model binding is used to set the value of the id parameter from the request.
清单 20.3 显示了一个必须返回 IActionResult 的示例。它显示了与以前一样,在同一个 FruitController 上的另一个作。此方法为 Client 端提供了一种通过 id 获取特定水果的方法,在本例中,我们假设该 ID 是您在上一个清单中定义的 _fruit 列表的索引。模型绑定用于设置请求中 id 参数的值。

NOTE API controllers use the same model binding infrastructure as Razor Pages to bind action method parameters to the incoming request. Model binding and validation work the same way you saw in chapter 16: you can bind the request to simple primitives, as well as to complex C# objects. The only difference is that there isn’t a PageModel with [BindProperty] properties; you can bind only to action method parameters.
注意:API 控制器使用与 Razor Pages 相同的模型绑定基础结构将作方法参数绑定到传入请求。模型绑定和验证的工作方式与第 16 章中介绍的相同:可以将请求绑定到简单的基元,也可以绑定到复杂的 C# 对象。唯一的区别是没有具有 [BindProperty] 属性的 PageModel;您只能绑定到作方法参数。

Listing 20.3 A web API action returning IActionResult to handle error conditions
列表 20.3 返回 IActionResult 以处理错误条件的 Web API action

[HttpGet("fruit/{id}")]                #A
public ActionResult<string> View(int id)    #B
{
    if (id >= 0 && id < _fruit.Count)   #C
    {
        return _fruit[id];    #D
    }
    return NotFound();    #E
}

❶ Defines the route template for the action method
定义action方法的路由模板
❷ The action method returns an ActionResult<string>, so it can return a string or an IActionResult.
作方法返回 ActionResult<string>,因此它可以返回字符串或 IActionResult。
❸ An element can be returned only if the id value is a valid _fruit element index.
仅当 id 值是有效的 _fruit 元素索引时,才能返回元素。
❹ Returning the data directly returns the data with a 200 status code.
返回数据直接返回状态代码为 200 的数据。
❺ NotFound returns a NotFoundResult, which sends a 404 status code.
NotFound 返回 NotFoundResult, ,这会发送 404 状态代码。

In the successful path for the action method, the id parameter has a value greater than 0 and less than the number of elements in _fruit. When that’s true, the value of the element is returned to the caller. As in listing 20.2, this is achieved by simply returning the data directly, which generates a 200 status code and returns the element in the response body, as shown in figure 20.3. You could also have returned the data using an OkResult, by returning Ok(_fruit[id]), using the Ok helper method on the ControllerBase class; under the hood, the result is identical.
在作方法的成功路径中, id 参数的值大于 0 且小于 _fruit 中的元素数。如果为 true,则元素的值将返回给调用方。与清单 20.2 一样,这是通过简单地直接返回数据来实现的,这会生成一个 200 状态代码并返回响应正文中的元素,如图 20.3 所示。您还可以通过 OkResult 返回 Ok(_fruit[id]),使用 ControllerBase 类上的 Ok 帮助程序方法返回数据;在后台,结果是相同的。

NOTE Some people get uneasy when they see the phrase helper method, but there’s nothing magic about the ControllerBase helpers; they’re shorthand for creating a new IActionResult of a given type. You don’t have to take my word for it, though. You can always view the source code for the base class on GitHub at http://mng.bz/5wQB.
注意:有些人在看到短语 helper method 时会感到不安,但 ControllerBase helpers 并没有什么神奇之处;它们是创建给定类型的新 IActionResult 的简写。不过,你不必相信我的话。您始终可以在 GitHub 上查看基类的源代码,网址为 http://mng.bz/5wQB

alt text

Figure 20.3 Data returned from an action method is serialized into the response body, and it generates a response with status code 200 OK.
图 20.3 从作方法返回的数据被序列化到响应正文中,并生成状态码为 200 OK 的响应。

If the id is outside the bounds of the _fruit list, the method calls NotFound() to create a NotFoundResult. When executed, this method generates a 404 Not Found status code response. The [ApiController] attribute automatically converts the response into a standard ProblemDetails instance, as shown in figure 20.4.
如果 ID 超出 _fruit 列表的边界,该方法将调用 NotFound() 来创建 NotFoundResult。执行时,此方法会生成 404 Not Found 状态代码响应。[ApiController] 属性会自动将响应转换为标准 ProblemDetails 实例,如图 20.4 所示。

alt text

Figure 20.4 The [ApiController] attribute converts error responses (in this case a 404 response) into the standard ProblemDetails format.
图 20.4 [ApiController] 属性将错误响应(在本例中为 404 响应)转换为标准 ProblemDetails 格式。

One aspect you might find confusing from listing 20.3 is that for the successful case, we return a string, but the method signature of View says we return an ActionResult<string>. How is that possible? Why isn’t there a compiler error?
清单 20.3 中您可能会感到困惑的一个方面是,对于成功的情况,我们返回一个字符串,但 View 的方法签名说我们返回一个 ActionResult<string>.这怎么可能呢?为什么没有编译器错误?

The generic ActionResult<T> uses some fancy C# gymnastics with implicit conversions to make this possible. Using ActionResult<T> has two benefits:
泛型ActionResult<T>使用一些带有隐式转换的花哨 C# 体来实现这一点。使用ActionResult<T> 有两个好处:

• You can return either an instance of T or an ActionResult implementation like NotFoundResult from the same method. This can be convenient, as in listing 20.3.
您可以从同一方法返回 T 的实例或 ActionResult 实现(如 NotFoundResult)。这很方便,如 清单 20.3 所示。
• It enables better integration with ASP.NET Core’s OpenAPI support.
它支持更好地与 ASP.NET Core 的 OpenAPI 支持集成。

You’re free to return any type of ActionResult from your web API controllers, but you’ll commonly return StatusCodeResult instances, which set the response to a specific status code, with or without associated data. NotFoundResult and OkResult both derive from StatusCodeResult, for example. Another commonly used status code is 400 Bad Request, which is normally returned when the data provided in the request fails validation. You can generate this using a BadRequestResult, but in many cases the [ApiController] attribute can automatically generate 400 responses for you, as you’ll see in section 20.5.
您可以自由地从 Web API 控制器返回任何类型的 ActionResult,但通常会返回 StatusCodeResult 实例,这些实例将响应设置为特定状态代码,无论是否包含关联数据。例如,NotFoundResult 和 OkResult 都派生自 StatusCodeResult。另一个常用的状态代码是 400 Bad Request,通常在请求中提供的数据未通过验证时返回。你可以使用 BadRequestResult 来生成它,但在许多情况下, [ApiController] 属性可以自动生成 400 个响应,如第 20.5 节所示。

Tip You learned about various ActionResults in chapter 15. BadRequestResult, OkResult, and NotFoundResult all inherit from StatusCodeResult and set the appropriate status code for their type (400, 200, and 404, respectively). Using these wrapper classes makes the intention of your code clearer than relying on other developers to understand the significance of the various status code numbers.
提示您在第 15 章中了解了各种 ActionResult。BadRequestResult、OkResult 和 NotFoundResult 都继承自 StatusCodeResult,并为其类型设置适当的状态代码(分别为 400、200 和 404)。使用这些包装类可以比依赖其他开发人员来了解各种状态代码编号的重要性更清楚地了解代码的意图。

Once you’ve returned an ActionResult (or other object) from your controller, it’s serialized to an appropriate response. This works in several ways, depending on
从控制器返回 ActionResult(或其他对象)后,它将被序列化为适当的响应。这以多种方式工作,具体取决于
• The formatters that your app supports
您的应用程序支持的格式化程序
• The data you return from your method
您从方法返回的数据
• The data formats the requesting client can handle
请求客户端可以处理的数据格式

You’ll learn more about formatters and serializing data in section 20.6, but before we go any further, it’s worth zooming out a little and exploring the parallels between traditional server-side rendered applications and web API endpoints. The two are similar, so it’s important to establish the patterns that they share and where they differ.
您将在 Section 20.6 中了解有关格式化程序和序列化数据的更多信息,但在我们进一步讨论之前,值得稍微缩小并探索传统服务器端渲染的应用程序和 Web API 端点之间的相似之处。这两者相似,因此确定它们的共同模式和不同之处非常重要。

20.2 Applying the MVC design pattern to a web API

20.2 将 MVC 设计模式应用于 Web API

In ASP.NET Core, the same underlying framework is used in conjunction with web API controllers, Razor Pages, and MVC controllers with views. You’ve already seen this yourself; the web API FruitController you created in section 20.2 looks similar to the MVC controllers you saw in chapter 19.
在 ASP.NET Core 中,相同的基础框架与 Web API 控制器、Razor Pages 和具有视图的 MVC 控制器结合使用。你自己已经见过了;您在第 20.2 节中创建的 Web API FruitController 看起来类似于您在第 19 章中看到的 MVC 控制器。

Consequently, even if you’re building an application that consists entirely of web APIs, using no server-side rendering of HTML, the MVC design pattern still applies. Whether you’re building traditional web applications or web APIs, you can structure your application virtually identically.
因此,即使您正在构建一个完全由 Web API 组成的应用程序,不使用服务器端的 HTML 呈现,MVC 设计模式仍然适用。无论您是构建传统的 Web 应用程序还是 Web API,您都可以以几乎相同的方式构建您的应用程序。

By now I hope you’re nicely familiar with how ASP.NET Core handles a request. But in case you’re not, figure 20.5 shows how the framework handles a typical Razor Pages request after it passes through the middleware pipeline. This example shows how a request to view the available fruit on a traditional grocery store website might look.
到目前为止,我希望您已经非常熟悉 ASP.NET Core 如何处理请求。但如果你不是,图 20.5 显示了框架在典型的 Razor Pages 请求通过中间件管道后如何处理该请求。此示例显示了在传统杂货店网站上查看可用水果的请求可能是什么样子的。

alt text

Figure 20.5 Handling a request to a traditional Razor Pages application, in which the view generates an HTML response that’s sent back to the user. This diagram should be familiar by now!
图 20.5 处理对传统 Razor Pages 应用程序的请求,其中视图生成 HTML 响应,该响应将发送回给用户。这张图现在应该很熟悉了!

The RoutingMiddleware routes the request to view all the fruit listed in the apples category to the Fruit.cshtml Razor Page. The EndpointMiddleware then constructs a binding model, validates it, sets it as a property on the Razor Page’s PageModel, and sets the ModelState property on the PageModel base class with details of any validation errors. The page handler interacts with the application model by calling into services, talking to a database, and fetching any necessary data.
RoutingMiddleware 将请求路由到 Fruit.cshtml Razor 页面,以查看 apples 类别中列出的所有水果。然后,EndpointMiddleware 构造一个绑定模型,对其进行验证,将其设置为 Razor 页面的 PageModel 上的属性,并在 PageModel 基类上设置 ModelState 属性,其中包含任何验证错误的详细信息。页面处理程序通过调用服务、与数据库通信以及获取任何必要的数据来与应用程序模型进行交互。

Finally, the Razor Page executes its Razor view using the PageModel to generate the HTML response. The response returns through the middleware pipeline and out to the user’s browser.
最后,Razor 页面使用 PageModel 执行其 Razor 视图以生成 HTML 响应。响应通过中间件管道返回并输出到用户的浏览器。

How would this change if the request came from a client-side or mobile application? If you want to serve machine-readable JSON instead of HTML, what is different for web API controllers? As shown in figure 20.6, the answer is “very little.” The main changes are related to switching from Razor Pages to controllers and actions, but as you saw in chapter 19, both approaches use the same general paradigms.
如果请求来自客户端或移动应用程序,情况会如何变化?如果要提供机器可读的 JSON 而不是 HTML,那么 Web API 控制器有什么不同?如图 20.6 所示,答案是 “very little”。主要更改与从 Razor Pages 切换到控制器和作有关,但正如您在第 19 章中看到的那样,这两种方法都使用相同的通用范例。

alt text

Figure 20.6 A call to a web API endpoint in an e-commerce ASP.NET Core web application. The ghosted portion of the diagram is identical to figure 20.5.
图 20.6 对电子商务 ASP.NET Core Web 应用程序中的 Web API 终端节点的调用。该图的重影部分与图 20.5 相同。

As before, the routing middleware selects an endpoint to invoke based on the incoming URL. For API controllers this is a controller and action instead of a Razor Page.
与以前一样,路由中间件根据传入 URL 选择要调用的终端节点。对于 API 控制器,这是控制器和作,而不是 Razor 页面。

After routing comes model-binding, in which the binder creates a binding model and populates it with values from the request. web API controllers often accept data in more formats than Razor Pages, such as XML, but otherwise the model-binding process is the same as for the Razor Pages request. Validation also occurs in the same way, and the ModelState property on the ControllerBase base class is populated with any validation errors.
路由之后是模型绑定,其中 Binder 创建一个绑定模型,并使用请求中的值填充它。Web API 控制器通常接受比 Razor Pages 更多格式的数据(例如 XML),但其他方面,模型绑定过程与 Razor Pages 请求相同。验证也以相同的方式进行,并且 ControllerBase 基类上的 ModelState 属性中填充了任何验证错误。

NOTE Web APIs use input formatters to accept data sent to them in a variety of formats. Commonly these formats are JSON or XML, but you can create input formatters for any sort of type, such as CSV. I show how to enable the XML input formatter in section 20.6. You can see how to create a custom input formatter at http://mng.bz/e5gG.
注意:Web API 使用输入格式化程序来接受以各种格式发送给它们的数据。这些格式通常为 JSON 或 XML,但您可以为任何类型的输入格式化程序创建,例如 CSV。我在 Section 20.6 中展示了如何启用 XML input 格式化程序。您可以在 http://mng.bz/e5gG 中了解如何创建自定义输入格式化程序。

The action method is the equivalent of the Razor Page handler; it interacts with the application model in the same way. This is an important point; by separating the behavior of your app into an application model instead of incorporating it into your pages and controllers themselves, you’re able to reuse the business logic of your application with multiple UI paradigms.
action方法等效于 Razor Page 处理程序;它以相同的方式与应用程序模型交互。这是很重要的一点;通过将应用程序的行为分离到应用程序模型中,而不是将其合并到页面和控制器本身中,您可以利用多个 UI 范例重用应用程序的业务逻辑。

Tip Where possible, keep your page handlers and controllers as simple as practicable. Move all your business logic decisions into the services that make up your application model, and keep your Razor Pages and API controllers focused on the mechanics of interacting with a user or client.
提示:在可能的情况下,请尽可能保持页面处理程序和控制器的简单性。将所有业务逻辑决策移动到构成应用程序模型的服务中,并使 Razor Pages 和 API 控制器专注于与用户或客户端交互的机制。

After the application model has returned the data necessary to service the request—the fruit objects in the apples category—you see the first significant difference between API controllers and Razor Pages. Instead of adding values to the PageModel to be used in a Razor view, the action method creates an API model. This is analogous to the PageModel, but rather than containing data used to generate an HTML view, it contains the data that will be sent back in the response.
在应用程序模型返回为请求提供服务所需的数据(apples 类别中的 fruit 对象)后,您会看到 API 控制器和 Razor Pages 之间的第一个显著差异。作方法不是向 PageModel 添加值以在 Razor 视图中使用的,而是创建一个 API 模型。这类似于 PageModel,但它不包含用于生成 HTML 视图的数据,而是包含将在响应中发回的数据。

DEFINITION View models and PageModels contain both the data required to build a response and metadata about how to build the response. API models typically contain only the data to be returned in the response.
定义:视图模型和 PageModel 包含构建响应所需的数据以及有关如何构建响应的元数据。API 模型通常仅包含要在响应中返回的数据。

When we looked at the Razor Pages app, we used the PageModel in conjunction with a Razor view template to build the final response. With the web API app, we use the API model in conjunction with an output formatter. An output formatter, as the name suggests, serializes the API model into a machine-readable response, such as JSON or XML. The output formatter forms the V in the web API version of MVC by choosing an appropriate representation of the data to return.
当我们查看 Razor Pages 应用时,我们将 PageModel 与 Razor 视图模板结合使用来构建最终响应。对于 Web API 应用程序,我们将 API 模型与输出格式化程序结合使用。顾名思义,输出格式化程序将 API 模型序列化为机器可读的响应,例如 JSON 或 XML。输出格式化程序通过选择要返回的数据的适当表示形式,在 MVC 的 Web API 版本中形成 V。

Finally, as for the Razor Pages app, the generated response is sent back through the middleware pipeline, passing through each of the configured middleware components, and back to the original caller.
最后,对于 Razor Pages 应用,生成的响应通过中间件管道发送回,通过每个配置的中间件组件,并返回给原始调用方。

I hope the parallels between Razor Pages and web APIs are clear. The majority of the behavior is identical; only the response varies. Everything from when the request arrives to the interaction with the application model is similar between the paradigms.
我希望 Razor Pages 和 Web API 之间的相似之处是明确的。大多数行为是相同的;只是反应不同。从请求到达到与应用程序模型的交互,范例之间的一切都是相似的。

Most of the differences between Razor Pages and web APIs have less to do with the way the framework works under the hood and are instead related to how the different paradigms are used. For example, in the next section you’ll learn how the routing constructs you learned about in chapters 6 and 15 are used with web APIs, using attribute routing.
Razor Pages 和 Web API 之间的大多数差异与框架在后台的工作方式关系不大,而是与不同范例的使用方式有关。例如,在下一节中,您将了解如何使用属性路由将您在第 6 章和第 15 章中学到的路由结构与 Web API 一起使用。

20.3 Attribute routing: Linking action methods to URLs

20.3 属性路由:将作方法链接到 URL

In this section you’ll learn about attribute routing: the mechanism for associating web API controller actions with a given route template. You’ll see how to associate controller actions with specific HTTP verbs like GET and POST and how to avoid duplication in your templates.
在本节中,您将了解属性路由:将 Web API 控制器作与给定路由模板关联的机制。您将了解如何将控制器作与特定的 HTTP 动词(如 GET 和 POST)相关联,以及如何避免模板中的重复。

We covered route templates in depth in chapter 6 in the context of minimal APIs, and again in chapter 14 with Razor Pages, and you’ll be pleased to know that you use exactly the same route templates with API controllers. The only difference is how you specify the templates. With Razor Pages you use the @page directive, and with minimal APIs you use MapGet() or MapPost(), whereas with API controllers you use routing attributes.
我们在第 6 章中深入介绍了最小 API 的路由模板,并在第 14 章中再次介绍了 Razor Pages,您会很高兴地知道您对 API 控制器使用完全相同的路由模板。唯一的区别是指定模板的方式。对于 Razor Pages,您可以使用 @page 指令,对于最少的 API,您可以使用 MapGet() 或 MapPost(),而对于 API 控制器,您可以使用路由属性。

NOTE All three paradigms use explicit routing under the hood. The alternative, conventional routing, is typically used with traditional MVC controllers and views, as described in chapter 19. As I’ve mentioned, I don’t recommend using that approach generally, so I don’t cover conventional routing in this book.
注意:这三种范例都在后台使用显式路由。另一种选择,即传统路由,通常与传统的 MVC 控制器和视图一起使用,如第 19 章所述。正如我所提到的,我不建议通常使用这种方法,因此我在本书中不介绍传统路由。

With attribute routing, you decorate each action method in an API controller with an attribute and provide the associated route template for the action method, as shown in the following listing.
使用属性路由,您可以使用属性修饰 API 控制器中的每个作方法,并为作方法提供关联的路由模板,如下面的清单所示。

Listing 20.4 Attribute routing example
列表 20.4 属性路由示例

public class HomeController: Controller
{
    [Route("")]                  #A
    public IActionResult Index()
    {
         /* method implementation*/
    }

    [Route("contact")]             #B
    public IActionResult Contact()
    {
         /* method implementation*/
    }
}

❶ The Index action will be executed when the / URL is requested.
请求 / URL 时,将执行 Index action。
❷ The Contact action will be executed when the /contact URL is requested.
请求 /contact URL 时,将执行 Contact action。

Each [Route] attribute defines a route template that should be associated with the action method. In the example provided, the / URL maps directly to the Index method and the /contact URL maps to the Contact method.
每个 [Route] 属性都定义一个应与作方法关联的路由模板。在提供的示例中,/ URL 直接映射到 Index 方法,而 /contact URL 映射到 Contact 方法。

Attribute routing maps URLs to a specific action method, but a single action method can still have multiple route templates and hence can correspond to multiple URLs. Each template must be declared with its own RouteAttribute, as shown in this listing, which shows the skeleton of a web API for a car-racing game.
属性路由将 URL 映射到特定的作方法,但单个作方法仍可以具有多个路由模板,因此可以对应于多个 URL。每个模板都必须使用自己的 RouteAttribute 进行声明,如下面的清单所示,它显示了一个赛车游戏的 Web API 的框架。

Listing 20.5 Attribute routing with multiple attributes
示例 20.5 具有多个属性的属性路由

public class CarController
{
    [Route("car/start")]         #A
    [Route("car/ignition")]      #A
    [Route("start-car")]         #A
    public IActionResult Start()    #B
    {
         /* method implementation*/
    }

    [Route("car/speed/{speed}")]             #C
    [Route("set-speed/{speed}")]             #C
    public IActionResult SetCarSpeed(int speed)  
    {
         /* method implementation*/
    }
}

❶ The Start method will be executed when any of these route templates is matched.
当这些路由模板中的任何一个匹配时,将执行 Start 方法。
❷ The name of the action method has no effect on the route template.
action方法的名称对路由模板没有影响。
❸ The RouteAttribute template can contain route parameters, in this case {speed}.
RouteAttribute 模板可以包含路由参数,在本例中为 {speed}。

The listing shows two different action methods, both of which can be accessed from multiple URLs. For example, the Start method will be executed when any of the following URLs is requested:
该列表显示了两种不同的作方法,这两种方法都可以从多个 URL 访问。例如,当请求以下任一 URL 时,将执行 Start 方法:

/car/start
/car/ignition
/start-car

These URLs are completely independent of the controller and action method names; only the value in the RouteAttribute matters.
这些 URL 完全独立于控制器和作方法名称;只有 RouteAttribute 中的值才重要。

NOTE By default, the controller and action name have no bearing on the URLs or route templates when RouteAttributes are used.
注意:默认情况下,当使用 RouteAttributes 时,控制器和作名称与 URL 或路由模板无关。

The templates used in route attributes are standard route templates, the same as you used in chapter 6. You can use literal segments, and you’re free to define route parameters that will extract values from the URL, as shown by the SetCarSpeed method in listing 20.5. That method defines two route templates, both of which define a route parameter, {speed}.
路由属性中使用的模板是标准路由模板,与您在第 6 章中使用的模板相同。您可以使用文字段,并且可以自由定义将从 URL 中提取值的路由参数,如清单 20.5 中的 SetCarSpeed 方法所示。该方法定义了两个路由模板,这两个模板都定义了一个路由参数 {speed}。

Tip I’ve used multiple [Route] attributes on each action in this example, but it’s best practice to expose your action at a single URL. This will make your API easier to understand and for other applications to consume.
提示:在此示例中,我对每个作使用了多个 [Route] 属性,但最佳做法是在单个 URL 上公开您的作。这将使您的 API 更易于理解,并可供其他应用程序使用。

As in all parts of ASP.NET Core, route parameters represent a segment of the URL that can vary. As with minimal APIs, and Razor Pages, the route parameters in your RouteAttribute templates can
与 ASP.NET Core 的所有部分一样,路由参数表示 URL 中可以变化的一段。与最少的 API 和 Razor Pages 一样,RouteAttribute 模板中的路由参数可以

• Be optional
• Have default values
• Use route constraints

For example, you could update the SetCarSpeed method in the previous listing to constrain {speed} to an integer and to default to 20 like so:
例如,您可以更新上一个清单中的 SetCarSpeed 方法,将 {speed} 约束为整数,并默认为 20,如下所示:

[Route("car/speed/{speed=20:int}")]
[Route("set-speed/{speed=20:int}")]
public IActionResult SetCarSpeed(int speed)

NOTE As discussed in chapter 6, don’t use route constraints for validation. For example, if you call the preceding "set-speed/{speed=20:int}" route with an invalid value for speed, /set-speed/oops, you will get a 404 Not Found response, as the route does not match. Without the int constraint, you would receive the more sensible 400 Bad Request response.
注意:如第 6 章所述,不要使用 route constraints 进行验证。例如,如果您使用无效的 speed 值 /set-speed/oops 调用前面的 “set-speed/{speed=20:int}” 路由,您将收到 404 Not Found 响应,因为路由不匹配。如果没有 int 约束,您将收到更明智的 400 Bad Request 响应。

If you managed to get your head around routing in chapter 6, routing with web API controllers shouldn’t hold any surprises for you. One thing you might begin noticing when you start using attribute routing with web API controllers is the amount you repeat yourself. Minimal APIs use route groups to reduce duplication, and Razor Pages removes a lot of the repetition by using conventions to calculate route templates based on the Razor Page’s filename. So what can we use with web API controllers?
如果您在第 6 章中设法了解了路由,那么使用 Web API 控制器进行路由应该不会给您带来任何惊喜。当您开始将属性路由与 Web API 控制器一起使用时,您可能会开始注意到的一件事是您自己重复的量。最小 API 使用路由组来减少重复,而 Razor Pages 通过使用约定根据 Razor Page 的文件名计算路由模板来消除大量重复。那么我们可以用什么来配合 Web API 控制器呢?

20.3.1 Combining route attributes to keep your route templates DRY

20.3.1 组合路由属性以保持路由模板 DRY

Adding route attributes to all of your web API controllers can get a bit tedious, especially if you’re mostly following conventions where your routes have a standard prefix, such as "api" or the controller name. Generally, you’ll want to ensure that you don’t repeat yourself (DRY) when it comes to these strings. The following listing shows two action methods with several [Route] attributes. (This is for demonstration purposes only. Stick to one per action if you can!)
向所有 Web API 控制器添加路由属性可能会有点乏味,尤其是当您主要遵循路由具有标准前缀(例如“api”或控制器名称)的约定时。通常,您需要确保在涉及这些字符串时不会重复自己 (DRY)。下面的列表显示了具有多个 [Route] 属性的两种作方法。(这仅用于演示目的。如果可以的话,每个动作坚持一个!

Listing 20.6 Duplication in RouteAttribute templates
列表 20.6 RouteAttribute 模板中的重复

public class CarController
{
    [Route("api/car/start")]             #A
    [Route("api/car/ignition")]          #A
    [Route("start-car")]
    public IActionResult Start()
    {
         /* method implementation*/
    }

    [Route("api/car/speed/{speed}")]     #A
    [Route("set-speed/{speed}")]
    public IActionResult SetCarSpeed(int speed)
    {
         /* method implementation*/
    }
}

❶ Multiple route templates use the same “api/car” prefix.
多个路由模板使用相同的 “api/car” 前缀。

There’s quite a lot of duplication here; you’re adding "api/car" to most of your routes. Presumably, if you decided to change this to "api/vehicles", you’d have to go through each attribute and update it. Code like that is asking for a typo to creep in!
这里有很多重复;您正在将 “api/car” 添加到大多数路线中。据推测,如果您决定将其更改为 “api/vehicles”,则必须检查每个属性并更新它。像这样的代码就是要求一个拼写错误悄悄溜进来!

To alleviate this pain, it’s possible to apply RouteAttributes to controllers, in addition to action methods. When a controller and an action method both have a route attribute, the overall route template for the method is calculated by combining the two templates.
为了减轻这种痛苦,除了作方法之外,还可以将 RouteAttributes 应用于控制器。当控制器和作方法都具有 route 属性时,该方法的总体路由模板是通过组合两个模板来计算的。

Listing 20.7 Combining RouteAttribute templates
示例 20.7 组合 RouteAttribute 模板

[Route("api/car")]
public class CarController
{
    [Route("start")]          #A
    [Route("ignition")]       #B
    [Route("/start-car")]          #C
    public IActionResult Start()
    {
         /* method implementation*/
    }

    [Route("speed/{speed}")]          #D
    [Route("/set-speed/{speed}")]                  #E
    public IActionResult SetCarSpeed(int speed)
    {
         /* method implementation*/
    }
}

❶ Combines to give “api/car/start”
❷ Combines to give “api/car/ignition”
❸ Does not combine because it starts with /; gives the “start-car” template
❹ Combines to give “api/car/speed/{speed}”
❺ Does not combine because it starts with /; gives the “set-speed/{speed}” template

Combining attributes in this way can reduce some of the duplication in your route templates and makes it easier to add or change the prefixes (such as switching "car" to "vehicle") for multiple action methods. To ignore the RouteAttribute on the controller and create an absolute route template, start your action method route template with a slash (/). Using a controller RouteAttribute reduces a lot of the duplication, but you can go one better by using token replacement.
以这种方式组合属性可以减少路线模板中的一些重复,并可以更轻松地为多个作方法添加或更改前缀(例如将 “car” 切换为 “vehicle”)。要忽略控制器上的 RouteAttribute 并创建绝对路由模板,请使用斜杠 (/) 启动作方法路由模板。使用控制器 RouteAttribute 可以减少很多重复,但您可以通过使用令牌替换来更好地进行一次重复。

20.3.2 Using token replacement to reduce duplication in attribute routing

20.3.2 使用令牌替换来减少属性路由中的重复

The ability to combine attribute routes is handy, but you’re still left with some duplication if you’re prefixing your routes with the name of the controller, or if your route templates always use the action name. If you wish, you can simplify even further!
组合属性路由的功能很方便,但如果您在路由前加上控制器的名称,或者如果您的路由模板始终使用作名称,则仍然会留下一些重复。如果您愿意,您可以进一步简化!

Attribute routes support the automatic replacement of [action] and [controller] tokens in your attribute routes. These will be replaced with the name of the action and the controller (without the “Controller” suffix), respectively. The tokens are replaced after all attributes have been combined, which can be useful when you have controller inheritance hierarchies. This listing shows how you can create a BaseController class that applies a consistent route template prefix to all the web API controllers in your application.
属性路由支持自动替换属性路由中的 [action] 和 [controller] 令牌。这些将分别替换为作和控制器的名称(不带 “Controller” 后缀)。在合并所有属性后,将替换令牌,这在具有控制器继承层次结构时非常有用。此清单显示了如何创建一个 BaseController 类,该类将一致的路由模板前缀应用于应用程序中的所有 Web API 控制器。

Listing 20.8 Token replacement in RouteAttributes
清单 20.8 RouteAttributes 中的 Token 替换

[Route("api/[controller]")]                      #A
public abstract class BaseController { }       #B

public class CarController : BaseController
{
    [Route("[action]")]          #C
    [Route("ignition")]             #D
    [Route("/start-car")]          #E
    public IActionResult Start()
    {
         /* method implementation*/
    }
}

❶ You can apply attributes to a base class, and derived classes will inherit them.
❷ Token replacement happens last, so [controller] is replaced with “car” not “base”.
❸ Combines and replaces tokens to give the “api/car/start” template
❹ Combines and replaces tokens to give the “api/car/ignition” template
❺ Does not combine with base attributes because it starts with /, so it remains as “start-car”

Warning If you use token replacement for [controller] or [action], remember that renaming classes and methods will change your public API. If that worries you, you can stick to using static strings like "car" instead.
警告:如果你对 [controller] 或 [action] 使用令牌替换,请记住重命名类和方法将更改你的公共 API。如果这让您感到担忧,您可以坚持使用像 “car” 这样的静态字符串。

When combined with everything you learned in chapter 6, we’ve covered pretty much everything there is to know about attribute routing. There’s just one more thing to consider: handling different HTTP request types like GET and POST.
结合您在第 6 章中学到的所有内容,我们几乎涵盖了有关属性路由的所有知识。还有一件事需要考虑:处理不同的 HTTP 请求类型,如 GET 和 POST。

20.3.3 Handling HTTP verbs with attribute routing

20.3.3 使用属性路由处理 HTTP 动词

In Razor Pages, the HTTP verb, such as GET or POST, isn’t part of the routing process. The RoutingMiddleware determines which Razor Page to execute based solely on the route template associated with the Razor Page. It’s only when a Razor Page is about to be executed that the HTTP verb is used to decide which page handler to execute: OnGet for the GET verb, or OnPost for the POST verb, for example.
在 Razor Pages 中,HTTP 谓词(如 GET 或 POST)不是路由过程的一部分。RoutingMiddleware 仅根据与 Razor Page 关联的路由模板来确定要执行的 Razor Page。仅当即将执行 Razor 页面时,才会使用 HTTP 谓词来决定要执行哪个页面处理程序:例如,OnGet 用于 GET 谓词,或 OnPost 用于 POST 谓词。

Web API controllers work like minimal API endpoints: the HTTP verb takes part in the routing process itself. So a GET request may be routed to one action, and a POST request may be routed to a different action, even if the request used the same URL.
Web API 控制器的工作方式类似于最小 API 端点:HTTP 动词参与路由过程本身。因此,GET 请求可以路由到一个作,而 POST 请求可以路由到不同的作,即使请求使用相同的 URL。

The [Route] attribute we’ve used so far responds to all HTTP verbs. Instead, an action should typically only handle a single verb. Instead of the [Route] attribute, you can use
到目前为止,我们使用的 [Route] 属性响应所有 HTTP 动词。相反,一个作通常应该只处理一个动词。您可以使用 [Route] 属性

• [HttpPost] to handle POST requests
• [HttpGet] to handle GET requests
• [HttpPut] to handle PUT requests

There are similar attributes for all the standard HTTP verbs, like DELETE and OPTIONS. You can use these attributes instead of the [Route] attribute to specify that an action method should correspond to a single verb, as shown in the following listing.
所有标准 HTTP 动词都有类似的属性,例如 DELETE 和 OPTIONS。可以使用这些属性而不是 [Route] 属性来指定作方法应对应于单个谓词,如下面的列表所示。

Listing 20.9 Using HTTP verb attributes with attribute routing
清单 20.9 在属性路由中使用 HTTP 动词属性

public class AppointmentController
{
    [HttpGet("/appointments")]                #A
    public IActionResult ListAppointments()   #A
    {                                         #A
        /* method implementation */           #A
    }                                         #A

    [HttpPost("/appointments")]                 #B
    public IActionResult CreateAppointment()    #B
    {                                           #B
        /* method implementation */             #B
    }                                           #B
}

❶ Executed only in response to GET /appointments
❷ Executed only in response to POST /appointments

If your application receives a request that matches the route template of an action method but doesn’t match the required HTTP verb, you’ll get a 405 Method not allowed error response. For example, if you send a DELETE request to the /appointments URL in the previous listing, you’ll get a 405 error response.
如果您的应用程序收到与作方法的路由模板匹配但与所需的 HTTP 动词不匹配的请求,您将收到 405 Method not allowed 错误响应。例如,如果您向上一个列表中的 /appointments URL 发送 DELETE 请求,您将收到 405 错误响应。

When you’re building web API controllers, there is some code that you’ll find yourself writing repeatedly. The [ApiController] attribute is designed to handle some of this for you and reduce the amount of boilerplate you need.
在构建 Web API 控制器时,您会发现自己需要重复编写一些代码。[ApiController] 属性旨在为您处理其中的一些问题,并减少您需要的样板数量。

20.4 Using common conventions with [ApiController]

20.4 在 [ApiController] 中使用通用约定

In this section you’ll learn about the [ApiController] attribute and how it can reduce the amount of code you need to write to create consistent web API controllers. You’ll learn about the conventions it applies, why they’re useful, and how to turn them off if you need to.
在本部分中,你将了解 [ApiController] 属性,以及它如何减少创建一致的 Web API 控制器所需的代码量。您将了解它适用的约定、它们为什么有用,以及如何在需要时关闭它们。

The [ApiController] attribute was introduced in .NET Core 2.1 to simplify the process of creating web API controllers. To understand what it does, it’s useful to look at an example of how you might write a web API controller without the [ApiController] attribute and compare that with the code required to achieve the same thing with the attribute.
[ApiController] 属性是在 .NET Core 2.1 中引入的,用于简化创建 Web API 控制器的过程。要了解它的作用,查看一个示例,了解如何编写没有 [ApiController] 属性的 Web API 控制器,并将其与使用该属性实现相同作所需的代码进行比较,这非常有用。

Listing 20.10 Creating a web API controller without the [ApiController] attribute
清单 20.10 创建不带 [ApiController] 属性的 Web API 控制器

public class FruitController : ControllerBase
{
    List<string> _fruit = new List<string>     #A
    {                                          #A
        "Pear", "Lemon", "Peach"               #A
    };                                         #A

    [HttpPost("fruit")]                              #B
    public ActionResult Update([FromBody] UpdateModel model)     #C
    {
        if (!ModelState.IsValid)                             #D
        {                                                    #D
             return BadRequest(                              #D
                new ValidationProblemDetails(ModelState));   #D
        }                                                    #D

        if (model.Id < 0 || model.Id > _fruit.Count)             
        {
            return NotFound(new ProblemDetails()              #E
            {                                                 #E
                Status = 404,                                 #E
                Title = "Not Found",                          #E
                Type = "https://tools.ietf.org/html/rfc7231"  #E
                       + "#section-6.5.4",                    #E
            });                                               #E
        }                                                     #E
        _fruit[model.Id] = model.Name;    #F
        return Ok();                      #F
    }

    public class UpdateModel                                    
    {                                                           
        public int Id { get; set; }                             

        [Required]                         #G
        public string Name { get; set; }   #G
    }
}

❶ The list of strings serves as the application model in this example.
在此示例中,字符串列表用作应用程序模型。
❷ Web APIs use attribute routing to define the route templates.
Web API 使用属性路由来定义路由模板。
❸ The [FromBody] attribute indicates that the parameter should be bound to the request body.
[FromBody] 属性指示参数应绑定到请求正文。
❹ You need to check if model validation succeeded and return a 400 response if it failed.
您需要检查模型验证是否成功,如果失败,则返回 400 响应。
❺ If the data sent does not contain a valid ID, returns a 404 ProblemDetails response
如果发送的数据不包含有效的 ID,则返回 404 ProblemDetails 响应
❻ Updates the model and returns a 200 Response
更新模型并返回 200 响应
❼ UpdateModel is valid only if the Name value is provided, as set by the [Required] attribute.
UpdateModel 仅在提供 Name 值时有效,如 [Required] 属性所设置。

This example demonstrates many common features and patterns used with web API controllers:
此示例演示了与 Web API 控制器一起使用的许多常见功能和模式:

• Web API controllers read data from the body of a request, typically sent as JSON. To ensure the body is read as JSON and not as form values, you have to apply the [FromBody] attribute to the method parameters to ensure it is model-bound correctly.
Web API 控制器从请求正文中读取数据,通常以 JSON 形式发送。若要确保将正文读取为 JSON 而不是表单值,必须将 [FromBody] 属性应用于方法参数,以确保其模型绑定正确。

• As discussed in chapter 16, after model binding, the model is validated, but it’s up to you to act on the validation results. You should return a 400 Bad Request response if the values provided failed validation. You typically want to provide details of why the request was invalid: this is done in listing 20.10 by returning a ValidationProblemDetails object in the response body, built from the ModelState.
如第 16 章所述,在模型绑定之后,将验证模型,但由您根据验证结果执行作。如果提供的值验证失败,则应返回 400 Bad Request 响应。您通常希望提供有关请求无效原因的详细信息:这是在清单 20.10 中通过在响应正文中返回一个 ValidationProblemDetails 对象来完成的,该对象是从 ModelState 构建的。

• Whenever you return an error status, such as a 404 Not Found, where possible you should return details of the problem that will allow the caller to diagnose the issue. The ProblemDetails class is the recommended way of doing that in ASP.NET Core.
每当返回错误状态(如 404 Not Found)时,应尽可能返回问题的详细信息,以便调用方诊断问题。ProblemDetails 类是在 ASP.NET Core 中执行此作的推荐方法。

The code in listing 20.10 is representative of what you might see in an ASP.NET Core API controller before .NET Core 2.1. The introduction of the [ApiController] attribute in .NET Core 2.1 (and subsequent refinement in later versions) makes this same code much simpler, as shown in the following listing.
清单 20.10 中的代码代表了您在 .NET Core 2.1 之前的 ASP.NET Core API 控制器中可能看到的内容。在 .NET Core 2.1 中引入 [ApiController] 属性(以及更高版本中的后续优化)使相同的代码变得更加简单,如下面的清单所示。

Listing 20.11 Creating a web API controller with the [ApiController] attribute
清单 20.11 创建具有 [ApiController] 属性的 Web API 控制器

[ApiController]                               #A
public class FruitController : ControllerBase
{
    List<string> _fruit = new List<string>
    {
        "Pear", "Lemon", "Peach"
    };

    [HttpPost("fruit")]
    public ActionResult Update(UpdateModel model)    #B
    {                                                    #C
        if (model.Id < 0 || model.Id > _fruit.Count)
        {
            return NotFound();   #D
        }

        _fruit[model.Id] = model.Name;

        return Ok();
    }

    public class UpdateModel
    {
        public int Id { get; set; }

        [Required]
        public string Name { get; set; }
    }
}

❶ Adding the [ApiController] attribute applies several conventions common to API controllers.
添加 [ApiController] 属性将应用 API 控制器通用的几个约定。
❷ The [FromBody] attribute is assumed for complex action method parameters.
[FromBody] 属性假定用于复杂的作方法参数。
❸ The model validation is automatically checked, and if invalid, returns a 400 response.
系统会自动检查模型验证,如果无效,则返回 400 响应。
❹ Error status codes are automatically converted to a ProblemDetails object.
错误状态代码会自动转换为 ProblemDetails 对象。

If you compare listing 20.10 with listing 20.11, you’ll see that all the bold code in listing 20.10 can be removed and replaced with the [ApiController] attribute in listing 20.11. The [ApiController] attribute automatically applies several conventions to your controllers:
如果你比较清单 20.10 和清单 20.11,你会发现清单 20.10 中的所有粗体代码都可以删除,并替换为清单 20.11 中的 [ApiController] 属性。[ApiController] 属性会自动将多个约定应用于控制器:

• Attribute routing—You must use attribute routing with your controllers; you can’t use conventional routing—not that you would, as we’ve discussed this approach only for API controllers anyway.
属性路由 - 必须对控制器使用属性路由;您不能使用传统路由 — 并不是说您会这样做,因为无论如何,我们只针对 API 控制器讨论了这种方法。
• Automatic 400 responses—I said in chapter 16 that you should always check the value of ModelState.IsValid in your Razor Page handlers and MVC actions, but the [ApiController] attribute does this for you by adding a filter, as we did with minimal APIs in chapter 7. We’ll cover MVC filters in detail in chapters 21 and 22.
自动 400 响应 - 我在第 16 章中说过,您应该始终在 Razor 页面处理程序和 MVC作中检查 ModelState.IsValid 的值,但 [ApiController] 属性通过添加过滤器来为您执行此作,就像我们在第 7 章中对最少的 API 所做的那样。我们将在第 21 章和第 22 章中详细介绍 MVC 过滤器。
• Model binding source inference—Without the [ApiController] attribute, complex types are assumed to be passed as form values in the request body. For web APIs, it’s much more common to pass data as JSON, which ordinarily requires adding the [FromBody] attribute. The [ApiController] attribute takes care of that for you.
模型绑定源推理 - 如果没有 [ApiController] 属性,则假定复杂类型在请求正文中作为表单值传递。对于 Web API,将数据作为 JSON 传递更为常见,这通常需要添加 [FromBody] 属性。[ApiController] 属性会为您处理该问题。
• ProblemDetails for error codes—You often want to return a consistent set of data when an error occurs in your API. The [ApiController] attribute intercepts any error status codes returned by your controller (for example, a 404 Not Found response), and converts them to ProblemDetails responses.
错误代码的 ProblemDetails - 当 API 中发生错误时,您通常希望返回一组一致的数据。[ApiController] 属性截获控制器返回的任何错误状态代码(例如,404 Not Found 响应),并将其转换为 ProblemDetails 响应。

When it was introduced, a key feature of the [ApiController] attribute was the Problem Details support, but as I described in chapter 5, the same automatic conversion to Problem Details is now supported by the default ExceptionHandlerMiddleware and StatusCodePagesMiddleware. Nevertheless, the [ApiController] conventions can significantly reduce the amount of boilerplate code you have to write and ensure that validation failures are handled automatically, for example.
引入 [ApiController] 属性时,它的一个关键功能是 Problem Details 支持,但正如我在第 5 章中描述的,默认的 ExceptionHandlerMiddleware 和 StatusCodePagesMiddleware 现在支持相同的自动转换为 Problem Details。尽管如此,[ApiController] 约定可以显著减少您必须编写的样板代码量,并确保自动处理验证失败。

As is common in ASP.NET Core, you will be most productive if you follow the conventions rather than trying to fight them. However, if you don’t like some of the conventions introduced by [ApiController],or want to customize them, you can easily do so.
正如 ASP.NET Core 中的常见做法一样,如果您遵循惯例而不是试图与之抗争,您将最有效率。但是,如果您不喜欢 [ApiController] 引入的某些约定,或者想要自定义它们,则可以轻松完成。

You can customize the web API controller conventions your application uses by calling ConfigureApiBehaviorOptions() on the IMvcBuilder object returned from the AddControllers() method in your Program.cs file. For example, you could disable the automatic 400 responses on validation failure, as shown in the following listing.
您可以通过对从 Program.cs 文件中的 AddControllers() 方法返回的 IMvcBuilder 对象调用 ConfigureApiBehaviorOptions() 来自定义应用程序使用的 Web API 控制器约定。例如,您可以在验证失败时禁用自动 400 响应,如下面的清单所示。

Listing 20.12 Customizing [ApiAttribute] behaviors
清单 20.12 自定义 [ApiAttribute] 行为

WebApplicationBuilder builder = WebApplication.CreateBuilder(args);

builder.Services.AddControllers();
    .ConfigureApiBehaviorOptions(options =>         #A
    {
        options.SuppressModelStateInvalidFilter = true;    #B
    });

// ...

❶ Controls which conventions are applied by providing a configuration lambda
通过提供配置 lambda来控制应用哪些约定
❷ This would disable the automatic 400 responses for invalid requests.
将禁用无效请求的自动 400 响应。

Tip You can disable all the automatic features enabled by the [ApiController] attribute, but I encourage you to stick to the defaults unless you really need to change them. You can read more about disabling features in the documentation at https://docs.microsoft.com/aspnet/core/web-api.
提示:您可以禁用 [ApiController] 属性启用的所有自动功能,但我建议您坚持使用默认值,除非您确实需要更改它们。您可以在 https://docs.microsoft.com/aspnet/core/web-api 上的文档中阅读有关禁用功能的更多信息。

The ability to customize each aspect of your web API controllers is one of the key differentiators with minimal APIs. In the next section you’ll learn how to control the format of the data returned by your web API controllers—whether that’s JSON, XML, or a different, custom format.
自定义 Web API 控制器各个方面的能力是最少 API 的关键区别之一。在下一节中,您将学习如何控制 Web API 控制器返回的数据的格式,无论是 JSON、XML 还是其他自定义格式。

20.5 Generating a response from a model

20.5 从模型生成响应

This brings us to the final topic in this chapter: formatting a response. It’s common for API controllers to return JSON these days, but that’s not always the case. In this section you’ll learn about content negotiation and how to enable additional output formats such as XML.
这就引出了本章的最后一个主题:格式化响应。如今,API 控制器返回 JSON 很常见,但情况并非总是如此。在本节中,您将了解内容协商以及如何启用其他输出格式,例如 XML。

Consider this scenario: you’ve created a web API action method for returning a list of cars, as in the following listing. It invokes a method on your application model, which hands back the list of data to the controller. Now you need to format the response and return it to the caller.
请考虑以下场景:您创建了一个 Web API作方法,用于返回汽车列表,如下面的清单所示。它调用应用程序模型上的一个方法,该方法将数据列表返回给控制器。现在,您需要设置响应的格式并将其返回给调用方。

Listing 20.13 A web API controller to return a list of cars
列表 20.13 返回汽车列表的 Web API 控制器

[ApiController]
public class CarsController : Controller
{
    [HttpGet("api/cars")]              #A
    public IEnumerable<string> ListCars()      #B
    {
        return new string[]                      #C
            { "Nissan Micra", "Ford Focus" };    #C
    }
}

❶ The action is executed with a request to GET /api/cars.
通过请求 GET /api/cars 来执行作。
❷ The API model containing the data is an IEnumerable<string>.
包含数据的 API 模型是 IEnumerable<string>
❸ This data would normally be fetched from the application model.
此数据通常从应用程序模型中提取。

You saw in section 20.2 that it’s possible to return data directly from an action method, in which case the middleware formats it and returns the formatted data to the caller. But how does the middleware know which format to use? After all, you could serialize it as JSON, as XML, or even with a simple ToString() call.
你在 Section 20.2 中看到,可以直接从 action 方法返回数据,在这种情况下,中间件会对其进行格式化并将格式化的数据返回给调用者。但是中间件如何知道要使用哪种格式呢?毕竟,您可以将其序列化为 JSON、XML,甚至使用简单的 ToString() 调用。

Warning Remember that in this chapter I’m talking only about web API controller responses. Minimal APIs support only automatic serialization to JSON, nothing else.
警告:请记住,在本章中,我只讨论 Web API 控制器响应。Minimal API 仅支持自动序列化为 JSON,不支持其他任何内容。

The process of determining the format of data to send to clients is known generally as content negotiation (conneg). At a high level, the client sends a header indicating the types of content it can understand—the Accept header—and the server picks one of these, formats the response, and sends a Content-Type header in the response, indicating which type it chose.
确定要发送给客户端的数据格式的过程通常称为内容协商 (conneg)。概括地说,客户端发送一个标头(指示它可以理解的内容类型)(Accept 标头),服务器选择其中一个标头,设置响应的格式,并在响应中发送 Content-Type 标头,指示它选择了哪种类型。

The Accept and Content-Type headers
Accept 和 Content-Type 标头

The Accept header is sent by a client as part of a request to indicate the type of content that the client can handle. It consists of a number of MIME types, with optional weightings (from 0 to 1) to indicate which type would be preferred. For example, the application/json,text/xml;q=0.9,text/plain;q=0.6 header indicates that the client can accept JSON, XML, and plain text, with weightings of 1.0, 0.9, and 0.6, respectively. JSON has a weighting of 1.0, as no explicit weighting was provided. The weightings can be used during content negotiation to choose an optimal representation for both parties.
Accept 标头由客户端作为请求的一部分发送,用于指示客户端可以处理的内容类型。它由许多 MIME 类型组成,具有可选的权重(从 0 到 1)以指示首选类型。例如,application/json,text/xml;q=0.9,text/plain;q=0.6 标头表示客户端可以接受 JSON、XML 和纯文本,权重分别为 1.0、0.9 和 0.6。JSON 的权重为 1.0,因为未提供显式权重。在内容协商期间,可以使用权重来为双方选择最佳表示形式。

The Content-Type header describes the data sent in a request or response. It contains the MIME type of the data, with an optional character encoding. For example, the application/json; charset=utf-8 header would indicate that the body of the request or response is JSON, encoded using UTF-8.
Content-Type 标头描述在请求或响应中发送的数据。它包含数据的 MIME 类型,以及可选的字符编码。例如,application/json;charset=utf-8 标头表示请求或响应的正文是使用 UTF-8 编码的 JSON。

For more on MIME types, see the Mozilla documentation: http://mng.bz/gop8. You can find the RFC for content negotiation at http://mng.bz/6DXo.
有关 MIME 类型的更多信息,请参阅 Mozilla 文档:http://mng.bz/gop8。您可以在 http://mng.bz/6DXo 中找到内容协商的 RFC。

You’re not forced into sending only a Content-Type the client expects, and in some cases, you may not even be able to handle the types it requests. What if a request stipulates that it can accept only Microsoft Excel spreadsheets? It’s unlikely you’d support that, even if that’s the only Accept type the request contains.
你不会被迫只发送客户端期望的 Content-Type,在某些情况下,你甚至可能无法处理它请求的类型。如果请求规定它只能接受 Microsoft Excel 电子表格,该怎么办?您不太可能支持这一点,即使这是请求包含的唯一 Accept 类型。

When you return an API model from an action method, whether directly (as in listing 20.13) or via an OkResult or other StatusCodeResult, ASP.NET Core always returns something in the response. If it can’t honor any of the types stipulated in the Accept header, it will fall back to returning JSON by default. Figure 20.7 shows that even though XML was requested, the API controller formatted the response as JSON.
当你从作方法返回 API 模型时,无论是直接返回(如清单 20.13 所示)还是通过 OkResult 或其他 StatusCodeResult,ASP.NET Core 始终在响应中返回一些内容。如果它不能接受 Accept 标头中规定的任何类型,它将默认回退到返回 JSON。图 20.7 显示,即使请求了 XML,API 控制器也将响应格式化为 JSON。

alt text

Figure 20.7 Even though the request was made with an Accept header of text/xml, the response returned was JSON, as the server was not configured to return XML.
图 20.7 即使请求是使用 text/xml 的 Accept 标头发出的,返回的响应也是 JSON,因为服务器未配置为返回 XML。

Warning In legacy ASP.NET, objects were serialized to JSON using PascalCase, where properties start with a capital letter. In ASP.NET Core, objects are serialized using camelCase by default, where properties start with a lowercase letter.
警告:在旧版 ASP.NET 中,对象使用 PascalCase 序列化为 JSON,其中属性以大写字母开头。在 ASP.NET Core 中,默认情况下使用 camelCase 序列化对象,其中属性以小写字母开头。

However the data is sent, it’s serialized by an IOutputFormatter implementation. ASP.NET Core ships with a limited number of output formatters out of the box, but as always, it’s easy to add additional ones or change the way the defaults work.
无论数据如何发送,它都会由 IOutputFormatter 实现进行序列化。ASP.NET Core 附带了有限数量的开箱即用输出格式化程序,但与往常一样,添加其他格式化程序或更改默认值的工作方式很容易。

20.5.1 Customizing the default formatters: Adding XML support

20.5.1 自定义默认格式化程序:添加 XML 支持

As with most of ASP.NET Core, the Web API formatters are completely customizable. By default, only formatters for plain text (text/plain), HTML (text/html), and JSON (application/json) are configured. Given the common use case of single-page application (SPAs) and mobile applications, this will get you a long way. But sometimes you need to be able to return data in a different format, such as XML.
与大多数 ASP.NET Core 一样,Web API 格式化程序是完全可自定义的。默认情况下,仅配置纯文本 (text/plain)、HTML (text/html) 和 JSON (application/json) 的格式化程序。鉴于单页应用程序 (SPA) 和移动应用程序的常见用例,这将使您大有帮助。但有时您需要能够以不同的格式(如 XML)返回数据。

Newtonsoft.Json vs. System.Text.Json

Newtonsoft.Json, also known as Json.NET, has for a long time been the canonical way to work with JSON in .NET. It’s compatible with every version of .NET under the sun, and it will no doubt be familiar to virtually all .NET developers. Its reach was so great that even ASP.NET Core took a dependency on it!
Newtonsoft.Json,也称为 Json.NET,长期以来一直是在 .NET 中使用 JSON 的规范方式。它与全球所有版本的 .NET 兼容,毫无疑问,几乎所有 .NET 开发人员都熟悉它。它的覆盖范围如此之大,以至于 ASP.NET Core 都依赖于它!

That all changed with the introduction of a new library in ASP.NET Core 3.0, System .Text.Json, which focuses on performance. In .NET Core 3.0 onward, ASP.NET Core uses System.Text.Json by default instead of Newtonsoft.Json.
随着 ASP.NET Core 3.0 中引入新库 System ,这一切都发生了变化。Text.Json,它侧重于性能。在 .NET Core 3.0 及更高版本中,ASP.NET Core 默认使用 System.Text.Json,而不是 Newtonsoft.Json。

The main difference between the libraries is that System.Text.Json is picky about its JSON. It will generally only deserialize JSON that matches its expectations. For example, System.Text.Json won’t deserialize JSON that uses single quotes around strings; you have to use double quotes.
这两个库之间的主要区别在于 System.Text.Json 对其 JSON 很挑剔。它通常只会反序列化符合其预期的 JSON。例如,System.Text.Json 不会反序列化在字符串周围使用单引号的 JSON;您必须使用双引号。

If you’re creating a new application, this is generally not a problem; you quickly learn to generate the correct JSON. But if you’re converting an application to ASP.NET Core or are sending JSON to a third party you don’t control, these limitations can be real stumbling blocks.
如果要创建新应用程序,这通常不是问题;您很快就学会了生成正确的 JSON。但是,如果您要将应用程序转换为 ASP.NET Core 或将 JSON 发送给您无法控制的第三方,则这些限制可能会成为真正的绊脚石。

Luckily, you can easily switch back to the Newtonsoft.Json library instead. Install the Microsoft.AspNetCore.Mvc.NewtonsoftJson package into your project and update the AddControllers() method in Program.cs to the following:
幸运的是,您可以轻松地切换回 Newtonsoft.Json 库。将 Microsoft.AspNetCore.Mvc.NewtonsoftJson 包安装到项目中,并将 Program.cs 中的 AddControllers() 方法更新为以下内容:

builder.Services.AddControllers()
    .AddNewtonsoftJson();

This will switch ASP.NET Core’s formatters to use Newtonsoft.Json behind the scenes, instead of System.Text.Json. For more details on the differences between the libraries, see Microsoft’s article “Compare Newtonsoft.Json to System.Text.Json, and migrate to System.Text.Json”: http://mng.bz/0mRJ. For more advice on when to switch to the Newtonsoft.Json formatter, see the section “Add Newtonsoft.Json-based JSON format support” in Microsoft’s “Format response data in ASP.NET Core Web API” documentation: http://mng.bz/zx11.
这会将 ASP.NET Core 的格式化程序切换为在后台使用 Newtonsoft.Json,而不是 System.Text.Json。有关库之间差异的更多详细信息,请参阅 Microsoft 的文章“将 Newtonsoft.Json 与 System.Text.Json 进行比较,并迁移到 System.Text.Json”:http://mng.bz/0mRJ。有关何时切换到 Newtonsoft.Json 格式化程序的更多建议,请参阅 Microsoft 的“在 ASP.NET Core Web API 中格式化响应数据”文档中的“添加基于 Newtonsoft.Json 的 JSON 格式支持”部分:http://mng.bz/zx11

You can add XML output to your application by adding an output formatter. You configure your application’s formatters in Program.cs by customizing the IMvcBuilder object returned from AddControllers(). To add the XML output formatter, use the following:
您可以通过添加输出格式化程序将 XML 输出添加到您的应用程序中。通过自定义从 AddControllers() 返回的 IMvcBuilder 对象,可以在 Program.cs 中配置应用程序的格式化程序。要添加 XML 输出格式化程序,请使用以下命令:

services.AddControllers()
    .AddXmlSerializerFormatters();

NOTE Technically, this also adds an XML input formatter, which means your application can now receive XML in requests too. Previously, sending a request with XML in the body would respond with a 415 Unsupported Media Type response. For a detailed look at formatters, including creating a custom formatter, see the documentation at http://mng.bz/e5gG.
注意:从技术上讲,这还添加了一个 XML 输入格式化程序,这意味着您的应用程序现在也可以在请求中接收 XML。以前,发送正文中包含 XML 的请求将响应 415 Unsupported Media Type 响应。有关格式化程序的详细信息,包括创建自定义格式化程序,请参阅 http://mng.bz/e5gG 中的文档。

With this simple change, your API controllers can now format responses as XML as well as JSON. Running the same request as shown in figure 20.7 with XML support enabled means the app will respect the text/xml accept header. The formatter serializes the string array to XML as requested instead of defaulting to JSON, as shown in figure 20.8.
通过这个简单的更改,您的 API 控制器现在可以将响应格式化为 XML 和 JSON。在启用 XML 支持的情况下运行如图 20.7 所示的相同请求意味着应用程序将遵循 text/xml accept 标头。格式化程序根据请求将字符串数组序列化为 XML,而不是默认为 JSON,如图 20.8 所示。

alt text

Figure 20.8 With the XML output formatters added, the Accept header’ text/xml value is respected, and the response is serialized to XML.
图 20.8 添加 XML 输出格式化程序后,将遵循 Accept 标头的 text/xml 值,并将响应序列化为 XML。

This is an example of content negotiation, where the client has specified which formats it can handle and the server selects one of those, based on what it can produce. This approach is part of the HTTP protocol, but there are some quirks to be aware of when relying on it in ASP.NET Core. You won’t often run into these, but if you’re not aware of them when they hit you, they could have you scratching your head for hours!
这是内容协商的一个示例,其中客户端指定了它可以处理的格式,服务器根据它可以生成的格式选择其中一种。此方法是 HTTP 协议的一部分,但在 ASP.NET Core 中依赖它时,需要注意一些怪癖。你不会经常遇到这些,但如果它们在它们击中你时没有意识到它们,它们可能会让你挠头几个小时!

20.5.2 Choosing a response format with content negotiation

20.5.2 使用内容协商选择响应格式

Content negotiation is where a client says which types of data it can accept using the Accept header and the server picks the best one it can handle. Generally speaking, this works as you’d hope: the server formats the data using a type the client can understand.
内容协商是客户端使用 Accept 标头说明它可以接受哪些类型的数据,服务器选择它可以处理的最佳数据类型。一般来说,这就像你希望的那样工作:服务器使用客户端可以理解的类型来格式化数据。

The ASP.NET Core implementation has some special cases that are worth bearing in mind:
ASP.NET Core 实现有一些值得牢记的特殊情况:

• By default, ASP.NET Core returns only application/json, text/plain, and text/html MIME types. You can add IOutputFormatters to make other types available, as you saw in the previous section for text/xml.
默认情况下,ASP.NET Core 仅返回 application/json、text/plain 和 text/html MIME 类型。您可以添加 IOutputFormatters 以使其他类型可用,如上一节 text/xml 中所示。
• By default, if you return null as your API model, whether from an action method or by passing null in a StatusCodeResult, the middleware returns a 204 No Content response.
默认情况下,如果返回 null 作为 API 模型 (无论是从作方法还是通过在 StatusCodeResult 中传递 null),中间件都会返回 204 No Content 响应。
• When you return a string as your API model, if no Accept header is set, ASP.NET Core formats the response as text/plain.
当您将字符串作为 API 模型返回时,如果未设置 Accept 标头,则 ASP.NET Core 会将响应格式设置为 text/plain。
• When you use any other class as your API model, and there’s no Accept header or none of the supported formats was requested, the first formatter that can generate a response is used (typically JSON by default).
当您使用任何其他类作为 API 模型,并且没有 Accept 标头或未请求任何支持的格式时,将使用第一个可以生成响应的格式化程序 (通常默认为 JSON)。
• If the middleware detects that the request is probably from a browser (the accept header contains /), it will not use conneg. Instead, it formats the response as though an Accept header was not provided, using the default formatter (typically JSON).
如果中间件检测到请求可能来自浏览器 (accept 标头包含 /) ,则不会使用 conneg。相反,它使用默认格式化程序(通常为 JSON)格式化响应,就像未提供 Accept 标头一样。

These defaults are relatively sane, but they can certainly bite you if you’re not aware of them. That last point in particular, where the response to a request from a browser is virtually always formatted as JSON, has certainly caught me out when trying to test XML requests locally!
这些违约相对来说是理智的,但如果你不知道它们,它们肯定会咬你一口。特别是最后一点,对来自浏览器的请求的响应几乎总是格式化为 JSON,在尝试在本地测试 XML 请求时,这无疑让我感到困惑!

As you should expect by now, all these rules are configurable; you can easily change the default behavior in your application if it doesn’t fit your requirements. For example, the following listing, taken from Program.cs, shows how you can force the middleware to respect the browser’s Accept header and remove the text/plain formatter for strings.
正如您现在应该预料的那样,所有这些规则都是可配置的;如果应用程序的默认行为不符合您的要求,您可以轻松更改应用程序的默认行为。例如,以下清单取自 Program.cs,展示了如何强制中间件遵守浏览器的 Accept 标头并删除字符串的文本/纯格式化程序。

Listing 20.14 Customizing MVC to respect the browser’s Accept header in web APIs
清单 20.14 在 Web API 中自定义 MVC 以遵循浏览器的 Accept 标头

WebApplicationBuilder builder = WebApplication.CreateBuilder(args);

builder.Services.AddControllers(options =>      #A
{
    options.RespectBrowserAcceptHeader = true;         #B
    options.OutputFormatters.RemoveType<StringOutputFormatter>();   #C
});

❶ AddControllers has an overload that takes a lambda function.
AddControllers 具有采用 lambda 函数的重载。
❷ False by default; several other properties are also available to be set.
默认为 False;还可以设置其他几个属性。
❸ Removes the output formatter that formats strings as text/plain
删除将字符串格式化为 text/plain 的输出格式化程序

In most cases, conneg should work well for you out of the box, whether you’re building an SPA or a mobile application. In some cases, you may find you need to bypass the usual conneg mechanisms for specific action methods, and there are various ways to achieve this, but I won’t cover them in this book as I’ve found I rarely need to use them. For details, see Microsoft’s “Format response data in ASP.NET Core Web API” documentation: http://mng.bz/zx11.
在大多数情况下,conneg 应该可以立即为您工作,无论您是构建 SPA 还是移动应用程序。在某些情况下,你可能会发现你需要绕过特定动作方法的通常连接机制,并且有多种方法可以实现这一点,但我不会在本书中介绍它们,因为我发现我很少需要使用它们。有关详细信息,请参阅 Microsoft 的“在 ASP.NET Core Web API 中设置响应数据的格式”文档:http://mng.bz/zx11

At this point we’ve covered the main points of using API controllers, but you probably still have one major question: why would I use web API controllers over minimal APIs? That’s a great question, and one we’ll look at in section 20.6.
在这一点上,我们已经介绍了使用 API 控制器的要点,但您可能仍然有一个主要问题:为什么我要使用 Web API 控制器而不是最小的 API?这是一个很好的问题,我们将在 20.6 节中讨论这个问题。

20.6 Choosing between web API controllers and minimal APIs

20.6 在 Web API 控制器和最小 API 之间进行选择

In part 1 of this book you learned all about using minimal APIs to build a JSON API. Minimal APIs are the new kid on the block, being introduced in .NET 6, but they are growing up quickly. With all the new features introduced in .NET 7 (discussed in chapter 5), minimal APIs are emerging as a great way to build HTTP APIs in modern .NET.
在本书的第 1 部分中,您了解了如何使用最小 API 构建 JSON API 的所有信息。最小 API 是 .NET 6 中引入的新成员,但它们正在迅速发展。随着 .NET 7 中引入的所有新功能(在第 5 章中讨论),最小 API 正在成为在现代 .NET 中构建 HTTP API 的好方法。

By contrast, web API controllers have been around since day one. They were introduced in their current form in ASP.NET Core 1.0 and were heavily inspired by the web API framework from legacy ASP.NET. The designs, patterns, and concepts used by web API controllers haven’t changed much since then, so if you’ve ever used web API controllers, they should look familiar in .NET 7.
相比之下,Web API 控制器从第一天起就已经存在。它们是在 ASP.NET Core 1.0 中以当前形式引入的,并受到旧版 ASP.NET 的 Web API 框架的严重启发。从那时起,Web API 控制器使用的设计、模式和概念没有太大变化,因此,如果您曾经使用过 Web API 控制器,它们在 .NET 7 中应该看起来很熟悉。

The difficult question in .NET 7 is if you need to build an API, which should you use, minimal APIs or web API controllers? Both have their pros and cons, and a large part of the decision will be personal preference, but to help your decision, you should ask yourself several questions:
.NET 7 中的难题是,您是否需要构建一个 API,您应该使用哪个 API,最小 API 还是 Web API 控制器?两者都有其优点和缺点,很大一部分决定将是个人喜好,但为了帮助你做出决定,你应该问自己几个问题:

  1. Do you need to return data in multiple formats using content negotiation?
    您是否需要使用 Content Negotiation 以多种格式返回数据?
  2. Is performance critical to your application?
    性能对应用程序至关重要吗?
  3. Do you have complex filtering requirements?
    您是否有复杂的筛选要求?
  4. Is this a new project?
    这是一个新项目吗?
  5. Do you already have experience with web API controllers?
    您是否已经有使用 Web API 控制器的经验?
  6. Do you prefer convention over configuration?
    您更喜欢约定而不是配置吗?

Questions 1-3 in this list are focused on technical differences between minimal APIs and web API controllers. Web API controllers support content negotiation (conneg), which allows clients to request data be returned in a particular format: JSON, XML, or CSV, for example, as you learned in section 20.5. Web API controllers support this feature out of the box, so if it’s crucial for your application, it may be better to choose web API controllers over minimal APIs.
此列表中的问题 1-3 侧重于最小 API 和 Web API 控制器之间的技术差异。Web API 控制器支持内容协商 (conneg),它允许 Client 端请求以特定格式返回数据:JSON、XML 或 CSV,例如,如您在第 20.5 节中学到的那样。Web API 控制器支持开箱即用的此功能,因此如果它对您的应用程序至关重要,最好选择 Web API 控制器而不是最少的 API。

Tip If you want to use content negotiation with minimal APIs, it’s possible but not built in. I show how to add conneg to minimal APIs using the open-source library Carter on my blog: http://mng.bz/o12d.
提示:如果您想通过最少的 API 使用内容协商,这是可能的,但不是内置的。我展示了如何使用开源库 Carter 将 conneg 添加到最小的 API:http://mng.bz/o12d

Question 2 is about performance. Everyone wants the most performant app, but there’s a real question of how important it is. Are you going to be regularly benchmarking your application and looking for any regressions? If so, minimal APIs are probably going to be a better choice, as they’re often more performant than web API controllers.
问题 2 是关于性能的。每个人都希望获得性能最高的应用程序,但存在一个真正的问题,即它有多重要。您是否会定期对应用程序进行基准测试并寻找任何回归?如果是这样,最小 API 可能是更好的选择,因为它们通常比 Web API 控制器性能更高。

The MVC framework that web API controllers use relies on a lot of conventions and reflection for discovering your controllers and a complex filter pipeline. These are obviously highly optimized, but if you’re writing an application where you need to squeeze out every little bit of throughput, minimal APIs will likely help get you there more easily. For most applications, the overhead of the MVC framework will be negligible when compared with any database or network access in your app, so this is worth worrying about only for performance-sensitive apps.
Web API 控制器使用的 MVC 框架依赖于许多约定和反射来发现控制器和复杂的筛选器管道。这些显然是高度优化的,但如果您正在编写一个需要挤出每一点吞吐量的应用程序,那么最少的 API 可能会帮助您更轻松地实现目标。对于大多数应用程序,与应用程序中的任何数据库或网络访问相比,MVC 框架的开销可以忽略不计,因此,仅对于性能敏感的应用程序,才值得担心。

Question 3 focuses on filtering. You learned about filtering with minimal APIs in chapter 5: filters allow you to attach a processing pipeline to your minimal API endpoints and can be used to do things like automatic validation. Web API controllers (as well as MVC controllers and Razor Pages) also have a filter pipeline, but it’s much more complex than the simple pipeline used by minimal APIs, as you’ll see in chapters 21 and 22.
问题 3 侧重于筛选。您在第 5 章中学习了如何使用最少的 API 进行过滤:过滤器允许您将处理管道附加到最小的 API 端点,并可用于执行自动验证等作。Web API 控制器(以及 MVC 控制器和 Razor Pages)也有一个筛选器管道,但它比最小 API 使用的简单管道要复杂得多,如第 21 章和第 22 章所示。

In most cases the filtering provided by minimal APIs will be perfectly adequate for your needs. The main cases where minimal API filtering will fall down will be when you already have an application that uses web API controllers and want to reuse some complex filters. In these cases, there may be no way to translate your existing web API filters to minimal API filters. If the filtering is important, then you may need to stick with web API controllers.
在大多数情况下,最小 API 提供的过滤将完全满足您的需求。最小 API 过滤失败的主要情况是,您已经有一个使用 Web API 控制器的应用程序,并且想要重用一些复杂的过滤器。在这些情况下,可能无法将现有的 Web API 筛选器转换为最小的 API 筛选器。如果筛选很重要,那么你可能需要坚持使用 Web API 控制器。

This leads to question 4: are you building a new application or working on an existing application? If this is a new application, I would be strongly in favor of using minimal APIs. Minimal APIs are conceptually simpler than web API controllers, are faster because of this, and are receiving a lot of improvements from the ASP.NET Core team. If there’s no other compelling reason to choose web API controllers in your new project, I suggest defaulting to minimal APIs.
这就引出了问题 4:您是构建新应用程序还是正在处理现有应用程序?如果这是一个新应用程序,我强烈赞成使用最少的 API。最小 API 在概念上比 Web API 控制器更简单,因此速度更快,并且从 ASP.NET Core 团队获得了很多改进。如果没有其他令人信服的理由在你的新项目中选择 Web API 控制器,我建议默认使用最小 API。

On the other hand, if you have an existing web API controller application, I would be strongly inclined to stick with web API controllers. While it’s perfectly possible to mix minimal APIs and web API controllers in the same application, I would favor consistency over using the new hotness.
另一方面,如果你有一个现有的 Web API 控制器应用程序,我强烈倾向于坚持使用 Web API 控制器。虽然完全可以在同一个应用程序中混合使用最少的 API 和 Web API 控制器,但我更喜欢一致性,而不是使用新的热度。

Question 5 considers how familiar you already are with web API controllers. If you’re coming from legacy ASP.NET or have already used web API controllers in ASP.NET Core and need to be productive quickly, you might decide to stick with web API controllers.
问题 5 考虑您对 Web API 控制器的熟悉程度。如果您来自传统 ASP.NET 或已经在 ASP.NET Core 中使用过 Web API 控制器,并且需要快速提高工作效率,则可以决定继续使用 Web API 控制器。

I consider this one of the weaker arguments, as minimal APIs are conceptually simpler than web API controllers; if you already know web API controllers, you will likely pick up minimal APIs easily. That said, the differences in the model binding approaches can be a little confusing, and you may decide it’s not worth the investment or frustration if things don’t work as you expect.
我认为这是较弱的论点之一,因为最小的 API 在概念上比 Web API 控制器简单;如果您已经了解 Web API 控制器,则可能会轻松掌握最少的 API。也就是说,模型绑定方法的差异可能有点令人困惑,如果事情没有按预期进行,您可能会认为不值得投资或感到沮丧。

The final question comes down entirely to taste and preference: do you like minimal APIs? web API controllers heavily follow the “convention over configuration” paradigm (though not to the extent of MVC controllers and Razor Pages). By contrast, you must be far more explicit with minimal APIs. Minimal APIs also don’t enforce any particular grouping, unlike web API controllers, which all follow the “action methods in a controller class” pattern.
最后一个问题完全归结为品味和偏好:您喜欢最少的 API 吗?Web API 控制器在很大程度上遵循“约定优于配置”范例(尽管没有达到 MVC 控制器和 Razor Pages 的范围)。相比之下,您必须使用最少的 API 更加明确。与 Web API 控制器不同,最小 API 也不强制执行任何特定的分组,它们都遵循“控制器类中的作方法”模式。

Different people prefer different approaches. Web API controllers mean less manual wiring up of components, but this necessarily means more magic and more rigidity around how you structure your applications.
不同的人喜欢不同的方法。Web API 控制器意味着更少的组件手动连接,但这必然意味着在构建应用程序的方式上更神奇、更严格。

By contrast, minimal API endpoints must be explicitly added to the WebApplication instance, but this also means you have more flexibility around how to group your endpoints. You can put all your endpoints in Program.cs, create natural groupings for them in separate classes, or create a file per endpoint or any pattern you choose.
相比之下,必须将最少的 API 端点显式添加到 WebApplication 实例中,但这也意味着您在如何对端点进行分组方面具有更大的灵活性。您可以将所有终端节点放在Program.cs中,在单独的类中为它们创建自然分组,或者为每个终端节点或您选择的任何模式创建一个文件。

Tip You can also more easily layer on helper frameworks to minimal APIs, such as Carter (https://github.com/CarterCommunity/Carter), which can provide some structure and support functionality if you want it.
提示:您还可以更轻松地将帮助程序框架分层到最小的 API,例如 Carter (https://github.com/CarterCommunity/Carter),如果需要,它可以提供一些结构和支持功能

Overall, the choice is up to you whether web API controllers or minimal APIs are better for your application. Table 20.1 summarizes the questions and where you should favor one approach over the other, but the final choice is up to you!
总的来说,Web API 控制器还是最小的 API 更适合您的应用程序,由您决定。表 20.1 总结了这些问题以及您应该在哪些方面更喜欢一种方法,但最终选择取决于您!

Table 20.1 Choosing between minimal APIs with web API controllers
表 20.1 在最小 API 和 Web API 控制器之间进行选择

Question Minimal APIs Web API controllers
1. Do you need conneg? Can’t use conneg out of the box Built-in and extensible
2. How critical is performance? More performant than web API controllers Less performant than minimal APIs
3. Complex filtering? Have a simple, extensible filter pipeline Have a complex, nonlinear, filter pipeline
4. Is this a new project? Minimal APIs are getting many new features and are a focus of the ASP.NET Core team The MVC framework is receiving small new features, but is less of a focus.
5. Do you have experience with web API controllers? Minimal APIs share many of the same concepts, but have subtle differences in model binding Web API controllers may be familiar to users of legacy ASP.NET or older ASP.NET Core versions
6. Do you prefer convention over configuration? Requires a lot of explicit configuration Convention- and discovery-based, which can appear more magic when you’re unfamiliar

That brings us to the end of this chapter on web APIs. In the next chapter we’ll look at one of more advanced topics of MVC and Razor Pages: the filter pipeline and how you can use it to reduce duplication in your code. The good news is that it’s similar to minimal API filters in principle. The bad news is that it’s far more complicated!
这让我们结束了本章关于 Web API 的内容。在下一章中,我们将介绍 MVC 和 Razor Pages 的更高级主题之一:筛选器管道以及如何使用它来减少代码中的重复。好消息是,它在原则上类似于最小 API 过滤器。坏消息是它要复杂得多!

20.7 Summary

20.7 总结

Web API action methods can return data directly or can use ActionResult<T> to generate an arbitrary response. If you return more than one type of result from an action method, the method signature must return ActionResult<T>.
Web API作方法可以直接返回数据,也可以用于 ActionResult<T>生成任意响应。如果从作方法返回多种类型的结果,则方法签名必须返回 ActionResult<T>

The data returned by a web API action is sometimes called an API model. It contains the data that will be serialized and send back to the client. This differs from view models and PageModels, which contain both data and metadata about how to generate the response.
Web API作返回的数据有时称为 API 模型。它包含将被序列化并发送回客户端的数据。这与视图模型和 PageModel 不同,后者包含有关如何生成响应的数据和元数据。

Web APIs are associated with route templates by applying RouteAttributes to your action methods. These give you complete control over the URLs that make up your application’s API.
通过将 RouteAttributes 应用于作方法,Web API 与路由模板相关联。这些 URL 使您可以完全控制构成应用程序 API 的 URL。

Route attributes applied to a controller combine with the attributes on action methods to form the final template. These are also combined with attributes on inherited base classes. You can use inherited attributes to reduce the amount of duplication in the attributes, such as where you’re using a common prefix on your routes.
应用于控制器的路由属性与作方法上的属性相结合,形成最终模板。这些还与继承的基类上的属性相结合。您可以使用继承的属性来减少属性中的重复数量,例如在路由上使用通用前缀的位置。

By default, the controller and action name have no bearing on the URLs or route templates when you use attribute routing. However, you can use the "[controller]" and "[action]" tokens in your route templates to reduce repetition. They’ll be replaced with the current controller and action name.
默认情况下,在使用属性路由时,控制器和作名称与 URL 或路由模板无关。但是,您可以在路由模板中使用 “[controller]” 和 “[action]” 令牌来减少重复。它们将替换为当前控制器和作名称。

The [HttpPost] and [HttpGet] attributes allow you to choose between actions based on the request’s HTTP verb when two actions correspond to the same URL. This is a common pattern in RESTful applications.
[HttpPost] 和 [HttpGet] 属性允许您在两个作对应于同一 URL 时根据请求的 HTTP 谓词在作之间进行选择。这是 RESTful 应用程序中的常见模式。

The [ApiController] attribute applies several common conventions to your controllers. Controllers decorated with the attribute automatically bind to a request’s body instead of using form values, automatically generate a 400 Bad Request response for invalid requests, and return ProblemDetails objects for status code errors. This can dramatically reduce the amount of boilerplate code you must write.
[ApiController] 属性将几个常见约定应用于控制器。使用 该属性修饰的控制器会自动绑定到请求正文,而不是使用表单值,为无效请求自动生成 400 Bad Request 响应,并为状态代码错误返回 ProblemDetails 对象。这可以显著减少您必须编写的样板代码量。

You can control which of the conventions to apply by using the ConfigureApiBehaviorOptions() method and providing a configuration lambda. This is useful if you need to fit your API to an existing specification, for example.
您可以通过使用 ConfigureApiBehaviorOptions() 方法并提供配置 lambda 来控制要应用的约定。例如,如果您需要使 API 适应现有规范,这将非常有用。

By default, ASP.NET Core formats the API model returned from a web API controller as JSON. In contrast to legacy ASP.NET, JSON data is serialized using camelCase rather than PascalCase. You should consider this change if you get errors or missing values when using data from your API.
默认情况下,ASP.NET Core 将从 Web API 控制器返回的 API 模型格式化为 JSON。与传统 ASP.NET 相比,JSON 数据使用 camelCase 而不是 PascalCase 进行序列化。如果您在使用 API 中的数据时出现错误或缺失值,则应考虑此更改。

ASP.NET Core 3.0 onwards uses System.Text.Json, which is a strict, high performance library for JSON serialization and deserialization. You can replace this serializer with the common Newtonsoft.Json formatter by calling AddNewtonsoftJson() on the return value from services.AddControllers().
ASP.NET Core 3.0 及更高版本使用 System.Text.Json,这是一个严格的高性能库,用于 JSON 序列化和反序列化。您可以通过对服务的返回值调用 AddNewtonsoftJson() 来将此序列化程序替换为通用的 Newtonsoft.Json 格式化程序。AddControllers() 的 Controller。

Content negotiation occurs when the client specifies the type of data it can handle and the server chooses a return format based on this. It allows multiple clients to call your API and receive data in a format they can understand.
当客户端指定它可以处理的数据类型,并且服务器根据此选择返回格式时,就会发生内容协商。它允许多个客户端调用您的 API 并以他们可以理解的格式接收数据。

By default, ASP.NET Core can return text/plain, text/html, and application/json, but you can add formatters if you need to support other formats.
默认情况下,ASP.NET Core 可以返回 text/plain、text/html 和 application/json,但如果您需要支持其他格式,则可以添加格式化程序。

You can add XML formatters by calling AddXmlSerializerFormatters() on the return value from services.AddControllers() in your Startup class. These can format the response as XML, as well as receive XML in a request body.
您可以通过对服务的返回值调用 AddXmlSerializerFormatters() 来添加 XML 格式化程序。AddControllers() 的 Startup。这些选项可以将响应格式化为 XML,并在请求正文中接收 XML。

Content negotiation isn’t used when the Accept header contains /, such as in most browsers. Instead, your application uses the default formatter, JSON. You can disable this option by setting the RespectBrowserAcceptHeader option to true when adding your controller services in Program.cs.
当 Accept 标头包含 / 时,不会使用内容协商,例如在大多数浏览器中。相反,您的应用程序使用默认格式化程序 JSON。在 Program.cs 中添加控制器服务时,您可以通过将 RespectBrowserAcceptHeader 选项设置为 true 来禁用此选项。

You can mix web API Controllers and minimal API endpoints in the same application, but you may find it easier to use one or the other.
您可以在同一应用程序中混合使用 Web API 控制器和最小 API 终端节点,但您可能会发现使用其中一种更容易。

Choose web API controllers when you need content negotiation, when you have complex filtering requirements, when you have experience with web controllers, or when you prefer convention over configuration for your apps.
当您需要内容协商、有复杂的筛选要求、具有 Web 控制器使用经验时,或者当您更喜欢应用程序的约定而不是配置时,请选择 Web API 控制器。

Choose minimal API endpoints when performance is critical, when you prefer explicit configuration over automatic conventions, or when you’re starting a new app.
当性能至关重要时,当您更喜欢显式配置而不是自动约定时,或者当您启动新应用程序时,请选择最少的 API 终端节点。

ASP.NET Core in Action 19 Creating a website with MVC controllers

19 Creating a website with MVC controllers
19 使用 MVC 控制器创建网站

This chapter covers
本章涵盖
• Creating a Model-View-Controller (MVC) application
创建模型-视图-控制器 (MVC) 应用程序
• Choosing between Razor Pages and MVC controllers
在 Razor Pages 和 MVC 控制器之间进行选择
• Returning Razor views from MVC controllers
从 MVC 控制器返回 Razor 视图

In this book I’ve focused on Razor Pages over MVC controllers for server-rendered HTML apps, as I consider Razor Pages to be the preferable paradigm in most cases. In this chapter we dig a bit more into exactly why I consider Razor Pages to be the right choice and take a brief look at the alternative.
在这本书中,我重点介绍了服务器渲染的 HTML 应用程序的 Razor Pages 而不是 MVC 控制器,因为我认为在大多数情况下,Razor Pages 是更可取的范例。在本章中,我们将更深入地探讨为什么我认为 Razor Pages 是正确的选择,并简要介绍一下替代方案。

In section 19.2 you’ll create a default MVC application using a template so you can familiarize yourself with the general project layout of an MVC application. We’ll look at some of the differences between an MVC application and a Razor Pages app, as well as the many similarities.
在 Section 19.2 中,您将使用模板创建默认的 MVC 应用程序,以便熟悉 MVC 应用程序的一般项目布局。我们将了解 MVC 应用程序和 Razor Pages 应用程序之间的一些差异,以及许多相似之处。

Next, I’ll dig into why I find Razor Pages to be a preferable application model compared with MVC controllers. You’ll learn about the improved developer ergonomics of Razor Pages compared with MVC controllers, as well as the cases in which MVC controllers are nevertheless the right choice.
接下来,我将深入探讨为什么我认为与 MVC 控制器相比,Razor Pages 是更可取的应用程序模型。您将了解 Razor Pages 与 MVC 控制器相比改进的开发人员人体工程学,以及 MVC 控制器仍然是正确选择的情况。

In section 19.4 you’ll learn about rendering Razor views using MVC controllers. You’ll learn how the MVC framework relies on conventions to locate view files and how to override these by selecting a specific Razor view template to render. Finally, you’ll see the full view selection algorithm in all its glory.
在第 19.4 节中,您将了解如何使用 MVC 控制器渲染 Razor 视图。您将了解 MVC 框架如何依赖约定来查找视图文件,以及如何通过选择要呈现的特定 Razor 视图模板来覆盖这些文件。最后,您将看到完整视图选择算法的所有荣耀。

19.1 Razor Pages vs. MVC in ASP.NET Core

19.1 Razor Pages 与 ASP.NET Core 中的 MVC

In this book I focus on Razor Pages, but I have also mentioned that Razor Pages use the ASP.NET Core MVC framework behind the scenes and that you can choose to use the MVC framework directly if you wish. Additionally, if you’re creating an API for working with mobile or client-side apps, and you don’t want to (or can’t) use minimal APIs, you may well use the MVC framework directly by creating web API controllers.
在本书中,我重点介绍了 Razor Pages,但我也提到了 Razor Pages 在后台使用 ASP.NET Core MVC 框架,如果您愿意,可以选择直接使用 MVC 框架。此外,如果您正在创建用于移动或客户端应用程序的 API,并且您不想(或不能)使用最少的 API,则可以通过创建 Web API 控制器来直接使用 MVC 框架。

NOTE I look at how to build web APIs with the MVC framework in chapter 20.
注意:在第 20 章中,我将介绍如何使用 MVC 框架构建 Web API。

So what are the differences between Razor Pages and the MVC framework, and when should you choose one or the other?
那么 Razor Pages 和 MVC 框架有什么区别,什么时候应该选择其中之一呢?

If you’re new to ASP.NET Core, the answer is pretty simple: use Razor Pages for server-side rendered applications, and use web API controllers (or minimal APIs) for building APIs. There are nuances to this advice, which I discuss in section 19.5, but that distinction will serve you well for now.
如果你不熟悉 ASP.NET Core,答案非常简单:将 Razor Pages 用于服务器端呈现的应用程序,并使用 Web API 控制器(或最小 API)来构建 API。这个建议有一些细微差别,我在第 19.5 节中讨论,但这种区别现在对你很有帮助。

Naming is hard, again
命名很困难,同样

Microsoft have a long history of creating a framework and naming it after a generic concept: MVC, Web Forms, Web Pages, Multi-platform App UI, and so on. it’s frankly incredible that Blazor survived! Web API is no different.
Microsoft 创建框架并以通用概念命名它的历史由来已久:MVC、Web Forms、Web Pages、Multi-platform App UI 等。坦率地说,Blazor 幸存下来真是不可思议!Web API 也不例外。

In legacy ASP.NET, Microsoft created a web API framework, which was similar in design to the existing MVC framework, but also was not interoperable. You therefore had MVC controllers, which were controller classes used with the MVC framework to generate HTML, and web API controllers, which were controller classes used with the web API framework, to generate JavaScript Object Notation (JSON) or Extensible Markup Language (XML).
在旧版 ASP.NET 中,Microsoft 创建了一个 Web API 框架,该框架在设计上与现有的 MVC 框架相似,但也不可互作。因此,您有 MVC 控制器(与 MVC 框架一起使用的控制器类,用于生成 HTML)和 Web API 控制器(与 Web API 框架一起使用的控制器类),用于生成 JavaScript 对象表示法 (JSON) 或可扩展标记语言 (XML)。

In ASP.NET Core, Microsoft merged these two parallel stacks into a single ASP.NET Core MVC framework. Controllers in ASP.NET Core can generate both HTML and JSON/XML; there is no separation. Nevertheless, it’s common for a controller to be dedicated to either HTML generation or JSON/XML. For that reason, the names MVC controller and web API controller are often used to refer to the two general types of controller: MVC for HTML and web API for JSON/XML.
在 ASP.NET Core 中,Microsoft将这两个并行堆栈合并到一个 ASP.NET Core MVC 框架中。ASP.NET Core 中的控制器可以生成 HTML 和 JSON/XML;没有分离。尽管如此,控制器通常专用于 HTML 生成或 JSON/XML。因此,MVC 控制器和 Web API 控制器这两个名称通常用于指代两种常规类型的控制器:用于 HTML 的 MVC 和用于 JSON/XML 的 Web API。

In this book when I refer to web API controllers, I’m talking about standard ASP.NET Core controllers that are generating API responses. This may be described elsewhere as a web API application using MVC controllers or as a web API application. All three cases refer to the same concept: an HTTP API built using ASP.NET Core controllers.
在本书中,当我提到 Web API 控制器时,我指的是生成 API 响应的标准 ASP.NET Core 控制器。这可能在其他地方描述为使用 MVC 控制器的 Web API 应用程序或 Web API 应用程序。这三种情况都是指同一个概念:使用 ASP.NET Core 控制器构建的 HTTP API。

Before we can get to comparisons, though, we should take a brief look at the ASP.NET Core MVC framework itself. Understanding the similarities and differences between MVC controllers and Razor Pages can be useful, as you’ll likely find a use for MVC controllers at some point, even if you use Razor Pages most of the time.
不过,在进行比较之前,我们应该简要了解一下 ASP.NET Core MVC 框架本身。了解 MVC 控制器和 Razor Pages 之间的异同可能很有用,因为即使您大部分时间都在使用 Razor Pages,您也可能会在某些时候发现 MVC 控制器的用途。

19.2 Your first MVC web application

19.2 您的第一个 MVC Web 应用程序

In this section you’ll learn how to create your first MVC web application, which server-renders HTML pages using MVC controllers and Razor views. We use a template to create the app and compare the generated code to see how it differs from a Razor Pages application.
在本部分中,你将了解如何创建第一个 MVC Web 应用程序,该应用程序使用 MVC 控制器和 Razor 视图服务器呈现 HTML 页面。我们使用模板创建应用并比较生成的代码,以了解它与 Razor Pages 应用程序有何不同。

We’ll again use a template to get an application up and running quickly. This time we’ll use the ASP.NET Core Web App (Model-View-Controller) template. To create the application in Visual Studio, follow these steps:
我们将再次使用模板来快速启动和运行应用程序。这次,我们将使用 ASP.NET Core Web 应用程序 (Model-View-Controller) 模板。要在 Visual Studio 中创建应用程序,请执行以下步骤:

  1. Choose File > New.
    选择 File > New (文件新建)。
  2. In the Create a new project dialog box, select the ASP.NET Core Web App (Model-View-Controller) template.
    在 Create a new project (创建新项目) 对话框中,选择 ASP.NET Core Web App (Model-View-Controller) 模板。
  3. In the Create a new project dialog box, enter your project name and review the Additional information box, shown in figure 19.1.
    在 Create a new project 对话框中,输入您的项目名称并查看 Additional information 框,如图 19.1 所示。
  4. Choose Create. If you’re using the command-line interface (CLI), you can create a similar template using dotnet new mvc.
    选择 Create (创建)。如果您使用的是命令行界面 (CLI),则可以使用 dotnet new mvc 创建类似的模板。

alt text

Figure 19.1 The Additional information screen for the MVC template. This screen follows on from the Configure your new project dialog box and lets you customize the template that generates your application.
图 19.1 MVC 模板的 Additional information 屏幕。此屏幕是 Configure your new project 对话框的后续屏幕,允许您自定义生成应用程序的模板。

The MVC template configures the ASP.NET Core project to use MVC controllers with Razor views. As always, you configure your app to use MVC controllers in Program.cs, as shown in listing 19.1. If you compare this template with your Razor Pages projects, you’ll see that the web API project uses AddControllersWithViews() instead of AddRazorPages(). The MVC controllers are mapped as endpoints by calling MapControllerRoute(). This method maps all the controllers in your app and configures a default conventional route for them. We discussed conventional routing in chapter 14, and I will discuss it again briefly shortly.
MVC 模板将 ASP.NET Core 项目配置为将 MVC 控制器与 Razor 视图一起使用。与往常一样,您将应用程序配置为在 Program.cs中使用 MVC 控制器,如清单 19.1 所示。如果将此模板与 Razor Pages 项目进行比较,你将看到 Web API 项目使用 AddControllersWithViews() 而不是 AddRazorPages()。通过调用 MapControllerRoute() 将 MVC 控制器映射为端点。此方法映射应用程序中的所有控制器,并为它们配置默认的常规路由。我们在第 14 章中讨论了 conventional routing,稍后我将再次简要讨论它。

Listing 19.1 Program.cs for the default MVC project
清单 19.1 默认 MVC 项目的 Program.cs

WebApplicationBuilder builder = WebApplication.CreateBuilder(args);

builder.Services.AddControllersWithViews();  #A

WebApplication app = builder.Build();

if (!app.Environment.IsDevelopment())
{
    app.UseExceptionHandler("/Home/Error");  #B
    app.UseHsts();
}

app.UseHttpsRedirection();
app.UseStaticFiles();
app.UseRouting();
app.UseAuthorization();

app.MapControllerRoute(    #C
    name: "default",    #C
    pattern: "{controller=Home}/{action=Index}/{id?}");    #D

app.Run();

❶ AddControllersWithViews adds the services for MVC controllers with Razor Views.
AddControllersWithViews 为具有 Razor 视图的 MVC 控制器添加了服务。

❷ The exception handler path differs from the default Razor Pages path of /Error.
异常处理程序路径不同于默认的 Razor Pages 路径 /Error。
❸ Adds all MVC controllers in your application using conventional routing
使用常规路由在应用程序中添加所有 MVC 控制器
❹ Defines the default conventional route pattern
定义默认的常规路由模式

Much of the configuration for an MVC application is the same as for Razor Pages. The middleware configuration is essentially identical, which isn’t that surprising considering that MVC and Razor Pages are the same type of application: a server-rendered app returning HTML. The main difference, as you’ll see in section 19.3, is in the project structure.
MVC 应用程序的大部分配置与 Razor Pages 的配置相同。中间件配置本质上是相同的,考虑到 MVC 和 Razor Pages 是同一类型的应用程序:返回 HTML 的服务器渲染应用程序,这并不奇怪。正如您将在 19.3 节中看到的那样,主要区别在于项目结构。

Before we go any further, run the MVC application by pressing F5 in Visual Studio or by running dotnet run in the project folder. The application should look remarkably familiar; it’s essentially identical to the Razor Pages version of the application you created in chapter 13, as shown in figure 19.2.
在继续之前,请在 Visual Studio 中按 F5 或在项目文件夹中运行 dotnet run 来运行 MVC 应用程序。该应用程序看起来应该非常熟悉;它与您在第 13 章中创建的应用程序的 Razor Pages 版本基本相同,如图 19.2 所示。

alt text

Figure 19.2 The default MVC application. The resulting application is identical to the Razor Pages equivalent created in chapter 13.
图 19.2 默认的 MVC 应用程序。生成的应用程序与第 13 章中创建的 Razor Pages 等效项相同。

The output of the MVC app is identical to the default Razor Pages app, but the infrastructure used to generate the response differs. Instead of a Razor Page PageModel and page handler, MVC uses the concept of controllers and action methods. The following listing shows the HomeController class from the default application. Each nonabstract, public method is an action that runs in response to a request. You can ensure that a candidate method is not treated as an action method by decorating it with the [NonAction] attribute.
MVC 应用的输出与默认的 Razor Pages 应用相同,但用于生成响应的基础结构不同。MVC 使用控制器和作方法的概念,而不是 Razor Page PageModel 和页面处理程序。下面的清单显示了默认应用程序中的 HomeController 类。每个非抽象的公共方法都是为响应请求而运行的作。您可以通过使用 [NonAction] 属性修饰候选方法,确保它不会被视为作方法。

Listing 19.2 The HomeController for the default MVC app
清单 19.2 默认 MVC 应用的 HomeController

public class HomeController : Controller  #A
{
    private readonly ILogger<HomeController> _logger;
    public HomeController(Ilogger<HomeController> logger)
    {
        _logger = logger;
    }

    public IactionResult Index()  #B
    {
        return View();  #C
    }

    public IactionResult Privacy()
    {
        return View();
    }

    [ResponseCache(Duration = 0, Location = ResponseCacheLocation.None,  #D
         NoStore = true)]    #D
    public IactionResult Error()
    {
        return View(new ErrorViewModel      #E
        {       #E
            RequestId = Activity.Current?.Id     #E
                ?? HttpContext.TraceIdentifier     #E
        });    #E
    }
}

❶ MVC Controllers often inherit from the Controller base class.
MVC 控制器通常继承自 Controller 基类。
❷ Action methods are the endpoints that run in response to requests.
Action methods 是为响应请求而运行的端点。
❸ Returning View() renders a Razor view.
返回 View() 会呈现 Razor 视图。
❹ You can apply filters to actions, as you’ll learn in chapters 21 and 22.
您可以将过滤器应用于作,您将在第 21 章和第 22 章中学到。
❺ Any object returned with View is passed to the Razor view as a view model.
使用 View 返回的任何对象都将作为视图模型传递给 Razor 视图。

DEFINITION An action (or action method) is a method that runs in response to a request. An MVC controller is a class that contains one or more logically grouped action methods.
定义:一个操作 (或作方法) 是为响应请求而运行的方法。MVC 控制器是包含一个或多个逻辑分组的作方法的类。

Each of the three action methods calls View() and returns the result. This returns a ViewResult, which instructs the MVC framework to render a Razor view for the action. You’ll learn more about this process in section 19.4. The Error action method also sets an object in the call to View(). This is the view model, which is passed to the Razor view when it’s rendered.
这三个作方法中的每一个都调用 View() 并返回结果。这将返回一个 ViewResult,它指示 MVC 框架为作呈现 Razor 视图。您将在 Section 19.4 中了解有关此过程的更多信息。Error作方法还会在对 View() 的调用中设置一个对象。这是视图模型,在呈现视图时传递给 Razor 视图。

NOTE MVC controllers use explicit view models to pass data to a Razor view rather than expose the data as properties on themselves (as Razor Pages do with page models). This provides a clearer separation between the various “models” than in Razor Pages, though both Razor Pages cases use the same general MVC design pattern.
注意:MVC 控制器使用显式视图模型将数据传递到 Razor 视图,而不是将数据作为自身的属性公开(就像 Razor 页面对页面模型所做的那样)。与 Razor Pages 相比,这在各种“模型”之间提供了更清晰的分离,尽管两种 Razor Pages 情况都使用相同的通用 MVC 设计模式。

Another big difference between Razor Pages and MVC controllers is that MVC controllers typically use conventional routing, as opposed to the explicit routing used by Razor Pages. I touched on conventional routing and how it differs from explicit routing in chapter 14, but you can see it in action in this MVC application.
Razor Pages 和 MVC 控制器之间的另一个重大区别是,MVC 控制器通常使用传统路由,而不是 Razor Pages 使用的显式路由。我在第 14 章中谈到了传统路由以及它与显式路由的不同之处,但您可以在此 MVC 应用程序中看到它的实际应用。

Conventional routing defines one or more route template patterns, which are used for all the MVC controllers in your app. The default route template, shown in listing 19.1, consists of three optional segments:
传统路由定义一个或多个路由模板模式,这些模式用于应用程序中的所有 MVC 控制器。默认路由模板,如清单 19.1 所示,由三个可选段组成:

"{controller=Home}/{action=Index}/{id?}"

Conventional routes must describe which controller and action should run for any given request, so they must include controller and action route parameters at a minimum. When a request is received, ASP.NET Core matches the route template and from that calculates which MVC controller and action method to use. For example, the default route would match all the following URLs:
传统路由必须描述应该为任何给定请求运行哪个控制器和作,因此它们必须至少包含控制器和作路由参数。收到请求时,ASP.NET Core 会匹配路由模板,并从中计算要使用的 MVC 控制器和作方法。例如,默认路由将匹配以下所有 URL:

• /Home/Privacy — Executes the HomeController.Privacy() action
• /Home — Executes the HomeController.Index() action
• /customer/list — Executes the CustomerController.List() action
• /products/view/123 — Executes the ProductsController.View() action, with the route parameter id=123

With conventional routing, a single route template maps to multiple endpoints, whereas in explicit routing, one or more route templates typically map to a single endpoint. There are subtleties in both cases, but in general conventional routing is terser, and explicit routing is more expressive.
使用传统路由时,单个路由模板映射到多个终端节点,而在显式路由中,一个或多个路由模板通常映射到单个终端节点。这两种情况都有微妙之处,但通常 conventional routing 更简洁,而 explicit routing 更具表现力。

NOTE As I mentioned in chapter 14, I won’t discuss conventional routing any further in this book. It is often used only with MVC controllers, but even then, I generally prefer to use explicit routing with attributes. I describe how to use attribute routing in chapter 20 when I discuss web API controllers.
注意:正如我在第 14 章中提到的,我不会在本书中进一步讨论 conventional routing。它通常只与 MVC 控制器一起使用,但即便如此,我通常更喜欢使用带有属性的显式路由。在第 20 章中讨论 Web API 控制器时,我将介绍如何使用属性路由。

Once you’ve familiarized yourself with a basic MVC application you will likely have spotted many of the similarities and differences between the MVC framework and Razor Pages. In the next section we look at one aspect of this: MVC controllers and their Razor Page PageModel equivalent.
熟悉基本的 MVC 应用程序后,您可能已经发现了 MVC 框架和 Razor Pages 之间的许多相似之处和不同之处。在下一部分中,我们将介绍其中一个方面:MVC 控制器及其 Razor Page PageModel 等效项。

19.3 Comparing an MVC controller with a Razor Page PageModel

19.3 将 MVC 控制器与 Razor Page PageModel 进行比较

In chapter 13 we looked at the MVC design pattern, and at how it applies to Razor Pages in ASP.NET Core. Perhaps unsurprisingly, you can use MVC controllers with the MVC design pattern in almost exactly the same way.
在第 13 章中,我们了解了 MVC 设计模式,以及它如何应用于 ASP.NET Core 中的 Razor 页面。也许不足为奇的是,您可以以几乎完全相同的方式将 MVC 控制器与 MVC 设计模式一起使用。

As mentioned in section 19.2, MVC controllers and actions are analogous to their Razor Pages counterparts of PageModel and page handlers. Figure 19.3 makes this clearer; it is the MVC controller equivalent of the Razor Pages version from chapter 13.
如第 19.2 节所述,MVC 控制器和作类似于 PageModel 和页面处理程序的 Razor Pages 对应项。图 19.3 更清楚地说明了这一点;它是第 13 章中 Razor Pages 版本的 MVC 控制器等效项。

alt text

Figure 19.3 A complete MVC controller request for a category. The MVC controller pattern is almost identical to that of Razor Pages, which was shown in figure 13.12. The controller is equivalent to a Razor Page, and the action is equivalent to a page handler.
图 19.3 类别的完整 MVC 控制器请求。MVC 控制器模式与 Razor Pages 的模式几乎相同,如图 13.12 所示。控制器等效于 Razor Page,作等效于页面处理程序。

In chapter 13 I showed a simple Razor Page PageModel for displaying all the to-do items in a given category in a ToDO application. The following listing reproduces that Razor Pages code from listing 13.5 for convenience.
在第 13 章中,我展示了一个简单的 Razor Page PageModel,用于在 ToDO 应用程序中显示给定类别中的所有待办事项。为方便起见,以下清单复制了清单 13.5 中的 Razor Pages 代码。

Listing 19.3 A Razor Page for viewing all to-do items in a given category
清单 19.3 用于查看给定类别中所有待办事项的 Razor 页面

public class CategoryModel : PageModel
{
    private readonly ToDoService _service;
    public CategoryModel(ToDoService service)
    {
        _service = service;
    }

    public ActionResult OnGet(string category)
    {
        Items = _service.GetItemsForCategory(category);
        return Page();
    }

    public List<ToDoListModel> Items { get; set; }
}

The MVC equivalent of this Razor Page is shown in listing 19.4. In the MVC framework, controllers are often used to aggregate similar actions, so the controller in this case is called ToDoController, as it would typically contain additional action methods for working with to-do items, such as actions to view a specific item or to create a new one.
此 Razor Page 的 MVC 等效项显示在清单 19.4 中。在 MVC 框架中,控制器通常用于聚合类似的作,因此在这种情况下,控制器称为 ToDoController,因为它通常包含用于处理待办事项的其他作方法,例如查看特定项或创建新项的作。

Listing 19.4 An MVC controller for viewing all to-do items in a given category
清单 19.4 一个 MVC 控制器,用于查看给定类别中的所有待办事项

public class ToDoController : Controller
{
    private readonly ToDoService _service;       #A
    public ToDoController(ToDoService service)   #A
    {
        _service = service;
    }

    public ActionResult Category(string id)     #B
    {
        var items = _service.GetItemsForCategory(id);     #C
        return View(items);    #D
    }

    public ActionResult Create(ToDoListModel model)   #E
    {                                                 #E
        // ...                                        #E
    }                                                 #E
}

❶ The ToDoService is provided in the controller constructor using dependency injection.
ToDoService 使用依赖项注入在控制器构造函数中提供。
❷ The Category action method takes a parameter, id.
Category作方法采用参数 id。
❸ The action method calls out to the ToDoService to retrieve data and build a view model.
方法调用 ToDoService 以检索数据并构建视图模型。
❹ Returns a ViewResult indicating the Razor view should be rendered, passing in the view model
返回一个 ViewResult,指示应呈现 Razor 视图,传入视图模型
❺ MVC controllers often contain multiple action methods that respond to different requests.
MVC 控制器通常包含多个响应不同请求的作方法。

Aside from some naming differences, the ToDoController looks similar to the Razor Page equivalent from listing 19.3:
除了一些命名差异之外,ToDoController 看起来类似于清单 19.3 中的 Razor Page 等效项:

• They both use dependency injection to access services.
它们都使用依赖关系注入来访问服务。
• Both handlers (page handler and action method) accept parameters created using model binding in exactly the same way.
两个处理程序 (页面处理程序和作方法) 都以完全相同的方式接受使用模型绑定创建的参数。
• Both interact with the application model in the same way to handle the request.
两者以相同的方式与应用程序模型交互以处理请求。
• They both create a view model for rendering the Razor view.
它们都创建用于渲染 Razor 视图的视图模型。

One of the main differences between Razor Pages and MVC controllers is in the final step: rendering the Razor view. In the next section you’ll see how to render Razor views from your MVC controller actions, how the views differ from the Razor views you’ve seen with Razor Pages, and how the framework locates the correct Razor view to render.
Razor Pages 和 MVC 控制器之间的主要区别之一是最后一步:呈现 Razor 视图。在下一部分中,你将了解如何从 MVC 控制器作呈现 Razor 视图,这些视图与使用 Razor 页面看到的 Razor 视图有何不同,以及框架如何找到要呈现的正确 Razor 视图。

19.4 Selecting a view from an MVC controller

19.4 从 MVC 控制器中选择视图

This section covers
本节涵盖
• How MVC controllers use ViewResults to render Razor views
MVC 控制器如何使用 ViewResults 呈现 Razor 视图
• How to create a new Razor view
如何创建新的 Razor 视图
• How the framework locates a Razor view to render
框架如何查找要呈现的 Razor 视图

One of the major differences between MVC controllers and Razor Pages is how the page handler or action method chooses a Razor view to render. For Razor Pages, it’s easy; the page renders the Razor view associated with the page. For MVC controllers it’s more complicated, so it’s important to understand how you choose which view to render once an action method has executed. Figure 19.4 shows a zoomed-in view of this process, right after the action has invoked the application model and received some data back.
MVC 控制器和 Razor Pages 之间的主要区别之一是页面处理程序或作方法如何选择要呈现的 Razor 视图。对于 Razor Pages,这很容易;页面呈现与页面关联的 Razor 视图。对于 MVC 控制器,情况更复杂,因此了解在执行作方法后如何选择要呈现的视图非常重要。图 19.4 显示了此过程的放大视图,该视图是在 action 调用应用程序模型并接收一些数据之后。

alt text

Figure 19.4 The process of generating HTML from an MVC controller using a ViewResult. This is similar to the process for a Razor Page. The main difference is that for Razor Pages, the view is an integral part of the Razor Page; for MVC controllers, the view must be located at runtime.
图 19.4 使用 ViewResult 从 MVC 控制器生成 HTML 的过程。这类似于 Razor 页面的过程。主要区别在于,对于 Razor Pages,视图是 Razor Page 不可或缺的一部分;对于 MVC 控制器,视图必须位于运行时。

Some of this figure should be familiar; it’s the bottom half of figure 19.3 (with a couple of additions). It shows that the MVC controller action method uses a ViewResult object to indicate that a Razor view should be rendered. This ViewResult contains the name of the Razor view template to render and a view model, an arbitrary plain old CLR object (POCO) class containing the data to render.
这个人物中的一些人应该很熟悉;它是图 19.3 的下半部分(添加了一些内容)。它显示 MVC 控制器作方法使用 ViewResult 对象来指示应呈现 Razor 视图。此 ViewResult 包含要呈现的 Razor 视图模板的名称,以及视图模型,即包含要呈现的数据的任意普通旧 CLR 对象 (POCO) 类。

NOTE ViewResult is the MVC equivalent of a Razor Page’s PageResult. The main difference is that a ViewResult includes a view name to render and a model to pass to the view template, while a PageResult always renders the Razor Page’s associated view and always passes the PageModel to the view template.
注意:ViewResult 是 Razor 页面的 PageResult 的 MVC 等效项。主要区别在于 ViewResult 包括要呈现的视图名称和要传递给视图模板的模型,而 PageResult 始终呈现 Razor Page 的关联视图,并始终将 PageModel 传递给视图模板。

After returning a ViewResult from an action method, the control flow passes back to the MVC framework, which uses a series of heuristics to locate the view, based on the template name provided. Once it locates the Razor view template, the Razor engine passes the view model from the ViewResult to the view and executes the template to generate the final HTML. This final step, rendering the HTML, is essentially the same process as for Razor Pages.
从作方法返回 ViewResult 后,控制流将传递回 MVC 框架,该框架根据提供的模板名称使用一系列启发式方法来查找视图。找到 Razor 视图模板后,Razor 引擎会将视图模型从 ViewResult 传递到视图,并执行模板以生成最终 HTML。最后一步(呈现 HTML)与 Razor Pages 的过程基本相同。

You can add a new Razor view template to your application in Visual Studio by right-clicking the folder you wish to add the view to in Solution Explorer. Choose Add > New Item and then select Razor View - Empty from the dialog, as shown in figure 19.5. If you aren’t using Visual Studio, create a blank new file in the Views folder with the file extension .cshtml.
通过在解决方案资源管理器中右键单击要向其添加视图的文件夹,可以在 Visual Studio 中将新的 Razor 视图模板添加到应用程序中。从对话框中选择Add > New Item 并选择 Razor View - Empty,如图 19.5 所示。如果不使用 Visual Studio,请在 Views 文件夹中创建一个文件扩展名为 .cshtml 的空白新文件。

alt text

Figure 19.5 The Add New Item dialog box. Choosing Razor View - Empty adds a new Razor view template file to your application.
图 19.5 “添加新项”对话框。选择“Razor 视图 - 空”会将新的 Razor 视图模板文件添加到应用程序中。

Razor view files are almost identical to the Razor Page .cshtml files you saw in chapter 17. The only difference is that Razor view files must not specify a @page directive at the top of the file. Aside from that, they’re identical; you can use the same syntax, partial views, layouts, and view models as you can with Razor Pages. The following listing, for example, shows part of the Error.cshtml Razor view for the default MVC template. This is all recognizable as standard Razor syntax.
Razor 视图文件与你在第 17 章中看到的 Razor Page .cshtml 文件几乎相同。唯一的区别是 Razor 视图文件不得在文件顶部指定 @page 指令。除此之外,它们是相同的;您可以使用与 Razor Pages 相同的语法、分部视图、布局和视图模型。例如,以下列表显示了默认 MVC 模板的 Error.cshtml Razor 视图的一部分。这都是可识别为标准 Razor 语法的。

Listing 19.5 A Razor view
清单 19.5 Razor 视图

@model ErrorViewModel    #A
@{
    ViewData["Title"] = "Error";    #B
}

<h1 class="text-danger">Error.</h1>    #C
<h2 class="text-danger">An error occurred while 
    processing your request.</h2>

@if (Model.ShowRequestId)    #D
{
    <p>
        <strong>Request ID:</strong> <code>@Model.RequestId</code>    #E
    </p>
}

❶ Razor views may specify a view model.
Razor 视图可以指定视图模型。
❷ You can access ViewData, and execute arbitrary C# statements.
您可以访问 ViewData 并执行任意 C# 语句。
❸ Standard HTML is written directly to the output.
标准 HTML 直接写入输出。
❹ You can use standard Razor control statements and can access the view model using Model.
您可以使用标准 Razor 控制语句,并可以使用 Model 访问视图模型。
❺ You can write C# expressions using @.
您可以使用 @ 编写 C# 表达式。

With your view template created, you now need to execute it. In most cases you won’t create a ViewResult directly in your action methods. Instead, you’ll use one of the View() helper methods on the Controller base class. These helper methods simplify passing in a view model and selecting a view template, but there’s nothing magic about them; all they do is create ViewResult objects.
创建视图模板后,您现在需要执行它。在大多数情况下,您不会直接在作方法中创建 ViewResult。相反,你将在 Controller 基类上使用 View() 帮助程序方法之一。这些帮助程序方法简化了视图模型的传入和视图模板的选择,但它们并没有什么神奇之处;他们所做的只是创建 ViewResult 对象。

In the simplest case you can call the View method without any arguments, as shown in the following listing, taken from the default MVC application. The View() helper method returns a ViewResult that uses conventions to find the view template to render and does not supply a view model when executing the view.
在最简单的情况下,可以调用 View 方法,不带任何参数,如下面的清单所示,它取自默认 MVC 应用程序。帮助程序方法返回一个 ViewResult,该方法使用约定查找要呈现的视图模板,并且在执行视图时不提供视图模型。

Listing 19.6 Returning ViewResult from an action method using default conventions
示例 19.6 使用默认约定从作方法返回 ViewResult

public class HomeController : Controller     #A
{
    public IActionResult Index()
    {
        return View();     #B
    }
}

In this example, the View helper method returns a ViewResult without specifying the name of the template to run. Instead, the name of the template to use is based on the name of the controller and the name of the action method. Given that the controller is called HomeController and the method is called Index, by default the Razor template engine looks for a template at the Views/Home/Index.cshtml location, as shown in figure 19.6.
在此示例中, View 帮助程序方法返回 ViewResult,而不指定要运行的模板的名称。相反,要使用的模板的名称基于控制器的名称和作方法的名称。鉴于控制器名为 HomeController 且方法名为 Index,默认情况下,Razor 模板引擎会在 Views/Home/Index.cshtml 位置查找模板,如图 19.6 所示。

alt text

Figure 19.6 View files are located at runtime based on naming conventions. Razor view files reside in a folder based on the name of the associated MVC controller and are named with the name of the action method that requested them. Views in the Shared folder can be used by any controller.
图 19.6 视图文件在运行时根据命名约定进行定位。Razor 视图文件驻留在基于关联 MVC 控制器名称的文件夹中,并使用请求它们的作方法的名称命名。Shared 文件夹中的视图可由任何控制器使用。

This is another case of using conventions in MVC to reduce the amount of boilerplate you have to write. As always, the conventions are optional. You can also explicitly pass the name of the template to run as a string to the View method. For example, if the Index method in listing 19.6 instead returned View("ListView"), the templating engine would look for a template called ListView.cshtml instead. You can even specify the complete path to the view file, relative to your application’s root folder, such as View("Views/global.cshtml"), which would look for the template at the Views/global.chtml location.
这是在 MVC 中使用约定来减少必须编写的样板数量的另一种情况。与往常一样,约定是可选的。还可以将要作为字符串运行的模板的名称显式传递给 View 方法。例如,如果列表 19.6 中的 Index 方法返回 View(“ListView”),则模板化引擎将改为查找名为 ListView.cshtml 的模板。您甚至可以指定视图文件相对于应用程序根文件夹的完整路径,例如 View(“Views/global.cshtml”),它将在 Views/global.chtml 位置查找模板。

NOTE When specifying the absolute path to a view, you must include both the top-level Views folder and the .cshtml file extension in the path. This is similar to the rules for locating partial view templates.
注意:指定视图的绝对路径时,必须在路径中同时包含顶级 Views 文件夹和 .cshtml 文件扩展名。这类似于查找局部视图模板的规则。

The process of locating an MVC Razor view is similar to the process of locating a partial view to render, which you learned about in chapter 17. The framework searches in multiple locations to find the requested view. The difference is that for Razor Pages the search process happens only for partial view rendering, as the main Razor view to render is already known; it’s the Razor Page’s view template.
查找 MVC Razor 视图的过程类似于查找要呈现的部分视图的过程,您在第 17 章中了解了该过程。框架在多个位置搜索以查找请求的视图。区别在于,对于 Razor Pages,搜索过程仅针对部分视图呈现进行,因为要呈现的主 Razor 视图是已知的;它是 Razor 页面的视图模板。

alt text

Figure 19.7 shows the complete process used by the MVC framework to locate the correct View template to execute when a ViewResult is returned from an MVC controller. It’s possible for more than one template to be eligible, such as if an Index.chstml file exists in both the Home and Shared folders. Similar to the rules for locating partial views, the engine uses the first template it finds.
图 19.7 显示了 MVC 框架用于查找从 MVC 控制器返回 ViewResult 时要执行的正确 View 模板的完整过程。多个模板可能符合条件,例如,如果 Index .chstml 文件同时存在于 Home 和 Shared 文件夹中。与查找分部视图的规则类似,引擎使用它找到的第一个模板。

Figure 19.7 A flow chart describing how the Razor templating engine locates the correct view template to execute. Avoiding the complexity of this diagram is one of the reasons I recommend using Razor Pages wherever possible!
图 19.7 描述 Razor 模板化引擎如何查找要执行的正确视图模板的流程图。避免此图表的复杂性是我建议尽可能使用 Razor Pages 的原因之一!

Tip You can modify all these conventions, including the algorithm shown in figure 19.8, during initial configuration. In fact, you can replace the whole Razor templating engine if you really want to!
提示:在初始配置期间,您可以修改所有这些约定,包括图 19.8 中所示的算法。事实上,如果您真的愿意,您可以替换整个 Razor 模板引擎!

You may find it tempting to explicitly provide the name of the view file you want to render in your controller; if so, I’d encourage you to fight that urge. You’ll have a much simpler time if you embrace the conventions as they are and go with the flow. That extends to anyone else who looks at your code; if you stick to the standard conventions, there’ll be a comforting familiarity when they look at your app. That can only be a good thing!
你可能会发现显式提供要在控制器中渲染的视图文件的名称很诱人;如果是这样,我鼓励你克制这种冲动。如果您接受惯例并顺其自然,您将度过一段轻松得多的时光。这延伸到查看你的代码的任何其他人;如果您遵守标准约定,当他们查看您的应用程序时,会有一种令人欣慰的熟悉感。那只能是一件好事!

As well as providing a view template name, you can also pass an object to act as the view model for the Razor view. This object should match the type specified in the view’s @model directive, and it’s accessed in exactly the same way as for Razor Pages; using the Model property.
除了提供视图模板名称外,您还可以传递一个对象以充当 Razor 视图的视图模型。此对象应与视图的 @model 指令中指定的类型匹配,并且访问方式与 Razor Pages 完全相同;使用 Model 属性。

Tip All the other ways of passing data to the view I described in chapter 17 are available in MVC controllers too. You should generally favor the view model where possible, but you can also use ViewData, TempData, or @inject services, for example.
提示:我在第 17 章中描述的所有其他将数据传递给视图的方法在 MVC 控制器中也可用。通常,您应该尽可能使用视图模型,但也可以使用 ViewData、TempData 或 @inject 服务等。

The following listing shows two examples of passing a view model to a view.
下面的清单显示了将视图模型传递给视图的两个示例。

Listing 19.7 Returning ViewResult from an action method using default conventions
示例 19.7 使用默认约定从作方法返回 ViewResult

public class ToDoController : Controller
{
    public IActionResult Index()
    {
        var listViewModel = new ToDoListModel();     #A
        return View(listViewModel);      #B
    }
    public IActionResult View(int id)
    {
        var viewModel = new ViewToDoModel();
        return View("ViewToDo", viewModel);    #C
    }

}

Once the Razor view template has been located, the view is rendered using the Razor syntax you learned about in chapters 17 and 18. You can use all the features you’ve already seen—layouts, partial views, _ViewImports, and _ViewStart, for example. From the point of view of the Razor view, there’s no difference between a Razor Pages view and an MVC Razor view.
找到 Razor 视图模板后,将使用您在第 17 章和第 18 章中学到的 Razor 语法呈现视图。您可以使用您已经见过的所有功能 — 例如布局、分部视图、_ViewImports 和 _ViewStart。从 Razor 视图的角度来看,Razor 页面视图和 MVC Razor 视图之间没有区别。

Now you’ve had a brief overview of an MVC application, we can look in more depth about when to choose MVC controllers over Razor Pages.
现在您已经简要概述了 MVC 应用程序,我们可以更深入地了解何时选择 MVC 控制器而不是 Razor Pages。

19.5 Choosing between Razor Pages and MVC controllers

19.5 在 Razor Pages 和 MVC 控制器之间进行选择

Throughout this book, I have said that you should generally choose Razor Pages for server-rendered applications instead of using MVC controllers. In this section I show the difference between Razor Pages and MVC controllers from a project structure point of view and defend my reasoning. I also describe the cases where MVC controllers are a good choice.
在本书中,我一直说过,您通常应该为服务器呈现的应用程序选择 Razor Pages,而不是使用 MVC 控制器。在本节中,我将从项目结构的角度展示 Razor Pages 和 MVC 控制器之间的区别,并为我的推理辩护。我还介绍了 MVC 控制器是不错选择的情况。

If you’re familiar with legacy .NET Framework ASP.NET or earlier versions of ASP.NET Core, you may already be familiar and comfortable with MVC controllers. If you’re unsure whether to stick to what you know or switch to Razor Pages, this section should help you choose. Developers coming from those backgrounds often have misconceptions about Razor Pages initially (as I did!), incorrectly equating them with Web Forms and overlooking their underlying basis of the MVC framework. This section attempts to set the record straight.
如果您熟悉旧版 .NET Framework ASP.NET 或 ASP.NET Core 的早期版本,则您可能已经熟悉并熟悉 MVC 控制器。如果您不确定是坚持您所知道的还是切换到 Razor Pages,本节应该可以帮助您进行选择。来自这些背景的开发人员最初通常对 Razor Pages 有误解(就像我一样),错误地将它们等同于 Web 窗体,而忽略了它们作为 MVC 框架的底层基础。本节试图澄清事实。

Indeed, architecturally, Razor Pages and MVC are essentially equivalent, as they both use the MVC design pattern. The most obvious differences relate to where the files are placed in your project, as I discuss in the next section.
事实上,从架构上讲,Razor Pages 和 MVC 本质上是等效的,因为它们都使用 MVC 设计模式。最明显的区别与文件在项目中的放置位置有关,我将在下一节中讨论。

19.5.1 The benefits of Razor Pages

19.5.1 Razor Pages 的优势

In section 19.5 I showed that the code for an MVC controller looks similar to the code for a Razor Page PageModel. If that’s the case, what benefit is there to using Razor Pages? In this section I discuss some of the pain points of MVC controllers and how Razor Pages attempts to address them.
在第 19.5 节中,我展示了 MVC 控制器的代码看起来类似于 Razor Page PageModel 的代码。如果是这样的话,使用 Razor Pages 有什么好处?在本节中,我将讨论 MVC 控制器的一些痛点,以及 Razor Pages 如何尝试解决这些痛点。

Razor Pages are not Web Forms
Razor Pages 不是 Web Forms

A common argument I hear from existing ASP.NET developers against Razor Pages is “Oh, they’re just Web Forms.” That sentiment misses the mark in many ways, but it’s common enough that it’s worth addressing directly.
我从现有的 ASP.NET 开发人员那里听到的反对 Razor Pages 的常见论点是“哦,它们只是 Web Forms”。这种情绪在很多方面都错失了目标,但它足够普遍,值得直接解决。

Web Forms was a web-programming model that was released as part of .NET Framework 1.0 in 2002. It attempted to provide a highly productive experience for developers moving from desktop development to the web for the first time.
Web Forms是一种 Web 编程模型,于 2002 年作为 .NET Framework 1.0 的一部分发布。它试图为首次从桌面开发转向 Web 的开发人员提供高效的体验。

Web Forms are much maligned now, but their weaknesses only became apparent later. Web Forms attempted to hide the complexities of the web from you, to give you the impression of developing a desktop app. That often resulted in apps that were slow, with lots of interdependencies, and that were hard to maintain.
Web Forms现在受到了很多诟病,但它们的弱点后来才显现出来。Web Forms 试图向您隐藏 Web 的复杂性,让您觉得自己在开发桌面应用程序。这通常会导致应用程序运行缓慢、存在大量相互依赖关系并且难以维护。

Web Forms provided a page-based programming model, which is why Razor Pages sometimes gets associated with them. However, as you’ve seen, Razor Pages is based on the MVC design pattern, and it exposes the intrinsic features of the web without trying to hide them from you.
Web Forms 提供了基于页面的编程模型,这就是 Razor Pages 有时会与它们相关联的原因。但是,正如你所看到的,Razor Pages 基于 MVC 设计模式,它公开了 Web 的内在功能,而不会试图对你隐藏它们。

Razor Pages optimizes certain flows using conventions, but it’s not trying to build a stateful application model over the top of a stateless web application, in the way that Web Forms did.
Razor Pages 使用约定优化某些流,但它不会像 Web 窗体那样尝试在无状态 Web 应用程序之上构建有状态应用程序模型。

If you were a fan of Web Forms’ stateful application model, you should consider Blazor Server, which uses a similar paradigm but embraces the web instead of fighting against it. You can read more about the similarities at https://learn.microsoft.com/zh-cn/dotnet/architecture/blazor-for-web-forms-developers/.
如果你是 Web Forms 的有状态应用程序模型的粉丝,你应该考虑 Blazor Server,它使用类似的范例,但拥抱 Web,而不是与之对抗。您可以在 https://learn.microsoft.com/zh-cn/dotnet/architecture/blazor-for-web-forms-developers/ 上阅读有关相似之处的更多信息。

In MVC, a single controller can have multiple action methods. Each action handles a different request and generates a different response. The grouping of multiple actions in a controller is somewhat arbitrary, but it’s typically used to group actions related to a specific entity or resource: to-do list items in this case. A more complete version of the ToDoController in listing 19.4 might include action methods for listing all to-do items, for creating new items, and for deleting items, for example. Unfortunately, you can often find that your controllers become large and bloated, with many dependencies.[1]
在 MVC 中,单个控制器可以有多个方法。每个作处理不同的请求并生成不同的响应。控制器中多个作的分组在某种程度上是任意的,但它通常用于对与特定实体或资源相关的作进行分组:在本例中为待办事项列表项。例如,清单 19.4 中更完整的 ToDoController 版本可能包括用于列出所有待办事项、创建新项和删除项的作方法。不幸的是,您经常会发现您的控制器变得庞大而臃肿,并且具有许多依赖项。[1]

NOTE You don’t have to make your controllers very large like this. It’s just a common pattern. You could, for example, create a separate controller for every action instead.
注意:您不必像这样将控制器做得非常大。这只是一种常见的模式。例如,您可以为每个作创建一个单独的控制器。

Another pitfall of MVC controllers is the way they’re typically organized in your project. Most action methods in a controller need an associated Razor view, for generating the HTML, and a view model for passing data to the view. The MVC approach in .NET traditionally groups classes by type (controller, view, view model), while the Razor Page approach groups by function; everything related to a specific page is co-located.
MVC 控制器的另一个缺陷是它们在项目中的组织方式。控制器中的大多数作方法都需要一个关联的 Razor 视图(用于生成 HTML)和一个视图模型(用于将数据传递到视图)。.NET 中的 MVC 方法传统上按类型(控制器、视图、视图模型)对类进行分组,而 Razor Page 方法按函数分组;与特定页面相关的所有内容都位于同一位置。

Figure 19.8 compares the file layout for a simple Razor Pages project with the MVC equivalent. Using Razor Pages means much less scrolling up and down between the controller, views, and view model folders whenever you’re working on a particular page. Everything you need is found in two files, the .cshtml Razor view and the (nested) .cshtml.cs PageModel file.
图 19.8 将简单 Razor Pages 项目的文件布局与 MVC 等效项进行了比较。使用 Razor Pages 意味着在处理特定页面时,在控制器、视图和视图模型文件夹之间上下滚动的时间要少得多。您需要的所有内容都可以在两个文件中找到:.cshtml Razor 视图和(嵌套的).cshtml.cs PageModel 文件。

alt text

Figure 19.8 Comparing the folder structure for an MVC project with the folder structure for a Razor Pages project
图 19.8 将 MVC 项目的文件夹结构与 Razor Pages 项目的文件夹结构进行比较

There are additional differences between MVC and Razor Pages, which I have highlighted throughout the book, but this layout difference is really the biggest win. Razor Pages embraces the fact that you’re building a page-based application and optimizes your workflow by keeping everything related to a single page together.
MVC 和 Razor Pages 之间还有其他差异,我在整本书中都强调了这些差异,但这种布局差异确实是最大的胜利。Razor Pages 接受了您正在构建基于页面的应用程序这一事实,并通过将与单个页面相关的所有内容放在一起来优化您的工作流程。

Tip You can think of each Razor Page as a mini controller focused on a single page. Page handlers are functionally equivalent to MVC controller action methods.
提示:您可以将每个 Razor 页面视为一个专注于单个页面的迷你控制器。页面处理程序在功能上等同于 MVC 控制器作方法。

This layout also has the benefit of making each page a separate class. This contrasts with the MVC approach of making each page an action on a given controller. Each Razor Page is cohesive for a particular feature, such as displaying a to-do item. MVC controllers contain action methods that handle multiple different features for a more abstract concept, such as all the features related to to-do items.
此布局还具有使每个页面成为单独类的优点。这与 MVC 方法形成鲜明对比,后者将每个页面都设置为给定控制器上的作。每个 Razor 页面对于特定功能(例如显示待办事项)都是内聚的。MVC 控制器包含作方法,这些方法处理多个不同功能,以实现更抽象的概念,例如与待办事项相关的所有功能。

NOTE ASP.NET Core is eminently customizable, so you don’t have to group your MVC applications by type; it’s simply the default state and the easy path. In fact, if you do choose to use MVC controllers, I strongly suggest grouping using feature folders instead. This MSDN article provides a good introduction: http://mng.bz/mVOr.
注意: ASP.NET Core 是高度可定制的,因此您不必按类型对 MVC 应用程序进行分组;它只是默认状态和简单的路径。事实上,如果您确实选择使用 MVC 控制器,我强烈建议改用功能文件夹进行分组。这篇 MSDN 文章提供了一个很好的介绍:http://mng.bz/mVOr

Another important point is that Razor Pages doesn’t lose any of the separation of concerns that MVC has. The view part of Razor Pages is still concerned only with rendering HTML, and the handler is the coordinator that calls out to the application model. The only real difference is the lack of the explicit view model that you have in MVC, but it’s perfectly possible to emulate this in Razor Pages if that’s a deal-breaker for you.
另一个重要的一点是,Razor Pages 不会失去 MVC 所具有的任何关注点分离。Razor Pages 的视图部分仍然只关心呈现 HTML,处理程序是调用应用程序模型的协调器。唯一真正的区别是缺少 MVC 中的显式视图模型,但如果这对您来说是一个交易破坏者,那么在 Razor Pages 中完全可以模拟它。

The benefits of using Razor Pages are particularly noticeable when you have content websites, such as marketing websites, where you’re mostly displaying static data and there’s no real logic. In that case, MVC adds complexity without any real benefits, as there’s not really any logic in the controllers at all. Another great use case is when you’re creating forms for users to submit data. Razor Pages is especially optimized for this scenario, as you saw in previous chapters.
当你拥有内容网站(如营销网站)时,使用 Razor Pages 的好处尤其明显,因为你主要显示静态数据,没有真正的逻辑。在这种情况下,MVC 增加了复杂性,但没有任何实际的好处,因为控制器中根本没有任何真正的逻辑。另一个很好的用例是当您为用户创建表单以提交数据时。Razor Pages 特别针对此方案进行了优化,如前几章所示。

Clearly, I’m a fan of Razor Pages, but that’s not to say they’re perfect for every situation. In the next section I discuss some of the cases when you might choose to use MVC controllers in your application. Bear in mind it’s not an either-or choice; it’s possible to use MVC controllers, Razor Pages, and even minimal APIs in the same application, and in many cases that may be the best option.
显然,我是 Razor Pages 的粉丝,但这并不是说它们适合所有情况。在下一节中,我将讨论一些您可能会选择在应用程序中使用 MVC 控制器的情况。请记住,这不是一个非此即彼的选择;可以在同一应用程序中使用 MVC 控制器、Razor Pages 甚至最小的 API,在许多情况下,这可能是最佳选择。

19.5.2 When to choose MVC controllers over Razor Pages

19.5.2 何时选择 MVC 控制器而不是 Razor Pages

Razor Pages are great for building page-based server-side rendered applications. But not all applications fit that mold, and even some applications that do fall in that category might be best developed using MVC controllers instead of Razor Pages. These are a few such scenarios:
Razor Pages 非常适合构建基于页面的服务器端渲染应用程序。但并非所有应用程序都适合这种模式,甚至一些属于该类别的应用程序也可能最好使用 MVC 控制器而不是 Razor Pages 进行开发。以下是一些这样的场景:

• When you don’t want to render views—Razor Pages are best for page-based applications, where you’re rendering a view for the user. If you’re building an HTTP API, you should use minimal APIs or MVC (web API) controllers instead. You’ll learn about web API controllers in chapter 20.
当您不想呈现视图时 - Razor Pages 最适合基于页面的应用程序,您可以在其中为用户呈现视图。如果要构建 HTTP API,则应改用最少的 API 或 MVC (Web API) 控制器。您将在第 20 章中了解 Web API 控制器。

• When you’re converting an existing MVC application to ASP.NET Core—If you already have a legacy ASP.NET application that you’re converting to ASP.NET Core or an app using an early version of ASP.NET Core that you’re updating, you’re likely using MVC controllers. It’s probably not worth converting your existing MVC controllers to Razor Pages in this case. It makes more sense to keep your existing code and consider whether to do new development in the application with Razor Pages.
将现有 MVC 应用程序转换为 ASP.NET Core 时 - 如果您已经有一个要转换为 ASP.NET Core 的旧版 ASP.NET 应用程序,或者使用要更新的 ASP.NET Core 早期版本的应用程序,则您可能使用的是 MVC 控制器。在这种情况下,可能不值得将现有的 MVC 控制器转换为 Razor Pages。保留现有代码并考虑是否使用 Razor Pages 在应用程序中进行新开发更有意义。

• When you’re doing a lot of partial page updates—It’s possible to use JavaScript in an MVC application to avoid doing full page navigations by updating only part of the page at a time. This approach, halfway between fully server-side rendered and a client-side application, may be easier to achieve with MVC controllers than Razor Pages. On the other hand, you can easily mix Razor Pages and MVC controllers, using Razor Pages where appropriate and MVC controllers for the partial view results.
当您执行大量部分页面更新时 - 可以在 MVC 应用程序中使用 JavaScript,通过一次只更新页面的一部分来避免执行整个页面导航。这种方法介于完全服务器端渲染和客户端应用程序之间,使用 MVC 控制器可能比 Razor Pages 更容易实现。另一方面,您可以轻松地混合使用 Razor Pages 和 MVC 控制器,在适当的情况下使用 Razor Pages,并使用 MVC 控制器获得部分视图结果。

When not to use Razor Pages or MVC controllers
何时不使用 Razor Pages 或 MVC 控制器

Typically, you’ll use either Razor Pages or MVC controllers to write most of the UI logic for an app. You’ll use it to define the APIs and pages in your application and to define how they interface with your business logic. Razor Pages and MVC provide an extensive framework and include a great deal of functionality to help build your apps quickly and efficiently. But they’re not suited to every app.
通常,你将使用 Razor Pages 或 MVC 控制器来编写应用的大部分 UI 逻辑。您将使用它来定义应用程序中的 API 和页面,并定义它们如何与您的业务逻辑交互。Razor Pages 和 MVC 提供了一个广泛的框架,并包含大量功能来帮助快速有效地构建应用。但它们并不适合每个应用程序。

Providing so much functionality necessarily comes with a certain degree of performance overhead. For typical line-of-business apps, the productivity gains from using MVC or Razor Pages often outweighs any performance effect. But if you’re building a JSON API you will likely want to consider minimal APIs for the performance improvements. For server-to-server APIs or nonbrowser clients, an alternative protocol like gRPC (https://docs.microsoft.com/aspnet/core/grpc) may be a good fit. You might also consider protocols like GraphQL, as discussed in Building Web APIs in ASP.NET Core, by Valerio De Sanctis (Manning, 2023).
提供如此多的功能必然会带来一定程度的性能开销。对于典型的业务线应用,使用 MVC 或 Razor Pages 带来的工作效率提升通常超过任何性能影响。但是,如果您正在构建 JSON API,则可能需要考虑使用最少的 API 来提高性能。对于服务器到服务器 API 或非浏览器客户端,gRPC (https://docs.microsoft.com/aspnet/core/grpc) 等替代协议可能很合适。您还可以考虑像 GraphQL 这样的协议,如 Valerio De Sanctis 在 ASP.NET Core 中构建 Web API 中所述(Manning,2023 年)。

Alternatively, if you’re building an app with real-time functionality, you’ll probably want to consider using WebSockets instead of traditional HTTP requests. ASP.NET Core SignalR can be used to add real-time functionality to your app by providing an abstraction over WebSockets. SignalR also provides simple transport fallbacks and a remote procedure call (RPC) app model. For details, see the documentation at https://docs.microsoft.com/aspnet/core/signalr.
或者,如果您正在构建具有实时功能的应用程序,则可能需要考虑使用 WebSockets 而不是传统的 HTTP 请求。ASP.NET Core SignalR 可用于通过通过 WebSockets 提供抽象来向应用添加实时功能。SignalR 还提供简单的传输回退和远程过程调用 (RPC) 应用程序模型。有关详细信息,请参阅 https://docs.microsoft.com/aspnet/core/signalr 中的文档。

Another option available in ASP.NET Core 7 is Blazor. This framework allows you to build interactive client-side web applications by using the WebAssembly standard to run .NET code directly in your browser or by using a stateful model with SignalR. See Blazor in Action, by Chris Sainty (Manning, 2022), for more details.
ASP.NET Core 7 中提供的另一个选项是 Blazor。此框架允许您通过使用 WebAssembly 标准直接在浏览器中运行 .NET 代码,或者将有状态模型与 SignalR 结合使用来构建交互式客户端 Web 应用程序。有关更多详细信息,请参阅 Chris Sainty 的 Blazor in Action(Manning, 2022)。

I hope that by this point you’re sold on Razor Pages and their overall design using the MVC pattern. Nevertheless, using MVC controllers makes sense in some situations, so it’s worth bearing that in mind. Another important point to remember is that you can include both MVC controllers and Razor Pages in the same application if you need them.
我希望到此时,您已经对使用 MVC 模式的 Razor Pages 及其整体设计感到满意。尽管如此,在某些情况下使用 MVC 控制器是有意义的,因此值得牢记这一点。要记住的另一个重要点是,如果需要,您可以将 MVC 控制器和 Razor Pages 包含在同一个应用程序中。

You’ve learned about MVC controllers as an alternative to Razor Pages, and in part 1 of this book you learned about using minimal APIs to build JSON API. Web API controllers sit somewhere in between; they use MVC controllers but generate JSON and other machine-friendly format data, not HTML. In chapter 20 you’ll learn why you might choose to use web API controllers over minimal APIs and how to build a web API application.
您已经了解了 MVC 控制器作为 Razor Pages 的替代方案,在本书的第 1 部分中,您了解了如何使用最少的 API 来构建 JSON API。Web API 控制器介于两者之间;它们使用 MVC 控制器,但生成 JSON 和其他机器友好的格式数据,而不是 HTML。在第 20 章中,您将了解为什么您可能会选择使用 Web API 控制器而不是最少的 API,以及如何构建 Web API 应用程序。

19.6 Summary

19.6 总结

An action (or action method) is a method that runs in response to a request. An MVC controller is a class that contains one or more logically grouped action methods.
action (或作方法) 是为响应请求而运行的方法。MVC 控制器是包含一个或多个逻辑分组的作方法的类。

To use MVC controllers in an ASP.NET Core application, call AddControllersWithViews() on your WebApplicationBuilder. This adds all the required services for MVC controllers and Razor view rendering to the dependency injection container.
要在 ASP.NET Core 应用程序中使用 MVC 控制器,请在 WebApplicationBuilder 上调用 AddControllersWithViews()。这会将 MVC 控制器和 Razor 视图呈现所需的所有服务添加到依赖项注入容器中。

MVC controllers typically use conventional routing to select an MVC controller and action method. Instead of associating a route template with each action method in your application, conventional routing specifies one or more route template patterns that map to multiple endpoints. Conventional routes must define a controller and action route parameter to determine the action to execute.
MVC 控制器通常使用传统路由来选择 MVC 控制器和作方法。传统路由不是将路由模板与应用程序中的每个作方法相关联,而是指定一个或多个映射到多个终端节点的路由模板模式。传统路由必须定义控制器和作路由参数,以确定要执行的作。

You can return IActionResult instances from MVC controllers and they are executed in the same way as for Razor Pages. The most commonly returned type is ViewResult, using the View() helper method, which instructs the framework to render a Razor view.
可以从 MVC 控制器返回 IActionResult 实例,这些实例的执行方式与 Razor Pages 相同。最常返回的类型是 ViewResult,它使用 View() 帮助程序方法,该方法指示框架呈现 Razor 视图。

ViewResult may contain the name of the view to render and optionally a view model object to use when rendering the view. If the view name is not provided, a view is chosen using conventions.
ViewResult 可能包含要渲染的视图的名称,以及渲染视图时要使用的视图模型对象(可选)。如果未提供视图名称,则使用约定选择视图。

By convention, MVC Razor views are named the same as the action method that invokes them. They reside either in a folder with the same name as the action method’s controller or in the Shared folder.
按照约定,MVC Razor 视图的名称与调用它们的作方法相同。它们位于与作方法的控制器同名的文件夹中,或者位于 Shared 文件夹中。

MVC controllers contain multiple action methods, typically grouped around a high-level entity or resource. In contrast, Razor Pages groups all the page handlers for a single page in one place, grouping around a page/feature instead of an entity. This gives improved developer ergonomics when working on an endpoint.
MVC 控制器包含多个作方法,通常围绕高级实体或资源进行分组。相比之下,Razor Pages 将单个页面的所有页面处理程序分组到一个位置,围绕页面/功能而不是实体进行分组。这为开发人员在端点上工作时提供了改进的人体工程学。

MVC controllers may make sense over Razor Pages if you are upgrading an application that already uses MVC controllers or if your application is using a lot of partial page updates.
如果要升级已使用 MVC 控制器的应用程序,或者应用程序正在使用大量部分页面更新,则 MVC 控制器可能对 Razor Pages 有意义。

[1] Before moving to Razor Pages, the ASP.NET Core template that includes user login functionality contained two such controllers, each containing more than 20 action methods and more than 500 lines of code!
[1] 在迁移到 Razor Pages 之前,包含用户登录功能的 ASP.NET Core 模板包含两个这样的控制器,每个控制器包含 20 多个作方法和 500 多行代码!

ASP.NET Core in Action 18 Building forms with Tag Helpers

18 Building forms with Tag Helpers
18 使用标记辅助对象构建表单

This chapter covers
本章涵盖
• Building forms easily with Tag Helpers
使用标签帮助程序轻松构建表单
• Generating URLs with the Anchor Tag Helper
使用锚点标签帮助程序生成 URL
• Using Tag Helpers to add functionality to Razor
使用标签帮助程序向 Razor 添加功能

In chapter 17 you learned about Razor templates and how to use them to generate the views for your application. By mixing HTML and C#, you can create dynamic applications that can display different data based on the request, the logged-in user, or any other data you can access.
在第 17 章中,您了解了 Razor 模板以及如何使用它们为应用程序生成视图。通过混合使用 HTML 和 C#,您可以创建动态应用程序,这些应用程序可以根据请求、登录用户或您可以访问的任何其他数据显示不同的数据。

Displaying dynamic data is an important aspect of many web applications, but it’s typically only half of the story. As well as needing to displaying data to the user, you often need the user to be able to submit data back to your application. You can use data to customize the view or to update the application model by saving it to a database, for example. For traditional web applications, this data is usually submitted using an HTML form.
显示动态数据是许多 Web 应用程序的一个重要方面,但通常只是其中的一半。除了需要向用户显示数据外,您还经常需要用户能够将数据提交回您的应用程序。例如,您可以使用 data 来自定义视图或通过将应用程序模型保存到数据库来更新应用程序模型。对于传统的 Web 应用程序,此数据通常使用 HTML 表单提交。

In chapter 16 you learned about model binding, which is how you accept the data sent by a user in a request and convert it to C# objects that you can use in your Razor Pages. You also learned about validation and how important it is to validate the data sent in a request. You used DataAnnotations attributes to define the rules associated with your models, as well as associated metadata like the display name for a property.
在第 16 章中,你了解了模型绑定,即如何接受用户在请求中发送的数据,并将其转换为可在 Razor Pages 中使用的 C# 对象。您还了解了验证以及验证请求中发送的数据的重要性。您使用 DataAnnotations 属性来定义与模型关联的规则,以及关联的元数据,例如属性的显示名称。

The final aspect we haven’t yet looked at is how to build the HTML forms that users use to send this data in a request. Forms are one of the key ways users will interact with your application in the browser, so it’s important they’re both correctly defined for your application and user-friendly. ASP.NET Core provides a feature to achieve this, called Tag Helpers.
我们还没有研究的最后一个方面是如何构建用户用来在请求中发送这些数据的 HTML 表单。表单是用户在浏览器中与您的应用程序交互的关键方式之一,因此它们必须为您的应用程序正确定义并且对用户友好。ASP.NET Core 提供了一项功能来实现此目的,称为 Tag Helpers。

Tag Helpers are additions to Razor syntax that you use to customize the HTML generated in your templates. Tag Helpers can be added to an otherwise-standard HTML element, such as an <input>, to customize its attributes based on your C# model, saving you from having to write boilerplate code. Tag Helpers can also be standalone elements and can be used to generate completely customized HTML.
标记帮助程序是 Razor 语法的新增功能,用于自定义模板中生成的 HTML。可以将标记帮助程序添加到其他标准的 HTML 元素(如 <input>)以基于 C# 模型自定义其属性,从而使您不必编写样板代码。标记帮助程序也可以是独立元素,可用于生成完全自定义的 HTML。

NOTE Remember that Razor, and therefore Tag Helpers, are for server-side HTML rendering. You can’t use Tag Helpers directly in frontend frameworks like Angular and React.
注意:请记住,Razor 以及标记帮助程序用于服务器端 HTML 呈现。你不能直接在 Angular 和 React 等前端框架中使用 Tag Helpers。

If you’ve used legacy (.NET Framework) ASP.NET before, Tag Helpers may sound reminiscent of HTML Helpers, which could also be used to generate HTML based on your C# classes. Tag Helpers are the logical successor to HTML Helpers, as they provide a more streamlined syntax than the previous, C#-focused helpers. HTML Helpers are still available in ASP.NET Core, so if you’re converting some old templates to ASP.NET Core, you can still use them. But if you’re writing new Razor templates, I recommend using only Tag Helpers, as they should cover everything you need. I don’t cover HTML Helpers in this book.
如果您以前使用过旧版 (.NET Framework) ASP.NET,则标记帮助程序听起来可能会让人想起 HTML 帮助程序,后者也可用于基于 C# 类生成 HTML。标记帮助程序是 HTML 帮助程序的逻辑继承程序,因为它们提供的语法比以前以 C# 为中心的帮助程序更简化。HTML 帮助程序在 ASP.NET Core 中仍然可用,因此,如果要将一些旧模板转换为 ASP.NET Core,您仍然可以使用它们。但是,如果您正在编写新的 Razor 模板,我建议仅使用 Tag Helpers,因为它们应该涵盖您需要的所有内容。在本书中,我不涉及 HTML Helpers。

In this chapter you’ll primarily learn how to use Tag Helpers when building forms. They simplify the process of generating correct element names and IDs so that model binding can occur seamlessly when the form is sent back to your application. To put them into context, you’re going to carry on building the currency converter application that you’ve seen in previous chapters. You’ll add the ability to submit currency exchange requests to it, validate the data, and redisplay errors on the form using Tag Helpers to do the legwork for you, as shown in figure 18.1.
在本章中,您将主要学习如何在构建表单时使用 Tag Helpers。它们简化了生成正确元素名称和 ID 的过程,以便在将表单发送回应用程序时可以无缝地进行模型绑定。为了将它们放在上下文中,您将继续构建您在前几章中看到的货币转换器应用程序。您将添加向其提交货币兑换请求、验证数据以及使用 Tag Helpers 在表单上重新显示错误的功能,以为您完成跑腿工作,如图 18.1 所示。

alt text

Figure 18.1 The currency converter application forms, built using Tag Helpers. The labels, drop-down lists, input elements, and validation messages are all generated using Tag Helpers.
图 18.1 使用 Tag Helper 构建的货币转换器应用程序表单。标签、下拉列表、input 元素和验证消息都是使用 Tag Helper 生成的。

As you develop the application, you’ll meet the most common Tag Helpers you’ll encounter when working with forms. You’ll also see how you can use Tag Helpers to simplify other common tasks, such as generating links, conditionally displaying data in your application, and ensuring that users see the latest version of an image file when they refresh their browser.
在开发应用程序时,您将遇到在使用表单时遇到的最常见的标记帮助程序。您还将了解如何使用标记帮助程序来简化其他常见任务,例如生成链接、在应用程序中有条件地显示数据,以及确保用户在刷新浏览器时看到最新版本的图像文件。

To start, I’ll talk a little about why you need Tag Helpers when Razor can already generate any HTML you like by combining C# and HTML in a file.
首先,我将简要介绍一下当 Razor 已经可以通过将 C# 和 HTML 组合到一个文件中来生成您喜欢的任何 HTML 时,为什么需要标记帮助程序。

18.1 Catering to editors with Tag Helpers

18.1 使用标签助手迎合编辑者

One of the common complaints about the mixture of C# and HTML in Razor templates is that you can’t easily use standard HTML editing tools with them; all the @ and {} symbols in the C# code tend to confuse the editors. Reading the templates can be similarly difficult for people; switching paradigms between C# and HTML can be a bit jarring sometimes.
关于 Razor 模板中 C# 和 HTML 混合的常见抱怨之一是,您无法轻松地对它们使用标准的 HTML 编辑工具;C# 代码中的所有 @ 和 {} 符号往往会使编辑器感到困惑。阅读模板对人们来说同样困难;在 C# 和 HTML 之间切换范例有时可能有点不和谐。

This arguably wasn’t such a problem when Visual Studio was the only supported way to build ASP.NET websites, as it could obviously understand the templates without any problems and helpfully colorize the editor. But with ASP.NET Core going cross-platform, the desire to play nicely with other editors reared its head again.
当 Visual Studio 是构建 ASP.NET 网站的唯一受支持方式时,这可以说不是问题,因为它显然可以毫无问题地理解模板并有助于为编辑器着色。但随着 ASP.NET Core 跨平台,与其他编辑器友好合作的愿望再次抬头。

This was one of the big motivations for Tag Helpers. They integrate seamlessly into the standard HTML syntax by adding what look to be attributes, typically starting with asp-. They’re most often used to generate HTML forms, as shown in the following listing. This listing shows a view from the first iteration of the currency converter application, in which you choose the currencies and quantity to convert.
这是 Tag Helper 的主要动机之一。它们通过添加看起来像属性的内容(通常以 asp-
开头)无缝集成到标准 HTML 语法中。它们最常用于生成 HTML 表单,如下面的清单所示。此清单显示了 currency converter 应用程序第一次迭代的视图,您可以在其中选择要转换的货币和数量。

Listing 18.1 User registration form using Tag Helpers
清单 18.1 使用 Tag Helpers 的用户注册表单

@page                    #A
@model ConvertModel      #A
<form method="post">                                        
    <div class="form-group">
        <label asp-for="CurrencyFrom"></label>      #B
        <input class="form-control" asp-for="CurrencyFrom" />     #C
        <span asp-validation-for="CurrencyFrom"></span>    #D
    </div>
    <div class="form-group">
        <label asp-for="Quantity"></label>          #B
        <input class="form-control" asp-for="Quantity" />         #C
        <span asp-validation-for="Quantity"></span>        #D
    </div> 
    <div class="form-group">
        <label asp-for="CurrencyTo"></label>        #B
        <input class="form-control" asp-for="CurrencyTo" />       #C
        <span asp-validation-for="CurrencyTo"></span>      #D
    </div>
    <button type="submit" class="btn btn-primary">Submit</button>
</form>

❶ This is the view for the Razor Page Convert.cshtml. The Model type is ConvertModel.
这是 Razor Page Convert.cshtml 的视图。Model 类型为 ConvertModel。
❷ asp-for on Labels generates the caption for labels based on the view model.
Labels 上的 asp-for 根据视图模型生成标签的标题。
❸ asp-for on Inputs generates the correct type, value, name, and validation attributes for the model.
inputs 上的 asp-for 为模型生成正确的类型、值、名称和验证属性。
❹ Validation messages are written to a span using Tag Helpers.
验证消息使用 Tag Helper 写入 span。

At first glance, you might not even spot the Tag Helpers, they blend in so well with the HTML! This makes it easy to edit the files with any standard HTML text editor. But don’t be concerned that you’ve sacrificed readability in Visual Studio. As you can see in figure 18.2, elements with Tag Helpers are distinguishable from the standard HTML <div> element and the standard HTML class attribute on the <input> element. The C# properties of the view model being referenced (CurrencyFrom, in this case) are also displayed differently from “normal” HTML attributes. And of course you get IntelliSense, as you’d expect. Most other integrated development environments (IDEs) also include syntax highlighting and IntelliSense support.
乍一看,您甚至可能没有注意到 Tag Helpers,它们与 HTML 融合得非常好!这使得使用任何标准 HTML 文本编辑器编辑文件变得容易。但不要担心您牺牲了 Visual Studio 中的可读性。如图 18.2 所示,带有 Tag Helpers 的元素与标准 HTML <div>元素和元素上的标准 HTML <input>class 属性是可以区分的。所引用的视图模型的 C# 属性(在本例中为 CurrencyFrom)的显示方式也与“普通”HTML 属性不同。当然,正如您所期望的那样,您可以获得 IntelliSense。大多数其他集成开发环境 (IDE) 还包括语法突出显示和 IntelliSense 支持。

alt text

Figure 18.2 In Visual Studio, Tag Helpers are distinguishable from normal elements by being bold and a different color from standard HTML elements and attributes.
图 18.2 在 Visual Studio 中,标记帮助程序与普通元素的区别在于粗体和与标准 HTML 元素和属性不同的颜色。

Tag Helpers are extra attributes on standard HTML elements (or new elements entirely) that work by modifying the HTML element they’re attached to. They let you easily integrate your server-side values, such as those exposed on your PageModel, with the generated HTML.
标签帮助程序是标准 HTML 元素(或完全是新元素)上的额外属性,通过修改它们所附加到的 HTML 元素来工作。它们可让您轻松地将服务器端值(例如 PageModel 上公开的值)与生成的 HTML 集成。

Notice that listing 18.1 doesn’t specify the captions to display in the labels. Instead, you declaratively use asp-for="CurrencyFrom" to say “For this <label>, use the CurrencyFrom property to work out what caption to use.” Similarly, for the <input> elements, Tag Helpers are used to
请注意,清单 18.1 没有指定要在标签中显示的标题。相反,您以声明方式使用 asp-for=“CurrencyFrom” 来表示 <label>,请使用 CurrencyFrom 属性来确定要使用的标题。同样,对于 <input>元素,Tag Helpers 用于

• Automatically populate the value from the PageModel property.
自动填充 PageModel 属性中的值。
• Choose the correct id and name, so that when the form is POSTed back to the Razor Page, the property is model-bound correctly.
选择正确的 ID 和名称,以便在将表单 POST 回 Razor 页面时,该属性将正确进行模型绑定。
• Choose the correct input type to display (for example, a number input for the Quantity property).
选择要显示的正确输入类型 (例如,Quantity 属性的数字输入)。
• Display any validation errors, as shown in figure 18.3.
显示所有验证错误,如图 18.3 所示。

alt text

Figure 18.3 Tag Helpers hook into the metadata provided by DataAnnotations attributes, as well as the property types themselves. The Validation Tag Helper can even populate error messages based on the ModelState, as you saw in chapter 16.
图 18.3 标记帮助程序挂接到 DataAnnotations 属性提供的元数据以及属性类型本身。Validation Tag Helper 甚至可以根据 ModelState 填充错误消息,如第 16 章所示。

Tag Helpers can perform a variety of functions by modifying the HTML elements they’re applied to. This chapter introduces several common Tag Helpers and how to use them, but it’s not an exhaustive list. I don’t cover all the helpers that come out of the box in ASP.NET Core (there are more coming with every release!), and you can easily create your own, as you’ll see in chapter 32. Alternatively, you could use those published by others on NuGet or GitHub.
标签帮助程序可以通过修改它们所应用的 HTML 元素来执行各种功能。本章介绍了几种常见的 Tag Helper 及其使用方法,但并非详尽无遗。我没有涵盖 ASP.NET Core 中开箱即用的所有帮助程序(每个版本都会提供更多帮助程序),您可以轻松创建自己的帮助程序,如第 32 章所示。或者,您也可以使用其他人在 NuGet 或 GitHub 上发布的 Navi。

WebForms flashbacks
WebForms 闪回

For those who used ASP.NET back in the day of WebForms, before the advent of the Model-View-Controller (MVC) pattern for web development, Tag Helpers may be triggering bad memories. Although the asp- prefix is somewhat reminiscent of ASP.NET Web Server control definitions, never fear; the two are completely different beasts.
对于那些在 WebForms 时代使用 ASP.NET 的人来说,在用于 Web 开发的模型-视图-控制器 (MVC) 模式出现之前,标记帮助程序可能会触发糟糕的回忆。尽管 asp- 前缀有点让人想起 ASP.NET Web 服务器控件定义,但不要害怕;两者是完全不同的野兽。

Web Server controls were added directly to a page’s backing C# class and had a broad scope that could modify seemingly unrelated parts of the page. Coupled with that, they had a complex life cycle that was hard to understand and debug when things weren’t working. The perils of trying to work with that level of complexity haven’t been forgotten, and Tag Helpers aren’t the same.
Web 服务器控件直接添加到页面的支持 C# 类中,并且具有广泛的范围,可以修改页面中看似不相关的部分。再加上,它们的生命周期很复杂,当事情不正常时,很难理解和调试。尝试处理这种复杂程度的危险并没有被遗忘,标签帮助程序也不一样。

Tag Helpers don’t have a life cycle; they participate in the rendering of the element to which they’re attached, and that’s it. They can modify the HTML element they’re attached to, but they can’t modify anything else on your page, making them conceptually much simpler. An additional capability they bring is the ability to have multiple Tag Helpers acting on a single element—something Web Server controls couldn’t easily achieve.
标记帮助程序没有生命周期;它们参与渲染它们所附加到的元素,仅此而已。他们可以修改它们所附加到的 HTML 元素,但不能修改页面上的任何其他内容,从而在概念上使它们变得更加简单。它们带来的另一项功能是能够让多个 Tag Helpers 作用于单个元素 — 这是 Web Server 控件无法轻松实现的。

Overall, if you’re writing Razor templates, you’ll have a much more enjoyable experience if you embrace Tag Helpers as integral to its syntax. They bring a lot of benefits without obvious downsides, and your cross-platform-editor friends will thank you!
总的来说,如果你正在编写 Razor 模板,如果你将 Tag Helpers 作为其语法的组成部分,你将获得更愉快的体验。它们带来了很多好处,而且没有明显的缺点,你的跨平台编辑器朋友会感谢你!

18.2 Creating forms using Tag Helpers

18.2 使用标记帮助程序创建表单

In this section you’ll learn how to use some of the most useful Tag Helpers: Tag Helpers that work with forms. You’ll learn how to use them to generate HTML markup based on properties of your PageModel, creating the correct id and name attributes, and setting the value of the element to the model property’s value (among other things). This capability significantly reduces the amount of markup you need to write manually.
在本节中,您将学习如何使用一些最有用的 Tag Helpers:使用表单的 Tag Helpers。您将学习如何使用它们根据 PageModel 的属性生成 HTML 标记,创建正确的 id 和 name 属性,以及将元素的值设置为 model 属性的值(以及其他内容)。此功能显著减少了您需要手动编写的标记量。

Imagine you’re building the checkout page for the currency converter application, and you need to capture the user’s details on the checkout page. In chapter 16 you built a UserBindingModel model (shown in listing 18.2), added DataAnnotations attributes for validation, and saw how to model-bind it in a POST to a Razor Page. In this chapter you’ll see how to create the view for it by exposing the UserBindingModel as a property on your PageModel.
假设您正在为货币转换器应用程序构建结帐页面,并且您需要在结帐页面上捕获用户的详细信息。在第 16 章中,您构建了一个 UserBindingModel 模型(如清单 18.2 所示),添加了用于验证的 DataAnnotations 属性,并了解了如何在 POST 中将其模型绑定到 Razor 页面。在本章中,您将了解如何通过将 UserBindingModel 作为 PageModel 上的属性公开来为其创建视图。

Warning With Razor Pages, you often expose the same object in your view that you use for model binding. When you do this, you must be careful to not include sensitive values (that shouldn’t be edited) in the binding model, to prevent mass-assignment attacks on your app. You can read more about these attacks on my blog at http://mng.bz/RXw0.
警告:使用 Razor Pages,您通常会在视图中公开用于模型绑定的相同对象。执行此作时,必须注意不要在绑定模型中包含敏感值(不应编辑),以防止对应用程序进行批量赋值攻击。您可以在我的博客 http://mng.bz/RXw0 上阅读有关这些攻击的更多信息。

Listing 18.2 UserBindingModel for creating a user on a checkout page
列表 18.2 用于在结帐页面上创建用户的 UserBindingModel

public class UserBindingModel
{
    [Required]
    [StringLength(100, ErrorMessage = "Maximum length is {1}")]
    [Display(Name = "Your name")]
    public string FirstName { get; set; }

    [Required]
    [StringLength(100, ErrorMessage = "Maximum length is {1}")]
    [Display(Name = "Last name")]
    public string LastName { get; set; }

    [Required]
    [EmailAddress]
    public string Email { get; set; }

    [Phone(ErrorMessage = "Not a valid phone number.")]
    [Display(Name = "Phone number")]
    public string PhoneNumber { get; set; }
}

The UserBindingModel is decorated with various DataAnnotations attributes. In chapter 16 you saw that these attributes are used during model validation when the model is bound to a request, before the page handler is executed. These attributes are also used by the Razor templating language to provide the metadata required to generate the correct HTML when you use Tag Helpers.
UserBindingModel 使用各种 DataAnnotations 属性进行修饰。在第 16 章中,你看到这些属性在模型验证期间、当模型绑定到请求时、在执行页面处理程序之前使用。Razor 模板语言还使用这些属性来提供在使用标记帮助程序时生成正确 HTML 所需的元数据。

You can use the pattern I described in chapter 16, exposing a UserBindindModel as an Input property of your PageModel, to use the model for both model binding and in your Razor view:
您可以使用我在第 16 章 将 UserBindindModel 公开为 PageModel 的 Input 属性中描述的模式,将该模型用于模型绑定和 Razor 视图:

public class CheckoutModel: PageModel
{
    [BindProperty]
    public UserBindingModel Input { get; set; }
}

With the help of the UserBindingModel property, Tag Helpers, and a little HTML, you can create a Razor view that lets the user enter their details, as shown in figure 18.4.
借助 UserBindingModel 属性、标记帮助程序和一些 HTML,您可以创建一个允许用户输入其详细信息的 Razor 视图,如图 18.4 所示。

alt text

Figure 18.4 The checkout page for an application. The HTML is generated based on a UserBindingModel, using Tag Helpers to render the required element values, input types, and validation messages.
图 18.4 应用程序的结帐页面。HTML 是基于 UserBindingModel 生成的,使用标记帮助程序呈现所需的元素值、输入类型和验证消息。

The Razor template to generate this page is shown in listing 18.3. This code uses a variety of tag helpers, including
用于生成此页面的 Razor 模板如清单 18.3 所示。此代码使用各种标签帮助程序,包括

• A Form Tag Helper on the <form> element
<form> 元素上的表单标记帮助程序
• Label Tag Helpers on the <label>
标签标签帮助程序
• Input Tag Helpers on the <input>
输入标记帮助程序
• Validation Message Tag Helpers on <span> validation elements for each property in the UserBindingModel
UserBindingModel 中每个属性的验证元素上的验证消息 <span>标记帮助程序

Listing 18.3 Razor template for binding to UserBindingModel on the checkout page
列表 18.3 用于在结帐页面上绑定到 UserBindingModel 的 Razor 模板

@page
@model CheckoutModel    #A
@{
    ViewData["Title"] = "Checkout";
}
<h1>@ViewData["Title"]</h1>
<form asp-page="Checkout">      #B
    <div class="form-group">
        <label asp-for="Input.FirstName"></label>               #C
        <input class="form-control" asp-for="Input.FirstName" />
        <span asp-validation-for="Input.FirstName"></span>
    </div>
    <div class="form-group">
        <label asp-for="Input.LastName"></label>             
        <input class="form-control" asp-for="Input.LastName" />
        <span asp-validation-for="Input.LastName"></span>
    </div>
    <div class="form-group">
        <label asp-for="Input.Email"></label>
        <input class="form-control" asp-for="Input.Email" />    #D
        <span asp-validation-for="Input.Email"></span>
    </div>
    <div class="form-group">
        <label asp-for="Input.PhoneNumber"></label>
        <input class="form-control" asp-for="Input.PhoneNumber" />
        <span asp-validation-for="Input.PhoneNumber"></span>    #E
    </div>
    <button type="submit" class="btn btn-primary">Submit</button>
</form>

❶ The CheckoutModel is the PageModel, which exposes a UserBindingModel on the Input property.
CheckoutModel 是 PageModel,它在 Input 属性上公开 UserBindingModel。
❷ Form Tag Helpers use routing to determine the URL the form will be posted to.
表单标签帮助程序使用路由来确定表单将发布到的 URL。
❸ The Label Tag Helper uses DataAnnotations on a property to determine the caption to display.
Label Tag Helper 在属性上使用 DataAnnotations 来确定要显示的标题。
❹ The Input Tag Helper uses DataAnnotations to determine the type of input to generate.
Input Tag Helper 使用 DataAnnotations 来确定要生成的输入类型。
❺ The Validation Tag Helper displays error messages associated with the given property.
Validation Tag Helper 显示与给定属性关联的错误消息。

You can see the HTML markup that this template produces in listing 18.4, which renders in the browser as you saw in figure 18.4. You can see that each of the HTML elements with a Tag Helper has been customized in the output: the <form> element has an action attribute, the <input> elements have an id and name based on the name of the referenced property, and both the <input> and <span> have data- attributes for validation.
您可以在清单 18.4 中看到此模板生成的 HTML 标记,该标记在浏览器中呈现,如图 18.4 所示。您可以看到,每个带有 Tag Helper 的 HTML 元素在输出中都已自定义: <form>元素具有 action 属性,<input> 元素具有基于引用属性名称的 id 和 name,并且<input><span> 都具有用于验证的 data-
属性。

Listing 18.4 HTML generated by the Razor template on the checkout page
列表 18.4 结帐页面上 Razor 模板生成的 HTML

<form action="/Checkout" method="post">
  <div class="form-group">
    <label for="Input_FirstName">Your name</label>
    <input class="form-control" type="text"
      data-val="true" data-val-length="Maximum length is 100"
      id="Input_FirstName" data-val-length-max="100"
      data-val-required="The Your name field is required."
      Maxlength="100" name="Input.FirstName" value="" />
    <span data-valmsg-for="Input.FirstName"
      class="field-validation-valid" data-valmsg-replace="true"></span>
  </div>
  <div class="form-group">
    <label for="Input_LastName">Your name</label>
    <input class="form-control" type="text"
      data-val="true" data-val-length="Maximum length is 100"
      id="Input_LastName" data-val-length-max="100"
      data-val-required="The Your name field is required."
      Maxlength="100" name="Input.LastName" value="" />
    <span data-valmsg-for="Input.LastName"
      class="field-validation-valid" data-valmsg-replace="true"></span>
  </div>
  <div class="form-group">
    <label for="Input_Email">Email</label>
    <input class="form-control" type="email" data-val="true"
      data-val-email="The Email field is not a valid e-mail address."
      Data-val-required="The Email field is required."
      Id="Input_Email" name="Input.Email" value="" />
    <span class="text-danger field-validation-valid"
      data-valmsg-for="Input.Email" data-valmsg-replace="true"></span>
    </div>
  <div class="form-group">
    <label for="Input_PhoneNumber">Phone number</label>
    <input class="form-control" type="tel" data-val="true"
      data-val-phone="Not a valid phone number." Id="Input_PhoneNumber"
      name="Input.PhoneNumber" value="" />
    <span data-valmsg-for="Input.PhoneNumber"
      class="text-danger field-validation-valid"
      data-valmsg-replace="true"></span>
  </div>
  <button type="submit" class="btn btn-primary">Submit</button>
  <input name="__RequestVerificationToken" type="hidden"
    value="CfDJ8PkYhAINFx1JmYUVIDWbpPyy_TRUNCATED" />
</form>

Wow, that’s a lot of markup! If you’re new to working with HTML, this might all seem a little overwhelming, but the important thing to notice is that you didn’t have to write most of it! The Tag Helpers took care of most of the plumbing for you. That’s basically Tag Helpers in a nutshell; they simplify the fiddly mechanics of building HTML forms, leaving you to concentrate on the overall design of your application instead of writing boilerplate markup.
哇,好多标记啊!如果您刚开始使用 HTML,这可能看起来有点让人不知所措,但需要注意的重要一点是,您不必编写大部分内容!Tag Helpers 为您处理了大部分管道工作。简而言之,这基本上就是 Tag Helpers;它们简化了构建 HTML 表单的繁琐机制,让您专注于应用程序的整体设计,而不是编写样板标记。

NOTE If you’re using Razor to build your views, Tag Helpers will make your life easier, but they’re entirely optional. You’re free to write raw HTML without them or to use the legacy HTML Helpers.
注意:如果您使用 Razor 构建视图,标记帮助程序将使您的生活更轻松,但它们完全是可选的。您可以自由编写没有它们的原始 HTML,也可以使用旧版 HTML 帮助程序。

Tag Helpers simplify and abstract the process of HTML generation, but they generally try to do so without getting in your way. If you need the final generated HTML to have a particular attribute, you can add it to your markup. You can see that in the previous listings where class attributes are defined on <input> elements, such as <input class="form-control" asp-for="Input.FirstName" />. They pass untouched from Razor to the HTML output.
标记帮助程序简化和抽象了 HTML 生成过程,但它们通常会尝试在不妨碍您的情况下这样做。如果需要最终生成的 HTML 具有特定属性,可以将其添加到标记中。你可以看到,在前面的清单中,类属性是在 <input> 元素上定义的,比如 <input class="form-control" asp-for="Input.FirstName" />.它们将原封不动的 Razor 传递到 HTML 输出。

Tip This is different from the way HTML Helpers worked in legacy ASP.NET; HTML helpers often require jumping through hoops to set attributes in the generated markup.
提示:这与 HTML 帮助程序在旧版 ASP.NET 中的工作方式不同;HTML 帮助程序通常需要跳过重重障碍才能在生成的标记中设置属性。

Even better, you can also override attributes that are normally generated by a Tag Helper, like the type attribute on an <input> element. For example, if the FavoriteColor property on your PageModel was a string, by default Tag Helpers would generate an <input> element with type="text". Updating your markup to use the HTML5 color picker type is trivial; set the type explicitly in your Razor view:
更好的是,您还可以覆盖通常由 Tag Helper 生成的属性,例如<input> 元素上的 type 属性。例如,如果 PageModel 上的 FavoriteColor 属性是一个字符串,则默认情况下,标记帮助程序将生成一个具有 type=“text” 的<input> 元素。更新标记以使用 HTML5 颜色选取器类型非常简单;在 Razor 视图中显式设置类型:

<input type="color" asp-for="FavoriteColor" />

Tip HTML5 adds a huge number of features, including lots of form elements that you may not have come across before, such as range inputs and color pickers. You can read about them on the Mozilla Developer Network website at http://mng.bz/qOc1.
提示:HTML5 添加了大量功能,包括许多您以前可能没有遇到过的表单元素,例如范围输入和颜色选择器。您可以在 Mozilla Developer Network 网站上阅读有关它们的信息,网址为 http://mng.bz/qOc1

For the remainder of section 18.2, you’ll build the currency converter Razor templates from scratch, adding Tag Helpers as you find you need them. You’ll probably find you use most of the common form Tag Helpers in every application you build, even if it’s on a simple login page.
在第 18.2 节的其余部分,您将从头开始构建货币转换器 Razor 模板,并根据需要添加 Tag Helpers。您可能会发现,在构建的每个应用程序中都使用了大多数常见形式的 Tag Helpers,即使它位于简单的登录页面上。

18.2.1 The Form Tag Helper

18.2.1 Form 标记帮助程序

The first thing you need to start building your HTML form is, unsurprisingly, the <form> element. In listing 18.3 the <form> element was augmented with an asp-page Tag Helper attribute:
毫无疑问,开始构建 HTML 表单需要做的第一件事是<form>元素。在清单 18.3 中,该<form>元素被扩充了一个 asp-page Tag Helper 属性:

<form asp-page="Checkout">

The Tag Helper adds action and method attributes to the final HTML, indicating which URL the form should be sent to when it’s submitted and the HTTP verb to use:
标记帮助程序将 action 和 method 属性添加到最终的 HTML 中,指示表单在提交时应发送到哪个 URL,以及要使用的 HTTP 动词:

<form action="/Checkout" method="post">

Setting the asp-page attribute allows you to specify a different Razor Page in your application that the form will be posted to when it’s submitted. If you omit the asp-page attribute, the form will post back to the same URL it was served from. This is common with Razor Pages. You normally handle the result of a form post in the same Razor Page that is used to display it.
设置 asp-page 属性后,可以在应用程序中指定不同的 Razor 页面,表单在提交时将发布到该页面。如果省略 asp-page 属性,表单将回发到提供它的同一 URL。这在 Razor Pages 中很常见。通常在用于显示表单帖子的同一 Razor Page 中处理表单帖子的结果。

Warning If you omit the asp-page attribute, you must add the method="post" attribute manually. It’s important to add this attribute so the form is sent using the POST verb instead of the default GET verb. Using GET for forms can be a security risk.
警告:如果省略 asp-page 属性,则必须手动添加 method=“post” 属性。添加此属性非常重要,以便使用 POST 动词而不是默认的 GET 动词发送表单。对表单使用 GET 可能会带来安全风险。

The asp-page attribute is added by a FormTagHelper. This Tag Helper uses the value provided to generate a URL for the action attribute, using the URL generation features of routing that I described in chapters 5 and 14.
asp-page 属性由 FormTagHelper 添加。此 Tag Helper 使用提供的值为 action 属性生成 URL,使用我在第 5 章和第 14 章中描述的路由的 URL 生成功能。

NOTE Tag Helpers can make multiple attributes available on an element. Think of them like properties on a Tag Helper configuration object. Adding a single asp- attribute activates the Tag Helper on the element. Adding more attributes lets you override further default values of its implementation.
注意:标记帮助程序可以在一个元素上提供多个属性。将它们视为 Tag Helper 配置对象上的属性。添加单个 asp- 属性会激活元素上的 Tag Helper。添加更多属性可让您覆盖其实现的更多默认值。

The Form Tag Helper makes several other attributes available on the <form> element that you can use to customize the generated URL. I hope you’ll remember that you can set route values when generating URLs. For example, if you have a Razor Page called Product.cshtml that uses the directive
Form Tag Helper 在 <form> 元素上提供了几个其他属性,您可以使用这些属性来自定义生成的 URL。我希望您会记住,您可以在生成 URL 时设置路由值。例如,如果你有一个名为 Product.cshtml 的 Razor 页面,该页面使用指令

@page "{id}"

the full route template for the page would be "Product/{id}". To generate the URL for this page correctly, you must provide the {id} route value. How can you set that value using the Form Tag Helper?
页面的完整路由模板将为 “Product/{id}”。要正确生成此页面的 URL,您必须提供 {id} 路由值。如何使用 Form Tag Helper 设置该值?

The Form Tag Helper defines an asp-route- wildcard attribute that you can use to set arbitrary route parameters. Set the in the attribute to the route parameter name. For example, to set the id route parameter, you’d set the asp-route-id value. If the ProductId property of your PageModel contains the id value required, you could use:
表单标记帮助程序定义可用于设置任意路由参数的 asp-route- 通配符属性。将 in 属性设置为路由参数名称。例如,要设置 id 路由参数,您需要设置 asp-route-id 值。如果 PageModel 的 ProductId 属性包含所需的 id 值,则可以使用:

<form asp-page="Product" asp-route-id="@Model.ProductId">

Based on the route template of the Product.cshtml Razor Page (and assuming ProductId=5 in this example), this would generate the following markup:
根据 Product.cshtml Razor 页面的路由模板(在此示例中假设 ProductId=5),这将生成以下标记:

<form action="/Product/5" method="post">

You can add as many asp-route-* attributes as necessary to your <form> to generate the correct action URL. You can also set the Razor Page handler to use the asp-page-handler attribute. This ensures that the form POST will be handled by the handler you specify.

您可以根据需要将任意数量的 asp-route-* 属性添加到 <form> 以生成正确的作 URL。您还可以将 Razor Page 处理程序设置为使用 asp-page-handler 属性。这可确保表单 POST 将由您指定的处理程序处理。

NOTE The Form Tag Helper has many additional attributes, such as asp-action and asp-controller, that you generally won’t use with Razor Pages. Those are useful only if you’re using MVC controllers with views. In particular, look out for the asp-route attribute—this is not the same as the asp-route- attribute. The former is used to specify a named route (such as a named minimal API endpoint), and the latter is used to specify the route values to use during URL generation.
注意:表单标记帮助程序具有许多其他属性,例如 asp-action 和 asp-controller,这些属性通常不会与 Razor Pages 一起使用。仅当您将 MVC 控制器与视图一起使用时,这些才有用。特别是,请注意 asp-route 属性 — 这与 asp-route-
属性不同。前者用于指定命名路由(例如命名的最小 API 终端节点),后者用于指定在 URL 生成期间要使用的路由值。

The main job of the Form Tag Helper is to generate the action attribute, but it performs one additional important function: generating a hidden <input> field needed to prevent cross-site request forgery (CSRF) attacks.
Form Tag Helper 的主要工作是生成 action 属性,但它执行一项额外的重要功能:生成防止跨站点请求伪造 (CSRF) 攻击所需的隐藏<input> 字段。

DEFINITION Cross-site request forgery (CSRF) attacks are a website exploit that can allow actions to be executed on your website by an unrelated malicious website. You’ll learn about them in detail in chapter 29.
定义:跨站点请求伪造 (CSRF) 攻击是一种网站漏洞,可以允许不相关的恶意网站在您的网站上执行作。您将在第 29 章中详细了解它们。

You can see the generated hidden <input> at the bottom of the <form> in listing 18.4; it’s named RequestVerificationToken and contains a seemingly random string of characters. This field won’t protect you on its own, but I’ll describe in chapter 29 how it’s used to protect your website. The Form Tag Helper generates it by default, so you generally won’t need to worry about it, but if you need to disable it, you can do so by adding asp-antiforgery="false" to your <form> element.
你可以在清单 18.4 的 <form> 底部看到生成隐藏<input> ;它被命名为
RequestVerificationToken 并包含一个看似随机的字符串。此字段本身不会保护您,但我将在第 29 章中介绍如何使用它来保护您的网站。默认情况下,Form Tag Helper 会生成它,因此您通常无需担心它,但如果您需要禁用它,可以通过将 asp-antiforgery=“false” 添加到您的<form> 元素来实现。

The Form Tag Helper is obviously useful for generating the action URL, but it’s time to move on to more interesting elements—those that you can see in your browser!
表单标记帮助程序显然可用于生成作 URL,但现在是时候转向更有趣的元素了 — 您可以在浏览器中看到的元素!

18.2.2 The Label Tag Helper

18.2.2 标签标签帮助程序

Every <input> field in your currency converter application needs to have an associated label so the user knows what the <input> is for. You could easily create those yourself, manually typing the name of the field and setting the for attribute as appropriate, but luckily there’s a Tag Helper to do that for you.
货币转换器应用程序中的每个 <input> 字段都需要有一个关联的标签,以便用户知道 for what for what.您可以轻松地自己创建这些标记,手动键入字段的名称并根据需要设置 <input> for 属性,但幸运的是,有一个 Tag Helper 可以为您执行此作。

The Label Tag Helper is used to generate the caption (the visible text) and the for attribute for a <label> element, based on the properties in the PageModel. It’s used by providing the name of the property in the asp-for attribute:
Label Tag Helper 用于根据 PageModel 中的属性为<label> 元素生成标题(可见文本)和 for 属性。通过在 asp-for 属性中提供属性的名称来使用它:

<label asp-for="FirstName"></label>

The Label Tag Helper uses the [Display] DataAnnotations attribute that you saw in chapter 16 to determine the appropriate value to display. If the property you’re generating a label for doesn’t have a [Display] attribute, the Label Tag Helper uses the name of the property instead. Consider this model in which the FirstName property has a [Display] attribute, but the Email property doesn’t:
Label Tag Helper 使用您在第 16 章中看到的 [Display] DataAnnotations 属性来确定要显示的适当值。如果要为其生成标签的属性没有 [Display] 属性,则 Label Tag Helper 会改用该属性的名称。请考虑以下模型:FirstName 属性具有 [Display] 属性,但 Email 属性没有:

public class UserModel
{
    [Display(Name = "Your name")]
    public string FirstName { get; set; }
    public string Email { get; set; }
}

The following Razor
以下 Razor

<label asp-for="FirstName"></label>
<label asp-for="Email"></label>

would generate this HTML:
将生成此 HTML:

<label for="FirstName">Your name</label>
<label for="Email">Email</label>

The inner text inside the <label> element uses the value set in the [Display] attribute, or the property name in the case of the Email property. Also note that the for attribute has been generated with the name of the property. This is a key bonus of using Tag Helpers; it hooks in with the element IDs generated by other Tag Helpers, as you’ll see shortly.
<label> 元素内部文本使用 [Display] 属性中设置的值,或者使用 Email 属性的属性名称。另请注意,已使用属性名称生成 for 属性。这是使用 Tag Helper 的一个关键好处;它与其他 Tag Helper 生成的元素 ID 挂钩,您很快就会看到。

NOTE The for attribute is important for accessibility. It specifies the ID of the element to which the label refers. This is important for users who are using a screen reader, for example, as they can tell what property a form field relates to.
注意:for 属性对于辅助功能非常重要。它指定标签所引用的元素的 ID。例如,这对于使用屏幕阅读器的用户来说非常重要,因为他们可以判断表单字段与哪个属性相关。

As well as properties on the PageModel, you can also reference sub-properties on child objects. For example, as I described in chapter 16, it’s common to create a nested class in a Razor Page, expose that as a property, and decorate it with the [BindProperty] attribute:
除了 PageModel 上的属性外,您还可以引用子对象上的子属性。例如,正如我在第 16 章中所描述的,在 Razor Page 中创建一个嵌套类,将其作为属性公开,并使用 [BindProperty] 属性对其进行修饰是很常见的:

public class CheckoutModel: PageModel
{
    [BindProperty]
    public UserBindingModel Input { get; set; }
}

You can reference the FirstName property of the UserBindingModel by “dotting” into the property as you would in any other C# code. Listing 18.3 shows more examples of this.
您可以通过在属性中“点”来引用 UserBindingModel 的 FirstName 属性,就像在任何其他 C# 代码中一样。清单 18.3 显示了更多这样的例子。

<label asp-for="Input.FirstName"></label>
<label asp-for="Input.Email"></label>

As is typical with Tag Helpers, the Label Tag Helper won’t override values that you set yourself. If, for example, you don’t want to use the caption generated by the helper, you could insert your own manually. The code
与标签帮助程序的典型情况一样,标签标签帮助程序不会覆盖您自己设置的值。例如,如果您不想使用帮助程序生成的标题,则可以手动插入自己的标题。代码:

<label asp-for="Email">Please enter your Email</label>

would generate this HTML:
将生成此 HTML:

<label for="Email">Please enter your Email</label>

As ever, you’ll generally have an easier time with maintenance if you stick to the standard conventions and don’t override values like this, but the option is there. Next up is a biggie: the Input and Textarea Tag Helpers.
与往常一样,如果您坚持标准约定并且不覆盖这样的值,您通常会更轻松地进行维护,但选项就在那里。接下来是一个大问题:Input 和 Textarea 标记帮助程序。

18.2.3 The Input and Textarea Tag Helpers

18.2.3 input 和 textarea 标记帮助程序

Now you’re getting into the meat of your form: the <input> elements that handle user input. Given that there’s such a wide array of possible input types, there’s a variety of ways they can be displayed in the browser. For example, Boolean values are typically represented by a checkbox type <input> element, whereas integer values would use a number type <input> element, and a date would use the date type, as shown in figure 18.5.
现在,你进入了表单的核心:处理用户输入的 <input>元素。鉴于可能的输入类型如此广泛,它们在浏览器中的显示方式多种多样。例如,布尔值通常由复选框类型 <input>元素表示,而整数值将使用数字类型 <input>元素,日期将使用日期类型,如图 18.5 所示。

alt text

Figure 18.5 Various input element types. The exact way in which each type is displayed varies by browser.
图 18.5 各种输入元素类型。每种类型的确切显示方式因浏览器而异。

To handle this diversity, the Input Tag Helper is one of the most powerful Tag Helpers. It uses information based on both the type of the property (bool, string, int, and so on) and any DataAnnotations attributes applied to it ([EmailAddress] and [Phone], among others) to determine the type of the input element to generate. The DataAnnotations are also used to add data-val- client-side validation attributes to the generated HTML.
为了处理这种多样性,Input Tag Helper 是最强大的 Tag Helper 之一。它使用基于属性类型(bool、string、int 等)和应用于它的任何 DataAnnotations 属性([EmailAddress] 和 [Phone] 等)的信息来确定要生成的输入元素的类型。DataAnnotations 还用于将 data-val-
客户端验证属性添加到生成的 HTML 中。

Consider the Email property from listing 18.2 that was decorated with the [EmailAddress] attribute. Adding an <input> is as simple as using the asp-for attribute:
请考虑清单 18.2 中的 Email 属性,该属性使用 [EmailAddress] 属性进行修饰。添加 <input>就像使用 asp-for 属性一样简单:

<input asp-for="Input.Email" />

The property is a string, so ordinarily the Input Tag Helper would generate an <input> with type="text". But the addition of the [EmailAddress] attribute provides additional metadata about the property. Consequently, the Tag Helper generates an HTML5 <input> with type="email":
该属性是一个字符串,因此通常 Input Tag Helper 会生成一个带有 type=“text” 的 <input> 。但是,添加 [EmailAddress] 属性会提供有关属性的其他元数据。因此,标记帮助程序会生成一个 type=“email” 的 HTML5 <input>

<input type="email" id="Input_Email" name="Input.Email"
    value="test@example.com" data-val="true"
    data-val-email="The Email Address field is not a valid e-mail address."
    Data-val-required="The Email Address field is required."
    />

You can take a whole host of things away from this example. First, the id and name attributes of the HTML element have been generated from the name of the property. The value of the id attribute matches the value generated by the Label Tag Helper in its for attribute, Input_Email. The value of the name attribute preserves the “dot” notation, Input.Email, so that model binding works correctly when the field is POSTed to the Razor Page.
您可以从这个例子中学到很多东西。首先,HTML 元素的 id 和 name 属性是从属性的名称生成的。id 属性的值与 Label Tag Helper 在其 for 属性 Input_Email 中生成的值匹配。Input.Email,name 属性的值保留“点”表示法,以便在将字段发布到 Razor 页面时,模型绑定正常工作。

Also, the initial value of the field has been set to the value currently stored in the property ("test@example.com", in this case). The type of the element has also been set to the HTML5 email type, instead of using the default text type.
此外,字段的初始值已设置为当前存储在属性中的值(在本例中为“test@example.com”)。元素的类型也已设置为 HTML5 电子邮件类型,而不是使用默认文本类型。

Perhaps the most striking addition is the swath of data-val- attributes. These can be used by client-side JavaScript libraries such as jQuery to provide client-side validation of your DataAnnotations constraints. Client-side validation provides instant feedback to users when the values they enter are invalid, providing a smoother user experience than can be achieved with server-side validation alone, as I described in chapter 16.
也许最引人注目的新增功能是大量的 data-val-
属性。客户端 JavaScript 库(如 jQuery)可以使用这些约束来提供 DataAnnotations 约束的客户端验证。客户端验证会在用户输入的值无效时向用户提供即时反馈,从而提供比单独使用服务器端验证更流畅的用户体验,如我在第 16 章中所述。

Client-side validation
客户端验证

To enable client-side validation in your application, you need to add some jQuery libraries to your HTML pages. In particular, you need to include the jQuery, jQuery-validation, and jQuery-validation-unobtrusive JavaScript libraries. You can do this in several ways, but the simplest is to include the script files at the bottom of your view using
要在应用程序中启用客户端验证,您需要向 HTML 页面添加一些 jQuery 库。特别是,您需要包括 jQuery、jQuery-validation 和 jQuery-validation-unobtrusive JavaScript 库。您可以通过多种方式执行此作,但最简单的方法是使用

<script src="~/lib/jquery-validation/dist/jquery.validate.min.js"></script>
<script src="~/lib/jquery-validation-unobtrusive/jquery.validate.unobtrusive.min.js"></script>

The default templates include these scripts for you in a handy partial template that you can add to your page in a Scripts section. If you’re using the default layout and need to add client-side validation to your view, add the following section somewhere on your view:
默认模板将这些脚本包含在一个方便的部分模板中,您可以将其添加到页面的 Scripts 部分。如果您使用的是默认布局,并且需要向视图添加客户端验证,请在视图上的某个位置添加以下部分:

@section Scripts{
    @Html.Partial("_ValidationScriptsPartial")
}

This partial view references files in your wwwroot folder. The default layout template includes jQuery itself. If you don’t need to use jQuery in your application, you may want to consider a small alternative validation library called aspnet-client-validation. I describe why you might consider this library and how to use it in this blog post: http://mng.bz/V1pX.
此分部视图引用 wwwroot 文件夹中的文件。默认布局模板包括 jQuery 本身。如果您不需要在应用程序中使用 jQuery,则可能需要考虑一个名为 aspnet-client-validation 的小型替代验证库。我在这篇博文中描述了为什么会考虑使用这个库以及如何使用它:http://mng.bz/V1pX

You can also load these files, whether you’re using jQuery or aspnet-client-validation, from a content delivery network (CDN). If you want to take this approach, you should consider scenarios where the CDN is unavailable or compromised, as I discuss in this blog post: http://mng.bz/2e6d.
您还可以从内容分发网络 (CDN) 加载这些文件,无论您使用的是 jQuery 还是 aspnet-client-validation。如果您想采用这种方法,您应该考虑 CDN 不可用或受损的情况,正如我在这篇博文中讨论的那样:http://mng.bz/2e6d

The Input Tag Helper tries to pick the most appropriate template for a given property based on DataAnnotations attributes or the type of the property. Whether this generates the exact <input> type you need may depend, to an extent, on your application. As always, you can override the generated type by adding your own type attribute to the element in your Razor template. Table 18.1 shows how some of the common data types are mapped to <input> types and how the data types themselves can be specified.
输入标记帮助程序尝试根据 DataAnnotations 属性或属性类型为给定属性选择最合适的模板。这是否生成您需要的确切类型可能在一定程度上取决于您的应用程序。与往常一样,您可以通过将自己的 type 属性添加到 Razor 模板中的 <input> 元素来替代生成的类型。Table 18.1 显示了如何将一些常见数据类型映射到类型以及如何指定数据类型本身。

Table 18.1 Common data types, how to specify them, and the input element type they map to
表 18.1 常见数据类型、如何指定它们以及它们映射到的输入元素类型

Data type How it’s specified Input element type
byte, int, short, long, uint Property type number
decimal, double, float Property type text
bool Property type checkbox
string Property type, [DataType(DataType.Text)] attribute text
HiddenInput [HiddenInput] attribute hidden
Password [Password] attribute password
Phone [Phone] attribute tel
EmailAddress [EmailAddress] attribute email
Url [Url] attribute url
Date DateTime property type, [DataType(DataType.Date)] attribute datetime-local

The Input Tag Helper has one additional attribute that can be used to customize the way data is displayed: asp-format. HTML forms are entirely string-based, so when the value of an <input> is set, the Input Tag Helper must take the value stored in the property and convert it to a string. Under the covers, this performs a string.Format() on the property’s value, passing in the format string.
Input Tag Helper 具有一个可用于自定义数据显示方式的附加属性:asp-format。HTML 表单完全基于字符串,因此在设置 <input> 的值时,Input Tag Helper 必须获取存储在属性中的值并将其转换为字符串。在后台,这将执行一个字符串。Format() 对属性的值执行,并传入格式字符串。

The Input Tag Helper uses a default format string for each different data type, but with the asp-format attribute, you can set the specific format string to use. For example, you could ensure that a decimal property, Dec, is formatted to three decimal places with the following code:
Input Tag Helper 对每种不同的数据类型使用默认格式字符串,但使用 asp-format 属性,您可以设置要使用的特定格式字符串。例如,您可以使用以下代码确保将 decimal 属性 Dec 的格式设置为三位小数:

<input asp-for="Dec" asp-format="{0:0.000}" />

If the Dec property had a value of 1.2, this would generate HTML similar to
如果 Dec 属性的值为 1.2,则生成类似于

<input type="text" id="Dec" name="Dec" value="1.200">

Alternatively, you can define the format to use by adding the [DisplayFormat] attribute to the model property:
或者,您可以通过将 [DisplayFormat] 属性添加到 model 属性来定义要使用的格式:

[DisplayFormat("{0:0.000}")]
public decimal Dec { get; set; }

NOTE You may be surprised that decimal and double types are rendered as text fields and not as number fields. This is due to several technical reasons, predominantly related to the way different cultures render decimal points and number group separators. Rendering as text avoids errors that would appear only in certain browser-culture combinations.
注意您可能会惊讶地发现,decimal 和 double 类型呈现为文本字段,而不是数字字段。这是由于几个技术原因,主要与不同区域性呈现小数点和数字组分隔符的方式有关。呈现为文本可避免仅在某些浏览器区域性组合中出现的错误。

In addition to the Input Tag Helper, ASP.NET Core provides the Textarea Tag Helper. This works in a similar way, using the asp-for attribute, but it’s attached to a <textarea> element instead:
除了 Input Tag Helper 之外,ASP.NET Core 还提供 Textarea Tag Helper。这以类似的方式工作,使用 asp-for 属性,但它被附加到一个<textarea> 元素上:

<textarea asp-for="BigtextValue"></textarea>

This generates HTML similar to the following. Note that the property value is rendered inside the element, and data-val- validation elements are attached as usual:
这将生成类似于以下内容的 HTML。请注意,property value 在元素内部呈现,并且 data-val-
验证元素像往常一样附加:

<textarea data-val="true" id="BigtextValue" name="BigtextValue"
    data-val-length="Maximum length 200." data-val-length-max="200"
    data-val-required="The Multiline field is required." >This is some text,
I'm going to display it
in a text area</textarea>

I hope that this section has hammered home how much typing Tag Helpers can cut down on, especially when using them in conjunction with DataAnnotations for generating validation attributes. But this is more than reducing the number of keystrokes required; Tag Helpers ensure that the markup generated is correct and has the correct name, id, and format to automatically bind your binding models when they’re sent to the server.
我希望本节已经阐明了 Tag Helpers 可以减少多少键入工作,尤其是在将它们与 DataAnnotations 结合使用以生成验证属性时。但这不仅仅是减少所需的击键次数;标记帮助程序确保生成的标记正确无误,并且具有正确的名称、ID 和格式,以便在将绑定模型发送到服务器时自动绑定绑定模型。

With <form>, <label>, and <input> under your belt, you’re able to build most of your currency converter forms. Before we look at displaying validation messages, there’s one more element to look at: the <select>, or drop-down, input.
使用 <form>, <label><input> ,您可以构建大多数货币转换器表单。在我们查看显示验证消息之前,还有一个元素需要查看:<select>或下拉列表,输入。

18.2.4 The Select Tag Helper

As well as <input> fields, a common element you’ll see on web forms is the <select> element, or drop-down lists and list boxes. Your currency converter application, for example, could use a <select> element to let you pick which currency to convert from a list.
除了<input> 字段之外,您将在 Web 表单上看到的一个常见元素是 <select>元素,即下拉列表和列表框。例如,您的货币转换器应用程序可以使用一个 <select>元素让您从列表中选择要转换的货币。

By default, this element shows a list of items and lets you select one, but there are several variations, as shown in figure 18.6. As well as the normal drop-down list, you could show a list box, add multiselection, or display your list items in groups.
默认情况下,此元素显示一个项目列表并允许您选择一个,但有几种变体,如图 18.6 所示。除了常规下拉列表外,您还可以显示列表框、添加多选或成组显示列表项。

alt text

Figure 18.6 Some of the many ways to display <select> elements using the Select Tag Helper.
图 18.6 使用 Select Tag Helper 显示<select>元素的多种方法中的一些。

To use <select> elements in your Razor code, you’ll need to include two properties in your PageModel: one property for the list of options to display and one to hold the value (or values) selected. For example, listing 18.5 shows the properties on the PageModel used to create the three leftmost select lists shown in figure 18.6. Displaying groups requires a slightly different setup, as you’ll see shortly.
要在 Razor 代码中使用<select> 元素,您需要在 PageModel 中包含两个属性:一个属性用于显示选项列表,另一个属性用于保存所选值。例如,清单 18.5 显示了用于创建图 18.6 中所示的三个最左侧选择列表的 PageModel 上的属性。显示组需要的设置略有不同,您很快就会看到。

Listing 18.5 View model for displaying select element drop-down lists and list boxes

public class SelectListsModel: PageModel
{
    [BindProperty]                                #A
    public class InputModel Input { get; set; }   #A

    public IEnumerable<SelectListItem> Items { get; set; }    #B
        = new List<SelectListItem>                            #B
    {                                                         #B
        new SelectListItem{Value = "csharp", Text="C#"},       #B
        new SelectListItem{Value = "python", Text= "Python"},  #B
        new SelectListItem{Value = "cpp", Text="C++"},         #B
        new SelectListItem{Value = "java", Text="Java"},       #B
        new SelectListItem{Value = "js", Text="JavaScript"},   #B
        new SelectListItem{Value = "ruby", Text="Ruby"},       #B
    };                                                        #B

    public class InputModel
    {
        public string SelectedValue1 { get; set; }                #C
        public string SelectedValue2 { get; set; }                #C
        public IEnumerable<string> MultiValues { get; set; }    #D
    }
}

❶ The InputModel for binding the user’s selections to the select boxes
用于将用户的选择绑定到选择框的 InputModel
❷ The list of items to display in the select boxes
要在选择框中显示的项目列表
❸ These properties will hold the values selected by the single-selection select boxes.
这些属性将保存由单选选择框选择的值。
❹ To create a multiselect list box, use an IEnumerable<>.
若要创建多选列表框,请使用 IEnumerable<>

This listing demonstrates several aspects of working with <select> lists:
此清单演示了使用<select>列表的几个方面:

• SelectedValue1/SelectedValue2—Used to hold the value selected by the user. They’re model-bound to the value selected from the drop-down list/list box and used to preselect the correct item when rendering the form.
SelectedValue1/SelectedValue2 - 用于保存用户选择的值。它们被模型绑定到从下拉列表/列表框中选择的值,并用于在呈现表单时预先选择正确的项目。

• MultiValues—Used to hold the selected values for a multiselect list. It’s an IEnumerable, so it can hold more than one selection per <select> element.
MultiValues - 用于保存多选列表的选定值。它是一个 IEnumerable,因此每个 <select> 元素可以保存多个选择。

• Items—Provides the list of options to display in the <select> elements. Note that the element type must be SelectListItem, which exposes the Value and Text properties, to work with the Select Tag Helper. This isn’t part of the InputModel, as we don’t want to model-bind these items to the request; they would normally be loaded directly from the application model or hardcoded. The order of the values in the Items property controls the order of items in the <select> list.
Items - 提供要在<select> 元素中显示的选项列表。请注意,元素类型必须是 SelectListItem,它公开 Value 和 Text 属性,才能使用 Select 标记帮助程序。这不是 InputModel 的一部分,因为我们不想将这些项模型绑定到请求;它们通常直接从应用程序模型加载或硬编码。Items 属性中值的顺序控制列表中项的顺序。

NOTE The Select Tag Helper works only with SelectListItem elements. That means you’ll normally have to convert from an application-specific list set of items (for example, a List<string> or List<MyClass>) to the UI-centric List<SelectListItem>.
注意:Select Tag Helper 仅适用于 SelectListItem 元素。这意味着您通常必须从特定于应用程序的列表项集(例如,a List<string>List<MyClass>)转换为以 UI 为中心的 List<SelectListItem>

The Select Tag Helper exposes the asp-for and asp-items attributes that you can add to <select> elements. As for the Input Tag Helper, the asp-for attribute specifies the property in your PageModel to bind to. The asp-items attribute provides the IEnumerable<SelectListItem> to display the available <option> elements.
Select 标记帮助程序公开可添加到<select>元素的 asp-for 和 asp-items 属性。对于 Input Tag Helper,asp-for 属性指定要绑定到的 PageModel 中的属性。asp-items 属性提供 以IEnumerable<SelectListItem> 显示可用 <option> 元素。

Tip It’s common to want to display a list of enum options in a <select> list. This is so common that ASP.NET Core ships with a helper for generating a SelectListItem for any enum. If you have an enum of the TEnum type, you can generate the available options in your view using asp-items="Html.GetEnumSelectList<TEnum>()" .
提示:希望在列表中显示枚举选项 <select>列表是很常见的。这种情况非常常见,因此 ASP.NET Core 附带了一个帮助程序,用于为任何枚举生成 SelectListItem。如果您有 TEnum 类型的枚举,则可以使用 asp-items="Html.GetEnumSelectList<TEnum>()" 在视图中生成可用选项。

The following listing shows how to display a drop-down list, a single-selection list box, and a multiselection list box. It uses the PageModel from the previous listing, binding each <select> list value to a different property but reusing the same Items list for all of them.
下面的清单显示了如何显示下拉列表、单选列表框和多选列表框。它使用上一个清单中的 PageModel,将每个<select> 列表值绑定到不同的属性,但对所有列表重用相同的 Items 列表。

Listing 18.6 Razor template to display a select element in three ways
清单 18.6 以三种方式显示 select 元素的 Razor 模板

@page
@model SelectListsModel
<select asp-for="Input.SelectedValue1"   #A
    asp-items="Model.Items"></select>    #A
<select asp-for="Input.SelectedValue2"            #B
    asp-items="Model.Items" size="4"></select>    #B
<select asp-for="Input.MultiValues"      #C
    asp-items="Model.Items"></select>    #C

❶ Creates a standard drop-down select list by binding to a standard property in asp-for
通过绑定到 asp-for中的标准属性创建标准下拉列表
❷ Creates a single-select list box of height 4 by providing the standard HTML size attribute
通过提供标准 HTML 大小属性创建高度为 4 的单选列表框
❸ Creates a multiselect list box by binding to an IEnumerable property in asp-for
通过绑定到 asp-for 中的 IEnumerable 属性创建多选列表框

I hope you can see that the Razor for generating a drop-down <select> list is almost identical to the Razor for generating a multiselect <select> list. The Select Tag Helper takes care of adding the multiple HTML attribute to the generated output if the property it’s binding to is an IEnumerable.
我希望你能看到,用于生成下拉<select>列表的 Razor 与用于生成多选<select>列表的 Razor 几乎相同。Tag Helper 负责将 multiple HTML 属性添加到生成的输出中(如果它绑定到的属性是 IEnumerable)。

Warning The asp-for attribute must not include the Model. prefix. The asp-items attribute, on the other hand, must include it if referencing a property on the PageModel. The asp-items attribute can also reference other C# items, such as objects stored in ViewData, but using a PageModel property is the best approach.
警告:asp-for 属性不得包含 Model。前缀。另一方面,如果引用 PageModel 上的属性,则 asp-items 属性必须包含它。asp-items 属性还可以引用其他 C# 项,例如存储在 ViewData 中的对象,但使用 PageModel 属性是最好的方法。

You’ve seen how to bind three types of select lists so far, but the one I haven’t yet covered from figure 18.6 is how to display groups in your list boxes using <optgroup> elements. Luckily, nothing needs to change in your Razor code; you have to update only how you define your SelectListItems.
到目前为止,您已经了解了如何绑定三种类型的选择列表,但是图 18.6 中我还没有介绍的是如何使用 <optgroup> 元素在列表框中显示组。幸运的是,您的 Razor 代码中不需要更改任何内容;您只需更新定义 SelectListItems 的方式。

The SelectListItem object defines a Group property that specifies the SelectListGroup the item belongs to. The following listing shows how you could create two groups and assign each list item to a “dynamic” or “static” group, using a PageModel similar to that shown in listing 18.5. The final list item, C#, isn’t assigned to a group, so it will be displayed as normal, without an <optgroup>.
SelectListItem 对象定义一个 Group 属性,该属性指定项目所属的 SelectListGroup。下面的清单显示了如何使用类似于清单 18.5 中所示的 PageModel 创建两个组并将每个列表项分配给“动态”或“静态”组。最后一个列表项 C# 未分配给组,因此没有它将正常显示。

Listing 18.7 Adding Groups to SelectListItems to create optgroup elements
清单 18.7 向 SelectListItems 添加组以创建 optgroup 元素

public class SelectListsModel: PageModel
{
    [BindProperty]
    public IEnumerable<string> SelectedValues { get; set; }    #A
    public IEnumerable<SelectListItem> Items { get; set; }

    public SelectListsModel()     #B
    {
        var dynamic = new SelectListGroup { Name = "Dynamic" };   #C
        var @static = new SelectListGroup { Name = "Static" };       #C
        Items = new List<SelectListItem>
        {
            new SelectListItem {
                Value= "js",
                Text="Javascript",
                Group = dynamic       #D
            },
            new SelectListItem {
                Value= "cpp",
                Text="C++",
                Group = @static        #D
            },
            new SelectListItem {
                Value= "python",
                Text="Python",
                Group = dynamic       #D
            },
            new SelectListItem {    #E
                Value= "csharp",    #E
                Text="C#",          #E
            }
        };
    }
}

With this in place, the Select Tag Helper generates <optgroup> elements as necessary when rendering the Razor to HTML. The Razor template
完成此作后,Select Tag Helper 会生成<optgroup>元素.

@page
@model SelectListsModel
<select asp-for="SelectedValues" asp-items="Model.Items"></select>

would be rendered to HTML as follows:
将呈现为 HTML,如下所示:

<select id="SelectedValues" name="SelectedValues" multiple="multiple">
    <optgroup label="Dynamic">
        <option value="js">JavaScript</option>
        <option value="python">Python</option>
    </optgroup>
    <optgroup label="Static">
        <option value="cpp">C++</option>
    </optgroup>
    <option value="csharp">C#</option>
</select>

Another common requirement when working with <select> elements is to include an option in the list that indicates that no value has been selected, as shown in figure 18.7. Without this extra option, the default <select> drop-down will always have a value, and it will default to the first item in the list.
使用<select>元素时的另一个常见要求是在列表中包含一个选项,该选项指示未选择任何值,如图 18.7 所示。如果没有这个额外的选项,<select>默认下拉列表将始终有一个值,并且它将默认为列表中的第一项。

alt text

Figure 18.7 Without a “not selected” option, the <select> element will always have a value. This may not be the behavior you desire if you don’t want an <option> to be selected by default.
图 18.7 如果没有 “not selected” 选项, <select> 元素将始终具有一个值。如果您不希望默认选择<option> ,这可能不是您想要的行为。

You can achieve this in one of two ways: you could add the “not selected” option to the available SelectListItems, or you could add the option to the Razor manually, such as by using
您可以通过以下两种方式之一来实现此目的:您可以将“未选择”选项添加到可用的 SelectListItems,也可以手动将选项添加到 Razor,例如使用

<select asp-for="SelectedValue" asp-items="Model.Items">
    <option Value="">**Not selected**</option>
</select>

This will add an extra <option> at the top of your <select> element, with a blank Value attribute, allowing you to provide a “no selection” option for the user.
这将在<select> 元素顶部添加一个额外的<option> Value,其中包含一个空白的 Value 属性,允许您为用户提供 “no selection” 选项。

Tip Adding a “no selection” option to a <select> element is so common that you might want to create a partial view to encapsulate this logic.
提示:向元<select>素添加 “no selection” 选项非常常见,以至于您可能希望创建一个 partial view 来封装此逻辑。

With the Input Tag Helper and Select Tag Helper under your belt, you should be able to create most of the forms that you’ll need. You have all the pieces you need to create the currency converter application now, with one exception.
有了 Input Tag Helper 和 Select Tag Helper,您应该能够创建所需的大多数表单。您现在拥有创建货币转换器应用程序所需的所有部分,但有一个例外。

Remember that whenever you accept input from a user, you should always validate the data. The Validation Tag Helpers provide a way for you to display model validation errors to the user on your form without having to write a lot of boilerplate markup.
请记住,无论何时接受用户的输入,都应始终验证数据。验证标记帮助程序提供了一种在表单上向用户显示模型验证错误的方法,而无需编写大量样板标记。

18.2.5 The Validation Message and Validation Summary Tag Helpers

18.2.5 验证消息和验证摘要标记帮助程序

In section 18.2.3 you saw that the Input Tag Helper generates the necessary data-val- validation attributes on form input elements themselves. But you also need somewhere to display the validation messages. This can be achieved for each property in your view model using the Validation Message Tag Helper applied to a <span> by using the asp-validation-for attribute:
在第 18.2.3 节中,您看到 Input Tag Helper 在表单 input 元素本身上生成必要的 data-val-
验证属性。但您还需要在某个位置显示验证消息。这可以通过使用 asp-validation-for 属性应用于<span> 的验证消息标记帮助程序为视图模型中的每个属性实现:

<span asp-validation-for="Email"></span>

When an error occurs during client-side validation, the appropriate error message for the referenced property is displayed in the <span>, as shown in figure 18.8. This <span> element is also used to show appropriate validation messages if server-side validation fails when the form is redisplayed.
当在客户端验证期间发生错误时,引用的属性的相应错误消息将显示在<span>中,如图 18.8 所示。此<span>元素还用于在重新显示表单时服务器端验证失败时显示相应的验证消息。

alt text

Figure 18.8 Validation messages can be shown in an associated <span> by using the Validation Message Tag Helper.
图 18.8 验证消息可以使用 Validation Message Tag Helper 显示在关联的<span>中。

Any errors associated with the Email property stored in ModelState are rendered in the element body, and the appropriate attributes to hook into jQuery validation are added:
与 ModelState 中存储的 Email 属性关联的任何错误都将呈现在元素正文中,并添加用于挂接到 jQuery 验证的相应属性:

<span class="field-validation-valid" data-valmsg-for="Email"
  data-valmsg-replace="true">The Email Address field is required.</span>

The validation error shown in the element is removed or replaced when the user updates the Email <input> field and client-side validation is performed.
当用户更新 Email <input>字段并执行客户端验证时,将删除或替换元素中显示的验证错误。

NOTE For more details on ModelState and server-side validation, see chapter 16.
注意有关 ModelState 和服务器端验证的更多详细信息,请参阅第 16 章。

As well as display validation messages for individual properties, you can display a summary of all the validation messages in a <div> with the Validation Summary Tag Helper, shown in figure 18.9. This renders a <ul> containing a list of the ModelState errors.
除了显示各个属性的验证消息外,您还可以使用 Validation Summary Tag Helper 在<div> 中显示所有验证消息的摘要,如图 18.9 所示。这将呈现一个包含 ModelState 错误列表的<ul>

alt text

Figure 18.9 Form showing validation errors. The Validation Message Tag Helper is applied to <span>, close to the associated input. The Validation Summary Tag Helper is applied to a <div>, normally at the top or bottom of the form.
图 18.9 显示验证错误的表单。验证消息标记帮助程序应用于 <span>,靠近关联的输入。验证摘要标记帮助程序应用于<div>,通常位于表单的顶部或底部。

The Validation Summary Tag Helper is applied to a <div> using the asp-validation-summary attribute and providing a ValidationSummary enum value, such as
验证摘要标记帮助程序使用 asp-validation-summary 属性并提供 ValidationSummary 枚举值(如

<div asp-validation-summary="All"></div>

The ValidationSummary enum controls which values are displayed, and it has three possible values:
ValidationSummary 枚举控制显示哪些值,它有三个可能的值:

• None—Don’t display a summary. (I don’t know why you’d use this.)
无 (None) - 不显示摘要。(我不知道你为什么会用这个。)
• ModelOnly—Display only errors that are not associated with a property.
“仅模型”(ModelOnly) - 仅显示与属性无关的错误。
• All—Display errors associated with either a property or the model.
“全部”(All) - 显示与属性或模型关联的错误。

The Validation Summary Tag Helper is particularly useful if you have errors associated with your page that aren’t specific to a single property. These can be added to the model state by using a blank key, as shown in listing 18.8. In this example, the property validation passed, but we provide additional model-level validation to check that we aren’t trying to convert a currency to itself.
如果存在与页面关联的错误,而这些错误并非特定于单个属性,则 Validation Summary Tag Helper 特别有用。这些可以通过使用空键添加到模型状态中,如清单 18.8 所示。在此示例中,属性验证通过,但我们提供了额外的模型级验证,以检查我们是否没有尝试将货币转换为自身。

Listing 18.8 Adding model-level validation errors to the ModelState
示例 18.8 向 ModelState 添加模型级验证错误

public class ConvertModel : PageModel
{
    [BindProperty]
    public InputModel Input { get; set; }

    [HttpPost]
    public IActionResult OnPost()
    {
        if(Input.CurrencyFrom == Input.CurrencyTo)    #A
        {
            ModelState.AddModelError(                  #B
                string.Empty,                          #B
                "Cannot convert currency to itself");  #B
        }
        if (!ModelState.IsValid)     #C
        {                            #C
            return Page();           #C
        }                            #C

        //store the valid values somewhere etc
        return RedirectToPage("Checkout");
    }
}

❶ Can’t convert currency to itself
无法将货币转换为自身
❷ Adds model-level error, not tied to a specific property, by using empty key
使用空键添加模型级错误,不与特定属性绑定
❸ If there are any property-level or model-level errors, displays them
如果存在任何属性级或模型级错误,则显示它们

Without the Validation Summary Tag Helper, the model-level error would still be added if the user used the same currency twice, and the form would be redisplayed. Unfortunately, there would have been no visual cue to the user indicating why the form did not submit. Obviously, that’s a problem! By adding the Validation Summary Tag Helper, the model-level errors are shown to the user so they can correct the problem, as shown in figure 18.10.
如果没有 Validation Summary Tag Helper,如果用户两次使用相同的货币,则仍会添加模型级错误,并且表单将重新显示。遗憾的是,不会向用户提供视觉提示,说明表单未提交的原因。显然,这是一个问题!通过添加 Validation Summary Tag Helper,可以向用户显示模型级错误,以便他们可以纠正问题,如图 18.10 所示。

alt text

Figure 18.10 Model-level errors are only displayed by the Validation Summary Tag Helper. Without one, users won’t have any indication that there were errors on the form and so won’t be able to correct them.
图 18.10 模型级错误仅由 Validation Summary Tag Helper 显示。如果没有 ID,用户将不会有任何迹象表明表单上存在错误,因此无法更正它们。

NOTE For simplicity, I added the validation check to the page handler. An alternative approach would be to create a custom validation attribute or use IValidatableObject (described in chapter 7). That way, your handler stays lean and sticks to the single- responsibility principle (SRP). You’ll see how to create a custom validation attribute in chapter 32.
注意:为简单起见,我将验证检查添加到页面处理程序中。另一种方法是创建自定义验证属性或使用 IValidatableObject(如第 7 章所述)。这样,您的处理人员就会保持精简并坚持单一责任原则 (SRP)。您将在第 32 章中了解如何创建自定义验证属性。

This section covered most of the common Tag Helpers available for working with forms, including all the pieces you need to build the currency converter forms. They should give you everything you need to get started building forms in your own applications. But forms aren’t the only area in which Tag Helpers are useful; they’re generally applicable any time you need to mix server-side logic with HTML generation.
本节介绍了可用于表单的大多数常见 Tag Helper,包括构建货币转换器表单所需的所有部分。它们应该为您提供开始在您自己的应用程序中构建表单所需的一切。但是,表单并不是 Tag Helpers 唯一有用的领域;它们通常适用于您需要将服务器端逻辑与 HTML 生成混合的任何时间。

One such example is generating links to other pages in your application using routing-based URL generation. Given that routing is designed to be fluid as you refactor your application, keeping track of the exact URLs the links should point to would be a bit of a maintenance nightmare if you had to do it by hand. As you might expect, there’s a Tag Helper for that: the Anchor Tag Helper.
一个这样的示例是使用基于路由的 URL 生成生成指向应用程序中其他页面的链接。鉴于路由设计为在重构应用程序时是流畅的,因此如果必须手动跟踪链接应指向的确切 URL,那将有点像维护的噩梦。如您所料,有一个 Tag Helper 可用于此:Anchor Tag Helper。

18.3 Generating links with the Anchor Tag Helper

18.3 使用 Anchor Tag Helper 生成链接

In chapters 6 and 15, I showed how you could generate URLs for links to other pages in your application using LinkGenerator and IUrlHelper. Views are another common place where you need to generate links, normally by way of an <a> element with an href attribute pointing to the appropriate URL.
在第 6 章和第 15 章中,我演示了如何使用 LinkGenerator 和 IUrlHelper 为指向应用程序中其他页面的链接生成 URL。视图是另一个需要生成链接的常见位置,通常是通过具有 href 属性的<a>元素指向相应的 URL。

In this section I show how you can use the Anchor Tag Helper to generate the URL for a given Razor Page using routing. Conceptually, this is almost identical to the way the Form Tag Helper generates the action URL, as you saw in section 18.2.1. For the most part, using the Anchor Tag Helper is identical too; you provide asp-page and asp-page-handler attributes, along with asp-route- attributes as necessary. The default Razor Page templates use the Anchor Tag Helper to generate the links shown in the navigation bar using the code in the following listing.
在本节中,我将介绍如何使用 Anchor Tag Helper 通过路由为给定的 Razor Page 生成 URL。从概念上讲,这与 Form Tag Helper 生成作 URL 的方式几乎相同,如您在第 18.2.1 节中看到的那样。在大多数情况下,使用 Anchor Tag Helper 也是相同的;根据需要提供 asp-page 和 asp-page-handler 属性以及 asp-route-
属性。默认的 Razor 页面模板使用 Anchor Tag Helper 使用以下清单中的代码生成导航栏中显示的链接。

Listing 18.9 Using the Anchor Tag Helper to generate URLs in _Layout.cshtml
列表 18.9 使用 Anchor 标记帮助程序在 _Layout.cshtml 中生成 URL

<ul class="navbar-nav flex-grow-1">
    <li class="nav-item">
        <a class="nav-link text-dark"
            asp-area="" asp-page="/Index">Home</a>
    </li>
    <li class="nav-item">
        <a class="nav-link text-dark"
            asp-area="" asp-page="/Privacy">Privacy</a>
    </li>
</ul>

As you can see, each <a> element has an asp-page attribute. This Tag Helper uses the routing system to generate an appropriate URL for the <a>, resulting in the following markup:
如您所见,每个<a> 元素都有一个 asp-page 属性。此 Tag Helper 使用路由系统为<a> 生成适当的 URL,从而生成以下标记:

<ul class="nav navbar-nav">
    <li class="nav-item">
        <a class="nav-link text-dark" href="/">Home</a>
    </li>
    <li class="nav-item">
        <a class="nav-link text-dark" href="/Privacy">Privacy</a>
    </li>t
</ul>

The URLs use default values where possible, so the Index Razor Page generates the simple "/" URL instead of "/Index".
URL 会尽可能使用默认值,因此索引 Razor 页面会生成简单的“/”URL,而不是“/Index”。

If you need more control over the URL generated, the Anchor Tag Helper exposes several additional properties you can set, which are during URL generation. The attributes most often used with Razor Pages are
如果您需要对生成的 URL 进行更多控制,则 Anchor Tag Helper 会公开您可以设置的几个其他属性,这些属性在 URL 生成期间进行。Razor Pages 最常用的属性是

• asp-page—Sets the Razor Page to execute.
asp-page - 设置要执行的 Razor 页面。
• asp-page-handler—Sets the Razor Page handler to execute.
asp-page-handler - 设置要执行的 Razor Page 处理程序。
• asp-area—Sets the area route parameter to use. Areas can be used to provide an additional layer of organization to your application.[1]
asp-area - 设置要使用的区域路由参数。区域可用于为应用程序提供额外的组织层。[1]
• asp-host—If set, the generated link points to the provided host and generates an absolute URL instead of a relative URL.
asp-host - 如果设置,则生成的链接将指向提供的主机,并生成绝对 URL 而不是相对 URL。
• asp-protocol—Sets whether to generate an http or https link. If set, it generates an absolute URL instead of a relative URL.
asp-protocol - 设置是生成 http 还是 https 链接。如果设置,它将生成绝对 URL 而不是相对 URL。
• asp-route-—Sets the route parameters to use during generation. Can be added multiple times for different route parameters.
asp-route-
- 设置生成过程中要使用的路由参数。可以为不同的路由参数多次添加。

By using the Anchor Tag Helper and its attributes, you generate your URLs using the routing system, as described in chapters 5 and 14. This reduces the duplication in your code by removing the hardcoded URLs you’d otherwise need to embed in all your views.
通过使用 Anchor Tag Helper 及其属性,您可以使用路由系统生成 URL,如第 5 章和第 14 章所述。这通过删除您需要嵌入到所有视图中的硬编码 URL 来减少代码中的重复。

If you find yourself writing repetitive code in your markup, chances are someone has written a Tag Helper to help with it. The Append Version Tag Helper in the following section is a great example of using Tag Helpers to reduce the amount of fiddly code required.
如果您发现自己在标记中编写了重复的代码,则很可能有人编写了 Tag Helper 来帮助处理它。以下部分中的 Append Version Tag Helper 是使用 Tag Helpers 减少所需繁琐代码量的一个很好的示例。

18.4 Cache-busting with the Append Version Tag Helper

18.4 使用 Append Version Tag Helper 进行缓存无效化

A common problem with web development, both when developing and when an application goes into production, is ensuring that browsers are all using the latest files. For performance reasons, browsers often cache files locally and reuse them for subsequent requests rather than calling your application every time a file is requested.
Web 开发的一个常见问题,无论是在开发时还是在应用程序投入生产时,都是确保浏览器都使用最新的文件。出于性能原因,浏览器通常会在本地缓存文件,并在后续请求中重复使用它们,而不是在每次请求文件时都调用应用程序。

Normally, this is great. Most of the static assets in your site rarely change, so caching them significantly reduces the burden on your server. Think of an image of your company logo. How often does that change? If every page shows your logo, caching the image in the browser makes a lot of sense.
通常,这很好。您网站中的大多数静态资源很少更改,因此缓存它们可以显著减轻服务器的负担。想想您公司徽标的图像。这种情况多久改变一次?如果每个页面都显示您的 logo,那么在浏览器中缓存图像就很有意义。

But what happens if it does change? You want to make sure users get the updated assets as soon as they’re available. A more critical requirement might be if the JavaScript files associated with your site change. If users end up using cached versions of your JavaScript, they might see strange errors, or your application might appear broken to them.
但是,如果它真的发生了变化,会发生什么呢?您希望确保用户在更新的资产可用时立即获得更新的资产。更关键的要求可能是与您的网站关联的 JavaScript 文件是否发生更改。如果用户最终使用您的 JavaScript 的缓存版本,他们可能会看到奇怪的错误,或者您的应用程序可能会对他们造成破坏。

This conundrum is a common one in web development, and one of the most common ways for handling it is to use a cache-busting query string.
这个难题在 Web 开发中很常见,最常见的处理方法之一是使用缓存清除查询字符串。

DEFINITION A cache-busting query string adds a query parameter to a URL, such as ?v=1. Browsers will cache the response and use it for subsequent requests to the URL. When the resource changes, the query string is also changed, such as to ?v=2. Browsers will see this as a request for a new resource and make a fresh request.
定义:缓存无效化查询字符串会将查询参数添加到 URL,例如 ?v=1。浏览器将缓存响应并将其用于对 URL 的后续请求。当资源更改时,查询字符串也会更改,例如 ?v=2。浏览器会将此视为对新资源的请求,并发出新的请求。

The biggest problem with this approach is that it requires you to update a URL every time an image, CSS, or JavaScript file changes. This is a manual step that requires updating every place the resource is referenced, so it’s inevitable that mistakes are made. Tag Helpers to the rescue! When you add a <script>, <img>, or <link> element to your application, you can use Tag Helpers to automatically generate a cache-busting query string:
这种方法的最大问题是,它要求您在每次图像、CSS 或 JavaScript 文件更改时更新 URL。这是一个手动步骤,需要更新引用资源的每个位置,因此不可避免地会犯错误。标记助手来救援!当您向应用程序添加 <script>, <img><link>元素时,您可以使用 Tag Helpers 自动生成缓存无效化查询字符串:

<script src="~/js/site.js" asp-append-version="true"></script>

The asp-append-version attribute will load the file being referenced and generate a unique hash based on its contents. This is then appended as a unique query string to the resource URL:
asp-append-version 属性将加载被引用的文件,并根据其内容生成唯一的哈希值。然后,将其作为唯一查询字符串附加到资源 URL:

<script src="/js/site.js?v=EWaMeWsJBYWmL2g_KkgXZQ5nPe"></script>

As this value is a hash of the file contents, it remains unchanged as long as the file isn’t modified, so the file will be cached in users’ browsers. But if the file is modified, the hash of the contents changes and so does the query string. This ensures that browsers are always served the most up-to-date files for your application without your having to worry about updating every URL manually whenever you change a file.
由于此值是文件内容的哈希值,因此只要文件未被修改,它就会保持不变,因此该文件将缓存在用户的浏览器中。但是,如果文件被修改,内容的哈希值会发生变化,查询字符串也会发生变化。这可确保浏览器始终为您的应用程序提供最新的文件,而不必担心在更改文件时手动更新每个 URL。

So far in this chapter you’ve seen how to use Tag Helpers for forms, link generation, and cache busting. You can also use Tag Helpers to conditionally render different markup depending on the current environment. This uses a technique you haven’t seen yet, where the Tag Helper is declared as a completely separate element.
到目前为止,在本章中,您已经了解了如何使用标签帮助程序进行表单、链接生成和缓存无效化。您还可以使用 Tag Helpers 根据当前环境有条件地呈现不同的标记。这使用了一种你还没见过的技术,其中 Tag Helper 被声明为一个完全独立的元素。

18.5 Using conditional markup with the Environment Tag Helper

18.5 将条件标记与环境标记帮助程序一起使用

In many cases, you want to render different HTML in your Razor templates depending on whether your website is running in a development or production environment. For example, in development you typically want your JavaScript and CSS assets to be verbose and easy to read, but in production you’d process these files to make them as small as possible. Another example might be the desire to apply a banner to the application when it’s running in a testing environment, which is removed when you move to production, as shown in figure 18.11.
在许多情况下,您希望在 Razor 模板中呈现不同的 HTML,具体取决于您的网站是在开发环境中运行还是在生产环境中运行。例如,在开发中,您通常希望 JavaScript 和 CSS 资源冗长且易于阅读,但在生产环境中,您需要处理这些文件以使其尽可能小。另一个示例可能是希望在应用程序在测试环境中运行时向应用程序应用横幅,当您移动到生产环境时,该横幅将被删除,如图 18.11 所示。

alt text

Figure 18.11 The warning banner will be shown whenever you’re running in a testing environment, to make it easy to distinguish from production.
图 18.11 当您在测试环境中运行时,都会显示警告横幅,以便于与生产区分开来。

You’ve already seen how to use C# to add if statements to your markup, so it would be perfectly possible to use this technique to add an extra div to your markup when the current environment has a given value. If we assume that the env variable contains the current environment, you could use something like this:
您已经了解了如何使用 C# 将 if 语句添加到标记中,因此当当前环境具有给定值时,完全可以使用此技术向标记中添加额外的 div。如果我们假设 env 变量包含当前环境,则可以使用如下内容:

@if(env == "Testing" || env == "Staging")
{
    <div class="warning">You are currently on a testing environment</div>
}

There’s nothing wrong with this, but a better approach would be to use the Tag Helper paradigm to keep your markup clean and easy to read. Luckily, ASP.NET Core comes with the EnvironmentTagHelper, which can be used to achieve the same result in a slightly clearer way:
这没有错,但更好的方法是使用 Tag Helper 范例来保持标记干净且易于阅读。幸运的是,ASP.NET Core 附带了 EnvironmentTagHelper,它可用于以更清晰的方式实现相同的结果:

<environment include="Testing,Staging">
    <div class="warning">You are currently on a testing environment</div>
</environment>

This Tag Helper is a little different from the others you’ve seen before. Instead of augmenting an existing HTML element using an asp- attribute, the whole element is the Tag Helper. This Tag Helper is completely responsible for generating the markup, and it uses an attribute to configure it.
此 Tag Helper 与您以前见过的其他 Tag Helper 略有不同。整个元素不是使用 asp- 属性来扩充现有的 HTML 元素,而是 Tag Helper。此 Tag Helper 完全负责生成标记,并使用属性对其进行配置。

Functionally, this Tag Helper is identical to the C# markup (where the env variable contains the hosting environment, as described in chapter 10), but it’s more declarative in its function than the C# alternative. You’re obviously free to use either approach, but personally I like the HTML-like nature of Tag Helpers.
从功能上讲,此 Tag Helper 与 C# 标记相同(其中 env 变量包含托管环境,如第 10 章所述),但它的函数比 C# 替代方案更具声明性。显然,您可以自由使用任何一种方法,但就个人而言,我喜欢 Tag Helper 的类似 HTML 的性质。

We’ve reached the end of this chapter on Tag Helpers, and with it, we’ve finished our main look at building traditional web applications that display HTML to users. In the last part of the book, we’ll revisit Razor templates when you learn how to build custom components like custom Tag Helpers and view components. For now, you have everything you need to build complex Razor layouts; the custom components can help tidy up your code down the line.
我们已经完成了本章关于标记帮助程序的结尾,这样,我们已经完成了构建向用户显示 HTML 的传统 Web 应用程序的主要内容。在本书的最后一部分,当您学习如何构建自定义组件(如自定义标记帮助程序)和视图组件时,我们将重新访问 Razor 模板。目前,您拥有构建复杂 Razor 布局所需的一切;自定义组件可以帮助整理您的代码。

Part 3 of this book has been a whistle-stop tour of how to build Razor Page applications with ASP.NET Core. You now have the basic building blocks to start making server-rendered ASP.NET Core applications. Before we move on to discussing security in part 4 of this book, I’ll take a couple of chapters to discuss building apps with MVC controllers.
本书的第 3 部分简要介绍了如何使用 ASP.NET Core 构建 Razor Page 应用程序。现在,您拥有了开始制作服务器渲染的 ASP.NET Core 应用程序的基本构建块。在我们继续讨论本书的第 4 部分的安全性之前,我将用几章来讨论使用 MVC 控制器构建应用程序。

I’ve talked about MVC controllers a lot in passing, but in chapter 19 you’ll learn why I recommend Razor Pages over MVC controllers for server-rendered apps. Nevertheless, there are some situations for which MVC controllers make sense.
我顺便谈了很多 MVC 控制器,但在第 19 章中,您将了解为什么我建议将 Razor Pages 用于服务器渲染的应用程序,而不是 MVC 控制器。尽管如此,在某些情况下,MVC 控制器是有意义的。

18.6 Summary

18.6 总结

With Tag Helpers, you can bind your data model to HTML elements, making it easier to generate dynamic HTML while remaining editor friendly.
使用标记帮助程序,您可以将数据模型绑定到 HTML 元素,从而更轻松地生成动态 HTML,同时保持编辑器友好性。

As with Razor in general, Tag Helpers are for server-side rendering of HTML only. You can’t use them directly in frontend frameworks, such as Angular or React.
与一般的 Razor 一样,标记帮助程序仅用于 HTML 的服务器端呈现。您不能直接在前端框架(如 Angular 或 React)中使用它们。

Tag Helpers can be standalone elements or can attach to existing HTML using attributes. This lets you both customize HTML elements and add entirely new elements.
标记帮助程序可以是独立元素,也可以使用属性附加到现有 HTML。这样,您既可以自定义 HTML 元素,也可以添加全新的元素。

Tag Helpers can customize the elements they’re attached to, add additional attributes, and customize how they’re rendered to HTML. This can greatly reduce the amount of markup you need to write.
标记帮助程序可以自定义它们所附加到的元素,添加其他属性,并自定义它们呈现为 HTML 的方式。这可以大大减少您需要编写的标记量。

Tag Helpers can expose multiple attributes on a single element. This makes it easier to configure the Tag Helper, as you can set multiple, separate values.
标记帮助程序可以在单个元素上公开多个属性。这使得配置 Tag Helper 变得更加容易,因为您可以设置多个单独的值。

You can add the asp-page and asp-page-handler attributes to the <form> element to set the action URL using the URL generation feature of Razor Pages.
可以将 asp-page 和 asp-page-handler 属性添加到<form>元素,以使用 Razor Pages 的 URL 生成功能设置作 URL。

You specify route values to use during routing with the Form Tag Helper using asp-route- attributes. These values are used to build the final URL or are passed as query data.
使用 asp-route-
属性通过表单标记帮助程序指定要在路由期间使用的路由值。这些值用于构建最终 URL 或作为查询数据传递。

The Form Tag Helper also generates a hidden field that you can use to prevent CSRF attacks. This is added automatically and is an important security measure.
Form Tag Helper 还会生成一个隐藏字段,您可以使用它来防止 CSRF 攻击。这是自动添加的,是一项重要的安全措施。

You can attach the Label Tag Helper to a <label> using asp-for. It generates an appropriate for attribute and caption based on the [Display] DataAnnotation attribute and the PageModel property name.
您可以将 Label Tag Helper 附加到<label> 使用 asp-for.它根据 [Display] DataAnnotation 属性和 PageModel 属性名称生成相应的属性和标题。

The Input Tag Helper sets the type attribute of an <input> element to the appropriate value based on a bound property’s Type and any DataAnnotation attributes applied to it. It also generates the data-val- attributes required for client-side validation. This significantly reduces the amount of HTML code you need to write.
Input Tag Helper 根据绑定属性的 Type 和应用于它的任何 DataAnnotation 属性,将 <input>元素的 type 属性设置为适当的值。它还生成客户端验证所需的 data-val-
属性。这大大减少了您需要编写的 HTML 代码量。

To enable client-side validation, you must add the necessary JavaScript files to your view for jQuery validation and unobtrusive validation.
要启用客户端验证,您必须将必要的 JavaScript 文件添加到视图中,以进行 jQuery 验证和不引人注目的验证。

The Select Tag Helper can generate drop-down <select> elements as well as list boxes, using the asp-for and asp-items attributes. To generate a multiselect <select> element, bind the element to an IEnumerable property on the view model. You can use these approaches to generate several different styles of select box.
Select Tag Helper 可以使用 asp-for 和 asp-items 属性生成下拉<select>元素和列表框。要生成多选元素,请将该<select>元素绑定到视图模型上的 IEnumerable 属性。您可以使用这些方法生成多种不同样式的选择框。

You can generate an IEnumerable<SelectListItem> for an enum TEnum using the Html.GetEnumSelectList<TEnum>() helper method. This saves you having to write the mapping code yourself.
您可以使用 helper Html.GetEnumSelectList<TEnum>() 方法生成 IEnumerable<SelectListItem> 枚举 TEnum。这样就不必自己编写映射代码。

The Select Tag Helper generates <optgroup> elements if the items supplied in asp-for have an associated SelectListGroup on the Group property. Groups can be used to separate items in select lists.
如果 asp-for 中提供的项在 Group 属性上具有关联的 SelectListGroup,则 Select Tag Helper 会生成<optgroup> 元素。组可用于分隔选择列表中的项目。

Any extra additional <option> elements added to the Razor markup are passed through to the final HTML unchanged. You can use these additional elements to easily add a “no selection” option to the <select> element.
添加到 Razor 标记的任何其他额外<option>元素都将原封不动地传递到最终 HTML。您可以使用这些附加元素轻松地向 <select>元素添加“无选择”选项。

The Validation Message Tag Helper is used to render the client- and server-side validation error messages for a given property. This gives important feedback to your users when elements have errors. Use the asp-validation-for attribute to attach the Validation Message Tag Helper to a <span>.
验证消息标记帮助程序用于呈现给定属性的客户端和服务器端验证错误消息。当元素有错误时,这会向用户提供重要的反馈。使用 asp-validation-for 属性将验证消息标记帮助程序附加到<span> .

The Validation Summary Tag Helper displays validation errors for the model, as well as for individual properties. You can use model-level properties to display additional validation that doesn’t apply to just one property. Use the asp-validation-summary attribute to attach the Validation Summary Tag Helper to a <div>.
Validation Summary Tag Helper 显示模型以及各个属性的验证错误。您可以使用模型级属性来显示不仅适用于一个属性的其他验证。使用 asp-validation-summary 属性将验证摘要标记帮助程序附加到 <div>.

You can generate <a> URLs using the Anchor Tag Helper. This helper uses routing to generate the href URL using asp-page, asp-page-handler, and asp-route- attributes, giving you the full power of routing.
您可以使用 Anchor Tag Helper 生成<a> URL。此帮助程序使用路由通过 asp-page、asp-page-handler 和 asp-route-
属性生成 href URL,从而为您提供完整的路由功能。

You can add the asp-append-version attribute to <link>, <script>, and <img> elements to provide cache-busting capabilities based on the file’s contents. This ensures users cache files for performance reasons, yet still always get the latest version of files.
您可以将 asp-append-version 属性添加到 <link>, <script><img>元素中,以根据文件的内容提供缓存清除功能。这可确保用户出于性能原因缓存文件,但仍始终获得最新版本的文件。

You can use the Environment Tag Helper to conditionally render different HTML based on the app’s current execution environment. You can use this to render completely different HTML in different environments if you wish.
您可以使用 Environment Tag Helper 根据应用程序的当前执行环境有条件地呈现不同的 HTML。如果你愿意,你可以使用它来在不同的环境中呈现完全不同的 HTML。

[1] I don’t cover areas in detail in this book. They’re an optional aspect of MVC that are often only used on large projects. You can read about them here: http://mng.bz/3X64.
[1] 我在这本书中没有详细介绍各个领域。它们是 MVC 的一个可选方面,通常仅用于大型项目。您可以在此处阅读有关它们的信息:http://mng.bz/3X64

ASP.NET Core in Action 17 Rendering HTML using Razor views

17 Rendering HTML using Razor views
17 使用 Razor 视图呈现 HTML

This chapter covers
本章涵盖
• Creating Razor views to display HTML to a user
创建 Razor 视图以向用户显示 HTML
• Using C# and the Razor markup syntax to generate HTML dynamically
使用 C# 和 Razor 标记语法动态生成 HTML
• Reusing common code with layouts and partial views
将通用代码与布局和部分视图重复使用

It’s easy to get confused between the terms involved in Razor Pages—PageModel, page handlers, Razor views—especially as some of the terms describe concrete features, and others describe patterns and concepts. We’ve touched on all these terms in detail in previous chapters, but it’s important to get them straight in your mind:
Razor Pages 中涉及的术语(PageModel、页面处理程序、Razor 视图)很容易混淆,尤其是当其中一些术语描述具体功能,而另一些术语描述模式和概念时。我们在前面的章节中详细介绍了所有这些术语,但请务必将它们清晰地记在脑海中:

• Razor Pages—Razor Pages generally refers to the page-based paradigm that combines routing, model binding, and HTML generation using Razor views.
Razor Pages - Razor Pages 通常是指基于 Page 的范例,它使用 Razor 视图将路由、模型绑定和 HTML 生成相结合。

• Razor Page—A single Razor Page represents a single page or endpoint. It typically consists of two files: a .cshtml file containing the Razor view and a .cshtml.cs file containing the page’s PageModel.
Razor 页面 - 单个 Razor 页面表示单个页面或端点。它通常由两个文件组成:一个包含 Razor 视图的 .cshtml 文件和一个包含页面 PageModel 的 .cshtml.cs 文件。

• PageModel—The PageModel for a Razor Page is where most of the action happens. It’s where you define the binding models for a page, which extracts data from the incoming request. It’s also where you define the page’s page handlers.
PageModel - Razor 页面的 PageModel 是大多数作发生的位置。您可以在此处定义页面的绑定模型,该页面从传入请求中提取数据。您还可以在此处定义页面的页面处理程序。

• Page handler—Each Razor Page typically handles a single route, but it can handle multiple HTTP verbs such as GET and POST. Each page handler typically handles a single HTTP verb.
页面处理程序 - 每个 Razor 页面通常处理单个路由,但也可以处理多个 HTTP 动词,例如 GET 和 POST。每个页面处理程序通常处理一个 HTTP 动词。

• Razor view—Razor views (also called Razor templates) are used to generate HTML. They are typically used in the final stage of a Razor Page to generate the HTML response to send back to the user.
Razor 视图 - Razor 视图 (也称为 Razor 模板) 用于生成 HTML。它们通常用于 Razor 页面的最后阶段,以生成 HTML 响应以发送回用户。

In the previous four chapters, I covered a whole cross section of Razor Pages, including the Model-View-Controller (MVC) design pattern, the Razor Page PageModel, page handlers, routing, and binding models. This chapter covers the last part of the MVC pattern: using a view to generate the HTML that’s delivered to the user’s browser.
在前四章中,我介绍了 Razor Pages 的整个横截面,包括模型-视图-控制器 (MVC) 设计模式、Razor Page PageModel、页面处理程序、路由和绑定模型。本章介绍 MVC 模式的最后一部分:使用视图生成传送到用户浏览器的 HTML。

In ASP.NET Core, views are normally created using the Razor markup syntax (sometimes described as a templating language), which uses a mixture of HTML and C# to generate the final HTML. This chapter covers some of the features of Razor and how to use it to build the view templates for your application. Generally speaking, users will have two sorts of interactions with your app: they’ll read data that your app displays, and they’ll send data or commands back to it. The Razor language contains several constructs that make it simple to build both types of applications.
在 ASP.NET Core 中,视图通常使用 Razor 标记语法(有时描述为模板语言)创建,该语法使用 HTML 和 C# 的混合来生成最终的 HTML。本章介绍 Razor 的一些功能,以及如何使用它来为您的应用程序构建视图模板。一般来说,用户将与你的应用进行两种类型的交互:他们将读取你的应用显示的数据,并将数据或命令发送回它。Razor 语言包含多个构造,使构建这两种类型的应用程序变得简单。

When displaying data, you can use the Razor language to easily combine static HTML with values from your PageModel. Razor can use C# as a control mechanism, so adding conditional elements and loops is simple—something you couldn’t achieve with HTML alone.
显示数据时,您可以使用 Razor 语言轻松地将静态 HTML 与 PageModel 中的值组合在一起。Razor 可以使用 C# 作为控制机制,因此添加条件元素和循环很简单,这是单独使用 HTML 无法实现的。

The normal approach to sending data to web applications is with HTML forms. Virtually every dynamic app you build will use forms; some applications will be pretty much nothing but forms! ASP.NET Core and the Razor templating language include Tag Helpers that make generating HTML forms easy.
将数据发送到 Web 应用程序的正常方法是使用 HTML 表单。您构建的几乎每个动态应用程序都将使用表单;有些应用程序几乎只不过是表单!ASP.NET Core 和 Razor 模板语言包括标记帮助程序,使生成 HTML 表单变得容易。

NOTE You’ll get a brief glimpse of Tag Helpers in section 17.1, but I explore them in detail in chapter 18.
注意:您将在 17.1 节中简要了解标记帮助程序,但我会在第 18 章中详细探讨它们。

In this chapter we’ll be focusing primarily on displaying data and generating HTML using Razor rather than creating forms. You’ll see how to render values from your PageModel to the HTML, and how to use C# to control the generated output. Finally, you’ll learn how to extract the common elements of your views into subviews called layouts and partial views, and how to compose them to create the final HTML page.
在本章中,我们将主要关注使用 Razor 显示数据和生成 HTML,而不是创建表单。您将了解如何将 PageModel 中的值呈现到 HTML,以及如何使用 C# 控制生成的输出。最后,您将学习如何将视图的常见元素提取到称为布局和分部视图的子视图中,以及如何编写它们以创建最终的 HTML 页面。

17.1 Views: Rendering the user interface

17.1 视图:渲染用户界面

In this section I provide a quick introduction to rendering HTML using Razor views. We’ll recap the MVC design pattern used by Razor Pages and where the view fits in. Then I’ll show how Razor syntax allows you to mix C# and HTML to generate dynamic UIs.
在本节中,我将简要介绍如何使用 Razor 视图呈现 HTML。我们将回顾 Razor Pages 使用的 MVC 设计模式以及视图的适用位置。然后,我将展示 Razor 语法如何允许您混合使用 C# 和 HTML 来生成动态 UI。

As you know from earlier chapters on the MVC design pattern, it’s the job of the Razor Page’s page handler to choose what to return to the client. For example, if you’re developing a to-do list application, imagine a request to view a particular to-do item, as shown in figure 17.1.
正如您在前面有关 MVC 设计模式的章节中所知,Razor Page 的页面处理程序的工作是选择要返回给客户端的内容。例如,如果您正在开发一个待办事项列表应用程序,请想象一个查看特定待办事项的请求,如图 17.1 所示。

alt text

Figure 17.1 Handling a request for a to-do list item using ASP.NET Core Razor Pages. The page handler builds the data required by the view and exposes it as properties on the PageModel. The view generates HTML based only on the data provided; it doesn’t need to know where that data comes from.
图 17.1 使用 ASP.NET Core Razor Pages 处理待办事项列表项的请求。页面处理程序构建视图所需的数据,并将其作为 PageModel 上的属性公开。视图仅根据提供的数据生成 HTML;它不需要知道这些数据来自哪里。

A typical request follows the steps shown in figure 17.1:
典型的请求遵循图 17.1 中所示的步骤:

• The middleware pipeline receives the request, and the routing middleware determines the endpoint to invoke—in this case, the View Razor Page in the ToDo folder.
中间件管道接收请求,路由中间件确定要调用的终结点 - 在本例中为 ToDo 文件夹中的 View Razor Page。

• The model binder (part of the Razor Pages framework) uses the request to build the binding models for the page, as you saw in chapter 16. The binding models are set as properties on the Razor Page or are passed to the page handler method as arguments when the handler is executed. The page handler checks that you passed a valid id for the to-do item and marks the ModelState as valid if so.
模型绑定器 (Razor Pages 框架的一部分) 使用请求为页面构建绑定模型,如第 16 章所示。绑定模型在 Razor Page 上设置为属性,或者在执行处理程序时作为参数传递给页面处理程序方法。页面处理程序检查您是否为待办事项传递了有效的 ID,如果是,则将 ModelState 标记为有效。

• If the request is valid, the page handler calls out to the various services that make up the application model. This might load the details about the to-do from a database or from the filesystem, returning them to the handler. As part of this process, either the application model or the page handler itself generates values to pass to the view and sets them as properties on the Razor Page PageModel.
如果请求有效,则页面处理程序将调用构成应用程序模型的各种服务。这可能会从数据库或文件系统加载有关 to-do 的详细信息,并将它们返回给处理程序。在此过程中,应用程序模型或页面处理程序本身会生成要传递给视图的值,并将其设置为 Razor Page PageModel 上的属性。
Once the page handler has executed, the PageModel should contain all the data required to render a view. In this example, it contains details about the to-do itself, but it might also contain other data, such as how many to-dos you have left, whether you have any to-dos scheduled for today, your username, and so on—anything that controls how to generate the end UI for the request.
执行页面处理程序后, PageModel 应包含呈现视图所需的所有数据。在此示例中,它包含有关待办事项本身的详细信息,但它也可能包含其他数据,例如您还剩下多少个待办事项、您今天是否安排了任何待办事项、您的用户名等 — 控制如何为请求生成最终 UI 的任何内容。

• The Razor view template uses the PageModel to generate the final response and returns it to the user via the middleware pipeline.
Razor 视图模板使用 PageModel 生成最终响应,并通过中间件管道将其返回给用户。

A common thread throughout this discussion of MVC is the separation of concerns MVC brings, and it’s no different when it comes to your views. It would be easy enough to generate the HTML directly in your application model or in your controller actions, but instead you delegate that responsibility to a single component: the view.
贯穿本次 MVC 讨论的一个共同点是 MVC 带来的关注点分离,对于您的视图来说,这没有什么不同。直接在应用程序模型或控制器作中生成 HTML 很容易,但您将该责任委托给单个组件:视图。

But even more than that, you separate the data required to build the view from the process of building it by using properties on the PageModel. These properties should contain all the dynamic data the view needs to generate the final output.
但更重要的是,通过使用 PageModel 上的属性,将构建视图所需的数据与构建视图的过程分开。这些属性应包含视图生成最终输出所需的所有动态数据。

Tip Views shouldn’t call methods on the PageModel. The view should generally only be accessing data that has already been collected and exposed as properties.
提示:视图不应调用 PageModel 上的方法。视图通常应仅访问已收集并作为属性公开的数据。

Razor Page handlers indicate that the Razor view should be rendered by returning a PageResult (or by returning void), as you saw in chapter 15. The Razor Pages infrastructure executes the Razor view associated with a given Razor Page to generate the final response. The use of C# in the Razor template means you can dynamically generate the final HTML sent to the browser. This allows you to, for example, display the name of the current user in the page, hide links the current user doesn’t have access to, or render a button for every item in a list.
Razor Page 处理程序指示应通过返回 PageResult(或返回 void)来呈现 Razor 视图,如第 15 章所示。Razor Pages 基础结构执行与给定 Razor 页面关联的 Razor 视图,以生成最终响应。在 Razor 模板中使用 C# 意味着您可以动态生成发送到浏览器的最终 HTML。例如,这允许您在页面中显示当前用户的名称,隐藏当前用户无权访问的链接,或者为列表中的每个项目呈现一个按钮。

Imagine your boss asks you to add a page to your application that displays a list of the application’s users. You should also be able to view a user from the page or create a new one, as shown in figure 17.2.
假设您的老板要求您向应用程序添加一个页面,该页面显示应用程序的用户列表。您还应该能够从页面查看用户或创建新用户,如图 17.2 所示。

alt text

Figure 17.2 The use of C# in Razor lets you easily generate dynamic HTML that varies at runtime. In this example, using a foreach loop inside the Razor view dramatically reduces the duplication in the HTML that you would otherwise have to write.
图 17.2 在 Razor 中使用 C# 可让您轻松生成在运行时变化的动态 HTML。在此示例中,在 Razor 视图中使用 foreach 循环可显著减少 HTML 中必须编写的重复项。

With Razor templates, generating this sort of dynamic content is simple. Listing 17.1 shows a template that could be used to generate the interface in figure 17.2. It combines standard HTML with C# statements and uses Tag Helpers to generate the form elements.
使用 Razor 模板,生成此类动态内容非常简单。清单 17.1 显示了一个可用于生成图 17.2 中接口的模板。它将标准 HTML 与 C# 语句相结合,并使用标记帮助程序生成表单元素。

Listing 17.1 A Razor template to list users and a form for adding a new user
清单 17.1 用于列出用户的 Razor 模板和用于添加新用户的表单

@page
@model IndexViewModel
<div class="row"> ❶
<div class="col-md-6"> ❶
<form method="post">
<div class="form-group">
<label asp-for="NewUser"></label> ❷
<input class="form-control" asp-for="NewUser" /> ❷
<span asp-validation-for="NewUser"></span> ❷
</div>
<div class="form-group">
<button type="submit"
class="btn btn-success">Add</button>
</div>
</form>
</div>
</div>
<h4>Number of users: @Model.ExistingUsers.Count</h4> ❸
<div class="row">
<div class="col-md-6">
<ul class="list-group">
@foreach (var user in Model.ExistingUsers) ❹
{
<li class="list-group-item d-flex justify-content-between">
<span>@user</span>
<a class="btn btn-info"
asp-page="ViewUser" ❺
asp-route-userName="@user">View</a> ❺
</li>
}
</ul>
</div>
</div>

❶ Normal HTML is sent to the browser unchanged.
普通 HTML 原封不动地发送到浏览器。
❷ Tag Helpers attach to HTML elements to create forms.
标签助手附加到 HTML 元素以创建表单。
❸ Values can be written from C# objects to the HTML.
值可以从 C# 对象写入 HTML。
❹ C# constructs such as for loops can be used in Razor.
可以在 Razor 中使用 for 循环等 C# 构造。
❺ Tag Helpers can also be used outside forms to help in other HTML generation.
标签助手也可以在表单之外使用,以帮助生成其他 HTML。

This example demonstrates a variety of Razor features. There’s a mixture of HTML that’s written unmodified to the response output, and there are various C# constructs used to generate HTML dynamically. In addition, you can see several Tag Helpers. These look like normal HTML attributes that start with asp-, but they’re part of the Razor language. They can customize the HTML element they’re attached to, changing how it’s rendered. They make building HTML forms much simpler than they would be otherwise. Don’t worry if this template is a bit overwhelming at the moment; we’ll break it all down as you progress through this chapter and the next.
此示例演示了各种 Razor 功能。响应输出中混合了未经修改的 HTML,并且有各种 C# 构造用于动态生成 HTML。此外,您还可以看到多个 Tag Helpers。这些看起来类似于以 asp- 开头的普通 HTML 属性,但它们是 Razor 语言的一部分。他们可以自定义附加到的 HTML 元素,从而更改其呈现方式。它们使构建 HTML 表单比其他方式简单得多。如果这个模板目前有点让人不知所措,请不要担心;随着您完成本章和下一章,我们将对其进行全部分解。

Razor Pages are compiled when you build your application. Behind the scenes, they become another C# class in your application. It’s also possible to enable runtime compilation of your Razor Pages. This allows you to modify your Razor Pages while your app is running without having to explicitly stop and rebuild. This can be handy when developing locally, but it’s best avoided when you deploy to production. You can read how to enable this at http://mng.bz/jP2P.
Razor Pages 是在构建应用程序时编译的。在后台,它们成为应用程序中的另一个 C# 类。还可以启用 Razor Pages 的运行时编译。这样,您就可以在应用运行时修改 Razor Pages,而无需显式停止和重新生成。在本地开发时,这可能很方便,但在部署到生产环境时最好避免。您可以在 http://mng.bz/jP2P 阅读如何启用此功能。

NOTE As with most things in ASP.NET Core, it’s possible to swap out the Razor templating engine and replace it with your own server-side rendering engine. You can’t replace Razor with a client-side framework like Angular or React. If you want to take this approach, you’d use minimal APIs or web API controllers instead and a separate client-side framework.
注意:与 ASP.NET Core 中的大多数内容一样,可以换出 Razor 模板引擎,并将其替换为您自己的服务器端渲染引擎。您不能将 Razor 替换为 Angular 或 React 等客户端框架。如果要采用此方法,则需要使用最少的 API 或 Web API 控制器以及单独的客户端框架。

In the next section we’ll look in more detail at how Razor views fit into the Razor Pages framework and how you can pass data from your Razor Page handlers to the Razor view to help build the HTML response.
在下一部分中,我们将更详细地了解 Razor 视图如何适应 Razor Pages 框架,以及如何将数据从 Razor Page 处理程序传递到 Razor 视图以帮助构建 HTML 响应。

17.2 Creating Razor views

17.2 创建 Razor 视图

In this section we’ll look at how Razor views fit into the Razor Pages framework. You’ll learn how to pass data from your page handlers to your Razor views and how you can use that data to generate dynamic HTML.
在本部分中,我们将了解 Razor 视图如何适应 Razor Pages 框架。您将了解如何将数据从页面处理程序传递到 Razor 视图,以及如何使用该数据生成动态 HTML。

With ASP.NET Core, whenever you need to display an HTML response to the user, you should use a view to generate it. Although it’s possible to directly generate a string from your page handlers, which will be rendered as HTML in the browser, this approach doesn’t adhere to the MVC separation of concerns and will quickly leave you tearing your hair out.
使用 ASP.NET Core,每当需要向用户显示 HTML 响应时,都应该使用视图来生成它。尽管可以直接从页面处理程序生成字符串,该字符串将在浏览器中呈现为 HTML,但这种方法不符合 MVC 关注点分离,并且很快就会让您感到困惑。

NOTE Some middleware, such as the WelcomePageMiddleware you saw in chapter 4, may generate HTML responses without using a view, which can make sense in some situations. But your Razor Page and MVC controllers should always generate HTML using views.
注意:一些中间件,比如你在第 4 章中看到的 WelcomePageMiddleware,可能会在不使用视图的情况下生成 HTML 响应,这在某些情况下是有意义的。但 Razor Page 和 MVC 控制器应始终使用视图生成 HTML。

Instead, by relying on Razor views to generate the response, you get access to a wide variety of features, as well as editor tooling to help. This section serves as a gentle introduction to Razor views, the things you can do with them, and the various ways you can pass data to them.
相反,通过依靠 Razor 视图生成响应,您可以访问各种功能以及提供帮助的编辑器工具。本节简要介绍了 Razor 视图、您可以使用它们执行的作以及向它们传递数据的各种方式。

17.2.1 Razor views and code-behind

17.2.1 Razor 视图和代码隐藏

In this book you’ve already seen that Razor Pages typically consist of two files:
在本书中,您已经看到 Razor Pages 通常由两个文件组成:
• The .cshtml file, commonly called the Razor view
.cshtml 文件,通常称为 Razor 视图
• The .cshtml.cs file, commonly called the code-behind, which contains the PageModel
.cshtml.cs 文件,通常称为代码隐藏,其中包含 PageModel

The Razor view contains the @page directive, which makes it a Razor Page, as you’ve seen previously. Without this directive, the Razor Pages framework will not route requests to the page, and the file is ignored for most purposes.
Razor 视图包含 @page 指令,这使其成为 Razor 页面,如前所述。如果没有此指令,Razor Pages 框架不会将请求路由到页面,并且在大多数情况下会忽略该文件。

DEFINITION A directive is a statement in a Razor file that changes the way the template is parsed or compiled. Another common directive is the @using newNamespace directive, which makes objects in the newNamespace namespace available.
定义:指令是 Razor 文件中的一条语句,用于更改模板的分析或编译方式。另一个常见指令是 @using newNamespace 指令,它使 newNamespace 命名空间中的对象可用。

The code-behind .cshtml.cs file contains the PageModel for an associated Razor Page. It contains the page handlers that respond to requests, and it is where the Razor Page typically interacts with other parts of your application.
代码隐藏 .cshtml.cs 文件包含关联 Razor 页面的 PageModel。它包含响应请求的页面处理程序,并且是 Razor Page 通常与应用程序的其他部分交互的位置。

Even though the .cshtml and .cshtml.cs files have the same name, such as ToDoItem.cshtml and ToDoItem.cshtml.cs, it’s not the filename that’s linking them. But if it’s not by filename, how does the Razor Pages framework know which PageModel is associated with a given Razor Page view file?
即使 .cshtml 和 .cshtml.cs 文件具有相同的名称(如 ToDoItem.cshtml 和 ToDoItem.cshtml.cs),也不是链接它们的文件名。但是,如果不是按文件名,Razor Pages 框架如何知道哪个 PageModel 与给定的 Razor Page 视图文件相关联?

At the top of each Razor Page, after the @page directive, is the @model directive with a Type, indicating which PageModel is associated with the Razor view. The following directives indicate that the ToDoItemModel is the PageModel associated with the Razor Page:
在每个 Razor 页面的顶部,@page 指令后面是带有 Type 的 @model 指令,指示哪个 PageModel 与 Razor 视图相关联。以下指令指示 ToDoItemModel 是与 Razor Page 关联的 PageModel:

@page
@model ToDoItemModel

Once a request is routed to a Razor Page, as covered in chapter 14, the framework looks for the @model directive to decide which PageModel to use. Based on the PageModel selected, it then binds to any properties in the PageModel marked with the [BindProperty] attribute (as we covered in chapter 16) and executes the appropriate page handler (based on the request’s HTTP verb, as described in chapter 15).
将请求路由到 Razor Page 后(如第 14 章所述),框架会查找 @model 指令来决定使用哪个 PageModel。然后,根据所选的 PageModel,它绑定到 PageModel 中标有 [BindProperty] 属性的任何属性(如第 16 章所述),并执行相应的页面处理程序(基于请求的 HTTP 动词,如第 15 章所述)。

NOTE Technically, the PageModel and @model directive are optional. If you don’t specify a PageModel, the framework executes an implicit page handler, as you saw in chapter 15, and renders the view directly. It’s also possible to combine the .cshtml and .cshtml.cs files into a single .cshtml file. You can read more about this approach in Razor Pages in Action, by Mark Brind (Manning, 2022).
注意:从技术上讲,PageModel 和 @model 指令是可选的。如果你没有指定 PageModel,框架将执行一个隐式页面处理程序,就像你在第 15 章中看到的那样,并直接渲染视图。还可以将 .cshtml 和 .cshtml.cs 文件合并到单个 .cshtml 文件中。您可以在 Mark Brind 的 Razor Pages in Action(Manning,2022 年)中阅读有关此方法的更多信息。

In addition to the @page and @model directives, the Razor view file contains the Razor template that is executed to generate the HTML response.
除了 @page 和 @model 指令之外,Razor 视图文件还包含为生成 HTML 响应而执行的 Razor 模板。

17.2.2 Introducing Razor templates

17.2.2 Razor 模板简介

Razor view templates contain a mixture of HTML and C# code interspersed with one another. The HTML markup lets you easily describe exactly what should be sent to the browser, whereas the C# code can be used to dynamically change what is rendered. The following listing shows an example of Razor rendering a list of strings representing to-do items.
Razor 视图模板包含相互穿插的 HTML 和 C# 代码的混合。HTML 标记可让您轻松准确描述应发送到浏览器的内容,而 C# 代码可用于动态更改呈现的内容。以下清单显示了 Razor 呈现表示待办事项的字符串列表的示例。

Listing 17.2 Razor template for rendering a list of strings
清单 17.2 用于渲染字符串列表的 Razor 模板

@page
@{ ❶
var tasks = new List<string> ❶
{ "Buy milk", "Buy eggs", "Buy bread" }; ❶
} ❶
<h1>Tasks to complete</h1> ❷
<ul>
@for(var i=0; i< tasks.Count; i++) ❸
{ ❸
var task = tasks[i]; ❸
<li>@i - @task</li> ❸
} ❸
</ul>

❶ Arbitrary C# can be executed in a template. Variables remain in scope throughout the page.
可以在模板中执行任意 C#。变量在整个页面中保持范围内。
❷ Standard HTML markup will be rendered to the output unchanged.
标准 HTML 标记将原封不动地呈现到输出。
❸ Mixing C# and HTML allows you to create HTML dynamically at runtime.
混合使用 C# 和 HTML 允许您在运行时动态创建 HTML。

The pure HTML sections in this template are in the angle brackets. The Razor engine copies this HTML directly to the output, unchanged, as though you were writing a normal HTML file.
此模板中的纯 HTML 部分位于尖括号中。Razor 引擎将此 HTML 直接复制到输出中,保持不变,就像您正在编写普通的 HTML 文件一样。

NOTE The ability of Razor syntax to know when you are switching between HTML and C# can be both uncanny and infuriating at times. I discuss how to control this transition in section 17.3.
注意:Razor 语法能够知道您何时在 HTML 和 C# 之间切换,这有时既不可思议又令人恼火。我在 17.3 节中讨论了如何控制这种转换。

As well as HTML, you can see several C# statements in there. The advantage of being able to, for example, use a for loop rather than having to explicitly write out each <li> element should be self-evident. I’ll dive a little deeper into more of the C# features of Razor in the next section. When rendered, the template in listing 17.2 produces the following HTML.
除了 HTML,您还可以在其中看到几个 C# 语句。例如,能够使用 for 循环而不是显式写出每个<li> 元素应该是不言而喻的。在下一节中,我将更深入地介绍 Razor 的更多 C# 功能。呈现后,清单 17.2 中的模板将生成以下 HTML。

Listing 17.3 HTML output produced by rendering a Razor template
列表 17.3 通过呈现 Razor 模板生成的 HTML 输出

<h1>Tasks to complete</h1> ❶
<ul> ❶
<li>0 - Buy milk</li> ❷
<li>1 - Buy eggs</li> ❷
<li>2 - Buy bread</li> ❷
</ul>

❶ HTML from the Razor template is written directly to the output.
Razor 模板中的 HTML 直接写入输出。
❷ The <li> elements are generated dynamically by the for loop, based on the data provided.
<li> 元素由 for 循环根据提供的数据动态生成。
❸ HTML from the Razor template is written directly to the output.
Razor 模板中的 HTML 直接写入输出。

As you can see, the final output of a Razor template after it’s rendered is simple HTML. There’s nothing complicated left, only straight HTML markup that can be sent to the browser and rendered. Figure 17.3 shows how a browser would render it.
如你所见,Razor 模板在呈现后的最终输出是简单的 HTML。没有留下任何复杂的内容,只有可以直接发送到浏览器并呈现的 HTML 标记。图 17.3 显示了浏览器如何呈现它。

alt text

Figure 17.3 Razor templates can be used to generate the HTML dynamically at runtime from C# objects. In this case, a for loop is used to create repetitive HTML <li> elements.
图 17.3 Razor 模板可用于在运行时从 C# 对象动态生成 HTML。在这种情况下,使用 for 循环创建重复的 HTML<li> 元素。

In this example, I hardcoded the list values for simplicity; no dynamic data was provided. This is often the case on simple Razor Pages, like those you might have on your home page; you need to display an almost static page. For the rest of your application, it will be far more common to have some sort of data you need to display, typically exposed as properties on your PageModel.
在此示例中,为简单起见,我对列表值进行了硬编码;未提供动态数据。这在简单的 Razor 页面上通常就是这种情况,就像你在主页上可能拥有的那些一样;您需要显示一个几乎静态的页面。对于应用程序的其余部分,需要显示某种类型的数据(通常作为 PageModel 上的属性公开)将更加常见。

17.2.3 Passing data to views

17.2.3 将数据传递给视图

In ASP.NET Core, you have several ways of passing data from a page handler in a Razor Page to its view. Which approach is best depends on the data you’re trying to pass through, but in general you should use the mechanisms in the following order:
在 ASP.NET Core 中,可以通过多种方式将数据从 Razor 页面中的页面处理程序传递到其视图。哪种方法最好取决于您尝试传递的数据,但通常应按以下顺序使用机制:

• PageModel properties—You should generally expose any data that needs to be displayed as properties on your PageModel. Any data that is specific to the associated Razor view should be exposed this way. The PageModel object is available in the view when it’s rendered, as you’ll see shortly.
PageModel 属性 - 通常应公开需要在 PageModel 上显示为属性的任何数据。特定于关联 Razor 视图的任何数据都应以这种方式公开。PageModel 对象在呈现时在视图中可用,您很快就会看到。

• ViewData—This is a dictionary of objects with string keys that can be used to pass arbitrary data from the page handler to the view. In addition, it allows you to pass data to layout files, as you’ll see in section 17.4. Layout files are the main reason for using ViewData instead of setting properties on the PageModel.
ViewData - 这是带有字符串键的对象字典,可用于将任意数据从页面处理程序传递到视图。此外,它还允许您将数据传递给 layout 文件,如 Section 17.4 所示。布局文件是使用 ViewData 而不是在 PageModel 上设置属性的主要原因。

• TempData—TempData is a dictionary of objects with string keys, similar to ViewData, that is stored until it’s read in a different request. This is commonly used to temporarily persist data when using the POST-REDIRECT-GET pattern. By default TempData stores the data in an encrypted cookie, but other storage options are available, as described in the documentation at http://mng.bz/Wzx1.
TempData - TempData 是具有字符串键的对象字典,类似于 ViewData,在读取其他请求之前会一直存储。这通常用于在使用 POST-REDIRECT-GET 模式时临时保留数据。默认情况下,TempData 将数据存储在加密的 Cookie 中,但也提供了其他存储选项,如 http://mng.bz/Wzx1 中的文档中所述。

• HttpContext—Technically, the HttpContext object is available in both the page handler and Razor view, so you could use it to transfer data between them. But don’t—there’s no need for it with the other methods available to you.
HttpContext - 从技术上讲,HttpContext 对象在页面处理程序和 Razor 视图中均可用,因此您可以使用它来在它们之间传输数据。但不要 - 没有必要使用其他可用的方法。

• @inject services—You can use dependency injection (DI) to make services available in your views, though this should normally be used sparingly. Using the directive @inject Service myService injects a variable called myService of type Service from the DI container, which you can use in your Razor view.
@inject服务 - 您可以使用依赖关系注入 (DI) 使服务在视图中可用,但通常应谨慎使用。使用指令 @inject Service myService 会从 DI 容器中注入一个名为 myService 的 Service 类型变量,您可以在 Razor 视图中使用该变量。

Far and away the best approach for passing data from a page handler to a view is to use properties on the PageModel. There’s nothing special about the properties themselves; you can store anything there to hold the data you require.
将数据从页面处理程序传递到视图的最佳方法无疑是使用 PageModel 上的属性。属性本身并没有什么特别之处;您可以在那里存储任何内容来保存您需要的数据。

NOTE Many frameworks have the concept of a data context for binding UI components. The PageModel is a similar concept, in that it contains values to display in the UI, but the binding is one-directional; the PageModel provides values to the UI, and once the UI is built and sent as a response, the PageModel is destroyed.
注意:许多框架具有用于绑定 UI 组件的数据上下文的概念。PageModel 是一个类似的概念,因为它包含要在 UI 中显示的值,但绑定是单向的;PageModel 向 UI 提供值,一旦构建了 UI 并将其作为响应发送,PageModel 就会被销毁。

As I described in section 17.2.1, the @model directive at the top of your Razor view describes which Type of PageModel is associated with a given Razor Page. The PageModel associated with a Razor Page contains one or more page handlers and exposes data as properties for use in the Razor view, as shown in the following listing.
如第 17.2.1 节所述,Razor 视图顶部的 @model 指令描述了与给定 Razor 页面关联的 PageModel 类型。与 Razor 页面关联的 PageModel 包含一个或多个页面处理程序,并将数据公开为属性,以便在 Razor 视图中使用,如下面的清单所示。

Listing 17.4 Exposing data as properties on a PageModel
清单 17.4 将数据作为 PageModel 上的属性公开

public class ToDoItemModel : PageModel ❶
{
public List<string> Tasks { get; set; } ❷
public string Title { get; set; } ❷
public void OnGet(int id)
{
Title = "Tasks for today"; ❸
Tasks = new List<string> ❸
{ ❸
"Get fuel", ❸
"Check oil", ❸
"Check tyre pressure" ❸
}; ❸
}
}

❶ The PageModel is passed to the Razor view when it executes.
PageModel 在执行时传递到 Razor 视图。
❷ The public properties can be accessed from the Razor view.
可以从 Razor 视图访问公共属性。
❸ Building the required data: this would normally call out to a service or database to load the data.
构建所需的数据:这通常会调用服务或数据库来加载数据。

You can access the PageModel instance itself from the Razor view using the Model property. For example, to display the Title property of the ToDoItemModel in the Razor view, you’d use <h1>@Model.Title</h1>. This would render the string provided in the ToDoItemModel.Title property, producing the <h1>Tasks for today</h1> HTML.
可以使用 Model 属性从 Razor 视图访问 PageModel 实例本身。例如,要在 Razor 视图中显示 ToDoItemModel 的 Title 属性,请使用 <h1>@Model.Title</h1>.这将呈现 ToDoItemModel.Title 属性中提供的字符串,从而生成 HTML <h1>Tasks for today</h1>

Tip Note that the @model directive should be at the top of your view, immediately after the @page directive, and it has a lowercase m. The Model property can be accessed anywhere in the view and has an uppercase M.
提示:请注意,@model 指令应位于视图顶部,紧跟在 @page 指令之后,并且它有一个小写的 m。Model 属性可以在视图中的任意位置访问,并且具有大写的 M。

In most cases, using public properties on your PageModel is the way to go; it’s the standard mechanism for passing data between the page handler and the view. But in some circumstances, properties on your PageModel might not be the best fit. This is often the case when you want to pass data between view layouts. You’ll see how this works in section 17.4.
在大多数情况下,在 PageModel 上使用公共属性是可行的方法;它是在 Page 处理程序和 View 之间传递数据的标准机制。但在某些情况下,PageModel 上的属性可能不是最合适的。当您想在视图布局之间传递数据时,通常会出现这种情况。您将在 Section 17.4 中看到它是如何工作的。

A common example is the title of the page. You need to provide a title for every page in your application, so you could create a base class with a Title property and make every PageModel inherit from it. But that’s cumbersome, so a common approach for this situation is to use the ViewData collection to pass data around.
一个常见的示例是页面的标题。您需要为应用程序中的每个页面提供一个标题,以便您可以创建一个具有 Title 属性的基类,并使每个 PageModel 都继承自该基类。但这很麻烦,因此这种情况的常见方法是使用 ViewData 集合来传递数据。

In fact, the standard Razor Page templates use this approach by default, by setting values on the ViewData dictionary from within the view itself:
事实上,标准 Razor 页面模板默认使用此方法,方法是从视图本身中设置 ViewData 字典的值:

@{
    ViewData["Title"] = "Home Page";
}
<h2>@ViewData["Title"].</h2>

This template sets the value of the "Title" key in the ViewData dictionary to "Home Page" and then fetches the key to render in the template. This set and immediate fetch might seem superfluous, but as the ViewData dictionary is shared throughout the request, it makes the title of the page available in layouts, as you’ll see later. When rendered, the preceding template would produce the following output:
此模板将 ViewData 字典中 “Title” 键的值设置为 “Home Page”,然后获取要在模板中呈现的键。这种 set 和 immediate fetch 可能看起来是多余的,但是由于 ViewData 字典在整个请求中是共享的,因此它使页面的标题在布局中可用,您稍后将看到。渲染时,前面的模板将生成以下输出:

<h2>Home Page.</h2>

You can also set values in the ViewData dictionary from your page handlers in two different ways, as shown in the following listing.
您还可以通过两种不同的方式从页面处理程序中设置 ViewData 字典中的值,如下面的清单所示。

Listing 17.5 Setting ViewData values using an attribute
示例 17.5 使用属性设置 ViewData 值

public class IndexModel: PageModel
{
    [ViewData]                        #A
    public string Title { get; set; }

    public void OnGet()
    {
        Title = "Home Page";             #B
        ViewData["Subtitle"] = "Welcome";     #C
    }
}

You can display the values in the template in the same way as before:
您可以像以前一样在模板中显示值:

<h1>@ViewData["Title"]</h3>
<h2>@ViewData["Subtitle"]</h3>

Tip I don’t find the [ViewData] attribute especially useful, but it’s another feature to look out for. Instead, I create a set of global, static constants for any ViewData keys, and I reference those instead of typing "Title" repeatedly. You’ll get IntelliSense for the values, they’re refactor-safe, and you’ll avoid hard-to-spot typos.
提示:我不觉得 [ViewData] 属性特别有用,但它是另一个需要注意的功能。相反,我为任何 ViewData 键创建一组全局静态常量,并引用这些常量,而不是重复键入“Title”。您将获得值的 IntelliSense,它们是重构安全的,并且您将避免难以发现的拼写错误。

As I mentioned previously, there are mechanisms besides PageModel properties and ViewData that you can use to pass data around, but these two are the only ones I use personally, as you can do everything you need with them. As a reminder, always use PageModel properties where possible, as you benefit from strong typing and IntelliSense. Only fall back to ViewData for values that need to be accessed outside of your Razor view.
正如我前面提到的,除了 PageModel 属性和 ViewData 之外,还有一些机制可用于传递数据,但这两种机制是我个人唯一使用的机制,因为您可以使用它们执行任何需要的作。提醒一下,请尽可能使用 PageModel 属性,因为强类型化和 IntelliSense 会让您受益。对于需要在 Razor 视图之外访问的值,请仅回退到 ViewData。

You’ve had a small taste of the power available to you in Razor templates, but in the next section we’ll dive a little deeper into some of the available C# capabilities.
您已经对 Razor 模板中可用的功能有了一些了解,但在下一节中,我们将更深入地介绍一些可用的 C# 功能。

17.3 Creating dynamic web pages with Razor

17.3 使用 Razor 创建动态网页

You might be glad to know that pretty much anything you can do in C# is possible in Razor syntax. Under the covers, the .cshtml files are compiled into normal C# code (with string for the raw HTML sections), so whatever weird and wonderful behavior you need can be created!
您可能很高兴地知道,在 C# 中可以执行的几乎任何事情都可以在 Razor 语法中完成。在后台,.cshtml 文件被编译成普通的 C# 代码(原始 HTML 部分带有字符串),因此你可以创建你需要的任何奇怪而美妙的行为!

Having said that, just because you can do something doesn’t mean you should. You’ll find it much easier to work with, and maintain, your files if you keep them as simple as possible. This is true of pretty much all programming, but I find it to be especially so with Razor templates.
话虽如此,仅仅因为您可以做某事并不意味着您应该这样做。您会发现,如果您尽可能简化文件,那么处理和维护文件会容易得多。几乎所有编程都是如此,但我发现 Razor 模板尤其如此。

This section covers some of the more common C# constructs you can use. If you find you need to achieve something a bit more exotic, refer to the Razor syntax documentation at http://mng.bz/8rMw.
本部分介绍一些可以使用的更常见的 C# 构造。如果您发现需要实现一些更奇特的东西,请参阅 http://mng.bz/8rMw 上的 Razor 语法文档。

17.3.1 Using C# in Razor templates

17.3.1 在 Razor 模板中使用 C#

One of the most common requirements when working with Razor templates is to render a value you’ve calculated in C# to the HTML. For example, you might want to print the current year to use with a copyright statement in your HTML, to give this result:
使用 Razor 模板时,最常见的要求之一是将您在 C# 中计算的值呈现到 HTML。例如,您可能希望打印当前年份以与 HTML 中的版权声明一起使用,以得到以下结果:

<p>Copyright 2022 ©</p>

Or you might want to print the result of a calculation:
或者您可能希望打印计算结果:

<p>The sum of 1 and 2 is <i>3</i><p>

You can do this in two ways, depending on the exact C# code you need to execute. If the code is a single statement, you can use the @ symbol to indicate you want to write the result to the HTML output, as shown in figure 17.4. You’ve already seen this used to write out values from the PageModel or from ViewData.
您可以通过两种方式执行此作,具体取决于您需要执行的确切 C# 代码。如果代码是单个语句,则可以使用 @ 符号来指示要将结果写入 HTML 输出,如图 17.4 所示。您已经看到它用于从 PageModel 或 ViewData 中写出值。

alt text

Figure 17.4 Writing the result of a C# expression to HTML. The @ symbol indicates where the C# code begins, and the expression ends at the end of the statement, in this case at the space.
图 17.4 将 C# 表达式的结果写入 HTML。@ 符号指示 C# 代码的开始位置,表达式在语句的末尾结束,在本例中在空格处。

If the C# you want to execute is something that needs a space, you need to use parentheses to demarcate the C#, as shown in figure 17.5.
如果要执行的 C# 需要空格,则需要使用括号来分隔 C#,如图 17.5 所示。

alt text

Figure 17.5 When a C# expression contains whitespace, you must wrap it in parentheses using @() so the Razor engine knows where the C# stops and HTML begins.
图 17.5 当 C# 表达式包含空格时,必须使用 @() 将其括在括号中,以便 Razor 引擎知道 C# 停止和 HTML 开始的位置。

These two approaches, in which C# is evaluated and written directly to the HTML output, are called Razor expressions.
这两种方法(其中 C# 被计算并直接写入 HTML 输出)称为 Razor 表达式。

Tip If you want to write a literal @ character rather than a C# expression, use a second @ character: @@.
提示:如果要编写文本 @ 字符而不是 C# 表达式,请使用第二个 @ 字符:@@。

Sometimes you’ll want to execute some C#, but you don’t need to output the values. We used this technique when we were setting values in ViewData:
有时,您需要执行一些 C#,但不需要输出值。我们在 ViewData 中设置值时使用了这种技术:

@{
    ViewData["Title"] = "Home Page";
}

This example demonstrates a Razor code block, which is normal C# code, identified by the @{} structure. Nothing is written to the HTML output here; it’s all compiled as though you’d written it in any other normal C# file.
此示例演示 Razor 代码块,这是由 @{} 结构标识的普通 C# 代码。此处的 HTML 输出不会写入任何内容;它全部编译,就像您用任何其他普通的 C# 文件编写它一样。

Tip When you execute code within code blocks, it must be valid C#, so you need to add semicolons. Conversely, when you’re writing values directly to the response using Razor expressions, you don’t need them. If your output HTML breaks unexpectedly, keep an eye out for missing or rogue extra semicolons.
提示:在代码块中执行代码时,它必须是有效的 C#,因此需要添加分号。相反,当您使用 Razor 表达式将值直接写入响应时,您不需要它们。如果输出 HTML 意外中断,请留意缺失或流氓的额外分号。

Razor expressions are one of the most common ways of writing data from your PageModel to the HTML output. You’ll see the other approach, using Tag Helpers, in the next chapter. Razor’s capabilities extend far further than this, however, as you’ll see in section 17.3.2, where you’ll learn how to include traditional C# structures in your templates.
Razor 表达式是将数据从 PageModel 写入 HTML 输出的最常用方法之一。您将在下一章中看到另一种方法,即使用 Tag Helpers。但是,Razor 的功能远不止于此,如第 17.3.2 节所示,您将在其中学习如何在模板中包含传统的 C# 结构。

17.3.2 Adding loops and conditionals to Razor templates

17.3.2 向 Razor 模板添加循环和条件语句

One of the biggest advantages of using Razor templates over static HTML is the ability to generate the output dynamically. Being able to write values from your PageModel to the HTML using Razor expressions is a key part of that, but another common use is loops and conditionals. With these, you can hide sections of the UI, or produce HTML for every item in a list, for example.
与静态 HTML 相比,使用 Razor 模板的最大优势之一是能够动态生成输出。能够使用 Razor 表达式将值从 PageModel 写入 HTML 是其中的关键部分,但另一个常见用途是循环和条件。例如,您可以使用这些功能隐藏 UI 的各个部分,或者为列表中的每个项目生成 HTML。

Loops and conditionals include constructs such as if and for loops. Using them in Razor templates is almost identical to C#, but you need to prefix their usage with the @ symbol. In case you’re not getting the hang of Razor yet, when in doubt, throw in another @!
循环和条件包括诸如 if 和 for 循环之类的结构。在 Razor 模板中使用它们与 C# 几乎相同,但您需要在它们的用法前面加上 @ 符号。如果您还没有掌握 Razor 的窍门,如有疑问,请再输入一个 @!

One of the big advantages of Razor in the context of ASP.NET Core is that it uses languages you’re already familiar with: C# and HTML. There’s no need to learn a whole new set of primitives for some other templating language: it’s the same if, foreach, and while constructs you already know. And when you don’t need them, you’re writing raw HTML, so you can see exactly what the user is getting in their browser.
Razor 在 ASP.NET Core 上下文中的一大优势是它使用您已经熟悉的语言:C# 和 HTML。没有必要为其他模板语言学习一整套新的原语:它与你已经知道的 if、foreach 和 while 结构相同。当您不需要它们时,您正在编写原始 HTML,因此您可以准确地看到用户在浏览器中获得的内容。

In listing 17.6, I’ve applied a few of these techniques in a template to display a to-do item. The PageModel has a bool IsComplete property, as well as a List property called Tasks, which contains any outstanding tasks.
在列表 17.6 中,我在模板中应用了一些技术来显示待办事项。PageModel 具有一个 bool IsComplete 属性,以及一个名为 Tasks 的 List 属性,其中包含任何未完成的任务。

Listing 17.6 Razor template for rendering a ToDoItemViewModel
列表 17.6 用于呈现 ToDoItemViewModel 的 Razor 模板

@page
@model ToDoItemModel ❶
<div>
@if (Model.IsComplete)
{ ❷
<strong>Well done, you’re all done!</strong> ❷
} ❷
else
{
<strong>The following tasks remain:</strong>
<ul>
@foreach (var task in Model.Tasks) ❸
{
<li>@task</li> ❹
}
</ul>
}
</div>

❶ The @model directive indicates the type of PageModel in Model.
@model 指令指示 Model 中 PageModel 的类型。
❷ The if control structure checks the value of the PageModel’s IsComplete property at runtime.
if 控件结构在运行时检查 PageModel 的 IsComplete 属性的值。
❸ The foreach structure will generate the <li> elements once for each task in Model.Tasks.
foreach 结构体将生成<li>元素。
❹ A Razor expression is used to write the task to the HTML output.
Razor 表达式用于将任务写入 HTML 输出。

This code definitely lives up to the promise of mixing C# and HTML! There are traditional C# control structures, such as if and foreach, that you’d expect in any normal C# program, interspersed with the HTML markup that you want to send to the browser. As you can see, the @ symbol is used to indicate when you’re starting a control statement, but you generally let the Razor template infer when you’re switching back and forth between HTML and C#.
这段代码绝对兑现了混合 C# 和 HTML 的承诺!在任何普通 C# 程序中,都有您期望使用的传统 C# 控制结构,例如 if 和 foreach,其中穿插着要发送到浏览器的 HTML 标记。如你所见,@ 符号用于指示何时启动控制语句,但你通常会让 Razor 模板推断你在 HTML 和 C# 之间来回切换。

The template shows how to generate dynamic HTML at runtime, depending on the exact data provided. If the model has outstanding Tasks, the HTML generates a list item for each task, producing output something like that shown in figure 17.6.
该模板演示如何在运行时生成动态 HTML,具体取决于提供的确切数据。如果模型有未完成的任务,HTML 会为每个任务生成一个列表项,产生如图 17.6 所示的输出。

alt text

Figure 17.6 The Razor template generates a <li> item for each remaining task, depending on the data passed to the view at runtime. You can use an if block to render completely different HTML depending on the values in your model.

图 17.6 Razor 模板会生成一个<li> item 的 SET 任务,具体取决于在运行时传递给视图的数据。您可以使用 if 块根据模型中的值呈现完全不同的 HTML。

IntelliSense and tooling support
IntelliSense 和工具支持

The mixture of C# and HTML might seem hard to read in the book, and that’s a reasonable complaint. It’s also another valid argument for trying to keep your Razor templates as simple as possible.
C# 和 HTML 的混合在书中似乎很难阅读,这是一个合理的抱怨。这也是尝试使 Razor 模板尽可能简单的另一个有效论点。

Luckily, if you’re using an editor like Visual Studio or Visual Studio Code, the tooling can help somewhat. As you can see in this figure, Visual Studio highlights the transition between the C# portions of the code and the surrounding HTML, though this is less pronounced in recent versions of Visual Studio.
幸运的是,如果您使用的是 Visual Studio 或 Visual Studio Code 等编辑器,这些工具可能会有所帮助。正如您在此图中所看到的,Visual Studio 突出显示了代码的 C# 部分与周围 HTML 之间的转换,尽管这在最新版本的 Visual Studio 中不太明显。

alt text

Visual Studio highlights the @ symbols where C# transitions to HTML and uses C# syntax coloring for C# code. This makes the Razor templates somewhat easier to read that than the pure plain text.
Visual Studio 突出显示 C# 转换为 HTML 的 @ 符号,并对 C# 代码使用 C# 语法着色。这使得 Razor 模板比纯文本更容易阅读。

Although the ability to use loops and conditionals is powerful—they’re one of the advantages of Razor over static HTML—they also add to the complexity of your view. Try to limit the amount of logic in your views to make them as easy to understand and maintain as possible.
尽管使用循环和条件的功能非常强大(它们是 Razor 相对于静态 HTML 的优势之一),但它们也增加了视图的复杂性。尝试限制视图中的逻辑数量,使其尽可能易于理解和维护。

A common trope of the ASP.NET Core team is that they try to ensure you “fall into the pit of success” when building an application. This refers to the idea that by default, the easiest way to do something should be the correct way of doing it. This is a great philosophy, as it means you shouldn’t get burned by, for example, security problems if you follow the standard approaches. Occasionally, however, you may need to step beyond the safety rails; a common use case is when you need to render some HTML contained in a C# object to the output, as you’ll see in the next section.
ASP.NET Core 团队的一个常见比喻是,他们试图确保您在构建应用程序时 “掉进成功的坑”。这指的是默认情况下,执行某项作的最简单方法应该是正确的执行方式。这是一个很棒的理念,因为它意味着如果您遵循标准方法,您就不应该被安全问题等问题所困扰。但是,有时您可能需要跨出安全栏杆;一个常见的用例是当您需要将 C# 对象中包含的一些 HTML 渲染到输出时,您将在下一节中看到。

17.3.3 Rendering HTML with Raw

17.3.3 使用 Raw 渲染 HTML

In the previous example, we rendered the list of tasks to HTML by writing the string task using the @task Razor expression. But what if the task variable contains HTML you want to display, so instead of "Check oil" it contains "<strong>Check oil</strong>"? If you use a Razor expression to output this as you did previously, you might hope to get this:
在前面的示例中,我们通过使用 @task Razor 表达式编写字符串 task 将任务列表呈现为 HTML。但是,如果任务变量包含要显示的 HTML,那么它不是“Check oil”,而是"<strong>Check oil</strong>",该怎么办?如果您像以前一样使用 Razor 表达式来输出此表达式,您可能希望得到以下内容:

<li><strong>Check oil</strong></li>

But that’s not the case. The HTML generated comes out like this:
但事实并非如此。生成的 HTML 如下所示:

<li><strong>Check oil</strong></li>

Hmm, looks odd, right? What’s happened here? Why did the template not write your variable to the HTML, like it has in previous examples? If you look at how a browser displays this HTML, like in figure 17.7, I hope that it makes more sense.
嗯,看起来很奇怪,对吧?这里发生了什么?为什么模板没有像前面的示例那样将变量写入 HTML?如果您查看浏览器如何显示此 HTML,如图 17.7 所示,我希望它更有意义。

alt text

Figure 17.7 The second item, "<strong>Check oil</strong>" has been HTML-encoded, so the <strong> elements are visible to the user as part of the task. This prevents any security problems, as users can’t inject malicious scripts into your HTML.
图 17.7 第二项 "<strong>Check oil</strong>" 已经过 HTML 编码,因此 <strong> 元素作为任务的一部分对用户可见。这可以防止任何安全问题,因为用户无法将恶意脚本注入您的 HTML。

Razor templates HTML-encode C# expressions before they’re written to the output stream. This is primarily for security reasons; writing out arbitrary strings to your HTML could allow users to inject malicious data and JavaScript into your website. Consequently, the C# variables you print in your Razor template get written as HTML-encoded values.
Razor 模板在将 C# 表达式写入输出流之前对其进行 HTML 编码。这主要是出于安全原因;将任意字符串写出到 HTML 中可能会允许用户将恶意数据和 JavaScript 注入您的网站。因此,在 Razor 模板中打印的 C# 变量将写入 HTML 编码的值。

NOTE Razor also renders non-ASCII Unicode characters, such as ó and è, as HTML entities: ó and è. You can customize this behavior using WebEncoderOptions in Program.cs, as in this example: builder.Services.Configure<WebEncoderOptions>(o => o.AllowCharacter('ó')) .

注意:Razor 还将非 ASCII Unicode 字符(如 ó 和 è)呈现为 HTML 实体:ó 和 è。您可以使用 Program.cs 中的 WebEncoderOptions 自定义此行为,如以下示例所示:。 `builder.Services.Configure(o => o.AllowCharacter('ó'))

In some cases, you might need to directly write out HTML contained in a string to the response. If you find yourself in this situation, first, stop. Do you really need to do this? If the values you’re writing have been entered by a user, or were created based on values provided by users, there’s a serious risk of creating a security hole in your website.
在某些情况下,您可能需要直接将字符串中包含的 HTML 写出到响应中。如果您发现自己处于这种情况,请先停止。您真的需要这样做吗?如果您编写的值是由用户输入的,或者是根据用户提供的值创建的,则存在在您的网站中创建安全漏洞的严重风险。

If you really need to write the variable out to the HTML stream, you can do so using the Html property on the view page and calling the Raw method:
如果您确实需要将变量写出到 HTML 流中,则可以使用视图页面上的 Html 属性并调用 Raw 方法来实现:

<li>@Html.Raw(task)</li>

With this approach, the string in task is directly written to the output stream, without encoding, producing the HTML you originally wanted, <li><strong>Check oil</strong></li>, which renders as shown in figure 17.8.
使用这种方法,task 中的字符串被直接写入输出流,无需编码,生成你最初想要的 HTML <li><strong>Check oil</strong></li>,如图 17.8 所示。

alt text

Figure 17.8 The second item, "<strong>Check oil<strong>" has been output using Html.Raw(), so it hasn’t been HTML-encoded. The <strong> elements result in the second item being shown in bold instead. Using Html.Raw() in this way should be avoided where possible, as it is a security risk.
图 17.8 第二项是使用 Html.Raw() 输出的 "<strong>Check oil<strong>" ,因此尚未进行 HTML 编码。这些 <strong> 元素会导致第二个项目以粗体显示。应尽可能避免以这种方式使用 Html.Raw(),因为这会带来安全风险。

Warning Using Html.Raw on user input creates a security risk that users could use to inject malicious code into your website. Avoid using Html.Raw if possible.
警告:在用户输入上使用 Html.Raw 会带来安全风险,用户可能会利用该风险将恶意代码注入您的网站。如果可能,请避免使用 Html.Raw。

The C# constructs shown in this section can be useful, but they can make your templates harder to read. It’s generally easier to understand the intention of Razor templates that are predominantly HTML markup rather than C#.
本节中所示的 C# 构造可能很有用,但它们可能会使模板更难阅读。通常更容易理解主要是 HTML 标记而不是 C# 的 Razor 模板的意图。

In the previous version of ASP.NET, these constructs, and in particular the Html helper property, were the standard way to generate dynamic markup. You can still use this approach in ASP.NET Core by using the various HtmlHelper methods on the Html property, but these have largely been superseded by a cleaner technique: Tag Helpers.
在早期版本的 ASP.NET 中,这些构造(特别是 Html 帮助程序属性)是生成动态标记的标准方法。您仍然可以在 ASP.NET Core 中通过使用 Html 属性上的各种 HtmlHelper 方法,但这些方法在很大程度上已被一种更简洁的技术所取代:Tag Helpers。

NOTE I discuss Tag Helpers and how to use them to build HTML forms in chapter 18. HtmlHelper is essentially obsolete, though it’s still available if you prefer to use it.
注意:我在第 18 章中讨论了 Tag Helpers 以及如何使用它们来构建 HTML 表单。HtmlHelper 基本上已过时,但如果您愿意使用它,它仍然可用。

Tag Helpers are a useful feature that’s new to Razor in ASP.NET Core, but many other features have been carried through from the legacy (.NET Framework) ASP.NET. In the next section of this chapter, you’ll see how you can create nested Razor templates and use partial views to reduce the amount of duplication in your views.
标记帮助程序是 ASP.NET Core 中 Razor 新增的一项有用功能,但许多其他功能已从旧版 (.NET Framework) ASP.NET 中继承而来。在本章的下一部分中,您将了解如何创建嵌套的 Razor 模板并使用分部视图来减少视图中的重复数量。

17.4 Layouts, partial views, and _ViewStart

17.4 布局、分部视图和_ViewStart

In this section you’ll learn about layouts and partial views, which allow you to extract common code to reduce duplication. These files make it easier to make changes to your HTML that affect multiple pages at once. You’ll also learn how to run common code for every Razor Page using _ViewStart and _ViewImports, and how to include optional sections in your pages.
在本节中,您将了解布局和分部视图,它们允许您提取通用代码以减少重复。通过这些文件,可以更轻松地对 HTML 进行一次影响多个页面的更改。您还将了解如何使用 _ViewStart 和 _ViewImports 为每个 Razor 页面运行通用代码,以及如何在页面中包含可选部分。

Every HTML document has a certain number of elements that are required: <html>, <head>, and <body>. As well, there are often common sections that are repeated on every page of your application, such as the header and footer, as shown in figure 17.9. Also, each page in your application will probably reference the same CSS and JavaScript files.
每个 HTML 文档都有一定数量的必需元素:<html>, <head><body>.此外,在应用程序的每个页面上通常都有重复的常见部分,例如 header 和 footer,如图 17.9 所示。此外,应用程序中的每个页面都可能引用相同的 CSS 和 JavaScript 文件。

alt text

Figure 17.9 A typical web application has a block-based layout, where some blocks are common to every page of your application. The header block will likely be identical across your whole application, but the sidebar may be identical only for the pages in one section. The body content will differ for every page in your application.
图 17.9 典型的 Web 应用程序具有基于块的布局,其中某些块对于应用程序的每个页面都是通用的。标题块在整个应用程序中可能相同,但侧边栏可能仅对一个部分中的页面相同。应用程序中每个页面的正文内容都不同。

All these different elements add up to a maintenance nightmare. If you had to include these manually in every view, making any changes would be a laborious, error-prone process involving editing every page. Instead, Razor lets you extract these common elements into layouts.
所有这些不同的因素加起来就是一场维护噩梦。如果您必须在每个视图中手动包含这些内容,则进行任何更改都将是一个费力且容易出错的过程,涉及编辑每个页面。相反,Razor 允许您将这些常见元素提取到布局中。

DEFINITION A layout in Razor is a template that includes common code. It can’t be rendered directly, but it can be rendered in conjunction with normal Razor views.
定义:Razor 中的布局是包含通用代码的模板。它不能直接呈现,但可以与普通 Razor 视图一起呈现。

By extracting your common markup into layouts, you can reduce the duplication in your app. This makes changes easier, makes your views easier to manage and maintain, and is generally good practice!
通过将通用标记提取到布局中,您可以减少应用程序中的重复。这使得更改更容易,使您的视图更易于管理和维护,并且通常是很好的做法!

17.4.1 Using layouts for shared markup

17.4.1 将布局用于共享标记

Layout files are, for the most part, normal Razor templates that contain markup common to more than one page. An ASP.NET Core app can have multiple layouts, and layouts can reference other layouts. A common use for this is to have different layouts for different sections of your application. For example, an e-commerce website might use a three-column view for most pages but a single-column layout when you come to the checkout pages, as shown in figure 17.10.
布局文件在大多数情况下是普通的 Razor 模板,其中包含多个页面通用的标记。ASP.NET Core 应用程序可以有多个布局,并且布局可以引用其他布局。这样做的一个常见用途是为应用程序的不同部分使用不同的布局。例如,电子商务网站可能在大多数页面中使用三列视图,但在您进入结帐页面时使用单列布局,如图 17.10 所示。

alt text

Figure 17.10 The https://manning.com website uses different layouts for different parts of the web application. The product pages use a three-column layout, but the cart page uses a single-column layout.
图 17.10 https://manning.com 网站对 Web 应用程序的不同部分使用不同的布局。产品页面使用三列布局,但购物车页面使用单列布局。

You’ll often use layouts across many different Razor Pages, so they’re typically placed in the Pages/Shared folder. You can name them anything you like, but there’s a common convention to use _Layout.cshtml as the filename for the base layout in your application. This is the default name used by the Razor Page templates in Visual Studio and the .NET CLI.
您经常在许多不同的 Razor Pages 中使用布局,因此它们通常位于 Pages/Shared 文件夹中。你可以为它们命名任何你喜欢的名字,但有一个常见的约定,即使用 _Layout.cshtml 作为应用程序中基本布局的文件名。这是 Visual Studio 和 .NET CLI 中的 Razor 页面模板使用的默认名称。

Tip A common convention is to prefix your layout files with an underscore (_) to distinguish them from standard Razor templates in your Pages folder. Placing them in Pages/Shared means you can refer to them by the short name, such as "Layout", without having to specify the full path to the layout file.
提示:一个常见的约定是在布局文件前面加上下划线 (
),以将它们与 Pages 文件夹中的标准 Razor 模板区分开来。将它们放在 Pages/Shared 中意味着您可以通过短名称(如“_Layout”)来引用它们,而不必指定布局文件的完整路径。

A layout file looks similar to a normal Razor template, with one exception: every layout must call the @RenderBody() function. This tells the templating engine where to insert the content from the child views. A simple layout is shown in listing 17.7. Typically, your application references all your CSS and JavaScript files in the layout and includes all the common elements, such as headers and footers, but this example includes pretty much the bare minimum HTML.
布局文件看起来类似于普通的 Razor 模板,但有一个例外:每个布局都必须调用 @RenderBody() 函数。这会告诉模板引擎将子视图中的内容插入到何处。一个简单的布局如清单 17.7 所示。通常,您的应用程序会引用布局中的所有 CSS 和 JavaScript 文件,并包含所有常见元素,例如页眉和页脚,但此示例包含的 HTML 几乎是最低限度的。

Listing 17.7 A basic _Layout.cshtml file calling RenderBody
清单 17.7 一个调用 RenderBody 的基本 _Layout.cshtml 文件

<!DOCTYPE html>
<html>
<head>
<meta charset="utf-8" />
<title>@ViewData["Title"]</title> ❶
<link rel="stylesheet" href="~/css/site.css" /> ❷
</head>
<body>
@RenderBody() ❸
</body>
</html>

❶ ViewData is the standard mechanism for passing data to a layout from a view.
ViewData 是从视图向布局传递数据的标准机制。
❷ Elements common to every page, such as your CSS, are typically found in the layout.
每个页面通用的元素(例如 CSS)通常位于布局中。
❸ Tells the templating engine where to insert the child view’s content
告诉模板引擎在何处插入子视图的内容

As you can see, the layout file includes the required elements, such as <html> and <head>, as well as elements you need on every page, such as <title> and <link>. This example also shows the benefit of storing the page title in ViewData; the layout can render it in the <title> element so that it shows in the browser’s tab, as shown in figure 17.11.
如您所见,布局文件包括所需的元素,如 <html> <head>,以及每个页面上所需的元素,如 <title> <link>。此示例还显示了在 ViewData 中存储页面标题的好处;布局可以在<title> 元素中渲染它,使其显示在浏览器的选项卡中,如图 17.11 所示。

alt text

Figure 17.11 The content of the <title> element is used to name the tab in the user’s browser, in this case Home Page.
图 17.11 <title>元素的内容用于命名用户浏览器中的选项卡,在本例中为 Home Page。

NOTE Layout files are not standalone Razor Pages and do not take part in routing, so they do not start with the @page directive.
注意:布局文件不是独立的 Razor 页面,不参与路由,因此它们不以 @page 指令开头。

Views can specify a layout file to use by setting the Layout property inside a Razor code block, as shown in the following listing.
视图可以通过在 Razor 代码块中设置 Layout 属性来指定要使用的布局文件,如下面的清单所示。

Listing 17.8 Setting the Layout property from a view
示例 17.8 从视图设置 Layout 属性

@{
Layout = "_Layout"; ❶
ViewData["Title"] = "Home Page"; ❷
}
<h1>@ViewData["Title"]</h1> ❸
<p>This is the home page</p> ❸

❶ Sets the layout for the page to _Layout.cshtml
将页面的布局设置为 _Layout.cshtml
❷ ViewData is a convenient way of passing data from a Razor view to the layout.
ViewData 是将数据从 Razor 视图传递到布局的便捷方法。
❸ The content in the Razor view to render inside the layout
要在布局内呈现的 Razor 视图中的内容

Any contents in the view are be rendered inside the layout, where the call to @RenderBody() occurs. Combining the two previous listings generates the following HTML.
视图中的任何内容都将在布局中呈现,其中会调用 @RenderBody()。将前面的两个列表组合在一起将生成以下 HTML。

Listing 17.9 Rendered output from combining a view with its layout
列表 17.9 将视图与其布局组合在一起的渲染输出

<!DOCTYPE html>
<html>
<head>
<meta charset="utf-8" />
<title>Home Page</title> ❶
<link rel="stylesheet" href="/css/site.css" />
</head>
<body>
<h1>Home Page</h1> ❷
<p>This is the home page</p> ❷
</body>
<html>

❶ ViewData set in the view is used to render the layout.
ViewData 中设置的view 用于渲染布局。
❷ The RenderBody call renders the contents of the view.
RenderBody 调用渲染视图的内容。

Judicious use of layouts can be extremely useful in reducing the duplication between pages. By default, layouts provide only a single location where you can render content from the view, at the call to @RenderBody. In cases where this is too restrictive, you can render content using sections.
明智地使用布局对于减少页面之间的重复非常有用。默认情况下,布局仅提供一个位置,您可以在调用 @RenderBody时从视图中呈现内容。如果这过于严格,您可以使用部分来呈现内容。

17.4.2 Overriding parent layouts using sections

使用部分覆盖父布局

A common requirement when you start using multiple layouts in your application is to be able to render content from child views in more than one place in your layout. Consider the case of a layout that uses two columns. The view needs a mechanism for saying “render this content in the left column” and “render this other content in the right column.” This is achieved using sections.
当您在应用程序中开始使用多个布局时,一个常见的要求是能够在布局中的多个位置呈现子视图中的内容。考虑使用两列的布局的情况。视图需要一种机制来表示 “render this content in the left column” 和 “render this other content in the right column”这是使用部分实现的。

NOTE Remember, all the features outlined in this chapter are specific to Razor, which is a server-side rendering engine. If you’re using a client-side single-page application (SPA) framework to build your application, you’ll likely handle these requirements in other ways, within the client.
注意:请记住,本章中概述的所有功能都是特定于 Razor 的,Razor 是一个服务器端渲染引擎。如果您使用客户端单页应用程序 (SPA) 框架来构建应用程序,则可能会在客户端内以其他方式处理这些要求。

Sections provide a way of organizing where view elements should be placed within a layout. They’re defined in the view using an @section definition, as shown in the following listing, which defines the HTML content for a sidebar separate from the main content, in a section called Sidebar. The @section can be placed anywhere in the file, top or bottom, wherever is convenient.
Sections 提供了一种组织视图元素在布局中应放置的位置的方法。它们是在视图中使用 @section 定义定义的,如下面的清单所示,该清单在名为 Sidebar 的部分中定义与主要内容分开的侧边栏的 HTML 内容。@section可以放置在文件中的任何位置,顶部或底部,只要方便即可。

Listing 17.10 Defining a section in a view template
清单 17.10 在视图模板中定义部分

@{
    Layout = "_TwoColumn";
}
@section Sidebar {                         #A
    <p>This is the sidebar content</p>     #A
}                                          #A
<p>This is the main content </p>     #B

❶ All content inside the braces is part of the Sidebar section, not the main body content.
大括号内的所有内容都是 Sidebar 部分的一部分,而不是主体内容。
❷ Any content not inside an @section will be rendered by the @RenderBody call.
不在 @section 中的任何内容都将由 @RenderBody 调用呈现。

The section is rendered in the parent layout with a call to @RenderSection(). This renders the content contained in the child section into the layout. Sections can be either required or optional. If they’re required, a view must declare the given @section; if they’re optional, they can be omitted, and the layout will skip them. Skipped sections won’t appear in the rendered HTML. The following listing shows a layout that has a required section called Sidebar and an optional section called Scripts.
该部分通过调用 @RenderSection() 在父布局中呈现。这会将子部分中包含的内容呈现到布局中。部分可以是必需的,也可以是可选的。如果需要,视图必须声明给定的@section;如果它们是可选的,则可以省略它们,布局将跳过它们。跳过的部分不会显示在呈现的 HTML 中。下面的清单显示了一个布局,该布局具有一个名为 Sidebar 的必需部分和一个名为 Scripts 的可选部分。

Listing 17.11 Rendering a section in a layout file, _TwoColumn.cshtml
清单 17.11 在布局文件中渲染部分 _TwoColumn.cshtml

@{
    Layout = "_Layout";     #A
}
<div class="main-content">
    @RenderBody()          #B
</div>
<div class="side-bar">
    @RenderSection("Sidebar", required: true)     #C
</div>
@RenderSection("Scripts", required: false)    #D

❶ This layout is nested inside a layout itself.
此布局嵌套在布局本身内。
❷ Renders all the content from a view that isn’t part of a section
从不属于某个部分的视图中呈现所有内容
❸ Renders the Sidebar section; if the Sidebar section isn’t defined in the view, throws an error
呈现侧边栏部分;如果视图中未定义 Sidebar 部分,则抛出错误
❹ Renders the Scripts section; if the Scripts section isn’t defined in the view, ignores it
呈现 Scripts 部分;如果 Scripts 部分未在视图中定义,则忽略它

Tip It’s common to have an optional section called Scripts in your layout pages. This can be used to render additional JavaScript that’s required by some views but isn’t needed on every view. A common example is the jQuery Unobtrusive Validation scripts for client-side validation. If a view requires the scripts, it adds the appropriate @section Scripts to the Razor markup.
提示:布局页面中通常有一个名为 Scripts 的可选部分。这可用于呈现某些视图需要但并非每个视图都需要的其他 JavaScript。一个常见的示例是用于客户端验证的 jQuery Unobtrusive Validation 脚本。如果视图需要脚本,它会将相应的 @section 脚本添加到 Razor 标记。

You may notice that the previous listing defines a Layout property, even though it’s a layout itself, not a view. This is perfectly acceptable and lets you create nested hierarchies of layouts, as shown in figure 17.12.
您可能会注意到,前面的清单定义了一个 Layout 属性,即使它本身是一个布局,而不是一个视图。这是完全可以接受的,并且允许您创建布局的嵌套层次结构,如图 17.12 所示。

alt text

Figure 17.12 Multiple layouts can be nested to create complex hierarchies. This allows you to keep the elements common to all views in your base layout and extract layout common to multiple views into sub-layouts.
图 17.12 可以嵌套多个布局以创建复杂的层次结构。这样,您就可以保持基本布局中所有视图通用的元素,并将多个视图通用的布局提取到子布局中。

Tip Most websites these days need to be responsive, so they work on a wide variety of devices. You generally shouldn’t use layouts for this. Don’t serve different layouts for a single page based on the device making the request. Instead, serve the same HTML to all devices, and use CSS on the client side to adapt the display of your web page as required.
提示:如今,大多数网站都需要响应式,因此它们可以在各种设备上运行。通常,您不应该为此使用布局。不要根据发出请求的设备为单个页面提供不同的布局。相反,应向所有设备提供相同的 HTML,并在客户端使用 CSS 来根据需要调整网页的显示。

As well as the simple optional/required flags for sections, Razor Pages have several other messages that you can use for flow control in your layout pages:
除了部分的简单可选/必需标志外,Razor Pages 还有其他几条消息可用于布局页面中的流控制:

• IsSectionDefined(string section)—Returns true if a Razor Page has defined the named section.
IsSectionDefined(string section) - 如果 Razor 页面已定义命名部分,则返回 true。

• IgnoreSection(string section)—Ignores an unrendered section. If a section is defined in a page but not rendered, the Razor Page throws an exception unless the section is ignored.
IgnoreSection(string section) - 忽略未渲染的部分。如果在页面中定义了某个部分但未呈现,则 Razor Page 会引发异常,除非忽略该部分。

• IgnoreBody()—Ignores the unrendered body of the Razor Page. Layouts must call either RenderBody() or IgnoreBody(); otherwise, they will throw an InvalidOperationException.
IgnoreBody() - 忽略 Razor Page 的未渲染主体。布局必须调用 RenderBody() 或 IgnoreBody();否则,它们将引发 InvalidOperationException。

Layout files and sections provide a lot of flexibility for building sophisticated UIs, but one of their most important uses is in reducing the duplication of code in your application. They’re perfect for avoiding duplication of content that you’d need to write for every view. But what about those times when you find you want to reuse part of a view somewhere else? For those cases, you have partial views.
布局文件和部分为构建复杂的 UI 提供了很大的灵活性,但它们最重要的用途之一是减少应用程序中的代码重复。它们非常适合避免您需要为每个视图编写的内容重复。但是,当您发现想要在其他地方重用视图的一部分时,该怎么办?对于这些情况,您有 partial views。

17.4.3 Using partial views to encapsulate markup

17.4.3 使用分部视图封装标记

Partial views are exactly what they sound like: part of a view. They provide a means of breaking up a larger view into smaller, reusable chunks. This can be useful for both reducing the complexity in a large view by splitting it into multiple partial views or for allowing you to reuse part of a view inside another.
部分视图正是它们听起来的样子:视图的一部分。它们提供了一种将较大的视图分解为更小的、可重用的块的方法。这既可以通过将大型视图拆分为多个部分视图来降低大型视图的复杂性,也可以允许您在另一个视图中重用某个视图的一部分。

Most web frameworks that use server-side rendering have this capability. Ruby on Rails has partial views, Django has inclusion tags, and Zend has partials. These all work in the same way, extracting common code into small, reusable templates. Even client-side templating engines such as Mustache and Handlebars, used by client-side frameworks like Angular and Ember, have similar “partial view” concepts.
大多数使用服务器端渲染的 Web 框架都具有此功能。Ruby on Rails 有 partial 视图,Django 有 inclusion 标签,而 Zend 有 partials。这些都以相同的方式工作,将通用代码提取到小型、可重用的模板中。即使是 Angular 和 Ember 等客户端框架使用的客户端模板引擎(如 Mustache 和 Handlebars)也具有类似的“部分视图”概念。

Consider a to-do list application again. You might find you have a Razor Page called ViewToDo.cshtml that displays a single to-do with a given id. Later, you create a new Razor Page, RecentToDos.cshtml, that displays the five most recent to-do items. Instead of copying and pasting the code from one page to the other, you could create a partial view, called _ToDo.cshtml, as in the following listing.
再次考虑一个待办事项列表应用程序。你可能会发现你有一个名为 ViewToDo.cshtml 的 Razor 页面,它显示具有给定 ID 的单个待办事项。稍后,您将创建一个新的 Razor 页面 RecentToDos.cshtml,该页面显示五个最新的待办事项。您可以创建一个名为 _ToDo.cshtml 的分部视图,而不是将代码从一个页面复制并粘贴到另一个页面,如下面的清单所示。

Listing 17.12 Partial view _ToDo.cshtml for displaying a ToDoItemViewModel
列表 17.12 用于显示 ToDoItemViewModel 的分部视图 _ToDo.cshtml

@model ToDoItemViewModel                                  #A
<h2>@Model.Title</h2>                   #B
<ul>                                    #B
    @foreach (var task in Model.Tasks)  #B
    {                                   #B
        <li>@task</li>                  #B
    }                                   #B
</ul>                                   #B

❶ Partial views can bind to data in the Model property, like a normal Razor Page uses a PageModel.
分部视图可以绑定到 Model 属性中的数据,就像普通的 Razor Page 使用 PageModel 一样。
❷ The content of the partial view, which previously existed in the ViewToDo.cshtml file
分部视图的内容,以前存在于 ViewToDo.cshtml 文件中

Partial views are a bit like Razor Pages without the PageModel and handlers. Partial views are purely about rendering small sections of HTML rather than handling requests, model binding, and validation, and calling the application model. They are great for encapsulating small usable bits of HTML that you need to generate on multiple Razor Pages.
分部视图有点像没有 PageModel 和处理程序的 Razor Pages。分部视图纯粹是关于呈现 HTML 的一小部分,而不是处理请求、模型绑定和验证以及调用应用程序模型。它们非常适合封装您需要在多个 Razor 页面上生成的少量可用 HTML。

Both the ViewToDo.cshtml and RecentToDos.cshtml Razor Pages can render the _ToDo.cshtml partial view, which handles generating the HTML for a single class. Partial views are rendered using the <partial /> Tag Helper, providing the name of the partial view to render and the data (the model) to render. For example, the RecentToDos.cshtml view could achieve this as shown in the following listing.
ViewToDo.cshtml 和 RecentToDos.cshtml Razor 页面都可以呈现 _ToDo.cshtml 分部视图,该视图处理为单个类生成 HTML。部分视图使用<partial /> Tag Helper 进行渲染,提供要渲染的分部视图的名称和要渲染的数据(模型)。例如,RecentToDos.cshtml 视图可以实现此目的,如下面的清单所示。

Listing 17.13 Rendering a partial view from a Razor Page
清单 17.13 从 Razor 页面渲染部分视图

@page                    #A
@model RecentToDoListModel                   #B

@foreach(var todo in Model.RecentItems)     #C
{
    <partial name="_ToDo" model="todo" />   #D
}

❶ This is a Razor Page, so it uses the @page directive. Partial views do not use @page.
这是一个 Razor 页面,因此它使用 @page 指令。分部视图不使用@page。
❷ The PageModel contains the list of recent items to render.
PageModel 包含要渲染的最近项目的列表。
❸ Loops through the recent items. todo is a ToDoItemViewModel, as required by the partial view.
循环浏览最近的项目。todo 是 ToDoItemViewModel,这是分部视图所需的。
❹ Uses the partial tag helper to render the _ToDo partial view, passing in the model to render
使用 partial 标签辅助函数渲染_ToDo 部分视图,传入模型以渲染

When you render a partial view without providing an absolute path or file extension, such as _ToDo in listing 17.13, the framework tries to locate the view by searching the Pages folder, starting from the Razor Page that invoked it. For example, if your Razor Page is located at Pages/Agenda/ToDos/RecentToDos.chstml, the framework would look in the following places for a file called _ToDo.chstml:
当您在不提供绝对路径或文件扩展名的情况下呈现部分视图时(如清单 17.13 中的 _ToDo),框架会尝试通过搜索 Pages 文件夹来查找视图,从调用它的 Razor Page 开始。例如,如果您的 Razor 页面位于 Pages/Agenda/ToDos/RecentToDos.chstml,则框架将在以下位置查找名为 _ToDo.chstml 的文件:

• Pages/Agenda/ToDos/ (the current Razor Page’s folder)
• Pages/Agenda/
• Pages/
• Pages/Shared/
• Views/Shared/

The first location that contains a file called _ToDo.cshtml will be selected. If you include the .cshtml file extension when you reference the partial view, the framework will look only in the current Razor Page’s folder. Also, if you provide an absolute path to the partial, such as /Pages/Agenda/ToDo.cshtml, that’s the only place the framework will look.
将选择包含名为 _ToDo.cshtml 的文件的第一个位置。如果在引用分部视图时包含 .cshtml 文件扩展名,则框架将仅在当前 Razor Page 的文件夹中查找。此外,如果提供部分的绝对路径(如 /Pages/Agenda/ToDo.cshtml),则这是框架将查看的唯一位置。

Tip As with most of Razor Pages, the search locations are conventions that you can customize. If you find the need, you can customize the paths as shown here: http://mng.bz/nM9e.
提示:与大多数 Razor Pages 一样,搜索位置是可以自定义的约定。如果找到需求,可以自定义路径,如下所示:http://mng.bz/nM9e

The Razor code contained in a partial view is almost identical to a standard view. The main difference is the fact that partial views are called only from other views. The other difference is that partial views don’t run _ViewStart.cshtml when they execute. You’ll learn about _ViewStart.cshtml shortly in section 17.4.4.
分部视图中包含的 Razor 代码与标准视图几乎相同。主要区别在于分部视图仅从其他视图调用。另一个区别是,分部视图在执行时不会运行 _ViewStart.cshtml。您很快就会在第 17.4.4 节中了解 _ViewStart.cshtml。

NOTE Like layouts, partial views are typically named with a leading underscore.
注意:与布局一样,分部视图通常使用前导下划线命名。

Child actions in ASP.NET Core

In the legacy .NET Framework version of ASP.NET, there was the concept of a child action. This was an MVC controller action method that could be invoked from inside a view. This was the main mechanism for rendering discrete sections of a complex layout that had nothing to do with the main action method. For example, a child action method might render the shopping cart in the corner of every page on an e-commerce site.
在 ASP.NET 的旧版 .NET Framework 中,存在子作的概念。这是一个可以从视图内部调用的 MVC 控制器作方法。这是渲染复杂布局的离散部分的主要机制,与主作方法无关。例如,子作方法可能会在电子商务网站上每个页面的一角呈现购物车。

This approach meant you didn’t have to pollute every page’s view model with the view model items required to render the shopping cart, but it fundamentally broke the MVC design pattern by referencing controllers from a view.
这种方法意味着你不必用渲染购物车所需的视图模型项来污染每个页面的视图模型,但它通过从视图中引用控制器,从根本上打破了 MVC 设计模式。

In ASP.NET Core, child actions are no more. View components have replaced them. These are conceptually quite similar in that they allow both the execution of arbitrary code and the rendering of HTML, but they don’t directly invoke controller actions. You can think of them as a more powerful partial view that you should use anywhere a partial view needs to contain significant code or business logic. You’ll see how to build a small view component in chapter 32.
在 ASP.NET Core 中,子作不再存在。视图组件已取代它们。它们在概念上非常相似,因为它们都允许执行任意代码和呈现 HTML,但它们不直接调用控制器作。您可以将它们视为一个功能更强大的分部视图,您应该在分部视图需要包含重要代码或业务逻辑的任何位置使用它。您将在第 32 章中看到如何构建一个小的视图组件。

Partial views aren’t the only way to reduce duplication in your view templates. Razor also allows you to put common elements such as namespace declarations and layout configuration in centralized files. In the next section you’ll see how to wield these files to clean up your templates.
分部视图并不是减少视图样板中重复的唯一方法。Razor 还允许将命名空间声明和布局配置等常见元素放在集中式文件中。在下一节中,您将看到如何使用这些文件来清理模板。

17.4.4 Running code on every view with _ViewStart and _ViewImports

17.4.4 使用 _ViewStart 和 _ViewImports 在每个视图上运行代码

Due to the nature of views, you’ll inevitably find yourself writing certain things repeatedly. If all your views use the same layout, adding the following code to the top of every page feels a little redundant:
由于视图的性质,您不可避免地会发现自己重复编写某些内容。如果所有视图都使用相同的布局,则将以下代码添加到每个页面的顶部感觉有点多余:

@{
    Layout = "_Layout";
}

Similarly, if you find you need to reference objects from a different namespace in your Razor views, then having to add @using WebApplication1.Models to the top of every page can get to be a chore. Fortunately, ASP.NET Core includes two mechanisms for handling these common tasks: _ViewImports.cshtml and _ViewStart.cshtml.
同样,如果你发现需要在 Razor 视图中引用来自不同命名空间的对象,则必须将 WebApplication1.Models 添加到每个页面的顶部@using这可能是一件苦差事。幸运的是,ASP.NET Core 包含两种用于处理这些常见任务的机制:_ViewImports.cshtml 和 _ViewStart.cshtml。

Importing common directives with _ViewImports
使用 _ViewImports 导入通用指令

The _ViewImports.cshtml file contains directives that are inserted at the top of every Razor view. This can include things like the @using and @model statements that you’ve already seen—basically any Razor directive. For example, to avoid adding a using statement to every view, you can include it in _ViewImports.cshtml instead of in your Razor Pages, as shown in the following listing.
_ViewImports.cshtml 文件包含插入到每个 Razor 视图顶部的指令。这可以包括您已经看到的 @using 和 @model 语句等内容,基本上是任何 Razor 指令。例如,若要避免将 using 语句添加到每个视图,可以将其包含在 _ViewImports.cshtml 中,而不是包含在 Razor Pages 中,如下面的清单所示。

Listing 17.14 A typical _ViewImports.cshtml file importing additional namespaces
列表 17.14 一个典型的 _ViewImports.cshtml 文件导入额外的命名空间

@using WebApplication1            #A
@using WebApplication1.Pages      #A
@using WebApplication1.Models                            #B
@addTagHelper *, Microsoft.AspNetCore.Mvc.TagHelpers    #C

❶ The default namespace of your application and the Pages folder
应用程序的默认命名空间和 Pages 文件夹
❷ Adds this directive to avoid placing it in every view
添加此指令以避免将其放置在每个视图中
❸ Makes Tag Helpers available in your views, added by default
使标签帮助程序在您的视图中可用,默认添加

The _ViewImports.cshtml file can be placed in any folder, and it will apply to all views and subfolders in that folder. Typically, it’s placed in the root Pages folder so that it applies to every Razor Page and partial view in your app.
_ViewImports.cshtml 文件可以放置在任何文件夹中,并且它将应用于该文件夹中的所有视图和子文件夹。通常,它位于根 Pages 文件夹中,以便应用于应用中的每个 Razor 页面和部分视图。

It’s important to note that you should put Razor directives only in _ViewImports.cshtml; you can’t put any old C# in there. As you can see in the previous listing, this is limited to things like @using or the @addTagHelper directive that you’ll learn about in chapter 18. If you want to run some arbitrary C# at the start of every view in your application, such as to set the Layout property, you should use the _ViewStart.cshtml file instead.
请务必注意,应仅将 Razor 指令放在 _ViewImports.cshtml 中;你不能把任何旧的 C# 放进去。正如您在前面的清单中所看到的,这仅限于 @using 或 @addTagHelper 指令之类的内容,您将在第 18 章中学习这些内容。如果要在应用程序中的每个视图的开头运行一些任意 C#,例如设置 Layout 属性,则应改用 _ViewStart.cshtml 文件。

Running code for every view with _ViewStart
使用 _ViewStart 为每个视图运行代码

You can easily run common code at the start of every Razor Page by adding a _ViewStart.cshtml file to the Pages folder in your application. This file can contain any Razor code, but it’s typically used to set the Layout for all the pages in your application, as shown in the following listing. Then you can omit the Layout statement from all pages that use the default layout. If a view needs to use a nondefault layout, you can override it by setting the value in the Razor Page itself.
通过将 _ViewStart.cshtml 文件添加到应用程序的 Pages 文件夹,可以轻松地在每个 Razor 页面的开头运行通用代码。此文件可以包含任何 Razor 代码,但它通常用于为应用程序中的所有页面设置 Layout,如下面的清单所示。然后,您可以从使用默认布局的所有页面中省略 Layout 语句。如果视图需要使用非默认布局,您可以通过在 Razor 页面本身中设置值来覆盖它。

Listing 17.15 A typical _ViewStart.cshtml file setting the default layout
列表 17.15 设置默认布局的典型 _ViewStart.cshtml 文件

@{
    Layout = "_Layout";
}

Any code in the _ViewStart.cshtml file runs before the view executes. Note that _ViewStart.cshtml runs only for Razor Page views; it doesn’t run for layouts or partial views. Also note that the names for these special Razor files are enforced and can’t be changed by conventions.
_ViewStart.cshtml 文件中的任何代码在视图执行之前运行。请注意,_ViewStart.cshtml 仅针对 Razor 页面视图运行;它不针对布局或分部视图运行。另请注意,这些特殊 Razor 文件的名称是强制性的,不能通过约定进行更改。

Warning You must use the names _ViewStart.cshtml and _ViewImports.cshtml for the Razor engine to locate and execute them correctly. To apply them to all your app’s pages, add them to the root of the Pages folder, not to the Shared subfolder.
警告:必须使用名称 _ViewStart.cshtml 和 _ViewImports.cshtml 以便 Razor 引擎正确查找和执行它们。要将它们应用于应用程序的所有页面,请将它们添加到 Pages 文件夹的根目录,而不是 Shared 子文件夹。

You can specify additional _ViewStart.cshtml or _ViewImports.cshtml files to run for a subset of your views by including them in a subfolder in Pages. The files in the subfolders run after the files in the root Pages folder.
您可以通过将视图子集包含在 Pages 的子文件夹中来指定要为视图子集运行的其他 _ViewStart.cs_ViewImports html 文件。子文件夹中的文件在根 Pages 文件夹中的文件之后运行。

Partial views, layouts, and AJAX
分部视图、布局和 AJAX

This chapter describes using Razor to render full HTML pages server-side, which are then sent to the user’s browser in traditional web apps. A common alternative approach when building web apps is to use a JavaScript client-side framework to build an SPA, which renders the HTML client-side in the browser.
本章介绍如何使用 Razor 在服务器端呈现完整的 HTML 页面,然后将其发送到传统 Web 应用程序中的用户浏览器。构建 Web 应用程序时,一种常见的替代方法是使用 JavaScript 客户端框架构建 SPA,该 SPA 在浏览器中呈现 HTML 客户端。

One of the technologies SPAs typically use is AJAX (Asynchronous JavaScript and XML), in which the browser sends requests to your ASP.NET Core app without reloading a whole new page. It’s also possible to use AJAX requests with apps that use server-side rendering. To do so, you’d use JavaScript to request an update for part of a page.
SPA 通常使用的技术之一是 AJAX(异步 JavaScript 和 XML),在这种技术中,浏览器将请求发送到您的 ASP.NET Core 应用程序,而无需重新加载全新的页面。还可以将 AJAX 请求与使用服务器端渲染的应用程序一起使用。为此,您需要使用 JavaScript 请求更新页面的一部分。

If you want to use AJAX with an app that uses Razor, you should consider making extensive use of partial views. Then you can expose these via additional Razor Page handlers, as shown in this article: http://mng.bz/vzB1. Using AJAX can reduce the overall amount of data that needs to be sent back and forth between the browser and your app, and it can make your app feel smoother and more responsive, as it requires fewer full-page loads. But using AJAX with Razor can add complexity, especially for larger apps. If you foresee yourself making extensive use of AJAX to build a highly dynamic web app, you might want to consider using minimal APIs or web API controllers with a client-side framework, or consider using Blazor instead.
如果要将 AJAX 与使用 Razor 的应用程序一起使用,则应考虑广泛使用分部视图。然后,您可以通过其他 Razor Page 处理程序公开这些内容,如本文所示:http://mng.bz/vzB1。使用 AJAX 可以减少需要在浏览器和应用程序之间来回发送的数据总量,并且可以使您的应用程序感觉更流畅、响应更快,因为它需要的整页加载更少。但是,将 AJAX 与 Razor 结合使用可能会增加复杂性,尤其是对于较大的应用程序。如果你预见到自己会广泛使用 AJAX 来构建高度动态的 Web 应用,则可能需要考虑将最少的 API 或 Web API 控制器与客户端框架结合使用,或者考虑改用 Blazor。

That concludes our first look at rendering HTML using the Razor templating engine. In the next chapter you’ll learn about Tag Helpers and how to use them to build HTML forms, a staple of modern web applications. Tag Helpers are one of the biggest improvements to Razor in ASP.NET Core over legacy ASP.NET, so getting to grips with them will make editing your views an overall more pleasant experience!
我们第一次使用 Razor 模板引擎渲染 HTML 到此结束。在下一章中,您将了解标记帮助程序以及如何使用它们来构建 HTML 表单,这是现代 Web 应用程序的主要内容。标签帮助程序是 ASP.NET Core 中 Razor 相对于旧版 ASP.NET 的最大改进之一,因此掌握它们将使编辑视图的整体体验更加愉快!

17.5 Summary

17.5 总结

Razor is a templating language that allows you to generate dynamic HTML using a mixture of HTML and C#. This provides the power of C# without your having to build up an HTML response manually using strings.
Razor 是一种模板语言,允许您使用 HTML 和 C# 的混合生成动态 HTML。这提供了 C# 的强大功能,而无需使用字符串手动构建 HTML 响应。

Razor Pages can pass strongly typed data to a Razor view by setting public properties on the PageModel. To access the properties on the view model, the view should declare the model type using the @model directive.
Razor Pages 可以通过在 PageModel 上设置公共属性,将强类型数据传递给 Razor 视图。要访问视图模型上的属性,视图应使用 @model 指令声明模型类型。

Page handlers can pass key-value pairs to the view using the ViewData dictionary. This is useful for implicitly passing shared data to layouts and partial views.
页面处理程序可以使用 ViewData 字典将键值对传递给视图。这对于将共享数据隐式传递给布局和分部视图非常有用。

Razor expressions render C# values to the HTML output using @ or @(). You don’t need to include a semicolon after the statement when using Razor expressions.
Razor 表达式使用 @ 或 @() 将 C# 值呈现到 HTML 输出。使用 Razor 表达式时,无需在语句后包含分号。

Razor code blocks, defined using @{}, execute C# without outputting HTML. The C# in Razor code blocks must be complete statements, so it must include semicolons.
使用 @{} 定义的 Razor 代码块执行 C# 而不输出 HTML。Razor 代码块中的 C# 必须是完整语句,因此它必须包含分号。

Loops and conditionals can be used to easily generate dynamic HTML in templates, but it’s a good idea to limit the number of if statements in particular, to keep your views easy to read.
循环和条件可用于在模板中轻松生成动态 HTML,但最好特别限制 if 语句的数量,以保持视图易于阅读。

If you need to render a string as raw HTML you can use Html.Raw, but do so sparingly; rendering raw user input can create a security vulnerability in your application.
如果需要将字符串呈现为原始 HTML,则可以使用 Html.Raw,但要谨慎使用;呈现原始用户输入可能会在您的应用程序中创建安全漏洞。

Tag Helpers allow you to bind your data model to HTML elements, making it easier to generate dynamic HTML while staying editor-friendly.
标签帮助程序允许您将数据模型绑定到 HTML 元素,从而更轻松地生成动态 HTML,同时保持编辑器友好性。

You can place HTML common to multiple views in a layout to reduce duplication. The layout will render any content from the child view at the location @RenderBody is called.
您可以将多个视图通用的 HTML 放置在布局中,以减少重复。布局将在调用子视图的位置呈现子视图中的任何内容@RenderBody。

Encapsulate commonly used snippets of Razor code in a partial view. A partial view can be rendered using the tag.
在分部视图中封装 Razor 代码的常用代码片段。可以使用 tag 呈现部分视图。

_ViewImports.cshtml can be used to include common directives, such as @using statements, in every view.
_ViewImports.cshtml 可用于在每个视图中包含常见指令,例如 @using 语句。

_ViewStart.cshtml is called before the execution of each Razor Page and can be used to execute code common to all Razor Pages, such as setting a default layout page. It doesn’t execute for layouts or partial views.
_ViewStart.cshtml 在执行每个 Razor 页面之前调用,可用于执行所有 Razor 页面通用的代码,例如设置默认布局页面。它不会对布局或分部视图执行。

_ViewImports.cshtml and _ViewStart.cshtml are hierarchical. Files in the root folder execute first, followed by files in controller-specific view folders.
_ViewImports.cshtml 和 _ViewStart.cshtml 是分层的。首先执行根文件夹中的文件,然后是特定于控制器的视图文件夹中的文件。