Author Archives: user

ASP.NET Core in Action 36 Testing ASP.NET Core applications

36 Testing ASP.NET Core applications‌

This chapter covers

• Writing unit tests for custom middleware, API controllers, and minimal API endpoints
• Using the Test Host package to write integration tests Testing your real application’s behavior with WebApplicationFactory
• Testing code dependent on Entity Framework Core with the in-memory database provider

In chapter 35 I described how to test .NET 7 applications using the xUnit test project and the .NET Test software development kit (SDK). You learned how to create a test project, add a project reference to your application, and write unit tests for services in your app.

In this chapter we focus on testing ASP.NET Core applications specifically. In sections 36.1 and 36.2 we’ll look at how to test common features of your ASP.NET Core apps: custom middleware, API controllers, and minimal API endpoints. I show you how to write isolated unit tests for both, much like you would any other service, and I’ll point out the tripping points to watch for.

To ensure that components work correctly, it’s important to test them in isolation. But you also need to test that they work correctly in a middleware pipeline. ASP.NET Core provides a handy Test Host package that lets you easily write these integration tests for your components. You can even go one step further with the WebApplicationFactory helper class and test that your app is working correctly. In section 36.3 you’ll see how to use WebApplicationFactory to simulate requests to your application and verify that it generates the correct response.

In the final section of this chapter I’ll demonstrate how to use the SQLite database provider for Entity Framework Core (EF Core) with an in-memory database. You can use this provider to test services that depend on an EF Core DbContext without having to use a real database. That prevents the pain of having unknown database infrastructure and resetting the database between tests, with different people having slightly different database configurations.

In chapter 35 I showed how to write unit tests for an exchange-rate calculator service, such as you might find in your application’s domain model. If well designed, domain services are normally relatively easy to unit-test. But domain services only make up a portion of your application. It can also be useful to test your ASP.NET Core-specific constructs, such as custom middleware, as you’ll see in the next section.

36.1 Unit testing custom middleware‌

In this section you’ll learn how to test custom middleware in isolation. You’ll see how to test whether your middleware handled a request or whether it called the next middleware in the pipeline. You’ll also see how to read the response stream for your middleware.

In chapter 31 you saw how to create custom middleware and encapsulate middleware as a class with an Invoke function. In this section you’ll create unit tests for a simple health- check middleware component, similar to the one in chapter 31. This is a basic implementation, but it demonstrates the approach you can take for more complex middleware components.

The middleware you’ll be testing is shown in listing 36.1. When invoked, this middleware checks that the path starts with /ping and, if it does, returns a plain text "pong" response. If the request doesn’t match, it calls the next middleware in the pipeline (the provided RequestDelegate).

Listing 36.1 StatusMiddleware to be tested, which returns a "pong" response

public class StatusMiddleware
{
private readonly RequestDelegate _next; ❶
public StatusMiddleware(RequestDelegate next) ❶
{
_next = next;
}
public async Task Invoke(HttpContext context) ❷
{
if(context.Request.Path.StartsWithSegments("/ping")) ❸
{ ❸
context.Response.ContentType = "text/plain"; ❸
await context.Response.WriteAsync("pong"); ❸
return; ❸
} ❸
await _next(context); ❹
}
}

❶ The RequestDelegate representing the rest of the middleware pipeline
❷ Called when the middleware is executed
❸ If the path starts with “/ping”, a “pong” response is returned . . .
❹ . . . otherwise, the next middleware in the pipeline is invoked.

In this section, you’re going to test two simple cases:

• When a request is made with a path of "/ping"
• When a request is made with a different path

WARNING Where possible, I recommend that you don’t directly inspect paths in your middleware like this. A better approach is to use endpoint routing instead, as I discussed in chapter 31. The middleware in this section is for demonstration purposes only.

Middleware is slightly complicated to unit-test because the HttpContext object is conceptually a big class. It contains all the details for the request and the response, which can mean there’s a lot of surface area for your middleware to interact with. For that reason, I find unit tests tend to be tightly coupled to the middleware implementation, which is generally undesirable.

For the first test, you’ll look at the case where the incoming request Path doesn’t start with /ping. In this case,StatusMiddleware should leave the HttpContext unchanged and call the RequestDelegate provided in the constructor, which represents the next middleware in the pipeline.

You could test this behavior in several ways, but in listing 36.2 you test that the RequestDelegate (essentially a one-parameter function) is executed by setting a local variable to true. In the Assert at the end of the method, you verify that the variable was set and therefore that the delegate was invoked. To invoke StatusMiddleware, create and pass in a DefaultHttpContext, which is an implementation of HttpContext.

NOTE The DefaultHttpContext derives from HttpContext and is part of the base ASP.NET Core framework abstractions. If you’re so inclined, you can explore the source code for it on GitHub at http://mng.bz/MB9Q.

Listing 36.2 Unit testing StatusMiddleware when a nonmatching path is provided

[Fact]
public async Task ForNonMatchingRequest_CallsNextDelegate()
{
var context = new DefaultHttpContext(); ❶
context.Request.Path = "/somethingelse"; ❶
var wasExecuted = false; ❷
RequestDelegate next = (HttpContext ctx) => ❸
{ ❸
wasExecuted = true; ❸
return Task.CompletedTask; ❸
}; ❸
var middleware = new StatusMiddleware(next); ❹
await middleware.Invoke(context); ❺
Assert.True(wasExecuted); ❻
}

❶ Creates a DefaultHttpContext and sets the path for the request
❷ Tracks whether the RequestDelegate was executed
❸ The RequestDelegate representing the next middleware should be invoked in
this example.
❹ Creates an instance of the middleware, passing in the next RequestDelegate
❺ Invokes the middleware with the HttpContext; should invoke the
RequestDelegate
❻ Verifies that RequestDelegate was invoked

When the middleware is invoked, it checks the provided Path and finds that it doesn’t match the required value of /ping. The middleware therefore calls the next RequestDelegate and returns.

The other obvious case to test is when the request Path is "/ping"; the middleware should generate an appropriate response. You could test several characteristics of the response:

• The response should have a 200 OK status code.
• The response should have a Content-Type of text/plain.
• The response body should contain the "pong" string.

Each of these characteristics represents a different requirement, so you’d typically codify each as a separate unit test. This makes it easier to tell exactly which requirement hasn’t been met when a test fails. For simplicity, in listing 36.3 I show all these assertions in the same test.

The positive case unit test is made more complex by the need to read the response body to confirm it contains "pong". DefaultHttpContext uses Stream.Null for the Response .Body object, which means anything written to Body is lost. To capture the response and read it out to verify the contents, you must replace the Body with a MemoryStream. After the middleware executes, you can use a StreamReader to read the contents of the MemoryStream into a string and verify it.

Listing 36.3 Unit testing StatusMiddleware when a matching Path is provided

[Fact]
public async Task ReturnsPongBodyContent()
{
var bodyStream = new MemoryStream(); ❶
var context = new DefaultHttpContext(); ❶
context.Response.Body = bodyStream; ❶
context.Request.Path = "/ping"; ❷
RequestDelegate next = (ctx) => Task.CompletedTask; ❸
var middleware = new StatusMiddleware(next: next); ❸
await middleware.Invoke(context); ❹
string response; ❺
bodyStream.Seek(0, SeekOrigin.Begin); ❺
using (var stringReader = new StreamReader(bodyStream)) ❺
{ ❺
response = await stringReader.ReadToEndAsync(); ❺
} ❺
Assert.Equal("pong", response); ❻
Assert.Equal("text/plain", context.Response.ContentType); ❼
Assert.Equal(200, context.Response.StatusCode); ❽
}

❶ Creates a DefaultHttpContext and initializes the body with a MemoryStream
❷ The path is set to the required value for the StatusMiddleware.
❸ Creates an instance of the middleware and passes in a simple RequestDelegate
❹ Invokes the middleware
❺ Rewinds the MemoryStream and reads the response body into a string
❻ Verifies that the response has the correct value
❼ Verifies that the ContentType response is correct
❽ Verifies that the Status Code response is correct

As you can see, unit testing middleware requires a lot of setup. On the positive side, it allows you to test your middleware in isolation, but in some cases, especially for simple middleware without any dependencies on databases or other services, integration testing can (somewhat surprisingly) be easier. In section 36.3 you’ll create integration tests for this middleware to see the difference.

Custom middleware is common in ASP.NET Core projects, but far more common are Razor Pages, API controllers, and minimal API endpoints. In the next section you’ll see how you can unit test them in isolation from other components.

36.2 Unit testing API controllers and minimal API endpoints‌

In this section you’ll learn how to unit-test API controllers and minimal API endpoints. You’ll learn about the benefits and difficulties of testing these components in isolation and the situations when it can be useful.

Unit tests are all about isolating behavior; you want to test only the logic contained in the component itself, separate from the behavior of any dependencies. The Razor Pages and MVC/API frameworks use the filter pipeline, routing, and model-binding systems, but these are all external to the controller or PageModels. The PageModels and controllers themselves are responsible for a limited number of things:

• For invalid requests (that have failed validation, for example), return an appropriate ActionResult (API controllers) or redisplay a form (Razor Pages).

• For valid requests, call the required business logic services and return an appropriate ActionResult (API controllers), or show or redirect to a success page (Razor Pages).

• Optionally, apply resource-based authorization as required.

Controllers and Razor Pages generally shouldn’t contain business logic themselves; instead, they should call out to other services. Think of them more as orchestrators, serving as the intermediary between the HTTP interfaces your app exposes and your business logic services.

If you follow this separation, you’ll find it easier to write unit tests for your business logic, and you’ll benefit from greater flexibility when you want to change your controllers to meet your needs. With that in mind, there’s often a drive to make your controllers and page handlers as thin as possible, to the point where there’s not much left to test!

TIP One of my first introductions to this idea was a series of posts by Jimmy Bogard. The following link points to the last post in the series, but it contains links to all the earlier posts too. Bogard is also behind the MediatR library (https://github.com/jbogard/MediatR), which makes creating thin controllers even easier. See “Put your controllers on a diet: POSTs and commands”: http://mng.bz/7VNQ.

All that said, controllers and actions are classes and methods, so you can write unit tests for them. The difficulty is deciding what you want to test. As an example, we’ll consider the simple API controller in the following listing, which converts a value using a provided exchange rate and returns a response.

Listing 36.4 The API controller under test

[Route("api/[controller]")]
public class CurrencyController : ControllerBase
{
private readonly CurrencyConverter _converter ❶
= new CurrencyConverter(); ❶
[HttpGet]
public ActionResult<decimal> Convert(InputModel model) ❷
{
if (!ModelState.IsValid) ❸
{ ❸
return BadRequest(ModelState); ❸
} ❸
decimal result = _converter.ConvertToGbp(model) ❹
return result; ❺
}
}

❶ The CurrencyConverter would normally be injected using DI and is created here
for simplicity.
❷ The Convert method returns an Action-Result.
❸ If the input is invalid, returns a 400 Bad Request result, including the ModelState
❹ If the model is valid, calculates the result
❺ Returns the result directly

Let’s first consider the happy path, when the controller receives a valid request. The following listing shows that you can create an instance of the API controller, call an action method, and receive an ActionResult response.

Listing 36.5 A simple API controller unit test

public class CurrencyControllerTest
{
[Fact]
public void Convert_ReturnsValue()
{
var controller = new CurrencyController(); ❶
var model = new InputModel ❶
{ ❶
Value = 1, ❶
ExchangeRate = 3, ❶
DecimalPlaces = 2, ❶
}; ❶
ActionResult<decimal> result = controller.Convert(model); ❷
Assert.NotNull(result); ❸
}
}

❶ Creates an instance of the ConvertController to test and a model to send to the
API
❷ Invokes the ConvertToGbp method and captures the value returned
❸ Asserts that the IActionResult is not null

An important point to note here is that you’re testing only the return value of the action, the ActionResult, not the response that’s sent back to the user. The process of serializing the result to the response is handled by the Model-View-Controller (MVC) formatter infrastructure, as you saw in chapter 9, not by the controller.

When you unit-test controllers, you’re testing them separately from the MVC infrastructure, such as formatting, model binding, routing, and authentication. This is obviously by design, but as with testing middleware in section 36.1, it can make testing some aspects of your controller somewhat complex.

Consider model validation. As you saw in chapter 6, one of the key responsibilities of action methods and Razor Page handlers is to check the ModelState.IsValid property and act accordingly if a binding model is invalid. Testing that your controllers and PageModels handle validation failures correctly seems like a good candidate for a unit test.

Unfortunately, things aren’t simple here either. The Razor Page/MVC framework automatically sets the ModelState property as part of the model-binding process. In practice, when your action method or page handler is invoked in your running app, you know that the ModelState will match the binding model values. But in a unit test, there’s no model binding, so you must set the ModelState yourself manually.

Imagine you’re interested in testing the error path for the controller in listing 36.4, where the model is invalid and the controller should return BadRequestObjectResult. In a unit test, you can’t rely on the ModelState property being correct for the binding model. Instead, you must add a model-binding error to the controller’s ModelState manually before calling the action, as shown in the following listing.

Listing 36.6 Testing handling of validation errors in MVC controllers

[Fact]
public void Convert_ReturnsBadRequestWhenInvalid()
{
var controller = new CurrencyController(); ❶
var model = new ConvertInputModel ❷
{ ❷
Value = 1, ❷
ExchangeRate = -2, ❷
DecimalPlaces = 2, ❷
}; ❷
controller.ModelState.AddModelError( ❸
nameof(model.ExchangeRate), ❸
"Exchange rate must be greater than zero" ❸
); ❸
ActionResult<decimal> result = controller.Convert(model); ❹
Assert.IsType<BadRequestObjectResult>(result.Result); ❺
}

❶ Creates an instance of the Controller to test
❷ Creates an invalid binding model by using a negative ExchangeRate
❸ Manually adds a model error to the Controller’s ModelState. This sets ModelState.IsValid to false.
❹ Invokes the action method, passing in the binding models
❺ Verifies that the action method returned a BadRequestObjectResult

NOTE In listing 36.6, I passed in an invalid model, but I could just as easily have passed in a valid model or even null; the controller doesn’t use the binding model if the ModelState isn’t valid, so the test would still pass. But if you’re writing unit tests like this one, I recommend trying to keep your model consistent with your ModelState; otherwise, your unit tests won’t be testing a situation that occurs in practice.

I tend to shy away from unit testing API controllers directly in this way. As you’ve seen with model binding, the controllers are somewhat dependent on earlier stages of the MVC framework, which you often need to emulate. Similarly, if your controllers access the HttpContext (available on the ControllerBase base classes), you may need to perform additional setup.

NOTE You can read more about why I generally don’t unit- test my controllers in my blog article “Should you unit-test API/MVC controllers in ASP.NET Core?” at http://mng.bz/YqMo.

So what about minimal API endpoints? There’s both good news and bad news here. On one hand, minimal API endpoints are simple lambda functions, so you can unit-test them, but these tests also suffer from many drawbacks:

• You must write your endpoint handlers as static or instance methods on a class, not as lambda methods or local functions, so that you can reference them from the test project.

• You are testing only the execution of the endpoint handler, outside any filters applied to the endpoint or route group that execute in the real app.

• You are not testing model-binding or result serialization—two common sources of errors in practice.

• If your endpoint is simple, as it should be, there’s not much to test!

I find unit tests for minimal APIs to be overly restrictive and limited in value, so I avoid them, but you can see an example of a minimal API unit test in the source code for this chapter.

NOTE I haven’t discussed Razor Pages much in this section, as they suffer from many of the same problems, in that they are dependent on the supporting infrastructure of the framework. Nevertheless, if you do wish to test your Razor Page PageModel, you can read about it in Microsoft’s “Razor Pages unit tests in ASP.NET Core” documentation: http://mng.bz/GxmM.

Instead of using unit testing, I try to keep my minimal API endpoints, controllers, and Razor Pages as thin as possible. I push as much of the behavior in these classes into business logic services that can be easily unit-tested, or into middleware and filters, which can be more easily tested independently.

NOTE This is a personal preference. Some people like to get as close to 100 percent test coverage for their code base as possible, but I find testing orchestration classes is often more hassle than it’s worth.

Although I tend to forgo unit-testing my ASP.NET Core endpoints, I often write integration tests that test them in the context of a complete application. In the next section, we’ll look at ways to write integration tests for your app so you can test its various components in the context of the ASP.NET Core framework as a whole.

36.3 Integration testing: Testing your whole app in-memory‌

In this section you’ll learn how to create integration tests that test component interactions. You’ll learn to create a TestServer that sends HTTP requests in-memory to test custom middleware components more easily. You’ll then learn how to run integration tests for a real application, using your real app’s configuration, services, and middleware pipeline. Finally, you’ll learn how to use WebApplicationFactory to replace services in your app with test versions to avoid depending on third-party APIs in your tests.

If you search the internet for types of testing, you’ll find a host of types to choose among. The differences are sometimes subtle, and people don’t universally agree on the definitions. I chose not to dwell on that topic in this book. I consider unit tests to be isolated tests of a component and integration tests to be tests that exercise multiple components at the same time.

In this section I’m going to show how you can write integration tests for the StatusMiddleware from section 36.1 and the API controller from section 36.2. Instead of isolating the components from the surrounding framework and invoking them directly, you’ll specifically test them in a context similar to how you use them in practice.

Integration tests are an important part of confirming that your components function correctly, but they don’t remove the need for unit tests. Unit tests are excellent for testing small pieces of logic contained in your components and are typically quick to execute. Integration tests are normally significantly slower, as they require much more configuration and may rely on external infrastructure, such as a database.

Consequently, it’s normal to have far more unit tests for an app than integration tests. As you saw in chapter 35, unit tests typically verify the behavior of a component, using valid inputs, edge cases, and invalid inputs to ensure that the component behaves correctly in all cases. Once you have an extensive suite of unit tests, you’ll likely need only a few integration tests to be confident your application is working correctly.

You could write many types of integration tests for an application. You could test that a service can write to a database correctly, integrate with a third-party service (for sending emails, for example), or handle HTTP requests made to it.

In this section we’re going to focus on the last point: verifying that your app can handle requests made to it, as it would if you were accessing the app from a browser. For this, we’re going to use a library provided by the ASP.NET Core team called Microsoft.AspNetCore.TestHost.

36.3.1 Creating a TestServer using the Test Host package‌

Imagine you want to write some integration tests for the StatusMiddleware from section 36.1. You’ve already written unit tests for it, but you want to have at least one integration test that tests the middleware in the context of the ASP.NET Core infrastructure.

You could go about this in many ways. Perhaps the most complete approach would be to create a separate project and configure StatusMiddleware as the only middleware in the pipeline. You’d then need to run this project, wait for it to start up, send requests to it, and inspect the responses.

This would possibly make for a good test, but it would also require a lot of configuration, and it would be fragile and error-prone. What if the test app can’t start because it tries to use an already-taken port? What if the test app doesn’t shut down correctly? How long should the integration test wait for the app to start?

The ASP.NET Core Test Host package lets you get close to this setup without having the added complexity of spinning up a separate app. You add the Test Host to your test project by adding the Microsoft.AspNetCore.TestHost NuGet package, using the Visual Studio NuGet GUI, Package Manager Console, or .NET command-line interface (CLI). Alternatively, add the element directly to your test project’s .csproj file:‌

<PackageReference Include="Microsoft.AspNetCore.TestHost" Version="7.0.0"/>

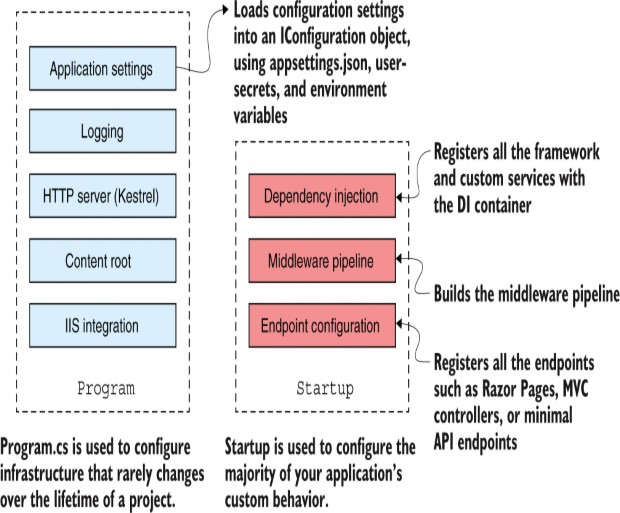
In a typical ASP.NET Core app, you create a HostBuilder in your Program class; configure a web server (Kestrel); and define your application’s configuration, services, and middleware pipeline (using a Startup file). Finally, you call Build() on the HostBuilder to create an instance of an IHost that can be run and that will listen for requests on a given URL and port.

NOTE All this happens behind the scenes when you use the minimal hosting WebApplicationBuilder and WebApplication APIs. I have an in-depth post exploring the code behind WebApplicationBuilder and how it relates to HostBuilder on my blog at http://mng.bz/a1mj.‌

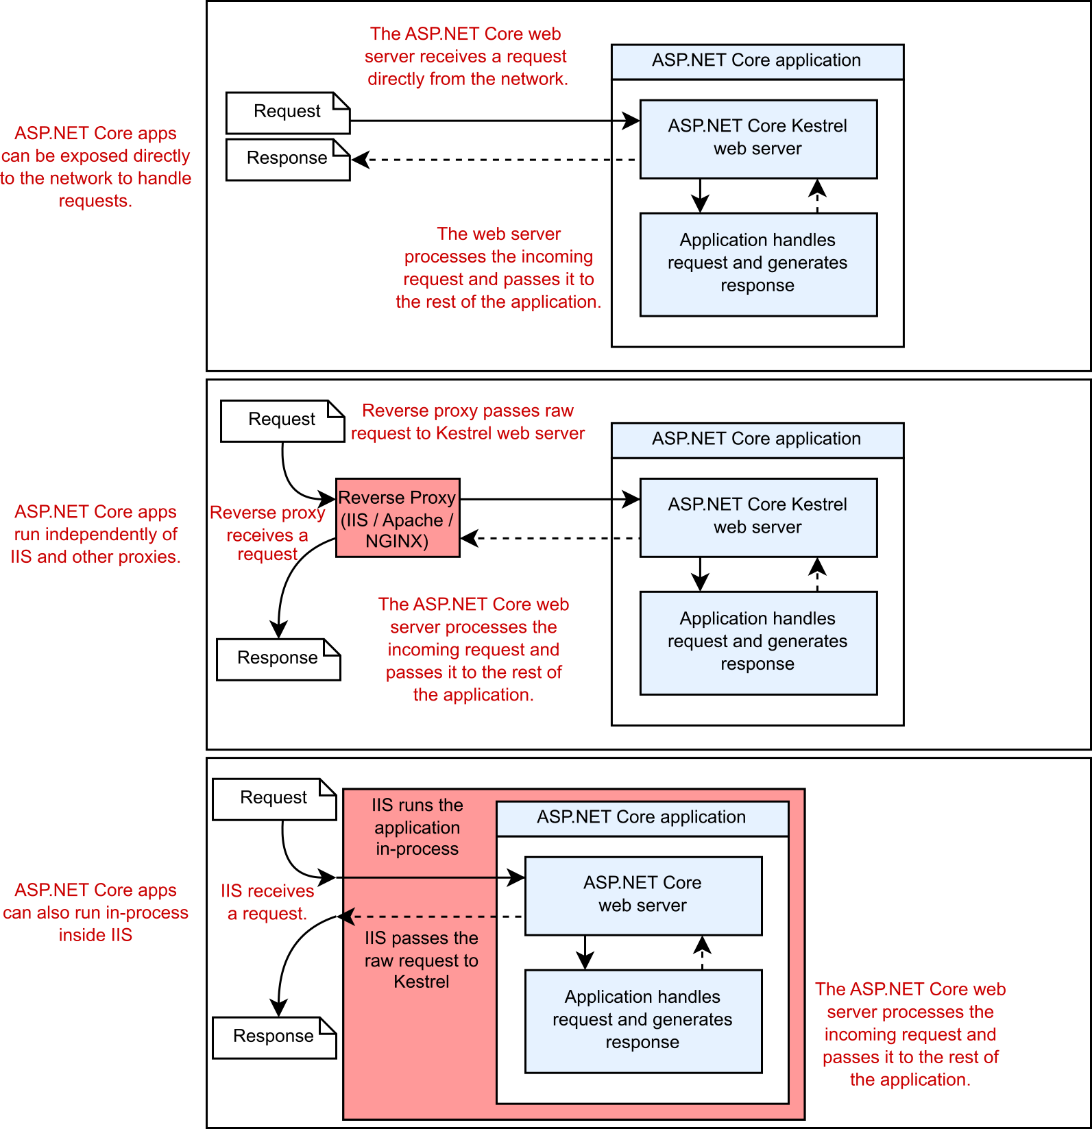
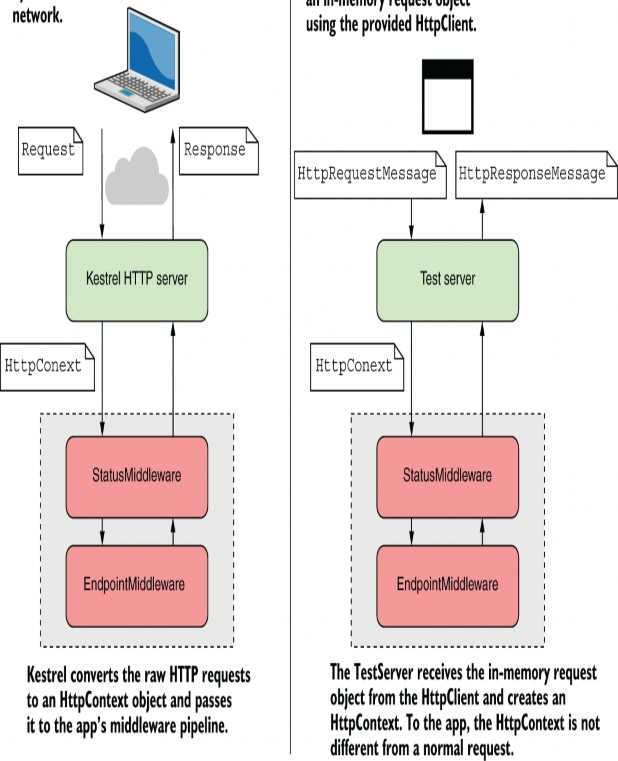
The Test Host package uses the same HostBuilder to define your test application, but instead of listening for requests at the network level, it creates an IHost that uses in-memory request objects, as shown in figure 36.1.

alt text
alt text

Figure 36.1 When your app runs normally, it uses the Kestrel server. This listens for HTTP requests and converts the requests to an HttpContext, which is passed to the middleware pipeline. The TestServer doesn’t listen for requests on the network. Instead, you use an HttpClient to make in-memory requests.From the point of view of the middleware, there’s no difference.

It even exposes an HttpClient that you can use to send requests to the test app. You can interact with the HttpClient as though it were sending requests over the network, but in reality, the requests are kept entirely in memory.

Listing 36.7 shows how to use the Test Host package to create a simple integration test for the StatusMiddleware. First, create a HostBuilder, and call ConfigureWebHost() to define your application by adding middleware in the Configure method. This is equivalent to the Startup.Configure() method you would typically use to configure your application when using the generic host approach.‌

NOTE You can write a similar test using WebApplicationBuilder, but this sets up lots of extra defaults such as configuration, extra dependency injection (DI) services, and automatically added middleware, which can generally slow and add some confusion to simple tests. You can see an example of this approach in StatusMiddlewareTestHostTests in the source code for this book, but I recommend using the approach in listing 36.7, using HostBuilder, in most cases.

Call the UseTestServer() extension method in ConfigureWebHost(), which replaces the default Kestrel server with the TestServer from the Test Host package.

The TestServer is the main component in the Test Host package, which makes all the magic possible. After configuring the HostBuilder, call StartAsync() to build and start the test application. You can then create an HttpClient using the extension method GetTestClient(). This returns an HttpClient configured to make in-memory requests to the TestServer, as shown in the following listing.

Listing 36.7 Creating an integration test with TestServer


public class StatusMiddlewareTests
{
[Fact]
public async Task StatusMiddlewareReturnsPong()
{
var hostBuilder = new HostBuilder() ❶
.ConfigureWebHost(webHost => ❶
{
webHost.Configure(app => ❷
app.UseMiddleware<StatusMiddleware>()); ❷
webHost.UseTestServer(); ❸
});
IHost host = await hostBuilder.StartAsync(); ❹
HttpClient client = host.GetTestClient(); ❺
var response = await client.GetAsync("/ping"); ❻
response.EnsureSuccessStatusCode(); ❼
var content = await response.Content.ReadAsStringAsync(); ❽
Assert.Equal("pong", content); ❽
}
}

❶ Configures a HostBuilder to define the in-memory test app
❷ Adds the Status-Middleware as the only middleware in the pipeline
❸ Configures the host to use the TestServer instead of Kestrel
❹ Builds and starts the host
❺ Creates an HttpClient, or you can interact directly with the server object
❻ Makes an in-memory request, which is handled by the app as normal
❼ Verifies that the response was a success (2xx) status code
❽ Reads the body content and verifies that it contains “pong”

This test ensures that the test application defined by HostBuilder returns the expected value when it receives a request to the /ping path. The request is entirely in- memory, but from the point of view of StatusMiddleware, it’s the same as if the request came from the network.

The HostBuilder configuration in this example is simple. Even though I’ve called this an integration test, you’re specifically testing the StatusMiddleware on its own rather than in the context of a real application. I think this setup is preferable for testing custom middleware compared with the “proper” unit tests I showed in section 36.1.

Regardless of what you call it, this test relies on simple configuration for the test app. You may also want to test the middleware in the context of your real application so that the result is representative of your app’s real configuration.

If you want to run integration tests based on an existing app, you don’t want to have to configure the test HostBuilder manually, as you did in listing 36.7. Instead, you can use another helper package, Microsoft.AspNetCore.Mvc.Testing.

36.3.2 Testing your application with WebApplicationFactory‌

Building up a HostBuilder and using the Test Host package, as you did in section 36.3.1, can be useful when you want to test isolated infrastructure components, such as middleware. However, it’s also common to want to test your real app, with the full middleware pipeline configured and all the required services added to DI. This gives you the most confidence that your application is going to work in production.

The TestServer that provides the in-memory server can be used for testing your real app, but in principle, a lot more configuration is required. Your real app likely loads configuration files or static files; it may use Razor Pages and views, as well as using WebApplicationBuilder instead of the generic host. Fortunately, the Microsoft.AspNetCore.Mvc.Testing NuGet package and WebApplicationFactory largely solve these configuration problems for you.

NOTE Don’t be put off by the Mvc in the package name; you can use this package for testing ASP.NET Core apps that don’t use any MVC or Razor Pages services or components.

You can use the WebApplicationFactory class (provided by the Microsoft.AspNetCore.Mvc.Testing NuGet package) to run an in-memory version of your real application. It uses the TestServer behind the scenes, but it uses your app’s real configuration, DI service registration, and middleware pipeline. The following listing shows an example that tests that when your application receives a "/ping" request, it responds with "pong".

Listing 36.8 Creating an integration test with WebApplicationFactory

public class IntegrationTests: ❶
IClassFixture<WebApplicationFactory<Program>> ❶
{
private readonly WebApplicationFactory<Program> _fixture; ❷
public IntegrationTests( ❷
WebApplicationFactory<Startup> fixture) ❷
{ ❷
_fixture = fixture; ❷
} ❷
[Fact]
public async Task PingRequest_ReturnsPong()
{
HttpClient client = _fixture.CreateClient(); ❸
var response = await client.GetAsync("/ping"); ❹
response.EnsureSuccessStatusCode(); ❹
var content = await response.Content.ReadAsStringAsync(); ❹
Assert.Equal("pong", content); ❹
}
}

❶ Implementing the interface allows sharing an instance across tests.
❷ Injects an instance of WebApplicationFactory, where T is a class in your app
❸ Creates an HttpClient that sends requests to the in-memory TestServer
❹ Makes requests and verifies the response as before

One of the advantages of using WebApplicationFactory as shown in listing 36.8 is that it requires less manual configuration than using the TestServer directly, as shown in listing 36.13, despite performing more configuration behind the scenes. The WebApplicationFactory tests your app using the configuration defined in your Program.cs and Startup.cs files.

NOTE The generic WebApplicationFactory must reference a public class in your app project. It’s common to use the Program or Startup class. If you’re using top-level statements for your app (the default in .NET 7), the automatically generated Program class is internal by default. To make it public and thereby expose it to your test project, add the following partial class definition to your app: public partial class Program {}.‌

Listings 36.8 and 36.7 are conceptually quite different too. Listing 36.7 tests that the StatusMiddleware behaves as expected in the context of a dummy ASP.NET Core app; listing 36.7 tests that your app behaves as expected for a given input. It doesn’t say anything specific about how that happens. Your app doesn’t have to use the StatusMiddleware for the test in listing 36.7 to pass; it simply has to respond correctly to the given request. That means the test knows less about the internal implementation details of your app and is concerned only with its behavior.

DEFINITION Tests that fail whenever you change your app slightly are called brittle or fragile. Try to avoid brittle tests by ensuring that they aren’t dependent on the implementation details of your app.‌

To create tests that use WebApplicationFactory, follow these steps:

  1. Install the Microsoft.AspNetCore.Mvc.Testing NuGet package in your project by running dotnet add package Microsoft.AspNetCore.Mvc.Testing, by using the NuGet explorer in Visual Studio, or by adding a <PackageReference> element to your project file as follows:

    <PackageReference Include="Microsoft.AspNetCore.Mvc.Testing" Version="7.0.0" />
  2. Update the <Project> element in your test project’s .csproj file to the following:

<Project Sdk="Microsoft.NET.Sdk.Web">

This is required by WebApplicationFactory so that it can find your configuration files and static files.

  1. Implement IClassFixture<WebApplicationFactory<T>> in your xUnit test class, where T is a class in your real application’s project. By convention, you typically use your application’s Program class for T.

• WebApplicationFactory uses the T reference to find the entry point for your application, running the application in memory, and dynamically replacing Kestrel with a TestServer for tests.

• If you’re using C# top-level statements and using the Program class for T, you need to make sure that the Program class is accessible from the test project. You can change the visibility of the automatically generated Program class by adding public partial class Program {} to your app.

• The IClassFixture<TFixture> is an xUnit marker interface that tells xUnit to build an instance of TFixture before building the test class and to inject the instance into the test class’s constructor. You can read more about fixtures at https://xunit.net/docs/shared- context.

  1. Inject an instance of WebApplicationFactory in your test class’s constructor. You can use this fixture to create an HttpClient for sending in-memory requests to the TestServer. Those requests emulate your application’s production behavior, as your application’s real configuration, services, and middleware are all used.

The big advantage of WebApplicationFactory is that you can easily test your real app’s behavior. That power comes with responsibility: your app will behave as it would in real life, so it will write to a database and send to third-party APIs! Depending on what you’re testing, you may want to replace some of your dependencies to avoid this, as well as to make testing easier.

36.3.3 Replacing dependencies in WebApplicationFactory‌

When you use WebApplicationFactory to run integration tests on your app, your app will be running in-memory, but other than that, it’s as though you’re running your application using dotnet run. That means any connection strings, secrets, or API keys that can be loaded locally will also be used to run your application.

TIP By default, WebApplicationFactory uses the "Development" hosting environment, the same as when you run locally.

On the plus side, that means you have a genuine test that your application can start correctly. For example, if you’ve forgotten to register a required DI dependency that is detected on application startup, any tests that use WebApplicationFactory will fail.

On the downside, that means all your tests will be using the same database connection and services as when you run your application locally. It’s common to want to replace those with alternative test versions of your services.

As a simple example, imagine the CurrencyConverter that you’ve been testing in this app uses IHttpClientFactory to call a third-party API to retrieve the latest exchange rates. You don’t want to hit that API repeatedly in your integration tests, so you want to replace the CurrencyConverter with your own StubCurrencyConverter.

The first step is to ensure that the service CurrencyConverter implements an interface— ICurrencyConverter for example—and that your app uses this interface throughout, not the implementation. For our simple example, the interface would probably look like the following:

public interface ICurrencyConverter
{
decimal ConvertToGbp(decimal value, decimal rate, int dps);
}

You would register your real CurrencyConverter service in Program.cs using


builder.Services.AddScoped<ICurrencyConverter, CurrencyConverter>();

Now that your application depends on CurrencyConverter only indirectly, you can provide an alternative implementation in your tests.

TIP Using an interface decouples your application services from a specific implementation, allowing you to substitute alternative implementations. This is a key practice for making classes testable.

We’ll create a simple alternative implementation of ICurrencyConverter for our tests that always returns the same value, 3. It’s obviously not terribly useful as an actual converter, but that’s not the point: you have complete control! Create the following class in your test project:

public class StubCurrencyConverter : ICurrencyConverter
{
public decimal ConvertToGbp(decimal value, decimal rate, int dps)
{
return 3;
}
}

You now have all the pieces you need to replace the implementation in your tests. To achieve that, we’ll use a feature of WebApplicationFactory that lets you customize the DI container before starting the test server.

TIP It’s important to remember that you want to replace the implementation only when running in the test project. I’ve seen some people try to configure their real apps to replace live services for fake services when a specific value is set, for example. That is often unnecessary, bloats your apps with test services, and generally adds confusion!

WebApplicationFactory exposes a method, WithWebHostBuilder, that allows you to customize your application before the in-memory TestServer starts. The following listing shows an integration test that uses this builder to replace the default ICurrencyConverter implementation with our test stub.‌

Listing 36.9 Replacing a dependency in a test using WithWebHostBuilder

public class IntegrationTests: ❶
IClassFixture<WebApplicationFactory<Startup>> ❶
{ ❶
private readonly WebApplicationFactory<Startup> _fixture; ❶
public IntegrationTests(WebApplicationFactory<Startup> fixture) ❶
{ ❶
_fixture = fixture; ❶
} ❶
[Fact]
public async Task ConvertReturnsExpectedValue()
{
var customFactory = _fixture.WithWebHostBuilder( ❷
(IWebHostBuilder hostBuilder) => ❷
{
hostBuilder.ConfigureTestServices(services => ❸
{
services.RemoveAll<ICurrencyConverter>(); ❹
services.AddScoped
<ICurrencyConverter, StubCurrencyConverter>(); ❺
});
});
HttpClient client = customFactory.CreateClient(); ❻
var response = await client.GetAsync("/api/currency"); ❼
response.EnsureSuccessStatusCode(); ❼
var content = await response.Content.ReadAsStringAsync(); ❼
Assert.Equal("3", content); ❽
}
}

❶ Implements the required interface and injects it into the constructor
❷ Creates a custom factory with the additional configuration
❸ ConfigureTestServices executes after all other DI services are configured in
your real app.
❹ Removes all implementations of ICurrency-Converter from the DI container
❺ Adds the test service as a replacement
❻ Calling CreateClient bootstraps the application and starts the TestServer.
❼ Invokes the currency converter endpoint
❽ As the test converter always returns 3, so does the API endpoint.

There are a couple of important points to note in this example:

• WithWebHostBuilder() returns a new WebApplicationFactory instance. The new instance has your custom configuration, and the original injected _fixture instance remains unchanged.

• ConfigureTestServices() is called after your real app’s ConfigureServices() method. That means you can replace services that have been previously registered. You can also use this to override configuration values, as you’ll see in section 36.4.

WithWebHostBuilder() is handy when you want to replace a service for a single test. But what if you want to replace the ICurrencyConverter in every test? All that boiler- plate would quickly become cumbersome. Instead, you can create a custom WebApplicationFactory.

36.3.4 Reducing duplication by creating a custom WebApplicationFactory‌

If you find yourself writing WithWebHostBuilder() a lot in your integration tests, it might be worth creating a custom WebApplicationFactory instead. The follow- ing listing shows how to centralize the test service we used in listing 36.9 into a custom WebApplicationFactory.

Listing 36.10 Creating a custom WebApplicationFactory to reduce duplication

public class CustomWebApplicationFactory ❶
: WebApplicationFactory<Program> ❶
{
protected override void ConfigureWebHost( ❷
IWebHostBuilder builder) ❷
{
builder.ConfigureTestServices(services => ❸
{ ❸
services.RemoveAll<ICurrencyConverter>(); ❸
services.AddScoped ❸
<ICurrencyConverter, StubCurrencyConverter>(); ❸
}); ❸
}
}

In this example, we override ConfigureWebHost and configure the test services for the factory.1 You can use your custom factory in any test by injecting it as an IClassFixture, as you have before. The following listing shows how you would update listing 36.9 to use the custom factory defined in listing 36.10.

Listing 36.11 Using a custom WebApplicationFactory in an integration test

public class IntegrationTests: ❶
IClassFixture<CustomWebApplicationFactory> ❶
{
private readonly CustomWebApplicationFactory _fixture; ❷
public IntegrationTests(CustomWebApplicationFactory fixture) ❷
{
_fixture = fixture;
}
[Fact]
public async Task ConvertReturnsExpectedValue()
{
HttpClient client = _fixture.CreateClient(); ❸
var response = await client.GetAsync("/api/currency");
response.EnsureSuccessStatusCode();
var content = await response.Content.ReadAsStringAsync();
Assert.Equal("3", content); ❹
}
}

❶ Implements the IClassFixture interface for the custom factory
❷ Injects an instance of the factory in the constructor
❸ The client already contains the test service configuration.
❹ The result confirms that the test service was used.

You can also combine your custom WebApplicationFactory, which substitutes services that you always want to replace, with the WithWebHostBuilder() method to override additional services on a per-test basis. That combination gives you the best of both worlds: reduced duplication with the custom factory and control with the per-test configuration.

Running integration tests using your real app’s configuration provides about the closest thing you’ll get to a guarantee that your app is working correctly. The sticking point in that guarantee is nearly always external dependencies, such as third-party APIs and databases.

In the final section of this chapter we’ll look at how to use the SQLite provider for EF Core with an in-memory database. You can use this approach to write tests for services that use an EF Core database context without needing access to a real database.‌

36.4 Isolating the database with an in-memory EF Core provider‌

In this section you’ll learn how to write unit tests for code that relies on an EF Core DbContext. You’ll learn how to create an in-memory database, and you’ll see the difference between the EF in-memory provider and the SQLite in- memory provider. Finally, you’ll see how to use the in- memory SQLite provider to create fast, isolated tests for code that relies on a DbContext.

As you saw in chapter 12, EF Core is an object-relational mapper (ORM) that is used primarily with relational databases. In this section I’m going to discuss one way to test services that depend on an EF Core DbContext without having to configure or interact with a real database.

NOTE To learn more about testing your EF Core code, see Entity Framework Core in Action, 2nd ed., by Jon P. Smith (Manning, 2021), http://mng.bz/QPpR.‌

The following listing shows a highly stripped-down version of the RecipeService you created in chapter 12 for the recipe app. It shows a single method to fetch the details of a recipe using an injected EF Core DbContext.

Listing 36.12 RecipeService to test, which uses EF Core to store and load entities

public class RecipeService
{
readonly AppDbContext _context; ❶
public RecipeService(AppDbContext context) ❶
{ ❶
_context = context; ❶
} ❶
public RecipeViewModel GetRecipe(int id)
{
return _context.Recipes ❷
.Where(x => x.RecipeId == id)
.Select(x => new RecipeViewModel
{
Id = x.RecipeId,
Name = x.Name
})
.SingleOrDefault();
}
}

❶ An EF Core DbContext is injected in the constructor.
❷ Uses the DbSet<Recipes> property to load recipes and creates a
RecipeViewModel

Writing unit tests for this class is a bit of a problem. Unit tests should be fast, repeatable, and isolated from other dependencies, but you have a dependency on your app’s DbContext. You probably don’t want to be writing to a real database in unit tests, as it would make the tests slow, potentially unrepeatable, and highly dependent on the configuration of the database—a failure on all three requirements!

NOTE Depending on your development environment, you may want to use a real database for your integration tests, despite these drawbacks. Using a database like the one you’ll use in production increases the likelihood that you’ll detect any problems in your tests. You can find an example of using Docker to achieve this in Microsoft’s “Testing ASP.NET Core services and web apps” documentation at http://mng.bz/zxDw.

Luckily, Microsoft ships two in-memory database providers for this scenario. Recall from chapter 12 that when you configure your app’s DbContext in Program.cs, you configure a specific database provider, such as SQL Server:

builder.Services.AddDbContext<AppDbContext>(options => options.UseSqlServer(connectionString);

The in-memory database providers are alternative providers designed only for testing. Microsoft includes two in-memory providers in ASP.NET Core:

• Microsoft.EntityFrameworkCore.InMemory—This provider doesn’t simulate a database. Instead, it stores objects directly in memory. It isn’t a relational database as such, so it doesn’t have all the features of a normal database. You can’t execute SQL against it directly, and it won’t enforce constraints, but it’s fast. These limitations are large enough that Microsoft generally advise against using it. See http://mng.bz/e1E9.

• Microsoft.EntityFrameworkCore.Sqlite—SQLite is a relational database. It’s limited in features compared with a database like SQL Server, but it’s a true relational database, unlike the in-memory database provider. Normally a SQLite database is written to a file, but the provider includes an in- memory mode, in which the database stays in memory. This makes it much faster and easier to create and use for testing.

Unfortunately, EF Core migrations are tailored to a specific database, which means you can’t run migrations created for SQL Server or PostreSQL against a SQLite database. It’s possible to create multiple sets of migrations, as described in the documentation (http://mng.bz/pP15), but this can add a lot of complexity. Consequently, always use EnsureCreated() with SQLite tests, which creates the database without running migrations, as you’ll see in listing 36.13.

Instead of storing data in a database on disk, both of these providers store data in memory, as shown in figure 36.2. This makes them fast and easy to create and tear down, which allows you to create a new database for every test to ensure that your tests stay isolated from one another.

alt text
alt text

Figure 36.2 The in-memory database provider and SQLite provider (in-memory mode) compared with the SQL Server database provider. The in-memory database provider doesn’t simulate a database as such. Instead, it stores objects in memory and executes LINQ queries against them directly.

NOTE In this section I describe how to use the SQLite provider as an in-memory database, as it’s more full-featured than the in-memory provider. For details on using the in- memory provider, see Microsoft’s “EF Core In-Memory Database Provider” documentation: http://mng.bz/hdIq.

To use the SQLite provider in memory, add the Microsoft.EntityFrameworkCore.Sqlite package to your test project’s .csproj file. This adds the UseSqlite() extension method, which you’ll use to configure the database provider for your unit tests.

Listing 36.13 shows how you could use the in-memory SQLite provider to test the GetRecipe() method of RecipeService. Start by creating a SqliteConnection object and using the "DataSource=:memory:" connection string. This tells the provider to store the database in memory and then open the connection. This is typically faster than using a file-based connection-string and means you can easily run multiple tests in parallel, as there’s no shared database.‌

WARNING The SQlite in-memory database is destroyed when the connection is closed. If you don’t open the connection yourself, EF Core closes the connection to the in- memory database when you dispose of the DbContext. If you want to share an in-memory database between DbContexts, you must explicitly open the connection yourself.

Next, pass the SqliteConnection instance into the DbContextOptionsBuilder<> and call UseSqlite(). This configures the resulting DbContextOptions<> object with the necessary services for the SQLite provider and provides the connection to the in-memory database.‌Because you’re passing this options object in to an instance of AppDbContext, all calls to the DbContext result in calls to the in-memory database provider.

Listing 36.13 Using the in-memory database provider to test an EF Core DbContext

[Fact]
public void GetRecipeDetails_CanLoadFromContext()
{
var connection = new SqliteConnection("DataSource=:memory:"); ❶
connection.Open(); ❷
var options = new DbContextOptionsBuilder<AppDbContext>() ❸
.UseSqlite(connection) ❸
.Options; ❸
using (var context = new AppDbContext(options)) ❹
{
context.Database.EnsureCreated(); ❺
context.Recipes.AddRange( ❻
new Recipe { RecipeId = 1, Name = "Recipe1" }, ❻
new Recipe { RecipeId = 2, Name = "Recipe2" }, ❻
new Recipe { RecipeId = 3, Name = "Recipe3" }); ❻
context.SaveChanges(); ❼
}
using (var context = new AppDbContext(options)) ❽
{
var service = new RecipeService(context); ❾
var recipe = service.GetRecipe (id: 2); ❿
Assert.NotNull(recipe); ⓫
Assert.Equal(2, recipe.Id); ⓫
Assert.Equal("Recipe2", recipe.Name); ⓫
}
}

❶ Configures an in-memory SQLite connection using the special “in-memory” connection string
❷ Opens the connection so EF Core won’t close it automatically
❸ Creates an instance of DbContextOptions<> and configures it to use the SQLite connection
❹ Creates a DbContext and passes in the options
❺ Ensures that the in-memory database matches EF Core’s model (similar to running migrations)
❻ Adds some recipes to the DbContext
❼ Saves the changes to the in-memory database
❽ Creates a fresh DbContext to test that you can retrieve data from the DbContext
❾ Creates the Recipe-Service to test and pass in the fresh DbContext
❿ Executes the GetRecipe function. This executes the query against the inmemory database.
⓫ Verifies that you retrieved the recipe correctly from the in-memory database

This example follows the standard format for any time you need to test a class that depends on an EF Core DbContext:

  1. Create a SqliteConnection with the "DataSource=:memory:" connection string, and open the connection.

  2. Create a DbContextOptionsBuilder<> and call UseSqlite(), passing in the open connection.

  3. Retrieve the DbContextOptions object from the Options property.

  4. Pass the options to an instance of your DbContext and ensure the database matches EF Core’s model by calling context.Database.EnsureCreated(). This is similar to running migrations on your database, but it should be used only on test databases. Create and add any required test data to the in- memory database, and call SaveChanges() to persist the data.

  5. Create a new instance of your DbContext and inject it into your test class. All queries will be executed against the in-memory database.

By using a separate DbContext for each purpose, you can avoid bugs in your tests due to EF Core caching data without writing it to the database. With this approach, you can be sure that any data read in the second DbContext was persisted to the underlying in-memory database provider.

This was a brief introduction to using the SQLite provider as an in-memory database provider and EF Core testing in general, but if you follow the setup shown in listing 36.13, it should take you a long way. The source code for this chapter shows how you can combine this code with a custom WebApplicationFactory to use an in-memory database for your integration tests. For more details on testing EF Core, including additional options and strategies, see Entity Framework Core in Action, 2nd ed., by Jon P. Smith (Manning, 2021).‌‌

Summary

Use the DefaultHttpContext class to unit-test your custom middleware components. If you need access to the response body, you must replace the default Stream.Null with a MemoryStream instance and read the stream manually after invoking the middleware.

API controllers, minimal APIs, and Razor Page models can be unit-tested like other classes, but they should generally contain little business logic, so it may not be worth the effort. For example, the API controller is tested independently of routing, model validation, and filters, so you can’t easily test logic that depends on any of these aspects.

Integration tests allow you to test multiple components of your app at the same time, typically within the context of the ASP.NET Core framework itself. The Microsoft.AspNetCore.TestHost package provides a TestServer object that you can use to create a simple web host for testing. This creates an in- memory server that you can make requests to and receive responses from. You can use the TestServer directly when you wish to create integration tests for custom components like middleware.

For more extensive integration tests of a real application, you should use the WebApplicationFactory class in the Microsoft.AspNetCore.Mvc.Testing package.

Implement IClassFixture<WebApplicationFactory<P rogram>> on your test class, and inject an instance of WebApplicationFactory<Program> into the constructor. This creates an in-memory version of your whole app, using the same configuration, DI services, and middleware pipeline. You can send in- memory requests to your app to get the best idea of how your application will behave in production.

To customize the WebApplicationFactory, call WithWebHostBuilder() and then call ConfigureTestServices(). This method is invoked after your app’s standard DI configuration. This enables you to add or remove the default services for your app, such as to replace a class that contacts a third-party API with a stub implementation.

If you need to customize the services for every test, you can create a custom WebApplicationFactory by deriving from it and overriding the ConfigureWebHost method. You can place all your configuration in the custom factory and implement IClassFixture<CustomWebApplicationFac tory> in your test classes instead of calling WithWebHostBuilder() in every test method.

You can use the EF Core SQLite provider as an in- memory database to test code that depends on an EF Core database context. You configure the in- memory provider by creating a SqliteConnection with a "DataSource=:memory:" connection string.

Create a DbContextOptionsBuilder<> object and call UseSqlite(), passing in the connection. Finally, pass DbContextOptions<> into an instance of your app’s DbContext, and call context.Database.EnsureCreated() to prepare the in-memory database for use with EF Core.

The SQLite in-memory database is maintained as long as there’s an open SqliteConnection.

When you open the connection manually, the database can be used with multiple DbContexts. If you don’t call Open() on the connection, EF Core will close the connection (and delete the in- memory database) when the DbContext is disposed of.

  1. WebApplicationFactory has many other methods you could override for other scenarios. For details, see https://learn.microsoft.com/aspnet/core/test/integration-tests.
ASP.NET Core in Action 35 Testing applications with xUnit

35 Testing applications with xUnit‌

This chapter covers

• Testing in ASP.NET Core

• Creating unit test projects with xUnit Creating Fact and Theory tests

When I started programming, I didn’t understand the benefits of automated testing. It involved writing so much more code. Wouldn’t it be more productive to be working on new features instead? It was only when my projects started getting bigger that I appreciated the advantages. Instead of having to run my app and test each scenario manually, I could click Play on a suite of tests and have my code tested for me automatically.

Testing is universally accepted as good practice, but how it fits into your development process can often turn into a religious debate. How many tests do you need? Should you write tests before, during, or after the main code? Is anything less than 100 percent coverage of your code base adequate? What about 80 percent?

This chapter won’t address any of those questions. Instead, I focus on the mechanics of creating a test project in .NET. In this chapter I show you how to use isolated unit tests to verify the behavior of your services in isolation. In chapter 36 we build on these basics to create unit tests for an ASP.NET Core application, as well as create integration tests that exercise multiple components of your application at the same time.

TIP For a broader discussion of testing, or if you’re brand-new to unit testing, see The Art of Unit Testing, 3rd ed., by Roy Osherove (Manning, 2024). If you want to explore unit test best practices using C# examples, see Unit Testing Principles, Practices, and Patterns, by Vladimir Khorikov (Manning, 2020). Effective Software Testing: A Developers Guide, by Maurício Aniche (Manning, 2022), uses Java examples but covers a broad range of topics and techniques. Alternatively, for an in- depth look at testing with xUnit in .NET Core, see .NET in Action, 2nd ed., by Dustin Metzgar (Manning, 2023).

In section 35.1 I introduce the .NET software development kit (SDK) testing framework and show how you can use it to create unit testing apps. I describe the components involved, including the testing SDK and the testing frameworks themselves, like xUnit and MSTest. Finally, I cover some of the terminology I use throughout this chapter and chapter 36.

This chapter focuses on the mechanics of getting started with xUnit. You’ll learn how to create unit test projects, reference classes in other projects, and run tests with Visual Studio or the .NET command-line interface (CLI). You’ll create a test project and use it to test the behavior of a basic currency- converter service. Finally, you’ll write some simple unit tests that check whether the service returns the expected results and throws exceptions when you expect it to.

Let’s start by looking at the overall testing landscape for ASP.NET Core, the options available to you, and the components involved.

35.1 An introduction to testing in ASP.NET Core‌

In this section you’ll learn about the basics of testing in ASP.NET Core. You’ll learn about the types of tests you can write, such as unit tests and integration tests, and why you should write both types. Finally, you’ll see how testing fits into ASP.NET Core.

If you have experience building apps with the full .NET Framework or mobile apps with Xamarin, you might have some experience with unit testing frameworks. If you were building apps in Visual Studio, the steps for creating a test project differed among testing frameworks (such as xUnit, NUnit, and MSTest), and running the tests in Visual Studio often required installing a plugin. Similarly, running tests from the command line varied among frameworks.

With the .NET SDK, testing in ASP.NET Core and .NET Core is a first-class citizen, on a par with building, restoring packages, and running your application. Just as you can run dotnet build to build a project, or dotnet run to execute it, you can use dotnet test to execute the tests in a test project, regardless of the testing framework used.

The dotnet test command uses the underlying .NET SDK to execute the tests for a given project. This is the same as when you run your tests using the Visual Studio test runner, so whichever approach you prefer, the results are the same.

Test projects are console apps that contain several tests. A test is typically a method that evaluates whether a given class in your app behaves as expected. The test project typically has dependencies on at least three components:
• The .NET Test SDK

• A unit testing framework, such as xUnit, NUnit, Fixie, or MSTest

• A test-runner adapter for your chosen testing framework so that you can execute your tests by calling dotnet test

These dependencies are normal NuGet packages that you can add to a project, but they allow you to hook in to the dotnet test command and the Visual Studio test runner. You’ll see an example .csproj file from a test app in the next section.

Typically, a test consists of a method that runs a small piece of your app in isolation and checks whether it has the desired behavior. If you were testing a Calculator class, you might have a test that checks that passing the values 1 and 2 to the Add() method returns the expected result, 3.‌

You can write lots of small, isolated tests like this for your app’s classes to verify that each component is working correctly, independent of any other components. Small isolated tests like these are called unit tests.
Using the ASP.NET Core framework, you can build apps that you can easily unit-test. You can test some aspects of your API controllers in isolation from your action filters and model binding, for example, because the framework

• Avoids static types

• Uses interfaces instead of concrete implementations

• Has a highly modular architecture, allowing you to test your API controllers in isolation from your action filters and model binding

But the fact that all your components work correctly independently doesn’t mean they’ll work when you put them together. For that, you need integration tests, which test the interaction between multiple components.

The definition of an integration test is another somewhat- contentious problem, but I think of integration tests as testing multiple components together or testing large vertical slices of your app—testing a user manager class that can save values to a database, for example, or testing that a request made to a health-check endpoint returns the expected response.Integration tests don’t necessarily include the entire app, but they use more components than unit tests.
NOTE I don’t cover UI tests, which (for example) interact with a browser to provide true end-to-end automated testing. Playwright (https://playwright.dev) and Cypress (https://www.cypress.io) are two of the most popular modern tools for UI testing.

ASP.NET Core has a couple of tricks up its sleeve when it comes to integration testing, as you’ll see in chapter 36. You can use the Test Host package to run an in-process ASP.NET Core server, which you can send requests to and inspect the responses. This saves you from the orchestration headache of trying to spin up a web server on a different process, making sure ports are available, and so on, but still allows you to exercise your whole app.

At the other end of the scale, the Entity Framework Core (EF Core) SQLite in-memory database provider lets you isolate your tests from the database. Interacting with and configuring a database is often one of the hardest aspects of automating tests, so this provider lets you sidestep the problem. You’ll see how to use it in chapter 36.

The easiest way to get to grips with testing is to give it a try, so in the next section you’ll create your first test project and use it to write unit tests for a simple custom service.

35.2 Creating your first test project with xUnit‌

As I described in section 35.1, to create a test project you need to use a testing framework. You have many options, such as NUnit and MSTest, but (anecdotally) the most used test framework with ASP.NET Core is xUnit (https://xunit.net). The ASP.NET Core framework project itself uses xUnit as its testing framework, so it’s become somewhat of a convention. If you’re familiar with a different testing framework, feel free to use that instead.

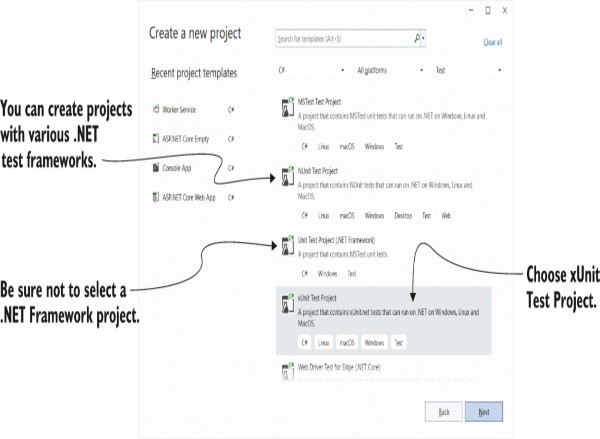
Visual Studio includes a template to create a .NET 7 xUnit test project, as shown in figure 35.1. Choose File > New > Project, and choose xUnit Test Project in the New Project dialog box. Alternatively, you could choose MSTest Project or

NUnit Test Project if you’re more comfortable with those frameworks.

alt text

Figure 35.1 The New Project dialog box in Visual Studio. Choose xUnit Test Project to create an xUnit project, or choose Unit Test Project to create an MSTest project.

Alternatively, if you’re not using Visual Studio, you can create a similar template using the .NET CLI with

dotnet new xunit

Whether you use Visual Studio or the .NET CLI, the template creates a console project and adds the required testing NuGet
packages to your .csproj file, as shown in the following listing. If you chose to create an MSTest (or other framework) test project, the xUnit and xUnit runner packages would be replaced by packages appropriate to your testing framework of choice.

Listing 35.1 The .csproj file for an xUnit test project

<Project Sdk="Microsoft.NET.Sdk"> ❶
<PropertyGroup> ❶
<TargetFramework>net7.0</TargetFramework> ❶
<IsPackable>false</IsPackable>
</PropertyGroup>
<ItemGroup>
<PackageReference
Include="Microsoft.NET.Test.Sdk" Version="17.3.2" /> ❷
<PackageReference Include="xunit" Version="2.4.2" /> ❸
<PackageReference
Include="xunit.runner.visualstudio" Version="2.4.5" /> ❹
<PackageReference Include="coverlet.collector" Version="3.1.2" /> ❺
</ItemGroup>
</Project>

❶ The test project is a standard .NET 7.0 project.
❷ The .NET Test SDK, required by all test projects
❸ The xUnit test framework
❹ The xUnit test adapter for the .NET Test SDK
❺ An optional package that collects metrics about how much of your code base is covered by tests

TIP Adding the Microsoft.NET.Test.Sdk package marks the project as a test project by setting the IsTestProject MsBuild property.

In addition to the NuGet packages, the template includes a single example unit test. This doesn’t do anything, but it’s a valid xUnit test all the same, as shown in the following listing.

In xUnit, a test is a method on a public class, decorated with a [Fact] attribute.

Listing 35.2 An example xUnit unit test, created by the default template

public class UnitTest1 ❶
{
[Fact] ❷
public void Test1() ❸
{
}
}

Even though this test doesn’t test anything, it highlights some characteristics of xUnit [Fact] tests:

• Tests are denoted by the [Fact] attribute.

• The method should be public, with no method arguments.
• The method is void. It could also be an async method and return Task.

• The method resides inside a public, nonstatic class.
NOTE The [Fact] attribute and these restrictions are specific to the xUnit testing framework. Other frameworks have other ways to denote test classes and different restrictions on the classes and methods themselves.

It’s also worth noting that although I said test projects are console apps, there’s no Program class or static void Main method. Instead, the app looks more like a class library because the test SDK automatically injects a Program class at build time. It’s not something you have to worry about in‌ general, but you may have problems if you try to add your own Program.cs file to your test project.

NOTE This isn’t a common thing to do, but I’ve seen it done occasionally. I describe this problem in detail and how to fix it in my blog post “Fixing the error ‘Program has more than one entry point defined’ for console apps containing xUnit tests,” at http://mng.bz/w9q5.

Before we go any further and create some useful tests, we’ll run the test project as it is, using both Visual Studio and the .NET SDK tooling, to see the expected output.

35.3 Running tests with dotnet test‌

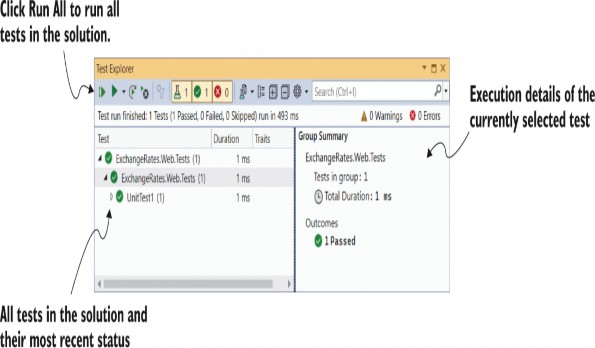
When you create a test app that uses the .NET Test SDK, you can run your tests by using Visual Studio or the .NET CLI. In Visual Studio, you run tests by choosing Test > Run All Tests or by choosing Run All in the Test Explorer window, as shown in figure 35.2.

alt text

Figure 35.2 The Test Explorer window in Visual Studio lists all tests found in the solution and their most recent pass/fail status. Click a test in the left pane to see details about the most recent test run in the right pane.

The Test Explorer window lists all the tests found in your solution and the results of each test. In xUnit, a test passes if it doesn’t throw an exception, so UnitTest1.Test1 passed successfully.

NOTE The Test Explorer in Visual Studio uses the open-source VSTest protocol (https://github.com/microsoft/vstest) for listing and debugging tests. It’s also used by Visual Studio for Mac and Visual Studio Code, for example.

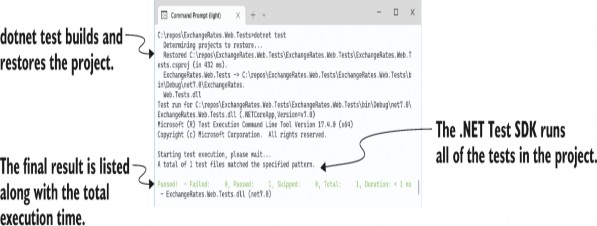
Alternatively, you can run your tests from the command line using the .NET CLI by running dotnet test from the unit-test project’s folder, as shown in figure 35.3.

alt text

Figure 35.3 You can run tests from the command line using dotnet test. This restores and builds the test project before executing all the tests in the project.

NOTE You can also run dotnet test from the solution folder. This runs all test projects referenced in the .sln solution file.

Calling dotnet test runs a restore and build of your test project and then runs the tests, as you can see from the console output in figure 35.3. Under the hood, the .NET CLI calls in to the same underlying infrastructure that Visual Studio does (the .NET SDK), so you can use whichever approach better suits your development style.

You’ve seen a successful test run, so it’s time to replace that placeholder test with something useful. First things first, though: you need something to test.

35.4 Referencing your app from your test project‌

In test-driven development (TDD), you typically write your unit tests before you write the actual class you’re testing, but I’m going to take a more traditional route here and create the class to test first. You’ll write the tests for it afterward.

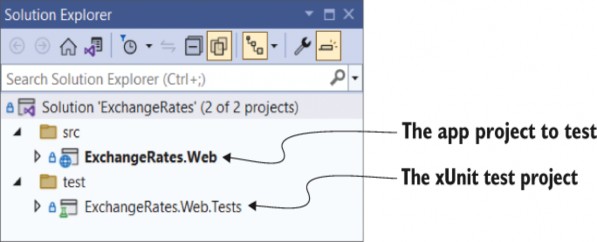
Let’s assume you’ve created an app called ExchangeRates.Web, which exposes an API that converts among different currencies, and you want to add tests for it. You’ve added a test project to your solution as described in section 35.2.1, so your solution looks like figure 35.4.

alt text

Figure 35.4 A basic solution containing an ASP.NET Core app called ExchangeRates.Web and a test project called ExchangeRates.Web.Tests

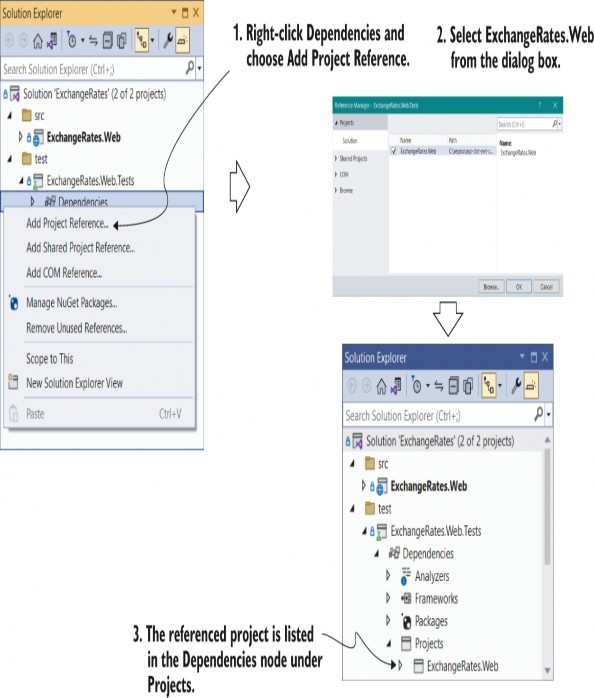
For the ExchangeRates.Web.Tests project to test the classes in the ExchangeRates.Web project, you need to add a reference to the web project from your test project. In Visual Studio, you can do this by right-clicking the Dependencies node of your test project and choosing Add Project Reference from the contextual menu, as shown in figure 35.5. You can then select the web project in the Reference Manager dialog box. After adding it to your project, it shows up inside the Dependencies node, under Projects.

alt text

Figure 35.5 To test your app project, you need to add a reference to it from the test project. Right-click the Dependencies node, and choose Add Project Reference from the contextual menu. The app project is referenced inside the Dependencies node, under Projects.

Alternatively, you can edit the .csproj file directly and add a <ProjectReference> element inside an <ItemGroup> element with the relative path to the referenced project’s .csproj file:

<ItemGroup>
<ProjectReference
Include="..\..\src\ExchangeRates.Web\ExchangeRates.Web.csproj" />
</ItemGroup>

Note that the path is the relative path. A ".." in the path means the parent folder, so the relative path shown correctly traverses the directory structure for the solution, including both the src and test folders shown in Solution Explorer in figure 35.5.

TIP Remember that you can edit the .csproj file directly in Visual Studio by double-clicking the project in Solution Explorer.

Common conventions for project layout

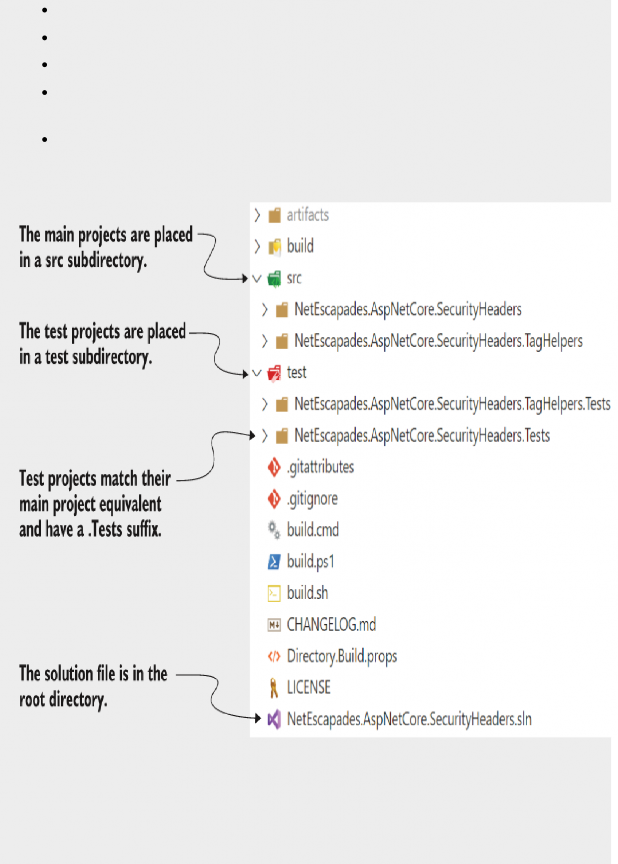
The layout and naming of projects within a solution are completely up to you, but ASP.NET Core projects have generally settled on a couple of conventions that differ slightly from the Visual Studio File > New defaults. These conventions are used by the ASP.NET team on GitHub, as well as by many other open-source C# projects.

The following figure shows an example of these layout conventions. In summary, these are as follows:

The .sln solution file is in the root directory.

The main projects are placed in a src subdirectory.

The test projects are placed in a test or tests subdirectory.

Each main project has a test project equivalent, named the same as the associated main project with a .Test or .Tests suffix.

Other folders (such as samples, tools, and docs) contain sample projects, tools for building the project, or documentation.

alt text

Conventions for project structures have emerged in the ASP.NET Core framework libraries and open- source projects on GitHub. You don’t have to follow them for your own project, but it’s worth being aware of them.

All these conventions are optional. Whether to follow them is entirely up to you. Either way, it’s good to be aware of them so you can easily navigate other projects on GitHub.

Your test project is now referencing your web project, so you can write tests for classes in the web project. You’re going to be testing a simple class used for converting among currencies, as shown in the following listing.

Listing 35.3 Example CurrencyConverter class to convert currencies to GBP

public class CurrencyConverter
{
public decimal ConvertToGbp( ❶
decimal value, decimal exchangeRate, int decimalPlaces) ❶
{
if (exchangeRate <= 0) ❷
{ ❷
throw new ArgumentException( ❷
"Exchange rate must be greater than zero", ❷
nameof(exchangeRate)); ❷
} ❷
var valueInGbp = value / exchangeRate; ❸
return decimal.Round(valueInGbp, decimalPlaces); ❹
}
}

❶ The ConvertToGbp method converts a value using the provided exchange rate
and rounds it.
❷ Guard clause, as only positive exchange rates are valid
❸ Converts the value
❹ Rounds the result and returns it

This class has a single method, ConvertToGbp(), that converts a value from one currency into GBP, given the provided exchangeRate. Then it rounds the value to the required number of decimal places and returns it.

WARNING This class is a basic implementation. In practice, you’d need to handle arithmetic overflow/underflow for large or negative values, as well as consider other edge cases. This example is for demonstration purposes only!

Imagine you want to convert 5.27 USD to GBP, and the exchange rate from GBP to USD is 1.31. If you want to round to four decimal places, you’d make this call:

converter.ConvertToGbp(value: 5.27, exchangeRate: 1.31, decimalPlaces: 4);

You have your sample application, a class to test, and a test project, so it’s about time you wrote some tests.

35.5 Adding Fact and Theory unit tests‌

When I write unit tests, I usually target one of three paths through the method under test:

• The happy path—Where typical arguments with expected values are provided

• The error path—Where the arguments passed are invalid and tested for

• Edge cases—Where the provided arguments are right on the edge of expected values

I realize that this is a broad classification, but it helps me think about the various scenarios I need to consider.

TIP A completely different approach to testing is property- based testing. This fascinating approach is common in functional programming communities, like F#. You can find a great introduction by Scott Wlaschin in his blog post series “The ‘Property Based Testing’ Series” at http://mng.bz/o1eZ. That post uses F#, but it is still highly accessible even if you’re new to the language.‌

Let’s start with the happy path, writing a unit test that verifies that the ConvertToGbp() method is working as expected with typical input values, as shown in the following listing.

Listing 35.4 Unit test for ConvertToGbp using expected arguments

[Fact] ❶
public void ConvertToGbp_ConvertsCorrectly() ❷
{
var converter = new CurrencyConverter(); ❸
decimal value = 3; ❹
decimal rate = 1.5m; ❹
int dp = 4; ❹
decimal expected = 2; ❺
var actual = converter.ConvertToGbp(value, rate, dp); ❻
Assert.Equal(expected, actual); ❼
}

❶ The [Fact] attribute marks the method as a test method.
❷ You can call the test anything you like.
❸ The class to test, commonly called the “system under test”
❹ The parameters of the test that will be passed to ConvertToGbp
❺ The result you expect
❻ Executes the method and captures the result
❼ Verifies that the expected and actual values match; if they don’t, throws an exception

This is your first proper unit test, which has been configured using Arrange, Act, Assert (AAA) style:

• Arrange—Define all the parameters and create an instance of the system (class) under test (SUT).

• Act—Execute the method being tested, and capture the result.

• Assert—Verify that the result of the Act stage had the expected value.

Most of the code in this test is standard C#, but if you’re new to testing, the Assert call will be unfamiliar. This is a helper class provided by xUnit for making assertions about your code. If the parameters provided to Assert.Equal() aren’t equal, the Equal() call will throw an exception and fail the test. If you change the expected variable in listing 35.4 to 2.5 instead of 2, for example, and run the test, Test Explorer shows a failure, as you see in figure 35.6.‌‌

alt text

Figure 35.6 When a test fails, it’s marked with a red cross in Test Explorer. Clicking the test in the left pane shows the reason for the failure in the right pane. In this case, the expected value was 2.5, but the actual value was 2.

TIP Alternative assertion libraries such as Fluent Assertions (https://fluentassertions.com) and Shouldly (https://github.com/shouldly/shouldly) allow you to write your assertions in a more natural style, such as actual.Should().Be(expected). These libraries are optional, but I find they make tests more readable and error messages easier to understand.

In listing 35.4 you chose specific values for value, exchangeRate, and decimalPlaces to test the happy path. But this is only one set of values in an infinite number of possibilities, so you probably should test at least a few different combinations. One way to achieve this would be to copy and paste the test multiple times, tweak the parameters, and change the test method name to make it unique. xUnit provides an alternative way to achieve the same thing without requiring so much duplication.

NOTE The names of your test class and method are used throughout the test framework to describe your test. You can customize how these are displayed in Visual Studio and in the CLI by configuring an xunit.runner.json file, as described at https://xunit.net/docs/configuration-files.

Instead of creating a [Fact] test method, you can create a [Theory] test method. A theory provides a way of parameterizing your test methods, effectively taking your test method and running it multiple times with different arguments. Each set of arguments is considered a different test.‌

You could rewrite the [Fact] test in listing 35.4 to be a [Theory] test, as shown in the next listing. Instead of specifying the variables in the method body, pass them as parameters to the method and then decorate the method with three [InlineData] attributes. Each instance of the attribute provides the parameters for a single run of the test.

Listing 35.5 Theory test for ConvertToGbp testing multiple sets of values

[Theory] ❶
[InlineData(0, 3, 0)] ❷
[InlineData(3, 1.5, 2)] ❷
[InlineData(3.75, 2.5, 1.5)] ❷
public void ConvertToGbp_ConvertsCorrectly ( ❸
decimal value, decimal rate, decimal expected) ❸
{
var converter = new CurrencyConverter();
int dps = 4; ❹
var actual = converter.ConvertToGbp(value, rate, dps); ❺
Assert.Equal(expected, actual); ❻
}

❶ Marks the method as a parameterized test
❷ Each [InlineData] attribute provides all the parameters for a single run of the test method.
❸ The method takes parameters, which are provided by the [InlineData] attributes.
❹ The dps variable doesn’t change, so there’s no need to include it in [InlineData].
❺ Executes the SUT
❻ Verifies the result

If you run this [Theory] test using dotnet test or Visual Studio, it will show up as three separate tests, one for each set of [InlineData], as shown in figure 35.7.

alt text

Figure 35.7 Each set of parameters in an [InlineData] attribute for a [Theory] test creates a separate test run. In this example, a single [Theory] has three [InlineData] attributes, so it creates three tests, named according to the method name and the provided parameters.

[InlineData] isn’t the only way to provide the parameters for your theory tests, but it’s one of the most commonly used. You can also use a static property on your test class with the

[MemberData] attribute or a class itself using the

[ClassData] attribute.

TIP I describe how you can use the [ClassData] and [MemberData] attributes in my blog post “Creating parameterised tests in xUnit with [InlineData], [ClassData], and [MemberData]”: http://mng.bz/8ayP.

You now have some tests for the happy path of the ConvertToGbp() method, and I even sneaked an edge case into listing 35.5 by testing the case where value = 0. The final concept I’ll cover is testing error cases, where invalid values are passed to the method under test.‌

35.6 Testing failure conditions‌

A key part of unit testing is checking whether the system under test handles edge cases and errors correctly. For the CurrencyConverter, that would mean checking how the class handles negative values, small or zero exchange rates, large values and rates, and so on.

Some of these edge cases might be rare but valid cases, whereas other cases might be technically invalid. Calling ConvertToGbp with a negative value is probably valid; the converted result should be negative too. On the other hand, a negative exchange rate doesn’t make sense conceptually, so it should be considered an invalid value.

Depending on the design of the method, it’s common to throw exceptions when invalid values are passed to a method. In listing 35.3 you saw that we throw an ArgumentException if the exchangeRate parameter is less than or equal to 0.

xUnit includes a variety of helpers on the Assert class for testing whether a method throws an exception of an expected type. You can then make further assertions on the exception, such as to test whether the exception had an expected message.

WARNING Take care not to tie your test methods too closely to the internal implementation of a method. Doing so can make your tests brittle, and trivial changes to a class may break the unit tests.

The following listing shows a [Fact] test to check the behavior of the ConvertToGbp() method when you pass it a 0 exchangeRate. The Assert.Throws method takes a lambda function that describes the action to execute, which should throw an exception when run.‌‌

Listing 35.6 Using Assert.Throws<> to test whether a method throws an exception

[Fact]
public void ThrowsExceptionIfRateIsZero()
{
var converter = new CurrencyConverter();
const decimal value = 1;
const decimal rate = 0; ❶
const int dp = 2;
var ex = Assert.Throws<ArgumentException>( ❷
() => converter.ConvertToGbp(value, rate, dp)); ❸
// Further assertions on the exception thrown, ex
}

❶ An invalid value
❷ You expect an Argument-Exception to be thrown.
❸ The method to execute, which should throw an exception

The Assert.Throws method executes the lambda and catches the exception. If the exception thrown matches the expected type, the test passes. If no exception is thrown or the exception thrown isn’t of the expected type, the Assert.Throws method throws an exception and fails the test.

That brings us to the end of this brief introduction to unit testing with xUnit. The examples in this section described how to use the new .NET Test SDK, but we didn’t cover anything specific to ASP.NET Core. In chapter 36 we’ll focus on applying these techniques to testing ASP.NET Core projects specifically.

Summary

Unit test apps are console apps that have a dependency on the .NET Test SDK, a test framework such as xUnit, MSTest, or NUnit, and a test runner adapter. You can run the tests in a test project by calling dotnet test from the command line in your test project or by using Test Explorer in Visual Studio.

Many testing frameworks are compatible with the .NET Test SDK, but xUnit has emerged as an almost de facto standard for ASP.NET Core projects. The ASP.NET Core team themselves use it to test the framework.

To create an xUnit test project, choose xUnit Test Project in Visual Studio or use the dotnet new xunit CLI command. This creates a test project containing the Microsoft.NET.Test.Sdk, xunit, and xunit.runner.visualstudio NuGet packages.

xUnit includes two attributes to identify test methods. [Fact] methods should be public and parameterless. [Theory] methods can contain parameters, so they can be used to run a similar test repeatedly with different parameters. You can provide the data for each [Theory] run using the [InlineData], [ClassData], or [MemberData] attributes.

Use assertions in your test methods to verify that the SUT returned an expected value. Assertions exist for most common scenarios, including verifying that a method call raised an exception of a specific type. If your code raises an unhandled exception, the test will fail.

ASP.NET Core in Action 34 Building background tasks and ser vices

34 Building background tasks and ser vices‌

This chapter covers

• Creating tasks that run in the background for your application

• Using the generic IHost to create Windows Services and Linux daemons

• Using Quartz.NET to run tasks on a schedule in a clustered environment

We’ve covered a lot of ground in the book so far. You’ve learned how to create page-based applications using Razor Pages and how to create APIs for mobile clients and services. You’ve seen how to add authentication and authorization to your application, use Entity Framework Core (EF Core) for storing state in the database, and create custom components to meet your requirements.

As well as using these UI-focused apps, you may find you need to build background or batch-task services. These services aren’t meant to interact with users directly. Rather, they stay running in the background, processing items from a queue or periodically executing a long-running process.

For example, you might want to have a background service that sends email confirmations for e-commerce orders or a batch job that calculates sales and losses for retail stores after the shops close. ASP.NET Core includes support for these background tasks by providing abstractions for running a task in the background when your application starts.

In section 34.1 you’ll learn about the background task support provided in ASP.NET Core by the IHostedService interface. You’ll learn how to use the BackgroundService helper class to create tasks that run on a timer and how to manage your DI lifetimes correctly in a long-running task.

In section 34.2 we’ll take the background service concept one step further to create headless worker services using the generic IHost. Worker services don’t use Razor Pages, API controllers, or minimal API endpoints; instead, they consist only of IHostedService services running tasks in the background. You’ll also see how to configure and install a worker service app as a Windows Service or as a Linux daemon.

In section 34.3 I introduce the open-source library Quartz.NET, which provides extensive scheduling capabilities for creating background services. You’ll learn how to install Quartz.NET in your applications, create complex schedules for your tasks, and add redundancy to your worker services using clustering.

Before we get to more complex scenarios, we’ll start by looking at the built-in support for running background tasks in your apps.

34.1 Running background tasks with IHostedService‌

In most applications, it’s common to create tasks that happen in the background rather than in response to a request. This could be a task to process a queue of emails, handling events published to some sort of a message bus or running a batch process to calculate daily profits. By moving this work to a background task, your user interface can stay responsive. Instead of trying to send an email immediately, for example, you could add the request to a queue and return a response to the user immediately. The background task can consume that queue in the background at its leisure.

In ASP.NET Core, you can use the IHostedService interface to run tasks in the background. Classes that implement this interface are started when your application starts, shortly after your application starts handling requests, and they are stopped shortly before your application is stopped. This provides the hooks you need to perform most tasks.

NOTE Even the default ASP.NET Core server, Kestrel, runs as an IHosted-Service. In one sense, almost everything in an ASP.NET Core app is a background task.

In this section you’ll see how to use the IHostedService to create a background task that runs continuously throughout the lifetime of your app. This could be used for many things, but in the next section you’ll see how to use it to populate a simple cache. You’ll also learn how to use services with a scoped lifetime in your singleton background tasks by managing container scopes yourself.

34.1.1 Running background tasks on a timer‌

In this section you’ll learn how to create a background task that runs periodically on a timer throughout the lifetime of your app. Running background tasks can be useful for many reasons, such as scheduling work to be performed later or performing work in advance.

In chapter 33 we used IHttpClientFactory and a typed client to call a third-party service to retrieve the current exchange rate between various currencies and returned them in an API endpoint, as shown in the following listing.

Listing 34.1 Using a typed client to return exchange rates from a third-party service

app.MapGet("/", async (ExchangeRatesClient ratesClient) => ❶
await ratesClient.GetLatestRatesAsync()); ❷

A typed client created using IHttpClientFactory is injected using dependency
injection (DI).
❷ The typed client is used to retrieve exchange rates from the remote API and
returns them.

A simple optimization for this code might be to cache the exchange rate values for a period. There are multiple ways you could implement that, but in this section we’ll use a simple cache that preemptively fetches the exchange rates in the background, as shown in figure 34.1. The API endpoint simply reads from the cache; it never has to make HTTP calls itself, so it remains fast.

alt text

Figure 34.1 You can use a background task to cache the results from a third-party API on a schedule. The API controller can then read directly from the cache instead of calling the third-party API itself. This reduces the latency of requests to your API controller while ensuring that the data remains fresh.

NOTE An alternative approach might add caching to your strongly typed client, ExchangeRatesClient. The downside is that when you need to update the rates, you will have to perform the request immediately, making the overall response slower. Using a background service keeps your API endpoint consistently fast.

You can implement a background task using the IHostedService interface. This consists of two methods:

public interface IHostedService
{
Task StartAsync(CancellationToken cancellationToken);
Task StopAsync(CancellationToken cancellationToken);
}

There are subtleties to implementing the interface correctly. In particular, the StartAsync() method, although asynchronous, runs inline as part of your application startup. Background tasks that are expected to run for the lifetime of your application must return a Task immediately and schedule background work on a different thread.

WARNING Calling await in the IHostedService.StartAsync() method blocks your application from starting until the method completes. This can be useful in some cases, when you don’t want the application to start handling requests until the IHostedService task has completed, but that’s often not the desired behavior for background tasks.

To make it easier to create background services using best- practice patterns, ASP.NET Core provides the abstract base class BackgroundService, which implements IHostedService and is designed to be used for long- running tasks. To create a background task, you must override a single method of this class, ExecuteAsync(). You’re free to use async-await inside this method, and you can keep running the method for the lifetime of your app.‌

The following listing shows a background service that fetches the latest interest rates using a typed client and saves them in a cache, as you saw in figure 34.1. The ExecuteAsync() method keeps looping and updating the cache until the Cancellation-Token passed as an argument indicates that the application is shutting down.

Listing 34.2 Implementing a BackgroundService that calls a remote HTTP API

public class ExchangeRatesHostedService : BackgroundService ❶
{
private readonly IServiceProvider _provider; ❷
private readonly ExchangeRatesCache _cache; ❸
public ExchangeRatesHostedService(
IServiceProvider provider, ExchangeRatesCache cache)
{
_provider = provider;
_cache = cache;
}
protected override async Task ExecuteAsync( ❹
CancellationToken stoppingToken) ❺
{
while (!stoppingToken.IsCancellationRequested) ❻
{
var client = _provider ❼
.GetRequiredService<ExchangeRatesClient>(); ❼
string rates = await client.GetLatestRatesAsync(); ❽
_cache.SetRates(rates); ❾
await Task.Delay(TimeSpan.FromMinutes(5), stoppingToken); ❿
}
}
}

❶ Derives from BackgroundService to create a task that runs for the lifetime of
your app
❷ Injects an IServiceProvider so you can create instances of the typed client
❸ A simple cache for exchange rates
❹ You must override ExecuteAsync to set the service’s behavior.
❺ The CancellationToken passed as an argument is triggered when the
application shuts down.
❻ Keeps looping until the application shuts down
❼ Creates a new instance of the typed client so that the HttpClient is short-lived
❽ Fetches the latest rates from the remote API
❾ Stores the rates in the cache
❿ Waits for 5 minutes (or for the application to shut down) before updating the
cache

The ExchangeRateCache in listing 34.2 is a simple singleton that stores the latest rates. It must be thread-safe, as it is accessed concurrently by your API endpoint. You can see a simple implementation in the source code for this chapter.

To register your background service with the dependency injection (DI) container, use the AddHostedService() extension method in Program.cs, which registers the service using a singleton lifetime, as shown in the following listing.‌

Listing 34.3 Registering an IHostedService with the DI container

WebApplicationBuilder builder = WebApplication.CreateBuilder(args);
builder.Services.AddHttpClient<ExchangeRatesClient>(); ❶
builder.Services.AddSingleton<ExchangeRatesCache>(); ❷
builder.Services.AddHostedService<ExchangeRatesHostedService>(); ❸

❶ Registers the typed client as before
❷ Adds the cache object as a singleton so it is shared throughout your app
❸ Registers ExchangeRatesHostedService as an IHostedService

By using a background service to fetch the exchange rates, your API endpoint becomes even simpler. Instead of fetching the latest rates itself, it returns the value from the cache, which is kept up to date by the background service:

app.MapGet("/", (ExchangeRatesCache cache) => 
cache.GetLatestRatesAsync());

This approach to caching works to simplify the API, but you may have noticed a potential risk: if the API receives a request before the background service has successfully updated the rates, the API will fail to return any rates.

This may be OK, but you could take another approach. As well as updating the rates periodically, you could use the StartAsync method to block app startup until the rates have successfully updated. That way, you guarantee that the rates are available before the app starts handling requests, so the API will always return successfully. Listing 34.4 shows how you could update listing 34.2 to block startup until the rates have been updated while still updating periodically in the background.

Listing 34.4 Implementing StartAsync to block startup in an IHostedService

public class ExchangeRatesHostedService : BackgroundService
{
private readonly IServiceProvider _provider;
private readonly ExchangeRatesCache _cache;
public ExchangeRatesHostedService(
IServiceProvider provider, ExchangeRatesCache cache)
{
_provider = provider;
_cache = cache;
}
public override async Task StartAsync( ❶
CancellationToken cancellationToken) ❶
{
var success = false;
while(!success && !cancellationToken.IsCancellationRequested) ❷
{ ❷
success = await TryUpdateRatesAsync(); ❷
} ❷
await base.StartAsync(cancellationToken); ❸
}
protected override async Task ExecuteAsync(
CancellationToken stoppingToken)
{
while (!stoppingToken.IsCancellationRequested)
{
await Task.Delay(TimeSpan.FromMinutes(5), stoppingToken);
await TryUpdateRatesAsync();
}
}
private async Task<bool> TryUpdateRatesAsync()
{
try
{
var client = _provider
.GetRequiredService<ExchangeRatesClient>();
string rates = await client.GetLatestRatesAsync();
_cache.SetRates(rates);
return true;
}
catch(Exception ex)
{
    return false;
}
}
}

❶ The StartAsync method runs on start, before the app starts handling requests.
❷ Keeps trying to update the rates until it succeeds
❸ Once the update succeeds, starts the background process

WARNING The downside to listing 34.4 is that if there’s a problem retrieving the rates, the app won’t ever start up and start listening for requests. Whether you consider that a bug or a feature will depend on your deployment process! Many orchestrators, for example, will use rolling updates, which ensure that a new deployment is listening for requests before shutting down the old deployment instances.

One slightly messy aspect of both listings 34.2 and 34.4 is that I used the Service Locator pattern to retrieve the typed client. This isn’t ideal, but you shouldn’t inject typed clients into background services directly. Typed clients are designed to be short-lived to ensure that you take advantage of the HttpClient handler rotation, as described in chapter 21.By contrast, background services are singletons that live for the lifetime of your application.

TIP If you wish, you can avoid the Service Locator pattern in listing 34.2 by using the factory pattern described in Steve Gordon’s post titled “IHttpClientFactory Patterns: Using Typed Clients from Singleton Services”: http://mng.bz/opDZ.

The need for short-lived services leads to another common question: how can you use scoped services in a background service?

34.1.2 Using scoped services in background tasks‌

Background services that implement IHostedService are created once when your application starts. That means they are by necessity singletons, as there will be only a single instance of the class.

That leads to a problem if you need to use services registered with a scoped lifetime. Any services you inject into the constructor of your singleton IHostedService must themselves be registered as singletons. Does that mean there’s no way to use scoped dependencies in a background service?

NOTE As I discussed in chapter 9, the dependencies of a service must always have a lifetime that’s the same as or longer than that of the service itself, to avoid captive dependencies.

Imagine a slight variation on the caching example from section 34.1.1. Instead of storing the exchange rates in a singleton cache object, you want to save the exchange rates to a database so you can look up the historic rates.

Most database providers, including EF Core’s DbContext, register their services with scoped lifetimes. That means you need to access the scoped DbContext from inside the singleton ExchangeRatesHostedService, which precludes injecting the DbContext with constructor injection. The solution is to create a new container scope every time you update the exchange rates.

In typical ASP.NET Core applications, the framework creates a new container scope every time a new request is received, immediately before the middleware pipeline executes. All the services that are used in that request are fetched from the scoped container. When the request ends, the scoped container is disposed, along with any of the IDisposable scoped and transient services that were obtained from it. In a background service, however, there are no requests, so no container scopes are created. The solution is to create your own.

You can create a new container scope anywhere you have access to an IServiceProvider by calling IServiceProvider.CreateScope(). This creates a scoped container, which you can use to safely retrieve scoped and transient services.

WARNING Always make sure to dispose of the IServiceScope returned by CreateScope() when you’re finished with it, typically with a using statement. This disposes of any IDisposable services that were created by the scoped container and prevents memory leaks.‌

The following listing shows a version of the ExchangeRatesHostedService that stores the latest exchange rates as an EF Core entity in the database. It creates a new scope for each iteration of the while loop and retrieves the scoped AppDbContext from the scoped container.

Listing 34.5 Consuming scoped services from an IHostedService

public class ExchangeRatesHostedService : BackgroundService ❶
{
private readonly IServiceProvider _provider; ❷
public ExchangeRatesHostedService(IServiceProvider provider) ❷
{
_provider = provider;
}
protected override async Task ExecuteAsync(
CancellationToken stoppingToken)
{
while (!stoppingToken.IsCancellationRequested)
{
using(IServiceScope scope = _provider.CreateScope()) ❸
{
var scopedProvider = scope.ServiceProvider; ❹
var client = scope.ServiceProvider ❺
.GetRequiredService<ExchangeRatesClient>(); ❺
var context = scope.ServiceProvider ❻
.GetRequiredService<AppDbContext>(); ❻
var rates = await client.GetLatestRatesAsync(); ❻
context.Add(rates); ❻
await context.SaveChanges(rates); ❻
} ❼
await Task.Delay(TimeSpan.FromMinutes(5), stoppingToken); ❽
}
}
}

❶ Background-Service is registered as a singleton.
❷ The injected IServiceProvider can be used to retrieve singleton services or to
create scopes.
❸ Creates a new scope using the root IServiceProvider
❹ The scope exposes an IServiceProvider that can be used to retrieve scoped
components.
❺ Retrieves the scoped services from the container
❻ Fetches the latest rates, and saves using EF Core
❼ Disposes of the scope with the using statement
❽ Waits for the next iteration. A new scope is created on the next iteration.

Creating scopes like this is a general solution whenever you need to access scoped services and you’re not running in the context of a request. For example, if you need to access scoped or transient services in Program.cs, you can create a new scope by calling WebApplication.Services.CreateScope(). You can then retrieve the services you need, do your work, and dispose the scope to clean up the services.

Another prime example is when you’re injecting services into an OptionsBuilder instance, as you saw in chapter 31. You can take exactly the same approach—create a new scope—as shown in my blog post titled “The dangers and gotchas of using scoped services in OptionsBuilder”: http://mng.bz/4D6j.

TIP Using service location in this way always feels a bit convoluted. I typically try to extract the body of the task to a separate class and use service location to retrieve that class only. You can see an example of this approach in the “Consuming a scoped service in a background task” section of Microsoft’s “Background tasks with hosted services in ASP.NET Core” documentation: http://mng.bz/4ZER.

IHostedService is available in ASP.NET Core, so you can run background tasks in your Razor Pages and minimal API applications. However, sometimes all you want is the background task; you don’t need any UI. For those cases, you can use the generic IHost abstraction without having to bother with HTTP handling at all.‌

34.2 Creating headless worker services using IHost‌

In this section you’ll learn about worker services, which are ASP.NET Core applications that do not handle HTTP traffic. You’ll learn how to create a new worker service from a template and compare the generated code with a traditional ASP.NET Core application. You’ll also learn how to install the worker service as a Windows Service or as a systemd daemon in Linux.

In section 34.1 we cached exchange rates based on the assumption that they’re being consumed directly by the UI part of your application, such as by Razor Pages or minimal API endpoints. However, in the section 34.1.2 example we saved the rates to a database instead of storing them in- process. That raises the possibility that other applications with access to the database will use the rates too. Taking that one step further, could we create an application which is responsible only for caching these rates and has no UI at all?

Since .NET Core 3.0, ASP.NET Core has been built on top of a generic IHost implementation, as you learned in chapter 30. The IHost implementation provides features such as configuration, logging, and DI. ASP.NET Core adds the middleware pipeline for handling HTTP requests, as well as paradigms such as Razor Pages or Model-View-Controller (MVC) controllers on top of that, as shown in figure 34.2.

alt text

Figure 34.2 ASP.NET Core builds on the generic IHost implementation. IHost provides features such as configuration, DI, and configuration. ASP.NET Core adds HTTP handling on top of that by way of the middleware pipeline, Razor Pages, and API controllers. If you don’t need HTTP handling, you can use IHost without the additional ASP.NET Core libraries to create a smaller application.

If your application doesn’t need to handle HTTP requests, there’s no real reason to use ASP.NET Core. You can use the IHost implementation alone to create an application that has a lower memory footprint, faster startup, and less surface area to worry about from a security perspective than a full ASP.NET Core application. .NET applications that use this approach are commonly called worker services or workers.‌

DEFINITION A worker is a .NET application that uses the generic IHost but doesn’t include the ASP.NET Core libraries for handling HTTP requests. They are sometimes called headless services, as they don’t expose a UI for you to interact with.

Workers are commonly used for running background tasks (IHostedService implementations) that don’t require a UI. These tasks could be for running batch jobs, running tasks repeatedly on a schedule, or handling events using some sort of message bus. In the next section we’ll create a worker for retrieving the latest exchange rates from a remote API instead of adding the background task to an ASP.NET Core application.

34.2.1 Creating a worker service from a template‌

In this section you’ll see how to create a basic worker service from a template. Visual Studio includes a template for creating worker services: choose File > New > Project > Worker Service. You can create a similar template using the .NET command-line interface (CLI) by running dotnet new worker. The resulting template consists of two C# files:‌

• Worker.cs—This simple BackgroundService implementation writes to the log every second, as shown in listing 34.6. You can replace this class with your own BackgroundService implementation, such as the example from listing 34.5.

• Program.cs—As in a typical ASP.NET Core application, this contains the entry point for your application, and it’s where the IHost is built and run. By contrast with a typical .NET 7 ASP.NET Core app, it uses the generic host instead of the minimal hosting WebApplication and WebApplicationBuilder.

Listing 34.6 Default BackgroundService implementation for worker service template

public class Worker : BackgroundService ❶
{
private readonly ILogger<Worker> _logger;
public Worker(ILogger<Worker> logger)
{
_logger = logger;
}
protected override async Task ExecuteAsync( ❷
CancellationToken stoppingToken)
{
while (!stoppingToken.IsCancellationRequested) ❸
{
_logger.LogInformation(
"Worker running at: {time}", DateTimeOffset.Now);
await Task.Delay(1000, stoppingToken); ❹
}
}
}

❶ The Worker service derives from BackgroundService.
❷ ExecuteAsync starts the main execution loop for the service.
❸ When the app is shutting down, the CancellationToken is canceled.
❹ The service writes a log message every second until the app shuts down.

The most notable difference between the worker service template and an ASP.NET Core template is that Program.cs doesn’t use the WebApplicationBuilder and WebApplication APIs for minimal hosting. Instead, it uses the Host.CreateDefaultBuilder() helper method you learned about in chapter 30 to create an IHostBuilder.‌

NOTE .NET 8 will change the worker service template to use a new type, HostApplicationBuilder, which is analogous to WebApplicationBuilder.

HostApplicationBuilder brings the familiar script-like setup experience of minimal hosting to worker services, instead of using the callback-based approach of IHostBuilder.

You configure your DI services in Program.cs using the ConfigureServices() method on IHostBuilder, as shown in listing 34.7. This method takes a lambda method, which takes two arguments:

• A HostBuilderContext object. This context object exposes the IConfiguration for your app as the property Configuration, and the IHostEnvironment as the property HostingEnvironment.

• An ISeviceCollection object. You add your services to this collection in the same way you add them to WebApplicationBuilder.Services in typical ASP.NET Core apps.

The following listing shows how to configure EF Core, the exchange rates typed client from chapter 33, and the background service that saves exchange rates to the database, as you saw in section 34.1.2. It uses C#’s top-level statements, so no static void Main entry point is shown.

Listing 34.7 Program.cs for a worker service that saves exchange rates using EF Core

using Microsoft.EntityFrameworkCore;
IHost host = Host.CreateDefaultBuilder(args) ❶
.ConfigureServices((hostContext, services) => ❷
{
services.AddHttpClient<ExchangeRatesClient>(); ❸
services.AddHostedService<ExchangeRatesHostedService>(); ❸
var connectionString = hostContext.Configuration ❹
.GetConnectionString("SqlLiteConnection")) ❹
services.AddDbContext<AppDbContext>(options => ❺
options.UseSqlite(connectionString)); ❺
})
.Build(); ❻
host.Run();

❶ Creates an IHostBuilder using the default helper
❷ Configures your DI services
❸ Adds services to the IServiceCollection
❹ IConfiguration can be accessed from the HostBuilderContext parameter.
❺ Adds services to the IServiceCollection
❻ Builds an IHost instance
❼ Runs the app and waits for shutdown

The changes in Program.cs to use the generic host instead of minimal hosting are the most obvious differences between a worker service and an ASP.NET Core app, but there are some important differences in the .csproj project file too. The following listing shows the project file for a worker service that uses IHttpClientFactory and EF Core, and highlights some of the differences with a similar ASP.NET Core application.

Listing 34.8 Project file for a worker service

<Project Sdk="Microsoft.NET.Sdk.Worker"> ❶
<PropertyGroup>
<TargetFramework>net7.0</TargetFramework> ❷
<Nullable>enable</Nullable>
<ImplicitUsings>enable</ImplicitUsings>
<UserSecretsId>5088-4277-B226-DC0A790AB790</UserSecretsId> ❸
</PropertyGroup>
<ItemGroup>
<PackageReference Include="Microsoft.Extensions.Hosting" ❹
Version="7.0.0" /> ❹
<PackageReference Include="Microsoft.Extensions.Http" ❺
Version="7.0.0" /> ❺
<PackageReference Include="Microsoft.EntityFrameworkCore.Design" ❻
Version="7.0.0" PrivateAssets="All" /> ❻
<PackageReference Include="Microsoft.EntityFrameworkCore.Sqlite" ❻
Version="7.0.0" /> ❻
</ItemGroup>
</Project>

❶ Worker services use a different project software development kit (SDK) type
from ASP.NET Core apps.
❷ The target framework is the same as for ASP.NET Core apps.
❸ Worker services use configuration so they can use User Secrets, like ASP.NET
Core apps.
❹ All worker services must explicitly add this package. ASP.NET Core apps add it
implicitly.
❺ If you’re using IHttpClient-Factory, you’ll need to add this package in worker
services.
❻ EF Core packages must be explicitly added, the same as for ASP.NET Core apps.

Some parts of the project file are the same for both worker services and ASP.NET Core apps:

• Both types of apps must specify a <TargetFramework>, such as net7.0 for .NET 7.

• Both types of apps use the configuration system, so you can use <UserSecretsId> to manage secrets in development, as discussed in chapter 10.

• Both types of apps must explicitly add references to the EF Core NuGet packages to use EF Core in the app.

There are also several differences in the project template:

• The <Project> element’s Sdk for a worker service should be Microsoft.NET.Sdk.Worker, whereas for an ASP.NET Core app it is Microsoft.NET.Sdk.Web. The Web SDK includes implicit references to additional packages that are not generally required in worker services.

• The worker service must include an explicit PackageReference for the Microsoft.Extensions.Hosting NuGet package. This package includes the generic IHost implementation used by worker services.

• You may need to include additional packages to reference the same functionality as in an ASP.NET Core app. An example is the Microsoft.Extensions.Http package (which provides IHttpClientFactory). This package is referenced implicitly in ASP.NET Core apps but must be explicitly referenced in worker services.

Running a worker service is the same as running an ASP.NET Core application: use dotnet run from the command line or press F5 in Visual Studio. A worker service is essentially a console application (as are ASP.NET Core applications), so they both run the same way.

You can run worker services in most of the same places you would run an ASP.NET Core application, though as a worker service doesn’t handle HTTP traffic, some options make more sense than others. In the next section we’ll look at two supported ways of running your application: as a Windows Service or as a Linux systemd daemon.

34.2.2 Running worker services in production‌

In this section you’ll learn how to run worker services in production. You’ll learn how to install a worker service as a Windows Service so that the operating system monitors and starts your worker service automatically. You’ll also see how to prepare your application for installation as a systemd daemon in Linux.

Worker services, like ASP.NET Core applications, are fundamentally .NET console applications. The difference is that they are typically intended to be long-running applications. The common approach for running these types of applications on Windows is to use a Windows Service or to use a systemd daemon in Linux.

NOTE It’s also common to run applications in the cloud using Docker containers or dedicated platform services like Azure App Service. The process for deploying a worker service to these managed services is typically identical to deploying an ASP.NET Core application.

Adding support for Windows Services or systemd is easy, thanks to two optional NuGet packages:

• Microsoft.Extensions.Hosting.Systemd—Adds support for running the application as a systemd application. To enable systemd integration, call UseSystemd() on your IHostBuilder in Program.cs.

• Microsoft.Extensions.Hosting.WindowsServices— Adds support for running the application as a Windows Service. To enable the integration, call UseWindowsService() on your IHostBuilder in Program.cs.

These packages each add a single extension method to IHostBuilder that enables the appropriate integration when running as a systemd daemon or as a Windows Service. The following listing shows how to enable Windows Service support.

Listing 34.9 Adding Windows Service support to a worker service

IHost host = Host.CreateDefaultBuilder(args) ❶
.ConfigureServices((hostContext, services) => ❶
{ ❶
Services.AddHostedService<Worker>(); ❶
}) ❶
.UseWindowsService() ❷
.Build();
host.Run();

❶ Configures your worker service as you would normally
❷ Adds support for running as a Windows Service.

During development, or if you run your application as a console app, UseWindowsService() does nothing; your application runs exactly the same as it would without the method call. However, your application can now be installed as a Windows Service, as your app now has the required integration hooks to work with the Windows Service system. The following basic steps show how to install a worker service app as a Windows Service:

  1. Add the Microsoft.Extensions.Hosting.WindowsServices NuGet package to your application using Visual Studio by running dotnet add package Microsoft.Extensions.Hosting.WindowsServices in the project folder, or by adding a <PackageReference> to your .csproj file:
<PackageReference Include="Microsoft.Extensions.Hosting.WindowsServices"  Version="7.0.0" />
  1. Add a call to UseWindowsService() on your IHostBuilder, as shown in listing 34.9.

  2. Publish your application, as described in chapter 27. From the command line you could run dotnet publish -c Release from the project folder.

  3. Open a command prompt as Administrator and install the application using the Windows sc utility. You need to provide the path to your published project’s .exe file and a name to use for the service, such as My Test Service:

    sc create "My Test Service" BinPath="C:\path\to\MyService.exe"
  4. You can manage the service from the Services control panel in Windows, as shown in figure 34.3. Alternatively, to start the service from the command line run sc start "My Test Service", or to delete the service run sc delete "My Test Service".

After you complete the preceding steps, your worker service will be running as a Windows Service.

alt text

Figure 34.3 The Services control panel in Windows. After installing a worker service as a Windows Service using the sc utility, you can manage your worker service from here. This control panel allows you to control when the Windows Service starts and stops, the user account that the application runs under, and how to handle errors.

WARNING These steps are the bare minimum required to install a Windows Service. When running in production, you must consider many security aspects not covered here. For more details, see Microsoft’s “Host ASP.NET Core in a Windows Service” documentation: http://mng.bz/Xdy9.

An interesting point of note is that installing as a Windows Service or system daemon isn’t limited to worker services; you can install an ASP.NET Core application in the same way. Simply follow the preceding instructions, add the call to UseWindowsService(), and install your ASP.NET Core app. You can do this thanks to the fact that the ASP.NET Core functionality is built directly on top of the generic Host functionality.

NOTE Hosting an ASP.NET Core app as a Windows Service can be useful if you don’t want to (or can’t) use Internet Information Services (IIS). Some older versions of IIS don’t support gRPC, for example. By hosting as a Windows Service, your application can be restarted automatically if it crashes.

You can follow a similar process to install a worker service as a system daemon by installing the Microsoft.Extensions.Hosting.Systemd package and calling UseSystemd() on your IHostBuilder. For more details on configuring system, see the “Monitor the app” section of Microsoft’s “Host ASP.NET Core on Linux with Nginx” documentation: http://mng.bz/yYDp.

So far in this chapter we’ve used IHostedService and the BackgroundService to run tasks that repeat on an interval, and you’ve seen how to install worker services as long-running applications by installing as a Windows Service.

In the final section of this chapter we’ll look at how you can create more advanced schedules for your background tasks, as well as how to add resiliency to your application by running multiple instances of your workers. To achieve that, we’ll use a mature third-party library, Quartz.NET.‌

34.3 Coordinating background tasks using Quartz.NET‌

In this section you’ll learn how to use the open-source scheduler library Quartz.NET. You’ll learn how to install and configure the library and how to add a background job to run on a schedule. You’ll also learn how to enable clustering for your applications so that you can run multiple instances of your worker service and share jobs among them.

All the background tasks you’ve seen so far in this chapter repeat a task on an interval indefinitely, from the moment the application starts. However, sometimes you want more control of this timing. Maybe you always want to run the application at 15 minutes past each hour. Or maybe you want to run a task only on the second Tuesday of the month at 3 a.m. Additionally, maybe you want to run multiple instances of your application for redundancy but ensure that only one of the services runs a task at any time.

It would certainly be possible to build all this extra functionality into your app yourself, but excellent libraries already provide all this functionality for you. Two of the most well known in the .NET space are Hangfire (https://www.hangfire.io) and Quartz.NET (https://www.quartz-scheduler.net).

Hangfire is an open-source library that also has a Pro subscription option. One of its most popular features is a dashboard UI that shows the state of all your running jobs, each task’s history, and any errors that have occurred.

Quartz.NET is completely open-source and essentially offers a beefed-up version of the BackgroundService functionality. It has extensive scheduling functionality, as well as support for running in a clustered environment, where multiple instances of your application coordinate to distribute the jobs among themselves.

NOTE Quartz.NET is based on a similar Java library called Quartz Scheduler. When looking for information on Quartz.NET, be sure you’re looking at the correct Quartz!

Quartz.NET is based on four main concepts:

• Jobs—The background tasks that implement your logic.

• Triggers—Control when a job runs based on a schedule, such as “every five minutes” or “every second Tuesday.” A job can have multiple triggers.

• Job factory—Responsible for creating instances of your jobs. Quartz.NET integrates with ASP.NET Core’s DI container, so you can use DI in your job classes.

• Scheduler—Keeps track of the triggers in your application, creates jobs using the job factory, and runs your jobs. The scheduler typically runs as an IHostedService for the lifetime of your app.

Background services vs. cron jobs

It’s common to use cron jobs to run tasks on a schedule in Linux, and Windows has similar functionality with Task Scheduler, used to periodically run an application or script file, which is typically a short-lived task.

By contrast, .NET apps using background services are designed to be long- lived, even if they are used only to run tasks on a schedule. This allows your application to do things like adjust its schedule as required or perform optimizations. In addition, being long-lived means your app doesn’t only have to run tasks on a schedule. It can respond to ad hoc events, such as events in a message queue.

Of course, if you don’t need those capabilities and would rather not have a long-running application, you can use .NET in combination with cron jobs. You could create a simple .NET console app that runs your task and then shuts down, and you could schedule it to execute periodically as a cron job. The choice is yours!

In this section I show you how to install Quartz.NET and configure a background service to run on a schedule. Then I explain how to enable clustering so that you can run multiple instances of your application and distribute the jobs among them.

34.3.1 Installing Quartz.NET in an ASP.NET Core application‌

In this section I show how to install the Quartz.NET scheduler into an ASP.NET Core application. Quartz.NET runs in the background in the same way as the IHostedService implementations do. In fact, Quartz.NET uses the IHostedService abstractions to schedule and run jobs.

DEFINITION A job in Quartz.NET is a task to be executed that implements the IJob interface. It is where you define the logic that your tasks execute.‌

Quartz.NET can be installed in any .NET 7 application, so in this chapter I show how to install Quartz.NET in a worker service using the generic host rather than an ASP.NET Core app using minimal hosting. You’ll install the necessary dependencies and configure the Quartz.NET scheduler to run as a background service. In section 34.3.2 we’ll convert the exchange-rate downloader task from section 34.1 to a Quartz.NET IJob and configure triggers to run on a schedule.

NOTE The instructions in this section can be used to install Quartz.NET in either a worker service or a full ASP.NET Core application. The only difference is whether you use the generic host in Program.cs or WebApplicationBuilder.

To install Quartz.NET, follow these steps:

  1. Install the Quartz.AspNetCore NuGet package in your project by running dotnet add package Quartz.Extensions.Hosting, by using the NuGet explorer in Visual Studio, or by adding a <PackageReference> element to your project file as follows:
<PackageReference Include="Quartz.Extensions.Hosting" Version="3.5.0" />
  1. Add the Quartz.NET IHostedService scheduler by calling AddQuartzHostedService() on the IServiceCollection in ConfigureServices (or on WebApplicationBuilder.Services) as follows. Set WaitForJobsToComplete=true so that your app will wait for any jobs in progress to finish when shutting down.
services.AddQuartzHostedService(q => q.WaitForJobsToComplete = true);
  1. Configure the required Quartz.NET services. The example in the following listing configures the Quartz.NET job factory to retrieve job implementations from the DI container and adds the required hosted service.

Listing 34.10 Configuring Quartz.NET

using Quartz;
IHost host = Host.CreateDefaultBuilder(args)
.ConfigureServices((hostContext, services) => ❶
{
services.AddQuartz(q => ❷
{
q. UseMicrosoftDependencyInjectionJobFactory(); ❸
});
services.AddQuartzHostedService( ❹
q => q.WaitForJobsToComplete = true); ❹
})
.Build();
host.Run();

❶ Adds Quartz.NET in ConfigureServices for worker services
❷ Registers Quartz.NET services with the DI container
❸ Configures Quartz.NET to load jobs from the DI container
❹ Adds the Quartz.NET IHostedService that runs the Quartz.NET scheduler

This configuration registers all Quartz.NET’s required components, so you can now run your application using dotnet run or by pressing F5 in Visual Studio. When your app starts, the Quartz.NET IHostedService starts its scheduler, as shown in figure 34.4. We haven’t configured any jobs to run yet, so the scheduler doesn’t have anything to schedule. The app will sit there, periodically checking whether any jobs have been added.

alt text

Figure 34.4 The Quartz.NET scheduler starts on app startup and logs its configuration. The default configuration stores the list of jobs and their schedules in memory and runs in a nonclustered state. In this example, you can see that no jobs or triggers have been registered, so the scheduler has nothing to schedule yet.

TIP Running your application before you’ve added any jobs is good practice. It lets you check that you have installed and configured Quartz.NET correctly before you get to more advanced configuration.

A job scheduler without any jobs to schedule isn’t a lot of use, so in the next section we’ll create a job and add a trigger for it to run on a timer.

34.3.2 Configuring a job to run on a schedule with Quartz.NET‌

In section 34.1 we created an IHostedService that downloads exchange rates from a remote service and saves the results to a database using EF Core. In this section you’ll see how you can create a similar Quartz.NET IJob and configure it to run on a schedule.

The following listing shows an implementation of IJob that downloads the latest exchange rates from a remote API using a typed client, ExchangeRatesClient. The results are then saved using an EF Core DbContext, AppDbContext.

Listing 34.11 A Quartz.NET IJob for downloading and saving exchange rates

public class UpdateExchangeRatesJob : IJob ❶
{
private readonly ILogger<UpdateExchangeRatesJob> _logger; ❷
private readonly ExchangeRatesClient _typedClient; ❷
private readonly AppDbContext _dbContext; ❷
public UpdateExchangeRatesJob( ❷
ILogger<UpdateExchangeRatesJob> logger, ❷
ExchangeRatesClient typedClient, ❷
AppDbContext dbContext) ❷
{ ❷
_logger = logger; ❷
_typedClient = typedClient; ❷
_dbContext = dbContext; ❷
} ❷
public async Task Execute(IJobExecutionContext context) ❸
{
    _logger.LogInformation("Fetching latest rates");
var latestRates = await _typedClient.GetLatestRatesAsync(); ❹
_dbContext.Add(latestRates); ❺
await _dbContext.SaveChangesAsync(); ❺
_logger.LogInformation("Latest rates updated");
}
}

❶ Quartz.NET jobs must implement the IJob interface.
❷ You can use standard DI to inject any dependencies.
❸ IJob requires you to implement a single asynchronous method, Execute.
❹ Downloads the rates from the remote API
❺ Saves the rates to the database

Functionally, the IJob in listing 34.11 is doing a similar task to the BackgroundService implementation in listing 34.5, with a few notable exceptions:

• The IJob defines only the task to execute; it doesn’t define timing information. In the BackgroundService implementation, we also had to control how often the task was executed.

• A new IJob instance is created every time the job is executed. By contrast, the BackgroundService implementation is created only once, and its Execute method is invoked only once.

• We can inject scoped dependencies directly into the IJob implementation. To use scoped dependencies in the IHostedService implementation, we had to create our own scope manually and use service location to load dependencies. Quartz.NET takes care of that for us, allowing us to use pure constructor injection. Every time the job is executed, a new scope is created and used to create a new instance of the IJob.

The IJob defines what to execute, but it doesn’t define when to execute it. For that, Quartz.NET uses triggers.Triggers can define arbitrarily complex blocks of time during which a job should execute. For example, you can specify start and end times, how many times to repeat, and blocks of time when a job should or shouldn’t run (such as only 9 a.m. to 5 p.m. Monday to Friday).

In the following listing, we register the UpdateExchangeRatesJob with the DI container using the AddJob() method, and we provide a unique name to identify the job. We also configure a trigger that fires immediately and then every five minutes until the application shuts down.

Listing 34.12 Configuring a Quartz.NET IJob and trigger

using Quartz;
IHost host = Host.CreateDefaultBuilder(args)
.ConfigureServices((hostContext, services) =>
{
services.AddQuartz(q =>
{
q. UseMicrosoftDependencyInjectionJobFactory();
var jobKey = new JobKey("Update exchange rates"); ❶
q.AddJob<UpdateExchangeRatesJob>(opts => ❷
opts.WithIdentity(jobKey)); ❷
q.AddTrigger(opts => opts ❸
.ForJob(jobKey) ❸
.WithIdentity(jobKey.Name + " trigger") ❹
.StartNow() ❺
.WithSimpleSchedule(x => x ❻
.WithInterval(TimeSpan.FromMinutes(5)) ❻
.RepeatForever())
);
});
services.AddQuartzHostedService(
q => q.WaitForJobsToComplete = true);
})
.Build();
host.Run();

❶ Creates a unique key for the job, used to associate it with a trigger
❷ Adds the IJob to the DI container and associates it with the job key
❸ Registers a trigger for the IJob via the job key
❹ Provides a unique name for the trigger for use in logging and in clustered
scenarios
❺ Fires the trigger as soon as the Quartz.NET scheduler runs on app startup
❻ Fires the trigger every 5 minutes until the app shuts down

Simple triggers like the schedule defined here are common, but you can also achieve more complex configurations using other schedules. The following configuration would set a trigger to fire every week on a Friday at 5:30 p.m.:

q.AddTrigger(opts => opts
.ForJob(jobKey)
.WithIdentity("Update exchange rates trigger")
.WithSchedule(CronScheduleBuilder
.WeeklyOnDayAndHourAndMinute(DayOfWeek.Friday, 17, 30)));

You can configure a wide array of time- and calendar-based triggers with Quartz.NET. You can also control how Quartz.NET handles missed triggers—that is, triggers that should have fired, but your app wasn’t running at the time. For a detailed description of the trigger configuration options and more examples, see the Quartz.NET documentation at https://www.quartz-scheduler.net/documentation.

TIP A common problem people run into with long-running jobs is that Quartz.NET keeps starting new instances of the job when a trigger fires, even though it’s already running. To avoid that, tell Quartz.NET to not start another instance by decorating your IJob implementation with the [DisallowConcurrentExecution] attribute.‌

The ability to configure advanced schedules, the simple use of DI in background tasks, and the separation of jobs from triggers are reasons enough for me to recommend Quartz.NET if you have anything more than the most basic background service needs. However, the real tipping point is when you need to scale your application for redundancy or performance reasons; that’s when Quartz.NET’s clustering capabilities make it shine.

34.3.3 Using clustering to add redundancy to your background tasks‌

In this section you’ll learn how to configure Quartz.NET to persist its configuration to a database. This is a necessary step in enabling clustering so that multiple instances of your application can coordinate to run your Quartz.NET jobs.

As your applications become more popular, you may need to run more instances of your app to handle the traffic they receive. If you keep your ASP.NET Core applications stateless, the process of scaling is relatively simple: the more applications you have, the more traffic you can handle, everything else being equal.

However, scaling applications that use IHostedService to run background tasks might not be as simple. For example, imagine your application includes the BackgroundService that we created in section 34.1.2, which saves exchange rates to the database every five minutes. When you’re running a single instance of your app, the task runs every five minutes as expected.

But what happens if you scale your application and run 10 instances of it? Every one of those applications will be running the BackgroundService, and they’ll all be updating every five minutes from the time each instance started!

One option would be to move the BackgroundService to a separate worker service app. You could then continue to scale your ASP.NET Core application to handle the traffic as required but deploy a single instance of the worker service. As only a single instance of the BackgroundService would be running, the exchange rates would be updated on the correct schedule again.

TIP Differing scaling requirements, as in this example, are one of the best reasons for splitting bigger apps into smaller microservices. Breaking up an app like this has a maintenance overhead, however, so think about the tradeoffs if you take this route. For more on this tradeoff, I recommend Microservices in .NET Core, 2nd ed., by Christian Horsdal Gammelgaard (Manning, 2021).‌

However, if you take this route, you add a hard limitation that you can have only a single instance of your worker service. If you need to run more instances of your worker service to handle additional load, you’ll be stuck.

An alternative option to enforcing a single service is using clustering, which allows you to run multiple instances of your application, with tasks distributed among the instances.Quartz.NET achieves clustering by using a database as a backing store. When a trigger indicates that a job needs to execute, the Quartz.NET schedulers in each app attempt to obtain a lock to execute the job, as shown in figure 34.5.Only a single app can be successful, ensuring that a single app handles the trigger for the IJob.

alt text

Figure 34.5 Using clustering with Quartz.NET allows horizontal scaling. Quartz.NET uses a database as a backing store, ensuring that only a single instance of the application handles a trigger at a time. This makes it possible to run multiple instances of your application to meet scalability requirements.

Quartz.NET relies on a persistent database for its clustering functionality. Quartz .NET stores descriptions of the jobs and triggers in the database, including when the trigger last fired. The locking features of the database ensure that only a single application can execute a task at a time.

TIP You can also enable persistence without enabling clustering, allowing the Quartz.NET scheduler to catch up with missed triggers.

Listing 34.13 shows how to enable persistence for Quartz.NET and how to enable clustering. This example stores data in a Microsoft SQL Server (or LocalDB) server, but Quartz.NET supports many other databases. This example uses the recommended values for enabling clustering and persistence as outlined in the documentation.

TIP The Quartz.NET documentation discusses many configuration setting controls for persistence. See the “Job Stores” documentation at http://mng.bz/PP0R. To use the recommended JSON serializer for persistence, you must also install the Quartz.Serialization.Json NuGet package.

Listing 34.13 Enabling persistence and clustering for Quartz.NET

using Quartz;
IHost host = Host.CreateDefaultBuilder(args)
.ConfigureServices((hostContext, services) => ❶
{
var connectionString = Configuration ❷
.GetConnectionString("DefaultConnection"); ❷
services.AddQuartz(q =>
{
q.SchedulerId = "AUTO"; ❸
q. UseMicrosoftDependencyInjectionJobFactory();
q.UsePersistentStore(s => ❹
{
s.UseSqlServer(connectionString); ❺
s.UseClustering(); ❻
s.UseProperties = true; ❼
s.UseJsonSerializer(); ❼
});
var jobKey = new JobKey("Update_exchange_rates");
q.AddJob<UpdateExchangeRatesJob>(opts =>
opts.WithIdentity(jobKey));
q.AddTrigger(opts => opts
.ForJob(jobKey)
.WithIdentity(jobKey.Name + " trigger")
.StartNow()
.WithSimpleSchedule(x => x
.WithInterval(TimeSpan.FromMinutes(5))
.RepeatForever())
);
});
services.AddQuartzHostedService(
q => q.WaitForJobsToComplete = true);
})
.Build();
host.Run();

❶ Configuration is identical for both ASP.NET Core apps and worker services.
❷ Obtains the connection string for your database from configuration
❸ Each instance of your app must have a unique SchedulerId. AUTO takes care of this for you.
❹ Enables database persistence for the Quartz.NET scheduler data
❺ Stores the scheduler data in a SQL Server (or LocalDb) database
❻ Enables clustering between multiple instances of your app
❼ Adds the recommended configuration for job persistence

With this configuration, Quartz.NET stores a list of jobs and triggers in the database, and uses database locking to ensure that only a single instance of your app handles a trigger and runs the associated job.

WARNING SQLite doesn’t support the database locking primitives required for clustering. You can use SQLite as a persistence store, but you won’t be able to use clustering. Quartz.NET stores data in your database, but it doesn’t attempt to create the tables it uses itself. Instead, you must add the required tables manually. Quartz.NET provides SQL scripts on GitHub for all the supported database server types, including SQL Server, SQLite, PostgreSQL, MySQL, and many more; see http://mng.bz/JDeZ.

TIP If you’re using EF Core migrations to manage your database, I suggest using them even for ad hoc scripts like these. In the code sample associated with this chapter, you can see a migration that creates the required tables using the Quartz.NET scripts.

Clustering is one of those advanced features that is necessary only as you start to scale your application, but it’s an important tool to have in your belt. It gives you the ability to safely scale your services as you add more jobs. There are some important things to bear in mind, however, so I suggest reading the warnings in the Quartz.NET documentation at http://mng.bz/aozj.

That brings us to the end of this chapter on background services. In the final chapters of this book I describe an important aspect of web development that sometimes, despite the best intentions, is left until last: testing. You’ll learn how to write simple unit tests for your classes, design for testability, and build integration tests that test your whole app.‌

Summary

You can use the IHostedService interface to run tasks in the background of your ASP.NET Core apps. Call AddHostedService<T>() to add an implementation T to the DI container.IHostedService is useful for implementing long- running tasks.

Typically, you should derive from BackgroundService to create an IHostedService, as this implements best practices required for long-running tasks. You must override a single method, ExecuteAsync, that is called when your app starts. You should run your tasks within this method until the provided CancellationToken indicates that the app is shutting down.

You can create DI scopes manually using IServiceProvider.CreateScope(). This is useful for accessing scoped lifetime services from within a singleton lifetime component, such as from an IHostedService implementation.

A worker service is a .NET Core application that uses the generic IHost but doesn’t include the ASP.NET Core libraries for handling HTTP requests. It generally has a smaller memory and disk footprint than an ASP.NET Core equivalent.

Worker services use the same logging, configuration, and DI systems as ASP.NET Core apps. However, they don’t use the WebApplicationBuilder minimal hosting APIs, so you must configure your app using the generic host APIs. For example, configure your DI services using IHostBuilder.ConfigureServices().

To run a worker service or ASP.NET Core app as a Windows Service, add the Microsoft.Extensions.Hosting.WindowsServices NuGet package, and call UseWindowsService() on IHostBuilder. You can install and manage your app with the Windows sc utility.

To install a Linux systemd daemon, add the Microsoft.Extensions.Hosting.Systemd NuGet package and call AddSystemd() on IHostBuilder. Both the Systemd and Windows Service integration packages do nothing when running the application as a console app, which is great for testing your app. You can even add both packages so that your app can run as a service in both Windows and Linux.

Quartz.NET runs jobs based on triggers using advanced schedules. It builds on the IHostedService implementation to add extra features and scalability. You can install Quartz by adding the Quartz.AspNetCore NuGet package and calling AddQuartz() and AddQuartzHostedService() in ConfigureServices().

You can create a Quartz.NET job by implementing the IJob interface. This requires implementing a single method, Execute. You can enable DI for the job by calling UseMicrosoftDependencyInjectionJobFac tory in AddQuartz(). This allows you to directly inject scoped (or transient) services into your job without having to create your own scopes.

You must register your job, T, with DI by calling AddJob<T>() and providing a JobKey name for the job. You can add an associated trigger by calling AddTrigger() and providing the JobKey. Triggers have a wide variety of schedules available for controlling when a job should be executed.

By default, triggers spawn new instances of a job as often as necessary. For long-running jobs scheduled with a short interval, that will result in many instances of your job running concurrently. If you want a trigger to execute a job only when an instance is not already running, decorate your job with the [DisallowConcurrentExecution] attribute.

Quartz.NET supports database persistence for storing when triggers have executed. To enable persistence, call UsePersistentStore() in your AddQuartz() configuration method, and configure a database, using UseSqlServer() for example. With persistence, Quartz.NET can persist details about jobs and triggers between application restarts.

Enabling persistence also allows you to use clustering. Clustering enables multiple apps using Quartz.NET to coordinate, so that jobs are spread across multiple schedulers. To enable clustering, first enable database persistence and then call UseClustering(). SQLite does not support clustering due to limitations of the database itself.

ASP.NET Core in Action 33 Calling remote APIs with IHttpClientFactory

33 Calling remote APIs with IHttpClientFactory‌

This chapter covers
• Seeing problems caused by using HttpClient incorrectly to call HTTP APIs

• Using IHttpClientFactory to manage HttpClient lifetimes Encapsulating configuration and handling transient errors with IHttpClientFactory

So far in this book we’ve focused on creating web pages and exposing APIs. Whether that’s customers browsing a Razor Pages application or client-side SPAs and mobile apps consuming your APIs, we’ve been writing the APIs for others to consume.

However, it’s common for your application to interact with third-party services by consuming their APIs as well as your own API apps. For example, an e-commerce site needs to take payments, send email and Short Message Service (SMS) messages, and retrieve exchange rates from a third-party service. The most common approach for interacting with services is using HTTP. So far in this book we’ve looked at how you can expose HTTP services, using minimal APIs and API controllers, but we haven’t looked at how you can consume HTTP services.

In section 33.1 you’ll learn the best way to interact with HTTP services using HttpClient. If you have any experience with C#, it’s likely that you’ve used this class to send HTTP requests, but there are two gotchas to think about; otherwise, your app could run into difficulties.

IHttpClientFactory was introduced in .NET Core 2.1; it makes creating and managing HttpClient instances easier and avoids the common pitfalls. In section 33.2 you’ll learn how IHttpClientFactory achieves this by managing the HttpClient handler pipeline. You’ll learn how to create named clients to centralize the configuration for calling remote APIs and how to use typed clients to encapsulate the remote service’s behavior.‌

Network glitches are a fact of life when you’re working with HTTP APIs, so it’s important for you to handle them gracefully. In section 33.3 you’ll learn how to use the open- source resilience and fault-tolerance library Polly to handle common transient errors using simple retries, with the possibility for more complex policies.

Finally, in section 33.4 you’ll see how you can create your own custom HttpMessageHandler handlers managed by IHttpClientFactory. You can use custom handlers to implement cross-cutting concerns such as logging, metrics, and authentication, whenever a function needs to execute every time you call an HTTP API. You’ll also see how to create a handler that automatically adds an API key to all outgoing requests to an API.

To misquote John Donne, no app is an island, and the most common way of interacting with other apps and services is over HTTP. In .NET, that means using HttpClient.

33.1 Calling HTTP APIs: The problem with HttpClient‌

In this section you’ll learn how to use HttpClient to call HTTP APIs. I’ll focus on two common pitfalls in using HttpClient—socket exhaustion and DNS rotation problems —and show why they occur. In section 33.2 you’ll see how to avoid these problems by using IHttpClientFactory.

It’s common for an application to interact with other services to fulfill its duty. Take a typical e-commerce store, for example. In even the most basic version of the application, you will likely need to send emails and take payments using credit cards or other services. You could try to build that functionality yourself, but it probably wouldn’t be worth the effort.

Instead, it makes far more sense to delegate those responsibilities to third-party services that specialize in that functionality. Whichever service you use, they will almost certainly expose an HTTP API for interacting with the service. For many services, that will be the only way.

RESTful HTTP vs. gRPC vs. GraphQL
There are many ways to interact with third-party services, but HTTP RESTful services are still the king, decades after HTTP was first proposed. Every platform and programming language you can think of includes support for making HTTP requests and handling responses. That ubiquity makes it the go-to option for most services.

Despite their ubiquity, RESTful services are not perfect. They are relatively verbose, which means that more data ends up being sent and received than with some other protocols. It can also be difficult to evolve RESTful APIs after you have deployed them. These limitations have spurred interest in two alternative protocols in particular: gRPC and GraphQL.

gRPC is intended to be an efficient mechanism for server-to-server communication. It builds on top of HTTP/2 but typically provides much higher performance than traditional RESTful APIs. gRPC support was added in .NET Core 3.0 and is receiving many performance and feature updates. For a comprehensive view of .NET support, see the documentation at https://learn.microsoft.com/aspnet/core/grpc.

Whereas gRPC works best with server-to-server communication and nonbrowser clients, GraphQL is best used to provide evolvable APIs to mobile and single-page application (SPA) apps. It has become popular among frontend developers, as it can reduce the friction involved in deploying and using new APIs. For details, I recommend GraphQL in Action, by Samer Buna (Manning, 2021).‌‌

Despite the benefits and improvements gRPC and GraphQL can bring, RESTful HTTP services are here to stay for the foreseeable future, so it’s worth making sure that you understand how to use them with HttpClient.

In .NET we use the HttpClient class for calling HTTP APIs. You can use it to make HTTP calls to APIs, providing all the headers and body to send in a request, and reading the response headers and data you get back. Unfortunately, it’s hard to use correctly, and even when you do, it has limitations.

The source of the difficulty with HttpClient stems partly from the fact that it implements the IDisposable interface. In general, when you use a class that implements IDisposable, you should wrap the class with a using statement whenever you create a new instance to ensure that unmanaged resources used by the type are cleaned up when the class is removed, as in this example:‌

using (var myInstance = new MyDisposableClass())
{
// use myInstance
}

TIP C# also includes a simplified version of the using statement called a using declaration, which omits the curly braces, as shown in listing 33.1. You can read more about the syntax at http://mng.bz/nW12.

That might lead you to think that the correct way to create an HttpClient is shown in listing 33.1. This listing shows a simple example where a minimal API endpoint calls an external API to fetch the latest currency exchange rates, and returns them as the response.

alt text

Figure 33.1 To create a connection, a client selects a random port and connects to the HTTP server’s port and IP address. The client can then send HTTP requests to the server.

WARNING Do not use HttpClient as it’s shown in listing 33.1. Using it this way could cause your application to become unstable, as you’ll see shortly.

Listing 33.1 The incorrect way to use HttpClient

WebApplicationBuilder builder = WebApplication.CreateBuilder(args);
WebApplication app = builder.Build();
app.MapGet("/", async () =>
{
using HttpClient client = new HttpClient(); ❶
client.BaseAddress = new Uri("https://example.com/rates/"); ❷
var response = await client.GetAsync("latest"); ❸
response.EnsureSuccessStatusCode(); ❹
return await response.Content.ReadAsStringAsync(); ❺
});
app.Run();

❶ Wrapping the HttpClient in a using declaration means it is disposed at the end of the scope.
❷ Configures the base URL used to make requests using the HttpClient
❸ Makes a GET request to the exchange rates API
❹ Throws an exception if the request was not successful
❺ Reads the result as a string and returns it from the action method

HttpClient is special, and you shouldn’t use it like this! The problem is due primarily to the way the underlying protocol implementation works. Whenever your computer needs to send a request to an HTTP server, you must create a connection between your computer and the server. To create a connection, your computer opens a port, which has a random number between 0 and 65,535, and connects to the HTTP server’s IP address and port, as shown in figure 33.1. Your computer can then send HTTP requests to the server.

DEFINITION The combination of IP address and port is called a socket.

The main problem with the using statement/declaration and HttpClient is that it can lead to a problem called socket exhaustion, illustrated in figure 33.2. This happens when all the ports on your computer have been used up making other HTTP connections, so your computer can’t make any more requests. At that point, your application will hang, waiting for a socket to become free—a bad experience!‌

alt text

Figure 33.2 Disposing of HttpClient can lead to socket exhaustion. Each new connection requires the operating system to assign a new socket, and closing a socket doesn’t make it available until the TIME_WAIT period of 240 seconds has elapsed. Eventually you can run out of sockets, at which point you can’t make any outgoing HTTP requests.

Given that I said there are 65,536 different port numbers, you might think that’s an unlikely situation. It’s true that you will likely run into this problem only on a server that is making a lot of connections, but it’s not as rare as you might think.

The problem is that when you dispose of an HttpClient, it doesn’t close the socket immediately. The design of the TCP/IP protocol used for HTTP requests means that after trying to close a connection, the connection moves to a state called TIME_WAIT. The connection then waits for a specific period (240 seconds in Windows) before closing the socket.

Until the TIME_WAIT period has elapsed, you can’t reuse the socket in another HttpClient to make HTTP requests. If you’re making a lot of requests, that can quickly lead to socket exhaustion, as shown in figure 33.2.

TIP You can view the state of active ports/sockets in Windows and Linux by running the command netstat from the command line or a terminal window. Be sure to run netstat -n in Windows to skip Domain Name System (DNS) resolution.

Instead of disposing of HttpClient, the general advice (before the introduction of IHttpClientFactory) was to use a single instance of HttpClient, as shown in the following listing.

Listing 33.2 Using a singleton HttpClient to avoid socket exhaustion

WebApplicationBuilder builder = WebApplication.CreateBuilder(args);
WebApplication app = builder.Build();
HttpClient client = new HttpClient ❶
{ ❶
BaseAddress = new Uri("https://example.com/rates/"), ❶
}; ❶
app.MapGet("/", async () =>
{
var response = await client.GetAsync("latest"); ❷
response.EnsureSuccessStatusCode();
return await response.Content.ReadAsStringAsync();
});
app.Run();

❶ A single instance of HttpClient is created for the lifetime of the app.
❷ Multiple requests use the same instance of HttpClient.

This solves the problem of socket exhaustion. As you’re not disposing of the HttpClient, the socket is not disposed of, so you can reuse the same port for multiple requests. No matter how many times you call the API in the preceding example, you will use only a single socket. Problem solved!

Unfortunately, this introduces a different problem, primarily related to DNS. DNS is how the friendly hostnames we use, such as manning.com, are converted to the Internet Protocol (IP) addresses that computers need. When a new connection is required, the HttpClient first checks the DNS record for a host to find the IP address and then makes the connection. For subsequent requests, the connection is already established, so it doesn’t make another DNS call.

For singleton HttpClient instances, this can be a problem because the HttpClient won’t detect DNS changes. DNS is often used in cloud environments for load balancing to do graceful rollouts of deployments.1 If the DNS record of a service you’re calling changes during the lifetime of your application, a singleton HttpClient will keep calling the old service, as shown in figure 33.3.

alt text

Figure 33.3 HttpClient does a DNS lookup before establishing a connection to determine the IP address associated with a hostname. If the DNS record for a hostname changes, a singleton HttpClient will not detect it and will continue sending requests to the original server it connected to.

NOTE HttpClient won’t respect a DNS change while the original connection exists. If the original connection is closed (for example, if the original server goes offline), it will respect the DNS change, as it must establish a new connection.

It seems that you’re damned if you do and damned if you don’t! Luckily, IHttpClientFactory can take care of all this for you.

33.2 Creating HttpClients with IHttpClientFactory‌

In this section you’ll learn how you can use IHttpClientFactory to avoid the common pitfalls of HttpClient. I’ll show several patterns you can use to create an HttpClient:

• Using CreateClient() as a drop-in replacement for HttpClient

• Using named clients to centralize the configuration of an HttpClient used to call a specific third- party API

• Using typed clients to encapsulate the interaction with a third-party API for easier consumption by your code

IHttpClientFactory makes it easier to create HttpClient instances correctly instead of relying on either of the faulty approaches I discussed in section 33.1. It also makes it easier to configure multiple HttpClients and allows you to create a middleware pipeline for outgoing requests.

Before we look at how IHttpClientFactory achieves all that, we will look at how HttpClient works under the hood.

33.2.1 Using IHttpClientFactory to manage HttpClientHandler lifetime‌

In this section we’ll look at the handler pipeline used by HttpClient. You’ll see how IHttpClientFactory manages the lifetime of this pipeline and how this enables the factory to avoid both socket exhaustion and DNS problems.

The HttpClient class you typically use to make HTTP requests is responsible for orchestrating requests, but it isn’t responsible for making the raw connection itself. Instead, the HttpClient calls into a pipeline of HttpMessageHandler, at the end of which is an HttpClientHandler, which makes the actual connection and sends the HTTP request, as shown in figure 33.4.

alt text

Figure 33.4 Each HttpClient contains a pipeline of HttpMessageHandlers. The final handler is an HttpClientHandler, which makes the connection to the remote server and sends the HTTP request. This configuration is similar to the ASP.NET Core middleware pipeline, and it allows you to make cross- cutting adjustments to outgoing requests.

This configuration is reminiscent of the middleware pipeline used by ASP.NET Core applications, but this is an outbound pipeline. When an HttpClient makes a request, each handler gets a chance to modify the request before the final HttpClientHandler makes the real HTTP request. Each handler in turn then gets a chance to view the response after it’s received.

TIP You’ll see an example of using this handler pipeline for cross-cutting concerns in section 33.3 when we add a transient error handler.

The problems of socket exhaustion and DNS I described in section 33.1 are related to the disposal of the HttpClientHandler at the end of the handler pipeline. By default, when you dispose of an HttpClient, you dispose of the handler pipeline too. IHttpClientFactory separates the lifetime of the HttpClient from the underlying HttpClientHandler.

Separating the lifetime of these two components enables the IHttpClientFactory to solve the problems of socket exhaustion and DNS rotation. It achieves this in two ways:

• By creating a pool of available handlers—Socket exhaustion occurs when you dispose of an HttpClientHandler, due to the TIME_WAIT problem described previously.

• IHttpClientFactory solves this by creating a pool of handlers.

IHttpClientFactory maintains an active handler that it uses to create all HttpClients for two minutes. When the HttpClient is disposed of, the underlying handler isn’t disposed of, so the connection isn’t closed. As a result, socket exhaustion isn’t a problem.

• By periodically disposing of handlers—Sharing handler pipelines solves the socket exhaustion problem, but it doesn’t solve the DNS problem. To work around this, the IHttpClientFactory periodically (every two minutes) creates a new active HttpClientHandler that it uses for each HttpClient created subsequently. As these HttpClients are using a new handler, they make a new TCP/IP connection, so DNS changes are respected.

IHttpClientFactory disposes of expired handlers periodically in the background once they are no longer used by an HttpClient. This ensures that your application’s HttpClients use a limited number of connections.

TIP I wrote a blog post that looks in depth at how IHttpClientFactory achieves its handler rotation. This is a detailed post, but it may be of interest to those who like to know how things are implemented behind the scenes. See “Exploring the code behind IHttpClientFactory in depth” at http://mng.bz/8NRK.

Rotating handlers with IHttpClientFactory solves both the problems we’ve discussed. Another bonus is that it’s easy to replace existing uses of HttpClient with IHttpClientFactory.

IHttpClientFactory is included by default in ASP.NET Core. You simply add it to your application’s services in Program.cs:

builder.Services.AddHttpClient();

This registers the IHttpClientFactory as a singleton in your application, so you can inject it into any other service. The following listing shows how you can replace the HttpClient approach from listing 33.2 with a version that uses IHttpClientFactory.

Listing 33.3 Using IHttpClientFactory to create an HttpClient

WebApplicationBuilder builder = WebApplication.CreateBuilder(args);
builder.Services.AddHttpClient(); ❶
WebApplication app = builder.Build();
app.MapGet("/", async (IHttpClientFactory factory) => ❷
{
HttpClient client = factory.CreateClient(); ❸
client.BaseAddress = ❹
new Uri("https://example.com/rates/"); ❹
var response = await client.GetAsync("latest"); ❺
response.EnsureSuccessStatusCode(); ❺
return await response.Content.ReadAsStringAsync(); ❺
});
app.Run();

❶ Registers the IHttpClientFactory service in DI
❷ Injects the IHttpClientFactory using DI
❸ Creates an HttpClient instance with an HttpClientHandler managed by the factory
❹ Configures the HttpClient for calling the API as before
❺ Uses the HttpClient in exactly the same way you would otherwise

The immediate benefit of using IHttpClientFactory in this way is efficient socket and DNS handling. When you create an HttpClient using CreateClient(), IHttpClientFactory uses a pooled HttpClientHandler to create a new instance of an HttpClient, pooling and disposing the handlers as necessary to find a balance between the tradeoffs described in section 33.1.

Minimal changes should be required to take advantage of this pattern, as the bulk of your code stays the same. Only the code where you’re creating an HttpClient instance changes. This makes it a good option if you’re refactoring an existing app.

SocketsHttpHandler vs. IHttpClientFactory

The limitations of HttpClient described in section 33.1 apply specifically to the HttpClientHandler at the end of the HttpClient handler pipeline in older versions of .NET Core. IHttpClientFactory provides a mechanism for managing the lifetime and reuse of HttpClientHandler instances.‌

From .NET 5 onward, the legacy HttpClientHandler has been replaced by SocketsHttpHandler. This handler has several advantages, most notably performance benefits and consistency across platforms. The SocketsHttpHandler can also be configured to use connection pooling and recycling, like IHttpClientFactory.

So if HttpClient can already use connection pooling, is it worth using IHttpClientFactory? In most cases, I would say yes. You must manually configure connection pooling with SocketsHttpHandler, and IHttpClientFactory has additional features such as named clients and typed clients. In any situations where you’re using dependency injection (DI), which is every ASP.NET Core app and most .NET 7 apps, I recommend using IHttpClientFactory to take advantage of these benefits.

Nevertheless, if you’re working in a non-DI scenario and can’t use IHttpClientFactory, be sure to enable the SocketsHttpHandler connection pooling as described in this post by Steve Gordon, titled “HttpClient connection pooling in .NET Core”: http://mng.bz/E27q.

Managing the socket problem is one big advantage of using IHttpClientFactory over HttpClient, but it’s not the only benefit. You can also use IHttpClientFactory to clean up the client configuration, as you’ll see in the next section.

33.2.2 Configuring named clients at registration time‌

In this section you’ll learn how to use the Named Client pattern with IHttpClientFactory. This pattern encapsulates the logic for calling a third-party API in a single location, making it easier to use the HttpClient in your consuming code.

NOTE IHttpClientFactory uses the same HttpClient type you’re familiar with if you’re coming from .NET Framework. The big difference is that IHttpClientFactory solves the DNS and socket exhaustion problem by managing the underlying message handlers.

Using IHttpClientFactory solves the technical problems I described in section 33.1, but the code in listing 33.3 is still pretty messy in my eyes, primarily because you must configure the HttpClient to point to your service before you use it. If you need to create an HttpClient to call the API in more than one place in your application, you must configure it in more than one place too.

IHttpClientFactory provides a convenient solution to this problem by allowing you to centrally configure named clients, which have a string name and a configuration function that runs whenever an instance of the named client is requested. You can define multiple configuration functions that run in sequence to configure your new HttpClient.

The following listing shows how to register a named client called "rates". This client is configured with the correct BaseAddress and sets default headers that are to be sent with each outbound request. Once you have configured this named client, you can create it from an IHttpClientFactory instance using the name of the client, "rates".

Listing 33.4 Using IHttpClientFactory to create a named HttpClient

WebApplicationBuilder builder = WebApplication.CreateBuilder(args);
builder.Services.AddHttpClient("rates", (HttpClient client) => ❶
{
client.BaseAddress = ❷
new Uri("https://example.com/rates/"); ❷
client.DefaultRequestHeaders.Add( ❷
HeaderNames.UserAgent, "ExchangeRateViewer"); ❷
})
.ConfigureHttpClient((HttpClient client) => {}) ❸
.ConfigureHttpClient(
(IServiceProvider provider, HttpClient client) => {}); ❹
WebApplication app = builder.Build();
app.MapGet("/", async (IHttpClientFactory factory) => ❺
{
HttpClient client = factory.CreateClient("rates"); ❻
var response = await client.GetAsync("latest"); ❼
❼
response.EnsureSuccessStatusCode();
return await response.Content.ReadAsStringAsync();
});
app.Run();

❶ Provides a name for the client and a configuration function
❷ The configuration function runs every time the named HttpClient is requested.
❸ You can add more configuration functions for the named client, which run in sequence.
❹ Additional overloads exist that allow access to the DI container when creating a named client.
❺ Injects the IHttpClientFactory using DI
❻ Requests the configured named client called “rates”
❼ Uses the HttpClient the same way as before

NOTE You can still create unconfigured clients using CreateClient() without a name. Be aware that if you pass an unconfigured name, such as CreateClient ("MyRates"), the client returned will be unconfigured. Take care—client names are case-sensitive, so "rates" is a different client from "Rates".

Named clients help centralize your HttpClient configuration in one place, removing the responsibility for configuring the client from your consuming code. But you’re still working with raw HTTP calls at this point, such as providing the relative URL to call ("/latest") and parsing the response. IHttpClientFactory includes a feature that makes it easier to clean up this code.

33.2.3 Using typed clients to encapsulate HTTP calls‌

A common pattern when you need to interact with an API is to encapsulate the mechanics of that interaction in a separate service. You could easily do this with the IHttpClientFactory features you’ve already seen by extracting the body of the GetRates() function from listing 33.4 into a separate service. But IHttpClientFactory has deeper support for this pattern.

IHttpClientFactory supports typed clients. A typed client is a class that accepts a configured HttpClient in its constructor. It uses the HttpClient to interact with the remote API and exposes a clean interface for consumers to call. All the logic for interacting with the remote API is encapsulated in the typed client, such as which URL paths to call, which HTTP verbs to use, and the types of responses the API returns. This encapsulation makes it easier to call the third-party API from multiple places in your app by using the typed client.

The following listing shows an example typed client for the exchange rates API shown in previous listings. It accepts an HttpClient in its constructor and exposes a GetLatestRates() method that encapsulates the logic for interacting with the third-party API.

Listing 33.5 Creating a typed client for the exchange rates API

public class ExchangeRatesClient
{
private readonly HttpClient _client; ❶
public ExchangeRatesClient(HttpClient client) ❶
{
_client = client;
}
public async Task<string> GetLatestRates() ❷
{
var response = await _client.GetAsync("latest"); ❸
response.EnsureSuccessStatusCode(); ❸
return await response.Content.ReadAsStringAsync(); ❸
}
}

❶ Injects an HttpClient using DI instead of an IHttpClientFactory
❷ The GetLatestRates() logic encapsulates the logic for interacting with the API.
❸ Uses the HttpClient the same way as before

We can then inject this ExchangeRatesClient into consuming services, and they don’t need to know anything about how to make HTTP requests to the remote service; they need only to interact with the typed client. We can update listing 33.3 to use the typed client as shown in the following listing, at which point the API endpoint method becomes trivial.

Listing 33.6 Consuming a typed client to encapsulate calls to a remote HTTP server

app.MapGet("/", async (ExchangeRatesClient ratesClient) => ❶
await ratesClient.GetLatestRates());

❶ Injects the typed client using DI
❷ Calls the typed client’s API. The typed client handles making the correct HTTP requests.

You may be a little confused at this point. I haven’t mentioned how IHttpClientFactory is involved yet!

The ExchangeRatesClient takes an HttpClient in its constructor. IHttpClientFactory is responsible for creating the HttpClient, configuring it to call the remote service and injecting it into a new instance of the typed client.

You can register the ExchangeRatesClient as a typed client and configure the HttpClient that is injected in ConfigureServices, as shown in the following listing. This is similar to configuring a named client, so you can register additional configuration for the HttpClient that will be injected into the typed client.

Listing 33.7 Registering a typed client with HttpClientFactory in Startup.cs

WebApplicationBuilder builder = WebApplication.CreateBuilder(args);
builder.Services.AddHttpClient<ExchangeRatesClient> ❶
(HttpClient client) => ❷
{ ❷
client.BaseAddress = ❷
new Uri("https://example.com/rates/"); ❷
client.DefaultRequestHeaders.Add( ❷
HeaderNames.UserAgent, "ExchangeRateViewer"); ❷
})
.ConfigureHttpClient((HttpClient client) => {}); ❸
}
WebApplication app = builder.Build();
app.MapGet("/", async (ExchangeRatesClient ratesClient) =>
await ratesClient.GetLatestRates());
app.Run();

❶ Registers a typed client using the generic AddHttpClient method
❷ You can provide an additional configuration function for the HttpClient that will be injected.
❸ As for named clients, you can provide multiple configuration methods.

Behind the scenes, the call to
AddHttpClient does several things:

• Registers HttpClient as a transient service in DI. That means you can accept an HttpClient in the constructor of any service in your app and IHttpClientFactory will inject a default pooled instance, which has no additional configuration.

• Registers ExchangeRatesClient as a transient service in DI.

• Controls the creation of ExchangeRatesClient so that whenever a new instance is required, a pooled HttpClient is configured as defined in the AddHttpClient lambda method.

TIP You can think of a typed client as a wrapper around a named client. I’m a big fan of this approach, as it encapsulates all the logic for interacting with a remote service in one place. It also avoids the magic strings that you use with named clients, removing the possibility of typos.

Another option when registering typed clients is to register an interface in addition to the implementation. This is often good practice, as it makes it much easier to test consuming code. If the typed client in listing 33.5 implemented the interface IExchangeRatesClient, you could register the interface and typed client implementation using

builder.Services.AddHttpClient<IExchangeRatesClient, ExchangeRatesClient>()

You could then inject this into consuming code using the interface type

app.MapGet("/", async (IExchangeRatesClient ratesClient) =>
await ratesClient.GetLatestRates());

Another common pattern is to not provide any configuration for the typed client in the AddHttpClient() call. Instead, you could place that logic in the constructor of your ExchangeRatesClient using the injected HttpClient:

public class ExchangeRatesClient
{
private readonly HttpClient _client;
public ExchangeRatesClient(HttpClient client)
{
_client = client;
_client.BaseAddress = new Uri("https://example.com/rates/");
}
}

This is functionally equivalent to the approach shown in listing 33.7. It’s a matter of taste where you’d rather put the configuration for your HttpClient. If you take this approach, you don’t need to provide a configuration lambda in AddHttpClient():

builder.Services.AddHttpClient<ExchangeRatesClient>();

Named clients and typed clients are convenient for managing and encapsulating HttpClient configuration, but IHttpClientFactory has another advantage we haven’t looked at yet: it’s easier to extend the HttpClient handler pipeline.‌‌

33.3 Handling transient HTTP errors with Polly‌

In this section you’ll learn how to handle a common scenario: transient errors when you make calls to a remote service, caused by an error in the remote server or temporary network problems. You’ll see how to use IHttpClientFactory to handle cross-cutting concerns like this by adding handlers to the HttpClient handler pipeline.

In section 33.2.1 I described HttpClient as consisting of a pipeline of handlers. The big advantage of this pipeline, much like the middleware pipeline of your application, is that it allows you to add cross-cutting concerns to all requests.For example, IHttpClientFactory automatically adds a
handler to each HttpClient that logs the status code and duration of each outgoing request.

In addition to logging, another common requirement is to handle transient errors when calling an external API. Transient errors can happen when the network drops out, or if a remote API goes offline temporarily. For transient errors, simply trying the request again can often succeed, but having to write the code to do so manually is cumbersome.

ASP.NET Core includes a library called Microsoft.Extensions.Http.Polly that makes handling transient errors easier. It uses the popular open-source library Polly (https://github.com/App-vNext/Polly) to automatically retry requests that fail due to transient network errors.

Polly is a mature library for handling transient errors that includes a variety of error-handling strategies, such as simple retries, exponential backoff, circuit breaking, and bulkhead isolation. Each strategy is explained in detail at https://github.com/App-vNext/Polly, so be sure to read about the benefits and trade-offs when selecting a strategy.

To provide a taste of what’s available, we’ll add a simple retry policy to the ExchangeRatesClient shown in section 33.2. If a request fails due to a network problem, such as a timeout or a server error, we’ll configure Polly to automatically retry the request as part of the handler pipeline, as shown in figure 33.5.

alt text
alt text

Figure 33.5 Using the PolicyHttpMessageHandler to handle transient errors. If an error occurs when calling the remote API, the Polly handler will automatically retry the request. If the request then succeeds, the result is passed back to the caller. The caller didn’t have to handle the error, making it simpler to use the HttpClient while remaining resilient to transient errors.

To add transient error handling to a named client or

  1. HttpClient, follow these steps:

Install the Microsoft.Extensions.Http.Polly NuGet package in your project by running dotnet add package Microsoft.Extensions.Http.Polly, by using the NuGet explorer in Visual Studio, or by adding a <PackageReference> element to your project file as follows:

<PackageReference Include="Microsoft.Extensions.Http.Polly" Version="7.0.0" />
  1. Configure a named or typed client as shown in listings 33.4 and 33.7.

  2. Configure a transient error-handling policy for your client as shown in list- ing 33.8.

Listing 33.8 Configuring a transient error-handling policy for a typed client

WebApplicationBuilder builder = WebApplication.CreateBuilder(args);
builder.services.AddHttpClient<ExchangeRatesClient>() ❶
.AddTransientHttpErrorPolicy(policy => ❷
policy.WaitAndRetryAsync(new[] { ❸
TimeSpan.FromMilliseconds(200), ❹
TimeSpan.FromMilliseconds(500), ❹
TimeSpan.FromSeconds(1) ❹
})
);

❶ You can add transient error handlers to named or typed clients.
❷ Uses the extension methods provided by the NuGet package to add transient
error handlers
❸ Configures the retry policy used by the handler. There are many types of
policies to choose among.
❹ Configures a policy that waits and retries three times if an error occurs

In the preceding listing we configure the error handler to catch transient errors and retry three times, waiting an increasing amount of time between requests. If the request fails on the third try, the handler ignores the error and pass it back to the client, as though there was no error handler at all. By default, the handler retries any request that

• Throws an HttpRequestException, indicating an error at the protocol level, such as a closed connection

• Returns an HTTP 5xx status code, indicating a server error at the API

• Returns an HTTP 408 status code, indicating a timeout

TIP If you want to handle more cases automatically or to restrict the responses that will be automatically retried, you can customize the selection logic as described in the “Polly and HttpClientFactory” documentation on GitHub: http://mng.bz/NY7E.

Using standard handlers like the transient error handler allows you to apply the same logic across all requests made by a given HttpClient. The exact strategy you choose will depend on the characteristics of both the service and the request, but a good retry strategy is a must whenever you interact with potentially unreliable HTTP APIs.

WARNING When designing a policy, be sure to consider the effect of your policy. In some circumstances it may be better to fail quickly instead of retrying a request that is never going to succeed. Polly includes additional policies such as circuit-breakers to create more advanced approaches.

The Polly error handler is an example of an optional HttpMessageHandler that you can plug in to your HttpClient, but you can also create your own custom handler. In the next section you’ll see how to create a handler that adds a header to all outgoing requests.

33.4 Creating a custom HttpMessageHandler‌

Most third-party APIs require some form of authentication when you’re calling them. For example, many services require you to attach an API key to an outgoing request, so that the request can be tied to your account. Instead of having to remember to add this header manually for every request to the API, you could configure a custom HttpMessageHandler to attach the header automatically for you.

NOTE More complex APIs may use JSON Web Tokens (JWT) obtained from an identity provider. If that’s the case, consider using the open source IdentityModel library (https://identitymodel.readthedocs.io), which provides integration points for ASP.NET Core Identity and HttpClientFactory.

You can configure a named or typed client using IHttpClientFactory to use your API-key handler as part of the HttpClient’s handler pipeline, as shown in figure 33.6. When you use the HttpClient to send a message, the HttpRequestMesssage is passed through each handler in turn. The API-key handler adds the extra header and passes the request to the next handler in the pipeline. Eventually, the HttpClientHandler makes the network request to send the HTTP request. After the response is received, each handler gets a chance to inspect (and potentially modify) the response.

alt text

Figure 33.6 You can use a custom HttpMessageHandler to modify requests before they’re sent to third-party APIs. Every request passes through the custom handler before the final handler (the HttpClientHandler) sends the request to the HTTP API. After the response is received, each handler gets a chance to inspect and modify the response.

To create a custom HttpMessageHandler and add it to a typed or named client’s pipeline, follow these steps:

• Create a custom handler by deriving from the DelegatingHandler base class.

• Override the SendAsync() method to provide your custom behavior. Call base.SendAsync() to execute the remainder of the handler pipeline.

• Register your handler with the DI container. If your handler does not require state, you can register it as a singleton service; otherwise, you should register it as a transient service.

• Add the handler to one or more of your named or typed clients by calling AddHttpMessageHandler<T>() on an IHttpClientBuilder, where T is your handler type. The order in which you register handlers dictates the order in which they are added to the HttpClient handler pipeline. You can add the same handler type more than once in a pipeline if you wish and to multiple typed or named clients.

The following listing shows an example of a custom HttpMessageHandler that adds a header to every outgoing request. We use the custom "API-KEY" header in this example, but the header you need will vary depending on the third-party API you’re calling. This example uses strongly typed configuration to inject the secret API key, as you saw in chapter 10.

Listing 33.9 Creating a custom HttpMessageHandler

public class ApiKeyMessageHandler : DelegatingHandler ❶
{
private readonly ExchangeRateApiSettings _settings; ❷
public ApiKeyMessageHandler( ❷
IOptions<ExchangeRateApiSettings> settings) ❷
{ ❷
_settings = settings.Value; ❷
} ❷
protected override async Task<HttpResponseMessage> SendAsync( ❸
HttpRequestMessage request, ❸
CancellationToken cancellationToken) ❸
{
request.Headers.Add("API-KEY", _settings.ApiKey); ❹
HttpResponseMessage response = ❺
await base.SendAsync(request, cancellationToken); ❺
return response; ❻
}
}

❶ Custom HttpMessageHandlers should derive from DelegatingHandler.
❷ Injects the strongly typed configuration values using DI
❸ Overrides the SendAsync method to implement the custom behavior
❹ Adds the extra header to all outgoing requests
❺ Calls the remainder of the pipeline and receives the response
❻ You could inspect or modify the response before returning it.

To use the handler, you must register it with the DI container and add it to a named or typed client. In the following listing, we add it to the ExchangeRatesClient, along with the transient error handler we registered in listing 33.7. This creates a pipeline similar to that shown in figure 33.6.

Listing 33.10 Registering a custom handler in Startup.ConfigureServices

WebApplicationBuilder builder = WebApplication.CreateBuilder(args);
builder.Services.AddTransient<ApiKeyMessageHandler>(); ❶
builder.Services.AddHttpClient<ExchangeRatesClient>()
.AddHttpMessageHandler<ApiKeyMessageHandler>() ❷
.AddTransientHttpErrorPolicy(policy => ❸
policy.WaitAndRetryAsync(new[] {
TimeSpan.FromMilliseconds(200),
TimeSpan.FromMilliseconds(500),
TimeSpan.FromSeconds(1)
})
);

❶ Registers the custom handler with the DI container
❷ Configures the typed client to use the custom handler
❸ Adds the transient error handler. The order in which the handlers are registered dictates their order in the pipeline.

Whenever you make a request using the typed client ExchangeRatesClient, you can be sure that the API key will be added and that transient errors will be handled automatically for you.

That brings us to the end of this chapter on IHttpClientFactory. Given the difficulties in using HttpClient correctly that I showed in section 33.1, you should always favor IHttpClientFactory where possible. As a bonus, IHttpClientFactory allows you to easily centralize your API configuration using named clients and to encapsulate your API interactions using typed clients.

Summary

Use the HttpClient class for calling HTTP APIs. You can use it to make HTTP calls to APIs, providing all the headers and body to send in a request, and reading the response headers and data you get back.

HttpClient uses a pipeline of handlers, consisting of multiple HttpMessageHandlers connected in a similar way to the middleware pipeline used in ASP.NET Core. The final handler is the HttpClientHandler, which is responsible for making the network connection and sending the request.

HttpClient implements IDisposable, but typically you shouldn’t dispose of it. When the HttpClientHandler that makes the TCP/IP connection is disposed of, it keeps a connection open for the TIME_WAIT period. Disposing of many HttpClients in a short period of time can lead to socket exhaustion, preventing a machine from handling any more requests.

Before .NET Core 2.1, the advice was to use a single HttpClient for the lifetime of your application. Unfortunately, a singleton HttpClient will not respect DNS changes, which are commonly used for traffic management in cloud environments.

IHttpClientFactory solves both these problems by managing the lifetime of the HttpMessageHandler pipeline. You can create a new HttpClient by calling CreateClient(), and IHttpClientFactory takes care of disposing of the handler pipeline when it is no longer in use.

You can centralize the configuration of an HttpClient in ConfigureServices() using named clients by calling AddHttpClient("test", c => {}). You can then retrieve a configured instance of the client in your services by calling IHttpClientFactory.CreateClient("test ").

You can create a typed client by injecting an HttpClient into a service, T, and configuring the client using AddHttpClient<T>(c => {}).

Typed clients are great for abstracting the HTTP mechanics away from consumers of your client.

You can use the Microsoft.Extensions.Http.Polly library to add transient HTTP error handling to your HttpClients. Call AddTransientHttpErrorPolicy() when configuring your IHttpClientFactory, and provide a Polly policy to control when errors should be automatically handled and retried.

It’s common to use a simple retry policy to try making a request multiple times before giving up and returning an error. When designing a policy, be sure to consider the effect of your policy; in some circumstances it may be better to fail quickly instead of retrying a request that is never going to succeed. Polly includes additional policies such as circuit-breakers to create more advanced approaches.

By default, the transient error-handling middleware will handle connection errors, server errors that return a 5xx error code, and 408 (timeout) errors. You can customize this if you want to handle additional error types but ensure that you retry only requests that are safe to do so.

You can create a custom HttpMessageHandler to modify each request made through a named or typed client. Custom handlers are good for implementing cross-cutting concerns such as logging, metrics, and authentication.

To create a custom HttpMessageHandler, derive from DelegatingHandler and override the SendAsync() method. Call base.SendAsync() to send the request to the next handler in the pipeline and finally to the HttpClientHandler, which makes the HTTP request.

Register your custom handler in the DI container as either a transient or a singleton. Add it to a named or typed client using AddHttpMessageHandler<T>(). The order in which you register the handler in the IHttpClientBuilder is the order in which the handler will appear in the HttpClient handler pipeline.

  1. Azure Traffic Manager, for example, uses DNS to route requests. You can read more about how it works at http://mng.bz/vnP4.

ASP.NET Core in Action 32 Building custom MVC and Razor Pages components

32 Building custom MVC and Razor Pages components‌

This chapter covers

• Creating custom Razor Tag Helpers
• Using view components to create complex Razor views
• Creating a custom DataAnnotations validation attribute
• Replacing the DataAnnotations validation framework with an alternative

In the previous chapter you learned how to customize and extend some of the core systems in ASP.NET Core: configuration, dependency injection (DI), and your middleware pipeline. These components form the basis of all ASP.NET Core apps. In this chapter we’re focusing on Razor Pages and Model-View-Controller (MVC)/API controllers. You’ll learn how to build custom components that work with Razor views. You’ll also learn how to build components that work with the validation framework used by both Razor Pages and API controllers.

We’ll start by looking at Tag Helpers. In section 32.1 I show how to create two Tag Helpers: one that generates HTML to describe the current machine and one that lets you write if statements in Razor templates without having to use C#.

These will give you the details you need to create your own custom Tag Helpers in your own apps if the need arises.

In section 32.2 you’ll learn about a new Razor concept: view components. View components are a bit like partial views, but they can contain business logic and database access. For example, on an e-commerce site you might have a shopping cart, a dynamically populated menu, and a login widget all on one page. Each of those sections is independent of the main page content and has its own logic and data-access needs. In an ASP.NET Core app using Razor Pages, you’d implement each of those as a view component.

In section 32.3 I’ll show you how to create a custom validation attribute. As you saw in chapter 6, validation is a key responsibility of Razor Page handlers and action methods, and the DataAnnotations attributes provide a clean, declarative way of doing so. We previously looked only at the built-in attributes, but you’ll often find you need to add attributes tailored to your app’s domain. In section 32.3 you’ll see how to create a simple validation attribute and how to extend it to use services registered with the DI container.

Throughout this book I’ve mentioned that you can easily swap out core parts of the ASP.NET Core framework if you wish. In section 32.4 you’ll do that by replacing the built-in attribute-based validation framework with a popular alternative, FluentValidation. This open-source library allows you to separate your binding models from the validation rules, which makes building certain validation logic easier.Many people prefer this approach of separating concerns to the declarative approach of DataAnnotations.

When you’re building pages with Razor Pages, one of the best productivity features is Tag Helpers, and in the next section you’ll see how you can create your own.

32.1 Creating a custom Razor Tag Helper‌

In this section you’ll learn how to create your own Tag Helpers, which allow you to customize your HTML output. You’ll learn how to create Tag Helpers that add new elements to your HTML markup, as well as Tag Helpers that can remove or customize existing markup. You’ll also see that your custom Tag Helpers integrate with the tooling of your integrated development environment (IDE) to provide rich IntelliSense in the same way as the built-in Tag Helpers.

In my opinion, Tag Helpers are one of the best additions to the venerable Razor template language in ASP.NET Core.They allow you to write Razor templates that are easier to read, as they require less switching between C# and HTML, and they augment your HTML tags rather than replace them (as opposed to the HTML Helpers used extensively in the legacy version of ASP.NET).

ASP.NET Core comes with a wide variety of Tag Helpers (see chapter 18), which cover many of your day-to-day requirements, especially when it comes to building forms.For example, you can use the Input Tag Helper by adding an

asp-for attribute to an <input> tag and passing a‌ reference to a property on your PageModel, in this case Input.Email:
`

`

The Tag Helper is activated by the presence of the attribute and gets a chance to augment the tag when rendering to HTML. The Input Tag Helper uses the name of the property to set the tag’s name and id properties, the value of the model to set the value property, and the presence of attributes such as [Required] or [EmailAddress] to add attributes for validations:‌‌‌

<input type="email" id="Input_Email" name="Input.Email" value="test@example.com" data-val="true"
data-val-email="The Email Address field is not a valid e-mail address."

data-val-required="The Email Address field is required."
/>

Tag Helpers help reduce the duplication in your code, or they can simplify common patterns. In this section I show how you can create your own custom Tag Helpers.

In section 32.1.1 you’ll create a system information Tag Helper, which prints details about the name and operating system of the server your app is running on. In section 32.1.2 you’ll create a Tag Helper that you can use to conditionally show or hide an element based on a C# Boolean property. In section 32.1.3 you’ll create a Tag Helper that reads the Razor content written inside the Tag Helper and transforms it.

32.1.1 Printing environment information with a custom Tag Helper‌

A common problem you may run into when you start running your web applications in production, especially if you’re using a server-farm setup, is working out which machine rendered the page you’re currently looking at. Similarly, when deploying frequently, it can be useful to know which version of the application is running. When I’m developing and testing, I sometimes like to add a little “info dump” at the bottom of my layouts so I can easily work out which server generated the current page, which environment it’s running in, and so on.

In this section I’m going to show you how to build a custom Tag Helper to output system information to your layout. You’ll be able to toggle the information it displays, but by default it displays the machine name and operating system on which the app is running, as shown in figure 32.1.

alt text

Figure 32.1 The SystemInfoTagHelper displays the machine name and operating system on which the application is running. It can be useful for identifying which instance of your app handled the request when running in a web-farm scenario.

You can call this Tag Helper from Razor by creating a <system-info> element in your template:

<footer>
<system-info></system-info>
</footer>

TIP You might not want to expose this sort of information in production, so you could also wrap it in an Tag Helper, as you saw in chapter 18.

The easiest way to create a custom Tag Helper is to derive from the TagHelper base class and override the Process() or ProcessAsync() function that describes how the class should render itself. The following listing shows your complete custom Tag Helper, SystemInfoTagHelper, which renders the system information to a

. You could easily extend this class if you wanted to display additional fields or add options.‌‌‌

Listing 32.1 SystemInfoTagHelper to render system information to a view

public class SystemInfoTagHelper : TagHelper ❶
{
private readonly HtmlEncoder _htmlEncoder; ❷
public SystemInfoTagHelper(HtmlEncoder htmlEncoder) ❷
{
_htmlEncoder = htmlEncoder;
}
[HtmlAttributeName("add-machine")] ❸
public bool IncludeMachine { get; set; } = true;
[HtmlAttributeName("add-os")] ❸
public bool IncludeOS { get; set; } = true;
public override void Process( ❹
TagHelperContext context, TagHelperOutput output) ❹
{
output.TagName = "div"; ❺
output.TagMode = TagMode.StartTagAndEndTag; ❻
var sb = new StringBuilder();
if (IncludeMachine) ❼
{ ❼
sb.Append(" <strong>Machine</strong> "); ❼
sb.Append(_htmlEncoder.Encode(Environment.MachineName)); ❼
} ❼
if (IncludeOS) ❽
{ ❽
sb.Append(" <strong>OS</strong> "); ❽
sb.Append( ❽
_htmlEncoder.Encode(RuntimeInformation.OSDescription)); ❽
} ❽
output.Content.SetHtmlContent(sb.ToString()); ❾
}
}

❶ Derives from the TagHelper base class
❷ An HtmlEncoder is necessary when writing HTML content to the page.
❸ Decorating properties with HtmlAttributeName allows you to set their values from Razor markup.
❹ The main function called when an element is rendered.
❺ Replaces the <system-info> element with a <div> element
❻ Renders both the <div> </div> start and end tag
❼ If required, adds a <strong> element and the HTML-encoded machine name
❽ If required, adds a <strong> element and the HTML-encoded OS name
❾ Sets the inner content of the

tag with the HTML-encoded value stored in the string builder

There’s a lot of new code in this example, so we’ll work through it line by line. First, the class name of the Tag Helper defines the name of the element you must create in your Razor template, with the suffix removed and converted to kebab-case. As this Tag Helper is called SystemInfoTagHelper, you must create a <system- info> element.‌

TIP If you want to customize the name of the element, for example to <env-info>, but you want to keep the same class name, you can apply [HtmlTargetElement] with the desired name, such as [HtmlTargetElement("Env-Info")]. HTML tags are not case-sensitive, so you could use "Env-Info" or "env-info".

Inject an HtmlEncoder into your Tag Helper so you can HTML-encode any data you write to the page. As you saw in chapter 29, you should always HTML-encode data you write to the page to avoid cross-site scripting (XSS) vulnerabilities and to ensure that the data is displayed correctly.

You’ve defined two properties on your Tag Helper, IncludeMachine and IncludeOS, which you’ll use to control which data is written to the page. These are decorated with a corresponding [HtmlAttributeName], which enables setting the properties from the Razor template. In Visual Studio you’ll even get IntelliSense and type-checking for these values, as shown in figure 32.2.‌

alt text

Figure 32.2 In Visual Studio, Tag Helpers are shown in a purple font, and you get IntelliSense for properties decorated with [HtmlAttributeName].

Finally, we come to the Process() method. The Razor engine calls this method to execute the Tag Helper when it identifies the target element in a view template. The Process() method defines the type of tag to render (<div>), whether it should render a start and end tag (or a self-closing tag—it depends on the type of tag you’re rendering), and the HTML content of the <div>. You set the HTML content to be rendered inside the tag by calling Content.SetHtmlContent() on the provided instance of TagHelperOutput.

WARNING Always HTML-encode your output before writing to your tag with SetHtmlContent(). Alternatively, pass unencoded input to SetContent(), and the output will be automatically HTML-encoded for you.

Before you can use your new Tag Helper in a Razor template, you need to register it. You can do this in the _ViewImports.cshtml file, using the @addTagHelper directive and specifying the fully qualified name of the Tag Helper and the assembly, as in this example:

@addTagHelper CustomTagHelpers.SystemInfoTagHelper, CustomTagHelpers

Alternatively, you can add all the Tag Helpers from a given assembly by using the wildcard syntax, *, and specifying the assembly name:

@addTagHelper *, CustomTagHelpers

With your custom Tag Helper created and registered, you’re now free to use it in any of your Razor views, partial views, or layouts.

TIP If you’re not seeing IntelliSense for your Tag Helper in Visual Studio, and the Tag Helper isn’t rendered in the bold font used by Visual Studio, you probably haven’t registered your Tag Helpers correctly in _ViewImports .cshtml using @addTagHelper.

The SystemInfoTagHelper is an example of a Tag Helper that generates content, but you can also use Tag Helpers to control how existing elements are rendered. In the next section you’ll create a simple Tag Helper that can control whether an element is rendered based on an HTML attribute.

32.1.2 Creating a custom Tag Helper to conditionally hide elements‌

If you want to control whether an element is displayed in a Razor template based on some C# variable, you’d typically wrap the element in a C# if statement:‌

@{
var showContent = true;
}
@if(showContent)
{
<p>The content to show</p>
}

Falling back to C# constructs like this can be useful, as it allows you to generate any markup you like. Unfortunately, it can be mentally disruptive having to switch back and forth between C# and HTML, and it makes it harder to use HTML editors that don’t understand Razor syntax.

In this section you’ll create a simple Tag Helper to avoid the cognitive dissonance problem. You can apply this Tag Helper to existing elements to achieve the same result as shown previously but without having to fall back to C#:

@{
var showContent = true;
}
<p if="showContent" >
The content to show
</p>

When rendered at runtime, this Razor template would return the HTML

<p>
The content to show
</p>

Instead of creating a new element, as you did for SystemInfoTagHelper (<system-info>), you’ll create a Tag Helper that you apply as an attribute to existing HTML elements. This Tag Helper does one thing: controls the visibility of the element it’s attached to. If the value passed in the if attribute is true, the element and its content is rendered as normal. If the value passed is false, the Tag Helper removes the element and its content from the template. The following listing shows how you could achieve this.

Listing 32.2 Creating an IfTagHelper to conditionally render elements

[HtmlTargetElement(Attributes = "if")] ❶
public class IfTagHelper : TagHelper
{
[HtmlAttributeName("if")] ❷
public bool RenderContent { get; set; } = true;
public override void Process( ❸
TagHelperContext context, TagHelperOutput output) ❸
{
if(RenderContent == false) ❹
{
output.TagName = null; ❺
output.SuppressOutput(); ❻
}
}
public override int Order => int.MinValue; ❼
}

❶ Setting the Attributes property ensures that the Tag Helper is triggered by an if attribute.
❷ Binds the value of the if attribute to the RenderContent property
❸ The Razor engine calls Process() to execute the Tag Helper.
❹ If the RenderContent property evaluates to false, removes the element
❺ Sets the element the Tag Helper resides on to null, removing it from the page
❻ Doesn’t render or evaluate the inner content of the element
❼ Ensures that this Tag Helper runs before any others attached to the element

Instead of a standalone <if> element, the Razor engine executes the IfTagHelper whenever it finds an element with an if attribute. This can be applied to any HTML element: <p>, <div>, <input>, whatever you need. You should define a Boolean property specifying whether you should render the content, which is bound to the value in the if attribute.‌‌‌‌

The Process() function is much simpler here. If RenderContent is false, it sets the TagHelperOutput.TagName to null, which removes the element from the page. It also calls SuppressOutput(), which prevents any content inside the attributed element from being rendered. If RenderContent is true, you skip these steps, and the content is rendered as normal.

One other point of note is the overridden Order property. This controls the order in which Tag Helpers run when multiple Tag Helpers are applied to an element. By setting Order to int.MinValue, you ensure that IfTagHelper always runs first, removing the element if required, before other Tag Helpers execute. There’s generally no point running other Tag Helpers if the element is going to be removed from the page anyway.

NOTE Remember to register your custom Tag Helpers in _ViewImports .cshtml with the @addTagHelper directive.

With a simple HTML attribute, you can now conditionally render elements in Razor templates without having to fall back to C#. This Tag Helper can show and hide content without needing to know what the content is. In the next section we’ll create a Tag Helper that does need to know the content.

32.1.3 Creating a Tag Helper to convert Markdown to HTML‌

The two Tag Helpers shown so far are agnostic to the content written inside the Tag Helper, but it can also be useful to create Tag Helpers that inspect, retrieve, and modify this

content. In this section you’ll see an example of one such Tag Helper that converts Markdown content written inside it to HTML.

DEFINITION Markdown is a commonly used text-based markup language that is easy to read but can also be converted to HTML. It is the common format used by README files on GitHub, and I use it to write blog posts, for example. For an introduction to Markdown, see the GitHub guide at http://mng.bz/o1rp.

We’ll use the popular Markdig library (https://github.com/xoofx/markdig) to create the Markdown Tag Helper. This library converts a string containing Markdown to an HTML string. You can install Markdig using Visual Studio by running dotnet add package Markdig or by adding a <PackageReference> to your .csproj file:

<PackageReference Include="Markdig" Version="0.30.4" />

The Markdown Tag Helper that we’ll create shortly can be used by adding elements to your Razor Page, as shown in the following listing.

Listing 32.3 Using a Markdown Tag Helper in a Razor Page

@page
@model IndexModel
@{
var showContent = true;
}
<markdown> ❶
## This is a markdown title ❷
This is a markdown list: ❸
* Item 1 ❸
* Item 2 ❸
<div if="showContent"> ❹
Content is shown when showContent is true ❹
</div> ❹
</markdown>

❶ Adds the Markdown Tag Helper using the <markdown> element
❷ Creates titles in Markdown using # to denote h1, ## to denote h2, and so on
❸ Markdown converts simple lists to HTML <ul> elements.
❹ Razor content can be nested inside other Tag Helpers.

The Markdown Tag Helper renders content with these steps:

  1. Render any Razor content inside the Tag Helper. This includes executing any nested Tag Helpers and C# code inside the Tag Helper. Listing 32.3 uses the IfTagHelper, for example.

  2. Convert the resulting string to HTML using the Markdig library.

  3. Replace the content with the rendered HTML and remove the Tag Helper <markdown> element.

The following listing shows a simple approach to implementing a Markdown Tag Helper using Markdig. Markdig supports many additional extensions and features that you could enable, but the overall pattern of the Tag Helper would be the same.

Listing 32.4 Implementing a Markdown Tag Helper using Markdig

public class MarkdownTagHelper: TagHelper ❶
{
public override async Task ProcessAsync(
TagHelperContext context, TagHelperOutput output)
{
TagHelperContent markdownRazorContent = await ❷
output.GetChildContentAsync(); ❷
string markdown = ❸
markdownRazorContent.GetContent(); ❸
string html = Markdig.Markdown.ToHtml(markdown); ❹
output.Content.SetHtmlContent(html); ❺
output.TagName = null; ❻
}
}

❶ The Markdown Tag Helper will use the <markdown> element.
❷ Retrieves the contents of the <markdown> element
❸ Renders the Razor contents to a string
❹ Converts the Markdown string to HTML using Markdig
❺ Writes the HTML content to the output
❻ Removes the <markdown> element from the content

When rendered to HTML, the Markdown content in listing 32.3 becomes

<h2>This is a markdown title</h2>
<p>This is a markdown list:</p>
<ul>
<li>Item 1</li>
<li>Item 2</li>
</ul>
<div>
Content is shown when showContent is true
</div>

NOTE In listing 32.4 we implemented ProcessAsync() instead of Process() because we called the async method GetChildContentAsync(). You must call async methods only from other async methods; otherwise, you can get problems such as thread starvation. For more details, see Microsoft’s “ASP.NET Core Best Practices” at http://mng.bz/KM7X.‌

The Tag Helpers in this section represent a small sample of possible avenues you could explore, but they cover the two broad categories: Tag Helpers for rendering new content and Tag Helpers for controlling the rendering of other elements.

TIP For further details and examples, see Microsoft’s “Author Tag Helpers in ASP.NET Core” documentation at http://mng.bz/Idb0.

Tag Helpers can be useful for providing small pieces of isolated, reusable functionality like this, but they’re not designed to provide larger, application-specific sections of an app or to make calls to business-logic services. Instead, you should use view components, as you’ll see in the next section.‌

32.2 View components: Adding logic to partial views‌

In this section you’ll learn about view components, which operate independently of the main Razor Page and can be used to encapsulate complex business logic. You can use view components to keep your main Razor Page focused on a single task—rendering the main content—instead of also being responsible for other sections of the page.

If you think about a typical website, you’ll notice that it may have multiple independent dynamic sections in addition to the main content. Consider Stack Overflow, shown in figure 32.3. As well as the main body of the page, which shows questions and answers, there’s a section showing the current logged-in user, a panel for blog posts and related items, and a section for job suggestions.

alt text

Figure 32.3 The Stack Overflow website has multiple sections that are independent of the main content but contain business logic and complex rendering logic.

Each of these sections could be rendered as a view component in ASP.NET Core.

Each of these sections is effectively independent of the main content. Each section contains business logic (deciding which posts or ads to show), database access (loading the details of the posts), and rendering logic for how to display the data.

In chapter 7 you saw that you can use layouts and partial views to split the rendering of a view template into similar sections, but partial views aren’t a good fit for this example. Partial views let you encapsulate view rendering logic but not business logic that’s independent of the main page content. Instead, view components provide this functionality, encapsulating both the business logic and rendering logic for displaying a small section of the page. You can use DI to provide access to a database context, and you can test view components independently of the view they generate, much like MVC and API controllers. Think of them as being a bit like mini MVC controllers or mini Razor Pages, but you invoke them directly from a Razor view instead of in response to an HTTP request.

TIP View components are comparable to child actions from the legacy .NET Framework version of ASP.NET, in that they provide similar functionality. Child actions don’t exist in ASP.NET Core.

View components vs. Razor Components and Blazor

In this book I focus on server-side rendered applications using Razor Pages and API applications using minimal APIs and web API controllers. .NET 7 also has a different approach to building ASP.NET Core applications: Blazor. I don’t cover Blazor in this book, so I recommend reading Blazor in Action, by Chris Sainty (Manning, 2021).‌

Blazor has two programming models, client-side and server-side, but both approaches use Blazor components (confusingly, officially called Razor components). Blazor components have a lot of parallels with view components, but they live in a fundamentally different world. Blazor components can interact easily, but you can’t use them with Tag Helpers or view components, and it’s hard to combine them with Razor Page form posts.

Nevertheless, if you need an island of rich client-side interactivity in a single Razor Page, you can embed a Blazor component in a Razor Page, as shown in the “Render components from a page or view” section of the “Prerender and integrate ASP.NET Core Razor components” documentation at http://mng.bz/PPen. You could also use Blazor components as a way to replace Asynchronous JavaScript and XML (AJAX) calls in your Razor Pages, as I show in my blog entry “Replacing AJAX calls in Razor Pages with Razor Components and Blazor” at http://mng.bz/9MJj.

If you don’t need the client-side interactivity of Blazor, view components are still the best option for isolated sections in Razor Pages. They interoperate cleanly with your Razor Pages; have no additional operational overhead; and use familiar concepts like layouts, partial views, and Tag Helpers. For more details on why you should continue to use view components, see my “Don’t replace your View Components with Razor Components” blog entry at http://mng.bz/1rKq.

In this section you’ll see how to create a custom view component for the recipe app you built in previous chapters, as shown in figure 32.4. If the current user is logged in, the view component displays a panel with a list of links to the user’s recently created recipes. For unauthenticated users, the view component displays links to the login and register actions.

alt text

Figure 32.4 The view component displays different content based on the currently logged-in user. It includes both business logic (determining which recipes to load from the database) and rendering logic (specifying how to display the data).

This component is a great candidate for a view component, as it contains database access and business logic (choosing which recipes to display) as well as rendering logic (deciding how the panel should be displayed).

TIP Use partial views when you want to encapsulate the rendering of a specific view model or part of a view model. Consider using a view component when you have rendering logic that requires business logic or database access or when the section is logically distinct from the main page content.

You invoke view components directly from Razor views and layouts using a Tag Helper-style syntax with a vc: prefix:

<vc:my-recipes number-of-recipes="3">
</vc:my-recipes>

Custom view components typically derive from the ViewComponent base class and implement an InvokeAsync() method, as shown in listing 32.5. Deriving from this base class allows access to useful helper methods in much the same way that deriving from the ControllerBase class does for API controllers. Unlike with API controllers, the parameters passed to InvokeAsync don’t come from model binding. Instead, you pass the parameters to the view component using properties on the Tag Helper element in your Razor view.‌‌

Listing 32.5 A custom view component to display the current user’s recipes

public class MyRecipesViewComponent : ViewComponent ❶
{
private readonly RecipeService _recipeService; ❷
private readonly UserManager<ApplicationUser> _userManager; ❷
public MyRecipesViewComponent(RecipeService recipeService, ❷
UserManager<ApplicationUser> userManager) ❷
{ ❷
_recipeService = recipeService; ❷
_userManager = userManager; ❷
} ❷
public async Task<IViewComponentResult> InvokeAsync( ❸
int numberOfRecipes) ❹
{
if(!User.Identity.IsAuthenticated)
{
return View("Unauthenticated"); ❺
}
var userId = _userManager.GetUserId(HttpContext.User); ❻
var recipes = await _recipeService.GetRecipesForUser( ❻
userId, numberOfRecipes);
return View(recipes); ❼
}
}

❶ Deriving from the ViewComponent base class provides useful methods like
View().
❷ You can use DI in a view component.
❸ InvokeAsync renders the view component. It should return a
Task<IViewComponentResult>.
❹ You can pass parameters to the component from the view.
❺ Calling View() will render a partial view with the provided name.
❻ You can use async external services, allowing you to encapsulate logic in your
business domain.
❼ You can pass a view model to the partial view. Default.cshtml is used by
default.

This custom view component handles all the logic you need to render a list of recipes when the user is logged in or a different view if the user isn’t authenticated. The name of the view component is derived from the class name, like Tag Helpers. Alternatively, you can apply the [ViewComponent] attribute to the class and set a different name entirely.

The InvokeAsync method must return a Task<IViewComponentResult>. This is similar to the way you can return IActionResult from an action method or a page handler, but it’s more restrictive; view components must render some sort of content, so you can’t return status codes or redirects. You’ll typically use the View() helper method to render a partial view template (as in the previous listing), though you can also return a string directly using the Content() helper method, which will HTML-encode the content and render it to the page directly.‌‌

You can pass any number of parameters to the InvokeAsync method. The name of the parameters (in this case, numberOfRecipes) is converted to kebab-case and exposed as a property in the view component’s Tag Helper (<number-of-recipes>). You can provide these parameters when you invoke the view component from a view, and you’ll get IntelliSense support, as shown in figure 32.5.

alt text

Figure 32.5 Visual Studio provides IntelliSense support for the method parameters of a view component’s InvokeAsync method. The parameter name, in this case numberOfRecipes, is converted to kebab-case for use as an attribute in the Tag Helper.

View components have access to the current request and HttpContext. In listing 32.5 you can see that we’re checking whether the current request was from an authenticated user. You can also see that we’ve used some conditional logic. If the user isn’t authenticated, we render the “Unauthenticated” Razor template; if they’re authenticated, we render the default Razor template and pass in the view models loaded from the database.

NOTE If you don’t specify a specific Razor view template to use in the View() function, view components use the template name Default.cshtml.

The partial views for view components work similarly to other Razor partial views that you learned about in chapter 7, but they’re stored separately from them. You must create partial views for view components at one of these locations:

• Views/Shared/Components/ComponentName/Templ ateName

• Pages/Shared/Components/ComponentName/Templ ateName

Both locations work, so for Razor Pages apps I typically use the Pages/ folder. For the view component in listing 32.5, for example, you’d create your view templates at

• Pages/Shared/Components/MyRecipes/Def ault.cshtml
• Pages/Shared/Components/MyRecipes/Una uthenticated.cshtml

This was a quick introduction to view components, but it should get you a long way. View components are a simple way to embed pockets of isolated, complex logic in your Razor layouts. Having said that, be mindful of these caveats:

• View component classes must be public, non- nested, and nonabstract classes.

• Although they’re similar to MVC controllers, you can’t use filters with view components.

• You can use layouts in your view components’ views to extract rendering logic common to a specific view component. This layout may contain @sections, as you saw in chapter 7, but these sections are independent of the main Razor view’s layout.

• View components are isolated from the Razor Page they’re rendered in, so you can’t, for example, define a @section in a Razor Page layout and then add that content from a view component; the contexts are completely separate.

• When using the <vc:my-recipes> Tag Helper syntax to invoke your view component, you must import it as a custom Tag Helper, as you saw in section 32.1.

• Instead of using the Tag Helper syntax, you may invoke the view component from a view directly by using IViewComponentHelper Component, though I don’t recommend using this syntax, as in this example:

@await Component.InvokeAsync("MyRecipes", new { numberOfRecipes = 3 })

We’ve covered Tag Helpers and view components, which are both features of the Razor engine in ASP.NET Core. In the next section you’ll learn about a different but related topic: how to create a custom DataAnnotations attribute. If you’ve used older versions of ASP.NET, this will be familiar, but ASP.NET Core has a couple of tricks up its sleeve to help you out.‌

32.3 Building a custom validation attribute‌

In this section you’ll learn how to create a custom DataAnnotations validation attribute that specifies specific values a string property may take. You’ll then learn how you can expand the functionality to be more generic by delegating to a separate service that is configured in your DI controller. This will allow you to create custom domain-specific validations for your apps.‌

We looked at model binding in chapter 7, where you saw how to use the built-in DataAnnotations attributes in your binding models to validate user input. These provide several built-in validations, such as

• [Required]—The property isn’t optional and must be provided.

• [StringLength(min, max)]—The length of the string value must be between min and max characters.

• [EmailAddress]—The value must have a valid email address format.

But what if these attributes don’t meet your requirements? Consider the following listing, which shows a binding model from a currency converter application. The model contains three properties: the currency to convert from, the currency to convert to, and the quantity.

Listing 32.6 Currency converter initial binding model

public class CurrencyConverterModel
{
[Required] ❶
[StringLength(3, MinimumLength = 3)] ❷
public string CurrencyFrom { get; set; }
[Required] ❶
[StringLength(3, MinimumLength = 3)] ❷
public string CurrencyTo { get; set; }
[Required] ❶
[Range(1, 1000)] ❸
public decimal Quantity { get; set; }
}

❶ All the properties are required.
❷ The strings must be exactly three characters.
❸ The quantity can be between 1 and 1000.

There’s some basic validation on this model, but during testing you identify a problem: users can enter any three- letter string for the CurrencyFrom and CurrencyTo properties. Users should be able to choose only a valid currency code, like "USD" or "GBP", but someone attacking your application could easily send "XXX" or "£$%".‌

Assuming that you support a limited set of currencies—say, GBP, USD, EUR, and CAD—you could handle the validation in a few ways. One way would be to validate the CurrencyFrom and CurrencyTo values within the Razor Page handler method, after model binding and attribute validation has already occurred.

Another way would be to use a [RegularExpresssion] attribute to look for the allowed strings. The approach I’m going to take here is to create a custom ValidationAttribute. The goal is to have a custom validation attribute you can apply to the CurrencyFrom and CurrencyTo attributes, to restrict the range of valid values. This will look something like the following example.

Listing 32.7 Applying custom validation attributes to the binding model

public class CurrencyConverterModel
{
[Required]
[StringLength(3, MinimumLength = 3)]
[CurrencyCode("GBP", "USD", "CAD", "EUR")] ❶
public string CurrencyFrom { get; set; }
[Required]
[StringLength(3, MinimumLength = 3)]
[CurrencyCode("GBP", "USD", "CAD", "EUR")] ❶
public string CurrencyTo { get; set; }
[Required]
[Range(1, 1000)]
public decimal Quantity { get; set; }
}

❶ CurrencyCodeAttribute validates that the property has one of the provided
values.

Creating a custom validation attribute is simple; you can start with the ValidationAttribute base class, and you have to override only a single method. The next listing shows how you could implement CurrencyCodeAttribute to ensure that the currency codes provided match the expected values.

Listing 32.8 Custom validation attribute for currency codes

public class CurrencyCodeAttribute : ValidationAttribute ❶
{
private readonly string[] _allowedCodes; ❷
public CurrencyCodeAttribute(params string[] allowedCodes) ❷
{ ❷
_allowedCodes = allowedCodes; ❷
} ❷
protected override ValidationResult IsValid( ❸
object value, ValidationContext context) ❸
{
if(value is not string code ❹
|| !_allowedCodes.Contains(code)) ❺
{ ❺
return new ValidationResult("Not a valid currency code"); ❺
}
return ValidationResult.Success; ❻
}
}

❶ Derives from ValidationAttribute to ensure that your attribute is used during validation
❷ The attribute takes in an array of allowed currency codes.
❸ The IsValid method is passed the value to validate and a context object.
❹ Tries to cast the value to a string and store it in the code variable
❺ If the value provided isn’t a string, is null, or isn’t an allowed code, returns an error . . .
❻ . . .otherwise, returns a success result.

As you know from chapter 16, Validation occurs in the filter pipeline after model binding, before the action or Razor Page handler executes. The validation framework calls IsValid() for each instance of ValidationAttribute on the model property being validated. The framework passes in value (the value of the property being validated) and the ValidationContext to each attribute in turn. The context object contains details that you can use to validate the property.

Of particular note is the ObjectInstance property. You can use this to access the top-level model being validated when you validate a subproperty. For example, if the CurrencyFrom property of the CurrencyConvertModel is being validated, you can access the top-level object from the ValidationAttribute as follows:

var model = validationContext.ObjectInstance as CurrencyConverterModel;

This can be useful if the validity of a property depends on the value of another property of the model. For example, you might want a validation rule that says that GBP is a valid value for CurrencyTo except when CurrencyFrom is also GBP. ObjectInstance makes these sorts of comparison validations easy.

NOTE Although using ObjectInstance makes it easy to make model-level comparisons like these, it reduces the portability of your validation attribute. In this case, you would be able to use the attribute only in the application that defines CurrencyConverterModel.

Within the IsValid() method, you can cast the value provided to the required data type (in this case, string) and check against the list of allowed codes. If the code isn’t allowed, the attribute returns a ValidationResult with an error message indicating that there was a problem. If the code is allowed, ValidationResult.Success is returned, and the validation succeeds.

Putting your attribute to the test in figure 32.6 shows that when CurrencyTo is an invalid value (£$%), the validation for the property fails, and an error is added to the ModelState. You could do some tidying-up of this attribute to set a custom message, allow nulls, or display the name of the property that’s invalid, but all the important features are there.

alt text

Figure 32.6 The Watch window of Visual Studio showing the result of validation using the custom ValidationAttribute. The user has provided an invalid currencyTo value, £$%. Consequently, ModelState isn’t valid and contains a single error with the message "Not a valid currency code".

The main feature missing from this custom attribute is client- side validation. You’ve seen that the attribute works well on the server side, but if the user entered an invalid value, they wouldn’t be informed until after the invalid value had been sent to the server. That’s safe, and it’s as much as you need to do for security and data-consistency purposes, but client- side validation can improve the user experience by providing immediate feedback.

You can implement client-side validation in several ways, but it’s heavily dependent on the JavaScript libraries you use to provide the functionality. Currently, ASP.NET Core Razor templates rely on jQuery for client-side validation. See the “Custom client-side validation” section of Microsoft’s “Model validation in ASP.NET Core MVC and Razor Pages” documentation for an example of creating a jQuery Validation adapter for your attributes: http://mng.bz/Wd6g.

TIP Instead of using the official jQuery-based validation libraries, you could use the open source aspnet-client- validation library (https://github.com/haacked/aspnet-client- validation) as I describe on my blog at http://mng.bz/AoXe.

Another improvement to your custom validation attribute would be to load the list of currencies from a DI service, such as an ICurrencyProvider. Unfortunately, you can’t use constructor DI in your CurrencyCodeAttribute, as you can pass only constant values to the constructor of an Attribute in .NET. In chapter 22 we worked around this limitation for filters by using [TypeFilter] or [ServiceFilter], but there’s no such solution for ValidationAttribute.

Instead, for validation attributes you must use the service locator pattern. As I discussed in chapter 9, this antipattern is best avoided where possible, but unfortunately it’s necessary in this case. Instead of declaring an explicit dependency via a constructor, you must ask the DI container directly for an instance of the required service.

Listing 32.9 shows how you could rewrite listing 32.8 to load the allowed currencies from an instance of ICurrencyProvider instead of hardcoding the allowed values in the attribute’s constructor. The attribute calls the GetService() method on ValidationContext to resolve an instance of ICurrencyProvider from the DI container. Note that ICurrencyProvider is a hypothetical service that would need to be registered in your application’s ConfigureServices() method in Startup.cs.‌

Listing 32.9 Using the service-locator pattern to access services

public class CurrencyCodeAttribute : ValidationAttribute
{
protected override ValidationResult IsValid(
object value, ValidationContext context)
{
var provider = context ❶
.GetRequiredService<ICurrencyProvider>(); ❶
var allowedCodes = provider.GetCurrencies(); ❷
if(value is not string code ❸
|| !_allowedCodes.Contains(code)) ❸
{ ❸
return new ValidationResult("Not a valid currency code"); ❸
} ❸
return ValidationResult.Success; ❸
}
}

❶ Retrieves an instance of ICurrencyProvider directly from the DI container
❷ Fetches the currency codes using the provider
❸ Validates the property as before

TIP The generic GetRequiredService<T> method is an extension method available in the Microsoft.Extensions.DependencyInjection namespace.‌

The default DataAnnotations validation system can be convenient due to its declarative nature, but this has tradeoffs, as shown by the dependency injection problem above. Luckily, you can replace the validation system your application uses, as shown in the following section.

32.4 Replacing the validation framework with FluentValidation‌

In this section you’ll learn how to replace the DataAnnotations-based validation framework that’s used by default in Razor Pages and MVC Controllers. You’ll see the arguments for why you might want to do this and learn how to use a third-party alternative: FluentValidation. This open- source project allows you to define the validation requirements of your models separately from the models themselves. This separation can make some types of validation easier and ensures that each class in your application has a single responsibility.‌

Validation is an important part of the model-binding process in ASP.NET Core. In chapter 7 you learned that minimal APIs don’t have any validation built in, so you’re free to choose whichever framework you like. I demonstrated using DataAnnotations, but you could easily choose a different validation framework.

In Razor Pages and MVC, however, the DataAnnotations validation framework is built into ASP.NET Core. You can apply DataAnnotations attributes to properties of your binding models to define your requirements, and ASP.NET Core automatically validates them. In section 32.3 we even created a custom validation attribute.

But ASP.NET Core is flexible. You can replace whole chunks of the Razor Pages and MVC frameworks if you like. The validation system is one such area that many people choose to replace.

FluentValidation (https://fluentvalidation.net) is a popular alternative validation framework for ASP.NET Core. It is a mature library, with roots going back well before ASP.NET Core was conceived of. With FluentValidation you write your validation code separately from your binding model code.This gives several advantages:

• You’re not restricted to the limitations of Attributes, such as the dependency injection problem we had to work around in listing 32.9.

• It’s much easier to create validation rules that apply to multiple properties, such as to ensure that an EndDate property contains a later value than a StartDate property. Achieving this with DataAnnotations attributes is possible but difficult.‌

• It’s generally easier to test FluentValidation validators than DataAnnotations attributes.

• The validation is strongly typed compared with DataAnnotations attributes where it’s possible to apply attributes in ways that don’t make sense, such as applying an [EmailAddress] attribute to an int property.

• Separating your validation logic from the model itself arguably better conforms to the single- responsibility principle (SRP).

That final point is sometimes given as a reason not to use FluentValidation: FluentValidation separates a binding model from its validation rules. Some people are happy to accept the limitations of DataAnnotations to keep the model and validation rules together.

Before I show how to add FluentValidation to your application, let’s see what FluentValidation validators look like.

32.4.1 Comparing FluentValidation with DataAnnotations attributes‌

To better understand the difference between the DataAnnotations approach and FluentValidation, we’ll convert the binding models from section 32.3 to use FluentValidation. The following listing shows what the binding model from listing 32.7 would look like when used with FluentValidation. It is structurally identical but has no validation attributes.

Listing 32.10 Currency converter initial binding model for use with FluentValidation

public class CurrencyConverterModel
{
public string CurrencyFrom { get; set; }
public string CurrencyTo { get; set; }
public decimal Quantity { get; set; }
}

In FluentValidation you define your validation rules in a separate class, with a class per model to be validated. Typically, these rules derive from the AbstractValidator<> base class, which provides a set of extension methods for defining your validation rules.‌

The following listing shows a validator for the CurrencyConverterModel, which matches the validations added using attributes in listing 32.7. You create a set of validation rules for a property by calling RuleFor() and chaining method calls such as NotEmpty() from it. This style of method chaining is called a fluent interface, hence the name.

Listing 32.11 A FluentValidation validator for the currency converter binding model

public class CurrencyConverterModelValidator ❶
: AbstractValidator<CurrencyConverterModel> ❶
{
private readonly string[] _allowedValues ❷
= new []{ "GBP", "USD", "CAD", "EUR" }; ❷
public CurrencyConverterModelValidator() ❸
{
RuleFor(x => x.CurrencyFrom) ❹
.NotEmpty() ❺
.Length(3) ❺
.Must(value => _allowedValues.Contains(value)) ❻
.WithMessage("Not a valid currency code"); ❻
RuleFor(x => x.CurrencyTo)
.NotEmpty()
.Length(3)
.Must(value => _allowedValues.Contains(value))
.WithMessage("Not a valid currency code");
RuleFor(x => x.Quantity)
.NotNull()
.InclusiveBetween(1, 1000); ❼
}
}

❶ The validator inherits from AbstractValidator.
❷ Defines the static list of currency codes that are supported
❸ You define validation rules in the validator’s constructor.
❹ RuleFor is used to add a new validation rule. The lambda syntax allows for strong typing.
❺ There are equivalent rules for common DataAnnotations validation attributes.
❻ You can easily add custom validation rules without having to create separate
classes.
❼ Thanks to strong typing, the rules available depend on the property being
validated.

Your first impression of this code might be that it’s quite verbose compared with listing 32.7, but remember that listing 32.7 used a custom validation attribute, [CurrencyCode]. The validation in listing 32.11 doesn’t require anything else. The logic implemented by the [CurrencyCode] attribute is right there in the validator, making it easy to reason about. The Must() method can be used to perform arbitrarily complex validations without having the additional layers of indirection required by custom DataAnnotations attributes.‌

On top of that, you’ll notice that you can define only validation rules that make sense for the property being validated. Previously, there was nothing to stop us from applying the [CurrencyCode] attribute to the Quantity property; that’s not possible with FluentValidation.

Of course, just because you can write the custom [CurrencyCode] logic in-line doesn’t necessarily mean you have to. If a rule is used in multiple parts of your application, it may make sense to extract it into a helper class. The following listing shows how you could extract the currency code logic into an extension method that can be used in multiple validators.

Listing 32.12 An extension method for currency validation

public static class ValidationExtensions
{
    public static IRuleBuilderOptions<T, string> ❶
MustBeCurrencyCode<T>( ❶
this IRuleBuilder<T, string> ruleBuilder) ❶
{
return ruleBuilder ❷
.Must(value => _allowedValues.Contains(value)) ❷
.WithMessage("Not a valid currency code"); ❷
}
private static readonly string[] _allowedValues = ❸
new []{ "GBP", "USD", "CAD", "EUR" }; ❸
}

❶ Creates an extension method that can be chained from RuleFor() for string
properties
❷ Applies the same validation logic as before
❸ The currency code values to allow

You can then update your CurrencyConverterModelValidator to use the new extension method, removing the duplication in your validator and ensuring consistency across country-code fields:

RuleFor(x => x.CurrencyTo)
.NotEmpty()
.Length(3)
.MustBeCurrencyCode();

Another advantage of the FluentValidation approach of using standalone validation classes is that they are created using DI, so you can inject services into them. As an example, consider the [CurrencyCode] validation attribute from listing 32.9, which used a service, ICurrencyProvider, from the DI container. This requires using service location to obtain an instance of ICurrencyProvider using an injected context object.‌

With the FluentValidation library, you can inject the ICurrencyProvider directly into your validator, as shown in the following listing. This requires fewer gymnastics to get the desired functionality and makes your validator’s dependencies explicit.

Listing 32.13 Currency converter validator using dependency injection

public class CurrencyConverterModelValidator
: AbstractValidator<CurrencyConverterModel>
{
public CurrencyConverterModelValidator(ICurrencyProvider provider) ❶
{
RuleFor(x => x.CurrencyFrom)
.NotEmpty()
.Length(3)
.Must(value => provider ❷
.GetCurrencies() ❷
.Contains(value)) ❷
.WithMessage("Not a valid currency code");
RuleFor(x => x.CurrencyTo)
.NotEmpty()
.Length(3)
.MustBeCurrencyCode(provider.GetCurrencies()); ❸
RuleFor(x => x.Quantity)
.NotNull()
.InclusiveBetween(1, 1000);
}
}

❶ Injects the service using standard constructor dependency injection
❷ Uses the injected service in a Must() rule
❸ Uses the injected service with an extension method

The final feature I’ll show demonstrates how much easier it is to write validators that span multiple properties with FluentValidation. For example, imagine we want to validate that the value of CurrencyTo is different from CurrencyFrom. Using FluentValidation, you can implement this with an overload of Must(), which provides both the model and the property being validated, as shown in the following listing.

Listing 32.14 Using Must() to validate that two properties are different

RuleFor(x => x.CurrencyTo) ❶
.NotEmpty()
.Length(3)
.MustBeCurrencyCode()
.Must((InputModel model, string currencyTo) ❷
=> currencyTo != model.CurrencyFrom) ❸
.WithMessage("Cannot convert currency to itself"); ❹

❶ The error message will be associated with the CurrencyTo property.
❷ The Must function passes the top-level model being validated and the current property.
❸ Performs the validation. The currencies must be different.
❹ Uses the provided message as the error message

Creating a validator like this is certainly possible with DataAnnotations attributes, but it requires far more ceremony than the FluentValidation equivalent and is generally harder to test. FluentValidation has many more features for making it easier to write and test your validators, too:

• Complex property validations—Validators can be applied to complex types as well as to the primitive types like string and int shown here in this section.

• Custom property validators—In addition to simple extension methods, you can create your own property validators for complex validation scenarios.

• Collection rules—When types contain collections, such as List<T>, you can apply validation to each item in the list, as well as to the overall collection.

• RuleSets—You can create multiple collections of rules that can be applied to an object in different circumstances. These can be especially useful if you’re using FluentValidation in additional areas of your application.

• Client-side validation—FluentValidation is a server- side framework, but it emits the same attributes as DataAnnotations attributes to enable client- side validation using jQuery.

There are many more features, so be sure to browse the documentation at https://docs.fluentvalidation.net for details. In the next section you’ll see how to add FluentValidation to your ASP.NET Core application.‌

32.4.2 Adding FluentValidation to your application‌

Replacing the whole validation system of ASP.NET Core sounds like a big step, but the FluentValidation library makes it easy to add to your application. Simply follow these steps:

  1. Install the FluentValidation.AspNetCore NuGet package using Visual Studio’s NuGet package manager via the command-line interface (CLI) by running dotnet add package FluentValidation.AspNetCore or by adding a <PackageReference> to your .csproj file:

    <PackageReference Include="FluentValidation.AspNetCore" Version="11.2.2" />
  2. Configure the FluentValidation library for MVC and Razor Pages in Program.cs by calling builder.Services.AddFluentValidationA utoValidation(). You can further configure the library as shown in listing 32.15.

  3. Register your validators (such as the CurrencyConverterModelValidator from listing 32.13) with the DI container. These can be registered manually, using any scope you choose:

    WebApplicationBuilder builder = WebApplication.CreateBuilder(args); builder.Services.AddRazorPages(); builder.Services.AddFluentValidationAutoValidation(); builder.services.AddScoped<IValidator<CurrencyConverterModelValidator>, CurrencyConverterModelValidator>();

Alternatively, you can allow FluentValidation to automatically register all your validators using the options shown in listing 32.15.

For such a mature library, FluentValidation has relatively few configuration options to decipher. The following listing shows some of the options available; in particular, it shows how to automatically register all the custom validators in your application and disable DataAnnotations validation.

Listing 32.15 Configuring FluentValidation in an ASP.NET Core application

var builder = WebApplication.CreateBuilder(args);
builder.Services.AddRazorPages();
builder.Services.AddValidatorsFromAssemblyContaining<Program>(); ❶
builder.Services.AddFluentValidationAutoValidation( ❷
x => x.DisableDataAnnotationsValidation = true) ❷
.AddFluentValidationClientsideAdapters(); ❸
ValidatorOptions.Global.LanguageManager.Enabled = false; ❹

❶ Instead of manually registering validators, FluentValidation can autoregister them for you.
❷ Setting to true disables DataAnnotations validation completely for model binding.
❸ Enables integration with client-side validation via data-* attributes
❹ FluentValidation has full localization support, but you can disable it if you don’t need it.

It’s important to understand that if you don’t set DisableDataAnnotationsValidation to true, ASP.NET Core will run validation with both DataAnnotations and FluentValidation. That may be useful if you’re in the process of migrating from one system to the other, but otherwise, I recommend disabling it. Having your validation split between both places seems like the worst of both worlds!

One final thing to consider is where to put your validators in your solution. There are no technical requirements for this; if you’ve registered your validator with the DI container, it will be used correctly, so the choice is up to you. I prefer to place validators close to the models they’re validating.

For Razor Pages binding-model validators, I create the validator as a nested class of the PageModel, in the same place as I create the InputModel, as described in chapter 16. That gives a class hierarchy in the Razor Page similar to the following:

public class IndexPage : PageModel
{
public class InputModel { }
public class InputModelValidator: AbstractValidator<InputModel> { }
}

That’s my preference. Of course, you’re free to adopt another approach if you prefer.

That brings us to the end of this chapter on custom Razor Pages components. When you combine it with the components in the previous chapter, you’ve got a great base for extending your ASP.NET Core applications to meet your needs. It’s a testament to ASP.NET Core’s design that you can swap out whole sections like the Validation framework entirely. If you don’t like how some part of the framework works, see whether someone has written an alternative!‌

Summary

With Tag Helpers, you can bind your data model to HTML elements, making it easier to generate dynamic HTML. Tag Helpers can customize the elements they’re attached to, add attributes, and customize how they’re rendered to HTML. This can greatly reduce the amount of markup you need to write.

The name of a Tag Helper class dictates the name of the element in the Razor templates, so the SystemInfoTagHelper corresponds to the

<system-info> element. You can choose a different element name by adding the [HtmlTargetElement] attribute to your Tag Helper.

You can set properties on your Tag Helper object from Razor syntax by decorating the property with an [HtmlAttributeName("name")] attribute and providing a name. You can set these properties from Razor using HTML attributes, as in <system- info name="value">.

The TagHelperOutput parameter passed to the Process or ProcessAsync methods control the HTML that’s rendered to the page. You can set the element type with the TagName property and set the inner content using Content.SetContent() or Content.SetHtmlContent().

You can prevent inner Tag Helper content from being processed by calling SupressOutput(), and you can remove the element by setting TagName=null. This is useful if you want to conditionally render elements to the response.

You can retrieve the contents of a Tag Helper by calling GetChildContentAsync() on the TagHelperOutput parameter. You can then render this content to a string by calling GetContent(). This will render any Razor expressions and Tag Helpers to HTML, allowing you to manipulate the contents.

View components are like partial views, but they allow you to use complex business and rendering logic. You can use them for sections of a page, such as the shopping cart, a dynamic navigation menu, or suggested articles.

Create a view component by deriving from the ViewComponent base class and implementing InvokeAsync(). You can pass parameters to this function from the Razor view template using HTML attributes, in a similar way to Tag Helpers.

View components can use DI, access the HttpContext, and render partial views. The partial views should be stored in the Pages/Shared/Components/<Name>/ folder, where Name is the name of the view component. If not specified, view components will look for a default view named Default.cshtml.

You can create a custom DataAnnotations attribute by deriving from ValidationAttribute and overriding the IsValid method. You can use this to decorate your binding model properties and perform arbitrary validation.

You can’t use constructor DI with custom validation attributes. If the validation attribute needs access to services from the DI container, you must use the Service Locator pattern to load them from the validation context, using the GetService<T> method.

FluentValidation is an alternative validation system that can replace the default DataAnnotations validation system. It is not based on attributes, which makes it easier to write custom validations for your validation rules and makes those rules easier to test.

To create a validator for a model, create a class derived from AbstractValidator<> and call RuleFor<>() in the constructor to add validation rules. You can chain multiple requirements on RuleFor<>() in the same way that you could add multiple DataAnnotations attributes to a model.

If you need to create a custom validation rule, you can use the Must() method to specify a predicate. If you wish to reuse the validation rule across multiple models, encapsulate the rule as an extension method to reduce duplication.

To add FluentValidation to your application, install the FluentValidation .AspNetCore NuGet package, call AddFluentValidationAutoValidation() in Program.cs, and register your validators with the DI container. This will add FluentValidation validations in addition to the built-in DataAnnotations system.

To remove the DataAnnotations validation system and use FluentValidation only, set the DisableDataAnnotationsValidation option to true in your call to AddFluentValidationAutoValidation().

Favor this approach where possible to avoid running validation methods from two different systems.

You can allow FluentValidation to automatically discover and register all the validators in your application by calling AddValidatorsFromAssemblyContaining<T>(), where T is a type in the assembly to scan. This means you don’t have to register each validator in your application with the DI container individually.

ASP.NET Core in Action 31 Advanced configuration of ASP.NET Core

31 Advanced configuration of ASP.NET Core‌

This chapter covers

• Building custom middleware
• Using dependency injection (DI) services in IOptions configuration
• Replacing the built-in DI container with a third-party container

When you’re building apps with ASP.NET Core, most of your creativity and specialization go into the services and models that make up your business logic and the Razor Pages and APIs that expose them. Eventually, however, you’re likely to find that you can’t quite achieve a desired feature using the components that come out of the box. At that point, you may need to look to more complex uses of the built- in features.

This chapter shows some of the ways you can customize cross-cutting parts of your application, such as your DI container or your middleware pipeline. These approaches are particularly useful if you’re coming from a legacy application or are working on an existing project, and you want to continue to use the patterns and libraries you’re familiar with.

We’ll start by looking at the middleware pipeline. You saw how to build pipelines by piecing together existing

middleware in chapter 4, but in this chapter you’ll create your own custom middleware. You’ll explore the basic middleware constructs of the Map, Use, and Run methods and learn how to create standalone middleware classes.‌

You’ll use these to build middleware components that can add headers to all your responses as well as middleware that returns responses. Finally, you’ll learn how to turn your custom middleware into a simple endpoint, using endpoint routing.

In chapter 10 you learned about strongly typed configuration using the IOptions<T> pattern, and in section 31.2 you’ll learn how to take this further. You’ll learn how to use the OptionsBuilder<T> type to fluently build your IOptions<T> object with the builder pattern. You’ll also see how to use services from DI when configuring your IOptions objects—something that’s not possible using the methods you’ve seen so far.

We stick with DI in section 31.3, where I’ll show you how to replace the built-in DI container with a third-party alternative. The built-in container is fine for most small apps, but your ConfigureServices function can quickly get bloated as your app grows and you register more services.

I’ll show you how to integrate the third-party Lamar library into an existing app, so you can use extra features such as automatic service registration by convention.

The components and techniques shown in this chapter are more advanced than most features you’ve seen so far. You likely won’t need them in every ASP.NET Core project, but they’re good to have in your back pocket should the need arise!

31.1 Customizing your middleware pipeline‌

In this section you’ll learn how to create custom middleware. You’ll learn how to use the Map, Run, and Use extension methods to create simple middleware using lambda expressions. You’ll then see how to create equivalent middleware components using dedicated classes. You’ll also learn how to split the middleware pipeline into branches, and you’ll find out when this is useful.

The middleware pipeline is one of the building blocks of ASP.NET Core apps, so we covered it in depth in chapter 4. Every request passes through the middleware pipeline, and each middleware component in turn gets an opportunity to modify the request or to handle it and return a response.

ASP.NET Core includes middleware for handling common scenarios out of the box. You’ll find middleware for serving static files, handling errors, authentication, and many more tasks.

You’ll spend most of your time during development working with Razor Pages, minimal API endpoints, or web API controllers. These are exposed as the endpoints for most of your app’s business logic, and they call methods on your app’s various business services and models. However, you’ve also seen middleware like the Swagger middleware and the WelcomePageMiddleware that returns a response without using the endpoint routing system. The various improvements to the routing system in .NET 7 mean I rarely find the need to create “terminal” middleware like this, as endpoint routing is easy to work with and extensible.Nevertheless, it may occasionally be preferable to create small, custom, terminal middleware components like these.

At other times, you might have requirements that lie outside the remit of Razor Pages or minimal API endpoints. For example, you might want to ensure that all responses generated by your app include a specific header. This sort of cross-cutting concern is a perfect fit for custom middleware. You could add the custom middleware early in your middleware pipeline to ensure that every response from your app includes the required header, whether it comes from the static-file middleware, the error handling middleware, or a Razor Page.

In this section I show three ways to create custom middleware components, as well as how to create branches in your middleware pipeline where a request can flow down either one branch or another. By combining the methods demonstrated in this section, you’ll be able to create custom solutions to handle your specific requirements.

We start by creating a middleware component that returns the current time as plain text whenever the app receives a request. From there we’ll look at branching the pipeline, creating general-purpose middleware components, and encapsulating your middleware into standalone classes.

Finally, in section 31.1.5 you’ll see how to turn your custom middleware component into an endpoint and integrate it with the endpoint routing system.

31.1.1 Creating simple apps with the Run extension‌

As you’ve seen in previous chapters, you define the middleware pipeline for your app in Program.cs by adding middleware to a WebApplication object, typically using extension methods, as in this example:‌

WebApplicationBuilder builder = WebApplication.CreateBuilder(args);
WebApplication app = builder.Build();
app.UseExceptionHandler();
app.UseStaticFiles();
app.Run();

When your app receives a request, the request passes through each middleware component, each of which gets a chance to modify the request or handle it by generating a response. If a middleware component generates a response, it effectively short-circuits the pipeline; no subsequent middleware in the pipeline sees the request. The response passes back through the earlier middleware components on its way back to the browser.

You can use the Run extension method to build a simple middleware component that always generates a response. This extension takes a single lambda function that runs whenever a request reaches the component. The Run extension always generates a response, so no middleware placed after it ever executes. For that reason, you should always place the Run middleware last in a middleware pipeline.

TIP Remember that middleware components run in the order in which you add them to the pipeline. If a middleware component handles a request and generates a response, later middleware never sees the request.

The Run extension method provides access to the request in the form of the HttpContext object you saw in chapter 4. This contains all the details of the request in the Request property, such as the URL path, the headers, and the body of the request. It also contains a Response property you can use to return a response.‌‌‌

The following listing shows how you could build a simple middleware component that returns the current time. It uses the provided HttpContext context object and the Response property to set the Content-Type header of the response (not strictly necessary in this case, as text/plain is used if an alternative content type is not set) and writes the body of the response using WriteAsync(text).

Listing 31.1 Creating simple middleware using the Run extension

app.Run(async (HttpContext context) => ❶
{
context.Response.ContentType = "text/plain"; ❷
await context.Response.WriteAsync( ❸
DateTimeOffset.UtcNow.ToString()); ❸
});
app.UseStaticFiles(); ❹

❶ Uses the Run extension to create simple middleware that always returns a response
❷ You should set the content-type of the response you’re generating; text/plain is the default value.
❸ Returns the time as a string in the response. The 200 OK status code is used if not explicitly set.
❹ Any middleware added after the Run extension will never execute.

The Run extension is useful for two different things:

• Creating simple middleware that always generates a response

• Creating complex middleware that hijacks the whole request to build an additional framework on top of ASP.NET Core

Whether you’re using the Run extension to create basic endpoints or a complex extra framework layer, the middleware always generates some sort of response.

Therefore, you must always place it at the end of the pipeline, as no middleware placed after it will execute.

TIP Using the Run extension to unconditionally generate a response is rare these days. The endpoint routing system used by minimal APIs provides many extra niceties such as model binding, routing, integration with other middleware such as authentication and authorization, and so on.

There may be occasional situations where you want to unconditionally generate a response, but a more common scenario is where you want your middleware component to respond only to a specific URL path, such as the way the Swagger UI middleware responds only to the /swagger path. In the next section you’ll see how you can combine Run with the Map extension method to create branching middleware pipelines.

31.1.2 Branching middleware‌ pipelines with the Map extension

So far when discussing the middleware pipeline, we’ve always considered it to be a single pipeline of sequential components. Each request passes through every middleware component until one component generates a response; then the response passes back through the previous middleware.

The Map extension method lets you change that simple pipeline into a branching structure. Each branch of the pipeline is independent; a request passes through one branch or the other but not both, as shown in figure 31.1. The Map extension method looks at the path of the request’s URL. If the path starts with the required pattern, the request travels down the branch of the pipeline; otherwise, it remains on the main trunk. This lets you have completely different behavior in different branches of your middleware pipeline.

alt text

Figure 31.1 A sequential middleware pipeline compared with a branching pipeline created with the Map extension. In branching middleware, requests pass through only one of the branches at most. Middleware on the other branch never see the request and aren’t executed.

NOTE The URL-matching used by Map is conceptually similar to the routing you’ve seen throughout the book, but it is much more basic, with many limitations. For example, it uses a simple string-prefix match, and you can’t use route parameters. Generally, you should favor using endpoint routing instead of branching using Map. A similar extension, MapWhen, allows matching based on anything in HttpContext, such as headers or query string parameters.

For example, imagine you want to add a simple health-check endpoint to your existing app. This endpoint is a simple URL you can call that indicates whether your app is running correctly. You could easily create a health-check middleware using the Run extension, as you saw in listing 31.1, but then that’s all your app can do. You want the health-check to respond only to a specific URL, /ping. Your Razor Pages should handle all other requests as normal.

TIP The health-check scenario is a simple example for demonstrating the Map method, but ASP.NET Core includes built-in support for health-check endpoints, which integrate into the endpoint routing system. You should use these instead of creating your own. You can learn more about creating health checks in Microsoft’s “Health checks in ASP.NET Core” documentation: http://mng.bz/nMA2.

One solution would be to create a branch using the Map extension method and to place the health-check middleware on that branch, as shown in figure 31.1. Only those requests that match the Map pattern /ping will execute the branch; all other requests are handled by the standard routing middleware and Razor Pages on the main trunk instead, as shown in the following listing.

Listing 31.2 Using the Map extension to create branching middleware pipelines

app.UseStatusCodePages(); ❶
app.Map("/ping", (IApplicationBuilder branch) => ❷
{
branch.UseExceptionHandler(); ❸
branch.Run(async (HttpContext context) => ❹
{ ❹
context.Response.ContentType = "text/plain"; ❹
await context.Response.WriteAsync("pong"); ❹
}); ❹
});
app.UseStaticFiles(); ❺
app.UseRouting(); ❺
app.MapRazorPages(); ❺
app.Run();

❶ Every request passes through this middleware.
❷ The Map extension method branches if a request starts with /ping.
❸ This middleware runs only for requests matching the /ping branch.
❹ The Run extension always returns a response, but only on the /ping branch.
❺ The rest of the middleware pipeline run for requests that don’t match the /ping branch.

The Map middleware creates a completely new IApplicationBuilder (called branch in the listing), which you can customize as you would your main app pipeline. Middleware added to the branch builder are added only to the branch pipeline, not the main trunk pipeline.‌

TIP The WebApplication object you typically add middleware to implements the IApplicationBuilder interface. Most extension methods for adding middleware use the IApplicationBuilder interface, so you can use‌ the extension methods in branches as well as your main middleware pipeline.

In this example, you add the Run middleware to the branch, so it executes only for requests that start with /ping, such as /ping, /ping/go, and /ping?id=123. Any requests that don’t start with /ping are ignored by the Map extension. Those requests stay on the main trunk pipeline and execute the next middleware in the pipeline after Map (in this case, the StaticFilesMiddleware).

WARNING There are several Map extension method overloads. Some of these are extension methods on IApplicationBuilder and are used to branch the pipeline, as you saw in listing 31.2. Other overloads are extensions on IEndpointRouteBuilder and are used to create minimal endpoints, using the endpoint routing system. If you’re struggling to make your app compile, make sure that you’re not accidentally using the wrong Map overload!

If you need to, you can create sprawling branched pipelines using Map, where each branch is independent of every other. You could also nest calls to Map so you have branches coming off branches.

The Map extension can be useful, but if you try to get too elaborate, it can quickly get confusing. Remember that you should use middleware for implementing cross-cutting concerns or simple endpoints. The endpoint routing mechanism of minimal APIs and Razor Pages is better suited to more complex routing requirements, so always favor it over Map where possible.

One situation where Map can be useful is when you want to have two independent subapplications but don’t want the hassle of multiple deployments. You can use Map to keep these pipelines separate, with separate routing and endpoints inside each branch of the pipeline.

TIP This approach can be useful, for example, if you’re embedding an OpenID Connect server such as IdentityServer in your application. By mapping IdentityServer to a branch, you ensure that the endpoints and controllers in your main app can’t interfere with the endpoints exposed by IdentityServer.

Be aware that these branches share configuration and a DI container, so they’re independent only from the middleware pipeline’s point of view. You must also remember that WebApplication adds lots of middleware to the pipeline by default, so you may need to override these by explicitly calling UseRouting() in all your branches, for example.

NOTE Achieving truly independent branches in the same application requires a lot of effort. See Filip Wojcieszyn’s blog post, “Running multiple independent ASP.NET Core pipelines side by side in the same application,” for guidance: http://mng.bz/vzA4.

The final point you should be aware of when using the Map extension is that it modifies the effective Path seen by middleware on the branch. When it matches a URL prefix, the Map extension cuts off the matched segment from the path, as shown in figure 31.2. The removed segments are stored on a property of HttpContext called PathBase, so they’re still accessible if you need them.

alt text

Figure 31.2 When the Map extension diverts a request to a branch, it removes the matched segment from the Path property and adds it to the PathBase property.‌

NOTE ASP.NET Core’s link generator (used in Razor and minimal APIs, as discussed in chapter 6) uses PathBase to ensure that it generates URLs that include the PathBase as a prefix.

You’ve seen the Run extension, which always returns a response, and the Map extension, which creates a branch in the pipeline. The next extension we’ll look at is the general- purpose Use extension.

31.1.3 Adding to the pipeline with the Use extension‌

You can use the Use extension method to add a general- purpose piece of middleware. You can use it to view and modify requests as they arrive, to generate a response, or to pass the request on to subsequent middleware in the pipeline.

As with the Run extension, when you add the Use extension to your pipeline, you specify a lambda function that runs when a request reaches the middleware. ASP.NET Core passes two parameters to this function:

• The HttpContext representing the current request and response—You can use this to inspect the request or generate a response, as you saw with the Run extension.

• A pointer to the rest of the pipeline as a Func—By executing this task, you can execute the rest of the middleware pipeline.

By providing a pointer to the rest of the pipeline, you can use the Use extension to control exactly how and when the rest of the pipeline executes, as shown in figure 31.3. If you don’t call the provided Func at all, the rest of the pipeline doesn’t execute for the request, so you have complete control.

alt text

Figure 31.3 Three pieces of middleware, created with the Use extension. Invoking the provided Func using next() invokes the rest of the pipeline. Each middleware component can run code before and after calling the rest of the pipeline, or it can choose to not call next() to short-circuit the pipeline.

Exposing the rest of the pipeline as a Func makes it easy to conditionally short-circuit the pipeline, which enables

many scenarios. Instead of branching the pipeline to implement the health-check middleware with Map and Run, as you did in listing 31.2, you could use a single instance of the Use extension, as shown in the following listing. This provides the same required functionality as before but does so without branching the pipeline.

Listing 31.3 Using the Use extension method to create a health-check middleware

app.Use(async (HttpContext context, Func<Task> next) => ❶
{
if (context.Request.Path.StartsWithSegments("/ping")) ❷
{
context.Response.ContentType = "text/plain"; ❸
await context.Response.WriteAsync("pong"); ❸
}
else
{
await next(); ❹
}
});
app.UseStaticFiles();

❶ The Use extension takes a lambda with HttpContext (context) and Func<Task> (next) parameters.
❷ The StartsWithSegments method looks for the provided segment in the current path.
❸ If the path matches, generates a response and short-circuits the pipeline
❹ If the path doesn’t match, calls the next middleware in the pipeline—in this case UseStaticFiles()\

If the incoming request starts with the required path segment (/ping), the middleware responds and doesn’t call the rest of the pipeline. If the incoming request doesn’t start with /ping, the extension calls the next middleware in the pipeline, with no branching necessary.

With the Use extension, you have control of when and whether you call the rest of the middleware pipeline. But it’s important to note that you generally shouldn’t modify the Response object after calling next(). Calling next() runs the rest of the middleware pipeline, so subsequent middleware may start streaming the response to the browser. If you try to modify the response after executing the pipeline, you may end up corrupting the response or sending invalid data.

WARNING Don’t modify the Response object after calling next(). Also, don’t call next() if you’ve written to the Response.Body; writing to this Stream can trigger Kestrel to start streaming the response to the browser, and you could cause invalid data to be sent. You can generally read from the Response object safely, such as to inspect the final StatusCode or ContentType of the response.

Another common use for the Use extension method is to modify every request or response that passes through it. For example, you should send various HTTP headers with all your applications for security reasons. These headers often disable old, insecure legacy behaviors by browsers or restrict the features enabled by the browser. You learned about the HSTS header in chapter 28, but you can add other headers for additional security.

TIP You can test the security headers for your app at https://securityheaders.com, which also provides information about what headers you should add to your application and why.

Imagine you’ve been tasked with adding one such header— X-Content-Type-Options: nosniff, which provides added protection against cross-site scripting (XSS) attacks— to every response generated by your app. This sort of cross- cutting concern is perfect for middleware. You can use the Use extension method to intercept every request, set the response header, and then execute the rest of the middleware pipeline. No matter what response the pipeline generates, whether it’s a static file, an error, or a Razor Page, the response will always have the security header.‌

Listing 31.4 shows a robust way to achieve this. When the middleware receives a request, it registers a callback that runs before Kestrel starts sending the response back to the browser. It then calls next() to run the rest of the middleware pipeline. When the pipeline generates a response, likely in some later middleware, Kestrel executes the callback and adds the header. This approach ensures that the header isn’t accidentally removed by other middleware in the pipeline and also ensures that you don’t try to modify the headers after the response has started streaming to the browser.

Listing 31.4 Adding headers to a response with the Use extension

app.Use(async (HttpContext context, Func<Task> next) => ❶
{
context.Response.OnStarting(() => ❷
{
context.Response.Headers["X-Content-Type-Options"] = "nosniff"; ❸
return Task.CompletedTask; ❹
});
await next(); ❺
}
app.UseStaticFiles(); ❻
app.UseRouting(); ❻
app.MapRazorPages ❻

❶ Adds the middleware at the start of the pipeline
❷ Sets a function that runs before the response is sent to the browser
❸ Adds the header to the response for added protection against XSS attacks
❹ The function passed to OnStarting must return a Task.
❺ Invokes the rest of the middleware pipeline
❻ No matter what response is generated, it’ll have the security header added.

Simple cross-cutting middleware like the security header example is common, but it can quickly clutter your Program.cs configuration and make it difficult to understand the pipeline at a glance. Instead, it’s common to encapsulate your middleware in a class that’s functionally equivalent to the Use extension but that can be easily tested and reused.

31.1.4 Building a custom middleware component‌

Creating middleware with the Use extension, as you did in listings 31.3 and 31.4, is convenient, but it’s not easy to test, and you’re somewhat limited in what you can do. For example, you can’t easily use DI to inject scoped services inside these basic middleware components. Normally, rather than call the Use extension directly, you’ll encapsulate your middleware into a class that’s functionally equivalent.

Custom middleware components don’t have to derive from a specific base class or implement an interface, but they have a certain shape, as shown in listing 31.5. ASP.NET Core uses reflection to execute the method at runtime. Middleware classes should have a constructor that takes a RequestDelegate object, which represents the rest of the middleware pipeline, and they should have an Invoke function with a signature similar to‌

public Task Invoke(HttpContext context);

The Invoke() function is equivalent to the lambda function from the Use extension, and it is called when a request is received. The following listing shows how you could convert the headers middleware from listing 31.4 into a standalone middleware class.

Listing 31.5 Adding headers to a Response using a custom middleware component


public class HeadersMiddleware
{
private readonly RequestDelegate _next; ❶
public HeadersMiddleware(RequestDelegate next) ❶
{ ❶
_next = next; ❶
} ❶
public async Task Invoke(HttpContext context) ❷
{
context.Response.OnStarting(() => ❸
{ ❸
context.Response.Headers["X-Content-Type-Options"] = ❸
"nosniff"; ❸
return Task.CompletedTask; ❸
}); ❸
await _next(context); ❹
}
}

❶ The RequestDelegate represents the rest of the middleware pipeline.
❷ The Invoke method is called with HttpContext when a request is received.
❸ Adds the header to the response as before
❹ Invokes the rest of the middleware pipeline. Note that you must pass in the
provided HttpContext.

NOTE Using this shape approach makes the middleware more flexible. In particular, it means you can easily use DI to inject services into the Invoke method. This wouldn’t be possible if the Invoke method were an overridden base class method or an interface. However, if you prefer, you can implement the IMiddleware interface, which defines the basic Invoke method.

This middleware is effectively identical to the example in listing 31.4, but it’s encapsulated in a class called HeadersMiddleware. You can add this middleware to your app in Startup.Configure by calling

app.UseMiddleware<HeadersMiddleware>();

A common pattern is to create helper extension methods to make it easy to consume your extension method from

Program.cs (so that IntelliSense reveals it as an option on the WebApplication instance). The following listing shows how you could create a simple extension method for HeadersMiddleware.

Listing 31.6 Creating an extension method to expose HeadersMiddleware

public static class MiddlewareExtensions
{
public static IApplicationBuilder UseSecurityHeaders( ❶
this IApplicationBuilder app) ❶
{
return app.UseMiddleware<HeadersMiddleware>(); ❷
}
}

❶ By convention, the extension method should return an IApplicationBuilder to allow chaining.
❷ Adds the middleware to the pipeline

With this extension method, you can now add the headers middleware to your app using

app.UseSecurityHeaders();

TIP My SecurityHeaders NuGet package makes it easy to add security headers using middleware without having to write your own. The package provides a fluent interface for adding the recommended security headers to your app. You can find instructions on how to install it at http://mng.bz/JggK.

Listing 31.5 is a simple example, but you can create middleware for many purposes. In some cases you may need to use DI to inject services and use them to handle a request. You can inject singleton services into the constructor of your middleware component, or you can inject services with any lifetime into the Invoke method of your middleware, as demonstrated in the following listing.

Listing 31.7 Using DI in middleware components

public class ExampleMiddleware
{
private readonly RequestDelegate _next;
private readonly ServiceA _a; ❶
public HeadersMiddleware(RequestDelegate next, ServiceA a) ❶
{ ❶
_next = next; ❶
_a = a; ❶
}
public async Task Invoke(
HttpContext context, ServiceB b, ServiceC c) ❷
{
// use services a, b, and c
// and/or call _next.Invoke(context);
}
}

❶ You can inject additional services in the constructor. These must be singletons.
❷ You can inject services into the Invoke method. These may have any lifetime.

WARNING ASP.NET Core creates the middleware only once for the lifetime of your app, so any dependencies injected in the constructor must be singletons. If you need to use scoped or transient dependencies, inject them into the Invoke method.

In addition to cross-cutting concerns, a good use for middleware is creating simple handlers with as few dependencies as possible that respond to a fixed URL, similar to the Use extension method you learned about in section 31.1.3. These simple handlers can be dropped into multiple applications, regardless of how the app’s routing is configured.

So-called well-known Uniform Resource Identifiers (URIs) are a good use case for these simple middleware handlers, such as the security.txt well-known URI (https://www.rfc- editor.org/rfc/rfc9116) and the OpenID Connect URIs (http://mng.bz/wvj2). These handlers always respond to a single path, so they can neatly encapsulate all the logic without risk of interfering with any other routing configuration.‌

Listing 31.8 shows a simple example of a security.txt handler implemented as middleware. It always responds to the well- known path with a fixed value and is easy to add to any application by calling app.UseMiddleware.

Listing 31.8 A Security.txt handler implemented as middleware

public class SecurityTxtHandler
{
private readonly RequestDelegate _next;
public SecurityTxtHandler(RequestDelegate next)
{
_next = next;
}
public Task Invoke(HttpContext context)
{
var path = context.Request.Path;
if(path.StartsWithSegments("/.well-known/security.txt")) ❶
{
context.Response.ContentType = "text/plain"; ❷
return context.Response.WriteAsync( ❷
"Contact: mailto:security@example.com"); ❷
}
return _next.Invoke(context); ❸
}
}

❶ The middleware looks for a fixed, well-known path.
❷ If the path is matched, the middleware returns a response.
❸ If the path didn’t match, the next middleware in the pipeline is called.

That covers pretty much everything you need to start building your own middleware components. By encapsulating your middleware in custom classes, you can easily test their behavior or distribute them in NuGet packages, so I strongly recommend taking this approach. Apart from anything else, it will make Program.cs file less cluttered and easier to understand.

31.1.5 Converting middleware into endpoint routing endpoints‌

In this section you’ll learn how you can take the custom middleware you created in section 31.1.2 and convert it to a simple middleware endpoint that integrates into the endpoint routing system. Then you can take advantage of features such as routing and authorization.

In section 31.1.2 I described creating a simple ping-pong endpoint, using the Map and Run extension methods, that returns a plain-text pong response whenever a /ping request is received by branching the middleware pipeline.‌‌This is fine because it’s so simple, but what if you have more complex requirements?

Consider a basic enhancement of this ping-pong example. How would you add authorization to the request? The AuthorizationMiddleware looks for metadata on endpoints like Razor Pages or minimal APIs to see whether there’s any authorization metadata, but it doesn’t know how to work with the ping-pong Map extension.

Similarly, what if you wanted to use more complex routing? Maybe you want to be able to call /ping/3 and have your ping-pong middleware reply pong-pong-pong. (No, I can’t think why you would either!) You now have to try to parse that integer from the URL, make sure it’s valid, and so on.That’s sounding like a lot more work and seems to be a clear indicator you should have created a minimal API endpoint using endpoint routing!

For our simple ping-pong endpoint, that wouldn’t be hard to do, but what if you have a more complex middleware component that you don’t want to rewrite completely? Is there some way to convert the middleware to an endpoint?

Let’s imagine that you need to apply authorization to the simple ping-pong endpoint you created in section 31.1.2. This is much easier to achieve with endpoint routing than simple middleware branches like Map or Use, but let’s imagine you want to stick to using middleware instead of a traditional minimal API endpoint. The first step is creating a standalone middleware component for the functionality,using the approach you saw in section 31.1.4, as shown in the following listing.

Listing 31.9 The PingPongMiddleware implemented as a middleware component

public class PingPongMiddleware
{
public PingPongMiddleware(RequestDelegate next) ❶
{
}
public async Task Invoke(HttpContext context) ❷
{
context.Response.ContentType = "text/plain"; ❸
await context.Response.WriteAsync("pong"); ❸
}
}

❶ Even though it isn’t used in this case, you must inject a RequestDelegate in the
constructor.
❷ Invoke is called to execute the middleware.
❸ The middleware always returns a “pong” response.

Note that this middleware always returns a "pong" response regardless of the request URL; we will configure the "/ping" path later. We can use this class to convert a middleware pipeline from the branching version shown in figure 31.1, to the endpoint version shown in figure 31.4.

alt text

Figure 31.4 Endpoint routing separates the selection of an endpoint from the execution of an endpoint. The routing middleware selects an endpoint based on the incoming request and exposes metadata about the endpoint. Middleware placed before the endpoint middleware can act based on the selected endpoint, such as short-circuiting unauthorized requests. If the request is authorized, the endpoint middleware executes the selected endpoint and generates a response.

Converting the ping-pong middleware to an endpoint doesn’t require any changes to the middleware itself. Instead, you need to create a mini middleware pipeline containing only your ping-pong middleware.

TIP Converting response-generating middleware to an endpoint essentially requires converting it to its own mini pipeline, so you can even include additional middleware in the endpoint pipeline if you wish.

To create the mini pipeline, you call CreateApplicationBuilder() on IEndpointRouteBuilder instance, which creates a new IApplicationBuilder. There are two ways to access the IEndpointRouteBuilder: call UseEndpoints(endpoints =>{}) and use the endpoints variable or explicitly cast WebApplication to IEndpointRouteBuilder.‌

NOTE Although WebApplication implements IEndpointRouteBuilder, it deliberately hides the advanced CreateApplicationBuilder() method from you! This should be a good indication that you’re in advanced territory and should probably consider using minimal API endpoints instead.

In the following listing, we create a new IApplicationBuilder, add the middleware that makes up the endpoint to it, and then call Build() to create the pipeline. Once you have a pipeline, you can associate it with a given route by calling Map() on the IEndpointRouteBuilder instance and passing in a route template.

Listing 31.10 Mapping the ping-pong endpoint in UseEndpoints

WebApplicationBuilder builder = WebApplication.CreateBuilder(args);
WebApplication app = builder.Build();
app.UseRouting();
app.UseAuthentication();
app.UseAuthorization();
var endpoint = ((IEndpointRouteBuilder)app) ❶
.CreateApplicationBuilder() ❷
.UseMiddleware<PingPongMiddleware>() ❸
.Build(); ❸
app.Map("/ping", endpoint); ❹
app.MapRazorPages();
app.MapHealthChecks("/healthz");
app.Run();

❶ Casts the WebApplication to IEndpointRouteBuilder so you can call
CreateApplicationBuilider
❷ Creates a miniature, standalone IApplicationBuilder to build your endpoint
❸ Adds the middleware and builds the final endpoint. This is executed when the
endpoint is executed.
❹ Maps the new endpoint with the route template “/ping”

TIP Note that the Map() function on IEndpointRouteBuilder creates a new endpoint (consisting of your mini-pipeline) with an associated route.

Although it has the same name, this is conceptually different from the Map function on IApplicationBuilder from section 31.1.2, which is used to branch the middleware pipeline. It is analogous to the MapGet (and kin) methods you use to create minimal API endpoints.

As is common with ASP.NET Core, you can extract this somewhat-verbose functionality into an extension method to make your endpoint easier to read and discover. The following listing extracts the code to create an endpoint from listing 31.10 into a separate class, taking the route template to use as a method parameter.

Listing 31.11 An extension method for using the PingPongMiddleware as an endpoint

public static class EndpointRouteBuilderExtensions
{
public static IEndpointConventionBuilder MapPingPong( ❶
this IEndpointRouteBuilder endpoints, ❶
string route) ❷
{
var pipeline = endpoints
.CreateApplicationBuilder() ❸
.UseMiddleware<PingPongMiddleware>() ❸
.Build(); ❸
return endpoints ❹
.Map(route, pipeline) ❹
.RequireAuthorization(); ❺
}
}

❶ Creates an extension method for registering the PingPongMiddleware as an endpoint
❷ Allows the caller to pass in a route template for the endpoint
❸ Creates the endpoint pipeline
❹ Adds the new endpoint to the provided endpoint collection, using the provide route template
❺ You can add additional metadata here directly, or the caller can add metadata themselves.

Now that you have an extension method, MapPingPong(), you can update your mapping code to be simpler and easier to understand:

app.MapPingPong("/ping"); 
app.MapRazorPages(); app.MapHealthChecks("/healthz");

Congratulations—you’ve created your first custom endpoint from middleware! By turning the middleware into an endpoint, you can now add extra metadata, as shown in listing 31.11. Your middleware is hooked into the endpoint routing system and benefits from everything it offers.

The example in listing 31.11 used a basic route template, "/ping", but you can also use templates that contain route parameters, such as "/ping/{count}", as you would with minimal APIs. The big difference is that you don’t get the benefits of model binding that you get from minimal APIs, and it clearly takes more effort than using minimal APIs!

TIP For examples of how to access the route data from your middleware, as well as best-practice advice, see my blog entry titled “Accessing route values in endpoint middleware in ASP.NET Core 3.0” at http://mng.bz/4ZRj.

Converting existing middleware like PingPongMiddleware to work with endpoint routing can be useful when you have already implemented that middleware, but it’s a lot of boilerplate to write if you want to create a new simple endpoint. In almost all cases you should use minimal API endpoints instead. But if you ever find yourself needing to reuse some existing middleware as an endpoint, now you know how!

In the next section we’ll move away from the middleware pipeline and look at how to handle a common configuration requirement: using DI services to build a strongly typed IOptions objects.‌

31.2 Using DI with OptionsBuilder and IConfigureOptions‌

In this section I describe how to handle a common scenario: you want to use services registered in DI to configure IOptions objects. There are several ways to achieve this, but in this section I introduce the OptionsBuilder as one possible approach and highlight some of the other features it enables.

In chapter 10 we discussed the ASP.NET Core configuration system in depth. You saw how an IConfiguration object is built from multiple layers, where subsequent layers can add to or replace configuration values from previous layers. Each layer is added by a configuration provider, which reads values from a file, from environment variables, from User Secrets, or from any number of possible locations.

A common and encouraged practice is to bind your configuration object to strongly typed IOptions objects, as you saw in chapter 10. Typically, you configure this binding in Program.cs by calling builder.Services.Configure<T>() and providing an IConfiguration object or a configuration section to bind.

For example, to bind a strongly typed object called CurrencyOptions to the "Currencies" section of an IConfiguration object, you could use the following:

builder.services.Configure<CurrencyOptions>( Configuration.GetSection("Currencies"));

TIP You can see an example of the CurrencyOptions type and the associated "Currencies" section of appsetttings.json in the source code for this chapter.

This sets the properties of the CurrencyOptions object, based on the values in the "Currencies" section of your IConfiguration object. Simple binding like this is common, but sometimes you might not want to rely on configuring your IOptions<T> objects via the configuration system; you might want to configure them in code instead.The IOptions pattern requires only that you configure a strongly typed object before it’s injected into a dependent service; it doesn’t mandate that you have to bind it to an IConfiguration section.

TIP Technically, even if you don’t configure an IOptions at all, you can still inject it into your services. In that case, the T object is simply created using the default constructor.

The Configure() method has an additional overload that takes a lambda function. The framework executes the lambda function to configure the CurrencyOptions object when it is injected using DI. The following listing shows an example that uses a lambda function to set the Currencies property on a configured CurrencyOptions object to a fixed array of strings.‌‌

Listing 31.12 Configuring an IOptions object using a lambda function

WebApplicationBuilder builder = WebApplication.CreateBuilder(args);
builder.Services.Configure<CurrencyOptions>( ❶
builder.Configuration.GetSection("Currencies")); ❶
builder.services.Configure<CurrencyOptions>(options => ❷
options.Currencies = new string[] { "GBP", "USD"}); ❷
WebApplication app = builder.Build();
app.MapGet("/", (IOptions<CurrencyOptions> opts) => opts.Value); ❸
app.Run();

❶ Configures the IOptions object by binding to an IConfiguration section
❷ Configures the IOptions object by executing a lambda function
❸ The injected IOptions value is built by first binding to configuration and then applying the lambda.

Each call to Configure<T>(), both the binding to IConfiguration and the lambda function, adds another configuration step to the CurrencyOptions object. When the DI container first requires an instance of IOptions, the steps run in turn, as shown in figure 31.5.

alt text

Figure 31.5 Configuring a CurrencyOptions object. When the DI container needs an IOptions<> instance of a strongly typed object, the container creates the object and then uses each of the registered Configure() methods to set the object’s properties.

In the previous code snippet, you set the Currencies property to a static array of strings in a lambda function. But what if you don’t know the correct values ahead of time? You might need to load the available currencies from a database or from some remote service, such as an ICurrencyProvider.

This situation, in which you need a configured service to configure your IOptions<T>, is potentially hard to resolve. Remember that you declared your IOptions<T> configuration as part of your app’s DI configuration. But if you need to resolve a service from DI to configure the IOptions object, you’re stuck with a chicken-and-egg problem: how can you access a service from the DI container before you’ve finished configuring the DI container?

This circular problem has several potential solutions, but the easiest approach is to use an alternative API for configuring IOptions instances, using the OptionsBuilder type. This type is effectively a wrapper around some of the core IOptions interfaces, but it often results in a terser and more convenient syntax to the approach you’ve seen so far.‌

TIP Another helpful feature of OptionsBuilder is adding validation to your IOptions objects. This ensures that your configuration is loaded and bound correctly on app startup so that you don’t have any typos in your configuration section names, for example. You can read more about adding validation to your IOptions objects on my blog at http://mng.bz/qrjJ.

The following listing shows the equivalent of listing 31.12 but using OptionsBuilder<T> instead. You create an OptionsBuilder<T> instance by calling AddOptions<T> (), and then chain additional methods such as BindConfiguration() and Configure() to configure your final IOptions<T> object, building up layers of options configuration, as shown previously in figure 31.5.‌

Listing 31.13 Configuring an IOptions<T> object using OptionsBuilder<T>

WebApplicationBuilder builder = WebApplication.CreateBuilder(args);
builder.Services
.AddOptions<CurrencyOptions>() ❶
.BindConfiguration("Currencies") ❷
.Configure(opts => ❸
opts.Currencies = new string[] { "GBP", "USD"}); ❸
WebApplication app = builder.Build();
app.MapGet("/", (IOptions<CurrencyOptions> opts) => opts.Value);
app.Run();

❶ Creates an OptionsBuilder object
❷ Binds to the Currencies section of the IConfiguration
❸ Configures the IOptions object by executing a lambda function

You’ve seen the builder pattern many times throughout the book, and the pattern in this case is no different. The builder exposes methods that you can chain together fluently. One of the benefits of the builder pattern is that it’s easy to discover all the methods it exposes. In this case, if you explore the type in your integrated development environment (IDE), you may notice that OptionsBuilder<T> exposes multiple Configure overloads, such as

• Configure(Action<T,TDep> config);

• Configure<TDep1,TDep2>(Action<T, TDep1, TDep2> config);

• Configure<TDep1,TDep2,TDep3> (Action<T,TDep1,TDep2,TDep3> config);

These methods allow you to specify dependencies that are automatically retrieved from the DI container and passed to the config action when the IOptions object is fetched from DI, as shown in figure 31.6. Five overloads for Configure allow you to inject dependencies, allowing you to inject up to five dependencies with these methods.

alt text
alt text

Figure 31.6 Using OptionsBuilder to build an IOptions object. Dependencies that are requested via the Configure methods are automatically retrieved from the DI container and used to execute the lambda function.

Using this pattern, we can update the code from listing 31.13 to use the ICurrencyProvider whenever our app needs to create the CurrencyOptions object. We can register the service in the DI container and know that the DI will take

care of providing it to the lambda function at runtime, as shown in the following listing.

Listing 31.14 Using a DI service

WebApplicationBuilder builder = WebApplication.CreateBuilder(args);
builder.Services
.AddOptions<CurrencyOptions>()
.BindConfiguration("Currencies")
.Configure<ICurrencyProvider>((opts, service) => ❶
opts.Currencies = service.GetCurrencies()); ❶
builder.Services.AddSingleton<ICurrencyProvider, CurrencyProvider>(); ❷
WebApplication app = builder.Build();
app.MapGet("/", (IOptions<CurrencyOptions> opts) => opts.Value); ❸
app.Run();

❶ Configures the Ioptions object using a service from DI
❷ Registers the service with the DI container
❸ Retrieves the IOptions object, which retrieves the service from DI and runs the lambda method

With the configuration in listing 31.14, when the IOptions<CurrencyOptions> is first injected into the minimal API endpoint, the IOptions<CurrencyOptions> object is built as described by the OptionsBuilder. First, the "Currencies" section of the app IConfiguration is bound to a new CurrencyOptions object. Then the ICurrencyProvider is retrieved from DI and passed to the Configure<TDep> lambda, along with the options object. Finally, the IOptions object is injected into the endpoint.

WARNING You must inject only singleton services using Configure<TDeps> methods. If you try to inject a scoped service, such as a DbContext, you will get an error in development warning you about a captive dependency. I describe how to work around this on my blog at http://mng.bz/7Dve.

The OptionsBuilder<T> is a convenient way to configure your IOptions objects using dependencies, but you can use an alternative approach: implementing the IConfigureOptions<T> interface. You implement this interface in a configuration class and use it to configure the IOptions object in any way you need, as shown in the following listing. This class can use DI, so you can easily use any other required services.

Listing 31.15 Implementing IConfigureOptions<T> to configure an options object

public class ConfigureCurrencyOptions : IConfigureOptions<CurrencyOptions>
{
private readonly ICurrencyProvider _currencyProvider; ❶
public ConfigureCurrencyOptions(ICurrencyProvider currencyProvider)
{
_currencyProvider = currencyProvider; ❶
}
public void Configure(CurrencyOptions options) ❷
{
options.Currencies = _currencyProvider.GetCurrencies(); ❸
}
}

❶ You can inject services that are available only after the DI is completely configured.
❷ Configure is called when an instance of IOptions<CurrencyOptions> is required.
❸ Uses the injected service to load the values

All that remains is to register the implementation in the DI container. As always, order is important, so if you want ConfigureCurrencyOptions to run after binding to configuration, you must add it after configuring your OptionsBuilder<T>:

builder.Services.AddOptions<CurrencyOptions>()
.BindConfiguration("Currencies");
builder.AddSingleton
<IConfigureOptions<CurrencyOptions>, ConfigureCurrencyOptions>();

TIP The order in which you configure your options matters. If you want to always run your configuration last, after all other configuration methods, you can use the PostConfigure() method on OptionsBuilder, or the IPostConfigureOptions interface. You can read more about this approach on my blog at http://mng.bz/mVj4.‌‌

With this configuration, when IOptions is injected into an endpoint or service, the CurrencyOptions object is first bound to the "Currencies" section of your IConfiguration and then configured by the ConfigureCurrencyOptions class.‌

WARNING The CurrencyConfigureOptions object is registered as a singleton, so it will capture any injected services of scoped or transient lifetimes.

Whether you use the OptionsBuilder or the IConfigureOptions approach, you need to register the ICurrencyProvider dependency with the DI container. In the sample code for this chapter, I created a simple CurrencyProvider service and registered it with the DI container using‌‌

builder.Services.AddSingleton<ICurrencyProvider, CurrencyProvider>();

As your app grows and you add extra features and services, you’ll probably find yourself writing more of these simple DI registrations, where you register a Service that implements IService. The built-in ASP.NET Core DI container requires you to explicitly register each of these services manually. If you find this requirement frustrating, it may be time to look at third-party DI containers that can take care of some of the boilerplate for you.

31.3 Using a third-party dependency injection container‌

In this section I show you how to replace the default DI container with a third-party alternative, Lamar. Third-party containers often provide additional features compared with the built-in container, such as assembly scanning, automatic service registration, and property injection. Replacing the built-in container can also be useful when you’re porting an existing app that uses a third-party DI container to ASP.NET Core.

The .NET community had used DI containers for years before ASP.NET Core decided to include a built-in one. The ASP.NET Core team wanted a way to use DI in their own framework libraries, and they wanted to create a common abstraction1 that allows you to replace the built-in container with your favorite third-party alternative, such as Autofac, StructureMap/Lamar, Ninject, Simple Injector, or Unity.

The built-in container is intentionally limited in the features it provides, and realistically, it won’t be getting many more. By contrast, third-party containers can provide a host of extra features. These are some of the features available in Lamar (https://jasperfx.github.io/lamar/guide/ioc), the spiritual successor to StructureMap (https://structuremap.github.io):

• Assembly scanning for interface/implementation pairs based on conventions

• Automatic concrete class registration Property injection and constructor selection

• Automatic Lazy/Func resolution

• Debugging/testing tools for viewing inside your container

None of these features is a requirement for getting an application up and running, so using the built-in container makes a lot of sense if you’re building a small app or are new to DI containers in general. But if at some undefined tipping point, the simplicity of the built-in container becomes too much of a burden, it may be worth replacing.

TIP A middle-of-the-road approach is to use the Scrutor NuGet package, which adds some features to the built-in DI container without replacing it. For an introduction and examples, see my blog post, “Using Scrutor to automatically register your services with the ASP.NET Core DI container” at http://mng.bz/MX7B.

In this section I show how you can configure an ASP.NET Core app to use Lamar for dependency resolution. It won’t be a complex example or an in-depth discussion of Lamar itself.Instead, I’ll cover the bare minimum to get you up and running.

Whichever third-party container you choose to install in an existing app, the overall process is pretty much the same:

  1. Install the container NuGet package.

  2. Register the third-party container with WebApplicationBuilder in Program.cs.

  3. Configure the third-party container to register your services.

Most of the major .NET DI containers include adapters and extension methods to hook easily into your ASP.NET Core app. For details, it’s worth consulting the specific guidance for the container you’re using. For Lamar, the process looks like this:

  1. Install the Lamar.Microsoft.DependencyInjection NuGet package using the NuGet package manager, by running dotnet add package

    dotnet add package Lamar.Microsoft.DependencyInjection

    or by adding a to your .csproj file:

    <PackageReference 
    Include="Lamar.Microsoft.DependencyInjection" Version="8.1.0" />
  2. Call UseLamar() on WebApplicationBuilder.Host in Program.cs:

    WebApplicationBuilder builder = WebApplication.CreateBuilder(args);
    builder.Host.UseLamar(services => {})
    WebApplication app = builder.Build();
  3. Configure the Lamar ServiceRegistry in the lambda method passed to UseLamar(), as shown in the following listing. This is a basic configuration, but you can see a more complex example in the source code for this chapter.

Listing 31.16 Configuring Lamar as a third-party DI container

builder.Host.UseLamar(services => ❶
{
services.AddAuthorization(); ❷
services.AddControllers() ❷
.AddControllersAsServices(); ❸
services.Scan(_ => { ❹
_.AssemblyContainingType(typeof(Program)); ❹
_.WithDefaultConventions(); ❹
}); ❹
}

❶ Configures your services in UseLamar() instead of on builder.Services
❷ You can (and should) add ASP.NET Core framework services to the
ServiceRegistry, as usual.
❸ Required so that Lamar is used to build your web API controllers
❹ Lamar can automatically scan your assemblies for services to register.

In this example I’ve used the default conventions to register services. This automatically registers concrete classes and services that are named following expected conventions (for example, Service implements IService). You can change these conventions or add other registrations in the UseLamar() lambda.

The ServiceRegistry passed into UseLamar() implements IServiceCollection, which means you can use all the built-in extension methods, such as AddControllers() and AddAuthorization(), to add framework services to your container.‌

WARNING If you’re using DI in your Model-View-Controller (MVC) controllers (almost certainly!), and you register those dependencies with Lamar rather than the built-in container, you may need to call AddControllersAsServices(), as shown in listing 31.16. This is due to an implementation detail in the way your MVC controllers are created by the framework. For details, see my blog entry titled “Controller activation and dependency injection in ASP.NET Core MVC” at http://mng.bz/aogm.

With this configuration in place, whenever your app needs to create a service, it will request it from the Lamar container, which will create the dependency tree for the class and create an instance. This example doesn’t show off the power of Lamar, so be sure to check out the documentation (https://jasperfx.github.io/lamar) and the associated source code for this chapter for more examples. Even in modest-size applications, Lamar can greatly simplify your service registration code, but its party trick is showing all the services you have registered and any associated issues.

TIP Third-party containers typically add configuration approaches but don’t change any of the fundamentals of how DI works in ASP.NET Core. All the techniques you’ve seen in this book will work whether you’re using the built-in container or a third-party container, so you can use the IConfigureOptions approach in section 31.2, for example, regardless of which container you choose.

That brings us to the end of this chapter on advanced configuration. In this chapter I focused on some of the core components of any ASP.NET Core app: middleware, configuration, and DI. In the next chapter you’ll learn about more custom components, with a focus on Razor Pages and web API controllers.‌

Summary

Use the Run extension method to create middleware components that always return a response. You should always place the Run extension at the end of a middleware pipeline or branch, as middleware placed after it will never execute.

You can create branches in the middleware pipeline with the Map extension. If an incoming request matches the specified path prefix, the request will execute the pipeline branch; otherwise, it will execute the trunk.

When the Map extension matches a request path segment, it removes the segment from the request’s HttpContext.Path and moves it to the PathBase property. This ensures that routing in branches works correctly.

You can use the Use extension method to create generalized middleware components that can generate a response, modify the request, or pass the request on to subsequent middleware in the pipeline. This is useful for cross-cutting concerns, like adding a header to all responses.

You can encapsulate middleware in a reusable class. The class should take a RequestDelegate object in the constructor and should have a public Invoke() method that takes an HttpContext and returns a Task. To call the next middleware component in the pipeline, invoke the RequestDelegate with the provided HttpContext.

To create endpoints that generate a response, build a miniature pipeline containing the response- generating middleware, and call endpoints.Map(route, pipeline). Endpoint routing will be used to map incoming requests to your endpoint.

You can configure IOptions<T> objects using a fluent builder interface. Call AddOptions<T>() to create an OptionsBuilder<T> instance and then chain configuration calls.

OptionsBuilder<T> allows easy access to dependencies for configuration, as well as features such as validation.

You can also use services from the DI container to configure an IOptions<T> object by creating a separate class that implements IConfigureOptions<T>. This class can use DI in the constructor and is used to lazily build a requested IOptions<T> object at runtime.

You can replace the built-in DI container with a third-party container. Third-party containers often provide additional features, such as convention- based dependency registration, assembly scanning, and property injection.

  1. Although the promotion of DI as a core practice has been applauded, this abstraction has seen some controversy. This post, titled “What’s wrong with the ASP.NET Core DI abstraction?”, from one of the maintainers of the SimpleInjector DI library, describes many of the arguments and concerns: http://mng.bz/yYAd. You can also read more about the decisions at http://mng.bz/6DnA.

ASP.NET Core in Action 30 Building ASP.NET Core apps with the generic host and Startup

Part 5 Going further with ASP.NET Core‌

第 5 部分:进一步了解 ASP.NET Core

Parts 1 through 4 of this book touched on all the aspects of ASP.NET Core you need to learn to build an HTTP application, whether that’s server-rendered applications using Razor Pages or JavaScript Object Notation (JSON) APIs using minimal APIs. In part 5 we look at four topics that build on what you’ve learned so far: customizing ASP.NET Core to your needs, interacting with third-party HTTP APIs, background services, and testing.
本书的第 1 部分到第 4 部分介绍了构建 HTTP 应用程序需要学习的 ASP.NET Core 的所有方面,无论是使用 Razor Pages 的服务器呈现的应用程序,还是使用最少 API 的 JavaScript 对象表示法 (JSON) API。在第 5 部分中,我们将介绍基于您目前所学知识的四个主题:根据您的需求自定义 ASP.NET Core、与第三方 HTTP API 交互、后台服务和测试。

In chapter 30 we start by looking at an alternative way to bootstrap your ASP.NET Core applications, using the generic host instead of the WebApplication approach you’ve seen so far in the book. The generic host was the standard way to bootstrap apps before .NET 6 (and is the approach you’ll find in previous editions of this book), so it’s useful to recognize the pattern, but it also comes in handy for building non-HTTP applications, as you’ll see in chapter 34.
在第 30 章中,我们首先研究了一种替代方法来引导 ASP.NET Core 应用程序,使用通用主机而不是您在本书中到目前为止看到的 WebApplication 方法。在 .NET 6 之前,泛型主机是引导应用程序的标准方法(您将在本书的前几个版本中找到该方法),因此识别模式很有用,但它在构建非 HTTP 应用程序时也很方便,如第 34 章所示。

In part 1 you learned about the middleware pipeline, and you saw how it is fundamental to all ASP.NET Core applications. In chapter 31 you’ll learn how to take full advantage of the pipeline, creating branching middleware pipelines, custom middleware, and simple middleware- based endpoints. You’ll also learn how to handle some complex chicken-and-egg configuration issues that often arise in real-life applications. Finally, you’ll learn how to replace the built-in dependency injection container with a third-party alternative.
在第 1 部分中,您了解了中间件管道,并了解了它如何成为所有 ASP.NET Core 应用程序的基础。在第 31 章中,您将学习如何充分利用管道,创建分支中间件管道、自定义中间件和基于中间件的简单端点。您还将学习如何处理实际应用程序中经常出现的一些复杂的先有鸡还是先有蛋的配置问题。最后,您将学习如何将内置的依赖项注入容器替换为第三方替代方案。

In chapter 32 you’ll learn how to create custom components for working with Razor Pages and API controllers. You’ll learn how to create custom Tag Helpers and validation attributes, and I’ll introduce a new component—view components—for encapsulating logic with Razor view rendering. You’ll also learn how to replace the attribute-based validation framework used by default in ASP.NET Core with an alternative.
在第 32 章中,您将学习如何创建自定义组件以使用 Razor Pages 和 API 控制器。您将学习如何创建自定义标记帮助程序和验证属性,并且我将介绍一个新组件 — 视图组件 — 用于使用 Razor 视图渲染封装逻辑。您还将了解如何将 ASP.NET Core 中默认使用的基于属性的验证框架替换为替代框架。

Most apps you build aren’t designed to stand on their own. It’s common for your app to need to interact with APIs, whether those are APIs for sending emails, taking payments, or interacting with your own internal applications. In chapter 33 you’ll learn how to call these APIs using the IHttpClientFactory abstraction to simplify configuration, add transient fault handling, and avoid common pitfalls.
您构建的大多数应用程序都不是为了独立而构建的。您的应用通常需要与 API 交互,无论这些 API 是用于发送电子邮件、收款还是与您自己的内部应用程序交互的 API。在第 33 章中,您将学习如何使用 IHttpClientFactory 抽象调用这些 API,以简化配置、添加瞬态故障处理并避免常见陷阱。

This book deals primarily with serving HTTP traffic, both server-rendered web pages using Razor Pages and web APIs commonly used by mobile and single-page applications.
本书主要介绍提供 HTTP 流量,包括使用 Razor Pages 的服务器呈现的网页,以及移动和单页应用程序常用的 Web API。

However, many apps require long-running background tasks that execute jobs on a schedule or that process items from a queue. In chapter 34 I’ll show how you can create these long-running background tasks in your ASP.NET Core applications. I’ll also show how to create standalone services that have only background tasks, without any HTTP handling, and how to install them as a Windows Service or as a Linux systemd daemon.
但是,许多应用程序需要长时间运行的后台任务,这些任务按计划执行作业或处理队列中的项目。在第 34 章中,我将展示如何在 ASP.NET Core 应用程序中创建这些长时间运行的后台任务。我还将展示如何创建仅包含后台任务而没有任何 HTTP 处理的独立服务,以及如何将它们安装为 Windows 服务或 Linux systemd 守护程序。

Chapters 35 and 36, the final chapters, cover testing your application. The exact role of testing in application development can lead to philosophical arguments, but in these chapters I stick to the practicalities of testing your app with the xUnit test framework. You’ll see how to create unit tests for your apps, test code that’s dependent on EF Core using an in-memory database provider, and write integration tests that can test multiple aspects of your application at the same time.
第 35 章和第 36 章是最后几章,涵盖了测试您的应用程序。测试在应用程序开发中的确切作用可能会导致哲学争论,但在这些章节中,我将重点介绍使用 xUnit 测试框架测试应用程序的实用性。你将了解如何为应用创建单元测试,使用内存中数据库提供程序测试依赖于 EF Core 的代码,以及编写可以同时测试应用程序多个方面的集成测试。

In the fast-paced world of web development there’s always more to learn, but by the end of part 5 you should have everything you need to build applications with ASP.NET Core, whether they be server-rendered page-based applications, APIs, or background services.
在快节奏的 Web 开发世界中,总是有更多的东西需要学习,但在第 5 部分结束时,您应该拥有使用 ASP.NET Core 构建应用程序所需的一切,无论它们是服务器渲染的基于页面的应用程序、API 还是后台服务。

In the appendices for this book, I provide some background and resources about .NET. Appendix A describes how to prepare your development environment by installing .NET 7 and an IDE or editor. In appendix B you’ll find a list of resources I use to learn more about ASP.NET Core and to stay up to date with the latest features.
在本书的附录中,我提供了一些有关 .NET 的背景和资源。附录 A 介绍了如何通过安装 .NET 7 和 IDE 或编辑器来准备开发环境。在附录 B 中,您将找到我用来了解有关 ASP.NET Core 的更多信息并了解最新功能的资源列表。

30 Building ASP.NET Core apps with the generic host and Startup

30 使用通用主机构建 ASP.NET Core 应用程序 和 Startup

This chapter covers
本章涵盖

• Using the generic host and a Startup class to bootstrap your ASP.NET Core app
使用泛型主机和 Startup 类引导 ASP.NET Core 应用程序

• Understanding how the generic host differs from WebApplication
了解通用主机与 WebApplication 的区别

• Building a custom generic IHostBuilder
构建自定义通用 IHostBuilder

• Choosing between the generic host and minimal hosting
在通用主机和最小主机之间进行选择

Some of the biggest changes introduced in ASP.NET Core in .NET 6 were the minimal hosting APIs, namely the WebApplication and WebApplicationBuilder types you’ve seen throughout this book. These were introduced to dramatically reduce the amount of code needed to get started with ASP.NET Core and are now the default way to build ASP.NET Core apps.‌
在 .NET 6 中引入 ASP.NET Core 的一些最大变化是最小的托管 API,即您在本书中看到的 WebApplication 和 WebApplicationBuilder 类型。引入这些应用程序是为了显著减少开始使用 ASP.NET Core 所需的代码量,现在是构建 ASP.NET Core 应用程序的默认方式。

Before .NET 6, ASP.NET Core used a different approach to bootstrap your app: the generic host, IHost, IHostBuilder, and a Startup class. Even though this approach is not the default in .NET 7, it’s still valid, so it’s important that you’re aware of it, even if you don’t need to use it yourself. In this chapter I introduce the generic host and show how it relates to the minimal hosting APIs you’re already familiar with. In chapter 34 you’ll learn how to use the generic host approach to build nonweb apps too.
在 .NET 6 之前,ASP.NET Core 使用不同的方法来启动应用程序:泛型主机、IHost、IHostBuilder 和 Startup 类。即使此方法不是 .NET 7 中的默认方法,它仍然有效,因此即使您自己不需要使用它,了解它也很重要。在本章中,我将介绍通用主机,并展示它与您已经熟悉的最小托管 API 的关系。在第 34 章中,你也将学习如何使用通用的 host 方法来构建非 Web 应用程序。

I start by introducing the two main concepts: the generic host components (IHostBuilder and IHost) and the Startup class. These split your app bootstrapping code between two files, Program.cs and Startup.cs, handling different aspects of your app’s configuration. You’ll learn why this split was introduced, where each component is configured, and how it compares with minimal hosting using WebApplication.
首先,我将介绍两个主要概念:通用主机组件(IHostBuilder 和 IHost)和 Startup 类。这些选项将你的应用程序引导代码拆分为两个文件(Program.cs 和 Startup.cs),处理应用程序配置的不同方面。您将了解引入此拆分的原因、每个组件的配置位置,以及它与使用 WebApplication 的最小托管的比较。

In section 30.4 you’ll learn how the helper function Host.CreateDefaultBuilder() works and use this knowledge to customize the IHostBuilder instance. This can give you greater control than minimal hosting, which may be useful in some situations.
在第 30.4 节中,您将了解帮助程序函数 Host.CreateDefaultBuilder() 的工作原理,并利用这些知识自定义 IHostBuilder 实例。这可以为您提供比最小托管更大的控制权,这在某些情况下可能很有用。

In section 30.5 we take a step back and look at some of the drawbacks in the generic host bootstrapping code we’ve explored, particularly its apparent complexity compared to minimal hosting with WebApplication.
在 Section 30.5 中,我们退后一步,看看我们探索过的通用主机引导代码中的一些缺点,特别是与使用 WebApplication 进行最小托管相比,它明显的复杂性。

Finally, in section 30.6 I discuss some of the reasons you might nevertheless choose to use the generic host instead of minimal hosting in your .NET 7 app. In most cases I suggest using minimal hosting with WebApplication, but there are valid cases in which the generic host makes sense.
最后,在第 30.6 节中,我将讨论一些原因,您可能仍然选择在 .NET 7 应用程序中使用通用主机而不是最小托管。在大多数情况下,我建议对 WebApplication 使用最小托管,但在某些情况下,通用主机是有意义的。

30.1 Separating concerns between two files‌

30.1 在两个文件之间分离关注点

As you’ve seen throughout this book, the standard way to create an ASP.NET Core application in .NET 7 is with the WebApplicationBuilder and WebApplication classes inside Program.cs, using top-level statements. Before .NET 6, however, ASP.NET Core used a different approach, which you can still use in .NET 7 if you wish.‌‌
正如您在本书中所看到的,在 .NET 7 中创建 ASP.NET Core 应用程序的标准方法是使用顶级语句在 Program.cs 中使用 WebApplicationBuilder 和 WebApplication 类。但是,在 .NET 6 之前,ASP.NET Core 使用不同的方法,如果您愿意,您仍然可以在 .NET 7 中使用该方法。

This approach typically uses a traditional static void Main() entry point (although top-level statements are supported) and splits its bootstrapping code across two files, as shown in figure 30.1:
这种方法通常使用传统的静态 void Main() 入口点(尽管支持顶级语句),并将其引导代码拆分为两个文件,如图 30.1 所示:

• Program.cs—This contains the entry point for the application, which bootstraps a host object. This is where you configure the infrastructure of your application, such as Kestrel, integration with Internet Information Services (IIS), and configuration sources.
Program.cs - 包含应用程序的入口点,用于引导主机对象。您可以在此处配置应用程序的基础结构,例如 Kestrel、与 Internet Information Services (IIS) 的集成以及配置源。

• Startup.cs—The Startup class is where you configure your dependency injection (DI) container, your middleware pipeline, and your application’s endpoints.
Startup.cs - Startup 类用于配置依赖关系注入 (DI) 容器、中间件管道和应用程序的端点。

alt text

Figure 30.1 The different responsibilities of the Program and Startup classes in an ASP.NET Core app that uses the generic host instead of WebApplication
图 30.1 使用泛型主机而不是 WebApplication 的 ASP.NET Core 应用程序中 Program 和 Startup 类的不同职责

We’ll look at each of these files in turn in section 30.2 and 30.3 to see how they might look for a typical Razor Pages app. I discuss the generic host at the center of this setup and compare the approach with the newer WebApplication APIs you’ve used so far throughout the book.
我们将在第 30.2 节和第 30.3 节中依次查看这些文件,以了解它们在典型 Razor Pages 应用程序中的外观。我将讨论此设置中心的通用主机,并将该方法与您在本书中到目前为止使用的较新的 WebApplication API 进行比较。

30.2 The Program class: Building a Web Host‌

30.2 Program 类:构建 Web 主机

All ASP.NET Core apps are fundamentally console applications. With the Startup-based hosting model, the Main entry point builds and runs an IHost instance, as shown in the following listing, which shows a typical Program.cs file. The IHost is the core of your ASP.NET Core application: it contains the HTTP server (Kestrel) for handling requests, along with all the necessary services and configuration to generate responses.‌‌
所有 ASP.NET Core 应用程序基本上都是控制台应用程序。使用基于启动的托管模型,Main 入口点构建并运行 IHost 实例,如下面的清单所示,其中显示了一个典型的 Program.cs 文件。IHost 是 ASP.NET Core 应用程序的核心:它包含用于处理请求的 HTTP 服务器 (Kestrel),以及用于生成响应的所有必要服务和配置。

Listing 30.1 The Program.cs file configures and runs an IHost
清单 30.1 Program.cs 文件配置并运行 IHost

public class Program
{
public static void Main(string[] args)
{
CreateHostBuilder(args) ❶
.Build() ❷
.Run(); ❸
}
public static IHostBuilder CreateHostBuilder(string[] args) =>
Host.CreateDefaultBuilder(args) ❹
.ConfigureWebHostDefaults(webBuilder => ❺
{
webBuilder.UseStartup<Startup>(); ❻
});
}

❶ Creates an IHostBuilder using the CreateHostBuilder method
使用 CreateHostBuilder 方法创建 IHostBuilder

❷ Builds and returns an instance of IHost from the IHostBuilder
从 IHostBuilder构建并返回 IHost 的实例

❸ Runs the IHost and starts listening for requests and generating responses
运行 IHost 并开始侦听请求并生成响应

❹ Creates an IHostBuilder using the default configuration
使用默认配置创建 IHostBuilder

❺ Configures the application to use Kestrel and listen to HTTP requests
将应用程序配置为使用 Kestrel 并侦听 HTTP 请求

❻ The Startup class defines most of your application’s configuration.
Startup 类定义了应用程序的大部分配置。

The Main function contains all the basic initialization code required to create a web server and to start listening for requests. It uses an IHostBuilder, created by the call to CreateDefaultBuilder, to define how the generic IHost is configured, before instantiating the IHost with a call to Build().
Main 函数包含创建 Web 服务器和开始侦听请求所需的所有基本初始化代码。它使用通过调用 CreateDefaultBuilder 创建的 IHostBuilder 来定义泛型 IHost 的配置方式,然后再通过调用 Build() 实例化 IHost。

TIP The IHost object represents your built application. The WebApplication type you’ve used throughout the book also implements IHost.
提示:IHost 对象表示您构建的应用程序。您在本书中介绍的 WebApplication 类型也实现了 IHost。

Much of your app’s configuration takes place in the IHostBuilder created by the call to CreateDefaultBuilder, but it delegates some responsibility to a separate class, Startup. The Startup class referenced in the generic UseStartup<> method is where you configure your app’s services and define your middleware pipeline.
应用程序的大部分配置都发生在由调用 CreateDefaultBuilder 创建的 IHostBuilder 中,但它将一些责任委托给单独的类 Startup。泛型 UseStartup<> 方法中引用的 Startup 类是您配置应用程序服务和定义中间件管道的位置。

NOTE The code to build the IHostBuilder is extracted to a helper method called CreateHostBuilder. The name of this method is historically important, as it was used implicitly by tooling such as the Entity Framework Core (EF Core) tools, as I discuss in section 30.5.‌
注意:用于构建 IHostBuilder 的代码被提取到名为 CreateHostBuilder 的帮助程序方法中。此方法的名称在历史上很重要,因为它由 Entity Framework Core (EF Core) 工具等工具隐式使用,如我在第 30.5 节中讨论的那样。

You may be wondering why you need two classes for configuration: Program and Startup. Why not include all your app’s configuration in one class or the other? The idea is to separate code that changes often from code that rarely changes.
您可能想知道为什么需要两个类进行配置:Program 和 Startup。为什么不将应用程序的所有配置都包含在一个类或另一个类中呢?这个想法是将经常更改的代码与很少更改的代码分开。

The Program class for two different ASP.NET Core applications typically look similar, but the Startup classes often differ significantly (though they all follow the same basic pattern, as you’ll see in section 30.3). You’ll rarely find that you need to modify Program as your application grows, whereas you’ll normally update Startup whenever you add additional features. For example, if you add a new NuGet dependency to your project, you’ll normally need to update Startup to make use of it.
两个不同的 ASP.NET Core 应用程序的 Program 类通常看起来相似,但 Startup 类通常有很大不同(尽管它们都遵循相同的基本模式,如您将在第 30.3 节中看到的那样)。您很少会发现需要随着应用程序的增长而修改 Program,而您通常会在添加其他功能时更新 Startup。例如,如果向项目添加新的 NuGet 依赖项,则通常需要更新 Startup 才能使用它。

The Program class is where a lot of app configuration takes place, but this is mostly hidden inside the Host.CreateDefaultBuilder method.
Program 类是进行大量应用程序配置的地方,但这主要隐藏在 Host.CreateDefaultBuilder 方法中。

CreateDefaultBuilder is a static helper method that simplifies the bootstrapping of your app by creating an IHostBuilder with some common configuration. This is similar to the way you’ve used WebApplication.CreateDefaultBuilder() throughout the book.
CreateDefaultBuilder 是一种静态帮助程序方法,它通过创建具有一些常见配置的 IHostBuilder 来简化应用程序的启动。这类似于您在整本书中使用 WebApplication.CreateDefaultBuilder() 的方式。

NOTE You can create custom HostBuilder instances if you want to customize the default setup and create a completely custom IHost instance, as you’ll see in section 30.4. This is different from WebApplicationBuilder, which always uses the same defaults.
注意:如果您想自定义默认设置并创建完全自定义的 IHost 实例,则可以创建自定义 HostBuilder 实例,如第 30.4 节所示。这与 WebApplicationBuilder 不同,后者始终使用相同的默认值。

The other helper method used by default is ConfigureWebHostDefaults. This uses a WebHostBuilder object to configure Kestrel to listen for HTTP requests.‌
默认情况下使用的另一个帮助程序方法是 ConfigureWebHostDefaults。这使用 WebHostBuilder 对象将 Kestrel 配置为侦听 HTTP 请求。

Creating services with the generic host
使用通用主机创建服务

It might seem strange that you must call ConfigureWebHostDefaults as well as CreateDefaultBuilder. Couldn’t we have one method? Isn’t handling HTTP requests the whole point of ASP.NET Core?
您必须调用 ConfigureWebHostDefaults 和 CreateDefaultBuilder 似乎很奇怪。我们不能有一种方法吗?处理 HTTP 请求不是 ASP.NET Core 的全部意义所在吗?

Well, yes and no! ASP.NET Core 3.0 introduced the concept of a generic host. This allows you to use much of the same framework as ASP.NET Core applications to write non-HTTP applications. These apps can run as console apps or can be installed as Windows services (or as systemd daemons in Linux) to run background tasks or read from message queues, for example.
嗯,是的,也不是!ASP.NET Core 3.0 引入了通用主机的概念。这允许您使用与 ASP.NET Core 应用程序相同的框架来编写非 HTTP 应用程序。例如,这些应用程序可以作为控制台应用程序运行,也可以作为 Windows 服务(或 Linux 中的 systemd 守护程序)安装,以运行后台任务或从消息队列中读取数据。

Kestrel and the web framework of ASP.NET Core build on top of the generic host functionality introduced in ASP.NET Core 3.0. To configure a typical ASP.NET Core app, you configure the generic host features that are common across all apps—features such as configuration, logging, and dependency services. For web applications, you then also configure the services, such as Kestrel, that are necessary to handle web requests. In chapter 34 you’ll see how to build applications using the generic host to run scheduled tasks and build background services.
Kestrel 和 ASP.NET Core 的 Web 框架构建在 ASP.NET Core 3.0 中引入的通用主机功能之上。要配置典型的 ASP.NET Core 应用程序,您需要配置所有应用程序中通用的通用主机功能,例如配置、日志记录和依赖项服务等功能。对于 Web 应用程序,您还可以配置处理 Web 请求所需的服务,例如 Kestrel。在第 34 章中,您将看到如何使用通用主机构建应用程序来运行计划任务和构建后台服务。

Even in .NET 7, WebApplication and WebApplicationBuilder use the generic host behind the scenes. You can read more about the evolution of ASP.NET Core’s bootstrapping code and the relationship between IHost and WebApplication on my blog at https://andrewlock.net/exploring-dotnet-6-part-2-comparing-webapplicationbuilder-to-the-generic-host/.
即使在 .NET 7 中,WebApplication 和 WebApplicationBuilder 也在后台使用通用主机。您可以在我的博客 https://andrewlock.net/exploring-dotnet-6-part-2-comparing-webapplicationbuilder-to-the-generic-host/ 上阅读有关 ASP.NET Core 引导代码的演变以及 IHost 和 WebApplication 之间的关系的更多信息。

Once the configuration of the IHostBuilder is complete, the call to Build produces the IHost instance, but the application still isn’t handling HTTP requests yet. It’s the call to Run() that starts the HTTP server listening. At this point, your application is fully operational and can respond to its first request from a remote browser.
IHostBuilder 的配置完成后,对 Build 的调用将生成 IHost 实例,但应用程序仍未处理 HTTP 请求。对 Run() 的调用将启动 HTTP 服务器侦听。此时,您的应用程序已完全运行,并且可以响应来自远程浏览器的第一个请求。

30.3 The Startup class: Configuring your application‌

30.3 Startup 类:配置应用程序

As you’ve seen, Program is responsible for configuring a lot of the infrastructure for your app, but you configure some of your app’s behavior in Startup. The Startup class is responsible for configuring two main aspects of your application:
如你所见,Program 负责为应用程序配置大量基础结构,但你在 Startup 中配置应用程序的一些行为。Startup 类负责配置应用程序的两个主要方面:

• DI container service registration
DI 集装箱服务注册

• Middleware configuration and mapping of endpoints
中间件配置和端点映射

You configure each of these aspects in its own method in Startup: service registration in ConfigureServices and middleware/endpoint configuration in Configure. A typical outline of Startup is shown in the following listing.
您可以在 Startup 中在其自己的方法中配置每个方面:ConfigureServices 中的服务注册和 Configure 中的中间件/终端节点配置。下面的清单显示了 Startup 的典型轮廓。

Listing 30.2 An outline of Startup.cs showing how each aspect is configured
清单 30.2 Startup.cs概述,显示每个 aspect 是如何配置的

public class Startup
{
public void ConfigureServices(IServiceCollection services) ❶
{
// method details
}
public void Configure(IApplicationBuilder app) ❷
{
// method details
}
}

❶ Configures services by registering them with the IServiceCollection
通过在 IServiceCollection中注册服务来配置服务
❷ Configures the middleware pipeline for handling HTTP requests
配置用于处理 HTTP 请求的中间件管道

The IHostBuilder created in Program automatically calls ConfigureServices and then Configure, as shown in figure 30.2. Each call configures a different part of your application, making it available for subsequent method calls. Any services registered in the ConfigureServices method are available to the Configure method. Once configuration is complete, you create an IHost by calling Build() on the IHostBuilder.
在 Program 中创建的 IHostBuilder 会自动调用 ConfigureServices,然后调用 Configure,如图 30.2 所示。每次调用都会配置应用程序的不同部分,使其可用于后续方法调用。在 ConfigureServices 方法中注册的任何服务都可用于 Configure 方法。配置完成后,您可以通过在 IHostBuilder 上调用 Build() 来创建 IHost。

alt text

Figure 30.2 The IHostBuilder is created in Program.cs and calls methods on Startup to configure the application’s services and middleware pipeline. Once configuration is complete, the IHost is created by calling Build() on the IHostBuilder.
图 30.2 IHostBuilder 是在 Program.cs中创建的,并在启动时调用方法来配置应用程序的服务和中间件管道。配置完成后,通过在 IHostBuilder 上调用 Build() 来创建 IHost。

An interesting point about the Startup class is that it doesn’t implement an interface as such. Instead, the methods are invoked by using reflection to find methods with the predefined names of Configure and ConfigureServices. This makes the class more flexible and enables you to modify the signature of the Configure method to inject any services you registered in ConfigureServices using DI.
关于 Startup 类的一个有趣之处在于,它没有实现这样的接口。相反,通过使用反射来查找具有预定义名称 Configure 和 ConfigureServices 的方法,从而调用这些方法。这使得该类更加灵活,并使您能够修改 Configure 方法的签名,以注入您使用 DI 在 ConfigureServices 中注册的任何服务。

TIP If you’re not a fan of the flexible reflection approach, you can implement the IStartup interface or derive from the StartupBase class, which provide the method signatures shown previously in listing 30.2. If you take this approach, you won’t be able to use DI to inject services into the Configure() method.‌‌
提示:如果您不喜欢灵活的反射方法,则可以实现 IStartup 接口或从 StartupBase 类派生,这些类提供前面清单 30.2 中所示的方法签名。如果采用此方法,则无法使用 DI 将服务注入 Configure() 方法。

ConfigureServices is where you add all your required and custom services to the DI container, exactly as you do with WebApplicationBuilder.Services in a typical .NET 7 ASP.NET Core app. The following listing shows how you might configure all the services for the Razor Pages recipe app you’ve seen throughout this book. This listing also shows how you can access the IConfiguration for your app: by injecting into the Startup constructor. You’ll see how to customize your app’s configuration in section 30.4.
在 ConfigureServices 中,您可以将所有必需的自定义服务添加到 DI 容器中,就像在典型的 .NET 7 ASP.NET Core 应用程序中使用 WebApplicationBuilder.Services 一样。以下清单显示了如何为本书中介绍的 Razor Pages 配方应用程序配置所有服务。此清单还显示了如何访问应用程序的 IConfiguration:通过注入 Startup 构造函数。您将在 Section 30.4 中看到如何自定义应用程序的配置。

Listing 30.3 Registering services with DI in ConfigureServices
清单 30.3 在 ConfigureServices 中向 DI 注册服务

public class Startup
{
public IConfiguration Configuration { get; } ❶
public Startup(IConfiguration configuration) ❶
{
Configuration = configuration;
}
public void ConfigureServices(IServiceCollection services) ❷
{
var conn = Configuration.GetConnectionString("DefaultConnection");
services.AddDbContext<AppDbContext>(options => ❸
options.UseSqlite(conn)); ❸
services.AddDefaultIdentity<ApplicationUser>(options => ❸
options.SignIn.RequireConfirmedAccount = true) ❸
.AddEntityFrameworkStores<AppDbContext>(); ❸
services.AddScoped<RecipeService>(); ❹
services.AddRazorPages(); ❺
services.AddScoped<IAuthorizationHandler, IsRecipeOwnerHandler>();
services.AddAuthorizationBuilder()
.AddPolicy("CanManageRecipe",
p => p.AddRequirements(new IsRecipeOwnerRequirement()));
}
public void Configure(IApplicationBuilder app) => { /* Not shown */ }
}

❶ The IConfiguration for the app is injected into the constructor.
应用程序的 IConfiguration 被注入到构造函数中。

❷ You must register your services against the provided IServiceCollection.
您必须针对提供的 IServiceCollection 注册您的服务。

❸ Registers all the EF Core and ASP.NET Core Identity services
注册所有 EF Core 和 ASP.NET Core Identity 服务

❹ Registers the custom service implementations
注册自定义服务实现

❺ Registers the framework services
注册框架服务

After configuring all your services, you need to set up your middleware pipeline and map your endpoints. The process is similar to configuring your middleware pipeline using WebApplication:
配置完所有服务后,您需要设置中间件管道并映射终端节点。该过程类似于使用 WebApplication 配置中间件管道:

• You add middleware to the pipeline by calling Use extension methods on an IApplicationBuilder instance.
通过在 IApplicationBuilder 实例上调用 Use
扩展方法,将中间件添加到管道中。

• The order in which you add the middleware to the pipeline is important and defines the final pipeline order.
将中间件添加到管道的顺序非常重要,它定义了最终的管道顺序。

• You can add middleware conditionally based on the environment.
您可以根据环境有条件地添加中间件。

However, there are some important differences between the WebApplication approach you’ve seen so far and the Startup approach:
但是,到目前为止,您看到的 WebApplication 方法与 Startup 方法之间存在一些重要差异:

• The IWebHostEnvironment for your app is exposed directly on WebApplication.Environment. To access this information inside Startup, you must inject it into the constructor or the Configure method using DI.
应用程序的 IWebHostEnvironment 直接在 WebApplication.Environment 上公开。要在 Startup 中访问此信息,您必须使用 DI 将其注入到构造函数或 Configure 方法中。

• As you saw in chapter 4, WebApplication automatically adds a lot of middleware to your pipeline, such as routing middleware, endpoint middleware, and the authentication middleware. You must add this middleware manually when using the Startup approach.
如第 4 章所示,WebApplication 会自动向管道中添加大量中间件,例如路由中间件、端点中间件和身份验证中间件。使用 Startup 方法时,必须手动添加此中间件。

• WebApplication implements both IApplicationBuilder and IEndpointRouteBuilder, so you can add endpoints directly to WebApplication, by calling MapGet() or MapRazorPages(), for example.When using the Startup approach, you must call UseEndpoints() and map all your endpoints in a lambda method instead.
WebApplication 同时实现 IApplicationBuilder 和 IEndpointRouteBuilder,因此您可以通过调用 MapGet() 或 MapRazorPages() 等方式将端点直接添加到 WebApplication。使用 Startup 方法时,您必须调用 UseEndpoints() 并改为在 lambda 方法中映射所有终端节点。

• The Configure method is not async, so it’s cumbersome to do async tasks. By contrast, when using WebApplication, you’re free to use async methods between any of your general bootstrapping code.
Configure 方法不是异步的,因此执行异步任务很麻烦。相比之下,在使用 WebApplication 时,您可以在任何常规引导代码之间自由使用异步方法。

Despite these caveats, in many cases your Startup.Configure method will look almost identical to the way you configure the pipeline on WebApplication. The following listing shows how the Configure() method for the Razor Pages recipe app might look.‌尽管有这些注意事项,但在许多情况下,您的 Startup.Configure 方法看起来与您在 WebApplication 上配置管道的方式几乎相同。以下清单显示了 Razor Pages 配方应用的 Configure() 方法的外观。

Listing 30.4 Startup.Configure() for a Razor Pages application
列表 30.4 Razor Pages 应用程序的 Startup.Configure()

public class Startup
{
public void Configure(
IApplicationBuilder app, ❶
IWebHostEnvironment env) ❷
{
if (env.IsDevelopment()) ❸
{
app.UseDeveloperExceptionPage(); ❹
}
else
{
app.UseExceptionHandler("/Error");
app.UseHsts();
}
app.UseHttpsRedirection();
app.UseStaticFiles();
app.UseRouting(); ❺
app.UseAuthentication();
app.UseAuthorization(); ❻
app.UseEndpoints(endpoints => ❼
{
endpoints.MapRazorPages(); ❽
});
}
}

❶ IApplicationBuilder is used to build the middleware pipeline.
IApplicationBuilder 用于构建中间件管道。

❷ Other services can be accepted as parameters.
其他服务可以作为参数接受。

❸ Different behavior when in development or production
开发或生产时的行为不同

❹ WebApplication adds this automatically. You must explicitly add it when using Startup.
WebApplication 会自动添加此内容。您必须在使用Startup 时显式添加它。

❺ Similarly, you must explicitly call UseRouting.
同样,您必须显式调用 UseRouting。

❻ Must always be placed between the call to UseRouting and UseEndpoints
必须始终放置在对 UseRouting 和 UseEndpoints的调用之间

❼ Adds the endpoint middleware, which executes the endpoints
添加执行终结点的终结点中间件

❽ Maps the Razor Pages endpoints
映射 Razor Pages 终结点

In this example, the IWebHostEnvironment object is injected into the Configure() method using DI so that you can configure the middleware pipeline differently in development and production. In this case, we add the DeveloperExceptionPageMiddleware to the pipeline when we’re running in development.‌
在此示例中,使用 DI 将 IWebHostEnvironment 对象注入到 Configure() 方法中,以便您可以在开发和生产中以不同的方式配置中间件管道。在本例中,我们在开发中运行时将 DeveloperExceptionPageMiddleware 添加到管道中。

NOTE Remember that WebApplication adds this middleware automatically, but with Startup you must add it manually. The same goes for all the other automatically added middleware.
注意:请记住,WebApplication 会自动添加此中间件,但使用 Startup 时,您必须手动添加它。所有其他自动添加的 middleware 也是如此。

After adding all the middleware to the pipeline, you come to the UseEndpoints() call, which adds the EndpointMiddleware to the pipeline. When you use WebApplication, you rarely need to call this, as WebApplication automatically adds it at the end of the pipeline, but when you use Startup, you should add it at the end of your pipeline.
将所有中间件添加到管道后,您将转到 UseEndpoints() 调用,该调用将 EndpointMiddleware 添加到管道中。当您使用 WebApplication 时,您很少需要调用它,因为 WebApplication 会自动将其添加到管道的末尾,但是当您使用 Startup 时,您应该将其添加到管道的末尾。

Note as well that the call to UseEndpoints() is where you define all the endpoints in your application. Whether they’re Razor Pages, Model-View-Controller (MVC) controllers, or minimal APIs, you must register them in the UseEndpoints() lambda.
另请注意,对 UseEndpoints() 的调用是定义应用程序中的所有终结点的位置。无论它们是 Razor Pages、Model-View-Controller (MVC) 控制器还是最小 API,都必须在 UseEndpoints() lambda 中注册它们。

NOTE Endpoints must be registered inside the call to UseEndpoints() using the IEndpointRouteBuilder instance from the lambda method.
注意:必须使用 lambda 方法中的 IEndpointRouteBuilder 实例在对 UseEndpoints() 的调用中注册终端节点。

Other than the noted differences, moving your service, middleware, and endpoint configuration between a Startup-based approach and WebApplication should be relatively simple, which may lead you to wonder whether there’s any good reason to choose the Startup approach over WebApplication. As always, the answer is “It depends,” but one possible reason is so that you can customize your IHostBuilder.
除了上述差异之外,在基于 Startup 的方法和 WebApplication 之间移动服务、中间件和端点配置应该相对简单,这可能会让您怀疑是否有任何充分的理由选择 Startup 方法而不是 WebApplication。与往常一样,答案是“视情况而定”,但一个可能的原因是您可以自定义 IHostBuilder。

30.4 Creating a custom IHostBuilder‌

30.4 创建自定义 IHostBuilder

As you saw in section 30.2, the default way to work with a Startup class in ASP.NET Core is to use the Host.CreateDefaultBuilder() method. This opinionated helper method sets up many defaults for your app. It is analogous to the WebApplication‌.CreateBuilder() method in that way.
如您在第 30.2 节中所见,在 ASP.NET Core 中使用 Startup 类的默认方法是使用 Host.CreateDefaultBuilder() 方法。这个固执己见的 helper 方法为您的应用程序设置了许多默认值。它类似于 WebApplication 。CreateBuilder() 方法。

However, you don’t have to use the CreateDefaultBuilder method to create an IHostBuilder instance: you can directly create a HostBuilder instance and customize it from scratch if you prefer. Before you start doing that, though, it’s worth seeing some of the things the CreateDefaultBuilder method gives you and what they’re used for. You may then consider customizing the default HostBuilder instance instead of creating a completely bespoke instance.‌
但是,您不必使用 CreateDefaultBuilder 方法创建 IHostBuilder 实例:如果您愿意,可以直接创建 HostBuilder 实例并从头开始自定义它。不过,在开始执行此作之前,有必要了解 CreateDefaultBuilder 方法为您提供的一些功能以及它们的用途。然后,您可以考虑自定义默认的 HostBuilder 实例,而不是创建完全定制的实例。

NOTE You can use Host.CreateDefaultBuilder() in .NET 7 even if you’re not using ASP.NET Core by installing the Microsoft.Extensions.Hosting package. You’ll learn how to create non-HTTP applications using the generic host in chapter 34.
注意:即使您没有使用 ASP.NET Core,也可以通过安装 Microsoft.Extensions.Hosting 包在 .NET 7 中使用 Host.CreateDefaultBuilder()。您将在第 34 章中学习如何使用通用主机创建非 HTTP 应用程序。

The defaults chosen by CreateDefaultBuilder are ideal when you’re initially setting up an app, but as your application grows, you may find you need to break it apart and tinker with some of the internals. The following listing shows a rough overview of the CreateDefaultBuilder method, so you can see how the HostBuilder is constructed. It’s not exhaustive or complete, but it should give you an idea of the amount of work the CreateDefaultBuilder method does for you!
CreateDefaultBuilder 选择的默认值在您最初设置应用程序时是理想的,但随着应用程序的增长,您可能会发现需要将其分解并修改一些内部结构。下面的清单显示了 CreateDefaultBuilder 方法的粗略概述,因此你可以看到 HostBuilder 是如何构造的。它并不详尽或完整,但它应该让您了解 CreateDefaultBuilder 方法为您完成的工作量!

Listing 30.5 The Host.CreateDefaultBuilder method
清单 30.5 Host.CreateDefaultBuilder 方法

public static IHostBuilder CreateDefaultBuilder(string[] args)
{
var builder = new HostBuilder() ❶
.UseContentRoot(Directory.GetCurrentDirectory()) ❷
.ConfigureHostConfiguration(IConfigurationBuilder config => ❸
{ ❸
config.AddEnvironmentVariables("DOTNET_"); ❸
config.AddCommandLine(args); ❸
}) ❸
.ConfigureAppConfiguration((hostingContext, config) => ❹
{ ❹
IHostEnvironment env = hostingContext.HostingEnvironment; ❹
config ❹
.AddJsonFile("appsettings.json") ❹
.AddJsonFile($"appsettings.{env.EnvironmentName}.json"); ❹
if (env.IsDevelopment()) ❹
{ ❹
config.AddUserSecrets(); ❹
} ❹
config ❹
.AddEnvironmentVariables() ❹
.AddCommandLine(); ❹
}) ❹
.ConfigureLogging((hostingContext, logging) => ❺
{ ❺
logging.AddConfiguration( ❺
hostingContext.Configuration.GetSection("Logging")); ❺
logging.AddConsole(); ❺
logging.AddDebug(); ❺
logging.AddEventSourceLogger(); ❺
logging.AddEventLog(); ❺
}) ❺
.UseDefaultServiceProvider((context, options) => ❻
{ ❻
var isDevelopment = context.HostingEnvironment ❻
.IsDevelopment(); ❻
options.ValidateScopes = isDevelopment; ❻
options.ValidateOnBuild = isDevelopment; ❻
}); ❻
return builder; ❼
}

❶ Creates an instance of HostBuilder
创建 HostBuilder的实例

❷ The content root defines the directory where configuration files can be found.
内容根定义可以找到配置文件的目录。

❸ Configures hosting settings such as determining the hosting environment
配置托管设置,例如确定托管环境

❹ Configures application settings
配置应用程序设置

❺ Sets up the logging infrastructure
设置日志记录基础设施

❻ Configures the DI container, optionally enabling verification settings
配置 DI 容器,可选择启用验证设置

❼ Returns HostBuilder for further configuration by calling extra methods before calling Build()
通过在调用 Build() 之前调用额外的方法返回 HostBuilder 以进行进一步配置

The first method called on HostBuilder is UseContentRoot(). This tells the application in which directory it can find any configuration or Razor files it needs later. This is typically the folder in which the application is running, hence the call to GetCurrentDirectory.
在 HostBuilder 上调用的第一个方法是 UseContentRoot()。这会告知应用程序稍后可以在哪个目录中找到所需的任何配置或 Razor 文件。这通常是运行应用程序的文件夹,因此调用 GetCurrentDirectory。

TIP Remember that ContentRoot is not where you store static files that the browser can access directly. That’s the WebRoot, typically wwwroot.
提示:请记住,ContentRoot 不是存储浏览器可以直接访问的静态文件的位置。这就是 WebRoot,通常是 wwwroot。

The ConfigureHostingConfiguration() method is where your application determines which HostingEnvironment it’s currently running in. The framework looks for environment variables that start with "DOTNET_" (such as the DOTNETENVIRONMENT variable you learned about in chapter 10) and command-line arguments to determine whether it’s running in a development or production environment. This is used to populate the IWebHostEnvironment object that’s used throughout your app.‌
ConfigureHostingConfiguration() 方法是应用程序确定它当前在哪个 HostingEnvironment 中运行的位置。框架会查找以 “DOTNET
” 开头的环境变量(例如您在第 10 章中学到的 DOTNET_ENVIRONMENT 变量)和命令行参数,以确定它是在开发环境中运行还是在生产环境中运行。这用于填充整个应用程序中使用的 IWebHostEnvironment 对象。

The ConfigureAppConfiguration() method is where you configure the main IConfiguration object for your app, populating it from appsettings.json files, environment variables, and User Secrets, for example. The default builder populates the configuration using all the sources shown in listing 30.5, which is similar to the configuration WebApplicationBuilder uses.‌
ConfigureAppConfiguration() 方法是为应用程序配置主 IConfiguration 对象的地方,例如,从 appsettings.json 文件、环境变量和用户密钥中填充它。默认构建器使用清单 30.5 中所示的所有源填充配置,这类似于 WebApplicationBuilder 使用的配置。

TIP There are some important differences in how the IConfiguration object is built using the default builder and the approach used by WebApplicationBuilder. You can read about these differences on my blog at http://mng.bz/e11V.
提示:使用默认生成器和 WebApplicationBuilder 使用的方法构建 IConfiguration 对象的方式存在一些重要差异。您可以在我的博客 http://mng.bz/e11V 上阅读这些差异。

Next up after app configuration comes ConfigureLogging(). ConfigureLogging is where you specify the logging settings and providers for your application, which you learned about in chapter 26. In addition to setting up the default ILoggerProviders, this method sets up log filtering, using the IConfiguration prepared in ConfigureAppConfiguration().
接下来,在应用程序配置之后是 ConfigureLogging()。ConfigureLogging 是指定应用程序的日志记录设置和提供程序的地方,您在第 26 章中了解了这一点。除了设置默认 ILoggerProviders 之外,此方法还使用 ConfigureAppConfiguration() 中准备的 IConfiguration 设置日志筛选。

The last method call shown in listing 30.5, UseDefaultServiceProvider, configures your app to use the built-in DI container. It also sets the ValidateScopes and ValidateOnBuild options based on the current HostingEnvironment. This ensures that when running the application in the development environment, the container automatically checks for captured dependencies, which you learned about in chapter 9.‌‌
清单 30.5 中显示的最后一个方法调用 UseDefaultServiceProvider 将您的应用程序配置为使用内置的 DI 容器。它还根据当前 HostingEnvironment 设置 ValidateScopes 和 ValidateOnBuild 选项。这可确保在开发环境中运行应用程序时,容器会自动检查捕获的依赖项,您在第 9 章中学到了这一点。

As you can see, CreateDefaultBuilder does a lot for you. In many cases, these defaults are exactly what you need, but if they’re not, the default builder is optional. You could call new HostBuilder() and start customizing it from there, but you’d need to set up everything that CreateHostBuilder does: logging, hosting configuration, and service provider configuration, as well as your app configuration.
如您所见,CreateDefaultBuilder 为您做了很多事情。在许多情况下,这些默认值正是您所需要的,但如果它们不是,则默认构建器是可选的。您可以调用新的 HostBuilder() 并从那里开始自定义它,但您需要设置 CreateHostBuilder 执行的所有作:日志记录、托管配置和服务提供商配置,以及您的应用程序配置。

An alternative approach is to layer additional configuration on top of the existing defaults. In the following listing, I show how to add a Seq logging provider to the configured providers using ConfigureLogging(), as well as how to reconfigure the app configuration to load only from the appsettings.json provider by clearing the default providers.
另一种方法是在现有默认值之上对其他配置进行分层。在下面的清单中,我将展示如何使用 ConfigureLogging() 将 Seq 日志记录提供程序添加到配置的提供程序中,以及如何通过清除默认提供程序来重新配置应用程序配置以仅从 appsettings.json 提供程序加载。

Listing 30.6 Customizing the default HostBuilder
清单 30.6 自定义默认的 HostBuilder

public class Program
{
public static void Main(string[] args)
{
CreateHostBuilder(args).Build().Run();
}
public static IHostBuilder CreateHostBuilder(string[] args) =>
Host.CreateDefaultBuilder(args)
.ConfigureLogging(logBuilder => logBuilder.AddSeq()) ❶
.ConfigureAppConfiguration((hostContext, config) => ❷
{
config.Sources.Clear(); ❸
config.AddJsonFile("appsettings.json"); ❹
}
.ConfigureWebHostDefaults(webBuilder =>
{
webBuilder.UseStartup<Startup>();
});
}

❶ Adds the Seq logging provider to the configuration
将 Seq 日志记录提供程序添加到配置中

❷ HostBuilder provides a hosting context and an instance of ConfigurationBuilder.
HostBuilder 提供托管上下文和 ConfigurationBuilder 实例。

❸ Clears the providers configured by default in CreateDefaultBuilder
清除 CreateDefaultBuilder中默认配置的提供程序

❹ Adds a JSON configuration provider, providing the filename of the configuration file
添加 JSON 配置提供程序,提供配置文件的文件名

A new HostBuilder is created in CreateDefaultBuilder() and executes all the configuration methods you saw in listing 30.5. Next, the HostBuilder invokes the extra ConfigureLogging() and ConfigureAppConfiguration() methods added in listing 30.6. You can call any of the other configuration methods on HostBuilder to further customize the instance before calling Build().‌
在 CreateDefaultBuilder() 中创建一个新的 HostBuilder,并执行您在清单 30.5 中看到的所有配置方法。接下来,HostBuilder 调用清单 30.6 中添加的额外 ConfigureLogging() 和 ConfigureAppConfiguration() 方法。在调用 Build() 之前,您可以在 HostBuilder 上调用任何其他配置方法以进一步自定义实例。

NOTE Each call to a Configure() method on HostBuilder adds an extra configuration function to the setup code; these calls don’t replace existing Configure () calls. The configuration methods are executed in the same order in which they’re added to the HostBuilder, so they execute after the CreateDefaultBuilder() configuration methods.
注意:对 HostBuilder 上的 Configure() 方法的每次调用都会向设置代码添加一个额外的配置函数;这些调用不会替换现有的 Configure () 调用。配置方法的执行顺序与添加到 HostBuilder 的顺序相同,因此它们在 CreateDefaultBuilder() 配置方法之后执行。

One of the criticisms of early ASP.NET Core apps was that they were quite complex to understand when you’re getting started, and after working your way through this chapter, you might well be able to see why! In the next section we compare the generic host and Startup approach with the newer minimal hosting WebApplication approach and discuss when you might want to use one over the other.‌
对早期 ASP.NET Core 应用程序的批评之一是,当您开始时,它们非常难以理解,在完成本章之后,您很可能能够明白为什么!在下一节中,我们将通用 host 和 Startup 方法与较新的最小托管 WebApplication 方法进行比较,并讨论何时可能需要使用其中一种方法。

30.5 Understanding the complexity of the generic host‌

30.5 了解泛型主机的复杂性

Before .NET 6, all ASP.NET Core apps used the generic host and Startup approach. Many people liked the consistent structure this added, but it also has some drawbacks and complexity:
在 .NET 6 之前,所有 ASP.NET Core 应用程序都使用通用主机和启动方法。许多人喜欢它添加的一致结构,但它也有一些缺点和复杂性:

• Configuration is split between two files.
配置在两个文件之间拆分。

• The separation between Program.cs and Startup is somewhat arbitrary.
Program.cs 和 Startup 之间的划分有些武断。

• The generic IHostBuilder exposes newcomers to legacy decisions.
通用 IHostBuilder 使新人能够接触到传统决策。

• The lambda-based configuration can be hard to follow and reason about.
基于 lambda 的配置可能难以遵循和推理。

• The pattern-based conventions of Startup may be hard to discover.
Startup 的基于模式的约定可能很难发现。

• Tooling historically relies on your defining a CreateHostBuilder method in Program.cs.
工具以前依赖于您在 Program.cs 中定义 CreateHostBuilder 方法。

I’ll address each of these problems in turn and afterward discuss how WebApplication attempted to improve the situation.
我将依次解决这些问题中的每一个,然后讨论 WebApplication 如何尝试改善这种情况。

Points 1 and 2 in the preceding list deal with the separation between Program.cs and Startup. As you saw in section 30.1, theoretically the intention is that Program.cs defines the host and rarely changes, whereas Startup defines the app features (services, middleware, and endpoints). This seems like a reasonable decision, but one inevitable downside is that you need to flick back and forth between at least two files to understand all your bootstrapping code.
前面列表中的第 1 点和第 2 点涉及 Program.cs 和 Startup 之间的分离。正如您在 Section 30.1 中看到的,理论上的目的是 Program.cs 定义主机并且很少更改,而 Startup 定义应用程序功能(服务、中间件和端点)。这似乎是一个合理的决定,但一个不可避免的缺点是,您需要在至少两个文件之间来回切换才能理解所有引导代码。

On top of that, you don’t necessarily need to stick to these conventions. You can register services in Program.cs by calling HostBuilder.ConfigureServices(), for example, or register middleware using WebHostBuilder.Configure(). This is relatively rare but not entirely unheard-of, further blurring the lines between the files.
最重要的是,您不一定需要遵守这些约定。例如,您可以通过调用 HostBuilder.ConfigureServices() 在 Program.cs 中注册服务,或使用 WebHostBuilder.Configure() 注册中间件。这种情况相对罕见,但并非完全闻所未闻,进一步模糊了文件之间的界限。

Point 3 relates to the fact that you must call ConfigureWebHostDefaults() (which uses an IWebHostBuilder) to set up Kestrel and register your Startup class. This level of indirection (and the introduction of another builder type) is a remnant of decisions harking back to ASP.NET Core 1.0. For people familiar with ASP.NET Core, this pattern is just one of those things, but it adds confusion when you’re new to it.
第 3 点与必须调用 ConfigureWebHostDefaults()(使用 IWebHostBuilder)来设置 Kestrel 并注册 Startup 类这一事实有关。这种间接级别(以及另一种构建器类型的引入)是可以追溯到 ASP.NET Core 1.0 的决策的残余。对于熟悉 ASP.NET Core 的人来说,这种模式只是其中之一,但当你刚接触它时,它会增加困惑。

NOTE For a walk-through of the evolution of ASP.NET Core bootstrapping code, see my blog post at https://andrewlock.net/exploring-dotnet-6-part-2-comparing-webapplicationbuilder-to-the-generic-host/ .
注意有关 ASP.NET Core 引导代码演变的演练,请参阅我在 https://andrewlock.net/exploring-dotnet-6-part-2-comparing-webapplicationbuilder-to-the-generic-host/ 上的博客文章。

Similarly, the lambda-based configuration mentioned in point 4 can be hard for newcomers to ASP.NET Core to follow. If you’re new to .NET, lambdas are an extra concept you’ll need to understand before you can understand the basics of the code. On top of that, the execution of the lambdas doesn’t necessarily happen sequentially; the HostBuilder essentially queues the lambda methods so they’re executed at the right time. Consider the following snippet:
同样,第 4 点中提到的基于 lambda 的配置对于 ASP.NET Core 的新手来说可能很难理解。如果您不熟悉 .NET,则 lambda 是一个额外的概念,您需要先了解,然后才能了解代码的基础知识。最重要的是,lambda 的执行不一定是按顺序发生的;HostBuilder 实质上是将 lambda 方法排队,以便它们在正确的时间执行。请考虑以下代码段:

public static IhostBuilder CreateHostBuilder(string[] args) =>
Host.CreateDefaultBuilder(args)
.ConfigureLogging(logging => logging.AddSeq())
.ConfigureAppConfiguration(config => {})
.ConfigureServices(s => {})
.ConfigureHostConfiguration(config => {})
.ConfigureWebHostDefaults(webBuilder =>
{
webBuilder.UseStartup<Startup>();
});

The lambdas execute in the following order:
lambda 按以下顺序执行:

  1. ConfigureWebHostDefaults()
  2. ConfigureHostConfiguration()
  3. ConfigureAppConfiguration()
  4. ConfigureLogging()
  5. ConfigureServices()
  6. Startup.ConfigureServices()
  7. Startup.Configure()

For the most part, this ordering detail shouldn’t matter, but it still adds apparent complexity for those who are new to ASP.NET Core.
在大多数情况下,这个排序细节应该无关紧要,但对于刚接触 ASP.NET Core 的人来说,它仍然增加了明显的复杂性。

Point 5 in the list of challenges relates to the Startup class and the default convention/ pattern-based approach. Users coming to ASP.NET Core for the first time will likely be familiar with interfaces and base classes, but they may not have experienced the reflection-based approach.
挑战列表中的第 5 点与 Startup 类和默认的约定/基于模式的方法有关。首次使用 ASP.NET Core 的用户可能熟悉接口和基类,但他们可能没有体验过基于反射的方法。

Using conventions instead of an explicit interface adds flexibility but can make things harder for discoverability. There are also various caveats and edge cases to consider. For example, you can inject only IWebHostEnvironment and IConfiguration into the Startup constructor; you can’t inject anything into the ConfigureServices() method, but you can inject any registered service into Configure(). These are implied rules that you discover primarily by breaking them and then having your app shout at you!‌
使用约定而不是显式接口可以增加灵活性,但可能会使可发现性变得更加困难。还有各种注意事项和边缘情况需要考虑。例如,只能将 IWebHostEnvironment 和 IConfiguration 注入 Startup 构造函数;你不能向 ConfigureServices() 方法注入任何内容,但你可以将任何已注册的服务注入到 Configure() 中。这些是隐含的规则,您主要是通过打破它们,然后让您的应用程序对您大喊大叫来发现的!

TIP The pattern-based approach allows for a lot more than DI into Configure. You can also create environment-specific methods, such as Configure-DevelopmentServices or ConfigureProductionServices, and ASP.NET Core invokes the correct method based on the environment. You can even create a whole StartupProduction class if you wish! For more details on these Startup conventions, see the documentation at http://mng.bz/Oxxw.
提示:基于模式的方法允许的不仅仅是 DI 到 Configure 中。您还可以创建特定于环境的方法,例如 Configure-DevelopmentServices 或 ConfigureProductionServices,ASP.NET Core 会根据环境调用正确的方法。如果您愿意,您甚至可以创建整个 StartupProduction 类!有关这些 Startup 约定的更多详细信息,请参阅 http://mng.bz/Oxxw 中的文档。

The Startup class isn’t the only place where ASP.NET Core relies on opaque conventions. You may remember in section30.2 I mentioned that Program.cs deliberately extracts the building of the IHostBuilder to a method called CreateHostBuilder. The name of this method was historically important. Tooling such as the EF Core tools hooked into it so that they could load your application configuration and services when running migrations and other functionality. In earlier versions of ASP.NET Core, renaming this method would break all your tooling!
Startup 类并不是 ASP.NET Core 依赖于不透明约定的唯一位置。你可能还记得30.2节我提到Program.cs特意将 IHostBuilder 的构建提取到一个名为 CreateHostBuilder 的方法中。这种方法的名称在历史上很重要。EF Core 工具等工具挂接到其中,以便它们可以在运行迁移和其他功能时加载应用程序配置和服务。在早期版本的 ASP.NET Core 中,重命名此方法会破坏您的所有工具!

NOTE As of .NET 6, you don’t have to create a CreateHostBuilder method; you can create your whole app inside your Main function (or using top-level statements), and the EF Core tools will work without error. This was fixed partly to add support for WebApplication. If you’re interested in the mechanics of how it was fixed, see my blog at http://mng.bz/Y11z.
注意:从 .NET 6 开始,您不必创建 CreateHostBuilder 方法;您可以在 Main 函数中(或使用顶级语句)创建整个应用程序,EF Core 工具将正常工作而不会出错。此问题已部分修复,以添加对 WebApplication 的支持。如果您对修复它的机制感兴趣,请参阅我的博客 http://mng.bz/Y11z

Once you’re experienced with ASP.NET Core, most of these gripes become relatively minor. You quickly get used to the standard patterns and avoid the pitfalls. But for new users of ASP.NET Core, Microsoft wanted a smoother experience, closer to the experience you get in many other languages.
一旦您体验了 ASP.NET Core,这些抱怨中的大多数都会变得相对较小。您很快就会习惯标准模式并避免陷阱。但对于 ASP.NET Core 的新用户,Microsoft 希望获得更流畅的体验,更接近您在许多其他语言中获得的体验。

The minimal hosting APIs provided by WebApplicationBuilder and WebApplication largely address these concerns. Configuration happens all in one file using an imperative style, with far fewer lambda-based configuration methods or implicit convention-based setup.
WebApplicationBuilder 和 WebApplication 提供的最小托管 API 在很大程度上解决了这些问题。使用命令式样式在一个文件中进行配置,基于 lambda 的配置方法或基于约定的隐式设置要少得多。

All the relevant objects like configuration and environment are exposed as properties on the WebApplicationBuilder or WebApplication types, so they’re easy to discover.‌
所有相关对象(如配置和环境)都作为 WebApplicationBuilder 或 WebApplication 类型的属性公开,因此很容易发现。

WebApplicationBuilder and WebApplication also try to hide much of the complexity and legacy decisions from you. Under the hood, WebApplication uses the generic host, but you don’t need to know that to use it or be productive. As you’ve seen throughout the book, WebApplication automatically adds various middleware to your pipeline, helping you avoid common pitfalls, such as incorrect middleware ordering.
WebApplicationBuilder 和 WebApplication 还试图向您隐藏许多复杂性和遗留决策。在后台,WebApplication 使用通用主机,但您无需知道它即可使用它或提高工作效率。正如您在整本书中所看到的,WebApplication 会自动将各种中间件添加到您的管道中,帮助您避免常见的陷阱,例如中间件顺序不正确。

NOTE If you’re interested in how WebApplicationBuilder abstracts over the generic host, see my post at https://andrewlock.net/exploring-dotnet-6-part-3-exploring-the-code-behind-webapplicationbuilder/ .
注意:如果您对 WebApplicationBuilder 如何在通用主机上进行抽象感兴趣,请参阅我在 https://andrewlock.net/exploring-dotnet-6-part-3-exploring-the-code-behind-webapplicationbuilder/ 上的帖子。

In most cases, minimal hosting provides an easier bootstrapping experience to the generic host and Startup, and Microsoft considers it to be the modern way to create ASP.NET Core apps. But there are cases in which you might want to consider using the generic host instead.
在大多数情况下,最小托管为通用主机和启动提供了更轻松的引导体验,Microsoft 认为这是创建 ASP.NET Core 应用程序的现代方式。但在某些情况下,您可能需要考虑改用通用主机。

30.6 Choosing between the generic host and minimal hosting‌

30.6 在通用主机和最小主机之间进行选择

The introduction of WebApplication and WebApplicationBuilder in .NET 6, also known as minimal hosting, was intended to provide a dramatically simpler “getting started” experience for newcomers to .NET and ASP.NET Core. All the built-in ASP.NET Core templates use minimal hosting now, and in most cases there’s little reason to look back. In this section I discuss some of the cases in which you might still want to use the generic host approach.
在 .NET 6 中引入 WebApplication 和 WebApplicationBuilder(也称为最小托管),旨在为 .NET 和 ASP.NET Core 的新手提供极其简单的“入门”体验。所有内置的 ASP.NET Core 模板现在都使用最少的托管,在大多数情况下,几乎没有理由回顾过去。在本节中,我将讨论您可能仍希望使用通用主机方法的一些情况。

In three main cases, you’ll likely want to stick with the generic host instead of using minimal hosting with WebApplication:
在三种主要情况下,您可能希望坚持使用通用主机,而不是对 WebApplication 使用最小托管:

• When you already have an ASP.NET Core application that uses the generic host
当您已有使用通用主机的 ASP.NET Core 应用程序时

• When you need (or want) fine control of building the IHost object
当您需要 (或想要) 精细控制构建 IHost 对象时

• When you’re creating a non-HTTP application
当您创建非 HTTP 应用程序时

The first use case is relatively obvious: if you already have an ASP.NET Core app that uses the generic host and Startup, you don’t need to change it. You can still upgrade your app to .NET 7, and you shouldn’t need to change any of your startup code. The generic host and Startup are fully supported in .NET 7, but they’re not the default experience.
第一个用例相对明显:如果您已经有一个使用通用主机和 Startup 的 ASP.NET Core 应用程序,则无需更改它。您仍然可以将应用程序升级到 .NET 7,并且不需要更改任何启动代码。.NET 7 完全支持泛型主机和启动,但它们不是默认体验。

TIP In many cases, upgrading an existing project to .NET 7 simply requires updating the framework in the .csproj file and updating some NuGet packages. If you’re unlucky, you may find that some APIs have changed. Microsoft publishes upgrade guides for each major version release, so it’s worth reading these before upgrading your apps: https://learn.microsoft.com/zh-cn/aspnet/core/migration/60-70 .
提示在许多情况下,将现有项目升级到 .NET 7 只需要更新 .csproj 文件中的框架并更新一些 NuGet 包。运气不好的话,你可能会发现一些 API 已经发生了变化。Microsoft 发布了每个主要版本的升级指南,因此在升级应用程序之前,值得阅读这些指南:https://learn.microsoft.com/zh-cn/aspnet/core/migration/60-70

If you’re creating a new app, but for some reason you don’t like the default options used by WebApplicationBuilder, using the generic host may be your best option. I generally wouldn’t advise this approach, as it will likely require more maintenance than using WebApplication, but it does give you complete control of your bootstrap code if you need or want it.
如果您正在创建新应用程序,但出于某种原因您不喜欢 WebApplicationBuilder 使用的默认选项,则使用通用主机可能是您的最佳选择。我通常不建议使用这种方法,因为它可能需要比使用 WebApplication 更多的维护,但如果您需要或想要它,它确实可以让您完全控制引导代码。

The final case applies when you’re building an ASP.NET Core application that primarily runs background processing services, handling messages from a queue for example, but doesn’t handle HTTP requests. The minimal hosting WebApplication and WebApplicationBuilder are, as their names imply, focused on building web applications, so they don’t make sense in this situation.
当您构建主要运行后台处理服务(例如处理来自队列的消息,但不处理 HTTP 请求)的 ASP.NET Core 应用程序时,最后一种情况适用。顾名思义,最小托管 WebApplication 和 WebApplicationBuilder 专注于构建 Web 应用程序,因此在这种情况下它们没有意义。

NOTE You’ll learn how to create background tasks and services using the generic host in chapter 34. .NET 8 introduces a non-HTTP version of the WebApplicationBuilder called HostApplicationBuilder which aims to simplify app bootstrapping for your background services.
注意:您将在第 34 章中学习如何使用通用主机创建后台任务和服务。.NET 8 引入了一个名为 HostApplicationBuilder 的非 HTTP 版本的 WebApplicationBuilder,旨在简化后台服务的应用程序启动。

If you’re not in any of these situations, strongly consider using the minimal hosting WebApplication approach and the imperative, scriptlike bootstrapping of top-level statements.
如果您不处于上述任何一种情况,强烈建议使用最小托管 WebApplication 方法和顶级语句的命令式脚本式引导。

NOTE The fact that you’re using WebApplication doesn’t mean you have to dump all your service and middleware configuration into Program.cs. For alternative approaches, such as using a Startup class you invoke manually or local functions to separate your configuration, see my blog post at https://andrewlock.net/exploring-dotnet-6-part-12-upgrading-a-dotnet-5-startup-based-app-to-dotnet-6/ .
注意:您使用的是 WebApplication 这一事实并不意味着您必须将所有服务和中间件配置转储到 Program.cs 中。有关替代方法,例如使用手动调用的 Startup 类或本地函数来分隔配置,请参阅我在 https://andrewlock.net/exploring-dotnet-6-part-12-upgrading-a-dotnet-5-startup-based-app-to-dotnet-6/ 上的博客文章。

In this chapter I provided a relatively quick overview of the generic host and Startup-based approach. If you’re thinking of moving from the generic host to minimal hosting, or if you’re familiar with minimal hosting but need to work with the generic host, you may find yourself looking around for an equivalent feature in the other hosting model. The documentation for migrating from .NET 5 to .NET 6 provides a good description of the differences between the two models, and how each individual feature has changed. You can find it at https://learn.microsoft.com/zh-cn/aspnet/core/migration/50-to-60.
在本章中,我相对快速地概述了通用主机和基于 Startup 的方法。如果您正在考虑从通用主机迁移到最小托管,或者如果您熟悉最小托管但需要与通用主机合作,您可能会发现自己在另一种托管模型中寻找等效功能。从 .NET 5 迁移到 .NET 6 的文档很好地描述了两种模型之间的差异,以及每个单独的功能是如何变化的。您可以在 https://learn.microsoft.com/zh-cn/aspnet/core/migration/50-to-60 找到它。

TIP Alternatively, David Fowler from the .NET team has a similar cheat sheet describing the migration. See https://gist.github.com/davidfowl/0e0372c3c1d895c3ce195ba983b1e03d .
提示:或者,来自 .NET 团队的 David Fowler 有一个类似的备忘单来描述迁移。请参阅 https://gist.github.com/davidfowl/0e0372c3c1d895c3ce195ba983b1e03d

Whether you choose to use the generic host or minimal hosting, all the same ASP.NET Core concepts are there: configuration, middleware, and DI. In the next chapter you’ll learn about some more advanced uses of each of these concepts, such as creating branching middleware pipelines and custom DI containers.
无论您选择使用通用主机还是最小托管,所有相同的 ASP.NET Core 概念都存在:配置、中间件和 DI。在下一章中,您将了解这些概念的一些更高级的用法,例如创建分支中间件管道和自定义 DI 容器。

30.7 Summary

30.7 总结

Before .NET 6, ASP.NET Core apps split configuration between two files: Program.cs and Startup.cs. Program.cs contains the entry point for the app and is used to configure and build a IHost object. Startup is where you configure the DI container, middleware pipeline, and endpoints for your app.
在 .NET 6 之前,ASP.NET Core 应用程序将配置拆分为两个文件:Program.cs 和 Startup.cs。Program.cs 包含应用程序的入口点,用于配置和生成 IHost 对象。Startup (启动) 是您为应用程序配置 DI 容器、中间件管道和终端节点的地方。

The Program class typically contains a method called CreateHostBuilder(), which creates an IHostBuilder instance. The Main entry point invokes CreateHostBuilder(), calls IHostBuilder.Build() to create an instance of IHost, and finally runs the app by calling IHost.Run().
Program 类通常包含一个名为 CreateHostBuilder() 的方法,该方法创建一个 IHostBuilder 实例。主入口点调用 CreateHostBuilder(),调用 IHostBuilder.Build() 来创建 IHost 的实例,最后通过调用 IHost.Run() 运行应用程序。

You can create an IHostBuilder by calling Host.CreateDefaultBuilder(). This creates a HostBuilder instance using the default configuration, similar to the configuration used when calling WebApplication.CreateBuilder(). The default HostBuilder uses default logging and configuration providers, configures the hosting environment based on environment variables and command-line arguments, and configures the DI container settings.
您可以通过调用 Host.CreateDefaultBuilder() 来创建 IHostBuilder。这将使用默认配置创建一个 HostBuilder 实例,类似于调用 WebApplication.CreateBuilder() 时使用的配置。默认 HostBuilder 使用默认日志记录和配置提供程序,根据环境变量和命令行参数配置托管环境,并配置 DI 容器设置。

ASP.NET Core apps using the generic host typically call ConfigureWebHostDefaults(), on the HostBuilder, providing a lambda that calls UseStartup<Startup>() on an IWebHostBuilder instance. This tells the HostBuilder to configure the DI container and middleware pipeline based on the Startup class.
使用通用主机的 ASP.NET Core 应用程序通常在 HostBuilder 上调用 ConfigureWebHostDefaults(),从而提供在 IWebHostBuilder 实例上调用 UseStartup<Startup>() 的 lambda。这会告诉 HostBuilder 根据 Startup 类配置 DI 容器和中间件管道。

Use the Startup class to register services with DI, configure your middleware pipeline, and register your endpoints. It is a conventional class, in that it doesn’t have to implement an interface or base class. Instead, the IHostBuilder looks for specific named methods to invoke using reflection.
使用 Startup 类向 DI 注册服务、配置中间件管道并注册终端节点。它是一个约定俗成的类,因为它不必实现接口或基类。相反,IHostBuilder 会查找要使用反射调用的特定命名方法。

Register your DI services in the ConfigureServices(IServiceCollection) method of Startup. You register services using the same Add methods you use to register services on WebApplicationBuilder.Services when using minimal hosting.
在 Startup 的 ConfigureServices(IServiceCollection) 方法中注册 DI 服务。使用最小托管时,您可以使用在 WebApplicationBuilder.Services 上注册服务时使用的相同 Add
方法注册服务。

If you need to access your app’s IConfiguration or IWebHostEnvironment (exposed as Configuration and Environment, respectively, on WebApplicationBuilder), you can inject them into your Startup constructor.You can’t inject any other services into the Startup constructor.
如果需要访问应用程序的 IConfiguration 或 IWebHostEnvironment(在 WebApplicationBuilder 上分别作为 Configuration 和 Environment 公开),则可以将它们注入到 Startup 构造函数中。您不能将任何其他服务注入 Startup 构造函数。

Register your middleware pipeline in Startup.Configure(IApplicationBuilder). Use the same Use methods you use with WebApplication to add middleware to the pipeline. As for WebApplication, the order in which you add the middleware defines their order in the pipeline.
在 Startup.Configure (IApplicationBuilder) 中注册中间件管道。使用与 WebApplication 相同的 Use
方法将中间件添加到管道中。对于 WebApplication,您添加中间件的顺序定义了它们在管道中的顺序。

WebApplication automatically adds middleware such as the routing middleware and endpoint middleware to the pipeline when you’re using minimal hosting. When using Startup, you must explicitly add this middleware yourself.
当您使用最小托管时,WebApplication 会自动将中间件(如路由中间件和终端节点中间件)添加到管道中。使用 Startup 时,您必须自己显式添加此中间件。

To register endpoints, call UseEndpoints(endpoints => {}) and call the appropriate Map functions on the provided IEndpointRouteBuilder in the lambda function. This differs significantly from minimal hosting, in which you can call Map directly on the WebApplication instance.
要注册终端节点,请调用 UseEndpoints(endpoints => {}) 并在 lambda 函数中提供的 IEndpointRouteBuilder 上调用相应的 Map 函数。这与最小托管有很大不同,在最小托管中,您可以直接在 WebApplication 实例上调用 Map。

You can customize the IHostBuilder instance by adding configuration methods such as ConfigureLogging() or ConfigureAppConfiguration(). These methods run after any previous invocations, adding extra layers of configuration to the IHostBuilder instance.
您可以通过添加配置方法(如 ConfigureLogging() 或 ConfigureAppConfiguration())来自定义 IHostBuilder 实例。这些方法在之前的任何调用之后运行,向 IHostBuilder 实例添加额外的配置层。

The generic host is flexible but has greater inherent complexity due to its deferred execution style, extensive use of lambda methods, and heavy use of convention. Minimal hosting aimed to simplify the bootstrapping code to make it more imperative, reducing much of the indirection.
泛型主机很灵活,但由于其延迟执行样式、广泛使用 lambda 方法和大量使用约定,因此具有更大的固有复杂性。最小托管旨在简化引导代码,使其更加必要,从而减少大部分间接性。

Minimal hosting enforces more defaults but is generally easier to work with for newcomers to ASP.NET Core.
最小托管强制实施更多默认值,但通常更容易使用 ASP.NET Core 的新手。

If you already have an ASP.NET Core application using Startup and the generic host, there’s no need to switch to using WebApplication and minimal hosting; the generic host is fully supported in .NET 7. Additionally, if you’re creating a non- HTTP application, the generic host is currently the best option.
如果您已经拥有使用 Startup 和通用主机的 ASP.NET Core 应用程序,则无需切换到使用 WebApplication 和最小托管;.NET 7 完全支持泛型主机。此外,如果要创建非 HTTP 应用程序,则通用主机是当前最佳选项。

If you’re creating a new ASP.NET Core application, minimal hosting will likely provide a smoother experience. You should generally favor it over the generic host for new apps unless you need fine control of the IHostBuilder configuration.
如果您正在创建新的 ASP.NET Core 应用程序,最小托管可能会提供更流畅的体验。对于新应用程序,您通常应该更喜欢它而不是通用主机,除非您需要对 IHostBuilder 配置进行精细控制。

ASP.NET Core in Action 29 Improving your application’s security

29 Improving your application’s security
29 提高应用程序的安全性

This chapter covers
本章涵盖

• Defending against cross-site scripting attacks
防御跨站点脚本攻击

• Protecting from cross-site request forgery attacks
防止跨站点请求伪造攻击

• Allowing calls to your API from other apps using CORS
允许使用 CORS从其他应用程序调用您的 API

• Avoiding attach vectors such as SQL injection attacks
避免 SQL 注入攻击等附加向量

In chapter 28 you learned how and why you should use HTTPS in your application: to protect your HTTP requests from attackers. In this chapter we look at more ways to protect your application and your application’s users from attackers. Because security is an extremely broad topic that covers lots of avenues, this chapter is by no means an exhaustive guide. It’s intended to make you aware of some of the most common threats to your app and how to counteract them, and also to highlight areas where you can inadvertently introduce vulnerabilities if you’re not careful.
在第 28 章中,您了解了如何以及为什么应该在应用程序中使用 HTTPS:保护您的 HTTP 请求免受攻击者的攻击。在本章中,我们将介绍更多方法来保护您的应用程序和应用程序用户免受攻击者的攻击。由于安全性是一个非常广泛的主题,涵盖了许多途径,因此本章绝不是详尽的指南。它旨在让您了解应用程序面临的一些最常见威胁以及如何应对这些威胁,并突出显示如果您不小心可能会无意中引入漏洞的区域。

TIP I strongly advise exploring additional resources around security after you’ve read this chapter. The Open Web Application Security Project (OWASP) (www.owasp.org) is an excellent resource. Alternatively, Troy Hunt has some excellent courses and workshops on security, geared toward .NET developers (https://www.troyhunt.com).
提示:我强烈建议您在阅读本章后探索有关安全性的其他资源。开放 Web 应用程序安全项目 (OWASP) (www.owasp.org) 是一个很好的资源。或者,Troy Hunt 有一些面向 .NET 开发人员 (https://www.troyhunt.com) 的优秀安全课程和研讨会。

In sections 29.1 and 29.2 you’ll start by learning about two potential attacks that should be on your radar: cross-site scripting (XSS) and cross-site request forgery (CSRF). We’ll explore how the attacks work and how you can prevent them in your apps. ASP.NET Core has built-in protection against both types of attacks, but you have to remember to use the protection correctly and resist the temptation to circumvent it unless you’re certain it’s safe to do so.
在第 29.1 节和第 29.2 节中,您将首先了解应该引起注意的两种潜在攻击:跨站点脚本 (XSS) 和跨站点请求伪造 (CSRF)。我们将探讨这些攻击的工作原理,以及如何在您的应用程序中防止它们。ASP.NET Core 具有针对这两种类型的攻击的内置保护,但您必须记住正确使用保护并抵制规避它的诱惑,除非您确定这样做是安全的。

Section 29.3 deals with a common scenario: you have an application that wants to use JavaScript requests to retrieve data from a second app. By default, web browsers block requests to other apps, so you need to enable cross-origin resource sharing (CORS) in your API to achieve this. We’ll look at how CORS works, how to create a CORS policy for your app, and how to apply it to specific endpoints.
Section 29.3 处理一个常见情况:您有一个应用程序,它想要使用 JavaScript 请求从第二个应用程序检索数据。默认情况下,Web 浏览器会阻止对其他应用程序的请求,因此您需要在 API 中启用跨域资源共享 (CORS) 才能实现此目的。我们将了解 CORS 的工作原理、如何为您的应用程序创建 CORS 策略以及如何将其应用于特定终端节点。

The final section of this chapter, section 29.4, covers a collection of common threats to your application. Each one represents a potentially critical flaw that an attacker could use to compromise your application. The solutions to each threat are generally relatively simple; the important thing is to recognize where the flaws could exist in your own apps so you can ensure that you don’t leave yourself vulnerable.
本章的最后一部分,即 29.4 节,涵盖了应用程序的一系列常见威胁。每个漏洞都代表一个潜在的严重缺陷,攻击者可以利用该漏洞来破坏您的应用程序。每种威胁的解决方案通常相对简单;重要的是识别您自己的应用程序中可能存在的缺陷,这样您就可以确保不会让自己容易受到攻击。

As I mentioned in chapter 28, you should always start by adding HTTPS to your app to encrypt the traffic between your users’ browsers and your app. Without HTTPS, attackers could subvert many of the safeguards you add to your app, so it’s an important first step to take.
正如我在第 28 章中提到的,您应该始终从将 HTTPS 添加到您的应用程序开始,以加密用户浏览器和应用程序之间的流量。如果没有 HTTPS,攻击者可能会破坏您添加到应用程序的许多保护措施,因此这是重要的第一步。

Unfortunately, most other security practices require rather more vigilance to ensure that you don’t accidentally introduce vulnerabilities into your app as it grows and develops. Many attacks are conceptually simple and have been known about for years, yet they’re still commonly found in new applications. In the next section we’ll look at one such attack and see how to defend against it when building apps using Razor Pages.
不幸的是,大多数其他安全实践都需要更加警惕,以确保您不会在应用程序的成长和发展过程中意外地将漏洞引入应用程序。许多攻击在概念上很简单,并且已经为人所知多年,但它们仍然常见于新应用程序。在下一节中,我们将介绍一种此类攻击,并了解如何在使用 Razor Pages 构建应用程序时防御它。

29.1 Defending against cross- site scripting (XSS) attacks‌

29.1 防御跨站点脚本 (XSS) 攻击

In this section I describe XSS attacks and how attackers can use them to compromise your users. I show how the Razor Pages framework protects you from these attacks, how to disable the protections when you need to, and what to look out for. I also discuss the difference between HTML encoding and JavaScript encoding, and the effect of using the wrong encoder.‌
在本节中,我将介绍 XSS 攻击以及攻击者如何利用它们来危害您的用户。我将展示 Razor Pages 框架如何保护您免受这些攻击,如何在需要时禁用保护,以及需要注意的事项。我还讨论了 HTML 编码和 JavaScript 编码之间的区别,以及使用错误编码器的影响。

Attackers can exploit a vulnerability in your app to create XSS attacks that execute code in another user’s browser. Commonly, attackers submit content using a legitimate approach, such as an input form, that is later rendered somewhere to the page. By carefully crafting malicious input, the attacker can execute arbitrary JavaScript on a user’s browser and so can steal cookies, impersonate the user, and generally do bad things.
攻击者可以利用您应用程序中的漏洞来创建 XSS 攻击,从而在其他用户的浏览器中执行代码。通常,攻击者使用合法方法(如输入表单)提交内容,这些方法稍后会呈现在页面的某个位置。通过精心设计恶意输入,攻击者可以在用户的浏览器上执行任意 JavaScript,从而窃取 Cookie、冒充用户,并通常会做坏事。

TIP For a detailed discussion of XSS attacks, see the “Cross Site Scripting (XSS)” article on the OWASP site: https://owasp.org/www-community/attacks/xss.
提示:有关 XSS 攻击的详细讨论,请参阅 OWASP 站点上的“跨站点脚本 (XSS)”文章:https://owasp.org/www-community/attacks/xss

Figure 29.1 shows a basic example of an XSS attack. Legitimate users of your app can send their name to your app by submitting a form. The app then adds the name to an internal list and renders the whole list to the page. If the names are not rendered safely, a malicious user can execute JavaScript in the browser of every other user who views the list.
图 29.1 显示了 XSS 攻击的一个基本示例。您应用的合法用户可以通过提交表单将其名称发送到您的应用。然后,应用程序将名称添加到内部列表,并将整个列表呈现到页面。如果名称未安全呈现,恶意用户可以在查看列表的所有其他用户的浏览器中执行 JavaScript。

alt text

Figure 29.1 How an XSS vulnerability is exploited. An attacker submits malicious content to your app, which is displayed in the browsers of other users. If the app doesn’t encode the content when writing to the page, the input becomes part of the HTML of the page and can run arbitrary JavaScript.
图 29.1 XSS 漏洞是如何被利用的。攻击者向您的应用提交恶意内容,这些内容会显示在其他用户的浏览器中。如果应用程序在写入页面时未对内容进行编码,则输入将成为页面 HTML 的一部分,并且可以运行任意 JavaScript。

In figure 29.1 the user entered a snippet of HTML, such as their name. When users view the list of names, the Razor template renders the names using @Html.Raw(), which writes the <script> tag directly to the document. The user’s input has become part of the page’s HTML structure. As soon as the page is loaded in a user’s browser, the<script> tag executes, and the user is compromised. Once an attacker can execute arbitrary JavaScript on a user’s browser, they can do pretty much anything.
在图 29.1 中,用户输入了一个 HTML 片段,例如他们的名称。当用户查看名称列表时,Razor 模板使用 @Html.Raw() 呈现名称,后者将<script>标记直接写入文档。用户的输入已成为页面 HTML 结构的一部分。一旦页面加载到用户的浏览器中,<script>标记就会执行,并且用户会受到威胁。一旦攻击者可以在用户的浏览器上执行任意 JavaScript,他们几乎可以做任何事情。

TIP You can dramatically limit the control an attacker has even if they exploit an XSS vulnerability using a Content- Security-Policy (CSP). You can read about CSP at http://mng.bz/nWW2. I have an open-source library you can use to integrate a CSP into your app available on NuGet at http://mng.bz/vnn4.
提示:您可以极大地限制攻击者的控制权,即使他们使用内容安全策略 (CSP) 利用 XSS 漏洞。您可以在 http://mng.bz/nWW2 上阅读有关 CSP 的信息。我有一个开源库,您可以使用它将 CSP 集成到 NuGet 上提供的应用程序中,网址为 http://mng.bz/vnn4

The vulnerability here is due to rendering the user input in an unsafe way. If the data isn’t encoded to make it safe before it’s rendered, you could open your users to attack. By default, Razor protects against XSS attacks by HTML- encoding any data written using Tag Helpers, HTML Helpers, or the @ syntax. So generally you should be safe, as you saw in chapter 17.
此处的漏洞是由于以不安全的方式呈现用户输入。如果数据在呈现之前没有进行编码以确保其安全,则可能会使用户受到攻击。默认情况下,Razor 通过对使用标记帮助程序、HTML 帮助程序或 @ 语法写入的任何数据进行 HTML 编码来防止 XSS 攻击。所以一般来说你应该是安全的,就像你在第 17 章中看到的那样。

Using @Html.Raw() is where the danger lies: if the HTML you’re rendering contains user input (even indirectly), you could have an XSS vulnerability. By rendering the user input with @ instead, the content is encoded before it’s written to the output, as shown in figure 29.2.
使用 @Html.Raw() 是危险所在:如果您渲染的 HTML 包含用户输入(即使是间接的),则可能存在 XSS 漏洞。通过使用 @ 来呈现用户输入,内容在写入输出之前进行编码,如图 29.2 所示。

alt text

Figure 29.2 Protecting against XSS attacks by HTML- encoding user input using @ in Razor templates. The <script> tag is encoded so that it is no longer rendered as HTML and can’t be used to compromise your app.
图 29.2 在 Razor 模板中使用 @ 对用户输入进行 HTML 编码来防范 XSS 攻击。该 <script>标记经过编码,因此它不再呈现为 HTML,也不能用于危害您的应用。

This example demonstrates using HTML encoding to prevent elements being directly added to the HTML Document Object Model (DOM), but it’s not the only case you have to think about. If you’re passing untrusted data to JavaScript or using untrusted data in URL query values, you must make sure to encode the data correctly.
此示例演示了如何使用 HTML 编码来防止元素被直接添加到 HTML 文档对象模型 (DOM) 中,但这并不是您必须考虑的唯一情况。如果要将不受信任的数据传递给 JavaScript 或在 URL 查询值中使用不受信任的数据,则必须确保正确编码数据。

A common scenario is when you’re using JavaScript with Razor Pages, and you want to pass a value from the server to the client. If you use the standard @ symbol to render the data to the page, the output will be HTML-encoded.
一种常见情况是,将 JavaScript 与 Razor Pages 配合使用,并且想要将值从服务器传递到客户端。如果使用标准 @ 符号将数据呈现到页面,则输出将采用 HTML 编码。

Unfortunately, if you HTML-encode a string and inject it directly into JavaScript, you probably won’t get what you expect.
不幸的是,如果你对字符串进行 HTML 编码并将其直接注入到 JavaScript 中,你可能不会得到你所期望的结果。

For example, if you have a variable in your Razor file called name, and you want to make it available in JavaScript, you might be tempted to use something like this:
例如,如果您的 Razor 文件中有一个名为 name 的变量,并且您希望在 JavaScript 中使其可用,您可能会想使用如下内容:

<script>var name = '@name'</script>

If the name contains special characters, Razor will encode them using HTML encoding, which probably isn’t what you want in this JavaScript context. For example, if name was Arnold "Arnie" Schwarzenegger, rendering it as you did previously would give this:
如果名称包含特殊字符,Razor 将使用 HTML 编码对其进行编码,这可能不是你在此 JavaScript 上下文中想要的。例如,如果 name 是 Arnold “Arnie” Schwarzenegger,则像以前一样呈现它将得到以下结果:

<script>var name = 'Arnold "Arnie" Schwarzenegger';</script>

Note that the double quotation marks (") have been HTML- encoded to ". If you use this value in JavaScript directly, expecting it to be a safe encoded value, it’s going to look wrong, as shown in figure 29.3.
请注意,双引号 (“) 已 HTML 编码为 ”.如果你直接在 JavaScript 中使用这个值,期望它是一个安全的编码值,它看起来会出错,如图 29.3 所示。

alt text

Figure 29.3 Comparison of alerts when using JavaScript encoding compared with HTML encoding
图 29.3 使用 JavaScript 编码与 HTML 编码时的警报比较

Instead, you should encode the variable using JavaScript encoding so that the double-quote character is rendered as a safe Unicode character, \u0022. You can achieve this by injecting a JavaScriptEncoder into the view and calling Encode() on the name variable:
相反,您应该使用 JavaScript 编码对变量进行编码,以便将双引号字符呈现为安全的 Unicode 字符 \u0022。您可以通过将 JavaScriptEncoder 注入视图并在 name 变量上调用 Encode() 来实现这一点:

@inject System.Text.Encodings.Web.JavaScriptEncoder encoder;
<script>var name = '@encoder.Encode(name)'</script>

To avoid having to remember to use JavaScript encoding, I recommend that you don’t write values into JavaScript like this. Instead, write the value to an HTML element’s attributes, and then read that into the JavaScript variable later, as shown in the following listing. That prevents the need for the JavaScript encoder entirely.
为避免记住使用 JavaScript 编码,我建议您不要像这样将值写入 JavaScript。相反,将值写入 HTML 元素的属性,然后稍后将其读取到 JavaScript 变量中,如下面的清单所示。这完全不需要 JavaScript 编码器。

Listing 29.1 Passing values to JavaScript by writing them to HTML attributes
清单 29.1 通过将值写入 HTML 属性来将值传递给 JavaScript

<div id="data" data-name="@name"></div>
<script> ❶
var ele = document.getElementById('data'); ❷
var name = ele.getAttribute('data-name'); ❸
</script>

❶ Write the value you want in JavaScript to a data-* attribute. This HTML-encodes the data.
在 JavaScript 中将你想要的值写入 data- 属性。此 HTML 对数据进行编码。

❷ Gets a reference to the HTML element
获取对 HTML 元素的引用

❸ Reads the data-* attribute into JavaScript, which converts it to JavaScript encoding
将 data- 属性读取到 JavaScript 中,从而将其转换为 JavaScript 编码

XSS attacks are still common, and it’s easy to expose yourself to them whenever you allow users to input data. Validation of the incoming data can help sometimes, but it’s often a tricky problem. For example, a naive name validator might require that you use only letters, which would prevent most attacks. Unfortunately, that doesn’t account for users with hyphens or apostrophes in their name, let alone users with non-Western names. People get (understandably) upset when you tell them that their name is invalid, so be wary of this approach!
XSS 攻击仍然很常见,只要您允许用户输入数据,就很容易将自己暴露在它们面前。验证传入数据有时会有所帮助,但这通常是一个棘手的问题。例如,一个 naive name validator 可能要求您只使用字母,这样可以防止大多数攻击。不幸的是,这并未考虑名称中包含连字符或撇号的用户,更不用说具有非西方名称的用户了。当你告诉他们他们的名字无效时,人们会(可以理解地)不安,所以要警惕这种做法!

Whether or not you use strict validation, you should always encode the data when you render it to the page. Think carefully whenever you find yourself writing @Html.Raw(). Is there any way, no matter how contrived, for a user to get malicious data into that field? If so, you’ll need to find another way to display the data.
无论是否使用严格验证,在将数据呈现到页面时,都应始终对数据进行编码。每当您发现自己编写 @Html.Raw() 时,请仔细考虑。无论多么人为,用户是否有任何方法可以将恶意数据导入该字段?如果是这样,您将需要找到另一种显示数据的方法。

XSS vulnerabilities allow attackers to execute JavaScript on a user’s browser. The next vulnerability we’re going to consider lets them make requests to your API as though they’re a different logged-in user, even when the user isn’t using your app. Scared? I hope so!‌
XSS 漏洞允许攻击者在用户的浏览器上执行 JavaScript。我们将要考虑的下一个漏洞允许他们向您的 API 发出请求,就好像他们是不同的登录用户一样,即使该用户没有使用您的应用程序。害怕吗?希望如此!

29.2 Protecting from cross-site request forgery (CSRF) attacks‌

29.2 防止跨站点请求伪造 (CSRF) 攻击

In this section you’ll learn about CSRF attacks, how attackers can use them to impersonate a user on your site, and how to protect against them using antiforgery tokens. Razor Pages protects you from these attacks by default, but you can disable these verifications, so it’s important to understand the implications of doing so.
在本节中,您将了解 CSRF 攻击、攻击者如何使用它们来冒充您网站上的用户,以及如何使用防伪令牌来防范它们。默认情况下,Razor Pages 会保护您免受这些攻击,但您可以禁用这些验证,因此请务必了解这样做的含义。

CSRF attacks can be a problem for websites or APIs that use cookies for authentication. A CSRF attack involves a malicious website making an authenticated request to your API on behalf of the user, without the user’s initiating the request. In this section we’ll explore how these attacks work and how you can mitigate them with antiforgery tokens.
对于使用 cookie 进行身份验证的网站或 API 来说,CSRF 攻击可能是一个问题。CSRF 攻击涉及恶意网站代表用户向您的 API 发出经过身份验证的请求,而无需用户发起请求。在本节中,我们将探讨这些攻击的工作原理,以及如何使用防伪令牌来缓解它们。

The canonical example of this attack is a bank transfer/withdrawal. Imagine you have a banking application that stores authentication tokens in a cookie, as is common (especially in traditional server-side rendered applications).Browsers automatically send the cookies associated with a domain with every request so the app knows whether a user is authenticated.
这种攻击的典型示例是银行转账/取款。假设您有一个银行应用程序,它将身份验证令牌存储在 Cookie 中,这很常见(尤其是在传统的服务器端呈现的应用程序中)。浏览器会自动将与域关联的 Cookie 与每个请求一起发送,以便应用程序知道用户是否经过身份验证。

Now imagine your application has a page that lets a user transfer funds from their account to another account using a POST request to the Balance Razor Page. You have to be logged in to access the form (you’ve protected the Razor Page with the [Authorize] attribute or global authorization requirements), but otherwise you post a form that says how much you want to transfer and where you want to transfer it. Seems simple enough?‌
现在,假设你的应用程序有一个页面,该页面允许用户使用对 Balance Razor 页面的 POST 请求将资金从其帐户转移到另一个帐户。您必须登录才能访问该表单(您已使用 [Authorize] 属性或全局授权要求保护了 Razor 页面),但除此之外,您需要发布一个表单,说明您要转移的金额以及要转移的位置。看起来很简单?

Suppose that a user visits your site, logs in, and performs a transaction. Then they visit a second website that the attacker has control of. The attacker has embedded a form in their website that performs a POST to your bank’s website, identical to the transfer-funds form on your banking website. This form does something malicious, such as transfer all the user’s funds to the attacker, as shown in figure 29.4.
假设用户访问您的网站、登录并执行事务。然后,他们访问攻击者可以控制的第二个网站。攻击者在其网站中嵌入了一个表单,该表单会向您的银行网站执行 POST,该表单与您的银行网站上的转账资金表单相同。这种形式会做一些恶意的事情,比如把用户的所有资金都转移给攻击者,如图 29.4 所示。

Browsers automatically send the cookies for the application when the page does a full form post, and the banking app has no way of knowing that this is a malicious request. The unsuspecting user has given all their money to the attacker!
当页面执行完整表单发布时,浏览器会自动发送应用程序的 Cookie,而银行应用程序无法知道这是恶意请求。毫无戒心的用户已经把他们所有的钱都给了攻击者!

alt text

Figure 29.4 A CSRF attack occurs when a logged-in user visits a malicious site. The malicious site crafts a form that matches one on your app and POSTs it to your app. The browser sends the authentication cookie automatically, so your app sees the request as a valid request from the user.
图 29.4 当登录用户访问恶意站点时,会发生 CSRF 攻击。恶意网站会制作一个与您的应用程序匹配的表单,并将其 POST 到您的应用程序。浏览器会自动发送身份验证 Cookie,因此您的应用会将该请求视为来自用户的有效请求。

The vulnerability here revolves around the fact that browsers automatically send cookies when a page is requested (using a GET request) or a form is POSTed. There’s no difference between a legitimate POST of the form in your banking app and the attacker’s malicious POST. Unfortunately, this behavior is baked into the web; it’s what allows you to navigate websites seamlessly after initially logging in.
此处的漏洞围绕以下事实展开:浏览器在请求页面(使用 GET 请求)或发布表单时自动发送 Cookie。您的银行应用程序中形式的合法 POST 与攻击者的恶意 POST 之间没有区别。不幸的是,这种行为已经融入了 Web;它允许您在初始登录后无缝浏览网站。

TIP Browsers have additional protections to prevent cookies being sent in this situation, called SameSite cookies. By default, most browsers use SameSite=Lax, which prevents this vulnerable behavior. You can read about SameSite cookies and how to work with them in ASP.NET Core at http://mng.bz/4DDj.
提示:浏览器具有额外的保护措施来防止在这种情况下发送 Cookie,称为 SameSite Cookie。默认情况下,大多数浏览器使用 SameSite=Lax,这可以防止这种易受攻击的行为。您可以在 http://mng.bz/4DDj 阅读有关 SameSite Cookie 以及如何在 ASP.NET Core 中使用它们的信息。

A common solution to this CSRF attack is the synchronizer token pattern, which uses user-specific, unique antiforgery tokens to enforce a difference between a legitimate POST and a forged POST from an attacker. One token is stored in a cookie, and another is added to the form you wish to protect. Your app generates the tokens at runtime based on the current logged-in user, so there’s no way for an attacker to create one for their forged form.
这种 CSRF 攻击的常见解决方案是同步器令牌模式,它使用特定于用户的唯一防伪令牌来强制区分来自攻击者的合法 POST 和伪造的 POST。一个令牌存储在 Cookie 中,另一个令牌将添加到您要保护的表单中。您的应用在运行时根据当前登录用户生成令牌,因此攻击者无法为其伪造表单创建令牌。

TIP The “Cross-Site Request Forgery Prevention Cheat Sheet” article on the OWASP site (http://mng.bz/5jRa) has a thorough discussion of the CSRF vulnerability, including the synchronizer token pattern.
提示:OWASP 站点 (http://mng.bz/5jRa) 上的“跨站点请求伪造预防备忘单”一文对 CSRF 漏洞进行了深入讨论,包括同步器令牌模式。

When the Balance Razor Page receives a form POST, it compares the value in the form with the value in the cookie. If either value is missing or the values don’t match, the request is rejected. If an attacker creates a POST, the browser posts the cookie token as usual, but there won’t be a token in the form itself or the token won’t be valid. The Razor Page rejects the request, protecting from the CSRF attack, as in figure 29.5.
当 Balance Razor 页面收到表单 POST 时,它会将表单中的值与 Cookie 中的值进行比较。如果缺少任一值或值不匹配,则请求将被拒绝。如果攻击者创建 POST,浏览器会照常发布 cookie 令牌,但表单本身不会有令牌,或者令牌无效。Razor Page 拒绝请求,防止 CSRF 攻击,如图 29.5 所示。

alt text

Figure 29.5 Protecting against a CSRF attack using antiforgery tokens. The browser automatically forwards the cookie token, but the malicious site can’t read it and so can’t include a token in the form.The app rejects the malicious request because the tokens don’t match.
图 29.5 使用防伪令牌防范 CSRF 攻击。浏览器会自动转发 Cookie 令牌,但恶意站点无法读取它,因此无法在表单中包含令牌。应用程序拒绝恶意请求,因为令牌不匹配。

The good news is that Razor Pages automatically protects you against CSRF attacks. The Form Tag Helper automatically sets an antiforgery token cookie and renders the token to a hidden field called _RequestVerificationToken for every <form> element in your app (unless you specifically disable them). For example, take this simple Razor template that posts back to the same Razor Page:
好消息是 Razor Pages 会自动保护您免受 CSRF 攻击。Form Tag Helper 会自动设置防伪令牌 Cookie,并将该令牌呈现到应用中每个<form>元素的名为 _RequestVerificationToken 的隐藏字段(除非您专门禁用它们)。例如,以这个简单的 Razor 模板为例,该模板回发到同一 Razor 页面:

<form method="post">
<label>Amount</label>
<input type="number" name="amount" />
<button type="submit">Withdraw funds</button>
</form>

When rendered to HTML, the antiforgery token is stored in the hidden field and is posted back with a legitimate request:
当呈现为 HTML 时,防伪令牌存储在 hidden 字段中,并通过合法请求发回:

<form method="post">
<label>Amount</label>
<input type="number" name="amount" />
<button type="submit" >Withdraw funds</button>
<input name="__RequestVerificationToken" type="hidden"

value="CfDJ8Daz26qb0hBGsw7QCK"/>

</form>

ASP.NET Core automatically adds the antiforgery tokens to every form, and Razor Pages automatically validates them. The framework ensures that the antiforgery tokens exist in both the cookie and the form data, ensures that they match, and rejects any requests where they don’t.
ASP.NET Core 会自动将防伪令牌添加到每个表单,Razor Pages 会自动验证它们。该框架确保防伪令牌同时存在于 Cookie 和表单数据中,确保它们匹配,并拒绝任何不匹配的请求。

If you’re using Model-View-Controller (MVC) controllers with views instead of Razor Pages, ASP.NET Core still adds the antiforgery tokens to every form. Unfortunately, it doesn’t validate them for you. Instead, you must decorate your controllers and actions with the [ValidateAntiForgeryToken] attribute. This ensures that the antiforgery tokens exist in both the cookie and the form data, checks that they match, and rejects any requests in which they don’t.
如果将模型-视图-控制器 (MVC) 控制器与视图而不是 Razor Pages 一起使用,则 ASP.NET Core 仍会将防伪令牌添加到每个表单中。不幸的是,它不会为您验证它们。相反,您必须使用 [ValidateAntiForgeryToken] 属性修饰控制器和作。这可确保防伪令牌同时存在于 Cookie 和表单数据中,检查它们是否匹配,并拒绝它们不匹配的任何请求。

WARNING ASP.NET Core doesn’t automatically validate antiforgery tokens if you’re using MVC controllers with Views. You must make sure to mark all vulnerable methods with [ValidateAntiForgeryToken] attributes instead, as described in the “Prevent Cross-Site Request Forgery (XSRF/CSRF) attacks in ASP.NET Core” documentation: http://mng.bz/QPPv. Note that if you’re not using cookies for authentication, you are not vulnerable to CSRF attacks: CSRF attacks arise from attackers exploiting the fact that browsers automatically attach cookies to requests. No cookies, no problem!
警告:ASP.NET 如果您将 MVC 控制器与视图一起使用,Core 不会自动验证防伪令牌。您必须确保使用 [ValidateAntiForgeryToken] 属性标记所有易受攻击的方法,如“防止 ASP.NET Core 中的跨站点请求伪造 (XSRF/CSRF) 攻击”文档中所述:http://mng.bz/QPPv。请注意,如果您不使用 cookie 进行身份验证,则不易受到 CSRF 攻击:CSRF 攻击是由于攻击者利用浏览器自动将 cookie 附加到请求这一事实而引起的。没有 cookie,没问题!

Generally, you need to use antiforgery tokens only for POST, DELETE, and other dangerous request types that are used for modifying state. GET requests shouldn’t be used for this purpose, so the framework doesn’t require valid antiforgery tokens to call them. Razor Pages validates antiforgery tokens for dangerous verbs like POST and ignores safe verbs like GET. As long as you create your app following this pattern‌‌ (and you should!), the framework does the right thing to keep you safe.
通常,您只需将防伪令牌用于 POST、DELETE 和其他用于修改状态的危险请求类型。GET 请求不应用于此目的,因此框架不需要有效的防伪令牌来调用它们。Razor Pages 会验证危险动词(如 POST)的防伪令牌,并忽略安全动词(如 GET)。只要你按照这种模式创建你的应用程序(你应该这样做),框架就会做正确的事情来保证你的安全。

If you need to explicitly ignore antiforgery tokens on a Razor Page for some reason, you can disable the validation by applying the [IgnoreAntiforgeryToken] attribute to a Razor Page’s PageModel. This bypasses the framework protections for those cases when you’re doing something that you know is safe and doesn’t need protecting, but in most cases it’s better to play it safe and validate.‌
如果出于某种原因需要显式忽略 Razor 页面上的防伪令牌,可以通过将 [IgnoreAntiforgeryToken] 属性应用于 Razor 页面的 PageModel 来禁用验证。当您执行一些已知安全且不需要保护的作时,这将绕过框架保护,但在大多数情况下,最好谨慎行事并进行验证。

CSRF attacks can be a tricky thing to get your head around from a technical point of view, but for the most part everything should work without much effort on your part.
从技术角度来看,CSRF 攻击可能是一件棘手的事情,但在大多数情况下,一切都应该可以正常工作,而无需您付出太多努力。

Razor adds antiforgery tokens to your forms, and the Razor Pages framework takes care of validation for you.
Razor 将防伪令牌添加到您的表单中,Razor Pages 框架会为您处理验证。

Things get trickier if you’re making a lot of requests to an API using JavaScript, and you’re posting JavaScript Object Notation (JSON) objects rather than form data. In these cases, you won’t be able to send the verification token as part of a form (because you’re sending JSON), so you’ll need to add it as a header in the request instead. Microsoft’s documentation “Prevent Cross-Site Request Forgery (XSRF/ CSRF) attacks in ASP.NET Core” contains an example of adding the header in JavaScript and validating it in your application. See http://mng.bz/XNNa.‌
如果您使用 JavaScript 向 API 发出大量请求,并且您发布的是 JavaScript 对象表示法 (JSON) 对象而不是表单数据,那么事情就会变得更加棘手。在这些情况下,您将无法将验证令牌作为表单的一部分发送(因为您发送的是 JSON),因此您需要将其作为标头添加到请求中。Microsoft 的文档“防止 ASP.NET Core 中的跨站点请求伪造 (XSRF/CSRF) 攻击”包含在 JavaScript 中添加标头并在应用程序中验证它的示例。请参阅 http://mng.bz/XNNa

TIP If you’re not using cookie authentication and instead have a single-page application (SPA) that sends authentication tokens in a header, the good news is that you don’t have to worry about CSRF at all! Malicious sites can send only cookies, not headers, to your API, so they can’t make authenticated requests.
提示:如果您不使用 cookie 身份验证,而是拥有在 Headers 中发送身份验证令牌的单页应用程序 (SPA),那么好消息是,您根本不需要担心 CSRF!恶意网站只能向您的 API 发送 Cookie,而不能发送标头,因此它们无法发出经过身份验证的请求。

Generating unique tokens with the data protection APIs
使用数据保护 API 生成唯一令牌

The antiforgery tokens used to prevent CSRF attacks rely on the ability of the framework to use strong symmetric encryption to encrypt and decrypt data. Encryption algorithms typically rely on one or more keys, which are used to initialize the encryption and to make the process reproducible. If you have the key, you can encrypt and decrypt data; without it, the data is secure.
用于防止 CSRF 攻击的防伪令牌依赖于框架使用强对称加密来加密和解密数据的能力。加密算法通常依赖于一个或多个密钥,这些密钥用于初始化加密并使过程可重现。如果你有密钥,你可以加密和解密数据;没有它,数据是安全的。

In ASP.NET Core, encryption is handled by the data protection APIs. They’re used to create the antiforgery tokens, encrypt authentication cookies, and generate secure tokens in general. Crucially, they also control the management of the key files that are used for encryption. A key file is a small XML file that contains the random key value used for encryption in ASP.NET Core apps. It’s critical that it’s stored securely. If an attacker got hold of it, they could impersonate any user of your app and generally do bad things!
在 ASP.NET Core 中,加密由数据保护 API 处理。它们通常用于创建防伪令牌、加密身份验证 Cookie 和生成安全令牌。至关重要的是,它们还控制用于加密的密钥文件的管理。密钥文件是一个小型 XML 文件,其中包含用于在 ASP.NET Core 应用程序中加密的随机密钥值。安全存储至关重要。如果攻击者掌握了它,他们就可以冒充您应用程序的任何用户,并且通常会做坏事!

The data protection system stores the keys in a safe location, depending on how and where you host your app:
数据保护系统会将密钥存储在安全的位置,具体取决于您托管应用的方式和位置:

• Azure Web App—In a special synced folder, shared between regions
Azure Web 应用程序 - 位于特殊同步文件夹中,在区域之间共享

• IIS without user profile—Encrypted in the registry
没有用户配置文件的 IIS - 在注册表中加密

• Account with user profile—In %LOCALAPPDATA%\ASP.NET\DataProtection-Keys on Windows, or ~/.aspnet/DataProtection-Keys on Linux or macOS
具有用户配置文件的帐户 - 在 Windows 上位于 %LOCALAPPDATA%\ASP.NET\DataProtection-Keys 中,在 Linux 或 macOS 上位于 ~/.aspnet/DataProtection-Keys 中

• All other cases—In memory; when the app restarts, the keys will be lost
所有其他情况 - 在内存中;当应用程序重新启动时,密钥将丢失

So why do you care? For your app to be able to read your users’ authentication cookies, it must decrypt them by using the same key that was used to encrypt them. If you’re running in a web-farm scenario, by default each server has its own key and won’t be able to read cookies encrypted by other servers.
那么,您为什么关心呢?为了使您的应用程序能够读取用户的身份验证 Cookie,它必须使用用于加密用户的相同密钥对其进行解密。如果您在 Web 场方案中运行,则默认情况下,每个服务器都有自己的密钥,并且无法读取由其他服务器加密的 Cookie。

To get around this, you must configure your app to store its data protection keys in a central location. This could be a shared folder on a hard drive, a Redis instance, or an Azure blob storage instance, for example.
要解决此问题,您必须将应用程序配置为将其数据保护密钥存储在一个中心位置。例如,这可以是硬盘驱动器上的共享文件夹、Redis 实例或 Azure Blob 存储实例。

Microsoft’s documentation on the data protection APIs is extremely detailed, but it can be overwhelming. I recommend reading the section on configuring data protection, (“Configure ASP.NET Core Data Protection,” http://mng.bz/d40i) and configuring a key storage provider for use in a web- farm scenario (“Key storage providers in ASP.NET Core,” http://mng.bz/5pW6). I also have an introduction to the data protection APIs on my blog at http://mng.bz/yQQd.
Microsoft 关于数据保护 API 的文档非常详细,但可能会让人不知所措。我建议阅读有关配置数据保护的部分(“配置 ASP.NET Core 数据保护”,http://mng.bz/d40i 年)和配置用于 Web 场方案的密钥存储提供程序(“ASP.NET Core 中的密钥存储提供程序”,http://mng.bz/5pW6 年)。我还在我的博客 http://mng.bz/yQQd 上介绍了数据保护 API。

It’s worth clarifying that the CSRF vulnerability discussed in this section requires that a malicious site does a full form POST to your app. The malicious site can’t make the request to your API using client-side-only JavaScript, as browsers block JavaScript requests to your API that are from a different origin.
值得澄清的是,本节中讨论的 CSRF 漏洞要求恶意网站对您的应用程序执行完整形式的 POST。恶意站点无法使用仅限客户端的 JavaScript 向您的 API 发出请求,因为浏览器会阻止来自不同来源的 JavaScript 请求。

This is a safety feature, but it can often cause you problems. If you’re building a client-side SPA, or even if you have a little JavaScript on an otherwise server-side rendered app, you may need to make such cross-origin requests. In the next section I describe a common scenario you’re likely to run into and show how you can modify your apps to work around Pit.
这是一项安全功能,但它通常会给您带来麻烦。如果您正在构建客户端 SPA,或者即使您在其他服务器端呈现的应用程序上有一点 JavaScript,也可能需要发出此类跨域请求。在下一节中,我将介绍您可能会遇到的常见场景,并展示如何修改您的应用程序以解决 Pit 问题。

29.3 Calling your web APIs from other domains using CORS‌

29.3 使用 CORS 从其他域调用 Web API

In this section you’ll learn about cross-origin resource sharing (CORS), a protocol to allow JavaScript to make requests from one domain to another. CORS is a frequent area of confusion for many developers, so this section describes why it’s necessary and how CORS headers work. You’ll then learn how to add CORS to both your whole application and specific web API actions, and how to configure multiple CORS policies for your application.
在本节中,您将了解跨域资源共享 (CORS),这是一种允许 JavaScript 从一个域向另一个域发出请求的协议。CORS 是许多开发人员经常混淆的领域,因此本节介绍为什么需要 CORS 以及 CORS 标头的工作原理。然后,您将了解如何将 CORS 添加到整个应用程序和特定 Web API作,以及如何为应用程序配置多个 CORS 策略。

As you’ve already seen, CSRF attacks can be powerful, but they would be even more dangerous if it weren’t for browsers implementing the same-origin policy. This policy blocks apps from using JavaScript to call a web API at a different location unless the web API explicitly allows it.
正如你已经看到的,CSRF 攻击可能很强大,但如果不是浏览器实施同源策略,它们会更加危险。此政策禁止应用使用 JavaScript 调用位于其他位置的 Web API,除非 Web API 明确允许。

DEFINITION Origins are deemed to be the same if they match the scheme (HTTP or HTTPS), domain (example.com), and port (80 by default for HTTP and 443 for HTTPS). If an app attempts to access a resource using JavaScript, and the origins aren’t identical, the browser blocks the request.
定义:如果源与方案(HTTP 或 HTTPS)、域 (example.com) 和端口(HTTP 默认为 80,HTTPS 为 443)匹配,则认为源相同。如果应用程序尝试使用 JavaScript 访问资源,并且来源不相同,则浏览器会阻止该请求。

The same-origin policy is strict. The origins of the two URLs must be identical for the request to be allowed. For example, the following origins are the same:
同源策略很严格。两个 URL 的来源必须相同,才能允许请求。例如,以下来源是相同的:

http://example.com/home
http://example.com/site.css

The paths are different for these two URLs (/home and /site.css), but the scheme, domain, and port (80) are identical. So if you were on the home page of your app, you could request the /site.css file using JavaScript without any problems.
这两个 URL (/home 和 /site.css) 的路径不同,但 scheme、domain 和 port (80) 相同。因此,如果你在应用程序的主页上,你可以使用 JavaScript 请求 /site.css 文件,而不会出现任何问题。

By contrast, the origins of the following sites are different, so you couldn’t request any of these URLs using JavaScript from the http://example.com origin:
相比之下,以下网站的来源不同,因此您无法使用 JavaScript 从 http://example.com 来源请求这些 URL 中的任何一个:

https://example.com—Different scheme (https)

http://www.example.com—Different domain (includes a subdomain)

http://example.com:5000—Different port (default HTTP port is 80)

For simple apps, where you have a single web app handling all your functionality, this limitation might not be a problem, but it’s extremely common for an app to make requests to another domain. For example, you might have an e- commerce site hosted at http://shopping.com, and you’re attempting to load data from http://api.shop ping.com to display details about the products available for sale. With this configuration, you’ll fall foul of the same-origin policy.Any attempt to make a request using JavaScript to the API domain will fail, with an error similar to figure 29.6.
对于简单的应用程序,您有一个 Web 应用程序处理您的所有功能,此限制可能不是问题,但应用程序向另一个域发出请求的情况非常常见。例如,您可能在 http://shopping.com 上托管了一个电子商务网站,并且您正在尝试从 http://api.shop ping.com 加载数据以显示有关可供销售产品的详细信息。使用此配置,您将违反同源策略。任何使用 JavaScript 向 API 域发出请求的尝试都将失败,并出现类似于图 29.6 的错误。

alt text

Figure 29.6 The console log for a failed cross-origin request. Chrome has blocked a cross-origin request from the app http://shopping.com:6333 to the API at http://api.shopping.com:5111.
图 29.6 失败的跨域请求的控制台日志。Chrome 在 http://api.shopping.com:5111 时阻止了应用 http://shopping.com:6333 向 API 发出的跨域请求。

The need to make cross-origin requests from JavaScript is increasingly common with the rise of client-side SPAs and the move away from monolithic apps. Luckily, there’s a web standard that lets you work around this in a safe way; this standard is CORS. You can use CORS to control which apps can call your API, so you can enable scenarios like this one.
随着客户端 SPA 的兴起和从整体式应用程序的转变,从 JavaScript 发出跨域请求的需求越来越普遍。幸运的是,有一个 Web 标准可以让您以安全的方式解决这个问题;这个标准是 CORS。您可以使用 CORS 来控制哪些应用程序可以调用您的 API,因此您可以启用此类方案。

29.3.1 Understanding CORS and how it works‌

29.3.1 了解 CORS 及其工作原理

CORS is a web standard that allows your web API to make statements about who can make cross-origin requests to it. For example, you could make statements such as these:
CORS 是一种 Web 标准,它允许您的 Web API 声明谁可以向其发出跨域请求。例如,您可以做出如下陈述:

• Allow cross-origin requests from https://shopping.com and https://app.shopping.com.
允许来自 https://shopping.comhttps://app.shopping.com 的跨域请求。

• Allow only GET cross-origin requests.
仅允许 GET 跨域请求。

• Allow returning the Server header in responses to cross-origin requests.
允许在响应跨域请求时返回 Server 标头。

• Allow credentials (such as authentication cookies or authorization headers) to be sent with cross- origin requests.
允许通过跨域请求发送凭据 (例如身份验证 Cookie 或授权标头)。

You can combine these rules into a policy and apply different policies to different endpoints of your API. You could apply a policy to your entire application or a different policy to every API action.
您可以将这些规则合并到一个策略中,并将不同的策略应用于 API 的不同终端节点。您可以将策略应用于整个应用程序,也可以将不同的策略应用于每个 API作。

CORS works using HTTP headers. When your web API application receives a request, it sets special headers on the response to indicate whether cross-origin requests are allowed, which origins they’re allowed from, and which HTTP verbs and headers the request can use—pretty much everything about the request.
CORS 使用 HTTP 标头工作。当您的 Web API 应用程序收到请求时,它会在响应上设置特殊标头,以指示是否允许跨域请求、允许它们来自哪些来源以及请求可以使用哪些 HTTP 动词和标头 — 几乎涵盖了有关请求的所有内容。

In some cases, before sending a real request to your API, the browser sends a preflight request, a request sent using the OPTIONS verb, which the browser uses to check whether it’s allowed to make the real request. If the API sends back the correct headers, the browser sends the true cross-origin request, as shown in figure 29.7.‌
在某些情况下,在向 API 发送实际请求之前,浏览器会发送预检请求,即使用 OPTIONS 谓词发送的请求,浏览器使用该请求来检查是否允许发出实际请求。如果 API 发回正确的 Headers,则浏览器会发送真正的跨域请求,如图 29.7 所示。

alt text

Figure 29.7 Two cross-origin requests. The response to the GET request doesn’t contain any CORS headers, so the browser blocks the app from reading it, even though the response may contain data from the server. The second request requires a preflight OPTIONS request to check whether CORS is enabled. As the response contains CORS headers, the browser makes the real request and provides the response to the JavaScript app.
图 29.7 两个跨域请求。对 GET 请求的响应不包含任何 CORS 标头,因此浏览器会阻止应用程序读取它,即使响应可能包含来自服务器的数据。第二个请求需要预检 OPTIONS 请求来检查是否启用了 CORS。由于响应包含 CORS 标头,因此浏览器会发出真正的请求并向 JavaScript 应用程序提供响应。

TIP For a more detailed discussion of CORS, see CORS in Action, by Monsur Hossain (Manning, 2014), http://mng.bz/aD41.‌
提示:有关 CORS 的更详细讨论,请参阅 CORS in Action,Monsur Hossain 著(Manning,2014 年),http://mng.bz/aD41

The CORS specification, which you can find at http://mng.bz/MBBB, is complicated, with a variety of headers, processes, and terminology to contend with. Fortunately, ASP.NET Core handles the details of the specification for you, so your main concern is working out exactly who needs to access your API, and under what circumstances.
CORS 规范(您可以在 http://mng.bz/MBBB 上找到)很复杂,需要处理各种标头、流程和术语。幸运的是,ASP.NET Core 会为您处理规范的细节,因此您主要关心的是准确确定谁需要访问您的 API,以及在什么情况下需要访问您的 API。

29.3.2 Adding a global CORS policy to your whole app‌

29.3.2 向整个应用程序添加全局 CORS 策略

Typically, you shouldn’t set up CORS for your APIs until you need it. Browsers block cross-origin communication for a reason: it closes an avenue of attack. They’re not being awkward. Wait until you have an API hosted on a different domain to the app that needs to access it.
通常,除非需要,否则不应为 API 设置 CORS。浏览器阻止跨域通信是有原因的:它关闭了攻击途径。他们没有尴尬。等待,直到您将 API 托管在与需要访问它的应用程序不同的域上。

Adding CORS support to your application requires you to do four things:
向应用程序添加 CORS 支持需要您执行以下四项作:

• Add the CORS services to your app.
将 CORS 服务添加到应用程序。

• Configure at least one CORS policy.
至少配置一个 CORS 策略。

• Add the CORS middleware to your middleware pipeline.
将 CORS 中间件添加到您的中间件管道中。

• Set a default CORS policy for your entire app or decorate your endpoints with EnableCors metadata to selectively enable CORS for specific endpoints.
为整个应用程序设置默认 CORS 策略,或使用 EnableCors 元数据装饰终端节点,以选择性地为特定终端节点启用 CORS。

To add the CORS services to your application, call AddCors() on your WebApplicationBuilder instance in Program.cs:
要将 CORS 服务添加到应用程序中,请在 Program.cs 中的 WebApplicationBuilder 实例上调用 AddCors():

builder.Services.AddCors();

The bulk of your effort in configuring CORS will go into policy configuration. A CORS policy controls how your application responds to cross-origin requests. It defines which origins are allowed, which headers to return, which HTTP methods to allow, and so on. You normally define your policies inline when you add the CORS services to your application.
配置 CORS 的大部分工作将用于策略配置。CORS 策略控制应用程序如何响应跨域请求。它定义允许哪些源、要返回哪些标头、允许哪些 HTTP 方法等。通常在将 CORS 服务添加到应用程序时,以内联方式定义策略。

Consider the previous e-commerce site example. You want your API that is hosted at http://api.shopping.com to be available from the main app via client-side JavaScript, hosted at http://shopping.com. You therefore need to configure the API to allow cross-origin requests.
考虑前面的电子商务网站示例。您希望托管在 http://api.shopping.com 的 API 可以通过托管在 http://shopping.com 的客户端 JavaScript 从主应用程序访问。因此,您需要配置 API 以允许跨域请求。

NOTE Remember, it’s the app that will get errors when attempting to make cross-origin requests, but it’s the API you’re accessing that you need to add CORS to, not the app making the requests.
注意:请记住,在尝试发出跨域请求时,应用程序会遇到错误,但需要将 CORS 添加到您正在访问的 API 上,而不是发出请求的应用程序。

The following listing shows how to configure a policy called "AllowShoppingApp" to enable cross-origin requests from http://shopping.com to the API. Additionally, we explicitly allow any HTTP verb type; without this call, only simple methods (GET, HEAD, and POST) are allowed. The policies are built up using the familiar fluent builder style you’ve seen throughout this book.
以下清单显示了如何配置一个名为 “AllowShoppingApp” 的策略,以启用从 http://shopping.com 到 API 的跨域请求。此外,我们明确允许任何 HTTP 动词类型;如果没有此调用,则只允许使用简单的方法 (GET、HEAD 和 POST) 。这些策略是使用您在本书中看到的熟悉的 Fluent Builder 风格构建的。

Listing 29.2 Configuring a CORS policy to allow requests from a specific origin
示例 29.2 配置 CORS 策略以允许来自特定源的请求

public void ConfigureServices(IServiceCollection services)
{
services.AddCors(options => { ❶
options.AddPolicy("AllowShoppingApp", policy => ❷
policy.WithOrigins("http://shopping.com") ❸
.AllowAnyMethod()); ❹
});
// other service configuration
}

❶ The AddCors method exposes an Action<CorsOptions> overload.
AddCors 方法公开Action<CorsOptions> 重载。

❷ Every policy has a unique name.
每个策略都有一个唯一的名称。

❸ The WithOrigins method specifies which origins are allowed. Note that the URL has no trailing /.
WithOrigins 方法指定允许的源。请注意,该 URL 没有尾部 /。

❹ Allows all HTTP verbs to call the API
允许所有 HTTP 动词调用 API

WARNING When listing origins in WithOrigins(), ensure that they don’t have a trailing "/"; otherwise, the origin will never match, and your cross-origin requests will fail.
警告:在 WithOrigins() 中列出源时,请确保它们没有尾随的 “/”;否则,源将永远不会匹配,并且您的跨源请求将失败。

Once you’ve defined a CORS policy, you can apply it to your application. In the following listing, you apply the "AllowShoppingApp" policy to the whole application using CorsMiddleware by calling UseCors().
定义 CORS 策略后,您可以将其应用于您的应用程序。在下面的清单中,通过调用 UseCors() 使用 CorsMiddleware 将 “AllowShoppingApp” 策略应用于整个应用程序。

Listing 29.3 Adding the CORS middleware and configuring a default CORS policy
清单 29.3 添加 CORS 中间件并配置默认 CORS 策略

var builder = WebApplication.CreateBuilder(args);
builder.Services.AddCors(options => {
options.AddPolicy("AllowShoppingApp", policy =>
policy.WithOrigins("http://shopping.com")
.AllowAnyMethod());
});
var app = builder.Build();
app.UseRouting();
app.UseCors("AllowShoppingApp"); ❶
app.UseAuthentication();
app.UseAuthorization();
app.MapGet("/api/products", () => new string[] {});
app.Run();

❶ Adds the CORS middleware and uses AllowShoppingApp as the default policy
添加 CORS 中间件并使用 AllowShoppingApp 作为默认策略

NOTE As with all middleware, the order of the CORS middleware is important. You must place the call to UseCors() after UseRouting(). The CORS middleware needs to intercept cross-origin requests to your web API actions so it can generate the correct responses to preflight requests and add the necessary headers. It’s common to place the CORS middleware before a call to UseAuthentication().
注意:与所有中间件一样,CORS 中间件的顺序也很重要。您必须在 UseRouting() 之后调用 UseCors()。CORS 中间件需要拦截对 Web API作的跨域请求,以便它可以生成对预检请求的正确响应并添加必要的标头。通常将 CORS 中间件放在调用 UseAuthentication() 之前。

With the CORS middleware in place for the API, the shopping app can now make cross-origin requests. You can call the API from the http://shopping.com site, and the browser lets the CORS request through, as shown in figure 29.8. If you make the same request from a domain other than http://shopping.com, the request continues to be blocked.
为 API 部署 CORS 中间件后,购物应用程序现在可以发出跨域请求。您可以从 http://shopping.com 站点调用 API,浏览器允许 CORS 请求通过,如图 29.8 所示。如果您从 http://shopping.com 以外的域发出相同的请求,该请求将继续被阻止。

alt text

Figure 29.8 With CORS enabled, as in the bottom image, cross-origin requests can be made, and the browser will make the response available to the JavaScript. Compare this to the top image, in which the request was blocked.
图 29.8 启用 CORS 后,如下图所示,可以发出跨域请求,并且浏览器会将响应提供给 JavaScript。将此图像与请求被阻止的顶部图像进行比较。

Applying a CORS policy globally to your application in this way may be overkill. If there’s only a subset of actions in your API that need to be accessed from other origins, it’s prudent to enable CORS only for those specific actions. This can be achieved by adding metadata to your endpoints.
以这种方式将 CORS 策略全局应用于您的应用程序可能有点矫枉过正。如果您的 API 中只有一个作子集需要从其他源访问,则谨慎的做法是仅为这些特定作启用 CORS。这可以通过向终端节点添加元数据来实现。

29.3.3 Adding CORS to specific endpoints with EnableCors metadata‌

29.3.3 使用 EnableCors 元数据将 CORS 添加到特定端点

Browsers block cross-origin requests by default for good reason: they have the potential to be abused by malicious or compromised sites. Enabling CORS for your entire app may not be worth the risk if you know that only a subset of actions will ever need to be accessed cross-origin.
默认情况下,浏览器会阻止跨域请求,这是有充分理由的:它们有可能被恶意或受感染的网站滥用。如果您知道只需要跨域访问一部分作,那么为整个应用程序启用 CORS 可能不值得冒险。

If that’s the case, it’s best to enable a CORS policy only for those specific endpoints. ASP.NET Core provides the RequireCors() method, which you can apply to your minimal API endpoints or route groups, and the [EnableCors] attribute, which lets you select a policy to apply to a given controller or action method.
如果是这种情况,最好仅为这些特定终端节点启用 CORS 策略。ASP.NET Core 提供了 RequireCors() 方法(可应用于最小 API 终端节点或路由组)和 [EnableCors] 属性(可用于选择要应用于给定控制器或作方法的策略)。

NOTE Both these methods add CORS metadata to the endpoint, which is used by the CorsMiddleware to determine the policy to apply. This is why the CorsMiddleware should be placed after the RoutingMiddleware, so that the CorsMiddleware knows which endpoint was selected and so which CORS policy to apply.
注意:这两种方法都会将 CORS 元数据添加到终端节点,CorsMiddleware 使用该元数据来确定要应用的策略。这就是为什么 CorsMiddleware 应该放在 RoutingMiddleware 之后,这样 CorsMiddleware 就知道选择了哪个端点,以及要应用哪个 CORS 策略。

With the RequireCors() method and [EnableCors] attribute, you can apply different CORS policies to different endpoints. For example, you could allow GET requests access to your entire API from the http://shopping.com domain but‌ allow other HTTP verbs only for a specific endpoint while allowing anyone to access your product list endpoints.
使用 RequireCors() 方法和 [EnableCors] 属性,您可以将不同的 CORS 策略应用于不同的端点。例如,您可以允许 GET 请求从 http://shopping.com 域访问您的整个 API,但仅允许特定终端节点使用其他 HTTP 动词,同时允许任何人访问您的产品列表终端节点。

You define CORS policies in the call to AddCors() by calling AddPolicy() and giving the policy a name, as you saw in listing 29.2. If you’re using endpoint-specific policies, instead of calling UseCors("AllowShoppingApp") as you saw in listing 29.3, you should add the middleware without a default policy by calling UseCors() only.
通过调用 AddPolicy() 并为策略命名,您可以在对 AddCors() 的调用中定义 CORS 策略,如清单 29.2 所示。如果您使用的是特定于端点的策略,而不是像您在清单 29.3 中看到的那样调用 UseCors(“AllowShoppingApp”),您应该仅通过调用 UseCors() 来添加没有默认策略的中间件。

You can then selectively enable CORS for individual endpoints and specifying the policy to apply. To apply CORS to a minimal API endpoint or route group, call RequireCors("AllowShoppingApp"), as shown in the following listing. To apply a policy to a controller or an action method, apply the [EnableCors("AllowShoppingApp"] attribute. You can disable cross-origin access for an endpoint by applying the [DisableCors] attribute.
然后,您可以有选择地为单个终端节点启用 CORS 并指定要应用的策略。要将 CORS 应用于最小 API 终端节点或路由组,请调用 RequireCors(“AllowShoppingApp”),如下面的清单所示。要将策略应用于控制器或作方法,请应用 [EnableCors(“AllowShoppingApp”] 属性。您可以通过应用 [DisableCors] 属性来禁用终端节点的跨域访问。

Listing 29.4 Applying a CORS policy to minimal API endpoints
清单 29.4 将 CORS 策略应用于最小的 API 端点

WebApplicationBuilder builder = WebApplication.CreateBuilder(args);
builder.Services.AddCors(options => { /* Config not shown*/});
var app = builder.Build();
app.UseCors(); ❶
app.MapGet("/api/products", () => new string[] {})
.RequireCors("AllowShoppingApp"); ❷
app.MapGet("/api/products",
[EnableCors("AllowShoppingApp")] () => new { }); ❸
app.MapGroup("/api/categories")
.RequireCors("AllowAnyOrigin"); ❹
app.MapDelete("/api/products",
[DisableCors] () => Results.NoContent()); ❺
app.Run();

❶ Adds the CorsMiddleware without configuring a default policy
添加 CorsMiddleware 而不配置默认策略

❷ Applies the AllowShoppingApp CORS policy to the endpoint
将 AllowShoppingApp CORS 策略应用于终端节点

❸ You can apply attributes to the lamba or handler method, as well as to MVC action methods.
您可以将属性应用于 lamba 或处理程序方法,以及 MVC动作方法。

❹ You can apply CORS policies to whole route groups.
您可以将 CORS 策略应用于整个路由组。

❺ The DisableCors attribute disables CORS for the endpoint completely.
DisableCors 属性完全禁用终端节点的 CORS。

If you define a default policy but then also call RequireCors() or add an [EnableCors] attribute, then both policies are applied. This can get confusing, so I recommend not applying a default CORS policy in the middleware and specifying the policy at the route group or endpoint level. Alternatively, if you do want to apply a policy to your whole app, avoid applying individual policies to endpoints as well.
如果定义了默认策略,但随后还调用 RequireCors() 或添加 [EnableCors] 属性,则会应用这两个策略。这可能会造成混淆,因此我建议不要在中间件中应用默认 CORS 策略,而是在路由组或终端节点级别指定策略。或者,如果您确实希望将策略应用于整个应用程序,请避免将单个策略也应用于终端节点。

Whether you choose to use a single default CORS policy or multiple policies, you need to configure the CORS policies for your application in the call to AddCors. Many options are available when configuring CORS. In the next section I provide an overview of the possibilities.
无论您选择使用单个默认 CORS 策略还是多个策略,都需要在对 AddCors 的调用中为应用程序配置 CORS 策略。配置 CORS 时,有许多选项可用。在下一节中,我将概述各种可能性。

29.3.4 Configuring CORS policies‌

29.3.4 配置 CORS 策略

Browsers implement the cross-origin policy for security reasons, so you should carefully consider the implications of relaxing any of the restrictions they impose. Even if you enable cross-origin requests, you can still control what data cross-origin requests can send and what your API returns. For example, you can configure
浏览器出于安全原因实施跨域策略,因此您应该仔细考虑放宽它们施加的任何限制的影响。即使您启用了跨域请求,您仍然可以控制跨域请求可以发送的数据以及 API 返回的数据。例如,您可以配置

• The origins that may make a cross-origin request to your API
可能向您的 API 发出跨源请求的源

• The HTTP verbs (such as GET, POST, and DELETE) that can be used
可以使用的 HTTP 动词 (如 GET、POST 和 DELETE)

• The headers the browser can send
浏览器可以发送的标头

• The headers the browser can read from your app’s response
浏览器可以从应用的响应中读取的标头

• Whether the browser will send authentication credentials with the request
浏览器是否会随请求发送身份验证凭证

You define all these options when creating a CORS policy in your call to AddCors() using the CorsPolicyBuilder, as you saw in listing 29.2. A policy can set all or none of these options, so you can customize the results to your heart’s content. Table 29.1 shows some of the options available and their effects.
使用 CorsPolicyBuilder 在调用 AddCors() 中创建 CORS 策略时,您可以定义所有这些选项,如清单 29.2 所示。策略可以设置所有这些选项,也可以不设置这些选项,因此您可以根据自己的喜好自定义结果。Table 29.1 显示了一些可用的选项及其效果。

Table 29.1 The methods available for configuring a CORS policy and their effect on the policy
表 29.1 可用于配置 CORS 策略的方法及其对策略的影响

CorsPolicyBuilder method example Result
WithOrigins("http://shopping.com") Allows cross-origin requests from http:/ /shopping.com
允许来自 http:/ /shopping.com 的跨域请求
AllowAnyOrigin() Allows cross-origin requests from any origin. This means any website can make JavaScript requests to your API.
允许来自任何源的跨域请求。这意味着任何网站都可以向您的 API 发出 JavaScript 请求。
WithMethods()/AllowAnyMethod() Sets the allowed methods (such as GET, POST, and DELETE) that can be made to your API
设置允许对 API 进行的方法(例如 GET、POST 和 DELETE)
WithHeaders()/AllowAnyHeader() Sets the headers that the browser may send to your API. If you restrict the headers, you must include at least Accept, Content-Type, and Origin to allow valid requests.
设置浏览器可以发送到 API 的标头。如果您限制标头,则必须至少包含 Accept、Content-Type 和 Origin 才能允许有效请求。
WithExposedHeaders() Allows your API to send extra headers to the browser. By default, only the Cache-Control, Content-Language,Content-Type, Expires, Last-Modified,and Pragma headers are sent in the response.
允许 API 向浏览器发送额外的标头。默认情况下,响应中仅发送 Cache-Control、Content-Language、Content-Type、Expires、Last-Modified 和 Pragma 标头。
AllowCredentials() By default, the browser won’t send authentication details with cross- origin requests unless you explicitly allow it. You must also enable sending credentials client-side in JavaScript when making the request.
默认情况下,除非您明确允许,否则浏览器不会通过跨域请求发送身份验证详细信息。发出请求时,您还必须在 JavaScript 中启用客户端发送凭证。

One of the first problems in setting up CORS is realizing you have a cross-origin problem at all. Several times I’ve been stumped trying to figure out why a request won’t work, until I realize the request is going cross-domain or from HTTP to HTTPS, for example.
设置 CORS 的首要问题之一是意识到您根本存在跨域问题。有好几次,我试图弄清楚为什么一个请求不起作用,直到我意识到请求是跨域的,或者从 HTTP 到 HTTPS,例如。

Whenever possible, I recommend avoiding cross-origin requests. You can end up with subtle differences in the way browsers handle them, which can cause more headaches. In particular, avoid HTTP to HTTPS cross-domain problems by running all your applications behind HTTPS. As discussed in chapter 28, that’s a best practice anyway, and it’ll help prevent a whole class of CORS headaches.
我建议尽可能避免跨源请求。您最终可能会在浏览器处理它们的方式上产生细微的差异,这可能会导致更多麻烦。特别是,通过在 HTTPS 后面运行所有应用程序来避免 HTTP 到 HTTPS 的跨域问题。正如第 28 章所讨论的,无论如何,这都是最佳实践,它将有助于防止一整类 CORS 头痛。

TIP Another (often preferable) option is to configure CORS policies in your reverse proxy or application gateway. You can configure Azure App Service with allowed origins, for example, so that you don’t need to modify your application code.
提示:另一个(通常更可取的)选项是在反向代理或应用程序网关中配置 CORS 策略。例如,可以使用允许的源配置 Azure 应用服务,这样就无需修改应用程序代码。

Once I’ve established that I definitely need a CORS policy, I typically start with the WithOrigins() method. Then I expand or restrict the policy further, as need be, to provide cross-origin lockdown of my API while still allowing the required functionality. CORS can be tricky to work around, but remember, the restrictions are there for your safety.
一旦我确定我肯定需要一个 CORS 策略,我通常从 WithOrigins() 方法开始。然后,我根据需要进一步扩展或限制策略,以提供 API 的跨域锁定,同时仍然允许所需的功能。CORS 可能很难解决,但请记住,这些限制是为了您的安全。

Cross-origin requests are only one of many potential avenues attackers could use to compromise your app. Many of these are trivial to defend against, but you need to be aware of them and know how to mitigate them. In the next section we’ll look at common threats and how to avoid them.
跨域请求只是攻击者可能用来破坏您的应用的众多潜在途径之一。其中许多是微不足道的防御,但您需要了解它们并知道如何减轻它们。在下一节中,我们将介绍常见的威胁以及如何避免它们。

29.4 Exploring other attack vectors‌

29.4 探索其他攻击媒介

So far in this chapter, I’ve described two potential ways attackers can compromise your apps—XSS and CSRF attacks and how to prevent them. Both of these vulnerabilities regularly appear in the OWASP top ten list of most critical web app risks, so it’s important to be aware of them and to avoid introducing them into your apps.
到目前为止,在本章中,我已经介绍了攻击者破坏您的应用程序的两种潜在方式 — XSS 和 CSRF 攻击以及如何预防它们。这两个漏洞经常出现在 OWASP 十大最关键的 Web 应用程序风险列表中,因此了解它们并避免将它们引入您的应用程序非常重要。

TIP OWASP publishes the list online, with descriptions of each attack and how to prevent those attacks. There’s a cheat sheet for staying safe here: https://cheatsheetseries.owasp.org.
提示:OWASP 在线发布该列表,其中包含每种攻击的描述以及如何防止这些攻击。这里有一张保持安全的备忘单:https://cheatsheetseries.owasp.org

In this section I’ll provide an overview of some of the other most common vulnerabilities and how to avoid them in your apps.
在本节中,我将概述其他一些最常见的漏洞,以及如何在您的应用程序中避免它们。

29.4.1 Detecting and avoiding open redirect attacks‌

29.4.1 检测和避免开放重定向攻击

A common OWASP vulnerability is due to open redirect attacks. An open redirect attack occurs when a user clicks a link to an otherwise-safe app and ends up being redirected to a malicious website, such as one that serves malware. The safe app contains no direct links to the malicious website, so how does this happen?
一个常见的 OWASP 漏洞是由于开放重定向攻击造成的。当用户点击指向其他安全应用程序的链接并最终被重定向到恶意网站(例如提供恶意软件的网站)时,就会发生开放重定向攻击。安全应用程序不包含指向恶意网站的直接链接,那么这是怎么发生的呢?

Open redirect attacks occur where the next page is passed as a parameter to an endpoint. The most common example is when you’re logging in to an app. Typically, apps remember the page a user is on before redirecting them to a login page by passing the current page as a returnUrl query string parameter. After the user logs in, the app redirects the user to the returnUrl to carry on where they left off.
当下一页作为参数传递给终端节点时,会发生开放重定向攻击。最常见的示例是当您登录应用程序时。通常,应用程序会记住用户所在的页面,然后通过将当前页面作为 returnUrl 查询字符串参数传递,将用户重定向到登录页面。用户登录后,应用程序会将用户重定向到 returnUrl 以从他们离开的位置继续。

Imagine a user is browsing an e-commerce site. They click Buy for a product and are redirected to the login page. The product page they were on is passed as the returnUrl, so after they log in, they’re redirected to the product page instead of being dumped back to the home screen.
假设用户正在浏览一个电子商务网站。他们单击产品的 Buy (购买) 并被重定向到登录页面。他们所在的产品页面作为 returnUrl 传递,因此在他们登录后,他们会被重定向到产品页面,而不是被转储回主屏幕。

An open redirect attack takes advantage of this common pattern, as shown in figure 29.9. A malicious attacker creates a login URL where the returnUrl is set to the website they want to send the user to and convinces the user to click the link to your web app. After the user logs in, a vulnerable app redirects the user to the malicious site.
开放重定向攻击利用了这种常见模式,如图 29.9 所示。恶意攻击者创建一个登录 URL,其中 returnUrl 设置为他们要将用户发送到的网站,并说服用户单击指向您的 Web 应用程序的链接。用户登录后,易受攻击的应用程序会将用户重定向到恶意站点。

alt text

Figure 29.9 An open redirect makes use of the common return URL pattern. This is typically used for login pages but may be used in other areas of your app too. If your app doesn’t verify that the URL is safe before redirecting the user, it could redirect users to malicious sites.
图 29.9 开放重定向使用常见的返回 URL 模式。这通常用于登录页面,但也可能用于应用程序的其他区域。如果您的应用程序在重定向用户之前未验证 URL 是否安全,则可能会将用户重定向到恶意网站。

The simple solution to this attack is to always validate that the returnUrl is a local URL that belongs to your app before redirecting users to it. The default Identity UI does this already, so you shouldn’t have to worry about the login page if you’re using Identity, as described in chapter 23.
这种攻击的简单解决方案是在将用户重定向到 returnUrl 之前,始终验证 returnUrl 是否是属于您的应用程序的本地 URL。默认的 Identity UI 已经这样做了,因此如果您使用的是 Identity,则不必担心登录页面,如第 23 章所述。

If you have redirects in other parts of your app, ASP.NET Core provides a couple of helper methods for staying safe, the most useful of which is Url.IsLocalUrl(). Listing 29.5 shows how you could verify that a provided return URL is safe and, if not, redirect to the app’s home page.
如果您在应用程序的其他部分有重定向,ASP.NET Core 提供了几个帮助程序方法来保持安全,其中最有用的是 Url.IsLocalUrl()。清单 29.5 显示了如何验证提供的返回 URL 是否安全,如果不是,则重定向到应用程序的主页。

You can also use the LocalRedirect() helper method on the ControllerBase and Razor Page PageModel classes, which throw an exception if the provided URL isn’t local.‌‌
还可以在 ControllerBase 和 Razor Page PageModel 类上使用 LocalRedirect() 帮助程序方法,如果提供的 URL 不是本地的,则会引发异常。

Listing 29.5 Detecting open redirect attacks by checking for local return URLs
清单 29.5 通过检查本地返回 URL 来检测开放重定向攻击

[HttpPost]
public async Task<IActionResult> Login(
LoginViewModel model, string returnUrl = null) ❶
{
// Verify password, and sign user in
if (Url.IsLocalUrl(returnUrl)) ❷
{
return Redirect(returnUrl); ❸
}
else
{
return RedirectToPage("Index"); ❹
}
}

❶ The return URL is provided as an argument to the action method.
返回 URL 作为作方法的参数提供。

❷ Returns true if the return URL starts with / or ~/
如果返回 URL 以 / 或 ~/开头,则返回 true

❸ The URL is local, so it’s safe to redirect to it.
该 URL 是本地的,因此可以安全地重定向到它。

❹ The URL was not local and could be an open redirect attack, so redirect to the homepage for safety.
该 URL 不是本地的,可能是公开重定向攻击,因此为了安全起见,请重定向到主页。

This simple pattern protects against open redirect attacks that could otherwise expose your users to malicious content. Whenever you’re redirecting to a URL that comes from a query string or other user input, you should use this pattern.
这种简单的模式可以防止开放重定向攻击,否则可能会使您的用户接触到恶意内容。每当重定向到来自查询字符串或其他用户输入的 URL 时,都应使用此模式。

TIP In some authentication flows, such as when authenticating with OpenID Connect, you can’t redirect to a local URL, so you can’t use this pattern. Instead, OpenID Connect requires that you preregister the allowed redirect URLs and redirect only to a registered URL. You should consider using this pattern when you can’t enforce a local- only redirect.
提示:在某些身份验证流中,例如使用 OpenID Connect 进行身份验证时,您无法重定向到本地 URL,因此不能使用此模式。相反,OpenID Connect 要求您预先注册允许的重定向 URL,并且仅重定向到已注册的 URL。当您无法强制执行仅限本地的重定向时,您应该考虑使用此模式。

Open redirect attacks present a risk to your users rather than to your app directly. The next vulnerability represents a critical vulnerability in your app itself.
开放重定向攻击会给您的用户带来风险,而不是直接给您的应用程序带来风险。下一个漏洞表示应用程序本身的严重漏洞。

29.4.2 Avoiding SQL injection attacks with EF Core and parameterization‌

29.4.2 使用 EF Core 和参数化避免 SQL 注入攻击

SQL injection attacks represent one of the most dangerous threats to your application. Attackers craft simple malicious input, which they send to your application as traditional form-based input or by customizing URLs and query strings to execute arbitrary code against your database. An SQL injection vulnerability could expose your entire database to attackers, so it’s critical that you spot and remove any such vulnerabilities in your apps.
SQL 注入攻击是应用程序面临的最危险的威胁之一。攻击者制作简单的恶意输入,这些输入作为传统的基于表单的输入发送到您的应用程序,或者通过自定义 URL 和查询字符串来针对您的数据库执行任意代码。SQL 注入漏洞可能会将您的整个数据库暴露给攻击者,因此发现并删除应用程序中的任何此类漏洞至关重要。

I hope I’ve scared you a little with that introduction, so now for the good news: if you’re using Entity Framework Core (EF Core) or pretty much any other object-relational mapper (ORM) in a standard way, you should be safe. EF Core has built-in protections against SQL injection, so as long as you’re not doing anything funky, you should be fine.
我希望我的介绍让您有点害怕,所以现在好消息是:如果您以标准方式使用 Entity Framework Core (EF Core) 或几乎任何其他对象关系映射器 (ORM),您应该是安全的。EF Core 具有针对 SQL 注入的内置保护功能,因此只要您不做任何时髦的事情,应该没问题。

SQL injection vulnerabilities occur when you build SQL statements yourself and include dynamic input that an attacker provides, even indirectly. EF Core provides the ability to create raw SQL queries using the FromSqlRaw() method, so you must be careful when using this method.
当您自己构建 SQL 语句并包含攻击者提供的动态输入(甚至是间接提供的)时,就会出现 SQL 注入漏洞。EF Core 提供了使用 FromSqlRaw() 方法创建原始 SQL 查询的功能,因此在使用此方法时必须小心。

Imagine your recipe app has a search form that lets you search for a recipe by name. If you write the query using LINQ extension methods (as discussed in chapter 12), you would have no risk of SQL injection attacks. However, if you decide to write your SQL query by hand, you open yourself to such a vulnerability, as shown in the following listing.
假设您的食谱应用程序有一个搜索表单,可让您按名称搜索食谱。如果使用 LINQ 扩展方法编写查询(如第 12 章所述),则不会有 SQL 注入攻击的风险。但是,如果您决定手动编写 SQL 查询,则可能会面临此类漏洞,如下面的清单所示。

Listing 29.6 An SQL injection vulnerability in EF Core due to string concatenation
列表 29.6 由于字符串串联而导致的 EF Core 中的 SQL 注入漏洞

public IList<User> FindRecipe(string search) ❶
{
return _context.Recipes ❷
.FromSqlRaw("SELECT * FROM Recipes" + ❸
"WHERE Name = '" + search + "'") ❹
.ToList();
}

❶ The search parameter comes from user input, so it’s unsafe.
search 参数来自用户输入,因此不安全。

❷ The current EF Core DbContext is held in the _context field.
当前 EF Core DbContext 保存在 _context 字段中。

❸ You can write queries by hand using the FromSqlRaw extension method.
您可以使用 FromSqlRaw 扩展方法手动编写查询。

❹ This introduces the vulnerability—including unsafe content directly in an SQL string.
这会引入漏洞 — 直接在 SQL字符串中包含不安全的内容。

In this listing, the user input held in search is included directly in the SQL query. By crafting malicious input, users can potentially perform any operation on your database.
在此清单中,搜索中保存的用户输入直接包含在 SQL 查询中。通过精心设计恶意输入,用户可能会对您的数据库执行任何作。

Imagine an attacker searches your website using the text
想象一下,攻击者使用文本

'; DROP TABLE Recipes; --

Your app assigns this to the search parameter, and the SQL query executed against your database becomes
您的应用程序将此参数分配给 search 参数,并且针对您的数据库执行的 SQL 查询将变为

SELECT * FROM Recipes WHERE Name = ''; DROP TABLE Recipes; --'

Simply by entering text into the search form of your app, the attacker has deleted the entire Recipes table from your app! That’s catastrophic, but an SQL injection vulnerability provides more or less unfettered access to your database.Even if you’ve set up database permissions correctly to prevent this sort of destructive action, attackers will likely be able to read all the data from your database, including your users’ details.
只需在应用的搜索表单中输入文本,攻击者就从您的应用中删除了整个 Recipes 表!这是灾难性的,但 SQL 注入漏洞或多或少提供了对数据库的不受限制的访问。即使您已正确设置数据库权限以防止此类破坏性作,攻击者也可能能够从您的数据库读取所有数据,包括您的用户的详细信息。

The simple way to prevent this from happening is to avoid creating SQL queries by hand this way. If you do need to write your own SQL queries, don’t use string concatenation, as in listing 29.6. Instead, use parameterized queries, in which the (potentially unsafe) input data is separate from the query itself, as shown here.
防止这种情况发生的简单方法是避免以这种方式手动创建 SQL 查询。如果你确实需要编写自己的 SQL 查询,请不要使用字符串连接,如清单 29.6 所示。相反,请使用参数化查询,其中(可能不安全的)输入数据与查询本身是分开的,如下所示。

Listing 29.7 Avoiding SQL injection by using parameterization
示例 29.7 使用参数化避免 SQL 注入

public IList<User> FindRecipe(string search)
{
return _context.Recipes
.FromSqlRaw( "SELECT * FROM Recipes WHERE Name = '{0}'", ❶
search) ❷
.ToList();
}

❶ The SQL query uses a placeholder {0} for the parameter.
SQL 查询使用参数的占位符{0}。

❷ The dangerous input is passed as a parameter, separate from the query.
危险输入作为参数传递,与查询分开。

Parameterized queries are not vulnerable to SQL injection attacks, so the attack presented earlier won’t work. If you use EF Core or other ORMs to access data using standard LINQ queries, you won’t be vulnerable to injection attacks. EF Core automatically creates all SQL queries using parameterized queries to protect you. Even if you’re using the low-level ADO.NET database APIs, stick to parameterized queries!
参数化查询不易受到 SQL 注入攻击,因此前面介绍的攻击不起作用。如果使用 EF Core 或其他 ORM 通过标准 LINQ 查询访问数据,则不会容易受到注入攻击。EF Core 使用参数化查询自动创建所有 SQL 查询以保护你。即使您使用的是低级 ADO.NET 数据库 API,也请坚持使用参数化查询!

NOTE I’ve talked about SQL injection attacks only in terms of a relational database, but this vulnerability can appear in NoSQL and document databases too. Always use parameterized queries or the equivalent, and don’t craft queries by concatenating strings with user input.
注意:我仅从关系数据库的角度讨论了 SQL 注入攻击,但此漏洞也可能出现在 NoSQL 和文档数据库中。始终使用参数化查询或等效查询,并且不要通过将字符串与用户输入连接起来来创建查询。

Injection attacks have been the number-one vulnerability on the web for more than a decade, so it’s crucial to be aware of them and how they arise. Whenever you need to write raw SQL queries, make sure that you always use parameterized queries.
十多年来,注入攻击一直是 Web 上的头号漏洞,因此了解它们及其出现方式至关重要。每当需要编写原始 SQL 查询时,请确保始终使用参数化查询。

The next vulnerability is also related to attackers accessing data they shouldn’t be able to. It’s a little subtler than a direct injection attack but is trivial to perform; the only skill the attacker needs is the ability to count.
下一个漏洞还与攻击者访问他们不应该访问的数据有关。它比直接注入攻击更微妙一些,但执行起来很简单;攻击者唯一需要的技能是计数能力。

29.4.3 Preventing insecure direct object references‌

29.4.3 防止不安全的直接对象引用

Insecure direct object reference is a bit of a mouthful, but it means users accessing things they shouldn’t by noticing patterns in URLs. Let’s revisit our old friend the recipe app. As a reminder, the app shows you a list of recipes. You can view any of them, but you can edit only recipes you created yourself. When you view someone else’s recipe, there’s no Edit button visible.‌
不安全的直接对象引用有点拗口,但这意味着用户通过注意到 URL 中的模式来访问他们不应该访问的内容。让我们重温一下我们的老朋友食谱应用程序。提醒一下,该应用程序会向您显示食谱列表。您可以查看其中任何一个,但只能编辑您自己创建的配方。当您查看其他人的配方时,没有可见的 Edit (编辑) 按钮。

A user clicks the Edit button on one of their recipes and notices that the URL is /Recipes/Edit/120. That 120 is a dead giveaway as being the underlying database ID of the entity you’re editing. A simple attack would be to change that ID to gain access to a different entity, one that you wouldn’t normally have access to. The user could try entering /Recipes/Edit/121. If that lets them edit or view a recipe that they shouldn’t be able to, you have an insecure direct object reference vulnerability.
用户单击其中一个配方上的 Edit (编辑) 按钮,并注意到 URL 为 /Recipes/Edit/120。这 120 是一个死的赠品,因为这是您正在编辑的实体的基础数据库 ID。一个简单的攻击是更改该 ID 以获得对不同实体的访问权限,该实体通常无权访问。用户可以尝试输入 /Recipes/Edit/121。如果这允许他们编辑或查看他们不应该能够编辑或查看的配方,则您存在不安全的直接对象引用漏洞。

The solution to this problem is simple: you should have resource-based authorization in your endpoint handlers. If a user attempts to access an entity they’re not allowed to access, they should get a permission-denied error. They shouldn’t be able to bypass your authorization by typing a URL directly into the search bar of their browser.
此问题的解决方案很简单:您应该在终端节点处理程序中具有基于资源的授权。如果用户尝试访问不允许他们访问的实体,他们应该会收到 permission-denied 错误。他们不应该能够通过在浏览器的搜索栏中直接输入 URL 来绕过您的授权。

In ASP.NET Core apps, this vulnerability typically arises when you attempt to restrict users by hiding elements from your UI, such as by hiding the Edit button. Instead, you should use resource-based authorization, as discussed in chapter 24.
在 ASP.NET Core 应用程序中,当您尝试通过隐藏 UI 中的元素(例如隐藏 Edit 按钮)来限制用户时,通常会出现此漏洞。相反,您应该使用基于资源的授权,如 Chapter 24 中所述。

WARNING You must always use resource-based authorization to restrict which entities a user can access. Hiding or disabling UI elements provides an improved user experience, but it isn’t a security measure.
警告您必须始终使用基于资源的授权来限制用户可以访问的实体。隐藏或禁用 UI 元素可以提供更好的用户体验,但这不是一项安全措施。

You can sidestep this vulnerability somewhat by avoiding integer IDs for your entities in the URLs, perhaps by using a pseudorandom globally unique identifier (GUID) such as C2E296BA-7EA8-4195-9CA7-C323304CCD12 instead.
您可以通过避免在 URL 中使用实体的整数 ID 来稍微回避此漏洞,也许可以改用伪随机全局唯一标识符 (GUID),例如 C2E296BA-7EA8-4195-9CA7-C323304CCD12。

This makes the process of guessing other entities harder, as you can’t simply add 1 to an existing number, but it’s masking the problem rather than fixing it. Nevertheless, using GUIDs can be useful when you want to have publicly accessible pages that don’t require authentication but don’t want their IDs to be easily discoverable.
这使得猜测其他实体的过程更加困难,因为你不能简单地将 1 添加到现有数字上,但它掩盖了问题,而不是解决问题。不过,当您希望拥有不需要身份验证但又不希望其 ID 易于发现的可公开访问页面时,使用 GUID 可能很有用。

The final section in this chapter doesn’t deal with a single vulnerability. Instead, I discuss a separate but related problem: protecting your users’ data.
本章的最后一节不涉及单个漏洞。相反,我讨论了一个单独但相关的问题:保护用户的数据。

29.4.4 Protecting your users’ passwords and data‌

29.4.4 保护用户的口令和数据

For many apps, the most sensitive data you’ll be storing is the personal data of your users. This could include emails, passwords, address details, or payment information. You should be careful when storing any of this data. As well as presenting an inviting target for attackers, you may have legal obligations for how you handle it, such as data protection laws and Payment Card Industry (PCI) compliance requirements.
对于许多应用程序,您将存储的最敏感数据是用户的个人数据。这可能包括电子邮件、密码、地址详细信息或付款信息。在存储任何此类数据时,您应该小心。除了为攻击者提供诱人的目标外,您可能还对如何处理它负有法律义务,例如数据保护法和支付卡行业 (PCI) 合规性要求。

The easiest way to protect yourself is to not store data you don’t need. If you don’t need your user’s address, don’t ask for it. That way, you can’t lose it! Similarly, if you use a third- party identity service to store user details, as described in chapter 23, you won’t have to work as hard to protect your users’ personal information.
保护自己的最简单方法是不存储您不需要的数据。如果您不需要用户的地址,请不要询问。这样,你就不会丢失它!同样,如果您使用第三方身份服务来存储用户详细信息,如第 23 章所述,则不必费力地保护用户的个人信息。

If you store user details in your own app or build your own identity provider, then you need to make sure to follow best practices when handling user information. The new project templates that use ASP.NET Core Identity follow most of these practices by default, so I highly recommend you start from one of these. You need to consider many aspects, too many to go into detail here,1 but they include the following:
如果您将用户详细信息存储在自己的应用程序中或构建自己的身份提供商,则需要确保在处理用户信息时遵循最佳实践。默认情况下,使用 ASP.NET Core Identity 的新项目模板遵循其中的大部分做法,因此我强烈建议您从其中一种做法开始。您需要考虑许多方面,太多了,无法在这里详细介绍,1但它们包括以下内容:

• Never store user passwords anywhere directly. You should store only cryptographic hashes computed using an expensive hashing algorithm, such as BCrypt or PBKDF2.
切勿将用户密码直接存储在任何位置。您应该只存储使用昂贵的哈希算法(如 BCrypt 或 PBKDF2)计算的加密哈希。

• Don’t store more data than you need. You should never store credit card details.
不要存储超出您需要的数据。您永远不应该存储信用卡详细信息。

• Allow users to use multifactor authentication (MFA) to sign in to your site.
允许用户使用多重身份验证 (MFA) 登录您的网站。

• Prevent users from using passwords that are known to be weak or compromised, such as disallowing dictionary words, sequential characters, and so on.
防止用户使用已知较弱或已泄露的密码,例如不允许使用字典单词、连续字符等。

• Mark authentication cookies as http (so that they can’t be read using JavaScript) and secure so they’ll be sent only over an HTTPS connection, never over HTTP. Where possible, you should also mark your cookies as SameSite=strict. See the documentation for details: http://mng.bz/a11m.
将身份验证 Cookie 标记为 http(这样就无法使用 JavaScript 读取它们)和安全,这样它们将仅通过 HTTPS 连接发送,而不是通过 HTTP。在可能的情况下,还应将 Cookie 标记为 SameSite=strict。有关详细信息,请参阅文档:http://mng.bz/a11m

• Don’t expose whether a user is already registered with your app. Leaking this information can expose you to enumeration attacks.
不要暴露用户是否已在您的应用程序中注册。泄露此信息可能会使您面临枚举攻击。

TIP You can learn more about website enumeration in this video tutorial by Troy Hunt: http://mng.bz/PAAA.
提示:您可以在 Troy Hunt 提供的此视频教程中了解有关网站枚举的更多信息:http://mng.bz/PAAA

These guidelines represent the minimum you should be doing to protect your users. The most important thing is to be aware of potential security problems as you’re building your app. Trying to bolt on security at the end is always harder than thinking about it from the start, so it’s best to think about it earlier rather than later.
这些准则代表了为保护用户而应采取的最低限度作。最重要的是在构建应用程序时了解潜在的安全问题。试图在最后加强安全性总是比从一开始就考虑它更难,因此最好尽早考虑而不是晚点考虑。

This chapter has been a whistle-stop tour of things to look out for. We’ve touched on most of the big names in security vulnerabilities, but I strongly encourage you to check out the other resources mentioned in this chapter. They provide a more exhaustive list of things to consider, complementing the defenses mentioned in this chapter. On top of that, don’t forget about input validation and mass assignment/overposting, as discussed in chapter 16. ASP.NET Core includes basic protections against some of the most common attacks, but you can still shoot yourself in the foot. Make sure it’s not your app making headlines for being breached!
本章是对需要注意的事项的简要介绍。我们已经触及了安全漏洞中的大多数知名专家,但我强烈建议您查看本章中提到的其他资源。它们提供了更详尽的需要考虑的事项列表,以补充本章中提到的防御措施。最重要的是,不要忘记 input validation 和 mass assignment / overposting,如 Chapter 16 所述。ASP.NET Core 包括针对一些最常见攻击的基本保护,但您仍然可以搬起石头砸自己的脚。确保不是您的应用因被泄露而成为头条新闻!

29.5 Summary

29.5 总结

XSS attacks involve malicious users injecting content into your app, typically to run malicious JavaScript when users browse your app. You can prevent XSS injection attacks by always encoding unsafe input before writing it to a page. Razor Pages do this automatically unless you use the @Html.Raw() method, so use it sparingly and carefully.
XSS 攻击涉及恶意用户将内容注入您的应用程序,通常是在用户浏览您的应用程序时运行恶意 JavaScript。您可以通过在将不安全的输入写入页面之前始终对其进行编码来防止 XSS 注入攻击。除非您使用 @Html.Raw() 方法,否则 Razor Pages 会自动执行此作,因此请谨慎使用。

CSRF attacks are a problem for apps that use cookie-based authentication, such as ASP.NET Core Identity. These attacks rely on the fact that browsers automatically send cookies to a website. A malicious website could create a form that POSTs to your site, and the browser will send the authentication cookie with the request. This allows malicious websites to send requests as though they’re the logged-in user.
CSRF 攻击对于使用基于 Cookie 的身份验证(例如 ASP.NET Core Identity)的应用程序来说是一个问题。这些攻击依赖于浏览器自动向网站发送 cookie 的事实。恶意网站可能会创建一个表单,该表单将 POST 到您的网站,并且浏览器会将身份验证 Cookie 与请求一起发送。这允许恶意网站像登录用户一样发送请求。

You can mitigate CSRF attacks using antiforgery tokens, which involve writing a hidden field in every form that contains a random string based on the current user. A similar token is stored in a cookie. A legitimate request will have both parts, but a forged request from a malicious website will have only the cookie half; it cannot re-create the hidden field in the form. By validating these tokens, your API can reject forged requests.
您可以使用防伪令牌缓解 CSRF 攻击,这涉及以每种形式编写一个隐藏字段,其中包含基于当前用户的随机字符串。类似的令牌存储在 Cookie 中。合法请求将包含两个部分,但来自恶意网站的伪造请求将只有 cookie 的一半;它无法在表单中重新创建隐藏字段。通过验证这些令牌,您的 API 可以拒绝伪造的请求。

The Razor Pages framework automatically adds antiforgery tokens to any forms you create using Razor and validates the tokens for inbound requests. You can disable the validation check if necessary, using the [IgnoreAntiForgeryToken] attribute.
Razor Pages 框架会自动将防伪令牌添加到您使用 Razor 创建的任何表单中,并验证入站请求的令牌。如有必要,您可以使用 [IgnoreAntiForgeryToken] 属性禁用验证检查。

Browsers won’t allow websites to make JavaScript AJAX requests from one app to others at different origins. To match the origin, the app must have the same scheme, domain, and port. If you wish to make cross-origin requests like this, you must enable CORS in your API.
浏览器不允许网站从一个应用程序向不同来源的其他应用程序发出 JavaScript AJAX 请求。要匹配源,应用程序必须具有相同的 scheme、domain 和 port。如果您希望发出这样的跨域请求,则必须在 API 中启用 CORS。

CORS uses HTTP headers to communicate with browsers and defines which origins can call your API. In ASP.NET Core, you can define multiple policies, which can be applied globally to your whole app or to specific controllers and actions.
CORS 使用 HTTP 标头与浏览器通信,并定义哪些源可以调用您的 API。在 ASP.NET Core 中,您可以定义多个策略,这些策略可以全局应用于整个应用程序或特定控制器和作。

You can add the CORS middleware by calling UseCors() on WebApplication and optionally providing the name of the default CORS policy to apply. You can also apply CORS to endpoints by calling RequireCors() or adding the [EnableCors] attribute and providing the name of the policy to apply.
您可以通过在 WebApplication 上调用 UseCors() 并选择性地提供要应用的默认 CORS 策略的名称来添加 CORS 中间件。您还可以通过调用 RequireCors() 或添加 [EnableCors] 属性并提供要应用的策略的名称,将 CORS 应用于终端节点。

Configure the policies for your application by calling AddCors() on WebApplicationBuilder and adding policies in the lambda using AddPolicy(). A policy defines which origins are allowed to call an endpoint, which HTTP methods they can use, and which headers are allowed.
通过在 WebApplicationBuilder 上调用 AddCors() 并使用 AddPolicy() 在 lambda 中添加策略来配置应用程序的策略。策略定义允许哪些源调用终端节点、它们可以使用哪些 HTTP 方法以及允许哪些标头。

Open redirect attacks use the common returnURL mechanism after logging in to redirect users to malicious websites. You can prevent this attack by ensuring that you redirect only to local URLs—URLs that belong to your app.
Open 重定向攻击在登录后使用常见的 returnURL 机制将用户重定向到恶意网站。您可以通过确保仅重定向到本地 URL(属于您的应用程序的 URL)来防止此攻击。

Insecure direct object references are a common problem where you expose the ID of database entities in the URL. You should always verify that users have permission to access or change the requested resource by using resource-based authorization in your action methods.
不安全的直接对象引用是一个常见问题,即在 URL 中公开数据库实体的 ID。您应该始终通过在作方法中使用基于资源的授权来验证用户是否有权访问或更改请求的资源。

SQL injection attacks are a common attack vector when you build SQL requests manually. Always use parameterized queries when building requests or use a framework like EF Core, which isn’t vulnerable to SQL injection.
当您手动构建 SQL 请求时,SQL 注入攻击是一种常见的攻击媒介。在生成请求时,请始终使用参数化查询,或使用 EF Core 等框架,该框架不易受到 SQL 注入的攻击。

The most sensitive data in your app is often the data of your users. Mitigate this risk by storing only data that you need. Ensure that you store passwords only as a hash, protect against weak or compromised passwords, and provide the option for MFA. ASP.NET Core Identity provides all of this out of the box, so it’s a great choice if you need to create an identity provider.
应用程序中最敏感的数据通常是用户的数据。通过仅存储您需要的数据来降低此风险。确保仅将密码存储为哈希值,防止弱密码或泄露密码,并提供 MFA 选项。ASP.NET Core Identity 提供了所有这些开箱即用的功能,因此如果您需要创建身份提供商,它是一个不错的选择。

  1. In 2020 the National Institute of Standards and Technology (NIST) updated its Digital Identity Guidelines on handling user details, which contains some great advice. See http://mng.bz/6gRA.
  2. 2020 年,美国国家标准与技术研究院 (NIST) 更新了关于处理用户详细信息的数字身份指南,其中包含一些很好的建议。请参阅 http://mng.bz/6gRA

ASP.NET Core in Action 28 Adding HTTPS to an application

28 Adding HTTPS to an application
28 将 HTTPS 添加到应用程序

This chapter covers
本章涵盖

• Encrypting traffic between clients and your app using HTTPS
使用 HTTPS加密客户端和应用程序之间的流量

• Using the HTTPS development certificate for local development
使用 HTTPS 开发证书进行本地开发

• Configuring Kestrel with a custom HTTPS certificate
使用自定义 HTTPS 证书配置 Kestrel

• Enforcing HTTPS for your whole app
为整个应用程序强制实施 HTTPS

Web application security is a hot topic at the moment. Practically every week another breach is reported, or confidential details are leaked. It may seem like the situation is hopeless, but the reality is that the vast majority of breaches could have been prevented with the smallest amount of effort.
Web 应用程序安全是目前的一个热门话题。几乎每周都会报告另一起数据泄露事件,或泄露机密细节。情况似乎没有希望,但现实是,绝大多数数据泄露本可以通过最小的努力来预防。

In chapter 29 we’ll look at a range of common attacks and how to protect against them in your ASP.NET Core app. In this chapter we start by looking at one of the most basic security measures: encrypting the traffic between a client such as a browser and your application.
在第 29 章中,我们将介绍一系列常见攻击,以及如何在 ASP.NET Core 应用程序中防范这些攻击。在本章中,我们首先介绍最基本的安全措施之一:加密客户端(如浏览器)和应用程序之间的流量。

Without HTTPS encryption, you risk third parties spying on or modifying the requests and responses as they travel over the internet. The risks associated with unencrypted traffic mean that HTTPS is effectively mandatory for production apps these days, and it is heavily encouraged by the makers of modern browsers such as Chrome and Firefox. In section 28.1 you’ll learn more about these risks and some of the approaches you can take to protect your application.
如果没有 HTTPS 加密,当请求和响应通过 Internet 传输时,您可能会面临第三方监视或修改它们的风险。与未加密流量相关的风险意味着 HTTPS 如今实际上是生产应用程序的强制性要求,并且 Chrome 和 Firefox 等现代浏览器的制造商强烈鼓励 HTTPS。在 Section 28.1 中,您将了解有关这些风险的更多信息以及您可以采取的一些方法来保护您的应用程序。

In section 28.2 you’ll see how to get started with HTTPS locally using the ASP.NET Core development certificate. I describe what it is, how to trust it on your application, and what to do if it’s not working as you expect.
在 Section 28.2 中,您将看到如何使用 ASP.NET Core 开发证书在本地开始使用 HTTPS。我将介绍它是什么,如何在您的应用程序上信任它,以及如果它没有按预期工作该怎么办。

The development certificate is great for local work, but in production you’ll need to configure a real, production certificate. I don’t describe the process of obtaining a certificate in section 28.3, as that will vary by provider; instead, I show how to configure Kestrel to use a custom certificate you’ve acquired.
开发证书非常适合本地工作,但在生产环境中,您需要配置一个真实的生产证书。我没有在第 28.3 节中描述获取证书的过程,因为这会因提供商而异;相反,我将介绍如何将 Kestrel 配置为使用您获取的自定义证书。

In section 28.4 I describe some of the approaches to enforcing HTTPS in your application. Unfortunately, web browsers still expect apps to be available over HTTP by default, so you typically need to expose your application on both HTTP and HTTPS ports. Nevertheless, there are things you can do to push clients toward the HTTPS endpoint, which are considered security best practices these days.
在 Section 28.4 中,我描述了在应用程序中强制执行 HTTPS 的一些方法。遗憾的是,默认情况下,Web 浏览器仍然希望应用程序通过 HTTP 可用,因此您通常需要在 HTTP 和 HTTPS 端口上公开您的应用程序。不过,您可以采取一些措施来将客户端推送到 HTTPS 终端节点,这如今被认为是安全最佳实践。

Before we look at HTTPS in ASP.NET Core specifically, we’ll start by looking at HTTPS in general and why you should use it in all your applications.
在我们具体研究 ASP.NET Core 中的 HTTPS 之前,我们首先一般地了解一下 HTTPS,以及为什么您应该在所有应用程序中使用它。

28.1 Why do I need HTTPS?

28.1 为什么我需要 HTTPS?

In this section you’ll learn about HTTPS: what it is, and why you need to be aware of it for all your production applications. We’re not going to go into details about the protocol or how certificates work at this point, instead focusing on why you need to use HTTPS. You’ll see two approaches to adding HTTPS to your application: supporting HTTPS directly in your application and using SSL/TLS-offloading with a reverse proxy.
在本节中,您将了解 HTTPS:它是什么,以及为什么您需要在所有生产应用程序中了解 HTTPS。此时,我们不会详细介绍协议或证书的工作原理,而是重点介绍为什么需要使用 HTTPS。您将看到两种将 HTTPS 添加到应用程序的方法:直接在应用程序中支持 HTTPS,以及将 SSL/TLS 卸载与反向代理一起使用。

So far in this book, I’ve shown how the user’s browser sends a request across the internet to your app using the HTTP protocol. We haven’t looked too much into the details of that protocol other than to establish that it uses verbs to describe the type of request (such as GET and POST), that it contains headers with metadata about the request, and optionally includes a body payload of data.
到目前为止,在本书中,我已经展示了用户的浏览器如何使用 HTTP 协议通过 Internet 向您的应用程序发送请求。我们没有深入研究该协议的细节,只是确定它使用动词来描述请求类型(例如 GET 和 POST),它包含带有请求元数据的标头,以及可选的数据正文有效负载。

By default, HTTP requests are unencrypted; they’re plain-text files being sent over the internet. Anyone on the same network as a user (such as someone using the same public Wi-Fi in a coffee shop) can read the requests and responses sent back and forth. Attackers can even modify the requests or responses as they’re in transit, as shown in figure 28.1.
默认情况下,HTTP 请求未加密;它们是通过 Internet 发送的纯文本文件。与用户位于同一网络上的任何人(例如在咖啡店使用同一公共 Wi-Fi 的人)都可以阅读来回发送的请求和响应。攻击者甚至可以在传输过程中修改请求或响应,如图 28.1 所示。

alt text

Figure 28.1 Unencrypted HTTP requests can be read by users on the same network. Attackers can even intercept the request and response, reading or changing the data. HTTPS requests can’t be read or manipulated by attackers.
图 28.1 同一网络上的用户可以读取未加密的 HTTP 请求。攻击者甚至可以拦截请求和响应,读取或更改数据。攻击者无法读取或纵 HTTPS 请求。

Using unencrypted web apps in this way presents both a privacy and a security risk to your users. Attackers could read sensitive details such as passwords and personally identifiable information (PII), they could inject malicious code into your responses to attack users, or they could steal authentication cookies and impersonate the user on your app.
以这种方式使用未加密的 Web 应用程序会给用户带来隐私和安全风险。攻击者可以读取密码和个人身份信息 (PII) 等敏感详细信息,他们可能会将恶意代码注入您的响应中以攻击用户,或者他们可能会窃取身份验证 Cookie 并在您的应用程序上冒充用户。

To protect your users, your app should encrypt the traffic between the user’s browser and your app as it travels over the network by using the HTTPS protocol. This is similar to HTTP traffic, but it uses an SSL/TLS certificate to encrypt requests and responses, so attackers cannot read or modify the contents.
为了保护您的用户,您的应用应使用 HTTPS 协议加密用户浏览器和您的应用之间的流量。这类似于 HTTP 流量,但它使用 SSL/TLS 证书来加密请求和响应,因此攻击者无法读取或修改内容。

DEFINITION Secure Sockets Layer (SSL) is an older standard that facilitates HTTPS. The SSL protocol has been superseded by Transport Layer Security (TLS), so I’ll be using TLS preferentially throughout this chapter. Normally, if you hear someone talking about SSL or SSL certificates, they actually mean TLS. You can find the RFC for the latest version of the TLS protocol at https://www.rfc-editor.org/rfc/rfc8446.
定义:SSL是一种促进 HTTPS 的旧标准。SSL 协议已被传输层安全性 (TLS) 取代,因此在本章中,我将优先使用 TLS。通常,如果您听到有人谈论 SSL 或 SSL 证书,他们实际上指的是 TLS。您可以在 https://www.rfc-editor.org/rfc/rfc8446 中找到最新版本的 TLS 协议的 RFC。

In browsers, you can tell that a site is using HTTPS by the https:// prefix to URLs (notice the s), or sometimes by a padlock, as shown in figure 28.2. Most modern browsers these days deemphasize that a site is using HTTPS, as most sites use HTTPS, and instead highlight when you’re on a site that isn’t using HTTPS, flagging it as insecure.
在浏览器中,您可以通过 URL 的 https:// 前缀(注意 s)或有时通过挂锁来判断站点正在使用 HTTPS,如图 28.2 所示。如今,大多数现代浏览器都不再强调网站正在使用 HTTPS,因为大多数网站都使用 HTTPS,而是在您访问未使用 HTTPS 的网站上时突出显示,将其标记为不安全。

alt text

Figure 28.2 Encrypted apps using HTTPS and unencrypted apps using HTTP in Edge. Using HTTPS protects your application from being viewed or tampered with by attackers.
图 28.2 Edge 中使用 HTTPS 的加密应用程序和使用 HTTP 的未加密应用程序。使用 HTTPS 可以保护您的应用程序不被攻击者查看或篡改。

The reality is that these days, you should always serve your production websites over HTTPS. The industry is pushing toward HTTPS by default, with most browsers marking HTTP sites as explicitly not secure. Skipping HTTPS will hurt the perception of your app in the long run, so even if you’re not interested in the security benefits, it’s in your best interest to set up HTTPS.
现实情况是,如今,您应该始终通过 HTTPS 为您的生产网站提供服务。默认情况下,该行业正在推动 HTTPS,大多数浏览器将 HTTP 站点标记为明确不安全。从长远来看,跳过 HTTPS 会损害您的应用程序的看法,因此即使您对安全优势不感兴趣,设置 HTTPS 也符合您的最佳利益。

TIP You can find a good cheat sheet for HTTPS by OWASP at http://mng.bz/PzxY. ASP.NET Core takes care of most of the points in this list for you, but there are some important ones in the Application section specifically.
提示:您可以在 http://mng.bz/PzxY 上找到 OWASP 的 HTTPS 优秀备忘单。ASP.NET Core 为您处理了此列表中的大部分要点,但 Application (应用程序) 部分中还有一些重要的要点。

Another reason to support HTTPS is that many browser features are available only when your site is served over HTTPS. Some of these features are JavaScript browser APIs, such as location APIs, microphone APIs, and storage APIs. These are available only over HTTPS to protect users from attackers that could modify insecure HTTP requests. Other features apply to server-side apps too, such as Brotli compression and HTTP/2 support.
支持 HTTPS 的另一个原因是,许多浏览器功能仅在您的网站通过 HTTPS 提供服务时可用。其中一些功能是 JavaScript 浏览器 API,例如位置 API、麦克风 API 和存储 API。这些选项仅通过 HTTPS 提供,以保护用户免受可能修改不安全 HTTP 请求的攻击者的攻击。其他功能也适用于服务器端应用程序,例如 Brotli 压缩和 HTTP/2 支持。

TIP For details on how the SSL/TLS protocols work, see chapter 9 of Real-World Cryptography, by David Wong (Manning, 2021), http://mng.bz/zxz1.
提示:有关 SSL/TLS 协议如何工作的详细信息,请参阅 David Wong (Manning, 2021) http://mng.bz/zxz1 合著的《真实世界密码学》第 9 章。

To enable HTTPS, you need to obtain and configure a TLS certificate for your server. Unfortunately, although that process is a lot easier than it used to be and is now essentially free thanks to Let’s Encrypt (https://letsencrypt.org), it’s still far from simple in many cases. If you’re setting up a production server, I recommend carefully following the tutorials on the Let’s Encrypt site. It’s easy to get it wrong, so take your time.
要启用 HTTPS,您需要为您的服务器获取并配置 TLS 证书。不幸的是,尽管这个过程比以前容易得多,并且现在由于 Let's Encrypt (https://letsencrypt.org) 而基本上是免费的,但在许多情况下,它仍然远非简单。如果您正在设置生产服务器,我建议您仔细按照 Let's Encrypt 站点上的教程进行作。很容易出错,所以要慢慢来。

TIP If you’re hosting your app in the cloud, most providers will provide one-click TLS certificates so that you don’t have to manage certificates yourself. This is extremely useful, and I highly recommend it for everyone. You don’t even have to host your application in the cloud to take advantage of this. Cloudflare (https://www.cloudflare.com) provides a CDN service that you can add TLS to. You can even use it for free.
提示:如果您在云中托管应用程序,大多数提供商将提供一键式 TLS 证书,这样您就不必自己管理证书。这非常有用,我强烈推荐给大家。您甚至不必在云中托管您的应用程序即可利用这一点。Cloudflare (https://www.cloudflare.com) 提供 CDN 服务,您可以将 TLS 添加到该服务中。您甚至可以免费使用它。

As an ASP.NET Core application developer, you can often get away without directly supporting HTTPS in your app by taking advantage of the reverse-proxy architecture, as shown in figure 28.3, in a process called SSL/TLS offloading/termination. This is generally standard in Platform as a Service (PaaS) cloud services, such as Azure App Service.
作为 ASP.NET Core 应用程序开发人员,您通常可以通过利用反向代理架构(如图 28.3 所示)在称为 SSL/TLS 卸载/终止的过程中,无需直接在应用程序中支持 HTTPS。这通常是平台即服务 (PaaS) 云服务(如 Azure 应用服务)中的标准。

alt text

Figure 28.3 You have two options when using HTTPS with a reverse proxy: SSL/TLS passthrough and SSL/TLS offloading. In SSL/TLS passthrough, the data is encrypted all the way to your ASP.NET Core app. For SSL/TLS offloading, the reverse proxy handles decrypting the data, so your app doesn’t have to.
图 28.3 将 HTTPS 与反向代理一起使用时,您有两个选项:SSL/TLS 直通和 SSL/TLS 卸载。在 SSL/TLS 直通中,数据会一直加密到 ASP.NET Core 应用程序。对于 SSL/TLS 卸载,反向代理会处理解密数据,因此您的应用不必这样做。

With SSL/TLS offloading, instead of your application handling requests using HTTPS directly, your app continues to use HTTP. The reverse proxy is responsible for encrypting and decrypting HTTPS traffic to the browser. This often gives you the best of both worlds: data is encrypted between the user’s browser and the server, but you don’t have to worry about configuring certificates in your application.
使用 SSL/TLS 卸载时,您的应用将继续使用 HTTP,而不是直接使用 HTTPS 处理请求。反向代理负责加密和解密到浏览器的 HTTPS 流量。这通常可以为您提供两全其美的效果:数据在用户的浏览器和服务器之间加密,但您不必担心在应用程序中配置证书。

NOTE If you’re concerned that the traffic is unencrypted between the reverse proxy and your app, I recommend reading Troy Hunt’s post “CloudFlare, SSL and unhealthy security absolutism”: http://mng.bz/eHCi. It discusses the pros and cons of the problem as it relates to decrypting on the reverse proxy and why you must consider the most likely attacks on your website, in a process called threat modeling.
注意:如果您担心反向代理和您的应用程序之间的流量未加密,我建议您阅读 Troy Hunt 的博文“CloudFlare、SSL 和不健康的安全绝对主义”:http://mng.bz/eHCi。它讨论了与反向代理解密相关的问题的利弊,以及为什么您必须在称为威胁建模的过程中考虑最有可能对您网站的攻击

Depending on the specific infrastructure where you’re hosting your app, SSL/TLS could be offloaded to a dedicated device on your network, a third-party service like Cloudflare, or a reverse proxy (such as Internet Information Services [IIS], NGINX, or HAProxy) running on the same or a different server. Nevertheless, in some situations, you may need to handle SSL/TLS directly in your app:
根据您托管应用程序的特定基础设施,SSL/TLS 可以卸载到您网络上的专用设备、第三方服务(如 Cloudflare)或反向代理(如 Internet Information Services [IIS]、NGINX 或 HAProxy)在相同或不同的服务器上运行。不过,在某些情况下,您可能需要直接在应用程序中处理 SSL/TLS:

• If you’re exposing Kestrel to the internet directly, without a reverse proxy—This is a supported approach since ASP.NET Core 3.0, and can give high performance. It is also often the case when you’re developing your app locally.
如果您将 Kestrel 直接暴露在 Internet 上,而不使用反向代理 - 这是自 ASP.NET Core 3.0 以来受支持的方法,并且可以提供高性能。在本地开发应用程序时,也经常会出现这种情况。

• If having HTTP between the reverse proxy and your app is not acceptable—While securing traffic inside your network is less critical compared with external traffic, it is undoubtedly more secure to use HTTPS for internal traffic too. This may be a hard requirement for some applications or sectors.
如果不能接受在反向代理和应用程序之间使用 HTTP – 虽然与外部流量相比,保护网络内部流量不那么重要,但对内部流量使用 HTTPS 无疑也更安全。对于某些应用程序或部门来说,这可能是一个硬性要求。

• If you’re using technology that requires HTTPS—Some newer network protocols, such as gRPC and HTTP/2, generally require an end-to-end HTTPS connection.
如果使用需要 HTTPS 的技术 - 某些较新的网络协议 (如 gRPC 和 HTTP/2) 通常需要端到端 HTTPS 连接。

In each of these scenarios, you’ll need to configure a TLS certificate for your application so Kestrel can receive HTTPS traffic. In section 28.2 you’ll see the easiest way to get started with HTTPS when developing locally, using the ASP.NET Core development certificate.
在上述每种情况下,您都需要为应用程序配置 TLS 证书,以便 Kestrel 可以接收 HTTPS 流量。在 Section 28.2 中,您将看到在本地开发时使用 ASP.NET Core 开发证书开始使用 HTTPS 的最简单方法。

28.2 Using the ASP.NET Core HTTPS development certificates

28.2 使用 ASP.NET Core HTTPS 开发证书

Working with HTTPS certificates is easier than it used to be, but unfortunately it can still be a confusing topic, especially if you’re a newcomer to the web. In this section you’ll learn how the .NET software development kit (SDK), Visual Studio, and IIS Express try to improve this experience by handling a lot of the grunt work for you, and what to do when things go wrong.
使用 HTTPS 证书比以前更容易,但不幸的是,它仍然是一个令人困惑的话题,尤其是如果您是 Web 新手。在本节中,您将了解 .NET 软件开发工具包 (SDK)、Visual Studio 和 IIS Express 如何通过为您处理大量繁重的工作来尝试改善这种体验,以及出现问题时该怎么做。

The first time you run a dotnet command using the .NET SDK, the SDK installs an HTTPS development certificate on your machine. Any ASP.NET Core application you create using the default templates (or for which you don’t explicitly configure certificates) will use this development certificate to handle HTTPS traffic. However, the development certificate is not trusted by default. If you access a site that’s using an untrusted certificate, you’ll get a browser warning, as shown in figure 28.4.
首次使用 .NET SDK 运行 dotnet 命令时,SDK 会在计算机上安装 HTTPS 开发证书。您使用默认模板(或未为其明确配置证书)创建的任何 ASP.NET Core 应用程序都将使用此开发证书来处理 HTTPS 流量。但是,默认情况下,开发证书不受信任。如果您访问的站点使用不受信任的证书,您将收到浏览器警告,如图 28.4 所示。

alt text

Figure 28.4 The developer certificate is not trusted by default, so apps serving HTTPS traffic using it will be marked as insecure by browsers. Although you can bypass the warnings if necessary, you should instead update the certificate to be trusted.
图 28.4 默认情况下,开发者证书不受信任,因此使用该证书提供 HTTPS 流量的应用程序将被浏览器标记为不安全。尽管您可以根据需要绕过警告,但您应该更新要信任的证书。

A brief primer on certificates and signing
证书和签名

HTTPS uses public key cryptography as part of the data-encryption process. This uses two keys: a public key that anyone can see and a private key that only your server can see. Anything encrypted with the public key can be decrypted only with the private key. That way, a browser can encrypt something with your server’s public key, and only your server can decrypt it. A complete TLS certificate consists of both the public and private parts.
HTTPS 的简要入门使用公钥加密作为数据加密过程的一部分。这使用两个密钥:任何人都可以看到的公钥和只有您的服务器可以看到的私钥。使用公钥加密的任何内容都只能使用私钥解密。这样,浏览器可以使用您服务器的公钥加密某些内容,并且只有您的服务器可以解密它。完整的 TLS 证书由公有部分和私有部分组成。

When a browser connects to your app, the server sends the public key part of the TLS certificate. But how does the browser know that it was definitely your server that sent the certificate? To achieve this, your TLS certificate contains additional certificates, including one or more certificates from a third party, a certificate authority (CA). At the end of the certificate chain is the root certificate.
当浏览器连接到您的应用时,服务器会发送 TLS 证书的公钥部分。但是浏览器如何知道发送证书的绝对是您的服务器呢?为此,您的 TLS 证书包含其他证书,包括来自第三方(证书颁发机构 (CA))的一个或多个证书。证书链的末尾是根证书。

CAs are special trusted entities, and browsers are hardcoded to trust specific root certificates. For the TLS certificate for your app to be trusted, it must contain (or be signed by) a trusted root certificate. Browsers periodically update their internal list of root certificates and revoke root certificates that can no longer be trusted.
CA 是特殊的受信任实体,浏览器被硬编码为信任特定的根证书。要使应用的 TLS 证书受信任,它必须包含受信任的根证书(或由其签名)。浏览器会定期更新其内部根证书列表,并吊销不再受信任的根证书。

When you use the ASP.NET Core development certificate, or if you create your own self-signed certificate, your site’s HTTPS is missing that trusted root certificate. That means browsers won’t trust your certificate and won’t connect to your server by default. To get around this, you need to tell your development machine to explicitly trust the certificate.
当您使用 ASP.NET Core 开发证书时,或者如果您创建自己的自签名证书,则站点的 HTTPS 缺少该受信任的根证书。这意味着浏览器不会信任您的证书,默认情况下不会连接到您的服务器。要解决此问题,您需要告诉开发计算机显式信任该证书。

In production, you can’t use a development or self-signed certificate, as a user’s browser won’t trust it. Instead, you need to obtain a signed HTTPS certificate from a service like Let’s Encrypt or from a cloud provider like AWS, Azure, or Cloudflare. These certificates are already signed by a trusted CA, so they are automatically trusted by browsers.
在生产环境中,您不能使用开发证书或自签名证书,因为用户的浏览器不会信任它。相反,您需要从 Let's Encrypt 等服务或 AWS、Azure 或 Cloudflare 等云提供商处获取签名的 HTTPS 证书。这些证书已由受信任的 CA 签名,因此浏览器会自动信任它们。

To solve these browser warnings, you need to trust the certificate. Trusting a certificate is a sensitive operation; it’s saying “I know this certificate doesn’t look quite right, but ignore that,” so it’s hard to do automatically. If you’re running on Windows or macOS, you can trust the development certificate by running
要解决这些浏览器警告,您需要信任该证书。信任证书是一项敏感作;它说“我知道这个证书看起来不太对劲,但请忽略它”,所以很难自动完成。如果您在 Windows 或 macOS 上运行,则可以通过在 Windows 或 macOS 上运行

dotnet dev-certs https --trust

This command trusts the certificate by registering it in the operating system’s certificate store. After you run this command, you should be able to access your websites without seeing any warnings or “not secure” labels, as shown in figure 28.5.
此命令通过在作系统的证书存储中注册证书来信任证书。运行此命令后,您应该能够访问您的网站,而不会看到任何警告或 “not secure” 标签,如图 28.5 所示。

alt text

Figure 28.5 Once the development certificate is trusted, you will no longer see browser warnings about the connection.
图 28.5 一旦开发证书被信任,您将不再看到有关连接的浏览器警告。

TIP You may need to close your browser after trusting the certificate to clear the browser’s cache.
提示:您可能需要在信任证书后关闭浏览器以清除浏览器的缓存。

If you’re using Windows, Visual Studio, and IIS Express for development, then you might not need to explicitly trust the development certificate. IIS Express acts as a reverse proxy when you’re developing locally, so it handles the SSL/TLS setup itself. On top of that, Visual Studio should trust the IIS development certificate as part of installation, so you may never see the browser warnings at all.
如果您使用 Windows、Visual Studio 和 IIS Express 进行开发,则可能不需要显式信任开发证书。在本地开发时,IIS Express 充当反向代理,因此它会自行处理 SSL/TLS 设置。最重要的是,Visual Studio 应该信任 IIS 开发证书作为安装的一部分,因此您可能根本看不到浏览器警告。

TIP In macOS, before .NET 7, you would have to retrust the developer certificate repeatedly for every new app. In .NET 7, the process is a lot smoother, so you shouldn’t have to retrust it anything like as often!
提示:在 macOS 中,在 .NET 7 之前,您必须为每个新应用程序反复重新信任开发人员证书。在 .NET 7 中,该过程要顺畅得多,因此您不必像以前那样经常重新信任它!

Trusting the developer certificate works smoothly in Windows and macOS, in most cases. Unfortunately, trusting the certificate in Linux is a little trickier and depends on the specific flavor of Linux you’re using. On top of that, software in Linux often uses its own certificate store, so you’ll probably need to add the certificate directly to your favorite browser. If you’re using any of the following scenarios, you’ll need to do more work:
在大多数情况下,信任开发人员证书在 Windows 和 macOS 中可以顺利运行。不幸的是,在 Linux 中信任证书有点棘手,具体取决于您使用的 Linux 的特定风格。最重要的是,Linux 中的软件通常使用自己的证书存储,因此您可能需要将证书直接添加到您最喜欢的浏览器中。如果您使用的是以下任何方案,则需要执行更多工作:

• Firefox browser in Windows, macOS, or Linux
• Edge or Chrome browsers in Linux
• API-to-API communication in Linux
• An app running in Windows Subsystem for Linux (WSL)
• Running applications in Docker

Each of these scenarios requires a slightly different approach. In many cases it’s one or two commands, so I suggest following the documentation for your scenario carefully at http://mng.bz/JglK.
这些方案中的每一种都需要略有不同的方法。在许多情况下,它只有一个或两个命令,因此我建议您在 http://mng.bz/JglK 中仔细遵循适用于您的方案的文档。

TIP If you’ve tried trusting the certificate, and your app is still giving errors, try closing all your browser windows and running dotnet dev-certs https --clean followed by dotnet dev-certs https --trust. Browsers cache certificate trust, so the close and open step is important!
提示:如果已尝试信任证书,但应用仍然提供错误,请尝试关闭所有浏览器窗口并运行 dotnet dev-certs https --clean,然后运行 dotnet dev-certs https --trust。浏览器会缓存证书信任,因此关闭和打开步骤很重要!

The ASP.NET Core and IIS development certificates make it easy to use Kestrel with HTTPS locally, but those certificates won’t help once you move to production. In the next section I show how to configure Kestrel to use a production TLS certificate.
ASP.NET Core 和 IIS 开发证书使在本地使用 Kestrel 和 HTTPS 变得容易,但一旦您迁移到生产环境,这些证书将无济于事。在下一节中,我将介绍如何配置 Kestrel 以使用生产 TLS 证书。

28.3 Configuring Kestrel with a production HTTPS certificate

28.3 使用生产 HTTPS 证书配置 Kestrel

Creating a TLS certificate for production is often a laborious process, as it requires proving to a third-party CA that you own the domain you’re creating the certificate for. This is an important step in the trust process and ensures that attackers can’t impersonate your servers. The result of the process is one or more files, which is the HTTPS certificate you need to configure for your app.
创建用于生产的 TLS 证书通常是一个费力的过程,因为它需要向第三方 CA 证明您拥有要为其创建证书的域。这是信任过程中的一个重要步骤,可确保攻击者无法模拟您的服务器。该过程的结果是一个或多个文件,这是您需要为应用程序配置的 HTTPS 证书。

TIP The specifics of how to obtain a certificate vary by provider and by your OS platform, so follow your provider’s documentation carefully. The vagaries and complexities of this process are one of the reasons I strongly favor the SSL/TLS-offloading or “one-click” approaches described previously. Those approaches mean my apps don’t need to deal with certificates, and I don’t need to use the approaches described in this section; I delegate that responsibility to another piece of the network, or to the underlying platform.
提示:如何获取证书的具体内容因提供商和 OS 平台而异,因此请仔细遵循提供商的文档。此过程的变幻莫测和复杂性是我强烈支持前面描述的 SSL/TLS 卸载或“一键式”方法的原因之一。这些方法意味着我的应用程序不需要处理证书,也不需要使用本节中描述的方法;我将该责任委托给网络的另一个部分或底层平台。

Once you have a certificate, you need to configure Kestrel to use it to serve HTTPS traffic. In chapter 27 you saw how to set the port your application listens on with the ASPNETCORE_URLS environment variable or via the command line, and you saw that you could provide an HTTPS URL. As you didn’t provide any certificate configuration, Kestrel used the development certificate by default. In production you need to tell Kestrel which certificate to use.
获得证书后,您需要配置 Kestrel 以使用它来提供 HTTPS 流量。在第 27 章中,您了解了如何使用 ASPNETCORE_URLS 环境变量或通过命令行设置应用程序侦听的端口,并且您还了解了可以提供 HTTPS URL。由于您未提供任何证书配置,因此 Kestrel 默认使用开发证书。在生产环境中,您需要告诉 Kestrel 要使用哪个证书。

You can configure the certificates Kestrel uses in multiple ways. For a start, you can load the certificate from multiple locations: from a .pfx file, from .pem/.crt and .key files, or from the OS certificate store. You can also use different certificates for different ports, use a different configuration for each URL endpoint you expose, or configure Server Name Indication (SNI). For full details, see the “Replace the default certificate from configuration” section of Microsoft’s “Configure endpoints for the ASP.NET Core Kestrel web server” documentation: http://mng.bz/wvv2.
您可以通过多种方式配置 Kestrel 使用的证书。首先,您可以从多个位置加载证书:从 .pfx 文件、从 .pem/.crt 和 .key 文件或从 OS 证书存储。您还可以对不同的端口使用不同的证书,对您公开的每个 URL 终端节点使用不同的配置,或配置服务器名称指示 (SNI)。有关完整详细信息,请参阅 Microsoft 的“为 ASP.NET Core Kestrel Web 服务器配置端点”文档的“从配置中替换默认证书”部分:http://mng.bz/wvv2

The following listing shows one possible way to set a custom HTTPS certificate for your production app by configuring the default certificate Kestrel uses for HTTPS connections. You can add the “Kestrel:Certificates:Default” section to your appsettings.json file (or use any other configuration source, as described in chapter 10) to define the .pfx file of the certificate to use. You must also provide the password for accessing the certificate.
以下清单显示了一种可能的方法,即通过配置 Kestrel 用于 HTTPS 连接的默认证书来为生产应用程序设置自定义 HTTPS 证书。您可以将 “Kestrel:Certificates:Default” 部分添加到您的 appsettings.json 文件中(或使用任何其他配置源,如第 10 章所述)来定义要使用的证书的 .pfx 文件。您还必须提供用于访问证书的密码。

Listing 28.1 Configuring the default HTTPS certificate for Kestrel using a .pfx file
清单 28.1 使用 .pfx 文件为 Kestrel 配置默认 HTTPS 证书

{
  “Kestrel”: {             #A
    “Certificates”: {      #A
      “Default”: {         #A
        “Path”: “localhost.pfx”,     #B
        “Password”: “testpassword”   #C
      }
    }
  }
}

❶ Creates a configuration section at Kestrel:Certificates:Default
在 Kestrel创建配置部分:Certificates:Default

❷ The relative or absolute path to the certificate
证书的相对或绝对路径

❸ The password for opening the certificate
打开证书的密码

The preceding example is the simplest way to replace the HTTPS certificate, as it doesn’t require changing any of Kestrel’s defaults. You can use a similar approach to load the HTTPS certificate from the OS certificate store (Windows or macOS), as shown in the “Replace the default certificate from configuration” documentation mentioned previously (http://mng.bz/wvv2).
前面的示例是替换 HTTPS 证书的最简单方法,因为它不需要更改 Kestrel 的任何默认值。您可以使用类似的方法从作系统证书存储区(Windows 或 macOS)加载 HTTPS 证书,如前面提到的“从配置中替换默认证书”文档 (http://mng.bz/wvv2) 中所示。

WARNING Listing 28.1 hardcoded the certificate filename and password for demonstration, but you should never do this in production. Either load these from a configuration store like user-secrets, as you saw in chapter 10, or load the certificate from the local store. Never put production passwords in your appsettings.json files.
警告:Listing 28.1 对证书文件名和密码进行了硬编码以进行演示,但是您永远不应该在 production 中这样做。如第 10 章所示,从配置存储(如 user-secrets)加载这些证书,或者从本地存储加载证书。切勿将生产密码放入 appsettings.json 文件中。

All the default ASP.NET Core templates configure your application to serve both HTTP and HTTPS traffic, and with the configuration you’ve seen so far, you can ensure that your application can handle both HTTP and HTTPS in development and in production.
所有默认的 ASP.NET Core 模板都将您的应用程序配置为同时提供 HTTP 和 HTTPS 流量,并且使用您目前看到的配置,您可以确保您的应用程序可以在开发和生产中同时处理 HTTP 和 HTTPS。

However, whether you use HTTP or HTTPS may depend on the URL users click when they first browse to your app. For example, imagine you have an app that listens using the default ASP.NET Core URLs: http://localhost:5000 for HTTP traffic and https://localhost:5001 for HTTPS traffic. The HTTPS endpoint is available, but if a user doesn’t know that and uses the HTTP URL (the default option in browsers), their traffic is unencrypted. Seeing as you’ve gone to all the trouble to set up HTTPS, it’s probably best that you force users to use it.
但是,您使用的是 HTTP 还是 HTTPS 可能取决于用户首次浏览到您的应用程序时单击的 URL。例如,假设您有一个应用程序使用默认的 ASP.NET 核心网址进行监听:http://localhost:5000 用于 HTTP 流量,https://localhost:5001 用于 HTTPS 流量。HTTPS 终端节点可用,但如果用户不知道并使用 HTTP URL(浏览器中的默认选项),则其流量将未加密。鉴于您已经费尽心思设置 HTTPS,最好强制用户使用它。

28.4 Enforcing HTTPS for your whole app

28.4 为整个应用程序强制执行 HTTPS

Enforcing HTTPS across your whole website is practically required these days. Browsers are beginning to explicitly label HTTP pages as insecure; for security reasons, you must use TLS any time you’re transmitting sensitive data across the internet. Additionally, thanks to HTTP/2 (and the upcoming HTTP/3), adding TLS can improve your app’s performance. In this section you’ll learn three techniques for enforcing HTTPS in your application.
如今,在整个网站上强制实施 HTTPS 实际上是必要的。浏览器开始明确地将 HTTP 页面标记为不安全;出于安全原因,您在通过 Internet 传输敏感数据时必须使用 TLS。此外,得益于 HTTP/2(以及即将推出的 HTTP/3),添加 TLS 可以提高应用程序的性能。在本节中,您将学习在应用程序中强制实施 HTTPS 的三种技术。

TIP HTTP/2 offers many performance improvements over HTTP/1.x, and all modern browsers require HTTPS to enable it. For a great introduction to HTTP/2, see Google’s “Introduction to HTTP/2” at http://mng.bz/9M8j. ASP.NET Core even includes support for HTTP/3, the next version of the protocol! You can read about HTTP/3 at http://mng.bz/qrrJ.
提示HTTP/2 提供了许多优于 HTTP/1.x 的性能改进,所有现代浏览器都需要 HTTPS 才能启用它。有关 HTTP/2 的精彩介绍,请参阅 Google 的“HTTP/2 简介”,网址为 http://mng.bz/9M8j。ASP.NET Core 甚至包括对 HTTP/3 的支持,这是该协议的下一个版本!您可以在 http://mng.bz/qrrJ 上阅读有关 HTTP/3 的信息。

There are multiple approaches to enforcing HTTPS for your application. If you’re using a reverse proxy with SSL/TLS-offloading, it might be handled for you anyway, without your having to worry about it within your apps. If that’s the case, you may be able to disregard some of the steps in this section.
有多种方法可以为您的应用程序强制实施 HTTPS。如果您使用的是具有 SSL/TLS 卸载功能的反向代理,则它可能无论如何都会为您处理,而无需您在应用程序中担心它。如果是这种情况,您可以忽略本节中的某些步骤。

WARNING If you’re building a web API rather than a Razor Pages app, it’s common to reject insecure HTTP requests entirely. You’ll see this approach in section 28.4.3.
警告:如果要构建 Web API 而不是 Razor Pages 应用,则通常会完全拒绝不安全的 HTTP 请求。您将在 Section 28.4.3 中看到这种方法。

One approach to improving the security of your app is to use HTTP security headers. These are HTTP headers sent as part of your HTTP response that tell the browser how it should behave. There are many headers available, most of which restrict the features your app can use in exchange for increased security. In chapter 30 you’ll see how to add your own custom headers to your HTTP responses by creating custom middleware.
提高应用程序安全性的一种方法是使用 HTTP 安全标头。这些是作为 HTTP 响应的一部分发送的 HTTP 标头,用于告诉浏览器它应该如何运行。有许多可用的标头,其中大多数都限制了您的应用程序可以使用的功能,以换取更高的安全性。在第 30 章中,您将看到如何通过创建自定义中间件将自己的自定义标头添加到 HTTP 响应中。

TIP Scott Helme has some great guidance on this and other security headers you can add to your site, such as the Content Security Policy (CSP) header. See “Hardening your HTTP response headers” on his website at http://mng.bz/7DDe.
提示:Scott Helme 对此标头以及您可以添加到站点中的其他安全标头提供了一些很好的指导,例如内容安全策略 (CSP) 标头。请参阅其网站上的“强化 HTTP 响应标头”,网址为 http://mng.bz/7DDe

One of these security headers, the HTTP Strict Transport Security (HSTS) header, can help ensure that browsers use HTTPS where it’s available instead of defaulting to HTTP.
其中一个安全标头,即 HTTP 严格传输安全 (HSTS) 标头,可以帮助确保浏览器在可用的情况下使用 HTTPS,而不是默认使用 HTTP。

28.4.1 Enforcing HTTPS with HTTP Strict Transport Security headers

28.4.1 使用 HTTP 严格传输安全标头强制执行 HTTPS

It’s unfortunate, but by default, browsers load apps over HTTP unless otherwise specified. That means your apps must typically support both HTTP and HTTPS, even if you don’t want to serve any traffic over HTTP, as shown in figure 28.6. On top of that, if the initial request is over HTTP, the browser may end up sending subsequent requests over HTTP too.
很遗憾,但默认情况下,除非另有说明,否则浏览器会通过 HTTP 加载应用程序。这意味着您的应用程序通常必须同时支持 HTTP 和 HTTPS,即使您不想通过 HTTP 提供任何流量,如图 28.6 所示。最重要的是,如果初始请求是通过 HTTP 发送的,浏览器最终也可能通过 HTTP 发送后续请求。

alt text

Figure 28.6 When you type in a URL, browsers load the app over HTTP by default. Depending on the links returned by your app or the URLs entered, the browser may make HTTP or HTTPS requests.
图 28.6 当您键入 URL 时,浏览器默认通过 HTTP 加载应用程序。根据应用程序返回的链接或输入的 URL,浏览器可能会发出 HTTP 或 HTTPS 请求。

One partial mitigation (and a security best practice) is to add HTTP Strict Transport Security headers to your responses.
一种部分缓解措施(也是安全最佳实践)是将 HTTP Strict Transport Security 标头添加到您的响应中。

DEFINITION HTTP Strict Transport Security (HSTS) is a specification (https://www.rfc-editor.org/rfc/rfc6797) for the Strict-Transport-Security header that instructs the browser to use HTTPS for all subsequent requests to your application. The HSTS header can be sent only with responses to HTTPS requests. It is also relevant only for requests originating from a browser; it has no effect on server-to-server communication or on mobile apps.
定义:HTTP 严格传输安全 (HSTS) 是 Strict-Transport-Security 标头的规范 (https://www.rfc-editor.org/rfc/rfc6797),它指示浏览器对应用程序的所有后续请求使用 HTTPS。HSTS 标头只能与对 HTTPS 请求的响应一起发送。它也仅与来自浏览器的请求相关;它对服务器到服务器的通信或移动应用程序没有影响。

After a browser receives a valid HSTS header, the browser stops sending HTTP requests to your app and uses only HTTPS instead, as shown in figure 28.7. Even if your app has an http:// link or the user enters http:// in the URL bar of the app, the browser automatically replaces the request with an https:// version.
在浏览器收到有效的 HSTS 标头后,浏览器将停止向您的应用程序发送 HTTP 请求,并仅使用 HTTPS,如图 28.7 所示。即使您的应用程序具有 http:// 链接或用户在应用程序的 URL 栏中输入 http://,浏览器也会自动将请求替换为 https:// 版本。

alt text

Figure 28.7 After a browser sends an HTTPS request, the app returns an HSTS header, instructing the browser to always send requests over HTTPS. The next time the user attempts to make an http:// request, the browser aborts the request and makes an https:// request instead.
图 28.7 浏览器发送 HTTPS 请求后,应用程序返回 HSTS 标头,指示浏览器始终通过 HTTPS 发送请求。下次用户尝试发出 http:// 请求时,浏览器会中止该请求并改为发出 https:// 请求。

TIP You can achieve a similar upgrading of HTTP to HTTPS requests using the Upgrade-Insecure-Requests directive in the Content-Security-Policy (CSP) header. This provides fewer protections than the HSTS header but can be used in combination with it. For more details on this directive and CSP in general, see http://mng.bz/mVV4.
提示:您可以使用 Content-Security-Policy (CSP) 标头中的 Upgrade-Insecure-Requests 指令实现从 HTTP 到 HTTPS 请求的类似升级。这提供的保护比 HSTS 标头少,但可以与之结合使用。有关此指令和 CSP 的更多详细信息,请参阅 http://mng.bz/mVV4

HSTS headers are strongly recommended for production apps. You generally don’t want to enable them for local development, as that would mean you could never run a non-HTTPS app locally. In a similar fashion, you should use HSTS only on sites for which you always intend to use HTTPS, as it’s hard (sometimes impossible) to turn off HTTPS once it’s enforced with HSTS.
强烈建议将 HSTS 标头用于生产应用程序。您通常不希望为本地开发启用它们,因为这意味着您永远无法在本地运行非 HTTPS 应用程序。以类似的方式,您应该仅在您始终打算使用 HTTPS 的站点上使用 HSTS,因为一旦使用 HSTS 强制实施 HTTPS,就很难(有时不可能)关闭 HTTPS。

ASP.NET Core comes with built-in middleware for setting HSTS headers, which is included in some of the default templates automatically. The following listing shows how you can configure the HSTS headers for your application using the HstsMiddleware in Program.cs.
ASP.NET Core 附带用于设置 HSTS 标头的内置中间件,该中间件自动包含在一些默认模板中。下面的清单显示了如何使用 Program.cs 中的 HstsMiddleware 为应用程序配置 HSTS 头文件。

Listing 28.2 Using HstsMiddleware to add HSTS headers to an application
Listing 28.2 使用 HstsMiddleware 向应用程序添加 HSTS 头文件

WebApplicationBuilder builder = WebApplication.CreateBuilder(args);

builder.Services.AddRazorPages();
builder.Services.AddHsts(options =>    #A
{    #A
    options.MaxAge = TimeSpan.FromHours(1);    #A
});    #A

WebApplication app = builder.Build();

if(app.Environment.IsProduction())  #B
{
    app.UseHsts();    #C
}

app.UseStaticFiles();
app.UseRouting();

app.MapRazorPages();

app.Run();

❶ Configures your HSTS header settings and changes the MaxAge from the default of 30 days
配置您的 HSTS 标头设置并将 MaxAge 从默认的更改为 30 天

❷ You shouldn’t use HSTS in local environments.
您不应在本地环境中使用 HSTS。

❸ Adds the HstsMiddleware
新增 HstsMiddleware

The preceding example shows how to change the MaxAge sent in the HSTS header. It’s a good idea to start with a small value initially. Once you’re sure your app’s HTTPS is functioning correctly, you can increase the age for greater security. A typical value for production deployments is one year.
前面的示例显示了如何更改 HSTS 标头中发送的 MaxAge。最好先从较小的值开始。确定应用的 HTTPS 正常运行后,您可以提高使用期限以提高安全性。生产部署的典型值为一年。

WARNING Once client browsers have received the HSTS header, browsers will default to using HTTPS for all requests to your application. That means you must commit to always using HTTPS for as long as you set MaxAge. If you disable HTTPS, browsers will not revert to using HTTP until this duration has expired, so your application may be inaccessible until then if you aren’t listening on HTTPS! You can notify the browser that your app no longer supports HSTS by setting MaxAge to 0.
警告:客户端浏览器收到 HSTS 标头后,浏览器将默认对应用程序的所有请求使用 HTTPS。这意味着,只要您设置了 MaxAge,就必须承诺始终使用 HTTPS。如果您禁用 HTTPS,浏览器在此持续时间到期之前不会恢复为使用 HTTP,因此如果您不监听 HTTPS,您的应用程序在此之前可能无法访问!您可以通过将 MaxAge 设置为 0 来通知浏览器您的应用程序不再支持 HSTS。

One limitation with the HSTS header is that you must make an initial request over HTTPS before you can receive the header. If the browser makes only HTTP requests, the app never has a chance to send the HSTS header, so the browser never knows to use HTTPS. One potential solution is called HSTS preload.
HSTS 标头的一个限制是,必须先通过 HTTPS 发出初始请求,然后才能接收标头。如果浏览器仅发出 HTTP 请求,则应用程序永远没有机会发送 HSTS 标头,因此浏览器永远不知道使用 HTTPS。一种可能的解决方案称为 HSTS 预加载。

HSTS preload isn’t part of the HSTS specification, but it’s supported by all modern browsers. Preload bakes your HSTS header into the browser so that the browser knows it should make only HTTPS requests to your site. That removes the “first request” problem entirely, but be aware that HSTS preload commits you to HTTPS forever, as it can’t easily be undone.
HSTS 预加载不是 HSTS 规范的一部分,但所有现代浏览器都支持它。Preload 将您的 HSTS 标头烘焙到浏览器中,以便浏览器知道它应该只向您的网站发出 HTTPS 请求。这完全消除了“第一个请求”问题,但请注意,HSTS 预加载会永久提交您到 HTTPS,因为它不能轻易撤消。

Once you’re comfortable with your application’s HTTPS configuration, you can prepare your app for HSTS preload by configuring an HSTS header that
一旦您对应用程序的 HTTPS 配置感到满意,就可以通过配置 HSTS 标头来为 HSTS 预加载准备应用程序,该标头

• Has a MaxAge of at least one year, though two years are recommended
MaxAge 至少为一年,但建议为两年

• Has the includeSubDomains directive
具有 includeSubDomains 指令

• Has the preload directive
具有 preload 指令

Listing 28.3 shows how you can configure these directives in your app. The listing also shows how to exclude the domain never-https.com so that if you host your app at this domain, HSTS headers won’t be sent. This can be useful for testing purposes.
清单 28.3 展示了如何在应用程序中配置这些指令。该清单还显示了如何排除域 never-https.com,以便在此域中托管应用程序时,不会发送 HSTS 标头。这对于测试目的非常有用。

Listing 28.3 Configuring the application HSTS header for preload
清单 28.3 配置应用程序 HSTS 头文件以进行预加载

builder.Services.AddHsts(options =>
{
    options.Preload = true;    #A
    options.IncludeSubDomains = true;    #B
    options.MaxAge = TimeSpan.FromDays(365);    #C
    options.ExcludedHosts.Add("never-https.com");    #D
});

❶ Sends the preload directive
发送 preload 指令

❷ Sends the includeSubDomains directive
发送 includeSubDomains 指令

❸ You must use a max-age directive of at least one year.
您必须使用至少一年的 max-age 指令。

❹ Don’t send the HSTS header in responses to requests for this domain.
不要发送 HSTS 标头来响应此域的请求。

Once you’ve prepared your application for HSTS preload, you can submit your app for inclusion in the HSTS preload list that ships with modern browsers. Visit the site https://hstspreload.org, confirm that your application meets the requirements, and submit your domain. If all goes well, your domain will be included in a future release of all modern browsers!
为 HSTS 预加载准备应用程序后,您可以提交应用程序以包含在现代浏览器附带的 HSTS 预加载列表中。https://hstspreload.org 访问网站,确认您的申请符合要求,然后提交您的域。如果一切顺利,您的域将包含在所有现代浏览器的未来版本中!

TIP For more details on HSTS and attacks it can mitigate, see Scott Helme’s article “HSTS—The missing link in Transport Layer Security,” at http://mng.bz/5wwa.
提示有关 HSTS 及其可缓解的攻击的更多详细信息,请参阅 Scott Helme 的文章“HSTS — 传输层安全性中缺失的环节”,第 http://mng.bz/5wwa 页。

HSTS is a great option for forcing users to use HTTPS on your website, and if you can use HSTS preload, you can ensure that modern clients never send requests over HTTP. Nevertheless, HSTS preload can take months to enforce, and you won’t always want to take that approach. In the meantime, if a browser makes an initial request over HTTP, it won’t receive the HSTS header and may stay on HTTP! That’s unfortunate, but you can mitigate the problem by redirecting insecure requests to HTTPS immediately.
HSTS 是强制用户在您的网站上使用 HTTPS 的绝佳选择,如果您可以使用 HSTS 预加载,则可以确保现代客户端永远不会通过 HTTP 发送请求。尽管如此,HSTS 预加载可能需要几个月的时间才能执行,并且您并不总是希望采用这种方法。同时,如果浏览器通过 HTTP 发出初始请求,它将不会收到 HSTS 标头,并且可能会停留在 HTTP!这很遗憾,但您可以通过立即将不安全的请求重定向到 HTTPS 来缓解问题。

28.4.2 Redirecting from HTTP to HTTPS with HTTPS redirection middleware

28.4.2 使用 HTTPS 重定向中间件从 HTTP 重定向到 HTTPS

The HstsMiddleware should always be used in conjunction with middleware that redirects all HTTP requests to HTTPS.
HstsMiddleware 应始终与将所有 HTTP 请求重定向到 HTTPS 的中间件结合使用。

TIP It’s possible to apply HTTPS redirection only to specific parts of your application, such as to specific Razor Pages, but I don’t recommend that, as it’s too easy to open a security hole in your application.
提示:可以仅将 HTTPS 重定向应用于应用程序的特定部分,例如特定的 Razor Pages,但我不建议这样做,因为很容易在应用程序中打开安全漏洞。

ASP.NET Core comes with HttpsRedirectionMiddleware, which you can use to enforce HTTPS across your whole app. You add it to the middleware pipeline in Program.cs, and it ensures that any requests that pass through it are secure. If an HTTP request reaches the HttpsRedirectionMiddleware, the middleware immediately short-circuits the pipeline with a redirect to the HTTPS version of the request. The browser then repeats the request using HTTPS instead of HTTP, as shown in figure 28.8.
ASP.NET Core 附带 HttpsRedirectionMiddleware,可用于在整个应用程序中强制实施 HTTPS。您可以将其添加到 Program.cs 中的中间件管道中,并确保通过它的任何请求都是安全的。如果 HTTP 请求到达 HttpsRedirectionMiddleware,中间件会立即通过重定向到请求的 HTTPS 版本来使管道短路。然后,浏览器使用 HTTPS 而不是 HTTP 重复请求,如图 28.8 所示。

alt text

Figure 28.8 The HttpsRedirectionMiddleware works with the HstsMiddleware to ensure that all requests after the initial request are always sent over HTTPS.
图 28.8 HttpsRedirectionMiddleware 与 HstsMiddleware 配合使用,以确保初始请求之后的所有请求始终通过 HTTPS 发送。

NOTE Even with HSTS and the HTTPS redirection middleware, there is still an inherent weakness: by default, browsers always make an initial insecure request over HTTP to your app. The only way to prevent this is with HSTS preload, which tells browsers to always use HTTPS.
注意:即使使用 HSTS 和 HTTPS 重定向中间件,仍然存在一个固有的弱点:默认情况下,浏览器总是通过 HTTP 向您的应用程序发出初始不安全的请求。防止这种情况的唯一方法是使用 HSTS 预加载,它告诉浏览器始终使用 HTTPS。

The HttpsRedirectionMiddleware is added in some of the default ASP.NET Core templates. It is typically placed after the error handling and HstsMiddleware, as shown in the following listing. By default, the middleware redirects all HTTP requests to the secure endpoint, using an HTTP 307 Temporary Redirect status code.
HttpsRedirectionMiddleware 已添加到一些默认的 ASP.NET Core 模板中。它通常放在 error handling 和 HstsMiddleware 之后,如下面的清单所示。默认情况下,中间件使用 HTTP 307 临时重定向状态代码将所有 HTTP 请求重定向到安全终端节点。

Listing 28.4 Using HttpsRedirectionMiddleware to enforce HTTPS for an application
列表 28.4 使用 HttpsRedirectionMiddleware 为应用程序强制执行 HTTPS

WebApplicationBuilder builder = WebApplication.CreateBuilder(args);

builder.Services.AddRazorPages();
builder.Services.AddHsts(o => options.MaxAge = TimeSpan.FromHours(1));

WebApplication app = builder.Build();

if(app.Environment.IsProduction())
{
    app.UseHsts();
}

app.UseHttpsRedirection();     #A

app.UseStaticFiles();
app.UseRouting();

app.MapRazorPages();

app.Run();

❶ Adds the HttpsRedirectionMiddleware to the pipeline and redirects all HTTP requests to HTTPS
将 HttpsRedirectionMiddleware 添加到管道并将所有 HTTP 请求重定向到 HTTPS

The HttpsRedirectionMiddleware automatically redirects HTTP requests to the first configured HTTPS endpoint for your application. If your application isn’t configured for HTTPS, the middleware won’t redirect and instead logs a warning:
HttpsRedirectionMiddleware 会自动将 HTTP 请求重定向到应用程序的第一个配置的 HTTPS 终结点。如果您的应用程序未配置 HTTPS,则中间件不会重定向,而是会记录警告:

warn: Microsoft.AspNetCore.HttpsPolicy.HttpsRedirectionMiddleware[3]
      Failed to determine the https port for redirect.

If you want the middleware to redirect to a different port than Kestrel knows about, you can configure that by setting the ASPNETCORE_HTTPS_PORT environment variable. This is sometimes necessary if you’re using a reverse proxy, and it can be set in alternative ways, as described in Microsoft’s “Enforce HTTPS in ASP.NET Core” documentation: http://mng.bz/6DDA.
如果您希望中间件重定向到 Kestrel 所知道的不同端口,您可以通过设置 ASPNETCORE_HTTPS_PORT 环境变量来配置它。如果您使用的是反向代理,这有时是必需的,并且可以以其他方式进行设置,如 Microsoft 的“在 ASP.NET Core 中强制实施 HTTPS”文档中所述:http://mng.bz/6DDA

SSL/TLS offloading, header forwarding, and detecting secure requests
SSL/TLS 卸载、标头转发和检测安全请求

At the start of section 28.1 I encouraged you to consider terminating HTTPS requests at a reverse proxy. That way, the user uses HTTPS to talk to the reverse proxy, and the reverse proxy talks to your app using HTTP. With this setup, your users are protected, but your app doesn’t have to deal with TLS certificates itself.
在第 28.1 节开始时,我鼓励您考虑在反向代理上终止 HTTPS 请求。这样,用户使用 HTTPS 与反向代理通信,而反向代理使用 HTTP 与你的应用通信。通过此设置,您的用户会受到保护,但您的应用程序不必自行处理 TLS 证书。

For the HttpsRedirectionMiddleware to work correctly, Kestrel needs some way of knowing whether the original request that the reverse proxy received was over HTTP or HTTPS. The reverse proxy communicates to your app over HTTP, so Kestrel can’t figure that out without extra help.
为了使 HttpsRedirectionMiddleware 正常工作,Kestrel 需要某种方式来了解反向代理收到的原始请求是通过 HTTP 还是 HTTPS。反向代理通过 HTTP 与您的应用程序通信,因此如果没有额外的帮助,Kestrel 无法解决这个问题。

The standard approach used by most reverse proxies (such as IIS, NGINX, and HAProxy) is to add headers to the request before forwarding it to your app. Specifically, a header called X-Forwarded-Proto is added, indicating whether the original request protocol was HTTP or HTTPS.
大多数反向代理(例如 IIS、NGINX 和 HAProxy)使用的标准方法是在将请求转发到应用程序之前向请求添加标头。具体来说,添加了一个名为 X-Forwarded-Proto 的标头,指示原始请求协议是 HTTP 还是 HTTPS。

ASP.NET Core includes ForwardedHeadersMiddleware to look for this header (and others) and update the request accordingly, so your app treats a request that was originally secured by HTTPS as secure for all intents and purposes.
ASP.NET Core 包含 ForwardedHeadersMiddleware 来查找此标头(和其他标头)并相应地更新请求,因此您的应用会将最初由 HTTPS 保护的请求视为对所有 intent 和目的都是安全的。

If you’re using IIS with the UseIisIntegration() extension, the header forwarding is handled for you automatically. If you’re using a different reverse proxy, such as NGINX or HAProxy, you can enable the middleware by setting the environment variable ASPNETCORE_FORWARDEDHEADERS_ENABLED=true, as you saw in chapter 27. Alternatively, you can add the middleware to your application manually, as shown in section 27.3.2.
如果将 IIS 与 UseIisIntegration() 扩展一起使用,则会自动处理标头转发。如果你正在使用不同的反向代理,比如 NGINX 或 HAProxy,你可以通过设置环境变量 ASPNETCORE_FORWARDEDHEADERS_ENABLED=true 来启用中间件,就像你在第 27 章中看到的那样。或者,您可以手动将中间件添加到应用程序中,如 Section 27.3.2 所示。

When the reverse proxy forwards a request, the ForwardedHeadersMiddleware looks for the X-Forwarded-Proto header and updates the request details as appropriate. For all subsequent middleware, the request is considered secure. When adding the middleware manually, it’s important that you place ForwardedHeadersMiddleware before the call to UseHsts() or UseHttpsRedirection() so that the forwarded headers are read and the request is marked secure, as appropriate.
当反向代理转发请求时,ForwardedHeadersMiddleware 会查找 X-Forwarded-Proto 标头并根据需要更新请求详细信息。对于所有后续中间件,该请求都被视为安全请求。手动添加中间件时,请务必将 ForwardedHeadersMiddleware 放在调用 UseHsts() 或 UseHttpsRedirection() 之前,以便读取转发的标头并根据需要将请求标记为安全。

Using the HSTS and HTTPS redirection middleware is best practice when you’re building a server-side application such as a Razor Pages app that will always be accessed in the browser. If you’re building an API application. however, a better approach is to not listen for insecure HTTP requests at all!
在构建始终在浏览器中访问的服务器端应用程序(如 Razor Pages 应用)时,最佳做法是使用 HSTS 和 HTTPS 重定向中间件。如果您正在构建 API 应用程序。但是,更好的方法是根本不监听不安全的 HTTP 请求!

28.4.3 Rejecting HTTP requests in API applications

28.4.3 在 API 应用程序中拒绝 HTTP 请求

Browsers have been adding more and more protections, such as the HSTS header, to try to protect users from using insecure HTTP requests. But not all clients are using a web browser. In this section you’ll learn why API applications should generally disable HTTP entirely.
浏览器一直在添加越来越多的保护措施,例如 HSTS 标头,以尝试保护用户免受使用不安全的 HTTP 请求的侵害。但并非所有客户端都使用 Web 浏览器。在本节中,您将了解为什么 API 应用程序通常应该完全禁用 HTTP。

If you’re building an API application, you often can’t rely on requests coming from a browser. Your API application may primarily serve a client-side framework in the browser, but it may also serve mobile applications or provide an API to other backend services. That means you can’t rely on the protections built into web browsers to use HTTPS for your API apps.
如果您正在构建 API 应用程序,则通常不能依赖来自浏览器的请求。您的 API 应用程序可能主要在浏览器中提供客户端框架,但它也可能提供移动应用程序或为其他后端服务提供 API。这意味着您不能依赖 Web 浏览器中内置的保护措施来将 HTTPS 用于 API 应用程序。

On top of that, even if you know all your users are using a browser, the only way to prevent sending all requests over HTTP is to use HSTS preload, as you saw in section 28.4.2. Sending even one request over HTTP can compromise a user, so the safest approach is to listen only for HTTPS requests, not HTTP requests. This is the best option for API apps.
最重要的是,即使您知道所有用户都在使用浏览器,防止通过 HTTP 发送所有请求的唯一方法是使用 HSTS 预加载,如您在 Section 28.4.2 中看到的那样。即使通过 HTTP 发送一个请求也可能危及用户,因此最安全的方法是仅侦听 HTTPS 请求,而不是 HTTP 请求。这是 API 应用程序的最佳选择。

NOTE It would be safest to take this same approach for your browser apps, but unfortunately, browsers currently default to the HTTP versions of apps by default.
注意:对浏览器应用程序采用相同的方法是最安全的,但遗憾的是,浏览器目前默认使用应用程序的 HTTP 版本。

You can disable HTTP requests for your application by setting the URLs for your app to include only https:// requests, using ASPNETCORE_URLS or another approach, as described in chapter 27. Setting
您可以通过使用 ASPNETCORE_URLS 或其他方法将应用程序的 URL 设置为仅包含 https:// 请求来禁用应用程序的 HTTP 请求,如第 27 章所述。设置

ASPNETCORE_URLS=https://*:5001

would ensure that your app serves only HTTPS requests on port 5001 and won’t handle HTTP connections at all. This protects your clients, as they can’t incorrectly make HTTP requests, and it may even make things simpler on your side, as you don’t need to add the HTTP redirection middleware.
将确保您的应用程序仅在端口 5001 上提供 HTTPS 请求,并且根本不处理 HTTP 连接。这可以保护你的客户端,因为它们不会错误地发出 HTTP 请求,甚至可能使你的事情变得更简单,因为你不需要添加 HTTP 重定向中间件。

HTTPS is one of the most basic requirements for adding security to your application these days. It can be tricky to set up initially, but once you’re up and running, you can largely forget about it, especially if you’re using SSL/TLS termination at a reverse proxy.
HTTPS 是当今为应用程序添加安全性的最基本要求之一。最初设置可能很棘手,但是一旦您启动并运行,您基本上可以忘记它,尤其是在反向代理上使用 SSL/TLS 终止时。

Unfortunately, most other security practices require rather more vigilance to ensure that you don’t accidentally introduce vulnerabilities into your app as it grows and develops. In the next chapter we’ll look at several common attacks, learn how ASP.NET Core protects you, and see a few things you need to watch out for.
不幸的是,大多数其他安全实践都需要更加警惕,以确保您不会在应用程序的成长和发展过程中意外地将漏洞引入应用程序。在下一章中,我们将介绍几种常见的攻击,了解 ASP.NET Core 如何保护您,并了解您需要注意的一些事项。

28.5 Summary

28.5 总结

HTTPS is used to encrypt your app’s data as it travels from the server to the browser and back. This encryption prevents third parties from seeing or modifying it.
HTTPS 用于加密应用程序的数据,因为它在服务器和浏览器之间传输。此加密可防止第三方查看或修改它。

HTTPS is virtually mandatory for production apps, as modern browsers like Chrome and Firefox mark non-HTTPS apps as explicitly “not secure.”
HTTPS 对于生产应用程序几乎是必需的,因为 Chrome 和 Firefox 等现代浏览器将非 HTTPS 应用程序明确标记为“不安全”。

In production, you can avoid handling the TLS in your app by using SSL/TLS offloading. This is where a reverse proxy uses HTTPS to talk to the browser, but the traffic is unencrypted between your app and the reverse proxy. The reverse proxy could be on the same or a different server, such as IIS or NGINX, or it could be a third-party service, such as Cloudflare.
在生产环境中,您可以通过使用 SSL/TLS 卸载来避免在应用程序中处理 TLS。这是反向代理使用 HTTPS 与浏览器通信,但应用与反向代理之间的流量未加密的位置。反向代理可以位于相同或不同的服务器上,例如 IIS 或 NGINX,也可以是第三方服务,例如 Cloudflare。

You can use the ASP.NET Core developer certificate or the IIS express developer certificate to enable HTTPS during development. This can’t be used for production, but it’s sufficient for testing locally. You must run dotnet dev-certs https --trust when you first install the .NET SDK to trust the certificate.
在开发过程中,您可以使用 ASP.NET Core 开发人员证书或 IIS Express 开发人员证书来启用 HTTPS。这不能用于生产,但足以在本地进行测试。首次安装 .NET SDK 时,必须运行 dotnet dev-certs https --trust 才能信任证书。

Kestrel is the default web server in ASP.NET Core. It is responsible for reading and writing data from and to the network, parsing the bytes based on the underlying HTTP and network protocols and converting from raw bytes to .NET objects you can use in your apps.
Kestrel 是 ASP.NET Core 中的默认 Web 服务器。它负责从网络读取和写入数据,根据底层 HTTP 和网络协议解析字节,以及将原始字节转换为可在应用程序中使用的 .NET 对象。

You can configure an HTTPS certificate for Kestrel in production using the Kestrel:Certificates:Default configuration section. This does not require any code changes to your application; Kestrel automatically loads the certificate when your app starts and uses it to serve HTTPS requests.
您可以使用 Kestrel:Certificates:Default 配置部分在生产中为 Kestrel 配置 HTTPS 证书。这不需要对应用程序进行任何代码更改;Kestrel 会在您的应用程序启动时自动加载证书,并使用它来处理 HTTPS 请求。

You can use the HstsMiddleware to set HSTS headers for your application to ensure that the browser always sends HTTPS requests to your app instead of HTTP requests. HSTS can be enforced only when an initial HTTPS request is made to your app, so it’s best used in conjunction with HTTP to HTTPS redirection.
你可以使用 HstsMiddleware 为你的应用设置 HSTS 头,确保浏览器总是向你的应用发送 HTTPS 请求,而不是 HTTP 请求。只有在向应用程序发出初始 HTTPS 请求时,才能强制执行 HSTS,因此最好将其与 HTTP 到 HTTPS 重定向结合使用。

You can enable HSTS preload for your application to ensure that HTTP requests from browsers are never sent and are always upgraded to HTTPS. You must configure your app as shown in listing 28.3, deploy your app with a TLS certificate, and register your app at the URL https://hstspreload.org. This will schedule your app to be included in browsers’ built-in list of HTTPS only sites.
您可以为您的应用程序启用 HSTS 预加载,以确保来自浏览器的 HTTP 请求永远不会发送,并且始终升级到 HTTPS。您必须按照清单 28.3 中所示配置您的应用程序,使用 TLS 证书部署您的应用程序,并在 URL https://hstspreload.org 处注册您的应用程序。这将安排您的应用程序包含在浏览器的内置仅限 HTTPS 站点列表中。

You can enforce HTTPS for your whole app using the HttpsRedirectionMiddleware. This will redirect any HTTP requests to the HTTPS version of endpoints.
你可以使用 HttpsRedirectionMiddleware 为整个应用程序强制实施 HTTPS。这会将任何 HTTP 请求重定向到终端节点的 HTTPS 版本。

If you’re building an API application, you should avoid exposing your application over HTTP entirely and use only HTTPS. Mobile and other nonbrowser clients don’t have protections such as HSTS, so there’s no safe way to support both HTTP and HTTPS. Disable HTTP for your app by listening only on https:// URLs, such as by setting ASPNETCORE_URLS=https://*:5001.
如果您正在构建 API 应用程序,则应避免完全通过 HTTP 公开应用程序,而仅使用 HTTPS。移动客户端和其他非浏览器客户端没有 HSTS 等保护措施,因此没有安全的方法可以同时支持 HTTP 和 HTTPS。通过仅侦听 https:// URL 来禁用应用程序的 HTTP,例如通过设置 ASPNETCORE_URLS=https://*:5001。

ASP.NET Core in Action 27 Publishing and deploying your application

27 Publishing and deploying your application
27 发布和部署应用程序

This chapter covers
本章涵盖

• Publishing an ASP.NET Core application
发布 ASP.NET Core 应用程序

• Hosting an ASP.NET Core application in IIS
在 IIS中托管 ASP.NET Core 应用程序

• Customizing the URLs for an ASP.NET Core app
自定义 ASP.NET Core 应用程序的 URL

We’ve covered a vast amount of ground so far in this book. We’ve gone over the basic mechanics of building an ASP.NET Core application, such as configuring dependency injection (DI), loading app settings, and building a middleware pipeline. We’ve looked at building APIs using minimal APIs and web API controllers. We’ve looked at the server-rendered UI side, using Razor templates and layouts to build an HTML response. And we’ve looked at higher-level abstractions, such as Entity Framework Core (EF Core) and ASP.NET Core Identity, that let you interact with a database and add users to your application. In this chapter we’re taking a slightly different route. Instead of looking at ways to build bigger and better applications, we’ll focus on what it means to deploy your application so that users can access it.
到目前为止,我们在这本书中已经涵盖了大量的内容。我们已经介绍了构建 ASP.NET Core 应用程序的基本机制,例如配置依赖项注入 (DI)、加载应用程序设置和构建中间件管道。我们已经研究了使用最少的 API 和 Web API 控制器来构建 API。我们已经了解了服务器呈现的 UI 端,使用 Razor 模板和布局来构建 HTML 响应。我们还研究了更高级别的抽象,例如 Entity Framework Core (EF Core) 和 ASP.NET Core Identity,它们允许您与数据库交互并将用户添加到您的应用程序。在本章中,我们采取了略有不同的路线。我们不会研究构建更大、更好的应用程序的方法,而是重点介绍部署应用程序以便用户可以访问它意味着什么。

We’ll start by looking again at the ASP.NET Core hosting model in section 27.1 and examining why you might want to host your application behind a reverse proxy instead of exposing your app directly to the internet. I show you the difference between running an ASP.NET Core app in development using dotnet run and publishing the app for use on a remote server. Finally, I describe some of the options available when you’re deciding how and where to deploy your app.
首先,我们将再次查看第 27.1 节中的 ASP.NET Core 托管模型,并研究为什么您可能希望将应用程序托管在反向代理后面,而不是直接向 Internet 公开应用程序。我将向您展示使用 dotnet run 在开发中运行 ASP.NET Core 应用程序与发布应用程序以在远程服务器上使用之间的区别。最后,我将介绍在决定如何以及在何处部署应用程序时可用的一些选项。

In section 27.2 I show you how to deploy your app to one such option: a Windows server running Internet Information Services (IIS). This is a typical deployment scenario for many developers who are familiar with the legacy .NET Framework version of ASP.NET, so it acts as a useful case study, but it’s certainly not the only possibility. I don’t go into all the technical details of configuring the venerable IIS system; instead, I show you the bare minimum required to get it up and running. If your focus is cross-platform development, don’t worry, because I don’t dwell on IIS for too long.
在第 27.2 节中,我将向您展示如何将您的应用程序部署到这样一个选项:运行 Internet Information Services (IIS) 的 Windows 服务器。对于许多熟悉旧版 ASP.NET 的 .NET Framework 版本的开发人员来说,这是一个典型的部署方案,因此它是一个有用的案例研究,但肯定不是唯一的可能性。我不会深入介绍配置古老的 IIS 系统的所有技术细节;相反,我向您展示了启动和运行它所需的最低限度。如果您的重点是跨平台开发,请不要担心,因为我不会在 IIS 上停留太久。

In section 27.3 I provide an introduction to hosting on Linux. You’ll see how it differs from hosting applications on Windows, learn the changes you need to make to your apps, and find out about some gotchas to look out for. I describe how reverse proxies on Linux differ from IIS and point you to some resources you can use to configure your environments rather than give exhaustive instructions in this book.
在 Section 27.3 中,我介绍了在 Linux 上托管。您将了解它与在 Windows 上托管应用程序有何不同,了解您需要对应用程序进行的更改,并了解一些需要注意的问题。我将介绍 Linux 上的反向代理与 IIS 的不同之处,并向您指出一些可用于配置环境的资源,而不是在本书中提供详尽的说明。

If you’re not hosting your application using IIS, you’ll likely need to set the URL that your ASP.NET Core app is using when you deploy your application. In section 27.4 I show two approaches: using the special ASPNETCORE_URLS environment variable and using command-line arguments. Although this task generally is not a problem during development, setting the correct URLs for your app is critical when you need to deploy it.
如果不使用 IIS 托管应用程序,则可能需要设置 ASP.NET Core 应用在部署应用程序时使用的 URL。在 Section 27.4 中,我展示了两种方法:使用特殊的 ASPNETCORE_URLS 环境变量和使用命令行参数。尽管此任务在开发过程中通常不是问题,但当您需要部署应用程序时,为应用程序设置正确的 URL 至关重要。

This chapter covers a relatively wide array of topics, all related to deploying your app. But before we get into the nitty-gritty, I’ll go over the hosting model for ASP.NET Core so that we’re on the same page. This is significantly different from the hosting model of the legacy version of ASP.NET, so if you’re coming from that background, it’s best to try to forget what you know!
本章涵盖了相对广泛的主题,所有主题都与部署应用程序有关。但在我们进入细节之前,我将介绍 ASP.NET Core 的托管模型,以便我们达成共识。这与旧版 ASP.NET 的托管模式有很大不同,因此如果您来自该背景,最好尝试忘记您所知道的!

27.1 Understanding the ASP.NET Core hosting model

27.1 了解 ASP.NET Core 托管模型

If you think back to part 1 of this book, you may remember that we discussed the hosting model of ASP.NET Core. ASP.NET Core applications are, essentially, console applications. They have a static void Main function that is the entry point for the application, as a standard .NET console app would.
如果您回想一下本书的第 1 部分,您可能还记得我们讨论了 ASP.NET Core 的托管模型。ASP.NET Core 应用程序本质上是控制台应用程序。它们具有一个静态 void Main 函数,该函数是应用程序的入口点,就像标准 .NET 控制台应用程序一样。

NOTE The entry point for programs using top-level statements is automatically generated by the compiler. It’s not called Main (it typically has an “invalid” name, such as <Main>$ ), but otherwise it has the same signature as the classic static void Main function you would write by hand.
注意使用 top-level 语句的程序的入口点由编译器自动生成。它不称为 Main (它通常具有“无效”名称,例如 <Main>$ ),但除此之外,它与你手动编写的经典静态 void Main 函数具有相同的签名。

What makes a .NET app an ASP.NET Core app is that it runs a web server, typically Kestrel, inside the console app process. Kestrel provides the HTTP functionality to receive requests and return responses to clients. Kestrel passes any requests it receives to the body of your application and generates a response, as shown in figure 27.1. This hosting model decouples the server and reverse proxy from the application itself so that the same application can run unchanged in multiple environments.
使 .NET 应用程序成为 ASP.NET Core 应用程序的原因是它在控制台应用程序进程中运行 Web 服务器,通常是 Kestrel。Kestrel 提供 HTTP 功能来接收请求并将响应返回给客户端。Kestrel 将其收到的任何请求传递到应用程序的主体并生成响应,如图 27.1 所示。此托管模型将服务器和反向代理与应用程序本身分离,以便同一应用程序可以在多个环境中保持不变地运行。

alt text

Figure 27.1 The hosting model for ASP.NET Core gives flexibility. The same application can run exposed directly to the network, behind various reverse proxies without modification, and even inside the IIS process.
图 27.1 ASP.NET Core 的托管模型提供了灵活性。同一个应用程序可以直接暴露在网络中,无需修改即可在各种反向代理后面运行,甚至可以在 IIS 进程内部运行。

In this book we’ve focused on the “application” part of figure 27.1—the ASP.NET Core application itself—but the reality is that sometimes you’ll want to place your ASP.NET Core apps behind a reverse proxy, such as IIS in Windows or NGINX or Apache in Linux. The reverse proxy is the program that listens for HTTP requests from the internet and then makes requests to your app as though the request came from the internet directly.
在本书中,我们重点介绍了图 27.1 的 “应用程序” 部分 — ASP.NET Core 应用程序本身 — 但现实情况是,有时您希望将 ASP.NET Core 应用程序放在反向代理后面,例如 Windows 中的 IIS,Linux 中的 NGINX 或 Apache。反向代理是侦听来自 Internet 的 HTTP 请求,然后向应用程序发出请求的程序,就像请求直接来自 Internet 一样。

DEFINITION A reverse proxy is software that’s responsible for receiving requests and forwarding them to the appropriate web server. The reverse proxy is exposed directly to the internet, whereas the underlying web server is exposed only to the proxy.
定义:反向代理是负责接收请求并将其转发到适当的 Web 服务器的软件。反向代理直接向 Internet 公开,而底层 Web 服务器仅向代理公开。

If you’re running your application using a Platform as a Service (PaaS) offering such as Azure App Service, you’re using a reverse proxy there too—one that is managed by Azure. Using a reverse proxy has many benefits:
如果使用平台即服务 (PaaS) 产品(如 Azure 应用服务)运行应用程序,则也会使用由 Azure 管理的反向代理。使用反向代理有很多好处:

• Security—Reverse proxies are specifically designed to be exposed to malicious internet traffic, so they’re typically extremely well-tested and battle-hardened.
安全性 - 反向代理专门设计用于暴露于恶意 Internet 流量,因此它们通常经过极其严格的测试和战斗。

• Performance—You can configure reverse proxies to provide performance improvements by aggressively caching responses to requests.
性能 - 您可以配置反向代理,通过主动缓存对请求的响应来提高性能。

• Process management—An unfortunate reality is that apps sometimes crash. Some reverse proxies can act as monitors/schedulers to ensure that if an app crashes, the proxy can automatically restart it.
进程管理 - 一个不幸的现实是,应用程序有时会崩溃。一些反向代理可以充当监视器/调度程序,以确保如果应用程序崩溃,代理可以自动重新启动它。

• Support for multiple apps—It’s common to have multiple apps running on a single server. Using a reverse proxy makes it easier to support this scenario by using the host name of a request to decide which app should receive the request.
支持多个应用程序 - 在单个服务器上运行多个应用程序是很常见的。使用反向代理可以更轻松地支持此方案,方法是使用请求的主机名来决定哪个应用应接收请求。

I don’t want to make it seem like using a reverse proxy is all sunshine and roses. There are some downsides:
我不想让使用反向代理看起来全是阳光和玫瑰。有一些缺点:

• Complexity—One of the biggest complaints is how complex reverse proxies can be. If you’re managing the proxy yourself (as opposed to relying on a PaaS implementation), there can be lots of proxy-specific pitfalls to look out for.
复杂性 - 最大的抱怨之一是反向代理的复杂程度。如果您自己管理代理(而不是依赖 PaaS 实现),则可能会有许多特定于代理的陷阱需要注意。

• Inter-process communication—Most reverse proxies require two processes: a reverse proxy and your web app. Communicating between the two is often slower than if you directly exposed your web app to requests from the internet.
进程间通信 - 大多数反向代理需要两个进程:反向代理和 Web 应用程序。两者之间的通信通常比直接将 Web 应用程序公开给来自 Internet 的请求要慢。

• Restricted features—Not all reverse proxies support all the same features as an ASP.NET Core app. For example, Kestrel supports HTTP/2, but if your reverse proxy doesn’t, you won’t see the benefits.
受限功能 - 并非所有反向代理都支持与 ASP.NET Core 应用程序相同的所有功能。例如,Kestrel 支持 HTTP/2,但如果您的反向代理不支持,您将看不到好处。

Whether you choose to use a reverse proxy or not, when the time comes to host your app, you can’t copy your code files directly to the server. First, you need to publish your ASP.NET Core app to optimize it for production. In section 27.1.1 we’ll look at building an ASP.NET Core app so that it can be run on your development machine, compared with publishing it so that it can be run on a server.
无论您是否选择使用反向代理,当需要托管您的应用程序时,您都无法将代码文件直接复制到服务器。首先,您需要发布 ASP.NET Core 应用程序以针对生产环境进行优化。在 Section 27.1.1 中,我们将介绍如何构建 ASP.NET Core 应用程序,使其可以在开发计算机上运行,而不是发布应用程序,使其可以在服务器上运行。

27.1.1 Running vs. publishing an ASP.NET Core app

27.1.1 运行与发布 ASP.NET Core 应用程序

One of the key changes in ASP.NET Core from previous versions of ASP.NET is making it easy to build apps using your favorite code editors and integrated development environments (IDEs). Previously, Visual Studio was required for ASP.NET development, but with the .NET command-line interface (CLI), you can build apps with the tools you’re comfortable with on any platform.
ASP.NET Core 与以前的 ASP.NET 版本相比,其中一项关键变化是,使用您最喜欢的代码编辑器和集成开发环境 (IDE) 可以轻松构建应用程序。以前,ASP.NET 开发需要 Visual Studio,但借助 .NET 命令行界面 (CLI),您可以使用熟悉的工具在任何平台上构建应用程序。

As a result, whether you build using Visual Studio or the .NET CLI, the same tools are being used under the hood. Visual Studio provides an additional graphical user interface (GUI), functionality, and wrappers for building your app, but it (mostly) executes the same commands as the .NET CLI behind the scenes.
因此,无论您是使用 Visual Studio 还是 .NET CLI 进行构建,都在后台使用相同的工具。Visual Studio 提供了用于构建应用程序的额外图形用户界面 (GUI)、功能和包装器,但它(主要)在后台执行与 .NET CLI 相同的命令。

As a refresher, you’ve used four main .NET CLI commands so far to build your apps:
作为复习,到目前为止,您已经使用了四个主要的 .NET CLI 命令来构建您的应用程序:

• dotnet new—Creates an ASP.NET Core application from a template
dotnet new - 从模板创建 ASP.NET Core 应用程序
• dotnet restore—Downloads and installs any referenced NuGet packages for your project
dotnet restore - 下载并安装项目的任何引用的 NuGet 包
• dotnet build—Compiles and builds your project
dotnet build - 编译和生成项目
• dotnet run—Executes your app so you can send requests to it
dotnet run - 执行应用程序,以便您可以向其发送请求

If you’ve ever built a .NET application, whether it’s a legacy ASP.NET app or a .NET Framework console app, you’ll know that the output of the build process is written to the bin folder by default. The same is true for ASP.NET Core applications.
如果您曾经构建过 .NET 应用程序,无论是旧版 ASP.NET 应用程序还是 .NET Framework 控制台应用程序,您都会知道默认情况下,构建过程的输出会写入 bin 文件夹。ASP.NET Core 应用程序也是如此。

If your project compiles successfully when you call dotnet build, the .NET CLI writes the artifacts to a bin folder in your project’s directory. Inside this bin folder are several files required to run your app, including a .dll file that contains the code for your application. Figure 27.2 shows the output of the bin folder for a basic ASP.NET Core application.
如果在调用 dotnet build 时项目编译成功,则 .NET CLI 会将项目写入项目目录中的 bin 文件夹。此 bin 文件夹中包含运行应用程序所需的多个文件,包括一个包含应用程序代码的 .dll 文件。图 27.2 显示了基本 ASP.NET Core 应用程序的 bin 文件夹的输出。

alt text

Figure 27.2 The bin folder for an ASP.NET Core app after running dotnet build. The application is compiled into a single .dll file, ExampleApp.dll.
图 27.2 运行 dotnet build 后 ASP.NET Core 应用的 bin 文件夹。该应用程序被编译成一个 .dll 文件 ExampleApp.dll。

NOTE In Windows you also have an executable .exe file, ExampleApp.exe. This is a simple wrapper file for convenience that makes it easier to run the application contained in ExampleApp.dll.
注意:在 Windows 中,您还有一个可执行的 .exe 文件 ExampleApp.exe。为方便起见,这是一个简单的包装文件,可以更轻松地运行 ExampleApp.dll 中包含的应用程序。

When you call dotnet run in your project folder (or run your application using Visual Studio), the .NET CLI uses the .dll to run your application. But this file doesn’t contain everything you need to deploy your app.
在项目文件夹中调用 dotnet run (或使用 Visual Studio 运行应用程序) 时,.NET CLI 会使用.dll运行应用程序。但此文件并不包含部署应用程序所需的一切。

To host and deploy your app on a server, you first need to publish it. You can publish your ASP.NET Core app from the command line using the dotnet publish command, which builds and packages everything your app needs to run. The following command packages the app from the current directory and builds it to a subfolder called publish. I’ve used the Release configuration instead of the default Debug configuration so that the output will be fully optimized for running in production:
要在服务器上托管和部署您的应用程序,您首先需要发布它。可以使用 dotnet publish 命令从命令行发布 ASP.NET Core 应用,该命令将生成和打包应用运行所需的一切。以下命令将当前目录中的应用程序打包,并将其构建到名为 publish 的子文件夹中。我使用了 Release 配置而不是默认的 Debug 配置,以便输出将得到全面优化,以便在生产环境中运行:

dotnet publish --output publish --configuration Release

TIP Always use the Release configuration when publishing your app for deployment. This ensures that the compiler generates optimized code for your app.
提示:在发布应用程序进行部署时,请始终使用 Release (发布) 配置。这可确保编译器为您的应用生成优化的代码。

Once the command completes, you’ll find your published application in the publish folder, as shown in figure 27.3.
命令完成后,您将在 publish 文件夹中找到已发布的应用程序,如图 27.3 所示。

alt text

Figure 27.3 The publish folder for the app after running dotnet publish. The app is still compiled into a single .dll file, but all the additional files, such as wwwroot, are also copied to the output.
图 27.3 运行 dotnet publish 后应用程序的 publish 文件夹。该应用程序仍编译为单个 .dll 文件,但所有其他文件(如 wwwroot)也会复制到输出中。

As you can see, the ExampleApp.dll file is still there, along with some additional files. Most notably, the publish process has copied across the wwwroot folder of static files. When running your application locally with dotnet run, the .NET CLI uses these files from your application’s project folder directly. Running dotnet publish copies the files to the output directory, so they’re included when you deploy your app to a server.
如您所见,ExampleApp.dll 文件仍然存在,还有一些其他文件。最值得注意的是,发布过程已复制静态文件的 wwwroot 文件夹。使用 dotnet run 在本地运行应用程序时,.NET CLI 会直接使用应用程序项目文件夹中的这些文件。运行 dotnet publish 会将文件复制到输出目录,以便在将应用部署到服务器时包含这些文件。

If your first instinct is to try running the application in the publish folder using the dotnet run command you already know and love, you’ll be disappointed. Instead of seeing the application starting up, you’ll see a somewhat confusing message: Couldn’t find a project to run.
如果您的第一反应是尝试使用您已经熟悉和喜爱的 dotnet run 命令在 publish 文件夹中运行应用程序,那么您会感到失望。您将看到一条有点令人困惑的消息,而不是看到应用程序启动:Couldn't find a project to run。

To run a published application, you need to use a slightly different command. Instead of calling dotnet run, you must pass the path to your application’s .dll file to the dotnet command. If you’re running the command from the publish folder, for the example app in figure 27.3, it would look something like
要运行已发布的应用程序,您需要使用略有不同的命令。必须将应用程序的 .dll 文件的路径传递给 dotnet 命令,而不是调用 dotnet run。如果您从 publish 文件夹运行命令,对于图 27.3 中的示例应用程序,它看起来类似于

dotnet ExampleApp.dll

This is the command that your server will run when running your application in production.
这是您的服务器在生产环境中运行应用程序时将运行的命令。

TIP You can also use the dotnet exec command to achieve the same thing, such as dotnet exec ExampleApp.dll. This makes some advanced runtime options available, as described in the docs at http://mng.bz/x4d8.
提示:您还可以使用 dotnet exec 命令来实现相同的作,例如 dotnet exec ExampleApp.dll。这使得一些高级运行时选项可用,如 http://mng.bz/x4d8 中的文档中所述。

When you’re developing, the dotnet run command does a whole load of work to make things easier on you. It makes sure that your application is built, looks for a project file in the current folder, works out where the corresponding .dlls will be (in the bin folder), and finally runs your app.
在开发时,dotnet run 命令会执行大量工作,以简化您的作。它确保您的应用程序已构建,在当前文件夹中查找项目文件,计算出相应的 .dll 将位于何处(在 bin 文件夹中),最后运行您的应用程序。

In production, you don’t need any of this extra work. Your app is already built; it only needs to be run. The dotnet <dll> syntax does this alone, so your app starts much faster.
在生产环境中,您不需要任何额外的工作。您的应用程序已构建完毕;它只需要运行。dotnet <dll>语法单独执行此作,因此您的应用启动速度要快得多。

NOTE The dotnet command used to run your published application is part of the .NET Runtime. The (identically named) dotnet command used to build and run your application during development is part of the .NET software development kit (SDK).
注意:用于运行已发布应用程序的 dotnet 命令是 .NET 运行时的一部分。在开发过程中用于生成和运行应用程序的(同名)dotnet 命令是 .NET 软件开发工具包 (SDK) 的一部分。

Framework-dependent deployments vs. self-contained deployments
依赖于框架的部署与独立部署:

.NET Core applications can be deployed in two ways: runtime-dependent deployments (RDD) and self-contained deployments (SCD).
.NET Core 应用程序可以通过两种方式进行部署:依赖于运行时的部署 (RDD) 和独立部署 (SCD)。

By default, you’ll use an RDD. This relies on the .NET 7 runtime being installed on the target machine that runs your published app, but you can run your app on any platform—Windows, Linux, or macOS—without having to recompile.
默认情况下,您将使用 RDD。这依赖于在运行已发布应用程序的目标计算机上安装的 .NET 7 运行时,但您可以在任何平台(Windows、Linux 或 macOS)上运行您的应用程序,而无需重新编译。

By contrast, an SCD contains all the code required to run your app, so the target machine doesn’t need to have .NET 7 installed. Instead, publishing your app packages up the .NET 7 runtime with your app’s code and libraries.
相比之下,SCD 包含运行应用程序所需的所有代码,因此目标计算机不需要安装 .NET 7。相反,将应用与应用的代码和库一起发布到 .NET 7 运行时中。

Each approach has its pros and cons, but in most cases I tend to create RDDs. The final size of RDDs is much smaller, as they contain only your app code instead of the whole .NET 7 framework, which SCDs contain. Also, you can deploy your RDD apps to any platform, whereas SCDs must be compiled specifically for the target machine’s operating system, such as Windows 10 64-bit or Red Hat Enterprise Linux 64-bit.
每种方法都有其优点和缺点,但在大多数情况下,我倾向于创建 RDD。RDD 的最终大小要小得多,因为它们仅包含您的应用程序代码,而不是 SCD 包含的整个 .NET 7 框架。此外,您可以将 RDD 应用程序部署到任何平台,而 SCD 必须专门为目标计算机的作系统(例如 Windows 10 64 位或 Red Hat Enterprise Linux 64 位)进行编译。

That said, SCDs are excellent for isolating your application from dependencies on the hosting machine. SCDs don’t rely on the version of .NET installed on a hosting provider, so you can (for example) use preview versions of .NET in Azure App Service without needing the preview version to be supported.
也就是说,SCD 非常适合将您的应用程序与主机上的依赖项隔离开来。SCD 不依赖于托管提供商上安装的 .NET 版本,因此你可以(例如)在 Azure 应用服务中使用 .NET 的预览版,而无需支持预览版。

Another advantage of SCDs is for regulated industries that require certification or procedure to change applications. In RDDs (such as in Azure App Service) the underlying runtime may be patched at any time without your intervention, potentially leading to noncompliance. With SCDs, your app contains a fixed runtime and can be considered an immutable snapshot of your app. Of course, that means you must make sure to patch the runtime of your SCDs manually, performing regular deployments. Patch versions of the .NET runtime are generally released every month, so make sure to plan for at least monthly releases of your SCD apps.
SCD 的另一个优势是适用于需要认证或程序来更改应用程序的受监管行业。在 RDD 中(例如在 Azure 应用服务中),可能随时修补基础运行时,而无需您的干预,这可能会导致不合规。使用 SCD 时,您的应用程序包含固定的运行时,并且可以被视为应用程序的不可变快照。当然,这意味着您必须确保手动修补 SCD 的运行时,并执行定期部署。.NET 运行时的补丁版本通常每个月发布一次,因此请确保至少每月发布一次 SCD 应用程序。

In this book I discuss RDDs only for simplicity, but if you want to create an SCD, provide a runtime identifier (in this case, Windows 10 64-bit) when you publish your app:
在本书中,我讨论 RDD 只是为了简单起见,但如果您想创建一个 SCD,请在发布应用程序时提供运行时标识符(在本例中为 Windows 10 64 位):

dotnet publish -c Release -r win10-x64 --self-contained -o publish_folder

The output will contain an .exe file, which is your application, and a ton of .dlls (about 100 MB of .dlls for a default sample app), which are the .NET 7 framework. You need to deploy this whole folder to the target machine to run your app. Note that you need to publish for a specific operating system and architecture. The list of available runtime identifiers is available in the documentation at http://mng.bz/Aolp.
输出将包含一个 .exe 文件(即您的应用程序)和大量 .dll(默认示例应用程序约为 100 MB 的 .dll),即 .NET 7 框架。您需要将整个文件夹部署到目标计算机才能运行您的应用程序。请注意,您需要针对特定的作系统和架构进行发布。可用运行时标识符的列表可在 http://mng.bz/Aolp 的文档中找到。

In .NET 7 it’s possible to trim these assemblies during the publish process, but this comes with risks in some scenarios. You can also bundle this folder into a single file automatically for easier deployments. For more details, see Microsoft’s “.NET application publishing overview” documentation at https://learn.microsoft.com/dotnet/core/deploying.
在 .NET 7 中,可以在发布过程中剪裁这些程序集,但在某些情况下,这会带来风险。您还可以自动将此文件夹捆绑到一个文件中,以便于部署。有关更多详细信息,请参阅 https://learn.microsoft.com/dotnet/core/deploying Microsoft的“.NET 应用程序发布概述”文档。

We’ve established that publishing your app is important for preparing it to run in production, but how do you go about deploying it? How do you get the files from your computer onto a server so that people can access your app? You have many, many options, so in the next section I’ll give you a brief list of approaches to consider.
我们已经确定,发布您的应用程序对于准备在生产环境中运行非常重要,但您如何部署它呢?如何将文件从计算机传输到服务器上,以便人们可以访问您的应用程序?您有很多很多选择,因此在下一节中,我将简要列出要考虑的方法。

27.1.2 Choosing a deployment method for your application

27.1.2 为应用程序选择部署方法

To deploy any application to production, you generally have two fundamental requirements:
要将任何应用程序部署到生产环境,您通常有两个基本要求:

• A server that can run your app
可以运行应用程序的服务器
• A means of loading your app onto the server
将应用程序加载到服务器上的方法

Historically, putting an app into production was a laborious and error-prone process. For many people, this is still true. If you’re working at a company that hasn’t changed practices in recent years, you may need to request a server or virtual machine for your app and provide your application to an operations team that will install it for you. If that’s the case, you may have your hands tied regarding how you deploy.
从历史上看,将应用程序投入生产是一个费力且容易出错的过程。对许多人来说,这仍然是正确的。如果你在一家近年来没有改变做法的公司工作,你可能需要为你的应用程序请求一个服务器或虚拟机,并将你的应用程序提供给运营团队,由他们为你安装它。如果是这种情况,您可能会在部署方式上束手无策。

For those who have embraced continuous integration (CI) or continuous delivery/deployment (CD), there are many more possibilities. CI/CD is the process of detecting changes in your version control system (for example, Git, SVN, Mercurial, or Team Foundation Version Control) and automatically building, and potentially deploying, your application to a server with little to no human intervention.
对于那些已经接受持续集成 (CI) 或持续交付/部署 (CD) 的人来说,还有更多的可能性。CI/CD 是检测版本控制系统(例如 Git、SVN、Mercurial 或 Team Foundation 版本控制)中的更改并自动构建应用程序并可能将应用程序部署到服务器的过程,几乎不需要人工干预。

NOTE There are important but subtle differences between these terms. Atlassian has a good comparison article, “Continuous integration vs. continuous delivery vs. continuous deployment,” at http://mng.bz/vzp4.
注意:这些术语之间存在重要但细微的差异。Atlassian 在 http://mng.bz/vzp4 上有一篇很好的比较文章“持续集成、持续交付与持续部署”。

There are many CI/CD systems out there—Azure DevOps, GitHub Actions, Jenkins, TeamCity, AppVeyor, Travis, and Octopus Deploy, to name a few. Each can manage some or all of the CI/CD process and can integrate with many systems.
有许多 CI/CD 系统,包括 Azure DevOps、GitHub Actions、Jenkins、TeamCity、AppVeyor、Travis 和 Octopus Deploy 等。每个系统都可以管理部分或全部 CI/CD 流程,并且可以与许多系统集成。

Rather than push any particular system, I suggest trying some of the services available and seeing which works best for you. Some are better suited to open-source projects, and some are better when you’re deploying to cloud services; it all depends on your particular situation.
与其推动任何特定的系统,我建议尝试一些可用的服务,看看哪种最适合您。有些更适合开源项目,有些更适合部署到云服务;这完全取决于您的具体情况。

If you’re getting started with ASP.NET Core and don’t want to have to go through the setup process of getting CI working, you still have lots of options. The easiest way to get started with Visual Studio is to use the built-in deployment options. These are available from Visual Studio via the Build > Publish <AppName> command, which presents the screen shown in figure 27.4.
如果您刚开始使用 ASP.NET Core,并且不想完成让 CI 正常工作的设置过程,那么您仍然有很多选择。开始使用 Visual Studio 的最简单方法是使用内置的部署选项。这些可以通过命令从 Visual Studio Build > Publish <AppName> 获得,该命令显示图 27.4 所示的屏幕。

alt text

Figure 27.4 The Publish application screen in Visual Studio 2022. This provides easy options for publishing your application directly to Azure App Service, to IIS, to an FTP site, or to a folder on the local machine.
图 27.4 Visual Studio 2022 中的 Publish application(发布应用程序)屏幕。这为将应用程序直接发布到 Azure 应用服务、IIS、FTP 站点或本地计算机上的文件夹提供了简单的选项。

From here, you can publish your application directly from Visual Studio to many locations. This is great when you’re getting started, though I recommend looking at a more automated and controlled approach when you have a larger application or a whole team working on a single app.
在这里,您可以直接从 Visual Studio 将应用程序发布到许多位置。这在您开始时非常有用,但当您有更大的应用程序或整个团队在开发单个应用程序时,我建议您考虑一种更加自动化和可控的方法。

TIP For guidance on choosing your Visual Studio publishing options, see Microsoft’s “Deploy your app to a folder, IIS, Azure, or another destination” documentation at http://mng.bz/4Z8j.
提示:有关选择 Visual Studio 发布选项的指导,请参阅 http://mng.bz/4Z8j Microsoft的“将应用程序部署到文件夹、IIS、Azure 或其他目标”文档。

Given the number of possibilities available in this space and the speed with which these options change, I’m going to focus on one specific scenario in this chapter: you’ve built an ASP.NET Core application, and you need to deploy it. You have access to a Windows server that’s already serving legacy .NET Framework ASP.NET applications using IIS, and you want to run your ASP.NET Core app alongside them.
考虑到此领域中可用的可能性数量以及这些选项变化的速度,我将在本章中重点介绍一个特定场景:您已经构建了一个 ASP.NET Core 应用程序,并且需要部署它。您可以访问已使用 IIS 为旧版 .NET Framework ASP.NET 应用程序提供服务的 Windows 服务器,并且您希望与它们一起运行 ASP.NET Core 应用程序。

In the next section you’ll see an overview of the steps required to run an ASP.NET Core application in production, using IIS as a reverse proxy. It won’t be a master class in configuring IIS (there’s so much depth to the 25-year-old product that I wouldn’t know where to start!), but I’ll cover the basics needed to get your application serving requests.
在下一部分中,你将看到使用 IIS 作为反向代理在生产中运行 ASP.NET Core 应用程序所需步骤的概述。它不会是配置 IIS 的大师课程(这个 25 年前的产品有太多的深度,我不知道从哪里开始!),但我将介绍让您的应用程序为请求提供服务所需的基础知识。

27.2 Publishing your app to IIS

27.2 将应用程序发布到 IIS

In this section I briefly show you how to publish your first app to IIS. You’ll add an application pool and website to IIS and ensure that your app has the necessary configuration to work with IIS as a reverse proxy. The deployment itself will be as simple as copying your published app to IIS’s hosting folder.
在本节中,我将简要介绍如何将第一个应用程序发布到 IIS。你将向 IIS 添加应用程序池和网站,并确保你的应用程序具有将 IIS 用作反向代理所需的配置。部署本身就像将您发布的应用程序复制到 IIS 的托管文件夹一样简单。

In section 27.1 you learned about the need to publish an app before you deploy it and the benefits of using a reverse proxy when you run an ASP.NET Core app in production. If you’re deploying your application to Windows, IIS will likely be your reverse proxy and will be responsible for managing your application.
在第 27.1 节中,您了解了在部署应用程序之前发布应用程序的必要性,以及在生产环境中运行 ASP.NET Core 应用程序时使用反向代理的好处。如果要将应用程序部署到 Windows,IIS 可能是您的反向代理,并负责管理您的应用程序。

IIS is an old and complex beast, and I can’t possibly cover everything related to configuring it in this book. Neither would you want me to; that discussion would be boring! Instead, in this section I’ll provide an overview of the basic requirements for running ASP.NET Core behind IIS, along with the changes you may need to make to your application to support IIS.
IIS 是一个古老而复杂的野兽,我不可能在本书中涵盖与配置它相关的所有内容。你也不希望我这样做;那个讨论会很无聊!相反,在本节中,我将概述在 IIS 后面运行 ASP.NET Core 的基本要求,以及您可能需要对应用程序进行的更改以支持 IIS。

If you’re on Windows and want to try these steps locally, you’ll need to enable IIS manually on your development machine. If you’ve done this with older versions of Windows, nothing much has changed. You can find a step-by-step guide to configuring IIS and troubleshooting tips in the ASP.NET Core documentation at http://mng.bz/6g2R.
如果您使用的是 Windows 并希望在本地尝试这些步骤,则需要在开发计算机上手动启用 IIS。如果你在旧版本的 Windows 上这样做了,那么没有什么太大的变化。您可以在 http://mng.bz/6g2R 的 ASP.NET Core 文档中找到配置 IIS 的分步指南和故障排除提示。

27.2.1 Configuring IIS for ASP.NET Core

27.2.1 为 ASP.NET Core 配置 IIS

The first step in preparing IIS to host ASP.NET Core applications is installing the ASP.NET Core Windows Hosting Bundle (http://mng.bz/opED). This includes several components needed to run .NET apps:
准备 IIS 以托管 ASP.NET Core 应用程序的第一步是安装 ASP.NET Core Windows 托管捆绑包 (http://mng.bz/opED)。这包括运行 .NET 应用所需的几个组件:

• The .NET Runtime—Runs your .NET 7 application
.NET 运行时 - 运行 .NET 7 应用程序

• The ASP.NET Core Runtime—Required to run ASP.NET Core apps
ASP.NET Core 运行时 - 运行 ASP.NET Core 应用程序所需

• The IIS AspNetCore Module—Provides the link between IIS and your app so that IIS can act as a reverse proxy
IIS AspNetCore 模块 - 提供 IIS 和应用程序之间的链接,以便 IIS 可以充当反向代理

If you’re going to be running IIS on your development machine, make sure that you install the bundle as well; otherwise, you’ll get strange errors from IIS.
如果要在开发计算机上运行 IIS,请确保同时安装捆绑包;否则,您将从 IIS 收到奇怪的错误。

TIP The Windows Hosting Bundle provides everything you need for running ASP.NET Core behind IIS in Windows. If you’re hosting your application in Linux or Mac, or aren’t using IIS in Windows, you need to install only the .NET Runtime and ASP.NET Core Runtime to run runtime-dependent ASP.NET Core apps. Note that you need to install the IIS AspNetCore Module even if you are using SCDs.
提示:Windows 托管捆绑包提供了在 Windows 中在 IIS 后面运行 ASP.NET Core 所需的一切。如果您在 Linux 或 Mac 中托管应用程序,或者不在 Windows 中使用 IIS,则只需安装 .NET 运行时和 ASP.NET Core 运行时即可运行依赖于运行时的 ASP.NET Core 应用程序。请注意,即使您使用的是 SCD,也需要安装 IIS AspNetCore 模块。

Once you’ve installed the bundle, you need to configure an application pool in IIS for your ASP.NET Core apps. Previous versions of ASP.NET would run in a managed app pool that used .NET Framework, but for ASP.NET Core you should create a No Managed Code pool. The native ASP.NET Core Module runs inside the pool, which boots the .NET 7 Runtime itself.
安装捆绑包后,您需要在 IIS 中为 ASP.NET Core 应用程序配置应用程序池。早期版本的 ASP.NET 将在使用 .NET Framework 的托管应用程序池中运行,但对于 ASP.NET Core,您应该创建一个无托管代码池。本机 ASP.NET Core Module 在池内运行,该池启动 .NET 7 运行时本身。

DEFINITION An application pool in IIS represents an application process. You can run each app in IIS in a separate application pool to keep the apps isolated from one another.
定义:IIS 中的应用程序池表示应用程序进程。您可以在 IIS 中的单独应用程序池中运行每个应用程序,以使应用程序彼此隔离。

To create an unmanaged application pool, right-click Application Pools in IIS and choose Add Application Pool from the contextual menu. Provide a name for the app pool in the resulting dialog box, such as dotnet7, and set the .NET CLR version to No Managed Code, as shown in figure 27.5.
要创建非托管应用程序池,请右键单击 IIS 中的应用程序池,然后从上下文菜单中选择添加应用程序池。在生成的对话框中为应用程序池提供一个名称,例如 dotnet7,并将 .NET CLR 版本设置为“无托管代码”,如图 27.5 所示。

alt text

Figure 27.5 Creating an app pool in IIS for your ASP.NET Core app. The .NET CLR version should be set to No Managed Code.
图 27.5 在 IIS 中为您的 ASP.NET Core 应用程序创建应用程序池。.NET CLR 版本应设置为无托管代码。

Now that you have an app pool, you can add a new website to IIS. Right-click the Sites node, and choose Add Website from the contextual menu. In the Add Website dialog box, shown in figure 27.6, you provide a name for the website and the path to the folder where you’ll publish your website. I created a folder that I’ll use to deploy the Recipe app from previous chapters. It’s important to change the Application Pool for the app to the new dotnet7 app pool you created. In production, you’d also provide a hostname for the application, but I’ve left it blank for now in this example and changed the port to 81 so the application will bind to the URL http://localhost:81.
现在,您已拥有应用程序池,可以向 IIS 添加新网站。右键单击 Sites 节点,然后从上下文菜单中选择 Add Website。在 Add Website 对话框中(如图 27.6 所示),您需要提供网站的名称以及要发布网站的文件夹的路径。我创建了一个文件夹,我将使用它来部署前面章节中的 Recipe 应用程序。请务必将应用的 Application Pool(应用程序池)更改为您创建的新 dotnet7 应用程序池。在生产环境中,您还需要为应用程序提供主机名,但在此示例中,我暂时将其留空,并将端口更改为 81,以便应用程序将绑定到 URL http://localhost:81

NOTE When you deploy an application to production, you need to register a hostname with a domain registrar so that your site is accessible by people on the internet. Use that hostname when configuring your application in IIS, as shown in figure 27.6.
注意:当您将应用程序部署到生产环境时,您需要向域注册商注册主机名,以便 Internet 上的用户可以访问您的站点。在 IIS 中配置应用程序时,请使用该主机名,如图 27.6 所示。

alt text

Figure 27.6 Adding a new website to IIS for your app. Be sure to change the Application Pool to the No Managed Code pool created in the previous step. You also provide a name, the path where you’ll publish your app files, and the URL that IIS will use for your app.
图 27.6 为您的应用程序向 IIS 添加新网站。请务必将 Application Pool(应用程序池)更改为在上一步中创建的 No Managed Code (无托管代码) 池。您还提供名称、发布应用程序文件的路径以及 IIS 将用于应用程序的 URL。

Once you click OK, IIS creates the application and attempts to start it. But you haven’t published your app to the folder, so you won’t be able to view it in a browser yet.
单击“确定”后,IIS 将创建应用程序并尝试启动它。但是您尚未将应用程序发布到该文件夹,因此您尚无法在浏览器中查看它。

You need to carry out one more critical setup step before you can publish and run your app: grant permissions for the dotnet7 app pool to access the path where you’ll publish your app. To do this, right-click the folder that will host your app in Windows File Explorer, and choose Properties from the contextual menu. In the Properties dialog box, choose Security > Edit > Add. Enter IIS AppPool\dotnet7 in the text box, as shown in figure 27.7, where dotnet7 is the name of your app pool; then choose OK. Close all the dialog boxes by choosing OK, and you’re all set.
在发布和运行应用之前,还需要执行一个关键的设置步骤:为 dotnet7 应用池授予访问将发布应用的路径的权限。为此,请右键单击将在 Windows 文件资源管理器中托管您的应用程序的文件夹,然后从上下文菜单中选择 Properties (属性)。在 Properties (属性) 对话框中,选择 Security > Edit > Add。在文本框中输入 IIS AppPool\dotnet7,如图 27.7 所示,其中 dotnet7 是应用程序池的名称;然后选择 OK (确定)。选择 OK (确定) 关闭所有对话框,一切就绪。Security > Edit > Add

alt text

Figure 27.7 Adding permission for the dotnet7 app pool to the website’s publish folder
图 27.7 将 dotnet7 应用池的权限添加到网站的发布文件夹

Out of the box, the ASP.NET Core templates are configured to work seamlessly with IIS, but if you’ve created an app from scratch, you may need to make a couple of changes. In the next section I’ll briefly show the changes you need to make and explain why they’re necessary.
开箱即用的 ASP.NET Core 模板配置为与 IIS 无缝协作,但如果您从头开始创建应用程序,则可能需要进行一些更改。在下一节中,我将简要介绍您需要进行的更改,并解释为什么这些更改是必需的。

27.2.2 Preparing and publishing your application to IIS

27.2.2 准备应用程序并将其发布到 IIS

As I discussed in section 27.1, IIS acts as a reverse proxy for your ASP.NET Core app. That means IIS needs to be able to communicate directly with your app to forward incoming requests to and outgoing responses from your app.
正如我在 Section 27.1 中所讨论的,IIS 充当 ASP.NET Core 应用程序的反向代理。这意味着 IIS 需要能够直接与你的应用程序通信,以将传入请求转发到你的应用程序以及从你的应用程序转发传出响应。

IIS handles this with the ASP.NET Core Module, but a certain degree of negotiation is required between IIS and your app. For this to work correctly, you need to configure your app to use IIS integration.
IIS 使用 ASP.NET 核心模块处理此问题,但 IIS 和你的应用程序之间需要一定程度的协商。要使其正常工作,您需要将应用程序配置为使用 IIS 集成。

IIS integration is added automatically when you use WebApplicationBuilder, so there’s typically nothing more to do. However, in chapter 30 you’ll learn about the generic host and how to create custom application builders using HostBuilder. If your app uses a customer application builder and you want to use IIS, you need to ensure that you add IIS integration with the UseIIS() or UseIISIntegration() extension methods:
当您使用 WebApplicationBuilder 时,会自动添加 IIS 集成,因此通常无需执行更多作。但是,在第 30 章中,您将了解通用主机以及如何使用 HostBuilder 创建自定义应用程序构建器。如果您的应用程序使用客户应用程序构建器,并且您想要使用 IIS,则需要确保添加与 UseIIS() 或 UseIISIntegration() 扩展方法的 IIS 集成:

• UseIIS() configures your application to support IIS with an in-process hosting model.
UseIIS() 将应用程序配置为使用进程内托管模型支持 IIS。

• UseIISIntegration() configures your application to support IIS with an out-of-process hosting model.
UseIISIntegration() 将应用程序配置为使用进程外托管模型支持 IIS。

These methods are automatically called by WebApplicationBuilder, but if you’re not using your application with IIS, the UseIIS() and UseIISIntegration() methods will have no effect on your app, so it’s safe to include them anyway.
这些方法由 WebApplicationBuilder 自动调用,但如果您未将应用程序与 IIS 一起使用,则 UseIIS() 和 UseIISIntegration() 方法将对您的应用程序没有影响,因此无论如何都包含它们是安全的。

In-process vs. out-of-process hosting in IIS
IIS中的进程内托管与进程外托管

The common reverse-proxy description assumes that your application is running in a separate process from the reverse proxy itself. That is the case if you’re running on Linux and was the default for IIS up until ASP.NET Core 3.0.
常见的反向代理描述假定应用程序在与反向代理本身不同的进程中运行。如果您在 Linux 上运行,并且在 ASP.NET Core 3.0 之前是 IIS 的默认设置,则会出现这种情况。

In ASP.NET Core 3.0, ASP.NET Core switched to using an in-process hosting model by default for applications deployed to IIS. In this model, IIS hosts your application directly inside the IIS process, reducing interprocess communication and boosting performance.
在 ASP.NET Core 3.0 中,ASP.NET Core 默认切换到对部署到 IIS 的应用程序使用进程内托管模型。在此模型中,IIS 直接在 IIS 进程内托管您的应用程序,从而减少进程间通信并提高性能。

You can switch to the out-of-process hosting model with IIS if you wish, which can sometimes be useful for troubleshooting problems. Rick Strahl has an excellent post on the differences between the hosting models, how to switch between them, and the advantages of each: “ASP.NET Core In Process Hosting on IIS with ASP.NET Core” at http://mng.bz/QmEv.
如果需要,可以使用 IIS 切换到进程外托管模型,这有时可用于解决问题。Rick Strahl 有一篇关于托管模型之间的差异、如何在它们之间切换以及每种模型的优点的优秀文章:http://mng.bz/QmEv 上的“使用 ASP.NET Core 在 IIS 上进行 ASP.NET Core In Process 托管”。

In general, you shouldn’t need to worry about the differences between the hosting models, but it’s something to be aware of if you’re deploying to IIS. If you choose to use the out-of-process hosting model, you should use the UseIISIntegration() extension method. If you use the in-process model, use UseIIS(). Alternatively, play it safe and use both; the correct extension method is activated based on the hosting model used in production. Neither extension does anything if you don’t use IIS.
通常,您不需要担心托管模型之间的差异,但如果您要部署到 IIS,则需要注意这一点。如果您选择使用进程外托管模型,则应使用 UseIISIntegration() 扩展方法。如果使用进程内模型,请使用 UseIIS()。或者,安全起见,两者兼而有之;根据生产中使用的托管模型激活正确的扩展方法。如果您不使用 IIS,则两个扩展都不会执行任何作。

When running behind IIS, these extension methods configure your app to pair with IIS so that it can seamlessly accept requests. Among other things, the extensions do the following:
在 IIS 后面运行时,这些扩展方法将你的应用配置为与 IIS 配对,以便它可以无缝接受请求。此外,扩展还执行以下作:

• Define the URL that IIS uses to forward requests to your app and configures your app to listen on this URL
定义 IIS 用于将请求转发到应用程序的 URL,并将应用程序配置为侦听此 URL

• Configure your app to interpret requests coming from IIS as coming from the client by setting up header forwarding
通过设置标头转发,将应用程序配置为将来自 IIS 的请求解释为来自客户端的请求

• Enable Windows authentication if required
根据需要启用 Windows 身份验证

Adding the IIS extension methods is the only change you need to make to your application to host in IIS (and even then, only when using a custom application builder). But there’s one additional aspect to be aware of when you publish your app. As with legacy .NET Framework ASP.NET, IIS relies on a web.config file to configure the applications it runs. It’s important that your application include a web.config file when it’s published to IIS; otherwise you could get broken behavior or even expose files that shouldn’t be exposed.
添加 IIS 扩展方法是您需要对要在 IIS 中托管的应用程序进行的唯一更改(即使这样,也仅在使用自定义应用程序构建器时)。但是,在发布应用程序时,还有一个方面需要注意。与旧版 .NET Framework ASP.NET 一样,IIS 依赖于 web.config 文件来配置它运行的应用程序。应用程序在发布到 IIS 时必须包含 web.config 文件;否则,您可能会破坏行为,甚至暴露不应公开的文件。

TIP For details on using web.config to customize the IIS AspNetCore Module, see Microsoft’s “ASP.NET Core Module” documentation: http://mng.bz/Xdna.
提示:有关使用 web.config 自定义 IIS AspNetCore 模块的详细信息,请参阅 Microsoft 的“ASP.NET Core Module”文档:http://mng.bz/Xdna

If your ASP.NET Core project already includes a web.config file, the .NET CLI or Visual Studio copies it to the publish directory when you publish your app. If your app doesn’t include a web.config file, the publish command creates the correct one for you. If you don’t need to customize the web.config file, it’s generally best not to include one in your project and let the CLI create the correct file for you.
如果您的 ASP.NET Core 项目已包含 web.config 文件,则 .NET CLI 或 Visual Studio 会在您发布应用程序时将其复制到发布目录。如果您的应用程序不包含 web.config 文件,则 publish 命令将为您创建正确的文件。如果您不需要自定义 web.config 文件,通常最好不要在项目中包含一个文件,并让 CLI 为您创建正确的文件。

With these changes, you’re finally in a position to publish your application to IIS. Publish your ASP.NET Core app to a folder, either from Visual Studio or with the .NET CLI, by running
通过这些更改,您终于可以将应用程序发布到 IIS。通过运行 Visual Studio 或使用 .NET CLI 将 ASP.NET Core 应用发布到文件夹

dotnet publish --output publish_folder --configuration Release

This will publish your application to the publish_folder folder. You can then copy your application to the path specified in IIS, as shown in figure 27.6. At this point, if all has gone smoothly, you should be able to navigate to the URL you specified for your app (http://localhost:81, in my case) and see it running, as shown in figure 27.8.
这会将您的应用程序发布到 publish_folder 文件夹。然后,您可以将应用程序复制到 IIS 中指定的路径,如图 27.6 所示。此时,如果一切顺利,您应该能够导航到您为应用程序指定的 URL(在本例中为 http://localhost:81 URL)并看到它正在运行,如图 27.8 所示。

alt text

Figure 27.8 The published application, using IIS as a reverse proxy listening at the URL http://localhost:81
图 27.8 已发布的应用程序,使用 IIS 作为反向代理侦听 URL http://localhost:81

And there you have it—your first application running behind a reverse proxy. Even though ASP.NET Core uses a different hosting model from previous versions of ASP.NET, the process of configuring IIS is similar.
这就是 - 在反向代理后面运行的第一个应用程序。尽管 ASP.NET Core 使用的托管模型与以前版本的 ASP.NET 不同,但配置 IIS 的过程是相似的。

As is often the case when it comes to deployment, the success you have is highly dependent on your precise environment and your app itself. If, after following these steps, you find that you can’t get your application to start, I highly recommend checking out the documentation at http://mng.bz/Zqom. This contains many troubleshooting steps to get you back on track if IIS decides to throw a hissy fit.
与部署时的情况一样,您获得的成功在很大程度上取决于您的精确环境和应用程序本身。如果在执行这些步骤后,您发现无法启动应用程序,我强烈建议您查看 http://mng.bz/Zqom 上的文档。这包含许多故障排除步骤,以便在 IIS 决定发出嘶嘶声时让您回到正轨。

This section was deliberately tailored to deploying to IIS, as it provides a great segue for developers who are used to deploying legacy ASP.NET apps and want to deploy their first ASP.NET Core app. But that’s not to say that IIS is the only, or best, place to host your application.
本部分专为部署到 IIS 而定制,因为它为习惯于部署旧版 ASP.NET 应用并希望部署其第一个 ASP.NET Core 应用的开发人员提供了一个很好的 segue。但这并不是说 IIS 是托管应用程序的唯一或最佳位置。

In the next section I provide a brief introduction to hosting your app on Linux, behind a reverse proxy like NGINX or Apache. I won’t go into configuration of the reverse proxy itself, but I will provide an overview of things to consider and resources you can use to run your applications on Linux.
在下一节中,我将简要介绍如何在 Linux 上托管您的应用程序,在 NGINX 或 Apache 等反向代理后面。我不会介绍反向代理本身的配置,但我将概述需要考虑的事项以及可用于在 Linux 上运行应用程序的资源。

27.3 Hosting an application in Linux

27.3 在 Linux 中托管应用程序

One of the great new features in ASP.NET Core is the ability to develop and deploy applications cross-platform, whether on Windows, Linux, or macOS. The ability to run on Linux in particular opens the possibility of cheaper deployments to cloud hosting, deploying to small devices like a Raspberry Pi or to Docker containers.
ASP.NET Core 中的一项出色的新功能是能够跨平台开发和部署应用程序,无论是在 Windows、Linux 还是 macOS 上。特别是在 Linux 上运行的能力为以更便宜的价格部署到云托管、部署到 Raspberry Pi 等小型设备或 Docker 容器提供了可能性。

One of the characteristics of Linux is that it’s almost infinitely configurable. Although that’s definitely a feature, it can also be extremely daunting, especially if you’re coming from the Windows world of wizards and GUIs. This section provides an overview of what it takes to run an application on Linux. It focuses on the broad steps you need to take rather than the somewhat-tedious details of the configuration itself. Instead, I point to resources you can refer to as necessary.
Linux 的一个特点是它几乎可以无限配置。虽然这绝对是一个功能,但它也可能非常令人生畏,特别是如果您来自向导和 GUI 的 Windows 世界。本节概述了在 Linux 上运行应用程序所需的条件。它侧重于您需要采取的广泛步骤,而不是配置本身的有点乏味的细节。相反,我指出了您可以根据需要参考的资源。

27.3.1 Running an ASP.NET Core app behind a reverse proxy in Linux

27.3.1 在 Linux 中的反向代理后面运行 ASP.NET Core 应用程序

You’ll be glad to hear that running your application on Linux is broadly the same as running your application on Windows with IIS:
您会很高兴地听到,在 Linux 上运行应用程序与使用 IIS 在 Windows 上运行应用程序大致相同:

  1. Publish your app using dotnet publish. If you’re creating an RDD, the output is the same as you’d use with IIS. For an SCD, you must provide the runtime identifier, as described in section 27.1.1.
    使用 dotnet publish 发布应用。如果要创建 RDD,则输出与用于 IIS 的输出相同。对于 SCD,您必须提供运行时标识符,如第 27.1.1 节中所述。

  2. Install the necessary prerequisites on the server. For an RDD deployment, you must install the .NET 7 Runtime and the necessary prerequisites. You can find details on this in Microsoft’s “Install .NET on Linux” documentation at http://mng.bz/Rxlj.
    在服务器上安装必要的先决条件。对于 RDD 部署,您必须安装 .NET 7 运行时和必要的先决条件。您可以在 http://mng.bz/Rxlj 的 Microsoft 的“在 Linux 上安装 .NET”文档中找到有关此内容的详细信息。

  3. Copy your app to the server. You can use any mechanism you like: FTP, USB stick, or whatever you need to get your files onto the server!
    将您的应用复制到服务器。您可以使用任何您喜欢的机制:FTP、U 盘或任何您需要将文件放到服务器上的机制!

  4. Configure a reverse proxy, and point it to your app. As you know by now, you may want to run your app behind a reverse proxy, for the reasons described in section 27.1. In Windows you’d use IIS, but in Linux you have more options. NGINX, Apache, and HAProxy are commonly used options. The ASP.NET Core-based YARP is also an option (https://microsoft.github.io/reverse-proxy). Alternatively, go without, and expose your app directly to the network.
    配置反向代理,并将其指向您的应用。正如您现在所知,出于第 27.1 节中描述的原因,您可能希望在反向代理后面运行您的应用程序。在 Windows 中,您将使用 IIS,但在 Linux 中,您有更多选择。NGINX、Apache 和 HAProxy 是常用的选项。基于 ASP.NET Core 的 YARP 也是一个选项 (https://microsoft.github.io/reverse-proxy)。或者,不这样做,直接将你的应用公开给网络

  5. Configure a process-management tool for your app. In Windows, IIS acts as both a reverse proxy and a process manager, restarting your app if it crashes or stops responding. In Linux, you typically need to configure a separate process manager to handle these duties; the reverse proxies won’t do them for you.
    为您的应用程序配置进程管理工具。在 Windows 中,IIS 既充当反向代理又充当进程管理器,如果应用程序崩溃或停止响应,则会重新启动应用程序。在 Linux 中,通常需要配置单独的进程管理器来处理这些任务;反向代理不会为您做这些事情。

The first three steps are generally the same, whether you’re running in Windows with IIS or in Linux, but the last two steps are more interesting. By contrast with the monolithic IIS, Linux has a philosophy of small applications, each with a single responsibility.
无论您是在带有 IIS 的 Windows 中运行,还是在 Linux 中运行,前三个步骤通常是相同的,但最后两个步骤更有趣。与整体式 IIS 相比,Linux 的理念是小型应用程序,每个应用程序都有单一的责任。

IIS runs on the same server as your app and takes on multiple duties—proxying traffic from the internet to your app, but also monitoring the app process itself. If your app crashes or stops responding, IIS restarts the process to ensure that you can keep handling requests.
IIS 与您的应用程序运行在同一台服务器上,并承担多项任务 — 将流量从 Internet 代理到您的应用程序,同时还要监控应用程序进程本身。如果您的应用程序崩溃或停止响应,IIS 将重新启动该过程以确保您可以继续处理请求。

In Linux, the reverse proxy might be running on the same server as your app, but it’s also common for it to be running on a different server, as shown in figure 27.9. This is similarly true if you choose to deploy your app to Docker; your app would typically be deployed in a container without a reverse proxy, and a reverse proxy on a server would point to your Docker container.
在 Linux 中,反向代理可能与您的应用程序运行在同一台服务器上,但它在不同的服务器上运行也很常见,如图 27.9 所示。如果您选择将应用程序部署到 Docker,则情况类似;您的应用程序通常会部署在没有反向代理的容器中,而服务器上的反向代理将指向您的 Docker 容器。

alt text

Figure 27.9 In Linux, it’s common for a reverse proxy to be on a different server from your app. The reverse proxy forwards incoming requests to your app, while a process manager, such as systemd, monitors your apps for crashes and restarts it as appropriate.
图 27.9 在 Linux 中,反向代理与你的应用程序位于不同的服务器上是很常见的。反向代理将传入请求转发到您的应用程序,而进程管理器(如 systemd)会监控您的应用程序是否崩溃并根据需要重新启动它。

As the reverse proxies aren’t necessarily on the same server as your app, they can’t be used to restart your app if it crashes. Instead, you need to use a process manager such as systemd to monitor your app. If you’re using Docker, you typically use a container orchestrator such as Kubernetes (https://kubernetes.io) to monitor the health of your containers.
由于反向代理不一定与您的应用程序位于同一服务器上,因此如果应用程序崩溃,它们不能用于重新启动应用程序。相反,您需要使用进程管理器(如 systemd)来监控您的应用程序。如果您使用的是 Docker,则通常使用 Kubernetes (https://kubernetes.io) 等容器编排器来监控容器的运行状况。

Running ASP.NET Core applications in Docker
在 Docker中运行 ASP.NET Core 应用程序

Docker is the most commonly used engine for containerizing your applications. A container is like a small, lightweight virtual machine, specific to your app. It contains an operating system, your app, and any dependencies for your app. This container can then be run on any machine that runs Docker, and your app will run exactly the same, regardless of the host operating system and what’s installed on it. This makes deployments highly repeatable: you can be confident that if the container runs on your machine, it will run on the server too.
Docker 是容器化应用程序最常用的引擎。容器类似于特定于您的应用程序的小型轻量级虚拟机。它包含作系统、应用程序以及应用程序的任何依赖项。然后,此容器可以在任何运行 Docker 的计算机上运行,并且无论主机作系统及其上安装的内容如何,您的应用程序都将以完全相同的方式运行。这使得部署具有高度的可重复性:您可以确信,如果容器在您的计算机上运行,它也将在服务器上运行。

All the major cloud vendors have support for running containers, either standalone or as part of an orchestration service. For example, in Azure, you can run containers in Azure App Service, Azure Container Instances, Azure Container Apps, and Azure Kubernetes Service. One advantage of containers is that you can easily use the same container in all these services or even move to a different cloud provider, and your app will run the same.
所有主要的云供应商都支持运行容器,无论是独立的还是作为编排服务的一部分。例如,在 Azure 中,可以在 Azure 应用服务、Azure 容器实例、Azure 容器应用和 Azure Kubernetes 服务中运行容器。容器的一个优点是,您可以轻松地在所有这些服务中使用相同的容器,甚至可以迁移到不同的云提供商,并且您的应用程序将以相同的方式运行。

ASP.NET Core is well suited to container deployments, but moving to Docker involves a big shift in your deployment methodology and may or may not be right for you and your apps. If you’re interested in the possibilities afforded by Docker and want to learn more, I suggest checking out the following resources:
ASP.NET Core 非常适合容器部署,但迁移到 Docker 涉及部署方法的重大转变,并且可能适合也可能不适合您和您的应用程序。如果您对 Docker 提供的可能性感兴趣并想了解更多信息,我建议您查看以下资源:

• Docker in Practice, 2nd ed., by Ian Miell and Aidan Hobson Sayers (Manning, 2019) provides a vast array of practical techniques to help you get the most out of Docker (http://mng.bz/nM8d).
Docker in Practice,第 2 版,由 Ian Miell 和 Aidan Hobson Sayers 编写(Manning,2019 年),提供了大量实用技术来帮助您充分利用 Docker (http://mng.bz/nM8d)。

• Even if you’re not deploying to Linux, you can use Docker with Docker for Windows. Check out the free e-book Introduction to Windows Containers, by John McCabe and Michael Friis (Microsoft Press, 2017), at https://aka.ms/containersebook.
即使您没有部署到 Linux,也可以将 Docker 与适用于 Windows 的 Docker 结合使用。查看 John McCabe 和 Michael Friis 合著的免费电子书 Introduction to Windows Containers(Microsoft出版社,2017 年),网址为 https://aka.ms/containersebook

• You can find a lot of details on building and running your ASP.NET Core applications on Docker in the .NET documentation at http://mng.bz/vz5a.
您可以在 http://mng.bz/vz5a 的 .NET 文档中找到有关在 Docker 上构建和运行 ASP.NET Core 应用程序的许多详细信息。

• Steve Gordon has an excellent blog post series on Docker for ASP.NET Core developers at http://mng.bz/2Da8.
Steve Gordon 在 http://mng.bz/2Da8 上为 ASP.NET Core 开发人员撰写了一篇关于 Docker 的优秀博客文章系列。

Configuring a reverse proxy and process manager on Linux is a laborious task that makes for dry reading, so I won’t detail it here. Instead, I recommend checking out the ASP.NET Core docs. They have a guide for NGINX and systemd, “Host ASP.NET Core on Linux with Nginx” (http://mng.bz/yYGd), and a guide for configuring Apache with systemd, “Host ASP.NET Core on Linux with Apache” (http://mng.bz/MXVB).
在 Linux 上配置反向代理和进程管理器是一项费力的任务,因此会枯燥阅读,因此我不会在这里详细说明。相反,我建议查看 ASP.NET Core 文档。他们有 NGINX 和 systemd 指南“使用 Nginx 在 Linux 上托管 ASP.NET Core”(http://mng.bz/yYGd),以及使用 systemd 配置 Apache 的指南“使用 Apache 在 Linux 上托管 ASP.NET Core”(http://mng.bz/MXVB)。

Both guides cover the basic configuration of the respective reverse proxies and systemd supervisors, but more important, they also show how to configure them securely. The reverse proxy sits between your app and the unfettered internet, so it’s important to get it right!
这两个指南都涵盖了相应的反向代理和 systemd 监控器的基本配置,但更重要的是,它们还展示了如何安全地配置它们。反向代理位于您的应用程序和不受限制的互联网之间,因此正确使用很重要!

Configuring the reverse proxy and the process manager is typically the most complex part of deploying to Linux, and that isn’t specific to .NET development: the same would be true if you were deploying a Node.js web app. But you need to consider a few things inside your application when you’re going to be deploying to Linux, as you’ll see in the next section.
配置反向代理和进程管理器通常是部署到 Linux 的最复杂的部分,这并非特定于 .NET 开发:如果要部署 Node.js Web 应用程序,情况也是如此。但是,当您要部署到 Linux 时,您需要在应用程序中考虑一些事项,您将在下一节中看到。

27.3.2 Preparing your app for deployment to Linux

27.3.2 准备将应用程序部署到 Linux

Generally speaking, your app doesn’t care which reverse proxy it sits behind, whether it’s NGINX, Apache, or IIS; your app receives requests and responds to them without the reverse proxy affecting things. When you’re hosting behind IIS, you need UseIISIntegration() to tell your app about IIS’s configuration; when you’re hosting on Linux, you need a similar method.
一般来说,你的应用并不关心它位于哪个反向代理后面,无论是 NGINX、Apache 还是 IIS;你的应用接收请求并响应这些请求,而反向代理不会影响事情。当您在 IIS 后面托管时,您需要 UseIISIntegration() 来告知您的应用程序 IIS 的配置;当您在 Linux 上托管时,您需要类似的方法。

When a request arrives at the reverse proxy, it contains some information that is lost after the request is forwarded to your app. For example, the original request comes with the IP address of the client/browser connecting to your app; once the request is forwarded from the reverse proxy, the IP address is that of the reverse proxy, not the browser. Also, if the reverse proxy is used for SSL/TLS offloading (see chapter 28), then a request that was originally made using HTTPS may arrive at your app as an HTTP request.
当请求到达反向代理时,它包含一些在请求转发到您的应用后丢失的信息。例如,原始请求附带连接到您的应用程序的客户端/浏览器的 IP 地址;从反向代理转发请求后,IP 地址是反向代理的 IP 地址,而不是浏览器的 IP 地址。此外,如果反向代理用于 SSL/TLS 卸载(参见第 28 章),那么最初使用 HTTPS 发出的请求可能会作为 HTTP 请求到达您的应用程序。

The standard solution to these problems is for the reverse proxy to add more headers before forwarding requests to your app. For example, the X-Forwarded-For header identifies the original client’s IP address, whereas the X-Forwarded-Proto header indicates the original scheme of the request (http or https).
这些问题的标准解决方案是让反向代理在将请求转发到您的应用程序之前添加更多标头。例如,X-Forwarded-For 标头标识原始客户端的 IP 地址,而 X-Forwarded-Proto 标头指示请求的原始方案(http 或 https)。

For your app to behave correctly, it needs to look for these headers in incoming requests and modify the request as appropriate. A request to http://localhost with the X-Forwarded-Proto header set to https should be treated the same as if the request were to https://localhost.
为了使您的应用程序正常运行,它需要在传入请求中查找这些标头并根据需要修改请求。如果 X-Forwarded-Proto 标头设置为 https http://localhost,则请求的处理方式应与请求 https://localhost 相同。

You can use ForwardedHeadersMiddleware in your middleware pipeline to achieve this. This middleware overrides Request.Scheme and other properties on HttpContext to correspond to the forwarded headers. WebApplicationBuilder partially handles this for you; the middleware is automatically added to the pipeline in a disabled state. To enable it, set the environment variable ASPNETCORE_FORWARDEDHEADERS_ENABLED=true.
您可以在中间件管道中使用 ForwardedHeadersMiddleware 来实现此目的。此中间件将覆盖 HttpContext 上的 Request.Scheme 和其他属性,以对应于转发的标头。WebApplicationBuilder 为您部分处理此问题;中间件会自动以 Disabled 状态添加到管道中。要启用它,请将环境变量设置为 ASPNETCORE_FORWARDEDHEADERS_ENABLED=true。

If you don’t want to use the automatically added middleware for some reason, or if you’re using the generic host (which you’ll learn about in chapter 30), you can add the middleware to the start of your middleware pipeline manually, as shown in listing 27.1, and configure it with the headers to look for.
如果由于某种原因不想使用自动添加的中间件,或者正在使用通用主机(您将在第 30 章中学习),则可以手动将中间件添加到中间件管道的开头,如清单 27.1 所示,并使用要查找的标头对其进行配置。

WARNING It’s important that ForwardedHeadersMiddleware be placed early in the middleware pipeline to correct Request.Scheme before any middleware that depends on the scheme runs.
警告:请务必将 ForwardedHeadersMiddleware 放在中间件管道的早期,以便在任何依赖于 scheme 的中间件运行之前更正 Request.Scheme。

Listing 27.1 Configuring an app to use forwarded headers in Startup.cs
清单 27.1 配置应用程序以在 Startup.cs 中使用转发的 Headers

WebApplicationBuilder builder = WebApplication.CreateBuilder(args);
WebApplication app = builder.Build();

app.UseForwardedHeaders(new ForwardedHeadersOptions      #A
{
    ForwardedHeaders = ForwardedHeaders.XForwardedFor |     #B
                       ForwardedHeaders.XForwardedProto     #B
});
app.UseHttpsRedirection();    #C
app.UseRouting();             #C
app.MapGet("/", () => "Hello world!");
app.Run();

❶ Adds ForwardedHeadersMiddleware early in your pipeline
在管道的早期添加 ForwardedHeadersMiddleware
❷ Configures the headers the middleware should look for and use
配置中间件应该查找和使用的标头
❸ The forwarded headers middleware must be placed before all other middleware.
转发的标头中间件必须放在所有其他中间件之前。

NOTE This behavior isn’t specific to reverse proxies on Linux; the UseIis() extension adds ForwardedHeadersMiddleware under the hood as part of its configuration when your app is running behind IIS.
注意:此行为并非特定于 Linux 上的反向代理;当应用在 IIS 后面运行时,UseIis() 扩展会在后台添加 ForwardedHeadersMiddleware 作为其配置的一部分。

Aside from considering the forwarded headers, you need to consider a few minor things when deploying your app to Linux that may trip you up if you’re used to deploying to Windows alone:
除了考虑转发的标头之外,在将应用程序部署到 Linux 时,还需要考虑一些小事项,如果您习惯于单独部署到 Windows,这些事项可能会让您感到困惑:

• Line endings (LF in Linux versus CRLF in Windows)—Windows and Linux use different character codes in text to indicate the end of a line. This isn’t often a problem for ASP.NET Core apps, but if you’re writing text files on one platform and reading them on a different platform, it’s something to bear in mind.
行尾 (Linux 中的 LF 与 Windows 中的 CRLF) - Windows 和 Linux 在文本中使用不同的字符代码来指示行尾。对于 ASP.NET Core 应用程序来说,这通常不是问题,但如果您在一个平台上编写文本文件并在另一个平台上阅读它们,则需要记住这一点。

• Path directory separator ("\" on Windows, "/" on Linux)—This is one of the most common bugs I see when Windows developers move to Linux. Each platform uses a different separator in file paths, so although loading a file using the "subdir\myfile.json" path will work fine in Windows, it won’t in Linux. Instead, you should use Path.Combine to create the appropriate separator for the current platform, such as Path.Combine("subdir", "myfile.json").
路径目录分隔符 (Windows 上为 “\”,Linux 上为 “/”) - 这是我在 Windows 开发人员迁移到 Linux 时看到的最常见的错误之一。每个平台在文件路径中使用不同的分隔符,因此尽管使用 “subdir\myfile.json” 路径加载文件在 Windows 中可以正常工作,但在 Linux 中则无法。相反,您应该使用 Path.Combine 为当前平台创建适当的分隔符,例如 Path.Combine(“subdir”, “myfile.json”)。

• ":" in environment variables—In some Linux distributions, the colon character (:) isn’t allowed in environment variables. As you saw in chapter 10, this character is typically used to denote different sections in ASP.NET Core configuration, so you often need to use it in environment variables. Instead, you can use a double underscore in your environment variables (); ASP.NET Core will treat it the same as though you’d used a colon.
环境变量中的 “:” - 在某些 Linux 发行版中,环境变量中不允许使用冒号字符 (:)。正如你在第 10 章中看到的,这个字符通常用于表示 ASP.NET Core 配置中的不同部分,因此你经常需要在环境变量中使用它。相反,您可以在环境变量 (
) 中使用双下划线;ASP.NET Core 会像使用冒号一样对待它。

• Missing time zone and culture data—Linux distributions don’t always come with time zone or culture data, which can cause localization problems and exceptions at runtime. You can install the time zone data using your distribution’s package manager.[1] It also may be organized differently. The hierarchy of Norwegian cultures is different in Linux, for example.
缺少时区和文化数据 - Linux 发行版并不总是附带时区或文化数据,这可能会导致运行时出现本地化问题和异常。您可以使用分配的软件包管理器安装时区数据。[1] 它的组织方式也可能不同。例如,挪威文化的层次结构在 Linux 中是不同的。

• Different directory structures—Linux distributions use a different folder structure from Windows, so you need to bear that in mind if your app hardcodes paths. In particular, consider differences in temporary/cache folders.
不同的目录结构 - Linux 发行版使用与 Windows 不同的文件夹结构,因此,如果您的应用程序对路径进行硬编码,则需要记住这一点。特别是,请考虑临时/缓存文件夹的差异。

The preceding list is not exhaustive by any means, but as long as you set up ForwardedHeadersMiddleware and take care to use cross-platform constructs like Path.Combine, you shouldn’t have too many problems running your applications on Linux. But configuring a reverse proxy isn’t the simplest of activities, so wherever you’re planning on hosting your app, I suggest checking the documentation for guidance at http://mng.bz/1qM1.
前面的列表无论如何都不是详尽无遗的,但只要您设置了 ForwardedHeadersMiddleware 并注意使用像 Path.Combine 这样的跨平台结构,在 Linux 上运行应用程序应该不会有太多问题。但是配置反向代理并不是最简单的活动,因此无论您打算在哪里托管您的应用程序,我建议您查看 http://mng.bz/1qM1 上的文档以获取指导。

27.4 Configuring the URLs for your application

27.4 为应用程序配置 URL

At this point, you’ve deployed an application, but there’s one aspect you haven’t configured: the URLs for your application. When you’re using IIS as a reverse proxy, you don’t have to worry about this inside your app. IIS integration with the ASP.NET Core Module works by dynamically creating a URL that’s used to forward requests between IIS and your app. The hostname you configure in IIS (in figure 27.6) is the URL that external users see for your app; the internal URL that IIS uses when forwarding requests is never exposed.
此时,您已经部署了一个应用程序,但有一个方面尚未配置:应用程序的 URL。当您使用 IIS 作为反向代理时,您不必担心应用程序内部的这个问题。IIS 与 ASP.NET 核心模块的集成的工作原理是动态创建一个 URL,该 URL 用于在 IIS 和您的应用程序之间转发请求。您在 IIS 中配置的主机名(如图 27.6 所示)是外部用户看到的应用程序的 URL;IIS 在转发请求时使用的内部 URL 永远不会公开。

If you’re not using IIS as a reverse proxy—maybe you’re using NGINX or exposing your app directly to the internet—you may find you need to configure the URLs your application listens to directly.
如果您没有将 IIS 用作反向代理(也许您使用的是 NGINX 或直接向 Internet 公开您的应用程序),您可能会发现您需要配置应用程序直接侦听的 URL。

By default, ASP.NET Core listens for requests on the URL http://localhost:5000. There are lots of ways to set this URL, but in this section I describe two: using environment variables or using command-line arguments. These are the two most common approaches I see (outside of IIS) for controlling which URLs your app uses.
默认情况下,ASP.NET Core 侦听 URL http://localhost:5000 上的请求。设置此 URL 的方法有很多种,但在本节中,我将介绍两种方法:使用环境变量或使用命令行参数。这是我看到的两种最常见的方法(在 IIS 之外),用于控制您的应用程序使用的 URL。

TIP For further ways to set your application’s URL, see my “5 ways to set the URLs for an ASP.NET Core app” blog post: http://mng.bz/go0v.
提示:有关设置应用程序 URL 的更多方法,请参阅我的“为 ASP.NET Core 应用程序设置 URL 的 5 种方法”博客文章:http://mng.bz/go0v

In chapter 10 you learned about configuration in ASP.NET Core, and in particular about the concept of hosting environments so that you can use different settings when running in development compared with production. You choose the hosting environment by setting an environment variable on your machine called ASPNETCORE_ENVIRONMENT. The ASP.NET Core framework magically picks up this variable when your app starts and uses it to set the hosting environment.
在第 10 章中,您了解了 ASP.NET Core 中的配置,特别是托管环境的概念,以便在开发环境中运行时与在生产环境中运行时可以使用不同的设置。您可以通过在计算机上设置名为 ASPNETCORE_ENVIRONMENT 的环境变量来选择托管环境。ASP.NET Core 框架会在您的应用启动时神奇地选取此变量,并使用它来设置托管环境。

You can use a similar special environment variable to specify the URL that your app uses; this variable is called ASPNETCORE_URLS. When your app starts up, it looks for this value and uses it as the application’s URL. By changing this value, you can change the default URL used by all ASP.NET Core apps on the machine. For example, you could set a temporary environment variable in Windows from the command window using
您可以使用类似的特殊环境变量来指定您的应用程序使用的 URL;此变量称为 ASPNETCORE_URLS。当您的应用程序启动时,它会查找此值并将其用作应用程序的 URL。通过更改此值,您可以更改计算机上所有 ASP.NET Core 应用程序使用的默认 URL。例如,您可以在命令窗口中使用

set ASPNETCORE_URLS=http://localhost:8000

Running a published application using dotnet <app.dll> within the same command window, as shown in figure 27.10, shows that the app is now listening on the URL provided in the ASPNETCORE_URLS variable.
如图 27.10 所示,在同一命令窗口中使用 dotnet <app.dll> 运行已发布的应用程序,显示该应用程序现在正在侦听 ASPNETCORE_URLS 变量中提供的 URL。

alt text
Figure 27.10 Change the ASPNETCORE_URLS environment variable to change the URL used by ASP.NET Core apps.
图 27.10 更改 ASPNETCORE_URLS 环境变量以更改 ASP.NET Core 应用程序使用的 URL。

You can instruct an app to listen on multiple URLs by separating them with a semicolon, or you can listen to a specific port without specifying the localhost hostname. If you set the ASPNETCORE_URLS environment variable to
您可以通过用分号分隔多个 URL 来指示应用程序侦听这些 URL,也可以在不指定 localhost 主机名的情况下侦听特定端口。如果将 ASPNETCORE_URLS 环境变量设置为
http://localhost:5001;http://*:5002

your ASP.NET Core apps will listen for requests sent to the following:
您的 ASP.NET Core 应用程序将侦听发送到以下各项的请求:

http://localhost:5001 — This address is accessible only on your local computer, so it will not accept requests from the wider internet.
http://localhost:5001 - 此地址只能在您的本地计算机上访问,因此它不会接受来自更广泛 Internet 的请求。

http://*:5002—Any URL on port 5002. External requests from the internet can access the app on port 5002, using any URL that maps to your computer.
• http://*:5002 - 端口 5002 上的任何 URL。来自 Internet 的外部请求可以使用映射到您计算机的任何 URL 访问端口 5002 上的应用程序。

Note that you can’t specify a different hostname, like tastyrecipes.com. ASP.NET Core listens to all requests on a given port; it doesn’t listen for specific domain names. The exception is the localhost hostname, which allows only requests that came from your own computer.
请注意,您不能指定其他主机名,例如 tastyrecipes.com。ASP.NET Core 侦听给定端口上的所有请求;它不侦听特定的域名。localhost 主机名例外,它只允许来自您自己的计算机的请求。

NOTE If you find the ASPNETCORE_URLS variable isn’t working properly, ensure that you don’t have a launchSettings.json file in the directory. When present, the values in this file take precedence. By default, launchSettings.json isn’t included in the publish output, so this generally won’t be a problem in production.
注意:如果您发现 ASPNETCORE_URLS 变量无法正常工作,请确保目录中没有 launchSettings.json 文件。如果存在,则此文件中的值优先。默认情况下,launchSettings.json 不包含在发布输出中,因此这在生产中通常不会成为问题。

Setting the URL of an app using a single environment variable works great for some scenarios, most notably when you’re running a single application in a virtual machine, or within a Docker container.
使用单个环境变量设置应用程序的 URL 适用于某些场景,尤其是当您在虚拟机或 Docker 容器中运行单个应用程序时。

TIP ASP.NET Core is well suited to running in containers but working with containers is a separate book in its own right. For details on hosting and publishing apps using Docker, see Microsoft’s “Host ASP.NET Core in Docker containers” documentation: http://mng.bz/e5GV.
提示: ASP.NET Core 非常适合在容器中运行,但使用容器本身是一本单独的书。有关使用 Docker 托管和发布应用程序的详细信息,请参阅 Microsoft 的“在 Docker 容器中托管 ASP.NET Core”文档:http://mng.bz/e5GV

If you’re not using Docker containers or a PaaS offering, chances are that you’re hosting multiple apps side-by-side on the same machine. A single environment variable is no good for setting URLs in this case, as it would change the URL of every app.
如果您没有使用 Docker 容器或 PaaS 产品,则很可能在同一台计算机上并排托管多个应用程序。在这种情况下,单个环境变量不适合设置 URL,因为它会更改每个应用程序的 URL。

In chapter 10 you saw that you could set the hosting environment using the ASPNETCORE_ENVIRONMENT variable, but you could also set the environment using the --environment flag when calling dotnet run:
在第 10 章中,您看到可以使用 ASPNETCORE_ENVIRONMENT 变量设置托管环境,但也可以在调用 dotnet run 时使用 --environment 标志设置环境:

dotnet run --no-launch-profile --environment Staging

You can set the URLs for your application in a similar way, using the --urls parameter. Using command-line arguments enables you to have multiple ASP.NET Core applications running on the same machine, listening to different ports. For example, the following command would run the recipe application, set it to listen on port 8081, and set the environment to staging (figure 27.11):
您可以使用 --urls 参数以类似的方式为应用程序设置 URL。使用命令行参数,您可以在同一台计算机上运行多个 ASP.NET Core 应用程序,侦听不同的端口。例如,以下命令将运行 recipe 应用程序,将其设置为侦听端口 8081,并将环境设置为 staging (图 27.11):

dotnet RecipeApplication.dll --urls "http://*:8081" --environment Staging

alt text

Figure 27.11 Setting the hosting environment and URLs for an application using command-line arguments. The values passed at the command line override values provided from appSettings.json or environment variables.
图 27.11 使用命令行参数设置应用程序的托管环境和 URL。在命令行中传递的值将覆盖appSettings.json或环境变量提供的值。

Remember that you don’t need to set your URLs in this way if you’re using IIS as a reverse proxy; IIS integration handles this for you. Setting the URLs is necessary only when you’re manually configuring the URL your app is listening on, such as if you’re using NGINX or are exposing Kestrel directly to clients.
请记住,如果您使用 IIS 作为反向代理,则无需以这种方式设置 URL;IIS 集成会为您处理此问题。只有当您手动配置应用程序正在侦听的 URL 时(例如,如果您使用的是 NGINX 或将 Kestrel 直接公开给客户端),才需要设置 URL。

WARNING If you are running your ASP.NET Core application without a reverse proxy, you should use host filtering for security reasons to ensure that your app only responds to requests for hostnames you expect. For more details, see my “Adding host filtering to Kestrel in ASP.NET Core” blog entry: http://mng.bz/pVXK.
警告:如果您在没有反向代理的情况下运行 ASP.NET Core 应用程序,则出于安全原因,您应该使用主机筛选,以确保您的应用程序仅响应您期望的主机名请求。有关更多详细信息,请参阅我的“在 ASP.NET Core 中向 Kestrel 添加主机筛选”博客文章:http://mng.bz/pVXK

That brings us to the end of this chapter on publishing your app. This last mile of app development—deploying an application to a server where users can access it—is a notoriously thorny problem. Publishing an ASP.NET Core application is easy enough, but the multitude of hosting options available makes providing concise steps for every situation difficult.
到此,我们来到了本章关于发布您的应用的结尾。众所周知,应用程序开发的最后一英里 — 将应用程序部署到用户可以访问它的服务器上 — 是一个非常棘手的问题。发布 ASP.NET Core 应用程序非常简单,但可用的大量托管选项使得为每种情况提供简洁的步骤变得困难。

Whichever hosting option you choose, there’s one critical topic that you mustn’t overlook: security. In the next chapter you’ll learn about HTTPS, how to use it when testing locally, and why it’s important your production apps all use HTTPS.
无论您选择哪种托管选项,都有一个关键主题是您不容忽视的:安全性。在下一章中,您将了解 HTTPS,在本地测试时如何使用 HTTPS,以及为什么您的生产应用程序都使用 HTTPS 很重要。

27.5 Summary

27.5 总结

ASP.NET Core apps are console applications that self-host a web server. In production, you may use a reverse proxy, which handles the initial request and passes it to your app. Reverse proxies can provide additional security, operations, and performance benefits, but they can also add complexity to your deployments.
ASP.NET Core 应用程序是自托管 Web 服务器的控制台应用程序。在生产环境中,您可以使用反向代理来处理初始请求并将其传递给您的应用程序。反向代理可以提供额外的安全性、作和性能优势,但它们也会增加部署的复杂性。

.NET has two parts: the .NET SDK (also known as the .NET CLI) and the .NET Runtime. When you’re developing an application, you use the .NET CLI to restore, build, and run your application. Visual Studio uses the same .NET CLI commands from the IDE.
.NET 有两个部分:.NET SDK(也称为 .NET CLI)和 .NET 运行时。在开发应用程序时,您可以使用 .NET CLI 来还原、构建和运行应用程序。Visual Studio 使用与 IDE 相同的 .NET CLI 命令。

When you want to deploy your app to production, you need to publish your application, using dotnet publish. This creates a folder containing your application as a DLL, along with all its dependencies.
如果要将应用部署到生产环境,则需要使用 dotnet publish 发布应用程序。这将创建一个文件夹,其中包含作为 DLL 的应用程序及其所有依赖项。

To run a published application, you don’t need the .NET CLI because you won’t be building the app. You need only the .NET Runtime to run a published app. You can run a published application using the dotnet app.dll command, where app.dll is the application .dll created by the dotnet publish command.
要运行已发布的应用程序,您不需要 .NET CLI,因为您不会构建应用程序。只需 .NET 运行时即可运行已发布的应用程序。可以使用 dotnet app.dll 命令运行已发布的应用程序,其中 app.dll 是由 dotnet publish 命令创建的应用程序.dll。

To host ASP.NET Core applications in IIS, you must install the ASP.NET Core Module. This allows IIS to act as a reverse proxy for your ASP.NET Core app. You must also install the .NET Runtime and the ASP.NET Core Runtime, which are installed as part of the ASP.NET Core Windows Hosting Bundle.
要在 IIS 中托管 ASP.NET Core 应用程序,必须安装 ASP.NET Core Module。这允许 IIS 充当 ASP.NET Core 应用程序的反向代理。您还必须安装 .NET 运行时和 ASP.NET Core 运行时,它们作为 ASP.NET Core Windows 托管捆绑包的一部分安装。

IIS can host ASP.NET Core applications using one of two modes: in-process and out-of-process. The out-of-process mode runs your application as a separate process, as is typical for most reverse proxies. The in-process mode runs your application as part of the IIS process. This has performance benefits, as no interprocess communication is required.
IIS 可以使用以下两种模式之一托管 ASP.NET Core 应用程序:进程内和进程外。进程外模式将您的应用程序作为单独的进程运行,这是大多数反向代理的典型特征。进程内模式将应用程序作为 IIS 进程的一部分运行。这具有性能优势,因为不需要进程间通信。

If you are using a custom web application builder with IIS, ensure that you call UseIISIntegration() and UseIIS() so that IIS forwards the request to your app correctly. If you’re using the default WebApplicationBuilder, these methods are called automatically for you.
如果将自定义 Web 应用程序生成器与 IIS 一起使用,请确保调用 UseIISIntegration() 和 UseIIS(),以便 IIS 将请求正确转发到应用。如果您使用的是默认的 WebApplicationBuilder,则会自动为您调用这些方法。

When you publish your application using the .NET CLI, a web.config file is added to the output folder. It’s important that this file be deployed with your application when publishing to IIS, as it defines how your application should run.
当您使用 .NET CLI 发布应用程序时,web.config 文件将添加到输出文件夹中。在发布到 IIS 时,此文件必须与应用程序一起部署,因为它定义了应用程序的运行方式。

The URL that your app listens on is specified by default using the environment variable ASPNETCORE_URLS. Setting this value changes the URL for all the apps on your machine. Alternatively, pass the --urls command-line argument when running your app, as in this example: dotnet app.dll --urls http://localhost:80.
默认情况下,您的应用程序侦听的 URL 是使用环境变量 ASPNETCORE_URLS 指定的。设置此值会更改计算机上所有应用程序的 URL。或者,在运行应用时传递 --urls 命令行参数,如以下示例所示:dotnet app.dll --urls http://localhost:80

[1] I ran into this problem myself. You can read about it in detail and how I solved it on my blog: http://mng.bz/aoem.
[1] 我自己也遇到过这个问题。您可以在我的博客上详细阅读它以及我是如何解决的:http://mng.bz/aoem